

Page 1
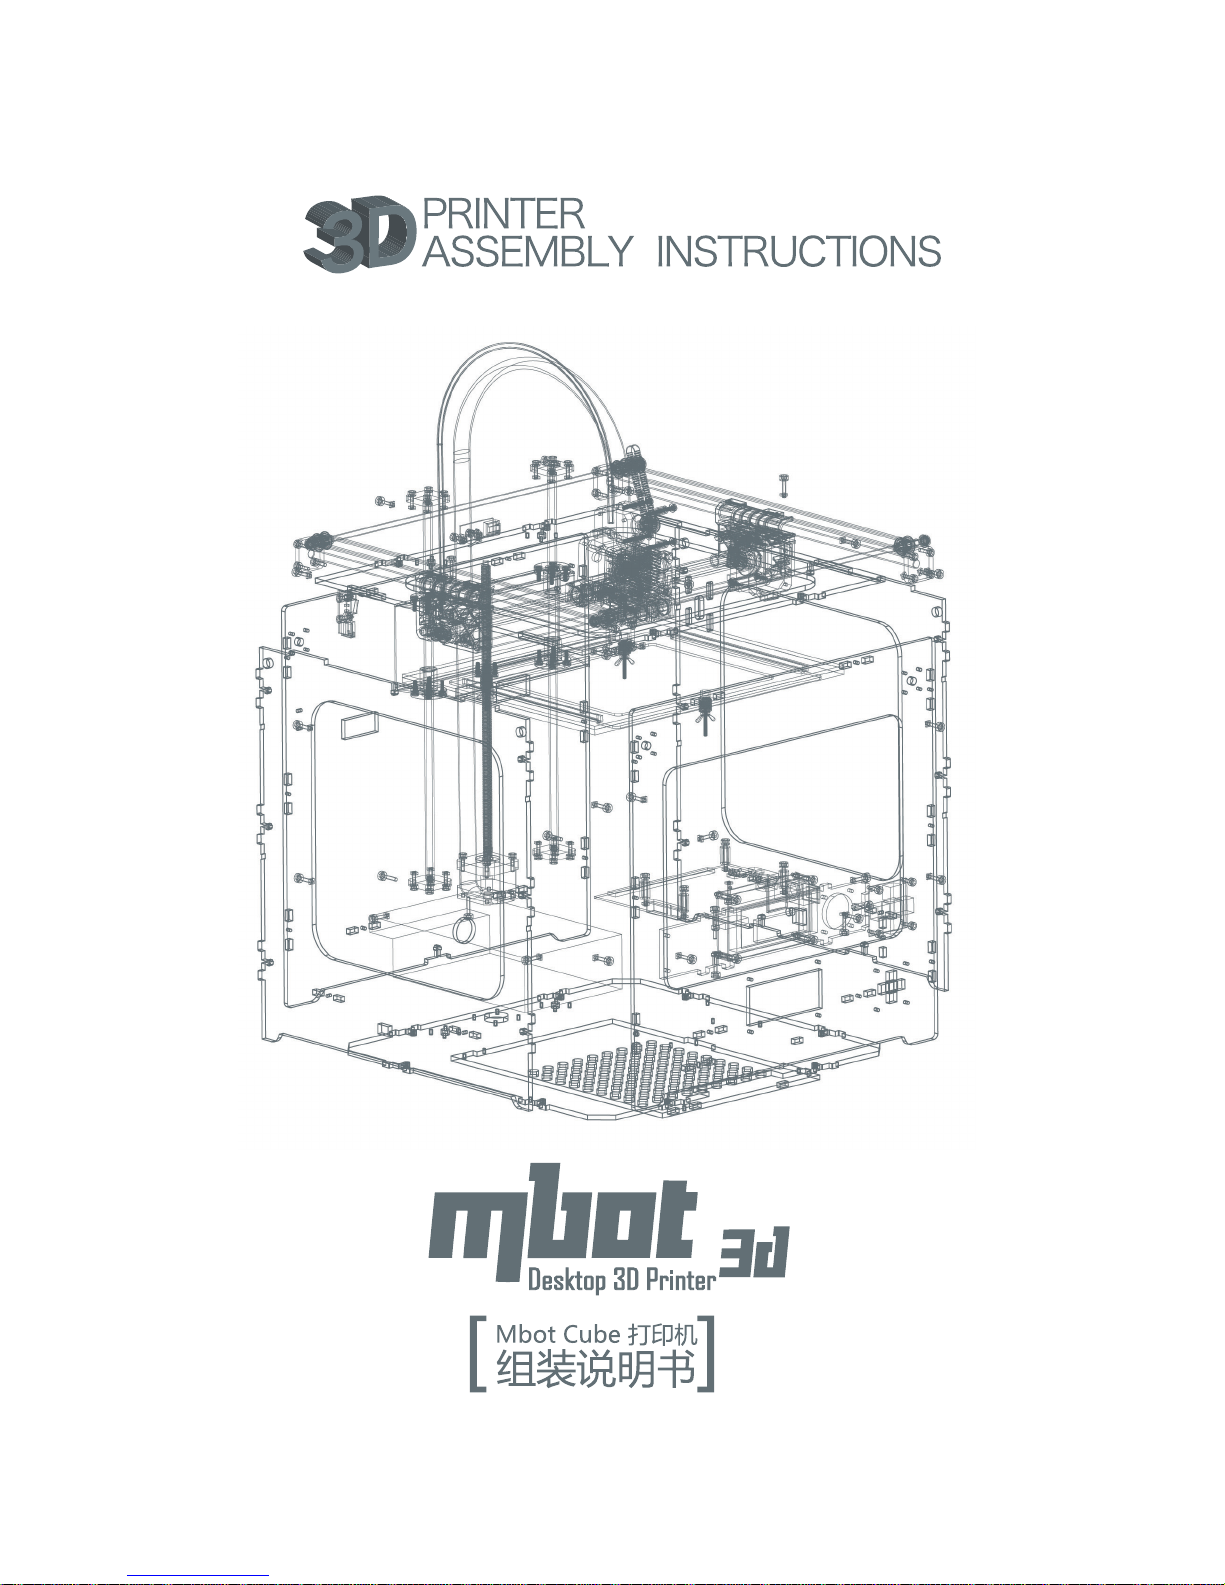
Page 2
Welcome to use MBot Cube 3D Printer
Please check all the accessories one by one in the package, any missing or
damage, Please contact sales representative within 7days of receiving the MBot
cube kit.
Have any problem during assembling or other query contact us at
[email protected]
Page 3
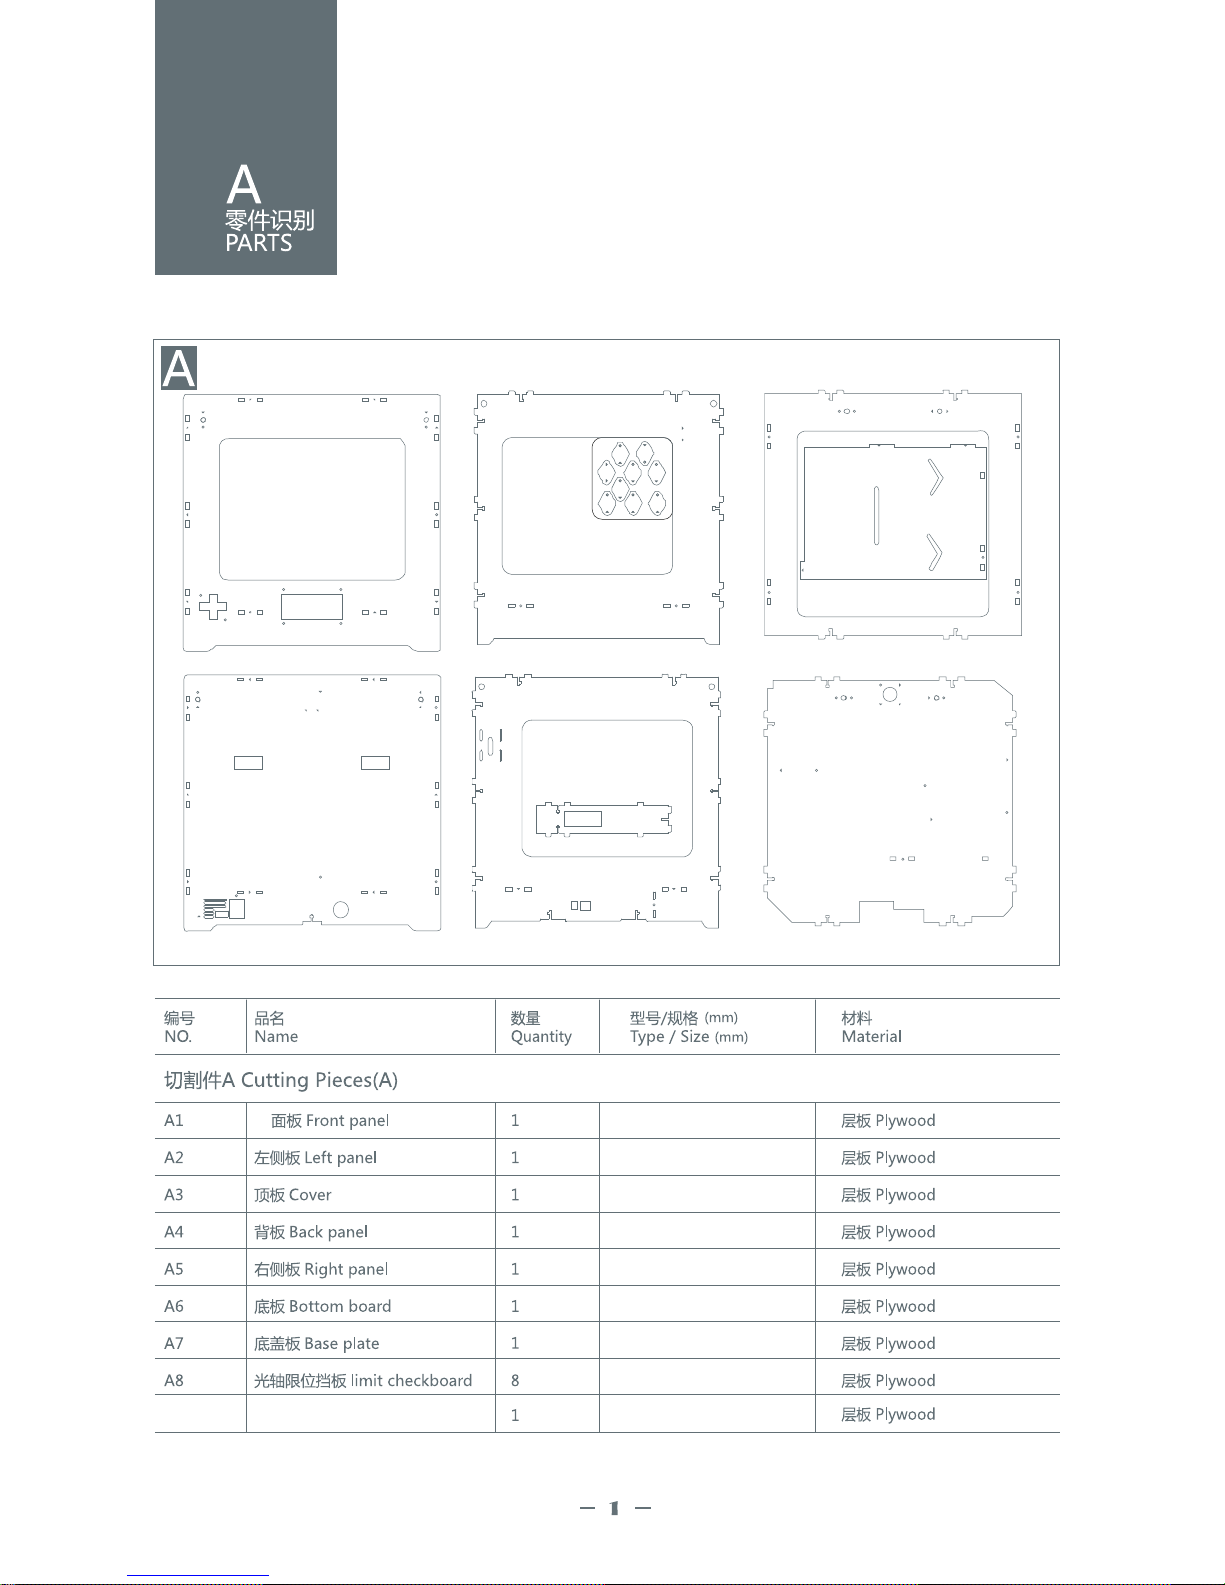
A3
A6
A1 A2
A4
A7
A9
A8
A5
前
抵挡板
Bottom dam-board
A9
panel
Page 4
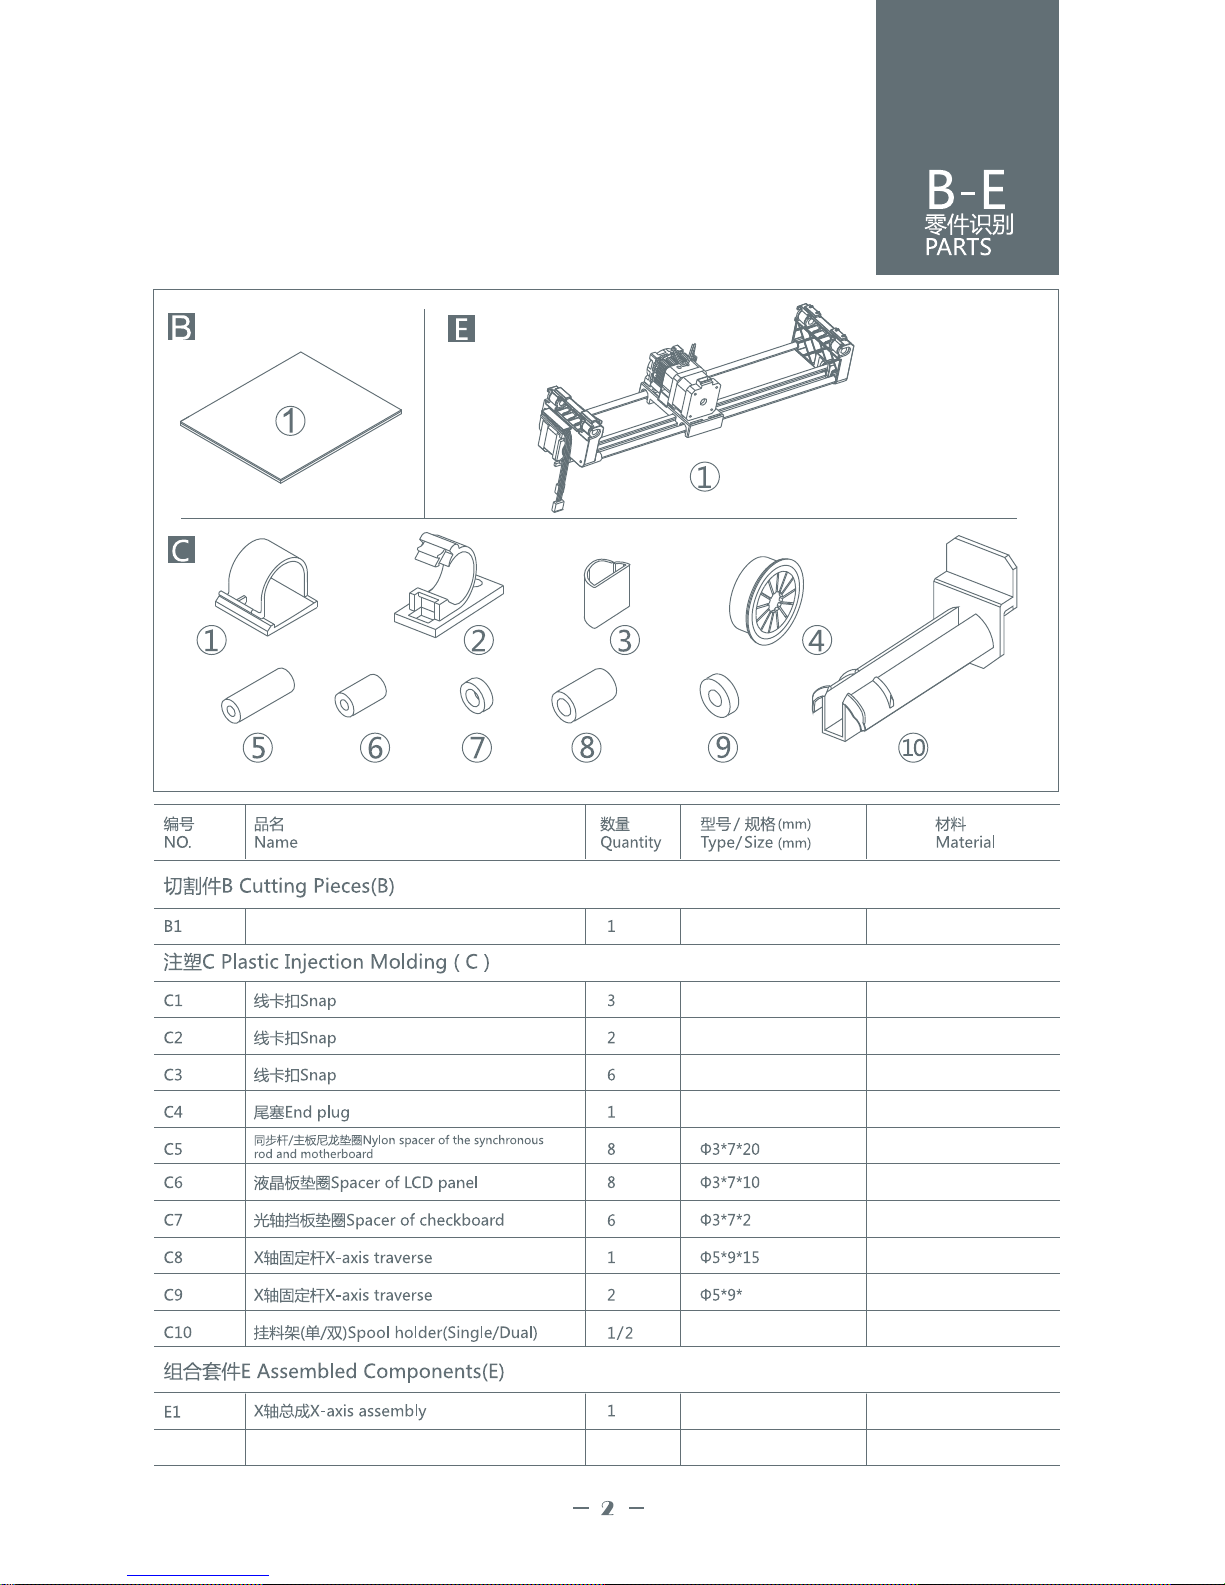
打印板 玻璃制品
4
Build plate
Page 5
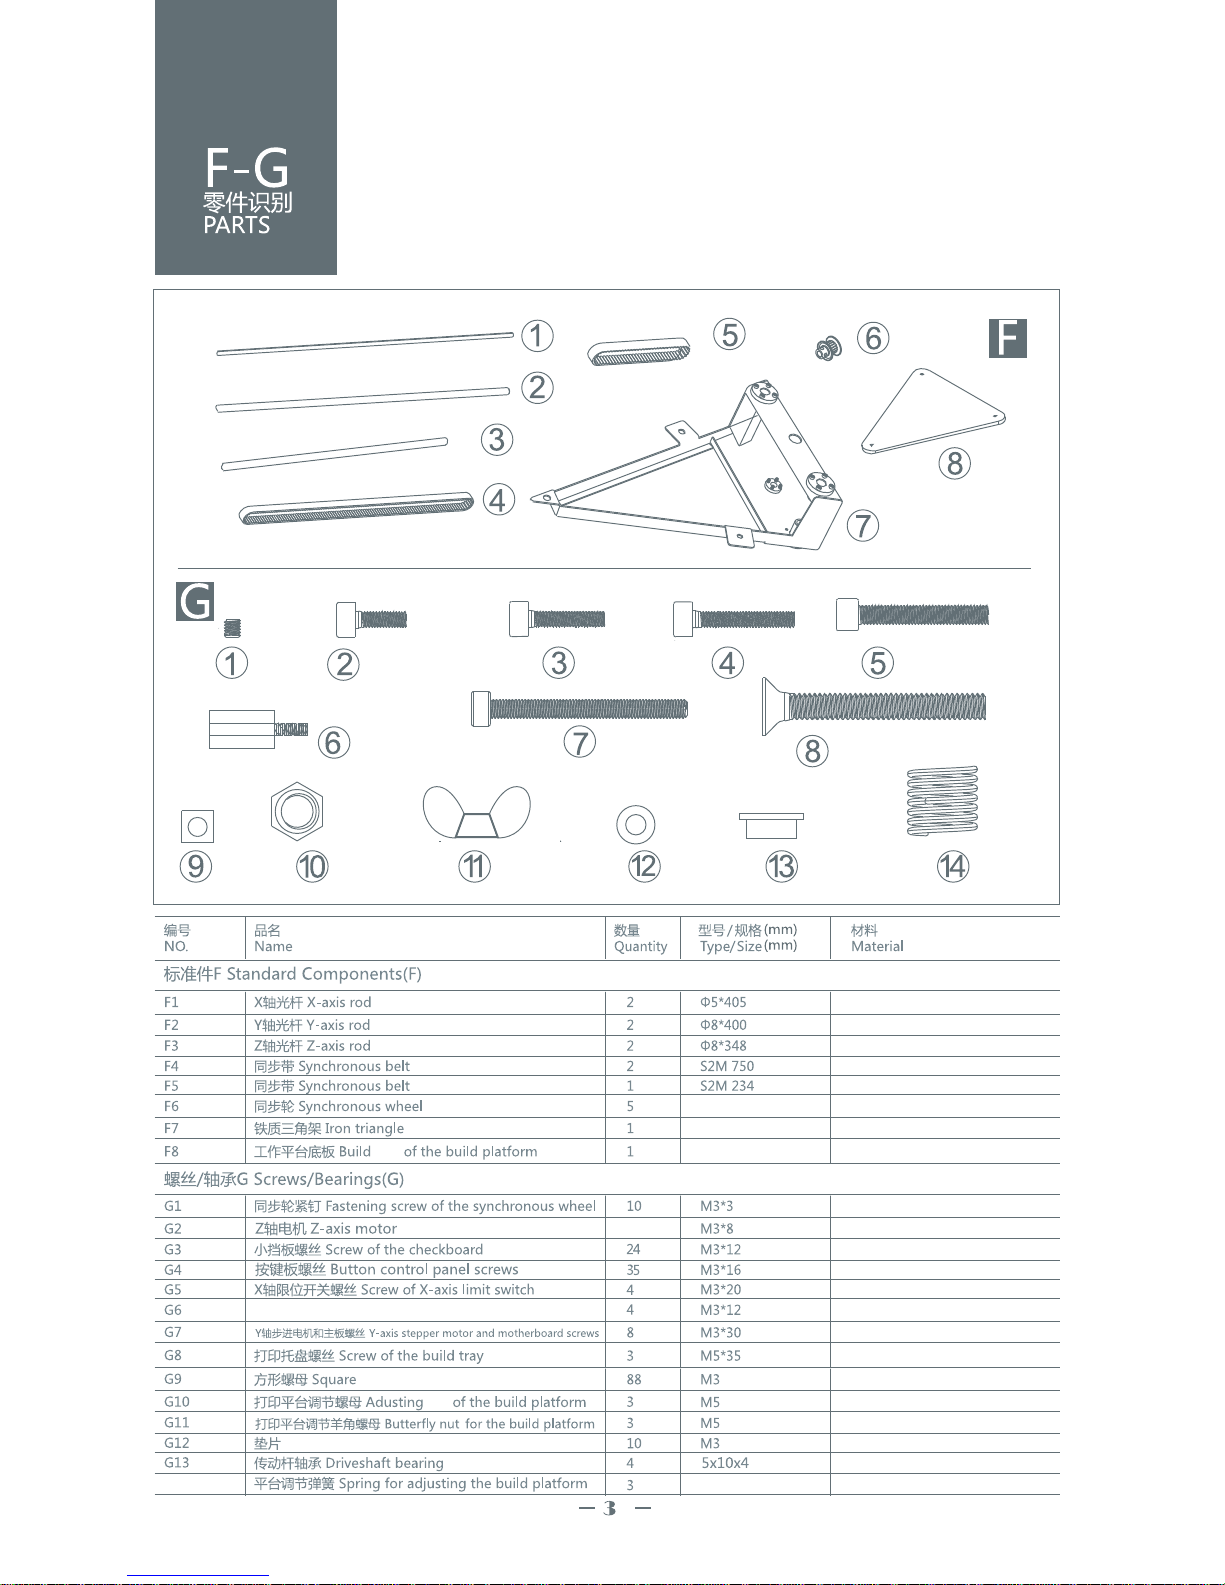
G14
黄铜柱
tray
Brass barrel
nut
nut
Washer
Page 6
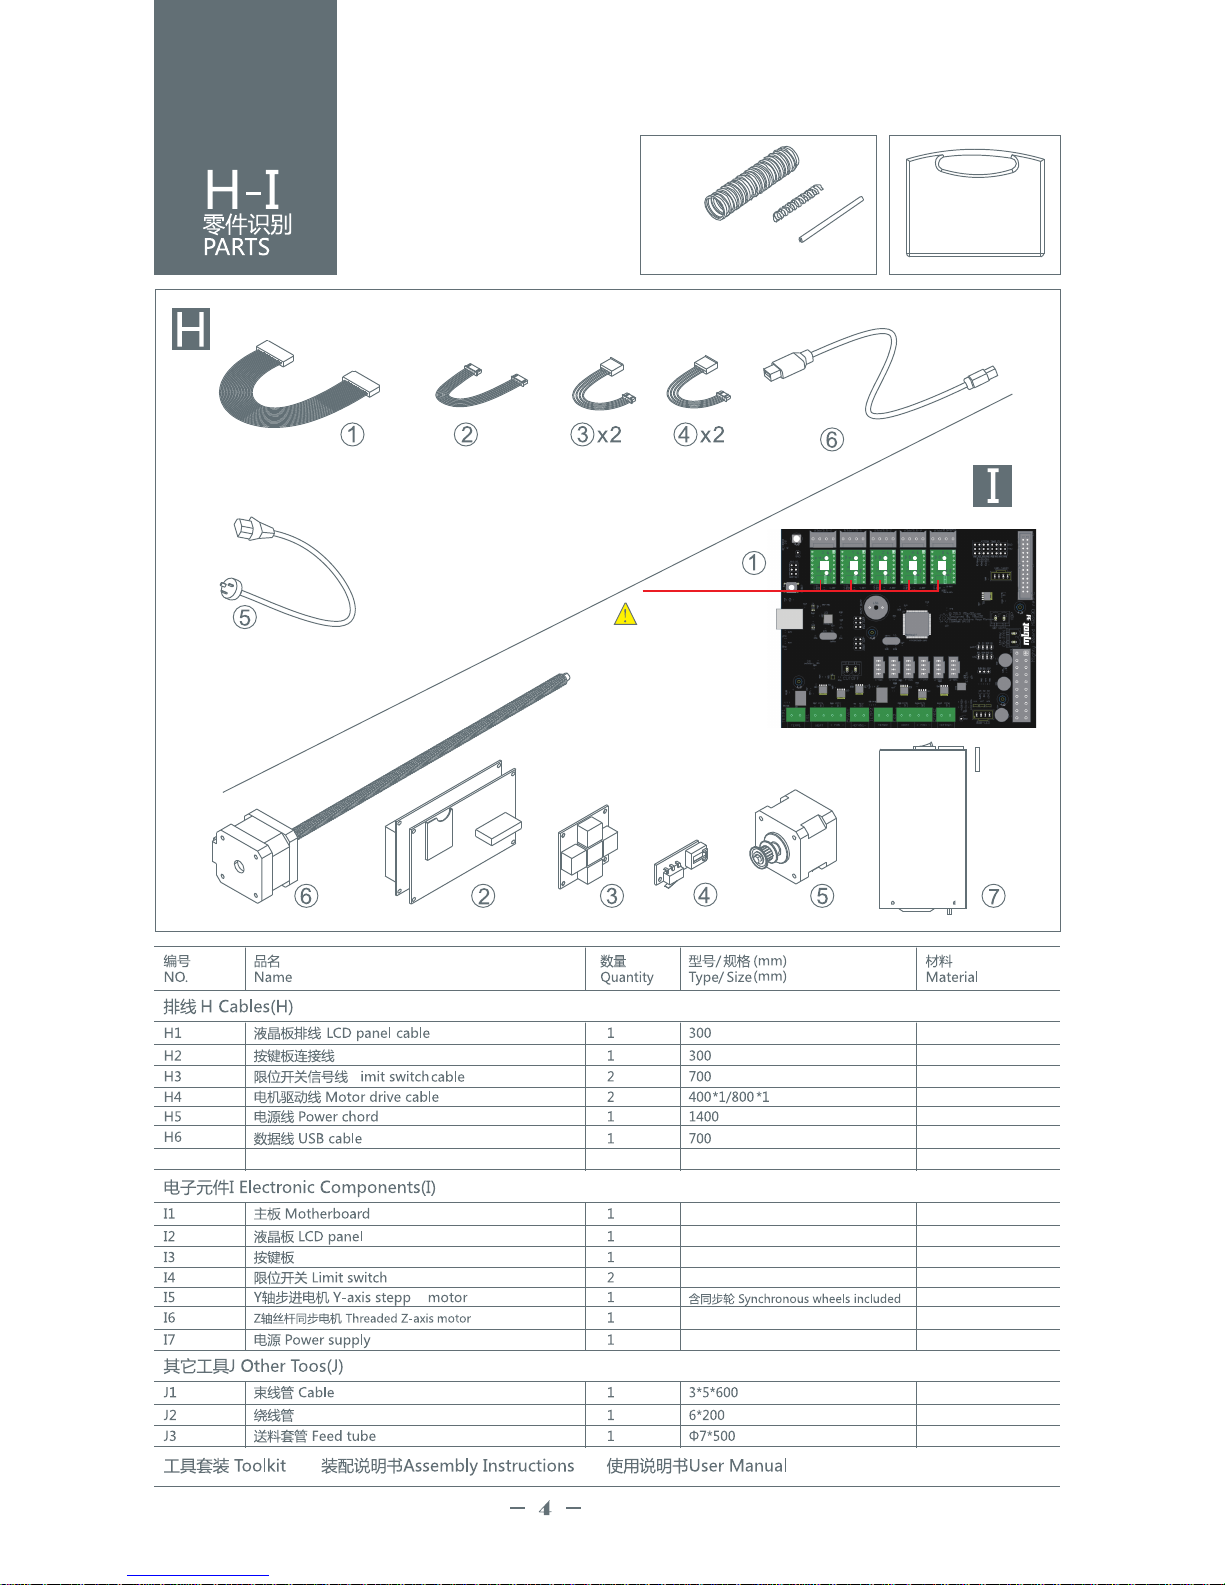
工具包
1 2
3
J
注意:
检查主板上的驱动小班,
必须和图示上的位置一致,
单打印头插4块,
分别为X、Y、Z、A。
Attention:
Tool box
Control button planel cable
L
Control button panel
protector
Cable wrap
Make sure the stepper
motor drivers chips are in
the right position.
Note:
Only 4 stepper motor
drivers chip for single head
3d printer.
er
Page 7
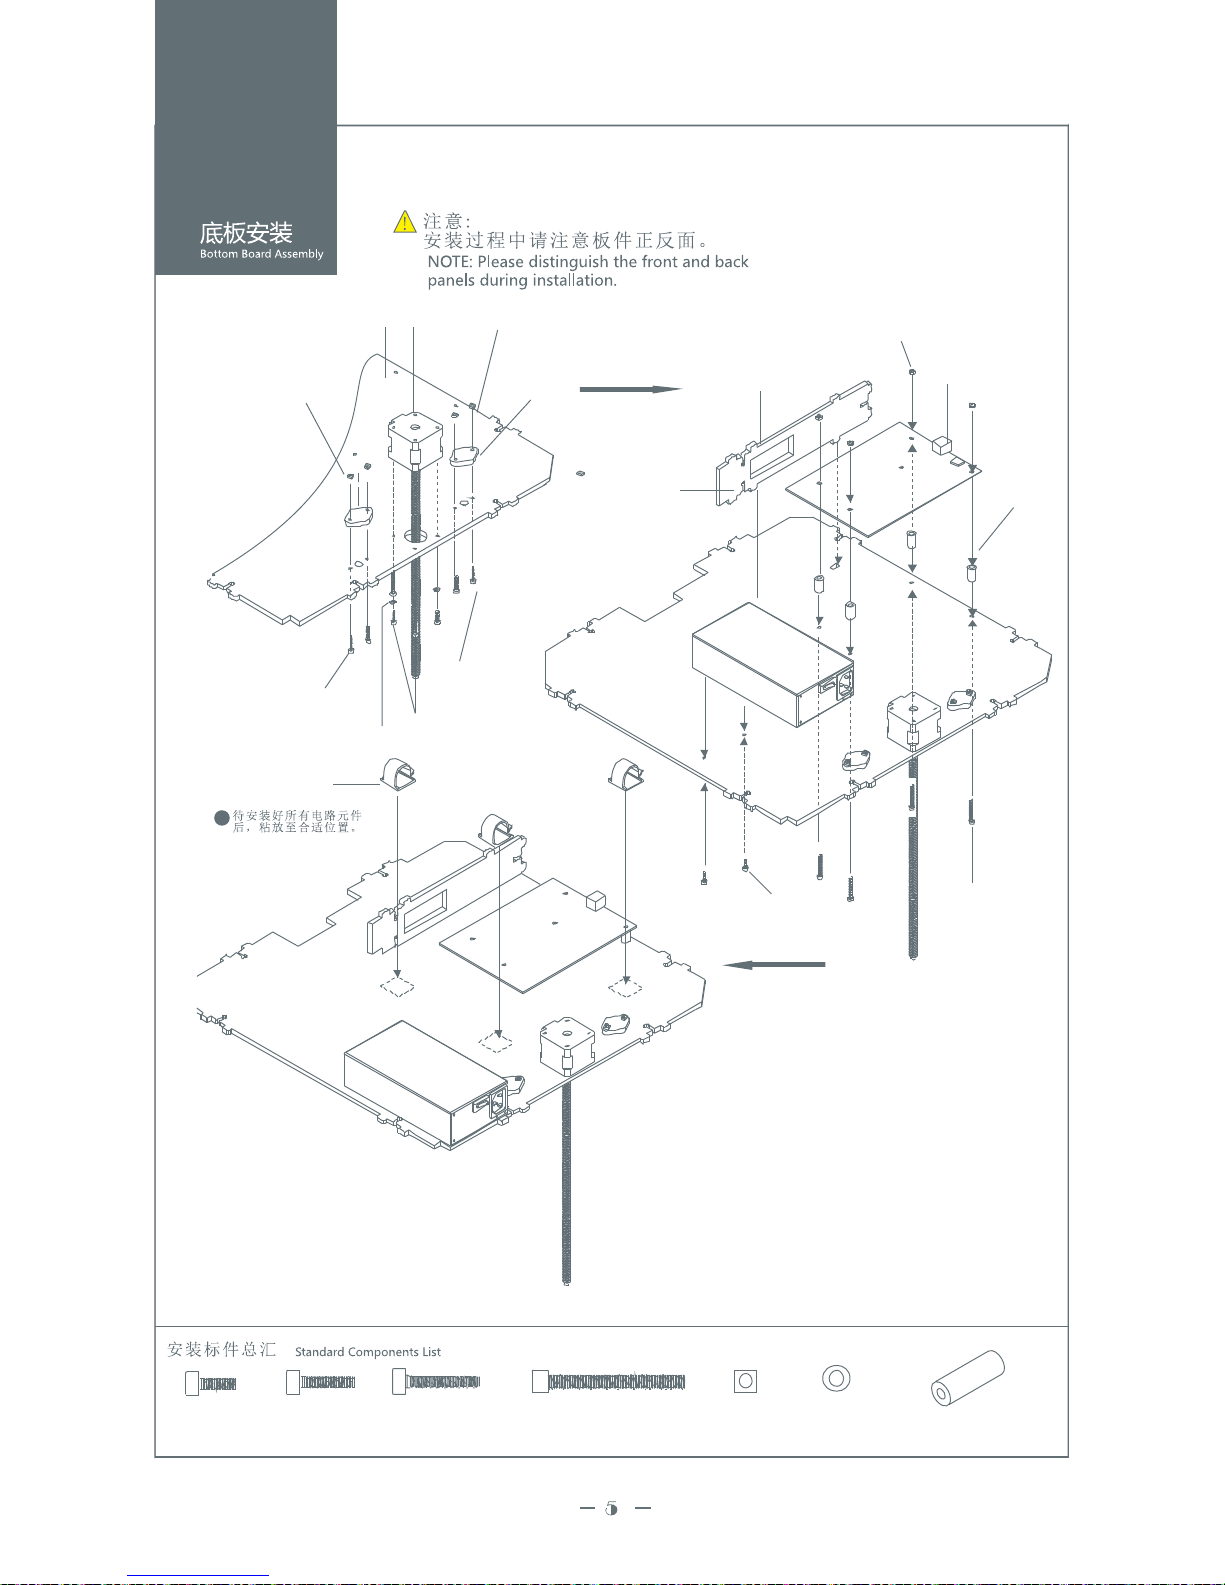
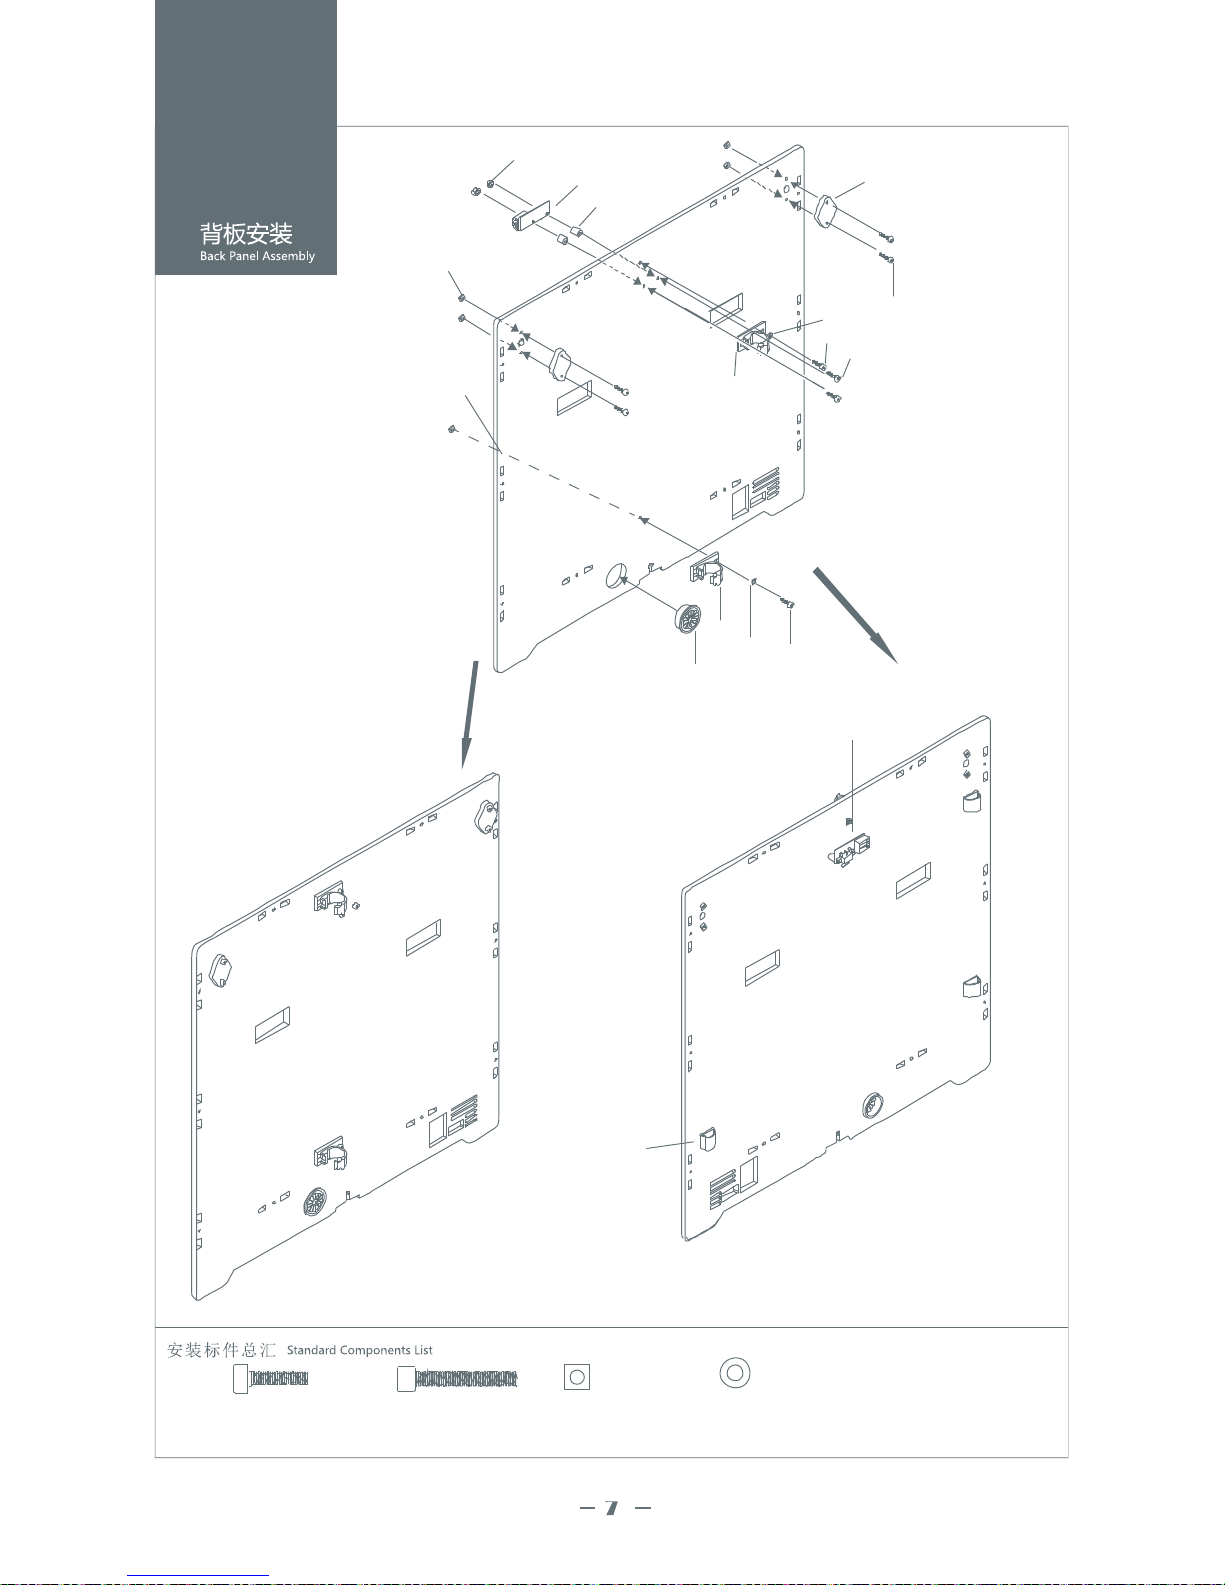
G2 m3 x8mm
6PC S
G3 m3 x12m m
4PC S
G7 m3 x30m m
4P CS
G9 m3
9PC S
G1 2 m3 C5 m3x7x20mm
4P CS 4P CS
G4 m3 x16m m
1PC S
A6
I6
G3
X2
G15
G4
X4
G7
X4
G2
X2
I7
G3
X2
G2
X4
G9
X2
G9
X2
A9
I1
C5
X4
A8
G12
X4
C1
X3
1
Assemble all the
electronics
components and
C1 stick to the
correct position.
Page 8
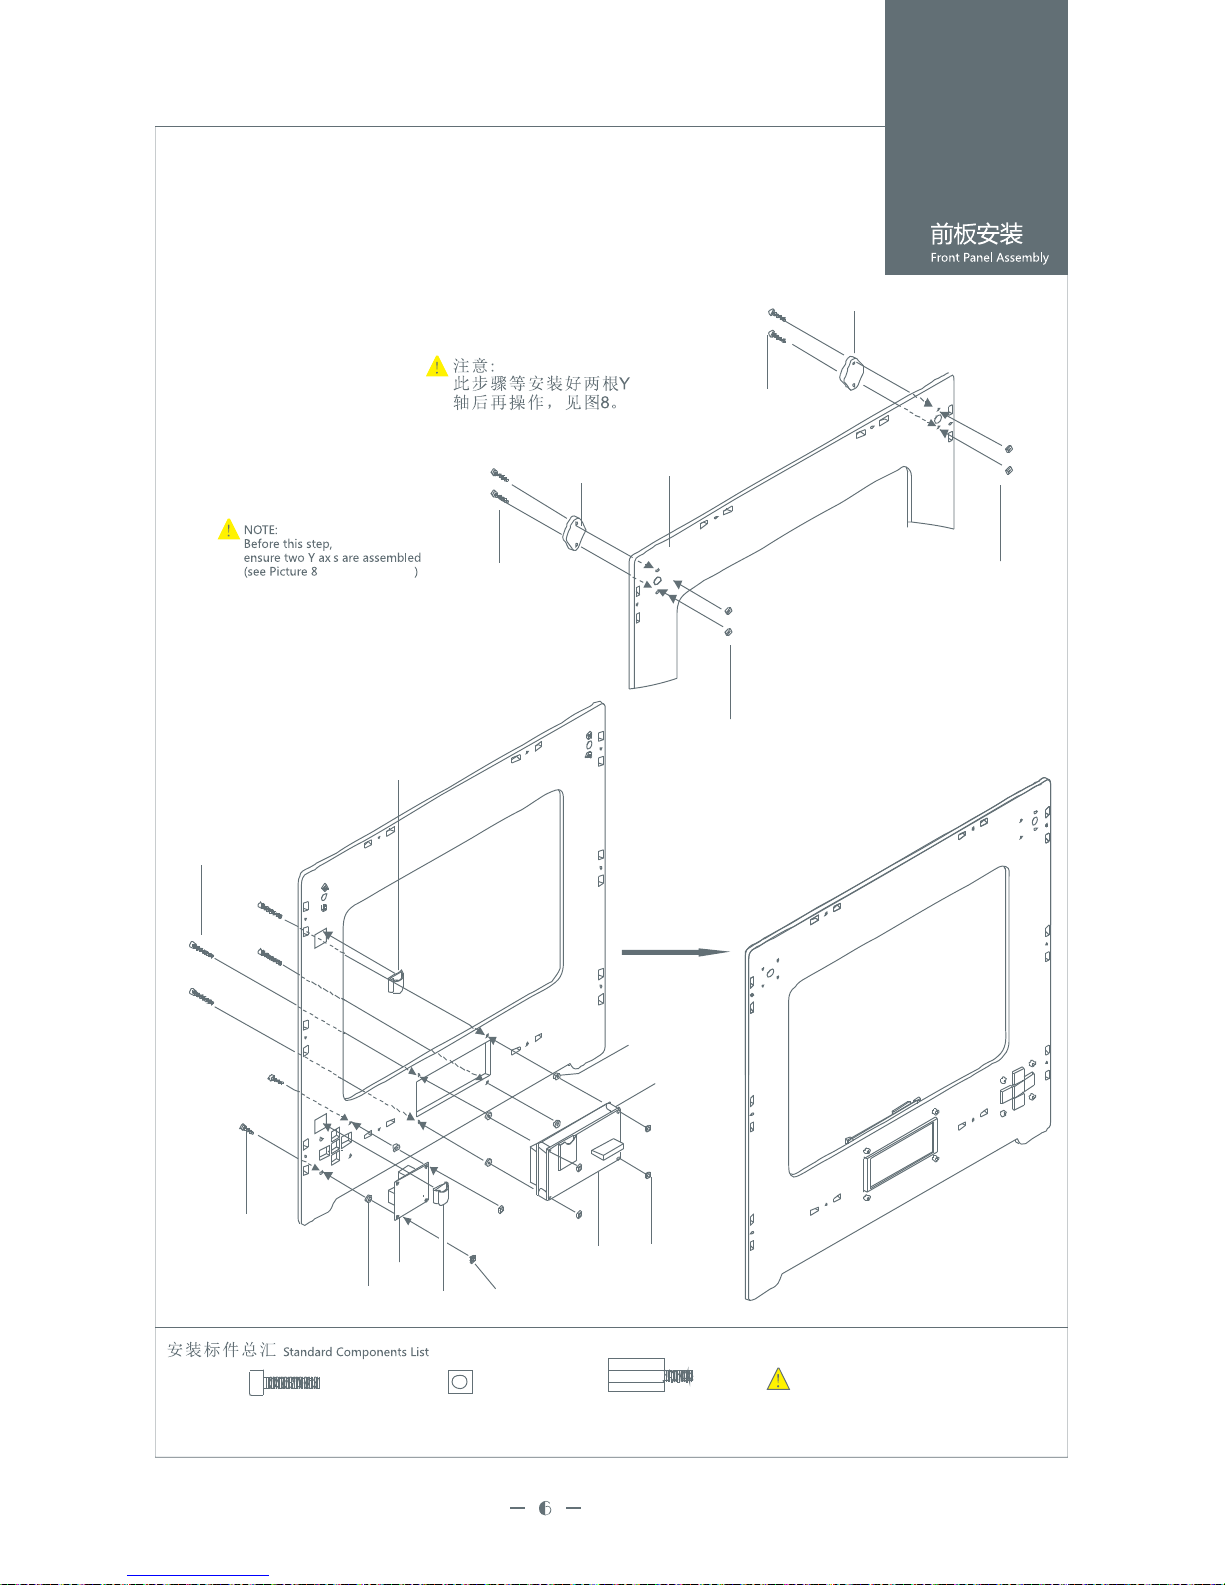
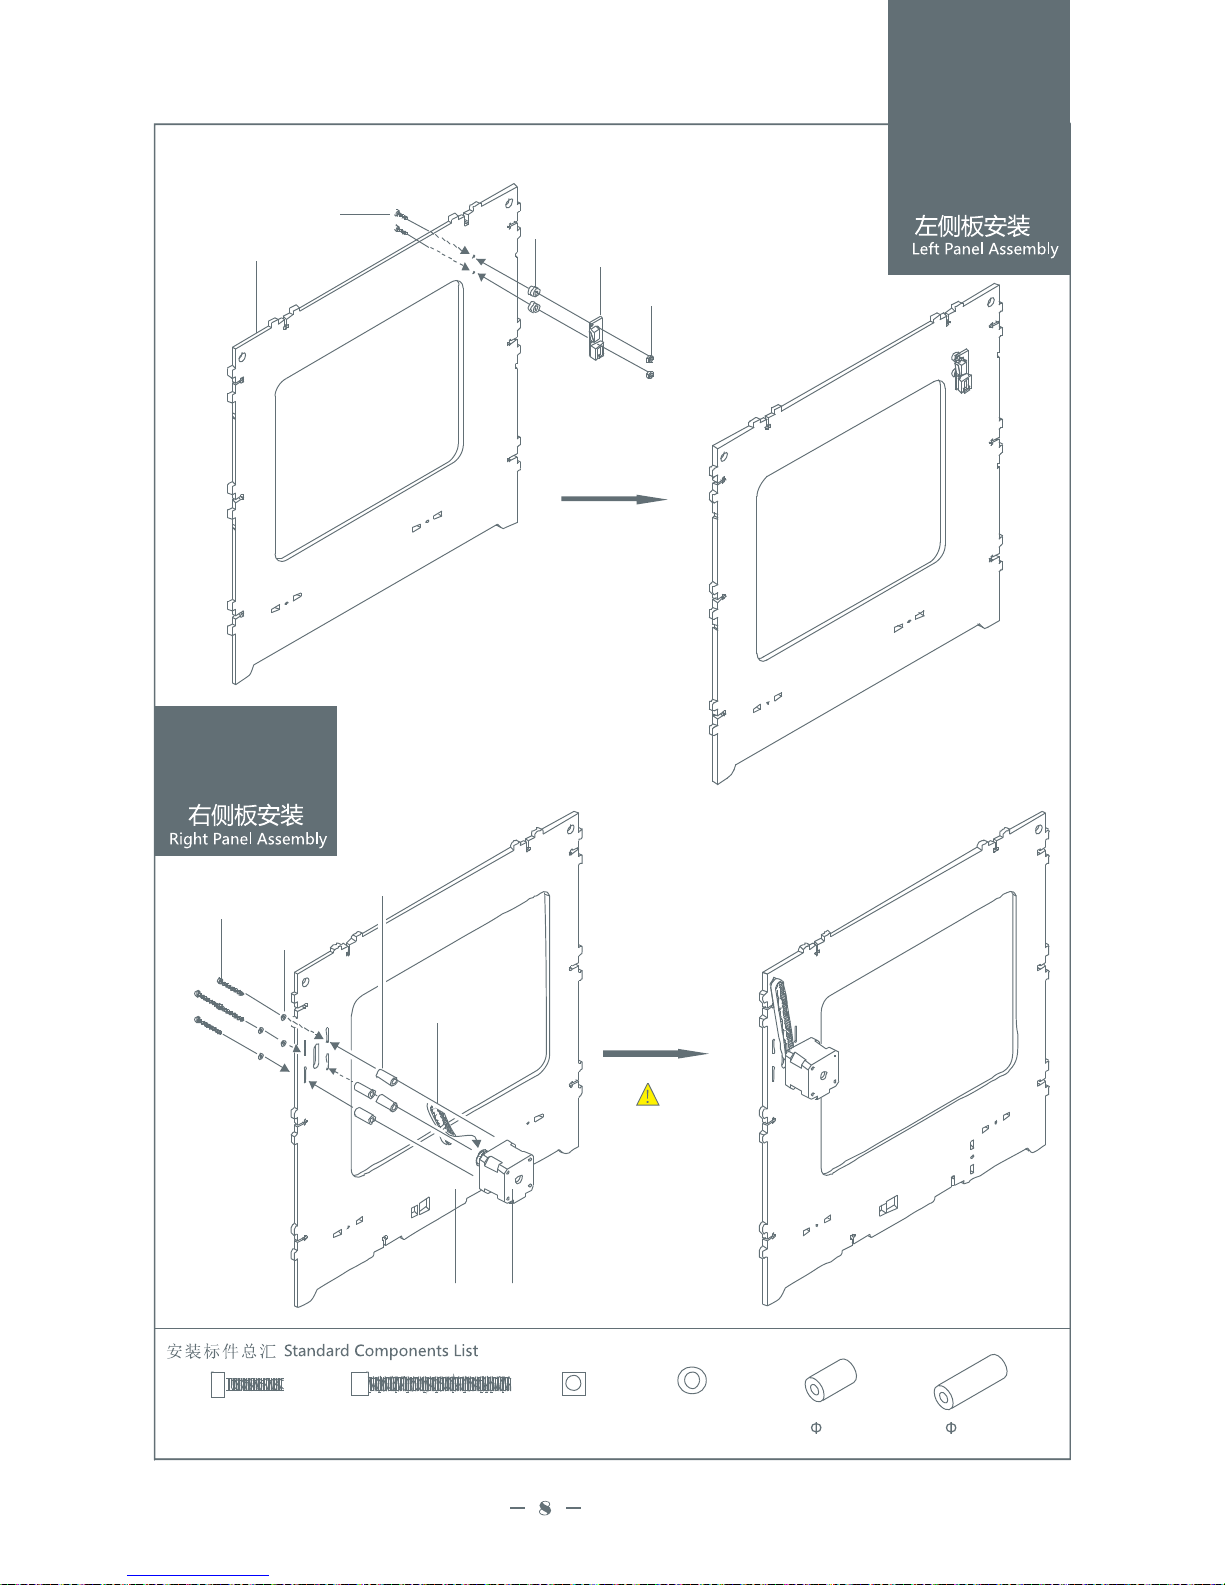
A8
G9
X
G3
X
A8
A1
G9
X
G3
X
C3
C3
I2
G3
X2
G3
X4
G9
X2
G9
X4
I3
C7
X4
G6
X4
C7
X2
G9
6PC S
G3 m3 x12 mm
PC S6
G1 5 m3
4P CS
2
注意:
按键(i3)安装时,注意插口在下方。
Attention:
i
2
2
2
2
Keep the cable connector socket of control
button pannel (i3) downside when assembling.
Y Axis Assembly
Page 9
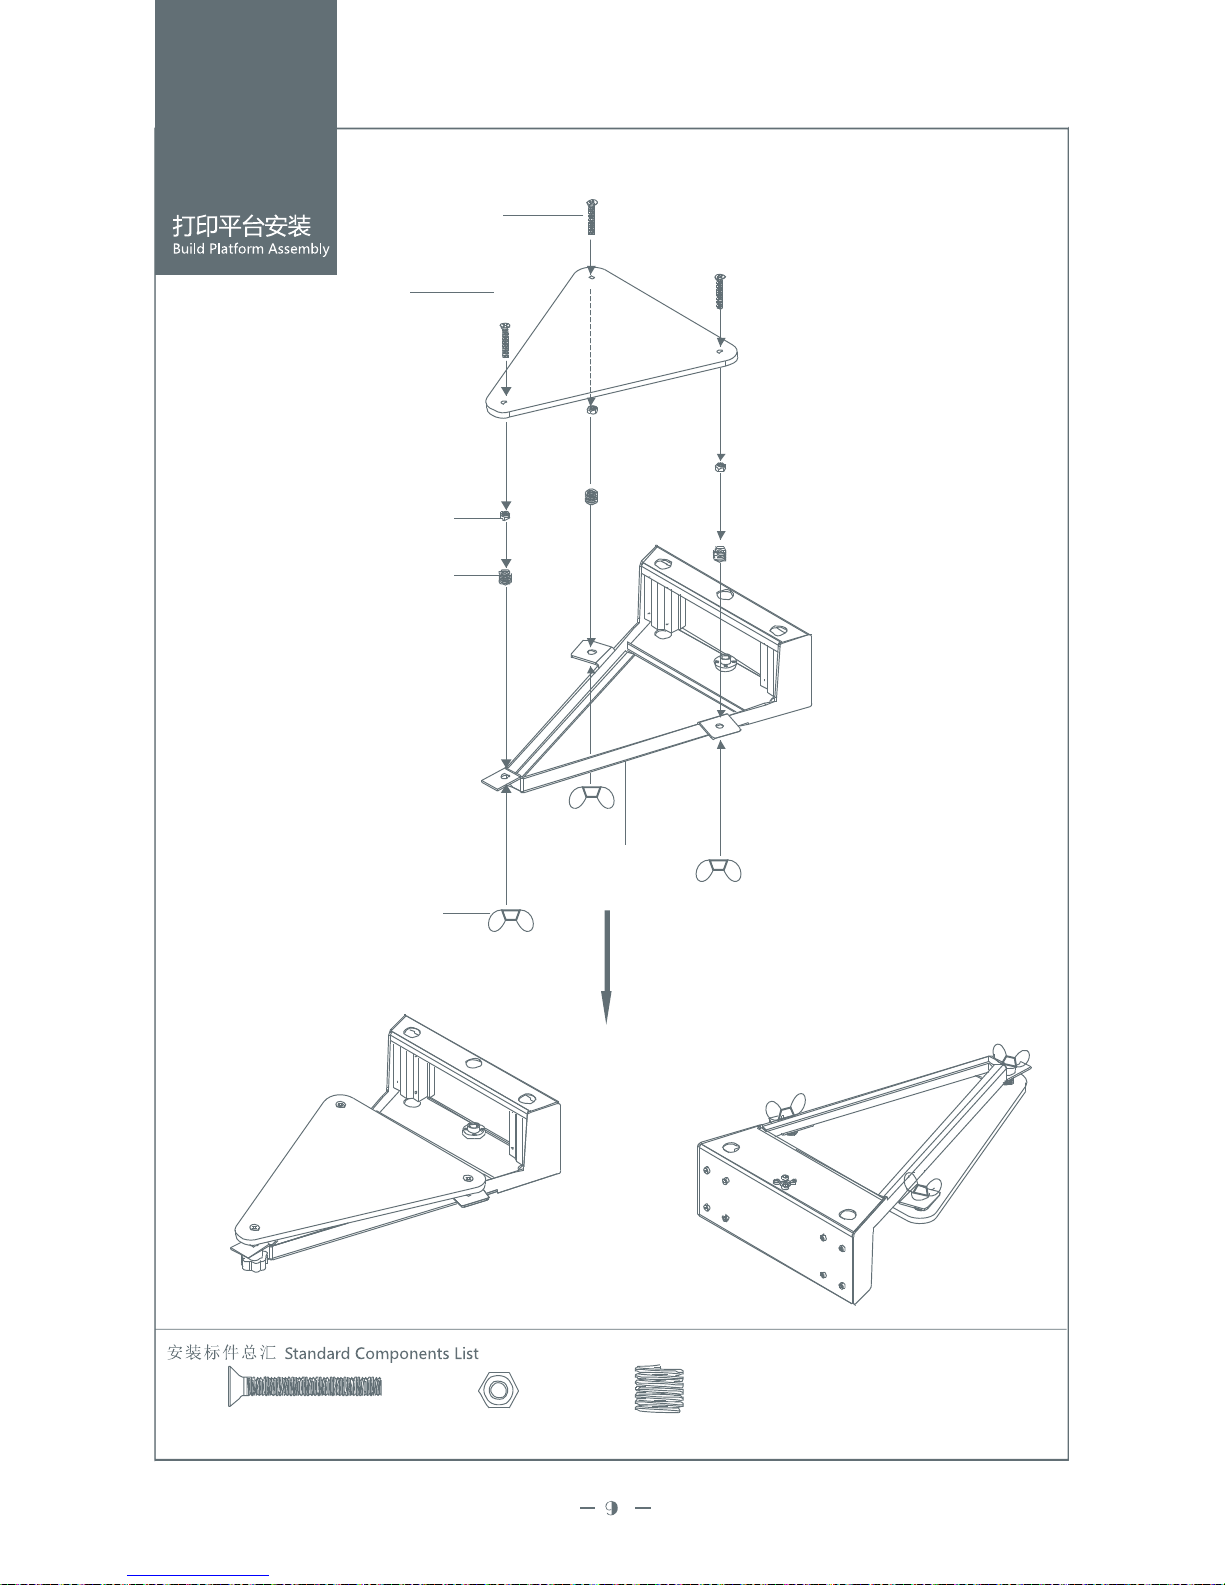
G3
X4
G9
X2
I4
C6
X2
G5
X2
G3
G9
X4
A8
C4
C3
x3
C2
G3
X轴限 位开关
正面
背面
G12
G12
C2
A4
G9
G 3 m3x12 mm
6P CS
G 5 m3x20 mm
2P CS
G 9
8P CS
G 12 m3
PC S2
3
X-axis limit switch
front
back
Page 10
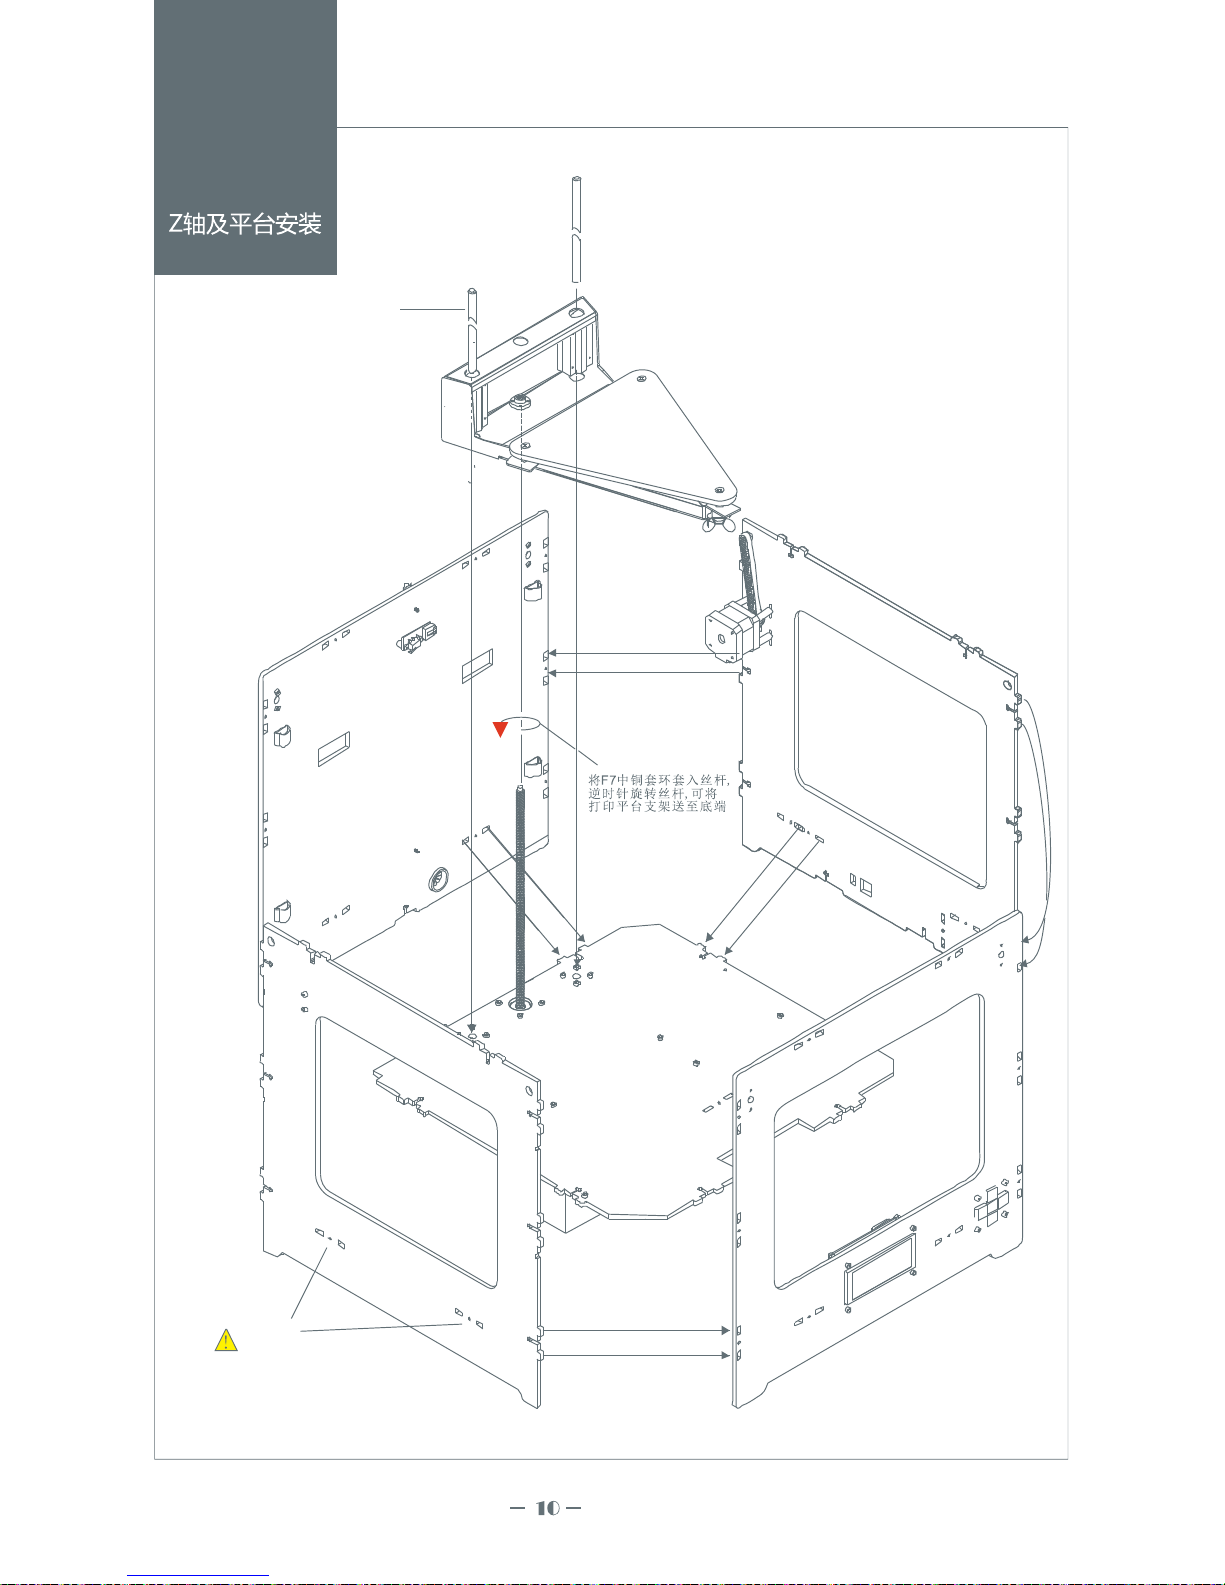
I4
G9
C6
X2
X2
C5
X2
A2
G12
X4
C5
X4
I5
F5
A5
G7
X4
G7 m3 x30 mm
4P CS
G9 m3
2P CS
G3 m3 x12 mm
2P CS
G1 2 m3
4P CS
C6 3x7x12
2PC S
C6 3x7x20
4PC S
4
5
注意:
电机先不要坚固。
Attention:
Don’ t fasten screw on
the motor too tight.
Page 11
G8 2
X
G14 3
X
G11 3
X
F7
G10 3
X
F8
G8
3P CS
m5 x35m m G1 4
3P CS
G1
PC S3
0 m5
6
Page 12
F3
X2
7
注意:
组装好后,拧紧最下面一圈螺丝。
Attention:
Z Axis and Build
platlorm Assembly
Insert (F7) the build
platlorm into threaded Z
axis rod and ratare the
threaded rod
anti-clockwise untill build
platlorm reach bottom.
Inter lock and screw tightly all the
pannels to each other.
Page 13
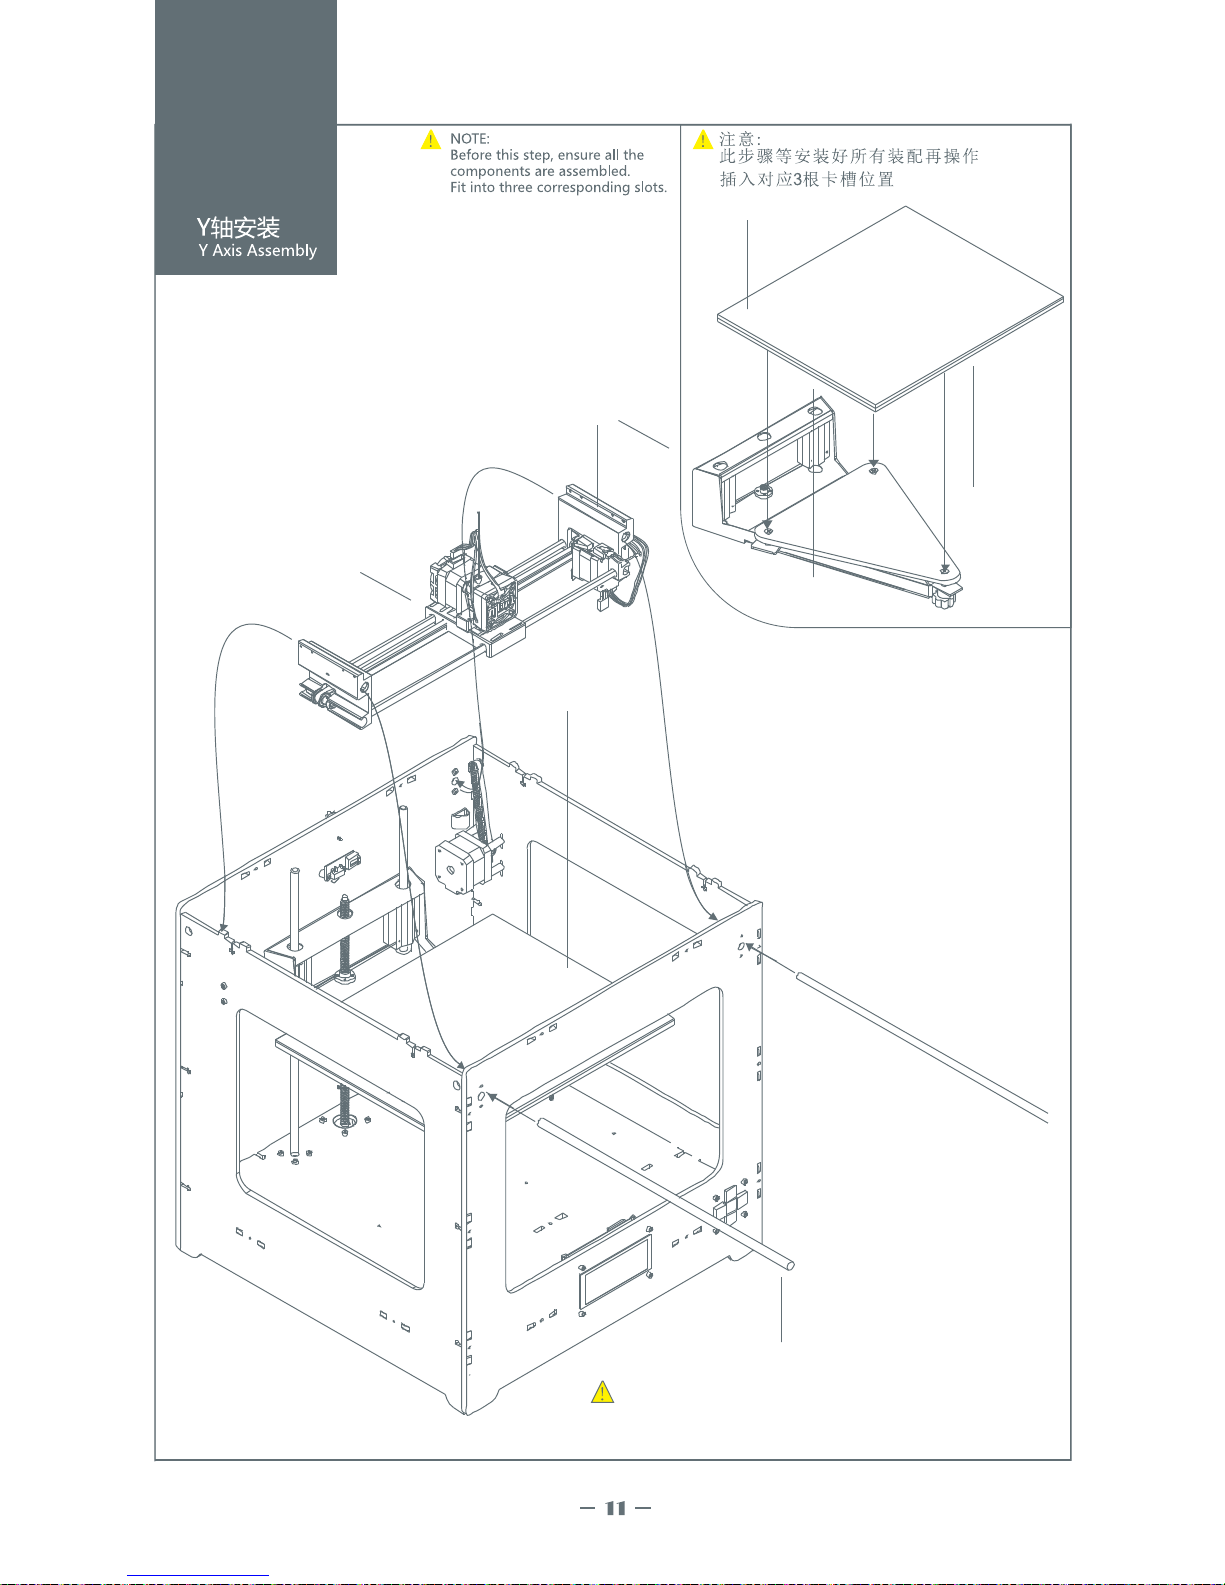
B1
F2
X2
E1
B1
8
注意:
F2 Y轴光杆插入后,安装固定挡板,如图步骤2。
Note:
Remeber to insert F2 to get the pannels fixed.
Page 14
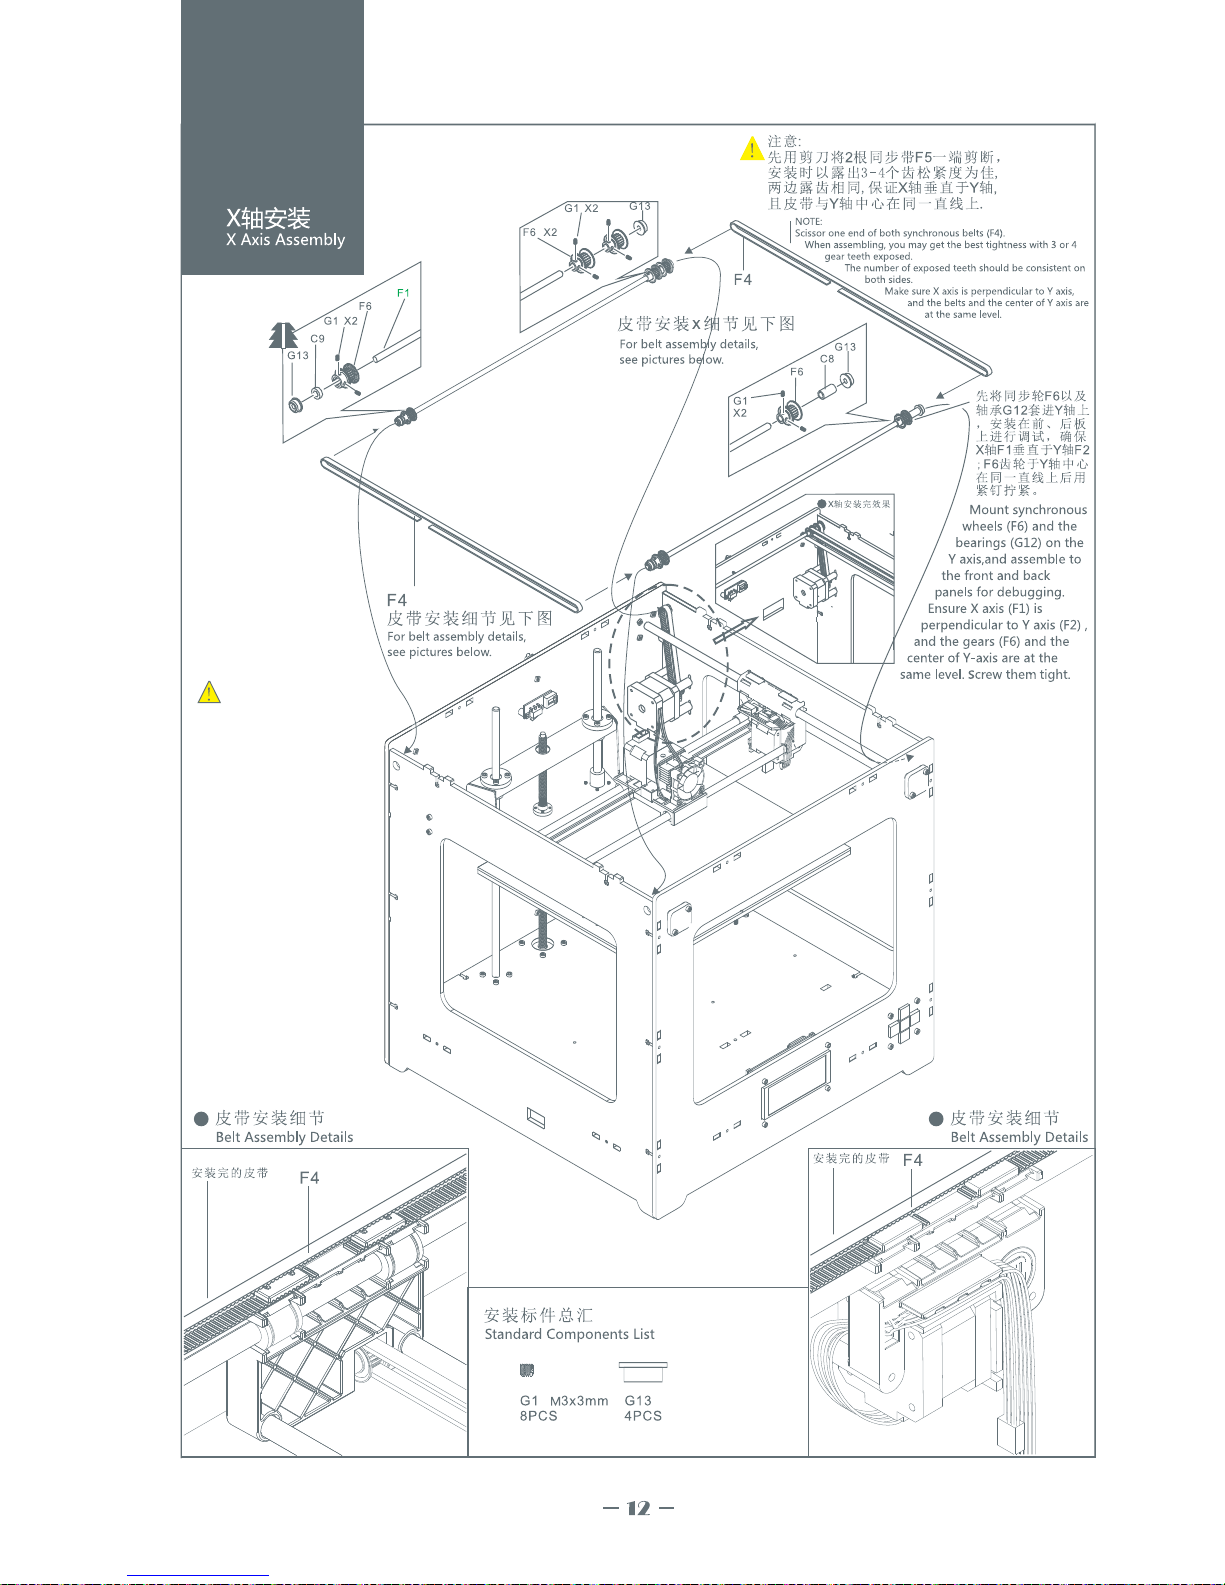
9
注意:
同步轮F6紧固后,确保
同步轴F1不会左右晃动。
Attention:
Make sure F1 is tightened
firmly after F6 is fastened
Left Right
Page 15
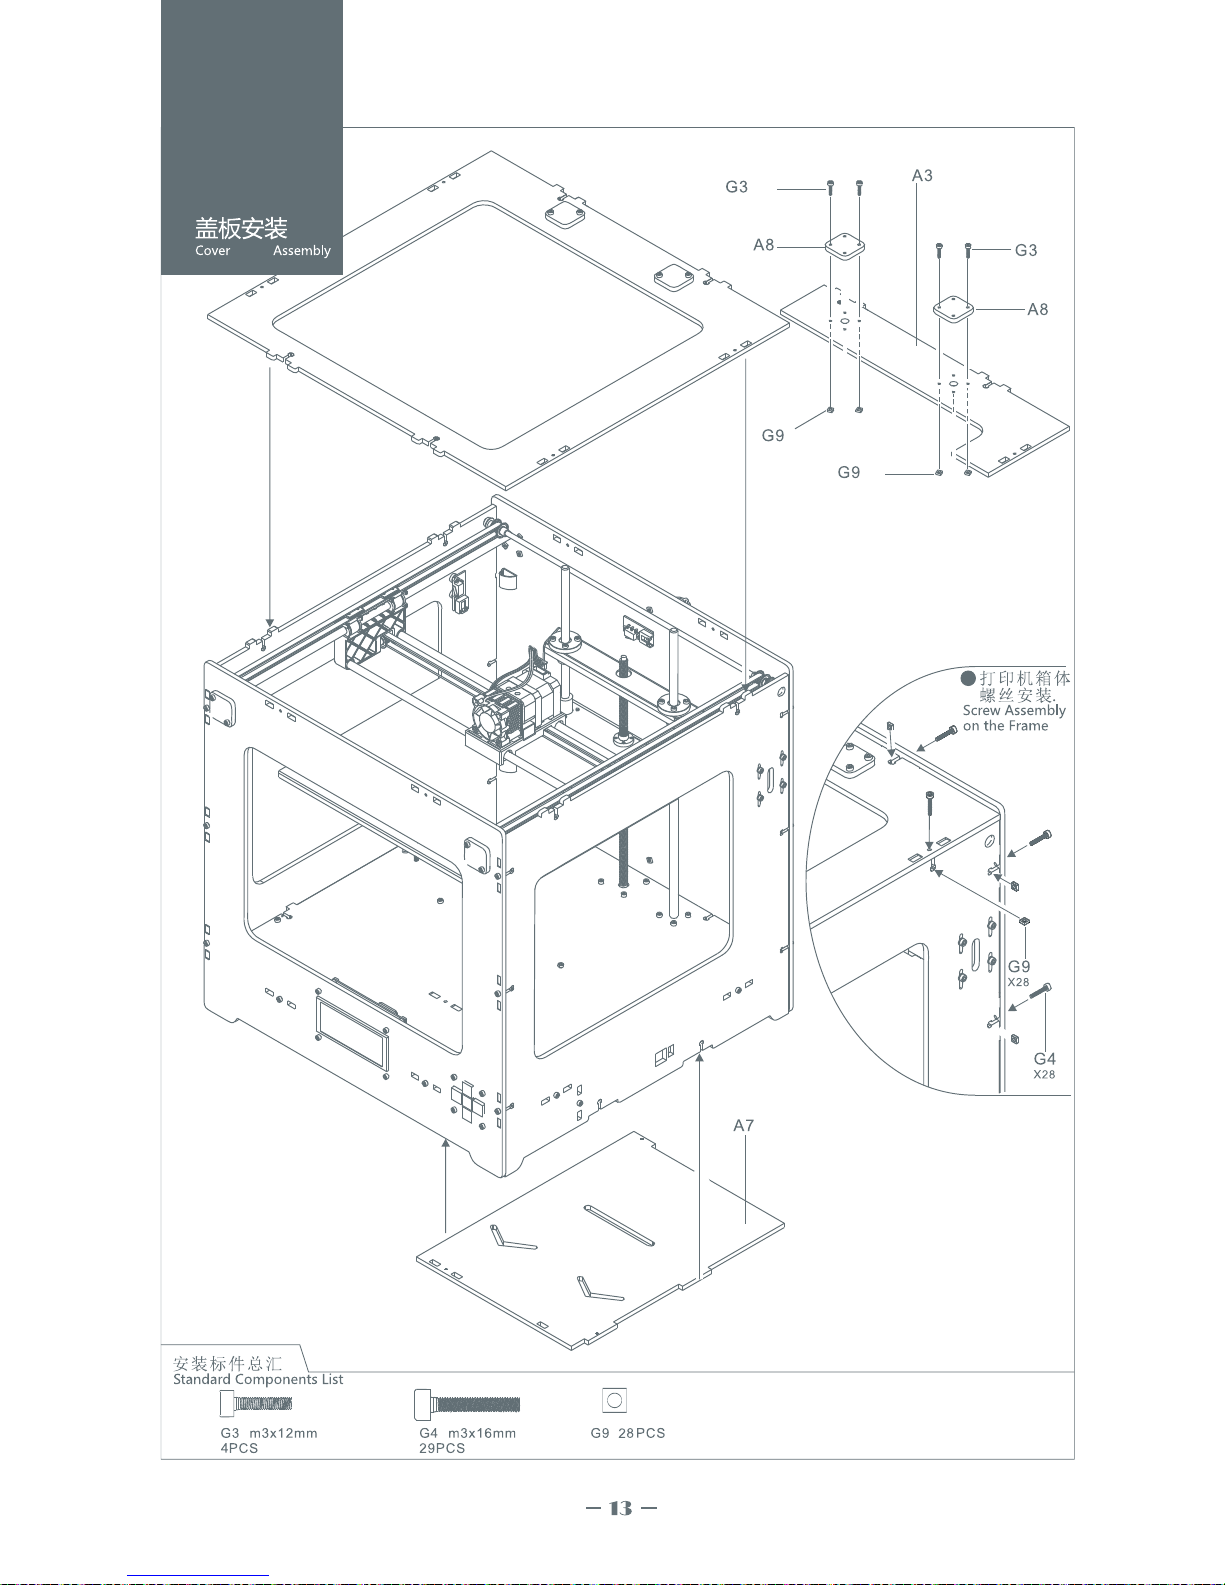
10
X2
X2
X2
X2
panel
Page 16
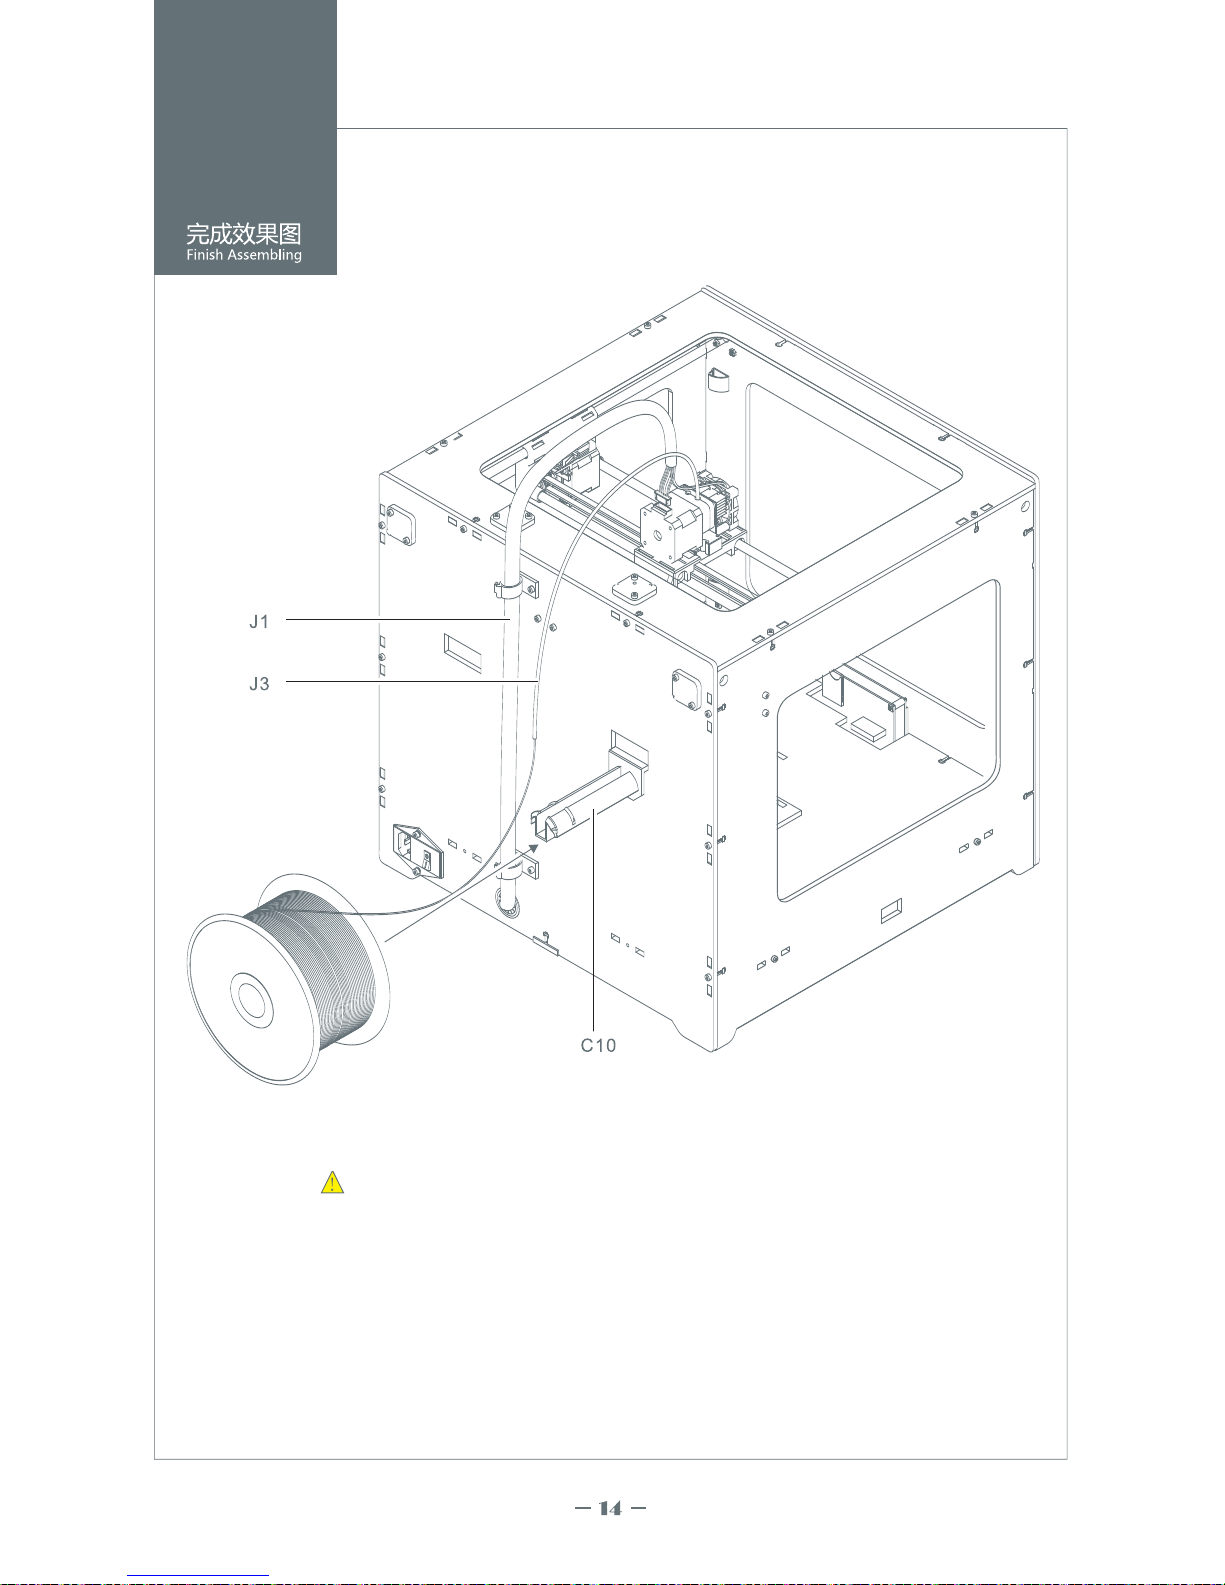
11
注意:
紧固Y轴电机(螺丝切勿拧紧,会导致电机轴承摩擦到侧板;
检查X轴总成是否与顶板平行,如不平行,固定机器后用手扳平行即可。
Attention:
FastenY-axis stepper motor. But don’t tighten the screw very tight, avoiding friction between
the stepper motor bearing and side pannel. Make sure the X-axis assembly parallel to cover pannel.
Page 17
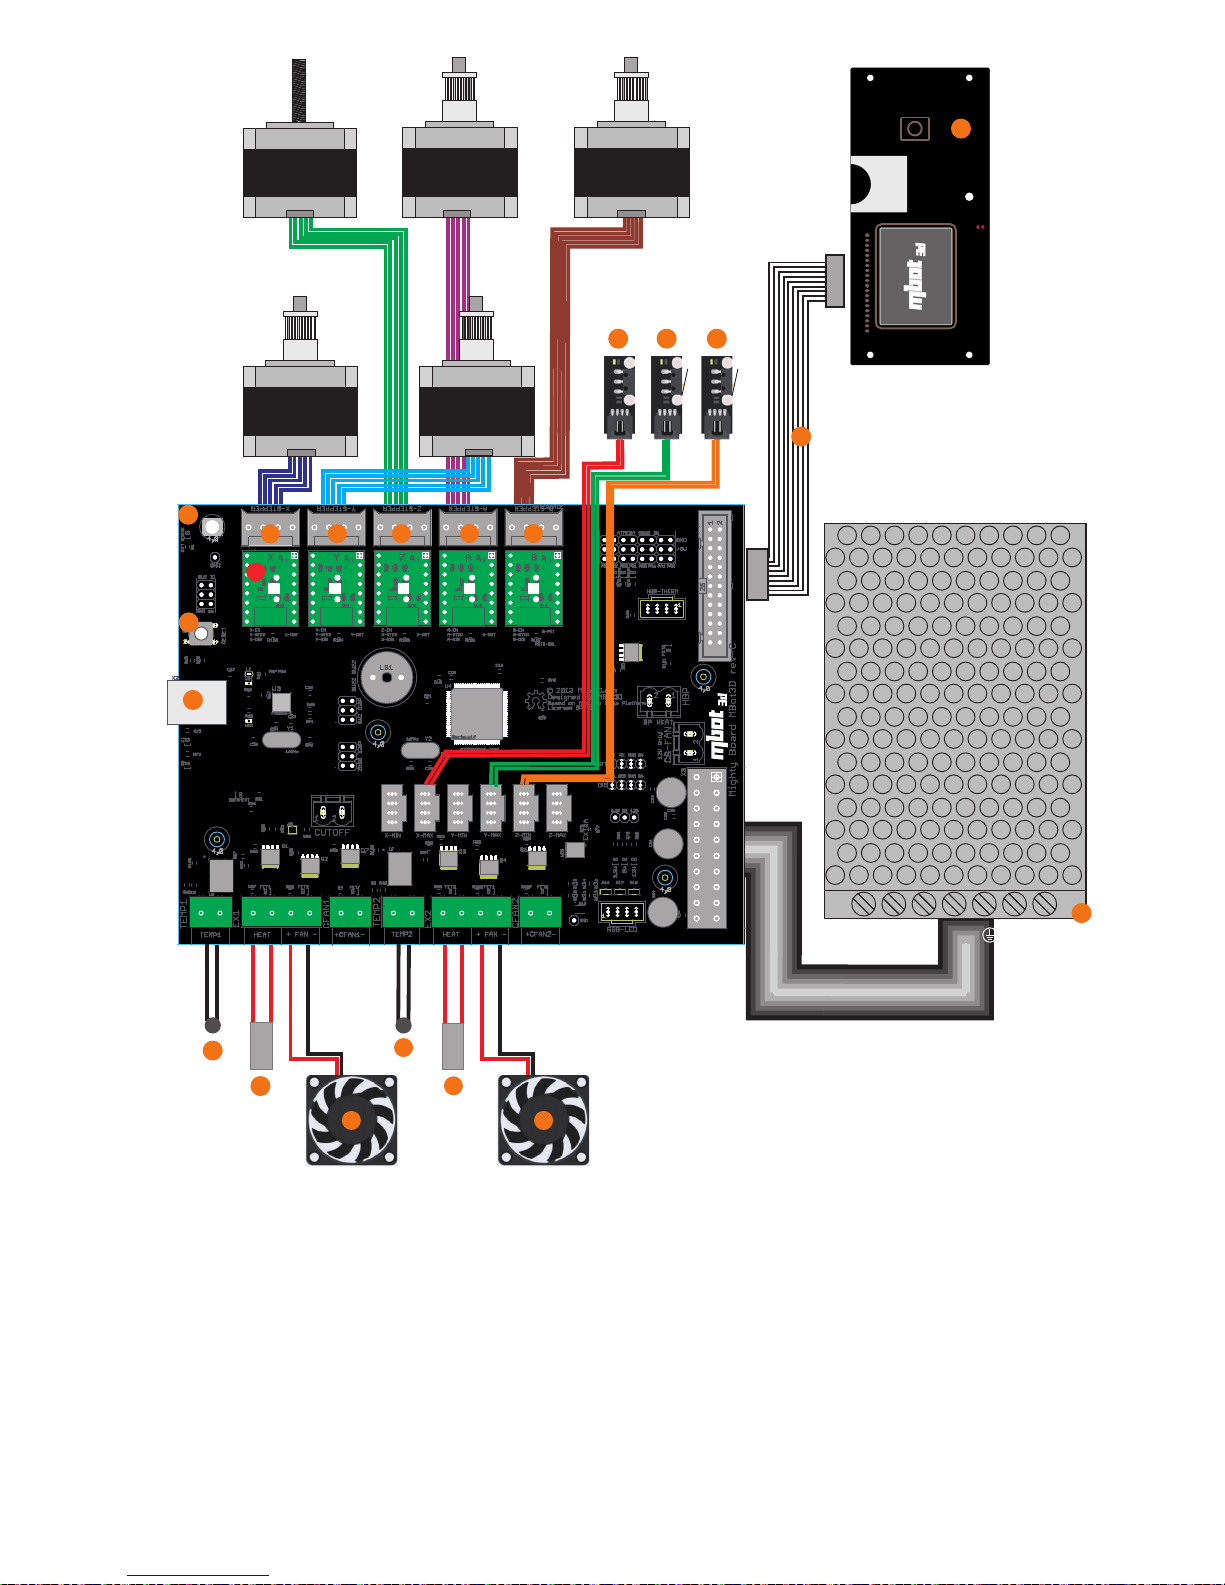
1、主板 Motherboard
2、电源 Power
8、左机头风扇线,注意正负极接线,红色“+”,黑“-”。
5、右机头风扇线,注意正负极接线,红“+”,黑“-”。
Right extruder fan cable. Connect red wire to“+”and black wire to“-”.
4、右机头加热棒线,两根粗红线,无正负级 Right extruder
cartridge heater cable.Two red wires.No distinguish Positive and negative.
13、左机头电机线 Left extruder motor drive cable
12、右机头电机线 Right extruder motor drive cable
11、Z轴电机线 Z-axis motor drive cable
10、Y轴电机线 Y-axis motor drive cable
9、X轴电机线 X-axis motor drive cable
14、X轴限位开关 X-axis limit switch
15、Y轴限位开关 Y-axis limit switch
16、Z轴限位开关 Z-axis limit switch
3、右机头温感线,两根细黑线,无正负极 Right extruder
thermocouple.Two black wires.No distinguish Positive and negative.
6、左机头温感线,两根细黑线,无正负极 Left extruder
thermocouple.Two black wires.No distinguish Positive and negative.
17、按键板 Control Button Panel
18、液晶显示屏线 LCD screen cable
19、USB接口 USB port
20、复位开关 reset switch
编号说明:Instructions
1
2
3
4
5
6
7
8
9
10
11
12
13
14
17
18
21
20
7、左机头加热棒线,两根粗红线,无正负级
Left extruder
cartridge heater cable.Two red wires.No distinguish Positive and negative
Left extruder fan cable. Connect red wire to“+” and black wire to“-”.
15
16
21、驱动小板,请按照图示的白色方块和圆检查小板的按插方向,
备注:单打印头机器,默认为右机头,驱动小板4块,分别为X,Y,Z,A.
PS: For single head printer, right extruder is the default,
4 pcs motor drivers, respectively X,Y,Z,A
如插反会引起主板烧坏。
19
备注:按键面板和液晶屏的连接线H2,连接时两端接口相反即可。
Check the direction of the TP1 and
TP2 at Chip on the motherboard. TP2 should be facing towards
the stepper motor jack. Wrong assemble may destroy chips
and motherboard.
PS:H2 cable each end jacks are same, but it should be
connecting each other jack in opposite directions on Control
button and the LCD Screen.
Page 18
13
命令识别及调校
主菜单:
Print from SD : 从SD卡打印
Preheat : 预热
Utilities : 设置
Utilities
Filament loading : 退料/进 料
Preheat settings : 预热设置
Level Build Plate : 水平调整
Home Axes : 原点归位
Filament Odometer : 用料统计
Exit menu : 退出
第一步:检查Z轴上下走动是否流畅。
执行Level Build Plate命令,等命令执行完成后,按左键取消,平台自动降至最低处,
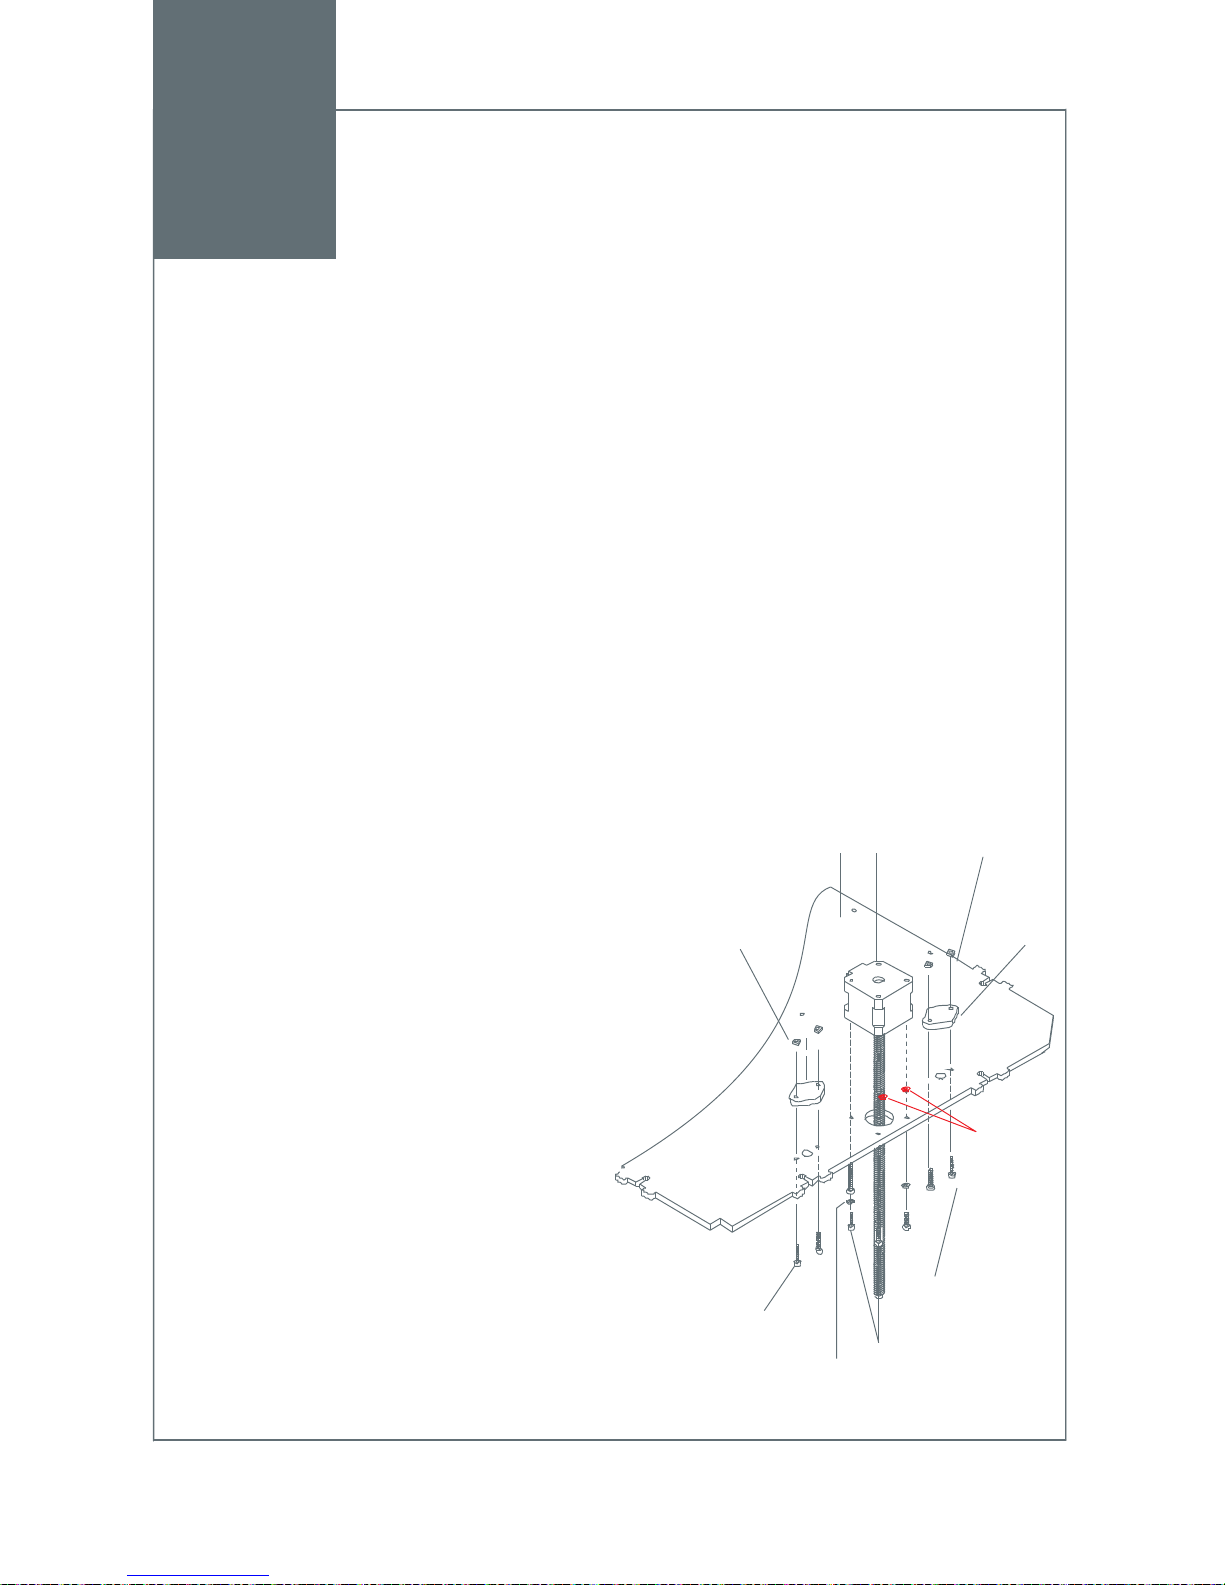
再次执行此命令,观察平台上升过程中是否卡顿【因外壳是软性木材,安装时可能会
产生一定偏差,如遇平台上升卡顿的情况,可按图示,在Z轴电机和底板之间的前方或
后方两个螺丝间套上垫片调整电机倾斜度】。多执行几次此命令,直接完全正常。
第二步:打印平台水平校准。
执行Level Build Plate命令,打印平台上升后,用手将
打印头分别移至对应底板调节螺母的三个位置,拧动
调节螺母调整打印头与底板之间间隙刚好卡片厚度即
可,来回多调几次。然后进料,开始准备打印。
打印准备:
机器使用Mprint软件切片后SD卡脱机打印,软件下载
及使用说明请至官网产品页:
http://www.mbot3d .cn/software
命令识别(以下仅注明需要用到的命令操作)
机器调校Calibration before printing
A6
I6
G3
X2
G3
X2
G2
X4
G9
X2
G9
X2
A8
G12
X4
G12
X2
Final preparation:
①Load filament
②Convert the STL file into X3G format with
Mprint software,which is for free download on:
http://www.mbot3d.com/software
Step 1: check and ensure the Z Axis move smoothly
On Menu, Select Utilities and click on utilities. Select level build plate and click on it. It will move
upward direction. Press left button and select “Yes” for cancelling. Repeat these steps for
more than once to check the smooth movement of the building platform. If it is not moving
smoothly, then add washers on the screws of the Z axis stepper motor to adjust the gradient.
Step 2: Level the build plate.
On Menu, Select Utilities and click on utilities. Select
level build plate and click on it. It will move upward
direction. Move extruder Right side check the gap
between the building plate and nozzle. Gap between
nozzle and build plate should be thickness of paper.
Rotate the butterfly nut to adjust the gap between
nozzles and build plate. Move extruder to left and front
and repeat same process for adjusting the gap between
nozzles and build plate.
Page 19

http://www.mbot3d.cn 购买与技术服务电话:400 004 1266 0571-88021266
Add:杭州市高新区(滨江)建业路511号华业大厦14楼 邮编:310052
http://www.mbot3d.com www.magicfirm.com
Tel: 400 004 1266 +86 571 8802 1266 ( UTC+8 9:30-18:00 work time)
14th Floor,Block A,Huaye Building,511 Jian Ye Road,Binjiang District,310052,Hangzhou
 Loading...