

Page 1

ALPHA 2400 DECT
BEDIENUNGSANLEITUNG
INSTRUCTION MANUAL
© by 4MBO International Electronic AG, Germany
Schnurloses Telefon nach DECT Standard
Page 2

1
CONTENTS
CONTENTS . . . . . . . . . . . . . . . . . . . . . . . . . . . . . . . . . . . . . . . . . . . . . . . . . . . . . . . . . . . . . . . . . . . . . . . . . . 1-2
INTRODUCTION
Welcome . . . . . . . . . . . . . . . . . . . . . . . . . . . . . . . . . . . . . . . . . . . . . . . . . . . . . . . . . . . . . . . . . . . . . . . . . . 3
General features . . . . . . . . . . . . . . . . . . . . . . . . . . . . . . . . . . . . . . . . . . . . . . . . . . . . . . . . . . . . . . . . . . . 3
Caution . . . . . . . . . . . . . . . . . . . . . . . . . . . . . . . . . . . . . . . . . . . . . . . . . . . . . . . . . . . . . . . . . . . . . . . . . . . . 3
Abbreviations . . . . . . . . . . . . . . . . . . . . . . . . . . . . . . . . . . . . . . . . . . . . . . . . . . . . . . . . . . . . . . . . . . . . . . 4
Glossary of terms . . . . . . . . . . . . . . . . . . . . . . . . . . . . . . . . . . . . . . . . . . . . . . . . . . . . . . . . . . . . . . . . . . 5
Range . . . . . . . . . . . . . . . . . . . . . . . . . . . . . . . . . . . . . . . . . . . . . . . . . . . . . . . . . . . . . . . . . . . . . . . . . . . . . . 6
General programming note . . . . . . . . . . . . . . . . . . . . . . . . . . . . . . . . . . . . . . . . . . . . . . . . . . . . . . . 6
Settings/programming . . . . . . . . . . . . . . . . . . . . . . . . . . . . . . . . . . . . . . . . . . . . . . . . . . . . . . . . . . . . 6
Handset PIN . . . . . . . . . . . . . . . . . . . . . . . . . . . . . . . . . . . . . . . . . . . . . . . . . . . . . . . . . . . . . . . . . . . . . . . . 6
CONNECTION / START-UP
Supply pack . . . . . . . . . . . . . . . . . . . . . . . . . . . . . . . . . . . . . . . . . . . . . . . . . . . . . . . . . . . . . . . . . . . . . . . . 7
Batteries . . . . . . . . . . . . . . . . . . . . . . . . . . . . . . . . . . . . . . . . . . . . . . . . . . . . . . . . . . . . . . . . . . . . . . . . . . . . 8
Loading / changing batteries . . . . . . . . . . . . . . . . . . . . . . . . . . . . . . . . . . . . . . . . . . . . . . . . . . . . . 8
First battery charge/charge process . . . . . . . . . . . . . . . . . . . . . . . . . . . . . . . . . . . . . . . . . . . . . . 8-9
Battery note . . . . . . . . . . . . . . . . . . . . . . . . . . . . . . . . . . . . . . . . . . . . . . . . . . . . . . . . . . . . . . . . . . . . . . . 9
Battery disposal . . . . . . . . . . . . . . . . . . . . . . . . . . . . . . . . . . . . . . . . . . . . . . . . . . . . . . . . . . . . . . . . . . . . 9
Connecting the telephone . . . . . . . . . . . . . . . . . . . . . . . . . . . . . . . . . . . . . . . . . . . . . . . . . . . . . . . . 10
BASE SET
Setting up the base set . . . . . . . . . . . . . . . . . . . . . . . . . . . . . . . . . . . . . . . . . . . . . . . . . . . . . . . . . . . 11
Base set displays and controls . . . . . . . . . . . . . . . . . . . . . . . . . . . . . . . . . . . . . . . . . . . . . . . . . . . . 11-12
Paging key . . . . . . . . . . . . . . . . . . . . . . . . . . . . . . . . . . . . . . . . . . . . . . . . . . . . . . . . . . . . . . . . . . . . . . . . . 12
HANDSET
Handset keys . . . . . . . . . . . . . . . . . . . . . . . . . . . . . . . . . . . . . . . . . . . . . . . . . . . . . . . . . . . . . . . . . . . . . . 13-15
LCD digits and icons . . . . . . . . . . . . . . . . . . . . . . . . . . . . . . . . . . . . . . . . . . . . . . . . . . . . . . . . . . . . . . 16
Description of icons . . . . . . . . . . . . . . . . . . . . . . . . . . . . . . . . . . . . . . . . . . . . . . . . . . . . . . . . . . . . . . . 16
Handset modes . . . . . . . . . . . . . . . . . . . . . . . . . . . . . . . . . . . . . . . . . . . . . . . . . . . . . . . . . . . . . . . . . . . . 17-18
Switching on the handset . . . . . . . . . . . . . . . . . . . . . . . . . . . . . . . . . . . . . . . . . . . . . . . . . . . . . . . . . 18
Handset out of base set range . . . . . . . . . . . . . . . . . . . . . . . . . . . . . . . . . . . . . . . . . . . . . . . . . . . 1 8
Viewing register entries . . . . . . . . . . . . . . . . . . . . . . . . . . . . . . . . . . . . . . . . . . . . . . . . . . . . . . . . . . . 19
Talk mode (autotalk) . . . . . . . . . . . . . . . . . . . . . . . . . . . . . . . . . . . . . . . . . . . . . . . . . . . . . . . . . . . . . . 19
Battery low . . . . . . . . . . . . . . . . . . . . . . . . . . . . . . . . . . . . . . . . . . . . . . . . . . . . . . . . . . . . . . . . . . . . . . . . . 1 9
Handset lock . . . . . . . . . . . . . . . . . . . . . . . . . . . . . . . . . . . . . . . . . . . . . . . . . . . . . . . . . . . . . . . . . . . . . . . 19
Call waiting . . . . . . . . . . . . . . . . . . . . . . . . . . . . . . . . . . . . . . . . . . . . . . . . . . . . . . . . . . . . . . . . . . . . . . . . 20
Pause . . . . . . . . . . . . . . . . . . . . . . . . . . . . . . . . . . . . . . . . . . . . . . . . . . . . . . . . . . . . . . . . . . . . . . . . . . . . . . . 20
Call duration . . . . . . . . . . . . . . . . . . . . . . . . . . . . . . . . . . . . . . . . . . . . . . . . . . . . . . . . . . . . . . . . . . . . . . . 20
USING THE TELEPHONE
Receiving a call . . . . . . . . . . . . . . . . . . . . . . . . . . . . . . . . . . . . . . . . . . . . . . . . . . . . . . . . . . . . . . . . . . . . 21
Making a call . . . . . . . . . . . . . . . . . . . . . . . . . . . . . . . . . . . . . . . . . . . . . . . . . . . . . . . . . . . . . . . . . . . . . . 21-22
Redial . . . . . . . . . . . . . . . . . . . . . . . . . . . . . . . . . . . . . . . . . . . . . . . . . . . . . . . . . . . . . . . . . . . . . . . . . . . . . . . 22
Page 3

2
CONTENTS
Internal calls among handsets . . . . . . . . . . . . . . . . . . . . . . . . . . . . . . . . . . . . . . . . . . . . . . . . . . . . 22
Forwarding a call between handsets . . . . . . . . . . . . . . . . . . . . . . . . . . . . . . . . . . . . . . . . . . . . 22-23
Forwarding an external call to an internal handset . . . . . . . . . . . . . . . . . . . . . . . . . . . . . 23
Changing the dial mode during an external call . . . . . . . . . . . . . . . . . . . . . . . . . . . . . . . . 23
Microphone muting . . . . . . . . . . . . . . . . . . . . . . . . . . . . . . . . . . . . . . . . . . . . . . . . . . . . . . . . . . . . . . 24
HANDSET SETTINGS
General . . . . . . . . . . . . . . . . . . . . . . . . . . . . . . . . . . . . . . . . . . . . . . . . . . . . . . . . . . . . . . . . . . . . . . . . . . . . 25
Caller identification (CLIP) . . . . . . . . . . . . . . . . . . . . . . . . . . . . . . . . . . . . . . . . . . . . . . . . . . . . . . . . 26-27
Selecting a base set . . . . . . . . . . . . . . . . . . . . . . . . . . . . . . . . . . . . . . . . . . . . . . . . . . . . . . . . . . . . . . 28-29
Setting the ear volume . . . . . . . . . . . . . . . . . . . . . . . . . . . . . . . . . . . . . . . . . . . . . . . . . . . . . . . . . . . 29-30
Ringing . . . . . . . . . . . . . . . . . . . . . . . . . . . . . . . . . . . . . . . . . . . . . . . . . . . . . . . . . . . . . . . . . . . . . . . . . . . . 30
Setting the melody and volume of the external ringing tone . . . . . . . . . . . . . . . . . . 30-31
Setting the melody and volume of the internal ringing tone . . . . . . . . . . . . . . . . . . 31
Key click on/off . . . . . . . . . . . . . . . . . . . . . . . . . . . . . . . . . . . . . . . . . . . . . . . . . . . . . . . . . . . . . . . . . . . 32
Registering a handset . . . . . . . . . . . . . . . . . . . . . . . . . . . . . . . . . . . . . . . . . . . . . . . . . . . . . . . . . . . . 32-33
Resetting the handset . . . . . . . . . . . . . . . . . . . . . . . . . . . . . . . . . . . . . . . . . . . . . . . . . . . . . . . . . . . . 34-35
Direct call (baby call) . . . . . . . . . . . . . . . . . . . . . . . . . . . . . . . . . . . . . . . . . . . . . . . . . . . . . . . . . . . . . 35-36
Handset PIN . . . . . . . . . . . . . . . . . . . . . . . . . . . . . . . . . . . . . . . . . . . . . . . . . . . . . . . . . . . . . . . . . . . . . . . 36-37
RFPI (Radio Fixed Part Identifier) code . . . . . . . . . . . . . . . . . . . . . . . . . . . . . . . . . . . . . . . . . . . 37
Assigning a user name to a handset . . . . . . . . . . . . . . . . . . . . . . . . . . . . . . . . . . . . . . . . . . . . 38
Telephone directory (phone book) . . . . . . . . . . . . . . . . . . . . . . . . . . . . . . . . . . . . . . . . . . . . . . 39-41
Using the handset in a PABX . . . . . . . . . . . . . . . . . . . . . . . . . . . . . . . . . . . . . . . . . . . . . . . . . . . . 4 2
BASE SETTINGS
Base settings . . . . . . . . . . . . . . . . . . . . . . . . . . . . . . . . . . . . . . . . . . . . . . . . . . . . . . . . . . . . . . . . . . . . . . 43
Setting the dial mode . . . . . . . . . . . . . . . . . . . . . . . . . . . . . . . . . . . . . . . . . . . . . . . . . . . . . . . . . . . . 44
Programming earth/flash time . . . . . . . . . . . . . . . . . . . . . . . . . . . . . . . . . . . . . . . . . . . . . . . . . . . 44-45
Setting the ringer melody . . . . . . . . . . . . . . . . . . . . . . . . . . . . . . . . . . . . . . . . . . . . . . . . . . . . . . . . 4 6
Setting the base ringer volume . . . . . . . . . . . . . . . . . . . . . . . . . . . . . . . . . . . . . . . . . . . . . . . . . . 47
Deregistering a handset . . . . . . . . . . . . . . . . . . . . . . . . . . . . . . . . . . . . . . . . . . . . . . . . . . . . . . . . . . 4 8
Changing the master PIN (base set) . . . . . . . . . . . . . . . . . . . . . . . . . . . . . . . . . . . . . . . . . . . . . 49
Resetting the base . . . . . . . . . . . . . . . . . . . . . . . . . . . . . . . . . . . . . . . . . . . . . . . . . . . . . . . . . . . . . . . . 50-51
Barring numbers . . . . . . . . . . . . . . . . . . . . . . . . . . . . . . . . . . . . . . . . . . . . . . . . . . . . . . . . . . . . . . . . . . 51-52
GENERAL INFORMATION
Troubleshooting and remedies . . . . . . . . . . . . . . . . . . . . . . . . . . . . . . . . . . . . . . . . . . . . . . . . . .53
Ambient noise . . . . . . . . . . . . . . . . . . . . . . . . . . . . . . . . . . . . . . . . . . . . . . . . . . . . . . . . . . . . . . . . . . . . 54
Safety instructions . . . . . . . . . . . . . . . . . . . . . . . . . . . . . . . . . . . . . . . . . . . . . . . . . . . . . . . . . . . . . . . . 5 5
Health . . . . . . . . . . . . . . . . . . . . . . . . . . . . . . . . . . . . . . . . . . . . . . . . . . . . . . . . . . . . . . . . . . . . . . . . . . . . . 55
Cleaning the telephone . . . . . . . . . . . . . . . . . . . . . . . . . . . . . . . . . . . . . . . . . . . . . . . . . . . . . . . . . . 55
Where to place the telephone? . . . . . . . . . . . . . . . . . . . . . . . . . . . . . . . . . . . . . . . . . . . . . . . . . .56
TECHNICAL SPECIFICATIONS . . . . . . . . . . . . . . . . . . . . . . . . . . . . . . . . . . . . . . . . . . . . . . . . . . . . . . . 58
Page 4

3
INTRODUCTION
We congratulate you on the purchase of this MBO
®
product. Your new telephone has all the performance features of the DECT standard with excellent voice transmission quality and aesthetic design. We are sure you will
enjoy your buy for a long time to come.
Your new telephone is a compact, cordless mobile telephone with many advanced features. The ”MBO ALPHA
2400 DECT” (Digital Enhanced Cordless Telephone) has
many useful features for use at home, in the office or
simply for fun.
To get the most our of your new telephone, be sure to
carefully read this manual and follow the caution and
operating instructions. If you follow the manual carefully
and fully understand how to use the telephone you will
enjoy it for a long time.
These operating instructions are only for information.
They are not part of the purchase contract. All data is
nominal only.
Subject to change without notice.
Closing date: 10/2001
WELCOME!
CAUTION
GENERAL FEATURES
Page 5

4
INTRODUCTION
ABBREVIATIONS
DECT Digital enhanced cordless
telecommunications
DTMF Dual tone multi-frequency
EEPROM Electronic erasable programmable
read-only memory
EXT RING External call ringer
EXT External (call)
FP Fixed part (base set)
IPEI International portable equipment identity
INT Internal (call)
INT RING Internal call ringer
LCD Liquid crystal display
LNR Last number redial
MEM Memory
MMI Man-machine interface
PABX Private access branch exchange
PIN Personal identification number
PP Portable part (handset)
PSTN Public switched telephone network
RFPI Radio fixed part identifier
VOL Volume
Page 6

5
INTRODUCTION
GLOSSARY
OF TERMS
Base set number
The base set number is the local number assigned to
the base set for registration of a service. A handset of
this base set can have another number assigned to it.
Engaged handset
Somebody is using the handset.
Free handset
A registered handset ready to receive calls.
Handset number
A number by which the base set identifies a handset.
The current number of the hand set depends on the
current registration.
Key
Is a button on the telephone’s keypad.
Registration
The service registration is a prerequisite which must be
met before a handset can use the services of the base
set. Note that a handset can register with several base
sets.
Icon
Denotes a symbol with information on the operating
state of the device.
Tone
Denotes a tone generated by the receiver or loudspeaker
of the handset.
Page 7

6
INTRODUCTION
The base set maintains radio contact with the handset.
Radio contact can be maintained over 300 m distance
outdoors and up to 50 m inside a building. The radio
reception can be impaired by obstacles in the path of the
radio signals. The quality of the voice communication
deteriorates rapidly at the fringe of and outside the range
of the base set and handset. A beep warns you that you
are leaving the reception range. If you hear the beep,
move nearer the base set, otherwise the communication
will be interrupted after about 10 seconds.
If the handset makes the radio link with the base set, you
hear the reception tone.
The best radio communication exists if you can see the
base set while using the handset.
The functions of your telephone are programmed via the
telephone buttons. If during a programming procedure
the telephone detects no activity within 20 seconds, i.e.
if no button is pressed within this time, the programming
is cleared and you must start the programming again.
Many functions of your telephone have default settings
when you buy it. You can change these defaults (see the
chapter on settings, page 25 and following).
The handset PIN protects the settings of the handset. If
you want to change the settings you must enter the
handset PIN as part of a programming procedure.
The default PIN of the handset is ”1590”. You can change this number at any time (see pages 36-37).
RANGE
GENERAL
PROGRAMMING
NOTE
SETTINGS /
PROGRAMMING
HANDSET PIN
Page 8

7
CONNECTION / START-UP
P
12
ABC
3
DEF
5
JKL
4
GHI
6
MNO
8
TUV
7
PQRS
9
WXYZ
0
OPR
*
#
R/P
R
C
SUPPLY PACK
The supply pack of the telephone
contains the following parts:
1 Handset with battery
2 Base set
3 Plug-in mains adapter
4 Telephone cable
5 Operating instructions (not shown)
6 Belt clip
Fig. 1
3
1
2
6
4
Page 9
8
CONNECTION / START-UP
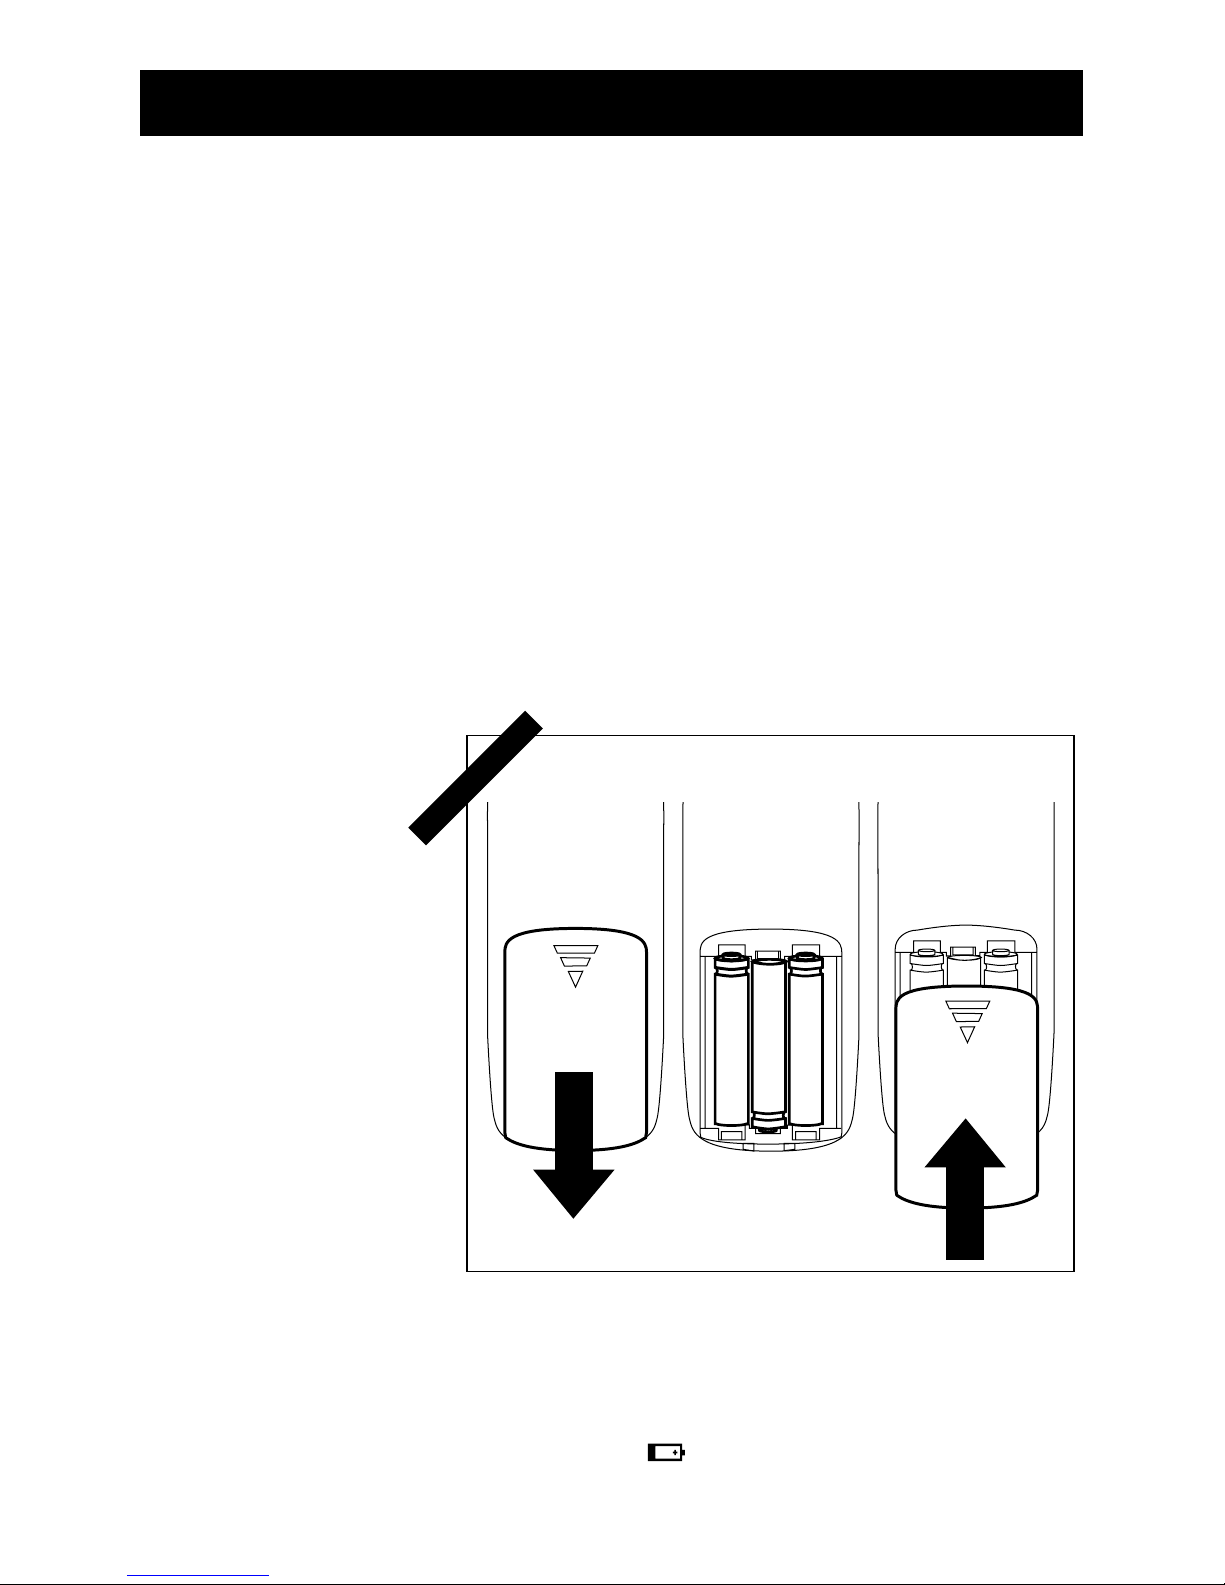
Before you connect and use your cordless phone, load
the three supplied NiMh batteries in the handset. If link
and stand-by hours are out of specification despite
correct charging, you must replace the batteries. Make
sure that you buy quality batteries such as are available
from a specialized dealer. Poor quality batteries can
effect the voice quality of your telephone.
• Open the battery compartment on the rear of your
handset by pulling the battery compartment cover.
• Take out the old batteries.
• Load the new batteries making sure to install the poles
correctly (see diagram in battery compartment).
• Replace the cover on the battery compartment.
BATTERIES
LOADING /
CHANGING
THE BATTERIES
Fig. 2
To charge the batteries, place the handset in the base set.
Before using the handset for the first time, charge the
batteries for 24 hours. Low battery voltage is indicated by
the battery icon on the LCD of the handset.
FIRST BATTERY
CHARGE / CHARGE
PROCESS
Page 10

9
CONNECTION / START-UP
BATTERY DISPOSAL
Important note:
The battery charge LED on the base set should light when
you place the handset in the base set. If the LED does not
light either the handset is not placed correctly in the base
set or the battery charge is not working.
The batteries cannot reach their full capacity at the first
charge. Physical reasons prevent this. Therefore the time
until depletion of the batteries can be shorter than normal; this will balance out after several charges.
The charge capacity of the batteries deteriorates with age
and due to the memory effect* which prevents full charge. Generally, the handset should be completely discharged and recharged from time to time. The discharge state
of the battery is indicated by the battery charge icon
and / or a warning beep.
To ensure that the batteries are charged correctly, clean
the charging contacts once a month with a soft cloth.
*) Repeated partial charging and discharging shifts the
capacity point of the batteries and less capacity is left.
Each partial charge or discharge defines a new capacity
point and shortens the life of the batteries.
Spent batteries must not be disposed of with the household garbage. Return spent batteries for recycling to your
dealer or a battery collection center. Because of the risk
of explosion, batteries must not be thrown in the fire. To
avoid fire and explosion, charge the batteries only with
the base set.
BATTERY NOTE
Page 11

10
CONNECTION / START-UP
CONNECTING
THE TELEPHONE
Note:
If your telephone connections
are different, please contact
your local telephone exchange
Fig. 3
Make certain that the mains voltage is the same as
the voltage on the nameplate of your telephone.
a) Connect one end of the telephone lead to the base set
and the other end to the telephone wall socket.
b) Connect the power cable to the base set and the plug
in the mains socket.
in the mains
socket
in the telephone
wall socket
Page 12

11
BASE SET
Observe the following points for setting up the base set:
• Place the base set on a level surface (e.g., a table).
• If you want to use several handsets with the base set,
ensure that the base set is about the same distance
from each handset.
• To avoid interference, maintain a minimum distance of
50 cm between the handset and other electronic equipment (e. g., a fax machine, television set, monitor
screen, etc.).
• Place the base set near a mains socket.
SETTING UP
THE BASE SET
P
BASE SET DISPLAYS
AND CONTROLS
Fig. 4
Description of
the numbers,
see page 12
1
2
3
4
5
Page 13

12
BASE SET
PAGING KEY
The page function is available when the base set is not
used otherwise. Press this key to call the handsets that
are connected to the base set.
• The page tone on the
handset will sound and
the base paging message
is displayed on the
LC panel.
• Press the call key [ ] on the handset or the page
key [ P ] on the base set to end the page function.
The page function cannot be performed during an external or internal call or while the telephone is ringing, i.e.
when a call is coming.
If you want to register a new handset, press the page
key for more than 15 sec.
1 Antenna
ensures good connection between the handset and the
base set.
2 Power on
indicates if the base set is connected to the power
source and ready for use.
3 Battery charge
lights when the battery is being charged.
4 Call
indicates that the call key was pressed and the line is
busy.
5 Paging key
Press the page key to call (search) a handset from the
base set
EXT
Base -->Paging
Page 14
13
HANDSET
12
ABC
3
DEF
5
JKL
4
GHI
6
MNO
8
TUV
7
PQRS
9
WXYZ
0
OPR
*
#
R/P
I
N
T
F
/
R
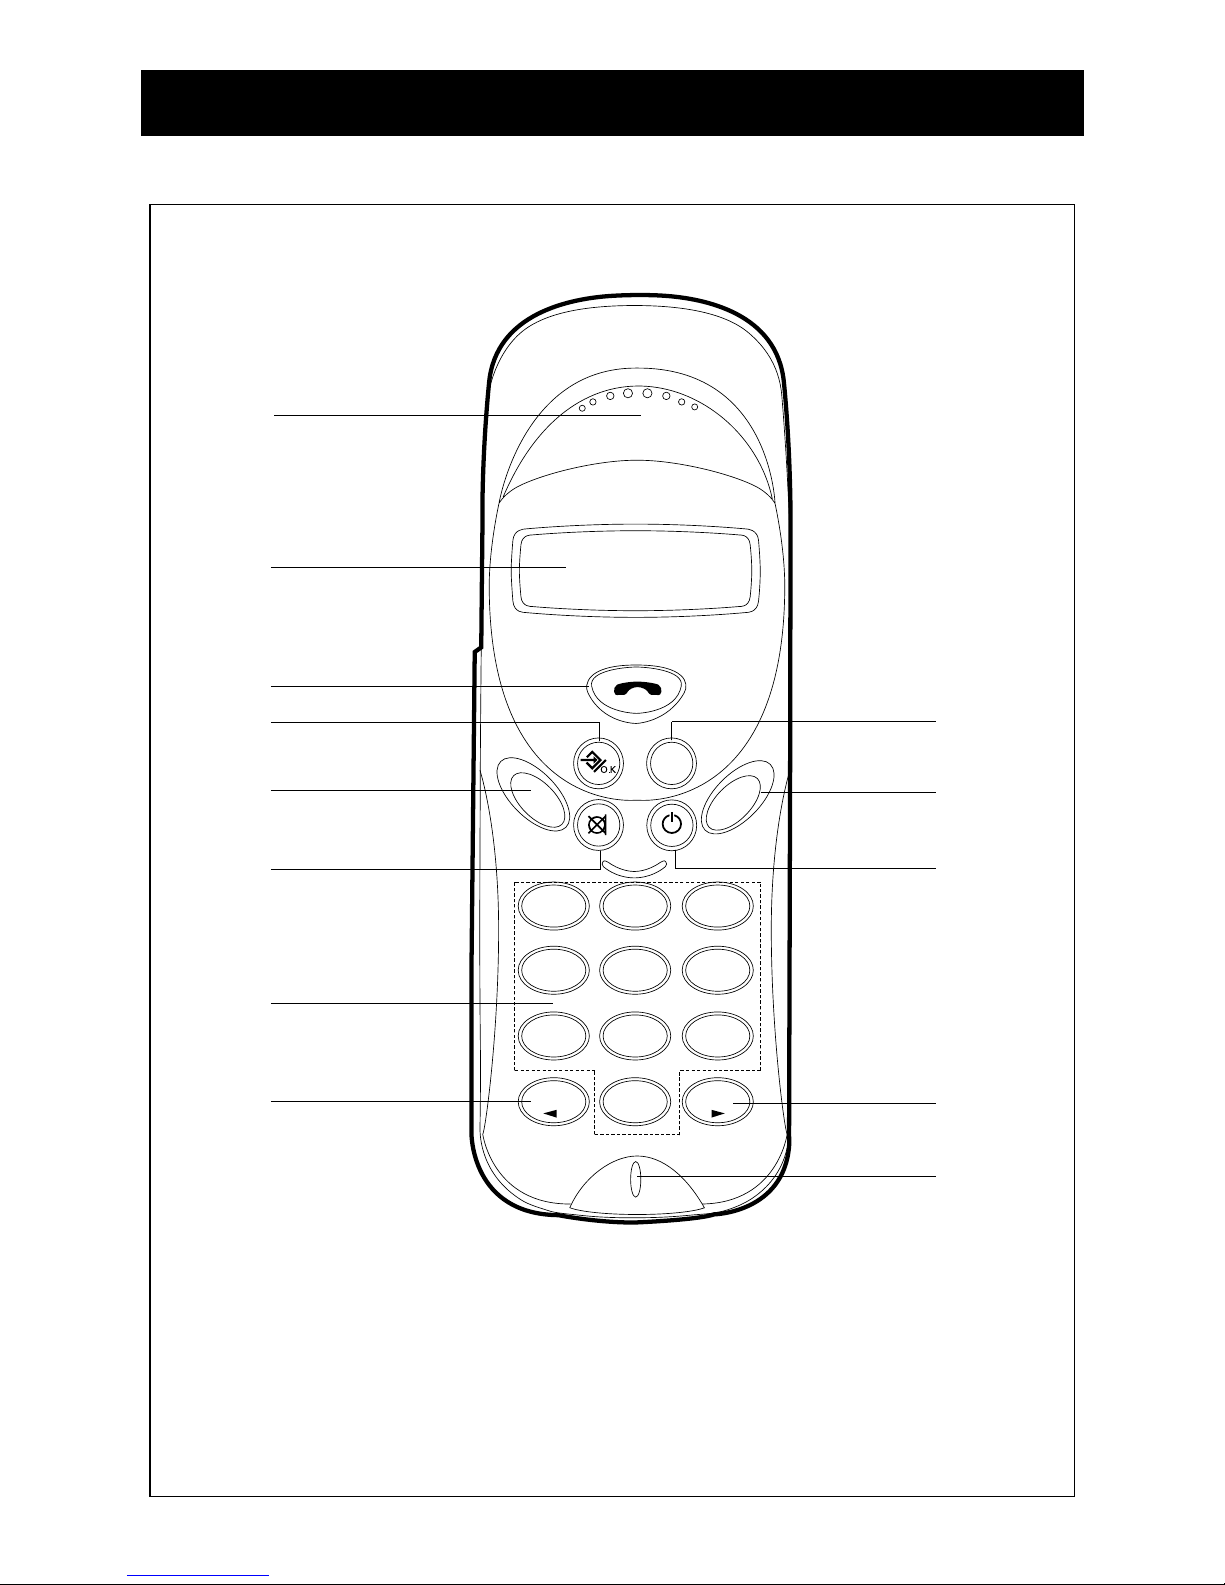
HANDSET KEYS
Fig 5
1
2
3
4
5
6
7
8
9
10
11
12
13
1 Earpiece
2 LCD
3 Linkl key
4 Memory / memory dial key
5 Function / flash key
6
Microphone mute, clear digit, escape and
memory
clear key
7 Number keys
8 Star key
9 Redial key
10 Internal call key
11 On / off key
12 Hash button
13 Mic
Page 15

14
HANDSET
HANDSET KEYS
3 Link key
Key to ”pick-up” and ”hang up” the telephone.
Pressing this key in function mode enables stand-by
mode.
4 Memory / memory dial key
Memory:
With this key you can store numbers, display stored
numbers and conclude settings / programming.
5 Function / flash key:
Function:
Press this key for settings and programming.
Flash: (earth / flash):
Displays the register content during a call.
6 Microphone mute, clear digit, escape and memory
clear key
Microphone mute:
Pressing this key and holding it pressed for a while
mutes the microphone (e.g., if you want to talk to
another person in the room).
Clear digit:
Pressing the key briefly clears erroneous input during
call preparation.
Escape:
Pressing the key in function mode takes you to standby mode
Memory clear:
Clears the specified memory and returns to stand-by
mode
7 Number pad
To input digits and letters of telephone numbers and
names for direct dialing or memory entry.
8 / asterisk key
Asterisk:
Special function for dual tone multi-frequency
dialing.
Page 16

15
HANDSET
Temporary tone dialing: If you press this key long
during a call, the set changes form pulse to tone dialing.
:
Navigation function in the menu.
9 Redial / pause key
Redial:
Redials the last number dialed
Pause:
Pause before the next digit is dialed.
10 Internal link / call forward key
Internal:
To make an internal call between handsets.
Call forward:
To forward an external call in call mode.
11 On / off, lock and receiver volume key
On / off:
Pressing this key long switches the hand set on or off.
Lock:
Pressing the key briefly locks the handset.
Receiver volume:
Pressing the key briefly in call mode sets the volume
to one of 3 steps (low, middle, high).
12 / hash button
Hash:
A special character, e.g., to control an answering
machine in remote mode (only DTMF mode).
:
Navigation function in the menu.
Page 17
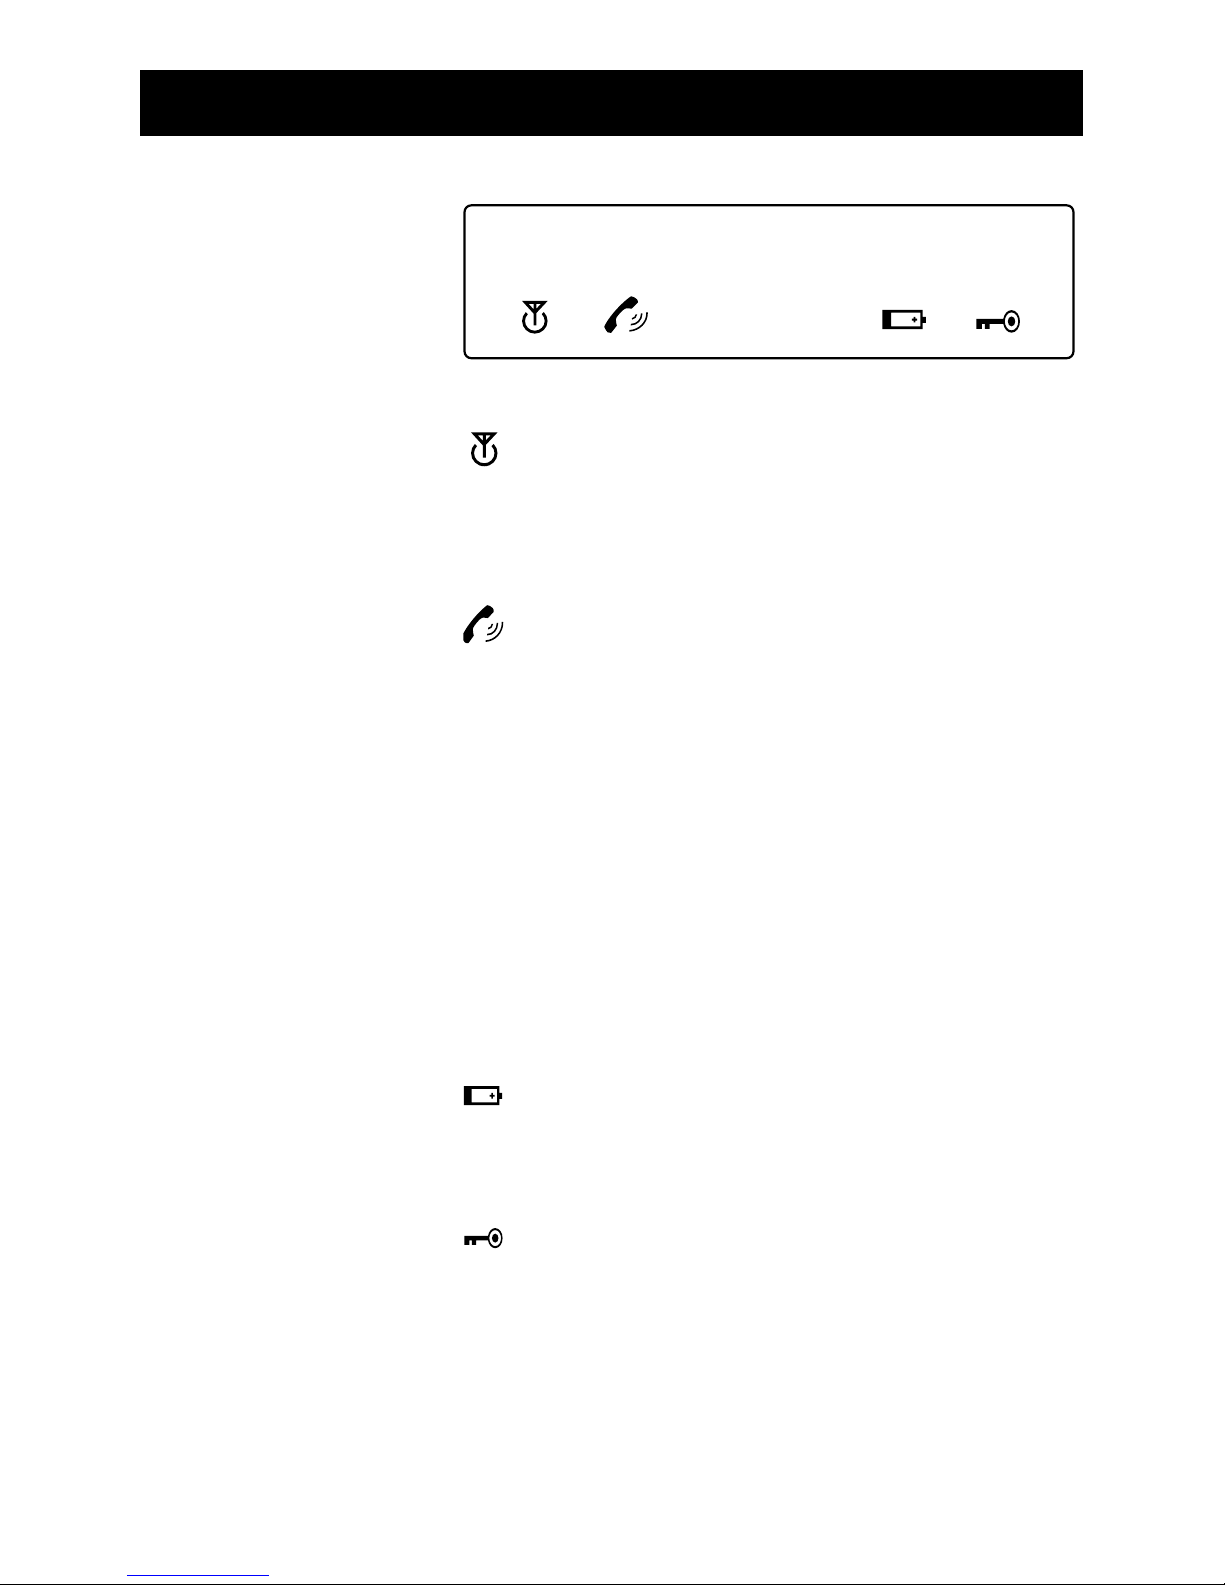
Antenna
The "antenna” icon is displayed when the handset is
switched on, registered with the base set and is wit
hin range of the base set. If the handset is not in
range, ”RANGE OUT” is displayed.
Call icon (pick-up/hang-up)
This icon is displayed when the call key (pick-up /
hang-up) is pressed to make a call and the radio connection exists between the base set and the handset.
External call
”EXT” is used for external calls. An existing external
call is displayed on all registered, switched-on hand
sets to inform all subscribers that an external call is
being made or received.
Interner Anruf (Mobilteil)
”INT” is displayed when one handset calls another
handset. The INT information is only displayed on the
participating handsets.
Battery
This icon indicates the battery charge. When it is displayed the batteries are nearing depletion and should
be charged.
Locked
When this icon is displayed, the handset is in lock
mode. In this mode only incoming calls are allowed.
All keys except the ON key, are locked.
16
HANDSET
LCD DIGITS
AND ICONS
The LCD displays the following information:
EXT
INT
000000000000
DESCRIPTION
OF ICONS
Page 18

The functions available on the handset (PP) depend on
the active mode. At least one of the following modes is
enabled at any time:
Stand-by
The handset is in stand-by mode after installation. In this
mode the handset is not used actively. The LCD displays
only the antenna icon and the handset number. The
handset number is displayed on the right of the LCD.
Stand-by mode capacity: max. 250 hours
Talk time: max. 10 hours
Not Subscribed (not registered)
The Not Subscribed mode is enabled when the handset
has not registered with the base set ( FP ). NOT SUB is displayed on the LCD.
Lock
The Lock mode is enabled when the handset is locked for
outgoing calls and only incoming calls are allowed. The
lock icon is displayed on the LCD. To enable the lock
mode, press the On [ ] key in stand by mode briefly
(max. 0.5 sec). To disable the lock mode, press the On
[ ] key again.
Direct Call
The Direct Call mode is enabled if the settings of the
handset are such that when any key is pressed (except
the defined key combination) a previously programmed
number is dialed out automatically. This mode has no
effect on incoming calls.
Dial Preparation
The Dial Preparation mode is enabled when a number is
processed and the link key [ ] is not pressed.
17
HANDSET
HANDSET MODES
Page 19

Call Active
The handset changes to Call Active mode if you press
the call key [ ] or [ INT ] to make a call.
Programming
The Programming mode is enabled if you want to
change settings. Press the [ F/R ] key to enable the pro-
gramming mode.
• You can switch on
and off the handset with
the ON [ ] key.
• When you switch on, the
handset ( PP ) tries to
find a base set ( FP ).
• When the base set is
found, a beep is heard.
The antenna icon and
the base set number
are displayed on the
LCD.
Note: If the handset
has not registered,
”NOT Sub” is displayed
on the LCD. You must
register the handset at
first (see page 32/33
”Registering a handset”).
This message is displayed when the handset is moving
out of the radio range of the base set.
• You hear a warning
beep. Take the handset
back within the range
of the base set.
18
HANDSET
SWITCHING ON
THE HANDSET
Searching FP
MULTi 1
Range out
HANDSET OUT OF
BASE SET RANGE
NOT SUB
Page 20

19
HANDSET
VIEWING REGISTER
ENTRIES
TALK MODE
(AUTOTALK)
During an external call you can transfer the call to another subscriber if that subscriber is served by the same
PBX. To make the transfer, press the [ F/R ] key. The base
set will signal either EARTH or FLASH on the telephone
line (see earth / flash time programming).
Note that the PBX must support this feature.
When the handset rings, it changes from ”Battery Charger Off” mode to ”Talk” mode. When the ”Talk” mode
is disabled the handset changes from ”Battery Charger
On” mode into ”Stand-by” mode.
In ”Talk” mode the call key [ ] is not available for 4
sec if the key is pressed by accident.
• This message is displayed
when the battery is nearing depletion.
• A warning beep is heard
and the battery icon
is displayed.
This display indicates that all keys of the handset are
locked. Only incoming calls are allowed.
• If you want to lock the
handset, press the ON
key [ ] briefly
(max. 0.5 sec).
• To clear the lock, press
the ON key [ ] again.
BATTERY LOW
HANDSET LOCK
Multi i
LOCK
Page 21

20
HANDSET
PAUSE
CALL DURATION
The pause function inserts a defined delay in the dial process. The pause must not be at the first digit of a number
as in this case the pause key [ R/P ] is interpreted as redial instruction.
During and after a telephone call, the call duration is
displayed for continuous 10 sec after dialing the number.
The duration is again
displayed for 2 secs
after hang-up.
Display format (mm : ss) (min : sec).
The call duration was 22 minutes and 28 seconds.
EXT
22:28
If you are making an internal call or calling another subscriber and an external call is coming in, you hear the call
waiting tone. Pressing the call key [ ] twice makes the
direct link to the incoming call.
Pressing the call key [ ] once ends the internal link and
the handset starts ringing. Now you can accept the incoming call in the normal way by pressing the call key
[ ].
CALL WAITING
Page 22

• The user can recive an internal or external call by
pressing the call key [ ]. Until the call is received the
”INT” or ”EXT” icon flashes, depending on where the
call originates. After hook-up the icon is displayed
permanently. If the call is internal only the called handset rings and ”INT” flashes on the LCD of that set. The
number of the calling handset is displayed on the left
of the LCD. If the call is external, all free handsets start
ringing and the ”EXT” icon flashed on the LCDs of all
(free and engaged) handsets.
• To hang up, press the call key [ ].
Making an external call
• Press the call key [ ].
• The icon is displayed on the LCD.
• You hear the dialing tone and ”EXT” appears on the
LCD.
• Dial the number. The call duration is displayed 10 sec
after dialing the last digit.
•
To hang up press the call key [ ] again. The call
duration is displayed for 2 sec.
External call with call preparation
• Dial the number.
• Press the call key [ ].
Note:
While you are preparing the call, you can change the
number with the delete key [ ]. Press this button
briefly to clear the digit dialed last. If you press the
button for more than 0.5 sec, the whole number is
cleared. If the whole number is cleared, the handset
returns to stand-by mode.
21
USING THE TELEPHONE
RECEIVING A CALL
MAKING A CALL
Page 23

• The number can also be retrieved from the telephone
directory, the caller ID memory or the redial memory.
The telephone supports numbers up to 25 characters. If
you try to enter more than 25 characters, you hear a
beep and every digit after the 25th digit is ignored.
• The three numbers dialed last are stored in the redial
memory and can be called with the redial key [ R/P ].
Several presses of the [ R/P ] key scroll through the
numbers in the redial memory.
• Then press the call key [ ]. After this the [ R/P ] key
also enables the pause function.
If you want to make an internal call from another handset, proceed as follows:
• Press the [ INT ] key on the handset.
• Dial the number of the handset you want to call.
• Press the call key [ ] on the handset you are calling.
• To hang up, press the call key [ ].
If you want to forward a call from one handset to
another handset, proceed as follows:
• Press the [ INT ] key (e.g. on handset 1).
• Dial the number of the handset you want to call
(e.g., 2)
• Press the call key [ ] on handset 2.
• If you want to forward the call from handset 2 to hand
set 3, press the call key [ ] on handset 1. The engage tone is heard on handset 2. Press the [ INT ] key
on handset 2 and dial ”3”.
22
USING THE TELEPHONE
REDIAL
INTERNAL CALLS
AMONG HANDSETS
FORWARDING
A CALL BETWEEN
HANDSETS
Page 24

If you are making a call with an external caller and you
want to forward this call to another internal handset,
proceed as follows:
• Press the [ INT ] key and dial the handset you want to
call.
• The internal ringing tone is heard on the handset you
have called. Press the call key [ ]. The handsets are
now linked with each other.
• Next, the first handset must press the call key [ ] to
forward the external call.
• If the second handset does not answer, press the
[ INT ] key again and the first handset is again connec-
ted to the external caller.
If the telephone is set to pulse dialing, you can temporarily change to tone dialing if you press the asterisk
key [ ]. This function is useful, for example, if you want
remote access to an answering machine.
The selected dial mode is only active for the duration of
that call. When you hang up, the original dial mode is
entered again.
23
USING THE TELEPHONE
Remark:
Call preparation is not possible for internal calls. Pressing
the [ INT ] key deletes the numbers you have dialed.
CHANGING THE
DIAL MODE DURING
AN EXTERNAL CALL
*
FORWARDING
AN EXTERNAL CALL
TO AN INTERNAL
HANDSET
Page 25

If you press the microphone [ ] key during a call, you
can mute the microphone. When the microphone is mute
the other party cannot hear you.
• If while you are calling
you press the micro-
phone [ ] key long.
• ”MUTEd” is displayed
on the LCD.
• If you want to continue
the call, press the
microphone [ ]
key long again.
24
USING THE TELEPHONE
MICROPHONE
MUTING
EXT
Mute8
EXT
Page 26

25
HANDSET SETTINGS
GENERAL
Press the [ F/R ] key in stand-by mode. The setting menus
are displayed one after another.
Press [ ] key to select the menu you want. If in menu
mode you do not press a programming key for 20 sec,
the program returns to stand-by mode.
Pressing the call key [ ] at any time during setting
returns to stand-by mode. In either case all unsaved
settings are lost.
Handset setting menus
Fig. 6
Page 27

The CLIP*) function displays the calling number on the
LCD of your set. The set receives calls in frequency shift
keying (FSK – name, telephone number, date and time of
a call)** and DTMF. The set can store up to 20 calls for
later viewing. The same call is never stored twice. If the
memory is full, old calls are automatically deleted to save
more recent calls.
**) Only if the provider provides name, date and time
signal service. Which function is supported depends on the
network configuration in the country in which the set is
used.
Selecting a number in the caller list
• Press the [ F/R ] key
until ”CALLER Id” is
displayed on the LCD.
• Press the [ ] key.
The number/name of
the last caller is
displayed.
• Press [ ] or [ ] to
view all callers in the
list in succession.
• Press [ ]. The requi-
red number/name is dislayed on the LCD and
dialed automatically.
Clearing a number from the caller list
• Press the [ ] key to
delete the number from
the LCD.
• Press the [ ] key if ”dELETE MEM” is displayed on
the LCD.
• Press the [ ] key to delete the number.
26
HANDSET SETTINGS
CALLER IDENTIFICATION (CLIP)
NOTE:
*) You can use the clip
function only if it is
activated by the provider.
Besides, the PBX (whether
analog or ISDN) must also
support the clip function.
Questions should be
addressed to the supplier
of your telecom system.
caller-ib
07I536630
belete Mem ?
07I536630
*
#
Page 28

Clearing all numbers from the caller list
• Press the [ F/R ] key until
”CALLER Id” is displayed
on the LCD.
• Press the [ ] key.
• Press the [ F/R ] key.
”dELETE ALL” is displayed on the LCD.
• Press the [ ] key to
delete all numbers from
the caller list.
Display name, date and time of a call
You can alternately display the calling number, caller
name and date / time of the call on the LCD if you press
[ ].
Remark:
Date and time are only displayed if the network transmits
the data with the calling number. If the caller’s name is
entered in the memory (phone book), the name appears
on the LCD as programmed (see phone book page 39 and
on). The same applies to the name if the network supports
name signal.
27
HANDSET SETTINGS
belete all ?
caller-ib
Page 29

28
HANDSET SETTINGS
SELECTING
A BASE SET
This function selects from all base sets the base set (FP –
fixed part) with which the handset (PP – portable part)
has registered. Up to four registrations are supported
at any one time. Only one base set can be selected.
The selection can be made automatically or manually.
Important:
Before you can select a base set for the handset the
handset must have registered with the base set (see page
32/33 ”Registering a handset”).
Remark:
If you select the option ”bASE NO : AUTO”, the base set
search proceeds automatically. If several base sets are
available, the handset selects any of them. This function
is only supported if the handset has already registered
with these base sets.
Selecting a base set
• Stand-by mode
• Press the [ F/R ] key to
display ”SELECT bASE”
on the LCD.
•
Now press the [ ] key.
• The selected base set is
displayed, e.g.,
”bASE NO : 1”.
• Press the [ F/R ] key.
The displays ”bASE NO :
1-4, AUTO” appear on
the LCD in succession.
• When the number of the
required base set is displayed, e.g., ”bASE NO :
2”, press the [ ] key. This example assumes that the
handset has registered with base set 2 and has been
assigned number 1 ”MULTI 1”.
select base
base no: i
base no: 2
multi i
Page 30

29
HANDSET SETTINGS
• If the handset wants to register with base set 2 again,
select ”bASE NO : 2”. Then press the [ ] key.
• Display: ”NEW bASE : 2”.
• After a moment ”bASE :
2” is displayed automatically.
• Press the [ ] key
to register with the new
base set.
• The program automati-
cally returns to stand-by
mode and ”MULTI 2” is
displayed on the LCD.
Remark:
If the handset was not
registered with base set 2,
”NOT Sub2” is displayed.
You can set the ear volume in this menu. The available
settings are ”VOL LOW”, ”VOL MIDDLE” and ”VOL
HIGH”. You can change the ear volume while you are
making a call.
If the [ ] key is pressed in ”Talk” mode, the selected
volume is adopted automatically after 3 sec and no confirmation is required. This volume setting is active only
temporarily.
• Stand-by mode
• Press the [ F/R ] key to
display ”EAR VOLUME”
on the LCD.
• Now press the [ ]
key.
not sub 2
base: 2
new base: 2
MULTI 2
SETTING
THE EAR VOLUME
ear volume
multi i
Page 31

• Select the volume, e.g.,
”VOL MIddLE with the
[ FR ] key.
• Press the [ ] key to
confirm.
• When the volume setting
is complete, the ”EAR
VOLUME” menu is again
displayed.
The ringer volume and the melody can be set separately
for external calls. The ringing tone setting for internal
calls is made in the ”H-INT RING” menu. The setting for
external calls is made in the ”H-EXT RING” menu. In
either menu at first the melody, then the ringing tone
volume is set. 9 melodies and 9 volumes are available.
Setting the melody
• Press the [ FR ] key to
display ”H-EXT RING”.
•
Then press the [ ] key
.
• When ”MELOdY” ap-
pears on the LCD, select
this menu with [ ]
key.
• The number of the selec-
ted melody is displayed,
e.g., ”MELOdY 1” and the melody is played.
•
Press the [ FR ] key to scroll through all available melodies (1-9 and OFF).
• Press the [ ] key to select the required melody.
•
The program returns to
the ”H-EXT RING” menu.
30
HANDSET SETTINGS
Ear volume
vol mi88le
RINGING
SETTING
THE MELODY AND
VOLUME OF
THE EXTERNAL
RINGING TONE
h--ext ring
melo8y
melo8y I
h--ext ring
Page 32

31
HANDSET SETTINGS
Setting the volume
• Stand-by mode
• Press the [ F/R ] key to
display ”H-EXT RING”.
• Then press the [ ] key.
•
When ”MELOdY” appears
on the LCD, press the
[ F/R ] key.
• ”VOLUME” is displayed
on the LCD.
• Select this menu with
[ ] key.
•
The selected volume, e.g.,
”1” is heard and the
number ”VOLUME 1” is
displayed.
• Press the [ F/R ] key to
scroll through all available volumes (1-9). Press
the [ ] key to select
the required volume.
• The program returns to
the ”H-EXT RING” menu.
Make the settings with the same procedure as for the
external melody and ringing tone in the ”H-INT RING”
menu.
SETTING
THE MELODY AND
VOLUME OF
THE INTERNAL
RINGING TONE
volume
volume 1
h--ext ring
h--ext ring
melo8y
multi
Page 33

32
You can make and answer calls with a handset only after
it has registered with the base. To register a handset, the
base must be in ”Register” mode. If you want to register
a new handset, press the page button [P] on the base set
for more than 15 seconds until a beep comes. This signals
that the base has been reset and entered the ”Register”
mode.
• ”NOT SUb” or ”SEAR-
CHING FP” is displayed
on the LCD.
• Press the [ F/R ] key to
display ”H-Register”.
• Now press the [ ]
key.
• ”SEARCH bS 1” is dis-
played on the LCD.
Not Sub
HANDSET SETTINGS
KEY CLICK ON / OFF
You can configure the handset such that each press of a
key is confirmed with an audible signal.
• Stand-by mode
• Press the [ F/R ] key to
display ”H-KEY CLICK”
on the LCD.
•
Now press the [ ] key.
• The current setting is
displayed.
• Press the [ F/R ] key to
select the required setting.
• Press the [ ] key to
confirm the setting.
• The program returns to
the ”H-KEY CLICK” menu.
h--key click
click on
h--key click
multi i
REGISTERING
A HANDSET
h--register
search bs i
Page 34

33
HANDSET SETTINGS
• Press the [ F/R ] key to
select the required base
set (1 to 4).
•
Select the required base set
and press the [ ] key.
• If you want to register
another handset, while
”SEARCH bS1” is displayed on the LCD, press
the paging key for 15
seconds until you hear a
beep. Press the [ ]
key while the beep is
sounded.
• The handset runs an
automatic search and the
radio fixed part identification (RFPI) is displayed
after a moment. The RFPI
is different for each base
set. Press the [ ] key.
• ”PIN” is displayed on the
LCD. Enter the PIN.
• Press the [ ] key to
confirm the four-digit
PIN.
• ”MULTI 1” is displayed
on the LCD.
NOTE:
The procedure is the same if you want to register a handset from another supplier. Press the paging key on the
base set for more than 15 seconds until the beep comes.
The menu of your handset may be different from the
menu described here, however. For further information,
consult the manual of your handset.
Pin:
Pin: x-x-x-X
-
MULTI I
00004--00 : IAb
Note:
The default PIN of your handset is ”1590”.
Page 35

You can restore all handset defaults with this menu. The
menu supports two options:
To reset the handset, proceed as follows:
• Stand-by mode
• Press the [ F/R ] key to
display ”H/-RESET” on
the LCD.
• Press the [ ] key.
• ”PP PIN” is displayed on
the LCD.
• Enter the PIN and press
the [ ] key.
• ”RESET ALL” is displayed
on the LCD. If you press
the [ ] key, all values
are cleared. If you press
the [ F/R ] key, ”INITIALIZE” is displayed on the
LCD. If you now press
the [ ] key, the default settings are loaded
34
HANDSET SETTINGS
RESETTING
THE HANDSET
1: Reset All
Clears phone book entries, direct dialing number,
user name, clip memory and PSBX number.
2: Initialize
Boots the default parameters of the handset.
Button click: On
Ringing volume: Step 9
External melody: 4
Internal melody: 7
Ear volume: Middle
H--Reset
PP PIN:
multi i
RESET ALL
Note:
The default PIN of your handset is ”1590”.
Page 36

35
HANDSET SETTINGS
and the program returns
to stand-by mode.
• ”H-RESET” is displayed on
the LCD.
Remark:
If you want to clear the handset 1 registration data, press
the ON [ ] and [ INT ] keys on the handset simulta-
neously while the handset is off. ”F->CLEARSUbS” is displayed on the LCD. If you press the [ F/R ] key now, the
registration data is deleted and ”NOT Sub” is displayed
on the LCD.
When the direct (baby) call function is enabled, each
press of a button dials out a pre-defined number. One
direct call number can be pre-defined for each handset.
Direct call is only possible for external outgoing calls.
Programming a direct (baby) call number
• Stand-by mode
• Press the [ F/R ] key to
display ”dIRECT CALL”
on the LCD.
• Press the [ ] key.
• If a direct call number is
already programmed,
this number is displayed
and can be edited.
• Press the [ ] key to
activate the ”Direct Call”
mode with this number.
If any button is pressed,
the pre-programmed
number is dialed out.
DIRECT CALL
(BABY CALL)
multi i
8irekt call
07i536630
H--Reset
Page 37

36
HANDSET SETTINGS
• If no direct call number is
pre-programmed, ”PHONE
NUMbER” is displayed on
the LCD. Enter the direct
call number and press
the [ ] key. This acti-
vates the direct call with
this number.
Remark:
If the direct call number is enabled, ”dIREKT CALL” is displayed on the LCD.
Disabling a direct (baby) call number
If you want to exit the ”Direct Call” mode, press the [ ]
key twice briefly.
Phone Number
A current PIN can be replaced by a new PIN only if the
new PIN is entered correctly two times and the entry is
not interrupted. It is possible to restore the default PIN
”1590” on the handset.
Changing the handset PIN
• Stand-by mode
• Press the [ F/R ] key to
display ”H-CHANGE PIN”
on the LCD.
•
Now press the [ ] key.
• ”PP PIN :” is displayed on
the LCD.
• Enter the current PIN and
press the [ ] key.
• When ”NEW PIN” is dis-
played, enter the new PIN
of the handset and press
HANDSET PIN
h--change pin
pp pin:
new pin:
multi i
Note:
The default PIN of your handset is ”1590”.
Page 38

37
HANDSET SETTINGS
the [ ] key.
• When ”RETYPE:” is dis-
played on the LCD, enter
the new PIN.
• Press the [ ] key
again.
•
”H-CHANGE PIN” is again
displayed on the LCD.
This function displays the radio fixed part identifier (RFPI)
code to which the handset is currently connected.
• Stand-by mode
• Press the [ F/R ] key to
display ”SHOW RFPI” on
the LCD.
• Press the [ ] key.
• The radio fixed part iden-
tifier (RFPI) of the base
set is displayed on the
LCD.
• If you press the [ ]
key, the program
returns to the ”SHOW
RFPI” menu.
Retype:
H--change pin
RFPI
(RADIO FIXED PART
IDENTIFIER)
CODE
show rfpi
00004--00 Ir8
show rfpi
multi i
Page 39

This function assigns a handset a name not exceeding 10
characters. The user name is displayed on the LCD when
the handset is in stand-by mode.
• Press the [ F/R ] key to
display ”USER NAME” on
the LCD.
• Now press the [ ] key.
• ”NAME” is displayed on
the LCD.
• Enter a name by the
number key.
• Press the [ ] key to confirm the entry. The handset
returns to stand-by mode and the user name is displayed on the LCD.
Example:
Entering the name ”KIM”
• Press the [ F/R ] key and select ‘USER NAME’.
• Press the [ ] key. ”NAME” is displayed.
• Press the [ 5 ] key twice (”K” is displayed).
• Press the [ 4 ] key three times (”I” is displayed).
• Press the [ 6 ] key once (”M” is displayed).
• Press the [ ] key to confirm.
Remark:
If you want to enter several letters in succession and these
letters are programmed on the same button, you must
press the [ ] key after every letter before the next letter
entry is supported.
Example:
Entering the name ”ABC”
• Press the [ F/R ] key and select ‘USER NAME’.
• Press the [ ] key. ”NAME” is displayed.
• Press the [ 2 ] key once (”A” is displayed).
• Press the [ ] key.
• Press the [ 2 ] key twice (”B” is displayed).
• Press the [ ] key.
• Press the [ 2 ] key three times (”C” is displayed).
• Press the [ ] key to confirm.
38
HANDSET SETTINGS
ASSIGNING
A USER NAME
TO A HANDSET
User name
name
#
#
#
Page 40

39
HANDSET SETTINGS
TELEPHONE
DIRECTORY
(PHONE BOOK)
You can store 20 numbers (not exceeding 20 digits each)
and names (not exceeding 12 characters each) in the
phone book.
Saving a telephone number of the caller ID memory
in the phone book
• Select the telephone number which you want to save
in the phone book in the caller ID list.
• Press the [ ] key.
• Press the [ F/R ] key
twice. ”INSERT Pb” is
displayed on the LCD.
• Press the [ ] key.
”NAME” is displayed on
the LCD.
• Enter the name and press
the [ ] key.
• ”AddRESS: XX” is dis-
played on the LCD.
• Press the [ ] key to confirm.
Saving a name in the phone book
There are 2 option to save a name in the phone book.
Option 1
•
Select the required number
and press the [ ] key.
•”NAME” is displayed on
the LCD.
• Enter the name and press
the [ ] key.
• When ”AddRESS : XX” is
displayed, press the [ ]
key again.
insert pb
name
abbress:
Name
abbress:
Page 41

Option 2
• Press the [ F/R ] key to
display ”PHONE bOOK”
on the LCD.
• Press the [ ] key.
• If you press the [ ]
key once, the prompt
”dELETE MEM?” is
displayed on the LCD.
•
If you press the [ F/R ] key
again, ”INSERT Pb” is displayed on the LCD.
• Press the [ ] key.
•
If ”NUMbER” is displayed,
enter the telephone number.
• Press the [ ] key.
• If ”NAME” is displayed,
enter the name.
• Press the [ ] key.
• If ”AddRESS : XX” is dis-
played, press the [ ]
key again.
Deleting a number from the phone book
• Press the [ F/R ] key to
display ”PHONE bOOK”
on the LCD.
• Press the [ ] key.
• Select the telephone num-
ber you want to delete
and press the [ ] key.
• Then press the [ ] key.
Abbress:
40
HANDSET SETTINGS
Phone Book
belete Mem ?
Insert pb ?
Number
Name
Phone Book
Page 42

Searching for a telephone number with automatic
dialing
• Press the [ F/R ] key
to display ”PHONE
bOOK” on the LCD.
• Press the [ ] key and
the [ ] key to search
for the number.
• Press the [ ] key.
• Press the [ ] key and
the number is dialed out
automatically.
Remark:
If you have saved the telephone number ”123” by the
name of ”ABC” in the phone book and you dial 123,
”ABC” is displayed on the LCD. When a name is displayed you can also view the number. Press the [ ] key.
41
HANDSET SETTINGS
phone Book
*
#
Page 43

Setting a PABX line number
• Press the [ F/R ] key to
display ”PAbX SETTING”
on the LCD.
• Press the [ ] key.
”PAbX SET 1” is displayed
on the LCD.
• Press the [ ] key
again and enter the PABX line number, e.g., ”0”.
• Press the [ ] key to confirm.
• ”PabX SETTING” is again displayed on the LCD.
Remark:
You can set ”PabX SET 2” with the same procedure. If no
PABX line number is programmed, the message
”EMPTY” is displayed on the LCD.
Clearing a PABX line number
• Press the [ F/R ] key to
display ”PAbX SETTING”
on the LCD.
• Press the [ ] key.
”PabX SET 1” is displayed
on the LCD.
• Press the [ ] key to display the programmed line
number on the LCD.
• Press the [ ] key
three times in succession.
”INPUT NUM” is displayed
on the LCD.
• Press the [ ] key.
The number is deleted. "PabX SETTING” is again displayed on the LCD.
42
HANDSET SETTINGS
USING THE HANDSET
IN A PABX
pabx setting
pabx set 1
pabx setting
pabx set 1
input num
Page 44

43
BASE SETTING
FLASH TIMEBARRING
BASE MELODYBASE RESET
BASE VOLUMEB–CHANGE PIN
SETTING DIAL
HANDY DESUB
F/R key
F/R keyF/R key
F/R key
F/R keyF/R key
F/R keyF/R key
O K key
BASE SETTINGS
BASE SETTINGS
You can change the base settings and the configuration
of the system in the base setting menu.
• If ”bASE SETTING” is displayed on the LCD and you press
the [ ] key, the ”SETTING dIAL” menu is displayed
after a moment of WAITING.
• If in an active menu mode you do not press a key for pro-
gramming the base set within 20 sec, the program returns to stand-by mode. Pressing the call key [ ] also
returns to stand-by mode. In either case all unsaved
settings are lost.
• The ”bASE SETTING” menu cannot be called in the follo
wing cases:
1. If the base set is switched off or is out of range of the
handset, in which case ”WAITING” is displayed continuously on the handset LCD.
2. If the handset has not registered.
The ”bASE SETTING” menu is skipped.
Base set programming
functions
Fig. 7
Page 45

44
BASE SETTINGS
SETTING THE DIAL
MODE
Two dial modes are supported: pulse dial and tone
(DTMF) dial.
• Stand-by mode
• Press the [ F/R ] key to
display ”bASE SETTING”
in the LCD display.
•
Now press the [ ] key.
• When ”SETTING dIAL” is
displayed, press the [ ]
key.
• The menu contains two
options: PULSE and DTMF
(tone) dial. You can toggle
between both with the
[ F/R ] key.
Select the required dial
mode and press the
[ ] key to confirm
your selection.
• ”SETTING dIAL” is again
displayed on the LCD.
The setting procedure is
complete.
• Press the [ ] key to return to stand-by mode.
You can program the base set to send an earth or flash
signal to the telephone network when a register recall
instruction is received. The basic setting depends on the
country in which the telephone is used. The initial setting
after a reset of the base is EARTH.
• Stand-by mode
Base setting
Setting 8ial
DTMF
PULSE
multi
multi i
Setting 8ial
PROGRAMMING
EARTH / FLASH TIME
Page 46

45
BASE SETTINGS
• Press the [ F/R ] key to
display ”bASE SETTING”
in the LCD display.
•
Now press the [ ] key.
• Press the [ F/R ] key to
change to ”FLASH TIME”
and press the [ ] key.
• This menu contains two
options, ”FLASH” and
”EARTH”. You can toggle
between them with the
[ F/R ] key. Select the re-
quired option with the
[ ] key.
• The flash value (FLASH) is
incremented in steps of
20 in the range between
40 and 400 with every
press of the [ F/R ] key.
The earth value (EARTH)
is incremented in steps of
50 in the range between
50 and 1500 with every
press of the [ F/R ] key.
Select the required value
and press the [ ] key
to confirm.
The selected value is recorded and ”FLASH TIME”
is displayed on the LCD.
This completes the setting.
• Press the [ ] key to
return to stand-by mode.
Flash time
Flash
EARTH
Flash time
Base setting
Page 47

46
BASE SETTINGS
SETTING THE
RINGER MELODY
You can set the ringer melody in this menu. You can
choose from 9 melodies (1-9).
• Stand-by mode
• Press the [ F/R ] key to
display ”bASE SETTING”
in the LCD display.
• Press the [ ] key.
• Press the [ F/R ] key to
display ”BASE MELODY”
on the LCD.
• Press the [ ] key.
• The number of the selected melody is displayed,
e.g., ”MELODY1” and
the melody played.
• Press the [ F/R ] key to
scroll through all melodies
(1-9 and OFF). Each time
the ringer melody is
played.
•
Select the required melody
and press the [ ] key
to confirm.
• ”BASE MELODY” is again
displayed on the LCD.
The setting is complete.
• Press the [ ] key to
return to stand-by mode.
base setting
Base melo8y
mel8dy i
multi i
Base melo8y
Page 48

47
BASE SETTINGS
SETTING THE BASE
RINGER VOLUME
You can set the base ringer volume in this menu. You can
choose from 9 volume levels (1-9).
Volume 0 serves a special function. Selecting volume step
0 mutes the base ringer. Step 9 is the highest volume.
• Stand-by mode
• Press the [ F/R ] key to
display ”bASE SETTING”
in the LCD display.
• Press the [ ] key.
• Press the [ F/R ] key to
display ”bASE VOLUME”
on the LCD.
• Press the [ ] key to
select this menu.
• The number of the selected volume is displayed,
e.g., ”VOLUME 1”.
• Press the [ F/R ] key to
scroll through all volume
steps (1-9). Each time you
hear the volume change.
• Select the required
volume and press the
[ ] key to confirm.
•
”bASE VOLUME” is again
displayed on the LCD. The
setting is complete.
• Press the [ ] key to
return to stand-by mode.
volume I
base setting
Base volume
Base volume
multi i
Page 49

48
BASE SETTINGS
DEREGISTERING
A HANDSET
A handset which has registered with the base set can
deregister.
The number of the handset is selected for deregistration.
• Stand-by mode
• Press the [ F/R ] key to
display ”bASE SETTING” in
the LCD display.
• Press the [ ] key to
select this menu.
• Press the [ F/R ] key to
display ”HANdY dESUB”
on the LCD.
• Press the [ ] key to select this menu.
• The registered handset number is displayed.
•
Press the [ F/R ] key to scroll through all handset numbers (2-5).
• When the number of the
handset you want to deregister is displayed, e.g.,
”HANdY NO: 2”, select it
with the [ ] key.
• ”HANdY dESUB” is displayed on the LCD.
• Press the [ ] key.
Handset ”Multi 2” sends an acoustic signal and dere
gisters. The message ”NOT Sub” is displayed on the
LCD of that handset.
• Press the [ ] key to return to stand-by mode.
Remark: You can deregister all handsets, except the
handset which you are using for deregistration and
”Multi 1”. For example, handset number 3 (Multi3) cannot deregister handsets of number 1 (Multi1) or number
3 (Multi3). For deregistration of these handsets, (see p.
50 ”RESETTING THE BASE”).
han8y no:2
base Setting
han8y 8esub
multi i
han8y 8esub
Page 50

49
BASE SETTINGS
CHANGING
THE MASTER PIN
(BASE SET)
The master PIN is an essential safety feature of the
system. It should be changed as soon as possible. The
default setting of the master PIN is ”1590”. An active PIN
can only be changed if a new pin is entered correctly
twice in succession and the procedure is not interrupted.
• Stand-by mode
• Press the [ F/R ] key to
display ”bASE SETTING”
in the LCD display.
• Press the [ ] key to
select this menu.
• Press the [ F/R ] key to
display ”b-CHANGE PIN”
on the LCD.
• Press the [ ] key.
The message ”FP PIN” is
displayed on the LCD.
• Enter the current PIN and
press the [ ] key.
WAIT is displayed for a
moment.
•
When the message ”NEW
PIN” is displayed, enter
the new base set PIN and
press the [ ] key.
• When the message ”RETYPE PIN:” is displayed,
enter the new base set
PIN again and press the
[ ]
key. ”b-CHANGE
PIN”
is displayed again.
• Press the [ ] key to return to the stand-by
menu.
base setting
b--change pin
fp pin:
new pin:
retype pin:
multi i
b--change pin
Note:
Do not forget your
personal PIN.
Note:
The default PIN of your handset is ”1590”.
Page 51

You can reset the base defaults in this menu. The reset
deregisters all handsets registered with the base and the
base enters the ”Register” mode.
The menu supports two options:
To reset the base set, proceed as follows:
• Stand-by mode
• Press the [ F/R ] key to
display ”bASE SETTING”
on the LCD.
• Press the [ ] key.
• Press the [ F/R ] key to
display ”bASE RESET” on
the LCD.
• Press the [ ] key. ”FP
PIN” is displayed on the
LCD. Enter the PIN and
press the [ ] key. The
message ”INITIALIZE” is
displayed.
• If you press the [ ]
key again, all defaults
are reset.
50
BASE SETTINGS
RESETTING
THE BASE
1: Reset All
Registration data No handset registered
2: Initialize
Boots the default parameters
Ringer volume. Step 9
Ringer melody Melody 4
Master PIN 1590
Dial mode DTMF (tone)
Call bar All barred numbers are
deleted together with their
assignments to handsets
base setting
base RESET
Initialize
multi i
FP PIN:
Note:
The default PIN of your handset is ”1590”.
Page 52

51
BASE SETTINGS
• If you press the [ F/R ]
key, ”RESET ALL” is dis
played on the LCD. If you
press the [ ] key, all
data relating to registered
handsets is deleted.
The handset is now again
in the ”NOT Sub” menu.
You can bar up to five numbers with up to five digits
each. You can define up to 5 handsets for each number.
Each time you enter this function, you can program one
barred number.
Barring a number
• Stand-by mode
• Press the [ F/R ] key to
display ”bASE SETTING”
on the LCD.
• Press the [ ] key.
• Press the [ F/R ] key
again to display ”bARRING” on the LCD.
• Press the [ ] key to
select this menu.
• The message ”FP PIN” is
displayed on the LCD.
• Enter the base set PIN
and press the [ ] key.
If a number has already
been barred, this is
displayed in format
”NO1 : 001”.
RESET ALL
NOT SUB
BARRING
NUMBERS
base setting
Barring
multi i
fp pin:
Note:
The default PIN of your handset is ”1590”.
Page 53

52
BASE SETTINGS
• If no number has been
barred, the message
”EMPTY” is displayed.
• You can now enter a
number which you want
to bar. Then press the
[ ] key. The barred
number can be changed
or deleted with the
[ ]
key.
• The message ”HANdY”
is displayed. Here you can
successively enter the
number of all handsets
for which the barred
number shall be effective.
• Then press the [ ]
key.
• The ”BARRING” menu is
displayed. This completes
the barring procedure.
• Press the [ ] key to
return to the stand-by
mode.
no I: empty
Barring
han8y: 2
no I : 0190
Page 54

53
GENERAL INFORMATION
TROUBLESHOOTING
AND REMEDIES
Problem Cause and remedy
The set does not work • Inspect the main supply.
• Isolate the base set and the handset from
power for a moment.
• Charge the batteries.
• Inspect the telephone connection.
• Inspect the telephone socket outlet.
• Out of base set range:
Reduce distance between handset and base.
No ringer tone • Inspect the telephone connection.
• Use the correct telephone socket outlet.
No dialing • Wrong dial mode setting;
change to other dial mode.
Poor communication • You are too far away from the base set or
the radio link between the base and
the handset is disturbed.
Rapid tone signal
- while you are calling • You are too far away from the base set.
Reduce the distance.
- while the link is being • You are off-range.
established Return to the radio range of the base set.
Ambient noise • Check if it is better to change the set to
another position. (Interference from other
appliances).
Noise • Battery low or defective.
Interference from other appliances.
Page 55

Possible cause
Does the antenna touch
an object or a wall?
Is the handset too far
away from the base?
Is there an obstacle, such
as a wall, between the
handset and the base?
Is the base/handset near
a radio, television, satellite receiver, fax machine,
power economy lamp,
computer?
Is there contact between
the power supply cable or
the telephone cable and
an electrical appliance?
54
GENERAL INFORMATION
AMBIENT NOISE
Depending on the position of your telephone, ambient
noise cannot always be excluded, not even in the best
environment. Electrical appliances, such as televisions,
satellite receiver systems, fax machines, economy lamps,
computers, etc., produce electromagnetic fields causing
interference and noise. Do not use your cordless telephone near electric cables or electrical appliances.
If you hear noise while phoning check the items in the list
below.
Hearing aids can sometimes produce disturbing noise.
Remedy
Change the position of
the base set.
Reduce the distance.
Reduce the distance or
change the position.
Remove the set to
another place.
Cable should not
make contact.
Page 56

55
GENERAL INFORMATION
• Use only the telephone cable supplied with the set.
• Power the base set only from a 230 V AC, 50 Hz mains.
• If the telephone is hit by an object or water enters the
set, inspect the housing, disconnect the power supply
and have the set inspected by a specialist before you
use it again.
• If the telephone cannot be fully plugged in the outlet,
consult your telephone provider.
• Make certain to plug the power supply cable and the
telephone cable in the correct sockets on the base of
the telephone.
• Ensure good ventilation to avoid heat buildup inside
the telephone.
• Do not place the set on a surface (e.g., table cloth,
wool blanket, etc.) or near material (e.g., curtains or
other textiles) such that the ventilation openings can be
blocked.
The radiation emitted by the set is not harmful to your
health.
Clean the telephone outside. Wipe the plastic parts with
a moist cloth. Do not wipe the plastic parts with a dry
cloth. This causes electrostatic charge which attracts dust
and causes contamination of the set.
SAFETY
INSTRUCTIONS
HEALTH
CLEANING
THE TELEPHONE
Page 57

56
GENERAL INFORMATION
WHERE TO PLACE
THE TELEPHONE?
The telephone is designed for normal use. The base set
should not be placed on a heater, in a wet room or near
a personal computer, television, radio or microwave
oven. Place the base set on a pad so that the plastic feet
are not attacked by the top coat of the furniture and ugly
marks are left. We will not be liable for damage from any
of the these causes. Avoid strong vibration and do not let
the base set or handset drop to the floor. This voids any
guarantee claim.
Page 58

57
TECHNICAL SPECIFICATIONS
Model :
Telephone standard :
Frequency range :
Modulation :
Output :
Range :
Dial mode :
Phone book :
CID memory :
Stand-by battery life :
Talking battery life :
Power supply :
Operating temperature :
Storage temperature :
Ambient conditions :
Dimensions (HxWxD)
base set with handset :
Weight
base set with handset :
MBO 2400
DECT
1.88 GHz – 1.90 GHz
QPSK
20 mW
inside a building: up to 50 m
outdoors: up to 300 m
pulse or tone, optional
alphanumeric, up to 20 telephone numbers
20 call numbers
max. 250 hours
max. 10 hours
Base set: by mains adapter DC 9V/100 mA
Handset: 3 x NiMh batteries type AAA (1.2V)
550 mAh, commercial type
+15°C to +35°C
0°C to +55°C
Do not expose to high RH or
constant direct sunshine
approx. 135 x 140 x 100 mm
approx. 300 g (incl. batteries)
Page 59

WARRANTY
This product is under warranty for 24 months from the date of
purchase. Defects which are obviously due to the material or
workmanship will be repaired free of charge during this period. This
warranty will not be honoured if the product has been mishandled,
e.g., dropped or pushed hard, or tampered with or altered by anyone
other than the manufacturer.
If you have a warranty claim, please call the service number on the
rear cover page. Please have the following handy:
1) a brief description of the difficulties encountered
2) proof of purchase.1
0682
Page 60

GARANTIE
Bei Garantie-Inanspruchnahme wenden Sie sich bitte an die unten
stehende Telefonnummer.
WARRANTY
If your product is defective, please call the phone number at the bottom
of this page.
Service in Deutschland:
Hotline 0180 / 532 37 49
Service for Germany:
Hotline 0180 / 532 37 49
 Loading...