

Page 1

ALPHA 1800 CTA
BEDIENUNGSANLEITUNG
INSTRUCTION MANUAL
© by MBO International Electronic GmbH, Germany
Schnurloses Telefon nach CT1+ Standard
mit digitalem Anrufbeantworter
Page 2

1
TABLE OF CONTENTS
TABLE OF CONTENTS . . . . . . . . . . . . . . . . . . . . . . . . . . . . . . . . . . . . . . . . . . . . . . . . . . . . . . . . . . . . . . . 1-2
INTRODUCTION / BEFORE USE . . . . . . . . . . . . . . . . . . . . . . . . . . . . . . . . . . . . . . . . . . . . . . . . . . . . . 3-7
SECTION A FUNCTION DESCRIPTION . . . . . . . . . . . . . . . . . . . . . . . . . . . . . . . . . . . . . . . . . . . . 8
1. Phone On from Standby State . . . . . . . . . . . . . . . . . . . . . . . . . . . . . . . . . . . . . . . . . . . . . . . . .8
2. Phone Off . . . . . . . . . . . . . . . . . . . . . . . . . . . . . . . . . . . . . . . . . . . . . . . . . . . . . . . . . . . . . . . . . . . . . . . . 8
3. Make Call . . . . . . . . . . . . . . . . . . . . . . . . . . . . . . . . . . . . . . . . . . . . . . . . . . . . . . . . . . . . . . . . . . . . . . . . 8
4. Make a New Call in the Phone state . . . . . . . . . . . . . . . . . . . . . . . . . . . . . . . . . . . . . . . . . . 8
5. Call Answering . . . . . . . . . . . . . . . . . . . . . . . . . . . . . . . . . . . . . . . . . . . . . . . . . . . . . . . . . . . . . . . . . . 8
6. Pre-dialing . . . . . . . . . . . . . . . . . . . . . . . . . . . . . . . . . . . . . . . . . . . . . . . . . . . . . . . . . . . . . . . . . . . . . . . 8-9
7. Last number Redial . . . . . . . . . . . . . . . . . . . . . . . . . . . . . . . . . . . . . . . . . . . . . . . . . . . . . . . . . . . . . . 9
8. Memory dialing . . . . . . . . . . . . . . . . . . . . . . . . . . . . . . . . . . . . . . . . . . . . . . . . . . . . . . . . . . . . . . . . . . 9
9. Extended Redial . . . . . . . . . . . . . . . . . . . . . . . . . . . . . . . . . . . . . . . . . . . . . . . . . . . . . . . . . . . . . . . . . 9
10. Temporary Tone Mode (optional, country dependent) . . . . . . . . . . . . . . . . . . . . . . . . 9-10
11. Baby Call . . . . . . . . . . . . . . . . . . . . . . . . . . . . . . . . . . . . . . . . . . . . . . . . . . . . . . . . . . . . . . . . . . . . . . . . . 10
12. Microphone Mute . . . . . . . . . . . . . . . . . . . . . . . . . . . . . . . . . . . . . . . . . . . . . . . . . . . . . . . . . . . . . . . 10
13. Base Paging . . . . . . . . . . . . . . . . . . . . . . . . . . . . . . . . . . . . . . . . . . . . . . . . . . . . . . . . . . . . . . . . . . . . . . 10
14. Call Barring . . . . . . . . . . . . . . . . . . . . . . . . . . . . . . . . . . . . . . . . . . . . . . . . . . . . . . . . . . . . . . . . . . . . . . 10
15. Battery Low Warning . . . . . . . . . . . . . . . . . . . . . . . . . . . . . . . . . . . . . . . . . . . . . . . . . . . . . . . . . . . . 10-11
16. Battery Level indication . . . . . . . . . . . . . . . . . . . . . . . . . . . . . . . . . . . . . . . . . . . . . . . . . . . . . . . . . 11
17. Out of Range Warning . . . . . . . . . . . . . . . . . . . . . . . . . . . . . . . . . . . . . . . . . . . . . . . . . . . . . . . . . . 11
18. Key Lock . . . . . . . . . . . . . . . . . . . . . . . . . . . . . . . . . . . . . . . . . . . . . . . . . . . . . . . . . . . . . . . . . . . . . . . . . 11
19. Recall . . . . . . . . . . . . . . . . . . . . . . . . . . . . . . . . . . . . . . . . . . . . . . . . . . . . . . . . . . . . . . . . . . . . . . . . . . . . . 1 2
SECTION B PROGRAMMING PROCEDURE DESCRIPTION . . . . . . . . . . . . . . . . . . . . . . . 13
1. Key Touch Tone Enable/Disable . . . . . . . . . . . . . . . . . . . . . . . . . . . . . . . . . . . . . . . . . . . . . . . . 13
2. Ringer Tone Select . . . . . . . . . . . . . . . . . . . . . . . . . . . . . . . . . . . . . . . . . . . . . . . . . . . . . . . . . . . . . . 13
3. Ringer Loudness Select . . . . . . . . . . . . . . . . . . . . . . . . . . . . . . . . . . . . . . . . . . . . . . . . . . . . . . . . . . 13
4. Auto Phone On . . . . . . . . . . . . . . . . . . . . . . . . . . . . . . . . . . . . . . . . . . . . . . . . . . . . . . . . . . . . . . . . . . 14
5. Baby Call . . . . . . . . . . . . . . . . . . . . . . . . . . . . . . . . . . . . . . . . . . . . . . . . . . . . . . . . . . . . . . . . . . . . . . . . . 14
6. Key Lock . . . . . . . . . . . . . . . . . . . . . . . . . . . . . . . . . . . . . . . . . . . . . . . . . . . . . . . . . . . . . . . . . . . . . . . . . 14
7. Setting Barring Number for Call Barring . . . . . . . . . . . . . . . . . . . . . . . . . . . . . . . . . . . . . . . 15
8. Setting tone/pulse dialing (Optional, country dependent) . . . . . . . . . . . . . . . . . . . . 15
9. Reset to default values . . . . . . . . . . . . . . . . . . . . . . . . . . . . . . . . . . . . . . . . . . . . . . . . . . . . . . . . . . 15-16
10. Program Personal Identity Number (PIN) . . . . . . . . . . . . . . . . . . . . . . . . . . . . . . . . . . . . . . . 16
11. Extended Redial . . . . . . . . . . . . . . . . . . . . . . . . . . . . . . . . . . . . . . . . . . . . . . . . . . . . . . . . . . . . . . . . . 16
12. Programming Memory . . . . . . . . . . . . . . . . . . . . . . . . . . . . . . . . . . . . . . . . . . . . . . . . . . . . . . . . . . 16-17
13. Selecting Signal [R] (Optional, country dependent) . . . . . . . . . . . . . . . . . . . . . . . . . . . 17
14. Programming Key List . . . . . . . . . . . . . . . . . . . . . . . . . . . . . . . . . . . . . . . . . . . . . . . . . . . . . . . . 17-18
Page 3
Precaution
Emergency calls (baby call function) are not avaible
in case of power failure.
Use only rechargeable batteries.
Replace only with the same or equivalent
type recommended by the manufacturer.
Attention should be drawn to the
environmental aspects of battery disposal.
2
TABLE OF CONTENTS
Section C DIGITAL ANSWERING MACHINE FUNCTIONS . . . . . . . . . . . . . . . . . . . . . . . . . 19
1. Memo Record . . . . . . . . . . . . . . . . . . . . . . . . . . . . . . . . . . . . . . . . . . . . . . . . . . . . . . . . . . . . . . . . . . . 19
2. Record Incoming Messages . . . . . . . . . . . . . . . . . . . . . . . . . . . . . . . . . . . . . . . . . . . . . . . . . . . . . 19
a. Answer ready . . . . . . . . . . . . . . . . . . . . . . . . . . . . . . . . . . . . . . . . . . . . . . . . . . . . . . . . . . . . . . . . 19-20
b. Answer only / memory full / Answer off . . . . . . . . . . . . . . . . . . . . . . . . . . . . . . . . . . . . 20
3. Play Incoming Messages / MEMO . . . . . . . . . . . . . . . . . . . . . . . . . . . . . . . . . . . . . . . . . . . . . . 20-21
4. Delete Incoming Messages & MEMO . . . . . . . . . . . . . . . . . . . . . . . . . . . . . . . . . . . . . . . . . . 21
5. Remote Control . . . . . . . . . . . . . . . . . . . . . . . . . . . . . . . . . . . . . . . . . . . . . . . . . . . . . . . . . . . . . . . . . 22
a. Remote Control from telephone line (DTMF phone only) . . . . . . . . . . . . . . . . . . 22
b. Remote Control from Handset . . . . . . . . . . . . . . . . . . . . . . . . . . . . . . . . . . . . . . . . . . . . . . 22
c. Remote Control command table . . . . . . . . . . . . . . . . . . . . . . . . . . . . . . . . . . . . . . . . . . . . . 22-25
6. Alarm Memo . . . . . . . . . . . . . . . . . . . . . . . . . . . . . . . . . . . . . . . . . . . . . . . . . . . . . . . . . . . . . . . . . . . . 25
a. Alarm Memo Record . . . . . . . . . . . . . . . . . . . . . . . . . . . . . . . . . . . . . . . . . . . . . . . . . . . . . . . . . 25
b. Alarm Memo Play / Delete . . . . . . . . . . . . . . . . . . . . . . . . . . . . . . . . . . . . . . . . . . . . . . . . . . . 25-26
7. Volume Control . . . . . . . . . . . . . . . . . . . . . . . . . . . . . . . . . . . . . . . . . . . . . . . . . . . . . . . . . . . . . . . . . 26
8. Mode Switch . . . . . . . . . . . . . . . . . . . . . . . . . . . . . . . . . . . . . . . . . . . . . . . . . . . . . . . . . . . . . . . . . . . . 2 6
a. F1 mode . . . . . . . . . . . . . . . . . . . . . . . . . . . . . . . . . . . . . . . . . . . . . . . . . . . . . . . . . . . . . . . . . . . . . . . 26-28
a. F2 mode . . . . . . . . . . . . . . . . . . . . . . . . . . . . . . . . . . . . . . . . . . . . . . . . . . . . . . . . . . . . . . . . . . . . . . . 28
b. F3 mode . . . . . . . . . . . . . . . . . . . . . . . . . . . . . . . . . . . . . . . . . . . . . . . . . . . . . . . . . . . . . . . . . . . . . . 28-29
c. F4 mode . . . . . . . . . . . . . . . . . . . . . . . . . . . . . . . . . . . . . . . . . . . . . . . . . . . . . . . . . . . . . . . . . . . . . . . 29-30
d. F5 mode . . . . . . . . . . . . . . . . . . . . . . . . . . . . . . . . . . . . . . . . . . . . . . . . . . . . . . . . . . . . . . . . . . . . . . 31
9. Back up Battery . . . . . . . . . . . . . . . . . . . . . . . . . . . . . . . . . . . . . . . . . . . . . . . . . . . . . . . . . . . . . . . . . . 26
SECTION D DEFAULT SETTING . . . . . . . . . . . . . . . . . . . . . . . . . . . . . . . . . . . . . . . . . . . . . . . . . . . . 27
Page 4
3
INTRODUCTION / BEFORE USE
We are glad that you have decided for this Phone. The
product you have bought is state of the art, of highest
quality and has many advanced features.
Please read this Instruction Manual carefully so that you
get the most from your phone with digital answering
machine.
The purpose of the Instruction Manual is to provide
information. Its content is not the subject of contract.
All data in this booklet is merely nominal. The right to
technical modifications is reserved.
Closing date: 01/2002
DEAR CUSTOMER
NOTE
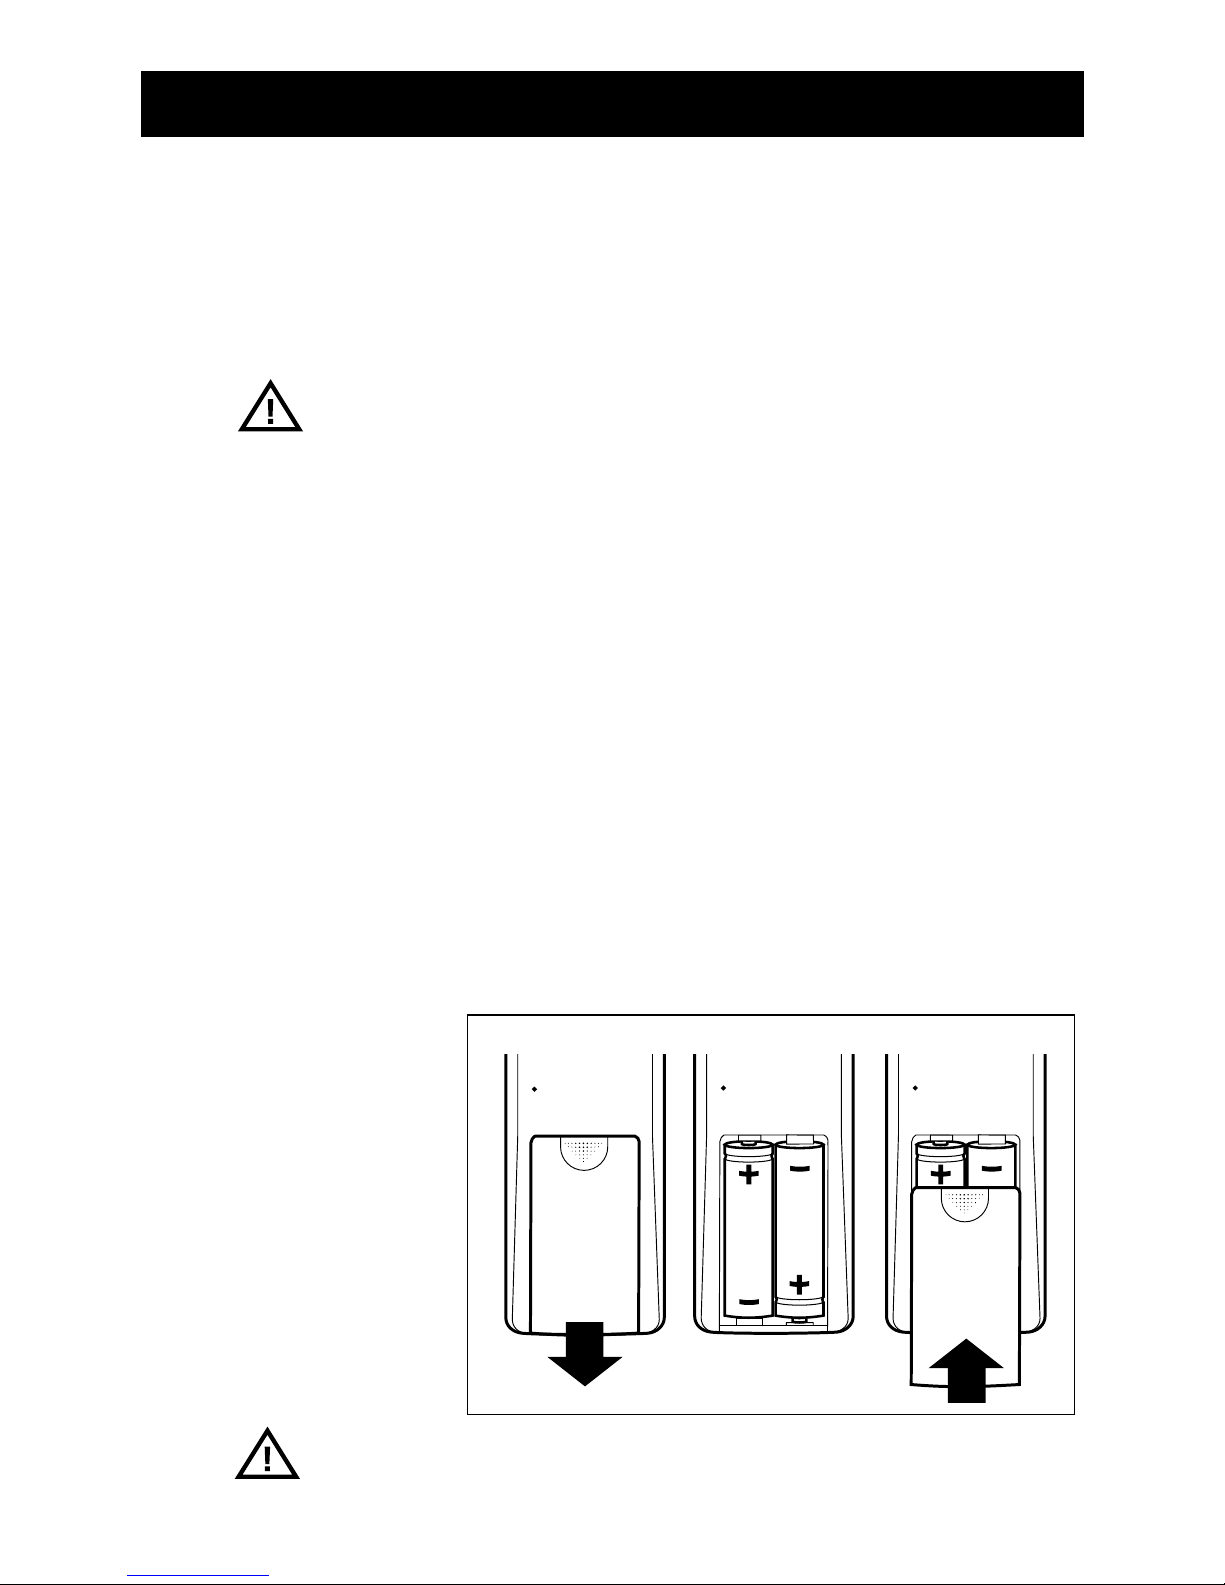
BATTERY
INSTALLATION
Fig. 1
a) The battery cover is on the back side of the unit. Push
it in the arrowed direction and remove it.
b) Insert the 2 supplied “AA“ size, 1.2 V NiCd storage
batteries as shown here. Ensure correct polarity.
c) Close the battery compartment.
Before first use, load up the storage batteries in the base
unit 10 hours at least.
NOTE
Page 5

4
BEFORE USE
MODE
+
-
3
6
9
#
R
2
0
8
5
1
7
*
4
PARTS AND ACCESSORIES
After unpacking the unit, please make sure the parts below are counted for:
1 Handset with storage batteries
2 Base unit
3 Belt clip
4 Power supply adaptor with cord
5 Telephone connection with cord
6 Instruction manual (no figure)
Fig. 2
1 2
3 4 5
Page 6
5
BEFORE USE
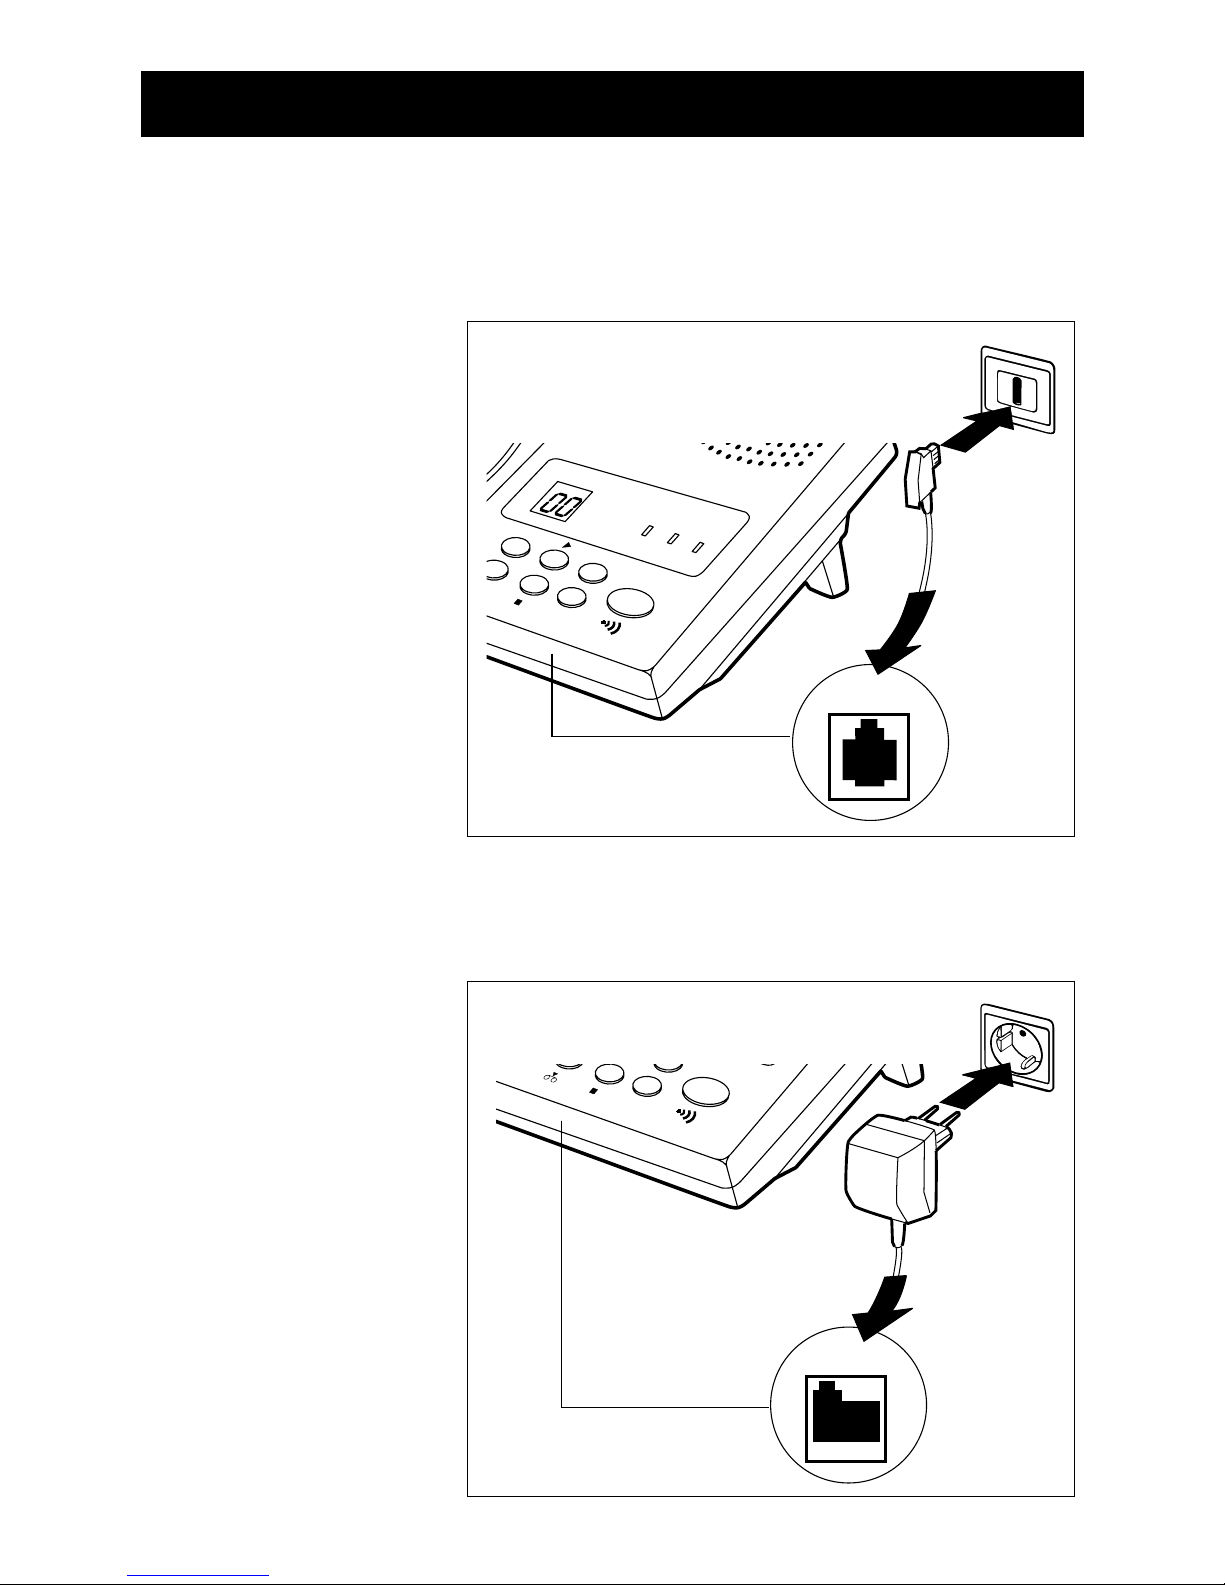
CONNECTING
THE UNIT
Fig. 3
Fig. 4
TEL
MODE
+
-
-
DC IN
As shown in the figure below, insert one end of the
telephone cord into the wall jack and the other end into
the opening at the underside of the unit.
As shown in the figure below, insert one end of the
power cord into the 230 V AC outlet and the other end
into the opening at the underside of the unit.
Page 7

6
BEFORE USE
MODE
+
-
BASE UNIT
(PARTS BY USING HANDSET)
Cradle
Power
LED
Fig. 5
LCD
Page
Button
Battery
LED
In use LED
Memory icon Tone icon
Mic icon Programming icon
Battery icon Barring icon
In use icon 7-Digit-sign
for numbers
Paging icon and letters
DISPLAY ICONS
(HANDSET)
Page 8
7
BEFORE USE
R
1
4
7
*
3
6
9
#
2
5
8
0
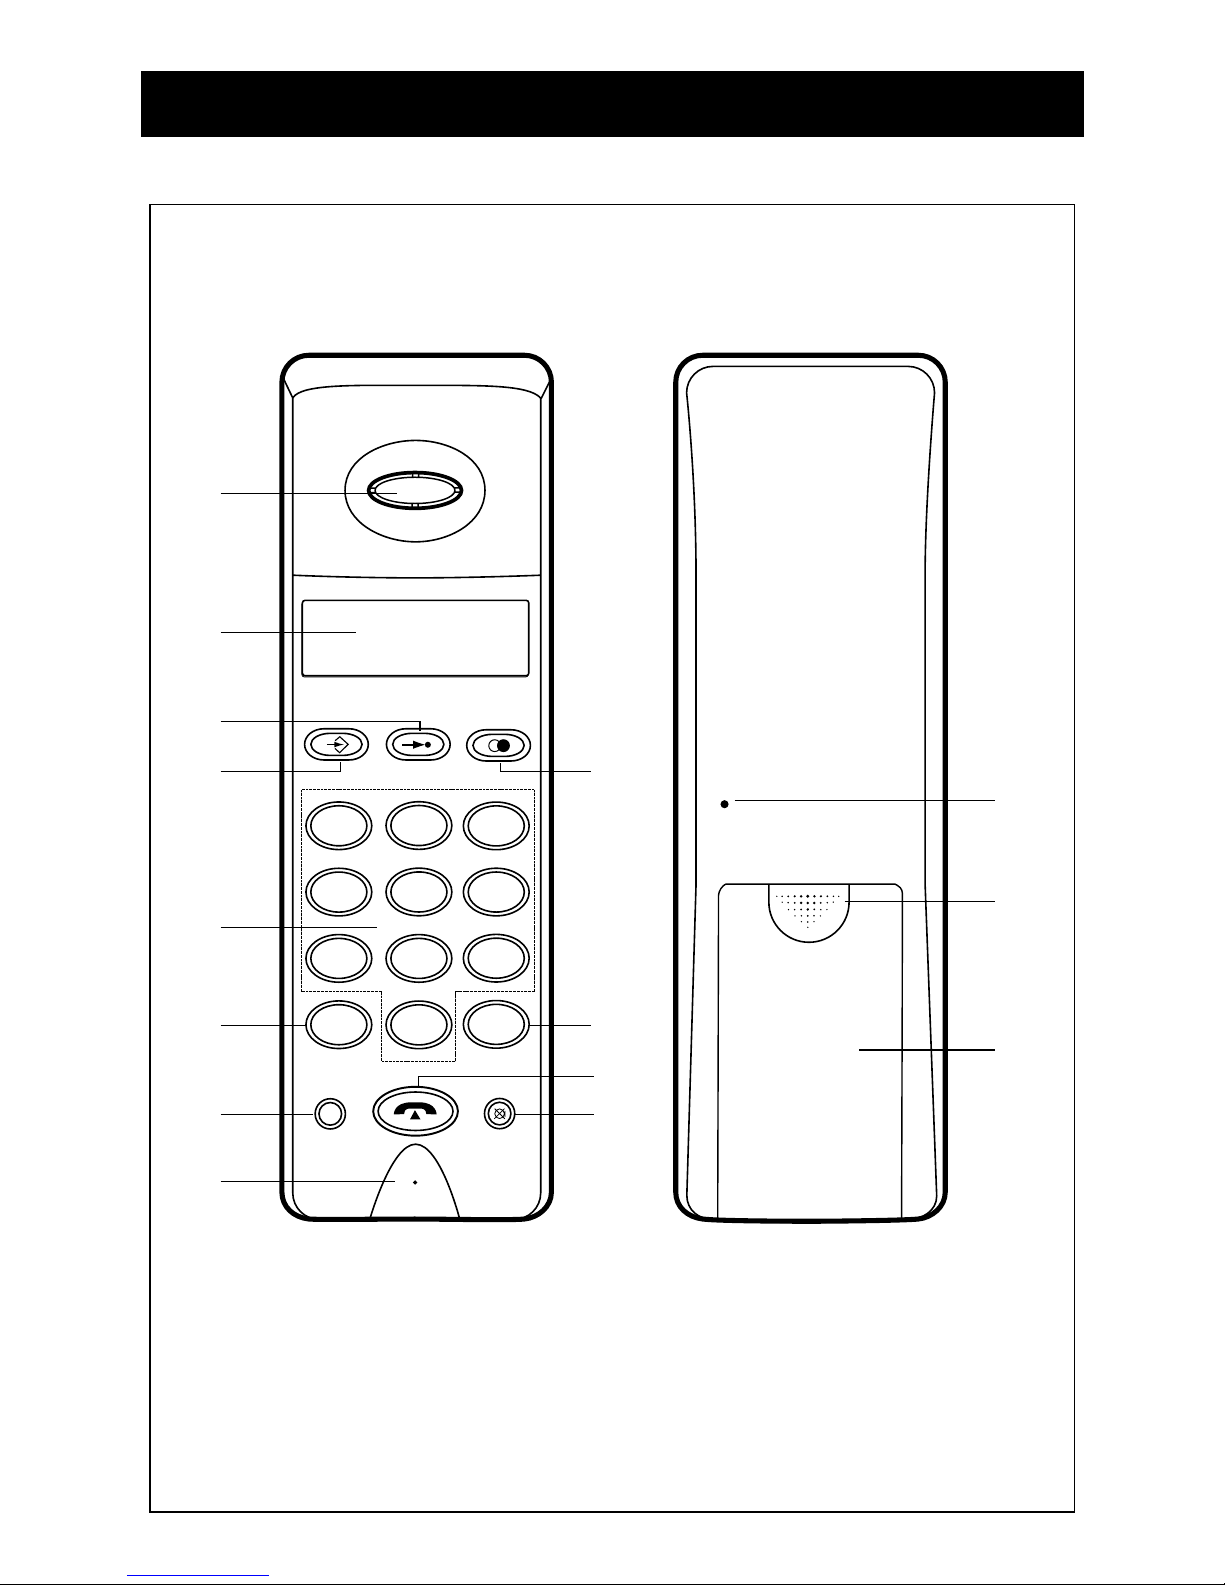
HANDSET
1 Earpiece 6 Star key 11 Rhomb key
2 LCD 7 Signal key 12 Redial key
3 Memory key 8 Mic 13 Sound opening
4 Programming key 9 Mic key 14 Bolt for battery compartment
5 Number keys 10 Call key 15 Battery cover
1
2
3
4
5
6
7
8
12
11
10
9
13
14
15
Fig. 6
Page 9

8
SECTION A
1. Phone On from Standby State
• Press [ ] button, key tone will be heard, a phone
icon [ ] will flash on LCD.
• If linking success, [ ] is on. In use LED on base is
on . After 5 sec. and then in stead of Call Time.
• If linking fails after 5 sec. 3 long beep fail tone will
be heard.
2. Phone Off
• Press [ ] button again, Handset exits phone state.
• Return Handset to cradle also exits phone state.
• Phone_on icon [ ] on handset and In use LED on
base will be off.
• Call time on LCD is off after a while.
3. Make Call
• Press [ ] button to link up the line.
• Hearing dial tone and then dial telephone number.
• LCD shows the Telephone Number you dial.
4. Make a New Call in the Phone state
• During phone state, press and hold the [ ] button
for 1 sec. 2 beep tone will be heard.
• Hearing dial tone and dial the new telephone
number.
• LCD shows the Telephone Number you dial.
5. Call Answering
• During ring in, the special ring sound on H/S and
B/S will be heard, [ ] on LCD will flash.
• Press [ ] button to answer the call.
• When H/S is in cradle, pick up H/S, the call will be
received automatically if H/S is set to Auto Phone
on by programming.
6. Pre-dialing
• Before Phone on, Enter a Tel. no. (up to 24 digits
available) on LCD.
• Press [ ] button to make Phone on, the line will
FUNCTION
DESCRIPTION
Page 10

9
SECTION A
be linked up and the Tel. no. will be sent automatically.
• During digit entering, LCD will shows the Tel. no.
one by one. User can press [ ] button to perform
backspace function. If depress [ ] button for
1 sec., whole entry will be erased.
• Leave the handset without pressing any key for
15 sec., the pre-entered digit will be clear and the
handset will go back to normal.
7. Last number Redial
• During phone state, Pressing [ ] button, The last
number dialed will be shown on LCD and sent to
telephone line.
• It can also be used in pre-digit dialing. Pressing
[ ] button, LCD shows the last number dialed. If
it exceeds 24 digits, the process will be invalid.
8. Memory dialing
• During in phone state, press [ ] button and
memory location from ”0” to ”9”.
• The Tel. no. pre-stored by programming will be
dialed out.
• It can also be used in pre-dialing.
• The contents of memory stored will be stored or
cleared by programming process.
9. Extended Redial
• It is used to redial an extra memory for last number
dialed.
• During in phone state, press [ ] + [ ] to dial
out the pre-stored extending redial digits.
• The contents of extra memory will be stored or
cleared by programming process.
10. Temporary Tone Mode (optional, country
dependent)
• During pulse dialing, press [ *] button to change
pulse dialing to tone dialing temporarily.
• A 3s/6s pause (optional depend on deferent country)
FUNCTION
DESCRIPTION
Page 11

10
SECTION A
will be attached automatically.
• The temporary tone function can also be used in
pre-dialing and storing memory redial.
11. Baby Call
• When Baby call function is enabled by program
setting, Only the pre-programmed Tel. no. (”mem
0”) can be dialed out if any button is pressed except
for [ ] key.
• The baby call is invalid if ”mem 0” is not preprogrammed.
NOTE: When Baby Call on, H/s can entry to Remote
control mode. But it cannot operate any Function on
Answer machine.
12. Microphone Mute
• Press [ ] button to mute H/S microphone, Mute
icon [ ] is on, and press again to return normal.
13. Base Paging
• Press [ ] button on base to perform page function.
• The page tone on H/S will continue for 15 sec.
• Page icon [ ] will flash, ”bASE PAGE” message
is displayed on LCD.
14. Call Barring
• When a barring number is set by programming, any
dialing number start with this no. will be blocked.
• LCD on H/S will show ”bArring” message.
• The default barring number is NULL.
15. Battery Low Warning
• If battery is low, H/S doesn’t make any operation
and LCD shows [ ] for 10s and then goes to sleep
(LCD turns off) until the battery is recharged to
normal voltage.
• 5 minutes after battery low in standby state, H/S
doesn’t response to any buttons and LCD turns off
until the battery is recharged to normal voltage.
FUNCTION
DESCRIPTION
Page 12

11
SECTION A
• During conversation, when battery power is lower
than a certain level, a short warning beep tone is
heard every 2 sec. and the normal operation of the
phone will be shut down in 3 minutes.
• Return Handset to cradle to re-charge to stop
warning tone.
• Notice: If the battery level is too low H/S may not
turn on after recharge battery to normal. In this case
the battery should be remove and re-plug to H/S to
turn H/S on.
• Notice: When handset is battery low, press [ ]
key the display will show ”Lo bAtt”.
16. Battery Level indication
• Battery level icon is shown on LCD.
• When battery level is high, LCD shows [ ].
• When battery level is low, LCD shows [ ], a
warning tone is heard if H/S in use.
• Notice: using a fully discharged battery, the battery
level indicator will show good after you placing the
handset on charge cradle a moment. It doesn’t
mean the battery is good, it will drop down rapidly
after off cradle. It is recommended that an overnight charging could be performed for a new or
discharged battery.
17. Out of Range Warning
• During in conversation, if Handset is far away from
base unit, a 2-short alert beep tone will be heard in
every 2 sec. to remind the user that the RF linking is
at a poor condition.
• If the user do not return to range within 10 sec. the
base will disconnect the line automatically.
18. Key Lock
• When key lock is set enable by programming, no
key can be press except [ ] button.
• During ringing, phone key [ ] can bypass the
key-lock function.
FUNCTION
DESCRIPTION
Page 13

12
SECTION A
19. Recall
• During in phone state, press [ R ] button will break
the Line for short time.
• The function is used to access special services
offered by Telephone Company.
• Recall time can be selected by programming
function according to deferent
FUNCTION
DESCRIPTION
Page 14

13
SECTION B
During in programming mode, press the [ ]
button to cancel and escape, no any changing will
be performed.
1. Key Touch Tone Enable/Disable
Key Entered Display Shown Tone Indication
Press [ ] Pro-
Press [
1] Pro-tonE @
Press [
1] for
toggle on/off Pro-tonE on/oFF
Press [ ]
Confirmation tone
Programming icon [ ] flash during the process. @ for current
setting, default is on.
2. Ringer Tone Select
Key Entered Display Shown Tone Indication
Press [ ] Pro-
Press [
2] Pro-ringtonE @
Enter the ringer
selection
1 to 4 Pro-ringtonE X
Corresponding ring
Press [ ] Confirmation tone
Programming icon [ ] flash during the process. @ for current
setting, default is 2, X for digit 1 to 4.
3. Ringer Loudness Select
Key Entered Display Shown Tone Indication
Press [ ] Pro-
Press [
3] Pro-ring @
Press [
1] to Select the
ringer off/Low/high Pro-ring oFF/Lo/Hi
Press [ ] Confirmation tone
Programming icon [ ] flash during the process. @ for current
setting, default ringer is high.
PROGRAMMING
PROCEDURE
DESCRIPTION
Page 15

14
SECTION B
4. Auto Phone On
Key Entered Display Shown Tone Indication
Press [ ] Pro-
Press [
4] Pro-Auto @
Press [
1] for
toggle on/off Pro-Auto on/oFF
Press [ ] confirmation tone
Programming icon [ ] flash during the process. @ for current
setting, default is off.
5. Baby Call
Key Entered Display Shown Tone Indication
Press [ ] Pro-
Press [
6] Pro-bAby @
Press [
1] for
toggle on/off Pro-bAby on/oFF
Press [ ] confirmation tone
Memory [0] must be programmed. Programming icon [ ] flash
during the process. @ for current setting, default is off.
6. Key Lock
Key Entered Display Shown Tone Indication
Press [ ] Pro-
Press [
7] Pro-Hold @
Press [
1] for
toggle on/off Pro-Hold on/oFF
Press [ ] confirmation tone
Programming icon [ ] and Key-lock setting icon [ ] flash
during the process. @ for current setting, default is off.
After Key-lock is set to on, LCD shows [Hold] message if any key,
except , is pressed.
PROGRAMMING
PROCEDURE
DESCRIPTION
Page 16

15
SECTION B
7. Setting Barring Number for Call Barring
Key Entered Display Shown Tone Indication
Press [ ] Pro-
Press [
8] EntEr codE
Press 4-digit PIN codE ——
PIN entered is correct bArring @ Happy tone
Enter the 1.. 3-digit
barring no. / Press
[ ] erase barring
no. bArring X
Press [ ] confirmation tone
Programming icon [ ] flash during the process. @ for current
setting, default is NULL, X for 1..3-digit barring no.
8. Setting tone/pulse dialing (Optional,
country dependent)
Key Entered Display Shown Tone Indication
Press [ ] Pro-
Press [
*
] Pro-@ diAL
Press [
1] for
toggle tone/pulse Pro-tonEdiAL/
Pro-PuLSE diAL
Press [ ] confirmation tone
Programming icon [ ] flash during the process. @ for current
setting, default is tone. If tone function is set, tone icon [ ] is
shown on LCD. Else [ ] is off.
9. Reset to default values
Key Entered Display Shown Tone Indication
Press [ ] ProPress [
0] EntEr codE
Enter 4-digit PIN codE ——
If PIN is correct,
process continue rESEt ? y Happy tone /
Else terminate Sad tone
PROGRAMMING
PROCEDURE
DESCRIPTION
Page 17

16
SECTION B
Press [1] to
toggle y/n rESEt ? y/n
Press [ ] Confirmation tone
Programming icon [ ] flash during the process.
10. Program Personal Identity Number (PIN)
Key Entered Display Shown Tone Indication
Press [ ] ProPress [
#] EntEr codE
Enter the old 4-
digit PIN. codE ——
If PIN entered is
correct, process
continue EntEr codE a happy tone /
Else terminate a sad tone
Enter new 4-digit PIN
codE xxxx
Press [ ] confirmation tone
Programming icon [ ] flash during the process. xxxx for 4-digit
PIN, default is 0000.
11. Extended Redial (PIN)
Key Entered Display Shown Tone Indication
Press [ ] ProPress [ ] Pro-rEdiAL
Show redial Tel. no.
Modify it if necessary XXXXX
Press [ ] confirmation tone
Programming icon [ ] flash during the process. If extended
redial Tel. no. exceed 24 digits, the process will be invalid.
XXXXX is telephone number. Extended redial memory content
will be cleared after programming reset.
12. Programming Memory
Key Entered Display Shown Tone Indication
Press [ ] Pro-
PROGRAMMING
PROCEDURE
DESCRIPTION
Page 18

17
SECTION B
Key Entered Display Shown Tone Indication
Press [ ] SEL LocAtion
Select memory
location 0..9 EntEr no
Enter Tel. No. : 0..9,
# , *, pause entered digit
‘*’ for temp. tone
in pulse mode ”r” for recall
Pressing [ ] for
backspace ”P” for pause
”u” for ”*”,
”n” for ”#”
Press [ ] Confirmation tone
Programming icon [ ] flash during the process. All
memory
contents will be cleared after programming reset.
13. Selecting Signal [R] (Optional, country)
Key Entered Display Shown Tone Indication
Press [ ] ProPress [ R ] Pro-r @
Enter selection 1 to 3 Pro-r 100/260/600
Press [ ] Confirmation tone
programming icon [ ] flash during the process. @ for current
setting (1/2/3 for 100ms/260ms/600ms time break).
Note: For some country without this option, it is fixed at 100ms
and cannot be changed.
Page 19

18
SECTION B
R
1
4
7
*
3
6
9
#
2
5
8
0
Auto-phone on
Key Lock
Barring no.
(must enter
PIN first)
Tone / pulse
Reset to
default
(must enter
PIN first)
PIN
(must enter
PIN first)
Baby call
Recall
Selecting signal
14. Programming Key List
Key touch tone
Ringer pitch
Ringer level
Memory
Extend redial
Page 20

19
SECTION C
1. Memo Record
• Press and hold the REC key for 2 seconds.
• After ”MEMO recording” is heard, start recording.
• Speak loudly and clearly.
• Press STO key to stop recording. A short beep is
heard and LED blinking to indicate the new message
is recorded.
• If the recording time is exceeded for 1 minute, it
stops automatically. A short beep is heard and LED
blinking to indicate the new message is recorded.
2. Record Incoming Messages
Make sure you have record ANS 1 & ANS2 and the
machine in ‘Answer Ready’ state. If you did not record
ANS1, the unit will use default ANS1.
After 2,4, or 6 rings, the following procedure begins.
a. Answer ready
After ANS1 playback, a beep is heard.
Start incoming message record.
Recording will stop, if silence or busy tone for 8 sec.,
a beep is heard.
DIGITAL ANSWERING
MACHINE FUNCTIONS
MODE
+
-
DIGITAL
ANSWERING
MACHINE
Display
Play key
Mode key
Record key
Volume +
Volume -
Stop key
Microphone
Page 21

20
SECTION C
It goes to stand-by state.
Each message Max length is 2 min.
Max. number of message is 60.
Note: Caller may skip ANS playback by pressing ”#0”
and start message recording.
b. Answer only / memory full / Answer off
If you selected answer only, Answer off or memory
storage full, the unit will playback ANS 2 after line
connection.
After ANS 2 playback, it will wait 8 sec. for remote
code. If no valid code input, a beep is heard and line
disconnect. It go to stand-by state. No message can
be record.
Note: The total of time for ALL Recording messages
(include OGM ) is 10-16 min.
Note: If ANS 2 did not record , it will generate music
(3 s) and then wait 8 s for remote code.
3. Play Incoming Messages / MEMO
• To play the message that have not
been listened.
If all the display is blinking, it indicates new MEMO
or ICM message.
Press and hold key for 2 seconds to play new
messages.
‘New message N’ will be heard before each message played.
Recorded day time will be heard after each message
played.
• To play all the messages.
If there are MEMO or ICM in the memory but no
new MEMO or ICM, answer LED will not blink.
Press ‘PL key to playback all the messages.
‘Message N’ will be heard before each message
played.
Page 22

Recorded day time will be heard after each message
played.
During playback,
Message no. will be displayed while playing.
It stops at the end of messages.
Press key to pause playing. Press key again to
continue playing.
After pause , if key is not pressed again within 8
seconds, the unit will stop playing.
During playing
Press MODE key to play the next message.
Press and hold MODE key for fast / play message.
Press and hold ‘REC’key to play the previous message.
Press ‘REC’ key to play the current message again.
After finishing playing, it goes to idle state.
As the message is played, the message number is
displayed and the number decreases.
Note: The last recorded message is played first.
If these is no message to be played, a warning beep is
heard, then it will play voice prompt ‘NO MESSAGE’.
4. Delete Incoming Messages & MEMO
• Delete Instant Message
Press key to playback the messages. During playback, press PLAkey to pause, then press MODE key
to delete the current message. ”Current message
erased” is heard.
• Delete All Messages
Press and Hold STOkey for 2 seconds to delete all
messages. ”ALL MESSAGES ERASED” is heard.
If there is new message , a warning beep is heard.
If there is no message, then it will play voice prompt
‘NO MESSAGE’.
Note: All the message should be listened before. Only
the messages which were listened can be deleted.
21
SECTION C
Page 23

22
SECTION C
5. Remote Control
a. Remote Control from telephone line (DTMF
phone only)
When the unit is connected to the telephone line.
The caller can skip the OGM by dial ”#0”.
Enter the security code number during message
recording.
Note: the default code is 159
If the code is correct, two short beep are heard, the
unit goes to the remote control state. The remote
operation procedure is shown on section c below.
Note: If no press any key for 8s, it will automatically disconnect the answer machine.
b. Remote Control from Handset
Both handset and the whole unit are in onhooked
standby. Press [ ] [5]
The unit goes to remote control state.
The remote operation procedure is shown section c
below.
”AE” is shown on base.
c. Remote Control command table
Remote control in remote standby the answering
machine will display ”AE”.
0 Stop 8 Room Monitor
13 MEMO Record #0 Skip OGM Play
21 ANS1 Play 22 ANS2 Play
23 ANS1 Change 24 ANS2 Change
31 Ans Ready 32 ANS Only
33 Ans Off 78 Delete All message
11 Play All ICM /MEMO 12 Play New ICM / MEMO
4 Forward 4 Forward
5 Repeat 5 Repeat
6 Rewind 6 Rewind
9 Pause 9 Pause
9# Delete Current 9# Delete Current
message message
0 Stop 0 Stop
Page 24

23
SECTION C
• Remote Control – ANS1 RECORD
Dial ‘23’.
After a short beep sound is heard, recording is started.
Speak loudly and clearly.
Dial ‘0’ to stop recording.
If the recording time exceeded 30 seconds, it stops
automatically.
Two Short beeps are heard. The unit return to remote
control state.
Recording will stop at silence or busy tone detected
for 8 seconds.
• Remote Control – ANS2 RECORD
Dial ‘24’.
After a short beep sound is heard, recording is started.
Speak loudly and clearly.
Dial ‘0’ to stop recording.
If the recording time exceeded 30 seconds, it stops
automatically.
Two short beeps are heard. The unit return to remote
control state.
Recording will stop at silence or busy tone detected
for 8 seconds.
• Remote Control – ANS1 PLAY
Dial ‘21’
After a short beep sound is heard, playing is started.
It stops at the end of messages or Dialing ‘0’.
Two short beep is heard. The unit returns to remote
control state.
• Remote Control – ANS2 PLAY
Dial ‘22’.
After a short beep sound is heard, playing is started.
It stops at the end of message or Dialing ‘0’.
Two short beeps are heard. The unit returns to remote
control state.
• Remote Control – MEMO Record
Dial ‘13’ to record memo, wait for starting beep.
After ”Memo Recording”is heard, recording is started.
Page 25

24
SECTION C
Speak loudly and clearly.
Dial ‘0’ stop recording.
If the recording time is exceeded 1 minute, it stops
automatically.
Two shot beeps are heard. The unit returns to remote
control state.
Recording will stop as silence or busy tone detected
for 8 seconds.
• Remote Control–Play Incoming Messages/Memo
Dial ‘12’ to play the new messages that have not been
listened.
Dial ‘11’ to play all the messages.
During playback,
Dial ‘4’ to play the next message.
Dial ‘5’ to play the current message again.
Dial ‘6’ to play the previous message.
Dial ‘9’ to pause.
Dial ‘0’ to stop playing.
If all message are played. It automatically stop, two
short beep is heard, the unit returns to remote state.
Note: * During playing message, it will pause automatically after 2.5 mins
If no key is pressed. Press ”9” to continue playing.
* If no key is pressed in 8 seconds, it disconnects.
Note: If there is no message, ”No message” will be
heard.
• Remote Control – Delete Instant Message
During playback, dial ‘9’ to pause, then dial ‘#’ to
delete the current message.
”Current message erased” is heard, next message is
played. If no message to play, two short beep is
heard, the unit return to remote control state.
• Remote Control – Delete all Messages
During remote control state, Dial ‘78’ to delete all the
messages. Then ”all messages erased” is heard to
indicate to delete it. Afterwards, it goes to remote
control state.
Page 26

25
SECTION C
Notice that all the message should be listened before.
Only the message which were listened can be deleted.
If there is new message, dialing ‘78’ can do nothing,
only a warning beep.
Notice that if the previous status is not answer ready,
you should do next step.
• Remote Control – Toggle On / Off State
During remote control state,
Dial ‘31’ to switch to on state for answer ready.
Dial ‘32’ to switch to on state for answer only.
Dial ‘33’ to switch to off state.
Unit will announce correspond status
• Remote Control – Room Monitor
During remote control state, Dial ‘8’ come into room
monitor, if the time exceeding 20 seconds, it stop
automatically, two short beep is heard. Then the unit
returns to remote control state.
Notice: if you want to switch off ringer sound and
beep sound in the base, please refer to sections
”volume control” and ”ringer control”.
6. Alarm Memo
a. Alarm Memo Record
Press and hold the REC key for 4 seconds to record
alarm MEMO. After two short beep heard, it come
into alarm memo record, the other operation is same
as memo record. The max. record time is 30 seconds.
The recorded alarm memo is played once after recording.
‘A L’ is displayed while playing.
a. Alarm Memo Play / Delete
Press REC key to play alarm memo, ‘A L’ is displayed
while playing.
Press MODE key to delete alarm memo during
playing.
If no alarm memo record, music alarm is heard.
Note: When the machine clock is reaches the alarm
Page 27

26
SECTION C
time and alarm is set ON, the unit will announce the
current time then play alarm memo or music alarm
once.
Note: Have record an alarm Memo- Play alarm memo
and then play music alarm (about 2 min).
Have not record an alarm Memo- Play music alarm
only (about 1 min).
7. Volume Control
Press + key to increase the volume, and the LED
displays the volume no. the max. volume no. is 7.
There is a warning beep if the user tries to set the
volume greater than 7.
Press -key to decrease the volume, and the LED
display the volume no., the min. volume no. is 0.
There is a warning beep if the user tries to set the
volume less than 0.
You can also switch the volume in other state (e.g.
ICM play, ANS play) by pressing + or -key, but the
unit will not display the volume no. and no warning
beep.
Notice that if ‘0’ is selected, there is no monitoring
sound from speaker after offhooked.
8. Mode Switch
There are 5 modes in the answering machine. Press
MODE key to switch to different mode. ‘Fn’ is
displayed to show the current mode. Press STOkey or
no key input within 30 seconds will switch the unit to
normal state automatically.
Mode 1, for ANS record / play and ON / OFF switch.
Mode 2, for password check and change.
Mode 3, for remain time check.
Mode 4, for time and alarm time check and set.
Mode 5, for ring delay selection.
a. F1 mode
• Mode Switch – ON / OFF answering machine
Press MODE key to switch to ”F1”
Page 28

27
SECTION C
Press Key to announce new status
Press to select
1. Answer ready (ANS1) : ready for answer and
ICM recording.
ANS1 LED on, ANS2 LED off.
2. Answer only (ANS2) : answer only.
ANS1 LED off, ANS2 LED on.
3. OFF : idle mode.
ANS1 LED off, ANS2 LED off.
Note:
a) Without ANS1 or ANS2 record, the unit uses
default ANS1.
b) When ICM memory full, the unit will switch to
ANS2 answer only automatically. If ANS2 does
not exist, the unit will turn off and will connect
after 8 rings. If ICM memory is not then full, the
user can switch back to answer mode. If necessary, by repeating above procedure or by ”31”
remote command.
c) In OFF mode, the unit will connect after 8 rings.
A short music is played.
• Mode Switch – OGM Record
Press MODE key to switch to ”F1”
1. Press and hold REC key for 3.5 seconds to start
recording.
2. LED ”A1” or ”A2” show ANS1 or ANS2 that you
are selected for record. You will hear voice
menu too.
3. After a short beep sound, start recording.
4.
Speak loudly, clearly and close to the microphone.
5. Press STOP key to stop recording. Or recording
time exceed 30 seconds, it stop automatically. A
shot beep is heard.
(Note: ANS record time must be over 3 seconds.
Otherwise cannot stop.)
6. The unit will go to answer ready automatically if
the recorded is ANS1.
7. For another ANS change, please follow the same
procedure.
Page 29

28
SECTION C
• Mode Switch – OGM Play
Press MODE key to switch to ”F1”
1. Press REC key to play ANS1 or ANS2.
2. LED display ”A1” or ”A2” and the unit play the
voice menu.
3. After a short beep, start playing.
4. Unit stops by pressing key.
5. If MODE key is pressed while playing ANS1 or
ANS2, correspond OGM will be erased.
a. F2 mode
• Mode Switch – Security Code Check
Press MODE key to switch to ”F 2”
Press REC key to check first digit security code.
Press PLAY key to check other digit security code.
• Mode Switch – Security Code Set
Press MODE key to switch ”F2”
Press and hold key for 2 seconds to set security
code.
First-digit blinks.
Press key to increment and key to decrement
(0-9).
Press STOP / TIME key to set second-digit.
Second-digit blinks.
Press key to increment and key to decrement
(0-9).
Press ST / TIME key to set third-digit.
Third-digit blinks.
Press key to increment and key to decrement
(0-9).
Press key to finish setting security code.
a. F3 mode
• Mode Switch – Remain Time Check
Press MODE key to switch to ”F3”.
Press key to check the remain time of seconds.
Page 30

seconds.
Press key to check the remain time of minutes.
c. F4 mode
• Mode Switch – Time Check
Press MODE key to switch to ”F4”.
Press key to display and announce the time.
• Mode Switch – Time Set
Press MODE key to switch to ”F4”.
Press and hold key for 2 seconds to set the
time. Current day is displayed (Default is ”d7” for
Sunday).
Day number blinks (announce the day).
Press PLkey to increment and RECkey to decrement
the number (1-7).
Press key to set hour.
First-digit of hour blinks.
Press key to increment and C key to decrement
first-digit of hour (0-2).
Press key to set second-digit of hour.
Second-digit of hour blinks.
Press key to increment and EC key to decrement
second-digit of hour (0-9).
Press key to finish and continue to set the minutes.
Note: If you set hour more than 23, the unit wil
not accept and a warning will be heard. Please
repeat the above procedure.
First-digit of minutes blinks.
Press key to increment and EC key to decrement
first-digit of minute (0-5).
Press key to set second-digit of minute.
Second–digit of minutes blinks.
Press key to increment and EC key to decrement
second-digit of minute (0-9).
Press key to finish, and the unit announce the
setting time.
29
SECTION C
Page 31

30
SECTION C
• Mode Switch – Alarm Time Check
Press MODE key to switch to ”F4”
Press key to display and announce alarm ON /
OFF status and the alarm time.
• Mode Switch – Alarm Time Set
Press MODE key to switch to ”F4”
Press and hold key for 2 seconds to set alarm
time.
First-digit of hour blinks.
Press key to increment and key to decrement
first-digit of hour (0-2).
Press key to set second-digit of hour.
Second-digit of hour blinks.
Press key to increment and key to decrement
second-digit of hour (0-9).
Press key to finish and continue to set the minutes.
Note: If you set hour more than 23, the unit will
not accept and a warning will be heard. Please
repeat the above procedure.
First-digit of minutes blinks.
Press key to increment and key to decrement
first-digit of minute (0-2).
Press key to set second-digit of minute.
Second-digit of minutes blinks.
Press key to increment and key to decrement
second-digit of minute (0-9).
Press key to finish, ad the unit announce the
setting time.
When the time set is over, the unit comes into
alarm time on/off set and display ”on”. That means
current alarm is in alarm on state.
Press key to set alarm off, ‘OF’ is displayed.
Press key to set alarm on, ‘ON’ is displayed.
Press key to finish. The unit will announce alarm
ON/OFF status and the alarm time.
Page 32

31
SECTION C
d. F5 mode
• Mode Switch – Ring delay selection
Press MODE key to switch to ”F5”.
Press key to display the current setting of ring
count.
Press key to select other rings 2, 4, or 6.
After correct setting is displayed, Press to finish.
9. Back up Battery
When the back up batteries are not insert or battery
low, The LED Will show ”00” and ”LO” Alternately.
Note: Sometimes the LED will no display if the base
receive a call which back up batteries are not fitted.
Warning: The back up batteries in the base unit are
used to keep all messages of DAM while AC power
is lost. If the voltage of back up battery is low, and
there is no AC power, then all segments of the
digital LED of DAM will be on. In this case, user
should replace the batteries as soon as possible.
Notice that in this case, the backup messages are
lost”
NOTE
Page 33

32
SECTION D
Ringer Tone select . . . . . . . . . . . . . . . . . . . . . pitch 2
Key touch Tone . . . . . . . . . . . . . . . . . . . . . . on
Auto phone on . . . . . . . . . . . . . . . . . . . . . . . off
Baby call . . . . . . . . . . . . . . . . . . . . . . . . . . . . off
Key lock . . . . . . . . . . . . . . . . . . . . . . . . . . . . off
Barring number for Call Barring . . . . . . . . . . NULL
Tone/pulse dialing . . . . . . . . . . . . . . . . . . . . . tone
Personal identity numer . . . . . . . . . . . . . . . . 0000
Recall time break . . . . . . . . . . . . . . . . . . . . . 100 ms
Memory location 0..9 . . . . . . . . . . . . . . . . . . clear
Extended redial memory . . . . . . . . . . . . . . . . clear
DEFAULT SETTING
Note:
Pursuant to regulation no. 51/2000 "General assignment of frequencies for CT1+ and
CT2" limitations of use must be tolerated for these frequencies from January 1, 2003.
Page 34

Congratulations on your purchase of this product from 4MBO International
Electronic AG, Fabrikstraße 45, D-73207 Plochingen. You are now the owner
of a device of the highest technical standard and tried-and-tested quality. If,
however, you should have a problem with this product at any time please
observe the following guarantee conditions:
1. We will provide a guarantee for this device, when used correctly, for a period
of 24 months calculated from the date of purchase from your dealer. We
will remedy any possible defects at our cost, insofar that the fault is a result
of material defects or production errors. The date of purchase must be
demonstrated by presentation of an invoice, till receipt or other proof of
purchase.
2. The guarantee becomes invalid if repairs are carried out without the
express consent of our company.
3. You do, of course, retain all legal rights both in relation to our company
and in relation to the seller of this device in addition to the rights provided
by this guarantee.
4.If you have questions regarding this device, or technical problems,
please contact our appointed service provider:
JET GmbH, Am Weimarer Berg 6, 99510 Apolda
Our helpline telephone number is printed on the reverse of this page.
Please have the following available during your call:
a) Description of any errors observed
b) Proof of purchase or receipt
5. We are happy to deal with repairs outside the guarantee period at cost. If
an estimate is required, we will have to charge you for this, but this cost
will of course be deducted from your final invoice if we carry out the work
required.
Yours faithfully
Customer Support
4MBO International Electronic AG
GARANTEE CONDITIONS
www.MBOservice.net
Page 35

GARANTIE
Bei Garantie-Inanspruchnahme wenden Sie sich bitte an die unten
stehende Telefonnummer.
WARRANTY
If your product is defective, please call the phone number at the bottom
of this page.
Service in Deutschland:
Hotline 0180 / 532 37 49
Service for Germany:
Hotline ++49 3644 517 280
0681
 Loading...