

Page 1

MBM GoCrease SEMI 17.7"
Semi-Automatic Programmable
Creaser and Perforating Machine
Instruction Manual
Page 2
Operator’s!Manual!
GoCrease
TM
SEMI
MyBinding.com
5500 NE Moore Court
Hillsboro, OR 97124
Toll Free: 1-800-944-4573
Local: 503-640-5920
Page 3

Op Manual | GoCreaseTM SEMI
2!
Content
1. Introduction…………………………… … …………………………………………… … ……………………..….3
2. Safety!Risks…………………………………………………………………………………………………………..3
2.1! Safety!Warning!................................................................................................!3!
2.2! General!Work!Safety!and!Health!Protection!...................................................!3!
3. Warnings!…………………………………………………………………………………………………………….4
4. Technical!Parameters! …………………………………………………………………………………………5
5. Machine!Description! …………………………………………………………………………………………6
6. Machine!Installation! …………………………………………………………………………………………9
7. Setting!Machine!Using!Touch!Screen!!………………………………………………………………..10
7.1! Language!selection!........................................................................................!10!
7.2! Setting!Number!of!Segments!........................................................................!10!
7.3! Setting!Position!of!Segments!........................................................................!11!
7.4! Special!Types!of!Folds!...................................................................................!11!
7.5! Saving!and!Loading!of!Program!.....................................................................!12!
7.6! Working!Cycle!...............................................................................................!13!
7.7! Manual!Control!.............................................................................................!13!
7.8! Service!menu!.................................................................................................!14!
8. The!Most!Common!Faults!(Troubleshooting)!!……………………………………………………14
9. Machine!Disposal!!……………………………………………………………………………………………..15
MyBinding.com
5500 NE Moore Court
Hillsboro, OR 97124
Toll Free: 1-800-944-4573
Local: 503-640-5920
Page 4

Op Manual | GoCreaseTM SEMI
3!
1. INTRODUCTION
We are presenting you with Operating Instructions that contain machine technical data and
instructions necessary for correct setting, machine start-up, operation and maintenance.
Instructions are intended for machine operation as well as for service engineers. People
manipulating, installing and operating the machine should familiarise themselves with the
instructions before they start.
The machine construction complies with the Directive 98/37/EC of the European
Parliament and of the Council. If all the instructions in this document are respected, you
will be satisfied with precision and performance of the machine. We can assure you the
machine received maximum care. Thoroughness of control ensures machine precision
within the scope of the acceptance standards applicable for this machine. We believe
these Operating Instructions will be a valuable guide for you.
2. SAFETY RISKS
2.1 Safety Warning
When using GoCrease 4000, all safety rules and procedures as well as all warnings
regarding work safety and health protection listed in this document must be observed.
Factors increasing risk:
- Rotating pulleys and moving belts
- Voltage
- Noise made during processing
- Moving parts of the machine and equipment
- Sharp edges created during processing
- Dust created during processing
2.2 General Work Safety and Health Protection
This section provides the user with basic information about work safety and health
protection of an operator and all other people who come into contact with the machine.
If the GoCrease 4000 is used correctly, it is a very safe machine. However, if used
incorrectly, it can be dangerous. When operating the machine, the operator is responsible
for their own personal safety. The manufacturer is not responsible for any injury to a
person or damage to the machine caused by use or operation that is not in compliance
with the Operating Instructions. The owner of the machine is responsible for the machine
being operated, maintained and serviced only by qualified people.
The machine design is in compliance with international standards and regulations for
construction of machine tools. For the machines exported to the European Economic Area
(EEA), the customer will obtain "Declaration of Conformity" together with the
accompanying technical documentation for the machine - Operating Instructions. The
machine also has the CE marking.
The CE marking on the machinery signifies that the product complies with the technical
requirements specified in all the legal regulations that apply to the machinery and that
require or allow this marking. This marking also signifies that a specified procedure was
followed during the assessment of the stated conformity.
Page 5

Op Manual | GoCreaseTM SEMI
4!
With the document “Declaration of Conformity” the manufacturer certifies that the given
machinery complies with the requirements of the Directive 98/37/ES of the European
Parliament and of the Council and the harmonised technical standards. Directive 98/37/ES
of the European Parliament and of the Council is a document defining the generally
applicable basic requirements of the health protection and safety for the machinery
operated by a user in the EEA.
The Directive 98/37/ES of the European Parliament and of the Council does not apply to
the machinery exported to the countries outside the EEA.
The customer will receive the accompanying technical documentation for the machine –
Operating Instructions. The manufacturer hereby asks the user to ensure comprehensive
safety as directed by the relevant legal proceedings, standards and regulations, the
Operating Instructions and other, by training the workers consistently.
The machine is intended for work in automatic cycles.
The machine operator monitors the process and the operating mode of the machine. Also
replaces material with the new one and checks the measurements.
3. WARNINGS
Only sheets of the size listed in the parameters can be creased and perforated in the
creasing and perforating machine.
a) It is not advised to crease and perforate foils, sheet metal or other similar materials.
b) Do not use the machine when the electric cord is damaged.
c) Do not plug the machine into other voltage than indicated on producer’s
identification plate.
d) Read all instructions before using the machine.
e) It is not suitable for children to be near the machine.
f) Do not put fingers or hands into the machine when the electric cord is plugged in.
g) When the machine is jammed, it is necessary to unplug the machine first and then
troubleshoot.
h) When replacing a faulty electrical component, do not use a different type of
component or different capacity component. When replacing a component, the
electric cord must be unplugged.
l) Covers can be only dismounted by a trained technician when the machine is
unplugged.
MyBinding.com
5500 NE Moore Court
Hillsboro, OR 97124
Toll Free: 1-800-944-4573
Local: 503-640-5920
Page 6

Op Manual | GoCreaseTM SEMI
5!
4. TECHNICAL PARAMETERS
a)
Max. working width
17.7”
b)
Recommended paper grammage - creasing
80 - 400 g/m²
Recommended paper grammage perforation
80 - 250 g/m²
c)
Crease width *
CITO 1,0 mm - paper thickness < 0.007”
(mostly 80 - 150 gsm)
CITO 1,4 mm - paper thickness 0.007” –
0.01”
(mostly 160 - 250 gsm)
iron channel - paper thickness 0.01” –
0.02”
(mostly 250 - 400 g/m²)
d)
Max. number of creases per sheet
15
e)
Number of Programs
5 f)Min./Max. distance of creases
0.07”/ 39.4”
g)
Min. distance of crease from edge of the
sheet
h)
Speed
i)
Predefined types of fold
j)
Machine dimensions
k)
Machine weight
l)
Voltage / frequency
m)
Power input
n)
Fuse
* Note: It is necessary to respect recommended width of creasing channel for different
paper thickness. If inappropriate width of crease is used (usually narrow creasing channel
for thick paper) inaccuracies in position of crease may appear, crease will be placed in
different distance than what is set on display. If thick paper is used in combination with
narrow crease, the result is that the paper is pressed into the creasing channel, the rollers
start to slip trying to release the paper. Use wider crease in such case.
0 >
1500 LTR sheets/ hr (with one crease)
1/2, 1/3, 1/4, book cover
27.5” x 29.1” x 15.7”
net 115.8 lbs., gross 124.6 lbs.
120 V, 60 Hz
2 A
T3,15 A / 120 V
MyBinding.com
5500 NE Moore Court
Hillsboro, OR 97124
Toll Free: 1-800-944-4573
Local: 503-640-5920
Page 7
Op Manual | GoCreaseTM SEMI
6!
5. MACHINE DESCRIPTION
Content of package
- the machine GoCrease SEMI 1 x
- magnetic side guide 1 x
- magnetic strip 2 x
- perforating knife 1 x
- creasing knife (fitted on the machine) 1 x
- lower creasing/perforating tool (fitted on the machine) 1 x
- supply cable 1 x
- hexagonal key 1 x
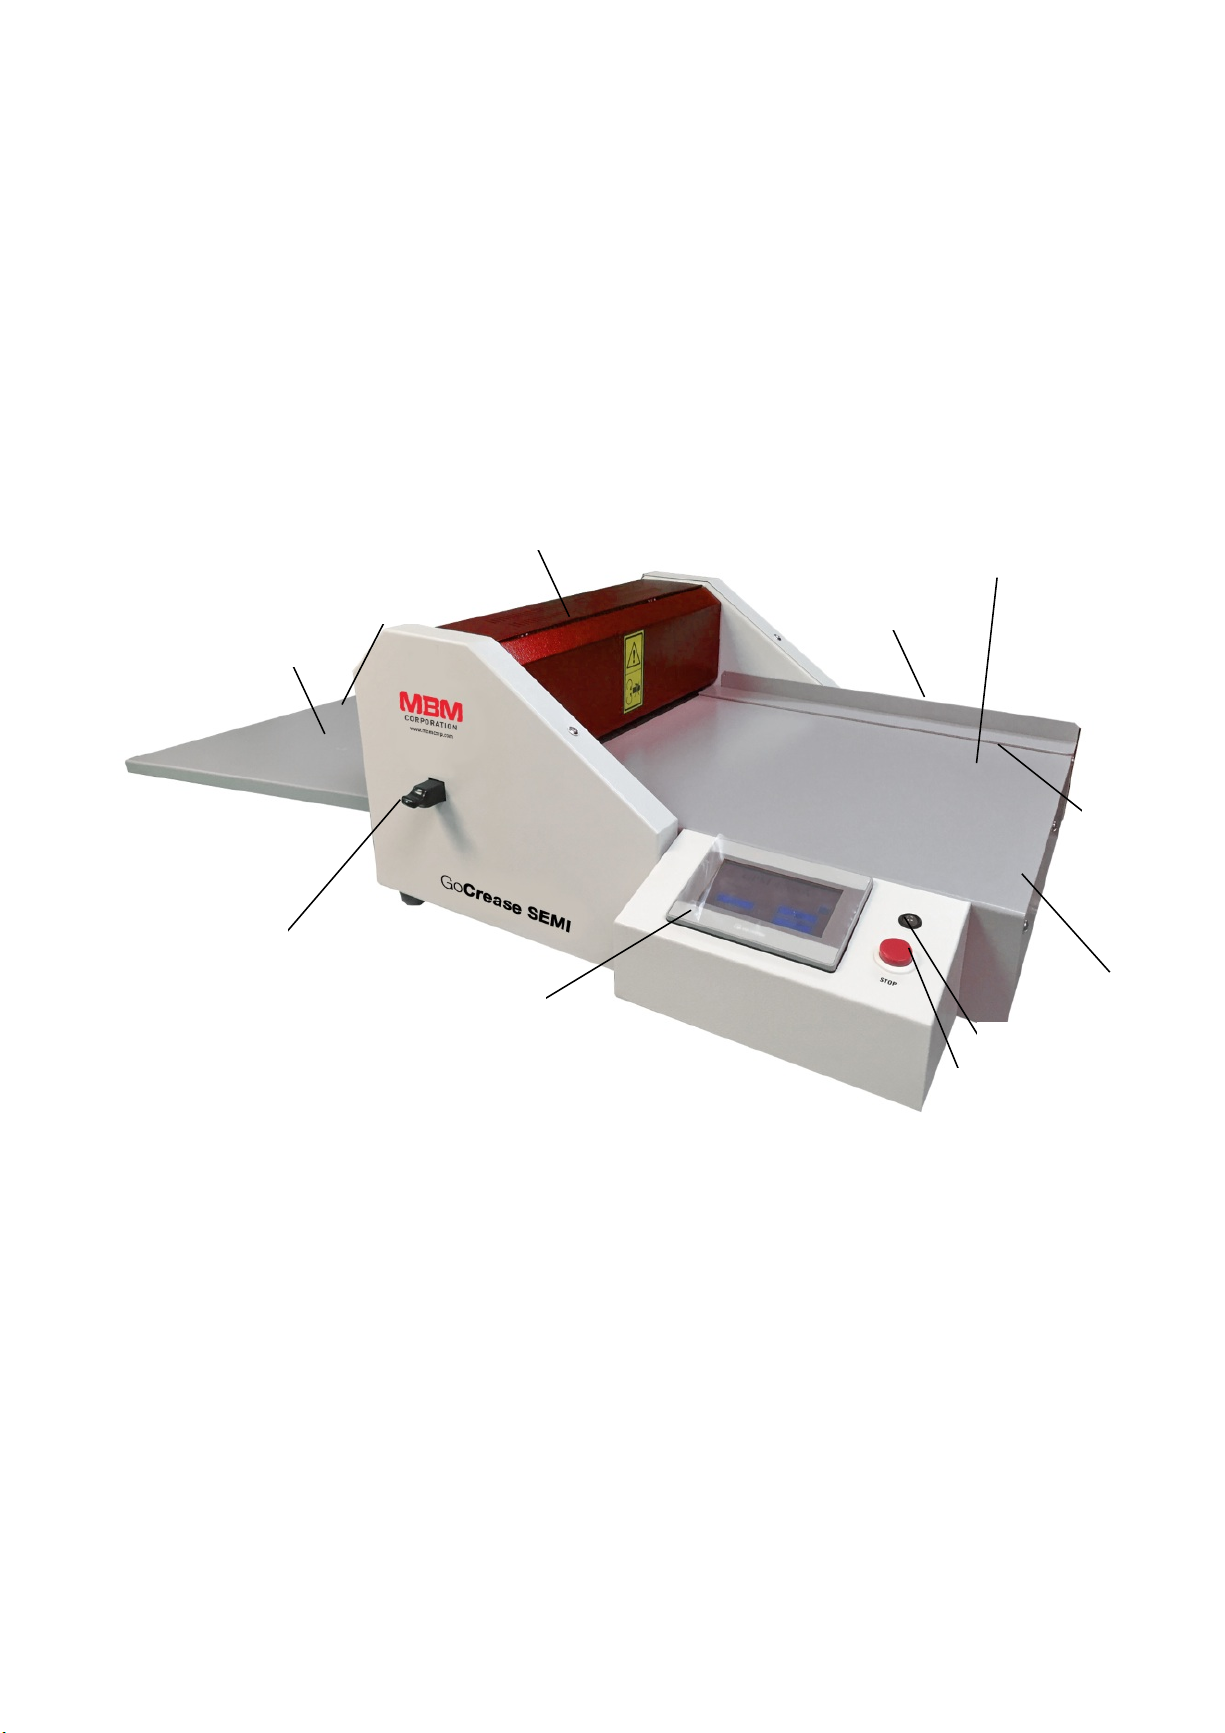
1 – Feeding table
2 – Delivery table
3 – Fixed T-square
4 – Left side guide
5 – Magnetic strip
6 – Display
7 – Control light
8 – STOP button
9 – Square bar
10 – Upper cover
11 – Magnetic stop
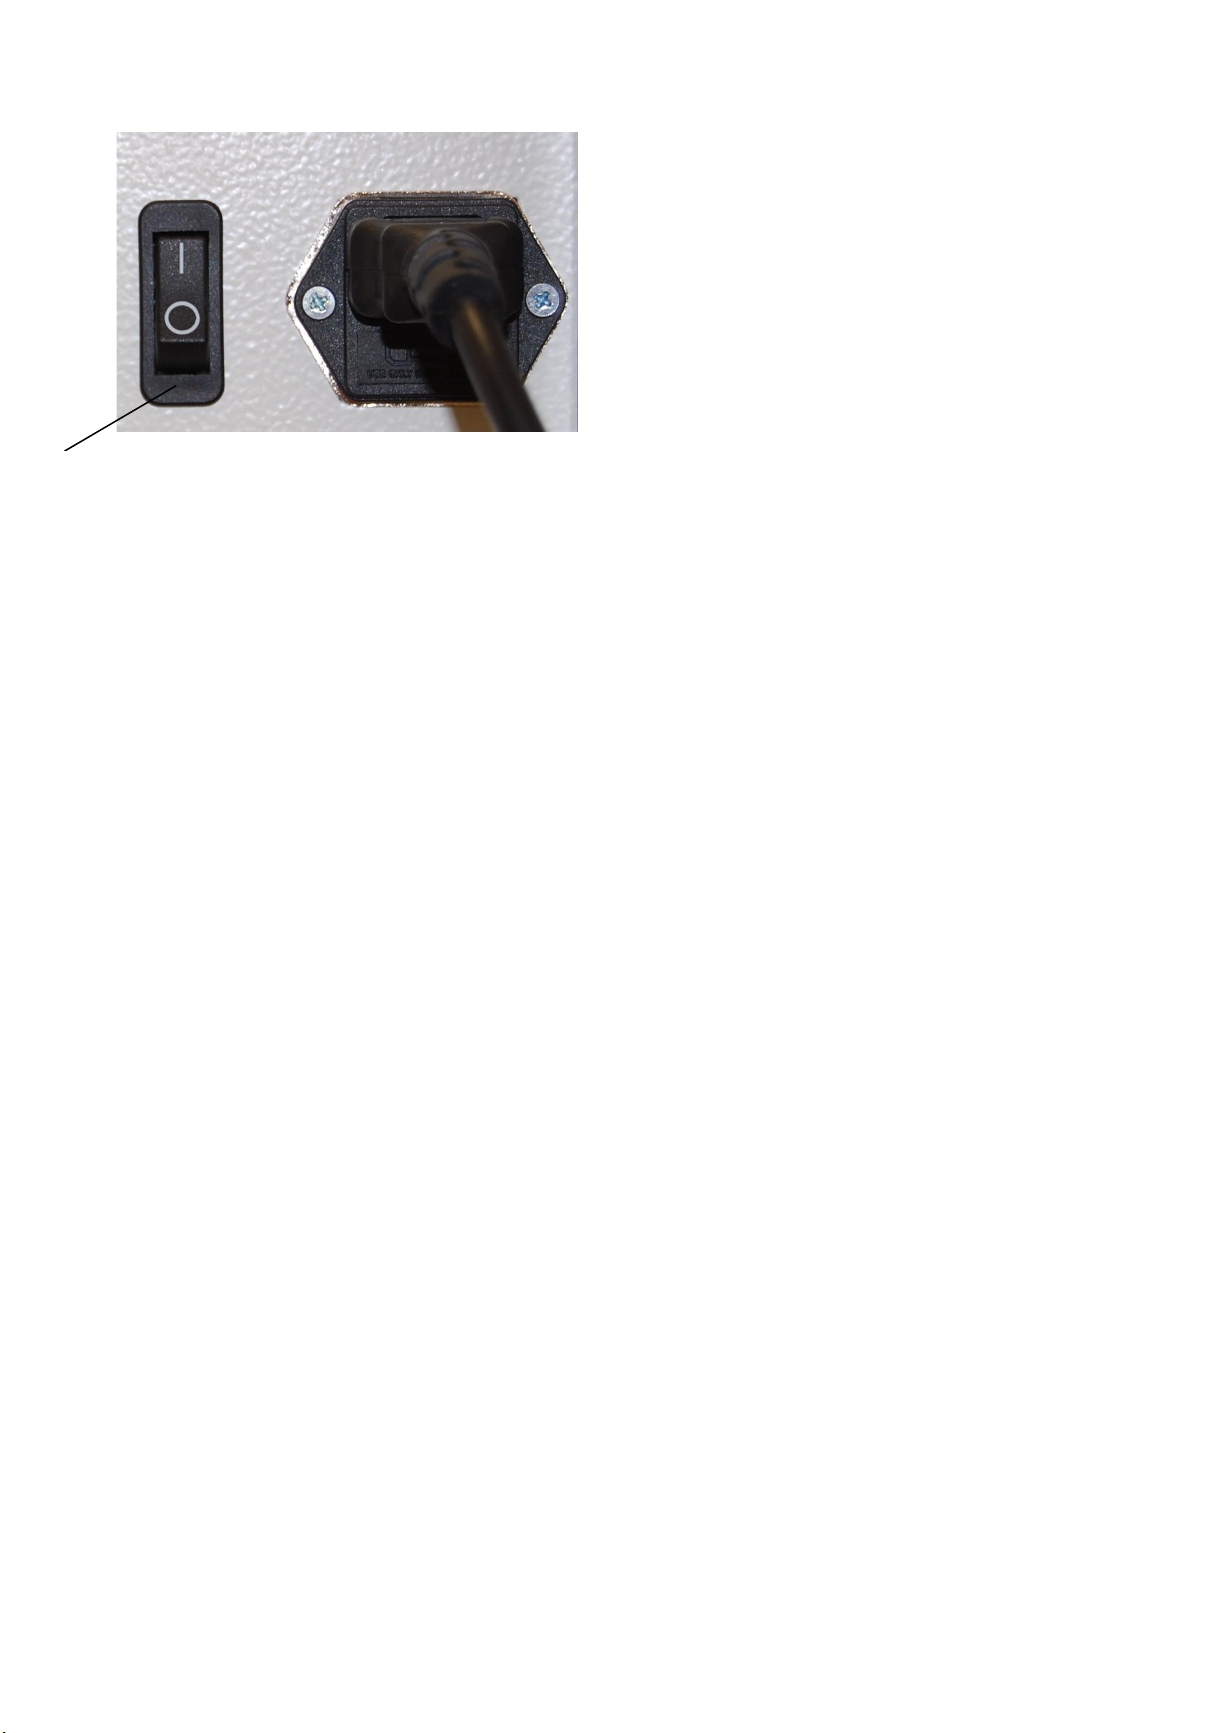
12 – Power supply switch
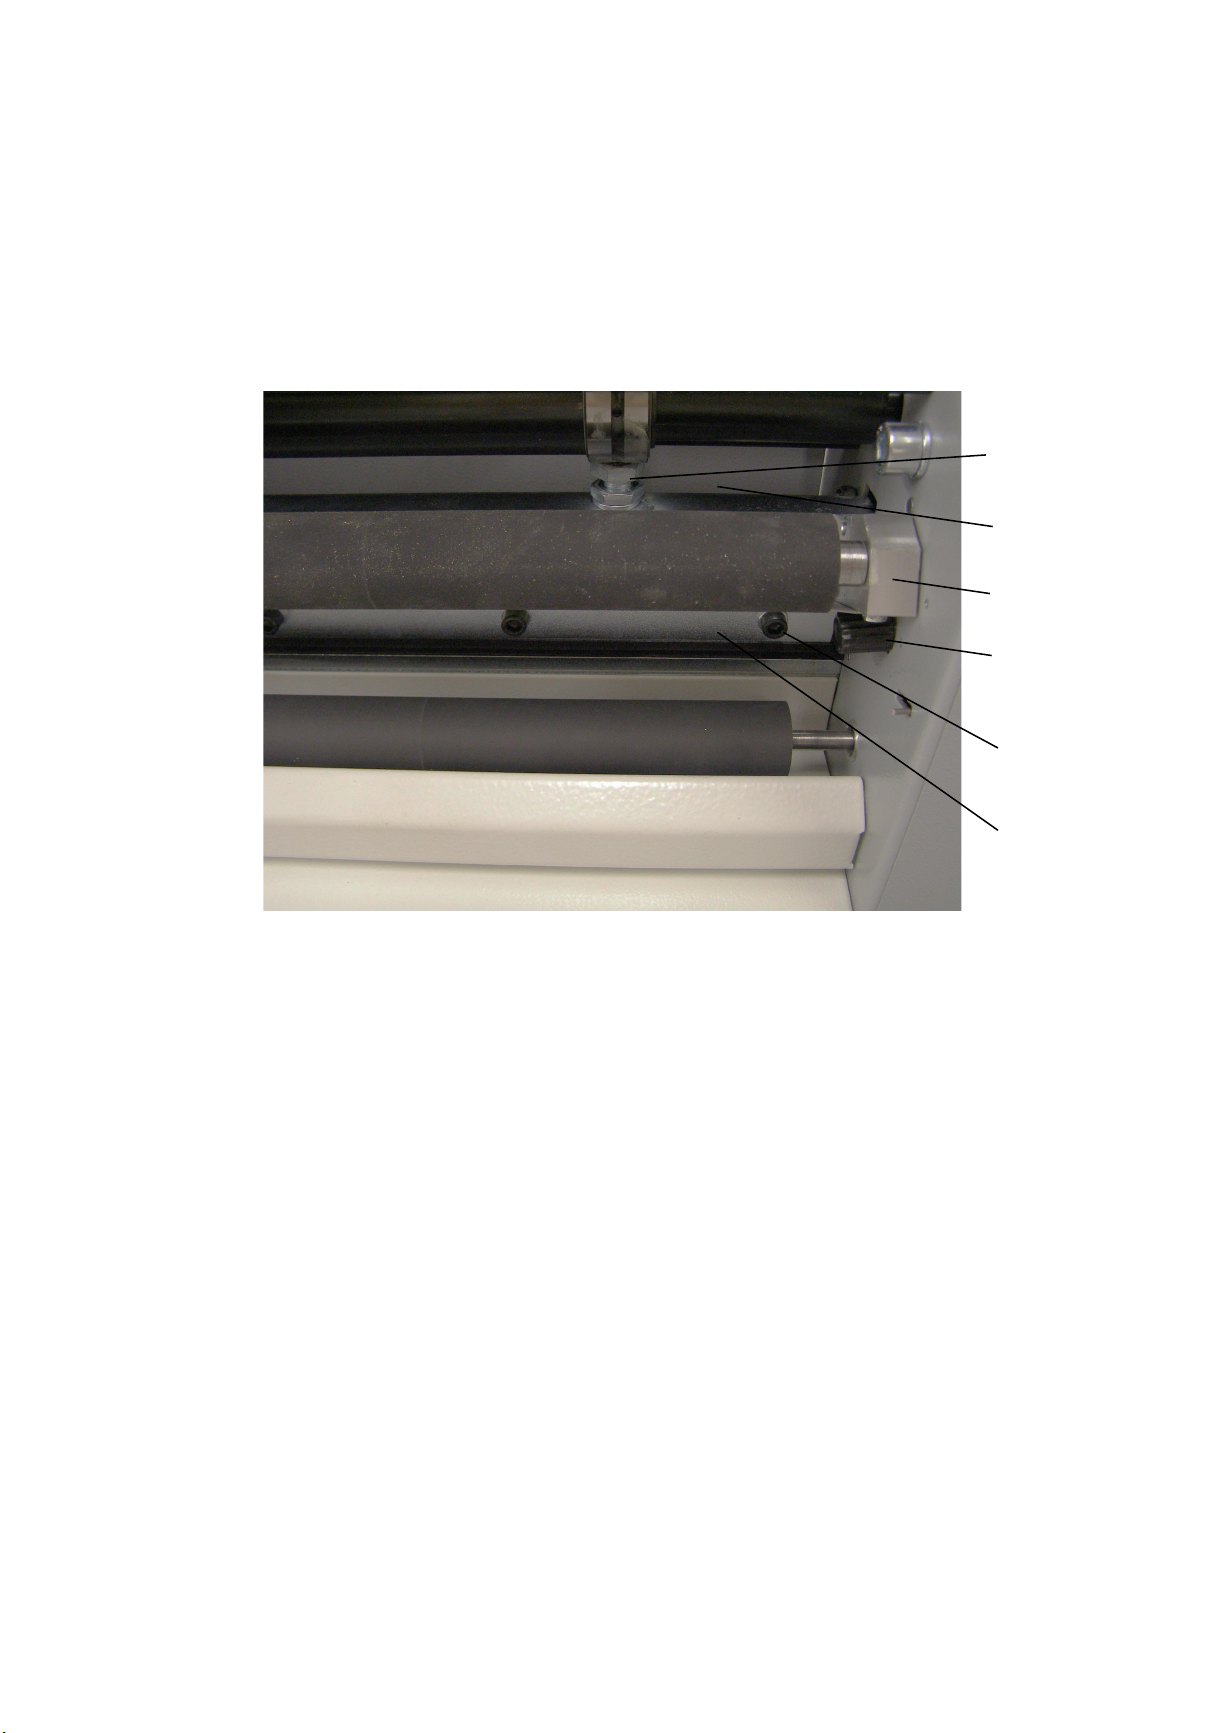
13 – Clamp A/B
14 – Ram
15 – 0.2” hexagonal screw
16 – Locking screw
17 – Pressing mechanism
18 – Adjusting screw
1 2 3 4 5 6 7 8 9
10
11
MyBinding.com
5500 NE Moore Court
Hillsboro, OR 97124
Toll Free: 1-800-944-4573
Local: 503-640-5920
Page 8
Op Manual | GoCreaseTM SEMI
8!
Electric creasing and perforating machine is suited for final processing of graphic materials
up to 17.7” width. Creasing enables easy folding of the paper. Knife change and turning of
the square bar (9) allows to make perforation. Waste-less perforation allows easy
separation of the paper.
12
MyBinding.com
5500 NE Moore Court
Hillsboro, OR 97124
Toll Free: 1-800-944-4573
Local: 503-640-5920
Page 9
Op Manual | GoCreaseTM SEMI
9!
6. MACHINE INSTALLATION
After unpacking the machine has to be put on a solid area, the delivery table is put on (2).
After the machine has been plugged into the power outlet, it is ready to operate and the
display is alight (6). When the upper cover (10) is lifted up the machine is automatically
turned off and the control light (7) turns red.
Machine is adjusted for creasing by manufacturer. To start with perforating, it is necessary
to change the knife (in the packaging included). First, the machine has to be unplugged
and the upper cover (10) lifted up. Dismount 2 locking screws (16) located on the joist of
the hinged pressing mechanism (17). Lift off the hinged mechanism and fix it in the upper
position by locking screws inserted into the sideboard. Dismount 5 hexagonal screws (15)
and the clamp (13A,B). For perforation, it is necessary to set the square bar (9) face up by
flat side without creasing channels. Do not tighten the knife completely, carry out a control
upstroke to make sure that the upper edge touches the slide and finally tighten the screws
(15). Carry out the assembly of the pressing mechanism (17) which is placed in the
original position.
Ram adjustment
The ram (14) with perforating or creasing tool can be moved down by the help of both
adjusting screws (18).The screws should be loosened in gradually by 1/6th revolution to the
left approx. 60˚(the bar moves down) and then it has to be fastened by a nut. After each
60˚ turn it is necessary to check whether perforating (creasing) quality is sufficient. When
the ram is set-up correctly (14) it is not needed to re-adjust it with each change of function
(perforating, creasing).
18
14
17
16
15
13 A/B
MyBinding.com
5500 NE Moore Court
Hillsboro, OR 97124
Toll Free: 1-800-944-4573
Local: 503-640-5920
Page 10
Op Manual | GoCreaseTM SEMI
10!
7. SETTING MACHINE USING TOUCH SCREEN
7.1 Language selection
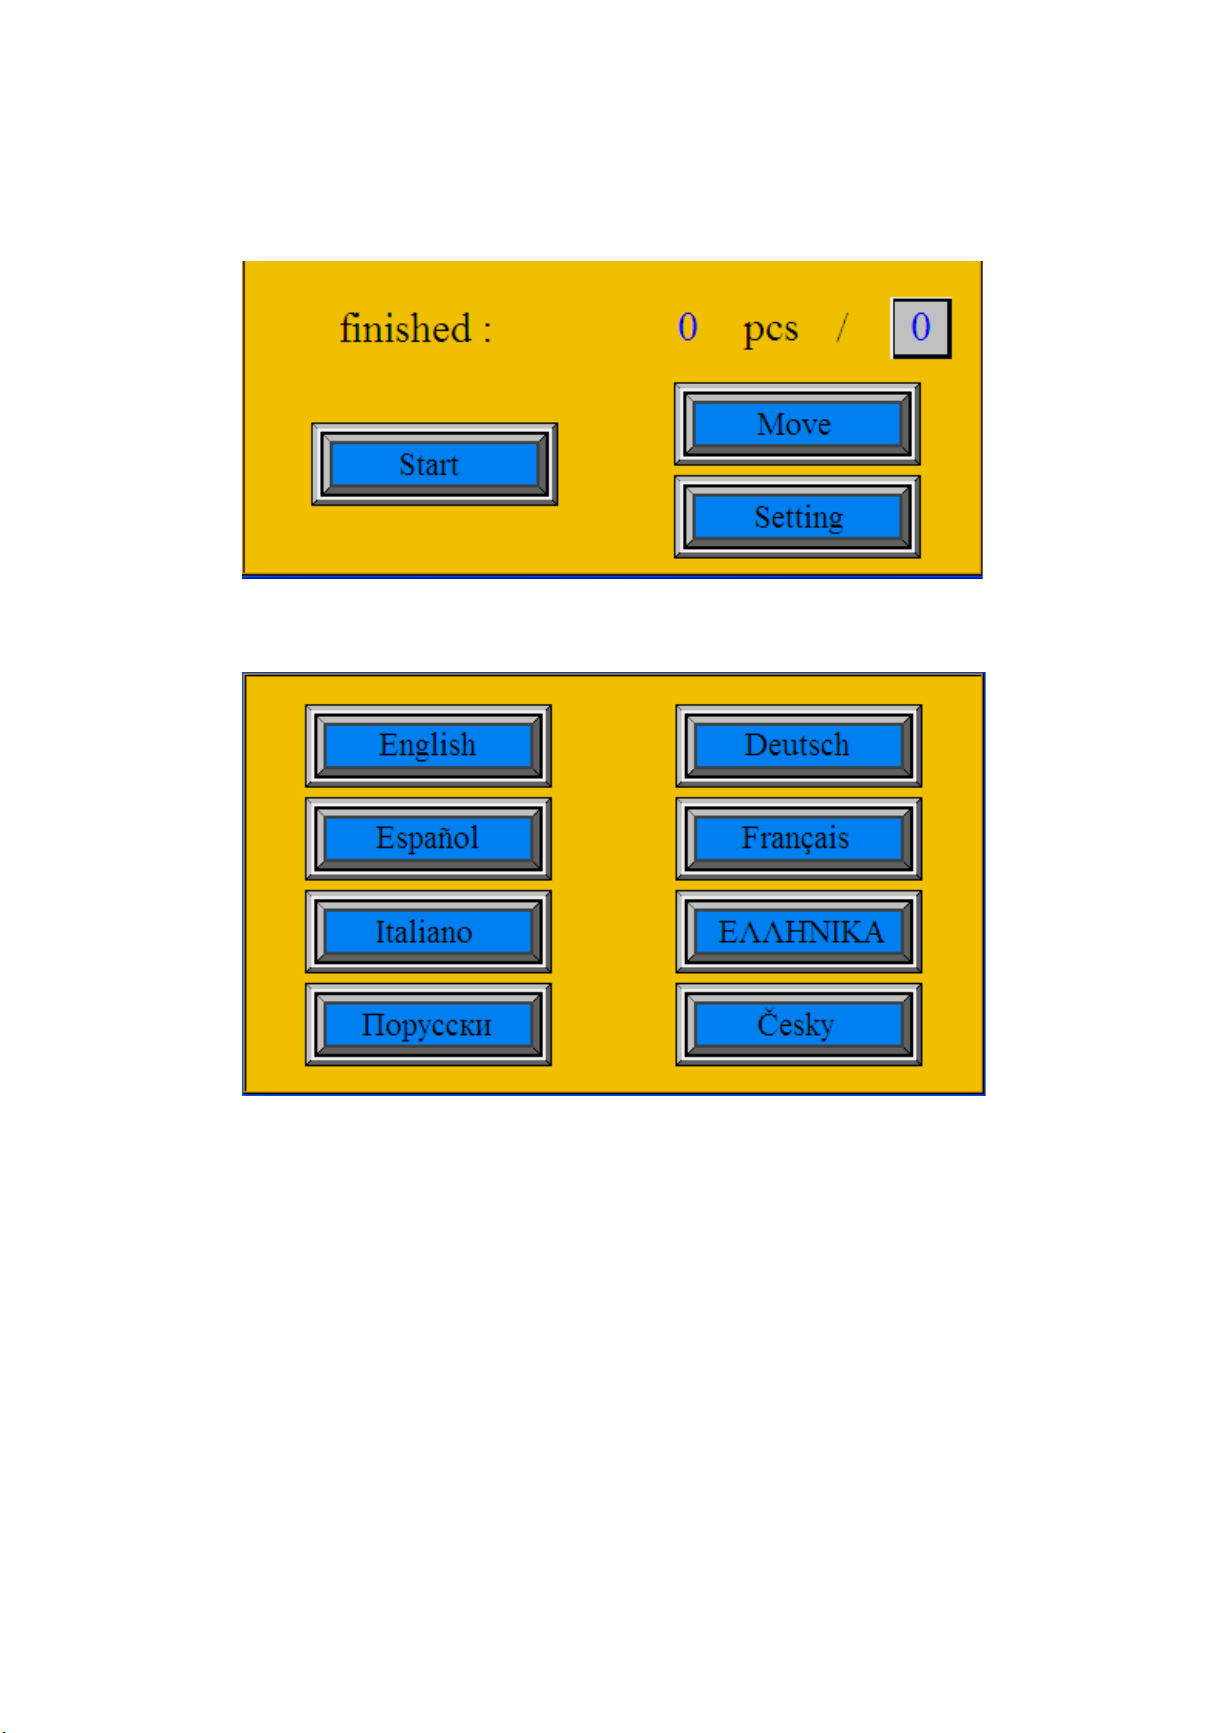
After the power supply switch has been turned on, the display shows the basic!menu (fig.1)!
Fig. 1: The Main screen
There is a hidden icon in the left upper corner. If you press this space a language menu
comes up (fig.2).
Fig. 2: Language selection!
Press an icon with required language. Then the display shows the basic!menu in chosen
language.
Counter reset (finished)
To reset the meter you should proceed as follows. Press the blue figure “pcs”, which is
the number of papers that have been processed last. This brings up a figure keyboard.
Press number “0” and confirm it by pressing “ENTER”. That takes you back to the
previous menu and the meter shows zero.
7.2 Setting Number of Segments
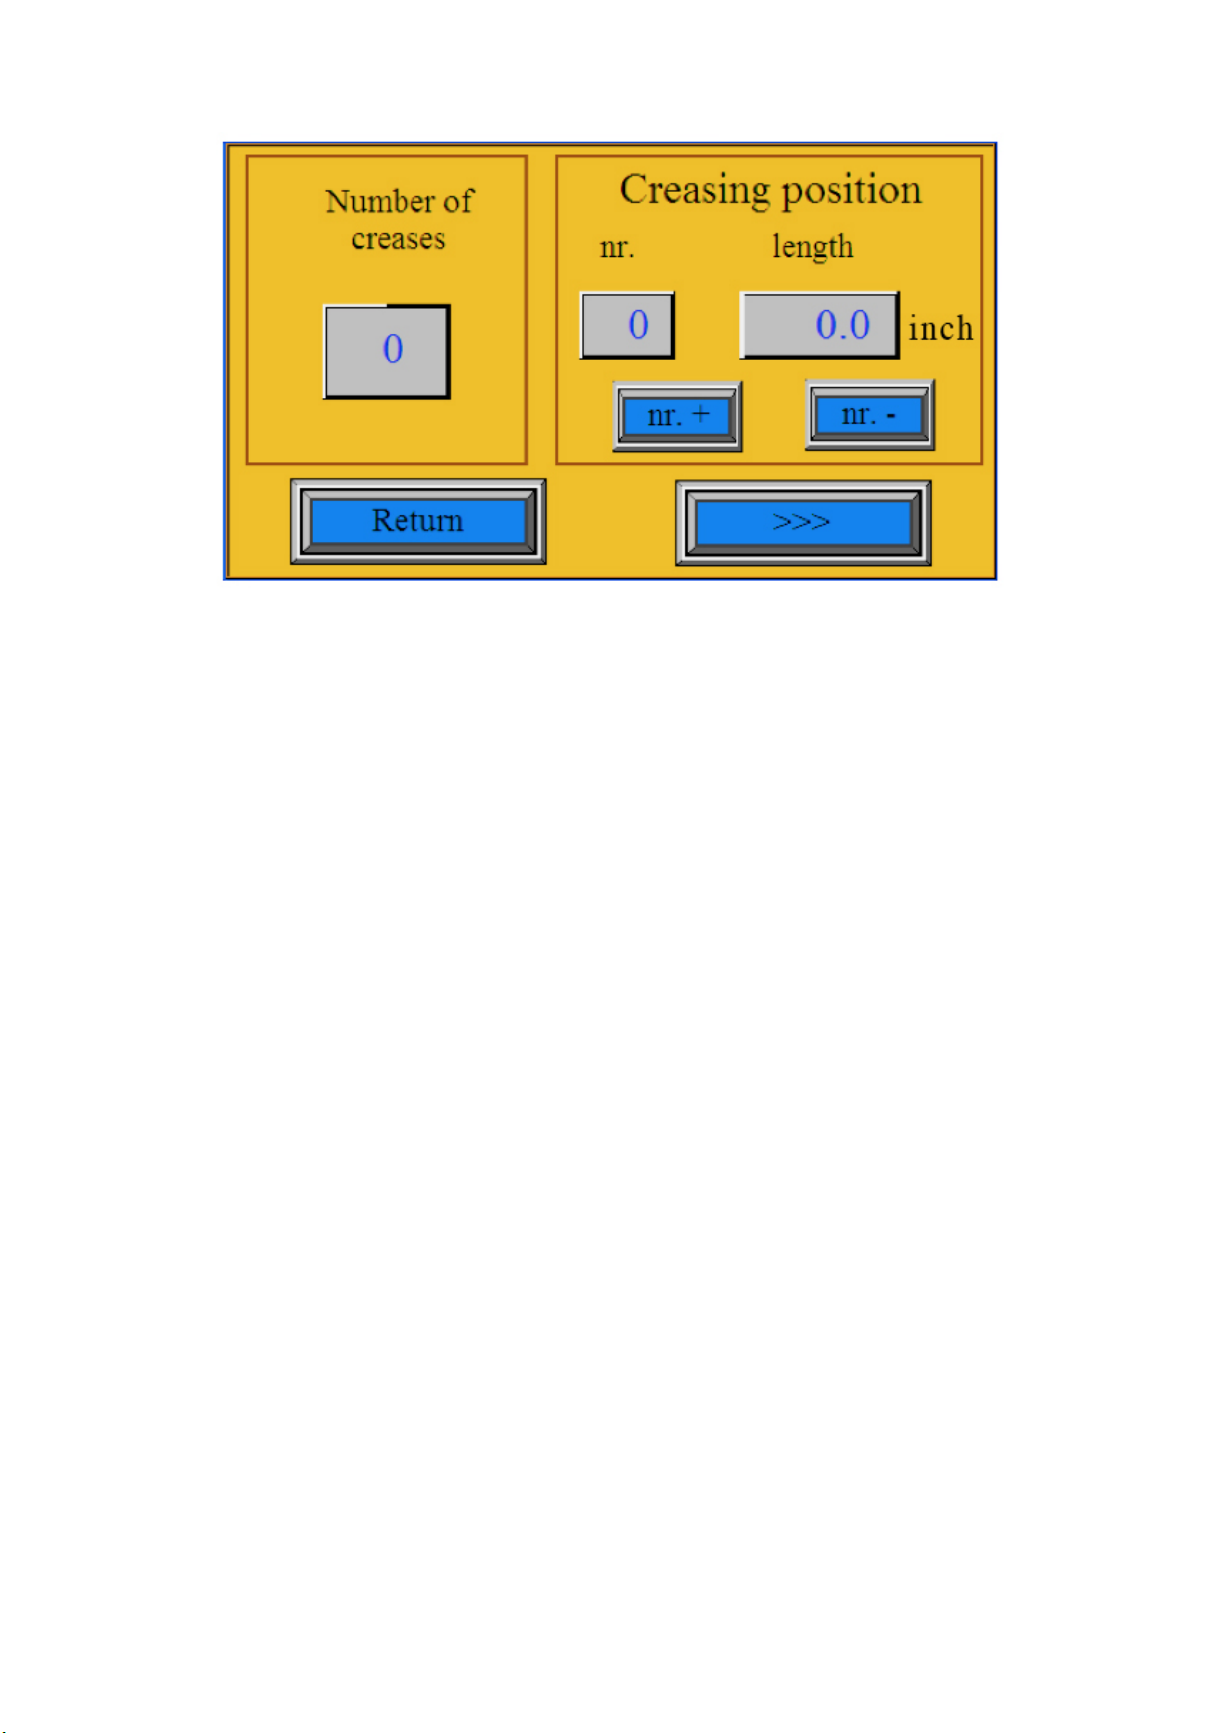
Pressing the numeric icon under the “Number of creases" displays the numeric keypad.
By pressing the relevant digit, the number of creases/perforations (segments) is set. The
program enables setting of up to 15 segments. The selection of number of segments is
ended by pressing the "Enter" key. The number of segments is now set.
MyBinding.com
5500 NE Moore Court
Hillsboro, OR 97124
Toll Free: 1-800-944-4573
Local: 503-640-5920
Page 11
Op Manual | GoCreaseTM SEMI
11!
Fig. 3: Setting screen!
7.3 Setting Position of Segments
The position of the first segment is set as the distance from the edge of the sheet. The
position of each following segment is defined as its distance from the previous segment.
The "no. +" and "no. -" serve for the choice of required segment. Choose the segment
number 1 and then press the numeric icon under the word "length". A numeric keypad is
now displayed. Use the numeric keypad to set the distance from the edge of the sheet and
press "Enter". The position of the first segment is set. Choose the segment number 2
using the "no. +" key and then press the numeric icon under the word "length" again.
Use the numeric keypad to set the distance from the first segment and press "Enter". The
second segment is set. Set all the remaining segments the same way. When all the
segments are set, press the "Return" icon to go back to the main menu. The machine is
now ready to process the task.
7.4 Special Types of Folds
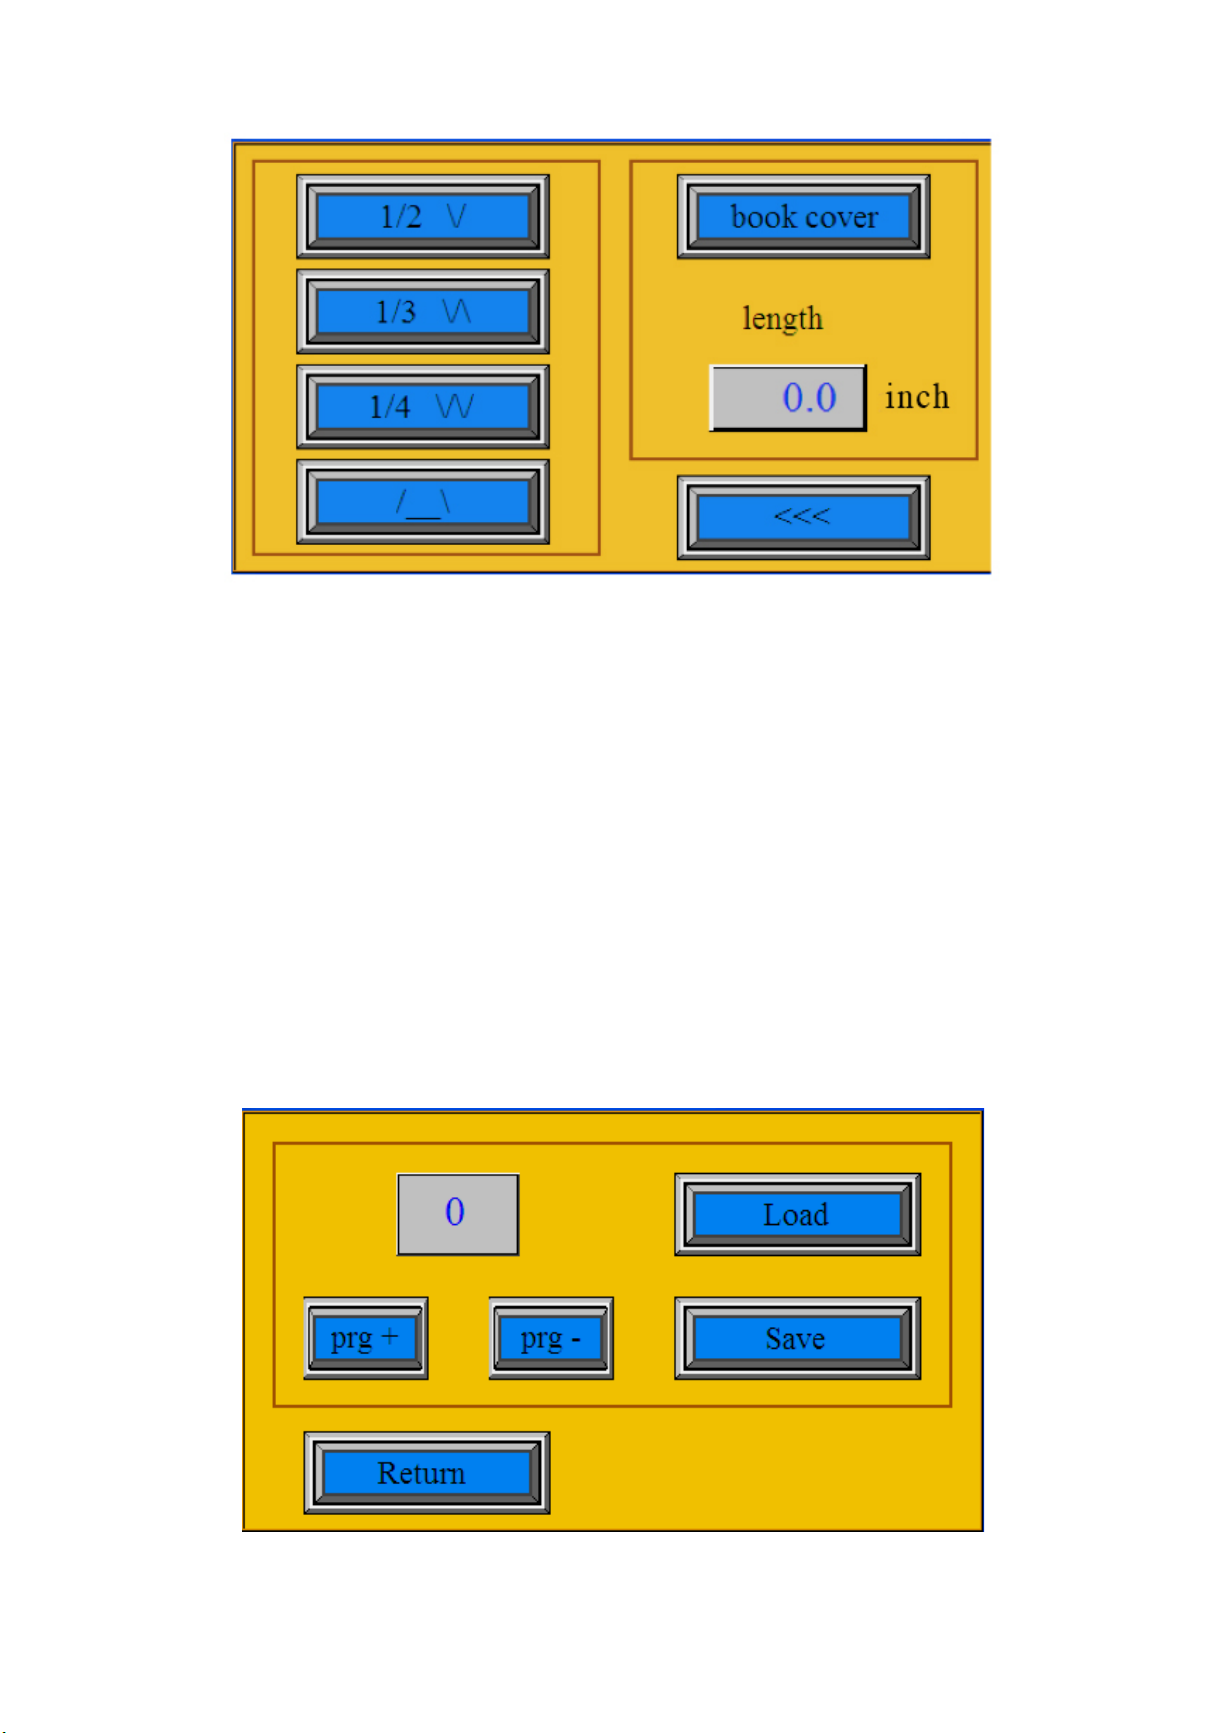
By pressing “>>>” icon in Setting screen we enter to screen where most common types of
fold are displayed (fig. 4). To achieve most common folds it is necessary to crease in
certain distances like 1/2, 1/3 or 1/4 of the paper. By pressing appropriate icon we can
easily achieve one of the most-used folds. First, it is necessary to prepare the required
sheet the same way as for the processing. Then press the “1/2” icon (other fold types
accordingly), followed by “<<<”, “Return” and “Start” icons. On main screen appears
symbol of appropriate icon (1/2, 1/3, etc.). One sheet goes through the machine, its length
is measured and 1/2 of the length is calculated. The screen changes to the Setting screen
(fig. 3). The calculated length of the 1/2 is displayed in the “length” box. Then return to the
main screen and press the “Start” icon. We recommend to process only one sheet and
check the position of the 1/2, whether the distance was measured correctly. If the crease is
not in precisely in the required distance, return to the Setting screen and correct the
distance manually. All other folds work the same way.
Page 12
Op Manual | GoCreaseTM SEMI
12!
Fig. 4: Most common types of fold!
7.4.1 Book cover
Amongst these types of fold there is one very special function called book cover. The
machine GoCrease SEMI is excellent for making professional book and brochure covers.
Book cover is defined by 4 creases made in the middle of the sheet with fixed distances
0.23” between the first and second crease and third and fourth crease. The distance
between second and third crease is optional depending on thickness of book. This
dimension is defined by “length” icon below book cover icon.
7.5 Saving and Loading of Program
The software allows saving up to 5 different programs. The number and position of the
segments is set according to the procedure described in Section 7.3. As soon as the last
step of setting (the required number of segments and their position) is done, the program
can be saved. On the main screen press the number in the right side of the screen
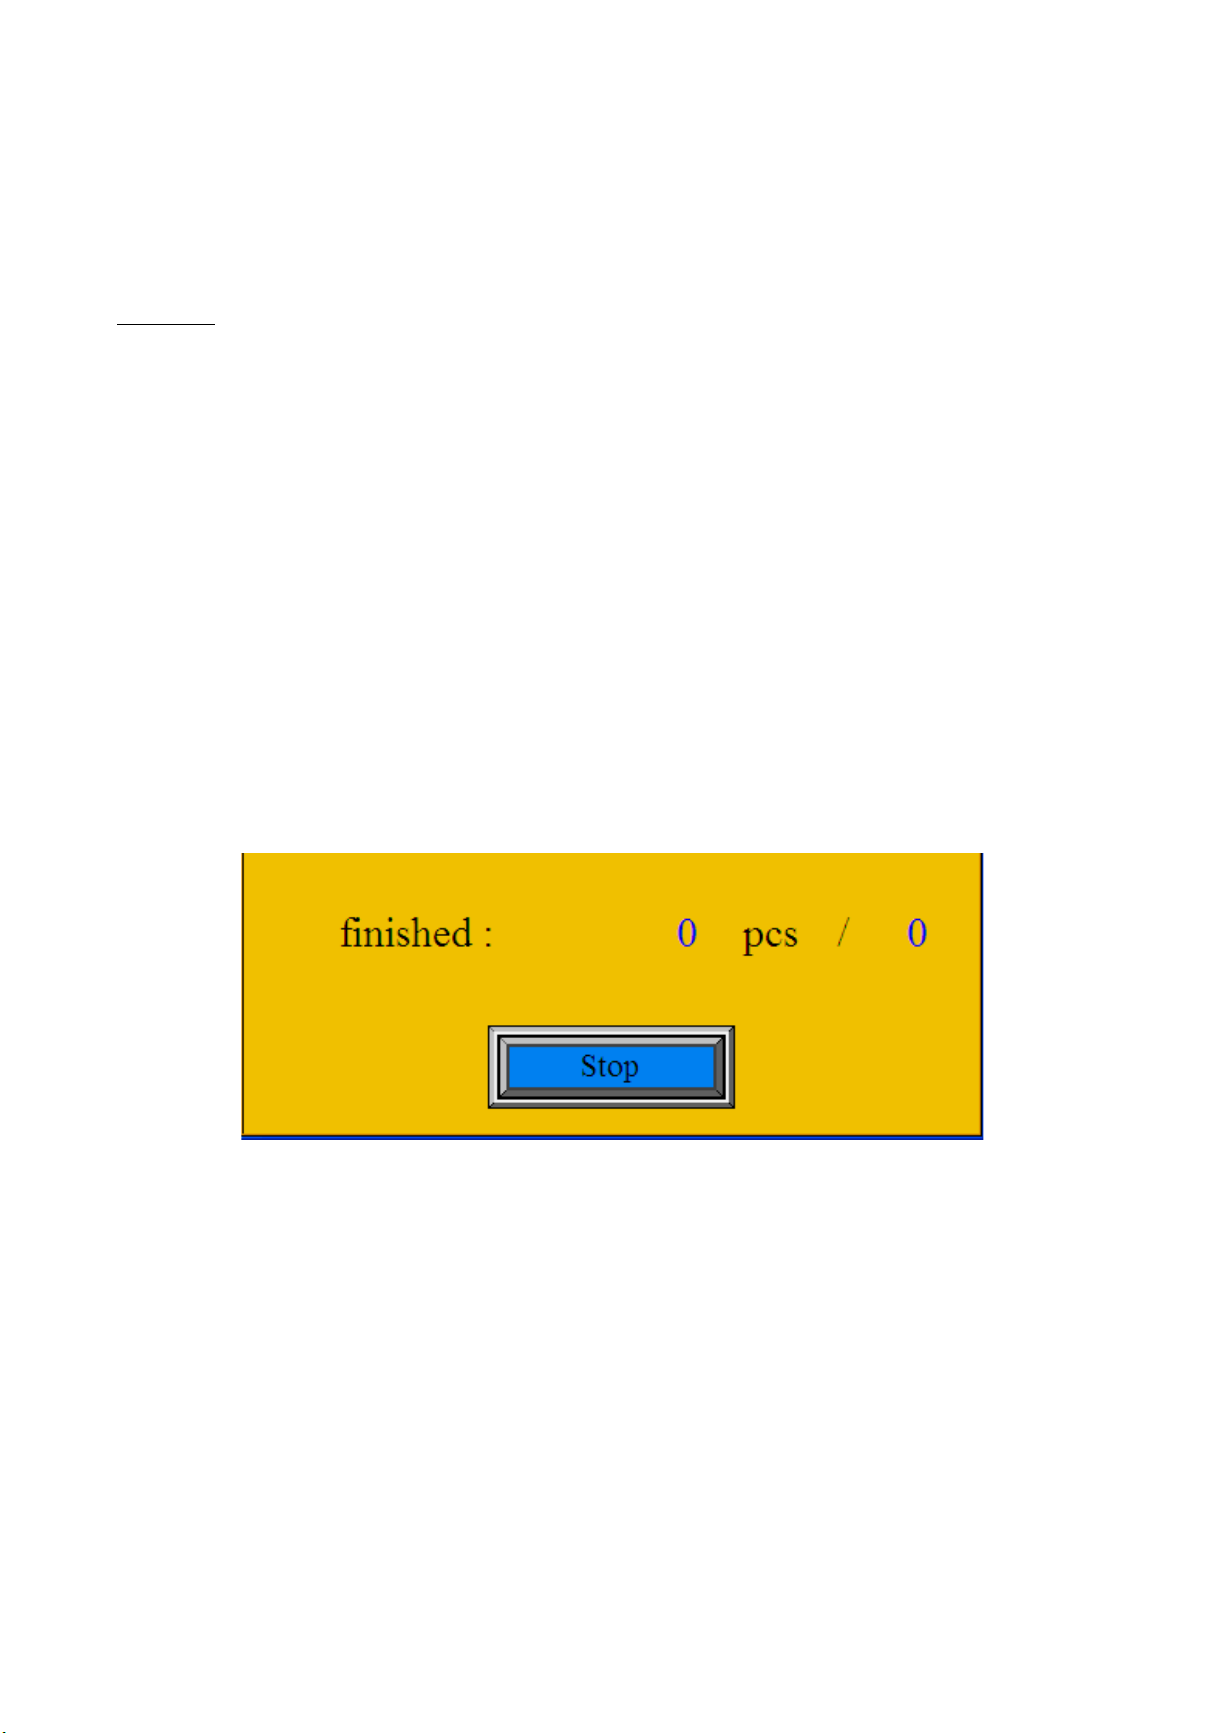
showing program number. The menu for saving and loading of a program (fig. 5) appears.
Fig. 5: Saving and loading program
Choose the number for numbering the program using the keys "prg +" and "prg -". Press
the “Save" icon. Go back to the main menu by pressing "Return". The program is saved.
Page 13
Op Manual | GoCreaseTM SEMI
13!
Load the program as follows: On the main screen press the number in the right side of the
screen showing program number. Choose the number of the program you want to load
using the keys "prg +" and "prg -". Press the "Load" icon. Go back to the main menu by
pressing "Return". The machine is ready to operate according to the loaded program.
Warning: The screen displays the number of the last program saved or loaded. For more
effective work the operator can change the program without saving it. In such case, the
number of the last program saved or loaded is still displayed, but the machine operates
according to the operator’s last setting, even though this setting has not been saved. If the
machine is turned off and then turned on again by the electric switch, the machine
operates according to the program displayed on the screen. The last unsaved setting is
deleted.
7.6 Working Cycle
You can either choose a preset program or create your setting. Adjust the movable left
side guide (4) on the feeding table according to the paper size. Between side guides either
remove or add magnetic strips (5) which prevent paper from deflection. Set the distance of
the magnetic stop (11) on a delivery table according to the paper size. Press the "Start"
icon on the screen (fig. 1). The machine starts up and the working cycle screen is
displayed (fig. 6). There are a "Stop" icon and information about the number of processed
sheets displayed on the screen.
Fig. 6: Working cycle screen
Start feeding the machine with the paper. It is very important to do this accurately. When
the machine is creasing or perforating the red diode on the main panel is on. You can put
more paper in the machine after the red light changes into green again. The machine can
be turned off by pressing the “Stop” button on the display. In case of emergency you can
use a red “STOP” button placed on the main panel.
7.7 Manual Control
When changing the tools it is necessary to carry out a testing upstroke (turn) to make sure
that both tools are parallel, and also to make sure that either creasing or perforating tool is
leaned against the slide. Do this by pressing the “Move” icon and the following menu
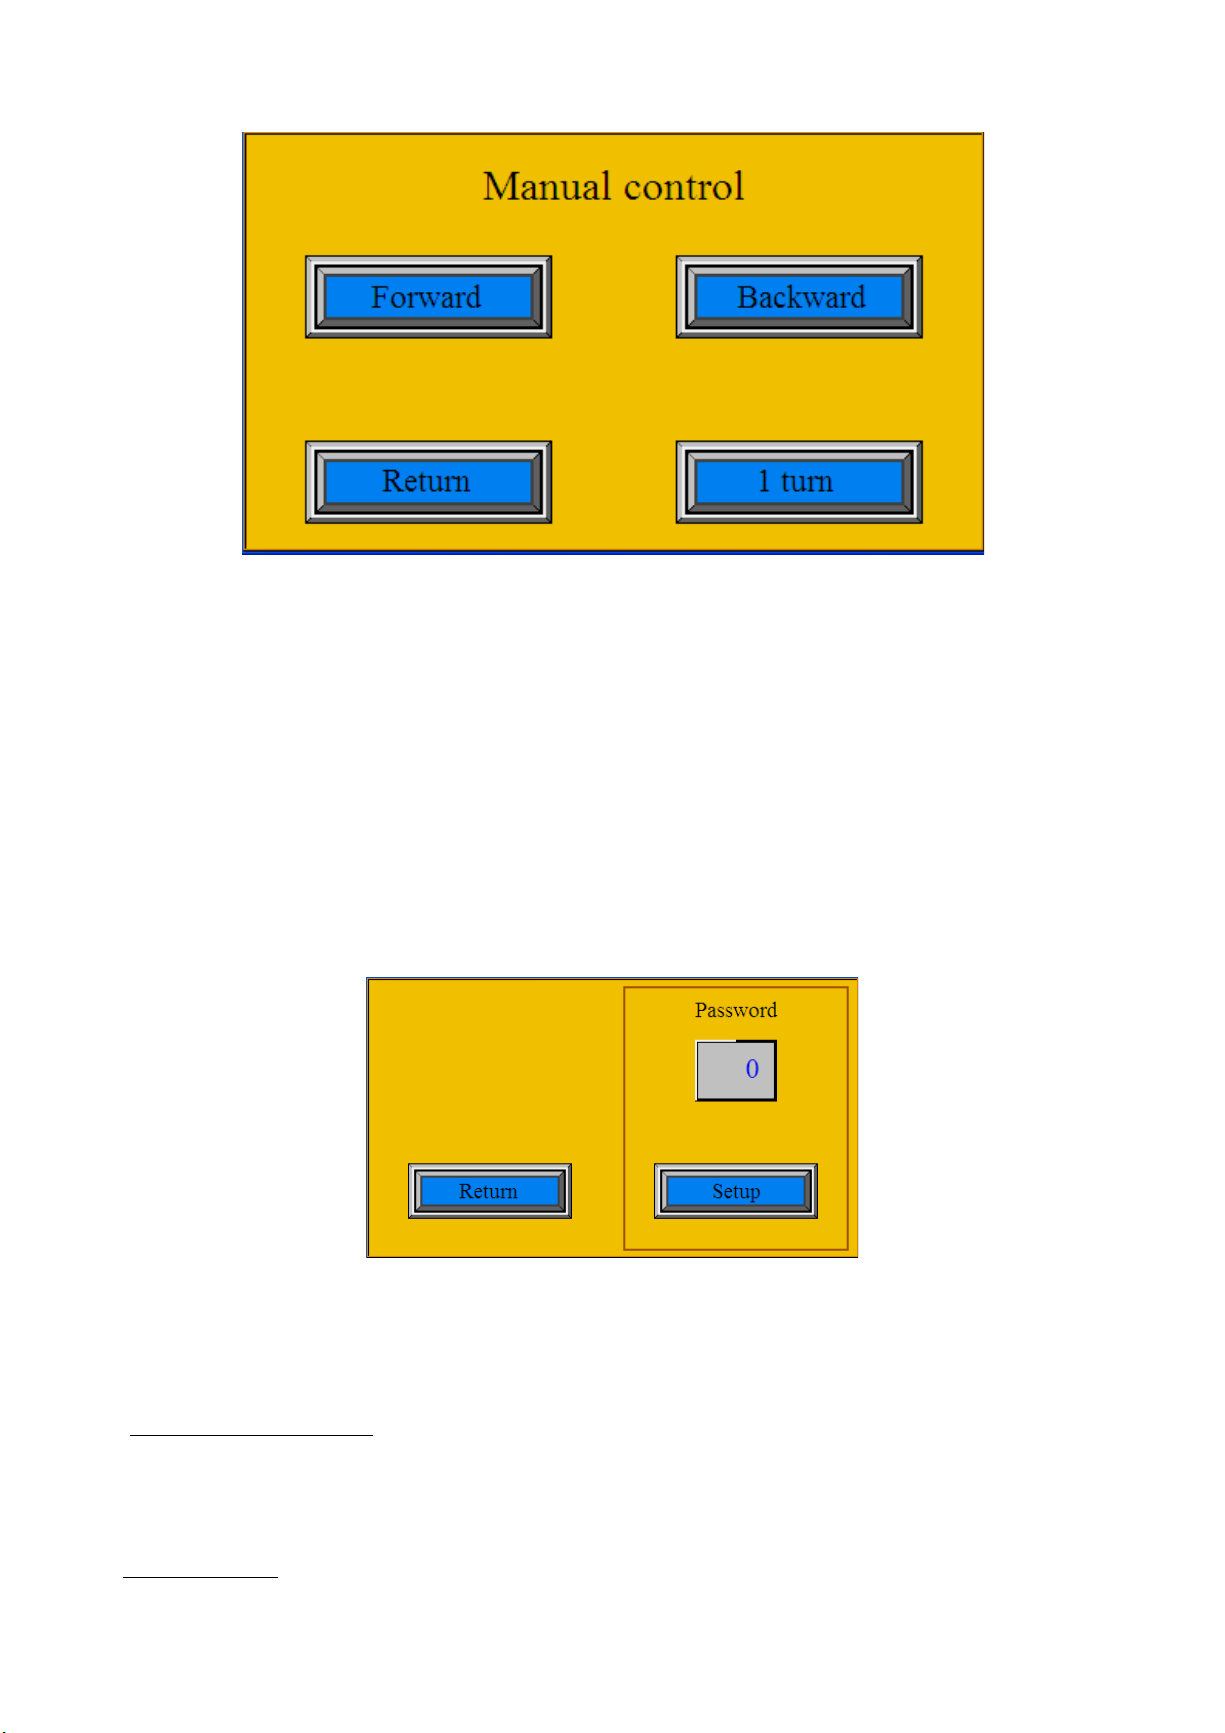
comes up – “Manual control” (fig. 7).
MyBinding.com
5500 NE Moore Court
Hillsboro, OR 97124
Toll Free: 1-800-944-4573
Local: 503-640-5920
Page 14
Op Manual | GoCreaseTM SEMI
14!
Fig. 7: Manual control
After activating the “1 turn“ icon the control upstroke is carried out. In case the crease
depth is not the same on the both sides of the paper or perforation does not result in direct
separation of the paper, adjust the ram (14) with a perforation knife. This can be done
using the adjusting screws (18). It is necessary to loosen the screws gradually by 1/6 of
the turn (60°) to the left (slide goes down), and then secure it with a nut. You should check
the quality of perforation after each turn (60°). If the quality is suitable, you can stop. After
the machine is adjusted for perforation, it is adjusted for creasing as well.
Icons “Forward“ and “Backward“ are used to release stuck pieces of paper from the
machine. To go back to the main menu, press “Return“.
7.8 Service menu
There is a hidden icon in the right upper corner. This icon is there for a service technician
trained by MBM Corporation. To access this icon you need to enter a password (fig. 8).
Fig. 8: Service screen
8. THE MOST COMMON FAULTS (TROUBLESHOOTING)
a) Upstroke stoppage: If this problem occurs during adjusting and checking the upstroke
of the ram (14), it is necessary to turn the adjusting screws (18) to the right by two turns
(the ram goes up). When the upstroke cycle is terminated, then the red diode is on. After
the machine is turned back on the upstroke process should finish. It is necessary to
readjust the ram (14).
b) Paper jam: When the paper gets jammed or damaged, it is necessary to turn the
machine off immediately (press the STOP button 8). After the machine has been stopped
Page 15

Op Manual | GoCreaseTM SEMI
15!
tap on the MOVE icon. Before removing the paper, it is necessary to carry out an upstroke
(1 turn icon). Use button Backward or Forward depending on situation.
c) Crease is in incorrect position compared to values set on display
It is necessary to respect recommended width of creasing channel for different paper
thickness. If using inappropriate width of crease (usually narrow creasing channel for thick
paper) inaccuracies in position of crease may appear, crease will be placed in different
distance than what is set on display. If using thick paper in combination with narrow
crease, the result is that the paper is pressed into the creasing channel, the rollers start to
slip trying to release the paper. Use wider crease in such case. Look for correct crease
width in chapter 2, c.
9. MACHINE DISPOSAL
When the lifetime period is over, do not dispose the machine in common waste. The
machine must be disassembled and metallic, non-metallic, plastic, rubber and electronic
parts sorted. These parts are disposed of in the relevant points of recycling. Some parts of
the machine can contain dangerous substances that are harmful to the environment and
health.
MyBinding.com
5500 NE Moore Court
Hillsboro, OR 97124
Toll Free: 1-800-944-4573
Local: 503-640-5920
 Loading...