

Page 1

MBM BC-10 BUSINESS CARD CUTTER
OPERATION MANUAL
Tokyo, August 1, 2006
http://www.monomachines.com/
http://www.monomachines.com/
Page 2

http://www.monomachines.com/
http://www.monomachines.com/
Page 3
CONTENTS
SPECIFICATIONS
1
EXPLANATION OF SYMBOLS
2
SAFETY INSTRUCTIONS
3
1. PRECAUTION OF INSTALLATION
6
2. OVERVIEW
8
3. UNPACKING AND SETUP
10
4. LAYOUT AND PRINTING
11
5. PREPARATION FOR CUTTING
14
6. OPERATION
15
7. MAINTENANCE
20
8. OPTIONAL PARTS
22
9. TROUBLESHOOTING 23
SPECIFICATIONS
Paper Size Letter size A4 size
Cutting Size 2.0" x 3.5" (50.8mm x 89mm) 55 x 90mm or 51 x 90mm
Cutting Format
Single cut (US size)
Double cut (US size)
Single cut (Standard size)
Double cut (Standard size)
Double cut (US size)
Cutting Thickness 6/1000" to 12/1000" (0.15 to 0.30mm), Approx. 110 to 302g/m
2
Speed 100 cards (10 sheets) per minute (Single cut)
Sheet Stacking Capacity 50 sheets (Sheet thickness: 0.20mm / 0.008")
Counter Addition and preset subtraction
Dimensions 23.0" (W) x 16.9" (D) x 12.8" (H) / 585 (W) x 428 (D) x 325 (H)mm
Net Weight 46.3lbs. / 21.0kg
Power Source 115V/60Hz
Power Consumption 32W
1
http://www.monomachines.com/
http://www.monomachines.com/
Page 4
Thank you for selecting the MBM BC-10 BUSINESS CARD CUTTER.
� The BC-10 BUSINESS CARD CUTTER is designed to cut an A4-sized or
letter-sized sheet into 10 business cards.
� Please read this Operation Manual thoroughly prior to operation.
� Keep the Manual nearby for future reference.
� Please be sure to include the Manual with the machine when you sell or rent it
to anyone else.
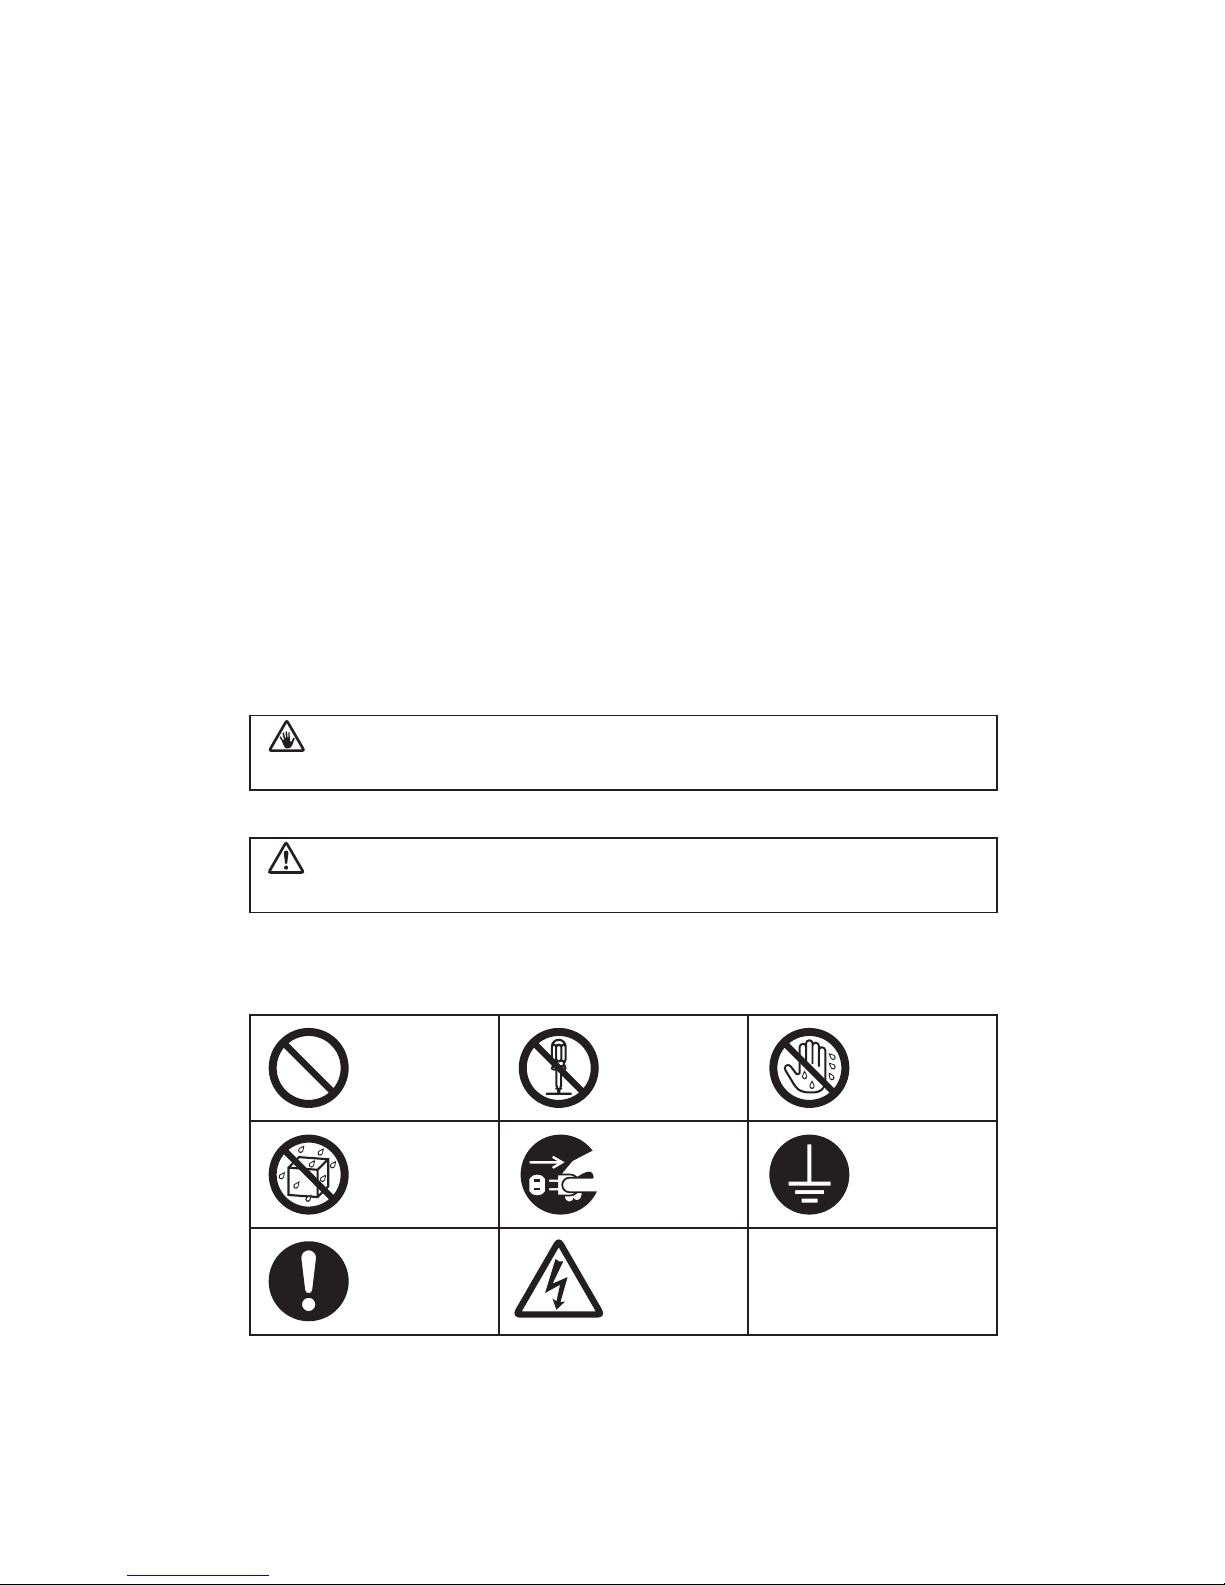
EXPLANATION OF SYMBOLS
You will find following symbols in this Manual and on labels attached onto the
machine.
DANGER
, identifies an imminently hazardous situation which, if not
avoided, could result in death or serious injury.
CAUTION, identifies a potentially hazardous situation which, if not
avoided, may result in minor injury or property damage incidents.
Prohibited
Do not disassemble
Do not touch
with wet hands
Do not expose to
wet conditions
Unplug
Need to
Ground
General
Risk of electric
Instruction
shock
2
http://www.monomachines.com/
http://www.monomachines.com/
Page 5
SAFETY INSTRUCTIONS
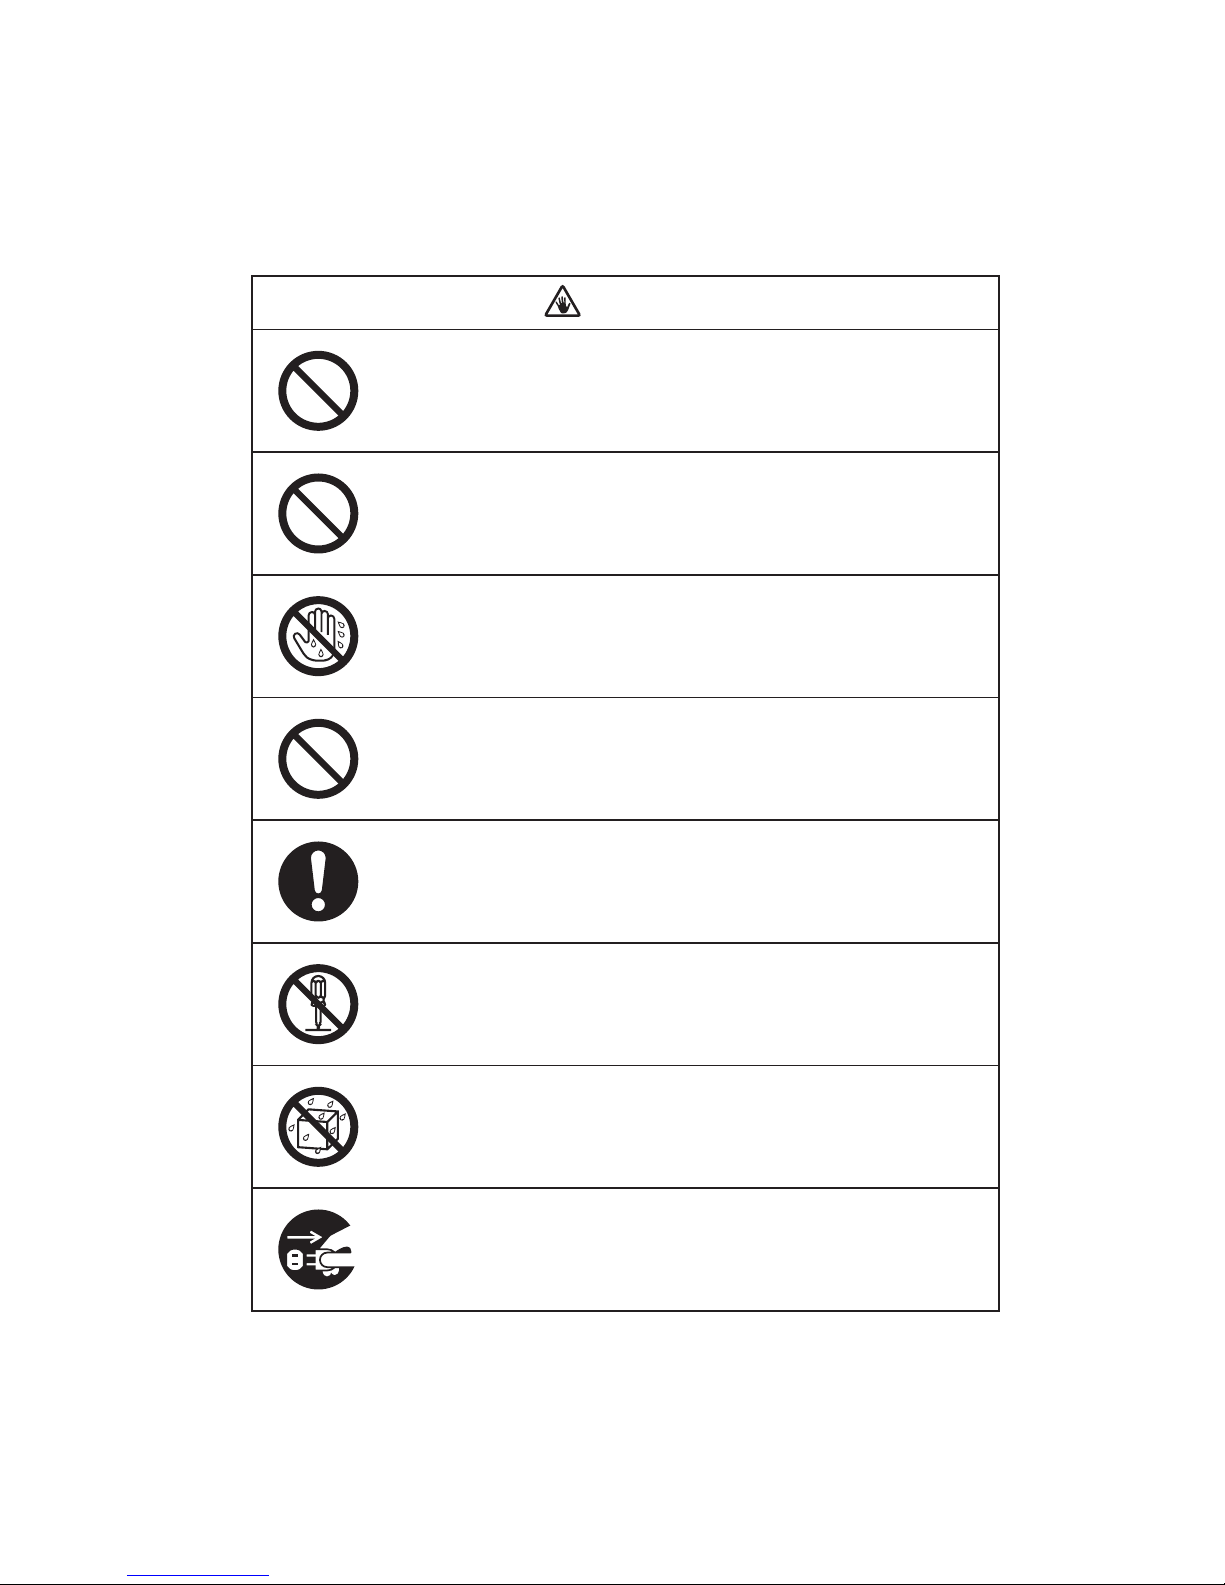
DANGER
Connect the power cord directly into a wall-mounted outlet of
appropriate voltage. To avoid the risk of fires or electric shock, do
not connect to a multiple outlet strip.
Do not plug into an outlet of a voltage that is different from the
one marked on the serial tag. Operating on an incorrect voltage
can cause fires or electric shock.
Do not connect or disconnect the power cord with wet hands in
order to avoid electric shock or fires.
To avoid the risk of fires or electric shock, do not abuse the power
cord. Do not 1put excessive weight on the cord, 2pull without
holding the plug, 3bend excessively, or 4modify the cord.
If a sheet is stuck in the Cutter Unit, 1clear the error, 2press the
start button to open the cutter, and 3turn off the Power Switch
before removing the paper.
Do not remove the transparent cover of the trash box. It is part of
the safety cover of the Slitter Unit, which keeps operator's hands
from being injured while the Card Stacking Box has been
removed.
Do not expose the BC-10 to rain or wet conditions in order to
avoid fires or electric shock.
If you notice a strange sound or smell while the BC-10 is running,
turn off the Power Switch immediately and remove the plug. Call
your supplier for repair.
3
http://www.monomachines.com/
http://www.monomachines.com/
Page 6

CAUTION
Do not connect the power cord to an outlet when the plug is dusty.
Make sure the plug fits completely into the outlet.
Do not use a power cord that is not attached to the BC-10.
Do not use the attached power cord for other use.
To avoid the risk of fires or electric shock, do not operate the BC10 without grounding. If a three-hole outlet is not available, be
sure to ground the power cord with the adapter.
Do not disassemble the Cutter Unit.
Do not disassemble the Slitter Unit.
Be sure to turn off the Power Switch before removing jammed
paper.
When you move the BC-10, lift from the bottom. The BC-10
weighs about 46 lbs. (21.0kg).
Do not rub the edges of paper in order to avoid the risk of injury.
4
http://www.monomachines.com/
http://www.monomachines.com/
Page 7
CAUTION
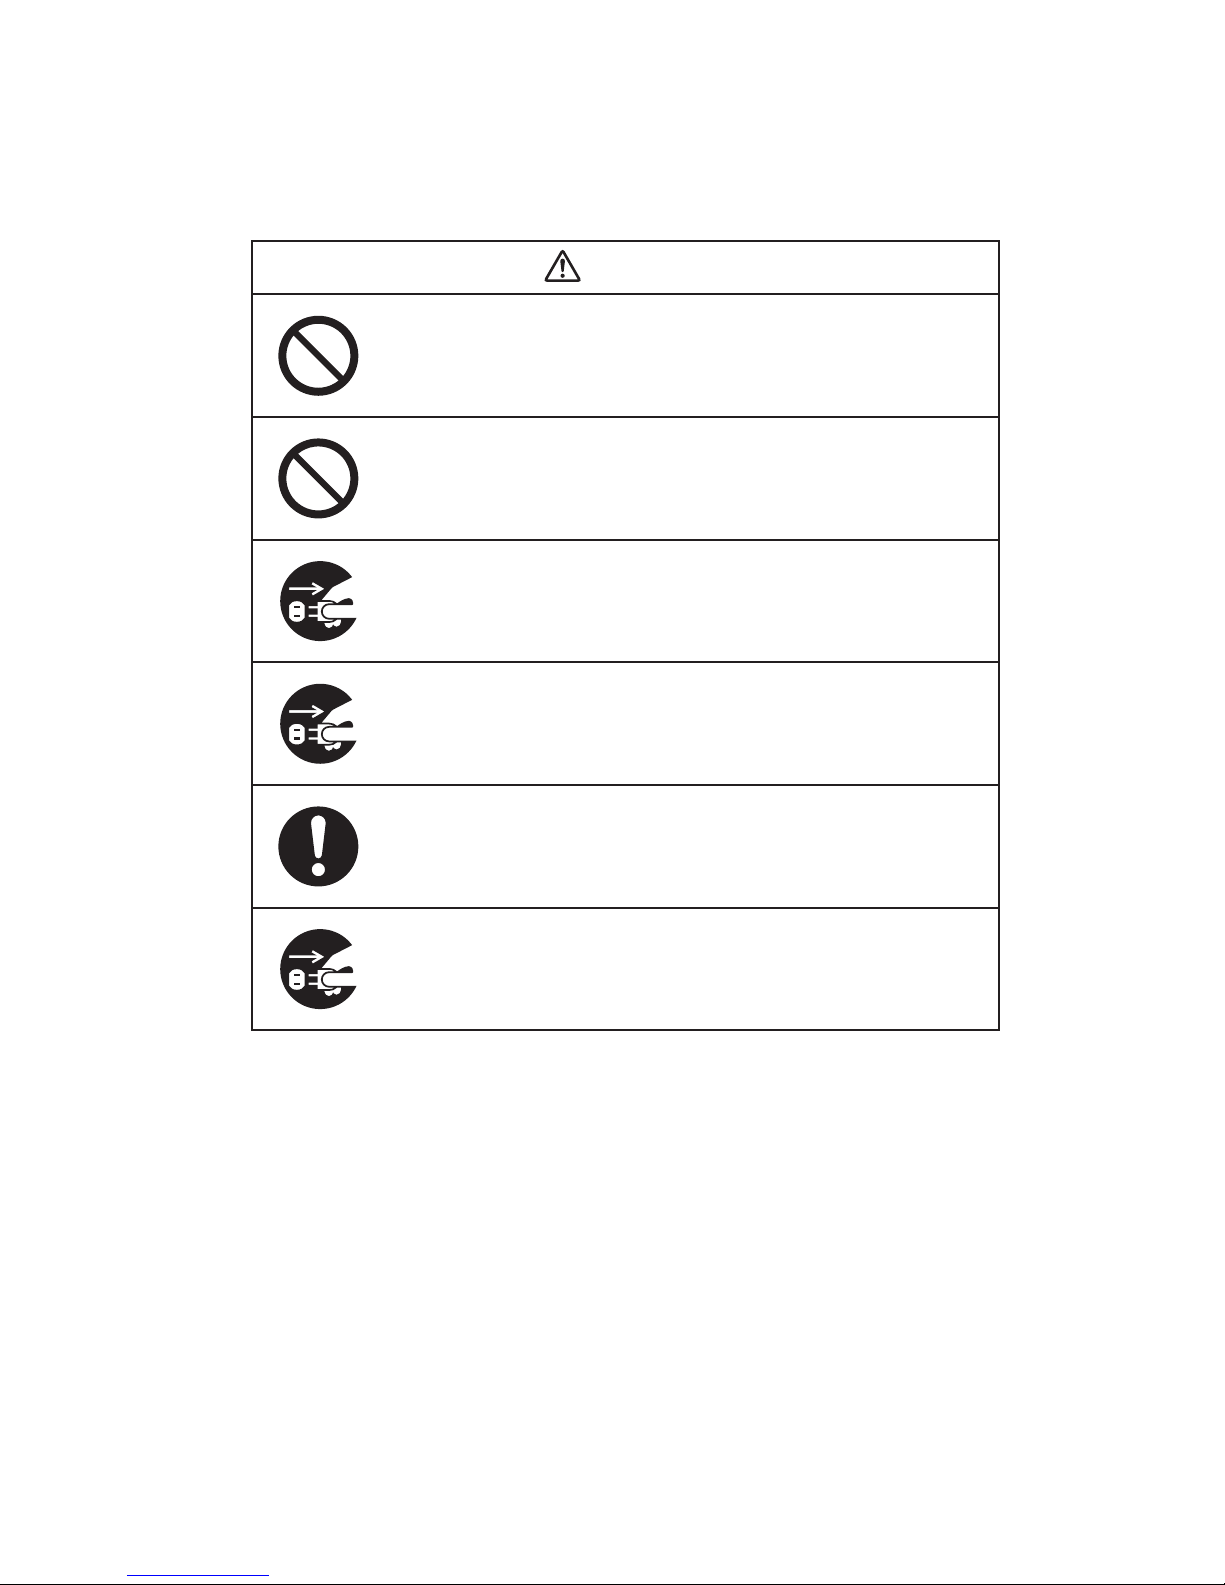
Do not use the BC-10 in dusty or damp conditions in order to
avoid the risk of fires or electric shock.
Do not put the BC-10 in an unstable place in order to avoid the
risk of falling down.
Remove the plug from the outlet if the BC-10 will not be in use
for a long period.
Never use the cord to pull the plug from an outlet.
Clean up the blades of the plug periodically. Dust on the blades
can cause fires.
Turn off the Power Switch and disconnect the plug before moving
the BC-10.
5
http://www.monomachines.com/
http://www.monomachines.com/
Page 8
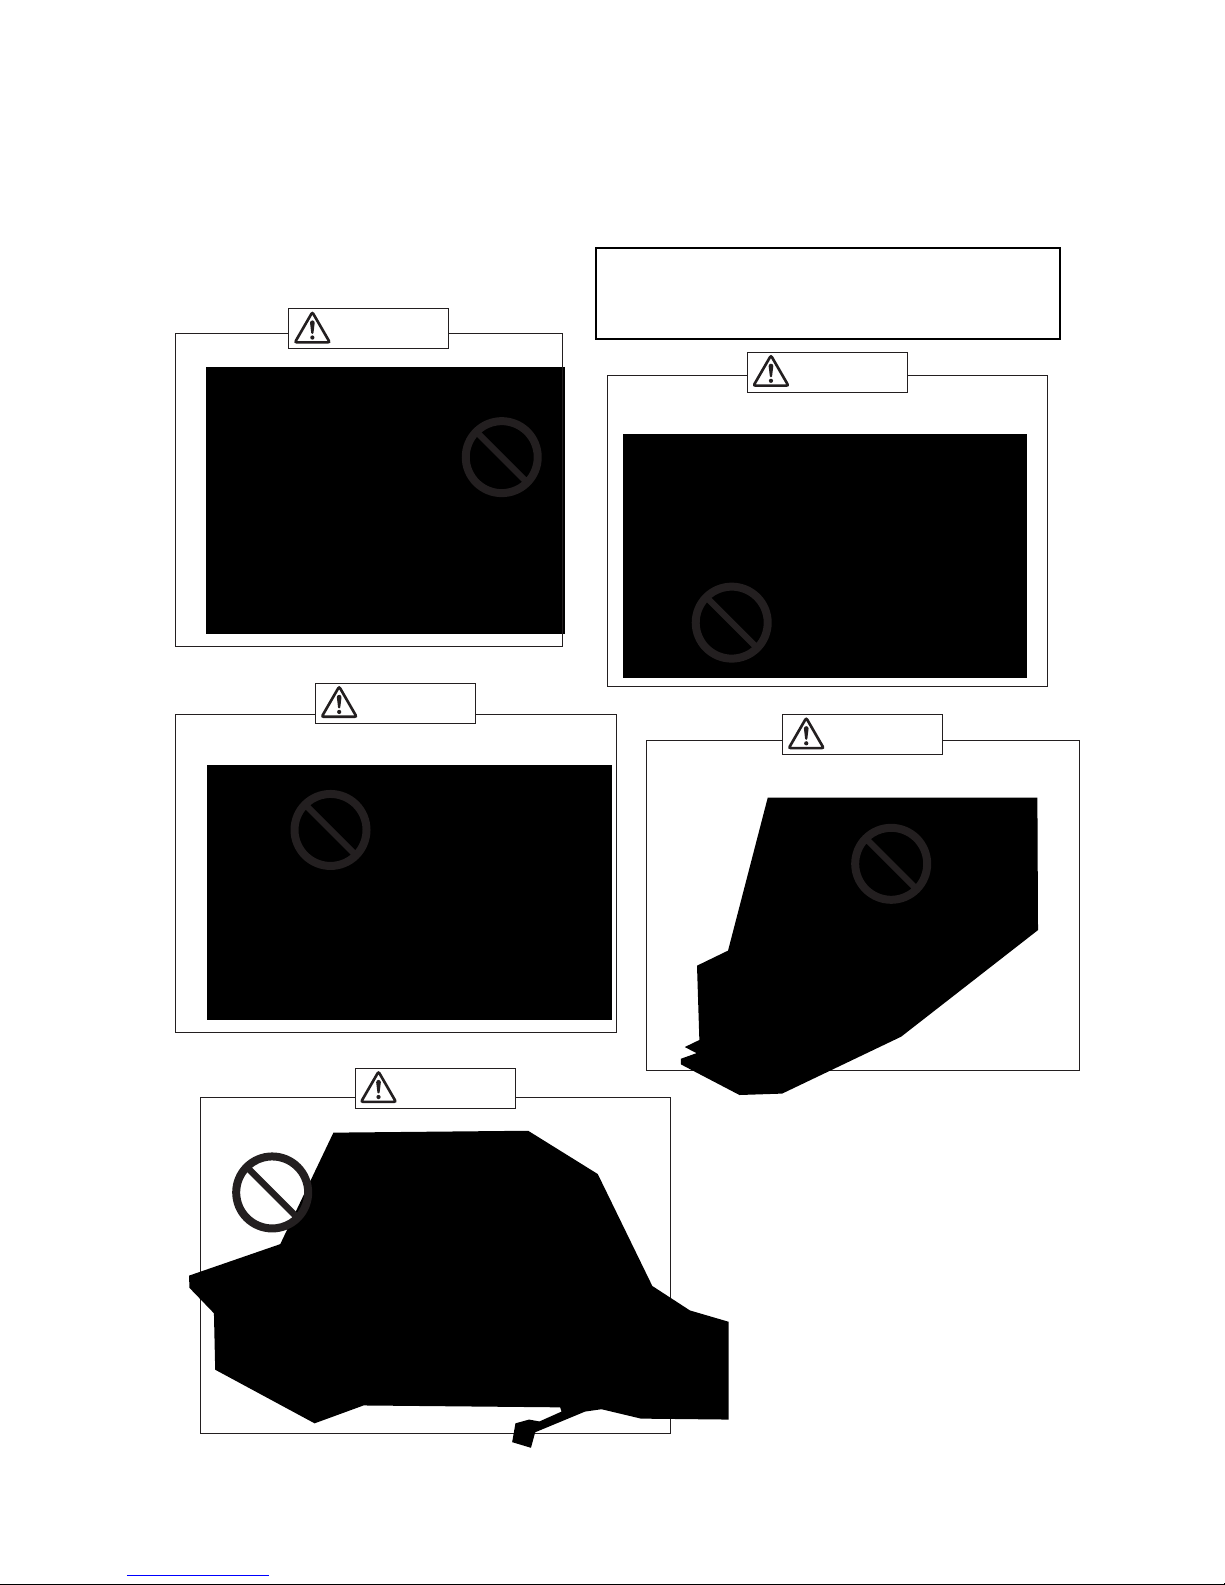
1. PRECAUTION OF INSTALLATION
Do not use in temperatures less than 50° or
higher than 100° Fahrenheit and in humidity less
Put the machine on a flat,
level and stable surface.
Keep the machine away from
heating devices or fires.
Keep the machine away from dusty locations.
Do not leave the machine in direct sunshine.
Avoid dropping or bumping the machine.
CAUTION
CAUTION
CAUTION
CAUTION
CAUTION
than 50% or higher than 80%.
6
http://www.monomachines.com/
http://www.monomachines.com/
Page 9
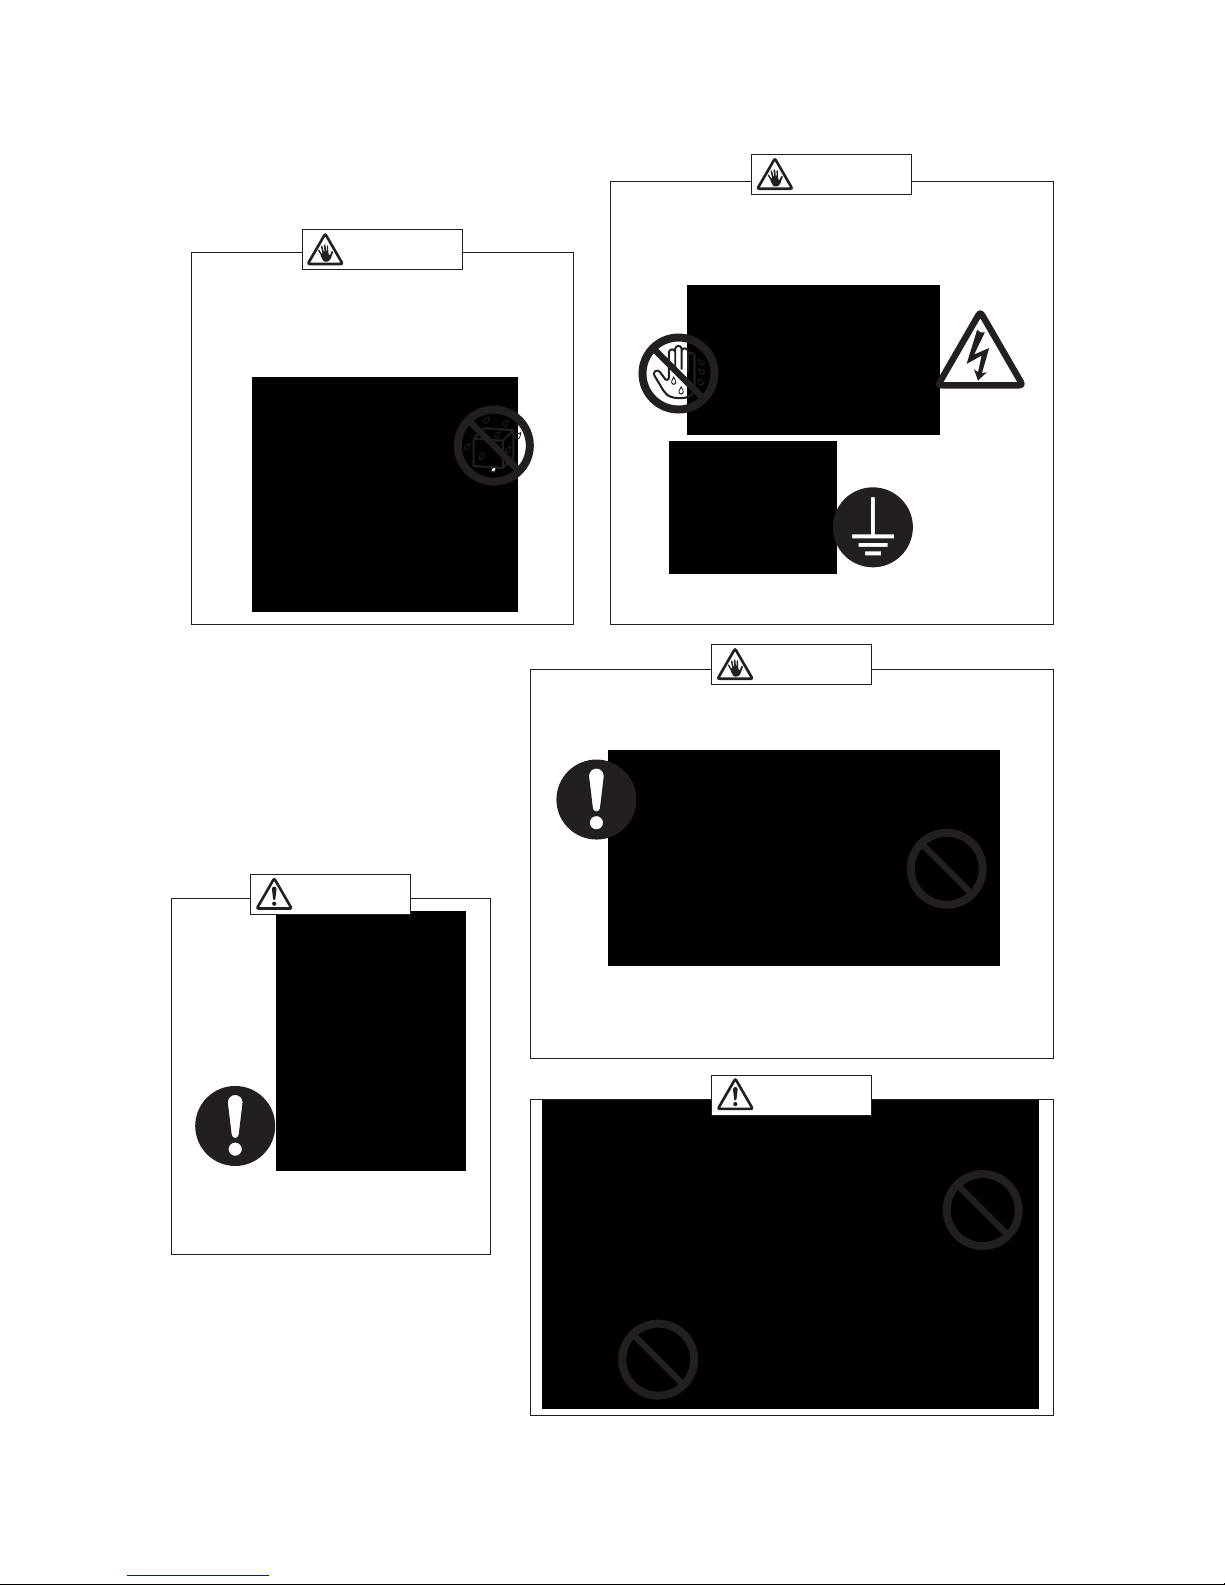
Be sure to ground the machine.
CAUTION
CAUTION
DANGER
DANGER
DANGER
Do not expose the machine to wet
conditions. Do not put anything on the
Upper Cover.
Do not connect or disconnect the power
cord with wet hands in order to avoid electric
shock.
Make sure the voltage of the outlet is consistent
with the voltage marked on the serial tag.
Do not operate in excessive
cold or heat.
Connect the machine directly
to a wall-mounted outlet.
Do not connect to a multiple outlet strip.
Grip on the bottom
to carry the machine.
7
http://www.monomachines.com/
http://www.monomachines.com/
Page 10
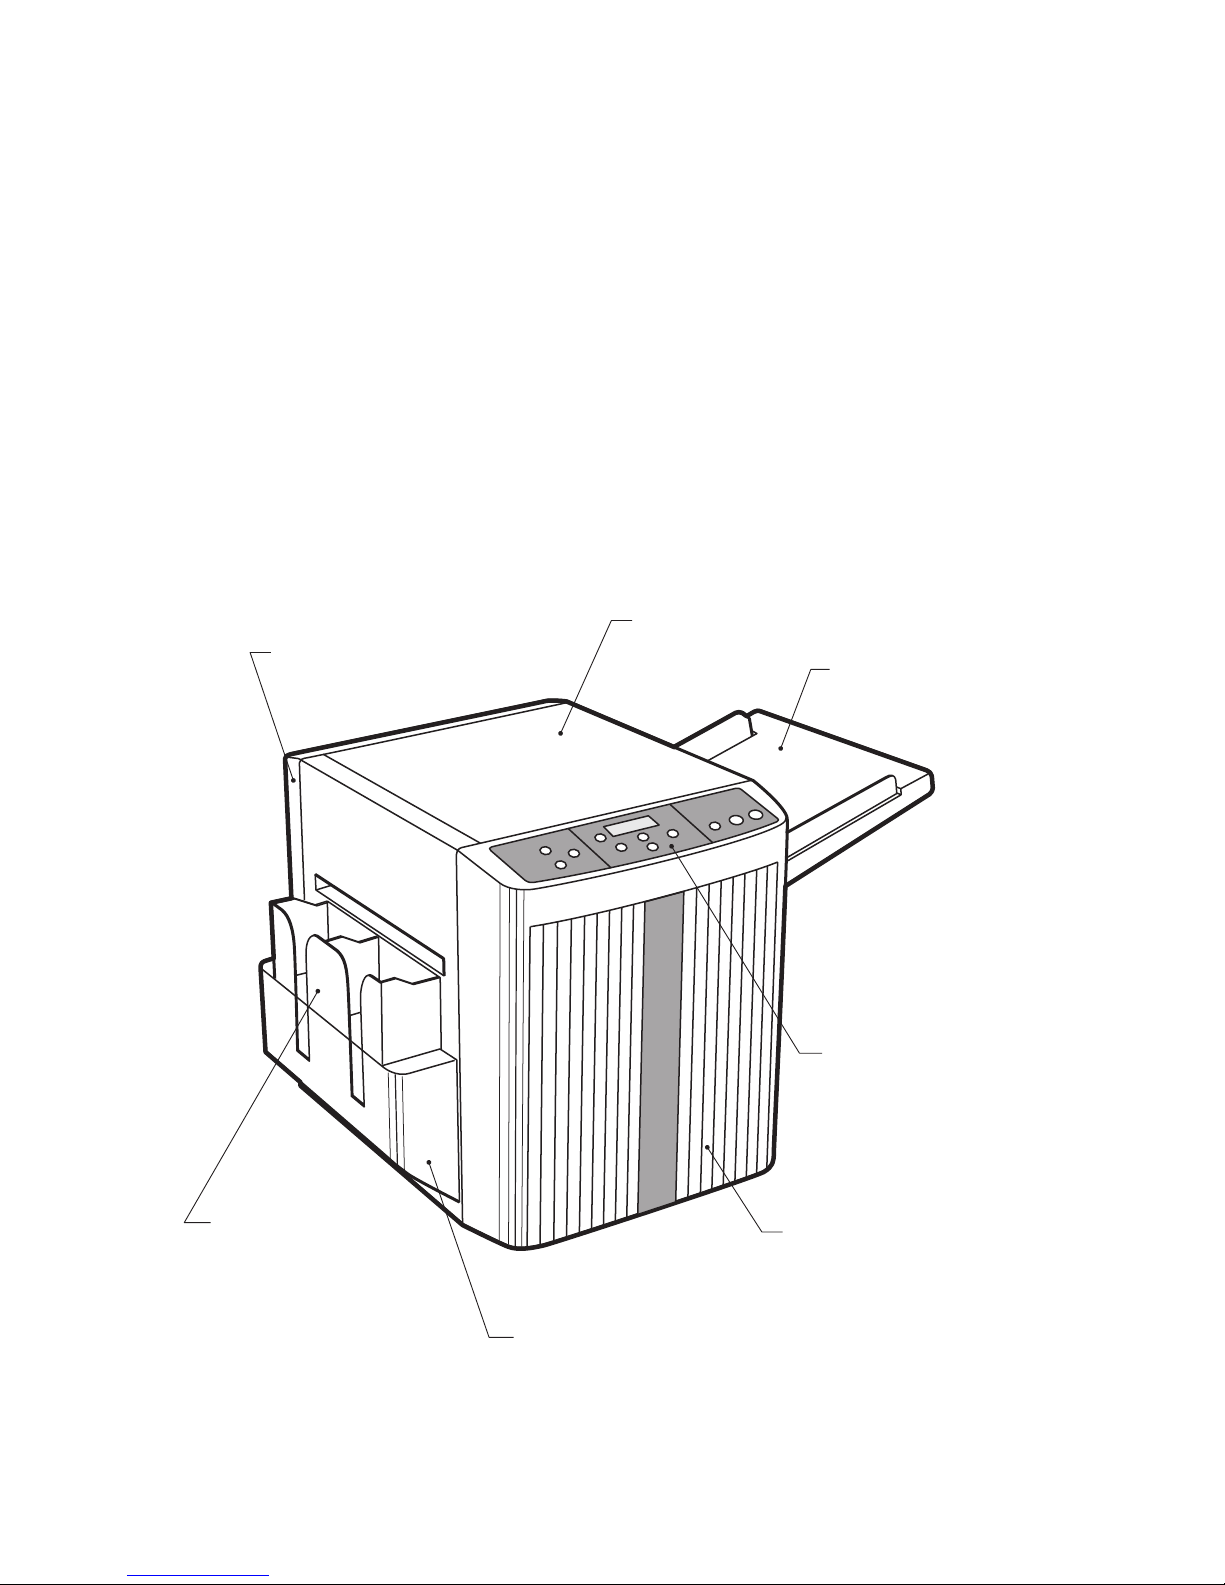
2. OVERVIEW
Upper Cover
Rear Cover
Paper Feeder Tray
Operation Panel
Card Stacking Box
Front Cover
Trash Box
8
http://www.monomachines.com/
http://www.monomachines.com/
Page 11
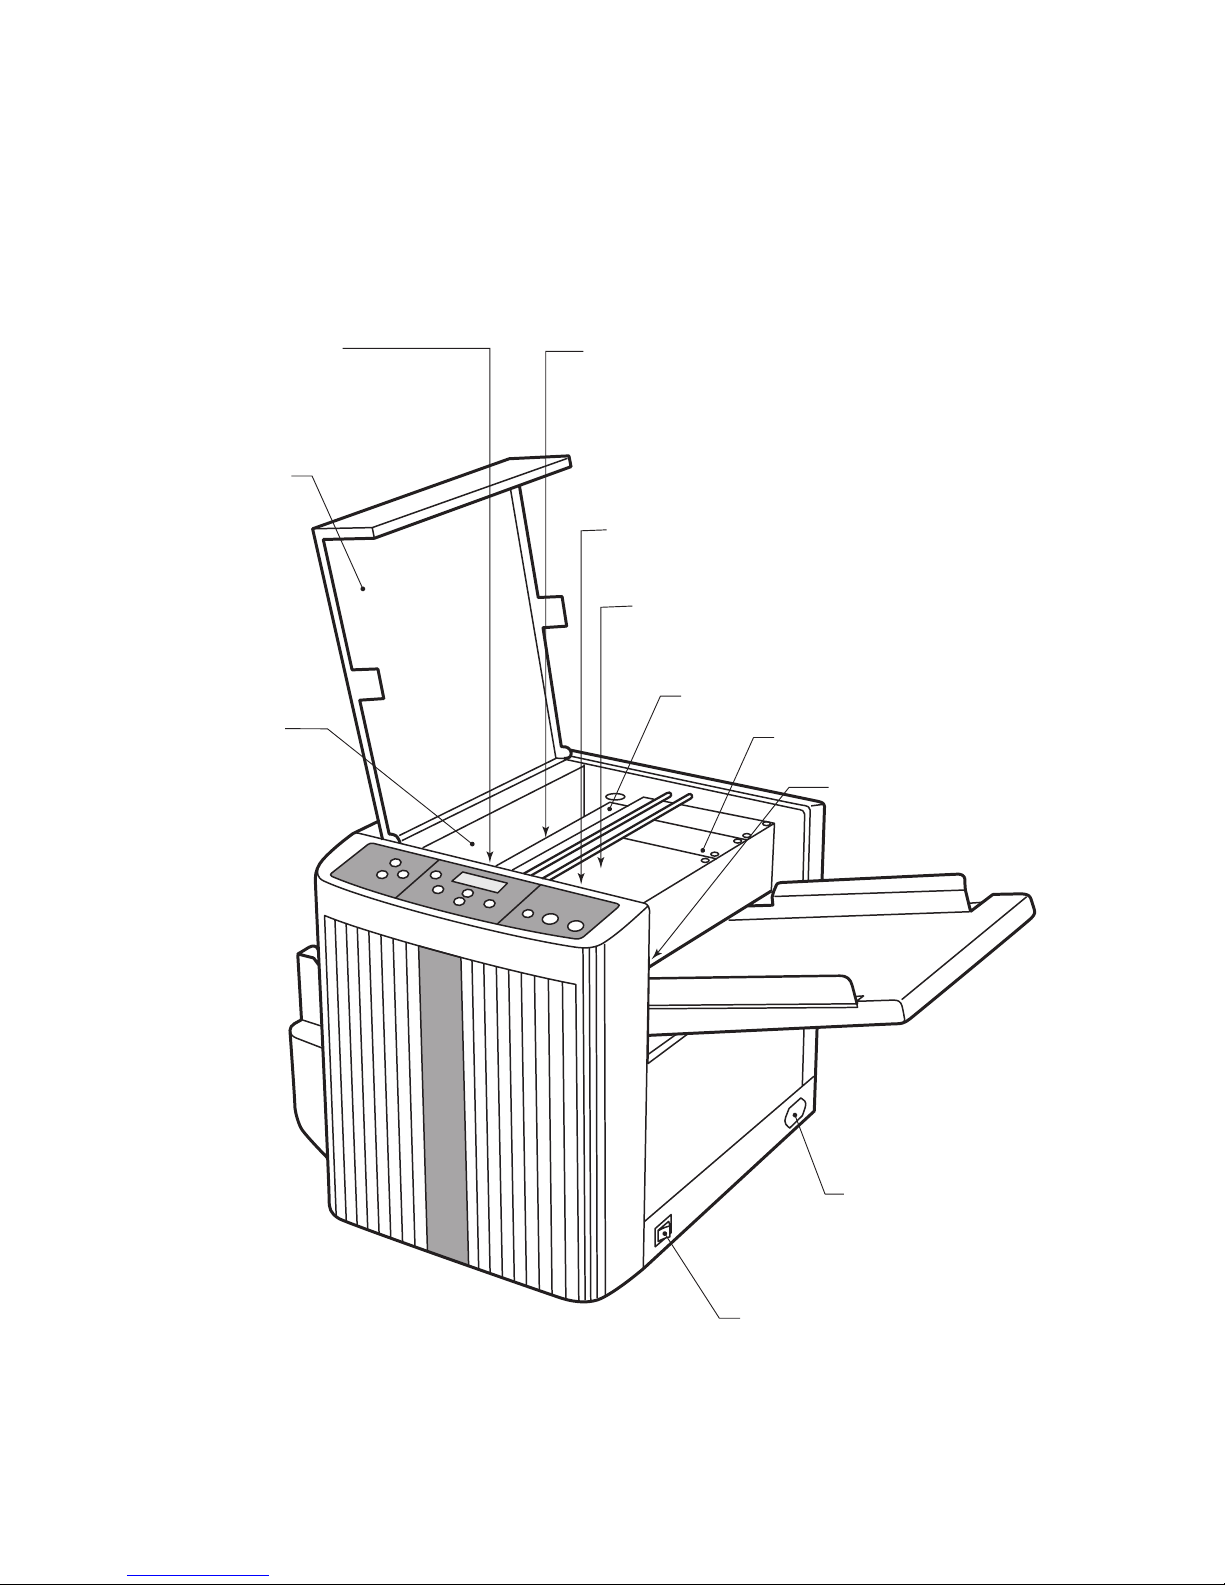
S1 Sensor (Under the Paper Feeder Unit)
Pressure Roller Unit
(Between the Cutter Unit and the Slitter Unit)
S3 Sensor
(Under the
Pressure Roller Unit)
Slitter Unit
Upper Cover
Cutter Unit
Power Inlet
Power Switch
Paper Feeder Unit
Separate Pad
(Under the Paper Feeder Unit)
S2 Sensor (Under the Paper Feeder
unit and just before the Cutter Unit)
9
http://www.monomachines.com/
http://www.monomachines.com/
Page 12
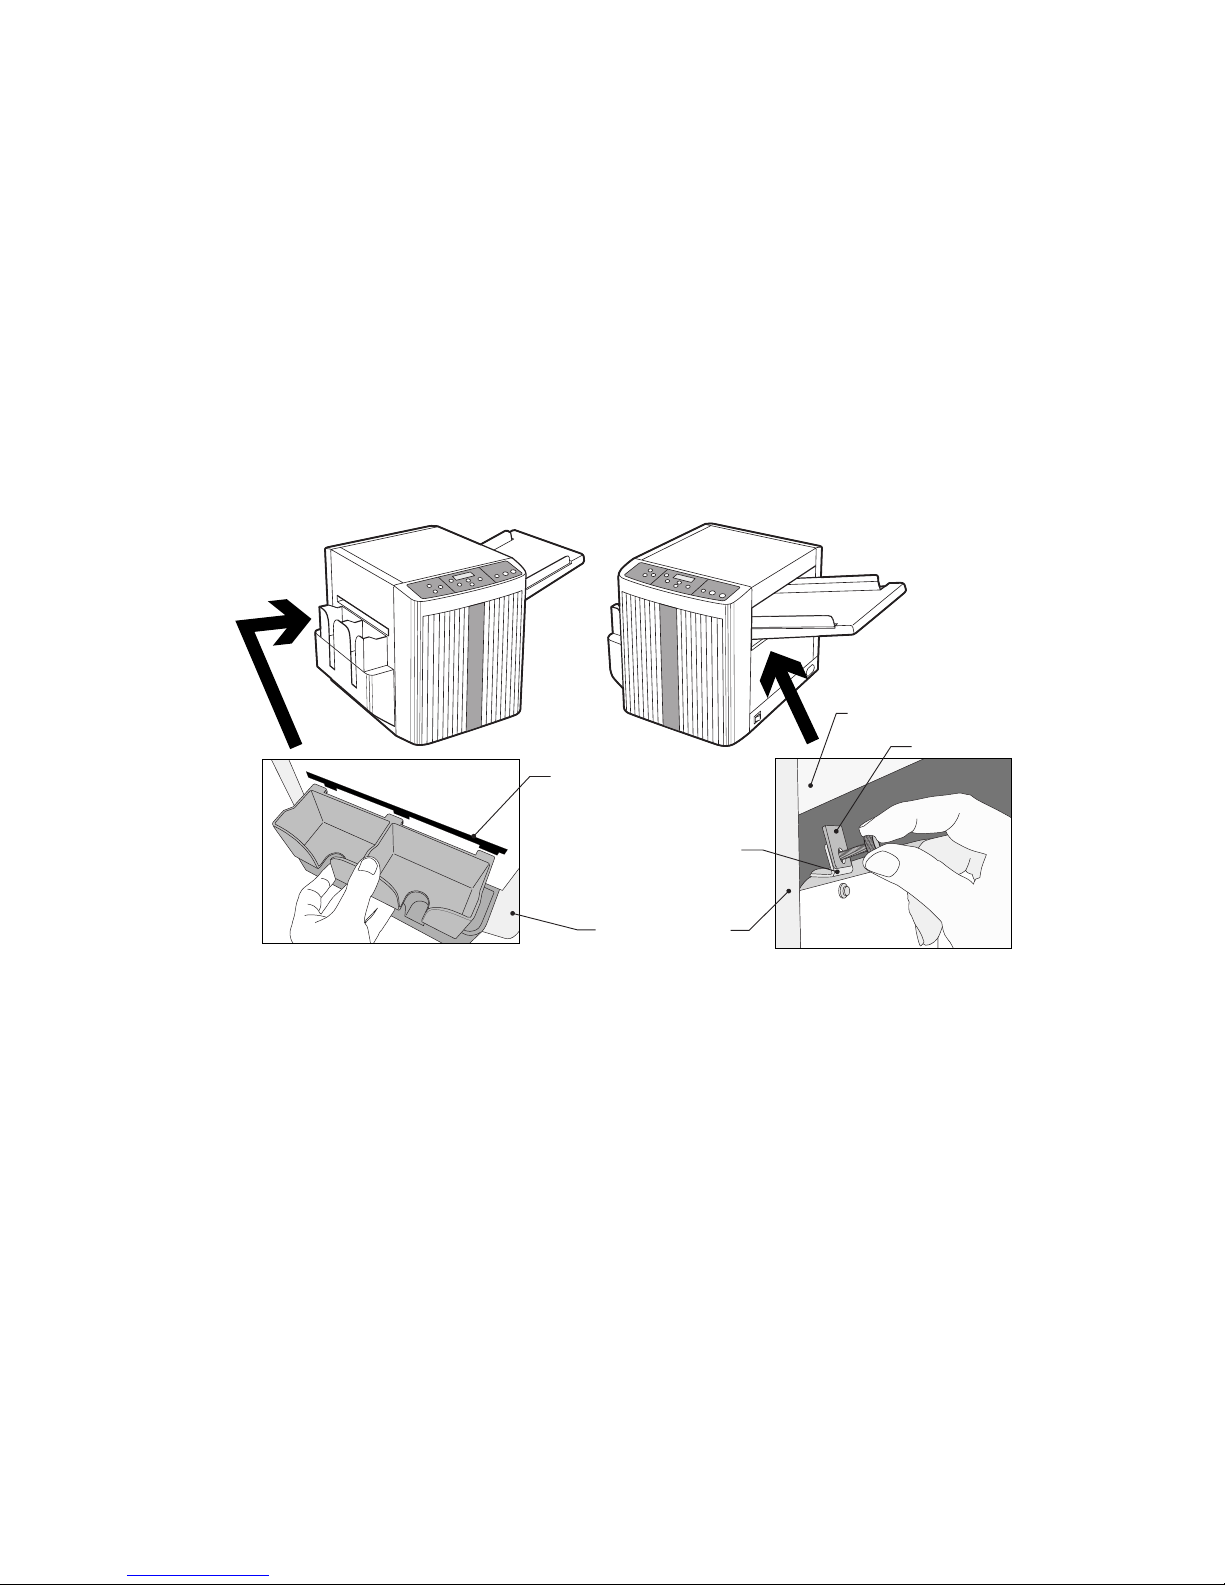
3. UNPACKING AND SETUP
3.1 Confirm that all components are present.
Check the items below. Call the supplier if anything is missing.
� BC-10
� Paper Feeder Tray
� Power Cord with two-pronged adaptor (in the Trash Box)
� Trash Box and Card Stacking Box (in the Trash Box)
� Operation Manual and 5 Test Sheets
Paper Feeder Tray
Tab
Card Outlet
Bracket
Front Cover
Figure 1
Figure 2
3.2 Setup
1. Place machine on a stable surface. See the figures.
2. Insert the Paper Feeder Tray along the guide rails until it stops.
3. Attach the two tabs under the Paper Feeder Tray to the brackets of the
machine with provided screws. Make sure the Paper Feeder Tray is securely
fixed to the machine. See Figure 2.
4. Insert the Trash Box and hang the Card Stacking Box on the verge of the Card
Outlet. See Figure 1.
5. Connect the Power Cord to a 120VAC outlet. If a three-hole outlet is not
available, ground the machine with the attached adaptor.
3.3 Packing Box
Keep the packing box and styrofoam. You may need these to transfer the
machine.
10
http://www.monomachines.com/
http://www.monomachines.com/
Page 13

4. LAYOUT AND PRINTING
4.1 The BC-10 cuts the following kinds of paper (See SPECIFICATIONS).
� A4-sized paper (297 x 210mm)
� Letter-sized paper (8.5" x 11")
The BC-10 has 5 cutting modes:
� 3 modes for A4-sized paper
� 2 modes for Letter-sized paper
4.2 Set up layouts according to the standard layout patterns shown on page 12 and
13. Microsoft Word contains templates for business cards or graphic programs
such as Adobe Illustrator or PageMaker may be used.
4.3 If your printer cannot precisely position the images on the sheet, the BC-10 can
be adjusted during the cutting procedure (See 6.9 and 6.11).
4.4 Print required number of sheets. One sheet makes 10 cards.
4.5 The heat of the printer can make sheets curl. These curls can cause paper jams or
affect cutting accuracy. Straighten out paper as much as possible before cutting.
4.6 Be sure to use short-grained papers (papers with the grain direction along the 8.5"
or 210mm sides).
11
http://www.monomachines.com/
http://www.monomachines.com/
Page 14
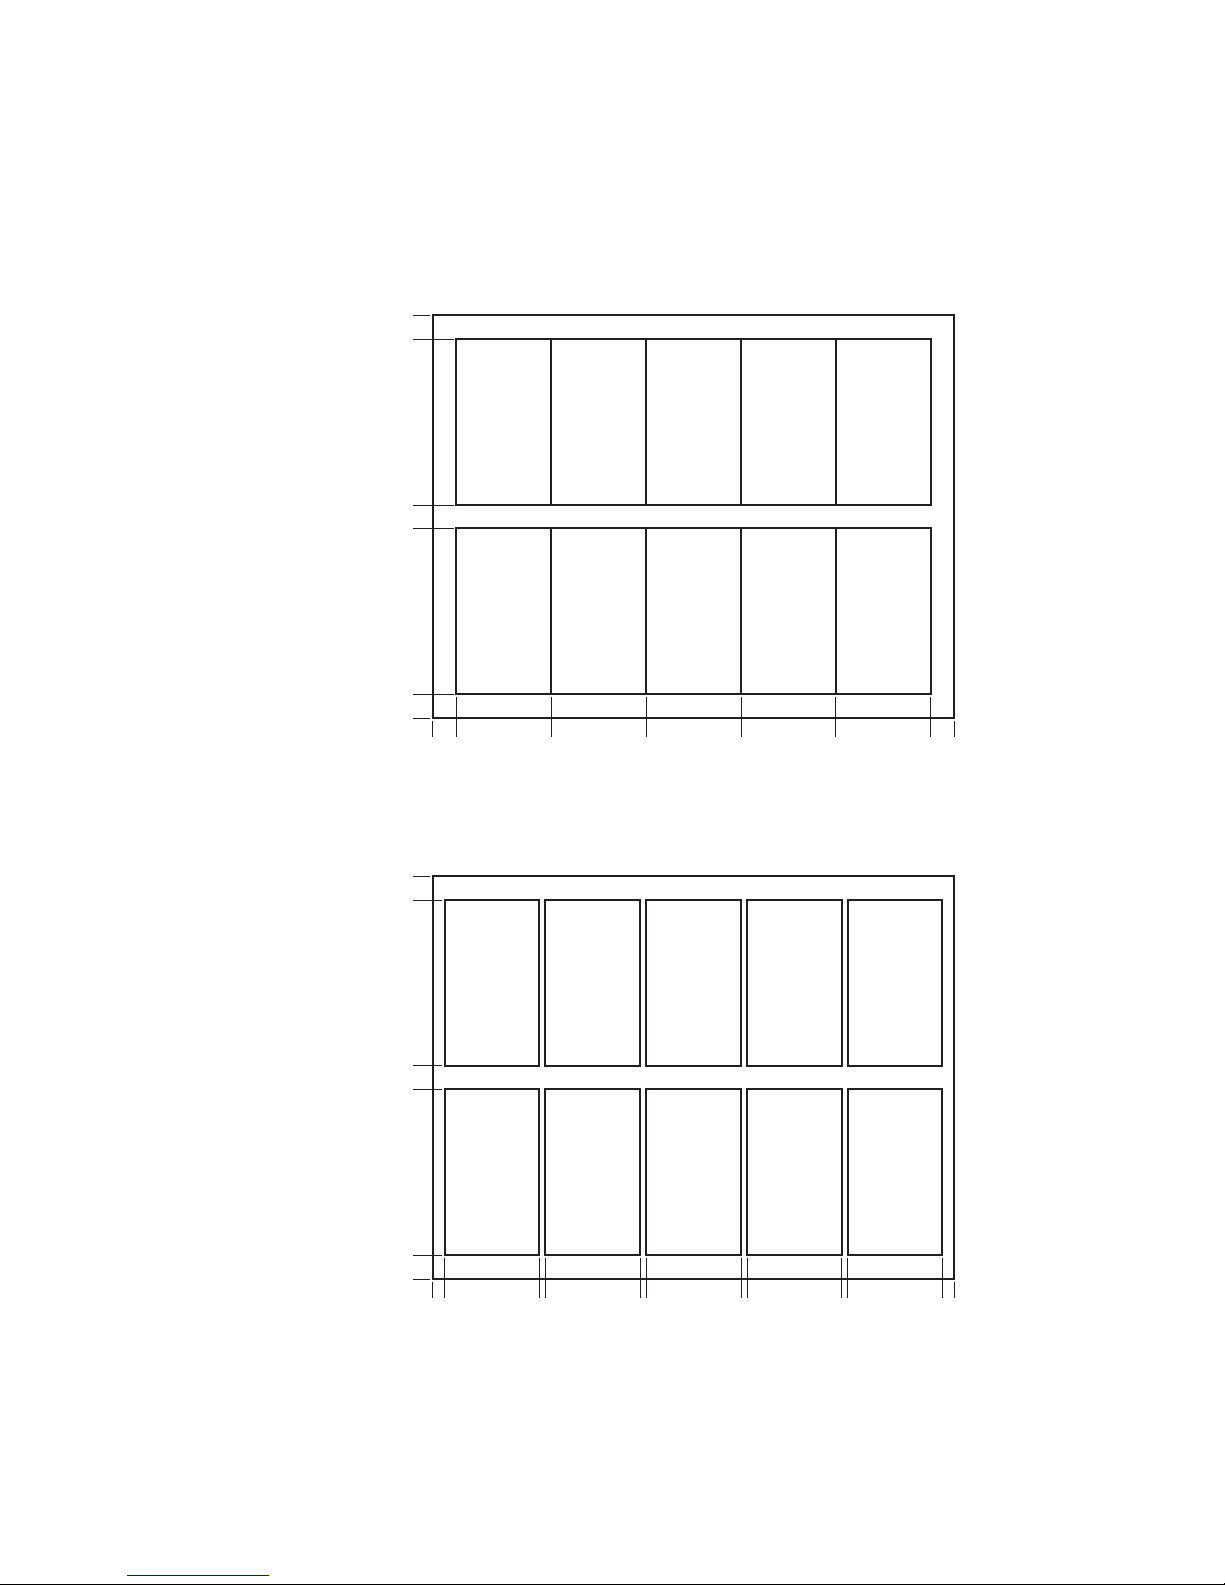
Standard Layouts
for Letter-sized paper
Unit: inch (mm)
(12.7) (12.7)(12.7)
(89) (89)
2 x 3.5 inches single cut
(50.8 x 89mm)
2 2 2 2 2
0.5 0.50.5
3.53.5
0.5
(50.8) (50.8) (50.8) (50.8) (50.8)
0.5
(12.7) (12.7)
(12.7)(12.7)(12.7)
(89)(89)
2 x 3.5 inches double cut
(50.8 x 89mm)
2
0.50.50.5
3.53.5
0.25 0.25
0.125 0.125 0.125 0.125
(50.8)
(6.4)
(3.2) (3.2) (3.2) (3.2)
(6.4)
12
http://www.monomachines.com/
http://www.monomachines.com/
Page 15
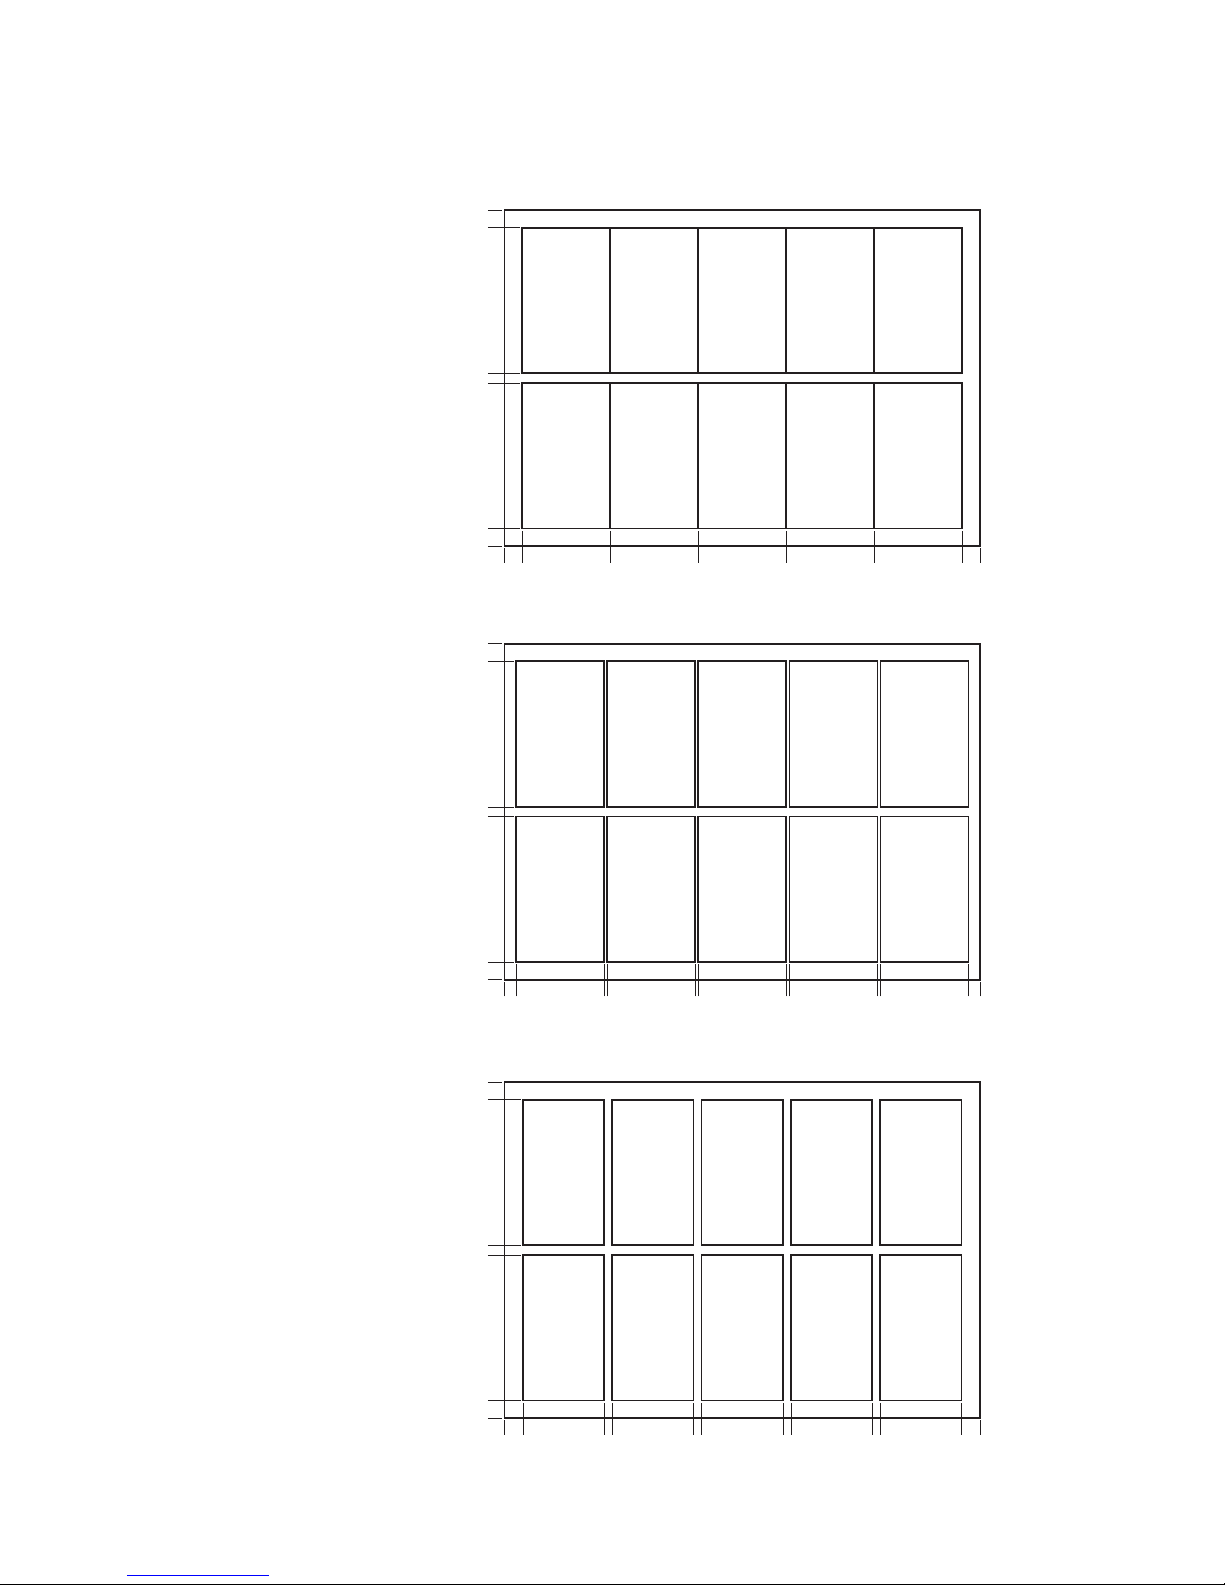
Unit: mm
Standard Layouts
for A4-sized paper
55 55 55 55 55
51 x 90mm double cut 55 x 90mm double cut 55 x 90mm single cut
11
55 55 55 55 55
7 2 2 2 2 7
51 51 51 51
11 5 5 5 5 11
12 6 12 12 6 12 12 6 12
90 90 90 90 90 90
13
11
51
http://www.monomachines.com/
http://www.monomachines.com/
Page 16
5. PREPARATION FOR CUTTING
5.1 Use the BC-10 only in the conditions described in the PRECAUTION OF
INSTALLATION section.
5.2 Make sure the Power Switch is off.
Connect the power cord into a wall-mounted outlet.
5.3 If a three-hole outlet is not available, ground the power cord with the adapter.
DANGER:
Do not connect or disconnect the power cord with wet hands
in order to avoid electric shock.
CAUTION:
Never use the cord to pull the plug from an outlet.
5.4 To set the paper
1. Jog a stack of sheets.
2. Place the stack on the Paper Feeder Tray face-up.
3. Press down the Left Paper Guide on the Paper Feeder Tray to turn the feeding
status "off."
4. While pressing down the Left Paper Guide, slide the paper down until it stops.
5. Release the Left Paper Guide to turn the feeding status "on."
� Load limit is 50 sheets (Sheet thickness: 0.20mm / 0.008").
5.5 Turn on the Power Switch.
The Display in the center of the Operation Panel will light up.
14
http://www.monomachines.com/
http://www.monomachines.com/
Page 17
6. OPERATION
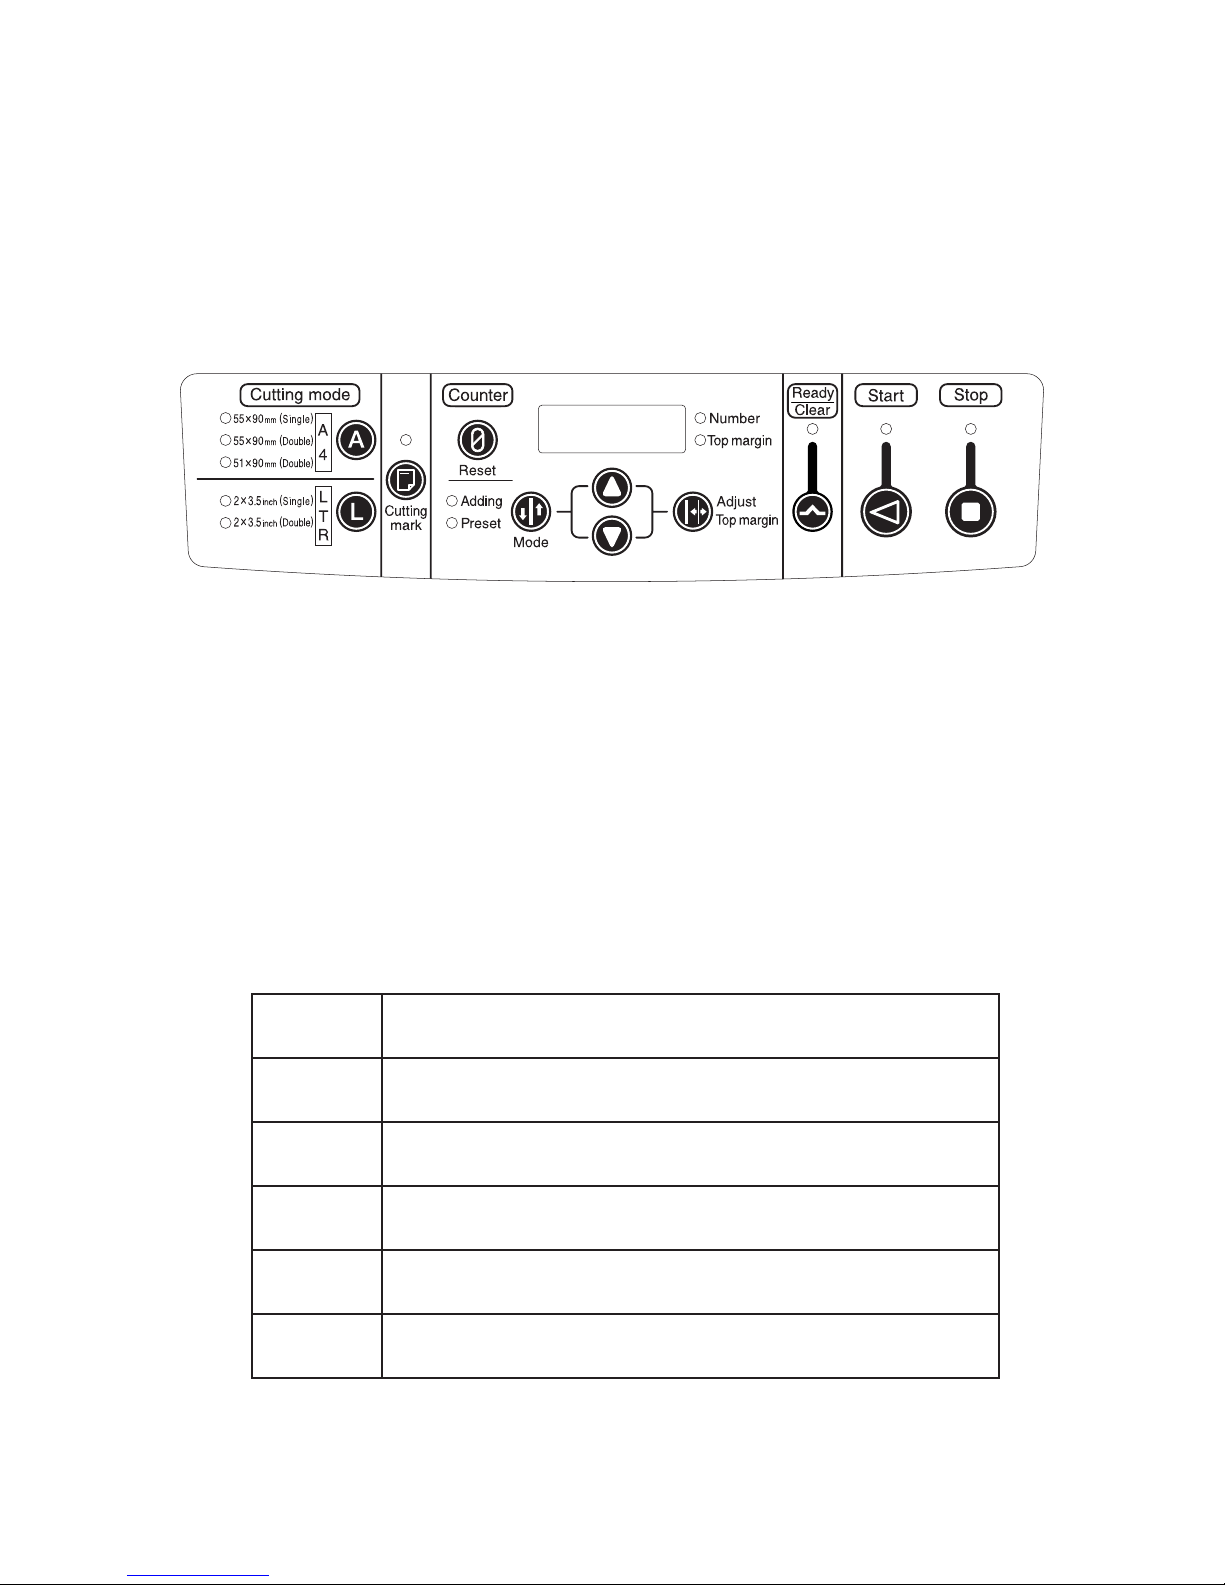
[ Operation Panel ]
Note: � Do not use excessive force to push the buttons.
� Confirm your selection with the LED lights.
6.1 With the Upper Cover being open, the BC-10 will not go on if you turn on the
Power Switch.
Shut the Upper Cover.
6.2 With the Trash Box being dislocated, the BC-10 will not go on if you turn on the
Power Switch.
Insert the Trash Box completely.
6.3 To clear errors, refer to the list of error codes below and press the Ready/Clear
button.
Error Code Description
E002
Malfunction of the sensor in the Cutter Unit.
(Or the malfunction of the Cutter Unit.)
E003 The Slitter Unit is not set properly.
E006 A sheet or cut fragment has stopped at the S2 sensor.
E007
Paper conveying problem (S3 sensor timeout: a sheet did not
reach the S3 sensor in time).
E008
Paper conveying problem (S3 sensor timeout: a sheet did not
transit through the S3 sensor in time).
15
http://www.monomachines.com/
http://www.monomachines.com/
Page 18
6.4 The "Ready" LED turns on and the number of the finished cards of the last job
appears in the Display after all errors are cleared.
6.5 Press the Counter Reset button (for a couple of seconds) to reset the number.
6.6 To select Cutting modes
A green LED indicates the present Cutting mode. The mode used for the last job
is the default. Press the "A" or "L" buttons to select your desired mode.
Note: � The 3 modes for A4-sized paper can be selected when a Slitter Unit for
the A4-sized is attached.
� The 2 modes for Letter-sized paper can be selected when a Slitter Unit
for the Letter-sized is attached.
� "E003" appears in the Display with no Slitter Unit being attached.
6.7 To select the Cutting Mark function
To use the Cutting Mark function, you have to print a "Cutting Mark" on your
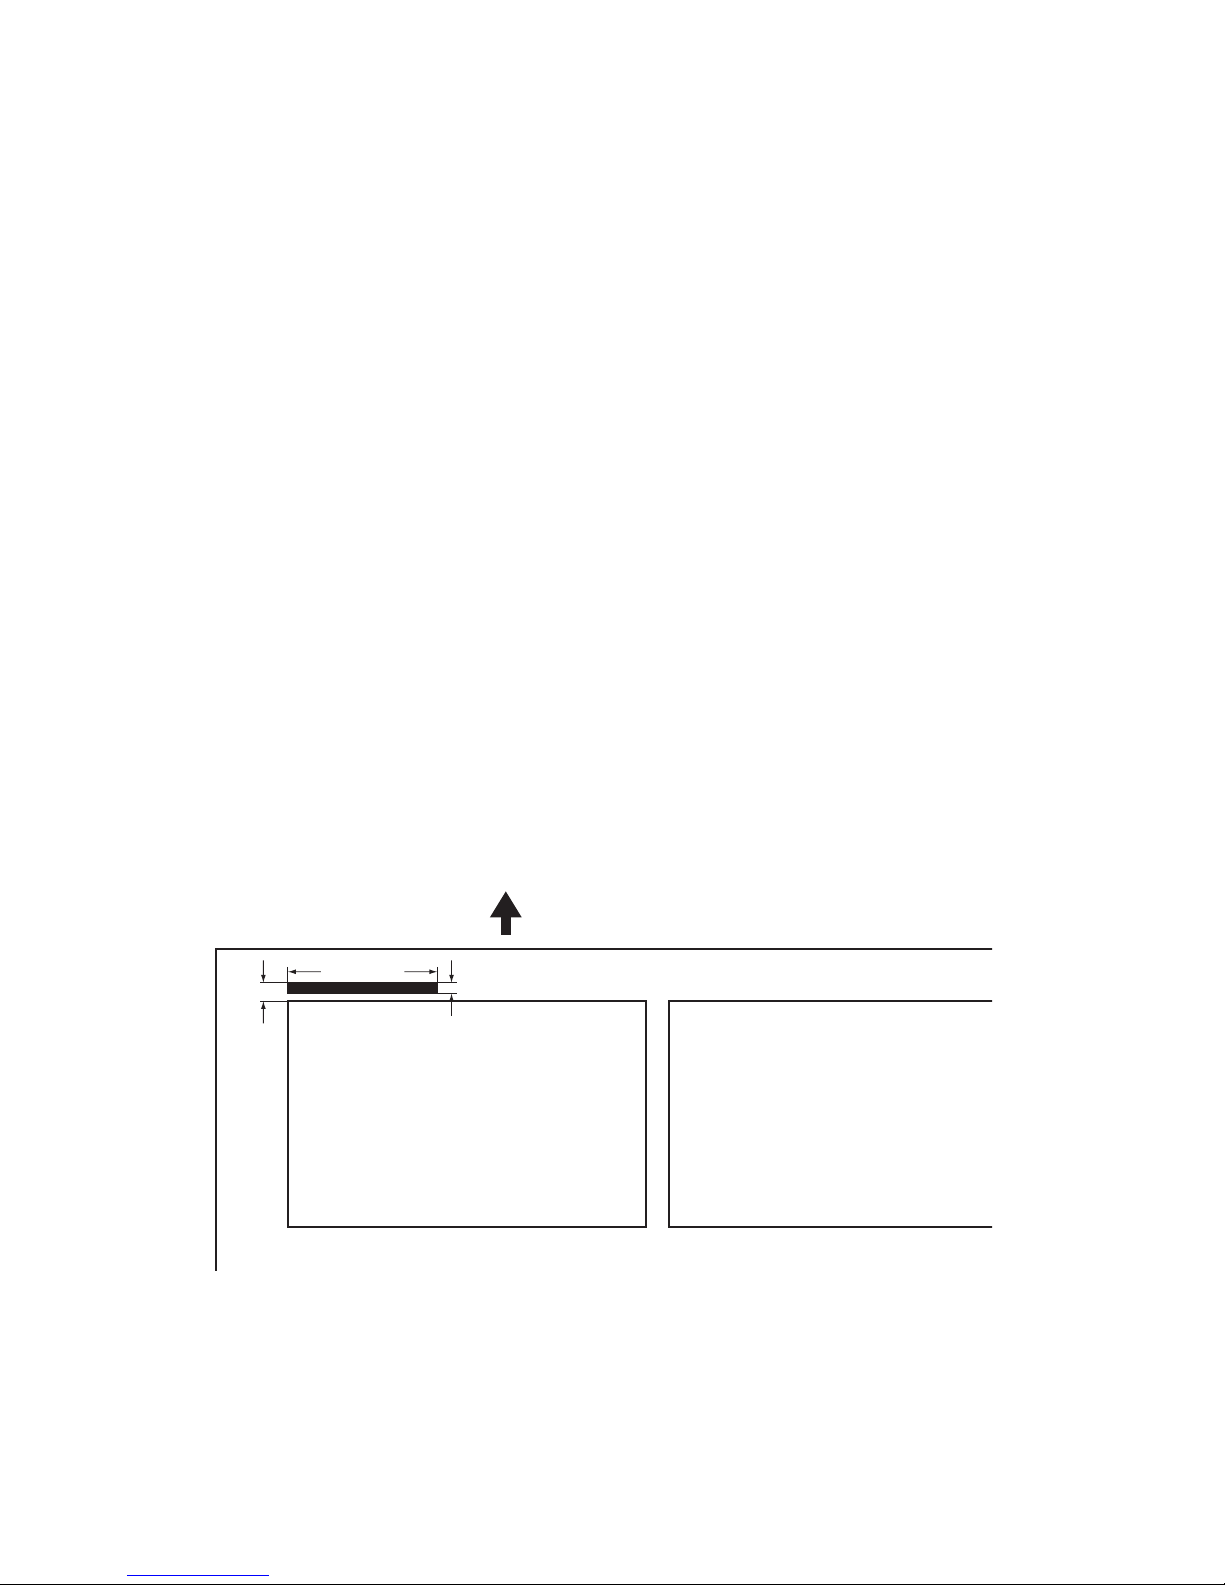
business card layout at the same time. The Cutting Mark is a black rectangle,
which size is 2mm x 31mm (0.08" x 1.22"), to tell the machine where to start
cuttings.
� Press the Cutting mark button to turn on the Cutting Mark function (The red
LED turns on).
� Press the Cutting mark button again to turn off the Cutting Mark function.
Paper Feed Direction
31mm / 1.22"
2mm / 0.08"
3mm / 0.12"
While the Cutting Mark function is on, the system starts cutting at the line which
is 3mm behind the lead edge of the Cutting Mark. Manually-set Top Margin
length is ignored. The resulting cuts (2nd, 3rd, 4th...) are done according to the
selected Cutting mode's layout pattern (See page 12 to 13).
16
http://www.monomachines.com/
http://www.monomachines.com/
Page 19

� The Cutting Mark must be printed in black in order to be read by the sensor.
Colored paper (especially dark colors) can also prevent the sensor from
reading.
� The maximum printing area varies. Some printers cannot always print the
Cutting Mark. In that case, enlarge the "Upper Margin" so that the Cutting
Mark can be printed.
Note: Be sure to keep the Top Margin length within the Upper Limit of each
cutting mode. Refer to 6.9 and the Top Margins table on page 18.
� With the Cutting Mark function being on, pre-printed logos or marks will not
be always located in the proper position when cards are finished.
� The BC-10 will stop if you try to cut sheets without a Cutting Mark while the
Cuttin Mark function is on.
� When the Cutting Mark function is off, the BC-10 cuts sheets according to a
manually-set Top Margin length of the selected Cutting Mode. Printed Cutting
Marks are ignored.
6.8 To select Counter Modes
Press the Mode button to select "Adding" or "Preset."
� When "Adding" is selected, the "Adding" LED turns on. The number of the
Counter increases by twos as the BC-10 goes on cutting.
� When "Preset" is selected, the "Preset" LED turns on. Press por qto
increase/decrease the "Preset" number in the Display by tens. The number of
the Counter decreases by tens as the BC-10 goes on cutting.
� With the "Preset" mode, the machine stops cutting and goes "Ready" when the
Counter comes down to "0000." Two seconds later, the Counter shows the
"Preset" number again.
6.9 To adjust the Top Margin
� Once you press the Adjust Top margin button, the "Top margin" LED turns on
and the Top Margin value used in the last job appears.
� Standard Top Margin lengths are shown in page 18.
� When you browse Cutting Modes, the standard Top Margin length for each
Cutting Mode appears. Press por qto increase/decrease the Top Margin
length one step at a time. Press the Adjust Top margin button to save the value
and return to the Counter Display.
6.10 When all settings for Cutting Modes and Counter Modes are finished, start the
job by pressing the Start button.
The "Start" LED turns on and the BC-10 begins cutting sheets.
17
http://www.monomachines.com/
http://www.monomachines.com/
Page 20
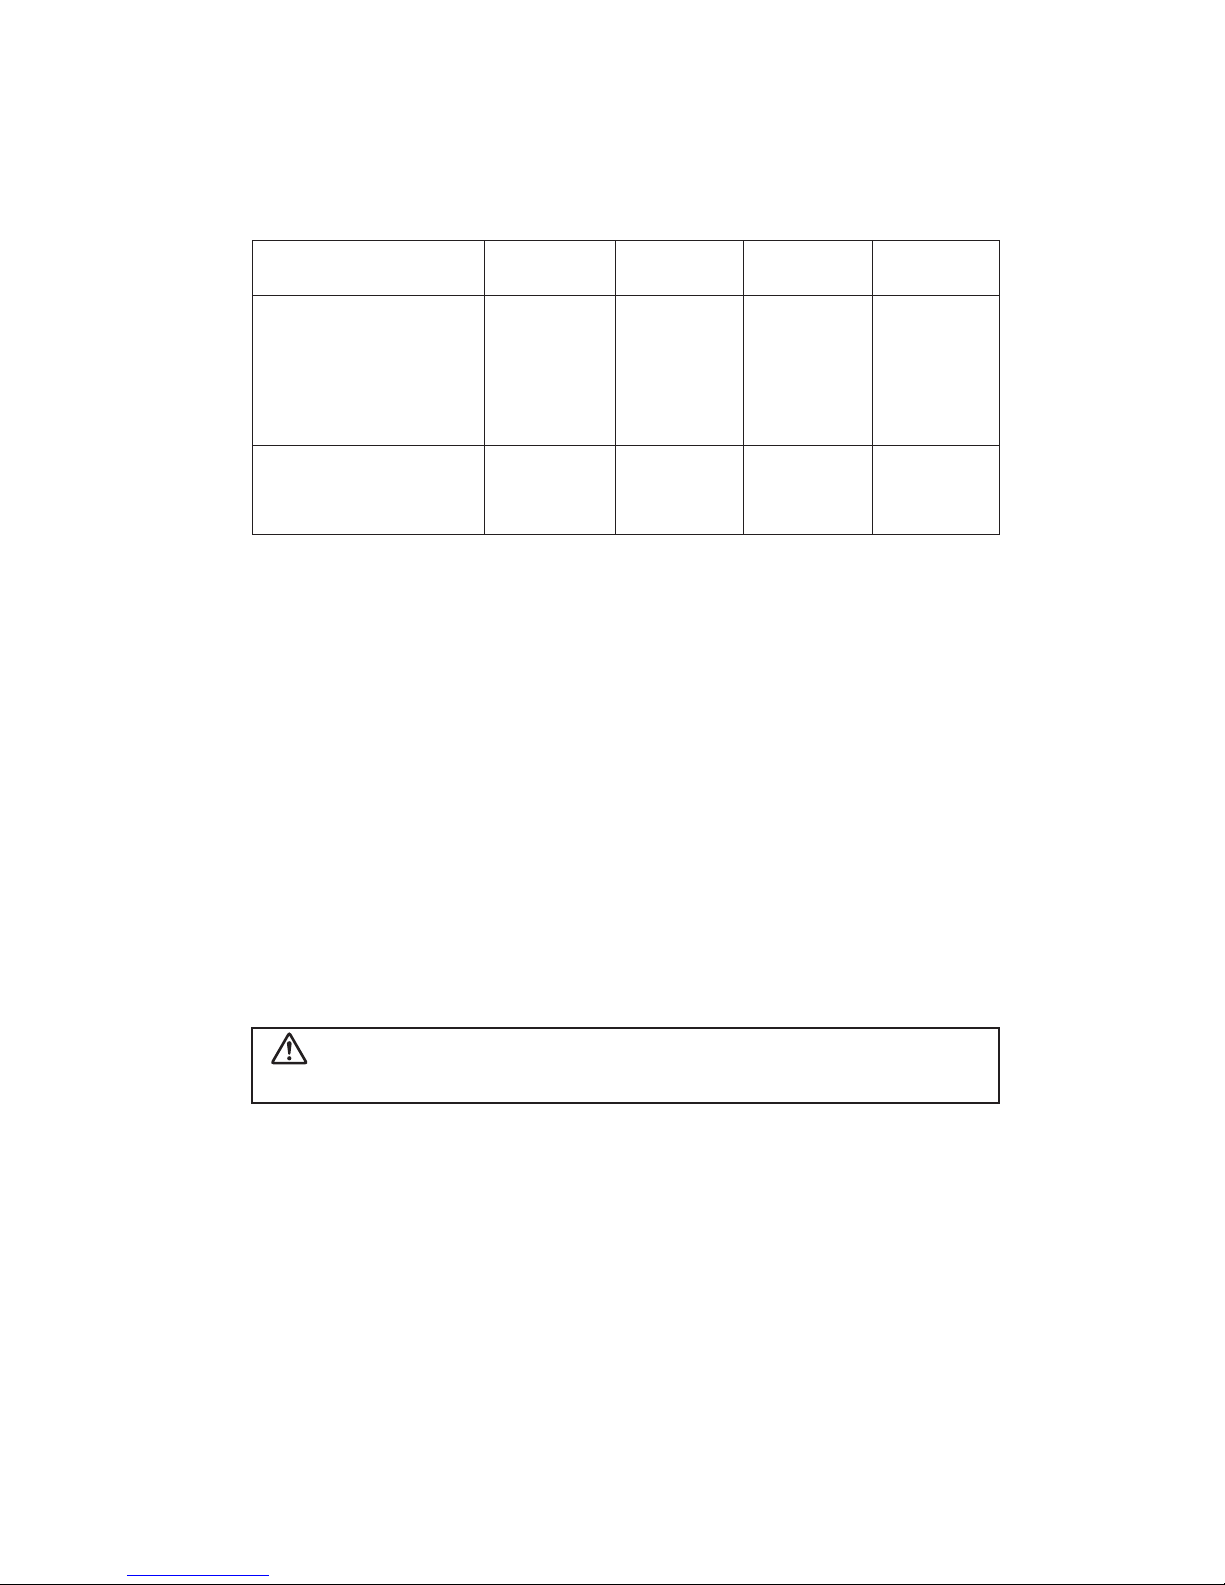
Top Margins
Cutting Mode
Standard Top
Margin
Upper Limit Lower Limit
Adjusting
Step
55 x 90 mm single cut
55 x 90 mm double cut
51 x 90 mm double cut
11 mm
7 mm
11 mm
(0.433 in.)
(0.276 in.)
(0.433 in.)
14.0 mm
8.0 mm
14.0 mm
(0.315 in.)
(0.551 in.)
(0.551 in.)
8.0 mm
6.0 mm
8.0 mm
(0.315 in.)
(0.236 in.)
(0.315 in.)
(0.010 in.)
(0.010 in.)
(0.010 in.)
0.25 mm
0.25 mm
0.25 mm
2 x 3.5 inches single cut
2 x 3.5 inches double cut
0.5 in.
0.25 in.
0.610 in.
0.291 in.
0.390 in.
0.209 in.
0.014 in.
0.014 in.
� In the "Adding" mode, the BC-10 stops when it runs out of sheets.
� In the "Preset" mode, the machine stops when the "Preset" numbers of sheets
are finished. And two seconds later, the "Preset" number apears again in the
Display. Press the Start button again to repeat the same job.
� To stop cutting, press the Stop button. The "Stop" LED turns on and the BC-10
stops after cutting the current sheet. Do not press the Start button until the
machine stops.
6.11 Move the Slitter Unit to adjust the side margin.
1. Loosen the Slitter Unit Adjusting Screws.
2. Using the Slitter Unit Adjusting Gauge (located on the Slitter Unit), slide the
Slitter Unit the necessary amount. The Slitter Unit can be moved about .08
inches or 2 mm from center.
3. Tighten the screws up after an adjustment.
CAUTION:
Never disassemble the Cutter Unit or the Slitter Unit.
Serious injury could result.
6.12 Emergency stop and safety features
The Upper Cover and the Trash Box are electrically interlocked with the
machine so that the BC-10 stops immediately whenever either one of them is
opened or pulled out.
� For emergency stops, open the Upper Cover or pull out the Trash Box.
� To restart the machine, 1close the Upper Cover or insert the Trash Box
completely, 2remove any jammed sheets, and 3press the Start button.
The machine will not restart unless the Upper Cover is closed and the Trash Box
is returned.
18
http://www.monomachines.com/
http://www.monomachines.com/
Page 21
6.13 To fix paper jams
CAUTION:
Be sure to turn off the Power Switch before removing the
jammed paper to avoid the risk of electric shock.
� Opening the Upper Cover stops the machine in the middle of an operation.
Open the Upper Cover to remove the jammed paper completely.
� "E002" appears in the Display. This indicates the Cutter Unit stopped in the
middle of cutting. Open the Upper Cover. If a sheet is jammed between the
blades, close the Upper Cover and turn the Power on. Press the Ready button
to open the Cutter Blades. Turn the Power off and open the Upper Cover to
remove the sheet.
DANGER:
After opening the Cutter Blades, turn off the Power Switch to
avoid the risk of electric shock. Confirm the power is off and remove the
jammed paper.
� "E006" means the S2 sensor cannot read the lead edge of a sheet. Lift up the
Paper Feeder Unit to remove the sheet. The sensor cannot read highly
transparent or dark paper. Curls or waves on paper can also cause feeding
problems. In this case, it is necessary to straighten the paper. Be sure to put the
Paper Feeder Unit back to its regular position.
� "E007" indicates a sheet did not reach the S3 sensor in time. Detach the
Pressure Roller Unit to remove the jammed sheet. Be sure to put the Pressure
Roller Unit back to its regular position.
6.14 Over time paper fragments will accumulate in the Trash Box.
Be sure to empty the Trash Box periodically. Overflowing fragments can cause
paper jams.
19
http://www.monomachines.com/
http://www.monomachines.com/
Page 22
CAUTION:
Do not put your hands in the Slitter Unit if the Trash Box
has been pulled out. Serious injury may result.
6.15 Always turn off the Power Switch when finished.
DANGER:
If you notice a strange sound or smell while the BC-10 is
running, turn off the Power Switch immediately and remove the plug. Call the
supplier for repair.
7. MAINTENANCE
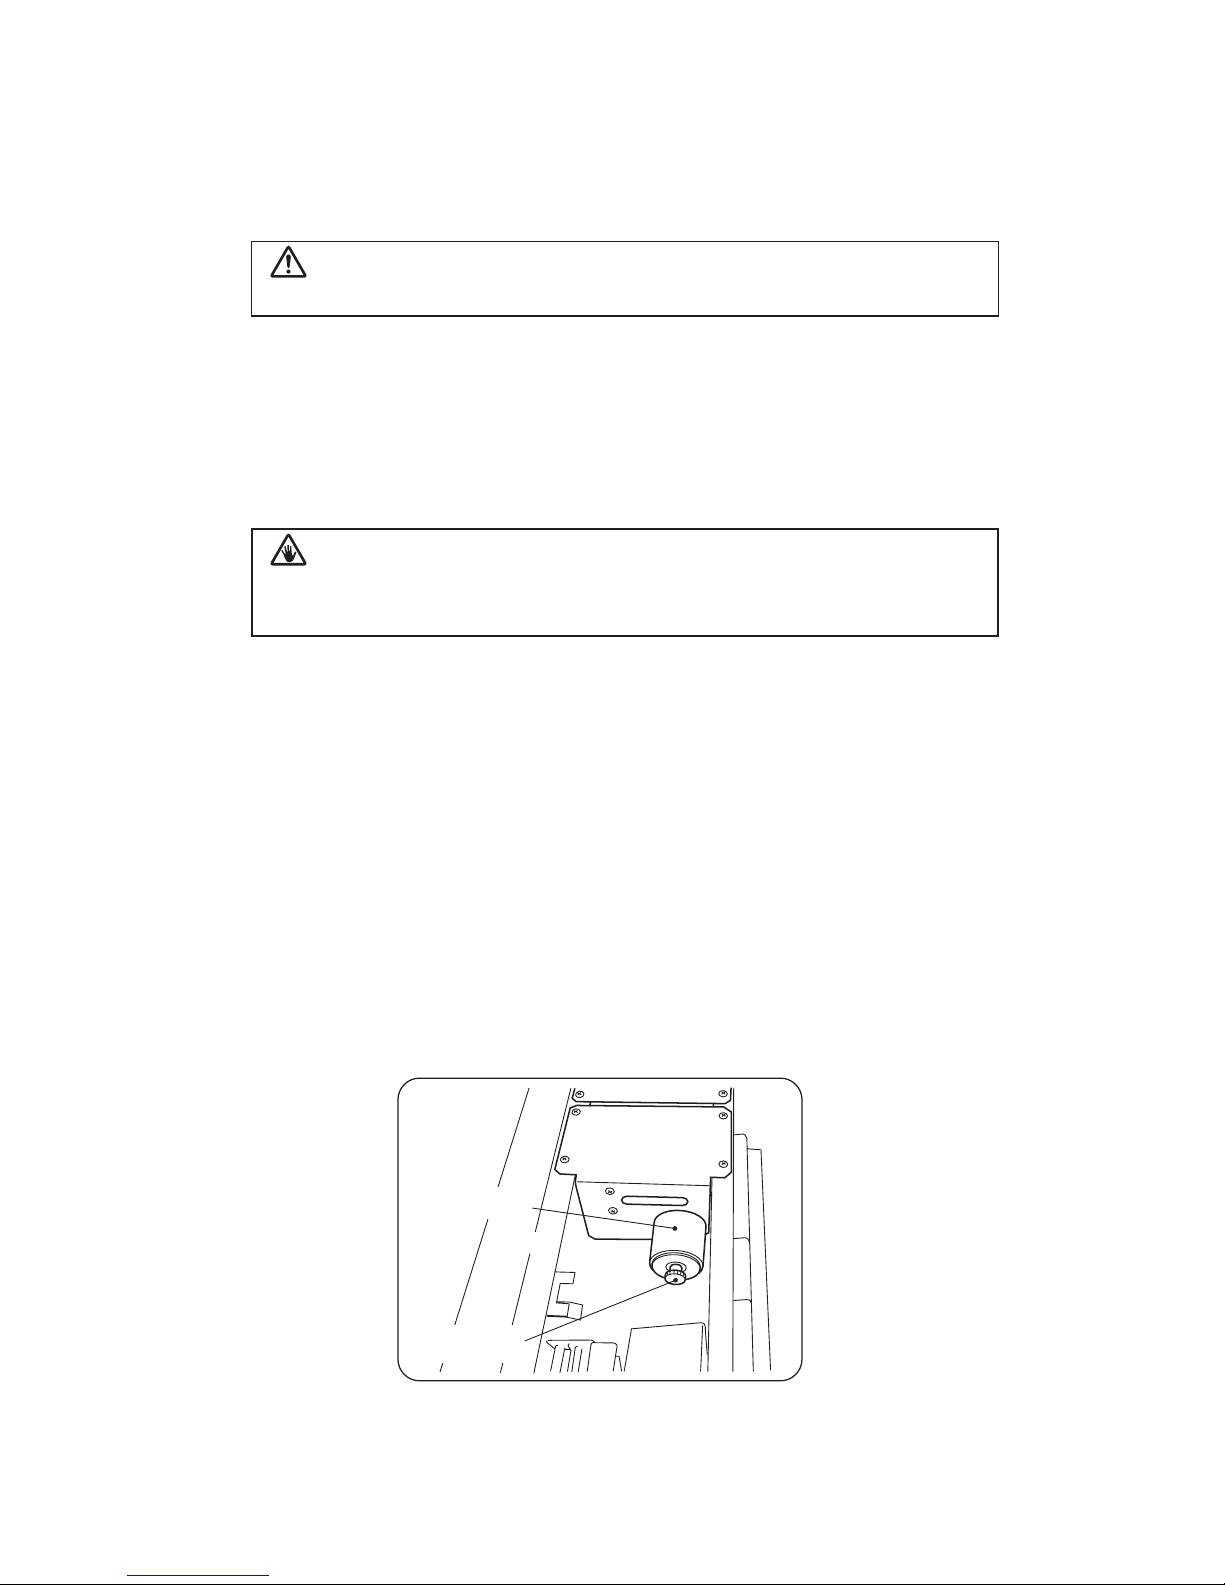
7.1 To replace the Pick-up Roller:
1. Remove the Setscrew and pull out the Roller.
2. Put a new Roller on the shaft. Make sure the Roller is set in the proper
direction. The Roller has a one-way clutch so that it will not rotate in the
wrong direction.
3. Tighten the Setscrew.
Pick-up Roller
Setscrew
20
http://www.monomachines.com/
http://www.monomachines.com/
Page 23
7.2 If the cut edges have gotten dull, it is necessary to replace the blades.
� If the long sides of finished cards are not crisp, the Cutter Unit must be
replaced.
� If the short sides of finished cards are not crisp, the Slitter Unit must be
replaced.
� Call the supplier for replacement.
CAUTION:
Never disassemble the Cutter Unit or the Slitter Unit.
Serious injury could result.
Take care not to feed staples or clips into the BC-10 −−− they will damage the
blades.
7.3 Do not touch the Mainboard under the Front Cover.
7.4 The BC-10 does not require oiling.
7.5 When cleaning, do not use alcohol or any solvents. They can harm plastics and
painted surfaces.
CAUTION:
Do not remove the transparent cover of the trash box. It is
part of the safety cover of the Slitter Unit, which protects operator's hands
while the Card Stacking Box has been removed.
21
http://www.monomachines.com/
http://www.monomachines.com/
Page 24

8. OPTIONAL PARTS
8.1 Slitter Unit
� The BC-10 has 5 cutting modes:
A. 3 modes for A4-sized paper
B. 2 modes for Letter-sized paper (See 4.2)
� When one of 3 modes (A) is selected, the width of the card is 90mm.
� When one of 2 modes (B) is selected, the width of the card is 3.5 inches
(89mm).
Two types of Slitter Units are available for the BC-10. If a customer selected a
Slitter Unit for Letter-sized paper, an A4 Slitter Unit is optional. The Slitter Units
are motorized for easy installation.
22
http://www.monomachines.com/
http://www.monomachines.com/
Page 25
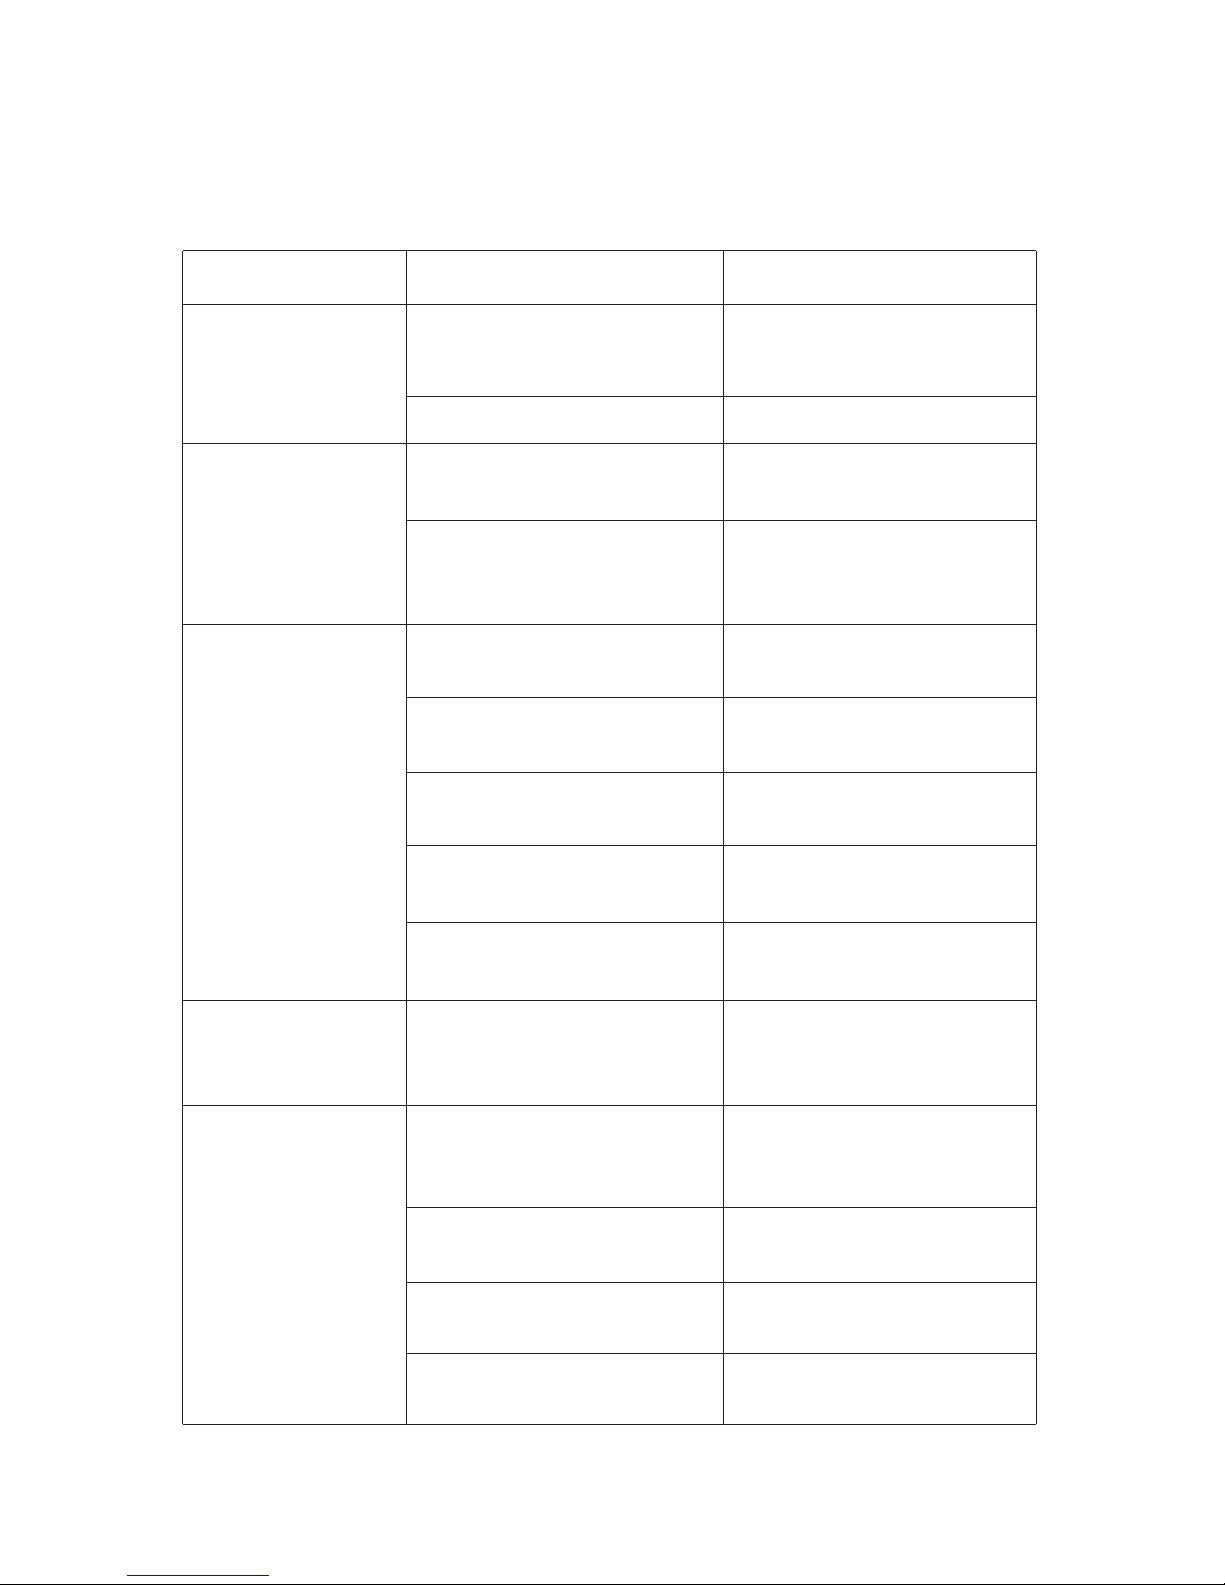
9. TROUBLESHOOTING
Troubles Possible Cause Action
1. The Display and
LEDs do not light
up when you turn on
the Power Switch.*
The Power Cord is not properly
connected to an outlet and the
Power Inlet.
Connect the Power Cord
properly to an outlet and the
Power Inlet.
The Outlet is dead. Make sure the outlet is alive.
2. The BC-10 does not
work when you
press the Start
button.*
There is an error code in the
Display.
Clear the error and restart.
The "Preset" number is set to "0"
with the "Preset" mode being on.
For a test cutting, select "10" as
the "Preset" number and try
cutting again. Refer to 6.8.
3. The BC-10 does not
start feeding sheets
when you press the
Start button.*
The sheets are too thick. Try thinner sheets (under 0.012"
or 0.30mm).
The lead edge of the sheets curls
too much.
Straighten the lead edge of the
sheets.
There is some silicone oil on the
sheets.
Replace the sheets.
The friction of the paper is too
much.
Try some other paper with less
friction.
The Pick-up Roller has worn out
to lose its grip.
Replace the Pick-up Roller.
4. A sheet stops after
moving slightly.
The sensor cannot detect
because the paper is irregular
(highly transparent or too dark).
Use proper papers.
5. Two or more sheets
are fed at one time.
The humidity of the atmosphere
is so low as to cause electrostatic
problems.
Operate the BC-10 under proper
conditions. See page 6.
The sheets get stuck together
because of static electricity.
Fan the stack of sheets and
reload.
The BC-10 is not grounded. Make sure the machine is
grounded.
The Separate Pad is worn out. Replace the Separate Pad.
23
http://www.monomachines.com/
http://www.monomachines.com/
Page 26

Troubles Possible Cause Action
6. The BC-10 stops in
the middle of
cutting and "E002"
appears in the
Display
(repeatedly).
The Cutter blades have got
damaged and got partly dull
because something hard such as
a clip or a staple was cut.
Replace the Cutter Unit.
7. The cut edges are
not crisp.
The Cutter blades have worn out.
(When the long sides of finished
cards are not crisp.)
Replace the Cutter Unit.
The Slitter discs have worn out.
(When the short sides of
finished cards are not crisp.)
Replace the Slitter Unit.
8. The lengths of
finished cards are
unequal (more than
0.15mm).
The paper curls or waves too
much to be conveyed smoothly.
Remove the paper from the
Paper Feeder Tray and straighten
it.
The paper has so much friction
that it cannot be conveyed
properly.
Try some other papers with less
friction.
9. Cutting accuracy is
good, but the
positions of printed
images are uneven.
The layout is not good. Redo the layout.
10. The Display does
not operate
correctly.
The BC-10 is out of order. Call for service.
11. Finished cards do
not accumulate
neatly in the Card
Stacking Box or cut
The BC-10 is not grounded and
affected by static electricity.
Make sure the machine is
grounded.
fragments get
scattered in the
Trash box.
The atmosphere is too dry and
static electricity affects.
Check the humidity and try a
humidifier if needed.
24
http://www.monomachines.com/
http://www.monomachines.com/
Page 27
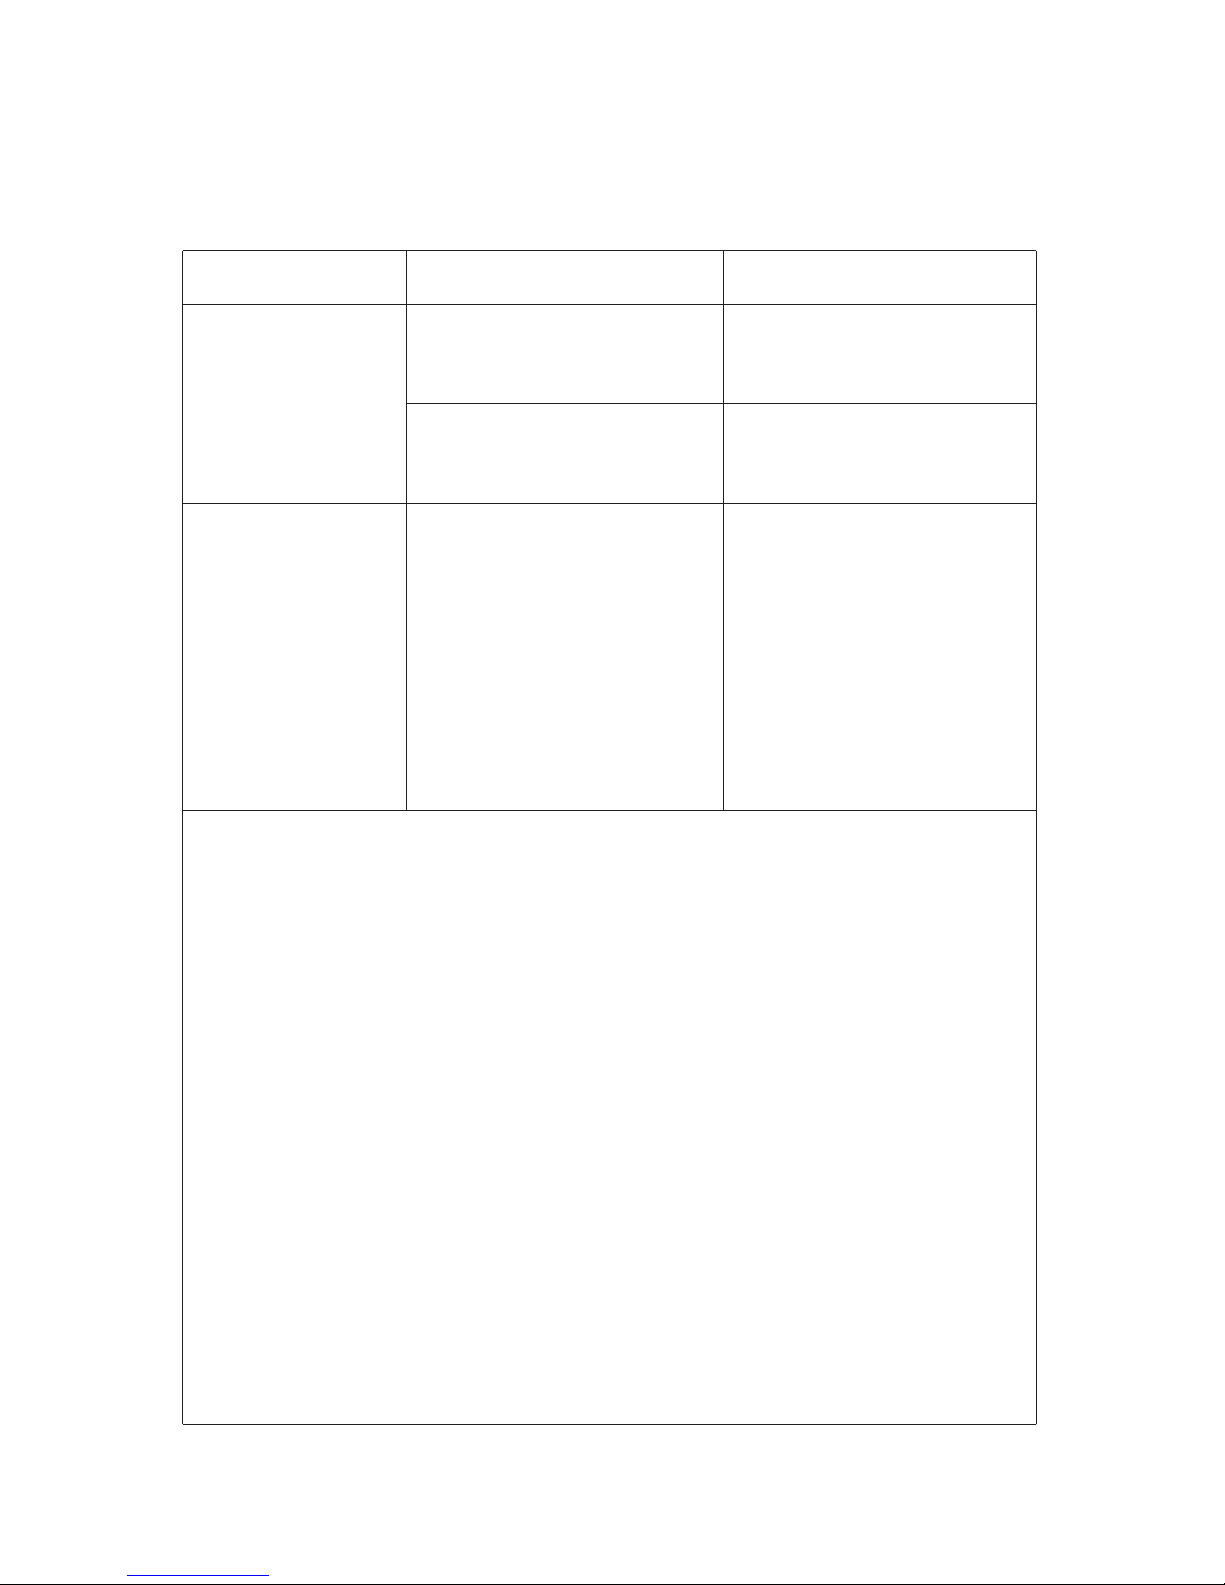
Troubles Possible Cause Action
12. With the cutting
mode set to "double
cut," cut fragments
go forward and
cause fouling.
The atmosphere is too dry and
static electricity affects.
Try a humidifier to make the
atmosphere more humid than
50%.
The BC-10 is not grounded and
affected by static electricity.
Make sure the machine is
grounded.
13. The BC-10 does
not respond to
command inputs.*
The Onboard Microcomputer
has been affected by an
electromagnetic noise.
Turn off the Power Switch. Wait
seven seconds and turn the
power back on. This procedure
resets the microcomputer.
*1, 2, 3, 13: If all of the items in each section have been checked and the problems are
still unresolved, the BC-10 needs to be repaired.
If problems continue after checking all the items above, call for service.
25
http://www.monomachines.com/
http://www.monomachines.com/
 Loading...