

Page 1
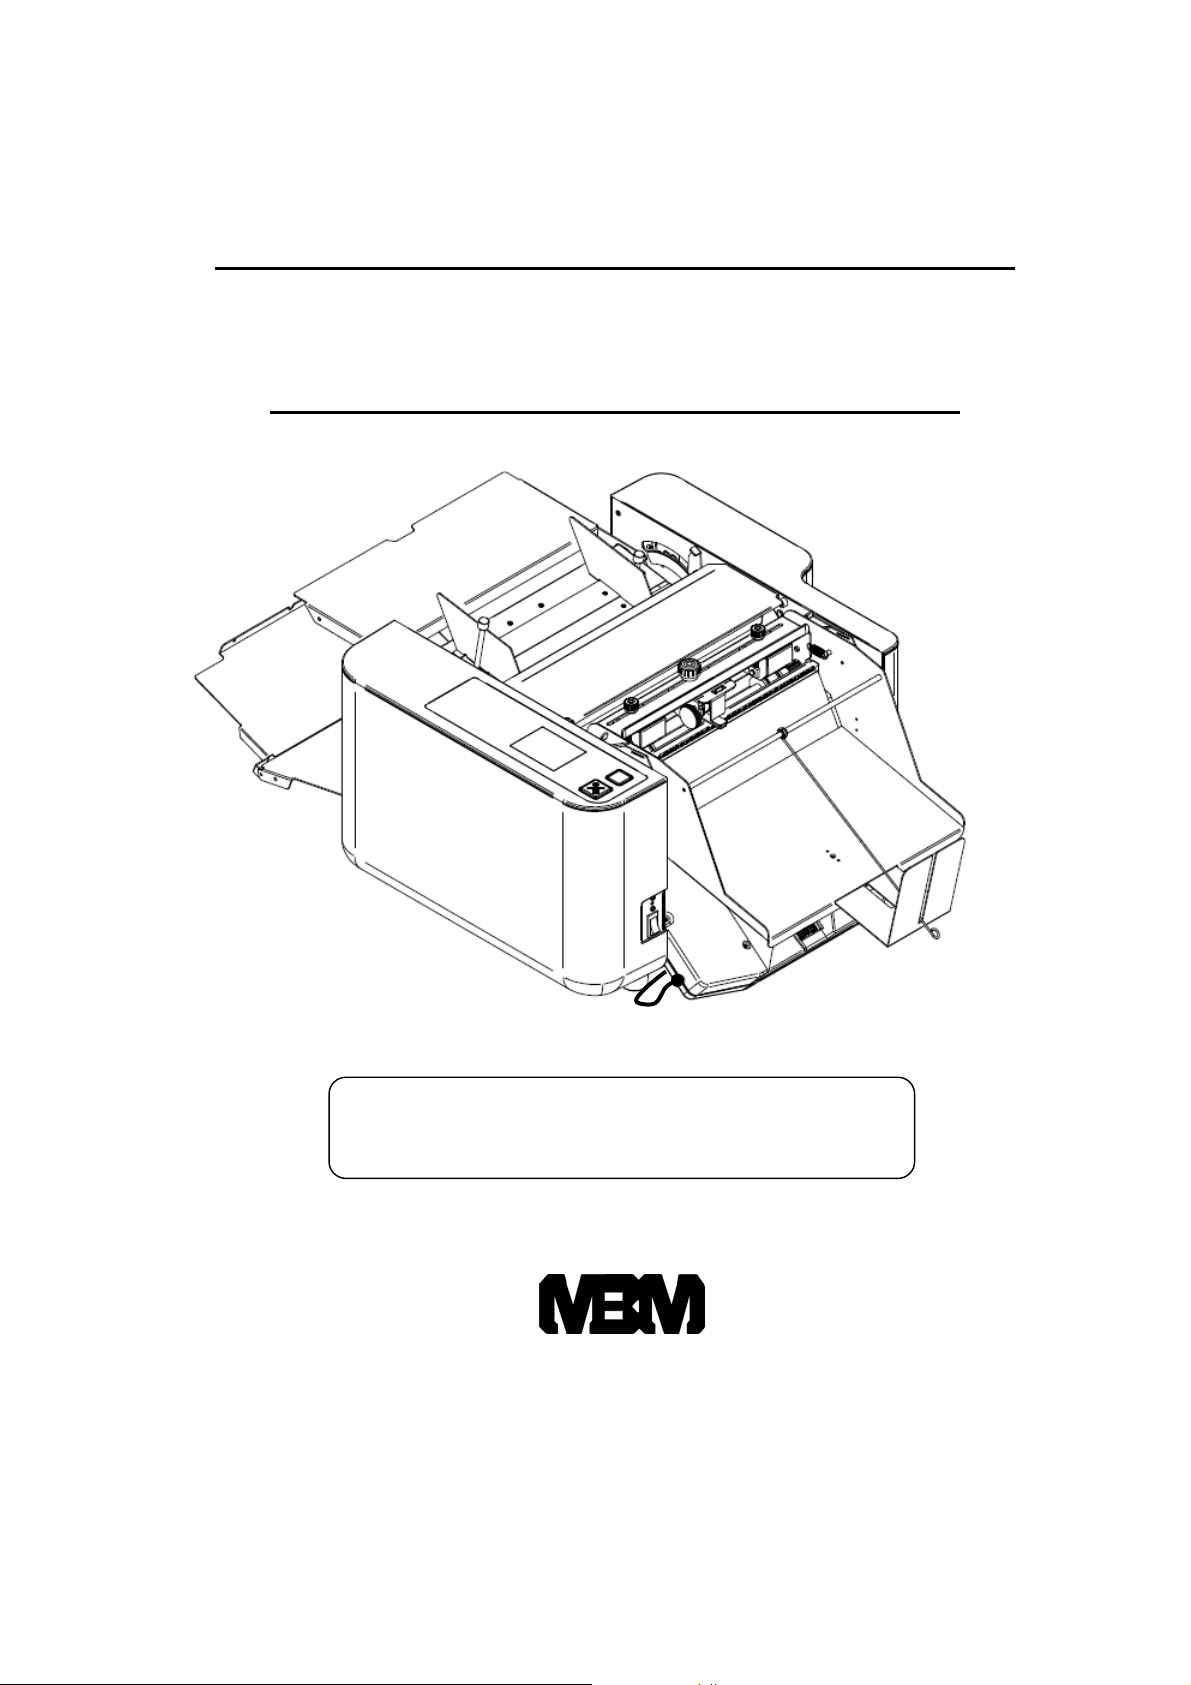
OPERATION MANUAL
for
Scoring unit & Perforating unit
Read this operation manual carefully before use.
Keep this booklet handy for your reference anytime.
A PRODUCT OF
CORPORATION
The Leader in Paper Handling Equipment
1-800-223-2508
www.mbmcorp.com
Sep,9,2016
Page 2

1
Page 3

Before use
Read this operation manual carefully before use.
Keep this booklet handy for your reference anytime.
Specifications are subject to change without notice for product improvement.
Always refer the original manual which came with the delivered unit.
Index
1. Names of Parts..................................................................................... 3
2. Preparation before use.........................................................................
4
3. How to use
1) Perforation Unit
3.1 Setting Perforating Block .......................................................................... 5
3.2 Method for changing operation mode........................................................ 8
3.3 Trial Perforation......................................................................................... 8
3.4 Fine Adjustment of Perforating Line ........................................................ 9
3.5 Perforation, continuous............................................................................ 10
3.6 Replacing Perforating Blade.................................................................... 11
How to use Thick-Paper Perforating Unit (Option)............................................. 12
How to Replace the Separator with Thick-paper Separator ............................... 13
2) Scoring Unit
3.7 Setting Scoring Block............................................................................... 14
3.8 Trial Scoring ............................................................................................. 15
3.9 Fine Adjustment of Scoring Line............................................................. 15
3.10 Scoring, continuous................................................................................ 16
4. Adding Perforation Unit.................................................................... 17
5. Exchanging Perforation Unit to Scoring Unit..................................
19
6. Replacing Transport Rubber Ring .................................................... 20
7. Troubleshooting..................................................................................
8. Product Specifications .......................................................................
2
21
21
Page 4
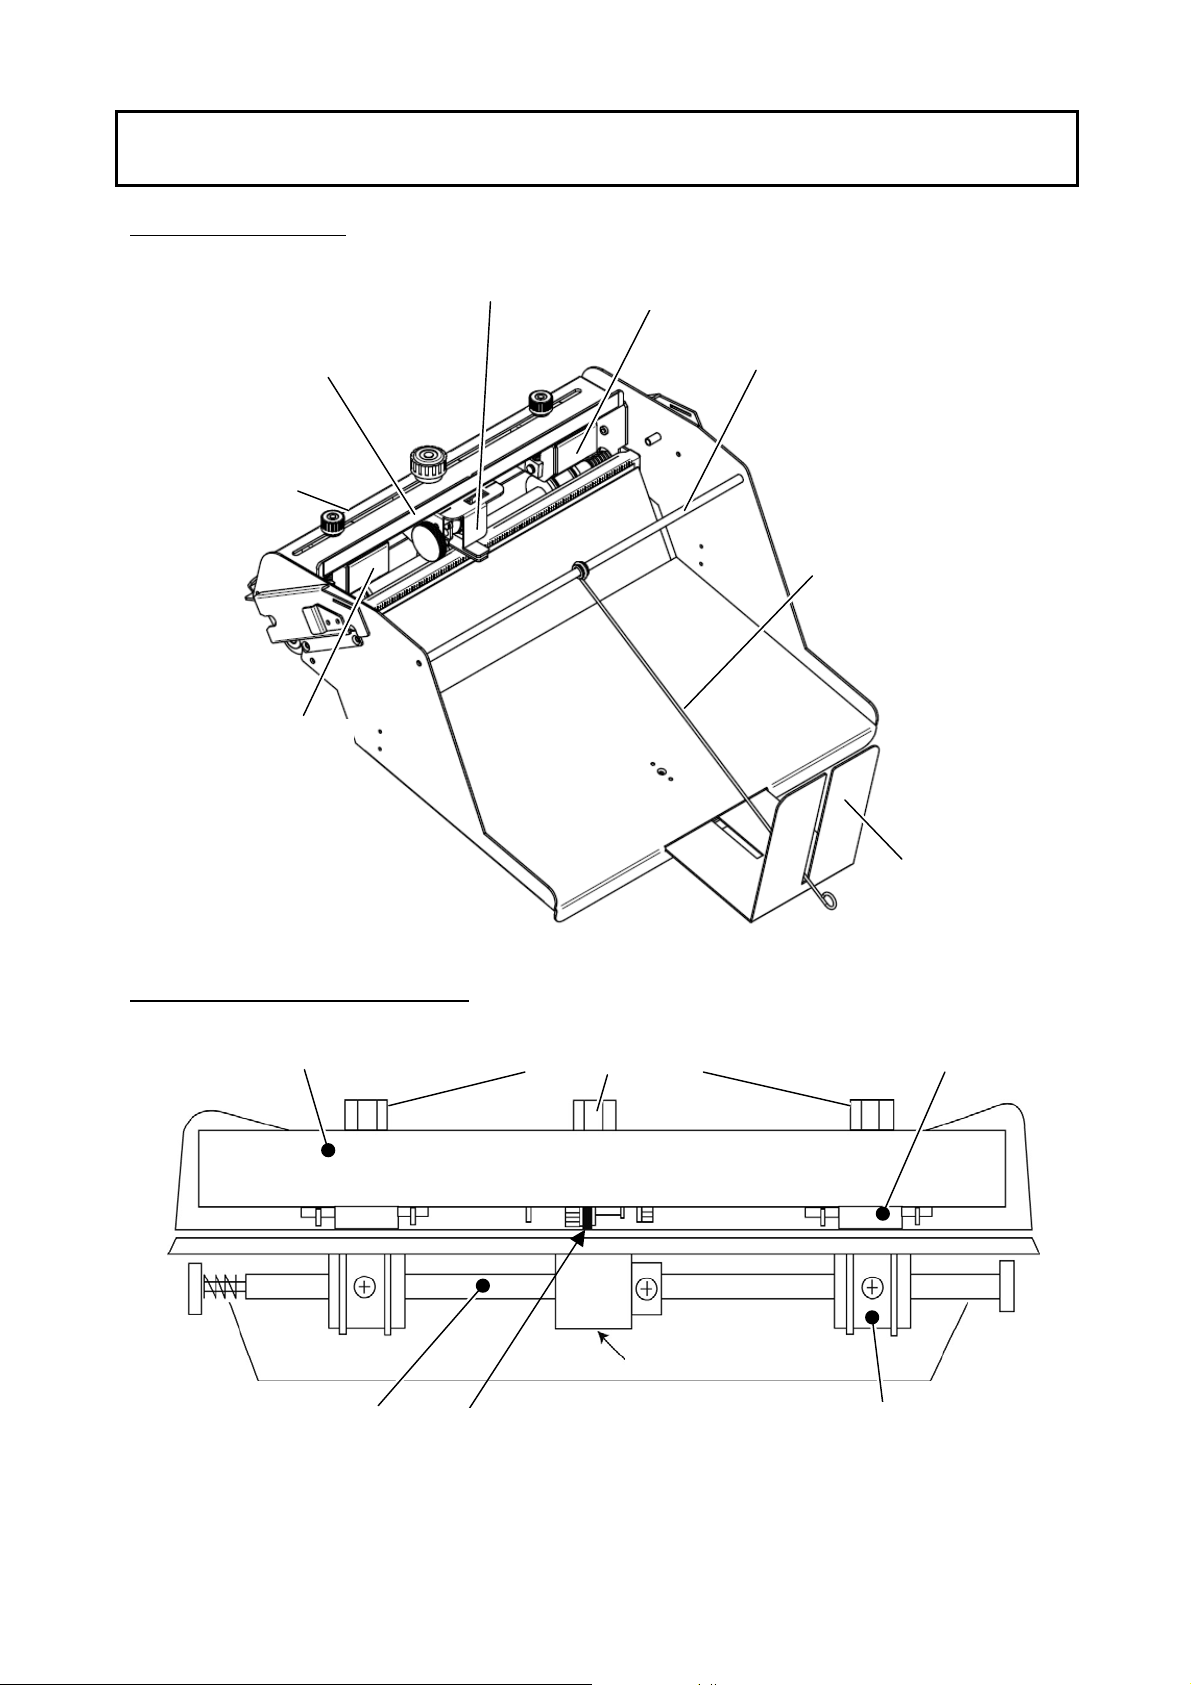
1. Names of Parts
Perforating Unit
Block Mounting Arm
Scale
Perforating Block
Transport Roller Unit
Wire Mounting Shaft
Paper Control Wire
Transport Roller Unit
The paper processing part
Block Mounting Arm
Thumb Screw
Paper Stopper
Upper Transport Roller
Blade Receipt Roller
Transportation Shaft
Perforating Blade
Lower Transport Roller
3
Page 5
V
2. Preparation before use
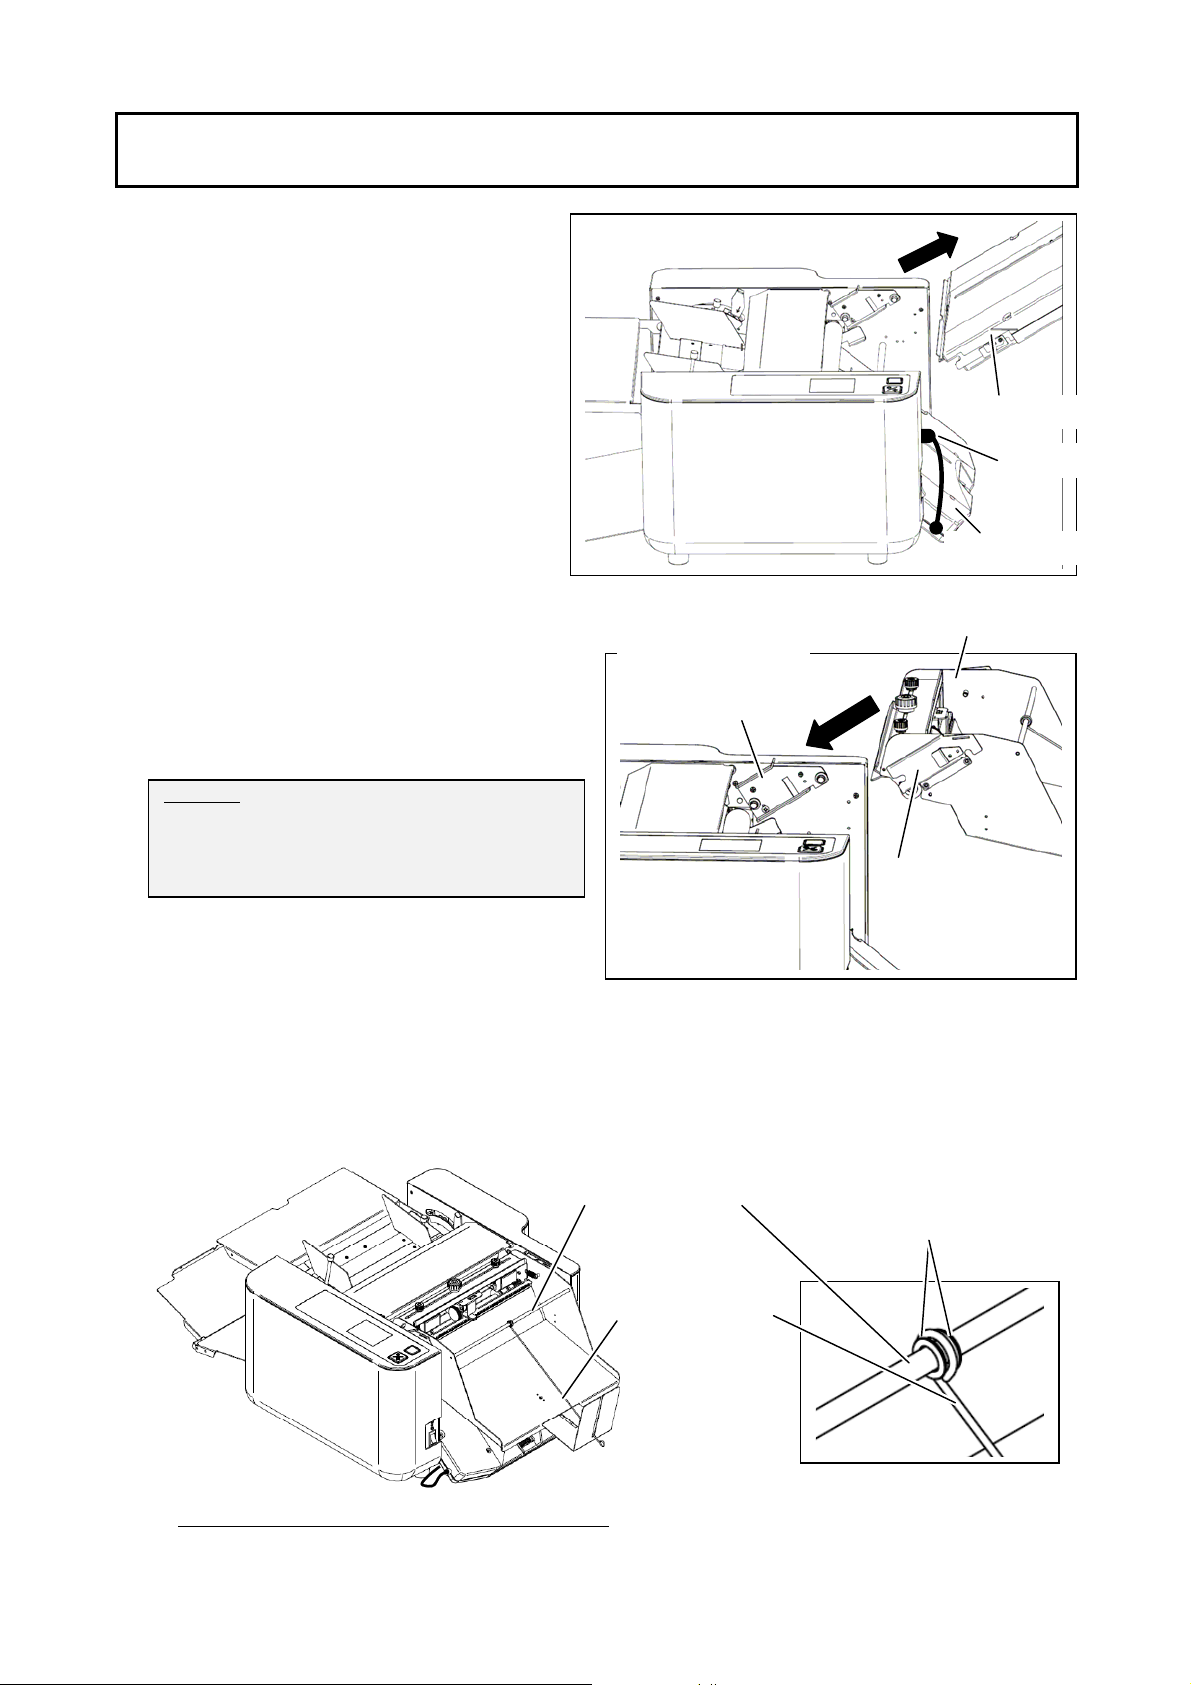
(1) Remove 1st Folding Table to the
direction of arrow.
(2) Remove the connector of 2nd Folding
Table.
1st Folding Table
(3) Install Perforating / Scoring Unit to
the place where 1st Folding Table
was mounted.
Guides
(2 positions
in right and left.)
NOTE:
Insert the Connecting Plates of
Perforator to the Guides of Folding
machine.
Connecting Plate
(2 positions
in right and left.)
(4) Set the Paper Control Wire onto the center of Wire Mounting Shaft and place the
Wire Rubber Rings on the both sides of the wire.
(5) Fix the Wire Mounting Shaft on the body of Perforating unit with screws.
Wire mounting shaft
Wire Rubber Rings
Connector
2nd Folding Table
Perforating Unit
Paper Control Wire
iew after Perforating unit is mounted
4
Page 6
3. How to use
1) Perforation Unit
3.1 Setting Perforating Block
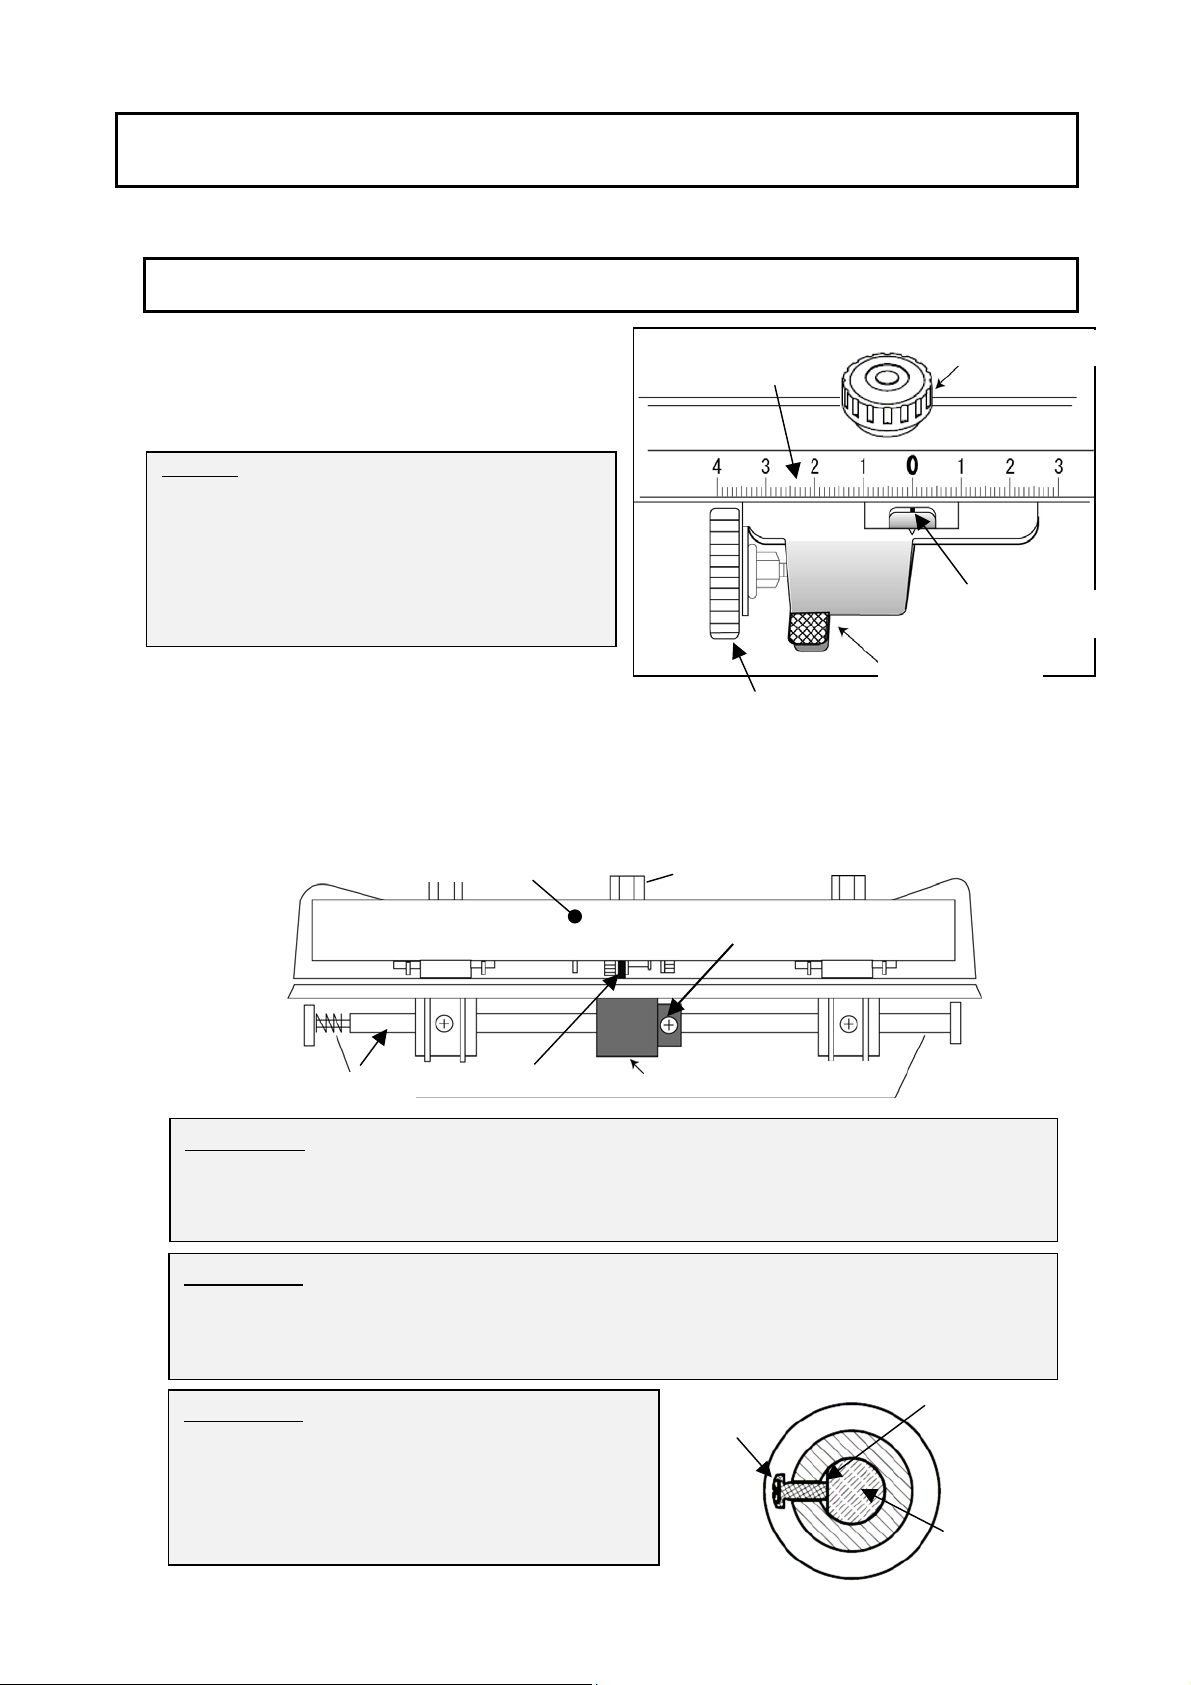
) Loose Thumb Screw and squeeze Release
Levers by fingers to slide Perforating Block
right or left. Refer guide scale.
NOTE:
Before setting Perforating Block, make
sure to place Blade Position Reference at
center position so that fine adjustment
may be possible after the Block is
installed.
Refer “3.4.1 Adjusting line location”
(2) Fitting and fixing Blade Receipt Roller
- Loosen Roller Fixing Screw by Phillips Screw Driver and place Blade Receipt Roller fit
to the Perforating Blade.
- Then fix Roller Fixing Screw.
Block Mounting Arm
Guide Scale
Blade Position
Reference
Release Lever
Fine Adjustment Dial
Thumb Screw
Thumb Screw
Transportation Shaft
CAUTION:
While fixing Thumb Screw, press Thumb Screw towards Block Mounting Arm
so that Perforating Block sets square to Block Mounting Arm.
This helps the paper to be fed straight.
CAUTION:
Perforating Blade is designed always to be pressed against Blade Receipt Roller.
Do not move the Roller without squeezing Release Levers.
When Levers are squeezed, they give distance between Blade and Roller.
CAUTION:
Roller Fixing Screw must be fixed at the
position where Transport Shaft has flat cut.
Otherwise, the Blade Receipt Roller will
not be fixed to the Shaft and the Roller
may be damaged.
Perforating Blade
Roller Fixing Screw
Blade Receipt Roller
Roller Fixing
Screw
Flat cut
Transportation
Shaft
5
Page 7
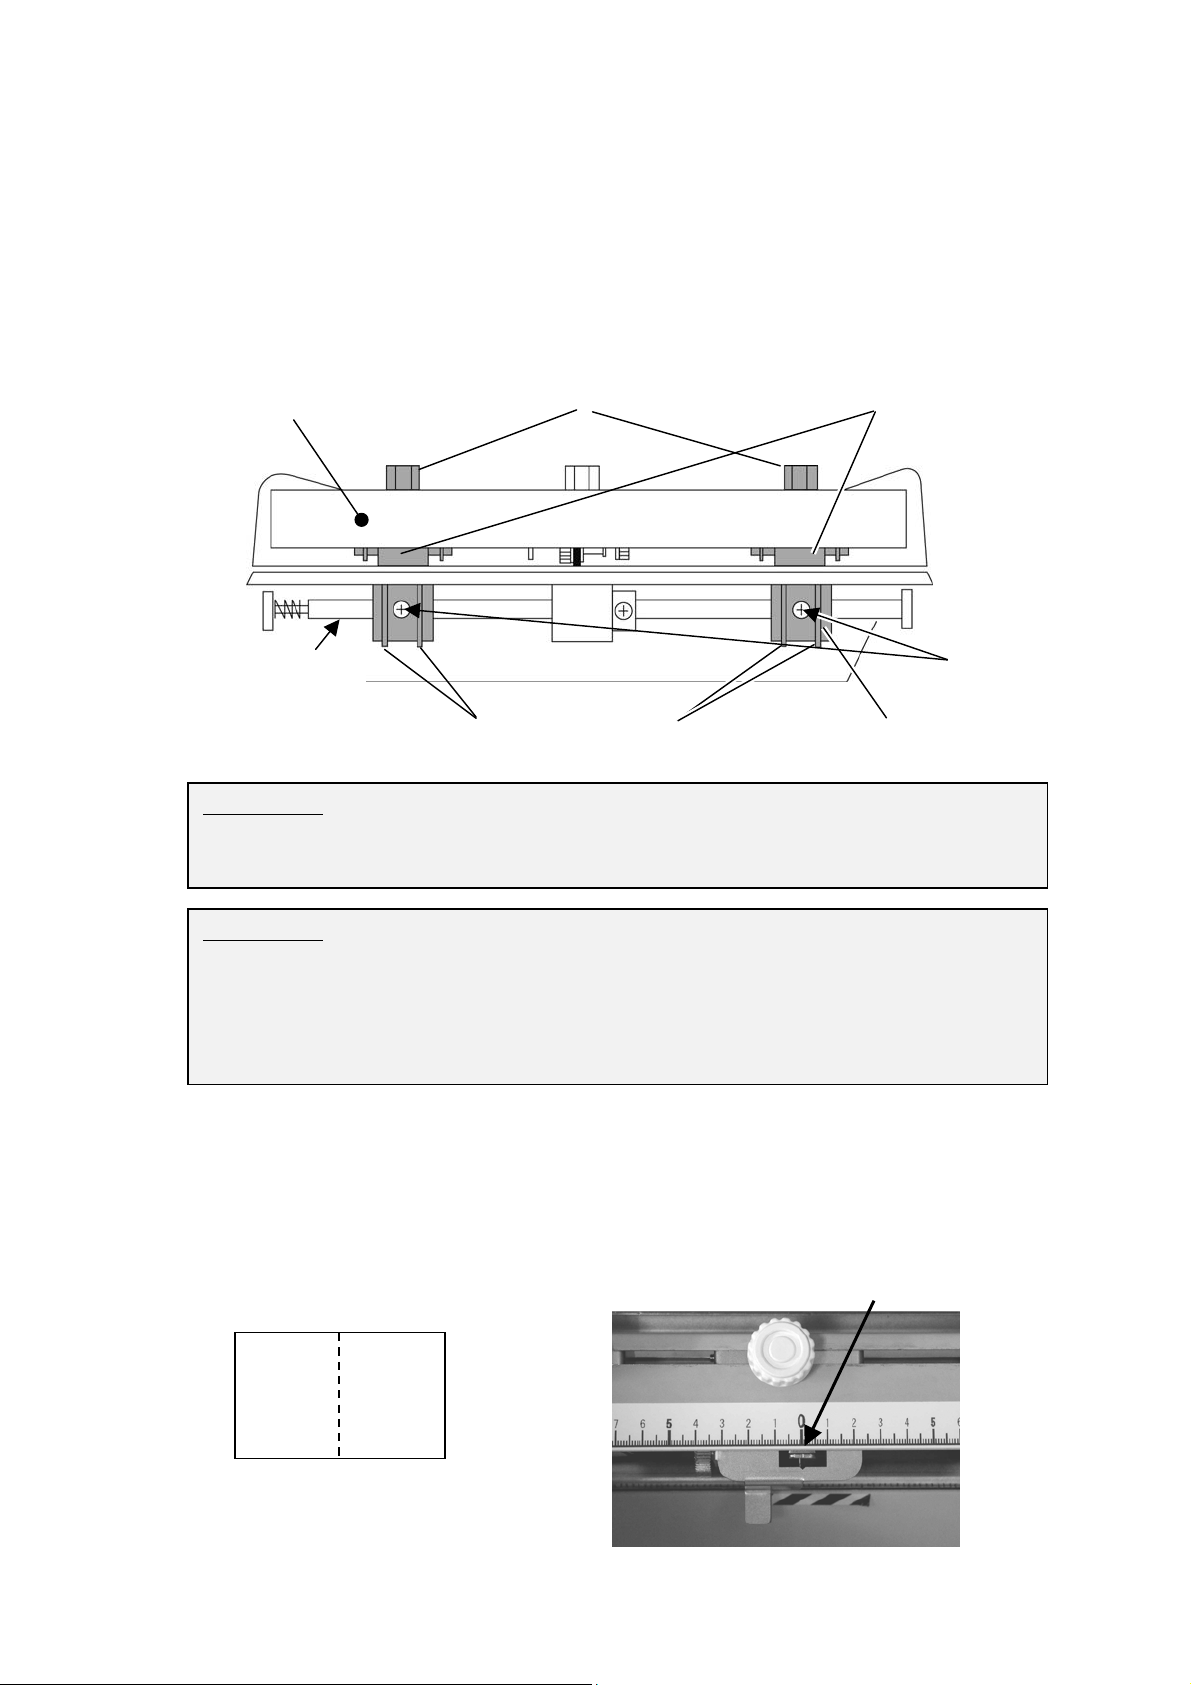
(3) Setting Paper Transport Rollers, Upper and Lower, at proper position
Place the Paper Transport Roller where they can grip paper positively.
Firstly, loosen Lower Philips Fixing Screws on both sides.
Slide and position them to the appropriate location and fix them.
Then, loosen Thumb Screws of Upper Transport Rollers on both sides.
Slide and position them so that Upper Transport Rollers ride on the Lower Transport
Rubber Rings.
Block Mounting Arm
Thumb Screw
Upper Transport Roller
Transportation
Shaft
Roller Fixing
Screw
Transport Rubber Rings
Lower Transport Roller
CAUTION:
Press Thumb Screw to Block Mounting Arm when fixing the Perforating Block.
This helps the paper to be fed straightly.
CAUTION:
Depending location of perforating line, it may not always be possible to place
Upper Transport Roller riding on the two Rubber Rings.
In this case, we have to live with single Rubber Ring.
However, as much as possible, try to use two Rubber Rings at both sides for
stable paper feeding.
【Perforation Examples】
(1) Perforating at the center of a sheet
- Place Blade Position Reference to 0 (Zero) position of the scale.
6
Blade Position Reference
Page 8
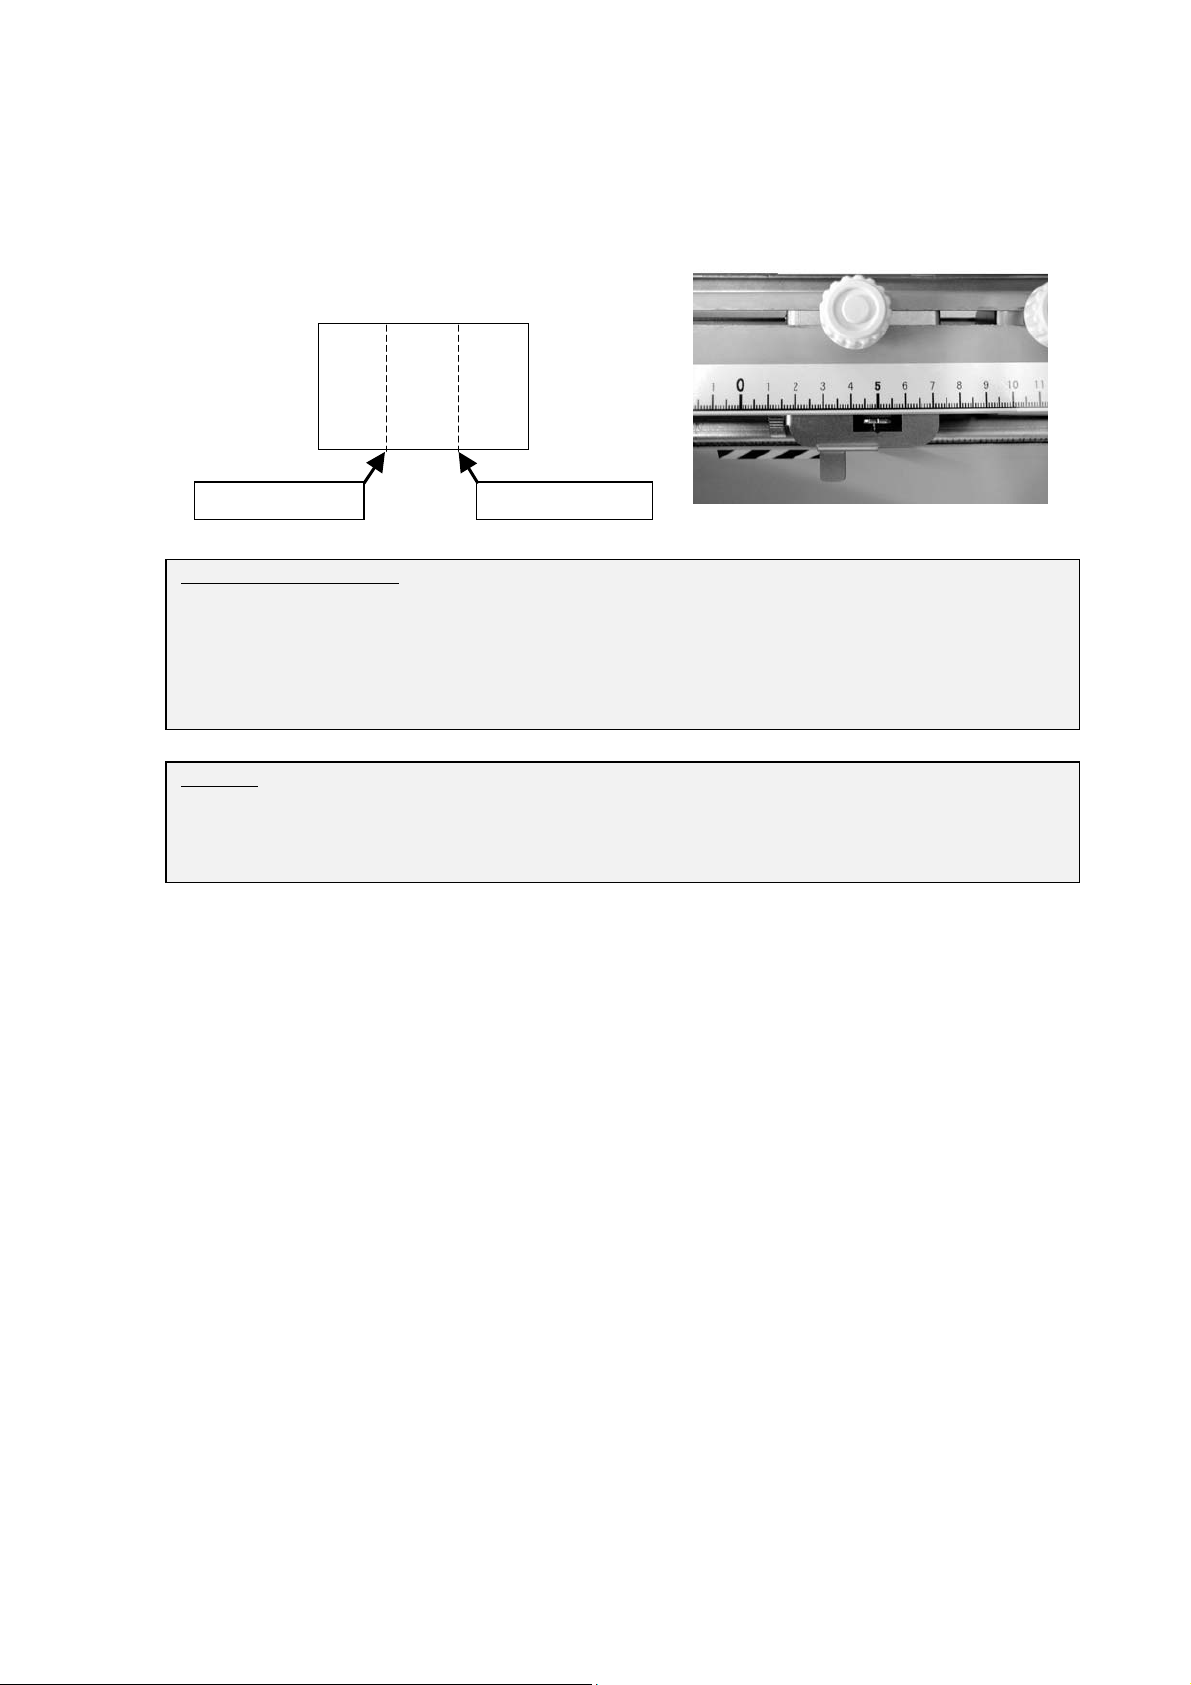
(2) Perforating two lines on a sheet by single perforation block.
- Place Blade Position Reference to adequate position and perforate.
- After first perforation done, reload the sheet to Paper Feed Tray reversing the paper
position.
- Then perforate 2nd line again.
1st Perforation 2nd Perforation
Further information:
If desired to perforate two lines by one operation, add one additional perforating block
(optional) to the transport shaft.
Note due to frame size of perforating block, perforating too closed lines or too far apart
lines may be limited.
Refer “ 4. Adding Perforation Unit “
NOTE:
Scale graduation and Blade Position Reference are for guidance only.
To perforate at the accurate position, use fine adjustment mechanism.
Refer “ 3.4.1 Adjusting line location ”
7
Page 9
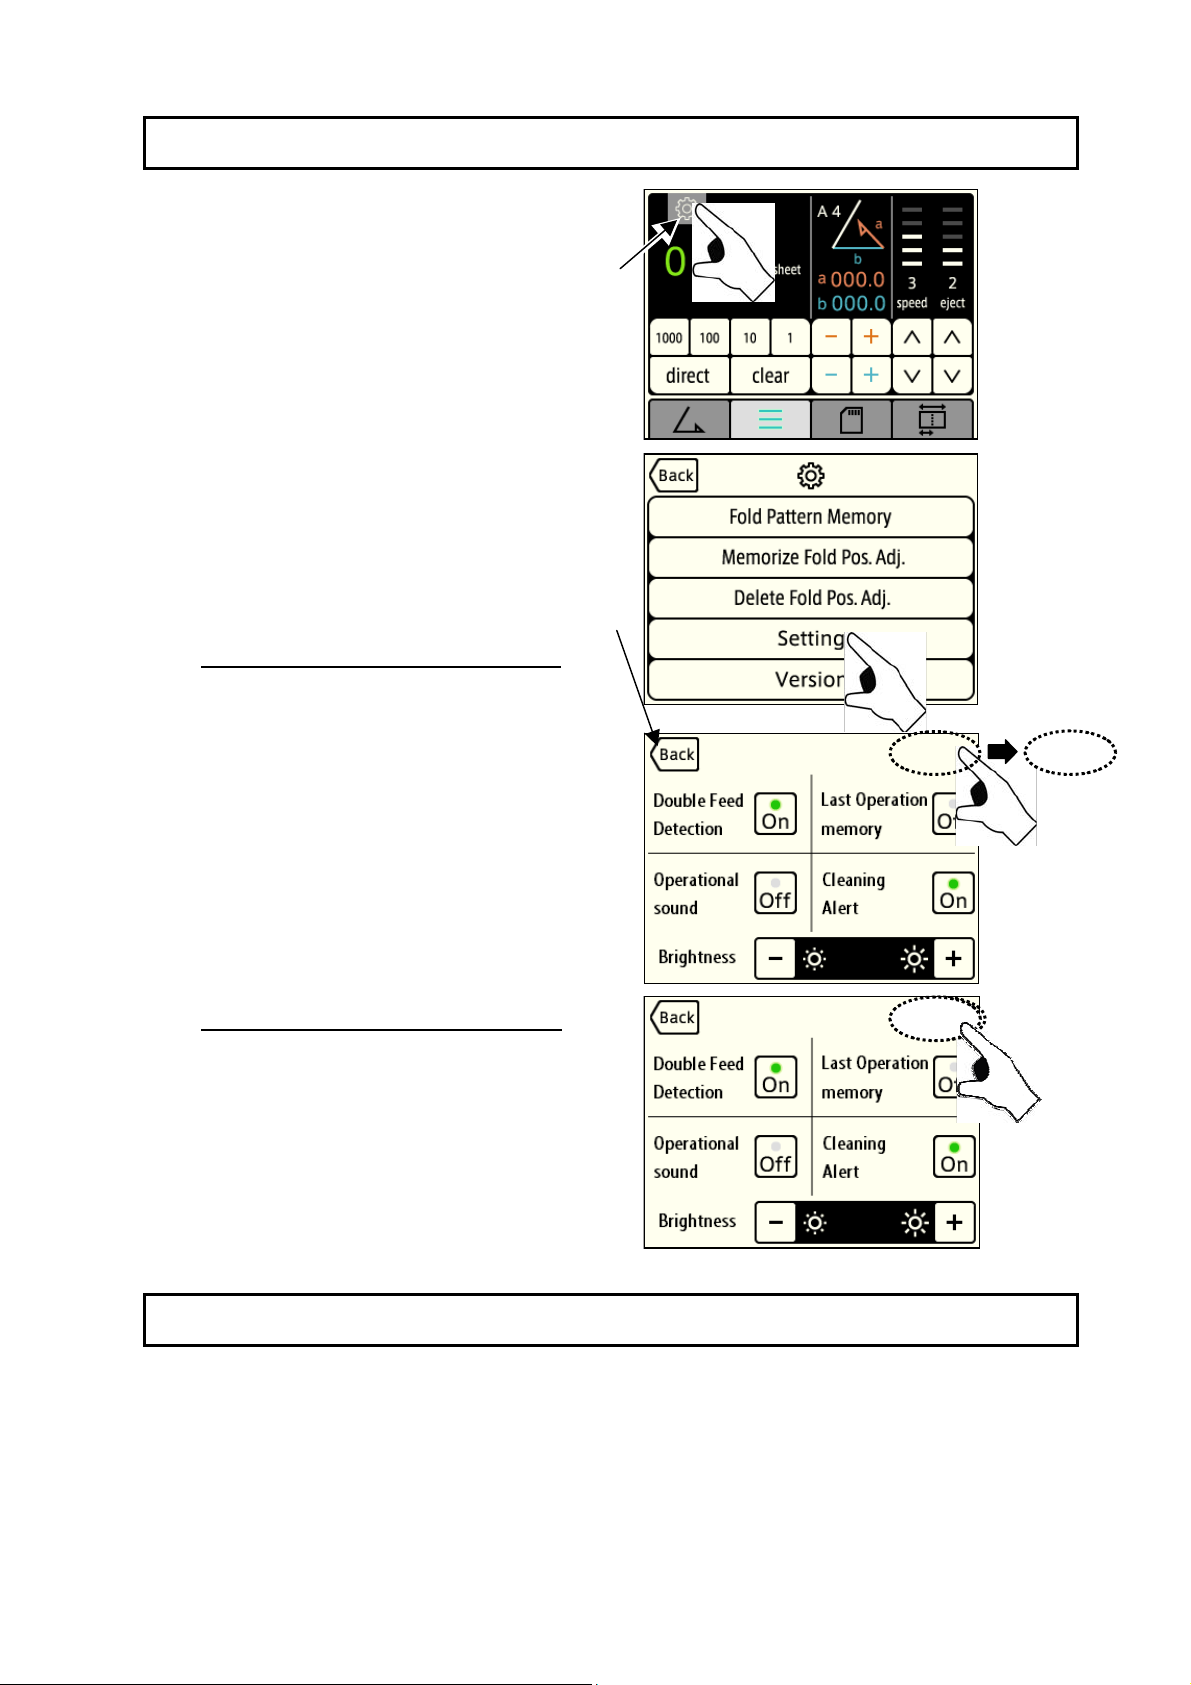
3.2 Method for changing operation mode
(1) Press the “ Gear mark ” on the control
panel to switch to the “ Setting ” screen.
(2) Press the “ Setting “ on the control panel
to switch to the “ Detail Setting ” screen.
(3) To turn “ On ” the Perforator Mode.
- By doing a long press (about 3 seconds) of
the upper right of the display screen, it
will change to the “ Perforator Mode ”.
- With this operation, the " Perfo. " will be
displayed on the screen.
- Press the “ Back ” key to return to the
“ Main Screen ”.
- Perforation / Scoring Unit(Option) will be
available..
(4) To turn “ Off ” the Perforator Mode.
- By doing a long press (about 3 seconds) of
the "Perfo." was displayed on the upper
right of the screen, it will exit the
“ Perforator Mode ”.
With this operation, the display of the
"Perfo." will disappear from the screen.
Gear mark
“ Back ” key
Long press
Perfo.
Perfo.
Long press
3.3 Trial Perforation
(1) Turn on the power of Paper Folding Machine.
Switch to the “ Perforator Mode ”.
Refer to the “ 3.2 Method for changing operation mode ”.
(2) Set papers on Paper Feed Tray, set Counter to “1” and press “START” Key.
(3) Evaluate if the perforation is done properly as desired.
8
Page 10
A
3.4 Fine Adjustment of Perforating Line
3.4.1 Adjusting line location
- If the line is extremely out of desired location, Perforating Unit must be relocated.
If the line is away for approximately 5mm or less from desired position, fine
adjustment may be possible without changing Perforating Block set up.
NOTE:
Before fixing Perforating Block, make
Guide Scale
sure to place Blade Position Reference to
center position so that fine adjustment
may be possible after the Block is fixed.
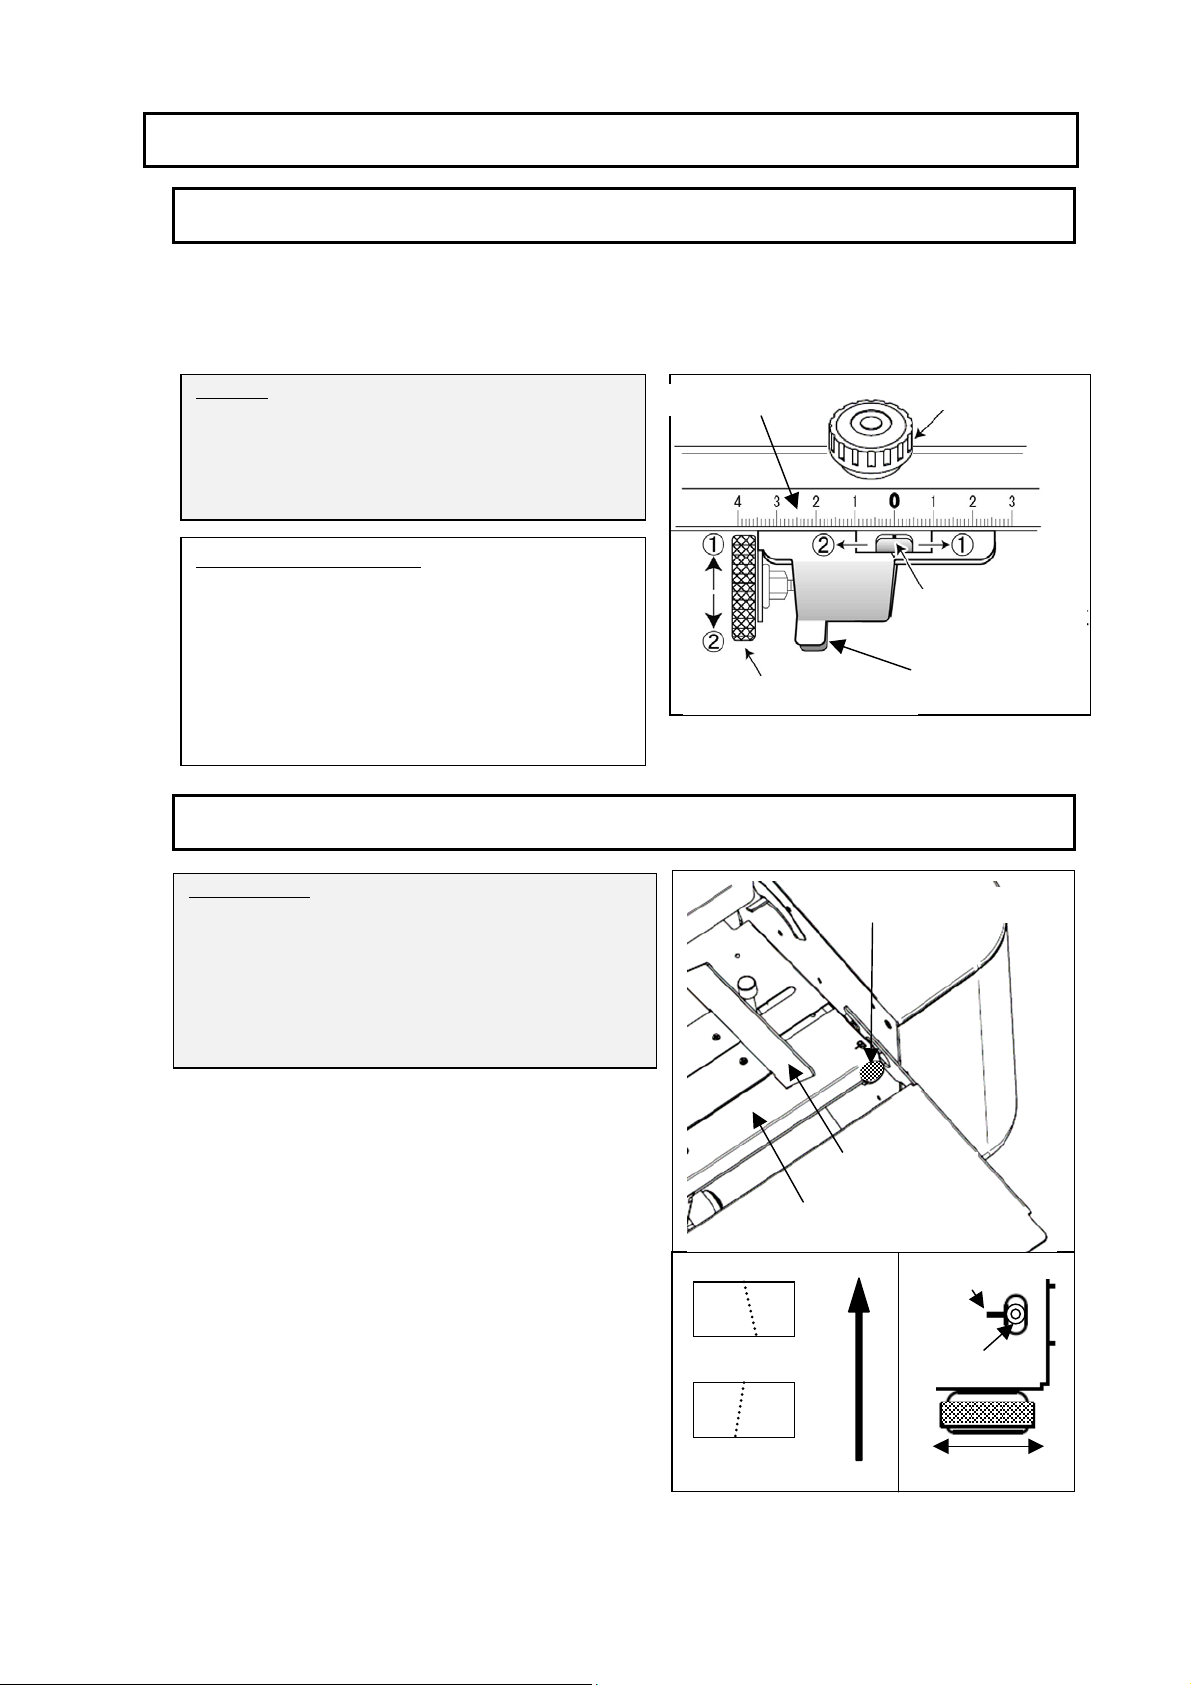
ine Adjustment Dial:
While squeezing release levers, turn Fine
Adjustment Dial to direction ① and
Perforation position moves to right
(direction ①) .
When it is turned towards direction ②,
Fine Adjustment Dial
Perforation position moves to left
(direction ②) .
Thumb Screw
Blade Position
Reference
Release Lever
3.4.2 Adjustment of perforating angle
CAUTION !
Before making any adjustment,make sure
that the paper is tightly placed without
clearance between the Paper Guides in the
Paper Feed Tray of Folder.
Otherwise, right angle of perforation is not
available in any event.
Slant Adjust Dial
In case perforation is not performed in the
right angle, adjustment of angle may be
Paper Guides
possible.
【Refer to the figure on the right.】
Paper Feed Tray
Engraved Mark
Paper Feed Direction
- In case finishing of perforation is angled to
right “a.”, turn Slant
direction of “1”.
djustment Dial to the
a. Angled to Right
Pin
- In case finishing of perforation is angled to
left “b.”, turn Slant Adjustment Dial to the
b. Angled to Left
direction of “2”.
2
Slant Adjust Dial
1
9
Page 11
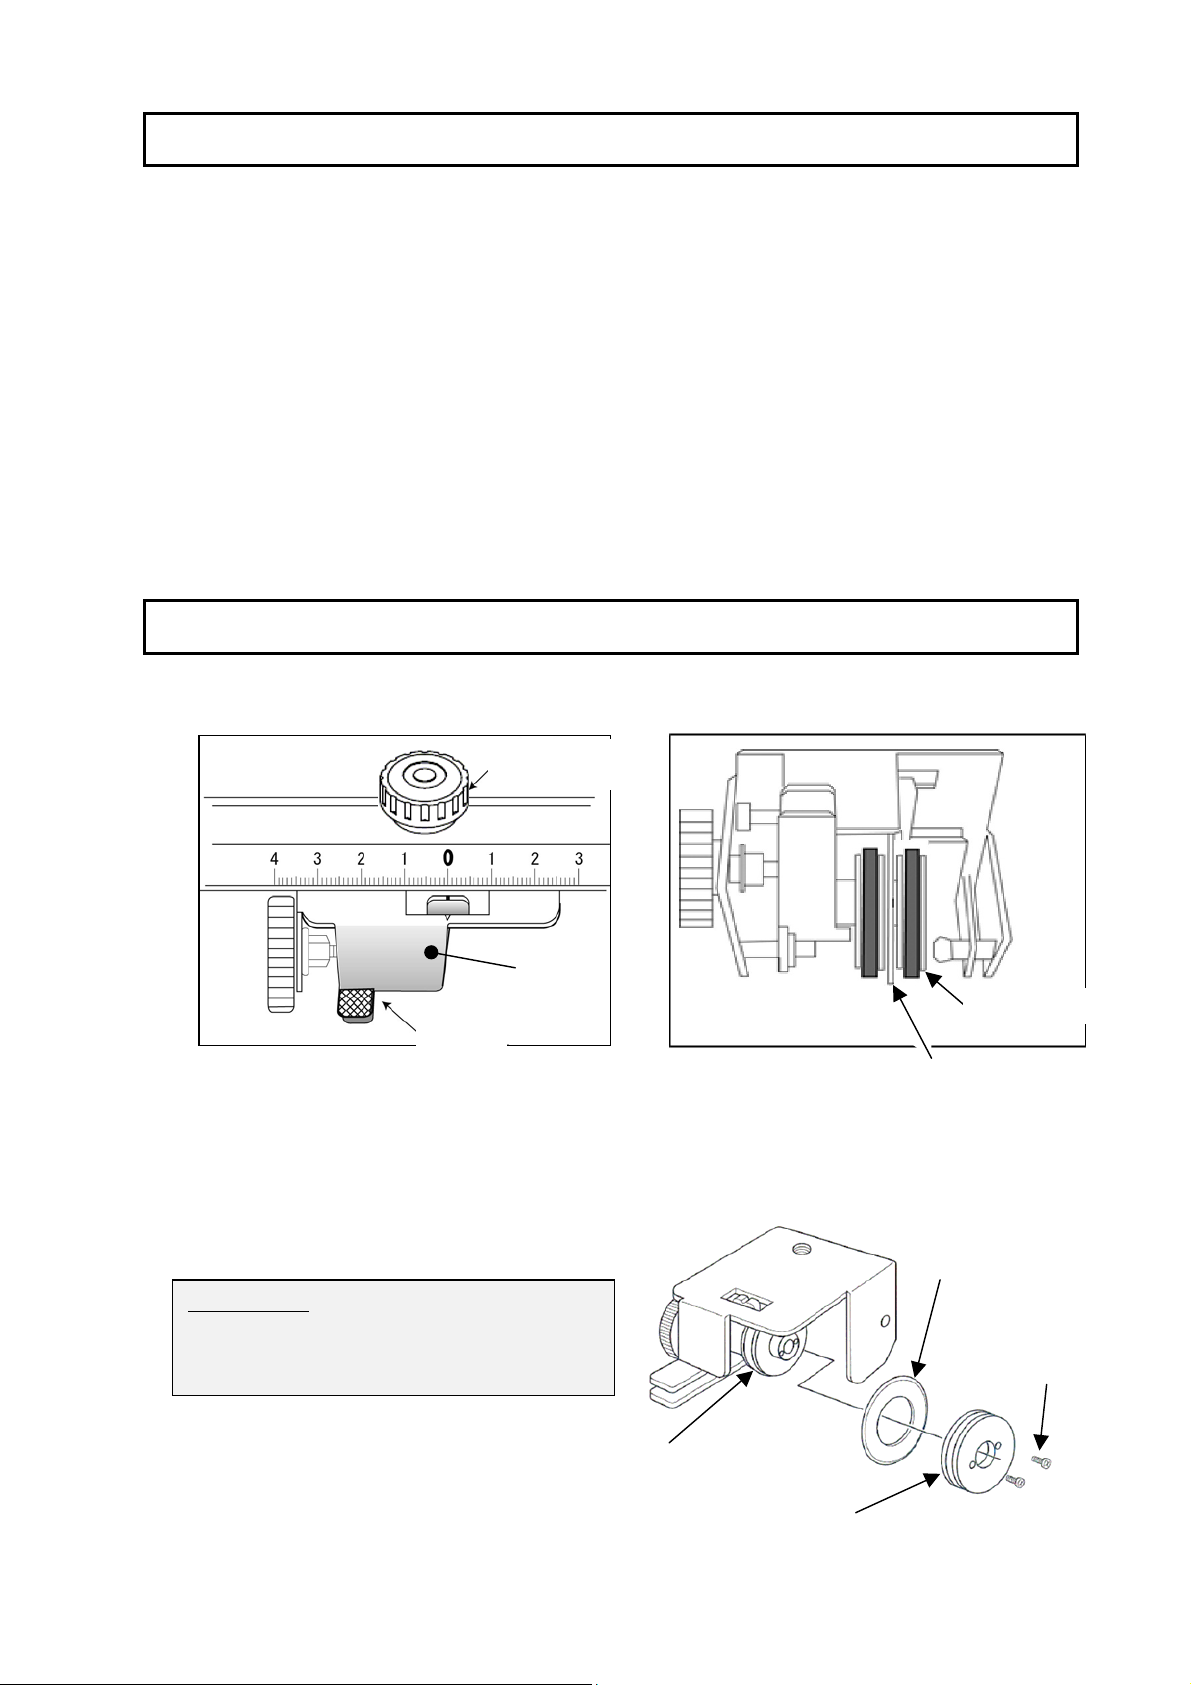
3.5 Perforation, continuous
(1) Press “Reset/Clear” Key and clear the counter setting to “0 (Zero)”.
(2) Perforate all the sheets loaded:
Load paper to Paper Feed Tray and press “START” Key.
Machine perforates up to the end of paper stack.
(3) Perforate designated number of sheets:
Load paper to Paper Feed Tray and preset quantity of sheet desired to perforate.
Then, press “START”.
Machine perforates up to the designated quantity of sheet and stops.
3.6 Replacing Perforating Blade
(1) While holding levers, loosen Thumb Screw and remove cutter unit from main unit.
Thumb Screw
(2) Remove 2 screws which are fixing Fixing Wheel by Philips screw driver and remove
USED Perforating Blade.
First remove Fixing Wheel and then
remove Perforating Blade.
Levers
Cutter
Unit
Cutter Boss
Perforating Blade
Perforating Blade
(USED)
CAUTION !
Perforating Blade is extremely sharp.
Do not touch the blade.
Fixing Wheel
Screws
Cutter Boss
Fixing Wheel
10
Page 12
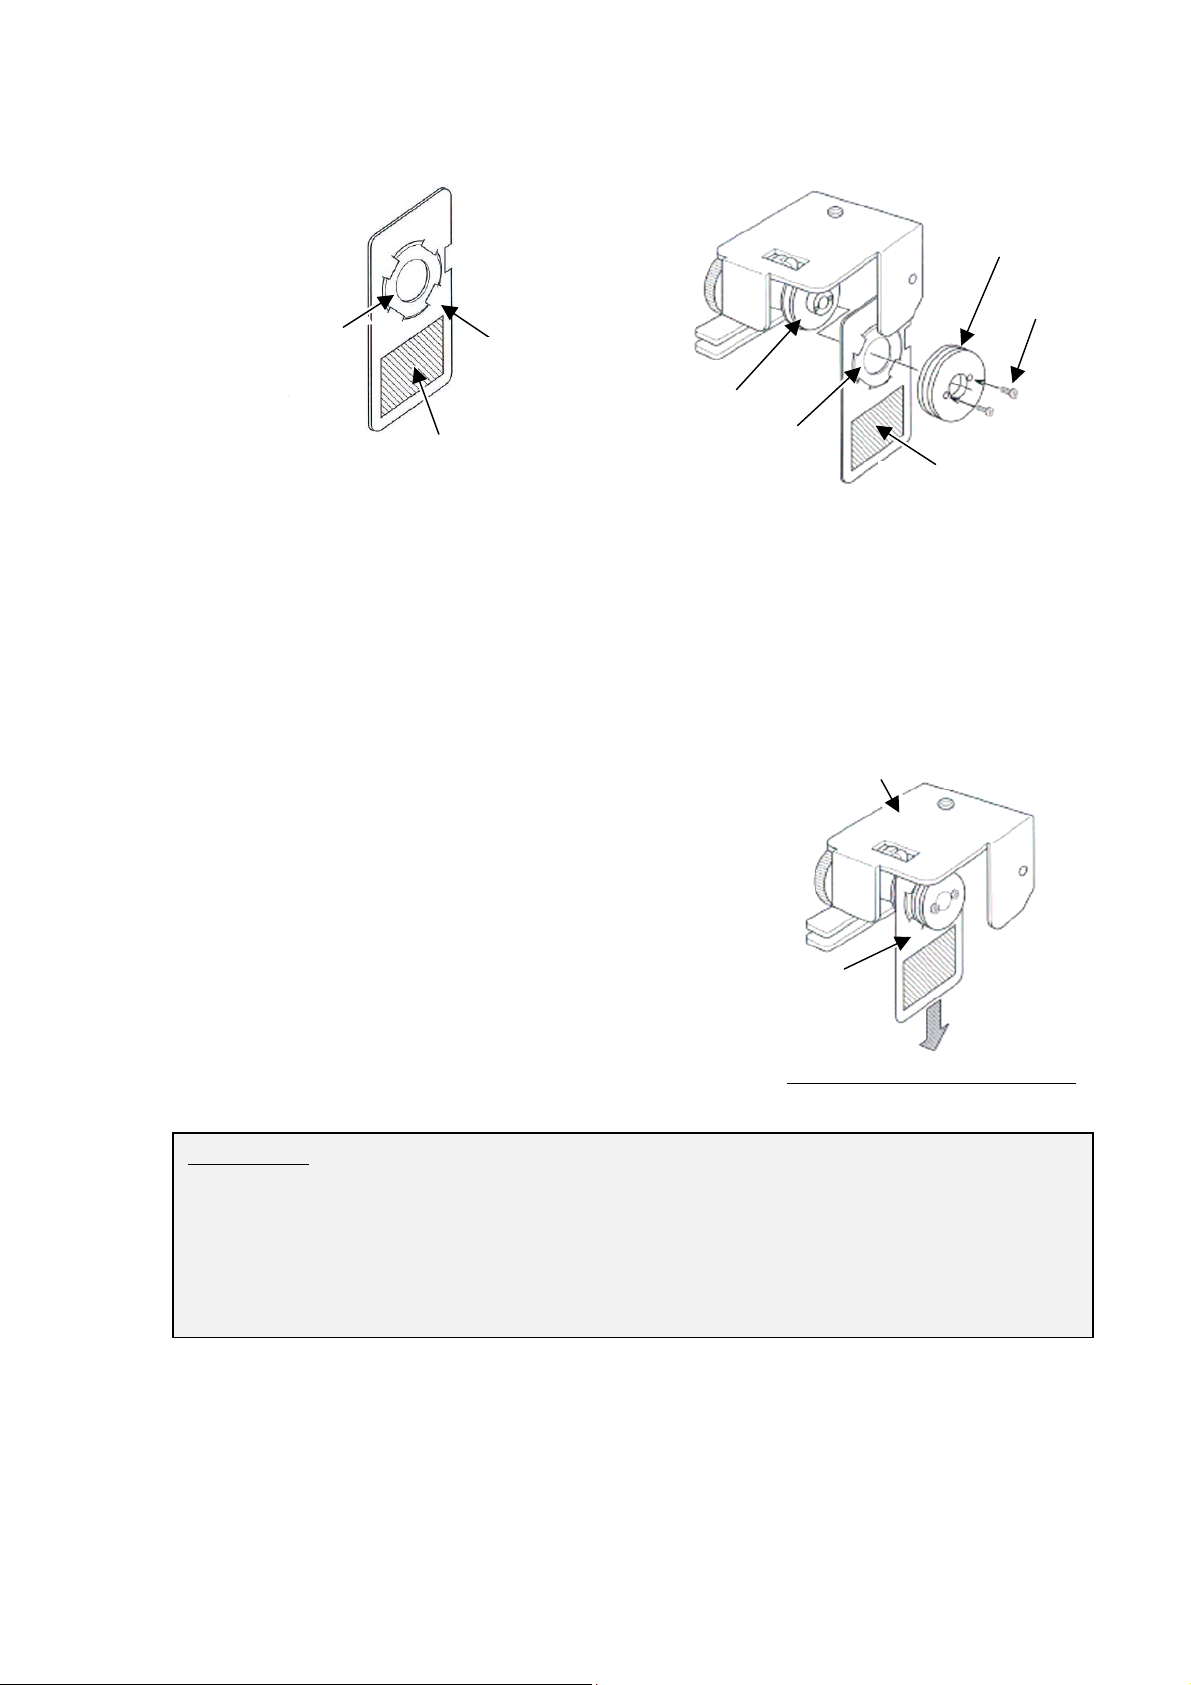
Perforating Blade(NEW)
(Blade is supported by
protective film.)
(3) Facing Explanation Level toward you per figure, Set NEW Blade to Cutter Boss.
Protective
film
Explanation Label
Fixing Wheel
Screws
Cutter Boss
Perforating Blade
Explanation Label
(4) Set Fixing Wheel by 2 Screws tight.
(5) Pull Protective Film toward direction of arrow so that the Film removes from
the installed Blade.
※Film may be sometimes torn up but it is not a problem.
(6) Confirm that the two screws are firmly
Cutter Unit
fixing the Fixing Wheel and consequently
Blade.
(7) Mount the Cutter Unit to the machine in the
reverse sequence of de-mounting.
Protective Film
Pull the film direction of arrow.
CAUTION !
1. 2 screws for fixing Fixing Wheel must firmly fixed.
2. Perforation Blade is extremely sharp and it must not be touched with bare finger.
3. After Perforation Blade (New) is firmly fixed to Cutter Unit, Protective Film must
be pulled out.
11
Page 13
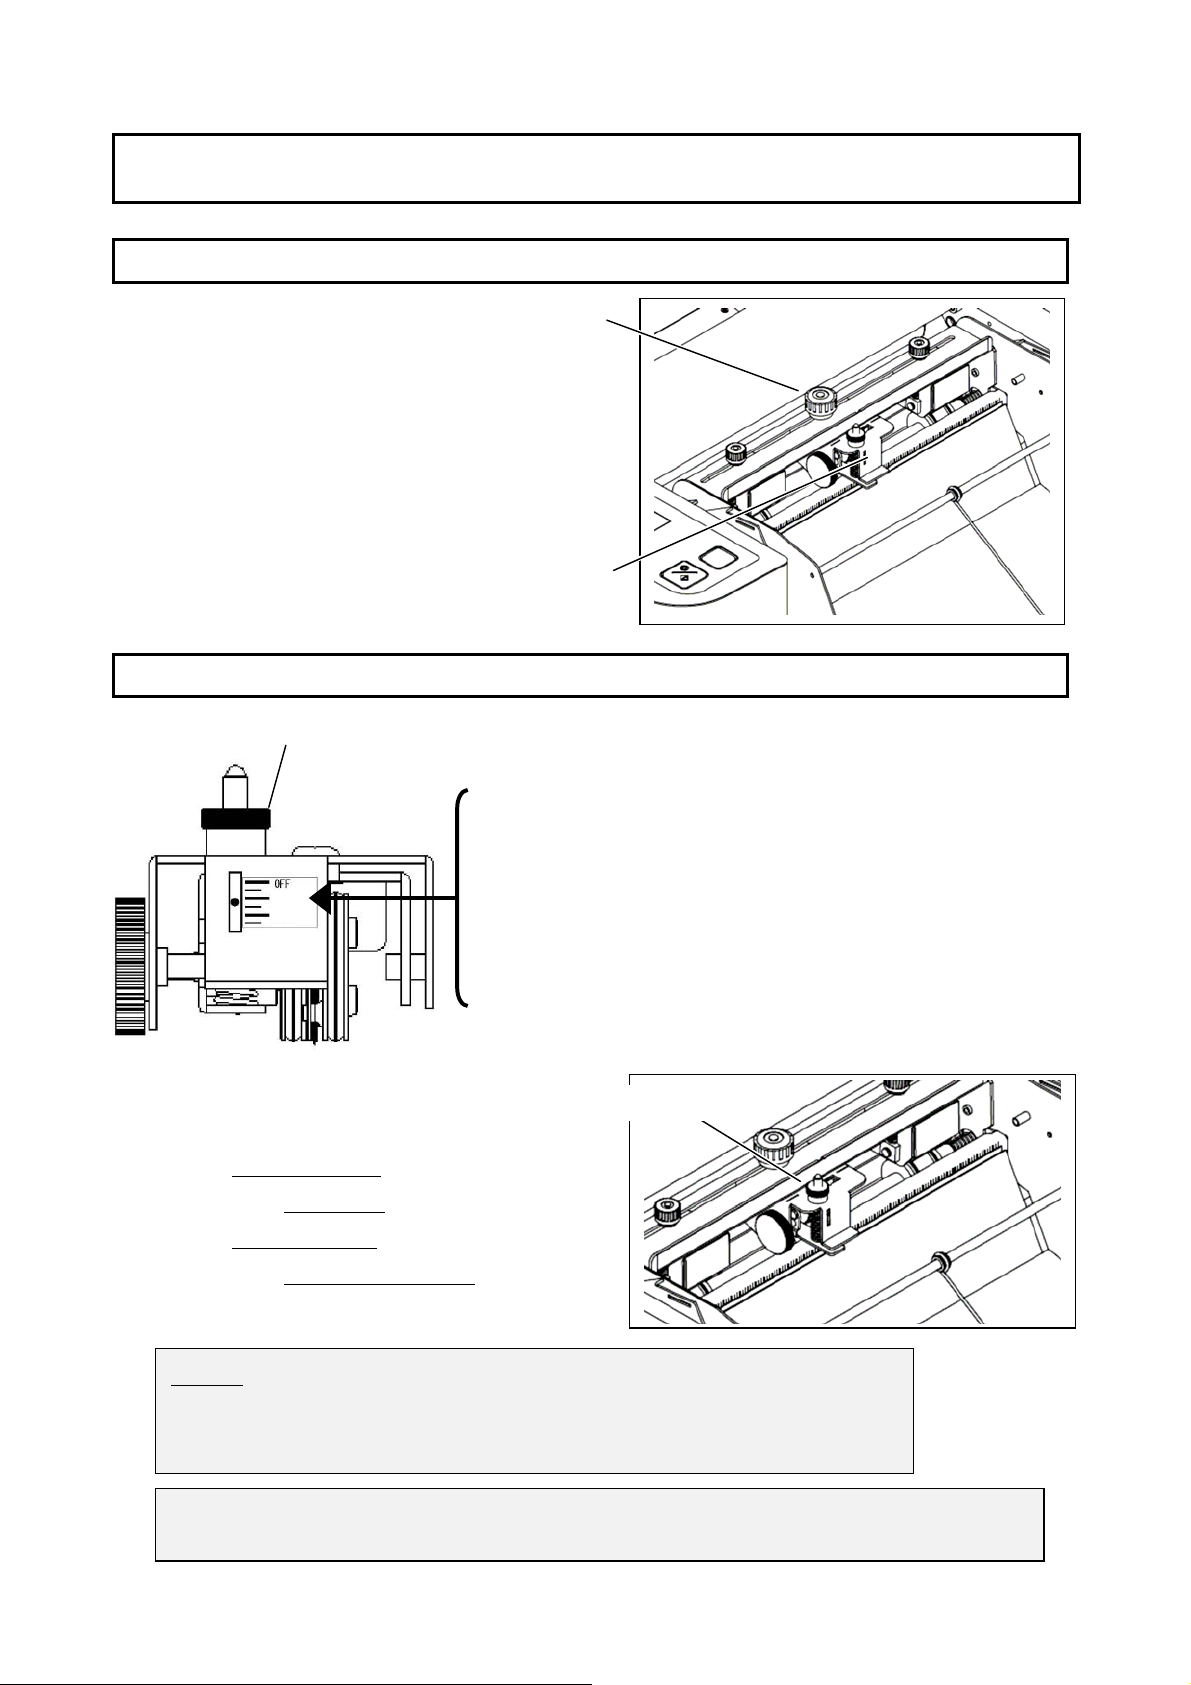
How to use Thick-Paper Perforating Unit (Option)
1) How to install the Thick-paper Perforating Block (Optional Parts)
Thumb Screw
Loosen Thumb Screw and remove Standard
Perforation Unit.
Replace with Thick-Paper Perforation Unit.
Then tighten the Thumb Screw to secure.
Thick-paper Perforating Block
2) How to use
Pressure Control Nut
OFF : While keep installing Perforation Unit(Medium,Thick
MEDIUM
THICK
MEDIUM : When medium thickness paper is perforated,
THICK : When thick paper is perforated, Adjust position here
By rotating Pressure Control Nut,
adjust Perforating blade pressure.
・When Thinner Paper
⇒ Rotate Clockwise
・When Thicker Paper
⇒ Rotate Counter-Clockwise
(Pressure increased)
(Pressure lowered)
Paper or Narrow), Unit does not perforate paper.
adjust position here around, watching perforated
sheet.
around, watching perorated sheet.
Pressure Control Nut
NOTE:
1) While watching how perforated, adjust pressure.
2) Perforating Blade is extremely sharp, do not touch by bare fingers.
※Other usage is the same as the Standard Perforation Unit.
Please refer to the “ 3. How to use “ and “ 4. Adding Perforation Unit “.
12
Page 14
it the f
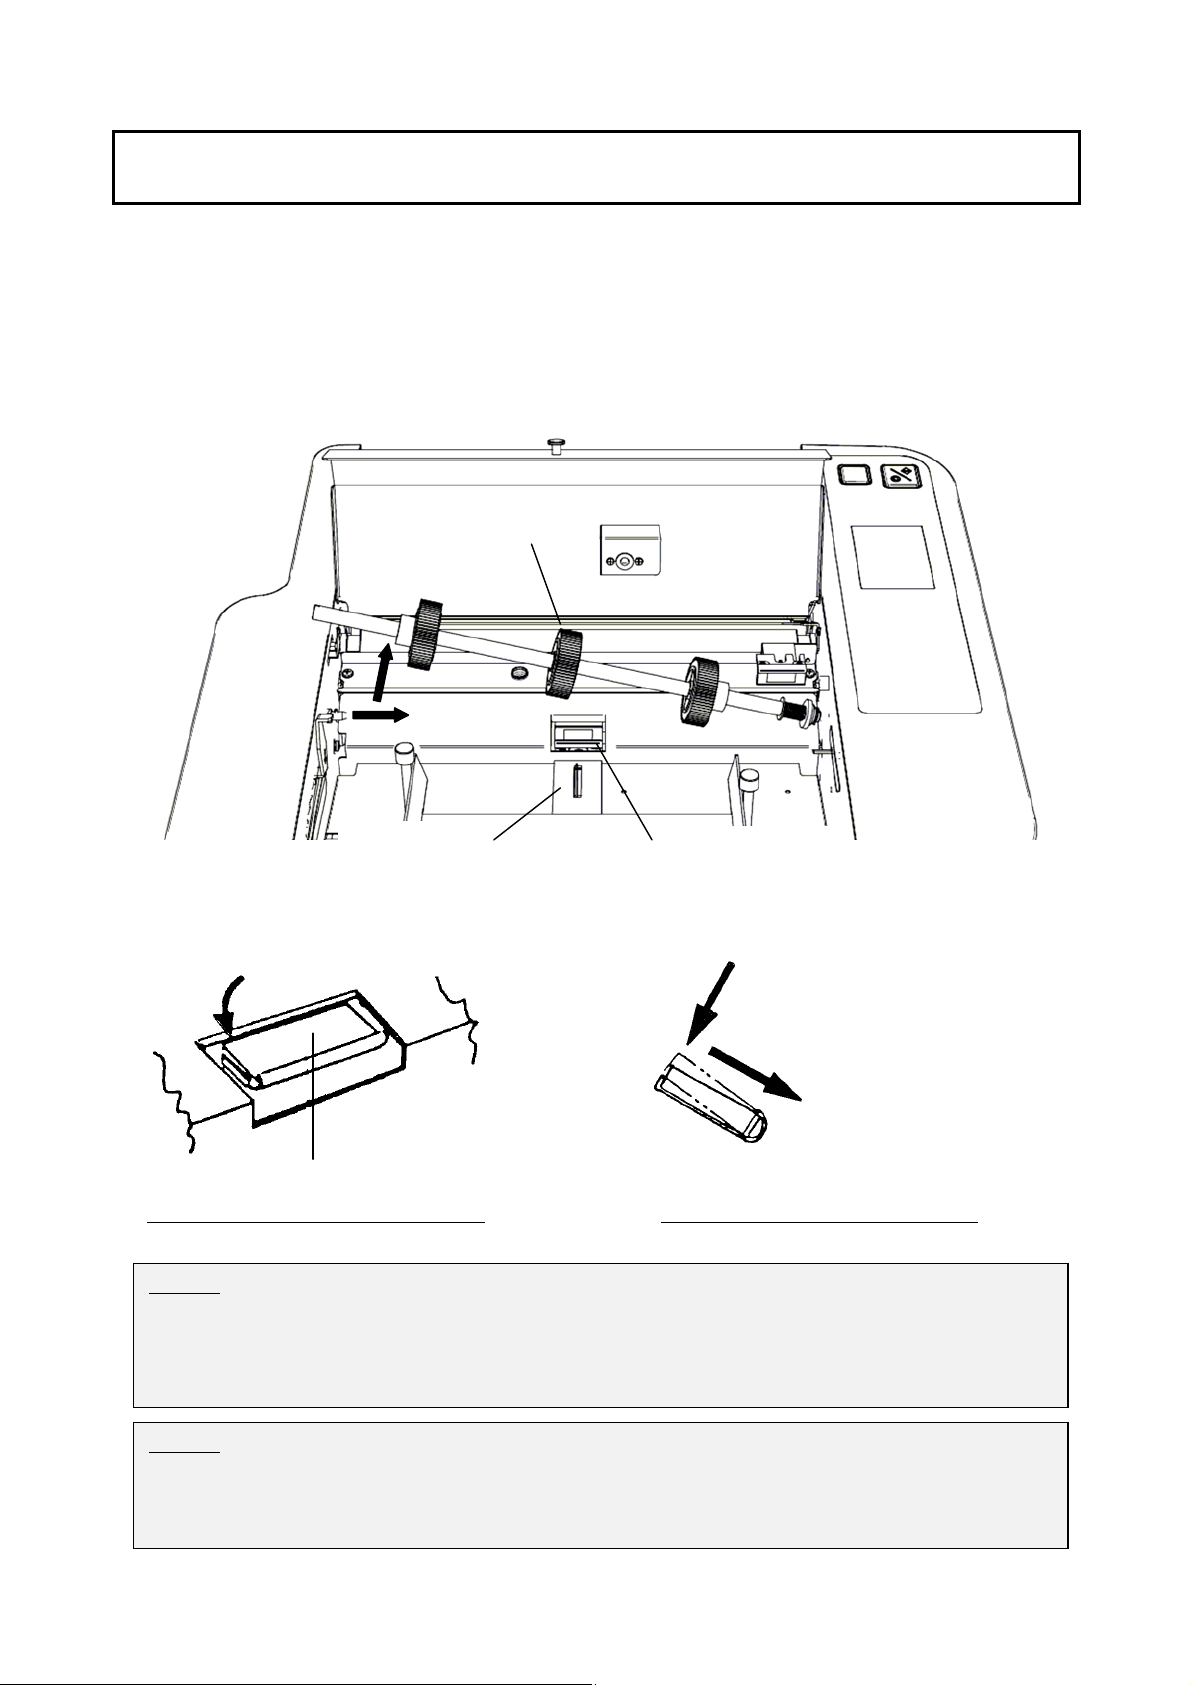
How to Replace the Separator with Thick-paper Separator
When fed, thicker paper might be damaged because of the friction between a paper feed
roller and a separator.
You should change the separator with Thick-paper Separator in that case.
Thick-Paper Separator is marked with red-line.
Please refer to the following for how to replace the separator.
Paper Feed Roller
②
①
Brake Rubber
Paper Separator
Raise the rear side to take out.
Press the rear side to set.
②
①
Paper Separator
How to remove a paper separator
NOTE:
How to place a paper separator
F
ront side in the curve.
If paper still curves or other problem remains even when you operate the machine with
Thick-paper separator, please turn over the papers you stack on the paper feed table and
try again.
NOTE:
If you find the cut edge is not fine when you tear off along the perforation, fold the paper
back and forth and tear it off slowly.
13
Page 15
V
【
】
2) Scoring Unit
3.7 Setting Scoring Block
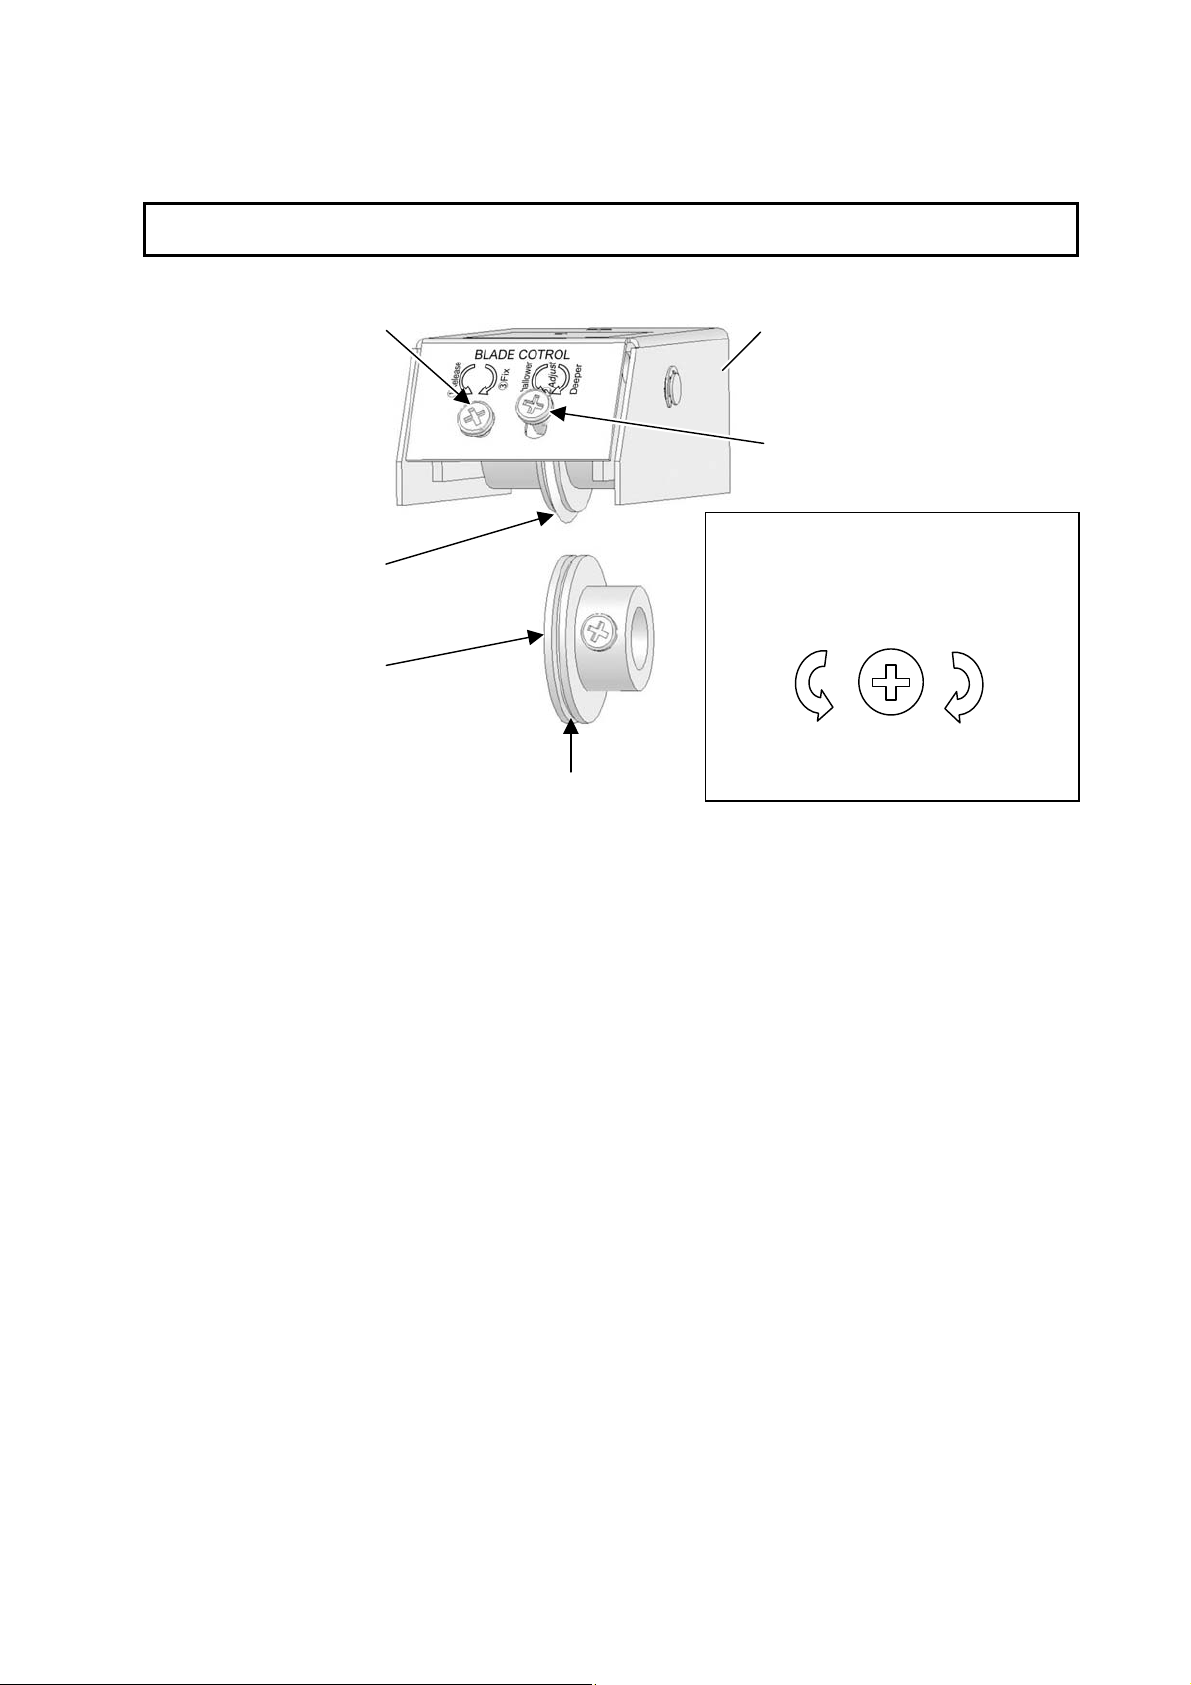
Upper Scoring Roller
Lower Scoring Roller
(1) Scoring Position
Move V-Groove of Lower Scoring Roller to the place where scoring.
Then, fix the Roller by Philips Screw Driver.
Press “Test” Key as leading edge of paper comes close to Lower Scoring Roller so that
scoring position is determined.
Do not feed paper yet to the rollers.
Fix / Release
-Groove
Scoring Block
Height
BLADE HEIGHT CONTROL
(Screw on right side)
①
Shallower
②
Deeper
(2) Positioning of Upper Scoring Roller
Loosen (turn) Release/Fix screw (left) on the left side for 2 to 3 rounds.
Turn Shallow/Deeper screw counterclockwise 2 to 3 rounds.
Slide the Upper Scoring Roller right above the lower V-Groove.
Turn Shallow/Deeper screw clockwise till Roller comes down in to the bottom of V-Groove.
Then, Fix the Scoring Block turning Release/Fix screw clockwise.
Now, Upper Blade and Lower Groove position is mechanically matched.
(3) Adjusting shallowness/depth of Upper Scoring Roller
Turn Shallower/Deeper screw counterclockwise for 2 to 3 turns. Then, fix the height by
Fix/Release screw.
14
Page 16
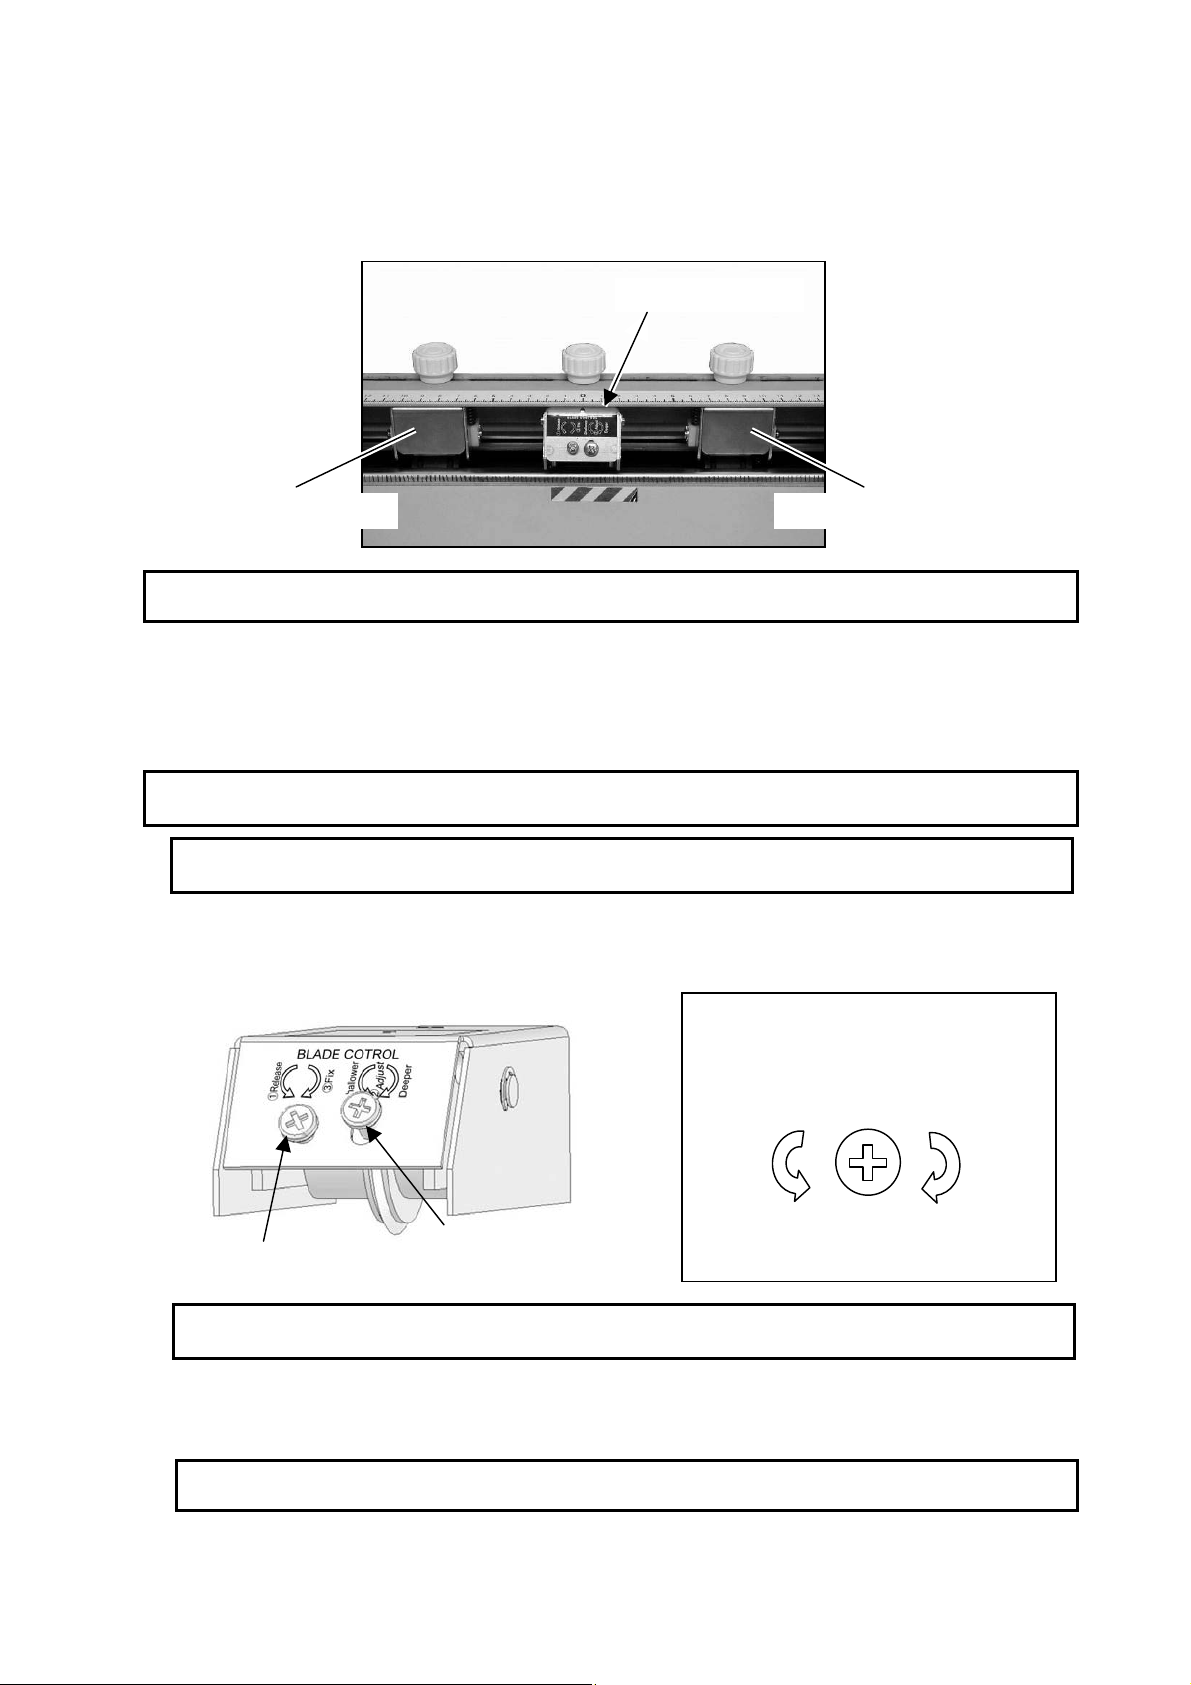
(4) Adjusting positions of Feed Rollers
【
】
Place Lower Transport Rollers to the positions where both of them stay on the paper
positively. Then, fix Upper Transport Rollers by Phillips Screw Driver where Upper
Rollers fit on the 2 Rubber Bands of Lower Transport Rollers.
Scoring Block
Upper Transport Roller
Upper Transport Roller
3.8 Trial Scoring
(1) Method of Trial Scoring, please refer to the “ 3.3 Trial Perforation”.
(2) Evaluate if the scoring is done properly as desired.
Please refer to the ” 3.9 Fine Adjustment of Scoring Line “ if adjustment is needed.
3.9 Fine Adjustment of Scoring Line
3.9.1 Shallower/Deeper Fine Adjustment
By turning Shallower/Deeper Screw, scoring depth is adjustable.
Loosen Release/Fix Screw first and make shallower/deeper adjustment.
After adjustment, fix it by Release/Fix Screw.
Release/Fix Screw
Shallower/Deeper Screw
3.9.2 Adjusting scoring line location
Slide and move Lower Scoring Roller first, then slide Upper Scoring Roller.
Make sure to fix both Rollers by Phillips Screw Driver after moved.
BLADE HEIGHT CONTROL
(Screw on right side)
①
②
Deeper Shallower
3.9.3 Adjusting scoring Angle
In case scoring is not made in square, refer “3.4.2 Adjustment of perforating angle”.
15
Page 17

3.10 Scoring, continuous
(1) Press “Reset/Clear” key and clear the counter setting to “0 (Zero)”.
(2) Scoring all the sheets loaded:
Load paper to Paper Feed Tray and press “START” Key.
Machine scores up to the end of paper stack.
(3) Scoring designated number of sheets:
Load paper to Paper Feed Tray and preset quantity of sheet desired to scores.
Then, press “START”.
Machine scores up to the designated quantity of sheets and stops.
16
Page 18
4.Adding Perforation Unit
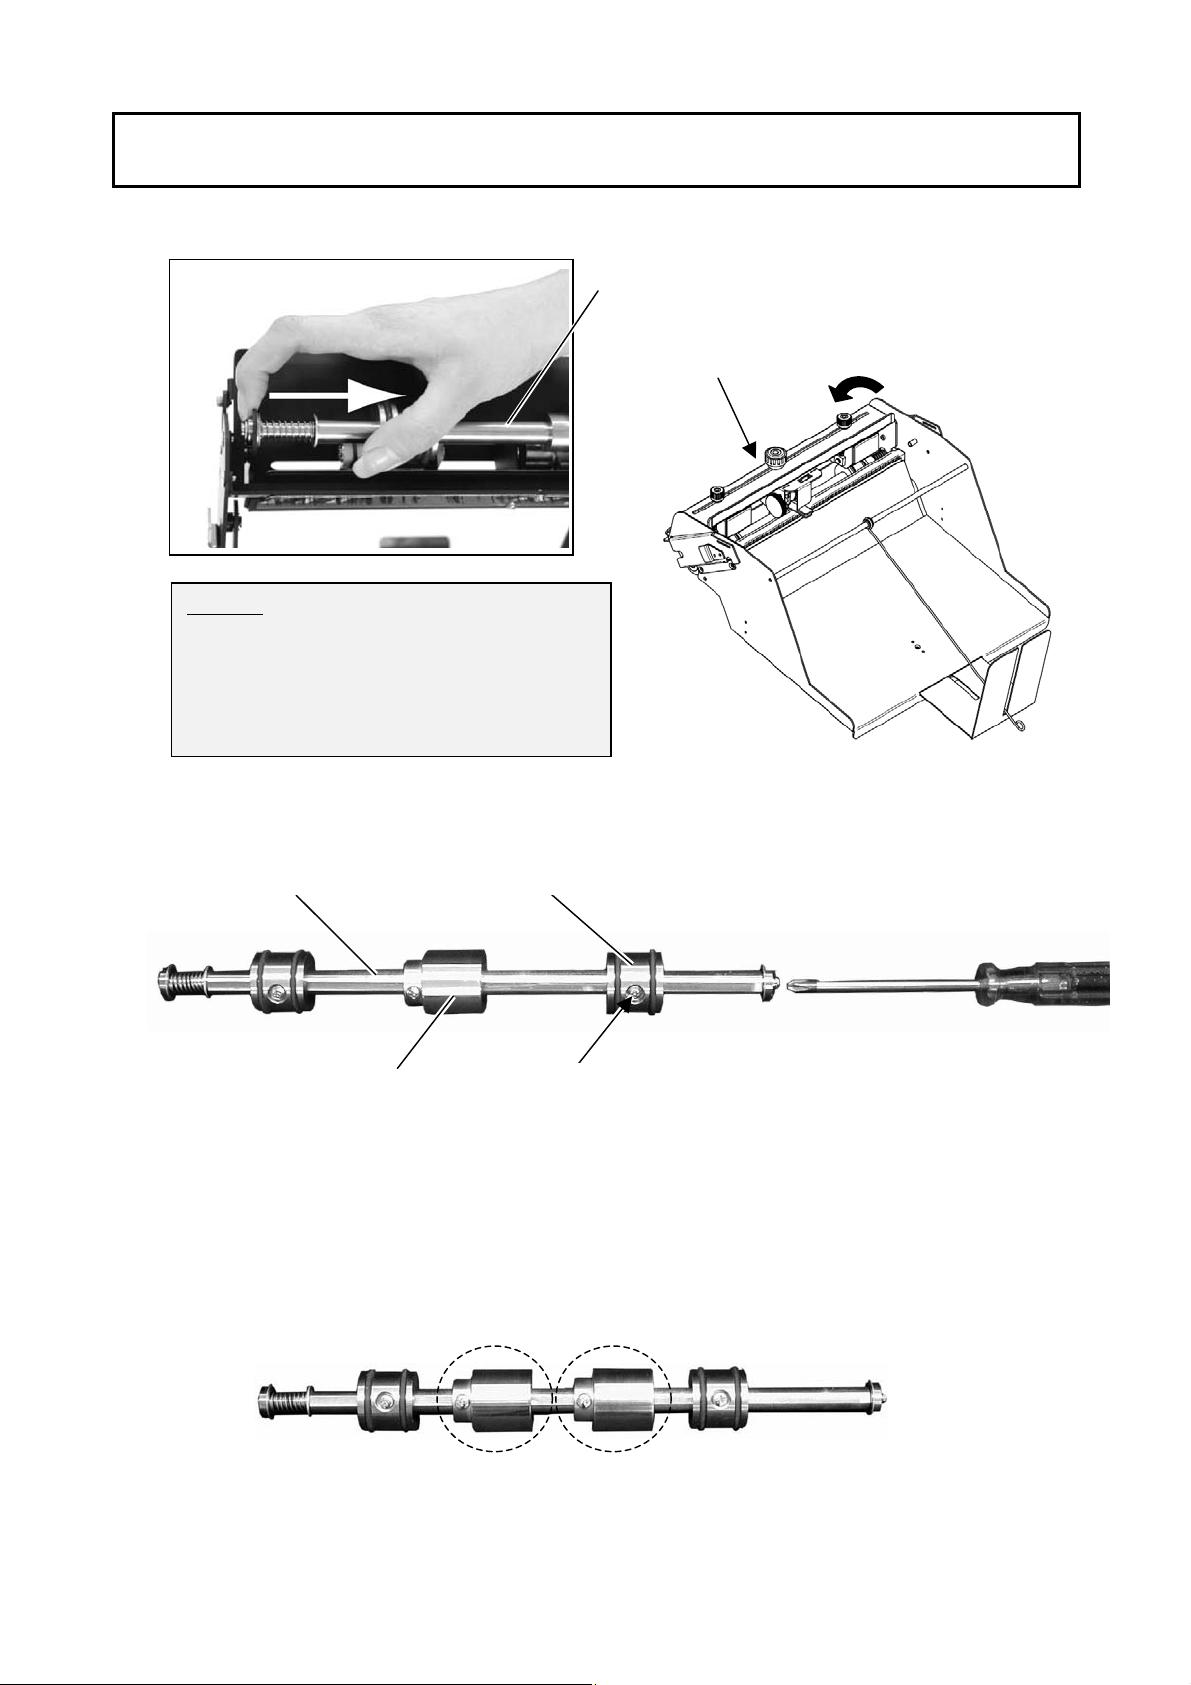
(1) Remove Transportation Shaft from Perforation Unit
NOTE:
When removing Transportation Shaft,
rotate Block Mounting Arm toward
the direction of arrow.
It makes wider opening and easier
to take out Transportation Shaft.
(2) Remove a Phillips screw from the end of Transportation Shaft.
Transportation Shaft
Lower Transport Roller
Transportation Shaft
Block Mounting Arm
Blade Receipt Roller
(3) Remove Lower Transport Roller from the Shaft after loosening Roller Fixing Screw.
(4) Add another Blade Receipt Roller to the Shaft and re-mount Lower Transport Roller.
Then, fix Rollers by screws.
Fix the Phillips Screw at end of the Shaft.
《Seen as two Perforation Units are mounted.》
Roller Fixing Screw
17
Page 19
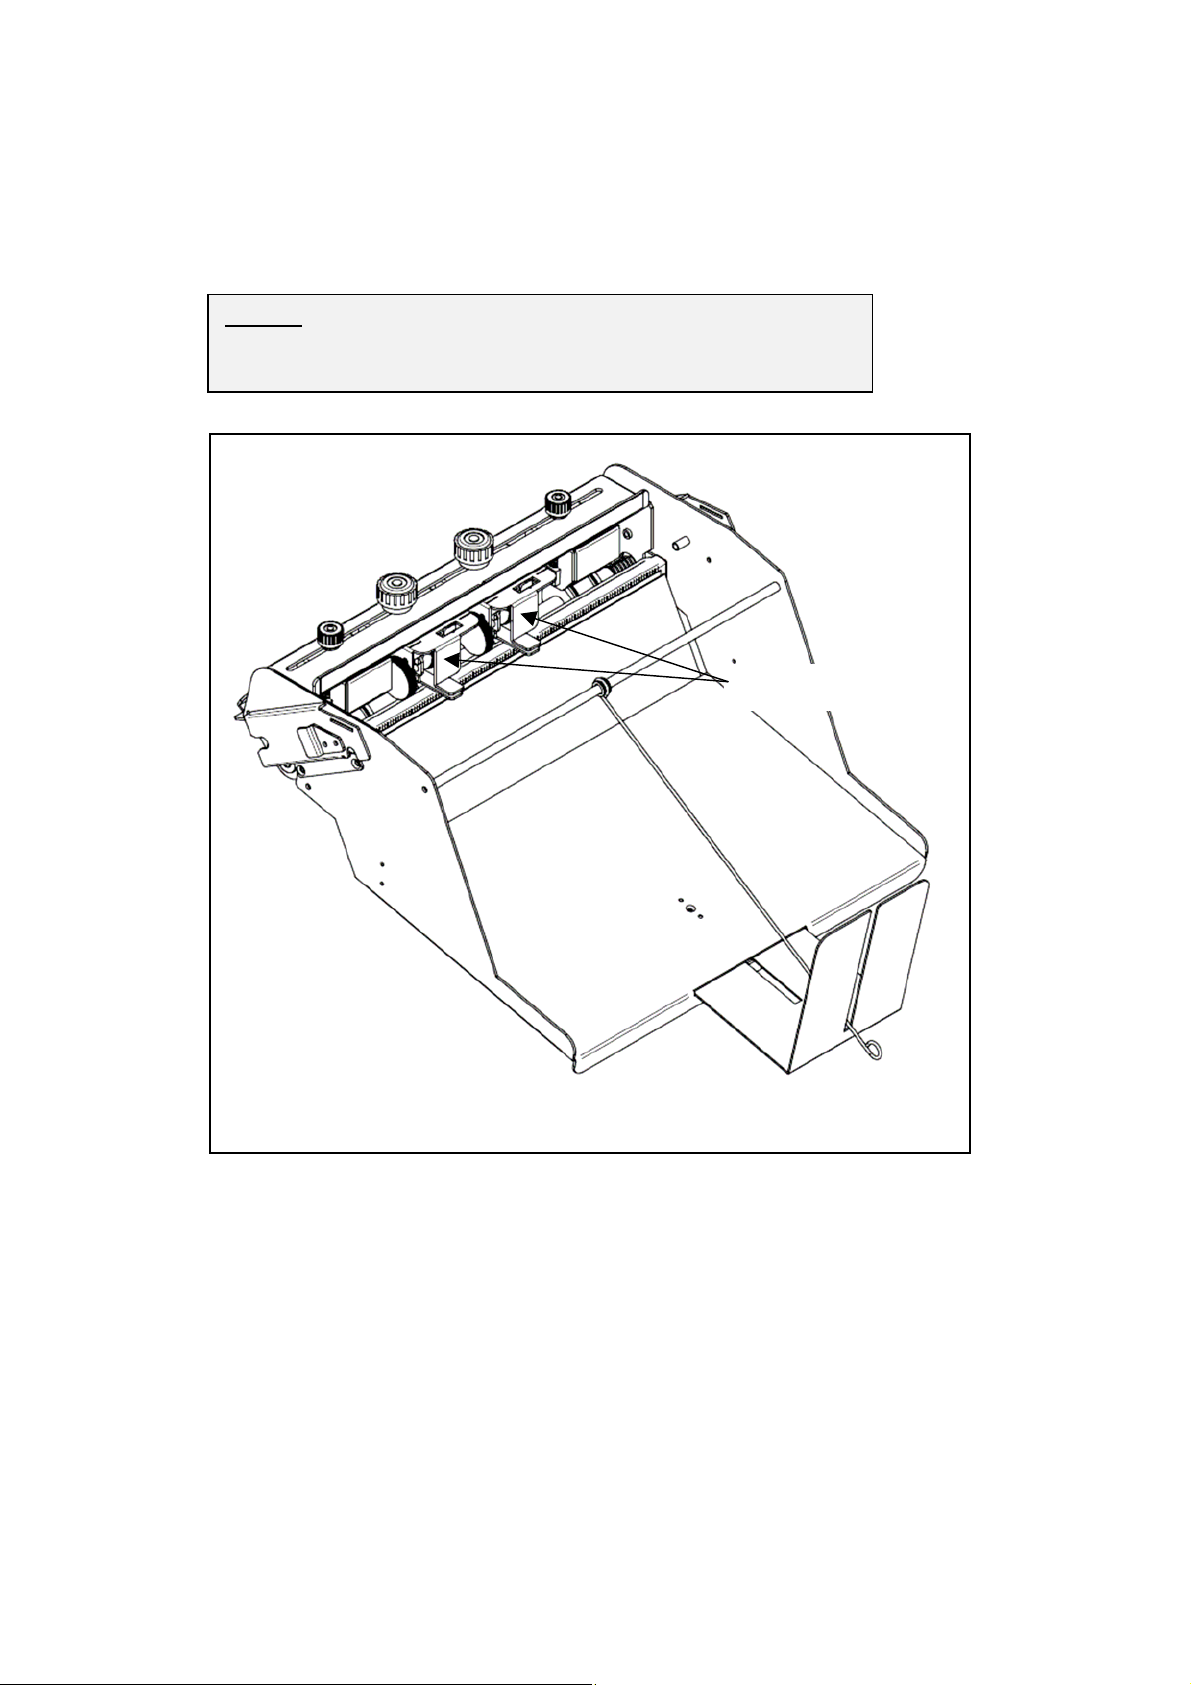
(5) Add another Perforation Unit to the Block Mounting Arm and fix by Thumb Screw.
(6) Place Transportation Rollers where they grip perforating sheet positively.
The two Perforation Units should not touch each other.
NOTE:
Position where perforation can be done is only between the
two Lower Transportation Rollers.
Perforation Units
《Seen as two Perforation Units are mounted.》
18
Page 20
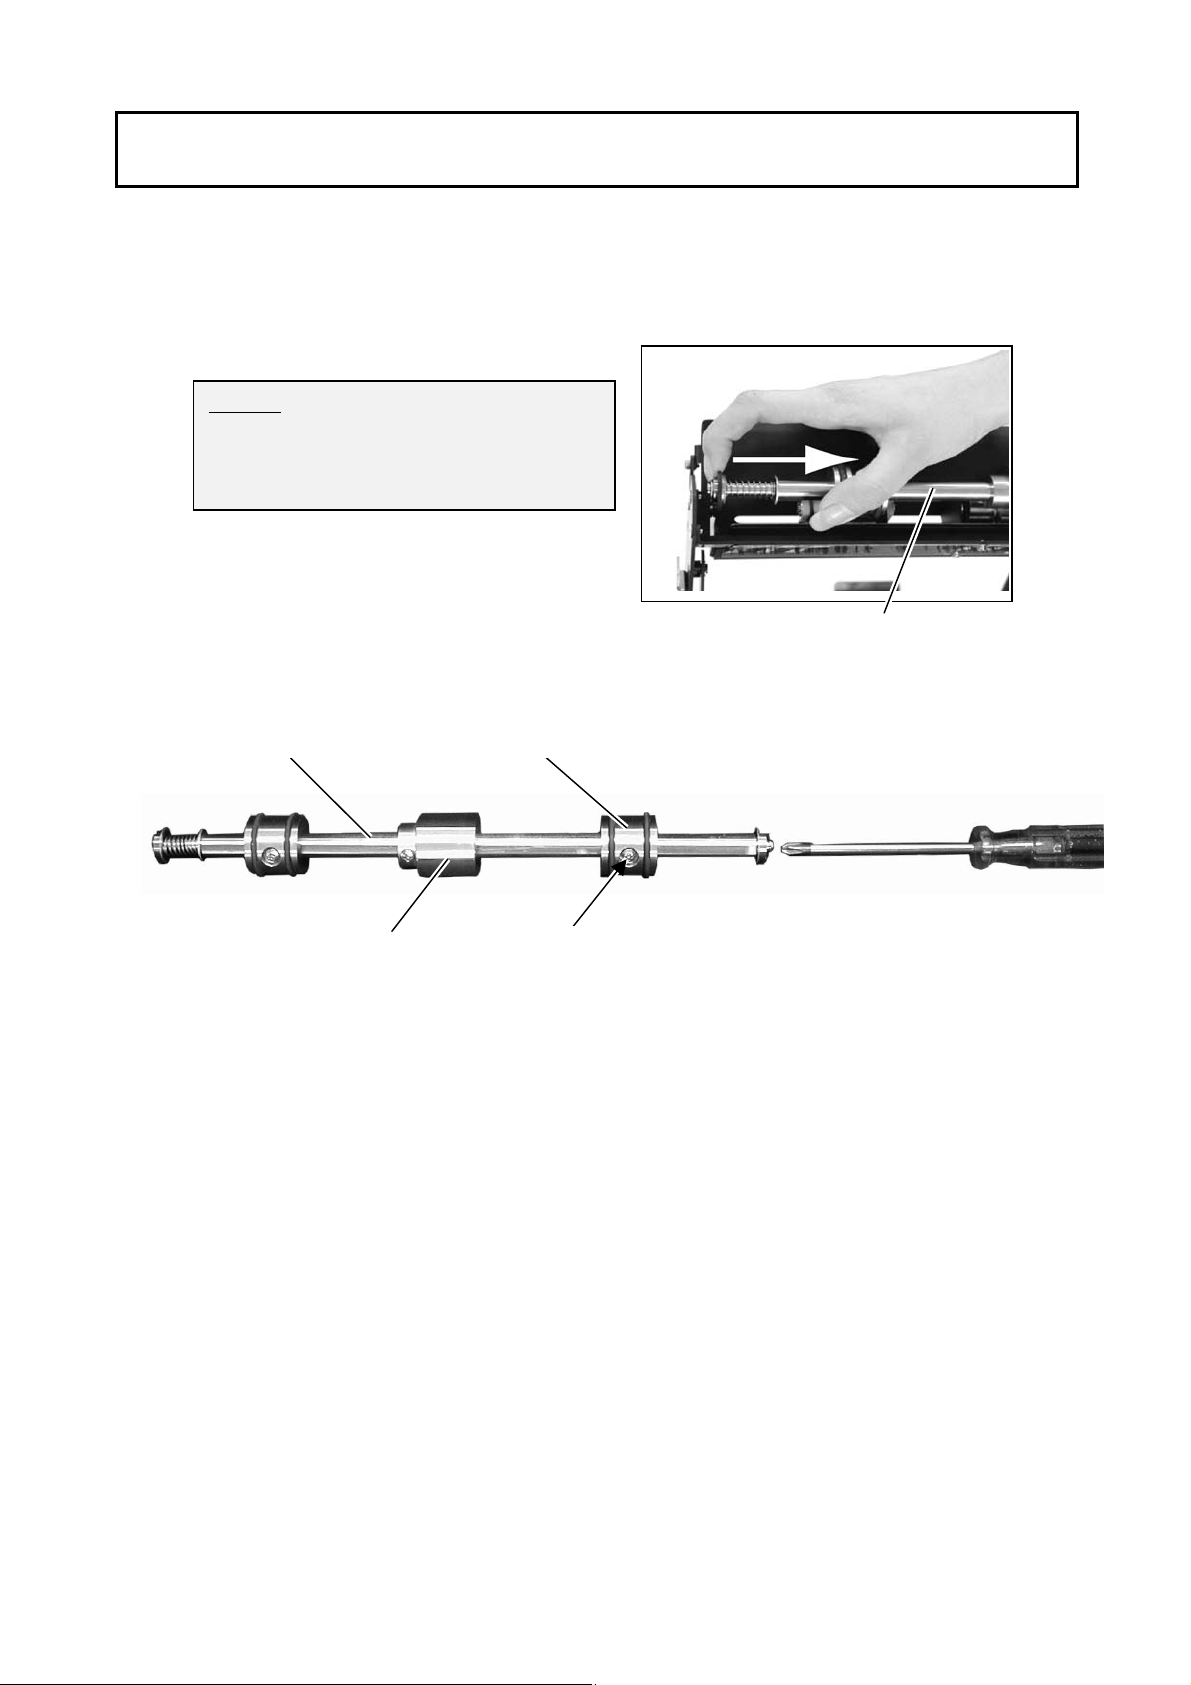
5. Exchanging Perforation Unit to Scoring Unit.
Perforation Unit can be exchanged to Scoring Unit and Scoring Unit can be exchanged
to Perforating Unit.
(1) Remove Transportation Shaft from Perforation Unit
NOTE:
For easier removal or installation,
Refer “ NOTE: ” at “ 4.
Perforation Unit “ .
(2) Remove a Phillips screw from the end of Transportation Shaft.
Transportation Shaft
Blade Receipt Roller
Adding
Lower Transport Roller
Roller Fixing Screw
Transportation Shaft
(3) Remove Lower Transportation Roller from the Shaft after loosening Lower Fixing Screw.
(4) Replace with Lower Transportation Roller, Blade Receipt Roller, etc. Fix the Phillips
screw at end of the Shaft.
(5) Mount Lower Transportation Roller and fix it. Then, re-mount Transportation Shaft
to the Perforation Unit.
(6) Place Scoring Block or Perforating Block as desired.
(7)Refer “ 3. How to use ” for use of Scoring and Perforating work.
19
Page 21
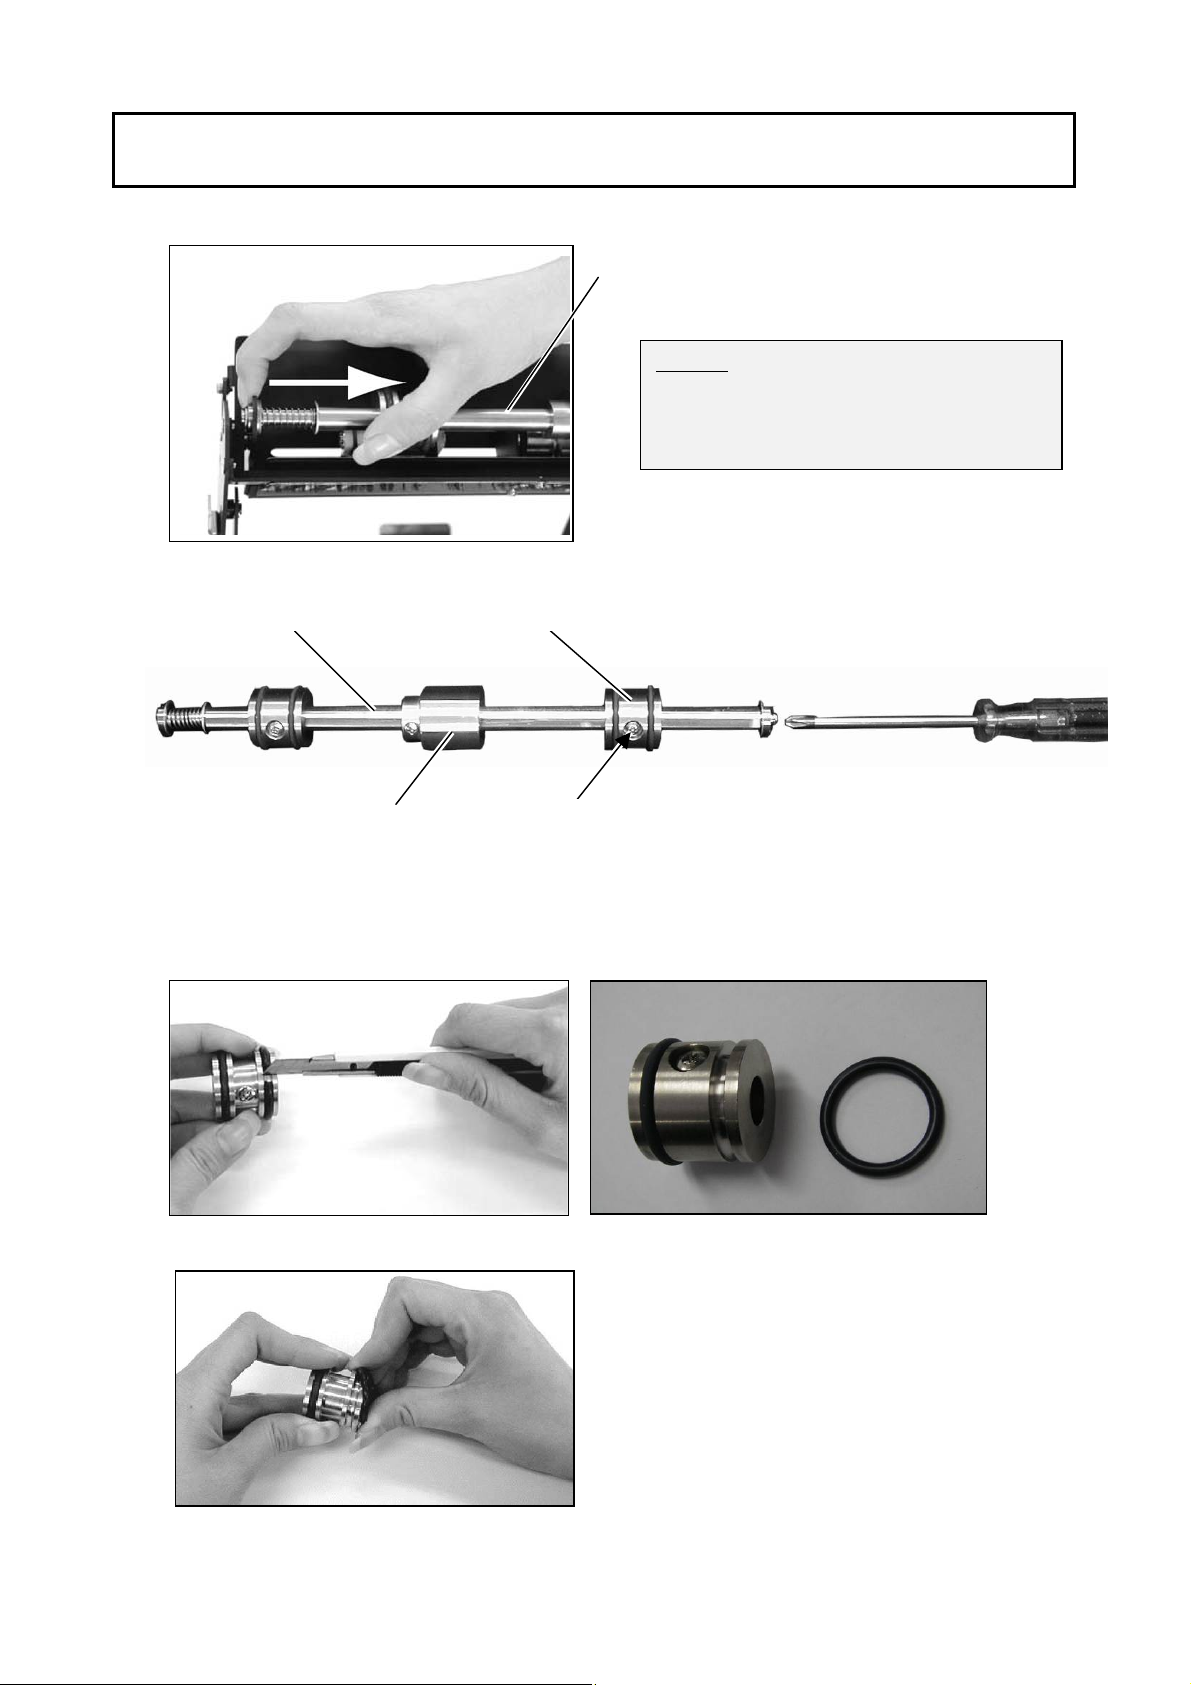
6. Replacing Transport Rubber Ring
(1) Remove Transportation Shaft from Perforation/Scoring Unit
(2) Remove a Phillips screw from the end of Transportation Shaft.
Transportation Shaft
(3) Remove Lower Transport Roller from the Shaft after loosening Roller Fixing Screw.
(4) Remove used/old Rubber Ring from the Lower Transport Roller.
Please be careful not to damage the roller when you cut the rubber ring.
Blade Receipt Roller
Lower Transport Roller
Roller Fixing Screw
Transportation Shaft
NOTE:
For easier removal or installation,
Refer “ NOTE: ” at “ 4.
Perforation Unit “ .
Adding
(5) Mount new Rubber Ring
(6) Re-mount Lower Transport Roller in the reversed procedures.
20
Page 22
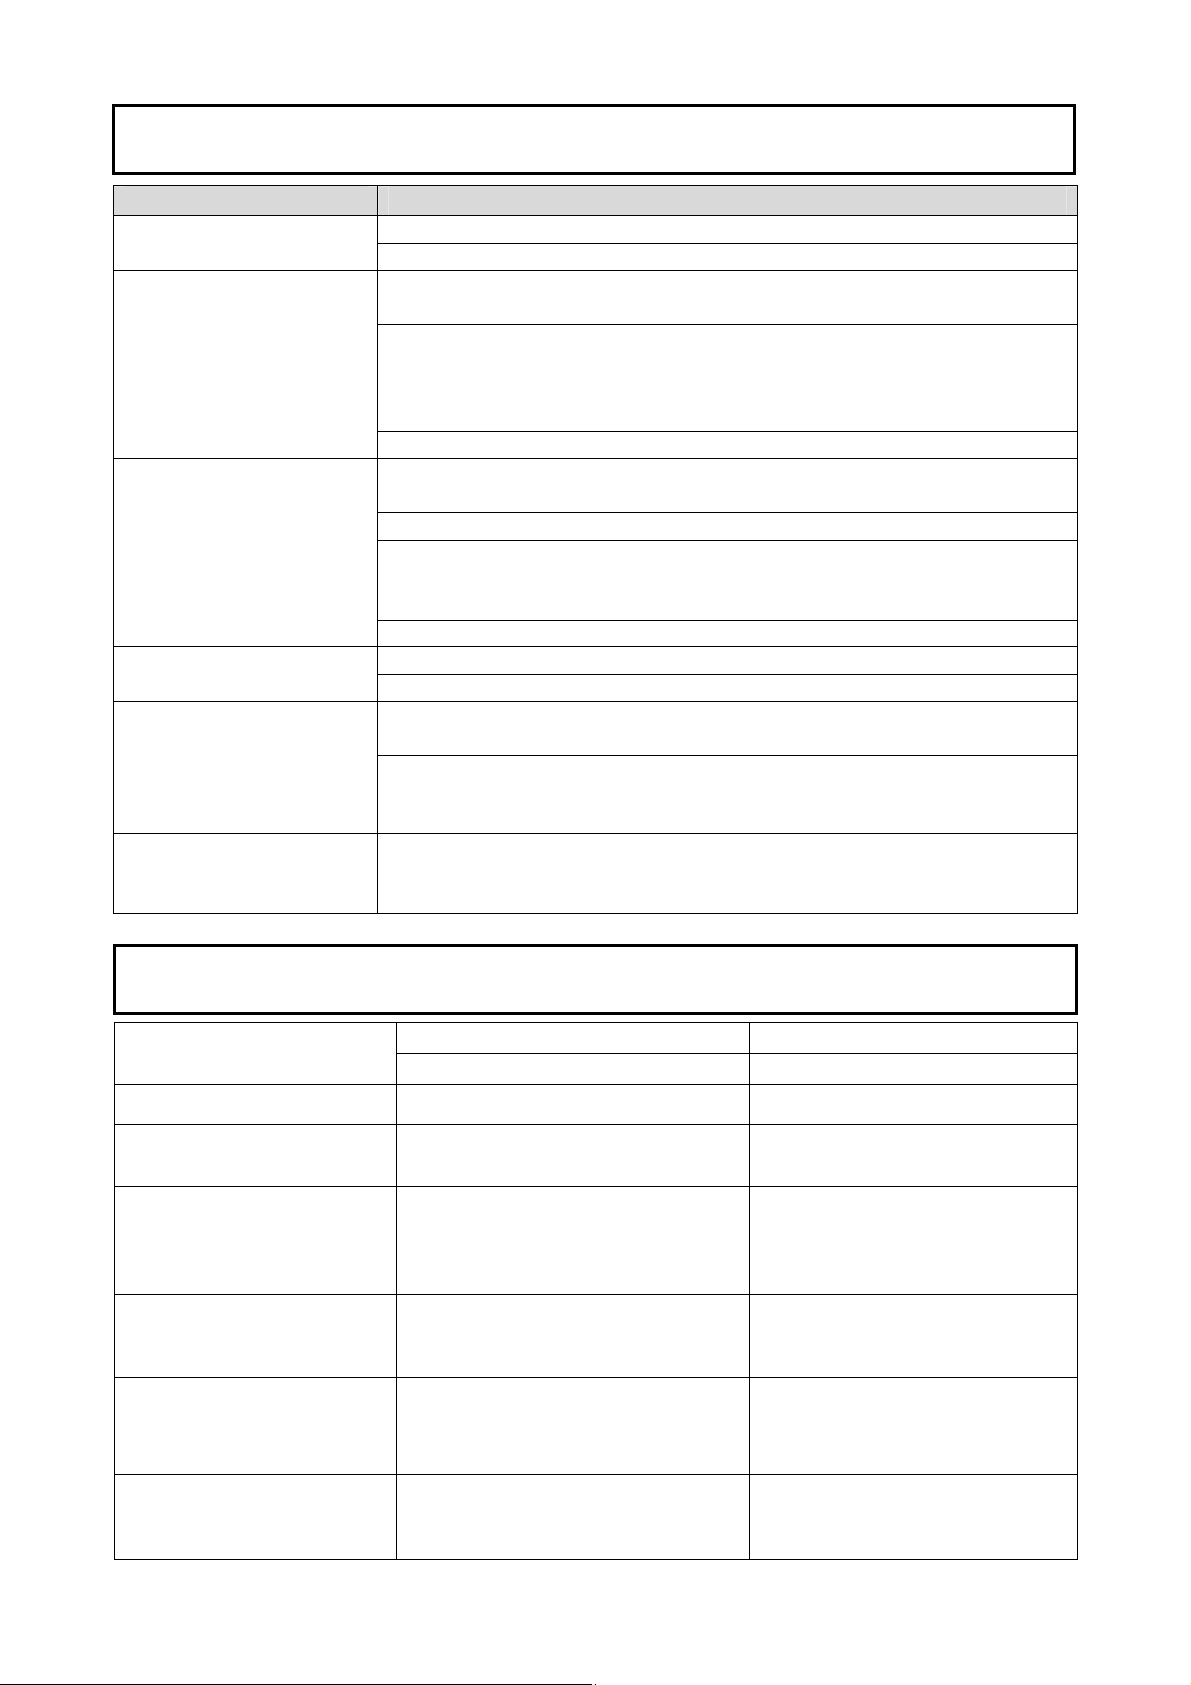
7. Troubleshooting
Symptom Remedy
- Replace Paper Separator Paper Slippage
- Replace Paper Feed Roller
Paper Jam
Slanting
Perforation
Torn Sco rin g
Not Sufficient Scoring - Upper Scoring Roller is too shallow against V-Grooved Lower
- Remove jammed paper by removing Perforation/Scoring Unit
from Folding Machine.
- Remove jammed paper.
Then adjust mounting location of Roller.
Make the Transport Rollers grip perforating/scoring paper at the
both sides.
- Slow down running speed
- Make no play to the paper placed between the Paper Guides in
the Paper Feed Tray of the Folding Machine.
- Adjust by Slant Adjustment Dial.
- Adjust mounting location of Transport Roller.
Make the Transport Rollers grip perforating/scoring paper at the
both sides.
- Re-mount Perforating/Scoring Unit firmly to Block Mounting Arm.
- Make sure to ride Perforating Blade on Blade Receipt Roller. Not Sufficient
- Replace used/old Framed Perforating Blade to new one.
- Upper Scoring Roller is too deep.
Lift the Scoring Roller by Shallower/Deeper Adjustment Screw.
- Upper Scoring Roller is not matching with V-Grooved Lower
Scoring Roller.
Match the Upper Scoring Roller to V-Groove by Fine Adjustment Dial.
Scoring Roller.
Lower the Scoring Roller by Height Adjustment Screw.
8. Product Specifications
Paper Weight
Paper Quality Offset paper / Coated paper Offset paper / Coated paper
Running speed
Location of perforation
and scoring line
Perforating pitch
Machine Dimensions
(Both Perforation and
Scoring Units)
Unit Weight
(Both Perforation and
Scoring Units)
Perforation: 64~127.9 g/㎡ 17~35 lbs (Bond)
Scoring : 64~157 g/㎡ 17~42 lbs (Bond)
60 to 85 sheets/minute
(3600 to 5100 sheets/hour)
Centering
0.35mm(perforation),
0.20mm(non-perforation),
continuous
In Use:
W480 x D380 x H200 mm
Not InUse:
W380 x D380 x H200 mm
Approx. 4.8 kg Approx. 10.6 lbs
A4 landscape
In case A4 paper, landscape,
+ or - 50mm (1.96")
when Transporation Rollers
are placed at paper sides
0.014"(perforation),
0.008"(non-perforation),
continuous
In Use:
W18.9 x D15.0 x H7.9"
Not In Use:
W15.0 x D15.0 x H7.9"
21
Page 23

22
Page 24

MBM Corporation
23
 Loading...