

MBL Corona Line, Corona C31, Corona C11, Corona C51, Corona C21 Owner's Manual
...
MBL
CORONA LINE
Owner’s Manual
Bedienungsanleitung
unique high end audio
CORONA LINE
1
ENGLISH
Dear Music Lover!
Congratulations on your purchase of a high-end product from MBL – you’ve made an excellent
choice we know you will not regret! You share with us our passion for the pleasure of music at
the very highest level and our love of exclusive and exquisitely crafted products.
Along with me personally, the entire MBL team puts its heart, soul, and meticulous care into the
development and fabrication of each MBL product. The fruit of all our eorts now stands before
you, waiting to be connected and thrill you with your favourite music.
To give you trouble-free musical enjoyment and life-long use of your MBL product, in the following we oer you a few tips on how to connect and operate your new product. Not to place
undue demands on your valuable time, we have deliberately kept our instructions short and
direct, limiting ourselves to the most important points. I am convinced that if you follow our tips
and recommendations, countless hours of pleasure with your MBL product lie before you.
Immerse yourself in the glorious sound. With my very best wishes for your musical pleasure,
Sincerely yours,
Christian Hermeling
Proprietor, MBL Akustikgeräte
CORONA LINE
2
Important Information!
Attention: The unit must be protected against humidity, vibration and excessive dust and should not be exposed to direct
sunlight or intense sources of heat (radiators). Do not operate the unit in the immediate vicinity of sources of electrical
interference (e.g. fluorescent lamps or electric motors). The permitted operating temperature is 10°C up to 40°C (50°F
up to 104°F). Avoid extreme variations in temperature.
Do not operate the unit under condensation! After exposure to low temperatures allow the unit to warm up for at least
three hours.
Do not open the unit and do not make any alterations to it.
If you wish to place the unit on a rack, you must ensure sucient ventilation. Minimum clearances of 10 cm (4 inch) above
the unit and 2 cm (0,8 inch) on all sides must be observed. The ventilation openings of the unit must not be covered with
tablecloths, magazines, curtains and the like in order not to interfere with the heat dissipation.
WARNING: Do not connect any musical instruments (e.g. electric guitar etc.) to the pre-amplifier. This use for a purpose
for which it is not designed – i.e. for a purpose other than playback - can result in irreparable damage to the equipment.
NEVER switch power amplifier on when no speaker is connected!
KETI, CE-Marking
This product conforms to the requirements of the EMC directive and low-voltage directive. Your MBL component com-
plies with the household power and safety requirements in your area.
Warranty
Please pay attention to the details given in the warranty card which accompanies the unit. Warranty is only issued, if you
send back the warranty card.

CORONA LINE
3
ENGLISH
Table of Content
1. Unpacking 4
1.1 What you still require 4
2. General Functions 4
2.1 Switching the device on and o 4
2.2 MBL SmartLink 4
2.3 Display Brightness 5
2.4 Standby 5
2.5 Using the Controls 5
2.6 Firmware Update 5
3. Menu navigation mbl C11 / mbl C51 5
3.1 Menu 6
3.2 Input Setup 6
3.3 C31 Input Mapping 6
3.4 Input Name 6
3.5 Volume Cut 7
3.6 Dim Standby 7
3.7 Info 7
3.7 Factory Default 7
4. Remote Control Functions 8
5. General Views 9
5.1 mbl C31 CD Player 9
5.2 mbl C11 Preamplifier 10
5.3 mbl C51 Integrated Amplifier 11
5.4 mbl C21 Stereo Power Amplifier 12
5.5 mbl C15 Mono Power Amplifier 13
6. Wiring Set-ups 14
6.1 Wiring a system consisting of a
CD Player and an Integrated Amplifier
14
6.1.1 Wiring the CD Player with the
Integrated Amplifier
14
6.1.2 Creating the MBL SmartLink Connection 15
6.1.3 Wiring the Loudspeakers with the
Stereo Power Amplifier
15
6.1.4 Connecting the Power Supply Cable 15
6.2 Wiring a system consisting of a CD Player,
Preamplifier and Stereo Power Amplifier
16
6.2.1 Wiring the CD Player with the Preamplifier 16
6.2.2 Wiring the Preamplifier with the
Stereo Power Amplifier
17
6.2.3 Creating the MBL SmartLink Connection 17
6.2.4 Wiring the Loudspeakers with the
Stereo Power Amplifier
18
6.2.5 Connecting the Power Supply Cable 18
page
6.3 Wiring a system consisting of a CD Player,
Preamplifier and Mono Power Amplifiers
19
6.3.1 Wiring the CD Player with the Preamplifier 19
6.3.2 Wiring the Preamplifier with the
Mono Power Amplifiers
20
6.3.3 Creating the MBL SmartLink Connection 20
6.3.4 Wiring the Loudspeakers with the
Mono Power Amplifiers
21
6.3.5 Connecting the Power Supply Cable 21
7. Cleaning the Unit 22
8. Specifications 23
8.1 mbl C31 CD Player 23
8.2 mbl C11 Preamplifier 25
8.3 mbl C51 Integrated Amplifier 27
8.4 mbl C21 Stereo Power Amplifier 29
8.5 mbl C15 Mono Power Amplifier 30
page

CORONA LINE
4
1. Unpacking
Included in the packing of your MBL Corona Line device you will find:
• A power supply cable
• A system remote control*
• White gloves
* the remote control is not included in the packing for the mbl C21 Stereo Power Amplifier nor the mbl C15 Mono Power
Amplifier.
1.1 What you still require
To connect the components of your Corona Line stereo system, you will need the following cables:
• Audio connection cable
• Loudspeaker cable
• RJ45 patch cable
Your dealer will gladly advise you on the choice of the best audio cable. Please also read the “5. Wiring Set-Ups” a little
further down in this document.
For wiring the MBL SmartLink busses, you can use standard RJ45 patch cable of the type used for networking computers.
We recommend UTP – unshielded category 6 (CAT 6) cable.
2. General Functions
2.1 Switching the device on and o
IMPORTANT NOTICE: Before you switch on the device, make sure that it is compliant with the voltage requirements of
your country. Voltage requirements are given on the rear panel of the device.
Always make sure that the power switch on the rear panel of the device is fully switched o before adding or removing
connections.
Once all the wiring has been properly connected, you can switch on the device by turning on the “Power” switch (on the
rear panel).
2.2 MBL SmartLink
All the components of the MBL Corona Line can be connected to one another using MBL
SmartLink cable. This enables interconnected components to exchange various pieces of
information. With MBL SmartLink cable, operation of the “Standby” and “Display Brightness” functions applies simultaneously to all devices and there is synchronisation of the
selected input source between the CD player and the preamplifier or power amplifier.

CORONA LINE
5
ENGLISH
2.3 Display Brightness
By activating the „Corona button“ the display may be dimmed in five steps. This setting is transmitted to all mbl devices
which are connected via MBL SmartLink (required cable type Cat.5 UTP or Cat.6 UTP).
Hint: When the menu is active, the display cannot be dimmed.
By keeping the “Corona button” pressed for more than two seconds the device is being removed from the common dim
function and the brightness of the display may be adjusted separately. This change of state is indicated by a brief flickering of the Corona ring. A further longer press of the “Corona button” brings the device back to the common dim function.
Pressing any standby key of a device within the MBL SmartLink chain switches the complete chain on or o.
2.4 Standby
Pressing any standby key of a device within the MBL SmartLink chain switches the complete chain on or o.
By pressing the standby button for more than two seconds this device may be switched of or on separately. The next
time the MBL SmartLink chain is switched on the device is back in the chain and switched on as well.
2.4 Using the Controls
The control buttons are known as “softkeys”. Their respective functions are shown in a context-sensitive manner in the
display beneath the buttons.
2.6 Firmware Update
Your Corona Line device features an interface that enables simple and uncomplicated updating of the device’s software
(Firmware) using a standard SD card.
If you wish to update your device’s software, please contact the dealer from whom you purchased the device.
3. Menu navigation mbl C11 / mbl C51
After switching on the device by pressing the standby button, the standard display is shown.
By turning the volume control knob the volume can be adjusted. The current value is displayed via bargraph and a number (0…100) next to it.
Below the control buttons (“softkeys”) the currently assigned function of each button is displayed.
“Mute“ switches the speaker outputs o when pressed, and switches them on again when pressed another time.
“Amp on/o” deactivates the built in amplifier stage so the mbl C51 can be used as preamp only.
“Menu” shows the menu for further options which can be left by pressing “Exit”.

CORONA LINE
6
“In- / In+” activates the desired input channel including the inputs of the mbl C31. In case a digital input of the mbl C31 is
selected, no functions of the CD player are available.
3.1 Menu
Within the menu two control buttons, ““ and ““ on the right side, are used to move the cursor (*), “Select” enters the
chosen menu point, “Exit” leaves it.
3.2 Input Setup
Use the control buttons ““ and ““ to navigate. The buttons “Enable“ and “Disable“ activate or deactivate the input
channels which shall be shown in the standard display. When the little square next to the input name shows a tick, the
input channel is activated. It is not possible to deactivate “CD1”. When the new setting is complete, you leave the screen
via “Exit”, then another screen shows up. “Save” saves the new setting, “Discard” rejects it and “Cancel” brings you back
to the last shown screen where you can make further alterations.
3.3 C31 Input Mapping
Here you can assign the input channel where you want to connect the mbl C31. Default setting is “CD1”, you may choose
“CD2” or “SYM”, the symmetrical XLR input, as well. When the new setting is complete, you leave the screen via “Exit”,
then another screen shows up. “Save” saves the new input setting, “Discard” rejects it and “Cancel” brings you back to
the last shown screen where you can choose another input.
3.4 Input Name
At this point you can rename input channels. The character set is capital and small letters, ciphers 0…9, furthermore -/:
and a blank. The new name is shown in the standard display, but not within the ”Input Setup”, where the factory default
name remains. The maximum length of the new name is 8 characters. The new name is generated by tripping one of the
two control buttons „“ / „“ until the desired character is shown. After a pause of a second the question mark moves
one character to the right, and the procedure starts over. In case of a mistake the last shown character can be erased
by pressing the backspace button (arrow to the left). When the new name is complete, you leave the screen via “Exit and
then another screen shows up. “Save” saves the new name, “Discard” rejects it and you get back to the menu. “Cancel”
brings you back to the last shown screen where you can continue to change the input name.
3.5 Volume Cut
You can choose the maximum volume setting when the device is switched on. In case the device has been switched o
with the volume adjusted beyond this level, the volume is reset to the chosen volume while the device is being switched
on. When the new maximum setting is chosen, you leave the screen via “Exit”, then another screen shows up. “Save”
saves the new setting, “Discard” rejects it and you return to the menu. “Cancel” brings you back to the last shown screen
where you can choose a new maximum value.

CORONA LINE
7
ENGLISH
3.6 Dim Standby
At this point you can adjust the brightness of the ring around the “standby“-button when standby is activated. This setting is sent to all other devices within the MBL SmartLink chain. If the value has been readjusted, and “Exit” has been
pressed, further Options appear, “Cancel, “Discard”, and “Save”. “Save” keeps the change, “Cancel” rejects it, and you
return to the menu. “Cancel” brings you back to the screen where you can change the value.
3.7 Info
Here you find the firmware version of the device as well as the type of an optional input module. “Exit” brings you back
to the menu.
3.8 Factory Default
Here you can reset the whole device. All changes to the factory default settings will be lost. To start the reset procedure,
press The “Execute” button for two seconds.

CORONA LINE
8
4. Remote Control Functions
To use the remote control please remove the cover panel by unscrewing it using the supplied screwdriver. Please insert
the batteries in the direction shown in the battery case. Then screw the cover panel back in. When changing the batteries, please discard the old batteries in accordance to your country´s laws.
All the functions of your MBL Corona Line equipment can be activated by the remote control. The table below gives you
an overview of the functions assigned to each respective button.
1
2
3
4
65
7
98
10
1211
13
14
Function Button
Switch to Amplifier Control Mode 1
Switch to CD Player Control Mode 2
Switch to Tuner Control Mode 3
Decrease Volume 4
Mute 5
Increase Volume 6
Display Brightness 13
Standby / On 14
Amplifier Control Mode
Input Selection Previous 10
Input Selection Next 12
CD Player Control Mode
Play / Pause 8
Skip to previous title 7 (press briefly)
Fast-backward 7 (press and hold)
Skip to next title 9 (press briefly)
Fast-forward 9 (press and hold)
Shue / Repeat / Continuous 10
Stop / Eject Disc 11
Input Selection* 12
Tuner Control Mode
Previous Channel 7 (press briefly)
Tune backward 7 (press and hold)
Next Channel 9 (press briefly)
Tune forward 9 (press and hold)
* Only when not connected via MBL SmartLink, otherwise Input Selection via preamp.

CORONA LINE
9
ENGLISH
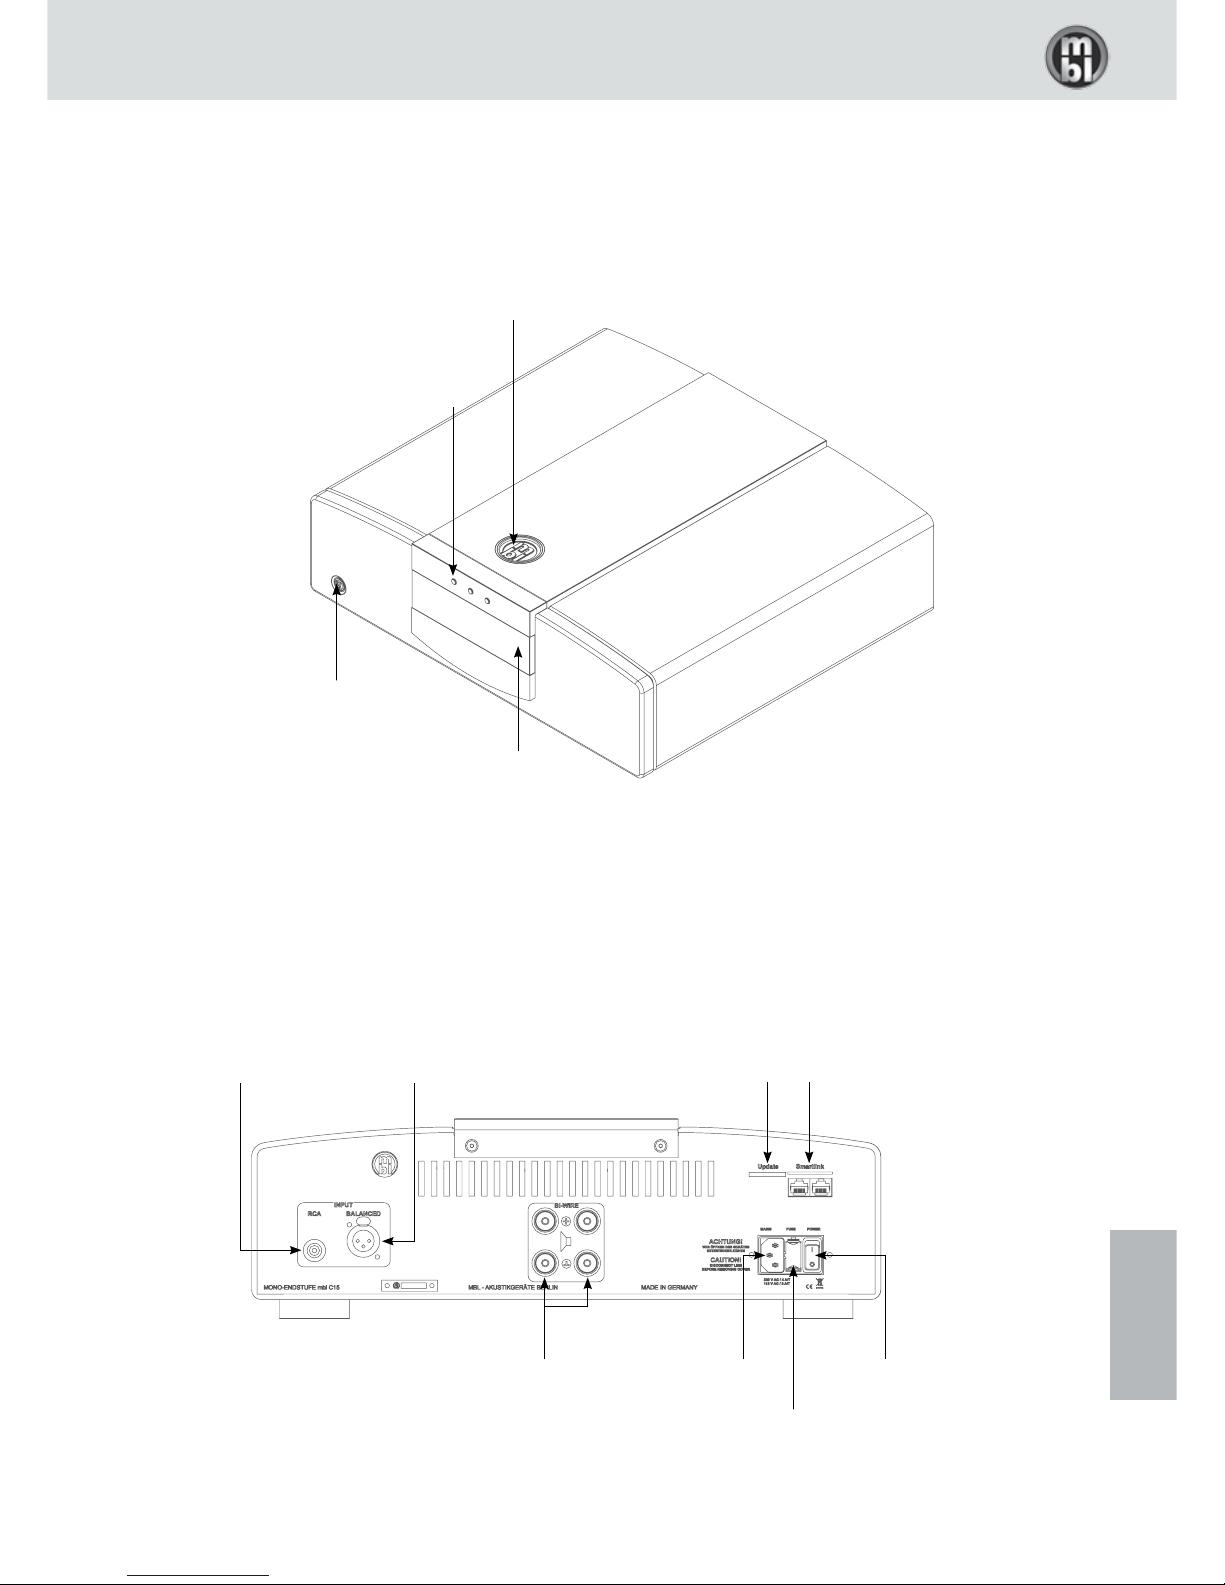
5. General Views
5.1 mbl C31 CD Player
Corona-Button
(Display Brightness)
Standby-Button
Display
Context-Sensitive
Control Buttons
“softkeys“
CD-Input
Digital Inputs
USB (MBL MCMI)
Toslink (S/P-DIF)
Digital Coax (S/P-DIF)
Analog Outputs
XLR (symmetrical)
Cinch (asymmetrical)
MBL SmartLink
Update
Interface
Connector
for Power Cord
Power Switch
Fuse Holder
Digital Output
Digital Coax (S/P-DIF)
CORONA LINE
10
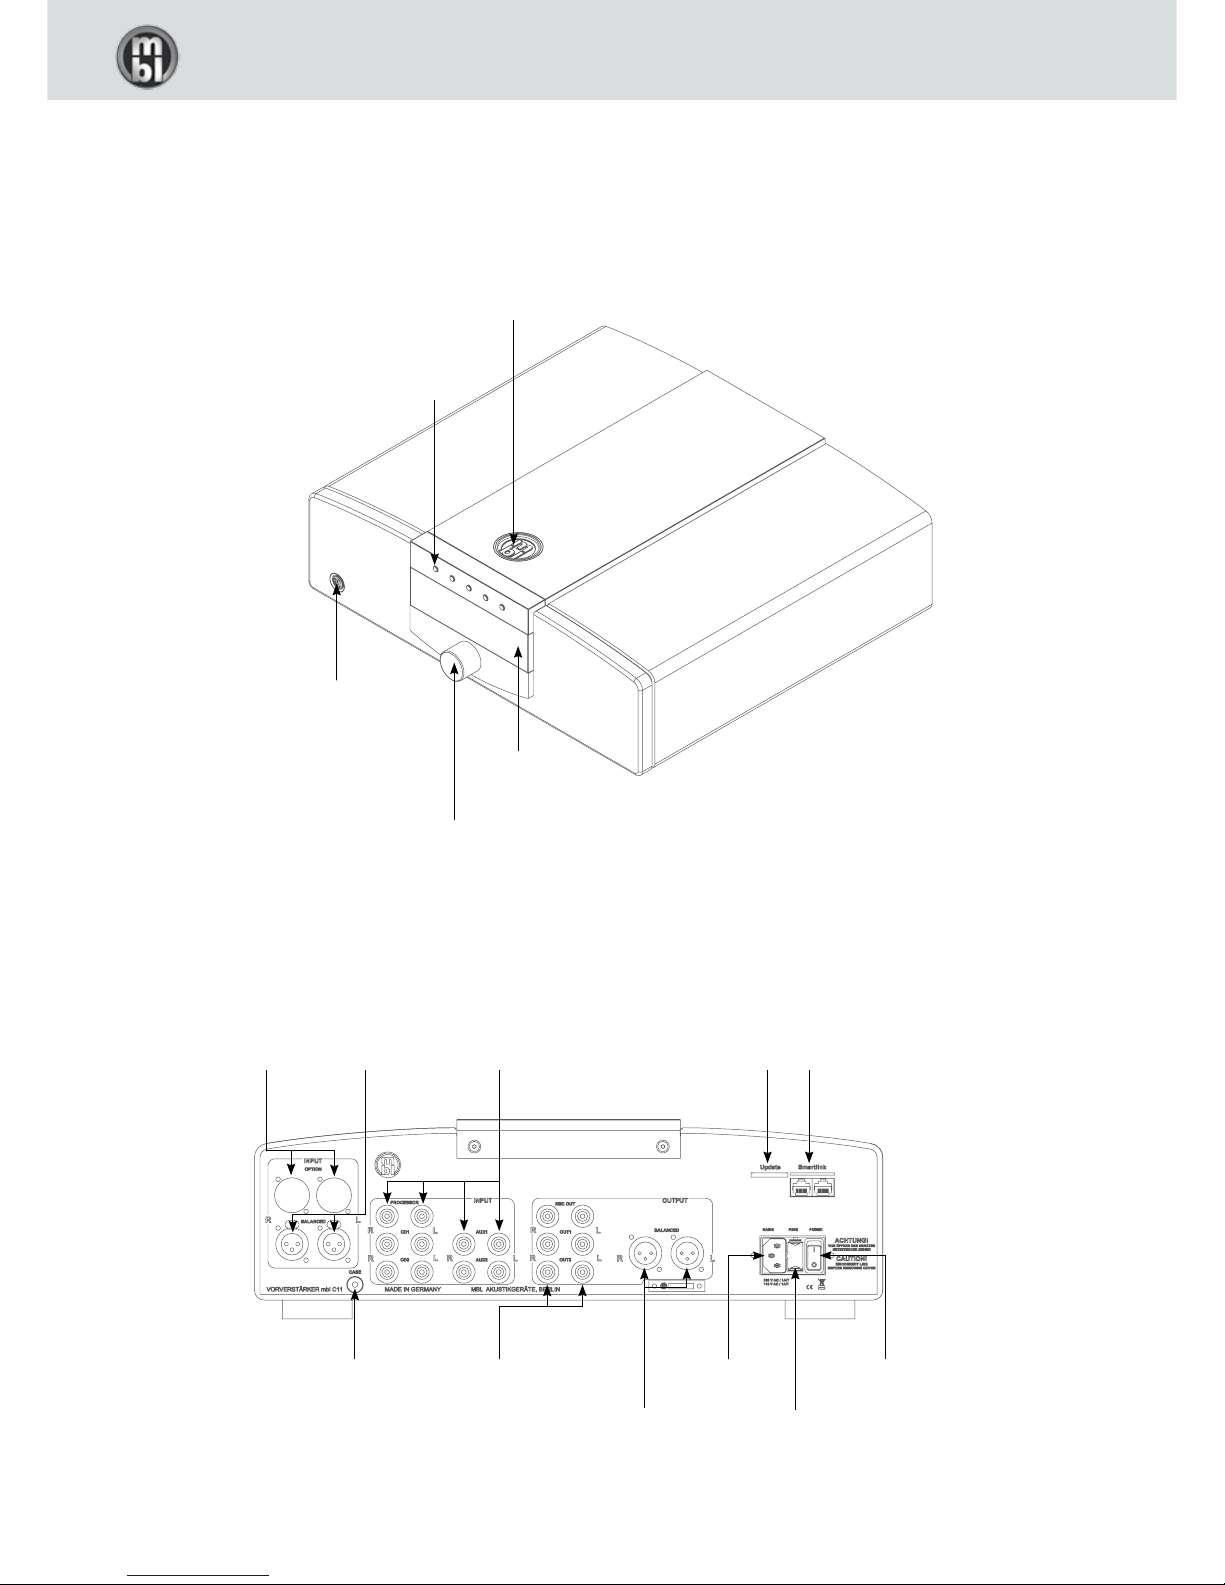
5.2 mbl C11 Preamplifier
Corona-Button
(Display Brightness)
Standby-Button
Display
Context-Sensitive
Control Buttons
“softkeys“
Volume Control
XLR Input
(symmetrical)
Cinch-/RCA Inputs
(asymmetrical)
CD 1 | CD 2
Processor
Aux 1 | Aux 2
MBL SmartLink
Update
Interface
Connector
for Power Cord
Power Switch
Fuse HolderBalanced
Output
Cinch-/RCA Outputs
(asymmetrical)
Record Out
Out 1 | Out 2
Optional
Input
Ground Connector
for optional
Phono Modul

CORONA LINE
11
ENGLISH
5.3 mbl C51 Integrated Amplifier
Corona-Button
(Display Brightness)
Standby-Button
Display
Context-Sensitive
Control Buttons
“softkeys“
Volume Control
XLR Input
(symmetrical)
Cinch-/RCA Inputs
(asymmetrical)
CD 1 | CD 2
Processor
Aux 1 | Aux 2
MBL SmartLink
Update
Interface
Connector
for Power Cord
Power Switch
Fuse Holder
Speaker
Terminals
Cinch-/RCA Outputs
(asymmetrical)
Record Out
Out 1
Optional
Input
Ground Connector
for optional
Phono Modul

CORONA LINE
12
5.4 mbl C21 Stereo Power Amplifier
Speaker Terminals
right
Cinch-/RCA Input
(asymmetrical)
MBL SmartLink
Update
Interface
Connector
for Power Cord
Power Switch
Fuse Holder
Corona-Button
(Display Brightness)
Standby-Button
Display
Speaker Terminals
left
XLR Input
(symmetrical)
CORONA LINE
13
ENGLISH
5.5 mbl C15 Mono Power Amplifier
MBL SmartLink
Update
Interface
Connector
for Power Cord
Power Switch
Fuse Holder
Speaker Terminals
Corona-Button
(Display Brightness)
Standby-Button
Display
Context-Sensitive
Control Buttons
“softkeys“
Cinch-/RCA Input
(asymmetrical)
XLR Input
(symmetrical)
CORONA LINE
14
6. Wiring Set-ups
In the following section we take you step by step to ensure correct wiring of the components in your MBL Corona Line
Stereo System. The Corona Line also oers you other wiring set-ups in addition to the recommended installations given
here. Your hi-fi dealer will be glad to advise you.
6.1 Wiring a system consisting of a CD Player and an Integrated Amplifier
As you wish, your CD player may be connected to the mbl integrated amplifier either using cable with Cinch/RCA plugs
(asymmetrical or “single-ended” connection) or with XLR plugs (symmetrical or “balanced” connection). For this connection we recommend that you use a single-ended connection through high quality cable terminated with Cinch/RCA
plugs.
You will need:
• 1 pair of audio interconnect cables, Cinch/RCA terminated
• 1 UTP-CAT 6 cable
• 2 loudspeaker cables
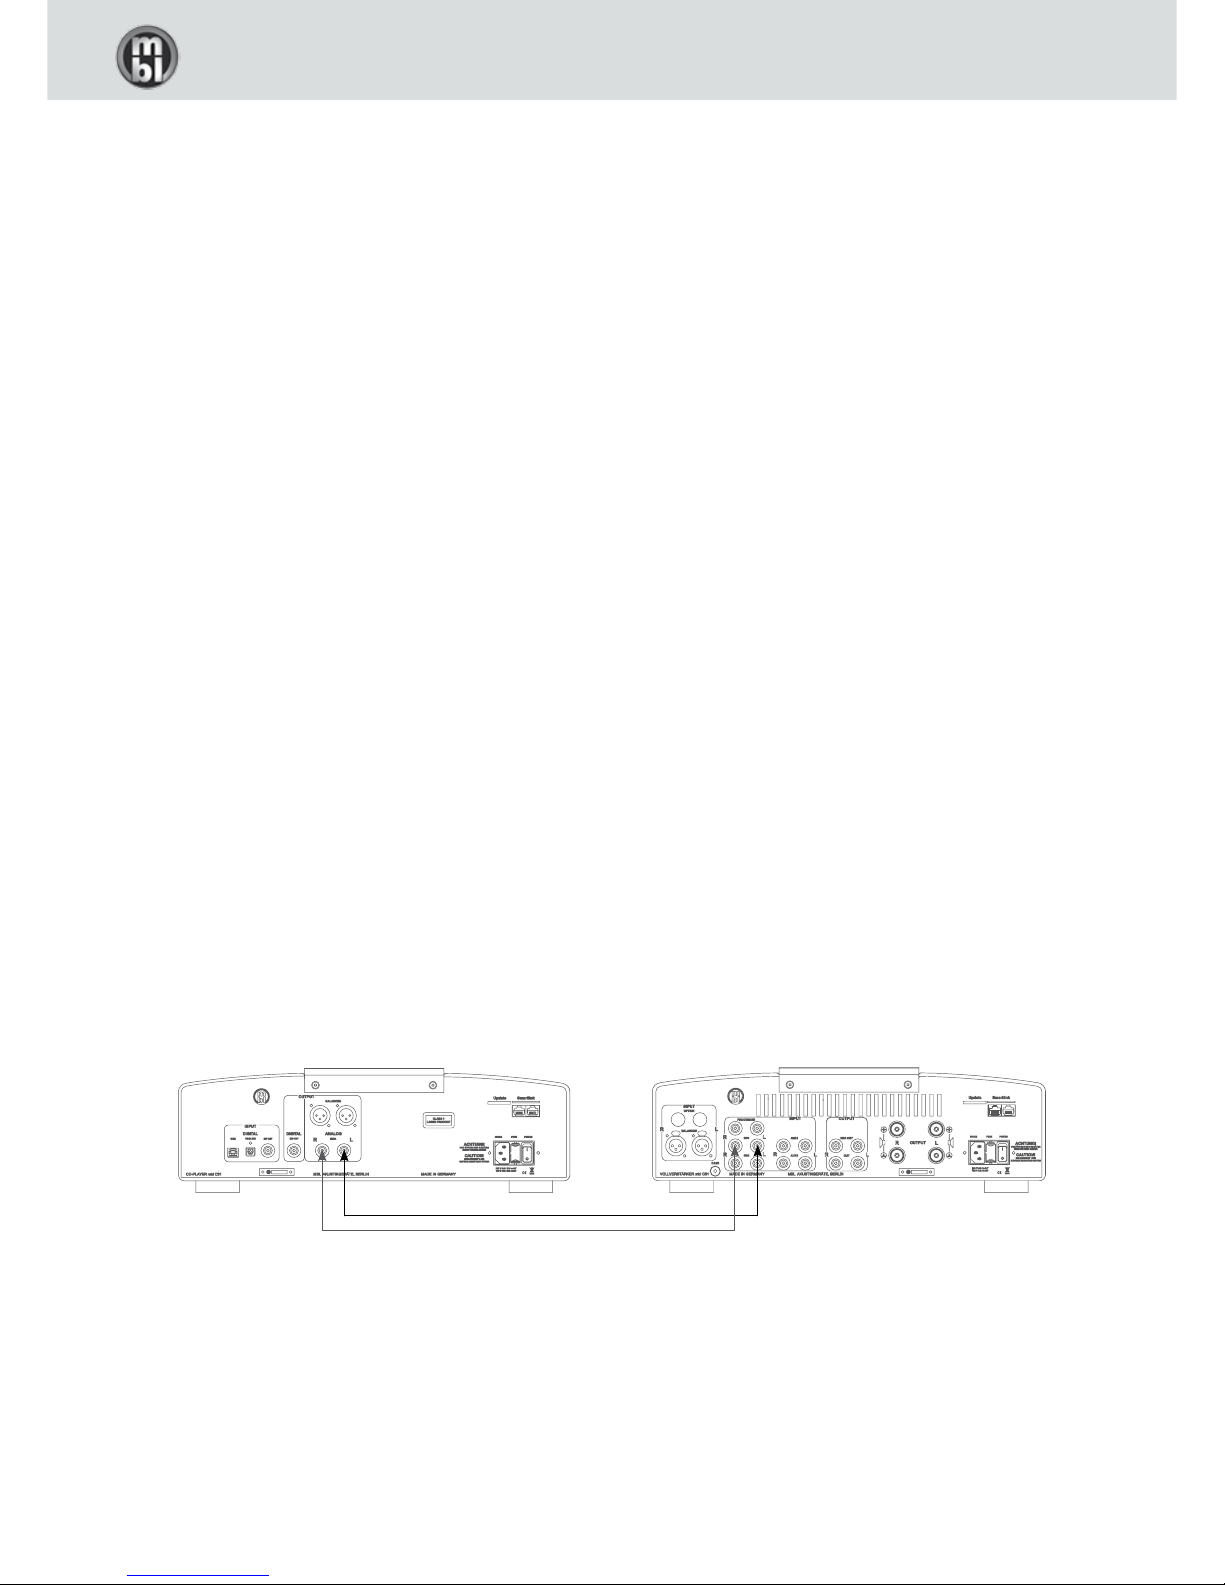
6.1.1 Wiring the CD Player with the Integrated Amplifier
Take the pair of Cinch/RCA cables and connect the “source” end securely to the CD player in the pair of sockets labelled
“RCA” in the “Output” group of connections. If the cable features a drawing of a signal direction arrow, secure the cable
end in the socket of the CD player whose arrow is pointing away from the CD player.
Secure the other end of the pair of cables in the sockets on the integrated amplifier labelled “CD 1” or whichever input
you desire. Please ensure that the same channels are connected together in the two devices (right to right; left to left).
mbl C31 CD Player mbl C51 Integrated Amplifier
CORONA LINE
15
ENGLISH
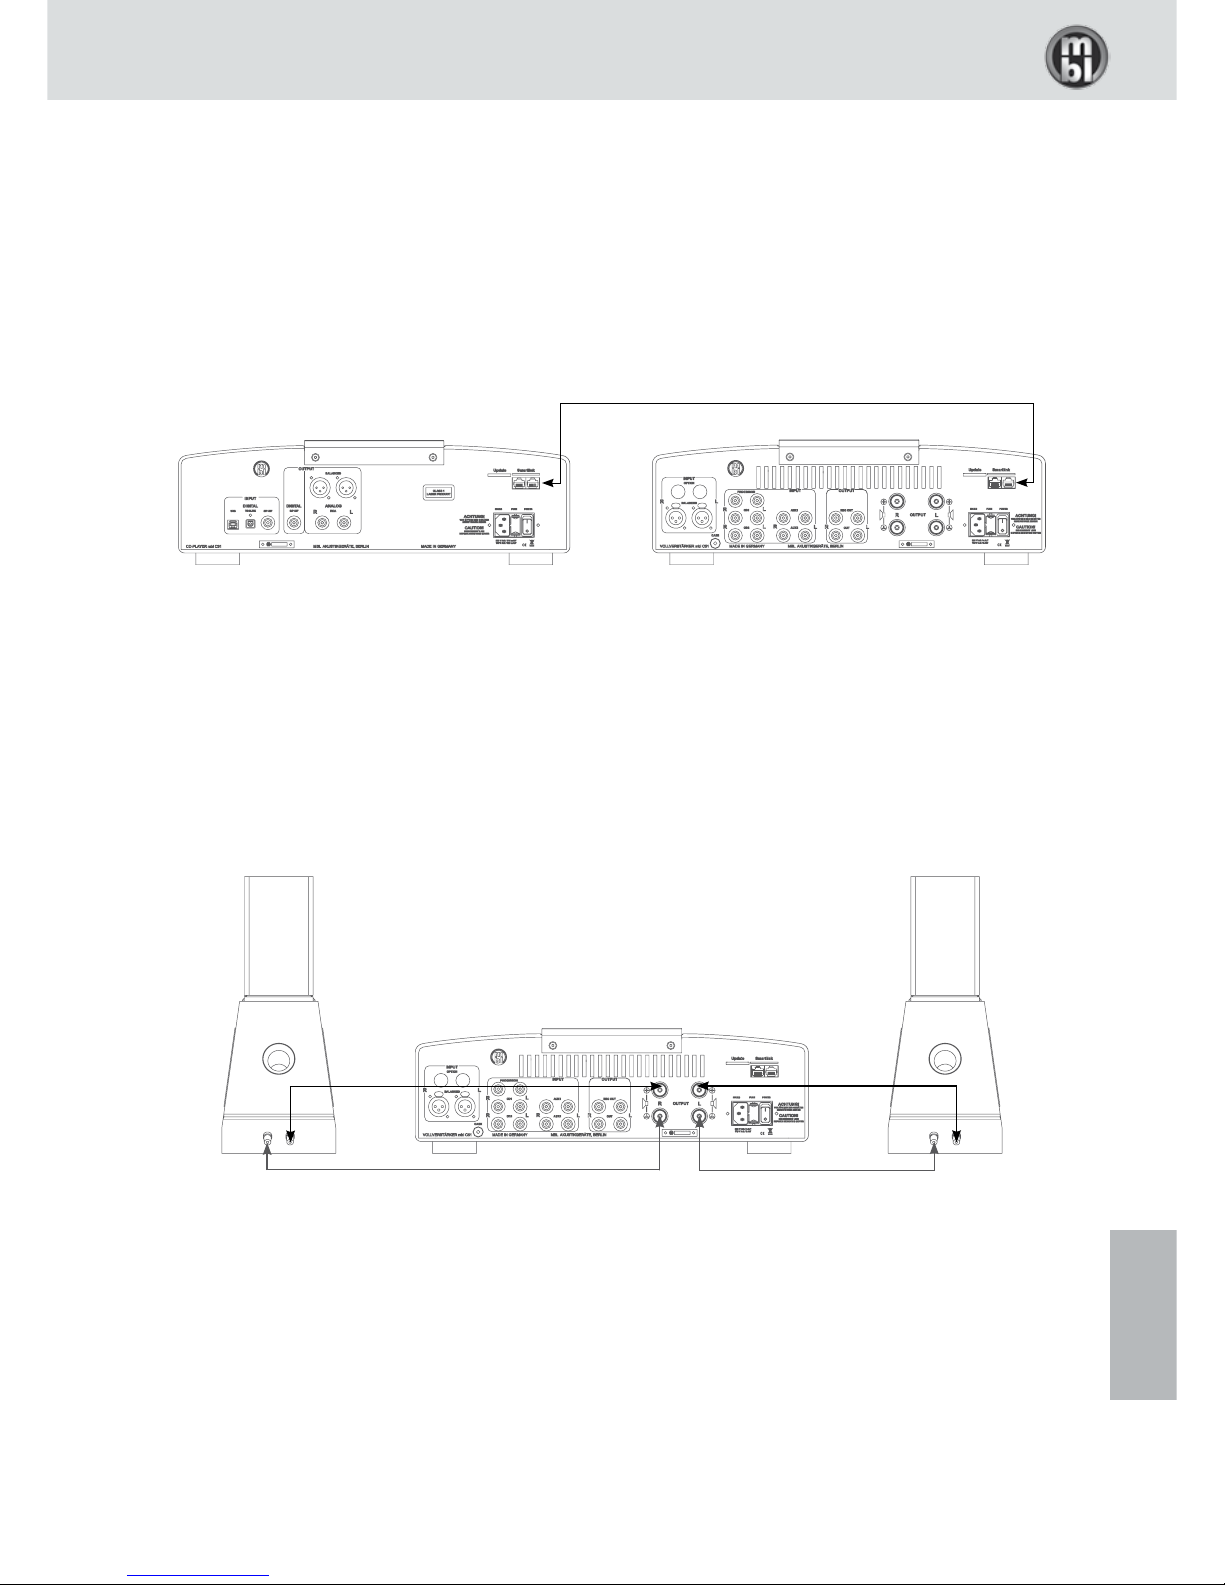
6.1.2 Creating an MBL SmartLink Connection
Plug one end of the MBL SmartLink cable into either one of the two MBL SmartLink sockets on the CD player and the
other end of the cable into one of the two MBL SmartLink sockets on the mbl integrated amplifier.
IMPORTANT NOTICE: When connecting the MBL SmartLink, please make sure that you do not create a closed circle. In
each system chain, two Corona devices must always be connected with only one plug.
6.1.3 Wiring the Loudspeakers with the Integrated Amplifier
Take one of the loudspeaker cables and connect one end to the loudspeaker terminal on the amplifier and the other end
with the loudspeaker. If the cable is directional, please follow the direction of the cable so the signal flows away from the
amplifier towards the loudspeaker. Please ensure that the red part of the cable is connected to the positive terminal (red)
on both the amplifier and the speaker. Please also make sure that the correct loudspeaker (left or right) is connected to
the proper terminal (“L” or “R”) on the amplifier. Repeat this procedure with the second loudspeaker cable for the other
side connection.
5.1.4 Connecting the Power Supply Cable
Now connect your Corona Line devices with the power socket (or multipoint connector) using the power supply cable
supplied (or appropriate 3rd party cable), and switch on your devices with the “Power” switch on the rear panel.
When you have completed this stage, your music system is activated and ready for operation. All you have to do now to
enjoy music is insert a CD, start the player and select the correct input source on the integrated amplifier.
We wish you many hours of joy and pleasure with your MBL Corona Line music system!
mbl C31 CD Player mbl C51 Integrated Amplifier
+
-
mbl C51 Integrated Amplifier
Right Speaker Left Speaker
+
-
CORONA LINE
16
6.2 Wiring a system consisting of a CD Player, Preamplifier and Stereo Power Amplifier
Your CD player as well as the preamplifier and the stereo power amplifier can be connected either using single-ended
cables with Cinch/RCA plugs (asymmetrical or “single-ended” connection), or with cable using XLR plugs (symmetrical or
“balanced” connection). Any connection methods may be combined. For both connections we recommend that you use
a high quality single-ended cable with Cinch/RCA plugs.
NOTE: The connection between the preamplifier and the stereo power amplifier should consist of either cables with
Cinch/RCA plugs or of cables with XLR plugs but NOT of both types together simultaneously. Connections consisting of
both types of cable lead to interference and impairment of sound quality.
You will need:
• 2 pairs of audio interconnect cables, Cinch/RCA termination
• 2 UTP-CAT 6 cables
• 2 loudspeaker cables
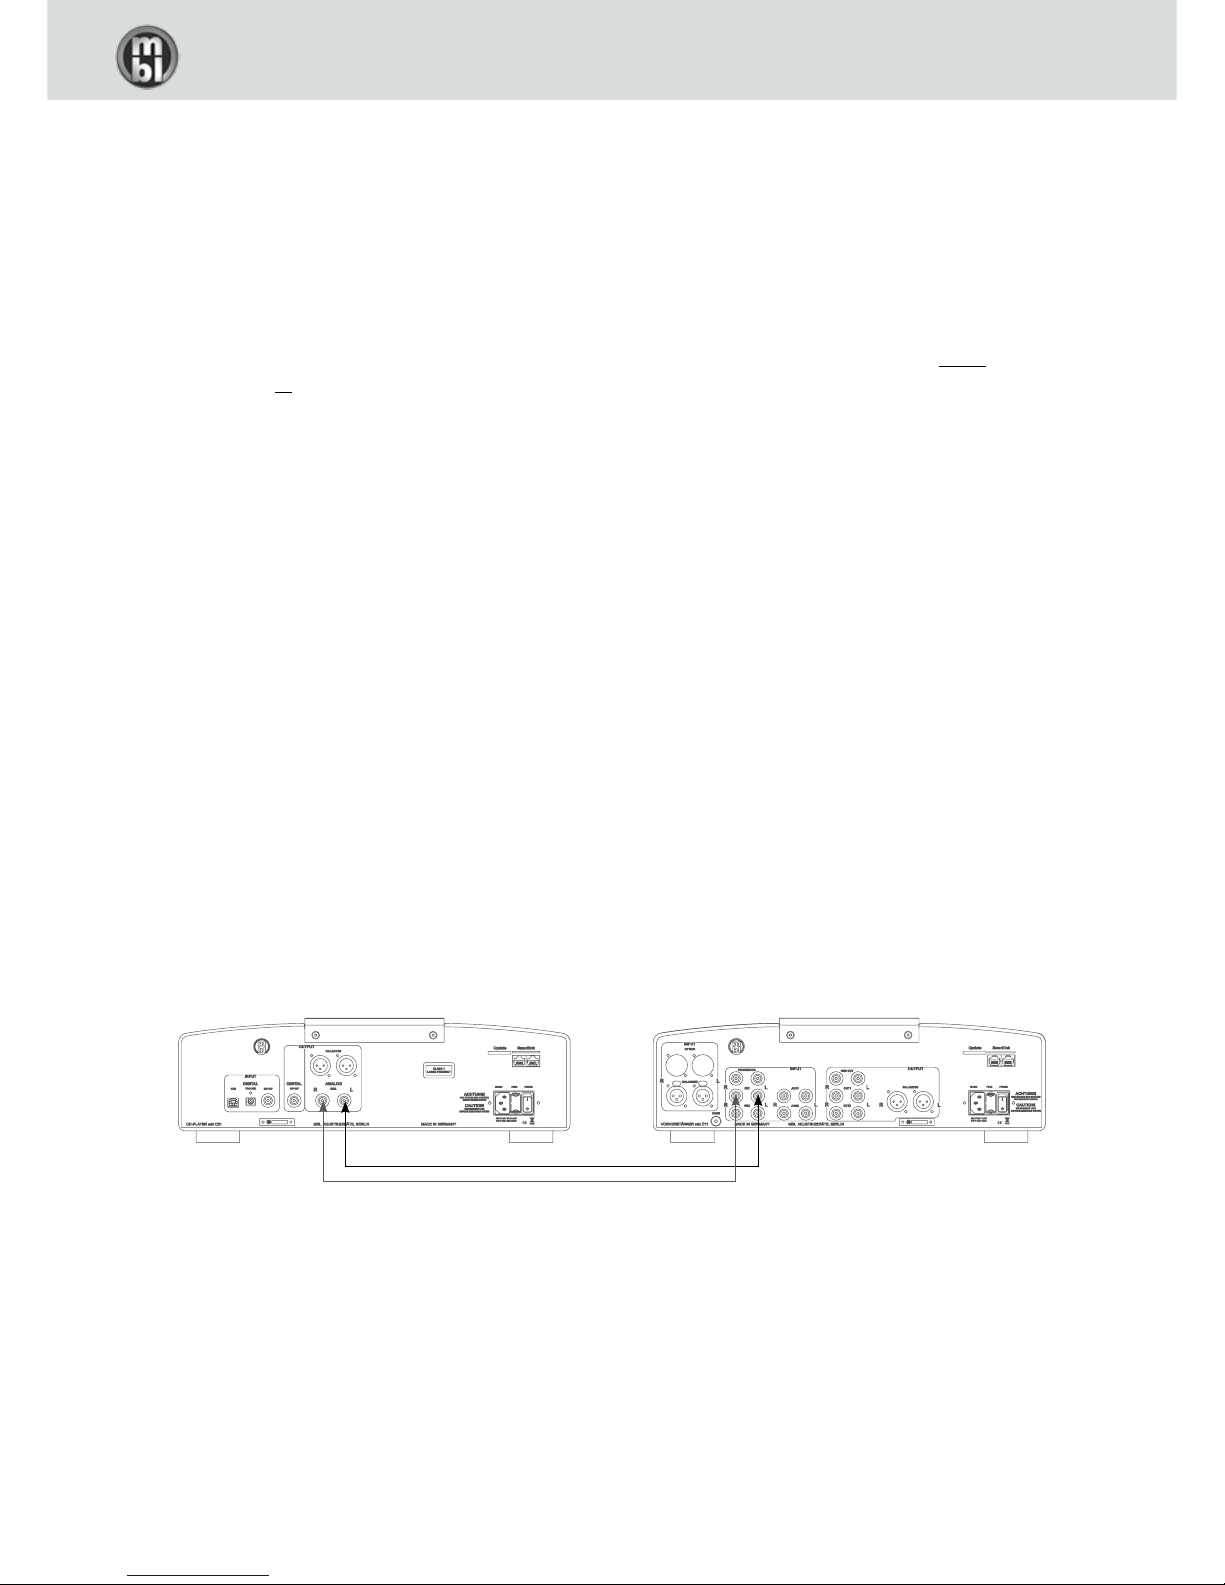
6.2.1 Wiring the CD Player with the Preamplifier
Take the pair of Cinch/RCA cables and connect the “source” end securely to the CD player in the pair of sockets labelled
“RCA” in the “Output” group of connections. If the cable features a drawing of a signal direction arrow, secure the cable
end in the socket of the CD player whose arrow is pointing away from the CD player.
Secure the other end of the pair of cables in the sockets on the preamplifier labelled “CD 1” or whichever input you desire.
Please ensure that the same channels are connected together in the two devices (right to right; left to left).
mbl C31 CD Player mbl C11 Preamplifier

CORONA LINE
17
ENGLISH
6.2.2 Wiring the Preamplifier with the Stereo Power Amplifier
Take the pair of Cinch/RCA cables and connect one end securely to the preamplifier in the pair of sockets labelled “OUT 1”.
This time the arrow on the cable (if existing) needs to be pointing away from the preamplifier. Secure the other end of
the pair of cables in the input sockets on the stereo power amplifier labelled “RCA”. Please ensure that the same channels
are connected together in the two devices (right to right; left to left).
6.2.3 Creating the MBL SmartLink Connection
Plug one end of the MBL SmartLink cable into one of the two MBL SmartLink sockets on the CD player and the other end
of the cable into one of the two MBL SmartLink sockets on the preamplifier. Take the second MBL SmartLink cable and
plug one end into the vacant MBL SmartkLink socket on the preamplifier and the other end of the cable into the one of
the two MBL SmartLink sockets on the stereo power amplifier.
IMPORTANT NOTICE: When connecting the MBL SmartLink, please make sure that you do not create a closed circle. In
each system chain, two Corona devices must always be connected with only one plug.
mbl C11 Preamplifier mbl C21 Stereo Power Amplifier
mbl C31 CD Player mbl C11 Preamplifier
mbl C21 Stereo Power Amplifier

CORONA LINE
18
6.2.4 Wiring the Loudspeakers with the Stereo Power Amplifier
Take one of the loudspeaker cables and connect one end to the loudspeaker terminal on the amplifier and the other end
with the loudspeaker. If the cable is directional, please follow the direction of the cable so the signal flows away from the
amplifier towards the loudspeaker. Please ensure that the red part of the cable is connected to the positive terminal (red)
on both the amplifier and the speaker. Please also make sure that the correct loudspeaker (left or right) is connected to
the proper terminal (“L” or “R”) on the amplifier. Repeat this procedure with the second loudspeaker cable for the other
side connection.
6.2.5 Connecting the Power Supply Cable
Now connect your Corona Line devices with the power socket (or multipoint connector) using the power supply cable
supplied (or appropriate 3rd party cable), and switch on your devices with the “Power” switch on the rear panel.
When you have completed this stage, your music system is activated and ready for operation. All you have to do now to
enjoy music is insert a CD, start the player and select the correct input source on the preamplifier.
We wish you many hours of joy and pleasure with your MBL Corona Line music system!
+
-
mbl C21 Stereo Power Amplifier
Right Speaker Left Speaker
+
-
 Loading...