

Page 1
MBIT Technologies
*
www.mbit.com.au 1
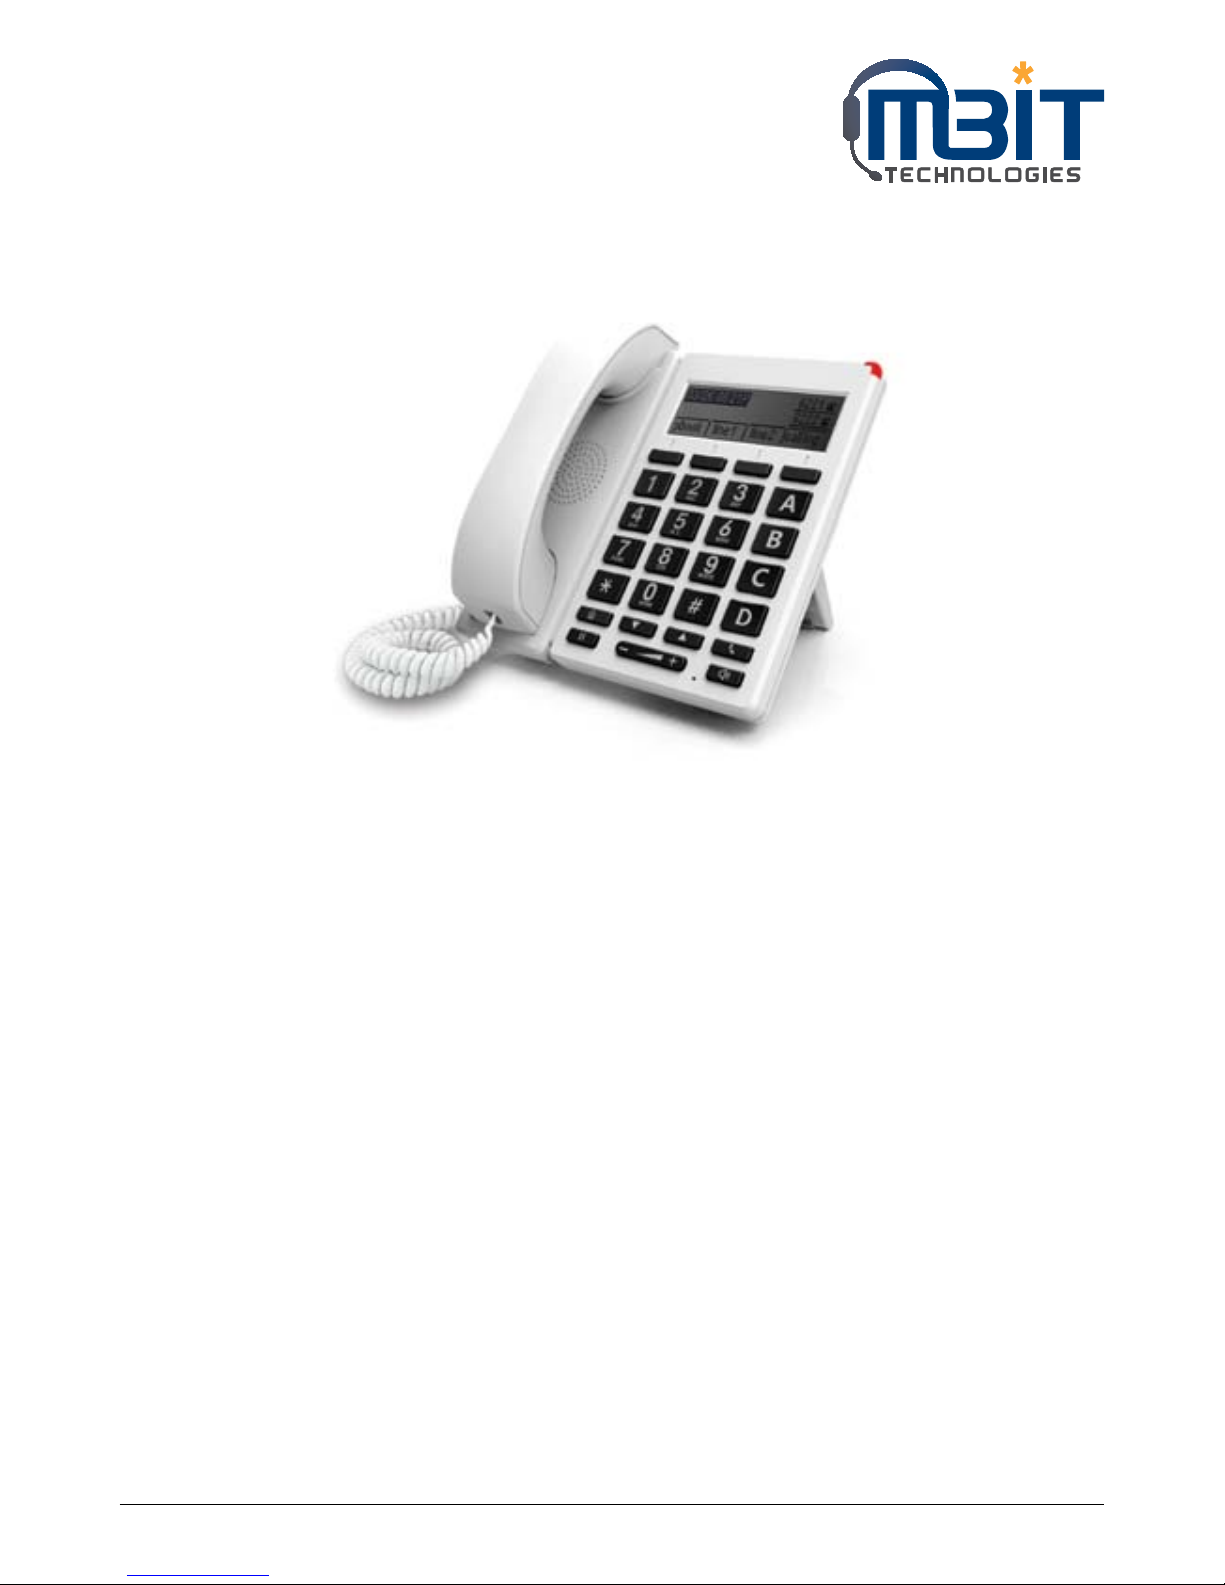
Wireless Big Button IP Phone (bb100)
The Intelligent Communication Device for Next Generation Network
User Manual
Page 2

MBIT Technologies
*
www.mbit.com.au 2
Table of Contents
1 INTRODUCTION 5
1.1 Thanks for Purchasing bb100 5
1.2
Package Contents 5
2 INSTALLING 6
2.1 Assembling the Phone and Connecting to the Network 6
2.2
Mounting the Phone to the Wall 6
2.3
Turning on the Phone 6
2.4
Connect to the Internet 6
2.4.1
Via Wired 6
2.4.2
Via Wireless 7
3 GET FAMILIAR WITH BB100 9
3.1 Front Panel 9
3.2
Rear Panel 10
3.3
LEDs Indicator 10
3.4
Get Familiar with LCD 10
4 MENU 11
4.1 Items 11
4.2 How to configuration from Menu 13
5 USING BASIC PHONE FUNCTION 14
5.1 Using the Handset/ Speakerphone/ Headset 14
5.1.1
Using the Handset 14
5.1.2
Using the Speakerphone 14
5.2 Making Telephone Call 14
5.2.1
Place a Call 14
5.2.2
Using Redial Button 14
5.2.3
Dialing from Phonebook 14
5.2.4
Dialing from Call History 15
5.2.5
Using Speed Dial 15
5.2.6
Using Dial Plan 15
5.2.7
Using Delayed Hotline 15
5.2.8
Answering a Telephone Call 15
5.3
Adjusting Call Volume 16
5.4
Black List 16
5.5
Placing a Call on Hold 17
5.6
Three Way Conference Calls 17
5.7
Attended Transfer 17
5.8
Unattended Transfer 17
5.9
Forwarding Calls 18
5.10
Call Waiting 18
5.11
Ending a Call 18
5.12
Viewing and Returning Missed Calls 18
5.13
Text Message 19
5.13.1
Sending Message 19
5.13.2
Reading Message 20
5.14
DND (Do Not Disturb) 20
Page 3

MBIT Technologies
*
www.mbit.com.au 3
6 USING ADVANCED PHONE FUNCTIONS 21
6.1 Speed Dials 21
6.2
BLF (Busy Lamp Field) 21
6.3
Shortcut Key 22
6.4
Pickup 23
6.5
Call Park 23
6.6
MSG 24
6.6.1
Enable and configuration MSG 24
6.6.2
Using MSG 25
6.7
Changing the LCD Screen Contrast 25
6.8
Changing Your Ring Tone 25
6.9
Setting Your Phone’s Date and Time 25
6.10
Rebooting Your Phone 25
6.11
Factory Default 26
7 CONFIGURATION 27
7.1 Web-based Configuration 27
7.2
Login 27
7.3
Webpage 27
7.4
Status 28
7.4.1
Basic 28
7.4.2
LAN Host 29
7.4.3
Syslog 29
7.5
Network 29
7.5.1
WAN 29
7.5.1.1
Internet Port (WAN) 30
7.5.2
LAN 31
7.5.3
MAC Clone 32
7.5.4
VPN 33
7.5.5
DMZ 33
7.5.6
Wireless 34
7.5.6.1
Wireless Settings 34
7.5.6.2
Wireless Connection 35
7.5.7
DDNS Setting 35
7.5.8
Routing 36
7.6
SIP Account 36
7.6.1
Line 1 36
7.6.1.1 Basic 36
7.6.1.2 Audio Configuration 37
7.6.1.3 Supplementary Services Subscription 38
7.6.1.4 Advanced 38
7.6.2
Line 2 39
7.6.3
SIP Settings 39
7.6.3.1 SIP Parameters 39
7.6.3.2 NAT Traversal 39
7.6.4
VoIP QoS 40
7.7
Phone 40
7.7.1
Preference 40
7.7.1.1
Preference 40
7.7.1.2 Regional 40
7.7.1.3 Call Forward 41
7.7.1.4 Miscellaneous 41
Page 4

MBIT Technologies
*
www.mbit.com.au 4
7.7.2 Multi-Functional Key 41
7.7.3
Dial Plan 43
7.7.3.1
Parameters and Settings 43
7.7.3.2
Dial Plan Syntactic 45
7.7.3.3
Example 46
7.7.4
Phone Book 46
7.7.4.1
Black List 48
7.7.5
Call Log 49
7.7.5.1
Redial List 49
7.7.5.2
Answered Calls 49
7.7.5.3
Missed Call 49
7.8
Administration 50
7.8.1
Management 50
7.8.1.1
Time/Date 50
7.8.1.2
Password Reset 51
7.8.1.3
Web Access 52
7.8.1.4
System Log Setting 52
7.8.1.5
Factory Defaults 53
7.8.2
Firmware Upgrade 53
7.8.3
Provision 54
7.8.4
SNMP 55
7.8.5
TR069 56
7.8.6
Diagnoisis 56
7.8.7
Operation Mode 57
8 TROUBLE SHOOTING 58
8.1 No Operation after Power On 58
8.2
Long Time Stop at “Initialising Network” 58
8.3
No Dial Tone 58
8.4
Can not Make a Call 58
8.5
Can not Receive Any Phone Call 58
8.6
No Voice During an Active Call 58
8.7
Can not Connect to the Configuration Website 59
8.8
Forget the Password 59
Page 5

MBIT Technologies
*
www.mbit.com.au 5
1 INTRODUCTION
1.1 Thanks for Purchasing bb100
Thank you for purchasing bb100. The bb100 which has 4 lines is a full-featured VoIP (Voice over Internet
Protocol) phone that provides voice communication over an IP network.
This phone functions not only much like a traditional phone, allowing to place and receive calls and enjoy
other features that traditional phone has, but also it own many data services which you could not expect
from traditional telephone.
This guide will help you easily use the various features and services available on your phone.
The bb100 which has a 3dB internal antenna for 802.11n 1T1R, supports wireless.
1.2 Package Contents
Your package includes the following:
• One bb100 IP Phone Unit
• Handset and handset cord
• Headset
• One universal power adapter
• One Ethernet cable
• Wall-mounting screw pack
Page 6

MBIT Technologies
*
www.mbit.com.au 6
2 INSTALLING
2.1 Assembling the Phone and Connecting to the Network
1) Plug one end of the coiled phone cord into the left side of the phone base.
2) Plug the other end of the handset cord into the jack at the bottom of the handset.
3) If you are using an external power source, push the power cord into the power supply, and plug the
power supply into the phone base unit. Note: Use only the power supply that came with the phone.
4) Plug the Ethernet cable into Internet port in the rear side of the base station. Plug the other end of the
Ethernet cable into your already prepared network connection.
2.2 Mounting the Phone to the Wall
1) Complete the assembly instructions.
2) Attach two appropriate screws to the wall. Leave 1/4 distance from the wall. This allows you to slide the
mounting brackets on to the screws. Push down slightly to lock the phone in place.
2.3 Turning on the Phone
This section assumes that the correct connections have been made.
1) Check whether the Internet port is well connected.
2) Plug the AC power adapter into the electrical outlet.
Note: Use only the adapter that came with the phone.
3) The LCD will firstly display “Welcome” and all of the lights on the phone will flash.
4) Next, the LCD display “Initialising Network”.
5) After the sequence, the phone will display date & time, lines status for the phone, and bb100 is started
normally.
Note: If the phone does not provide this screen, re-confirm installation and connections. If these
are incorrect, try unplugging the phone and plugging it back in again. If you still don’t see the
display, then contact your Phone Administrator or service provider.
2.4 Connect to the Internet
You can connect the bb100 to the Internet via wired and via wireless.
2.4.1 Via Wired
Step 1: Check bb100 have powered on correctly.
Step 2: Plug the Ethernet cable into Internet port in the rear side of the base station. Plug the other end of
the Ethernet cable into your already prepared network connection.
Step 3: After the sequence, the IP Address of Internet port will appear at the bottom of the LCD.
Page 7
MBIT Technologies
*
www.mbit.com.au 7
2.4.2 Via Wireless
You can configuration wireless from LCD menu and from webpage
From LCD menu:
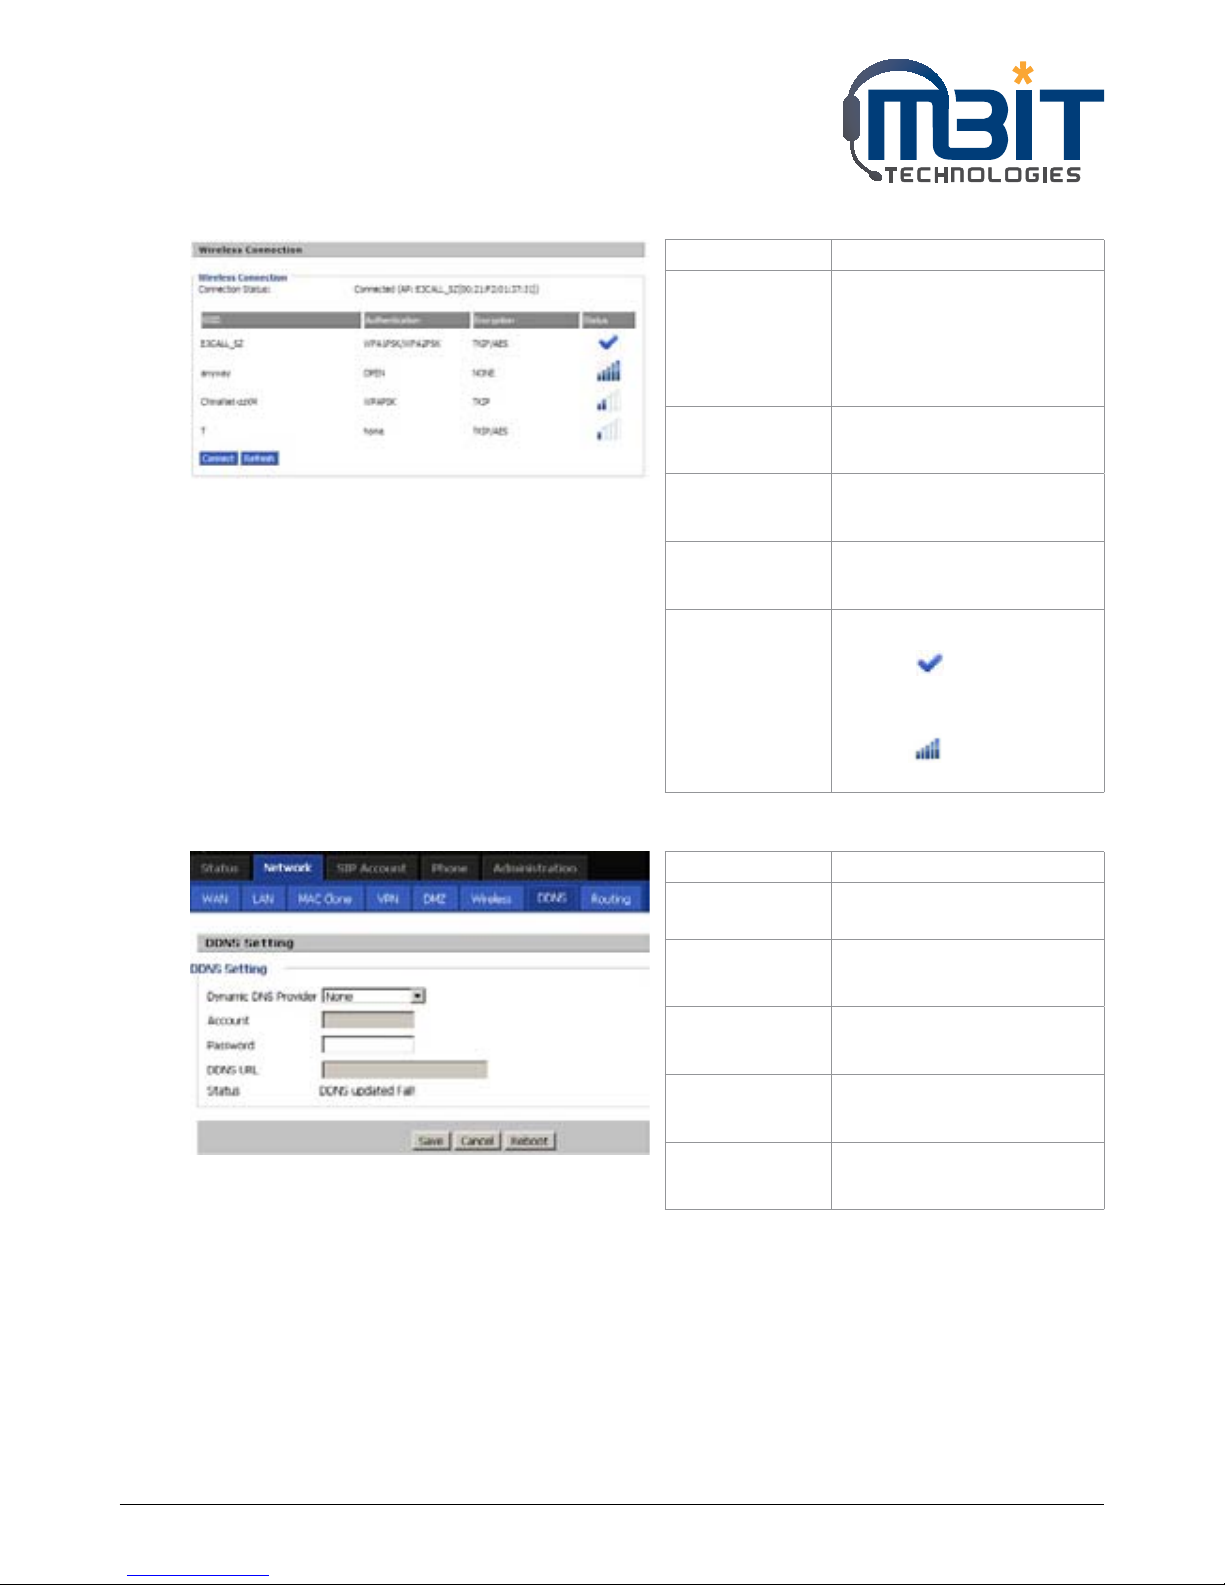
Step 1: Press the button , and then select 13 Wireless using the UP and DOWN button.
Step 2: Choose 2 Wireless Connection and you can view the wireless then bb100 can connect to.
Step 3: Highlight one network using the UP and DOWN button, and press the softkey button under
link to connect.
Note: If the Wi-Fi need authentication, choose the authentication and fill in the password.
Step 4: Press the softkey button under ok to confirm connecting.
Step 5: If the AP has connected, the wireless icon in LCD will display linked.
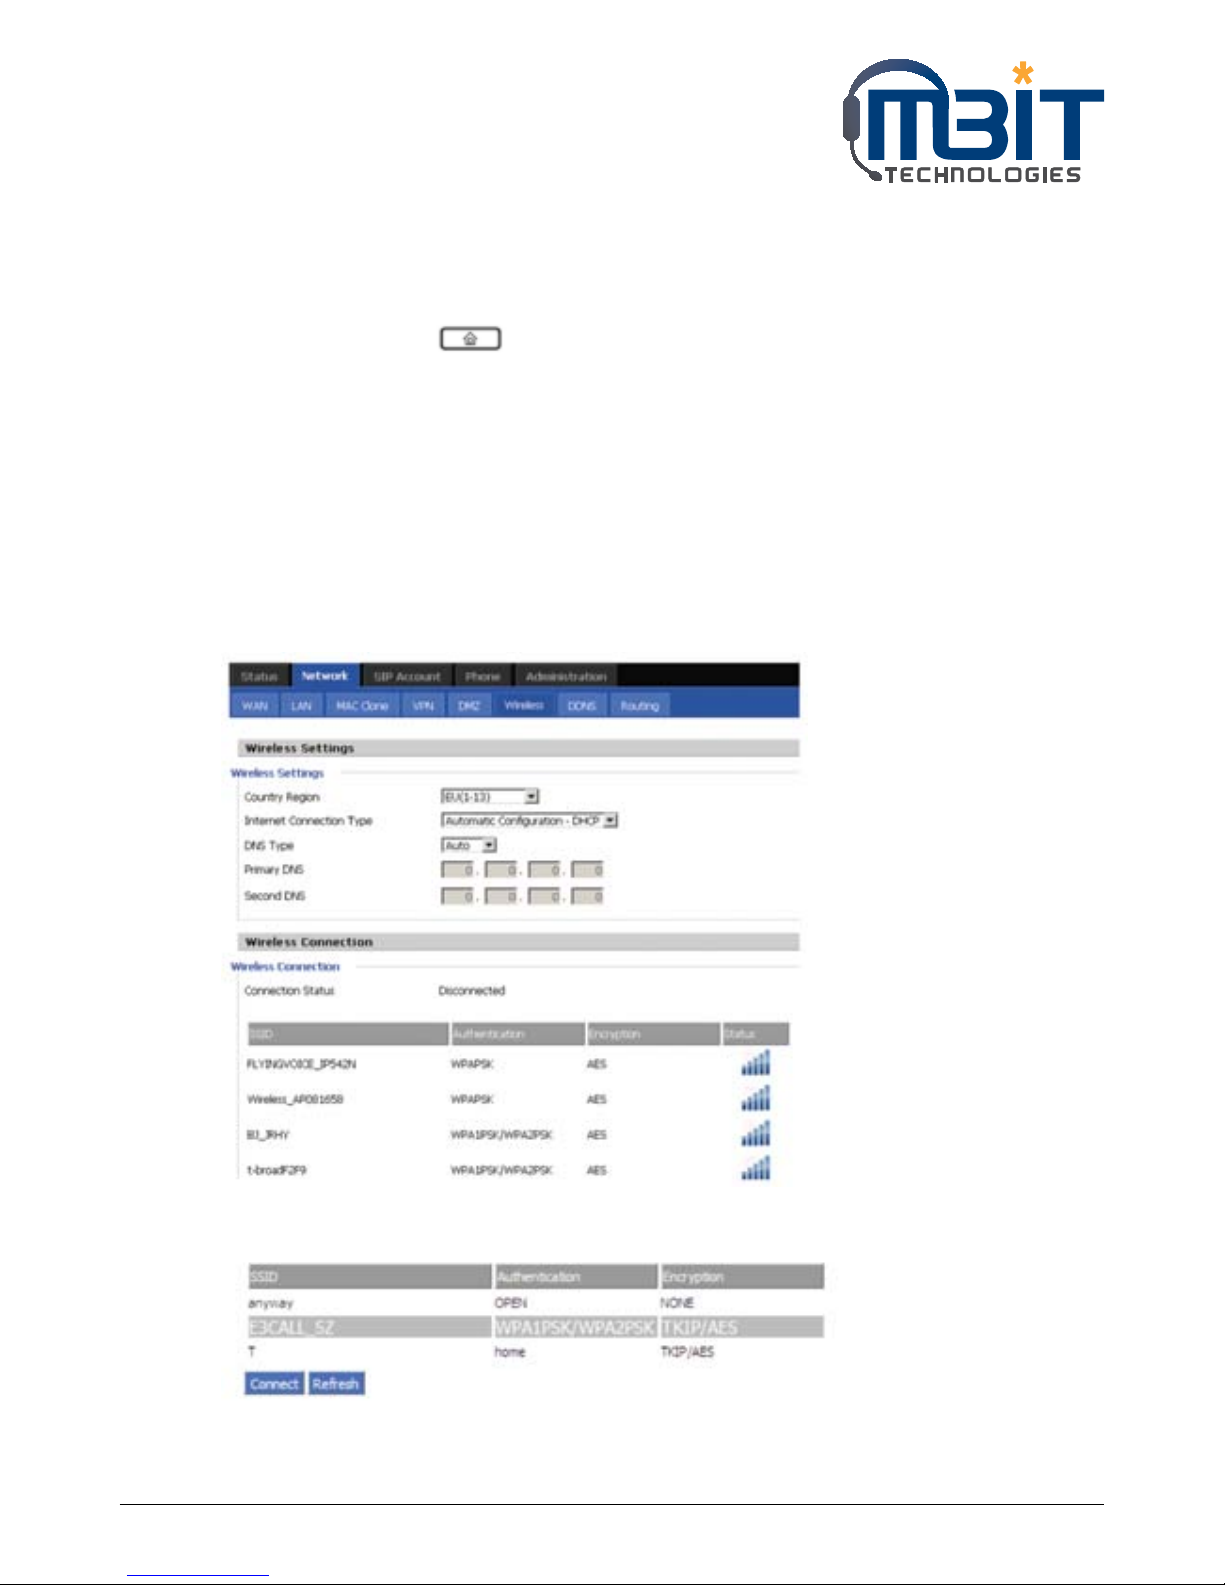
From webpage:
Step 1: Login the web and then open Network/Wireless webpage.
Step 2: Highlight one Wi-Fi and the words will get larger, following is one example:
Step 3: Press the Connect button to connect to the E3CALL_SZ.
Page 8
MBIT Technologies
*
www.mbit.com.au 8
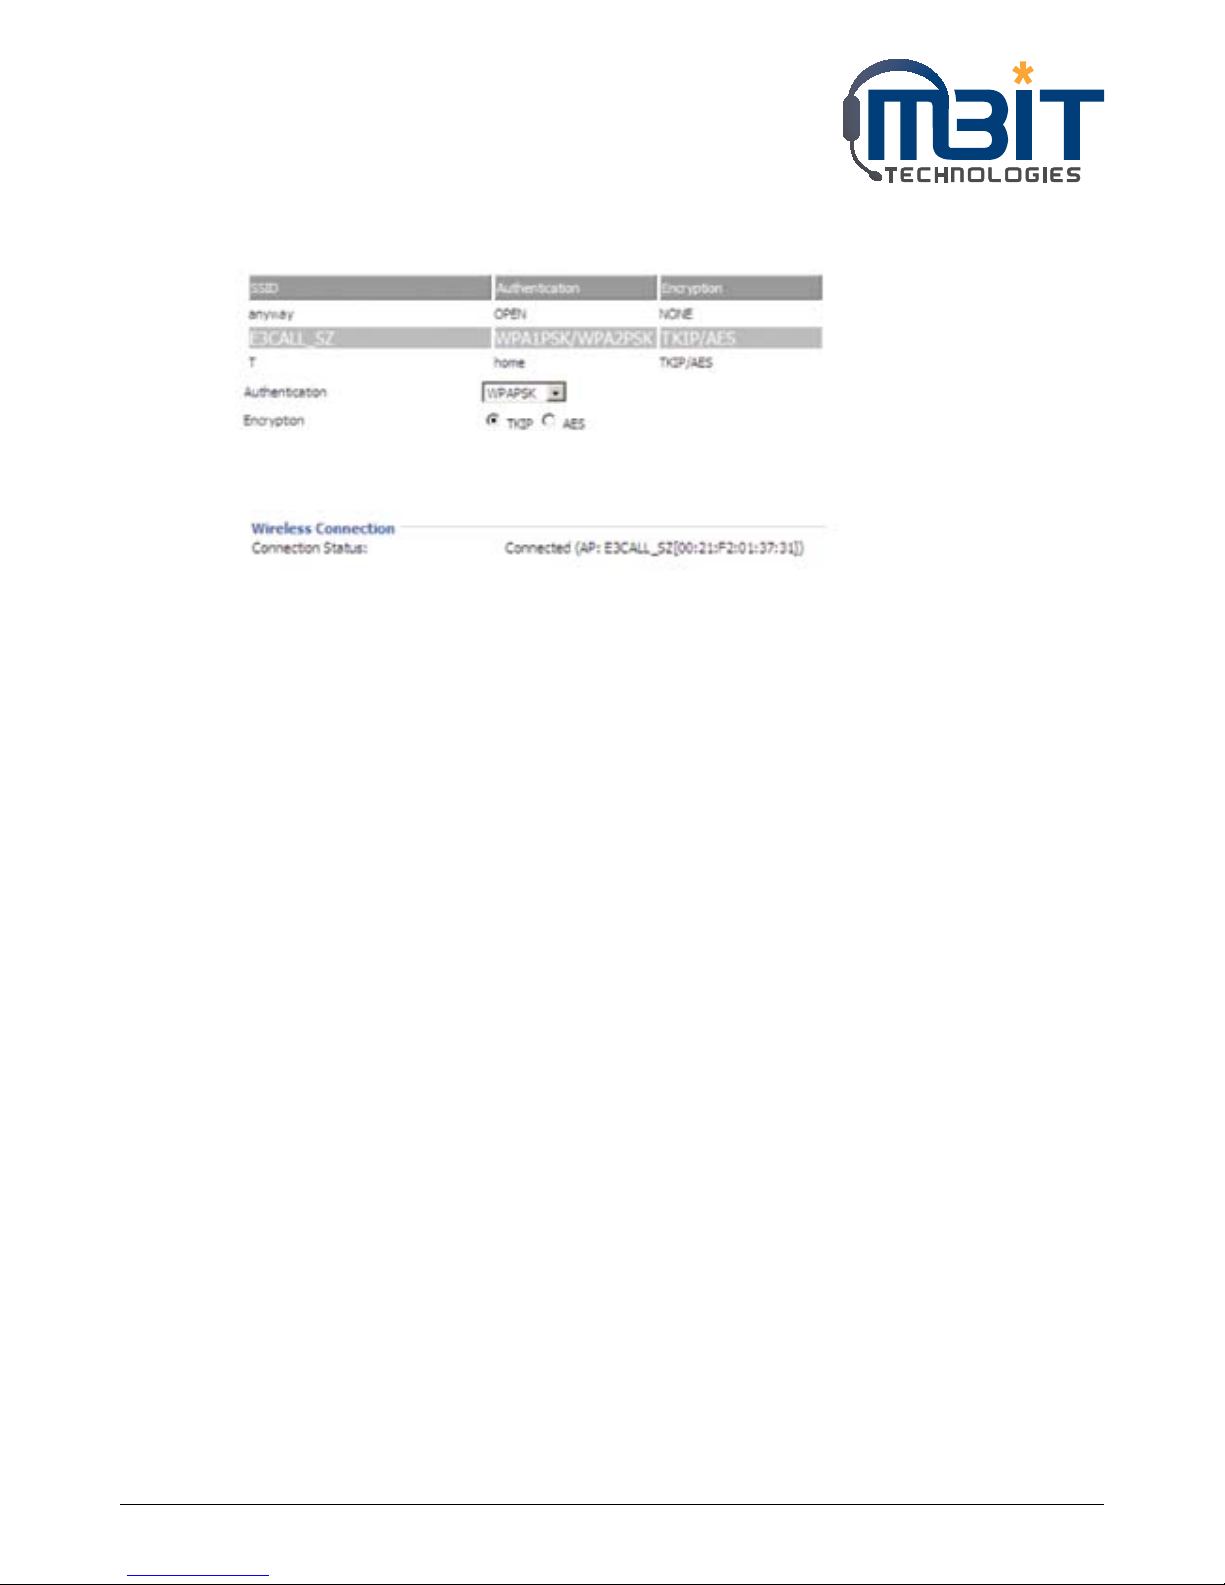
Step 4: If the Wi-Fi need authentication, choose the authentication and fill in the password, then choose
the OK button to connection
Step 5: If the AP have connected, then connection status will change like following picture and the icon
of wireless will display linked.
Page 9
MBIT Technologies
*
www.mbit.com.au 9
3 GET FAMILIAR WITH BB100
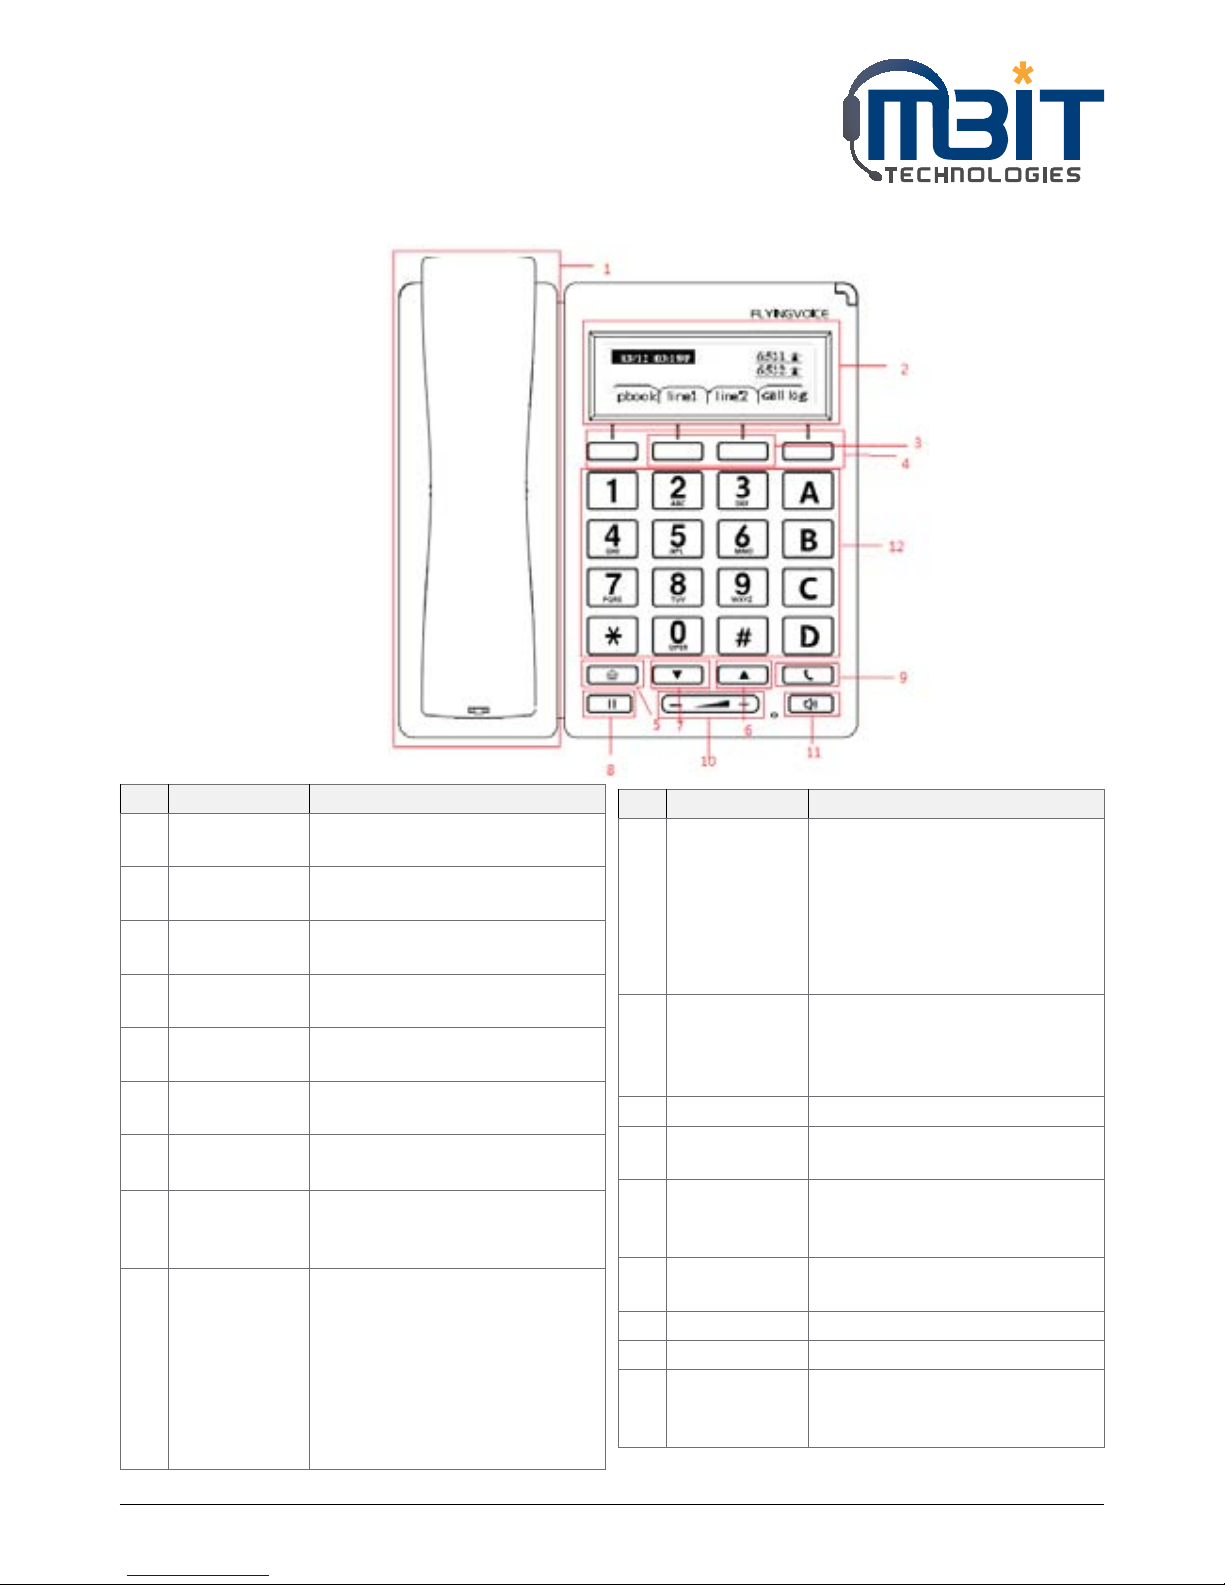
3.1 Front Panel
No. Part Name Description of Function
1 Handset top
cradle
For the placement of handset
(Receiver end)
Hook switch For hang-up and hang-off of
handset
Cradle latch To prevent the handset from
dropping when it is wall-mounted.
Handset
bottom cradle
For the placement of handset
(Transmitter end)
Handset cord
port
RJ-11 jack on the left side of the IP
phone
Headset wire
port
RJ-11 jack on the bottom of the
handset
Headset To mount mouthpiece and earpiece
on the single handle.
2 LCD screen The LCD screen is for displaying
your settings, such as phone
number, line status and so on.
3 Line keys In standby: These keys are used
as line keys; you can press the line
button to select the corresponding
line, and then user can make call or
do other functions.
The LEDs under the keys used to
display the status of each extension,
please refer to 3.3 LCD indicator
No. Part Name Description of Function
4 Soft keys These keys are used as soft keys.
These can be used for item
selection or control on the LCD
screen.
The softkey’ function depends
on their corresponding content
displayed on the LCD at that time.
5 Menu Press it to access to menu items:
such as phonebook, multifunctional key, and call history and
so on.
6 UP To scroll up or turn up the volume
7 DOWN To scroll down or turn down the
volume
8 Hold The Hold key is used to hold the
current call, press it again to release
the hold function.
9 Redial The Redial key is used to redial the
last dialed number automatically.
10 Volume Add or reduce the volume
11 Handsfree Press it to use Handsfree
12 Numeric
Keypad
Enters numeric digits for initiating
a call or for entering configuration
information.
Page 10
MBIT Technologies
*
www.mbit.com.au 10
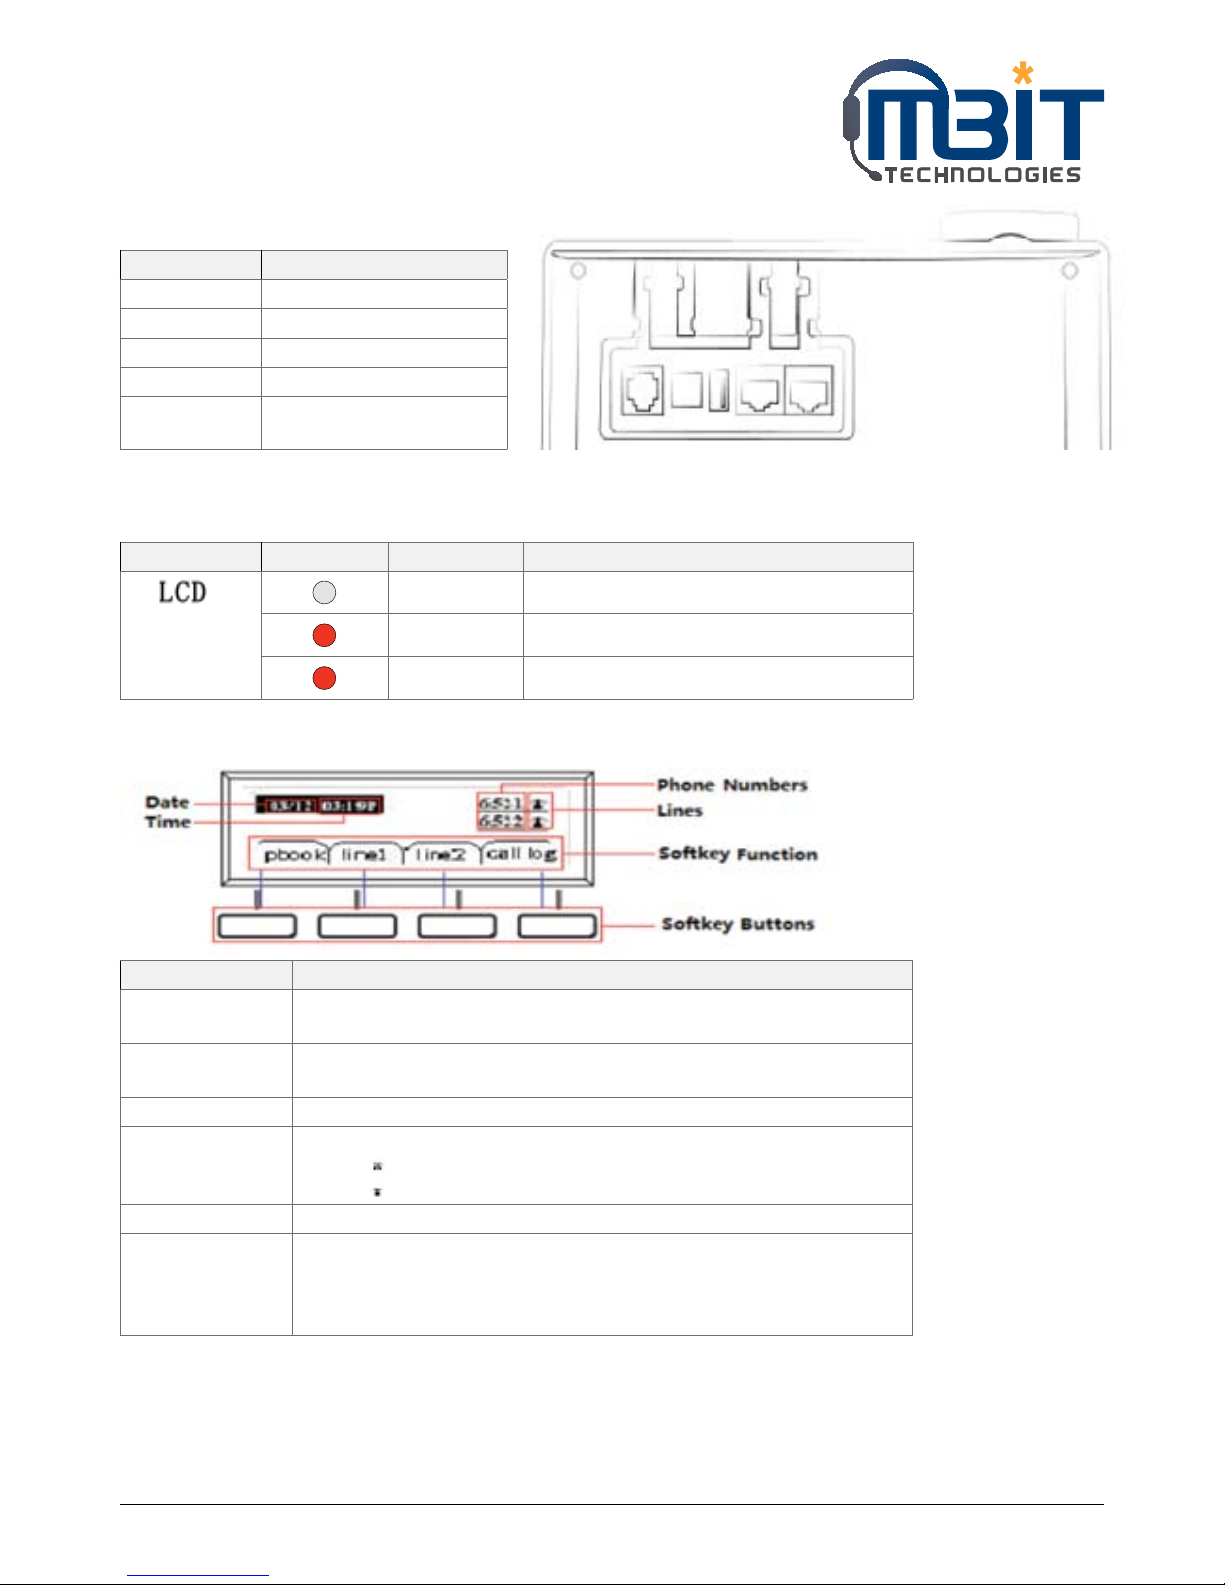
3.2 Rear Panel
Part Name Description of Function
Line Connect to PSTN
USB Use the USB for storage
DC 5V Power port
PC Connects to a PC
Internet Connects to the Ethernet
switch, router or Internet
3.3 LEDs Indicator
LED Colour Status Description
OFF Power off or Phone is standby
Red In use
Blink Red Have a new call or Voice MSG or is updating
3.4 Get Familiar with LCD
Name Description of Function
Date To display the current date.
Date format is mm/dd
Time To display the current time.
Time format is mm:ss (A or P)
Phone Numbers To display the phone number of lines.
Lines To display the status of lines.
The icon means unregistered.
The icon mean registered.
Softkey Function To display the current softkey function.
Softkey Buttons You can use the softkey button to highlight the item displayed on the LCD
screen and then configuration.
One button directs to one softkey function, the blue line in the left picture
displays the corresponding relationship.
Page 11

MBIT Technologies
*
www.mbit.com.au 11
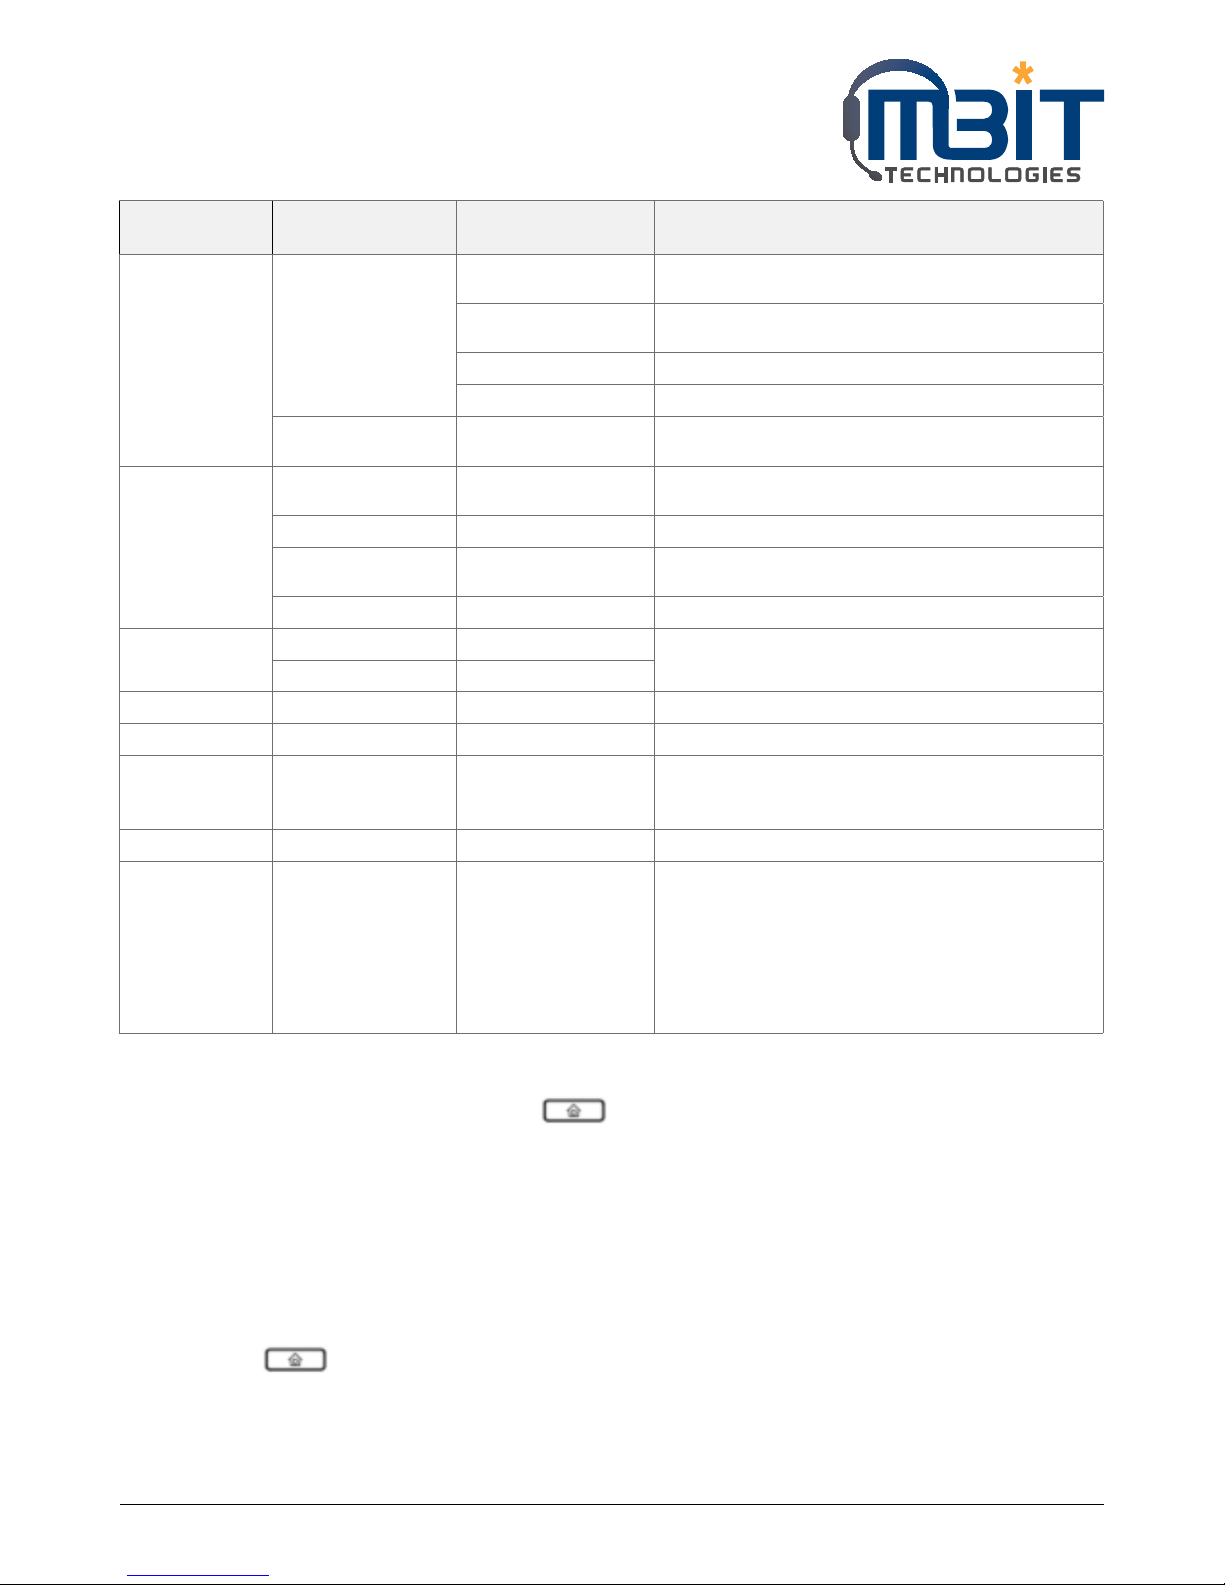
4 MENU
User can use MENU, soft key and button to browse, modify and configuration the phonebook,
multi-functional keys, network, accounts, factory default and so on.
4.1 Items
The table below lists Menu items which bb100 included:
Main menu
(LCD display)
Menu Items
(LCD display)
Submenu Items
(LCD display)
Explanation
1 Phonebook 1.1 NewEntry User can view, add, edit, and delete phonebook using
the five softkey.
User can also make call, and send text message directly
using the five softkey.
The Max records are 100.
3 Call History
3.1 RedialList To list the latest 100 records of called call, answered call
and missed calls.
3.2 Answered Calls
3.3 Missed Calls
4 Text Message
4.1 SEND User can send message according to prompt.
4.2 Received Box To list the latest 100 records of received message and
sent message.
4.3 SentBox
5 BlackList 5.1 NewEntry To configuration the blacklist, max record is 100.
6 Preferences 6.1 Call Waiting To enable or disable call waiting
6.2 Auto Answer To enable or disable auto answer.
7 Ring Tone 7.1 Bell Type 1 Choose the ring tone from Bell Type1- Bell Type15.
7.2 Bell Type 2
7.3 Bell Type 3
7.4 Bell Type 4
7.5 Bell Type 5
7.6 Bell Type 6
7.7 Bell Type 7
7.8 Bell Type 8
7.9 Bell Type 9
7.10 Bell Type 10
8 Volume Setting To turn up or turn down volume.
9 Accounts
(need password)
9.1Line 1
9.1. 1 Account Enable To enable/disable line1.
9.1.2 Password To set password of line1.
9.1.3 Account To set account of line1.
9.1.4 Display Name To set display name of line1.
9.1.5 Phone Number To set the phone number of line1.
9.1.6 SIP Domain Name To set the SIP domain name or domain name of line1.
9.1.7 SIP Server To set the SIP server IP address of line1.
9.1.8 SIP Server Port To set the SIP server port of line1.
Page 12

MBIT Technologies
*
www.mbit.com.au 12
Main menu
(LCD display)
Menu Items
(LCD display)
Submenu Items
(LCD display)
Explanation
9.1.9 Outbound Proxy To set the outbound proxy IP address or domain name
of line1.
9.1.10 Outbound Proxy
Port
To set the outbound proxy port of line1.
9.2 Line 2 Same to 9.1
10 Call Forward 10.1 CFWD
AllNumber
To set the destination phone number of CFWD
AllNumber
10.2 CFWD Busy
Number
To set the destination phone number of CFWD Busy
Number
10.3 CFWD No
AnsNumber
To set the destination phone number of CFWD No
AnsNumber
10.4 CFWD No
AnsDelay
To set the destination phone number of CFWD No
AnsDelay
11 Time/Date
11.1 Time(H:m:s)
11.2 Date(m/d/y)
12 Voice Mail 12.1 Line 1 12.1.1 MWI Enable To enable or disable voice mail of line1
12.1.2 Voice Mail
Number
To set the voice mail number of line1.
12.1 Line 2 Same to 12.1
13 Network 13.1 WAN Connection
Type
To view the current Internet port’s connection type, or
to change the Internet port connection type from Static,
DHCP and PPPoE.
13.2 Current IP To view the current Internet port IP address, or to
change the Internet port IP address.
13.3 Current Netmask To view the Current Netmask, or to change the Current
Netmask.
13.4 Current Gateway To view the Current Gateway, or to change the Current
Gateway.
13.5 DNS1 To view the DNS1, or to change the DNS1.
13.6 DNS2 To view the DNS2, or to change the DNS2.
13.7 Enable WAN
Login
To enable or disable user login webpage from Internet
port.
13.8 Web Port To view the Web Port, or to change the Web Port.
13.9 SIP QoS To view the SIP QoS, or to change the SIP QoS.
13.10 RTP QoS To view the RTP QoS, or to change the RTP QoS.
13.11 Data QoS To view the Data QoS, or to change the Data QoS.
13.12 VLANID To view the VLANID, or to change the VLANID.
13.13802.1p Priority To view the802.1p Priority, or to change the802.1p
Priority.
14 Wireless 14.1 Wireless Settings 14.1.1 WiFi Connection
Type
Choose the connection type from Static and DHCP
14.1.2 Current IP To view the current Internet port IP address, or to
change the Internet port IP address.
Page 13
MBIT Technologies
*
www.mbit.com.au 13
Main menu
(LCD display)
Menu Items
(LCD display)
Submenu Items
(LCD display)
Explanation
14.1.3 Current Netmask To view the Current Netmask, or to change the Current
Netmask.
14.1.4 Current Gateway To view the Current Gateway, or to change the Current
Gateway.
14.1.5 DNS1 To view the DNS1, or to change the DNS1.
14.1.6 DNS2 To view the DNS2, or to change the DNS2.
14.2 Wireless
Connection
AP To display the name of all APs.
15 Product INFO 15.1 Product Name To view the current information of Product Name,
Software Version, Hardware Version and MAC Address.
15.2 Software Version
15.3 Hardware
Version
15.4 MAC Address
16 Status 16.1 Account1 Status To view the current information about the status of
account1/2/3/4/5.
16.2 Account2 Status
17 Reboot To reboot bb100.
18 Factory Default To set bb100 factory default.
19 Set Password To reset password.
The password of LCD is same as the one of Webpage.
Default is null.
20 LCD Contrast To view and change the contrast of LCD.
21Login/Logout Press it to logout LCD.
bb100 will memory the password if user has input the
password when access to 9Accounts and bb100 will not
request the password if user access to it again.
Press 20 Login/Logout to erase memory, and then user
should input password when user access to 9Accounts
again.
4.2 How to configuration from Menu
1) When the phone is on-hook, press the button to enter Main menu.
2) Use the Numeric Keypad to input the digit or character
3) Press the en softkey button to change the input method between digit, capital letter and small letter.
4) Use the up and down softkey button to scroll up and scroll down. Configuration the item or sub-item
according to the prompt.
5) Press the ok softkey button to confirm.
6) Press the save softkey button to save changes.
7) Press button or delChr softkey button to delete one digit or a character.
8) Press the cancel softkey button to cancel changes and back to the up level.
9) The password which need when access to Accounts item is the same as the one of admin mode when
login Web, default is null.
Page 14

MBIT Technologies
*
www.mbit.com.au 14
5 USING BASIC PHONE FUNCTION
5.1 Using the Handset/ Speakerphone/ Headset
5.1.1 Using the Handset
To place and answer calls using the handset, simply lift the handset.
5.1.2 Using the Speakerphone
To place and answer calls using the speaker, press the speaker button. The green light behind the button
will illuminate.
5.2 Making Telephone Call
5.2.1 Place a Call
You can place a call by:
Step 1: Lifting the handset and dialing phone number, followed by the # or wait 5 seconds, bb100 will
dial out the phone number
Step 2: Connect the headset, press the headset button and dial phone number, followed by the # or
wait 5 seconds, bb100 will dial out the phone number
Step 3: Press the speaker button and dial phone number, followed by the # or wait 5 seconds, bb100
will dial out the phone number
5.2.2 Using Redial Button
To redial the last number called:
Lift the handset or press speakerphone or press headset, and then press the redial button; the number will
be automatically dialed.
5.2.3 Dialing from Phonebook
Adding a phonebook:
Below are the steps to add a phonebook in menu, User can also add phonebooks from you PC using bb100
Web Interface:
Step 1: Press button access to the menu items, and use the softkey button to choose
1. Phonebook
Step 2: Add one phonebook according to the prompt, press the en softkey button to change the input
method between digit, capital letter and small letter.
Using phonebook:
Press button to access to the menu items, and use the softkey button to choose 1. Phonebook,
and then highlight the phonebook you want to call, press the dial softkey button to make call
immediately.
Page 15

MBIT Technologies
*
www.mbit.com.au 15
5.2.4 Dialing from Call History
Press button access to the menu items, and use the up and down button to choose 3. Call
History, and then highlight the phone number you want to call, press the dial softkey button to dial
immediately.
5.2.5 Using Speed Dial
Adding a speed dial:
Below are the steps to add a speed dial from menu, User can also set speed dial from you PC using bb100
Web Interface.
Step 1: Press button access to the menu items, and use the up and down button to choose
2. Multi-Function Key
Step 2: Configuration one Multi-Function Key to speed dial according to the prompt.
Making speed dial:
Press the Multi-Function Key corresponding to speed dial to make call immediately.
5.2.6 Using Dial Plan
Adding one dial plan:
Step 1: Open Phone/Dial Plan webpage
Step 2: Add one dial plan, user can refer to 7.7.3 Dial Plan
Using dial plan to make call:
Dial the phone number according to one dial plan.
5.2.7 Using Delayed Hotline
Add the delayed hotline from SIP Account/Account1/2 webpage, User column, below is one example:
Step 1: Open SIP Account/Account1/2 webpage, User column
Step 2: Fill in the delayed hotline number, user can also add the delayed time.
Example 1: set the delayed hotline number is 111.
Example 2: set the delayed hotline number is 111 & delayed time is 4 seconds.
5.2.8 Answering a Telephone Call
When a call is incoming, the associated line button will flash and the phone will ring.
You can receive the call by:
Step 1: Pressing the corresponding line button or
Step 2: Pressing the speakerphone, or
Step 3: Lifting the handset, or
Step 4: Auto-answer: if auto-answer is enabling, bb100 will answer the phone automatically when
there is a call incoming
Page 16
MBIT Technologies
*
www.mbit.com.au 16
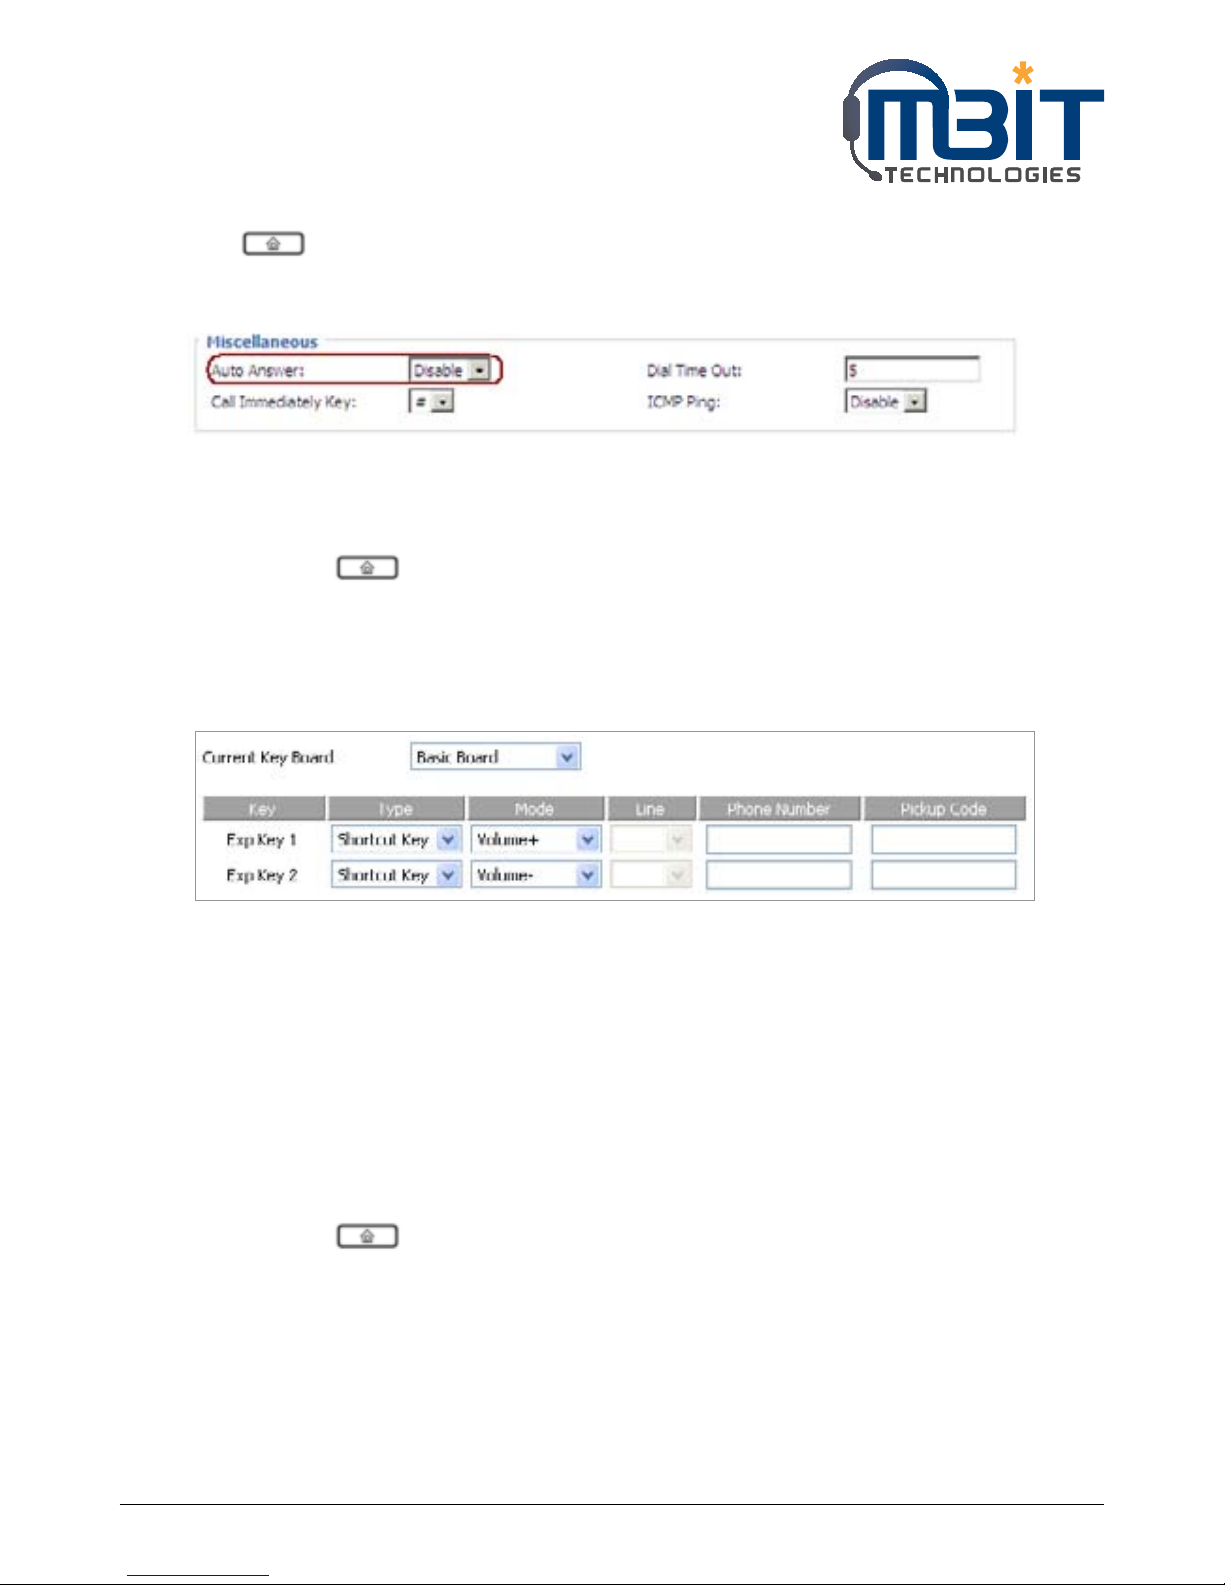
Enable auto-answer:
Press button to access to the menu items, then use the up and down button to choose 6
Reference, set auto-answer enable according to the prompt.
Note: user can also enable auto-answer in Phone/Preference webpage, miscellaneous column.
5.3 Adjusting Call Volume
From menu:
Step 1: Press button, and then choose volume.
Step 2: Press up and down button to turn up or turn down volume.
Using multi-functional key:
Step 1: Choose two multi-functional key (assuming the two multi-functional keys are Exp Key 1 and Exp
Key 2), and configuration as follows:
Step 2: Press Save Settings to save changes and user can see the corresponding LED is solid green.
Step 3: Press the Exp Key1 button to turn up volume, press the Exp Key 2 button to turn down volume.
5.4 Black List
If user added a black list, bb100 will forbid the phone number incoming.
Adding a black list:
There are two ways to add black list, one is from menu, and the other is from your PC to use bb100’s
webpage.
From menu:
Step 1: Press button, and then choose 5 black list.
Step 2: Choose New Entry, and then add one black list according to the prompt.
From Webpage:
Step 1: Log on the web, open Phone/Phonebook webpage, Black List column.
Step 2: Refer to the 7.7.4.1 Black List to add blacklist.
Page 17

MBIT Technologies
*
www.mbit.com.au 17
5.5 Placing a Call on Hold
When bb100 is during one active call:
Step 1: Pressing the button to put the active call on hold, then you will hear a dial tone, the
remote party will hear the hold music
Step 2: User can input the phone number to make call
Step 3: Pressing the button again to release the previously Hold state and resume the
bi-directional media.
5.6 Three Way Conference Calls
Step 1: To initiate a conference call, press the button during an active call and the first call is
placed on hold, and you will hear a dial tone.
Step 2: Dial the second person’s telephone number
Step 3: After the second person answers the call, press CONF softkey button to start the conference
call; all three parties will be participating in a conference call.
Note: If you hang up firstly, the other two parties will be disconnected; if one party hangs up firstly, you can
go on talking with the other party.
5.7 Attended Transfer
You call the person to whom you are transferring the call and speak to them before transferring the call:
Step 1: To initiate a transfer; press the button during an active call. This places the first call on
hold and you will hear a dial tone.
Step 2: Dial the second person’s telephone number.
Step 3: When the second person answers, you can have a private conversation with the second person
without the first person hearing it.
Step 4: To connect the call to the second person, press the XFER softkey button to complete the
transfer. You will be disconnected from the call.
Step 5: If you hang up during the call with the second person before pressing XFER softkey button,
the transfer is not completed; this only ends the call with the second person, and you can press
the button to continue the first call.
5.8 Unattended Transfer
You can transfer an active call to a third party without announcement.
Step 1: To initiate an unattended (blind) transfer; press the XFER softkey button during an active call.
The first call is placed on hold and you will hear a dial tone.
Step 2: Now dial the second person’s telephone number with immediately ending char “#”, bb100 will
transfer phone automatically and you will be disconnected from the call.
Page 18

MBIT Technologies
*
www.mbit.com.au 18
5.9 Forwarding Calls
You can forward all calls, forward calls when the phone is busy or forward calls when there is no answer.
Below are the steps to configuration call forward from menu. You can also set call forwarding options from
your PC using the IP Phone Web Interface.
From menu:
Step 1: Press the button.
Step 2: Select 10 Call Forward and choose one type of call forwarding.
• CFWD All Number - Forwards all calls to a single number immediately when there is an incoming call.
• CFWD Busy Number - Forwards all calls to another number when the phone is busy.
• CFWD No Ans Number - Forwards calls to another number if there’s no answer at your phone.
• CFWD No Ans Delay - the seconds to delay forwarding calls, if there is no answer at your phone.
Step 3: Fill in the call forwarding number.
Step 4: Press the save softkey button to save changes.
5.10 Call Waiting
Before using call waiting, you should enable it firstly, and default is enabling.
During an active call:
Step 1: If call waiting is enabled, call waiting alerts you with ringing if there is another call is incoming,
and the associate line button will change to red blinking, press the line key of the second call to
answer the second call with the first call holding, pressing the line button of the first call to back
to the first call with the second call holding.
Step 2: If the call waiting is off, new calls would be rejecting and the new caller will hear busy tone
when you are on another call.
Enable Call Waiting:
You can turn call waiting on or off from menu in Menu/6References item.
And user can also enable call waiting by using your PC to open SIP Account/Account X (1/2) webpage,
User column.
5.11 Ending a Call
To end a handset call, hang up the handset.
To end a speakerphone call, press the speaker button.
To end a headset call, press the headset button.
5.12 Viewing and Returning Missed Calls
The LCD screen on your IP phone will notify you like the following picture if a call came in that was
unanswered.
Page 19

MBIT Technologies
*
www.mbit.com.au 19
To return a missed call:
• If the LCD screens shows a missed call:
Step 1: Press the softkey button under miss to view the call.
Step 2: Press the softkey button under dial to return the missed call.
• If the LCD screen does not show a missed call, you can return a call from the Missed Call list:
Step 1: Press the button.
Step 2: Then selects 3 Call History.
Step 3: Then selects Missed Calls.
Step 4: Choose the call you want to return and press Dial.
To view a list of all missed calls:
• If the LCD screen shows a missed call, press the softkey button under miss to view a list of missed calls.
• If the LCD screen does not show a missed call:
Step 1: Press the button.
Step 2: Then selects 3 Call History.
Step 3: Then selects Missed Calls.
5.13 Text Message
5.13.1 Sending Message
Step 1: Press button, and then choose 4 Text Message by using the up button or the down
button.
Step 2: Press the select softkey button to enter to 1 SEND item.
Step 3: Press the select softkey button to edit message.
Note: When inputting text, use the en softkey button to change the input method among
numbers, capital and lowercase English letters, en stands lower case, EN stands capital letter, and
num stands digit
Step 4: Press the ok softkey button to input receivers’ phone number.
Note: bb100 support group mails, user can send one message to 10 friends or family one a time;
Press the ok softkey button to access to configuration the next receiver’s phone number;
You can select one number in phonebook by pressing the pbook softkey button.
If user has configuration the phone numbers which you want to send, press the ok softkey
button twice to access to the next item (Sender number).
Step 5: Set Sender phone number, default is line1’s phone number.
Step 6: Press the select softkey button to start sending message.
Page 20

MBIT Technologies
*
www.mbit.com.au 20
5.13.2 Reading Message
Step 1: Press button, and then choose 4 Text Message by using the up button or the down
button.
Step 2: Press the select softkey button to enter to 2 Recived Box item or Sent Box item.
Note: In Received Box are messages have received from others including new messages and old
messages. The ones in Sent Box are messages have sent out.
Step 3: Press the select softkey button to access to the next item. Choose the message you want to read
by using the up button or the down button.
5.14 DND (Do Not Disturb)
Use the Do Not Disturb feature to prevent incoming calls from ringing your phone.
To enable Do Not Disturb, use the softkey under the Not disturb.
Page 21
MBIT Technologies
*
www.mbit.com.au 21
6 USING ADVANCED PHONE FUNCTIONS
6.1 Speed Dials
Creating Speed Dials:
Following are the steps to creating speed dials in webpage; you can also creating it from LCD Menu.
Step 1: Access to web, and then open Phone/Multi-Functional Key webpage
Step 2: Then configures one Exp key to speed dial, and then choose the line and fill in the phone
number. The following picture is a setting example:
Step 3: Press Save Settings button to save changes and then press Reboot button to make changes
effective.
Using Speed Dials:
Step 1: Press the configured Exp Key 1 to call 111 or press Exp Key 2 to call 112 immediately.
6.2 BLF (Busy Lamp Field)
Your system administrator may configure your phone so that you can monitor other user’s phones from
your phone. User can create BLF from Menu/Multi-functional key or from your PC in Phone/Multi-
Functional Key webpage.
If this feature is configured, some multi-functional key buttons on your phone are assigned to display the
status of another user’s phone. For example, if your one multi-functional key is configured to display Bob’s
phone line, the associate multi-functional key shows you the status of his phone line:
• Green: Line is idle.
• Red (steady): Line is active or in use.
• Red (blinking): Line is ringing.
In addition, if you have configured the pickup code in BLF, you can press the same multi-functional button
to pick up a ringing call at his extension.
The example below describes the steps to configuration the pickup in BLF from Webpage, user can also
configuration from MENU.
Page 22
MBIT Technologies
*
www.mbit.com.au 22
Configure the pickup code in BLF:
Step 1: Access to web, and then open Phone/Multi-Functional Key webpage
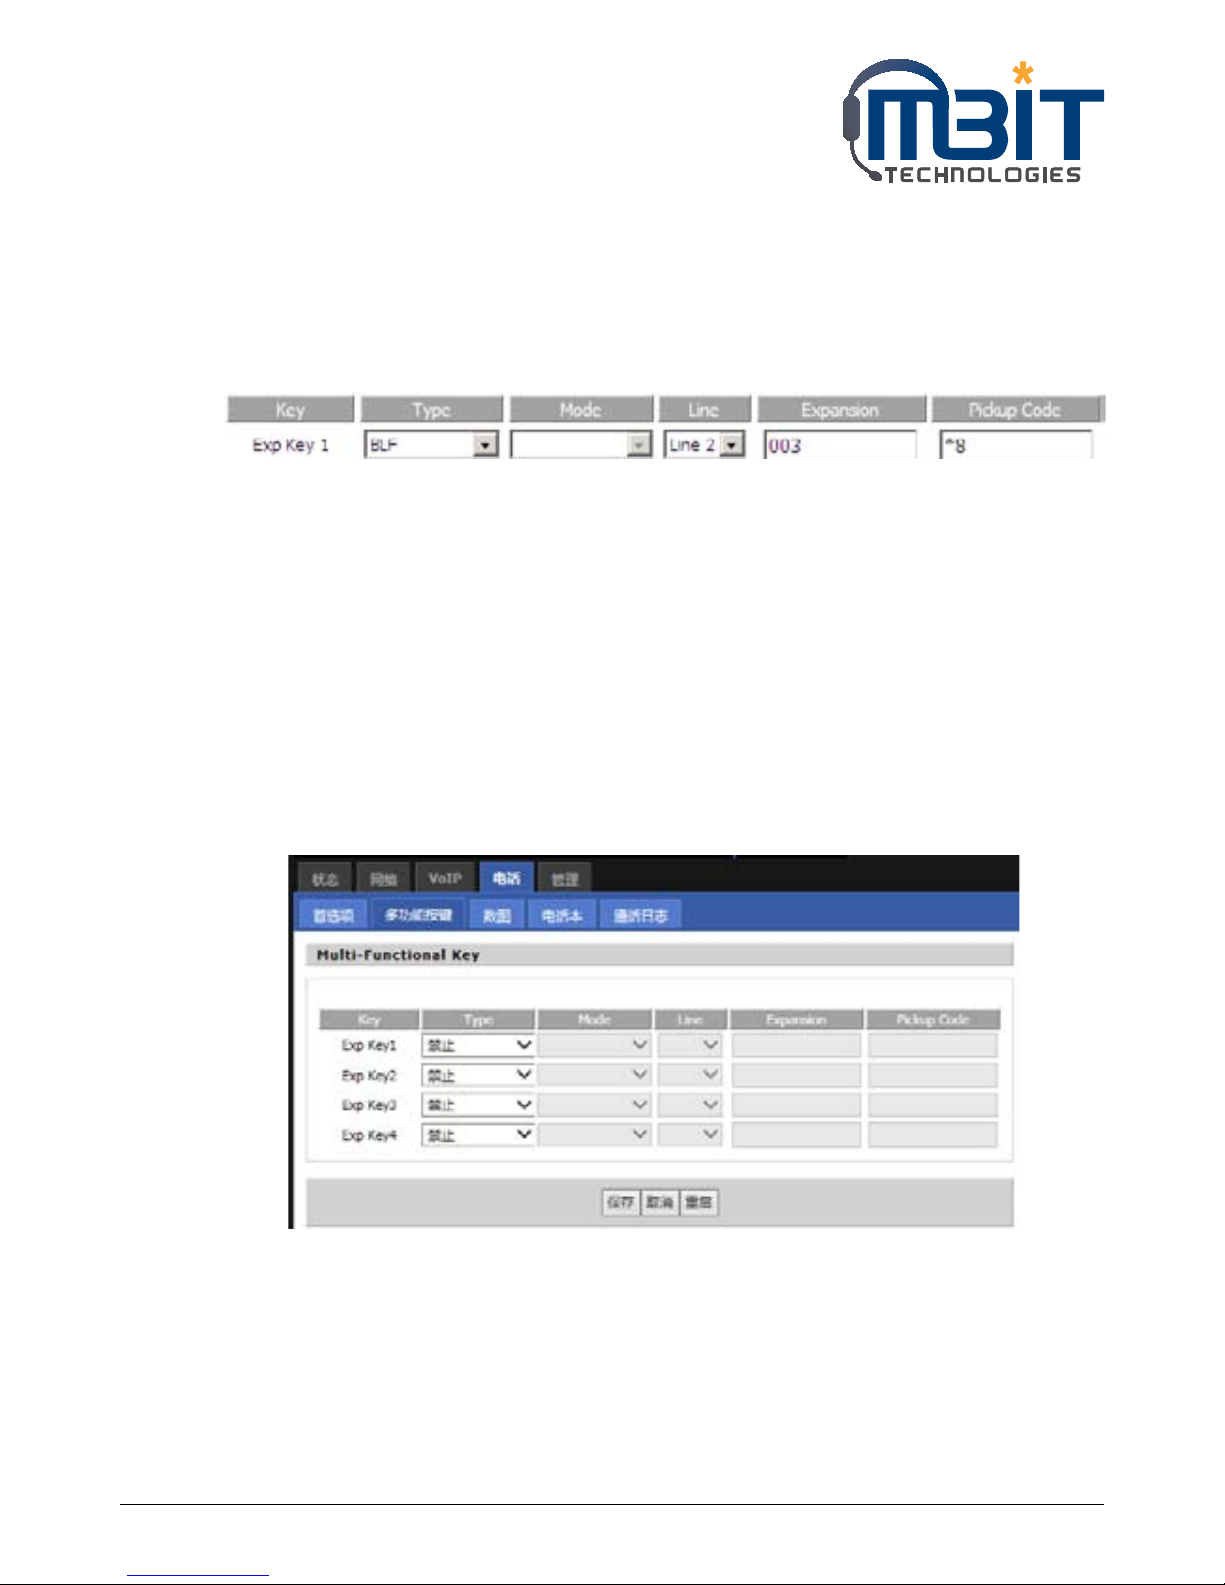
Step 2: Then configures one Exp key to BLF, and set Pickup Code (you can get the pickup code from
your administrator). The following picture is a setting example based on Asterisk
Step 3: Press Save Settings button to save changes and then press Reboot button to make changes
effective.
To pick up a ringing call:
Step 1: Assuming a ringing call at 003 and the associate LED is blinking.
Step 2: Press line2 button, and then press the Exp key 1 button to pickup the call.
6.3 Shortcut Key
The steps below described how to configuration the shortcut key from Webpage, user can also
configuration from MENU.
Creating Shortcut Key:
Step 1: Access to web, and then open Phone/Multi-Functional Key webpage
Step 2: Then configures the Exp keys to shortcut key, and set as you need. The following picture is a
setting example:
Step 3: Press Save Settings button to save changes and then press Reboot button to make changes
effective.
Using shortcut Key:
Press the Exp Key 1, then the LCD will display the phonebook item immediately, and user can configuration
it, the steps are same as configuration from menu.
Press the next Exp Keys, and the LCD will display the corresponding item immediately, and user can also
configuration it.
Page 23
MBIT Technologies
*
www.mbit.com.au 23
6.4 Pickup
The function of pickup is similar to the speed dial.
The example below describes the steps to configuration the pickup from Webpage, user can also
configuration from MENU.
Adding pickup:
Step 1: Log in the web, open Phone/Multi-functional Key webpage.
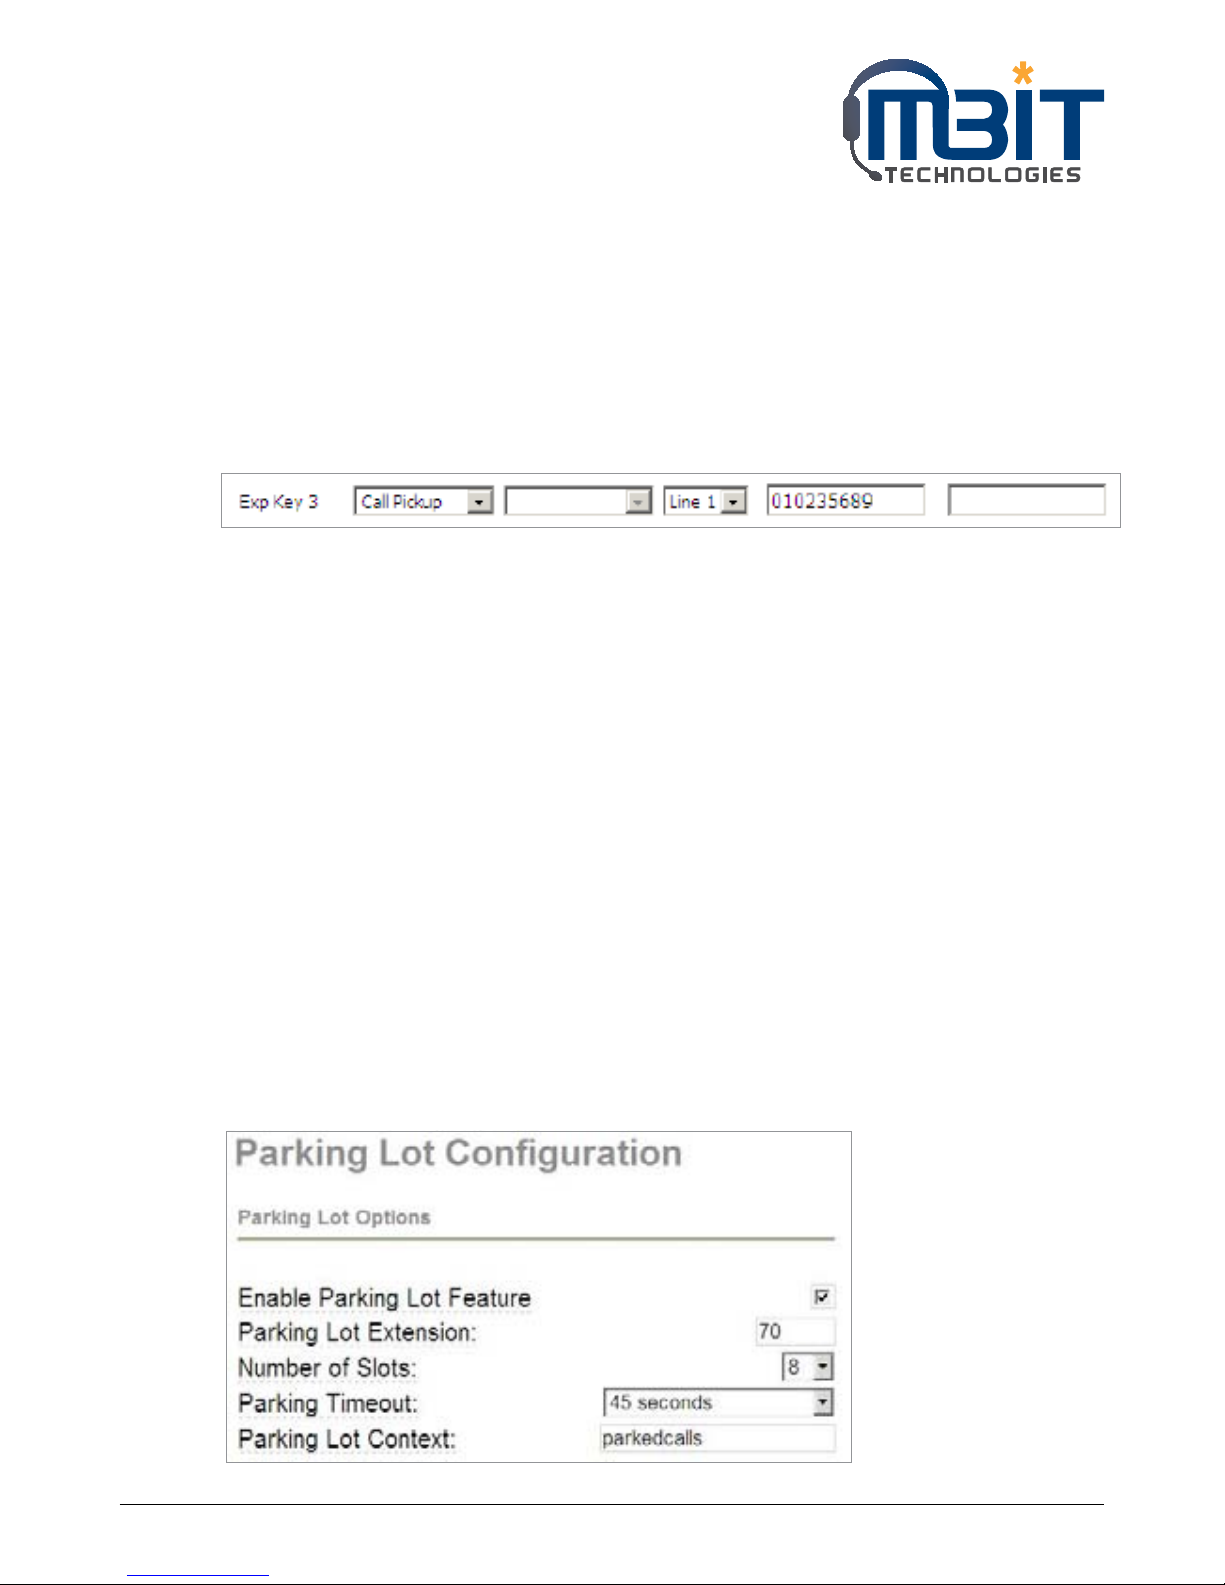
Step 2: Choose one Exp key (assuming is Exp Key 3), and configuration as follows, user can refer to 7.6.2
Multi-functional Key:
Step 3: Press Save Settings button to save changes and then press Reboot button to make changes
effective.
Using pickup:
Press the Exp Key 3 button (the configured multi-functional key) to ring 010235689 quickly.
6.5 Call Park
Call Park is a feature of some telephone systems that allows a person to put a call on hold at one telephone
set and continue the conversation from any other telephone set.
During an active call, pressing one preprogrammed multi-functional key button to transfer the current
telephone conversation to an unused extension number and immediately puts the conversation on hold.
The telephone system will then display the extension number of the parked call so that the call can later
be retrieved.
If no one picks up the parked call within the set time, the telephone system may ring back the parked call.
This transfers the parked call back to the person who originally parked the call.
The example below describes the steps to configuration the call park from Webpage, user can also
configuration from MENU.
Adding Call Park:
Step 1: View the parking settings in server, below is an example in TrixBox
Page 24
MBIT Technologies
*
www.mbit.com.au 24
Step 2: Log in the web, open Phone/Multi-functional Key webpage.
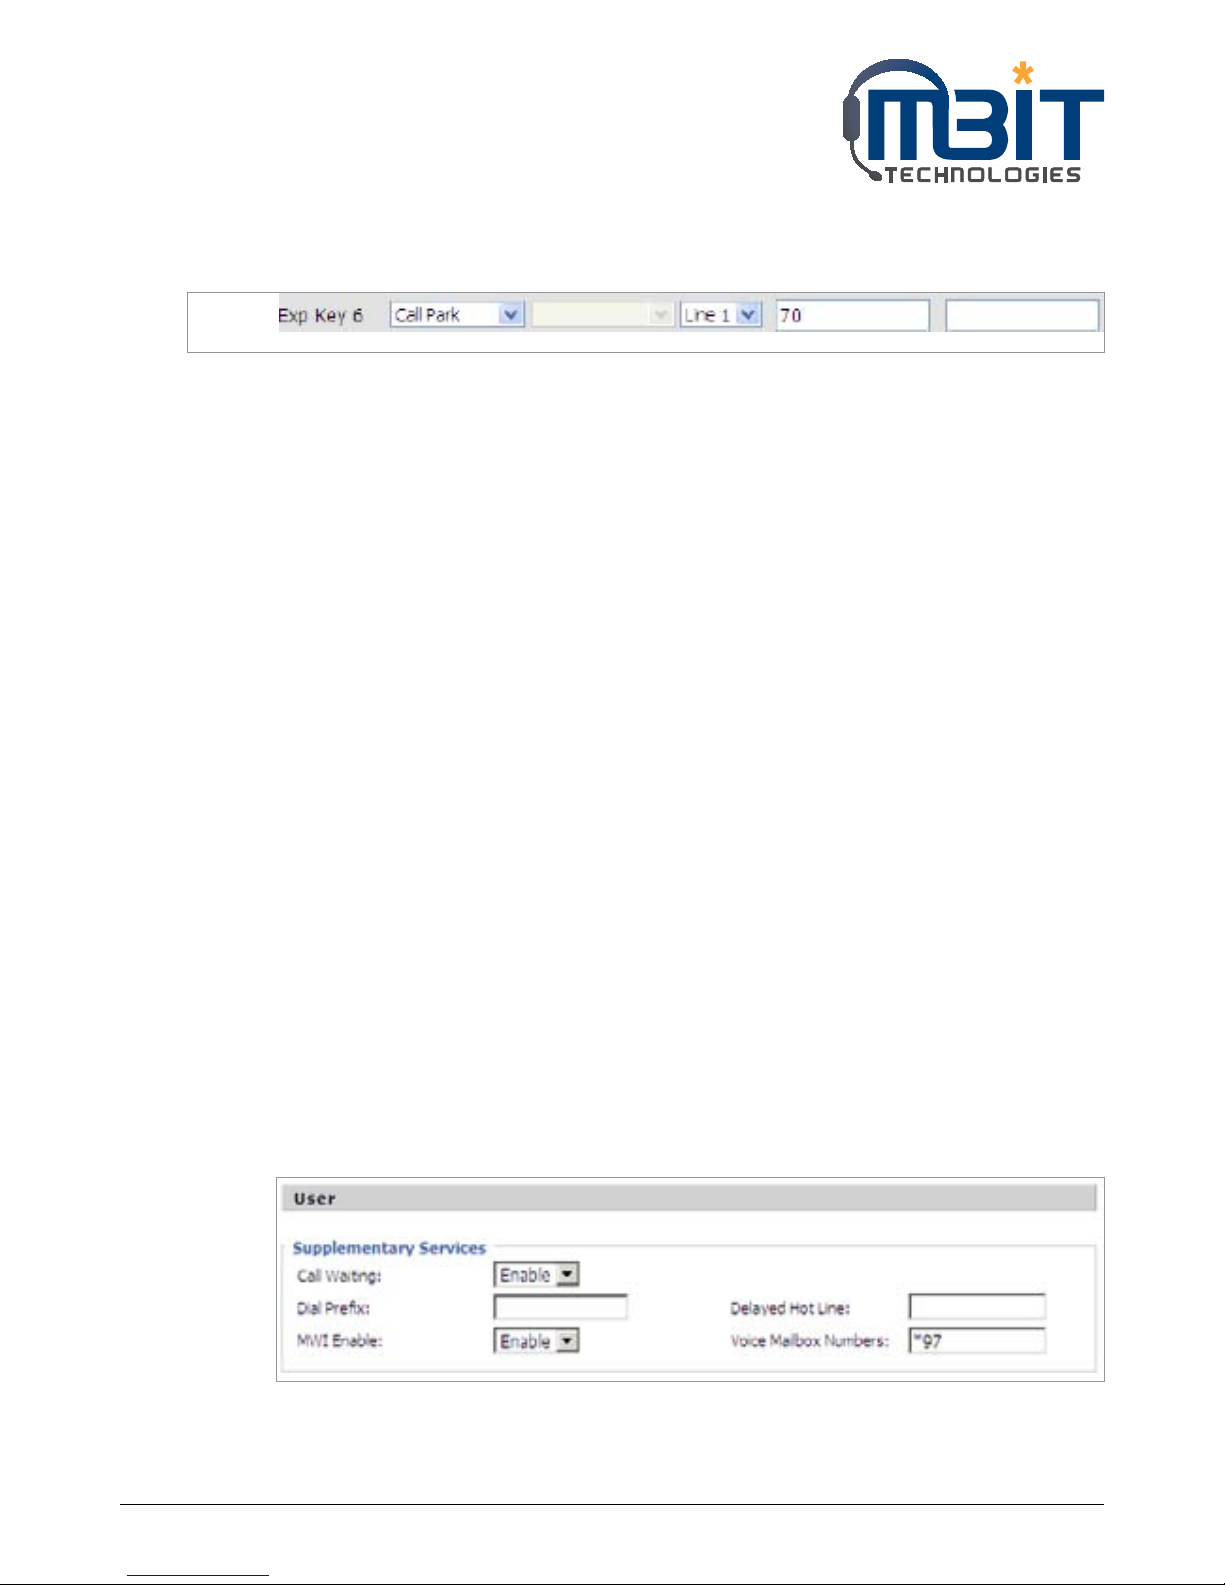
Step 3: Choose one Exp key (assuming is Exp Key 6), and configuration as follows, user can refer to
7.7.2 Multi-functional Key:
Step 4: Press Save Settings button to save changes and then press Reboot button to make changes
effective.
Using Call Park:
Step 1: During an active call (assuming party 1(bb100)’s phone number is 6221, party 2’s phone
number is 111)
Step 2: Party 1 press the Exp Key 6 button (the configured multi-functional key) to park the current
conversation and listen the voice prompt patiently,
Step 3: Party 3 dialing 71 using another phone to retrieve the call with party 2.
6.6 MSG
Voice Mail service must be available on your network to use this feature.
6.6.1 Enable and configuration MSG
There are two ways to enable MSG, one is from menu, and the other is from your PC to use bb100’s
webpage.
From Menu:
Step 1: Press Menu button to enter menu items and then choose 12 Voice Mail
Step 2: Highlight the line you want to configuration, and then select it
Step 3: And then use the softkey buttons to configuration it according to the prompt
Step 4: Press the save softkey button to save the changes
From Webpage:
Step 1: Log into Web, open Account X(1/2)/User webpage.
Step 2: Enable MWI Enable and fill in the Voice Mailbox Numbers (get the number from your phone
administrator), below is a settings example based on Asterisk.
Step 3: Press Saev Settings button to save changes, then the Please REBOOT to make the changes
effective! notice will appear, press Reboot button to make changes effective.
Page 25

MBIT Technologies
*
www.mbit.com.au 25
6.6.2 Using MSG
To access you voice mail box, press the MSG button.
Then user can listen to the new voice mail or old voice mail or reply voice mail according to the voice
prompt.
6.7 Changing the LCD Screen Contrast
Step 1: Press the button, scroll to 19 LCD Contrast, and press the Select softkey button to
access.
Step 2: Use the up and down buttons to adjust the screen contrast. Press the Up button to increase the
contrast. Press the Down button to decrease the contrast.
Step 3: Press the save softkey button to save.
6.8 Changing Your Ring Tone
To change a ring tone:
Step 1: Press the button.
Step 2: Select 7 Ring Tone.
Step 3: Use the up and down buttons to highlight the ring tone. Press the select softkey button to
choose the highlighted ringtone.
6.9 Setting Your Phone’s Date and Time
The date and time for your phone normally come from the phone server. However, if you need to change
some date and time parameters, you can follow these steps:
Step 1: Press the button, select Time/Date.
Step 2: Choose date to adjust date; enter the date in the following format: mm/dd/yy.
Step 3: Choose time to adjust time; enter the time in the following format: hh/mm/ss.
Step 4: Press the ok softkey button to save the changes.
6.10 Rebooting Your Phone
This setting is to configure and troubleshoot the network. You should not change these settings unless
directed to by your Administrator as this can negatively affect your phone’s function.
To reboot your phone:
Step 1: Press the button.
Step 2: Scroll to 16 Reboot; press the select softkey button to access to reboot item.
Step 3: Then a notice “Confirm System Reboot” will appear, press the ok softkey button to confirm
rebooting.
Page 26
MBIT Technologies
*
www.mbit.com.au 26
6.11 Factory Default
There two ways to make factory default: in menu and using website.
In menu:
Press button and choose 17 factory Default, then a notice will appear, press the ok softkey
button to continue.
Using Website:
Step 1: Access to website, open Administration/Management webpage;
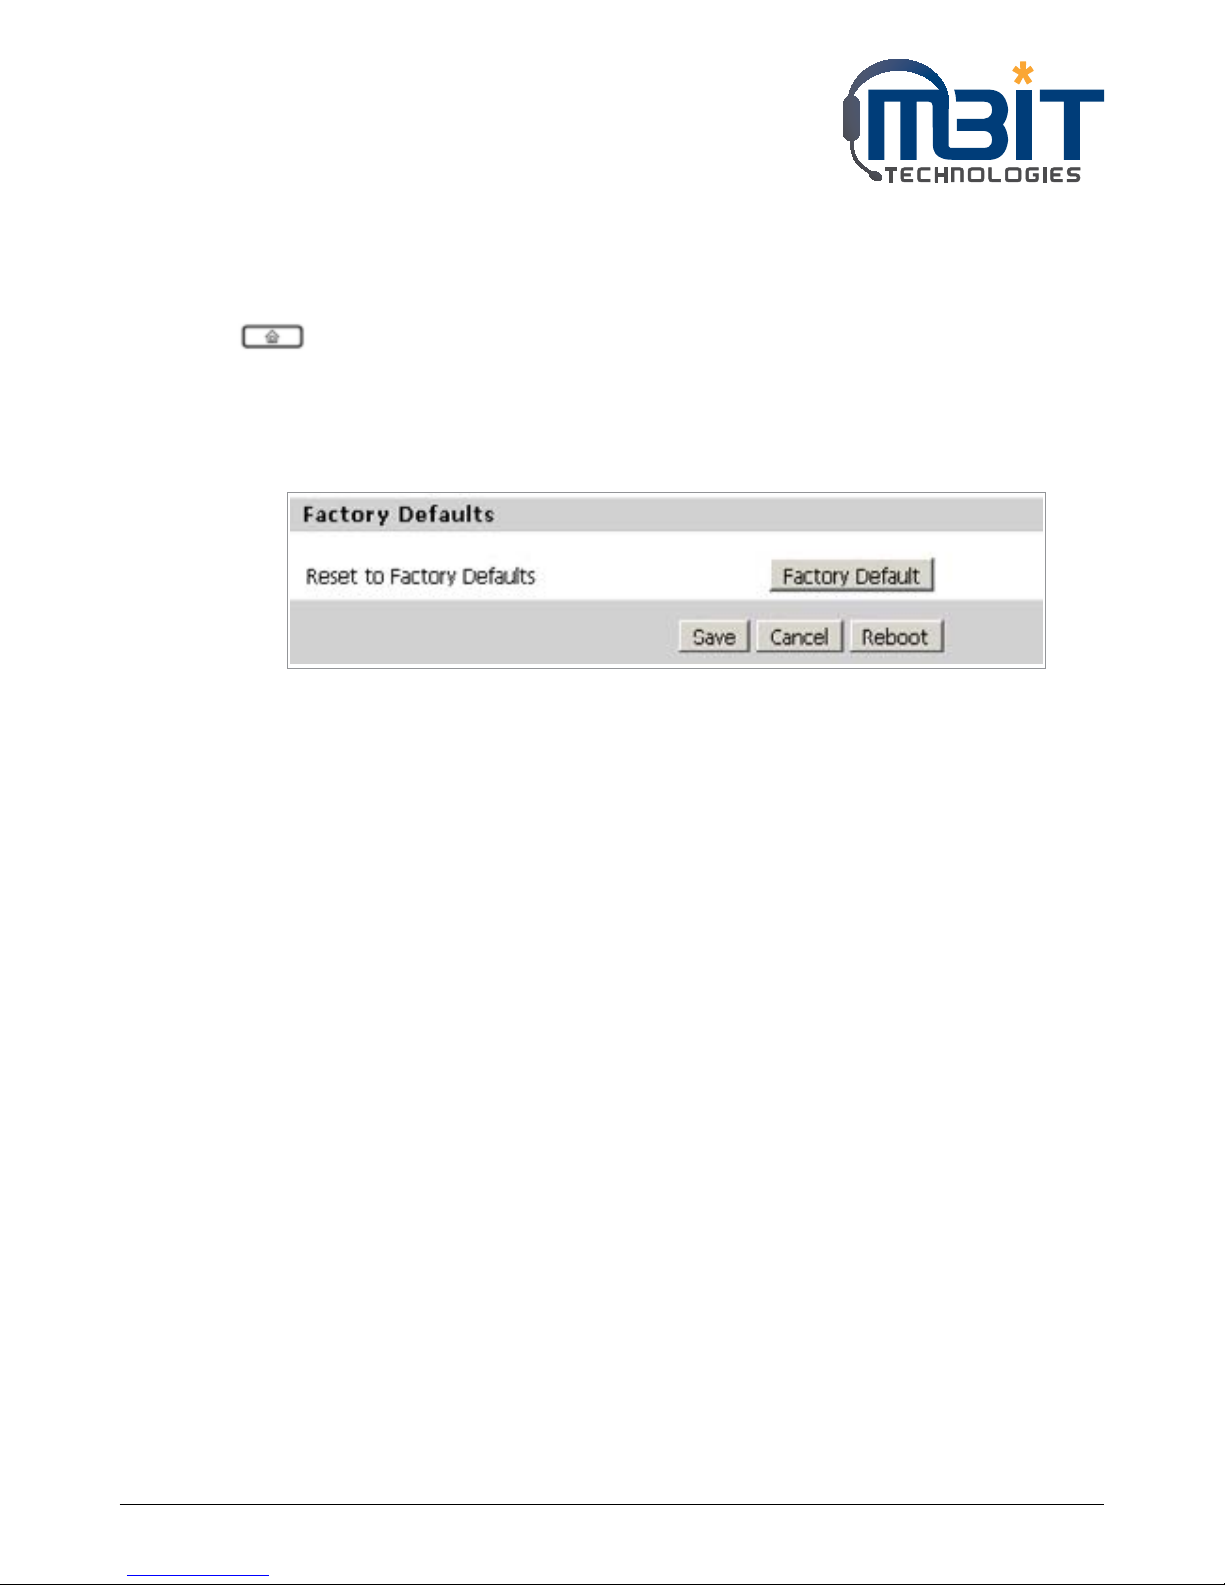
Step 2: Press the factory default button at the bottom of the webpage;
Step 3: Waiting about 5 seconds, the red notice Please REBOOT to make the changes effective! will
appear, and then press Reboot button to reboot bb100.
Note: If you choose factory default, you will return the phone to the original factory settings
and will erase all current settings, including the directory and call logs.
Page 27
MBIT Technologies
*
www.mbit.com.au 27
7 CONFIGURATION
7.1 Web-based Configuration
This section will show you how to configure your bb100 using the web-based configuration interface. The
default network settings are the following:
Default Internet Connection Type: DHCP
Default PC Port Connection Type: Bridge
Default user name of admin mode: admin
Default user name of user mode: user
Default password of Web: (null)
Default Web login port: 8080
Web Idle Timeout: 5 min
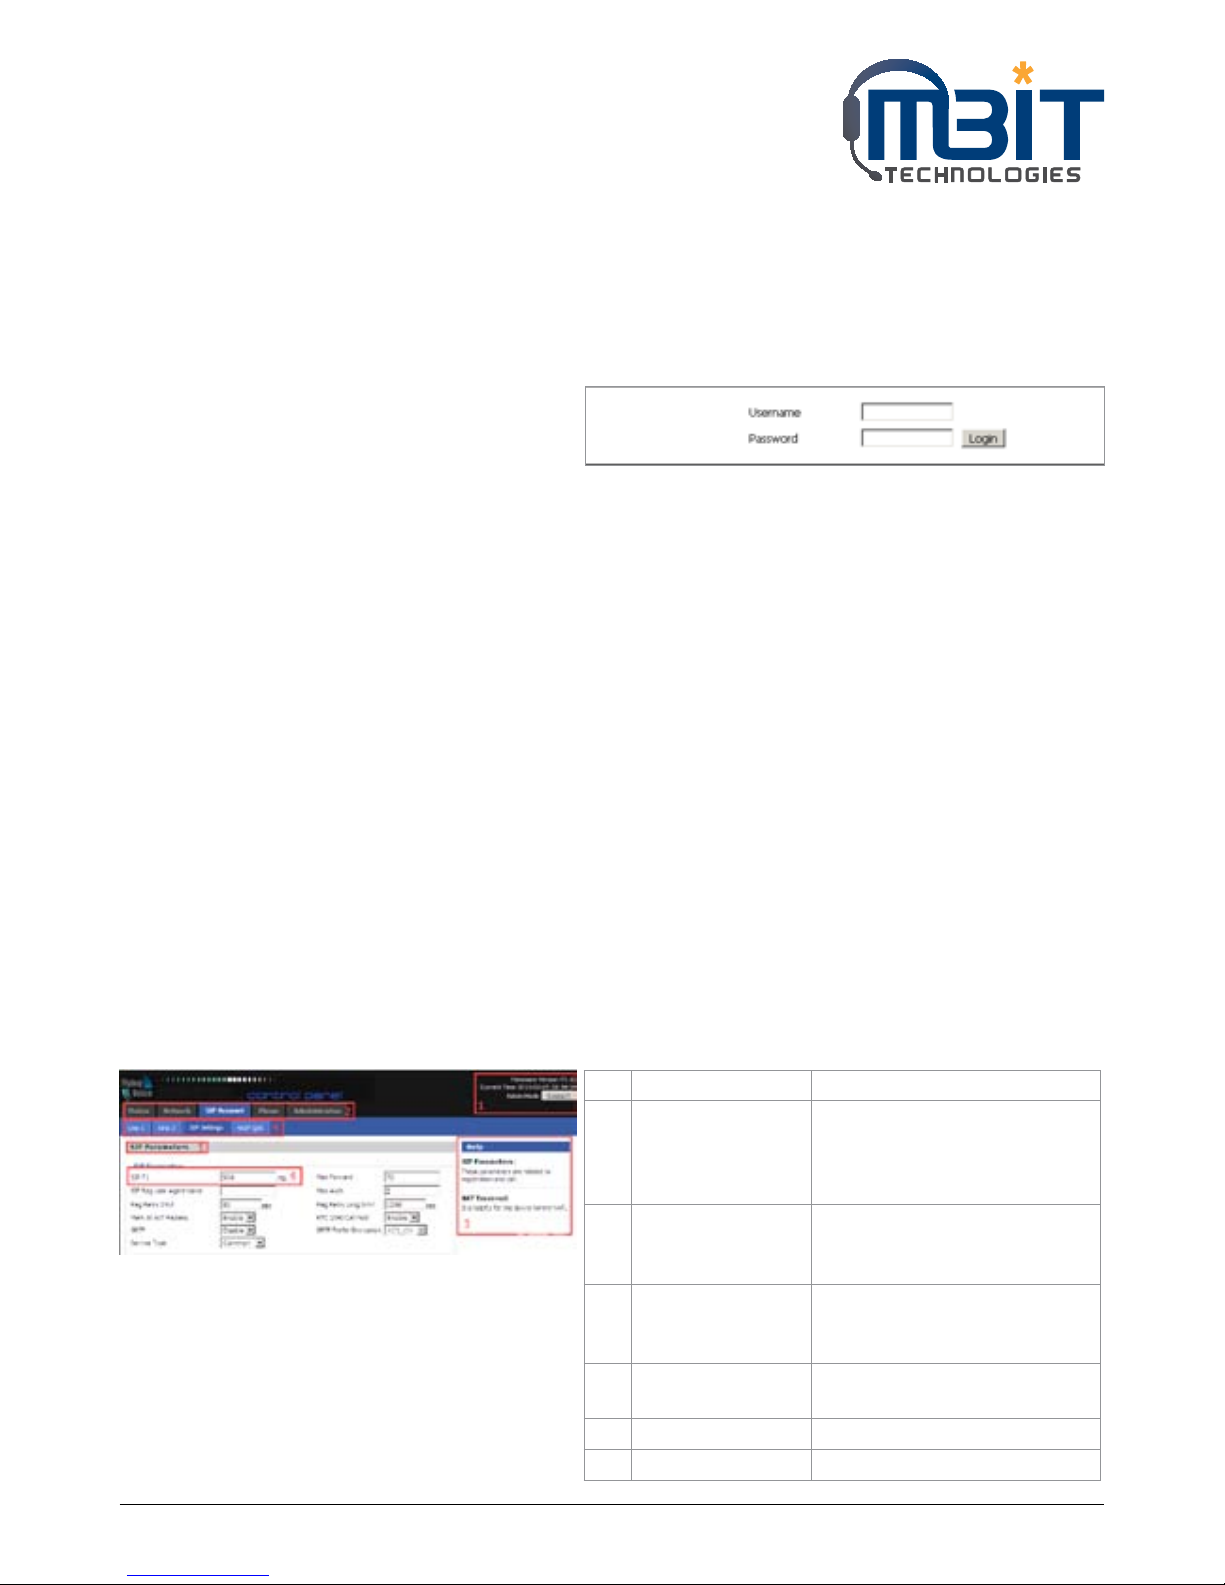
7.2 Login
To access the phone through a web browser
Step 1: Setup bb100 correctly
Step 2: Lookup the Internet IP Address in the left side of LCD
Step 3: Enter “http://Internet IP Address:8080” in the address field of the browser.
Step 4: Type “admin” or “user” for the User Name, click on the Login button to access the
configuration page
There are two levels of web configuration: one “user” ID level that can view just some portion in the web,
and the other “admin” ID level that can view and configure all settings in the web-based configuration
interface. To use “admin” ID for login, please contact your administrator, supplier or service provider.
7.3 Webpage
No. Name Description
1 Main information Display the firmware version,
DSP version, Current Time, and
administration mode.
Press Logout button to logout.
2 Navigation bar Click navigation bar, many sub-
navigation bar will appear in
the place 4.
3 Help Display the main information
for configuration; user can get
help from it directly.
4 Sub-navigation bar Click sub-navigation bar to
enter to configuration webpage
5 Configuration title The configuration title
6 Configuration bars The configuration bars
Page 28
MBIT Technologies
*
www.mbit.com.au 28
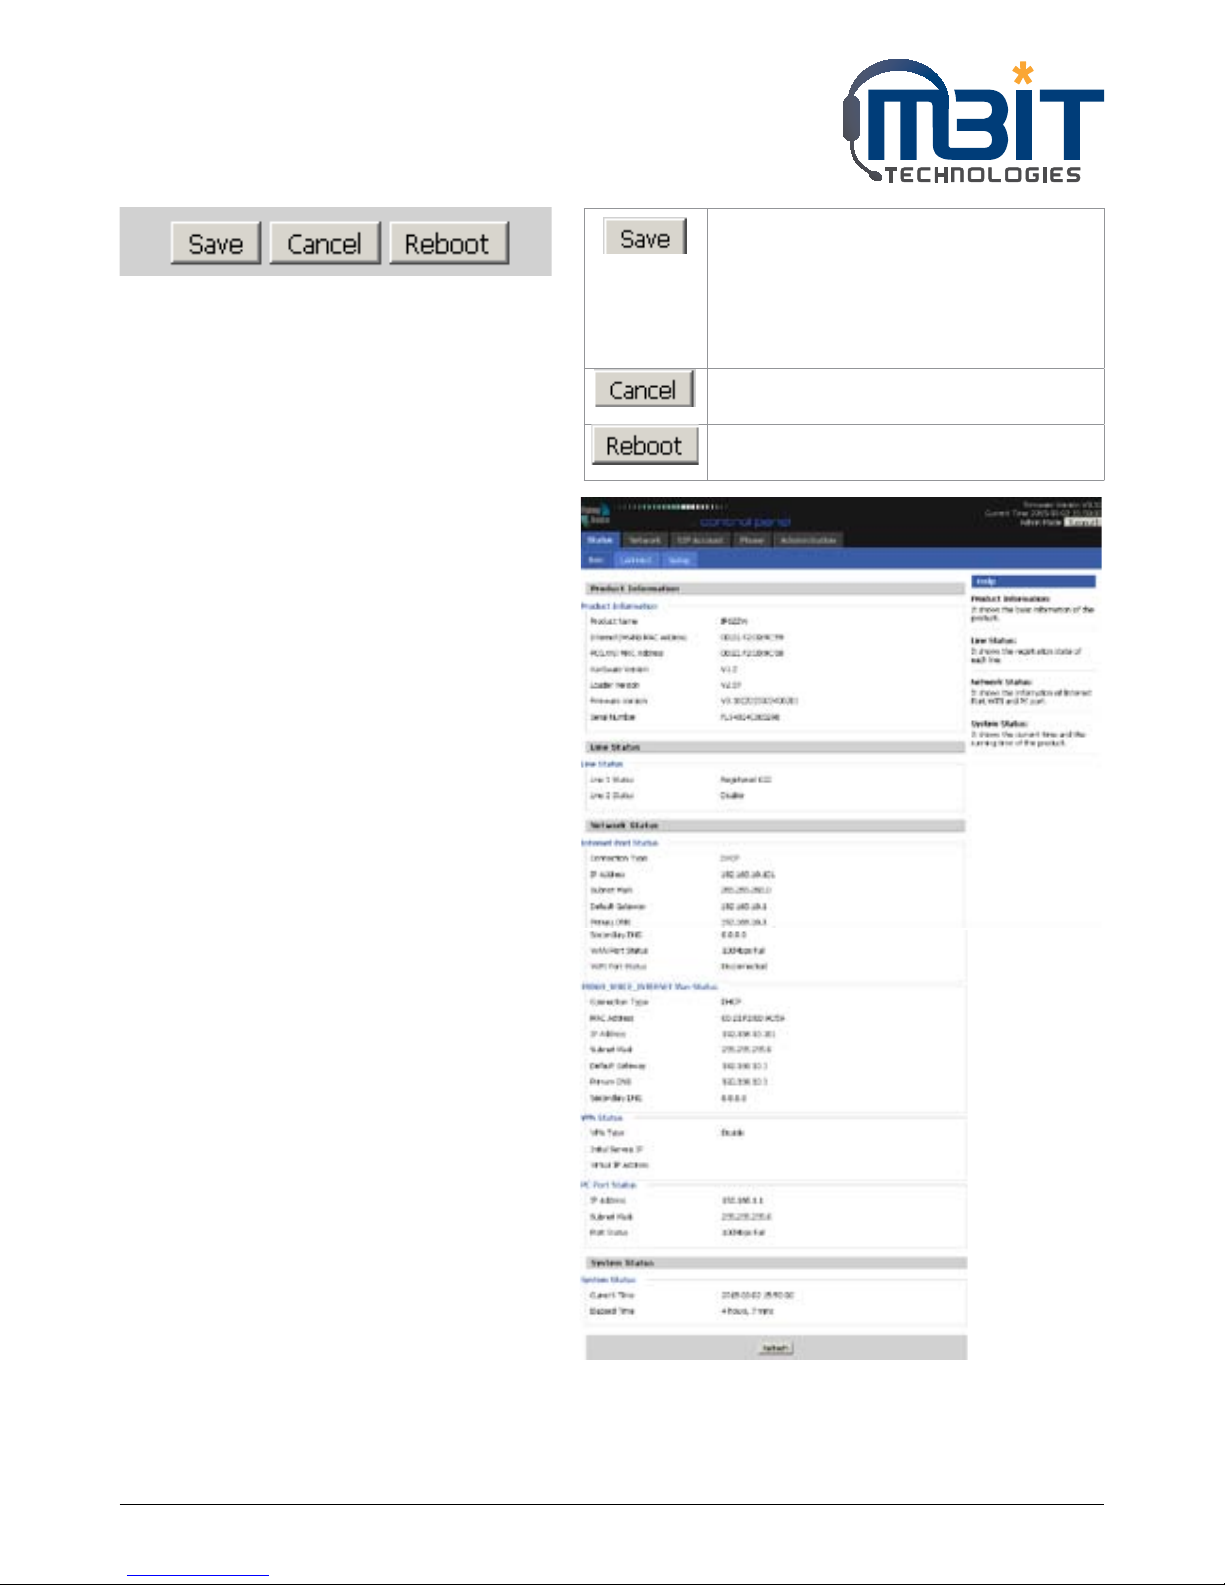
• Every time making some changes, user
should press the button to confirm and
save the changes.
• After pressing the button, the red Please
REBOOT to make the changes effective!
will appear to notice user to reboot.
To cancel the changes
Press it to reboot bb100
7.4 Status
7.4.1 Basic
This webpage displays the basic status
of your bb100, including the information
about product information, SIP account
status, network status, VPN status, PC port
status and system status.
Click Refresh button to refresh the status.
Page 29
MBIT Technologies
*
www.mbit.com.au 29
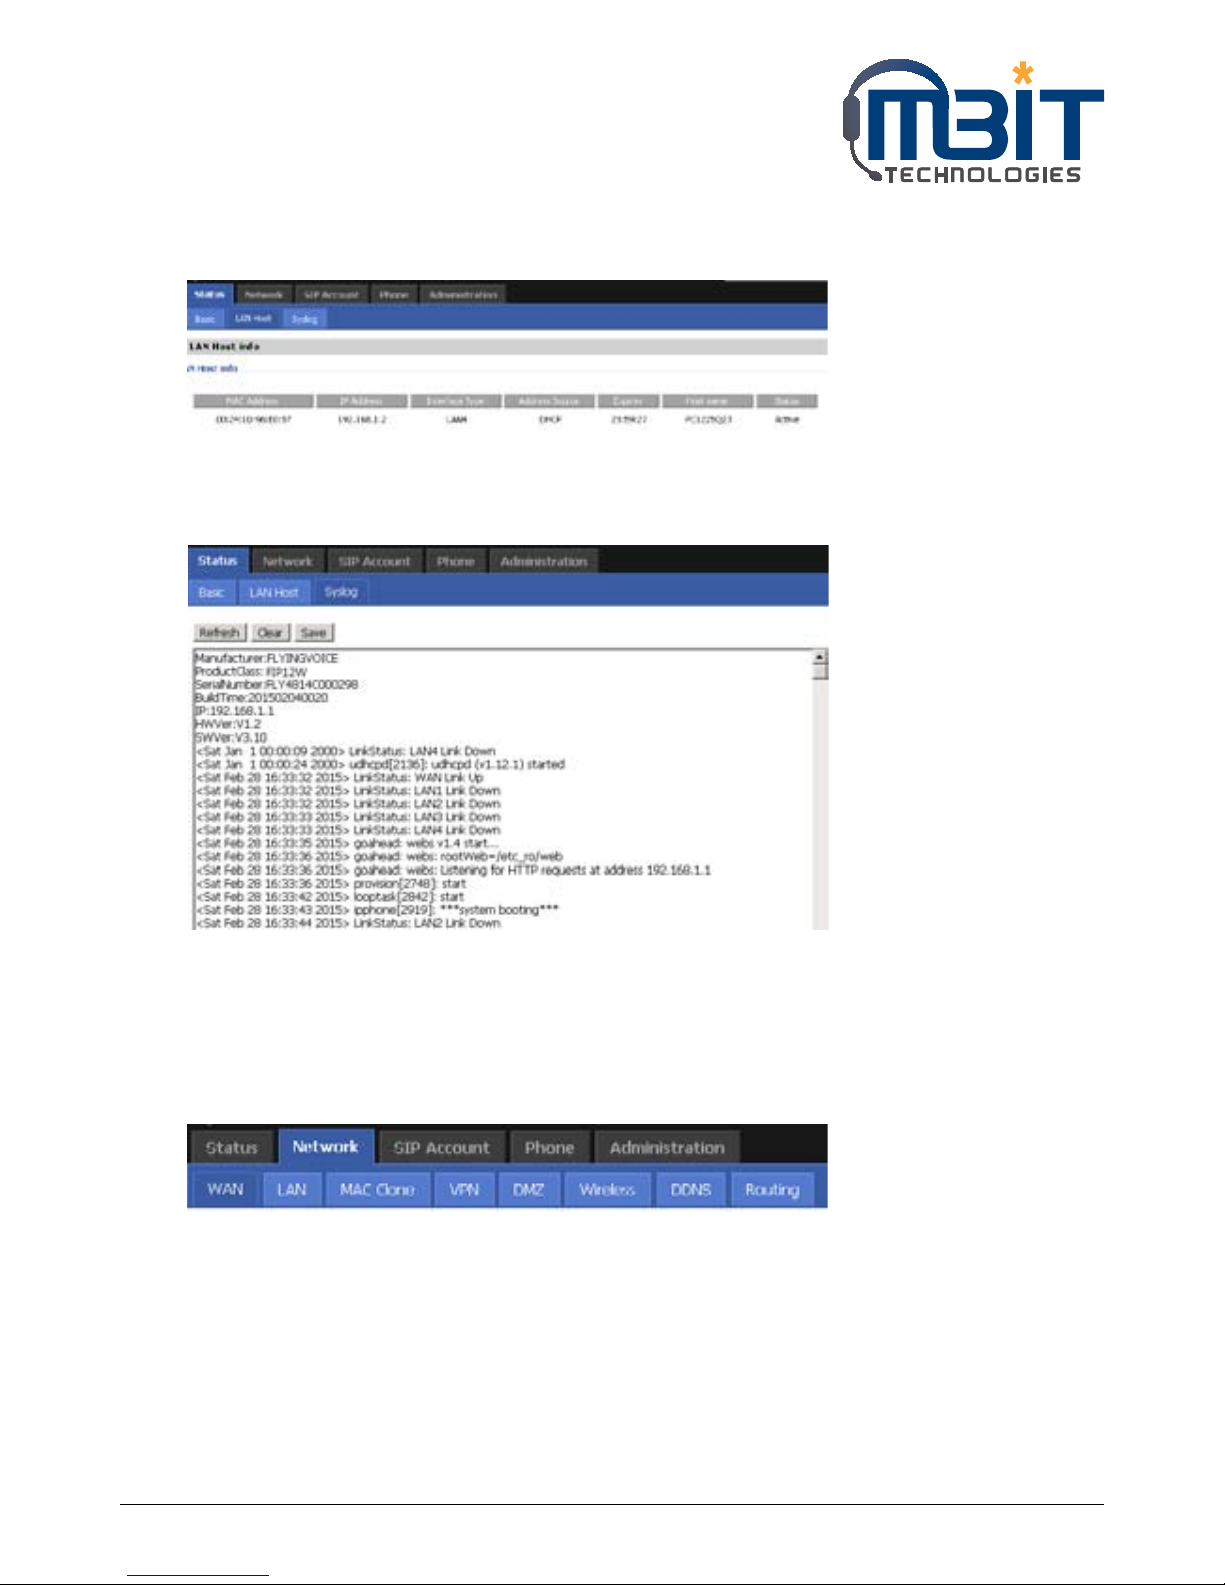
7.4.2 LAN Host
This page displays the status about the cliend which connected to the bb100’s LAN port
7.4.3 Syslog
This page displays the log of system.
User can press Clear button to clear all information,
Click Refresh button to refresh syslog.
Click Save button to save syslog.
7.5 Network
7.5.1 WAN
User can configuration the parameters of Internet Port, PC port and Network Address Server Settings
(DHCP). The details are as follows:
Page 30
MBIT Technologies
*
www.mbit.com.au 30
7.5.1.1 Internet Port (WAN)
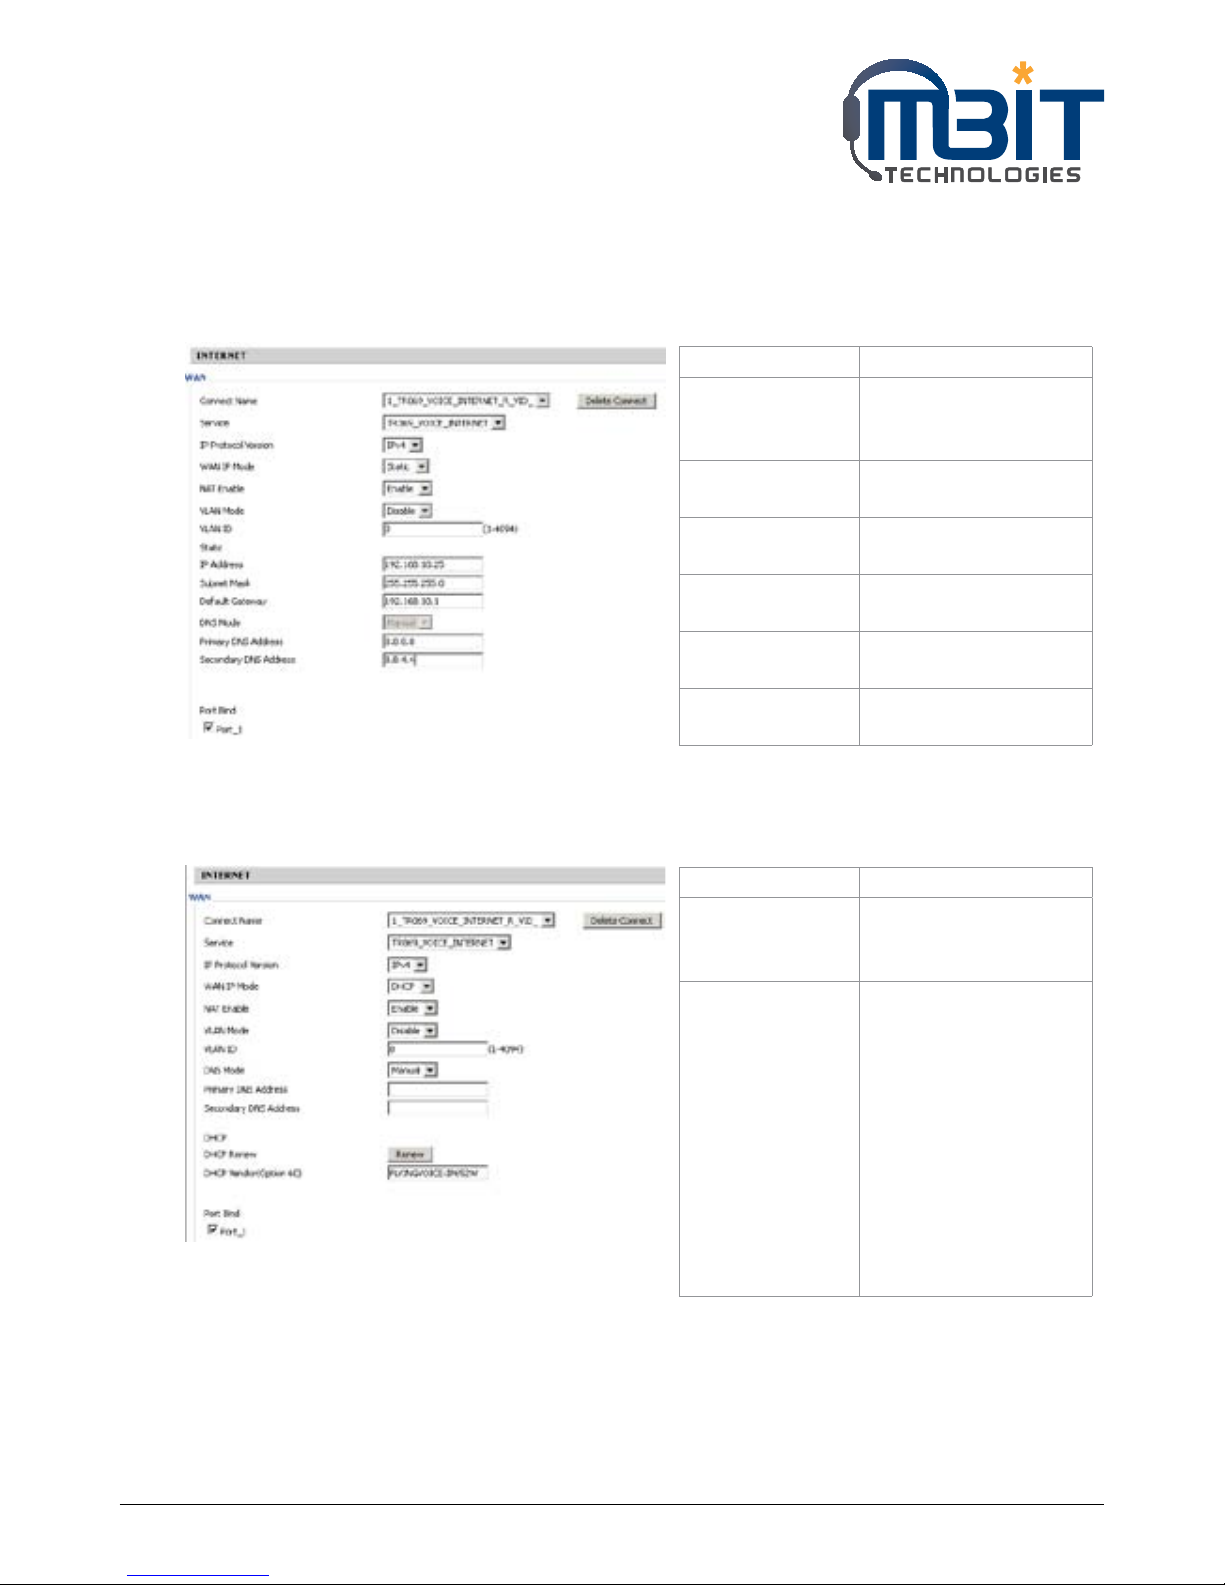
Static:
In static mode, user should fill in the values of IP Address, Subnet Mask, Default Gateway, Primary DNS and
Second DNS got from your administration.
Field Name Description
Internet
Connection
Type
Choose Static IP
IP Address The IP address of
Internet port
Subnet Mask The subnet mask of
Internet port
Default Gateway The default gateway of
Internet port
Primary DNS The primary DNS of
Internet port
Second DNS The second DNS of
Internet port
DHCP:
In DHCP mode, IP phone is a DHCP client.
IP phone will get the IP Address, Subnet Mask and Default Gateway from the DHCP server.
Field Name Description
Internet
Connection
Type
Choose Automatic
Configuration-DHCP
DNS type Choose DNS type from
Manual and Automatic
• In Manual: user should
set the Primary DNS
and Second DNS
manually
• In Automatic: IP Phone
will get the Primary
DNS and Second DNS
from DHCP Server
automatically
Page 31
MBIT Technologies
*
www.mbit.com.au 31
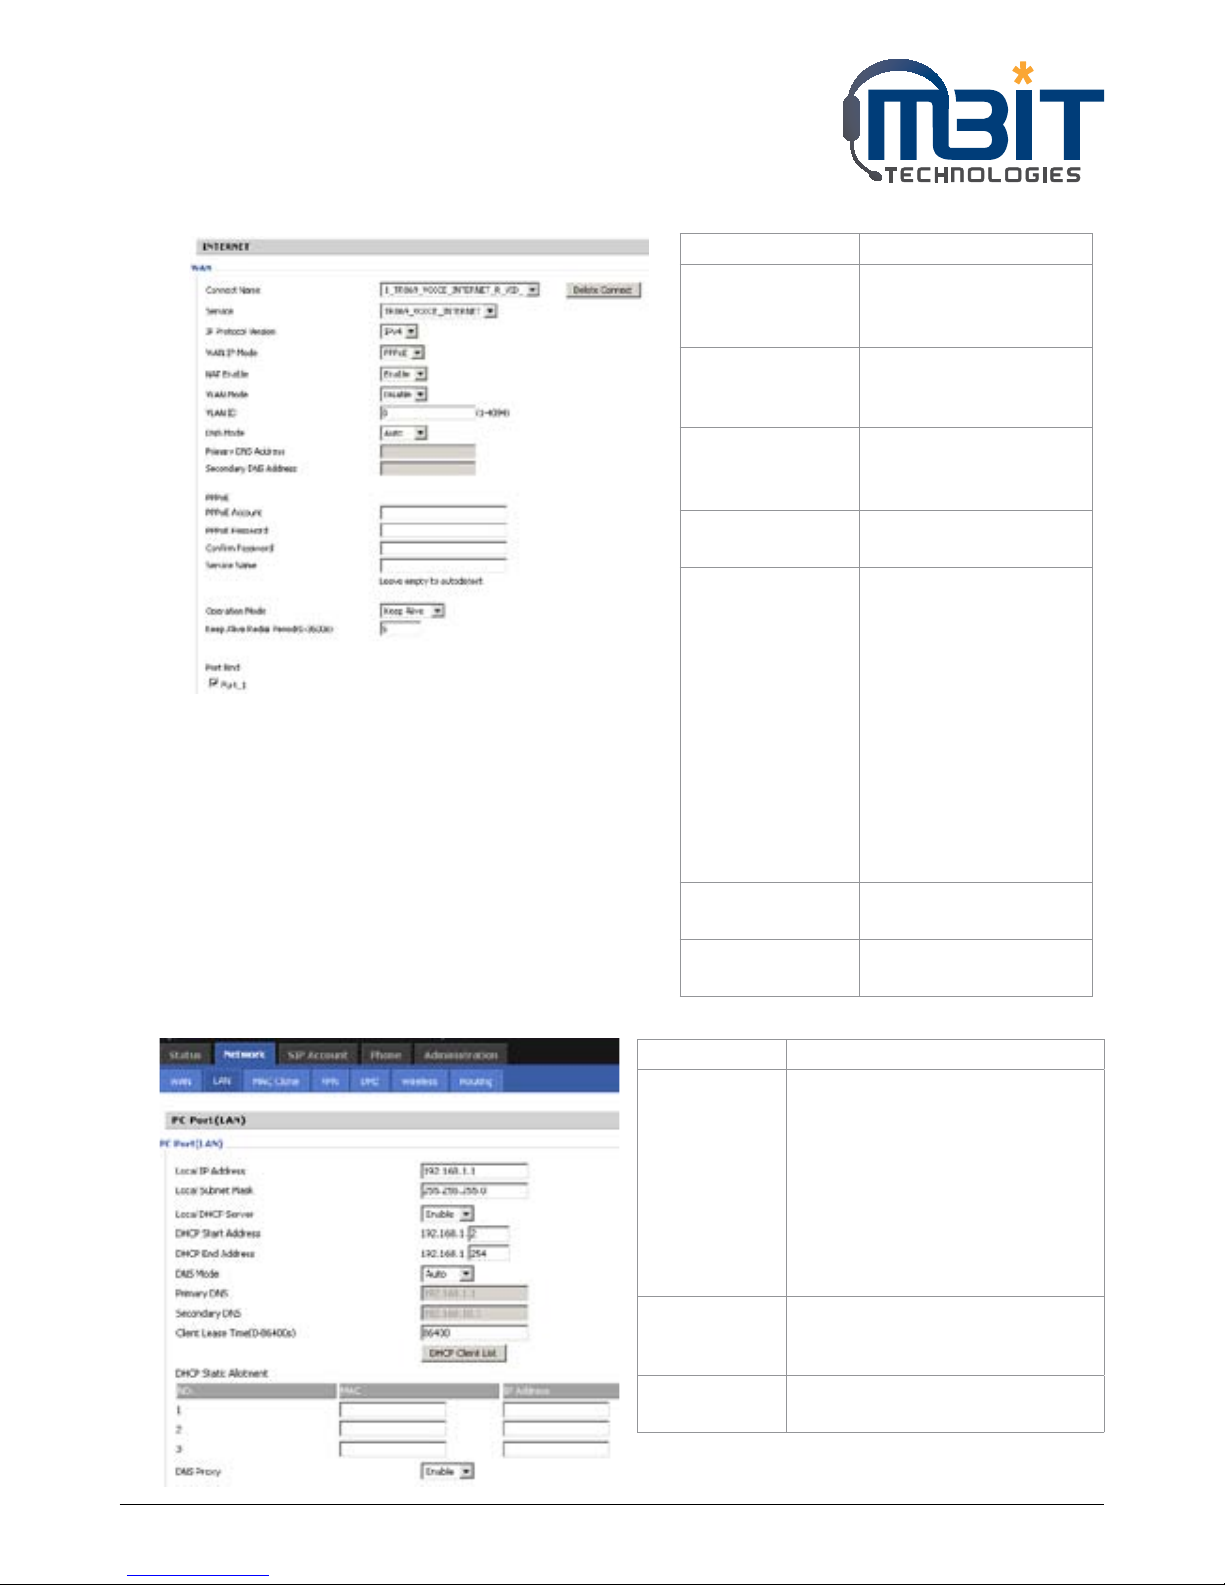
PPPoE:
Field Name Description
Internet
Connection
Type
Choose PPPoE
PPPoE Account Fill in the PPPoE account
which get from Internet
Service Provider
PPPoE Password Fill in the PPPoE account
get from Internet Service
Provider
PPPoE Auto-Dial If or not enable PPPoE
Auto-Dial.
DNS Type Choose DNS type from
Manual and Automatic
• In Manual: user should
set the Primary DNS
and Second DNS
manually.
• In Automatic: IP Phone
will get the Primary
DNS and Second DNS
from DHCP Server
automatically.
Primary DNS The primary DNS of
Internet port.
Second DNS The primary DNS of
Internet port.
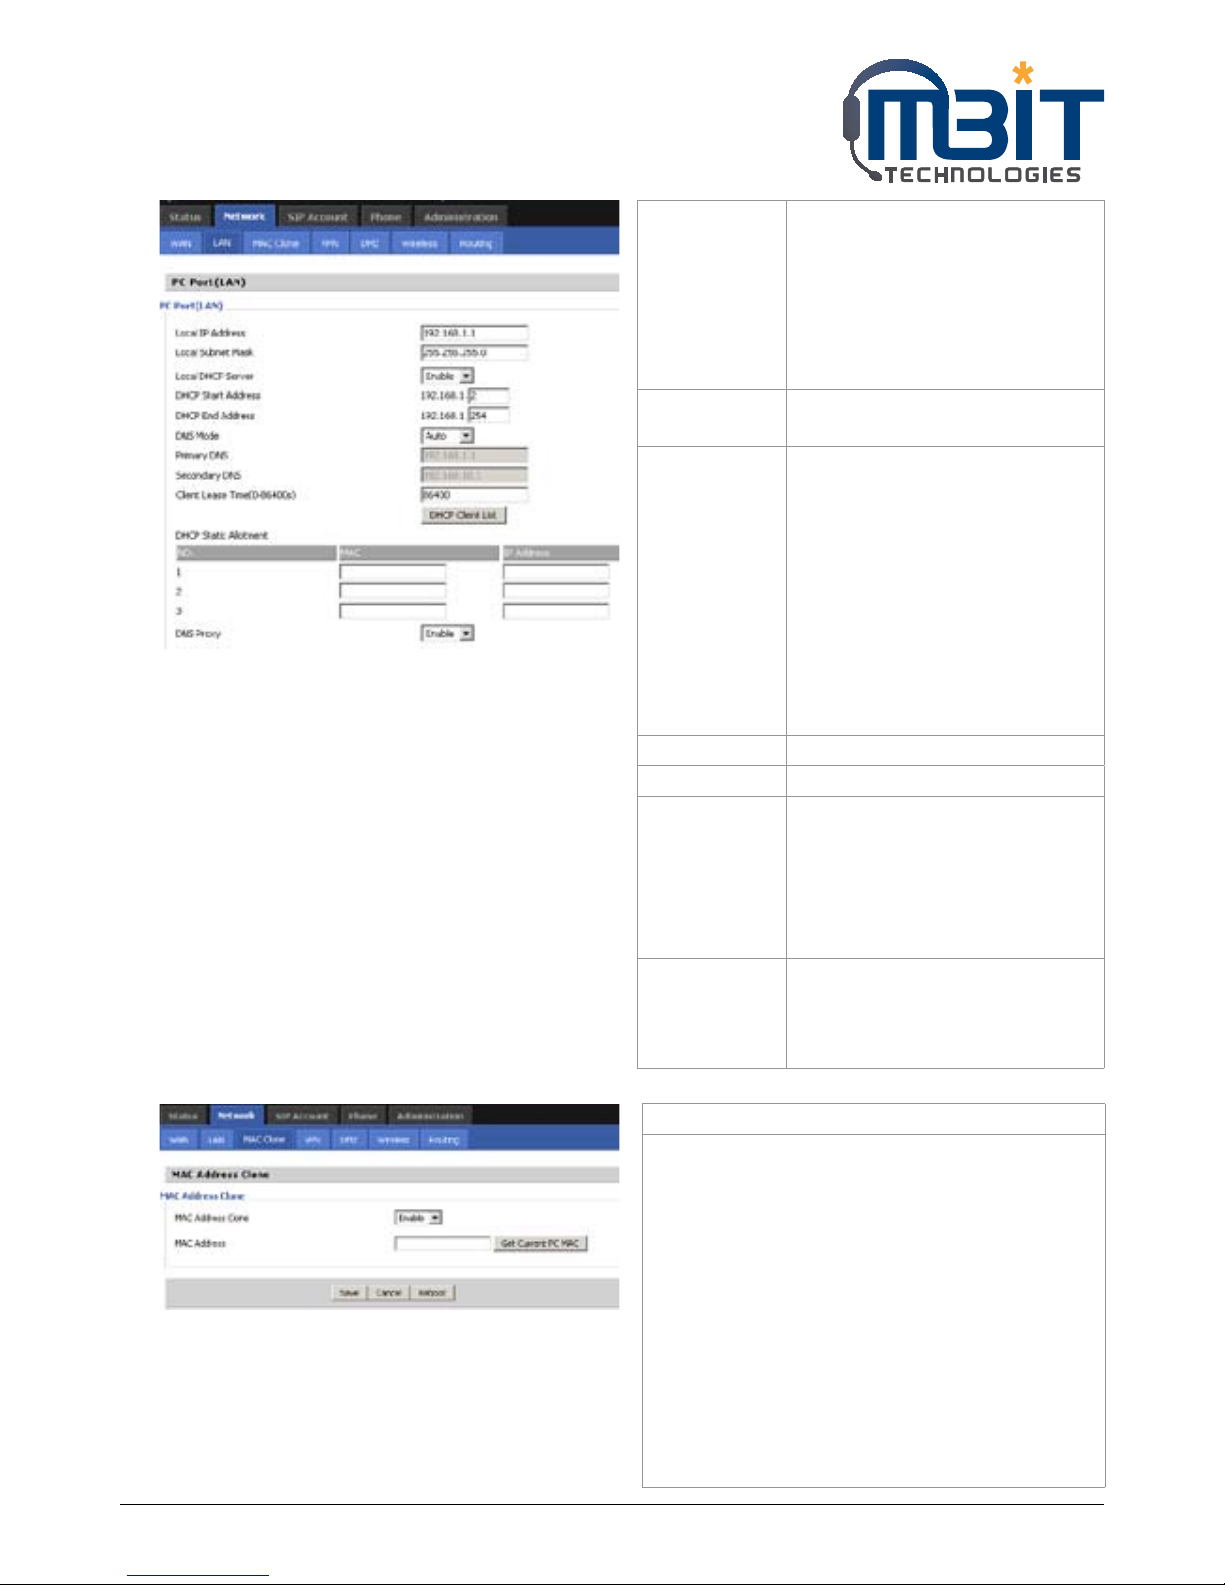
7.5.2 LAN
Field Name Description
Local IP
Address
Enter the IP address of the router
on the local area network, all the
IP addresses of the computers
which are in the router’s LAN must
be in the same network segment
with this address, and the default
gateway of the computers must
be this IP address. (The default is
192.168.1.1)
Local Subnet
Mask
Enter the subnet mask to
determine the size of the network
(default is 255.255.255.0/24)
Local DHCP
Server
If or not enable Local DHCP Server
Page 32
MBIT Technologies
*
www.mbit.com.au 32
DHCP Start
Address
Enter a valid IP address as a
starting IP address of the DHCP
server, and if the router’s LAN IP
address is 192.168.1.1, starting
IP address can be 192.168.1.2 or
greater, but should be less than the
ending IP address
DHCP End
Address
Enter a valid IP address as an end
IP address of the DHCP server
DNS Mode Select DNS mode, options are Auto
and Manual:
1. When DNS mode is Auto, the
device under LAN port will
automatically obtains the
preferred DNS and alternate DNS
2. When DNS mode is Manual, the
user should manually configure
the preferred DNS and alternate
DNS
Primary DNS Enter the preferred DNS address
Secondary DNS Enter the secondary DNS address
Client Lease
Time
This option defines how long the
address will be assigned to the
computer within the network. In
that period, the server does not
assign the IP address to the other
computer
DNS Proxy Enable or disable; If enabled,
the device will forward the DNS
request of LAN-side network to the
WAN side network
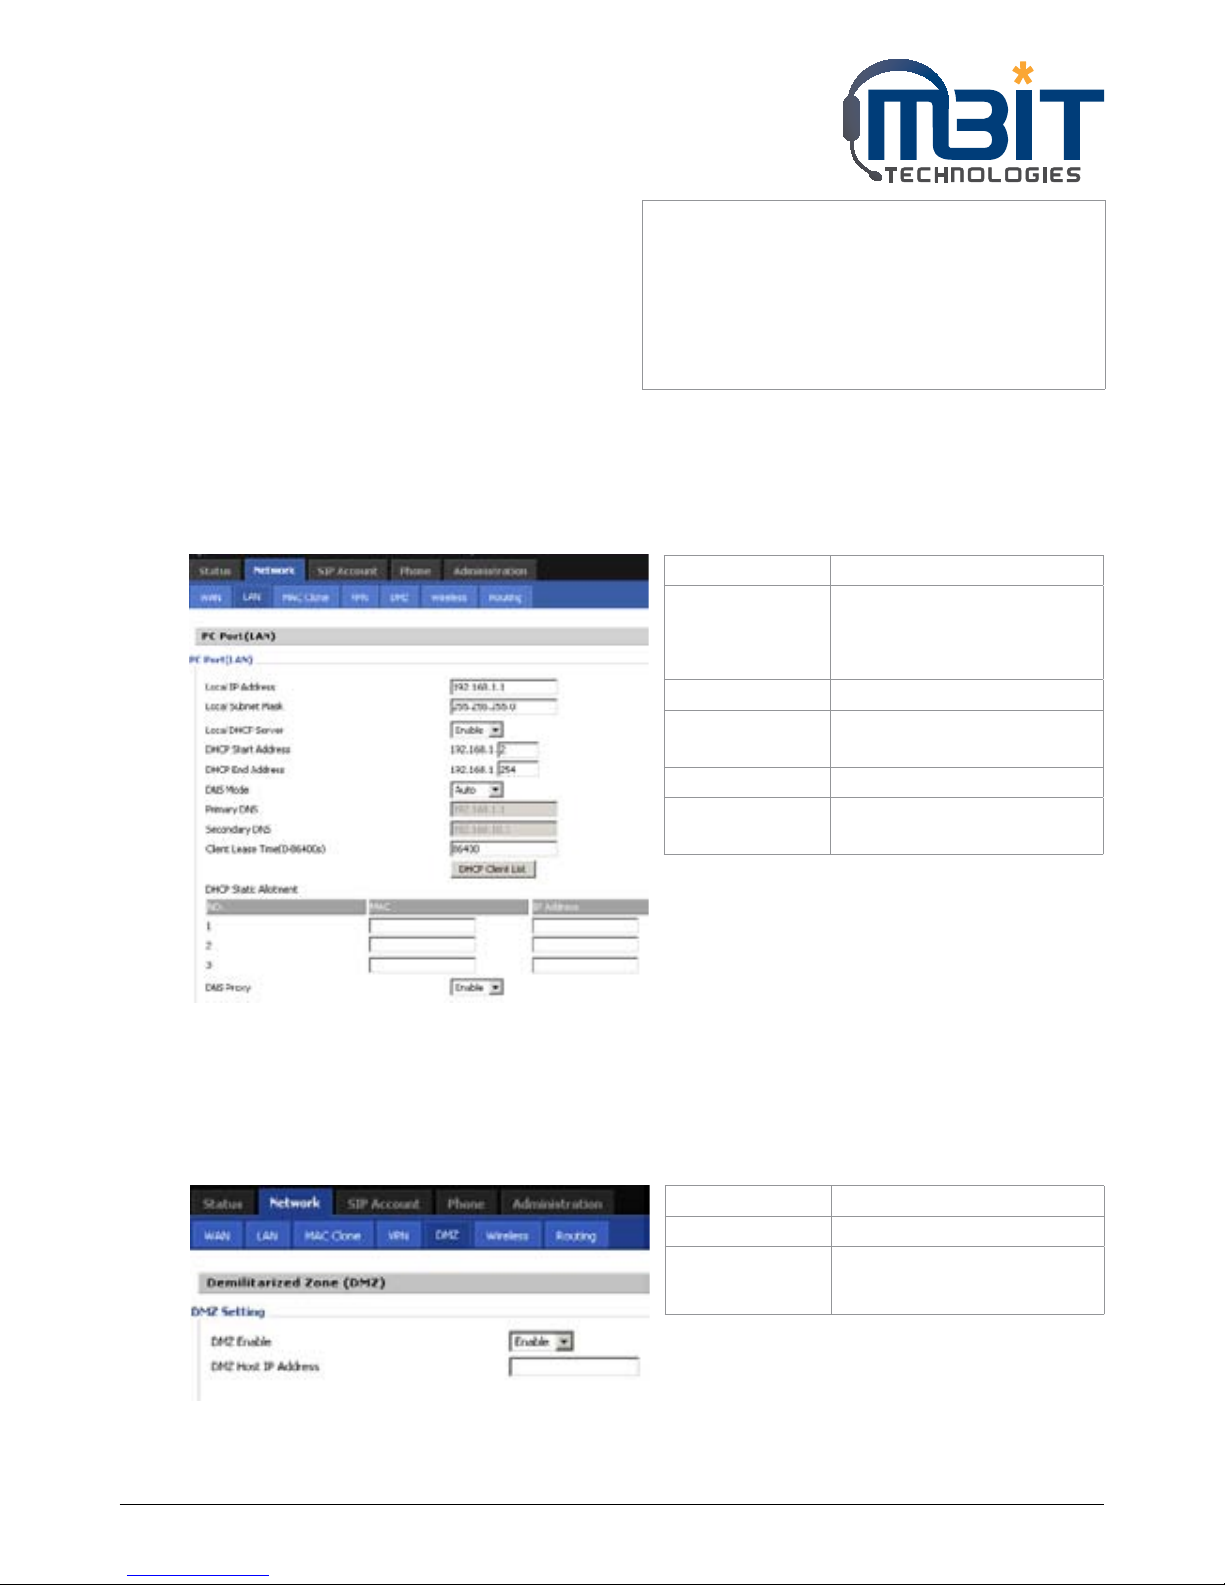
7.5.3 MAC Clone
Description
MAC is the hardware address of network
equipment. Sometimes, network providers
may bind network account with the network
equipment’s MAC address. So you may not pass
the provider’s authentication when you use a new
bb100. In this case, you can use MAC Clone to copy
your PC’s MAC address to bb100’s Internet port.
MAC is an important parameter for network
equipments, so you should make sure that the MAC
is right, in order to prevent to make bb100 unusable.
You can login bb100’s Web via PC port if you are
incautious to make it wrong. And then cloning the
right MAC or resume the default settings.
Page 33
MBIT Technologies
*
www.mbit.com.au 33
Step 1: Press Get Current PC MAC Address button
to get the PC’s MAC address
Step 2: Press Save button to save the changes
Step 3: Press Cancel button to cancel MAC address
clone.
Step 4: Press Reboot button to reboot bb100.
7.5.4 VPN
A Virtual Private Network (VPN) is the extension of a private network that encompasses links across
shared or public networks like the Internet. In short, by VPN technology, you can send data between two
computers across a shared or public network in a manner that emulates the properties of a point-to-point
private link.
7.5.5 DMZ
bb100 provides a facility DMZ Host that maps ALL unsolicited data on any protocol to a single host in
the LAN. Regular web surfing and other such Internet activities from other clients will continue to work
without inappropriate interruption. DMZ Host allows a defined internal user to be totally exposed to the
Internet, which usually helps some special applications such as Netmeeting or Internet Games etc.
Field Name Description
VPN Enable If or not enable VPN.
And user can choose the VPN
mode from PPTP and L2TP.
Initial Service IP VPN server IP address
User Name The user name for
authentication
Password Password for authentication
VPN As Default
Route
Set the VPN as default route
Field Name Description
DMZ Enable If or not enable DMZ
DMZ Host IP
Address
Set the IP address of DMZ
host
Page 34
MBIT Technologies
*
www.mbit.com.au 34
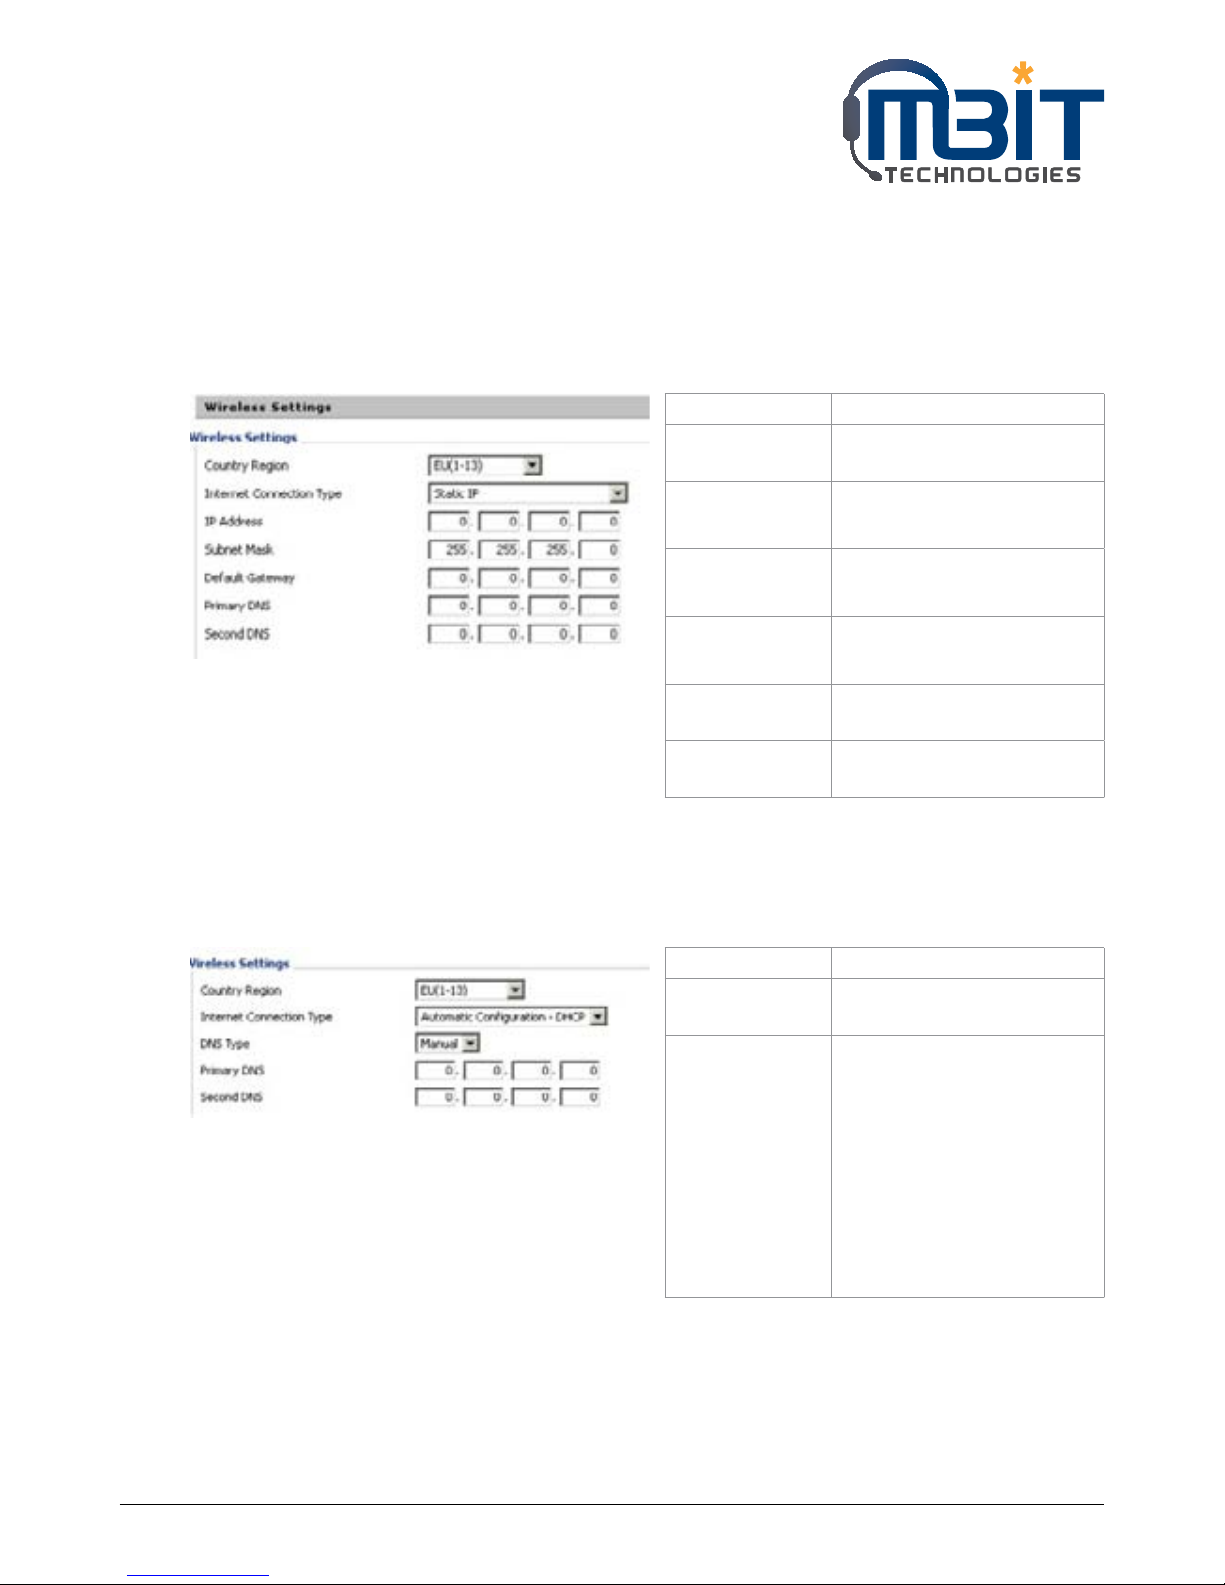
7.5.6 Wireless
7.5.6.1 Wireless Settings
Static:
In static mode, user should fill in the values of IP Address, Subnet Mask, Default Gateway, Primary DNS and
Second DNS got from your administration.
DHCP:
In DHCP mode, IP phone is a DHCP client.
IP phone will get the IP Address, Subnet Mask and Default Gateway from the DHCP server from AP.
Field Name Description
Internet
Connection Type
Choose Static IP
IP Address The IP address of Internet
port
Subnet Mask The subnet mask of Internet
port
Default Gateway The default gateway of
Internet port
Primary DNS The primary DNS of Internet
port
Second DNS The second DNS of Internet
port
Field Name Description
Internet
Connection Type
Choose Automatic
Configuration-DHCP.
DNS type Choose DNS type from
Manual and Automatic
• In Manual: user should set
the Primary DNS and Second
DNS manually.
• In Automatic: IP Phone will
get the Primary DNS and
Second DNS from DHCP
Server automatically.
Page 35
MBIT Technologies
*
www.mbit.com.au 35
7.5.6.2 Wireless Connection
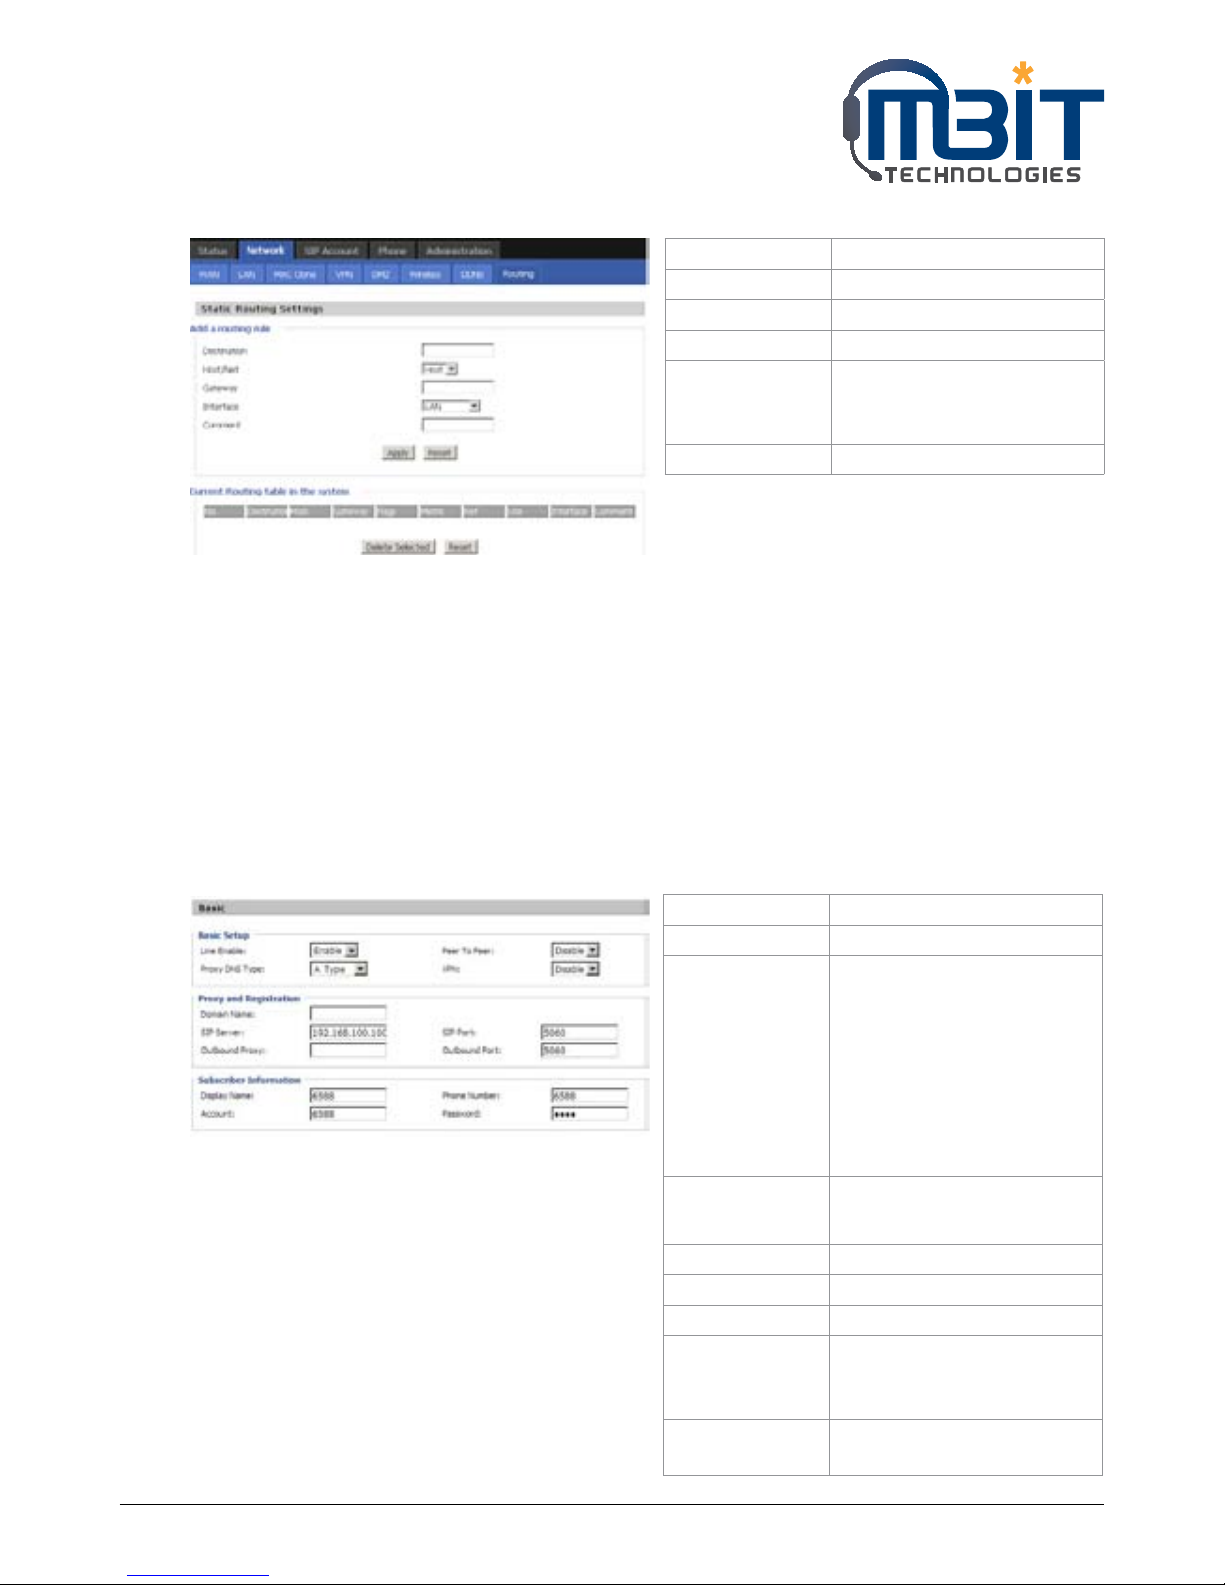
7.5.7 DDNS Setting
Field Name Description
Connection
Status
Display the current
connection status, and the
name of connected AP
appear in the brackets if the
wireless is connected.
SSID The SSID name of all searched
A P.
Authentication Display the authentication
type of the AP.
Encryption Display the encryption type
of the AP.
Status Display the status of the AP.
The icon stands for the
IP542N have connected to
the AP.
The icon stands for the
signal strength of the AP.
Field Name Description
Dynamic DNS
Provider
DDNS is enabled and select a
DDNS service provider
Account Enter the DDNS service
account
Password Enter the DDNS service
account password
DDNS URL Enter the DDNS domain
name or IP address
Status See if DDNS is successfully
upgraded
Page 36
MBIT Technologies
*
www.mbit.com.au 36
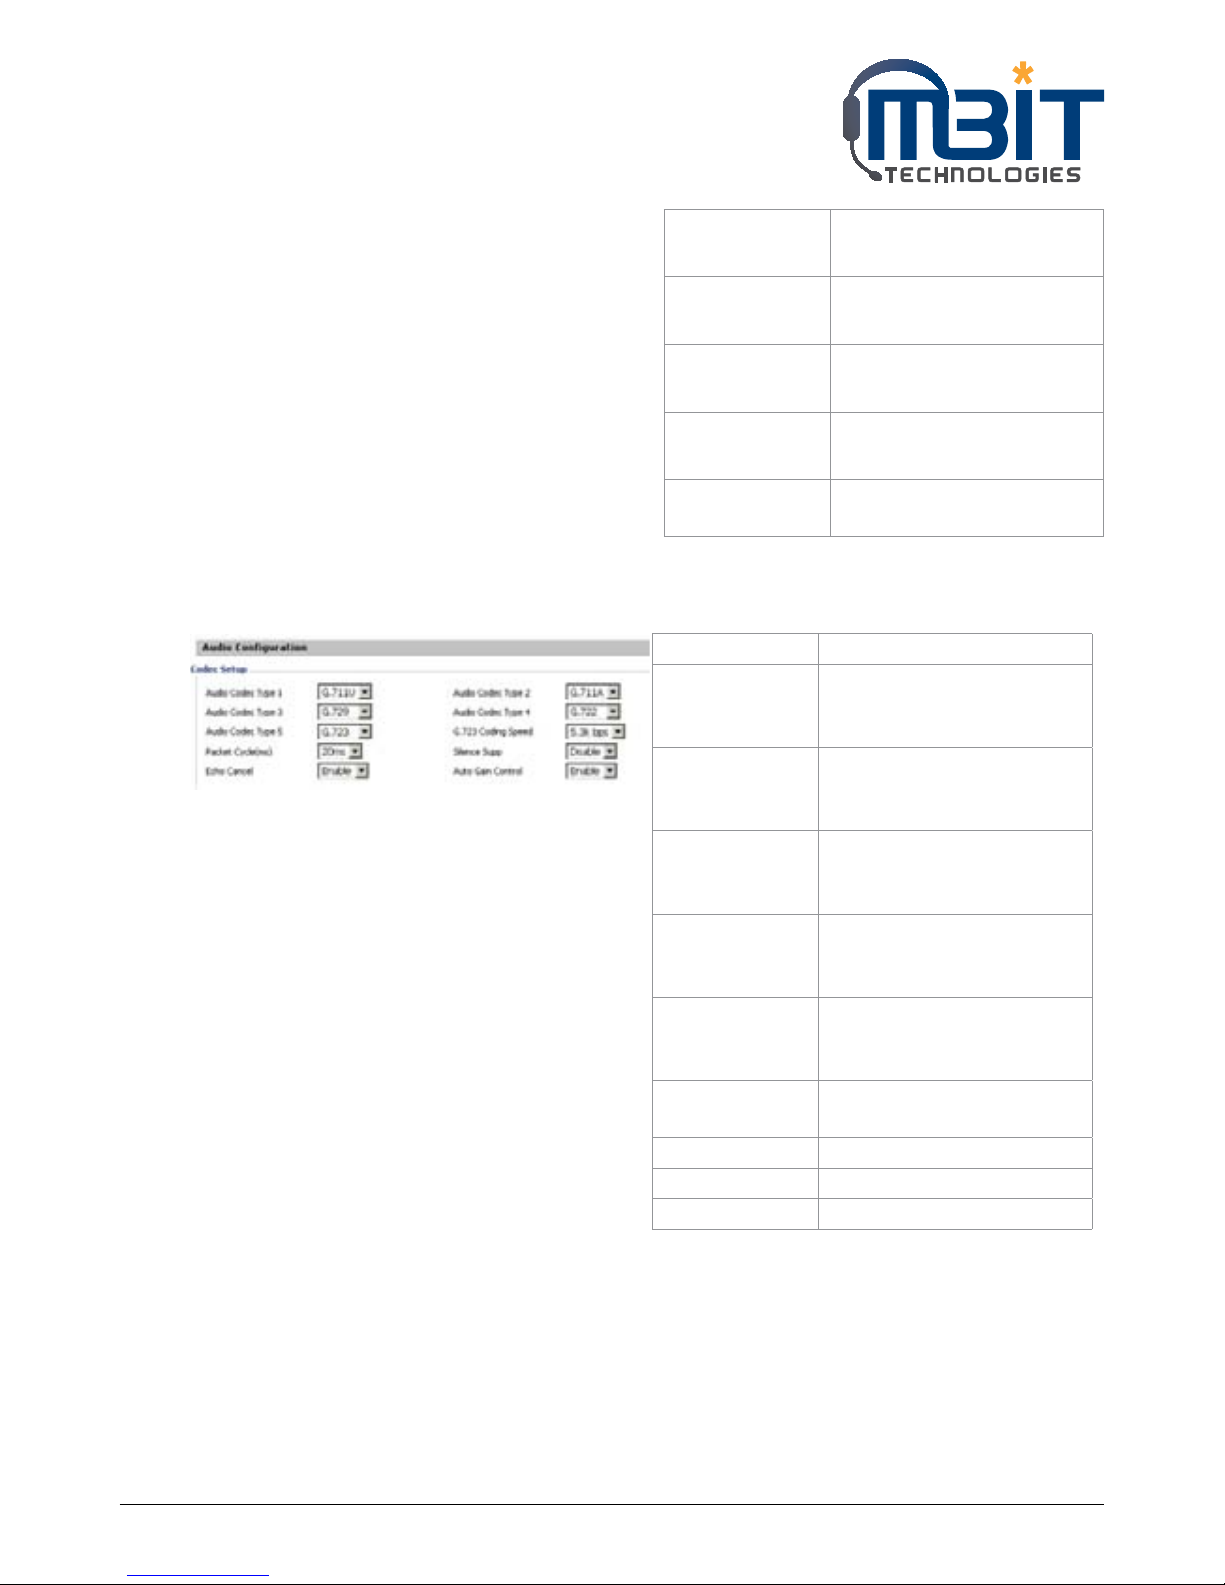
7.5.8 Routing
7.6 SIP Account
7.6.1 Line 1
In this webpage, users can configuration the information about SIP account1, including the following 4
parts: Basic, Audio Configuration, Supplementary Service Subscription and Advanced.
Following is the description about that.
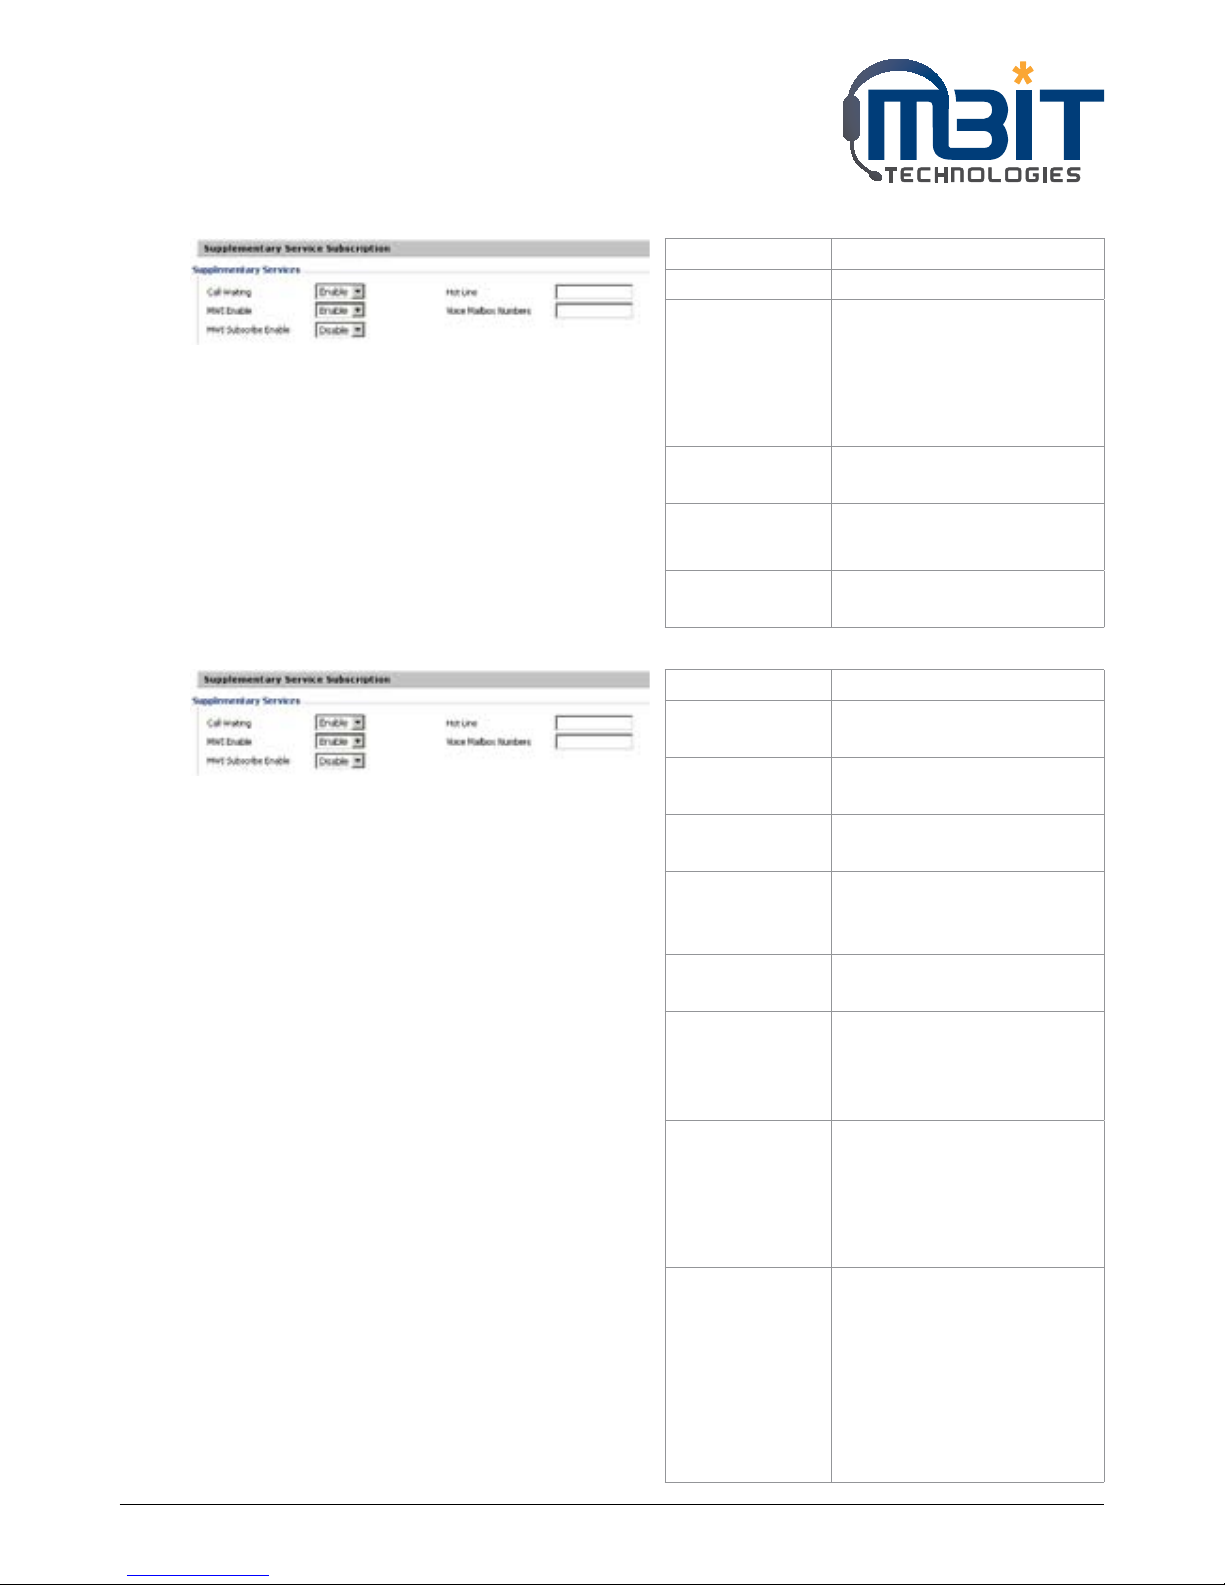
7.6.1.1 Basic
Set the basic information provided by your VOIP Service Provider, such as Phone Number, Account,
password, SIP Proxy and so on.
Field Name Description
Destination Destination address
Host/Net Both Host and Net selection
Gateway Gateway IP address
Interface LAN/WAN/Custom three
options, and add the
corresponding address
Comment Comment
Field Name Description
Line Enable If or not enable Line 1
Peer to Peer If or not enable PEER to PEER
If enable, SIP-1 will not send
register request to SIP server;
In System Status, SIP-1 Status
is Registered;
SIP-1 can make call out, but
others can not call SIP-1.
Proxy DNS Type Choose DNS type from A Type
and DNS SRV.
Use VPN If or not enable VPN
Domain Name The domain of SIP Server
SIP Server The IP address of SIP Server
SIP Port The port which SIP Server
supports for VOIP service,
default is 5060
Outbound Proxy Outbound Proxy IP or domain
name
Page 37
MBIT Technologies
*
www.mbit.com.au 37
7.6.1.2 Audio Configuration
Select the audio Codec you want to use.
Outbound Port Outbound Proxy’s Service
port
Display Name The number will display in
callee
Phone Number Number of telephone
provided by SIP Proxy
Account SIP account provided by SIP
Proxy
Password SIP password provided by SIP
Proxy
Field Name Description
Audio Codec
Type 1
Choose the audio codec type
from G.711U, G.711A, G.722,
G.729, G.723
Audio Codec
Type 2
Choose the audio codec type
from G.711U, G.711A, G.722,
G.729, G.723
Audio Codec
Type 3
Choose the audio codec type
from G.711U, G.711A, G.722,
G.729, G.723
Audio Codec
Type 4
Choose the audio codec type
from G.711U, G.711A, G.722,
G.729, G.723
Audio Codec
Type 5
Choose the audio codec type
from G.711U, G.711A, G.722,
G.729, G.723
G.723 Coding
Speed
Choose the speed of G.723
from 5.3kbps and 6.3kbps
Packet Cycle The RTP packet cycle time
Silence Supp If or not enable silence
Echo Cancel If or not enable echo cancel
Page 38
MBIT Technologies
*
www.mbit.com.au 38
7.6.1.3 Supplementary Services Subscription
7.6.1.4 Advanced
Field Name Description
Call Waiting If or not enable Call waiting.
Hot Line Fill in the hotline number.
Pickup handset or press
speaker/headset button,
bb 100100 will dial out the
hotline number automatically.
MWI Enable If or not enable MWI
(message waiting indicate).
Voice Mailbox
Numbers
Fill in the voice mailbox
phone number
MWI Subscribe
Enable
If or not enable MWI
subscribe
Field Name Description
Domain name
Mode
If or not use domain name in
the SIP URI
Carry Port
Information
If or not carry Port
information in the SIP URI.
Signal Port The local port of SIP protocol,
default is 5060
DTMF Type Choose the DTMF type from
IN_band, RFC2833 and SIP
INFO.
RFC2833 Payload
(>=96)
User can use the default
setting
Register Refresh
Interval
The interval between two
normal Register messages.
You can use the default
setting.
RTP Port Set the port to send RTP.
IP Phone will select one idle
port for RTP if you set “0”,
otherwise use the value user
set.
Cancel Message
Enable
When you set enable, an
unregistered message will be
sent before registration, while
you set disable, unregistered
message will not be sent
before registration. You
should set the option for
different Proxy.
Page 39
MBIT Technologies
*
www.mbit.com.au 39
7.6.2 Line 2
The parameters of Line2 is same as Line1 except the value of Line 0.
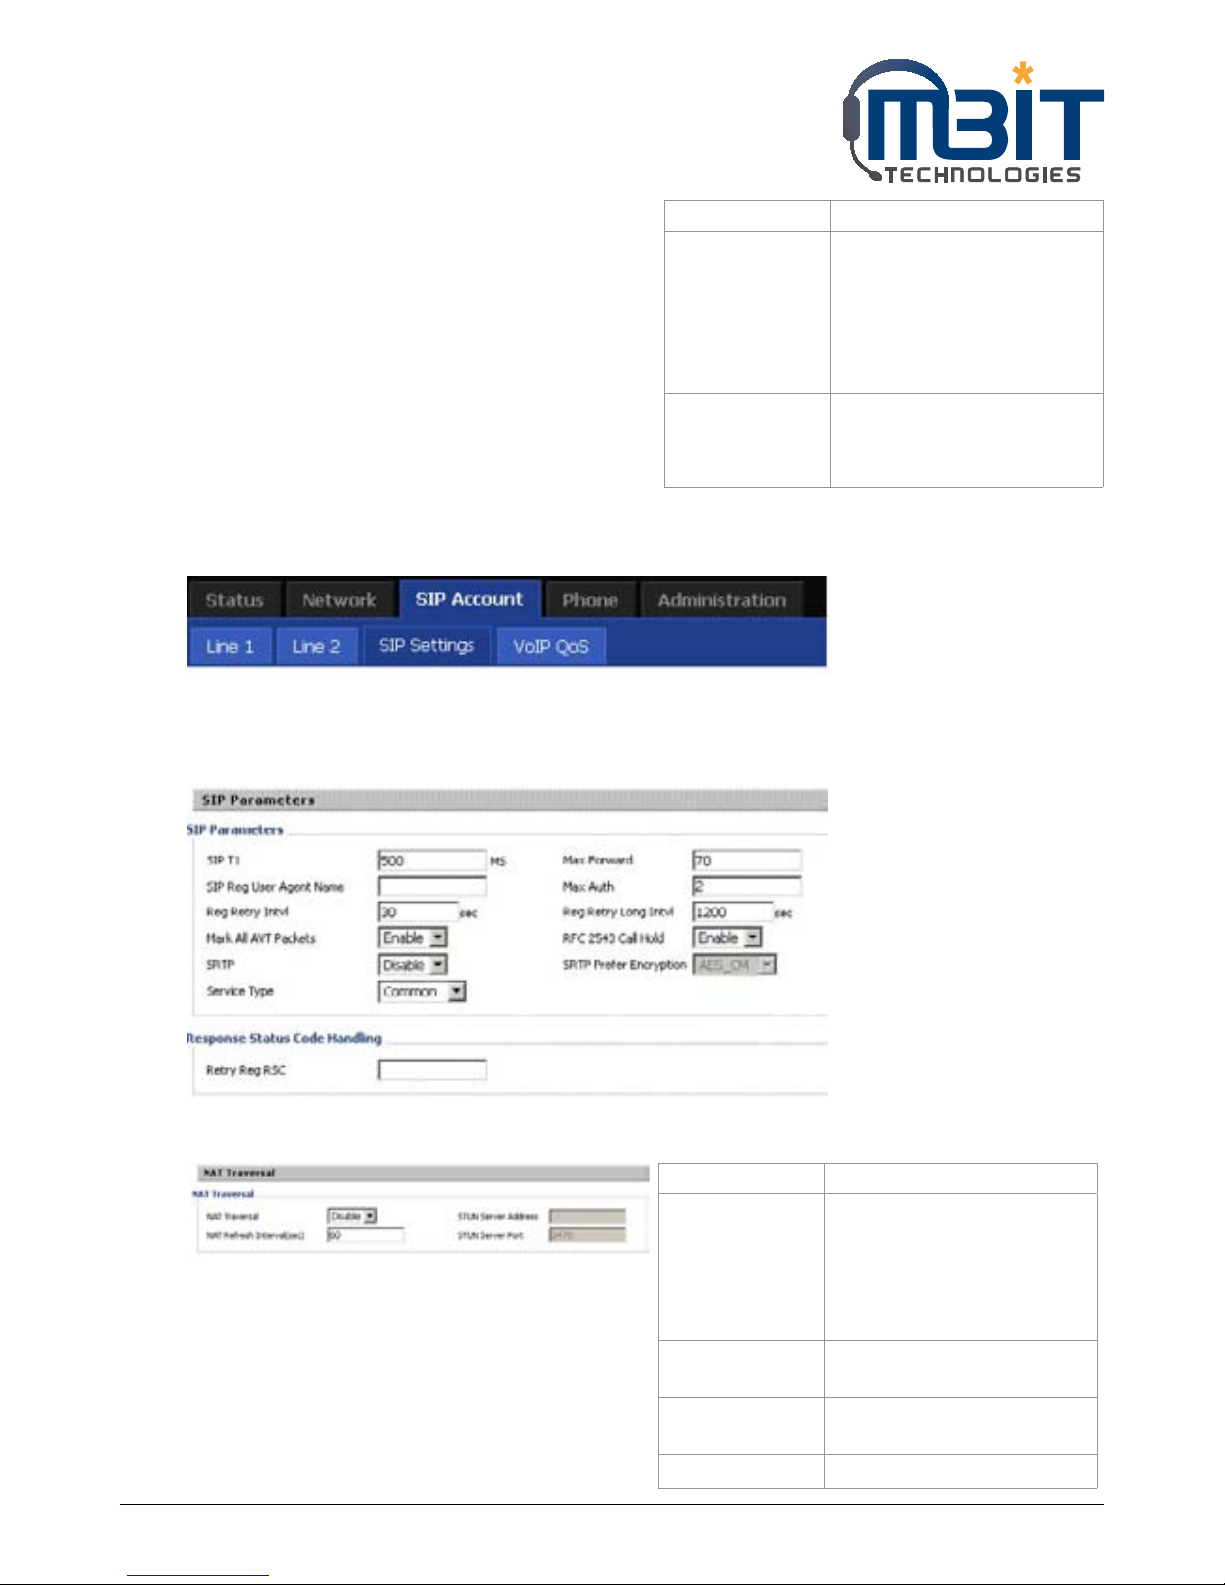
7.6.3 SIP Settings
7.6.3.1 SIP Parameters
7.6.3.2 NAT Traversal
Prack Enable If or not enable prack.
SIP Ping Enable If this option enable, IP
Phone will send SIP-PING to
Server periodically instead
of sending hello packet. The
send interval is Keep-alive
interval.
Keep-alive
interval (10-60s)
The interval that IP Phone
will send an empty packet to
Proxy.
Field Name Description
NAT Traversal If or not enable NAT.
bb100 supports STUN
traversal, choose “STUN” in the
“NAT Traversal Mode” if you
want traverse NAT/Firewall.
STUN Server IP STUN server IP address,
default is stun.fwdnet.net
NAT Refresh
Interval (sec)
the interval to refresh
Port STUN port
Page 40
MBIT Technologies
*
www.mbit.com.au 40
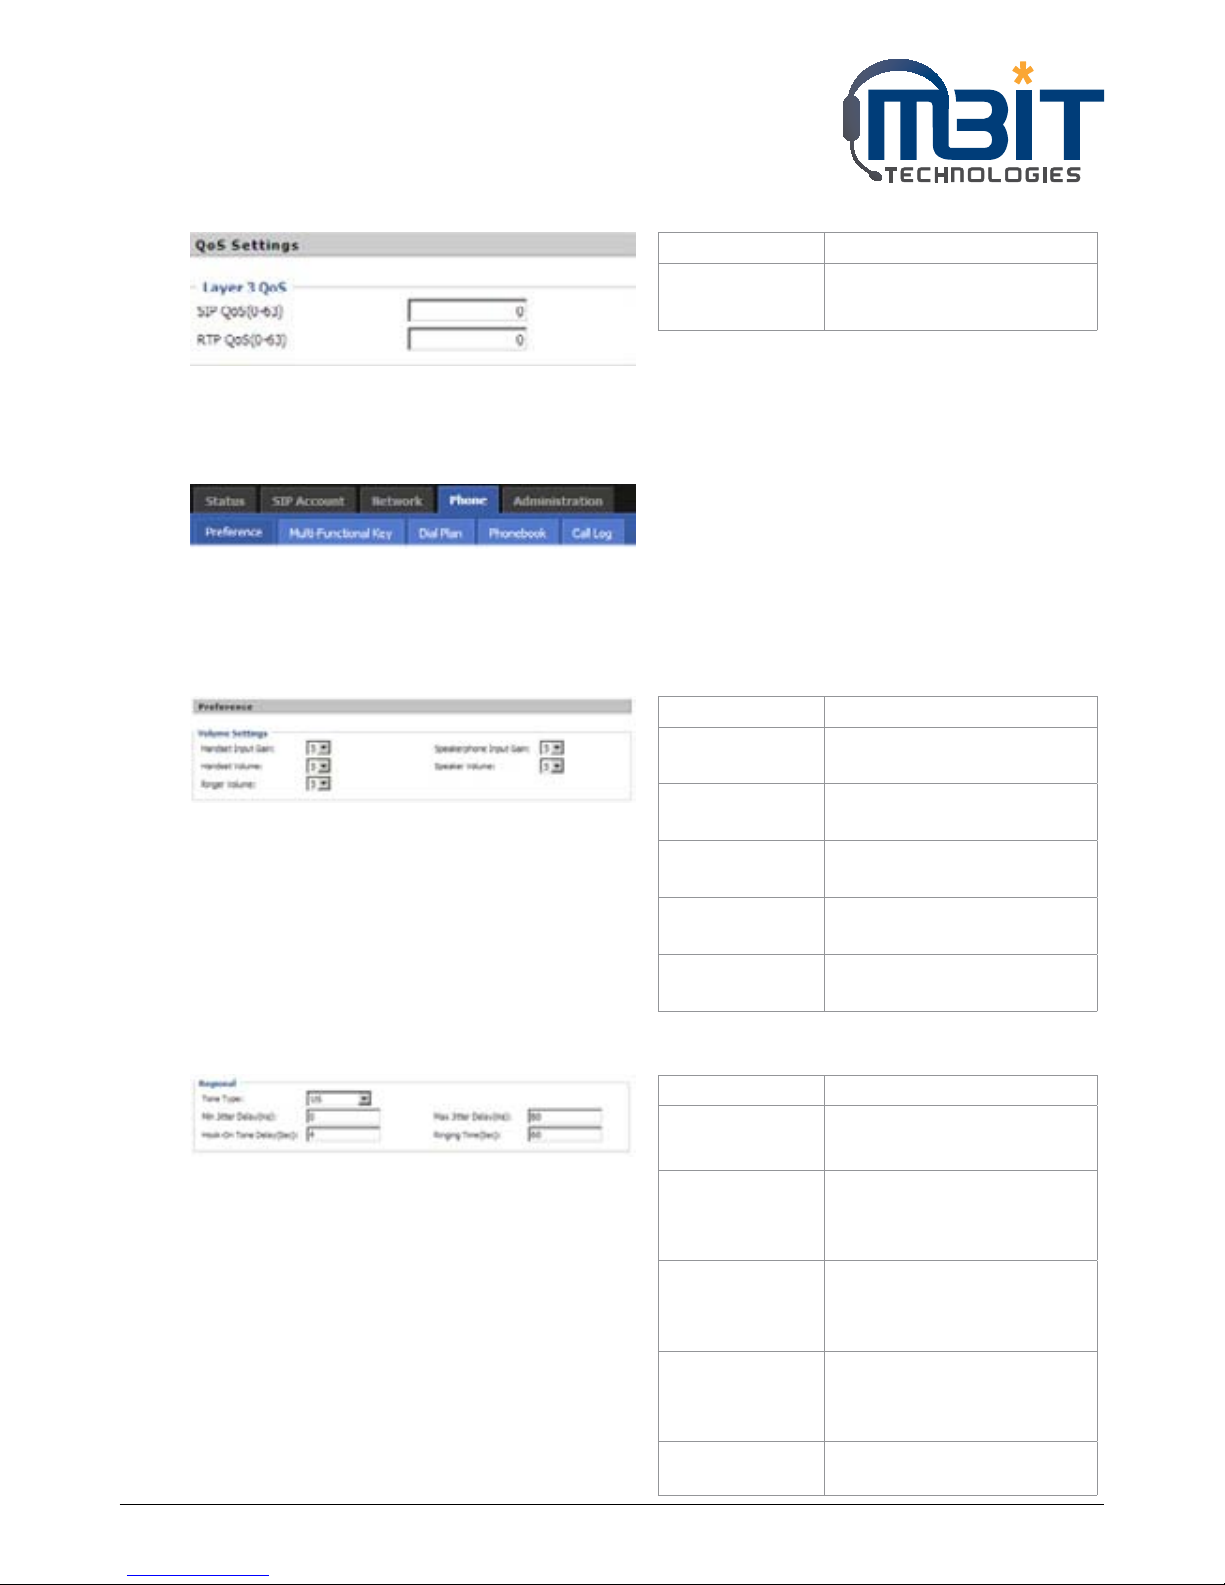
7.6.4 VoIP QoS
7.7 Phone
User can configuration volume, call forward, multi-functional key, dial plan, phonebook and call log
7.7.1 Preference
User can configuration the value of ring volume, speakerphone volume, handset volume and so on.
7.7.1.1 Preference
7.7.1.2 Regional
Field Name Description
SIP /RTP QoS The default value is 0,you can
set a range of values is 0~63
Field Name Description
Handset Input
Gain
Adjust the handset input gain
from 0-7
Handset Volume
Gain
Adjust the output gain from
0-7
Speakerphone
Input Gain
Adjust the speakerphone
input gain from 0-7
Speaker Volume Adjust the speaker volume
form 0-7
Ringer Volume Adjust the ringer volume
form 0-7
Field Name Description
Tone Type Choose tone type form China,
US, Hong Kong and KR.
Min Jitter Delay
(ms)
The Min value of bb100’s
jitter delay, bb100’s jitter is an
adaptive jitter mechanism.
Max Jitter Delay
(ms)
The Max value of bb100’s
jitter delay, bb100’s jitter is an
adaptive jitter mechanism.
Hook-On Tone
Delay (sec)
How long bb100 will delay to
sound hook-on tone when
call party end call.
Ringing
Time(Sec)
How long bb100 will ring
Page 41
MBIT Technologies
*
www.mbit.com.au 41
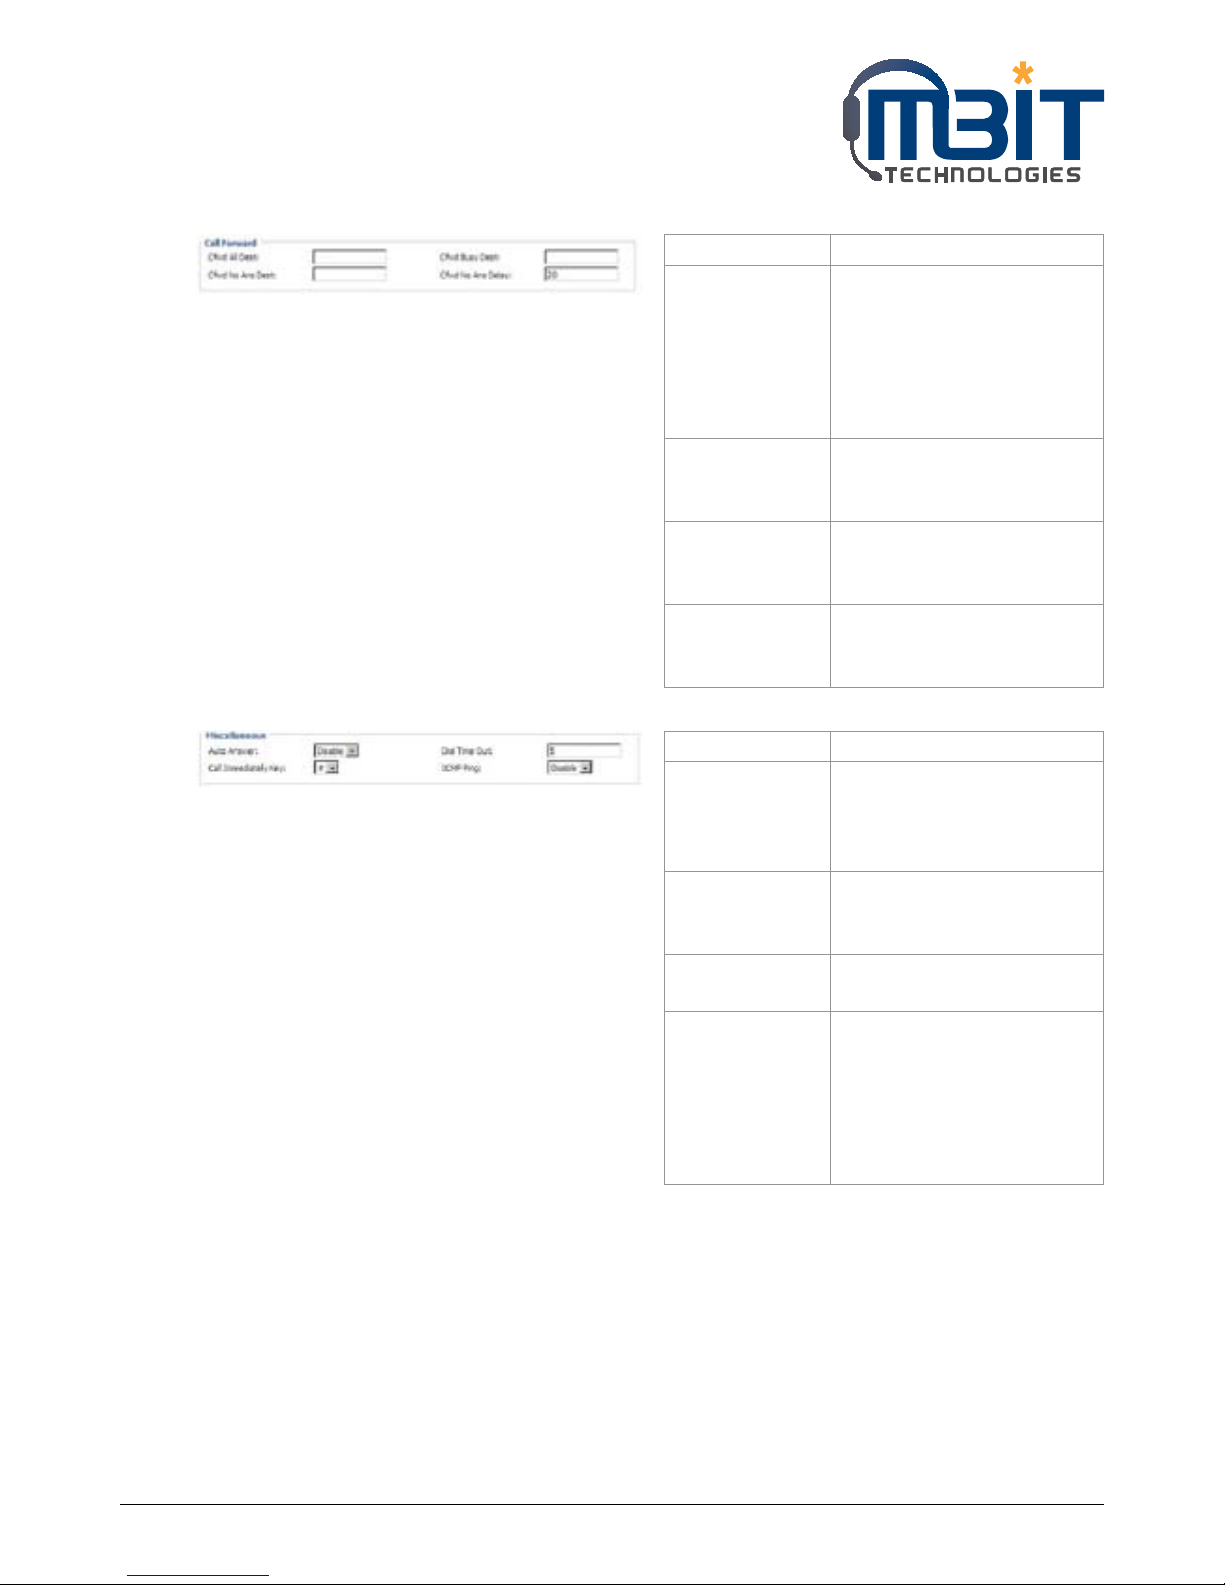
7.7.1.3 Call Forward
7.7.1.4 Miscellaneous
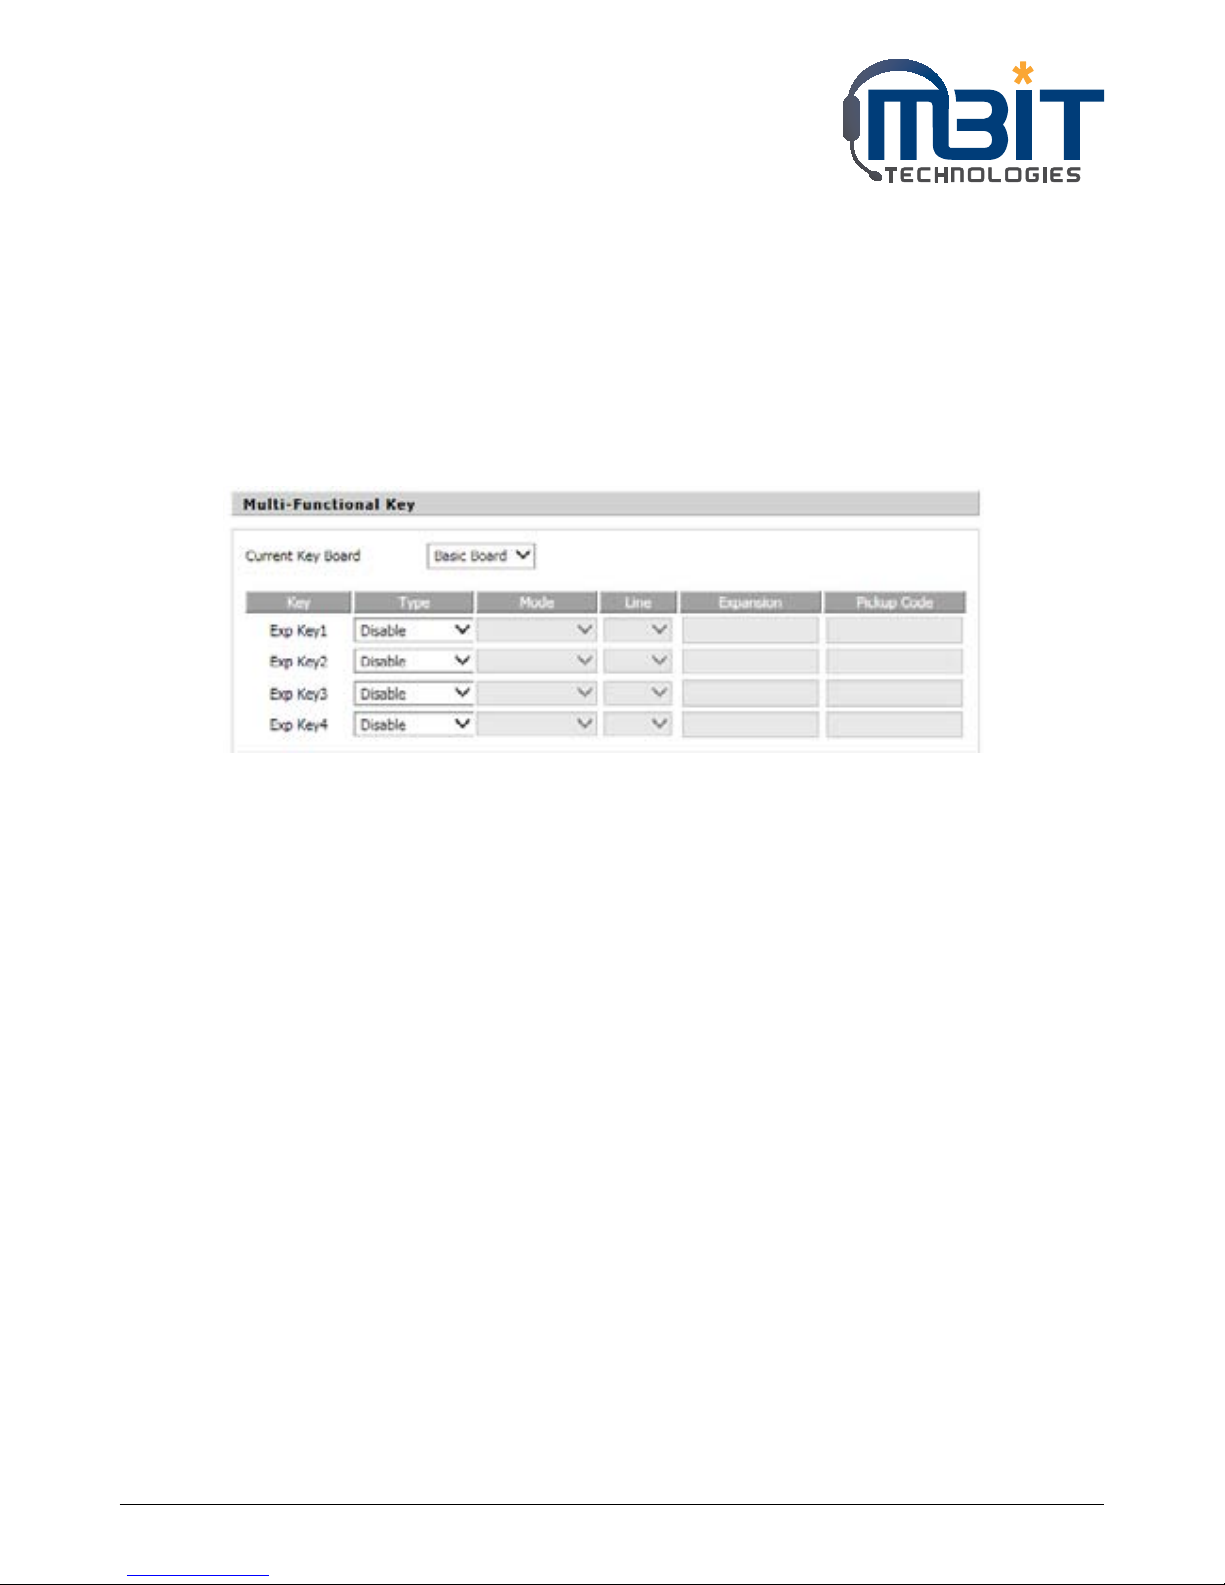
7.7.2 Multi-Functional Key
Step 1: Choose one Exp Key from the Exp Key 1…4.
Step 2: Choose one function type from speed dial, BLF, shortcut key, call pickup and call park.
Step 3: Set the other corresponding parameters.
Step 4: Press Save Settings button to save changes, press Cancel Changes button to cancel changes.
An example is on page 42.
Field Name Description
Cfwd All Dest The phone number which will
be forwarded to.
IP Phone will forward all
calls to the phone number
immediately when there is an
incoming call.
Cfwd Busy Dest The phone number which will
be forwarded to when line is
busy.
Cfwd No Ans
Dest
The phone number which will
be forwarded to when there’s
no answer at your phone.
Cfwd No Ans
Delay
The seconds to delay
forwarding calls, if there is no
answer at your phone.
Field Name Description
Auto Answer If or not enable auto answer.
If enable, bb100 will auto
answer all incoming call
immediately.
Dial Time Out How long bb100 to sound
dial out tone when bb100
dialing number.
Call Immediately
Key
Choose call immediately key
form * or #.
ICMP Ping If or not enable ICMP Ping.
If enable this option, bb100
will ping the SIP Server every
interval time, otherwise, It will
send “hello” empty packet to
the SIP Server.
Page 42

MBIT Technologies
*
www.mbit.com.au 42
Adding speed dial:
Step 1: Choose one Exp Key to configuration
Step 2: Select the speed dial from the drop down list
Step 3: Choose the Line from auto (the first line registered), line1, line2
Step 4: Fill the phone number in Expansion
Step 5: Press the Save button to save changes and you can see the status of corresponding LED is solid
green.
Step 6: Press the Reboot button to make changes effective.
If set properly, press the corresponding key to make call immediately, and the status of LED is solid red.
Adding BLF:
Step 1: Choose one Exp Key to configuration
Step 2: Select the BLF from the drop down list
Step 3: Choose the Line from line1, line2.
Step 4: Fill the monitored phone number in Expansion
Step 5: Fill the pickup code in Pickup Code if user wants to pickup the call when there is a new call
coming in monitored phone.
Step 6: Press the Save button to save changes.
Step 7: Press the Reboot button to make changes effective.
Adding shortcut key:
Step 1: Choose one Exp Key to configuration
Step 2: Select the shortcut key from the drop down list
Step 3: Select the mode from the phonebook, call history, text message, volume+, volume- and login/
logout in the drop down list.
Step 4: Press the Save to save changes and you can see the status of corresponding LED is solid green.
Step 5: Press the Reboot button to make changes effective.
If set properly, press the corresponding button to access to phonebook, call history, text message,
volume+, volume- and login/logout menu directly.
Adding Call Pickup:
Step 1: Choose one Exp Key to configuration
Step 2: Select the call pickup from the drop down list
Step 3: Choose the Line from line1, line2.
Step 4: Fill the phone number in Expansion
Page 43
MBIT Technologies
*
www.mbit.com.au 43
Step 5: Press the Save button to save changes and you can see the status of corresponding LED is solid
green.
Step 6: Press the Reboot button to make changes effective.
In idle, press the corresponding button to make call immediately.
Adding call park:
Step 1: Choose one Exp Key to configuration
Step 2: Select the Call Park from the drop down list in type
Step 3: Choose the Line from line1, line2.
Step 4: Fill the pickup extension code in Expansion
Step 5: Press the Save button to save changes and you can see the status of corresponding LED is solid
green.
Step 6: Press the Reboot button to make changes effective.
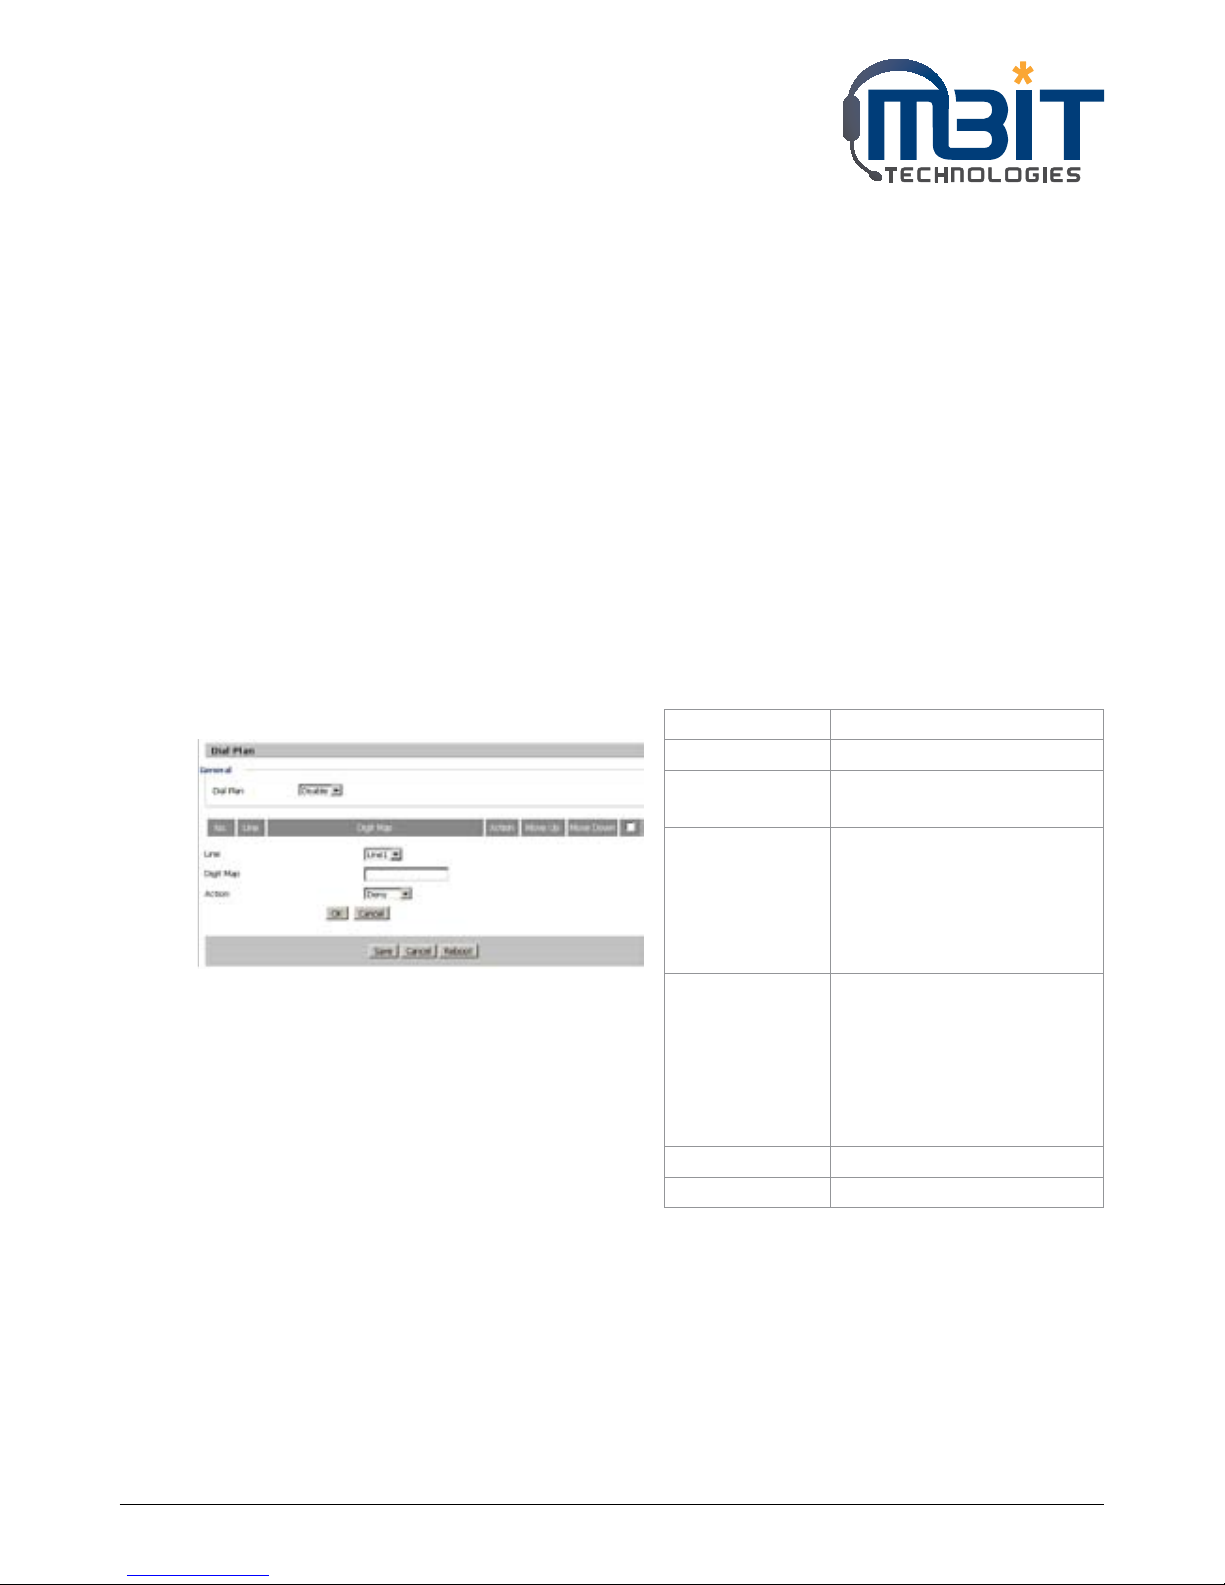
7.7.3 Dial Plan
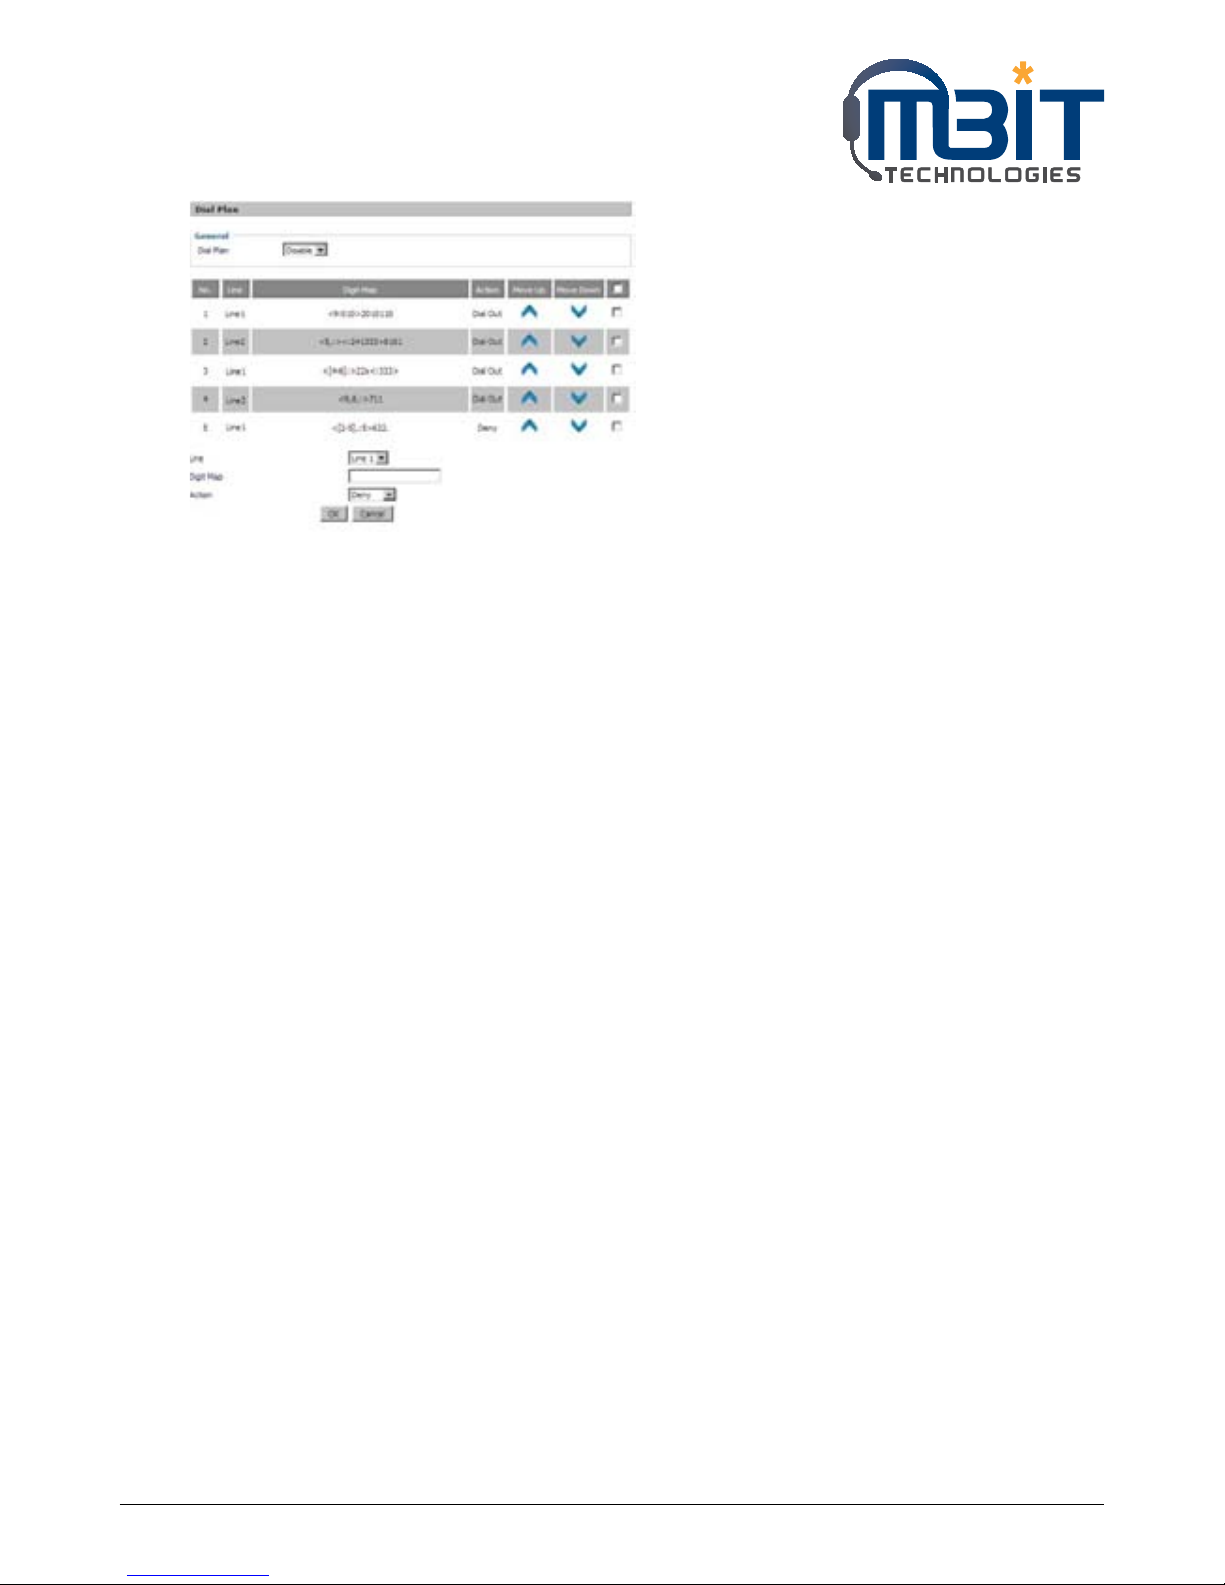
7.7.3.1 Parameters and Settings
Field Name Description
Dial Plan If or not enable dial rule.
Line Choose the call mode from
line1, line2.
Digit Map Fill in the sequence used to
match input number
The syntactic, please refer
to the following Dial Plan
Syntactic
Action Choose the dial plan mode
from Deny and Dial Out.
Deny means bb100 will reject
the matched number, while
Dial Out means bb100 allow
dial out the matched number.
Move Up Press it to move up.
Move Down Press it to move down.
Picture 1
Page 44
MBIT Technologies
*
www.mbit.com.au 44
Steps:
Adding one dial plan:
Step 1: Enable Dial Plan
Step 2: Click Add button, and the configuration table like Picture 1 will appear
Step 3: Fill in the value of parameters.
Step 4: Press OK button to end configuration.
Step 5: Press Save Settings button to save changes.
Editing one dial plan:
Step 1: Enable Dial plan
Step 2: Choose one dial plan
Step 3: Click Edit button, and the configuration table like Picture 2 will appear
Step 4: Change the value of parameters.
Step 5:Press OK button to end configuration.
Step 6: Press Save Settings button to save changes.
Deleting one dial plan:
Step 1: Enable Dial plan
Step 2: Choose one dial plan
Step 3: Click Delete button to delete the dial plan
Picture 2
Page 45

MBIT Technologies
*
www.mbit.com.au 45
7.7.3.2 Dial Plan Syntactic
No. String Description
1 0 1 2 3 4 5 6 7 8 9 * # Legal characters
2 X Lowercase letter x stands for one legal character
3 [sequence] To match one character form sequence.
For example:
[0-9]: match one digit form 0 to 9
[23-5*]: match one character from 2 or 3 or 4 or 5 or *
4 x. Match to,,, …...
For example:
“01.”: can match ”0”, “01”, “011”, ”0111”, …….., ”01111…”
5 <dialed: substituted> Replace dialed with substituted.
For example:
<8:1650>123456:input is “85551212”, output
is“16505551212”
6 x,y Make outside dial tone after dialing “x”, stop until
dialing character “y”
For example:
“9,1xxxxxxxxxx”:bb100 make outside dial tone after
inputting “9”, stop tone until inputting “1”
“9,8,010x”: make outside dial tone after inputting “9”,
stop tone until inputting “0”
7 T Set the delayed time.
For example:
“<9:111>T2”: bb100 will dial out the matched
number “111” after 2 seconds.
Page 46
MBIT Technologies
*
www.mbit.com.au 46
7.7.3.3 Example
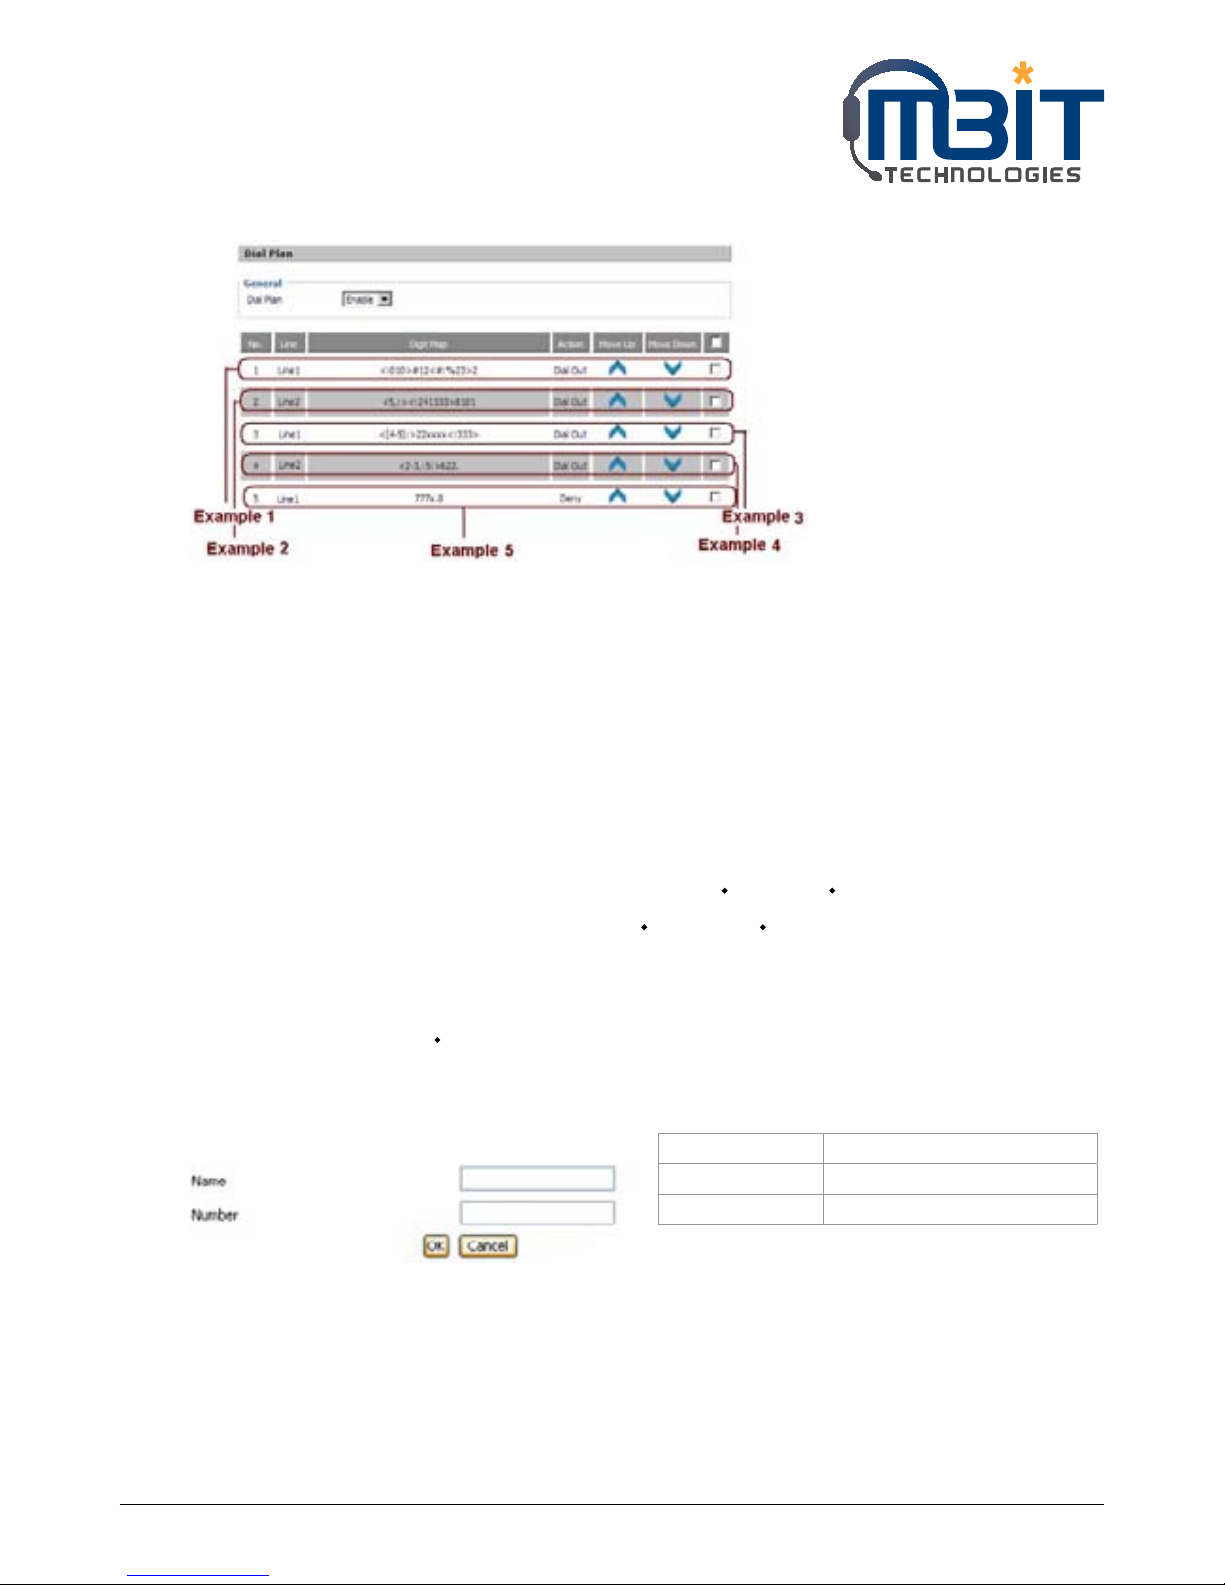
1. Example 1
Using line 1, if user dials #12#2, bb100 will call 010#12%232 immediately.
2. Example 2
Using line 2, if user dials 5,8101, bb100 will call 2413338101 immediately,
And bb100 will make outside dial tone after inputting “5”, stop tone until inputting “8”.
3. Example 3
Using line 1, if user dials 422xxxx or 522xxxx, bb100 will call 22xxxx333 immediately.
4. Example 4
Using line 2, if user dials 2622 or 26222 or 262222 or 2622222 or 2622222,
bb100 will call 5622 or 56222 or 562222 or 5622222 or 56222222 immediately.
And bb100 will make outside dial tone after inputting “2” or “3”, stop tone until inputting “6”.
5. Example 5
Using line 1, if user dials 777x8, bb100 will reject the phone number out.
7.7.4 Phone Book
Field Name Description
Name Input the name
Number Input the phone number
Picture 1
Page 47
MBIT Technologies
*
www.mbit.com.au 47
Steps :
Adding one phone book:
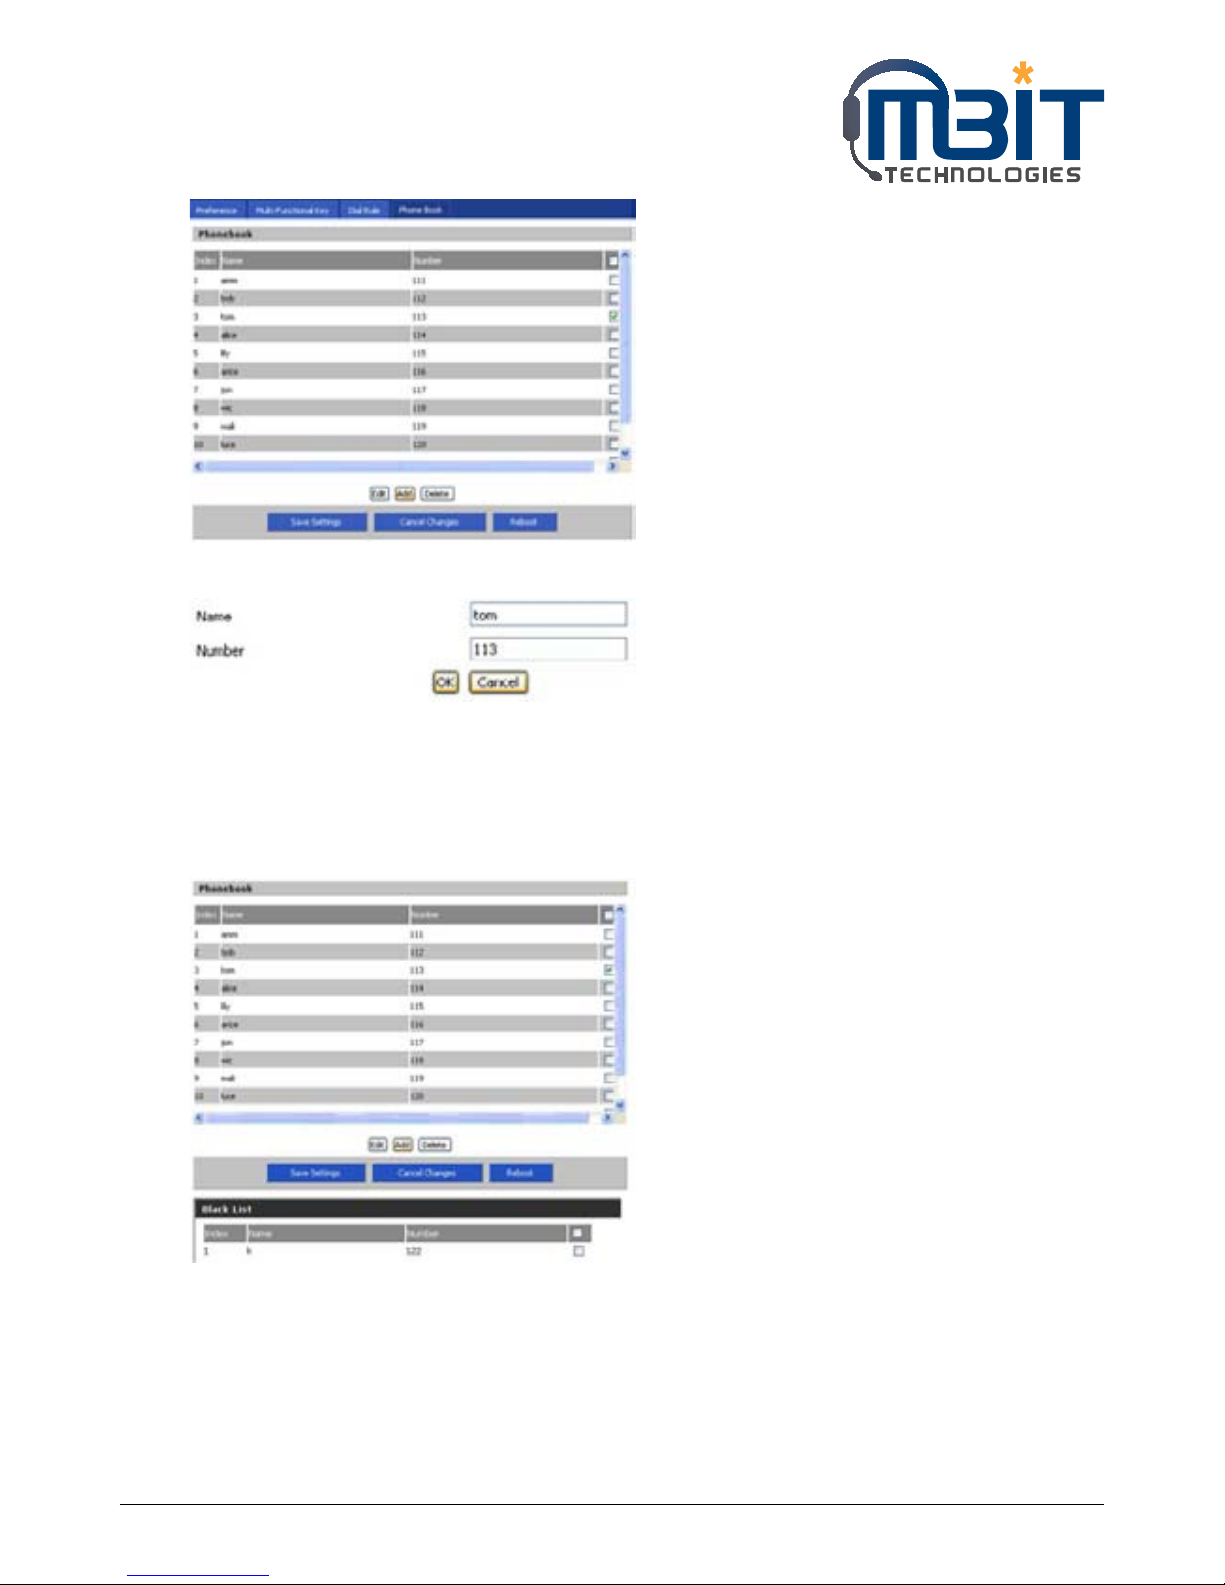
Step 1: Click Add button, and the configuration
table like Picture 1 will appear
Step 2: Fill in the value of parameters.
Step 3: Press OK button to end configuration.
Step 4: Press Save Settings button to save
changes.
Editing one phone book:
Step 1: Choose one phone book
Step 2: Click Edit button, and the configuration
table like Picture 3 will appear
Step 3: Change the value of parameters.
Step 4: Press OK button to end configuration.
Step 5: Press Save Settings button to save
changes.
Deleting one phone book:
Step 1: Choose one phone book
Step 2: Click Delete button to delete the phone
book
Move one phone book to Black list:
Step 1: Choose one phone book
Step 2: Click Move to blacklist button to delete
the phone book
Picture 2
Picture 3
Picture 4
Page 48
MBIT Technologies
*
www.mbit.com.au 48
7.7.4.1 Black List
Steps :
Adding one Black List:
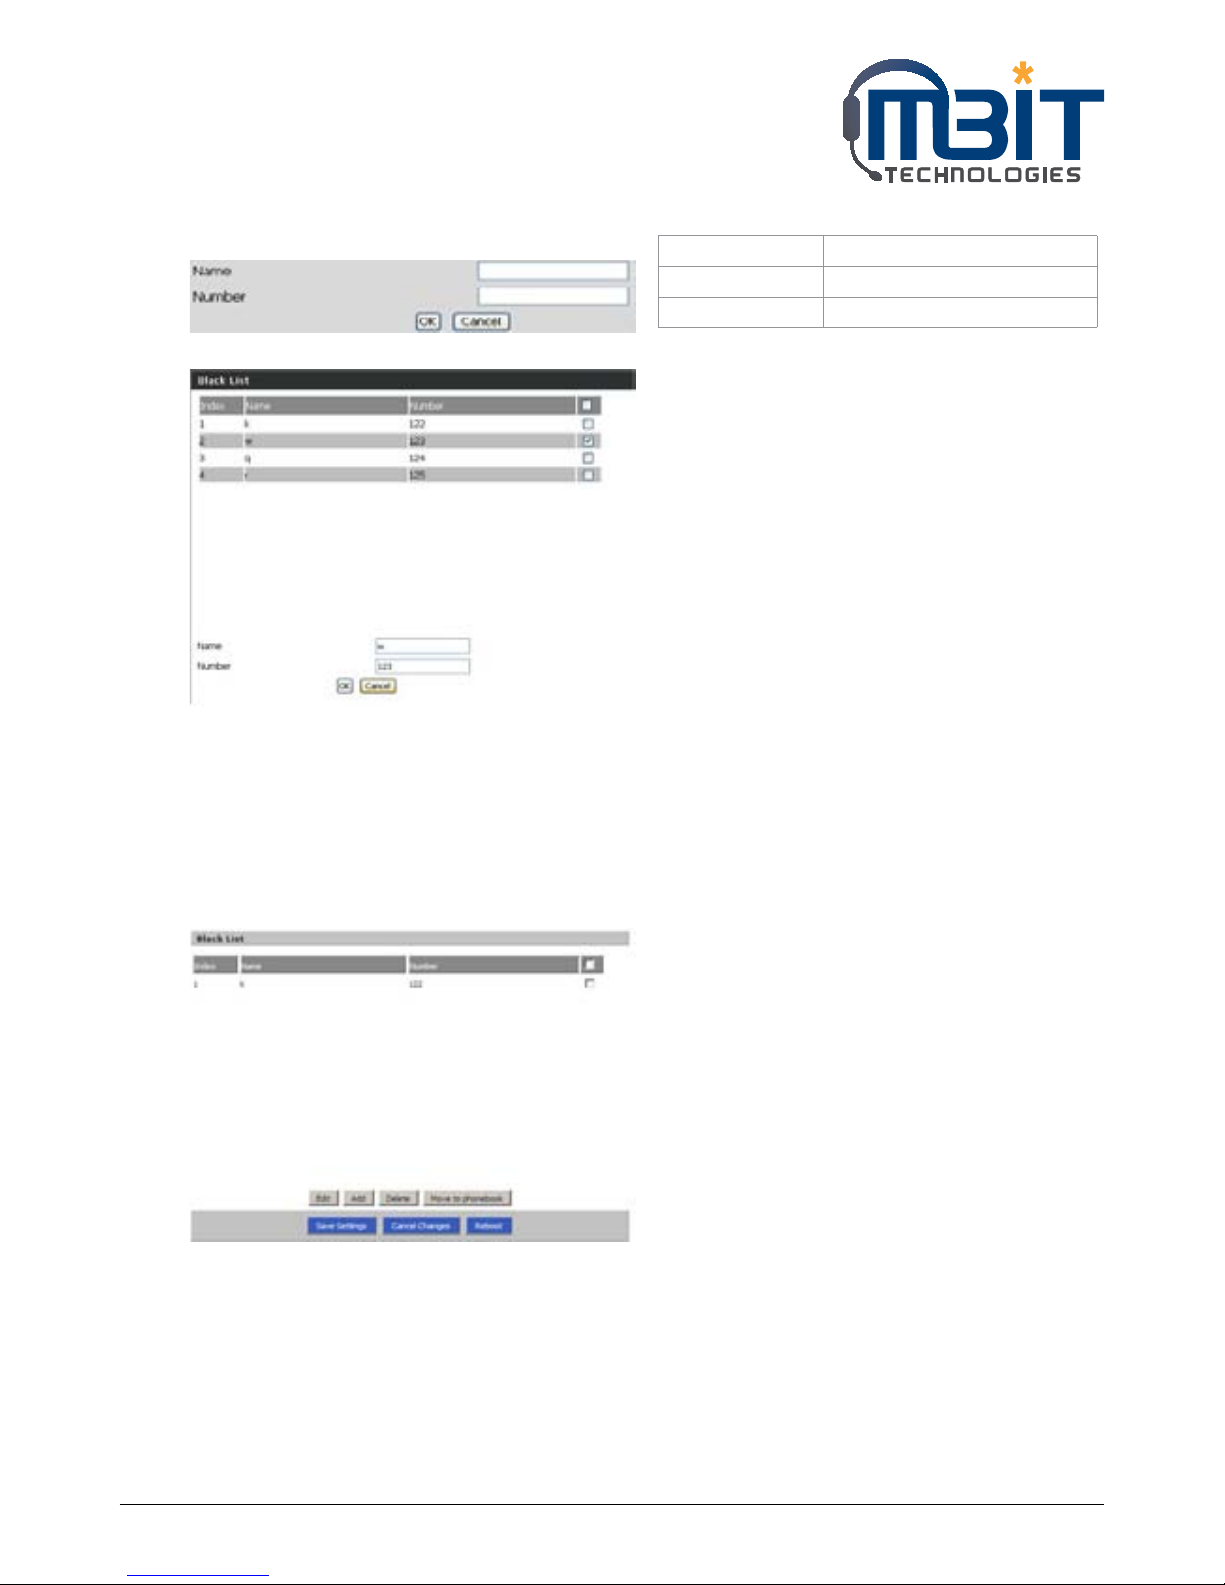
Step 1: Click Add button, then the configuration
table like Picture 1 will appear
Step 2: Fill in the value of parameters.
Step 3: Press OK button to end configuration.
Step 4: Press Save Settings button to save
changes.
Editing one Black List:
Step 1: Choose one black list
Step 2: Click Edit button, and the configuration
table like Picture 2 will appear
Step 3: Change the value of parameters.
Step 4: Press OK button to end configuration.
Step 5: Press Save Settings button to save
changes.
Deleting one Black List:
Step 1: Choose one black list
Step 2: Click Delete button to delete the black list
Moving one Black List to phonebook:
Step 1: Choose one black list
Step 2: Click Move to Phonebook button to
move the black list to the phonebook
Field Name Description
Name Input the name
Number Input the phone number
Picture 1
Picture 2
Picture 3
Page 49
MBIT Technologies
*
www.mbit.com.au 49
7.7.5 Call Log
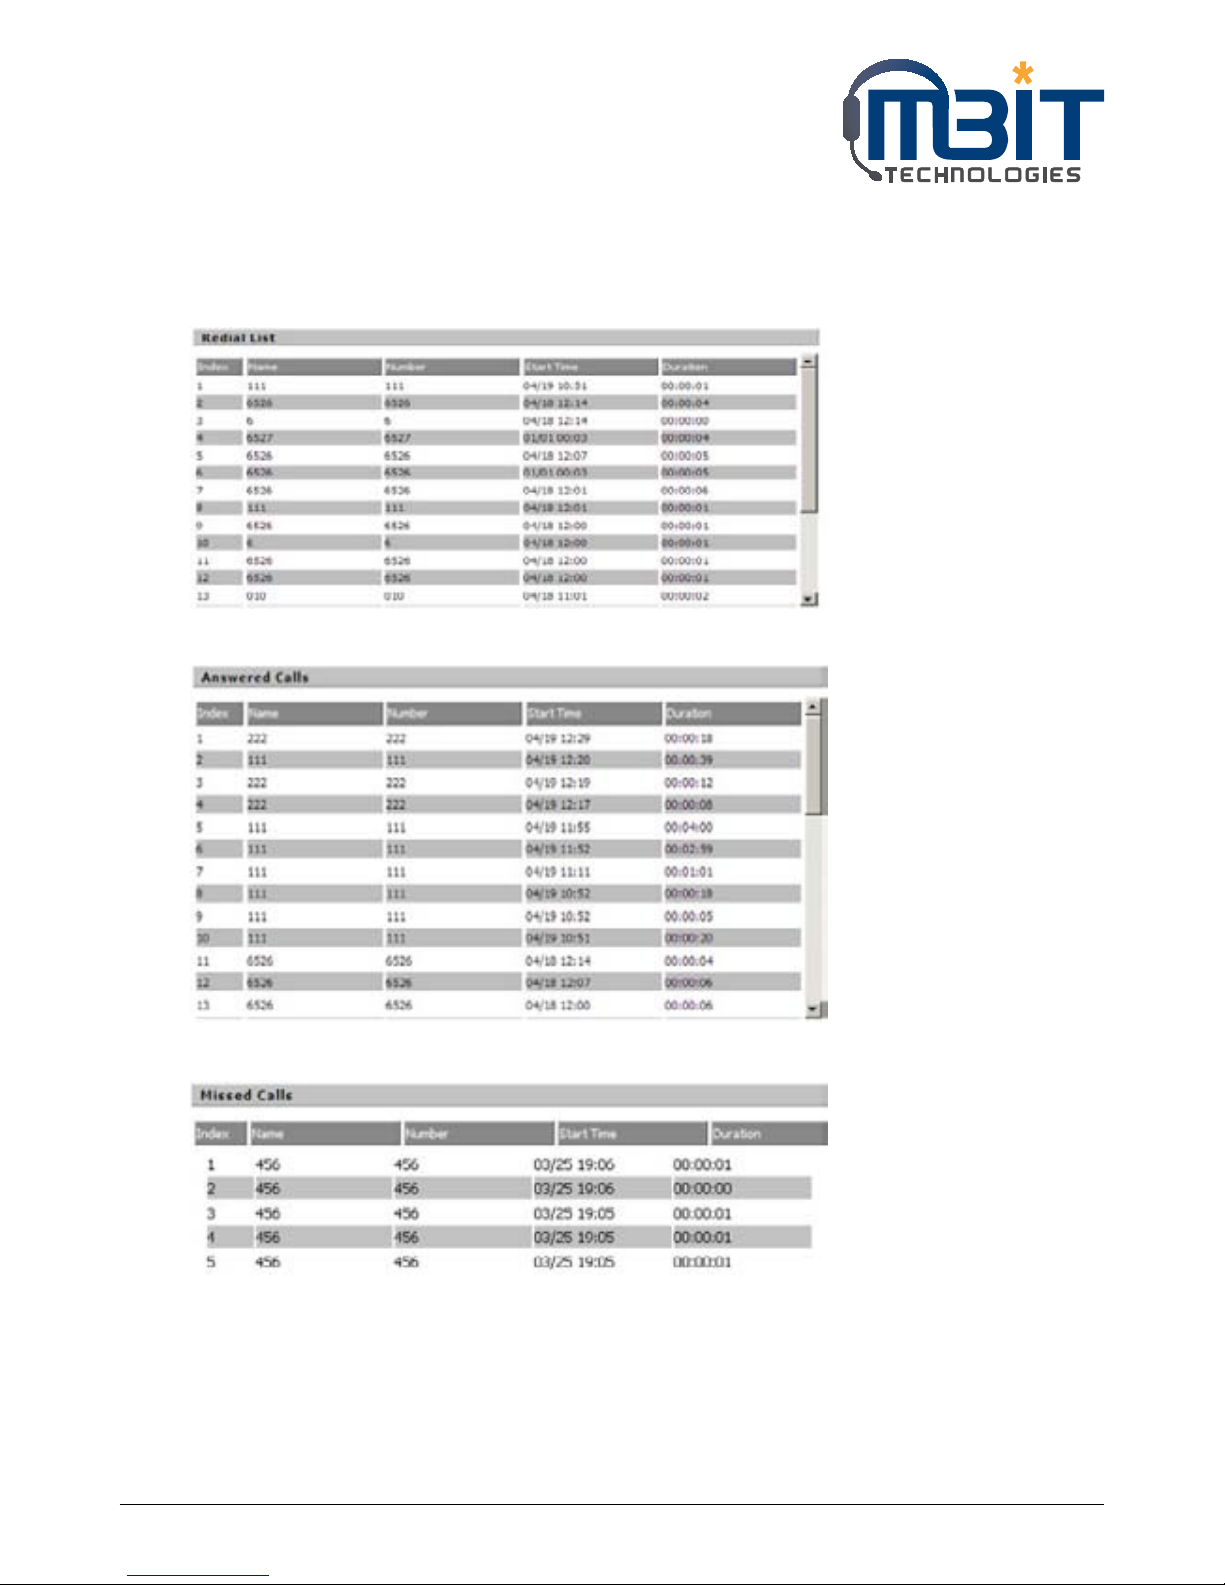
To view the call log information such as redial list (incoming call), answered call and missed call.
7.7.5.1 Redial List
7.7.5.2 Answered Calls
7.7.5.3 Missed Call
Page 50
MBIT Technologies
*
www.mbit.com.au 50
7.8 Administration
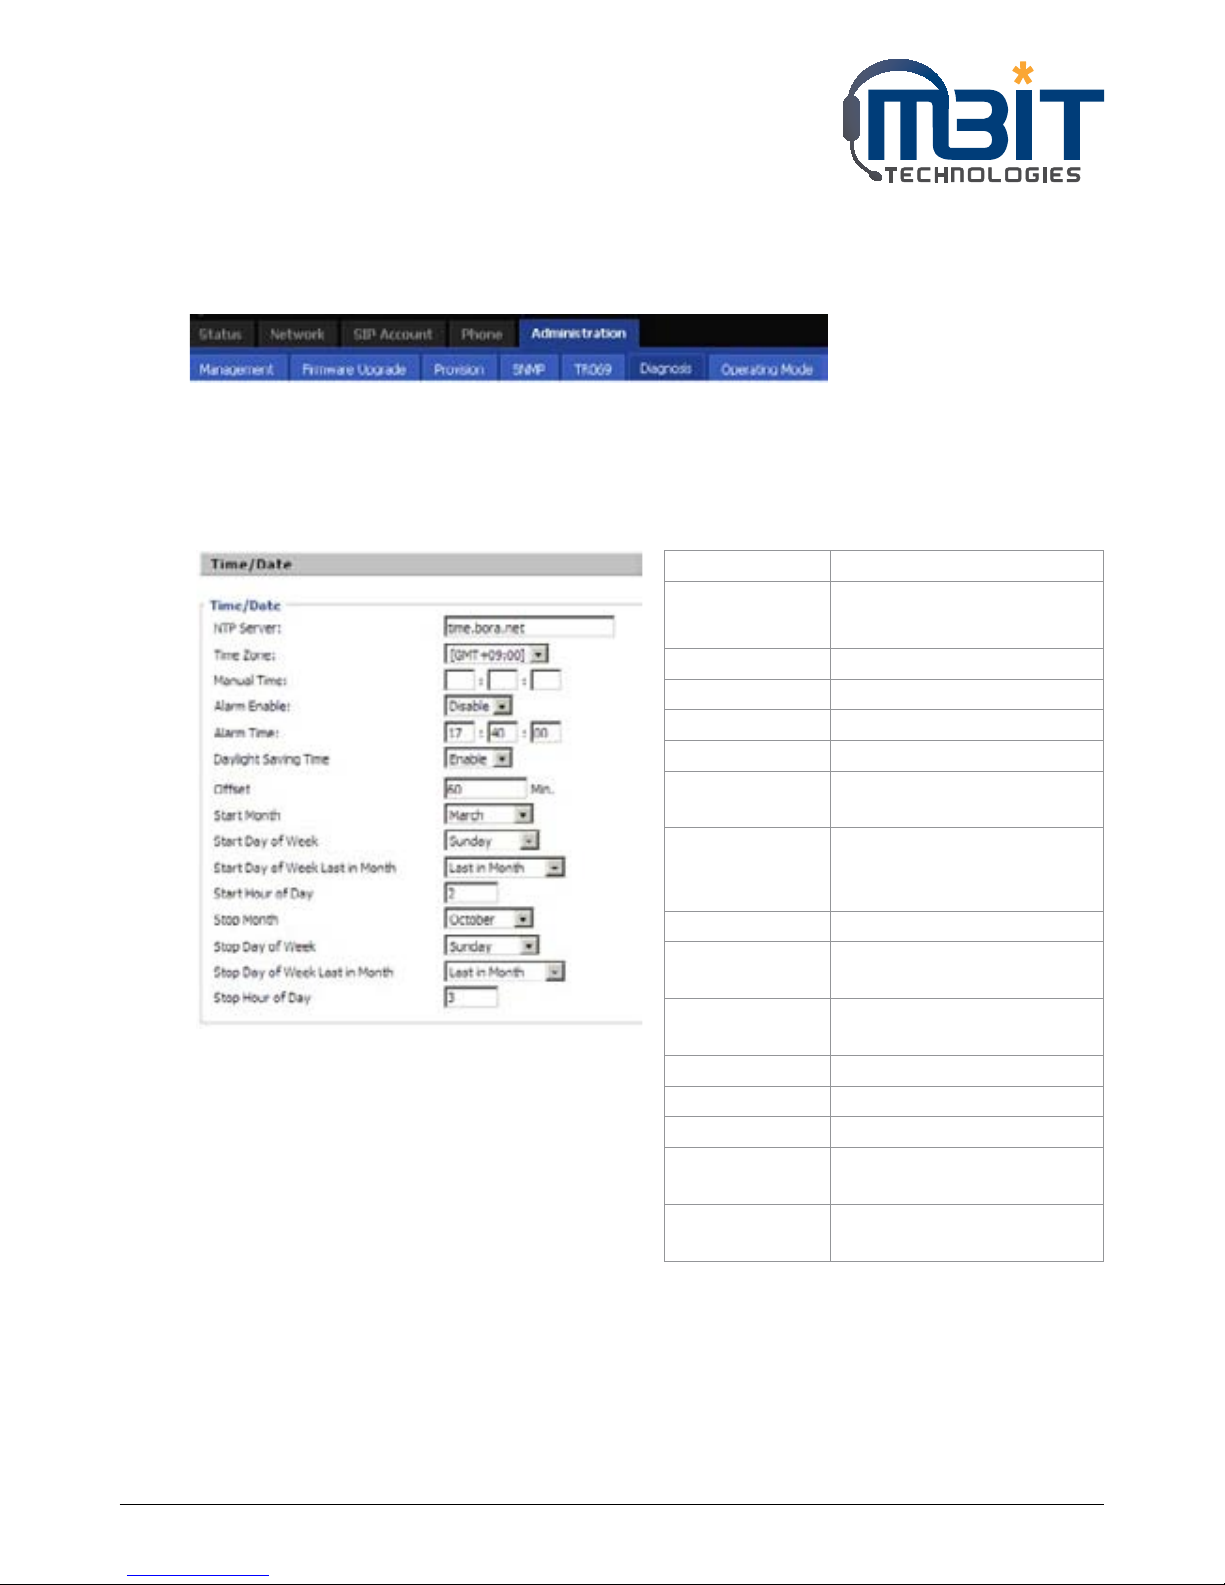
Use can manage the bb100 in these six webpage; you can configuration the Time/Date, password, web
access, system log and so on.
7.8.1 Management
You can configuration the value of Time/Date, password, web access, and system log and so on.
7.8.1.1 Time/Date
Field Name Description
NTP Server Fill in the NTP server IP
address or Domain name
Time Zone Choose the time zone
Manual Time Adjust time by manual
Alarm Enable If or not enable alarm
Alarm Time Set alarm time
Daylight Saving
Time
If or not enable daylight
saving time.
Offset Offset time, “-60” means
advancing 60miniter, “60”
means delaying 60minite
Start Month Choose starting month
Start Day of
Week
Choose starting day
Start Day of Week
Last in Month
Choose starting week
Start Hour of Day Choose starting hour
Stop Month Choose stopping month
Stop Day of Week Choose stopping day
Stop Day of Week
Last in Month
Choose stopping week
Stop Hour of Day Choose stopping the function
hour
Page 51
MBIT Technologies
*
www.mbit.com.au 51
Steps:
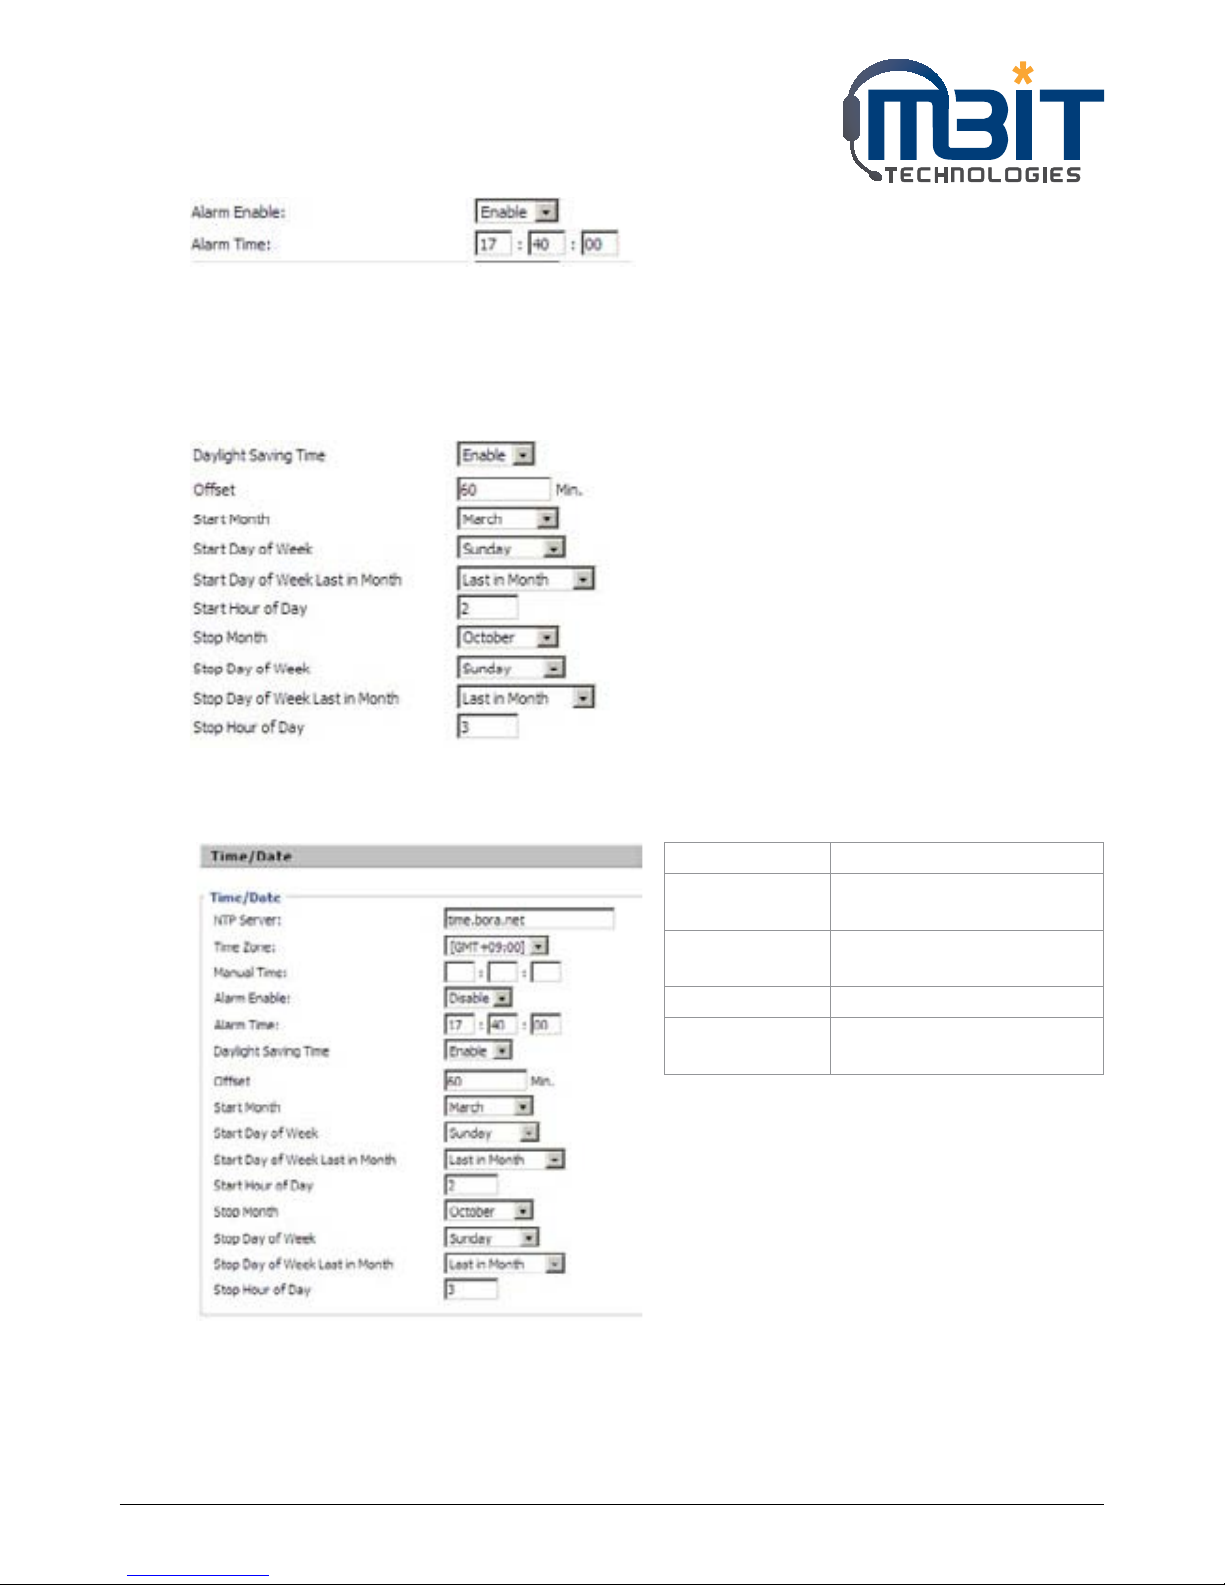
Alarm:
Step 1: Enable alarm
Step 2: Set alarm time, like Picture 1.
Step 3.: Press Save Settings button to save
changes and then press Reboot button to
active changes.
Daylight Saving Time:
Step 1: Enable Daylight Saving Time.
Step 2: Set value of offset, like Picture 2
Step 3: Set staring Month/Week/Day/Hour in
Start Month/Start Day of Week Last in
Month/Start Day of Week/Start Hour
of Day, analogously set stopping Month/
Week/Day/Hour in Stop Month/Stop
Day of Week Last in Month/Stop Day of
Week/Stop Hour of Day.
Step 4: Press Saving Settings button to save and
press Reboot button to active changes.
7.8.1.2 Password Reset
Change the password of admin mode:
Steps:
Step 1: Choose the admin from the drop-down
list.
Step 2: Input original password, default setting is
null.
Step 3: Input a new password twice time in New
Password and Confirm Password.
Field Name Description
User Type Choose the user type from
admin and user.
Original
Password
Input original password
New Password Input the new password
Password
Confirm
Input the new password
again
Picture 1
Picture 2
Page 52
MBIT Technologies
*
www.mbit.com.au 52
Change the password of user mode:
Step 1: Choose the user from the drop-down list.
Step 2: Input original password, default setting is
null.
Note: In admin mode, you can change the user
password directly without the password
of user mode.
Step 3: Input a new password twice time in New
Password and Confirm Password.
7.8.1.3 Web Access
7.8.1.4 System Log Setting
Field Name Description
WAN Interface
Login
If or not enable user login
WEB via Internet port.
If enable, user can access Web
to administration.
Web Login Port Set the port which used to
login WEB via Internet port
and PC port, Default is 8080,
that is why URL should have
8080.
Web Idle Timeout Set the web idle timeout time.
The web page can be logged
out after Web Idle Timeout
without any operation.
Field Name Description
SysLog Server Set the SysLog Server IP
address or domain name for
bb100.
Log Level Choose log level from None/
Error/Warn/INFO/Debug.
The priority changes from
left to right, left is the lowest,
right is the highest; the higher
priority, the more information
in syslog.
Picture 1
Page 53
MBIT Technologies
*
www.mbit.com.au 53
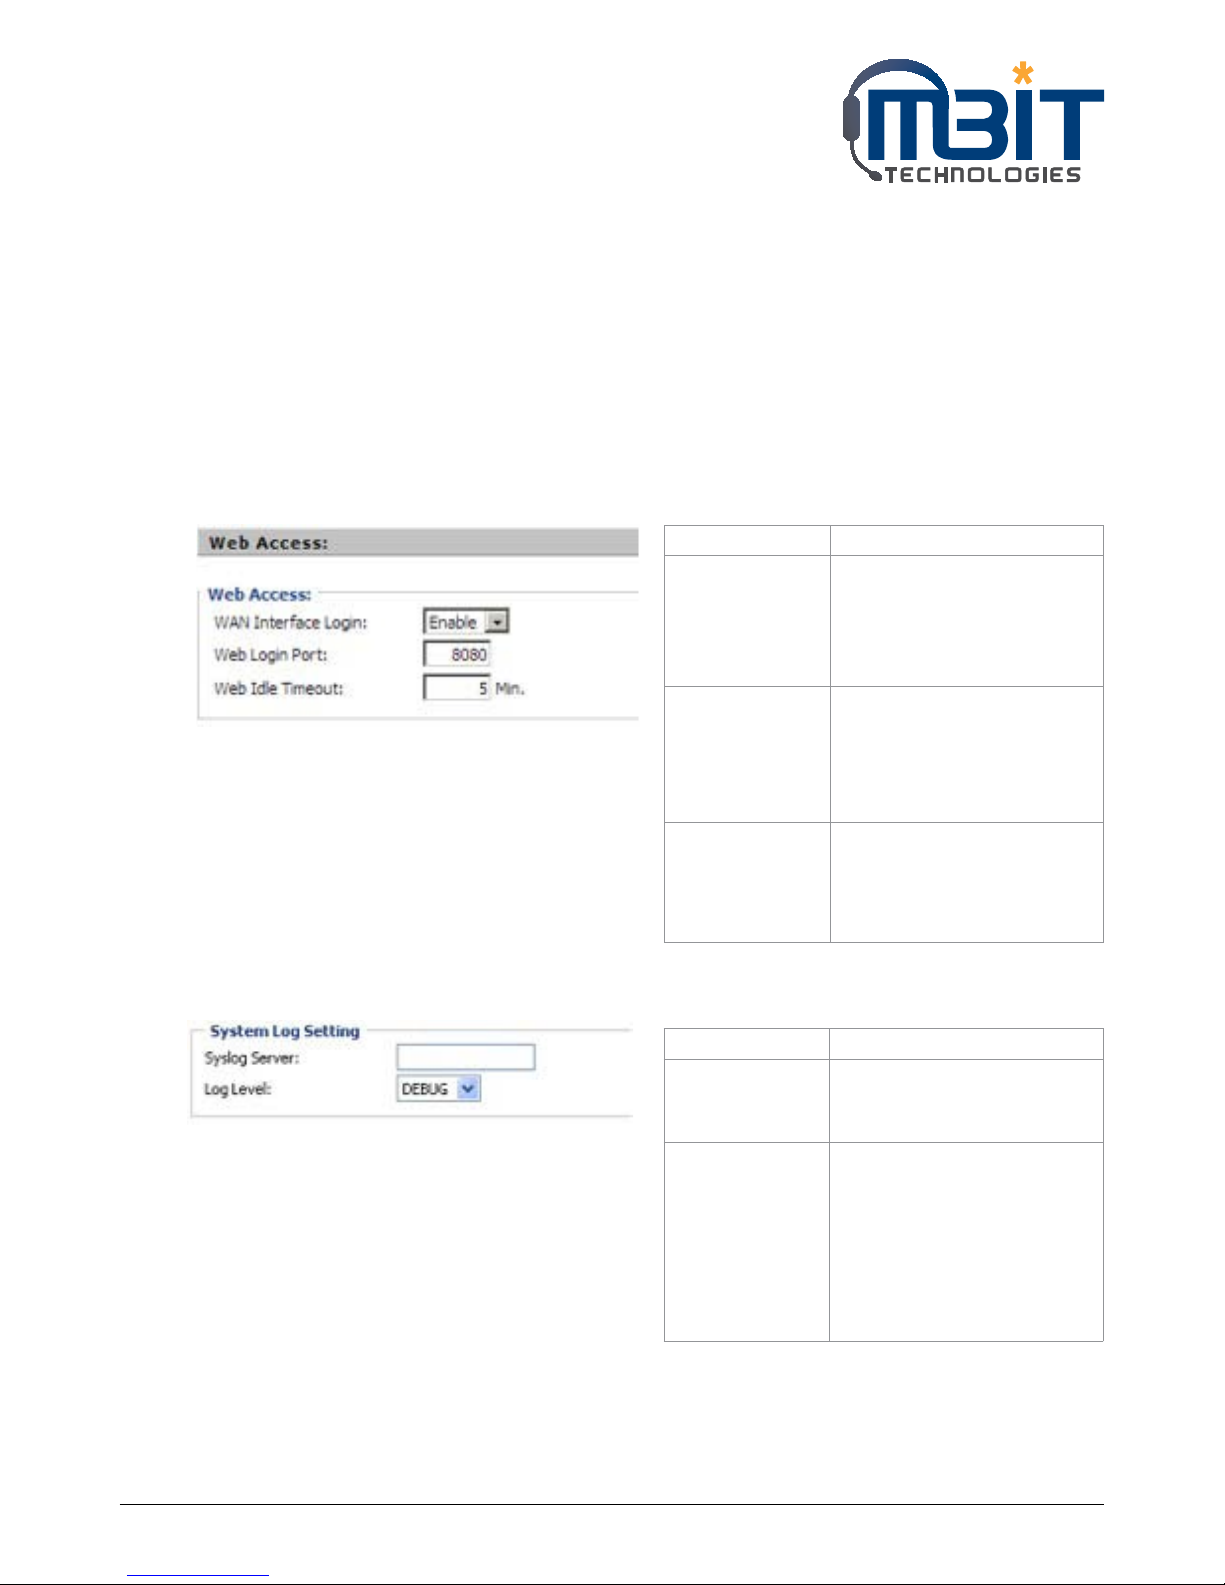
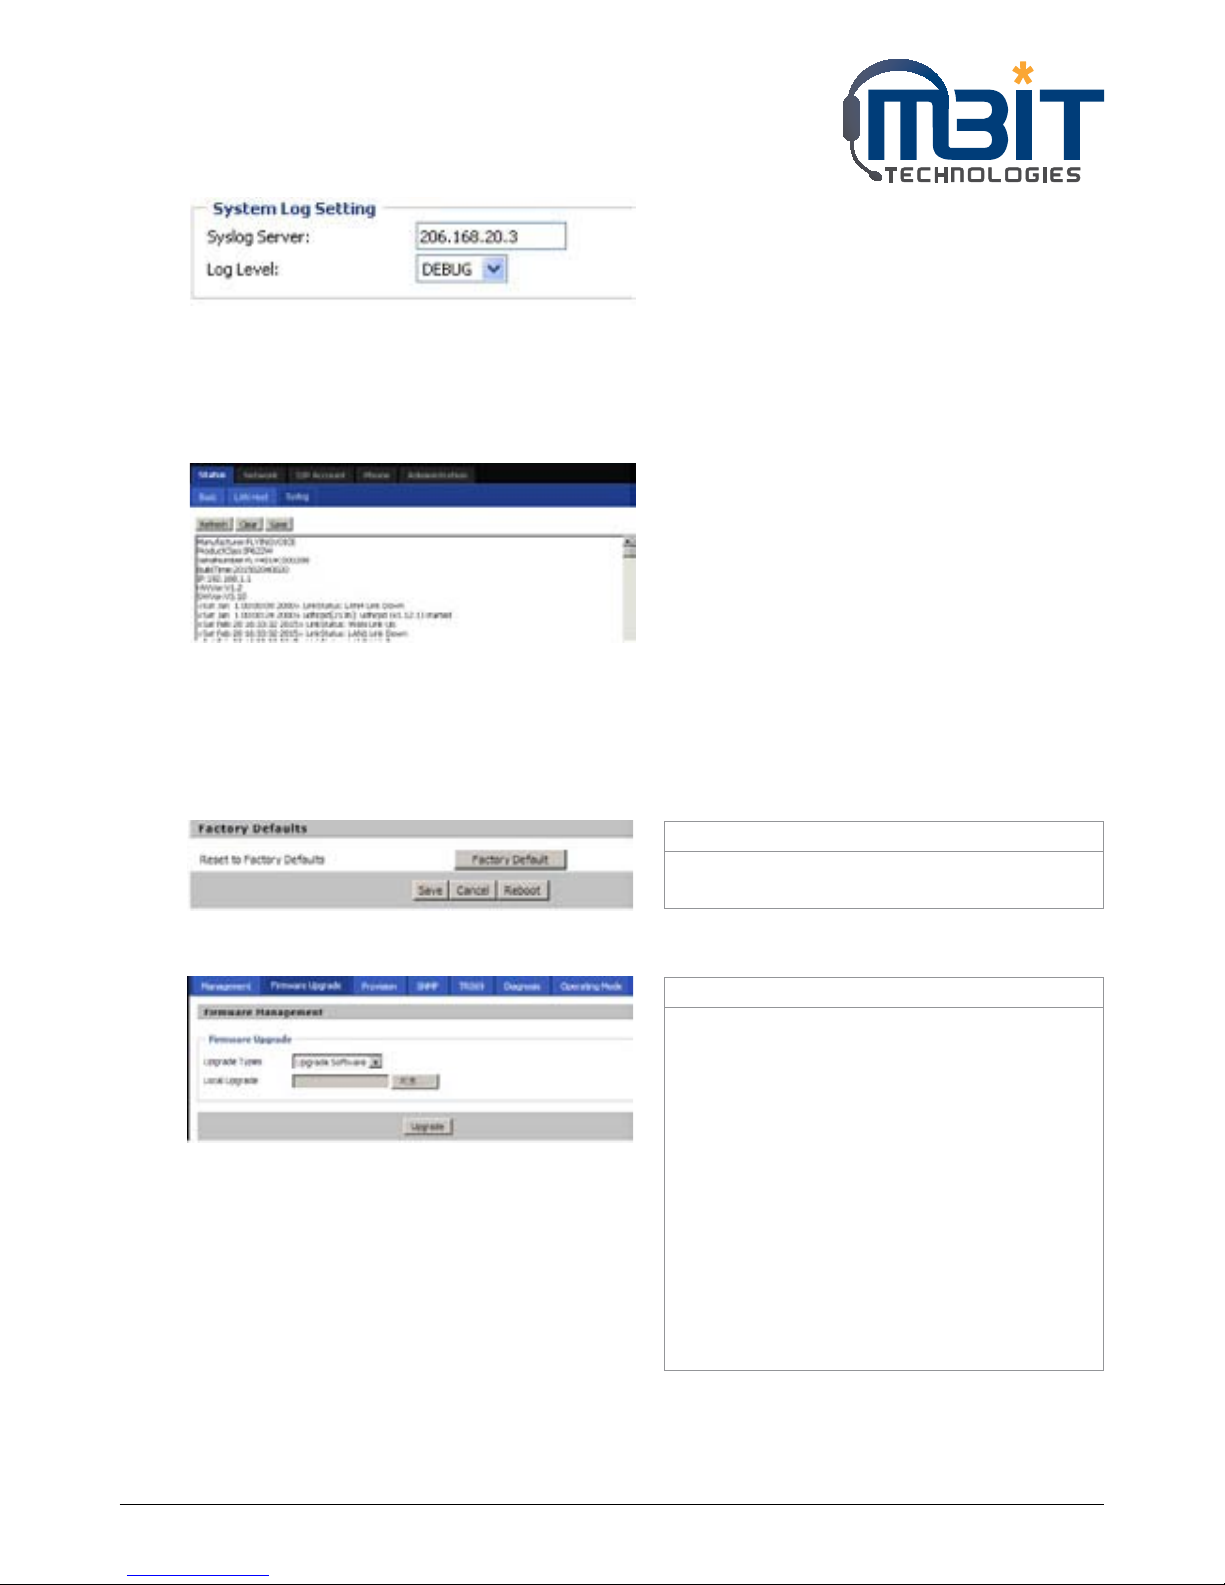
bb100 support local and remote Syslog.
In local:
Step 1. Set syslog server null and choose one
kind of Log Level, like Picture 1.
Step 2. Press Saving Settings button to save and
press Reboot button to active changes.
Step 3. User can view syslog in Status/Syslog
webpage.
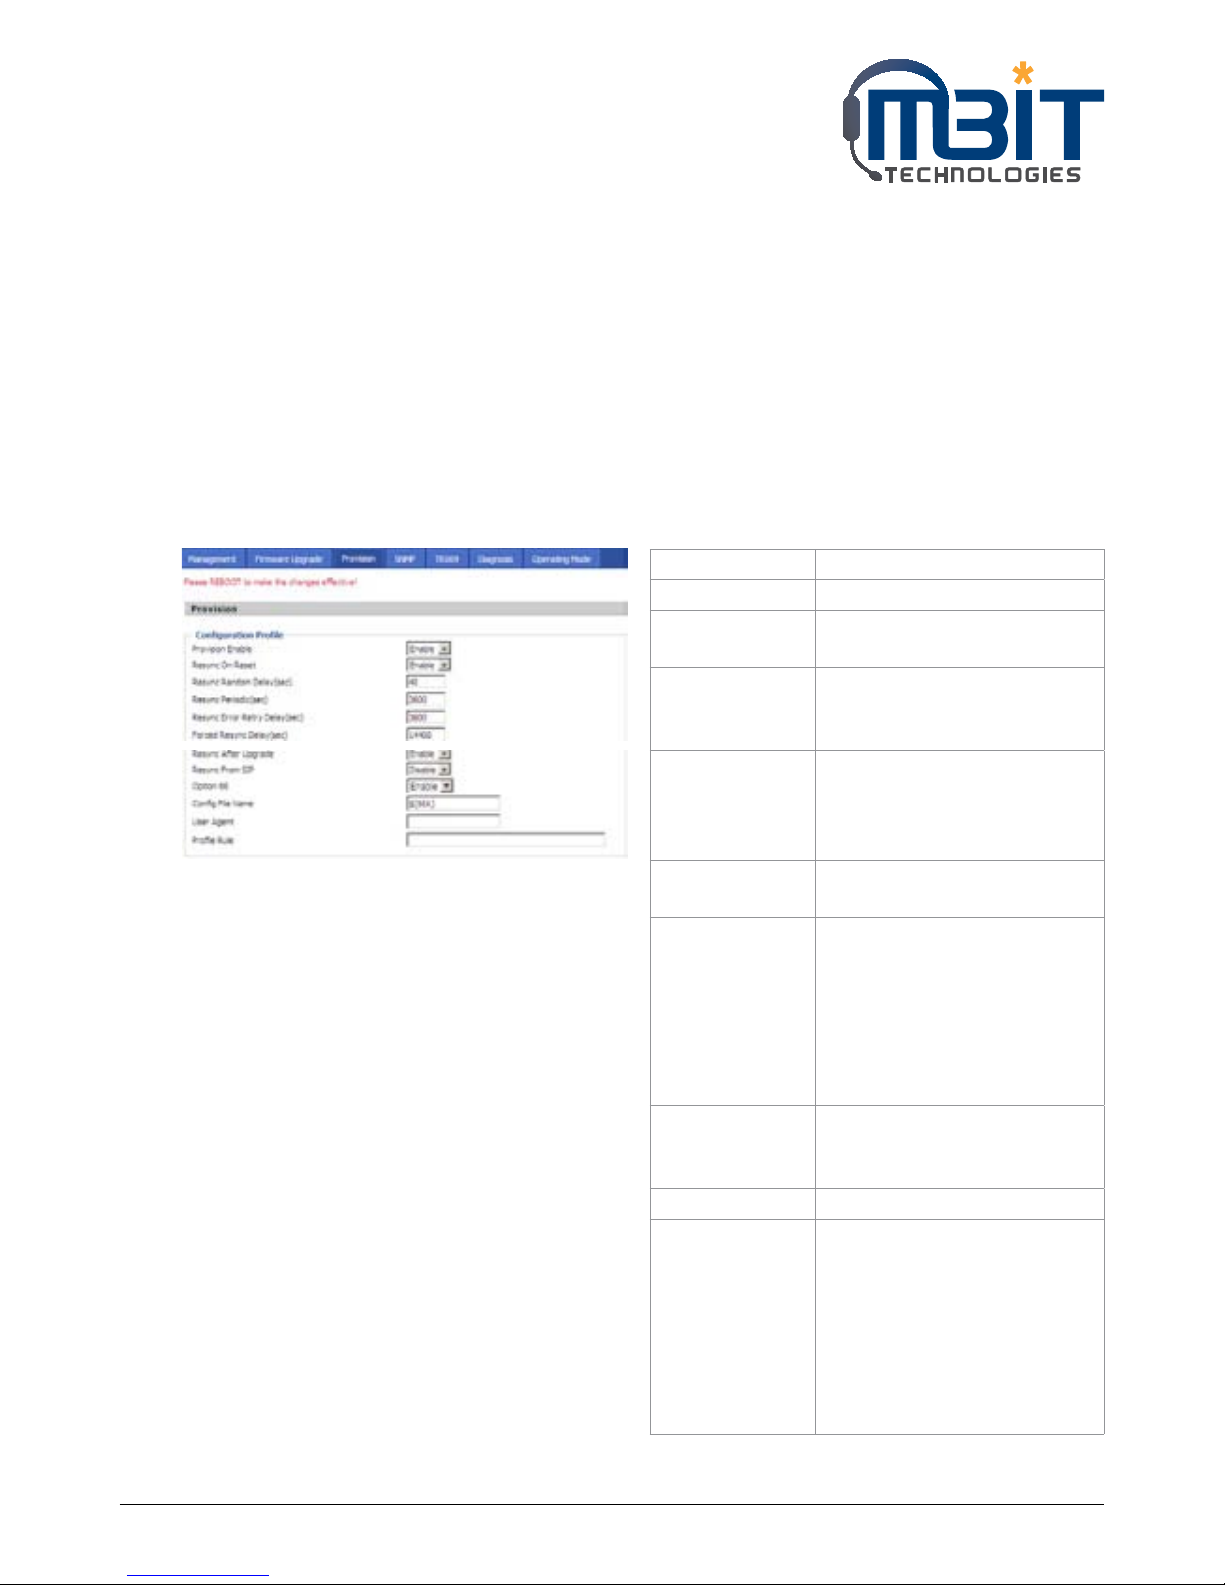
In remote:
Step 1. Fill in syslog server IP address or domain
name
Step 2. Choose one kind of Log Level, like Picture
2.
Step 3. Press Saving Settings button to save and
press Reboot button to active changes.
Step 4. User can view syslog in syslog server, and
you can also view the syslog in Status/
Syslog webpage.
7.8.1.5 Factory Defaults
7.8.2 Firmware Upgrade
Description
Press Factory Default button to set bb100
default.
Description
Steps:
Step 1: Choose a upgrade file type from Upgrade
Software, Upgrade Ring Voice, Upgrade
Dial Plan and Upgrade Config File
Step 2: Press Browser to browser the upgrade
file.
Step 3: Press Update to start upgrading, LCD will
display the notice when upgrading.
Step 4: Login web and then check the firmware
whether well upgraded by viewing
the firmware version in Status/Basic
webpage.
Picture 2
Picture 3
Page 54
MBIT Technologies
*
www.mbit.com.au 54
7.8.3 Provision
1) Provisioning allow bb100 auto-upgrading or auto-configuring
2) bb100 supports 3 ways to provision: TFTP, HTTP and HTTPS.
• Before testing or using TFTP, user should have tftp server and upgrading le and conguring le.
• Before testing or using HTTP, user should have http server and upgrading le and conguring le.
• Before testing or using HTTPS, user should have https server and upgrading le and conguring le
and CA Certificate file(should same as https server’s) and Client Certificate file and Private key file
3) User can uploading CA Certificate file and Client Certificate file and Private Key file in Equipment
Manage/Cert Manage page.
4) Details please refer to document Provision_User Manual_en_v1.1.doc
Field Name Description
Provision Enable If or not enable provision.
Resync on Reset If or not enable resync after
restart
Resync Random
Delay(sec)
Set the maximum delay for
request the synchronization
file, default is 40.
Resync
Periodic(sec)
If the last resync was failure,
bb100 will retry resync after the
“Resync Error Retry Delay ” time,
default is 3600s.
Resync Error
Retry Delay(rec)
Set the periodic time for resync,
default is 3600s.
Forced Resync
Delay(sec)
If it’s time to resync, but bb100
is busy now, in this case, bb100
will wait for a period time,
the longest is “Forced Resync
Delay”, default is 14400s, when
the time over, bb100 will forced
to resync.
Resync After
Upgrade
If or not enable firmware
upgrade after resync, by default
it is enabled.
Resync From SIP If or not enable resync from SIP.
Option 66 It is used for In-house provision
mode only. When use TFTP
with option 66 to realize
provisioning, user must
input right configuration file
name in IP542N’s webpage.
When disable Option 66, this
parameter has no effect.
Page 55
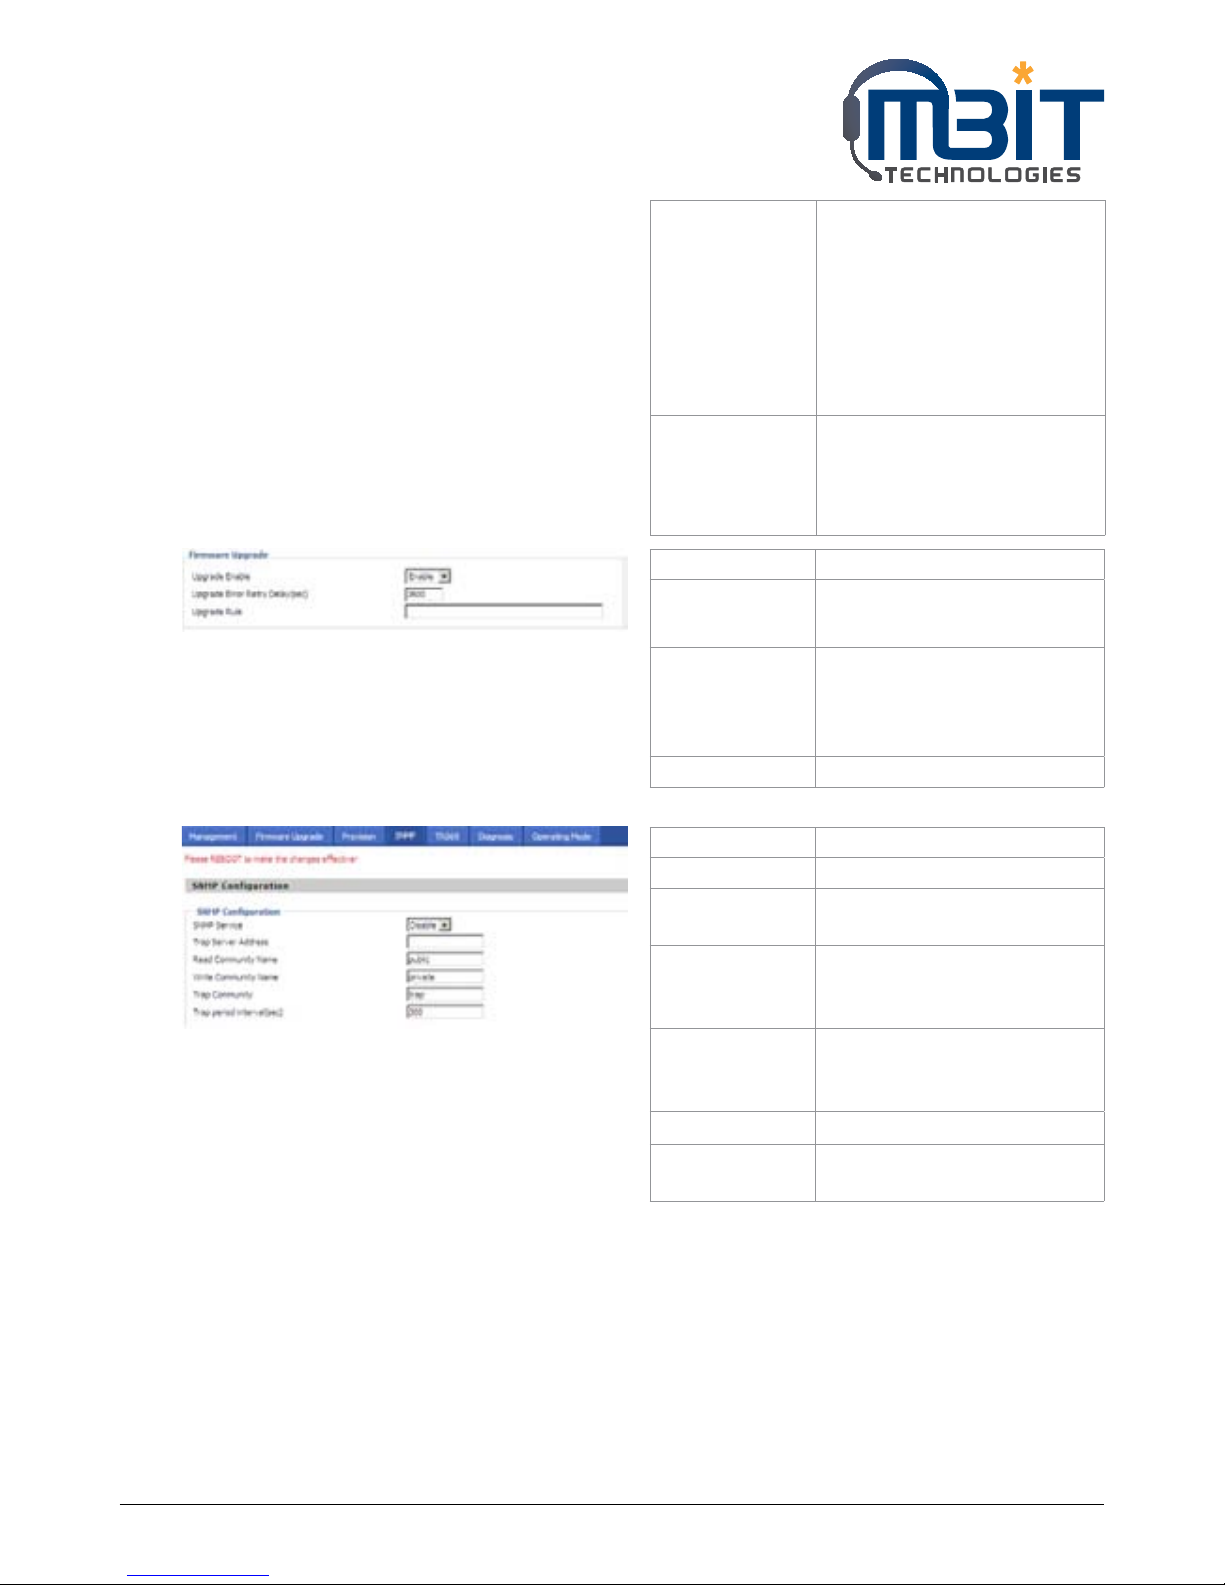
MBIT Technologies
*
www.mbit.com.au 55
7.8.4 SNMP
Config File Name It is used for In-house provision
mode only. When use TFTP
with option 66 to realize
provisioning, user must input
right configuration file name
in the webpage. When disable
Option 66, this parameter has
no effect.
Profile Rule URL of profile provision file
Note: that the specified file
path is relative to the TFTP
server’s virtual root directory.
Field Name Description
Upgrade Enable If or not enable firmware
upgrade via provision.
Upgrade Error
Retry Delay(sec)
If the last upgrade fails, bb100
will try upgrading again after
“Upgrade Error Retry Delay”
period, default is 3600s.
Upgrade Rule URL of upgrade file
Field Name Description
SNMP Service If or not enable SNMP.
Trap Server
Address
Enter the trap server address.
Read Community
Name
String, as an express password
between management
progress and agent progress.
Write
Community
Name
String, as an express password
between management
progress and agent progress.
Trap Community The community field in trap.
Trap period
interval(sec)
The interval of sending trap.
Page 56
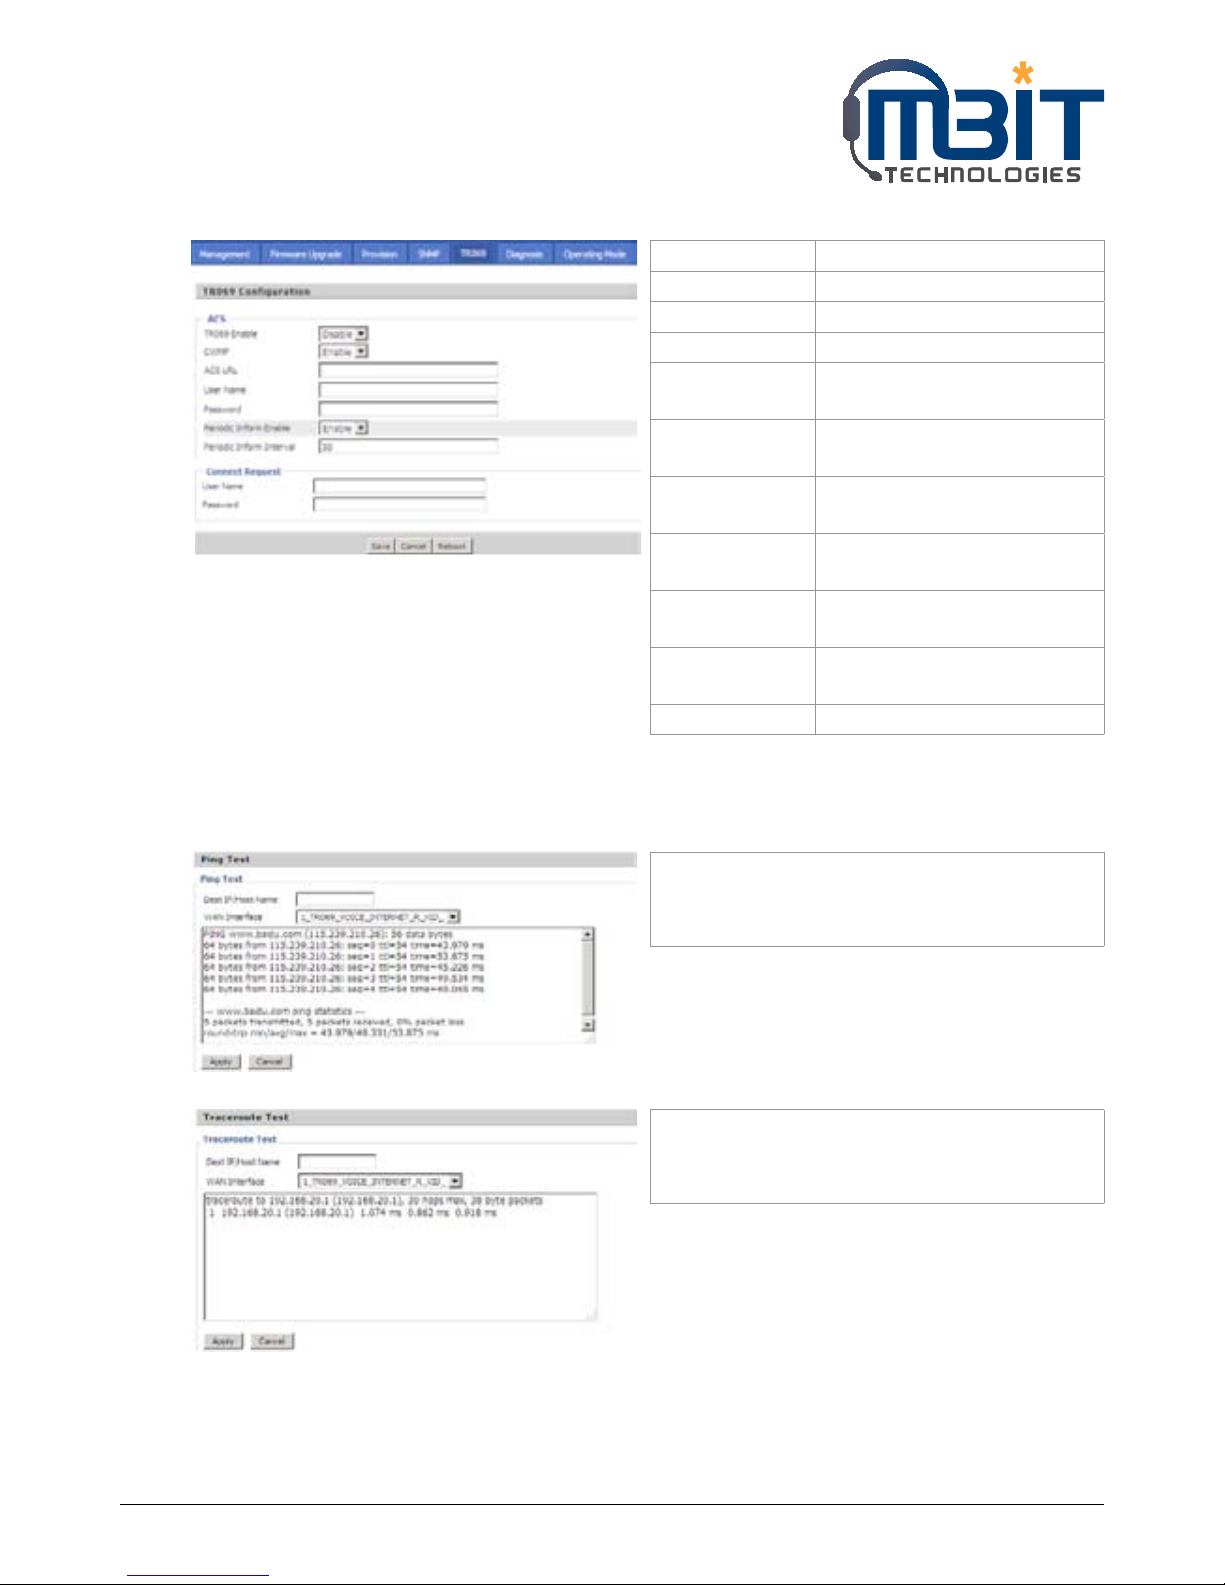
MBIT Technologies
*
www.mbit.com.au 56
7.8.5 TR069
7.8.6 Diagnoisis
In this page, user can do ping test and traceroute test to diagnose the device’s connection status.
Field Name Description
TR069 Enable If or not enable TR069
CWMP If or not enable TR069
ACS URL The URL of TR069 server
User Name The bb100’s user name for
connecting to TR069 server
Password The bb100’s password for
connecting to TR069 server
Periodic Inform
Enable
If or not enable periodic
information
Periodic Inform
Interval
The interval to send
information to TR069 server
User Name The TR069 server’s user name
for connecting to bb100
Password The TR069 server’s password for
connecting to bb100
SSL Key Fill in SSL key.
1. Ping Test
Enter the destination IP or host name, and then
click Apply, device will perform ping test.
2. Traceroute Test
Enter the destination IP or host name, and then
click Apply, device will perform traceroute test.
Page 57

MBIT Technologies
*
www.mbit.com.au 57
7.8.7 Operation Mode
Choose the Operation Mode as Basic Mode or
Advance Mode.
Page 58

MBIT Technologies
*
www.mbit.com.au 58
8 TROUBLE SHOOTING
This section provides solutions to problems that can occur during the installation and operation of the IP
phone. Read the following descriptions if you are having problems.
8.1 No Operation after Power On
Solution:
Check if the power adapter is properly connected.
If applicable, check if the PoE (Power over Ethernet) switch behind the IP phone is set correctly.
8.2 Long Time Stop at “Initialising Network”
Solution:
Check if the Ethernet cable is properly connected.
Check if the DHCP server is working normally.
Check if the connection between the DHCP Server and bb100 is properly connected.
8.3 No Dial Tone
Solution:
Check if the handset cord is properly connected.
8.4 Can not Make a Call
Solution:
Check the status of your SIP registration status or contact your administrator, supplier, or ITSP for more
information or assistance.
8.5 Can not Receive Any Phone Call
Solution:
Check the status of your SIP registration status, or contact your administrator, supplier, or ITSP for more
information or assistance.
8.6 No Voice During an Active Call
Solution:
Check if the servers support the current audio codec type, or contact your administrator, supplier, or ITSP
for more information or assistance.
Page 59

MBIT Technologies
*
www.mbit.com.au 59
8.7 Can not Connect to the Configuration Website
Solution:
Check if the Ethernet cable is properly connected.
Check if the URL is right wrote, the format of URL is: http:// the Internet port IP address: 8080, 8080 must
be added.
Check if your firewall/NAT settings are correct.
Check if the version of IE is IE8, or use other browser such as Firefox or Mozilla, or contact your
administrator, supplier, or ITSP for more information or assistance.
8.8 Forget the Password
Default password of website and menu is null.
If user changed the password and then forgot, you can not access to the configuration website or the
menu items which need password.
Solution:
Factory default: press button and choose 16Factory Default, then a notice will appear, choose
OK by using the corresponding softkey button.
If you choose factory default, you will return the phone to the original factory settings and will erase ALL
current settings, including the directory and call logs.
 Loading...