

Page 1

SM{RT ST{RT GUIDE
zoo}-zoo}
2012 m{ZD{5
Optional equipment shown.
283163_12a_Mazda5_SSG_110410.indd 1 11/4/10 11:50 AM
Page 2

Key
Information Display
KEYLESS ENTRY SYSTEM
This system remotely locks and unlocks the doors and the lif tgate.
Release Button
• Push to extend key.
• Push and fold to
retract key.
Lock
• Push once to lock all
doors and liftgate.
• Push twice (within
ve seconds) for horn
sound verication that
all doors are locked.
INFO
Push INFO button on steering wheel to display the following (actual
displayed information will vary on your vehicle):
INFO Button
Unlock
• Push once to
unlock driver’s door.
• Push twice (within ve
seconds) to unlock all
doors and liftgate.
Panic Alarm
• Push for one second or
more to activate alarm.
• Push Lock, Unlock,
or Panic Alarm to
turn alarm off.
Current fuel economy
Retractable Key
LIFTGATE
Average fuel economyDistance-to-empty Average vehicle speed
Grasp the lower end of the liftgate and push
the electric liftgate opener button on the liftgate,
when the latch releases, raise the liftgate.
While the ignition is switched ON, the liftgate
can be opened only when the vehicle is
stopped with the parking brake applied
(manual transaxle), or with the selector lever in
the P position (automatic transaxle).
NOTE:
When the liftgate opener switch is pushed,
the liftgate will open slightly. If the liftgate is not
opened within 1.5 seconds, the liftgate latch locks
(you will hear it lock) and the liftgate cannot be
opened or closed from this slightly raised position.
To open/close the liftgate, push the liftgate opener
switch, open the liftgate within 1.5 seconds, then
close it. The door/lif tgate ajar warning light will be
1 2
on if the liftgate is not fully closed.
Electric Liftgate Opener
GENUINE MAZDA ACCESSORIES
Genuine Mazda Accessories are built to the same standards of quality as your
Mazda. That means they t right, work right, and look great. Choose from a
wide range of interior and exterior accessories to make your MA ZDA5 t your
personality and lifestyle. Af ter all, you are what you drive.
Personalize your MAZDA5 with the following Genuine Mazda Accessories:
• 3.5 mm Audio Cable
• 6-Disc
CD/MP3 Changer
• All-Weather Floor Mats
• Auto-Dimming
Rearview Mirror
with Compass
and HomeLink
• Bluetooth® Car Kit
by Motorola
• Cargo Net
®
• DVD Entertainment
System
• Expandable Cargo Tote
• Fog Lights
®
• iPod
Integration
• License Plate Frame
• Moonroof
Wind Deflector
• Portable Navigation
Devices by Garmin
• Rear Bumper Guard
®
• Remote Engine Start
• Retractable
Cargo Cover
• Roof Rack
and Attachments
• SIRIUS Satellite Radio
• Soft Cargo Liner
• Splash Guards
• Tailpipe Finisher
• Touch-Up Paint
• Wheel Locks
283163_12a_Mazda5_SSG_110410.indd 2-3 11/4/10 11:51 AM
Page 3

Seat Controls and Storage
www.MazdaUSA.com
SEAT CONTROLS
Recline Lever
Pull up to adjust seatback angle.
Height Adjustment Lever
Raise or lower seat height by
repeatedly pulling up or pushing
down on the lever.
Slide Release Lever
Pull lever up to move seat
backward or forward.
Lumbar Adjustment
Lumbar can be changed by pulling
the lumbar lever forward to adjust the
lumbar support.
FUEL DOOR RELEASE
(locate d on o or ne xt to d river’s s eat)
To open, pull the fuel door release.
Fuel requirement 87 Octane.
NOTE:
Split-Folding Third-Row Seatback
• To create a at luggage compartment space, lower the head restraints all
the way down, pull the release strap, then fold the seatbacks forward.
• To return the seatbacks to the original position, pull the release strap.
Release
Str ap
Second Row Seat Storage/Flip Out Center Console
• Pull up on the strap on either seat to lift the seat bottom and you’ll nd
convenient space to store small items and a console in the right side seat
that ips out.
• When returning the seat bottom into place, make sure it locks into position
by attempting to move it up and down.
NOTE: The second row seats are equipped with foldable head
restraints. To fold the head restraint, pull the strap on the back of the
head restraint and fold the head restraint downward. To return the
head restraint to its upright position, lift it upward.
To fold the second row seats at:
1 Slide the seat all the way back.
2 Lift up the seat bottom.
Strap
Fuel Door
To avoid scratching the paint during
refueling, secure the fuel ller cap
tether over the hook as shown.
3 4
283163_12a_Mazda5_SSG_110410.indd 4-5 11/4/10 11:51 AM
Center Console
Recline Lever
Strap
Storage
3 Fold the head restraint downward.
4 Fold down the seatback using the
recline lever.
Page 4
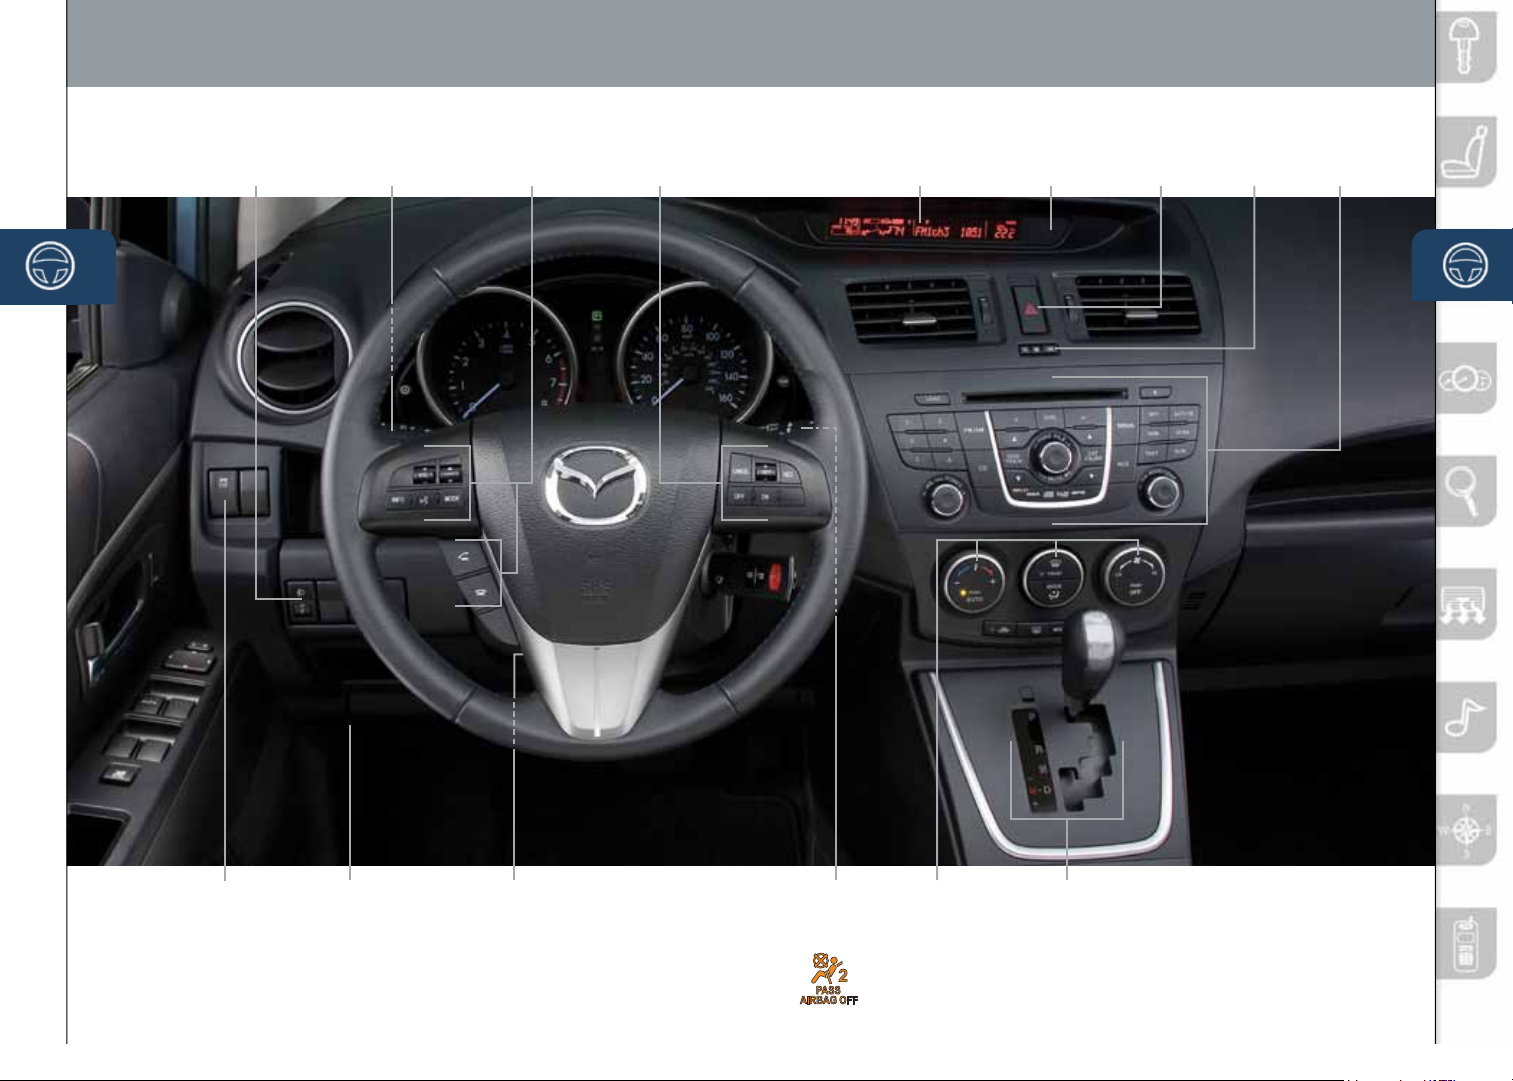
Driver’s View
www.MazdaUSA.com
HEADLIGHT
LEVELING
LIGHTING/
TURN SIGNALS
(P. 9)
BLUETOOTH®
& AUDIO
CRUISE
CONTROL
INFORMATION
DISPLAY
(PP. 2, 13-16)
PASSENGER
AIRBAG OFF
INDICATOR
HAZARD
1
WARNING
CLOCK
(P. 15)
AUDIO
SYSTEM
(PP. 15-16)
DSC/TCS
SWITCH
HOOD
RELEASE
5 6
283163_12a_Mazda5_SSG_110410.indd 6-7 11/4/10 11:52 AM
TILT/TELESCOPING
STEERING WHEEL
LEVER
WIPER/
WASHER
(P. 10)
1
CLIMATE
CONTROL
(PP. 13-14)
This indicator light illuminates to remind you that the front passenger’s front/side airbags and seat
belt pretensioner will not deploy during a collision. The reason for this is that the weight in the seat is
less than approximately 66 lbs. Always wear your seat belt and secure children in the rear seats in
appropriate child restraints. See the Owner’s Manual for important information on this safety feature.
SPORT A/T
(P. 11)
SEAT WARMER
(LOCATED ON CENTER CONSOLE)
Page 5
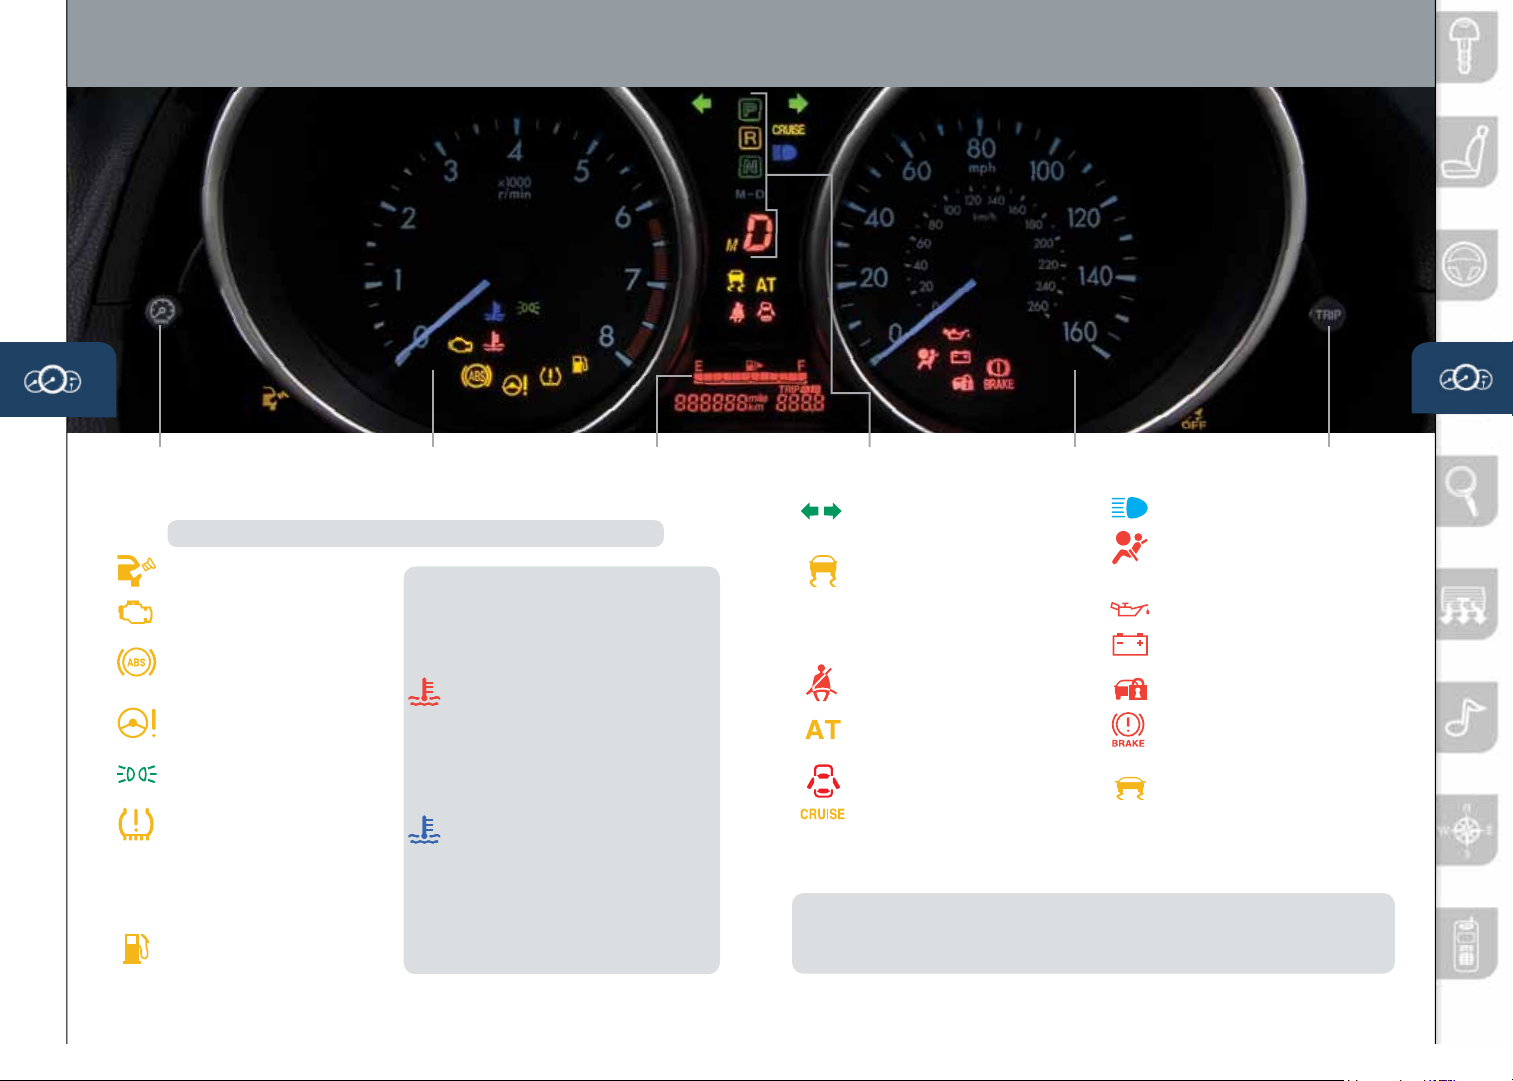
Instrument Cluster
www.MazdaUSA.com
INSTRUMENT
CLUSTER DIMMER
1
TACHOMETER
FUEL GAUGE
GLOSSARY OF WARNING AND INDICATOR LIGHTS
NOTE: See Owner’s Manual for more details and explanations
Check Fuel Cap
Check Engine Light
ABS (Ant ilock Brake
System) Malfunction
Power Steering
Malfunction
Lights On (Exterior)
Tire Pressure
Monitoring
System ( TPMS)
Warning Light
On/ Warning Beep: Low tire
pressure in one or more tires.
Low Fuel Level
7 8
1
• Rotate the knob to adjust the brightness of the instrument cluster and other dashboard illuminations.
ENGINE COOLANT TEMP LIGHTS
Since this vehicle does not u se an engin e
cool ant temperature g auge, red an d blue
engi ne coolant tempe rature lights are used to
indicate hi gh and low coolant temperatu re.
Red Coolant Temp Light
Flashing: Engine is starting to run hot.
Drive slowly to reduce engine load.
On: Engine is overheating. Safely pull over to
the side of the road and turn the engine off.
Refer to the Owner’s Manual for
more information.
Blue Coolant Temp Light
On: Engine coola nt is cold and no warm
air is available for heater/defroster.
Off: Engine coolant is warm and warm air
is available for heater/defroster.
The light may stay on for a few minutes
after start-up when the engine is cold, but
the vehicle can be dr iven with the light on
or off.
SHIFT LEVER
POSITION INDICATOR
Turn Signals/Hazard
Warning Indicator Lights
Traction Control System
(TCS)/Dynamic Stability
Control (DSC)
On: TCS/DSC malfu nction
Flashin g: TCS/ DSC operating
Seat Belt
Unbuckled/Malfunction
Automatic Transmission
Malfunction
Door/Liftgate Ajar
Cruise Main Indicator
Light On
Cruise Set Indicator
Light On (GREEN)
(AMBER)/
SPEEDOMETER
OFF
Headlight High Beams On
Airbag/Front Seat Belt
Pretensioner System
Malfunction
Low Engine Oil Pressure
Charging System
Malfunction
Security Indicator Light
Brake Warning Light
Parking br ake on /low brake
uid /malf unction
Dynamic Stability Control
(DSC)/Traction Control
System ( TCS) Off
Indicator Light
DSC OFF switch push ed and
TCS/DSC turned off.
TRIP METER
SELECTOR
NOTE: Low ambient temperature and /or high altitude causes tire pressures to drop
and may turn the TPMS warning light on. If the warning light comes on, check the tire
pressure and ll the tires as soon as possible, preferably before moving the vehicle and
warming up the tires. Tire pre ssure should be checked when the tires are cold.
2
• Push to toggle between trip meter (A & B).
• When a trip meter is selected, push and hold to reset to zero.
2
283163_12a_Mazda5_SSG_110410.indd 8-9 11/4/10 11:52 AM
Page 6
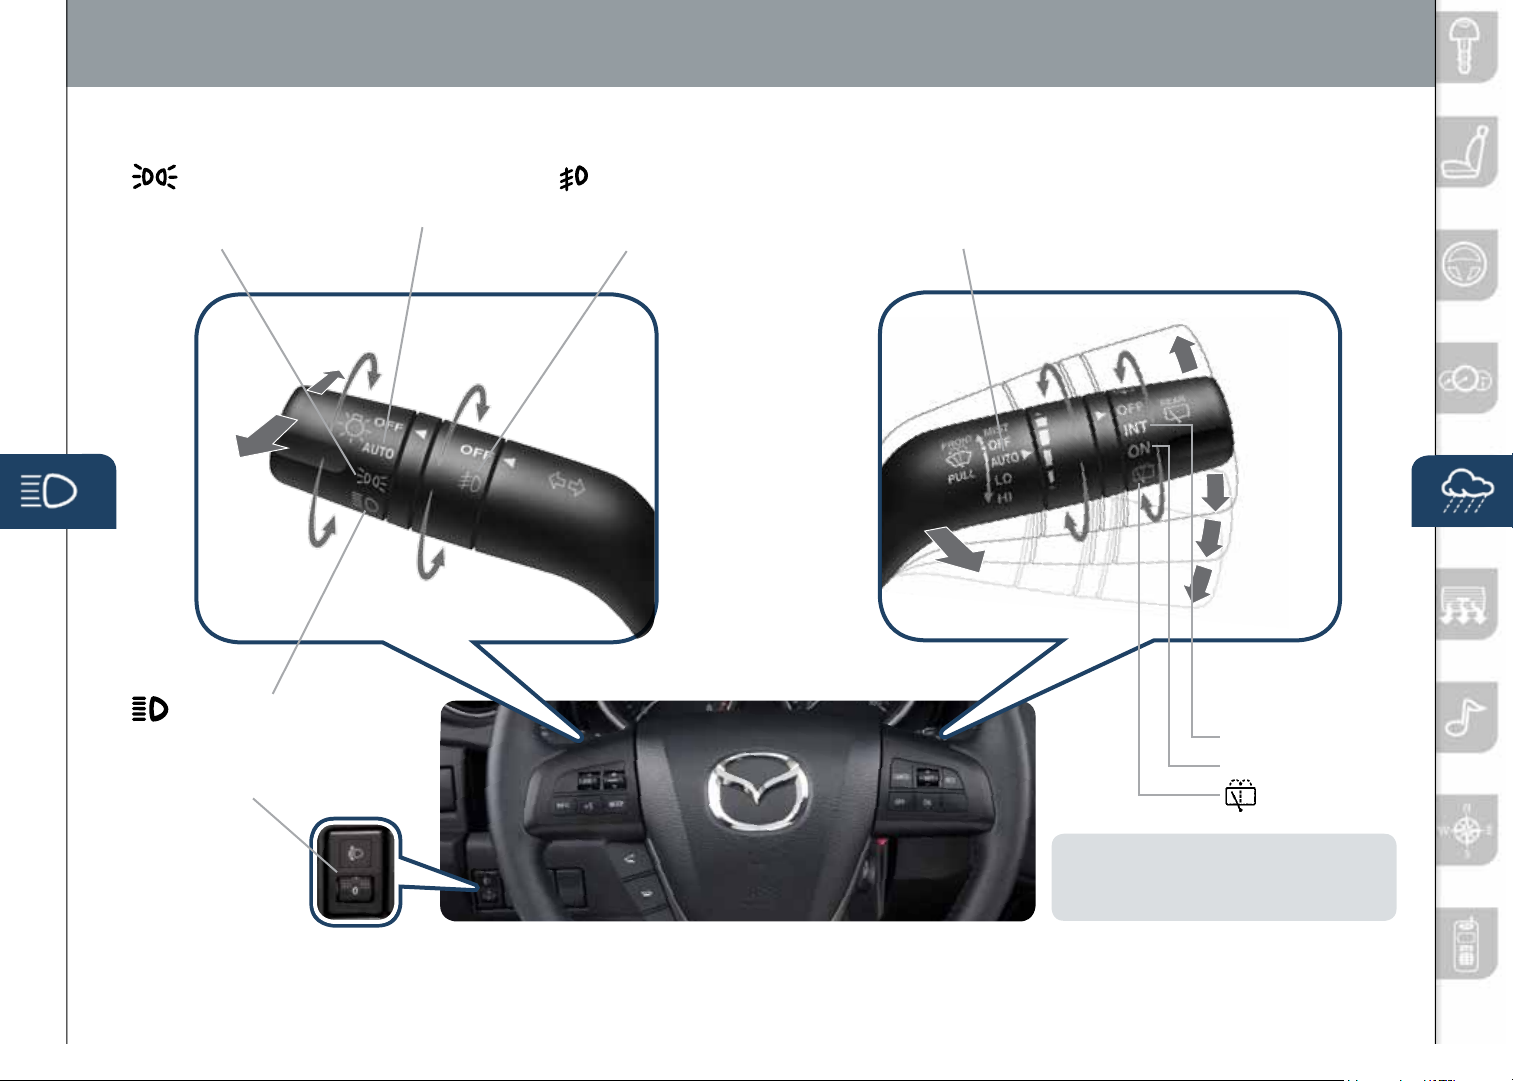
Feature Highlights
www.MazdaUSA.com
LIGHTING CONTROL/TURN SIGNAL LEVER
: Turns tail,
parking, and
dashboard
lights on.
Pull
to Flash
High Beams
AUTO: The light sensor
automatically determines
when to turn the headlights
on or off.
Push for
High Beams
: Turns fog lights
on only when
headlights
are on.
WINDSHIELD/REAR WINDOW WIPER/WASHER CONTROL LEVER
AUTO: The rain sensor senses the amount of rainfall and turns the wipers
on or off. Rotate inner ring away from you (clockwise) for less sensitivity
(requires more rain to turn wipers on) and towards you (counterclockwise)
for more sensitivity (requires less rain to turn wipers on).
Less sensitive
More sensitive
Pull lever to dispense
windshield washer uid
3
MIST
1
2
OFF
AUTO
LO
HI
Rear Window
: Turns tail, parking, dashboard,
and headlights on.
Wiper/Washer
INT: Intermittent
ON: Normal speed
HEADLIGHT LEVELING
Adjust headlight
angle with headlight
leveling switch
depending on vehicle
passengers & load
(example: Driver only
= 0, Driver + Passengers = 1 or
2, etc. ). Refer to your Owner’s
9 10
Manual for complete details.
CAUTION: When the ignition is ON turn the AUTO wipers OFF when
going through a car wash, or while cleaning or touching the windshield.
NOTE: Vehicles not equipped with AUTO wipers
will have INT wipers. Set the lever to INT and
choose an interval timing by rotating the ring
between fast and slow.
: Washer/wiper
(hold as desired)
283163_12a_Mazda5_SSG_110410.indd 10-11 11/4/10 11:52 AM
Page 7
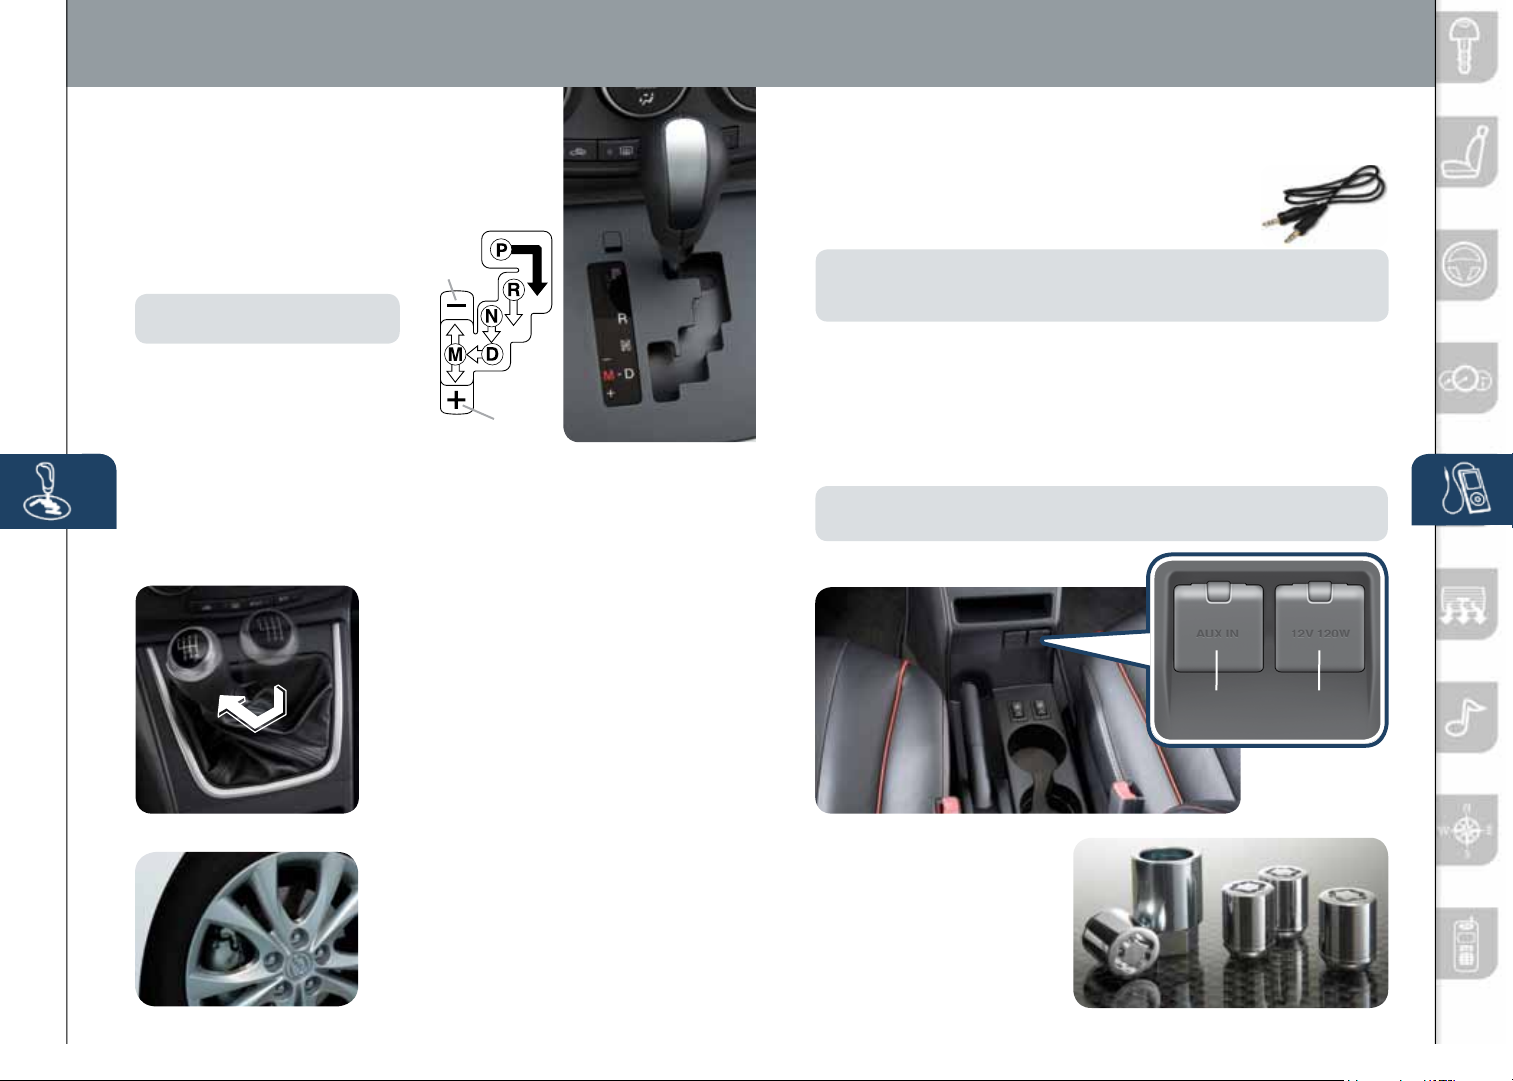
Feature Highlights
www.MazdaUSA.com
SPORT A/T MANUAL SHIFT MODE
The Sport A/T Manual Shift Mode gives you the
feel of driving a manual transmission by allowing
you to manually shift to control engine rpm and
torque when more control is desired.
To Use Manual Shift Mode:
• Shift the lever from D to M.
NOTE:
Changing to manual mode
can be done while driving the vehicle.
To Shift Up To A Higher Gear:
• Tap the shif t lever back (+) once.
To Shift Down To A Lower Gear:
• Tap the shif t lever forward (-) once.
The transmission will automatically adjust how and when it shifts gears
based on road conditions and your driving style. The transmission may stay
in a lower gear longer than usual when going up or down hills or driving
around corners. This feature gives you better control and a more connected
driving experience.
Lower
Gear
Higher
Gear
6-SPEED MANUAL TRANSMISSION
• Push the clutch pedal completely down
to start the engine and to shift gears.
• To place the transmission in Reverse,
place shifter in the neutral position, push
the shifter knob down, move to the left
and push forward.
PORTABLE AUDIO PLAYER INTEGRATION USING THE AUX JACK
Your vehicle is equipped with an AUX or auxiliary jack
that will allow you to play your portable audio player
through the vehicle’s audio system. Learn the system
when parked and do not let it distract you while driving.
Available at your Mazda dealer is the Genuine Mazda Acce ssor y 3.5 mm
NOTE:
audio cable which can be used to connect your portable audio player into the
aux jack.
1 Locate the AUX jack inside the center console.
2 Plug 3.5 mm audio cable into the por table audio player and into the
AUX jack. Turn portable audio player on.
3 Turn the vehicle audio system on.
4 Push the AUX button on the audio face OR the MODE button on the
steering wheel controls.
5 Use the portable audio player controls to play music.
IMPORTANT:
level before distortion starts, then adjust the volume on the audio system.
Set the volume level on your portable audio player to the highest
AUX ACC
ALUMINUM WHEEL CARE
Your aluminum wheels have a protective
coating on them. Only use a mild soap or
neutral detergent with a sponge or soft cloth
to clean them. Using a wire brush, polishing
11 12
283163_12a_Mazda5_SSG_110410.indd 12-13 11/4/10 11:53 AM
compound, solvent, or any type of abrasive
cleaner may damage the protective coating.
Genuine Mazda Accessory
Wheel Locks are available
at your Mazda dealer
Page 8
Manual Climate ControlAutomatic Climate Control
www.MazdaUSA.com
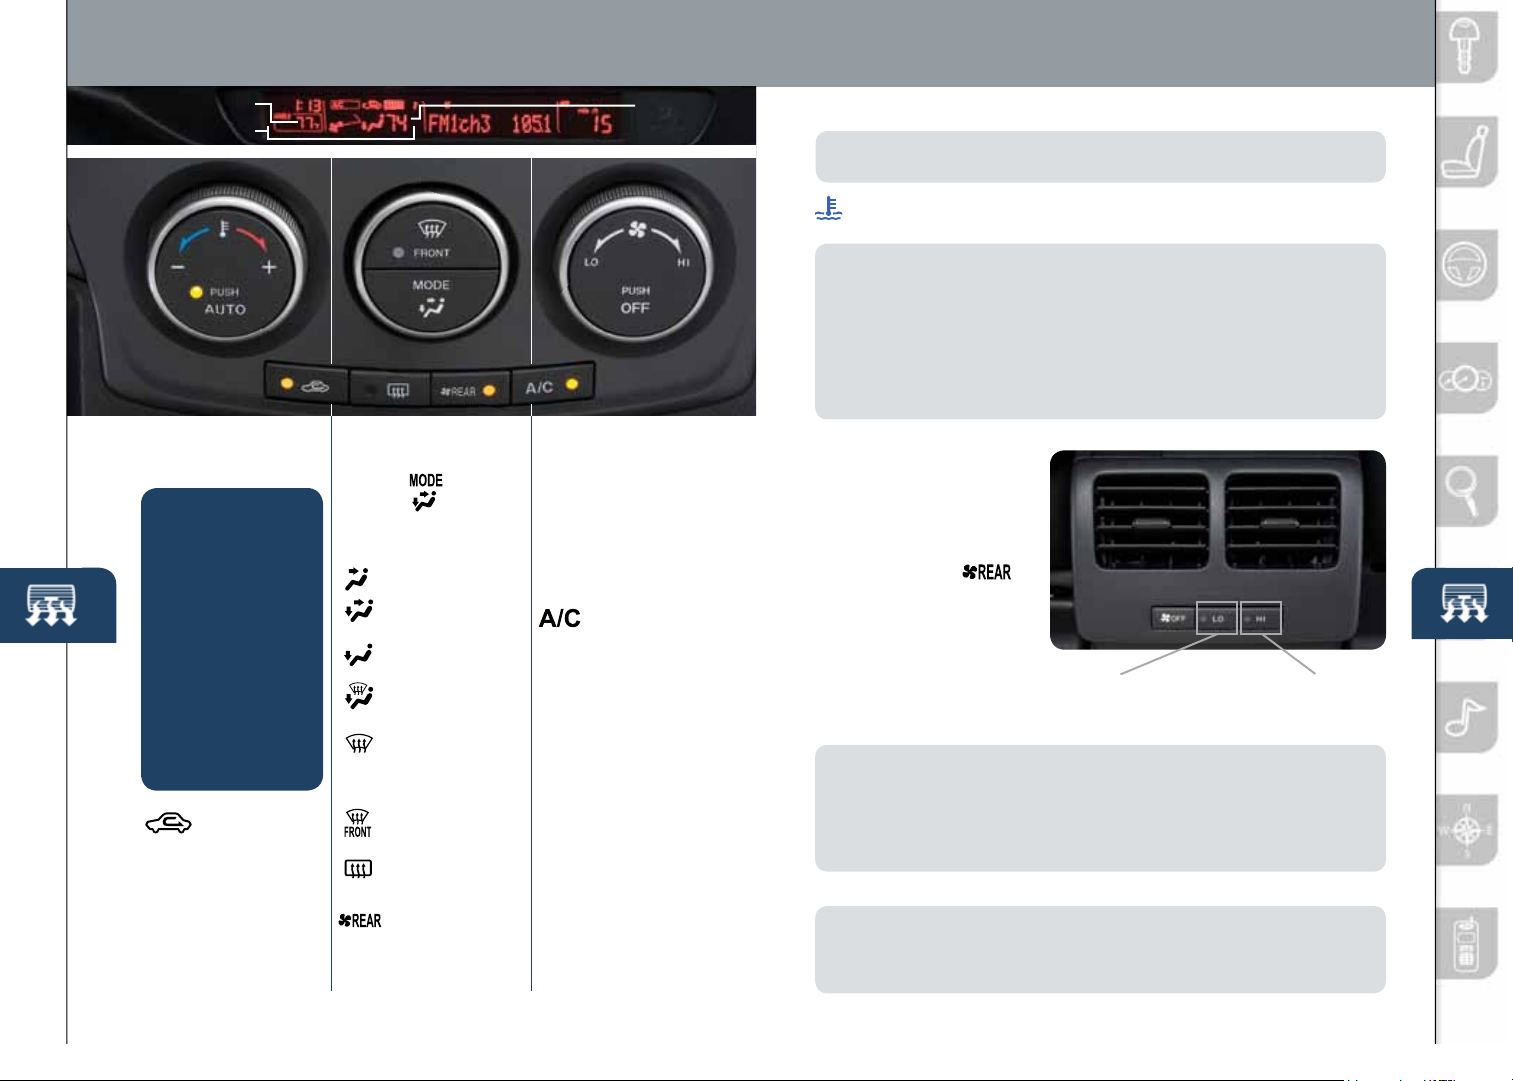
Outside Temperature
Climate Control
Interior Set
Temperature
NOTE: Automatic climate control will allow you to maintain a preset
cabin
temperature.
The heater and defroster work best when the blue coolant
temperature light in the instrument cluster is of f.
NOTE:
• Rotating the fan control dial, or pushing the MODE button, A/C switch, or
windshield defroster switch while in AUTO ON mode will cancel auto A/C.
• With any defroster mode, the syste m turns on the A/C compressor and
sele cts the FRESH AIR mode. This helps defrost the windows more
efciently by dehumidifying the air. The A/C compressor will always be on in
defroster mode, but the defroster (and oor) will deliver warm air when the
temperature dial is set to a warmer temperature and the engine warms up.
Temperature
Control Dial
AUTO ON: Push dial
to turn Automatic Air
Conditioning system
on. Rotate dial to
select your desired
set temperature
(shown in Information
Display above). The
airow mode and
the amount of airow
will be automatically
controlled in
accordance with the
set temperature.
Push to
recirculate
cabin air to
reduce outside
odors and
improve cooling
(indicator on) or
receive fresh air
13 14
(indicator off).
Mode Selector
Push to select the
following airow mode:
Dashboard vents
Dashboard and
oor vents
Floor vents
Defroster and
oor vents
Windshield
defroster
Push to defrost
the windshield.
Push to defrost
the rear window.
Push to turn
rear vent system
on or off.
Fan Control Dial
• Rotate the dial to
select the desired
fan speed.
• Push OFF to turn
climate control
system off.
Push to
manually turn
air conditioning
on or off.
REAR VENT SYSTEM
1 Turn the front air
conditioning system on
(AUTO or manually).
2 Push the rear ventilation
control switch
located on the front
climate control panel,
or push either the low
or high rear vent
button on the rear
console (indicator light
will illuminate).
Low speed cool
or cold air only
from vents.
High speed cool
or cold air only
from vents.
NOTE: Only cool or cold air (no heat) blows through the rear vents while
the front climate control is on. Heat for the rear passengers comes from
under the front seats when the front heater is on and set to oor mode. When
pushing the rear ventilation control switch on the front control panel (with climate
control system on), the rear ventilation system operates at low speed only. To
change to high speed, push the HI rear vent button.
NOTE:
The displayed outside ambient temperature may vary from the actual
ambient
temperature depending on the surrounding area and vehicle conditions.
The best time to read the ambient temperature is when the vehicle is moving at a
steady rate of speed and not when moving slow in trafc.
283163_12a_Mazda5_SSG_110410.indd 14-15 11/4/10 11:53 AM
Page 9
Audio Controls
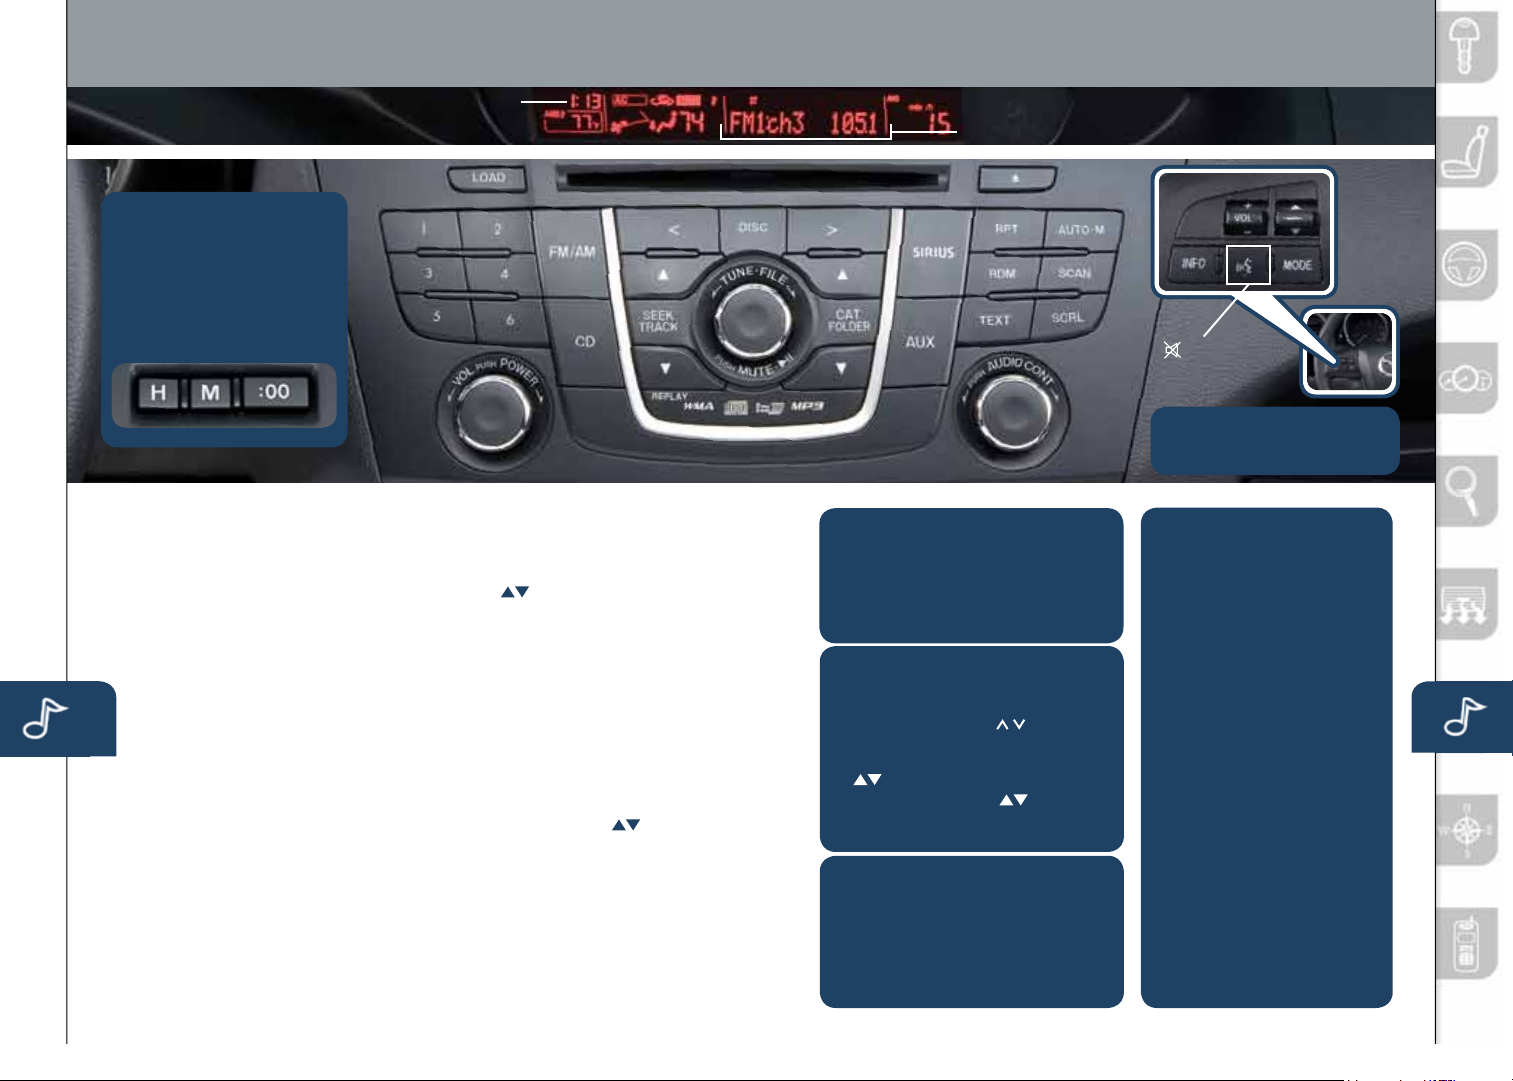
SETTING YOUR CLOCK
• Push the H button to set
the hour.
• Push the M button to set
the minutes.
NOTE:
Push the :0 0 but ton to
reset clock to nearest hour.
Clock
Audio
www.MazdaUSA.com
MUTE
(without
Bluetooth
®
)
NOTE: Push the MODE button
to change betwee n FM1, FM2,
AM, CD, SIRIUS 1, 2, 3, and AUX.
POWER ON
Push the VOL /POWER dial to turn
the audio system on.
MEDIA SELECTION
Radio: Push FM/AM button to select
the FM1, FM2, or AM band.
Satellite Radio: Push the SIRIUS
button for SIRIUS XM Radio
vehicle is equipped with SIRIUS XM
®
(satellite radio antenna on
Radio
®
. If your
roof or trunk lid), your new Mazda
includes a free introductory
subscription with a limited term trial
offer. Call 888-539-7474 to activate!
See the Owner’s Manual and/or
dealer for details. Contact your
Mazda dealer about adding SIRIUS
XM Radio
®
if your MAZDA5 is not
already equipped with it.
CD: Push the CD button to select
the CD player which plays CDs,
MP3s, and WMAs. See the Owner’s
Manual for complete details.
Auxiliary Input: Push the AUX
15 16
button to select the auxiliary jack.
283163_12a_Mazda5_SSG_110410.indd 16-17 11/4/10 11:53 AM
TUNING
Manual: Turn the TUNE dial to
manually change the frequency.
Seek: Push the SEEK/TRACK tuning
buttons
to automatically seek a
higher or lower frequency with a station.
Scan: Push the SCAN button to
automatically sample strong stations
for a few seconds each. Push again
to cancel.
Preset Channel: Push the Preset
Channel buttons (1-6) to select a
station stored in memor y. To store a
station, push and hold a button (1-6)
until a beep is heard.
Category (SIRIUS XM Radio
Push the CAT/FOLDER
®
only):
to change
to a different categor y.
Auto Memory Tuning: Push and
hold the AUTO-M but ton to store
an additional 6 stations on each FM
and AM band without disturbing the
previously stored stations. To return
to the previously stored stations, push
FM/AM button. Refer to the Owner’s
Manual for complete details.
LOADING A CD
Single CD Player
• Insert CD, label-side up.
In-Dash CD Changer
• Push the LOAD button; when “IN”
is displayed, insert CD.
PLAYING A CD
• Push CD button to play a CD
when a CD is in the unit.
• Push DISC buttons
to select a
CD (6 CD changer) during playback.
• Push SEEK/TRACK tuning buttons
to select previous or next track.
• Push CAT/FOLDER
to select
previous or next folder (for MP3s
and WMAs).
®
PLAYING BLUETOOTH
(BT) AUDIO
1 Make sure BT audio device
is paired.
2 Turn on BT audio device.
3 Push the AUX button until
“BT AUDIO” is displayed.
BLUETOOTH® AUDIO
Bluetooth® enabled phones
and audio players provide an
oppor tunity to play music through
the audio system with no wires
attached, however, there are
some limitations:
• During playback, the song title
or artist will be shown on the
vehicle’s information display.
(This may var y due to the
specication of your phone or
player (AVRCP 1.3 required).
To obtain fur ther information,
please refer to the Owner’s
Manual). This is not a problem
with the vehicle, phone, or
player. The current audio prole
does not send this information.
• Not all controls on the phone
or player will be active when
paired to the vehicle.
• Wi-Fi signal strength can affect
audio streaming.
• Sound quality of streaming audio
varies depending on the device.
Page 10
®
Bluetooth
(Refer to your Owner’s Manual for more information)
PAIRING YOUR BLUETOOTH® PHONE OR AUDIO DEVICE
NOTE:
• For safety reasons, you cannot pair a phone while driving.
• Before pairing your cell phone or audio device, it is recommended that you
refer to its manual for steps to turn on Bluetooth
• For toll-fre e Bluetooth
call 800-430 -015 3 or go to ww w.MazdaUSA.com /bluetooth for assistance.
• IMPORTANT: Set the volume level on your cell phone or audio device to the
highest level before distortion starts, then adjust the volume on the audio system.
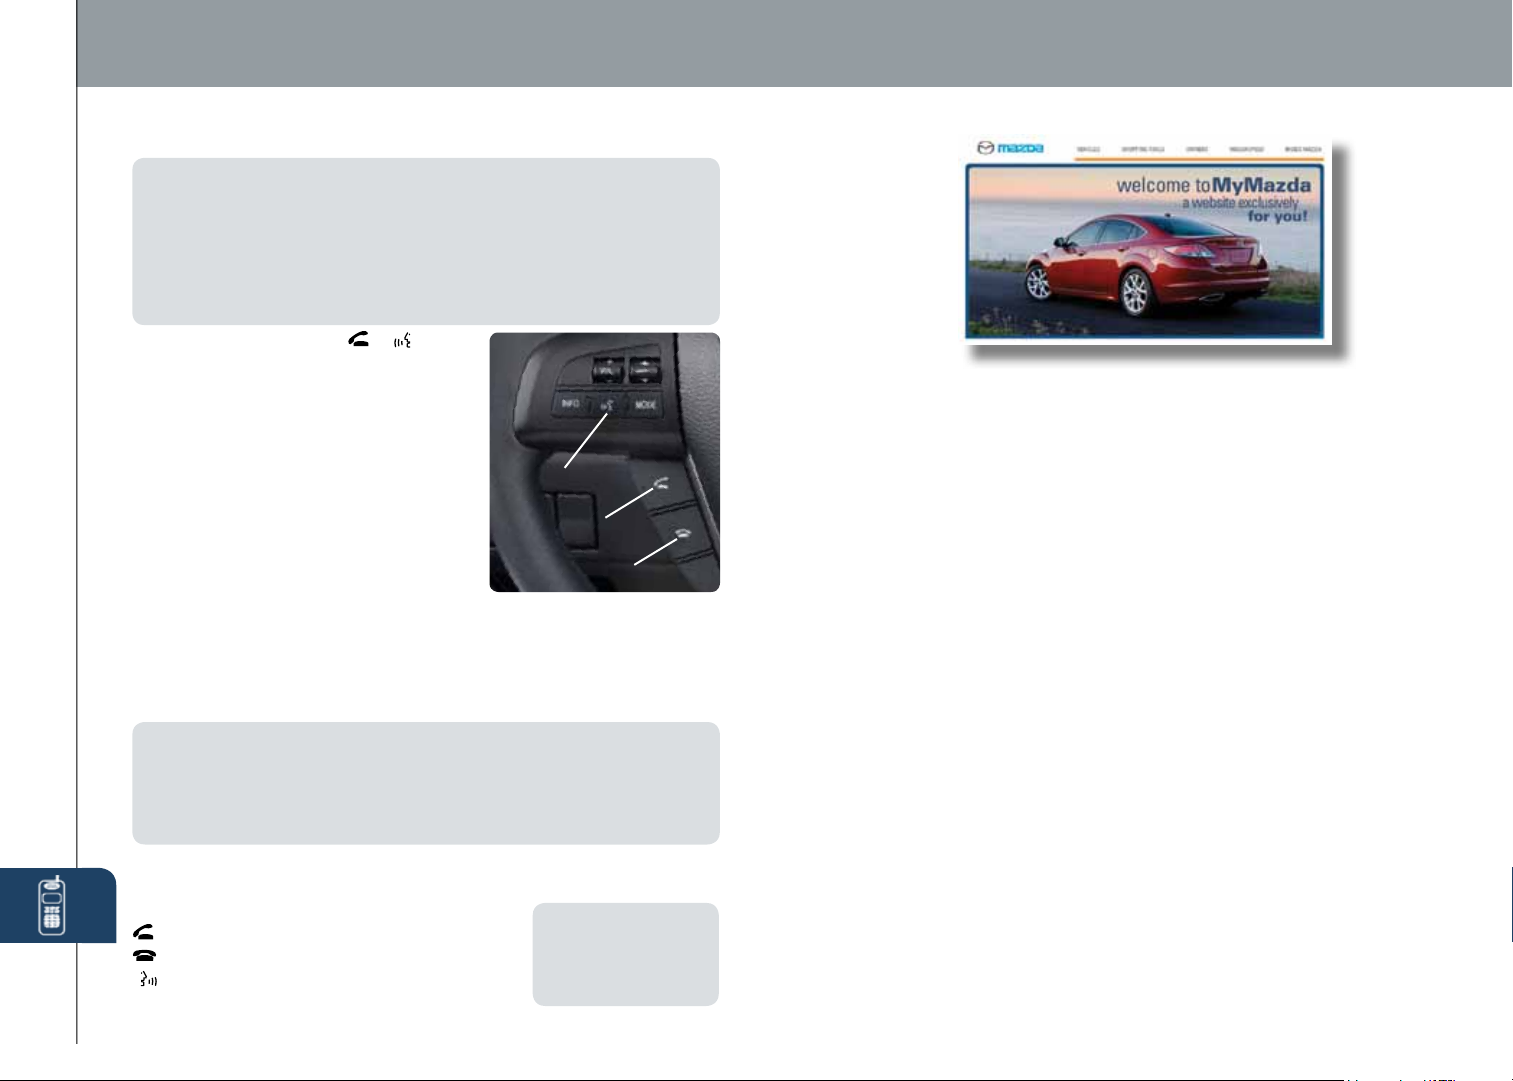
1 Push and release the or button
located on the steering wheel and wait
for a beep.
2 After the beep say, “Set-up”.
3 After the beep say, “Pairing options”.
4 After the beep say, “Pair”.
5 After the beep, say any 4-digit code.
6 Place phone or audio device in
Discovery mode; if necessary,
consult its manual, or go to
www.mazdausa.com/bluetooth
and select model, Bluetooth
then follow screen prompts.
7 Input the 4-digit code you chose earlier.
8 After the phone or audio device is recognized, you will be prompted
to name the paired device, such as “Tom’s phone or player”.
9 When paired, a symbol will be displayed in the information display - a
phone symbol for a phone
the symbol
NOTE:
If your compatible Bluetooth® phone is equipped with a music player and
supports the Bluetooth
as well as Bluetooth
unit. Please refer to your Owner’s Manual for complete details on how to “pair” up
to 7 Bluetooth
other important safety information.
is not displayed, the Bluetooth® device is not paired.
®
phones and audio devices, and how to use the built-in tutorial and
®
Hands-Free customer service and device compatibility
®
,
and a music symbol for an audio device. If
®
prole A2DP, your phone will pair for both hands-free calling
®
audio during the pairing process, and will be considered one
®
and perform pairing.
Talk
Pick-up
Hang up
TO MAKE OR RECEIVE A HANDS-FREE CALL
Basic Operation:
button: To make/receive/swap a call.
button: To end/reject a call.
17
button: To skip voice guidance (for speeding
up operation).
NOTE: On engine star t,
the last connected
device will automatically
be re-connected after
several seconds.
www.MazdaUSA.com
My Maz da.co m—The Of fic ial
Si te for M azd a Owner s
Register today on MyMazda.com—the ultimate
destination for Mazda Owners. Once registered,
you’ll be able to take advantage of benets
exclusively for Mazda Owners:
•
Insider access to exclusive events and promotions
• Personalized maintenance schedules
• Zoom-Zoom Owner Magazine
•
Warranty information and on-line Owner’s Manuals
• Wallpaper, videos and other fun stuff
• Accessories specically designed for your vehicle
• Car Care Discount Coupons available from your
Mazda Dealer
Visit and register at MyMazda.com today!
Roadside assistance is available 24 hours a
day, 365 days a year. Using the toll free phone
number or iPhone® app (which uses GPS-enabled
technology to determine your exact location), will
put you in touch with a roadside assistance agent.
Phone: 1-800-866-1998
The app can be downloaded, free of charge, by
logging onto http://mazda.crosscountry-auto.com/
or directly from App store on your iPhone or your
PC using iTunes. After downloading app, customer
name, email, iPhone number and VIN are required.
283163_12a_Mazda5_SSG_110410.indd 18-19 11/4/10 11:54 AM
Page 11
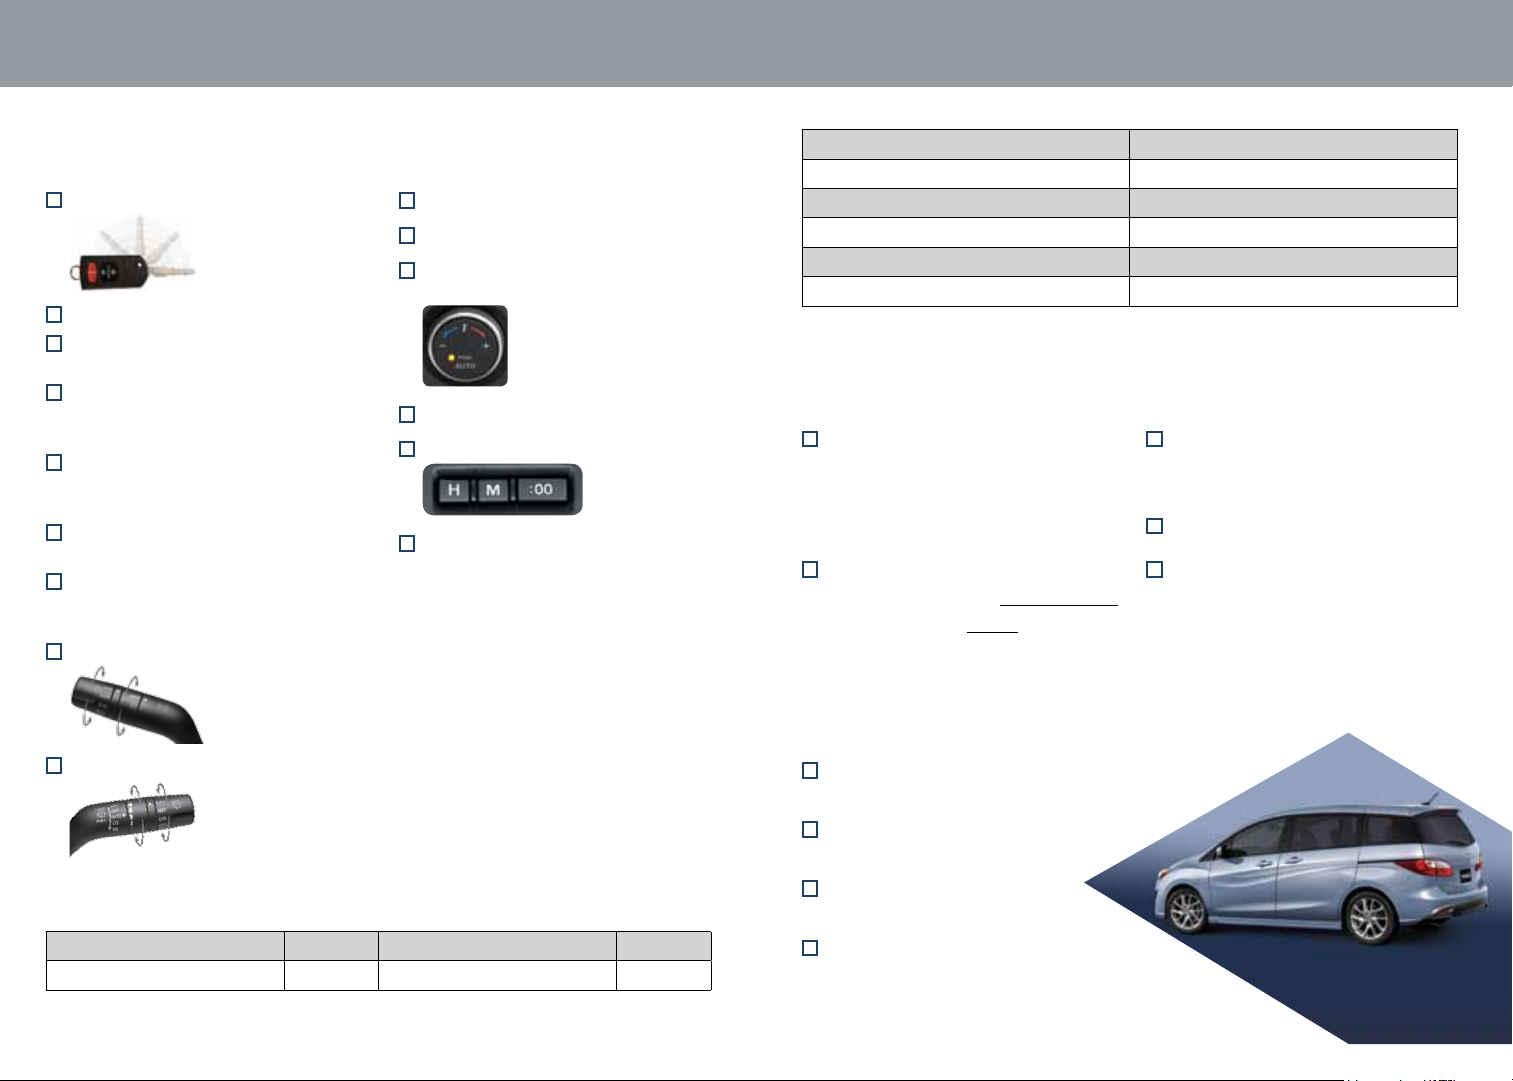
Customer Delivery Checklist
Customer Delivery Checklist
VEHICLE PRESENTATION:
Refer to the Smart Star t Guide during presentation
Keyless Entr y .................................
Liftgate ............................................
Seats ...............................................
• Adjustment
Fuel Door ........................................
• Fuel Door Release
• Fuel Specications
Rear Seats ......................................
• 2nd and 3rd row seating access
• 2nd row seat storage/center console
Driver’s View ...............................
• Location of Switches and Controls
Instrument Cluster ........................
• Review indicator light function
and location
Lights ..............................................
Wiper/Washer ...............................
1
2
3
3
4
5-6
7-8
9
10
Aluminum Wheel Care .................... 11
AUX Input .........................................
Climate Control ..........................
• Auto Mode
Audio Controls .........................
Set Clock ......................................
Bluetooth
• Pair Phone • Toll-Free
• Make a Call Customer Service
800-430-0153
SCHEDULED MAINTENANCE
When replacing or topping off engine
oil, use Mazda Genuine oil. For optimal
engine performance, use SAE 0W-20
engine oil. Please consult an Authorized
Mazda Dealer for additional information.
13-14
15-16
®
Hands-Free ................. 17
DEALERSHIP DATE
SALES CONSULTANT CUSTOMER’S NAME
12
VIN E-MAIL
PRESENTATION OF OWNER’S MATERIALS:
Review the following items with the customer
Smart Star t Guide
15
• Remove this checklist from
Smar t Start Guide
• Personalization Features
(refer to your Owner’s Manual)
Warranty Information
Warrant y Start Date:
Customer Initial:
• Basic Vehicle –
36 months/36,000 miles
• Roadside assistance program
MyMazda.com
• Offer to register customer on
MyMazda.com
Owner’s Manual
Floor Mats
• Ensure oor mats are properly
hooked after cleaning
• Do not install two oor mats, one on
top of the other, on the driver side
SERVICE DEPARTMENT
Introduce Service Manager;
provide business cards
Review Ser vice and Parts Department
*if equipped
All items in the Customer Delivery Checklist have been reviewed with the customer and
the first maintenance appointment has been scheduled:
SALES CONSULTANT DATE CUSTOMER DATE
Signed copy must be plac ed in dealer jac ket
283163_12a_Mazda5_SSG_110410.indd 20-21 11/4/10 11:54 AM
hours of operation
Explain free Full Circle
Service Inspection
Schedule rst maintenance service
Page 12
GENUINE MAZDA SERVICE
Because you and your Mazda deserve the best
Your new Mazda deser ves nothing less than the ver y best. To keep it running
like new for years to come, trust the experts at your local Authorized Mazda
Dealer. Simply bring your vehicle in for your scheduled maintenance and any
needed repairs.*
At par ticipating Mazda Full Circle Service Centers,** our technicians will
automatically perform a complimentary Full Circle inspection on your vehicle
and issue a detailed report card at every visit. This is designed to help you
keep track of your Mazda’s critical operating condition. Our factory-trained
technicians know your vehicle inside out, and use Genuine Mazda Parts,
giving your vehicle the optimum care and maintenance it requires to run
with awless precision.
Remember, to further enhance your driving experience, visit your local
Mazda Ser vice Center for your scheduled maintenance. It’s also the place
where you can nd a wide variety of tires, parts, and accessories that are
just right for your vehicle.
* See vehicle’s schedul ed-maintenance program for d etails.
** Visit the Mazda Own ers website at MyM azda.com/fullc ircle to nd a
par ticipating Mazda Full Circle Ser vice Dealer.
Custome r Assist anc e Center:
Road sid e Assist ance Contact: 1-8 00-866 -1998
1-80 0-22 2-5 500
FREE FULL CIRCLE
SERVICE INSPECTION
We’re committed to providing
expert Mazda service.
You love to drive your Mazda, and we love to service your Mazda. With our Full Circle
Service, we’ll give your vehicle a COMPLIMENTARY MULTI-POINT INSPECTION.
Your Mazda will receive a thorough review of its most crucial components.
This easy-to-use Smart Start Guide is intended to help you more fully appreciate some
of the unique features a nd functions of your new vehicle. However, it is not intended to
replace your Owner’s Manual. T he Owner’s Ma nual contains more detailed information
to help you better understand the impor tant safety warnings, features, operation, and
maintenance of your vehicle. All information, specications, photographs and illustrations
in this publication are those in ef fect at the time of printing. Mazda reser ves the right to
change specications or design without obligation.
© Mazda North American Operations
Printed in U.S.A. 10/10
Print 1
9999 95 005C 12SS
www.MazdaUSA.com
283163_12a_Mazda5_SSG_110410.indd 22 11/4/10 11:54 AM
 Loading...