

Page 1
M{zd{ 3
SMART START GUIDE
1669736_15_Mazda3_SSG_041514.indd 1 4/15/14 2:16 PM
Page 2
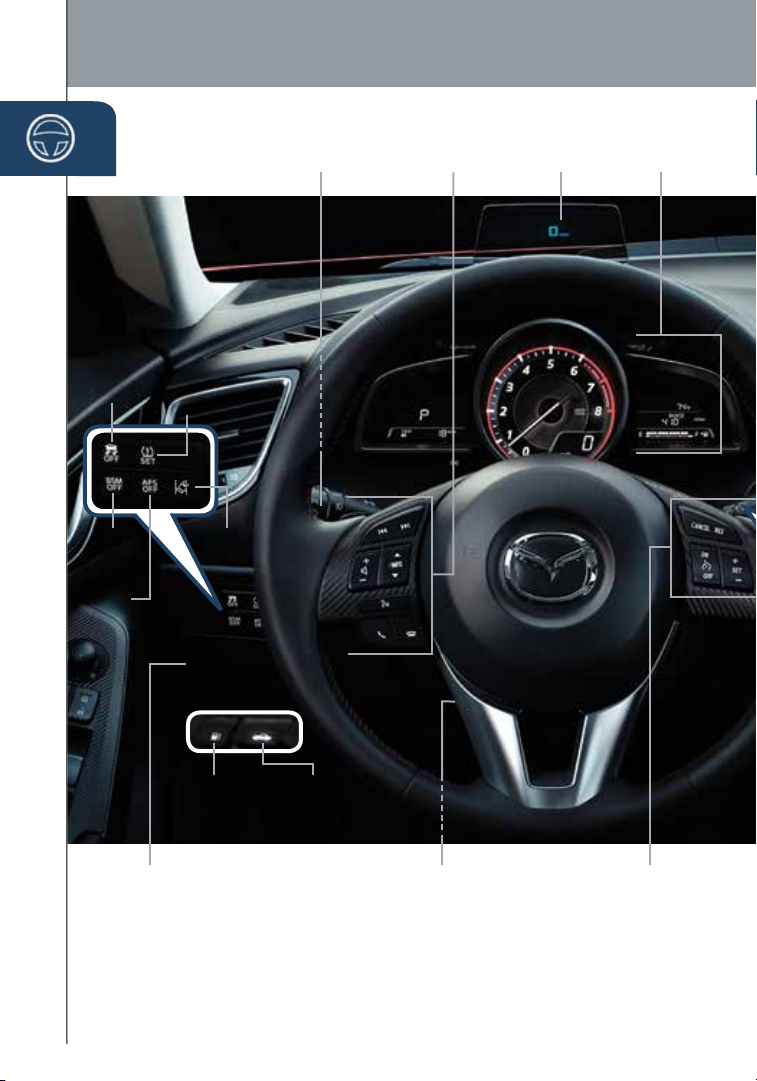
Driver’s View
DSC
OFF
BSM
(P. 21)
AFS
(P. 15)
TPMS
SET
(P. 16)
LDWS
(P. 17)
LIGHTING/
TURN SIGNALS
(P. 23)
BLUETOOTH®
HANDS-FREE/
AUDIO
(PP. 11-12 , 29- 32)
ACTIVE
DRIVING
DI S PL AY
(P. 15)
INSTRUMENT
1
CLUSTER
(P P. 35 -3 8)
FUEL
FILLER LID
HOOD
RELEASE
RELEASE
TRUNK
RELEASE
(4-DOOR)
1
DO NOT try to adjust the angle or open/close the Active Driving Display by hand. Fingerprints on the display
will make it difcult to view and manual operation could cause damage. Always adjust the Active Driving
Display using the AD-Disp tab in Settings (pg. 16).
1
3
To provide a better view of the instrument cluster, adjust the steering wheel up or down/in or out.
1669736_15_Mazda3_SSG_041514.indd 1 4/15/14 2:16 PM
TILT/TELESCOPING
STEERING WHEEL
RELEASE LEVER
3
MAZDA RADAR
CRUISE CONTROL
(P P. 17-1 8 )
Page 3
www.MazdaUSA.com
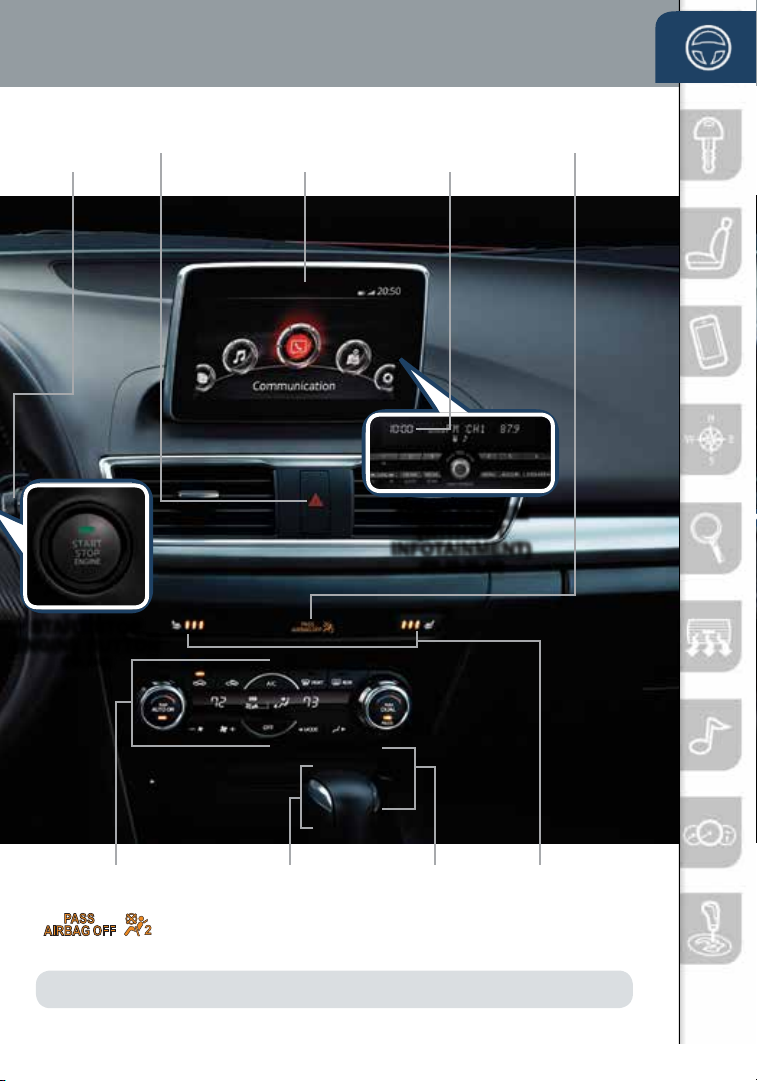
WIPER/
WASHER
(P. 24)
HAZARD
WARNING
START/STOP
ENGINE BUTTON
(P P. 5- 6)
MAZDA CONNECT
INFOTAINMENT
SYSTEM
(PP. 9-10, 16, 13-14, 31-3 3)
CLOCK
(P. 29)
AUDIO SYSTEM
(WITHOUT
INFOTAINMENT)
(PP. 29-3 0, 33 )
PASSENGER
AIRBAG OFF
INDICATOR
2
CLIMATE CONTROL
(P P. 27- 28 )
2
This indicator light illuminates to remind you that the front passenger’s front/side airbags
weight in the seat is less than approximately 66 lbs. Always wear your seat belt and secure children in the rear
seats in appropriate child restraints. See the Owner’s Manual for important information on this safety feature.
Indicator light turns off when cond itions h ave been met for ne cess ary ai rbag de ploym ent. See
NOTE:
Owner’s Manual for further information.
1669736_15_Mazda3_SSG_041514.indd 2 4/15/14 2:16 PM
and seat belt pretensioner will not deploy during a collision. The reason for this is that the
TRANSMISSION
(P P. 39 -4 0)
CD
PL AY E R
SE AT
WARMERS
2
Page 4
Key
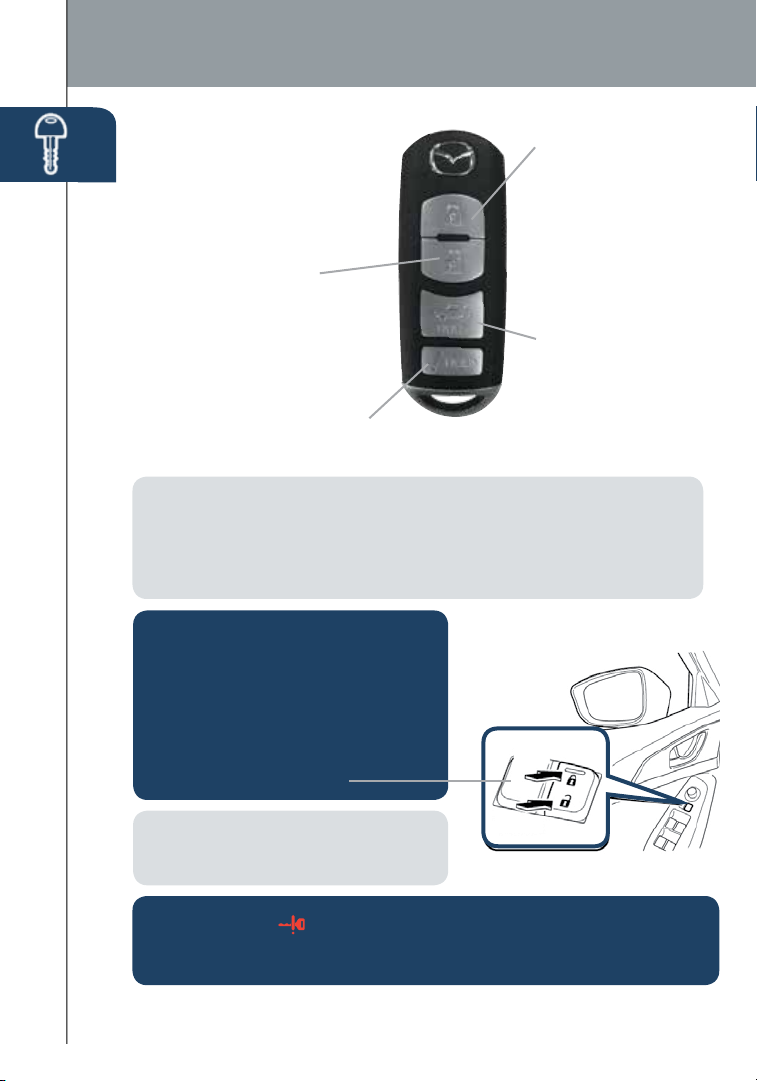
KEYLESS ENTRY SYSTEM
• This system allows you to
lock and unlock the doors by
pushing the desired buttons.
Unlock
• Push once to unlock
driver’s door or all the
doors (depending on
personalization setting*).
• Push twice (within three
seconds) to unlock all doors.
Panic Alarm
• Push for one second or more to activate alarm.
• Push Lock, Unlock, or Panic Alarm to turn alarm off.
NOTE: For the hatchback, when the liftgate opener switch is pushed, the liftgate
will open slightly. If the liftgate is not opened within 1.5 seconds, the liftgate latch
locks (you will hear it lock) and the liftgate cannot be opened or closed from this
slightly raised position. To open/close the liftgate, push the liftgate opener switch,
open the liftgate within 1.5 seconds, then close it. The door/lif tgate ajar warning
light will be on if the liftgate is not fully closed.
CAUTION:
• Make sure vehicle is OFF and take
the keyless entry system key with
you when leaving the vehicle.
• When locking doors using inside
door switches or inside door-lock
knobs, be careful not to leave the
key inside the vehicle.
Lock
• Push once to lock
all doors.
• Push twice (within
ve seconds)
for horn sound
verication that all
doors are locked.
Trunk (4-door
sedan only)
• Push and hold to
open the trunk.
Inside Door
Lock Switch
Lock
NOTE: With Advanced Keyless, there
is a recognizable beep sound to alert you
that the key is inside the vehicle.
CAUTION: RED Key Indicator Light may illuminate if either advance
key or keyless entry key is placed in the cup holder. The key can sometimes
not be detected in the cup holder.
Unlock
3
*
Refer to your Owner’s Manual for additional details about “Personalization Features”.
1669736_15_Mazda3_SSG_041514.indd 3 4/15/14 2:16 PM
Page 5
www.MazdaUSA.com
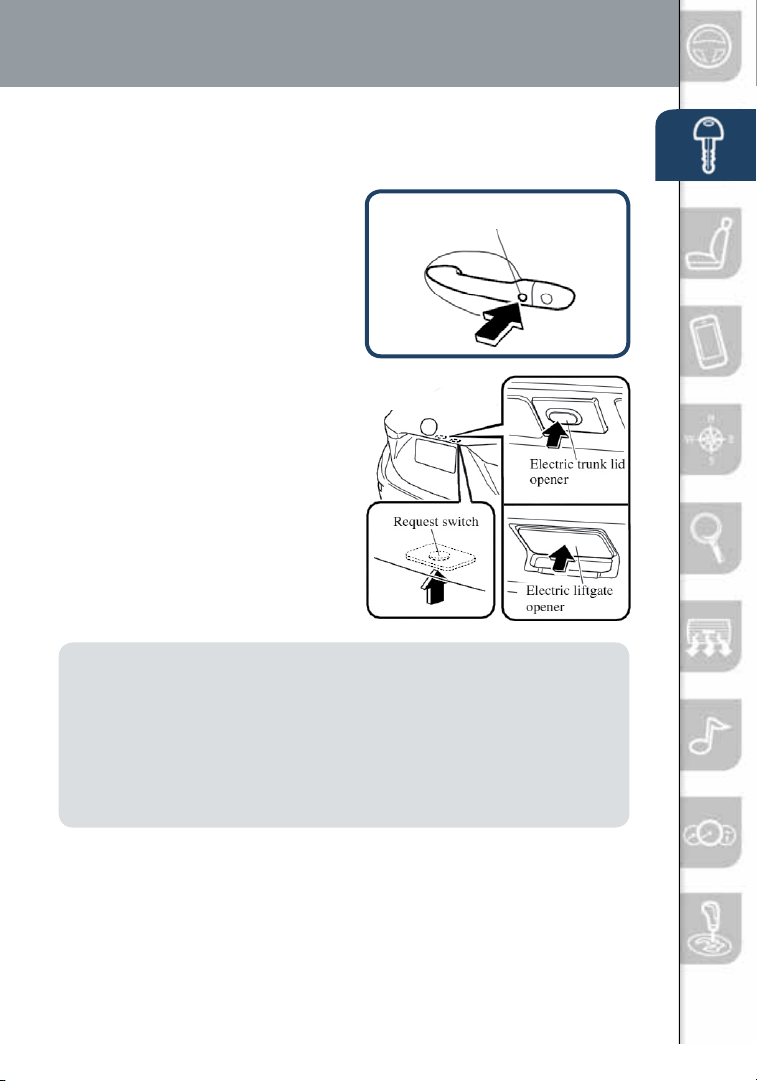
ADVANCED KEYLESS ENTRY SYSTEM (if equipped)
• This system allows you to lock
and unlock the doors without
taking the key out.
Advanced Key
Request Switch
While Carrying the
Advanced Key…
• Unlock the driver’s door
by pushing the driver’s door
request switch once.
• Unlock all doors by pushing
the driver’s door request switch
once or twice (depending on
personalization setting) OR by
pushing the passenger’s door
request switch once.
• Lock all doors by pushing
any request switch once.
• Open the trunk/liftgate
by pushing the opener
switch once (switch is
located a little to the right
of the Mazda emblem).
NOTE:
• Vehicles equipped with the Advanced Keyless Entr y System and the Keyless
Entry System both use the same type of keyless entry transmitter. However,
only vehicles equipped with the Advanced Keyless Entry System allow you to
lock and unlock the doors with the door request switches (without taking the
key out of your purse or pocket).
• Vehicles equipped with the Keyless Entry System do not have request
switches on the doors/trunk. To lock and unlock the doors, the
corresponding transmitter button must be pushed.
4
1669736_15_Mazda3_SSG_041514.indd 4 4/15/14 2:16 PM
Page 6
Key
STARTING THE ENGINE WITH
ACCELERATED WARM-UP SYSTEM (AWS)
The Mazda3 is equipped with SK YACTIV combustion technology.
This technology includes AWS (Accelerated Warm-up System) for
optimal emission performance during cold starting conditions.
While Carrying the Key…
• Start the engine by pushing the START/STOP ENGINE button while
pushing the clutch pedal (M/T) or the brake pedal (A/ T).
What you will notice? On start-up, the engine speed and sound are
higher (1500 RPM) for less than 1 minute to quickly bring the catalyst
to efcient operating temperature. The RPM will reduce to idle once the
temperature is achieved. This is normal engine operation under cold
start conditions.
What this does? This heats up the catalytic converter faster to reduce
emissions and allows Mazda to use an exhaust header on the engine
(to improve efciency and horsepower).
NOTE:
NOTE:
You can drive the vehicle during AWS activation, no need to wait.
• Shut the engine OFF by setting the parking brake/placing the
vehicle in Park (A/T), then push the START/STOP ENGINE button.
• Activate Accessories (ACC) by pushing the START/STOP
ENGINE button once without pushing the clutch or brake pedal.
• Turn the ignition to the ON position by pushing the START/STOP
ENGINE button twice without pushing the clutch or brake pedal.
The key indicator light
(engine ready to start) when the key is detected and the clutch pedal (M/T)
or the brake pedal (A/T) is pushed. If the KEY warning light illuminates
RED, or the START/STOP ENGINE button indicator light ashes AMBER,
this could indicate a problem with the engine starting system and the
inability to start the engine or switch the ignition to ACC or ON. Have your
vehicle inspected at an Authorized Mazda Dealer as soon as possible.
RED Key Indicator Light may ash if the key is placed in the cup holder.
The key may not be detected in the cup holder.
in the instrument cluster will show GREEN
5
1669736_15_Mazda3_SSG_041514.indd 5 4/15/14 2:16 PM
Page 7
www.MazdaUSA.com
Emergency Engine Stop
Pushing and holding the
START/STOP ENGINE button
or repeatedly pushing the button
while the engine is running will
turn the engine OFF. Use only in
case of an emergency.
Emergency Vehicle Entry
If the key cannot be used due to
a malfunction or dead key battery,
use the auxiliary key to lock or
unlock the doors.
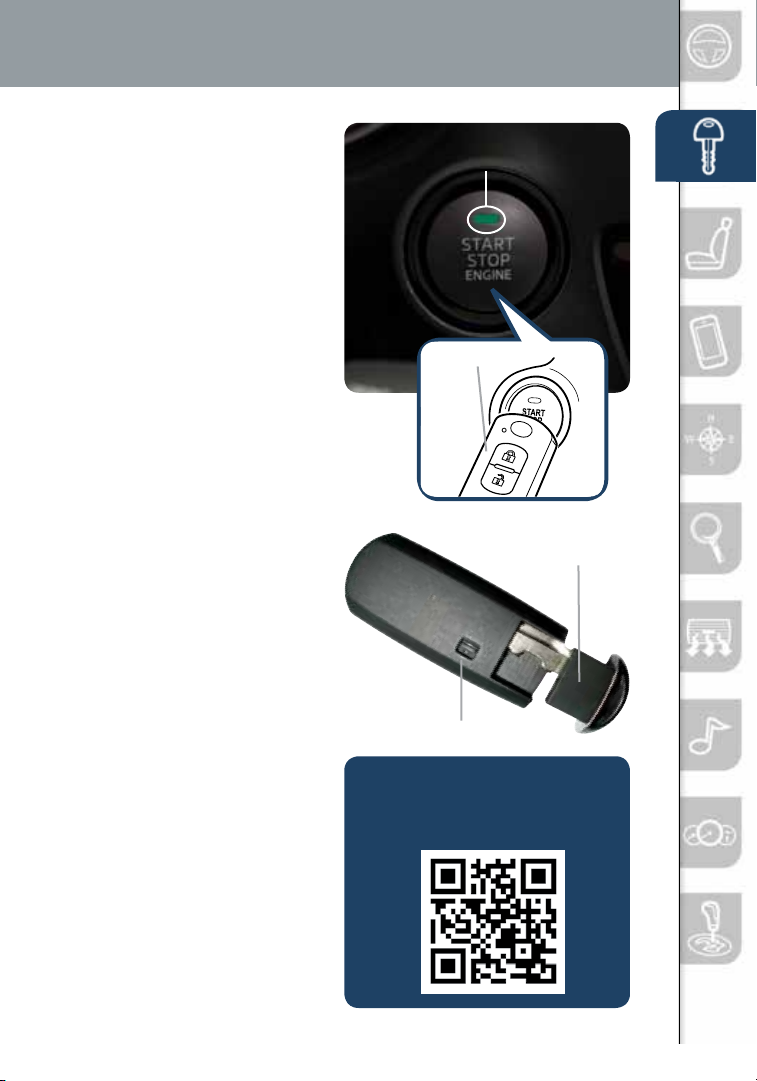
Emergency Engine Start
If the engine cannot be started
due to a dead key battery:
1 Push the brake pedal (A/T)
or the clutch pedal (M/ T).
2 While the indicator light ashes
GREEN, touch the START/STOP
ENGINE button using the back
side of the transmitter
(as shown).
3 After the GREEN indicator light
illuminates constantly, push the
START/STOP ENGINE button with
your nger to start the engine.
BREAK-IN PERIOD
No special break-in is necessary,
but a few precautions in the rst
600 miles should be observed.
• Do not race the engine.
• Do not maintain one constant
speed, either slow or fast,
for a long period of time.
• Avoid full-throttle starts.
• Avoid unnecessary hard stops.
• Do not drive constantly at
full-throttle or high engine rpm
for extended periods of time.
START/STOP ENGINE Button
Indicator Light
Transmitter
Key (Rear)
Auxiliary Key
Auxiliary Key Release
FUEL ECONOMY:
To achieve the best fuel economy,
visit www.fueleconomy.gov for
more information.
6
1669736_15_Mazda3_SSG_041514.indd 6 4/15/14 2:16 PM
Page 8
Tires
TIRE PRESSURE MONITORING SYSTEM (TPMS)
For your safety, the Mazda3 is equipped with TPMS that detects low tire
pressure in one or more tires. If the tire pressure starts getting low in
one or more tires, the system alerts the driver by turning on a light in the
instrument cluster (p. 35 -38) and sounding an alarm.
What to do? Don’t ignore the TPMS warning light. Stop and check your
tire pressure (when tires are cold) and inate them to the proper pressure.
Properly inated tires are safer, last longer, and increase fuel economy.
In the following cases, the TPMS must be “initialized” so the system can
operate normally.
• The tire pressure is adjusted (up or down) in one or more tires.
• A tire rotation is performed.
• Any tire or wheel is replaced.
• The vehicle’s battery is disconnected, replaced or completely dead.
Initialization Process
(TPMS Warning Light is Illuminated)
1 Park the vehicle in a safe place and rmly apply the parking brake.
2 Let the tires cool, then adjust the tire pressure to the specied
pressure (See tire label located on the driver’s side door jam area) on
all four (4) tires.
3 Switch the ignition ON, but leave the vehicle parked.
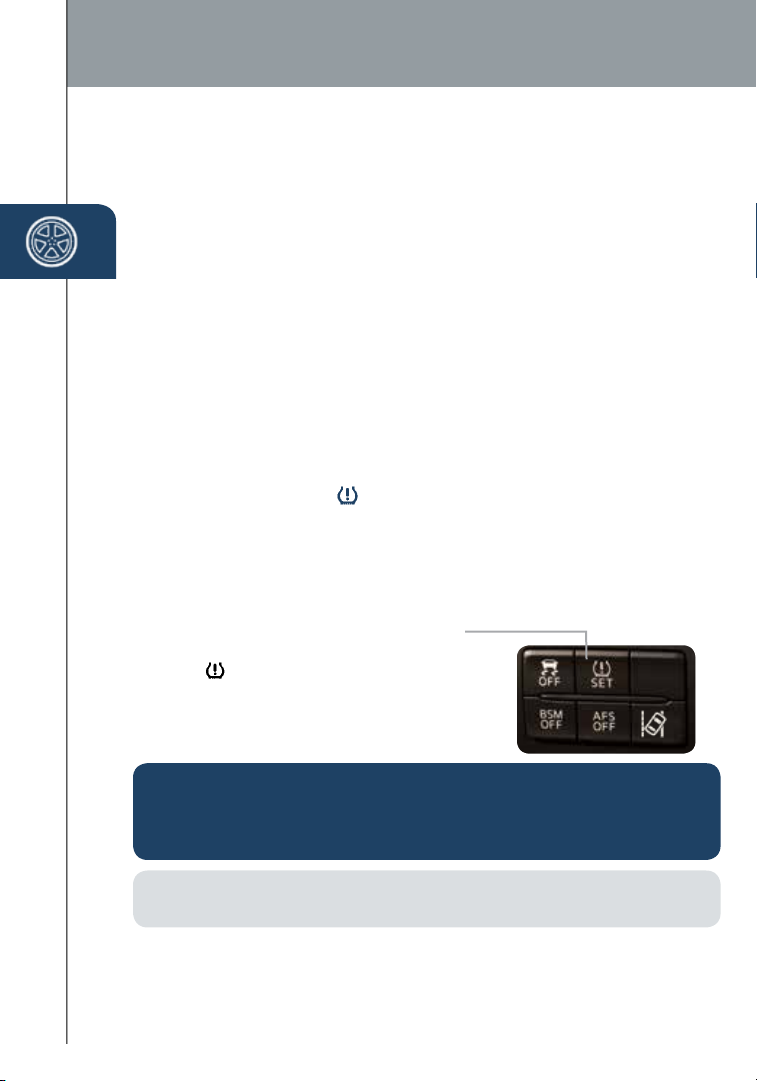
4 Push and hold the TPMS “Set Switch”
(left side of dash) until the TPMS warning
light
twice and a beep sound is heard once.
in the instrument cluster ashes
CAUTION: If the TPMS “Set Switch” is pushed without adjusting the tire
pressure, the system cannot detect the normal tire pressure. The TPMS
warning light may not turn on, even if the tire pressure is low, or it may turn on
if the tire pressure is normal.
NOTE: Drastic changes in temperature or altitude may cause the TPMS warning
light to turn on.
7
1669736_15_Mazda3_SSG_041514.indd 7 4/15/14 2:16 PM
Page 9
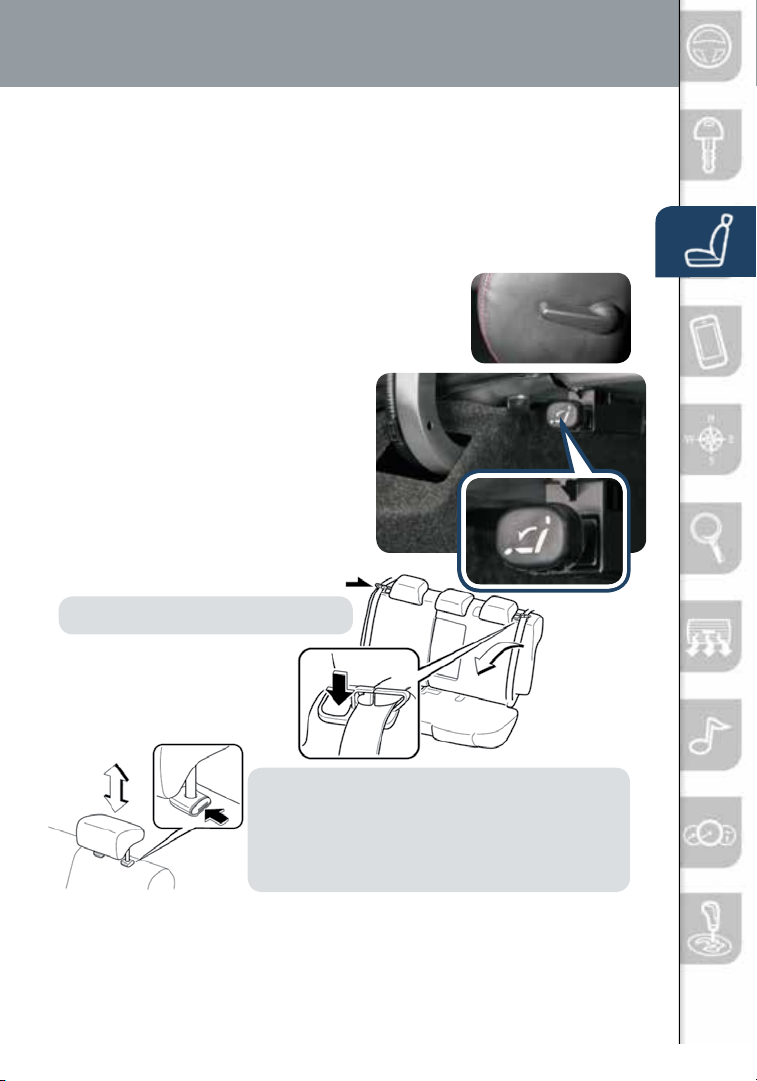
Seats and Headrests
FR O N T SE AT S
Headrests
For your safety, the front seats are equipped with active headrests that
are not adjustable forward or backward, only up and down. An active
headrest is designed to move forward in the event of a collision to close
the gap between your head and the headrest (to prevent whiplash).
Driver’s Seat Lumbar Support Adjustment
(if equipped)
To increase the lumbar support, move the lever
upward. Move the lever downward to decrease
lumbar support.
REAR SEATS
Folding rear seatbacks down:
4-door sedan
1 Check that rear seats are clear
of objects.
2 Open the trunk and pull the left
and/or right side remote handle lever(s).
3 Open a rear door and fold the
seatback forward.
NOTE: Left rear seat release is shown.
5‐door hatchback
Push the button to fold
down the seatback.
NOTE: For tall drivers and f ront passengers who
adjust the front seats all the way back, the headrests
on the rear seats need to be removed when folding the
rear seatbacks down. If not removed, the rear headrest
will press into the front seatback. In order to remove the
headrest from the rear seat, the seatback needs to be
tilted slightly forward.
Returning rear seats to upright position:
1 Install the headrest (if removed).
2 Raise seatbacks until they lock into position.
3 Pull on the top of the seatbacks to make sure they are locked.
4 Check that all seat belts are routed properly for passenger use.
1669736_15_Mazda3_SSG_041514.indd 8 4/15/14 2:16 PM
8
Page 10
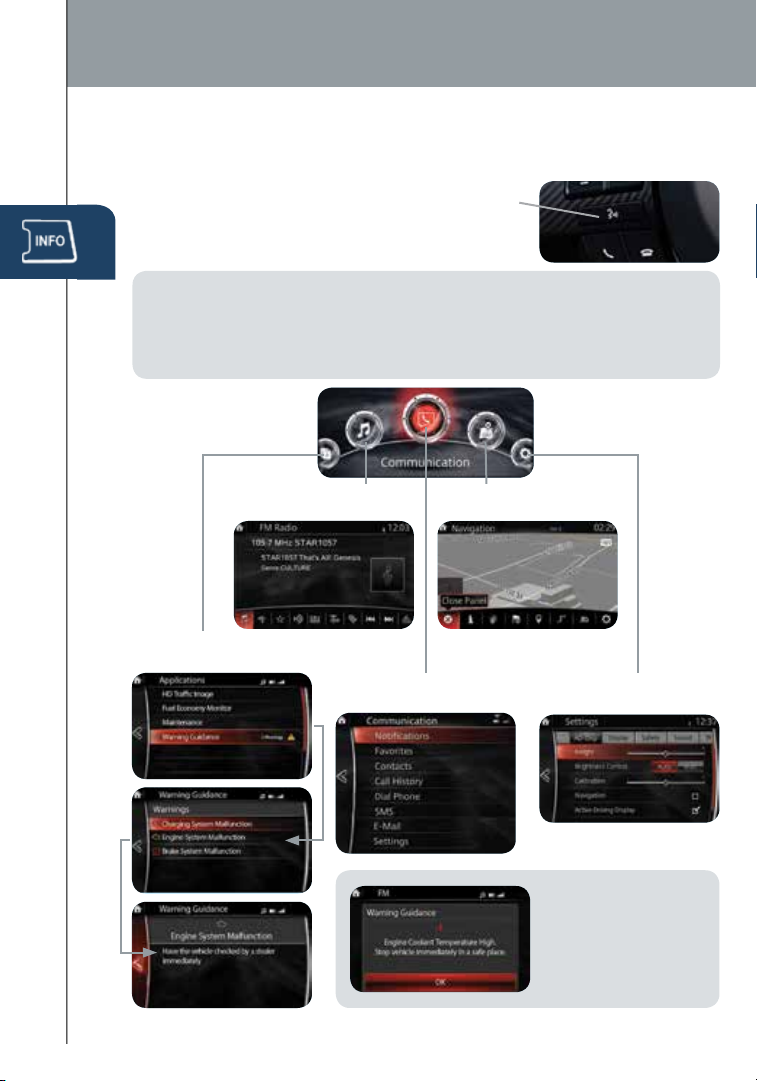
Mazda Connect Infotainment System
MAZDA CONNECT INFOTAINMENT SYSTEM (if equipped)
Mazda Connect is designed to be operated by using one of the following
three interfaces:
1 The commander switch (p. 10).
2 The touchscreen (if the vehicle is not moving).
3 Voice control (p. 10).
NOTE:
In the interest of safety and to avoid distracted driving, the touchscreen is
•
disabled at speeds over 5 mph. Use the commander switch or voice control to
operate the infotainment system.
• You can touch and tap, slide or swipe the touchscreen, but cannot pinch.
TAL K
SD Card
Push TALK button
and say “Entertainment.”
Push TALK button
and say “Applications.”
Push TALK button and
say “Communication.”
Push TALK button
and say “Navigation.”
Push TALK button
and say “Settings.”
NOTE:
These types of Warning
screens appear when
there is a problem with
the vehicle.
9
1669736_15_Mazda3_SSG_041514.indd 9 4/15/14 2:16 PM
Page 11
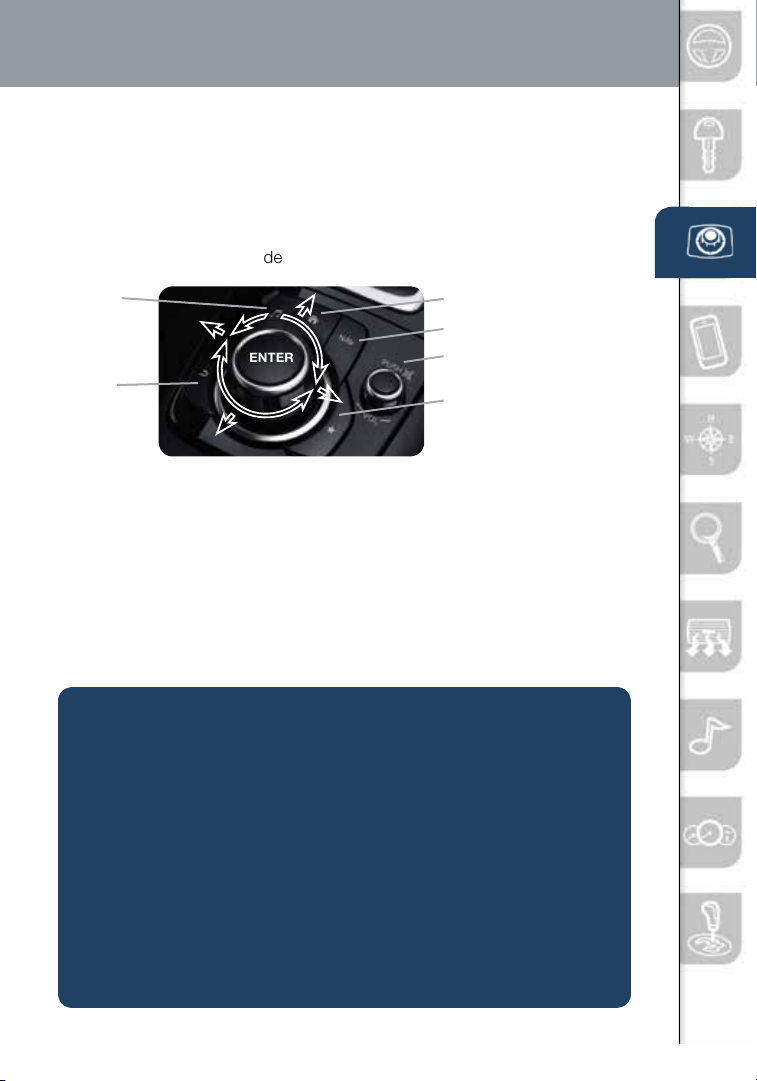
Commander/Voice Control
COMMANDER SWITCH (if equipped)
The commander is the primary means for operating Mazda Connect.
It allows you to keep your head up and eyes on the road.
The control places ve buttons naturally beneath the ve ngers and shows
ve matching icons on the home screen for touch-only operation. Select a
button around the commander knob to operate the desired system.
AUDIO
HOME
NAVIGATION
ENTER
BACK
(to previous
screen)
Select an item on the screen by:
1 Moving the knob up or down, left or right, and/or
turn the dial to move the cursor to the desired onscreen location (and get a description of the icon).
2 Pushing the knob down (ENTER) to select your
choice on the screen.
VOICE CONTROL (if equipped)
Voice control is activated by pressing the TALK button
on the steering wheel and speaking a command. Voice
commands usually contain a verb (action word) followed
by a noun. Common verbs are “Go to” and “Play”.
SOME COMMON VOICE COMMANDS ARE:
• Help
• Cancel
• Go Back or Previous
• Next or Skip
Go to (and one of the following):
• Home
• Entertainment
• Navigation
• Communication
• Settings
Play (and one of the following):
• AM/FM
• XM
• CD
• Bluetooth
• AUX
• USB
• Tutorial
• Scroll/Page Down
• Scroll/Page Up
• Turn Display/Screen Off
• Messages
• Contacts
• Email
• Phone
• Call History
• Pandora
• Aha
• Stitcher
• Select <line number>
• Display Clock
• Text
• AM/FM
• XM
• CD
• Bluetooth
• Song
• Playlist
• Artist
MUTE (push down)/
VOLUME (turn dial)
FAVORITES
The following can be
stored in Favorites:
• 50 stations total for
AM, FM, and XM.
• 50 contacts in the
system phonebook.
• 50 points of interest
in navigation. (To
edit or delete HOME,
select HOME and
push and hold the
commander knob until
the Edit/Delete HOME
screen appears.)
(ex: “Select Four” or
“Select Line Four”
• AUX
• USB
• Pandora
• Aha
• Stitcher
• Album
• Genre
• Folder
10
1669736_15_Mazda3_SSG_041514.indd 10 4/15/14 2:16 PM
Page 12
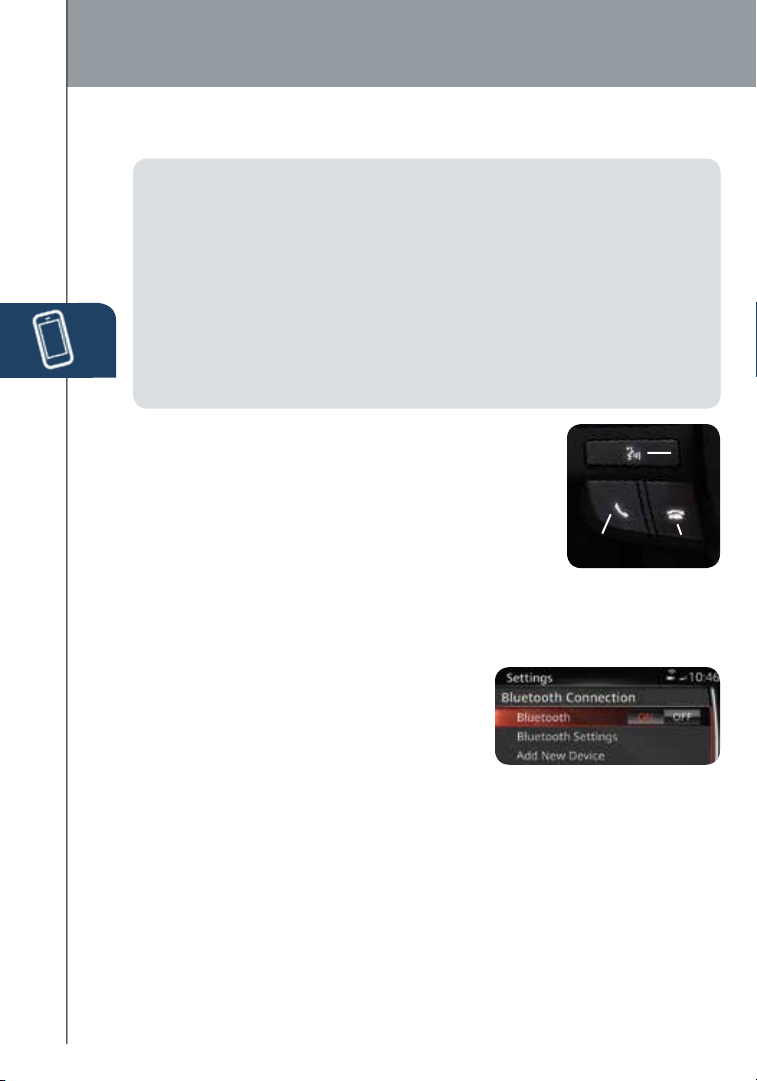
®
Bluetooth
PAIRING YOUR BLUETOOTH® PHONE OR AUDIO DEVICE
NOTE:
• For safety reasons, you cannot pair a phone while driving.
• Before pairing your cell phone or audio device, you must manually turn on
the device’s Bluetooth® function. Refer to the owner’s manual for your device.
• For customer service and device compatibility:
Toll-free call: 800 -4 30-0153
Website: www.MazdaUSA.com/bluetooth
• IMPORTANT: Set the volume level on your cell phone or audio device to the highest
level before distortion starts, then adjust the volume on the vehicle’s audio system.
• When in range of another Wi-Fi device, the Bluetooth connection between your
phone and the system may disconnect for a short time if you have Wi-Fi enabled
Turn off Wi-Fi on your phone if needed.
Without Mazda Connect:
1 Manually turn Bluetooth on your phone or audio device.
2 Push and release the TALK button on the steering
wheel (wait for beep).
3 From main menu, say, “Setup,” then “Pairing Options.”
4 Say, “Pair.”
5 Say a four-digit code (i.e., “1, 2, 3, 4”).
6 Place phone in discovery mode; if necessary, consult
your phone’s manual or go to www.mazdausa.com/bluetooth.
Select model, Bluetooth, and follow screen prompts.
7 After phone is recognized, you will be prompted to name the paired phone.
With Mazda Connect:
1 Manually turn Bluetooth on your phone or
audio device.
2 Select Communication from Home screen.
3 Select Settings.
4 Select Bluetooth.
5 Select Add New Device to display the message and switch to the device
operation. If this option is grayed out, make sure Bluetooth is turned on at
the top of the menu.
6 Using the device, perform a search for the Bluetooth
(Peripheral device).
7 Select “Mazda3” from the device list searched by the device. (Device with
Bluetooth® version 2.0) Input the displayed 4-digit pairing code into the
device. (Device with Bluetooth® version 2.1 or higher.)
• Just Works is detected the pairing is per formed automatically.
• Numeric Comparison is detected
8 Verify the displayed 6-digit code on the audio unit is also displayed on the
11
device, and touch the Yes on-screen button and then “YES” on the device
if needed.
Pick-up
®
device
Talk
Hang up
1669736_15_Mazda3_SSG_041514.indd 11 4/15/14 2:16 PM
Page 13
www.MazdaUSA.com
For phone’s compatible with Email, SMS and MMS:
9 (Call History) Incoming/Outgoing history for the device is downloaded
automatically as well as your Phonebook.
10 (Devices compatible with Mazda Email/SMS function) SMS (Short
Message Service) messages, MMS (Multimedia Message Service)
messages, and Email for the device are downloaded automatically.
Permission may be required, depending on the mobile device.
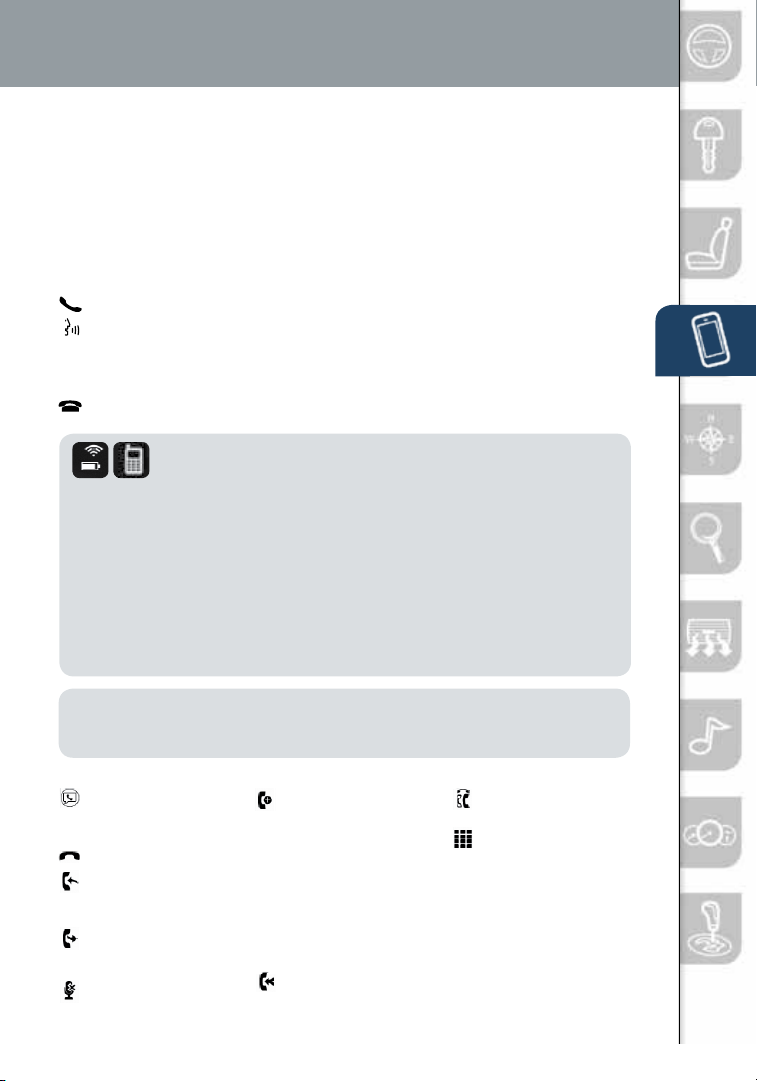
TO MAKE OR RECEIVE A HANDS-FREE CALL
button: To receive/swap a call.
button: To make a call (push and
button: To end/reject a call.
say “Phone”) or to skip vehicle
voice guidance and allow user
to speak next voice command.
NOTE: For connection issues, please conrm the Bluetooth
audio display (without infotainment) or by making sure there is a battery and
signal strength icon in the top right corner of the screen (with infotainment).
Some phones will turn off the Bluetooth signal after connecting the USB cable
to the vehicle or after downloading an update.
• If not displayed, check your phone and make sure Bluetooth is turned on
• If there is still no connection, delete the pairing data on the system and
connection status by making sure there is cell phone icon on the
(or discoverable) in the Settings menu. Detailed instructions for some
phones are available online.
your phone and try again after conrming your cell phone is compatible at
www.MazdaUSA.com/bluetooth.
Automatic Bluetooth
Reconnection:
On engine start, the last connected
device will automatically be
re-connected after several seconds.
To switch phones, go to Device
Settings and select Bluetooth.
NOTE: Some phone models do not support all features. If your phone or
device does not pair, please visit www.MazdaUSA.com/bluetooth or contact
(800) 430-0153 for further assistance or to report a phone/audio device concern.
The following icons are displayed on the touchscreen during a call:
Displays the
Communication
screen.
Ends a call.
Transfers a call from
hands‐free to the
mobile phone.
Transfers a call from
the mobile phone
to hands‐free.
Mutes the call.
1669736_15_Mazda3_SSG_041514.indd 12 4/15/14 2:16 PM
Calls another person
during a call and
creates a 3‐way
call. Select the
contact from one of
the following: Call
History, Contacts
(from phonebook),
or Dial (from
numerical keypad).
Joins the call on hold
to make a 3‐way call.
Switches the
call on hold.
Allows transmitting
DTMF (Dual Tone
Multi‐Frequency)
signal via the
numerical keypad
(generally to a
home telephone
answering machine
or an automated
guidance call center).
12
Page 14
Navigation System
NAVIGATION SYSTEM (if equipped)
Planning A Route
IM P O R TA N T:
• In the interest of safety and to reduce
distractions while you are driving, you should
always plan a route before you star t driving.
• To adjust the volume of the navigation system
voice while driving, adjust the volume by
turning the VOL knob when voice guidance is
being given. To prompt voice guidance, push
the NAVI button to repeat the last instruction.
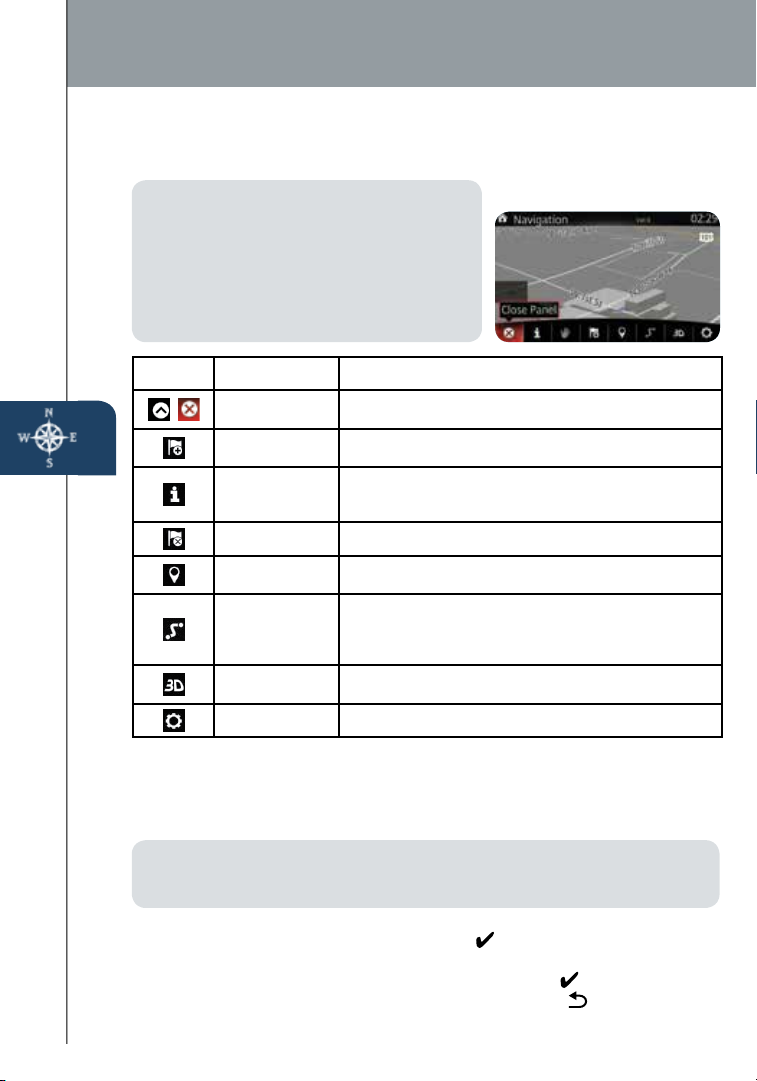
ICON Voice Control Purpose
Hide/Show
Menu Bar
Enter
Destination
Navigation
Information
Cancel To cancel an existing way point/route.
Point of
Interest
Route Options
View Mode
Settings To adjust the navigation settings.
To open and close the Menu bar.
To enter an address or favorite destination, or select
a place of interest or a location on the map.
To switch to the navigation information screen on
which items such as trafc information and GPS
reception conditions.
To nd places nearby.
To display the route parameters and full length of
route. Perform route-related actions such as edit
or cancel, pick route alternatives, avoid parts, add
destination to Favorites.
To change the map mode
(2D north up / 2D heading up / 3D).
To plan a route on your Navigation system, do the following:
1 Push the NAV button on the commander switch.
2 Select NEW DESTINATION.
3 Select Find Address.
NOTE: By default, the navigation system detects the countr y and city/town
you are in. If needed, you can change the country or state setting by selecting
Country or a new city/town by selecting City or Zipcode.
4 Enter the street name.
5 Enter the house number, then select the
.
6 The system transitions to a screen where the input location can
13
be checked. To transition to the next screen, select
Select or to transition to the previous screen, select
1669736_15_Mazda3_SSG_041514.indd 13 4/15/14 2:16 PM
.
Page 15
www.MazdaUSA.com
NOTE: Select Places Nearby for POIs (points of interest) around the selected
location, or select Add to Favorites to register the selected location to Favorites.
NOTE: The route can be edited by selecting other options.
7 If Go is selected or if no operation is performed with 10 seconds, the
route guidance is started. The set route can be checked by selecting MAP.
Planning A Route Using Voice Commands
You can navigate to any of the following places using your voice:
• AN address, including home
• Favorites
• Cities and towns
• POI (Point of Interest) categories
• POIs for named brands of,
for example, restaurants, gas
stations, car rental and gyms.
• A recent destination
NOTE: POI searches for points of interest near your present location.
To plan a route to an address using your voice, do the following:
1 Push the TALK button on the steering wheel.
2 When you hear the tone, you can say, for example “Drive to an address”.
3 Say the full address (without zip code) for your destination, for example “123
Main St., Los Angeles, California”. The system does not recognize zip codes.
NOTE:
• For best results, say the full address without pausing between words.
• Voice guidance can be skipped by pushing the talk button.
4 Say “Yes” if the address is correct. If shown a list of addresses, say
the list number for the correct address or say “none of these”.
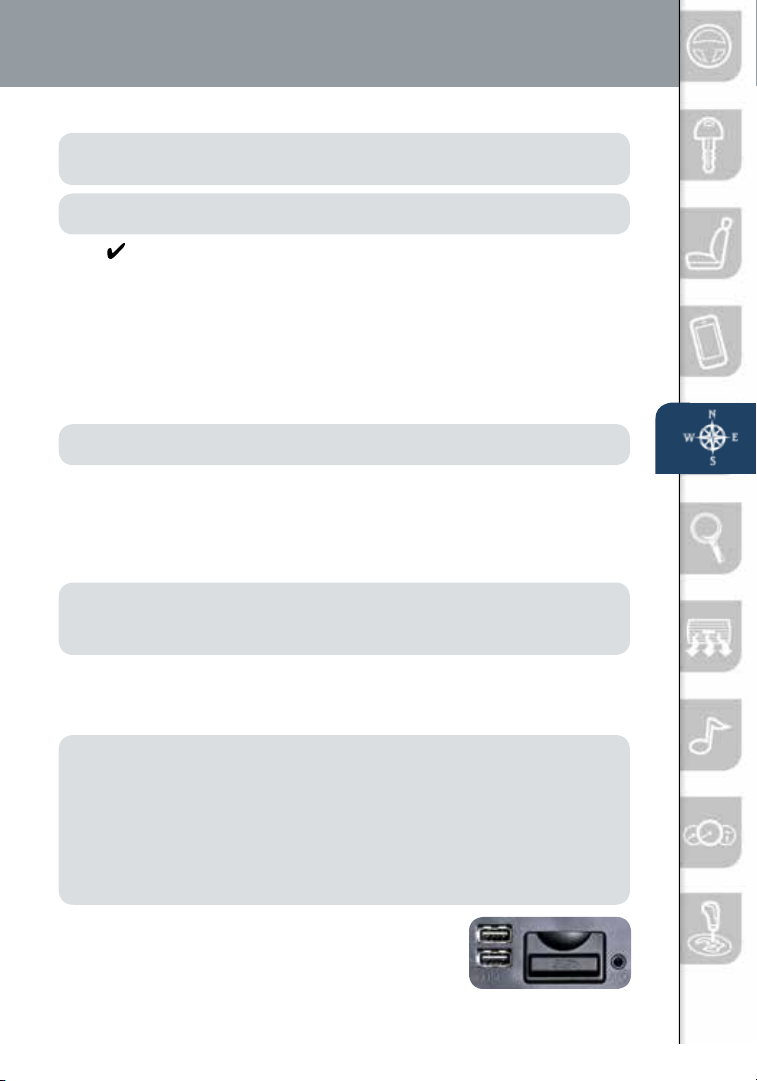
To remove or insert the MAP SD card (to update the map database):
NOTE:
Visit www.mazdausa.com/navigation and download the most recent map
•
available for your device for free for 3 years from vehicle delivery. Please refer
to the Navigation System Owners Manual section of www.mazdausa.com/
navigation for additional information.
• Only use your MAP SD card for operating and updating your navigation
system. Do not insert the MAP SD card into another vehicle or into any other
device such as a camera.
• Do not put other SD cards in this slot.
1 Turn the vehicle ignition OFF.
2 Locate the SD card slot inside the center console.
• Remove card: Open the cover and push the
card once, then pull it out.
14
• Insert card: Push the card in (label-side up), then close the cover.
1669736_15_Mazda3_SSG_041514.indd 14 4/15/14 2:16 PM
Page 16
Active Driving Display
ACTIVE DRIVING DISPLAY (if equipped)
CAUTION: Always adjust the display
using the Settings screen (AD-Disp
tab). Do not try to adjust the angle
or open/close the display by hand.
Fingerprints on the display will
make it difcult to view and manual
operation could cause damage.
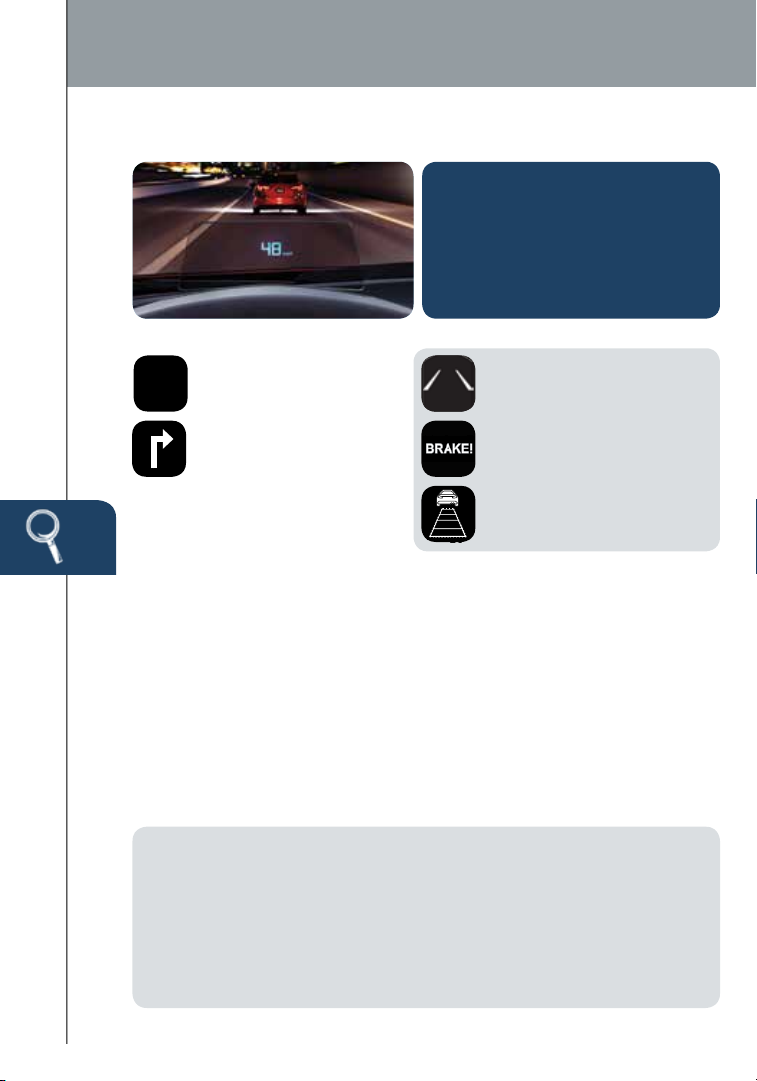
The Active Driving Display displays the following information:
• Vehicle Speed Setting
0
MPH
To change the settings/adjustments for the Active Driving Display:
1 Select the Settings icon on the
2 Select the AD-Disp tab.
3 Select the desired item to change.
• Height: Adjust the position of the
• Brightness Control: Method
using cruise control
• Navigation Turn-by-Turn
(TBT) direction, distance
and lane guidance
Home screen.
virtual image of the Active Driving
Display up or down.
for adjusting screen brightness
(Automatically with instrument
cluster illumination or manually).
• Lane Departure Warning
System (LDWS) operation
conditions and warnings
• Smart City Brake
Support (SCBS)
warnings
• Vehicle Speed Setting
using cruise control
• Calibration: Brightness
initialization setting (when
selecting automatic adjustment).
• Brightness: Brightness
adjustment (when selecting
manual adjustment).
• Navigation: On/O ff.
• Active Driving Display:
On/Of f.
• Reset: Reset to
default settings.
(if equipped)
NOTE:
• If the display does not operate, switch the ignition off and then switch it back on. If it
still does not operate even with the ignition switched ON, have the vehicle inspected at
an Authorized Ma zda Dealer.
• It may be dif cult to view the display when wearing sunglasses. Take off your
sunglasses or adjust the luminosity.
• If the battery has been removed and re-installed or the battery voltage is low, the
adjusted position may deviate.
15
1669736_15_Mazda3_SSG_041514.indd 15 4/15/14 2:16 PM
• The display may be difcult to view or temporarily af fected by weather conditions such
as rain, snow, light, and temperature.
Page 17
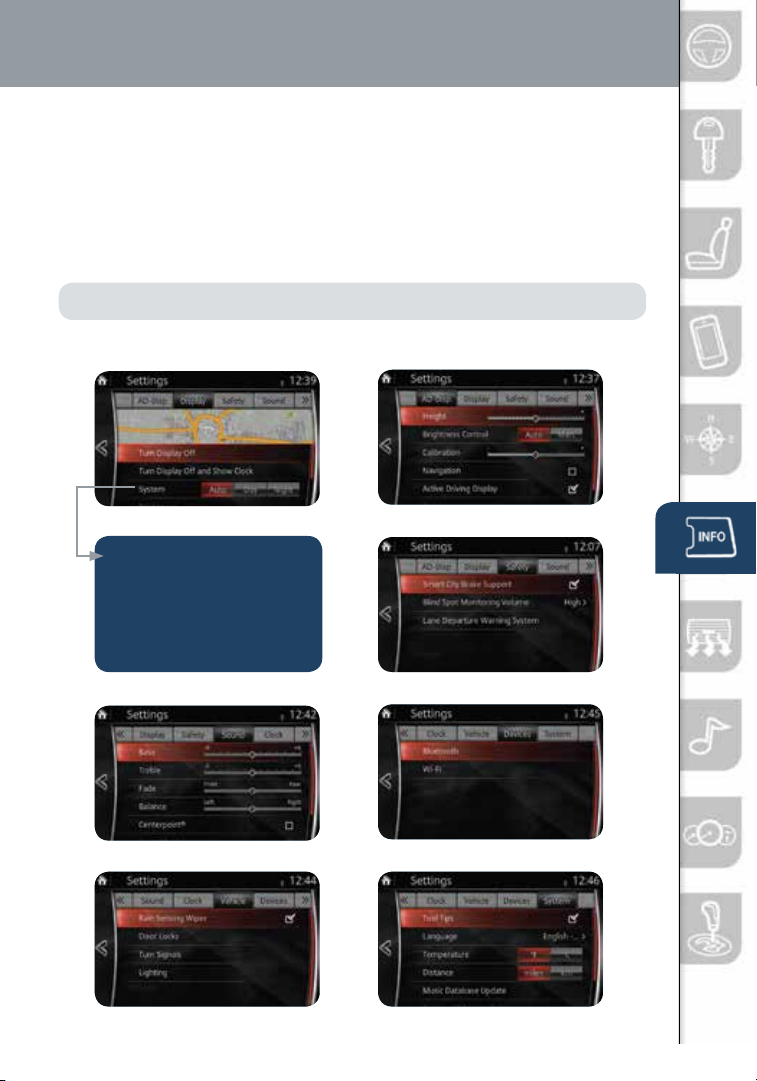
Mazda Connect Settings
MAZDA CONNECT SETTINGS (if equipped)
To view the different setting screens:
1 Move the commander switch to the left or right to change tabs.
2 When the desired tab is highlighted, press the knob of the
commander switch down.
3 Turn the dial of the commander switch to scroll down the list.
NOTE: If there is a scroll bar on the right side, there are more items further down.
Display Settings
Use System to change the
brightness of the Display
between Day (bright), Night
(dim), and AUTO (switches
from Day to Night when
headlights are turned ON).
Sound Settings
Vehicle Settings System Settings
Active Driving
Display Settings
Safety Settings
Device Settings
16
1669736_15_Mazda3_SSG_041514.indd 16 4/15/14 2:17 PM
Page 18
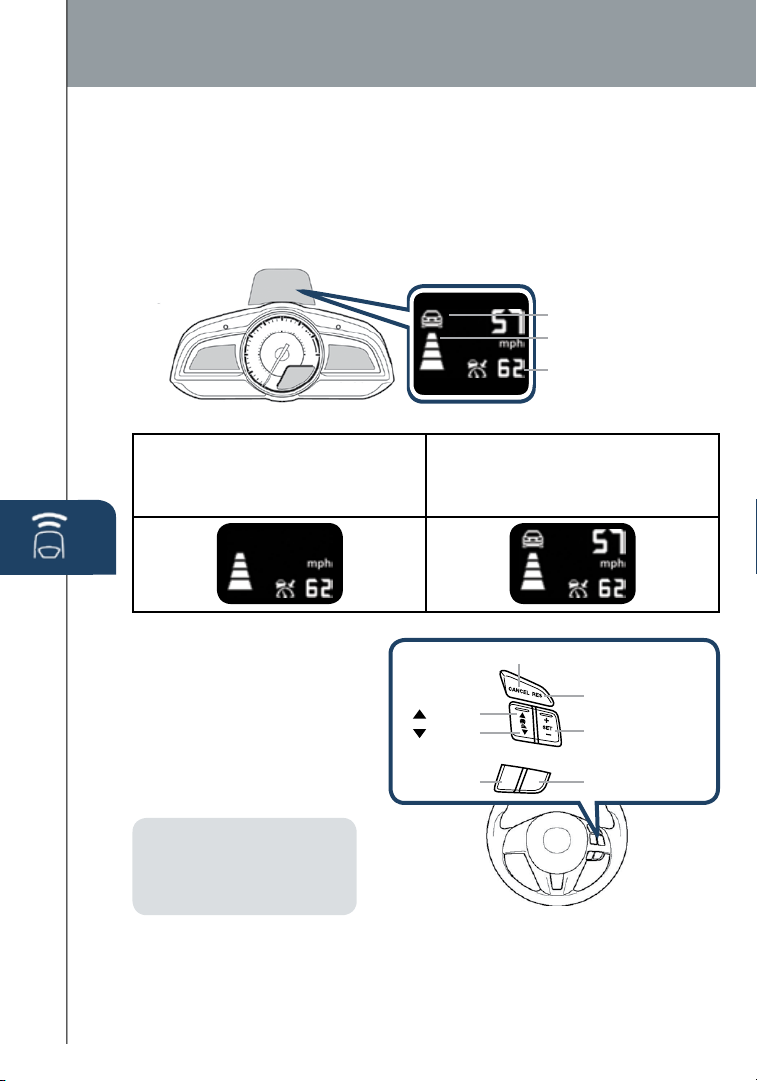
Mazda Radar Cruise Control
MAZDA RADAR CRUISE CONTROL (MRCC) SYSTEM (if equipped)
The MRCC system maintains vehicle speed and following distance using
a radar sensor to detect a vehicle ahead. The driver simply presets the
vehicle speed between 19 mph (30 km/h) and 90 mph (145 km/h) and the
system will maintain a safe following distance without having to turn the
cruise control off.
Vehicle ahead display
MRCC Distance
between vehicle display
MRCC Set vehicle speed
The system operates in two modes, Constant Speed and Headway Control modes:
Constant Speed Mode
When no vehicle is detected ahead,
the driver’s set speed is maintained.
Headway Control Mode
When a vehicle is detected ahead,
a distance between your vehicle and
the vehicle ahead is maintained.
Setting the MRCC
CANCEL switch
When the ON switch is pushed,
the vehicle speed and the
distance between vehicles
while in headway control can
be set. The MRCC indication
is shown in the display of the
instrument cluster.
NOTE: The radar for the
MRCC is located behind the
Mazda emblem in the grill.
Keep this area clean to avoid
the system not working properly.
switch
switch
OFF switch
OFF
ON
RES switch
Cruise control
SET+/SET– switch
ON switch
17
1669736_15_Mazda3_SSG_041514.indd 17 4/15/14 2:17 PM
Page 19
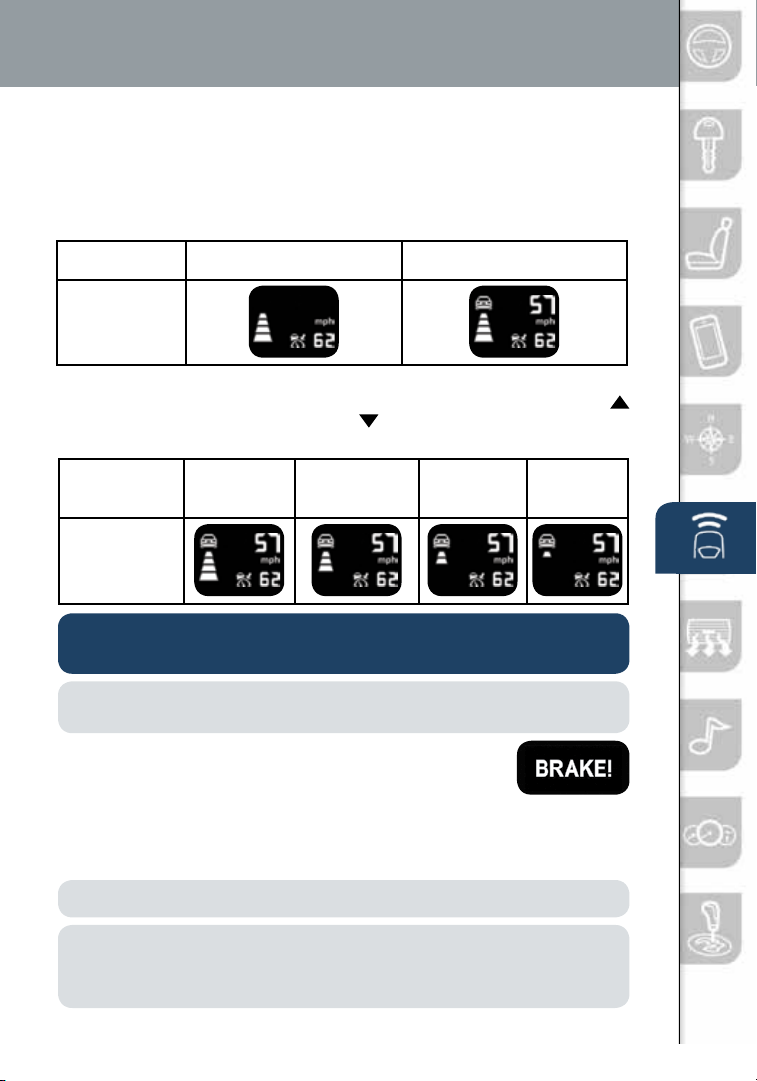
Forward Obstruction Warning
How to set the speed:
1 Adjust the vehicle to the desired speed using the accelerator pedal.
2 Push the SET + or SET – switch. The set speed and the inter-vehicle
distance display lled with white lines is displayed in the active driving
display and the MRCC indicator light (green) turns on simultaneously.
Travel Status
Display
During travel at
constant speed
How to set the distance between vehicles:
The distance between vehicles is set to a shorter distance by pushing the
switch a longer distance by pushing the
switch. The distance-between-
vehicles can be set to 4 levels.
Distance between
vehicles guideline
(at 50mph
(80km /h))
Display
Long (about
164ft (5 0 m))
Medium (about
131f t (40 m))
CAUTION: Do not rely completely on the MRCC system and always
drive carefully obeying the speed limit.
During travel under
headway control
Short (about
98ft (30m))
Extremely
short (about
82ft (25m))
NOTE: The MRCC sometimes will brake your vehicle when passing a semi truck (tractor
trailer). This is normal. Simply press the accelerator pedal to override the system.
FORWARD OBSTRUCTION WARNING (FOW)
The Forward Obstruction Warning (FOW) system alerts the
driver of a possible collision using an indicator in the active
driving display and instrument cluster along with a warning sound.
The system operates when driving at 10 mph (15 km/h) or faster and the
system’s radar sensor determines that your vehicle may hit a vehicle or
obstruction ahead.
NOTE: FOW can be turned off using the DSC OFF button.
WARNING: FOW is only a supplementary system designed to reduce damage in
the event of a collision. The FOW has limitations and does not detect all objects. Do not
rely solely on the FOW. Relying solely on the FOW may cause an unexpected accident
resulting in death or serious injury. Always keep your eyes on the road.
1669736_15_Mazda3_SSG_041514.indd 18 4/15/14 2:17 PM
18
Page 20
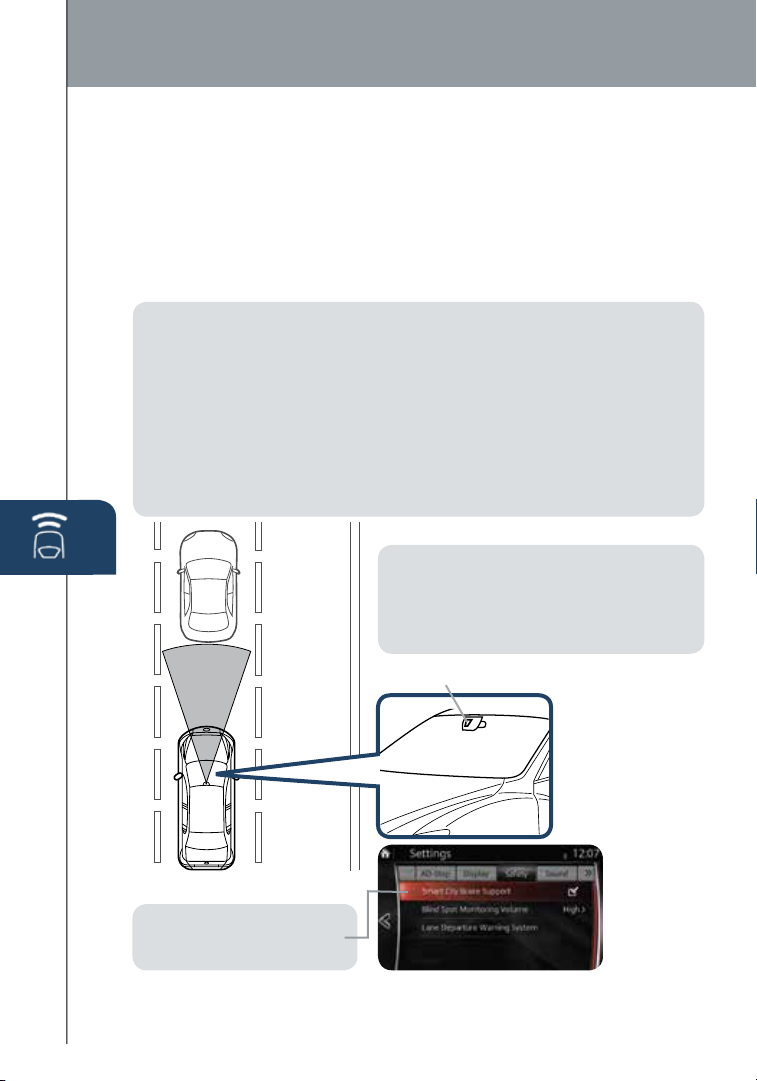
Smart City Brake Support
SMART CITY BRAKE SUPPORT (SCBS) SYSTEM
(if equipped)
The SCBS system is designed to reduce damage in the event of a
collision by applying the brakes when the system’s laser sensor detects
a vehicle ahead. The system operates when the vehicle speed is 2 to
18 mph (4 to 30 km/h) and the system determines that a collision with
a vehicle ahead is unavoidable.
NOTE:
• It may be possible to avoid a collision if the relative speed between
your vehicle and the vehicle ahead is less than 9 mph (15 km/h).
• When the driver depresses the brake pedal while the system is in the
operation range between 2 to 18 mph (4 to 30 km/h), the brakes are
applied rmly and quickly to assist. (SCBS Automatic Brake is displayed
in the active driving display.)
• SCBS automatic brake is released approximately 2 seconds after the
vehicle comes to a stop.
• Refer to your Owner’s Manual for complete details.
WARNING: SCBS is only a supplementary
system to reduce damage in the event of a
collision, however the SCBS has limitations.
Do not rely solely on the SCBS. Always keep
your eyes on the road.
Laser Sensor
NOTE: SCBS system can be
turned off using Safety Settings
in the infotainment system.
19
1669736_15_Mazda3_SSG_041514.indd 19 4/15/14 2:17 PM
Page 21
Lane Departure Warning System
LANE DEPARTURE WARNING SYSTEM (LDWS) (if equipped)
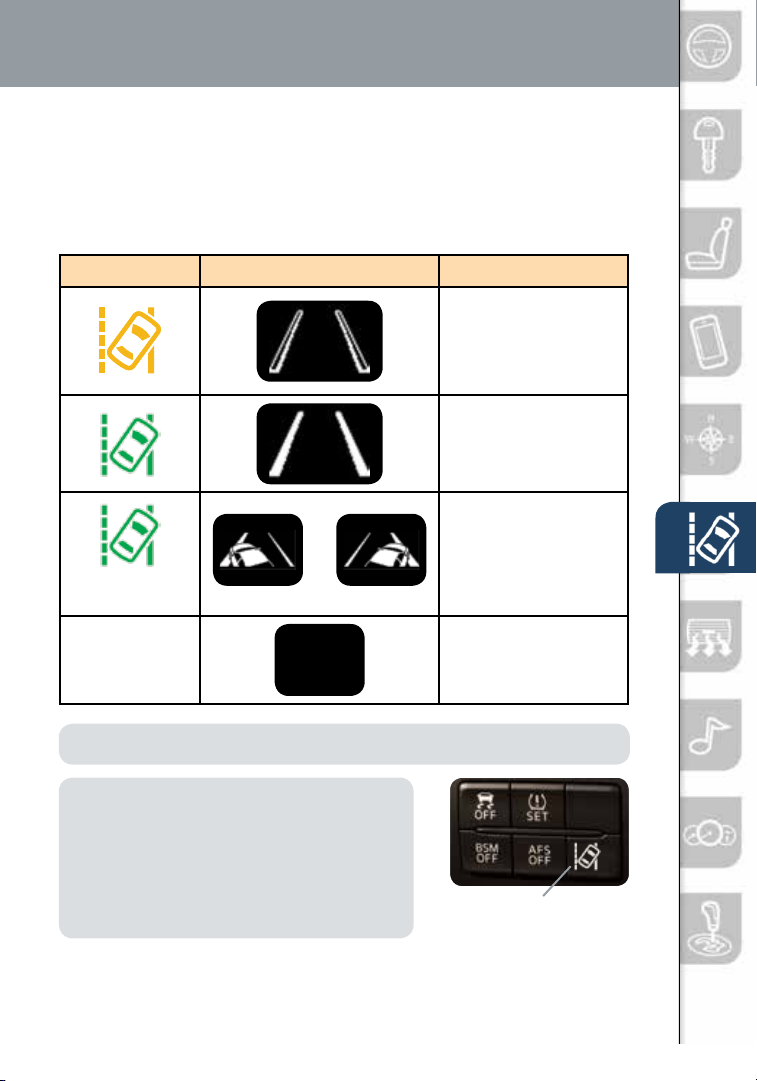
The LDWS recognizes painted lane lines on a road using the forward
sensing camera (FSC) installed to the windshield. If the vehicle deviates
from its lane at speeds above 44 mph, the system alerts the driver using
the following indicators.
Indicator Light Active Driving Display Condition
The painted lane lines
on the road are not
recognized or the
vehicle speed is less
than 44 mph
The painted lane
lines are recognized
at vehicle speeds of
44 mph or more
Warning is triggered
when vehicle deviates
Flashes +
warning sound
OR
from its lane
No indicator light
NOTE: Any driver input (e.g., turn signal, steering or acceleration) will cancel warning.
WARNING: LDWS is only a supplementary
system to warn the driver that the vehicle may
be deviating from its lane, however the LDWS
has limitations. Do not rely solely on the LDWS.
Relying solely on the LDWS may cause an
unexpected accident resulting in death or serious
injury. Always pay attention to the direction in
which the vehicle is traveling and drive safely.
LDWS OFF
Use the LDWS switch to
turn system ON or OFF
20
1669736_15_Mazda3_SSG_041514.indd 20 4/15/14 2:17 PM
Page 22
Blind Spot Monitoring System
BLIND SPOT MONITORING (BSM) (if equipped)
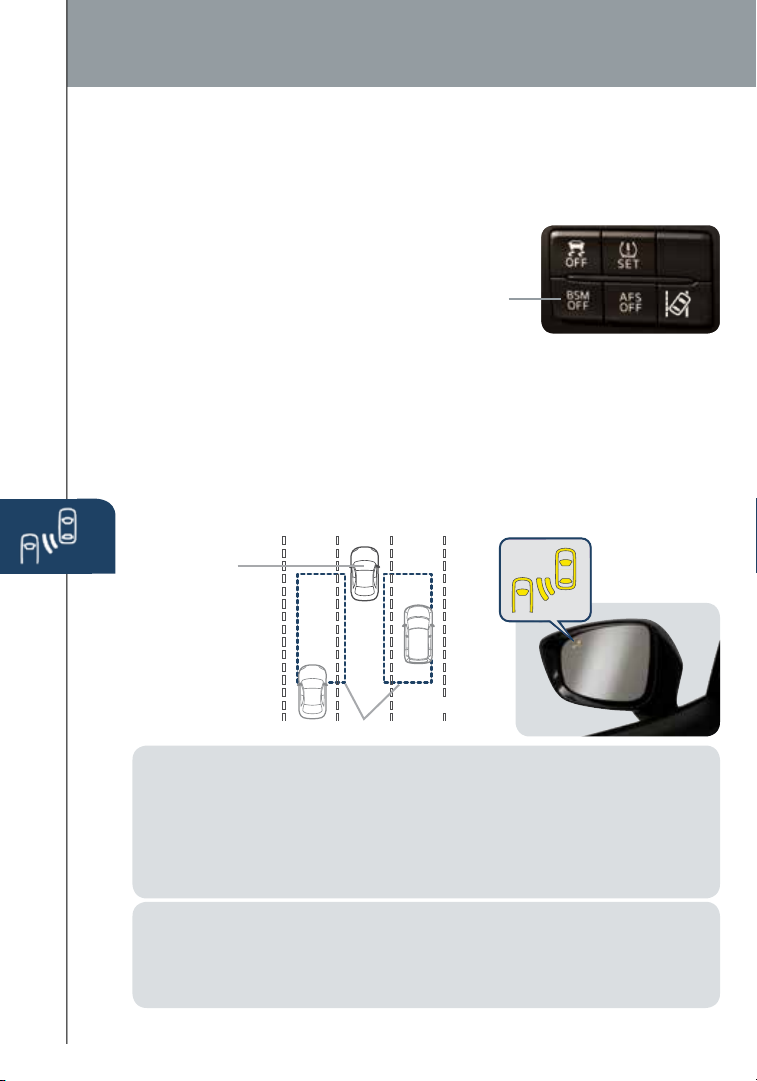
The BSM system is designed to assist the driver by monitoring blind spots
on both sides of the vehicle to the rear in certain situations such as when
changing lanes on roads and freeways.
Turning BSM System Off
Turning the BSM system off will turn off both the light
and sound indicators. To manually turn the BSM
system off, push the BSM OFF switch on the dash.
The BSM OFF indicator in the instrument cluster will
turn on to indicate when the BSM system is off. The
BSM system will automatically turn on the next time the vehicle is started.
• If your vehicle speed is 7 mph (11 km/h) or more, the BSM will warn
you of vehicles in the detection area by illuminating the BSM warning
lights located on the left and right door mirrors.
• If you operate a turn signal in the direction of an illuminated BSM warning
light, the system will also warn you with a beep and warning light ash.
• BSM sensors are located under the left and right rear bumper areas.
The BSM system may not operate properly if the rear bumper gets dirty,
so keep the rear bumper area clean and free of bumper stickers.
Your Vehicle
Refer to your
Owner’s Manual
for complete
details.
Detection Areas
NOTE:
• The BSM can assist the driver in conrming the safety of the surroundings,
but is not a complete substitute.
• The driver is responsible for ensuring safe lane changes and other maneuvers.
• Always pay attention to the direction in which the vehicle is traveling and the
vehicle’s surroundings.
• The BSM does not operate when the vehicle speed is lower than about
7 mph (11 km/h).
WARNING: BSM is only a supplementary system to help aid in monitoring blind
spots, however BSM has limitations. The system may not detect all vehicles,
especially a motorcycle. Do not rely solely on the BSM. Relying solely on the BSM
may cause an unexpected accident resulting in death or serious injur y. Make sure to
21
look over your shoulder before changing lanes.
1669736_15_Mazda3_SSG_041514.indd 21 4/15/14 2:17 PM
Page 23
Rear Cross Traffic Alert
REAR CROSS TRAFFIC ALERT (RCTA) (if equipped)
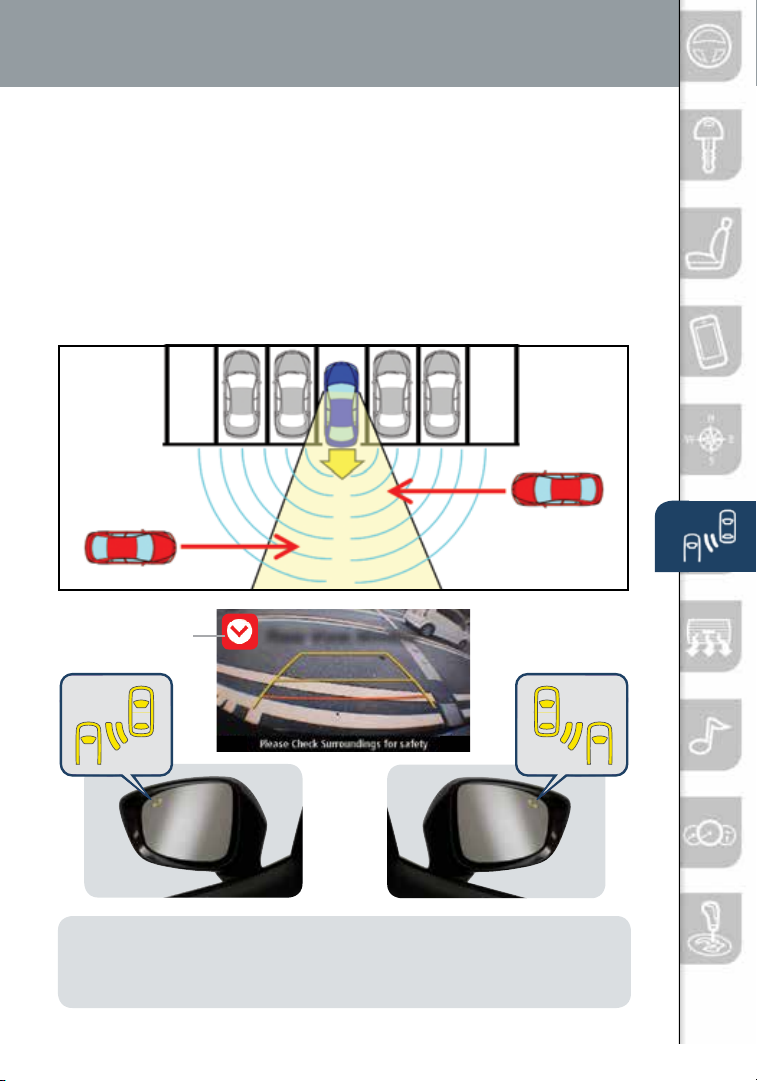
The RCTA is designed to alert the driver of oncoming traffic when
backing out of a parking spot. RCTA is active when your vehicle is in
reverse and your vehicle speed is 0 to 8 mph (13 km/h).
When BSM sensors detect an object moving 3 to 18 mph (5 to 30 km/h),
RCTA will notify the driver with indicators and sound:
• Rear View Monitor and outside mirror ashing indications.
• Beep sound (same as BSM).
Refer to your Owner’s Manual for complete details.
Object Detected Object Detected
Settings
button for rear
view monitor.
Rear View Monitor
Image is
for reference.
WARNING: RCTA is only a supplementary system to help aid when backing up,
however RCTA has limitations. The system does not detect all vehicles, especially
a motorcycle. Do not rely solely on the R C TA . Relying solely on the R C TA may
cause an unexpected accident resulting in serious injury. Always back up slowly.
1669736_15_Mazda3_SSG_041514.indd 22 4/15/14 2:17 PM
22
Page 24
Lights
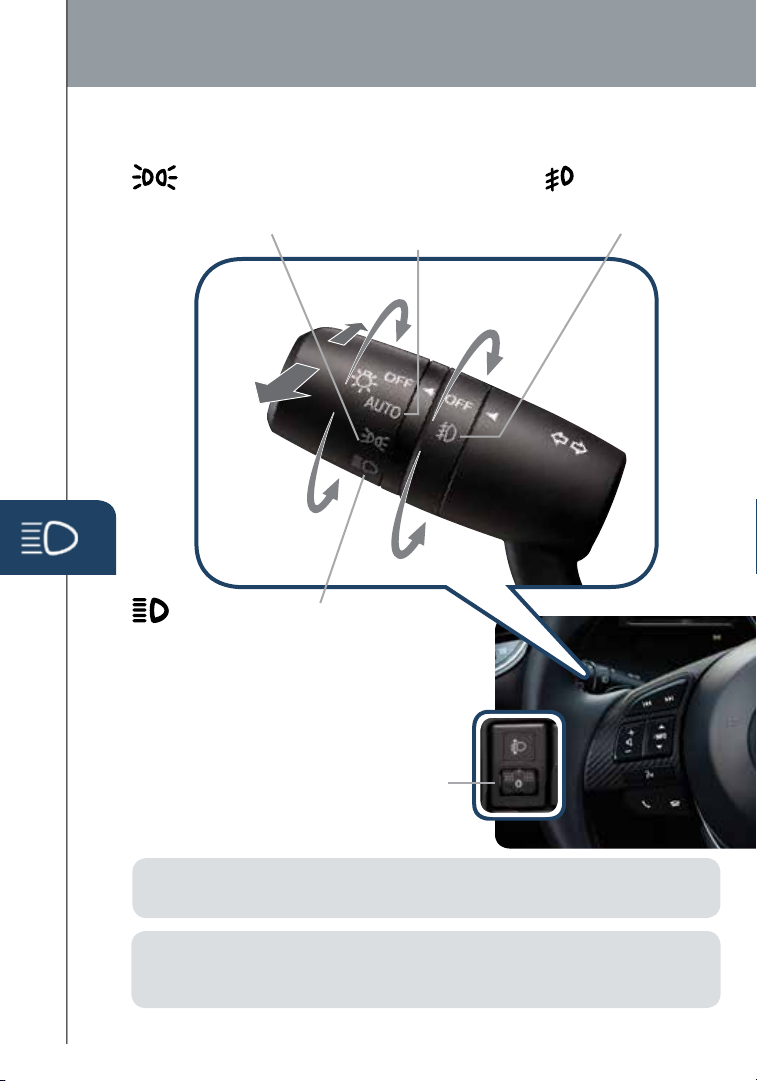
LIGHTING CONTROL/TURN SIGNAL LEVER
: Turns tail,
parking, and
dashboard
lights on.
Push for
High Beams
Pull
to Flash
High Beams
: Turns tail, parking,
dashboard, and headlights on.
Three-Flash Turn Signal: To signal
a lane change, push the turn signal lever
up or down halfway and release. The turn
signal indicator will ash three times.
HEADLIGHT LEVELING (without AFS)
Adjust headlight angle with headlight leveling
switch depending on vehicle passengers
and load (example: Driver only = 0,
Driver + Passengers = 1 or 2, etc.). Refer to
your Owner’s Manual for complete details.
AUTO: The light
sensor automatically
determines when to turn
the headlights on or off.
: Turns fog lights
on only when
headlights are on.
NOTE: The DRL (Daytime Running Lights) automatically turn on when the ignition
is switched ON. To disable/enable this feature see your Authorized Mazda Dealer.
NOTE:
23
1669736_15_Mazda3_SSG_041514.indd 23 4/15/14 2:17 PM
• You can adjust the timing of the Auto Headlights OFF and the sensitivity of the
Auto Light Control.
Page 25
Wipers
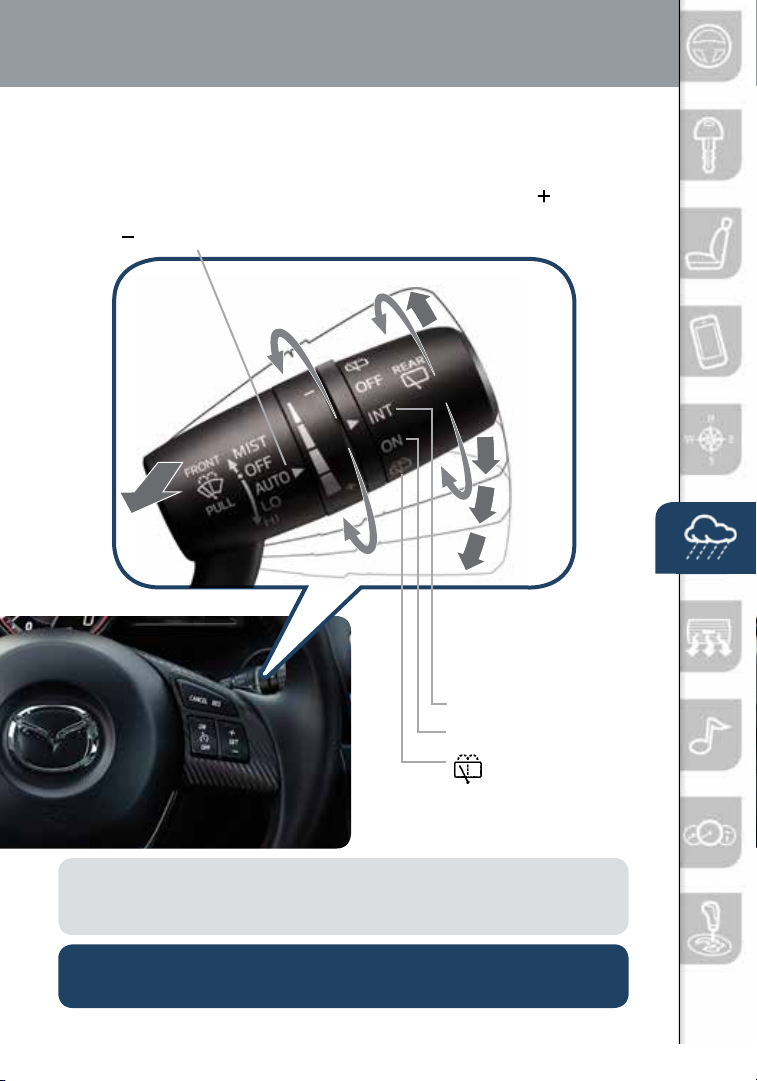
WINDSHIELD WIPER/WASHER CONTROL LEVER
AUTO: The rain sensor senses the amount of rainfall and turns the wipers
on or off. Rotate inner ring away from you (clockwise) for more ( ) sensitivity
(requires less rain to turn wipers on) and toward you (counterclockwise)
for less ( ) sensitivity (requires more rain to turn wipers on).
Pull lever
to dispense
windshield
washer uid
MIST
OFF
AUTO
1
2
LO
3
HI
Rear Window
Wiper/Washer
(Hatchback)
INT: Intermittent
ON: Normal speed
: Washer/wiper
(hold as desired)
NOTE: Vehicles not equipped with AUTO wipers will have INT wipers. Set
the lever to INT and choose an interval timing by rotating the ring between
fast and slow.
CAUTION: If the ignition is ON, turn the AUTO wipers OFF when going
through a car wash, or while cleaning or touching the windshield.
1669736_15_Mazda3_SSG_041514.indd 24 4/15/14 2:17 PM
24
Page 26
High Beam Control
HIGH BEAM CONTROL (HBC) (if equipped)
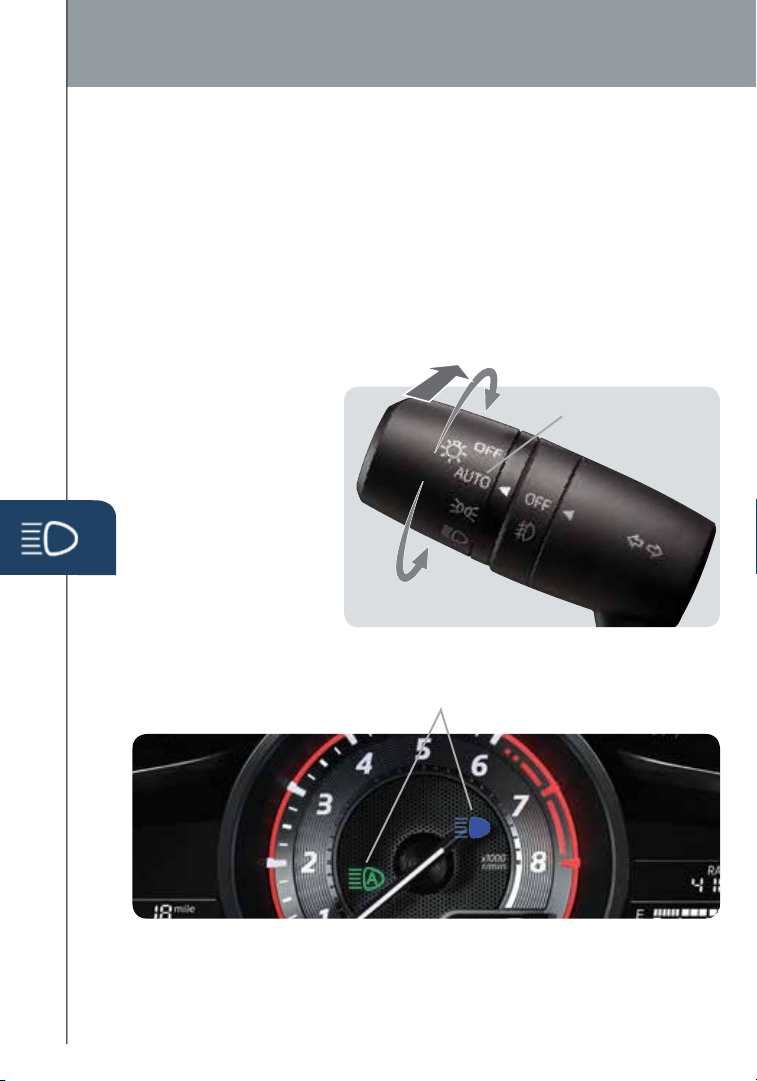
With HBC, the headlights are switched to high beams at speeds above
18 mph (30 km/h) when there are no vehicles in front of your vehicle
or approaching in the opposite direction.
The HBC system switches to low beam when:
• You are approaching a vehicle or a vehicle is approaching in
the opposite direction.
• Driving on roads lined with street lights or well-lit cities and towns.
• At speeds lower than 12 mph (20 km/h).
FORWARD
To turn HBC on:
1 Turn the headlight
switch to the
AUTO position.
2 Push the headlight
lever forward to the
High Beam position.
AUTO
When the HBC system is on, the HBC indicator light in the instrument
cluster will illuminate (
(
BLUE) when the HBC system switches to high beam and will turn off when
the HBC system switches to low beam.
GREEN). The High Beam indicator light will turn on
25
1669736_15_Mazda3_SSG_041514.indd 25 4/15/14 2:17 PM
Page 27
Adaptive Front Lighting System
ADAPTIVE FRONT-LIGHTING SYSTEM (AFS) (if equipped)
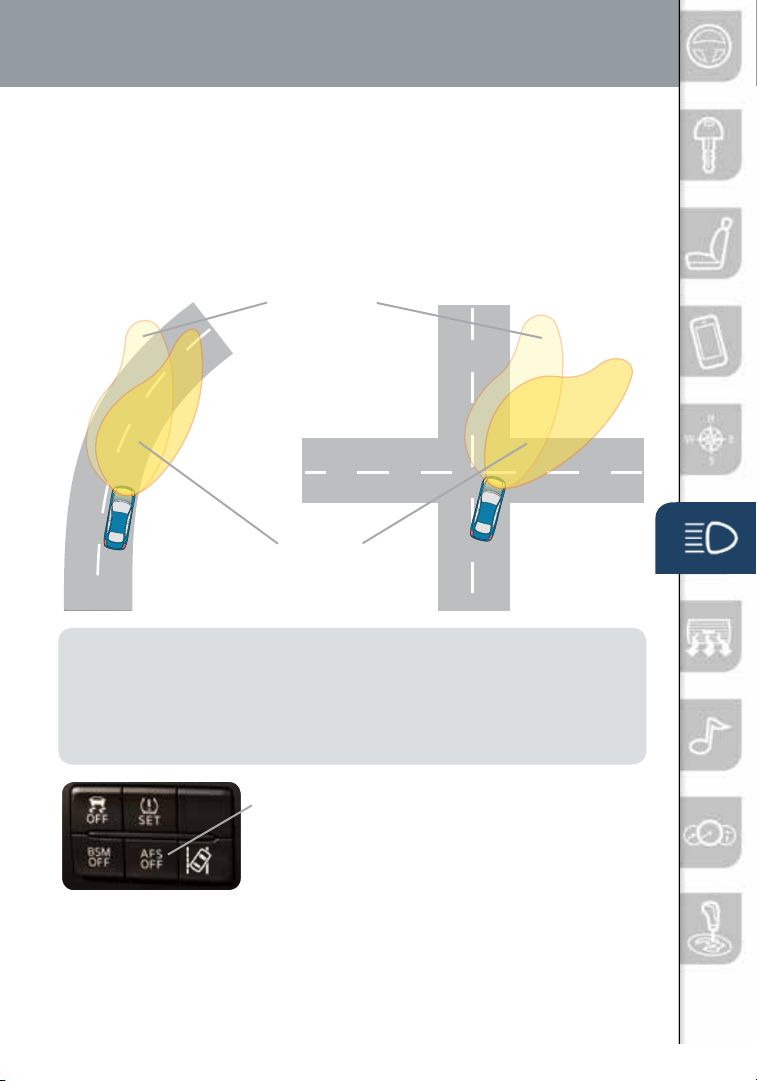
The AFS automatically turns the headlight beam to the right or left
(in conjunction with the direction of the steering wheel) to improve
the direction of headlight illumination while cornering. AFS only
works when the vehicle is moving.
Without AFS
With AFS
NOTE:
• With AFS, it is normal to see the headlights move and hear the sound of the
headlight leveling motors at the front of the vehicle when the ignition is ON.
• The system will need to be reset if the vehicle batter y has been disconnected
or the system fuse has been replaced. Refer to your Owner’s Manual for easy
to follow resetting instructions.
Push AFS OFF to turn
system off or on. When off,
the AFS OFF indicator in the
instrument panel will turn on.
26
1669736_15_Mazda3_SSG_041514.indd 26 4/15/14 2:17 PM
Page 28
Manual Climate Control
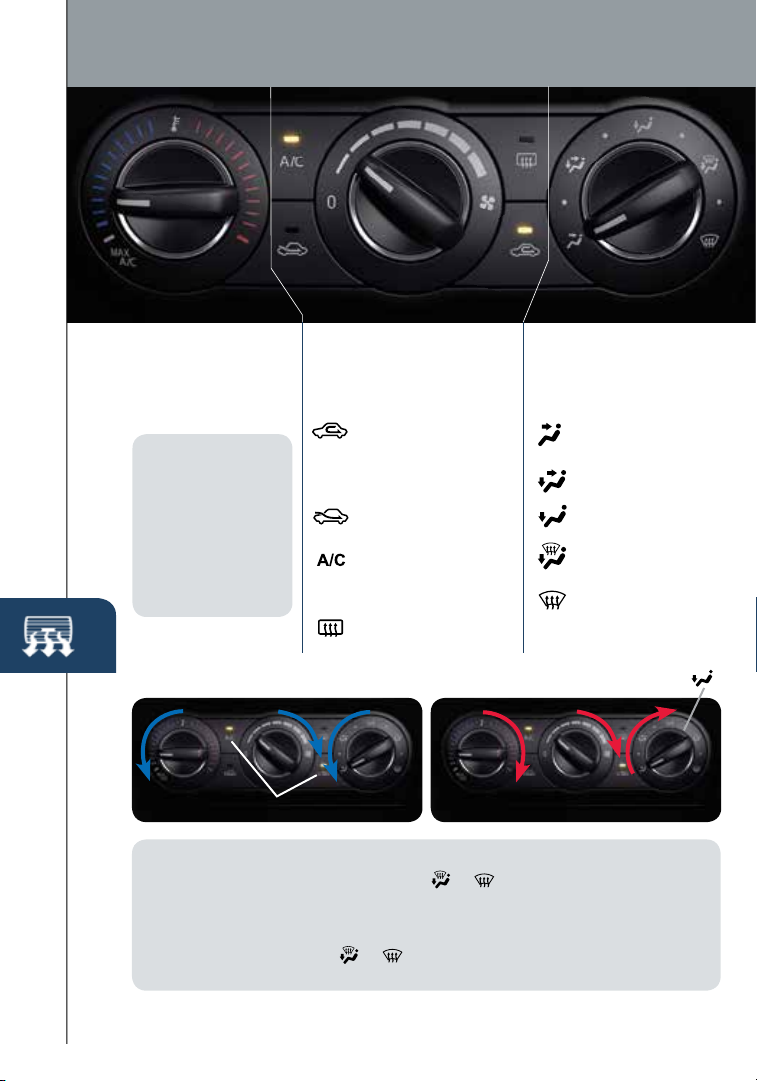
TEMPERATURE
CONTROL DIAL
Rotate the dial for
temperature control.
NOTE:
When set
to MAX A /C with
dashboard vents
or dashboard and
oor vents, the A/C
will turn on, and
recirculated air will
be selected for
maximum cooling.
Best Cooling Settings
Indicator ON (automatically)
DEFROSTER NOTE:
• When selecting either defroster mode ( or ), the air conditioner and fresh
air mode are automatically turned on by the system. This helps defrost the
windows more efciently by dehumidifying the air. Manually set the fan control
and temperature control dials as desired.
• In either defroster mode (
27
To defrost the side windows faster, point the vents toward the side windows.
FAN CONTROL DIAL
Rotate the dial to set
desired fan speed.
Push to recirculate
cabin air to reduce
outside odors and
improve cooling.
Push for fresh
air circulation.
Push to manually
turn air conditioning
on or off.
Push to defrost the
MODE SELECTOR DIAL
Rotate the dial to
select airow mode.
Dashboard
vents
Dashboard
and oor vents
Floor vents
Defroster and
oor vents
Windshield
defroster
rear window.
Best Heating Settings
or ), air will blow from the side dashboard vents.
1669736_15_Mazda3_SSG_041514.indd 27 4/15/14 2:17 PM
Page 29
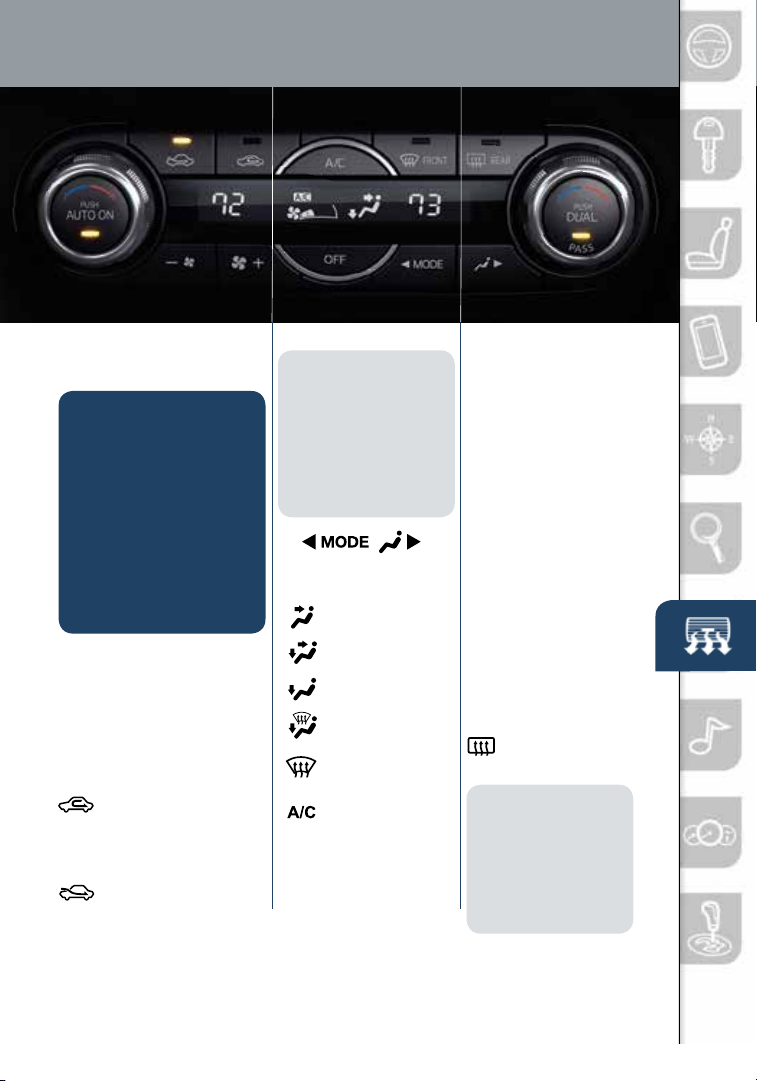
Automatic Climate Control
DRIVER TEMPERATURE
CONTROL DIAL
AUTO ON: Push dial
to turn automatic Air
conditioning system
on (indicator light on).
Rotate dial to select your
desired set temperature
(shown above). The
airow mode and the
amount of airow will be
automatically controlled
in accordance with the
set temperature.
Fan Control
• Push the fan (+) and (-)
buttons to select the
desired fan speed.
• Push OFF to turn climate
control system off.
Push to recirculate
cabin air to reduce
outside odors and
improve cooling.
Push for fresh
air circulation.
NOTE: Automatic
climate control will
allow you to maintain
individual preset cabin
temperatures for the
driver and passenger
when DUAL mode
is selected.
Push to select the
following airow mode:
Dashboard vents
Dashboard
and oor vents
Floor vents
Defroster and
oor vents
Push to defrost
the windshield.
Push to
manually turn
air conditioning
on or off.
PASSENGER
TEMPERATURE
CONTROL DIAL
Push to turn DUAL
mode ON/OFF.
• With DUAL mode
ON (indicator on),
rotate the dial to
set passenger
side temperature
separate from
the driver’s side
(shown above).
• With DUAL mode
OFF (indicator off),
driver controls the
temperature setting
on both sides.
Push to defrost
the rear window.
NOTE: Automatic
temperature control
always works even
if the AUTO indicator
turns off by changing
the fan speed or
airow mode.
28
1669736_15_Mazda3_SSG_041514.indd 28 4/15/14 2:17 PM
Page 30
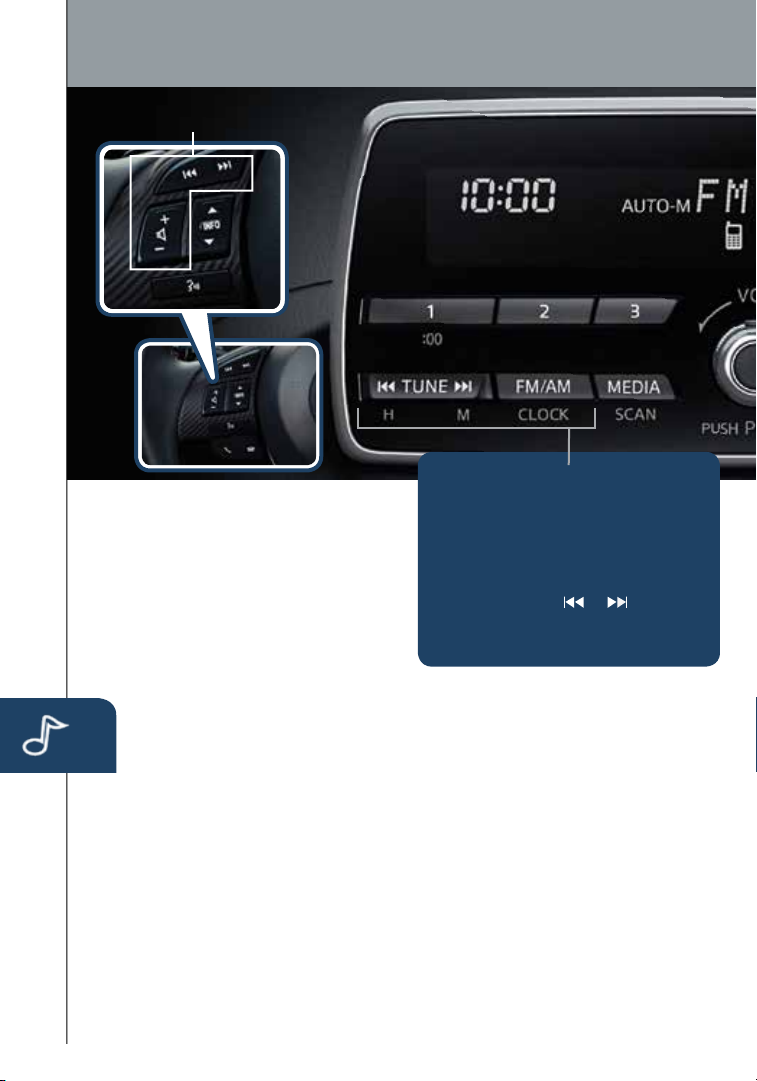
Audio Controls (without Mazda Connect)
AUDIO CONTROLS
SETTING THE CLOCK
POWER ON/OFF
Push the POWER/VOL dial.
MEDIA SELECTION
FM/AM: Push FM/AM button to
select the FM1, FM2, or AM band.
The selected band will be
indicated in the display.
MEDIA: Push to select
Bluetooth, CD, USB, or AUX.
TUNING
The radio has the following
tuning controls:
Manual: Lightly push the TUNE
arrows to manually change the
frequency up or down.
Seek: Push and hold the TUNE
arrows until a beep is heard to
automatically seek a higher or lower
frequency with a station.
Scan: Push and hold the MEDIA
button to automatically sample
strong stations for about 5 seconds
29
each. Push again to cancel.
1 Push and hold FM/AM (CLOCK)
button until a beep sound is
heard. The current time will ash.
2 To adjust the time, push (and
hold) the Hour or Minute set
button (TUNE
3 Push the FM/AM (CLOCK)
button again.
Preset Channel: Push 1/2/3 /4/5/6
button to select a station stored in
memory. To store a station, push
and hold 1/2/3/4/5/6 until station
is displayed.
Auto Memory Tuning: Push and
hold the AUTO-M button until a
beep is heard to store an additional
6 stations with a strong signal on
each FM and AM band without
disturbing the previously stored
stations. To return to the previously
stored stations, push FM/AM button.
Use this when travelling outside
your local area. Refer to the Owner’s
Manual for complete details.
or ).
1669736_15_Mazda3_SSG_041514.indd 29 4/15/14 2:17 PM
Page 31
www.MazdaUSA.com
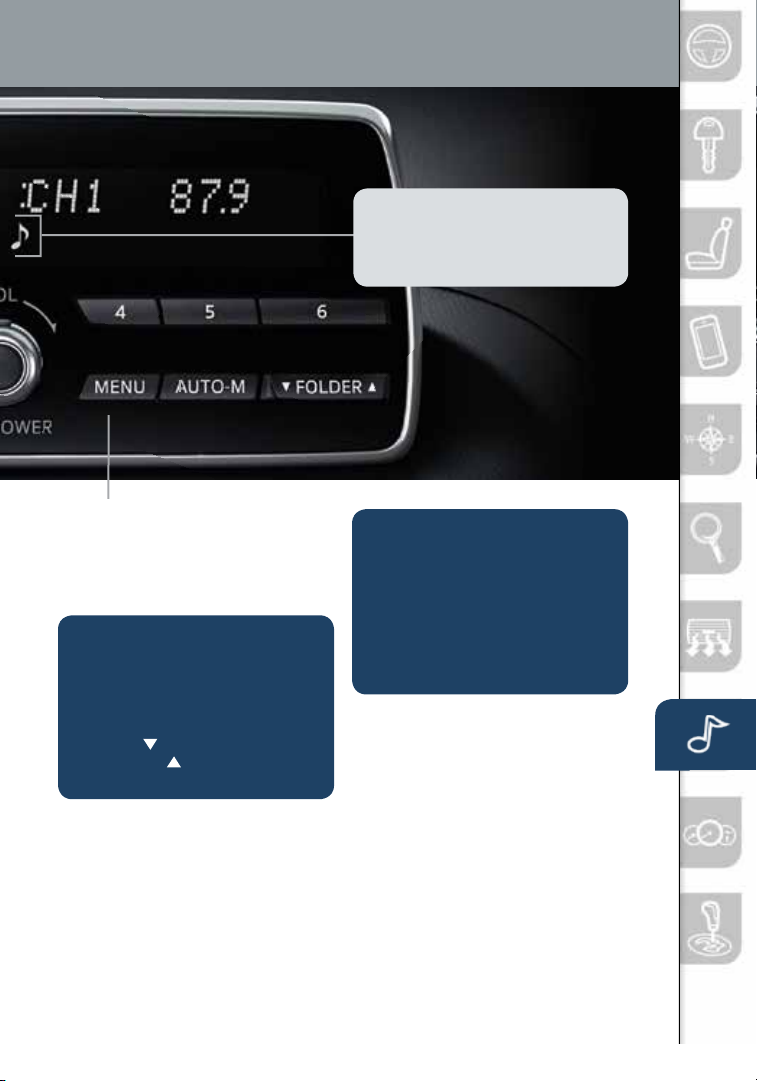
NOTE: To use BT audio, make sure
the musical note icon is displayed in the
audio display. Some Bluetooth
device s need a certain amount of time
before the icon is displayed.
®
audio
MENU: Push the MENU button to
adjust the audio sound, turn audio
operation beep on and off, perform
Bluetooth setup, or change the
clock between 12 and 24 hr times.
LOADING A CD
• CD player is located just in
front of the transmission gear
selector (if equipped).
• Insert the CD into the slot,
FOLDER SEARCH
(during MP3/WMA/AAC
CD or USB playback)
label-side up. The auto
loading mechanism will load
the CD and begin to play it.
• To change to the previous
folder, push the folder down
button
up button
, or push the folder
to advance to the
next folder.
30
1669736_15_Mazda3_SSG_041514.indd 30 4/15/14 2:17 PM
Page 32
Audio Controls (with Mazda Connect)
BLUETOOTH® AUDIO
Bluetooth® enabled phones and audio players
provide an opportunity to play music through the
audio system with no wires attached.
Some phone models do not support all features.
Go to www.MazdaUSA.com/bluetooth or contact
(800) 430-0153 for further assistance or to repor t
a phone /MP3 device concern.
Playing Bluetooth® (BT) Audio
1 Make sure BT audio device is paired to
your vehicle.
2 Turn on BT audio device.
3 Select Bluetooth from Sources.
See your Owner’s Manual for further information on:
· Pandora · Aha · Stitcher
AUDIO OPERATION
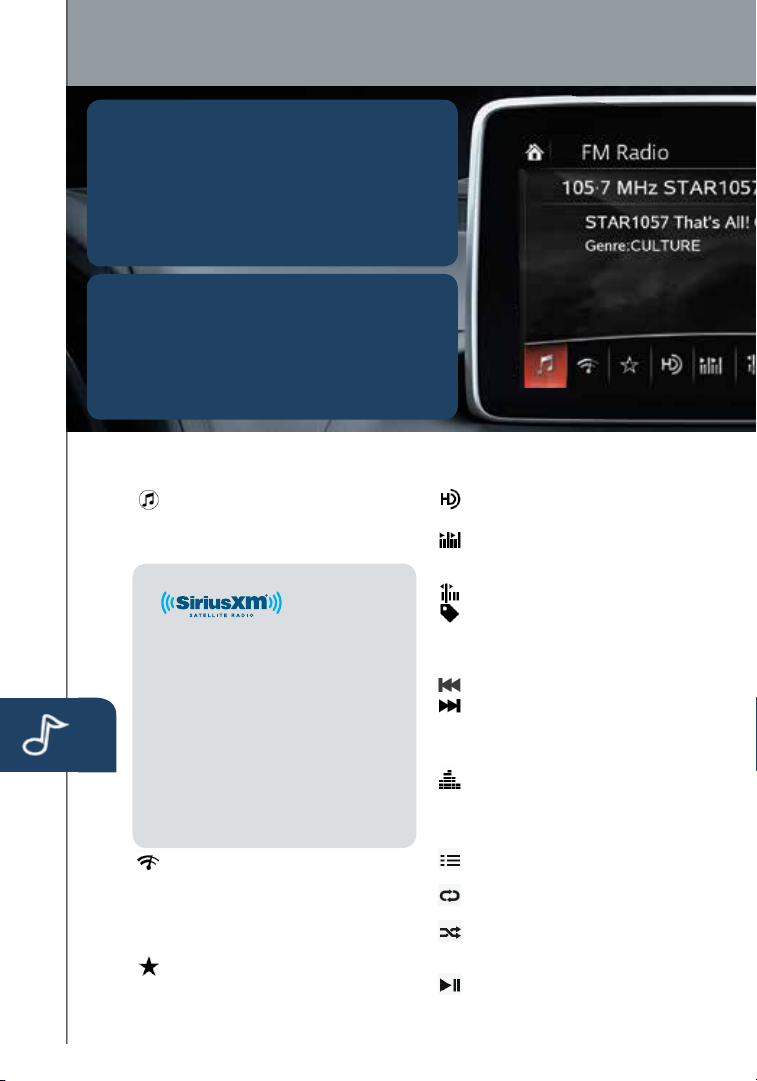
The following icons are displayed on the screen:
31
SOURCES: Displays Audio menu
to change audio source (FM / AM
/ XM / Aha / Pandora / Stitcher /
Bluetooth / USB / CD / AUX).
NOTE:
• New Mazda
with SiriusXM
receive an introductory subscription
with a limited term tr ial offer to over 150
channels of SiriusXM Satellite Radio.
Enjoy commercial-free music, plus
sports, news, entertainment, and ever y
premium channel in your vehicle. Call
877-447-0011 to activate. See the
Owner’s Manual and/or dealer for details.
• In order to use Aha, Pandora and
Stitcher as audio sources, the App must
be installed on your phone. These A pps
stream music using your data plan and
listening to them counts towards your
monthly cellular data usage.
AUTO MEMORY: Displays a
list of 10 strongest radio stations.
vehicles equipped
®
Satellite Radio will
Because station strength
changes as you drive, select
Update Station List icon to
re-scan for strong stations.
FAVORITES: Displays list of
your favorite AM, FM, and XM
radio stations.
HD RADIO: Switches HD Radio
On /Of f.
SCAN: Scans radio stations or
songs (scanning stops at each one
for 5 seconds). Select again to stop.
TUNER: Displays manual radio tuner.
TAG : Saves artist and title
and sends them to your Apple
device (for Apple devices
with USB use only).
SEEK PREVIOUS/NEXT:
Selects previous or next receivable
radio station or song. Press and
hold to change radio station
continually.
SETTINGS: Adjusts the audio
quality level (bass, treble, etc.).
The following icons are displayed
on the CD screen only:
TRACK LIST: Displays the track
list of the CD.
RE P E AT: Repeats the current
song. Select again to stop.
SHUFFLE: Plays the songs on
the CD in random order. Select
again to stop.
PL AY/PAU S E : Plays and Pauses
the CD.
1669736_15_Mazda3_SSG_041514.indd 31 4/15/14 2:17 PM
Page 33
www.MazdaUSA.com
GRACENOTE
The Gracenote media database is used to improve
voice recognition of artist and album names with the
Mazda Hands Free system. To make best use of the
voice recognition, install the most recent database.
1 Load the Gracenote update on a memory stick
from ww w.MazdaUSA.com/USB. Insert the
memory stick into the USB por t.
2 Go to System Settings in the infotainment system.
3 Select Music Database Update.
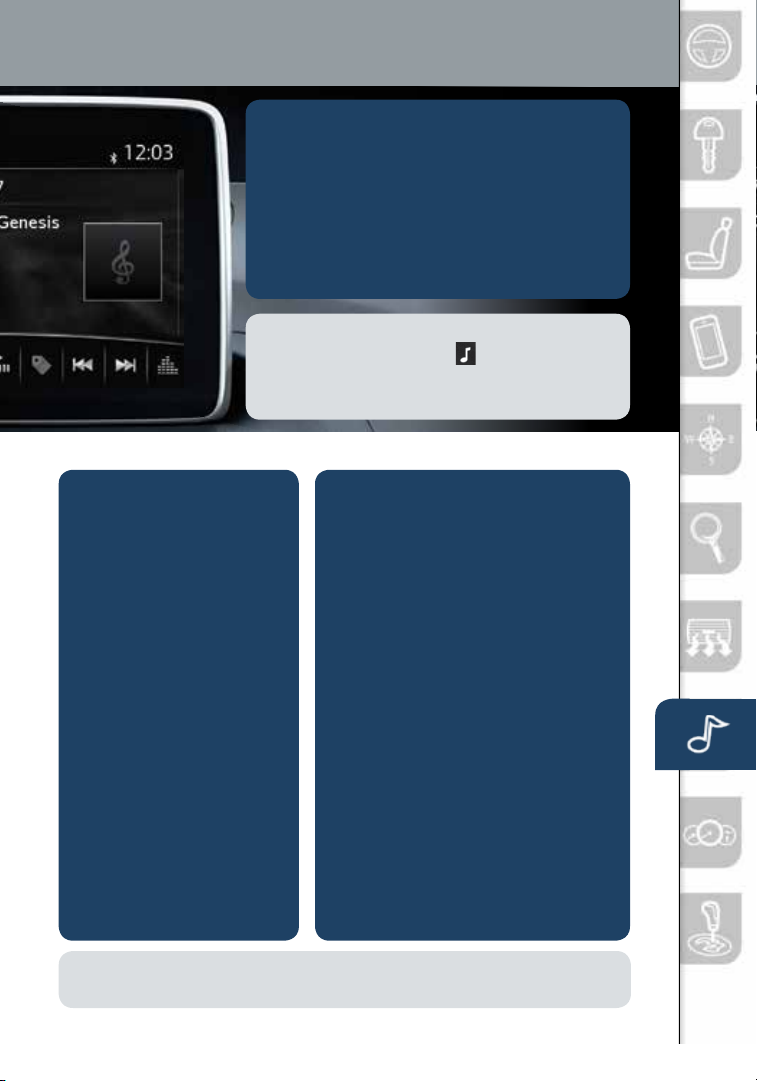
NOTE: To use BT audio, make sure the musical
icon is displayed by going to
Device settings.
Some Bluetooth
amount of time before the icon
HD RADIO
HD radio has a special
receiver which allows it to
receive digital broadcasts
(where available) in addition
to the analog broadcasts
it already receives. Digital
broadcasts have better
sound quality than analog
broadcasts as digital
broadcasts provide free,
crystal clear audio.
When the HD radio button
is ON (red), there could be a
noticeable difference in sound
quality and volume when a
change from digital to analog
signals occurs. If the sound
quality and volume becomes
noticeably diminished or cuts
off, select the HD button to
turn OFF HD radio (not red).
Bluetooth in
®
audio devices need a cer tain
is displayed.
AUDIO OPERATION
USING VOICE
Audio operation and media selection
can be done using voice. Push the
“TALK” button on the steering wheel,
wait for a beep, then say a command in
a clear, natural voice (not too fast or too
slow). Some common commands are
listed below.
Play (and any of the following):
AM, FM, XM, CD, Bluetooth, Aha,
Pandora, Stitcher, USB, AUX
Play or Resume / Pause or
Stop / Next or Previous
Play (and any of the following):
Song, Playlist <playlist name>,
Artist <artist name>, Album
<album name>, Genre <genre
name>, Folder <folder name>
Tune to Station <frequency AM or FM>
Tune to Channel Number (XM)
NOTE: Push the TALK button and say “Help” at any time to hear a list of
available commands.
1669736_15_Mazda3_SSG_041514.indd 32 4/15/14 2:17 PM
32
Page 34
Audio USB and AUX Inputs
PORTABLE AUDIO PLAYER
(without CD player) (with CD player)
INTEGRATION USING THE
USB PORT OR AUX JACK
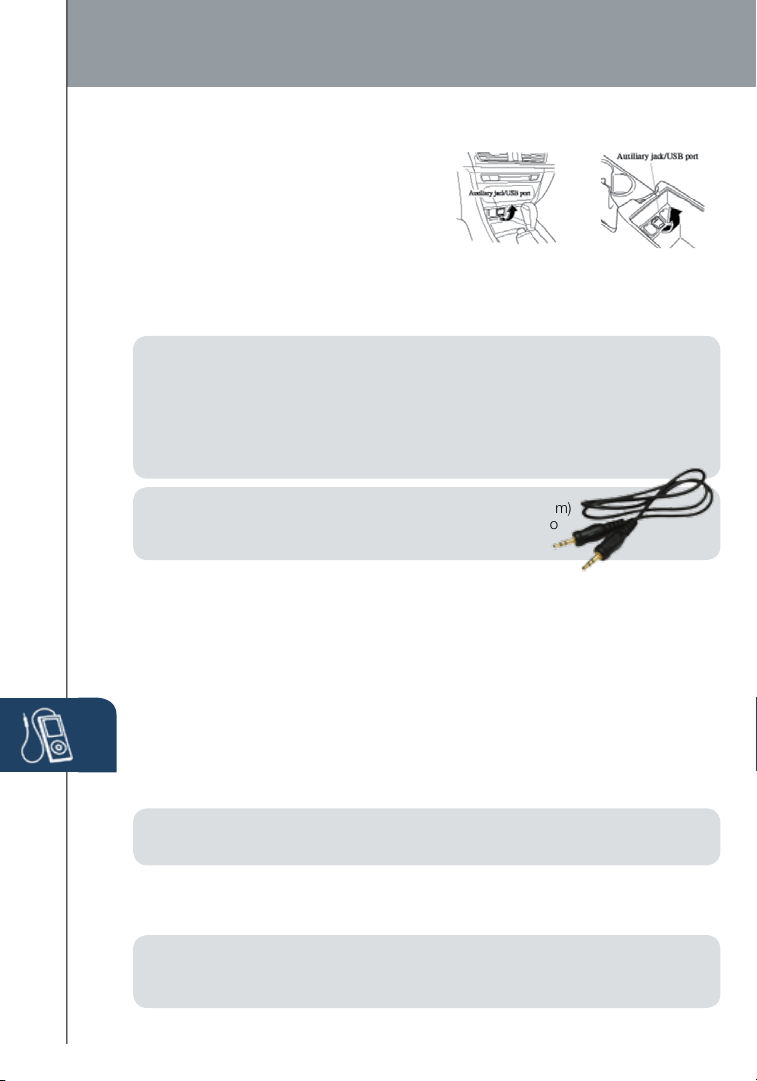
Your vehicle is equipped with a USB port
and auxiliary AUX jack, conveniently located
below the climate controls (without CD
player) or in the center console (with CD player), that allows you to play your
iPod, USB device, or portable audio player through the vehicle’s audio system.
The center console is useful for storing your personal media/phone devices.
Learn the system when parked and do not let it distract you while driving.
IM P O R TA N T:
• Set the volume level on your portable audio player to the highest level before
distortion starts, then use the vehicle’s audio system to adjust the volume.
• Unplug any device from the USB por t and accessory socket before turning off
the vehicle. Leaving devices plugged in can drain the batter y and cause issues
during the Bluetooth pairing process at star tup. Wait about 15 seconds after
starting the vehicle before plugging any thing into the USB port.
NOTE: You will need an audio cable with an 1/8 inch (3.5 mm)
mini stereo plug (available as a Genuine Mazda accessory) to
connect your portable audio player into the AUX jack.
1 Locate the USB port or AUX jack.
2 Connect the device plug into the portable audio player and into the
USB port or AUX jack.
3 Turn the vehicle audio system on.
4 • Audio Controls (without Mazda Connect): Push the MEDIA
button on the audio unit to switch to the AUX or USB mode.
• Audio Controls (with Mazda Connect): Select AUX or USB from
the Sources menu.
5 • USB Port: Use the vehicle’s audio system or steering wheel controls
to control the connected USB device.
• AUX Jack: Use the portable audio player controls to play music.
Refer to the Owner’s Manual for additional information.
NOTE: When using a USB memor y stick, the system plays the rst audio le when
restar ting the vehicle. It does not start where it left off when turning of f the engine.
12 VOLT ACCESSORY SOCKETS
The accessory socket in the dash is on with ignition on and the accessory socket
in the center console is always on.
NOTE: When using the accessory socket in the center console, make sure to
disconnect any device from it when turning off the ignition, otherwise the vehicle’s
33
batter y could go dead.
1669736_15_Mazda3_SSG_041514.indd 33 4/15/14 2:17 PM
Page 35
i-ELOOP
i-ELOOP (if equipped)
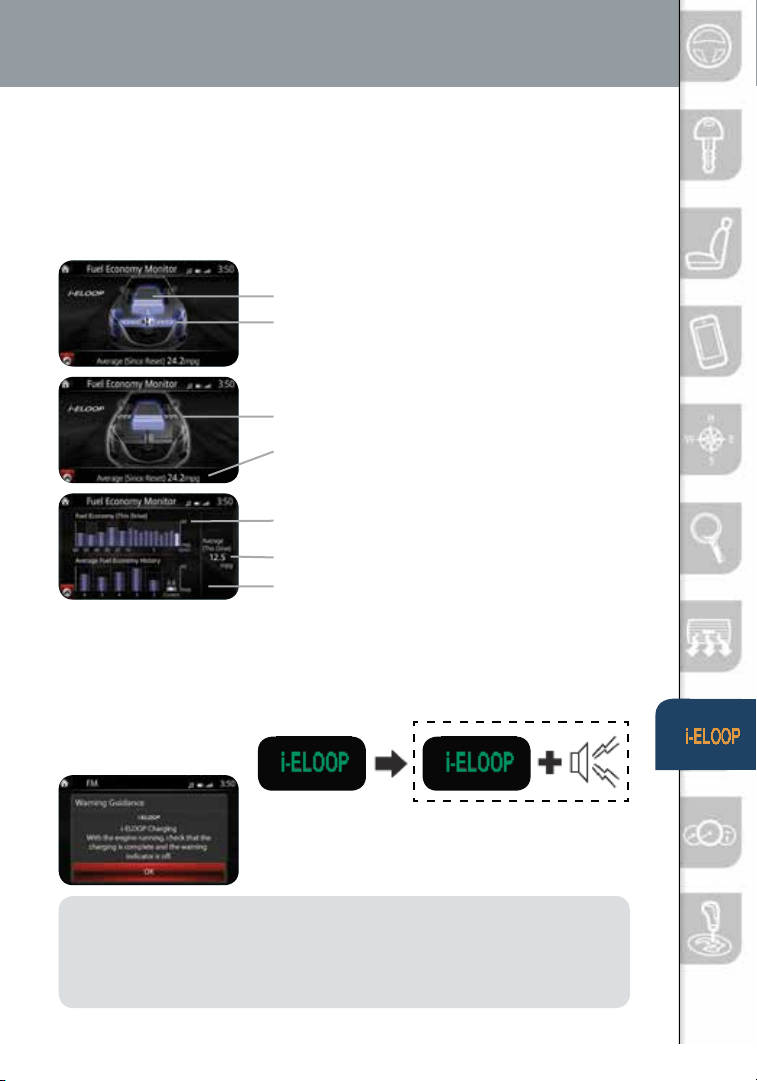
The Mazda-unique regenerative braking system (i-ELOOP) generates
and stores electrical energy in a capacitor during deceleration. Through
efficient energy regeneration, storage, and usage, fuel economy is
improved. To view i-ELOOP information, select Applications from
the Home screen, then scroll down to Fuel Economy Monitor.
Capacitor charge level
Regeneration level
Capacitor discharge
Average fuel consumption since reset
60-minute Fuel Economy
0-10 min.: Every 1 min.
10-60 min.: Every 10 min.
Average fuel consumption for this drive
Average Current Fuel History:
Average since reset 2nd to 6th history
i-ELOOP Pre-Charge Mode
If the capacitor is discharged because of vehicle storage (the vehicle is
parked for long periods of time), the i-ELOOP indicator in the instrument
cluster will ash and a
warning screen appears
on the screen of the
infotainment system.
In Pre-charge
mode
Driving in Pre-charge mode
When this warning screen appears, do not drive the
vehicle. Allow the engine to idle until the warning
screen disappears. This time is needed for normal
generator operation.
NOTE:
• If the vehicle is jump started, leave the jumper cables connected until the
warning message is no longer displayed.
• If the vehicle is driven while the warning screen is displayed, a warning sound
will be heard and power steering assist will be limited.
1669736_15_Mazda3_SSG_041514.indd 34 4/15/14 2:17 PM
34
Page 36
Instrument Cluster (Type A)
OUTSIDE
TEMPERATURE DISPLAY
The outside temperature unit can
be switched between °C and °F
using System Settings in the
infotainment system.
SPEED UNIT
SELECTOR
NOTE: See Owner’s Manual for more details and explanations.
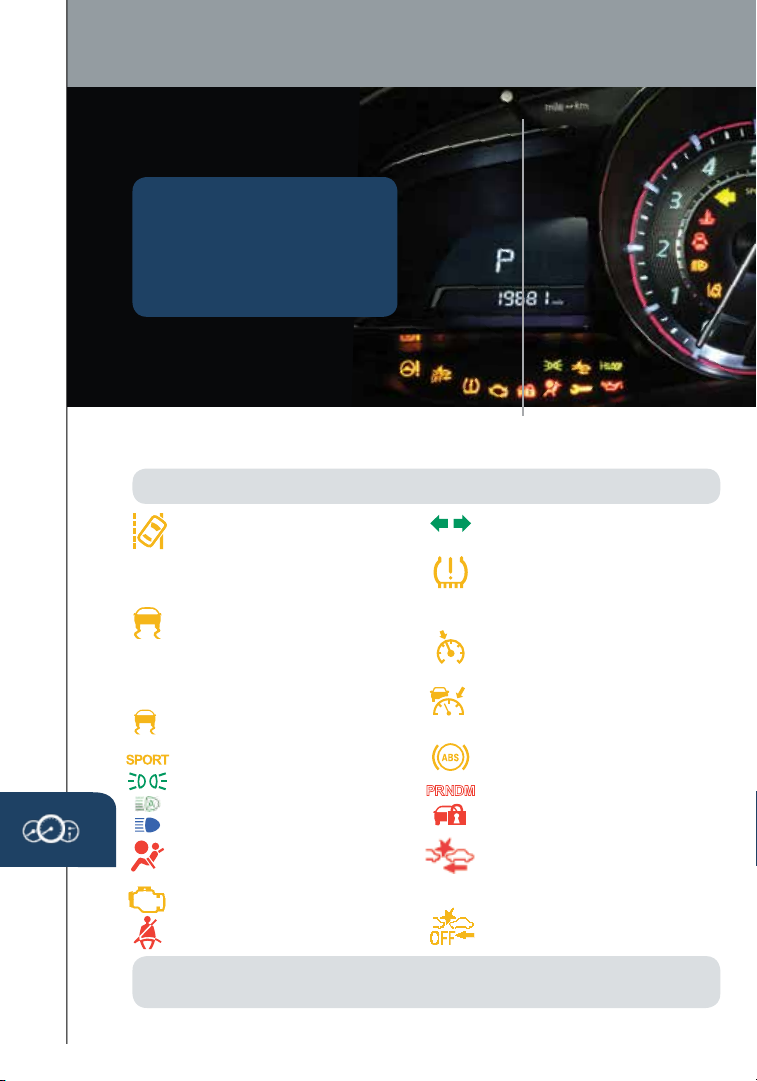
Lane Departure Warning
System On (AMBER)/
Lane Detected (GREEN) (p. 20)
AFS
Adaptive Front Lighting System
OFF
(AFS) OFF (p. 26)
Traction Control System (TCS)/
Dynamic Stability Control (DSC)
On: TCS/DSC malfunction
Flashing: TCS/DSC operating
BSM
BSM OFF (Blind Spot
OFF
Monitoring) (p. 2 1)
Dynamic Stability Control
(DSC) Off Indicator Light
OFF
SPORT Mode On (p. 39)
Lights On (Exterior)
High Beam Control On
Headlight High Beams On
Air Bag/Front Seat Belt
Pretensioner System
Malfunction
Check Engine Light
Seat Belt Unbuckled/
Malfunction
TPMS NOTE: Low ambient temperature and/or high altitude may cause tire pressures to
35
change and turn the TPMS warning light on. If the warning light comes on, see p. 7.
Turn Signals/Hazard
Warning Indicator Lights
Tire Pressure Monitoring System
(TPMS) Warning Light (p. 7)
On/Warning Beep: Low ti re pressure in on e
or more tires. Flashing: TPMS Malfunction
Cruise Main Indicator Light
On (AMBER)/Cruise Set
Indicator Light On (GREEN)
Mazda Radar Cruise Control
Warning Light On (AMBER)
Set Indicator (GREEN) ( pp. 17-18 )
ABS (Antilock Brake
System) Malfunction
Shift Position Indicator Light
Security Indicator Light
Forward Obstruction Warning
(FOW) and Smart City Brake
System (SCBS)
Flashing red: FOW and SCBS are operating.
Amber: FOW and/or SCBS malfunction.
FOW and SCBS are turned off.
3
1669736_15_Mazda3_SSG_041514.indd 35 4/15/14 2:17 PM
Page 37
www.MazdaUSA.com
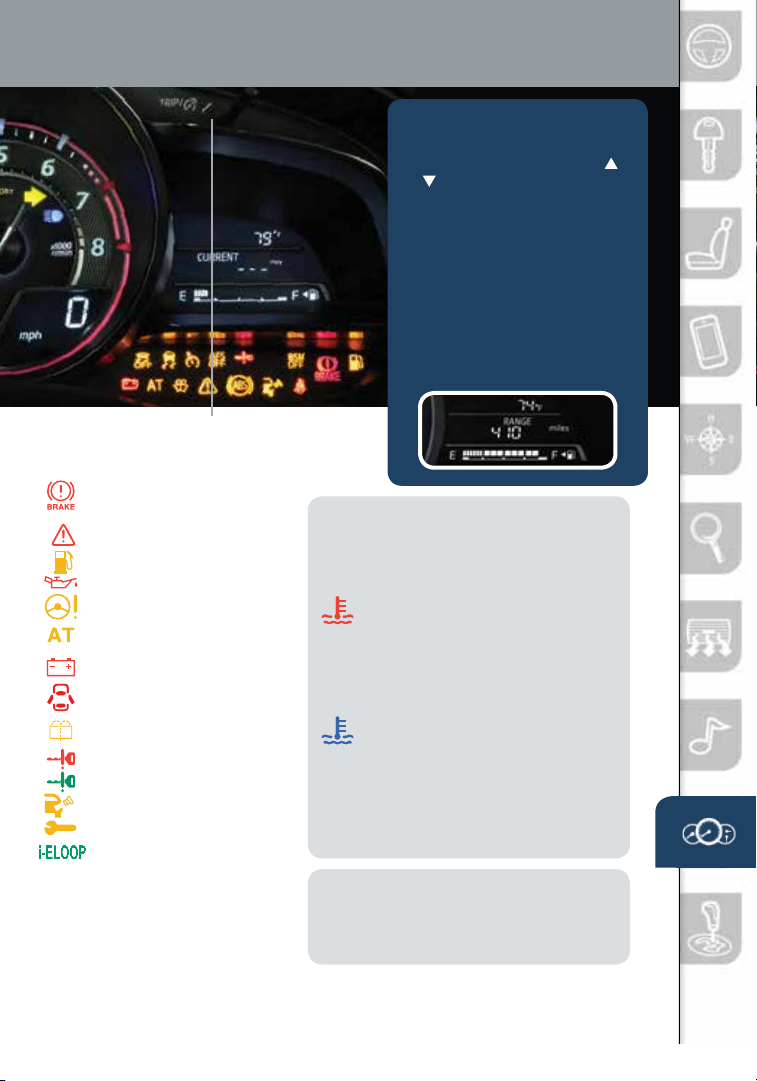
TRIP COMPUTER
The following information can
be selected by pushing the
or of the INFO button on the
steering wheel.
• Approximate distance you
can travel on the available
fuel (RANGE)
• Average fuel economy
• Current fuel economy
• Average vehicle speed
• To reset, push and hold
the INFO button for more
than 1.5 seconds.
DASHBOARD ILLUMINATION/
DIMMER
Brake Warning Light
Parking brake on/low brake
uid/malfunction
1
/TRIP METER2
Master Warning Light
Low Fuel Level
Low Engine Oil Pressure
Power Steering Malfunction
Automatic Transaxle
Warning Light
Charging System
Malfunction
Door/Trunk/Tailgate Ajar
Low Washer Fluid Level
Warning Light
KEY Warning Light RED
KEY Indicator Light GREEN
Check Fuel Cap
Perform Maintenance
i-ELOOP Status (p. 34 )
On: Power generation
Flashing: Pre-Charge Mode
1
• Rotate the knob to adjust the brightness
of the instrument cluster and other
dashboard illuminations.
2
• Push to toggle between trip meter (A & B).
• When a trip meter is selected, push and
hold to reset to zero.
3
• Push the knob for 1.5 seconds or more to
change the speed units between km/h and mph.
ENGINE COOL ANT TEMP LIGHTS
Since this vehicle does not use an engine
coolant temperature gauge, red and blue
engine coolant temperature lights are used to
indicate high and low coolant temperature.
Red Coolant Temp Light
Flashing: Engine is starting to run hot.
Drive slowly to reduce engine load.
On: Engine is overheating. Safely pull
over to the side of the road and turn
the engine off. Refer to the Owner’s
Manual for more information.
Blue Coolant Temp Light
On: Engine coolant is cold and no warm
air is available for heater/defroster.
Off: Engine coolant is warm and warm air
is available for he ater/defroster. The light
may stay on for a few minutes after startup when the engine is cold, but the vehicle
can be driven with the light on or off.
NOTE: The instrument cluster becomes
dimmer when the headlights are on. If the
illumination is too dim or too bright with the
headlights on, simply rotate the knob to adjust
the brightness of the illumination.
36
1669736_15_Mazda3_SSG_041514.indd 36 4/15/14 2:17 PM
Page 38
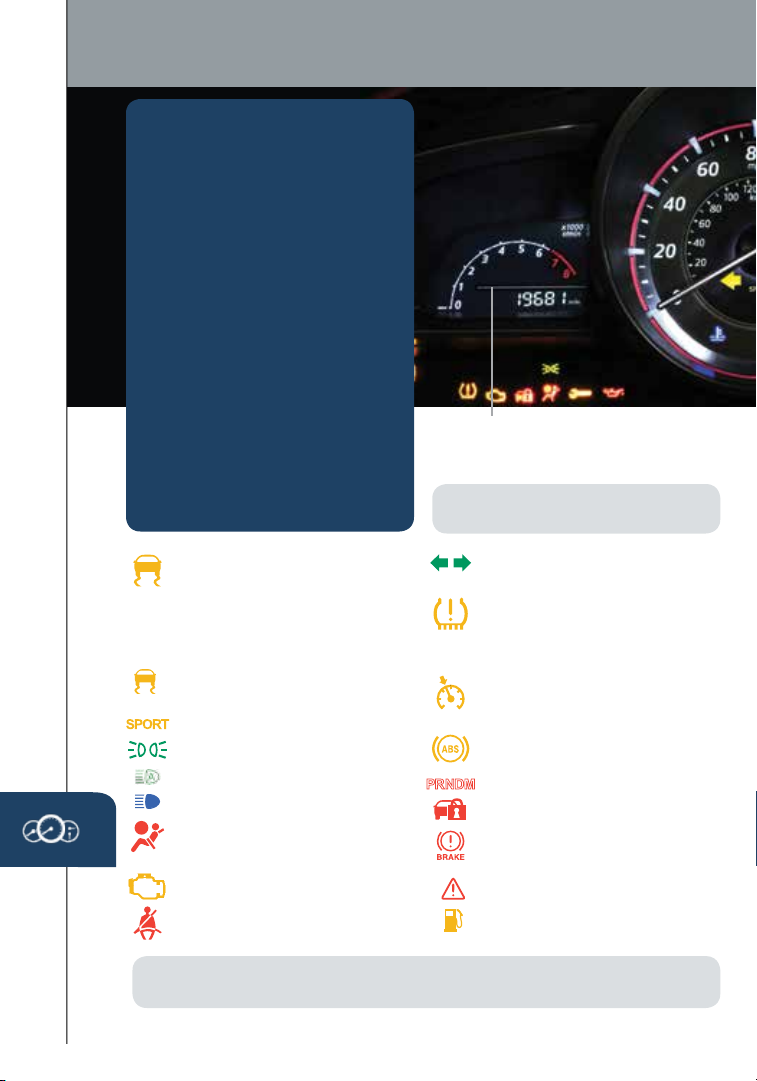
Instrument Cluster (Type B)
OUTSIDE
TEMPERATURE DISPLAY
The outside temperature unit can
be switched between °C and °F
using the following procedure
Without Infotainment:
1 Push the INFO button with
the ignition OFF and continue
pressing the INFO button for 5
seconds or longer after switching
the ignition ON. The outside
temperature display ashes.
2 Push the up or down part of
the INFO switch to change the
temperature unit.
3 Push and hold the INFO button
for 3 seconds or longer until it
stops ashing.
With Infotainment:
1 Go to System Settings.
TACHOMETER
NOTE: See Owner’s Manual for more
details and explanations.
Traction Control System (TCS)/
Dynamic Stability Control (DSC)
On: TCS/DSC malfunction
Flashing: TCS/DSC operating
BSM
BSM OFF (Blind Spot
OFF
Monitoring)
Dynamic Stability Control
(DSC) Off Indicator Light
OFF
SPORT Mode On (p. 39)
Lights On (Exterior)
High Beam Control On
Headlight High Beams On
Air Bag/Front Seat Belt
Pretensioner System
Malfunction
Check Engine Light
Seat Belt Unbuckled/
Malfunction
TPMS NOTE: Low ambient temperature and/or high altitude may cause tire pressures to
37
change and turn the TPMS warning light on. If the warning light comes on, see p. 7.
1669736_15_Mazda3_SSG_041514.indd 37 4/15/14 2:17 PM
(p. 21)
Turn Signals/Hazard
Warning Indicator Lights
Tire Pressure Monitoring System
(TPMS) Warning Light
On/Warning Beep: Low ti re pressure in on e
or more tires. Flashing: TPMS Malfunction
Cruise Main Indicator Light
On (AMBER)/Cruise Set
Indicator Light On (GREEN)
ABS (Antilock Brake
System) Malfunction
Shift Position Indicator Light
Security Indicator Light
Brake Warning Light
Parking brake on/low brake
uid/malfunction
Master Warning Light
Low Fuel Level
(p. 7)
Page 39
www.MazdaUSA.com
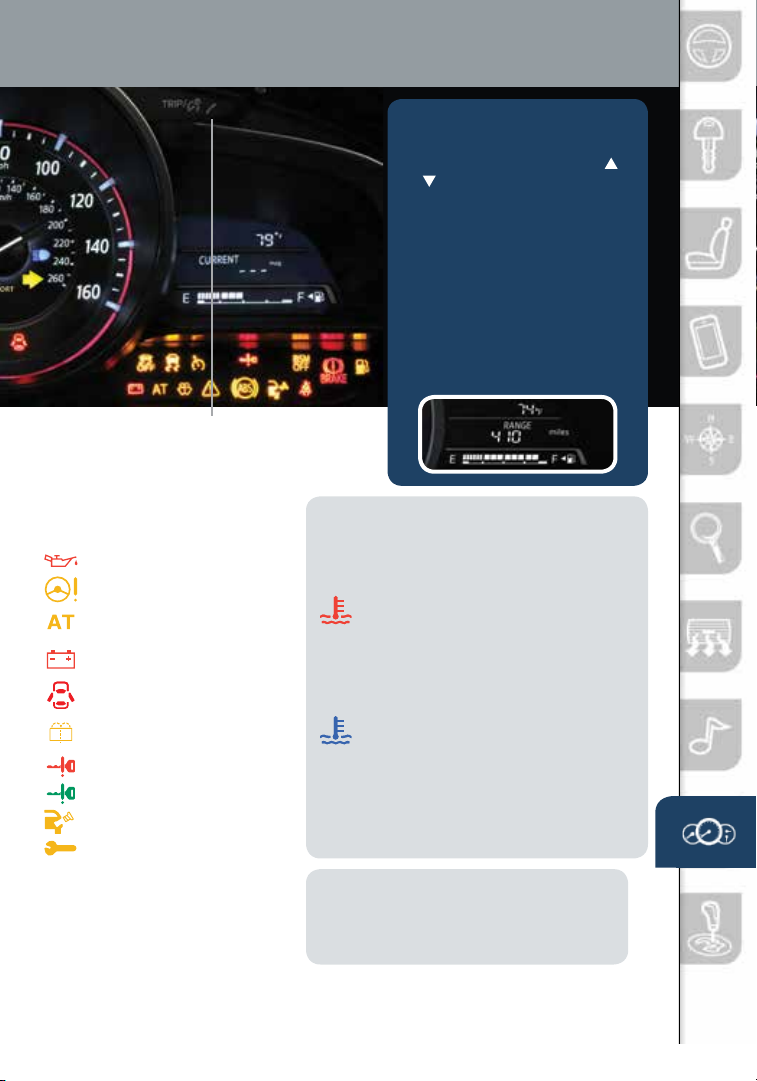
TRIP COMPUTER
The following information can
be selected by pushing the
or of the INFO button on the
steering wheel.
• Approximate distance you
can travel on the available
fuel (RANGE)
• Average fuel economy
• Current fuel economy
• Average vehicle speed
• To reset, push and hold
the INFO button for more
than 1.5 seconds.
DASHBOARD ILLUMINATION/
DIMMER
Low Engine Oil Pressure
Power Steering Malfunction
Automatic Transaxle
Warning Light
Charging System
Malfunction
Door/Trunk/Tailgate Ajar
Low Washer Fluid Level
Warning Light
KEY Warning Light RED
KEY Indicator Light GREEN
Check Fuel Cap
Perform Maintenance
1
• Rotate the knob to adjust the brightness
of the instrument cluster and other
dashboard illuminations.
2
• Push to toggle between trip meter (A & B).
• When a trip meter is selected, push and
hold to reset to zero.
1
/TRIP METER2
ENGINE COOL ANT TEMP LIGHTS
Since this vehicle does not use an engine coolant
temperature gauge, red and blue engine coolant
temperature lights are used to indicate high and
low coolant temperature.
Red Coolant Temp Light
Flashing: Engine is starting to run hot.
Drive slowly to reduce engine load.
On: Engine is overheating. Safely pull over
to the side of the road and turn the engine
off. Refer to the Owner’s Manual for more
information.
Blue Coolant Temp Light
On: Engine coolant is cold and no warm air
is available for he ater/defroster.
Off: Engine coolant is warm and warm air is
available for heater/defroster. The light may
stay on for a few minutes after start-up when
the engine is cold, but the vehicle can be
driven with the light on or of f.
NOTE: The instrument cluster becomes
dimmer when the headlights are on. If the
illumination is too dim or too bright with the
headlights on, simply rotate the knob to adjust
the brightness of the illumination.
38
1669736_15_Mazda3_SSG_041514.indd 38 4/15/14 2:17 PM
Page 40
Transmission
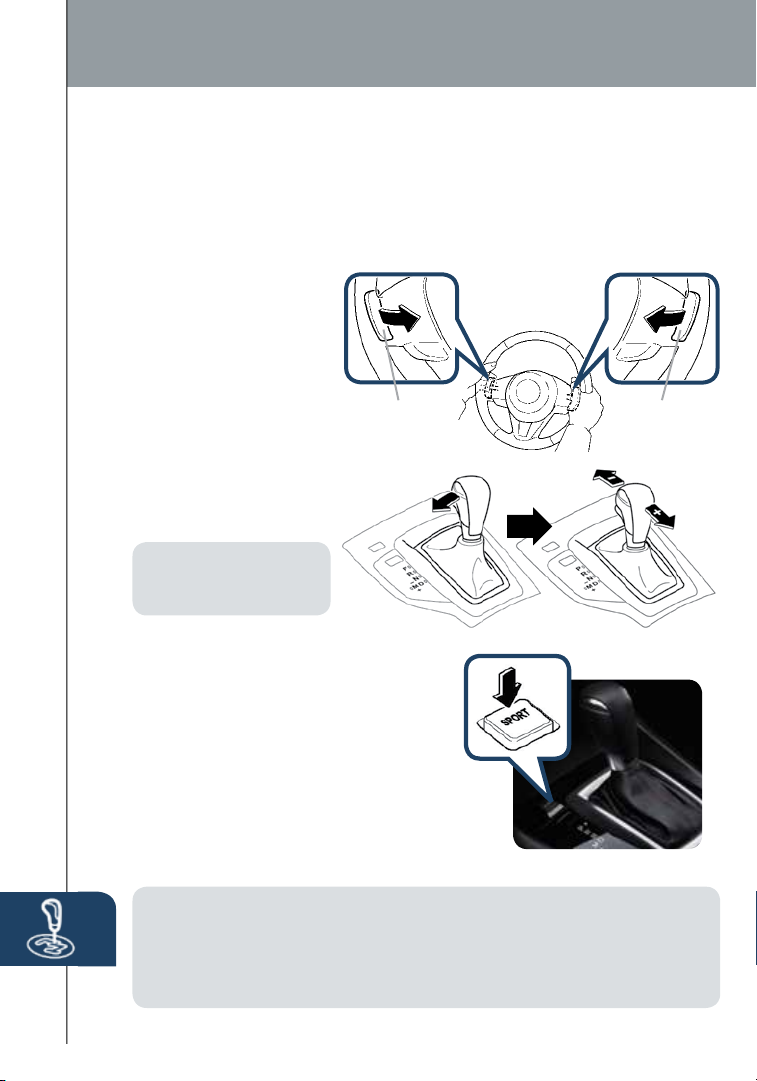
MANUAL SHIFT MODE (if equipped)
Manual Shift Mode gives you the feel of driving a manual transmission by
allowing you to manually shift to control engine rpm and torque when more
control is desired.
To Use Manual Shift Mode:
• Shift the lever from D to M.
To Shift Up
To A Higher Gear:
• Pull the steering UP
switch (+) once or
tap the shift lever
back (+) once.
To Shift Down
To A Lower Gear:
• Pull the steering DOWN
switch (-) once or tap
the shift lever forward
(-) once.
NOTE: Steering Shift
Switches can be used in
“D” or “M”.
- DOWN Shift
Switch
DRIVE SELECTION (if equipped)
By selecting Sport mode, greater vehicle
response is achieved through automatic
adjustments in transmission shift control
and engine throttle control. This provides
additional quick acceleration which may
be needed to safely make maneuvers such
as lane changes, merging onto freeways, or
passing other vehicles.
Push the SPORT button to switch to SPORT
mode and the SPORT mode indicator light in the
instrument cluster turns on. Push again to turn off.
(if equipped)
+ UP Shift
Switch
NOTE:
• If the SET button of the cruise control is pushed while in SPORT mode, SPORT
mode is switched off. SPORT mode cannot be turned on or off when cornering.
39
1669736_15_Mazda3_SSG_041514.indd 39 4/15/14 2:17 PM
• When the ignition is switched off, SPORT mode is also switched off.
• Fuel consumption increases slightly when using SPORT mode.
Page 41
www.MazdaUSA.com
ACTIVE ADAPTIVE SHIFT (AAS) CONTROL
AAS will automatically adjust how and when the transmission shifts gears
based on road conditions and your driving style. The transmission may stay
in a lower gear longer than usual when going up or down hills or driving
around corners. This feature gives you better control and a more connected
driving experience.
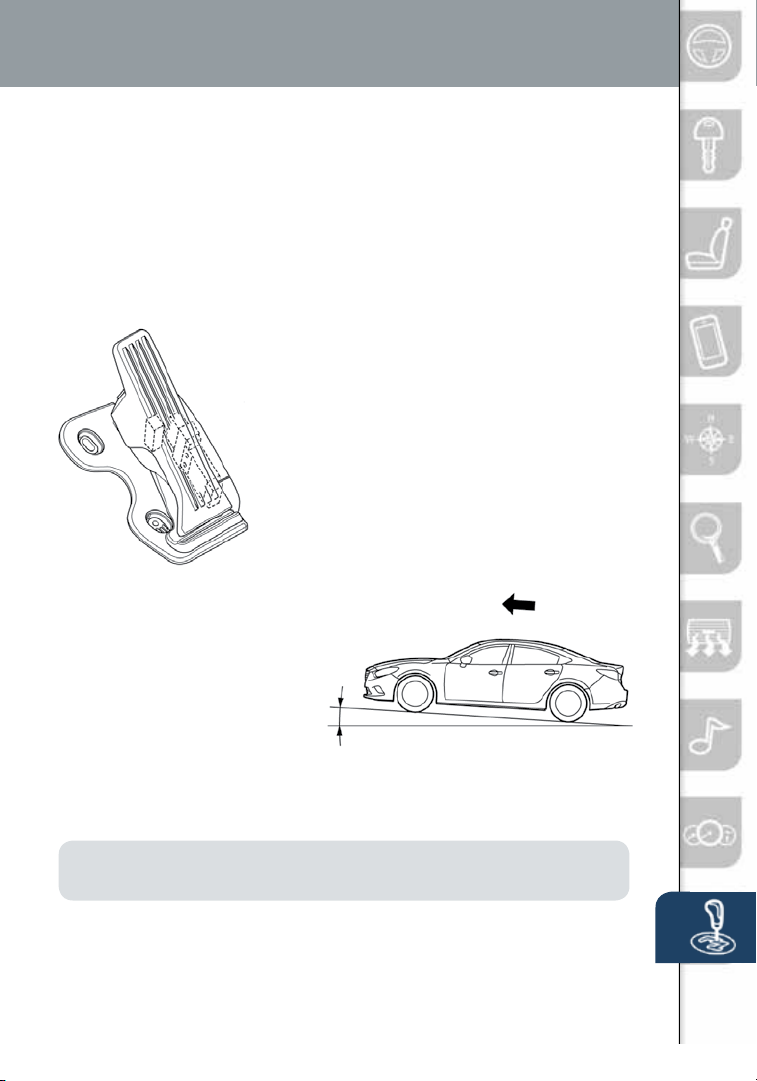
ACCELERATOR PEDAL KICKDOWN SWITCH*
The accelerator pedal is equipped with a
kickdown switch designed to allow optimal
engine performance while accelerating.
When you depress the accelerator 95% of the
way, you will feel an increase in resistance.
Push harder, and you will feel a click as you
activate the kickdown switch. The transmission
will usually downshift (depending on engine
speed) and the engine will switch to maximum
power mode. This kickdown switch function is
the same in both Manual mode and in “D”.
*Available on vehicles with automatic transmission only.
HILL LAUNCH ASSIST (HLA)
HLA helps assist you when
accelerating the vehicle from
a stop while on a hill or slope.
When the brake pedal is released
and the accelerator pedal is pushed, HLA prevents the vehicle from rolling
forward or backward. It operates on a downward slope when the shift lever
is in the reverse (R) position, and on an upward slope when the shif t lever is
in a position other than the reverse (R) position.
IM P O R TA N T: The HL A system will hold the vehicle for a maximum of 2.0
seconds while the driver is changing from the brake pedal to the accelerator pedal.
40
1669736_15_Mazda3_SSG_041514.indd 40 4/15/14 2:17 PM
Page 42
Cupholders
The Mazda3 is equipped with cup holders and bottle holders conveniently
located throughout the cabin.
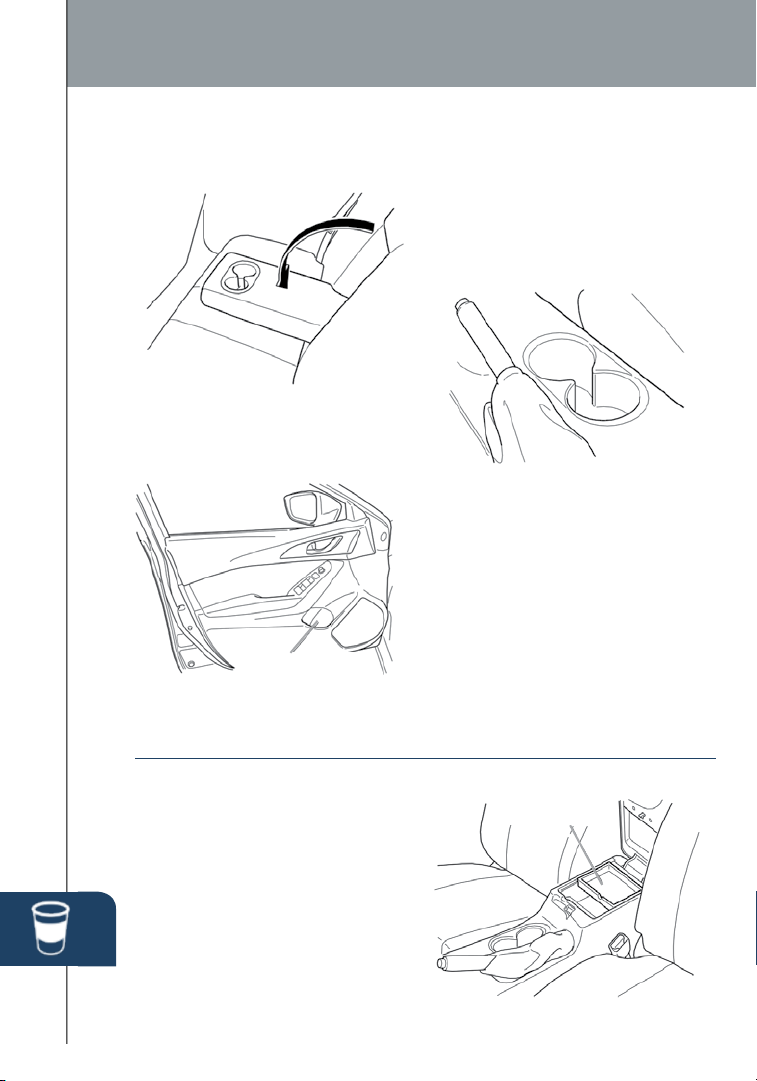
The rear cup holders are located
on the rear center armrest.
The front cup holders are located
in the center console behind the
shifter and commander switch
(if equipped).
Bottle Holder
Bottle holders are located on
the inside of the doors.
STORAGE
The Mazda3 is equipped with
several storage locations:
• Glovebox
• Center Console
(including storage tray)
• Door Pockets
Storage Tray
41
1669736_15_Mazda3_SSG_041514.indd 41 4/15/14 2:17 PM
Page 43
www.MazdaUSA.com
PERSONALIZE YOUR
MAZDA3 WITH GENUINE
MAZDA ACCESSORIES
Go to www.MyMazda.com, then select
“Accessories” below the MyMazda
Home header for a complete listing of
available accessories for your Mazda3.
www.MyMazda.com—The Official Site
for M{zd{ Owners
Register today on www.MyMazda.com—the ultimate destination for Mazda
Owners. Once registered, you’ll be able to take advantage of benets
exclusively for Mazda Owners:
• Insider access to exclusive events and promotions
• Personalized maintenance schedules
• Zoom-Zoom Owner Magazine
• Warranty information and on-line Owner’s Manuals
• Wallpaper, videos and other fun stuff
• Accessories specically designed for your vehicle
• Car Care Discount Coupons available from your Authorized Mazda Dealer
Visit and register at www.MyMazda.com today!
MAZDA MOBILE
The following apps are available for iPhone® and Android smartphones:
• Mazda Assist app - Provides roadside assistance 24 hours a day,
365 days a year. Toll free number 1-800-866-1998 can also be used
for roadside assistance.
• MyMazda app - Keep track of your Mazda from the palm of your hand
with these features:
Maintenance schedule
Service coupons
Promotional alerts
Service history
Recall information
Parked car locator
The apps can be downloaded, free of charge, from the App store for the iPhone
and Google Play (Android Market) for Android powered devices. After downloading
app, customer name, email, smartphone number and VIN are required.
Free Mazda Assist app
iPhone and Android
1669736_15_Mazda3_SSG_041514.indd 42 4/15/14 2:17 PM
Scan VIN barcode capability
when registering a vehicle
Mazda Dealer locator
Update owner prole
Link to Mazda Assist
Free MyMazda app
iPhone and Android
®
Page 44
Customer Delivery Checklist
VEHICLE PRESENTATION:
Refer to the Smart Start Guide during presentation
Driver’s View ........................1
• Location of Switches and Control
Keyless Entry ........................3
Advanced Keyless Entry* ..........4
• Door Request Switch*
Star ting the Engine .................5
• Accelerated Warm-Up System (AWS)
• Push Button Start System
• Emergency Vehicle Entr y/
Engine Start/Stop
Break In Period .....................6
Fuel Economy .......................6
Tire Pressure Monitor System ....7
• Initialize TPMS before delivery
Seats and Headrests ...............8
Mazda Connect* ....................9
Commander / Voice Control* ....10
ESSENTIAL INFORMATION
Bluetooth®* .........................11
• Pair Phone
• Make/Receive Call
• Toll-Free Customer
Service 800-430-0153
Navigation System* ...............13
• SD Card
• Planning a Route
*if equipped
SAFETY & TECHNOLOGY INFORMATIONGENERAL INFORMATION
• Bluetooth Audio
• Review of Warning and Indicator
Active Driving Display* ...........15
Mazda Connect Settings* ........16
Mazda Radar Cruise Control* ...17
Forward Obstruction Warning* ...18
Smar t City Brake Support* .......19
Lane Departure
Warning System (LDWS)*
........20
Blind Spot Monitoring*. . . . . . . . . . . .21
Rear Cross Trafc Alert* .........22
High Beam Control* ...............25
Adaptive Front
Lighting System (AFS)*
...........26
Lights ...............................23
Wiper/Washer ......................24
Climate Control ....................27
Audio Controls .....................29
Set Clock ............................29
Audio USB & AUX Inputs .........33
i-E LOOP* ...........................34
Instrument Cluster ................35
Light Function and Location
Transmission .......................39
Cupholders/Storage ..............41
SCHEDULED MAINTENANCE:
When replacing or topping off engine oil, use Mazda Genuine oil. For optimal engine performance,
use SAE 0W-20 engine oil. Please consult an Authorized Mazda Dealer for additional information.
All items in the Customer Delivery Checklist have been reviewed with the
customer and the first maintenance appointment has been scheduled:
SALES CONSULTANT DATE CUSTOMER DATE
Signed copy must be placed in deale r jacket.
1669736_15_Mazda3_SSG_041514.indd 43 4/15/14 2:17 PM
Page 45
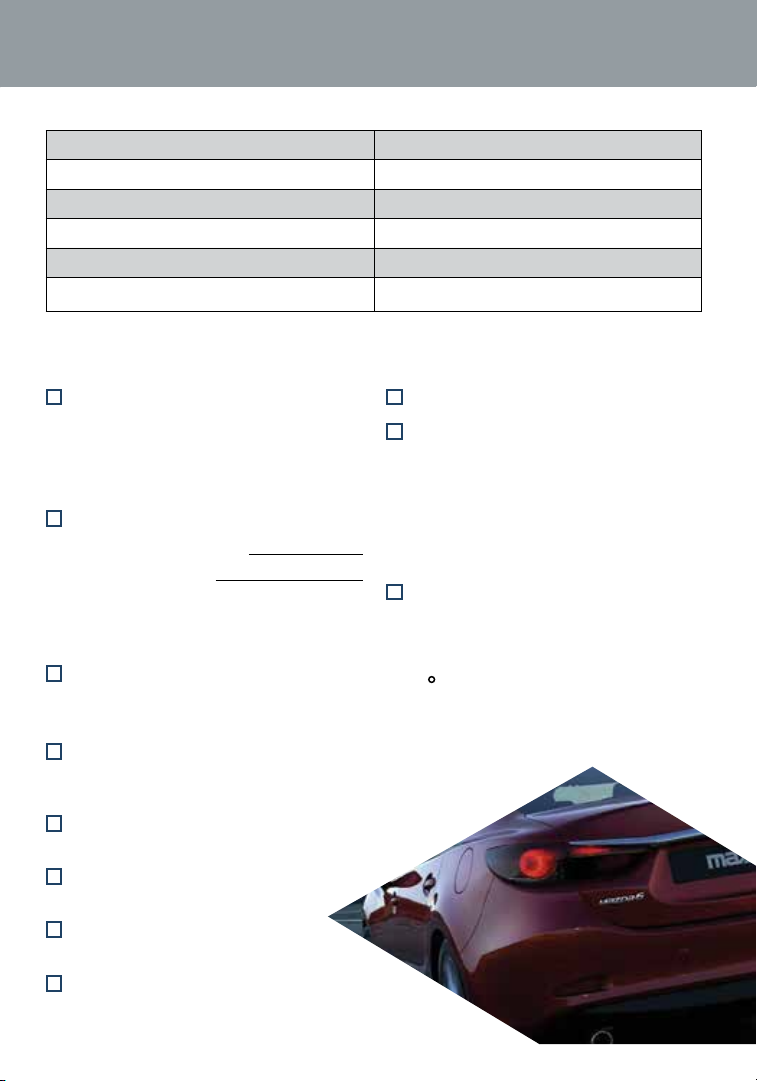
Customer Delivery Checklist
DEALERSHIP DATE
SALES CONSULTANT CUSTOMER’S NAME
VIN E-MAIL
PRESENTATION OF OWNER’S MATERIALS:
Review the following items with the customer
Smart Start Guide
• Remove this checklist from
Smart Start Guide
• Personalization Features
(refer to your Owner’s Manual)
Warranty Information
Warranty Start Date:
Customer Initial:
• Basic Vehicle –
36 months/36,000 miles
• Roadside assistance program
www.MyMazda.com
• Offer to register customer on
www.MyMazda.com
Owner’s Manual
Maintenance Passport
Floor Mats
• Ensure oor mats are properly hooked
after cleaning
• Do not install two oor mats, one on
top of the other, on the driver side
• Accessory rubber oor mats should be
cleaned with mild soap and water only
Tire Pressure Monitoring System
• System overview
• Demonstrate how to initialize the
TPMS system
the TPMS warning light ashes twice
and one beep is heard
• Review the system Caution
SERVICE DEPARTMENT
Introduce Service Manager;
provide business cards
Review Service and Parts
Department hours of operation
Explain free Full Circle
Service Inspection
Schedule rst maintenance service
Push and hold the “SET switch” until
1669736_15_Mazda3_SSG_041514.indd 44 4/15/14 2:17 PM
Page 46
GENUINE MAZDA SERVICE
Because you and your Mazda deserve the best
Your new Mazda deserves nothing less than the very best. To keep it running
like new for years to come, trust the experts at your local Authorized Mazda
Dealer. Simply bring your vehicle in for your scheduled maintenance and any
needed repairs.*
At participating Mazda Full Circle Service Centers,** our technicians will
automatically perform a complimentary Full Circle inspection on your vehicle
and issue a detailed report card at every visit. This is designed to help you
keep track of your Mazda’s critical operating condition. Our factory-trained
technicians know your vehicle inside out and use Genuine Mazda Parts,
giving your vehicle the optimum care and maintenance it requires to run
with awless precision.
Remember, to further enhance your driving experience, visit your local
Mazda Service Center for your scheduled maintenance. It’s also the place
where you can nd a wide variety of tires, parts, and accessories that are
just right for your vehicle.
* See vehicle’s scheduled-maintenance program for details.
** Visit the Mazda Owners website at www.MyMazda.com/fullcircle to nd
a participating Mazda Full Circle Service Dealer.
Customer Experience Center: 1-800-222-5500
Roadside Assistance Contact:
1-800-866-1998
FREE FULL CIRCLE
SERVICE INSPECTION
We’re committed to providing
expert Mazda service.
You love to drive your Mazda, and we love to service your Mazda. With our Full Circle
Service, we’ll give your vehicle a COMPLIMENTARY MULTI-POINT INSPECTION.
Your Mazda will receive a thorough review of its most crucial components.
This easy-to-use Smart Start Guide is intended to help you more fully appreciate some
of the unique features and functions of your new vehicle. However, it is not intended to
replace your Owner’s Manual. The Owner’s Manual contains more detailed information
to help you better understand the important safety warnings, features, operation, and
maintenance of your vehicle. All information, specications, photographs and illustrations
in this publication are those in effect at the time of printing. Mazda reser ves the right to
change specications or design without obligation.
© Mazda North American Operations
Printed in U.S.A. 04/14
Print 1
9999 95 038C 15SS
www.MazdaUSA.com
1669736_15_Mazda3_SSG_041514.indd 45 4/15/14 2:18 PM
 Loading...