


RovaEarth
USER MANUAL
COMMERCIAL ICE MAKER
Models CIM-480F, CIM-720F, CIM-960F

TABLE OF CONTENTS
2
3
4
6
8
10
11
12
BEFORE STARTING
PART NUMBERS
INSTALLATION
HOW TO USE
TROUBLESHOOTING
MAINTENANCE
SPECIFICATIONS
WARRANT Y
1
BEFORE STARTING
PART NUMBERS
• To prevent any internal damage or malfunctions, keep
refrigeration unit upright during transportation and
installation. Keep the unit upright for 24 hours before
beginning use.
• Inspect the unit before installing. Do not use unit with
any visible damage or warranty may be waived. Report any shipping damage to the manufacturer immediately for replacement.
• It is recommended that the unit not be used with an
extension cord. If the user proceeds with an extension cord, be sure that the exension cord has a cable
thickness of at least 0.75mm and has a rated voltage of 6A/250V or above. This equipment must be
grounded.
• Do not use the unit outdoors. Keep away from direct
sunlight.
• Keep the unit on a level surface. Do not place the unit
on carpet or other fabric materials. Do not cover power cord or keep near exposed liquid.
• Do not use any liquid other than water in this unit.
• Do not use flammable liquids to clean the unit.
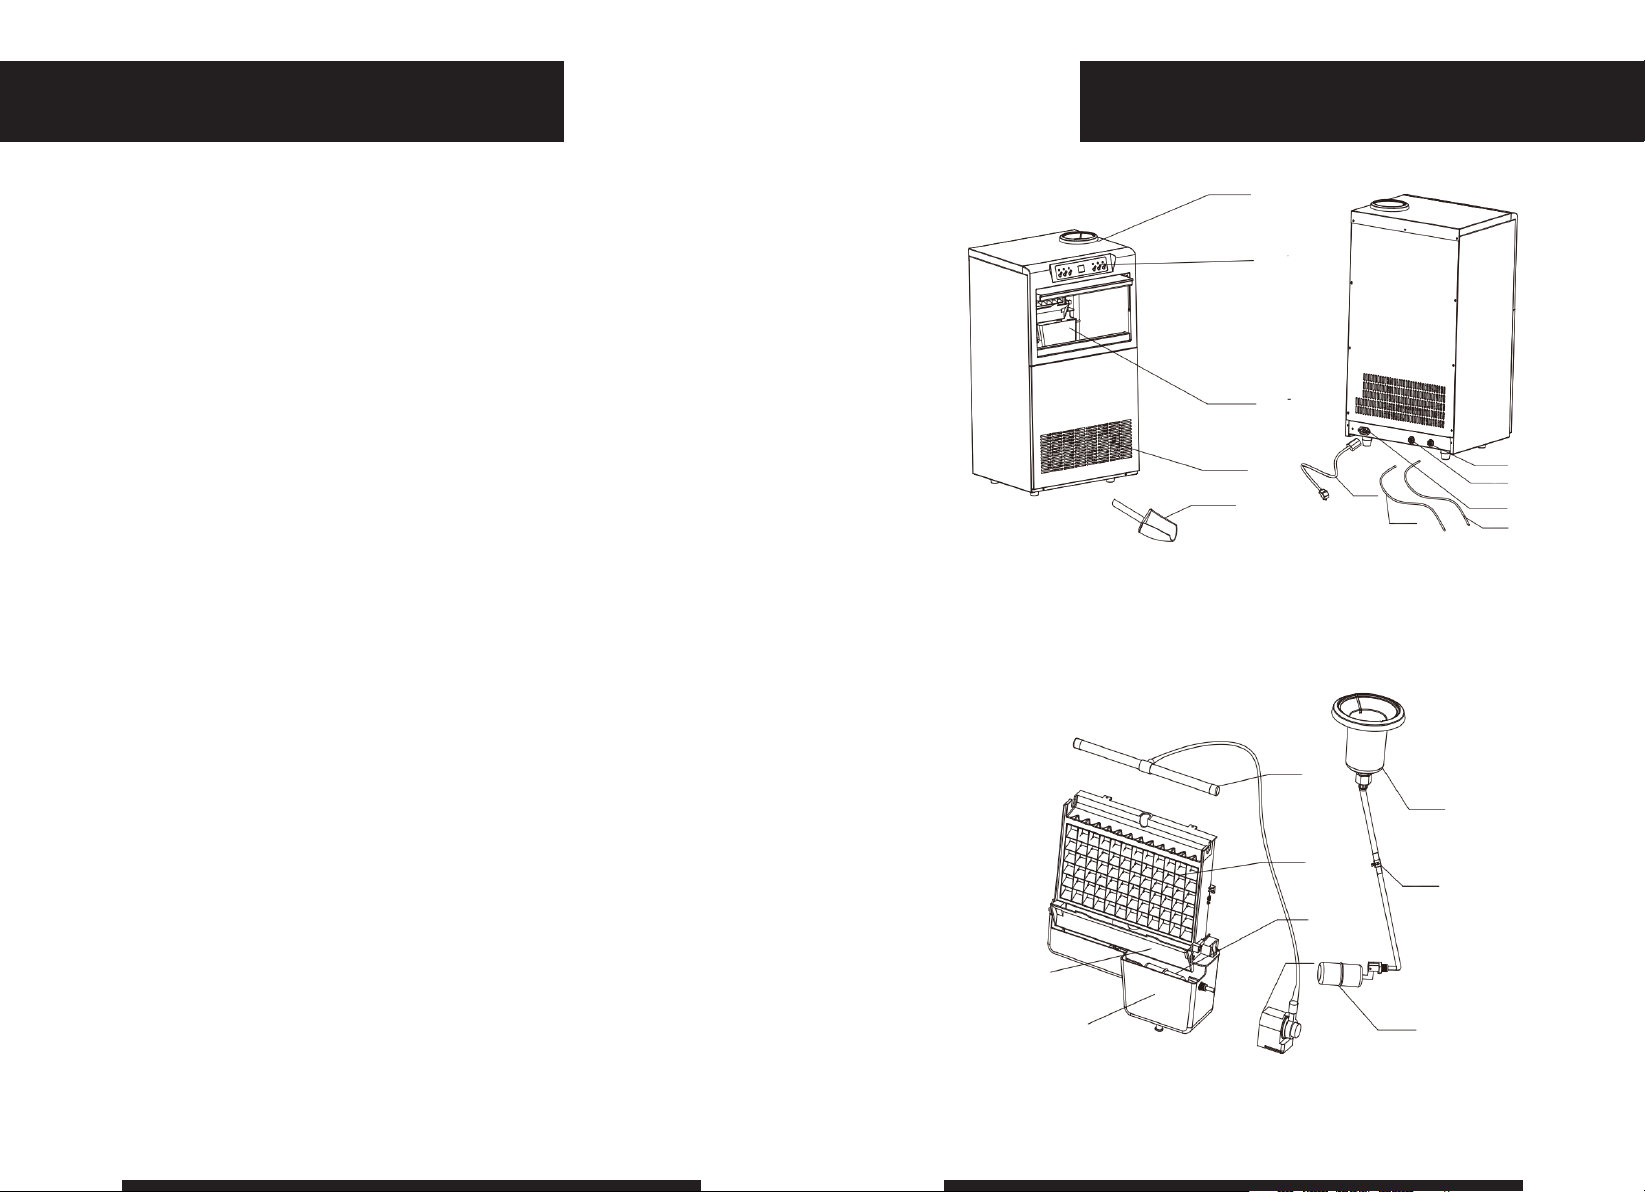
EXTERIOR
. TOP COVER
. CONTROL PANEL
. WATER BASIN
. COOLING FAN
INTERIOR
1
2
3
4
5
. ICE SCOOP
. DRAIN VALVE
. WATER INLET
. POWER SOCKET
1
6
7
11
10
. DRAIN PIPE
. WATER INLET PIPE
. POWER CORD
7
8
9
• Do not use any third-party equipment to modify the
unit other than those recommended by the manufacturer.
• Dispose of flammable gas of refrigerant and blowing
agent acording to local regulations.
8
9
. DISTRIBUTIVE PIPE
. ICECUBE TRAY
. LEVEL CONTROLLER
. WATER PUMP
. WATER PLUG
. WATER VALVE
2
6
3
4
5
. BOTTLE HOLDER
. RETAINING FLAP
. WATE R TA N K
2 3

INSTALLATION
BOT TLED WATER
INSTALLATION
WATER LINE
INSTALLATION
WATER LINE
INLET PIPE
VA LV E
WATER FILTER
FILTER HOLDER
UNIT WATER
INLET PIPE
DRAIN PIPE
DRAIN PIPE
1. Tilt the unit slightly to install the four feet.
2. Place the bottled water into the holder.
3. Open the valve inside of the unit.
4. Place the drain pipe accordingly.
5. Wait 24 hours before plugging in the unit.
1. Tilt the unit slightly to install the four feet.
2. Mount the water filter holder.
3. Connect the water line inlet pipe to the water source.
4. Connect the unit water inlet pipe to the water inlet.
5. Place the drain pipe accordingly.
6. Wait 24 hours before plugging in the unit.
4 5
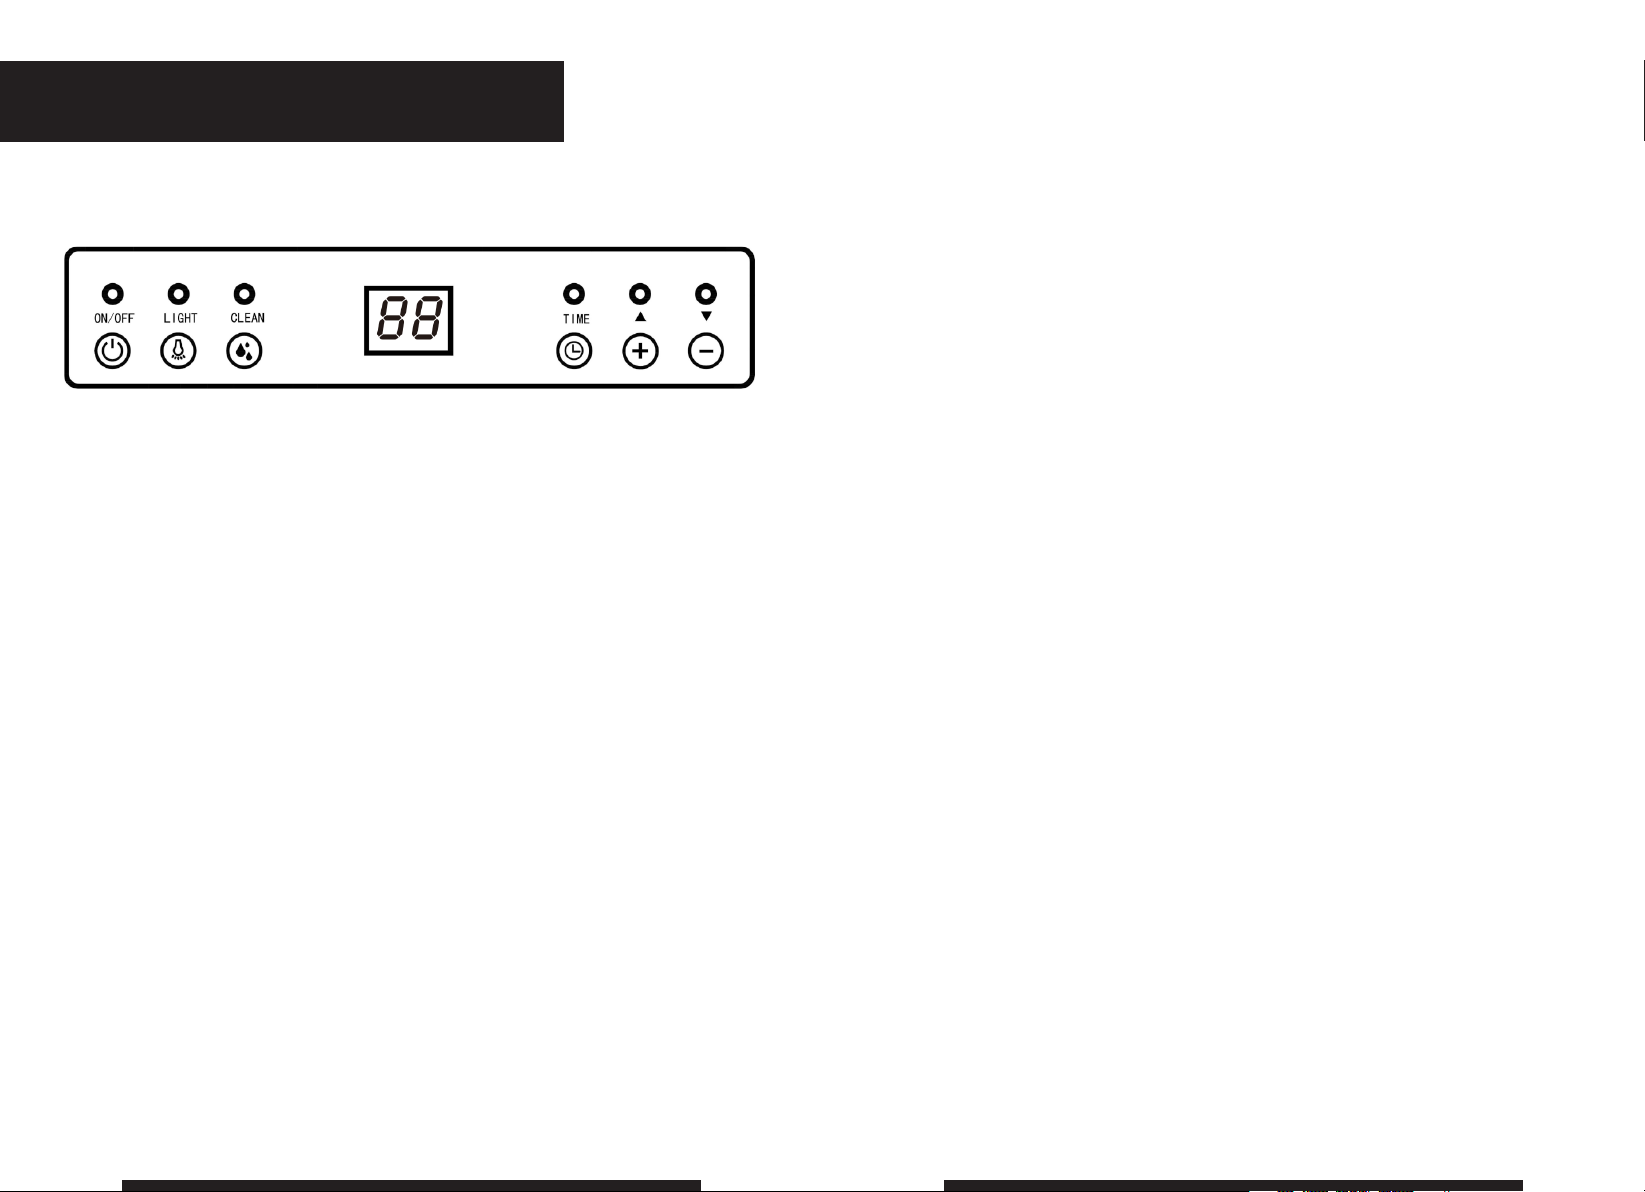
HOW TO USE
• Once a start/stop timer has been set, the indicator
light will turn green.
TURNING THE LIGHT ON/OFF
• Press the light button to turn on the interior lighting.
The green indicator light will appear and the interior
lights will be present. Press the button again to turn
the lights off.
POWERING ON
• Connect the water source and plug the unit in to
the power source. The indicator light will turn green.
Press the power button to turn on.
• If a red light appears and the LED screen displays
00, the water source is not properly connected. Make
sure that the valve has been opened inside of the unit.
SELECTING ICE SIZE
• Once the water tank has been filled, the red indicator
light will turn off. The LED screen will display numbers counting from 00 to 59, indicating the warm-up
time in seconds.
• After the first minute of warm-up, select the preferred
ice size, the smallest being -9 and largest +9.
SETTING THE START/STOP TIMER
To set a start time while the unit is off, press the timer
button. Use the +/- buttons to select the number of
hours that the unit will begin function, up to 24 hours.
To set a stop time while the unit is running, press
the timer button. Use the +/- buttons to select the
number of hours that the unit will remain on, up to 24
hours.
DEICING MODE
• If the unit senses a blockage in the ice pallet, the red
indicator light will flash red. The LED screen will then
display 00, and the water pump and fan will stop running.
• After de-icing is completed, the unit will automatically resume icemaking.
• To force de-icing while unit is in use, hold the clean
button until the indicator flashes red. The LED screen
will then display 00, and the water pump and fan will
stop running.
• After de-icing is completed, the unit will automatically resume icemaking.
CLEANING MODE
• To turn on cleaning mode while the unit is in standby,
press the clean button. The indicator light will turn
green.
• Once the unit door has been open for 10 minutes, it
will automatically shut off cleaning mode and resume
standby mode.
6 7

TROUBLESHOOTING
ERROR CAUSE SOLUTION
E1, E2
E3, E4
Temperature probe experiencing an open circuit
Ice is too thick or thin,
causing a de-icing failure
Water retaining flap failure
or magnetic sensor failure
Refrigerant leak After the unit has been on for 10
Compressor not running Check to see if the fan is blowing
Check the connection of the insert.
Use +/- to change the ice size
accordingly.
Hold the clean button force de-icing,
then press down on the retaining flap
to simulate the de-icing process. If the
the unit does not resume icemaking,
the part may need replacement.
minutes, check the water basin to see
whether it is cold. If the water is not
cold, add coolant to the unit.
warm air and the compressor is running (recognizable by a low buzz). If
the compressor is not running or the
fan is blowing cold air, the part may
need replacement.
ERROR CAUSE SOLUTION
Unit has stopped
working and the +
indicator is red
Water is overflowing
from the water basin
The basin is full of
water but the +
indicator is red
Unit is cycling, but
no ice is produced
No water or not enough
water
The water valve is not tightened or the water source is
not connected correctly
The float control is stuck De-ice the unit and make
The refrigerant is leaking or
there’s a malfunction with
the cooling system
Check the water supply or
refill the water supply.
If the water source is a
water line, close the interior
valve. Check the external
source conections.
sure that the float can move
as needed.
Add coolant to the unit. If
the unit is still malfunctioning, replace the refrigeration
pipeline.
Fan not turning Check to see if there is air blowing
Water pump not working Press the clean button to prompt a
from the back of the unit. If there is no
air, check the circuit connection. If the
fan still does not work, the part may
need replacement.
start/stop of the water pump. Also
check the circuit connection of the
pump. If the pump is not working, the
part may need a replacement.
8 9

MAINTENANCE
SPECIFICATIONS
• Clean the unit thoroughly before use and every 360
hours to maintain proper function and cleanliness.
• Unplug the unit before cleaning.
• To clean the unit before use:
1. Remove the ice scoop. Soak a soft cloth with en-
vironmental protection deterent diluted with warm
water. Wipe the machine and accessories with the
detergent-soaked cloth.
2. Rinse the ice scoop with room temperature drink-
ing water. Connect the drain on the back of the
unit to drain any residual fluid.
3. Wipe the outside of the unit a soft cloth and envi-
ronmental protection detergent diluted with room
temperature water.
4. Dry the inside and outside of the unit with a dry
soft cloth.
• If the unit has not been used for more 96 hours, close
the water supply and drain residual fluid from the water basin to maintain cleanliness. Wipe with a soft
cloth before restarting use.
MODEL CIM-480F CIM-720F CIM-960F
RATED VOLTAGE
RATED FREQUENCY
RATED CURRENT
REFRIGERANT
HIGH SIDE PRESSURE
LOW SIDE PRESSURE
INSULATION
BLOWING GAS
115V 115V 115V
60Hz 60Hz 60Hz
2.1 49 A 3.012A 4.380A
R290 /
1.69oz
275psig 275psig 275psig
130psig 130psig 130psig
C5H
10
R290 /
2.29oz
C5H
10
R290 /
3.1oz
C5H
10
10 11

WARRANT Y
• When receiving the unit, check for damage from
transportation.
• Any damage seen should be immediately reported to
the manufacturer via Amazon. Please be sure to provide photos of the damage to the item and any damage to the exterior packaging. A new machine will
only be reissued if photos of the damage are provided. For all damaged units a prepaid return label will
be provided in order to ship the item back to the manufacturer’s facility.
• To request a return, contact the manufacturer via
Amazon and provide a reason for the request.
• This product has a limited warranty in which manufacturer defects and shipping damage is covered.
• The warranty does not cover the following:
• Normal wear-and-tear
• Damage caused by non-compliance with manual
• Inappropriate point source connections
• Partial or complete removal of components
• Modification of the unit using unauthorized
third-party equipment or tools
Please contact our 24/7 customer service line at
909-479-7844 for further assistance.
12

 Loading...