

Maytag Commercial MHN30PD, MHN30PN User Manual
FOR SERVICE TECHNICIAN ONLY - DO NOT REMOVE OR DESTROY
BASIC OPERATION OF EXPORT COMMERCIAL FL
WASHER, STARTING WITH MODEL 30
■
For additional information, see
www.MaytagCommercialLaundry.com
IMPORTANT
Electrostatic Discharge (ESD)
Sensitive Electronics
ESD problems are present everywhere. ESD may damage
or weaken the electronic control assembly. The new control
assembly may appear to work well after repair is finished,
but failure may occur at a later date due to ESD stress.
■
Use an anti-static wrist strap. Connect wrist strap to green
earth connection point or unpainted metal in the appliance.
Touch your finger repeatedly to a green earth connection point
or unpainted metal in the appliance.
■
Before removing the part from its package, touch the antistatic bag to a green earth connection point or unpainted
metal in the appliance.
■
Avoid touching electronic parts or terminal contacts; handle
electronic control assembly by edges only.
■
When repackaging failed electronic control assembly in antistatic bag, observe above instructions.
-OR-
Door Lock
The door will be locked when the cycle starts. The door will remain
ocked until the end of a cycle or approximately 2 minutes after a
l
power interruption.
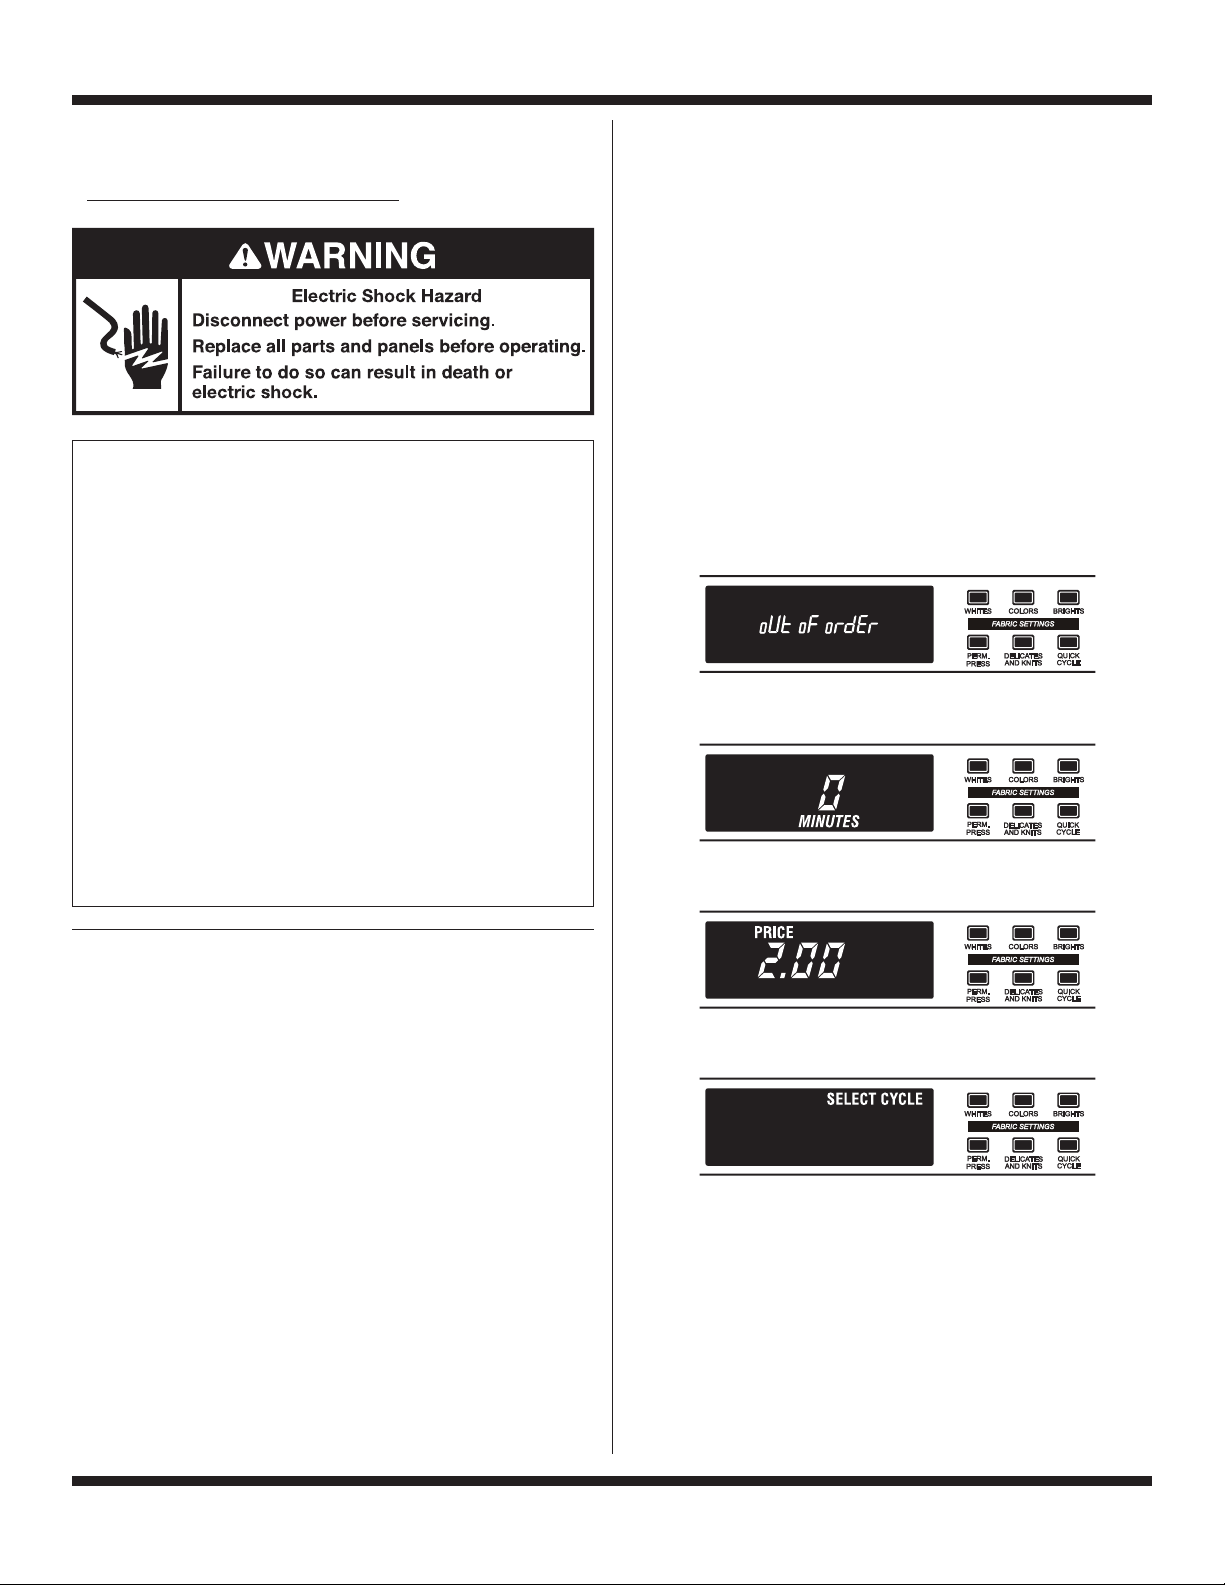
Pricing
After the door is opened following the completion of a cycle,
the display indicates the cycle price (unless set for free operation).
As coins are dropped or debit inputs arrive, the display will change
to lead the user through the initiation of a cycle.
Free Cycles
This is established by setting the cycle price to zero. When this
happens, ‘SELECT CYCLE’ will appear rather than a cycle price.
Display
After the washer has been installed and plugged in, the display will
show ‘0 MINUTES’. Once the washer has been plugged in and the
washer door opened and closed, the display will show the price. In
washers set for free cycles, the display will flash ‘SELECT CYCLE’.
NOTE: Not displayed on washer as shown. Message scrolls
followed by the failure or diagnostic code.
GENERAL USER INFORMATION
Scrolling ‘out of order’ showing in display, followed by a
failure or diagnostic code
This condition indicates the washer is inoperative.
‘0 Minutes’ showing in display
This condition indicates the washer cannot be operated. Coins
dropped or debit inputs during this condition will be stored in escrow
but cannot be used until normal operation is restored by opening
and closing the door. If a door switch fails, it must be replaced before
normal operation can be restored.
Cold Start (initial first use)
Washer is programmed at the factory as follows:
■
11 minute wash period
■
3 rinses (extra rinse not enabled)
■
$1.75 wash price (PD models)
■
$0.00 wash price (PN models)
Warm Start (after power failure)
A few seconds after power is restored, if a cycle was in progress
at the time of the power failure, ‘RESELECT CYCLE’ will flash
in the display, indicating the need for a button press to restart
the washer.
PART NO. W10340707A PAGE 1

FOR SERVICE TECHNICIAN ONLY - DO NOT REMOVE OR DESTROY
ONTROL SET-UP PROCEDURES
C
IMPORTANT: Read all instructions before operating.
■
PD Models: Insertservice access door key, turn, and lift to remove
ccess door.
a
■
PN Models: Remove connector AA1 on the circuit board.
et-up procedures can be entered by using the Service Access
S
Code (see Service Access Code section, page 10) for PN washers
without a key switch installed.
IMPORTANT: Unplug washer or disconnect power before opening
the console. To access connector AA1:
Unplug washer or disconnect power.
Open console, disconnect plug on AA1, close console.
Plug in washer or reconnect power.
The washer is now in the set-up mode. The lower fabric setting
buttons and the digital display are used to set up the controls. The
display can contain 4 numbers and/or letters and a decimal point.
These are used to indicate the set-up codes and related code
values available for use in programming the washer.
Once the washer has been programmed with a hand held device
using Accu Trac, or a Gen. 2 card reader has been installed, the
washer will be put into dAS mode permanently, and dAS will be
displayed every time set-up mode is accessed.
How to use the key pads to program the controls
1. The PERMANENT PRESS button is used to adjust the values
associated with set-up codes. Pressing this button will change
the value by increments. Rapid adjustment is possible by holding
this button down.
2. The DELICATES AND KNITS button advances through the setup codes. Pressing this button will advance to the next available
set-up code. Holding this button down will automatically advance
through the set-up codes at a rate of one (1) per second.
3. The QUICK CYCLE button is used to select or deselect options.
Start Operating Set-Up
NOTE: Prior tooperation, a payment system or an OPLkit must be installed.
Before proceeding, it is worth knowing that, despite all of the options
available, an owner can simply choose to uncrate a new commercial
washer, hook it up, plug it in, and have a washer that operates.
SET-UP CODES
■
The DELICATES AND KNITS button will advance from code to code.
■
The PERMANENT PRESS button will change the code value.
■
The QUICK CYCLE button will select or deselect options.
FOR PN MODELS: The set-up codes are the same as for the ‘PD’
models except where noted.
The set-up code is indicated by the one or two left-hand characters. The
set-up code value isindicated by the two or three right-hand characters.
NOTE: First code shown in each section is default code for coin equipment.
CODE EXPLANATION
607
607
600
Press the DELICATES AND KNITS button once to advance to next code.
REGULAR CYCLE PRICE
Represents the number of coins (coin 1) needed to start the washer;
may adjust from 0-39. (SeeVALUE OF COIN 1.)Advance from 0-39
by pressing the PERMANENT PRESS button. Factory default of
7 x coin 1.
PN MODELS ONLY: Factory default of 0 coins.
With coin slide activation, this represents the number of push-in
actuations of a coin slide to start the washer.
6 01 setting would represent one coin slide actuation.
NOTE:For coin slide activation, replacement of the meter case is necessary.
ODE EXPLANATION
C
711
711
Press the DELICATES AND KNITS button once to advance to next code.
8 0 0
8 0 0
8A8
Press the DELICATES AND KNITS button once to advance to next code.
9 0 0
9 0 0
9 0
Press the DELICATES AND KNITS button once to advance to next code.
1.0 0
1.0 0
1.0
1.C0
Press the DELICATES AND KNITS button once to advance to next code.
2.0 0
2.0 0
2.
SP
If SPECIAL PRICING OPTION is selected, there is access to codes ‘3.XX’
through ‘9.XX’.
Press the DELICATES AND KNITS button once to advance to next code.
3. 0 7
3. 0 7
3. 0 0
Press the DELICATES AND KNITS button once to advance to next code.
WASH LENGTH
This is the number of minutes for WASH.Washer comes from the
factory preset with 11 minutes.Choose from 9-17 minutes by
ressing the PERMANENT PRESS button.
p
ADDITIONAL RINSE OPTION
his option is either SELECTED ‘ON’ or NOT SELECTED ‘OFF’.
T
Not Selected ‘OFF’.
Selected ‘ON’.Cannotbe combinedwith the Super Cycle rinse option.
Press the QUICK CYCLE button once to change this selection.
CYCLE COUNTER OPTION
This option is either SELECTED ‘ON’ or NOT SELECTED ‘OFF’.
Not Selected ‘OFF’.
Selected ‘ON’ and not able to be deselected.
C
Press the QUICK CYCLE button 3 consecutive times
to select ‘ON’. Once selected ‘ON’ it cannot be deselected.
MONEY COUNTER OPTION
This option is either SELECTED ‘ON’ or NOT SELECTED ‘OFF’.
Not Selected ‘OFF’.
Selected ‘ON’.
C
Press the QUICK CYCLE button 3 consecutive times
to select ‘ON’ and 3 consecutive times to remove (Not
Selected ‘OFF’.) Counter resets by going from ‘OFF’ to ‘ON’.
Selected ‘ON’ and not able to be deselected.
To select‘ON’ and not able to be deselected, first select‘ON’,
then within two seconds press the QUICK CYCLE button twice,
the PERMANENT PRESS button once, and exit the set-up mode.
SPECIAL PRICING OPTION
This option is either SELECTED ‘ON’ or NOT SELECTED ‘OFF’.
Not Selected ‘OFF’, and next available code will be A.00.
Selected ‘ON’.Press the QUICK CYCLE button once
to change this selection.
OPTIONS TO USE IF SPECIAL PRICING IS SELECTED:
SPECIAL CYCLE PRICE
Represents the number of coins (coin 1) needed to start the
washer; may adjust from 0-39. (See VALUE OF COIN 1.) Advance
from 0-39 by pressing the PERMANENT PRESS button. Factory
default of 7 x coin 1.
PN MODELS ONLY: Factory default of 0 coins.
PART NO. W10340707A PAGE 2
FOR SERVICE TECHNICIAN ONLY - DO NOT REMOVE OR DESTROY
ODE EXPLANATION
C
OPTIONS TO USEIF SPECIAL PRICING IS SELECTED (cont.):
5.0 0
5.0 0
Press the DELICATES AND KNITS button once to advance to next code.
6.0 0
6.0 0
P
7.0 0
7.0 0
Press the DELICATES AND KNITS button once to advance to next code.
8.0 0
8.0 0
Press the DELICATES AND KNITS button once to advance to next code.
9. 1 0
9. 1 0
Press the DELICATES AND KNITS button once to advance to next code.
A.
00
A.
00
A.SC
Press the DELICATES AND KNITS button once to advance to next code.
6.0 5
6.0 5
Press the DELICATES AND KNITS button once to advance to next code.
TIME-OF-DAY CLOCK, MINUTES
This is the TIME-OF-DAY CLOCK, minute setting; select 0-59
inutes by pressing the PERMANENT PRESS button.
m
TIME-OF-DAY CLOCK, HOURS
OTE: Uses the 24 hr. clock.
N
This is the TIME-OF-DAY CLOCK, hour setting; select 0-23 hours
by pressing the PERMANENT PRESS button.
ress the DELICATES AND KNITS button once to advance to next code.
SPECIAL PRICE START HOUR
NOTE: Uses the 24 hr. clock.
This is the start hour; 0-23 hours. Select START HOUR by pressing
the PERMANENT PRESS button.
SPECIAL PRICE STOP HOUR
NOTE: Uses the 24 hr. clock.
This is the stop hour; 0-23 hours. Select STOP HOUR by pressing
the PERMANENT PRESS button.
SPECIAL PRICE DAY
This represents the day of the week and whether special pricing
is selected for that day.A number followed by ‘0’ indicates no
selection that particular day (9.10).A number followed by an ‘S’
indicates selected for that day (9.1S).To change the value of ‘0’
and ‘S’, use the QUICK CYCLE button.
Days of the week (1-7) are selected by pressing the PERMANENT
PRESS button.
When exiting set-up code ‘9’, the display must show current day
of week:
DISPLAY DAY OF WEEK CODE (selected)
10 Day 1 = Sunday 1S
20 Day 2 = Monday 2S
30 Day 3 = Tuesday 3S
40 Day 4 = Wednesday 4S
50 Day 5 = Thursday 5S
60 Day 6 = Friday 6S
70 Day 7 = Saturday 7S
VAULT VIEWING OPTION
This option is either SELECTED ‘ON’ or NOT SELECTED ‘OFF’.
Not Selected ‘OFF’.
Selected ‘ON’.Press the QUICK CYCLE button once for
this selection.When selected, the money and/or cycle counts
will be viewable (if counter option(s) is selected) when the coin
box is removed.
VALUE OF COIN 1
This represents the value of coin 1 in the quantity of 5%
increments of the larger coin value. 5 x 5% = 25%.
By pressing the PERMANENT PRESS button, there is the option
of 1-199 for the quantity of 5% increments.
With coin slide activation, this represents the total vend price.
ODE EXPLANATION
C
C
.20
C
.20
C
.05
Press the DELICATES AND KNITS button once to advance to next code.
8.0 0
8.0 0
8.
CS
Press the DELICATES AND KNITS button once to advance to next code.
E
. 0 0
E
. 0 0
E.AC
Press the DELICATES AND KNITS button once to advance to next code.
F
. 0 0
F
. 0 0
F.CP
F.S
Press the DELICATES AND KNITS button once to advance to next code.
H
.0 1
H
.0 1
Press the DELICATES AND KNITS button once to advance to next code.
H
.0 1
H
.0 1
Press the DELICATES AND KNITS button once to advance to next code.
VALUE OF COIN 2
This represents the value of coin 2 in the quantity of 5%
increments of the larger coin value. 20 x 5% = 100%.
By pressing the PERMANENT PRESS button, there is the option
of 1-199 for the quantity of 5% increments.
PN MODELS:This represents the value of coin 2 in the quantity of
% increments of the larger coin value. Factory default = 5 x 5%
5
of the larger coin value.
OIN SLIDE OPTION
C
This option is either SELECTED ‘ON’ or NOT SELECTED ‘OFF’.
Not Selected ‘OFF’. Used with coin drop or card readers.
Selected ‘ON’.Press the QUICK CYCLE button
3 consecutive times to change this selection.
NOTE: This option needs to be set to “00” unless the meter case
has been changed to accept a coin slide device.
When coin slide mode is selected ‘ON’, set ‘b.’ equal to value of
vend price. Set set-up code 6 (regular cycle price) and set-up code
3 (special cycle price) to number of slide pushes. If washer is set
up as ‘CS’ and a coin drop is installed,it will not register coins.
ADD COINS OPTION
This option is either SELECTED ‘ON’ or NOT SELECTED ‘OFF’. This
option causes the customer display to show the number of coins
(coin 1) to enter, rather than the amount.
Not Selected ‘OFF’.
Selected ‘ON’.Press the QUICK CYCLE button
3 consecutive times to change this selection.
ENHANCED PRICING OPTION
Not Selected ‘OFF’.
Cycle-Based pricing enabled. This option allows configuration
of different prices for cold, warm, and hot water cycles.
Super Cycle pricing enabled. This option allows customers
8
to upgrade cycles by depositing extra money. Set-up codes
‘H.’ and ‘h.’ will be displayed only when this option is enabled.
Press the QUICK CYCLE button to change this selection.
SUPER CYCLE UPGRADE PRICE
(Skipped unless Super Cycle pricing is enabled.)
This represents the number of coin 1 required to upgrade a
base cycle to a super cycle. Advance from 0-39 by pressing
the PERMANENT PRESS button.
SUPER CYCLE TYPE
(Skipped unless Super Cycle pricing is enabled.)
This represents the Super Cycle upgrade option. Press the
PERMANENT PRESS button to step through upgrade options 1
through 3 as follows:
01 - enhanced wash, extra 3 minutes of wash tumble in addition
to the programmed wash time.
02 - extra rinse for all cycles.
03 - both 01 and 02.
PART NO. W10340707A PAGE 3
FOR SERVICE TECHNICIAN ONLY - DO NOT REMOVE OR DESTROY
ODE EXPLANATION
C
J.C
J.C
J.C
J.C
J.E
Press the DELICATES AND KNITS button once to advance to next code.
L
. 0 0
L
. 0 0
L.PS
Press the DELICATES AND KNITS button once to advance to next code.
8.
CE
8.0 0
8.
CE
Press the DELICATES AND KNITS button once to advance to next code.
8. 8 0 0
8. 8 0 0
Press the DELICATES AND KNITS button once to advance to next code.
0.0 0
0.0 0
Press the DELICATES AND KNITS button once to advance to next code.
81.00
81.00
Press the DELICATES AND KNITS button once to advance to next code.
82.03
82.03
Press the DELICATES AND KNITS button once to advance to next code.
COIN/DEBIT OPTION
8
Both coin & debit selected. Press the QUICK CYCLE button
8
3 consecutive times to change this selection.
Coins selected, debit disabled. Press the QUICK CYCLE
8
button 3 consecutive times to change this selection.
Debit Card selected, coins disabled.This is the factory default for
8
8
N models. Press the QUICK CYCLE button 3 consecutive times
P
to change this selection.
Enhanced Debit is self-selected when a Generation 2 card reader
is installed in the washer. The Ed option cannot be manually
selected or deselected.
PRICE SUPPRESSION OPTION
This option causes the customer display to show ‘ADD’ or
‘AVAILABLE’ rather than the amount of money to add. (Used
mainly in debit installations.)
Not Selected ‘OFF’.
Selected‘ON’. Press the QUICKCYCLE button once
to change this selection.
CLEAR ESCROW OPTION
When selected, money held in escrow for 30 minutes without
further escrow or cycle activity will be cleared.
Not selected ‘OFF’.
Selected‘ON’. Press the QUICKCYCLE button once
to change this selection.
TOP SPIN SPEED RPM
This can be selected from the following spin speeds: 600 rpm,
750 rpm, 800 rpm,1000 (displays as 999) rpm. Step between
speeds by pressing the PERMANENT PRESS button. Factory
preset for 800 rpm.
PENNY INCREMENT OFFSET
This option is not supported for non-North American models and
the value must be set to 00.
PREWASH LENGTH
This is the number of minutes of PREWASH. Choose 0 to disable
the prewash or select between 2 and 7 minutes by pressing the
PERMANENT PRESS button.
FINAL SPIN LENGTH
This is the number of minutes of final high speed spin. Choose
from 3-8 minutes by pressing the PERMANENT PRESS button.
If cycle counter (9 0C) is selected, the following is true:
1 00 Number of cycles in HUNDREDS. 1 02
2 00 Number of cycles in ONES. 2 25 = 225
TOTAL CYCLES = 225
This is “VIEW ONLY” and cannot be cleared.
Press the DELICATES AND KNITS button once
to advance to next code.
If money counter (1.0C or 1.C0) is selected, the following is true:
3 00 Number of coins in HUNDREDS. 3 01
4 00 Number of coins in ONES. 4 68
5 00 Number of coins in HUNDREDTHS 5 75 = .75
TOTAL = 168.75
END OF SET-UP PROCEDURES
= 200
= 100
= 68
EXIT FROM SET-UP MODE
■
PD Models: Reinstall access door.
■
PN Models:
If Service Access Code was used to enter set-up mode,
Follow exit instructions in Service Access Code, page 10.
If AA1 plug was removed to enter set-up mode,
Unplug washer or disconnect power.
Open console, reinsert plug into AA1, close console.
Plug in washer or reconnect power.
■
PN MODELS WITH PROGRAMMING SWITCH:
Turn key clockwise and remove.
PART NO. W10340707A PAGE 4
FOR SERVICE TECHNICIAN ONLY - DO NOT REMOVE OR DESTROY
IAGNOSTIC GUIDE
D
Before servicing, check the following:
■
Make sure there is power at the wall outlet.
■
Are both hot and cold water faucets open and water supply
hoses unobstructed?
■
Check all connections before replacing components. Look for
broken or loose wires, failed terminals, or wires not pressed
into or onto connections far enough.
■
potential cause of a control not functioning is corrosion on
A
connections. Observe connections and check for continuity
with an ohmmeter.
■
Connectors: Look at top of connector. Check for broken or loose
wires. Check for wires not pressed into connector far enough
to engage metal barbs.
■
Resistance checks must be made with power cord unplugged
from outlet, and with wiring harness or connectors disconnected.
WASHER DIAGNOSTIC MODE
To enter the ‘Washer Diagnostic Mode,’ first enter ‘Start Operating
Set-Up.’ Then press and hold the QUICK CYCLE button for
1 second while in set-up code 6xx, anytime a diagnostic code
is present, or while dAS displays if operating with Maytag Data
Acquisition set-up.
On entry to diagnostic mode, the entire display will flash, a cycle
in process is canceled, money in escrow is cleared, and diagnostic
codes are cleared. If a diagnostic code persists, it must be
corrected before the following cycle options are permitted.
There are five possible ways to initiate cycle activity from diagnostic
mode as follows:
1. Washer Cleanout Cycle – With the entire display flashing,
this cycle is started by pressing the BRIGHTS button.
Use the Washer Cleanout Cycle once a month to keep the inside
of the washer fresh and clean. This cycle uses a higher water
level. Use with liquid chlorine bleach to thoroughly clean the
inside of the washer. This cycle should not be interrupted.
IMPORTANT: Do not place garments or other items in the
washer during the Washer Cleanout Cycle. Use this cycle
with an empty wash drum.
2. Cycle Credit – With the entire display flashing, a cycle may be
credited by pressing the PERMANENT PRESS button (CC will
display). When the service mode is exited, ‘SELECT CYCLE’ will
be displayed unless the end-of-cycle door opening is required.
3. Manual Overview Test – With the entire display flashing,
this cycle is started by pressing the WHITES button. This cycle
provides more typical full length fills, tumbles, and drains, allowing
for a more thorough analysis of the washer operation, including
pressure switch behavior.
4. Quick Spin Cycle – With the entire display flashing, this cycle is
started by pressing the COLORS button. This cycle provides a
method to quickly drain and spin (remove water from the washer),
if desired.
5. Quick Overview Test – With the entire display flashing, this cycle
is started by pressing the DELICATES AND KNITS button. This
cycle provides a quick verification that the cold and hot water
valves and pump motor are working. It also includes door lock,
drain, and spin operations.
Pressing the QUICK CYCLE button will exit diagnostic mode
and cancel a diagnostic cycle in process.
AILURE/ERROR DISPLAY CODES
F
ACCU
®
TRAC
INDICATION
d
d
WASHER
DISPLAY EXPLANATION AND RECOMMENDEDPROCEDURE
6
11
F
F
CCU ERROR
01
The pump drive or one of the main relays in the CCU
fails to activate.
Possible Cause
– A power surge/drop.
Surge/drop procedure
1. Clear error code.
2. Unplug washer or disconnect power.
3. Wait 2 minutes before reconnecting power.
4. Verify CCU by running a short diagnostic test.
If this procedure does not correct the failure, replace
the CCU control.
MCU ERROR
11
Motor Control Unit (MCU) has a failure.
Possible Cause
– A repeating under or overvoltage condition. If the
failure occurs during a high-speed spin, the door
remains locked for 3 minutes.
Procedure
1. Clear error code.
2. Unplug the washer or disconnect power.
3. Using Ohm meter, check wire harness connections
for continuity between drive motor and the MCU.
4. Check the motor and do a continuity test (page 14).
5. The MCU is good if the motor operates in diagnostic
mode.
If the motor fails to turn on, replace the MCU.
PART NO. W10340707A PAGE 5
 Loading...