

Page 1
PEDESTAL INSTALLATION INSTRUCTIONS
For use only with front load washers and dryers
INSTRUCTIONS D’INSTALLATION DU PIÉDESTAL
Pour utilisation avec les laveuses et sécheuses à chargement frontal
Para una versión de estas instrucciones en español, visite www.whirlpool.com
Table of Contents Table des matières
PEDESTAL SAFETY ......................................................1
INSTALLATION REQUIREMENTS ................................2
Location Requirements .........................................2
Tools and Parts .......................................................2
INSTALLATION INSTRUCTIONS ..................................3
Before Installing Pedestal .....................................3
INSTALLING THE PEDESTAL .......................................4
COMPLETE THE INSTALLATION. ................................5
WARRANTY ...................................................................7
INSTALLATION NOTES
Date of purchase: _________________________________
Date of installation: _______________________________
Installer: ________________________________________
Model number: ___________________________________
Serial number: ___________________________________
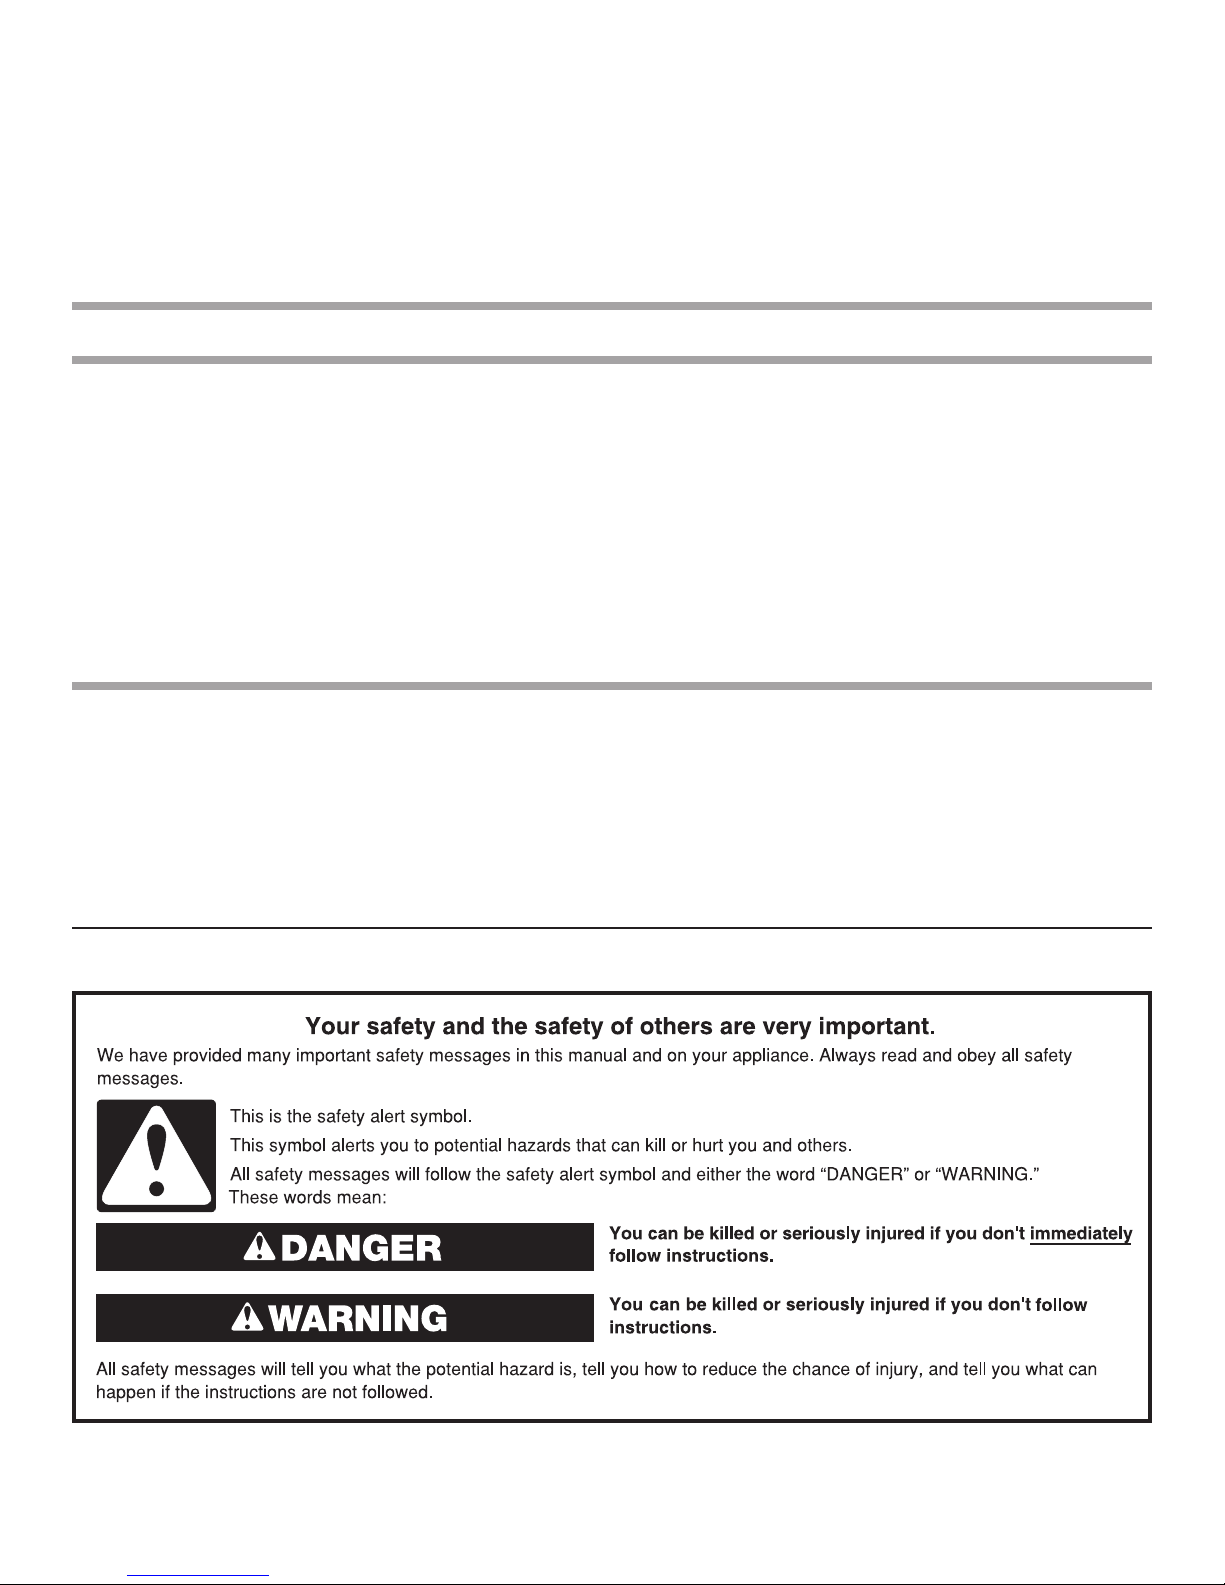
PEDESTAL SAFETY
SÉCURITÉ DU PIÉDESTAL ..........................................9
EXIGENCES D’INSTALLATION ....................................9
Exigences d’emplacement ....................................9
Outillage et pièces. ................................................9
INSTRUCTIONS D’INSTALLATION. ...........................10
Avant l’installation du piédestal.. ........................10
INSTALLATION DU PIÉDESTAL .................................11
ACHEVER L’INSTALLATION. ......................................13
GARANTIE ...................................................................15
NOTES CONCERNANT L’INSTALLATION
Date d’achat : _____________________________________
Date d’installation : ________________________________
Installateur : ______________________________________
Numéro de modèle : ________________________________
Numéro de série : __________________________________
W10178072B
W10348604B-SP
Page 2
INSTALLATION REQUIREMENTS
LOCATION REQUIREMENTS
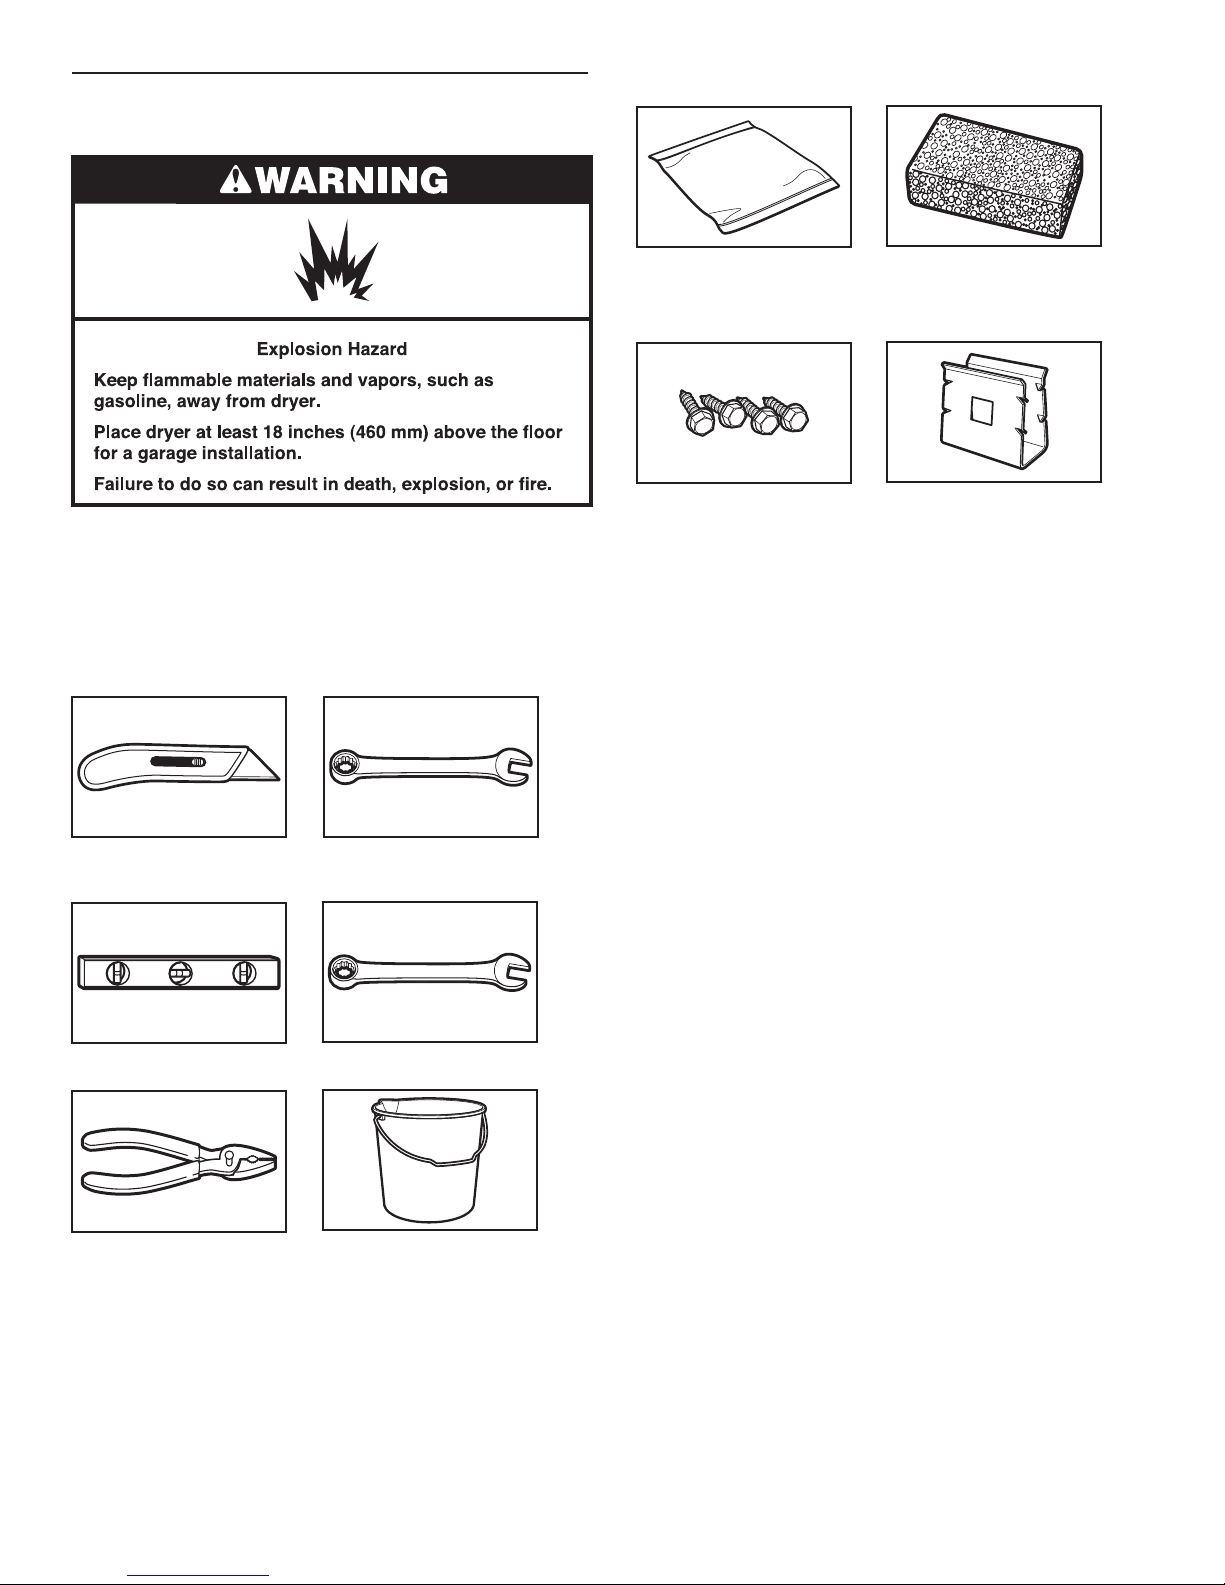
Additional items needed:
NOTE: If the washer/dryer and pedestal assembly are located
in a garage, 8" (203 mm) must be added under the pedestal so
that the washer/dryer is 18" (458 mm) above the garage oor.
TOOLS AND PARTS
Gather the required tools and parts before starting installation.
Tools needed:
Towel
Parts supplied:
Four #12 x 5/8" hex-head
sheet metal screws
(in parts bag)
Sponge
Two retainer clips
(in parts bag)
Utility knife 1/4" hex-head ratchet or
Level
Pliers or slip-joint pliers
open-end wrench
9/16" open-end wrench
Bucket
2
Page 3
INSTALLATION INSTRUCTIONS
BEFORE INSTALLING PEDESTAL
IMPORTANT: If your washer and dryer are already installed,
they must be uninstalled.
Uninstalling your washer
To avoid possible damage to the washer, the transport bolts on
the back of the washer must be in place before installing the
pedestal. For more information on transport bolts, see “Remove
Transport System” in washer Use and Care Guide.
NOTE: If the washer is to be transported, call your local
service center. To avoid suspension and structural damage,
your washer must be properly set up for relocation by a certied
technician.
1. Turn off the hot and cold water faucets.
2. Unplug the power supply cord.
3. Slowly loosen the ll hoses at the faucets to relieve the water
pressure. Use a sponge or towel to absorb the released water.
4. Remove the “HOT” and “COLD” ll hoses from the back of the
washer. Drain the water from the hoses into a bucket.
5. Remove the drain hose from the standpipe or laundry tub
and drain any water remaining in the hose into a bucket.
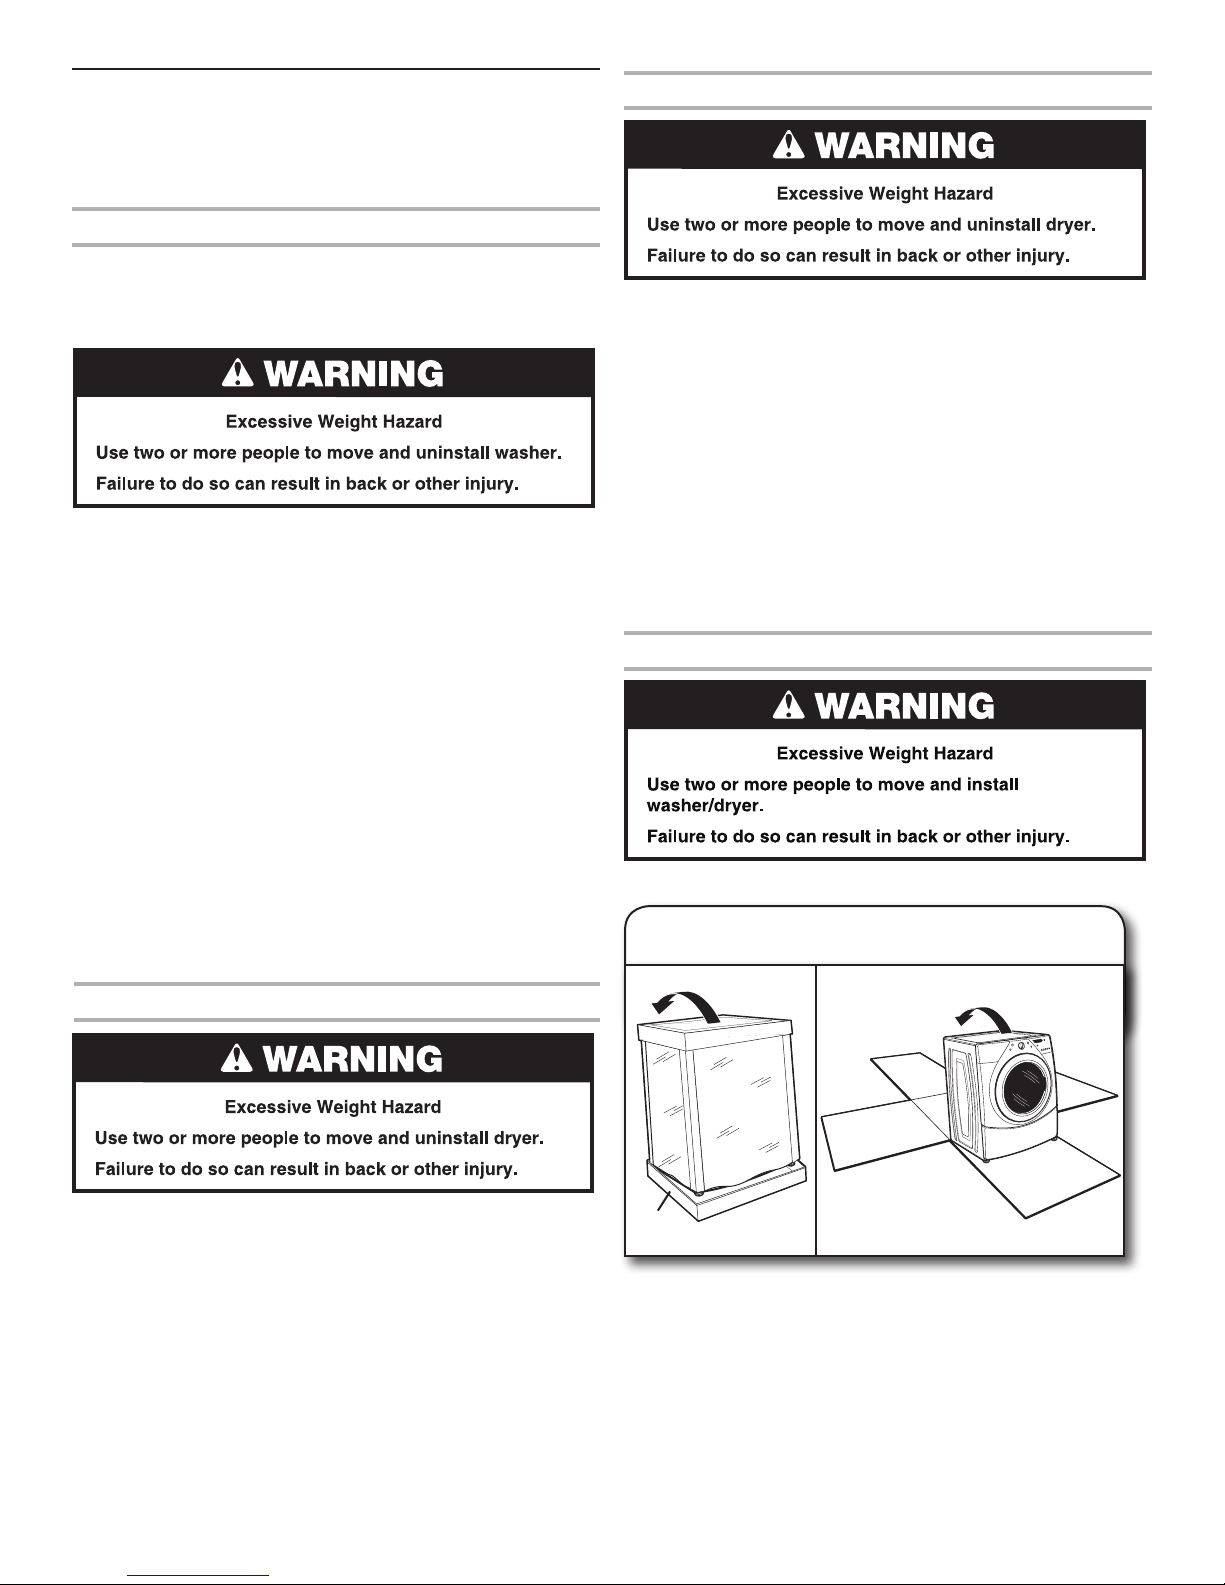
6. Pull the washer away from the wall so it can be tipped on its
back.
7. To avoid oor damage and ease installation and handling,
unfold the empty pedestal box at and place it next to the
washer. Lay the washer on its back (make sure that the power
supply cord is not under the washer) so that the cardboard is
under the entire lower back edge of the washer.
8. An additional small amount of water will drain out of the
washer when it is tipped back. Go to “Installing the Pedestal”.
Uninstalling your gas dryer
1. Unplug the power supply cord.
2. Turn off the gas supply.
3. Pull the dryer away from the wall enough to loosen the vent
clamp. Loosen the clamp and gently remove the exhaust vent
from the dryer exhaust outlet.
4. Disconnect the exible gas supply line from the dryer. Put a
piece of tape over the open ends of the gas line connection
ttings.
5. Pull the dryer away from the wall so that it can be tipped on
its back.
6. To avoid oor damage and ease installation and handling,
unfold the empty pedestal box at and place it next to the
dryer. Lay the dryer on its back (make sure that the power
supply cord is not under the dryer) so that the cardboard is
under the entire lower back edge of the dryer. Go to “Installing
the Pedestal”.
Installation of new washer/dryer
If your washer/dryer is still in the packaging:
1. Unpacking Washer/Dryer
Uninstalling your electric dryer
1. Unplug the power supply cord.
2. Pull the dryer away from the wall enough to loosen the vent
clamp. Loosen the clamp and gently remove the exhaust vent
from the dryer exhaust outlet.
3. Pull the dryer away from the wall so that it can be tipped on
its back.
4. To avoid oor damage and ease installation and handling,
unfold the empty pedestal box at and place it next to the
dryer. Lay the dryer on its back (make sure that the power
supply cord is not under the dryer) so that the cardboard
is under the entire lower back edge of the dryer. Go to
“Installing the Pedestal”.
Base
Washer: Cut plastic lm along dotted cut line around the base.
Do not remove the packaging.
Dryer: Cut carton around top and down corners along dotted
cut lines. Lay all four carton sides on oor. Discard carton top
and corner posts.
Washer
Dryer
3
Page 4
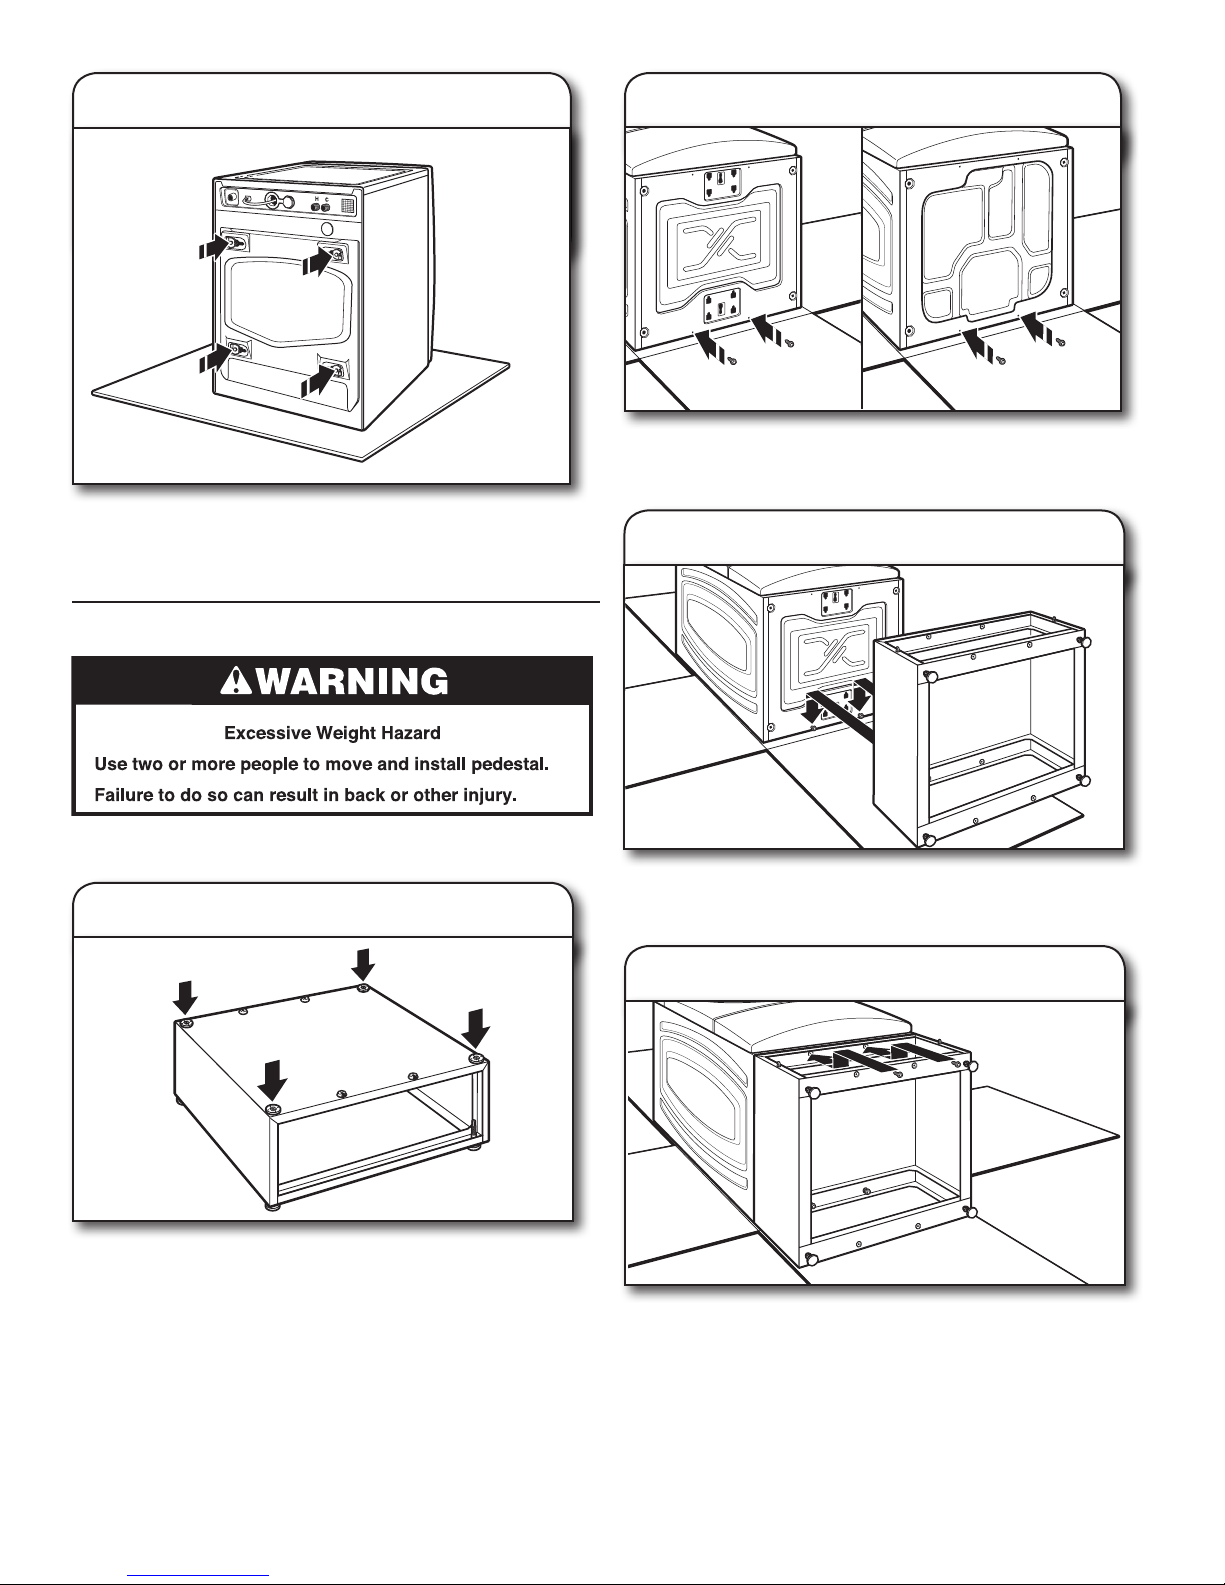
2. Washer transport bolts
2. Prepare the washer/dryer
Locate the transport bolts on rear of washer. Transport bolts
must remain in washer while pedestal is installed. When laying
the washer on its back, hold the base down on the oor. Do
not remove the plastic lm, corner posts, or top cap.
INSTALLING THE PEDESTAL
Follow these instructions to install the pedestal on a washer
or dryer.
1. Locate spacer pads
Washer Bottom
Partially install two of the #12 x 5/8" hex-head sheet metal
screws in the lower holes. Leave a space of about 3/8" (10 mm)
between the screw head and the bottom of the washer/dryer.
Dryer Bottom
3. Attach the pedestal
Move the pedestal against the washer/dryer bottom. Slide
the pedestal’s keyhole slots over the lower two partially
installed screws.
Make sure that all four spacer pads are in place on the top
of the pedestal. Spacer pads reduce vibration between the
pedestal and the washer/dryer.
NOTE: If your washer/dryer has feet installed, remove them.
4
4. Secure the pedestal
Position the pedestal toward the front of the washer/dryer and
install the two remaining hex-head sheet metal screws. Do not
tighten completely.
Page 5
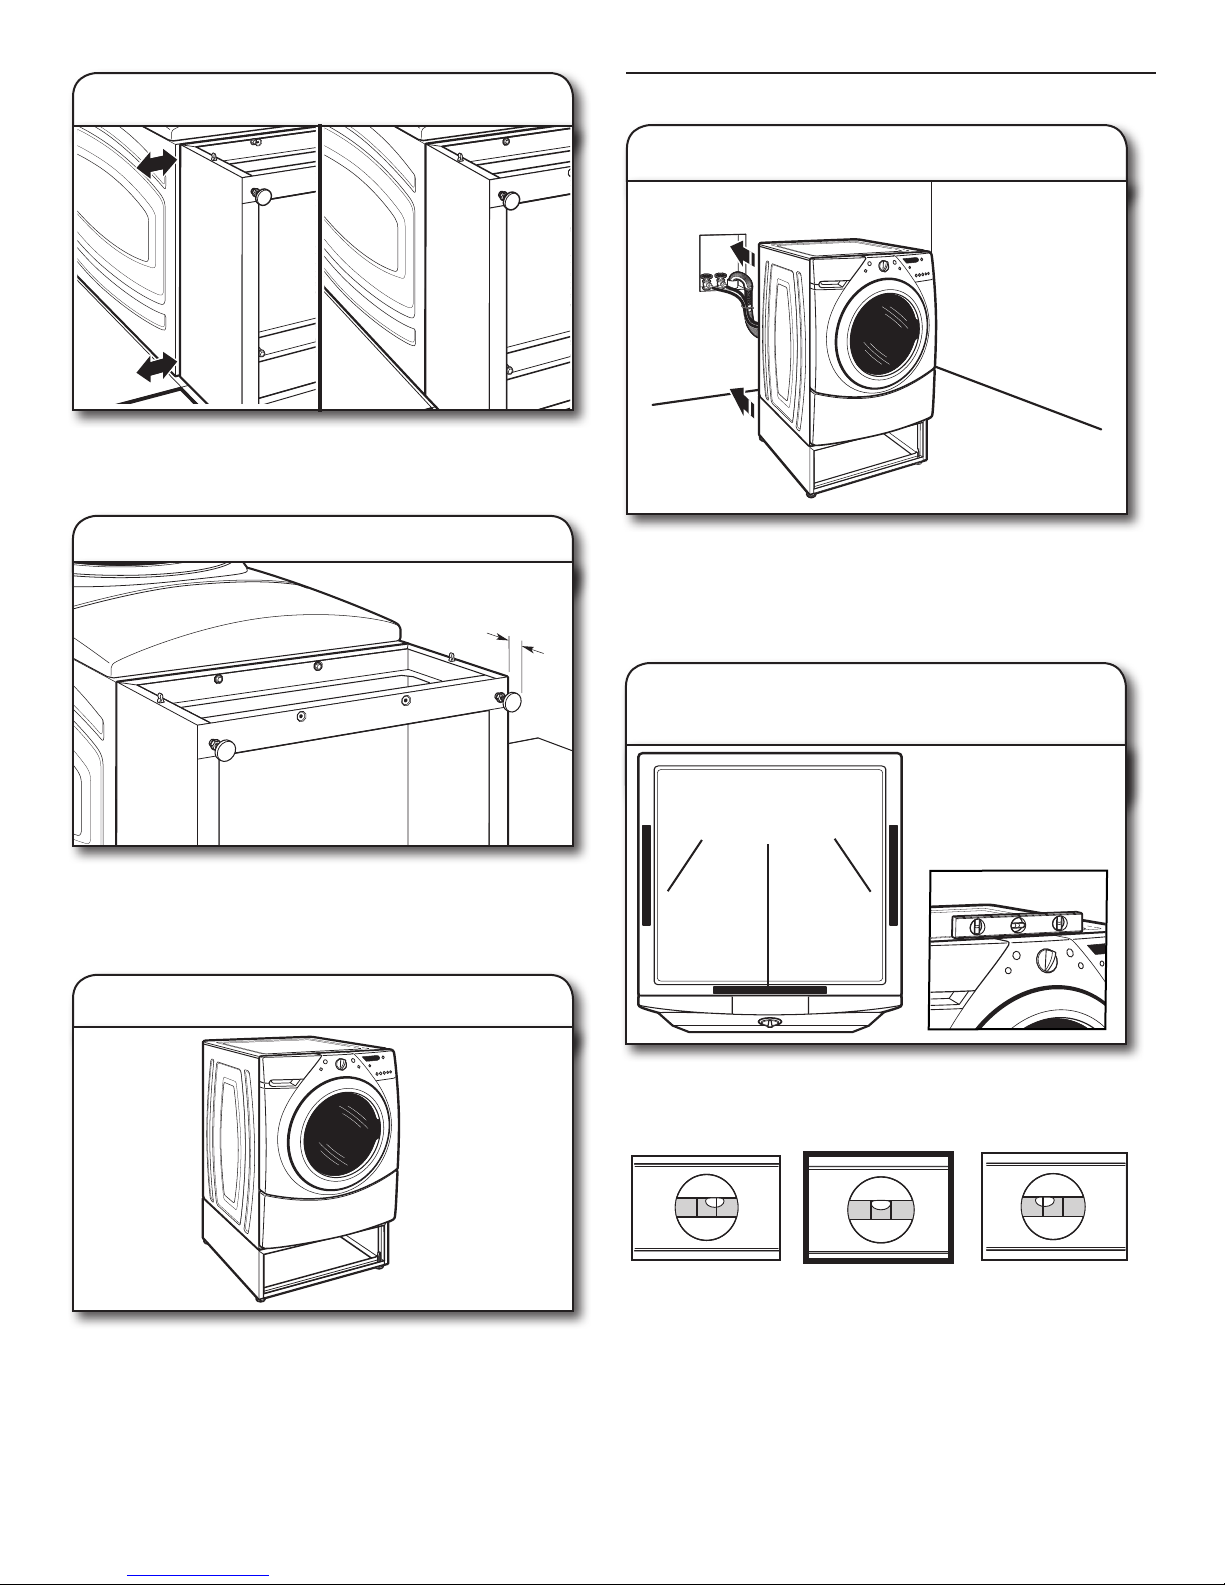
5. Align sides of pedestal
1"
(25 mm)
Align the sides of the pedestal so that they are even with the
sides of the washer/dryer. Reach inside the pedestal opening
and securely tighten all four pedestal screws.
COMPLETE THE INSTALLATION
8. Move close to nal location
6. Prepare pedestal feet
The pedestal arrives with the feet tight against the bottom
of the unit. Using a 1/4" hex-head ratchet or open-end
wrench, lower the feet approximately 1" (25 mm) away
from the bottom of the pedestal.
7. Stand the washer/dryer upright
Follow the installation instructions that came with your model
to nish installing or reinstalling your washer/dryer (i.e., hoses,
vents, etc.).
NOTE: Be sure to remove the transport bolts from the back
of the washer.
9. Check levelness
of washer/dryer
Place level here
Place a level on top edges of washer/dryer, checking each
side and front. Rock washer/dryer back and forth to make
sure all four feet make solid contact with oor.
Tip the washer/dryer back to its upright position. Remove
and discard any remaining packaging material.
Not Level
If not level, adjust pedestal feet up or down, repeating as
necessary.
LEVEL
Not Level
5
Page 6
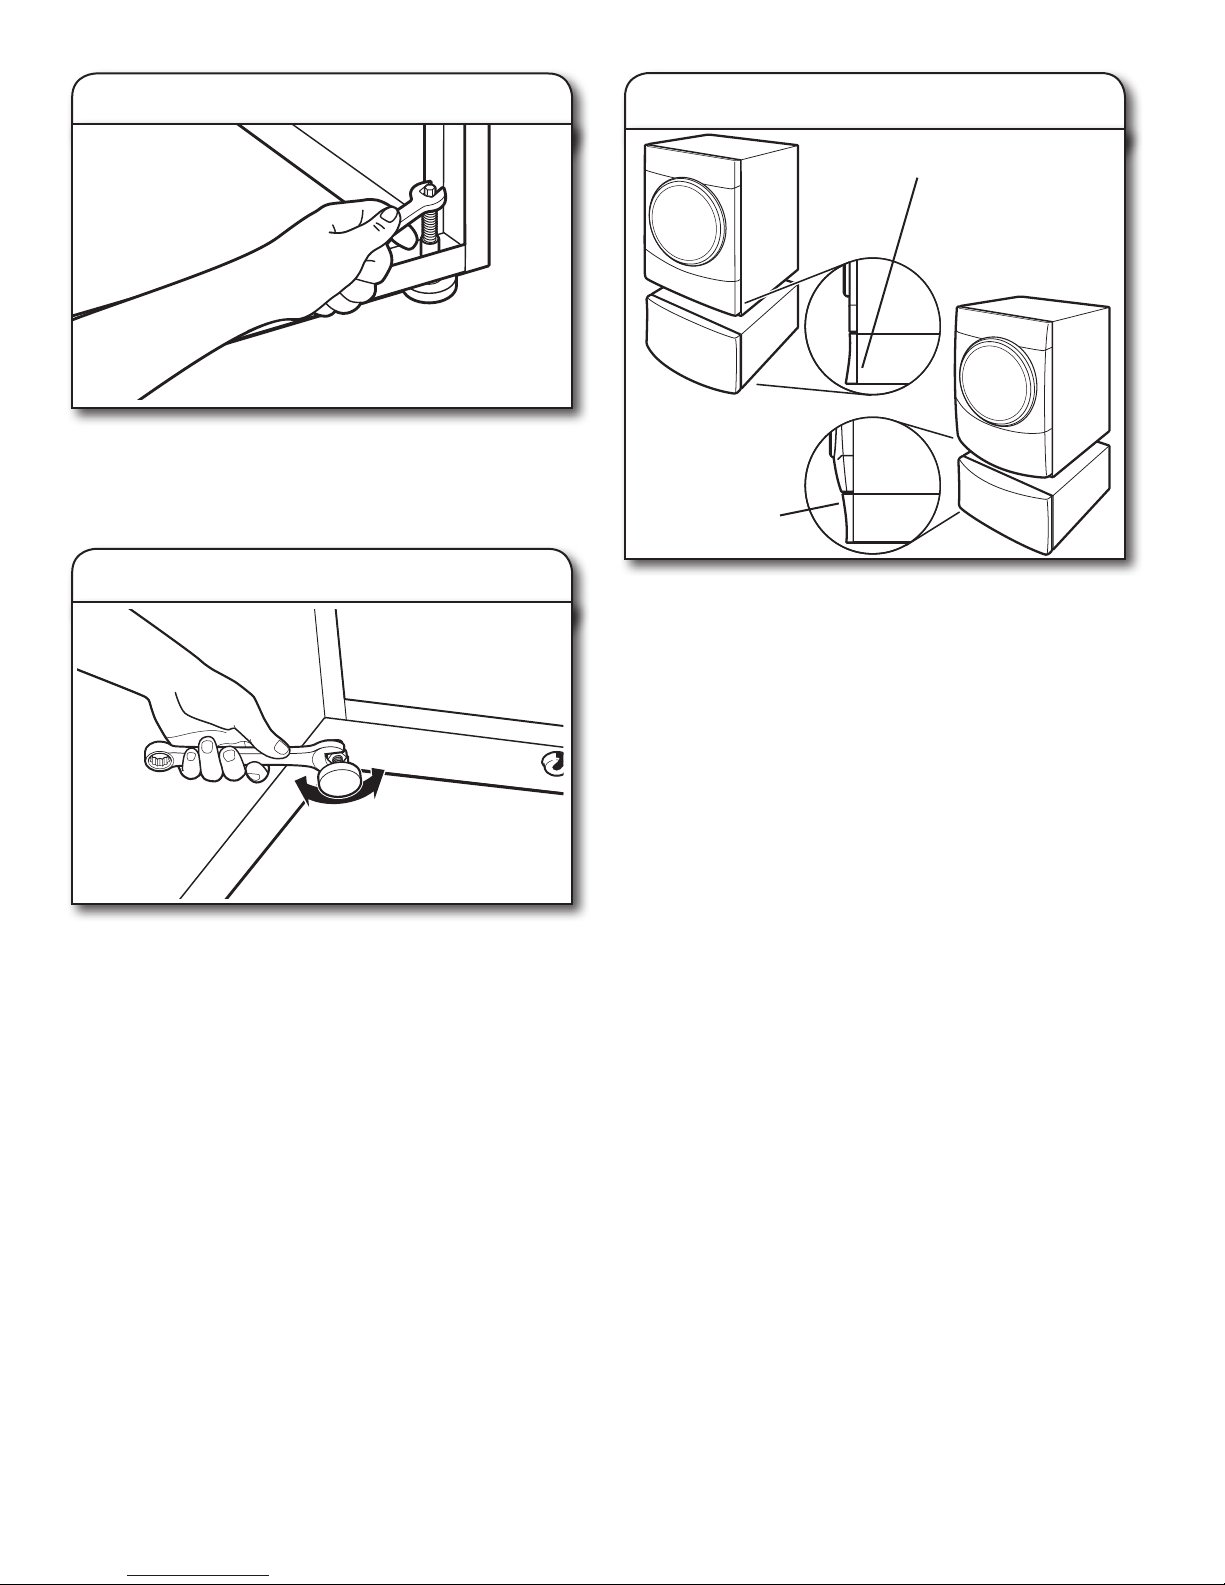
10. Adjust pedestal feet
Locate the 1/4" hex-head screws on the top of each
pedestal foot. Reach inside the pedestal and use a
1/4" hex-head ratchet or open-end wrench to adjust the
feet up or down as needed to level the washer/dryer.
11. Securely tighten jam nuts
12. Install pedestal front panel
36" (914 mm) tall models,
place wide edge of front
panel on bottom
38" (965 mm) tall
models, place wide edge
of front panel on top
Align the front panel with the pedestal and snap in place.
NOTE: Follow the “Showroom Display Kit Installation
Instructions” if you wish to use the two retainer clips included
in the parts bag. Discard the retainer clips if not used.
When the washer/dryer is level, use a 9/16" open-end wrench
to securely tighten all four jam nuts against the pedestal.
IMPORTANT: The jam nuts must be tightened to avoid
vibration.
6
Page 7

WHIRLPOOL CORPORATION PEDESTAL WARRANTY
Deale r name_______________________ ___________ _______
Address__ ___________ ___________ _____________________
Phone number_______________________ ___________ ______
Model number________________________________________
Serial number ___________________________________ _____
Purchase date________________________________________
Keep this book and your sales slip together for future
reference. You must provide proof of purchase or
installation date for in-warranty service.
Write down the following information about your major appliance
to better help you obtain assistance or service if you ever nee d
it. You will need to know your complete model number and serial
number. You can find this information on the model and serial
number label located on the product.
Before you call for Service
This pedestal must be installed only with the appropriate Whirlpool®or Maytag®.front-load washer or dryer. This pedestal must be
operated according to the instructions provided with your Whirlpool or Maytag front-load washer or dryer’s Owner’s manual or Use
and Care G uide. Be fore you call for service, please locate your model and serial number for both the pedestal and the corresponding
Whirlpool or Maytag front-load washer or dryer.
For any pedestal purchased for use with a Whirlpool or Maytag front-load washer or
dryer, the Whirlpool Corporation Pedestal
Warranty applies.
ONE-YEAR LIMITED WARRANTY
For one ye ar from the date of purchase, when this appliance is operated and maintained according to instructions attached to or
furnished with the product and is used with the appropriate Whirlpool Corporation front-load washer or dryer, Whirlpool or Whirlpool
Canada (hereafter “Whirlpool”) will pay for factory specified replacement parts and repair labor to correct defects in m
aterials or
workmanship. Service must be provided by a Whirlpool designated service company.
ITEMS WHIRLPOOL WILL NOT PAY FOR
1. Service calls to correct the installation of your appliance, to instruct you how to use your appliance, to replace or repair house fuses
or to correct house wiring or plumbing.
2. Repairs when your appliance is used for other than normal, single-family household use.
3. Damage resulting from accident, alteration, misuse, abuse, fire, flood, ac
ts of God, improper installation, installation not in
accordance with electrical or plumbing codes, or use of products not approved by Whirlpool.
4. Replacement parts or repair labor costs for units operated outside the United States or Canada.
5. Pickup and delivery. This appliance is designed to be repaired in the home.
6. Repairs to parts or systems resulting from unauthorized modifications made to the appliance.
7. Expenses for travel and transportation for product
service in remote locations.
8. The removal and reinstallation of your appliance if it is installed in an inaccessible location or is not installed in accordance with
published installation instructions.
DISCLAIMER OF IMPLIED WARRANTIES; LIMITATION OF REMEDIES
DISCLA IMER OF IMPLIED WARRANTIES; LIMITATION OF REMEDIES
CUSTOMER'S SOLE AND EXCLUSIVE REMEDY UNDER THIS LIMITED WAR RANTY SHALL BE PRODUCT REPAIR AS
PROVIDED HEREIN. IMPLIED WARRANTIES, INCLUDING WARRAN
TIES OF MERCHANTABILITY OR FITNESS FOR A
PARTICULAR PURPOSE, ARE LIMITED TO ONE YEAR OR THE SHORTEST PERIOD ALLOWED BY LAW. WHIRLPOOL S HALL
NOT BE LIABLE FOR INCIDENTAL OR CONSEQUENTIAL DAMAGES. SOME STATES AND PROVINCES DO NOT ALLOW THE
EXCLUSION OR LIMITATION OF INCIDENTAL OR CONSEQ UENTIAL DAMAGES, OR LIMITATIONS ON THE DURATION OF
IMPLIE D WARRANTIES OF MERCHANTABILITY OR FITNESS, SO THESE EXCLUSIONS OR LIMITATIONS MAY NOT APPLY TO
YOU. THIS WARRANTY GIVES YOU SPECIF
IC LEGAL RIGHTS AND YOU MAY ALSO HAVE OTHE R RIGHTS, WHICH VARY
FROM STATE TO STATE OR PROVINCE TO PROVINCE.
Outside the 50 United States and Canada, this warranty does not apply. Contact your authorized Whirlpool dealer to determine if
another warranty applies. If you need service, in the U.S.A., call 1-800-422-1230. In Canada, call 1-800-807-6777. 4/06
7
Page 8

LAUNDRY PRODUCT WARRANTY
Before you call for Service
If this laundry product was purchased at Sears
®
Laundry Product Warranty” applies (see following).
If this laundry product was purchased elsewhere, the “Whirlpool Corporation Laundry Product Warranty” applies (see following). Please
have your sales receipt available when you call Whirlpool Corporation for service under the “Whirlpool Corporation Laundry Product
Warranty.”
KENMORE LAUNDRY PRODUCT WARRANTY
ONE YEAR LIMITED WARRANTY
When installed, operated and maintained according to all
instructions supplied with the product, if this laundry product fails
due to a defect in material or workmanship within one year from
the date of purchase, call 1-800-4-MY-HOME to arrange for free
repair. If this laundry product is used for other than private family
purposes, this warranty applies for only 90 days from the date of
purchase.
THI
S WARRANTY COVERS ONLY DEFECTS IN MATERIAL
AND WORKMANSHI
P. SEARS WILL NOT PAY FOR:
1. Expendable items that can wear out from normal use,
including but not limited to
rs, belts, light bulbs, and bags.
2. A service technician to instruct the user in correct product
installation, operation or maintenance.
3. A service technician to clean or maintain this product.
4. Damage to or failure of this product if it is not installed,
operated or maintained according to all instructions supplied
with the product.
5. Damage to or failure of this product resulting from accident,
abuse, misuse or use for other
than its intended purpose.
6. Damage to or failure of
this product caused by the use of
detergents, cleaners, chemicals or utensils other than those
recommended in all instructions supplied with the product.
7. Damage to or failure of parts or systems resulting from
unauthorized modi
cations made to this product.
DISCLAIMER OF IMPLIED WARRANTIES; LIMITATION OF
REMEDIES
Customer's sole and exclusive remedy under this limited warranty
shall be product repair as provided herein. Implied warranties,
including warranties
of merchantability or
tness for a particular
purpose, are limited to one year or the shortest period allowed by
law. Sears shall not be liable for incidental or consequential
damages. Some states and provinces do not allow the exclusion
or limitation of incidental or consequential damages, or limitations
on the duration of implied warranties of merchantability or
tness,
so these exclusions or limitations may not apply to you.
This warranty applies only while this laundry product is used in the
United States and
Canada.
This warranty gives you spe
c legal rights, and you may also
have other rights which vary from state to state.
Sears, Roebuck and Co.
Hoffman Estates, IL 60179
Sears Canada Inc.
Toronto, Ontario, Canada M5B 2B8
PRODUCT RECORD
In the space below, record your complete model number, serial
number, and purchase date. You can
nd this information on the
model and serial number label located on the product.
Have this information available to help you obtain assistance or
service more quickly whenever you contact Sears concerning
your laundry product.
Model number __ __ __. __________________________________________
Serial number __________________________________________________
Purchase date __________________________________________________
Save these instructions and your sales receipt for future
reference.
8
Page 9
SÉCURITÉ DU PIÉDESTAL
EXIGENCES D’INSTALLATION
EXIGENCES D’EMPLACEMENT
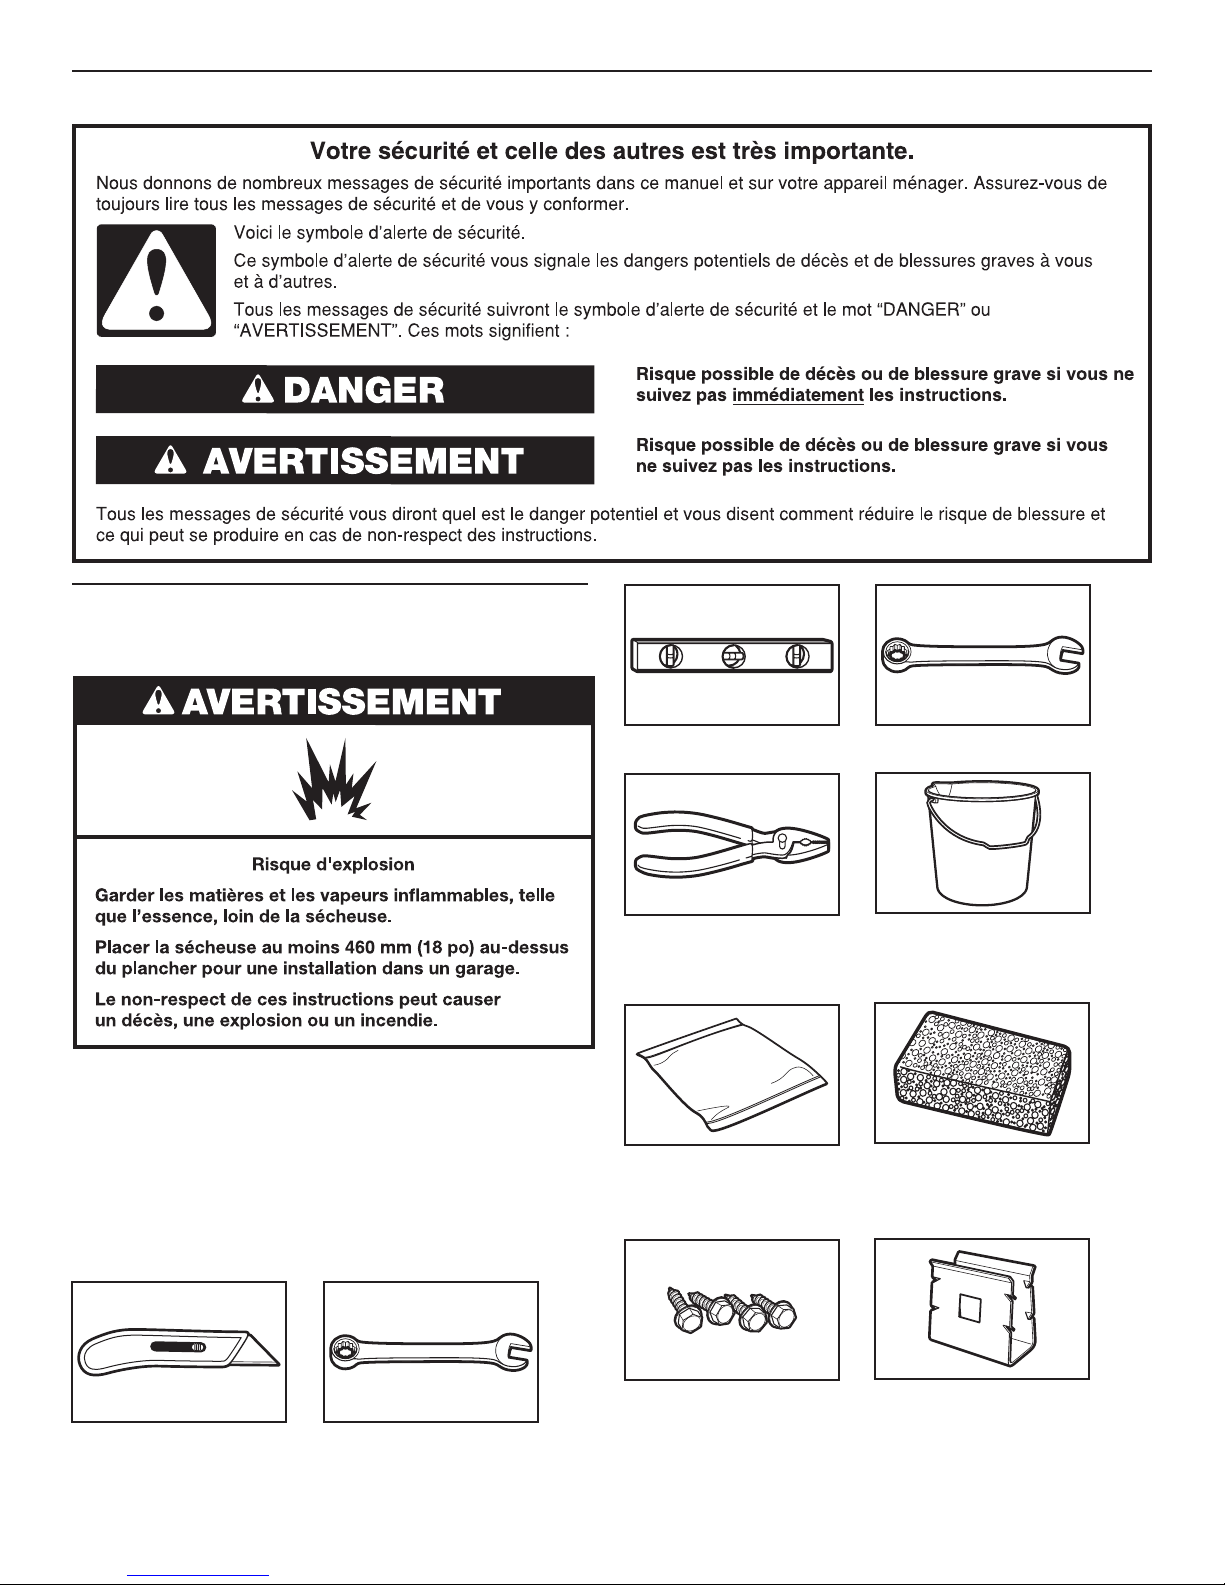
REMARQUE : Si l’ensemble de laveuse/sécheuse et du
piédestal se trouve dans un garage, il faut ajouter 8" (203 mm)
en dessous du piédestal pour que l’ensemble de laveuse/
sécheuse soit à 18" (458 mm) au-dessus du plancher du
garage.
OUTILLAGE ET PIÈCES
Rassembler les outlis et pièces nécessaires avant de
commencer l’installation.
Outillage nécessaire :
Niveau
Pince ou pince articulée
Clé plate 9/16"
Seau
Autres articles nécessaires :
Serviette
Pièces fournies :
Éponge
Couteau utilitaire Clé à cliquet à tête
hexagonale de 1/4"
ou clé plate
Quatre vis de tôlerie
n° 12 x 5/8" à tête
hexagonale (sachet de
pièces)
Deux attaches de retenue
(sachet de pièces)
9
Page 10
INSTRUCTIONS D’INSTALLATION
AVANT L’INSTALLATION DU PIÉDESTAL
IMPORTANT : Si l’ensemble de laveuse et sécheuse est déjà
installé, on doit le désinstaller.
Désinstallation de la laveuse
An d’éviter d’endommager la laveuse, les boulons de transport
à l’arrière de l’appareil doivent être en place avant l’installation
du piédestal. Pour plus d’informations concernant les boulons de
transport, voir “Élimination des accessoires de transport” dans le
Guide d’utilisation et d’entretien de la laveuse.
REMARQUE : Si la laveuse doit être transportée, appeler le
centre de service local. An d’éviter tout endommagement de
la suspension et de la structure, votre laveuse doit d’abord être
correctement installée pour être ensuite réinstallée par un
technicien certié.
1. Fermer les robinets d’arrivée d’eau chaude et d’eau froide.
2. Débrancher le cordon d’alimentation électrique.
3. Desserrer doucement les tuyaux d’alimentation sur les
robinets pour libérer la pression de l’eau. Utiliser une éponge
ou une serviette pour absorber l’eau libérée.
4. Déconnecter les tuyaux d’arrivée d’eau chaude et d’eau
froide portant les mentions “HOT” (chaud) et “COLD” (froid)
de l’arrière de la laveuse. Laisser l’eau dans les tuyaux
s’écouler dans un seau.
5. Enlever le tuyau de vidange du tuyau de rejet à l’égout ou de
l’évier de buanderie et vidanger l’eau qui reste dans un seau.
6. Écarter la laveuse du mur pour pouvoir la faire basculer et la
faire reposer sur la face arrière.
7. Pour éviter d’endommager le plancher et pour faciliter
l’installation et la manipulation, aplatir la boîte vide du
piédestal et la placer à proximité de la laveuse. Coucher
la laveuse sur sa partie arrière (s’assurer que le cordon
d’alimentation ne se trouve pas sous la laveuse) de manière
à ce que le carton se trouve sous la totalité de l’arête
inférieure arrière de la laveuse.
8. Une petite quantité d’eau supplémentaire peut s’écouler de
la laveuse lorsqu’elle est en appui sur la face arrière. Consulter
la section “Installation du piédestal”.
Désinstallation de la sécheuse électrique
1. Débrancher le cordon d’alimentation électrique.
2. Écarter la sécheuse du mur sufsamment pour pouvoir
desserrer la bride du conduit d’évacuation. Desserrer la bride
et retirer doucement le conduit d’évacuation de la bouche
de décharge de la sécheuse.
3. Écarter la sécheuse du mur pour pouvoir la faire basculer
et la faire reposer sur la face arrière.
4. Pour éviter d’endommager le plancher et pour faciliter
l’installation et la manipulation, aplatir la boîte vide du
piédestal et la placer à proximité de la laveuse. Coucher
la sécheuse sur sa partie arrière (s’assurer que le cordon
d’alimentation ne se trouve pas sous la laveuse) de manière
à ce que le carton se trouve sous la totalité de l’arête
inférieure arrière de la sécheuse. Consulter la section
“Installation du piédestal”.
Désinstallation de la sécheuse à gaz
1. Débrancher le cordon d’alimentation électrique.
2. Fermer l’arrivée de gaz.
3. Écarter la sécheuse du mur sufsamment pour pouvoir
desserrer la bride du conduit d’évacuation. Desserrer la bride
et retirer doucement le conduit d’évacuation de la bouche de
décharge de la sécheuse.
4. Déconnecter le conduit exible de la canalisation de gaz de
la sécheuse. Obturer avec du ruban adhésif l’ouverture de
chaque raccord de la canalisation de gaz.
5. Écarter la sécheuse du mur pour pouvoir la faire basculer et
la faire reposer sur la face arrière.
6. Pour éviter d’endommager le plancher et pour faciliter
l’installation et la manipulation, aplatir la boîte vide du
piédestal et la placer à proximité de la sécheuse. Coucher
la sécheuse sur sa partie arrière (s’assurer que le cordon
d’alimentation ne se trouve pas sous la sécheuse) de
manière à ce que le carton se trouve sous la totalité de
l’arête inférieure arrière de la sécheuse. Consulter la section
“Installation du piédestal”.
10
Page 11
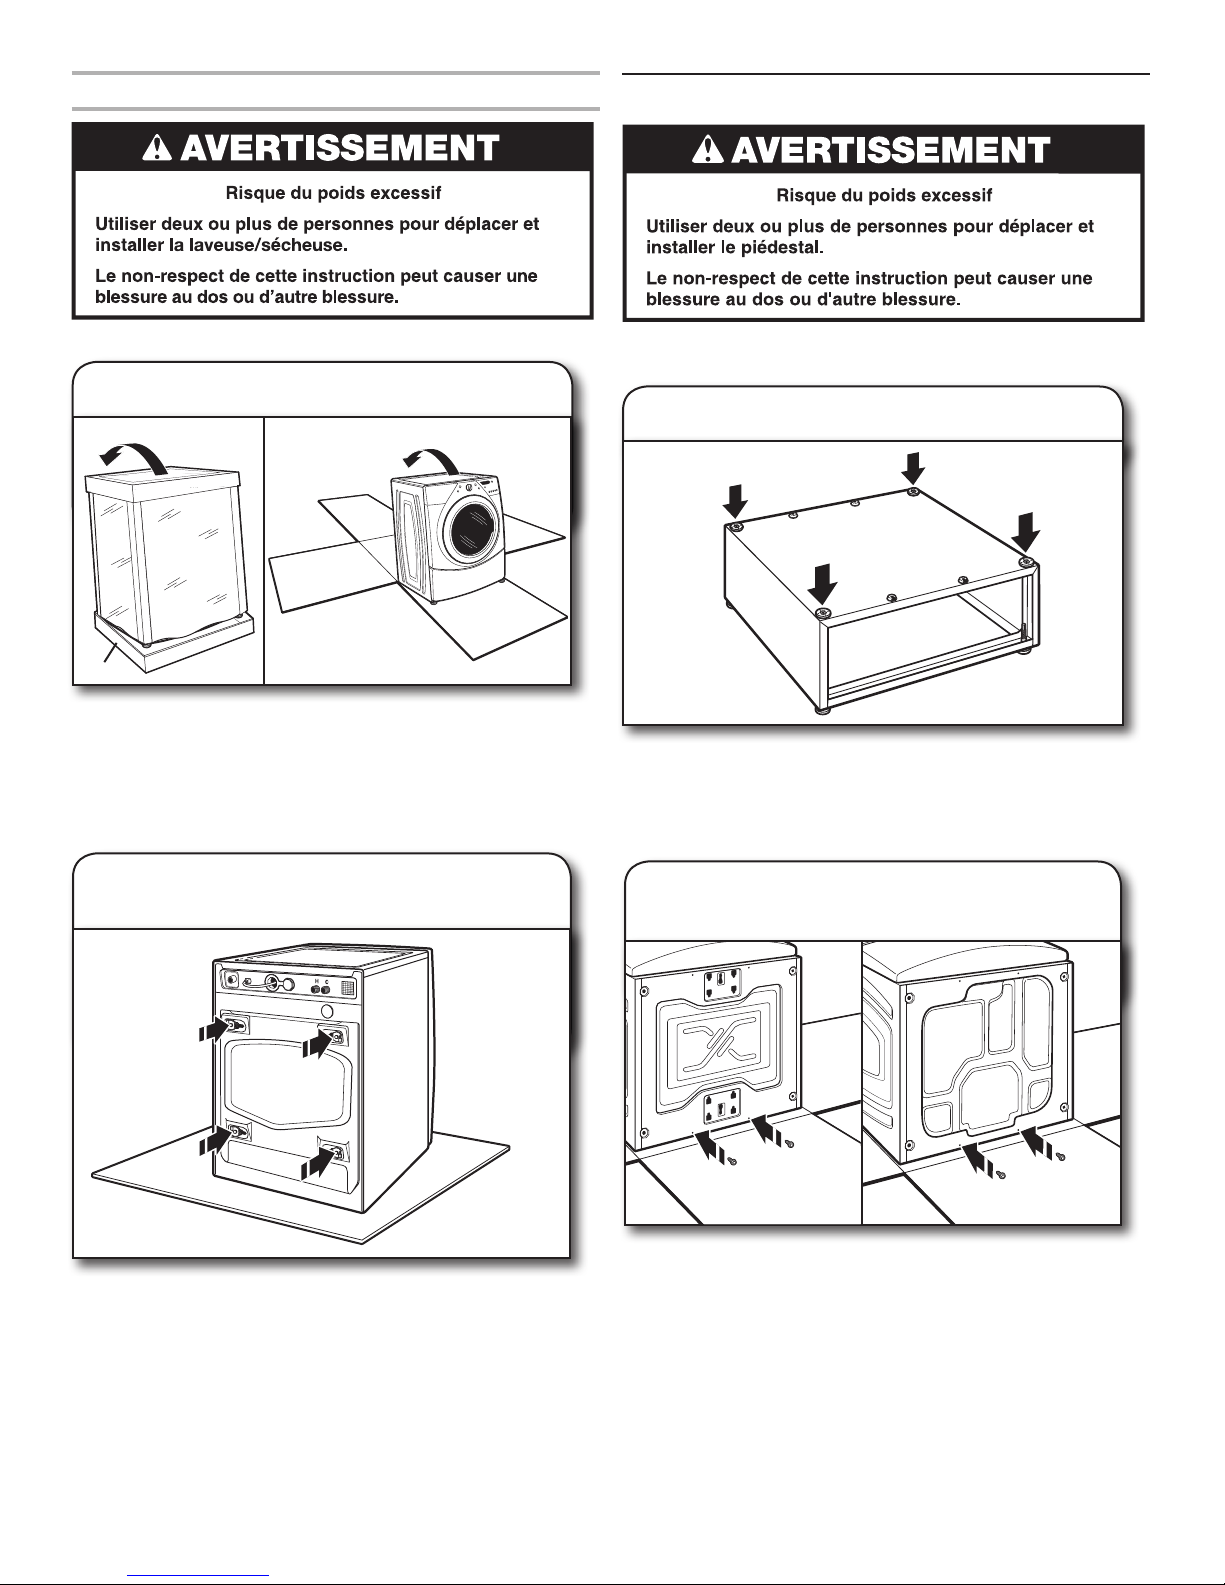
Installation de la nouvelle laveuse/sécheuse
INSTALLATION DU PIÉDESTAL
La laveuse/sécheuse est encore dans son emballage :
1. Déballer la laveuse/sécheuse
base
Laveuse : Découper la pellicule de plastique le long de la ligne
de pointillés autour de la base. Ne pas enlever l’emballage.
Sécheuse : Découper le carton le long du dessus jusqu’aux
coins inférieurs le long de la ligne de pointillés. Disposer les
4 côtés du carton sur le sol. Jeter le dessus du carton et les
coins de protection.
laveuse
sécheuse
2. Boulons de transport de
la laveuse
Pour l’installation du piédestal sur une laveuse ou une sécheuse,
suivre les instructions qui suivent.
1. Identier les cales d’espacement
Veiller à placer les quatre cales d’espacement au sommet du
piédestal. Les cales d’espacement réduisent les vibrations entre
le piédestal et la laveuse/sécheuse.
REMARQUE : Si des pieds sont installés sur la laveuse/
sécheuse, les enlever.
2. Préparer l’ensemble de
laveuse/sécheuse
Repérer les boulons de transport à l’arrière de la laveuse. Les
boulons de transport doivent rester dans la laveuse pendant
l’installation du piedéstal. Lorsqu’on couche la laveuse sur
le dos, maintenir l’embout inférieur sur le sol. Ne pas enlever
la pellicule de plastique, les coins protecteurs, ni l’embout
supérieur.
Base de la laveuse
Insérer partiellement les deux vis de tôlerie à tête hexagonale
n° 12 x 5/8" dans les trous inférieurs et laisser un espace
d’environ 3/8" (10 mm) entre la tête de vis et le fond de
la laveuse/sécheuse.
Base de la sécheuse
11
Page 12
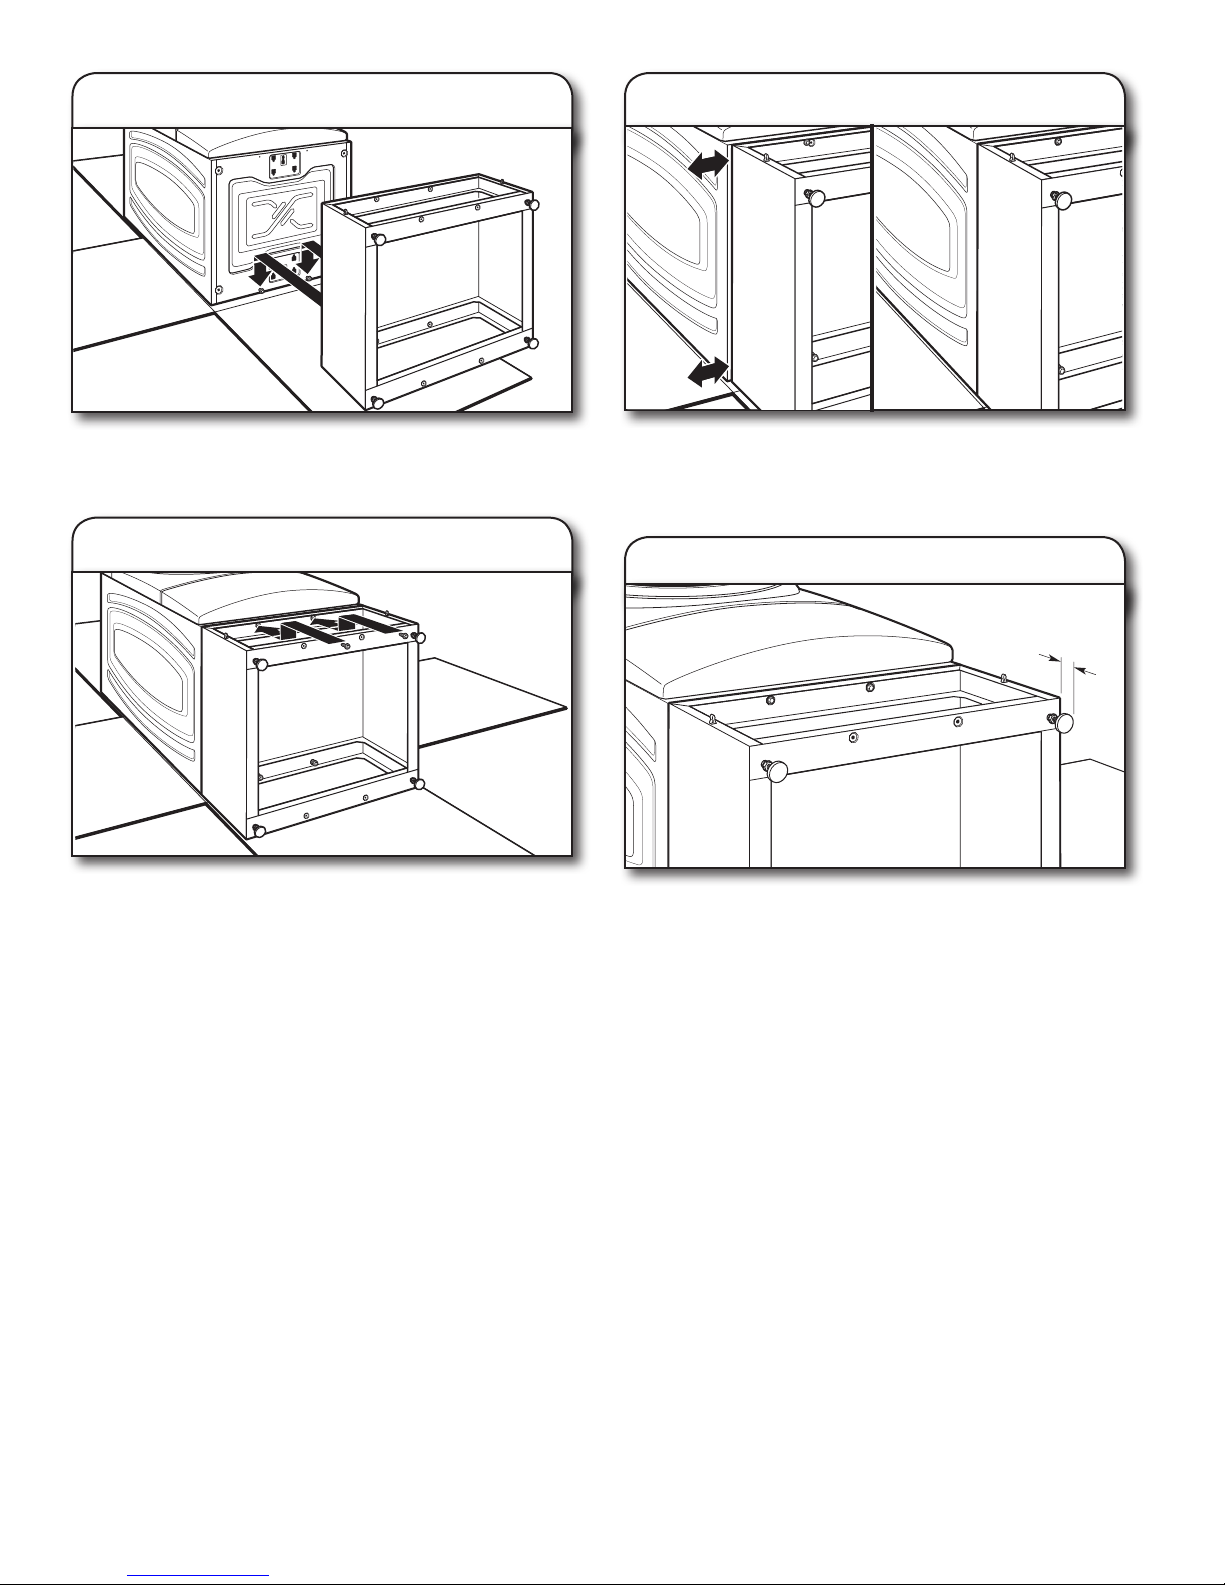
3. Rapprocher le piédestal
1"
(25 mm)
5. Aligner les bords du piédestal
Placer le piédestal en contact avec la base de la laveuse/
sécheuse. Engager les ouvertures en trou de serrure du
piédestal sur les deux vis inférieures partiellement enfoncées.
4. Fixer le piédestal
Positionner le piédestal vers l’avant de la laveuse/sécheuse
et installer les deux autres vis de tôlerie à tête hexagonale.
Ne pas visser complètement.
Aligner les bords du piédestal pour qu’ils soient en
afeurement avec les bords de la laveuse/sécheuse. Bien
serrer les quatre vis du piédestal (introduire le bras dans
l’ouverture de passage du tiroir).
6. Préparer les pieds du piédestal
Le piédestal est fourni avec les pieds serrés contre la base
de l’unité. À l’aide d’une clé à tête hexagonale de 1/4", ou
d’une clé à molette, abaisser le pied d’environ 1" (25 mm) de
la base du piédestal.
12
Page 13
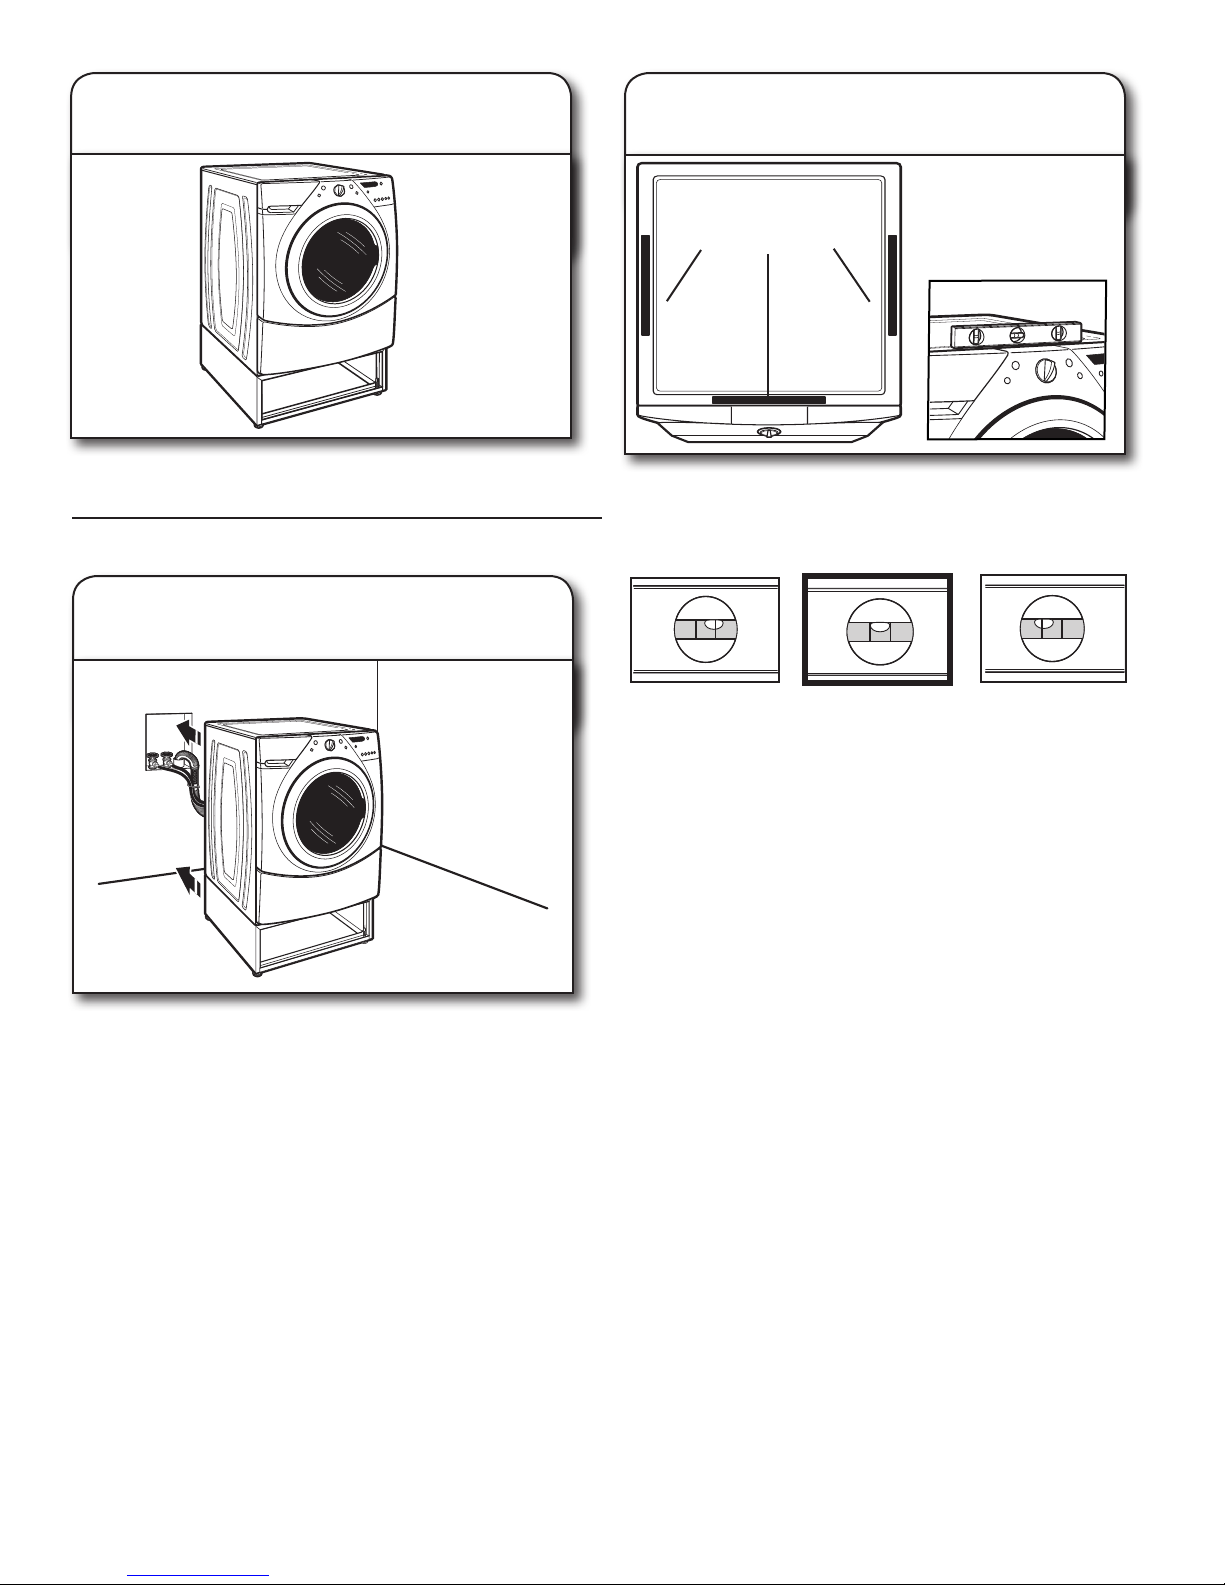
7. Relever verticalement
la laveuse/sécheuse
9. Vérier l’aplomb de
la laveuse/sécheuse
Placer un niveau ici
Redresser la laveuse/sécheuse. Retirer et jeter tous les
matériaux d’emballage restants.
ACHEVER L’INSTALLATION
8. Placer près de l’emplacement
nal
Exécuter les instructions d’installation fournies avec l’appareil
pour terminer l’installation ou la réinstallation de la laveuse ou
de la sécheuse (tuyaux d’eau, évents, etc.).
REMARQUE : Veiller à retirer les boulons de transport de
l’arrière de la laveuse.
Placer un niveau aux bords supérieurs de la laveuse/sécheuse,
en vériant chaque côté et le l’avant. Faire basculer l’appareil
d’arrière en avant pour s’assurer que les quatre pieds sont
fermement en contact avec le sol.
Non d’aplomb
Si non d’aplomb, ajuster les pieds du piédestal vers le haut ou
le bas en répétant au besoin.
D’APLOMB
Non d’aplomb
13
Page 14
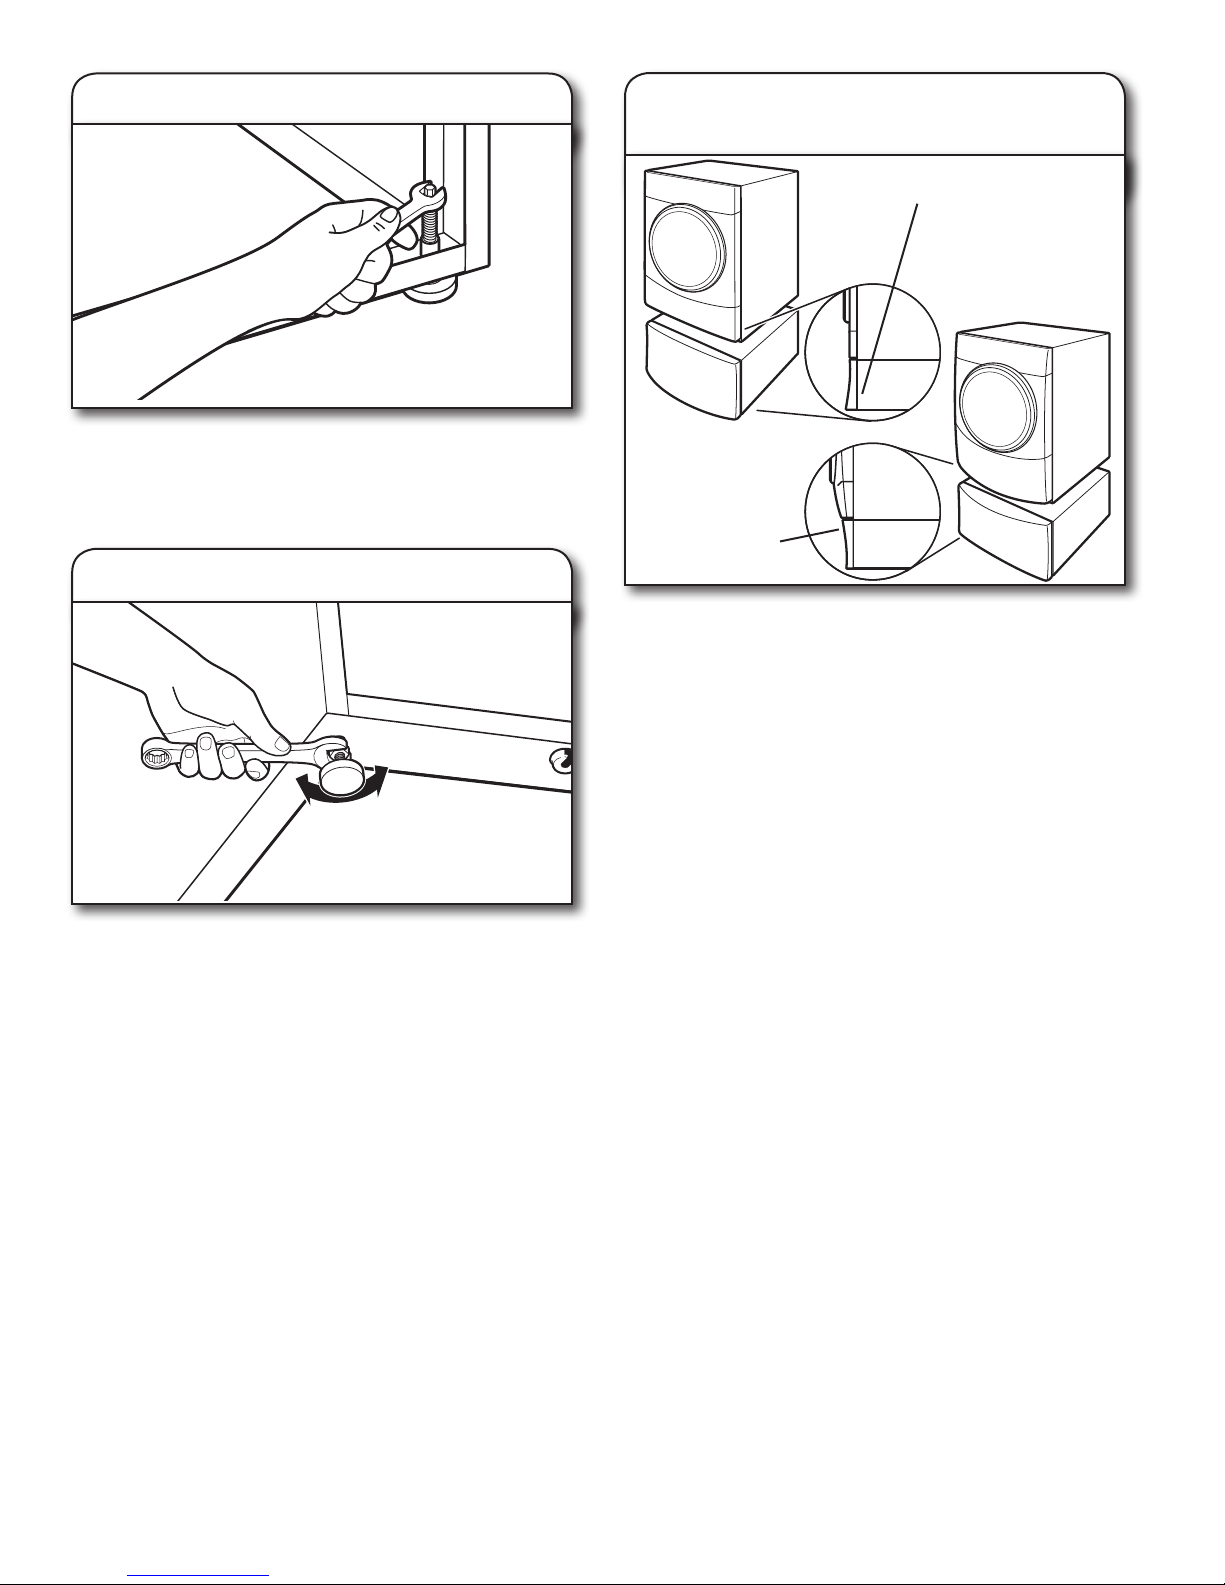
10. Ajuster les pieds du piédestal
Localiser les vis à tête hexagonale de 1/4" au-dessus de
chaque pied du piédestal. Pour mettre la laveuse/sécheuse
d’aplomb, passer le bras à l’intérieur du piédestal et utiliser
un cliquet à tête hexagonale ou une clé plate de 1/4" pour
abaisser ou rehausser les pieds selon le besoin.
11. Bien serrer les contre-écrous
12. Installer le panneau avant du
piédestal
Pour modèles de
36" (914 mm), le bord large
du panneau avant doit être
placé en bas.
Pour modèles de
38" (965 mm), le bord
large du panneau avant
doit être placé en haut.
Aligner le panneau avant avec le piédestal et emboîter
l’ensemble.
REMARQUE : Suivre les “Instructions d’installation de
la trousse d’étalage en magasin” si vous désirez utiliser
les deux attaches de retenue incluses dans le sachet de
pièces. Jeter les attaches de retenue si elles ne sont pas
utilisées.
Une fois la laveuse ou la sécheuse d’aplomb et les quatre
pieds sont bien en contact avec le plancher, utiliser une clé
plate de 9/16" pour xer solidement les quatre contre-écrous
contre le piédestal.
IMPORTANT : Les contre-écrous doivent être serrés pour
éviter les vibrations.
14
Page 15

GARANTIE DU PIÉDESTAL WHIRLPOOL CORPORATION
Nom du marchand ___________________________________________
Adresse ___________________________________________________
Numéro de téléphone ______________________________________
Numéro de modèle _________________________________________
Numéro de série ___________________________________________
Date d’achat ______________________________________________
Conservez ce manuel et votre reçu de vente pour référence
ultérieure. Pour l’entretien s ous garantie, vous devez
présenter un document prouvant la date d’achat ou
d’installation.
Inscrivez les renseignements suivants au sujet de votre gros
appareil ménager pour mieux vous aider à obtenir assistance ou
réparation en cas de besoin. Vous devrez connaître le numéro
de modèle et le numéro de série au complet. Vous trouverez ces
renseignements sur la plaque signalétique sit
uée sur le produit.
Avant de faire un appel de service
Ce piédestal doit être installé seulement avec la laveuse ou sécheuse à chargement frontal appropriée de marque Whirlpool®ou Maytag®.
Ce piédestal doit être utilisé conformément aux instructions du Manuel du propriétaire ou du Guide d’utilisation et d’entretien de votre
laveuse ou sécheuse à chargement frontal de marque Whirlpool ou Maytag. Avant de faire un appel de service, veuillez repérer les
numéros de modèle e
t de série pour le piédestal et la laveuse ou sécheuse correspondante à chargement frontal de marque Whirlpool ou
Maytag.
Pour tout piédestal acheté pour utilisation avec une laveuse ou sécheuse à chargement frontal de marque Whirlpool ou Maytag, c’est la
garantie du piédestal Whirlpool Corporation qui s’applique.
GARANTIE LIMITÉE DE UN AN
Pendant un an à compter de la date d’achat, lorsque cet appareil ménager est utilisé et entretenu conformément aux instructions
joi
ntes à ou fournies avec le produit et utilisé avec la laveuse ou sécheuse à chargement frontal Whirlpool Corporation appropriée,
Whirlpool ou Whirlpool Canada (ci-après désignées “Whirlpool”) paiera pour les pièces de rechange spécifiées par l’usine et la maind’œuvre pour corriger les vices de matériaux ou de fabrication. Le service doit être fourni par une compagnie de service désignée
par Whirlpool.
WHIRLPOOL NE PRENDRA PAS EN CHARGE
1. Les visites de service pour rectifier l’installation de l’appareil, montrer à l’utilisateur comment utiliser l’appareil, remplacer ou
réparer des fusibles ou rectifier le câblage ou la plomberie du domicile.
2. Les réparations lorsque l’appareil est utilisé à des fins autres que l’usage unifamilial normal.
3. Les dommages imputables à : accident, modification, usage impropre ou abusif, incendie, inondation, actes de Dieu, installation
fautive ou installation non conforme aux codes d’élect
ricité ou de plomberie, ou l’utilisation de produits non approuvés par
Whirlpool.
4. Le coût des pièces de rechange et de la main-d’œuvre pour les appareils utilisés hors des États-Unis ou du Canada.
5. Le ramassage et la livraison. Cet appareil est conçu pour être réparé à domicile.
6. Les réparations aux pièces ou systèmes résultant d’une modification non autorisée faite à l’appareil.
7. Les frais de voyage et de transport pour le service d’un produit dans les régions éloi
gnées.
8. La dépose et la réinstallation de votre appareil si celui-ci est installé dans un endroit inaccessible ou n’est pas installé
conformément aux instructions d’installation fournies.
CLAUSE D’EXONÉRATION DE RESPONSABILITÉ AU TITRE DES GARANTIES IMPLICITES;
LIMITATION DES RECOURS
CLAUSE D’EXONÉRATION DE RESPONSABILITÉ AU TITRE DES GARANTIES IMPLICITES; LIMITATION DES RECOURS
LE SEUL ET EXCLUSIF RECOURS DU CLIENT DANS LE CADRE DE LA PRÉSENTE GARANTIE LIMIT
ÉE CONSISTE EN LA
RÉPARATION PRÉVUE CI-DESSUS. LES GARANTIES IMPLICITES, Y COMPRIS LES GARANTIES APPLICABLES DE QUALITÉ
MARCHANDE ET D’APTITUDE À UN USAGE PARTICULIER, SONT LIMITÉES À UN AN OU À LA PLUS COURTE PÉRIODE
AUTORISÉE PAR LA LOI. WHIRLPOOL N’ASSUME AUCUNE RESPONSABILITÉ POUR LES DOMMAGES FORTUITS OU
INDIRECTS. CERTAINES JURIDICTIONS NE PERMETTENT PAS L’EXCLUSION OU LA LIMITATION DES DOMMAGES FORTUITS OU
INDIRECTS, OU LES LIMITATIONS DE LA DURÉE DES GARANTI
ES IMPLICITES DE QUALITÉ MARCHANDE OU D’APTITUDE À UN
USAGE PARTICULIER, DE SORTE QUE CES EXCLUSIONS OU LIMITATIONS PEUVENT NE PAS S’APPLIQUER DANS VOTRE CAS.
CETTE GARANTIE VOUS CONFÈRE DES DROITS JURIDIQUES SPÉCIFIQUES ET VOUS POUVEZ ÉGALEMENT JOUIR D’AUTRES
DROITS QUI PEUVENT VARIER D’UNE JURIDICTION À UNE AUTRE.
À l’extérieur du Canada et des 50 États des États-Unis, cette garantie ne s’applique pas. Contacter votre marchand Whirlpool
autorisé pour déterminer si
une autre garantie s’applique. Pour le service aux États-Unis, composer le 1-800-422-1230.
Au Canada, composer le 1-800-807-6777. 4/06
15
Page 16

GARANTIE DES APPAREILS DE BUANDERIE
Avant de faire un appel de service
Si cet appareil de buanderie a été acheté chez Sears, la “Garantie des appareils de buanderie Kenmore®” s’applique (voir les
dispositions qui suivent).
Si cet appareil de buanderie a été acheté ailleurs, la “Garantie des appareils de buanderie Whirlpool Corporation” s’applique (voir les
dispositions qui suivent). Veuillez avoir votre reçu de vente à disposition lorsque vous appelez Whirlpo
ol Corporation pour un service
dans le cadre
de la “Garantie des appareils de buanderie Whirlpool Corporation”.
GARANTIE DES APPAREILS DE BUANDERIE KENMORE
®
GARANTIE LIMITÉE DE UN AN
Lorsqu’il est installé, utilisé et entretenu conformément à toutes
les instructions fournies avec le produit, si cet appareil de
buanderie fait défaut par suite d'un vice de matériau ou de
fabrication au cours de l’année qui suit la date d’achat, composer
le 1-800-4-MY-HOME pour obtenir une réparation gratuite. Si
l’appareil de buanderie fonctionne à toute autre
que l’utilisation
familiale privée, la présente garantie ne s’appliquera que pendant
90 jours à partir de la date d’achat.
LA PRÉ
SENTE GARANTIE COUVRE UNIQUEMENT LES VICES
DE MATÉRIAUX ET DE FABRICATION. SEARS NE PRENDRA
PAS EN CHARGE :
1. Les pièces courantes qui peuvent s’user suite à une utilisation
normale, notamment les
res, courroies, ampoules et sacs.
2. L’intervention d’un technicien pour montrer à l utilisateur
comment installer, utiliser et entretenir correctement le
produit.
3. L’intervention d’un technicien pour nettoyer ou entretenir ce
produit.
4. L’endommagement ou les défauts du produit si celui-ci n’est
pas installé, utilisé
ou entretenu conformément à toutes les
instructions fournies avec le produit.
5. L’endommagement ou les défauts du produit résultant
d’accident, usage impropre ou abusif
ou utilisation autre que
pour laquelle il est destiné.
6. L’endommagement ou les défauts du produit causés par
l’utilisation de détergents, agents de nettoyage, produits
chimiques ou ustensiles autres que ceux recommandés dans
toutes les instructions fournies avec le produit.
7. L’endommagement ou les défauts des pièces ou système
s
résultant d’une modi
cation non autorisée faite au produit.
CLAUSE D'EXONÉRATION DE RESPONSABILITÉ AU TITRE
DES GARANTIES IMPLICITES; LIMITATION DES RECOURS
Le seul et exclusif recours du client dans le cadre de la présente
garantie limitée consiste en la réparation prévue ci-dessus. Les
garanties implicites, y compris les garanties applicables de qualité
marchande et d’aptitude à un usage particulier, sont limitées à un
an ou à la plus courte période autorisée par la loi.
Sears n’assume
aucune responsabilité pour les dom
mages fortuits ou indirects.
Certains États ou certaines provinces ne permettent pas
l’exclusion ou la limitation des dommages fortuits ou indirects, ou
la limitation de la durée des garanties implicites de qualité
marchande ou d’aptitude à un usage particulier, de sorte que
cette exclusion ou limitation peut ne pas être applicable dans
votre cas.
Cette garantie s’applique seulement lorsque cet appareil de
buande
rie est utilisé aux États-Unis et au Canada.
Cette garantie vous confère des droits juridiques s
ques et
vous pouvez égale
ment jouir d’autres droits qui peuvent varier
d’un État à l’autre.
Sears, Roebuck and Co.
Hoffman Estates, IL 60179
Sears Canada Inc.
Toronto, Ontario, Canada M5B 2B8
ENREGISTREMENT DU PRODUIT
Dans l’espace ci-dessous, inscrire les numéros de modèle et de
série complets et la date d’achat. Vous trouverez ces
renseignements sur la plaque signalétique située sur le produit.
Gardez ces renseignements à disposition pour obtenir plus
rapidement assistance ou service lorsque vous communiquez
avec Sears au su
jet de votre appareil de buanderie.
Numéro de modèle __ __ __. _____________________________________
Numéro de série ________________________________________________
Date d’achat____________________________________________________
Conservez ces instructions et votre reçu de vente pour
référence ultérieure.
W10178072B
W10348604B-SP
© 2010 Whirlpool Corporation. 12/10
All rights reserved Printed in U.S.A.
Tous droits réservés Imprimé aux É.-U.
KENMORE, KENMORE ELITE, sont des marques de commerce de Sears, Roebuck and Co.
KENMORE, KENMORE ELITE, are trademarks of Sears, Roebuck and Co.
® Registered Trademark/TM Trademark of Whirlpool, U.S.A.,
Whirlpool Canada LP Licensee in Canada
® Marque déposée/TM Marque de commerce de Whirlpool, U.S.A.,
emploi sous licence par Whirlpool Canada LP au Canada
 Loading...