

Page 1
ICE MAKER KIT
INSTALLING AUTOMATIC ICE MAKER
IN SIDE BY SIDE REFRIGERATORS
BEFORE YOU BEGIN
IMPORTANT
THEREFRIGERATORHASTOBELEVELTOINSURE
PROPEROPERATIONOFTHE ICEMAKER. REFER
TO THE USEAND CARE MANUAL FORLEVELING
INSTRUCTIONS
For better understanding of this kit, please read all of the
instructionsbefore you begin.
The followinginstructions are designed for home assembly,
however we strongly recommend that a qualified Service
Technicianinstall this kit for you.
TOOLS YOU WILL NEED
PLIERS
PHILLIPS SCREWDRIVER
TABLEKNIFE
ADJUSTABLEOPEN END WRENCH
FLATBLADESCREW DRIVER
RULER
Comparethiskitnumberwiththelabelontheserialplate.Ifthis
kit does not have thesame number,returnit and order the
correct kit.
Removethe following items from the kit:
The Icemakerand allsmall parts shown on page 2.
110843-2
Page 2
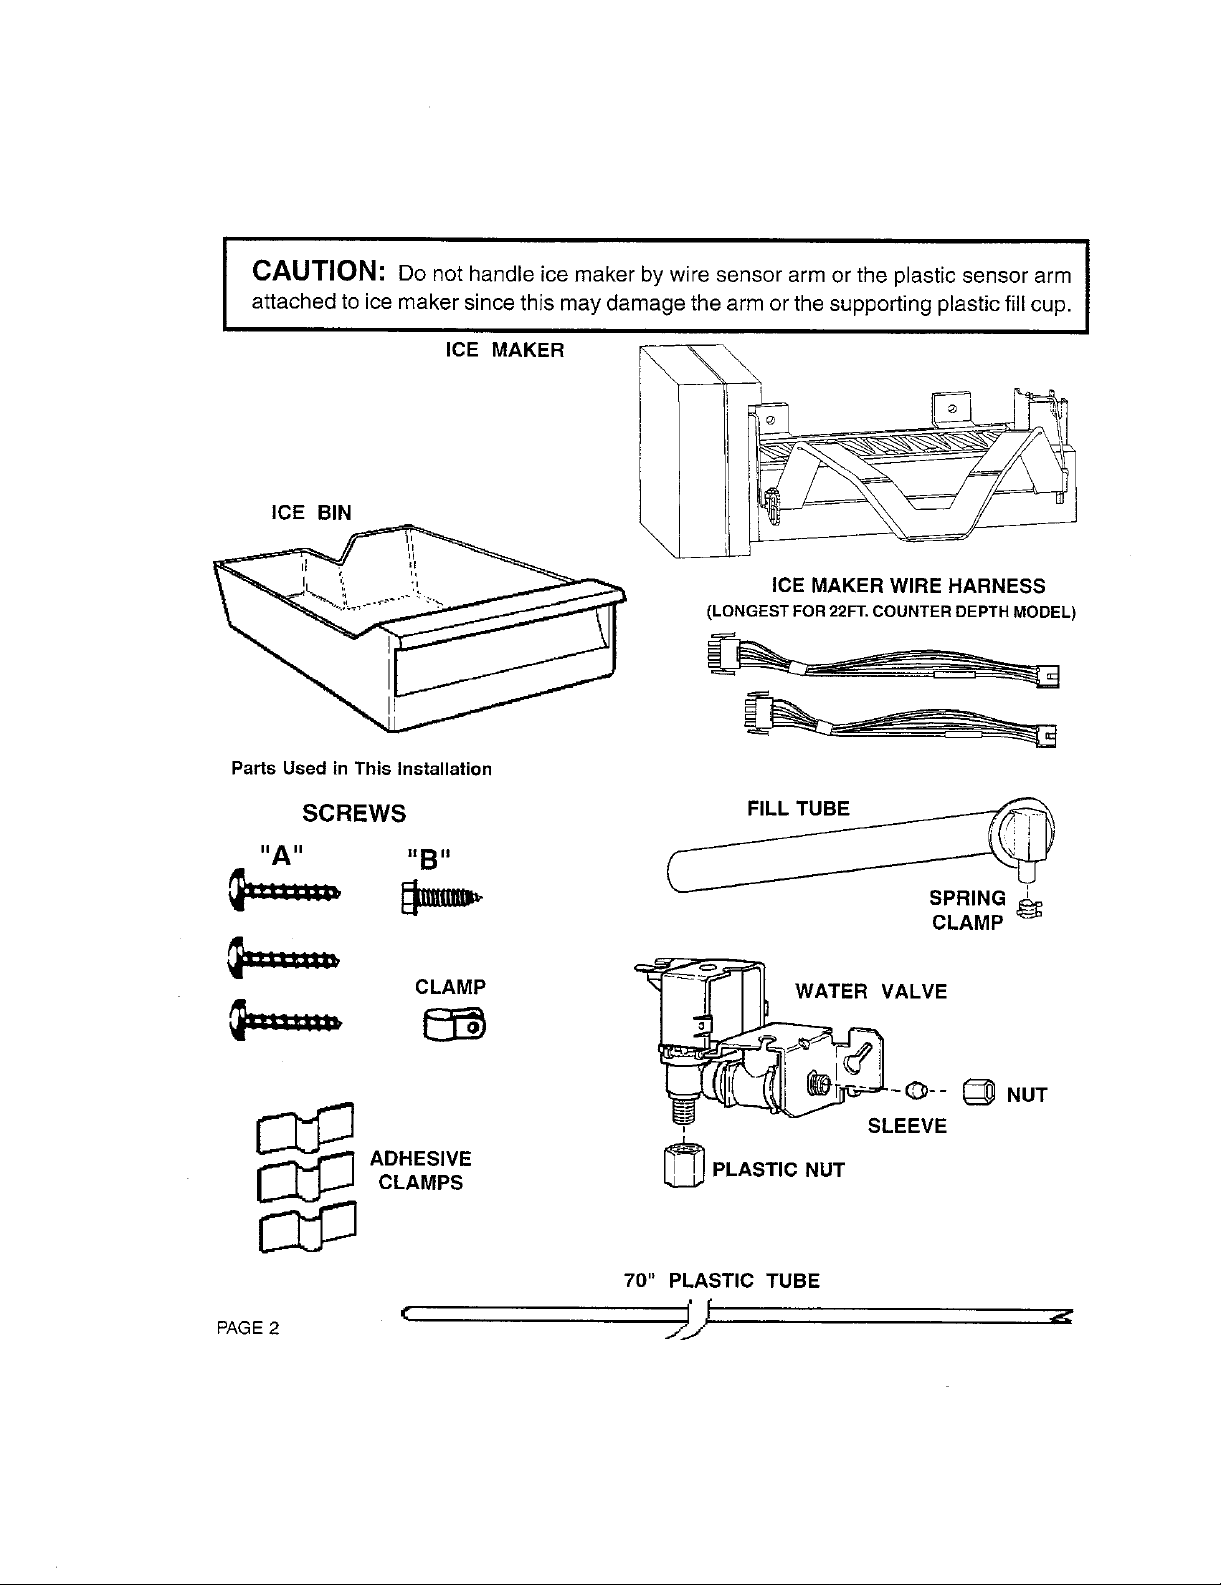
attached to ice maker since this may damage the arm or the supporting plastic fill cup.
I CAUTION: Do not handle ice maker by wire sensor arm or the plastic sensor arm I
ICE MAKER
ICE BIN [ I/
(LONGEST FOR 22FT. COUNTER DEPTH MODEL)
_ _L ICE MAKERWIREHARNESS
Parts Used in This Installation
I
I
"A" "B"
SCREWS
_ SPRING
CLAMP
_===== CLAMP _ _ WATERVALVE
_-(_-- (_ NUT
SLEEVE
CLAMPS [_
_@ ADHESIVE PLASTICNUT
70" PLASTIC TUBE
PAGE 2 ¢ __j}
I d
Page 3
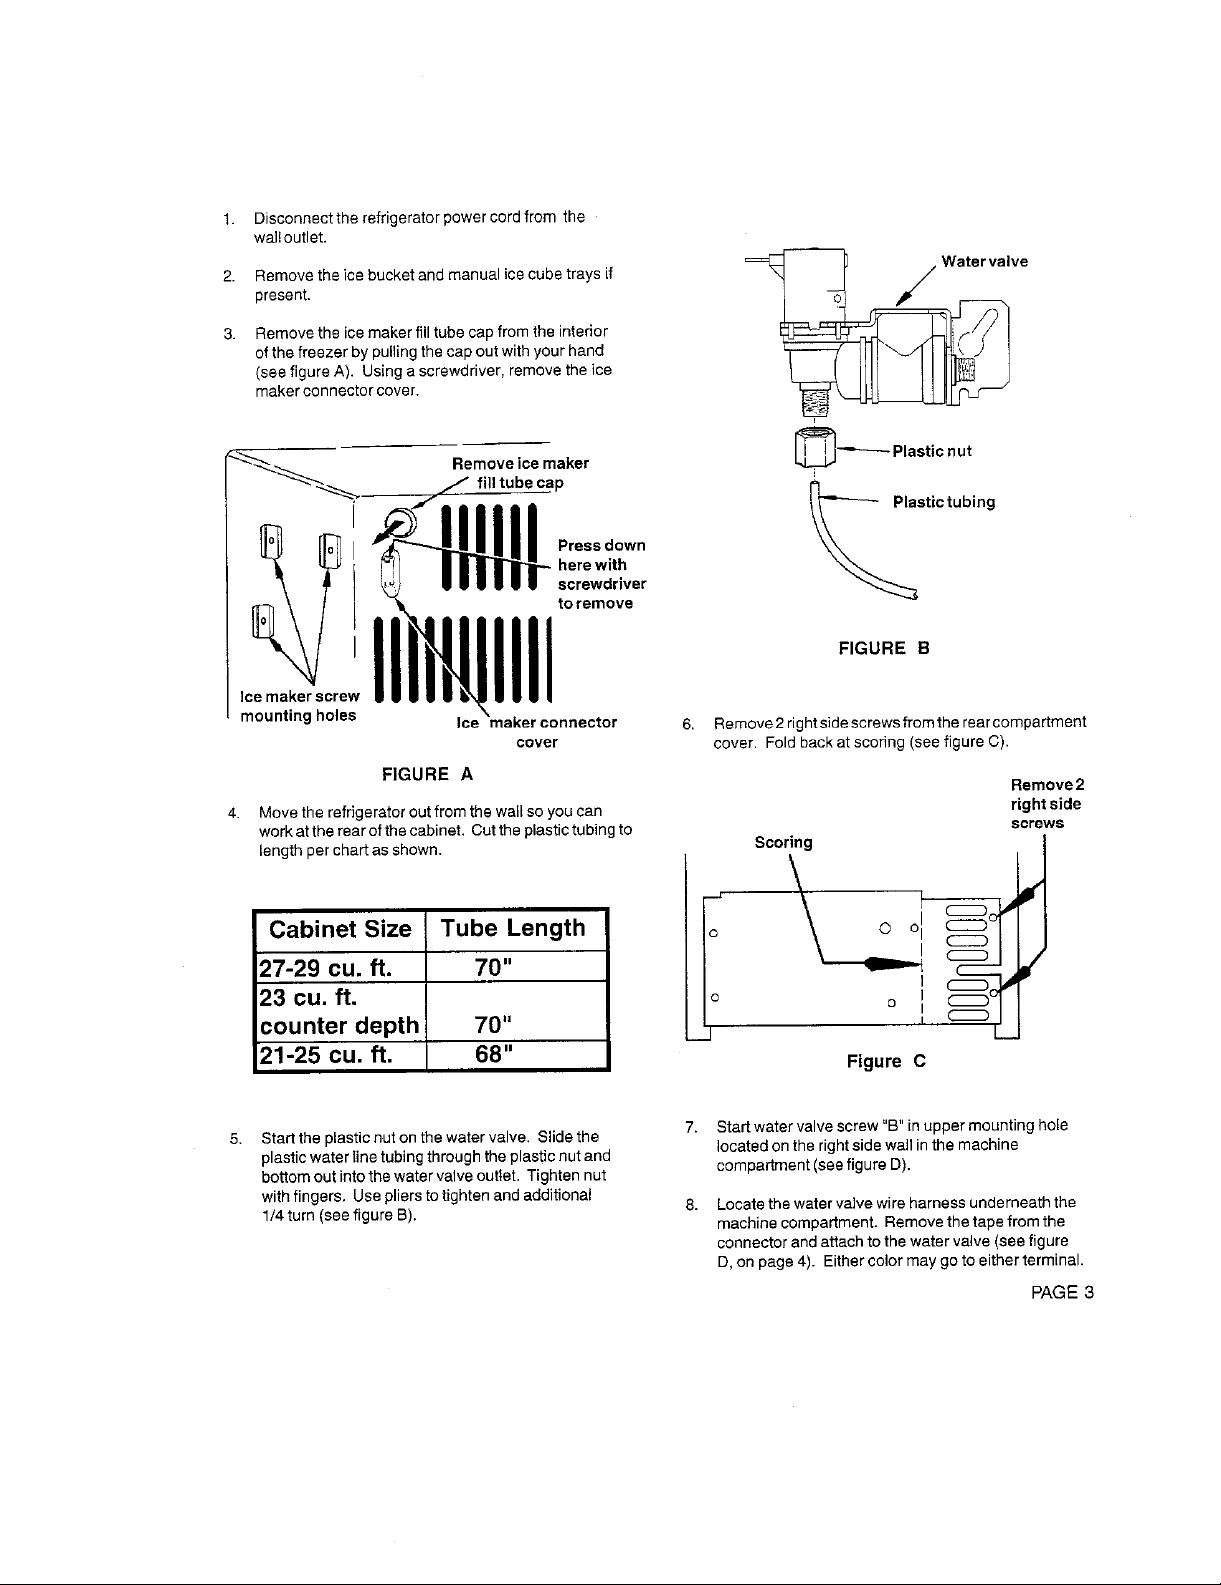
1. Disconnecttherefrigeratorpower cordfrom the
walloutlet.
2. Removetheice bucketandmanualicecubetrays if ===_ t _ " watervalve
present.
3. Removetheice makerfilltubecap fromthe interior
ofthe freezerby pullingthe capoutwith yourhand
(seefigureA). Usingascrewdriver,removetheice
makerconnectorcover.
i
[_'_---- PlasticnutRemoveicemaker
:"_"_ _:'_ ./ fill tubecap
herewith
i _ _astie tubing
lee makerscrew
mountingholes a nnector 6. Remove2rightsidescrewsfromtherearcompartment
FIGURE A Remove2
4. Movethe refrigeratoroutfromthewallso youcan right side
workattherearofthecabinet. Cuttheplastictubingto screws
screwdriver
toremove
FIGURE B
cover cover. Foldbackat scoring(seefigure C).
lengthperchart asshown. Scoring J
Cabinet Size Tube Length o o
27-29 cu. ft. 70" L _..,
23 cu. ft. o
counter depth 70" _' L__
21-25 CU.ft. 68"
5. Startthe plastic nutonthewatervalve. Slidethe
plasticwaterlinetubingthroughtheplasticnutand compartment(seefigure D).
bottomoutintothewater valveoutlet. Tightennut
withfingers. Useplierstotightenand additional
1/4turn(seefigureB). machinecompartment. Removethetapefromthe
7. Startwatervalve screw"B"inupper mountinghole
locatedonthe rightsidewallinthe machine
8. Locatethe watervalvewireharnessunderneaththe
connectorandattachtothe watervalve (seefigure
D,on page4). Eithercolor maygo to eitherterminal.
o I
J
Figure C
PAGE 3
Page 4

9. Slidethewater valvebracketovertheheadof screw 12. Placethespringclampovertheotherendofthe plastic
"B"andpositionmountinginthe bottomhole(see tubing(seefigure F).
figureD). Tighten the screw.
Watervalve Watervalve spreadthespringclamptoallowthe clamptoslide
wire harness mtg.b_'aeket _l overthe filltube inlet. Releasepliersandthe tube
(Removetape) ___11
f
[)). ,_. _ ../. tab I "B"inthis
V/' ,'3 _ __=Mtg;.... __ hole
13. Insert tubing into the filltubeand use pliersto
isclampedto thefill tube(seefigure F).
backofthecabinetand align it straight downthe
back(seefigure G).
15. Attachthe 3 adhesiveclips (seefigureG).
16, Snaptheplasticwaterlineintothebracketonthewater
va)ve(see figureG).
sorawB" ,ab
2"
iv Figure D Water
10. Removethetubecapon thebackofthe unitby
insertingascrewdriverintheslotandturning 1/8
turnand pullout or peelofflabel.(seefigure E).
ho,s
/
FIlltubecap-_l m I1_ Adhesive
Figure E
11. Installthefilltube by insertingtheendintothe hole intothe water
andturning 118turntolockthegrommetinplace.
Verify that the filltube flangesetsflushtothe
cabinettoavoidair leakage(seefigureF).
Insertfill tube_
allthe way in
Rotatefill tubehea Plasticwater
clockwiseuntilvertical tubing
PAGE 4
Figure F Figure G
Snapwaterline
clips
Page 5

17. Returntothefreezercompartmentandstartthe2upper 23. Positionthefreezershelfsothatitisapproximately
icemakermountingscrews "A"onthe leftwall (seefigureJ). 33A'' belowthebottomof the icemaker (seefigure K).
On23cubicfootcounterdepthmodeis,connectthelongestice _ r;q [b=,__Wireice
makerwireharnessto theicemakerhead (seefigureH). On I I _ marker arm in
21,23and25cubicfootmodels,connecttheshortericemaker _ tie _ down "On"
harnesstothe ice makerhead(seefigureH). IL_,r__eitio n
sleeveunder (.;onneetharnessto sor
clipasshown icemakerhead arm
18. Connecttheicemakerwireharnesstotheconnector 24. tnstalltheicebinontopofthefreezershelf.
intherearof thefreezerwall(seefigure I).
Figure H Figure K
(seefigureK).
Pushplastic armto disired
sensorarm icelevel.
25. Turnthe icemakeronb_ theice makerarm
Connectharnessto tubeis inthefill
rearof cabinet cu..qgg 26. Toselecttheice levelin thebin, pushinwardon the
19. Hangthe icemakeronthe2upper icemaker mounting levelof bincapacity.
screws andverifythatthefill tubeis positionedinthe CON NECTING THE WATER VALVE TO THE
icemakerfill cup.(see.,,.'_,'-=,,,="figureJ). Icemakermounting WATERSUPPLY
_/-_- _ J _ screws"A" 1. Allinstallationsmustbeinaccordancewith local
/ i I I _ _f'__/_-_ /'__" plumbingcoderequirements.
iL_/_ 1 2. Coppertubing(1/4"O.D.)andamanualshut-offvalve
Adjustment / | plasticstubingmaybecomebrittlewith ageand
screw Bottommounting Makesurethe fill
20. Installthebottomscrewandtightenallicemaker advisabletouse a filterinthewatersupplyline.
mountingscrews. This eliminatesallpossibilityofsmall particles
21. Verifythatthe ice makerislevel. Ifnot, loosenthe
adjustmentscrewandthe3 icemakermountingscrews. 4. Find a3/8"to 1"verticalCOLDwater pipenearthe
(seefigureJ). Leveltheicemaker andtightenallscrews, refrigerator. Water pressuremust bebetween20
22. Checkonce aeainthatthefilltube isPositionedinthe horizontalpipewillwork. Ifa horizontalisused,
ice makerfill cut). installthe shut-offvalve on the TOP orthe SIDEof
=tn_j _r" t Makesurethe fill inward.
Figure I plasticsensorarmand rotatethearm tothe desired
I_ canbe purchasedfrom localhardwarestores.
screw "A" tube is inthefill cuo maycrack,resultinginwaterleakage.
Figure J NOTE: Whenusingnon-filteredwellwater,itis
,, 3. DONOTUSE PLASTICTUBINGOR PLASTIC
FITTINGSbecausetheconnectionsbetweenthe
watersupplyandtherefrigeratorwatervalveinlet is
underconstantpressure. Also,certaintypes of
from enteringthewatervalve.
and120p.s.i. Verticalpipe is preferable, but a
the pipe,noton thebottom.
Turnplastic
Page 5
Page 6

5. Turn OFFthe mainwatersupplyand drainthe
6. Fot(owthe installationinstructionsthatare supplied Coldwaterpipe
with the shut-offvalve for proper and safe
selectedpipe.
7. Routethe coppertubingthroughthefloor, wallor
installation. _pe clamp
excess tubing into a large loop. Other routing
sinkcabinettotheshut-offvalvelocation. Formthe _ _ "'1_t2_" B_assnut
methodsare shown. Manual J J
REAR VIEW OF CABINET valve J I
9. Turn ON themainwatersupplyandflushoutthe
! pipeuntil thewaterrunsclear. At the sametime,
= checkfor leaksatthe shut-offvalve. Next,prepare
I open endofthe 1/4"tubingsoitwill catchthewater.
I thenturnit OFF.
Inthecrawl space under Throughthefloor to protectivecapfromthewater valveinlet. Insertthe
yourhome basementcoldwater pipe endof thecoppertubingintothewatervalveasfar
I
toflush outthe 1/4"tubing. Positiona bucketat the
TurnONthe manualshut-offvalveforashorttime,
10. Slidethestrainreliefclamp,brassnutandsleeveon
the customer providedsupplyline. Removethe
asitwillgo. Tightenthe nut withanadjustable
wrench(seeillustrationbelow).
Machine
"_._"_P-. _ Brasssleeve
shutoff J I
_ Coppertubing
cover _ _
_" _"""_ -_ _"- I ,_ Strain
,= l_'| _' I clamp
-:_ Customer's
_, _ _/ / nut water line
Underthe sinkto the Through the wallto the utility _ J
coldwater pipe roomcoldwaterpipe J Watervalve
CAUTION: Icemakertubingshouldnotbeinstalled
wherethetemperaturemayfallbelowfreezing.
8. Locatethe brass nutandsleevewhich comewiththe
shut-offvalve. Slidethem onto the 1/4"copper 11. Realignmachinecompartmentcoverwithcabinet
tubing. Insertthe endofthetubingintothe shut-off holesandreinstallthelowerright screw. Insertthe
valveas far asitwill goand tightenthe nutwith an second screw through the strain reliefclampand
adjustablewrench.Turn offthe shut-off valve(see intothe upperright holeofthecabinet.
illustration). (seeillustrationon nextpage)
Page 6
c°mpartman?_ ! _ If / /Sleeve
b,
_, ss 1/4"Copper
cap
_---._--relief
Page 7

Upper righ Facts about your
AUTOMATIC ICE MAKER
_b__ )J_ IStrain relief Theicemakerworksbestwhenthecabinetislevel. Please
i _ Iclamp useacarpenter'slevelorotherdevicetoassureyourcabinet
= ii _:::_f:_H islevelatthe timeofinstallation. Your InstallationInstruc-
tionsManualincludescompletelevelinginstructions.
Lower right screw After your modelhas been installedand the water supply
12. Turn ON the manualshut-offvalve. Tighteneny theicemakerfurnisheeanyusableicecubes. Thefiretone
connectionsthat leak. ortwoharvestswillprobablycontainundersizedandirregu-
13. PlugJnthepowercordandpushtherefdgeraterinto
place,arranging thecoppertubing sothat it does Theinitialharvestmayalsocontainimpuritiesfromthenew
not vibrateagainst the backoftherefrigeratoror watersupplypiping.Therefore,allcubesfromthefirsttwoor
againstthewall. threeharvestsshouldbediscarded.Oncethisinitialstarting
IMPORTANT: Becausethe refrigeratorand ice periodis past, your ice maker will perform steadily and
makerarewarm,it maytake upto 12hoursbefore dependably.
the ice maker produces the first supply of ice
cubes.PLEASEREADthe useandcare nstructions. Icecubesthat havebeeninthe icestoragebinfor a consid-
connectedtotheicemaker,itmaytakeupto 12hoursbefore
larcubesdueto airinthe watersupplyline.
erablelengthoftime,pickupoff-flavortaste, sf_cktogether
Use and Care Instructions andgraduallybecomesmaller.Wesuggestthatthesecubes
bethrown away. We alsosuggest using an open box of
bakingsodainthe refrigeratorfor foododor absorption.
maker.Themotormayhaveaslighthum-thecubeswillrattle
astheyfall intoan emptystoragebin -thewatervalve may
clickor "buzz"occasionally.All ofthesesoundsare normal
Certainsoundsmayaccompanythevariouscyclesoftheice
andshouldbeignored.
FOR YOUR SAFETY The icemakerhas awiresensorarmthat isconnectedtoa
Donotplacefingersorhandson theautomaticicemaking cubestoragebinisfullandrestartsitafterseveralicecubes
mechanismwhiletherefrigeratorispluggedin.Thiswillhelp havebeenused. Youcan usethestop armtohaltall
protectyoufrompossibleinjury. ]twillalsopreventinterfer- productionof iceatanytime, Simplyraisethe sensorarm
encewith movingpartsof theejectormechanismandthe intotheOFF position.
heatingelementthat releasesthecubes.
The automaticicemakerisdesignedtofurnisha continual
supplyoficecubes. Withthis ussfulfeature,younolonger 1. Theice storagebinistobe removedforan extended
havethe inconvenienceof filling ice cube trays, or the periodof time.
frustrationofrunningout ofice.
Theamountoficeproduceddependsonthetemperaturein periodof timesuchasvacations. Also,turn offthe
the freezer sectionof your refrigerator. The colder the watersupplytothe ice makerinthis instance,if
freezer,themoreiceisproduced.Wesuggestyoustartwith prac#caL
yourrefrigeratorandfreezercontrolsattheirmidsettings. In
mostcases,thisissatisfactory.Ifthedoortotherefrigerator
orfreezerisopenedfrequentlyortemperaturesinthekitchen
areabnormallyhigh,acoldersettingmaybenecessary.See
youruseandcaremanualfor settingthecold controls. Page 7
shut-offswitch. Thisarmstopsthe mechanismwhentheice
The ice makershould beturned off (armup)when:
2. The refrigeratorisnotto beusedfor anextended
Page 8

How the ice maker works The sensor arm determines when the bin is filled to the
selectedlevel and signals the ice maker to stop ejecting
Waterfills theemptycubemold whenthefreezercompart- _ Plasticsensor
directlymenthaSovertheC°°ledmold.t°freezingtemperature. Coldairisforced ._t_ arm
, . _ ___._ _'"Wireeensor
__ _arm
\Filltube However,themoldhasbeenrefilledwithwaterandthecubes
Whenfrozen,thecubes arerotatedupandout ofthe mold. resumesoperationbyejectingtheready-and-waitingfrozen
Thesweeperarmejectsthemintotheicestoragebin below, cubes.
in CAUSINGICE MAKERDAMAGEOR MALFUNCTION.
cubes. [q__.4
arefrozenso thata newsupplyis readywhenneeded. As
soon asthe ice is removedfrom the bin, the sensor arm
signalsthat more cubesare needed. The ice makerthen
coEVEcoseco
PLACEDINTHEICESTORAGEBIN FORQUICKCHILL-
ING. THESE ITEMS CAN BLOCKTHE SENSOR ARM
SAVETHESE INSTRUCTIONS
THE PROBLEM SOLVER
Ifyouhaveaproblem,itmaybeminor.Youmaybeabletocorrectityourself.JustusethisProblemSolvertolocateyourproblem
andthen followthesuggestedrecommendations.
Save time and money .... before you request service, check the following:
PROBLEM POSSIBLECAUSEAND REMEDY
ICEMAKERAPPEARS • Sensor Armup in "OFF"position-shouldbedownin "ON" position.
TO HAVE STOPPED
OPERAT(NG
• Ice makernotgettingnecessarysupplyofwater. Makesurewatersupplyis connectedand
turnedon.
• Freezercompartmentistoowarm. Softicecreamisanindicatorofwarmfreezertemperatures.
Turntemperaturecontrolto caldersetting.(Seeyour refrigeratorUseandCarebook).
ICECUBESTOOSMALL • Restrictioninwater supply.
WATEROVERFLOWS • Ailowthreeorfourbatchesoficetobemade. Ifwaterstilloverflows,callforservice.
ICEMOLD
ilCECUBESHAVE I O Useice regularly. Discardoldcubes. Icestoredforextendedperiodsoftimemayabsorbodors
ODOR,"rASTE whichaffecttaste.
EXCESSIVEICEINTHE • Verifyfilltubeis placedin theicemakerfillcup.
FREEZER
Page 8
I
• Icestoragebinneeds tobeemptiedendwashed.
• Unsealedpackagesinrefrigeratorand/orfreezercompartmentsmaybetransmittingodor/taste
to icecubes.
• Interiorof refrigeratorneedscleaning- seeyourrefrigeratorUseand Carebook.
• Useanopenboxof bakingsoda inthe refrigeratorand/orthefreezercompartment.
Page 9

ICE LEVEL ADJUSTER
Turn plastic
_ Push plastic
sensor arm
inward.
.Toselect the ice level in the bin, push plastic sensor arm inward
and rotate the arm to the desired level of bin capacity.
sensor arm
to desired
ice level.
111096-
 Loading...