

Page 1

Form No. C/08/03 Part No.111541.001 h t t p : / / w w w . m a y t a g . c o m Litho U.S.A.
©2003 Maytag Appliance Sales Co.
TOP MOUNT REFRIGERATOR TM-1
Installer: Please leave this manual with
this appliance.
Consumer: Please read and keep this
manual for future reference.Keep sales receipt and/or cancelled check as proof of
purchase.
If you have questions, write us (include
your model number and phone number) or
call:
Maytag Services
SM
Attn: CAIR®Center
P.O. Box 2370
Cleveland, TN 37320-2370
1-800-688-9900 U.S.A.
1-800-688-2002 Canada
1-800-688-2080 (U.S.A.TTY for
hearing or speech impaired)
(Mon.-Fri., 8 a.m.-8 p.m.Eastern Time)
Internet: http://www.maytag.com
For service information, see page 15.
In our continuing effort to improve
the quality and performance of our
appliances, it may be necessary to
make changes to the appliance
without revising this guide.
R
Page 2

1
IMPORTANT SAFETY INSTRUCTIONS
➢
When using your appliance,
always follo w basic precautions.
➢ Use the refrigerator only for its intend-
ed purpose.
➢ To prevent possibility of hazard due to
electrical shock, never plug the refrigerator into a receptacle which has not
been grounded adequately and in
accordance with the local and national
electrical codes. See warning and
the grounding instructions that follow.
➢ Unplug the refrigerator before clean-
ing or replacing a light bulb.
➢ In case of po wer f ailure , minimiz e door
openings. If the power failure is of a
long duration, protect the food by placing blocks of dry ice on top of the
packages or check with a local frozen
foods locker about temporary storage.
Frozen foods which have thaw ed completely should not be refrozen.
➢ Any electrical service cord that
becomes frayed or damaged should
be immediately repaired or replaced.
Never unplug your appliance by
pulling on the power cord.
➢ Your refrigerator should not be operat-
ed in the presence of explosive fumes .
➢ Children should not climb, hang or
stand on the shelves of this refrigerator.
IMPORTANT: Child entrapment and suffocation are not problems of the past.
Junked or abandoned refrigerators are still
dangerous…even if they will sit for “just a
➢ This appliance is designed to
operate on a normal 115 volt, 15
amp, 60 cycle line. There should
be a separate, grounded circuit
serving this appliance only. Do
not use an extension cord. Do
not use any device that will alter
the electrical performance of this
appliance.
This appliance is equipped with a threepronged grounding plug for your protection against possible electrical shock hazards. It must be plugged into a grounding
receptacle. Where a standard two-prong
wall receptacle is encountered, it is the
personal responsibility and obligation of
the customer to have it replaced with a
properly grounded three-prong wall
receptacle. Do not under any circumstances, cut or remove the third (ground)
prong from the power cord.Do not use an
adapter plug.
Save These Instructions For Future Reference
What You Need to Know
About Safety
Instructions
Warning and Important Safety Instructions appearing in this manual are not
meant to cover all possible conditions
and situations that may occur. Common
sense, caution and care must be exercised when installing, maintaining or
operating this appliance.
Always contact your dealer, distributor,
service agent or manufacturer about
problems or conditions you do not understand.
RECOGNIZE SAFETY
SYMBOLS,WORDS,
LABELS
few days.” If you are getting rid of your old
refrigerator, please follow the instructions
below to help prevent accidents.
➢ Take off the doors.
➢ Leave the
shelves in
place so
that children may
not easily
climb inside.
POWER SUPPLY CORD
WITH 3-PRONG
GROUNDING PLUG
GROUNDING TYPE
WALL RECEPTACLE
DANGER – Immediate hazards which
WILL result in severe personal injury
or death.
DANGER
WARNING – Hazards or unsafe prac-
tices which COULD result in severe
personal injury or death.
WARNING
CAUTION – Hazards or unsafe prac-
tices which COULD result in minor
personal injury or product or proper ty
damage.
CAUTION
WARNING
WARNING
POWER SUPPLY CORD
WITH 3-PRONG
GROUNDING PLUG
GROUNDING TYPE
WALL RECEPTACLE
Page 3
2
safety
INSTALLATION
For further assistance, call 1-800-688-9900 U.S.A., 1-800-688-2002 Canada or www.maytag.com
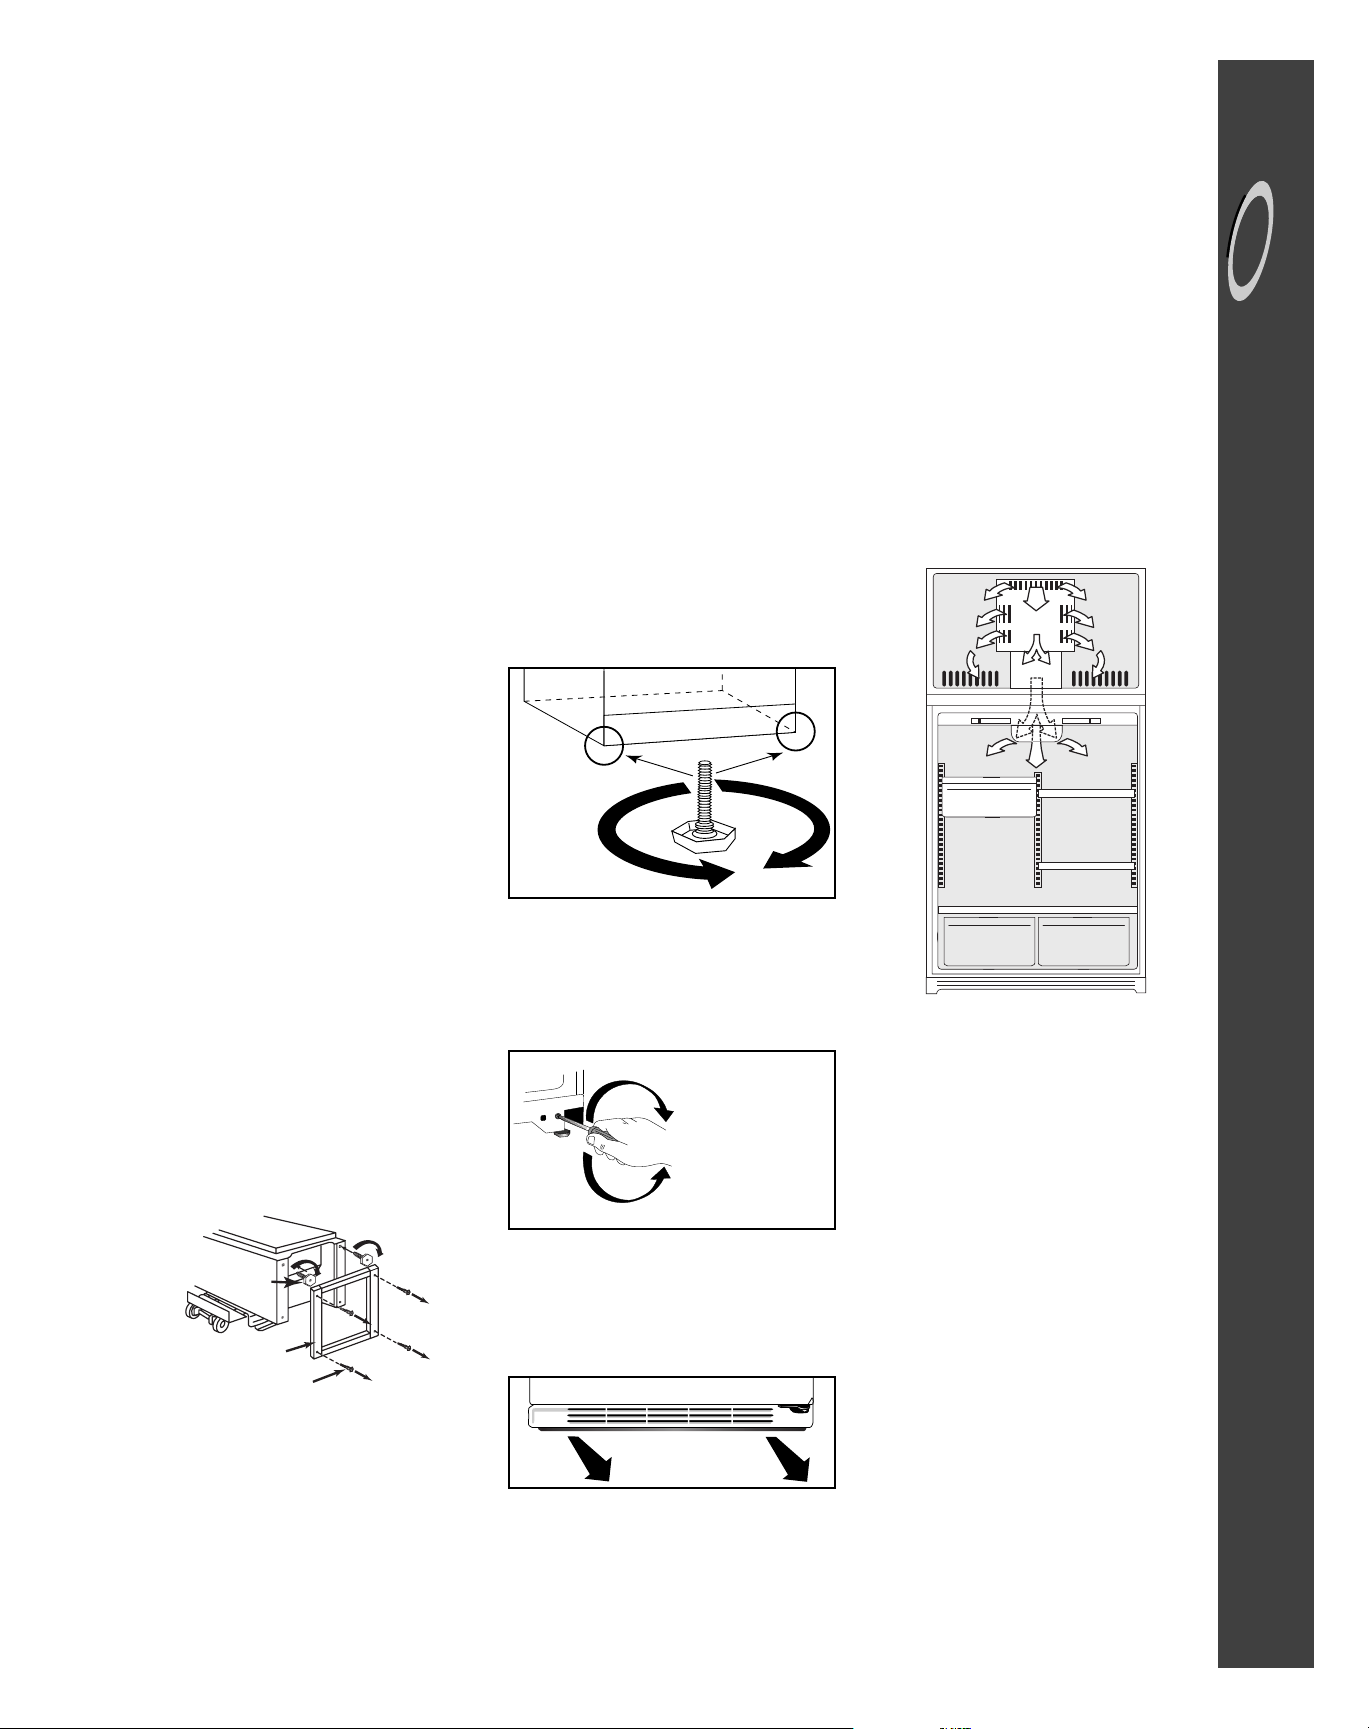
Leveling
To enhance appearance and maintain
performance, the refrigerator should be
level.Depending on the model, the refrigerator can be leveled in one of two ways.
➢ All refrigerator models have leveling
screws at the base of the cabinet
beneath each front corner. Levelers
can be adjusted by turning in or out as
required. If the floor is not level and it
is necessary to raise the rear of the
cabinet, use a piece of plywood or
other shim material. To lock the cabinet into place, turn down both leveling
screws.(See figure 1.)
TURN COUNTER-
CLOCKWISE TO
LOWER CABINET
CORNER
TURN CLOCKWISE
TO RAISE CABINET
CORNER
➢ Some refrigerator models have
adjustable wheels and can be leveled
by removing the base grille* and
adjusting the wheels with a
1
⁄4" socket
or screwdriver. (See figure 2.)
*To remove the base grille, grasp both
ends and pull straight out. To replace,
align the spring clips with the round
openings in the cabinet and push each
end in until the grille locks into place.
➢ For best results, after leveling the
cabinet, open and close the doors,
then relevel.
Figure 1
Figure 2
Location
➢ Allow for a free flow of air through the
front base grille.
➢ Install the refrigerator where the room
temperature will not go below 55° F.
With temperatures below 55° F, the
refrigerator will not run frequently
enough to maintain proper temperature in the freezer.
➢ Allow a minimum
1
⁄2" clearance on the
sides, top and back for ease of installation. If refrigerator is placed with the
door hinge side against a wall, you
may want to allow additional space or
reverse the door swing (see page 4)
so the door can be opened wider.
➢ Use caution when installing the unit on
vinyl or hardwood floors so as not to
mark or otherwise damage the flooring. A piece of plywood, a rug or other
material should be used to protect the
floor while positioning the unit.
➢ Refrigerator should remain upright for
at least 30 minutes before plugging in.
Uncrate
➢ Remove and retain levelers attached
to crate base.
➢ Remove and discard crate base and
screws.
➢ Using slip joint pliers, install levelers
all the way into holes located in the
front corners of the cabinet.
Your new refrigerator was packed carefully for shipment. Remove and discard
shelf packing clips (if used) located just
above each shelf where they hook onto
the frame. To remove plastic clips wiggle
the clips sideways and pull straight out.
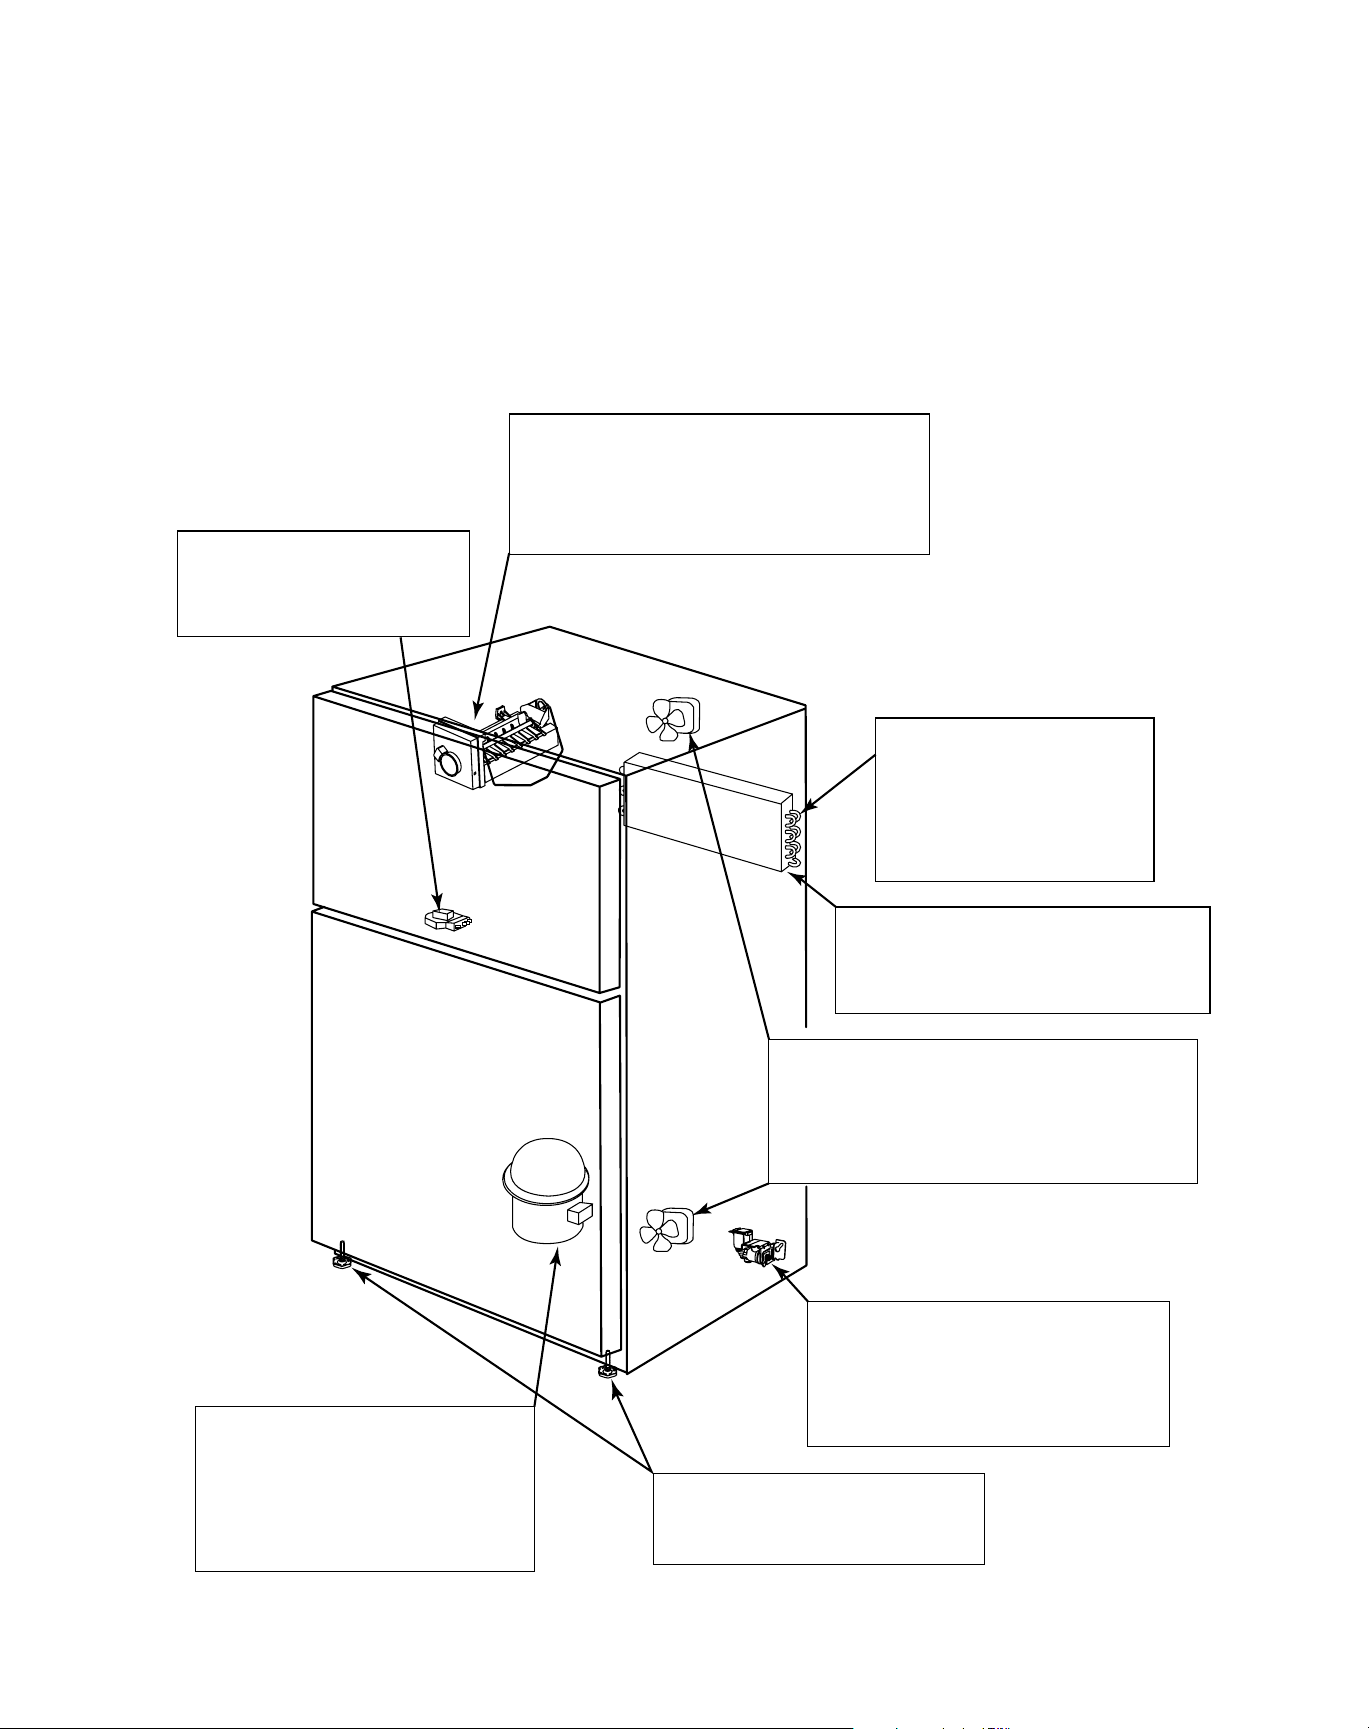
Ensure proper
air circulation
In order to ensure proper temperatures,
you need to permit air flow between the
refrigerator and freezer sections. As
shown in the illustration.
DO NOT block any of these vents with
food packages. If the vents are blocked,
airflow will be prevented and temperature
and moisture problems may occur.
IMPORTANT: Do not remove foam insulation from the vents located in the ceiling
of the fresh food compartment.
T
O
T
O
L
O
W
E
R
R
A
I
S
E
Levelers
Crate
Base
Screws
Page 4
3
INSTALLATION,CONT.
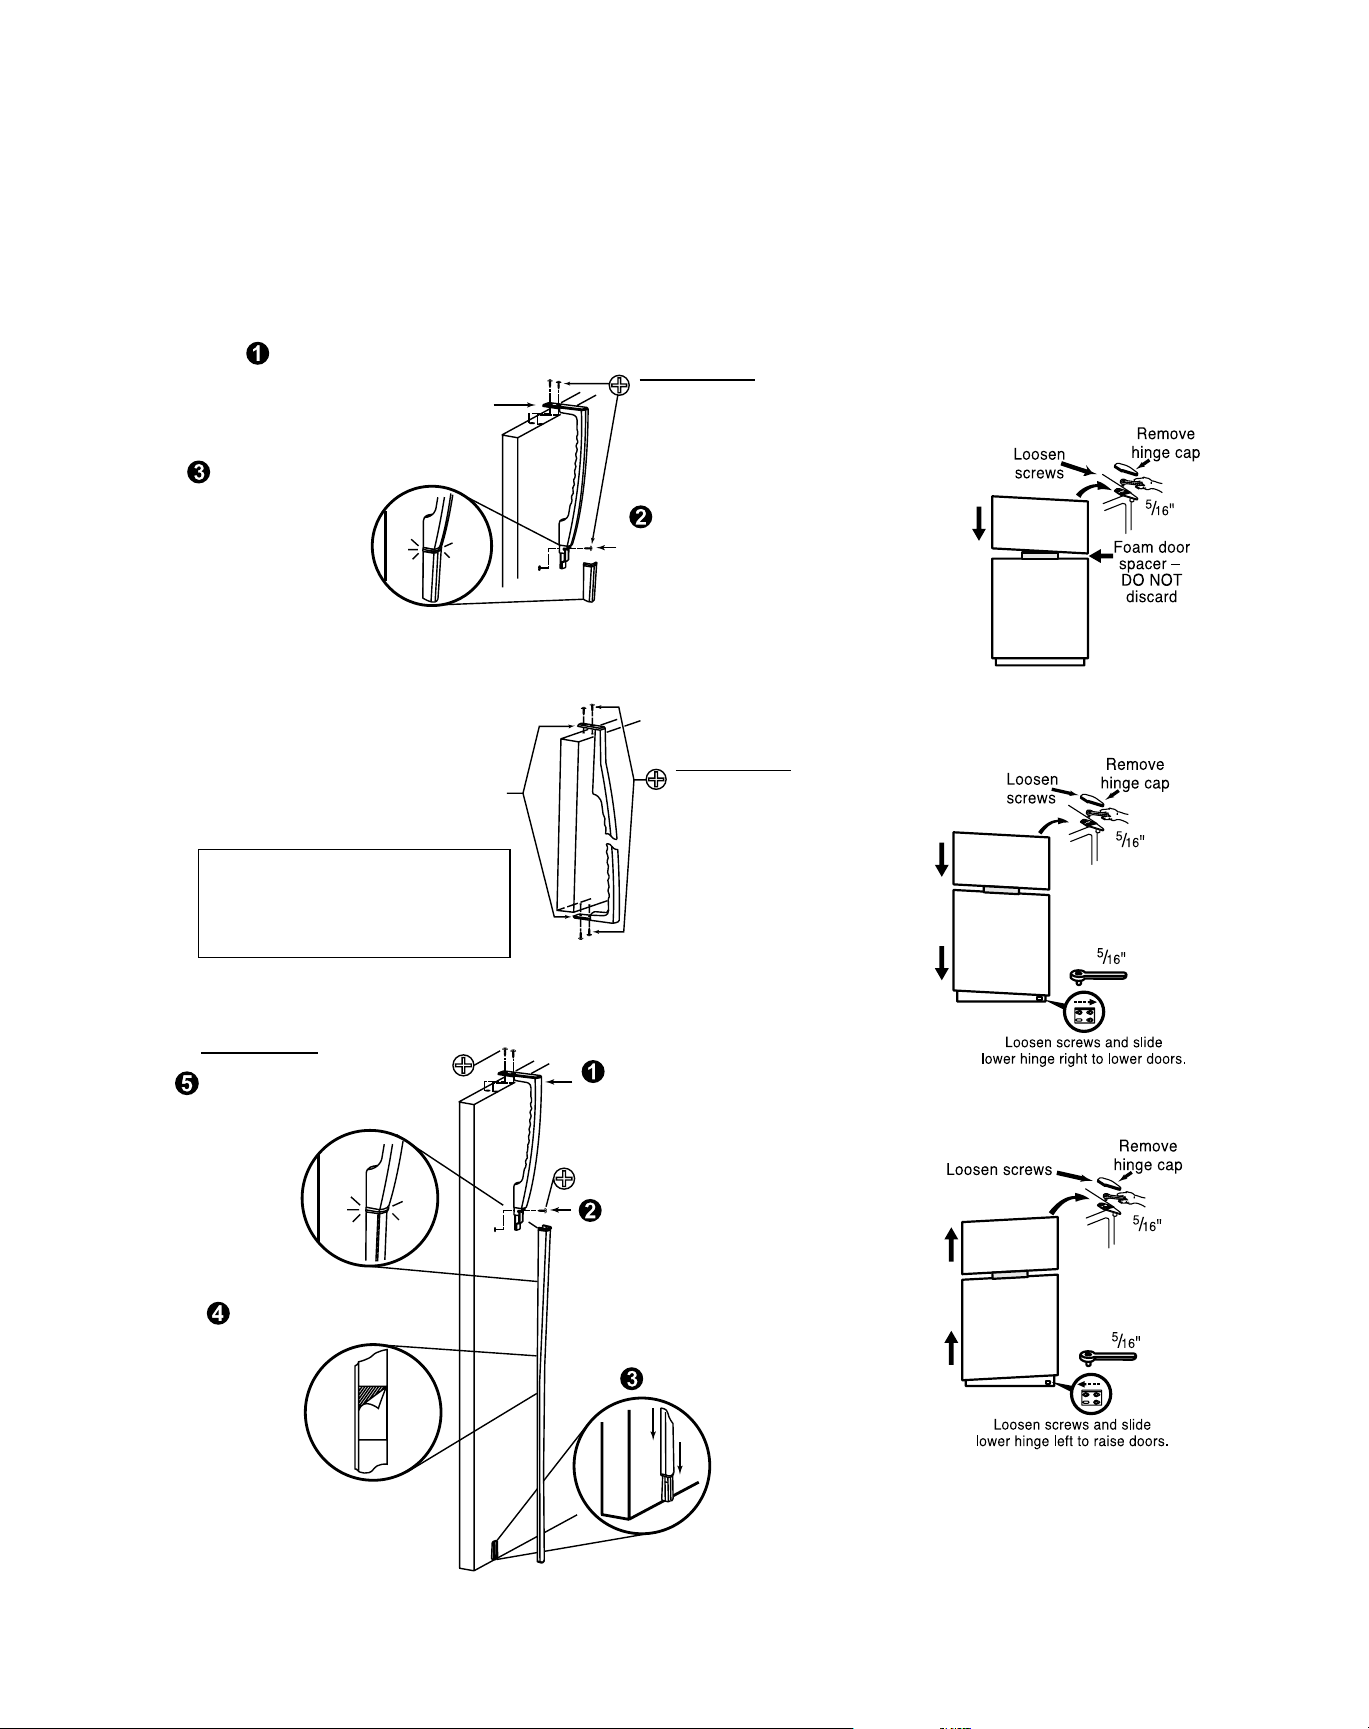
Door Adjustment
(IF NEEDED)
• Retighten screws after making
adjustments.
* Refer to installation instructions for
more information.
Door should be level when the cabinet is
level.
• The freezer door is too high.
•Both doors are too high.
•Both doors are too low.
Top-Mount Handle
TOP MOUNT HANDLE INSTALLATION INSTRUCTIONS
TOP OF FREEZER DOOR
ALIGN HANDLE OVER SCREW HOLES.
FIRST INSTALL THE "A" SCREWS TO
SECURE HANDLE, FOLLOWED BY THE
"B" SCREWS.
DO NOT OVER TIGHTEN.
NO. 2 PHILLIPS
SCREW DRIVER
IS REQUIRED
FOR
INSTALLATION.
A
A
B
B
NOTE: ALL HANDLE TIE DOWN
SCREW HOLES AT THE TOP AND
BOTTOM OF THE DOORS ARE SIZED
FOR SELF THREADING SCREWS.
DO
NOT
DRILL THEM TO A LARGER SIZE.
REFRIGERATOR DOOR HANDLE WITHOUT EXTENSION TRIM
ALIGN HANDLE OVER SCREW
HOLES. FIRST INSTALL THE "A"
SCREW TO SECURE HANDLE,
FOLLOWED BY THE "B" SCREW.
DO NOT OVER TIGHTEN.
NO. 2 PHILLIPS
SCREW DRIVER
IS REQUIRED
FOR
INSTALLATION.
INSTALL SCREW IN
HANDLE HOLE.
DO
NOT OVER TIGHTEN.
SNAP EXTENSION INTO
PLACE AT THE BOTTOM
OF THE HANDLE.
A
B
REFRIGERATOR DOOR HANDLE WITH EXTENSION TRIM
NO. 2 PHILLIPS SCREW DRIVER IS
REQUIRED FOR INSTALLATION.
ALIGN HANDLE OVER SCREW
HOLES. FIRST INSTALL THE "A"
SCREW TO SECURE HANDLE,
FOLLOWED BY THE "B" SCREW.
DO NOT OVER TIGHTEN.
INSTALL SCREW IN HANDLE
HOLE.
DO NOT OVER TIGHTEN.
SLIDE HANDLE
EXTENSION OVER
BRACKET AT
BOTTOM OF
DOOR.
SNAP TOP OF EXTENSION
INTO PLACE AT THE
BOTTOM OF THE
HANDLE.
ON CERTAIN MODELS
REMOVE BACKING
FROM TAPE.
AFTER
STEP 5
APPLY
PRESSURE.
A
B
Page 5
4
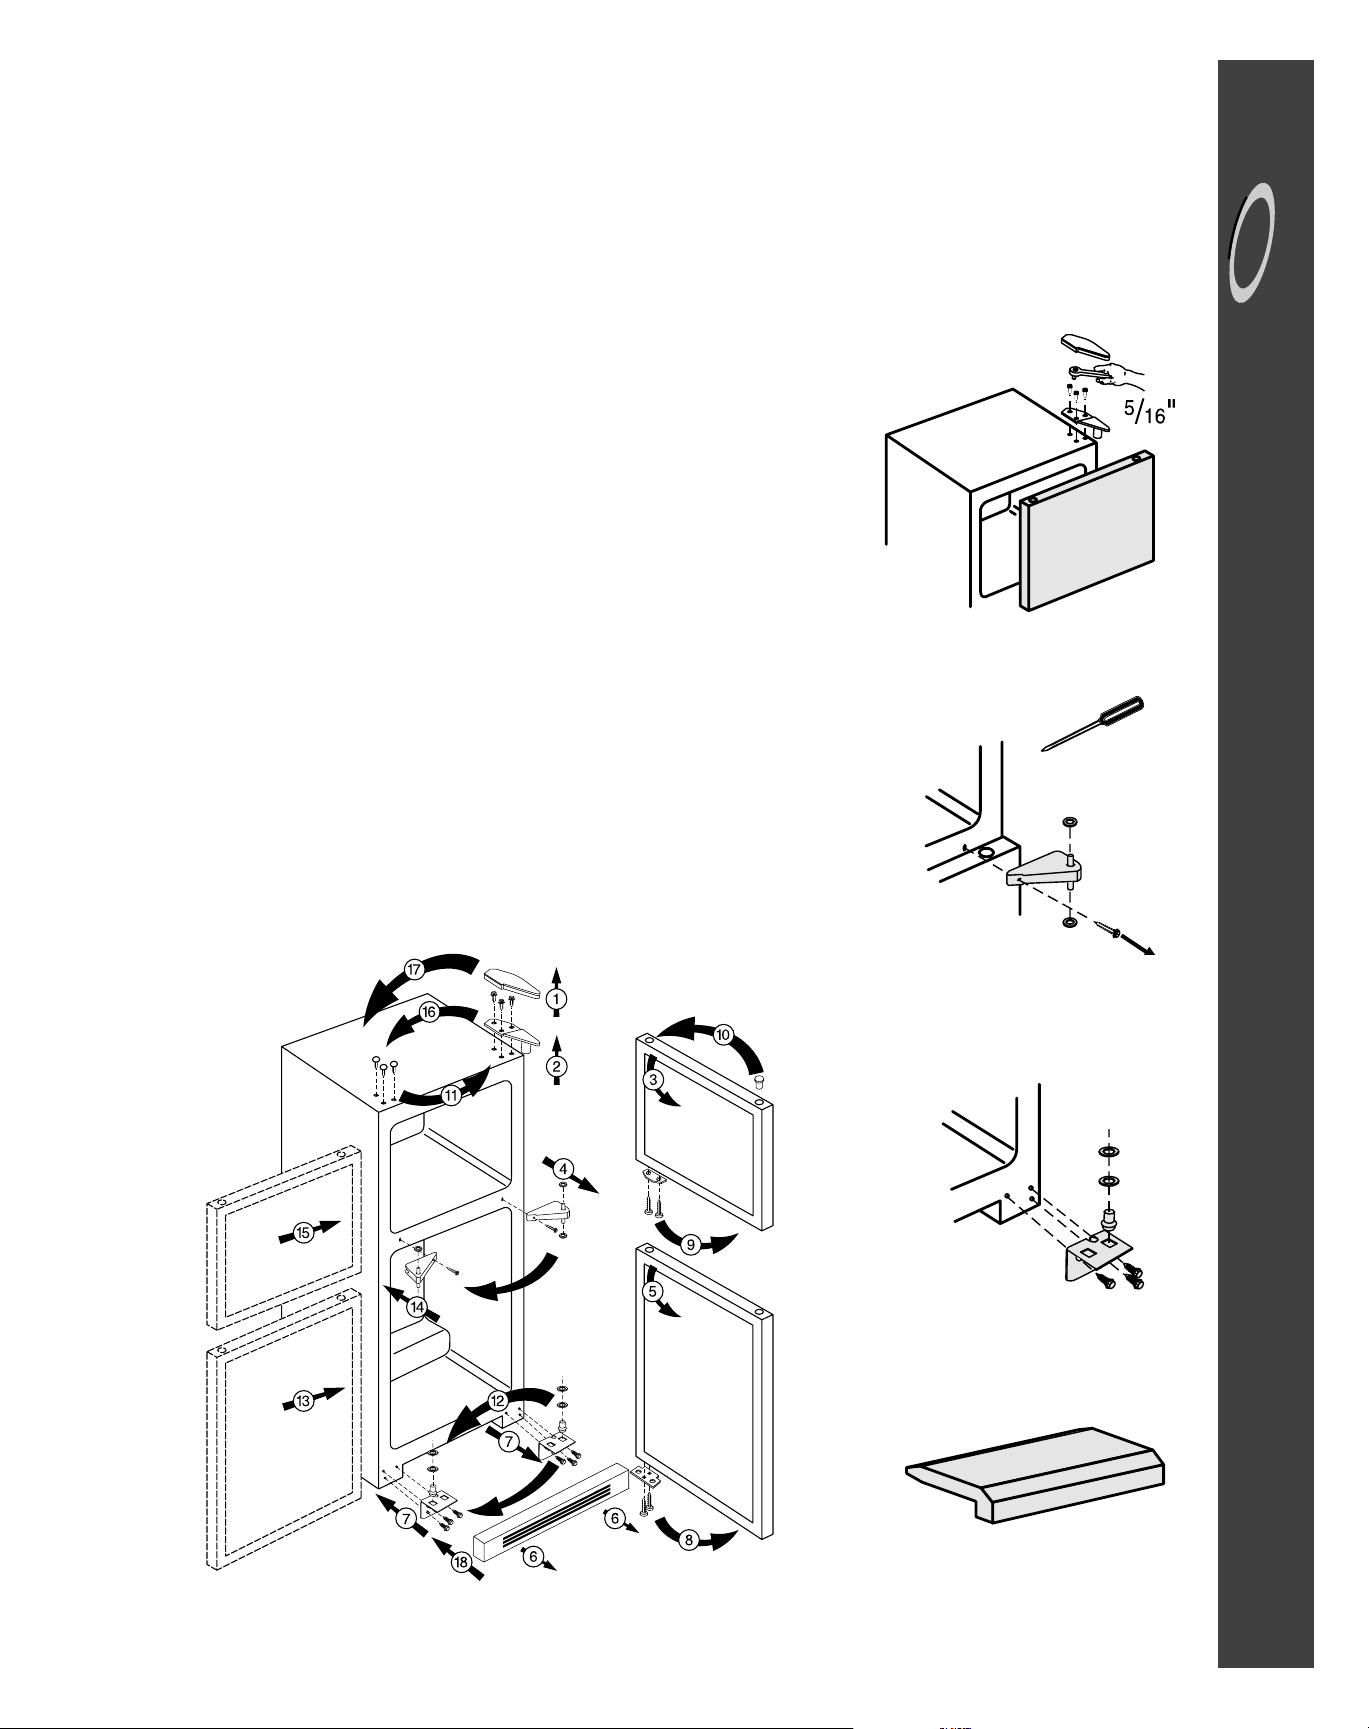
installation
Reversing Doors
Tools Required: Phillips screwdriver,
5/16" socket and ratchet, putty knife or
5/16" end wrench.
1. Remove the hinge cap and set aside.
2. Remove screws and hinge with a
5/16" socket wrench and set aside.
3. Carefully lift and remove freezer door.
4. Remove screw and hinge arm from
top of the refrigerator door.
5. Carefully lift and remove refrigerator
door.
6. Remove grille cover and set aside.
7. Remove hinge plate from lower corner of refrigerator and secure it on the
opposite side.
8. Remove the plate from the underside
of the refrigerator door and secure it
on the opposite side.
9. Remove the plate from the underside
of the freezer door and secure it on
the opposite side.
10. Remove the plug buttons from tops of
freezer and refrigerator doors and
replace them on the opposite side.
11. Remove screw hole plugs from top of
cabinet and replace on the opposite
side.
12. Remove washers and stem from the
inside of the hinge plate and place
them on the outside of the hinge
plate.
13. Carefully replace refr igerator door on
the hinge plate in lower corner.
14. Slide the hinge arm into place and
secure with screw.
15. Carefully place freezer door on top of
hinge arm use foam door spacer to
set gap.*
16. Slide top hinge into place on freezer
door and secure screws with 5/16"
wrench.
17. Snap hinge cap securely in place.
18. Replace grille cover.
Remember to plug in your refrigerator
and reset the controls to the appropriate
setting(s).
Removing Doors
(IF NEEDED)
Rest door on a non-scratching surface.
A. Remove left screw.
B. Open door and lift. Rest door on a
non-scratching surface.
Tools
Remove hinge plate assembly. Rest door
on a non-scratching surface.
Do not discard the foam door spacer.
Doors may settle with use.
*
For further assistance, call 1-800-688-9900 U.S.A., 1-800-688-2002 Canada or www.maytag.com
Page 6
5
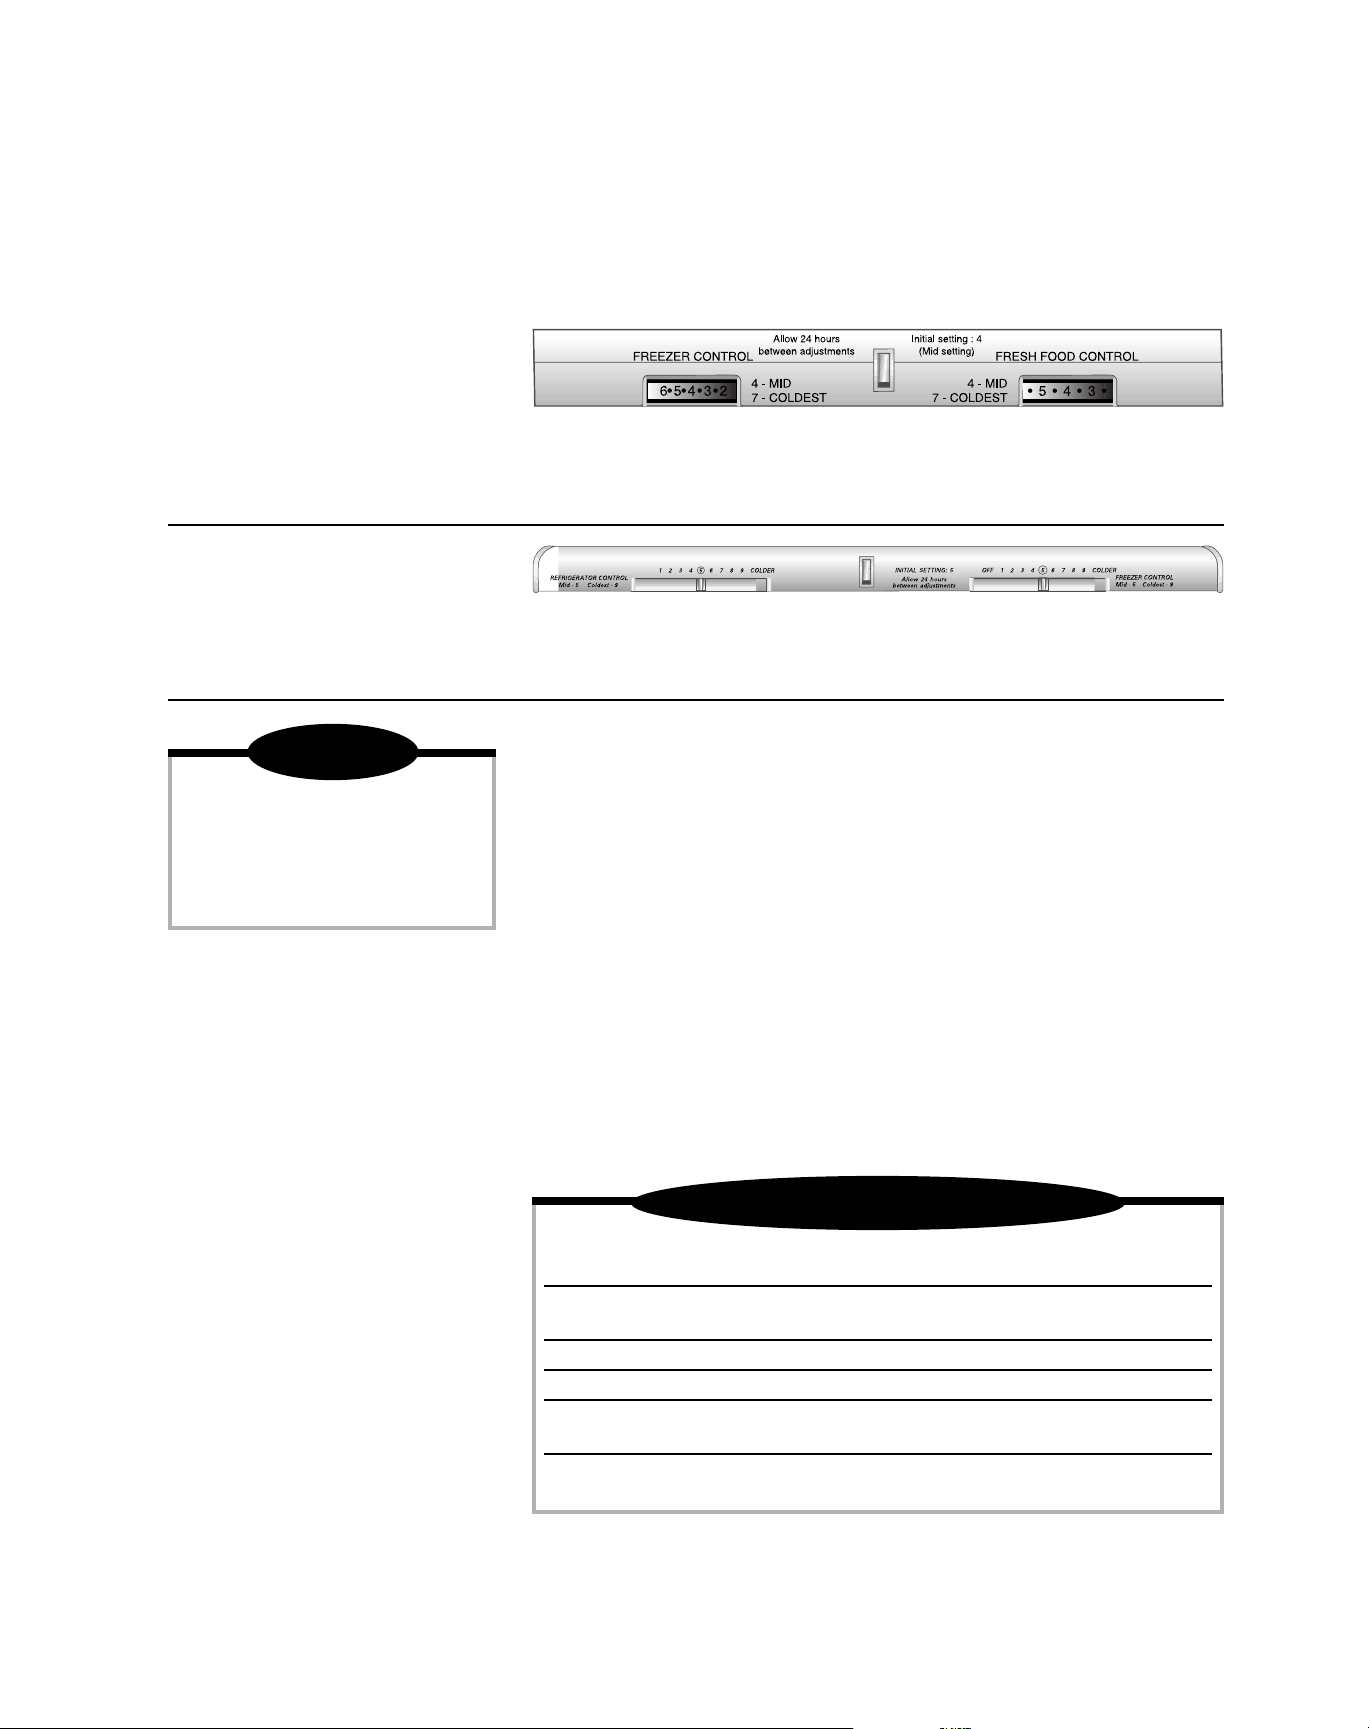
TEMPERATURE CONTROLS
Depending on the model, the style of the controls will vary. The controls are located at the top of the fresh food compartment.
Dial controls
TEMPERATURE CONTROL GUIDE
Fresh Food Compartment Adjust fresh food control to next higher setting.
too Warm
Fresh Food Compartment Adjust fresh food control to next lower setting.
too Cold
Freezer too Warm Adjust freezer control to next higher setting.
Freezer too Cold Adjust freezer control to next lower setting.
Turn Refrigerator Off Set fresh food control to OFF or 0.
(Dial Controls)
Turn Refrigerator Off Slide the freezer control to OFF.
(Slide Controls)
NOTE: Turning the control to OFF or 0 stops cooling in BOTH compartments. It does
not shut off power to the refrigerator.
Slide controls
➢ The freezer control has settings from 1
(warmest) to 7 (coldest). Initially set
this control on 4.
➢ The refrigerator control has settings
from 1 (warmest) to 9 (coldest).
Initially set this control on 5.
➢ The freezer control has settings from 1
(warmest) to 9 (coldest). Initially set
this control on 5.
NOTE
❚ Your refrigerator will run continu-
ously for several hours when you
first start it. This is normal.
❚ Let the refrigerator run at least 8-12
hours before adding food.
Adjusting the controls
➢ 24 hours after adding food, you may
decide that one or both compartments
should be colder or warmer. If so,
adjust the control(s) as indicated in the
table below.
➢ Except when starting the refr igerator,
do not change either control more
than one number at a time.
➢ Allow 24 hours for temperatures to
stabilize before resetting.
➢ Changing either control will have
some effect on the temperature of the
other compartment.
Wa rm cabinet surfaces
At times, the front of the refrigerator cabinet may be warm to the touch. This is a
normal occurrence that helps prevent
moisture from condensing on the cabinet.
This condition will be more noticeable
when you first start the refrigerator, during hot weather and after excessive or
lengthy door openings.
➢ The fresh food control has settings
from 1 (warmest) to 7 (coldest).
Initially set this control on 4.
INITIAL SETTINGS
INITIAL SETTINGS
Page 7
6
ice service
ICE SERVICE
Some models are automatic ice maker
ready. The number of the appropriate ice
maker kit needed for installation into
these models appears on the data plate.
The kit contains installation instructions
and water connection instructions.
Other models have a factory installed ice
maker. Connect the ice maker to the
water supply as instructed in the separate
instructions furnished with the refrigerator.Proper water flow and a level refrig-
erator is essential for optimal ice
maker performance.
After your refrigerator has been connected to the water supply, move the sensor
arm into the down position.The ice maker
will fill with water when the freezer reaches the proper temperature.
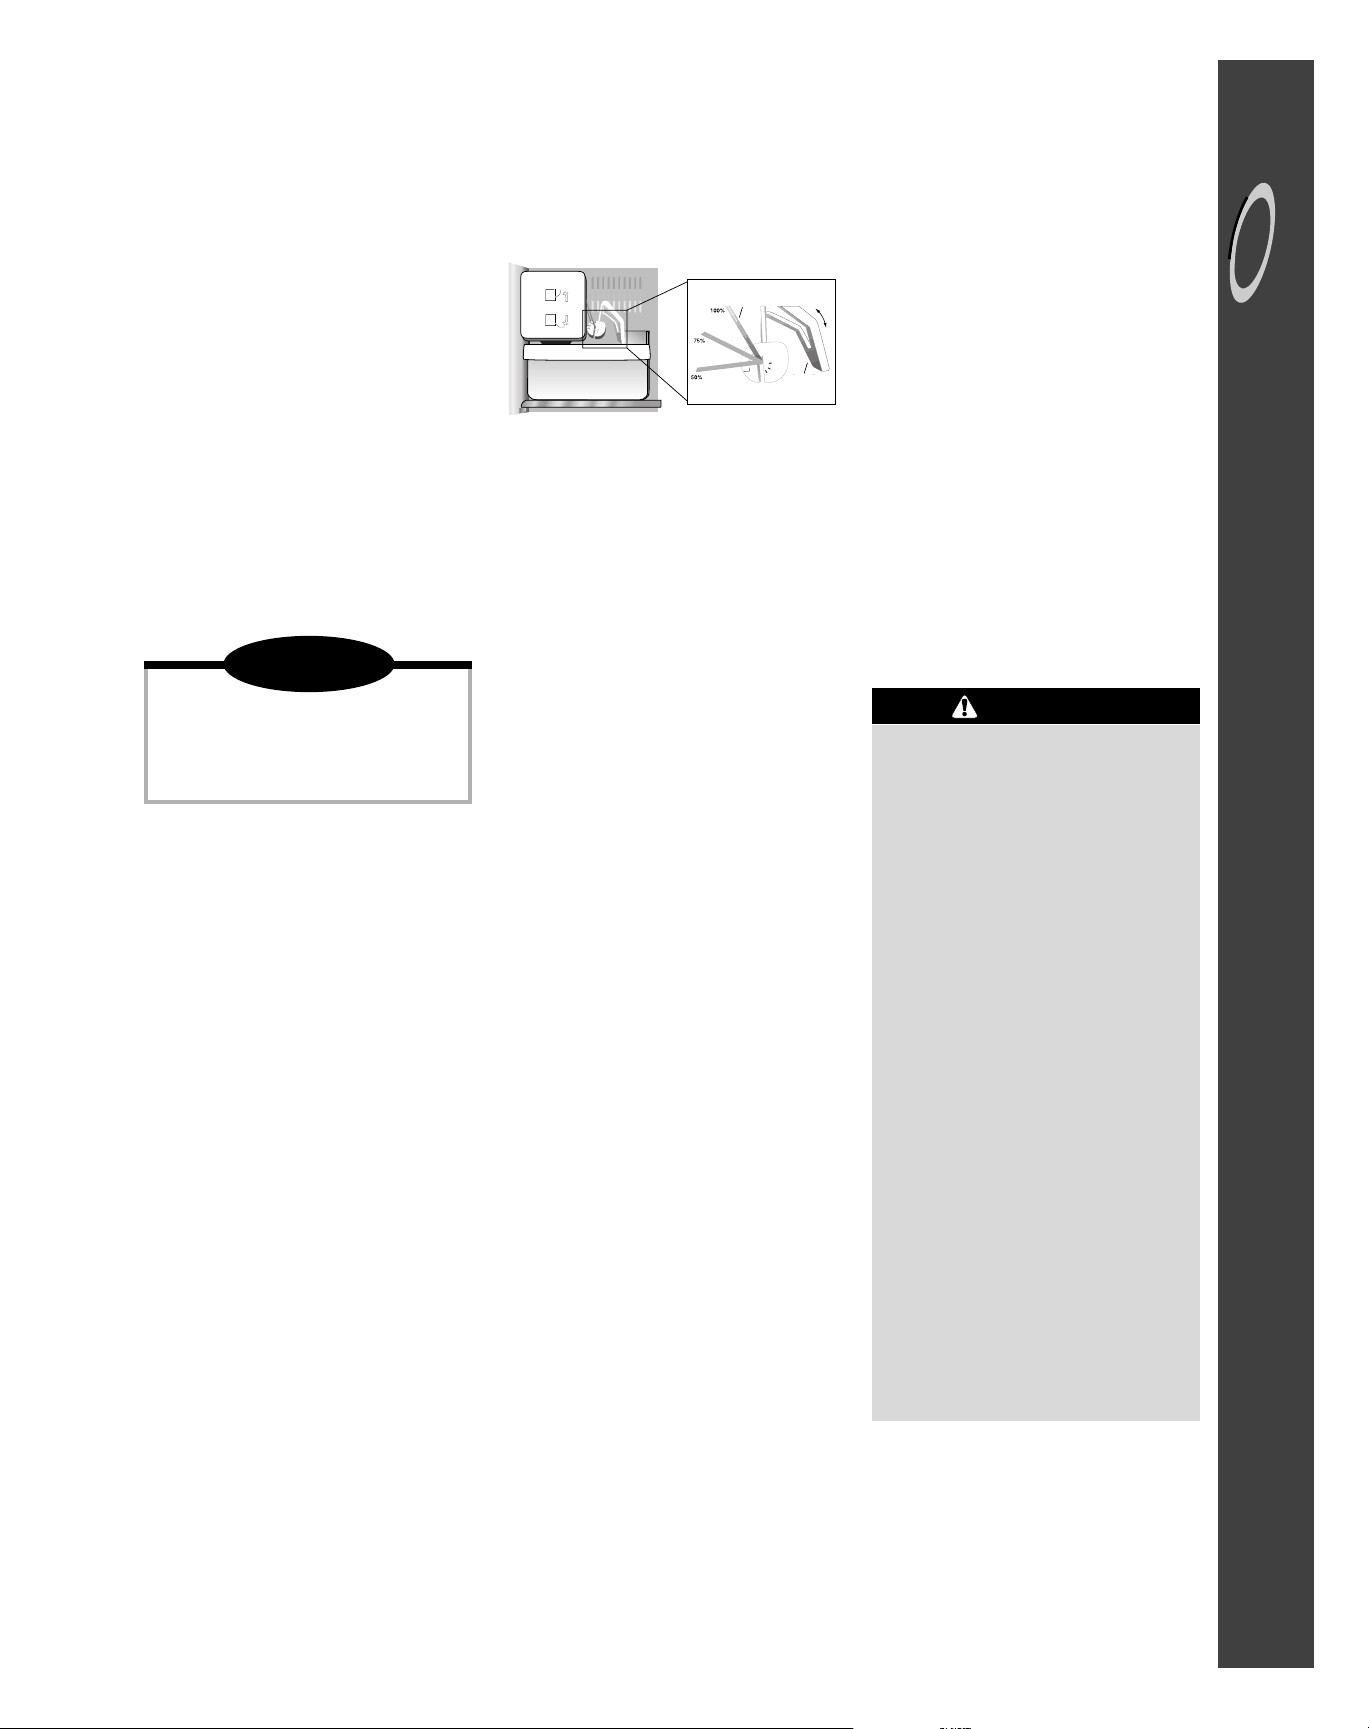
Some ice makers are equipped with an
adjustable sensor arm that allows you to
adjust the amount of ice in your ice storage
tray for times when less ice is needed.
NOTE
❚ Energy rating guides that are post-
ed on the refrigerator at the time of
purchase do not include optional
ice maker energy usage.
To adjust the amount of ice produced:
(select models) Rotate the wire lever arm
to provide the desired level of ice production. The 100% setting provides maximum ice production.
➢ It may be 8 to 12 hours before the ice
maker furnishes any usable ice cubes.
The first one or two batches will probably contain undersized and irregular
cubes because of air in the supply
line.
➢ The initial batch may also contain
impurities from the new water supply
piping. Therefore, all cubes from the
first two or three batches should be
discarded.
➢ When the ice cubes are ejected it is
normal for several cubes to be joined
together at the ends. They can easily
be broken apart. The ice maker will
continue to make ice until the supply
of ice cubes raises the sensor arm,
shutting the ice maker off.
➢ Certain sounds may accompany the
various cycles of the ice maker. The
motor may have a slight hum, the
cubes will rattle as they fall into an
empty storage pan and the water
valve may click or “buzz” occasionally.
➢ If the ice is not used frequently, the ice
cubes will become cloudy, shrink, stick
together and taste stale.Empty the ice
storage bin periodically and wash it in
lukewarm water. Be sure to dry the bin
before replacing it.
ON
OFF
ON
OFF
1
0
0
%
7
5
%
I
C
E
L
E
V
E
L
5
0
%
I
C
E
L
E
V
E
L
5
0
%
7
5
%
1
0
0
%
1
0
0
%
7
5
%
I
C
E
L
E
V
E
L
5
0
%
I
C
E
L
E
V
E
L
5
0
%
7
5
%
1
0
0
%
Wire Lever
Arm
Sensor
Arm
➢ To r em o v e the ice bin, pull it forward,
away from the ice maker.To avoid the
ice maker dumping ice while the bin is
removed, turn the ice maker off by lifting the sensor arm.
➢ To replace the ice bin, reverse the
above procedure. Turn the ice maker
on by lowering the sensor arm.
➢ Beverage and foods should not be
placed in the ice storage bin for quick
chilling. These items can block the
sensor arm, causing the ice maker to
malfunction.
➢ Tu rn off (arm up) the ice maker when
the water supply is to be shut off for
several hours.
Ice Cube Trays
Some models are equipped with ice cube
trays.To release the ice cubes from a tray,
hold the tray upside down and twist both
ends.
The ice bin (select models) either slides
into rails under an ice cube tray rack or
stacks on top of the ice cube trays.
Automatic Ice Maker
(optional)
FOR Y OUR SAFETY
Do not place fingers or hands on
the automatic ice making mechanism while the refrigerator is
plugged in. This will help protect
you from possible injury. It will also
prevent interference with moving
parts of the ejector mechanism and
the heating element that releases
the cubes.
Under certain rare circumstances,
ice cubes may be discolored,
usually appearing with a greenbluish hue. The cause of this
unusual discoloration can be a
combination of factors such as certain characteristics of local waters,
household plumbing and the accumulation of copper salts in an inactive water supply line which feeds
the ice maker.
Continued consumption of such
discolored ice cubes may be injurious
to health. If such discoloration is
observed, discard the ice cubes
and contact your dealer to purchase and install a water line filter.
For further assistance, call 1-800-688-9900 U.S.A., 1-800-688-2002 Canada or www.maytag.com
WARNING
Page 8

7
LOOKING INSIDE
Shelves
Your refrigerator has either SpillCatcher™ or Tempered Glass Shelves.
The Spill-Catcher™ shelves have a spill
retainer edge which allows for easier
clean up, and some are equipped with
the Easy Glide slide out feature.
To slide out (select models), grasp the
front of the shelf and pull forward.Push in
the shelf to return to the original position.
To remove a shelf, slightly lift up the rear
of the shelf and pull the shelf straight out
To lock the shelf into another position, tilt
up the front edge of the shelf. Inser t the
hooks into the desired frame openings
and let the shelf settle into place, being
sure the shelf is securely locked at the
rear.
➢
Never attempt to adjust a shelf
that is loaded with food (except
in the case of the Elevator
TM
Shelf).
ELEVATOR™ SHELF
(select models)
The fresh food compartment may also be
equipped with an Elevator™ Shelf. This
shelf has a spill retainer edge for easy
cleanup. It also has the convenient slide
out feature that allows easy access to
items stored at the rear of the shelf.
This shelf can be adjusted up or down
without having to be unloaded of its contents. To adjust an Elevator™ Shelf, pull
out the knob on the crank handle. Rotate
the crank clockwise to raise the height of
the shelf, and counterclockwise to lower
the height of the shelf.
To remove the Elevator™ shelf for occasional cleaning, completely unload the
shelf and pull the shelf forward.When the
shelf stops, press up on the tabs located
underneath its outside edges, then continue pulling forward, clear of the frame.
To reinstall, align the shelf to the frame
and push it all the way back.(There is no
need to depress the tabs for reinstallation).
In ordinary use, the Elevator™ shelf with
the frame assembly does NOT require
removal.Though unlikely, and not recommended, the correct removal procedure
is as follows:
Unload the shelf completely, raise the
shelf to its highest possible position.
While supporting the shelf and frame
from the front, press both locks inward.
Lift slightly and tilt the frame assembly to
allow the rear guides to clear the vertical
rails.
To reinstall, tilt the frame assembly while
depressing both locks, reposition the rear
guide behind the vertical rails. When the
shelf is level, release the locks allowing
the shelf to latch in the correct position.
ADJUSTABLE FREEZER
SHELF (select models)
To remove the shelf, lift the left end up
about 3 inches; pull the right end bars out
of the side wall cups.To replace the shelf,
reposition the removable support plugs
on the left side wall to the desired level
and reverse the removal procedure.
EXPANDABLE-WIDTH
FREEZER SHELF
(select models)
The shelf adjusts sideways to open up a
full-height space for tall packages, such
as pizza. The leg on the right side of the
shelf slides to make this adjustment.
The shelf can also adjust to two heights.
To adjust the shelf height, remove the
shelf from the freezer.Slide the leg out of
the channels and reinsert the leg in the
alternate height position. Return the shelf
to the freezer, inserting the left end into
the liner cups.
DOOR STORAGE
Pick-Off Door Bins (select models) are
roomy enough to handle gallon-plus
sized containers.They are adjustable and
can be easily removed.
To remove, lift the bin front up until it
clears the retainers on the door liner then
pull the bin straight out
To replace, reverse the above procedure.
Other models are constructed with
durable, Fixed Door Shelves with the
gallon-plus storage capacity.
Some refrigerator and freezer door
shelves have Keepers to secure bottles
and other containers in place when the
door is being opened or closed. The
keepers are easily adjusted by sliding
from side to side.
The Tall Bottle Retainer (select models)
is designed to prevent tall bottles from tipping forward. It is easily adjusted by sliding from side to side.
WARNING
Other models have a partial width freezer
shelf. This shelf is positioned on the left
side of the freezer compartment by
mounting into the left side wall.
Page 9
8
looking inside
RACKS
The Multi-Can Rack (select models)
suspends from one of the spill-proof
refrigerator shelves. It hooks over the
wires found in the framework under the
shelf. The sloped design allows for cans
to roll forward as one is removed. (This
rack cannot be positioned under an
Elevator™ shelf.)
The Multi-Use Rack (select models)
provides a place for horizontally storing
wine.The rack also can hold canned beverages or an egg carton.
Position the rack to rest on the left hand
side of a refrigerator shelf (this rack cannot be positioned on an Elevator™ shelf).
Special Storage Areas
Your refrigerator has either a Snack
Center Drawer or an Adjusti-Temp™
Drawer.
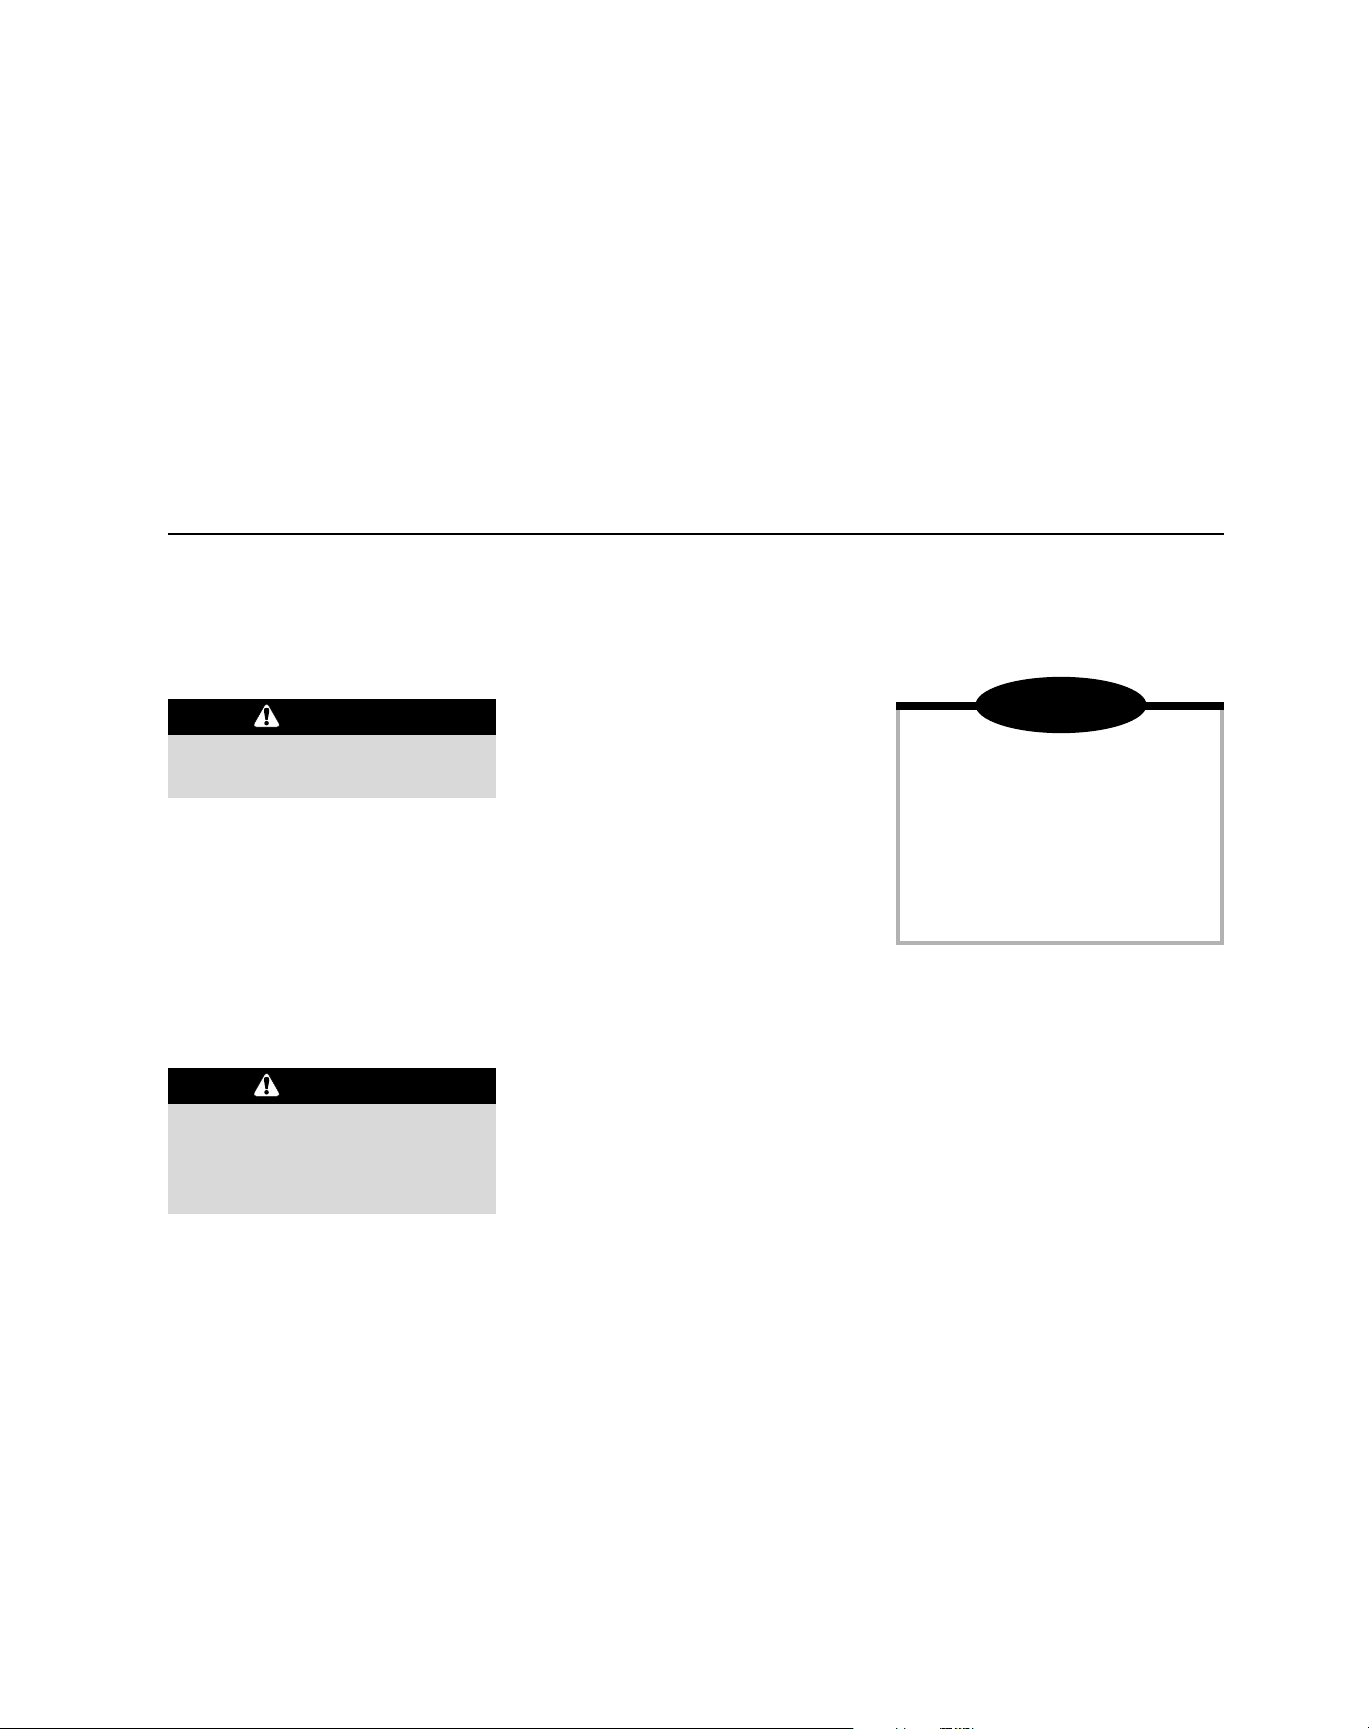
For models with the Adjusti-Temp™
Drawer, a control is located on the shelf
front above the drawer. Simply slide the
control knob left or right to adjust the internal temperature of the drawer.
➢ For cheese storage, slide the control
to the left. To achieve a lower temperature within the drawer when storing
fresh meat, poultry or fish, slide the
control to the right.
To replace the drawer, reverse the above
procedure.
This drawer can be positioned as desired
on either the left or right side of the refrigerator cabinet.
For best results, keep this drawer closed
tightly.
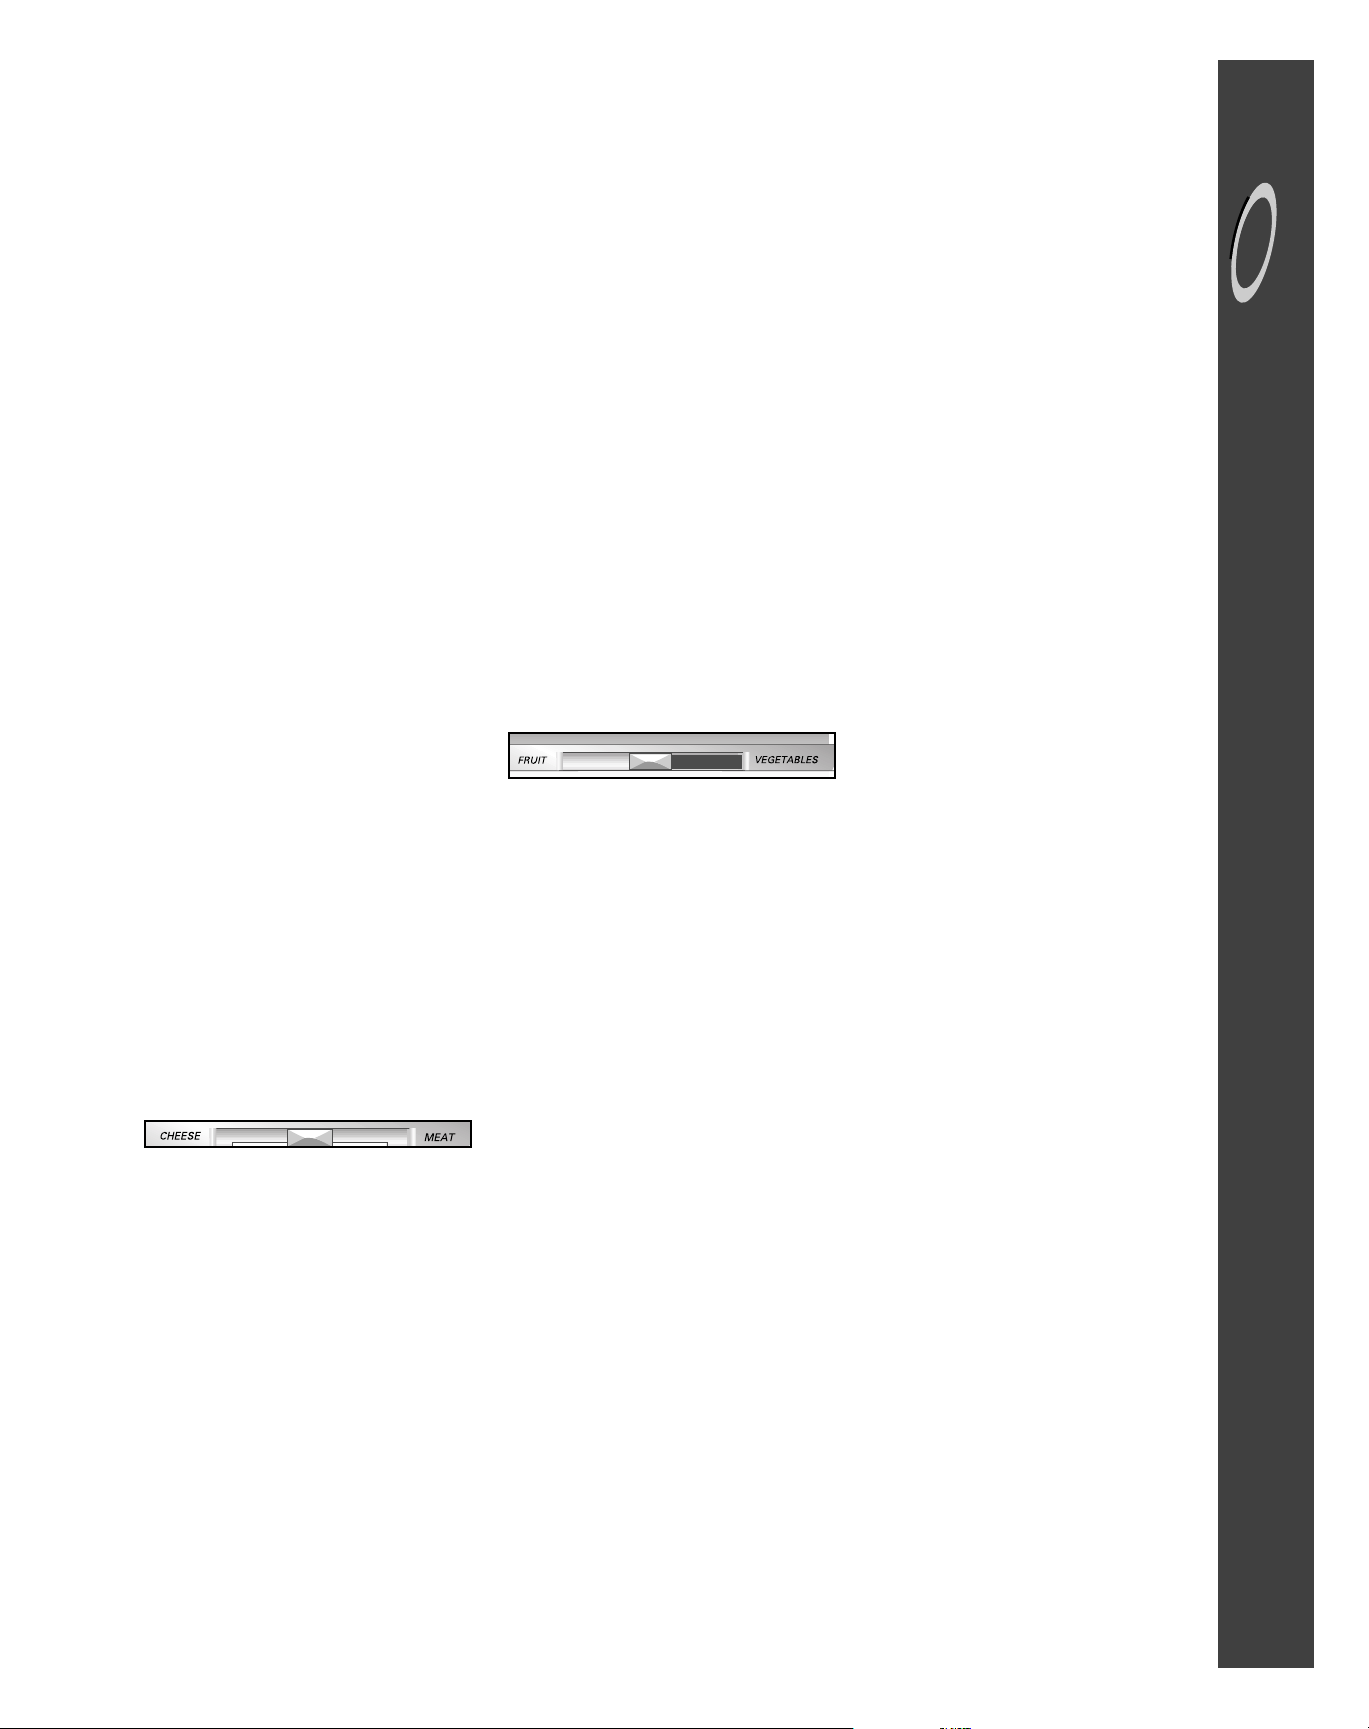
The Crispers provide storage for fruit
and vegetables.There is a humidity control located on the crisper shelf above
each of the crisper drawers.
➢ For fruit storage, slide the crisper con-
trol to the left to provide lower humidity conditions in the drawer.
➢ For vegetable storage, slide the crisper
control to the right to provide higher
humidity conditions in the drawer.
To remove a crisper drawer for cleaning:
➢ pull out the crisper until it stops
➢ tilt the drawer front up and pull it out
To replace a crisper drawer:
➢ align the drawer in the tracks
➢ lift the drawer front and slide in
For best results, keep the crispers tightly
closed.
To remove the Crisper Top:
➢ lift the front edge of the shelf
➢ pull the shelf straight out
To replace the Crisper Top:
➢ set the rear bars on the support
➢ push the shelf back until the front edge
can be lowered into place
Your refrigerator may come equipped
with an Egg Cradle (style may vary). It
can be removed to be washed or carried
to a work area.
To use the Dairy Compartment, raise
the cover.The dairy compartment may be
equipped with a Keeper to secure food
items in place.If your model has the dairy
keeper , simply slide it from side to side for
desired placement.
In some models, the dairy compartment
can be removed.
The Slide Out Freezer Basket (select
models) is found in the main freezer compartment. It is a convenient storage area,
providing easy access to items stored in
the rear of the freezer. Slide the basket
out to reach or store frozen foods.
To remove the basket:
➢ pull the basket until it stops
➢ lift and pull the basket out
To replace the basket, reverse the
removal procedure.
The Drop Down Freezer Basket (select
models) is found on the lower shelf of the
freezer door.This area provides space for
frozen food items that tend to shift or slide
(such as bagged vegetables).
The Snack Center drawer does not have
an adjustable temperature capability.
To remove the Snack Center Drawer or
Adjusti-Temp Drawer for cleaning:
➢ pull the drawer out until it stops
➢ lift the drawer up slightly and pull it out
For further assistance, call 1-800-688-9900 U.S.A., 1-800-688-2002 Canada or www.maytag.com
Page 10

9
FOOD STORAGE TIPS
Fresh Food Storage
➢ The fresh food compartment of a
refrigerator should be kept between
34° F and 40° F with an optimum temperature of 37° F. To check the temperature, place an appliance thermometer in a glass of water and place
in the center of the refrigerator.Check
after 24 hours. If the temperature is
above 40° F adjust the controls as
explained on page 5.
➢ Avoid overcrowding the refrigerator
shelves.This reduces the circulation of
air around the food and results in
uneven cooling.
FRUITS AND VEGETABLES
➢ Storage in the crisper drawers traps
moisture to help preserve the fruit and
vegetable quality for longer time periods. (Refer to page 8).
➢ Sort fr uits and vegetables before stor-
age and use bruised or soft items first.
Discard those showing signs of decay.
➢ Always wrap odorous foods such as
onions and cabbage so the odor does
not transfer to other foods.
➢ While vegetables need a certain
amount of moisture to remain fresh,
too much moisture can shorten storage times (especially leafy vegetables). Drain vegetables well before
storing.
MEAT AND CHEESE
➢ Raw meat and poultry should be
wrapped securely so leakage and
contamination of other foods or surfaces does not occur.
➢ Occasionally mold will develop on the
surface of hard cheeses (Swiss,
Cheddar, Parmesan). Cut off at least
an inch around and below the moldy
area. Keep your knife or instrument
out of the mold itself. The remaining
cheese will be safe and flav orful to eat.
Do NOT try to save individual cheese
slices, soft cheese, cottage cheese,
cream, sour cream or yogurt when
mold appears.
DAIRY FOOD
➢ Most dairy foods such as milk, yogurt,
sour cream and cottage cheese have
freshness dates on their cartons for
appropriate length of storage. Store
these foods in the original carton and
refrigerate immediately after purchasing and after each use.
Frozen Food Storage
➢ The freezer compartment of a refriger-
ator should be kept at approximately
0° F. To check the temperature, place
an appliance thermometer between
the frozen packages and check after
24 hours. If the temperature is above
0˚ F, adjust the control as described on
page 5.
➢ A freezer operates more efficiently
when it is at least two-thirds full.
PACKAGING FOODS FOR
FREEZING
➢ To minimize dehydration and quality
deterioration use aluminum foil, freezer wrap, freezer bags or airtight containers. Force as much air out of the
packages as possible and be sure
they are tightly sealed.Tr apped air can
cause the food to dry out, change
color and develop an off-flavor (freezer burn).
➢ Overwrap fresh meats and poultry
with suitable freezer wrap prior to
freezing.
➢ Do not refreeze meat that has com-
pletely thawed.
LO ADING THE FREEZER
➢ Avoid adding too much warm food to
the freezer at one time.This overloads
the freezer, slows the rate of freezing
and can raise the temperature of
frozen foods.
➢ Leave space between the packages so
cold air can circulate freely, allowing
food to freeze as quickly as possible.
➢ Avoid storing hard-to-freeze foods
such as ice cream and orange juice on
the freezer door shelves.These foods
are best stored in the freezer interior
where the temperature varies less with
door openings.
Refer to the Food Storage Chart on
page 10 for approximate storage
times.
Page 11
10
food storage tips
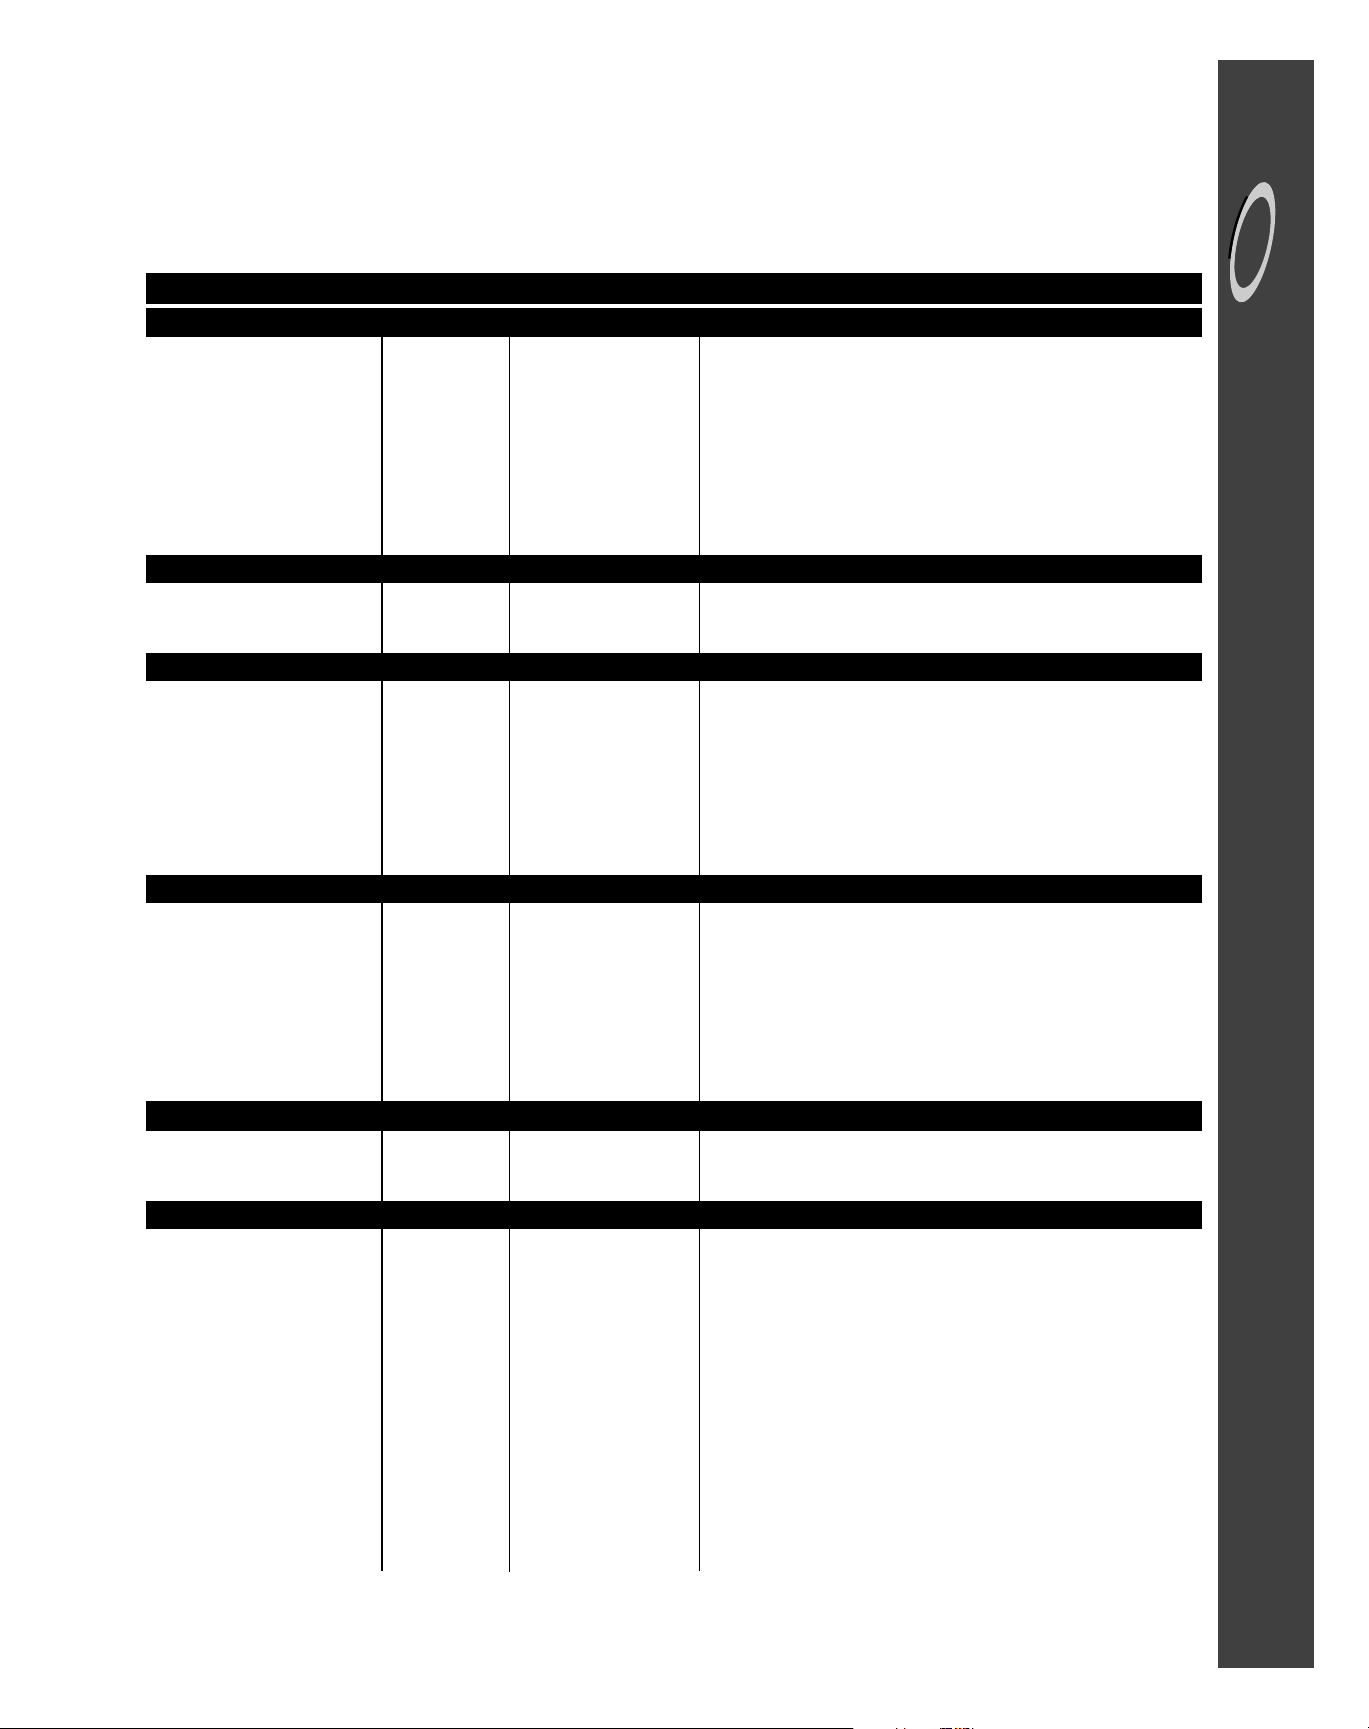
FOOD STORAGE CHART
(Storage times are approximate and ma y v ary depending on type of packaging, storage temperature , and the quality of the f ood when
purchased.)
Foods
Butter
Milk & cream
Cream cheese, cheese
spread & cheese food
Cottage cheese
Sour cream
Hard cheese (Swiss,
Cheddar & Parmesan)
Eggs in the shell
Leftover yolks or whites
Apples
Bananas
Pears, plums, avocados
Berries, cherries, apricots
Grapes
Citrus fruits
Pineapples, cut
Asparagus
Brussels sprouts, broccoli, cau-
liflower, green peas, lima
beans, onions, peppers
Cabbage, celery
Carrots, parsnips, beets, &
turnips
Lettuce
Chicken and Turkey, whole
Chicken and Turkey, pieces
Fish
Bacon
Beef or lamb, ground
Beef or lamb, roast & steak
Ham, fully cooked, whole
half
slices
Luncheon meat
Pork, roast
Pork, chops
Sausage, ground
Sausage, smoked
Veal
Frankfurters
Refrigerator
1 month
1 week
1-2 weeks
3-5 days
10 days
1-2 months
3 weeks
2-4 days
1 month
2-4 days
3-4 days
2-3 days
3-5 days
1-2 weeks
2-3 days
1-2 days
3-5 days
1-2 weeks
7-10 days
7-10 days
1-2 days
1-2 days
1-2 days
7 days
1-2 days
3-5 days
7 days
5 days
3 days
3-5 days
3-5 days
3-5 days
1-2 days
7 days
3-5 days
7 days
Freezer
6-9 months
Not recommended
Not recommended
Not recommended
4-6 months
May become crumbly
Not recommended
9-12 months
8 months (cooked)
6 months (whole/peeled)
Not recommended
6 months
1 month (whole)
Not recommended
6-12 months
8-10 months
8-10 months
Not recommended
8-10 months
Not recommended
12 months
9 months
2-6 months
1 month
3-4 months
6-9 months
1-2 months
1-2 months
1-2 months
1-2 months
4-6 months
4 months
1-2 months
1-2 months
4-6 months
1 month
Storage Tips
Wrap tightly or cover.
Check carton date. Close tightly. Don’t retur n unused por tions
to original container.Don’t freeze cream unless whipped.
Wrap tightly.
Store in original carton. Check carton date.
Wrap tightly. Cut off any mold.
Refrigerate small ends down.
For each cup of yolks to be frozen, add 1 tsp.sugar for use in
sweet, or 1 tsp. salt for non-sweet dishes.
May also store unripe or hard apples at 60-70° F.
Ripen at room temperature before refrigerating.Bananas and avo-
cados darken when refrigerated.
May also store at 60-70° F. If refrigerated, store uncovered.
Will not ripen after purchase. Use quickly.
Do not wash before refrigerating.Store in crisper.
Wrap odorous foods.Leave peas in pods.
Wrap odorous foods & refrigerate in crisper.
Remove tops.Wrap odorous foods and refrigerate in the crisper.
Keep in original packaging for refrigeration. Place in the Meat and
Cheese Drawer.When freezing longer than 2 weeks, overwrap with
freezer wrap.
Fresh meats can be kept in original packaging for refrigeration.
Place in the Meat and Cheese Drawer.When freezing longer than
2 weeks, overwrap with freezer wrap.
Unopened, vacuum-packed luncheon meat may be kept up to 2
weeks in the Meat and Cheese Drawer.
Processed meats should be tightly wrapped and stored in the Meat
and Cheese Drawer.
EGGS
FRUITS
DAIRY PRODUCTS
Sources: United States Department of Agriculture; Food Marketing Institute; Cooperative Extension Service, Iowa State University
VEGETABLES
MEATS
POULTRY & FISH
Page 12
11
STORING THE REFRIGERATOR
Vacat i ons
If you will be gone for a month or less,
leave the controls at the usual settings.
During longer absences:
1. Remove all food.
2. Shut off the ice maker (if installed) and
the valve where you tapped into the
water line to supply the refrigerator.
3. Disconnect the refrigerator from the
electrical outlet.
4. Clean and dry the refrigerator
thoroughly.
5. Leave the doors open to prevent
odors.
Moving
When moving, follow steps 1–4 under
Vacations. In addition, remove and carefully pack any items that are easily
removable. Ship the refrigerator in an
upright position with the doors taped
shut.
CARE AND CLEANING
Refer to the chart on the following page for
specific refrigerator cleaning guidelines.
➢
Disconnect the power cord
before cleaning.
➢
Disconnect the power cord
before replacing light bulb(s).
Wear gloves as protection
against broken glass.
CLEANING UNDER THE
REFRIGERATOR
Your refrigerator can be rolled out for cleaning the floor underneath. Raise the leveling
screws if engaged (see page 2). Pull the
refrigerator straight out from the wall.
REPLACING A
LIGHT BULB
Always use a standard 40 or 60 watt
appliance bulb.
Refrigerator
There are two light bulbs located under
the top of the refrigerator compartment,
on either side of the Dual Cool™ control
housing.
➢ Carefully grasp the lightbulb by reach-
ing behind the bulb cover.
➢ Unscrew the light bulb and replace.
Freezer
The freezer light (select models) is located on the back wall, near the upper right
corner.
To remove the bulb cover:
➢ Grasp the top and bottom of the bulb
cover.Press in the areas of the attachment tabs, applying enough pressure
to unhook the tabs. At the same time,
pivot the cover down and remove.
➢ Unscrew the lightbulb and replace.
➢ Replace the bulb cover by pivoting it
back into place and snapping the tabs
into the appropriate slots.
NO CLEAN™
COMMERCIAL-DUTY
CONDENSER
A clean condenser means more efficient
refrigerator operation. Thanks to the
unique design of the No Clean™ condenser there is no longer a need for routine condenser cleaning in normal home
usage surroundings.
Some operating environments may be
particularly dusty or greasy.In these situations, the condenser can be periodically
cleaned to insure maximum efficiency.
No Defrosting
Your refrigerator is designed to defrost
automatically.
Energy Saving Tips
➢ Locate the refrigerator away from heat
producing appliances such as the
range or dishwasher, heat vents and
direct sunlight.
➢ Level the refrigerator and do not block
ventilation around the front grille.
➢ Keep the freezer full to near capacity
so less cold air will escape during door
openings. When the freezer is less
than two-thirds full, place milk cartons
half full of water in the freezer.
➢ Let hot dishes cool slightly before put-
ting into the refrigerator or freezer.
➢ Cover liquids.
➢ Wipe moisture from the outside of
containers before placing them into
the refrigerator.
➢ Avoid opening the doors too often.
CAUTION
CAUTION
NOTE
❚ During the automatic defrost cycle,
you may notice a red glow/reflection in the vents on the back wall of
the freezer compartment and you
may hear the sound of water
droplets coming into contact with
the defrost heater. This is normal
during the defrost cycle.
Page 13

12
Part
Cleaning Agents
Mild detergent and warm
water
Mild liquid sprays
Vacuum cleaner attachment
Cleaning brush
(Part No.20001017)
available from your dealer.
Mild detergent and warm
water
Mild liquid sprays
Mild detergent and warm
water
Mild liquid sprays
Light cleaning: mild
detergent and water or a
solution of white vinegar
and water
Moderate soil: Bon Ami*
Discolorations: Cameo
Stainless Steel Cleaner*
Tips and Precautions
Remove the base grille by grasping the ends and pulling straight out.
To replace, align the clips with the round openings in the cabinet and
push each end in until the base grille snaps into place.
No need for cleaning unless environment is particularly greasy, dusty
or there is significant pet traffic in the home (see page 11).
Dry with a clean, soft cloth.
Do not wipe the refrigerator with a soiled dishwashing cloth or wet
towel.These may leave residue that can scratch and weaken the
paint. Do not use scouring pads, powdered cleansers, bleach or
cleaners containing bleach.These products can scratch and erode
the paint finish.
Do not wax plastic or vinyl parts.
Use a soft cloth or sponge.
Always wipe with the grain of the stainless steel.
Do not use chlorine bleach or a cleaning product that contains chlo-
rine bleach.
After cleaning, rinse and dry.To retore luster and remove streaks fol-
low with Stainless Steel Magic Spray* (Part No. 20000008).
Refrigerator Exterior
Refrigerator & Freezer Interior
Base grille
Condenser
Door handles
Door gasket
Glass shelves
Interior and door liner
Drawers, bins,
egg cradle, etc.
Painted metal surfaces:
Cabinet, doors
Stainless steel doors
(select models)
Refrigerator Cleaning Chart
Baking soda and warm
water
Mild detergent and warm
water
Mild detergent and warm
water
Glass cleaner
Mild liquid sprays
Mild detergent and warm
water
Baking soda and warm
water
Mild detergent and warm
water
Use 1-2 tablespoons baking soda per quart of water.Be sure to
wring out excess water from sponge or cloth when cleaning
around controls, lights, or electrical parts.
Allow the glass to warm up to room temperature before
immersing in warm water. Never use hot water.
See above for baking soda solution.
DO NOT use abrasive cleaners, concentrated detergents, bleaches, cleaning waxes, solvents or polish cleaners to clean the refrigerator interior.
Dry thoroughly. DO NOT wash in automatic dishwasher.
* Brand names are the trademarks of the respective manufacturer
➢
Disconnect the power cord before c leaning.Do not touch refrigerated surfaces with wet or damp hands. Damp objects
stick to cold metal surfaces. Before cleaning the freezer, allow it to warm up. Allow glass shelves to warm up before
immersing in warm water.
For further assistance, call 1-800-688-9900 U.S.A., 1-800-688-2002 Canada or www.maytag.com
care & cleaning
CAUTION
Page 14
13
NORMAL OPERATING SOUNDS
Improvements in refrigeration design may produce sounds in your new refrigerator that are different or were not present in an older
model.These improvements were made to create a refrigerator that is better at preserving food, is more energy efficient, and is quieter
overall. Because new units run quieter, sounds may be detected that were present in older units, but were masked by higher sound
levels. Many of these sounds are normal. Please note that the surfaces adjacent to a refrigerator, such as hard walls, floors and
cabinetry may make these sounds seem ev en louder .The following are some of the normal sounds that may be noticed in a new refrigerator.
DEFROST TIMER: Frost-free
refrigerators have a defrost timer
that will generate a clicking
sound when it cycles the unit into
and out of defrost cycle.
ICE MAKER: (if equipped) The ice maker will
occasionally generate a rattling sound when the
ice cubes are ready to drop down into the ice
bin. Also, the motor that ejects the ice from its
tray prior to dropping the ice may also be
detectable. These are normal sounds necessary
for making ice.
FREEZER COMPARTMENT
CONTRACTION AND EXPANSION: A popping sound
may occur in the freezer when
the unit starts up due to
contraction or expansion of
the materials in the freezer
area.
REFRIGERANT FLOW: The flow of the
refrigerant in your refrigerator may cause a
gurgling or rattling sound when the unit is
running or just after the unit cycles off. The
refrigerant is still flowing in the tubing.
AIRFLOW SOUNDS: Both the freezer evaporator
fan and the condenser fan at the bottom of the
cabinet will create airflow sounds. The evaporator
fan is circulating the cold air throughout the
refrigerator and freezer compartments. The
condenser fan is removing the heat generated
when the unit is cooled.
WATER VALVE (if equipped): A buzzing
sound may be detected in the back of the
unit when the ice dispenser calls for the
water valve to open to fill the ice maker
tray. Following the ejection of the ice,
there may be some water dripping
sounds when the trays are being filled.
CABINET LEVELING: An unlevel
cabinet may cause rattling or vibrating
noises. This can be fixed by adjusting
the wheels or levelers properly.
COMPRESSOR: In order for a new
refrigerator to run more efficiently, the
refrigeration system may run longer to
keep food at the desired temperatures
for freshness. That new, high
efficiency compressor may run longer
and generate sounds such as a higher
pitched hum or pulsation.
Page 15
14
BEFORE YOU CALL FOR SERVICE
before you call
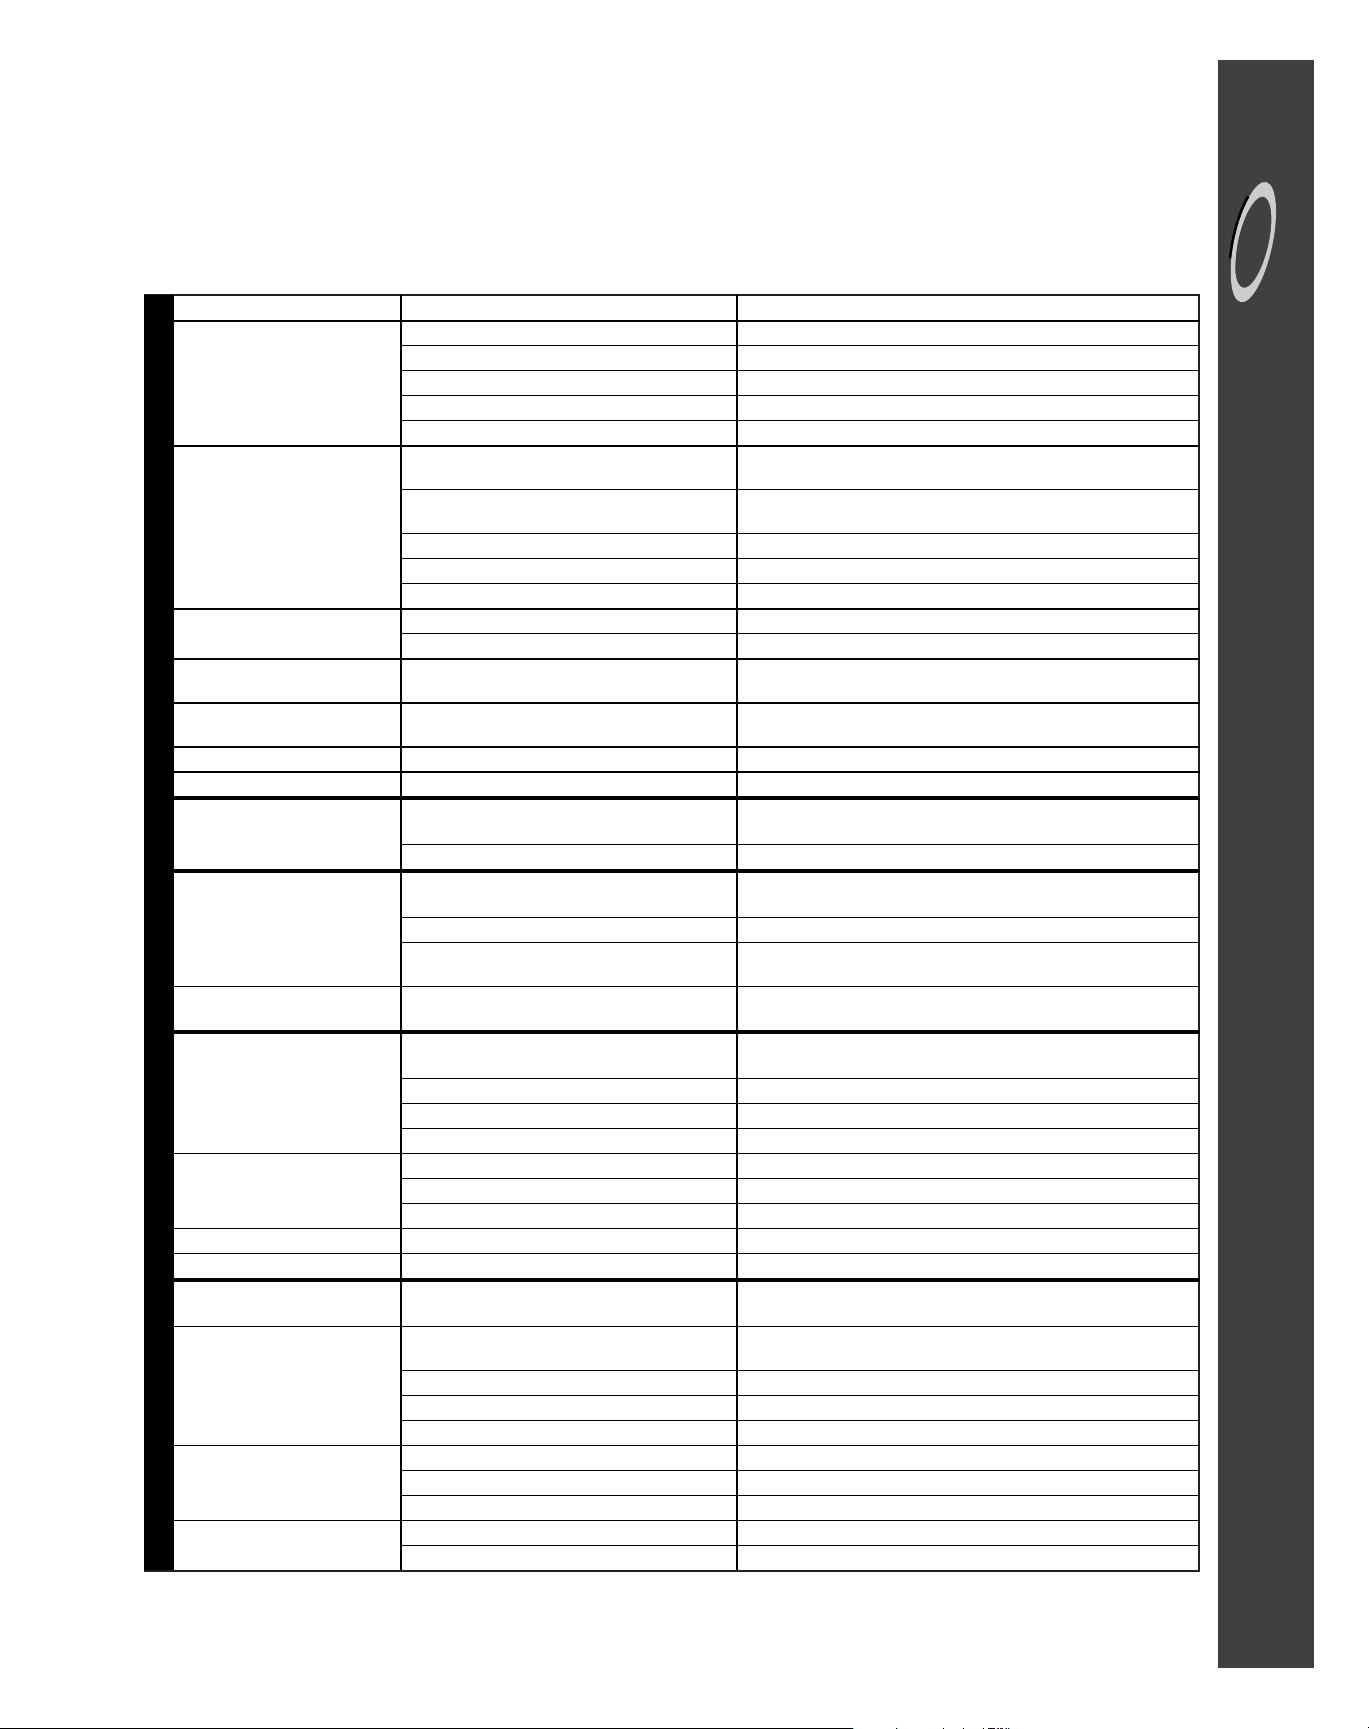
PROBLEM POSSIBLE CAUSES WHAT TO DO
Won’t run Power cord not plugged in. Push plug into outlet.
No power to outlet. Replace fuse, reset circuit breaker.
Freezer control set to OFF position. Set freezer control (see page 5).
Refrigerator is in automatic defrost. Wait 25 minutes for defrost cycle to end.
Room temperature less than 55° F. Relocate unit to proper climate (see installation on page 2).
Runs too long, Today’s refrigerators start and stop more
too frequently often to maintain even temperatures.
Normal at startup for new or recently Wait 24 hours to completely cool down
installed units. (see temperature controls on page 5).
Prolonged or frequent door openings. This is normal.Minimize door openings.
Door not sealing. Check to see if something is preventing door from closing.
Base grille blocked. Unblock to allow warm air to exit unit.
Light not working Bulb burned out. Unplug refrigerator and change bulb (see page 11).
No power to unit. Check to see if power cord is completely plugged in.
Visible glow in Appearance of a red glow or reflection is
freezer vents normal during the defrost cycle.
War m air from This is normal air flow for condenser
cabinet bottom circulation.
Cabinet vibrates Cabinet not level.Weak floor. Level cabinet (see page 2.)
Odor in cabinet Odor producing foods not covered. Cover or wrap odorous foods tightly. Clean cabinet.
Noise, sounds and Normal noise. See Normal Operating Sounds page 13.
vibrations
Cabinet not level. Level cabinet (see page 2).
Freezer, refrigerator Control set too warm. Adjust temperature control (see page 5).
too warm (soft ice cream) Prolonged door openings. Minimize door openings.
Room temperature less than 55° F. Unit will not run often enough to maintain proper temperatures.
Products with high sugar content may
not harden completely when frozen.
Freezer, refrigerator Control set too cold. Adjust temperature control (see page 5).
too cold (food freezing)
Automatic icemaker Sensor ar m in up position. Adjust sensor arm down to ON position.
not working
Cabinet not level. Level unit (see page 2).
Water supply not connected or restricted. Connect water supply, or clear obstr uctions.
Freezer too warm. Adjust freezer temperature control (see page 5).
Ice cubes have Old cubes. Discard; ice cubes may absorb odors which affect taste.
odor/taste
Bad water quality. Contact local water treatment company.
Food transmits odor/taste to ice. Wrap foods tightly.
Ice cubes sticking in tray Residue from minerals in the water. Wipe trays with vinegar-soaked cloth until clean.
Ice cubes evaporating Limited use of ice. Dump old ice cubes.
Moisture on cabinet Not unusual during periods of high humidity.
surface between doors
Moisture on inside cabinet Hot humid weather. Normal.
walls or in crisper
Frequent or prolonged door openings. Minimize door openings.
Door not closed properly. Check to see if something is preventing door from closing.
Food not wrapped properly. Wrap or cover all foods tightly.
Foods dry out Crisper not tightly closed. Close crisper all the way.
Temperature controls set too cold. Adjust temperature controls (see page 5).
Packages not wrapped or sealed properly. Wrap or cover all foods tightly.
Excessive moisture in Food not wrapped properly. Wrap or cover all foods tightly.
crisper
Hot, humid weather. Minimize door openings.
Review this chart of troubleshooting tips first…you may not need to call for service at all.
GENERAL OPERATION
NOISE
TEMPERATURE
ICEMOISTURE
For further assistance, call 1-800-688-9900 U.S.A., 1-800-688-2002 Canada or www.maytag.com
Page 16

15
MAYTAG • 403 West Fourth Street North • P.O. Box 39 • Newton, Iowa 50208
Maytag Warranty What is Not Covered By These Warranties:
1. Conditions and damages resulting from any of the following:
a. Improper installation, delivery, or maintenance.
b. Any repair, modification, alteration, or adjustment not authorized by the
manufacturer or an authorized servicer.
c. Misuse, abuse, accidents, or unreasonable use.
d. Incorrect electric current, voltage, or supply.
e. Improper setting of any control.
2. Warranties are void if the original serial numbers have been removed,
altered, or cannot be readily determined.
3. Light bulbs.
4. Products purchased for commercial or industrial use.
5. The cost of service or service call to:
a. Correct installation errors.
b. Instruct the user on the proper use of the product.
c. Transpor t the appliance to the ser vicer.
6. Consequential or incidental damages sustained by any person as a result
of any breach of these warranties.Some states do not allow the exclusion
or limitation of consequential or incidental damages, so the above exclusion may not apply.
To purchase accessories or replacement parts not covered by your
product warranty:
Please have your model and serial numbers ready and call our parts
specialists at 1-877-232-6771 U.S.A.or 1-800-688-8408 Canada from
7 a.m. to 7 p.m. central time Monday through Friday.
If You Need Service
❚ Call the dealer from whom your appliance was purchased or call Maytag
ServicesSM, Maytag Customer Assistance at 1-800-688-9900, USA or
1-800-688-2002 Canada to locate an authorized servicer.
❚ Be sure to retain proof of purchase to verify warranty status. Refer to
WARRANTY for further information on owner’s responsibilities for warranty service.
❚ If the dealer or service company cannot resolve the problem, write to
Maytag ServicesSM, Attn: CAIR®Center, P.O. Box 2370, Cleveland, TN
37320-2370, or call 1-800-688-9900 U.S.A. or 1-800-688-2002 Canada.
U.S. customers using TTY for deaf, hearing impaired or speech impaired,
call 1-800-688-2080.
NOTE: When wr iting or calling about a service problem, please include
the following information:
a.Your name, address and telephone number;
b. Model number and serial number ;
c. Name and address of your dealer or servicer;
d. A clear description of the problem you are having;
e. Proof of purchase (sales receipt).
❚ User’s guides, service manuals and parts information are available from
Maytag ServicesSM, Maytag Customer Assistance.
Full One Year Warranty
For one (1) year from the date of original retail
purchase, any part that fails in normal home
use will be repaired or replaced free of charge.
Ice Maker - When purchased with the refrigerator and installed by the dealer the ice maker
will be considered part of the refrigerator for
warranty purposes.
Limited Warranty - Major Refrigeration
Components
Second Through Fifth Year - After the first
year from the date of original retail purchase,
through the end of the fifth year, Maytag
Services
SM
will repair or replace, at its option,
free of charge for parts and labor only, any part
of the sealed refrigeration system (consisting
of the compressor, evaporator, condenser,
drier and connecting tubing) and the cabinet
liner (exclusive of the door liner) which fail in
normal home use. All other costs, including
mileage, transportation, trip charge and diagnostic charge, if required, shall be the responsibility of the owner.
Limited Warranty - Other Parts
Second Y ear - Parts other than major refriger-
ation components which fail in normal home
use during the second year following the date
of original retail purchase will be repaired or
provided free of charge for the part itself, with
the owner paying all other costs, including
labor, mileage, transportation, trip charge and
diagnostic charge, if required.
Please note: The full warranty and the limited
warranties apply when the refrigerator is located in the United States or Canada.
Refrigerators located elsewhere are covered
by the limited warranties only including parts
that fail during the first year.
Limitations of Liability
The warrantor shall not be liable for any incidental or consequential damages, including
food loss. Some states do not allow the exclusion or limitation of consequential damages, so
the above limitation or exclusion may not apply
to you.
The specific warranties expressed above are
the ONLY warranties provided by the manuf ac-
turer. These warranties give you specific
legal rights, and you may also ha v e other rights
which vary from state to state.
Page 17

RÉFRIGÉRATEUR À COMPARTIMENTS SUPERPOSÉS TM-1
R
Form No. A/01/01 Part No. 8113P291-60 h t t p : / / w w w . m a y t a g . c o m 7400???? Litho U.S.A .
Installateur : Veuillez laisser ce guide
avec l’appareil.
Consommateur : Veuillez lire et conserver ce guide pour consultation ultérieure.
Conservez la facture d’achat ou le chèque
annulé comme preuve d’achat.
Si vous av ez des questions, v euillez écrire
ou nous appeler (en incluant le numéro de
modèle et votre numéro de téléphone) à :
Maytag Services
SM
Attn: CAIR®Center
P.O. Box 2370
Cleveland, TN 37320-2370
É.-U.1-800-688-9900
Canada 1-800-688-2002
Les clients des É.-U.utilisant un ATS
(pour handicap d’audition ou d’élocution)
doivent composer le 1-800-688-2080.
(Du lundi au vendredi de 8 h à 20 h,
heure de l’Est)
Internet : http://www.maytag.com
Pour des informations sur le service
après-vente, voir page 31.
Dans le cadre de nos pratiques
d’amélioration constante de la qualité
de nos appareils, des modifications
peuvent être introduites sur les
appareils sans que cela donne lieu à
une révision de ce guide.
Page 1 7
Pages 18-20
Page 2 1
Page 2 2
Pages 23-24
Pages 25-26
Page 2 7
Pages 27-28
Page 2 9
Page 3 0
Page 3 1
Page 3 2
Numéro de modèle
Numéro de série
Date de l’achat
bruits normaux
conseils pour la conservation des aliments
intérieur du réfrigérateur
production de glace
réglage des les températures
installation
remisage du réfrigérateur
sécurité
entretien et nettoyage
avant d'appeler
garantie
guía del usuario
Page 18

17
INSTRUCTIONS DE SÉCURITÉ IMPORTANTES
➢
Utiliser le réfrigérateur uniquement pour
son application prévue.
➢
Pour é viter un risque de choc électrique, ne
jamais brancher le réfrigérateur sur une
prise de courant qui n’a pas été adéquatement reliée à la terre, conformément aux
prescriptions des codes national et local
des installations électriques. Voir
ci-dessous l’avertissement et les instructions de liaison à la terre.
➢
Débrancher le réfrigérateur avant de le nettoyer ou de remplacer une ampoule.
➢
En cas de panne d’électricité, éviter d’ouvrir les portes. Si l’interruption de l’alimentation se prolonge, placer des blocs de
glace carbonique par-dessus les paquets
pour protéger les aliments plus longtemps,
ou contacter un entrepôt frigorifique local
pour organiser un stockage temporaire.Ne
pas recongeler des aliments surgelés qui
ont été complètement décongelés.
➢
Réparer ou remplacer tout cordon d’alimentation électrique qui a été endommagé
ou détérioré. Ne jamais tirer sur le cordon
pour débrancher l’appareil.
➢
Ne pas faire fonctionner le réfrigérateur en
présence de fumée explosive.
➢
Ne jamais laisser un enfant se tenir sur,
grimper sur, ou se suspendre à une
clayette de ce réfrigérateur.
IMPORTANT : Les r isques d’enfermement et
d’étouffement d’un enfant dans un réfrigérateur n’ont pas disparu. Un réfrigérateur abandonné demeure dangereux...même s’il ne
reste ainsi accessible que pendant quelques
Cet appareil est doté d’une fiche de branchement à 3 broches (pour liaison à la terre), ce
qui assure une protection adéquate contre les
risques de chocs électriques.On doit brancher
l’appareil uniquement sur une prise de courant
reliée à la terre. Si la prise de courant
disponible ne comporte que deux alvéoles,
c’est au client qu’incombent la responsabilité
et l’obligation personnelle de la faire remplacer
par une prise de courant à 3 alvéoles convenablement reliée à la terre. On ne doit
jamais, quelles que soient les circonstances,
couper ou arracher la troisième broche (liaison
à la terre) de la fiche de branchement. Ne
jamais utiliser une fiche d’adaptation.
CONSERVER CES INSTRUCTIONS COMME RÉFÉRENCES
CE QUE VOUS DEVEZ
SAVOIR SUR LES
INSTRUCTIONS DE
SÉCURITÉ
Les instructions de sécurité impor tantes et les
avertissements paraissant dans ce guide ne
sont pas destinés à couvrir toutes les situations et conditions éventuelles qui peuvent se
présenter.Il faut faire preuve de bon sens et de
prudence lors de l’installation, de l’entretien ou
de l’utilisation de l’appareil.
Prenez toujours contact avec votre revendeur,
distributeur, agent de service ou fabricant, au
sujet de problèmes ou conditions que vous ne
comprenez pas.
RECONNAISSEZ LES
ÉTIQUETTES, PHRASES
OU SYMBOLES SUR LA
SÉCURITÉ
jours. Lorsqu’on se débarrasse d’un vieux
réfrigérateur, il faut appliquer les instructions
ci-dessous pour éviter tout accident.
➢
Démonter les portes.
➢
Laisser les
clayettes en
place pour
qu’un
enfant ne
puisse pas
facilement
s’introduire
dans le réfrigérateur.
➢
Suivre toujours les précautions de
base lors de l’utilisation de cet
appareil.
➢
Cet appareil est conçu pour être
alimenté à partir du réseau normal
de 115 V/60 Hz, 15 A. L’appareil
devrait être alimenté par un circuit
indépendant. Ne pas utiliser un câble
de rallonge. Ne jamais utiliser un dispositif susceptible de dégrader la
performance électrique de cet
appareil.
CORDON D’ALIMENTATION
AVEC FICHE DE BRANCHEMENT
À 3 BROCHES
PRISE DE COURANT
MURALE RELIÉE
À LA TERRE
DANGER – risques immédiats qui
RÉSULTERONT en de graves blessures
ou même la mort.
DANGER
AVERTISSEMENT – r isques ou pratiques
non sûres, qui POURRAIENT résulter en
de graves blessures ou même la mort.
AVERTISSEMENT
ATTENTION – risques ou pratiques non
sûres qui POURRAIENT résulter en
blessures mineures, dommages du produit
ou dégâts matériels.
ATTENTION
AVERTISSEMENT
AVERTISSEMENT
POWER SUPPLY CORD
WITH 3-PRONG
GROUNDING PLUG
Page 19

18
sécurité
INSTALLATION
Pour toute aide supplémentaire, composez le 1-800-688-9900 aux É.-U., le 1-800-688-2002 au Canada, ou consultez www.maytag.com
Établissement de la
bonne circulation de
l’air
Pour assurer le maintien des températures
appropriées, il est nécessaire que la circulation de l’air se fasse correctement entre les
compartiments de réfrigération et de congélation, comme l’indique l’illustration.
NE bloquer aucun de ces évents avec des
aliments. S’ils étaient bloqués, la circulation
de l’air serait entravée, ce qui entraînerait des
problèmes de température et d’humidité.
Emplacement
d’installation
➢ Veiller à ce que l’air puisse circuler libre-
ment à travers la grille de plinthe avant.
➢ Installer le réfrigérateur à un endroit où la
température ambiante ne baissera pas audessous de 13 °C (55 °F). Lorsque la
température ambiante est inférieure à
13 °C (55 °F), le réfrigérateur ne fonctionne
pas assez fréquemment pour le maintien
de la température adéquate dans le compartiment de congélation.
➢ Prévoir un espace libre d’au moins 1,5 cm
(
1
⁄2 po) sur les côtés, au sommet et à
l’arrière pour faciliter l’installation. Si le côté
comportant les charnières de porte est
contre un mur, il est désirable qu’il y ait un
espace libre plus important de ce côté pour
pouvoir ouvrir complètement les portes ou
inverser leur sens d’ouverture (page 20).
➢ Dans le cas d’un plancher en vinyle ou en
bois, travailler prudemment lors de l’installation pour éviter de laisser des marques
sur le plancher ou de l’endommager.
Utiliser une plaque de contreplaqué ou un
morceau de tapis ou d’un autre matériau
pour protéger le sol lors du positionnement
de l’appareil.
➢ Le réfrigérateur doit rester vertical pendant
au moins 30 minutes avant d’être branché.
Deballage
➢ Retirer et conserver les dispositifs de mise
à niveau fixés à la base de déménagement.
➢ Retirer et jeter la base de déménagement
et les vis.
➢ À l’aide d’une pince à joint coulissant,
installer les dispositifs de mise à niveau
dans les trous situés aux angles avant de
la caisse.
Aplomb du réfrigérateur
Pour optimiser l’esthétique et la performance
du réfrigérateur, il faut le placer d’aplomb.
Selon le modèle, le réfrigérateur peut être mis
d’aplomb de deux façons.
➢ Tous les modèles de réfr igérateur ont des
vis de mise à niveau à la base de la caisse,
sous chacun des coins avant. Ces pieds
peuvent être ajustés en les tournant dans
un sens ou l’autre, au besoin.Si le plancher
n’est pas de niveau et qu’il soit nécessaire
de relever l’arrière de la caisse, utiliser un
morceau de contreplaqué ou autre matériau de calage.Pour immobiliser la caisse en
place, faire descendre les deux vis de mise
à niveau (voir fig.1).
ROTATION ANTIHORAIRE
POUR BAISSER LE COIN
DE LA CAISSE
ROTATION HORAIRE
POUR SOULEVER LE
COIN DE LA CAISSE
➢ Les modèles de réfrigérateur qui com-
portent des roulettes réglables peuvent
être mis à niveau en retirant la grille de
plinthe* et en réglant ces roulettes à l’aide
d’un tournevis ou d’une douille de
1
⁄4 pouce
(voir fig. 2).
*Pour retirer la grille de plinthe, saisir les
deux extrémités et tirer en ligne droite.Pour
la réinstaller, aligner les attaches avec les
ouvertures rondes dans la caisse et pousser sur chaque extrémité pour l’emboîtement.
➢ Pour de meilleurs résultats, après avoir mis
la caisse à niveau, ouvrir et fermer les
portes et remettre à niveau.
Figure 1
Figure 2
IMPORTANT : Ne pas enlever l’isolant en
mousse des évents situés dans le plafond du
compartiment d’aliments frais.
Ce réfrigérateur a fait l’objet d’un emballage
soigné. Enlever et jeter les agrafes éventuellement utilisées pour l’immobilisation des
clayettes (juste au-dessus de chaque
clayette -- accrochage sur le châssis). Pour
enlever les agrafes de plastique, faire bouger
les agrafes latéralement et tirer en ligne droite.
P
O
U
R
S
P
O
U
R
B
A
I
S
S
E
R
L
A
C
A
I
S
S
E
O
U
L
E
V
E
R
L
A
C
A
I
S
S
E
Dispositifs
de mise à
niveau
Base de
déménagement
Vis
Page 20

19
INSTALLATION,SUITE
RÉGLAGE DE LA PORTE
(AU BESOIN)
•Resserrer les vis après avoir fini les
réglages.
* Se repor ter aux instructions d’installa-
tion pour obtenir plus d’informations.
La porte doit être de niveau lorsque la
caisse l’est.
• La porte du congélateur est trop
haute.
•Les deux portes sont trop hautes.
•Les deux portes sont trop basses.
POIGNÉE MONTÉE SUR LE DESSUS
Page 21

20
installation
INVERSION DU SENS
DES PORTES
Outils nécessaires : tour nevis Phillips, clé à
rochet et douille de 5/16 po (8 mm), couteau à
mastic ou clé ouverte de 5/16 po (8 mm).
1. Retirer le couvre-char nière et le mettre de
côté.
2. Retirer les vis et la charnière avec une clé
à douille de 5/16 po (8 mm) et les mettre
de côté.
3. Soulever doucement la porte du congélateur et la retirer.
4. Enlever la vis et le bras de charnière du
dessus de la porte du réfrigérateur.
5. Soulever doucement la porte du réfrigérateur et la retirer.
6. Retirer le protecteur de grille et le mettre
de côté.
7. Retirer la plaque de charnière du coin
inférieur du réfrigérateur et l’installer de
l’autre côté.
8. Retirer la plaque du dessous de la por te
du réfrigérateur et l’installer de l’autre
côté.
9. Retirer la plaque du dessous de la por te
du congélateur et l’installer de l’autre côté.
10. Retirer les boutons sur le dessus des
portes de réfrigérateur et de congélateur
et les réinstaller de l’autre côté.
11. Retirer les bouchons des trous de vis du
dessus de la caisse et les réinstaller de
l’autre côté.
12. Retirer les rondelles et l’axe de l’intérieur
de la plaque de charnière et les installer à
l’extérieur de la plaque de charnière.
13. Réinstaller soigneusement la porte du
réfrigérateur sur la plaque de charnière au
coin inférieur.
14. Coulisser le bras de char nière en place et
le fixer avec une vis.
15. Installer soigneusement la porte du congélateur sur le dessus du bras de
charnière en se servant de la cale
d’espacement pour maintenir l’intervalle.*
16. Coulisser la charnière supérieure en place
sur la porte du congélateur et fixer les vis à
l’aide d’une clé de 5/16 po (8 mm).
17. Bien enclencher en place le couvrecharnière.
18. Remettre le protecteur de grille.
Ne pas oublier de rebrancher le réfrigérateur et
de réenclencher les commandes au réglage
voulu.
DÉPOSE DES PORTES
(AU BESOIN)
po
Poser la por te sur une surface non rugueuse.
A. Retirer la vis gauche.
B. Ouvrir la porte et la soulever. Poser la
porte sur une surface non rugueuse.
Outils
Retirer l’ensemble de plaque de charnière.
Poser la por te sur une surface non rugueuse.
Ne pas jeter la cale d’espacement en mousse
de la porte. Les por tes peuvent se stabiliser à
l’usage.
*
Pour toute aide supplémentaire, composez le 1-800-688-9900 aux É.-U., le
1-800-688-2002 au Canada, ou consultez www.maytag.com
Page 22

21
Surfaces de la caisse
chaudes
Occasionnellement, la face avant de la caisse
du réfrigérateur peut être chaude au toucher.Il
s’agit d’un effet normal qui empêche la condensation d’humidité sur la caisse. Ceci se
remarque particulièrement lors de la mise en
marche initiale du réfrigérateur, par temps
chaud ou après une période prolongée ou
excessive des portes.
RÉGLAGE DE LES TEMPÉRATURES
GUIDE POUR LE RÉGLAGE DE LA TEMPÉRATURE
Compartiment «réfrigération»
trop chaud
Compartiment «réfrigération»
trop froid
Compartiment «congélation»
trop chaud
Compartiment «congélation»
trop froid
Mettre le réfrigérateur à l’arrêt
(Commandes rotatives)
Mettre le réfrigérateur à l’arrêt
(Commandes à curseur)
Faire tour ner le bouton «réfrigérateur» jusqu’au chiffre
supérieur (1 unité)
Faire tour ner le bouton «réfrigérateur» jusqu’au chiffre
inférieur (1 unité).
Faire tour ner le bouton «congélateur» jusqu’au chiffre
supérieur (1 unité).
Faire tour ner le bouton «congélateur» jusqu’au chiffre
inférieur (1 unité)
Placer la commande «réfrigérateur» à la position
d’arrêt «OFF».
Mettre le curseur sur «OFF» (ARRÊT)
REMARQUE : Lorsqu’on place le bouton de commande «réfrigérateur» à la position d’arrêt
«OFF», le refroidissement cesse dans les DEUX compartiments. L’alimentation de l’appareil n’est
pas interrompue.
INITIAL DES COMMANDES
REMARQUE
❚ Lors de la mise en marche initiale, le com-
presseur du réfrigérateur fonctionnera pendant plusieurs heures.Ceci est normal.
❚ Laisser le réfrigérateur fonctionner pen-
dant au moins 8 à 12 heures avant d’y
placer des aliments.
Réglage fin des
commandes
➢ 24 heures après l’addition d’aliments, il est
possible de décider s’il convient d’ajuster la
température dans l’un ou l’autre ou les
deux compartiments. Dans ce cas, modifier
la position du ou des boutons de commande, selon les indications du tableau
ci-dessous.
➢ Sauf lors de la mise en marche initiale du
réfrigérateur, ne pas changer la position du
bouton de commande de plus d’une unité à
la fois.
Le style des commandes varient selon le modèle. Les commandes sont emplacer à curseur à la partie supérieure du compar timent réfrigérateur.
Commandes rotatives
Commandes à curseur
➢ La commande qui agit sur le compartiment
de réfrigération comporte une graduation
de 1 (température maximale) à 9 (température minimale). Sélectionner initialement la
valeur 5 pour cette commande.
➢ La commande qui agit sur le compartiment
de congélation comporte une graduation
de 1 (température maximale) à 9 (température minimale). Sélectionner initialement la
valeur 5 pour cette commande.
INITIAL DES COMMANDES
➢ La commande qui agit sur le compartiment
de réfrigération comporte une graduation
de 1 (température maximale) à 7 (température minimale). Sélectionner initialement la
valeur 4 pour cette commande.
➢ La commande qui agit sur le compartiment
de congélation comporte une graduation
de 1 (température maximale) à 7 (température minimale). Sélectionner initialement la
valeur 4 pour cette commande.
➢ Laisser les températures se stabiliser pen-
dant 24 heures avant de modifier les
réglages.
➢ Une modification du réglage de l’un ou
l’autre des boutons de commande entraîne
une modification de la température dans
l’autre compartiment.
Page 23

22
production de glace
PRODUCTION DE GLACE
Certains modèles sont prêts pour une installation de machine à glaçons automatique. Le
numéro du nécessaire de machine à glaçons
approprié pour l’installation sur ces modèles
apparaît sur la plaque signalétique. Le nécessaire comprend les instructions d’installation et
de raccordement de l’eau.
D’autres modèles ont une machine à glaçons
installée à l’usine. Raccorder la machine à
glaçons à la canalisation d’eau comme il est
indiqué dans les instructions fournies à part
avec le réfrigérateur. Une bonne circulation
d’eau et la mise à niveau du réfrigérateur
sont essentielles à des performances optimales de la machine à glaçons.
Après le raccordement du réfrigérateur à l’alimentation d’eau, abaisser le bras de détection.
La machine à glaçons se remplit d’eau dès
que la température adéquate est établie avec
le congélateur.
Certaines machines à glaçons sont dotées
d’un bras de détection réglable, qui permet de
choisir la quantité de glaçons dans le moule à
glaçons pour les fois où une quantité inférieure
de glaçons est nécessaire.
Pourrégler la quantité de glaçons produits :
(certains modèles) Tourner le levier métallique
pour produire la quantité désirée de glaçons.
Le réglage 100% assure une production
maximale.
➢ Il faut attendre 8 à 12 heures avant que la
machine à glaçons produise des glaçons
utilisables.Le premier ou les deux premiers
lots seront probablement constitués de
glaçons de petite taille et irréguliers, du fait
de la présence d’air dans la canalisation.
➢ Le premier lot peut également contenir des
impuretés présentes dans la nouvelle canalisation d’eau.Par conséquent, jeter tous les
glaçons des deux ou trois premiers lots.
➢ Lors de l’éjection des glaçons, il est normal
que plusieurs glaçons soient collés ensemble aux extrémités. Il est facile de les
séparer. La machine à glaçons continuera
à produire des glaçons jusqu’à ce que
l’accumulation de glaçons relève le bras de
détection, ce qui arrête la machine à
glaçons.
➢ Certains sons peuvent accompagner les
diverses phases de la production de
glaçons : léger bourdonnement du moteur,
chute de glaçons dans le bac à glaçons
vide et déclic de l’électrovanne ou, de
temps à autre, bourdonnement.
➢ Si la consommation de glaçons est faible,
les glaçons accumulés vont prendre un
aspect trouble, se contracter , coller ensemb le
et prendre un goût.Vider périodiquement le
bac pour le laver à l’eau tiède.Veiller à bien
le sécher avant de le réinstaller.
➢ Pour retirer le bac à glaçons, le tirer vers
l’avant puis l’enlever de la machine à
glaçons. Pour empêcher que la machine à
glaçons ne produise des glaçons alors que
le bac est enlevé, arrêter la machine à
glaçons en relevant le bras de détection.
ON
OFF
ON
OFF
1
0
0
%
7
5
%
I
C
E
L
E
V
E
L
5
0
%
I
C
E
L
E
V
E
L
5
0
%
7
5
%
1
0
0
%
1
0
0
%
7
5
%
I
C
E
L
E
V
E
L
5
0
%
I
C
E
L
E
V
E
L
5
0
%
7
5
%
1
0
0
%
Levier
métallique
Bras de
détection
➢ Pour remettre le bac à glaçons en place,
inverser la méthode ci-dessus. Remettre
en marche la machine à glaçons en baissant le bras de détection.
➢ Ne placer dans le bac à glaçons aucun ali-
ment ou liquide pour un refroidissement
rapide. Ces ar ticles entraveraient les mouvements du bras de détection, ce qui
entraînerait un mauvais fonctionnement de
la machine à glaçons.
➢ Lorsque l’arrivée d’eau doit être inter-
rompue pendant plusieurs heures, arrêter
la machine à glaçons en relevant le bras de
détection.
MOULES À GLAÇONS
Certains modèles comportent des moules à
glaçons. Pour libérer les glaçons d’un moule,
retourner le moule au-dessus et effectuer un
mouvement de torsion aux deux extrémités.
Le bac à glaçons (certains modèles) coulisse
dans des rails sous un support ou s’empile avec
netteté au-dessus des moules à glaçons.
MACHINE À GLAÇONS
AUTOMATIQUE
(EN OPTION)
Pour toute aide supplémentaire, composez le 1-800-688-9900 aux É.-U., le
1-800-688-2002 au Canada, ou consultez www.maytag.com
REMARQUE
❚
Les guides de classification d’énergie
indiqués sur le réfrigérateur au moment
de l’achat ne comprennent pas l’utilisation d’une machine à glaçons en option.
MESURES DE SÉCURITÉ
Ne jamais placer les doigts ou la main
sur le mécanisme de la machine à
glaçons lorsque le réfrigérateur est
branché, pour éviter tout risque de
blessure. Cela évitera aussi toute interférence avec les pièces mobiles du
mécanisme d’éjection et avec l’élément
chauffant qui provoque la libération des
glaçons.
Dans certaines circonstances rares, les
glaçons peuvent présenter une coloration vert-bleu. Ceci est dû à une
combinaison de facteurs comme caractéristiques de l’eau locale, circuits de
plomberie de la résidence, et accumulation de sels de cuivre dans la canalisation inactive qui alimente la machine à
glaçons.
La consommation répétitive de glaçons
ainsi colorés peut être néfaste pour la
santé. Jeter tous les glaçons manifestant une telle coloration, et contacter le
détaillant pour l’achat d’un filtre qui
devra être installé sur la canalisation
d’eau.
AVERTISSEMENT
Page 24

23
INTÉRIEUR DU RÉFRIGÉRATEUR
CLAYETTES ET ÉTAGÈRES
Le réfrigérateur comporte des étagères SpillCatcher™ ou des clay ettes en verre trempé.
Les étagères Spill-Catcher™ comportent un
rebord de retenue qui permet un nettoyage
plus facile. Certaines sont également coulis-
santes.
Pour coulisser l’étagère (certains modèles),
saisir l’avant de l’étagère et la tirer par l’avant.
La pousser en place pour la remettre à sa
position d’origine.
Pour retirer une étagère ou une clayette,
soulever légèrement l’arrière de celle-ci et la
tirer droit vers soi.
Pour immobiliser une étagère ou une clayette à
une autre place, soulev er le bord av ant de celleci. Introduire les crochets dans les ouvertures
souhaitées et laisser l’étagère ou la clayette se
mettre solidement en place à l’arrière.
ÉTAGÈRE À MANIVELLE
ELEVATOR™
(certains modèles)
Le compartiment d’aliments frais peut être
doté d’une étagère à manivelle Elevator™.
Celle-ci comporte un rebord de retenue qui
facilite le nettoyage. Elle est également coulissante, ce qui donne un accès facile aux
articles se trouvant à la partie arr ière.
Cette étagère se relève ou s’abaisse sans
avoir à retirer les aliments. Pour ajuster une
étagère Elevator™, tirer sur le bouton de la
manivelle. Tourner la manivelle dans le sens
horaire pour relever l’étagère ou dans le sens
antihoraire pour la baisser.
Pour enle v er l’étagère Elevator™ lors d’un nettoyage, la décharger complètement et la tirer
vers l’avant. Une fois que l’étagère s’arrête,
appuyer sur les pattes situées sous ses bords
extérieurs, puis la tirer vers l’avant pour la f aire
sortir.
Pour la réinstaller, aligner l’étagère avec le
cadre et la pousser jusqu’au fond. (Il n’est
alors pas nécessaire d’appuyer sur les pattes.)
Il N’est PAS nécessaire, lors de l’usage
courant, d’enlever l’étagère Elevator™ avec
son cadre.Bien qu’improbable et pas non plus
recommandée, l’opération d’enlèvement
appropriée est la suivante :
Décharger complètement l’étagère et la relever
au maximum. Tout en relevant l’étagère et le
cadre à partir de l’avant, appuyer sur les deux
dispositifs de verrouillage, et ce, v ers l’intérieur.
Relever légèrement l’ensemble de cadre en
l’inclinant, pour permettre aux guides arrière de
se dégager des rails verticaux.
Pour la réinstallation, incliner l’ensemble de
cadre tout en appuyant sur les deux dispositifs
de verrouillage, et repositionner les guides
arrière derrière les rails verticaux. Une fois
l’étagère de niveau, relâcher les dispositifs de
verrouillage pour permettre à l’étagère de se
loger à la bonne position.
CLAYETTE RÉGLABLE
DE CONGÉLATEUR
(certains modèles)
Pour enlever la clayette, soulever l’extrémité
gauche d’environ 3 po (7,5 cm); sortir les
barres d’extrémité du côté droit des alvéoles
dans la paroi. Pour remettre en place la
clayette, repositionner les bouchons de support
amovibles sur le côté gauche de la paroi, au
niveau souhaité, et inverser la méthode de
dépose.
D'autres modèles ont une étagère partielle de
congélateur de largeur. Cette étagère est
placée du côté gauche du compartiment de
congélateur par le montage dans la paroi de
gauche.
CLAYETTE DE
CONGÉLATEUR À
LARGEUR EXTENSIBLE
(certains modèles)
La clayette s’ajuste latéralement pour dégager
un espace permettant le rangement des conditionnements hauts, comme les pizzas.La patte
du côté droit de la clayette coulisse pour permettre cet ajustement.
La clayette peut être aussi réglée à deux hauteurs. Pour cela, retirer la clayette du congélateur. Coulisser la patte hors des rainures et la
réinsérer à l’autre place. Remettre la clayette
dans le congélateur en introduisant le côté
gauche dans les alvéoles de la doublure.
RANGEMENT DANS LA
CONTRE-PORTE
Les bacs de porte amovibles (certains
modèles) sont assez spacieux pour des
récipients de plus d’un gallon. Ils sont
réglables et peuvent être facilement enlevés.
Pour enlever un bac, soulever l’avant jusqu’à
ce qu’il se libère des retenues sur la doublure
de la porte, puis sortir le bac tout droit.
Pour le remettre en place, inverser les opérations ci-dessus.
D’autres modèles sont fabriqués avec des bal-
connets fixes, durables, permettant le rangement de contenants d’un gallon et plus.
Certains balconnets de réfrigérateur et de congélateur comportent des retenues pour maintenir les flacons et autres contenants en place
lorsque la porte est ouverte ou fermée. Ces
retenues sont facilement réglables par
coulissement d’un côté à l’autre.
➢ Ne jamais essayer de régler une
clayette/étagère chargée d’aliments
(sauf dans le cas de l’étagère
Elevator™).
AVERTISSEMENT
Page 25

24
Le dispositif de retenue pour grandes
bouteilles (certains modèles) est prévu pour
empêcher les grandes bouteilles de s’incliner
vers l’avant. Il est facilement réglable par
coulissement d’un côté à l’autre.
SUPPORTS
Le support multi-canettes (cer tains modèles)
s’accroche à l’une des clayettes de réfrigérateur à rebords, sur les parties métalliques se
trouvant sous la clayette. L’inclinaison permet
aux canettes de rouler en avant au fur et à
mesure qu’une canette est enlevée. (Ce support ne peut être placé sous une étagère
Elevator™.)
Le support multi-usages (certains modèles)
permet le rangement à l’horizontale de
bouteilles de vin. Il peut aussi servir au rangement d’une boîte d’oeufs ou de boissons en
canettes.
Placer le support sur le côté gauche d’une
clayette de réfrigérateur (ce support ne peut
être placé sur une étagère Elevator™.)
ESPACES DE REMISAGE
SPÉCIAUX
Le réfrigérateur comporte un tiroir central
pour collation ou un bac Adjusti-Temp™.
Pour les modèles comportant un bac AdjustiTemp™, une commande est située sur le
devant de la clayette, au-dessus du bac.Il suffit de coulisser le bouton à gauche ou à droite
pour obtenir la température interne souhaitée
du bac.
➢ Pour entreposer le fromage, coulisser la
commande à gauche. Pour la viande
fraîche, la volaille ou le poisson, coulisser
la commande à droite pour obtenir une
température plus basse dans le bac.
intérieur du réfrigérateur
Pour toute aide supplémentaire, composez le 1-800-688-9900 aux É.-U., le
1-800-688-2002 au Canada, ou consultez www.maytag.com
La température n’est pas réglable dans le
tiroir central pour collation.
Pour enlever le tiroir pour collation ou le bac
Adjusti-Temp afin de les nettoyer :
➢ ouvrir le tiroir ou le bac jusqu’à la position
de butée
➢ soulever légèrement le tiroir ou le bac pour
pouvoir l’extraire
Dépose d’un bac à légumes pour le nettoyer :
➢ tirer le bac jusqu’à la butée
➢ soulever l’avant et tirer pour extraire le bac
Réinstallation d’un bac à légumes :
➢ aligner le bac avec les rails de coulissement
➢ soulever l’av ant du bac et faire glisser le bac
Pour obtenir les meilleurs résultats, veiller à
toujours bien fermer les bacs.
Dépose de l’étagère au-dessus du bac :
➢ soulever le bord avant de l’étagère
➢ tirer l’étagère en ligne droite
Réinstallation de l’étagère au-dessus du
bac :
➢ placer les barres arrière sur le suppor t
➢ pousser l’étagère vers l’arrière jusqu’à ce
qu’il soit possible d’effectuer la mise en
place correcte du bord avant
Le réfrigérateur peut être équipé d’un oeufrier
(style variable). Il est amovible pour le lavage
ou une autre utilisation.
Pour utiliser le casier laitier, relever le couvercle. Le casier laitier peut être équipé d’une
retenue pour maintenir les articles en place. Si
le modèle comporte une retenue, il suffit de la
coulisser d’un côté à l’autre à l’emplacement
souhaité.
Dans certains modèles, le casier laitier peut
être enlevé.
Le panier de congélateur sur glissières
(certains modèles) se trouve dans le compartiment principal de congélation. C’est un
espace de rangement pratique, permettant un
accès facile aux articles rangés à l’arrière du
congélateur. Coulisser le panier à l’extérieur
pour atteindre ou pour ranger les articles congelés.
Pour enlever le panier :
➢ le tirer jusqu’à la butée
➢ le soulever et le tirer pour le sortir
Pour remettre le panier en place, procéder
inversement.
Le panier amovible de congélateur (certains
modèles) se trouve sur le balconnet inférieur
du congélateur. Il permet le rangement
d’articles congelés qui ont tendance à bouger
ou à glisser (comme les légumes en sachets).
Pour réinstaller le tiroir ou le bac, procéder
inversement.
On peut installer ce tiroir sur le côté gauche ou
le côté droit dans le réfrigérateur, au choix.
Pour obtenir les meilleurs résultats, veiller à
toujours bien fermer le tiroir.
Les bacs à légumespermettent l’entreposage
de fruits et légumes. Un dispositif de contrôle
de l’hydrométrie est situé sur l’étagère, audessus de chacun des bacs.
➢ Pour la conservation de fruits, faire coulis-
ser la commande vers la gauche pour
minimiser l’humidité dans le bac.
➢ Pour la conservation de légumes, faire
coulisser la commande vers la droite pour
augmenter l’humidité dans le bac.
Page 26

25
CONSEILS POUR LA CONSERVATION DES ALIMENTS
CONSERVATION DE
PRODUITS FRAIS
➢ On devrait maintenir la température dans le
compartiment réfrigérateur entre 1° C et
4° C (34° F et 40° F) (la valeur optimale est
3° C [37° F]). Pour contrôler la température ,
placer un thermomètre dans un verre
d’eau, au centre du compartiment
réfrigérateur. Noter l’indication du thermomètre après 24 heures. Si la température est supérieure à 4° C (40° F), ajuster
le bouton de commande, selon les instructions de la page 21.
➢ Éviter de placer trop de produits sur les
clayettes et étagères du réfrigérateur. Ceci
entrave la circulation de l’air autour des aliments et entraîne un refroidissement non
uniforme.
FRUITS ET LÉGUMES
➢ L’humidité des produits conser vés dans les
bacs à légumes est retenue, ce qui permet
de maximiser la qualité et la durée de conservation des fruits et légumes (page 24).
➢ Effectuer un tri des fruits et légumes avant
de les placer dans le réfrigérateur; veiller à
consommer d’abord les articles amollis ou
qui ont subi des chocs. Jeter les articles
manifestant un début de dégradation.
➢ Veiller à toujours envelopper les aliments
très odorants – oignons, choux, etc. – afin
que l’odeur ne soit pas transférée à
d’autres aliments.
➢ Tandis qu’une certaine dose d’humidité est
nécessaire à la conservation de la
fraîcheur des légumes, un excès d’humidité peut réduire la durée de conservation
(particulièrement pour les légumes feuillus). Veiller à bien égoutter les légumes
avant de les placer dans le réfrigérateur.
VIANDES ET FROMAGES
➢ On devrait parfaitement envelopper la
viande ou volaille non cuite pour qu’il ne
puisse y avoir aucune contamination
d’autres aliments ou des surfaces du
réfrigérateur.
➢ Occasionnellement une moisissure peut se
développer à la surface de certains fromages durs (gruyère, cheddar, parmesan).
Couper dans le fromage, jusqu’à 2 cm
(1 pouce) autour et au-dessous de la zone
moisie. Veiller à ce que couteau ou autre
instrument ne touche pas la zone moisie.
Le reste du fromage conservera sa saveur
et pourra être consommé sans danger.NE
PAS tenter de récupérer après l’apparition
de moisissure, tranches de fromage individuelles, fromage mou, fromage cottage,
crème, crème sure ou yaourt.
PRODUITS LAITIERS
➢ Une date de péremption indiquant la limite
de conservation apparaît généralement sur
l’emballage de la plupart des produits
laitiers comme lait, yaourt, crème sure et
fromage cottage. On doit veiller à conserver ces aliments dans leur emballage
d’origine et à les réfrigérer immédiatement
après l’achat et après chaque prélèvement.
CONSERVATION DES
ALIMENTS SURGELÉS
➢ La température dans le compartiment
congélateur d’un réfrigérateur doit être
maintenue à 18° C (0° F). Pour contrôler la
température, placer un thermomètre pour
appareils ménagers entre les paquets
d’aliments surgelés. Noter l’indication du
thermomètre après 24 heures. Si la température est supérieure à 18° C (0° F),
ajuster le bouton de commande, selon les
instructions de la page 21.
➢ Le fonctionnement du congélateur est plus
efficace lorsqu’il est rempli aux deux tiers
ou plus.
PRÉPARATION DES
ALIMENTS POUR LA
CONGÉLATION
➢ Pour minimiser la déshydratation et la
détérioration qualitative, utiliser feuille
d’aluminium, pellicule plastique, et sachets
ou contenants étanches pour congélateur.
Expulser autant d’air que possible de l’emballage, veiller à ce que chaque paquet soit
parfaitement fermé.L’air retenu peut provoquer l’assèchement des aliments, un
changement de couleur, ou le développement d’une saveur non naturelle (brûlures
de congélation).
➢ Avant de les congeler, envelopper les
paquets de viande fraîche et de volaille
avec un produit adéquat d’emballage pour
congélation.
➢ Ne pas congeler de nouveau une pièce
de viande complètement décongelée.
CHARGEMENT DU
CONGÉLATEUR
➢ Éviter de placer trop d’aliments tièdes dans
le congélateur en une seule fois. Ceci
soumet le congélateur à une surcharge, ce
qui ralentit le refroidissement et peut provoquer une augmentation de la température
des aliments déjà congelés.
➢ Laisser un espace entre les paquets pour
que l’air froid puisse circuler librement, ce
qui entraînera une congélation plus rapide.
➢ Éviter de placer sur les balconnets du
congélateur des produits à congélation difficile comme crème glacée ou jus d’orange;
il est préférable de placer ces produits à
l’intérieur du congélateur où la température
vari e m o i n s lors de l’ouverture des portes.
Se reporter au tableau de conservation des
aliments à la page 26 pour connaître les
durées approximatives de conservation.
Page 27

26
conservation des aliments
TABLEAU DE CONSERVATION DES ALIMENTS
(La durée de conservation est approximative et peut varier selon le type d’emballage, la température de conservation et la qualité du produit lors de
son achat.)
Aliments
Beurre
Lait et crème
Fromage à la crème, tartinade de
fromage et produits au fromage
Fromage cottage
Crème sure
Fromage dur (gruyère, cheddar
et parmesan)
Oeufs en coquille,
Jaunes ou blancs
Pommes
Bananes
Poires, prunes, avocats
Baies, cerises, abricots
Raisins
Agrumes
Ananas, découpé
Asperges
Choux de Bruxelles, brocoli,
chou-fleur, petits pois, haricots
de lima, oignons, poivrons
Chou, céleri
Carottes, panais, betteraves
et navets
Laitue
Poulet et dinde, entiers
Poulet et dinde, morceaux
Poisson
Bacon
Boeuf ou agneau, haché
Boeuf ou agneau, rôti et steak
Jambon, entier,
entièrement cuit, moitié,
en tranches
Viandes froides
Rôti de porc
Côtelettes de porc
Saucisses à base de viande hachée
Saucisses fumées
Veau
Saucisses de Francfort
Réfrigérateur
1 mois
1 semaine
1-2 semaines
3-5 jours
10 jours
1-2 mois
3 semaines
2-4 jours
1 mois
2-4 jours
3-4 jours
2-3 jours
3-5 jours
1-2 semaines
2-3 jours
1-2 jours
3-5 jours
1-2 semaines
7-10 jours
7-10 jours
1-2 jours
1-2 jours
1-2 jours
7 jours
1-2 jours
3-5 jours
7 jours
5 jours
3 jours
3-5 jours
3-5 jours
3-5 jours
1-2 jours
7 jours
3-5 jours
7 jours
Congélateur
6-9 mois
Non recommandé
Non recommandé
Non recommandé
4-6 mois
Peut s’émietter
Non recommandé
9-12 mois
8 mois (cuites)
6 mois (entières/pelées)
Non recommandé
6 mois
1 mois (entiers)
Non recommandé
6-12 mois
8-10 mois
8-10 mois
Non recommandé
8-10 mois
Non recommandé
12 mois
9 mois
2-6 mois
1 mois
3-4 mois
6-9 mois
1-2 mois
1-2 mois
1-2 mois
1-2 mois
4-6 mois
4 mois
1-2 mois
1-2 mois
4-6 mois
1 mois
Conseils de conservation
Bien empaqueter ou couvrir
Vérifier la date sur l’emballage. Bien fermer.Ne pas remettre la partie non utilisée dans le
contenant d’origine. Ne pas congeler la crème à moins qu’elle ne soit fouettée.
Bien envelopper.
Conserver dans le contenant d’origine.Vérifier la date sur le cartonnage.
Bien envelopper. Découper toute partie moisie.
Réfrigérer, pointe vers le bas.
Pour chaque tasse de jaunes d’oeuf, ajouter 1 c. à thé de sucre pour les
pâtisseries ou 1 c. à thé de sel pour les mets non sucrés.
Également, conservation de pommes à chair ferme ou non mûres à 15-21° C (60-70° F).
Faire mûrir à la température ambiante avant de mettre au réfrigérateur.Les
bananes et les avocats noircissent lorsqu’ils sont mis au réfrigérateur.
Se conservent aussi à 15-21° C (60-70° F). Au réfrigérateur, conserver sans les recouvrir.
Ne mûrit pas après l’achat. Utiliser rapidement.
Ne pas laver avant de réfrigérer.Ranger dans le bac à légumes.
Envelopper les aliments dégageant une odeur. Laisser les petits pois en gousse.
Envelopper les aliments dégageant une odeur et les réfrigérer dans le bac à légumes.
Enlever les feuilles. Envelopper les aliments dégageant une odeur et les
réfrigérer dans le bac à légumes.
Conserver dans l’emballage d’origine pour la réfrigération. Ranger dans le bac
à viande et fromage. Si la congélation est de plus de 2 semaines, réenvelopper
avec un emballage pour congélation.
Les viandes fraîches peuvent être conservées dans leur emballage d’origine
pour la réfrigération. Placer dans le bac à viande et fromage. Si la congélation
est de plus de 2 semaines, réenvelopper avec un emballage pour congélation.
La charcuterie non ouverte, emballée sous vide, peut être conservée jusqu’à
2 semaines dans le bac à viande et fromage.
Bien envelopper les viandes transformées et les ranger dans le bac à viande et
fromage.
OEUFS
FRUITS
PRODUITS LAITIERS
Sources: Depar tment of Agriculture des États-Unis; Food Marketing Institute; Cooperative Extension Service, Université d’état de l'Iowa
LÉGUMES
VIANDES
VOLAILLES ET POISSONS
Pour toute aide supplémentaire, composez le 1-800-688-9900 aux É.-U., le
1-800-688-2002 au Canada, ou consultez www.maytag.com
Page 28

27
REMISAGE DU REFRIGÉRATEUR
VACANCES
Pour une absence de un mois ou moins,
laisser les boutons de commande aux
positions de réglage habituelles.
Pour une absence de plus longue durée:
1. Retirer tous les aliments.
2. Arrêter la machine à glaçons (si elle est
installée) et fermer le robinet d’arrêt de la
canalisation d’eau.
3. Débrancher le réfrigérateur de la prise de
courant.
4. Nettoyer et sécher parfaitement le
réfrigérateur.
5. Laisser les portes ouvertes pour éviter le
développement d’odeurs.
DÉMÉNAGEMENT
Pour un déménagement, e x écuter les étapes 1
à 4 décrites au paragraphe Vacances.De plus,
enlever et emballer soigneusement tout article
facilement amovible. Faire transporter le
réfrigérateur verticalement; les por tes doivent
être fermées et immobilisées avec du ruban
adhésif.
ENTRETIEN ET NETTOYAGE
Le tableau de la page suivante présente des
directives spécifiques pou le nettoyage du
réfrigérateur.
NETTOYAGE SOUS LE
RÉFRIGÉRATEUR
Il est possible de faire rouler le réfrigérateur sur
le sol pour pouvoir nettoyer le plancher sous le
réfrigérateur. Faire d’abord remonter les vis de
mise à niveau si elles sont abaissées (page 18).
Tirer le réfrigérateur en ligne droite pour l'écarter
du mur.
REMPLACEMENT D’UNE
AMPOULE
Utiliser toujours une ampoule standard de
40 ou 60 W, pour appareils ménagers.
Compartiment réfrigérateur
Il y a deux lampes d'éclairage au sommet du
compartiment réfrigérateur, sur chaque côté
de la commande Dual Cool™.
➢ Saisir doucement l’ampoule derrière le
cabochon.
➢ Dévisser/remplacer l’ampoule.
Compartiment congélateur
Certains modèles comportent une lampe sur
la paroi arrière, dans l'angle supérieur/droit.
Pour enlever le cabochon:
➢ Saisir le cabochon en haut et en bas.
Appuyer dans la zone des pattes de fixation, en exerçant une pression suffisante
pour les dégager. Simultanément, faire
pivoter le cabochon pour l'enlever.
➢ Dévisser/remplacer l’ampoule.
➢ Réinstaller le cabochon en le faisant pivo-
ter dans le sens inverse pour la mise en
position, puis en emboîtant les pattes dans
les ouvertures appropriées.
CONDENSEUR NO
CLEAN™ POUR
SERVICE COMMERCIAL
Le réfrigérateur fonctionne plus efficacement
si le condenseur est propre. Grâce à la conception particulière du condenseur No
Clean™, il n’est plus nécessaire d’effectuer un
nettoyage de routine du condenseur dans le
cadre de l’utilisation résidentielle normale du
réfrigérateur.
Certains environnements d’utilisation peuvent
être particulièrement poussiéreux ou graisseux. Dans un tel cas, il faudra nettoyer périodiquement le condenseur pour maintenir l’efficacité optimale.
Pas de dégivrage
Ce réfrigérateur comporte une fonction de
dégivrage automatique.
CONSEILS POUR
L’ÉCONOMIE D’ÉNERGIE
➢ Installer le réfrigérateur à distance des
sources de chaleur (cuisinière, lave-vaisselle, bouches de chauffage) et du rayonnement solaire direct.
➢ Établir correctement l’aplomb du réfrigéra-
teur et ne pas obstruer les orifices de ventilation de la grille de plinthe avant.
➢ Essayer de maintenir le compartiment de
congélation aussi plein que possible; ainsi
moins d’air froid s’échappera lors de l’ouverture de la porte. Lorsque le compartiment de congélation est rempli à moins des
deux tiers, il est utile d’y placer des récipients de lait à demi remplis d’eau.
➢ Laisser refroidir les plats chauds avant de
les placer dans le réfrigérateur ou le congélateur.
➢ Couvrir/fermer les récipients de liquide.
➢ Essuyer les récipients pour enlever toute
trace d’eau avant de les placer dans le
réfrigérateur.
➢ Éviter d’ouvrir fréquemment les por tes de
l’appareil.
➢ Débrancher le cordon d’alimentation
avant toute opération de nettoyage.
➢ Débrancher le cordon d’alimentation
avant de remplacer une ampoule.
Porter des gants à titre de protection
contre un éventuel bris du verre.
ATTENTION
ATTENTION
REMARQUE
❚ Lors du cycle de dégivrage automa-
tique, l’on peut remarquer un reflet
rougeoyant dans les é vents, sur la paroi
arrière du compartiment de congélation, et l’on peut entendre aussi le bruit
de gouttes d’eau venant en contact
avec l’élément chauffant du système de
dégivrage. Ceci est normal lors du
dégivrage.
Page 29

28
Composants
Cleaning Agents
Eau tiède et détergent doux
Liquide pulvérisable doux
Aspirateur
Brosse de nettoyage (produit
n° 20001017), disponible
chez le détaillant
Eau tiède et détergent doux
Liquide pulvérisable doux
Eau tiède et détergent doux
Liquide pulvérisable doux
Nettoyage léger: détergent
doux et eau ou solution de
vinaigre blanc et d’eau.
Saleté moyenne: Bon Ami*
Décolorations: nettoyant
pour acier inoxydable
Cameo.*
Conseils et précautions
Pour enlever la grille de plinthe, saisir les extrémités et tirer en ligne droite.
Pour la réinstaller, aligner les attaches avec les ouvertures rondes dans la
caisse et pousser sur chaque extrémité.
Aucun besoin de nettoyage, sauf si l’environnement est particulièrement
graisseux ou poussiéreux, ou s’il y a plusieurs animaux de compagnie dans la
maison (voir page 27).
Sécher avec un linge doux propre.
Ne pas essuyer le réfrigérateur avec une serviette humide ou un torchon à vaisselle sale; il pourrait y avoir sur ces articles des résidus susceptibles de dégrader ou érafler la peinture.Ne pas utiliser non plus tampon de récurage, produit
de nettoyage en poudre, ou produit de nettoyage contenant un agent de
blanchiment. Ces produits peuvent érafler et dégrader la peinture de finition.
N’appliquer aucune cire sur les composants en plastique ou vinyle.
Utiliser une éponge ou un linge souple.
Essuyer toujours dans le sens du grain de l’acier inoxydable.Ne pas utiliser de
produit de blanchiment chloré ou de produit de nettoyage qui contient du chlore.
Après le nettoyage, rincer et sécher. Pour redonner du lustre et enlever les
marques, faire suivre par une pulvérisation de produit Magic Spray* pour acier
inoxydable (n° de pièce 20000008).
Extérieur du réfrigérateur
Intérieur des compartiments réfrigérateur et congélateur
Grille de plinthe
Condenseur
Poignées de porte
Joints de porte
Étagères en verre
Doublures internes – porte et
interieur
Tiroirs, bacs, oeufrier, balconnets, etc.
Surfaces métalliques peintes :
caisse, portes
Portes en acier inoxydable
(certains modèles)
Tableau de nettoyage du réfrigérateur
Bicarbonate de sodium et
eau tiède
Eau tiède et détergent doux
Eau tiède et détergent doux
Produit de nettoyage du
verre
Liquide pulvérisable doux
Eau tiède et détergent doux
Bicarbonate de sodium et
eau tiède
Eau tiède et détergent doux
Utiliser 1-2 cuil. à soupe de bicarbonate de sodium par litre d’eau. Veiller à
bien essorer l’excès d’eau de l’éponge ou du chiffon avant de nettoyer
autour des commandes, des lampes ou des composants électriques.
Laisser le verre se réchauffer à la température ambiante avant de l’immerger dans de l’eau tiède. Ne jamais utiliser de l’eau chaude.
Voir ci-dessus pour la solution de bicarbonate de sodium.
NE PAS utiliser de produit de nettoyage abrasif, détergent concentré, agent
de blanchiment, solvant ou cire nettoyante pour nettoyer l’intérieur du
réfrigérateur.
Sécher parfaitement. NE PAS laver dans un lave-vaisselle automatique.
* Les noms de marque sont les marques de commerce des fabricants respectifs.
Pour toute aide supplémentaire, composez le 1-800-688-9900 aux É.-U., le
1-800-688-2002 au Canada, ou consultez www.maytag.com
➢ Débrancher le cordon d’alimentation avant d’entreprendre le nettoyage. Ne pas toucher les surfaces réfrigérées avec une main
humide ou mouillée. Un objet mouillé adhère sur une surface métallique très froide. Avant de nettoyer le compartiment congélateur,
on doit le laisser se réchauffer. Laisser les étagères en verre se réchauffer avant de les immerger dans de l’eau tiède.
entretien et nettoyage
ATTENTION
Page 30

29
BRUITS NORMAUX
Des améliorations dans la conception du système de réfrigération peuvent produire des bruits dans le nouveau réfrigérateur qui sont différents ou qui
n’étaient pas présents dans un ancien modèle.Ces améliorations ont été réalisées pour produire un réfrigérateur meilleur pour la préservation des aliments, plus efficace en énergie et plus silencieux.Parce que ces nouveaux appareils fonctionnent de façon plus silencieuse, l’on détecte des sons qui
étaient présents dans les anciens appareils, mais qui étaient masqués par des niveaux de bruit plus élevés. Nombre de ces bruits sont normaux. Il
faut noter que les surfaces adjacentes à un réfrigérateur, comme les murs, les sols et les armoires, peuvent amplifier ces bruits. Voici les bruits normaux qui peuvent être remarqués dans un réfrigérateur neuf.
Page 31

30
AVANT D’APPELER
avant d'appeler
PROBLÈMES CAUSES POSSIBLES SOLUTIONS
Le réfrigérateur ne Cordon d’alimentation non branché. Brancher la fiche dans la prise.
fonctionne pas
Prise sans courant Remplacer le fusible.Réenclencher le disjoncteur.
Commande de congélateur à la position d’ARRÊT (OFF). Régler la commande du congélateur (page 21).
Réfrigérateur en cours de dégivrage automatique. Attendre 25 minutes que le dégivrage se termine.
Température ambiante inférieure à 13 °C (55 °F).
Réinstaller l’appareil dans un environnement convenable (voir installation page 18).
Le compresseur fonctionne Les réfrigérateurs d’aujourd’hui se mettent en
trop fréquemment ou trop marche et s’arrêtent plus souvent afin de maintenir
longtemps des températures uniformes.
Normal à la mise en marche initiale pour les appareils Attendre 24 heures pour un refroidissement complet (voir commandes de
neufs ou installés récemment. température page 21).
Ouvertures des portes prolongées ou fréquentes. Ceci est normal. Minimiser les ouvertures de por tes.
Étanchéité déficiente des portes. Vérifier si quelque chose n’empêche pas les portes de se fermer.
Grille de plinthe obstruée. Dégager pour permettre à l’air tiède de quitter l’appareil.
Lumière ne Ampoule grillée. Débrancher le réfrigérateur et changer l’ampoule (page 27).
fonctionnant pas
Aucune électricité n’arrive à l’appareil. Vérifier si le cordon est bien branché.
Luminescence visible dans Une luminescence rougeâtre ou un reflet est nor mal
les évents du congélateur lors du dégivrage.
Air tiède sortant du bas Ceci est normal. Il s’agit de l’air qui a circulé au contact
de la caisse du condenseur.
Vibration de la caisse Aplomb déficient de la caisse. Plancher insuffisamment Mettre la caisse à niveau (page 18).
ferme.
Odeur dans les compartiments Des aliments générateurs d’odeur ne sont pas couverts. Les couvrir ou bien les envelopper.Nettoyer la caisse.
Bruits, sons et vibrations Ceci est normal. Voir Bruits Normaux page 29.
Aplomb déficient de la caisse. Mettre la caisse à niveau (page 18).
Compartiments congélateur Commande réglée à une température trop élevée. Régler la commande de température (page 21).
et réfrigérateur – Ouvertures prolongées des portes. Minimiser l’ouverture des portes.
température trop élevée
Température ambiante inférieure à 13 °C (55 °F). L’appareil ne fonctionne pas assez pour maintenir les bonnes températures.
(crème glacée molle)
Les produits à teneur élevée en sucre peuvent ne pas
durcir complètement même congelés.
Compartiments congélateur et Commande réglée à une température trop basse. Régler la commande de température (page 21).
réfrigérateur – température
trop basse (congélation des
alim aliments)
Machine à glaçons ne Le bras de détection est en position relevée. Baisser le bras de détection à la position de MARCHE (ON).
fonctionne pas
Aplomb déficient de la caisse. Mettre la caisse à niveau (page 18).
Arrivée d’eau gênée ou fermée. Raccorder l’alimentation d’eau ou enlever les obstructions.
Température trop élevée dans le congélateur. Régler la commande de température du congélateur (page 21).
Les glaçons ont un goût/ Glaçons anciens. Les jeter.Les glaçons peuvent absorber les odeurs, ce qui modifie leur goût.
une odeur
Mauvaise qualité de l’eau. Prendre contact avec la compagnie locale de traitement d’eau.
La nourriture transmet les odeurs/le goût aux glaçons. Bien envelopper les aliments.
Glaçons collés dans le moule Résidus de minéraux dans l’eau. Essuyer les moules avec un linge trempé dans le vinaigre jusqu’à ce qu’ils
soient propres.
Évaporation des glaçons Utilisation limitée de glaçons. Jeter les vieux glaçons.
Humidité sur la surface de la Pas inhabituel par temps très humide.
caisse entre les portes
Humidité sur les parois Temps chaud et humide. Ceci est normal.
internes ou dans les bacs
Ouvertures prolongées ou fréquentes des portes. Minimiser les ouvertures des por tes.
Fermeture incorrecte d’une porte. Vérifier si quelque chose n’empêche pas la porte de se fermer.
Aliments incorrectement enveloppés. Bien envelopper ou recouvrir tous les aliments.
Assèchement des aliments Bac à légumes pas parfaitement fermé. Bien le fermer.
Commandes de température trop basses. Ajuster les commandes de température (page 21).
Paquets non parfaitement scellés ou enveloppés. Bien envelopper ou recouvrir tous les aliments.
Humidité excessive dans le bac Aliments incorrectement enveloppés. Bien envelopper ou recouvrir tous les aliments.
à légumes
Temps chaud et humide. Minimiser les ouvertures des portes.
Essayer les solutions suivantes si les anomalies indiquées se manifestent…
FONCTIONNEMENT GÉNÉRAL
BRUITS
TEMPÉRATURE
GLAÇONSHUMIDITÉ
Pour toute aide supplémentaire, composez le 1-800-688-9900 aux É.-U., le
1-800-688-2002 au Canada, ou consultez www.maytag.com
Page 32

31
MAYTAG • 403 West Fourth Street North • P.O. Box 39 • Newton, Iowa 50208
GARANTIE MAYTAG NE SONT PAS COUVERTS PAR CETTE GARANTIE :
1. Les dommages ou dérangements dus à:
a. Mise en ser vice, livraison ou entretien effectués incorrectement.
b. Toute réparation, modification, altération et tout réglage non autorisés par le
fabricant ou par un prestataire de service après-vente agréé.
c. Accidents, mauvaise utilisation ou usage abusif ou déraisonnable.
d. Alimentation électrique (tension, intensité) incorrecte.
e. Réglage incorrect d'une commande.
2. Les garanties ne peuvent être honorées si les numéros de série d'origine ont été
enlevés, modifiés ou ne sont pas facilement lisibles.
3. Ampoules.
4. Appareils achetés aux fins d'usage commercial ou industriel.
5. Les frais de visite d'un prestataire de service ou de ser vice après-vente encourus
pour les raisons suivantes:
a. Correction d'erreurs de mise en ser vice.
b. Initiation de l'utilisateur à l'emploi de l'appareil.
c. Transpor t de l'appareil aux locaux du prestataire de ser vice.
6. Dommages secondaires ou indirects subis par toute personne suite au non-respect
de la garantie. Certains états ou provinces ne permettent pas l'exclusion ou la limitation des dommages secondaires ou indirects; par conséquent, les limitations ou
exclusions ci-dessus peuvent ne pas s'appliquer à votre cas.
Pour acheter des accessoires ou des pièces de rechange non couverts par la
garantie du produit :
Ayez vos numéros de modèle et de série sous la main. Appelez nos spécialistes –
pièces, en composant le 1-877-232-6771 aux Etats-Unis ou 1-800-688-8408 au
Canada, entre 7 h du matin et 7 h du soir, heure centrale, du lundi au vendredi.
SI VOUS AVEZ BESOIN DE SERVICE APRÈS-VENTE
❚ Contactez le détaillant où vous avez acheté l’appareil ou contactez Maytag
ServicesSM, service à la clientèle de Maytag, au 1-800-688-9900 aux É.-U., ou au
1-800-688-2002 au Canada pour connaître l’adresse d’un réparateur agréé.
❚ Conservez la preuve de l’achat pour vérifier le statut de la garantie. Reportez-vous
à la GARANTIE pour obtenir plus d’informations sur les responsabilités du propriétaire quant au service en vertu de la garantie.
❚ Si le détaillant ou l’établissement de service après-vente ne peut résoudre le pro-
blème, écrivez à Maytag ServicesSM, Attn: CAIR®Center, P.O. Box 2370, Cleveland,
TN 37320-2370, ou composez le 1-800-688-9900 aux É.-U. ou 1-800-688-2002 au
Canada.
Pour les clients des É.-U. avec ATS dans le cas d’un handicap de l’audition ou de
l’élocution, composez le 1-800-688-2080.
REMARQUE : Lors de tout contact auprès de Maytag ServicesSMen raison d’un
problème particulier, veuillez fournir l'information suivante.
a.Vos nom, adresse et numéro de téléphone;
b. Numéro de modèle et numéro de série de l'appareil;
c. Nom et adresse du détaillant ou du réparateur;
d. Description claire du problème observé;
e. Preuve d'achat (facture de vente).
❚ Les guides de l'utilisateur, les manuels de ser vice et les catalogues de pièces sont
disponibles auprès de Maytag ServicesSM, service à la clientèle de Maytag.
Garantie complète d'une année
Durant une période d'un (1) an à compter de la date
de l'achat initial, toute pièce qui se révélerait
défectueuse dans des conditions normales d'usage
ménager, sera réparée ou remplacée gratuitement.
Machine à glaçons – Lorsque la machine à glaçons est
achetée avec le réfrigérateur et installée par le détaillant,
elle fait partie du réfrigérateur aux fins de la garantie.
Garantie limitée – Principaux éléments du
système de réfrigération
Deuxième à cinquième année – Après la première
année suivant la date de l'achat au détail initial,
jusqu'à la fin de la cinquième année, Maytag
Sevices
SM
réparera ou remplacera, à son choix, gratuitement pour les pièces et la main-d'œuvre seulement, toute pièce du système de réfrigération scellé
(comprenant le compresseur, l'évaporateur, le condenseur, le déshydrateur et la tubulure) et la doublure de caisse (à l'exclusion de la doublure de porte)
qui se révéleraient défectueuses dans des conditions
normales d'usage ménager. Le propriétaire devra
assumer, dans le cas échéant, tous les autres frais,
y compris les frais de kilométrage, transport,
déplacement et diagnostic.
Garantie limitée – Autres pièces
Deuxième année – Les pièces autres que les princi-
paux éléments du système de réfrigération, qui se
révéleraient défectueuses dans des conditions normales d'usage ménager durant la deuxième année
suivant la date de l'achat au détail initial, seront
réparées ou fournies gratuitement pour la pièce ellemême.Le propriétaire devra assumer tous les autres
frais, dans le cas échéant, y compris les frais de
main-d'œuvre, kilométrage, transport, déplacement
et diagnostic.
Veuillez noter: Cette garantie complète et les
garanties limitées ne s'appliquent qu'à un réfrigérateur
situé aux États-Unis ou au Canada. Les réfrigérateurs
situés ailleurs ne sont couverts que par les garanties
limitées, y compris dans le cas de pièces qui se
révéleraient défectueuses la première année.
Limites de responsabilité
Le garant ne sera responsable d’aucun dommage
secondaire ou indirect, y compris perte de produits
alimentaires. Certains états ou provinces ne permettent pas l'exclusion ou la limitation des dommages
secondaires ou indirects; par conséquent, les limitations ou exclusions ci-dessus peuvent ne pas s'appliquer à votre cas.
Les garanties spécifiques formulées ci-dessus sont
les SEULES que le fabricant accorde. Cette garantie
vous confère des droits juridiques spécifiques et v ous
pouvez également jouir d'autres droits, variables d'un
état à un autre ou d’une province à une autre.
Page 33

Form No. A/01/01 Part No. 8113P291-60 h t t p : / / w w w . m a y t a g . c o m 7400???? Litho U.S.A .
REFRIGERADOR CON COMPARTIMIENTO SUPERPUESTO TM-1
Instalador: Por favor deje este manual
junto con el electrodoméstico.
Consumidor: Por favor lea y conserve
este manual para referencia futura.
Conserve el recibo de compra y/o el
cheque cancelado como comprobante de
compra.
Número de Modelo
Número de Serie
Fecha de Compra
Si tiene preguntas, por favor escríbanos
(incluya el número de modelo y su
número de teléfono) o llame a:
Maytag Services
SM
Attn: CAIR®Center
P. O. Box 2370
Cleveland, IN 37320-2370
1-800-688-9900 EE.UU.
1-800-688-2002 Canadá
1-800-688-2080 (EE.UU. TTY para personas con problemas auditivos o del
habla)
(De lunes a viernes, desde las 8:00 a.m.
hasta las 8:00 p.m.Hora del Este)
Internet: http://www.maytag.com
Para i n fo rmación sobre servicio, ver la
página 47
En nuestro afán de mejorar la calidad
de nuestros electrodomésticos, puede
que sea necesario modificar el electrodoméstico sin actualizar esta guía.
R
Página 33
Páginas 34-36
Página 37
Página 38
Páginas 39-40
Páginas 41-42
Página 43
Páginas 43-44
Página 45
Página 46
Página 47
sonidos de funcionamiento
sugerencias para almacenar alimentos
vista del interior
fa bricacion de hielo
controles de las temperaturas
instalacion
almacenamiento del refrigerador
Seguridad
cuidado y limpieza
antes de solicitar servicio
garantia
Page 34

33
INSTRUCCIONES IMPORTANTES DE SEGURIDAD
➢
Use el refrigerador únicamente para el
propósito que ha sido diseñado.
➢
Para prevenir la posibilidad de peligro
debido a choques eléctricos, nunca
enchufe el refrigerador en un tomacorriente que no haya sido debidamente
puesto a tierra según los códigos eléctricos locales y nacionales.V er la advertencia y las instrucciones de puesta a tierra que se indican continuación.
➢
Desenchufe el refrigerador antes de
limpiarlo o de reemplazar el foco.
➢
En caso de un corte de corriente eléctr ica,
trate de abrir la puerta lo menos posible. Si
la falla eléctrica se prolonga demasiado,
proteja los alimentos colocando bloques de
hielo seco encima de los paquetes o
averigüe si puede almacenarlos en un congelador provisional local. Los alimentos
que se hayan descongelado completamente no deben congelarse de nuevo.
➢
Si el cordón eléctrico se deshilacha o se
daña se debe reparar o reemplazar de
inmediato. Nunca desenchufe su electrodoméstico tirando del cordón eléctrico.
➢
Su refrigerador no debe hacerse funcionar
cerca de vapores explosivos.
➢
No permita que los niños se suban, se
cuelguen o se paren en las parrillas del
refrigerador.
IMPORTANTE: Los problemas de atrapamiento y asfixia de los niños no han quedado relegados al pasado. Los refrigeradores desechados o abandonados todavía son peligrosos…aún si se van a dejar allí "solamente
Este electrodoméstico está equipado con un
enchufe de tres clavijas con puesta a tierra
como protección contra el posible peligro de
choques eléctricos. Se debe enchufar en un
tomacorriente puesto a tierra. Si sólo se
dispone de un tomacorriente estándar para
enchufe de dos clavijas, el cliente tiene la
responsabilidad y obligación de reemplazarlo
por un tomacorriente para enchufe de tres
clavijas debidamente puesto a tierra. Por
ningún motivo corte o retire la tercera clavija
(puesta a tierra) del cable eléctrico. No use un
adaptador.
CONSERVE ESTAS INSTRUCCIONES PARA REFERENCIA FUTURA
Lo que necesita saber
sobre las instrucciones
de seguridad
Las advertencias e instrucciones impor tantes
sobre seguridad que aparecen en este manual
no están destinadas a cubrir todas las posibles
circunstancias y situaciones que puedan
ocurrir. Se debe ejercer sentido común, precaución y cuidado cuando instale, realice
mantenimiento o haga funcionar el artefacto.
Siempre póngase en contacto con su distribuidor, agente de servicio o fabricante si surgen problemas o situaciones que usted no
comprenda.
RECONOZCA LOS
SIMBOLOS DE
SEGURIDAD,
ADVERTENCIAS,
ETIQUETAS
por unos días." Si va a descartar su refrigerador antiguo, por favor siga las siguientes
instrucciones para ayudar a prevenir accidentes.
➢
Retire las
puertas.
➢
Deje las
parrillas en
su lugar de
modo que
los niños no
puedan
entrar fácilmente.
PELIGRO - Riesgos inmediatos que
CAUSARÁN lesión personal grave o
mortal.
ADVERTENCIA - Peligros o prácticas no
seguras que PODRIAN causar lesión personal grave o mortal.
PRECAUCIÓN - Peligros o prácticas no
seguras que PODRIAN causar lesión
personal menos grave o daños materiales
o personales.
➢
Cuando utilice el electrodoméstico
siempre siga las precauciones
básicas.
➢
Este electrodoméstico ha sido diseñado para funcionar con una
fuente de energía eléctrica de
115 voltios, 15 amperios, 60 Hz. Se
recomienda usar un circuito separado y puesto a tierra, exclusivamente
para el refrigerador. No use un cable
de extensión. No utilice ningún
dispositivo que pueda alterar el
rendimiento eléctrico de este
electrodoméstico.
CORDON ELECTRICO CON
ENCHUFE DE TRES CLAVIJAS
CON PUESTA A TIERRA.
TOMACORRIENTE
DEL TIPO CON
PUESTA A TIERRA
PELIGRO
ADVERTENCIA
PRECAUCIÓN
ADVERTENCIA
ADVERTENCIA
POWER SUPPLY CORD
WITH 3-PRONG
GROUNDING PLUG
GROUNDING TYPE
WALL RECEPTACLE
Page 35

34
seguridad
INSTALACION
Para mayor ayuda, llame al 1-800-688-9900 EE.UU., al 1-800-688-2002 Canadá o visite www.maytag.com
IMPORTANTE: No retire el aislamiento de
espuma de los respiraderos ubicados en el
techo del compartimiento de alimentos frescos.
Ubicacion
➢ Deje que el aire circule libremente a través
de la rejilla inferior delantera.
➢ Instale el refrigerador en un lugar donde la
temperatura ambiente no descenderá a
menos de 55° F (13° C). Con temperaturas
inferiores a 55° F (13° C), el refrigerador no
funcionará con la suficiente frecuencia
para mantener la temperatura correcta en
el congelador.
➢ Deje un espacio mínimo de
1
⁄2" (1,5 cm) en
ambos lados, arriba y detrás del refrigerador para facilitar la instalación. Si el
refrigerador es colocado con el lado de la
bisagra de la puerta contra una pared, es
necesario dejar espacio adicional o invertir
la puerta (ver página 36) para que la puerta
pueda abrirse más.
➢ Tenga cuidado al instalar el refrigerador
sobre pisos de vinilo o madera de modo
que no se rayen o dañen. Se puede utilizar
un pedazo de madera contrachapada, una
alfombra u otro material para proteger el
piso mientras se instala el refrigerador.
➢ El refrigerador debe permanecer vertical
durante por lo menos 30 minutos antes de
ser enchufado.
Desembalaje
➢ Retire y conserve los tornillos niveladores
que se encuentran en la base de la jaula
de embalaje.
➢ Retire y descarte la base de la jaula y los
tornillos.
➢ Usando pinzas ajustables instale los nive-
ladores hasta el fondo en los agujeros ubicados en la esquina delantera del gabinete
del refrigerador.
GIRE A LA
IZQUIERDA PARA BAJAR
LA ESQUINA DEL
GABINETE
GIRE A LA DERECHA
PARA SUBIR LA
ESQUINA DEL GABINETE
Su refrigerador nuevo fue empacado cuidadosamente para el embarque. Retire y
descarte los sujetadores de empaque (si se
usaron) de las parrillas que se encuentran
inmediatamente arriba de cada parrilla donde
se enganchan en el marco. Para quitar los
sujetadores plásticos muévalos hacia los
lados y levántelos directamente hacia afuera.
Nivelado
Para mejorar la apariencia y mantener buen
rendimiento, el refrigerador debe estar nivelado. Dependiendo del modelo, el refrigerador
puede ser nivelado de dos maneras.
➢ Todos los modelos de refrigerador tienen
tornillos niveladores en la base del gabinete debajo de cada esquina delantera.
Los niveladores pueden ser ajustados
girándolos hacia adentro o hacia afuera
según sea requerido. Si el piso no está
nivelado y es necesario elevar la parte
trasera del refrigerador, use un pedazo de
madera contrachapada u otro material similar. Para bloquear el gabinete en su lugar,
gire hacia abajo ambos tornillos niveladores. (Ver figura 1.)
➢ Los modelos de refrigerador que tienen
ruedas ajustables pueden ser nivelados
retirando la rejilla inferior* y ajustando las
ruedas con un destornillador o casquillo de
1
⁄4". (Ver figura 2.)
*Para sacar la rejilla inferior, sujete ambos
extremos y tire de la rejilla derecho hacia
afuera. Para volver a colocarla, alinee los
clips a resorte con las aber turas redondas
del gabinete y empuje cada extremo de la
rejilla inferior hasta que entre en su lugar.
Figura 1
Figura 2
➢ Para obtener mejores resultados, después
de nivelar el gabinete, abra y cierre las
puertas y luego vuelva a nivelar.
Asegure una buena
circulación del aire
Para asegurar temperaturas apropiadas, usted
debe dejar que el aire circule entre el refrigerador y el congelador como se muestra en la
ilustración.
NO bloquee ninguno de estos respiraderos
con paquetes de alimentos. Si los respiraderos están bloqueados, se obstruirá el flujo
del aire y ocurrirán problemas de temperatura
y humedad.
Tornillos
Niveladores
P
A
R
P
A
R
A
B
A
J
A
R
A
L
E
V
A
N
T
A
R
Base de
la Jaula
Tornillos
Page 36

35
INSTALACION,CONT.
Ajuste de la puerta
(SI ES NECESARIO)
• Vuelva a apretar los tornillos
después de hacer los ajustes.
*Para mayor información consulte las
instrucciones de instalación.
La puerta debería estar nivelada si el
gabinete está nivelado.
• La puerta del congelador está
demasiado alta.
• Ambas puertas están demasiado
altas.
• Ambas puertas están demasiado
bajas.
Manija instalada en la parte superior
Page 37

36
instalacion
Inversión de las puertas
Herramientas Necesarias: Destornillador
Phillips, llave de tubo y trinquete de 5/16",
cuchillo para enmasillar o llave de una sola
boca de 5/16".
1. Retire la tapa de la bisagra y colóquela a
un lado.
2. Retire los tornillos y la bisagra con una
llave de tubo de 5/16" y deje a un lado.
3. Levante cuidadosamente y retire la puerta
del congelador.
4. Retire el tornillo y el brazo de la bisagra de
la parte superior de la puer ta del refrigerador.
5. Levante cuidadosamente y retire la puerta
del refrigerador.
6. Retire la cubierta de la rejilla inferior y
colóquela a un lado.
7. Retire la pala de la bisagra de la esquina
inferior del refrigerador e instálela en el
lado opuesto.
8. Retire la pala de la bisagra del lado inferior de la puerta del refrigerador y
colóquela en el lado opuesto.
9. Retire la pala del lado inferior de la puerta
del congelador y colóquela en el lado
opuesto.
10. Retire los tapones situados en la parte
superior de las puertas del congelador y
del refrigerador y colóquelos en el lado
opuesto.
11. Retire los tapones de los agujeros de los
tornillos de la parte super ior del gabinete
y colóquelos en el lado opuesto.
12. Retire las arandelas y virgulitas del interior de la pala de la bisagra y colóquelas en
el exterior de la pala de la bisagra.
13. Vuelva a colocar cuidadosamente la puerta del refrigerador en la pala de la bisagra
en la esquina inferior.
14. Inser te el brazo de la bisagra en su lugar
y asegúrelo con un tornillo.
15. Coloque cuidadosamente la puerta del
congelador arriba del brazo de la bisagra.
Use el espaciador de espuma de la puerta
para determinar el espacio entre las
puertas.*
16. Inser te la bisagra superior en su lugar en
la puerta del congelador y apriete los
tornillos con la llave de 5/16".
17. Instale a presión la tapa de la bisagra
firmemente en su lugar.
18. Vuelva a colocar la rejilla inferior.
Recuerde enchufar su refrigerador y volver a
programar los controles en el (los) ajuste(s)
apropiado(s).
Para retirar las puertas
(SI ES NECESARIO)
Deposite la puerta sobre una superficie que no
la raye.
A. Retire el tornillo izquierdo
B. Abra la puer ta y levántela. Deposite la
puerta sobre una superficie que no la
raye.
Herramientas
Retire el conjunto de la pala de la bisagra.
Deposite la puerta sobre una superficie que no
la ralle.
No descarte el espaciador de espuma de la
puerta. Las puer tas se asientan con el uso.
*
Para mayor ayuda, llame al 1-800-688-9900 EE.UU., al 1-800-688-2002 Canadá o visite www.maytag.com
Page 38

37
CONTROLES DE LAS TEMPERATURAS
GUIA DE CONTROL DE LA TEMPERATURA
Compartimiento de Alimentos
Frescos demasiado Caliente
Compartimiento de Alimentos
Frescos demasiado Frío
Congelador demasiado Caliente
Congelador demasiado Frío
Apague el Refrigerador
(Controles de Discos Rotatorios)
Apague el Refrigerador
(Controles Deslizables)
NOTA: Al apagar el control de alimentos frescos se detiene el enfr iamiento en AMBOS compartimientos pero no se corta la electricidad al refr igerador.
SUPERFICIES CALIENTES
DEL GABINETE
A veces, la parte delantera del refrigerador
puede sentirse caliente al tacto. Esta es una
situación normal que ayuda a prevenir la con-
➢ El control del congelador se puede ajustar
de 1 (más caliente) a 7 (más frío).
Inicialmente ajuste este control en 4.
➢ El control para los alimentos frescos se
puede ajustar desde 1 (más caliente) hasta
9 (más frío). Inicialmente, ajuste este
control en 5.
➢ El control del congelador tiene ajustes
desde 1 (más caliente) hasta 9 (más frío).
Inicialmente, ajuste este control en 5.
NOTA
❚ El refrigerador funcionará ininterrumpdo
por vaias horas al cuándo en
funcionamiento por primera vez. Esto
es normal.
❚ Deje funcionar el refrigerador por lo
menos de 8 a 12 horas antes de colocar los alimentos.
El estilo y de los controles puede variar dependiendo del modelo. Los controles estas ubicar en la par te super ior del compar timiento de los alimentos frescos. Otros modelos tienen controles separados, uno en la parte superior del compar timiento de los alimentos frescos y otro control sencillo
al fondo del compartimiento del congelador.
Controles giratorios
AJUSTES INICIALES
➢ El control de los alimentos frescos se
puede ajustar de 1 (más caliente) a 7 (más
frío). Inicialmente ajuste este control en 4.
Controles deslizables
AJUSTES INICIALES
Ajuste de los controles
➢ Si 24 horas después de colocar los alimen-
tos observa que uno o ambos compartimientos deberían estar más fríos o más
calientes, ajuste el (los) control(es) según
se indica en la tabla siguiente.
➢ Con la excepción de cuando se pone en
funcionamiento el refrigerador por primera
vez, no cambie ninguno de los controles
más de un número a la vez.
➢ Espere 24 horas para que la temperatura
se estabilice antes de reajustar.
➢ Cualquier cambio en uno de los controles
afectará la temperatura del otro compartimiento.
densación en el gabinete. Esta condición será
más notoria cuando el refrigerador funciona
por primera vez, durante tiempo caluroso y
después de abrir la puerta de manera excesiva o prolongada.
Gire el control de alimentos frescos al próximo
ajuste más alto.
Gire el control de alimentos frescos al próximo
ajuste más bajo.
Gire el control del congelador al próximo ajuste
más alto.
Gire el control del congelador al próximo ajuste
más bajo.
Gire el control de alimentos frescos a ‘OFF’
(APAGADO)
Deslice el control del congelador a la posición
“OFF” (Apagado)
Page 39

38
fabricacion de hielo
FA B RI C ACION DE HIELO
Algunos modelos fabrican hielo automáticamente. El número del kit para fabricar hielo
apropiado para su instalación en estos modelos, se encuentra en la placa de datos. El
juego contiene las instrucciones de instalación
y las instrucciones para la conexión del agua.
Otros modelos tienen una máquina de hacer
hielo instalada en la fábrica. Conecte la
máquina de hacer hielo al suministro de agua
según las instrucciones provistas por separado
con su refrigerador.Es esencial un buen flujo
de agua y un refrigerador nivelado para
obtener un óptimo rendimiento de la
máquina de hacer hielo.
Después de que el refrigerador haya sido
conectado al suministro de agua, mueva el
brazo sensor hacia abajo. La máquina de
hacer hielo se llenará con agua cuando el congelador alcance la temperatura correcta.
Algunas máquinas de hacer hielo están
equipadas con un brazo sensor ajustable que
permite ajustar la cantidad de hielo en su
recipiente de almacenamiento del hielo para
aquellas oportunidades en que se necesita
menos hielo.
Para ajustar la cantidad de hielo producida:
(modelos selectos) Gire la manecilla de alambre para proporcionar el nivel deseado de producción de hielo. El ajuste 100% proporciona
una producción de hielo máxima.
ON
OFF
ON
OFF
1
0
0
%
7
5
%
I
C
E
L
E
V
E
L
5
0
%
I
C
E
L
E
V
E
L
5
0
%
7
5
%
1
0
0
%
1
0
0
%
7
5
%
5
0
%
5
0
%
7
5
%
1
0
0
%
Manecilla
de Alambre
Brazo Sensor
Nivel
del Hielo
➢ Pueden transcurrir de 8 a 12 horas antes de
que la máquina de hacer hielo comience a
producir cubos de hielo utilizables. Los
primeros dos lotes probablemente contendrán cubos muy pequeños o de forma
irregular debido al aire que puede haber en
la tubería de suministro de agua.
➢ El lote inicial también puede contener
impurezas provenientes de la tubería nuev a
del suministro de agua. Por lo tanto, es
preferible descartar todos los cubos de los
primeros dos o tres lotes.
➢ Cuando los cubos de hielo son expulsados
es normal que varios cubos salgan unidos.
Se podrán separar fácilmente. La máquina
de hacer hielo continuará haciendo hielo
hasta que la cantidad de cubos de hielo
producida levante el brazo sensor, apagando así la máquina.
➢ Se pueden oír ciertos ruidos cuando se
está fabricando el hielo. El motor puede
hacer un leve zumbido, los cubos sonarán
al caer sobre la bandeja vacía y la llave de
agua puede emitir un chasquido o zumbido
de vez en cuando.
➢ Si el hielo no se usa con frecuencia, los
cubos se opacarán, disminuirán de tamaño ,
se pegarán y adquirirán mal sabor. Vacíe el
depósito de hielo periódicamente y límpielo
con agua tibia. Cerciórese de secar bien el
depósito antes de volver a colocarlo en su
lugar.
➢ Para sacar el recipiente del hielo, tire de él
hacia adelante, alejándolo de la máquina
de hacer hielo. Para evitar que la máquina
de hacer hielo produzca cubos cuando el
BANDEJAS DE CUBOS DE
HIELO
Algunos modelos están equipados con bandejas de cubos de hielo. Para sacar los cubos de
la bandeja, coloque la bandeja invertida sobre el
recipiente y tuerza ambos extremos de la bandeja.
El recipiente del hielo (modelos selectos) se
desliza ya sea en rieles debajo de la rejilla de la
bandeja de cubos de hielo o está colocado
sobre las bandejas de cubos de hielo.
MAQUINA AUTOMATICA
DE HACER HIELO
(OPCIONAL)
Para mayor ayuda, llame al 1-800-688-9900 EE.UU., al 1-800-688-2002 Canadá o visite www.maytag.com
NOTA
❚
Las guías de consumo de energía que
están indicadas en el refrigerador al
momento de la compra, no incluyen el
uso de energía de la máquina de hacer
hielo opcional.
PARA SU SEGURIDAD
No introduzca los dedos o la mano en el
mecanismo automático de hacer hielo
mientras el refrigerador esté conectado.
Esto le protegerá contra posibles
lesiones y también evitará interferencia
con las piezas móviles del mecanismo
eyector y del calentador que expulsa los
cubos.
En raras ocasiones, los cubos de hielo
pueden salir descoloridos, mostrando
generalmente un color azul verdoso. La
causa de esta rara decoloración es una
combinación de factores tales como
ciertas características del agua local, la
plomería de la casa y la acumulación de
sales de cobre en la tubería inactiva de
suministro de agua que abastece a la
máquina de hielo.
El consumo continuo de los cubos descoloridos puede ser nocivo para la
salud. Si observa la mencionada descoloración, descarte los cubos de hielo y
póngase en contacto con su
Distribuidor para comprar e instalar un
filtro en la tubería del agua.
recipiente haya sido quitado, apague la
máquina de hacer hielo levantando el braz o
sensor.
➢ Para volver a colocar el recipiente del hielo,
invierta el procedimiento anterior.Ponga en
marcha la máquina de hacer hielo bajando
el brazo sensor.
➢ No se deben colocar bebidas ni alimentos
en el depósito del hielo para enfriarlos rápidamente.Estos artículos pueden bloquear
el brazo sensor, afectando el funcionamiento de la máquina de fabricar hielo.
➢ Cuando el suministro de agua vaya a ser
interrumpido por varias horas, apague la
máquina de hacer hielo levantando la
manecilla.
ADVERTENCIA
Manecilla
de Alambre
Brazo
Sensor
Page 40

39
VISTA DEL INTERIOR
PARRILLAS
Su refrigerador tiene ya sea parrillas 'SpillCatcher'™ o parrillas de vidrio templado. Las
parrillas 'Spill-Catcher'™ tienen un borde retenedor de derrames que facilita la limpieza y algunas
están provistas de la característica 'Easy Glide'
que permite deslizarla hacia afuera.
Para deslizar la parrilla hacia afuera (modelos
selectos), sujete la parte delantera y tire de
ella hacia adelante. Empuje la parrilla hacia
adentro para volverla a su lugar.
Para sacar una parrilla, levante ligeramente la
parte trasera de la parrilla y tire de la parrilla
derecho hacia afuera.
Para bloquear una parrilla en otra posición, levante el borde delantero de la parrilla. Inser te
los ganchos en las aberturas deseadas del
marco y deje que la parrilla entre en su lugar,
asegurándose de que quede firmemente bloqueada en la parte de atrás.
PARRILLA ELEVATOR™
(modelos selectos)
El compartimiento de los alimentos frescos
puede estar equipado con una Parrilla
Elevator™.Esta parrilla está equipada con un
borde para retener derrames para facilitar la
limpieza.También puede deslizarse hacia afuera
para permitir fácil acceso a los alimentos que
están guardados en la parte trasera de la parrilla.
Esta parrilla puede ser cambiada de posición,
hacia arriba o hacia abajo, sin tener que sacar
los alimentos que están en ella.Para ajustar la
parrilla Elevator™tire hacia afuera la perilla de
la manivela. Gire la manivela a la derecha
para elevar la altur a de la parrilla y a la izquierda para bajar la altura de la parrilla.
➢ Nunca intente ajustar una parrilla
que tenga alimentos sobre ella
(excepto en el caso de la parrilla
Elevator™).
Para sacar la parrilla Elevator™ para su
limpieza ocasional, retire todos los alimentos
de la parrilla y tire de la parrilla hacia delante.
Cuando la parrilla se detenga, oprima las
lengüetas ubicadas debajo de los bordes exteriores, luego continúe tirando hacia delante
hasta que se salga del marco.
Para volver a instalar la parrilla alinee la parrilla con el marco y empújela completamente
hacia atrás. (No es necesario oprimir las
lengüetas para la reinstalación).
Durante uso normal, la parrilla Elevator™ con
el conjunto del marco NO necesita ser sacada.
Aunque improbable y no se recomienda
hacerlo, el procedimiento correcto para retirar
la parrilla es el siguiente:
Retire todos los alimentos de la parrilla y
levántela a su posición más elevada posible.
Mientras sujeta la parrilla y el marco desde la
parte delantera, oprima ambos seguros hacia
adentro. Levante ligeramente e incline el conjunto del marco para permitir que las guías
traseras salgan de los rieles verticales.
Para volver a instalar, incline el conjunto del
marco a la vez que oprime ambos seguros,
vuelva a colocar la guía trasera detrás de los
rieles verticales. Cuando la parrilla está nivelada, suelte los seguros permitiendo que la
parrilla se enganche en su posición correcta.
PARRILLA AJUSTABLE
DEL CONGELADOR
(modelos selectos)
Para retirar la parrilla, levante el extremo izquier-
do aproximadamente 3 pulgadas; retire las barras del extremo derecho fuera de las ca vidades
de la pared. Para volver a colocar la parrilla,
coloque nuevamente los tapones de soporte
removibles en la pared izquierda a la altura
deseada e invierta el procedimiento anterior.
Otros modelos tienen un estante parcial
del congelador de la anchura. Este
estante es colocado en el lado izquierdo
del compartimiento del congelador montando en la pared del lado izquierdo.
PARRILLA EXTENSIBLE A
TODO EL ANCHO DEL
CONGELADOR
(modelos selectos)
La parrilla se ajusta lateralmente para abrir un
espacio de mayor altura para paquetes altos,
tales como de pizza. La pata del lado izquierdo
de la parrilla se desliza para lograr este ajuste.
La parrilla además se puede ajustar en dos
alturas. Para ajustar la altura de la parrilla,
saque la parrilla del congelador. Deslice la
pata fuera de las canaletas y vuelva a colocar
la pata en la posición de altura alterna. Vuelva
a colocar la parrilla en el congelador, insertando el extremo izquierdo en las cavidades del
forro del congelador.
ALMACENAMIENTO
EN LA PUERTA
Los compartimientos removibles de la
puerta (modelos selectos) son lo suficiente-
mente espaciosos para acomodar envases de
más de un galón de capacidad. Son ajustables y pueden ser retirados con facilidad.
Para retirar, levante la parte delantera del
compartimiento hacia arriba hasta que se
salga de los retenes del forro de la puerta y
luego tire del compartimiento derecho hacia
afuera.
Par a vo l ve r a colocar, invierta el procedimiento anterior.
Otros modelos están equipados con
Compartimientos Fijos de la Puerta con
capacidad para envases de más de un galón.
Algunas parrillas de la puerta del refr igerador y
congelador tienen Divisiones para asegurar
botellas y otros envases en su lugar cuando la
puerta se abre o se cierra.Las divisiones se ajustan fácilmente deslizándolas de un lado al otro.
ADVERTENCIA
Page 41

40
El retén de botellas altas (modelos selectos)
ha sido diseñado para evitar que las botellas
altas se inclinen hacia delante. Es fácilmente
ajustable deslizándolo de un lado a otro.
PARRILLAS
La parrilla para envases múltiples (modelos
selectos) está suspendida de una de las parrillas a prueba de derrames del refrigerador. Se
engancha sobre los alambres del marco debajo de la parrilla. El diseño inclinado permite
que los envases rueden hacia delante cada
vez que se saca uno. (Esta parrilla no puede
instalarse debajo de una parrilla Elevator™).
La parrilla para uso múltiple (modelos selectos) ofrece un lugar para guardar vino en posición horizontal. La parrilla también puede
sostener bebidas en lata o una caja de huevos .
Coloque la parrilla de modo que descanse en
el lado izquierdo de una parrilla del refrigerador (esta parrilla no puede ser colocada
sobre una parrilla Elevator™).
AREAS ESPECIALES DE
CONSERVACION DE
ALIMENTOS
Su refrigerador tiene ya sea una Gaveta para
Bocadillos o una Gaveta Adjusti-Temp™.
Para los modelos con la gaveta AdjustiTemp™, se ha provisto un control en la parte
delantera superior de la gaveta. Simplemente
deslice la perilla de control a la izquierda o a la
derecha para ajustar la temperatura interna de
la gaveta.
➢
Para guardar queso, deslice el control a la
izquierda. Para lograr una temperatura
más baja dentro de la gaveta cuando
guarde carne fresca, carne de ave o
pescado, deslice el control a la derecha.
vista del interior
Para mayor ayuda, llame al 1-800-688-9900 EE.UU., al 1-800-688-2002 Canadá o visite www.maytag.com
La Gaveta para Bocadillos no tiene temperatura ajustable.
Para sacar la gaveta para bocadillos o la gaveta Adjusti-Temp para su limpieza:
➢
tire de la gaveta hacia afuera hasta el tope
➢
levante la ga veta liger amente hacia arriba y
sáquela hacia afuera
Para vol ver a colocar la gaveta, invierta el procedimiento anterior.
Esta gaveta puede ser colocada según se
desee en el lado izquierdo o derecho del gabinete del refrigerador.
Para mejores resultados, mantenga la gaveta
bien cerrada.
Las gavetas de las verduras proporcionan
espacio para guardar frutas y verduras. La
gaveta de las verduras tiene un control de
humedad en la parrilla situada sobre cada una
de las gavetas de las verduras.
➢
Para guardar frutas, deslice el control de la
gaveta a la izquierda a fin de proporcionar
menos humedad en la gaveta.
➢
Para guardar verduras, deslice el control a
la derecha para proporcionar más
humedad en la gaveta.
Para retirar la gaveta de las verduras para
limpiarla:
➢
Tire de la gaveta de las verduras hacia
afuera hasta el tope
➢
Incline hacia arriba la parte delantera de la
gaveta y tire de ella hacia afuera
Para volver a colocar la gaveta de las verduras:
➢
Alinee la gaveta en los rieles
➢
Levante la parte delantera de la gaveta y
deslícela hasta su lugar.
Para obtener mejores resultados, mantenga
las gavetas de las verduras herméticamente
cerradas.
Para retirar la parrilla situada sobre la
gaveta de las verduras:
➢
levante el borde delantero de la parrilla
➢
tire de la parrilla directamente hacia afuera
Para volver a colocar la parrilla de la gaveta de las verduras:
➢
coloque las barras posteriores en el
soporte
➢
empuje la parrilla hacia el fondo hasta que el
borde delantero pueda ser bajado a su lugar
Su refrigerador puede venir equipado con una
bandeja para huevos (el estilo puede ser
diferente). Se puede retirar para lavarla o llevarla donde la necesite.
Para usar el compartimiento de productos
lácteos, levante la tapa. El compartimiento de
productos lácteos puede estar equipado con una
división para asegurar los alimentos en sus
lugares. Si su modelo tiene una división en este
compartimiento, simplemente deslícelo de un
lado al otro para colocarlo en el lugar deseado.
En algunos modelos, el compartimiento de
productos lácteos es removible.
La canasta deslizable del congelador (modelos selectos) se encuentra en el compartimiento principal del congelador. Es un área
conveniente para tener fácil acceso a los
artículos guardados en la parte trasera del
congelador. Deslice la canasta hacia afuera
para guardar o retirar alimentos congelados.
Para sacar la canasta:
➢
tire de la canasta hasta que llegue al tope
➢
levante y tire de la canasta hacia afuera
Para volver a colocar la canasta, invierta el
procedimiento anterior.
La canasta para alimentos congelados
(modelos selectos) se encuentra en la parrilla
inferior de la puerta del congelador. En la
canasta se provee espacio para aquellos alimentos congelados que tienden a moverse o
deslizarse (tal como verduras en bolsas).
Page 42

41
SUGERENCIAS PARA ALMACENAR ALIMENTOS
ALMACENAMIENTO DE
ALIMENTOS FRESCOS
➢ La temperatura del compartimiento de ali-
mentos frescos del refrigerador se debe
mantener entre 34° F y 40° F (1° C y 4° C).
La temperatura ideal es de 37° F (3° C).
Para verificar la temperatura, coloque un
termómetro para electrodomésticos en un
vaso de agua en el centro del refrigerador.
Espere 24 horas antes de verificar la temperatura. Si la temperatura sobrepasa
40° F (4° C) ajuste los controles según se
explica en la página 37.
➢ Evite sobrecargar las parrillas del refrige-
rador pues esto reduce la circulación de
aire alrededor de los alimentos y ocasiona
enfriamiento irregular.
FRUT AS Y VERDURAS
➢ La gaveta de las verduras retiene la
humedad para ayudar a preservar la frescura de las frutas y verduras por períodos
más prolongados. (Consulte la página 40).
➢ Clasifique las frutas y verduras antes de
guardarlas y consuma primero las que se
encuentren maduras o magulladas.
Descarte aquellas que muestren señales
de descomposición.
➢ Siempre envuelva los alimentos que despi-
den olor tales como cebollas y repollo de
modo que el olor no se transfiera a otros
alimentos.
➢ Aunque las verduras necesitan cierta can-
tidad de humedad para retener la frescura,
demasiada humedad puede acortar el
tiempo de conservación (especialmente
las verduras con hojas). Seque bien las
verduras antes de guardarlas.
QUESOS Y CARNES
➢ La carne cruda y de ave debe envolverse
muy bien para que no ocurran derrames y
contaminación de otros alimentos o superficies.
➢ A veces se puede formar un moho en la
superficie de los quesos duros (Suizo,
Cheddar y Parmesano). Corte por lo
menos una pulgada (2 cm) alrededor y
debajo del área afectada. Mantenga el cor-
tador alejado del moho. El queso restante
retendrá su sabor y se puede comer sin
preocupación. NO trate de conservar las
rodajas individuales de queso, queso
suave, requesón, crema, nata cortada o
yogur cuando tengan señales de moho.
PRODUCTOS LACTEOS
➢ La mayoría de los productos lácteos como
la leche, yogur, nata cortada y requesón
muestran la fecha de vencimiento en sus
envases para asegurar su correcta
duración. Guarde estos alimentos en los
envases originales y refrigérelos inmediatamente y después de cada uso.
CONSERVACION DE
ALIMENTOS CONGELADOS
➢ El compartimiento del congelador de un
refrigerador debe ser mantenido aproximadamente entre a 0° F (-18° C).Para verificar la temperatura, coloque un termómetro para electrodomésticos entre los
paquetes congelados y espere 24 horas
antes de verificarla. Si la temperatura es
superior a 0° F (-18° C), ajuste el control
como se indica en la página 37.
➢ El congelador funcionará más eficazmente
si se ocupa por lo menos dos terceras
partes de su capacidad.
ENVOLTURA
DE ALIMENTOS PARA
SU CONGELACIÓN
➢ Para reducir la deshidratación y el dete-
rioro de la calidad, use papel de aluminio,
envoltura para alimentos congelados, bolsas especiales para alimentos congelados
o envases herméticamente cerrados.
Extraiga la mayor cantidad posible de aire
del paquete y asegúrese de que esté bien
sellado, el aire atrapado puede resecar,
cambiar de color o dar mal sabor (quemadura de congelación) a los alimentos.
➢ Envuelva bien las carnes frescas y de ave
con envoltura especial para alimentos congelados antes de guardarlas.
➢ No congele nuevamente la carne que se
haya descongelado completamente.
COMO CARGAR EL
CONGELADOR
➢ Evite guardar demasiados alimentos
calientes en el refrigerador de una sola
vez. Esto sobrecarga el congelador,
reduce la velocidad de congelación y
puede elevar la temperatura de los alimentos congelados.
➢ Deje un espacio entre los paquetes de
manera que el aire pueda circular libremente para que los alimentos se congelen
lo más rápido posible.
➢ Evite guardar alimentos difíciles de conge-
lar tales como helado y jugo de naranja
concentrado en las parrillas de la puerta
del congelador. Es preferible guardar estos
alimentos en el interior del congelador
donde la temperatura fluctúa menos al
abrir la puerta.
Consulte la Tabla de Conservación de los
Alimentos en la página 42 para los tiempos
de almacenamiento aproximados.
Page 43

42
sugerencias para almacenar alimentos
TABLA DE CONSERVACION DE LOS ALIMENTOS
(Los tiempos de conservación son aproximados y pueden variar dependiendo del tipo de empaque, temperatura de almacenamiento y la calidad del
alimento cuando fué comprado.)
Alimentos Refrigerador
Congelador Sugerencias para el Almacenamiento
HUEVOS
FRUTAS
PRODUCTOS LACTEOS
Fuentes: Ministerio de Agricultura de los Estados Unidos; Instituto de Mercadotecnia de Alimentos; Servicio de Extensión Cooperativa, Universidad Estatal de Iowa.
VERDURAS
CARNES
AVES Y PESCADO
Para mayor ayuda, llame al 1-800-688-9900 EE.UU., al
1-800-688-2002 Canadá o visite www.maytag.com
Mantequilla
Leche y Crema
Queso en crema, pasta de queso
y alimentos de queso
Requesón
Crema Acida
Queso duro (Suizo,
Cheddar y Parmesano)
1 mes
1 semana
1 a 2 semanas
3 a 5 días
10 días
1 a 2 meses
6 a 9 meses
No se recomienda
No se recomienda
No se recomienda
4 a 6 meses
Puede quedar migajoso
Envolver bien o cubrir.
Verifique la fecha del envase.Cierre firmemente. No vuelva a colocar las porciones
no usadas en el envase original. No congele la crema a menos que sea batida.
Envolver bien.
Guardar en el envase original. Verificar la fecha del envase.
Envolver bien. Cor tar cualquier moho.
Huevos enteros
Claras o yemas restantes
3 semanas
2 a 4 días
No se recomienda
9 a 12 meses
Refrigerar colocando el extremo pequeño hacia abajo.
Por cada taza de yemas que se desee congelar, agregue 1 cucharadita de azúcar
si se van a usar en dulces o una cucharadita de sal si es para platos no dulces.
Manzanas
Plátanos
Peras, ciruelas, aguacate
Fresas, cerezas, damascos
Uvas
Frutas ácidas
Piña, cortada
1 mes
2 a 4 días
3 a 4 días
2 a 3 días
3 a 5 días
1 a 2 semanas
2 a 3 días
8 meses (cocinadas)
6 meses
(enteros/pelados)
No se recomienda
6 meses
1 mes (enteras)
No se recomienda
6 a 12 meses
Puede también guardarse verdes o manzanas duras a una temperatura de
60 a 70° F (15 a 21° C).
Madurar a temperatura ambiente antes de ser refrigeradas. Los plátanos y
los aguacates se obscurecen cuando son refrigerados.
También se puede guardar a 60 a 70° F (15 a 21° C). Si se refrigeran,
guárdelas sin cubrirlas.
No madurarán después de la compra. Use rápidamente.
Espárragos
Repollitos de Bruselas, brócoli,
coliflor, chícharos, frijoles,
cebollas, pimientos
Repollo, apio
Zanahorias, pastinaca, betarraga
y nabos
Lechuga
1 a 2 días
3 a 5 días
1 a 2 semanas
7 a 10 días
7 a 10 días
8 a 10 meses
8 a 10 meses
No se recomienda
8 a 10 meses
No se recomienda
No lave antes de refrigerar. Guarde en la gaveta de las verduras.
Envuelva los alimentos que producen olor. Deje los chícharos en las
vainas.
Envuelva los alimentos que producen olor y refrigere en la gaveta de las
verduras.
Retire las hojas. Envuelva los alimentos que producen olor y refrigere en la
gaveta de las verduras.
Pollo y pavo, entero
Pollo y pavo, presas
Pescado
1 a 2 días
1 a 2 días
1 a 2 días
12 meses
9 meses
2 a 6 meses
Mantener en el envase original para refrigeración. Coloque en la gaveta de
la carne y queso. Cuando congele por más de 2 semanas, envuelva nuevamente con envoltura para congelador.
Tocino
Res o cordero, molida
Res o ternera, asada y bistec
Jamón, completamente cocido,
entero
mitad
rebanadas
Fiambres
Cerdo, asado
Cerdo, chuletas
Salchichas, molidas
Salchichas, ahumadas
Ternera
Salchichas
7 días
1 a 2 días
3 a 5 días
7 días
5 días
3 días
3 a 5 días
3 a 5 días
3 a 5 días
1 a 2 días
7 días
3 a 5 días
7 días
1 mes
3 a 4 meses
6 a 9 meses
1 a 2 meses
1 a 2 meses
1 a 2 meses
1 a 2 meses
4 a 6 meses
4 meses
1 a 2 meses
1 a 2 meses
4 a 6 meses
1 mes
Las carnes frescas pueden ser guardadas en el envase original para su
refrigeración. Colóquelas en la gaveta de la carne y queso.Cuando congele
por más de 2 semanas, envuelva nuevamente con papel para congelador.
Los fiambres sin abrir envasados al vacío pueden ser guardados durante 2
semanas en la gaveta de la carne y queso.
Las carnes procesadas deben ser bien envueltas y guardadas en la gaveta
de la carne y queso.
Page 44

43
ALMACENAMIENTO DEL REFRIGERADOR
Vacaciones
Si estará ausente menos de un mes, deje los
controles en la posición normal.
Durante ausencias más prolongadas:
1. Retire todos los alimentos.
2. Apague la máquina de hacer hielo (si está
instalada) y cierre la llave del suministro de
agua al refrigerador.
3. Desenchufe el refrigerador.
4. Limpie y seque el refrigerador meticulosamente.
5. Deje las puertas abiertas para evitar malos
olores.
Mudanza
Para la mudanza, siga los pasos 1 al 4 de la
sección Vacaciones. Además, retire y
empaque con cuidado todas las piezas que se
pueden desmontar fácilmente. Transporte el
refrigerador en posición vertical con las puertas cerradas y aseguradas con cinta adhesiva.
CUIDADO Y LIMPIEZA
Consulte la tabla en la página siguiente para
las instrucciones específicas de limpieza del
refrigerador.
LIMPIEZA DEBAJO DEL
REFRIGERADOR
El refrigerador puede rodarse hacia afuera para
limpiar el piso debajo de él. Levante los tornillos
niveladores si están bloqueados (v er página 34).
Tire del refrigerador directamente hacia afuera
de la pared.
REEMPLAZO DE UN FOCO
Siempre use un foco estándar de 40 o 60
watts.
Refrigerador
Hay dos focos situados debajo de la parte
superior del compartimiento del refrigerador,
en cada lado de la caja del control Dual
Cool™.
➢ Sujete cuidadosamente el foco que se
encuentra detrás de la cubierta.
➢ Destornille el foco y reemplácelo.
Congelador
La luz del congelador (modelos selectos) se
encuentra en la pared trasera, cerca de la
esquina superior derecha.
Par a s acar la cubier ta del foco:
➢ Sujete la parte superior e inferior de la
cubierta del foco. Oprima en el área de las
lengüetas de instalación, aplicando suficiente presión como para desenganchar
las lengüetas. Al mismo tiempo, gire la
cubierta hacia abajo y sáquela.
➢ Destornille el foco y reemplácelo.
➢ Vuelva a colocar la cubierta del foco girán-
dola nuevamente a su lugar y colocando
las lengüetas a presión en las ranuras
correspondientes.
CONDENSADOR
'NO CLEAN'™ DE
USO COMERCIAL
Un condensador limpio significa rendimiento
más eficaz del refrigerador. Gracias al diseño
único del condensador 'No Clean'™, ya no hay
necesidad de efectuar la limpieza rutinaria del
condensador para uso doméstico normal.
Algunos entornos pueden ser muy polvorientos o grasosos. En tales casos, el condensador se puede limpiar periódicamente para
asegurar el máximo rendimiento.
Descongelación
Automática
El refrigerador ha sido diseñado para descongelarse automáticamente.
Sugerencias para
ahorrar electricidad
➢ Coloque el refrigerador lejos de otros elec-
trodomésticos que generen calor como la
estufa o el lavavajillas, orificios de calefacción y luz solar directa.
➢ Nivele el refrigerador y no obstruya la ven-
tilación alrededor de la rejilla delantera.
➢ Mantenga el congelador casi lleno para
que escape menos aire frío al abrir la puerta. Cuando dos terceras partes del congelador estén llenas, coloque cajas de cartón
de leche a medio llenar con agua en el
congelador.
➢ Espere que los alimentos se enfríen ligera-
mente antes de colocarlos en el refrigerador o congelador.
➢ Tape los líquidos.
➢ Limpie la humedad del exterior de los
envases antes de colocarlos en el refrigerador.
➢ Evite abrir las puertas con demasiada
frecuencia.
➢ Desenchufe el cordón eléctrico
antes de la limpieza.
➢ Desenchufe el cordón eléctrico
antes de reemplazar el (los) foco(s).
Póngase guantes como protección
contra posibles vidrios rotos.
PRECAUCIÓN
PRECAUCIÓN
NOTA
❚ Durante el ciclo automático de descon-
gelación, puede observarse un resplandor/reflejo rojo en los orificios de ventilación en la pared posterior del compartimiento del congelador y oírse el
sonido de gotas de agua cuando entran
en contacto con el calentador de
descongelación. Esto es normal
durante el ciclo de descongelación.
Page 45

44
Pieza
Cleaning Agents
Detergente suave y agua tibia
Detergentes líquidos suaves
en aerosol
Accesorio de la aspiradora
Escobilla de Limpieza (Pieza
No.20001017) disponible de
su Distribuidor.
Detergente suave y agua tibia
Detergentes líquidos suaves
en aerosol
Detergente suave y agua tibia
Detergentes líquidos suaves
en aerosol
Limpieza leve: detergente
suave y agua o una solución
de agua y vinagre blanco.
Suciedad moderada: usar
'Bon Ami'*
Descoloraciones: Limpiador
de Acero Inoxidable 'Cameo'*.
Sugerencias y Advertencias
Retire la rejilla inferior sujetando los extremos y tirándola derecho hacia
afuera. Para volver a colocar, alinee los clips con las aberturas redondas del
gabinete y empuje cada extremo hacia adentro hasta que la rejilla inferior
entre en su lugar a presión.
No necesita limpiarlo a menos que esté ubicado en un lugar grasoso,
polvoriento o muy transitado por animales domésticos (Ver página 43).
Seque con un paño suave y limpio.
Nunca limpie el refrigerador con un paño sucio o una toalla mojada. Estos
pueden dejar residuos que pueden rayar o debilitar la pintura. No use esponjas de alambre, productos de limpieza en polvo, blanqueador o productos que
contengan blanqueador. Estos productos pueden rayar y corroer el acabado
de la pintura.
No use cera en las piezas de plástico o de vinilo.
Use un paño o una esponja suave.
Siempre limpie siguiendo el grano del acero inoxidable.
No use blanqueador con cloro ni un producto de limpieza que contenga blanqueador con cloro.
Después de la limpieza, enjuague y seque. Para restaurar el brillo y quitar las
vetas use el rociador para acero inoxidable 'Stainless Steel Magic Spray'*
(Pieza No.20000008).
Exterior del Refrigerador
Interior del Refrigerador y del Congelador
Rejilla inferior
Condensador
Manijas de la puerta
Junta de la puerta
Parrillas de vidrio
Pared Interior y
revestimiento de la puerta
Gavetas, depósitos, bandeja
para los huevos, etc.
Superficies metálicas pintadas:
gabinetes, puertas
Puertas de acero inoxidable
(modelos selectos)
Tabla de Limpieza del Refrigerador
Bicarbonato de soda y agua
tibia
Detergente suave y agua tibia
Detergente suave y agua tibia
Limpiavidrios
Detergentes líquidos suaves
en aerosol
Detergente suave y agua tibia
Bicarbonato de soda y agua
tibia
Detergente suave y agua tibia
Use 1 o 2 cucharadas de bicarbonato de soda por cada cuarto de galón
de agua. Asegúrese de exprimir bien el paño o la esponja antes de limpiar
alrededor de los controles, luces o piezas eléctricas.
El vidrio debe estar a la temperatura ambiente antes de sumergirlo en
agua tibia. Nunca use agua caliente.
Vea las indicaciones anteriores para la solución de bicarbonato de soda.
NO use productos de limpieza abrasivos, detergentes concentrados, blanqueadores, ceras de limpieza, solventes y abrillantadores para limpiar el
interior del refrigerador.
Seque esmeradamente. NO los lave en el lavavajillas automático.
* Los nombres de los productos son las marcas registradas de los respectivos fabricantes.
Para mayor ayuda, llame al 1-800-688-9900 EE.UU., al 1-800-688-2002 Canadá o visite www.maytag.com
➢ Desenchufe el cordón eléctrico antes de la limpieza. No toque las superficies refrigeradas con las manos húmedas o mojadas. Los
objetos mojados se adhieren a las superficies metálicas. Antes de limpiar el congelador, espere que se descongele y entibie. Deje
que las parrillas de vidrio se entibien antes de sumergirlas en agua tibia.
cuidado y limpieza
PRECAUCIÓN
Page 46

45
SONIDOS NORMALES DE FUNCIONAMIENTO
Las mejoras en el diseño de la refrigeración pueden producir sonidos en su nuevo refrigerador que son diferentes o que no existían en el modelo
antiguo. Estas mejoras fueron hechas para crear un refrigerador que sea mejor para conservar los alimentos, que ahorre energía y que en general
sea más silencioso. Debido a que los nuevos modelos funcionan más silenciosamente, ahora es posible detectar sonidos que estaban presentes en
los modelos más antiguos pero que pasaban inadvertidos debido a los niveles de ruido más altos. Muchos de estos sonidos son normales. Por favor
tome nota de que las superficies adyacentes a un refrigerador, tales como las paredes, los pisos y la estantería pueden a veces aumentar el nivel de
estos sonidos. A continuación se indican algunos de los sonidos normales que pueden estar presentes en un refrigerador nuevo.
Page 47

46
ANTES DE SOLICITAR SERVICIO
antes de solicitar servicio
PROBLEMA CAUSAS POSIBLES SOLUCION
No funciona El cordón eléctrico no está enchufado. Enchufe el refrigerador en el tomacorriente.
El tomacorriente no tiene almentación eléctrica. Reemplace el fusible, vuelva a reponer el disyuntor.
Control del congelador colocado en la posición "OFF" Ajuste el control del congelador (ver página 37).
(Apagado).
El refrigerador está en descongelación automática. Espere 25 minutos para que el ciclo de descongelación termine.
Temperatura ambiente inferior a 55° F (13° C).
Vuelva a ubicar el refrigerador en un clima apropiado (ver instalación en la página 34).
Funciona durante mucho tiempo, Los ciclos de los refrigeradores modernos son más
con demasiada frecuencia más frecuentes para mantener temperaturas uniformes.
Esto es normal cuando el refrigerador es nuevo o ha Espere 24 horas hasta que se enfríe completamente (ver controles de la
sido recientemente instalado. temperatura en la página 37).
La puerta se abre durante períodos prolongados o con Esto es normal. Disminuya las aperturas de la puer ta.
mucha frecuencia.
La puerta no queda bien cerrada. Verifique para ver si algo está evitando que la puerta se cierre.
La rejilla inferior está bloqueada. Desbloquee para que el aire tibio salga del refrigerador.
La luz no trabaja El foco se quemó. Desenchufe el refrigerador y cambie el foco (ver página 43).
No llega energía eléctrica al refrigerador. Verifique si el cordón eléctrico está bien enchufado.
Resplandor visible en los La apar ición de un brillo o reflejo rojo es nor mal
respiraderos del congelador durante el ciclo de descongelación.
Aire tibio proveniente de la Este es flujo de aire normal para la circulación del
parte inferior del gabinete. condensador.
El gabinete vibra El gabinete no está nivelado. El suelo es débil. Nivele el gabinete (ver página 34).
Olor en el gabinete Los alimentos que producen olores no están cubiertos. Cubra o envuelva los alimentos que produzcan olor. Limpie el gabinete.
Ruidos, sonidos y vibraciones Ruido normal. Ver Sonidos Normales de Funcionamiento en la página 45.
El gabinete no está nivelado. Nivele el gabinete (ver página 34).
El congelador, refrigerador Control ajustado a una temperatura demasiado tibia Ajuste el control de la temperatura (ver página 37).
demasiado tibios (el helado Aperturas prolongadas de la puer ta. Reduzca la frecuencia de apertura de la puerta.
helado queda blando)
La temperatura ambiente es inferior a 55° F (13° C). Refrigerador no funcionará lo suficiente como para mantener la temperatura
apropiada.
Los productos con alto contenido de azúcar pueden que
que no se endurezcan completamente cuando están
congelados.
Congelador, refrigerador está El control está en un ajuste demasiado frío. Ajuste el control de la temperatura (ver página 37).
demasiado fríos (congelación
trop congelación de los alimentos)
La máquina de hacer hielo El brazo sensor está en posición hacia arriba. Baje el brazo sensor a la posición "ON" (Encendido).
automática no funciona
El gabinete no está nivelado. Nivele el refrigerador (ver página 34).
El suministro de agua no está conectado o está obstruido. Conecte el suministro de agua o retire las obstrucciones.
El congelador está demasiado tibio. Ajuste el control de la temperatura del congelador (ver página 37).
Los cubos de hielo tienen Cubos de hielo añejos. Descártelos; los cubos de hielo pueden absorber olores que afectan también el sabor.
olor/sabor
Mala calidad del agua. Póngase en contacto con la compañía de tratamiento de agua.
Los alimentos transmiten olor/sabor a del hielo. Envuelva bien los alimentos.
Los cubos de hielo se pegan Residuo de minerales en el agua. Limpie las bandejas con un trapo humedecido en vinagre hasta que queden
en la bandeja limpias.
Los cubos de hielo se evaporan Uso limitado del hielo. Descarte los cubos de hielo añejos.
Humedad en la superficie del Es común durante períodos de alta humedad.
gabinete entre las puertas
Humedad en las paredes Tiempo húmedo caliente. Normal.
interiores del refrigerador o
en la gaveta de las verduras
Aperturas prolongadas o muy frecuentes de la puerta. Reduzca las aperturas de la puerta.
La puerta no está cerrada en forma correcta. Verifique si existe algo que evite que la puerta se cierre.
Los alimentos no envueltos en forma correcta. Envuelva o cubra bien todos los alimentos.
Los alimentos se secan La gaveta de las verduras no está bien cerrada. Cierre bien la gaveta de las verduras.
Los controles de la temperatura están en un ajuste Ajuste los controles de la temperatura (ver página 37).
muy frío.
Los paquetes no están envueltos o sellados en forma Envuelva o cubra bien todos los alimentos.
correcta.
Humedad excesiva en la Los alimentos no están envueltos en forma correcta. Envuelva o cubra bien todos los alimentos.
gaveta de las verduras
Tiempo húmedo, caliente. Reduzca las aperturas de la puerta.
Consulte primero esta tabla de sugerencias para la solución de averías…posiblemente no es necesario solicitar servicio.
FUNCIONAMIENTO GENERAL
RUIDOTEMPERATURA
HIELOHUMEDAD
Para mayor ayuda, llame al 1-800-688-9900 EE.UU., al 1-800-688-2002 Canadá o visite www.maytag.com
Page 48

Form No. C/08/03 Part No.111541.001 h t t p : / / w w w . m a y t a g . c o m Litho U.S.A .
©2003 Maytag Appliance Sales Co.
MAYTAG • 403 West Fourth Street North • P.O. Box 39 • Newton, Iowa 50208
GARANTIA DE MAYTAG Lo que no cubren estas garantías:
1. Situaciones y daños resultantes de cualquiera de las siguientes eventualidades:
a. Instalación, entrega o mantenimiento inapropiados.
b. Cualquier reparación, modificación, alteración o ajuste no autorizado por el
fabricante o por un centro de servicio autorizado.
c. Mal uso, abuso, accidentes o uso irrazonable.
d. Corriente eléctr ica, voltaje o suministro incorrecto.
e. Programación incorrecta de cualquiera de los controles.
2. Las garantías quedan nulas si los números de serie originales han sido retirados,
alterados o no son fácilmente legibles.
3. Focos.
4. Productos comprados para uso comercial o industrial.
5. El costo del ser vicio o llamada de ser vicio para:
a. Corregir errores de instalación.
b. Instruir al usuario sobre el uso correcto del ar tefacto.
c. Transpor te del ar tefacto al establecimiento de servicio.
6. Los daños consecuentes o incidentales sufridos por cualquier persona como
resultado del incumplimiento de esta garantía. En algunos estados no se per mite
la exclusión o limitación de daños consecuentes o incidentales, por lo tanto la
limitación o exclusión anterior puede no aplicarse en su caso.
Para comprar los accesorios o los repuestos no cubiertos por la garantía del
producto:
Por favor tenga disponible el número de modelo y el número de serie y llame a nuestros especialistas en repuestos al 1-877-232-6771 en EE.UU.o al 1-800-688-8408
Canadá de Lunes a Viernes desde las 7:00 a.m. a las 7:00 p.m., Hora Central.
Si Necesita Servicio
❚ Llame al distribuidor donde compró su electrodoméstico o llame a Ma ytag ServicesSM,
Maytag Customer Assistance al 1-800-688-9900, EE.UU. o al 1-800-688-2002
Canadá para ubicar un servicio de reparaciones autorizado.
❚ Asegúrese de conservar el comprobante de compra para verificar el estado de la
garantía. Consulte la sección sobre la GARANTIA para mayor información sobre
las responsabilidades del propietario para servicio bajo la garantía.
❚ Si el distribuidor o la compañía de servicio no pueden resolver el problema, escri-
ba a Maytag ServicesSM, Attn: CAIR®‚ Center, P.O. Box 2370, Cleveland, TN 373202370 o llame al 1-800-688-9900, EE.UU. o al 1-800-688-2002, Canadá.
Los clientes de EE.UU.que usan TTY para personas con impedimentos auditivos o
del habla deben llamar al 1-800-688-2080.
NOTA: Cuando llame o escriba acerca de un problema de servicio, por fav or incluy a
la siguiente información.
a. Su nombre, dirección y número de teléfono;
b. Número de modelo y número de serie;
c. Nombre y dirección de su distribuidor o técnico de servicio;
d. Una descripción clara del problema que está experimentando;
e. Comprobante de compra (recibo de compra).
❚ Las guías del usuario , manuales de servicio e información sobre las piezas pueden
solicitarse a Maytag ServicesSM, Maytag Customer Assistance.
Garantía Completa de Un Año
Durante un (1) año desde la fecha original de compra al por menor, se reparará o reemplazará gratuitamente cualquier pieza que falle durante el uso
normal en el hogar.
Máquina para hacer hielo - cuando se compra con
el refrigerador y es instalada por el distribuidor se
considera parte del refrigerador para efectos de la
garantía.
Garantía Limitada - Componentes
Principales de Refrigeración
Desde el Segundo hasta el Quinto año - Después
del primer año desde la fecha original de compra al
por menor, hasta el final del quinto año, Maytag
Services
SM
reparará o reemplazará, a su elección, sin
costo alguno en cuanto a las piezas y mano de obra
solamente, cualquier pieza del sistema de refrigeración sellado (compuesto por el compresor, evaporador, condensador, secador y tubería de conexión)
y el revestimiento interior del gabinete (e xcluyendo el
revestimiento interior de la puerta) que falle durante
uso normal en el hogar. El propietario deberá pagar
todos los otros costos, incluyendo el kilometraje,
transporte, costo del viaje y costo del diagnóstico, si
fuese necesario.
Garantía Limitada – Otras Piezas
Segundo Año - Otras piezas, que no sean los compo-
nentes de refrigeración principales, que fallen durante
uso normal en el hogar durante el segundo año
después de la fecha original de compra al por menor
serán reparadas o reemplazadas sin costo alguno en lo
que respecta a las piezas mismas y el propietario
deberá pagar todos los otros costos incluyendo mano
de obra, kilometraje, transporte, costo del viaje y costo
del diagnóstico, si fuese necesario.
Sírvase tomar nota: La garantía completa y las
garantías limitadas son aplicables cuando el refrigerador se encuentra en los Estados Unidos o Canadá.
Los refrigeradores que se encuentren en cualquier
otro lugar están cubiertos por garantía limitadas que
incluyen solamente las piezas que fallen durante el
primer año.
Limitaciones de la Responsabilidad
El garante no será responsable por ningún daño
incidental o consecuente, incluyendo pérdida de
alimentos. En algunos estados no se permite la
exclusión o limitación de daños consecuentes, por lo
tanto la limitación o exclusión anterior puede no
aplicarse en su caso.
Las garantías específicas expresadas anteriormente
son las UNICAS garantías ofrecidas por el fabricante. Estas garantías le confieren derechos legales
específicos, pudiendo también tener otros derechos
que varían de un estado a otro.
 Loading...