

Page 1

Timer Control Dishwasher
USER’S GUIDE
Your satisfaction is
very important to us, so
please read this guide carefully.
You will find instructions on the proper operation and maintenance of your new
appliance, in addition to a list of what can and what
should not be washed in an automatic dishwasher.
Save time and money. If something should go
wrong, we suggest consulting the “Before You Call”
section. It is designed to help you solve basic problems before consulting a servicer.
If you have questions, write us (include your model
number and phone number) or call:
Maytag Appliances Sales Company
Attn: CAIR
P.O. Box 2370
Cleveland, TN 37320-2370
1-800-688-9900 USA
1-800-688-2002 CANADA
1-800-688-2080 USA TTY (for deaf, hearing
impaired or speech impaired)
(Mon.–Fri., 8am–8pm Eastern Time)
http://www.maytag.com
®
Center
Table of Contents
Safety Instructions. . . . . . . . . . . . . . . . . 1
Loading Tips . . . . . . . . . . . . . . . . . . . . . 2
Operating Steps. . . . . . . . . . . . . . . . . . . 3
Cycles at a Glance. . . . . . . . . . . . . . . . . 4
Care and Cleaning. . . . . . . . . . . . . . . . . 4
What Can and Cannot be Washed. . . . . 5
Before You Call . . . . . . . . . . . . . . . . . . 6-7
Portable Dishwashers . . . . . . . . . . . . . . 8
Part No. 6 915963 B MCS No. 99002394
Guide de L’Utilisateur . . . . . . . . . . . . . 10
Guía del Usuario . . . . . . . . . . . . . . . . . 19
Page 2

For Future Assistance
WARNING:
Check with the installer to make sure the appliance has been properly grounded to
avoid possible electrical shock. Be sure you read the IMPORTANT PERSONAL SAFETY INSTRUCTIONS
before you start to use this dishwasher.
Please record your model and serial numbers in the spaces
provided below. These numbers can be found in the upper
left corner of the tub opening. They are needed for any correspondence or service calls concerning your dishwasher.
Model Number
Serial Number
In addition, keep your sales slip or cancelled check. Should
any warranty service be required, proof of original date of
purchase is needed.
In our continuing effort to improve the quality of our
dishwashers, it may be necessary to make changes
to the appliance without revising this guide.
Important Safety Instructions
Products with a label have been listed with Underwriter’s
Laboratories, Inc. – those with a CSA tag have been listed
with Canadian Standards Association. Nevertheless, as with
any other equipment using electricity and moving parts,
there is a potential hazard.
WARNING:
When using your dishwasher, fol-
low basic precautions, including the following:
8. Be careful not to touch the heating element on the bottom
of the tub during or at the completion of a cycle. It may
be hot.
9. Use only detergents and rinse additives designed for an
automatic dishwasher. Never use soap, laundry detergent, or hand washing detergent in your dishwasher.
Keep these products out of reach of children.
10. Do not sit, stand on or abuse the door or dish racks of the
dishwasher.
1. Read all instructions before using the dishwasher.
2. Use the dishwasher only for its intended function.
3. Disconnect electrical power to dishwasher before
attempting to service.
4. To avoid electrical shock hazard, the sides and back
must be enclosed and the front panels must be attached
before electrical power is applied to the dishwasher.
Refer to the installation instructions for proper grounding procedures.
5. Connect to a properly rated, protected and sized power
supply circuit to avoid electrical overload.
6. Children should never be permitted to operate, or play
in, with, or around this dishwasher.
7. To reduce the risk of injury when loading items to be
washed, sharp or pointed items should be located with
the handles up. Also, load sharp items so they are not
likely to damage the door seal.
SAVE THESE INSTRUCTIONS
11. Under certain conditions, hydrogen gas may be produced in a hot water system that has not been used for
two weeks or more. Hydrogen gas is explosive. If the
hot water system has not been used for such a period,
turn on all hot water faucets and let the water flow from
each for several minutes. This will release any accumulated hydrogen gas. As the gas is flammable, do not
smoke or use an open flame during this process.
12. Do not wash plastic items unless marked “dishwasher
safe” or the equivalent. For plastic items not so marked,
check the manufacturer’s recommendations.
13. Do not tamper with controls.
14. To prevent accidental child entrapment and suffocation
risk, always remove the door to the washing compartment when removing an old dishwasher from service or
discarding it.
15. Use caution when unloading the dishwasher. Dishes will
be hot if unloaded shortly after a cycle has completed.
1
Page 3
Loading Tips
• Scrape off bones or large food particles. Remove excessive
quantities of greasy/oily substances.
• Scrape or soak items with burnt on foods as they require
more energy than the rest of the load to clean.
• Scrape off tomato based food soils.
• If connected to a food waste disposer, make certain the disposer is empty before starting the dishwasher. This allows
proper draining.
• Mustard, mayonnaise, vinegar, lemon and other acidic
foods can cause rust or discoloration on stainless steel.
Rinse these pieces as soon as possible.
• Starch from foods like potatoes, pasta, rice and oatmeal
require more energy to clean than the rest of the load.
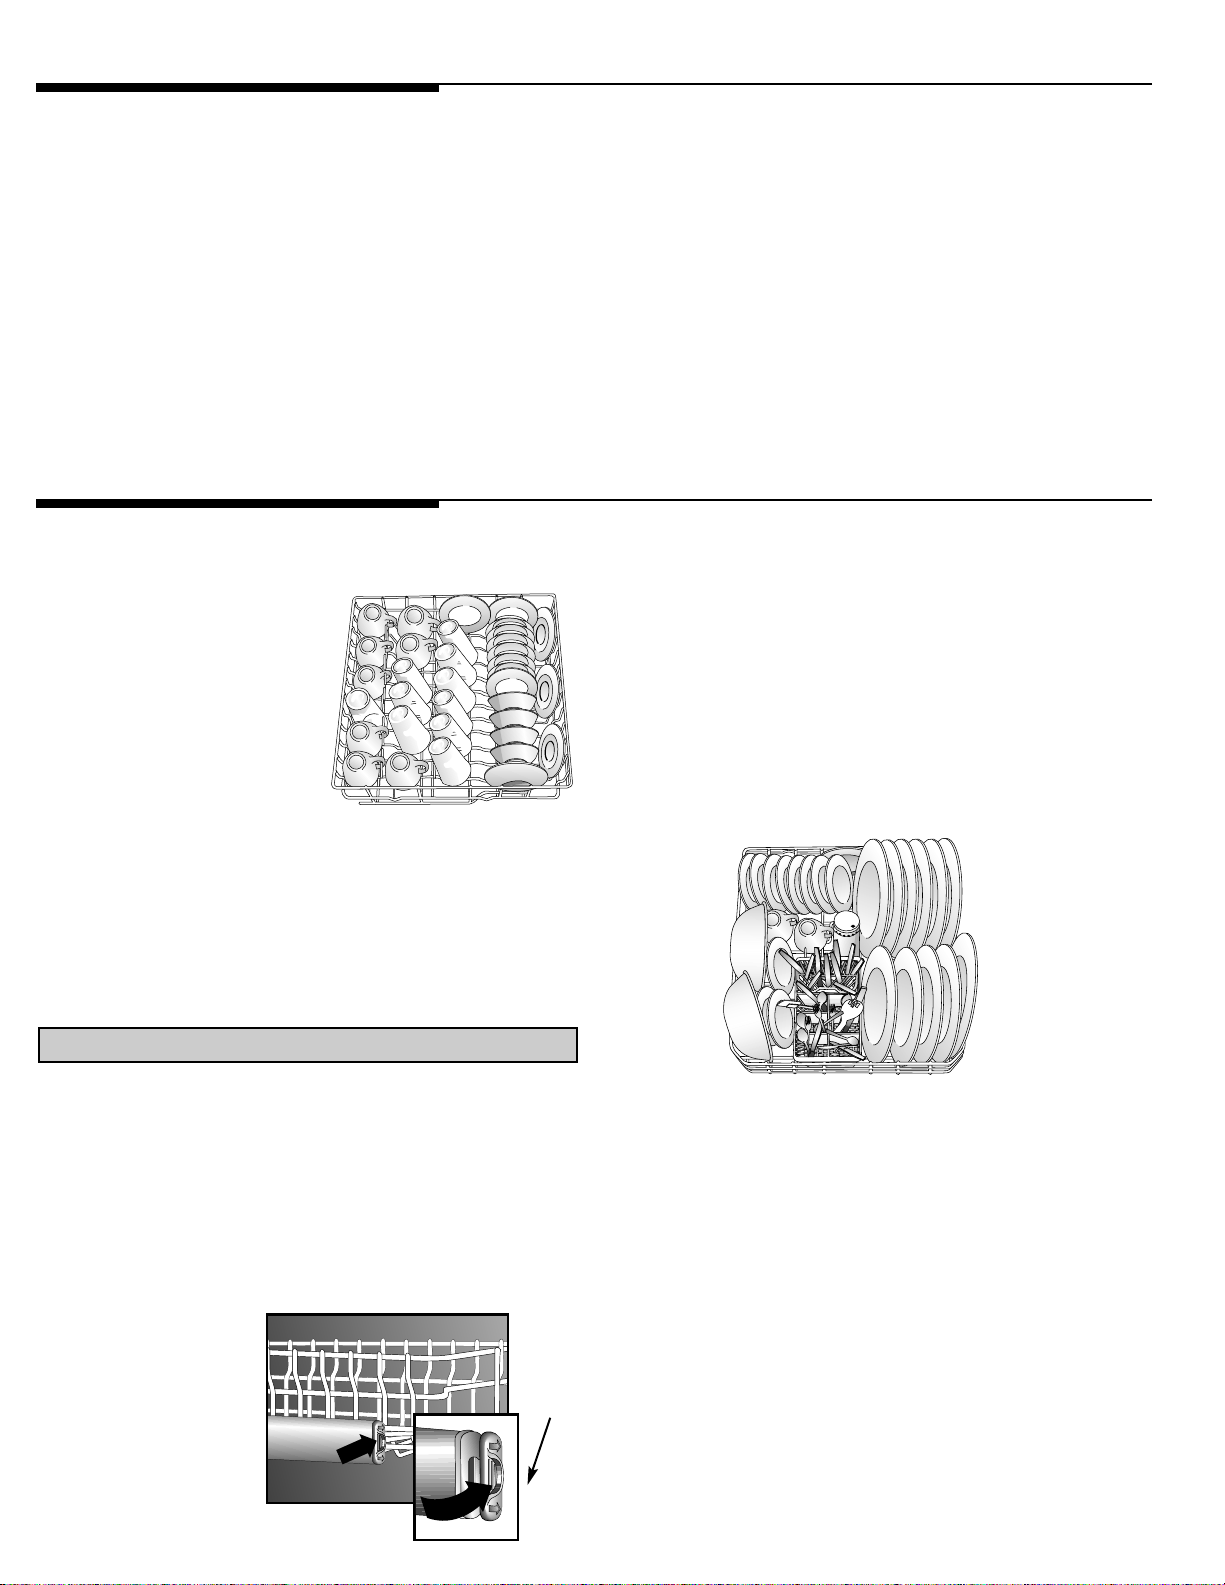
Upper Rack (Features vary slightly by model.)
This rack is designed to hold
glasses, cups, small plates,
bowls, cookware, etc. Small
plates or bowls should be loaded
with soiled surfaces facing the
center of the rack. Do not load
glasses over tines.
• Place all items in the racks so they are separated and facing the center of the racks.
• Wedge flat, lightweight items next to the silverware basket
or along the sides and back of the racks.
• Load items so they do not rest over the wash tower located in the center of the lower rack.
• Avoid blocking the upper and lower spray arms by not
allowing items to extend beyond the racks.
• Place glasses in any row of the upper rack for proper cleaning and rinsing. Do not load glasses over the tines.
Lower Rack
(Features vary slightly by model.)
Large items may be placed in any convenient location in this
rack. Keep soiled surfaces facing the center of the rack.
The back of this rack accommodates a row of dinner plates or
two rows of smaller plates. Serving bowls and large pans fit
across the front of the rack or on the left side.
The Twin Shelf (select models) on
the right side of the upper rack
folds up or down. Fold it down
to hold long-handled knives, spatulas and spoons or short items like cups or juice glasses. Fold it
up for taller items like bowls, plates, etc.
10 Place Settings
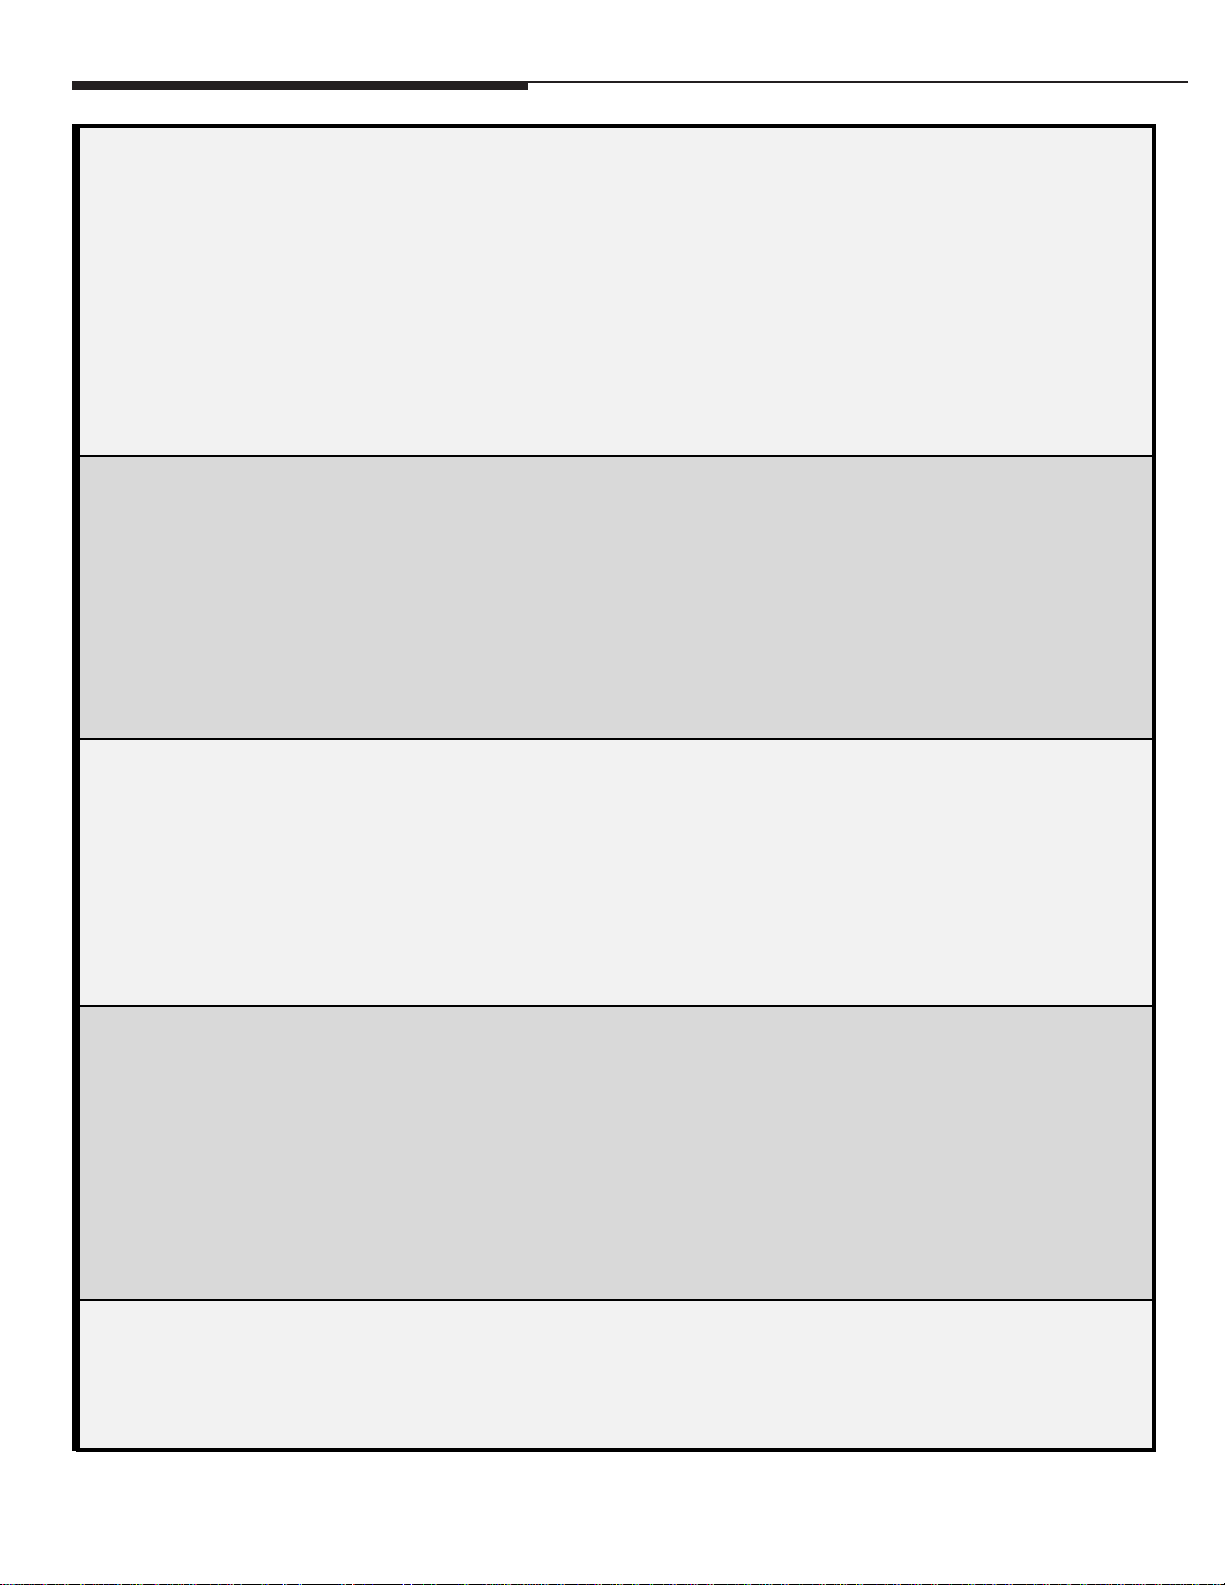
Removing the Upper Rack
The upper rack can be removed when tall or oversized items
need to be loaded into the lower rack.
Note: Avoid resting items over the center wash tower.
To remove:
• Roll the upper rack 1/3 to 1/2 of the way out.
• Remove the plastic rack stop from the end of each track.
To remove each plastic rack stop, push inward (towards
the rack) on the ridged area of the rack stop. The rack
stop will snap open and can be easily removed by
pulling straight out. Take care to support the track
while removing rack stops.
• Roll the rack all the
way out of the
track and remove
from the dishwasher.
• Reverse the above
procedure to replace
the upper rack into
the dishwasher.
Rack
Stop
Folding tines (select models) located on the right side, provide loading flexibility for large-shaped items.
10 Place Settings
Removable Utensil Basket
(Features vary slightly by model.)
For best cleaning results, prevent items from nesting together
by placing some items in the basket with handles up and some
with handles down. Load knives, handles up, through the
slots in the covered section when closed (select models).
Be sure that thin, finely pointed items do not extend through
the basket. This could block the lower wash arm.
Small, lightweight items like baby spoons and plastic measuring spoons should be placed in the covered section (select models) of the basket for washing.
2
Page 4

Operating Steps
Step 1 Hot Water
For best results, the incoming water temperature should be
120°-140° F. Check the water temperature by turning on the
hot water faucet nearest the dishwasher and letting it run
into a glass in the sink. Place a candy thermometer in the
glass and check the temperature once it has stopped rising. If
it is below 120° F have a qualified person raise the water
heater setting.
If the outside temperature is unusually low, or if your water
travels a long distance from the water heater to the dishwasher, you may want to turn on the hot water faucet at the
sink and allow it to run until the water is hot. This assures
that the initial fill of water is hot.
Step 2 Detergent
Use a detergent designed specifically for use in an automatic
dishwasher. Other types (laundry, hand soap, etc,) will cause
oversudsing. Be sure to use fresh detergent and store it in a
cool, dry place (not under the sink).
The amount of detergent to use depends on the water hardness measured in grains per gallon* (gpg) and the amount of
soil on the dishes. Generally detergent amounts should be
increased for harder water and heavier soil. Refer to the following chart for detergent usage recommendations.
Do not use detergent with Rinse Only. Leave the detergent
lid open when running Rinse Only.
If the water hardness is 13 gpg or harder, it is difficult to
achieve good results with any dishwasher. The solution is a
mechanical water softener to improve water quality, detergent effectiveness, and to protect the dishwasher parts from
the damage that hard water deposits may cause.
Step 3 Rinse Aid
A liquid rinse aid dispenser (select models) automatically
releases a measured amount of rinse aid into the final rinse
portion of each cycle.
To fill the dispenser, turn the cap counterclockwise to open.
Pour the rinse aid into the reservoir. Replace the cap and be
sure it is securely in place before closing the dishwasher
door. Check the dispenser monthly and refill as needed.
Rinse aid is available in solid form for models without a liquid dispenser. When using a solid rinse aid, fasten it to the
back right corner of the lower rack. Purchase more rinse aid
when the material dissolves and the container is empty.
Step 4 Starting the
Dishwasher
• After loading the dishwasher and adding detergent, set
the control knob to the desired cycle and press the appropriate buttons.
• Press the door until it latches. The cycle will begin with a
drain prior to a fill.
Step 5 Adding a
Forgotten Item
For best cleaning, the forgotten item should be added early
in the cycle.
1. Unlatch the door.
2. Wait for the water circulation to stop.
3. Open the door and add the item.
4. Close and latch the door.
5. The cycle resumes automatically.
Water Hardness* Soil Level Detergent Amount**
(per cup dosage)
Soft (0-4 gpg) Light Soil 5 teaspoons
Normal Soil 6 teaspoons
Heavy Soil 8 teaspoons
Medium (5-9 gpg) Light Soil 7 teaspoons
Normal Soil 8 teaspoons
Heavy Soil 10 teaspoons
Hard (10-12 gpg) Light Soil 9 teaspoons
Normal Soil 10 teaspoons
Heavy Soil 12 teaspoons
3
*Your local water utility or state university extension service can tell you the
degree of water hardness in your area.
** Add recommended amount of detergent to both compartments for Heavy or
Normal wash cycles, and to the main
cup only for the Light wash cycle.
Page 5

Cycles at a Glance
Your dishwasher offers various cycles and options to adjust
to specific load conditions. Please refer to the chart below.
CYCLE WATER USESEQUENCE
Heavy Wash
for heavily soiled dishes and pots & pans
Normal Wash
for normally
soiled dishes
Light Wash
for lightly
soiled dishes
Rinse Only
for rinsing dishes waiting for a full load
3 Prewashes,
Main Wash,
Purge,
Rinse
2 Prewashes,
Main Wash,
Purge,
Rinse
Prewash,
Main Wash,
Purge,
Rinse
Rinse
Off
10.0 gallons
8.0 gallons
6.0 gallons
2.0 gallons
Options and Indicator Lights:
Temp Boost(select models) checks the main wash and final
rinse water temperatures and will extend the heating and
water circulation until proper water temperature is reached.
Select Temp Boost to ensure proper water temperature for
activating detergent and dissolving greasy food soils.
Extended Wash (select models) provides a water temperature check early in the main wash and also in the final rinse
of the cycle. If necessary, the heating element turns on and
the cycle extends until the water is heated to the proper temperature. Select Extended Wash for best results when wash-
ing loads with tough food soils.
Heated Dry turns the heating element on to improve drying
results. Selecting Heated Dry Off (select models) or Energy
Saver (select models) turns the element off to save energy.
Towel drying may be needed with these selections.
Delay Hours (select models) can be used to delay the start
of the cycle for up to 6 hours. The Delay Start indicator light
glows when the dishwasher is set for a delay start.
The Water Heating indicator light (select models) illumi-
nates when the cycle is being extended to heat the water to
the proper temperature.
Care & Cleaning
Interior
The dishwasher interior is normally self-cleaning.
Periodically check the bottom of the dishwasher tub to see if
any large particles have not gone through the strainer portion of the module.
Wipe the edge of the inner door liner to remove any food soil
splashes which occurred during loading.
The color from some tomato-based food soils has been
known to occasionally adhere to today's dishwasher tubs,
causing temporary discoloration. To help prevent this, when
washing a load of dishes soiled with tomato sauce:
• Scrape excess tomato-based food soils off of dishes, prior
to loading. Do not prewash the dishes, however.
• Run the Heavy Wash cycle.
Exterior
The front of the dishwasher can be cleaned with a soft damp
cloth and liquid spray cleaner. Do not use abrasive powders
or cleaning pads.
Storage/Moving
Fill both detergent cups with a fresh-scented dishwasher
detergent or baking soda and select the Normal Wash cycle.
Allow the dishwasher to complete the cycle. Then turn the
water supply off and drain the dishwasher. To drain, start any
cycle as all cycles begin with a drain. Listen for the drain to
complete, then open the door to interrupt the cycle prior to the
fill. Operate the drain twice to ensure most of the water is
removed. Last, disconnect the electrical supply and prop open
the door. (See Important Safety Instructions, #14, page 1).
To Change the Door Panel Insert
(select models)
WARNING: Disconnect electrical power to the dishwasher before changing the door panel insert.
1. Using a Phillips screw driver, remove either the right or
left-hand door trim strips by removing the three screws.
2. Grasp the panel insert(s) and gently flex out slightly. Slide
panel(s) out about two inches. Continue to flex insert
panel(s) enough to remove them. Use care, edges may be
sharp.
3. Select color and reinstall panel(s). Place insert panel(s)
(notched corners at the top) on the inside of the lower
door panel trim. Make sure the upper notched corners of
the insert(s) are under the control panel.
4. Reinstall the side trim.
4
Page 6

What Can and Cannot Be Washed
Most tableware, cookware and flatware can safely be washed in your dishwasher. If you have any doubts about an
item, check with the manufacturer
Material
Aluminum
Cast Iron
China/
Stoneware
Crystal
Furnace Filters
Glass
Gold-Plated
Flatware
Pewter, Tin
Plastics
Stainless
Steel
Dishwasher Safe?
Yes, except anodized.
No
No, if antique or handpainted.
No, if antique or delicate crystal.
Not recommended.
Yes
No
No
Yes, top rack.
Yes
Special Information
High water temperature and detergents may affect finish.
Seasoning will be removed, and iron will rust.
Always check manufacturer’s recommendation before washing. Antique,
hand-painted or over-the-glaze patterns may fade. Gold leaf may discolor.
Always check manufacturer’s recommendation before washing. Some types
of leaded crystal may etch with repeated washings.
May leave a dingy deposit or stain on dishwasher interior.
Milkglass can yellow with repeated dishwasher washing.
Will discolor.
Always check manufacturer’s recommendation before washing. Plastics vary
in their capacity to withstand high water temperatures and detergents.
Disposable plastic items are not dishwasher safe for this reason.
Run a Rinse Only cycle if not washing immediately. Prolonged contact with
foods containing salt, vinegar, milk products or juice could damage finish.
Sterling
Silver or
Silverplate
Wooden Items
No, if has commercial
“darkening”.
No
Always check manufacturer’s recommendation before washing. Run a Rinse
Only cycle if not washing immediately. Prolonged contact with food containing salt, acid or sulfide (eggs, mayonnaise and seafood) could damage finish.
Commercial “darkening” may be removed by detergent.
Wood may warp, crack or discolor.
5
Page 7
Before You Call
Check these points to help save you time and money.
Dishwasher Will Not Fill:
• Be sure door is latched securely.
• Be sure the water is turned on.
• Check that the dial/pad is properly selected for a cycle.
• Allow time for select models to drain/pause before filling.
• Check your home‘s circuit breaker or fuse box.
• Check inlet hose for a kink.
• Check water valve inlet for sediment and clean if necessary.
Dishwasher Will Not Drain/Water In Tub Bottom:
• If connected to a food waste disposer, be sure the knock-out is removed from the disposer inlet.
• Be sure the drain hose is elevated at least 32” so water cannot siphon back into the tub.
• Check for food obstruction in the drain or disposer.
• Check drain hose for a kink.
• Check your home‘s circuit breaker or fuse box.
• Check that the cycle is completed.
Detergent Cup Is Not Empty:
• Check that the cycle is completed.
• Be sure dispenser is not blocked by a dish or utensil.
• Use fresh detergent stored in a cool, dry place.
Dishwasher Seems Noisy:
• A water valve hiss during fill is normal.
• Water circulation sounds are normal.
• A ticking noise is a normal timer sound.
• A thumping sound may be a wash arm bumping an item that is extending beyond the racks.
• Chopping or grinding sounds may be heard during drain as the internal food disposer chops hard items like fruit
seeds, nuts, etc.
• Humming during the drain is normal.
• A snap noise is the detergent cup lid hitting the door liner when the dishwasher door is opened at the end of the
cycle. This is normal.
• Proper installation affects the noise level.
Cycle Takes Too Long (Heating Delay Light Stays On, select models):
• AccuTemp™or Temp Boost (select models) has been selected and the cycle is extended if the water temperature is low.
• Check to see that the incoming water temperature is 120-140° F (49-60° C).
Dishwasher has an Odor:
• Run dishes being held in the dishwasher through a Rinse Only cycle.
• Many dishwashers have a “new” smell when first installed. This will dissipate with use.
• Dishwasher may not be draining properly. (See “Will Not Drain” section.)
• For a strong odor place baking soda in both sides of the detergent cup. Select Light Wash and allow the water to
circulate for about 10 minutes. Interrupt the cycle by unlatching the door and let it stand overnight. Restart the
dishwasher by latching the door and allow it to complete the cycle. Acommercial dishwasher cleaning product such
as Jet-Dry Dishwasher Cleaner* can also be used.
Dishwasher Leaks:
• Check that the dishwasher is level. (Refer to the Installation Instructions.)
• Suds can cause the dishwasher to overflow. Measure the detergent carefully and use only detergents designed for
use in a dishwasher. Less detergent is needed in soft water. Try another brand if sudsing continues.
• Follow directions closely on how to add a forgotten item (pg. 3).
• Be sure the Rinse Aid (select models) lid is securely attached and is not leaking.
* Brand names are trademarks of the respective manufacturer.
Continued on next page.
6
Page 8
Before You Call
Food Soil Remains on Dishes:
• Check water temperature (pg 3).
• Run hot water at the sink before starting the dishwasher.
• Select AccuTemp
• Check water hardness and adjust detergent amount accordingly (pg. 3).
• Use fresh detergent stored in a cool dry place.
• Select proper cycle for the soil level.
• Load items so they do not block the wash arms or center tower (pg. 2).
• Load the utensil basket with some handles up and some down to prevent nesting.
• Do not place glasses over tines.
• Prior to loading, scrape off burnt on foods and wipe the starchy film from utensils used with pasta, rice and oatmeal. These soils require more energy than the rest of the load to clean.
Glasses Are Cloudy/Spotted:
• Always use a rinse aid.
• Check water temperature, incoming water should be 120°-140° F (49-60° C).
• Confirm that the cloudiness is removable by soaking the item in white vinegar for approximately 5 minutes. If
removed, the problem is due to hard water. Adjust detergent amount being used to match water hardness (pg. 3).
Be sure detergent is fresh, stored properly and is a high quality brand.
• If cloudiness is not removable, it is etching. This is an erosion of the surface of the glassware and can be caused by
water that is too hot, from using too much detergent or by prewashing. Detergent needs food soil to act upon. If
etching has occurred, the glassware is permanently damaged. To prevent further etching, adjust the detergent
amount to match the water hardness, stop prewashing, and be sure incoming water is not greater than 140° F
(60° C). Use water heating options only when incoming water temperature is below 120° F (49° C).
™
or Temp Boost (select models).
Items Washed In The Dishwasher Or The Dishwasher Tub Itself Is Stained/Discolored:
• Aluminum utensils or pans can leave marks when they rub against other items. Leave a slight space between items.
• Iron deposits in the water can leave a yellow, brown or orange film on dishes or the dishwasher tub. A filter may be
needed, check with a water treatment company. RoVer Rust Remover* (part no. 057961)** can be used to remove
rust. Do not use RoVer along with dishwasher detergent. Fill both cups with RoVer and complete a Normal Wash
cycle. Follow with a short wash cycle using dishwasher detergent.
• Color from tomato sauces may adhere to the tub (pg. 4). If light staining has occurred, leave the door open to oxidize the stain away. For removal of heavier stains, try a citric acid containing dishwasher cleaning product such as
Glisten* (part no. 18001017)**. Change dishwasher detergent and be sure to use a dishwasher detergent that contains chlorine to better fight staining.
Items Not Properly Dried/Moisture Is Present On The Dishwasher Interior After The Dry Cycle:
• Be sure Heated Dry is selected.
• Water droplets may form on the inner door as part of the drying process.
• Always use a rinse aid like Jet Dry* or Cascade Rinse Aid*.
• Check water temperature (pg. 3).
• Select AccuTemp
• Increase detergent amount to match water hardness (pg. 3).
• Load properly (pg. 2)
• Plastic and teflon items are difficult to dry because the porous surface tends to collect water droplets. Towel drying
may be necessary.
• Glasses and cups with concave bottoms hold water and require towel drying.
™
or Temp Boost (select models).
Dishware is Chipped:
• Load dishes according to instructions so they do not strike each other (pg. 2).
• Washing antique china/crystal in the dishwasher is not recommended.
• Do not load glasses over the tines.
• Do not overload.
* Brand names are trademarks of the respective manufacturer.
** Call 1-800-688-8408 to order.
7
Page 9

Portable Dishwashers
Connecting a Portable
1. Turn on the faucet at the sink until the water runs hot.
Turn off the faucet.
2. Pull the connector from the recess in the back of the dishwasher.
3. Press down on the thumb release and lift the connector
onto the faucet.
4. Remove pressure from the thumb release and tug slightly on
the connector to be sure it is securely in place.
5. Turn the hot water on full force.
6. Check that the sink drain is open so water from the dishwasher can drain properly.
7. Pull the electrical cord from the recess. Plug it into a properly grounded outlet.
8. Select the proper cycle and options for the load and start
the dishwasher.
Disconnecting a Portable
1. Be sure to turn the water supply off and press the pressure
release button BEFORE removing the connector.
2. Press down on the thumb release and remove the connector from the faucet.
3. Push the connector and hoses back into the cabinet recess.
4. Unplug the electrical cord and push it back into the cabinet recess.
Thumb Release
Faucet
Connector
Pressure
Release
Button
Care and Cleaning
Clean the cabinet and laminate top with a soft damp cloth
and liquid spray cleaner.
To polish and protect the laminate top, use a product specifically developed for countertops such as Hope’s Countertop
Polish*.
Apply an appliance wax to the cabinet once a year.
Note:To protect the laminate top from damage, do not
use it as a cutting surface or resting place for warm/hot
cookware. Do not slide ceramic or other hard or abrasive objects across the surface.
*Brand names are the trademarks of the respective manufacturer.
8
Page 10

®
MAYTAG • 403 W . 4thStreet N. • P.O. Box 39 • Newton, Iowa 50208
9
Litho U. S. A.
Page 11

Lave-vaisselle de Commande de Teporisateur
GUIDE DE
L’UTILISATEUR
Votre satisfaction étant très importante pour nous, veuillez lire attentivement
ce guide. Vous y trouverez des instructions sur le
fonctionnement et l’entretien appropriés de votre
nouvel appareil.
Économiser temps et argent. En cas d'anomalie,
consulter la section «Avant de contacter un dépanneur». L'information qu'on y trouve permet de
résoudre plusieurs problèmes simples sans recourir
à un dépanneur.
Pour toute question, nous écrire (inclure le modèle,
le numéro de série et le numéro de téléphone) ou
téléphoner au:
Maytag Appliances Sales Company
Attn: CAIR
P.O. Box 2370
Cleveland, TN 37320-2370 États-Unis
1-800-688-2002 CANADA
(Lundi-vendredi, 8 h à 8 h, heure de l’est)
Internet : http://www.maytag.com
®
Center
Table des Matieres
Mesures de Sécurité . . . . . . . . . . . . . . 11
Conseils de Chargement. . . . . . . . . . . 12
Conseils d’Utilisation. . . . . . . . . . . . . . 13
Les Contrôles en Bref . . . . . . . . . . . . . 14
Nettoyage et Entretien . . . . . . . . . . . . . 14
Matériaux allant ou non
au lave-vaisselle . . . . . . . . . . . . . . . . 15
Avant d’appeler. . . . . . . . . . . . . . . . 16-17
Lave-Vaisselle Portatif. . . . . . . . . . . . . 18
Guía del Usuario . . . . . . . . . . . . . . . . . 19
Page 12

Pour Assistance Ultérieure
ATTENTION:
Vérifier ,auprès de l’installateur,que l’appareil est bien relié à la terre pour éviter toute
possibilité d’électrocution.Veiller également à lire les Mesures de Sécurité Importantes, avant d’utiliser l’appareil.
Veuillez noter les numéros de modèle et de série de votre
lave-vaisselle dans les espaces prévus à cet effet ci-dessous.
Ces renseignements se trouvent dans le coin supérieur
gauche de l’ouverture de la cuve. Ils vous seront nécessaires
pour toute correspondance ou tout appel concernant votre
lave-vaisselle.
Numéro de modèle
Numéro de série
Par ailleurs, veuillez conserver votre récépissé de vente ou
votre chèque oblitéré. Une preuve de la date d’achat d’origine est exigée pour toutes prestations de garantie.
En raison des perfectionnements constamment
apportés à nos lave-vaisselle, il se peut qu’une le lavevaisselle soit modifiée sans que ce guide soit révisé.
Mesures de Sécurité
Les appareils portant le symbole sont homologués par les
Laboratoires des Assureurs, Inc. Ceux portant le monogramme
CSA sont homologués par l’Association Canadienne de
Normalisation. Cependant, comme avec tout appareil utilisant
de l’électricité et comportant des pièces mobiles, il existe toujours des possibilités de danger.
ATTENTION:
selle, suivre des précautions de base, dont les
suivantes:
1. Lire toutes les instructions avant d’utiliser le lavevaisselle.
2. Utiliser le lave-vaisselle uniquement pour l’usage pour
lequel il est prévu.
3. Débrancher le lave-vaisselle ou en couper l’alimentation
avant toute réparation ou intervention de dépannage.
4. Pour éviter tout risque d’électrocution, les côtés et le
dos de l’appareil doivent être enclos et les panneaux
avant en place avant que le lave-vaisselle ne soit mis
sous tension. Vous référer au manuel de mise en service pour une mise à la terre correcte.
5. Brancher l’appareil sur un circuit d’alimentation correctement protégé et d’une puissance nominale suffisante pour éviter une surcharge électrique.
6. Ne pas laisser les enfants utiliser le lave-vaisselle ni
jouer avec, dedans ou autour.
7. Pour réduire les risques de blessures lors du chargement du lave-vaisselle, placer tout objet pointu ou
coupant manche vers le haut. Veiller également à le
charger de façon à ce qu’il ne puisse pas abîmer le joint
de la porte.
Lors de l’utilisation du lave-vais-
8. Ne pas toucher l’élément chauffant situé au fond de la
cuve durant le lavage ou à la fin de ce dernier. Il est
alors chaud.
9. Utiliser uniquement des détergents ou agents de rinçage
spécialement conçus pour les lave-vaisselle. Ne jamais
utiliser de savon, de détergent pour la lessive ni de détergent pour la vaisselle à la main. Garder ces produits hors
de portée des enfants.
10. Ne pas vous asseoir ni monter sur la porte ni les
paniers, ni autrement les abîmer.
11. Dans certaines conditions, il peut y avoir production
d’hydrogène dans un système de chauffage d’eau qui
n’est pas utilisé pendant 2 semaines ou plus.
L’hydrogène est un gaz explosif. Si votre système de
chauffage d’eau n’est pas utilisé pendant une telle durée,
ouvrir tous les robinets d’eau chaude et laisser couler
l’eau pendant plusieurs minutes. Ceci élimine toute accumulation d’hydrogène. Ce gaz étant inflammable, ne pas
fumer ni utiliser de flamme vive pendant ce temps.
12. Ne pas laver d’articles en plastique dans le lave-vaisselle, sauf s’ils sont indiqués comme pouvant aller au
lave-vaisselle. Dans le cas d’articles en plastique ne portant pas d’indications précises à cet effet, se référer aux
recommandations du fabricant.
13. Ne pas modifier les mécanismes de commande.
14. Pour éviter tout risque d'enfermement et suffocation
d'un enfant, on doit toujours démonter la porte du
compartiment de lavage lorsqu'on retire un vieux lavevaisselle du service ou lorsqu'on le met au rebut.
15. Faire preuve de prudence lors du déchargement du
lave-vaisselle. La vaisselle est brûlante lorsqu’elle est
retirée peu de temps après que le cycle se soit terminé.
11
CONSERVER CES INSTRUCTIONS
Page 13

Conseils de Chargement
• Enlever les os et les gros morceaux de nourriture ainsi que
l’excès de graisse ou de substances grasses.
• Gratter ou faire tremper les récipients dans lesquels des aliments ont brûlé car ils exigent davantage d’énergie que le
reste de la vaisselle pour donner des résultats satisfaisants.
• Gratter les taches tenaces laissées par les aliments à base de
tomates
• Si le lave-vaisselle s’évacue dans un broyeur à déchets, veiller à
ce que celui-ci soit totalement vide avant de mettre le lave-vaisselle en marche afin d’assurer la bonne évacuation de l’eau.
• La moutarde, la mayonnaise, le vinaigre, le citron et autres
aliments acides peuvent entraîner la formation de rouille
ou la décoloration de l’acier inoxydable. Rincer aussi rapidement que possible.
Panier supérieur
(les caractéristiques peuvent varier en fonction du modèle)
Ce panier est conçu pour les verres, les tasses, les petites assiettes, les bols, les récipients, etc. Les bols se placent dans la
partie arrière du panier
supérieur, où ils sont maintenus fermement en place. Ne
pas placer les verres sur les
tiges de retenue.
La tablette Twin Shelf (modèles sélectionnés), du côté droit
du panier supérieur, se relève
et se rabat, permettant plus de
flexibilité dans le chargement
d’une variété d’articles. La rabattre pour maintenir en place
couteaux à long manche, spatules et cuillères ou encore des
articles de peu de hauteur tels que tasses ou verres à jus de
fruit. La relever pour permettre de placer des articles plus
hauts tels que bols, assiettes, etc.
10 Couverts
Pour Retirer le Panier Supérieur
On peut retirer le panier supérieur si on désire placer des articles de plus grandes dimensions dans le panier du bas.
Remarque: Ne pas disposer d’articles par-dessus la
tour centrale de lavage.
Pour retirer le panier supérieur:
• Faire rouler le panier vers soi jusqu’à ce qu’il soit retiré
environ du tiers ou de la moitié.
• Pour retirer la butée en plastique installée à l’extrémité de
chaque glissière, pousser vers l’intérieur (vers le panier)
sur la moulure de la
butée. La butée s’ouvre
d’un coup sec; il est alors
facile de l’enlever en
tirant vers soi. S’assurer
de bien soutenir la glissière au moment d’enlever les butées.
Butée
• Les féculents comme les pommes de terre, les pâtes, le riz et
le gruau d’avoine exigent davantage d’énergie que le reste
de la vaisselle pour donner des résultats satisfaisants.
• Placer les articles dans les paniers de façon à ce qu’ils ne soient
pas collés les uns aux autres et les tourner vers le centre.
• Les pièces légères et plates peuvent être glissées à côté du panier
à couverts ou le long des côtés et de l’arrière des paniers.
• Charger la vaisselle de façon à ce qu’aucun article ne repose
sur le dessus de la tourelle au centre du panier inférieur.
• Éviter de bloquer les bras gicleurs inférieur et supérieur.
Pour cela, ne rien laisser dépasser des paniers.
• Pour assurer un lavage et un rinçage corrects, placer les verres en rangées dans l’un ou l’autre panier. Ne pas placer les
verres sur les tiges de retenue.
• Tirer complètement le panier vers soi afin de le retirer du
lave-vaisselle.
• Pour remettre le panier supérieur en place, inverser l’ordre
des instructions précitées.
Panier inférieur
(les caractéristiques peuvent varier en fonction du modèle)
Les articles de grandes dimensions se placent à l’endroit qui
semble le mieux convenir dans le panier inférieur. Tourner la
surface sale vers le centre.
L’arrière de ce panier peut
recevoir une rangée de grandes
assiettes ou deux rangées de
petites assiettes. Les saladiers et
les casseroles peuvent se à l’avant de ce panier ou se à placer
l’gauche.
Les tiges de retenue rabattables
qui se trouvent sur la droite
offrent un maximum de flexibilité pour le chargement d’articles
de grandes dimensions.
10 Couverts
Panier à couverts amovible
(les caractéristiques peuvent varier en fonction du modèle)
Pour de meilleurs résultats de lavage, éviter de disposer les
ustensiles l’un sur l’autre. En ce sens, placer la poignée de
certains ustensiles vers le bas, et d’autres vers le haut.
Charger les couteaux en disposant la poignée vers le haut par
les fentes de la section recouverte lorsqu’elle est fermée (certains modèles).
S’assurer que les ustensiles minces pointus ne dépassent pas du
panier, sinon ils risquent de bloquer le mouvement du bras
inférieur de lavage.
Placer les petits ustensiles légers, comme les cuillers de bébé et
les cuillers à mesurer de plastique dans la section recouverte
(certains modèles) du panier durant le lavage.
12
Page 14

Conseils d’Utilisation
Pas 1 Eau Chaude
Pour obtenir les résultats voulus, elle doit être entre 49° et
60° C (120° et 140° F). Vérifier la température de l’eau, ouvrir
le robinet d’eau chaude le plus proche du lave-vaisselle et faire
couler l’eau dans un verre, dans l’évier. Mettre un thermomètre à confiserie dans le verre, attendre que la température cesse de monter et lire la température indiquée. Si l’eau
est à une température inférieure à 49° C (120° F), faire régler le
thermostat de votre chauffe-eau par une personne qualifiée.
Si la température est particulièrement basse à l’extérieur ou
si la distance est grande entre le chauffe-eau et le lave-vaisselle, il se peut que ouvrir le robinet d’eau chaude de l’évier et le
laisser couler jusqu’à ce que l’eau sorte très chaude. Ceci s’assure
que le remplissage initial de l’eau est chaud.
Pas 2 Détergent
Utiliser du détergent conçu spécifiquement pour les lave-vaisselle. Tout autre type de détergent (pour la lessive, savon, etc.)
produira trop de mousse. Veiller à utiliser du détergent frais et
à l’entreposer dans un endroit frais et sec (pas sous l’évier).
La quantité de détergent à utiliser dépend de la dureté de
l’eau (mesurée en grains par 3,8 L (gallons), ou gpg*) et du
degré de saleté de la vaisselle. En règle générale, plus l’eau
est dure et plus la vaisselle est sale, plus il faut de détergent.
Référez-vous au diagramme suivant pour des recommendations détergent d’utilisation.
Ne pas utiliser de détergent avec le cycle Rinse Only
(rinçage seulement). Laisser le couvercle du distributeur
ouvert lors de l’exécution du cycle Rinse Only (rinçage
seulement).
Si la dureté de l’eau est de 13 grains ou plus, il est difficile
d’obtenir de bons résultats, quel que soit le lave-vaisselle. La
seule solution est alors d’ajouter un produit adoucissant
l’eau pour améliorer la qualité de l’eau, l’efficacité du détergent, et protéger les pièces du lave-vaisselle contre les dommages causés par les dépôts d’eau dure.
Pas 3 Agent de Rinçage
Le distributeur d’agent de rinçage (certains modéles) ajoute
automatiquement la quantité de produit voulue au rinçage
final du cycle.
Pour remplir le distributeur, dévisser le capuchon et verser
de l’agent de rinçage dans le réservoir. Revisser le capuchon
et s’assurer qu’il soit bien en place avant de fermer la porte
du lave-vaisselle. Vérifier le distributeur tous les mois et le
remplir selon le besoin.
Des agents de rinçage sont disponibles en forme solide pour
les modèles qui ne comportent pas un distributeur de liquide. Lors de l'utilisation d'un agent de rinçage solide, on
doit le fixer dans l'angle arrière/droit de la grille inférieure.
Il suffit de le remplacer après dissolution du produit, lorsque
le réceptacle est vide.
Pas 4
Mise en Marche du
Lave-Vaisselle
• Une fois le lave-vaisselle chargé et le détergent ajouté, mettre le sélecteur sur le cycle désiré et appuyer sur le ou les
touches bouton appropriées.
• Appuyer sur la porte jusqu’à ce qu’elle se verrouille. Le cycle
commence par une période de vidange avant de se remplir.
Pas 5 Ajout d’un Article
Oublié
Pour des résultats optimums, il est préférable que l’article oublié
soit ajouté aussi tôt que possible une fois le cycle commencé.
1. Déverrouiller la porte.
2. Attendre que le bruit de circulation de l’eau ait cessé.
3. Ouvrir la porte et ajouter l’article.
4. Fermer la porte et la verrouiller.
5. Le cycle reprend automatiquement.
Dureté de l’eau* Niveau de Sale Quantité de Détergent**
(par dosage de tasse)
Douce (0 à 4 grains) Peu Sale 5 cuillère café
Tache Normal 6 cuillère café
Tache Rebelle 8 cuillère café
Moyenne (5 à 9 grains) Peu Sale 7 cuillère café
Tache Normal 8 cuillère café
Tache Rebelle 10 cuillère café
Dure (10 à 12 grains) Peu Sale 9 cuillère café
Tache Normal 10 cuillère café
Tache Rebelle 12 cuillère café
13
*Le service local de distribution d’eau ou les
services connexes de l’université peuvent
vous indiquer le degré de dureté de l’eau
dans votre région.
**Ajoutez a recommandé la quantité de détergent aux deux compartiments pour les cycles
d’Heavy or Normal de lavage, et seulement
au compartiment principal pour le cycle Light
de lavage.
Page 15

Les Contrôles en Bref
Votre lave-vaisselle offre plusieurs cycles et options permettant d’adapter le cycle au type de vaisselle. Le tableau cidessous donne leur description.
PROGRAMME
Heavy Wash (Lavage
rigoureux)
casseroles et ustensiles,
et vaisselle très souillée
Normal Wash (Lavage
normal)
normalement souillée
Light Wash (Lavage
léger)
pour vaisselle peu
souillée
Rinse Only (Rinçage
seulement)
préliminaire, en attente
d'une charge pleine
pour
pour vaisselle
pour rinçage
PHASES
SUCCESSIVES
3 Prélavages,
Lavage principal,
Purger,
Rinçage
2 Prélavages,
Lavage principal,
Purger,
Rinçage
Prélavage,
Lavage principal,
Purger,
Rinçage
Rinçage
Arrêt
CONSOMMATION D'EAU
37,9 litres
10,0 gallons
30,3 litres
8,0 gallons
22,7 litres
6,0 gallons
7,6 litres
2,0 gallons
Options et Témoins Lumineux:
Temp Boost (température précise) (certains modèles) avec
contrôle de la température de l'eau durant les opérations de
lavage principal et rinçage final; le chauffage et la circulation
de l'eau seront prolongés jusqu'à ce que la température
adéquate soit atteinte. Sélectionner l'option Temp Boost (tem-
pérature précise) pour obtenir la température appropriée qui
permet à l'eau d'activer détergent et de dissoudre les graisses.
L’option Extended Wash (lavage prolongé) (certains mod-
èles) vérifie la température de l’eau dans les premiers
instants du lavage principal et durant le rinçage final du
cycle. Au besoin, l’élément chauffant s’allume et le cycle se
poursuit jusqu’à ce que l’eau atteigne la température appropriée. Choisir cette option pour obtenir de meilleurs résultats
lorsque la vaisselle comporte des taches rebelles.
Heated Dry (séchage avec chauffage) la mise en oeuvre d'un
élément chauffant améliore le résultat du séchage. Lorsqu'on
choisit de désactiver le Heated Dry Off (séchage sans
chauffage) (certains modèles) ou lorsqu'on choisit l'option
Energy Saver (d'Économie d'énergie) (certains modèles)
l'élément chauffant n'est pas utilisé, ce qui économise l'énergie. Il peut alors être nécessaire d'effectuer un essuyage
manuel avec un torchon.
Delay Hours (lavage différé )(certains modèles) cette fonction permet de différer la mise en marche du lave-vaisselle
jusqu'à 6 heures. Le témoin «mise en marche différée» s'illumine lorsque cette fonction a été sélectionnée.
Le voyant Water Heating (chauffe-eau) s’allume lorsque le
cycle se prolonge pour chauffer l’eau jusqu’à la température
appropriée.
Nettoyage et Entretien
Intérieur
L’intérieur de la lave-vaisselle se nettoie normalement de luimême. Il est cependant recommandé de vérifier périodiquement,
au fond de la cuve, la présence éventuelle de grosses particules
qui pourraient ne pas être passées dans le filtre du module.
Il est également recommandé d’essuyer le rebord de l’habillage intérieur de la porte pour enlever les liquides qui s’y sont
écoulés au cours du chargement du lave-vaisselle.
La couleur laissée par certains aliments à base de tomates adhère
parfois à la cuve des lave-vaisselle modernes, causant ainsi une
décoloration. Pour aider à prévenir ceci, procéder comme suit
avant de laver de la vaisselle tachée de sauce tomate:
• Gratter l’excédent de sauce tomate sur les plats avant de les
mettre dans le lave-vaisselle.
• Faire fonctionner sous le cycle Heavy Wash (gros lavage).
Extérieur
L’avant du lave-vaisselle peut être nettoyé à l’aide d’un linge
doux humide et de produit nettoyant liquide à vaporiser. Ne
pas utiliser de poudres ni de tampons à récurer.
Remisage ou Déménagement
Remplir les deux distributeurs d’un détergent à parfum de
fraîcheur ou de bicarbonate de soude et sélectionner le cycle
Normal Wash (lavage normal). Laisser le lave-vaisselle ter-
miner le cycle. Fermer le robinet d’alimentation en eau et vider
le lave-vaisselle. Faire fonctionner la portion vidange du
cycle une deuxième fois pour éliminer la plus grande partie
de l’eau. Finalement, débrancher l’alimentation électrique et
ouvrir la porte. (Consulter l’importante consigne de sécurité
14 à la page 11).
Changement du panneau de la porte
(modèles sélectionnés)
1. À l’aide d’un tournevis cruciforme, enlever les trois vis qui
2. Tenir le rebord du panneau et le plier doucement vers l’ex-
3. Sélectionner la couleur désirée et remettre le panneau ou
4. Remettre la bande de garniture latérale et la fixer en place.
DANGER : Débrancher le lave-vaisselle ou le couper
du secteur avant de changer le panneau de la porte.
retiennent les bandes de garniture de droite ou de gauche
de la porte et enlever celles-ci.
térieur. Glisser le panneau vers l’extérieur sur environ 2
po (5 cm). Continuer à plier le panneau pour en permettre le retrait. Agir avec précaution, car les rebords peuvent
être coupants.
les deux panneaux en place. Les placer (coins évidés vers
le haut) sous la moulure inférieure. Veiller à ce que les
coins évidés se trouvent sous le tableau de commande.
14
Page 16

Matériaux Allant ou Non au Lave-Vaisselle
La plupart des plats, assiettes, couverts et récipients servant à la cuisson et à la consommation d’aliments peuvent
être lavés sans danger dans votre lave-vaisselle. Néanmoins, en cas de doute sur un article, vérifier avec le fabricant.
Matériau
Aluminum
Fonte
Porcelaine/Faïence
Cristal
Filtres de Fournaise
Verre
Étain, Bois
Couverts plaqués or
Plastique
Acier Inoxydable
Convient au
Lave-Vaisselle ?
Oui, sauf l’aluminium
anodisé .
Non
Non s’il s’agit de
porcelaine ancienne
ou peinte à la main.
Non s’il s’agit de
cristal ancien ou de
cristal fin et fragile.
Non recommandés.
Oui
Non
Non
Oui, panier
supérieur
Oui
Renseignements Utiles
L’eau à température élevée et le détergent peuvent en abîmer le fini.
Le «culottage» de la fonte se trouve enlevé et le fer rouille.
Toujours vérifier les recommandations du fabricant avant de laver. La porcelaine
ancienne, peinte à la main et les motifs rapportés peuvent perdre de leur netteté.
Les dorures peuvent ternir.
Toujours vérifier les recommandations du fabricant avant de laver. Un voile peut
se former sur certains types de cristal de plomb après des lavages répétés.
Peut laisser une tache ou un dépôt poisseux sur la paroi intérieure du lave-vaisselle.
L’opaline jaunit lorsqu’elle est lavée au lave-vaisselle de façon répétée.
Ternit.
Toujours vérifier les recommandations du fabricant avant le lavage. Les plastiques
résistent différemment aux températures élevées de l’eau et aux détergents. Les articles de plastique jetables ne conviennent pas au lave-vaisselle pour cette raison.
Utiliser le cycle «Rinse Only» (rinçage d’attente) si les articles ne vont pas être
lavés immédiatement. Le contact prolongé avec les aliments contenant du sel, du
vinaigre, des produits laitiers ou du jus de fruits peut en abîmer le fini.
Argent our Plaqué
Argent
Fer Blanc
Non s’il a été « patiné »
artificiellement.
Non
Toujours vérifier les recommandations du fabricant avant de mettre au laver.
Utiliser le cycle «Rinse Only» (rinçage d’attente) si les articles ne vont pas être lavés
immédiatement. Le contact prolongé avec les aliments acides ou contenant du sel
ou du soufre (oeufs, mayonnaise, fruits de mer) peuvent en abîmer le fini. La
«patine» artificielle peut être éliminée par le détergent.
Le bois peut gauchir, se fendre ou ternir.
15
Page 17

Avant d’Appeler
Vérifier ces points pour épargner temps et argent si:
Le lave-vaisselle ne se remplit pas :
• S’assurer que la porte est fermée à fond et verrouillée.
• Vérifier que l’arrivée d’eau est bien ouverte.
• Vérifier que la touche du cycle désiré est bien enfoncée ou que le sélecteur est sur le cycle désiré.
• Attendre, dans le cas de certains modèles, que le lave-vaisselle se vidange ou fasse une pause avant de se remplir.
• Vérifier le disjoncteur ou la boîte à fusibles.
• Vérifier que le boyau d’arrivée d’eau n’est pas tordu.
• Vérifier si l’électrovanne est obstruée par des sédiments et nettoyer s’il y a lieu.
Le lave-vaisselle ne s’évacue pas/Eau au fond de la cuve :
• Si le lave-vaisselle est relié à un broyeur à déchets, vérifier que l’obturateur du broyeur a bien été enlevé.
• Veiller à ce que le boyau de vidange soit surélevé d’au moins 81,3 cm (32 po) de façon à ce que l’eau ne soit pas resyphonée dans
la cuve.
• S’assurer qu’aucune nourriture ne vient obstruer le boyau ou le broyeur.
• Vérifier que le boyau de vidange n’est pas tordu.
• Vérifier le disjoncteur ou la boîte à fusibles.
• Vérifier que le cycle est bien terminé.
Le compartiment de détergent ne se vide pas :
• Vérifier que le cycle est bien terminé.
• Vérifier que l’ouverture du distributeur n’est pas bloquée par un plat ou un ustensile.
• Utiliser du détergent frais et le ranger dans un endroit frais et sec.
Le lave-vaisselle semble bruyant :
• Le sifflement de l’électrovanne pendant le remplissage est normal.
• Les bruits de circulation d’eau sont normaux.
• Un tic-tac est normal et provient de la minuterie.
• Un cognement peut être dû au bras gicleur qui tappe dans un article qui dépasse des paniers.
• Un bruit de broyage ou de hachage peut se produire pendant l’évacuation de l’eau lorsque le broyeur à déchets intégré broie des
articles durs comme des pépins, des noix, etc.
• Il est normal qu’il se produise un bourdonnement pendant l’évacuation de l’eau.
• Un claquement provient du couvercle du compartiment du distributeur de détergent qui tappe dans l’habillage intérieur de la
porte lorsque la porte du lave-vaisselle est ouverte à la fin du cycle. Cela est normal.
• Le niveau de bruit dépend de la qualité de la mise en service.
Le cycle est trop long (le voyant «Heating Delay» reste allumé, certains modèles) :
• Les options AccuTemp
pérature de l’eau est basse.
• Vérifier si le chauffe-eau est réglé de façon à assurer une eau entre 49° et 60° C (120° et 140° F) au robinet.
Le lave-vaisselle a une odeur :
• Démarrer le cycle Rinse Only (rinçage seulement) lorsqu’on désire laisser la vaisselle dans le lave-vaisselle.
• Un lave-vaisselle nouvellement installé a une odeur de «neuf». Celle-ci disparaît à l’usage.
• Le lave-vaisselle ne s’évacue pas correctement. (Voir sous «Le lave-vaisselle ne s’évacue pas».)
• Si l’odeur est forte, verser du bicarbonate de soude de part et d’autre du distributeur de détergent. Sélectionner le cycle Light
Wash (lavage léger) pour faire circuler l’eau pendant environ 10 minutes. Interrompre le cycle en déverrouillant la porte et laisser tel quel pendant une nuit. Redémarrer le lave-vaisselle en verrouillant la porte et laisser terminer le cycle. Il est aussi possible d’utiliser un nettoyeur de lave-vaisselle, comme le produit Jet-Dry Dishwasher Cleaner*.
Fuites :
• Vérifier que le lave-vaisselle est de niveau. (Voir le manuel de mise en service.)
• La mousse peut faire déborder le lave-vaisselle. Mesurer le détergent avec soin et utiliser uniquement du détergent pour lave-
vaisselle. Une eau douce nécessite moins de détergent. Essayer une autre marque de détergent si le détergent utilisé continue à
produire trop de mousse.
• Veiller à procéder selon la marche à suivre indiquée pour ajouter un article oublié. (Voir page 13.)
• S’assurer que le couvercle de l’agent de rinçage (certains modèles) est bien fixé et que ne fuit pas.
™
(température précise) or Temp Boost (certains modèles) ont été choisies et le cycle se prolonge si la tem-
*Les noms de produits sont des marques déposées de leurs fabricants.
Voir page suivante
16
Page 18

Avant d’Appeler
Il reste des résidus de nourriture sur la vaisselle :
• Vérifier la température de l’eau. (Voir page 13).
• Faire couler le robinet d’eau chaude de l’évier avant de mettre le lave-vaisselle en marche.
• Sélectionner le option AccuTemp
• Vérifier la dureté de l’eau et modifier la quantité de détergent en conséquence. (Voir page13).
• Utiliser du détergent frais, qui a été entreposé dans un endroit frais et sec.
• Sélectionner le cycle qui convient pour le degré de saleté.
• Charger la vaisselle de façon à ce que rien ne vienne bloquer les bras gicleurs ni la tourelle centrale. (Voir page 12).
• Charger le panier à couverts en tournant certains manches vers le haut et d’autres vers le bas pour éviter qu’ils ne s’emboîtent les
uns dans les autres.
• Ne pas placer les verres sur les tiges de retenue.
• Avant de charger, gratter les aliments brûlés et essuyer la pellicule amidée des ustensiles utilisés par les pâtes, le riz et le gruau.
Ces taches sont plus difficiles à laver que les autres saletés.
Le lave-vaisselle laisse des taches ou un voile sur les verres :
• Toujours utiliser un agent de rinçage.
• Vérifier la température de l’eau. L’eau du robinet doit être entre 49° et 60° C (120° et 140° F).
• Confirmer qu’il est possible d’enlever la nébulosité de l’article en le trempant pendant environ 5 minutes dans du vinaigre blanc.
Si cela réussit, le problème est causé par une eau dure. Ajuster la quantité de détergent utilisée pour l’adapter à la dureté de l’eau
(page 13). S’assurer que le détergent est frais, bien rangé et de haute qualité.
• Si la nébulosité persiste, il s’agit alors de gravure. Une telle érosion d’une surface vitrée peut être causée par une eau trop chaude,
par une utilisation d’une trop grande quantité de détergent ou par le prélavage (le détergent agit sur la saleté). S’il s’agit de
gravure, le verre est endommagé de manière permanente. Pour empêcher la progression de l’érosion, ajuster la quantité de détergent selon la dureté de l’eau, ne plus prélaver et s’assurer que la température de l’eau chaude n’est pas supérieure à 140 °F
(60 °C). Utiliser les options de chauffage de l’eau seulement lorsque la température de l’eau est inférieure à 120 °F (49 °C).
Les articles lavés dans le lave-vaisselle ou la cuve du lave-vaisselle sont tachés/décolorés :
• Les plats ou ustensiles en aluminium peuvent laisser des marques lorsqu’ils entrent en contact avec d’autres articles. Laisser un petit
espace entre les articles.
• Le fer dans l’eau peut laisser une pellicule jaune, brune ou orange sur la vaisselle ou la cuve du lave-vaisselle. Un filtre peut être
nécessaire,vérifier avec une compagnie spécialisée comme. RoVer Rust Remover** peut être utilisé pour enlever la rouille. Ne
pas utiliser RoVer avec détergent. Remplir les deux compartiments à détergent de RoVer. Faire au lave-vaisselle un cycle
«Normal» complet. Faire suivre d’un cycle de lavage plus court.
• Les taches de nourriture à base de tomate peuvent adhérer à la cuve (page 14). S’il apparaît des taches légères, laisser la porte
ouverte pour oxyder la tache. Pour enlever des taches rebelles, essayer un nettoyeur de lave-vaisselle à base d’acide citrique, tel
que Glisten**. Utiliser un autre détergent pour lave-vaisselle et s’assurer d’en utiliser un qui contient du chlore pour mieux combattre les taches.
La vaisselle ne sèche pas correctement / on peut remarquer d’humidité à l’intérieur du lave-vaisselle aprés le cycle. :
• Vérifier que l’option «Heated Dry» (séchage á chaud) a été sélectionnée
• Il peut se former des gouttelettes d’eau sur l’intérieur de la porte durant le séchage.
• Toujours utiliser un agent de rinçage, tel que Jet Dry* ou Cascade Rinse Aid*.
• Vérifier la température de l’eau. (Voir page 13).
• Sélectionner le option AccuTemp
• Augmenter la quantité de détergent utilisée en fonction de la dureté de l’eau. (Voir page 13).
• Charger correctement le lave-vaisselle. (Voir page 12).
• Les articles de plastique et de téflon sont difficiles à sécher parce que leur surface poreuse tend à retenir les gouttelettes d’eau.
Au besoin, sécher au moyen d’un linge.
• Les verres et les tasses à fond concave peuvent retenir l’eau. Il peut être nécessaire de les sécher au moyen d’un linge.
La vaisselle se trouve ébréchée :
• Veiller à ce que la vaisselle soit chargée tel que recommandé, de façon à ce que les articles ne se cognent pas. (Voir page 12).
• Il n’est pas recommandé de laver de la porcelaine ou du cristal ancienne dans le lave-vaisselle.
• Ne pas placer les verres sur les tiges de retenue.
• Ne pas trop charger le lave-vaisselle.
™
(température précise) ou Temp Boost (certains modèles).
™
(température précise) ou Temp Boost (certains modèles).
*Les noms de produits sont des marques déposées de leurs fabricants.
**RoVer Rust Remover, numéro de pièce 057961, Glisten, numéro de pièce 18001017
Pour commander, téléphoner au 1-800-688-2002.
17
Page 19

Lave-vaisselle Portatif
Raccordement D’un
Lave-Vaiselle Portatif
1. Ouvrir le robinet d’eau chaude jusqu’à ce que l’eau soit
très chaude. Fermer le robinet.
2. Sortir le dispositif de raccordement du logement à
l’arrière du lave-vaisselle tel qu’indiqué.
3. Appuyer sur la bague de dégagement et emboîter le dis-
positif de raccordement sur le robinet.
4. Cesser d’appuyer sur la bague de dégagement et tirer
légèrement sur le dispositif de raccordement pour vérifier
qu’il est bien enclenché.
5. Ouvrir le robinet d’eau chaude à fond.
6. S’assurer que l’écoulement de l’évier n’est pas bouché de
façon à ce que l’évacuation de l’eau puisse se faire correctement.
7. Sortir le cordon d’alimentation de son logement et le
brancher sur une prise murale correctement reliée à la
terre.
8. Sélectionner le cycle approprié et mettre le lave-vaisselle
en marche.
Déconnecter le lave-vaisselle
1. Veiller à couper l’alimentation en eau et appuyer sur le
bouton de réduction de la pression AVANT d’enlever le
dispositif de raccordement.
2. Appuyer sur la bague de dégagement et enlever le dispositif de raccordement du robinet.
3. Mettre le dispositif de raccordement et les boyaux dans le
logement dans la carrosserie.
4. Débrancher le cordon d’alimentation et le mettre dans le
logement dans la carrosserie.
Bague de
Bague de
dégagement
dégagement
Dispositif de
raccordement
Bouton de
réduction de
la pression
Nettoyage et Entretien
Nettoyer la carrosserie et le dessus en laminé avec un linge
doux et un produit nettoyant à vaporiser.
Pour faire briller et protéger le dessus en laminé, utiliser un
produit spécial pour les comptoirs tel que Hope’s
Countertop Polish*.
Appliquer de la cire pour appareils électro-ménagers environ une fois par an.
REMARQUE: Afin d’éviter que le dessus ne se trouve
endommagé, ne pas l’utiliser comme surface de
coupe ni y placer des plats chauds. Ne pas faire glisser d’articles en céramique ou autres objets abrasifs
sur la surface.
*Les noms de produits sont des marques déposées de leurs fabricants.
18
Page 20

Lavaplatos del Control del Temporizador
GUÍA DEL
USARIO
Su satisfacción es muy importante para nosotros, por lo tanto lea
detenidamente esta guía. En ella encontrará instrucciones sobre el funcionamiento y
mantenimiento apropiado de su nuevo electrodoméstico, además de una lista de lo que puede y
no puede ser lavado en un lavaplatos automático.
Ahorre tiempo y dinero. Si tiene algún problema, le
sugerimos consultar la sección “Antes de Solicitar
Servicio”. Ha sido diseñada para ayudarle a resolver
problemas básicos antes de consultar a un técnico.
Si tiene preguntas, comuníquese (incluya el número
de modelo y su número telefónico) por escrito o por
teléfono a:
Maytag Appliances Sales Company
Atención: CAIR
P.O. Box 2370
Cleveland, TN 37320-2370
1-800-688-9900 EE.UU.
1-800-688-2002 CANADÁ
(de lunes a viernes; de 8 am a 8 pm hora del Este)
Internet: http://www.maytag.com
®
Center
Índice
Instrucciones de Seguridad . . . . . . . . 20
Consejos de Cargar. . . . . . . . . . . . . . . 21
Pasos de Operación . . . . . . . . . . . . . . 22
Un Vistazo a los Controles . . . . . . . . . 23
Cuidado y Limpieza. . . . . . . . . . . . . . . 23
Lo Que Puede y No Puede ser Lavado24
Antes de Llamar . . . . . . . . . . . . . . . 25-26
Lavaplatos Portàtil. . . . . . . . . . . . . . . . 27
Page 21

Para Solicitar Servicio en el Futuro
ADVERTENCIA:
Consulte con el instalador para asegurarse de que la unidad esté conectada a tierra correctamente para evitar posibles descargas eléctricas. Asegúrese de leer las Instrucciones
Importantes de Seguridad personal antes de comenzar a usar la lavaplatos.
Por favor anote el número de modelo y el número de serie en
los espacios provistos a continuación. Estos números se
encuentran en la esquina superior izquierda de la abertura
de la tina. Son necesarios para cualquier correspondencia o
llamadas de servicio respecto a su lavaplatos.
Número de Modelo
Número Serie
Además, conserve su comprobante de venta o el cheque cancelado. Si requiere servicio bajo la garantía, es necesario presentar prueba de la fecha original de compra.
En un esfuerzo continuo para mejorar la calidad de
nuestras lavaplatos, podría ser necesario hacer cambios a la unidad sin hacer revisiones a esta guía.
Instrucciones Importantes de Seguridad
Los productos con un sello están clasificados por
Underwriter’s Laboratories, Inc., los que tienen una etiqueta
CSA están clasificados por Canadian Standards Association.
Sin embargo, al igual que con cualquier otro equipo que usa
electricidad y piezas movibles, siempre existe un riesgo
potencial.
ADVERTENCIA:
siga las precauciones básicas, incluyendo las
siguientes:
1. Lea todas las instrucciones de seguridad antes de usar la
lavaplatos.
2. Use la lavaplatos sólo para lo que fue diseñada.
3. Desconecte la energía eléctrica antes de prestarle servicio.
4. Para evitar riesgos de descargas eléctricas, los lados y la
parte posterior deben estar encerradas y los paneles
delanteros deben estar sujetos antes de aplicar la energía
eléctrica a la lavaplatos. Consulte las instrucciones de
instalación para ver los procedimientos de conexión a tierra adecuados.
5. Conéctela a un circuito de suministro de energía con el régimen correcto, debidamente protegido y del tamaño adecuado para evitar sobrecargas eléctricas.
6. Nunca se debe permitir que los niños operen, o jueguen
dentro, con o alrededor de esta lavaplatos.
7. Para reducir el riesgo de lesiones cuando cargue artículos
para lavar, los artículos filosos o puntiagudos deben colocarse con los mangos hacia arriba. También, cargue los
artículos filosos de modo que no dañen el sello de la puerta.
Cuando use la lavaplatos,
8. No toque el elemento calentador que se encuentra en la
parte inferior de la tina durante el ciclo ni cuando se termine, ya que estará caliente.
9. Use solamente detergentes y aditivos de enjuague diseñados para una lavaplatos automática. Nunca use
jabón, detergente de ropa o detergente para lavado a
mano en la lavaplatos. Mantenga estos productos fuera
del alcance de los niños.
10. No se siente, se pare, ni maltrate la puerta ni las rejillas de
la lavaplatos.
11. Bajo ciertas condiciones, se puede producir gas hidrógeno
en un sistema de agua caliente que no se haya usado en
dos semanas o más. El gas hidrógeno es explosivo. Si el
sistema de agua caliente no se ha usado por un período de
tiempo así de largo, abra todas las llaves de agua caliente
y deje que el agua fluya por cada una por varios minutos.
Esto liberará el gas hidrógeno que se haya acumulado. Ya
que el gas es inflamable no fume ni use una llama abierta
durante este proceso.
12. No lave artículos de plástico a menos que estén marcados
“seguro para lavar en lavaplatos” o un equivalente. Para
los artículos de plástico sin marcar, consulte las recomendaciones del fabricante.
13. No altere los controles.
14. A fin de evitar atrapamiento y riesgo de asfixia acciden-
tal de un niño, siempre retire la puerta del compartimiento del lavado cuando ya no use más un lavavajillas
antiguo o lo descarte.
15. Tenga cuidado cuando descargue la lavaplatos. Los
platos estarán calientes si se descarga un poco después
de terminar el ciclo.
CONSERVE ESTAS INSTRUCCIONES
20
Page 22

Consejos de Cargar
• Retire los huesos o partículas grandes de alimentos. Quite
las cantidades excesivas de grasa/sustancias aceitosas.
• Raspe o deje en remojo la vajilla que tenga quemaduras de
alimentos pues necesita más energía para limpiarla que el
resto de los artículos.
• Limpie los residuos de alimentos con base de tomate.
• Si el lavavajillas está conectado a un triturador de deshechos, asegúrese de que el triturador esté vacío antes de
poner en funcionamiento el lavavajillas. Esto ayuda a
facilitar el desagüe.
• La mostaza, mayonesa, vinagre, limón y otros alimentos ácidos pueden causar oxidación o decoloración del acero inoxidable. Enjuague estas piezas tan pronto como sea posible.
Canastilla Superior (Las características
pueden variar ligeramente dependiendo del modelo.)
En esta canastilla se colocan los vasos, tazas, platos pequeños,
tazones, utensilios de cocina, etc.
Los tazones se acomodan firmemente en la mitad derecha trasera de
la canastilla superior. Los platillos o
tazones deben colocarse con las
superficies sucias dirigidas hacia el
centro de la canastilla. No cargue
vasos sobre los dientes.
La tabla doble (Twin Shelf) (modelos
selectos) que se encuentra en el lado
derecho de la parrilla superior se dobla hacia arriba o hacia abajo.
Dóblela hacia abajo para colocar cuchillos con mango largo, espátulas y cucharas o artículos cortos como tazas o vasos de jugo.
Dóblela hacia arriba para artículos altos como tazones, platos, etc.
Cubiertos para
10 Personas
• El almidón de tales alimentos como las papas, fideos,
arroz y harina de avena requieren más energía para ser
limpiados que el resto de la vajilla.
• Al colocar los artículos en las canastillas asegúrese de que queden separados y dirigidos hacia el centro de las canastillas.
• Coloque los artículos livianos y planos junto a la canasta de los
cubiertos o en los lados y en la parte trasera de las canastillas.
• Coloque los artículos de modo que ellos no obstruyan la
torre de lavado situada en el centro de la canastilla inferior.
• Evite bloquear los brazos rociadores superior e inferior no
dejando que los artículos sobresalgan de las canastillas.
• Coloque los vasos en cualquier fila de la canastilla superior para su limpieza y enjuague apropiado. No coloque los
vasos sobre las púas.
Canastilla Inferior
(Las características pueden variar ligeramente dependiendo del modelo.)
Los artículos grandes pueden ser colocados en cualquier ubicación conveniente en esta canastilla. Mantenga las superficies sucias dirigidas hacia el centro de la canastilla.
En la parte trasera de esta canastilla se puede colocar una fila
de platos de comer o dos filas de
platos más pequeños. Los tazones
de servir y sartenes también
pueden colocarse en la parte
delantera de la canastilla o en la
parte izquierda.
Las púas plegables (modelos
selectos) ubicadas en el lado derecho, facilitan la ubicación de los
artículos grandes.
Cubiertos para
10 Personas
Remoción de la Parrilla
Superior
La parrilla superior puede quitarse cuando se necesite cargar
artículos altos o demasiado grandes en la parrilla inferior.
Nota: Evite colocar artículos que descansen sobre el
centro de la torre de lavado.
Para Quitarla:
• Saque la tercera parte o la mitad de la parrilla superior.
• Quite el tope de plástico de la parrilla en cada extremo del carril. Para quitar cada uno de los topes de plástico, empuje hacia
adentro (en dirección de la parrilla) en el área acanalada del tope
de la parrilla. El tope de la parrilla se abrirá y podrá sacarlo fácilmente jalándolo hacia afuera en forma recta. Tenga cuidado de
sostener el carril mientras saca los topes de la parrilla.
• Saque completamente la
parrilla del carril y retírela
de la lavaplatos.
• Realize el procedimiento
anterior en orden inverso
para volver a colocar la parril-
21
la superior en la lavaplatos.
Tope de
Parrilla
Canasta de Utensilio
Removible
(Las características pueden variar ligeramente dependiendo del modelo.)
Para obtener los mejores resultados de limpieza, evite que los
artículos queden empalmados colocando algunos artículos
en la canasta con los mangos hacia arriba y otros con los mangos hacia abajo. Cargue los cuchillos con los mangos hacia
arriba a través de los orificios de la sección cubierta (cuando
esté cerrada). Siempre coloque los artículos afilados o puntiagudos con los mangos hacia arriba (modelos selectos).
Asegúrese de que los artículos delgados puntiagudos no se
extiendan a través de la canasta. Esto podría bloquear el
brazo inferior de lavado.
Los artículos pequeños y ligeros tales como cucharas de bebé y
tazas de medir de plástico deben colocarse en la sección cubierta de la canasta (modelos selectos).
Page 23

Pasos de Operación
Paso 1 Agua Caliente
Para obtener mejores resultados, la temperatura del agua de
entrada debe ser 49°- 60° C (120° - 140° F). Verifique la temperatura del agua abriendo la llave de agua caliente más cercana al
lavavajillas y llene un vaso con el agua en el fregadero. Coloque
un termómetro en el vaso y verifique la temperatura cuando ésta
se estabilice. Si es inferior a 49° C (120° F) pida a una persona
calificada que eleve el ajuste del calentador del agua.
Si la temperatura exterior es demasiado baja o si el recorrido
del agua desde el calentador del agua hacia el lavavajillas es
largo, puede que sea necesario abrir la llave del agua caliente
en el fregadero y dejarla correr hasta que salga agua caliente.
Esto asegura que el terraplén inicial del agua es caliente.
Paso 2 Detergente
Use un detergente diseñado específicamente para uso en
lavavajillas automáticos. Otros tipos (detergentes para lavar
ropa, jabón de manos, etc.) producirán demasiada espuma.
Asegúrese de usar detergente fresco y consérvelo en un lugar
fresco y seco (no debajo del fregadero).
La cantidad de detergente que use depende de la dureza del
agua medida en granos por galones* (gpg) y la cantidad de
suciedad de la vajilla. Generalmente las cantidades de detergente deben ser aumentadas para el agua más pesada y para
vajillas más sucias. Refiera a la carta siguiente para las
recomendaciones detergentes del uso.
No use detergente con Rinse Only (solamente enjuague).
Deje la tapa de la taza de detergente abierta cuando use
Rinse Only (solamente enjuague).
Si la dureza del agua es 13 gpg o más dura, es difícil lograr
buenos resultados con cualquier lavavajillas. La solución es
un suavizador de agua mecánico para mejorar la calidad del
agua, la eficacia del detergente y para proteger las piezas del
lavavajillas contra el daño que puedan producir los depósitos del agua dura.
Paso 3 Complemento
Líquido de Enjuague
El distribuidor de agente de enjuague líquido (modelos
selectos) automáticamente distribuye una cantidad medida
de agente de enjuague en la última parte del enjuague final
de cada ciclo.
Para llenar el distribuidor, abra la tapa girándola a la izquierda. Coloque agente de enjuague en el distribuidor. Cierre la
tapa y asegúrese de que esté firmemente colocada antes de
cerrar la puerta del lavavajillas. Revise el distribuidor men-
sualmente y vuelva a llenarlo según sea necesario.
Para los modelos que no tienen un distribuidor de agente de
enjuague líquido se dispone de un agente de enjuague sólido. Cuando use un agente de enjuague sólido, colóquelo en
la esquina derecha trasera de la canastilla inferior. Compre
agente de enjuague adicional cuando el material se disuelva
y el depósito esté vacío.
Paso 4 Arrancar la
Lavavajillas
• Después de cargar la lavavajillas y añadirle el detergente,
coloque la perilla de control en el ciclo deseado y oprima
los opción(es) apropiado(s).
• Oprima la puerta hasta que se enganche. El ciclo comenzará con un drenado antes de llanarse de agua.
Paso 5 Para Añadir un
Artículo Olvidado
El artículo olvidado debe añadirse en los inicios del ciclo
para que quede mejor lavado.
1. Desenganche la puerta.
2. Espere a que se detenga la circulación de agua.
3. Abra la puerta y añada el artículo.
4. Cierre y enganche la puerta.
5. El ciclo se reanuda automáticamente.
Dureza del Agua* Nivel de Sucio Cantidad de Detergente**
(por la dosificación
de la taza)
Blanda (0-3 gpg) Ligero Sucio 5 cucharita de té
Normal Sucio 6 cucharita de té
Pesada Sucio 8 cucharita de té
Mediana (4-9 gpg) Ligero Sucio 7 cucharita de té
Normal Sucio 8 cucharita de té
Pesada Sucio 10 cucharita de té
Dura (10-12 gpg) Ligero Sucio 9 cucharita de té
Normal Sucio 10 cucharita de té
Pesada Sucio 12 cucharita de té
*El departamento local de servicios públicos
de agua o el servicio de extensión de la universidad estatal pueden decirle el grado de
dureza de agua en su región.
**Agregue recomendó la cantidad de detergente a ambos compartimientos para los
ciclos de Heavy o Normal de la colada, y
solamente al compartimiento principal para
el ciclo Light de la colada.
22
Page 24

Un Vistazo de los Controles
Su lavavajillas ofrece varios ciclos y opciones para adaptarse
a las condiciones específicas de la vajilla. Por favor consulte
la tabla siguiente.
CICLO USO DE AGUASECUENCIA
Heavy Wash (Lavado
Pesada)
y sartenes muy sucios
Normal Wash (Lavado
Normal)
suciedad normal
Light Wash (Lavado
Liviano)
ligeramente sucios
Rinse Only (Enjuague
Solamente)
los platos mientras espera
tener una carga completa
para platos, ollas
para platos con
para platos
para enjuagar
Prelavado (3),
Lavado Principal,
Purgar,
Enjuague
Prelavado (2),
Lavado Principal,
Purgar,
Enjuague
Prelavado,
Lavado Principal,
Purgar,
Enjuague
Enjuague,
Apagado
37.9 litros
10 galones
30.3 litros
8 galones
22.7 litros
6 galones
7.6 litros
2 galones
Opciones y Luces Indicadoras:
Temp Boost (Aumento de Temperatura) (modelos selectos)
verifica la temperatura del agua del lavado principal y del
agua del enjuague final y prolongará la calefacción y la circulación del agua hasta que se logre la temperatura de agua
deseada. Seleccione Temp Boost para asegurar la temper-
atura apropiada del agua que active el detergente y disuelva
la suciedad de alimentos grasosos.
Extended Wash (Lavado Prolongado) (modelos selectos) proporciona una revisión de la temperatura del agua al principio del
lavado principal y también en el enjuague final del ciclo. Si es
necesario, el elemento calentador se enciende y el ciclo se prolonga hasta que el agua se caliente a la temperatura adecuada.
Seleccione la opción Extended Wash para obtener los
mejores resultados cuando lave cargas con residuos de alimentos difíciles de quitar.
Heated Dry (secado caliente) pone en marcha el elemento
calefactor para mejorar los resultados del secado. Al seleccionar Heated Dry Off (modelos selectos) o Energy Saver
(modelos selectos) el elemento calefactor se apaga para ahorrar energía. Si se usan estas opciones es necesario secar la
vajilla con una toalla.
Delay Hours (Horas Diferir) (modelos selectos) puede ser
usado para retrasar el comienzo del ciclo hasta 6 horas. La
luz indicadora de Delay Start se ilumina cuando el lavavajillas ha sido programado para Delay Start.
La luz Water Heating (Calentamiento de Agua) (modelos
selectos) se ilumina cuando se prolonga el ciclo para calentar
el agua a la temperatura adecuada.
Cuidado y Limpieza
Interior
El interior de la lavaplatos es normalmente auto limpiable.
Usted debería revisar periódicamente el fondo de la tina de
la lavaplatos para ver si las partículas grandes se atoraron en
la porción del colador del módulo.
Usted debería limpiar el borde del recubrimiento interior de
la puerta para quitar cualquier salpicadura que haya ocurrido durante el cargado.
Se sabe que el color de las suciedades de algunos alimentos
con tomate algunas veces se adhiere en las tinas de las
lavaplatos modernas y causa decoloración. Para ayudar a
evitar que esto suceda, cuando lave una carga con vasijas
sucias con salsa de tomate:
• Retire el exceso de los restos de alimentos con tomate de las
vasijas, antes de cargarlas. Pero no preenjuage las vasijas.
• Arranque el ciclo Heavy Wash (Carga Pesada).
Exterior
El frente de la lavaplatos puede limpiarse con un paño
húmedo suave y limpiador líquido de rocío. No use polvos
abrasivos o almohadillas limpiadoras.
Almacenaje/Mudanza
Llene las dos tazas de detergente con un detergente de
lavaplatos con olor a fresco o con bicarbonato de sodio y
seleccione el ciclo Normal Wash (Carga Normal). Permita
que la lavaplatos termine el ciclo. A continuación, cierre el
23
suministro de agua y drene la lavaplatos. Para drenarla,
arranque cualquier ciclo ya que todos los ciclos comienzan
con un drenado. Escuche para verificar que se ha terminado
el ciclo de drenado y, a continuación, abra la puerta para
interrumpir el ciclo antes del llenado. Haga que funcione el
ciclo de drenado dos veces para asegurarse que la mayor
parte del agua haya sido eliminada. Finalmente, desconecte
el suministro eléctrico y abra la puerta. (Vea Instrucciones
Importantes de Seguridad, No.14, página 20).
Para Cambiar el Inserto del Panel de la Puerta
(modelos selectos)
Advertencia: Desconecte el suministro eléctrico a la
lavaplatos antes de cambiar el inserto del panel de la puerta.
1. Con un desarmador Phillips, retire las tiras del adorno del lado
derecho o izquierdo de la puerta sacando los tres tornillos.
2. Sujete el inserto del panel y suavemente sáquelo un poco.
Deslice el panel hacia afuera aproximadamente 2 pulgadas
(5.08 cm.). Continúe sacando el inserto del panel lo suficiente
para sacarlos. Tenga cuidado, los bordes pueden estar filosos.
3. Seleccione el color y vuelva a instalar el panel. Coloque el
panel del inserto (con las esquinas melladas en la parte superior) en la parte interior del adorno del panel de la puerta
inferior. Cerciórese de que las esquinas melladas superiores
del inserto se encuentren debajo del panel de control.
4. Vuelva a instalar el adorno lateral.
Page 25

Artículos que Requieren un Cuidado
Especial
La mayoría de las vajillas, las baterías de cocina y de los cubiertos pueden lavarse de manera segura en su lavaplatos. Si tiene dudas respecto a algún artículo, consulte al fabricante de dicho artículo.
Material Información Especial
Aluminio
Hierro Forjado
Porcelana y Barro
Crístal
Filtros para Calentadora
Vidrio
Vajillas Enchapadas en oro
Peltre, Estaño
Plásticos
Seguridad en Lavaplatos
Si, excepto el aluminio anodizado.
No
No, si la porcelana es antigua o pintada a mano.
No, si es cristal antiguo o delicado y
ligero.
No se recomienda usar filtros para
calentador.
Sí
No
No
Si, en la parrilla superior.
La alta temperatura y los detergentes pueden afectar el acabado.
Se le caerá el curado y se oxidará.
Siempre revise las recomendaciones del fabricante antes de
lavar. Los patrones antiguos, pintados a mano o por encima del
barniz pueden despintarse. La hoja de oro puede descolorarse.
Siempre revise las recomendaciones del fabricante antes de
lavar. Algunos tipos de cristal de plomo pueden grabarse
después de lavadas repetidas.
Pueden dejar depósitos de color oscuro o manchas en el interior de la lavaplatos.
El vidrio de criolita se volverá amarillo con repetidas lavadas en
lavaplatos.
Se descolorará.
Siempre consulte las recomendaciones del fabricante antes de
lavar. Los plásticos varían en la capacidad de resistencia a temperaturas altas de agua y a los detergentes. Los artículos de
plástico desechables no son seguros para lavarse en la
lavaplatos por esta razón.
Acero Inoxidable
Plata de Ley y
Acero Plateado
Artículos de Madera
Sí
No, si tiene “manchador” comercial.
No
Use un ciclo de Rinse Only (Sólo Enjuague) si no va a lavarse
inmediatamente. El contacto prolongado con alimentos que contienen sal, vinagre, productos lácteos o jugos de frutas pueden
dañar el acabado.
Siempre revise las recomendaciones del fabricante antes de
lavar. Use el ciclo Rinse Only (Sólo Enjuague) si no se lavará
inmediatamente. El contacto prolongado con alimentos que
contienen sal, ácidos o sulfuro (huevos, mayonesa y mariscos)
puede dañar el acabado. El manchador comercial puede disolverse con el detergente.
La madera se puede deformar, quebrar o descolorar.
24
Page 26

Antes de Llamar
Revise estos puntos para ayudar a ahorrar tiempo y dinero:
¿La lavaplatos no se llena?
• Verifique que la puerta esté firmemente enganchada.
• Verifique que el agua esté abierta.
• Revise que la perilla o el botón estén seleccionados apropiadamente para un ciclo.
• De tiempo a los modelos de selección para que drenen y hagan una pausa antes de llenarse.
• Revise el interruptor automático o la caja de fusibles de su casa.
• Revise que la manguera de entrada no esté torcida.
• Revise la entrada de la válvula de agua por posibles sedimentos y límpiela si es necesario.
¿La lavadora no drena/Agua en el fondo de la pila?
• Si está conectada a un triturador de deshechos, verifique que el expulsor se haya quitado de la entrada del triturador.
• Verifique que la manguera de drenaje esté elevada cuando menos 32” (81 cm) de modo que el agua no se pueda devolver a la
tina.
• Revise posibles obstrucciones de alimentos en la alcantarilla o en el triturador.
• Revise que la manguera de drenaje no esté torcida.
• Revise el interruptor automático o la caja de fusibles de su casa.
• Revise que el ciclo haya terminado.
¿La taza de detergente no está vacía?
• Verifique que el ciclo terminó.
• Asegúrese de que el surtidor no esté bloqueado por un plato o un utensilio.
• Use detergente nuevo almacenado en un lugar seco y fresco.
¿La lavaplatos parece ruidosa?
• Un silbido de la válvula de agua durante el llenado es normal.
• Los ruidos de circulación de agua son normales.
• Un ruido de tictac es un sonido normal del cronómetro.
•
Un ruido de trueno puede ser un brazo de lavado golpeando un artículo que se extiende fuera de las parrillas.
• Los ruidos golpeando o moliendo se pueden escuchar durante el drenado ya que el triturador interno de alimentos corta los
artículos duros como semillas de frutas, nueces, etc.
• Un murmullo durante el drenado es normal.
• Un ruido de encajado a presión es la tapa de la taza de detergente pegándole al recubrimiento de la puerta cuando se abre la
puerta de la lavaplatos al final del ciclo. Esto es normal.
• La instalación apropiada tiene que ver con el nivel de ruido.
¿El ciclo se tarda mucho? (La luz de Heating Delay permanece encendida, modelos selectos)
• La opción AccuTemp
y el ciclo se prolonga si la temperatura del agua está baja.
• Revise para ver si la temperatura del agua de entrada está entre 120-140º F (49-60° C).
¿La lavaplatos tiene mal olor?
• Arranque el ciclo Rinse Only (Sólo Enjuague) para las vasijas que están adentro de la lavaplatos.
• Muchas lavaplatos tienen un olor a "nuevo" al principio. Este olor se disipará con el uso.
• Es posible que la lavaplatos no se esté drenando correctamente (vea la sección "No se drena").
• Para eliminar los olores fuertes, utilice bicarbonato de sodio en ambos lados de la taza de detergente. Seleccione el ciclo Light Wash
(Carga Ligera) y deje que el agua circule durante más o menos 10 minutos. Interrumpa el ciclo destrabando la puerta y deje que el
bicarbonato de sodio permanezca toda la noche. Vuelva a arrancar la lavaplatos trabando la puerta y permitiendo que concluya el
ciclo. Otra posible solución es utilizar un producto limpiador de lavaplatos comercial tal como Jet-Dry Dishwasher Cleaner*.
¿La lavaplatos gotea?
• Compruebe que la lavaplatos esté nivelada (consulte las instrucciones de instalación).
• La espuma puede causar que la lavaplatos se desborde. Mida cuidadosamente la cantidad de detergente y utilice solamente deter-
gentes diseñados específicamente para usarse en lavaplatos. Se necesita menos detergente con el agua blanda. Utilice otra marca si
se sigue formando mucha espuma.
• Siga al pie de la letra las instrucciones sobre cómo añadir un artículo olvidado (página 22).
• Cerciórese de que la tapa del aditivo de enjuague (modelos selectos) esté unida firmemente y queno esté goteando.
*Los nombres de marcas son marcas registradas del fabricante respectivo.
™
(Temperatura Exacta) o Temp Boost (Aumento de Temperatura) (modelos selectos) ha sido seleccionada
Continua en la página siguiente.
25
Page 27

Antes de Llamar
¿En las vasijas quedan restos de suciedad de alimentos?
•
Verifique la temperatura del agua (Vea la página 22).
• Deje correr el agua caliente en el fregadero antes de encender la lavaplatos.
• Seleccione AccuTemp
• Revise la dureza del agua y ajuste la cantidad de detergente según sea necesario. (Vea la página 22).
• Use detergente nuevo almacenado en un lugar seco y fresco.
•
Seleccione el ciclo apropiado para el nivel de suciedad.
• Cargue los artículos de modo que no bloqueen los brazos de lavado o la torre del centro. (Vea la página 21).
• Cargue la canasta de utensilios con algunos mangos hacia arriba y otros hacia abajo para evitar que se atoren.
• No coloque los vasos sobre las púas.
• Antes de cargar la lavaplatos, elimine los alimentos quemados y los residuos de almidón de los utensilios que se utilizaron con
pastas, arroz y avena. Estos residuos requieren más energía que el resto de la carga para limpiarse.
¿Están los vasos nublados o manchados?
• Siempre utilice un aditivo de enjugue.
• Revise la temperatura del agua, el agua de entrada debe estar a una temperatura de 120-140º F (49-60° C).
• Verifique que el empañamiento pueda eliminarse remojando el artículo en vinagre blanco durante aproximadamente 5 minutos.
Si se elimina, el problema se debe a la dureza del agua. Ajuste la cantidad de detergente que se está utilizando para igualar la
dureza del agua (página 22). Asegúrese de que el detergente sea nuevo, haya estado almacenado correctamente y que sea de
buena calidad.
• Si el empañamiento no puede eliminarse es debido a que hay corrosión de la superficie. Esto significa que hay una erosión de la
superficie de la cristalería lo que puede resultar del uso de agua demasiado caliente, demasiado detergente o por lavar previamente los artículos (el detergente necesita residuos de alimentos para poder activarse). Si ya hay corrosión de la superficie, significa que la cristalería ya está dañada permanentemente. Para prevenir que haya más corrosión de la superficie, ajuste la cantidad de detergente para igualar la dureza del agua, no lave los artículos previamente y cerciórese de que la temperatura del agua
de entrada no sea superior a 120-140º F (49-60° C). Use las opciones de calentamiento del agua sólo cuando la temperatura del
agua sea inferior a 120-140º F (49-60° C).
¿Están los artículos lavados en la lavaplatos o la tina misma manchados o descolorados?
• Los utensilios o cacerolas de aluminio pueden dejar marcas cuando se talla contra otros artículos,
deje un pequeño espacio entre los artículos.
• El hierro en el agua puede dejar una película amarilla, café o anaranjada en las vasijas o en la tina de la lavaplatos. Puede nece-
sitarse un filtro, revise con una compañía de tratamiento de agua. El Ro Ver Rust Remover (numero de parte 057961)** puede
usarse para quitar óxido. No use RoVer con detergente de lavaplatos. Llene ambas tazas de detergente con RoVer. Disponga un
ciclo de lavado Normal completo. Continúe con un ciclo más corto usando detergente de lavaplatos.
• Es posible que el color proveniente de los productos con base de tomate se adhiera a la tina (página 23). Si se mancha levemente,
deje abierta la puerta para que se oxide y pueda eliminarse la mancha. Para eliminar manchas más difíciles, utilice un ácido cítrico
que contenga un producto de limpieza de lavaplatos tal como Glisten (numero de parte 18001017)**. Cambie el detergente de la
lavaplatos y asegúrese de utilizar un detergente de lavaplatos que contenga cloro para eliminar mejor las manchas.
¿Los artículos no están completamente secos? ¿Hay humedad en el interior de la lavaplatos después del
ciclo de secado?
• Asegúrese que seleccionó Heated Dry.
• Se pueden formar gotas de agua en la parte interior de la puerta como parte del proceso de secado.
• Siempre utilice un aditivo de enjuague tal como Jet Dry* o Cascade Rinse Aid*.
• Revise la temperatura del agua. (Vea la página 22).
• Seleccione AccuTemp
• Aumente la cantidad de detergente para ajustar la dureza del agua. (Vea la página 22).
• Cárguela apropiadamente. (Vea la página 21).
• Los artículos de plástico y de teflón son difíciles de secar debido a que la superficie porosa tiende a acumular gotas de agua.
Puede ser necesario secar estos artículos con una toalla.
• Los vasos de vidrio y las tazas que tienen el fondo cóncavo pueden acumular agua ahí y tal vez sea necesario secarlos con una toalla.
™
(Temperatura Exacta) o Temp Boost (Aumento de Temperatura) (modelos selectos).
™
(Temperatura Exacta) Temp Boost (Aumento de Temperatura) (modelos selectos).
¿Se desportillaron las vasijas?
• Cargue las vasijas de acuerdo a las instrucciones de modo que no se golpeen entre sí. (Vea la página 21).
• No se recomienda lavar en la lavaplatos vajillas antiguas de cristal ni de porcelana.
• No cargue los vasos sobre las agujas.
• No la cargue de más.
* Los nombres de las marcas son las marcas registradas de los fabricantes respectivos.
**Llame al 1-800-688-8408 para hacer el pedido.
26
Page 28

Lavavajillas de Modelo Portàtil
Para Conectar un Modelo
Portàtil
1. Abra la llave del agua del fregadero hasta que salga agua
caliente. Cierre la llave del agua.
2. Jale el conector del hueco que se encuentra en la parte posterior de la lavaplatos.
3. Oprima hacia abajo el liberador manual y levante el
conector a la llave del agua.
4. Elimine la presión del liberador manual y tire ligeramente
del conector para asegurarse de que esté bien puesto en su
lugar.
5. Abra completamente la llave del agua caliente.
6. Revise que el drenaje del fregadero esté abierto para que
el agua de la lavaplatos pueda drenarse correctamente.
7. Jale el cordón eléctrico del hueco. Enchufe el cordón eléctrico en un tomacorriente correctamente conectado a
tierra.
8. Seleccione el ciclo y las opciones correctas de las cargas y
arranque la lavaplatos.
Para Desconectar un Modelo
Portàtil
1. Cerciórese de cerrar el suministro de agua y de oprimir el
botón liberador de presión antes de quitar el conector.
2. Oprima hacia abajo el liberador manual y quite el conector de la llave del agua.
3. Empuje el conector y las mangueras hacia atrás hasta que
queden adentro del hueco del gabinete.
4. Desconecte el cordón eléctrico y empújelo hasta que
quede adentro del hueco del gabinete.
Liberador
Manual
Conector de la
Llave de Agua
Botón Liberador
de Presión
Cuidado y Limpieza
Limpie el gabinete y la parte superior laminada con un paño
suave y húmedo, y con un limpiador en atomizador líquido.
Para pulir y proteger la parte superior laminada, utilice un
producto diseñado específicamente para mostradores tal
como Hope’s Countertop Polish *.
Aplique una cera para electrodomésticos al gabinete una vez
al año.
Nota: Para proteger contra daños la parte superior
laminada, no la use como superficie para cortar ni
para colocar utensilios de cocina tibios o calientes.
No deslice por la superficie objetos de cerámica ni
otros objetos abrasivos o duros.
*Los nombres de las marcas son marcas comerciales de los respec-
tivos fabricantes.
MAYTAG • 403 West Fourth Street North • P.O. Box 39 • Newton, Iowa 50208
Part No. 6 915963 B MCS No. 99002394 Litho U. S. A.
 Loading...