

Page 1
AUTO DRY DRYER
Page 1
Pages 2
Pages 3-4
Pages 5-6
Pages 6-7
Pages 8-9
Pages 9-10
Page 11
SDE/G4000
NOTE:In our continuing effort to improve
the quality of our appliances, it may be
necessary to make changes to the appliance without revising this guide.
IMPORTANT: Keep this guide and the
sales receipt in a safe place for future
reference. Proof of original purchase
date is needed for warranty service.
IMPORTANT: For service and warranty
information, see page 11.
Introduction
Safety
Controls
Operating tips
Care and cleaning
Laundry tips
Before you call
Warranty
A/09/01 Part No. 40139101 http://www.maytag.com MCS No. 22003711 Litho U.S.A.
®
Page 2
Please take the time to complete the registration card and return promptly. If registration card is missing, call Maytag Customer Assistance. When contacting Maytag,
provide product information from serial plate found on upper right-hand corner of door
opening:
Model Number _______________________________________________________
Serial Number (S/N) ___________________________________________________
Purchase Date _______________________________________________________
Dealer Name ________________________________________________________
Dealer Address _______________________________________________________
Dealer Phone ________________________________________________________
Keep this manual and your sales receipt together in a safe place for future reference or if warranty service is required.
For additional questions, please contact us: Maytag Appliances Sales Company,
1-800-688-9900 USA, 1-800-688-2002 Canada, 1-800-688-2080 USA TTY (for deaf,
hearing impaired or speech impaired) Mon.-Fri., 8am-8pm Eastern Time; Internet:
http://www.maytag.com.
Parts and accessories
Purchase replacement parts and additional
accessories by phone. To order accessories
for your Maytag product, call 1-800-688-9900
inside U.S.A., 1-800-688-2080 for U.S. customers using TTY for deaf, hearing impaired
or speech impaired or 1-800-688-2002 for
Canada.
Save time and money
If something seems unusual, please check
“Before you Call” section, which is designed to
help you solve problems before calling service. If you have a question, write or call us
(include model number and phone number) at:
Maytag Appliances Sales Company
Attn: CAIR
®
Center
P.O. Box 2370
Cleveland, TN 37320-2370
U.S. 1-800-688-9900
Canada 1-800-688-2002
U.S. customers using TTY for deaf,
hearing impaired or speech impaired, call
1-800-688-2080.
THANK YOU FOR BUYING A MAYTAG DRYER!
What you need to know about safety instructions
Warning and Important Safety Instructions appearing in this manual are not meant to
cover all possible conditions and situations that may occur. Common sense, caution,
and care must be exercised when installing, maintaining, or operating dryer.
Always contact your dealer, distributor, service agent, or manufacturer about problems
or conditions you do not understand.
Recognize safety symbols, words, labels
DANGER – Immediate hazards which WILL result in severe personal injury or death.
WARNING – Hazards or unsafe practices which COULD result in severe personal
injury or death.
CAUTION – Hazards or unsafe practices which COULD result in minor personal injury
or product or property damage.
DANGER
WARNING
CAUTION
For more information on this and
other Maytag products, visit our Web site
www.maytag.com
or call Maytag Customer Assistance at
1-800-688-9900 (U.S.A.)
1-800-688-2002 (Canada)
1-800-688-2080 (TTY U.S.A. Only)
For your safety, the information in this
manual must be followed to minimize
the risk of fire or explosion or to prevent property damage, personal injury
or death.
–Do not store or use gasoline or other
flammable vapors and liquids in the
vicinity of this or any other appliance.
–WHAT TO DO IF YOU SMELL GAS
• Do not try to light any appliance.
• Do not touch any electrical switch.
• Do not use any phone in your
building.
• Clear the room, building or area of
all occupants.
• Immediately call your gas supplier
from a neighbor’s phone. Follow
the gas supplier’s instructions.
• If you cannot reach your gas supplier, call the fire depar tment.
Installation and service must be performed by a qualified installer, service
agency or the gas supplier.
1
WARNING:
Page 3

SAVE THESE INSTRUCTIONS FOR FUTURE REFERENCE
IMPORTANT SAFETY INSTRUCTIONS
To reduce risk of fire, electric
shock, serious injury, or death
when using your dryer, follow
basic precautions, including the
following:
To reduce risk of fire, electric
shock, serious injury, or death
when using your dryer, follow
basic precautions, including the
following:
4. Before the appliance is removed from
service or discarded, remove the door
to the drying compartment.
5. Do not reach into the appliance if the
drum is moving.
6. Do not install or store this appliance
where it will be exposed to the weather.
7. Do not tamper with controls.
8. Do not repair or replace any part of
the appliance or attempt any servicing
unless specifically recommended in
published user-repair instructions that
you understand and have the skills to
carry out.
9. Do not use fabric softeners or products to eliminate static unless recommended for dryer use by the manufacturer of the fabric softener or product.
10. Clean the lint screen before or after
each load.
11. Keep the area around the exhaust
opening and surrounding areas free
from lint accumulation, dust and dirt.
12. The interior of the dryer and exhaust
duct should be cleaned periodically by
qualified service personnel.
13. This appliance must be properly
grounded. Never plug the appliance
cord into a receptacle which is not
grounded adequately and in accordance with local and national codes.
See installation instructions for
grounding this appliance.
14. Do not sit on top of the clothes dryer.
WARNING:
1. Read all instructions before using the
appliance.
2. T o avoid the possibility of fire or explosion:
a. Do not dry items that have been
previously cleaned in, washed in,
soaked in, or spotted with gasoline, dry-cleaning solvents, other
flammable or explosive substances as they give off vapors
that could ignite or explode. Any
material on which you have used a
cleaning solvent, or which is saturated with flammable liquids or
solids, should not be placed in the
dryer, until all traces of these flammable liquids or solids and their
fumes have been removed. There
are many highly flammable items
used in homes, such as: acetone,
denatured alcohol, gasoline,
kerosene, some liquid household
cleaners, some spot removers, turpentine, waxes and wax removers.
b. Items containing foam rubber (may
be labeled latex foam) or similarly
textured rubber-like materials must
not be dried on a heat setting.
Foam rubber materials when heated, can under certain circumstances produce fire by spontaneous combustion.
3. Do not allow children or pets to play
on, in, or in front of the appliance.
Close supervision is necessary when
the appliance is used near children
and pets.
Do not place into your dryer items that
have been spotted or soaked with vegetable oil or cooking oil. Even after
being washed, these items may contain
significant amounts of these oils. The
remaining oil can ignite spontaneously.
The potential for spontaneous ignition
increases when the items containing
vegetable oil or cooking oil are exposed
to heat. Heat sources, such as your
clothes dryer, can warm these items,
allowing an oxidation reaction in the oil
to occur. Oxidation creates heat. If this
heat cannot escape, the items can
become hot enough to catch fire. Piling,
stacking or storing these kinds of items
may prevent heat from escaping and
can create a fire hazard.
All washed and unwashed fabrics that
contain vegetable oil or cooking oil can
be dangerous. Washing these items in
hot water with extra detergent will reduce,
but will not eliminate, the hazard. Always
use the “cool down”cycle for these items
to reduce the items’ temperature. Never
remove these items from the clothes
dryer hot or interrupt the drying cycle
until the items have run through the “cool
down” cycle. Never pile or stack these
items when they are hot.
WARNING:
California Safe Drinking Water and Toxic
Enforcement Act (Proposition 65)—Gas
Dryers Only
The Governor of California is required to
publish a list of substances known to the
state of California to cause cancer or reproductive harm and requires business to warn
customers of potential exposures to such
substances.
Gas appliances contain or produce substances which can cause death or serious
illness and which are known to the State of
California to cause cancer, birth defects, or
other reproductive harm. To reduce the risk
from substances in fuel or from fuel combustion, make sure this appliance is
installed, operated, and maintained according to the manufacturer’s instructions.
2
Page 4
CONTROLS AT A GLANCE
SIGNAL
OFF
LOUD
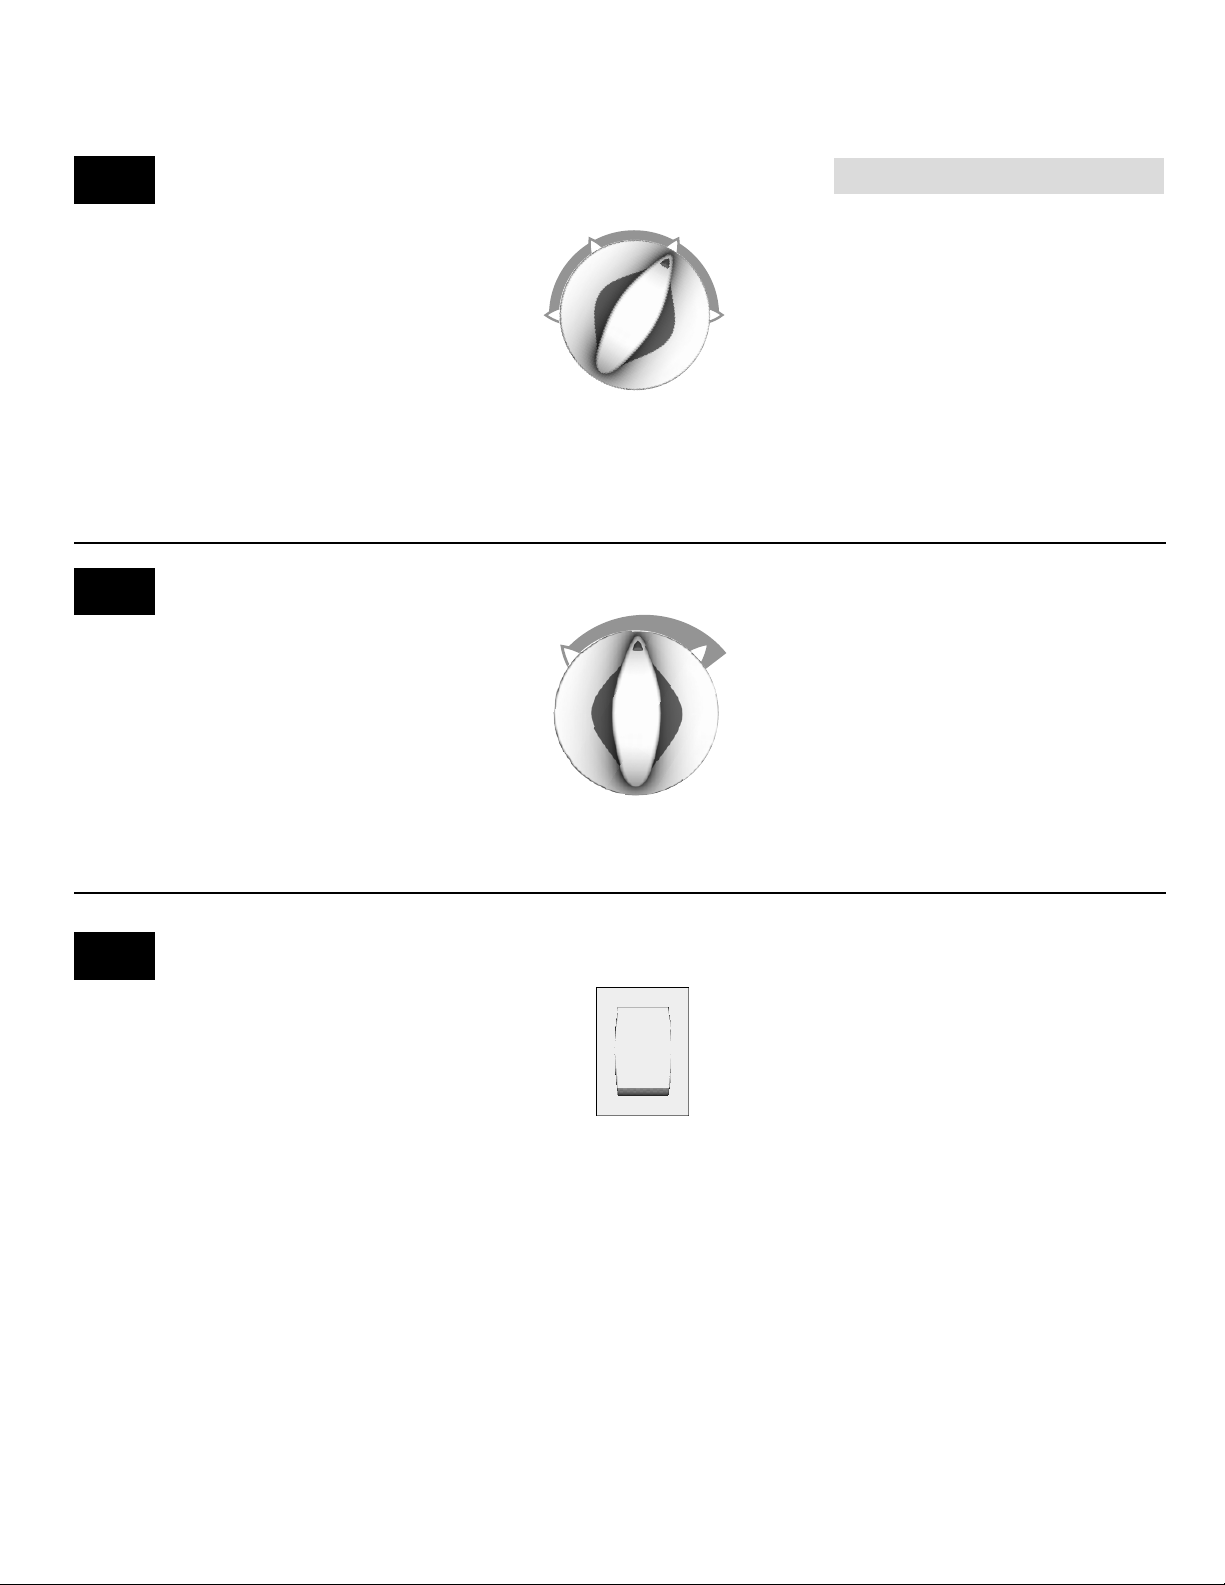
Step 2 Select ‘signal’
volume
If a volume level is selected, the signal will let
you know when the cycle is done. Signal will
stop when the door is opened, or when the
timer is advanced to an OFF position.
Step 1 Select
temperature setting
Set TEMPERATURE setting knob to most
appropriate temperature for type of fabric in
load. Follow garment manufacturer’s care
label for recommended temperature settings.
See chart to the right.
LOAD TYPE
REGULAR
(approximately 160° F): Use
for sturdy items like play or work clothes.
MEDIUM (approximately 150° F): Use for
permanent press and synthetic items.
EXTRA LOW (approximately 129° F):
Use for delicate items.
AIR FLUFF (no heat): Use for sensitive
loads or items needing freshening.
Time Dry cycle can be used with all
Temperature settings.
Step 3 Select ‘press care’,
if desired
On Auto Dry only, PRESS CARE helps to
reduce wrinkling after the normal drying cycle.
After COOL DOWN portion of the cycle, it
continues to tumble clothes without heat for
40 minutes, until the dryer door is opened, or
the switch is turned to the OFF position.
3
EXTRA LOW
AIR FLUFF
MEDIUM
TEMPERATURE
REGULAR
ON
OFF
PRESS
CARE
Page 5

AUTO DRY cycles will automat-
ically determine the time needed to
dry your clothes and will work on any
TEMPERATURE setting. Set the
timer for the type of fabric in the load.
WRINKLE RELEASE cycle
helps remove wrinkles from slightly
wrinkled items that may have been
sitting in a dryer or laundry basket
overnight. The cycle has a short heat
setting followed by a 5-minute COOL
DOWN.
Push in timer knob to
start.
To stop dryer at any time,
open door or turn timer knob to the
OFF position. To restart dryer, close
door, reset timer if necessary, and
push in the timer knob.
TIME DRY cycle will operate dryer for up to 75 min-
utes. Cottons and heavyweight items dry best between 50
and 75 minutes, lightweight items dry best between 20 and
40 minutes.
Step 4 Select desired setting
4
Page 6

OPERATING TIPS
Sort clothes for drying
Properly dried clothes will need a minimum of care when removed from the
dryer. Clothes properly sorted for washing
should be properly sorted for drying also.
Follow the examples below.
DARK AND LIGHT COLORS: Separate
light clothes from dark clothes.
LINT-SHEDDING FABRICS: Towels, flannels, chenille, cottons, rugs.
LINT-RECEIVING FABRICS: Corduroys,
knits (including socks), permanent press
and synthetics.
HEAVY AND LIGHTWEIGHT FABRICS:
Lightweight fabrics dry faster than heavyweight fabrics. If mixed loads are dried
together (such as sheets and towels),
remove the lighter weight fabrics when
they are dry to prevent over drying and
wrinkling.
Clean the lint filter
before each use
A clean lint filter ensures efficient drying
and clothes will remain lint-free when
unloading dryer. A layer of lint on the
screen will reduce air flow through the
dryer and lengthen drying time. Lint
screen may be washed if needed.
• Lint filter is located at front of the dryer
in the lower part of door opening.
• Replace lint filer in door recess and
push in firmly. Words on filter should
face front of dryer.
• Add clothes loosely into dryer drum.
Add fabric softener sheet, if desired.
• Close loading door. Dryer will not operate with the door open.
Optional drying rack
Drying rack is useful for drying items that
require no tumble drying, such as tennis
shoes, sweaters, stuffed toys or other delicate items. See your Maytag dealer for
details.
IMPORTANT: Lint filter must be in place in
door opening when using dryer or loading
and unloading dryer. If filter is not in place,
clothing could fall into front air duct.
5
LINT FILTER
Page 7

• Installation (length of exhaust duct,
etc.).
• Electric voltage or gas pressure.
If you have an automatic cycle, you need
not worry about time. The automatic cycle
will determine the time needed.
Here are some important items to remember:
• In some models, the automatic cycle
does not operate as a timed cycle.
While using this feature, the cycle dial
advances as the clothes dry. The dial
may advance slowly or quickly
Drying times
It is impossible to give exact drying times.
Conditions from home to home vary and
directly affect drying times. The length of
time it takes to dry loads will depend on
several variables.
• Load size.
• Type of fabric, washer and spin speed
will determine moisture in the fabric.
• Heat and moisture in the room. Damp
air coming into the dryer will increase
drying time.
depending on the moisture content of
the clothes.
• Do not set the timer for a “higher” setting than necessary. If you have a permanent press/knit cycle, use it for
loads of permanent press, knits, and
for clothes made from, or containing
synthetic fibers. This cycle has a
longer COOL DOWN period at the end
of the cycle to reduce wrinkling.
CARE AND CLEANING
Cleaning
• Ordinarily, dryer cylinder will need no
care.
• Wipe dryer cabinet as needed. If detergent, bleach or other washing products
have been spilled on the dryer, wipe
immediately. Some products will cause
permanent damage if spilled on the
cabinet.
• Do not allow sharp or rough objects to
lean against the dryer. The finish could
be damaged.
• Use only a damp or sudsy cloth for
cleaning the control panel. Some spray
prewash products may harm the finish
on the control panel.
How to Remove Ball Point Pen
Ink Marks from the Dryer Drum
• If the ink stain is fresh, place dry rags
in the dryer. Using the hottest heat setting, run the dryer for one hour to
absorb the ink.
• If the stain is not fresh, apply household spray or cream cleaner to a soft
cloth, and rub the stain. Then, place
wet rags in the dryer. Using the hottest
heat setting, run the dryer for one hour
to remove any cleaner residue.
Lubrication
All moving parts are sealed in a permanent supply of lubricant or are equipped
with oilless bearings. Additional lubrication
will not be necessary.
Exhaust system
• The exhaust duct should be inspected
after one year of use and cleaned if
necessary. Inspect and clean exhaust
duct every one to two years as
required thereafter.
• The weather hood should be checked
frequently to make sure the dampers
move freely, dampers are not pushed
in and that nothing has been set
against them.
• Keep dryer area clear and free from
combustible materials, gasoline and
other flammable vapors and liquids.
• Do not obstruct the flow of combustion
(gas dryers) and ventilation air.
6
Page 8

4. Rotate door panel 180° as shown.
5. Remove door strike from door liner
and reinstall on opposite side.
6. Insert liner under flange on bottom of
door (A), then push top of door liner
into place (B).
7. Reinstall nine screws removed in
Step 2.
Reversing the door
Follow these steps to reverse the
door:
1.
Remove four hinge-attaching screws.
2. Remove all nine screws from door
and hinges.
3. Pull bottom of door liner out (A), then
pull down (B), removing door liner
from door panel.
8. Using screwdriver, remove two door
plugs and reinstall on opposite side of
door opening.
9. Reinstall four hinge attaching screws
removed in Step 1.
7
CARE AND CLEANING CONT.
1
2
A
3
B
4
7
5
8
6
B
A
9
Page 9

SPECIAL LAUNDRY TIPS
Please follow the care label or manufacturer’s instructions for drying special items. If care label instructions are not available, use the following information as a guide.
Choose heat for the type fabric used. Dry one double or two single spreads at once. (Chenille and tufted spreads
will shed lint and should be dried along. New spreads will contain loose lint.) Tumble new spreads on AIR FLUFF
setting before washing to remove loose lint. (These spreads may be dried completely.)
DELICATE or AIR FLUFF cycles. If the manufacturer recommends drying the blanket in the dryer, follow the “Wool”
instructions below. Do not stretch the blanket because of the wiring. Some electric blankets may have insulation on
the thermostats or on the wiring which will not withstand dryer heat. Do not dry in dryer unless the blanket manufacturer says it can be done.
DELICATE or AIR FLUFF cycles. Some of these blankets are fluffy and will shed lint. Tumble on AIR FLUFF setting before washing to remove loose lint. Use a gentle wash method, then dry in dryer until just dry. The lint filter
may need to be cleaned during the drying.
AUTO DRY REGULAR cycle.
Agitation and tumbling contribute to the shrinkage and felting of wool. We cannot guarantee that wool will not shrink.
However, if care is taken and the blanket manufacturer’s instructions are followed,satisfactory results should be
obtained. Wash by the soak method with as little agitation as possible. After washing, stretch blanket gently in both
directions. Use approximately five dry bath towels and place them between folds in blanket. This will "cushion” it to
lessen the tumbling. Set dryer for 20 minutes on the TIME DRY cycle. Use REGULAR heat setting, if it is available
on your dryer. Check blanket when timer reaches 10. Wool blankets must be removed from the dryer when damp.
Stretch gently to shape and finish drying over two clotheslines or in a flat position.
Choose heat and cycle for fabric. Filling and cover must be completely washable. Old quilts may be too fragile to
machine wash or dry. Quilts filled with cotton may become lumpy. Quilting should be close together. Remove from
dryer slightly damp and stretch gently to shape. Quilted articles may shrink if over dried.
Material in mattress pads is made of either cotton or synthetic fibers. Read fiber content label, found on your mattress pad, to determine what type of fiber was used to manufacture the pad. READ AND CAREFULLY FOLLOW
the fabric care instructions supplied by the mattress pad manufacturer. Some pads made of synthetic fibers are very
heat sensitive. These pads can be flammable if over-heated or over-dried. TO AVOID A FIRE HAZARD, DO NOT
OVER-DRY mattress pads. Remove pads from the dryer while they are still damp.
Choose heat for fabric. Close zippers. Dry one couch cover, two chair covers or five or six pillow covers at one time.
Remove from dryer when slightly damp. Press pleats if necessary and replace on furniture immediately . Stretch fabrics and knits should be dried completely so they will fit snugly when replaced on furniture.
Ticking must be strong and seams secure. If in doubt, sew pillow into a case or use a zippered pillowcase to prevent feathers from coming out. After washing, shake pillow to fluff feathers. Dry one large or two smaller pillows.
Use TIME DRY cycle. Use LOW or MEDIUM heat setting if it is available on you dryer. Shake and reposition pillows several times during drying. Pillows must be dry in the center to prevent mildew. Drying may take two hours
or longer. Reset dryer timer if necessary. The odor of wet feathers is not pleasant. However, the odor will disappear
once the pillows dry.
Follow manufacturer’s directions.
Do not dry in the dryer.
AUTO DRY REGULAR or TIME DRY cycles. Remove damp items for ironing or dry completely, then steam iron.
DO NOT DRY IN THE DRYER unless recommended by the manufacturer. Fiberglass may shred. Particles may
remain in the dryer and rub off on the next load. This could irritate the skin. “Beta” fiberglass may be dried in the
dryer if recommended by the manufacturer.
DELICATE or AIR FLUFF cycles. Allow room for tumbling to prevent wrinkling. Delicate or sheer curtains must be
dried by themselves so they will not be snagged by hooks or crushed by other clothes in the load. Some sheer curtains are heat sensitive. Dry 10 minutes only, plus the cool down period. Remove from dryer immediately and hang.
If the dryer has been heated from a previous load, AIR FLUFF setting may be sufficient.
Remove hooks and weights before washing. Choose heat for fabric and allow space in the dryer for tumbling. Some
draperies may be removed when slightly damp and hung immediately. Lined draperies should be dry-cleaned
because they have a tendency to pucker.
Bedspreads
Blankets
Quilts
Mattress Pads
Slip Covers
Pillows
Curtains
Draperies
Electric
Synthetic Fibers
Thermal Cotton
Wool
Feather and
Down-Filled
Fiber-Filled
(polyester)
Foam Rubber
Cotton
Fiberglass
Synthetic Fibers
8
Page 10

SPECIAL LAUNDRY TIPS CONT.
Knit fabrics are usually manufactured under tension (stretching). Cotton knits especially may relax or draw together if every bit of moisture is removed form them. It is best to take them out of the dryer with a trace of moisture
remaining, then stretch to shape. If they do shrink from over drying, rewet them and dry properly.
AUTO DRY REGULAR or TIME DRY cycle. Remove slightly damp to minimize ironing. Reshape, smooth seams
and pockets, etc.
AUTO DRY REGULAR or AUTO DRY WRINKLE FREE FABRICS cycle. Turn inside out to prevent “pilling” (rolling
up of the fiber ends from friction). Dry sweaters only with similar things because they tend to attract lint. Make sure
the load is large enough for tumbling. Dry completely and remove from dryer immediately to minimize wrinkling.
DELICATE or AIR FLUFF cycle. For wool labeled “machine washable” follow manufacturer ’s directions. For other
wool, use wool blanket method. Do not dry loosely knit wool or hand knits. Dry these flat and stretch to shape from
a pattern drawn before washing.
AUTO DRY REGULAR cycle.
Body oils can cause elastic to deteriorate. Wash garments containing elastic frequently. Elastic in such things as
shorts may be dried, however avoid over drying.
Bras, bathing suits, sun suits, etc, DO NOT DRY THESE ITEMS IN THE DRYER WITH HEAT, FIRE MAY RESULT.
AIR FLUFF setting may be used.
Choose heat for the most delicate fiber. These may be dried completely as they will stretch into shape. Avoid dry-
ing with lint-shedding fabrics.
TIME DRY cycle. Use a DELICATE or AIR FLUFF setting, if it is available on dryer. Some sheer fabrics, especially sheer
knits, can be heat sensitive. Dry these until they are just dry (about 10 minutes) and remove from dryer immediately. Sheer
fabrics should not be washed and dried with garments containing hooks or zippers. Synthetic fabrics will create static electricity if over dried. TO prevent this, use fabric softener and avoid over drying.
AUTO DRY REGULAR cycle. Dry completely and remove from dryer when seams are slightly wet to minimize shrinkage.
AUTO DRY REGULAR or TIME DRY cycles. Dry one large or several small rugs. For one small rug only, add tow-
els for buffers.
Hot water and heat tend to deteriorate many types of rubber. Some types of rubber-like materials are flammable under
certain conditions. DO NOT DRY FOAM RUBBER AND RUBBER-LIKE MATERIALS WITH HEAT.
DELICATE or AIR FLUFF cycles. Follow manufacturer ’s suggestions. Some of these rugs are heat sensitive and
should be removed from the dryer when damp or dried with no heat.
Make sure the filling and covering is washable and can be dried in the dryer. Cotton filling may become lumpy.
Protect glass eyes by covering with a stocking or tie toy into a pillowcase. Choose heat for most sensitive fiber. Dry
enough clothes in the load for good tumbling. DO NOT DRY TOYS STUFFED WITH FOAM RUBBER OR KAPOK
IN THE DRYER WITH HEAT.
DELICATE or AIR FLUFF cycle. Use a drying rack or tumble with at least four old bath towels.
Knit Articles
Lingerie
Denim, Corduroy
Rugs
Stuffed Animals
and T oys
Tennis Shoes
All Knits
Cottons
Synthetic Fibers
(nylon, orlon, polyester, etc.)
Wool
Cotton
Elastic
Foam Rubber
Stretch Fabrics
Synthetic Fibers
Cotton with
Cotton Backing
Rubber-backed
Synthetic Fibers
BEFORE YOU CALL
You may save time and money by checking items below before calling for service. List includes common concerns that are not the result of
defective workmanship or materials.
TOPIC POSSIBLE CAUSE SOLUTION
NOISE
Some vibration is normal. Adjust leveling legs so dryer rests firmly on floor. See
Installation Instructions for leveling details.
Stop dryer and check for loose objects. Remove loose objects if possible.
Close zippers, buttons, and fasteners. Clothing with
buckles should be turned inside out.
Normal.
Normal.
Normal
Vibrating Noise
Thumping, rattling or
clanking noise
Whirling Sound
Pulsating Sound
Clicking Sound
Dryer may not be resting firmly on floor.
Loose objects, such as coins or pins.
Belt buckles, metal fasteners hitting drum.
As air moves through the dry, a whirling
sound may be noticed.
When the drum rotates, it may create a pulsating sound.
Many of the parts, such as the timer, click as they operate.
9
Page 11

DRYING
BEFORE YOU CALL
TOPIC POSSIBLE CAUSE SOLUTION
OPERATION
Make sure plug from power cord fits tightly into wall outlet.
Replace fuse or reset circuit breaker. Do NOT increase fuse capacity. Call qualified electrician to correct circuit overload problem. Call local utility company to
correct power outage.
Push door closed.
If dryer door was opened during a cycle, the timer knob
must be pushed in to restart the cycle.
Reset TEMPERATURE knob.
Severely restricted airflow will cause dryer to stop heating.
Check weather hood and exhaust system for restrictions.
Check other gas appliances in house for gas supply.
Check exhaust system and vent area for obstructions.
Dryer Does Not Run
Dryer Does Not Heat
Electrical power cord may not be plugged in, or connection may be loose.
Fuse blown, circuit breaker tripped, or power outage
occurred.
Dryer door is not closed.
Timer knob must be pushed in to restart dryer.
Dryer set to AIR FLUFF setting.
Damper on weather hood is stuck closed or frozen.
Gas supply is shut off (Gas dryers only).
Exhaust system or outside vent is blocked.
APPEARANCE
Normal. Will not affect performance.
Make a paste from powdered detergent and rub on stain. Though you may not
be able to remove stain immediately, the stain may fade and disappear over
time.
Screen in Back of
Drum Darkens
Dryer Drum
Becomes Stained
Heat causes the metal to darken.
Fabric dyes that are not set can stain the dryer drum.
Check Installation Instructions for length of proper exhaust system. Only use 4”
diameter rigid or semi-rigid duct. Restricted airflow will cause dryer to stop heating. Check weather hood and exhaust system for restrictions.
Dry one wash load at a time.
Separate heavy items from lightweight items.
Clean lint filter before each use.
Check that the washer had enough spin speed to extract water. Clothes may
need to be rearranged in the washer and put through an additional spin cycle to
extract enough water before drying.
Clean lint filter before each use.
Separate lint producers (cotton towels) from lint attracters (synthetic fabrics).
Remove items from pockets before washing or drying.
Overloading reduces airflow so lint is not collected in filter. Dry one wash load at
a time.
Adjust controls for shorter drying time.
Use a fabric softener.
Use a fabric softener.
Long Drying Times
Lint
Static
Improper exhaust system.
Overloading.
Sorting.
Full lint filter.
Clothes too wet from washer.
Full lint filter.
Improper sorting.
Paper, tissues, or other items left in pockets.
Overloading
Over drying
No fabric softener was used.
Synthetic fabrics can cause static.
10
Page 12

To Receive Warranty Service
Service must be performed by an authorized Maytag service representative.
To schedule service, contact the Maytag dealer where you purchased your
appliance or contact :
Maytag Appliances Sales Company
Attn: CAIR
®
Center
P.O. Box 2370
Cleveland, TN 37320-2370
U.S. 1-800-688-9900
Canada 1-800-688-2002
U.S. customers using TTY for deaf, hearing impaired or
speech impaired, call 1-800-688-2080.
When contacting Maytag Appliances Sales Company, please include the following information:
a. Your name, address and telephone number;
b. Model number and serial number of your appliance;
c. The name and address of your dealer and the date of purchase;
d. A clear description of the problem.
e. Proof of purchase (sales receipt).
What is not covered by these warranties:
1. Conditions and damages resulting from any of the following:
a. Improper installation, delivery, or maintenance.
b. Any repair, modification, alteration or adjustment not authorized by the
manufacturer or an authorized servicer.
c. Misuse, abuse, accidents, or unreasonable use.
d. Incorrect electric current, voltage or supply.
e. Improper setting of any control.
2. Warranties are void if the original serial numbers have been removed,
altered, or cannot be readily determined.
3. Products purchased for commercial or industrial use.
4. The cost of service or service call to:
a. Correct installation errors.
b. Instruct the user on proper use of the product.
c. Transport the appliance to the servicer.
5. Consequential or incidental damages sustained by any person as a result of
any breach of these warranties.
Some states do not allow the exclusion or limitation of consequential or incidental damages, so the above exclusion may not apply.
User’s Guides, service manuals and parts catalogs are available from
Maytag Appliances Sales Company, Maytag Customer Assistance.
Full One Year Warranty
For one (1) year from the date of original retail
purchase, any part which fails in normal home
use will be repaired or replaced free of charge.
Limited Warranty
After the first year from date of original retail
purchase, through the time periods listed below,
the parts designated below which fail in normal
home use will be repaired or replaced free of
charge for the part itself, with the owner paying
all other costs, including labor, mileage and
transportation.
Second Y ear – All parts.
Third through Fifth Year – Dryer tumbler.
Additional Limited Warranty Against
Rust-Through
Should an exterior cabinet, including the door,
rust through during the one year period starting
from the date of retail purchase, repair or
replacement will be made free of charge. After
the first and through the tenth year, repair or
replacement will be made free of charge for the
part itself, with the owner paying all other costs,
including labor, mileage and transportation.
Please Note: This full warranty and the limited
warranty apply when the dryer is located in the
United States or Canada. Dryers located elsewhere are covered by the limited warranty only,
including parts which fail during the first two
years.
Canadian Residents
This warranty covers only those dryers installed
in Canada that have been listed with the
Canadian Standards Association unless the dryers are brought into Canada due to transfer of
residence from the United States to Canada.
The specific warranties expressed above are
the ONLY warranties provided by the manufacturer. This warranty gives you specific legal
rights, and you may also have other rights that
vary from state to state.
MAYTAG DRYER WARRANTY
MAYTAG • 403 W. 4
th
Street N. • P.O. Box 39 • Newton, Iowa 50208
A/09/01 Part No. 40139101 http://www.maytag.com MCS No. 22003711 Litho U.S.A.
 Loading...