

Page 1
Instruction 16025947
2204513
Sheet
Description: Searcy Platform Triple Lip Seal and Bearing Kit
Repair Part Number: 2204512
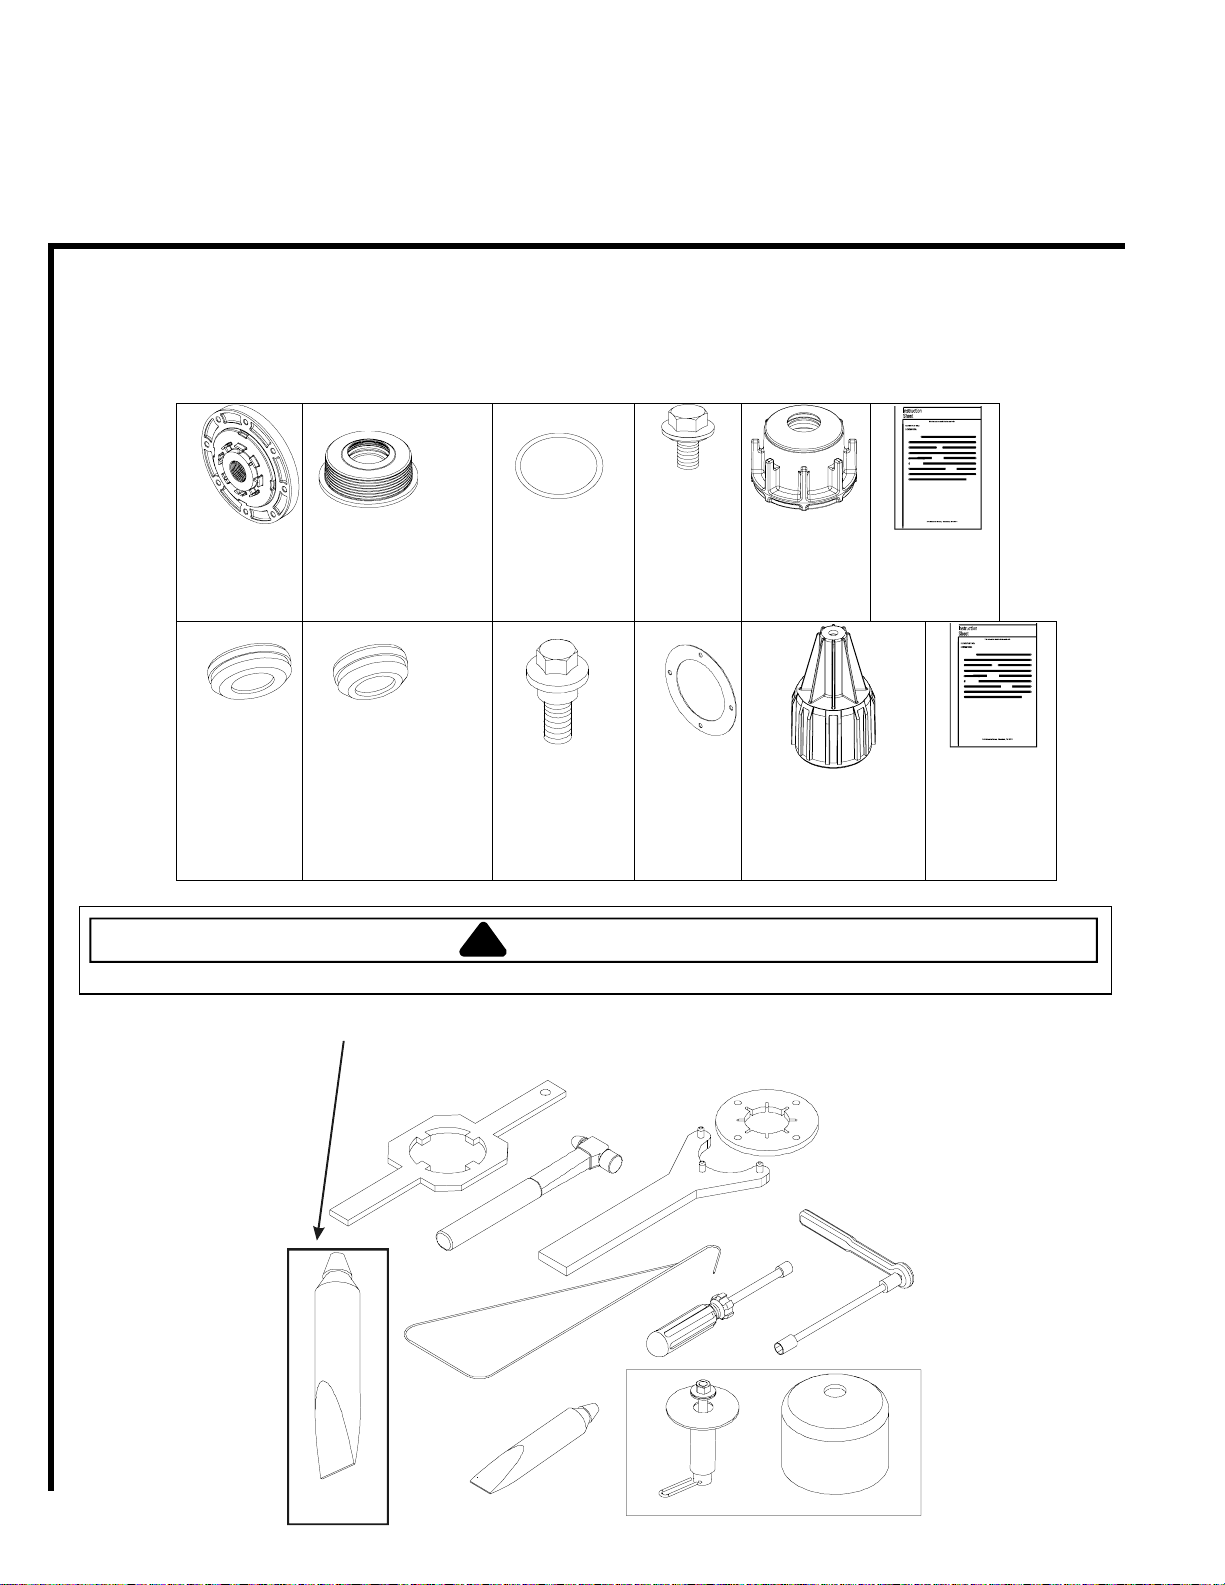
Kit includes:
Agitator
Screw
Seal Nut
16025947
Instruction
Sheet
Washtub
Hub
Seal & Bearing
O-Ring
2201455
Plug Qty 2
To avoid risk of electrical shock, personal injury or death; disconnect electrical power before servicing.
Tools:
Important: This kit requires grease to be used on
triple lip bearing. Do not use Vaseline
2201458
Plug Qty 8
Inner Tub
Screw with
Loctite ®
Qty (4)
!
WARNING
Hub
Gasket
Drive Bell
Note: Only used
on non Auger
Agitator models
TS Bulletins
0015A-S
16023368
TDL-
&
™
22038313
22002898
35-2968
Page 1 of 7 16025947
1/25/2005
056016
Grease
289P4
See Attached Bulletin:
27615P
3M800
Brake\Bearing Tool
Page 2
Procedure:
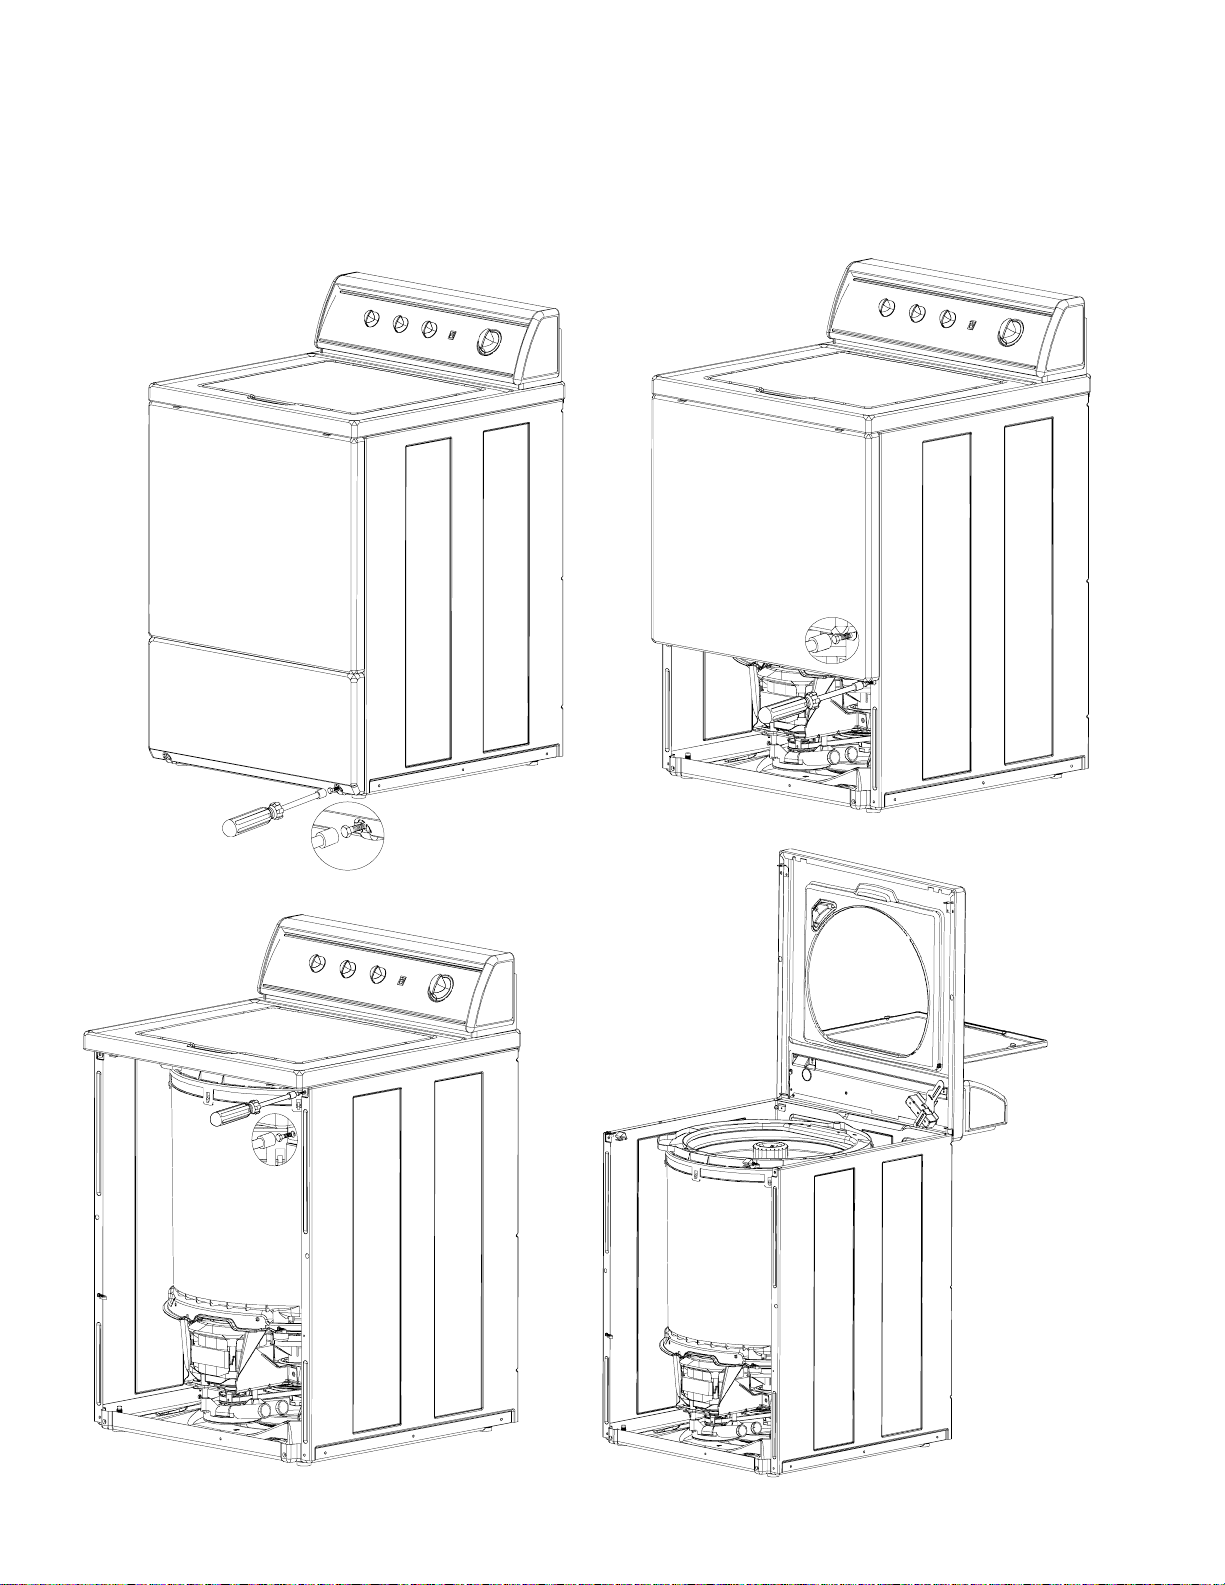
1. Remove Toe Panel with a 5/16” nut driver. Loosen bottom screws far enough to tip bottom of panel out and away
from washer. Remove 2 screws holding Front Panel to Cabinet. Tip Front Panel bottom away from Cabinet and
remove. Remove two screws holding Top assembly to Cabinet. Carefully Lift Top Assembly, and prop in an open
position.
16025947 Page 2 of 7
1/25/2005
Page 3
2. Remove fabric softener dispenser by unsnapping from agitator. Remove agitator by one of two ways.
a. (Auger style agitators) Loosen bolt in agitator and remove by sliding straight up output shaft of
transmission.
b. (Flex vane agitators) Remove flex vane agitator by placing hands under agitator lip and pull upward. If
agitator is difficult to remove, use two agitator removal hooks, No. 254PRP under bottom edge of
agitator. Remove drive bell by pulling upward. If drive bell is difficult to remove, use agitator hooks.
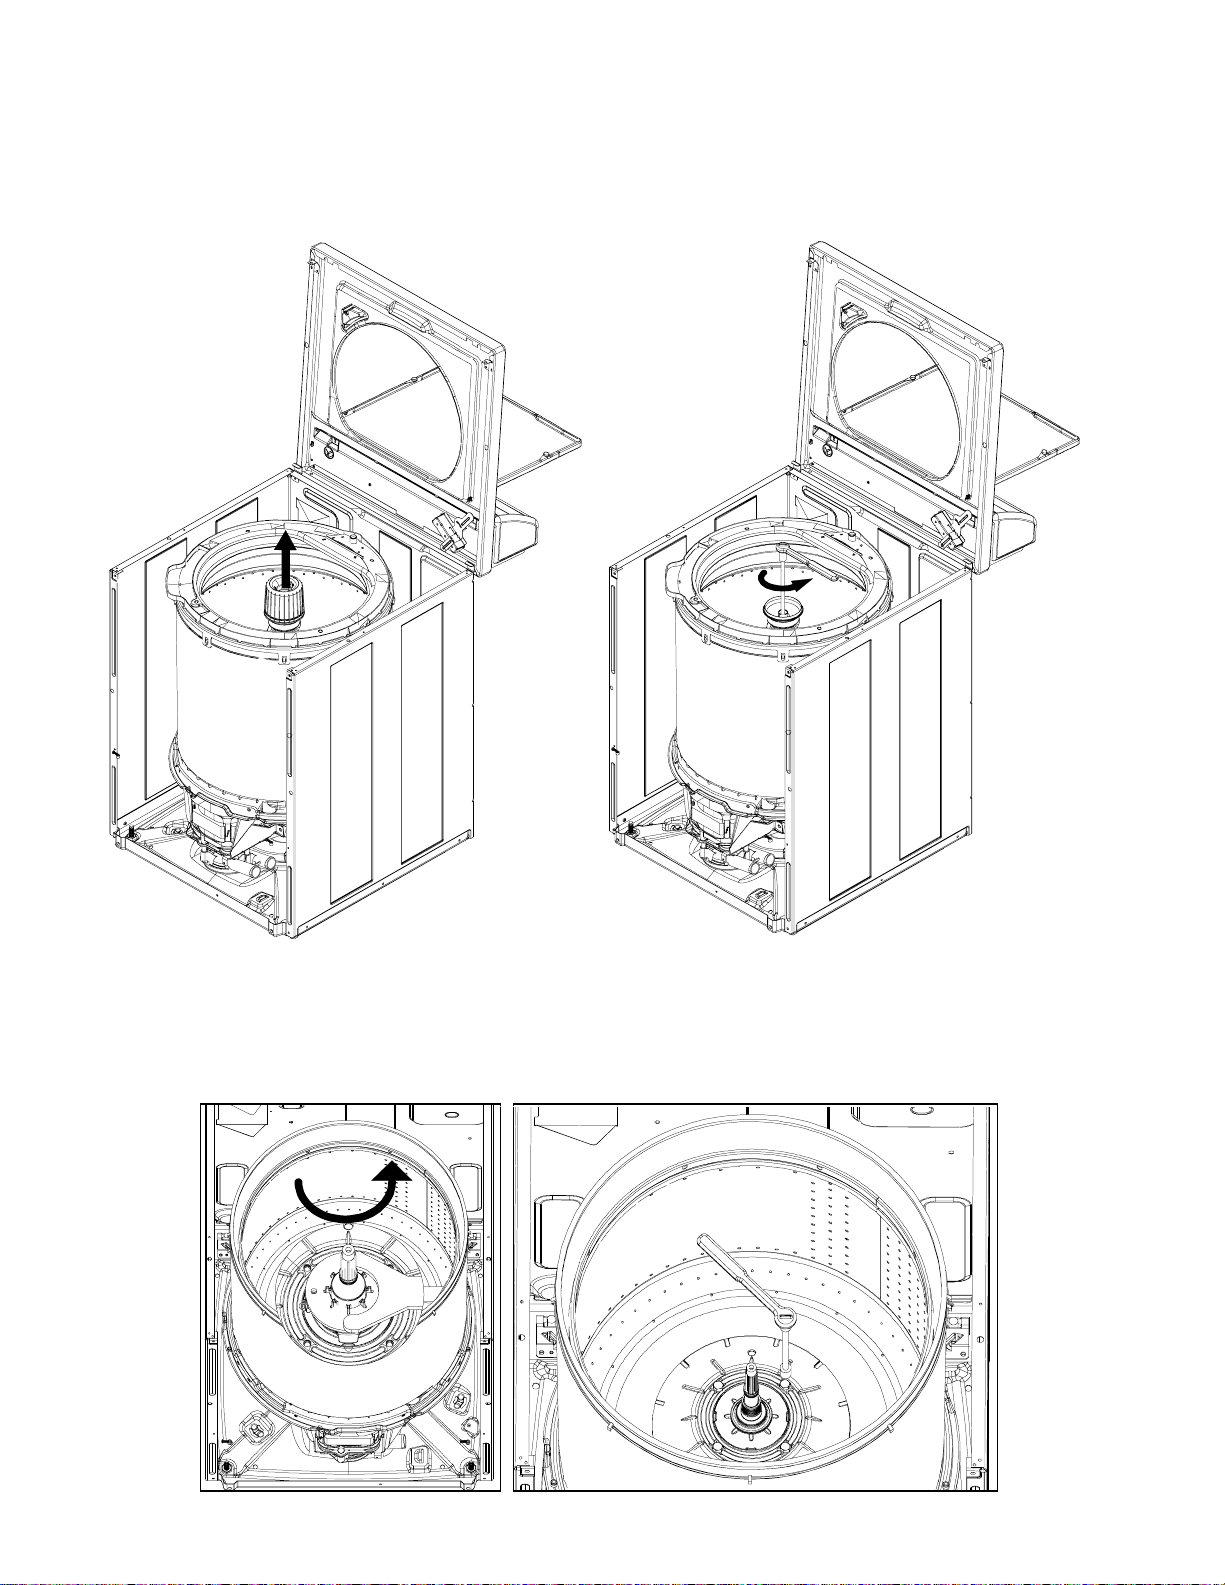
3. Remove six tub springs from lower lip of outer tub using spring hook tool 289P4. Remove counter balance spring
located in the rear of the washer.
4. Unsnap and remove Outer Tub Cover.
5. Remove O-Ring from transmission output shaft. During reassembly, be sure to install new O-Ring (25-7941)
provided with kit.
6. Use spanner wrench (35-2968) and seal tool (22002898) to remove seal nut.
7. Remove inner tub bolts and inner tub.
Page 3 of 7 16025947
1/25/2005
Page 4
8. Remove and dispose gray lint filter, if equipped.
9. Remove washtub hub with Maytag spanner tool 22038313. Turn spanner counterclockwise to remove. It may be
necessary to lock transmission from turning. Attach clamp or Visegrip® tool to transmission only as shown.
Transmission will stop rotating when clamp contacts tub support.
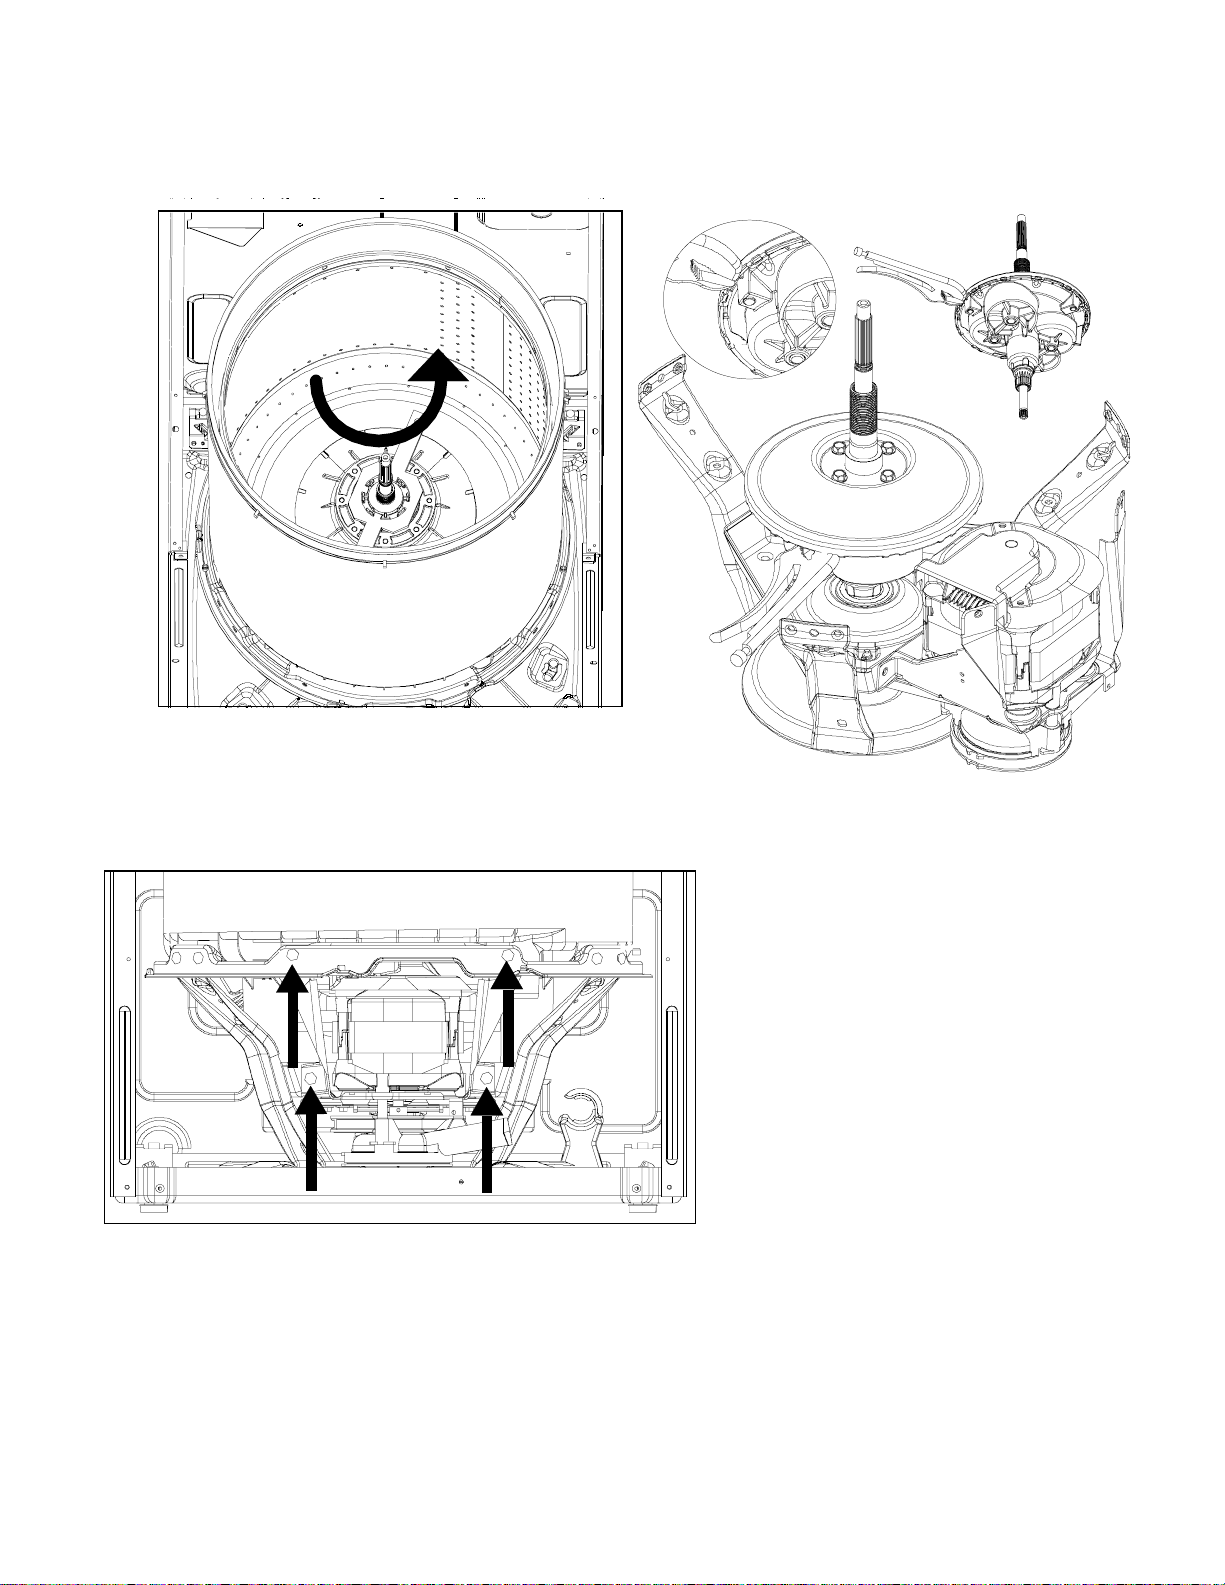
10. Disconnect tub drain hose from outer tub.
11. Remove bolts from motor assembly and drop motor down to base. Disconnect wire harness from motor tap.
12. Remove drive belt from transmission pulley.
13. Remove pressure hose from pressure bulb on outer tub.
14. Lift outer tub and transmission assembly out of washer cabinet. Turn outer tub and transmission assembly
upside-down on protective padding.
16025947 Page 4 of 7
1/25/2005
Page 5
15. Remove screws holding leg support to outer tub. Separate transmission assembly from outer tub.
16. Remove seal and bearing using the brake removal tool 12002012 with included 3” PVC end cap.
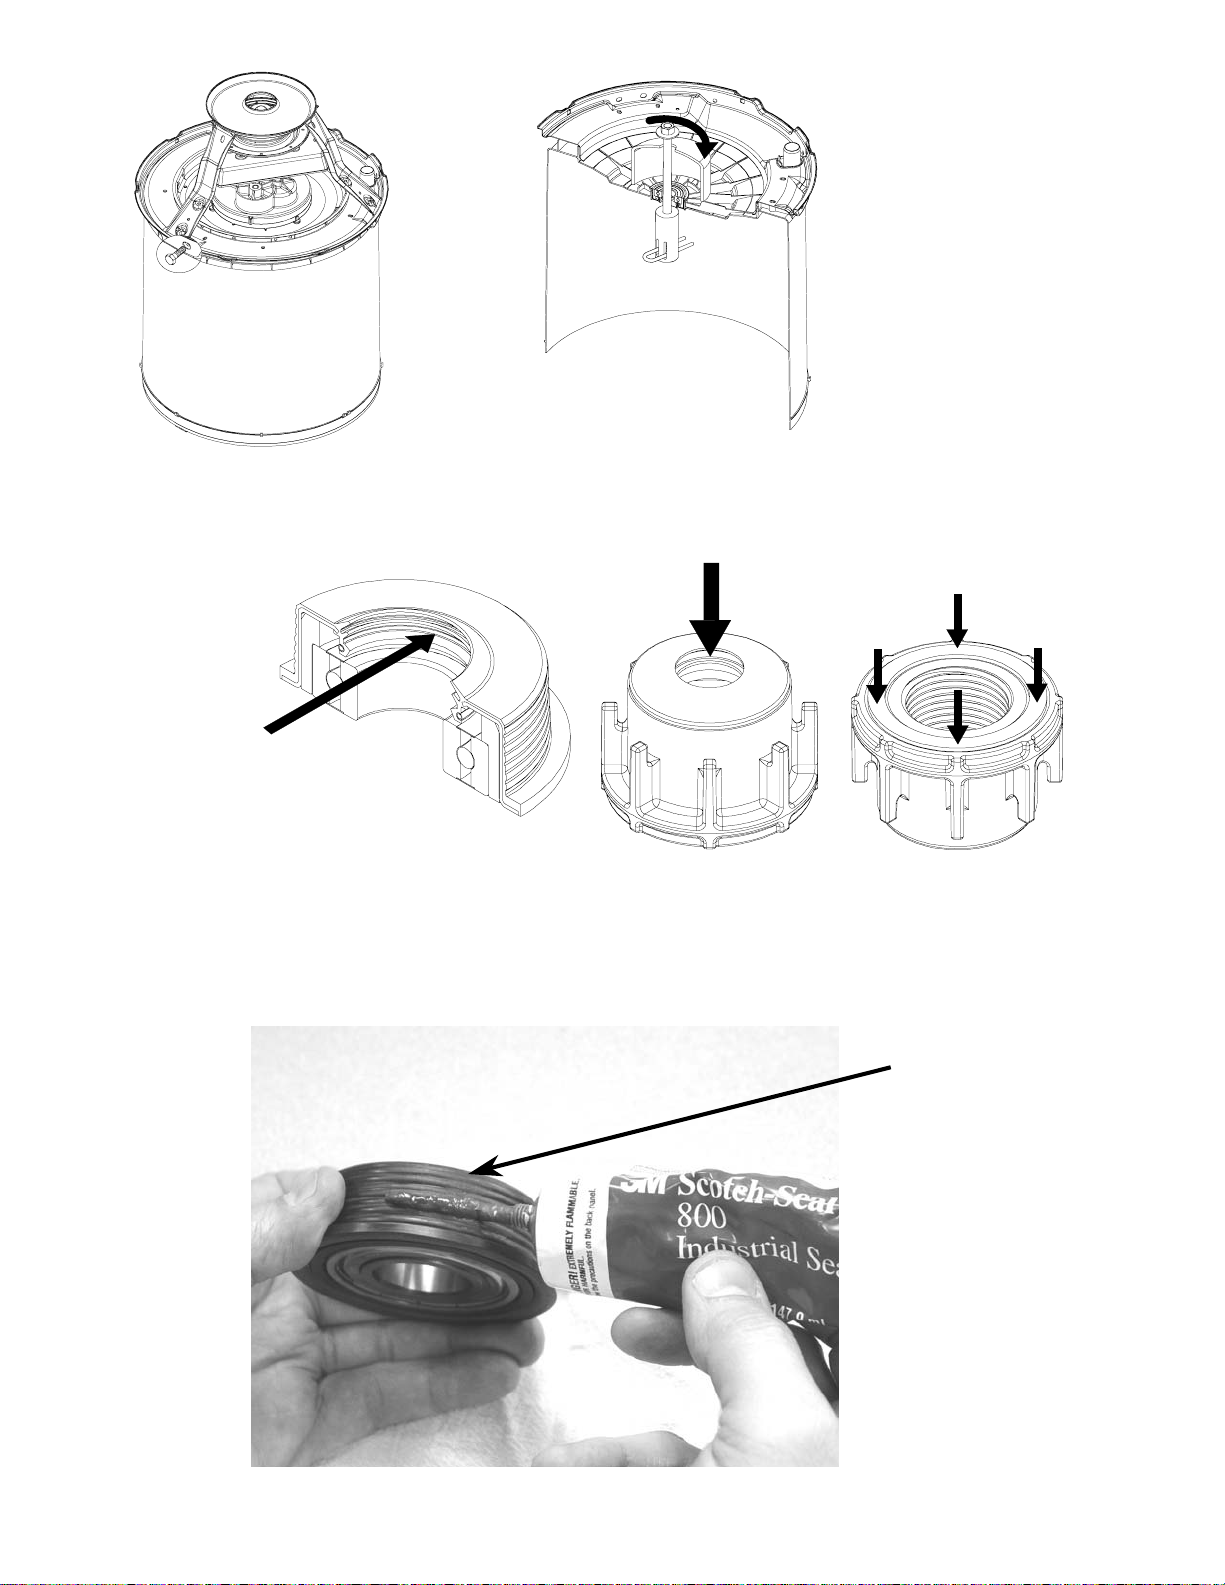
17. Coat new triple lip seal with center seal grease (056016).
18. Apply center seal grease (056016) to Seal Nut before installing.
Seal Nut (seal grease 056016.)
Triple Lip Seal (center seal grease).
19. Clean the outside diameter of the Tub Bearing to insure there is no excess grease on outside diameter. Check the
inside diameter of the outer tub for plastic imperfections. If there are imperfections on the inside diameter of the outer
tub, or the tub bearing appears to have a loose fit in the outer tub, use a small amount of 3M800 (27615P) on the
outside diameter of the Tub Bearing as shown below. Spread a thin layer with index finger around the entire
diameter. New outer tubs will have a tighter fit; use of 3M800 on a tight fitting bearing/tub will cause the bearing to
push back out. Only use the 3M800 if there are imperfections in the outer tub, or the bearing has a loose fit.
Clean O.D.
Page 5 of 7 16025947
1/25/2005
Page 6

20. Install new bearing using Brake/Bearing tool 12002012, large washers and PVC end cap.
Important: Use large washers to prevent damage to bearing.
21. Confirm the lower bearing which is located in the Milk Stool has not been damaged from a water leak and replace
bearing if necessary (Bearing #40004001).
22. Reassemble Transmission and attach leg support to bottom of Outer Tub
23. Install Outer Tub and Transmission Assembly onto base and reattach springs.
24. Reassemble all hoses.
25. Install new hub.
26. Install (27001222) foam gasket on hub.
27. Turn Spin Basket upside down and push out and dispose of filter screens, if present.
NOTE: Only plastic Spin Tubs have filter screens to push out.
28. Turn Spin Basket right-side up and insert plugs into tub, if present. NOTE: Stainless Steel baskets have 2 (2201455)
plugs and plastic baskets have 8 (2201458) plugs.
IMPORTANT: Inspect plugs to insure the lower lip of plug is fully inserted through the hole to prevent
air leakage.
29. Properly position Inner Basket on hub by aligning the exposed tub holes with the open holes on the hub. Prevent
damage to gasket during assembly.
30. Install 4 supplied screws (2201470) securing basket to hub.
31. Complete reassembly of washer.
Illustration shown is of a stainless steel tub,
plastic tub models will have 8 screen/holes.
16025947 Page 6 of 7
1/25/2005
Page 7

Technical Bulletin
g
Policy Letter
Type
Attention √ Service Managers
Service and Parts Managers
Models Searcy platform washers ALW*, DLW*, SLW*, SAV*, LAV*
Issue Tool required for removal and installation of bearing and seal.
Warranty N/A
Action A new combination Tub Seal and Bearing has been released for
12002011.
Service Information
√
Searcy platform washers. When replacing this Seal\Bearing you
will need to purchase a new Brake\Bearing tool part number
12002012. Or you may upgrade the existing Brake tool part number LA-2004 by
ordering part number
Date: Sept, 2002
No: TDL-0015A-S
Pa
e 1 of 1
Brand
Amana
Maytag
Product
Laundry
12002012 Brake\Bearing Tool
LA-2004 Upgrade to 12002011
Page 7 of 7 16025947
1/25/2005
Page 8

Feuille 16025947
2204513
d’instructions
Description : Trousse de palier et de joint à trois lèvres pour
plate-forme Searcy
Pièce de rechange numéro : 2204512
La trousse inclut :
Vis
d’agitateur
Écrou
d’étanchéité
16025947
Feuille
d’instructions
Moyeu de la
cuve de
lavage
Joint torique
Joint et palier
2201455
Bouchon
Qté 2
Pour éviter les risques de choc électrique, de blessures ou de mort, débrancher l’alimentation électrique avant
d’effectuer l’entretien.
Important : Cette trousse exige l’utilisation de graisse sur le
Outils :
2201458
Bouchon Qté 8
palier à trois lèvres. Ne pas utiliser de Vaseline ™
Vis de cuve
intérieure avec
Loctite ®
Qté (4)
AVERTISSEMENT
!
WARNING
22038313
Joint
statique
du moyeu
Cloche
d’entraînement
Remarque : Utilisée
seulement sur les
modèles avec
agitateur à dégorgeoir
22002898
35-2968
Bulletin TS
TDL-0015A-S
&
16023368
Page 1 de 7 16025947
1/26/2005
056016
Graisse
289P4
27615P
3M800
Voir le bulletin ci-joint :
Outil pour frein/palier
Page 9

Étapes à suivre :
1. Enlevez le panneau inférieur avec un tourne-écrou de 5/16 po. Desserrez les vis du bas suffisamment pour écarter le bas du
panneau de la laveuse. Enlevez les deux vis qui maintiennent le panneau avant à l’armoire. Écartez le panneau avant de
l’armoire et enlevez. Enlevez les deux vis qui maintiennent l’assemblage supérieur de l’armoire. Levez avec précaution
l’assemblage supérieur et maintenez-le en position ouverte.
16025947 Page 2 de 7
1/26/2005
Page 10

2. Enlevez la distributrice d’adoucisseur en la dégageant de l’agitateur. Enlevez l’agitateur en utilisant une des deux méthodes.
a. (Agitateurs de type dégorgeoir) Desserrez le boulon situé dans l’agitateur et enlevez en faisant glisser en ligne
droite vers le haut l’arbre de sortie de la transmission.
b. (Agitateurs à pales flexibles) Enlevez l’agitateur à pales flexibles en plaçant les mains sous la lèvre de l’agitateur et
en tirant vers le haut. Si l’agitateur est difficile à enlever, utilisez deux crochets de retrait d’agitateur, n
vous placez sous le rebord inférieur de l’agitateur. Enlevez la cloche d’entraînement en tirant vers le haut. Si la
cloche d’entraînement et difficile à enlever, utilisez les crochets de retrait pour agitateur.
o
254PRP, que
3. Enlevez les six ressorts de cuve de la lèvre inférieure de la cuve en utilisant un porte-mousqueton 289P4. Enlevez le ressort
d’équilibrage situé à l’arrière de la laveuse.
4. Dégagez et enlevez le couvercle de la cuve.
5. Enlevez le joint torique de l’arbre de sortie de transmission. Pendant l’assemblage, assurez-vous d’installer un nouveau joint
torique (25-7941), fourni avec la trousse.
6. Utilisez une clef à écrou (35-2968) et un outil à jointage (22002898) pour enlever l’écrou d’étanchéité.
7. Enlevez les boulons de la cuve intérieure, puis la cuve intérieure.
Page 3 de 7 16025947
1/26/2005
Page 11

8. Enlevez et jetez le filtre à charpie gris, si installé.
9. Enlevez le moyeu de la cuve de lavage avec l’outil à écrou 22038313 de Maytag. Tournez l’outil à écrou dans le sens
antihoraire pour enlever. Il peut s’avérer nécessaire de bloquer le mouvement de la transmission. Attachez une pince ou un
outil Visegrip® à la transmission seulement commeil est illustré. La transmission s’arrêtera de tourner lorsque la pince
entrera en contact avec le support de cuve.
10. Déconnectez le flexible d’évacuation de la cuve.
11. Enlevez les boulons de l’assemblage du moteur et abaissez le moteur sur la base. Débranchez le faisceau de fils de la prise
du moteur.
12. Enlevez la courroie d’entraînement de la poulie d’entraînement.
13. Enlevez le tuyau de pression de la bulle de pression sur la cuve extérieure.
14. Levez la cuve et l’assemblage d’entraînement pour les retirer de la caisse de la laveuse. Renversez la cuve extérieure et
l’assemblage d’entraînement en les plaçant sur un recouvrement protecteur.
16025947 Page 4 de 7
1/26/2005
Page 12

15. Enlevez les vis qui maintiennent le support à pied de la cuve. Séparez l’assemblage de transmission de la cuve extérieure.
16. Enlevez le joint et le palier en utilisant un extracteur de frein 12002012 avec le capuchon d’extrémité en PVC de 76 mm
fourni.
17. Appliquez de la graisse pour joint central (056016) sur le nouveau joint à trois lèvres.
18. Appliquez de la graisse pour joint central (056016) sur l’écrou d’étanchéité avant d’installer.
Écrou d’étanchéité (graisse à joint 056016)
Graisse sur le joint à trois lèvres
(graisse pour joint central)
19. Nettoyez le diamètre extérieur du palier de la cuve pour vous assurer qu’il ne comporte aucun excès de graisse. Vérifiez le
diamètre intérieur de la cuve extérieure pour vérifier qu’aucune imperfection n’est présente sur le plastique. Si des
imperfections sont détectées sur le diamètre intérieur de la cuve intérieure ou si l’ajustement du palier de la cuve semble
avoir du jeu à l’extérieur, utilisez une petite quantité de 3M800 (27615P) sur le diamètre extérieur du palier de la cuve,
comme il est illustré ci-dessus. Étalez une mince couche avec l’index, autour de tout le diamètre. Les nouvelles cuves
extérieures seront ajustées plus serré; l’utilisation du 3M800 sur un palier ou sur une cuve ajusté(e) serré fera ressortir le
palier. Utilisez seulement le 3M800 si vous détectez des imperfections sur la cuve extérieure ou si le palier a du jeu.
Diamètre extérieur
propre
Page 5 de 7 16025947
1/26/2005
Page 13

20. Installez le nouveau palier en utilisant l’outil pour frein/palier 12002012, des grandes rondelles et un capuchon d’extrémité en
PVC.
Important : Utilisez de grandes rondelles pour éviter d’endommager
le palier.
21. Vérifiez que le palier inférieur situé dans le siège n’a pas été endommagé par une fuite d’eau et remplacez le palier si nécessaire
(Palier n
22. Réassemblez la transmission et fixez le support à pied sur la partie inférieure de la cuve extérieure.
23. Installez la cuve extérieure et l’ensemble transmission sur la base et réattachez les ressorts.
24. Réassemblez tous les flexibles.
25. Installez le nouveau moyeu.
26. Installez le joint statique en mousse (27001222) sur le moyeu.
27. Mettez le panier d’essorage à l’envers puis retirez-le pour en jeter les crépines, si installées.
28. Remettez le panier d’essorage à l’endroit et insérez les bouchons dans la cuve, si installés. REMARQUE : Les paniers en acier
inoxydable comportent deux bouchons (2201455) et les paniers en plastique en comportent 8 (2201458).
o
40004001).
REMARQUE : Seules les cuves d’essorage en plastique ont des filtres en plastique que l’on peut enlever en tirant vers
l’extérieur.
IMPORTANT : Inspectez les bouchons pour vous assurer que leur lèvre inférieure est complètement insérée
à travers le trou afin de prévenir toute fuite d’air.
29. Positionnez correctement le panier intérieur sur le moyeu en alignant les trous exposés de la cuve avec les trous libres du moyeu.
Évitez d’endommager le joint statique pendant l’assemblage.
30. Installez les quatre vis fournies (2201470) pour fixer le panier au moyeu.
31. Terminez le réassemblage de la laveuse.
L’illustration indique une cuve en acier
inoxydable; les cuves en plastique ont
8 écrans/trous.
16025947 Page 6 de 7
1/26/2005
Page 14

Bulletin Technique
Type
Aux soins
de
Modèles
Objet Outil requis pour la dépose et l’installation du palier et du joint.
Garantie
Action
Lettre d’orientation
√
Informations sur le service
Gérants du service
√
Gérants des pièces et du service
Laveuses à plate-forme Searcy ALW*, DLW*, SLW*, SAV*, LAV*
Sans objet
Une nouvelle combinaison de joint et de palier pour cuve vient
d’être offerte pour les laveuses à plate-forme Searcy. Lors du
remplacement de ce palier à joint vous devrez acheter un nouvel
outil pour frein\palier, numéro de pièce 12002012. Vous pouvez également
choisir de mettre à jour l’extracteur pour frein actuellement utilisé, numéro de
pièce LA-2004, en commandant le numéro de pièce 12002011.
Date : Sept, 2002
No : TDL - 0015A-S
Page 1 de 1
Marque
Amana
Maytag
Produit
Blanchisserie
Outil pour frein\palier 12002012
Mise à jour de LA-2004 à 12002011
Page 7 de 7 16025947
1/26/2005
 Loading...