

Page 1
SAV-1Maytag Clothes Washer
Congratulations on
your purchase of a Maytag
clothes washer! Your satisfaction
is very important to us.
Read this manual for best results. It contains instructions to acquaint you with proper
operating and maintenance procedures.
In addition you will find a Laundering Tips guide
packed with your clothes washer. It contains information on recommended laundering procedures,
stain removal and special laundering situations.
Save time and money. If something should go
wrong, we suggest consulting the “Before You Call”
section. It is designed to help you solve basic problems before consulting a servicer.
If you have questions, write us (include your model
number and phone number) or call:
Maytag Appliances Sales Company
Attn: CAIR
®
Center
P.O. Box 2370
Cleveland, TN 37320-2370
1-800-688-9900 USA
1-800-688-2002 CANADA
1-800-688-2080 USA TTY (for deaf, hearing
impaired or speech impaired)
(Mon.–Fri., 8am–8pm Eastern Time)
Internet: http://www.maytag.com
Table of Contents
Safety Instructions . . . . . . . . . . . . . . . . 1
Operating Tips. . . . . . . . . . . . . . . . . . . . 2
Controls at a Glance . . . . . . . . . . . . . . 3-4
Special Features . . . . . . . . . . . . . . . . . . 5
Care and Cleaning. . . . . . . . . . . . . . . . . 6
Storing the Washer . . . . . . . . . . . . . . . . 6
Before You Call. . . . . . . . . . . . . . . . . . 7-8
Warranty. . . . . . . . . . . . . . . . . . . . . . . . . 9
Guide de L’Utilisateur . . . . . . . . . . . . . 10
Guía del Usuario . . . . . . . . . . . . . . . . . 20
USER’S GUIDE
Form No. B/11/02 Part No. 2200533 MCS Part No. 27001032 ©2002 Maytag Appliances Sales Co.
Page 2

1. Read all instructions before using the appliance.
2. As with any equipment using electricity and having
moving parts, there are potential hazards. To use this
appliance safely, the operator should become familiar
with the instructions for operation of the appliance and
always exercise care when using it.
3. Do not install or store this appliance where it will be
exposed to the weather.
4. Install and level washer on a floor that can support the
weight.
5. This appliance must be properly grounded. Never plug
the appliance cord into a receptacle which is not grounded adequately and in accordance with local and national
codes. See installation instructions for grounding this
appliance.
6. To avoid the possibility of fire or explosion:
a. Do not wash items that have been previously cleaned
in, washed in, soaked in, or spotted with gasoline, drycleaning solvents, other flammable or explosive substances as they give off vapors that could ignite or
explode. Hand wash and line dry any items containing
these substances.
Any material on which you have used a cleaning solvent, or which is saturated with flammable liquids or
solids, should not be placed in the washer until all
traces of these liquids or solids and their fumes have
been removed.
These items include acetone, denatured alcohol, gasoline, kerosene, some liquid household cleaners, some
spot removers, turpentine, waxes and wax removers.
b. Do not add gasoline, dry-cleaning solvents, or other
flammable or explosive substances to the wash water.
These substances give off vapors that could ignite or
explode.
c. Under certain conditions, hydrogen gas may be pro-
duced in a hot water system that has not been used for
2 weeks or more. HYDROGEN GAS IS EXPLOSIVE.
If the hot water system has not been used for such a
period, before using a washing machine or combination washer-dryer, turn on all hot water faucets and let
the water flow from each for several minutes. This
will release any accumulated hydrogen gas. As the
gas is flammable, do not smoke or use an open flame
during this time.
7. Do not reach into the appliance if the tub or agitator is
moving.
8. Do not allow children or pets to play on, in, or in front of
the appliance. Close supervision is necessary when the
appliance is used near children and pets.
9. Do not tamper with controls.
10. Do not repair or replace any part of the appliance or
attempt any servicing unless specifically recommended
in published user-repair instructions that you understand and have the skills to carry out.
1
SAVE THESE INSTRUCTIONS
Important safety instructions
11. Unplug power supply cord before attempting to service
your washer.
12. The agitator should not be removed. If the agitator is
removed, it must be replaced by pushing down completely and the locking screw tightened before the washer is operated.
13. Store laundry aids and other material in a cool, dry place
where children cannot reach them.
14. Do not wash or dry items that are soiled with vegetable
or cooking oil. These items may contain some oil after
laundering. Due to the remaining oil, the fabric may
smoke or catch fire by itself.
15. Do not use chlorine bleach and ammonia or acids (such
as vinegar or rust remover) in the same wash. Hazardous
fumes can form.
16. Do not machine wash fiberglass materials. Small particles can stick to fabrics washed in following loads and
cause skin irritation.
17. Before the appliance is removed from service or discarded, remove the door to the washing compartment.
18. Inlet hoses are subject to damage and deterioration over
time. Check the hoses periodically for bulges, kinks, cuts,
wear or leaks and replace them every five years.
WARNING: To reduce the risk of fire, explosion, electric shock, or personal injury when using
your washer, follow basic safety precautions, including the following:
Recognize safety symbols,
words, labels
WARNING – Hazards or unsafe practices which COULD
result in severe personal injury or death.
CAUTION – Hazards or unsafe practices which COULD
result in minor personal injury.
WARNING
CAUTION
What you need to know about
safety instructions
Warning and Important Safety Instructions appearing in this
manual are not meant to cover all possible conditions and situations that may occur. Common sense, caution, and care
must be exercised when installing, maintaining or operating
appliance.
Always contact your dealer, distributor, service agent, or
manufacturer about problems or conditions you do not
understand.
Page 3
Operating tips
2
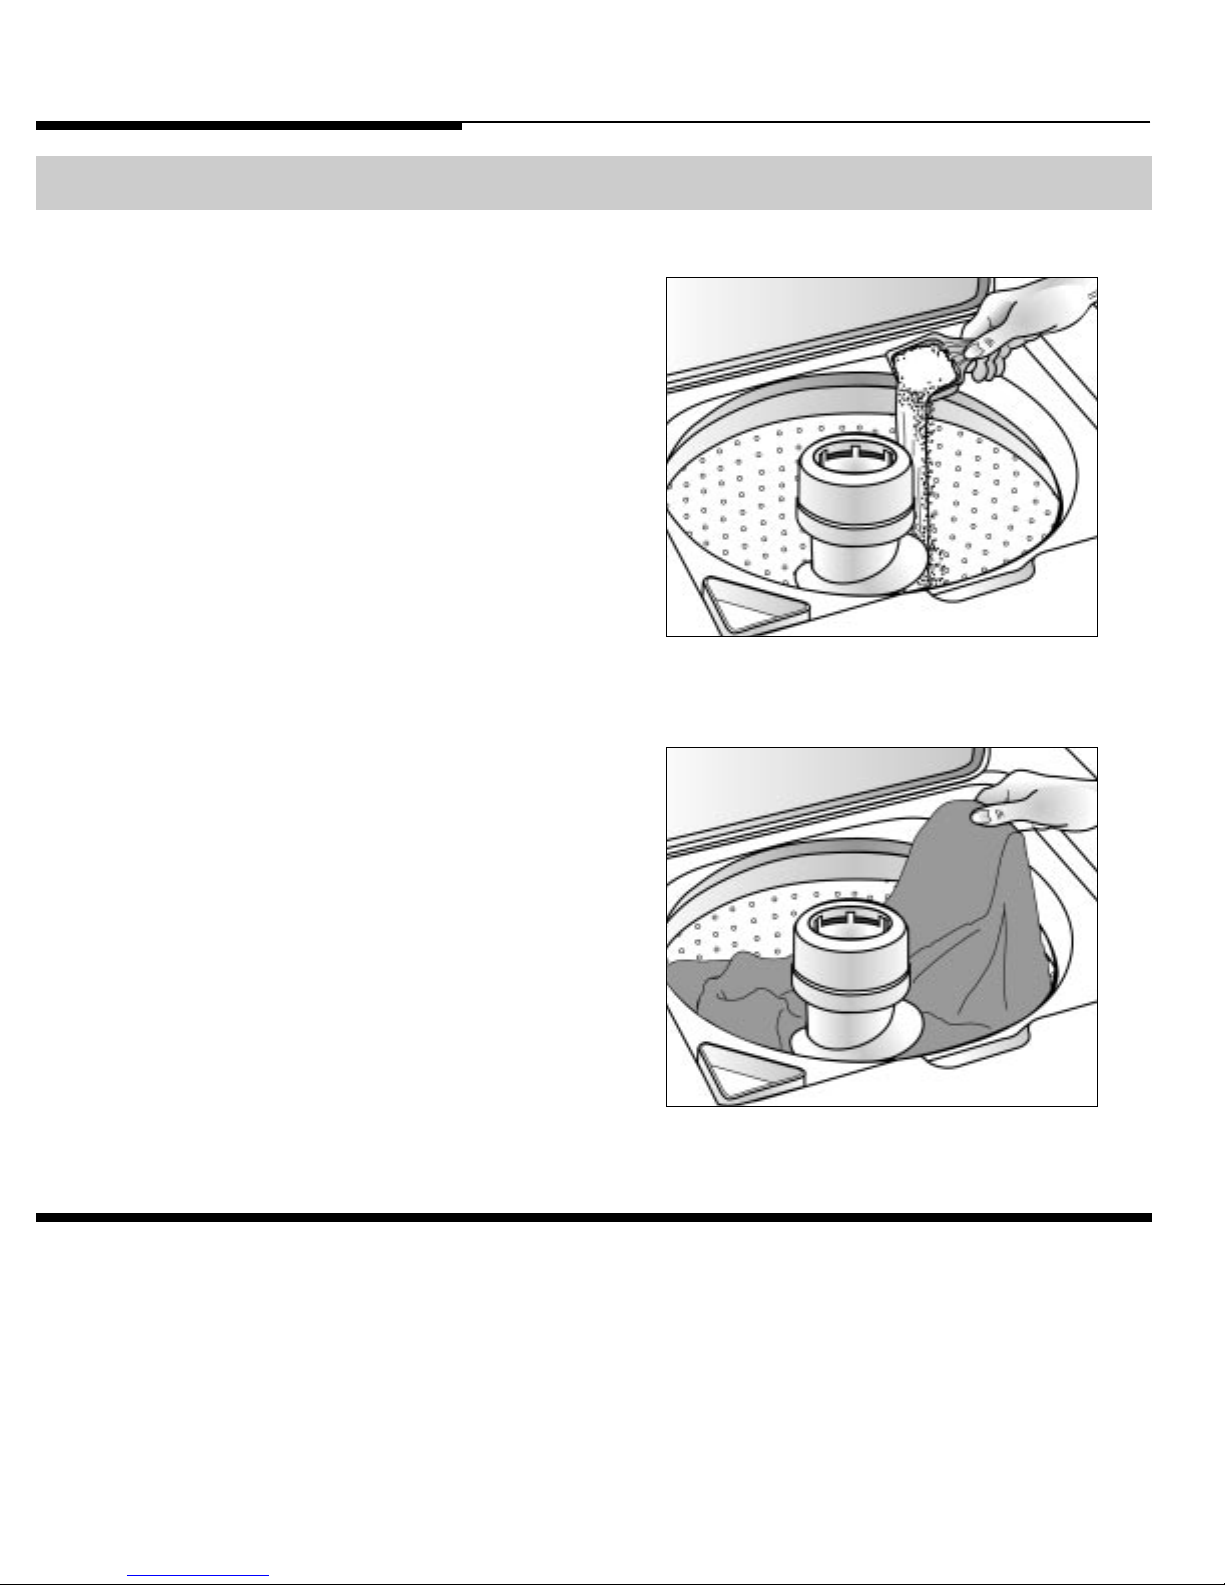
Loading
• Put dry, unfolded clothes loosely in the tub, up to the
top row of holes for a maximum load.
• Do not wrap large items like sheets around the agitator.
• Mix large and small items for best circulation. Wash
bulky items like blankets separately.
• When laundering permanent press items or items of
delicate construction, washable woolens or loosely
knit items, never use less than the MEDIUM water
level setting. This will minimize shrinkage, wrinkling
and pulling of seams.
• For best results add the detergent to the washtub
before adding the load.
• Close lid carefully to avoid slamming.
Additional tips
• During the spin, it is possible for the load to become
unevenly distributed in the tub. If this happens, push
in the control knob, open the lid, redistribute the
load, close the lid and pull out the control knob. The
spin will resume at the point it was interrupted.
• The washer will pause briefly throughout each cycle.
These pauses are normal.
For detailed information on sorting, pretreating stains, etc., see the enclosed Laundering Tips pamphlet.
Detergent
• Use either liquid or granular laundry detergent. For
best results, be sure detergent is added to the washer BEFORE the load and be sure the wash water is
above 65° F.
• Use the correct amount of detergent for the load size,
soil level and water conditions. Use more detergent if
you have hard water and very soiled loads.
If you have soft water or a lightly soiled load, use less
detergent. (See manufacturer’s instructions.)
•Wipe up any detergent spills on the washer.
• This washer is designed so that it will not agitate or
spin when the lid is open. It will, however, fill with
the lid open so water is available for pretreating
stains or diluting fabric softener.
• If you open the lid during a cycle, the washer will
stop. When the lid is closed and the control knob
pulled out, the washer will continue the cycle at the
point it was interrupted.
Page 4
Step 3
Step 1
3
REMEMBER: Items must circulate freely for best results.
Hot/Cold
Warm/Warm
Warm/Cold
Cold/Cold
REMEMBER: In wash water temperatures below 65° F, detergents do not dissolve well or clean well. Care labels define
cold water as up to 85° F.
Controls at a glance
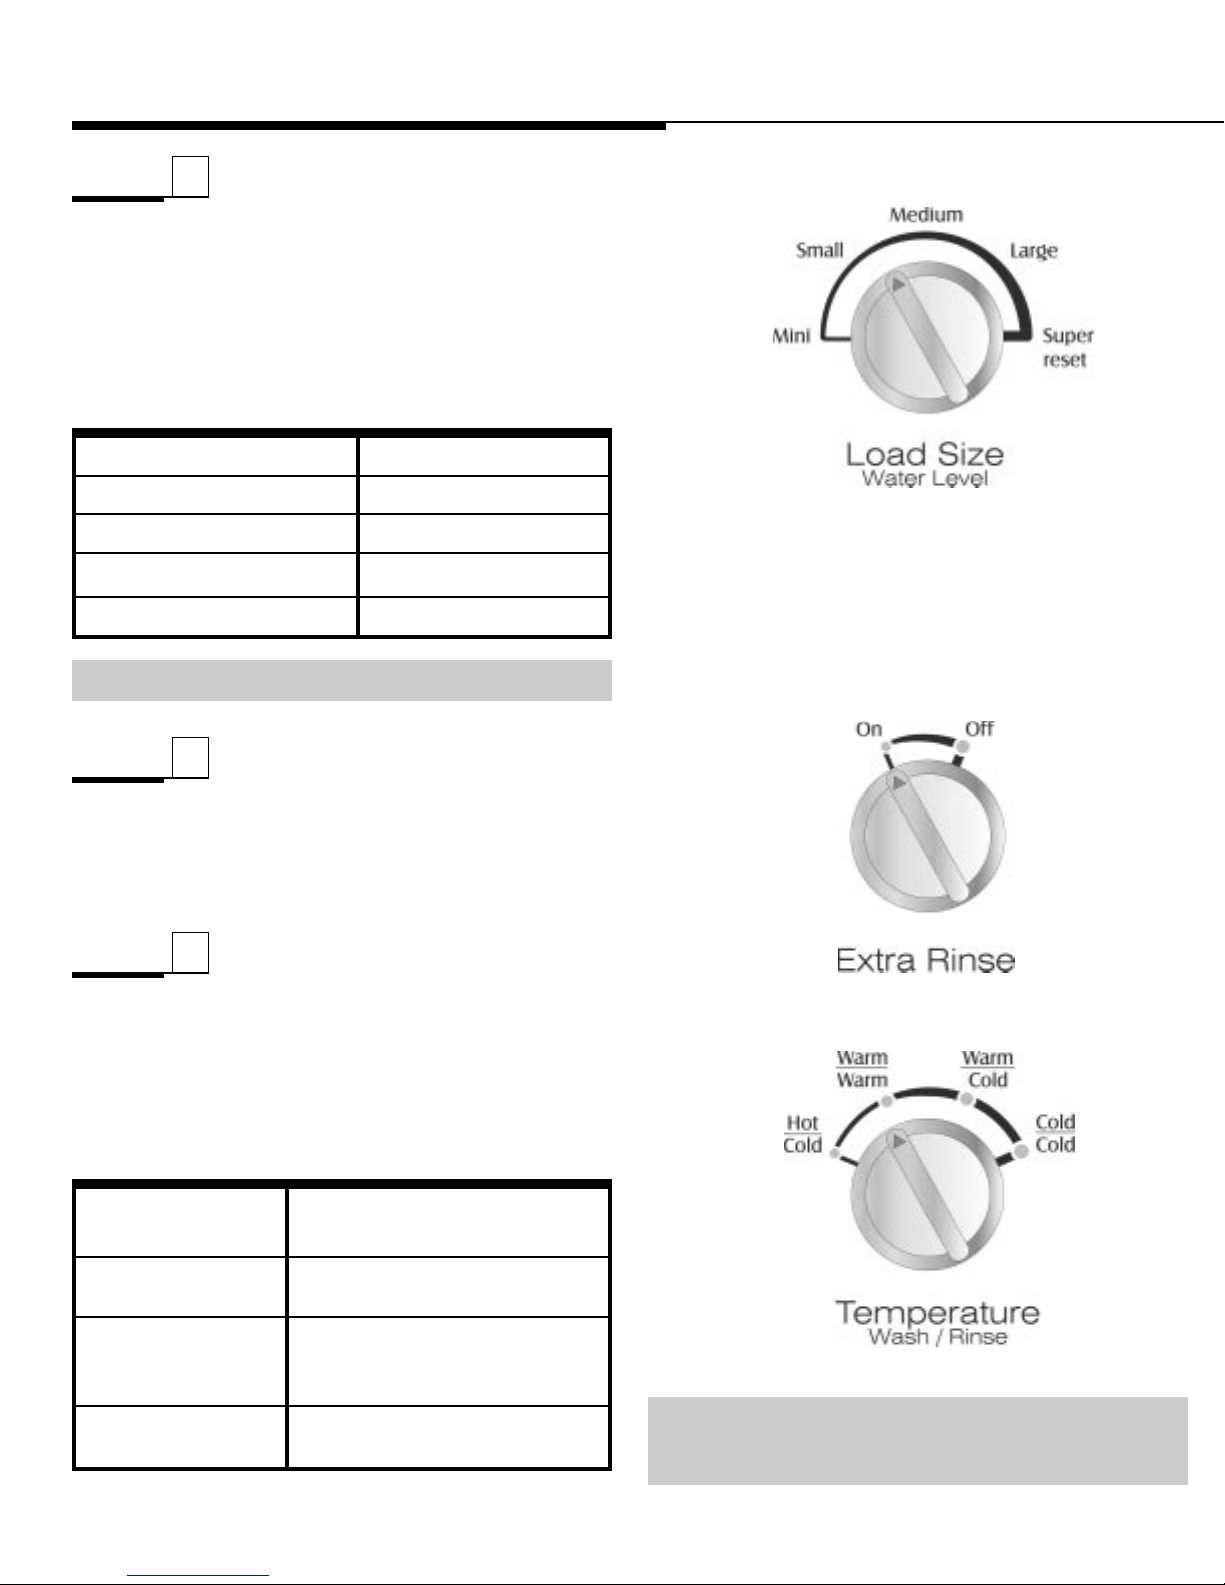
Select Temperature
Turn the Wash/Rinse Temperature knob to the desired
water temperatures. Follow the garment care label for
best results. Use the chart below as a guide.
Select Load Size
Turn the Load Size knob to the setting that matches the
size of the load.
If more water is needed once the fill is complete, turn
the knob to reset and then to the proper setting.
WASH/RINSE TEMPS LOAD TYPE
Step 2
Extra Rinse (if desired)
Provides an additional rinse near the end of the cycle to
more completely remove laundry additives, perfumes, etc.
White and heavily soiled,
color-fast items
Moderately soiled,
colored items
Moderately soiled,
colored items;
most permanent press items
Brightly colored, lightly soiled
items; washable woolens
Super
Large
Medium
Small
Mini
3/4 – Full
1/2 – 3/4 Full
1/3 – 1/2 Full
1/4 – 1/3 Full
1/4 Full
WATER LEVEL SETTING LOAD SIZE
Page 5
Step 6
Step 5
4
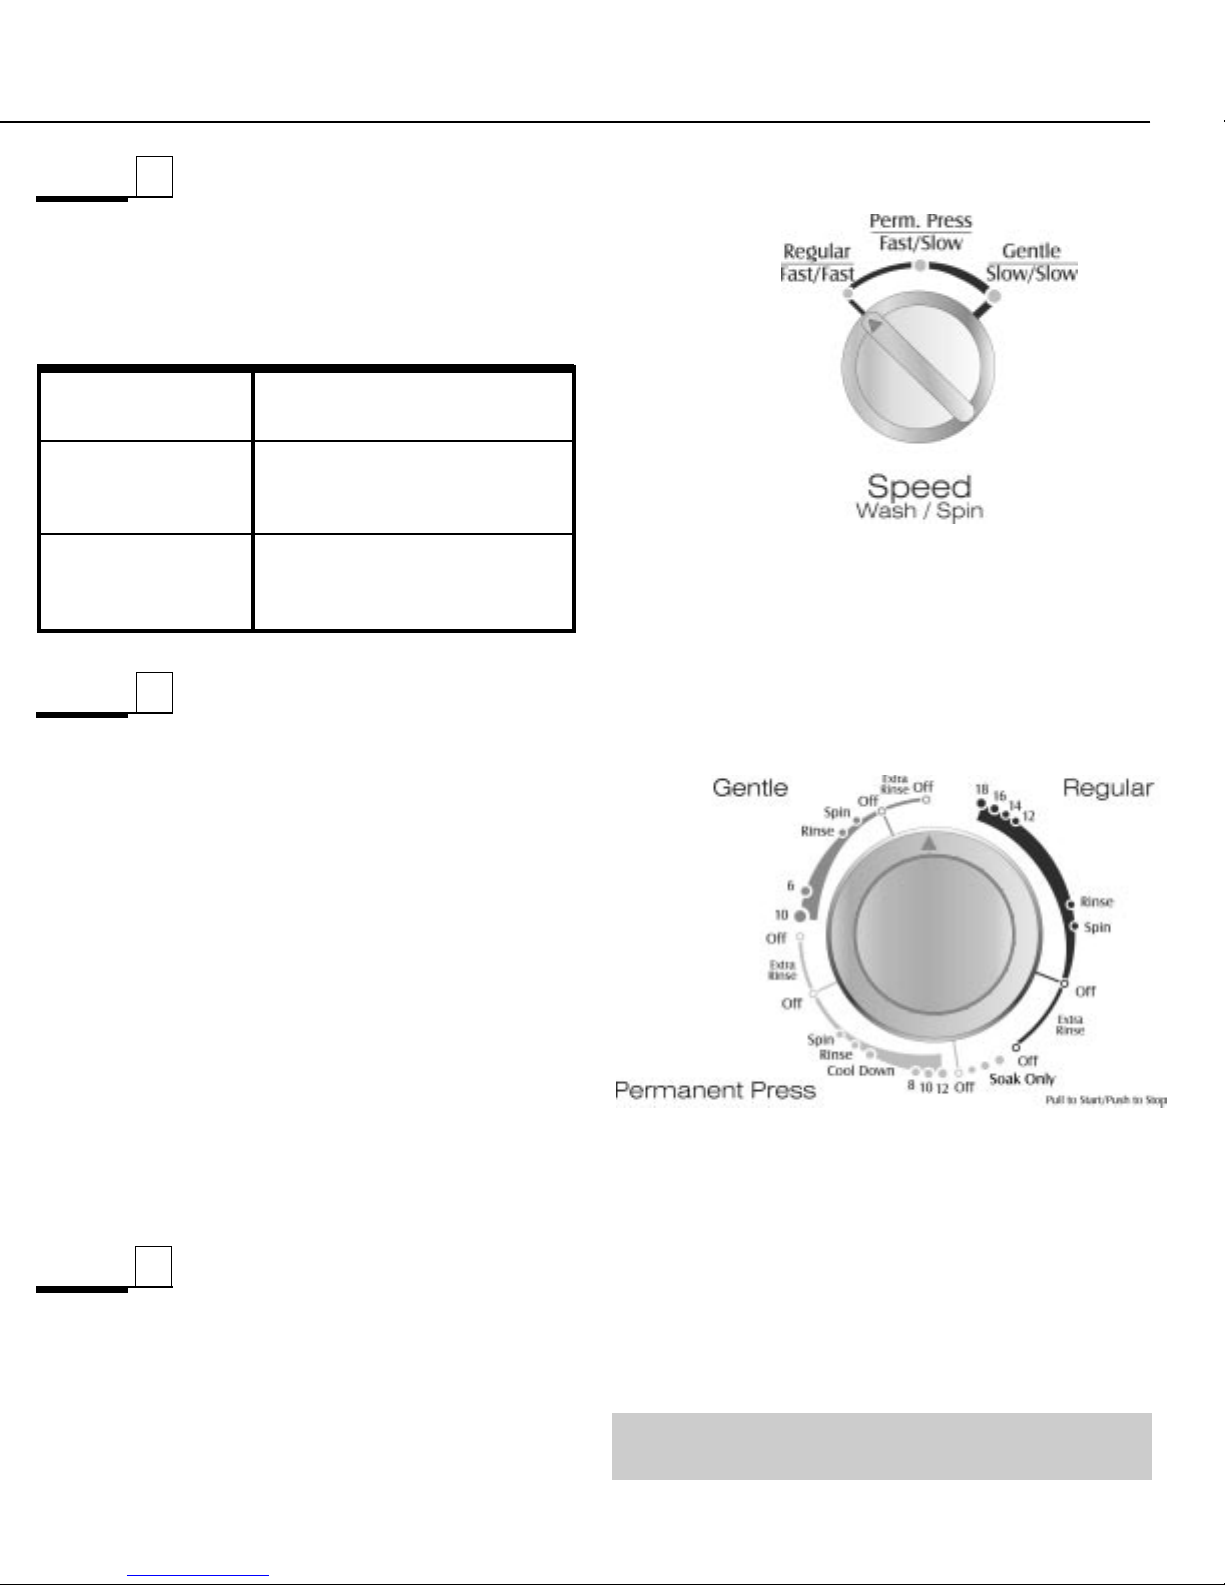
Select Cycle
To select a cycle, push the control dial IN and turn it to
the right (clockwise) until the pointer is at the number
of minutes desired for the wash load.
Regular Cycle
For regular fabrics, select the cycle time and turn the
Wash/Spin Speed dial to Regular/Fast/Fast. For maximum cleaning set the dial at 18.
Permanent Press Cycle
This cycle provides up to 12 minutes of agitation.
Depending on the load, select either the
Regular/Fast/Fast or Perm. Press/Fast/Slow wash/
spin speed.
Gentle Cycle
The Gentle Cycle provides approximately 10 minutes
of agitation and soaking to help remove stains.
Pull Control Dial Out to Start
You may stop the washer at any time by simply pushing the control dial IN. Therefore it is possible to obtain
a non-agitated soak or to shorten, skip or repeat any
part of a cycle. The control dial must be pushed IN (off
position) when you change the setting.
See Laundering Tips for proper washing procedures,
stain removal, and special laundering situations.
Sturdy fabrics needing maximum water extraction.
Sturdy fabrics needing a slower spin speed because of wrinkling.
Delicate fabrics needing
slower spin speed because
of clothing construction.
Regular
Fast/Fast
Perm. Press
Fast/Slow
Gentle
Slow/Slow
WASH/SPIN SPEEDS WASH/SPIN SPEEDS
Select Wash/Spin Speed
Your washer has selectable wash and spin speed combinations.
Step 4
Soak Only
There will be a brief period of agitation followed by a
soak. Soaking should be no longer than 30 minutes. The
control dial must be advanced manually to a spin or a
wash setting.
Page 6
5
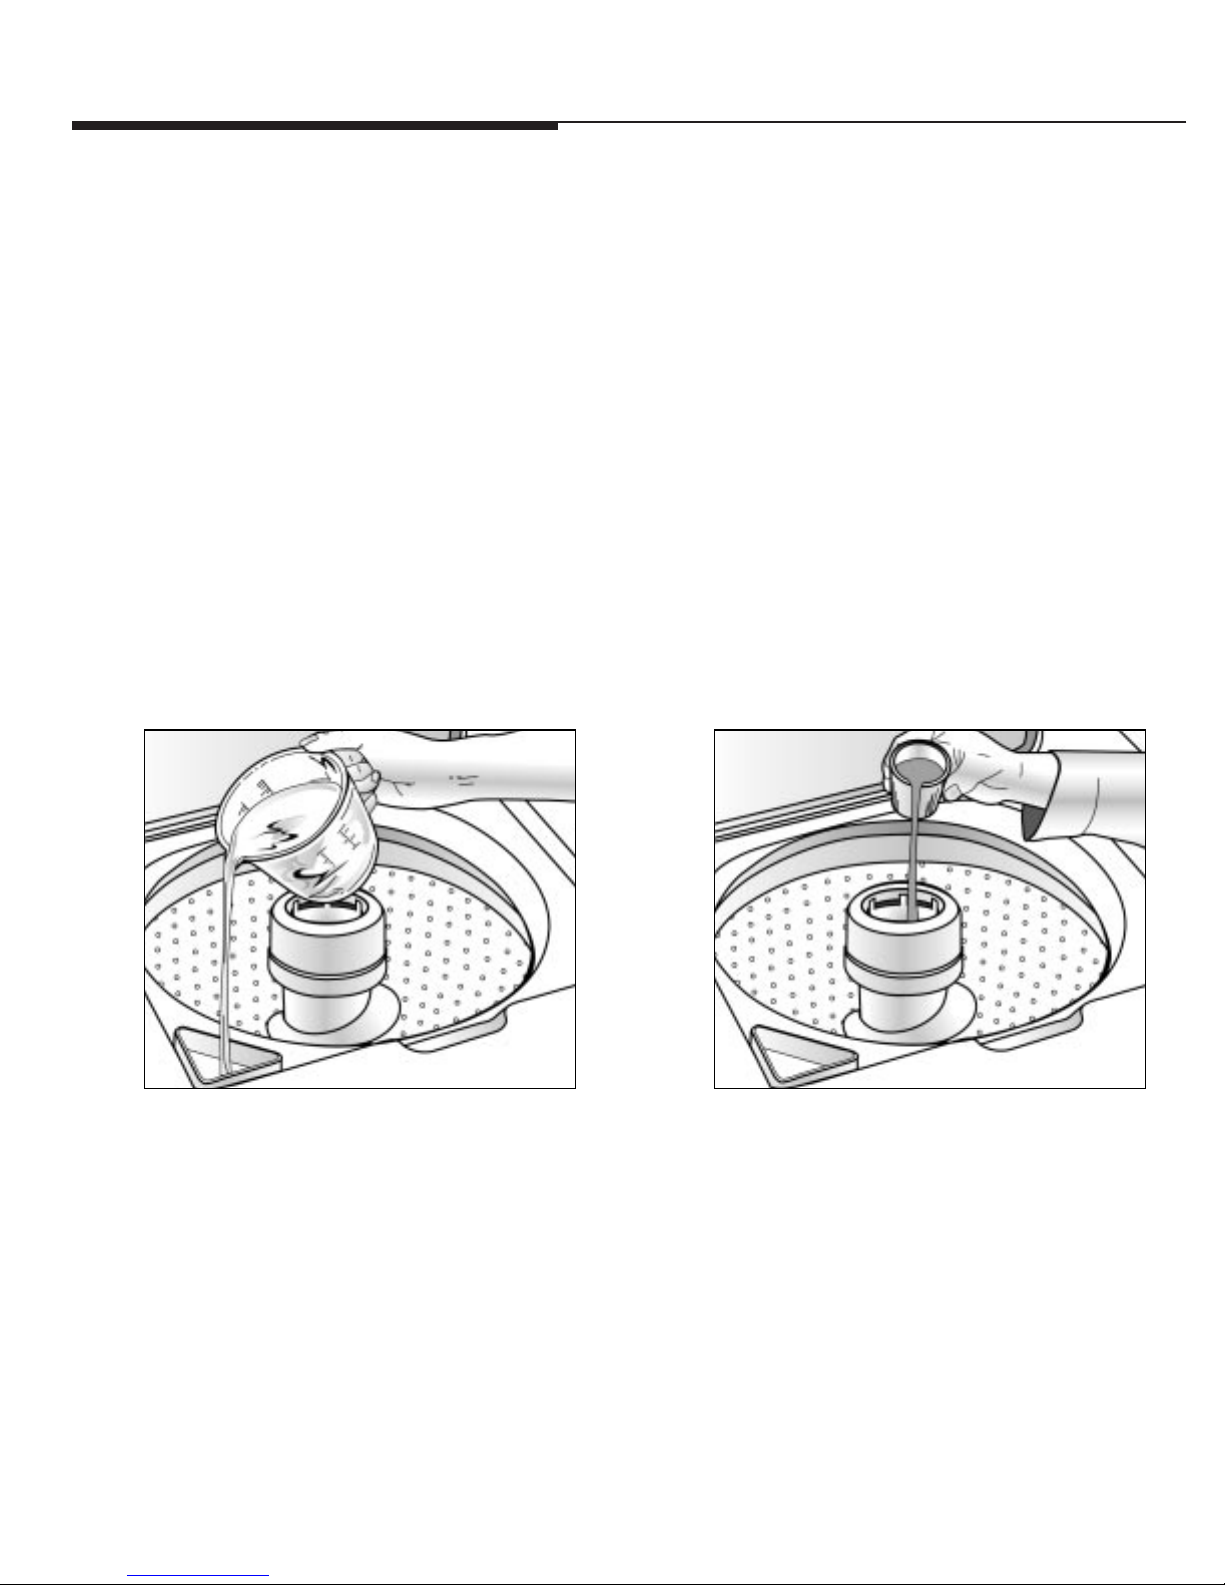
Bleach Dispenser
The dispenser automatically dilutes liquid chlorine
bleach before it reaches your wash load. To use, follow
these steps:
1.Measure liquid chlorine bleach carefully, following
the instructions on the bottle.
2.Add the bleach to the dispenser before adding the
load. Avoid splashing or over-filling the dispenser.
NOTE:
• Never pour undiluted liquid chlorine bleach directly
onto the load or into the wash tub. It is a powerful
chemical and can cause fabric damage, such as tearing or color loss, if not used properly.
•If you prefer to use color-safe, non-chlorine bleach,
pour it into the wash tub with your detergent. Do not
pour non-chlorine bleaches into the bleach dispenser.
Pour liquid chlorine bleach into
bleach dispenser.
Special Features
Fabric Softener Dispenser
This dispenser automatically releases liquid fabric softener at the proper time during the cycle. To use, follow
these steps:
1. Pour a measured amount of desired liquid into
the dispenser to fill line only.
2. If liquid comes below line, add warm water.
NOTE:
• Do not stop the washer during the first spin. This
will cause the dispenser to empty too soon.
• Never pour fabric softener directly on the load. It
will leave spots and stains.
•Use the dispenser for liquid fabric softeners only.
Pour liquid fabric softener into cup and
dilute with warm water.
Page 7
6
Care and Cleaning
Turn off the water faucets after finishing the day’s
washing. This will shut off the water supply to the
washer and prevent the unlikely possibility of damage
from escaping water.
Use a soft cloth to wipe up all detergent, bleach or other
spills as they occur.
Clean the following as recommended:
Control Panel – clean with a soft, damp cloth and glass
cleaner. Do not use abrasive powders or cleaning
pads.
Cabinet – clean with soap and water followed with an
appliance wax, if desired.
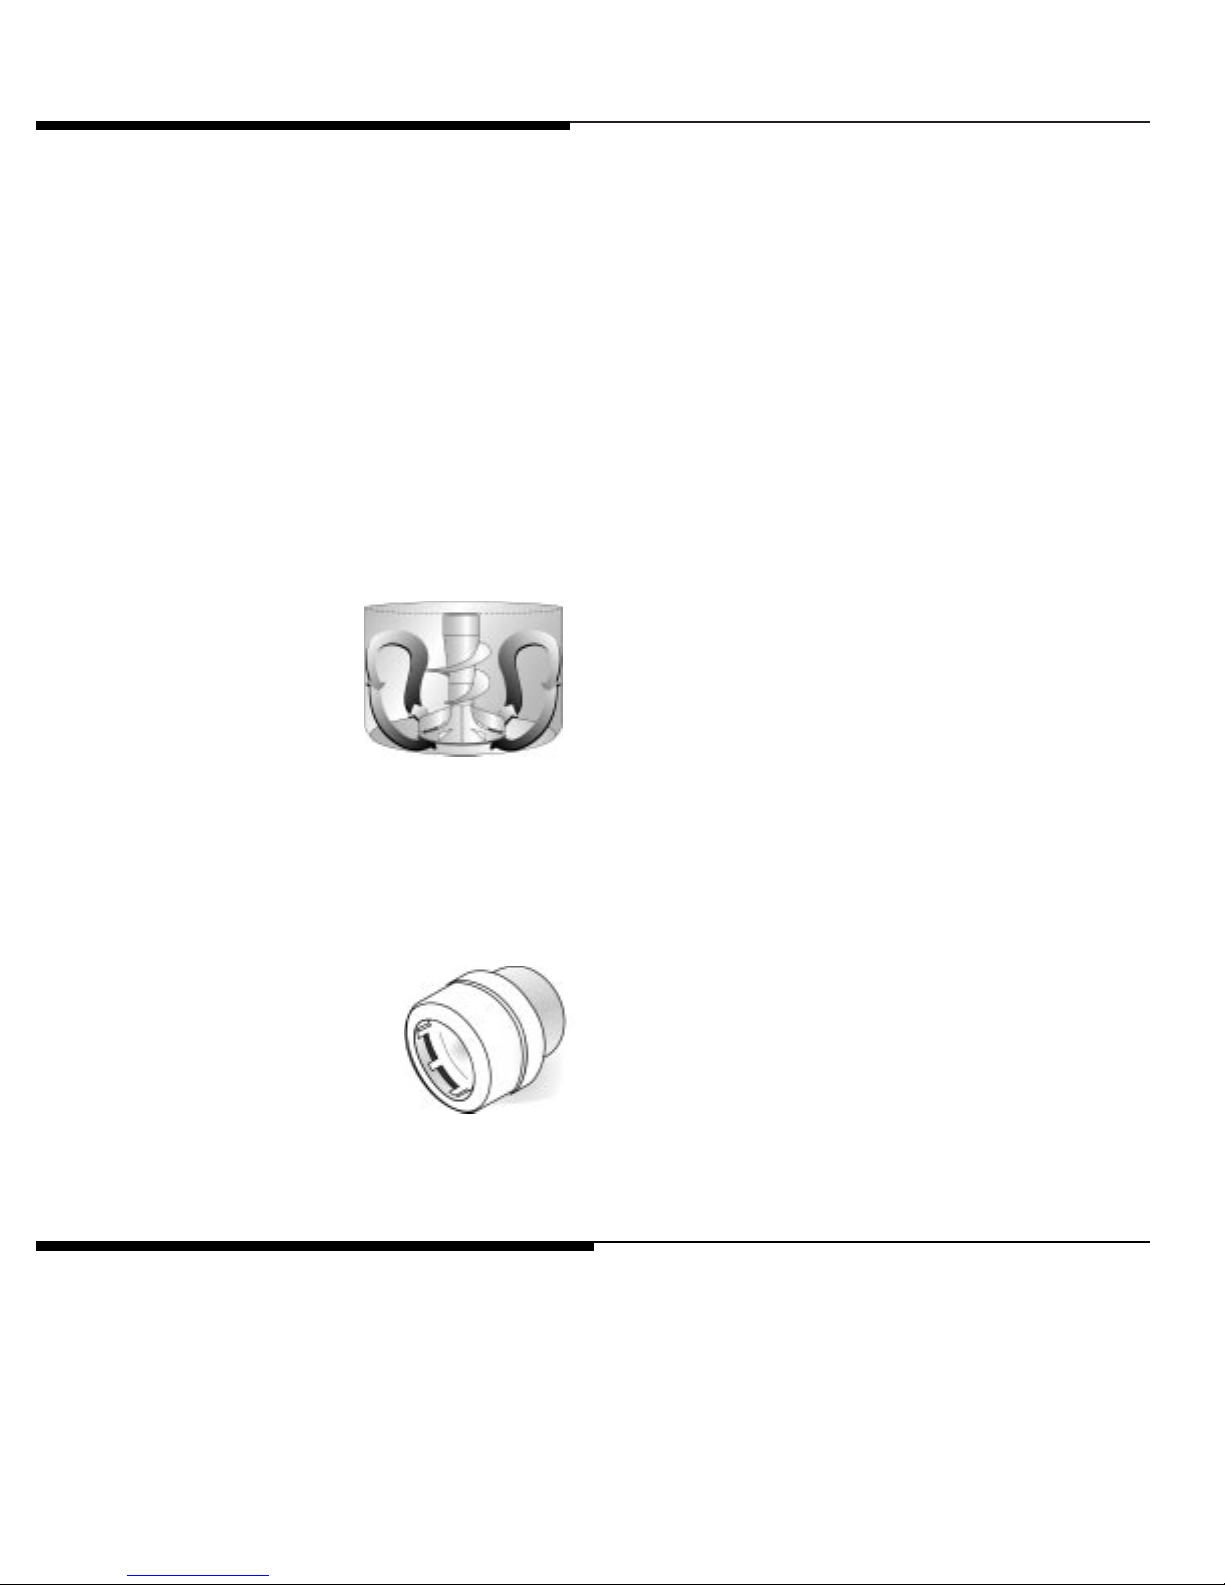
Lint Filter – it is self-cleaning and requires no mainte-
nance. The filter is located under the agitator on the
bottom of the washtub.
During the wash and rinse
portion of the cycle, lint is
collected on the filter. Then
during the spin and drain
the filter is cleaned automatically.
Fabric Softener Dispenser
If it is necessary to clean the dispenser:
1. Pull the dispenser off of the top of the agitator.
2. Soak for one hour in sink or container in hot
water and dishwashing liquid.
3. Hold hands over top and bottom of dispenser and
shake to loosen buildup.
4. Rinse with clean, hot water.
5. Repeat process if necessary.
6. Replace dispenser on agitator.
Do not use dishwashing liquid
inside the washer. Oversudsing can
occur.
Storing the Washer
Washers can be damaged if water is not removed from
hoses and internal components before storage. Prepare
the washer for storage as follows:
• Select Regular, 12 minutes, and add one cup of chlorine bleach OR white vinegar to a full load of water
without clothes. Run the washer through a complete
cycle. (Do not mix bleach and vinegar in the same
wash. Hazardous fumes can form.)
•Turn the water faucets off and disconnect the inlet
hoses.
• Advance the cycle control knob to Spin and lower
the drain hose to eliminate any water that may be in
the drain hose.
• Disconnect the washer from the electrical supply and
leave the washer lid open to let air circulate inside
the tub.
Interior – hard water deposits may be removed, if
needed, using a recommended cleaner labeled washer safe.
The interior of the washer should be cleaned periodically to remove dirt, soil, odor or bacteria residue that
may remain in the washer as a result of washing
clothes. We recommend taking the following steps
every 60 to 120 days to clean and freshen your washer
interior. The frequency with which the washer should
be cleaned and freshened depends on factors such as
usage, the amount of dirt, soil or bacteria being run
through your washer, or the use of cold water.
To clean and freshen the washer interior:
1. Add a measured amount of chlorine bleach to the
bleach dispenser, following package directions.
2. Add 1/4 cup of detergent to the tub.
3. Run the washer through a complete cycle using
hot water.
4. Repeat the process if necessary.
Page 8
Before You Call
7
For problem laundry solutions (i.e. fabric damage, residue, tangling) and special laundry care procedures,
see the enclosed Laundry Tips brochure.
Won’t Fill
• Plug cord into live electrical outlet.
• Check fuse or reset circuit breaker.
• Turn the control knob to proper cycle and pull knob out to start the washer.
• Turn both faucets on fully.
• Straighten inlet hoses.
• Disconnect hoses and clean screens. Hose filter screens may be plugged.
Won’t Agitate
• Check fuse or reset circuit breaker.
• Make sure the lid is completely closed.
• Turn the control knob to proper cycle and pull knob out to start the washer.
• Close lid and pull knob out to start the washer. For your safety, washer will not agitate or spin unless the lid is closed.
• Pauses are normal. Wait and see if the washer will start again.
Won’t Spin or Drain
• Check fuse or reset circuit breaker.
• Straighten drain hoses. Eliminate kinked hoses. If there is a drain restriction, call for service.
• Close lid and pull knob out to start the washer. For your safety, washer will not agitate or spin unless the lid is closed.
• Suds lock – caused by too much suds. Rewash without detergent. Use correct amount of a low-sudsing detergent.
Load is Wet
• Unevenly distributed load. Redistribute the load, close the lid and pull knob out. Check for leveling. Be sure water
level is acceptable for load size.
• A normal spin speed is recommended for heavy loads like jeans or towels.
Stops
• Plug cord into live electrical outlet.
• Check fuse or reset circuit breaker.
• Turn the control knob to proper cycle and pull knob out to start the washer.
• Close lid and pull knob out to start the washer. For your safety, washer will not agitate or spin unless lid is closed.
• This may be a pause or soak period in the cycle. Wait briefly and it may start.
Leaks Water
• Make sure hose connections are tight.
• Make sure end of drain hose is correctly inserted and secured to drain facility.
• Avoid extended soaking – soak for 30 minutes or less.
• Avoid overloading.
Is Noisy
• Be sure washer is leveled properly as outlined in installation manual.
• Weak floors can cause vibration and walking.
• Be sure rubber feet are installed on leveling legs.
• Operating sounds will vary depending on agitation speed.
Cont.
Page 9

8
For further assistance contact Maytag Appliances Sales Company, Maytag Customer Assistance:
U.S. 1-800-688-9900 or Canada 1-800-688-2002
U.S. customers using TTY for deaf, hearing impaired or speech impaired, call 1-800-688-2080.
Fills with the Wrong Temperature Water
• Turn both faucets on fully.
• If equipped with a temperature selector knob, be sure it is set directly on a temperature setting and not between settings.
• Make sure temperature selection is correct.
• Make sure hoses are connected to correct faucets and inlet connections. Be sure water supply is regulated correctly.
Flush water line before filling washer.
• Check the water heater. It should be set to deliver a minimum 120°F (49°C) hot water at the tap. Also check water
heater capacity and recovery rate.
• Disconnect hoses and clean screens. Hose filter screens may be plugged.
Cycle Selector Advances Through Off
• Extra Rinse is selected.
Notes
Page 10

9
MAYTAG • 403 W. 4thStreet N. • P.O. Box 39 • Newton, Iowa 50208
Full One Year Warranty
For one (1) year from the date of original retail purchase, any part which fails in normal home use will be repaired or
replaced free of charge.
Limited Warranty
After the first year from date of original retail purchase, through the time periods listed below, the parts designated below
which fail in normal home use will be repaired or replaced free of charge for the part itself, with the owner paying all other
costs, including labor, mileage and transportation.
Second Year – All parts.
Third through Fifth Year – The drive motor. All parts of the solid state controls (if so equipped).
Third through Tenth Year – All parts of the transmission assembly.
Third through Lifetime – Inner wash basket.
Additional Limited Warranty Against Rust-Through
Should an exterior cabinet, including the top, lid and baseframe, rust through during the one year period starting from the
date of retail purchase, repair or replacement will be made free of charge. After the first and through the tenth year, repair
or replacement will be made free of charge for the part itself, with the owner paying all other costs, including labor, mileage
and transportation.
Please Note: This full warranty and the limited warranty apply when the washer is located in the United States or
Canada. Washers located elsewhere are covered by the limited warranty only, including parts which fail during the first
two years.
Canadian Residents
This warranty covers only those appliances installed in Canada that have been listed with the Canadian Standards Association
unless the appliances are brought into Canada due to transfer of residence from the United States to Canada.
The specific warranties expressed above are the ONLY warranties provided by the manufacturer. This warranty gives you
specific legal rights, and you may also have other rights that vary from state to state.
Maytag Clothes Washer Warranty
TO OBTAIN WARRANTY SERVICE
To locate an authorized service company in your area contact the Maytag dealer from whom your appliance was purchased;
or call Maytag Appliances Sales Company, Maytag Customer Assistance. Should you not receive satisfactory warranty service, please call or write:
Maytag Appliances Sales Company
Attn: CAIR®Center
P.O. Box 2370
Cleveland, TN 37320-2370
U.S. 1-800-688-9900 Canada 1-800-688-2002
U.S. Customers using TTY for deaf, hearing impaired or speech impaired, call 1-800-688-2080.
When contacting Maytag Appliances Sales Company, Maytag Customer Assistance about a service problem, please include the
following:
(a) Your name, address and telephone number;
(b) Model number and serial number (found on the back center of the control panel) of your appliance;
(c) Name and address of your dealer and the date the appliance was purchased;
(d) A clear description of the problem you are having.
(e) Proof of purchase.
1. Conditions and damages resulting from any of the
following:
a. Improper installation, delivery, or maintenance.
b. Any repair, modification, alteration or adjustment
not authorized by the manufacturer or an authorized
servicer.
c. Misuse, abuse, accidents or unreasonable use.
d. Incorrect electric current, voltage or supply.
e. Improper setting of any control.
2. Warranties are void if the original serial numbers have
been removed, altered, or cannot be readily determined.
3. Products purchased for commercial or industrial use.
4. The cost of service or service call to:
a. Correct installation errors.
b. Instruct the user on proper use of the product.
c. Transport the appliance to the servicer.
5. Consequential or incidental damages sustained by any
person as a result of any breach of these warranties.
Some states do not allow the exclusion or limitation of consequential or incidental damages, so the above exclusion
may not apply.
What is not covered by these warranties:
User’s Guides, service manuals and parts catalogs are available from Maytag Appliances Sales Company, Maytag Customer Assistance.
Page 11

SAV-1La Laveuse de Maytag
Toutes nos félicitations pour avoir
choisi une machine à laver Maytag! Il
est très important pour nous que vous en
soyez satisfait.
Pour de meilleurs résultats, nous vous conseillons
de lire ce manuel. Vous y trouverez des renseignements
qui vous aideront à comprendre les procédures de fonctionnement et d’entretien de la machine.
De plus, vous trouverez ci-joint un Conseils de blan-
chissage. Il renferme des renseignements supplémentaires sur les techniques de lavage, l’enlèvement des
taches et les situations particulières.
Épargnez temps et argent. En cas de problème, nous
vous suggérons de consulter la section “Avant d’appeler”. Elle a été rédigée pour vous aider à trouver une
solution aux problèmes mineurs avant d’appeler un
technicien.
Si vous avez des questions, veuillez nous écrire (en
incluant le numéro de modèle de votre machine et
votre numéro de téléphone) ou appelez-nous :
Maytag Appliances Sales Company
Attn: CAIR
®
Center
P.O. Box 2370
Cleveland, TN 37320 États-Unis
1-800-688-2002 CANADA
(Du lundi au vendredi, 8 h à 8 h, heure de l’est)
Internet : http://www.maytag.com
Table des matières
Mesures de sécurité. . . . . . . . . . . . . . 11
Fonctionnement. . . . . . . . . . . . . . . . . 12
Commandes en un coup d’oeil . . . 13-14
Caractéristiques spéciales . . . . . . . . 15
Entretien. . . . . . . . . . . . . . . . . . . . . . . 16
Remisage de la machine à laver . . . . 16
Avant d’appeler. . . . . . . . . . . . . . . 16-17
Garantie . . . . . . . . . . . . . . . . . . . . . . . 18
Guía del Usuario . . . . . . . . . . . . . . . . 20
GUIDE DE L’UTILISATEUR
Page 12

11
Mesures de sécurité importantes
1. Lire toutes les instructions avant d’utiliser la machine.
2. Comme avec tout équipement fonctionnant à l’électricité et
comportant des pièces mobiles, il existe toujours des possibilités de danger. Pour utiliser cette machine dans les meilleures
conditions de sécurité, l’opérateur doit se familiariser avec les
instructions de fonctionnement de l’appareil et user de prudence pendant son utilisation.
3. Ne pas installer ni remiser la machine dans un endroit où elle
est exposée aux intempéries.
4. Installer la machine et la mettre de niveau sur un plancher pouvant supporter son poids.
5. Cet appareil doit être correctement mis à la terre. Ne jamais
brancher le câble électrique d’une machine à laver sur une prise
murale non mise à la terre conformément aux codes locaux et
nationaux. Voir les instructions d’installation pour la mise à la
terre de cette machine.
6. Pour éviter les risques d’incendie ou d’explosion :
a. Ne pas laver d’articles qui ont auparavant été nettoyés ou
lavés à l’aide d’essence, de solvants de nettoyage à sec ou
d’autres produits explosifs ou inflammables, ou qui en sont
imbibés ou éclaboussés, car ces substances produisent des
vapeurs qui peuvent s’enflammer ou exploser. Laver à la
main et sécher à l’air tout article contenant ces substances.
Tout tissu sur lequel des solvants de nettoyage ont été utilisés ou qui sont saturés de liquides ou solides inflammables
ne doit pas être mis dans la machine à laver avant que toute
trace et toute vapeur de ces liquides ou solides ne soient
complètement éliminées.
Ces produits comprennent l’acétone, l’alcool dénaturé,
l’essence, le kérosène, certains produits de nettoyage
ménagers, les détachants, la térébenthine, les cires et les
décapants de cire.
b. Ne pas ajouter d’essence, de solvants de nettoyage à sec ou
toute autre substance inflammable ou explosive à l’eau de
lavage. Ces substances produisent des vapeurs qui pourraient s’enflammer ou exploser.
c. Dans certaines conditions, il peut y avoir production d’hy-
drogène dans un système de chauffage d’eau qui n’est pas
utilisé pendant 2 semaines ou plus. L’HYDROGÈNE EST UN
EXPLOSIF. Si votre système de chauffage d’eau n’est pas utilisé sur une telle durée, ouvrir tous les robinets d’eau chaude
et laisser couler l’eau pendant plusieurs minutes avant d’utiliser votre machine à laver ou votre ensemble machine à
laver-sécheuse. Ceci élimine toute accumulation d’hydrogène. Ce gaz étant inflammable, ne pas fumer ni utiliser
de flamme vive pendant ces quelques minutes.
7. Ne pas mettre la main ou le bras dans la machine si l’agitateur
ou cuve est en mouvement.
8. Ne pas permettre aux enfants ou aux animaux familiers de
jouer sur l’appareil, à l’intérieur ou en face de celui-ci. Une
supervision étroite est nécessaire lorsque l’appareil est utilisé à
proximité d’enfants ou d’animaux familiers.
9. Ne pas modifier les mécanismes de commande.
10. Ne pas réparer ou remplacer une pièce de la machine ou
procéder à un dépannage, sauf si les instructions publiées le
recommandent et que la personne effectuant la réparation les
comprend et possède les connaissances voulues pour les exécuter.
11. Débrancher la machine de la prise de courant avant toute réparation.
CONSERVER CES INSTRUCTIONS
12. L’agitateur ne doit pas être retiré. S’il est retiré, le replacer en
l’enfonçant à fond, puis serrer la vis de blocage avant de faire
fonctionner la machine.
13. Mettre les produits pour la lessive et autres substances dans un
endroit frais et sec où les enfants n’ont pas accès.
14. Ne pas laver ni sécher des articles imprégnés d’huile végétale
ou de cuisson. Il pourrait y rester de l’huile après lavage, et ils
pourraient fumer ou s’enflammer.
15. Ne pas mélanger de javellisant et d’ammoniaque ou d’acides
(tels que du vinaigre ou du produit pour enlever la rouille)
pour une même charge de linge. Des vapeurs nocives peuvent
se former.
16. Ne pas laver d’articles en fibre de verre à la machine. De petites
particules peuvent se coller sur le linge lavé par la suite et
provoquer des irritations cutanées.
17. Avant de mettre la machine hors service ou au rebut, retirer la
porte du compartiment de lavage.
18. Les tuyaux d'alimentation se détériorent progressivement.
Inspecter les tuyaux à intervalle régulier; rechercher dilatations,
écrasements, coupures, fuites et indices d'usure. Remplacer les
tuyaux après 5 ans de service.
AVERTISSEMENT : Pour réduire les risques d’incendie, d’explosion, d’électrocution ou des blessures lors
de l’utilisation de cet appareil, suivre les précautions d’usage, dont les suivantes :
Reconnaissez les étiquettes,
phrases ou symboles
sur la securite
AVERTISSEMENT – Risques ou pratiques non sûres, qui
POURRAIENT résulter en de graves blessures ou même la mort.
ATTENTION – Risques ou pratiques non sûres qui
POURRAIENT résulter en blessures mineures.
AVERTISSEMENT
ATTENTION
Ce qu’il faut savoir à propos
des consignes de sécurité
Les consignes de sécurité et les mises en garde présentées
dans ce manuel ne couvrent pas toutes les situations possibles. Faire preuve de jugement, de prudence et d’attention
lors de l’installation, de l’entretien et de l’utilisation du propriétaire.
Lorsque survient un problème ou une situation inhabituelle,
toujours communiquer avec le détaillant, le distributeur, le
technicien agréé ou le fabricant.
Page 13

12
Fonctionnement
Chargement
• Mettre le linge sec, non plié sans le tasser dans la machine,
en remplissant le panier jusqu’au rang supérieur de trous
pour une charge maximum.
• Ne pas enrouler de grands articles tels que des draps
autour de l’agitateur.
• Pour une meilleure circulation, mélanger les petits et les
grands articles. Laver les articles volumineux comme les
couvertures séparément.
• Le blanchissage des articles à pli permanent ou délicats,
des lainages lavables ou des tricots, nécessite une quantité
d’eau supérieure au niveau MEDIUM (moyen). Cela
empêche les vêtements de rétrécir, de se froisser ou de se
découdre.
• Pour des résultats optimums, mettre du détergent dans la
cuve avant d’ajouter le linge.
• Refermer soigneusement le couvercle pour qu’il ne claque
pas.
Conseils supplémentaires
• Il est possible pour la charge peut être déséquilibrée pendant l’essorage. Si cela se produit, pousser sur le sélecteur,
ouvrir le couvercle, rééquilibrer la charge, fermer le couvercle et tirer sur le sélecteur. L’essorage reprend au point
où il s’était interrompu.
• Cette machine effectue des pauses à plusieurs reprises au
cours d’un cycle de lavage. Ces pauses momentanées font
partie de son fonctionnement normal.
Pour de plus amples renseignements concernant le triage, le pré-traitement des taches, etc., consulter le Conseils
de blanchissage inclus.
Détergent
• Utiliser du détergent liquide ou en poudre. Pour des résultats optimums, ajouter suffisamment de détergent dans
la machine AVANT de la remplir et régler la température
de l’eau à plus de 18° C (65° F).
• Utiliser la quantité de détergent qui convient à la charge,
au degré de saleté et à la dureté de l’eau. Utiliser plus de
détergent si l’eau est dure et que la charge est très sale.
Si l’eau est douce ou que la charge est peu sale, utiliser
moins de détergent. (Voir les instructions du fabricant.)
• Essuyer la machine si elle se trouve éclaboussée de détergent.
• Cette machine à laver est conçue de telle façon que tout
essorage ou agitation s’arrête quand le couvercle est
soulevé. Elle ne s’arrête cependant pas pendant le remplissage, permettant l’accès à l’eau pour prétraiter les taches
ou diluer l’assouplisseur.
• Si le couvercle est ouvert au cours d’un cycle, la machine
s’arrête. Une fois le couvercle fermé et le sélecteur tiré, le
cycle reprend là où il avait été interrompu.
Page 14

13
Commandes en un coup d’oeil
Étape 1
REMARQUE : Pour des résultats optimums, le linge doit circuler librement.
Sélection du Volume de Charge
Mettre le sélecteur Load Size (charge) sur le réglage correspondant à la charge de linge.
Pour ajouter de l’eau à la fin du remplissage, régler le
sélecteur sur la position «reset» (nouveau réglage), puis le
positionner face au réglage désiré.
RÉGLAGE DU
NIVEAU D’EAU
GROSSEUR DE LA
CHARGE
REMARQUE : À moins de 18° C, (65° F),l’eau est trop froide pour
dissoudre les détergents en poudre et les activer. Les étiquettes
d’entretien considèrent l’eau froide jusqu’à 29° C (85° F).
Étape 3
Sélection de la Température
Tourner le sélecteur Temperature Wash/Rinse (lavage/
rinçage) sur les températures d’eau désirées. Pour des résultats optimums, suivre las indications de l’étiquette du vêtement. Utiliser le tableau ci-dessous comme guide.
Blanc très sale et couleurs bon
teint
Linge modérément sale, articles
de couleur
Linge modérément sale, articles
de couleur ; la plupart des articles à pli permanent
Articles aux couleurs vives, peu
sales ; lainages lavables
Hot/Cold
(Chaud/Froide)
Warm/Warm
(Tiède/Tiède)
Warm/Cold
(Tiède/Froide)
Cold/Cold
(Froide/Froide)
TEMPÉRATURE
LAVAGE/RINÇAGE
TYPE DE CHARGE
Super
(Super)
Large
(Gros)
Medium
(Moyen)
Small
(petit)
Mini
(en miniature)
3/4 – plein
1/2 – 3/4 plein
1/3 – 1/2 plein
1/4 – 1/3 plein
1/4 plein
Étape 2
Sélection de Extra Rinse
(Rinçage Supplémentaire)
Supplémentaire rinçage à la fin du programme pour l’élimination plus complète des additifs de lavage et parfums.
Page 15

14
Sélection du cycle
Pour sélectionner un cycle, pousser sur le sélecteur et le
tourner vers la droite (dans le sens des aiguilles d’une montre) jusqu’à ce que la flèche soit vis-à-vis la durée de lavage
(en minutes) désirée.
Cycle Regular (pour tissus ordinaires)
Pour les tissus ordinaires, sélectionner le temp de cycle et
tourner le sélecteur de vitesse « Wash/Spin » (lavage/essorage) à « Regular/Fast/Fast » (normale/rapide/rapide). Pour
un lavage optimum, régler le sélecteur à la position 18.
Cycle Permanent Press (pour vêtements
infroissables)
Ce cycle procure jusqu’à 12 minutes. Selon la charge, placer
le sélecteur de vitesse « Wash/Spin » (lavage/essorage) à
« Regular/Fast/Fast » (normale/rapide/rapide) OU « Perm.
Press/Fast/Slow » (pour vêtements infroissables/rapide/lente).
Cycle Gentle (pour tissus delicats)
Le cycle delicats environ 10 minutes d'agitation et de trempage pour enlever la saleté.
Mettre la machine en marche
La machine peut être arrêtée à tout moment en poussant sur
le sélecteur. Il est alors possible d’obtenir un trempage sans
agitation ou de raccourcir, sauter ou répéter toute partie d’un
cycle. Le sélecteur doit être enfoncé (position « off ») lorsque
le réglage est modifié.
Étape 5
Étape 6
Consulter le Conseils de blanchissage pour connaître les
procédures de nettoyage, de détachage et les situations
particulières de blanchissage.
Sélectionner le cycle de
lavage/d’essorage
La machine est programmée pour combinaisons de vitesse
de lavage et d’essorage.
Étape 4
Soak Only (trempage seulement)
Il se compose d’une brève période d’agitation suivie d’un
trempage. Le trempage ne doit pas dépasser 30 minutes. Le
sélecteur doit être passé manuellement à un cycle de lavage
ou à l’essorage.
Tissus résistants nécessitant une
extraction maximum d’eau.
Tissus solides nécessitant une
vitesse d'essorage plus lente pour
éviter qu'ils se froissent.
Tissus fragiles, couvertures ou draps
nécessitant une attention particulière.
VITESSES DE
LAVAGE/D’ESSORAGE
Regular/Fast/Fast
Normale/Rapide/Rapide
Perm. Press/
Fast/Slow
Pour vêtements infroiss-
ables/Rapide/Lente
Gentle/Slow/Slow
Délicate/Lente/Lente
TYPE DE LINGE
Page 16

15
Distributeur de javellisant
Le distributeur dilue automatiquement le javellisant liquide
avant qu’il atteigne le linge. Pour l’utiliser, procéder comme
suit :
1. Mesurer la quantité de javellisant liquide avec soin en
suivant les instructions sur le récipient.
2. Verser le javellisant dans le distributeur avant d’ajouter le
linge. Éviter les éclaboussures ou le débordement du distributeur.
REMARQUE :
• Ne jamais verser de javellisant liquide non dilué directe-
ment sur le linge ou dans la cuve. Ce produit chimique est
puissant et peut endommager les tissus, en les déchirant
ou décolorant, s’il n’est utilisé correctement.
• Lorsqu’un javellisant sans chlore et sans danger pour les
couleurs est utilisé, le verser dans la cuve avec le détergent.
Ne pas verser de javellisant sans chlore dans le distributeur
de javellisant.
Caractéristiques spéciales
Distributeur d’assouplissant
Ce distributeur ajoute l’assouplissant liquide au moment
voulu du cycle. Pour l’utiliser, procéder comme suit :
1. Verser la quantité voulue de liquid dans le godet, jusqu’au
repère de remplissage seulement.
2. Si le liquide n’atteint pas le repère, ajouter de l’eau tiède.
REMARQUE :
• Ne pas arrêter la machine durant le premier essorage. Le
distributeur se viderait trop tôt.
• Ne jamais verser d’assouplissant directement sur le linge.
Il laisserait des traînées et des taches.
• Utiliser le distributeur pour l’assouplissant liquide unique-
ment.
Verser le javellisant liquide dans
le distributeur de javellisant.
Verser l’assouplissant liquide dans le godet
et diluer avec de l’eau tiède.
Page 17

Couper l’arrivée d’eau en fermant les robinets, une fois la
lessive terminée pour la journée, pour éviter toute possibilité
de dégâts dûs à une fuite d’eau, aussi improbable soit-elle.
Utiliser un linge doux pour essuyer tout détergent, javellisant
ou autre dès qu’il se trouve répandu ou éclaboussé sur la
machine.
Nettoyer les éléments suivants tel qu’indiqué :
Tableau de commande : Nettoyer avec un linge doux et
humide et du nettoyeur pour vitres. Ne pas utiliser de
poudres abrasives ni de tampons nettoyants.
Carrosserie : Nettoyer au savon et à l’eau, puis, si désiré,
appliquer de la cire pour appareils électroménagers.
Filtre à charpie : Ces filtres sont
autonettoyants et n’exigent aucun
entretien. Ils se trouvent sous l’agitateur, au fond de la cuve. Pendant
l’étape lavage et rinçage du cycle, la
charpie se dépose sur les filtres.
Celle-ci est automatiquement éliminée au cours de la vidange et de l’essorage.
Distributeur d’assouplissant
S’il devient nécessaire de nettoyer le godet à liquide:
1. Retirez le distributeur de l’appareil.
2. Le tremper pendant une heure dans l’evier ou dans un
recipient dans une solution d’eau chaude et de détergent liquide pour la vaisselle.
3. Mettez les mains sur le dessus et le dessous du distributeur et secouez-le, pour détacher l’accumulation des
côtés du distributeur.
4. Le rincer à l’eau chaude.
5. Répétez au besoin le processus.
6. Remettre le distributeur sur l’agitateur.
N’utilisez pas de liquide pour la vaisselle
à l’intérieur de la laveuse, il y aurait risqué
d’un excès de mousse.
Intérieur : Les dépôts dûs à l’eau dure peuvent, s’il y a lieu,
être éliminés en utilisant un produit nettoyant dont l’étiquette indique qu’il convient à une machine à laver.
Nettoyer périodiquement l'intérieur de la laveuse pour retirer
toutes saletés, odeurs ou bactéries qui resteraient dans la
laveuse par suite du lavage du linge. Nous recommandons de
suivre les étapes suivantes tous les 60 – 120 jours pour nettoyer et rafraîchir l'intérieur de la laveuse. La fréquence à laquelle
la laveuse doit être nettoyée et rafraîchie dépend de facteurs
tels qu'utilisation, quantité de saleté ou bactéries passant par la
laveuse, ou encore l'utilisation d'eau froide.
Nettoyage de l’intérieur :
1. Ajouter une quantité mesurée de javellisant dans le
distributeur d’agent de blanchiment, en suivant les
instructions données sur le paquet.
2. Ajouter 1/4 tasse de détergent dans la cuve.
3. Faire faire à la laveuse un cycle complet avec de l’eau
très chaude.
4. Répéter au besoin le processus.
Remisage de la machine à laver
La machine risque d’être endommagée si l’eau qui se trouve à
l’intérieur ainsi que dans les boyaux n’est pas évacuée avant
de la remiser. Voici la marche à suivre pour préparer le remisage de la machine :
• Sélectionner 12 minutes avec un cycle Regular et ajouter
une tasse de javellisant OU de vinaigre blanc par charge
complète d’eau, sans ajouter de linge. Faire fonctionner la
machine à laver pendant un cycle complet. (Ne pas
mélanger de javellisant et d’ vinaigre pour une même
charge de linge. Des vapeurs nocives peuvent se former.)
•
Fermer les robinets d’eau et détacher les tuyaux d’arrivée.
• Régler le sélecteur de cycle sur la partie essorage («spin») et
abaisser le boyau de vidange pour éliminer toute eau qui
pourrait encore s’y trouver.
• Débrancher la machine et laisser le couvercle ouvert pour
que l’air circule dans la cuve.
Entretien
16
Avant d’appeler
Ne se remplit pas :
• Brancher la machine sur une prise murale sous tension.
• Vérifier le fusible ou réenclencher le disjoncteur.
• Mettre le sélecteur sur le cycle voulu et tirer dessus pour le mettre en position de marche.
• Ouvrir les deux robinets à fond.
• Redresser les boyaux d’arrivée.
• Débrancher les boyaux et nettoyer les filtres. Les filtres des boyaux pourraient être bouchés.
Pour des solutions aux problèmes de lessive (tissus abîmés, résidus, linge emmêlé, par exemple) et des méthodes spéciales d’entretien du linge, voir le livret «Conseils de blanchissage» inclus.
Suite
Page 18

Avant d’appeler
(Suite)
Ne produit pas d’agitation :
• Vérifier le fusible ou réenclencher le disjoncteur.
• S’assurer que le couvercle est bien fermé.
• Mettre le sélecteur sur le cycle voulu et tirer dessus pour le mettre en position de marche.
• Fermer le couvercle et tirer sur le sélecteur. Pour des raisons de sécurité, l’agitation et l’essorage ne fonctionnent pas si le couvercle est ouvert.
• Les pauses sont normales. Attendre pour voir si la machine à laver va se remettre en marche.
N’essore pas, ne se vidange pas :
• Vérifier le fusible ou réenclencher le disjoncteur.
• Redresser les boyaux. Éliminer les boyaux ne pouvant plus être redressés. Si l’évacuation est bouchée, appeler le service aprèsvente.
• Fermer le couvercle et tirer sur le sélecteur. Pour des raisons de sécurité, l’agitation et l’essorage ne fonctionnent pas si le couvercle est ouvert.
• Blocage causé par une quantité trop abondante de mousse. Relaver sans détergent. Utiliser une quantité correcte de détergent à
mousse réduite.
Linge mouillé
• La charge est déséquilibrée. Redistribuer le linge, fermer le couvercle et tirer sur le sélecteur. Vérifier que la machine est de
niveau. S’assurer que le niveau d’eau choisi est suffisant pour la quantité de linge lavée.
• Une vitesse d'essorage normal est recommandée pour du linge lourd comme jeans et serviettes.
S’arrête :
• Brancher la machine sur une prise murale sous tension.
• Vérifier le fusible ou réenclencher le disjoncteur.
• Mettre le sélecteur sur le cycle voulu et tirer dessus pour le mettre en position de marche.
• Fermer le couvercle et tirer sur le sélecteur. Pour des raisons de sécurité, l’agitation et l’essorage ne fonctionnent pas si le couvercle est ouvert.
• C’est peut-être simplement une pause ou une phase de trempage du cycle de lavage. Attendre quelques minutes ; il est possible
que la machine se remette en marche.
Fuit :
• Vérifier que les raccords des boyaux sont bien serrés.
• S’assurer que l’extrémité du boyau d’évacuation est insérée correctement et bien fixée sur le système d’évacuation.
• Trempage prolongé ; faire tremper 30 minutes maximum.
• Éviter de trop mettre de linge.
Est bruyante :
• Vérifier que la machine a été mise de niveau tel qu’indiqué dans le manuel de mise en service.
• Les planchers peu solides peuvent produire des vibrations et le déplacement de la machine.
• S’assurer que les pieds réglables sont équipés d’embouts en caoutchouc.
• Des bruits de fonctionnement varient selon la vitesse de l’agitation.
Se remplit d’eau à une température incorrecte :
• Ouvrir les deux robinets à fond.
• Si la machine est dotée d’un sélecteur de température, vérifier que celui-ci est bien placé sur une température et non pas entre
deux réglages.
• S’assurer que la température sélectionnée est la bonne.
• S’assurer que les boyaux sont raccordés aux robinets et raccords d’arrivée d’eau voulus. S’assurer que l’alimentation en eau est
correctement réglée. Faire passer de l’eau sous forte pression dans les conduites avant de remplir la machine à laver.
• Vérifier le chauffe-eau. Il doit être réglé pour assurer une eau chaude à 49° C (120° F) au robinet. Également vérifier la capacité
du chauffe-eau et sa rapidité de chauffage une fois qu’il a été vidé.
• Déconnecter les boyaux et nettoyer les filtres. Les filtres des boyaux pourraient être bouchés.
Le selecteur passe automatiquement a un reglage audela de «Off» (Arret)
• Un Extra Rinse (rinçage supplémentaire) a été sélectionné.
Pour toute assistance technique, communiquer avec Maytag Appliances Sales Company,
Service-clients Maytag : au Canada : 1-800-688-2002
17
Page 19

MAYTAG • 403 W. 4thStreet N. • P.O. Box 39 • Newton, Iowa 50208 • États-Unis
Maytag Garantie de la machine à laver
Garantie totale d’un an
Pendant un (1) an à partir de la date de l’achat d’origine, toute pièce qui vient à être défectueuse dans des conditions normales d’utilisation ménagère sera réparée ou remplacée gratuitement.
Garantie limitée
Après la première année suivant la date de l’achat d’origine et pendant les périodes de temps énumérées ci-dessous, les pièces indiquées
ci-après qui viennent à être défectueuses dans des conditions normales d’utilisation ménagère seront réparées ou remplacées gratuitement
en ce qui concerne la pièce elle-même, le client prenant à sa charge les autres frais, y compris les frais de main-d’oeuvre, de déplacement et
de transport.
Deuxième année : Toutes les pièces.
De la troisième à la cinquième année : Le moteur. Toutes les commandes à circuits intégrés (si la machine en est équipée).
De la troisième à la dixième année : Toutes les pièces de l’ensemble de transmission.
De la troisième année à vie : Panier intérieur.
Garantie limitée additionnelle contre la rouille à coeur
Si la carrosserie extérieure, dessus et socle compris, rouille à coeur au cours de la première année suivant la date de l’achat d’origine, elle
sera réparée ou remplacée gratuitement. Après la première année et jusqu’à la fin de la dixième année, elle sera réparée ou remplacée
gratuitement en ce qui concerne la pièce elle-même, tous autres frais, y compris ceux de main-d’oeuvre, de déplacement et de transport,
étant à la charge du client.
À noter : Cette garantie totale et la garantie limitée s’appliquent quand la machine se trouve aux États-Unis ou au Canada. Si elle se
trouve dans une autre partie du monde, elle n’est couverte que par la garantie limitée, y compris en ce qui concerne les pièces se révélant
défectueuses au cours de la première deux années.
Résidents canadiens
Cette garantie ne couvre que les appareils électroménagers mis en service au Canada et homologués par des organismes de vérification
appropriés ou certifiés conformes aux directives de l’Association canadienne de normalisation, sauf en ce qui concerne les appareils
transférés au Canada à la suite d’un changement de résidence à partir des États-Unis.
Les garanties spécifiques ci-dessus sont les SEULES garanties accordées par le fabricant. Cette garantie vous donne des droits juridiques
spécifiques et vous pouvez également bénéficier d’autres droits qui varient d’une province à l’autre.
POUR OBTENIR LES PRESTATIONS DE GARANTIE
Pour localiser une entreprise de service après-vente agréé Maytag dans votre région, contacter le concessionnaire MAYTAG où la machine a
été achetée ou appeler Maytag Appliances Sales Company le service-clients Maytag. Si les prestations de garantie obtenues ne vous donnent
pas satisfaction, contacter ce service par courrier ou par téléphone:
Maytag Appliances Sales Company
Attn: CAIR
®
Center
P.O. Box 2370
Cleveland, TN 37320 États-Unis Canada 1-800-688-2002
REMARQUE : Quand vous écrivez au sujet d’un problème non résolu, veuillez inclure les renseignements suivants :
(a) Vos nom, adresse et numéro de téléphone ;
(b) Les numéros de modèle et de série de votre machine (sur la plaque signalétique sur le bord supérieur couvercle du tableau de com-
mandes) ;
(c) Les nom et adresse du concessionnaire ainsi que la date d’achat de l’appareil ;
(d) Une description claire du problème rencontré ;
(e) Date de la preuve d’achat (bon de caisse).
1. Les problèmes et dommages résultant des situations suivantes:
a. Installation, livraison ou entretien défectueux.
b. Toute réparation, modification, altération ou ajustement non
autorisé par le fabricant ou un prestataire de service après-
vente agréé.
c. Usage inapproprié, abusif, dérasionnable ou accidents.
d. Alimentation électrique ou tension incorrectes.
e. Réglage inapproprié de toute commande.
2. Les garanties sont annulées si les numéros de série d’origine ont
été enlevés, modifiés ou ne peuvent être déterminés facilement.
3. Appareils achetés à des fins commerciales ou industrielles.
4. Les frais de dépannage ou de visite pour:
a. Corriger des erreurs d’installation.
b. Enseigner au consommateur comment utiliser son appareil
correctment.
c. Assurer le transport de l’appareil jusqu’à l’enterprise de service
après-vente.
5. Dommages indirects ou accessories supportés par toute personne
à la suite d’une quelconque violation de garantie.
Certain éstas ne permettent pas l’exclusion ou la limitation de
responsablilté en ce qui concerne les dommages indirects, et l’exclusion ci-dessus peut ne pas s’appliquer à votre cas.
Ne sont pas couverts par ces deux garanties:
Guide de l’utilisateur, manuels de dépannage et catalogues de pièces détachées sont disponibles auprès Maytag Appliances Sales
Company, du service-clients Maytag.
18
Page 20

Maytag Garantía de la lavadora
PARA OBTENER EL SERVICIO DE GARANTÍA
Para ubicar un centro de servicio autorizado en su área, comuníquese con el distribuidor Maytag con el cual compró el electrodoméstico; o
llame al Departamento de Asistencia al Cliente de Maytag Appliances Sales Company. Si no recibe un servicio de garantía satisfactorio,
por favor llame o escriba a:
Maytag Appliances Sales Company
Attn: CAIR
®
Center
P.O. Box 2370
Cleveland, TN 37320-2370
1-800-688-9900 EE.UU. 1-800-688-2002 CANADÁ
Cuando se comunique con el Departamento de Asistencia al Cliente de Maytag Appliances Sales Company con relación a un problema de
servicio, por favor incluya la siguiente información:
(a) Su nombre, domicilio y número de teléfono;
(b) El número de modelo y el número de serie (se encuentran en la parte posterior central del panel de control)
de su electrodoméstico;
(c) El nombre y la dirección de su distribuidor y la fecha de compra del electrodoméstico;
(d) Una descripción clara del problema que experimenta;
(e) Un comprobante de compra.
1. Condiciones y daños resultantes de cualquiera de las siguientes
condiciones:
a. Instalación, entrega o mantenimiento inadecuados.
b. Cualquier reparación, modificación, alteración o ajuste no
autorizado por el fabricante o por un técnico de
servicio autorizado.
c.
Uso inadecuado, abuso, accidentes o uso irrazonable.
d. Corriente, voltaje o suministro eléctrico incorrecto.
e. Ajuste incorrecto de uno de los controles.
2. Las garantías se anularán si los números de serie originales se
quitan, alteran o no se pueden determinar fácilmente.
3. Productos comprados para uso comercial o industrial.
4. El costo del servicio o de las llamadas de servicio para:
a. Corregir errores de instalación.
b.
Instruir al usuario sobre el uso correcto del producto.
c. T
ransportar el electrodoméstico al centro de servicio.
5. Daños resultantes o incidentales sufridos por una persona como
resultado de la violación de alguna de estas garantías.
Algunos estados no permiten la exclusión ni la limitación de
daños resultantes ni incidentales, de manera que es posible que
no aplique la exclusión anterior.
Estas garantías no cubren lo siguiente:
Las guías del usuario, los manuales de servicio y los catálogos de piezas están disponibles en el Departamento de Asistencia al Cliente de
Maytag Appliances Sales Company.
19
Un año de garantía en partes y mano de obra
Durante un (1) año a partir de la fecha original de la compra, cualquier parte que falle durante el uso normal en su hogar se reparará o
remplazará sin costo alguno.
Garantía Limitada
Después del primer año a partir de la fecha de compra original al menudeo, o durante los períodos que se indican a continuación, las
piezas designadas que fallen en el uso doméstico normal de la unidad serán reparadas o reemplazadas gratuitamente, y el propietario
deberá pagar todos los demás cargos, inclusive mano de obra, millaje y transportación.
Segundo Año – Todas las piezas.
Del Tercero al Quinto Año – El motor impulsor. Todas las piezas de los controles de estado sólidos (si así está equipada).
Del Tercero al Décimo Año – Todas las piezas del conjunto de la transmisión.
Desde el tercer año hasta el fin de la vida útil – La tina interior de lavar.
Garantía Limitada Adicional contra Oxidación
Si el gabinete exterior, incluyendo la cubierta, la tapa y el bastidor se oxidan durante el primer año a partir de la fecha de compra al por
menor, se repararán o reemplazarán gratuitamente. Despues del primer año y hasta el décimo año, la reparación y el reemplazo serán
efectuados gratuitamente en lo que respecta a las piezas mismas y el propietario deberá pagar todos los otros costos, incluyendo mano
de obra, kilometraje y transporte.
Se Ruega Nota: La garantía total y la garantía limitada aplican cuando el electrodoméstico se encuentre en Estados Unidos o en Canadá.
Los electrodomésticos que se encuentren en otro lugar solamente están cubiertos por la garantía limitada, inclusive las piezas que fallen
durante el primer dos año.
Residentes de Canadá
Las garantías antes mencionadas sólo cubren los electrodomésticos instalados en Canadá certificados o listados por las agencias de pruebas
apropiadas para cumplir con el National Standard of Canada (Norma Nacional de Canadá), a menos que el electrodoméstico se lleve a Canadá
debido a un cambio de residencia desde los Estados Unidos hacia Canadá.
Las garantías específicas expresadas anteriormente son las ÚNICAS garantías que ofrece el fabricante. Estas garantías le otorgan derechos legales específicos y puede también tener otros derechos los cuales varían entre estados.
Page 21

Lavadora de Maytag
¡Felicitaciones por la compra
de su lavadora de ropa Maytag!
Su satisfacción es muy importante
para nosotros.
Lea este manual para obtener los mejores resultados. El manual contiene las instrucciones para oper-
ar adecuadamente la lavadora y los procedimientos para
su mantenimiento.
Además, con su lavadora encontrará la guía Laundering
Tips (Sugerencias para el lavado de la ropa). Esta guía contiene procedimientos que se recomiendan para lavar la
ropa, quitar manchas y algunas situaciones especiales.
Ahorre tiempo y dinero. Si tiene algún problema, le sugerimos que primero consulte la sección “Antes de llamar”.
Esta sección se preparó para ayudarle a resolver problemas
básicos antes de consultar a un técnico de servicio.
Si tiene preguntas, escríbanos (incluya los números de
modelo y serie de su lavadora y su número de teléfono), o
llame al teléfono que se indica a continuación:
Maytag Appliances Sales Company
Attn: CAIR
®
Center
P.O. Box 2370
Cleveland, TN 37320-2370
1-800-688-9900 EE.UU.
1-800-688-2002 CANADÁ
(De lunes a viernes, de las 8 a.m. a las 8 p.m.
hora del Este)
Internet: http://www.maytag.com
Contenido
Garantía de la lavadora.........................19
Instrucciones de seguridad..................21
Sugerencias para la operación ............22
Un vistazo a los controles...............23-24
Características especiales ....................25
Cuidado y limpieza................................26
Almacenamiento de la lavadora ...........26
Antes de llamar.................................26-27
SAV-1
GUÍA DEL USUARIO
Page 22

21
1. Lea todas las instrucciones antes de usar el electrodoméstico.
2. Al igual que con cualquier equipo que utiliza electricidad y que
tiene piezas móviles, existen ciertos riesgos potenciales. Para
usar este electrodoméstico con seguridad, el usuario debe
familiarizarse con las instrucciones de funcionamiento del electrodoméstico y ejercer siempre cuidado cuando lo usa.
3. No instale ni almacene este electrodoméstico donde estará
expuesto a las inclemencias del tiempo.
4. Instale y nivele la lavadora sobre un piso firme que pueda
soportar el peso.
5. Este electrodoméstico debe ser puesto a tierra de manera
apropiada. Nunca enchufe el cordón del electrodoméstico en
un tomacorriente que no esté debidamente puesto a tierra y de
acuerdo con el código nacional y local. Vea las instrucciones de
instalación para la puesta a tierra de este electrodoméstico.
6. Para evitar la posibilidad de incendio o explosión:
a. No lave artículos que han sido previamente limpiados, lava-
dos, sumergidos o manchados con gasolina, solventes de
limpiar en seco u otras sustancias inflamables o explosivas
pues pueden emitir vapores inflamables o producir una
explosión. Lave a mano y cuelgue en una cuerda de secar
cualquier artículo que contenga estas sustancias.
Cualquier material en el cual se haya usado un agente de
limpieza o que esté saturado con líquidos o sólidos inflamables, no debe ser colocado en la lavadora hasta que todos los
restos de estos líquidos o sólidos y sus vapores hayan sido
eliminados.
Estos artículos incluyen acetona, alcohol desnaturalizado,
gasolina, kerosén, algunos líquidos de limpieza domésticos,
algunos quitamanchas, agua ras, ceras y quitaceras.
b. No agregue gasolina, solventes de lavado en seco ni otras
sustancias inflamables o explosivas al agua del lavado. Estas
sustancias emiten vapores que pueden encenderse o
explotar.
c. Bajo ciertas condiciones, se puede producir gas hidrógeno en
un sistema de agua caliente que no ha sido usado durante
dos semanas o más. EL GAS HIDROGENO ES EXPLOSIVO.
Si el sistema del agua caliente no ha sido usado durante tal
período, antes de usar una lavadora o una combinación de
lavadora y secadora, abra todas las llaves del agua caliente y
deje que el agua escurra durante varios minutos. Esto eliminará cualquier gas hidrógeno acumulado. Debido a que el
gas es inflamable, no fume ni use una llama abierta durante
este período.
7. No coloque la mano dentro del electrodoméstico cuando la tina
o el agitador estén en movimiento.
8. No permita que los niños o animales domésticos jueguen dentro,
delante o en el electrodoméstico. Es necesaria una supervisión
estricta cuando el electrodoméstico es usado cerca de los niños o
animales domésticos.
9. No altere los controles.
10. No repare ni reemplace ninguna pieza de la lavadora ni intente
efectuar ningún servicio a menos haya sido recomendado
específicamente en las instrucciones de reparación por el
usuario y que usted las comprenda y tenga habilidad para efectuarlas.
11. Desenchufe el cordón de alimentación antes de intentar reparar
su lavadora.
CONSERVE ESTAS INSTRUCCIONES
Instrucciones importantes de seguridad
12. El agitador no debe ser sacado. Si el agitador se retira, debe ser
colocado nuevamente oprimiéndolo hacia bajo completamente
y apretando el tornillo de bloqueo antes de que la lavadora sea
usada.
13. Guarde los detergentes y otros materiales en un lugar fresco y
seco donde los niños no puedan alcanzarlos.
14. No lave ni seque artículos que están sucios con aceite vegetal o
de cocinar. Estos artículos pueden contener un poco de aceite
después del lavado. Debido a ésto, la tela puede ahumarse o
encenderse por si sola.
15. No use blanqueador de cloro ni amoníaco o ácidos (tales como
vinagre o desoxidantes) en el mismo lavado. Se pueden formar
vapores peligrosos.
16. No lave en la lavadora materiales de fibra de vidrio. Se pueden
pegar partículas en las ropas que se vayan a lavar a continuación y causar irritación a la piel.
17. Antes de que la lavadora sea puesta fuera de servicio o descartada, retire la puerta del compartimiento del lavado.
18. Las mangueras de admisión del agua están sujetas a daño y
deterioro con el pasar del tiempo. Verifique periódicamente las
mangueras para comprobar que no tengan protuberancias,
torceduras, cortes, desgaste o escapes y reemplácelas cada
cinco años.
ADVERTENCIA:
Para reducir el riesgo de incendio, explosión, descarga eléctrica o lesiones person-
ales al usar su lavadora, siga las precauciones básicas de seguridad, entre ellas las siguientes:
ADVERTENCIA – Peligros o prácticas no seguras que
PODRIAN causar lesión personal grave o mortal.
PRECAUCIÓN – Peligros o prácticas no seguras que
PODRIAN causar lesión personal menos grave.
Reconozca los símbolos
de seguridad,
advertencias, etiquetas
ADVERTENCIA
PRECAUCIÓN
Ahora debe conocer las
instrucciones de seguridad
Las advertencias y las instrucciones importantes de seguridad que aparecen en este manual no tienen el propósito de
cubrir todas las condiciones posibles que podrían ocurrir.
Debe usarsé sentido común, precaución y cuidado cuando se
instale, se presente maintenimiemto o se opere el electrodoméstico.
Siempre comuníquese con el distribuidor, concesionario,
agente de servicio o fabricante para los asuntos relacionados
con problemas o condiciones que no entienda.
Page 23

Sugerencias para la operación
22
Colocación de la carga de ropa
• Coloque en la tina de la lavadora la ropa seca, desdoblada
y de manera holgada, hasta la fila superior de orificios en
el caso de una carga completa.
• No envuelva alrededor del agitador las prendas grandes,
como por ejemplo las sábanas.
• Mezcle prendas pequeñas y grandes para obtener la mejor
circulación. Lave por separado los artículos voluminosos
como por ejemplo cobijas o cobertores.
• Cuando lave artículos inarrugables o prendas delicadas,
lanas lavables o artículos de tejido holgado, nunca coloque
el nivel del agua en un ajuste menor al ajuste MEDIUM
(MEDIO). Esto minimizará el encogimiento, la producción
de arrugas y la tensión en las costuras de las prendas.
• Para obtener mejores resultados, ponga el detergente en la
tina de lavado antes de añadir la carga.
• Cierre cuidadosamente la tapa para evitar golpearla.
Sugerencias adicionales
• Está posible por la ropá llegar a ser uniformemente dis-
tribuida durante el centrifugado. Si esto sucede, oprima la
perilla de control, abra la tapa, vuelva a distribuir la ropa,
cierre la tapa y tire hacia afuera la perilla de control. El
centrifugado continuará desde el punto en que fue interrumpido.
• La lavadora se detendrá brevemente a través de cada ciclo.
Estas pausas son normales.
Consulte el folleto Sugerencias para el lavado de la ropa que se adjunta si desea ver información detallada sobre la separación de la ropa, el pretratamiento de manchas, etc.
Detergente
• Utilice detergente líquido o granular para lavar ropa. Para
obtener los mejores resultados, asegúrese de añadir el
detergente a la lavadora ANTES de colocar la carga de
ropa, y de que el agua de lavado tenga una temperatura
mayor que 18.3 °C (65 °F).
• Use la cantidad de detergente adecuada para el tamaño de
la carga, el grado de suciedad y las condiciones del agua.
Utilice más detergente si el agua es dura y las cargas están
muy sucias.
Si el agua es suave o la carga está ligeramente sucia, utilice
menos detergente. (Consulte las instrucciones del fabricante.)
•
Quite cualquier cantidad de detergente que caiga en la
lavadora.
• Esta lavadora ha sido diseñada de modo que no agitará ni
centrifugará cuando la tapa esté abierta. Sin embargo, se
seguirá llenando con la tapa abierta a fin de que haya agua
disponible para pretratar las manchas o diluir el
suavizador de tela.
• Si usted abre la tapa durante un ciclo, la lavadora se
detendrá. Cuando se cierre la tapa y la perilla de control
está hacia afuera, la lavadora continuará el ciclo en el
punto en que fue interrumpido.
Page 24

Paso 3
Paso 1
23
RECUERDE: Los artículos deben moverse libremente para
obtener los mejores resultados.
AJUSTE DEL
NIVEL DEL AGUA
TAMAÑO DE
LA CARGA
Hot/Cold
Caliente/Fría
Warm/Cold
Tibia/Fría
Cold/Cold
Fría/Fría
RECUERDE: El detergente no se disuelve bien en el agua
de lavado con temperatura menor que 18.3˚ C (65˚ F), y por
lo tanto no limpiará adecuadamente la ropa.Las etiquetas de
cuidado de la ropa definen agua fría aquella con una temperatura de hasta 29.4˚ C (85˚ F).
Warm/Warm
Tibia/Tibia
Un vistazo a los controles
Seleccione las Temperaturas
La lavadora le permite seleccionar entre agua caliente, tibia o
fría para lavar, y agua fría o tibia para enjuagar. Utilice la
siguiente tabla como guía.
Seleccione la Carga de Ropa
Coloque la perilla ‘Load Size’ (tamaño de carga) en el ajuste
que corresponda a la carga de ropa.
Si se necesita más agua al final del llenado, gire la perilla a
‘reset’ (reajuste) y después colóquela en el ajuste apropiado.
TEMPS. DE LAVADO/
ENJUAGUE
TIPO DE CARGA
Super
Más Grande
Large
Grande
Medium
Media
Small
Pequeña
Mini
Más Pequeña
Ropa de colores brillantes, ligeramente sucia. Lanas lavables.
Paso 2
Seleccione Extra Rinse (Enjuague
Adicional)
Proporciona un enjuague adicional al final del ciclo para
eliminar mejor los residuos de aditivos de lavado, espuma,
perfumes, etc.
De 3/4 a completa
De 1/2 – 3/4 completa
De 1/3 – 1/2 completa
De 1/4 – 1/3 completa
De 1/4 completa
Ropa blanca y ropa de colores
sólidos muy sucia
Ropa de color moderadamente
sucia
Ropa de color moderadamente
sucia; la mayoría de la ropa inarrugable
Page 25

Paso 6
Paso 5
24
Seleccione el ciclo
Para seleccionar un ciclo, presione el disco de control y hágalo
girar hacia la derecha hasta que el indicador apunte el número
de minutos de lavado que desea.
Regular Cycle (Ciclo regular)
Para telas regulares, seleccione el tiempo de ciclo y coloque el
disco de Wash/Spin (Lavado/Velocidad) de centrifugado en
Regular/ Fast/Fast (regular/rápida/rápida). Para obtener la
máxima limpieza ajuste el disco en el número 18.
Arranque de la Lavadora
Puede detener el funcionamiento de la lavadora en cualquier
momento presionando el disco de control. Por lo tanto, es posible realizar un remojo sin agitación o acortar, evitar o repetir
cualquier parte de un ciclo. El disco de control debe estar PRESIONADO (en la posición off, apagado) cuando cambie el
ajuste.
Consulte la guía Laundering Tips (Sugerencias para el lavado
de la ropa) si desea ver los procedimientos adecuados para
lavar la ropa, quitar manchas y algunas situaciones especiales.
La lavadora ofrece varias combinaciones de tipo de lavado y
velocidad de centrifugado de las cuales puede seleccionar.
LAVADO/VELOCIDAD
DE CENTRIFUGADO
TIPO DE CARGA
Regular/Fast/Fast
Regular/Rápida/Rápida
Perm. Press/Fast/Slow
Telas Inarrugables/
Rápida/Lenta
Gentle/Slow/Slow
Delicado/Lenta/Lenta
Telas resistentes que necesitan la máxima extracción de agua.
Telas resistentes que necesitan una
menor velocidad de centrifugado
debido a que se arrugan.
Telas delicadas que necesitan una
menor velocidad de centrifugado
debido a la construcción de la ropa.
Seleccione el tipo de lavado y la
velocidad de centrifugado
Paso 4
Permanent Press Cycle (Ciclo telas inarrugables)
Este ciclo permite hasta 12 minutos de agitación. Dependiendo
del tipo de carga, seleccione ya sea el ajuste Regular/Fast/Fast
(regular/rápida/rápida) o el Perm. Press/Fast/Slow (telas
inarrugables/rápida/lenta).
Gentle Cycle (Ciclo delicado)
La lavable a mona permite aproximadamente 10 minutos de
agitación y remojo para ayudar a quitar la suciedad.
Soak Only (remojo solamente)
Habrá un breve período de agitado seguido por un remojo. El
remojo no debe durar más de 30 minutos. El disco de control
debe avanzarse a mano para un ajuste de lavado o de exprimido.
Page 26

25
Surtidor de blanqueador
El surtidor diluye automáticamente el blanqueador de cloro
líquido antes de que éste entre en contacto con la carga de
ropa. Siga estos pasos para usar el surtidor:
1. Mida cuidadosamente el blanqueador de cloro líquido,
siguiendo las instrucciones del envase.
2. Añada el blanqueador al surtidor antes de colocar la carga
de ropa. Evite salpicar o llenar en exceso el surtidor.
NOTA:
• Nunca vierta blanqueador de cloro líquido no diluido
directamente sobre la carga de ropa ni en la tina de la
lavadora. Es una sustancia química muy fuerte y si no se
usa adecuadamente puede dañar las telas; por ejemplo,
puede romperlas o decolorarlas.
• Si prefiere utilizar un blanqueador sin cloro que no decolore, viértalo en la tina de lavado junto con el detergente.
No vierta blanqueadores sin cloro en el surtidor de blanqueador.
Vierta el blanqueador de cloro líquido en el
surtidor de blanqueador.
Características especiales
Surtidor de suavizante de
telas
Este surtidor automáticamente descarga el suavizante líquido de telas en el momento propicio durante el ciclo.
1. Vierta una cantidad medida del líquido deseado en la parte
superior del surtidor, solamente hasta la línea de llenado.
2. Si el líquido no llega hasta esta línea, añada agua tibia.
NOTA:
• No pare la lavadora durante la primera exprimida. Esto
causará que el surtidor se descargue antes de tiempo.
• Nunca vierta suavizante de telas directamente en la carga.
Dejará marcas y manchas.
• Use el surtidor sólo para suavizantes líquidos de tela.
Vacíe el suavizador de telas líquido en una
taza y diluya con agua tibia.
Page 27

Cierre las llaves del agua después de terminar el lavado del
día. Esto cortará el suministro de agua a la lavadora y evitará
la improbable posibilidad de producir daño a causa de escape
de agua.
Use un paño suave para limpiar todo el detergente, blanqueador u otros derrames que puedan haber ocurrido.
Limpie lo siguiente según se recomienda:
Panel de Control – limpie con un paño suave y húmedo y con
limpiador de vidrio. No use polvos abrasivos o esponjas de
limpiar.
Gabinete – lave con agua y jabón y agregue una cera para elec-
trodomésticos, si se desea.
Filtro de la Pelusas – este es un filtro autolimpiante y no
requiere mantenimiento. El filtro está ubicado bajo el agitador en el fondo de la tina.
Durante el lavado y la porción
del enjuague del ciclo, las pelusas
se acumulan en el filtro. Luego
durante el ciclo de centrifugado y
desagüe el filtro se limpia
automáticamente.
Surtidor de líquidos
1. Retire el dispensador del agitador.
2. Remoje en el fregadero o en un recipiente en agua caliente
y detergente de lavar platos durante una hora.
3. Coloque las manos sobre la parte superior e inferior del
dispensador y agitelo para sacar la suciedad de los lados
del dispensador.
Cuidado y limpieza
4. Enjuague con agua caliente.
5. Repita el proceso si es necessario.
6. Reinstale el dispensador en el agitador.
No use detergente liquido de lavar platos
dentro de la lavadora pues se puede formar mucha espuma.
Interior – los depósitos del agua dura pueden ser quitados, si
es necesario, usando un limpiador recomendado que
pueda ser usado en lavadoras.
El interior de la lavadora debe ser limpiado periódicamente a
fin de sacar cualquier suciedad, tierra, olor o residuos de bacterias que puedan quedar en la lavadora después que se lava
la ropa. Recomendamos que se proceda de la siguiente manera
cada 60 a 120 días para limpiar y refrescar el interior de la
lavadora. La frecuencia de la limpieza de la lavadora depende
de tales factores como el uso, la cantidad de suciedad, tierra o
bacterias que pasen por su lavadora, o el uso de agua fría.
Para limpiar y refrescar el interior de la lavadora:
1. Agregue una cantidad medida de blanqueador de
cloro en el distribuidor del blanqueador, siguiendo las
instrucciones del envase.
2. Agregue 1/4 taza de detergente en la tina de la lavadora.
3. Haga funcionar la lavadora durante un ciclo completo
usando agua caliente.
4. Repita el proceso si es necesario
Almacenamiento de la Lavadora
A fin de evitar daño a la lavadora, es necesario sacar completamente el agua que queda en la manguera y en los componentes internos antes del almacenamiento. Prepare la lavadora
para el almacenamiento como sigue:
•Seleccione ‘Regular’ (Regulares), 12 minutos y agregue una
taza de blanqueador de cloro O vinagre blanco en la tina
llena de agua sin ropa. Haga funcionar la lavadora a través
de un ciclo completo. (No mezcle el blanqueador y el vinagre en el mismo lavado. Se pueden formar vapores peligrosos.)
• Cierre las llaves del agua y desconecte las mangueras de
entrada del agua.
• Mueva la perilla de control de ciclo a ‘Spin’ (Centrifugado)
y baje la manguera de desagüe para eliminar cualquier
agua que puede haber quedado dentro de ella.
• Desenchufe la lavadora del suministro eléctrico y deje la
lavadora con la tapa abierta para que el aire circule dentro
de la tina.
Antes de llamar
La Lavadora No Se Llena
• Enchufe el cordón en un tomacorriente eléctrico con corriente.
•Verifique el fusible o reponga el disyuntor.
• Gire la perilla de control al ciclo apropiado y tire de la perilla hacia afuera para poner en marcha la lavadora.
• Abra ambas llaves completamente.
• Enderece las mangueras de admisión.
• Desconecte las mangueras y lave las mallas de los filtros. Los filtros de malla de la manguera pueden estar obstruidos.
Para las soluciones de problemas de lavado (es decir, daño de las telas, residuos, ropa enredada) y procedimientos especiales
para cuidado de la ropa, vea el folleto adjunto “Sugerencias para el Lavado”.
Cont.
26
Page 28

Antes de llamar (cont.)
MAYTAG • 403 W. 4thStreet N. • P.O. Box 39 • Newton, Iowa 50208
La Lavadora No Agita
•Verifique el fusible o reponga el disyuntor.
• Asegúrese de que la tapa esté bien cerrada.
• Gire la perilla de control al ciclo apropiado y tire de la perilla hacia afuera para poner en marcha la lavadora.
• Cierre la tapa y tire la perilla hacia afuera para poner en marcha la lavadora. Para su seguridad, la lavadora no agitará ni
centrifugará a menos que la tapa esté cerrada.
• Las pausas son normales. Espere y vea si la lavadora vuelve a arrancar.
La Lavadora No Centrifuga ni Desagua
•Verifique el fusible o reponga el disyuntor.
•Enderece las mangueras de desagüe. Elimine las mangueras torcidas. Si hay una restricción del desagüe, llame a
reparaciones.
• Cierre la tapa y tire de la perilla hacia afuera para poner en marcha la lavadora. Para su seguridad, la lavadora no
agitará ni centrifugará a menos que la tapa esté cerrada.
• Bloqueo por espuma – causado por exceso de espuma. Vuelva a lavar sin detergente. Use la cantidad correcta de un detergente
que forme poca espuma.
La Ropa Queda Mojada
• La ropa no está distribuida uniformemente. Vuelva a distribuir la ropa, cierre la tapa y tire de la perilla hacia afuera.
Verifique si la lavadora está nivelada. Asegúrese de que el nivel del agua sea aceptable para el tamaño de la carga
de ropa.
• Para las cargas pesadas, tales como vaqueros o toallas, se recomienda la velocidad de centrifugado normal.
La Lavadora Se Detiene
• Enchufe el cordón en un tomacorriente eléctrico con corriente.
•Verifique el fusible o reponga el disyuntor.
• Gire la perilla de control al ciclo apropiado y tire de la perilla hacia afuera para poner en marcha la lavadora. Si está
equipada con botones, asegúrese de que han sido completamente oprimidos.
• Cierre la tapa y tire de la perilla hacia afuera para poner en marcha la lavadora. Para su seguridad, la lavadora no
agitará ni centrifugará a menos que la tapa esté cerrada.
• Puede que sea una pausa del ciclo o el período de remojo. Espere brevemente y puede que continúe funcionando.
Hay Escape de Agua
• Asegúrese de que las conexiones de la manguera estén herméticas.
• Asegúrese de que el extremo de la manguera de desagüe esté correctamente insertado y asegurado en el
receptáculo de desagüe.
• Evite el remojo prolongado – remoje durante 30 minutos o menos.
• Evite cargar demasiado la lavadora.
La Lavadora Tiene Ruido
• Asegúrese de que lavadora esté debidamente nivelada como se describe en el manual de instalación.
• Los pisos débiles pueden causar vibración y movimiento.
• Asegúrese que se hayan instalado los protectores de goma en los tornillos niveladores.
• Los sonidos del funcionamiento variarán de acuerdo con la velocidad del centrifugado.
La Lavadora se Llena pero con Temperatura Incorrecta del Agua
• Abra ambas llaves completamente.
• Si está equipada con una perilla selectora de temperatura, asegúrese de que esté colocada exactamente en el ajuste
de temperatura y no entre dos ajustes.
• Asegúrese de que la selección de temperatura sea correcta.
• Asegúrese de que las mangueras estén conectadas a las llaves correctas y las conexiones de admisión. Asegúrese de
que el suministro del agua esté regulado correctamente. Limpie la tubería del agua antes de llenar la lavadora. Deje
correr agua dentro de la tubería del agua antes de llenar la lavadora.
•Verifique el calefactor del agua. Debe estar ajustado para entregar un mínimo de agua caliente a 120°F (49°C) en la
llave. También verifique la capacidad del calefactor del agua y la velocidad de recuperación.
• Desconecte las mangueras y limpie las mallas de los filtros. Los filtros de malla de las mangueras pueden estar
obstruidos.
La perilla de control de ciclo avanza hasta ''OFF'' (APAGADO)
• La opción Extra Rinse (enjuague adicional) está seleccionada.
Si desea recibir más asistencia comuníquese con Maytag Appliances Sales Company, Departamento de
Asistencia al Cliente de Maytag: 1-800-688-9900 en EE.UU.; o 1-800-688-2002 en Canadá
Form No. B/11/02 Part No. 2200533 MCS Part No. 27001032 ©2002 Maytag Appliances Sales Co.
 Loading...