

Maytag RV Cooking Appliance User Manual

RV Cooking Appliance
WARNING
Use and Care
(Appliance is not approved for marine use)
CONTENTS
S SAFETY INSTRUCTIONS 3to5.........
S USE AND CARE 6to19................
S Using the cooktop
S Using the oven
S Maintenance
S Care
FOR YOUR SAFETY IF YOU SMELL
GAS:
1. Open windows and evacuate all persons
from the vehicle.
2. Shut off the gas supply at the gas
container or source.
3. Extinguish any open flame.
4. Do not touch electrical switches or use any
phone or radio in the vehicle.
5. Do not start the vehicle’s engine or electric
generator.
6. Immediately call your gas supplier or
qualified service technician for repairs.
7. Do not turn on the gas supply until the gas
leak(s) has been repaired.
S Service
FORYOURSAFETY
Do not store or use gasoline or
other flammable vapors and liquids
in the vicinity of this or any other
appliance.
WARNING
Improper installation, adjustment, alteration,
service, or maintenance can cause injury or
property damage. Refer to this manual. For
assistance or additional information consult
a qualified installer, service agency, manufacturer (dealer), or the gas supplier.
INSTALLER Please leave this manual with the appliance.
CONSUMER To save you time, energy and money, read and keep this manual for future
reference.
FOR CUSTOMER ASSISTANCE CALL: 1-800-688-9900 USA
1-800-688-2002 Canada
W10381533A
8110P24
A0

2
ABOUT YOUR RV APPLIANCE
Thank You ...for purchasing our cooking
appliance. To help you obtain the maximum in cooking
satisfaction, we offer these suggestions:
. Read this manual before using the appliance.
. Review all safety and caution instructions.
. Review the Troubleshooting Chart on
pages 18 to 19 if service becomes necessary.
. Include the model and serial numbers of your
appliance when requesting service.
S Proof of purchase such as sales receipt
will be needed for warranty service.
. You can contact us at:
Maytag Appliances Sales Company
Attn: CAIR® Center
P. O. Box 2370
Cleveland, TN 37320-2370
1-800-688-9900 USA
1-800-688-2002 Canada
In our continuing effort to improve the quality and
performance of our cooking appliances, it may be
necessary to make changes to the appliance without
revising this manual.
TABLE OF CONTENTS
IMPORTANT SAFETY INSTRUCTIONS 3-5.........
USING THE COOKTOP 6-7.......................
Ignition system 6...............................
How to light surface burner 6.....................
Shutdown instructions 6.........................
Selecting the flame size 7........................
Adjusting the flame 7............................
Cookware considerations 7......................
USING THE OVEN 8-11...........................
Ignition system 8...............................
How to light oven pilot 8.........................
Oven characteristics 8...........................
Oven knob 8...................................
Shutdown instructions 8.........................
How to set oven 9..............................
Preheating 9...................................
Use of aluminum foil 9...........................
Baking tips 9...................................
Common baking problems chart 10................
Roasting tips 11................................
Broiling tips 11.................................
MAINTENANCE 12-14............................
Cooktop 12....................................
Burner grates 12................................
Sealed surface burners 13.......................
Conventional burners 13.........................
Oven door 14..................................
Oven rack 14...................................
Oven bottom 14................................
CARE AND CLEANING CHART 15-17..............
SERVICE 18-19..................................
Before you call for service chart
IMPORTANT SAFETY INSTRUCTIONS
Read all instructions before using this appliance.
The following instructions are based on safety
considerations and must be strictly followed to eliminate
the potential risks of fire, electric shock, or personal injury.
Have your appliance installed and properly grounded by a
qualified installer according to the installation instructions.
Have the installer show you the location of the gas shut off
valve and how to shut it off in an emergency.
Always disconnect power to appliance before servicing.
To ensure proper operation and avoid possible injury or
damage to unit do not attempt to adjust, repair, service, or
replace any part of your appliance unless it is specifically
recommended in this book. All other servicing should be
referred to a qualified installer or servicer.
3
TO PREVENT FIRE OR SMOKE DAMAGE
Be sure all packing materials are removed from the
appliance before operating it.
Keep areaaround applianceclear andfree from combustible
materials, gasoline, and other flammable vapors and
materials.
If appliance is installed near a window, proper precautions
should be taken to prevent curtains from blowing over
burners.
Never leave any items unattended on the cooktop. The hot
air from the vent may ignite flammable items and may
increase pressure in closed containers which may cause
them to burst.
Many aerosol-type spray cans are EXPLOSIVE when
exposed to heat and may be highly flammable. Avoid their
use or storage near an appliance.
Many plastics are vulnerable to heat. Keep plastics away
from parts of the appliance that may become warm or hot.
Do not leave plastic items on the cooktop as they may melt
or soften if left too close to the vent or a lighted surface
burner.
To eliminate the hazard of reaching over hot surface
burners, cabinet storage should not be provided directly
above a unit. If such storage is provided, it should be limited
to items which are used infrequently and which are safely
stored in an area subjected to heat from an appliance.
Temperatures may be unsafe for some items, such as
volatile liquids, cleaners or aerosol sprays.
IN CASE OF FIRE
Turn off appliance and ventilating hood to avoid spreading
the flame. Extinguish flame then turn on hood to remove
smoke and odor.
Use dry chemical or foam-type extinguisher or baking soda
to smother fire or flame. Never use water on a grease fire.
If fire is in the oven or broiler pan, smother by closing oven
door.
If fire is in a pan on the surface burner, cover pan. Never
attempt to pick up or move a flaming pan.
CHILD SAFETY
Never leave children alone or unsupervised near the
appliance when it is in use or is still hot. Children should
never be allowed to sit or stand on any part of the appliance.
Children must be taught that the appliance and utensils in
it can be hot. Let hot utensils cool
in a safe place, out of reach of
small children. Children should be
taught that an appliance is not a
toy. Children should not be
allowed to play with controls or
other parts of the unit.
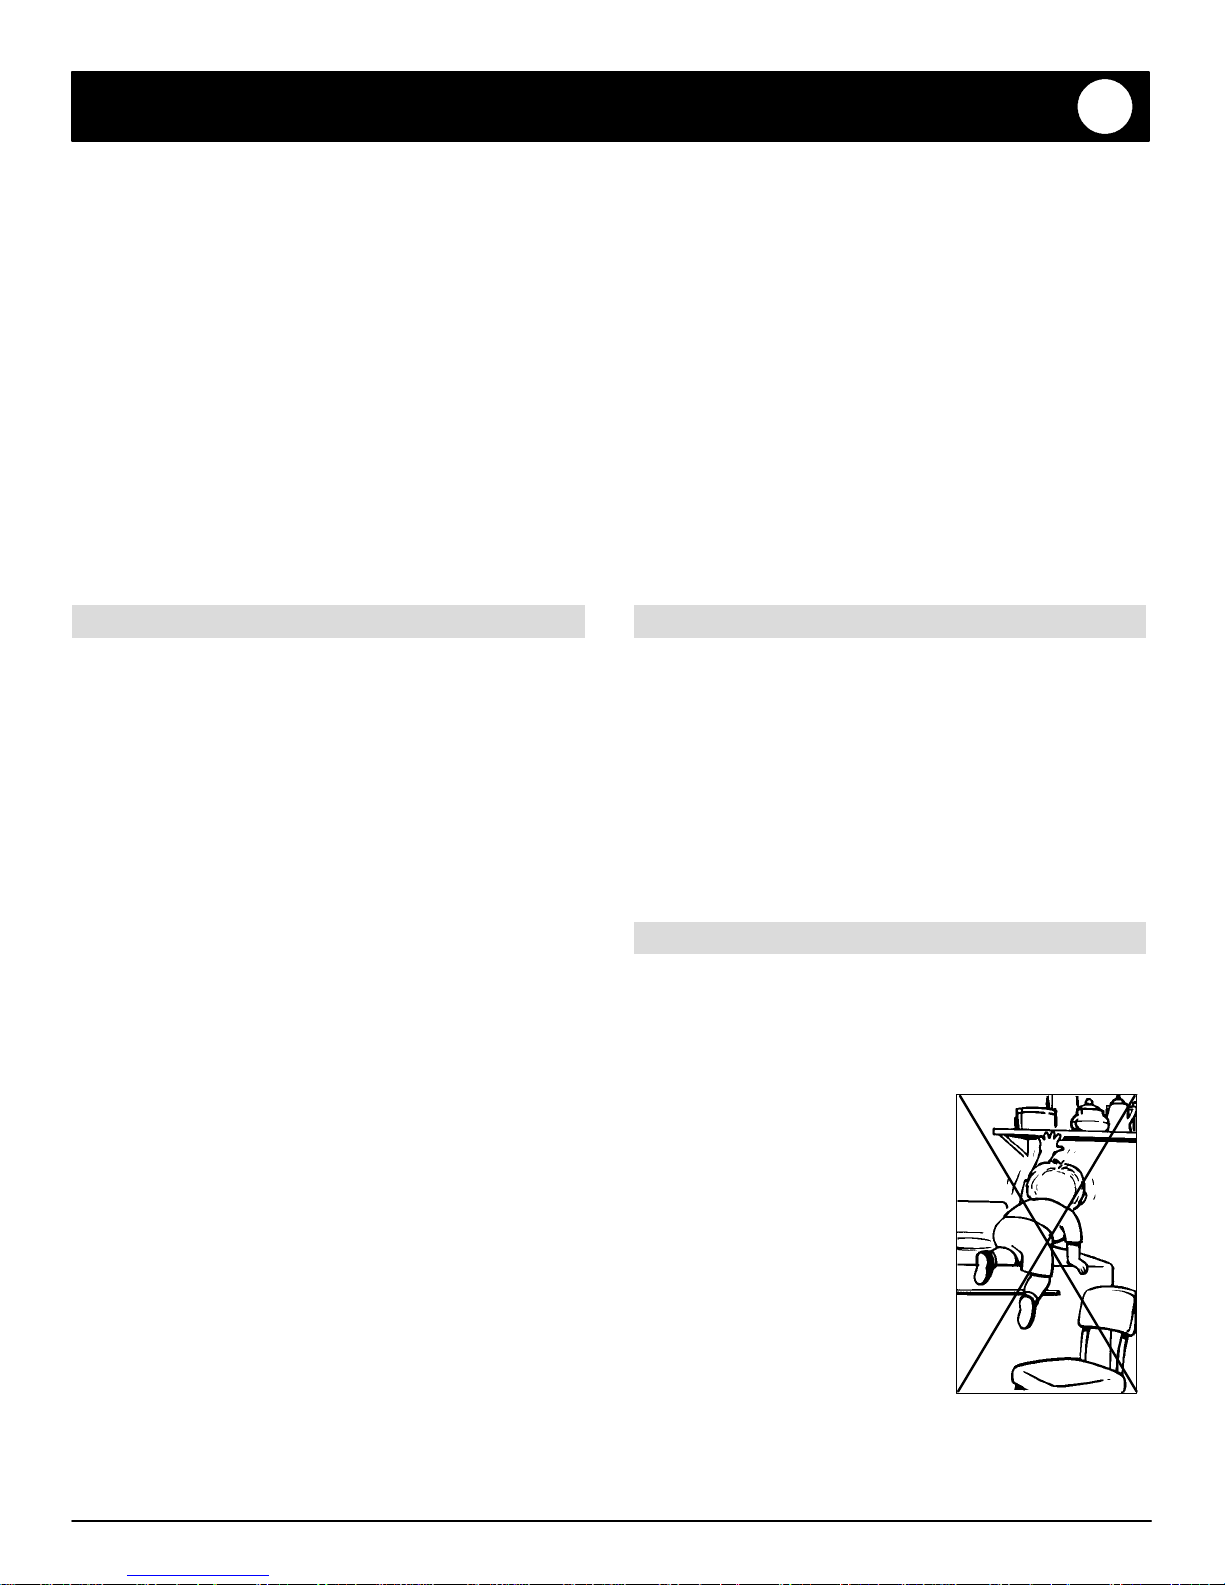
CAUTION: Never store items of
interest to children in cabinets
above an appliance or on the
backguard of a range. Children
climbing onthe appliance or onthe
appliance door to reach items
could be seriously injured.

4
IMPORTANT SAFETY INSTRUCTIONS
ABOUT YOUR APPLIANCE
To prevent potential hazard to the user and damage to the
appliance, never use appliance asa space heater
to heat or warm a room.
Also, do not use the
cooktoporovenasa
storage area for food or
cooking utensils.
Do not obstruct the flow
of combustion and ventilation air by blocking the
oven vent or air intakes. Restriction of air flow to the burner
prevents proper performance and increases carbon
monoxide emission to unsafe levels.
Avoid touching oven vent area while oven is on and for
several minutes after oven is turned off. Some parts of the
vent and surrounding area become hot enough to cause
burns. After oven is turned off, do not touch the oven vent or
surrounding areas until they have had sufficient time to cool.
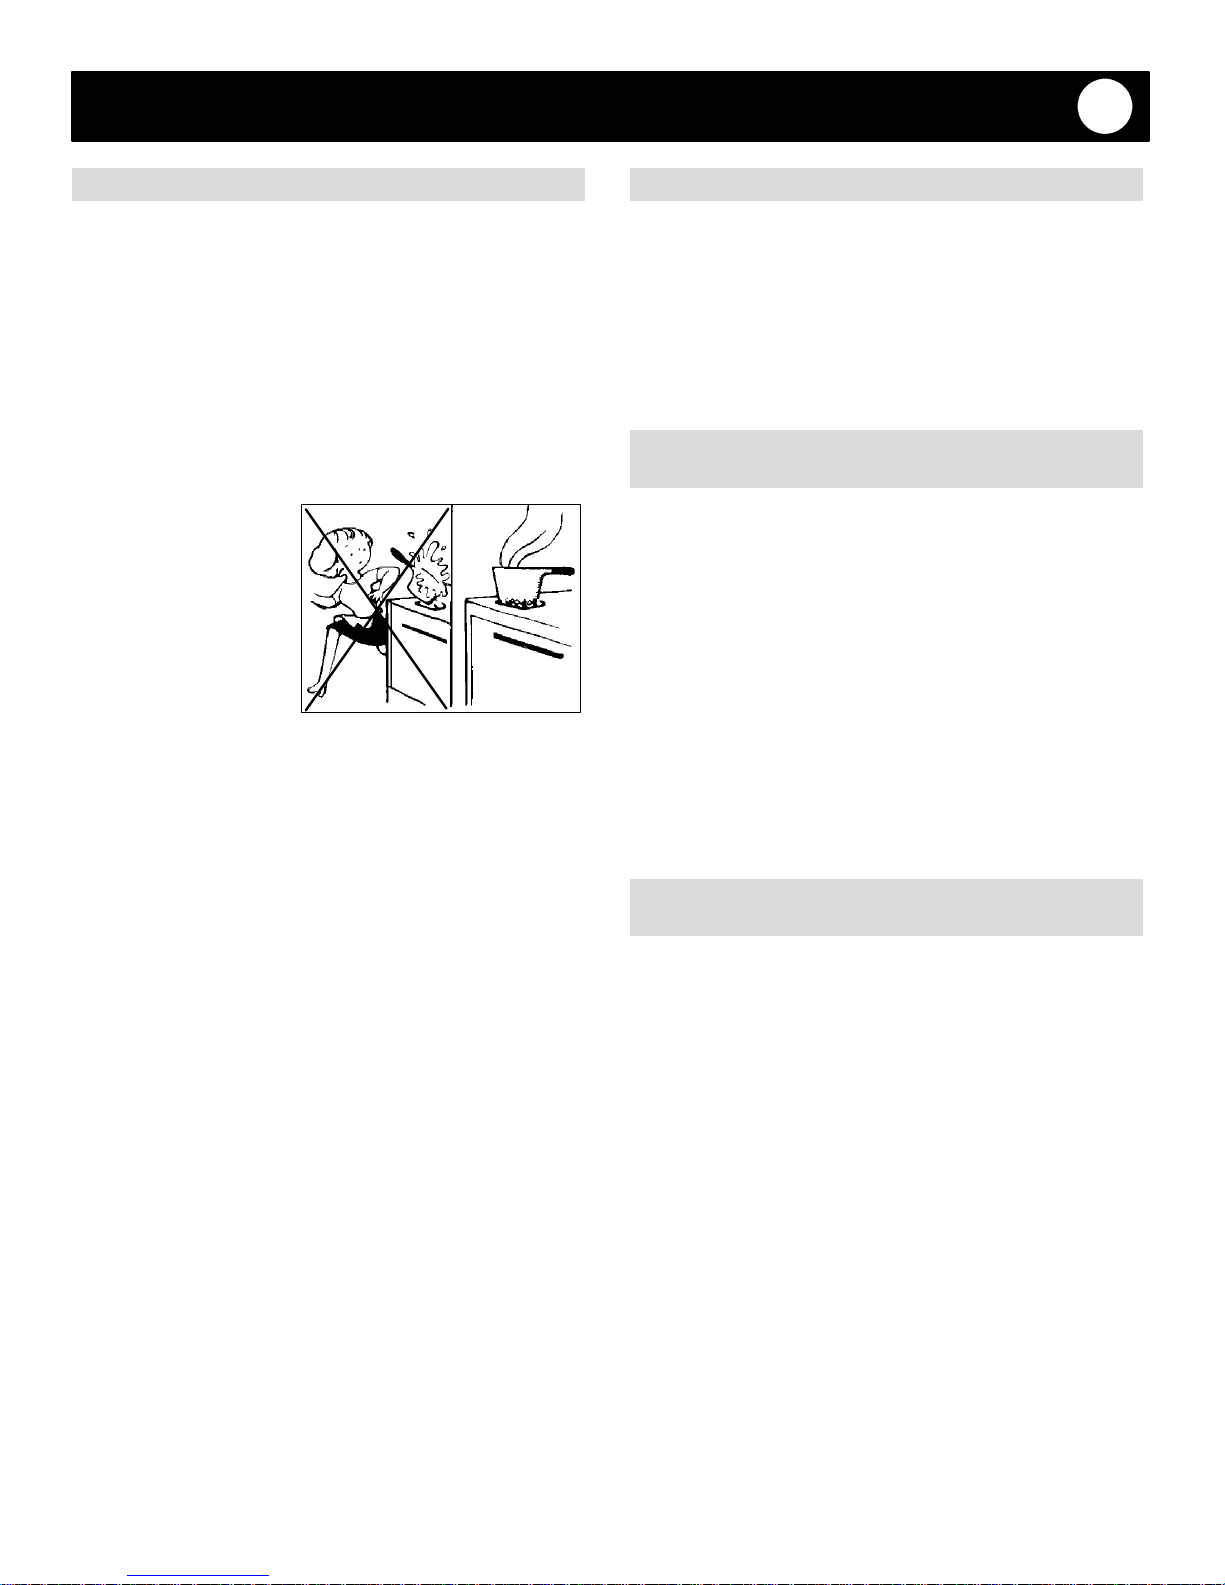
CAUTION: Never use an
appliance as a step stool to
cabinets above. Misuse of
appliance doors or drawers,
such as stepping, leaning or
sitting on the door or drawer,
may result in possible tipping
of the appliance, breakage of
door, and serious injuries.
COOKING SAFETY
Always place a pan on a surface burner before turning it on.
Be sure you know which knob controls which surface burner.
Make sure the correct burner is turned on and that the burner
has ignited. When cooking is completed, turn burner off
before removing pan to prevent exposure to burner flame.
Always adjust surface burner flame so that it does notextend
beyond the bottom edge of the pan. An excessive flame is
hazardous, wastes energy and may damage the appliance,
pan or cabinets above the appliance.
Never leave a surface cooking operation unattended
especially when using a
high heat setting or when
deep fat frying. Boilovers
cause smoking and
greasy spillovers may
ignite. Clean up greasy
spills as soon as
possible. Do not use high
heat for extended
cooking operations.
Never heat an unopened container on the surface burner or
in the oven. Pressure build-up may cause container to burst
resulting in serious personal injury or damage to the
appliance.
Use dry, sturdy pot holders. Damp pot holders may cause
burns from steam. Dish towels or other substitutes should
never be used as pot holders because they can trail across
hot surface burners and ignite or get caught on appliance
parts.
Do not touch a hot oven light bulb with a damp cloth as the
bulb could break. Should the bulb break, disconnect power
to the appliance before removing bulb to avoid electrical
shock.
PREPARED FOOD WARNING
Follow food manufacturer’s instructions. If a plastic frozen
food container and/or its cover distorts, warps, or is
otherwise damaged during cooking, immediately discard the
food and its container. The food could be contaminated.
Always let quantities of hot fat used for deep fat frying cool
before attempting to move or handle.
Do not let cooking grease or other flammable materials
accumulate in or near the appliance, hood or vent fan. Clean
hood frequently to prevent grease from accumulating on
hood or filter. When flaming foods under the hood, turn the
fan on.
Use caution when wearing garments made of flammable
material to avoid clothing
fires. Loose fitting or long
hanging-sleeved apparel
should not be worn while
cooking. Clothing may ignite
or catch utensil handles.
Always place oven racks in the desired positions while oven
is cool. Slide oven rack out to add or remove food, using dry
sturdy pot holders. Always avoid reaching into the oven to
add or remove food. If a rack must be moved while hot, use
a dry pot holder. Always turn the oven off at the end of
cooking.
Use care when opening the oven door. Let hot air or steam
escape before removing or replacing food.
IMPORTANT SAFETY INSTRUCTIONS
5
UTENSIL SAFETY
Use pans with flat bottoms and handles that are easily
grasped and stay cool. Avoid using unstable, warped, easily
tipped or loose handled pans. Pans that are heavy to move
when filled with food may also be hazardous.
Be sure utensil is large enough to properly contain food and
avoid boilovers. Pan size is particularly important in deep fat
frying. Be sure panwill accommodate the volume of foodthat
is to be added as well as the bubble action of fat.
To minimize burns, ignition of flammable materials and
spillage due to unintentional contact with the utensil, donot
extend handles over
adjacent surface
burners. Always turn
pan handles toward the
side or back of the
appliance, not out into
the room where they
are easily hit or
reached by small
children.
Never let a pan boil dry as this could damage the utensil and
the appliance.
Follow the manufacturer’s directions when using oven
cooking bags.
CLEANING SAFETY
Turn off allcontrols and wait for appliance parts tocool before
touching or cleaning them. Do not touch the burner grates or
surrounding areas until they have had sufficient time to cool.
Clean appliance with caution. Use care to avoid steam burns
if awet sponge or cloth is used to wipespills on a hot surface.
Some cleaners can produce noxious fumes if appliedto a hot
surface.
IMPORTANT SAFETY NOTICE AND
WARNING
The California Safe Drinking Water and Toxic Enforcement
Act of 1986 (Proposition 65) requires the Governor of
California to publish a list of substances known to the State
of California to cause cancer or reproductive harm, and
requires businesses to warn customers of potential
exposures to such substances.
Users of this appliance are hereby warned that the burning
of gas can result in low-level exposure to some of the listed
substances, including benzene, formaldehyde and soot, due
primarily to the incomplete combustion ofnatural gas or liquid
petroleum (LP) fuels. Properly adjusted burners will minimize
incomplete combustion. Exposure to these substances can
also be minimized by properly venting the burners to the
outdoors by opening the windows and/or door in the room
where the appliance is located.
Only certain types of glass, glass/ceramic, ceramic, or
glazed utensils are suitable for cooktop or oven usage
without breaking due to the sudden change in temperature.
This appliance has been tested for safe performance using
conventional cookware. Do not use any devices or
accessories that are not specifically recommended in this
manual. Do not use eyelid covers for the surface units, stove
top grills, or add-on oven convection systems. The use of
devices or accessories that are not expressly recommended
in this manual can create serious safety hazards, result in
performance problems, and reduce the life of the
components of the appliance.
IMPORTANT NOTICE REGARDING PET
BIRDS. . .
Never keep pet birds in the kitchen or in rooms where the
fumes from the kitchen could reach. Birds have a very
sensitive respiratory system. Fumes released during an
oven self-cleaning cycle may be harmful or fatal to birds.
Fumes released due to overheated cooking oil, fat,
margarine and overheated non-stick cookware may be
equally harmful.
SAVE THESE INSTRUCTIONS
6
IGNITION SYSTEM
USING THE COOKTOP
The surface burners will feature either matchlit ignition or
Piezo pilotless ignition. Be sure all control knobs are in the
OFF position before supplying gas to the appliance. Be sure
gas supply to appliance is on before lighting burner.
HOW TO LIGHT SURFACE BURNER
To prevent damage to the cooktop or pan:
S Never operate the surface burner without a pan in
place.
S Never allow a pan to boil dry.
S Never operate a surface burner on HIGH for
extended periods of time.
CAUTION: If the burner does not light within about 4
seconds or if the flame should go outduring cooking,turn
the burner off. If gas has accumulated and a strong gas
odor is detected, open a window and wait 5 minutes for
the gas odor to disappear before relighting the burner.
If the appliance has not been operated for a period of time,
the surface burnermay bedifficult to lightdue to airin thegas
line.
To light surface burner with Piezo ignition:
1. Place a pan on the burner grate.
2. Push in and turn the surface
burner control knob to the LITE
position.
IMPORTANT: Only light one
surface burner at a time.
3. Immediately, rotate the TOP
BURNER IGNITOR knob to the
right (clockwise) several clicks
until the burner lights. The burner
should light within 6 clicks or one
full rotation of the knob.
4. When the burner lights, adjust the surface burner
control knob between HI and LOW to select the desired
flame size.
5. After cooking, turn the surface burner control knob to the
OFF position.
To bleed off air from the line:
1. Hold a lighted match next to the burner.
2. Turn the surface burner control knob to the LITE position.
3. When the burner lights, turn the knob back to the OFF
position.
4. Proceed as directed below.
To light surface burner with matchlit ignition:
1. Place a pan on the burner grate.
2. Hold a lighted match next to the desired surface burner
head.
CAUTION: Do not turn the control knob on and allow gas
to escape before lighting the match.
3. Push in and turn the surface
burner control knob to the LITE
position.
4. When the burner lights, adjust
the knob between HI and LOW to
select the desired flame size.
To operate burner if the Piezo ignitor is not functional:
1. Be sure all controls are in the OFF position.
2. Hold a lighted match to the desired surface burner head.
CAUTION: Do not turn the control knob on and allow gas
to escape before lighting the match.
3. Push in and turn the surface burner control knob to the
LITE position.
4. When the burner lights, adjust the knob between HI and
LOW to select the desired flame size.
5. After cooking, turn the knob to the OFF position.
SHUTDOWN INSTRUCTIONS
When the recreational vehicle is not in useor while traveling,
turn all knobs to the OFF position and turn off the main gas
supply.
5. After cooking, turn the surface burner control knob to the
OFF position.
USING THE COOKTOP
7
SELECTING FLAME SIZE
Use a HIGH flame setting to quickly bring liquids to a boil or
to begin a cooking operation. Then reduce to a lower setting
to continue cooking. Never leave food unattended when
using a HIGH flame setting.
Flame adjusted for HIGH setting.
An intermediate flame size is used to continue a cooking
operation. Food will not cook any faster when a higher
flame setting is used than needed to maintain a gentle
boil. Remember, water boils at the same temperature
whether boiling gently or vigorously.
Use LOW to simmer or keep foods at serving temperatures.
ADJUSTING THE FLAME
Adjust the flame size so it
does not extend beyond
the edge of the cooking
utensil. This is for
personal safety and to
prevent possible damage
to the appliance, pan, or
cabinets above the
appliance. This also improves cooking efficiency.
COOKWARE CONSIDERATIONS
Cookware which extends more than one inch beyond the
grate, rests on two grates, or touches the cooktop will cause
a build up of heat and result in damage to the the burner
grate, burner and cooktop.
CAUTION: The maximum pan size is a 10-inch skillet.
To prevent damage to the cooktop and the burner valves,
do not use canners or oversized cookware. The pan
should not be more than one inch larger than the burner
grate.
Flame adjusted for LOW setting.
If a knob is turned very quickly from the HI to the LOW
setting, the flame may go out, particularly if the burner is
cold. If this occurs, turn the knob to the OFF position. Wait
several seconds, then light the burner again.
Cookware, such as a wok with a support ring,which restricts
air circulation around the burner will cause heat to build up
and may result in damage to the burner grate, burner or
cooktop.
Foods cook faster when the cookware is covered because
more heat is retained. Lower the flame size when cookware
is covered. This also improves cooking efficiency.
The cooking performance is greatly affected by the type of
cookware used.Proper cookware will reduce cookingtimes,
use less energy andproduce moreeven cooking results. For
best results use a heavy gauge metal pan with a smooth flat
bottom, straight sides and a tight fitting lid. Select a material,
such as aluminum or copper, that conducts heatquickly and
evenly.
8
USING THE OVEN
IGNITION SYSTEM
The oven features pilot ignition.Be sure all control knobs are
in the OFF position before supplying gas to the appliance.
Be sure gas supply to appliance is on before lighting pilot or
oven burner.
HOW TO LIGHT OVEN PILOT
If the appliance has not been operated for a period of time,
the oven pilotmay be difficult to light due to air in the gasline.
To bleed air from the line, follow instructions from page 6
under the section “HOW TO LIGHT SURFACE BURNER”
where it specifically details how to bleed off air from the line.
To light oven pilot:
1. Be sure all controls are in
the OFF position.
2. Push in and turn the
OVEN knob to the PILOT
ON position.
3. Open the oven door, and
locate the oven pilot
(beneath the oven
bottom, on the left side of
the burner). While
pushing in the knob,
hold a match next to the
oven pilot (see
illustration) for 10-15
seconds or until a small
flame is visible without
needing to continue
pushing in the knob.
OVEN CHARACTERISTICS
Because each oven has its own personal baking
characteristics, do not expect that your new oven will
perform exactly like your previous oven. You may find that
the cooking times, oven temperatures, and cooking results
differ somewhat from your previous range. Allow a period of
adjustment. If you have questions concerning baking
results, please refer to pages 9, 10 and 11 for additional
information.
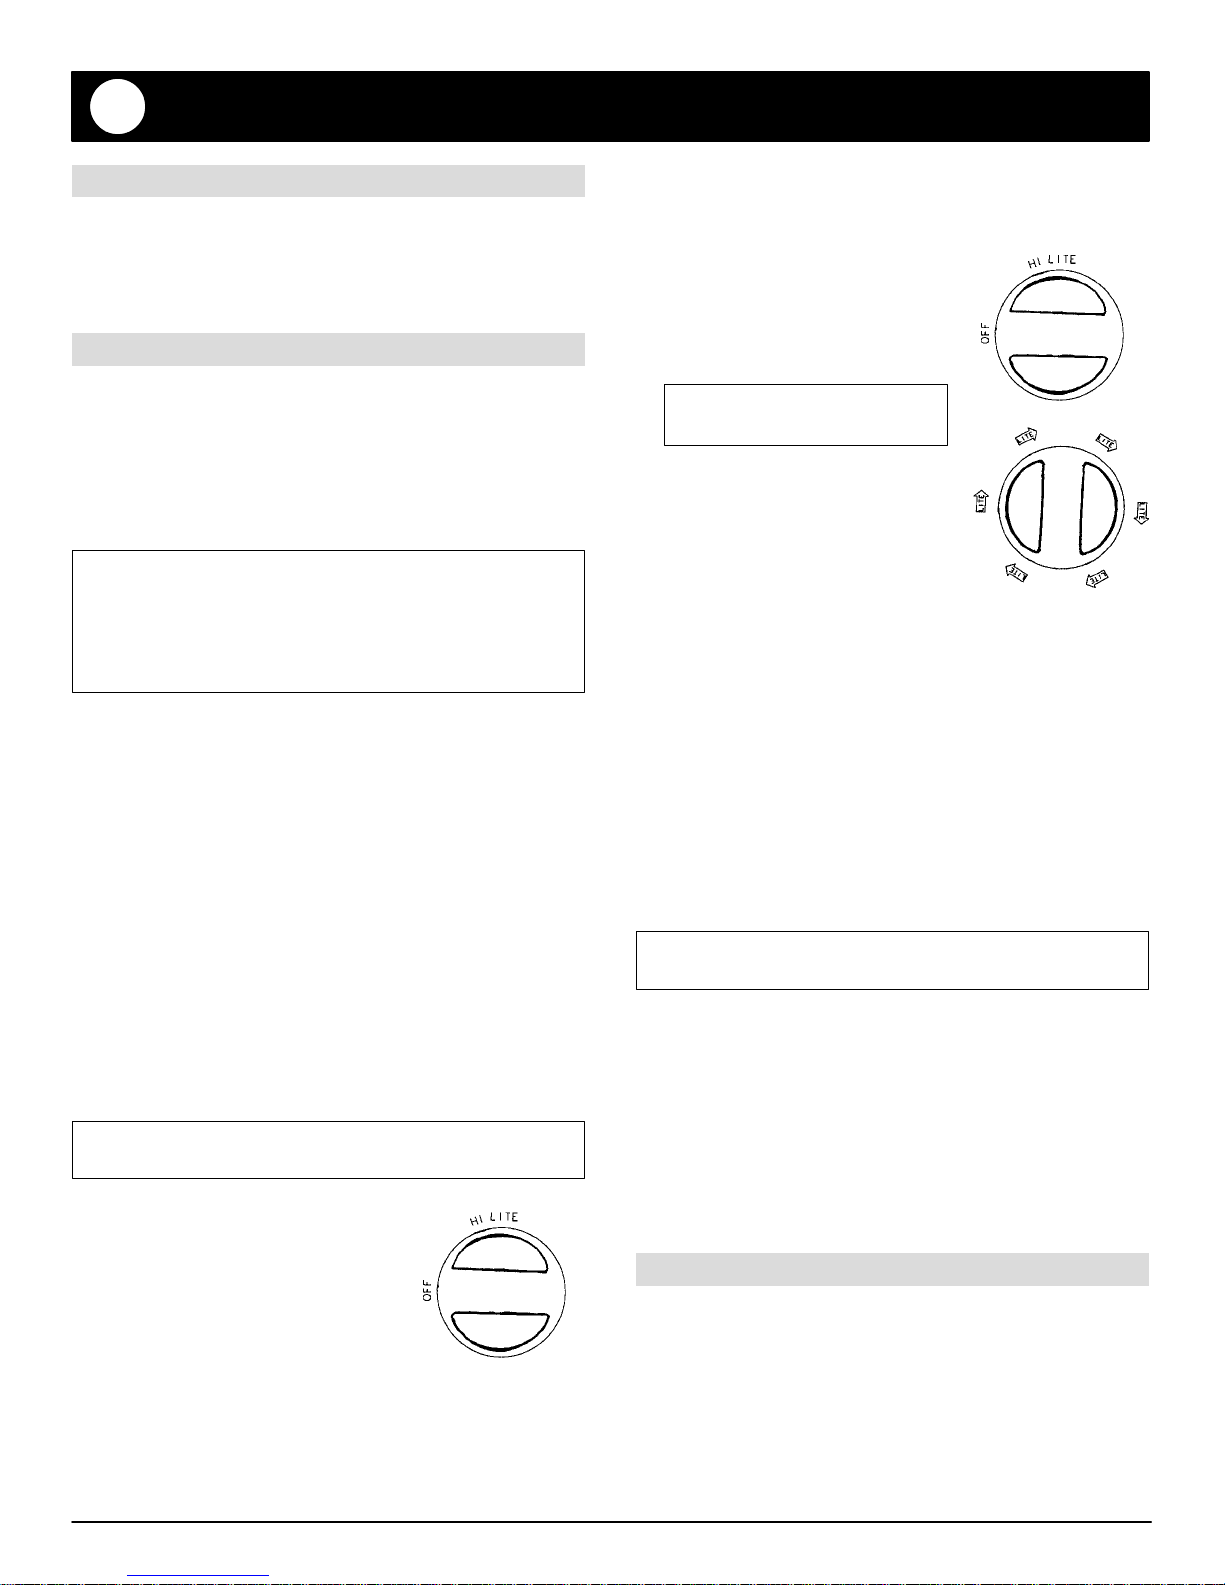
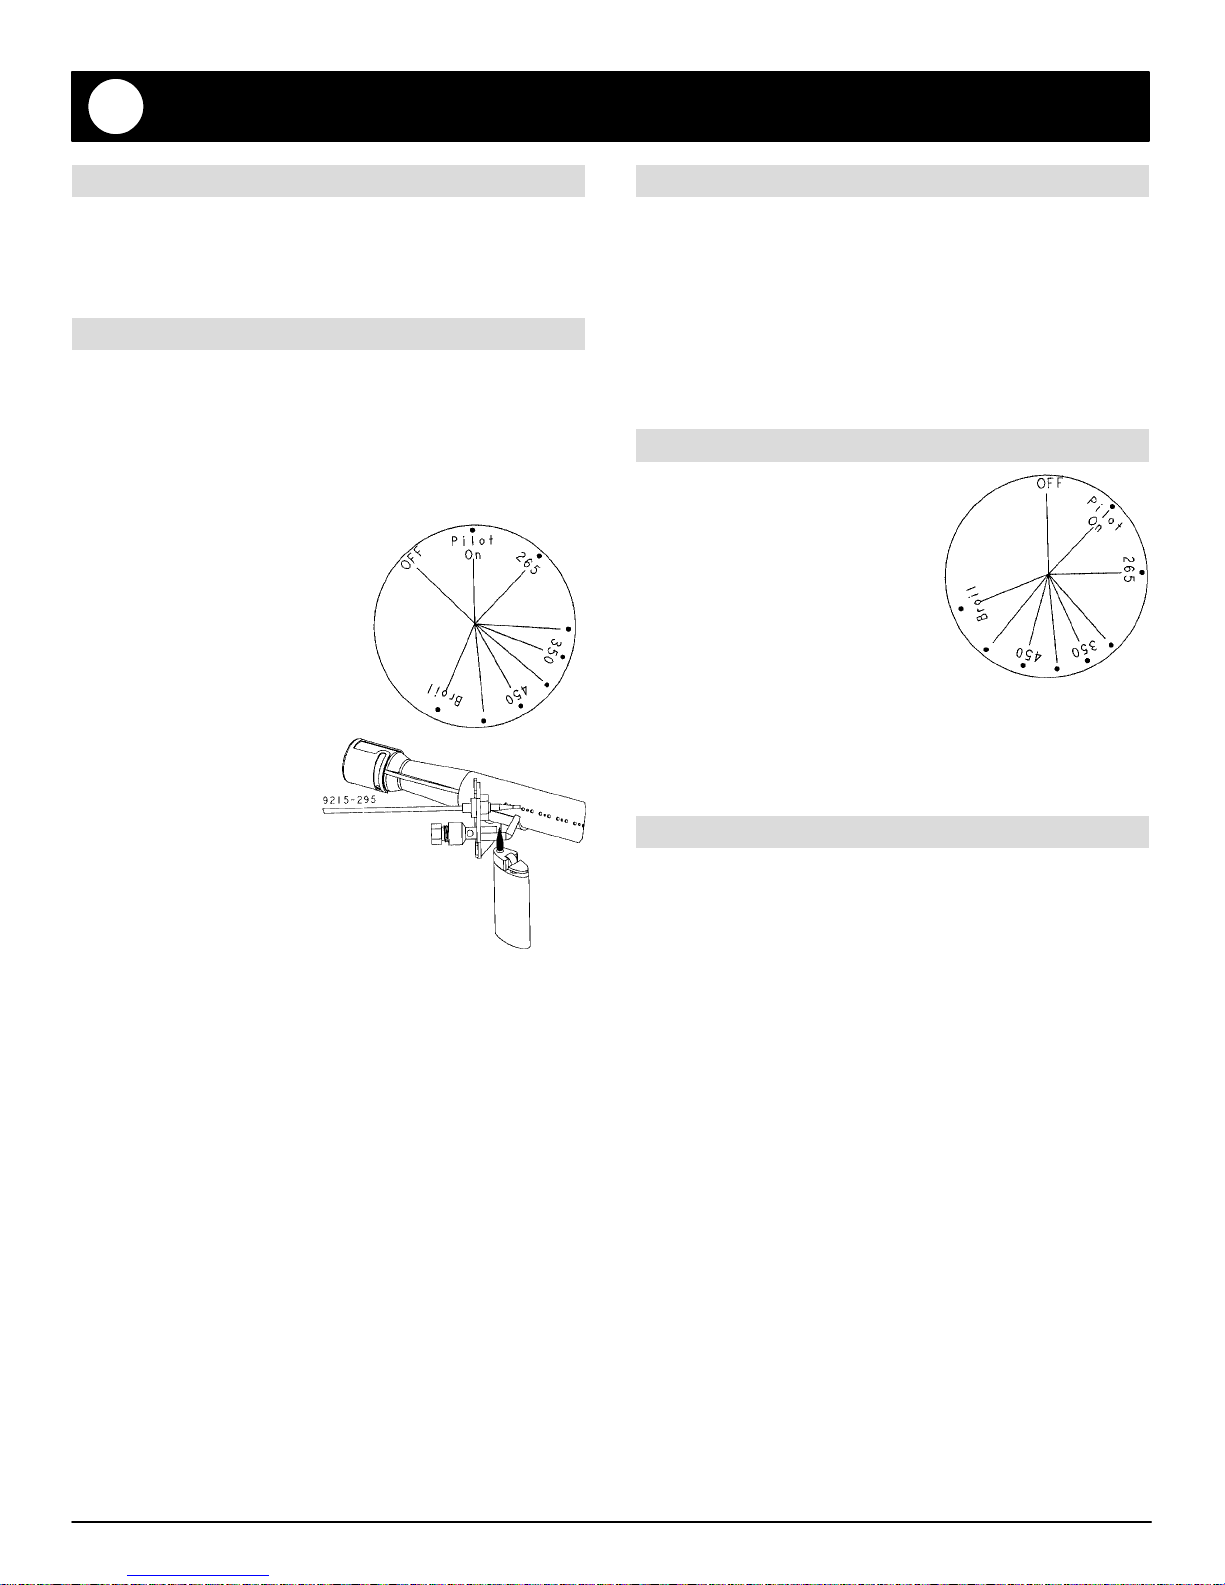
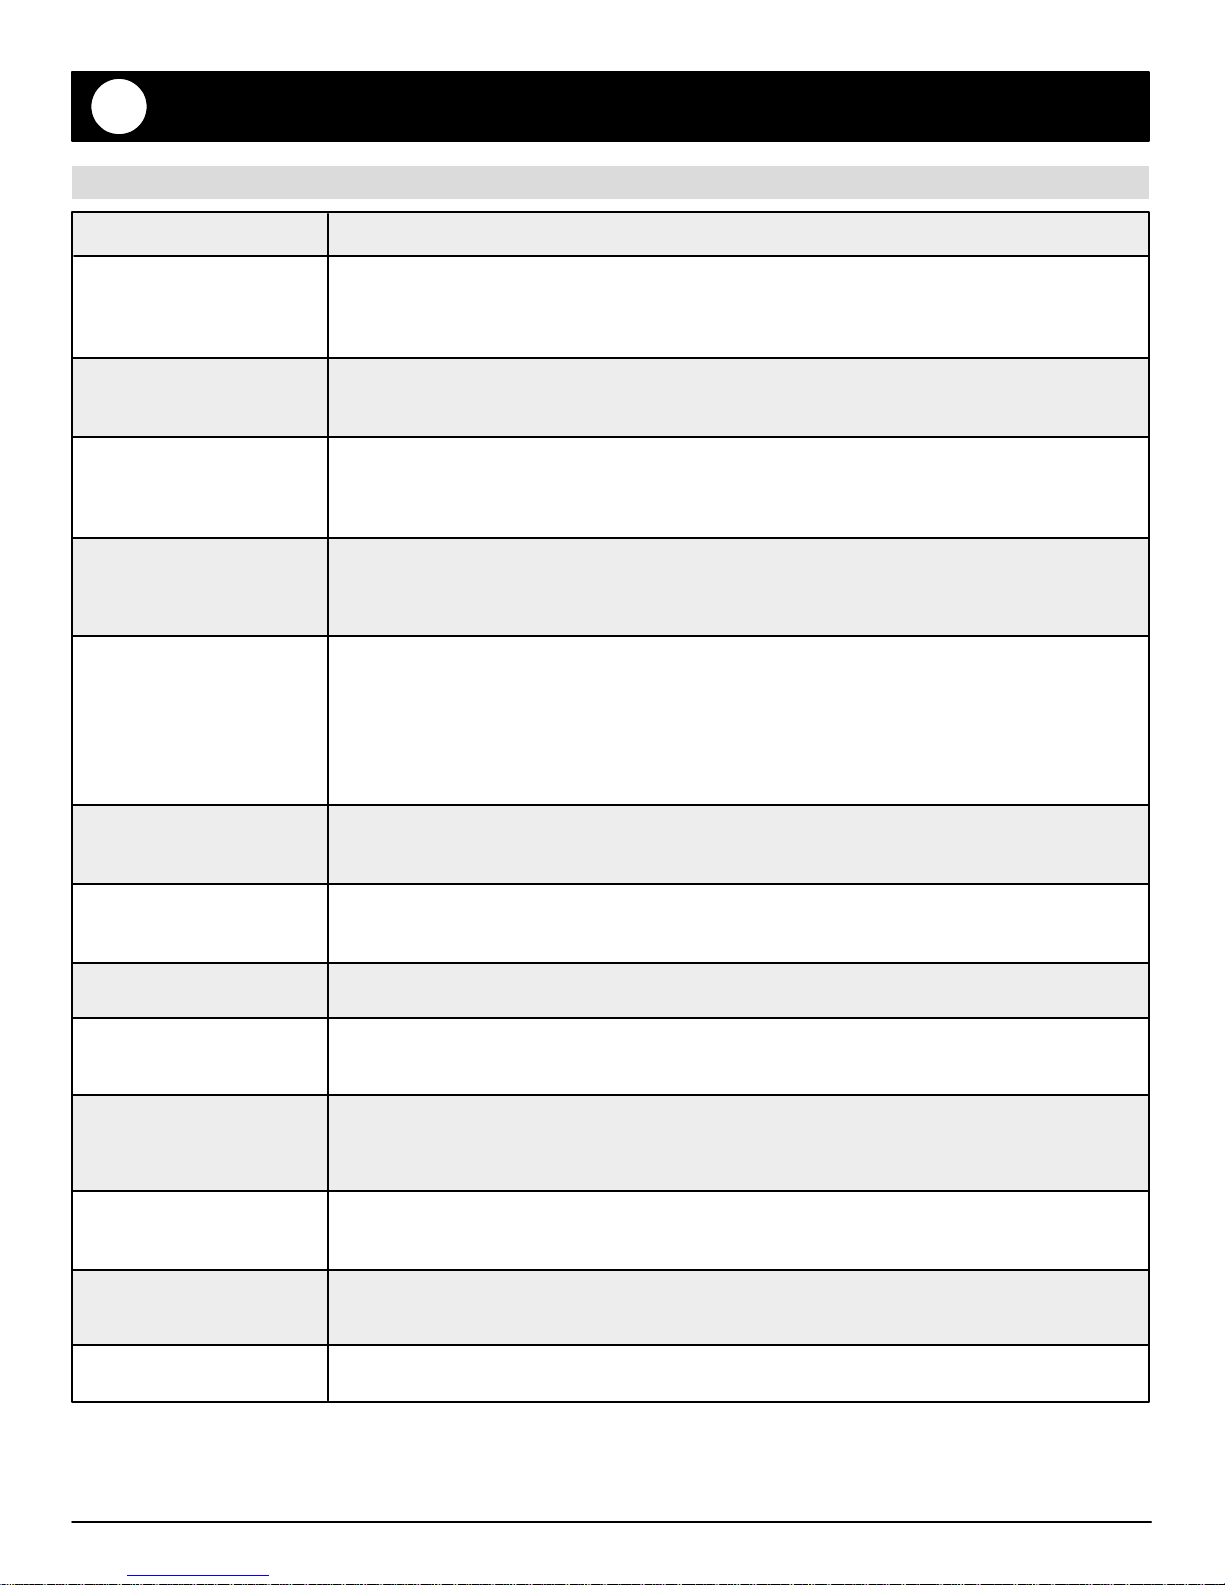
OVEN KNOB
The OVEN knob is used to select
and maintain the oven temperature. Push in and turn this
knob just to the desired
temperature - not to a higher
temperature and then back. This
provides more accurate oven
temperatures.
Turn this knob to the PILOT ON
position if you wish to use the
oven. The oven standby pilot will remain lit. Turn the knob
to OFF if the oven will not be used or when traveling.
OVEN KNOB
9215-294
SHUTDOWN INSTRUCTIONS
When the recreational vehicle is not in useor while traveling,
turn the OVEN knob to theOFF position and turnoff themain
gas supply. This will turn off the oven pilot.
NOTE: A delay in the time it takes to light the pilot may
signal a need to bleed air from the line. Reference the
above paragraph “HOW TO LIGHT OVEN PILOT” for
detailed instructions.
4. Once the pilot is lit, leave the OVEN knob in the PILOT
ON position if you wish to use the oven.
The standing pilot will remain lit if the OVEN knob is left
in the PILOT ON position. If the OVEN knob is turned to
the OFF position, gas supply to the pilot will beturned off
and the standing pilot flame will extinguish.

USING THE OVEN
9
HOW TO SET OVEN
1. When cool, position the rack in the oven.
2. Push in and turn the OVEN knob to the desired
temperature for baking or roasting or to BR (broil) for
broiling.
For baking: Selecting a temperature higher than desired
will NOT preheat the oven any faster, and may have a
negative effect on baking results.
For broiling: The OVEN knob can be turned to a lower
temperature (400 to 450°F) for broiling longer cooking
meats or poultry or if excessive smoking or splattering
occurs.
3. For baking: Place the food in the center of the oven,
allowing one to two inches between the utensil and the
oven walls.
For broiling: Place the broiler pan in the broiler area
directly below the oven burner.
When the oven is in use, the oven vent area may feel
warm or hotto thetouch. Do not block this area or the vent
opening as this may affect cooking results.
4. Check the food for doneness at the minimum time in the
recipe. Cook longer if necessary.
5. Remove the food from the oven and turn the OVEN knob
to the PILOT ON or the OFF position.
PREHEATING
Preheating is necessary for baking. Turn the OVEN knob to
the desired temperature andallow about10 to15 minutes for
the oven to preheat.
Selecting a higher temperature will not shorten the preheat
time and may affect baking results. It is not necessary to
preheat for roasting or broiling.
USE OF ALUMINUM FOIL
Do not cover the oven bottom or the entire oven rack
with foil.
BAKING TIPS
Useareliablerecipeand accurately measure fresh
ingredients. Carefully follow directions for oven
temperature and cooking time. Preheat oven if recommended.
Use the correct rack position. There are two or three rack
positions, depending on the model. Baking results may be
affected if the wrong rack position is used.
S Use the lower rack position for most baking. Use the
upper rack position for cookies or biscuits on a cookie
sheet .
S Top browning may be darker if food is located toward
the top of the oven.
S Bottom browning may be darker if food is located toward
the bottom of the oven.
Cookware material and size. Always use the type and size
of pan called for in the recipe. Cooking times or cooking
results may be affected if the wrong size is used.
The maximum recommended pan size is a 13 x 9 x
2-inch cake pan or a 14 x 10 x 2-inch cookie sheet.
S Shiny metal pan reflects heat away from the food,
produces lighter browning and a softer crust. Use shiny
pans for baking cakes or cookies. For optimum baking
results, bake cookies and biscuits on a flat cookie sheet.
If the pan has sides, such as ajelly roll pan, browning may
not be even.
S Dark metal pan or a pan with an anodized (dull)
bottom absorbs heat, produces darker browning and a
crisper crust. Use this type of pan for pies, pie crusts or
bread.
S If using oven-proof glassware,ordark pans such as
Baker’s Secret reduce the oven temperature by 25°F
except when baking pies or bread. Use the same baking
time as called for in the recipe.
Allow hot air to flow freely through the oven for optimum
baking results. Large pans or improper placement of pans
in the oven will block air flow and may result in uneven
browning. For optimum browning and even cooking results:
S Do not crowd a rack by placing several pans on a rack.
Also, do not block air flow by using too large of a pan.
S Allow one to two inches between the pan and the oven
walls.
Check the cooking progress at the minimum time. If
necessary, continue checking at intervals until the food is
done. If the oven door is opened too frequently, heat will
escape from the oven; this can affect baking results and
wastes energy.
10
USING THE OVEN
COMMON BAKING PROBLEMS AND WHY THEY HAPPEN
PROBLEM
Cakes are uneven. · Pans too close or touching each other or oven walls. · Batter uneven in pans.
· Temperature set too low or baking time too short. · Oven not level. · Undermixing.
· Too much liquid.
Cake high in middle. · Temperature set too high. · Baking time too long. · Overmixing. · Too much flour. · Pans
touching each other or oven walls. · Incorrect rack position.
Cake falls. · Too much shortening or sugar. · Too much or too little liquid. · Temperature set too low.
· Old or too little baking powder. · Pan too small. · Oven door opened frequently. · Added
incorrect type of oil to cake mix. · Added additional ingredients to cake mix or recipe.
Cakes, cookies, biscuits
don’t brown evenly.
Cakes, cookies, biscuits
too brown on bottom.
· Incorrect rack position. · Oven door not closed properly. · Door gasket not sealing
properly. · Incorrect use of aluminum foil. · Oven not preheated. · Pans darkened, dented
or warped.
· Oven not preheated. · Pans touching each other or oven walls. · Incorrect rack position.
· Incorrect use of aluminum foil. · Placed 2 cookie sheets on one rack. · Used glass, dark,
stained warped or dull finish metal pans. (Use a shiny cookie sheet.)
Follow cookware manufacturer’s instructions for oven temperature. Glassware and dark
cookware such as Ecko’s Baker’s Secret require lowering the oven temperature by 25°F.
CAUSE
Cakes don’t brown on
top.
Excessive shrinkage.
Uneven texture.
Cakes have tunnels.
Cake not done in
middle.
Pie crust edges too
brown.
Pies don’t brown on
bottom.
Pies have soaked crust.
· Incorrect rackposition. · Temperature set too low. · Overmixing. · Too much liquid. · Pan
size too large or too little batter in pan. · Oven door opened too often.
· Too little leavening. · Overmixing. · Pan too large. · Temperature set too high. · Baking
time too long. · Pans too close to each other or oven walls.
· Too much liquid. · Undermixing. · Temperature set too low. · Baking time too short.
· Not enough shortening. · Too much baking powder. · Overmixing or at too high a speed.
· Temperature set too high.
· Temperature set too high. · Pan too small. · Baking time too short.
If additional ingredients were added to mix or recipe, expect cooking time to increase.
· Temperature set too high. · Pans touching each other or oven walls. · Edges of crust too
thin; shield with foil.
· Used shiny metal pans. · Temperature set too low. · Incorrect rack position.
· Temperature too low at start of baking. · Filling too juicy. · Used shiny metal pans.

USING THE OVEN
11
ROASTING TIPS
S Roasting is the method for cooking large, tender cuts of
meat uncovered, without adding moisture. Most meats
are roasted at 325°F. It is not necessary to preheat the
oven.
S Use tender cuts of meat weighing three pounds or more.
Some good choices are: Beef rib, ribeye, top round, high
quality tip andrump roast, pork loin roast,leg oflamb, veal
shoulder roast and cured or smoked hams.
S Season meat, if desired, either before or after roasting.
Rub into the surface of the roast if added before cooking.
S Place the meat fat-side-up on a rack in a shallow roasting
pan. Placing the meat on a rack holds it out of the
drippings, thus allowing better heat circulation for even
cooking. As the fat on top of the roast melts, the meat is
basted naturally, eliminating the need for additional
basting.
S The cooking time is determined by the weight of the meat
and the desired doneness.For moreaccurate results,use
a meat thermometer. Insert it so the tip is in the center of
the thickest part of the meat. It should not touch fat or
bone.
S Remove the roast from the oven when the thermometer
registers approximately 5°F below the doneness wanted.
As the meat stands, the temperature will rise.
NOTE: For more information about food safety, call
USDA’s Meat & Poultry Hotline at 1-800-535-4555. For
cooking information write to the National Live Stock and
Meat Board, 444 North Michigan Avenue, Chicago,
Illinois 60611.
BROILING TIPS
S Broiling is a method of cooking tender meats by direct
radiant heat. The cooking time is determined by the
distance between the meat and the oven burner, the
desired degree of doneness and the thickness of the
meat.
S Broiling requires the use of the broiler pan and insert. The
broiler insert must be in place to allow fat and liquid to
drain to the pan below to prevent spatters, smoke and
flare-ups. Improper use may cause grease fires.
S For easier clean up, line the broiler pan with foil and spray
the insert with a non-stick vegetable spray. Do not cover
the broiler insert with aluminum foil as this prevents fat
from draining into pan below.
S Trim excess fat and slash remaining fat to helpkeep meat
from curling and to reduce smoking and spattering.
Season meat after cooking.
S It is possible to broil longer cooking foods such as pork
chops at a lower temperature to prevent overbrowning.
Turn the knob to400° or 450°F, rather than BROIL, forlow
temperature broiling. Reducethe broil temperature to400
to 450°F if excessive smoking or splattering occurs.
S Meat should be turned once about halfway through its
cooking time. Check the doneness by cutting a slit in the
meat near the center to check the color.
S See Care and Cleaning Chart on page 15 for instructions
on cleaning the broiler pan and insert.
NOTE: To purchase a two-piece broiler pan for your RV
range, fill out the purchase order form that came withyour
RV range. If you did not receive the form call
1-800-688-9900 USA, 1-800-688-2002 Canada.

12
MAINTENANCE
COOKTOP
CAUTION: To prevent damageto the cooktop, do not use
canners or oversized cookware. The pan should not be
more than one inch larger than the burner grate. The
maximum pan size is a 10-inch skillet.
To prevent staining or discoloration, clean cooktop after
each use. Wipe acid or sugar stains as soon as the cooktop
has cooled as these stains may discolor or etch the
porcelain.
To remove:
1. When cool, grasp the two front corners and lift up.
2. Release the slot on the left rear corner of the cooktop
flange from the tab on the burner box wall.
3. Then move the cooktop toward the left to release the slot
on the cooktop flange from the tab on the burner box wall.
BURNER GRATES
CAUTION: Do not operate a surface burner without a
pan on the grate. The porcelain finish on the grate may
chip without a pan to absorb the intense heat from the
burner flame.
To install grates:
1. Place grate on cooktop, locating each of the four grate
legs on top of the four black plastic grommets.
2. Press down at each corner to secure burner grate to
cooktop.
3. To prevent damage to the grommets, do not press down
on all four corners at the same time.
4. Install one side of the grate then install the other side.
SLOT
To replace:
1. Insert the slot on the right rear corner of the cooktop
flange over the tab on the burner box wall.
2. Lower the rear of the cooktop into place, inserting the slot
on the left rear corner of the cooktop flange over the tab
on the burner box wall.
3. Lower the top into place and apply slight pressure at the
two front corners to secure the cooktop in place.
Due to certain atmospheric conditions, the cooktop on your
appliance may show signs of rust on the underneath side.
This is especially true in areas of high humidity and salt air
areas.
To help eliminate this condition, caution should be taken to
make sure that the underneath side of the main top is kept
dry. This is especially important in areas of high humidity
where moisture accumulates. If you detect signs of rust, we
have found ithelpful to spray theunderneath side with a coat
of high-heat tested rustolium or silicone paint.
CAUTION: Remove top from appliance and spray in a
well vented area.

MAINTENANCE
13
SEALED SURFACE BURNERS,
select models
The porcelain on the burner is durablebut over time andwith
use may gradually lose its shine.
The three sealed surfaceburners are secured to the cooktop
and are NOT designed to be removed by the consumer.
Select models feature one special POWER BOOST sealed
burner located at the front. Use this burner to quickly bring
water to a boil.
Clean burner cap after each use especially if a spillover
occurs. A soiled burner may result in improper ignition or an
uneven flame. When cleaning the sealed surface burner,
use care to prevent damage to the ignitor. If a cleaning cloth
should catch the ignitor, it could be damaged or broken.
If burner does not light:
1. The surface burner will not light if the ignitor is damaged,
broken, soiled or wet. The burner will also not light if the
ports, especially the small port located directly below the
ignitor, are blocked.
2. Check to see if the burner ports are clogged. If so, clean
with a straight pin or small metal paper clip.
CONVENTIONAL SURFACE BURNERS,
select models
Your RV range or cooktop will feature three surface burners.
Each burner is secured in place with ascrew. Whenburner is
cool, remove the screw before removing the burner. When
re-installing thesurface burner be sure to replace the screw.
If the surface burner does not light, check to seeif the burner
ports are clogged. If so, clean with a straight pin or small
metal paper clip. Be sure thestanding pilot is lit.Check to be
sure that the burner is correctly installed.
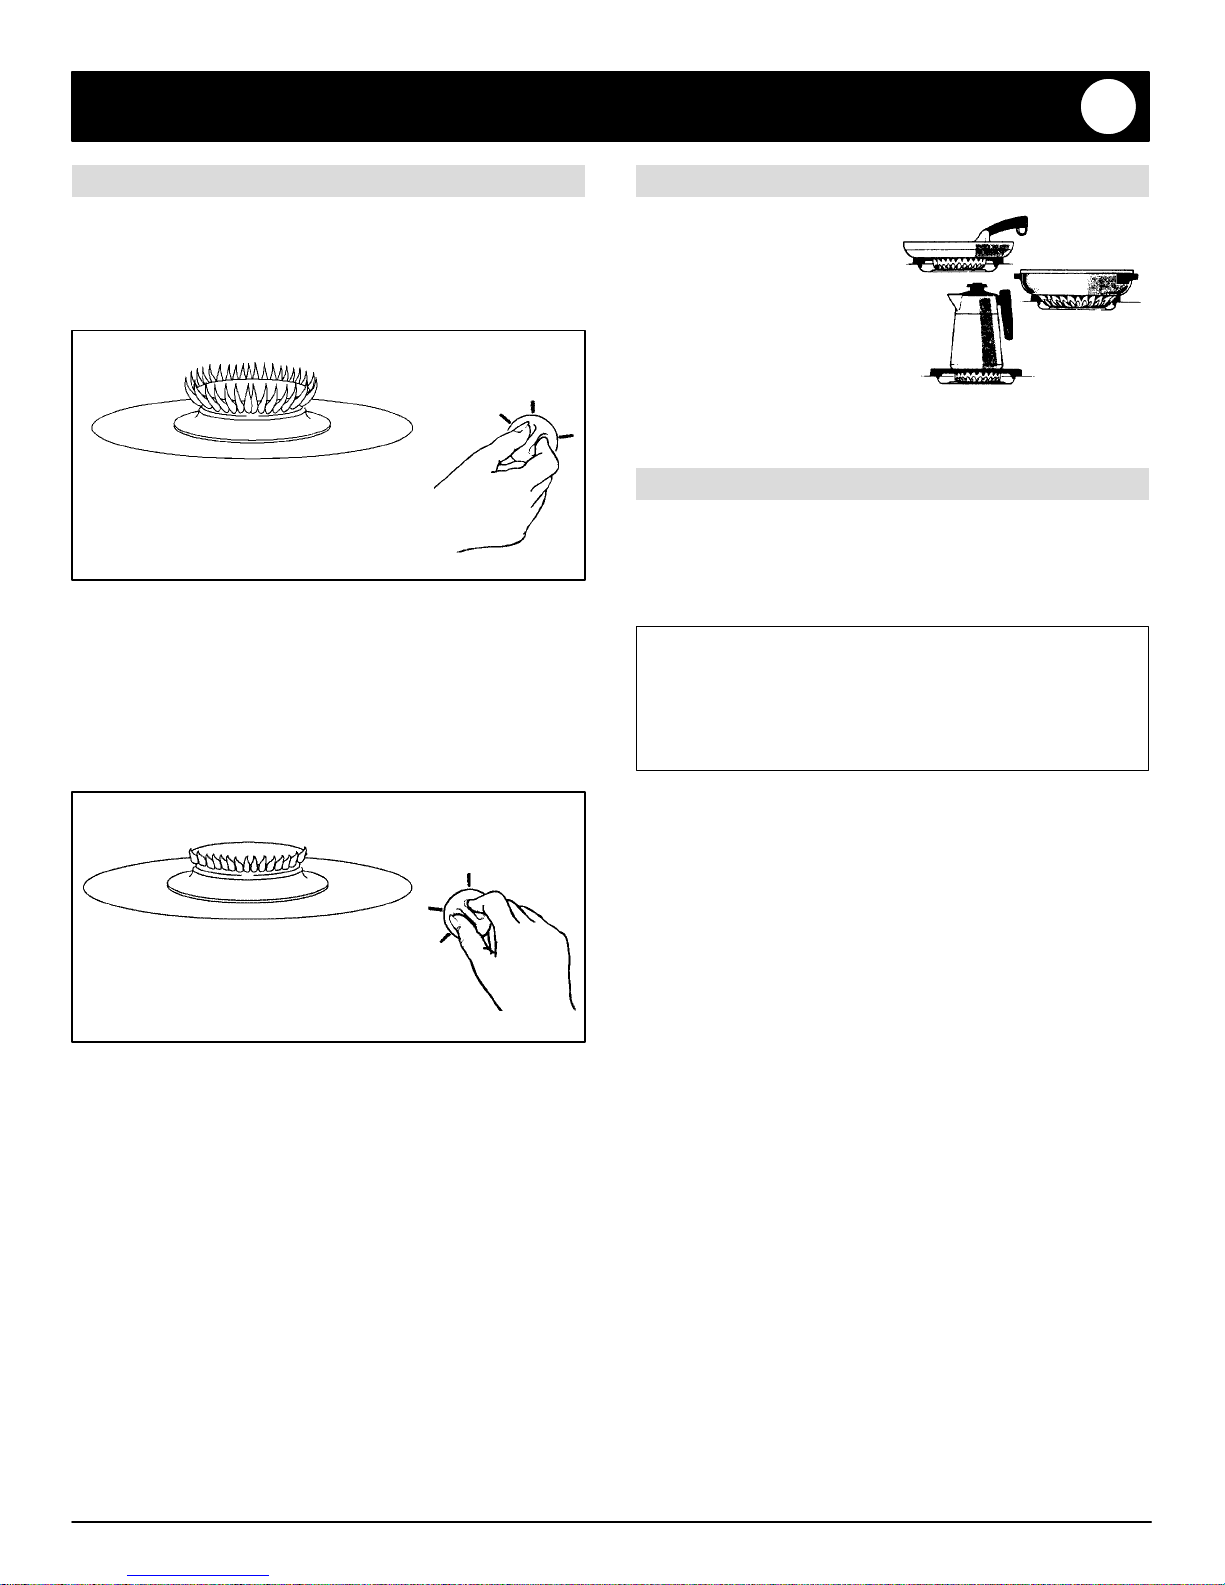
To install surface burner: The air shutter end onthe burner
should fit over the orifice hood.
Air Shutter
Orifice Hood
SEALED BURNER HEAD
Lip
Ports
Ignitor
Port directly below ignitor
To install surface burner with Piezo ignition: The two
tabs on each flashtube should be securely inserted into the
two slots on each burner head.
Slots
Two
Tabs
The flashtube “hold down” clips should secure the flashtube
in place. The clips are located under the metal shield.
Flash
Tubes
“Hold down”
Clips
3 BURNER COOKTOP
14
MAINTENANCE
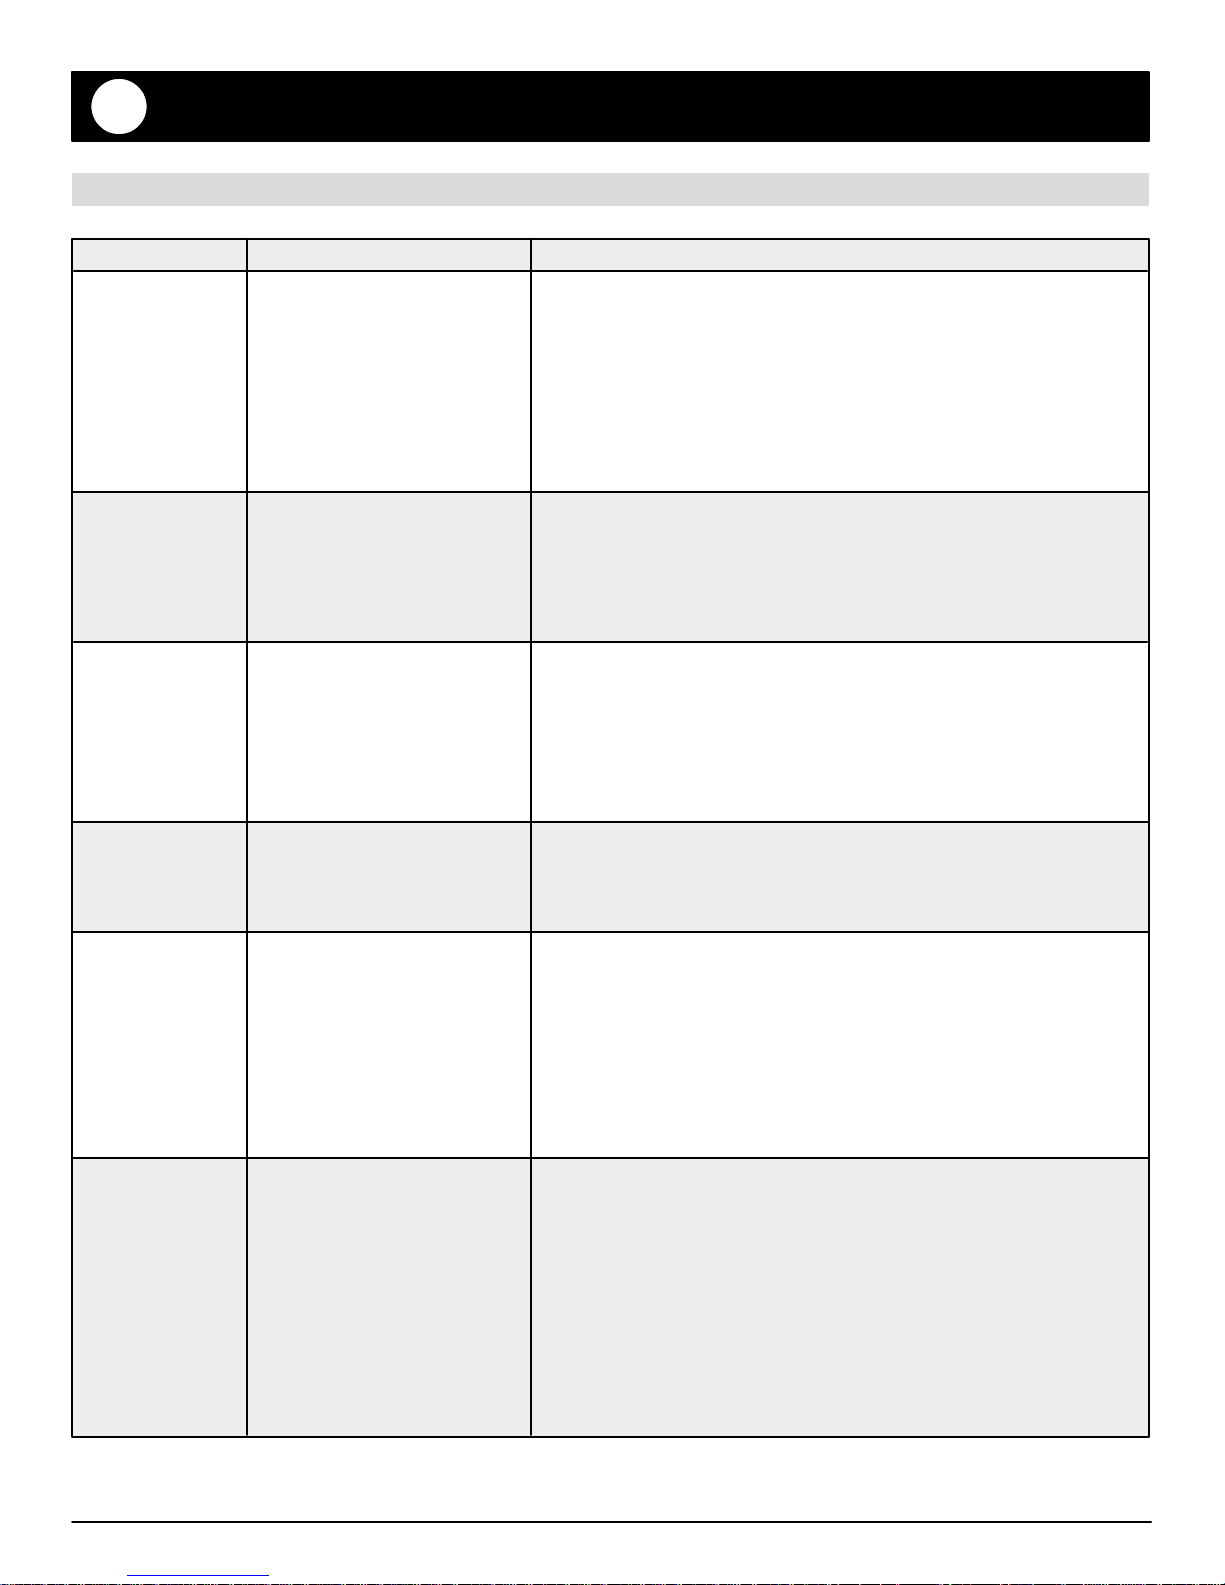
OVEN DOOR
Do not place excessive weight on an open oven door or
stand on an open oven door as, in some cases, it could
cause the range totip over, break the door, or cause serious
injury to the user.
When opening the oven door, allow steam and hot air to
escape before reaching in oven to check, add or remove
food.
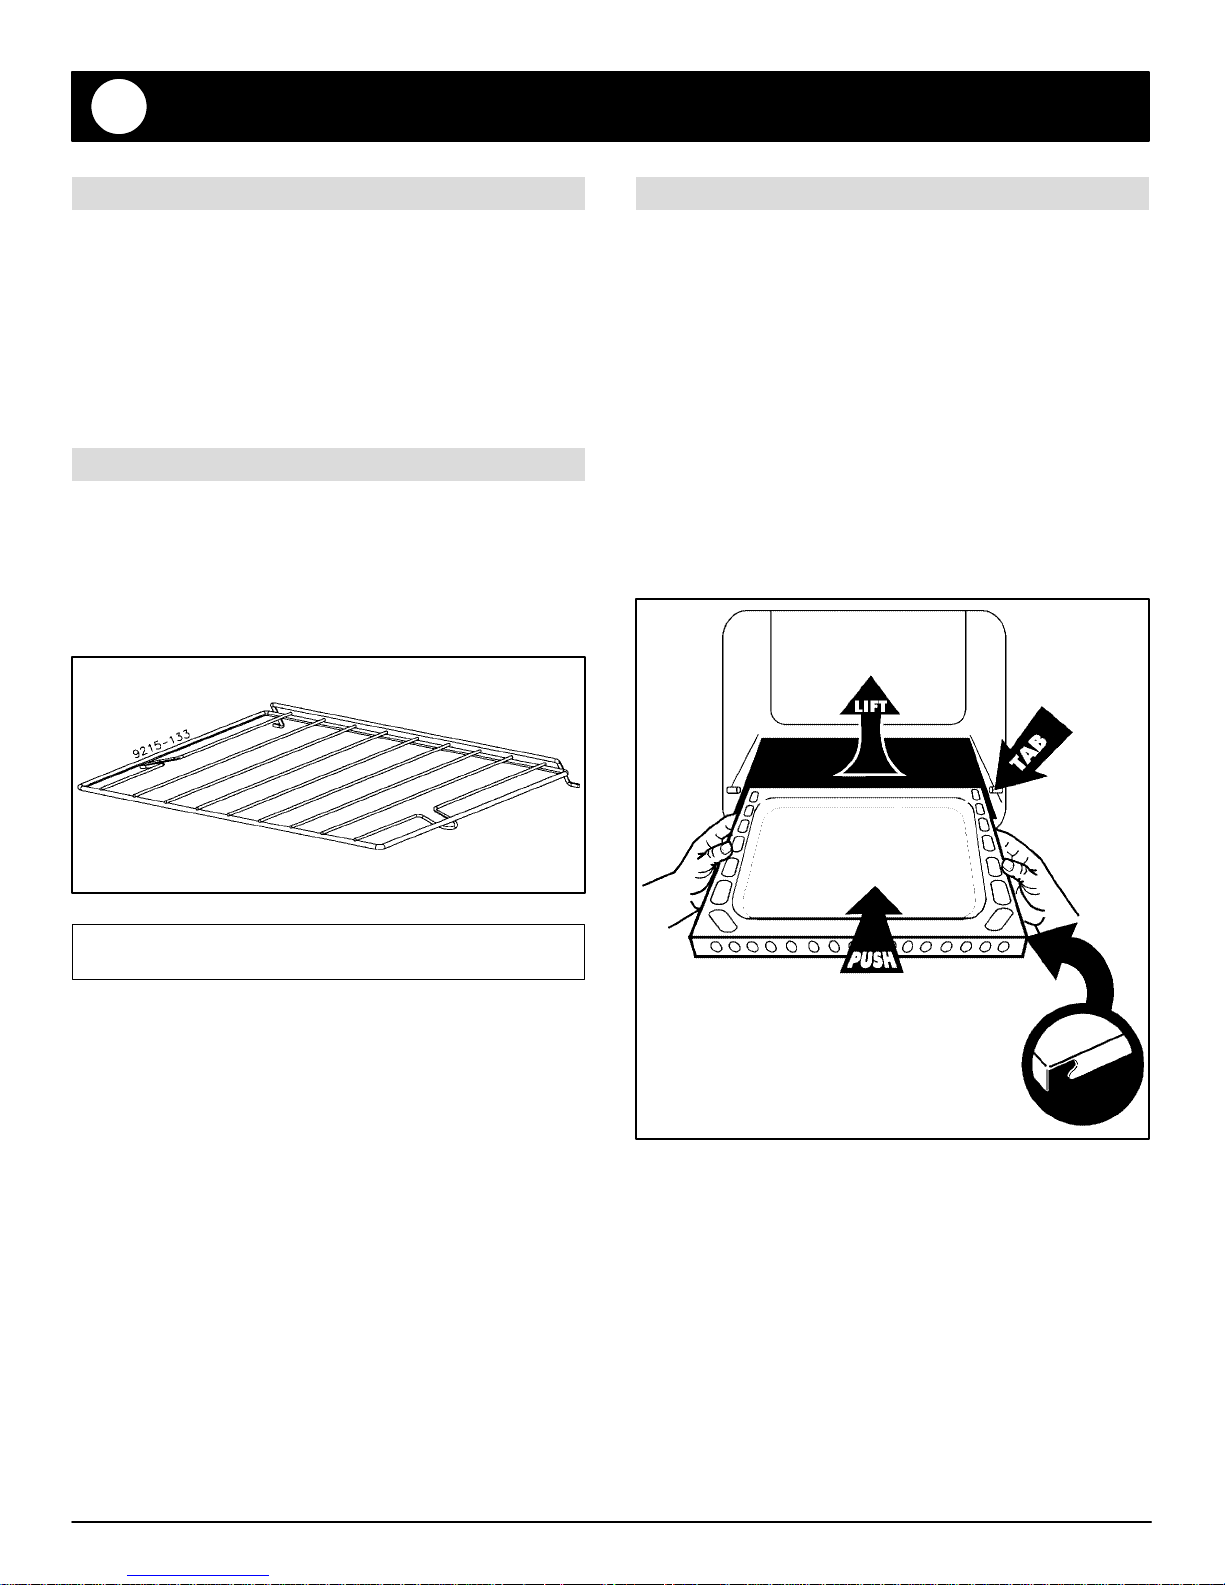
OVEN RACK
Your RV range featuresone oven rackwith achoice oftwo or
three rack positions. The oven rack is designed with a safety
lock-stop position to keep the rack from accidently coming
completely out of theoven whenpulling the rackout toadd or
remove food. The rack also features two tabs to keep the
rack from rattling during travel.
OVEN BOTTOM
Protect the oven bottom against excessive spillovers,
especially acid or sugary spillovers, as theymay discolor the
porcelain. Use the correct size cooking utensil to avoid
boilovers. Never place utensils or aluminum foil directly on
the oven bottom.
To remove:
1. When cool, push the oven bottom toward the back of the
oven against the springs on the back wall.
This will release the oven bottom from the two tabs on the
oven walls.
2. Then lift the oven bottom up and out of the oven.
©
CAUTION: Do not attempt to change the rack position
when the oven is hot.
To remove:
1. Be sure rack is cool.
2. Pull the rack straight out until it stops. This releases the
two tabs on the sides of the rack.
3. Tilt the front end of the rack up, then push the rack to the
back of the oven.
4. Lift the rear of the rack up, then remove it from the oven.
To replace:
1. Place the oven rack in the oven, on top of the rack
supports.
2. Push the rack to the back of the oven to allow the rack to
drop into place.
3. Pull the rack forward to the stop position.
4. Then, as you push the rack back, lower the two tabs
under the rack support. This will anchor the rack into
place and prevent it from rattling during travel.
¡
To replace:
1. Position the oven bottom so the holes on the flange are
located at the front of the oven.
2. Slide theoven bottom to the back of the oven until the rear
edge is inserted into the bracket across the back of the
oven.
3. Then, push the oven bottom back against the springs and
lower into place.
4. Be sure each slot on the side-front corner securely fits
over the tabs on the oven wall. This will lock the oven
bottom into place and prevent it from rattling during travel.

CARE AND CLEANING CHART
CARE AND CLEANING CHART
15
PARTS
Baked enamel
· Oven door
· Side panels
Broiler pan and
insert
CLEANING AGENTS
· Soap and water
· Mild liquid cleaner
· Glass cleaner
· Soap and water
· Plastic scouring pad
· Soap-filled scouring pad
· Dishwasher
DIRECTIONS
Use a dry towel or cloth to wipe up spills, especially acid (milk, lemon
juice, fruit, mustard, tomato sauce) or sugary spills. Surface may
discolor or dull if soil is not immediately removed. This is especially
important for white surfaces.
When surface is cool, wash with warm soapy water, rinseand dry. For
stubborn soil, use non-abrasive cleaning agents such as baking soda
paste or Bon Ami. If desired, a thin coat of mild appliance wax can be
used to protect the side panels. A glass cleaner can be used to add
“shine” to the surface.
NOTE: Do not use abrasive, caustic or harsh cleaning agents such as
steel wool pads or oven cleaners. These products will scratch or
permanently damage the surface.
NOTE: Never wipe a warm or hot surface with a damp cloth as this
may damage the surface and may cause a steam burn.
Remove from oven after use. Cool then pour off grease. Place soapy
cloth over insert and pan; let soak to loosen soil. Wash in warm soapy
water. Use soap-filled scouring pad to remove stubborn soil. Clean in
dishwasher if desired.
NOTE: For easier cleanup, spray insert with a non-stick vegetable
coating and line broiler pan with aluminum foil.
Burner box · Soap and water
· Paste of baking soda and
water
· Non-abrasive plastic pad or
sponge
· Liquid cleaner
· Glass cleaner
Control knobs · Soap and water To remove knobs for cleaning, gently pull forward. Wash in mild
Glass
· Oven window
· Soap and water
· Paste of baking soda and
water
· Glass cleaner
Burner box is located under lift-up cooktop. Clean frequently to
remove spillovers. If soil is not removed and is allowed to accumulate,
it may damage the finish. To clean remove grates and surface burners
and clean with soap and water, rinse and dry.
detergent andwater. Do not soak knobs in water. Do not use abrasive
cleaning agents. They will scratch finish and remove markings. Rinse
dry and replace. Turn ON each burner to see if knobs have been
replaced correctly.
Wash with soap and water. Use a glass cleaner and a soft cloth after
cleaning. Remove stubborn soil with paste of baking soda and water.
Rinse with a cloth wrung out in clear water. Dry. Do not use abrasive
materials such as scouring pads, steel wool or powdered cleaning
agents.
NOTE: To avoid inside staining of oven door glass, do not
oversaturate cloth.
(Continued next page)
16
CARE AND CLEANING CHART
CARE AND CLEANING CHART
PARTS
Grates
Metal finishes
· Trim parts
· Manifold panel
· Cooktop
· Oven door
Oven bottom Protect the oven bottom by (1) using large enough cookware to
CLEANING AGENTS
· Soap and water
· Non-abrasive plastic pad
· Soap and water
· Glass cleaner
Grates are madeof porcelain-coated steel. They canbe cleaned atthe
sink with soap and water or in the dishwasher. To clean baked on soil,
place a damp soapy paper towel over the grate and let stand for 30
minutes. Use a non-abrasive plastic pad to scour stubborn soil.
NOTE: Never operate burner without a grate in place. To protect the
porcelain finish on the grate from excessive heat, never operate
surface burner without a cooking utensil on the grate. It is normal for
grates to lose their shine over a period of time.
Wash with soap and water. Use a glass cleaner and a soft cloth to
remove fingermarks or smudges. Do not use oven cleaners, abrasive
or caustic agents. They will damage the finish.
CAUTION: Protect aluminum gas tubing from exposure to caustic
cleaners such as oven cleaners.
prevent boilovers; (2) place a piece of aluminum foil, that is slightly
larger than the cookware, on the lower rack. NEVER place foildirectly
on the oven bottom as foil may melt onto oven bottom. Protect oven
bottom against acid spills (milk, cheese, tomato, lemon juice, etc.) or
sugary spills (pie filling) as they may pit or discolor the oven bottom.
See porcelain enamel for additional information.
DIRECTIONS
Oven rack · Soap and water
· Cleansing powders
· Plastic pad
· Soap filled scouring pad
Plastic finishes
· Door handles
· Overlays
· Knobs
· End caps
Porcelain
enamel
· Cooktop
· Oven cavity
· Soap and water
· Non-abrasive plastic pad
or sponge
· Soap and water
· Mild abrasive cleaners
· Plastic pad
· Oven cleaner, oven only
· Soap filled scouring pad
Clean with soapy water. Remove stubborn soil with cleansing powder
or soap filled scouring pad. Rinse and dry.
When surface is cool, clean with soap and water; rinse, and dry. Use a
glass cleaner and a soft cloth.
NOTE: Never use oven cleaners, abrasive or caustic liquid or
powdered cleansers on plastic finishes. These cleaning agents will
scratch or marr finish.
NOTE: To prevent staining or discoloration, wipe up fat, grease or
acid (tomato, lemon, vinegar, milk, fruit juice, marinade) immediately
with a dry paper towel or cloth.
Clean porcelain with soap and water; rinse. Use cleansing powders or
a plastic scouring pad to remove stubborn soil. Wipe acid or sugar
stains as soon as area is cool as these stains may discolor or etch the
porcelain. Do not use metallic scouring pads as they will scratch the
porcelain.
To make cleaning the oven easier, place 1/2 cup household ammonia
in a shallow glass container and leave in a cold oven overnight. The
ammonia fumes willhelp loosenthe burned on grease and food. Oven
cleaners can be used on the porcelain oven only. Follow
manufacturer’s directions. If oven cleaner was used, thoroughly rinse
oven cavity and capillary tube which is located at the top of the oven.
(Continued next page)
CARE AND CLEANING CHART
CARE AND CLEANING CHART
17
PARTS
Silicone rubber
· Door gasket
Stainless steel,
select models
· Cooktop
· Oven door
Surface
burners, sealed
select models
CLEANING AGENTS
· Soap and water
· Soap and water
· Glass cleaner
· Mildly abrasive cleaner
· Soap and water
· Paste of baking soda and
water
· Plastic scouring sponge or
pad
· Mildly abrasive cleaner
DIRECTIONS
Wash withsoap and water, rinse and dry. Do not remove door gasket.
DO NOT USE ANY CLEANING PRODUCT CONTAINING
CHLORINE BLEACH.
ALWAYS WIPE WITH THE GRAIN WHEN CLEANING.
Wash with soap and water. Use a glass cleaner and a soft cloth to
remove finger marks or smudges. Use cleansing powders or plastic
scouring pad to remove moderate/heavy soils. Rinse and dry. Do not
use oven cleaners, abrasive or caustic agents. They will damage the
finish.
NOTE: For discoloration, use a stainless steel cleaner and asoft cloth.
Rinse immediately and dry.
For ease ofcleaning, clean burners each time the cooktop is usedwith
warm soapy water.If a boilover occurs, remove pan to anotherburner;
cool burner and clean. To remove stubborn soil, use a dry cloth and
mildly abrasive cleanser. Use care to prevent cleaner from clogging
ports. Burner must be dry before use.
NOTE: Yellow tipping or distortion of the flame may occur until the
burner is completely dry.
Surface
burners,
conventional,
select models
· Soap and water
· Paste of baking soda and
water
· Plastic scouring sponge or
pad
· Mildly abrasive cleaner
Clean burner ports with a straight pin or smallmetal paper clip.Do not
enlarge or distortports. Do not use a wooden toothpickas it may break
off and clogport. If ports are clogged or soiled, the burner may not light
properly or the flame may not be even.
Sealed burner can not be removed by the consumer. When cleaning
burner, use care to prevent damage to the ignitor. Surface burner will
not light properly if ignitor is damaged, broken, soiled, or wet. When
cleaning the ports, be sure to clean the port directly below the ignitor.
For ease of cleaning, remove soil from the burner as soon as burner
has cooled. If food boils over, remove pan to another burner. Then,
cool soiled burner and clean.
Clean, when cool, after each use with warm soapy water. Remove
stubborn soil by scouring with anon-abrasive plastic scouring pad and
a paste of baking soda and water. Clean ports with a straight pin. Do
not enlarge or distort the ports. Do not use a wooden toothpick. It may
break off and clog port.Surface burners can be dried in the ovenset at
170°F. Burner must be dry before use.
18
SERVICE INFORMATION
CHECK THESE POINTS BEFORE YOU CALL FOR SERVICE
PROBLEM
Surface burner fails to light.
Burner flame is uneven.
Surface burner flame lifts off port
or is yellow in color.
Oven burner fails to light.
Popping sound heard when
burner extinguishes.
Moisture condensation on oven
window, if equipped, when oven
is in use.
CAUSE
a. clogged burner port(s).
b. surface control not completely turned
to the LITE position or turned too
quickly from the LITE position.
c. burner will not light if the ignitor is
damaged, soiled, wet or if the port
directly below the ignitor is blocked.
a. clogged burner port(s).
a. air/gas mixture not proper.
NOTE: Some yellow tipping with LP gas
is normal and acceptable.
a. oven incorrectly set.
b. oven pilot is not lit.
This is a normal sound that occurs with some types of gas when a hot burner is
turned off. The popping sound is not a safety hazard and will not damage the
appliance.
a. it is normal for the window to fog during
the first few minutes the oven is on.
b. cloth saturated with water is used to
clean the window.
a. clean ports with straight pin.
b. turn control to the LITE position until
the burner ignites, then turn control to
desired flame size.
c. clean and dry burner head. If broken
or damaged, call a serviceman.
a. clean ports with straight pin.
a. call serviceman to adjust burner.
NOTE: Be sure installer properly
adjusted range at time of installation.
a. see page 9.
b. light pilot. See page 8.
a. leave door ajar for one or two minutes
to allow moisture to escape.
b. use a damp cloth to clean window to
prevent excess water from seeping
between the panels of glass.
CORRECTION
Baking results are not
satisfactory.
· browning is too pale, too dark
or is uneven.
· food cooks unevenly.
· food is underdone or
overdone.
Oven smokes excessively during
a broil operation.
a. oven not preheated or set at correct
temperature.
b. used incorrect rack position.
c. incorrect use of aluminum foil.
d. oven bottom incorrectly replaced.
e. too many pans on rack; pan too large.
f. oven thermostat sensing device is out
of the holding clip(s).
a. temperature too high.
b. meat has too much fat.
c. sauce applied too early or marinade
not completely drained.
d. soiled broiler pan.
e. broiler insert covered with aluminum
foil.
f. broiler area or oven is soiled.
a. preheat oven 10 to 15 minutes.
b. see page 9.
c. see page 9.
d. replace oven bottom correctly.
See page 14.
e. see page 9.
f. reinstall thermostat sensing device.
See Problem Chart on page 10 for
additional information.
a. lower temperature to 400-450°F.
b. trim fat.
c. apply sauce during last few minutes of
cooking. If meat has been marinated,
drain thoroughly before cooking.
d. always clean broiler pan and insert
after each use.
e. never cover insert with foil as this
prevents fat from draining to pan
below.
f. clean oven or broiler area.
 Loading...