

Maytag RTT1700DAE, RSD2400EAM, RSD2400EAE, RSD2400DAM, RSD2400DAE Installation Instructions
...Page 1

REFRIGERATOR
INSTALLATION
INSTRUCTIONS
LEAVE THESE INSTRUCTIONS WITH THE OWNER.
IMPORTANT TO INSTALLER
REMOVE THE DOOR FROM ALL DISCARDED APPLIANCES SUCH AS REFRIGERATORS T 0
A VOID THE DANGER OF A CHILD SUFFOCATING SHOULD HE/SHE CRAWL INSIDE AND THE
DOOR BE SHUT.
This folder containsinformationof interest to the owner. After the appliancehas been properly installed, LEAVE
THESE INSTRUCTIONS WITH THE OWNER.
13VF-0994 Printed in U.S.A. 109682-1
Page 2
_=- lr _
" TOP
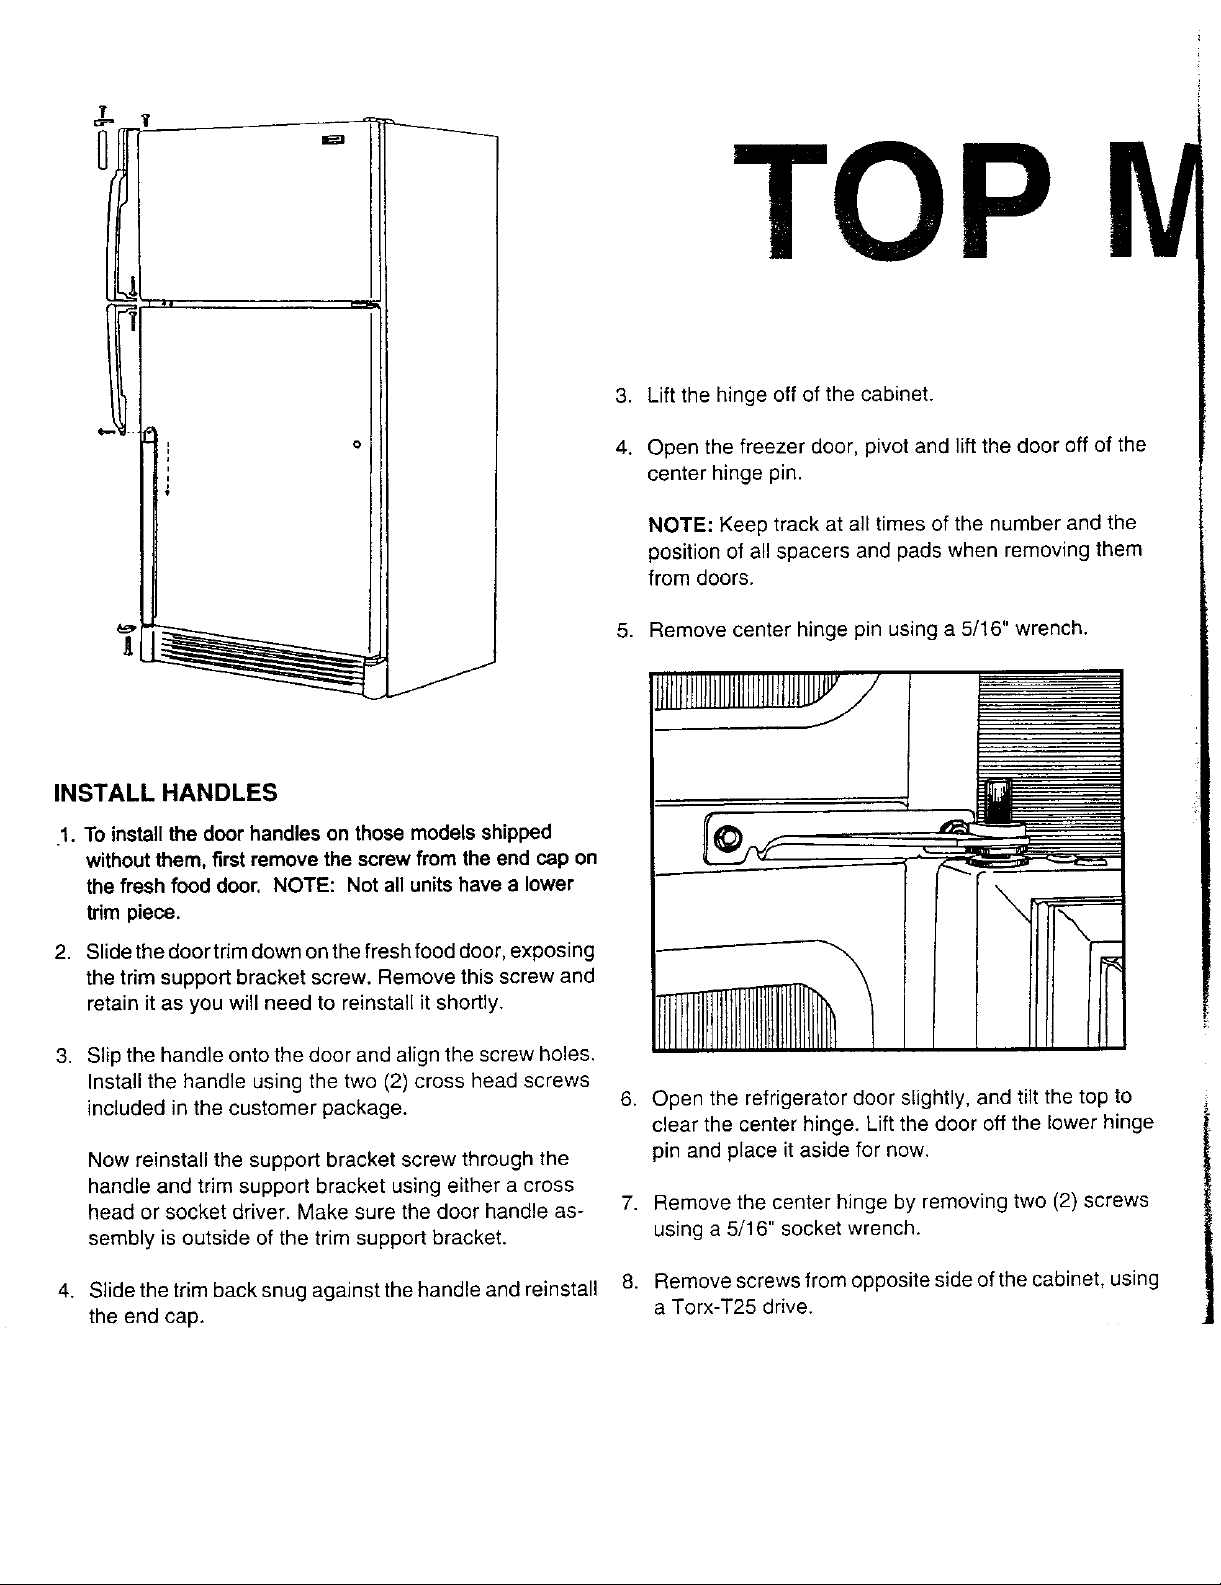
Ill' _' 3. Lift the hinge off of the cabinet.
o 4. Open the freezer door, pivot and lift the door off of the
center hinge pin.
NOTE: Keep track at all times of the number and the
position of all spacers and pads when removing them
from doors.
_' _ 5. Remove center hinge pin using a 5/16" wrench.
INSTALL HANDLES
.1. Toinstallthedoorhandles onthose modelsshipped _(_ ._ "_L-." ,,
withoutthem,firstremovethescrewfrom theend capon _L_--/_f ._
the freshfood door. NOTE: Not all unitshave a lower "x
\
2. Slidethe doortrim down onthe fresh food door, exposing
the trim support bracket screw. Remove this screw and
retain it as you will need to reinstall it shortly.
trimpiece. _ / _-_
3. Slip the handle onto the door and align the screw holes.
Install the handle using the two (2) cross head screws
included in the customer package. 6. Open the refrigerator door slightly, and tilt the top to
Now reinstall the support bracket screw through the pin and place itaside for now.
handle and trim support bracket using either a cross
head or socket driver. Make sure the door handle as-
sembly is outside of the trim support bracket, using a 5/16" socket wrench.
4. Slidethetrimbacksnugagainstthehandleandreinstall 8. Removescrewsfromoppositesideofthecabinet, using
the end cap. a Torx-T25 drive.
clear the center hinge. Lift the door off the lower hinge
7. Remove the center hinge by removing two (2) screws
Page 3
5. Thehandleand trim forthe freezer door isonepiece. Slip _ IF
this assembly over the freezer door so the screw holes
align. NOTE: The handle portion of the assembly must
be on the bottom of the freezer door.
i
6. Install two (2) screws through the door handle to the (_) (_) (_
bottom of the door.
7. Install a screw through the metal handle frame at the top
of the door.
8. Slide the trim piece down onto the trim bracket.
9. Place the trim cap on the top of the door, _nd secure it 9. Turn the center hinge over and reinstall on the left side
with a screw, of cabinet using the same screws you just removed from
the center hinge. Reinstall the screws that were used on
the opposite side.
REVERSING DOORS NOTE: If door removal is necessary on those models
with an ice and water fountain, use care in removing the
Door reversal is NOT possible on those models that
have a built-in ice and water fountain. However, if door
water and electrical lines from the hinge by pulling the
water line first followed by the electrical wires.
removal becomes necessary please see the note in
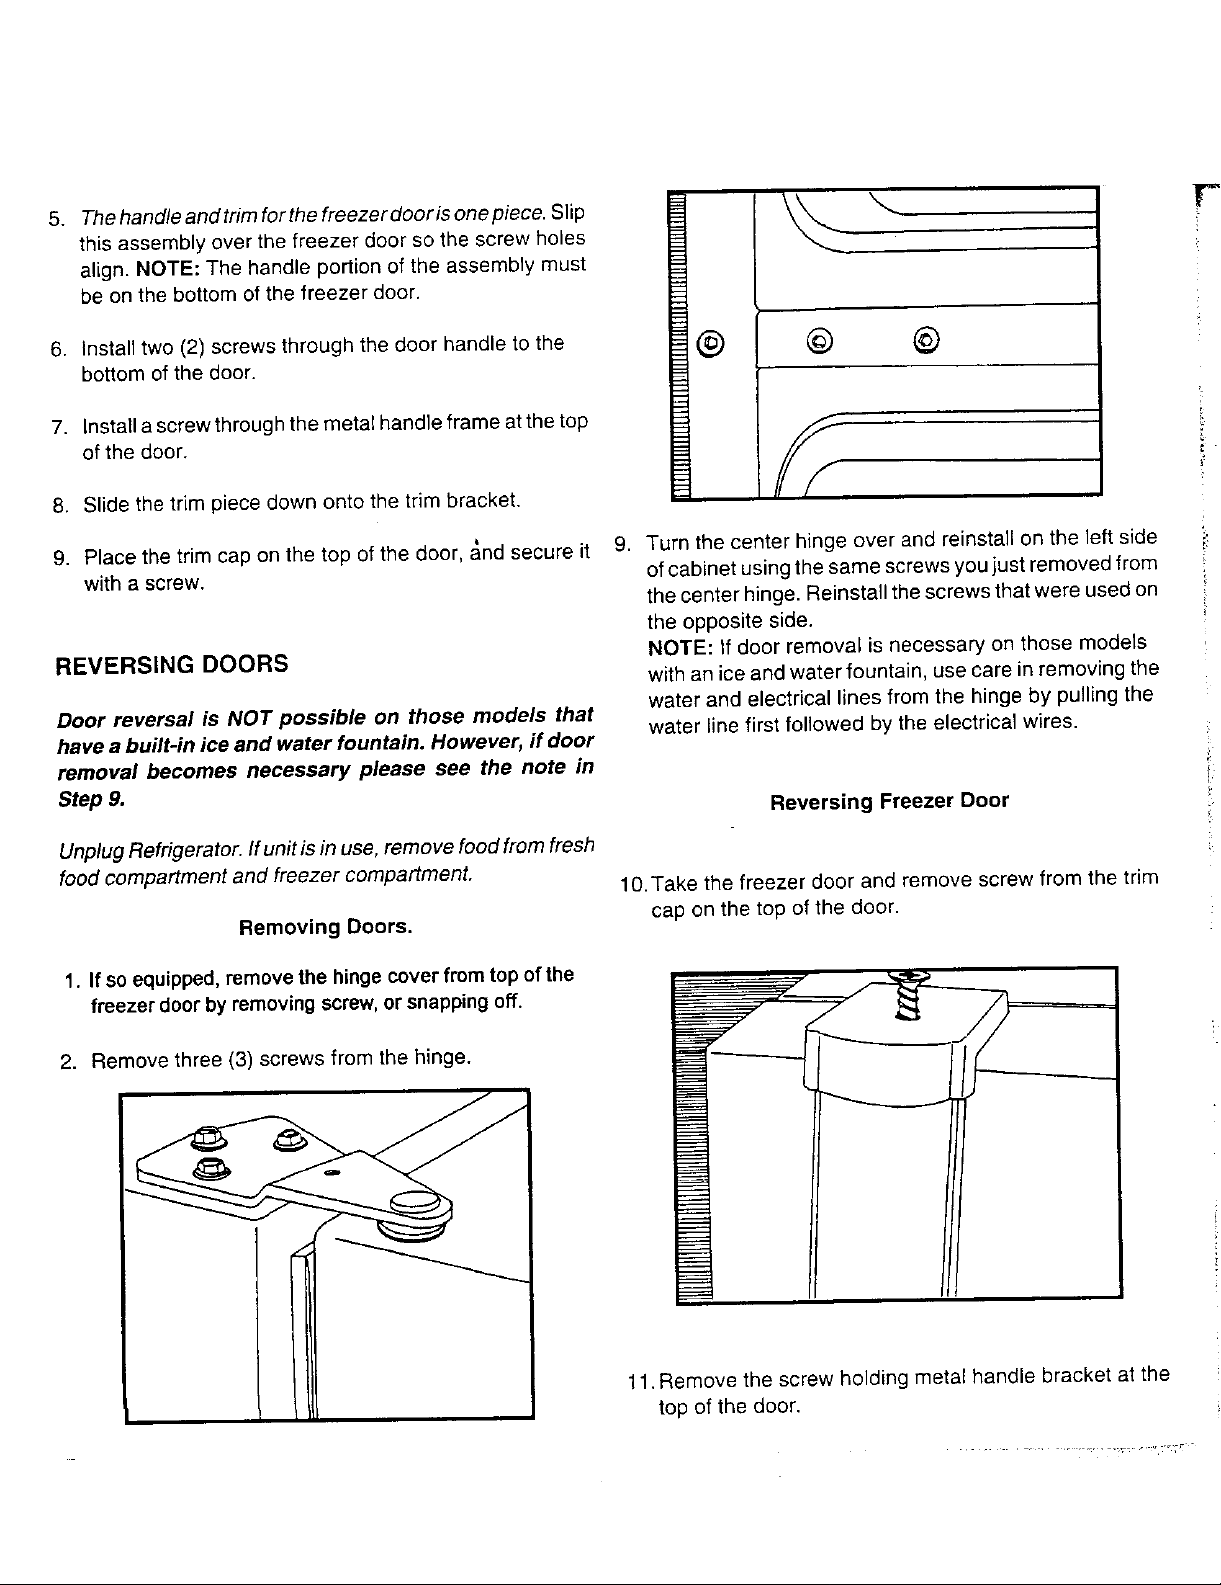
Step 9. Reversing Freezer Door
Unplug Refrigerator. Ifunitis in use,remove food from fresh
food compartment and freezer compartment. 10.Take the freezer door and remove screw from the trim
Removing Doors. cap on the top of the door.
1. If so equipped,remove the hinge coverfrom top of the
freezer door by removingscrew,or snapping off. _/ _,,_
2. Remove three (3) screws from the hinge.
J
t
I 11.Remove the screw holding metal handle bracket at the
I
, top of the door.
Page 4

IOUNT
12.Remove two (2) screws holding handle to bottom of 19.Remove the bottom hinge using a 5/16" wrench. Install
door. it on the opposite side of the cabinet using the same
screws.
from the trim cap located on the bottom of the door.
21.Slide the trim down on the metal door bracket.
20. Now take the refrigerator door and remove the screw
of the door, and the center of the door, just underneath
the handle.
23. Remove thetwo (2) screws holding the handle to the top
ofdoor.
_ i top and center.Take thesame caution in removal as
Handle and trim should be completely removed from
freezer door. 25.Remove the two (2) screws securing the door stop.
_ Reinstall on the opposite side.
13.With a putty knife, pry offthe plugs on the left side of the
_ top of the door. Take care not to damage them or the / I
door, / I _
14.Putthe plugs into exposed holes on the right hand side
the°fthe freezer door. These would be the holesfromwhiChscrewswere removed. __, _
the hingesideand reinstallon oppositesidein the
15.Remove the door stop (if so equipped) on bottomedge of __
t_ original handle holes. _ __'_---_---
_ _,_.l,_f i 22.Remove the screw holding metal bracket at the bottom
@
24.Now remove the plugs from opposite side of door at the
did for the freezer door.
you
Page 5

: jDoor__"-,, I _ 26.Just as you did for the freezer door, move all of the
16.Now move the handle and all the parts to the opposite right hand side of the door.
end of the freezer door and reinstall by reversing steps
above. 28.Reinstall the refrigerator door.
NOTE: Make sure the spacer pad is in the proper Lower the refrigerator door so the socket on the bottom
: position. Slide the trim over the metal bracket and black fits onto the pin on bottom hinge bracket. Be sure washer
gasket which is positioned under the metal bracket, is in place. Tilt the door towards the cabinet and gently
Reversing Refrigerator Door
17.Remove the lower grille by grasping itwith both hands extends through the hole in the center hinge bracket on
and pulling it forward, top of the refrigerator door.
handle and trim parts to the opposite side of the
refrigerator door and reinstall. This is done by reversing
the steps as you did for the freezer door.
NOTE: Care must once again be taken to make sure all
spacer pads are returned to their proper position.
27.Reinstall the plugs into the screw holes exposed on the
push door under center hinge bracket and align with the
hole in the center hinge bracket.
Reinstall hinge pin with 5/16" socket and ratchet so it
18.With grille now removed, you have access to the bottom Loosen the screws on the lower hinge and grille mount-
hinge, the refrigerator door. Tighten the screws on the hinge.
' _ _ j Install the grille.
_il _ Lower the freezer door so the socket on the bottom fits
i
/ 30.Examine the door gasket all around each door, making
.... J door. The magnet will contact the cabinet surface.
ing brackets. Adjust the lower hinge left or right to align
29.Reinstall the freezer door.
onto the center hinge pin. Be sure the washer isinplace.
Close the door. The gasket should hold it in place. Install
the top hinge so the pin fits into the socket on top of the
Tighten the top hinge screws after supporting the door
door is even all across the front.
on the handle side and aligning so the gap between the
sure no gaps are visible between the gasket and cabinet.
If a gap shows, try stretching the gasket away from the
Page 6

Page 7

ELECTRICAL REQUIREMENTS
OBSERVE ALL NATIONAL ELECTRICAL CODES AND LOCAL CODES & ORDINANCES
ELECTRICAL SERVICE - 120 VOLTS, 60 HZ ONLY
A 120 volt, 60 HZ, 15 ampere fused electrical supply isrequired. An individual branch (or separate circuit serving only this
appliance is recommended.) DO NOT USE EXTENSION CORD unless it meets allrequirements as outlined for grounding,
polarizing (3-wire) and capacity. Wire size should be at least No. 14.
BEFORE PLUGGING IN POWER CORD, OPERATING OR TESTING, Follow grounding instructions in Grounding
Section.
GROUNDING - 120 VOLTS, 60 HZ
IMPORTANT SAFETY PRECAUTIONS
WARNING. Toprevent unnecessary risk of fire, electrical shock orpersonal injury, all wiring and grounding must be done
anaccordance with National Electrical Code and local codes and ordinances. Itis the personal responsibility and obligation
of the appliance owner to provide adequate electrical service for this appliance.
ELECTRICAL GROUND IS REQUIRED ON THIS APPLIANCE
GROUNDING INSTRUCTIONS
Thisapplianceisequippedwithapowersupplycordhaving DO NOT UNDER ANY CIRCUMSTANCES, RE-
a 3-prong grounding plug. For your safety, this cord must be MOVE THE ROUND GROUNDING PRONG FROM
plugged into amating 3 prong type wall receptacle which is POWER SUPPLY CORD.
properly wired, grounded and polarized.
If a mating wall receptacle is not available, contact a quali- f_/_|_
fled electrician to have thewall receptacle replaced. Ifthere
is any question, local building officials or electrical utility
should be consulted.
Page 8

Q WATER CONNECTION
For those models without an Ice Maker.
1. Find a 3/8" to 1" vertical COLD water pipe near the
Most models are designed so an automatic Ice Maker can refrigerator. Water pressure must be between 20 and
be easily installed. The Ice Maker kits come with installation 120 P.S.I. Vertical pipe is preferable, but a horizontal
instructions, water connection instructions and other infor- pipe will work. If a horizontal pipe is used, install the
mation concerning the ice maker operation, saddle valve on the top orthe side of the pipe, not on the
For those models with Ice Maker.
To locate water valve: instructions included with the valve.
Remove the center screw from the dght end of the black fiber 3. Route the copper tubing through the floor, wall or sink
panelthat covers themachine compartment and fold backthe cabinet to the saddle valve location. Form the excess
perforated flap. Save the screw for later reinstallation as this tubing into a large loop.
flap is required for proper and safe operation of the refrigera-
tor.
To connect water:
All installations must be in accordance with local plumbing "_--
code requirements.
bottom. TURN OFF THE MAIN WATER SUPPLY.
2. InstaLlthe saddle valve according to manufacturer's
A copper tubing (1/4" O.D.) and saddle valve can be
purchased from local hardware stores. Sweat or flare con-
nection can be used instead of the compression union, if
desired.
Do not use plastic tubing or plastic fittings because the .4
connection between the water supply and the refrigerator '_,
water valve inlet is under constant pressure. Also, certain '_'_Water
types of plastic tubing may become brittle with age and
crack, resulting in water leakage.
NOTE: When using unfiltered well water, it is advisable to
use a filter in the water supply line. This eliminates all _ Compression
possibility of small particles from entering the water valve. "--.. Union
The water line should be installed on an active water line. ToSaddleValve
(Example: the kitchen sink).
7,
Water Supply Line
Page 9

®
This allows movement for the refrigerator without dis- 7. Working atthe rear ofthe cabinet, remove the protective
connecting the tubing. Other routing methods are shown cap from the water valve inlet.
below.
8. Slide the brass nut and sleeve onto the copper tubing.
4. Slide the brass nut and sleeve onto the 1/4" copper Insert the end of the tubing into the water valve inlet as
tubing. Insert the end of the tubing into the saddle valve far as it will go and tighten the nut with an adjustable
as far as itwill go and tighten the nut with an adjustable wrench. I 1
wrench.
ColdWater
j Line
PipeClamps
/ _.Nut__
_ BrassSleeve _ .__
Shut-off _per Tubing 9. Secure the water supply line clam _with the screw as
Valve _ shown.
10.Turn on the saddle va[ve. Tighten any connections that
Connecting Water Line To Saddle Valve leak.
5. Turn ON the main water supply and flush out the water
pipe until water runs clear. At the same time, check for 11.Reinstall the fiber panel and secure with the screws
leaks at the saddle valve. After the water has cleared, removed and saved earlier.
flush out the tubing from the saddle valve to the water
valve into a bucket by turning the saddle valve on. When 12.Plug in the power cord and push the refrigerator to the
the water has cleared, turn off the saddle valve, wall, arranging the copper tubing so that it does not
6. Remove the small bag of parts from the inside of the wall.
crisper drawer.
IMPORTANT: Because the refrigerator and ice maker are warm. Itmay take up to 12hours before the ice maker produces
the first supply of ice cubes.
SecureWaterSupply
LineWithClampAnd
ScrewAsShown
Sleeve_,_
vibrate against the back of the refrigerator or against the
SIDE-BY-SIDE TOP MOUNT
Under The Sink
Ba_menl Cold Waler Pipe _ i
InThe Crawl S_ace IiI_ Cm'_ S_
Ur,_er Your Home und_ y_lt Home
Tl_touqh The Wall TOThe _
Page 10

GENERAL iIIFORMATION
IMPORTANT. t
Proper operation of your new refrigerator can be found in the User's
Guide. Please review carefully before you use it.
LOCATION
1. Selecta locationfor your new refrigeratoraway from any heatsources. Allow a freeflow of air throughthefront base grille.
2. Yourmodel should NOT be installed where the temperature will go below 55_Fbecause it willnot run frequently
enough to maintainproper temperature inthe freezer.
3. Forease of installation, you should leave a space of about one-half inch between your refrigerator and adjacent walls
orcabinets.
LEVELING
Toenhanceitsappearanceandmaintainefficient performance,your refdgeratorshould belevel.Thefrontwheelswere adjusted
atthe factory sothe cabinet wouldbelevel. However,jarring intransit,or standing the refrigeratoron an unevenfloor maycause
the cabinet to appear unlevel. **
Iflevelingis necessary,removethe basegrille;thenraisethestabilizinglegstoclearthe floor.Adjustthewheelswithascrewdriver
as shown below. Tilt refrigerator back just enough to allow easyturning of the adjustingscrews.
TOPMOUNT SIDE-BY-SIDE
Turn clockwise to raise the cabinet corner and Turn counterclockwise to raise the cabinet corner
counterclockwise to lower cabinet corner, and clockwise to lower cabinet corner.
After leveling, turn the stabilizing legs down until they make contact with the floor. For all models: If the
floor is not level and it is necessary to raise the rear of the cabinet, we suggest rolling the rear wheels
onto a piece of plywood or other shim'material.
** MAY NOT APPLY TO ALL MODELS
 Loading...