

Maytag RTD17E0CAL User Manual
TABLE OF CONTENTS
Page
1
About Your Maytag ...............................................................................................
For Future Reference .......................................................................................... 1
Consumer Publications ........................................................................................ 1
Installation .............................................................................................................. 2
3
General Features ..................................................................................................
Operating the Refrigerator ................................................................................. 4
• Temperature Controls .................................................................................. 4
• Energy Saver Switch .................................................................................... 4
• Warm Cabinet Surfaces ............................................................................... 4
Adjusting the Refrigerator and Freezer Interiors ......................................... 5-6
• Refrigerator Interior .................................................................................... ,5
Sure-Lock Shelves ................................................................................... 5
Keepers .................................................................................................... .5
• Freezer Interior ............................................................................................ 6
Freezer Shelf ........................................................................................... 6
Special Storage Areas ........................................................................................... 6 8
• Crispers ......................................................................................................... 6
• Meat/Cheese Drawer ................................................................................... 7
• Covered Dairy Compartment ...................................................................... 7
• Egg Cradle .................................................................................................... 7
8
Energy Saving Tips ...............................................................................................
Food Storage Tips ................................................................................................. 8 11
• Fresh Food Storage ...................................................................................... 8-9
• Frozen Food Storage .................................................................................... 9
• Food Storage Chart ...................................................................................... 10 11
Ice Service ........................................................... i.................................................. 12
• Twist Ice Cube Trays .................................................................................... 12
• Automatic Ice Maker ................................................................................... 12
Care and Cleaning ................................................................................................ 13-14
• Refrigerator Exterior and Interior ............................................................... 13
• Cleaning Under the Refrigerator ................................................................ 13
• Cleaning the Condenser .............................................................................. 13
• Cleaning the Defrost Pan ............................................................................. 13
• Replacing the Interior Lights ...................................................................... 13
• Cleaning Chart ............................................................................................. 14
Non-Use Periods .................................................................................................... 15
• Vacations ....................................................................................................... 15
• Moving .......................................................................................................... 15
Important Personal Safety Instructions ........................................................... 15
To Avoid Unnecessary Service Calls .................................................................. 16
17
Warranty .................................................................................................................
INSTALLATION
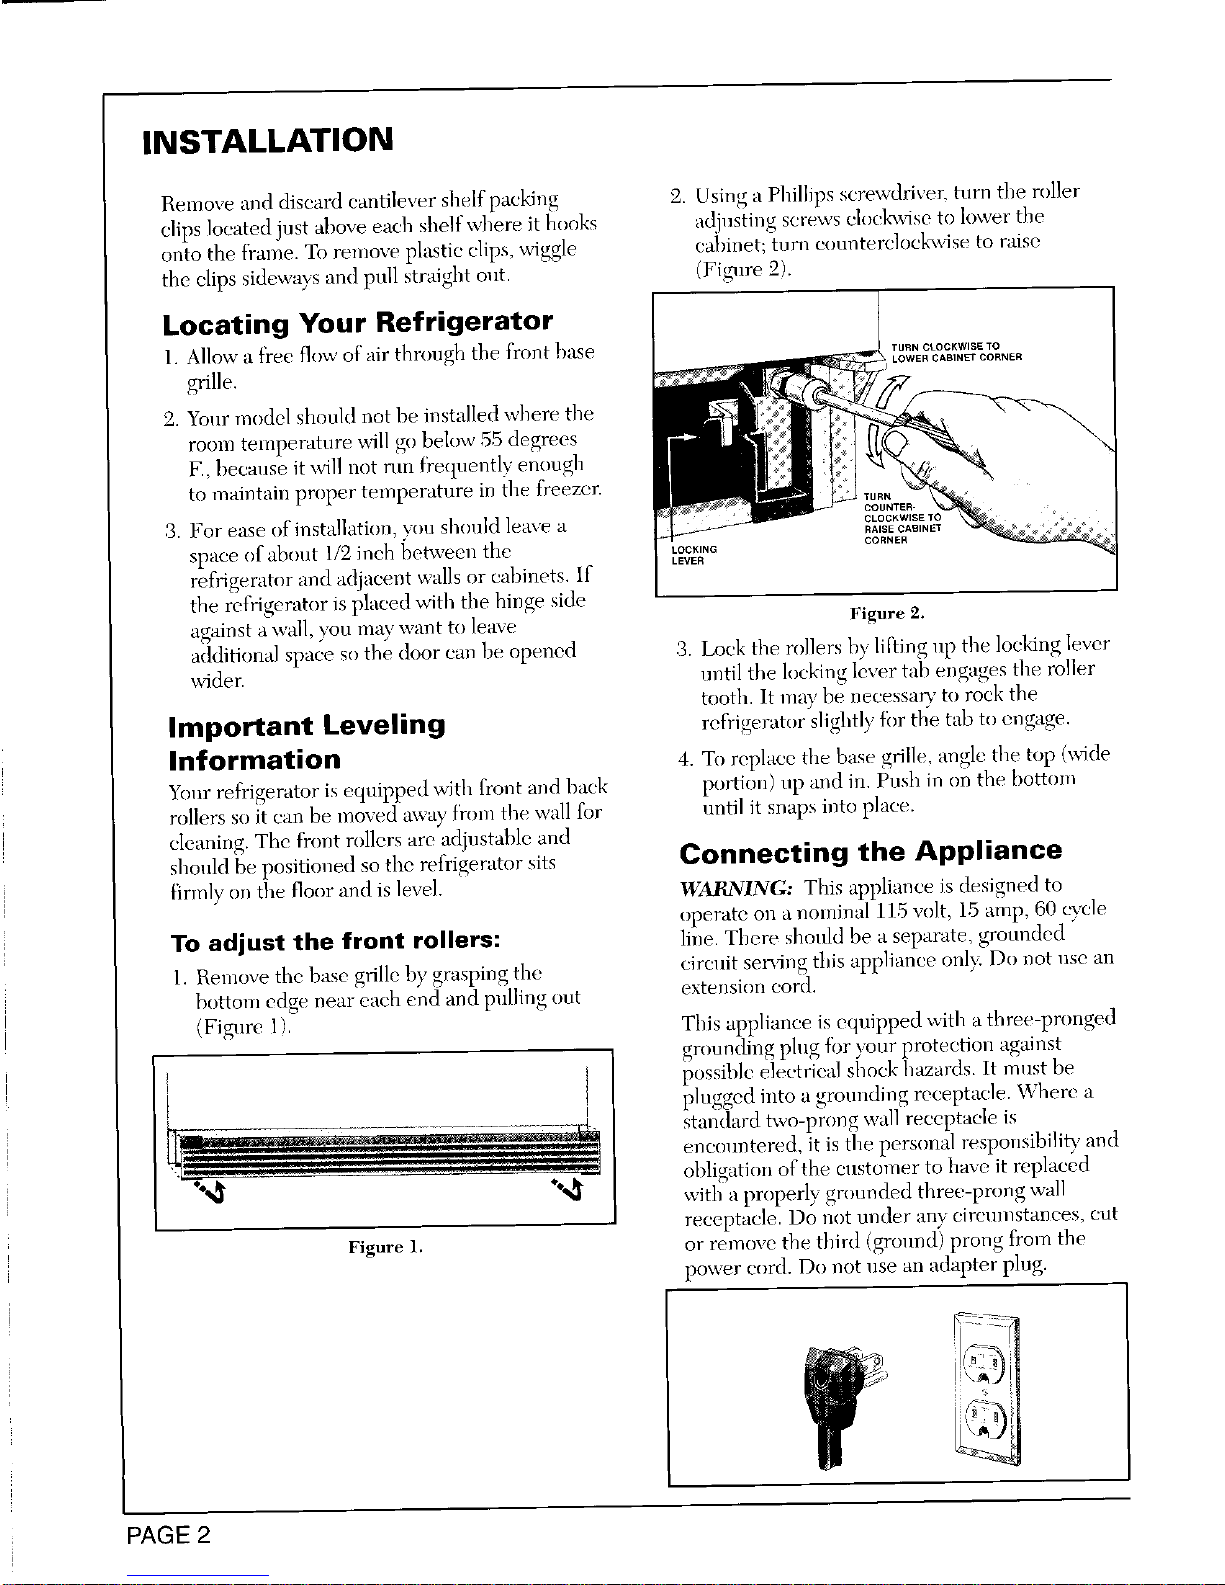
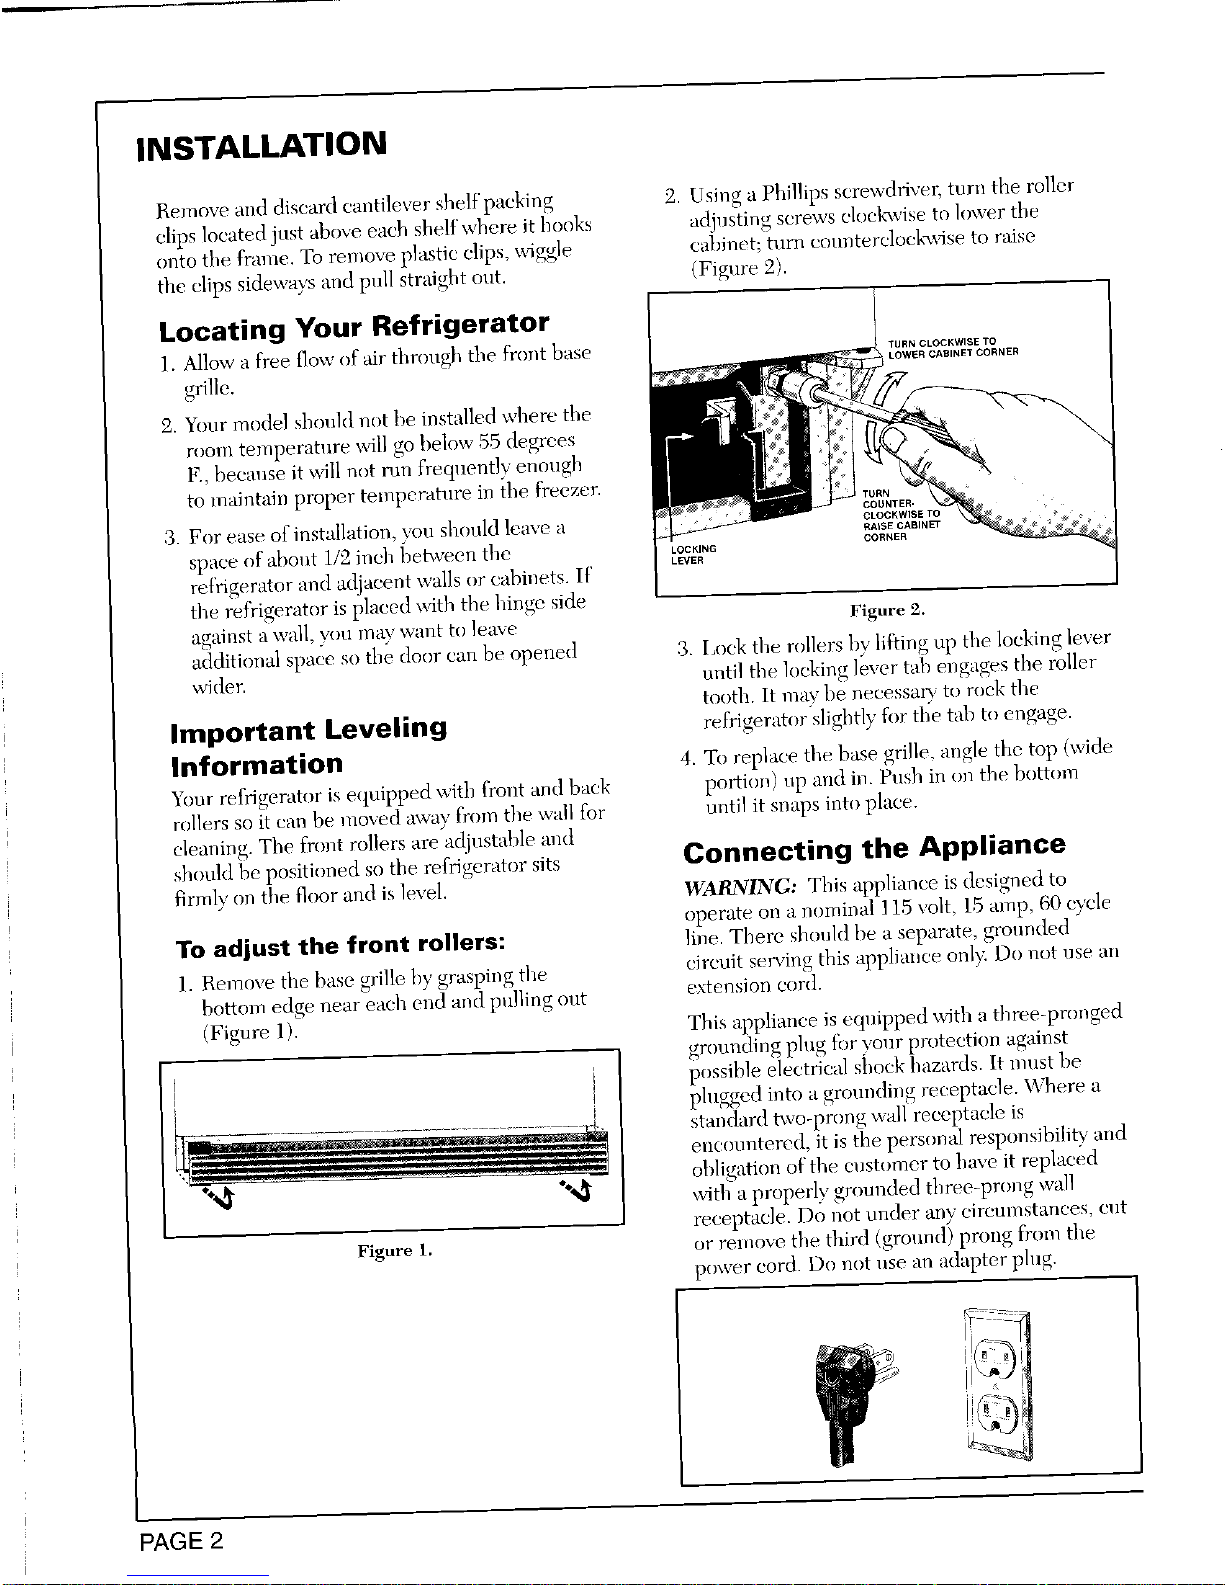
Remove and discard cantilever shelf packing '2. Using a Phillips screwdriver, turn the miler
clips located just above each shelf where it hooks actinstiug screws clockwise to lower the
onto the frame. To remove plastic clips, wiggle cabinet; tunl eounterck)cla_dse to raise
the clips sideways and pull straight out. (Figmre 2).
L
Locating Your Refrigerator
1. Allow a free flow of air through tile front base
grille.
2. Your model should not be installed where the
room temperature will go be[uw 55 degrees
F., because it will not mn fi'equently enough
to maintaiu proper temperature in tlle freezer.
3. For ease nfinstallation you should leave a
space of abnut 1/2 inch betweeu the
refrigerator and adjacent walls or cabinets. If
the refrigerator is placed with the hinge side
against a wall you nmy want to leave Figure 2.
additional space so the door can be opened 3. Lock tile rollers hy lifting up the locking lever
wider, until the locking lever tab engages the roller
tooth. It may be necessao to rock the
Important Leveling refrigerator slightly fbr the tab tu engage.
Information 4. To replace tile base grille, angle tile top (wide
5%1r refrigerator is equipped with flout and hack portion) up and in. Push in on the l)ottoln
fullers soit can be moved away from tile wall for until it snaps into place.
cIcaning. The front rollers are adjustable and
should be positioned so the refrigerator sits Connecting the Appliance
firmly on the floor and is level. WARNING: This appliance is designed to
operate on a nominal 115 w)lt, 15 amp, 617)cycle
To adjust the front rollers: line. There should be a separate, grounded
1. Remove the base grille by graspirJg the circuit serving this appliance only. Do not use an
bottom edge near each end and pulling out extension cord.
(Figure 1). This appliance is equipped with a three-pronged
grounding plug fbr your protection against
I possibk! electrical shock hazards. It mnst be
plugged into a grounding receptacle. Where a
standard bye-prong wall receptacle is
encuuntered, it is tile personal responsibility and
obligation of the cnstomer to have it replaced
'%_ *°_ with a properly grounded three-prong wall
receptacle. Do not under any eireluustanees, out
Figure 1. or remove the third (gronnd) prong from the
power cord. Do not use an adapter plug.
PAGE 2
INSTALLATION
Remove ai/(t discard cantilever shelt'packing '2. Using a Phillips screwddvel, turn the roller
clips located just above each shelf where it hooks adjusting screws cloclavise to lower tbe
onto the frame. To remove plastic clips, u4ggle cabinet; turn com?terelock_,vise to rinse
the clips sideways and pull straight out. (Figure 2).
Locating Your Refrigerator
1. Allow a free flow of air tbrougb the front base
grille.
2. Your model should not be installed where tbe
room temperature x_dllgo below 55 degrees
F., because it will not run frequently enough
to maintain proper temperature in the freezer.
3. For ease of installation, you should leave a
space of about 1/'2inch [)etwecn the
ref}igenttor and adjacent walls or cabinets. If
tile ret;'igerator is placed with the hinge side
against a wall, you may want to leave Figure v'.
Mditional space so the door can be opened 3. Luck the rollers by lit_ing up the locking lever
wider, until the locking lever tab engages the roller
tooth. It may be necessa 0, to rock the
Important Leveling refrigerator slightly for the tab u_engage.
Information 4. To replace tile base grille, angle the top (wide
Your refiigerator is equipped with front and back po_ion) np and in. Push in (m the bottom
rollers so it can be mo_'d aw_ayfrom the wall for until it snaps into place.
cleaning. The front rollers are adjustable and
should be positioned so the refrigerator sits Connecting the Appliance
_3rmlyon the floor and is leveh WARNING: This appliance is designed to
operate on a nomiiml 115 volt, 1,5amp, 60 cycle
To adjust the front rollers: line. There sbould be a separate, grounded
circuit serving this appliance onl)< Do not use an
1. Bemove the base grille by grasping the
bottom edge near each end and pulling ont extension cord.
(Figure 1). This appliance is equipped w/th a three-pronged
grounding ping for your protecti(m against
possible electrical shock hazards. It must be
plunged into a grounding receptacle. Where a
standard two-prong w_dlreeeptacle is
encountered, it is the personal responsibility and
obligation of the customer to have it replaced
°'%'_ with a properly grounded three-prong wall
receptacle. Do not under any circmnstanees, cut
Figure 1, or remove, the third (ground) prong from the
power cord. Do not use an adapter plug.
PAGE 2
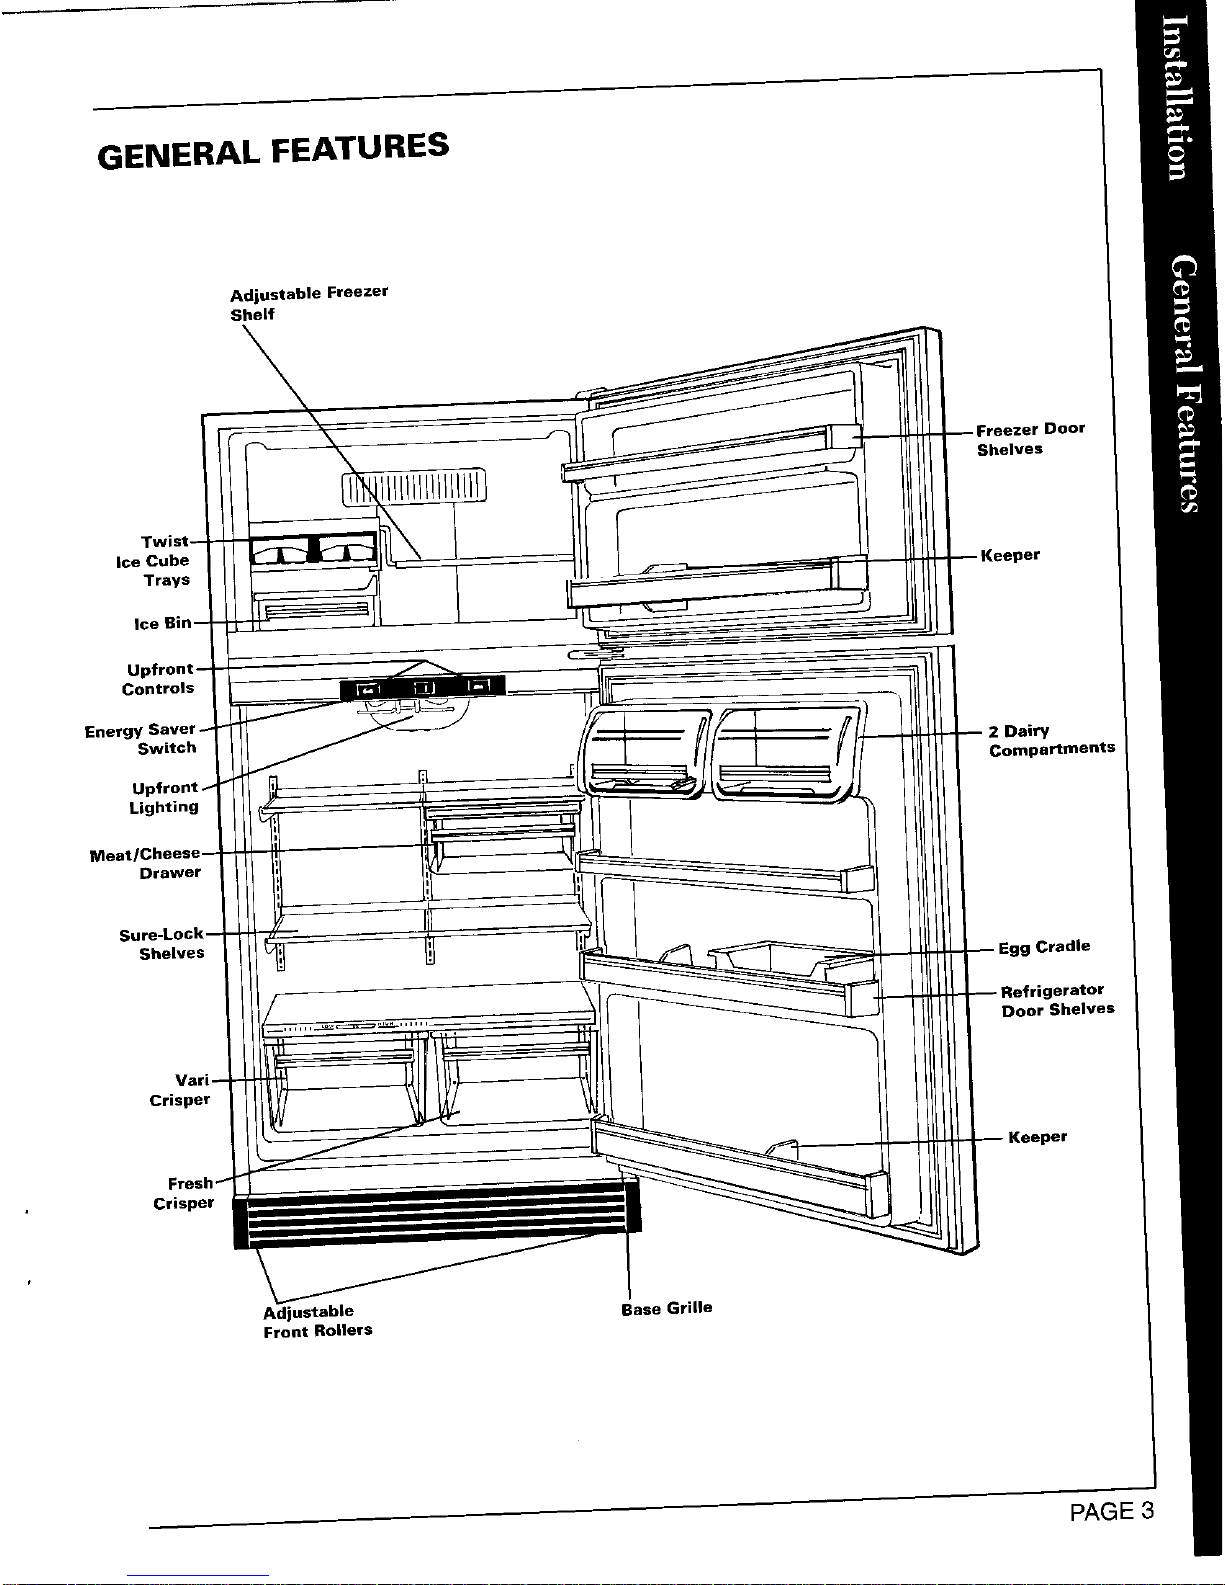
GENERAL FEATURES
Adjustable Freezer
Shelf
:reezer Door
Shelves
IIIIIIIllllll
Ice Cube
Trays
Controls
Dairy
Switch Compartments
Lighting
Drawer
Sure-Lock
Shelves I Cradle
Door Shelves
Crisper
Crisper
Adjustable Base Grille
Front Roners
PAGE3
OPERATING THE REFRIGERATOR
Temperature Controls
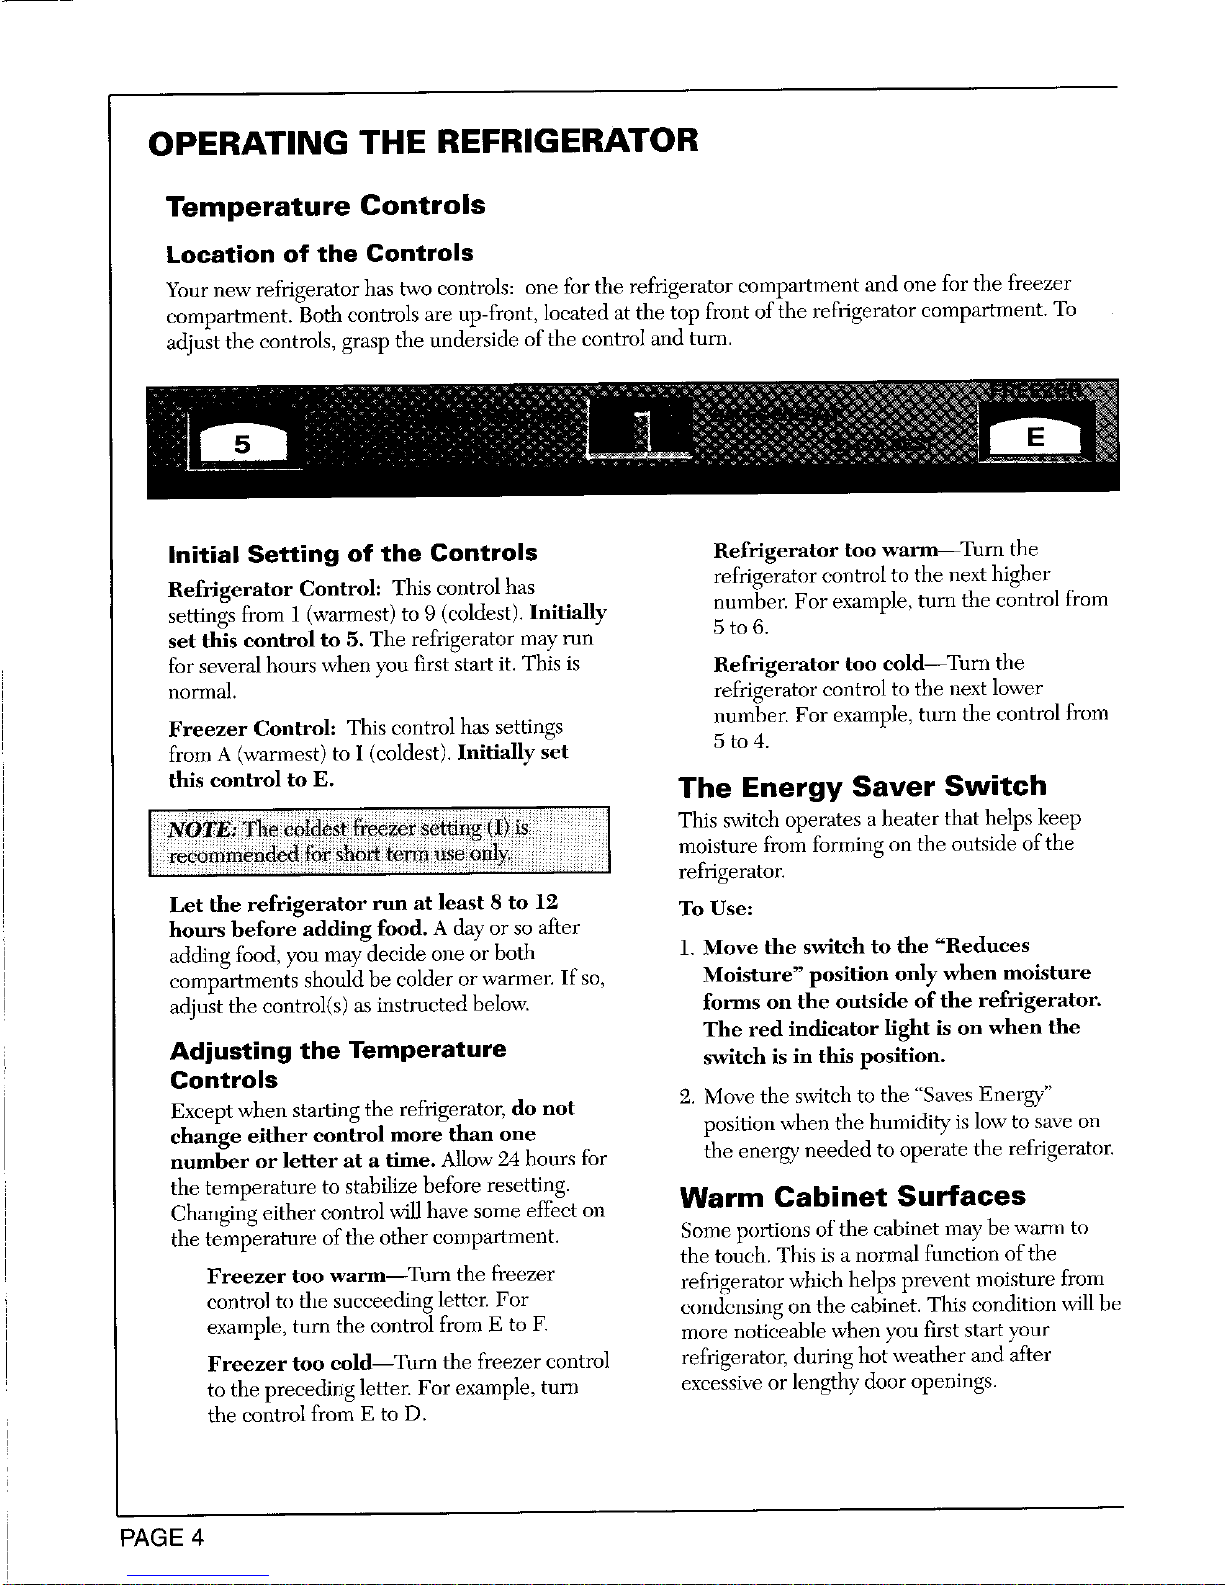
Location of the Controls
Your new refrigerator has two controls: one for the refrigerator compartment and one for the freezer
compartment. Both controls are up-front, located at the top front of the refrigerator compartment. To
adjust the controls, grasp the underside of the control and turn.
Initial Setting of the Controls Refrigerator too warm--Tnrn the
Refrigerator Control: This control has refrigerator control to the next higher
settings from 1 (warmest) to 9 (coldest). Initially nmnber. For example, turn the control ti'om
5to6.
set this eontrol to 5. The refrigerator may run
for several hours when you first start it. This is Refrigerator too eold--Tnrn the
normal, refrigerator control to the next lower
number. For example, turn the control from
Freezer Control: This control has settings 5 to 4.
from A (warmest) to I (coldest). Initially set
this control to E. The Energy Saver Switch
This switch operates a heater that helps keep
moisture ficomforming on the outside of the
refrigerator.
Let the refrigerator run at least 8 to 12 To Use:
hours before adding food. A day or so after
adding food, you may decide one or both 1. Move file switch to the "Reduces
compartments should be colder or warmer. If so, Moisture" position only when moisture
adjust the control(s) as instructed below, forms on the outside of the refrigerator.
The red indicator light is on when the
Adjusting the Temperature switch is in this position.
Controls
Except when staiting the refrigerator, do not 2. Move tile switch to the "Saves Energy-"
change either control more than one position when the humidity is low to save on
number or letter at a time. Allow 24 hours for the energy needed to operate the refrigerator.
the temperature to stabilize before resetting. Warm Cabinet Surfaces
Ch:mging either control will have some effect on
the temperature of the other compartment. Some portions of the cabinet may be wanu to
the touch. This is a normal function of the
Freezer too warm--Turn the freezer refrigerator which helps prevent moisture from
control to the succeeding letter. For condensing on the cabinet. This condition will be
example, turn the control from E to F. more noticeable when you first start your
Freezer too cold--Turn the freezer control refrigerator, during hot weather and after
to the preceding letter. For example, tuna excessive or lengthy door openings.
the control from E to D.
PAGE 4
ADJUSTING THE REFRIGERATORAND FREEZERINTERIORS
Refrigerator Interior Keepers
Some refrigerator door bins have "keepers" to
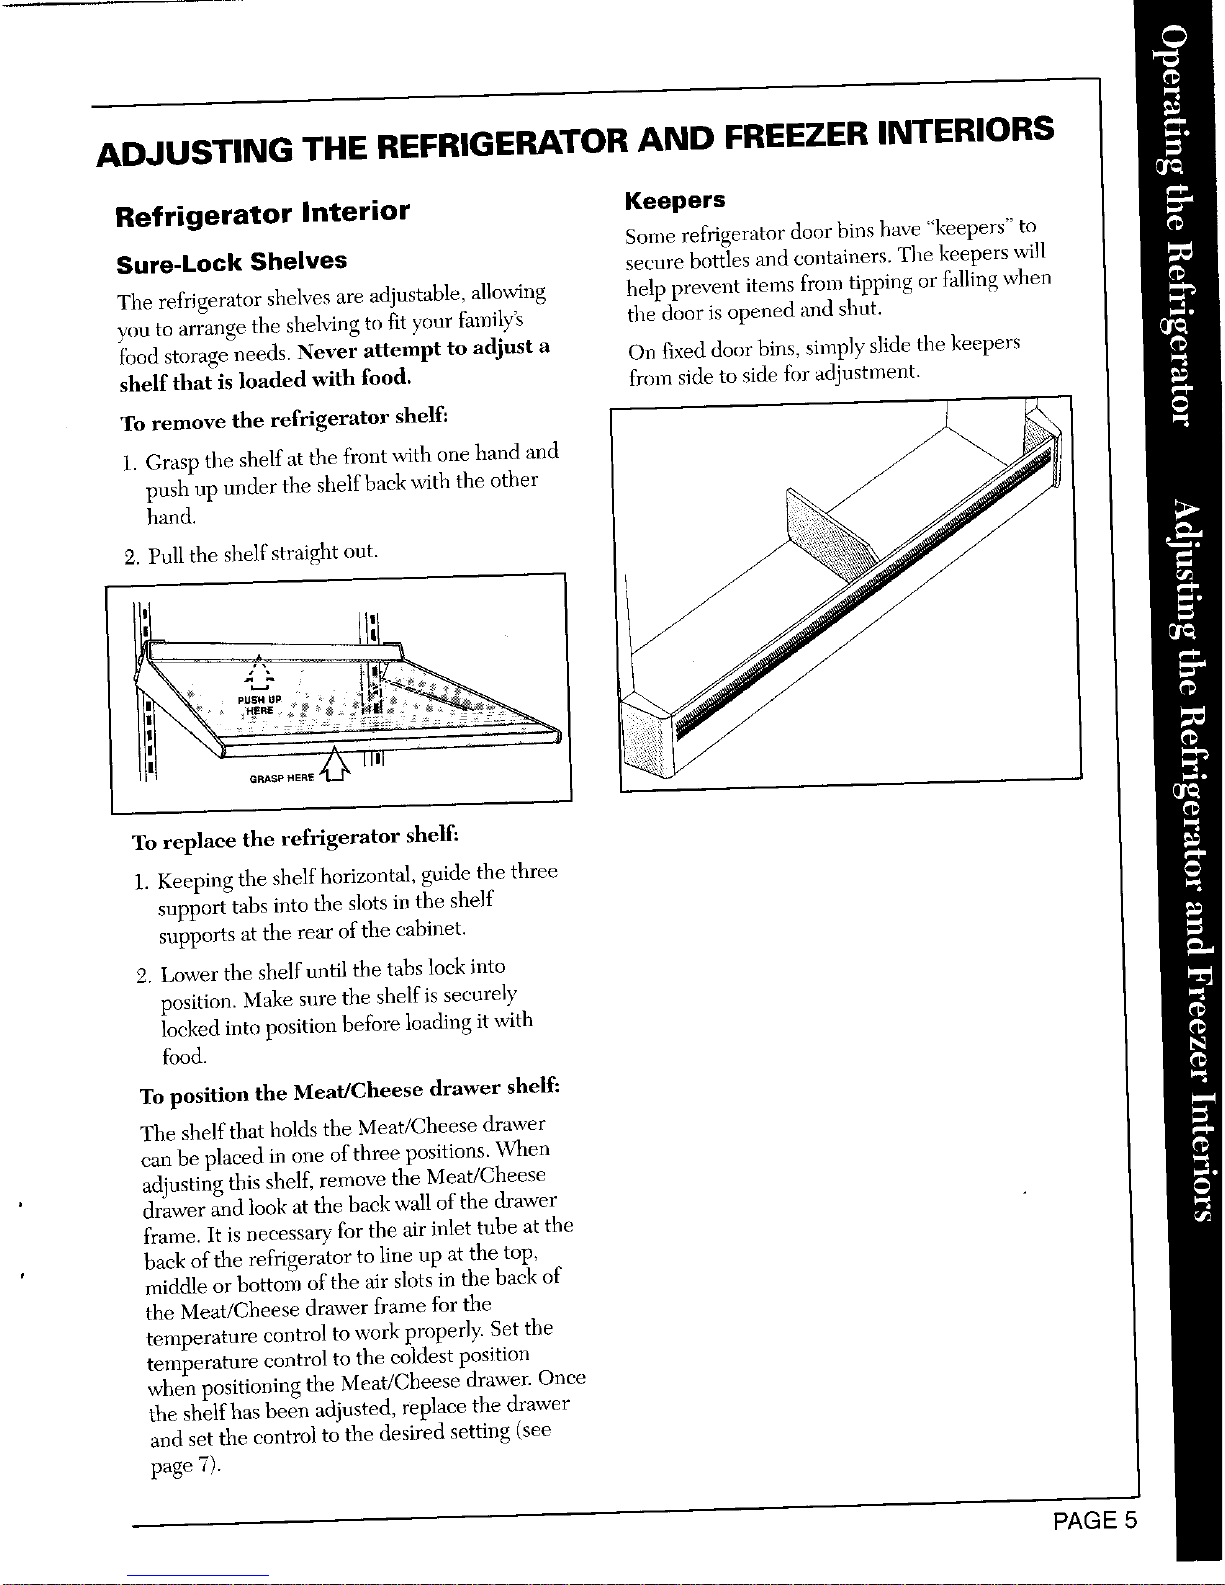
Sure-Lock Shelves
secure bottles and containers. The keepers will
The refrigerator shelves are adjustable, allowing help prevent items from tipping or falling when
you to arrange the shelving to fit your family_ the door is opened and sbut.
ibod storage needs. Never attempt to adjust a On fixed door bins, simply slide the keepers
shelf that is loaded with food. from side to side fbr adjustment.
To remove the refrigerator shelf:
1. Grasp the shelf at the front with one hand and
push up under the shelf back with the other ///
hand.
2. Pull the shelf'straight out.
J
GRASPHERE _
To replace the refrigerator shelf:
l. Keeping the shelf horizontal, guide the three
support tabs into the slots in the shelf
supports at the rear of the cabinet.
2. Lower the shelf until the tabs lock into
position. Make snre the shelf is securely
locked into position before loading it with
food.
To position the Meat/Cheese drawer shelf:
The shelf that holds the Meat/Cheese drawer
can be placed in one of three positions. When
adjusting this shelf, remove the Meat/Cheese
drawer and look at the back wall of the drawer
frame. It is necessary fur the air inlet tube at the
back oftbe refrigerator to line up at the top,
middle or bottom ufthe air slots in the back of
the Meat/C}_eese drawer frame for the
temperature control to work properly: Set the
temperature control to the coldest position
when positioning the Meat/C]0eese drawer. Once
the shelf has been adjusted, replace the drawer
and set the control to the desired setting (see
page 7).
PAGE!
 Loading...