

Maytag RSW22E0CAE/DM35A, RSW22E0CAE/DM35B, RSW22E0DAE, RSW22E0CAL/DM38A, RSW22E0DAM User Manual
...
INSTALLATION
Remove and discard the canti]e;er shelf packing clips If the floor is not level and it is neecssaD7 to raise the
located just above each shelf" where it books onto the rear of the cabinet, we suggest rolling the rear wheels
frame. To remove the plastic clips, _iggle the clips onto apiece ofply_Tood or other sbim material.
sideways and pull straight out. 4. To replace, center the clips in the cut-out areas and
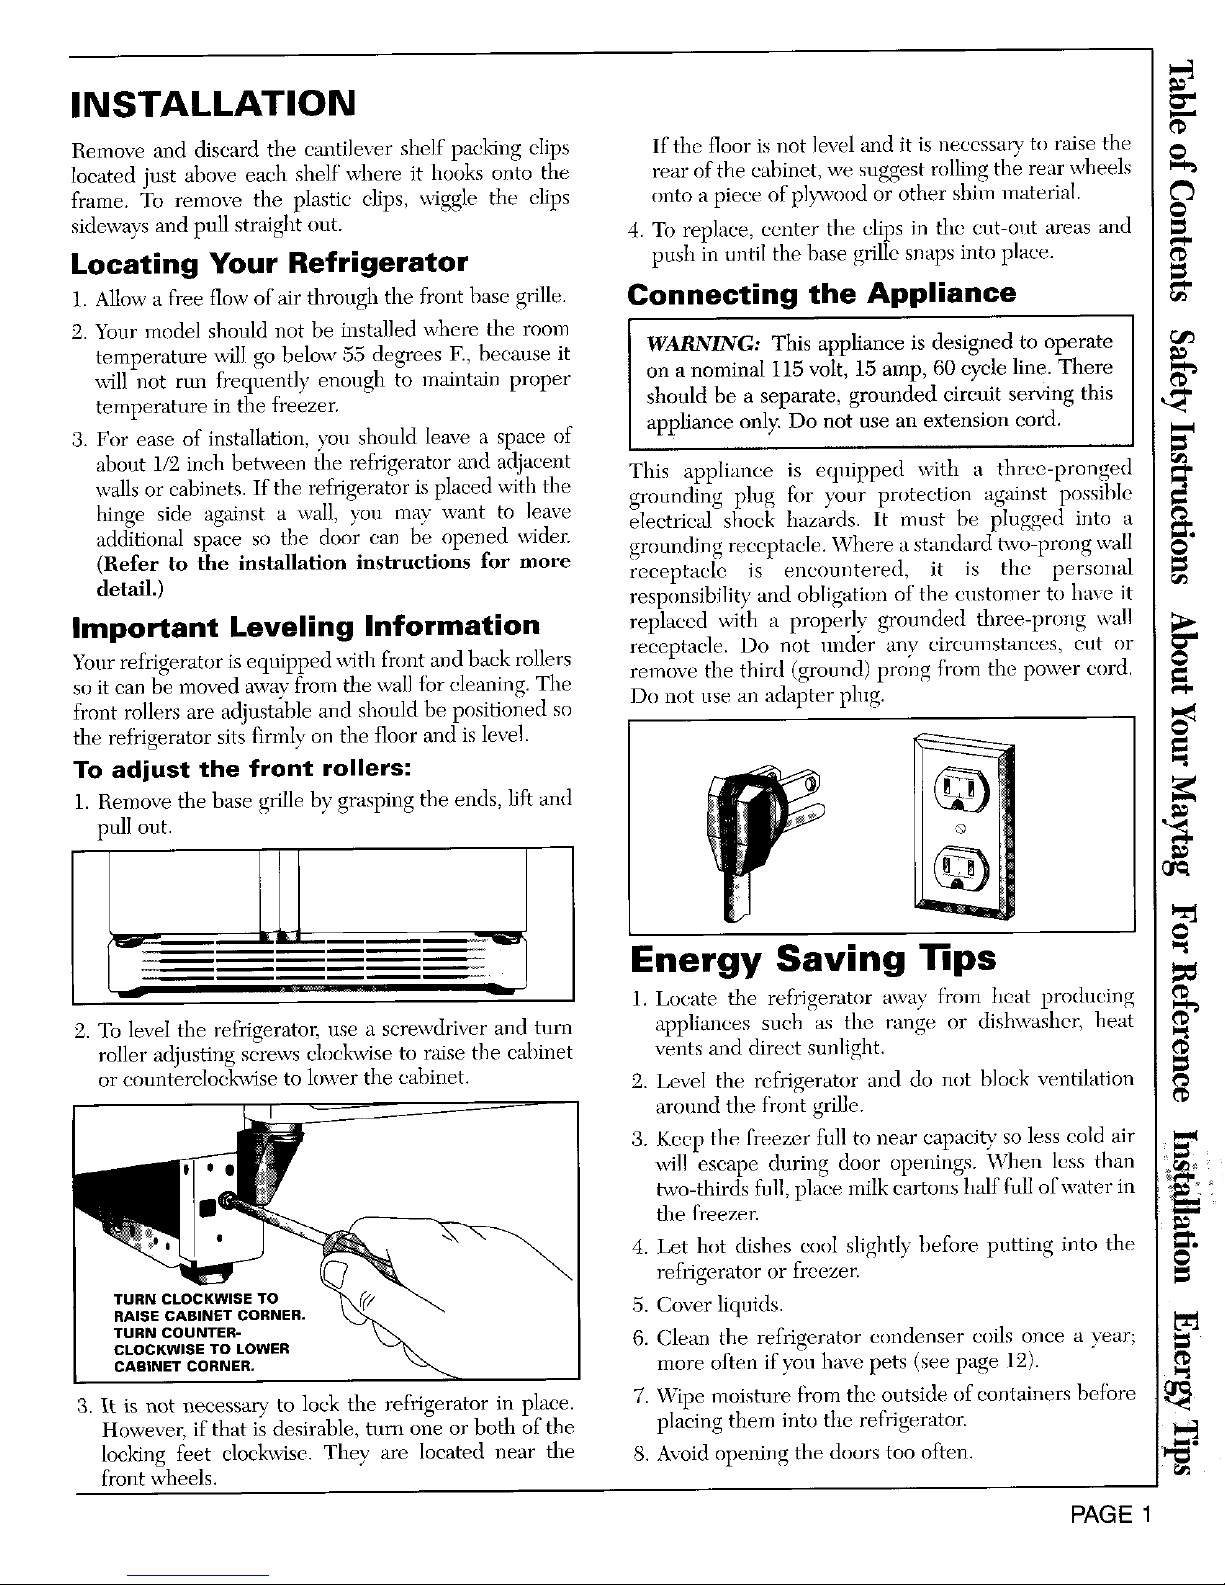
Locating Your Refrigerator push in mltil the base grille snaps into place.
1. Allow a free flow of air through the front base grille. Connecting the Appliance
2. Yonr model should not be installed where the room
temperature will go below 55 degrees F., because it WARNING: This appliance is designed to operate
will not run freqnently enough to maintain proper on a nominal 115 volt, 15 amp, 60 cycle line. There
temperatnre in the freezer, should be a separate, grounded circuit serving this
3. For ease of installation, you should leave a space of appliance only. Do not use an extension cord.
about 1/2 inch between the refrigerator and adjacent This appliance is equipped with a three-pronged
walls or cabinets. If the refrigerator is placed ruth the grounding plug for your protection against possible
hinge side against a wall, you mav want to leave electrical shock hazards. It must be plugged into a
additional space so the door can be opened x_4der, grounding reccptacIe. Where a standard two prongwall
(Refer to the installation instructions for more receptacle is encountered, it is the personal
detail.) responsibility arid obligation of"the customer to haxe it
Important Leveling Information replaced with a properly grounded three-prnng wall
Your refrigerator is equipped with front and back rollers receptacle. Do not under anv circmnstances, cut or
remove the third (ground) pro;lg f?om the power cord.
sn it can be moved away from the wall fbr cleaning. The
front rollers are adjustable and should be positioned so Do not use an adapter plug.
the refrigerator sits firmly on the floor and is level.
To adjust the front rollers: _,_
1. Remove the base grille by grasping file ends, lift and _
,ull out. o
Energy Saving Tips
_ _ l. Locate the refrigerator away f)'ona be'at prodndng
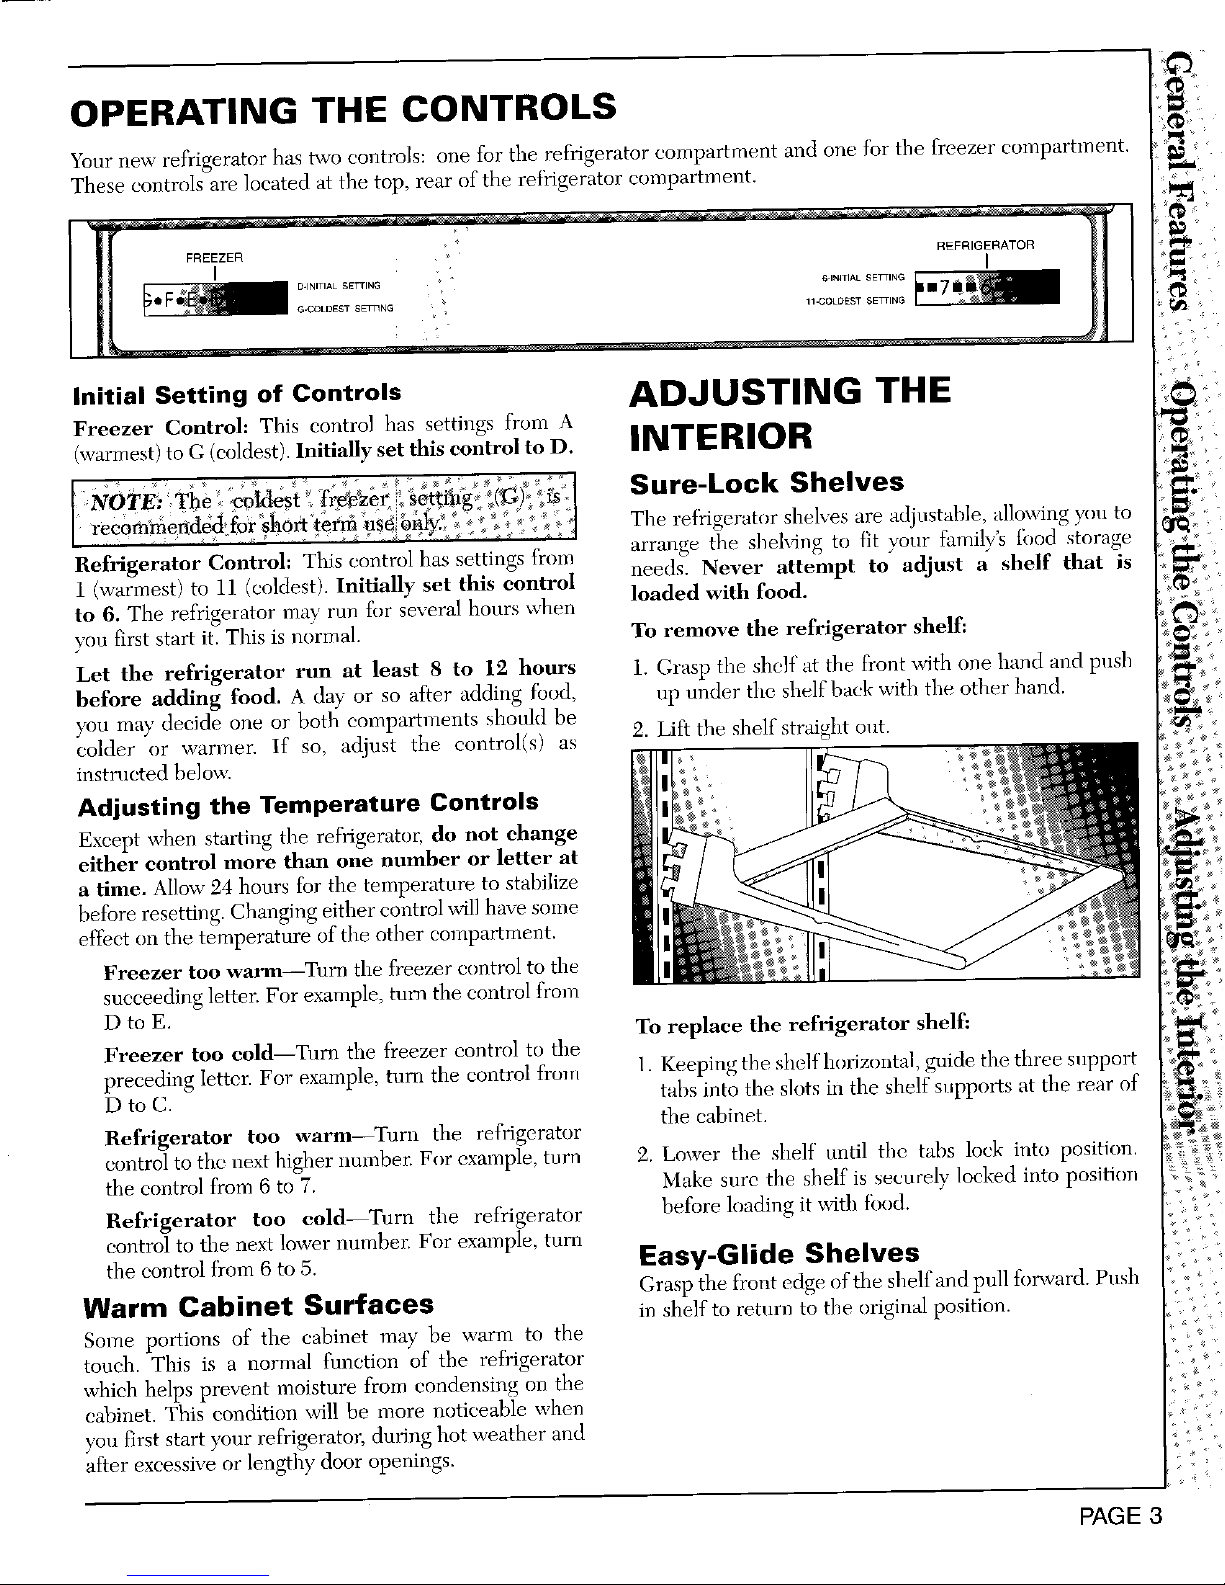
2. To level the refrigeratm; nse a screwdriver and tnrn appliances such as the range or dishwasher, heat
roller adjusting screws cloc!_vise to raise the cabinet vents and direct sunlight.
or counterclockavise to lower the cabinet. 2. Level the refrigerator and do not block ventilation
i around the f?ont grille.
3. Kccp the freezer fidl to near capaci)' so less cold air
will escape during door openings. When less than
two-thirds full, place milk cartons half full of water in
the freezer.
4. Let hot dishes cool slightl;_ before putting into the
refrigerator or freezer.
5. Cover liquids.
6. Clean the refrigerator condenser coils once a year;
more often if yon have pets (see page 12).
3. It is not necessary- to lock the refrigerator in place. 7. Wipe moisture from the outside of containers before
However, if that is desirable, tuna one or both of the placing them into the refi'igerator.
locking feet clocl_4se. They are located near the 8. A_oid opening the doors too often.
front wheels.
PAGE 1

INSTALLATION
Remove and discard the canti]e;er shelf packing clips If the floor is not level and it is neecssaD7 to raise the
located just above each shelf" where it books onto the rear of the cabinet, we suggest rolling the rear wheels
frame. To remove the plastic clips, _iggle the clips onto apiece ofply_Tood or other sbim material.
sideways and pull straight out. 4. To replace, center the clips in the cut-out areas and
Locating Your Refrigerator push in mltil the base grille snaps into place.
1. Allow a free flow of air through the front base grille. Connecting the Appliance
2. Yonr model should not be installed where the room
temperature will go below 55 degrees F., because it WARNING: This appliance is designed to operate
will not run freqnently enough to maintain proper on a nominal 115 volt, 15 amp, 60 cycle line. There
temperatnre in the freezer, should be a separate, grounded circuit serving this
3. For ease of installation, you should leave a space of appliance only. Do not use an extension cord.
about 1/2 inch between the refrigerator and adjacent This appliance is equipped with a three-pronged
walls or cabinets. If the refrigerator is placed ruth the grounding plug for your protection against possible
hinge side against a wall, you mav want to leave electrical shock hazards. It must be plugged into a
additional space so the door can be opened x_4der, grounding reccptacIe. Where a standard two prongwall
(Refer to the installation instructions for more receptacle is encountered, it is the personal
detail.) responsibility arid obligation of"the customer to haxe it
Important Leveling Information replaced with a properly grounded three-prnng wall
Your refrigerator is equipped with front and back rollers receptacle. Do not under anv circmnstances, cut or
remove the third (ground) pro;lg f?om the power cord.
sn it can be moved away from the wall fbr cleaning. The
front rollers are adjustable and should be positioned so Do not use an adapter plug.
the refrigerator sits firmly on the floor and is level.
To adjust the front rollers: _,_
1. Remove the base grille by grasping file ends, lift and _
,ull out. o
Energy Saving Tips
_ _ l. Locate the refrigerator away f)'ona be'at prodndng
2. To level the refrigeratm; nse a screwdriver and tnrn appliances such as the range or dishwasher, heat
roller adjusting screws cloc!_vise to raise the cabinet vents and direct sunlight.
or counterclockavise to lower the cabinet. 2. Level the refrigerator and do not block ventilation
i around the f?ont grille.
3. Kccp the freezer fidl to near capaci)' so less cold air
will escape during door openings. When less than
two-thirds full, place milk cartons half full of water in
the freezer.
4. Let hot dishes cool slightl;_ before putting into the
refrigerator or freezer.
5. Cover liquids.
6. Clean the refrigerator condenser coils once a year;
more often if yon have pets (see page 12).
3. It is not necessary- to lock the refrigerator in place. 7. Wipe moisture from the outside of containers before
However, if that is desirable, tuna one or both of the placing them into the refi'igerator.
locking feet clocl_4se. They are located near the 8. A_oid opening the doors too often.
front wheels.
PAGE 1
OPERATING THE CONTROLS
Your new refrigerator has two controls: one for the refrigerator compartment and one }br the freezer compartment.
These controls are located at the top, rear of the refrigerator compartment.
FREEZER _ REFRIGERATOR
I I
Initial Setting of Controls ADJUSTING THE
Freezer Control: This control has settings from A
(warn est)toG(coldest)Initiallysetthiscontrolto D. INTERIOR
Sure-Lock Shelves
The refi'igerator shelves are adjustable, allowing you to
Refrigerator Control: This control has settings {)om arrange the shelving to flt your family's food storage
needs. Never attempt to adjust a shelf that is
1 (warmest) to 11 (c_]dest). Initially set this control loaded with food.
to 6. The refrigerator may run for several hours _en
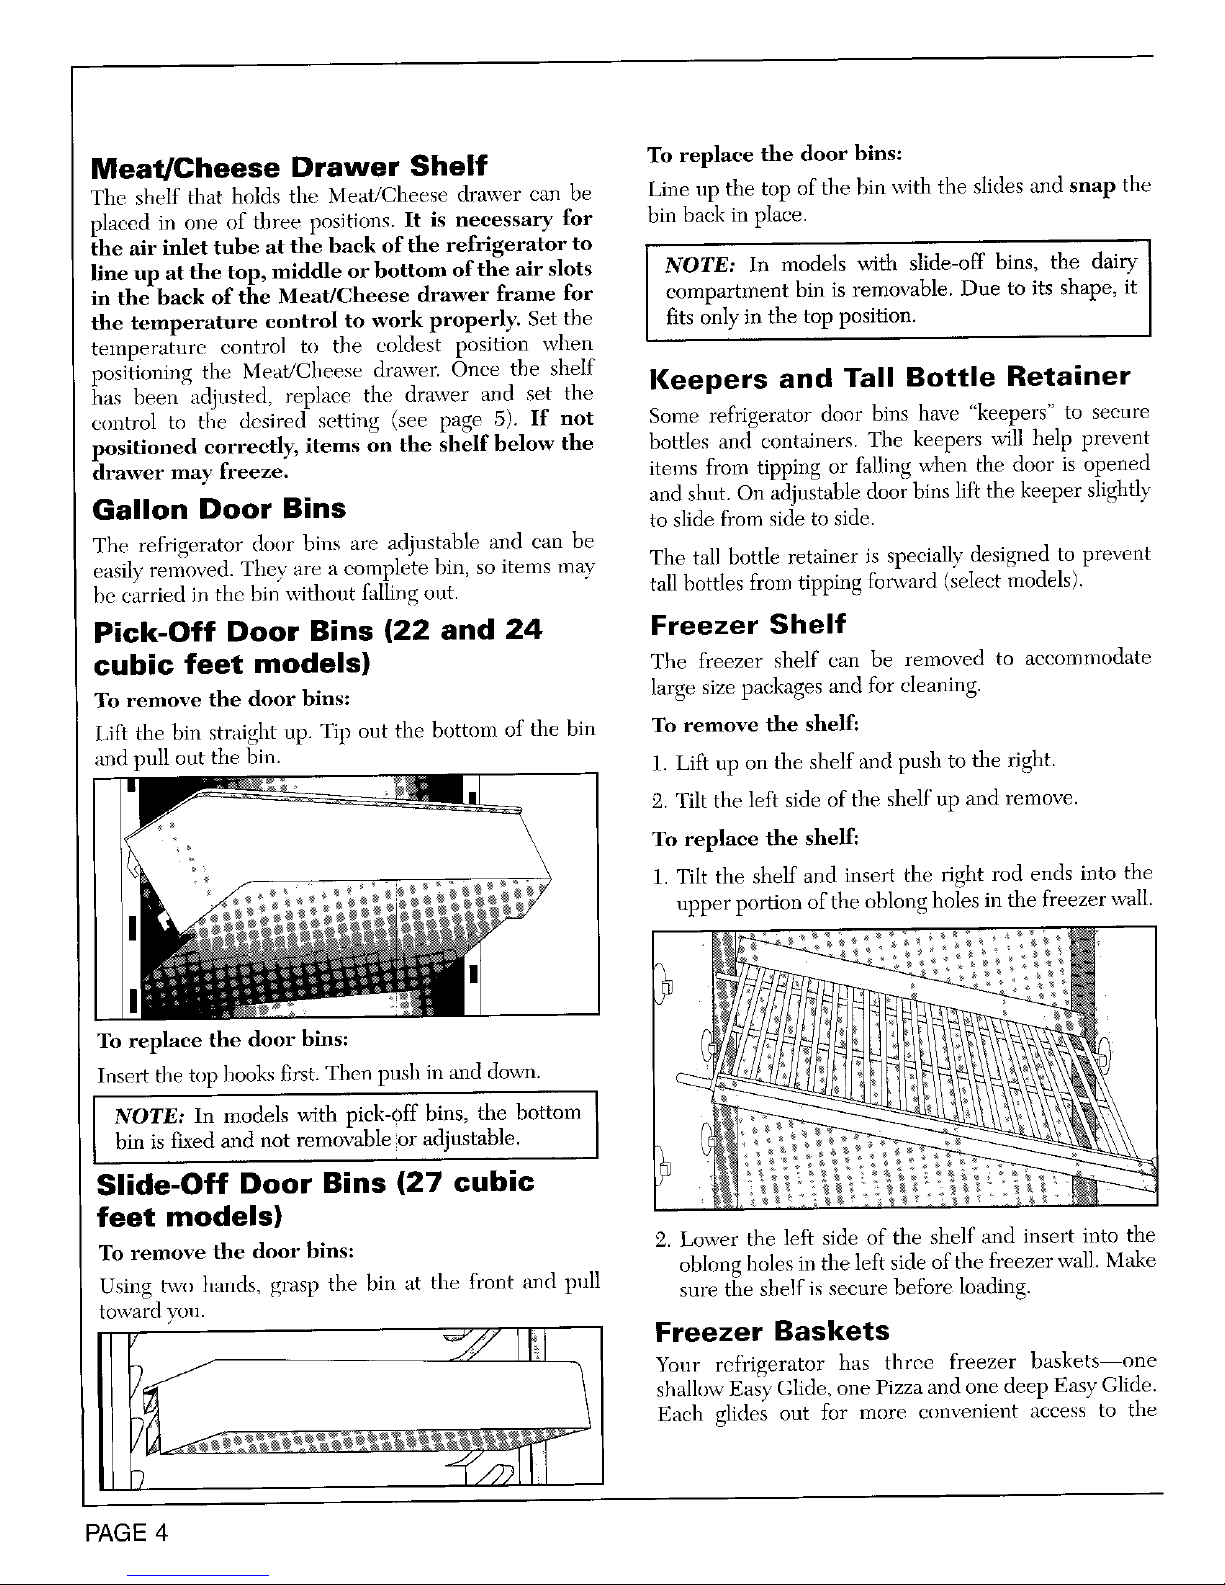
voo first start it. This is normal. To remove the refrigerator shelf:
Let the refrigerator run at least 8 to 12 hours 1. Grasp the shelf at the front with one hand and push
before adding food. A day or so after adding tbod, up under the shelf back with the other band.
you may decide one or both compartments should be
2. Lift the shelf straight ont.
colder ur warmer. If so, adjust the control(s) as
instrncted below.
Adjusting the Temperature Controls
Except when starting the refrigerator, do not change
either control more than one number or letter at
a time. Allow 24 hours for the temperature to stabilize
before resetting. Changing either control will have some
effect on the temperature of the other compartment.
Freezer too warm--Turn the freezer control to the
succeeding letter. For example, turn the control from
D to E. To replace the refrigerator shelf:
Freezer too eold_Tnrn the freezer control to the
preceding letter. For example, turn the control from 1. Keeping the shelf horizuntal, guide the three support
D to C. tabs into the sluts in the shelf supports at the rear of
the cabinet.
Refrigerator too warm Turn the ref?igerator
control to the next higher number, For example, torn 2. Lower the shelf until the tabs lock into position.
the control from 6 to 7, Make sure the shelf is securely locked into position
Refrigerator too cold Turn the refrigerator before loading it x_Sthfond.
control to the next lower numbeJ: For example, turn
the control _Yom6 to 5, Easy-Glide Shelves
Grasp the front edge of the shelf and pull forward. Push
Warm Cabinet Surfaces in shelf to retnrn to the original position•
Some portions of the cabinet may be warm to the
touch. This is a normal funetion of the refrigerator
which helps prevent moisture from condensing on the
cabinet. This condition will be more noticeable when
you first start your ref?dgerator, during hot weather and
after excessive or lengthy door openings.
PAGE 3
Meat/Cheese Drawer Shelf To replace the door bins:
The shelf that holds the iVleat/Cheese drawer can be Line up the top of the bin with the slides and snap the
placed in one of three positions. It is necessary for bin back in place.
tile air inlet tube at tile back of the refrigerator to
I
llne up at the top, middle or bottom of the air slots NOTE: In models with slide-off bins, the dairy I
in the back of the Meat/Cheese drawer frame for compartment bin is removable. Due to its shape, it
the temperature control to work properly. Set the fits only in the top position.
temperature control to the coldest position when
positioning the Meat/Cheese drawer. Once the shelf
has been adjusted, replace the drawer and set the Keepers and Tall Bottle Retainer
control to the desired setting (see page 5). If not Some refrigerator door bins have "keepers" to secure
positioned correctly, items on the shelf below the bottles and containers. The keepers will help prevent
drawer may freeze, items from tipping or falling when the door is opened
Gallon Door Bins and shut. On adjustable doer bins lificthe keeper slightly
to slide from side to side.
The refrigerator dour bins are adjustable and can be
The tall bottle retainer is special b' designed to prevent
easil)' removed. They are a complete bin, so items may
he carried in the bin without falling ont. tall bottles from tipping fmxvard (select models).
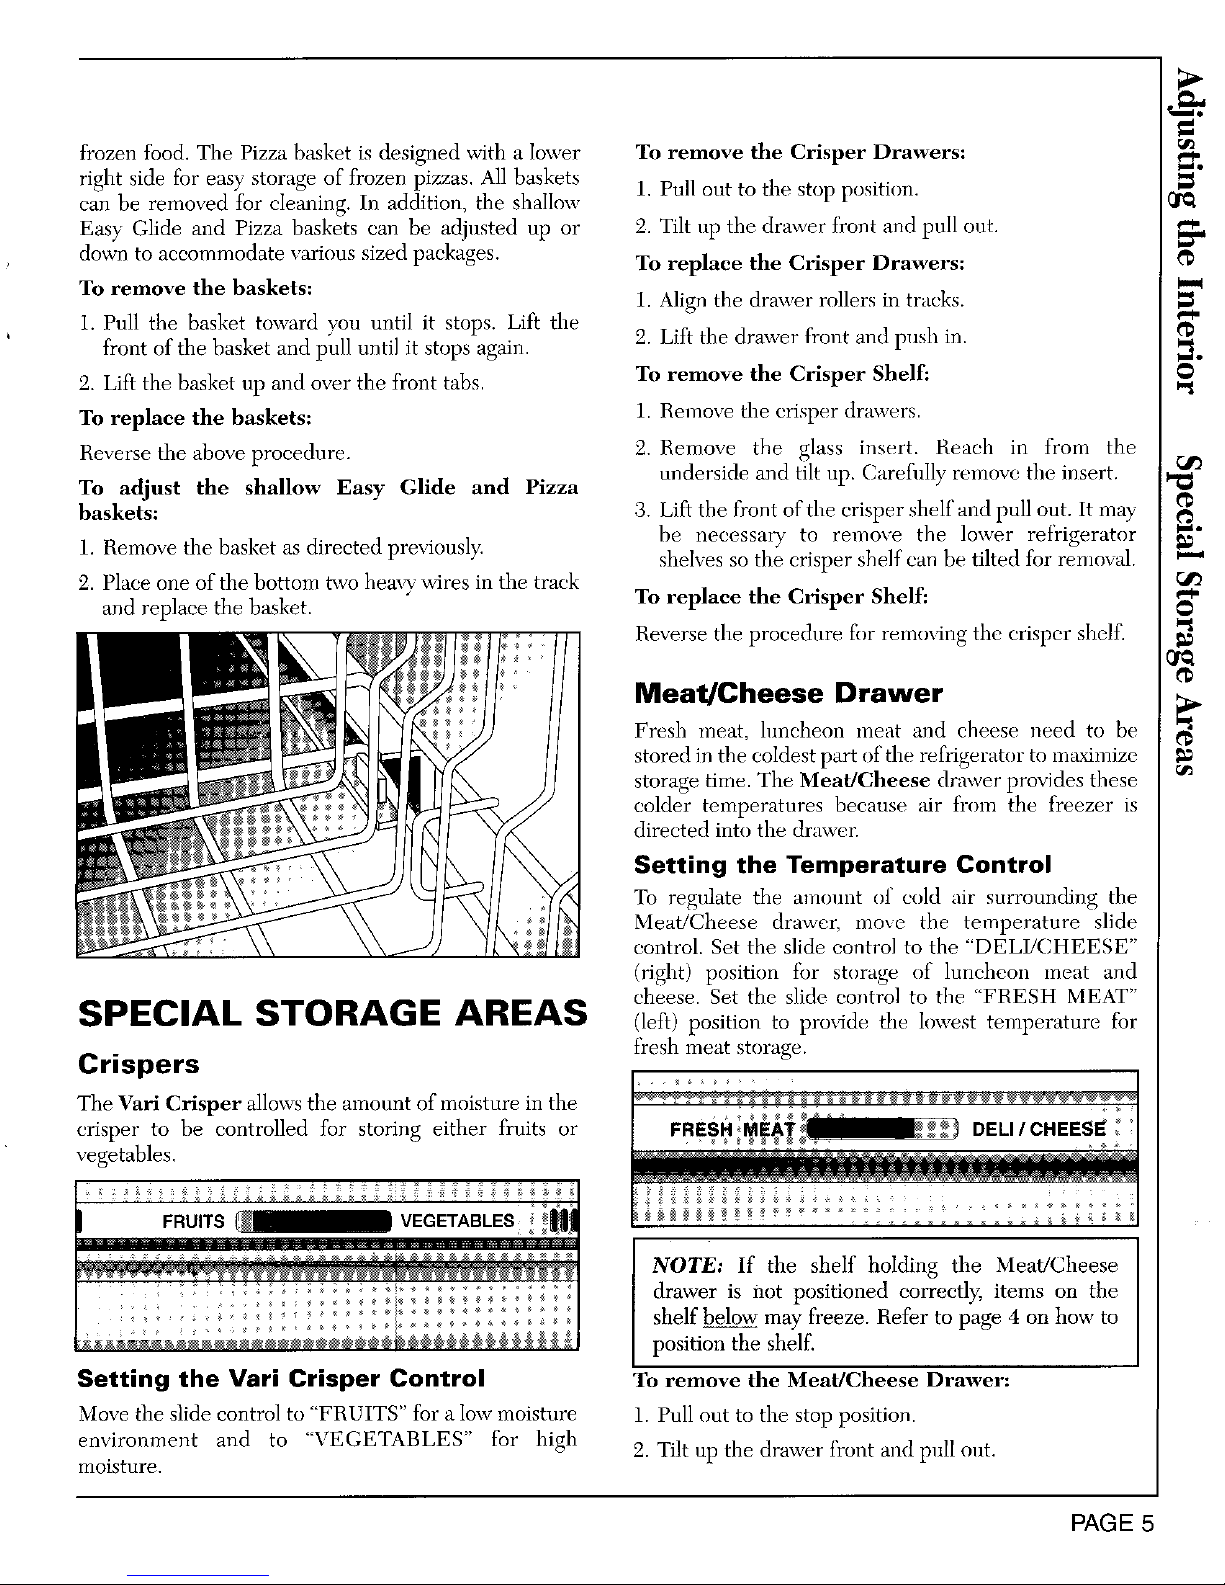
Pick-Off Door Bins (22 and 24 Freezer Shelf
cubic feet models) The freezer shelf can be reinoved to accommodate
To remove the door bins: large size packages and for cleaning.
Lift the bin straight up. Tip out the bottom of the bin To remove the shelf:
and pull ont the bin. 1. Lift up on the shelf and push to the right.
'2.Tilt the left side of the shelf"up and remove.
\ To replace the shelf:
\
1. Tilt the shelf and insert the right rod ends into the
upper portion of the oblong holes in the freezer wall.
&
_Y
To replace the door bins:
Insert the top hooks first. Then push in and down.
NOTE: In models with pick-0ff bins, the bottom
bin is t_xed and not removable or adjustable, o
Slide-Off Door Bins (27 cubic
feet models)
To remove the door bins: 2. Lower the left side of the shelf and insert into the
oblong holes in the left side of the freezer wall. Make
Using two hands, grasp the bin at the front and pnll sure the shelf is secure before loading.
toward you.
Freezer Baskets
Your refrigerator has three freezer baskets one
shallow Easy Glide, one Pizza and one deep Easy Glide.
Each glides out for more convenient access to the
PAGE4
frozen food. The Pizza basket is designed with a lower To remove the Crisper Drawers:
right side for easy storage of frozen pizzas. All baskets
1. Pull out to the stop position.
can be removed for cleaning. In addition, the shallow
Easy Glide and Pizza baskets can be adjusted up or 2. Tilt up the drawer t>ont and pull out.
down to accommodate various sized packages. To replace the Crisper Drawers:
To remove the baskets:
1. Align the drawer rollers in tracks.
1. Pull the basket toward you until it stops. Lift the
2. Lift the drawer front amt push in.
front of the basket and pull until it stops again.
2. Lift the basket up and over the front tabs. To remove the Crisper Shelf:
To replace the baskets: 1. Remove the crisper drawers.
Reverse theaboveprocedure. 2. Remove the glass insert. Reach in from the
underside and tilt up. Carefillly remove the insert.
To adjust the shallow Easy Glide and Pizza
baskets: 3. Lift the front of the crisper shelf and pull out. It may
be necessary to remoxe the lower refrigerator
1. Remove the basket as directed previously, shelves so the crisper shelf can be tilted for renmval.
2. Place one of the bottom two hea_T wires in the track
and replace the basket. To replace the Crisper Shelf:
Reverse the procednre for removing the crisper shelf.
Meat/Cheese Drawer
Fresh meat, hmcheon nmat and cheese need to be
stored in the coldest part of the refi%erator to maximize
storage time. The Meat/Cheese drawer provides these
colder temperatures because air from the freezer is
directed into the drawer.
Setting the Temperature Control
To regulate the amount of cold air surrounding the
Meat/Cheese drawer, move the temperature slide
control. Set the slide control to the "DELI/CHEESE"
(right) position fbr storage of luncheoil meat and
cheese. Set the slide control to the "FRESH MEAT"
SPECIAL STORAGE AREAS (left)position to provide the lowest temperature for
Crispers fresh meat storage.
The Yari Crisper allows the mnount of moisture in the
crisper to he controlled for storing either fruits or
vegetables.
e e , e g g 5
FRUITS _ VEGETABLES _] __ __ _ _ ' _
................... NOTE: If the shelf holding the Meat/Cheese
drawer is not positioned correctly, items on the
shelf below may freeze. Refer to page 4 on how to
position the shell:
Setting the Vari Crisper Control To remove the Meat/Cheese Drawer:
Move the slide control to "FRUITS" for a low moisture 1. Pull out to the stop position.
environment and to "VEGETABLES" for high 2. Tilt up the drawer front and pull out.
moisture.
PAGE5
To replace the Meat/Cheese Drawer: Egg Cradle
1. Align the drawer rollers in tracks. Tile egg cradle can be placed on a refrigerator shelf or
2. Lift tile drawer front and push in. stored in a door bin. It holds a "dozen-plus" eggs.
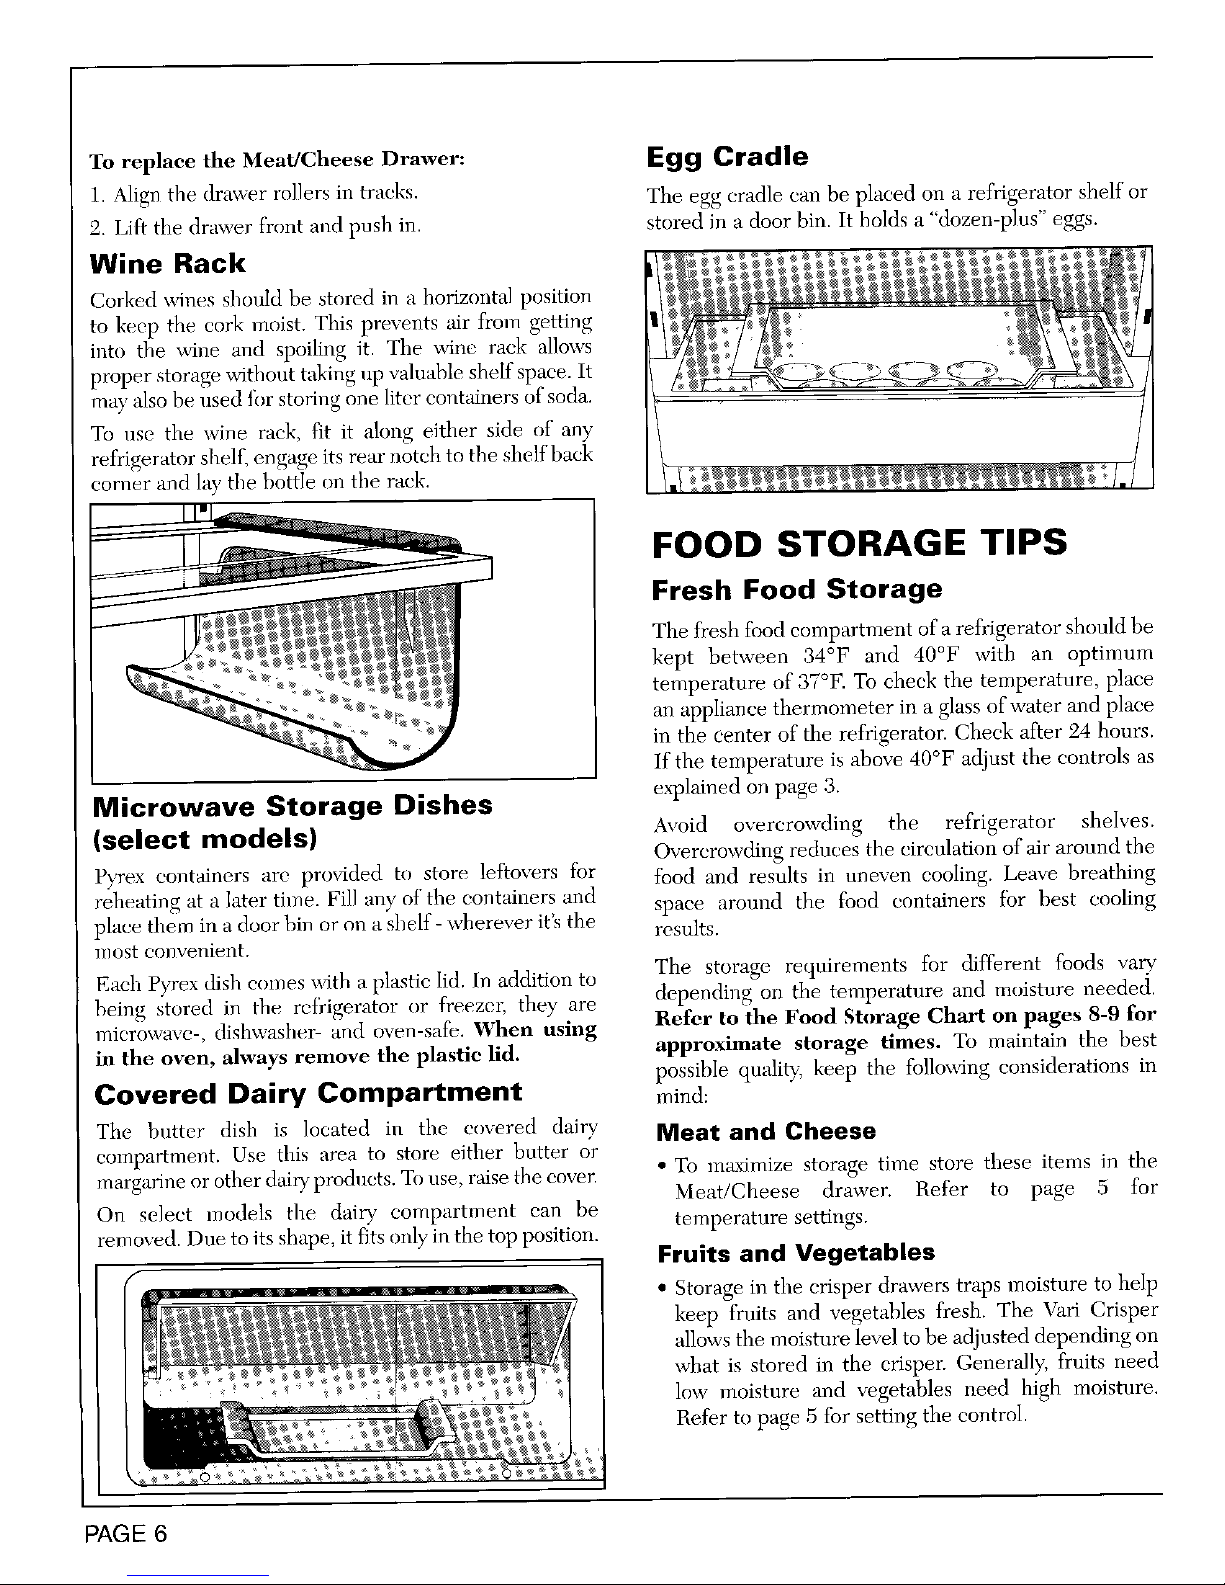
Wine Rack
Corked wines should be stored in a horizontal position
to keep the cork moist. This prevents air from getting
into the x_dne and spoiling it. The wine rack allows
proper storage without taking up valuable shelf space. It
may also be used fur storing one liter containers of soda.
To use the wine rack, fit it along either side of any
refrigerator shelf, engage its rear notch to the shelf back
corner and lay the bottle on the rack.
FOOD STORAGE TIPS
Fresh Food Storage
The fresh food compartment of a refrigerator should be
kept between 34°F and 40°F with an optimum
temperature of 37°F. To cheek the temperature, place
an appliance thermometer in a glass of water and place
in the center of the refrigerator. Cheek after 24 hours.
If the temperature is above 40°F adjust the controls as
Microwave Storage Dishes explained on page 3.
(select models) Avoid overcrowding the refrigerator shelves.
Overcrowding reduces the circulation of air around the
Pyrex containers are provided to store leftovers fbr food and results in uneven cooling. Leave breathing
reheating at a later time. Fill any of the containers and
space around the food containers for best cooling
place them in a door bin or on a shelf - wherever it's the results.
inos{ convenient.
The storage requirements for dift_rent foods vary
Each Pyrex dish comes _dth a plastic lid. In addition to depending on the temperature and moisture needed.
being stored in the re_)igerator or freezm; they are
microwave-, dishwasher- arid oven-safe. When using Refer to the Food Sturage Chart on pages 8-9 for
in the oven, always remove the plastic lid. approximate storage times. To maintain the best
possible quality,-,keep the following considerations in
Covered Dairy Compartment mi_d:
The butter dish is located in the covered dairy Meat and Cheese
compartment. Use tiffs area to store either butter or
narga'ine or other daffy products. Touse. raise the cover • To maximize storage time store these items in the
Meat/Cheese drawer, Refer to page 5 for
On select models the dait T compartment can be temperature settings.
removed. Due to its shape, it fits only in the top position.
Fruits and Vegetables
1
f
I • Storage in the crisper drawers traps moisture to help
/ keep fruits and vegetables fresh. The Vari Crisper
allows the moisture level to be adjusted depending on
what is stored in the crisper. Generally, fruits need
low moisture and vegetables need high moisture.
/ Refer to page 5 for setting the control.
!
PAGE 6
 Loading...