

Maytag RSD2400, RSD2200, SS-2, RSD2000 User Manual
Model: RSD2400, RSD2200, RSD2000
TABLE OF CONTENTS ABOUT YOUR MAYTAG
Page
Installation ................................................. 1 Congratulations on your choice ofa Maytag refrigerator!
General Features ...................................... 2 As yon use your new refrigerator we know you will
Operating the Controls ........................... 3 appreciate ti_e many, features that provide excellent
Adjusting the Interior .............................. 4-5 performance, ease of cleaning, convenience and
dependability.
Special Storage Areas ............................... 56
It is important to understand how )our new refrigerator
Food Storage Tips ..................................... 6-9
operates before you use it. On the following pages you
Ice Service .................................................. 10 will find a wealth of information regarding all aspects of
Care and Cleaning ................................... 11-12 ),our refrigerator. By following the instructions carefully,
Non-Use Periods ....................................... 13 you will be able to fully"enjoy and properly maintain
Consumer Publieations ............................ 13 your Maytag refrigerator.
To Avoid Unnecessary Serviee Calls ..... 14 Should you have any questions about using your Ma_ag
refrigerator, contact us. Be sure to provide the model
and serial number of your refrigerator.
IMPORTANT PERSONAL MAYTAG CONSUMER EDUCATION
ONE DEPENDABILITY SQUARE
SAFETY INSTRUCTIONS NEWTON, IOWA 50208
1. To prevent possibility of hazard due to electrical (515) 791-8911
sbock, never plug the refrigerator into a receptacle (Mon. Fri., 8 am-5 pm Central Time)
which has not been grounded adequately and in
accordance with the local and national electrical NOTE: For service information, see pagel4.
codes. See the grounding instructions on page 1. [ IMPOBTAdV_ Keep your sales slip or cancelled
2. Unplug the refrigerator before cleaning the eheck forwarrantyserviee. Proof of original date of
condenser or replacing a light bulb. I
purchase is needed.
3. In ease of power failure, minimize door openings. If ,
the power failure is of a long duration, protect the
food by placing blocks of dry ice on top of the FOR FUTURE REFERENCE
packages or check with a local frozen foods locker For future reference we suggest you retain this manual
plant about temporary storage. Frozen foods which after recording the model nmnber, serial number (six
bave thawed completely should not be reffozen, numbers and two letters) and revision number of this
4. Any electrical service cord that becomes frayed or refrigerator in the spaces provided belo_
damaged should be ilmnediately repaired or This information can be found on the data sticker
replaced. Never unplug your applianee by' pulling on located at the top front interior of the refrigerator
the power cord. compartment. (See example below.)
5, Your refrigerator should not be operated in the c
presenee of explosive fumes. /MAY'TAG _gD,,L,_.
REVHO
NEWTON IA MAXA_p_ s Es
6. Remove tlre doors from any' out-of-use refrigerator usa 5o2o8 _o'_,_d'_'_................... °' c(_
to prevent child entrapment and suftbcatiou.
7. Children should not climb, }rang or stand on the ModelNumber SerialNumber RevisionNumber
shelves of this refrigerator.
INSTALLATION
Remove and discard tile cantilever shelf packing clips
located just above each shelf where it hooks onto the
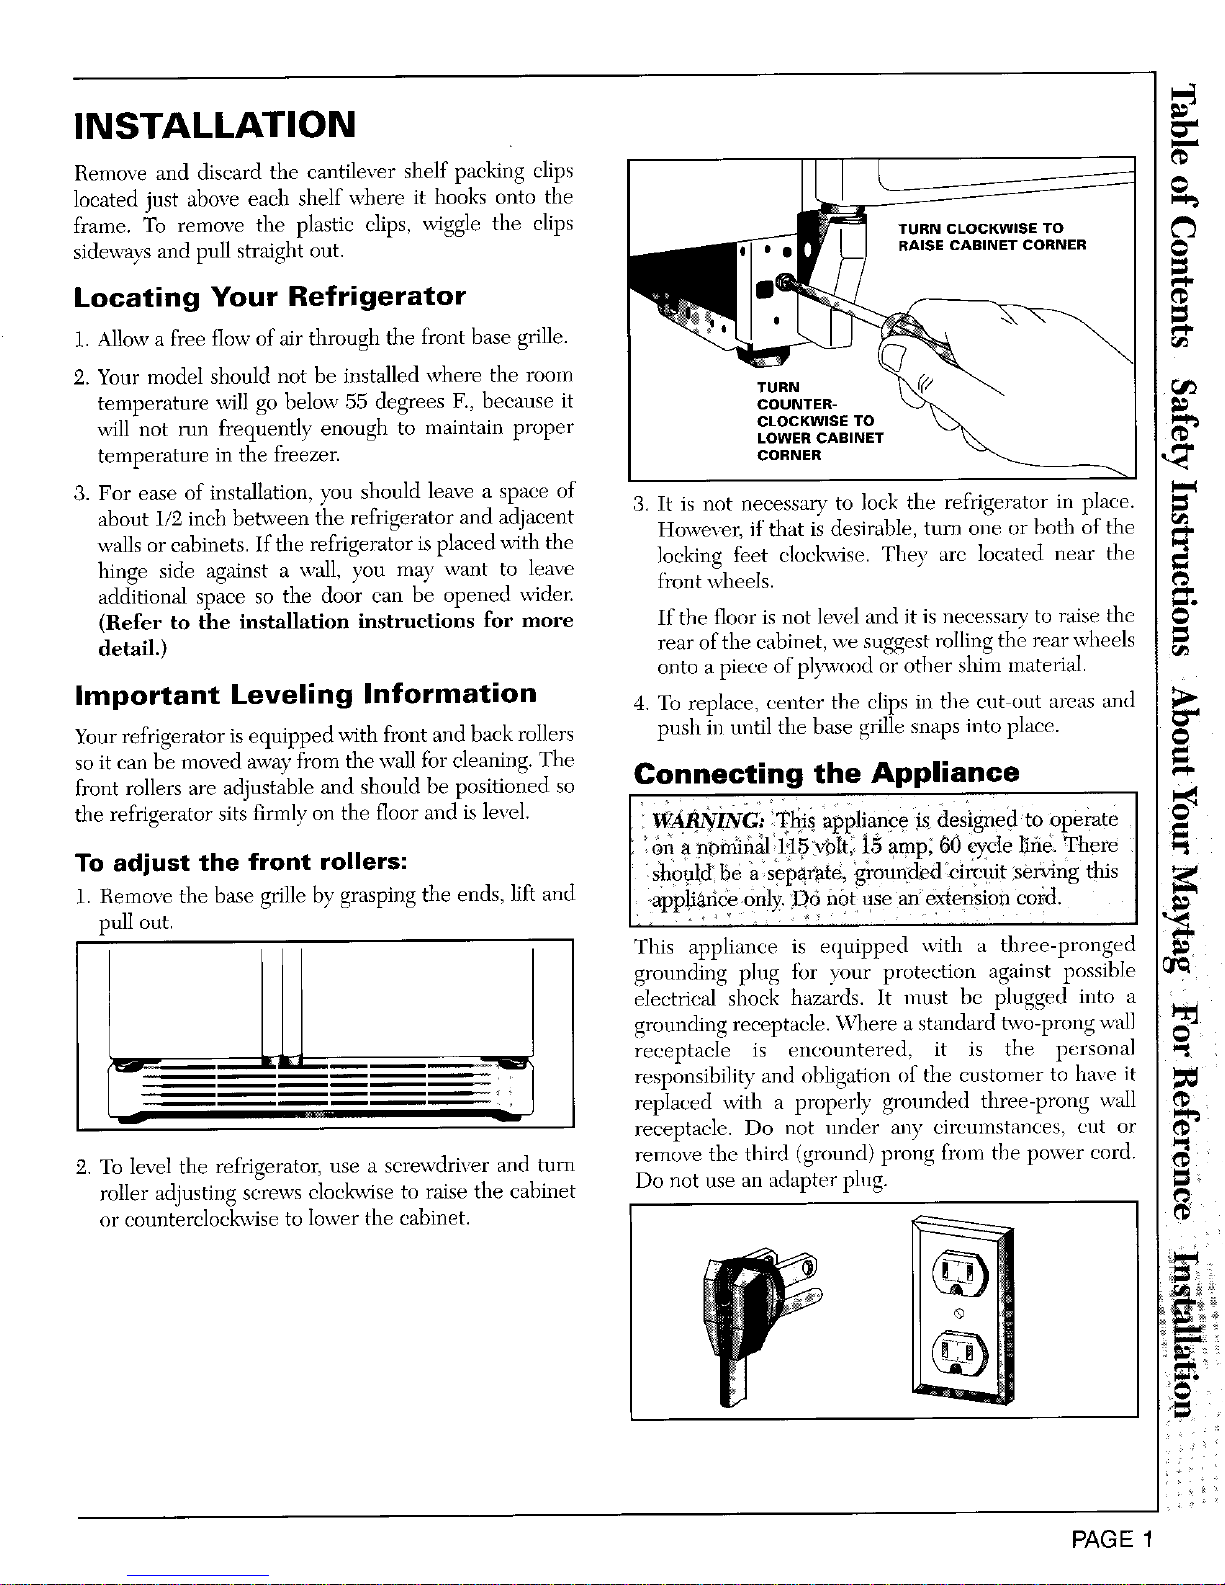
frame. To remove the plastic clips, wiggle the clips TURNCLOCKWISETO
sideways and pull straight out. RAISECABINETCORNER
Locating Your Refrigerator
1. Allow a free flow"of air through the front base grille.
2. Your model should not be installed where the room
TURN
temperature will go below 55 degrees F., because it COUNTER-
will not run frequently enough to maintain proper CLOCKWISETO
LOWER CABINET
temperature in the freezer. CORNER
3. For ease of installation, you should leave a space of
about i/2 inch between the refrigerator and adjacent 3. It is not necessary to lock the refrigerator in place.
Howexer, if that is desirable, turn one or both of the
walls or cabinets. If the refrigerator is placed with the
hinge side against a wall, you may want to leave locking feet clocl_dse. They arc located near the
f?contwheels.
additional space so the door can be opened wider.
(Refer to the installation instructions for more If the floor is not level and it is necessary to raise the
detail.) rear of the cabinet, we suggest rolling the rear wheels
onto a piece of pl}_vood or other shim n/aterial.
Important Leveling Information 4. To replace, center the clips iu file cut out areas and
Your refrigerator isequipped with front and back rollers push in until the base grille snaps into place.
so it can be moved away from the wall fbr cleaning. The
Connecting the Appliance
front rollers are adjustable and should be positioned so
the refrigerator sits firmly on the floor aud is level. ] W_g/NG} '_tlis appliance is designed to operate
I on a nominal 1:15"_01t,15 amp, 60 eycte _ne. There
To adjust the front rollers: / should' be ase arate, ?oundedi_ircuit seMng this
P g ,
1. Remove the base grille by grasping the ends, lift and / apptia6ce0nly.D6 n6t use a3aextension cord.
pull out.
This appliance is equipped with a three-pronged
IO1 grounding p]ng tbr vour protection against possible
electrical shock hazards. It nmst be plugged into a
grounding receptacle. Where a standard two-prong wall
receptacle is encountered, it is the personal
. responsibility and obligation of the customer to have it
-'- replaced with a properly grounded three-prong wail
_ receptacle. Do not under any cireulnstaoces, cut or
remove the third (ground) prong from the power cord.
2. To level the refrigerator, use a screwdriver and turn
roller adjusting screws clocGvise to raise the cabinet Do not use an adapter plug.
or couuterclockavise to lower the cabinet.
PAGE 1
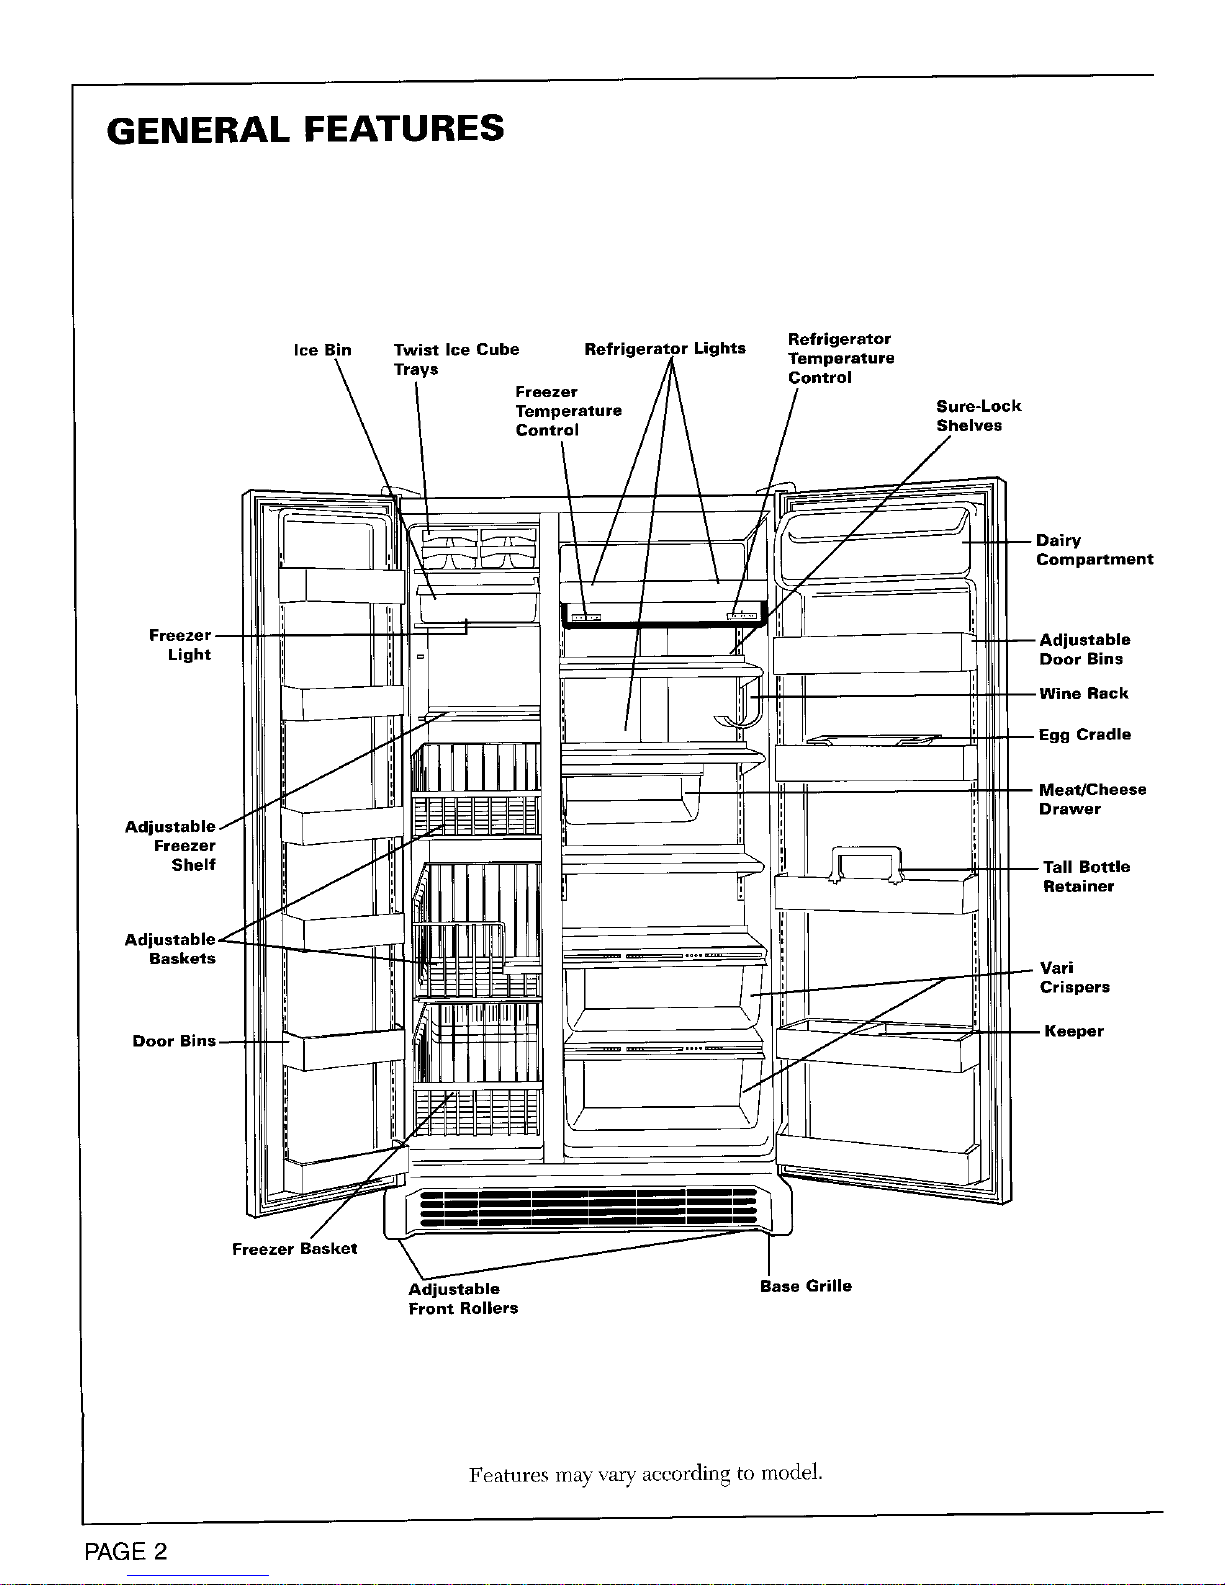
GENERAL FEATURES
Ice Bin Twist Ice Cube )r Lights Refrigerator
Temperature
Trays Control
Freezer
Temperature Sure-Lock
Control Shelves
III
Compartment
Ii
Freezer ;;; -- ustable
Light Door Bins
Rack
Cradle
Adjustable J Drawer
Freezer
Shelf Bottle
Retainer
Adjustable
Baskets
Vari
Crispers
Door Bins ....... / Keeper
J
]
Freezer Basket
Adjustable Base Grille
Front Rollers
Features may vary according to model.
PAGE 2
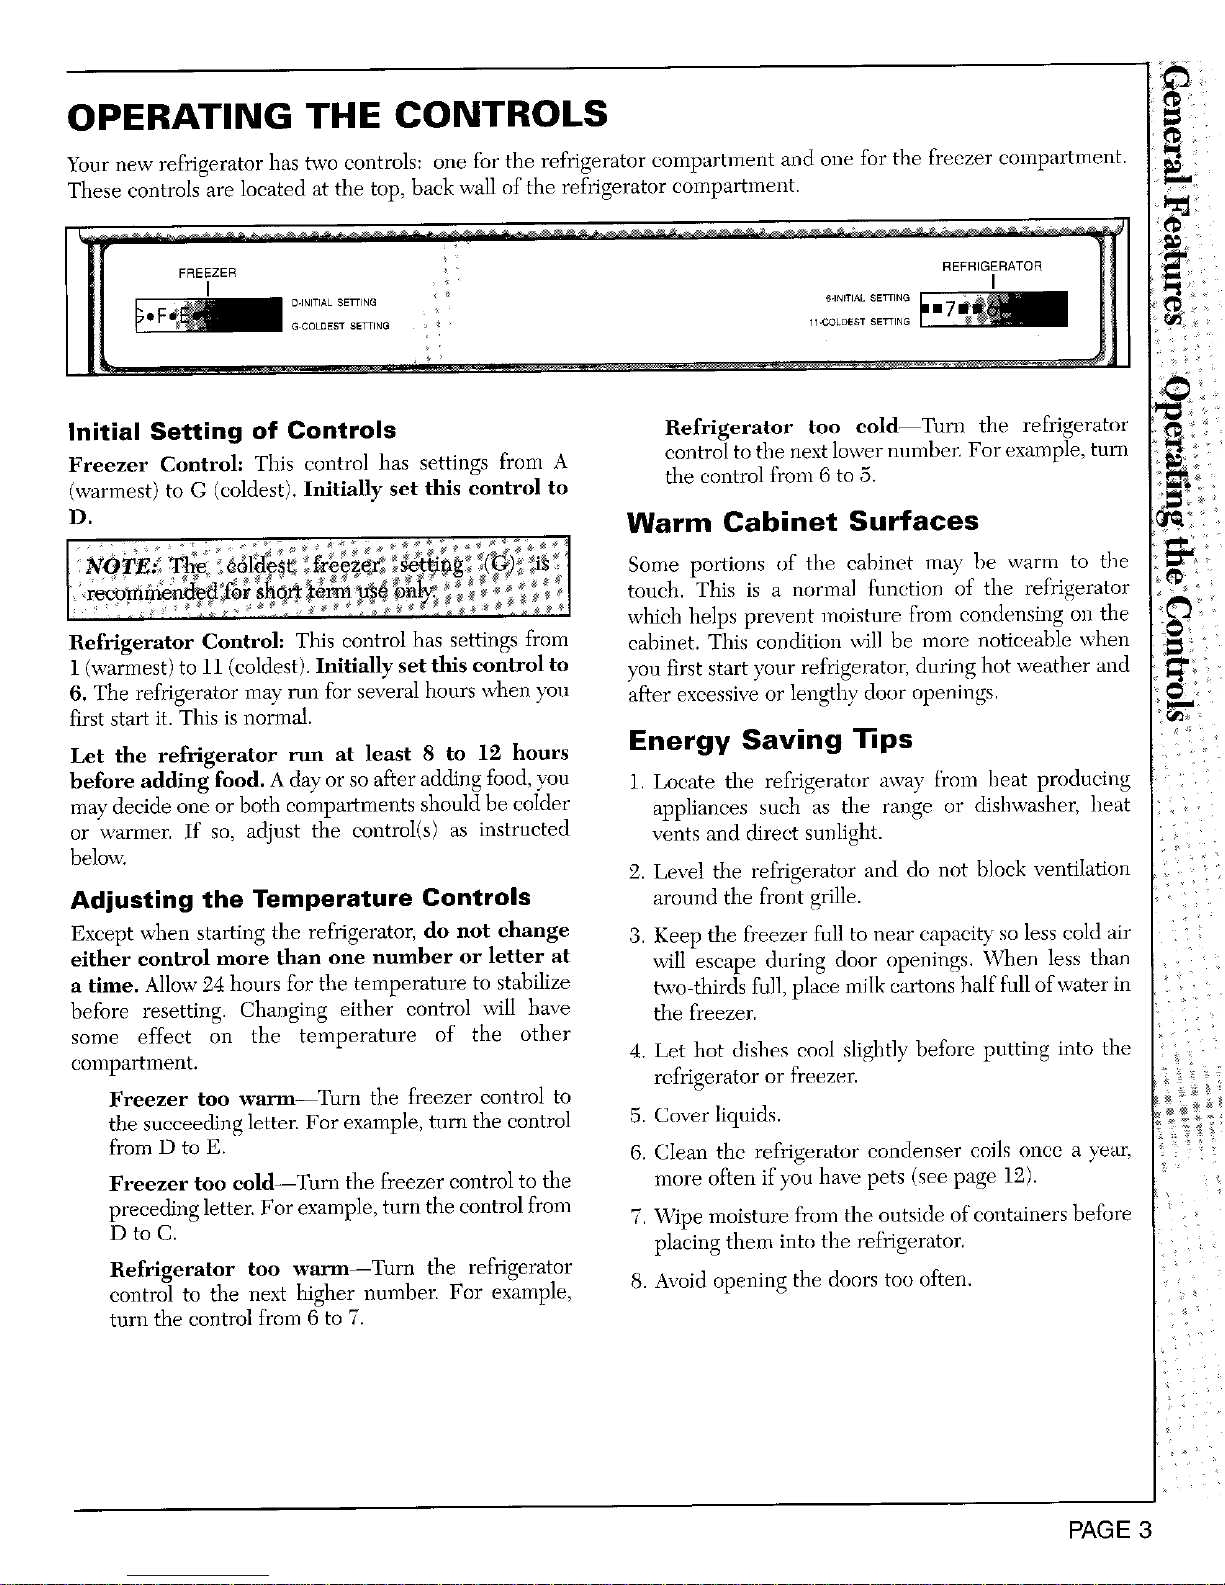
OPERATING THE CONTROLS
Your new refrigerator has two controls: one for the refrigerator compartment and one for the fieczer compartment.
These controls are located at the top, back wall of the refrigerator compartment.
FREEZER " REFRIGERATOR
I D.INITIALSET'ING 6.1Nr£1ALSETTING
G COLDEST8E]q'ING 114_OLDESTSETTING
Initial Setting of Controls Refrigerator too cold--Turn the refrigerator
Freezer Control: This control has settings from A control to the next lower number. For example, turn
(warmest) to G (coldest). Initially set this control to the control front 6 to 5.
D. Warm Cabinet Surfaces
Some portions of the cabinet may he warm to the
touch. This is a normal fnnction of the refrigerator
which helps prevent moisture from condensing on the
Refrigerator Control: This control has settings from cabinet. This condition _411be more noticeable when
1 (warmest) to 11 (coldest). Initially set this control to you first start your refrigerator, during hot weather and
6. The refrigerator may run for several hours when you after excessive or lengthy door openings.
first start it. This is normal.
Let the refrigerator run at least 8 to 12 hours Energy Saving
before adding food. A day or so after adding food, you 1. Locate the refrigerator away ti'oin heat producing
may decide one or both compartments should be colder appliances snch as the range or dishwasher, heat
or warmer. If so, adjust the control(s) as instructed vents and direct sunlight.
below. '2. Level the refrigerator and do not block ventilation
Adjusting the Temperature Controls around the front grille.
Except when starting the refrigerator, do not change 3. Keep the fi'eezer full to near capacity so less cold air
either control more than one number or letter at will escape dnring door openings. When less than
a time. Allow 24 hours for the temperature to stabilize two-thirds full, place milk cartons half fidl of water in
before resetting. Changing either control will have the freezer.
some effect on the temperature of the other
compartment 4. Let hot dishes cooI slightly before putting into the
refrigerator or freezer.
Freezer too warm--Turn the freezer control to
the succeeding letter. For example, turn the control 5. Cover liquids.
from D to E. 6. Clean the refrigerator condenser coils once a year.
Freezer too cold--Turn the freezer control to the more often if you have pets (see page 12).
preceding letter. For example, turn the control front
7. Wipe moisture from the outside of"containers before
D to C. placing them into the ref?dgerator.
Refrigerator too warm--Turn the refrigerator
control to the next higher number. For example, 8. Avoid opening the doors too often.
turn the control from 6 to 7.
PAGE 3
ADJUSTING THE INTERIOR
Refrigerator Interior I_OTE. ThebottombinisK_edandnotremovable I
Sure-Lock Shelves :6r adjugthblel
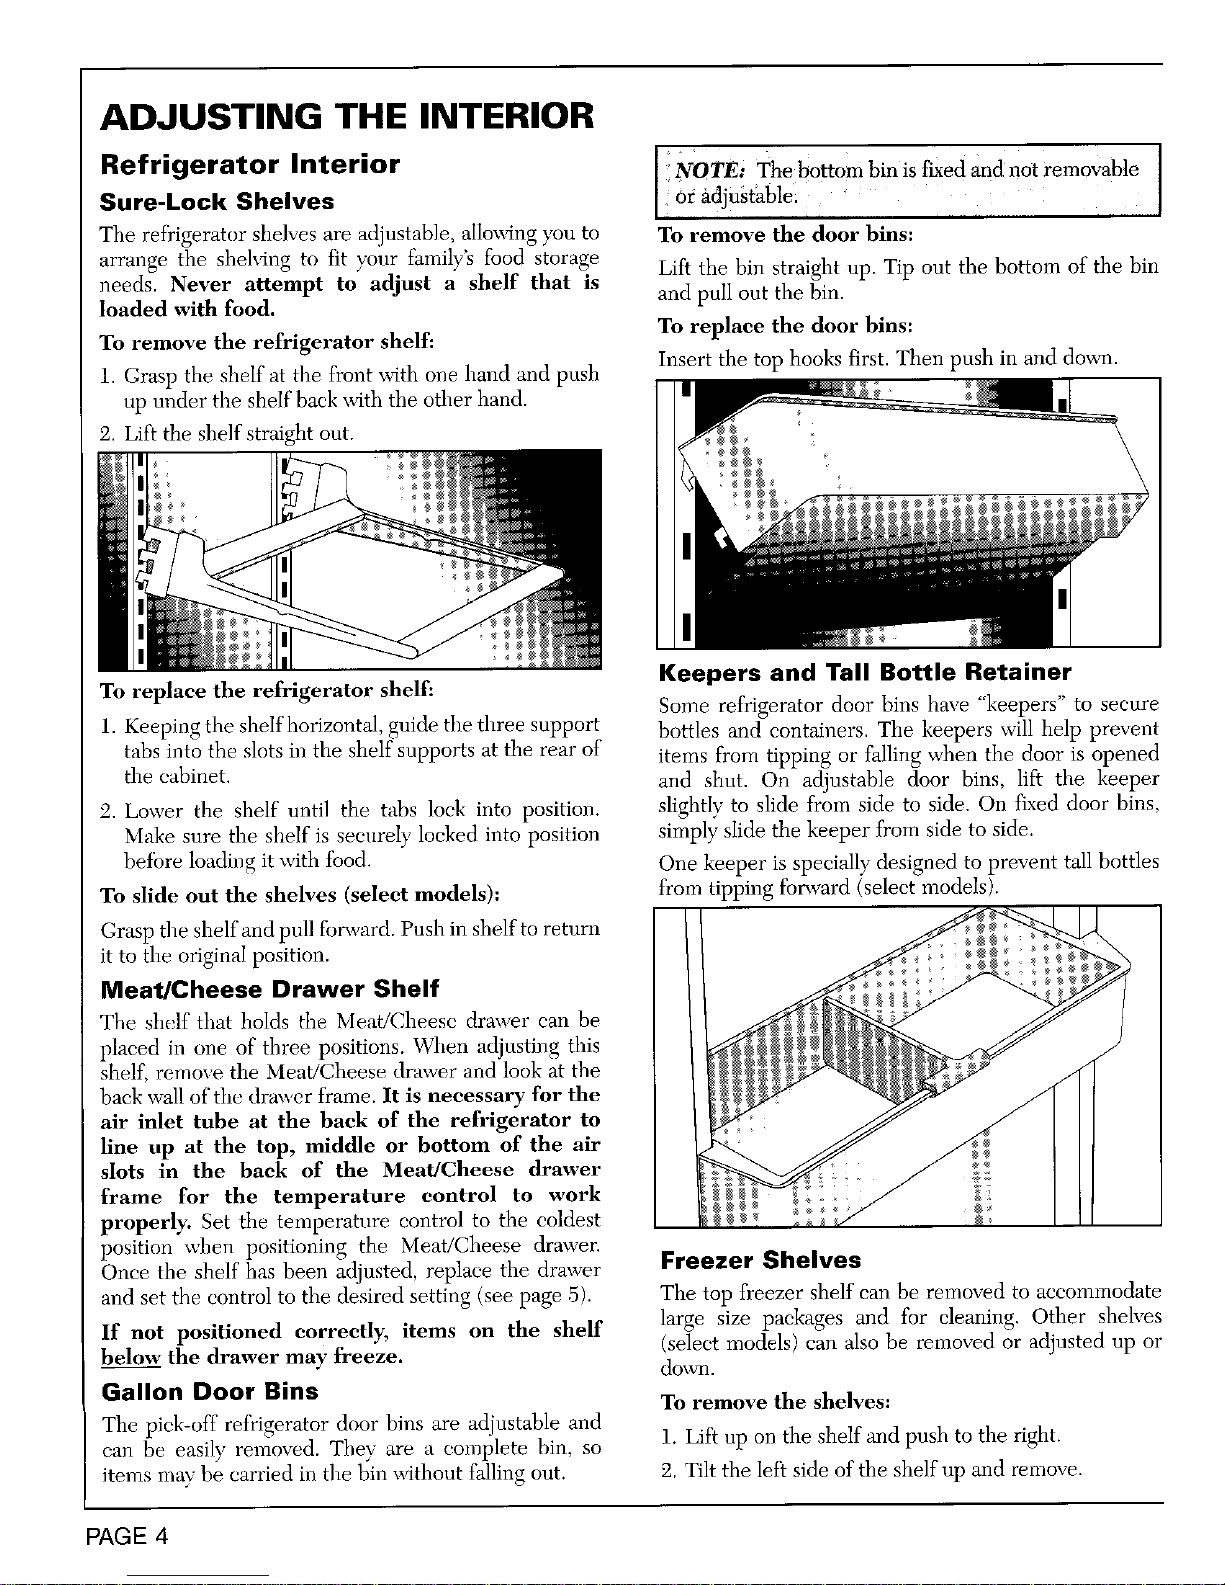
The refrigerator shelves are adjustable, alloxx_ngyou to To remove the door bins:
arrange the sheMng to fit your family's food storage Lift the bin straight up. Tip out the bottom of the bin
needs. Never attempt to adjust a shelf that is and pull out the bin.
loaded with food.
To remove the refrigerator shelf: To replace the door bins:
1. Grasp the shelf at the front _*_thone hand and push Insert the top hooks first. Then push in and down.
up under the shelf back with the other hand.
2. Lift the shelf straight out.
Keepers and Tall Bottle Retainer
To replace the refrigerator shelf: Some refrigerator door bins have "keepers" to secure
1. Keeping the shelf horizontal, guide the three support bottles and containers. The keepers will help prevent
tabs into the slots in the shelf supports at the rear of items from tipping or falling when the door is opened
the cabinet, and shut. On adjustable door bins, lift the keeper
2. Lower the shelf until the tabs lock into position, slightly to slide from side to side. Oi1 fixed door bins,
Make sure the shelf is securely locked into position simply slide the keeper from side to side.
betbre loading it with food. One keeper is specially designed to prevent tall bottles
To slide out the shelves (select models): from tipping forward (select models).
Grasp the shelf and pull forward. Push in shelf to return
it to the original position.
Meat/Cheese Drawer Shelf
The shelf that holds the Meat/Cheese drawer can be
placed in one of three positions. When adjusting this
shelf, remove the Meat/Cheese drawer and look at the
back wall of"the drawer frame. It is necessary for the
air inlet tube at the back of the refrigerator to
line up at the top, middle or bottom of the air
slots in the back of the Meat/Cheese drawer
frame for the temperature control to work
properly'. Set the temperature control to the coldest
position when positioning the Meat/Cheese drawer.
Once the shelf has been adjusted, replace the drawer Freezer Shelves
and set the control to the desired setting (see page 5). The top freezer shelf can be removed to accommodate
large size packages and for cleaning. Other shelves
If not positioned correctly, items on the shelf (select models) can also be removed or adjusted up or
below the drawer may freeze, down.
Gallon Door Bins To remove the shelves:
The pick-off refiigerator door bins are adjustable and
1. Lift up on the shelf and push to the right.
can be easily removed. They are a complete bin, so
items may be carried in the bin without falling out. '2. Tilt the left side of the shelf up and remove.
PAGE4
 Loading...