

Page 1
MLI7500AAW Maytag™ Cordless Electronic
Steam Iron
®
USER’S
GUIDE
Table of Contents
Safety Instructions ....................................1-2
Controls .........................................................3
Features .........................................................4
Preparing to Iron...........................................5
Setting the Temperature...............................6
Heating the Iron.............................................7
Using Steam Features ..................................8
Using the Spray Function ............................9
After Use/Storage .......................................10
Maintenance.................................................11
Trouble Shooting ........................................12
Warranty.......................................................13
Congratulations on your purchase of a
Maytag™ Cordless Steam Iron! Your
satisfaction is very important to us.
Before operating this iron, please read these
instructions completely. This manual should
be kept for future reference. It contains
instructions to acquaint you with proper
operating procedures for your iron.
If you have questions, call or write us (include
your model and serial numbers and your
phone number):
Maytag Appliances Sales Company
Attn. CAIR
®
Center
P. O. Box 2370
Cleveland, TN 37320-2370
1-877-366-5426 USA
1-800-688-2002 CANADA
1-800-688-2080 USA TTY (for deaf,
hearing impaired, or speech impaired)
(Mon.-Fri., 8am-8pm Eastern Time)
Internet: http://www.maytag.com
10/02 MCS Part No. 16022001
Page 2

1
IMPORTANT SAFEGUARDS
When using your cordless steam iron, basic safety precautions should always be
followed, including the following:
READ ALL INSTRUCTIONS BEFORE USING
1. Use iron only for its intended use.
2. To protect against a risk of electric shock, do not immerse the iron in water or other
liquids.
3. The iron should always be turned OFF before plugging or unplugging cradle cord
from outlet. Never yank cord to disconnect from outlet; instead, grasp plug and pull
to disconnect.
4. Do not allow cord to touch hot surfaces. Retract cord into cord reel unit when
storing.
5. Always disconnect cradle cord from electrical outlet when filling iron with water and
when not in use. Be careful to avoid spilling water over iron when filling.
6. Do not operate iron with a damaged cord or if the iron or cradle has been dropped or
damaged. To avoid a risk of electric shock, do not disassemble the iron or cradle.
Incorrect reassembly can cause a risk of electric shock when the iron is used.
7. Close supervision is necessary for any appliance being used by or near children. Do
not leave iron unattended while connected to an electrical outlet or on an ironing
board. Always position iron carefully to prevent it from falling if ironing board is
accidentally bumped or if cord is pulled. When not in use, always place iron securely
into cradle.
8. Burns can occur from touching hot metal parts, the hot surface of the cradle, hot
water, or steam. Use caution when turning a steam iron upside down. There may
be hot water in the reservoir.
SPECIAL INSTRUCTIONS
1. To avoid a circuit overload, do not operate another high-wattage appliance on the
same circuit.
2. If an extension cord is absolutely necessary, a 12 ampere cord should be used.
Cords rated for less amperage may overheat. Care should be taken to arrange the
cord so that it cannot be pulled or tripped over.
SAVE THESE INSTRUCTIONS
Page 3

2
Be sure that these precautions
are carefully followed.
SAFETY PRECAUTIONS
When retracting the electrical cord, keep
hold of the plug.
If the plug is not held,
the uncontrolled moving
plug may cause injury.
Be sure that your hands and arms do not
come into contact with the hot steam.
Touching hot steam
can cause burns.
Do not touch high heat areas, such as the
hot soleplate or support area.
Touching hot areas can cause burns.
Do not direct steam toward people or
toward clothes that are being worn by a
person.
Hot steam can cause burns.
Prevent the entry of dust and dirt into the
charging pins and contact points area. Be
sure that metal objects, such as pins or
wires, never come into contact with these
areas.
Touching the contact points with any pins or wires can
cause short-circuiting, electric shock and fire.
Do not tilt the iron or shake it rapidly back
and forth.
These actions can cause hot water to leak from the
water inlet/outlet spout, resulting in possible burns.
Do not use steel wool or other abrasives
to polish the charging pins.
This action may result in
faulty connections.
Do not press the burst of steam button
rapidly, over and over again.
If the burst of steam button is
pressed at intervals of less than
2 seconds, hot water droplets
may be discharged, possibly
causing burns.
Do not pour water onto the iron or cradle.
This action
may cause
a malfunction.
Be sure that the soleplate does not come
into contact with the surface of the iron
cradle or case.
This action may
deform or
damage the
surface of the
iron cradle or case.
Page 4
3
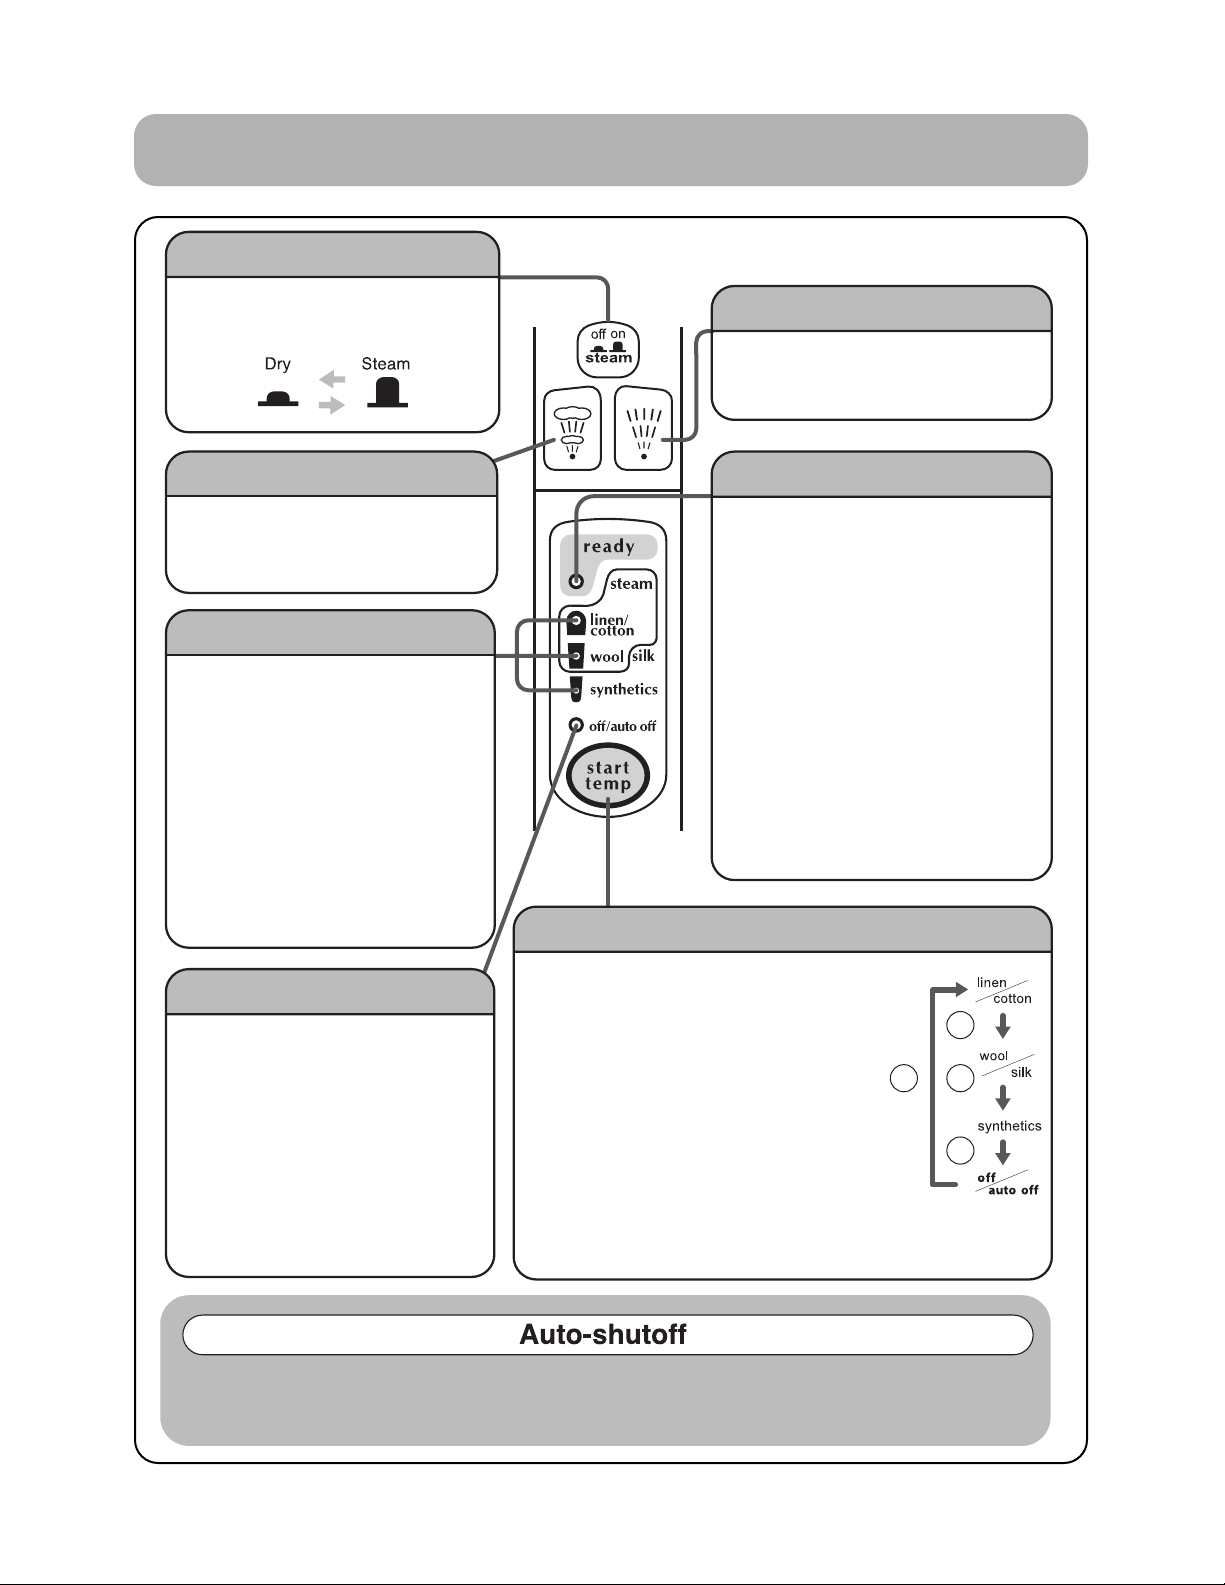
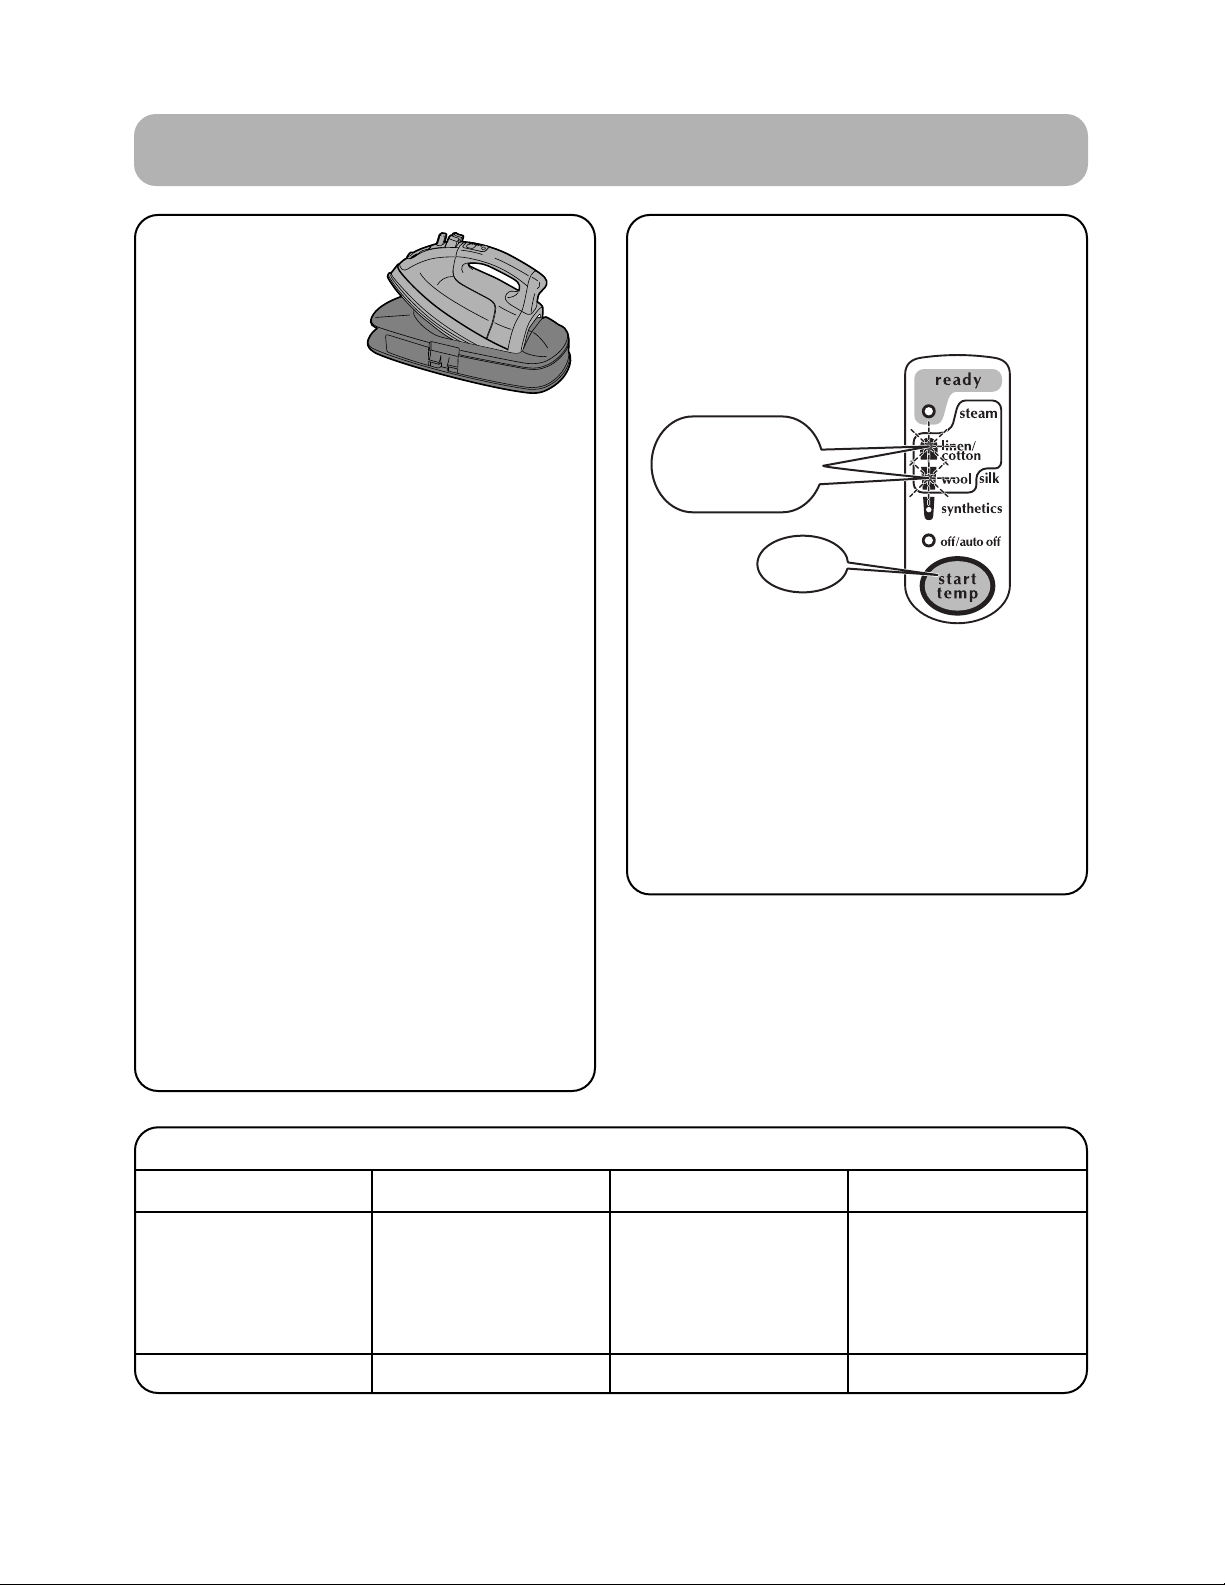
CONTROLS
13
2
4
Temperature Control Button
Off/Auto Off Light
Temperature Indicator Lights
Burst of Steam Button
Steam Button
Spray Button
Ready Light
• Pressing this button will
discharge a powerful shot
of steam.
• This light will illuminate when the
appropriate operating
temperature is reached.
• During ironing, the ready light will
begin to flash whenever the
temperature of the iron starts to
decrease. If the temperature
continues to decrease, the light
will eventually turn off. When the
light begins to flash, place the
iron back on the cradle for
reheating. Once the soleplate
heats up to the appropriate
operating temperature, the light
will again illuminate.
• The selected light will continue
flashing until the preset
temperature is reached.
• Once the preset temperature is
reached, the light will stop
flashing and remain illuminated.
• If the iron is not on the cradle,
these lights will not be
illuminated.
• Leave button up for steam, press
down for a dry iron.
• Pressing this button will
discharge a mist of water from
the spray nozzle.
The “OFF / AUTO OFF” light will
flash when:
• The electrical plug is inserted into
the electrical outlet.
• The temperature is set to “OFF”.
• The auto-shutoff function is
activated.
• If the iron is left on the cradle with the power still on, it will automatically shut off after
approximately 10 minutes. The “Auto off” light will illuminate.
Press this button firmly, once the iron
has been placed on the cradle.
• Each time this button is pressed, the
flashing light will cycle to the next
temperature indicator, in the order
shown by the arrows in the diagram.
• In order to avoid a malfunction
caused by accidental button contact,
the iron has been designed so that
the activation of the temperature
control button requires additional
pressure.
Page 5
4
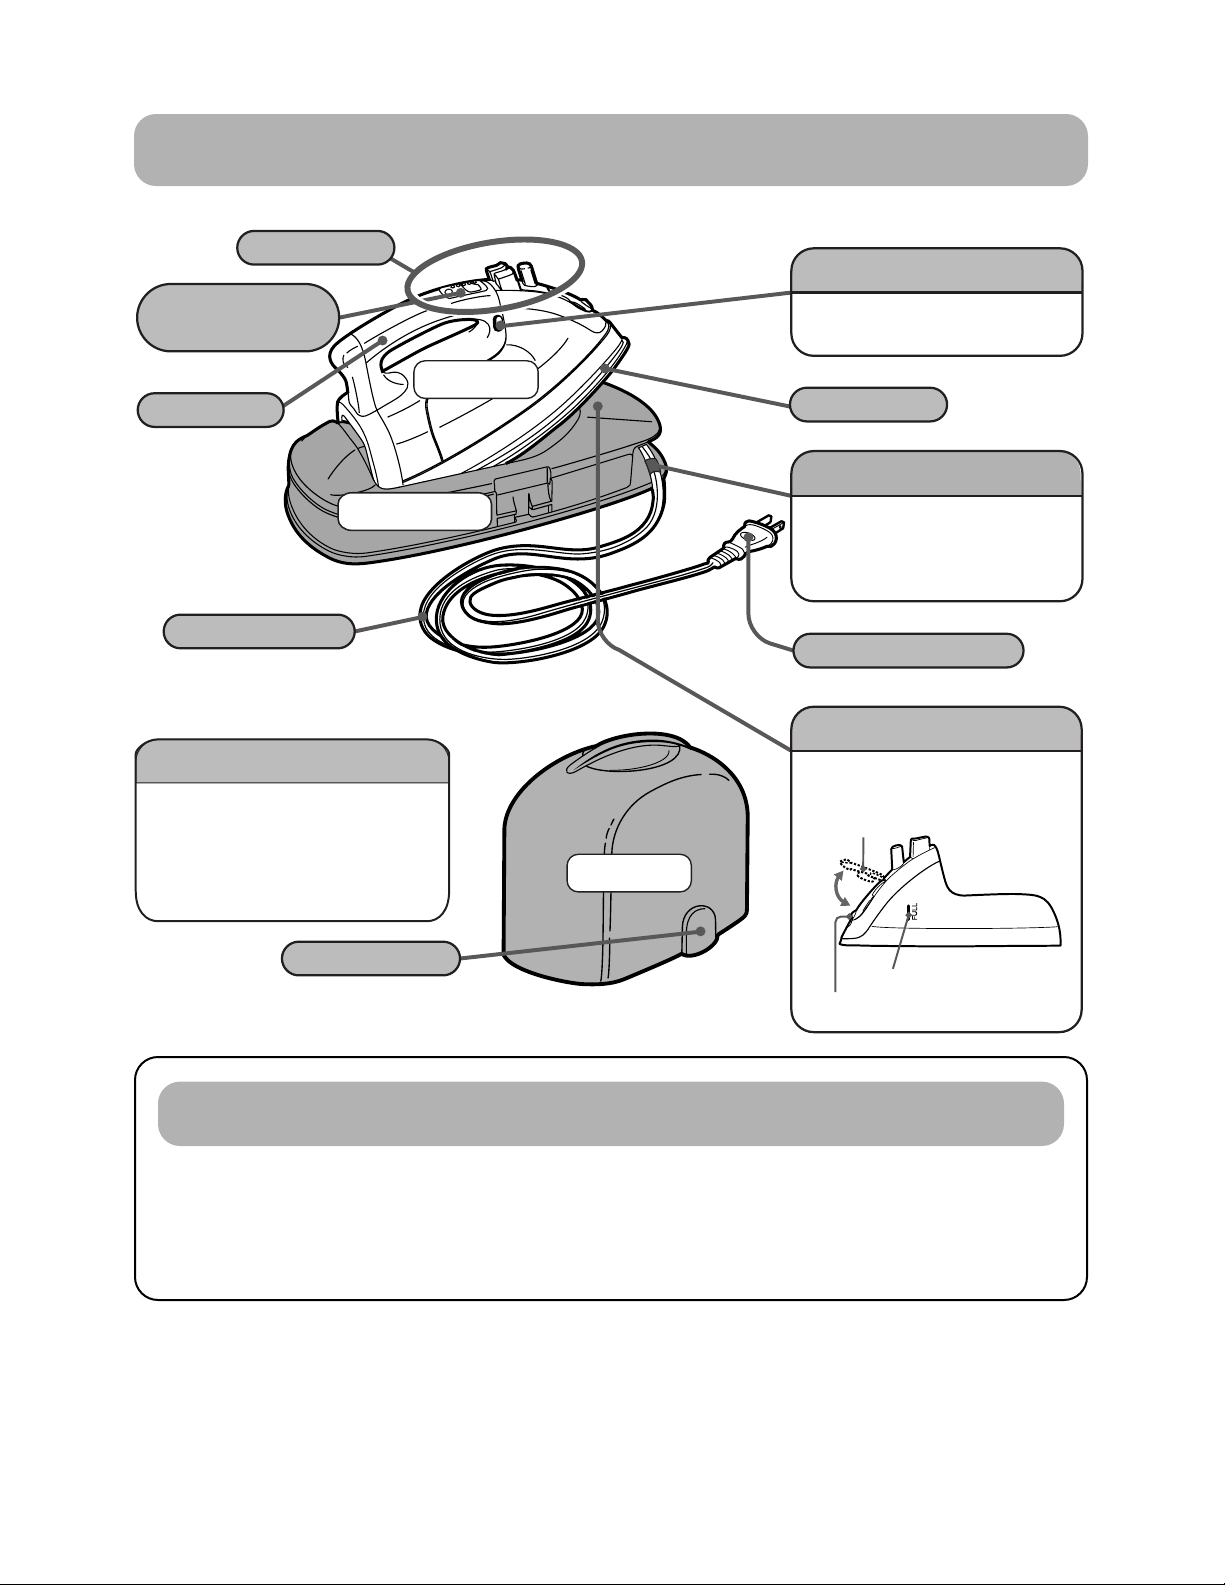
FEATURES
How does a cordless iron work?
• The iron rests on a cradle that supplies the power to heat the iron.
• Each time you set aside the iron to adjust a garment on the ironing board, the iron should
be placed back on the cradle. This will allow the iron to quickly “heat” so the temperature
of the iron remains at the desired level.
FULL indicator
Spray nozzle
Anti-drip Control
Iron
Cradle
Case
Tank
Red tape
Lock/Release button
Soleplate
Handle
Temperature
control
Case latch
Controls
Cord
(cord reel)
Electrical plug
If the temperature of the
soleplate decreases significantly
during iron usage, this function
will be activated to stop the
production of steam.
Press this button to remove
the water tank.
Do not over-extend the cord
by pulling it farther than the
section marked by this red
tape.
Lid for water inlet / outlet
spout. This lid prevents debris
from entering the spout.
Page 6
5
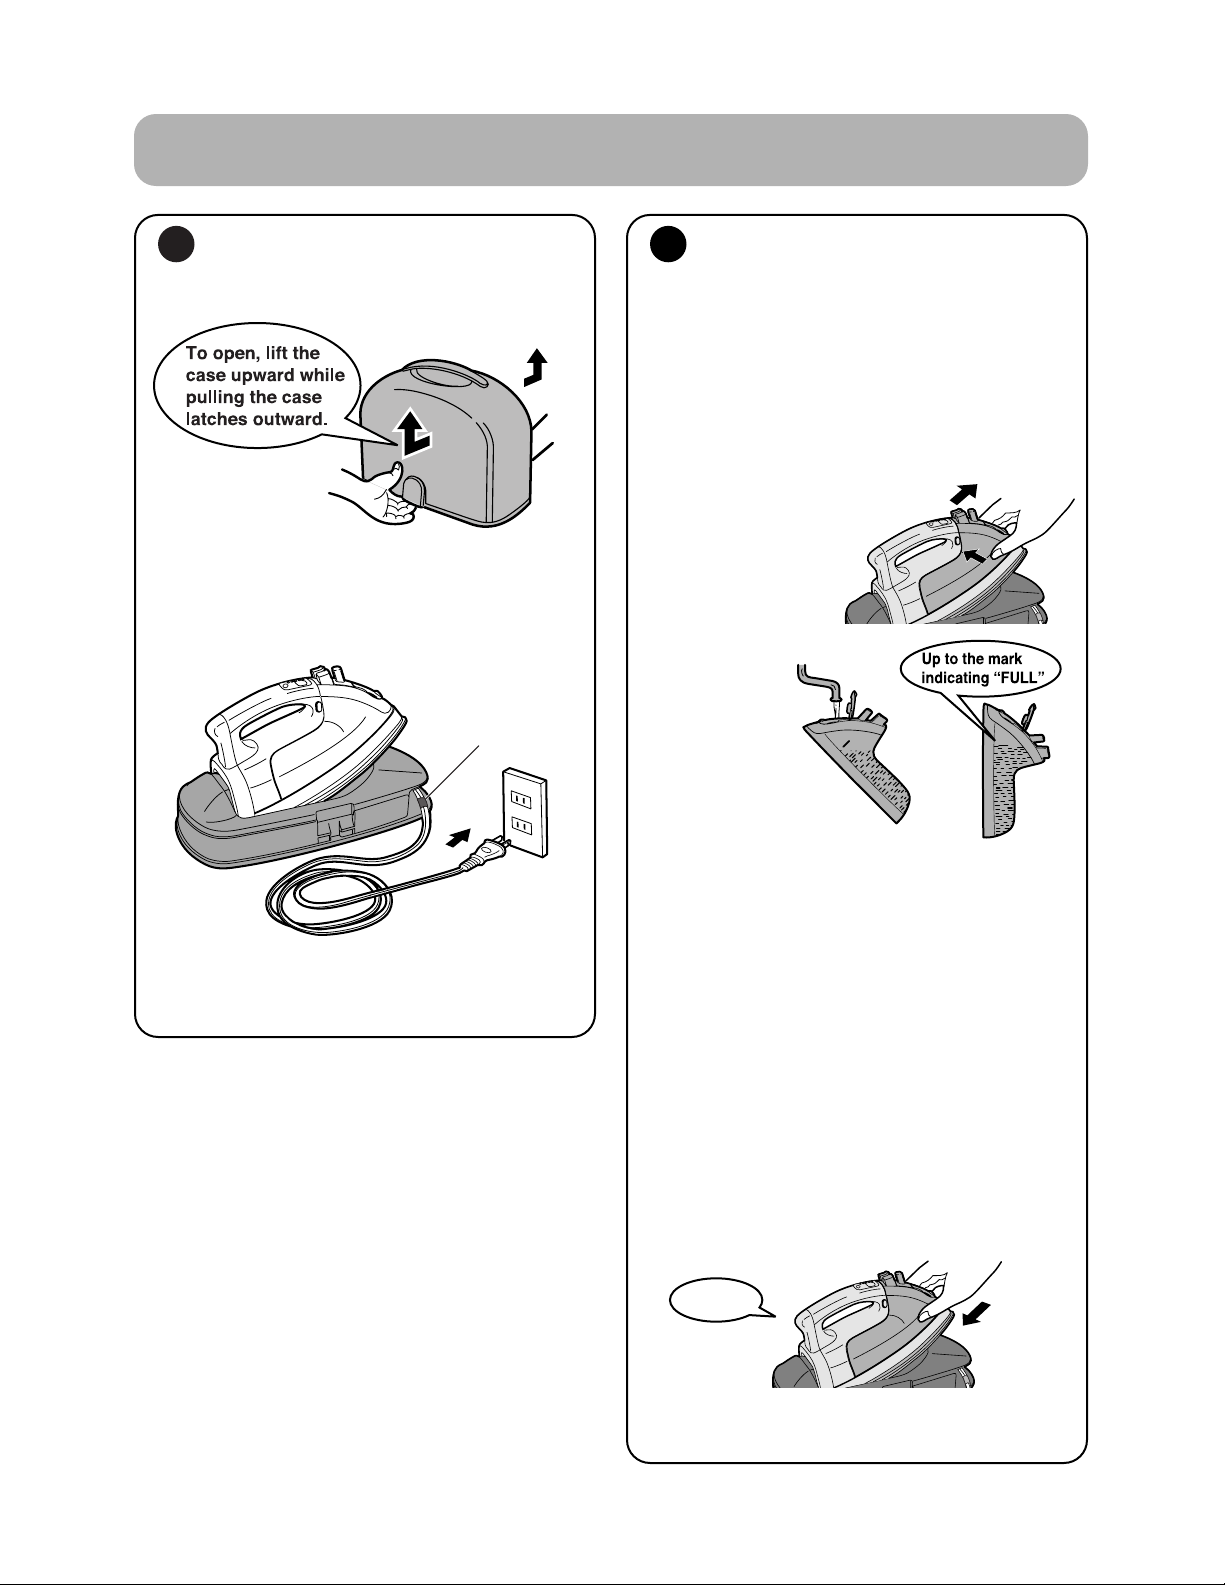
PREPARING TO IRON
1 Preparation
1. Remove the case.
2. Pull the electrical cord out only to the
length required. Insert the plug all the
way into an electrical outlet.
120 V AC
Red tape
• Do not over-extend the cord farther
than the section marked by this red
tape.
2 Filling with Water
It is not necessary to pour water into the
water tank if not using steam or water spray
features.
1. Press down the steam button to set the
iron to the “Dry” position.
2. Remove the tank and fill it with water, up
to the mark indicating “FULL”.
While pressing down
the release button,
remove the tank.
Fill with tap water
• Regions that have extremely hard
water should use a mixture of 50% tap
water and 50% distilled water.
• Do not use water treated by household
soft water systems, as it contains
minerals that are harmful to the iron.
• Do not fill the iron with water in excess
of the mark indicating “FULL”. If too
much water has been poured in,
steam will be discharged continuously
whenever the iron is placed on the
cradle.
3. Close the inlet/ outlet spout lid, then
reinstall the tank onto the iron.
Push water tank all the way in until it
clicks.
Click!
Page 7
6
SETTING THE TEMPERATURE
1. Place the iron on the
cradle.
2. Press the steam
button down.
3. Press the
temperature control
button until the desired temperature
indicator light is flashing.
• The temperature setting cannot be
changed unless the iron is on the
cradle.
• Refer to the Fabric Guide (shown
below) to select proper temperature
setting.
• Irons heat up more quickly than they
cool down, so start with lower
temperature settings and gradually
increase as needed.
• When ironing fabric blends, select a
temperature setting for the fabric
component that requires the lowest
temperature.
• When ironing fabrics that are
especially susceptible to heat, first
“test the fabric” by ironing in an
inconspicuous area of the fabric.
Utilize a pressing cloth as needed.
• Be sure to read garment care labels
since using improper temperature
settings could damage fabrics.
Settings
Choose the appropriate setting to suit the
fabric.
Fabric Guide
Setting Synthetics Wool/Silk Linen/Cotton
Acrylic Silk Linen
Acetate Wool Cotton
Fabric Type
Nylon Rayon
Velvet
Polyester
Temperature Low Medium High
Note: When ironing velvet, use steam but do not let the iron touch the fabric.
Test an inconspicuous area first before proceeding.
• The steam range is indicated for higher
temperature settings.
• When steam-ironing fabrics that require
lower temperature steam than is available
with the lowest steam setting, a pressing
cloth suitable for use with the particular
steam setting should be placed on top of
the fabric.
Press
Wait until the
selected light
begins to flash.
Page 8

7
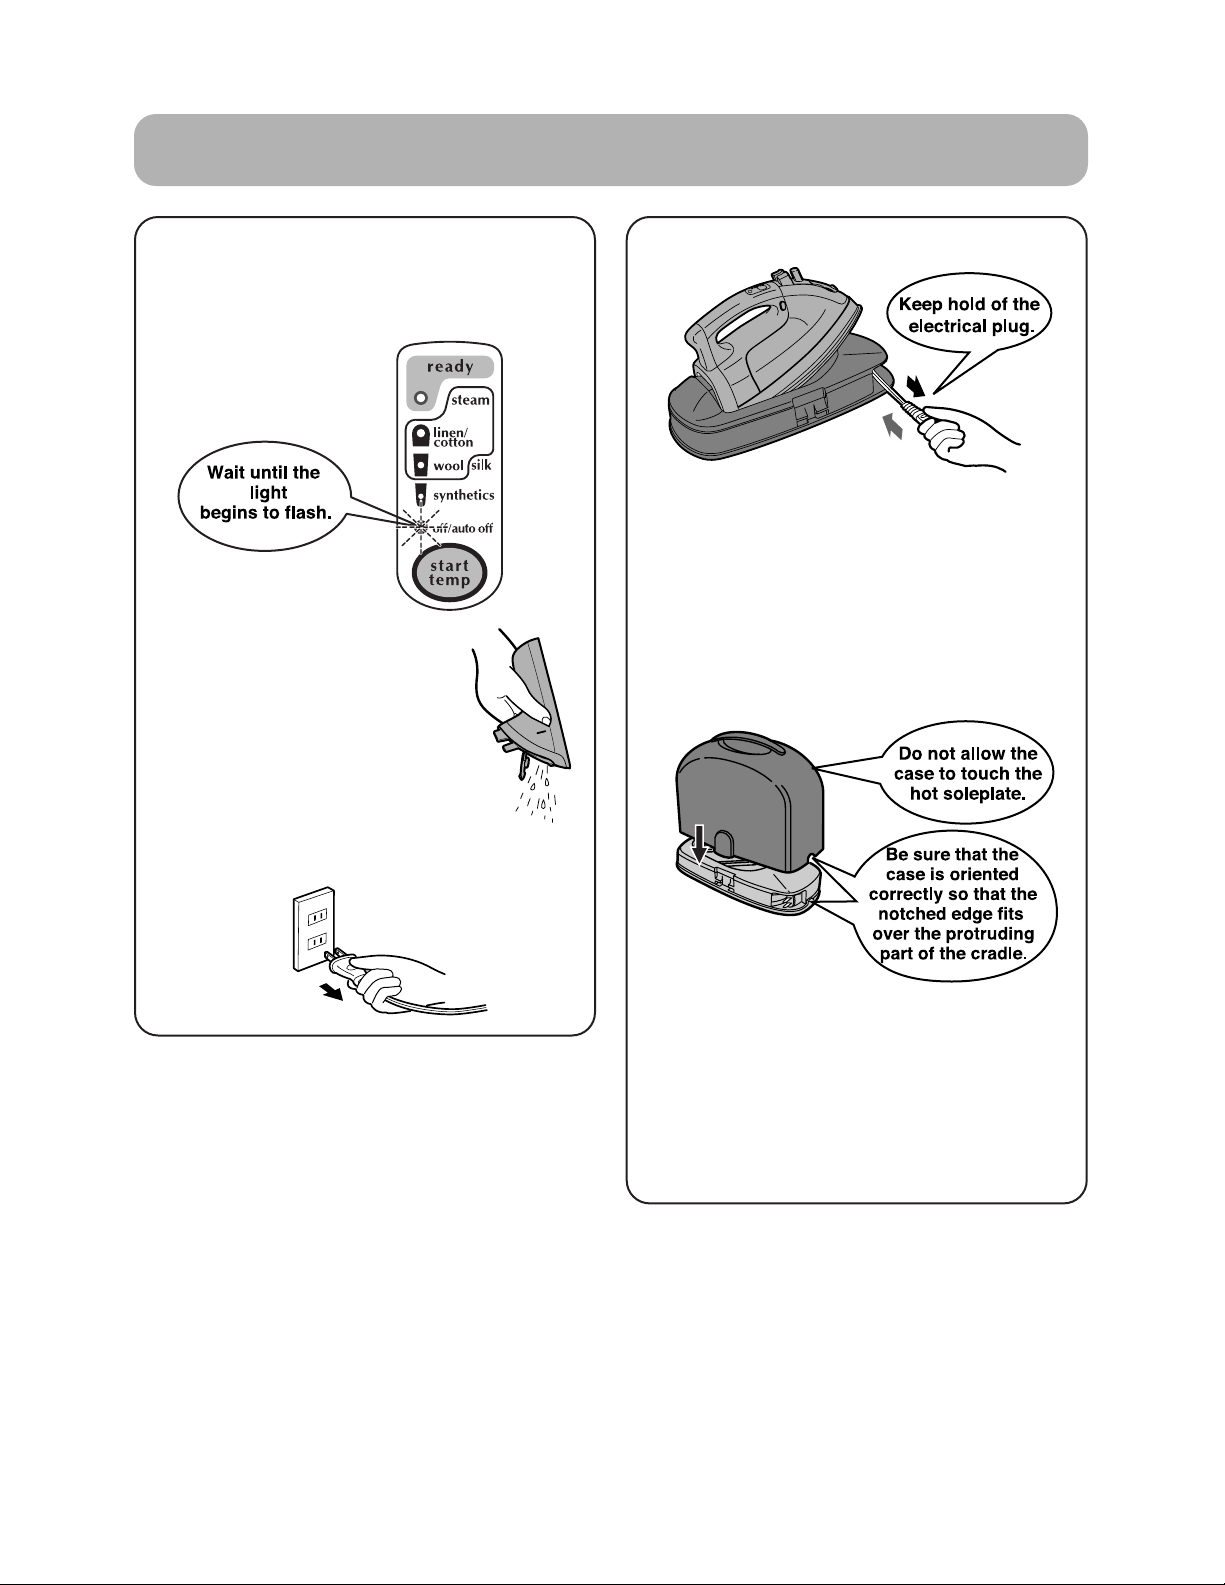
HEATING THE IRON
1. After setting the temperature, allow
the iron to preheat on the cradle. The
iron will be ready for use once the
ready light illuminates, approximately
1 - 2 minutes.
• If the temperature setting is changed
from high to low during iron operation,
the ready light will turn off and the
temperature indicator light will begin
flashing. The iron will be ready for use
once the ready light again illuminates
and the temperature indicator light
stops flashing.
• When the iron is removed from the
cradle, the temperature indicator
light will turn off.
Example: When “linen/cotton” has
been selected
2. Be sure that the iron is always placed
back on the cradle whenever you take
a break from ironing or when you
adjust clothes on the ironing board.
• The ready light will begin to flash
whenever the temperature of the iron
starts to decrease. If the temperature
continues to decrease, the light will
eventually turn off. When this occurs,
place the iron back on the cradle for
reheating.
• The iron will be ready to use once the
ready light illuminates.
• The most efficient ironing
performance will be obtained when
the iron is reheated briefly each
time the iron is placed on the cradle
while adjusting a garment during
normal ironing.
• When returning the iron to its cradle,
never place it in a sideways or
backwards position. The contact points
will become deformed and the iron will
not be able to heat properly.
• Steam may occasionally continue to
discharge for a short time after the iron
has been placed back on the cradle.
This is normal.
Place
correctly
Cuff Press
When used as a “dry” iron, the removal of
the water tank allows the iron to be used for
pressing hard to reach
areas such as sleeves,
cuffs and childrens clothes.
Page 9

8
USING STEAM FEATURES
Steam
• Choose a
setting within
the steam range
on the
temperature control.
• Steam will help remove
stubborn wrinkles on
wool, cotton and linen
fabrics.
•To iron velvet, use
steam but do not let the
iron touch the fabric.
Burst of Steam
Be sure that the iron is operated
using the “linen /cotton” setting.
• Press the Burst of Steam button at
intervals of 2 - 5 seconds to apply powerful
shots of steam directly onto wrinkles.
• If the burst of steam button is pressed at
shorter intervals, hot water droplets may
be discharged.
• If shots of steam are not discharged during
initial usage, press the burst of steam
button several times.
• NEVER iron clothes while being worn.
• DO NOT use the burst of steam feature
with delicate fabrics.
• In the event that the steam / bursts of steam are not easily discharged due to insufficient
water within the tank, refill the tank with water up to the mark indicating “FULL”.
(☞Refer to page 5.)
• If the bursts of steam decrease during usage, place the iron back on the cradle for reheating.
(If the burst of steam button has been operated more than 10 times consecutively, hot water
droplets may be discharged.)
• Do not place the iron on its side or upside down. This may cause water leakage and may
result in burns due to the escape of hot water.
Page 10
9
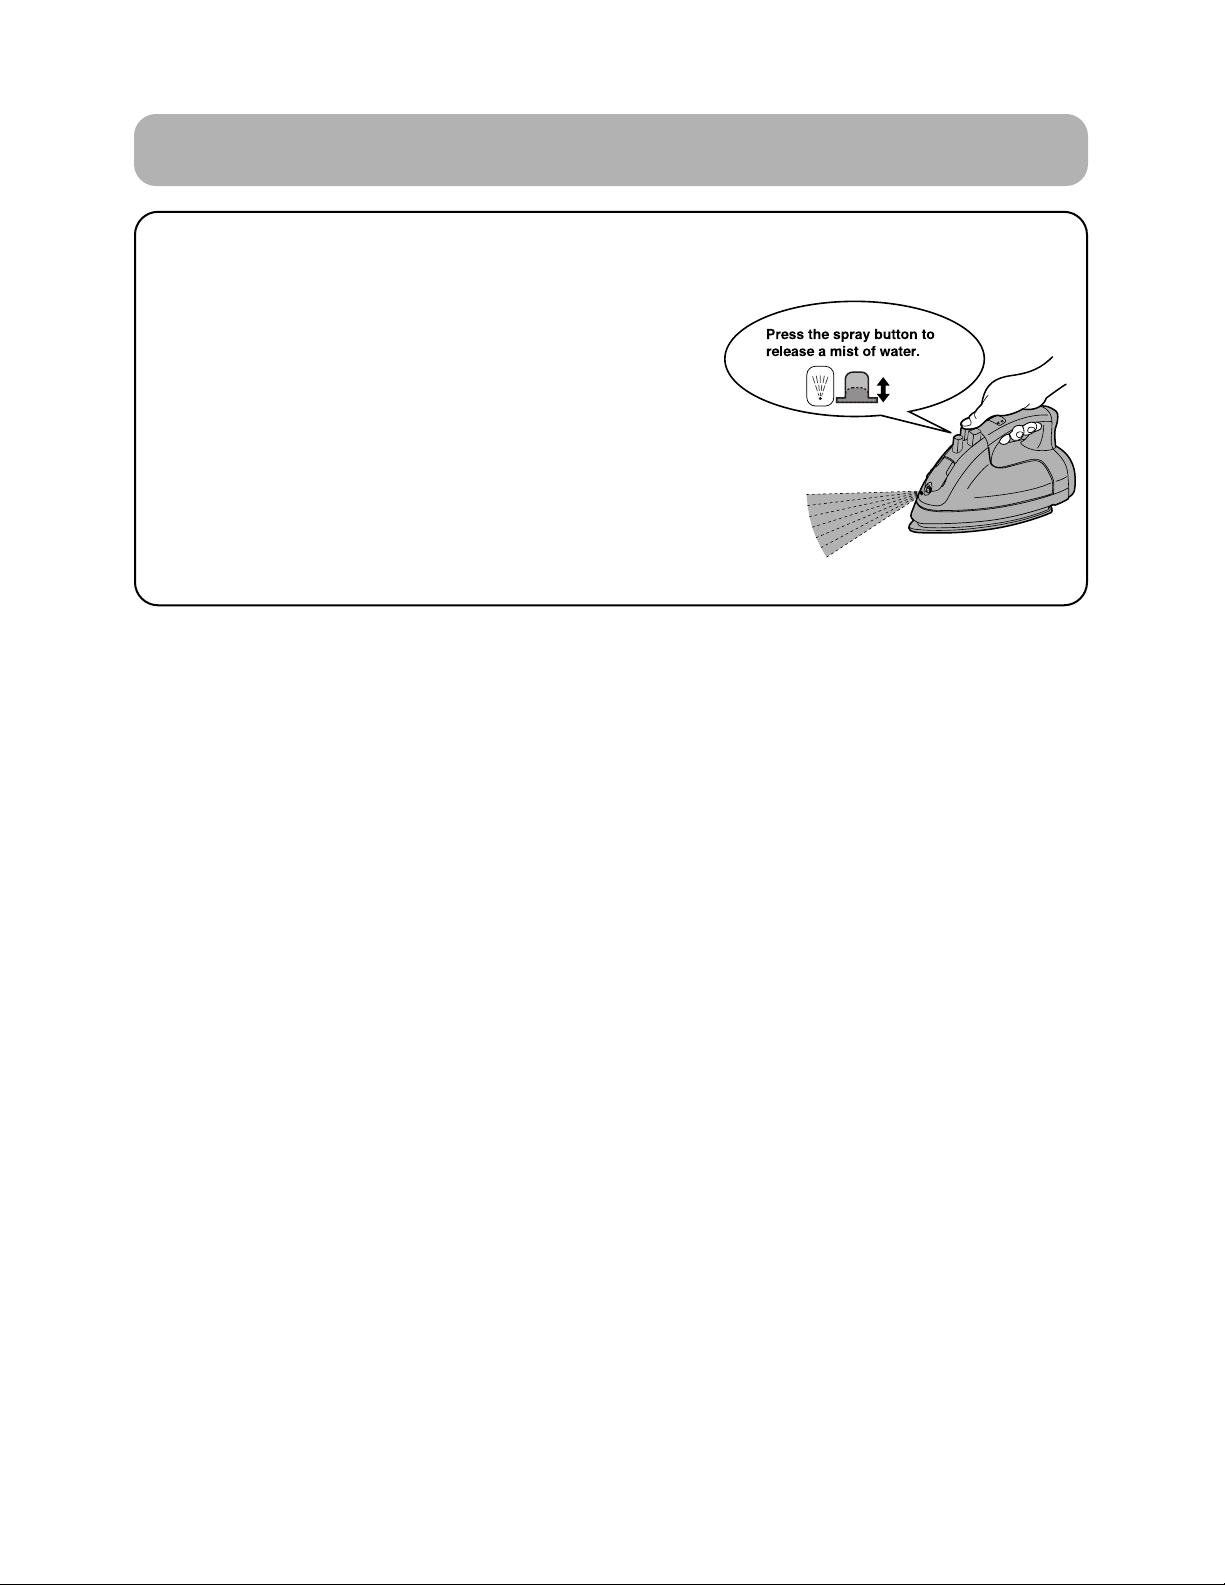
USING THE SPRAY FUNCTION
• The spray button can be utilized with either the “Dry” or the “Steam” functions.
•The spray button should be pressed only while the iron is kept level.
• If the spray does not discharge upon initial usage, then
press the spray button several times.
• The spray function helps to smooth cotton and linen
fabrics, as well as stubborn wrinkles on other fabrics.
• Some fabrics may stain if sprayed with water, so consult the
garment care label carefully.
• When storing the iron after using the spray function, press the
spray button several times after the water has been drained
from the tank, to be sure that all water is completely removed
from within the spray unit.
Page 11
10
AFTER USE / STORAGE
1. Press the steam button, so that it
returns to the “Dry” position.
2. Set the temperature control to “OFF”.
3. Remove the tank and drain
any remaining water. After
draining the water, reinstall
the tank onto the iron.
4. Remove the electrical plug
from the electrical outlet.
• Grasp the electrical cord
by the plug when unplugging it.
5. Retract the electrical cord.
•To retract the electrical cord, pull it out
slightly, then release it.
• If the cord stops before retracting
completely, pull out the cord slightly,
straighten out any twisted parts, then
slowly release it again.
6. Place the case back over the iron.
• Be sure that both case latches are
closed securely prior to storage.
• Please be aware that the case will
only fit correctly in one direction. If the
case is placed sideways over the iron,
it may become deformed due to the
iron’s heat.
Page 12

11
MAINTENANCE
Handle/ Tank / Soleplate
• These areas should be wiped clean using
a soft cloth.
• Stubborn soils on the soleplate may be
wiped off using a cloth that contains a mild
detergent or water. In particular, the
soleplate can become soiled if glue or other
adhesive materials are used when pressing.
To remove this residue, heat the iron and
run the soleplate over a cotton rag.
• Do not use scrub brushes, polishing
powders, thinners, benzene, bleach or
other harsh cleaning materials.
•To avoid scratching the soleplate, never
place the iron on rough surfaces such as
zippers, metal fasteners, etc.
Be sure that the electrical plug has been removed from the electrical outlet and wait until
the iron COOLS DOWN before proceeding with maintenance tips!!
Charging Pins
• Use a dry cloth to
clean any dirt and
debris from the
pins.
Page 13

12
TROUBLE SHOOTING
PROBLEMS
A“Clattering” Sound is
Heard When the Iron
is Shaken
Clicks are Heard While
the Iron is Being Used
Avoid Damaging
Iron Surface
White Powder Generated
When Steam (Particularly
with Bursts of Steam) is
Discharged
SOLUTIONS
This sound is caused by the anti-drip control mechanism.
This sound is normal.
“Clicking” noises may be generated from the inside of the iron.
These sounds are caused by the operation of the automatic
temperature regulator (thermostat). These sounds are normal.
Avoid ironing over metal buttons, zippers and other items that
could scratch the surface of the soleplate.
Do not touch the iron to the plastic buttons or other garment
accessories that could melt near the heat of the iron.
White powder may occasionally be discharged together with
the steam (particularly with bursts of steam). This powder
occurs due to the cleaning effect of the steam pressure, and is
normal. If the white powder gets onto clothing, simply brush the
clothes lightly to remove it. This will not harm clothing.
Page 14
13
MAYTAG STEAM IRON WARRANTY
One Year Limited Warranty
Maytag irons are warranted for 1 year from date of purchase against defects in material and
workmanship. During this period, any Maytag iron that, upon inspection by Maytag, is proved
defective, will be repaired or replaced, at Maytag’s option, without charge to the customer. If
a replacement iron is sent, it will carry the remainder of the warranty from the original iron.
THE WARRANTIES SET FORTH HEREIN ARE EXCLUSIVE AND NO OTHER
WARRANTIES, EXPRESS OR IMPLIED, INCLUDING BUT NOT LIMITED TO ANY
WARRANTY OF MERCHANTABILITY OR FITNESS FOR A PARTICULAR PURPOSE OR
USE, ARE MADE BY MAYTAG OR ARE AUTHORIZED TO BE MADE WITH RESPECT TO
THE PRODUCT.
What Is Not Covered By This Warranty:
1. Conditions and damages resulting from any of the following:
a. Any repair, disassembly, modification, alteration, or adjustment not authorized by
Maytag.
b. Misuse, abuse, accidents, unreasonable use, negligence or failure to follow Maytag’s
instructions.
c. Incorrect electric current, voltage or supply other than that listed on the product.
d. Improper setting of any control.
2. Warranty is void if the original serial numbers have been removed, altered or cannot be
readily determined.
3. Products purchased for commercial or industrial use.
4. Consequential or incidental damages sustained by any person as a result of any breach of
these warranties. Some states do not allow the exclusion or limitation of consequential or
incidental damages, so the above exclusion may not apply.
If You Need Service:
1. Call Maytag Appliances Sales Company, Maytag Customer Assistance at 1-877-366-5426,
USA or 1-800-688-2002 Canada. They may be able to assist you with troubleshooting
product difficulties. U.S. customers using TTY for deaf, hearing impaired or speech
impaired, call 1-800-688-2080
2. Write to Maytag Appliances Sales Company, Attn. CAIR
®
Center, P.O. Box 2370,
Cleveland, TN 37320-2370. When writing or calling about a service problem, please
include the following information:
a. Your name, address and telephone number;
b. Model and serial number of iron;
c. A clear description of the problem you are having;
d. Proof of purchase (sales receipt)
3. User’s guides are available from Maytag Appliances Sales Company, Maytag Customer
Assistance.
MAYTAG, 403 West Fourth Street North, P.O. Box 39, Newton, IA 50208
Page 15

MLI7500AAW Fer à repasser à vapeur électronique, sans fil
®
GUIDE DE L'UTILISATEUR
Table des matières
Mesures de sécurité ......................................15-16
Commandes.........................................................17
Caractéristiques ..................................................18
Préparation du fer ...............................................19
Sélection de la température ...............................20
Chauffage du fer..................................................21
Repassage à la vapeur .......................................22
Utilisation de la fonction «aspersion» ..............23
Après l'utilisation / remisage ..............................24
Entretien...............................................................25
Diagnostic............................................................26
Garantie................................................................27
Manual del Usuario .............................................28
Nous vous félicitations de votre achat d'un fer à
repasser à vapeur, sans fil Maytag! Il est important
pour nous que vous soyez totalement satisfait.
Avant d'utiliser ce fer, veuillez lire toutes les
instructions. Aussi, gardez ce guide pour vous y
reporter à l'avenir, le cas échéant. Il contient des
indications vous permettant de vous familiariser
avec les méthodes d'utilisation appropriées :
Si vous aviez des questions, veuillez écrire ou nous
appeler (en incluant les numéros de modèle et de
série ainsi que votre numéro de téléphone) à :
Maytag Appliances Sales Company
Attn. CAIR
®
Center
P. O. Box 2370
Cleveland, TN 37320-2370
É.-U. 1-877-366-5426
Canada 1-800-688-2002
Les clients des É.-U. utilisant un ATS (pour
handicap d’audition ou d’élocution) doivent
composer le 1-800-688-2080.
(Du lundi au vendredi de 8 h à 20 h,
heure de l’Est)
Internet: http://www.maytag.com
Page 16

15
IMPORTANT – MESURES DE SÉCURITÉ
Lors de l’utilisation du fer à repasser à vapeur sans fil, on doit toujours observer certaines
précautions pour garantir la sécurité, dont les suivantes :
LIRE LA TOTALITÉ DES INSTRUCTIONS AVANT D’UTILISER L’APPAREIL
1. Utiliser le fer à repasser uniquement pour l’application prévue.
2. Pour la protection contre les risques de chocs électriques, ne jamais immerger le fer dans de
l’eau ou un autre liquide.
3. Veiller à toujours INTERROMPRE l’alimentation du fer avant de brancher ou débrancher le
cordon d’alimentation de la base sur la prise de courant. Ne jamais tirer sur le cordon pour
débrancher la fiche; saisir la fiche et tirer.
4. Ne pas laisser le cordon d’alimentation toucher une surface chaude. Rétracter le cordon sur
l’enrouleur pour le remisage.
5. Veiller à toujours débrancher de la prise de courant le cordon d’alimentation de la base lors
d’une opération de remplissage du fer avec de l’eau, ou lorsque l’appareil n’est pas utilisé.
Veiller à éviter de renverser de l’eau sur le fer durant le remplissage.
6. Ne pas faire fonctionner le fer lorsque le cordon d’alimentation est endommagé ou si la base a
fait l’objet d’une chute ou a été endommagée. Pour éviter tout risque de choc électrique, ne
jamais démonter le fer ou la base. Un remontage incorrect pourrait susciter un risque de choc
électrique lors de l’utilisation du fer.
7. Superviser étroitement les enfants qui peuvent se trouver à proximité lors de l’utilisation du fer
ou de tout autre appareil ménager. Ne pas laisser le fer sans surveillance lorsqu’il est branché
sur la prise de courant, ou sur une planche à repasser. Veiller à toujours poser le fer à un
endroit tel qu’il ne pourra tomber de la planche à repasser en cas de choc accidentel ou d’une
traction sur le cordon. Lorsque le fer n’est pas utilisé, on doit toujours le placer correctement
sur la base.
8. Tout contact avec un composant métallique chaud, la surface chaude de la base, de l’eau
chaude ou de la vapeur, peut provoquer des brûlures. Procéder très prudemment s’il est
nécessaire de placer un fer à vapeur à l’envers; il peut y avoir de l’eau chaude dans le
réservoir.
INSTRUCTIONS SPÉCIALES
1. Pour éviter une surcharge du circuit d’alimentation, ne pas brancher sur un même circuit
plusieurs appareils qui suscitent une forte demande d’énergie.
2. S’il est absolument nécessaire d’utiliser un câble de rallonge, utiliser un câble de 12 A. Un
câble conçu pour une intensité inférieure pourrait s’échauffer excessivement. Veiller à placer le
câble de rallonge de manière qu’il ne puisse susciter un trébuchement ou subir une traction.
CONSERVER CES INSTRUCTIONS
Page 17

16
Veiller à observer scrupuleusement
ces précautions
MESURES DE SÉCURITÉ
Pour la rétraction du cordon d’alimentation,
maintenir la prise sur la fiche.
Si on ne tient pas la fiche,
la rétraction violente peut
provoquer des blessures.
Veiller à éviter tout contact des mains avec la
vapeur chaude.
Le contact avec la vapeur
chaude peut provoquer des brûlures.
Ne pas toucher une zone très chaude, comme
la semelle du fer ou la zone de support.
Le contact avec
une surface chaude peut provoquer des brûlures.
Ne jamais orienter le jet de vapeur vers une
personne ou vers les vêtements que porte une
personne.
La vapeur chaude peut provoquer des brûlures.
Empêcher l’introduction de poussière ou
souillures dans le logement des broches de
recharge et au voisinage des bornes de contact.
Veiller à ce qu’aucun objet métallique comme
épingle ou fil conducteur ne puisse venir en
contact avec
ces zones.
Tout contact d’un objet métallique avec les bornes de contact
peut provoquer court-circuit, choc électrique ou incendie
Ne jamais incliner le fer, ou le secouer
rapidement.
Ces mouvements peuvent provoquer une sortie d’eau chaude
par l’orifice de remplissage, et éventuellement des brûlures.
Ne jamais essayer de polir les broches de
recharge avec de la laine d’acier ou un autre
produit abrasif.
Ceci pourrait susciter une
détérioration des connexions.
Ne pas appuyer répétitivement sur le bouton
d’éjection de vapeur.
Des pressions répétitives à intervalles
de moins de 2 secondes sur le bouton
d’éjection de vapeur peuvent entraîner
l’éjection de gouttes d’eau chaude, ce
qui peut provoquer des brûlures.
Ne jamais verser de l’eau sur le fer ou sur la
base.
Ceci peut provoquer
une anomalie de
fonctionnement.
Veiller à ce que la semelle ne vienne pas en
contact avec la surface du support ou le
boîtier.
Ceci peut faire
subir des
dommages au
support du fer ou
à son capot.
Page 18

17
COMMANDES
13
2
4
• Lors d’une pression sur ce bouton,
un puissant jet de vapeur est émis.
• Ce témoin « Ready » (« Prêt »)
s’allume quand la température de
service appropriée est atteinte.
• Pendant le repassage, le témoin
« Ready » (« Prêt ») commence à
clignoter dès que la température du
fer commence à baisser. Si la
température continue de baisser, le
témoin finit par s’éteindre. Quand le
témoin commence à clignoter,
remettre le fer sur le support pour le
recharger. Une fois que la semelle
se retrouve à la température de
service appropriée, le témoin se
rallume.
• Le témoin sélectionné continue de
clignoter jusqu’à obtention de la
température prédéfinie.
• Lorsque la température prédéfinie
est atteinte, le témoin s’arrête de
clignoter et reste allumé.
• Si le fer n’est pas sur le support,
ces témoins ne seront pas illuminés.
• Le bouton doit être sorti pour
l’utilisation de vapeur. Pour
L’utilisation du fer simple, enfoncer le
bouton.
• Une pression sur ce bouton
provoque la sortie d'un brouillard
d’eau par la buse.
Le témoin « OFF/AUTO OFF »
(« MARCHE/ARRÊT
AUTOMATIQUE ») clignote quand :
• La fiche est branchée dans une prise.
• La température est réglée sur
« OFF » (« ARRÊT »).
• La fonction d’arrêt automatique est
activée.
• Si on laisse le fer sur le support qui demeure alimenté, il cesse automatiquement de fonctionner après
environ 10 minutes. Le témoin «Auto off» / «Arrêt automatique» s’illuminera.
Fermement appuyer sur ce bouton, une fois
que le fer est placé sur le support.
• Chaque fois que l’on appuie sur ce bouton,
le témoin de l’indicateur du prochain niveau
de température s’allumera dans l’ordre
indiqué par les flèches du schéma.
• Afin d’éviter un mauvais fonctionnement
entraîné par un contact accidentel du
bouton, le fer a été conçu pour que
l’activation du bouton de commande de la
température n’ait lieu que si l’on appuie sur
celui-ci avec suffisamment de force.
Page 19

18
CARACTÉRISTIQUES
Comment fonctionne un fer à repasser sans fil?
• Le fer repose sur un support qui fournit l’énergie pour le chauffage du fer.
• Chaque fois qu’on doit lâcher le fer pour ajuster la position d’un vêtement sur la planche à repasser, on devrait
replacer le fer sur le support. Ceci permet une recharge rapide du fer et le maintien de sa température au
niveau désiré.
Fer
Capot
Support
Si la température de la semelle du
fer diminue sensiblement durant
l’utilisation, cette fonction
interrompt la production de vapeur.
Appuyer sur ce bouton pour la
dépose du réservoir d’eau.
Ne pas faire sortir le cordon
d’alimentation au-delà du point
identifié par le ruban rouge.
Couvercle de l’orifice de
remplissage.
Ce couvercle empêche
l’introduction de débris.
Page 20

19
PRÉPARATION DU FER
1 Preparation
1. Enlever le capot.
2. Déployer seulement la longueur de cordon
d’alimentation nécessaire. Enfoncer
complètement la fiche dans les alvéoles de
la prise de courant.
• Ne pas faire sortir le cordon d’alimentation
au-delà du point identifié par le ruban
rouge.
2 Remplissage avec l’eau
Il n’est pas nécessaire de remplir le réservoir
avec de l’eau s’il n’y aura pas d’utilisation d’eau
chaude ou de vapeur durant le repassage.
1. Enfoncer le bouton steam/vapeur pour
utiliser le mode de repassage à sec.
2. Retirer le réservoir pour le remplir avec de
l’eau. Remplir jusqu’au repère « FULL
»
(« PLEIN »).
Pendant que le bouton de
déblocage est enfoncé,
retirer le réservoir.
Remplir avec de
l’eau du robinet
• Dans une région où l’eau est très dure,
utiliser un mélange eau du robinet 50% /
eau distillée 50%.
• Ne pas utiliser de l’eau traitée par un
système d’adoucissement domestique, qui
peut contenir des composés minéraux
dangereux pour le fer.
• Ne pas remplir le réservoir au-delà du
repère «FULL». Toute quantité d’eau
excessive ressortira du réservoir lorsque
l’on placera le fer sur le support.
3. Fermer le couvercle de l'orifice de
remplissage puis réinstaller le réservoir dans
le fer.
Enfoncer le réservoir complètement, jusqu’à
l’émission du déclic.
Page 21

20
SÉLECTION DE LA TEMPÉRATURE
1. Placer le fer sur le
support.
2. Enfoncer le bouton
steam/vapeur.
3. Appuyer sur le
bouton de commande
de la température jusqu’à ce que le témoin
d’indication de la température voulue se
mette à clignoter.
• Le réglage de la température ne peut
être changé que si le fer se trouve sur
le support.
• Se reporter au guide de repassage (ci-
dessous) pour sélectionner le réglage de
température appropriée.
• Le fer s’échauffe plus rapidement qu’il se
refroidit; on peut donc commencer avec
une température relativement basse et
l’augmenter graduellement selon le besoin.
• Lors du repassage d’un textile de fibres
mixtes, sélectionner la température
correspondant aux composants les plus
délicats (la plus basse).
• Lors du repassage d’un textile
particulièrement susceptible à la chaleur,
effectuer d’abord un test de repassage
dans une zone peu visible. Le cas
échéant, utiliser une pattemouille.
•Veiller à lire les instructions d’entretien du
vêtement. L’emploi d’une température
incorrecte peut faire subir des dommages
aux textiles.
Réglages
Choisissez le réglage le plus approprié pour le
tissu.
Guide de repassage
Position de réglage Synthetics Laine /Soie Coton/Lin
Acrylique Laine Lin
Type de tissu Acétate Soie Coton
Nylon Rayonne
Velours
Polyester
Température de la semelle Basse Moyenne Élevée
Remarque : Pour le repassage de velours, utiliser la vapeur, mais sans laisser le fer toucher le tissu.
Effectuer d’abord un test dans une zone peu visible.
•L’emploi de vapeur est utile avec les
températures les plus élevées.
• Pour le repassage à la vapeur d’un textile qui
nécessite une température de vapeur inférieure
à celle disponible avec la plus basse
température offerte par le fer, placer par-dessus
le vêtement une pattemouille compatible avec
ce réglage vapeur particulier.
Page 22

21
CHAUFFAGE DU FER
1. Après avoir sélectionné la température,
laisser le fer préchauffer sur le support.
Le témoin de recharge s’éteint lorsque la
température sélectionnée est atteinte, en
1 à 2 minutes.
• Si on réduit la température de repassage
durant l’utilisation du fer, le témoin
« Ready » (« Prêt ») s’éteindra et le
témoin d’indication de la température
commencera à clignoter. Le fer sera prêt à
l’emploi une fois que le témoin « Ready »
(« Prêt ») s’allume à nouveau et que le
témoin de température s’arrête de
clignoter.
• Quand le fer est retiré du support, le
témoin de température s’éteint.
Exemple : Quand « Linen/Cotton » est
sélectionné
2. Veiller à toujours replacer le fer sur son
support lors de chaque pause, et
lorsqu'on doit ajuster la position du
vêtement sur la planche à repasser.
• Le témoin « Ready » commence à
clignoter dès que la température du fer
commence à diminuer. Si la température
continue à diminuer, le témoin finira par
s’éteindre. Quand ceci a lieu, remettre le
fer sur le support pour le recharger.
• Le fer sera prêt à l’emploi une fois que le
témoin « Ready » (« Prêt ») s’illumine.
• Le repassage le plus efficace est
obtenu quand le fer est rechargé, même
brièvement, chaque fois qu’il est remis
sur le support lorsque l’on doit ajuster
la position du vêtement pendant le
repassage.
• Ne jamais placer le fer de travers ou en
sens inverse sur le support : ceci pourrait
déformer les bornes de contact, et la
charge ne se produirait pas correctement.
• Le fer peut occasionnellement poursuivre
l’émission de vapeur pendant un court laps
de temps, après qu’il a été posé de
nouveau sur le support. Ceci est normal.
Repassage des poignets
Lors d’un repassage à sec, on
peut travailler plus facilement
sur manches, poignets, et
vêtements d’enfant si on
enlève le réservoir d’eau.
Page 23

22
REPASSAGE À LA VAPEUR
Vapeur
• Sélectionner une
température
permettant
l'utilisation de la
vapeur.
•L’application de vapeur facilite
l’élimination des faux plis sur
les articles en laine ou coton,
et sur le linge de maison.
• Pour le repassage de
velours, utiliser la vapeur,
mais sans laisser le fer
toucher le vêtement.
Jet de vapeur
Vérifier que le fer est utilisé avec le
réglage « linen/cotton ».
• Appuyer sur le bouton Jet de vapeur
à intervalles de 2 à 5 secondes pour projeter de
la vapeur directement sur les zones froissées.
• Si on réduit l’intervalle entre les pressions
successives, l’appareil peut émettre des
gouttes d’eau chaude.
• Si de la vapeur ne sort pas dès la première
pression sur le bouton, appuyer plusieurs fois
sur le bouton.
• NE JAMAIS repasser un vêtement directement
sur soi.
• NE PAS utiliser la projection de vapeur sur un
textile délicat.
• Si le fer ne parvient pas à émettre facilement de la vapeur parce que la quantité d’eau dans le
réservoir est insuffisante, remplir le réservoir jusqu’au repère « FULL » (« PLEIN ») (voir la page 19).
• Si la force des jets de vapeur diminue durant l’utilisation, remettre le fer sur le support pour une
recharge. (Si on a appuyé consécutivement plus de 10 fois sur le bouton d’éjection de vapeur,
l’appareil projette des gouttes d’eau chaude.)
• Ne pas placer le fer sur son côté, ou à l’envers; ceci peut provoquer la sortie d’eau chaude, qui
pourrait provoquer des brûlures.
Page 24

23
• On peut utiliser le bouton aspersion pour le repassage à sec ou avec vapeur.
• On ne doit appuyer sur le bouton aspersion que lorsque le fer est placé horizontalement.
• Si un jet n’est pas émis dès la première pression, appuyer
plusieurs fois sur le bouton.
• La projection d’eau chaude facilite le repassage des
articles en coton et lin, et l’élimination des faux plis tenaces
sur d’autres tissus.
• Les gouttes d’eau pourraient laisser des taches sur certains tissus;
consulter attentivement l’étiquette d’entretien du vêtement.
•Avant de remiser le fer après un repassage avec projection d’eau
chaude, appuyer plusieurs fois sur le bouton après avoir vidé l’eau
du réservoir, pour expulser la totalité de l’eau résiduelle du dispositif
de projection.
UTILISATION DE LA FONCTION
«ASPERSION»
Page 25

24
APRÈS L’UTILISATION / REMISAGE
1. Enfoncer le bouton « steam » (« vapeur »)
pour passer au mode de repassage à sec.
2. Placer le bouton de sélection de la
température à la position « OFF »
(« ARRÊT »).
3. Retirer le réservoir d’eau; vider
tout résidu d’eau. Réinstaller
ensuite le réservoir dans le fer.
4. Débrancher la fiche de la prise
de courant.
• Saisir la fiche et tirer; ne pas
tirer sur le cordon.
5. Rétracter le cordon d’alimentation électrique.
• Pour la rétraction du cordon, tirer
légèrement, puis laisser le cordon
s’enrouler.
• Si le cordon ne se rétracte pas
complètement, tirer légèrement sur le
cordon, redresser toute section vrillée, puis
laisser le cordon s’enrouler lentement.
6.
Installer le capot.
•Avant le remisage, bien fermer les deux
loquets.
• Une seule orientation du capot permet le
verrouillage correct des loquets. Si le fer a
été mal aligné sur le support, la chaleur du
fer peut provoquer une déformation du
support.
Page 26

25
ENTRETIEN
Poignée /Réservoir/Semelle
• Essuyer ces surfaces avec un linge doux.
• Pour des souillures tenaces sur la semelle,
essuyer avec un chiffon imbibé d’eau et d’un
détergent doux. En particulier, la semelle
pourrait être souillée par des résidus de colle
ou autres adhésifs utilisés dans les vêtements.
Pour éliminer ces résidus, faire chauffer le fer
et effectuer des mouvements de repassage sur
un chiffon de coton.
• Ne jamais utiliser brosse à récurer, poudre de
polissage, diluant, benzène, agent de
blanchiment ou autre produit de nettoyage
énergique.
• Pour éviter de rayer la semelle, ne jamais
placer le fer sur une surface accidentée –
fermeture à glissière, boutons métalliques, etc.
Avant d’entreprendre une opération d’entretien, veiller à ce que la fiche de branchement soit
débranchée de la prise de courant, et attendre le REFROIDISSEMENT COMPLET de l’appareil.
Broches de recharge
• Nettoyer les broches
avec un chiffon sec
pour enlever tous
débris.
Page 27

26
DIAGNOSTIC
PROBLÈMES
Émission d’un cliquetis
lorsqu’on secoue le fer
Émission de déclics lors
de l’utilisation du fer
Détérioration de la
surface de la semelle
Décharge de poudre
blanche avec la vapeur
(particulièrement avec
un jet de vapeur)
SOLUTION
Ce son est dû au mécanisme de contrôle des fuites.
Ceci est normal.
Les déclics peuvent être générés à l’intérieur du fer. Ceci est dû au
fonctionnement du régulateur de température automatique
(thermostat). Ceci est normal.
Éviter de repasser par-dessus fermeture à glissière, boutons métalliques
ou autres articles susceptibles de rayer la surface de la semelle.
Ne pas approcher le fer chaud des boutons en plastique ou autres
accessoires que la chaleur du fer pourrait affecter.
Une poudre blanche peut être occasionnellement déchargée avec la
vapeur (particulièrement avec un jet de vapeur). Ceci est dû à l’effet
de nettoyage de la pression de vapeur; c’est normal. Si la poudre
blanche est projetée sur le vêtement, il suffit de brosser légèrement
pour l’éliminer. Elle ne fera subir aucun dommage au vêtement.
Page 28

27
GARANTIE POUR LE FER À
REPASSER À VAPEUR
Garantie limitée de 1 an
Les fers Maytag sont garantis pendant 1 an à compter de la date de l'achat contre tout défaut de
matériau ou de fabrication. Pendant cette période, tout fer Maytag qui, après inspection par Maytag, se
révélera défectueux, sera réparé ou remplacé, au gré de Maytag, gratuitement pour le client. Si un fer
de rechange est envoyé, il bénéficiera de la durée de garantie restante sur le fer d'origine.
LES GARANTIES DÉTAILLÉES DANS LES PRÉSENTES SONT EXCLUSIVES ET AUCUNE
AUTRE GARANTIE, EXPRESSE OU IMPLICITE, Y COMPRIS, MAIS SANS S’Y LIMITER,
TOUTE GARANTIE DE QUALITÉ MARCHANDE OU D’APTITUDE DU PRODUIT POUR UNE
UTILISATION OU APPLICATION PARTICULIÈRE, NE SERA ACCORDÉE PAR MAYTAG OU
NE SERA AUTORISÉE À ÊTRE APPLIQUÉE AU PRODUIT EN QUESTION.
Ce qui n'est pas couvert par cette garantie :
1. Les dommages ou problèmes dus à :
a. Toute réparation, modification, altération et tout démontage, réglage non autorisés par Maytag.
b. Accidents, mauvaise utilisation ou usage abusif ou déraisonnable, négligence ou non-respect des
instructions de Maytag.
c. Alimentation électrique (tension, intensité) incorrecte ou différente de celle indiquée sur le produit.
d. Réglage incorrect d'une commande.
2. La garantie ne peut être honorée si le numéro de série d'origine a été enlevé, modifié ou n'est pas
facilement lisible.
3. Les appareils achetés aux fins d'usage commercial ou industriel.
4. Les dommages secondaires ou indirects subis par toute personne suite au non-respect de cette
garantie. Certains états ou provinces ne permettent pas l'exclusion ou la limitation des dommages
secondaires ou indirects; par conséquent, les limitations ou exclusions ci-dessus peuvent ne pas
s'appliquer à votre cas..
Si vous avez besoin de service après-vente :
1. Contactez Maytag Appliances Sales Company, service à la clientèle de Maytag, au 1-877-366-5426
aux É.-U. ou 1-800-688-2002 Canada. Ce service pourra vous aider à diagnostiquer certains
problèmes. Pour les clients des É.-U. avec ATS dans le cas d'un handicap de l'audition ou de
l'élocution, composez le 1-800-688-2080.
2. Écrivez à Maytag Appliances Sales Company, Attn : CAIR
®
Center, P.O. Box 2370, Cleveland TN
37320-2370. Lors de tout contact auprès de Maytag Appliances Sales Company en raison d'un
problème particulier, veuillez fournir l'information suivante:
a. Vos nom, adresse et numéro de téléphone;
b. Numéro de modèle et numéro de série du fer;
c. Description claire du problème observé;
d. Preuve d'achat (facture de vente).
3. Les guides de l'utilisateur sont disponibles auprès de Maytag Appliances Sales Company, service à
la clientèle de Maytag.
MAYTAG, 403 West Fourth Street North, P.O. Box 39, Newton, IA 50208
Page 29

MLI7500AAW Plancha de Vapor Electrónica a
Batería Maytag™
®
M
ANUAL DEL
U
SUARIO
Tabla de Materias
Instrucciones de Seguridad..........................29-30
Controles..............................................................31
Características.....................................................32
Preparándose para Planchar .............................33
Selección de la Temperatura..............................34
Calentando la Plancha........................................35
Planchado con Vapor..........................................36
Uso del Rociador.................................................37
Después del Uso/Almacenamiento ...................38
Mantenimiento .....................................................39
Localización y Solución de Avería ....................40
Garantía................................................................43
¡Lo felicitamos por haber comprado una plancha de
vapor a batería Maytag! Su satisfacción es muy
importante para nosotros.
Antes de usar esta plancha, por favor lea
completamente todas estas instrucciones. Conserve
este manual para referencia futura. Contiene
instrucciones que le ayudarán a familiarizarse con
los procedimientos adecuados para usar la plancha.
Si usted tiene preguntas, llame o escriba (incluya su
número de modelo y número de serie y su número
de teléfono) a:
Maytag Appliances Sales Company
Attn: CAIR
®
Centre
P. O. Box 2370
Cleveland, TN 37320-2370
1-877-366-5426 EE.UU.
1-800-688-2002 CANADA
1-800-688-2080 EE.UU. TTY (para personas
sordas, con problemas auditivos o del habla)
(Lunes a Viernes, 8:00 a.m. a 8:00 p.m.
Hora del Este)
Internet: http://www.maytag.com
Page 30

29
ADVERTENCIAS IMPORTANTES
Cuando use su plancha de vapor a batería, siempre debe seguir ciertas precauciones de
seguridad básicas, incluyendo las siguientes:
LEA TODAS LAS INSTRUCCIONES ANTES DE USAR LA PLANCHA
1. Use la plancha solamente para el propósito que ha sido destinada.
2. Para protegerse contra un riesgo de choque eléctrico, no sumerja la plancha en agua ni en
ningún otro líquido.
3. La plancha debe siempre estar APAGADA antes de enchufar o desenchufar el cordón
eléctrico del tomacorriente. Nunca tire del cordón para desenchufarlo del tomacorriente;
sujete el enchufe y tire de él para desenchufarlo.
4. No deje que el cordón toque superficies calientes. Cuando guarde la plancha, enrolle
nuevamente el cordón en el recogecable.
5. Siempre desenchufe el cordón eléctrico del tomacorriente cuando llene la plancha con agua o
cuando no esté en uso. Tenga cuidado de no derramar agua sobre la plancha cuando la está
llenando.
6. No use la plancha si el cordón está dañado o si la plancha o el soporte se ha dejado caer o
están dañados. Para evitar un riesgo de choque eléctrico, no desarme la plancha ni el
soporte. El montaje incorrecto puede causar un riesgo de choque eléctrico cuando se use la
plancha.
7. Es necesaria una supervisión estricta si cualquier electrodoméstico va a ser usado por niños o
cerca de ellos. No deje desatendida la plancha cuando esté enchufada o sobre una tabla de
planchar. Siempre coloque la plancha con cuidado para evitar que se caiga si es que la tabla
de planchar es golpeada accidentalmente o si se tira del cordón. Cuando no esté en uso,
siempre coloque la plancha firmemente en el soporte.
8. Pueden ocurrir quemaduras al tocar las piezas de metal calientes, la superficie caliente del
soporte, el agua caliente o el vapor. Tenga cuidado al invertir la plancha de vapor. Puede
haber agua caliente en el depósito.
INSTRUCCIONES ESPECIALES
1. Para evitar sobrecarga del circuito, no use ningún otro electrodoméstico de alta potencia en el
mismo circuito.
2. Si es absolutamente necesario usar un cordón de extensión, se debe usar un cordón para 12
amperes. Los cordones para amperajes inferiores pueden sobrecalentarse. Es necesario
acomodar el cordón eléctrico de modo que nadie tropiece ni tire de él.
CONSERVE ESTA INSTRUCCIONES
Page 31

30
Cuando retraiga el cordón eléctrico, sujételo
del enchufe.
Si no se sujeta el
enchufe, el movimiento
descontrolado del enchufe
puede causar una lesión.
Asegúrese de que sus manos y brazos no
entren en contacto con el vapor caliente.
Al tocar el vapor caliente se
puede causar quemaduras.
No toque las áreas de alto calor, tal como la
suela de la plancha o el área de apoyo.
Al tocar las áreas calientes se pueden causar quemaduras.
No dirija el vapor hacia las personas o hacia
las ropas que están siendo usadas por una
persona.
El vapor caliente puede causar quemaduras.
Evite la entrada de polvo y suciedad en las
clavijas de carga y en las áreas de los puntos
de contacto. Asegúrese de que ningún objeto
de metal, tales como alfileres o alambres
entren en contacto con estas áreas.
Al tocar los puntos de contacto con algún alfiler o alambre
puede causar un cortocircuito, choque eléctrico e incendio.
No incline la plancha ni la sacuda rápidamente
hacia adelante y hacia atrás.
Estas acciones pueden causar que escape agua caliente de
la boquilla de llenado del rociador, causando posibles
quemaduras.
No use lana de acero ni otros abrasivos para
limpiar las clavijas de carga.
Esto puede afectar las
conexiones.
No oprima el botón del vapor rápidamente una
y otra vez.
Si se oprime el botón del vapor a
intervalos de menos de 2 segundos,
pueden salir gotas de agua,
posiblemente causando
quemaduras.
No derrame agua en la plancha ni en el
soporte.
Esto puede causar
un malfuncionamiento.
Asegúrese de que la suela no toque la
superficie de soporte o la tapa.
Esto puede
deformar o dañar
la superficie del
soporte o la tapa
de la plancha.
PRECAUCIONES DE SEGURIDAD
Asegúrese de que estas advertencias sean estrictamente cumplidas.
Page 32

31
CONTROLES
13
2
4
• Al oprimir este botón se descargará
un chorro potente de vapor.
• Esta luz ‘Ready’ (Lista) se iluminará
cuando se ha alcanzado la temperatura
de funcionamiento apropiada.
• Durante el planchado, la luz ‘ready’
comenzará a destellar siempre que la
temperatura de la plancha comience a
disminuir. Si la temperatura continúa
disminuyendo, la luz eventualmente
se apagará. Cuando la luz comienza
a destellar, coloque la plancha de
vuelta en el soporte para recargarla.
Una vez que la suela de la plancha se
calienta hasta la temperatura de
funcionamiento apropiada, la luz
nuevamente se iluminará.
• La luz seleccionada continuará
destellando hasta que se alcance la
temperatura preseleccionada.
• Una vez que la temperatura
preseleccionada es alcanzada, la
luz dejará de destellar y
permanecerá iluminada.
• Si la plancha no está en el soporte,
estas luces no estarán iluminadas.
•
Deje el botón hacia arriba para
vapor, oprímalo para planchar en
seco.
• Al oprimir este botón se expulsará
una neblina de agua por el rociador.
La luz ‘OFF/AUTO OFF’
(Apagado/Apagado Automático)
destellará cuando:
• El enchufe eléctrico es insertado en un
tomacorriente eléctrico.
• La temperatura está en el ajuste ‘OFF’.
• La función ‘auto/shutoff’ (apagado
automático) está activada.
• Si la plancha es dejada en el soporte y aún está encendida, se apagará automáticamente después
de aproximadamente 10 minutos. La luz ‘Auto off’ se iluminará.
Oprima este botón firmemente una vez que la
plancha haya sido colocada en el soporte.
• Cada vez que se oprima este botón, la luz
que destella pasará al siguiente indicador
de temperatura, en el orden mostrado con
las flechas del diagrama.
•Afin de evitar un malfuncionamiento
causado por contacto accidental del botón,
la plancha ha sido diseñada de modo que
es necesaria presión adicional para activar
el botón de control de la temperatura.
Page 33

32
CARACTERISTICAS
¿Cómo funciona una plancha a batería?
• La plancha descansa sobre un soporte que suministra la energía para calentar la plancha.
• Cada vez que usted deja la plancha a un lado para acomodar una prenda en la tabla de planchar, la plancha
debe ser colocada de vuelta en el soporte. Esto permite que la plancha se “cargue” rápidamente de modo que
la temperatura de la plancha permanezca al nivel deseado.
Soporte
Tapa
Plancha
Si la temperatura de la suela de la
plancha disminuye en forma
significativa durante el uso de la
plancha, esta función se activará
para detener la producción de vapor.
Oprima este botón para retirar el
depósito del agua.
No extienda el cordón más allá
de la sección marcada con
cinta roja.
Tapa de la boquilla de
entrada/salida del agua. Esta
tapa evita que entre suciedad a la
boquilla.
Page 34

33
PREPARANDOSE PARA LA PLANCHAR
1 Preparación
1. Retire la tapa.
2. Extienda el cordón eléctrico solamente hasta
el largo requerido. Inserte bien el enchufe
en el tomacorriente eléctrico.
• No extienda el cordón más allá de la
sección marcada con esta cinta roja.
2 Llenado con Agua
No es necesario vaciar agua en el depósito del
agua si no va usar las características del vapor o
rociado con agua.
1. Oprima el botón del vapor para colocar la
plancha en la posición ‘Dry’ (Seca).
2. Retire el depósito y llénelo con agua hasta la
marca ‘FULL’ (Lleno).
Oprima hacia abajo el botón
de desenganche y retire
el depósito.
Llene el depósito
con agua de la
llave.
• Las regiones que tienen
agua extremadamente dura deben usar
una mezcla de 50% de agua de la llave y
50% de agua destilada.
• No use agua tratada mediante sistemas
domésticos de ablandamiento de agua,
pues contienen minerales que son
perjudiciales para la plancha.
• No llene la plancha con agua más allá de la
marca ‘FULL’ (Lleno). Si se coloca
demasiada agua, el vapor se descargará
continuamente cada vez que la plancha sea
colocada en el soporte.
3. Cierre la tapa de la boquilla de
entrada/salida del agua, luego vuelva a
instalar el depósito en la plancha.
Inserte el depósito del agua hasta el fondo
hasta que escuche un chasquido.
Page 35

34
SELECCION DE LA TEMPERATURA
1. Coloque la plancha en
el soporte.
2. Oprima hacia abajo
el botón del vapor.
3. Oprima el botón de
control de la
temperatura hasta que
destelle la luz indicadora de la temperatura
deseada.
• El ajuste de la temperatura no puede
ser cambiado a menos de que la
plancha esté en el soporte.
• Consulte la Guía de Telas (incluida a
continuación) para seleccionar el ajuste
apropiado de temperatura.
• Las planchas se calientan más
rápidamente que lo que se enfrían, de
modo que comience con un ajuste de
temperatura más bajo y gradualmente
aumente, según sea necesario.
• Cuando planche mezclas de telas,
seleccione un ajuste de temperatura para
el componente de la tela que requiera la
temperatura más baja.
• Cuando planche telas que son
especialmente susceptibles al calor, primero
“pruebe la tela” planchando una área oculta
de la tela. Utilizando un paño de planchar,
como sea necesario.
• Lea las etiquetas de cuidado de las
prendas ya que si usa ajustes de
temperaturas incorrectos puede dañar las
telas.
Ajustes
Seleccione el ajuste más adecuado para la tela
específica.
Guía de Telas
Ajuste Sintéticos Lana/Seda Lino/Algodón
Acrílico Seda Lino
Acetato Lana Algodón
Tipo de tela
Nilón Rayón
Terciopelo
Poliéster
Temperatura Baja Mediana Alta
Nota: Cuando planche terciopelo, use vapor pero no deje que la plancha toque la tela. Pruebe en una
área oculta primero antes de proceder.
• El límite del vapor se recomienda para ajustes
de temperatura más altos.
• Cuando esté planchando con vapor telas que
requieran temperaturas de vapor más bajas
que el ajuste de vapor más bajo disponible en
la plancha, se recomienda usar un paño de
planchar adecuado sobre la tela.
Page 36

35
CALENTANDO LA PLANCHA
1. Después de seleccionar la temperatura,
deje que la plancha se precaliente en el
soporte. La plancha estará lista para usar
una vez que la luz de carga se apague,
aproximadamente en 1 – 2 minutos.
• Si el ajuste de la temperatura se cambia
de alta a baja durante el planchado, la luz
‘ready’ se apagará y la luz indicadora de la
temperatura comenzará a destellar. La
plancha estará lista para usar una vez que
la luz ‘ready’ se ilumine nuevamente y la
luz indicadora de la temperatura deje de
destellar.
• Cuando la plancha es retirada del
soporte, la luz indicadora de la
temperatura se apagará.
Ejemplo: Cuando se ha seleccionado
‘linen/cotton’ (lino/algodón)
2. Asegúrese de dejar la plancha en el
soporte siempre que usted termine de
planchar o cuando está acomodando las
ropas en la tabla de planchar.
• La luz ‘ready’ comenzará a destellar
siempre que la temperatura de la plancha
comience a disminuir. Si la temperatura
continua disminuyendo, la luz
eventualmente se apagará. Cuando esto
ocurra, coloque la plancha de nuevo en el
soporte para recargarla.
• La plancha estará lista para usar una vez
que la luz ‘ready’ se ilumine.
• El rendimiento más eficiente del
planchado se obtendrá cuando la
plancha es recargada brevemente cada
vez que se coloca sobre el soporte
cuando esté acomodando una prenda
durante el planchado normal.
• Cuando vuelva la plancha a su soporte,
nunca la coloque de lado o dirigida hacia
atrás. Esto deformará los puntos de
contacto y la plancha no podrá ser
cargada de manera apropiada.
• El vapor puede a veces continuar saliendo
durante un período corto después de que
la plancha ha sido colocada nuevamente
en el soporte. Esto es normal.
Planchado de Puños
Cuando use la plancha para planchar en seco
(‘dry’), al retirar el depósito del agua la plancha
puede ser usada para
planchar las áreas difíciles de
alcanzar tales como mangas,
puños y ropa de niños.
Page 37

36
PLANCHADO CON VAPOR
Vapor
• Seleccione un
ajuste dentro de
los límites del
vapor del selector
de temperatura.
• El vapor le ayudará a retirar las
arrugas difíciles en las talas
de lana, de algodón y de
lino.
• Para planchar terciopelo,
use vapor pero no deje
que la plancha toque la tela.
Chorro de Vapor
Asegúrese de que la plancha esté en
el ajuste ‘linen/cotton’ (lino/algodón).
• Oprima el 'botón del vapor' a
intervalos de 2 – 5 segundos para aplicar
chorros potentes de vapor directamente en las
arrugas.
• Si el botón del vapor se oprime a intervalos
más cortos, se pueden formar gotas de agua
caliente.
• Si no salen chorros de vapor durante el uso
inicial, oprima el botón varias veces.
• NUNCA planche ropas cuando están siendo
usadas.
• NO use el chorro de vapor con telas delicadas.
• En caso de que el vapor/chorros de vapor no son fácilmente descargados debido a que hay
insuficiente agua dentro del depósito, vuelva a llenar el depósito con agua hasta la marca ‘FULL’
(Lleno). (Consulte la página 33.)
• Si los chorros de vapor disminuyen durante el uso, coloque la plancha de vuelta en el soporte para
recargarla. (Si el botón de chorro de vapor ha sido usado más de 10 veces consecutivas, pueden salir
gotas de agua caliente.)
• No coloque la plancha de costado ni al revés. Esto puede causar escape de agua y puede resultar en
quemaduras debido al escape de agua caliente.
Page 38

37
USO DEL ROCIADOR
• El botón rociador puede utilizarse ya sea con el planchado en seco o con vapor.
• El botón rociador debe ser oprimido solamente cuando la plancha está nivelada.
• Si no funciona el rociador durante el uso inicial, oprima el
botón varias veces.
• El rociador ayuda a alisar las telas de algodón y lino, así como
también las arrugas difíciles en otras telas.
• Algunas telas pueden mancharse si se rocían con agua, por lo
tanto consulte la etiqueta de cuidado de la prenda.
• Cuando guarde la plancha después de usar la función de rociado,
oprima el botón de rociado varias veces después de que el agua ha
sido vaciada del depósito, para asegurarse de que no quede agua en
depósito rociador.
Page 39

38
DESPUES DEL USO/ALMACENAMIENTO
1. Oprima el botón del vapor, para que vuelva a
la posición “Seca”.
2. Gire el selector de temperatura a la posición
‘OFF’.
3. Retire el depósito y vacíe toda
el agua que quede en él.
Después de vaciar el agua,
vuelva a instalar el depósito
en la plancha.
4. Desenchufe la plancha del
tomacorriente eléctrico.
• Sujete el enchufe del cuando lo
desenchufe.
5. Enrolle el cordón eléctrico.
• Para reinsertar el cordón eléctrico, tírelo
hacia afuera levemente y luego suéltelo.
• Si el cordón se detiene antes de retraerse
completamente, tire ligeramente del
cordón, enderécelo si está torcido, luego
suéltelo levemente nuevamente.
6. Coloque la tapa de vuelta sobre la plancha.
• Asegúrese de que ambos pestillos de la
tapa estén firmemente cerrados antes de
guardarla.
• La tapa solamente calza en una sola
dirección. Si la tapa es colocada
horizontalmente sobre la plancha puede
deformarse debido al calor de la plancha.
Page 40

39
MANTENIMIENTO
Manija / Depósito/ Suela
• Estas áreas deben ser limpiadas usando un
paño suave.
• Las manchas difíciles en la suela de la plancha
pueden ser limpiadas usando un paño
empapado con un detergente suave o agua. En
particular, la suela puede ensuciarse si se ha
usado goma u otros materiales adhesivos
cuando se plancha. Para quitar este residuo,
caliente la plancha y pase la suela sobre un
paño de algodón.
• No use escobillas de restregar, polvos
pulidores, solventes, benceno, blanqueador u
otros materiales de limpieza abrasivos.
• Para evitar rayar la suela de la plancha, nunca
coloque la plancha sobre superficies ásperas
tales como cremalleras, sujetadores de metal,
etc.
¡Asegúrese de que el enchufe ha sido desconectado del tomacorriente y espere hasta que la
plancha SE ENFRIE antes de proceder con las sugerencias de mantenimiento!
Clavijas de Carga
• Use un paño seco
para limpiar cualquier
suciedad que puedan
tener las clavijas.
Page 41

40
LOCALIZACION Y SOLUCION DE AVERIAS
PROBLEMAS
Se escucha un "tintineo"
cuando la plancha es
sacudida
Se oyen chasquidos
cuando la plancha está
siendo usada
Evitar daño a la superficie
de la plancha
Producción de polvo
blanco cuando sale el
vapor (particularmente
con chorros de vapor)
SOLUTIONS
Este sonido es causado por el mecanismo de control de escape.
Este sonido es normal.
Los ruidos de chasquidos pueden ser generados en el interior de la
plancha. Estos sonidos son causados por el regulador automático de la
temperatura (termostato). Estos sonidos son normales.
Evite planchar sobre botones de metal, cremalleras y otros artículos que
puedan rayar la suela de la plancha.
No deje que la plancha toque los botones de plástico u otros accesorios
de las prendas que puedan derretirse con el calor de la plancha.
Puede salir ocasionalmente polvo blanco junto con el vapor
(particularmente con chorros de vapor). Este polvo ocurre debido al
efecto de limpieza de la presión del vapor y es normal. Si el polvo
blanco se adhiere a la ropa, simplemente escobille la ropa levemente
para retirarlo. Esto no dañará las ropas.
Page 42

41
NOTAS
Page 43

42
Page 44

GARANTIA DE LA PLANCHA
DE VAPOR MAYTAG
Garantía Limitada de Un Año
Las planchas Maytag son garantizadas, durante 1 año desde la fecha de compra original, contra
defectos de material y fabricación. Durante este período, cualquier plancha Maytag que, una vez
inspeccionada por Maytag, se compruebe estar defectuosa, será reparada o reemplazada, según lo
decida Maytag, sin costo alguno para el cliente. Si se envía una plancha de repuesto, la garantía
restante de la plancha original será transferida a la plancha de repuesto.
LAS GARANTIAS DESCRITAS AQUI SON EXCLUSIVAS Y MAYTAG NO OFRECE NI
AUTORIZA QUE SE OFREZCA NINGUNA OTRA GARANTIA RESPECTO A ESTE
PRODUCTO, YA SEA EXPRESA O IMPLICITA, INCLUYENDO PERO NO LIMITANDO,
CUALQUIER GARANTIA DE MERCANTIBILIDAD O APTITUD PARA UN PROPOSITO O
USO ESPECIFICO.
Lo que no cubre esta garantía:
1. Situaciones y daños resultantes de cualquiera de las siguientes eventualidades:
a. Cualquier reparación, desmontaje, modificación, alteración o ajuste no autorizado por Maytag.
b. Mal uso, abuso, accidentes o uso irrazonable, negligencia o incumplimiento de las instrucciones
de Maytag.
c. Corriente eléctrica, voltaje o suministro incorrecto y que no sea lo que está indicado en el
producto.
d. Ajuste incorrecto de cualquiera de los controles.
2. La garantía quedan nula si los números de serie originales han sido retirados, alterados o no son
fácilmente legibles.
3. Productos comprados para uso comercial o industrial.
4. Los daños consecuentes o incidentales sufridos por cualquier persona como resultado del
incumplimiento de esta garantía. En algunos estados no se permite la exclusión o limitación de
daños consecuentes o incidentales, por lo tanto la limitación o exclusión anterior puede no aplicarse
en su caso.
Si necesita servicio:
1. Llame a Maytag Appliances Sales Company, Maytag Customer Assistance al 1-877-366-5426
EE.UU. o 1-800-688-2002 Canada. Ellos le pueden ayudar a solucionar problemas relacionados con
averías del producto. Los clientes de EE.UU. que usan TTY para personas con impedimentos
auditivos o del habla deben llamar al 1-800-688-2080.
2. Escriba a Maytag Appliances Sales Company, Attn: CAIR
®
‚ Center, P.O. Box 2370, Cleveland, TN
37320-2370. Cuando llame o escriba acerca de un problema de servicio, por favor incluya la
siguiente información:
a. Su nombre, dirección y número de teléfono;
b. Número de modelo y número de serie de la plancha;
c. Una descripción clara del problema que está experimentando;
d. Comprobante de compra (recibo de compra).
3. Las guías del usuario pueden solicitarse a Maytag Appliances Sales Company, Maytag Customer
Assistance.
MAYTAG, 403 West Fourth Street North, P.O. Box 39, Newton, IA 50208
 Loading...