

Page 1
Gas - Precision Touch
M_AYI'AG
®
Control 500
_ Care & Cleaning ....................... 5=7
Self-Clean Oven
Cleaning Procedures
Maintenance ............................. 8=9
Oven Window & Light
Removal of Gas Appliance
Troubleshooting ..................... 9=10
Surface Cooking .................. 10=1 1
Surface Controls
Sealed Gas Burners
Form No. A/01/08 Part No. 8113P734-60 Rev. 1 _c)2006 Maytag Appliances Sales Co. All rights reserved. Litho U.S.A
Delay Cook & Hold
Keep Warm
Broiling
Sabbath Mode
Oven Racks
Warranty & Service .................... 19
Guide d'utilisation et
d'entretien ................................... 20
Gu[a de uso y cuidado .............. 40
Page 2
technician. Do not attempt to adjust, repair, service, or
replace any part of your appliance unless it is specifically
recommended in this guide. All other servicing should be
referred to a qualified servicer. Have the installer show
you the location of the gas shut off valve and how to
shut it off in an emergency.
Always disconnect power to appliance before servicing.
portantSafety
Warning and Important Safety Instructions appearing in
this guide are not meant to cover all possible conditions
and situations that may occur. Common sense, caution,
and care must be exercised when installing, maintaining,
or operating the appliance.
Always contact the manufacturer about problems or
conditions you do not understand.
Recognize Safety Symbols, Words, labels
General Instructions
Read and follow all instructions before using this
appliance to prevent the potential risk of fire, electric
shock, personal injury or damage to the appliance as a
result of improper usage of the appliance. Use appliance
only for its intended purpose as described in this guide.
To ensure proper and safe operation: Appliance
must be properly installed and grounded by a qualified
1
Page 3
Tocheckif deviceisproperlyinstalled,lookunderneath
rangewithaflashlightto makesureoneoftherear
levelinglegsisproperlyengagedinthebracketslot.The
anti-tipdevicesecurestherearlevelinglegtothefloor
whenproperlyengaged.Youshouldcheckthisanytime
therangehasbeenmoved.
To Prevent Fire or
Child Safety
Smoke Damage
Be sure all packing materials are removed from the
appliance before operating it.
Keep area around appliance clear and free from
combustible materials, gasoline, and other flammable
vapors and materials.
If appliance is installed near a window, proper
precautions should be taken to prevent curtains from
blowing over burners.
NEVER leave any items on the cooktop. The hot air from
the vent may ignite flammable items and may increase
pressure in closed containers which may cause them to
burst.
Many aerosol-type spray cans are EXPLOSIVE when
exposed to heat and may be highly flammable. Avoid
their use or storage near an appliance.
Many plastics are vulnerable to heat. Keep plastics away
from parts of the appliance that may become warm or
hot. Do not leave plastic items on the cooktop as they
may melt or soften if left too close to the vent or a
lighted surface burner.
NEVER leave children alone or unsupervised near the
appliance when it is in use or is still hot.
NEVER allow children to sit or stand on any part of the
appliance as they could be injured or burned.
Children must be taught that the appliance and utensils
in it can be hot. Let hot utensils cool in a safe place, out
of reach of small children. Children should be taught
that an appliance is not a toy. Children should not be
allowed to play with controls or other parts of the
appliance.
About Your Appliance
To eliminate the hazard of reaching over hot surface
burners, cabinet storage should not be provided
directly above a unit. If storage is provided, it should be
limited to items which are used infrequently and which
are safely stored in an area subjected to heat from an
appliance. Temperatures may be unsafe for some items,
such as volatile liquids, cleaners or aerosol sprays.
in Case of Fire
Turn off appliance and ventilating hood to avoid
spreading the flame. Extinguish flame then turn on hood
to remove smoke and odor.
. Cooktop: Smother fire or flame in a pan with a lid or
cookie sheet.
NEVER pick up or move a flaming pan.
. Oven: Smother fire or flame by closing the oven door.
Do not use water on grease fires. Use baking soda, a
dry chemical or foam-type extinguisher to smother fire
or flame.
The oven vent is located at the base of the backguard.
Avoid touching oven vent area while oven is on and for
several minutes after oven is turned off. Some parts of
the vent and surrounding area become hot enough to
cause burns. After oven is turned off, do not touch the
oven vent or surrounding areas until they have had
sufficient time to cool.
Other potentially hot surfaces include cooktop, areas
facing the cooktop, oven vent, surface near the vent
opening, oven door, area around the oven door and
oven window.
2
Page 4
Do not touch a hot oven light bulb with a damp cloth as
the bulb could break. Should the bulb break, disconnect
power to the appliance before removing bulb to avoid
electrical shock.
Do not use the cooktop or ovens as a storage area for
food or cooking utensils.
Cooking Safety
Always place a pan on a surface burner before turning it
on. Be sure you know which knob controls which
surface burner. Make sure the correct burner is turned
on and that the burner has ignited. When cooking is
completed, turn burner off before removing pan to
prevent exposure to burner flame.
Always adjust surface burner flame so that it does
not extend beyond the bottom edge of the pan. An
excessive flame is hazardous, wastes energy and may
damage the appliance, pan or cabinets above the
appliance.
NEVER leave a surface cooking operation unattended
especially when using a high heat setting or when deep
fat frying. Boilovers cause smoking and greasy spillovers
may ignite. Clean up greasy spills as soon as possible.
Do not use high heat for extended cooking operations.
NEVER heat an unopened container on the surface
burner or in the oven. Pressure build-up may cause
container to burst resulting in serious personal injury or
damage to the appliance.
Use dry, sturdy potholders. Damp potholders may cause
burns from steam. Dish towels or other substitutes
should never be used as potholders because they can
trail across hot surface burners and ignite or get caught
on appliance parts.
Always let quantities of hot fat used for deep fat frying
cool before attempting to move or handle.
Do not let cooking grease or other flammable materials
accumulate in or near the appliance, hood or vent fan.
Clean hood frequently to prevent grease from
accumulating on hood or filter. When flaming foods
under the hood turn the fan on.
NEVER wear garments made of flammable material or
loose fitting or long-sleeved apparel while cooking.
Clothing may ignite or catch utensil handles.
Always place oven racks in the desired positions while
oven is cool. Slide oven rack out to add or remove food,
using dry, sturdy potholders. Always avoid reaching into
the oven to add or remove food. If a rack must be
moved while hot, use a dry potholder. Always turn the
oven off at the end of cooking.
PREPARED FOOD WARNING: Follow food
manufacturer's instructions. If a plastic frozen food
container and/or its cover distorts, warps, or is otherwise
damaged during cooking, immediately discard the food
and its container. The food could be contaminated.
NEVER use aluminum foil to cover oven racks or oven
bottom. This could result in risk of electric shock, fire, or
damage to the appliance. Use foil only as directed in this
guide.
Utensil Safety
Use pans with flat bottoms and handles that are easily
grasped and stay cool. Avoid using unstable, warped,
easily tipped or loose-handled pans. Also avoid using
pans, especially small pans, with heavy handles as they
could be unstable and easily tip. Pans that are heavy to
move when filled with food may also be hazardous.
Be sure utensil is large enough to properly contain food
and avoid boilovers. Pan size is particularly important in
deep fat frying. Be sure pan will accommodate the
volume of food that is to be added as well as the bubble
action of fat.
To minimize burns, ignition of flammable materials and
spillage due to unintentional contact with the utensil, do
not extend handles over adjacent surface burners.
Always turn pan handles toward the side or back of the
appliance, not out into the room where they are easily
hit or reached by small children.
Never let a pan boil dry as this could damage the
utensil and the appliance.
Follow the manufacturer's directions when using oven
cooking bags.
0nly certain types of glass, glass/ceramic, ceramic or
glazed utensils are suitable for cooktop or oven usage
without breaking due to the sudden change in
temperature. Follow manufacturer's instructions when
using glass.
This appliance has been tested for safe performance
using conventional cookware. Do not use any devices
or accessories that are not specifically recommended in
this guide. Do not use element covers for the surface
units, stovetop grills, or add-on oven convection
systems. The use of devices or accessories that are not
expressly recommended in this manual can create
serious safety hazards, result in performance problems,
and reduce the life of the components of the appliance.
Use care when opening the oven door. Let hot air or
steam escape before moving or replacing food.
3
Page 5
Cleaning Safety
Turn off all controls and wait for appliance parts to cool
before touching or cleaning them. Do not touch the
burner grates or surrounding areas until they have had
sufficient time to cool.
Clean appliance with caution. Use care to avoid steam
burns if a wet sponge or cloth is used to wipe spills on a
hot surface. Some cleaners can produce noxious fumes
if applied to a hot surface.
Self-Clean Oven
important Safety Notice
and Warning
The California Safe Drinking Water and Toxic
Enforcement Act of 1986 (Proposition 65) requires the
Governor of California to publish a list of substances
known to the State of California to cause cancer or
reproductive harm, and requires businesses to warn
customers of potential exposures to such substances.
Users of this appliance are hereby warned that the
burning of gas can result in low-level exposure to
some of the listed substances, including benzene,
formaldehyde and soot, due primarily to the incomplete
combustion of natural gas or liquid petroleum (LP) fuels.
Properly adjusted burners will minimize incomplete
combustion. Exposure to these substances can also be
minimized by properly venting the burners to the
outdoors.
Clean only parts listed in this guide. Do not clean door
gasket. The door gasket is essential for a good seal.
Care should be taken not to rub, damage, or move the
gasket. Do not use oven cleaners of any kind in or
around any part of the self-clean oven.
It is normal for the cooktop of the range to become hot
during a self-clean cycle. Therefore, touching the
cooktop during a clean cycle should be avoided.
Save These instructions for Future Reference
Users of this appliance are hereby warned that when
the oven is engaged in the self-clean cycle, there may
be some low-level exposure to some of the listed
substances, including carbon monoxide. Exposure to
these substances can be minimized by properly venting
the oven to the outdoors by opening the windows and/
or door in the room where the appliance is located
during the self-clean cycle.
IMPORTANT NOTICE REGARDING PET BIRDS:
Never keep pet birds in the kitchen or in rooms where
the fumes from the kitchen could reach. Birds have a
very sensitive respiratory system. Fumes released during
an oven self-cleaning cycle may be harmful or fatal to
birds. Fumes released due to overheated cooking oil, fat,
margarine and overheated non-stick cookware may be
equally harmful.
4
Page 6
re ¢leenin9
Self-Clean Oven
The self-clean cycle uses above-normal cooking temperatures
to automatically clean the oven interior.
The oven should be cleaned regularly by wiping up spillovers
to prevent excessive smoke and flare-ups. Do not allow a
heavy build-up of soil to accumulate in the oven.
During the cleaning process, the kitchen should be well
ventilated to get rid of normal odors associated with cleaning.
Before Self=Cleaning
1. Turn off the oven light before cleaning. The light may burn
out during the clean cycle.
2.
Remove all pans and oven racks from the oven. The oven
racks will discolor and may not slide easily after a self-
clean cycle if they are not removed.
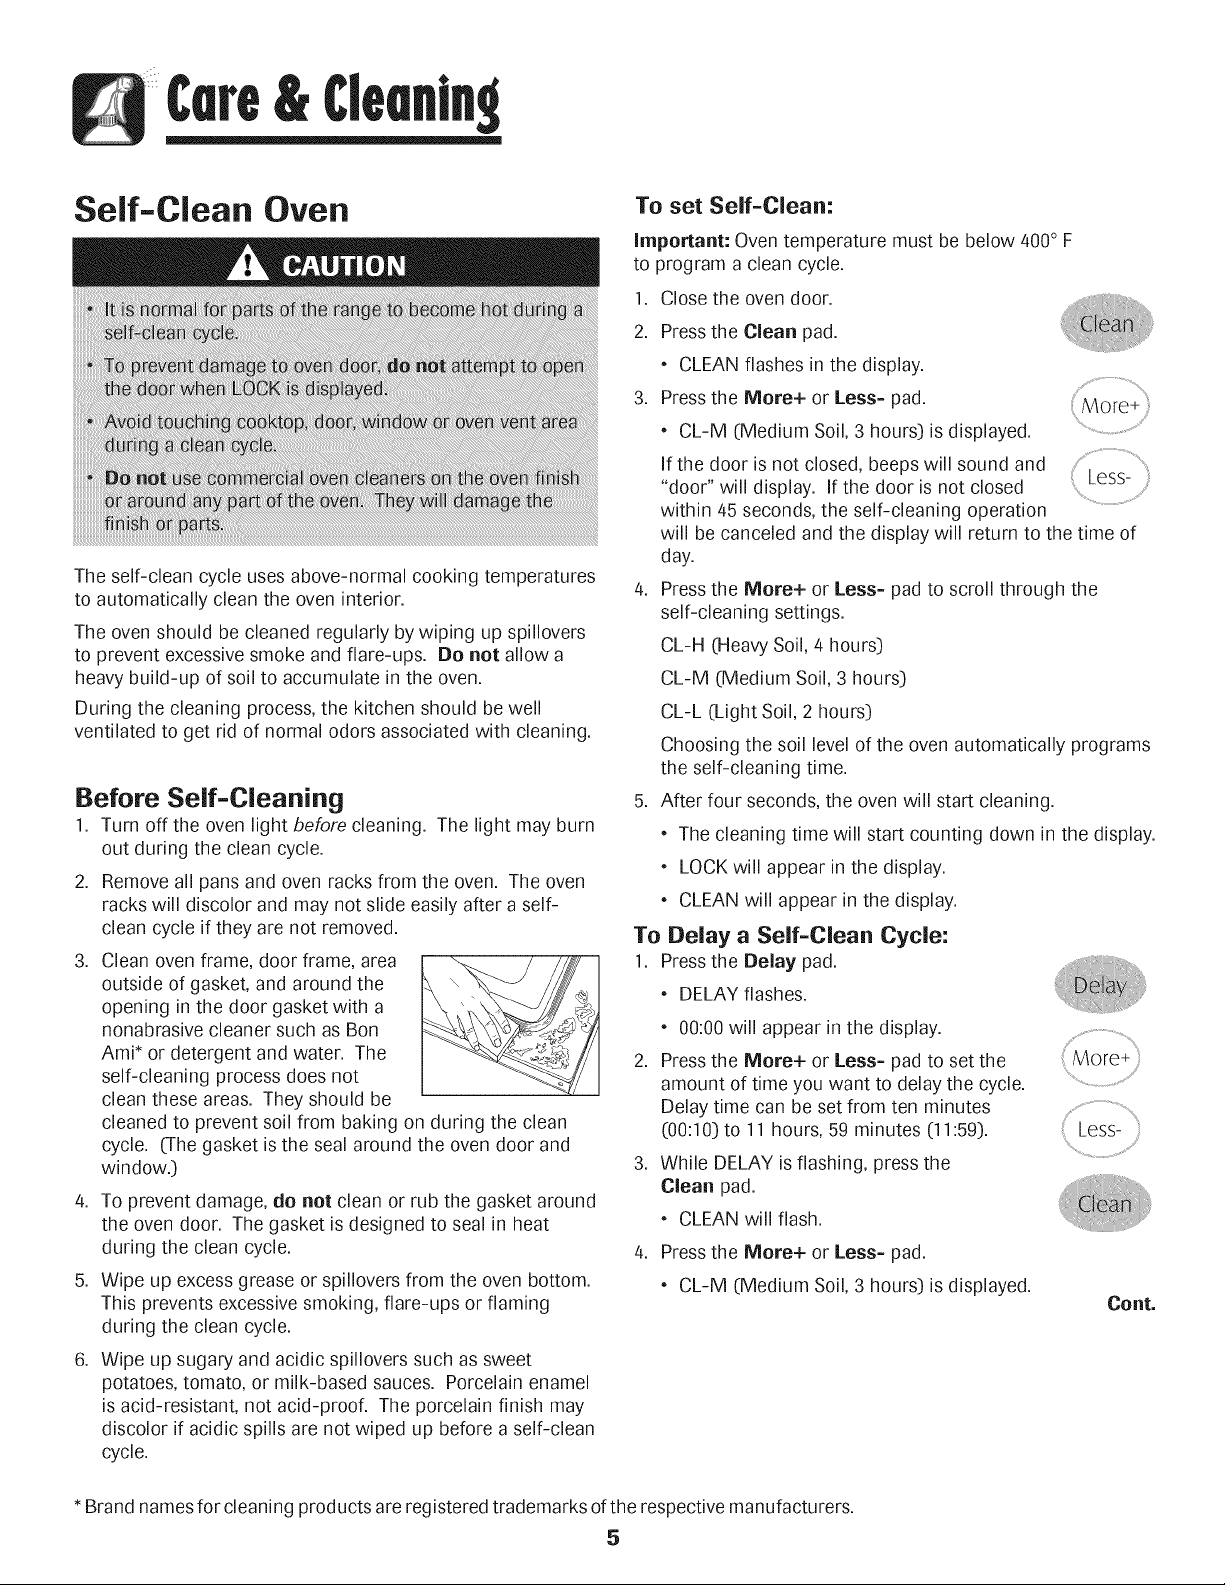
.
Clean oven frame, door frame, area
outside of gasket, and around the
opening in the door gasket with a
nonabrasive cleaner such as Bon
Ami* or detergent and water. The
self-cleaning process does not
clean these areas. They should be
cleaned to prevent soil from baking on during the clean
cycle. (The gasket isthe seal around the oven door and
window.]
4. To prevent damage, do not clean or rub the gasket around
the oven door. The gasket isdesigned to seal in heat
during the clean cycle.
5. Wipe up excess grease or spillovers from the oven bottom.
This prevents excessive smoking, flare-ups or flaming
during the clean cycle.
.
Wipe up sugary and acidic spillovers such as sweet
potatoes, tomato, or milk-based sauces. Porcelain enamel
isacid-resistant, not acid-proof. The porcelain finish may
discolor ifacidic spills are not wiped up before a self-clean
cycle.
To set Self=Clean:
Important: Oven temperature must be below 400° F
to program a clean cycle.
1.
Close the oven door.
2.
Press the Clean pad.
* CLEAN flashes in the display.
3. Pressthe More+ or Less= pad. More+
* CL-M (Medium Soil,3 hours] is displayed.
If the door is not closed, beeps will sound and
"door" will display. If the door is not closed
within 45 seconds, the self-cleaning operation
will be canceled and the display will return to the time of
day.
4. Press the More+ or Less= pad to scroll through the
self-cleaning settings.
CL-H (Heavy Soil, 4 hours]
CL-M (Medium Soil, 3 hours]
CL-L (Light Soil, 2 hours]
Choosing the soil level of the oven automatically programs
the self-cleaning time.
5. After four seconds, the oven will start cleaning.
* The cleaning time will start counting down in the display.
* LOCK will appear in the display.
* CLEAN will appear in the display.
Less-
.................................................
To Delay a Self=Clean Cycle:
1. Press the Delay pad.
* DELAY flashes.
* 00:00 will appear in the display.
2.
Press the More+ or Less= pad to set the
amount of time you want to delay the cycle.
Delay time can be set from ten minutes
(00:10] to 11 hours, 59 minutes (11:59].
.
While DELAY is flashing, press the
Clean pad.
* CLEAN will flash.
4. Press the More+ or Less= pad.
* CL-M (Medium Soil,3 hours] is displayed.
Less-
Cont.
*Brand names for cleaning products are registered trademarks ofthe respective manufacturers.
5
Page 7
5. Pressthe More+ or Less- pad to scroll through the self-
cleaning settings.
CL-H (Heavy Soil, 4 hours:)
CL-M (Medium soil, 3 hours:)
CL-L (Light Soil, 2 hours:)
Choosing the soil level of the oven automatically programs
the self-cleaning time.
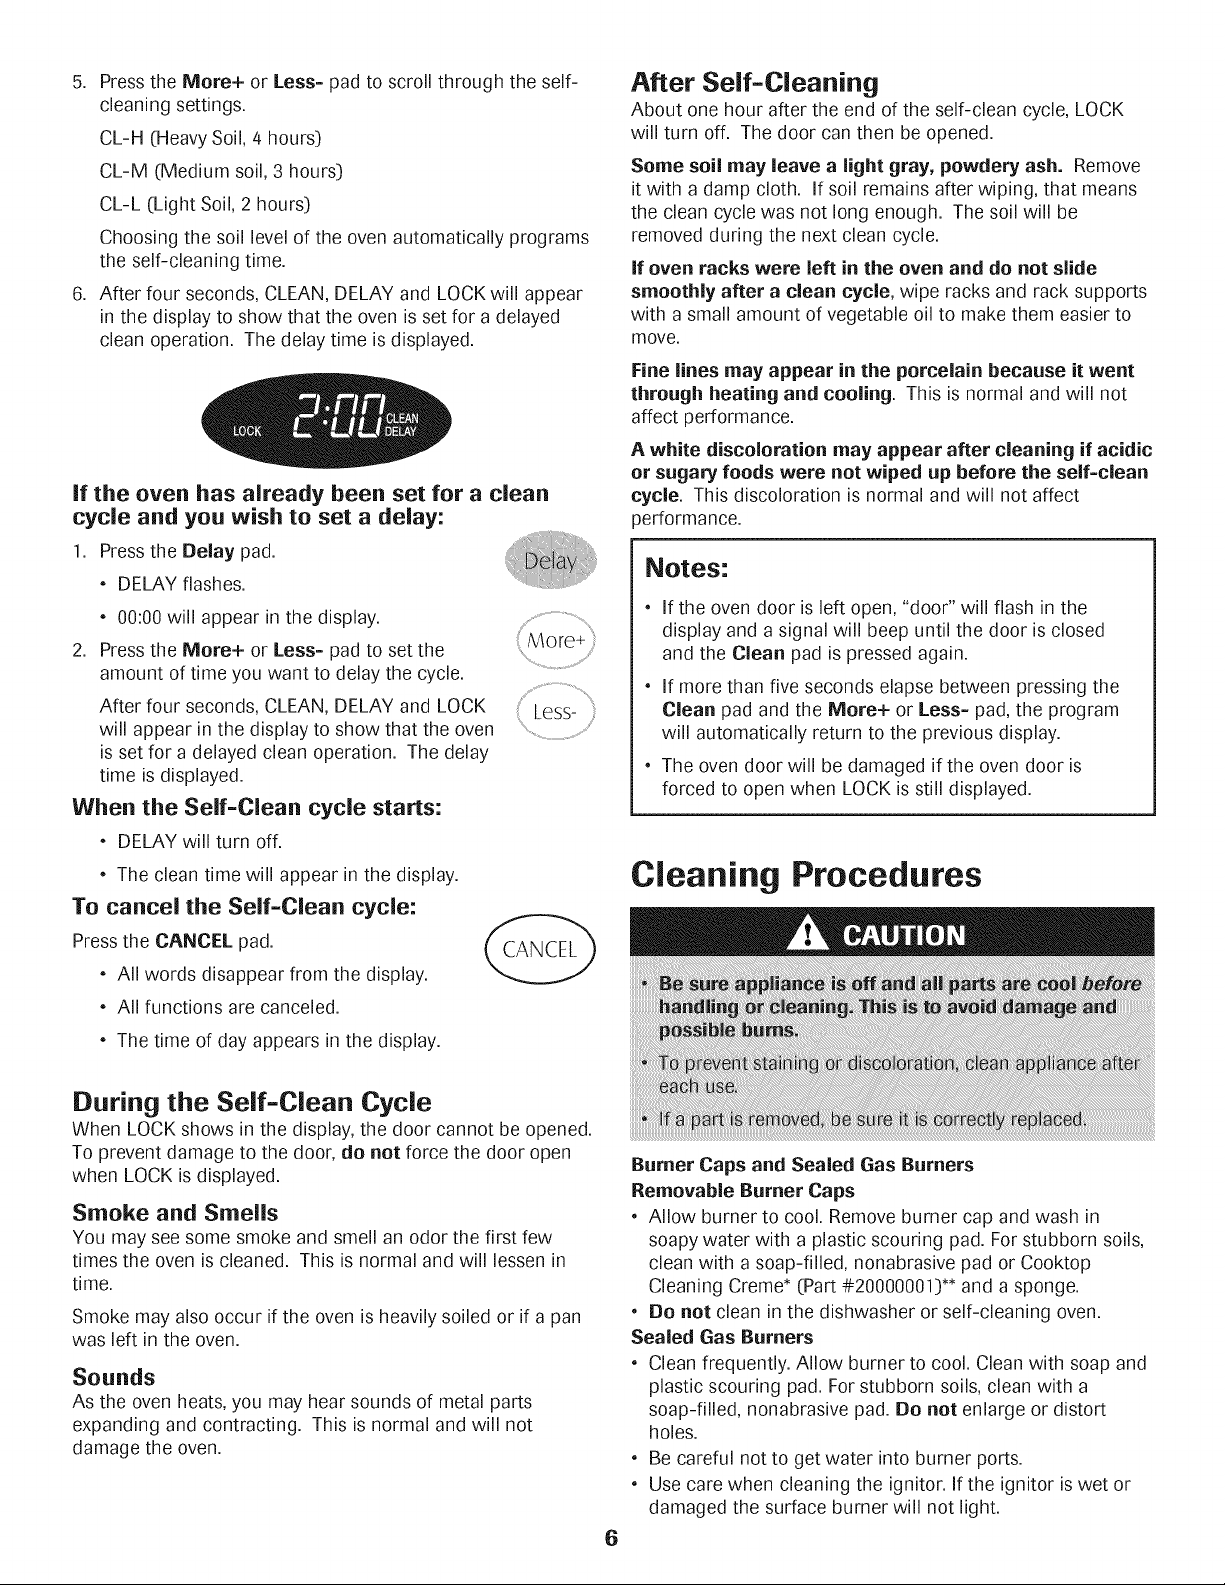
6. After four seconds, CLEAN, DELAY and LOCK will appear
in the display to show that the oven isset for a delayed
clean operation. The delay time is displayed.
if the oven has already been set for a clean
cycle and you wish to set a delay:
1. Pressthe Delay pad.
, DELAY flashes.
, 00:00will appear in the display.
2. Pressthe More+ or Less- pad to set the
amount of time you want to delay the cycle.
After four seconds, CLEAN, DELAY and LOCK
will appear in the display to show that the oven
is set for a delayed clean operation. The delay
time is displayed.
When the Self-Clean cycle starts:
, DELAY will turn off.
After Self-Cleaning
About one hour after the end of the self-clean cycle, LOCK
will turn off. The door can then be opened.
Some soil may leave a light gray, powdery ash. Remove
it with a damp cloth. If soil remains after wiping, that means
the clean cycle was not long enough. The soil will be
removed during the next clean cycle.
If oven racks were left in the oven and do not slide
smoothly after a clean cycle, wipe racks and rack supports
with a small amount of vegetable oil to make them easier to
move.
Fine lines may appear in the porcelain because it went
through heating and cooling. This isnormal and will not
affect performance.
A white discoloration may appear after cleaning if acidic
or sugary foods were not wiped up before the self=clean
cycle. Thisdiscoloration isnormal and will not affect
performance.
Notes:
, If the oven door isleft open, "door" will flash inthe
display and a signal will beep until the door is closed
and the Clean pad is pressed again.
If more than five seconds elapse between pressing the
Clean pad and the More+ or Less= pad, the program
will automatically return to the previous display.
The oven door will be damaged if the oven door is
forced to open when LOCK is still displayed.
The clean time will appear inthe display.
To cancel the Self-Clean cycle:
Press the CANCEL pad.
All words disappear from the display.
All functions are canceled.
The time of day appears in the display.
CANCEL
During the Self=Clean Cycle
When LOCK shows in the display, the door cannot be opened.
To prevent damage to the door, do not force the door open
when LOCK is displayed.
Smoke and Smells
You may see some smoke and smell an odor the first few
times the oven is cleaned. This is normal and will lessen in
time.
Smoke may also occur if the oven is heavily soiled or if a pan
was left in the oven.
Sounds
As the oven heats,you may hear sounds of metal parts
expanding and contracting. This is normal and will not
damage the oven.
Cleaning Procedures
Burner Caps and Sealed Gas Burners
Removable Burner Caps
Allow burner to cool. Remove burner cap and wash in
soapy water with a plastic scouring pad. For stubborn soils,
clean with a soap-filled, nonabrasive pad or Cooktop
Cleaning Creme* (Part #20000001:)** and a sponge.
Do not clean in the dishwasher or self-cleaning oven.
Sealed Gas Burners
, Clean frequently. Allow burner to cool. Clean with soap and
plastic scouring pad. Forstubborn soils, clean with a
soap-filled, nonabrasive pad. Do not enlarge or distort
holes.
Be careful not to get water into burner ports.
Use care when cleaning the ignitor. If the ignitor iswet or
damaged the surface burner will not light.
6
Page 8
Burner Grates - Porcelain on Cast iron
* Wash with warm, soapy water and a nonabrasive, plastic,
scrubbing pad. For stubborn soils,
clean with a soap-filled, nonabrasive, plastic pad or
Cooktop Cleaning Creme* (Part #20000001_)**
and a sponge. If soil remains, reapply Cooktop Cleaning
Creme*, cover with a damp paper towel
and soak for 30 minutes. Scrub again, rinse and dry.
* Do not clean in the dishwasher or self-cleaning oven.
Clock and Control Pad Area
* To activate control lock for cleaning, see Locking the
Controls page 13.
* Wipe with a damp cloth and dry. Do not use abrasive
cleaning agents as they may scratch the finish.
* Glass cleaners may be used if sprayed on a cloth first. DO
NOT spray directly on control pad and display area.
Control Knobs
* Remove knobs in the OFFposition by pulling forward.
* Wash, rinse and dry. Do not use abrasive cleaning agents
as they may scratch the finish.
* Turn on each burner to be sure the knobs have been
correctly replaced.
Cooktop and Control Panel = Porcelain Enamel
Porcelain enamel is glass fused on metal and may crack or
chip with misuse. It isacid resistant, not acid proof.
All spillovers, especially acidic or sugary spillovers, should be
wiped up immediately with a dry cloth.
* When cool, wash with soapy water, rinse and dry.
* Never wipe off a warm or hot surface with a damp cloth.
This may cause cracking or chipping.
* Never use oven cleaners, abrasive or caustic cleaning
agents on exterior finish of range.
Side Panels, Storage Drawer and Door Handles =
Painted Enamel
* When cool, wash with warm soapy water, rinse and dry.
Never wipe a warm or hot surface with adamp cloth as
this may damage the surface and may cause a steam burn.
* For stubborn soil, use mildly abrasive cleaning agents such
as baking soda paste or Bon Ami*. Do not use abrasive
cleaners such as steel wool pads or oven cleaners. These
products will scratch or permanently damage the surface.
important: Use a dry towel or cloth to wipe up spills,
especially acidic or sugary spills. Surface may
discolor or dull if soil is not immediately removed. This
is especially important for white surfaces.
Oven Window and Door = Glass
* Avoid using excessive amounts of water which may seep
under or behind glass, causing staining.
* Wash with soap and water. Rinse with clear water and dry.
Glass cleaner can be used if sprayed on a cloth first.
* Do not use abrasive materials such as scouring pads, steel
wool or powdered cleaners as they will scratch glass.
Oven interior
* Follow instructions on pages 5-6 to set a self-clean cycle.
Oven Racks
* Clean with soapy water.
* Remove stubborn soil with cleansing powder or soap-filled
scouring pad. Rinse and dry.
* Racks will permanently discolor and may not slide out
smoothly if left inthe oven during a self-clean operation. If
this occurs, wipe the rack and embossed rack supports with
a small amount of vegetable oil to restore ease of
movement, then wipe off excess oil.
Stainless Steel ([selectmodels_
* DO NOT USEANY CLEANING PRODUCT CONTAINING
CHLORINE BLEACH.
* DO NOT USEABRASIVE OR ORANGE CLEANERS.
* ALWAYS WIPE WITH THE GRAIN WHEN CLEANING.
,, Daily Cleaning/Light Soil -- Wipe with one of the
following - soapy water, white vinegar/water solution,
Formula 409 Glass and Surface Cleaner* or a similar glass
cleaner - using a sponge or soft cloth. Rinse and dry. To
polish and help prevent fingerprints, follow with Stainless
Steel Magic Spray* ([PartNo. 20000008_)**.
* Moderate/Heavy Soil == Wipe with one of the following -
Bon Ami, Smart Cleanser, or Soft Scrub* - using a damp
sponge or soft cloth. Rinse and dry. Stubborn soils may be
removed with a damp multi-purpose Scotch-Brite* pad; rub
evenly with the grain. Rinse and dry. To restore luster and
remove streaks, follow with Stainless Steel Magic Spray*.
* Discoloration == Using a damp sponge or soft cloth, wipe
with Cameo Stainless Steel Cleaner*. Rinse immediately and
dry. To remove streaks and restore luster, follow with
Stainless Steel Magic Spray*.
* Brand names are registered trademarks of the respective
manufacturers.
** To order call 1-877-232-6771 USA or 1-800-688-8408
Canada.
7
Page 9
Meintenence
Oven Door
important: The oven door on a new range may feel "spongy"
when it is closed. This isnormal and will decrease with use.
Oven Window
To protect the oven door window:
1. Do not use abrasive cleaning agents such as steel wool
scouring pads or powdered cleansers as they may scratch
the glass.
2. Do not hit the glass with pots, pans, furniture, toys, or
other objects.
3. Do not close the oven door until the oven racks are in
place.
Oven Light
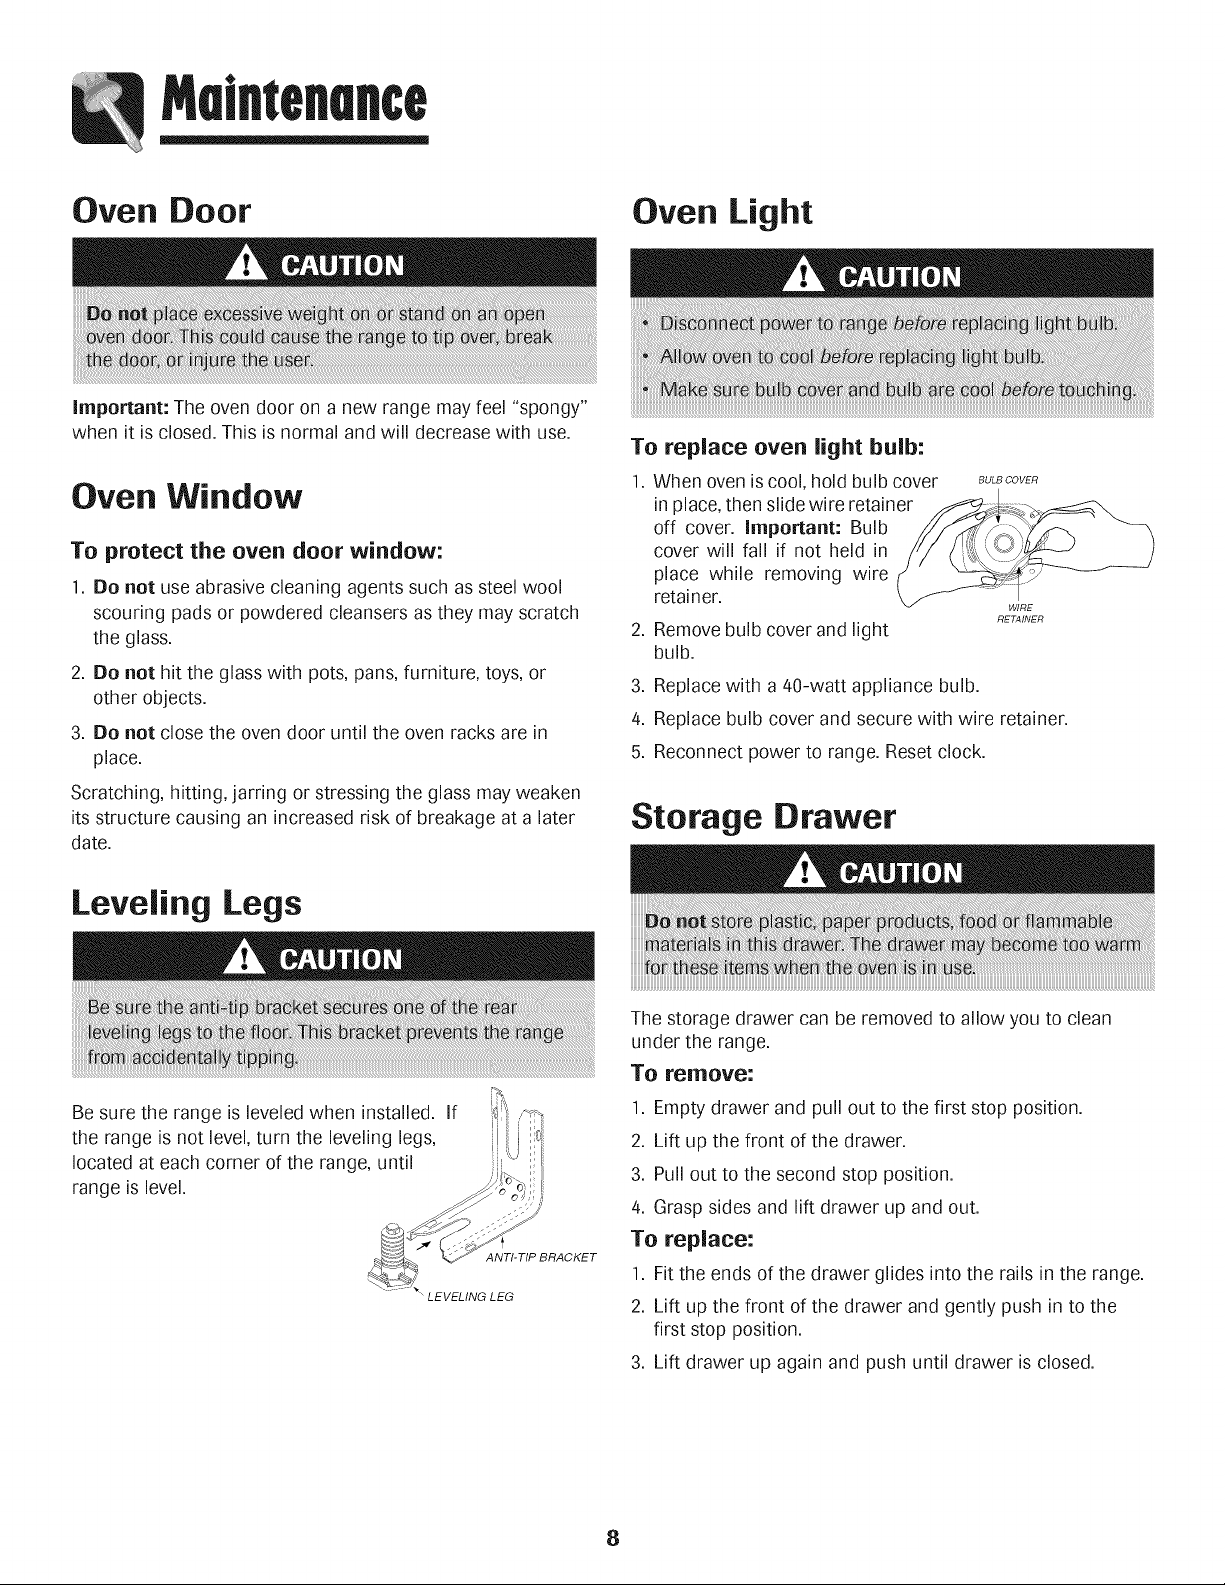
To replace oven light bulb:
1. When oven iscool, hold bulb cover BULSOOVER
inplace,then slide wire retainer
off cover. Important: Bulb
cover will fall if not held in
place while removing wire
retainer.
2. Remove bulb cover and light
bulb.
3. Replace with a 40-watt appliance bulb.
4. Replace bulb cover and secure with wire retainer.
5. Reconnect power to range. Reset clock.
RETAINER
Scratching, hitting, jarring or stressing the glass may weaken
itsstructure causing an increasedrisk of breakage at a later
date.
Leveling Legs
Be sure the range is leveled when installed. If
the range isnot level, turn the leveling legs,
located at each corner of the range, until
range islevel.
ANTI-TIP BRACKET
\LEVELINGLEG
Storage Drawer
The storage drawer can be removed to allow you to clean
under the range.
To remove:
1. Empty drawer and pull out to the first stop position.
2. Lift up the front of the drawer.
3. Pull out to the second stop position.
4. Grasp sides and lift drawer up and out.
To replace:
1. Fit the ends of the drawer glides into the rails in the range.
2. Lift up the front of the drawer and gently push in to the
first stop position.
3. Lift drawer up again and push until drawer isclosed.
8
Page 10
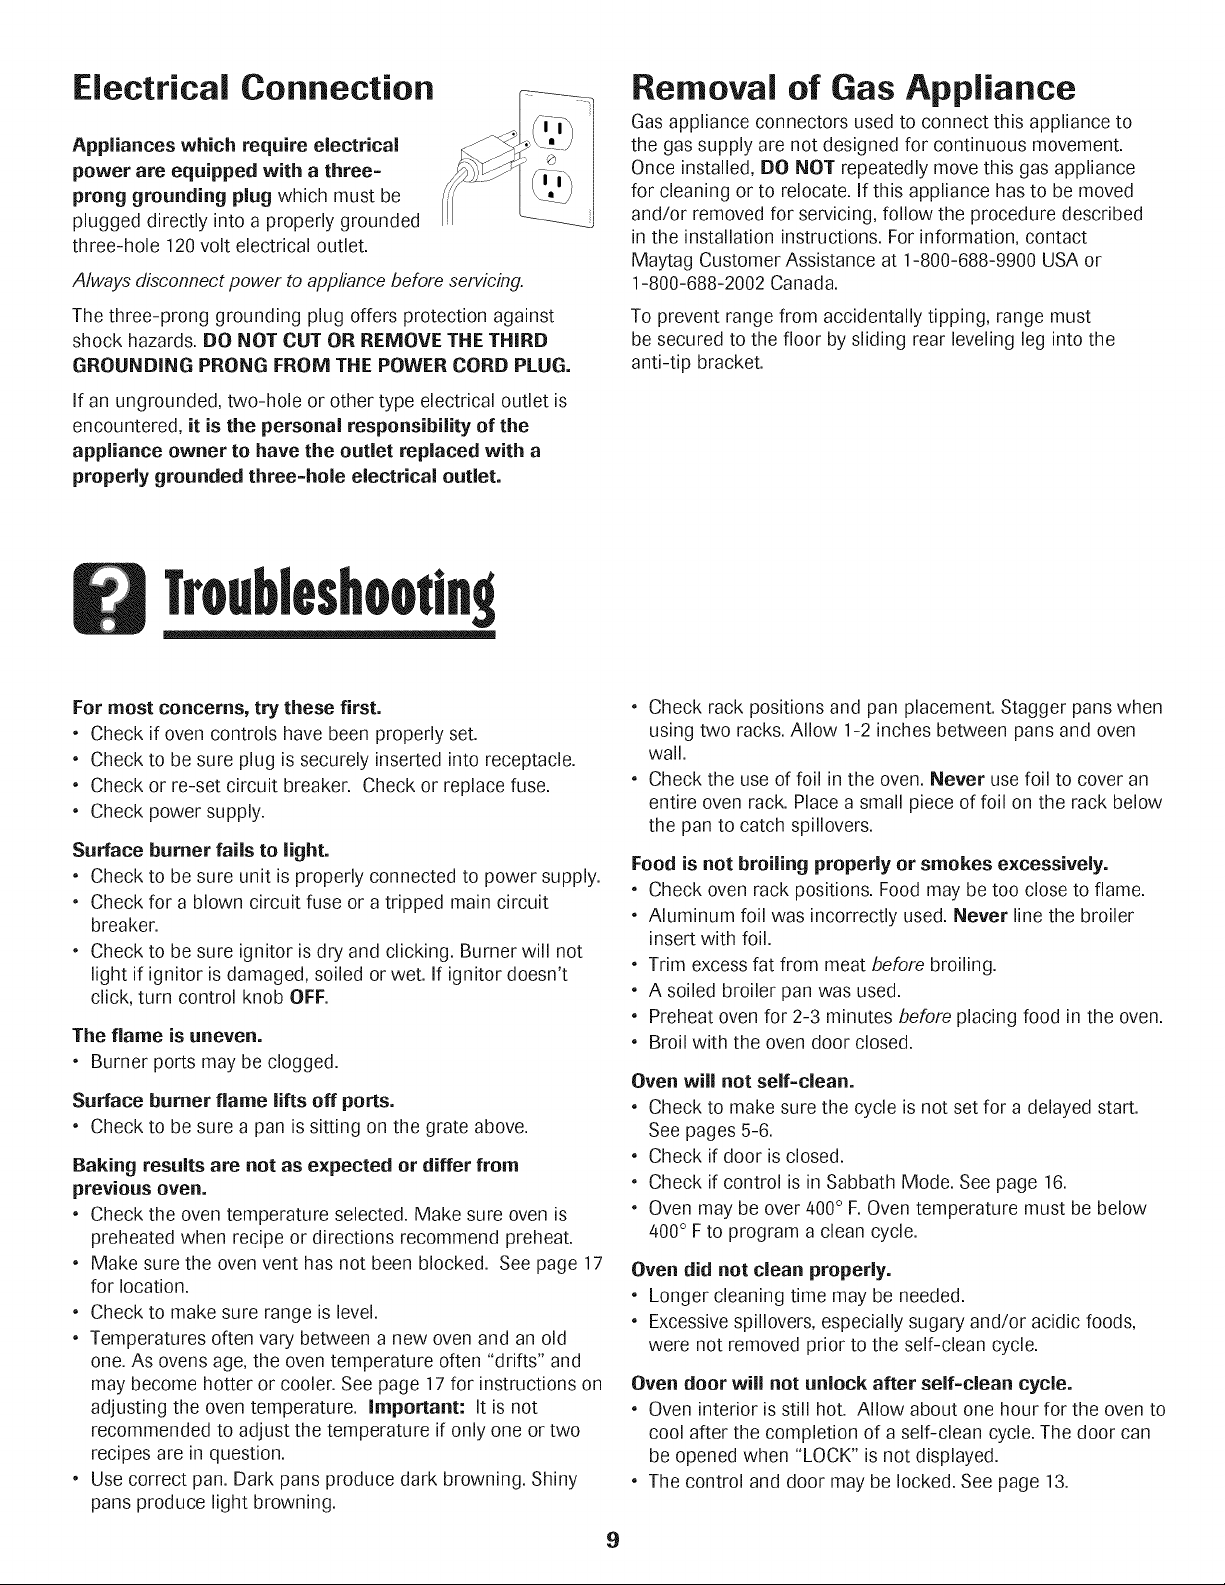
Electrical Connection
Appliances which require electrical
power are equipped with a three=
prong grounding plug which must be
plugged directly intoa properly grounded
three-hole 120volt electrical outlet.
Always disconnect power to appliance before servicing.
The three-prong grounding plug offers protection against
shock hazards. DO NOT CUT OR REMOVE THE THIRD
GROUNDING PRONG FROM THE POWER CORD PLUG.
If an ungrounded, two-hole or other type electrical outlet is
encountered, it is the personal responsibility of the
appliance owner to have the outlet replaced with a
properly grounded three=hole electrical outlet.
Troubleshootln9
Removal of Gas Appliance
Gas appliance connectors used to connect this appliance to
the gas supply are not designed for continuous movement.
Once installed,DO NOT repeatedly move this gas appliance
for cleaning or to relocate. If this appliance has to be moved
and/or removed for servicing, follow the procedure described
in the installationinstructions.Forinformation,contact
Maytag Customer Assistance at 1-800-688-9900 USA or
1-800-688-2002 Canada.
To prevent range from accidentally tipping, range must
be secured to the floor by sliding rear leveling leg into the
anti-tip bracket.
For most concerns, try these first.
* Check if oven controls have been properly set.
* Check to be sure plug is securely inserted into receptacle.
* Check or re-set circuit breaker. Check or replace fuse.
* Check power supply.
Surface burner fails to light.
* Check to be sure unit isproperly connected to power supply.
* Check for a blown circuit fuse or a tripped main circuit
breaker.
* Check to be sure ignitor isdry and clicking. Burner will not
light if ignitor is damaged, soiled or wet. If ignitor doesn't
click, turn control knob OFF.
The flame is uneven.
* Burner ports may be clogged.
Surface Burner flame lifts off ports.
* Check to be sure a pan is sitting on the grate above.
Baking results are not as expected or differ from
previous oven.
* Check the oven temperature selected. Make sure oven is
preheated when recipe or directions recommend preheat.
* Make sure the oven vent has not been blocked. See page 17
for location.
* Check to make sure range is level.
* Temperatures often vary between a new oven and an old
one. As ovens age, the oven temperature often "drifts" and
may become hotter or cooler. See page 17 for instructionson
adjusting the oven temperature. Important: It isnot
recommended to adjust the temperature if only one or two
recipes are in question.
* Use correct pan. Dark pans produce dark browning. Shiny
pans produce light browning.
* Check rack positions and pan placement. Stagger pans when
using two racks. Allow 1-2 inches between pans and oven
wall.
* Check the use of foil in the oven. Never usefoil to cover an
entire oven rack. Place a small piece of foil on the rack below
the pan to catch spillovers.
Food is not broiling properly or smokes excessively.
* Check oven rack positions. Food may be too close to flame.
* Aluminum foil was incorrectlyused. Never line the broiler
insertwith foil.
* Trim excess fat from meat before broiling.
* A soiled broiler pan was used.
* Preheat oven for 2-3 minutes before placing food in the oven.
* Broil with the oven door closed.
Oven will not self=clean.
* Check to make sure the cycle is not set for a delayed start.
See pages 5-6.
* Check ifdoor is closed.
* Check ifcontrol is in Sabbath Mode. See page 16.
* Oven may be over 400° F.Oven temperature must be below
400° Fto program a clean cycle.
Oven did not clean properly.
* Longer cleaning time may be needed.
* Excessive spillovers, especially sugary and/or acidic foods,
were not removed prior to the self-clean cycle.
Oven door will not unlock after self=clean cycle.
* Oven interior is still hot. Allow about one hour for the oven to
cool after the completion of a self-clean cycle. The door can
be opened when "LOCK" isnot displayed.
* The control and door may be locked. See page 13.
9
Page 11
Moisture collects on oven window or steam comes from
oven vent.
* This is normal when cooking foods high in moisture.
* Excessive moisture was used when cleaning the window.
There is a strong odor or light smoke when oven is
turned on.
* This isnormal for a new range and will disappear after a
few uses. Initiating a clean cycle will "burn off" the odors
more quickly.
* Turning on a ventilation fan will help remove the smoke
and/or odor.
Excessivefood soils on the oven bottom. Use a self-clean
cycle.
Fault Codes
* BAKE or LOCK may flash rapidly in the display to alert you if
there is an error or a problem. If BAKE or LOCK appear in
the display, press the CANCEL pad. If BAKE or LOCK
continue to flash, disconnect power to the appliance. Wait a
few minutes, and then reconnect power. If the flashing still
continues, disconnect power to the appliance and call an
authorized servicer.
If the oven is heavily soiled, excessive flareups may result in
a fault code during cleaning. Press the CANCEL pad and
allow the oven to cool completely, wipe out excess soil,
then reset the clean cycle. If the fault code reappears,
contact an authorized servicer.
Noises may be heard.
* The oven makes several low level noises. You may hear the
oven relays as they go on and off. This is normal.
As the oven heats and cools, you may hear sounds of metal
parts expanding and contracting. This isnormal and will not
damage your appliance.
There are no beeps and no display.
* Oven may be in Sabbath Mode. See page 16.
SAb flashing and then displayed continuously.
* Oven is in Sabbath Mode. To cancel, press and hold the
Clock pad for five seconds.
SurfuceCeekln
Surface Controls
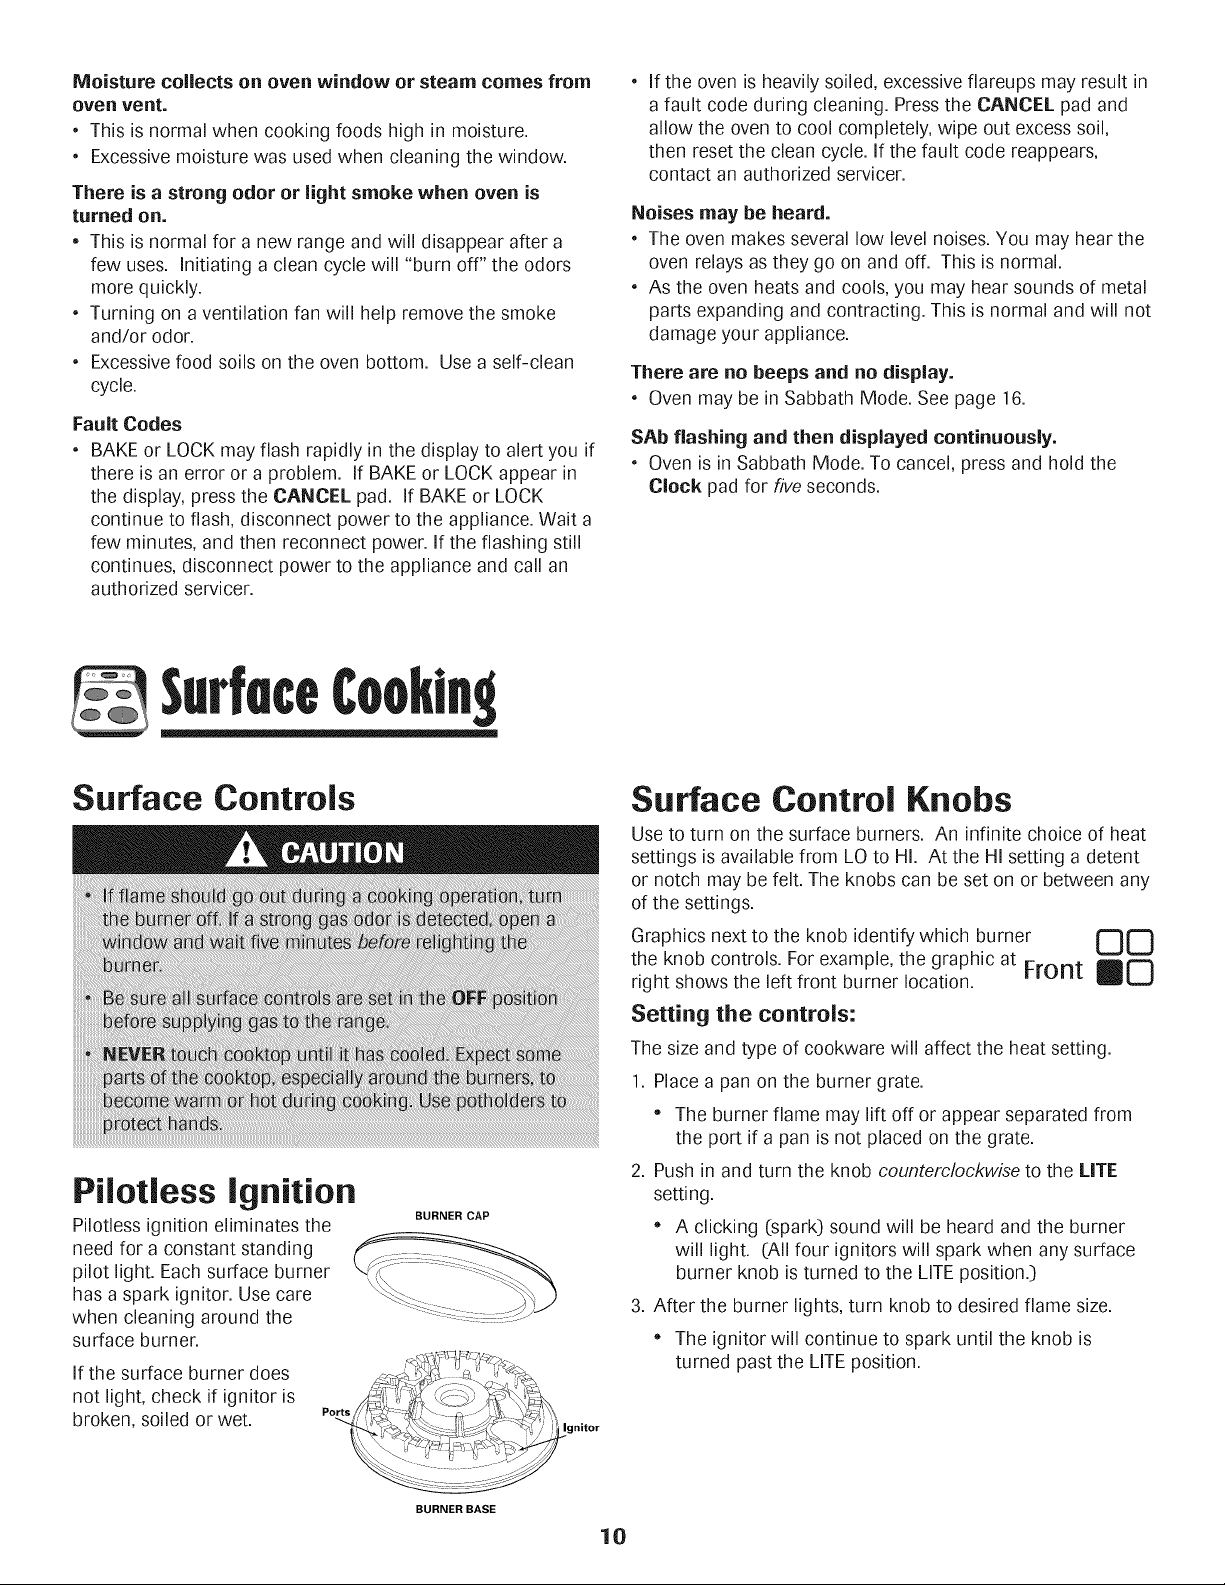
Pilotless Ignition
Pilotless ignitioneliminates the
need for a constant standing
pilot light. Each surface burner
has a spark ignitor. Use care
when cleaning around the
surface burner.
If the surface burner does
not light, check if ignitor is
broken, soiled or wet.
BURNER CAP
Surface Control Knobs
Use to turn on the surface burners. An infinite choice of heat
settings is available from LO to HI. At the HI setting a detent
or notch may be felt. The knobs can be set on or between any
of the settings.
Graphics next to the knob identify which burner I_
the knob controls. For example, the graphic at Front _rm
right shows the left front burner location.
Setting the controls:
The size and type of cookware will affect the heat setting.
1. Place a pan on the burner grate.
" The burner flame may lift off or appear separated from
the port if a pan is not placed on the grate.
2. Push in and turn the knob counterclockwise to the LITE
setting.
* A clicking (spark) sound will be heard and the burner
will light. (All four ignitors will spark when any surface
burner knob is turned to the LITEposition.)
3. After the burner lights, turn knob to desired flame size.
" The ignitor will continue to spark until the knob is
turned past the LITE position.
_U
.. _ X_
BURNER BASE
10
Page 12
Suggested heat settings:
LO: Food maintains a temperature above
140° Fwithout continuing to cook. Food
is heated on a higher flame size until it
reaches this temperature and then the
flame size is reduced. Some cooking may
take place on the LO setting if the pan is
covered.
MED: An intermediateflame size is used to continue cooking.
Food will not cook any faster when a higher flame setting is
used than needed to maintain a gentle boil. Water boils at the
same temperature whether boiling gently or vigorously.
ill: Use to bring liquid to a boil, or reach pressure in a
pressure cooker. Always reduce setting to a lower heat when
liquids begin to boil or foods begin to cook.
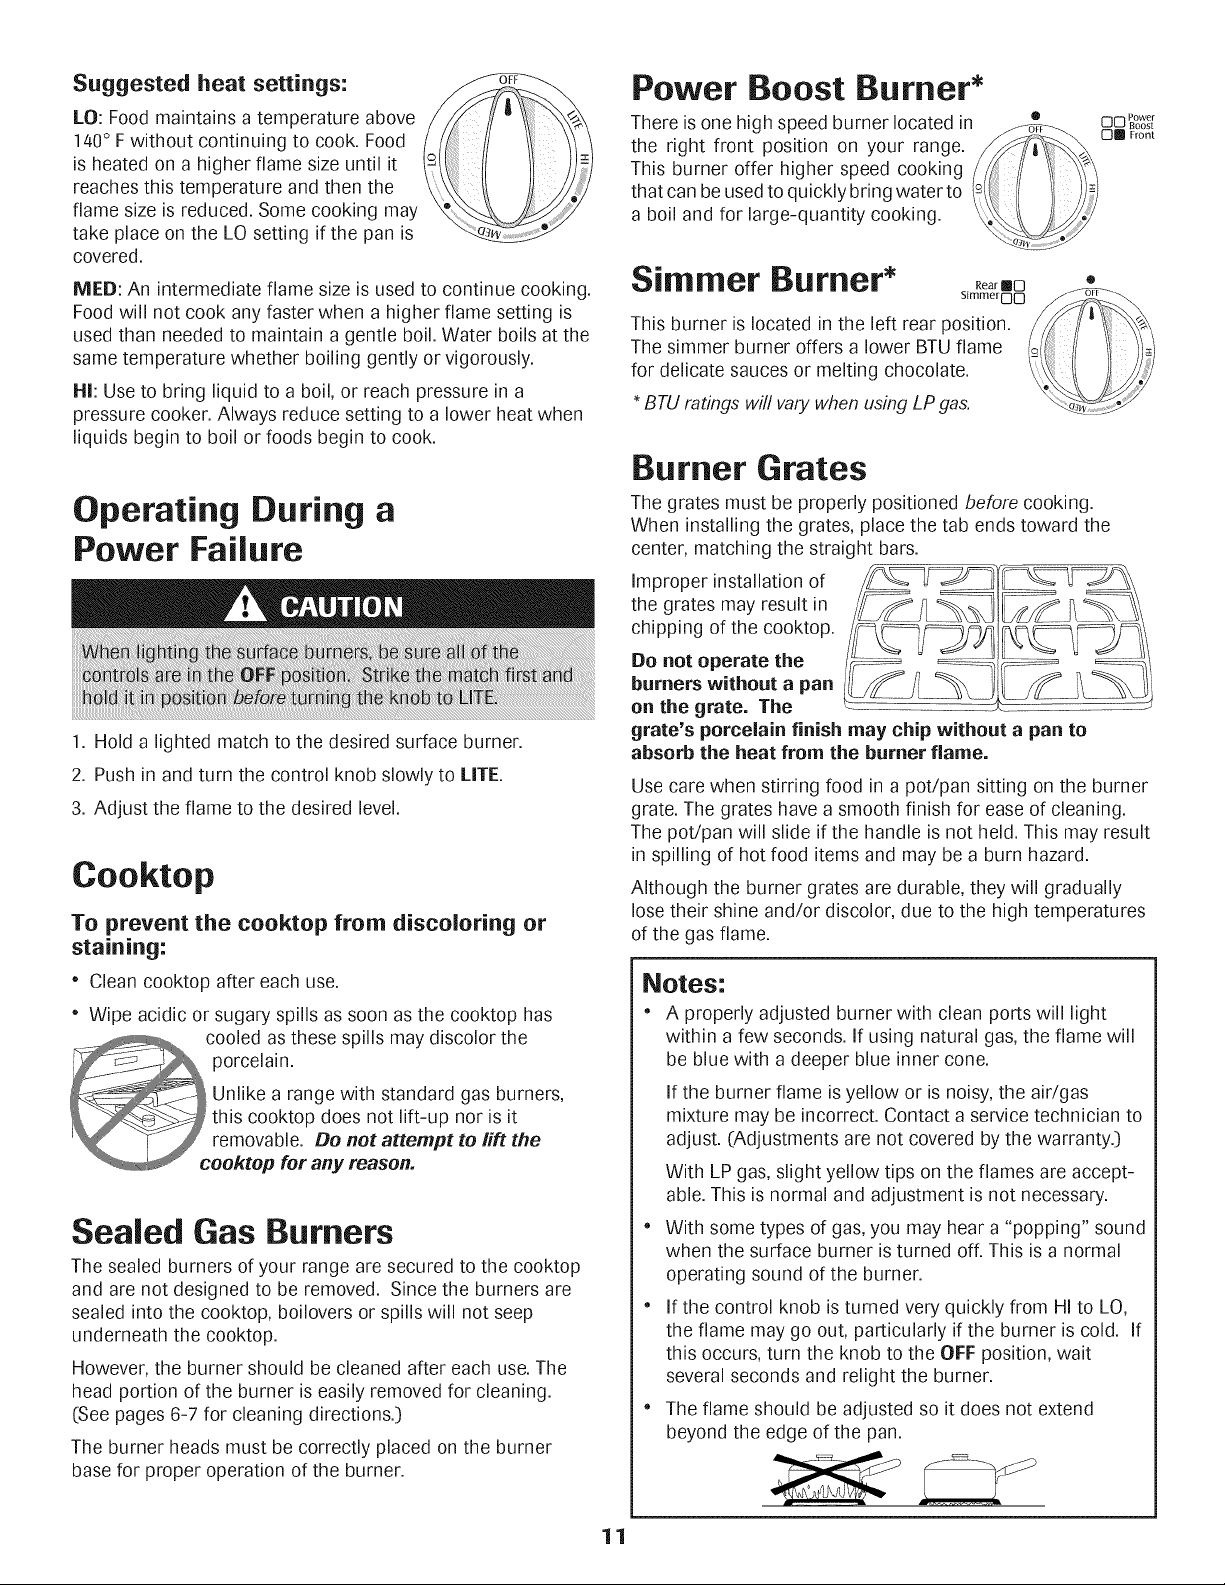
Power Boost Burner*
There isone high speed burner located in -o._-e co PBoo,,....
the right front position on your range, omF_ont
This burner offer higher speed cooking
that can be usedto quickly bring water to -=/
a boil and for large-quantity cooking.
Simmer Burner* Re ,O "
This burner is located in the left rear position. _
The simmer burner offers a lower BTU flame
for delicate sauces or melting chocolate. _/_,_
BTU ratings will vary when using LPgas.
.
Burner Grates
Operating During a
Power Failure
1. Hold a lighted match to the desired surface burner.
2. Push in and turn the control knob slowly to LITE.
3. Adjust the flame to the desired level.
Cooktop
To prevent the cooktop from discoloring or
staining:
" Clean cooktop after each use.
Wipe acidic or sugary spills as soon as the cooktop has
cooled as these spills may discolor the
porcelain.
Unlike a range with standard gas burners,
this cooktop does not lift-up nor is it
removable. Do not attempt to lift the
cooktop for any reason.
Sealed Gas Burners
The sealed burners of your range are secured to the cooktop
and are not designed to be removed. Since the burners are
sealed into the cooktop, boilovers or spills will not seep
underneath the cooktop.
However, the burner should be cleaned after each use. The
head portion of the burner is easily removed for cleaning.
(See pages 6-7 for cleaning directions._)
The burner heads must be correctly placed on the burner
base for proper operation of the burner.
The grates must be properly positioned before cooking.
When installing the grates, place the tab ends toward the
center, matching the straight bars.
the grates may result in
chipping of the cooktop.
Improperinstallationof __
oooo,o o,o,o, oburners without a pan
on the grate. The L............
grate's porcelain finish may chip without a pan to
absorb the heat from the burner flame.
Use care when stirring food in a pot/pan sitting on the burner
grate. The grates have a smooth finish for ease of cleaning.
The pot/pan will slide if the handle is not held. This may result
in spilling of hot food items and may be a burn hazard.
Although the burner grates are durable, they will gradually
lose their shine and/or discolor, due to the high temperatures
of the gas flame.
Notes:
" A properly adjusted burner with clean ports will light
within a few seconds. If using natural gas, the flame will
be blue with a deeper blue inner cone.
If the burner flame isyellow or is noisy,the air/gas
mixture may be incorrect. Contact a service technician to
adjust. (Adjustments are not covered by the warranty._)
With LP gas, slight yellow tips on the flames are accept-
able. This is normal and adjustment is not necessary.
With some types of gas, you may hear a "popping" sound
when the surface burner is turned off. This is a normal
operating sound of the burner.
If the control knob is turned very quickly from HI to LO,
the flame may go out, particularly if the burner is cold. If
this occurs, turn the knob to the OFF position, wait
several seconds and relight the burner.
The flame should be adjusted so it does not extend
beyond the edge of the pan.
11
Page 13
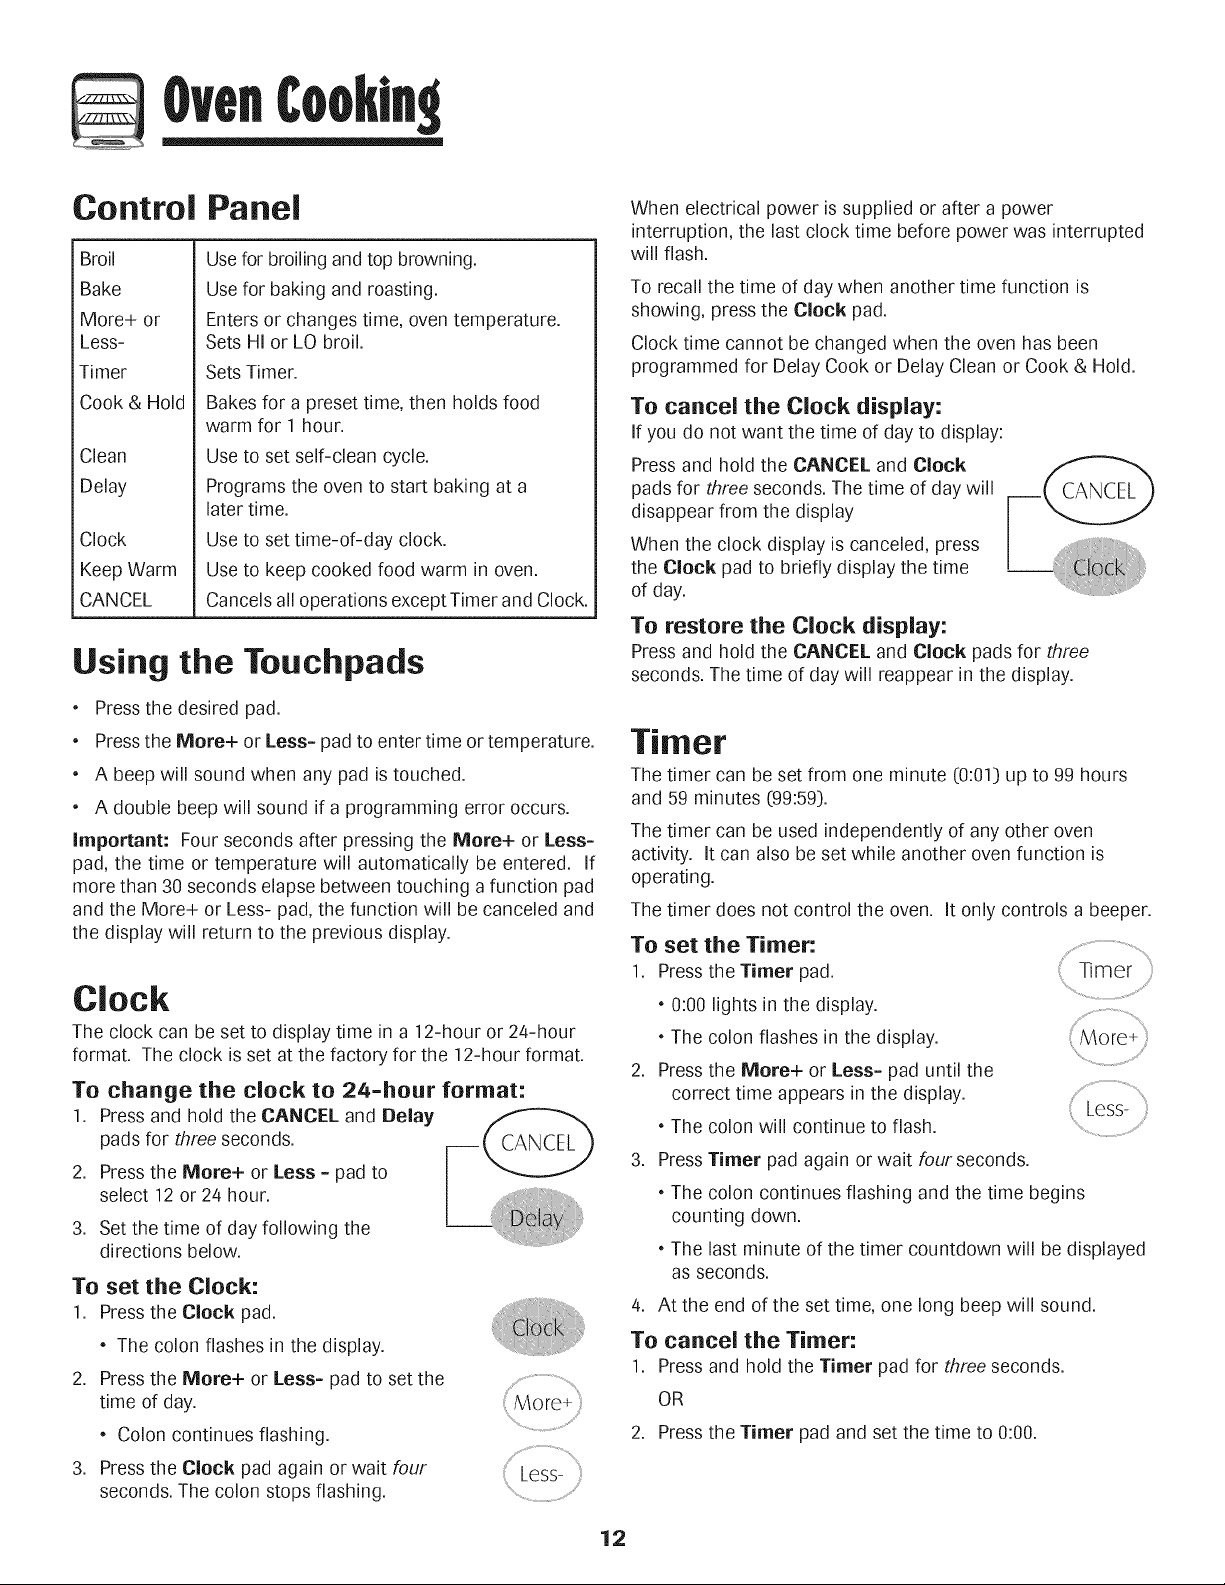
Control Panel
Broil
Bake
More+ or
Less-
Timer
Cook & Hold
Clean
Delay
Clock
Keep Warm
CANCEL
Usefor broiling and top browning.
Use for baking and roasting.
Enters or changes time, oven temperature.
Sets HI or LO broil.
Sets Timer.
Bakes for a preset time, then holds food
warm for 1 hour.
Use to set self-clean cycle.
Programs the oven to start baking at a
later time.
Use to set time-of-day clock.
Use to keep cooked food warm in oven.
Cancels all operations except Timer and Clock.
Using the Touchpads
Pressthe desired pad.
Pressthe More+ or Less= pad to enter time or temperature.
A beep will sound when any pad is touched.
, A double beep will sound if a programming error occurs.
Important: Four seconds after pressing the More+ or Less=
pad, the time or temperature will automatically be entered, if
more than 30 seconds elapse between touching a function pad
and the More+ or Less- pad, the function will be canceled and
the display will return to the previous display.
Clock
The clock can be set to display time in a 12-hour or 24-hour
format. The clock is set at the factory for the 12-hour format.
To change the clock to 24=hour format:
1. Pressand hold the CANCEL and Delay
pads for three seconds.
2.
Press the More+ or Less = pad to
select 12 or 24 hour.
.
Set the time of day following the
directions below.
To set the Clock:
1. Pressthe Clock pad.
The colon flashes in the display.
2. Pressthe More+ or Less= pad to set the
time of day.
Colon continues flashing.
3. Pressthe Clock pad again or wait four
seconds. The colon stops flashing.
More+ i
, Less- i,
When electrical power is supplied or after a power
interruption,the last clock time before power was interrupted
will flash.
To recall the time of day when another time function is
showing, press the Clock pad.
Clock time cannot be changed when the oven has been
programmed for Delay Cook or Delay Clean or Cook & Hold.
To cancel the Clock display:
If you do not want the time of day to display:
Press and hold the CANCEL and Clock
pads for three seconds. The time of day will
disappear from the display
When the clock display is canceled, press
the Clock pad to briefly display the time
of day.
To restore the Clock display:
Press and hold the CANCEL and Clock pads for three
seconds. The time of day will reappear in the display.
Timer
The timer can be set from one minute (0:01) up to 99 hours
and 59 minutes (99:59].
The timer can be used independently of any other oven
activity. It can also be set while another oven function is
operating.
The timer does not control the oven. It only controls a beeper.
To set the Timer:
1. Press the Timer pad.
0:00 lights in the display.
The colon flashes in the display.
2. Pressthe More+ or Less= pad until the
correct time appears in the display. Less-
The colon will continue to flash.
3. PressTimer pad again or wait four seconds.
The colon continues flashing and the time begins
counting down.
The last minute of the timer countdown will be displayed
as seconds.
4. At the end of the set time, one long beep will sound.
To cancel the Timer:
1. Press and hold the Timer pad for three seconds.
OR
2. Pressthe Timer pad and set the time to 0:00.
\
12
Page 14
Locking the Control
and Oven Door
The touchpad controls and oven door can be locked for
safety, cleaning, or to prevent unwanted use. They will not
function when locked.
If the oven is currently in use, the controls and door cannot
be locked.
The current time of day will remain in the display when the
controls are locked.
To lock:
Press and hold the CANCEL and Cook &
Hold pads for three seconds. (press
CANCEL pad first.)
* LOCK flashes in the display.
To unlock:
Press and hold the CANCEL and Cook & Hold pads for three
seconds. (Press CANCEL pad first.)
* LOCK disappears from the display.
Fault Codes
BAKE or LOCK may flash rapidly in the display to alert you if
there is an error or a problem. If BAKE or LOCK flash in the
display, press CANCEL pad. If BAKE or LOCK continue to
flash, disconnect power to the appliance. Wait a few minutes,
and then reconnect power. If the flashing still continues,
disconnect power to the appliance and call an authorized
servicer.
4. Allow the oven to preheat for 8-15 minutes.
* When the set oven temperature is reached, one long
beep will sound.
* To recall the set temperature during preheat, press the
Bake pad.
5. Place food in the oven.
6. Check cooking progress. Cook longer if needed.
7. When cooking is finished, press CANCEL. (fCANCFI_'_
8. Remove food from the oven.
Notes:
* Tochange the oven temperature during cooking, press the
Bake pad, then the More+ or Less= pad until you reach
the desired temperature.
* To change the oven temperature during preheat, press the
Bake pad twice, then press the More+ or Less= pads
until the desired temperature is displayed.
If you forget to turn off the oven, it will automatically turn
off at the end of 12 hours. If you wish to deactivate this
feature, see page 16.
Baking Differences Between Your Old
and New Oven
It isnormal to notice some baking time differences between a
new oven and an old one. See Adjusting the Oven Temperature
on page 17.
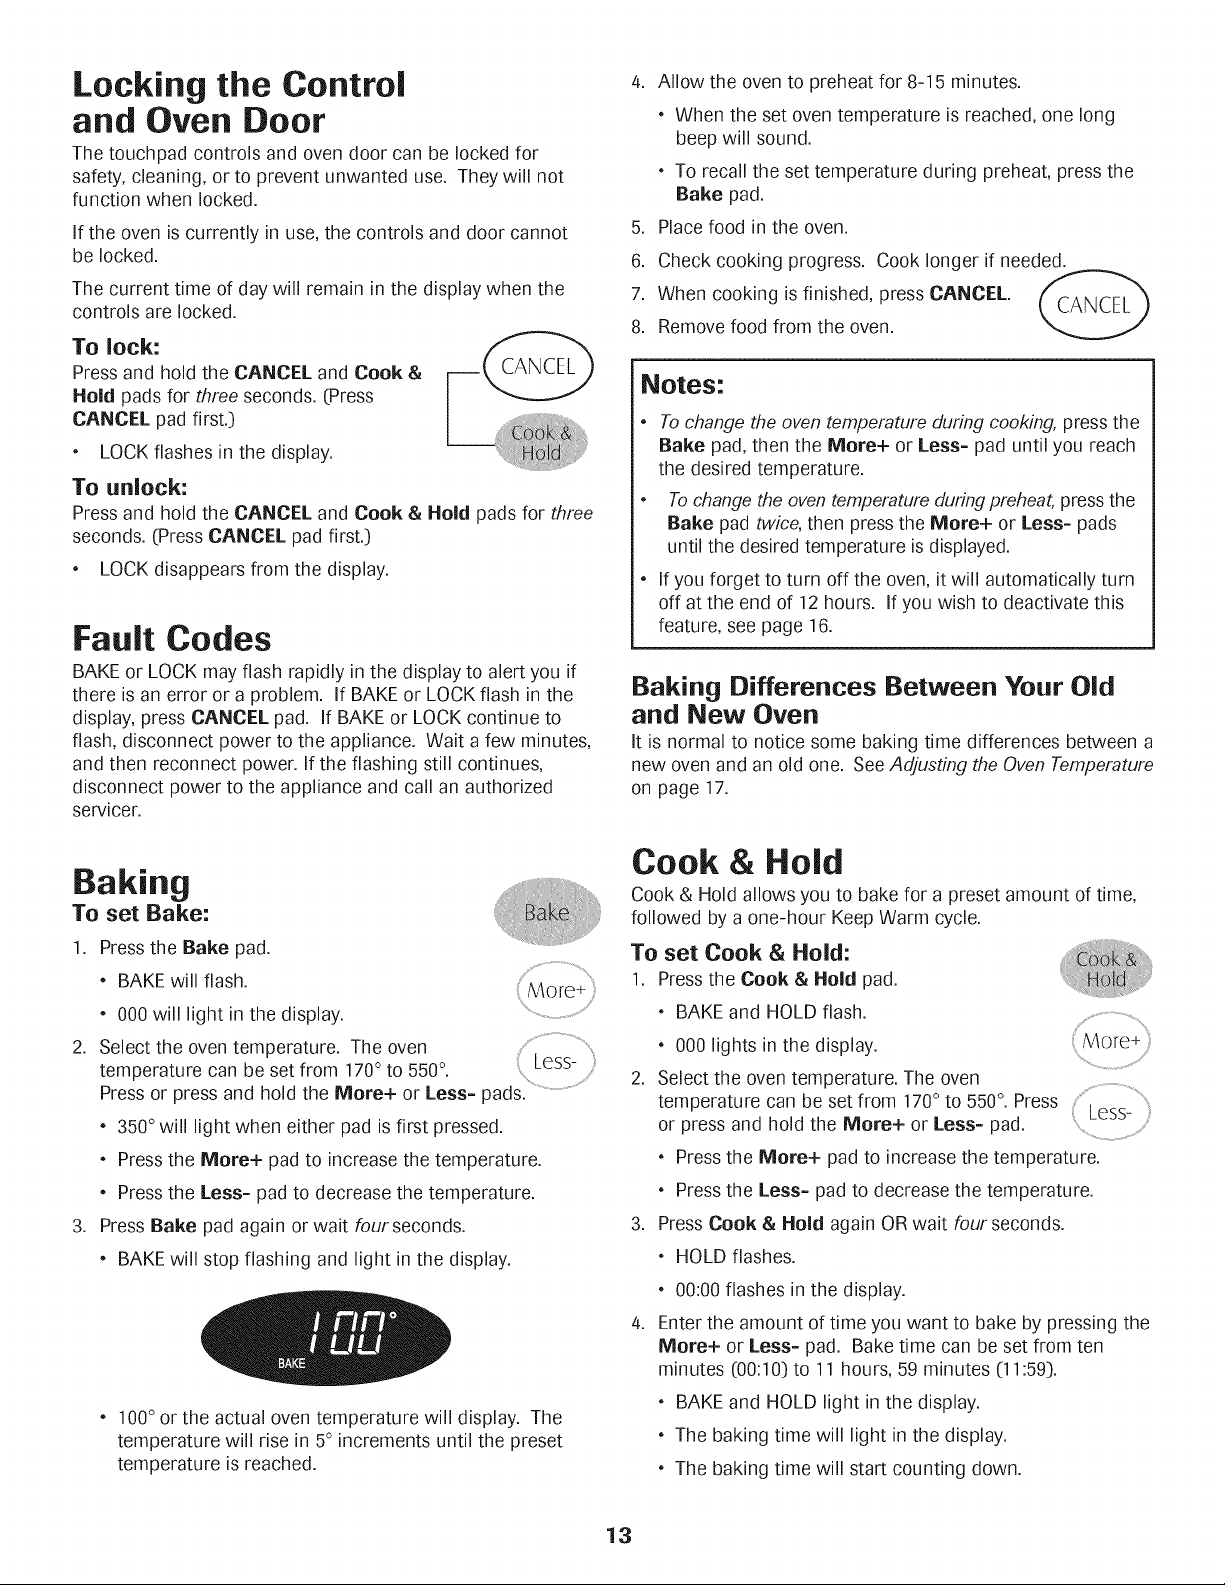
Baking
To set Bake:
1. Pressthe Bake pad.
* BAKE will flash.
* 000 will light in the display.
2. Select the oven temperature. The oven
temperature can be set from 170 ° to 550 °.
Press or press and hold the More+ or Less= pads.-
* 350°will light when either pad is first pressed.
* Press the More+ pad to increase the temperature.
* Press the Less= pad to decrease the temperature.
.
Press Bake pad again or wait four seconds.
* BAKEwill stop flashing and light in the display.
* 100° or the actual oven temperature will display. The
temperature will rise in 5° increments until the preset
temperature is reached.
::More+
/' %
Less-
Cook & Hold
Cook & Hold allows you to bake for a preset amount of time,
followed by a one-hour Keep Warm cycle.
To set Cook & Hold:
1. Press the Cook & Hold pad.
* BAKE and HOLD flash.
* 000 lights in the display.
2. Select the oven temperature. The oven
temperature can be set from 170° to 550°.Press , Less-
or press and hold the More+ or Less= pad. ................................................
* Pressthe More+ pad to increase the temperature.
* Pressthe Less- pad to decrease the temperature.
3. PressCook & Hold again ORwait four seconds.
* HOLD flashes.
* 00:00 flashes in the display.
4. Enter the amount of time you want to bake by pressing the
More+ or Less- pad. Bake time can be set from ten
minutes (00:10)to 11 hours, 59 minutes (11:59).
* BAKE and HOLD light in the display.
* The baking time will light in the display.
* The baking time will start counting down.
13
Page 15
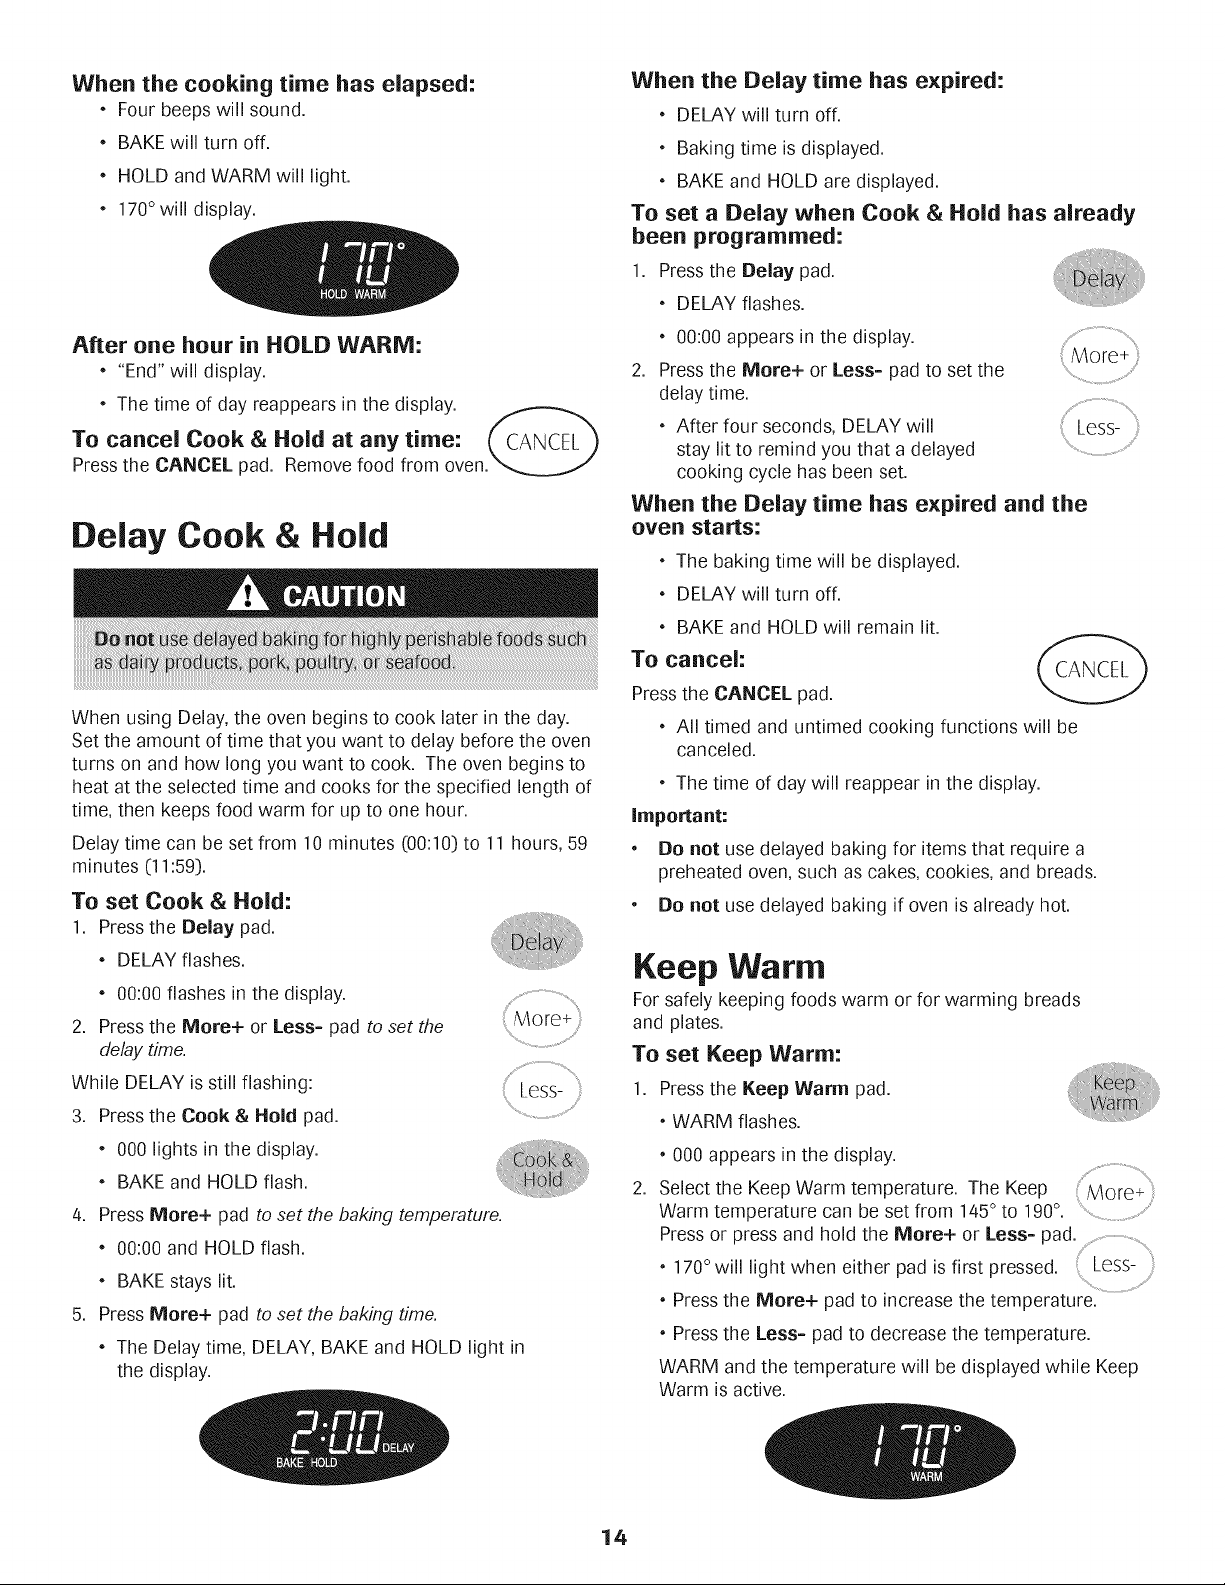
When the cooking time has elapsed:
* Four beeps will sound.
* BAKEwill turn off.
HOLD and WARM will light.
170°will display.
When the Delay time has expired:
DELAY will turn off.
Baking time is displayed.
BAKE and HOLD are displayed.
To set a Delay when Cook & Hold has already
been programmed:
1. Press the Delay pad.
DELAY flashes.
After one hour in HOLD WARM:
"End" will display.
The time of day reappears in the display.
To cancel Cook & Hold at any time: (, CANCEL )
Press the CANCEL pad. Remove food from oven._
Delay Cook & Hold
When using Delay, the oven begins to cook later in the day.
Set the amount of time that you want to delay before the oven
turns on and how long you want to cook. The oven begins to
heat at the selected time and cooks for the specified length of
time, then keeps food warm for up to one hour.
Delay time can be set from 10 minutes (00:10] to 11 hours, 59
minutes (11:59).
To set Cook & Hold:
1. Press the Delay pad.
DELAYflashes.
0O:0Oflashes inthe display.
2. Press the More+ or Less= pad to set the
delay time.
While DELAY isstill flashing:
3. Press the Cook & Hold pad.
000 lights in the display.
BAKE and HOLD flash.
4.
Press More+ pad to set the baking temperature.
0O:0Oand HOLD flash.
BAKE stays lit.
5.
Press More+ pad to set the baking time.
The Delay time, DELAY, BAKE and HOLD light in
the display.
Less- i'_
0O:0Oappears in the display. ........
2. Pressthe More+ or Less= pad to set the
delay time.
After four seconds, DELAY will
stay lit to remind you that a delayed ...........................................................
cooking cycle has been set.
More+
When the Delay time has expired and the
oven starts:
', The baking time will be displayed.
* DELAY will turn off.
* BAKE and HOLD will remain lit.
To cancel:
Pressthe CANCEL pad.
', All timed and untimed cooking functions will be
canceled.
', The time of day will reappear in the display.
Important:
* Do not use delayed baking for itemsthat require a
preheated oven, such as cakes, cookies, and breads.
* Do not use delayed baking if oven is already hot.
Keep Warm
For safely keeping foods warm or for warming breads
and plates.
To set Keep Warm:
Pressthe Keep Warm pad.
,, WARM flashes.
" 0OOappears in the display.
2.
Select the Keep Warm temperature. The Keep More+
Warm temperature can be set from 145° to 199°.
Pressor press and hold the More+ or Less= pad. ...................................................
* 170°will light when either pad is first pressed. Less-
. Press the More+ pad to increase the temperature.
* Press the Less= pad to decrease the temperature.
WARM and the temperature will be displayed while Keep
Warm isactive.
14
Page 16
To cancel Keep Warm:
1. Press the CANCEL pad.
2. Remove food from the oven.
Notes:
Foroptimal food quality, ovencooked foods should be kept
warm for no longer than 1to 2 hours.
To keep foods from drying, cover loosely with foil or a lid.
To warm dinner rolls:
- cover rolls loosely with foil and place in oven.
- press Keep Warm and More+ pads to set 170° F.
- warm for 12-15 minutes.
. Towarm plates:
- place 2 stacks of up to four plates each in the oven.
- press Keep Warm and More+ pads to set 170° F.
- warm for five minutes, turn off the oven and leave plates
in the oven for 15 minutes more.
- use only oven-safe plates, check with the manufacturer.
- do not set warm dishes on a cold surface as rapid
temperature changes could cause crazing or breakage.
Changing Temp °F/°C
1. The factory default setting for temperature is Fahrenheit.
2. To change the setting, pressand hold the CANCEL and Bake
pads at the same time for three seconds.
.
A single beep will sound and the current setting will be
displayed (°F or °C). (if no change is made, the range will
return to the existing setting after 30 seconds.)
4.
To change the setting, press the More+ or Less= pad. Press
again to return to existing setting. Wait five seconds and the
setting will be complete.
Broiling
To set Broil:
1. Press the Broil pad.
, BROILflashes.
, SEt is displayed.
2. Pressthe More+ pad to set HI broil or press the Less-
pad to set LO broil.
, HIor LO will be displayed.
, Select HI broil (550° F)for normal broiling. Select
LO broil (450° F) for low-temperature broiling of longer
cooking foods such as poultry.
3. After four seconds, the oven will start.
, BROILwill remain lit.
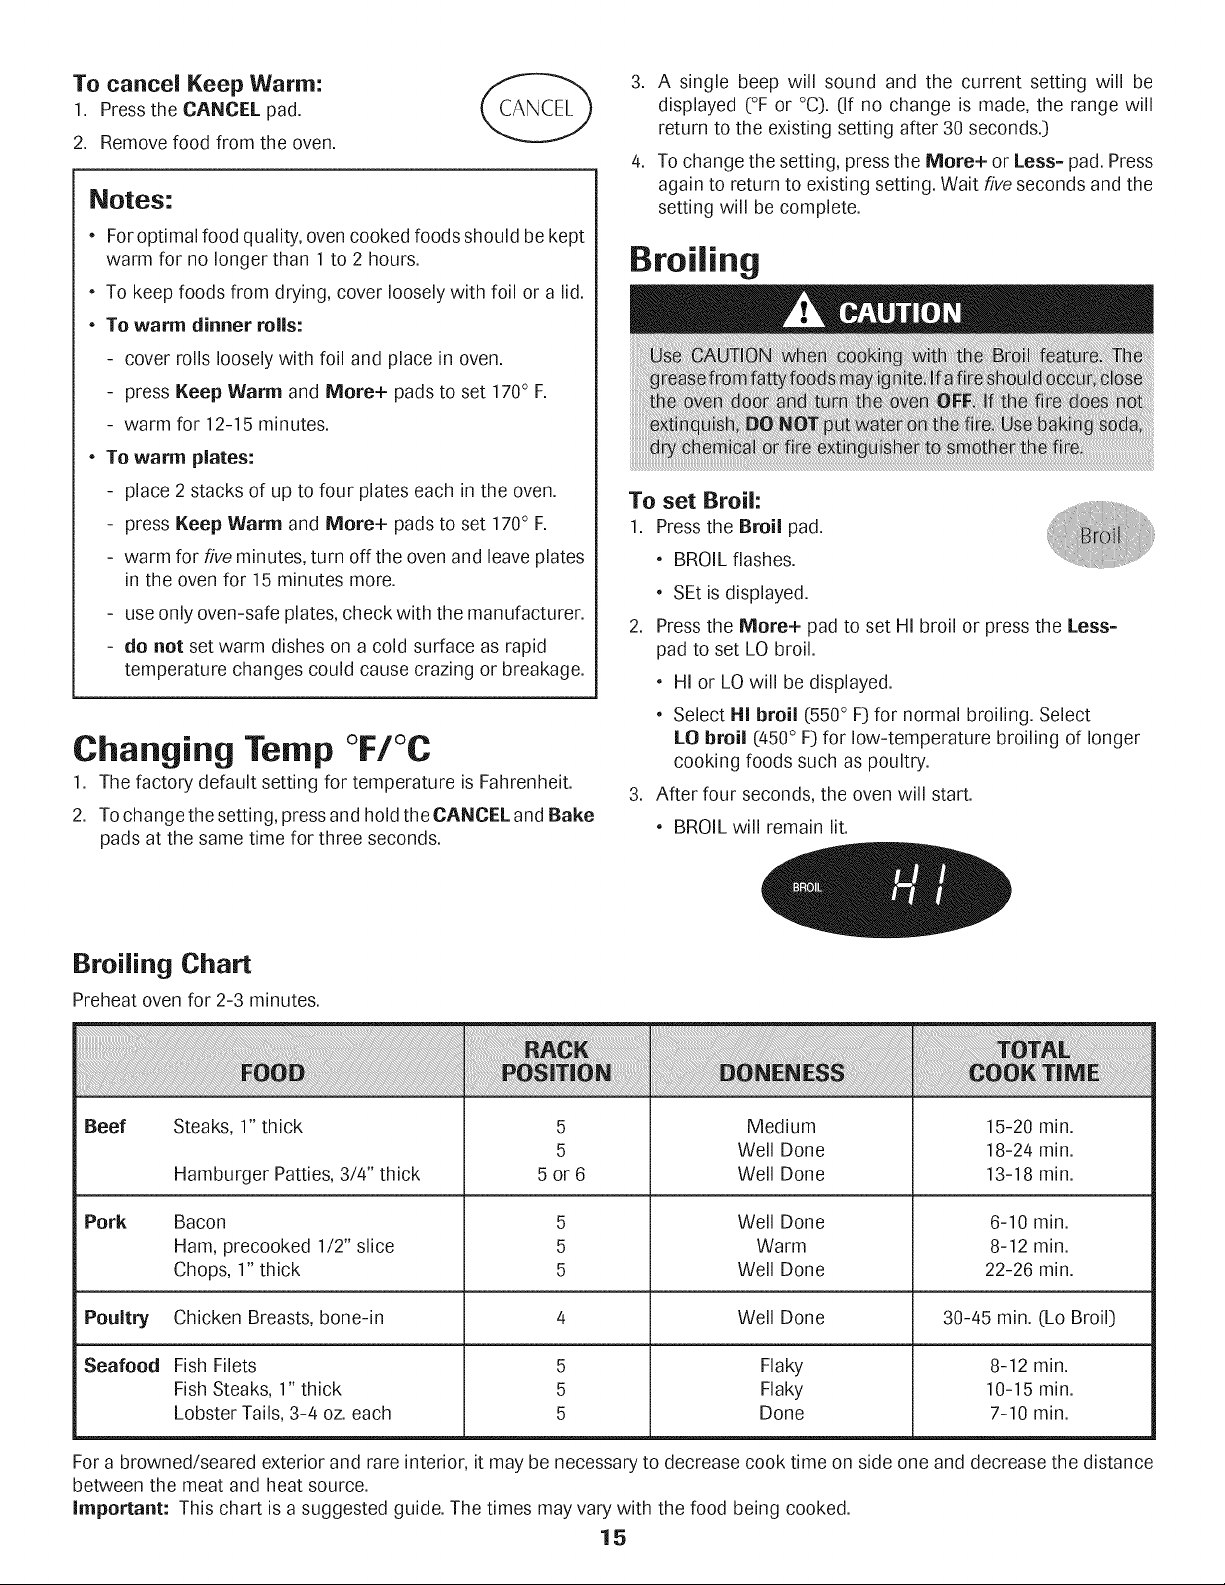
Broiling Chart
Preheat oven for 2-3 minutes.
Beef Steaks, 1" thick
Hamburger Patties, 3/4" thick
Pork
Bacon
Ham, precooked 1/2" slice
Chops, 1" thick
Poultry
Seafood
Chicken Breasts, bone-in
Fish Filets
Fish Steaks, 1" thick
Lobster Tails, 3-4 oz. each
For a browned/seared exterior and rare interior, it may be necessary to decrease cook time on side one and decrease the distance
between the meat and heat source.
Important: This chart is a suggested guide. The times may vary with the food being cooked.
5or6
5
5
5
5
5
5
5
5
Medium
Well Done
Well Done
Well Done
Warm
Well Done
Well Done
Flaky
Flaky
Done
15-20 min.
18-24 min.
13-18 min.
6-10 min.
8-12 min.
22-26 min.
30-45 min. (Lo Broil)
8-12 min.
10-15 min.
7-10 min.
15
Page 17
4. Foroptimumbrowning,preheatfor2-3minutesbefore
adding food.
5. Place food in the oven. Leave oven door open about four
inches (the first stop:).
6. Turn meat once about halfway through cooking.
7. When food is cooked, press the CANCEL
pad. Remove food and broiler pan from the CANCEL
oven.
The time of day will reappear in the display.
Notes:
For best results when broiling, use a pan designed for
broiling.
HI is used for most broiling. Use LO broil when broiling
longer cooking foods. The lower temperature allows
food to cook to the well done stage without excessive
browning.
Tochange the oventemperature during broiling, press the
Broil pad and then press the More+ or Less= pad to
switch between LO and HI broil.
Broil times may be longer when the lower broiling
temperature is selected.
Most foods should be turned halfway through broiling
time.
Automatic Shut-Off/
Sabbath Mode
The oven will automatically turn off after 12 hours if you
accidentally leave it on. This safety feature can be turned off.
To cancel the 12-hour shut-off and run the
oven continuously for 72 hours:
1. Set the oven to bake (see page 13:).
2. Press and hold the Clock pad for five seconds.
SAb will be displayed and flash for five seconds.
SAb will then be displayed continuously until turned off
or until the 72-hour time limit is reached.
BAKEwill also be displayed if a bake cycle is in use
while the oven is in Sabbath Mode.
BAKE b the only function that operates during the
Sabbath Mode. All other functions (Timer, Keep Warm,
Clean, etc.) are locked out during the Sabbath Mode.
To cancel Bake when in Sabbath Mode:
Press CANCEL.
BAKEwill turn off in the display.
No beeps will sound.
To cancel the Sabbath Mode:
1. Press the Clock pad for five seconds.
OR
2. After 72 hours, the Sabbath Mode will end.
SAb will flash for five seconds.
Notes:
Sabbath Mode can be turned on at any time with or
without the oven on.
Sabbath Mode cannot be turned on if the touchpads are
locked out or when the door is locked.
If the oven is baking when Sabbath Mode is set, BAKE
will go out at the end of the baking cycle. There will be
no audible beeps.
If the oven light is desired while in Sabbath Mode, it
must be turned on before the Sabbath Mode is started.
The time of day will return to the display.
When the Sabbath Mode is started, no preheat beep will
sound.
All prompts, messages and beeps are deactivated when
Sabbath Mode is active.
The automatic door lock does not operate during the
Sabbath Mode.
Pressing CANCEL will cancel a Bake cycle, however the
control will stay in the Sabbath Mode.
If power fails, the oven will power up in Sabbath Mode with
72 hours remaining and no cycle active.
16
Page 18
Adjusting the Oven Temperature
Oven temperatures are carefully tested for accuracy at the
factory. It is normal to notice some baking or browning
differences between a new oven and an old one. As ranges
get older, the oven temperature can shift.
You may adjust the oven temperature if you think the oven is
not baking or browning correctly. To decide how much to
change the temperature, set the temperature 25° higher or
lower than your recipe recommends, then bake. The results
of the "test" should give you an idea of how much to adjust
the temperature.
To adjust the oven temperature:
1. PressBake.
Oven Bottom
Protect oven bottom against spillovers, especially acidic or
sugary spills, asthey may discolor the porcelain enamel. Use
the correct pan size to avoid spillovers and boilovers. Do not
place utensils or aluminum foil directly on the oven
bottom.
Oven Racks
2. Enter 550° by pressing the More+ pad.
3. Pressand hold the Bake pad for several
seconds or until 0° appears in the display.
If the oven temperature was previously adjusted, the
change will be displayed. Forexample, if the oven tem-
perature was reduced by 15° the display will show "-15 °".
4. Pressthe More+ or Less= pad to adjust the temperature.
Eachtime a pad is pressed, the temperature changes by
5°. The oven temperature can be increased or decreased
by 5° to 35°.
5. The time of day will automatically reappear in the display.
You do not need to readjust the oven temperature if there
is a power failure or interruption. Broiling and cleaning
temperatures cannot be adjusted.
................................¸%¸¸¸¸
/,
Pilotless Ignition
Your range is equipped with pilotless ignition. With this type of
ignition system, the gas automatically shuts off and the oven
will not operate during a power failure.
A lighted match will not light the oven burner. No attempt
should be made to operate the oven during a power
failure.
Oven Vent
When the oven is in use the area near the vent may become
hot enough to cause burns. Never block the vent opening.
The oven vent is located below the backguard vent shield
on your range.
OVEN VENT
TION
Oven Light
The oven light automatically comes on when the
door isopened. When the door isclosed, press the
oven light switch to turn the oven light on and off.
Do not place
plastics near the
vent opening as
heat from the vent
could distort or
melt the plastic.
Oven
Light
The oven has two racks. All racks
are designed with a lock-stop
edge.
To remove:
I. Pullrackstraightoutuntilit
stopsatthelock-stopposition.
2. Liftup on thefrontoftherackand pullout.
To replace:
1. Place rack on the rack support in the oven.
2. Tilt the front end up slightly. Slide rack back until it clears
the lock-stop position.
3. Lower front and slide back intothe oven.
Do not cover an entire rack with aluminum foil or place
foil on the oven bottom. Baking results will be affected
and damage may occur to the oven bottom.
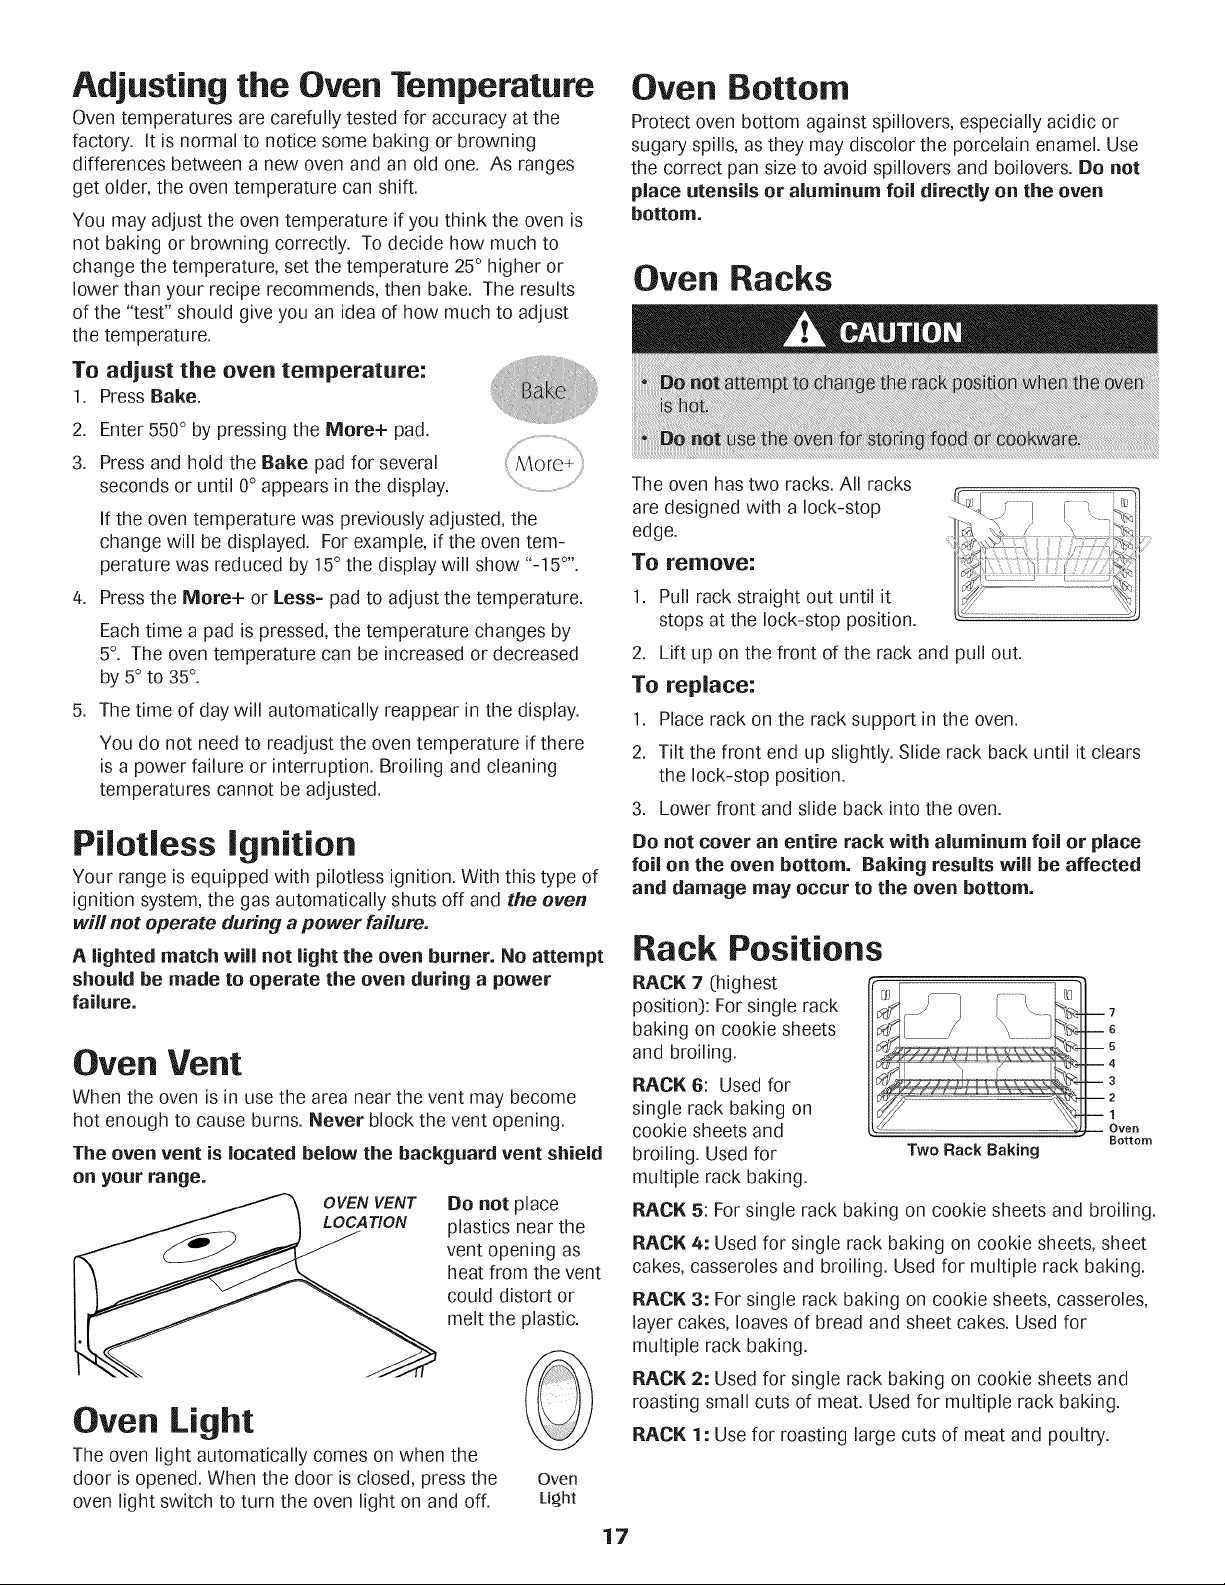
Rack Positions
RACK 7 (highest
position): For single rack
baking on cookie sheets
and broiling.
RACK 6: Used for
single rack baking on
cookie sheets and
broiling. Used for
multiple rack baking.
RACK 5: For single rack baking on cookie sheets and broiling.
RACK 4: Used for single rack baking on cookie sheets, sheet
cakes, casseroles and broiling. Used for multiple rack baking.
RACK 3: For single rack baking on cookie sheets, casseroles,
layer cakes, loaves of bread and sheet cakes. Used for
multiple rack baking.
RACK 2: Used for single rack baking on cookie sheets and
roasting small cuts of meat. Used for multiple rack baking.
RACK 1: Usefor roasting large cuts of meat and poultry.
17
Two Rack Baking
_ven
Bottom
Page 19

Oven Bottom: Place oven rack
on raised sides of oven bottom.
Use for additional space when
cooking large oven meals.
MULTIPLE RACK COOKING:
Two rack: Use rack positions 3
and 6, or 2 and 4.
Baking Layer Cakes on Two Racks
For best results when
baking cakes on two
racks, use racks 2 and 4.
Place the cakes on the
t_
,j
rack as shown.
18
Page 20

MAYTAG®MAJOR APPLIANCE WARRANTY
LIM ITED WARRANTY
For one year from the date of purchase, when this major appliance is operated and maintained according to instructions attached to or
furnished with the product, Maytag brand of Whirlpool Corporation or Whirlpool Canada LP (hereafter "Maytag") will pay for factory
specified parts and repair labor to correct defects in materials or workmanship. Service must be provided by a Maytag designated
service company. This limited warranty is valid only in the United States or Canada and applies only when the major appliance is used
in the country in which it was purchased. Outside the 50 United States and Canada, this limited warranty does not apply. Proof of
original purchase date is required to obtain service under this limited warranty.
ITEMS EXCLUDED FROM WARRANTY
This limited warranty does not cover:
1. Service calls to correct the installation of your major appliance, to instruct you on how to use your major appliance, to replace or
repair house fuses, or to correct house wiring or plumbing.
2. Service calls to repair or replace appliance light bulbs, air filters or water filters. Consumable parts are excluded from warranty
coverage.
3. Repairs when your major appliance is used for other than normal, single-family household use or when it is used in a manner that is
contrary to published user or operator instructions and/or installation instructions.
4. Damage resulting from accident, alteration, misuse, abuse, fire, flood, acts of God, improper installation, installation not in
accordance with electrical or plumbing codes, or use of consumables or cleaning products not approved by Maytag.
5. Cosmetic damage, including scratches, dents, chips or other damage to the finish of your major appliance, unless such damage
results from defects in materials or workmanship and is reported to Maytag within 30 days from the date of purchase.
6. Any food loss due to refrigerator or freezer product failures.
7. Costs associated with the removal from your home of your major appliance for repairs. This major appliance is designed to be
repaired in the home and only in-home service is covered by this warranty.
8. Repairs to parts or systems resulting from unauthorized modifications made to the appliance.
9. Expenses for travel and transportation for product service if your major appliance is located in a remote area where service by an
authorized Maytag servicer is not available.
10. The removal and reinstallation of your major appliance if it is installed in an inaccessible location or is not installed in accordance
with published installation instructions.
11. Major appliances with original model/serial numbers that have been removed, altered or cannot be easily determined. This warranty
is void if the factory applied serial number has been altered or removed from your major appliance.
The cost of repair or replacement under these excluded circumstances shall be borne by the customer.
DISCLAIMER OF IMPLIED WARRANTIES; LIMITATION OF REMEDIES
CUSTOMER'S SOLE AND EXCLUSIVE REMEDY UNDER THIS LIMITED WARRANTY SHALL BE PRODUCT REPAIR AS PROVIDED
HEREIN. IMPLIED WARRANTIES, INCLUDING WARRANTIES OF MERCHANTABILITY OR FITNESS FOR A PARTICULAR PURPOSE,
ARE LIMITED TO ONE YEAR OR THE SHORTEST PERIOD ALLOWED BY LAW. MAYTAG SHALL NOT BE LIABLE FOR INCIDENTAL
OR CONSEQUENTIAL DAMAGES. SOME STATES AND PROVINCES DO NOT ALLOW THE EXCLUSION OR LIMITATION OF
INCIDENTAL OR CONSEQUENTIAL DAMAGES, OR LIMITATIONS ON THE DURATION OF IMPLIED WARRANTIES OF
MERCHANTABILITY OR FITNESS, SO THESE EXCLUSIONS OR LIMITATIONS MAY NOT APPLY TO YOU. THIS WARRANTY GIVES
YOU SPECIFIC LEGAL RIGHTS, AND YOU MAY ALSO HAVE OTHER RIGHTS WHICH VARY FROM STATE TO STATE OR PROVINCE
TO PROVINCE.
If outside the 50 United States and Canada, contact your authorized Maytag dealer to determine if another warranty applies.
If you need service, first see the "Troubleshooting" section of the Use & Care Guide. After checking "Troubleshooting," you may find
additional help by checking the "Assistance or Service" section or by calling Maytag. In the U.S.A., call 1-800-688-9900. In Canada, call
1-800-807-6777.
9/07
Page 21

M_A AG
Cuisini_re
gaz _ touches
de
precision 500
/sin/
Table
instructions de s_curit_ Cuisson darts le four
importantes ......,,.._;!:.:;,::::;i;;!::21-24 Cuisson coUrante
cuisson et m@intien
Nettoyage ................................... 25-27 Cuisson et maintien diff_r_e
Four autonettoyant Maintien au chaud
Methodes de nettoyage Cuisson au gril
Arr_te automatique/Mode sabbat
Entretien ...................................... 28=29 Grilles du four
Hublot et lampe du four
Deplacement d'un appareil b gaz Garantie etservice apr_s=vente ....39
Recherche des pannes ............. 29=30 Guia de uso y cuidado .....................40
Cuisson sur la sudace ............. 30=32
Commandes de la surface de cuisson
BrQleurs b gaz scelles
Page 22

Life routes ies instructions avant d'utiliser cet appareil;
observer toutes les instructionspour _liminer les risques
d'incendie, choc 61ectrique,dommages mat6riels et corporels
que pourrait susciter une utilisation incorrectede I'appareik
Utiliser I'appareil uniquement pour lesfonctions pr6vues,
d6crites dans ce guide.
Pour une utJlisation adequate et en s_curit_, ilfaut que
I'appareil soit convenablement install6 par un techrficien
qualifi& et reli6 _ la terre. Ne pas r6gler, r@arer ni remplacer un
composant, _ moins que cela ne soit sp6cifiquement
recommand6 dans ce guide.Toute autre r@aration dolt 6tre
effectu6e par un technicien qualifi& Demander _ I'installateur
de montrer o_ se trouve le robinet d'arr6t de gaz et comment le
fermer en cas d'urgence.
Toujours d6brancher I'appareil avant d'y faire de I'entretien.
securlteimportentes
Les instructions de s6curit6 importantes et les paragraphes
_avertissement ))de ce guide ne sont pas destin6s _ couvrir
toutes les conditions et situations qui pourraient se pr6senter. II
faut fake preuve de bon sens,de prudence et de soin Iors de
I'installation, de I'entretien ou du fonctionnement de I'appareik
Toujours prendre contact avec le fabricant dans le cas de
probl_mes ou de conditions qui ne seraient pas comprises.
Reconnaitre les tiquettes, paragraphes et
syrnbolessur la s curit
21
Page 23

instructions g6n6rales
Pour eliminer le besoin d'atteindre quelque chose par-dessus
les br01eursde surface, il est preferable qu'il n'y ait aucune
armoire de cuisine directement au-dessus de I'appareil. S'il y a
une armoire, on nedevrait y remiser que des articles peu
frequemment utilises et capables de resister _ la chaleur Cruise
par I'appareil. La temperature pourrait 6tre excessive pour
certains articles, comme liquides volatils, produits de nettoyage
ou flacons d'aerosol.
En cas d'incendie
Interrompre le fonctionnement de I'appareil et de la hotte de
ventilation pour minimiser le risque d'extension des flammes.
I_teindrelos flammes, puis mettre la hotte en marche pour
evacuer la fumee et Fairvici&
, Table de cuisson : Utiliser un couvercle ou une plaque
biscuits pour etouffer los flammes d'un feu qui se declare
dans un ustensile de cuisine.
Utiliser une lampe torche pour d6terminer si la bride
antibasculement est convenablement install6e sous la
cuisini6re. L'un des pieds arriere de reglage de I'aplomb dolt
etre convenablement engage dans la fente de la bride. Lorsque
la cuisiniere estconvenablement calee, la bride
antibasculement immobilise le pied arriere contre le sol.Verifier
la parfaite immobilisation de lacuisiniere par la bride apres
chaque d@lacement de la cuisiniere.
Pour 6viter un incendie ou des
domrnages par la fum e
S'assurerque tous los materiaux de conditionnement sont
retires de I'appareil avantde le mettre en marche.
Garder los materiaux combustibles, I'essence et autres matieres
etvapeurs inflammables bien eloignes de I'appareil.
Si I'appareil est installe pros d'une fenetre, des precautions
appropriees doivent etre prises pour eviter que le vent entraine
les rideaux au-dessus des brOleurs.
NEJANIAIS laisser des articles sur la table de cuisson. L'air
chaud de I'eventpeut les enflammer et mettre egalement sous
pression des contenants fermes qui pourraient alors exploser.
De nombreux flacons d'aerosol peuvent EXPLOSERIorsqu'on
lesexpose _ la chaleur,et ils peuvent contenir un produit tres
inflammable. @iter d'utiliser ou remiser un flacon d'aerosol
proximite de I'appareil.
De nombreux articles en plastique peuvent 6tre deteriores par la
chaleur. Conserver les articles en plastique _ distance des
composants de I'appareil susceptibles de devenir tiedes ou
chauds. Ne pas laisserdes articles en plastique sur la table de
cuisson; un article en plastique trop proche de I'event du four
ou d'un brOleur allume pourrait s'amollir ou fondre.
NEJAMAIS saisir ou d@lacer un ustensile de cuisine
enflamm&
, Four: Fermerla porte du four pour etouffer los flammes.
Ne pas projeter de I'eau sur un feu de graisse.Utiliser du
bicarbonate de sodium ou un extincteur _ mousse ou produit
chimique sec pour eteindre lesflammes.
S curit6 pour los enfants
NE JAMAIS laisser des enfants seuls ou sans supervision
Iorsque I'appareil est en service ou encore chaud.
NE JANIAIS laisser un enfant s'asseoir ou setenir sur une
partie quelconque de I'appareil. II pourrait se blesser ou se
brOler.
II est importantd'enseigner aux enfants que la cuisiniere et les
ustensiles places dessus ou dedans peuvent etre chauds.
Laisser refroidir los ustensiles en un lieu s0r, hors d'atteinte
des enfants. II est important d'enseigner aux enfants qu'un
appareil menager n'estpas un jouet, et qu'ils ne doivent
toucher aucune commande ou autre composant de I'appareil.
22
Page 24

Familiarisation avec I'appareil
L'6vent de four est situ6 _ la basedu dosseret.
I_vitezde toucher le voisinage de 1'6ventde four Iorsque le four
est utilis6 et pendant plusieurs minutes apres rarret du four.
Certains composants de I'eventet la zonevoisine peuvent
devenir suffisamment chauds pour provoquer des brOlures.
Apres I'arret du four, ne touchez pas I'event de four ou la zone
voisine avant que ces composants aient pu se refroidir
suffisamment.
Autres surfaces potentiellement chaudes : table de cuisson,
zones faisant face _ la table de cuisson, event de four, zone
voisine de I'event, porte de four et zone voisine de porte et de
hublot.
Ne touchez pas I'ampoule chaude du four avec un linge humide;
le choc thermique pourrait la briser. Sitel est le cas, debranchez
I'appareil avant de retirer I'ampoule pour eviter une decharge
electrique.
Ne remisez pas des aliments ou ustensiles de cuisine sur la table
de cuisson ou dans lesfours.
Cuisson et s curit
Placertoujours un ustensile sur un br_leur de surface avant de
I'allumer.Veiller _ bien connaftre la correspondance entre les
boutons de commande et lesbrOleurs.Veiller _ allumer lebrOleur
correct et verifier que le brOleur s'allume effectivement. A la fin
de la periode decuisson, eteindre le brOleuravantde retirer
I'ustensile, pour eviter une exposition aux flammes du brOleur.
Veiller _ toujours ajuster correctement la taille des flammes pour
qu'elles ne d@assent pas sur la peripherie de I'ustensile.Des
flammes de trop grande taille sur un brOleur sont dangereuses,
elles entrai'nent un gaspillage d'energie et elles peuvent faire
subir des dommages _ I'ustensile,_ I'appareil ou _ I'armoire
situee au-dessus.
NE JAMAIS laisserun brOleur de surface allume sans surveil-
lance, particulierement avec une puissancede chauffage elevee
ou Iors d'une operation de friture. Un debordement pourrak
provoquer la formation de fumee et des produits gras pourraient
s'enflammer. I_liminerdes que possible les produits gras
renverses. Ne pas utiliser une puissance de chauffage elevee
pendant une periode prolongee.
NE JANIAIS faire chauffer un recipient non ouvert dans le four
ou sur un brOleurde surface; I'accumulation de pression dans le
recipient pourrait provoquer son eclatement et de graves
dommages materiels ou corporels.
Utiliser des maniques robustes et seches. Desmaniques
humides peuvent provoquer la formation de vapeur brOlante.Ne
jamais utiliser un torchon _ vaisselleou autre article textile _ la
place de maniques; un tel article pourrait trainer sur un brOleur et
s'enflammer, ou accrocher un ustensile ou un composant de
I'appareil.
Laisser toujours refroidir un recipient d'huile defriture chaude
avant de tenter de le d@lacer et le manipuler.
Ne pas laisser la graisse de cuisson ou autre materiau inflam-
mable s'accumuler dans ou pres de I'appareil, de la hotte ou du
ventilateur de I'event. Nettoyerfrequemment la hotte pour
empecher toute accumulation sur la hotte elle-meme ou sur le
filtre. Lors du flambage d'aliments sous la hotte, mettre le
ventilateur en marche.
NE JAMAIS porter, Iors de I'utilisation de I'appareil, des
vetements faits d'un materiau inflammable, ou amples,ou
Iongues manches. De tels vetements peuvent s'enflammer ou
accrocher la poignee d'un ustensile.
Placertoujours les grilles _ la position appropriee dans le four
Iorsque le four est froid. Fake coulisser la grille vers I'ext6rieur
avant d'ajouter ou enlever un plat; utiliser pour cela une manique
robuste et seche.I_viterd'introduire la main dans le four pour y
placer ou retirer un plat. S'il est necessairede d@lacer une grille
Iorsqu'elle est chaude, utiliser une manique seche.Veiller
toujours arreter le four _ la fin d'une periode de cuisson.
Ouvrir toujours la porte du four tres prudemment. Laisser Fair
chaud ou lavapeur s'echapper avantde retirer/introduire un plat.
AVERTISSEMENT : Mets prepares : Respecter les instructions
du fabricant. Si lecontenant ou le couvercle en plastique d'un
mets surgele sedeforme ou est endommage durant la cuisson,
jeter immediatement le recipient et son contenu. Les aliments
pourraient etre contamines.
NE JANIAIS garnir la sole ou une grille du four avec de la feuille
d'aluminium. Ceci pourrait susciter un risque de choc electrique
ou d'incendie, ou une autre deterioration de I'appareil. Utiliser de
la feuille d'aluminium uniquement selon lesinstructions de ce
guide.
Ustensiles et s curit
Utiliser des ustensiles _ fond plat comportant une poignee qu'on
peut facilement saisir et qui reste froide. I_viterd'utiliser un
23
Page 25

ustensileinstableoudOformO,quipourraitfacilementbasculer,
oudontiapoignOeestrealfixOe,leviter6galement d'utiiiser des
ustensiles de petite taiile comportant une poignOeiourde; ces
ustensiles sont gOnOralementinstables et peuvent facilement
basculer. Un ustensile iourd iorsqu'il est rempli peut 6galement
6tre dangereux iors des manipulations.
Veiller _ utiliser un ustensile de taille suffisante pour que ie
contenu ne risque pas de dOborder.Ceci est particuliOrement
important pour un ustensiie rempli d'huiie de friture. Verifier que
ia taille de rustensile est suffisante pour qu'il puisse recevoir ies
produits alimentaires _ cuire, et absorber raugmentation de
volume suscitOepar rObullition de ia graisse.
Pour minimiser les risques de brOlure,d'inflammation de
matieres et de renversement par contact non intentionnel avec
un ustensile, ne pas orienter la poignee d'un ustensile vers un
brOleur adjacent; orienter toujours la poignee d'un ustensile vers
le cote ou rarriere de rappareil; ne pas laisser non plus la
poignee d'un ustensile deborder _ ravant de rappareil, oOun
jeune enfant pourrait facilement la saisir.
Certains produits de nettoyage peuvent gOnOrerdesvapeurs
nocives Iorsqu'on losapplique sur une surface chaude.
Four autonettoyant
Nettoyer uniquement les pieces mentionnees dans ce guide. Ne
pas nettoyer le joint de porte; lejoint joue un r01eessentiel quant
retancheite. Ne pas frotter, endommager ou deplacer le joint.
Ne pas utiNserde produit de nettoyage du four dans le four
autonettoyant ou sur loszones voisines.
II est normal que la surface de cuisson devienne chaude durant
une operation d'autonettoyage; par consequent, eviter de toucher
la surface de cuisson durant rautonettoyage.
Veiller _ ne jamais laisser le contenu liquide d'un ustensile
s'evaporer completement; rustensile et rappareil pourraient subir
des dommages.
Appliquer lesinstructions du fabricant iors de remploi d'un
sachet pour cuisson aufour.
Seulscertains materiaux en verre, vitroceramique, ceramique, ou
certains ustensiles vitrifies/emaiNespeuvent etre utiNsessur la
table de cuisson ou dans le four sans risque de bris sous reffet
du choc thermique. Observer lesinstructions du fabricant Iors de
rutiNsation d'un ustensile en verre.
La securite de fonctionnement de cet appareil a ete testee
raide d'ustensiles de cuisine conventionnels. Ne pas utiNser un
ustensile ou accessoire qui n'est pas specifiquement
recommande dans ce guide. Ne pas utiliser de couvre-br01eur,
gril place sur la table de cuisson ou systeme deconvection
additionnel. L'utilisation d'un dispositif ou accessoire qui n'est
pas expressement recommande dans ce guide pout degrader la
securite de rappareil ousa performance, ou reduire la Iongevite
des composants.
Nettoyage et s curit
Arreter toutes loscommandos et attendre le refroidissement de
tous los composants avant de los toucher ou d'entre-prendre le
nettoyage. Ne pas toucher la grille d'un br01eurou la zone
voisine avant que cos composants aient pu suffisam-ment
refroidir.
Exercer une grande prudence Iors du nettoyage de I'appareil.
Travailler prudemment pour eviter des br01urespar la vapeur en
cas d'utilisation d'un chiffon ou d'une eponge humide Iorsde
reNmination d'un produit renverse sur une surface chaude.
Avertissement et avis
important pour la s curit
La Ioi californienne <<SafeDrinking Water and Toxic Enforcement
Act )>de 1986 (:proposition 65)stipule la publication par le
gouverneur de laCalifornie d'une Nstede substances que I'etat
de Californie considere comme cancerigenes ou dangereuses
pour le systeme reproducteur, et impose aux entreprises
commerciales robligation de signaler _ leurs clients losrisques
d'exposition _ de telles substances.
Los utiNsateursde cot appareil peuvent etre exposes _ une faible
concentration de certaines substances figurant dans la Nste
mentionnee ci-dessus, dont benzene, formaldehyde et suie, du
fait de la combustion incomplete du gaz naturel ou du gaz de
petrole liquefi6. Pour minimiser la combustion incomplete, veiller
ce que les brOleurssoient parfaitement regles. Pour minimiser
rexposition _ ces substances,veiller _ bien evacuer les gaz de
combustion _ rexterieur.
Nous informons losutiNsateursde cot appareil que Iors d'une
operation d'autonettoyage, ils peuvent etre exposes _ une faible
concentration de certaines substances figurant dans la Nste
mentionnee ci-dessus, dont le monoxyde de carbone. Pour
minimiser rexposition, veiNer_ ce que la piece o0 se trouve le
four soit convenablement aeree durant une operation
d'autonettoyage par rouverture d'une fenOtreou d'une porte.
AVIS IMPORTANT = OISEAUX FAMILIERS : Lesoiseaux ont
un systeme respiratoire tres sensible. Ne pas garder un oiseau
familier dans la cuisine ou dans une piece oOil pourrait 8tre
expose aux fumees. Lesfumees Cruisesdurant une operation
d'autonettoyage peuvent etre dangereuses ou mortelles pour un
oiseau, de mOmeque lesfumees CruisesIorsdu chauffage
excessif de graisse, huile, margarine, et du chauffage excessif
dans un ustensile _ revetement antiadhesif.
Conserver cos instructions pour consultation ult rieure
24
Page 26

Four autonettoyant
Le cycled'autonettoyageutilisedestemperaturessuperieures9 la
normalepourassurerle nettoyageautomatiquede latotalite du four.
Le four dolt ¢tre nettoyeregulierement.Leseclaboussuresdoivent
¢treessuyeespour eviterune productionexcessivedefumee ou
I'apparitiondeflammes.Ne laissezpas deresiduss'accumulerdans
le four.
Durant le processusd'autonettoyage,il convientde bienaererla
cuisinepour eliminerles odeursnormalementCruisesdurant le
nettoyage.
Avant I'autonettoyage
1. I_teindrelalampedu four avantlenettoyage.Ellerisqueraitsinon,
de griller.
2. Enlevertousles platset lesgrillesdu four. Lesgrillesrisquent de
sedecoloreret dene plusglisseraussibienapresun cycle
d'autonettoyagesion neles enlevepas.
3. Nettoyerle cadredu four, lecadrede la porte,lazone_ I'exterieur
dujoint et autourde I'ouverturedanslejoint de laporte,_ I'aide
d'un produitde nettoyagenon abrasifcommeBonAmi* ou d'eau
additionneededetergent.Le processusd'autonettoyagene
nettoiepasceszones.Ellesdoivent¢tre nettoyeespourempecher
la saletede s'incrusterpendantle cyclede nettoyage.(Lejoint
assureI'etancheiteautourde laporte etdu hublotdu four.)
/4. Pourempechertout dommage,ne #as nettoyernifrotter lejoint
qui setrouve autourde laportedu four.
Cejoint est congupour eviterlespertes
de chaleurpendant le cycle
d'autonettoyage.
5. I_liminerlesresidusde graisseou de
produitsrenversessurla soleavantle
nettoyage.Ceciempechelaformation
deflammesou defumee durantle nettoyage.
.
Essuyerlesresidussucreset acides,commelespatatesdouces,
latomateou lessauces9 basede lait. Laporcelainevitrifiee
possedeunecertaine resistanceaux composesacides,maisqui
n'estpas limitee.Ellepeut se decolorersi lesresidusacidesou
sucresnesont pasenlevesavantde commencerI'autonettoyage.
Programmation de rautonettoyage :
Important : Latemperaturedu four dolt etresitueeen dessousde
205°C(/400° F)pour programmerun cycled'autonettoyage.
1. Fermerla portedu four.
2. Appuyer surla toucheClean (Nettoyage).
• Lemot CLEANclignote_ rafficheur.
3. Appuyer surla touche More + (Plus+)ou Less=
(Moins-).
• CL-M (Nettoyage- saletemoyenne)estaffiche.
Si la porten'est pasfermee,desbips retentissentet Less-
Áemot'door' (Porte)parait_ I'afficheur.Sila porten'est pas
fermeedansles/45secondes,I'operationd'autonettoyageest
annuleeet rafficheur revient_ I'heure dujour.
/4. Appuyer sur latouche More + ou Less- pourvoir defiler les
differentsreglagesdeI'autonettoyage.
CL-H(Nettoyage- saleteimportante,/4heures)
CL-M (Nettoyage-saletemoyenne,3 heures)
CL-L(Nettoyage- saletelegere,2 heures)
Lechoixdu niveaudesaletedu four programme
automatiquementladuree du cycled'autonettoyage.
5. Apres quatresecondes,lefourcommencelenettoyage.
• Ladureede nettoyagecommencele decompte9 I'afficheur.
• Lemot LOCKparait9 rafficheur.
• Lemot CLEANparait9 I'afficheur.
.............................................
D_marrage diff_r_ d'un cycle d'autonettoyage :
1. Appuyer sur latoucheDelay (Differe).
• Lemot DELAYclignote.
• 00:00parait9 I'afficheur.
2. Appuyer surla touche More + ou Less- pour
programmerla dureed'attenteavantque ne
commencelecycle.Laduree d'attentepeut etre
reglee,dedix minutes(00:10)9 onzeheures,
cinquante-neufminutes (11:59). .............................................
3. Alors quele motDELAYclignote,appuyersur
latouche Clean.
• Lemot CLEANva clignoter.
Suite...
*Lesnomsde marquedes produitsde nettoyagesontdesmarquesd@oseesdesdifferentsfabricants.
25
Page 27

Appuyersurla toucheMore + (Plus+)ou Less-
(Moins-).
• CL-M (Nettoyage- saletemoyenne)est affich&
Appuyersurla toucheMore + ouLess- pourvoirdefiler les
differents reglagesde rautonettoyage.
CL-H (Nettoyage- saleteimportante,4 heures)
CL-M (Nettoyage- saletemoyenne,3 heures)
CL-L (Nettoyage- saletelegere,2 heures)
Lechoix duniveaudesaletedu four programme
automatiquementladureedu cycled'autonettoyage.
Apresquatresecondes,lesrootsCLEAN(Nettoyage),DELAY
(Differe)etLOCK(Verrouillage)paraissent9 I'afficheurpour
indiquerque lefour est programmepouruneoperation de
nettoyagediffer& Letempsd'attenteparait 9I'afficheur.
More+
Si le four a d6jtt 6t6 programm6 pour an cycle de
nettoyage et que ron d6sire 6tablir an d61ai:
1. Appuyersur latouche Belay.
• Lemot DELAYclignote.
• 00:00parait _I'afficheur
2. Appuyersur latouche More + ou Less- pour
programmerladuree desireede I'attenteavantque
ne debute lecycle. Less- i:,
Apresquatresecondes,les rootsCLEAN,DELAYet
LOCKparaissent_ rafficheur pour indiquerque lefour est
programmepourune operationde nettoyagediffer& Letemps
d'attenteparait _ rafficheur.
Lorsque le cycle d'autonettoyage d6bute :
• Lemot DELAYs'eteint.
• Ladureede nettoyageparait9 I'afficheur.
Annulation du cycle d'autonettoyage :
Appuyersur latouche CANCEL(Annuler).
• Tousles rootsdisparaissentde I'afficheur.
• Touteslos fonctionssont annulees.
Bruits
Pendantque lefour chauffe,il peutse produiredes bruitsde metal
en dilatationou encontraction.Ceciest normalet n'indiquepus que
le four s'abime.
Apr6s ie cycle d'autonettoyage
Environune heureapresla fin ducycle,le motLOCKs'eteint.A ce
moment,la portepout etreouverte.
Lasalet6 peat avoir laiss6 anr6sidugris poudreux.L'enlever
avecun lingehumide.S'il restede lasalet& celaindiqueque lecycle
de nettoyagen'apasete assezlong.Cettesaleterestantesera
enleveeauprochaincycled'autonettoyage.
Silos grillesoat 6t6 laiss6estt I'int6rieurdu four pendant
le cycle d'autonettoyageet qu'elles glissent real sur leurs
supports,lesenduire,ainsi quelessupports,d'unefine couche
d'huilevegetale.
Be fines lignes peuventapparaitre duns laporcelaine puree
qu'elle a subi chaleur et refroidissement.Ceciestnormal et
n'affecterapasla performance.
Une deceleration blanche peat apparaitre apr6s le nettoyage
si des aliments acides ou sucres n'ont pus6t6 enlev6s avant
que ne commence I'autonettoyage. Ladecolorationestnormale
et n'affecterapasla performancedufour.
Remarques -
• Si laportedu four n'estpasfermee,lemot <{door_>(porte)
clignote 9 I'afficheuret le four emetdesbipsjusqu'9 ceque la
portesoit fermeeet queI'on appuie9 nouveausurClean.
• S'ils'ecouleplus decinqsecondesentre le momento_ I'on
appuiesur Clean et celuio_ I'onappuiesurla touche
More + ou Less-, I'afficheurretourneautomatiquement
I'affichageprecedent.
• Laportedu four setrouveraendommageesi ron forceson
ouverturealorsque lemot LOCKest encoreaffich&
Ni6thodes de nettoyage
• L'heuredu jour parait_ I'afficheur.
Pendant le cycle d'autonettoyage
Lorsquele mot LOCKparaft_ I'afficheur,la portene poutetre
ouverte.Poureviterd'endommagerla porte,ne pusforcer laporte
pour I'ouvrir IorsqueLOCKestaffich&
Fum6e et odeurs
La premierelois o_ lefour est nettoy& ilpeaty avoir production
d'odeuret defumee.Ceciest normaletdisparaitra9 I'usage.
Sile four esttres saleousi la luneustensileaete laisseedunsle
four, il pouty avoirproductiondefumee.
Chapeauxde braleur et braleurs ttgaz
Chapeauxde braleur amovibles
• Laisserle br_leurrefroidir.Enleverle chapeade br_leurpour le
laverdansde I'eausavonneuseavecun tampon _recureren
plastique.Pourlossouillurestenaces,nettoyeravecuntampon
non abrasif,savonneux,ou avecune @onge et lacremede
nettoyagepourtable de cuissonCooktopCleaningCreme*
(produit n°20000001)**.
Ne puseffectuer lenettoyageau lave-vaisselleou dunsle four
autonettoyant.
Page 28

Braleurs_gazscelles
• Nettoyerfr6quemment.Laisserle br01eurrefroidir. Nettoyeravec
du savonetun tampon 9 recureren plastique.Pourlossouillures
tenaces,nettoyeravecuntamponsavonneuxet nonabrasif. Ne
pusagrandirou deformerlos trous.
• Veiller9 ne pus introduired'eau dunslosorifices dubr01eur.
• Travaillerprudemmentlots du nettoyagede I'allumeur.Si
rallumeurest endommageou mouill6,losbr01eursde latablede
cuissonne pourrontpuss'allumer.
Grillesdes braleurs = porcelainesur fonte
• Laverlos grillesavecde reausavonneusetiede et untampon
r6cureren plastiquenonabrasif.Pourlos souillurestenaces,
nettoyeravecun tamponen plastiquenon abrasif,savonneux,ou
avecuneepongeet la cremede nettoyagepour tablede cuisson
CooktopCleaningCreme*(produitn°20000001)**.S'il restedes
souillures,appliquerde nouveaula cremepourtable de cuisson,
recouvriravecun essuie-touthumide,et laissertremperpendant
30 minutes.Frotterde nouveau,rinceretfaires6cher.
• Ne puseffectuer le nettoyageau lave-vaisselleou dunsle four
autonettoyant.
Zone dela console de commande et horloge
• Pourutiliser lafonction Verroui//agedescommandespour/e
nettoyage,voir page33.
• Laver,rinceretfaire s6cher.Ne pus utiliserun agentde nettoyage
abrasifsusceptiblede rayerla finition.
• On poututiliser un produit denettoyageduverre,pulv6ris6
d'abordsurun chiffon.NEPASprojeterlepreduit
directementsur les touchesde commande ou sur I'afficheur.
Boutons decommande
• Placerchaquebouton_ la positionde OFF(Arret),etrotifer
chaqueboutonen letirant.
• Laver,rinceretfaire s6cher.Ne pus utiliserun agentde nettoyage
abrasifsusceptiblede rayerla finition.
• Fairefonctionner brievementchaquebr01eurpourverifier que le
boutona 6t6correctementr6install6.
Tablede caisson et tableau de commande =6mail vitrifi6
L'6mailvitrifi6 estdu verrelie aumetalparfusion.II peatsefissurer
ou s'6cailleren casde mauvaiseutilisation.IIest resistantaux
acides,maispustotalementinattaquablepar losacides.Touslos
produits renvers6s,en particulieracidesousucres,doivent6tre
essuy6simm6diatementavecun lingosec.
• Unefois refroidi,laveravecde reausavonneuse,rincerets6cher.
• Nejamais essuyerunesurfacetiede ou chaudeavecun lingo
humide.Cecipourrait lafissurerou 1'6cailler.
• Nejamais utiliserde nettoyantspour four,d'agentsde nettoyage
caustiquesou abrasifssur le fini ext6rieurde lacuisiniere.
Panneauxlat6raux,tiroir de remisageet poign6esde porte=
6mail point
• Unelois lospiecesrefroidies,loslaver_ I'eausavonneusetiede,
rincerets6cher.Nejamais essuyerunesurfacetiede ouchaude
avecun lingohumide,ceci pouvantendommagerlasurfaceet
entrainerunebr01ureparlavapeur.
• Pourlostachesrebelles,utiliserdesagentsde nettoyage
16gerementabrasifscommela pateau bicarbonatede soudeou
BonAmi*.Ne pusutiliser denettoyantsabrasifs,caustiquesou
6nergiquescommelosnettoyantspour four ou lostampons en
lained'acier.Cesproduitsraieraientou endommageraientde fagon
permanentela surface.
Important: Utiliserunlinge ouun torchonsec pour essuyer
lesproduits renvers_s, surtouts'ils sont acides ou sucr#s, La
surface pourrait se ddcolorerou se ternir si la salet# n'dtait pus
imm#diatementenlevde. Ceci est particuli#rement important
duns lecas de surfaces blanches.
Hublotet porte du four en verre
• Eviterd'utilisertrop d'eau,qui risqueraitde s'infiltrer sousou derriere
le verreet detacher.
• Laver_ I'eauet au savon.Rinceravecde I'eaupropreets6cher.Un
produit de nettoyagedu verrepeut 6tre utilis6en le vaporisant
d'abordsurun linge.
• Ne pas utiliser deproduitsabrasifscommetampons_ r6curer,laine
d'acierou produitde nettoyageen poudrequi risqueraientderayer
le verre.
Interieur du four
• Ex6cuterlosinstructionspr6sent6esauxpages25-26pour
I'autonettoyagedu four.
Grillesdu four
• Nettoyeravecde I'eausavonneuse.
• I_liminerlossouillurestenacesavecune poudrede nettoyageouun
tampon9 r6curersavonneux.Rinceret faires6cher.
• Si losgrillessont laiss6esdunslefour pendantlecycle
d'autonettoyage,oliossed6colorentet peuventne plustres bien
glisser.Sicecise produit,appliquerpar essuyageunpeud'huile
v6g6talesurla grilleet sossupportsen reliefpour faciliterle
mouvement,etenleverI'excesd'huile.
Acierino×ydable(certainsmodeles)
• /tiEPASUTILISERDEPRODUITSDENETTOYAGECONTENANT
DU JAVELLISANT.
• /tiePAS UTILlSERDE NETTOYANTS. ORANGE_ OUABRASIFS.
• TOUJOURSESSUYERDANSLE SENSDELA TEXTUREDE
L'ACIERLORSDU NETTOYAGE.
• Nettoyage journalier/salete I_g_re=EssuyeravecI'un des
produitssuivants:eausavonneuse,vinaigreblanc/eau,produitde
nettoyagepourverreetsurface Formula/409"ou un produit
semblablepourverre- avecun linge soupleet une@onge.Rinceret
s6cher.Pourpoliret enleverlesmarquesde doigts,faire suivrepar
unevaporisationde MagicSpray*pour acierinoxydable(produit n°
20000008)**.
• Salet6 moderee/epaisse =Essuyeravecrun desproduitssuivants:
BonAmi*,SmartCleanser*ou SoftScrub*- _l'aided'un lingesouple
ou d'une @ongehumide.Rinceret s6cher.Lestaches rebelles
peuvent6treenlev6esavecuntampon multi-usages Scotch-Brite*
humidifi6.Frotteruniform6mentduns lesonsdu metal.Rinceret
s6cher.Pourredonnerdu lustreet rotifer losrayures,fairesuivre par
unevaporisationde MagicSpray*pour acierinoxydable.
• D_coloration =A raide d'une @ongehumidifi6eou d'un linge
souple,essuyer_ raide du nettoyantCameo*pour acierinoxydable.
Rincerimm6diatementets6cher.Pourenlever los marqueset
redonnerdu lustre,fairesuivrepar unevaporisationde MagicSpray*
pour acier inoxydable.
Losnomsde marquesont desmarquesd@os6esdesdiff6rents
lubricants.
Pourcommanderdirectement,composerle 1-877-232-6771
I_.-U.ou 1-800-688-8408 Canada.
27
Page 29

Porte du four
important: Onpeutpercevoirunecertaine<<elasticite>>lots dela
fermeturede la porte dufour d'unecuisiniereneuve;ceci est normal;
cet effet disparaitprogressivement.
Hublot du four
Pour prot_ger le hublot de la porte du four :
1. Ne pasutiliserde produitsnettoyantsabrasifscommedes
tampons_ recureren lained'acierou desproduitsde nettoyage
en poudrequi risqueraientderayer leverre.
2. Ne pasheurter le hublotenverre avecun ustensile,un articlede
mobilier,un jouet, etc.
3. Ne pasfermerla portedu four avantque lesgrilles nesoienten
placedartsle four.
Toutedegradationdu hublotdeverre- rayure,choc,tension,etc.-
peutaffaiblir sastructureet augmenterle risquede bris_ unedate
ulterieure.
Lampe du four
Pour remplacer rampoule du four :
Apresle refroidissementdufour,
maintenirle cabochontout en
enlevantla piecemetallique
qui la maintienten place.
Important : Lecabochon
tomberasion ne lemaintient
pasen place.
Enleverlecabochonet
rampoule.
.
Installeruneampoulede/40watts pour appareilmenager.
4.
Reinstallerlecabochonet lefil metalliquede retenue.
5.
RetablirI'alimentationde lacuisiniere.Reglerde nouveau
rhorloge.
Tiroir de remisage
CABOCHON
RESSORTDE RETENUE
(ill m#tallique)
Pieds de r glage de I'aplomb
Verifierque lacuisiniereest d'aplombune lois
installee.Sielle ne I'estpas,tourner lespiedsde
reglagede raplomb,_ chacundesanglesde la
cuisiniere,jusqu'_ cequecelle-ci soitd'aplomb.
BRIDE
ANTIBASCULEMENT
t_IED DE REGLAGE
DE L'APLOMB
Letiroir de remisagepeut¢treenlevepourvouspermettrede
nettoyersousla cuisiniere.
D_pose :
1. Vider letiroir et le tirerjusqu'_la positionde lapremierebutee.
2. SouleverI'avant.
3. Tirerjusqu'_ la positionde lasecondebutee.
/4. Saisir letiroir par lescotesetsoulever/tirerpour I'extraire.
R_installation :
1. Insererles extremitesdesglissieresdutiroir dans les railsde la
cuisiniere.
2. SouleverI'avantdu tiroir et pousserdoucementjusqu'_ la
positionde lapremierebutee.
3. Souleverde nouveauletiroir et le pousserpour lefermer.
28
Page 30

Raccordement lectrique
Lesappareils necessitant une alimentation
61ectrique comportent une fiche _ trois broches
mise_ laterre qui dolt 6trebrancheedirectement
dansune prisede 120volts 9trois caviteset
correctementraise9 laterra.
Toujours d#brancher I'appareil avant d'y faire de
I'entretien.
La fiche9 troisbrochesmise9 laterre fournit uneprotectioncontre
losdecharges61ectriques.NEPAS COUPERNi ENLEVERLA
BROCNEDETERREDU CORDOND'ALIMENTATION.
Si la prisene comportequa deuxcavites,n'estpasraise9 laterra ou
n'est pasappropriee,le proprietairede I'appareil a la responsa=
bilit6 de faire remplacer la prisepar une prise_ trois cavites
correctement raise_ la terra.
D placement d'un appareil
gaz
Lesraccordsdesappareils_ gazservant_ branchercet appareil
ralimentationde gaznesont pasprevuspour 6tredeplaces
continuellement.Unefois rappareilinstalle,NE PASle deplacerde
fa%n repeteepour le nettoyerou lechanger deplace.Si cot
appareildolt 6tredemenag6et/ou enlev6pour 6trerepare,suivrela
methodedecritedans losinstructionsd'installation.Pourtoute
information,prendrecontactavecleservice_ laclientelede Maytag
au 1-800-688-9900I_.-U.ou 1-800-688-2002auCanada.
II faut qua lepiedarrierede lacuisinieresoit engagedansla bride
antibasculementpourqua lacuisinierene puissebasculer
accidentellement.
Pourla plupartdesproblemesobserves,essayer d'abord los
solutions possibles,_ droite.
• Verifierqua loscommandosdu four sontcorrectementreglees.
• Verifiersi la fiche estbien insereeduns laprise.
• Inspecter/rearmerle disjoncteur.Inspecter/remplacerlosfusibles.
• Contr01erlasourced'alimentationelectrique.
Un braleur de surface nes'allume pus.
• Verifierqua rappareil estcorrectementraccorde_ lasource
d'electricite.
• Determinersi ralimentationelectriqueest interrompue(fusible
grille/disjoncteurouvert).
• Verifierqua I'allumeurestsacet qu'il emetdesetincelles.Le
br01eurne pout s'allumersi I'allumeurest endommage,souilleou
mouille.Sirallumeur negenerapas d'etincelles,ramenerle
boutonde commando_ la positionOFF(Arret).
Fiammes non uniformes.
* Orificesdu br01eurobstrues.
Separationentre losflammes et le braleur.
• Veiller_ placercorrectementI'ustensilesur lagrille dubr01eur.
Resultatsde caisson au four differentsdes attentes ou de
ceux produitspar le four anterieur.
• Verifierqua la temperatureselectionneeestcorrecte. Veiller
prechaufferle four siceci estdemandedans la recette.
• Determinersi I'eventdu four estobstrue.Voirson emplacement
page38.
• S'assurerquala cuisiniereestd'aplomb.
• Losreglagesdetemperaturevariantsouvententreunfour neufet
le four qu'il remplace.On observesouventunederivedu reglage
detemperatured'un four _ mesurequ'il vieillit; il poutdevenirplus
chaudou moinschaud.Voir page37 losinstructionsd'ajustement
de latemperaturedu four.Remarque : IIn'est pasutile de
modifier le reglagede temperaturesi lavariationn'affectequ'une
ou deux recettes.
• Utiliserlesbons ustensiles.Losustensilesfoncesdonnentun
brunissementde couleurfoncee,losustensilesbrillants,un
brunissementplusclair.
• Verifierla positiondesgrilles et desustensiles. Lorsde la
repartitionsurdeux grilles,ne passuperposerlosplats. Veiller
laisserun espacede2,59 5cm (1 9 2 pc)entre los platset los
paroisdu four.
• Contr01erI'utilisationde feuilled'aluminiumdans lefour. Ne
jamais recouvrircompletementune grille du fouravecde la
feuilled'aluminium.Placerun petitmorceaude feuilled'aluminium
sur lagrille sousle plat pourrecupererlosmatieresrenversees.
Resultats incorrectsIors de la caisson au gril, ou emission
excessive de fumee.
• Determinerla positiondes grilles.Lesalimentspeuventetretrop
prosdesflammes.
• Utilisationincorrectede feuilled'aluminium.Nejamais garnirla
grille de lechefriteavecde lafeuille d'aluminium.
• EnleverI'excesdegraissesur la piecede viandeavantla cuisson
au gril.
• Utilisationd'une lechefritesouillee.
• Prechaufferlefour pendantdeux_ 2_ 3minutesavantde placer
le plat dansle four.
• Portedu four fermeedurant la cuissonau gril.
Impossibilite d'autonettoyagedufour.
• Determinerqua rappareil n'apasetaprogrammepour un
autonettoyagediffere,voir pages25-26.
• verifier quala porteestfermee.
• verifier si lacommandoesten modesabbat.Voir page37.
• Le fourest pout¢tre_ unetemperaturesuperieure_ 205° C
(400°F).Latemperaturedu four dolt¢tre inferieure_ 205° C
(400°F)pour pouvoirprogrammerun cycled'autonettoyage.
29
Page 31

Lefourneseaettoie puscorrectement.
• Untempsde nettoyagepluslong peut6trenecessaire.
• On n'apaselimineavantI'operationd'autonettoyagelesaccumu-
lationsexcessivesde residus,particulierementlos residus
d'alimentsacidesousucres.
Laportedu four ne se d6verrouillepusapres I'autonettoyage.
= L'interieurdu four est encorechaud.Attendreenviron uneheure
apresrachevementde laperioded'autonettoyage.IIest possible
d'ouvrirla porteapresla disparitiondu messageLOCK
(Verrouillage)surI'afficheur.
• Lescommandeset la portesontpeut-etreverrouillees.Voir
page33.
Accumulationd'humidit6 sur le hublotou vapeursortant de
1'6vent.
• Ceciest normaldurant lacaissond'alimentscontenantbeaucoup
d'eau.
• Utilisationexcessived'humiditelots du nettoyagedu hublot.
l'-:missiond'une forte odeur oude fum6e Iorsde la raiseen
marche du four.
= Ceciest normalpour unecuisiniereheaveet disparaftapres
quelquesutilisations.Uncycle d'utonettoyage{_br01era>>plus
rapidementlesodeurs.
• La miseen marched'un ventilateuraide 9retirerfumee etodeurs.
• Presencede salutessur lasole.Proceder9un autonettoyage.
Codesd'anomalie.
• LesrootsBAKE(Cuissoncourante)ou LOCKpeuventclignoter
rapidement9 rafficheur pour prevenird'une erreurou d'un
probleme.Si le mot BAKEou LOCKparait_ I'afficheur,appuyer
sur latouche CANCEL(Annuler).Sile mot BAKEou LOCK
continue_ clignoter,debrancherI'appareil.Attendre quelques
minutes,puisrebrancherrappareil.Sile motcontinue _ clignoter,
debrancherrappareil etprendrecontact avecun r@arateur
autorise.
Sile four esttres sale,lesflammechespeuventproduire uncode
d'anomalieaucours du cycled'autonettoyage.Appuyersur la
toucheCANCELet laisserlefour refroidircompletement,essuyer
la saluteenexcespuis reprogrammerI'autonettoyage.Sile code
d'anomaliereapparait,prendrecontact avecun r@arateur
autorise.
Des bruits se font entendre.
• Le fourfait plusieursbruits faibles.IIest possibled'entendrelos
relaisdu fourqui se mettenten marcheet s'arretent.Ceciest
normal.
• Alorsque lefour se rechauffeet serefroidit,il est possible
d'entendredesbruits correspondant_ ladilatationet _ la
contractiondespiecesmetalliques.Ceciest normalet
n'endommagepusrappareil.
Hn'ya ni hip ni affichage.
• Le fourest peut-etreen modesabbat.Voir page37.
SAbclignote puisreste allure&
• Le fourest en modesabbat.Pourannuler,appuyersur latouche
Clock (Horloge)etmaintener-laenfonceependantcinqsecondes.
Cutssonsurlusurfece
Commandos de la
surface de caisson
Allumage sans flamme
de veille c.Ap oo,oROLwR
Le dispositifd'allumagenefait
interveniraucuneflammedeveille.
Chaquebr01eurde latablede cuisson
comporteun allumeurpar etincelle.
Trava_llerprudemmentIorsdu _ _z_.. _"_b_,
nettoyageautour des bruleursde _!'_ _*_/_C___
la table deculsson.... _:_(;-_c_._A.....
S,on o,oo o,ota ,o oco,s onno
s'allumepas,determinersi I'allumeur
est brise,sail oumouille, o_s_#u°RULEUR
Boutons de commando de la
surface de caisson
On utilisecos boutonspourcommanderrallumagedes brOleursde
surface.On peut reglerchaque bouton_toute positionentreles
positionsextremesLOet HI.On peutpercevoirune detentede
3O
Page 32

calage_ la position HI.On poutchoisirtoute positionde reglage
entrelosdeuxpositionsextremes.
Ungraphiquepros de chaquebouton identifiele brQleurde
surfacecommandopar cebouton.Parexemple,le OC}
graphique9 droit identifielebrQleuravant/gauche.IFl'ont _[_
R_glage des commandos :
La puissancede chauffage9 employerdependdu type etde la taille
de I'ustensileutilis&
1. Placerun ustensilesur la grilledu brQleur.
* Si aucunustensilen'est placesur la grille du brQleur,los
flammespeuventavoirtendance9se s@arer du brQleur.
2. Appuyer ettourner le boutondansle sonsanti-horaire,jusqu'9la
positionLifE (Allumage}.
* Onpout percevoirle cliquetiscorrespondant9 laproduction
desetincelles,et le brQleurs'allume.(Lescuatreallumeurs
produisentdesetincellesIorsqu'onplacele boutonde I'undes
brQleurs9 lapositionLifE)
3. Apres I'allumagedubrQleur,reglerla tailledesflammessolonle
desken tournantle boutonde commando.
* L'allumeurcontinue_ produiredesetincellesaussiIongtemps
que leboutonest _ la positionLife
60° C(1400F}sanscontinuer _cuire.Lesaliments
sont chauffessur desflammesplusgrandes
jusqu'_ cequ'ils atteignentcettetemperature, ___
puis,la tailledes flammesestreduite. /// /is _ -
Lorsquele plat ou I'ustensileest couvert,un f // //
debutde cuissonpoutse produireavecla
puissancedechauffageLO. \_X tl
MED (Moyen}:Une puissancedechauffage
intermediaireest utiliseepour lapoursuitede la _ _
cuisson.Losalimentsne cuisentpas plusrapidementsi on utilise
une puissancede chauffagepluseleveeque n@essairepour le
maintiend'une douceebullition. L'eaubouttoujours _ la memo
temperature,que I'ebullitionsoit tranquilleouvigoureuse.
HI (F-levee}: S'utilisepour porterun liquide_ ebullition ouatteindre
la bonne pressiondansun autocuiseur.Reduireensuitela puissance
de chauffageapres ledebutde I'ebullitionou de lacuissondes
aliments.
Utilisation durant une panne
d' lectricit
Surface de cuisson
Pour bviter la formation de taches ou un
changement de couleur de la surface de
cuisson :
* Nettoyer la surface de cuisson apres chaque utiiisation.
* Enlever les residus renverses de produits acides ou sucres
des que la surface de cuisson a refroidi; cos produits
renverses peuvent faire changer la couleur de
l'email.
A la difference d'une cuisiniere dotee de
brOleurs _ gaz standard, la surface de
cuisson de cette cuisiniere n'est pas
amovible ou relevable. Nepas tenterde
relever la surface de cuisson, quelle
"onsoit la raison.
Br leurs gaz scell s
Les brQleurs scelles de la cuisiniere sont fixes sur la surface de
cuisson; ils ne sont pas con(_uspour etre enleves. Comme los
brQleurs sont scelles, un produit qui deborde d'un ustensile ne
s'infiltrera pas sous la surface de cuisson.
On devrait cependant nettoyer los brOleurs apres chaque
utilisation. La tote du brOleur s'enleve facilement pour etre
nettoyee. (Voir los instructionsde nettoyage _ la page 27.)
Pour le bon fonctionnement du brOleur, le chapeau de brOleur
doit etre correctement place sur la base du brQleur.
Br leur de
Power Boost*
Cettecuisiniereestdotee d'un brOleur
hautevitesse,place_ I'avantdroit. Ce
brQleurpermetunecuisson rapidequi pout
servir_faire bouillirrapidem'aliments.
Br leur de
haute performance
• Power
_ff_ E3E3_oost
Rear mC}
Simmer00
0
0 mu Front
mijotage
Ce brOleur est situe _ la position arriere
gauche. II offre une plus faible puissance*
pour la cuisson de sauces delicates ou la
fusion du chocolat.
La pubsance thermique (BTU) des brDleurs est diff#rente /ors
de I'alimentation au gaz de p#trole fiqu#fi#.
1. Approcher une allumetteenflammeedu brQleur_ utiliser.
2. Enfonceretfairetourner lentementle boutondecommando
jusqu'_la positionMTE.
3. Ajuster losflammes_ lataille desiree.
Grilles de br leur
Avant une operation de cuisson, verifier que la grille est
correctement placee. Lors de I'installation des grilles, placer
I'extremite avec pattes vers le centre, au niveau des barres
droites.
Une grille de brOleur incorrectement installee peut ecailler
I'email de la surface de cuisson.
31
Page 33

Ne pas faire fonctionner un br_leur sans qu'un ustensile
soit plac_ sur la grille. L'Omail de ia grille peut s'Ocailler
s'il n'y a aucun ustensile capable d'absorber la chaleur
_mise par le br_leur.
Travailler prudemment Iorsqu'il faut remuer des aliments dans
un ustensile place sur la grille de brOleur. Les grilles
comportent un fini lisse qui facilite le nettoyage. L'ustensile
peut glisser sur la grille si on ne tient pas fermement la
poignee; ceci pourrait provoquer un renversement d'aliments
chauds, et susciter un risque de brOlure.
M(_me siles grilles de brOleur sont tres durables, elles
perdront progressivement leur lustre et changeront de
couleur, du fait des temperatures elevees auxquelles les
brOleurs les exposent.
Remarques -
. Un brOleur convenablement regle et dont les orifices sont
propres s'allume en quelques secondes. Lors de
I'alimentation au gaz naturel los flammes sont bleues,
avec un cone interne bleu intense.
Si les flammes d'un brOleur sont jaunes ou si la
combustion est bruyante, le ratio air/gaz peut (_tre
incorrect. Demander _ un technicien d'effectuer le
reglage. (La garantie ne couvre pas ce reglage.)
Lors de I'alimentation au gaz de petrole liquefi& il est
acceptable que I'extremite des flammes soit jaune. Ceci
est normal; aucun reglage n'est necessaire.
Avec certains types de gaz, on peut percevoir un petit
bruit d'explosion Iors de I'extinction d'un brOleur de
surface. Ceci est normal.
Si on fait passer rapidement le bouton de commande de
la position HI I_levee) b la position LO (Basse), les
flammes peuvent s'eteindre, particulierement sile brOleur
est froid. Si ceci se produit, placer le bouton de
commande _ la position OFF (Arret) et attendre quelques
secondes avant d'allumer de nouveau le brOleur.
Ajuster la puissance de chauffage de telle maniere que
les fiammes ne debordent pas b la peripherie de
I'ustensile.
C.issondensle!out
Broil(GriO
Bake(Cuisson
r0tissage.
More+/Less-
(Plus+/moins-)
Timer(IVlinuterie)
Cook& Hold(Cuisson
etmaintien)
Clean(Nettoyage)
Delay(Demarrage
differe)
Clock(Horloge)
KeepWarm(IVlaintien
auchaud)
CANCEL(Annulet)
S'utilisepourlacuissonaugrilet lerissolage
surpattiesuperieure.
S'utilisepourlacuissoncouranteetlecourante)
S'utilisepourentrerouchangerladuree,la
temperaturedufour.I_tablitle gril
temperatureI--leveeouBasse.
Programmelaminuterie.
Pourcuirependantunedureepreetablie,avec
maintienauchaudpendantuneheure.
S'utilisepourprogrammerlecycle
d'autonettoyage.
Programmelefourpourdebuterunecuisson
plustard.
S'utilisepourprogrammerrheuredujour.
S'utilisepourmaintenirauchauddanslefour
lesalimentscults.
Annuletouteslesoperationssaufminuterieet
horloge.
32
Utilisation des touches
• Appuyersur latouche desiree.
• Appuyersur More+ ou Less- pour entrerladuree ou la
temperature.
• Un bip retentitIorsqueron appuiesur unetouche.
• Undouble bipretentit en casd'erreurde programmation.
Important : Quatresecondesapresavoirappuyesur lestouches
More+ ou Less=,la dureeou latemperatureseraautomatiquement
entree.Si plus de30secondess'ecoulententrela pressionetsur une
touchede fonctionsur lostouches More+ ou Less-,lafonctionsera
annuleeet rafficheurreviendra_ I'affichageprecedent.
Horloge
L'horlogepeut etreprogrammeepour afficherla dureedans un
formatde 12ou 24 heures.L'horlogeestprogrammeeen usinepour
un format de12 heures.
Changement de I'horloge _ un format de 24 heures :
1. Appuyer sur lestouchesCANCEL(Annuler)
etBelay (Differe)et maintenirla pression
pendanttroissecondes.
2. Appuyer surMore+ ou Less- pour
programmerun format de12ou 24 heures.
Page 34

3. ProgrammerI'heureensuivantlesinstructions
donneesci-dessous.
• Laderniereminutedu decompteseraafficheesousforme
de secondes.
R_glage de I'horloge :
1.
Appuyersurla toucheClock (Horloge).
• Lesdeux pointsclignotent _ I'afficheur.
2. Appuyer surMore+ (Plus+)ou Less- (Moins-) pour
programmerI'heuredujour.
• Lesdeux pointscontinuent _clignoter.
3. Appuyer _nouveausur latouche Clock ou attendrequatre
secondes.Lesdeux pointss'arretentde clignoter.
Lorsquele courantelectriquearrive ouapresune interruptionde
courant,laderniereheureavantrinterruption decourantva
clignoter.
Pourrappelerrheure dujour Iorsqu'uneautre fonction deduroc
s'affiche,appuyersur latouche Clock
L'heurede I'horlogene peutetre changeeIorsquele four a ete
programmepour une cuissonou un nettoyagediffereou pour la
fonctionde cuissonet maintien.
More+ '_
Less-
Annalation de raffichage de I'heare :
Si I'on nedesirepasI'affichagede I'heuredujour :
Appuyersur lostouchesCANCEL (Annule0 et
Clock et losmaintenirainsipendanttrois
secondes.L'heure dujour disparaitde
I'afficheur.
Lorsqueraffichage de rheure estannule,
appuyersur latouche Clock pour afficher
brievementI'heuredujour.
CANCEL
R_affichage de I'heare :
Appuyersur lestouchesCANCELet Clock et los
maintenirainsipendant troissecondes.L'heuredu
jour reapparait_ rafficheur.
4. A la fin deladuree programmee,un biplong retentit.
Annalation de la minaterie :
1. Appuyer sur latoucheTimer et la maintenirainsipendanttrois
secondes.
OU
2. Appuyer surla toucheTimer et regler I'heure9 0:00.
Verrouillage des commandos
et de la porte du four
Lostouches peuventetreverrouilleespour desraisonsde securite,
nettoyageou pouremp_,chertoute utilisationnon souhaitee.Ellesne
pourront¢treutiliseessi ellessontverrouillees.
Si lefour est encours d'utilisation,lescommandesnepeuvent¢tre
verrouillees.
L'heureactuelledujour restera9 I'afficheurIorsqueloscommandos
serontverrouillees.
Verroaillage :
Appuyersur lestouchesCANCELet Cook &
Hold (Cuissonet maintien)et losmaintenirains_
pendanttroissecondes.(Appuyerd'abordsur la
toucheCANCEL.)
• Le motLOCK(Verrouillage)clignote
I'afficheur.
D_verroaillage :
Appuyersur lostouchesCANCELet Cook & Hold et los maintenir
ainsipendanttroissecondes.(Appuyerd'abordsur latouche
CANCEL.)
• Le motLOCKdisparaitde I'afficheur.
Minuterie
La minuteriepoutetre programmeede une minute(0:01)jusqu'_
99 heureset 59 minutes(99:59).
La minuteriepoutetre utiliseeind@endammentdetoute autre
activitedu four.Ellepeut¢treaussiprogrammeealorsqu'uneautre
fonctiondu four estencours d'utilisation.
La minuteriene commandopusle four.Ellene sortqu'_ emettre
desbips.
Programmation de la minaterie :
1. Appuyer surla toucheTimer (Minuterie).
• 0:00s'allume_ I'afficheur.
• Losdeux pointsclignotent.
Appuyersurla toucheMore+ ouLess- jusqu'_ ce
queI'heurejuste paraisse_I'afficheur.
•Les deux pointscontinuent 9clignoter. Less-
.
Appuyer9 nouveausur latouche Timer ou attendre ...................................................
quatresecondes.
• Lesdeux pointscontinuent 9clignoteret le decomptede la
duroccommence.
s
Timer
Codes d'anomalie
LesrootsBAKE(Cuissoncourante)ou LOCKpeuventclignoter
rapidement9 rafficheur pour preveniren casd'erreurou de
probleme.Sitel est lecas,appuyersur latouche CANCEL.Silos
rootsBAKEou LOCKcontinuent9 clignoter,debrancherI'appareil.
Attendrequelquesminutes,puis rebrancherI'appareil.SiI'un des
motscontinue9 clignoter,debrancherI'appareilet prendrecontact
avecun r@arateurautorise.
Caisson courante
Programmation de ane caisson coarante :
1.
Appuyersurlatouche Bake.
• Lemot BAKEet000clignotent9 I'afficheur.
2.
Selectionnerlatemperature du four. Latemperature
poutetreprogrammeede75 9 290° C(1709 550° F). ,iMore+ !
Appuyerune lois sur latouche More+ ou Less-, ou
appuyersurlatoucheMore+ ouLess- etlamaintenir
ainsi. Less-
. 175° (350°) s'allumeIorsqueI'on appuiela
premierelois sur I'unedestouches.
33
Page 35

• Appuyersur latouche More+ (Plus+) pouraugmenterla
temperature.
• Appuyersur latoucheLess- (Moins-)pour diminuerla
temperature.
.
Appuyer9 nouveausur latouche Bake (Cuissoncourante)ou
attendrequatresecondes.
• Le motBAKEs'arr6tede clignoterets'allume9 I'afficheur.
• 38°(100°)ou latemperaturereelledu four seraaffichee.La
temperatureaugmenterapar intervallede 3 °C (5°E)jusqu'_
ceque latemperaturepr@rogrammeesoit atteinte.
4. Laisserlefour prechaufferpendant8 915minutes.
• Lorsquelatemperatureprogrammeepourlefour est atteinte,
un bip long retentit.
• Pourrappelerlatemperatureprogrammeependantle
prechauffage,appuyersur latouche Bake.
5.
Placerlanourrituredansle four.
6.
VerifierI'avancementde la cuisson9 ladureeminimalede
cuisson.Cuireplus Iongtempsaubesoin.
7. Lorsquela cuissonestterminee,appuyersur /f ,-_
latouche CANCEL(Annuler).
8. Retirerlanourrituredu four.
touche More+ ou Less- ou appuyersur latouche
More+ ou Less- et la maintenirainsi.
• Appuyersurla toucheMore+ pouraugmenterla
temperature.
• Appuyersurla toucheLess- pour diminuerla
temperature.
.
Appuyer_ nouveausur latouche Cook& HoldOUattendre
quatresecondes.
• Lemot HOLDclignote.
• 00:00clignote9 I'afficheur.
4.
Entrerla dureependantlaquelleI'on desireque lacuissonait
lieuen appuyantsurlostouches More+ ou Less-. Ladurocde
cuissonpout etre programmeededix minutes(00:10)
11heures,59 minutes(11:59).
•Les mots BAKEet HOLDs'allument _I'afficheur.
• Laduroc de cuissons'allume_ I'afficheur.
• Laduroc de cuissoncommencele compte_ rebours.
: More+
Lorsque la duroc de caisson s'est _coul_e :
= Quatrebipsretentissent.
• Lemot BAKEs'eteint.
• Lesmots HOLDetWARM (Chaud)s'allument.
• 75°(170°) parait_ I'afficheur.
Remarques -
• Pourchangerla temp#raturedu fourpendantla cuisson,appuyer
sur latouche Bake, puissur la touche More+ ou Less- jusqu'9
ceque I'onobtiennela temperaturedesiree.
• Pourchangerla temp#raturedu four/ors dupr#chauffage,
appuyerdeuxfoissur latouche Bake, puissur latouche More+
ou Less- jusqu'9 ce que latemperaturedesireesoit affichee.
• Si I'on oublied'arr_,terle four, ils'arreteraautomatiquementapres
12heures.Si I'ondesire desactivercettefonction,voir page37.
Diff6rences de caisson entre I'ancien
four et le nouveau
II est normalde remarquerquelquesdifferencesdans laduroc de
cuissonentre un four neufet un four ancien.VoirAjustementde la
temp#raturedufour9 la page37.
Caisson et maintien
La fonction cuissonet maintienpermetde cuirependantune duree
predeterminee,suiviepar un cycle demaintienauchaudd'une heure.
Programmation de la fonction caisson et maintien :
1. Appuyer surla toucheCook& Hold (Cuissonet
maintien).
• Lesmots BAKEet HOLD(Maintien)clignotent.
• 000s'allume9 I'afficheur.
2. Selectionnerla temperaturedufour. Latemperaturepoutetre
programmeede 75 9290°C (1709550°E).Appuyerunefois surla
Apr_s une heure de MAINTIEN AU CHAUD :
• Le motEnd(Fin)s'affiche.
• L'heuredujour reapparait_ I'afficheur.
Annalation de la fonction caisson et maintien _ tout
moment :
Appuyersur latouche CANCEL.Retirerla nourrituredu four.
Caisson et maintien diff r e
Avecla fonctiondifferee, lefour se met_ cuireplustard dans la
journee.Programmerladurocd'attente desireeavantquele four
nese mottoen marcheet ladurocde cuissondesiree.Lefour
commence9 chauffer 9I'heureselectionneeetcult pour laduroc
specifiee.
Ladureed'attente peutetreprogrammeede 10minutes(00:10)
11heures,59minutes (11:59).
Programmation d'an cycle de caisson
et maintien diff_ree :
1. Appuyer sur latouche Delay (Differe).
34
• Le motDELAYclignote.
Page 36

• 00:00clignote_I'afficheur.
2. AppuyersurlatoucheMore+ouLess- pour
programmerla dur_ed'attente.
Alorsque lemot DELAYclignotetoujours :
3. Appuyer surla toucheCook& Hold (Cuisson
etmaintien).
• 000s'allume_ I'afficheur.
• LesrootsBAKE(Cuissoncourante)et HOLD(Maintien)
clignotent.
AppuyersurMore+ pour programmer/atemp#raturedecuisson.
• 00:00et lemot HOLDclignotent.
• Le motBAKEresteallum6.
AppuyersurMore+ pour programmer/adur#edecuisson.
• Ladur6ed'attente,lesmotsDELAY,BAKEetHOLDs'allument
I'afficheur.
Lorsque la dur_e d'attente s'est _coul_e :
• Le motDELAYs'6teint.
• Ladur6ede cuissonest affich6e.
• LosrootsBAKEet HOLDsont affich6s.
Nlaintien au chaud
Pourmaintenirau chauddanslefour desalimentscultset chauds
ou pour r6chaufferpains etassiettes.
Programmation du maintien au chaud :
1. Appuyer sur latouche KeepWarm
(Maintienau chaud).
• Lemot WARM(Chaud)clignote.
• 000 parait _rafficheur.
2. S61ectionnerlatemperaturede maintienau chaud. More+
Celle-cipeut6tre r6gl6ede 63_ 90° C(1/45_ .....
190° F).Appuyerunelois surla toucheMore+ ou
Less- ou appuyersur latouche More+ ou Less- et Less-
la maintenirainsi. ................................
• 75°(170°)s'allumeIorsqueI'onappuiela premierefois sur
I'unedestouches.
• Appuyersurla toucheMore+ pouraugmenterlatemperature.
• Appuyersurla toucheLess- pour diminuerlatemperature.
Le motWARMet latemperatureserontaffich6spendantque la
fonctionmaintienau chaudestactive.
Annulation du maintien au chaud :
Pour programmer un temps d'attente Iorsque la
fonction cuisson et maintien a d_j_ _t_ programm_e :
1. Appuyer surla toucheDelay.
• Le motDELAYclignote.
• 00:00parait_ I'afficheur.
2. Appuyer surla touche More+ ou Less= pour ...................................................
programmerla dur6ed'attente.
• Apresquatresecondes,le motDELAYresteallum6 Less-
pour rappelerqu'un cycle decuissondiff6r6ea 6t6 .............................................................
programme.
Lorsque la dur6e d'attente s'est _coul_e et que le
four se met en marche :
• Ladur6ede cuissonseraaffich6e.
• Le motDELAYs'6teint.
• LesrootsBAKEet HOLDrestentallum6s.
Appuyersur latouche CANCEL.
Annulation :
• Toutesles fonctionsde cuissonminut6eet non
minut6eseront annul6es.
• L'heuredu jour r6apparaitb rafficheur.
Important :
e
Ne pusutiliser lacuissondiff6r6epourdesarticles qui
n6cessitentquelefour soit pr6chauff&commelos g_teaux,los
petitsbiscuitset lespains.
Ne pasutiliser lecyclede cuissonet maintiendiff6r6ssi lefour
estd6j_ chaud.
1.Appuyersur latouche CANCEL(Annuler).
2.Retirerla nourrituredu four.
Remarques -
• Pourobtenir des qualit6salimentaireset nutritivesoptimales,
losalimentscults aufour ne doiventpas6tre gard6sauchaud
plusde 1_ 2heures.
• Pourempecherles alimentsde dess6cher,los recouvrirde
papieraluminium,sansserrer,ou d'un couvercle.
* Pour r6chaufferdes petitspains:
recouvrirlespetits pains depapieraluminiumsansserreret
losplaceraufour.
- appuyersur lestouches KeepWarm et More+ pour
programmer75° C(170° F).
r6chauffer pendant 12 _ 15 minutes.
• Pourr6chaufferdes assiettes :
placerdeuxpilesde quatreassiettesmaximumdansle four.
appuyersur lostouchesKeepWarm et More+ pour
programmer75° C(170° F).
r6chaufferpendantcinq minutes,arr6terlefour et laisserlos
assiettesaufour pendantencore 15minutes.
n'utiliserque desassiettespouvantallerau four,_verifier
avecle fabricant.
- ne pasposerdesassiettestiedessur unesurfacefroide, les
changementsrapidesdetemperaturepouvantcasser
I'assietteoula fendiller.
35
Page 37

Caisson au gril
Programmation de la caisson au gril :
1. Appuyer sur latouche Broil (Gril).
• Le motBROILclignote.
• Le motSEt(Valider)estaffich&
Appuyersur latouche More + (Plus+)pour programmerungril
temperatureeleveeou surla toucheLess- (Moins-) pour
programmerun gril _temperaturebasse.
•Les rootsHI(l:-Ievee)ou LO(Basse)serontaffiches.
• %lectionner H! broil (Gril _temperatureelevee)(290° C
[550° F]) pourun gril normal.SelectionnerLO broil (Gril
temperaturebasso)(230° C [450° F]) pour un gril
temperatureinferieured'aliments_ cuissonplusIongue
commalavolaille.
4.
Pourun rissolagemaximum,prechaufferlefour pendant2 ou 3
minutesavantd'ajouter lanourriture.
5.
Placerlanourritureclanslefour. Laisserla portedu four ouverte
d'environ10cm (4 po) (premierebutee).
.
Retournerlaviandeunelois _ lamoitie deladureede cuisson.
7.
LorsqueI'alimentestcult,appuyersur latouche
CANCEL(Annular).Rotiferla nourritureetla
lechefritedu four.
• L'heuredu jour reapparait9 I'afficheur.
Remarques •
• Pourde meilleursresultatslots dugril, se servird'un ustensile
prevupource type de cuisson.
• Le grilau reglageHIest utilise pour lamajoritedesoperations
de cuissonau gril.Utiliserle grilau reglageLOpour la cuisson
de matsdevantcuire plusIongtemps,afinde leur permettre
d'etrebiencultssans rissolageexcessif.
• Pourchanger/atemp#raturedu fourpendant/a cuissonaugril,
appuyersur latoucheBroil, puis sur latouche More+ ou
Less- pour changerentre lacuissonaugril _temperature
elevee(HI)et la cuissonau gril_ temperaturebasse(LO).
•Les dureesdecuisson augril peuventetre plusIonguesavec
unetemperaturede gril inferieure.
• Retournerla laplupartdes alimentsIorsquela moitiede la
dureeprevuepourla cuissonau grils'est ecoulee.
3. Apresquatresecondes,lefour se meten marche.
• Lemot BROILtaste allum&
Tableau de caisson aa gril
Prechaufferlefour pendant 2-3 minutes.
Boeuf
Pore
Volaille
Fruits de mar Filetde poisson
Bifteck,2,5cm (1 po)d'@aisseur
Hamburger,2cm (3/4 po)d'@aisseur
Bacon
Tranchedejambon precuit,
1,3cm (1/2po) d'@aisseur
C0telette,2,5cm (1po)d'@aisseur
Blancs,avecos
Dame de poisson,2,5cm (1po) d'@aisseur
Queuede homard,85_ 115g (3 _4 onces)
5
5
5ou6
5
5
5
5
5
A point
Biencult
Biencult
Biencult
Chaud
Biencult
Biencult
I_miettement
I_miettement
Biencult
15 - 20 min
18 - 24 rain
13 - 18 min
6 - 10 min
8 - 12 min
22 - 26 min
30-45min
(Gril
temperaturebasse)
8 - 12 min
10 - 15 min
7 - 10 min
Fourobtenir unesurfaceexterieuresaisie/brunieetun interieursaignant,il poutetre necessairede reduireletempsdecuisson
et de reduirela distanceentrelaviandeet lasourcede chaleur.
Important : Cetableau n'estqu'un guide desuggestions.Lesdureespeuventvarlet solonI'aliment_ cuire.
36
surlapremiereface,
Page 38

Arr t automatique/
Mode sabbat
Le four s'arreteautomatiquementapres12heuress'il a ete
accidentellementlaisseenmarche.Cettecaracteristiquede securite
pout¢trearretee.
Pour annuler I'arr_t 12 heures et faire fonctionner le
four en continu pendant 72 heures :
l. Programmerle four pourune cuissoncourante(voirpages
33-34].
Appuyersurla toucheClock (Horloge]et la
maintenirainsipendantcinqsecondes.
• SAbseraaffiche et clignoterapendant
5secondes.
• SAbseraensuiteafficheen continujusqu'9ce qu'on I'arrete
oujusqu'9 ceque la duroc limitede 72heuressoitatteinte.
• Le motBAKE(Cuissoncourante]seraaussiaffichesi un
cyclede cuissoncouranteesten cours alorsque lefour est en
modesabbat.
• LaCU/SSONAUFOURestla seulefonctionqui est
operationnelleenmodesabbat.Touteslesautresfonctions
(Minuterie,Maintienauchaud,Nettoyage,etc.)sontverrouill6es
pendantle modesabbat.
Annulation de la caisson courante alors que le four
est en mode sabbat :
Appuyersur CANCEL(Annuler]. CANCEL
• Le mot BAKE s'eteint _ I'afficheur.
• Aucun bip sonorene retentit.
Remarques -
• Le modesabbatpout ¢tre misen marche_tout moment,que
le four soiten marcheou non.
• Le modesabbatne poutpas¢tremis enmarchesi los
commandossont verrouilleesou la porteverrouillee.
• Sile four esten modecuissonIorsquele modesabbatest
programme,lemot BAKEs'eteint _la fin ducycle de cuisson.II
n'yauraaucunsignalsonoreaudible.
• Si I'eclairagedu four estsouhaitependantle modesabbat,la
lampedevra ¢tre allumeeavantque le modesabbatne debute.
• Lorsquele modesabbata demarre,aucunbip de prechauffage
ne retentit.
• Touslos messageset losbips sontdesactivesIorsquele mode
sabbatestactif.
• Leverrouillageautomatiquede laportenefonctionnepas
pendantle modesabbat.
• Si I'onappuiesur latouche CANCEL,un cyclede cuisson
couranteaufour sera annule.Cependant,le programmateur
resteraen modesabbat.
• Apresune pannedecourant,lefour revienten modesabbat
avec72 heures restanteset aucuncycleactif.
Annulation du mode sabbat :
1. Appuyer sur latoucheClock pendantcinqsecondes.
OU
2. Apres 72heures,le modesabbatsetermine.
• SAbclignote pendant5 secondes.
• L'heuredu jour revient_ I'afficheur.
Ajustement de la temperature
du four
La precisiondes temperaturesdufour aete soigneusementverifiee
I'usine.IIest normalde remarquerquelquesdifferencesdansla
cuissonentre un four neufet un four ancien.Aufur et 9 mesureque
loscuisinieressontmoinsneuves,la temperaturedu four poutvarier.
II est possibled'ajusterlatemperaturedu four siI'on penseque le
four necult pasoune rissolepascorrectement.Pourdecider de
I'ajustement_apporter,reglerlefour _ unetemperature de15° C
(25° F] plus eleveeou plus bassoque latemperatureindiqueedans
la recette,puisfaire cuirela preparation.Lesresultatsdu <<test >>de
cuissondoiventdonner uneideedu nombrede degresduquel la
temperaturedolt etre ajustee.
Ajustement de la temperature du four :
1. Appuyer sur latoucheBake (Cuissoncourante].
2. Entrer285° C (550° F] enappuyantsurla touche
More + (Plus+].......................................
.
Appuyersurla toucheBake et la maintenirainsi
pendantplusieurssecondesoujusqu'_ ceque 0°
paraisse_ I'afficheur.
Si latemperaturedu foura ete precedemmentajustee,le
changementseraaffiche.Parexemple,si latemperaturedu four
a ete reduitede 8°C (15° F],I'afficheurindiquera-8 (-15].
4.
Appuyersurla toucheMore + ou Less- (Moins-] pourajusterla
temperature.
A chaquefois queI'onappuie surunetouche, latemperature
changede 3° C (5° F].Latemperaturedu four peutetre
augmenteeou diminueede3 _ 20° C(5 _35° F].
5.
L'heuredu jour reapparaitautomatiquement_ I'afficheur.
II n'est pas necessairede reajusterlatemperaturedu fouren cas
de panneou d'interruption decourant.Lostemperaturesde
cuissonau gril et de nettoyagenepeuventetreajustees.
Changement de la
temperature °F/°C
1. Lereglagepar ddaut de I'usinepour latemperatureesten
Fahrenheit.
2. Pourmodifiercereglage,appuyersur lostouchesCANCELet
Bake simultanementet maintener-lesenfonceespendant trois
secondes.
3. Unbip retentitet le reglagecourant(°Fou °C]parait_ I'afficheur.
(Sivous nefaites pasde changement,la cuisiniereretourneau
reglageexistantapres30secondes.]
4.
Pourmodifierle reglage,appuyersur latouche More+ ou Less-.
Appuyer_ nouveausur latouche pour retournerau reglage
existant.Attender cinqsecondeset le reglagesera effectue.
37
Page 39

Allurnage sans flarnrne
de veille
Lacuisiniereestdot6ed'unsystemed'allumagesansflammede
veille.CesystemefermeautomatiquementI'arriveede gazet
emp_che tout fonctionnementdu fourlots druneinterruption
de Ira/imentation #/ectrique.
II ne sera paspossibled'allumer le br_leur du four avec une
allumette. Ne pastenter de faire fonctionner le four Iorsd'une
interruptionde I'alimentation 61ectrique.
R_instailation :
1. Placerlagrille sur lossupportsdanslefour.
2. Soulever16gerementravant.Faireglisserla grillevers I'arriere
au-del_de lapositionde calage.
3. Abaisserla grilleet lafaireglisserdans lefour.
Ne pascouvrir la totaiit6 d'une grille de papier d'aluminiumni
mettre d'aluminium sur la sole du four. Cola ne donnerait pas
de borisr6suitats dartsla cuisson de g_teau× et la sole
pourrait se trouver abim6e.
u
Eclairage du four
La lampedu four s'allumeautomatiquement_I'ouverture
de la porte.Lorsquela porteestferm6e,appuyersur le
commutateurd'6clairagedu four pourallumerou 6teindre
la lampe.
Sole du four
Protegerlasoledesproduits renvers6s,en particulieracidesou
sucres,ceux-cipouvantd6colorer1'6mailvitrifi6. Utiliserdes
ustensilesde la bonnedimensionpour6viterque losproduitsnese
renversentoupassentpar-dessusI'ustensileenbouillant.Ne pas
placerd'ustensilesou de feuille d'aluminium directementsur
la sole dufour.
u
Event du four
Lorsquelefour fonctionne,lossurfacesvoisinesde 1'6ventpeuvent
devenirassezchaudespourentrainerdesbr01ures.Nejamais
bloquer1'6vent.
L'6vent est situ6 sous le protecteurd'6vent dudosseret,sur la
Ne pas mettrede
plastiquesprosde
1'6vent,la chaleur
pouvantlesddormer
ou lesfairefondre.
Grilles du four
Oven
Light
Positions
des grilles
POSITION7 (positionla plus
haute): Pourla cuissonau
gril et lacuissonau four sur
uneseulegrille avecunetOle
biscuits.
POSITION6 :S'utilisepour
lacuissonau gril etla
cuissonau four surune seulegrille avecunet01e_biscuits.S'utilise
pourune cuissonsurplusieursgrilles.
POSITION5 : Pourla cuissonaugril et lacuissonaufour sur une
seulegrille avecunet01e_ biscuits.
POSITION4 :S'utilisepour lacuissonaufour de g_teauxetde
metsensauce,sur uneseulegrille avecunetOle_ biscuits,et la
cuissonau gril. S'utilisepour unecuissonsur plusieursgrilles.
POSITION3 : Pourla cuissonaufour de mets ensauce,de g_teaux
etages,de michesde pain,sur une seulegrille avecunet01e
biscuits.S'utilisepour unecuissonsur plusieursgrilles.
POSITION2 :S'utilisepour lacuissonaufour de g_teauxsur une
seulegrille avecunet01e_ biscuits,et pourle r0tissagede petites
piecesdeviande.S'utilisepour unecuissonsur plusieursgrilles.
POSITION 1 :S'utilisepour ler0tissaged'unevolaille oude grosses
piecesdeviande.
Sole du four : Placerla grillesur losc0t(!s
relev6sde la sole.Donneune place
suppl6mentairepourla cuissonde
grandesquantit(!s.
CUiSSONSUR PLUSIEURSGRILLES:
Deu× grilles : Utiliserles positions3 et 6,ou 2 et/4.
Cuisson de g_teaux _ _tages sur deux grilles
pourde meilleursr6sultatspour lacuissonde g_teauxsurdeux
grilles,utiliser lespositions2 et/4.
Placerlesg_teauxsur lagrille, commeil est indiqu6.
Cuisson sur deux grilles
--7
--6
--5
--4
i SOle dU
four
Le four comportedeuxgrillesavec,pour chacune,un dispositifde
calage.
Extraction :
1. Tirer lagrille enligne droitejusqu'_
cequ'elles'arr6te_ la positionde
calage.
2. Souleverla grille_ I'avantpour
pouvoirI'extraire.
38
Page 40

p
GARANTIE DES GROS APPAREILS MENAGERS
MAYTAG CORPORATION
GARANTIE LIMITI_E
Pendant un an & compter de la date d'achat, Iorsque ce gros appareil menager est utilise et entretenu conformement aux instructions
jointes & ou fournies avec le produit, la marque Maytag de Whirlpool Corporation ou Whirlpool Canada LP (ci-apres designees
"Maytag") paiera pour les pieces specifiees par I'usine et la main-d'ceuvre pour corriger les vices de materiaux ou de fabrication. Le
service doit etre fourni par une compagnie de service designee par Maytag. Cette garantie limitee est valide uniquement aux €:tats-Unis
ou au Canada et s'applique exclusivement Iorsque I'appareil est utilise dans le pays oQil a ete achet& A I'exterieur du Canada et des 50
€:tats des €:tats-Unis, cette garantie limitee ne s'applique pas. Une preuve de la date d'achat original est exigee pour obtenir un service
dans le cadre de la presente garantie limitee.
ARTICLES EXCLUS DE LA GARANTIE
La pr_sente garantie limit_e ne couvre pas :
1. Les visites de service pour rectifier I'installation du gros appareil menager, montrer a I'utilisateur comment utiliser I'appareil,
remplacer ou reparer des fusibles ou rectifier le c&blage ou la plomberie du domicile.
2. Les visites de service pour reparer ou remplacer les ampoules electriques de I'appareil, les filtres & air ou les filtres & eau. Les pieces
consomptibles ne sont pas couvertes par la garantie.
3. Les reparations Iorsque le gros appareil menager est utilise & des fins autres que I'usage unifamilial normal ou Iorsque les
instructions d'installation et/ou les instructions de I'operateur ou de I'utilisateur fournies ne sont pas respectees.
4. Les dommages imputables & : accident, modification, usage impropre ou abusif, incendie, inondation, actes de Dieu, installation
fautive ou installation non conforme aux codes d'electricite ou de plomberie, ou I'utilisation de pieces consomptibles ou de produits
nettoyants non approuves par Maytag.
5. Les defauts apparents, notamment les eraflures, les bosses, fissures ou tout autre dommage au fini du gros appareil menager, &
moins que ces dommages soient dus & des vices de materiaux ou de fabrication et soient signales & Maytag dans les 30 jours
suivant la date d'achat.
6. Toute perte d'aliments due & une defaillance du refrigerateur ou du congelateur.
7. Les coQts associes au transport du gros appareil menager du domicile pour reparation. Ce gros appareil menager est con£_upour
etre repare & domicile et seul le service &domicile est couvert par la presente garantie.
8. Les reparations aux pieces ou systemes resultant d'une modification non autorisee faite & I'appareil.
9. Les frais de transport pour le service d'un produit si votre gros appareil est situe dans une region eloignee oQ un service d'entretien
Maytag autorise n'est pas disponible.
10. La depose et la reinstallation de votre gros appareil si celui-ci est installe dans un endroit inaccessible ou n'est pas installe
conformement aux instructions d'installation fournies.
11. Les gros appareils menagers dont les numeros de serie et de modele originaux ont ete enleves, modifies ou qui ne peuvent pas etre
facilement identifies. La presente garantie est nulle si le numero de serie d'usine a ete modifie ou enleve du gros appareil menager.
Le coQt d'une reparation ou des pieces de rechange dans le cadre de ces circonstances exclues est & la charge du client.
CLAUSE D'EXONI:!:RATION DE RESPONSABILITI:!: AU TITRE DES GARANTIES IMPLICITES; LIMITATION DES RECOURS
LE SEUL ET EXCLUSIF RECOURS DU CLIENT DANS LE CADRE DE LA PR¢:SENTE GARANTIE LIMIT¢:E CONSISTE EN LA
R¢:PARATION PR¢:VUE CI-DESS.US. LES GARANTIES IMPLICITES, Y COMPRIS LES GARANTIES APPLICABLES DE QUALIT¢:
MARCHANDE ET D'APTITUDE A UN USAGE PARTICULIER, SONT LIMIT¢:ES A UN AN OU A LA PLUS COURTE P¢:RIODE AUTORIS¢:E
PAR LA LOI. MAYTAG N'ASSUME AUCUNE RESPONSABILIT¢: POUR LES DOMMAGES FORTUITS OU INDIRECTS. CERTAINES
JURIDICTIONS NE PERMETTENT PAS L'EXCLUSION OU LA LIMITATION DES DOMMAGES FORTUITS OU INDIRECTS, OU LES
LIMITATIONS DE LA DUR¢:E DES GARANTIES IMPLICITES DE QUALIT¢: MARCHANDE OU D'APTITUDE A UN USAGE PARTICULIER,
DE SORTE QUE CES EXCLUSIONS OU LIMITATIONS PEUVENT NE PAS S'APPLIQUER DANS VOTRE CAS. CE-I-I-EGARANTIE VOUS
CONF#RE DES DROITS JURIDIQUES SP¢:CIFIQUES ET VOUS POUVEZ €:GALEMENT JOUIR D'AUTRES DROITS QUI PEUVENT
VARIER D'UNE JURIDICTION A UNE AUTRE.
A I'exterieur du Canada et des 50 €:tats des €:tats-Unis, cette garantie ne s'applique pas. Contactez votre marchand Maytag autorise
pour determiner si une autre garantie s'applique.
Si vous avez besoin de service, voir d'abord la section "Depannage" du Guide d'utilisation et d'entretien. Apres avoir verifie la section
"Depannage", de I'aide supplementaire peut etre trouvee en verifiant la section "Assistance ou service" ou en appelant Maytag. Aux
E.-U., composer le 1-800-688-9900. Au Canada, composer le 1-800-807-6777.
9/07
Page 41

Y[AG
Estufa a gas con control a
precisi6n sensible al tacto 500
Cuidado y limpieza ...................45=47
Homo autolimpiante
Procedimientos de limpieza
Mantenimiento ..........................48=49
Ventana y luz del homo
Retiro de la estufa a gas
Localizaci6n y soluci6.
de averias ...................................49=50
Cocinando en el homo ............52=58
Horneado
'Cook & Hold'
'Cook & Hold' diferido
Mantener caliente
Asar a la parrilla
Cierre automgtico/Modo sab_tico
Parrillas del homo
Garantia y servicio .... P;igina _ltima
Page 42

Lea y siga todas ias instrucciones antes de usar este
eiectrodom_stico para evitar el riesgo potencial de incendio,
choque el6ctrico, lesi6n personal o daNo alelectrodom6stico
como resultado de su uso inapropiado. Utilice este
electrodom6stico solamente para el prop6sito que ha sido
destinado segOnse describe en esta gufa.
Para asegurar funcionamiento correcto y seguro: El
electrodom6stico debe set instalado debidamente y puesto a
tierra pot un t6cnico calificado. No intente ajustar, reparar,
prestar servicio o reemplazar ninguna pieza de este electro-
dom6stico a menos que sea espec[ficamente recomendado en
esta gu[a. Todas las reparaciones deben set realizadas pot un
t6cnico calificado. Pida al instaladorque le indique la
ubicaci6n de la v_ilvula de cierre del gasy como cerrafla en
caso de una emergencia.
Siempre desenchufe el electrodom6stico antes de efectuar
alguna reparaci6n.
Las advertencias e instruccionesimportantessobre seguridad
que aparecen en esta gu[a no est_n destinadas a cubrir todas
las posibles circunstancias y situaciones que puedan ocurrir.
Se debe ejercer sentido comOn,precauci6n y cuidado cuando
instale, realice mantenimiento o haga funcionar el artefacto.
Siempre p6ngase en contacto con el fabricante si surgen
problemas o situaciones que usted no comprenda.
Reconozca los sirnbolos, advertencias,
etiquetas de seguridad
41
Page 43

instrucciones generales
Para verificar si el dispositivo est4 debidamente instalado, mire
debajo de la estufa con una linterna para asegurarse de que
uno de los tornillos niveladores traseros est6 debidamente
enganchado en la ranura del soporte. El dispositivo antivuelco
asegura el tornillo nivelador trasero al piso cuando est4
debidamente enganchado. Esto debe verificarse carla vez
que la estufa sea movida.
Para eliminar el riesgo de pasar sobre los quemadores
superiores calientes, no se deben guardar art[culos en los
armarios que est4n directamente sobre la estufa. Si tales
armarios son usados para almacenamiento, debe limitarse a
colocar art[culos de uso poco frecuente y que pueden
guardarse en forma segura en una 4rea que est4 sujeta al
calor proveniente de la estufa. Lastemperaturas pueden no
ser apropiadas para algunos art[culos, tal como I[quidos
vol4tiles, limpiadores o sprays en aerosol.
En caso de incendio
Apague el electrodom6stico y la campana de ventilaci6n para
evitar que las llamas se dispersen. Extinga las llamas luego
encienda la campana para expulsar el humo y el olor.
, Enla cubierta: Apague el fuego o la llama en una sart6n
con una tapa o una bandeja de hornear.
NUNCA levante o mueva una sart6n en llamas.
• E. el homo: Apague el fuego o la llama cerrando la puerta
del homo.
No use agua en los incendios de grasa. Usebicarbonato, un
producto qu[mico seco o un extinguidor del tipo con espuma
para apagar un incendio o la llama.
Generalidades
Para evitar un incendio o da o
causado pot el humo
Aseg_rese de que se hayan retirado todos los materiales de
empaque del electrodom6stico antes de su uso.
Mantenga el 4tea alrededor del electrodom6stico libre y
exenta de materiales combustibles, gasolina u otros vapores y
materiales inflamables.
Si el electrodom6stico es instalado cerca de una ventana, se
debe tenet cuidado para evitar que lascortinas pasen sobre
los quemadores.
NUNCA deje art[culos sobre la cubierta de la estufa. El aire
caliente del respiradero puede encender los art[culos
inflamables y aumentar la presi6n en los envases cerrados
hasta hacerlos reventar.
Muchos envases de tipo aerosol son EXPLOSIVOScuando son
expuestos al calory pueden set altamente inflamables. Evite
su uso o su almacenamiento cerca del electrodom6stico.
Muchos pl4sticos son vulnerables al calor. Mantenga los
pl4sticos alejados de las piezas de la estufa que puedan estar
tibias o calientes. No deje art[culos de pl4stico sobre la
cubierta de la estufa pues se pueden derretir o ablandar si
est4n demasiado cerca del respiradero ode un quemador
superior encendido.
El respiradero del homo se encuentra debajo del protector
trasero.
Evitetocar el 4rea del respiradero mientras el homo est6
encendido y durante varios minutos despu6s de haberlo
apagado. Algunas partes del respiradero y del 4rea que Io
rodea se calientan Io suficiente como para causar
quemaduras. Despu6s de apagar el homo, no toque el
42
Page 44

respiraderooel4reaqueIorodeahastaquehayatenido
suficientetiempoparaenfriarse.
Otrassuperficiesquepuedenestarcalientesincluyenla
cubierta,lassuperficiesqueest4ndirigidashacialacubierta,
elrespiraderodelhomo,lasuperficiecercanaalaaberturadel
respiradero,lapuertadelhomoy la4reaquelarodea,yla
ventanilladelhomo.
Netoqueunfocodehomocalienteconunpasoh0medoya
quesepuederomper.Sielfocoserompe,desconecteel
suministroelOctricoalelectrodomOsticoantesderetirarelfoco
paraevitarunchoqueelOctrico.
Neutilicelacubiertaoloshornoscomo4reasde
almacenamientoparaalimentosoutensiliosdecocina.
Seguridad para los ni os
NUNCA deje a losni_os solos o sin supervision cuando el
electrodomOstico est6 en uso o est6caliente.
NUNCA permita que los ni_os se sienten o se paren en
ninguna parte del electrodomOstico pues se pueden lesionar o
quemar.
Se les debe ense_ar a los niNos que el electrodomOstico y los
utensilios que est4n en 61o sobre 61pueden estar calientes.
Deje enfriar los utensilios calientes en un lugar seguro, fuera
del alcance de los ni_os peque_os. Se les debe ense_ar a los
ni_os que un electrodomOstico no es un juguete. No se debe
permitir que los ni_os jueguen con los controles u otras piezas
de la estufa.
Seguridad para cocinar
Siempre coloque un utensilio en un quemador superior antes
de encenderlo. Aseg0rese de usar la perilla correcta que
controla cada quemador superior. AsegOrese de encender el
quemador correcto y comprobar de queen efecto el
quemador haya sido encendido. Cuando haya terminado de
cocinar, apague el quemador antes de retirar el utensilio para
evitar exposiciOn a la llama del quemador.
Siempre ajuste la llama del quemador superior de modo que
no se extienda m4s all4 del borde inferior del utensilio. Una
llama excesiva es peligrosa, desperdicia energ[a y puede
da_ar la estufa, el utensilio o los armarios que est4n sobre la
estufa.
NUNCA deje sin supervision la cubierta de la estufa cuando
est6 cocinando, especialmente cuando usa un ajuste de calor
alto o cuando est6 usando una freidora. Los reboses pueden
producir humo y los derrames de grasa pueden inflamarse.
Limpie los derrames grasosos tan pronto como sea posible. No
use calor alto durante per[odos de cocci6n prolongados.
NUNOA caliente un envase cerrado en el quemador superior o
en el homo. La acumulaci6n de presiOn puede hacer explotar el
envase causando una lesion personal grave o da_o a la estufa.
Use tomaollas secos y gruesos. Los tomaollas hOmedos pueden
causar quemaduras a causa del vapor. Las toallas u otros
sustitutos no deben set usados como tomaollas porque ellos
pueden quedar colgando a travOsde los quemadores superiores
y encenderse o enredarse en las piezas de la estufa.
Siempre deje enfriar la grasa caliente que se ha usado en la
freidora antes de intentar mover o manipularla.
No permita que se acumule grasa u otros materiales inflamables
en la estufa o cerca de ella, en la campana o en el ventilador
aspirador. Limpie la campana extractora con frecuencia para
evitar que la grasa u otros materiales inflamables se acumulen
en la campana o en el filtro. Encienda el ventilador cuando
cocine alimentos flameados debajo la campana.
NUNOA use vestimentas de materiales inflamables, ropa suelta
o de mangas largas cuando est6 cocinando. La vestimenta se
puede encender o enganchar en los mangos de los utensilios.
Siempre coloque las parrillas del homo en la posici6n deseada
cuando el homo est6if[o. Deslice la parrilla del homo hacia
afuera para agregar o retirar alimento, usando tomaollas secosy
resistentes. Siempre evite alcanzar dentro del homo para
agregar o retirar alimentos. Si una parrilla debe ser sacada
cuando est4 todav[a caliente, use un tomaollas seco. Siempre
apague el homo despuOsde haber terminado de cocinar.
Tenga cuidado cuando abra la puerta del horno. Deje que
escape el aire o el vapor caliente antes de sacar o volver colocar
el alimento.
ADVERTENCIA SOBRE LOSALIMENTGS PREPARADOS:
Siga las instrucciones del fabricante de los alimentos. Si un
envase de pl4stico de alimento congelado y/o su tapa se
deforma, se comba o se da_a de alguna otra manera durante la
cocci6n, descarte inmediatamente el alimento y su envase. El
alimento puede estar contaminado.
NUNCA use papel de aluminio para cubrir una parrilla del homo
o la parte inferior del homo. El uso incorrecto puede resultar en
un riesgo de choque elOctrico, incendio o da_o al
electrodomOstico. Usepapel de aluminio solamente como se
indica en esta gu[a.
Utensilios apropiados
Use sartenes con fondos pianos y mangos que sean f4ciles de
tomar y que permanezcan fr[os. Evite usar sartenes u ollas
inestables, combadas que se pueden volcar f4cilmente u ollas
cuyos mangos estOnsueltos. Adem4s evite usar utensilios
especialmente peque_os o sartenes con mangos pesados pues
ellos pueden set inestables y volcarse f4cilmente. Los utensilios
que son pesados de mover cuando est4n Ilenos con alimento
pueden tambiOn set un peligro.
43
Page 45

AsegOresedequeelutensilioseaIosuficientementegrande
comoparacontenerenformadebidalosalimentosyevitar
derrames.Eltama_oesparticularmenteimportantecuandose
utilizanfreidoras.AsegOresedequeelutensiliotienecapacidad
paraelvolumendealimentosquesevaaagregaraligualque
paralaformaci6ndeburbujasdelagrasa.
Parareduciraunm[nimolasquemadurasyquelosmateriales
inflamablesylosderramesseenciendandebidosacontactono
intencionalconelutensilio,losmangosnodebenextenderse
Limpie solamente las piezas que se indican en esta gu[a. No
limpie la junta de la puerta. La junta esesencial para un
sellado hermOtico. No restriegue, da_e, ni mueva la junta de
la puerta. No use limpiadores de homo de ninguna clase en
el homo ni alrededor de cualquier parte del homo
autolimpiante.
Esnormal que la cubierta de la estufa se caliente durante el
ciclo de autolimpieza. Por Io tanto, se debe evitar tocar la
cubierta durante un ciclo de autolimpieza.
sobreelquemadorsuperioradyacente.Siempregirelos
mangosdelosutensilioshaciaelladoohacialapartetrasera
delaestufa,nohacialahabitaci6ndondepuedeserf_cilmente
golpeadosoalcanzadosporlosni_ospeque_os.
Nuneadejequeunutensiliohiervahastaquedarsecopues
estopuededa_arelutensilioylaestufa.
Sigalasinstruccionesdelfabricantecuandousebolsaspara
cocinarenelhorno.
Solamenteciertostiposdeutensiliosdevidriocer_imico,de
cer_micaoglaseadossonconvenientesparausoenlacubierta
delaestufaoenelhomosinquebrarsedebidoalcambio
Aviso y advertencia
importante sobre seguridad
La Propuesta 65 de la Ley de 1986 del Estado de California
Sobre Seguridad y Contaminaci6n del Agua Potable (California
Safe Drinking Water and Toxic Enforcement Act of 1986)exige
que el Gobernador de California publique una lista de las
sustancias que seg0n el estado de California causan c_ncer o
da_o al sistema reproductivo y exige que las empresas
adviertan a sus clientes sobre la exposiciOn potencial a tales
sustancias.
repentinodetemperatura.Sigalasinstruccionesdelfabricante
cuandouseutensiliosdevidrio.
EsteelectrodomOsticohasidoprobadorespectoasu
rendimientosegurousandoutensiliosdecocinaconvencionales.
NeuseningOndispositivooaccesorioquenohayasido
espec[ficamenterecomendadoenestagu[a.Neusecubiertas,
rejillassuperioresdelaestufaosistemasdeconvecci0npara
hornos.Elusodedispositivosoaccesoriosquenoson
expresamenterecomendadosenestagu[a,puedecrearserios
peligrosdeseguridad,resultarenproblemasderendimientoy
reducirlavida_tildeloscomponentesdelaestufa.
Seguridad de la limpieza
Apague todos los controles y espere que se enfr[en las piezas
de ia estufa antes de tocarlas o iimpiarias. No toque ias rejillas
de los quemadores o ias _ireascircundantes hasta que elias no
hayan tenido tiempo suficiente de enfriarse.
Limpie ia estufa con cuidado. Tenga cuidado para evitar
quemaduras de vapor si se usa una esponja o un paso mojado
para iimpiar los derrames en una superficie caliente. Algunos
iimpiadores pueden producir vapores nocivos cuando se aplican
a una superficie caliente.
Homo autolimpiante
Se advierte a los usuarios de esta estufa que la combustion
del gas puede resultar en exposiciOn de bajo nivel a algunas
de las sustancias publicadas en la lista, incluyendo benceno,
formaldeh[do y holl[n, debido principalmente a la combustion
incompleta del gas natural o de los combustibles de petrOleo
licuado. Los quemadores ajustados en forma debida
reducir_in la combustion incompleta. La exposici6n a estas
sustancias puede tambiOn ser reducida a un m[nimo
ventilando los quemadores al exterior en forma adecuada.
Se advierte a los usuarios de este electrodomOstico que
cuando el homo est,1funcionando en el ciclo de autolimpieza,
puede haber exposici6n de bajo nivel a algunas de las
sustancias indicadas en la lista, incluyendo monOxido de
carbono. La exposici6n a estas sustancias puede ser reducida
a un m[nimo ventilando el homo al exterior en forma
adecuada, abriendo las ventanas y/o la puerta en la habitaciOn
en donde est_ ubicado el electrodomOstico durante el ciclo de
autolimpieza.
AVISO INIPORTANTE RESPECTO A LOS PAJAROS
DOIVIESTICOS:
Nunca mantenga los p_ijarosen la cocina o en las
habitaciones donde puedan Ilegar los humos de la cocina. Los
p_ijarostienen un sistema respiratorio muy sensitivo. Los
humos producidos durante el ciclo de autolimpieza del homo
pueden ser perjudiciales o mortales para los p_jaros. Los
humos que despide el aceite de cocina recalentado, lagrasa,
margarina y los utensilios antiadherentes recalentados pueden
tambiOn ser perjudiciales.
Conserve estas instrucciones
para referencia futura
44
Page 46

Cut@do plezo
Homo autolimpiante
Elciclo deautolimpiezausatemperaturasdecocci6n superioresa Ins
normalesparalimpiar automdticamentetodo el interiordel homo.
Limpieel homo confrecuenciaremoviendolosderramesparaevitar
humoexcesivoy Ilamaradas.No permitaqueseacumuledemasiado
sucio enel homo.
Duranteel procesode limpieza,la cocinadebeestarbienventilada
para eliminar losoloresnormalesasociadosconla limpieza.
Antes de ia autoiimpieza
1. Apague la luz delhomoantesde la limpieza.Laluzdel homo
puedefundirsedurante elciclo delimpieza.
2. Retiretodoslosutensiliosy Insparrillasdel homo.Lasparrillas
del homo sedescolorardny no sedeslizardnfdcilmentedespu_s
de un ciclo deautolimpiezasi no sonretiradasdel homo.
3. Limpieel marcodel homo,el marcode
la puerta,eldreafuerade lajunta de la
puertay alrededorde la abertura enla
junta de la puerta,con un agentede
limpiezano abrasivotal como'Bon
Ami'* ocon detergentey agua. El
procesode autolimpiezano limpia
estasdreas. Eliasdebenser limpiadasparaevitarque la suciedad
sehorneeduranteel ciclode autolimpieza. (Lajunta es elsello
alrededorde la puertay ventanadel homo.)
4. Paraevitardaffono limpieni frotelajunta situadaalrededorde la
puertadel homo.Lajunta estddiseSadaparasellar
hermeticamenteel calordurante el ciclo delimpieza.
5. Limpieel excesode grasao derramesdela parteinferior del
homo. Estoevitahumoexcesivoo Ilamaradasduranteel ciclode
limpieza.
6. Limpielos derramesazucaradoso dcidostalescomopapadulce
(camote),tomateso salsasa basede leche.Laporcelana
esmaltadaesresistenteal dcidoperono apruebade dcidos. El
acabadodeporcelanapuededescolorarsesi los derramesdcidos
o azucaradosnoson limpiadosantesde unciclo deautolimpieza.
Para programar 'Self-Clean' (Autolimpieza):
lmportante: Latemperaturadel homodebe serinferiora 205° C
(400° F) paraprogramarun ciclode limpieza.
1. Cierre lapuertadel homo.
2. Oprima latecla 'Clean' (Limpieza).
• 'CLEAN'destellaen el indicadorvisual.
Oprimalatecla 'More+' (Mds) o'Less=' (Menos).
• Sedespliega'CL-M' (Suciedadmoderada,
3 horns).
Si la puertanose cierra,se oirdunasepalsonoray la Less-
palabra'door'sedesplegardenel indicadorvisual. Si
la puertano escerradadentro de45segundos,laoperaci6nde
autolimpiezaserdcanceladay el indicadorvolverda desplegarla
horndel dfa.
4. Optima latecla 'More+' o 'Less='para desplazarlos ajustesde
autolimpieza.
'CL-H' (Suciedadintensa,4 horns)
'CL-M' (Suciedadmoderada,3 horns)
'CL- L' (Suciedadleve,2horns)
AIseleccionarel niveldesuciedaddel homose programa
automdticamenteel tiempo delimpieza.
5. Despuesdecuatro segundos,elhomocomenzardalimpiar.
• Eltiempo de limpiezacomenzardlacuentaregresivaenel
indicador.
• 'LOCK'sedesplegardenel indicadorvisual.
• 'CLEAN'sedesplegardenel indicadorvisual.
1. Oprima latecla 'Delay' (Diferido).
• 'DELAY'destella.
Para diferir an cic[o de autolimpieza:
• '00:00'sedesplegardenel indicadorvisual.
2. Oprima latecla 'More+' o 'Less=' para programarla
cantidadde tiempoqueusted deseadiferir el ciclo.El
tiempo diferido puedeset programadode 10minutos Less-
(00:10)a11horns,59minutos (11:59).
3. CuandoDELAYest(!destellando,optima latecla
'Clean'.
• 'CLEAN'destellard.
Optima latecla 'More+' o'Less='.
• 'CL-M' (Suciedadmoderada,3 horns)se
despliegaen el indicador.
Cont.
*Loshombresde losproductosson marcasregistradasdesus respectivosfabricantes.
45
Page 47

Oprimalatecla 'More+' (Mds)o 'Less=' (Menos)paradesplazar
losajustesdeautolimpieza.
'CL-H'(Suciedadintensa,/4horas)
'CL-M' (Suciedadmoderada,3 horns)
'CL-L' (Suciedadleve,2 horas)
AI seleccionarelniveldesuciedaddel homose programa
autom_ticamenteeltiempo delimpieza.
Despu(!sde cuatrosegundos,'CLEAN'(Limpieza),'DELAY'
(Diferido)y'LOCK'(Bloqueado)sedesplegar_nenel indicador
visual paraindicarque el homo est_programatic paraun ciclo
de limpiezadiferido.Eltiempodiferidotambiensedespliegaen
el indicadorvisual.
Si el home ya ha side programatic para un ciclo de
limpieza y usted desea programar un tiempe
diferido:
Despues del ciclo de
autolimpieza
Aproximadamenteunahera despu(!sdelfin del title de limpieza,
'LOCK'desaparecer& Lapuertaahora puedeset abierta.
Alguna suciedad puedequedar come una loveceniza gris tipo
polvo. Retfrelaconun pa_oh_medo. Si la suciedadpermanece
despu(!sdelimpiarla,significaque elciclo de limpiezano rue Io
suficientementelargo. Lasuciedadser_ eliminadaduranteel
proximociclo delimpieza.
SiIns parrillasdel homo fueron dejadas enel homo y no se
deslizansuavemente despu6sde an title de limpieza, limpie
lasparrillasy lossoportesde lasparrillasconuna peque_acantidad
de aceitevegetalpara hacerlasdeslizarconm_sfacilidad.
Puedenaparecer linensdelgadas en la porcelanaal pasarper
ciclos de calentamiento y enfriamiento. Estoes normaly no
afectar_el rendimiento.
Una descoloraci6n blanca puede aparecer despu6s del ciclo
de limpiezasilos alimentos ;icidoso azucarados no fueron
limpiadosantes del ciclo de autolimpieza. Estadescoloraci0nes
normaly no afectar_el rendimiento.
1. Oprimalatecla 'Belay' (Diferido).
• 'DELAY'destella.
• '00:00'sedesplegar_enel indicadorvisual.
Oprimalatecla 'More+' o 'Less=' paraprogramar : More+
la cantidaddetiempo que usteddeseadiferir el
ciclo.
Despuesdecuatrosegundos,'CLEAN','DELAY'y
'LOCK'sedesplegar_nenel indicadorvisualpara
indicarqueel homoest_programatic parauna ciclode limpieza
diferido.Eltiempo diferidotambiensedespliegaen elindicador
visual.
Cuando cemienza el ciclo de autolimpieza:
• 'DELAY'seapagar&
• Eltiempo delimpiezasedesplegar_enel indicadorvisual.
Para cancelar el ciclo de autelimpieza:
Optimala tecla'CANCEL' (Cancelar).
• Elindicadorvisualquedaen blanco.
• TodasInsfuncionesson canceladas.
• La heradel dfase despliegaen elindicadorvisual.
Durante el title de autolimpieza
Cuandoaparece'LOCK'enel indicador,la puertano sepuedeabrir.
Paraevitarda_o ala puerta,no fuerce la puerta paraabrirlacuando
la palabra'LOCK'est_desplegadaenel indicadorvisual.
Heine y olores
Ustedpuedevet humoy sentirclot Insprimerasvecesque elhomo
eslimpiado. Estoes normaly disminuir_con el tiempo.
Tambi(!npuedeocurrir humosi el homoest_demasiadosucioo si
seha dejadoun utensilioen el horno.
Sonidos
A medidaqueel homose calienta,ustedpuedeoir sonidosde
piezasmet_licasque se expandeny contraen. Estoesnormaly no
da_ar_el homo.
Notas.-
• si sedejaabierta lapuertadel homo,la palabra'door'
destellar_en el indicadorvisualyse escuchardunasepal
sonorahastaque la puertasea cerraday la tecla'Clean' sea
oprimidanuevamente.
• Si transcurrenm_sde cincosegundosdespu(!sde oprimir la
tecla 'Clean' y antesdeoprimir lasteclas'More+' o 'Less=',
el programavolverdautom_ticamentealdespliegueprevio.
• La puertadel hornoseda_ar_si sefuerzaparaabrirla cuando
la palabra'LOCK'contin[_adesplegadaen el indicador.
Procedimientos de limpieza
Tapasde quemadores y quemadores de gas sellados
Tapasde quemadores removibles
• Dejeenfriarel quemador.Retirela tapay I_velaenaguajabonosa
con unaesponjade restregardepl_stico.Parasuciedaddificil,
limpiecon unaesponjano abrasivarellenaconjab0n o concrema
para limpiezade cubiertas'CooktopCleaningCreme'*(Pieza
#20000001)**y una esponja.
• No Inslave enel lavavajillasni enun homoautolimpiante.
Cont.
46
Page 48

Quemadores de gas seilados
* Limpielosconfrecuencia.Dejeenfriarel quemador.Limpiecon
jab6n y una esponjade restregarde pldstico.Parasuciedaddificil,
limpiecon unaesponjano abrasivarellenaconjab6n. No agrande
ni modifiquelosagujeros.
*Tenga cuidadode que no entreaguaen losorificiosde los
quemadores.
* Tengacuidadocuandolimpieel encendedor.Si elencendedor
estdh_medoo datiado,el quemadorsuperior noencenderd.
Rejiiiasde losquemadores= porcelanasobre hierro forjado
* Ldvelascon aguatibia jabonosay unaesponjade pldsticono
abrasiva.Paramanchasrebeldes,limpieconuna esponjade
pldsticorellenaconjab6n,no abrasivao con 'CooktopCleaning
Creme'*(CremaparaLimpiezade Cubiertas)(Pieza20000001)**y
una esponja.Sila suciedadpersiste,vuelvaaaplicar 'Cooktop
CleaningCreme',cubracon unatoalla de papelh_meday deje
remojardurante 30 minutos.Restrieguenuevamente,enjuaguey
seque.
. No Inslave enel lavavajillasni en un homo autolimpiante.
Area del reloj y de insteclas decontrol
* Paraactivar Bloqueodelos controlesparalalimpieza,ver
pdgina53.
. Lave,enjuaguey seque.No useagentesde limpiezaabrasivos
puespuedenrayarel acabado.
. Sepuedeusarlimpiavidriossi serocianenel patioprimero.
NOretie directamenteen el paneL
Perillasde control
* Retirelasperillascuandoest(!nen laposici0n'OFF'tirdndolas
haciaadelante.
. Lave,enjuaguey seque.No useagentesde limpiezaabrasivos
puespuedenrayarel acabado.
. Enciendacadaquemadorparaasegurarsedeque las perillashan
sidocorrectamentereinstaladas.
Cubiertay panelde control =Esmaltede porcelana
La porcelanaesmaltadaesvidrio fundido en metaly puede
agrietarseo picarsesino seusacorrectamente.Esresistente
a los dcidos,no apruebade dcidos.Todoslosderrames,
especialmentelos derramesazucaradoso acidicosdebenset
limpiadosinmediatamenteconun patioseco.
. Cuandoseenfde,laveconaguajabonosa,enjuaguey seque.
. Nunca limpieunasuperficietibia o calientecon un patioh_medo.
Estopuedecausaragrietamientoo picaduras.
. Nunca uselimpiadoresde homo,agentesde limpiezaabrasivoso
cdusticosen elacabadoexteriorde la estufa.
Paneles laterales,gavetade almacenamiento ymanijasde Ins
puertas=Esmaltepintado
. Cuandoest_fda, laveconaguatibiajabonosa,enjuaguey seque.
Nunca limpieunasuperficietibia o calientecon un patioh_medo
puesestopuededatiarla superficiey causaruna quemaduraa
causadelvapor.
. Paramanchasrebeldes,useagentesde limpiezalevemente
abrasivostal comopastade bicarbonatoo'BonAmi'*. No use
limpiadoresabrasivos,cdusticoso dsperostal comoesponjasde
lanade aceroo limpiadoresde hornos.Estosproductospueden
rayaro datiar permanentementela superficie.
lmportante:Useuna toallao unpatio seco para limpiarlos
derrames, especia/mente los derrames addicos oazucarados.
La superficie se puede descolorar o perder elbrillo si el
derrame no se limpiainmediatamente. Estoes especialmente
importanteen Inssuperficies blancas.
Ventana y puertadel homo =vidrio
• Eviteusarcantidadesexcesivasde aguapuespuedeescurrirse
debajoo detrdsdelvidrio causandomanchas.
• Lavecon aguay jab6n. Enjuaguecon agualimpiay seque.
El limpiadordevidrio puedeusarsesi se roda en un
patio primero.
• No usematerialesabrasivostalescomoesponjasde restregar,
limpiadoresen polvo oesponjasde lanade acero
puespuedenrayarel vidrio.
interior del homo
• Sigalas instruccionesen laspdginas45-46para programarun
ciclo de autolimpieza.
Parriiiasdel homo
• LimpiarconaguaconjabOn.
• Sacarlas manchasdificilescon polvode limpiezaouna esponja
Ilenacon jabOn. Enjuagueyseque.
• Lasparrillassedescolorardnpermanentementey puedenno
deslizarseconsuavidadsison dejadasen el homo duranteun
ciclo de autolimpieza.Siestosucede,limpie laparrillay los
soportesen relievecon una pequetiacantidadde aceitevegetal
para restaurarla facilidadde movimiento,luegolimpieel exceso
de aceite.
Acero inoxidable(modelosselectos)
• NO USENINGUN PRODUCTODELIMPIEZA QUECONTENGA
BLANQUEADORA BASEDECLORO.
• NO USELIMPIADORES "ORANGE"IV/LIMPIADORES
ABRASlVOS.
• SlEMPRELIMPIE LAS SUPERFICIESDEACEROA FAVORDEL
GRANO.
• Limpieza diaria/Suciedadleve = Limpiecon unode los
siguientes- aguacon jabOn,unasoluci6nde vinagreblancocon
agua,limpiador parasuperficiesyvidrio 'Formula409'*o un
limpiavidriossimilar- usandouna esponjao unpatio suave.
Enjuaguey seque. Parapuliry evitarmarcasdelos dodos,useel
producto'StainlessSteelMagic Spray'*(PiezaNo.20000008)**.
• Suciedadmoderada/Intensa =Limpiecon uno de los
siguientes- 'BonAmi'*,'SmartCleanser'*o 'SoftScrub'*- usando
una esponjahOmedaoun patio suave. Enjuaguey seque. Las
manchasdificiles puedenser quitadascon unaesponjamulti-uso
'Scotch-Brite'*hOmeda;frotea favor delgrano. Enjuaguey seque.
Pararestaurarel lustreysacarlas vetas,aplique'StainlessSteel
Magic Spray'*.
• Descoloraci6n - Useunaesponjamojadaoun patiosuave,
limpiecon limpiadorde acero'CameoStainlessSteelCleaner'*.
Enjuagueinmediatamentey seque.Paraeliminarlas estdasy
restaurarel lustre,usedespu(!srociadorparaaceroinoxidable
'StainlessSteel MagicSpray'*.
* Los hombresdelosproductossonmarcasregistradasdesus
respectivosfabricantes.
** Parahacer pedidos,Ilameal 1-877-232-6771EE.UU.o al
1-800-688-8/408Canadd.
47
Page 49

MantenimJento
Puerta del homo
Importante: Lapuertadel homoen una estufanuevapuede
sentirse"esponjosa"cuandose cierra. Estoesnormaly disminuird
conel uso.
Ventana del homo
Para proteger la ventana de la puerta del homo:
1. No use agentesdelimpiezaabrasivostalescomoesponjasde
restregarde lanade aceroo limpiadoresen polvo puesellos
puedenrayarelvidrio.
2. No golpeeelvidrio conollas,sartenes,muebles,juguetesu otros
objetos.
3. No cierrela puertadel homohastaque lasparrillasdel homo no
est(!nensu lugar.
AI golpear,rayar,hacervibraro esforzarelvidrio puededebilitarsu
estructuracausandoun mayorriesgode roturaen unafecha
posterior.
Cone×i6n electrica
Los electrodom6sticos que requierenenergia
electrica est_n equipados con anenchufe de
tres ciavijas con conexi0na tierra, el cual
debeset enchufadodirectamenteen un
tomacorrienteel(!ctricodetres agujeros,para
120voltiosdebidamenteconectadoa tierra.
Siempredesenchufeel e/ectrodom6sticoantesde efectuar
reparaciones.
Elenchufede tres clavijascon conexiOna tierraofreceprotecciOn
contra peligrosde choquesel(!ctricos.NOCORTENI ELIMINE LA
TERCERACLAVlJADECONEXIONA TIERRADELENCHUFE
DELCORDONELECTRICO.
Sisolamentesedisponede untomacorrientesinconexi6natierra,
de dos agujerosu ottotipo de tomacorrienteel(!ctrico,el
propietariodel electrodom_stico es personalmente
responsablede reemplazar el tomacorriente con an
tomacorriente el6ctrico detres agujeros debidamentepuesto
a tierra.
Luz del homo
Tornillos niveladores
Verifiquesi laestufa est_niveladacuandose instala.
Sila estufano est_nivelada,girelostornillos
niveladoresubicadosencada esquinade laestufa
hastaquequede nivelada.
TORN_LLON_VEL,_OR
t
DISPOSITIVO
ANTIVUELCO
Para reemplazar el foco del homo:
1. Cuandoel homo est_frio, sujete latapade la bombillaensu
lugar,luegodesliceel ret(!nde alambrefuerade lacubierta.
Importante: La cubiertade la
bombillase caer_si no essujetaen CUBIERTADE
su lugarcuandoest_sacandoel
retchde alambre.
2. Saquela cubiertadel foco y el
foco.
3. Coloqueun focode 40watts
paraelectrodomesticos.
4. Vuelvaa colocarla cubiertade
labombillay aseg_relacon el ret(!nde alambre.
5. Vuelvaa enchufarla estufa.Vuelvaa colocarla horacorrect&
LA BOMBILLA
RETEN DE ALAMBRE
48
Page 50

6aveta de almacenamiento Paravelvetacolocar:
1. Insertelos extremesde lascorrederasde la gavetaenlosrieles
de laestufa.
2. Levantelapartedelanterade la gavetay suavementeempOjelaa
la primeraposici0ndetope.
3. Levantelagavetanuevamentey emp[_jelahastaquequede
completamentecerrada.
La gavetade almacenamientopuedeser retiradaparaque usted
puedalimpiardebajode laestufa.
Para sacar :
1. Vacie lagavetay deslfcelahaciaafuera hastala primeraposici0n
tope.
2. Levantelapartedelanteradela gaveta.
3. Tfrelahastalasegundaposici0nde tope.
/4. Sujete los ladesy levantela gavetapararetirarla.
Retire de la estufa a gas
Losconectoresde laestufaa gasusadosparaconectareste
artefactoal suministrodegas no est_ndise_adosparamovimiento
continue. Unavez instalados,NOmuevarepetidamenteeste
artefactoa gasparasulimpiezao paraubicarlo enotrolugar. Si
esteartefactotiene queser movidoy/o retiradopara reparaci0n,
sigael procedimientodescritoen lasinstruccionesde instalaci0n.
Parainformaci0n,p0ngaseencontactoconel ServicioalosClientes
MaytagIlamandoal 1-800-688-9900EE.UU.oal 1-800-688-2002
Canada.
Paraevitarque laestufasevuelque accidentalmente,sedebe
aseguraral pisocolocandoel tornillo niveladortraserodentro del
soporteantivuelco.
Para lamayoria de los problemas,verifiqueprimero Io
siguiente.
Revisesi loscontroles del homoest_ndebidamenteajustados.
Verifiquesi el enchufeest_firmementeinsertadoenel
tomacorriente.
• Verifiqueo vuelvaa reponerel disyuntor. Verifiqueo reemplaceel
fusible.
• Verifiqueel suministrode energfael_ctrica.
El quemadorsuperiorno se enciende.
Verifiquesi la estufaest_debidamenteconectadaa lafuente de
alimentaci0n.
Verifiquesi est_fundidoun fusibledelcircuito o sise dispar0 el
disyuntorprincipal.
• Verifiqueparaasegurarsedeque el encendedorest(!secoy que
emitachasquidos. Elquemadorno seencender_si elencendedor
est_da_ado,sucioo mojado.Si el encendedornoproduceun
chasquido,gire laperilla decontrola la posici0n'OFF'(Apagado).
Lallama es dispareja.
Losorificiosdel quemadorpuedenestarobstruidos.
La llama del quemadorsuperiorse levantadel orificio.
Verifiqueparaasegurarsedeque el utensilioest_asentadoen la
parrillasobreel quemador.
Los resultados del homeado no son come se esperaban oson
diferentesa losdel homoanterior.
Verifiquela temperaturadel hornoseleccionada.Aseg_resede
que el homoeste precalentadocuandola recetao instrucciones
recomiendanprecalentamientodel horno.
Aseg0resede que elrespiraderodelhomo no est(!bloqueado. Ver
p_gina58 parala ubicaciOn.
• Verifiqueparaasegurarsedeque la estufaest_nivelada.
• Lastemperaturasa menudovarfanentreun hornonuevoy uno
antiguo. A medidaque pasael tiempo,la temperaturadel homo
cambiay puede hacersem_scalienteo m_sfrfa. Ver p_g.57 para
lasinstruccionescomeajustarlatemperaturadel borne.
Importante: No serecomiendaajustarla temperaturasi hatenido
problemasconsolouna odos recetas.
• Useel utensiliocorrecto.Los utensiliososcurosproducen dorado
oscuro.Los utensiliosbrillantesproducendoradoclare.
• Verifiquelas posicionesde las parrillasy la colocaciOnde los
utensilios.Alternelosutensilioscuandousedos parrillas.Deje
2,5-5cm (1-2 pulgadas)entrelos utensiliosy lasparedesdelhomo.
• Verifiqueel usede papelde aluminioen el horno.Nunea usepapel
de aluminio paracubrir unaparrilla completadel horno.Coloqueun
pedazopeque_ode papelde aluminioen la parrillaque est_debajo
del utensiliopara recibirlos derrames.
Los alimentos no se asan a la parrilla en forma debida o sale
demasiadohumo.
Verifiquelas posicionesde las parrillasdel homo.Elalimento
puedeestarmuy cercade la llama.
El papelde aluminioseus0 de maneraincorrecta. Nunea forre el
insertodel asadorcon papeldealuminio.
• Recorteel excesodegrasade lacameantesde ponerlaa asara la
parrilla.
• Seus0 unaasaderasucia.
• Precalienteel homo durante2a 3 minutesantesde colocarel
alimentoen elhorno.
o
Asea laparrillacon la puertadel homo cerrada.
49
Page 51

Elhomo no seautolimpia.
. Verifiqueparaasegurarsedeque elciclo no est(!ajustadoparaun
comienzodiferido.Vet pdginas45-46.
• Verifiquesi la puertaestdcerrada.
• Verifiquesi el controlestden ModoSabdtico.Vet pdg.57.
• Elhomo puedeestara rodsde 205° C(400° F). Latemperatura
del homo debeset inferiora 205° C (400° F)paraprogramarun
ciclo de limpieza.
Ei homo nose limpi6 en forma debida.
. Puedequeseanecesarioun tiempode limpiezamdslargo.
. Losderramesexcesivos,especialmentedealimentosazucarados
y/o dcidosno fueronlimpiadosantesdelciclo deautolimpieza.
Lapuerta del homo nose desbloqueadespu6s delcido
deautolimpieza.
. Elinterior del homotodavfaestdcaliente. Dejeque pase
aproximadamenteuna hora paraque elhomo se enfdeantesde
quese completeun ciclode autolimpieza.La puertapuedeset
abiertacuando desaparezcala palabra'LOCK'(Bloqueado)del
indicadorvisual.
• Elcontrol y la puertapuedeestarbloqueada.Vet pdg.53.
Sejunta humedad en la ventana del homo o sale vaporporel
respiraderodel homo.
. Estoes normalcuandose cocinanalimentoscon altocontenido
de humedad.
. Seus6 humedadexcesivacuandolimpi6la ventana.
Hayun olor fuerte o humolevecuandose enciende el homo.
* Estoes normalen una estufanuevay desaparecerddespu_sde
unospocosusos. AI iniciarun ciclodeautolimpiezase
"quemardn"los oloresrodsrdpidamente.
. Sise enciendeel ventiladorayudarda eliminarel humoy/o elclot.
. Suciedadexcesivade alimentosen elpanelinferior del homo.
Useun ciclode autolimpieza.
C6digos de Errores
. 'BAKE'(Horneado)o'LOCK'puedendestellarrdpidamenteen el
indicadorparaavisarleque hayun error o unproblema. Si 'BAKE'
o 'LOCK'aparecenen el indicadorvisual,optima latecla
'CANCEL' (Cancelar).Si 'BAKE'o 'LOCK'contin0andestellando,
desconectela energfael(!ctricaal electrodom(!stico.Espereunos
pocosminutosy vuelvaa reconectarla energfael(!ctrica.Si
contin0andestellando,desconectelaenergfael(!ctricadel
electrodomesticoy Ilameal t(!cnicodeservicio autorizado.
• Siel homoestddemasiadosucio,puedenocurrirdemasiadas
IlamaradasIocualresultarden un c6digo deerror durantela
limpieza. Optimala tecla'CANCEL' ydeje queel homoseenfde
completamente,limpie elexcesodesuciedady luegovuelvaa
programarel ciclo de limpieza.Si elc6digo de errorreaparece,
Ilameaun t(!cnico autorizado.
Se escuchan ruidos.
. Elhomo emitevariossonidosbajos. Ustedpuedeoir losrelesdel
homo cuandose enciendeny se apagan.Estoesnormal.
• A medidaqueel homo secalientay se enfda,ustedpuedeoir
sonidosde piezasmetdlicasqueseexpandeny contraen. Estoes
normaly no dafiardsuelectrodomestico.
No se escuchan sefiales sonoras y el indicadorvisualno
se activa.
* Elhomo puedeestaren Modosabdtico. Vet pdg.57.
'SAb' destellay luego se despliegacontinuamente.
• El homoestden modosabdtico.Paraanularel modosabdtico,
oprimay mantengaoprimida la tecla'Clock' (Reloj)durante cinco
segundos.
¢ocinandoenlu
Controles superiores Encendido sin piloto
Elencendidosin pilotoeliminala TAPABELQUEMABOR
constantepermanente.Cada
necesidadde una luzpiloto
uric de losquemadores
superiorestiene un encendedorde _ _-_'-J
chispa.Tengacuidadocuando
limpiealrededordelquemador ,_d9_4,{_:_:4,'_-
superior. _,-_,:- -_....- ---_
Siel quemadorsuperior o,_o_o,_,,,/q,-<'_-_9_::_/?_\.""- -=f_,--/_C,)_._.._
no encienae,verifiquesiel _._
encendedorestdroto,sucioo _.. -- .................
mojado.
BASE BEE QUEMABOR
5O
Coat.
Page 52

Perillas de control de los
elementos superiores
Seutilizan paraencenderlosquemadoressuperiores.Sedisponede
unaselecciOninfinita de ajustesdecalordesde'LO' (Bajo)a'HI'
(Alto). Enel ajuste'HI' se puedesentirun tope ouna muesca. Las
perillaspuedenserajustadasexactamenteen los ajustes
correspondienteso entrecualquierade olios.
Lasilustracionescercade laperillaidentifican cuales el [_O
quemadorque controlaesaperilla. Porejemplo, Front _O
la ilustraciOna derechamuestrala ubicaciOndel
quemadordelanteroizquierdo.
Programaci6n de los controles:
Eltamaffoy eltipo de utensilioafectardnel ajustede calor.
1. Coloqueun utensiliosobrela rejilladel quemador.
• La llamadel quemadorpuedelevantarseoparecerseparada
del orificiosi no secolocaun utensilioen larejilla.
2. Optimay girela perillaa laizquierdaal ajuste'UTE' (Encendido).
• Seoirdun chasquido(chispa)y el quemadorse encenderd.
(Loscuatroquemadoresproducirdnchispacuandose coloca
la perillade cualquierade losquemadoresenla posici0n
'LifE'.)
3. Despu(!sque elquemadorse haencendido,gire laperilla al
tamafiode llamadeseado.
• Elencendedorcontinuardproduciendochispashastaque la
perillaseagiradarodsalldde la posici0n'LITE'.
Ajustes de calor sugeridos
'LO' (Bajo):Losalimentosmantienenuna
temperaturasobrelos 140°F(60° C)sin que
sigancocindndose.Losalimentosse
calientanconuna llamamdsalta hastaque
alcanzanestatemperaturaluegose reduce
la llama. Sepuedecocinaren el ajuste'LO'
siempreque el utensilioest(!tapado.
'MED' (Mediano):Seusaunallamadetamafio intermediopara
continuarcocinando. Elalimento nose cocinardrodsrdpidocuando
seusaun ajustede llamarodsalto queel necesariopara mantener
un hervorsuave. Elagua hiervea lamismatemperaturasi estd
hirviendosuaveo vigorosamente.
'HI' (Alto): Se usapara hacerhervirun liquido o alcanzarlapresiOn
adecuadaen unaolla apresiOn.Siemprereduzcael ajustea uncalor
rodsbajo cuandolos Ifquidoscomiencena herviro cuandolos
alimentoscomiencena cocinarse.
S
Funcionamiento durante una
interrupci6n de la energfa
el ctrica
1.
Acerqueun f0sforoencendidoa latapadel quemadorsuperior
deseado.
2.
Optimay gire la perillade control lentamentea la posici0n'LIFE'.
3.
Ajuste la llamaal niveldeseado.
Cubierta
Para evitar que la cubierta se descolore o se
manche:
• Limpielacubierta de laestufa despu6sdecadauso.
• Limpielosderramesdcidoso azucaradostan prontocomo la
_ puedendescolorarla porcelana.
A diferenciade unaestufaconquemadoresde
gasestdndar,estacubiertano selevantani
__cubierta sehayaenfriadopuesestosderrames
tampocoes removible. No intente levanlar la
cubiertaper ning_nmotive.
quemadores a gas sellados
Losquemadoresselladosdesu estufaestdnaseguradosa la
cubiertay no ban sidodisefiadosparasersacados. Debidoa que
losquemadoresestdnselladosen la cubierta,los derrameso
rebosesnoseescurrirdndebajode la cubiertade laestufa.
Sin embargo,los quemadorespuedenser limpiadosdespu(!sde
cadauso. Lapartede la cabezadel quemadorpuedeser fdcilmente
sacadaparasu limpieza.(Veren la pdgina47las instruccionessobre
la limpieza.)
Lascabezasde los quemadoresdebenestarcorrectamente
colocadasenla basedel quemadorafin deque 6stefuncione de
maneraapropiada.
quemador de alto
rendimiento 'Power Boost'*
Existeunquemadorde altorendimiento
ensu estufa,situadoen la posici0n
derechadelantera. Estoquemador
ofrececocciOnmdsrdpiday puedenser
usadosparaherviraguacon rapidezo
paracocinargrandescantidadesde
alimento.
• Powe[
Rear liE:} •
O0 _oo_t
0_ Front
Quemador para
cocinar a fuego lento
Estequemadorseencuentraen la posiciOntrasera
izquierdao. Elquemadorparacocinara fuego ....
lentoofreceuna llamade menorintensidad(BTU*inferior) para
calentarsalsasdelicadaso derretirchocolate.
*El r#gimen nominal de BTU variarb cuando se usa gas flcuado.
_______!_
51
Page 53

Rejillas de los quemadores
Lasrejillasdebenestar debidamentecolocadasantesde comenzara
cocinar.Cuandoinstalelas rejillas,coloquelos extremosde las
leng0etashaciael centro,de maneraque coincidancon lasbarras
derechas.
La instalaci0nincorrectade lasrejillas puederesultaren picaduras
de la cubierta.
No uselosquemadoressintoner un utensilioen la rejilla. El
aeabado de porcelana de Ins rejillaspuedepiearse si no existe
un utensilioque absorba el calor de la llama del quemador.
Tongacuidado al revolverel alimentode unaolla o sart_ncolocado
sobrela rejilladel quemador.Lasrejillastienenun acabadosuave
parafacilitar sulimpieza.Laolla osartenpuedenresbalarsi no se
sujetanpor elmango.Estopuedeprovocarderramede alimentos
calientesy constituir un riesgodesufrir unaquemadura.
Aunque las rejillasde losquemadoressondurables,gradualmente
perder_nsubrillo y/o sedescolorar_n,debidoa lasaltas
temperaturasde la llamadel gas.
NOtaS:
• Unquemadorajustadode maneracorrectaconorificios
limpiosseencender_dentro de unospocossegundos.Si est_
usandogas natural lallamaser_azulcon un conointerior azul
profundo.
Si la llamadel quemadores amarillao esruidosa,lamezclade
aire/gaspuedeser incorrecta. P0ngaseen contactocon un
t(!cnico deservicioparaajustarla. (Losajustesno est_n
cubiertosporla garantia.)
Congaslicuadosonaceptablesalgunaspuntas amarillasenla
llama. Estoes normaly noes necesariohacerningOnajuste.
• Conalgunostiposde gas,usted puedeoir un "chasquido"
cuandoel quemadorsuperiorse apaga. Estees unsonido
normaldelfuncionamientodel quemador.
• Si laperillade controlse gira muy r@idamentede'HI' (Alto)a
'LO'(Bajo),la llamapuedeapagarse,particularmentesi el
quemadorest_frio. Siesto ocurre,gire la perilla ala posici0n
'OFF'(Apagado),esperealgunossegundosyvuelvaencender
el quemador.
• La llamadebeser ajustadade modoque noseextiendam_s
all_ del bordedel utensilio.
Codnendoenel
Panel de control
'Broil'(Asara laparrilla)
'Bake'(Hornea0
'More+/Less-'
(M_s+/Menos-)
'Timer'(Temporizador)
'Cook& Hold'(Cocci0n
y mantenercaliente)
'Clean'(Limpieza)
'Delay'(Difefido)
'Clock'(Reloj)
'KeepWarm'
(Mantenercaliente)
'CANCEL'(Cancela0
Seusaparaasaralaparrillaydorarlos
alimentos.
Seusaparahornearyasar.
Programaocambialahora,latemperatura
delhomo.Programaasara laparrilla'HI'o 'LO'.
Programaaltemporizador.
Seusaparahornearduranteuntiempo
seleccionado,luegomantieneel alimento
calienteduranteunahora.
Seusaparaprogramarunciclodeautolimpieza.
Programaelhornoparacomenzarahornear
o limpiarseaunahoraposterior.
Seusaparaprogramarlahoradeldia.
Seusaparamantenercalienteenel homoel
alimentococinado.
Cancelatodaslasfuncionesa excepciOndel
temporizadory elreloj.
Use de las teclas
• Optimala tecla deseada.
• Optima'More+' o'Less-' paraprogramareltiempo o latemperatura.
• Seescuchar_una sepalsonoracadavez queoptima unatecla.
• Seescuchar_ndosso,alessonorassi ocurreun erroren la
programaci0n.
Importante: Cuatrosegundosdespu(!sde haberoprimido latecla
'More+' o 'Less='eltiempo o latemperaturaser_autom_ticamente
programada.Sitranscurrenm_sde 30segundosdespu(!sdehaber
oprimidounatecla defunci0n y antesdeoprimir lasteclas'More+' o
'Less-',lafunci0n ser_canceladay el indicadorvisualvolver_al
despliegueanterior.
'Clock'
Elreloj puedeserajustadoparadesplegarla horaya seaen formato
de 12 horaso 24 horas.Elreloj hasido programadoen la f_brica
parael formatode 12 horas.
Para cambiar el reloj a formate de 24
horns:
1. Optimay mantengaoprimidaslasteclas
'CANCEL' y 'Belay' durantetressegundos.
52 Coat.
Page 54

2. Oprima'More+'(Mas+)o'Less='(Menos-)paraprogramarel
formatode12horaso24horas.
3. Programelahoradeldfasiguiendolasinstrucciones
indicadasabajo.
Programaci6n del reloj:
1. Oprimalatecla 'Clock' (Reloj).
• Losdos puntosdestellanen el indicador.
2. Optima'More+' o 'Less='paraprogramarla
horadel dfa.
• Losdos puntoscontin0andestellando.
3. Optimalatecla 'Clock' nuevamenteoesperecuatro _ Less-
segundos.Losdospuntosdejar4nde destellar.
Cuandose conectaenergfael(!ctricaal homo odespu(!s
de una interrupci6nde la energfael(!ctrica,la 01timahora del reloj
previaa la interrupci6ndestellar4en el indicador.
Paradesplegarla horadel dfacuando elindicadorest(!mostrando
otrafunci6n detiempo, oprimalatecla 'Clock'.
La horadel relojno puedeset cambiadacuandoel homoha sido
programadopara'DelayCook' (Cocci6ndiferido),'DelayClean'
(Limpiezadiferido)o 'Cook& Hold'(CocciOny mantenercaliente
diferido).
Para cancelar el despliegue del reloj:
Si nodeseaque elindicadorvisual muestrela horadel da:
Optimay mantengaoprimidalasteclas
'CANCEL' (Cancelar)y 'Clock' durante tres
segundos.Lahoradel dfadesaparecer4del
indicador.
Cuandose cancelael desplieguedel reloj,
oprimalatecla 'Clock' paradesplegar
brevementelahoradel dfa.
Para restaurar el despliegue del reloj:
Oprimay mantengaoprimida lasteclas 'CANCEL'y 'Clock' durante
tressegundos.Lahoradel dfareaparecer4enel indicador.
More+
3. Oprimanuevamentelatecla 'Timer' o esperecuatrosegundos.
• Losdos puntoscontin0an destellandoy comienzalacuenta
regresivadel tiempo.
• El01timominutode la cuentaregresivadeltemporizadorse
desplegar4ensegundos.
4. AI final deltiempo programatic,seescuchar4una seral sonora
larga.
Para cancelar el temporizador:
1. Optimay mantengaoprimida latecla'Timer' durantetres
segundos.
U
2. Oprimalatecla 'Timer' y coloquela horaa 0:00.
Bloqueo de los controles y de
la puerta del homo
Eltecladoy la puertadel homopuedenset bloqueadospara
seguridad,limpiezao evitarel usonoautorizado.Nofuncionar4n
cuandoest(!nbloqueados.
Siel homoest4en uso,loscontrolesni lapuertapuedenbloquearse.
La horaactual deldfa permanecer4en el indicadorcuando los
controlesest(!nbloqueados.
Para bloquear:
Optimay mantengaoprimidaslasteclas
'CANCEL'y 'Cook & Hold'durantetres
segundos.(Oprimaprimerolatecla 'CANCEL').
• 'LOCK'(Bloqueado)destellaen el indicador
visual.
Para desbloquear:
Oprimay mantengaoprimidaslasteclas'CANCEL' y 'Cook & Hold'
durantetres segundos.(Oprimaprimerola tecla'CANCEL').
• ' LOCK' desaparecedelindicadorvisual.
'Timer' (Temporizador)
Eltemporizadorpuedeset programaticde un minuto (0:01)hasta99
horasy 59 minutos(99:59).
Eltemporizadorpuedeset usadoindependientementede cualquier
otraactividaddel homo.Adem4spuedeset programaticcuandootra
funci6n del homoest(!en funcionamiento.
Eltemporizadornocontrola el homo.Solamentecontrola unaserial
sonora.
Para programar el temporizador:
1. Oprimalatecla 'Timer'. Timer
• '0:00'seiluminaen el indicadorvisual.
• Losdos puntosdestellar4n.
2. Oprimalatecla 'More+' o 'Less-' hastaque el
tiempo correcto aparezcaen elindicadorvisual.
• Losdos puntoscontin0andestellando.
Less->
C6digos de errores
'BAKE'(Horneado)o 'LOCK'puedendestellarrdpidamentepara
advertirlequehay unerror oun problema.Si'BAKE'o 'LOCK'
destellanen el indicadorvisual, optimaletecla'CANCEL'. Si'BAKE'
o 'LOCK'contin0andestellando,desconectelacorrienteel(!ctrica
haciael artefacto.Espereunospocosminutosy vuelvaa conectarla
corrienteel(!ctrica.Silas palabrasa0n contin0andestellando,
desconectela corrienteelectricahaciael artefactoy Ilamea un
t(!cnicodeservicio autorizado.
'Bake' (Horneado)
Para programar 'Bake':
1. Oprimalatecla 'Bake'.
• 'BAKE'y '000'destellar4nen elindicadorvisual.
2.
Seleccionelatemperaturadel homo.Latemperatura
del homo puedeset programadade75° a 285° C
(170° a 550° F).Oprimau oprimay mantenga
oprimidala tecla'More+' o 'Less='.
53
:'Less-
Page 55

• Cuandocualquierade estasdosteclasseoprime
porprimeravez,175°(350°)seiluminar4.
• Optimalatecla 'More+' (Mas+) paraaumentarla temperatura.
• Optimalatecla 'Less-' (Menos-) paradisminuir latemperatura.
.
Optimalatecla 'Bake' nuevamenteo esperecuatrosegundos.
• 'BAKE'dejar4de destellaryse iluminar4en elindicadorvisual.
. 38° (100°) o la temperatura actual delhornosedesplegar&
Latemperaturaseelevar4enincrementosde 5° hastaquese
alcancela temperaturaprogramada.
Espereaque el homo se precalientedurante8-15minutos.
• Cuandoel hornoIlegaa latemperaturaprogramadase
escuchar4unasepal sonoralarga.
• Paraverificarlatemperaturaprogramadaduranteel
precalentamientodel homo,oprima latecla 'Bake'.
5.
Coloqueelalimentoen el horno.
6.
Verifiqueel progresode lacocciOncuando hayatranscurridoel
tiempo minimorecomendado.ContinOela cocciOnsies
necesario.
7.
AI t_rminode lacocciOn,oprimala tecla'CANOEL'.(_¢ANIrFI_"_
8.
Retireel alimentodel horno.
2. Seleccionelatemperaturadel horno.Latemperatura
del hornopuedeser programadade 75° a 285° C
(170° a 550° F).Optima uoprimay mantenga
oprimidala tecla'More+' o 'Less='.
• Oprimalatecla 'More+' paraaumentarla Less-
temperatura. ........................................
• Optima latecla 'Less=' paradisminuir latemperatura.
3. Oprimalatecla 'Cook & Hold' nuevamente0 esperecuatro
segundos.
• 'HOLD'(Mantener)destella.
• '00:00'destellaen elindicadorvisual.
4. Programela cantidaddetiempo durantelacual usteddesea
hornearoprimiendolatecla 'More+' o 'Less=',Eltiempo de
horneadopuedeprogramarsedesde10minutos (00:10)hasta
11horas,59 minutos(11:59).
• 'BAKE'y 'HOLD'se iluminanen el indicadorvisual.
• Eltiempo dehorneadoseiluminar4en el indicadorvisual.
• Comenzar4lacuenta regresivadel tiempode horneado.
More+
Cuando haya e×pirado el tiempo de cocci6n:
• Seescuchardncuatrose_alessonoras.
• 'BAKE'se apagar&
• 'HOLD'y 'WARM'(Caliente)seiluminar4n.
• Enel indicadorse desplegar475° (170°).
Notas:
• Paracambiarla temperaturade/homo durantee/homeado,
optima latecla 'Bake', luego optimalatecla'More+' o 'Less='
hastaque Ileguea latemperaturadeseada.
• Paracambbr latemperaturade/homo durante'Preheat',
oprimadosveceslatecla 'Bake', luegooptima latecla 'More+'
o 'Less=' hastaquese desplieguelatemperaturadeseada.
• Siolvida apagarel homo,seapagar4autom4ticamentedespues
detranscurrir 12horas.Si deseadesactivarestacaracterBtica,
yea la p4gina57.
Diferencias del horneado entre su homo
antiguo y su homo nuevo
Esnormal observaralgunasdiferenciasen el tiempode horneadode
su homoantiguoy su homo nuevo.VeaAjustedela Temperaturade/
Homoen lap4gina67.
'Cook & Hold' (CocciOn y
mantener caliente)
'Cook& Hold'le permitehornearduranteunacantidad determinada
detiempo,seguidode unciclo 'KeepWarm' (Mantenercaliente)de
una hora.
Para programar 'Cook & Hold':
1. Optimalatecla 'Cook& Hold'.
• 'BAKE'y 'HOLD'destellan.
• '000'seiluminaen elindicadorvisual.
Despu_s de una hera en 'HOLD WARM' (Mantener
caliente):
• 'End'sedesplegar&
• Lahora del diavolver4adesplegarseen elindicadorvisual.
Para cancelar 'Cook & Hold' en cualquier momento:
Optima latecla'CANCEL' (Cancelar).Retireel /f ,--'_
alimentodel horno.
'Delay Cook & Hold' (Cocci6ny
mantener caliente)
Cuandousa 'Delay'(Diferido),el homocomienzaacocinar m4s
tardeen eldia.Programela cantidaddetiempo que usteddesea
diferir antesde que seenciendael homoy cuantotiempodesea
cocinarel alimento.Elhomo comienzaa calentaren la hora
seleccionaday cocinadurante eltiempo especificado.
Eltiempo diferidopuedeprogramarsede 10minutos(00:1O)hasta
11horas,59 minutos(11:59).
Cont.
54
Page 56

Para programar un ciclo de horneado diferido:
1. Oprimalatecla 'Delay' (Diferido).
• 'DELAY'destella.
• '00:00'destellaen el indicadorvisual.
2. Optimalatecla 'More+' (M_s+) 'Less='
(Menos-)paraprogramarel tiempodiferido.
Cuando'DELAY'estetodaviadestellando:
3.
Optimalatecla 'Cook & Hold (Cocci0ny
MantenerCaliente).
• '000'seiluminaen elindicadorvisual.
• 'BAKE'y 'HOLD'(Mantener)destellan.
Optima'More+' paraprogramar/atemperaturadehomeado.
• 00:00y'HOLD' destellan.
• 'BAKE'permaneceiluminado.
Optima'More+' paraprogramarel tiempode homeado.
• Enel indicadorvisualseiluminan'DELAY','BAKE',y
'HOLD'.
=Keep Warm' (Mantener caliente)
Paramantenercalientesen formaseguraalimentoscalienteso para
calentar panesy platos.
Para programar 'Keep Warm':
1. Optima latecla'Keep Warm'.
• 'WARM'(Caliente)destella.
• '000'se despliegaenel indicadorvisual.
Seleccionela temperaturade 'KeepWarm'.La
temperaturapara'Keep Warm' puedeset
programadade63°a 90°C (145°a 190° F).Optima
u optima y mantengaoprimidalatecla'More+' o Less-
'Less='.
• Cuandocualquierade estasdosteclasseoprime
pot primeravez,75° (170°)se iluminar&
• Optimala tecla'More+' paraaumentarlatemperatura.
• Optimala teela'Less=' paradisminuirla temperatura.
'WARM'y latemperaturasedesplegar_nen elindicadorcuando
el ciclo 'KeepWarm'esteactivo.
Cuando el tiempo diferido ha expirado:
• 'DELAY'seapagar&
• Sedespliegael tiempoy latemperaturade horneado.
• Sedespliega'BAKE'y 'HOLD'.
Para programar an tiempo diferido cuando ya se ha
programatic 'Cook & Hold':
1. Oprimalatecla 'Delay'.
• 'DELAY'destella.
• '00:00'sedespliegaenel indicadorvisual.
2. Optimalatecla 'More+' o'Less=' paraprogramar
eltiempo diferido.
• Despu(]sde cuatrosegundos,'DELAY' Less- :
permanecer_iluminadopara recordarlequese
ha programaticun ciclo de horneadodiferido.
Cuando ha expirado el tiempo diferido y el homo
comienza a funcionar:
= Sedesplegar_el tiempoy la temperaturade horneado.
• 'DELAY'seapagar&
• 'BAKE'y 'HOLD'permanecer_niluminados.
Para cancelar: @
Oprimala tecla 'CANCEL'.
• Todaslasfuncionesde horneadocontroladaso nopor el
temporizadorser_ncanceladas.
• La horadel diavolver_a desplegarseenel indicadorvisual.
Importante:
• No usehorneadodiferidoparalos articulosque necesitan
precalentamientodel homo,tal comopasteles,galletasy panes.
• No use horneadodiferidosi el homoyaest_caliente.
Para cancelar 'Keep Warm':
1. Oprima latecla'CANCEL'.
2. Retireel alimentodel homo.
Notas:
• Paracalidad@tima de losalimentos,losalimentoscocinados
en el homodebenset mantenidoscalientespor no m_sde 1a
2 horas.
Paraevitarque losalimentossesequen,cObraloslevemente
con papelde aluminioouna tapa.
Para calentar panecillos:
- cubralevementelospanecilloscon papelde aluminioy
col6quelosen el homo.
- optimalas teclas'Keep Warm' y 'More+' paraprogramar
75° C (175° F).
- calientedurante 12a 15minutos.
Para calentar platos:
- coloque2 pilasde cuatroplatoscarlaunaen elhomo.
- optimalas teclas'Keep Warm' y 'More+' para programar
75° C (175° F).
- calientelos platosdurantecincominutos,apagueel homo y
dejelosplatosen elhomo durante15minutosm_s.
- usesolamenteplatosresistentesalhomo,verifique conel
fabricante.
- no coloquelos platoscalientessobreunasuperficiefria
puesel cambior_pidode temperaturapuedecausarfisuras
superficialeso rotura.
55
Page 57

'Broiling' (Asar a la parrilla)
Paraun dorado6ptimo,precalienteel hornodurante2 a 3
minutosantesde colocarel alimento.
Coloqueel alimentoenel homo. Dejela puertaabierta
aproximadamente10cm (cuatropulgadas)(el primertope).
Devueltaa la came unavezaproximadamentea mitad dela
cocciOn.
7.
Cuandoel alimentoestecocinado,oprimala
tecla'CANCEL' (Cancelar).Retireel alimentoy
la asaderadel horno.
Para programar 'Broil' (Asado):
1. Optima latecla'Broil'.
• 'BROIL'destella.
• 'SEt'(Establacer)sedespliegaenel indicador.
2.
Optima latecla'More+' (M_s) ara programarasara laparrilla
'HI' (Alto)u optimala tecla'Less-' (Menos)paraprogramarasar
la parrilla 'LO'(Bajo).
• Enel indicadorvisualsedesplegar_'HI'o 'LO'.
• Selecciones'H! broil' 285°C (550° F)paraasadoa laparrilla
normal. Seleccione'LObroil' 230° C(450° F)paraasar ala
parrilla contemperatura bajaalimentosquedebenser
cocinadospor m_stiempo,tal comola camede ave.
.
Despu(!sde cuatrosegundos,el homocomenzar_afuncionar.
• 'BROIL'continuar_iluminado.
• La horadel dfavolver_a desplegarseen el
indicadorvisual.
Notas:
• Paramejoresresultadoscuandoasea la parrilla,useuna
asaderadisefiadaparaasara laparrilla.
• 'HI'se usapara lamayorfadelos asadosa la parrilla. Use'LO
broil' cuandoasea la parrillaalimentosque necesitancocciOn
prolongada. Latemperaturainferiorpermiteque el alimento
secocinehastaquedarbien asadosin dorarsedemasiado.
• Paracambiarla temperaturade/homo durantelaasara la
parrilla,oprima latecla 'Broil', luegooptima latecla 'More+' o
'Less-' paracambiarelajustede asadoentre 'LO'y 'HI'.
• Lostiempos deasadoa laparrilla puedenserm_slargos
cuandose seleccionalatemperaturam_sbajadeasar ala
parrilla.
• La mayorfadesalimentosdebeserdado vueltacuandoest_a
mitad deltiempo deasar.
Tabla de asar a la parrilla
Precalienteel hornodurante2-3 minutos.
Came de res
Biftec,2,5cm (1")
Hamburguesas,1,9cm(3/4") de grosor
Came decerdo
Tocino
JamOn,precocido,rebanadade
1,3cm (1/2")
Chuletas,2,5cm(1")
Came deave Pechugasde Polio,conhueso 30-
Mariscos
Filetesdepescado
Tajadasde pescado,
2,5cm (1")de grosor
Colasde langosta,85-115g
(3-4 onzas)cada una
Paraun exteriorm_sdoradoy m_sasadoy un interiora mediococer,puedeser necesariodisminuireltiempo de cocciOnenel primerladoy
acercarm_sla came alafuente de calor.
Importante: Estatabla essolo unagufa. Lostiempos puedenvariar coneltipo de alimentoquese est_cocinando.
56
506
5
5
5
5
5
4
5
5
5
A medioasar
Bienasado
Bienasado
Bienasado
Tibio
Bienasado
Bienasado
Hojaldrado
Hojaldrado
Biencocidas
15 - 20 minutos
18 - 2/4minutos
13 - 18 minutos
6 - 10 minutos
8 - 12 minutos
22 - 26 minutos
/45minutos ('Lo Broil')
8- 12 minutos
10 - 15 minutos
7- 10 minutos
Page 58

Cierre automfitico/
Mode sabfitico
Elhorno seapagar4autom4ticamentedesp@sde 12horassi usted
Iodeja accidentalmenteencendido. EstacaracterBticadeseguridad
puedeserdesactivada.
Para cancelar el cierre aurora;trice de 12 betas y
dejar que el homo funcione continuamente durante
72 horas:
1.
Programeelhomopara hornear(verp4ginas53-54).
2.
Oprimay mantengaoprimida latecla'Clock'
(Reloj)durantecinco segundos.
• 'SAb'sedesplegar4y destellar4durantecincosegundos.
• 'SAb'sedesplegar4continuamentehastaque sedesactiveo
hastaquetranscurrael Ifmitede 72betas.
• 'BAKE'(Horneado)tambi@ se desplegar4si se est4usando
un ciclo de homeadocuandoel homoest4en ModeSab4tico.
• La funcidn 'BAKE' es/a Onicaque se puede ufilizar
con et mode sabbtico. Las dembs funciones (temporizador,
mantener caliente, autolimpieza, etc.) se bloquearbn durante el
mode sabbtico.
Para cancelar 'Bake' cuando el mode sab;itice
estfi active:
Optima'CANCEL'(Cancelar).
• 'BAKE'seapagar4en el indicadorvisual.
• Noseoir4 ningunas@alsonora.
Para cancelar el mode sab_tico:
CANCEL
Ustedpuedeajustarlatemperaturadel homo,si consideraquesu
homo no est4horneandoo dorandoen formacorrecta. Paradecidir
cuantodebe cambiarlatemperatura,programelatemperaturadel
homo a 15° C(25°F) m4salta o m4sbajaque latemperatura
indicadaen sus recetas,luegohomee. Losresultadosdela
"prueba"puedendarleuna ideade cuantoajustar latemperatura.
Ajuste de la temperatura del homo:
1. Optimalatecla 'Bake' (Hornear).
2. Programe280° (550°) oprimiendola tecla
'More+' (M4s).
.
Optimay mantengaoprimidala tecla'Bake'
durantevariessegundoso hastaque0° aparezcaen elindicador
visual.
Si latemperaturadelhorno haside previamenteajustada,el
cambioaparecer4enel indicadorvisual. Perejemplo,si la
temperaturadel homofue reducidaen 8°C (15° F)el indicador
mostrard'- 8°,('-15°').
4.
Oprimalatecla 'More+' o 'Less-' (Menos)paraajustarla
temperatura.
Cadavezque seoprimeuna tecla,latemperaturacambiaen3° C
(5° F). Latemperaturadel homo puedeseraumentadao
disminuidaen 3° a20° C(5° a 35° F).
5.
Lahera deldfa reaparecer4autom4ticamenteen elindicador
visual.
Nonecesitareajustarla temperaturadel homosi hayunafallao
interrupci0nde energfael@trica. Lastemperaturasde asara la
parrillay lirnpiezanopuedenser ajustadas.
1. Optimalatecla 'Clock' durantecincosegundos.
Desp@sde72 horas,el modesab4ticoterminar&
• 'SAb'destellar4durante5 segundos.
• La heradel dfareaparecer4en el indicadorvisual.
Ajuste de la temperatura
del homo
La exactitudde lastemperaturasdel hornoescuidadosamente
probadaen laf4brica. Esnormalnotaralgunadiferenciaentre la
temperaturade horneado,entreun hornonuevoy un homoantiguo.
Conel correrdeltiempo,latemperaturadel horno puedecambiar.
Notas,
• Elmodesab4ticopuedeser activadoencualquier memento,
est(!o no el hornoencendido.
• Elmodesab4ticonose puedeactivarsilasteclas est4n
bloqueadasocuandola puertaest4 bloqueada.
• Si el homoest4 horneandocuandoel modesab4ticoes
programado,'BAKE'se apagar4cuandosecanceleel
horneado.No seemitir4ns@alessonoras.
• Si se deseala luzdel homoduranteel modesab4tico,(!sta
debeserencendidaantesde quecomienceel modesab4tico.
• Cuandocomienzael modesab4tico,no seemitir4 las@al
sonorade precalentamiento.
Cambio de la temperatura
de °F/°C
1. Elajustedef4brica dela medidadetemperaturaes Fahrenheit.
2. Paracambiarel ajuste,oprimay mantengaoprirnidaslasteclas
'CANCEL' (Cancelar)y'Bake' al mismotiempodurantetres
segundos.
3. Escuchar4unas@al sonoray elajusteactual (°Fo °C)se
desplegar4en la pantalla.(Sino serealizaning@ cambio,la
estufaregresar4al ajusteactualdesp@s de30 segundos).
4. Paracambiarel ajuste,optimala tecla'More+' o 'Less-'.
Oprfmalanuevamentepara regresaral ajusteanterior.Espere
cincosegundosyel ajusteseguardar4.
Lamayo@ delasadvertenciasy mensajesytodas lass@ales
sonorasest4ndesactivadascuandoel modesab4ticoest4active.
Elciclo deautolimpiezay bloqueoautom4ticode la puertano
funcionar4duranteel modesab4tico.
• Si oprime latecla 'CANCEL' secancelar4un ciclo 'Bake',sin
embargoel control permanecer4en modesab4tico.
• Si falla lacorrienteel@trica,cuandovuelva laenergiael homose
activar4en modesab4ticocon72 horasrestantesy ning@ ciclo
active.
57
Page 59

Encendido sin piloto
Suestufaest_equipadacon unsistemade encendidosin piloto.
Conestetipo de encendido,elgasse apagaautomdticamentey el
homono operar#duranteuna interrupci6nde la corriente
el#ctrica.
Un f6sforo encendido no encender_ el quemadordel homo.
No se debeintentar encender el homodurante ann
interrupci6nde la corriente el6ctrica.
Respiradero del homo
Cuandoel homoest_en uso,el _reacercadel respiraderopuede
calentarseIosuficiente comoparacausarquemaduras.Nunca
bloqueela aberturadel respiradero.
El respiradero del homose encuentra debajo delrespaldo
protectorde su estufa.
RESP, RADERO
cercade laabertura
del respiraderopues
el calorque sale
puededeformaro
No coloquepl_sticos
derretirel pl_stico.
La luz delhomose enciendeautom_ticamentesiempre
'Oven Light' (Luz del homo)
que se abrelapuerta delhomo. Cuandosecierra la
puerta,optima elinterruptorde laluzdel homo para
encendero apagarla luzdel homo. Oven
Light
Panel inferior del homo
Protejael panelinferiordel homocontraderrames,especialmente
azucaradosoacidicos,puespuedendescolorarla porcelana
esmaltada.Useel utensiliodetama_o correctoa fin de evitar
derrames.No coloque utensiliosni papelde aluminio
directamente en la parte inferiordel homo.
Parrillas del homo
Para reinstalar la parrilla:
1. Coloquela parrillaen lossoportesde laparrilla enel homo.
2. Inclinelevementehaciaarribael extremodelantero;deslicela
parrillahaciaatr_shastaquepasesobre lostopesde enganche.
3. Bajeelfrente dela parrillay deslfcelahaciaadentrodel homo.
No cubra ann parrilla completa con papel de aluminio ni
coloque papel de aluminio en el panel inferiordel homo. Se
afectar_n los resultadosdel horneadoy se puededa_ar el
panel inferiordel homo.
Posiciones de la parrilla
PARRILLA7 (posici0nm_s
alta): Parahornearconuna
solaparrillaen bandejasde
horneargalletasy paraasara
la parrilla.
PARRILLA6: Seusapara
hornearcon unasola parrilla
en bandejasde hornear
galletas,paraasara la parrilla
y parahorneadoconvariasparrillas.
PARRILLA5: Parahornearcon unasolaparrilla enbandejasde
horneargalletasy paraasara la parrilla.
PARRILLA4: Seusaparahornearcon unasolaparrillaen bandejas
de horneargalletas,pastelesde unacap&cacerolas,asara la
parrillay parahomeadoconvariasparrillas.
PARRILLA3: Parahomearcon unasola parrillaen bandejasde
horneargalletas,cacerolas,pastelesdevariascapas,barrasde pan,
pastelesdeuna capay para homeadoconvariasparrillas.
PARRELA2: Seusa parahornearcon unasolaparrillaen bandejas
de horneargalletas,paraasarcortesde camepeque_osy para
horneadoconvariasparrillas.
PARRILLA1: Seusaparaasarcortesde camegrandesy camede
ave.
Panel inferiordel homo:Coloquela
parrilladel homoen lossoportesen
relievedel panelinferiordel homo.Use
paradisponerdeespacioadicional
cuandococinecomidasgrandesen el
homo.
HORNEADOCONPARRILLASMULTIPLES:
Dos parrillas:Usela posici0n3 y 6o 2y/4.
L[ L
Horneado pot Dos del
Parrillas Homo
_:_/ ...............i -_LII
_ / _%11
_(} 7
inferior
_Jj
El homotiene dos parrillas. TodasInsparrillastienen unbordecon
topede enganche.
Para retirar la parrilla:
1. Tire dela parrilladerechohacia
afuerahastaquese detenga enla
posici0ndeltope deenganche.
2. Levanteelfrente de laparrillay tire
de la parrillahacia afuera.
Horneado de pasteles de capas en
dos parrillas
Paraobtenermejoresresultadoscuandohorneapastelesendos
parrillas,usela posici0n
2y4.
Coloquelos pasteles
en Insparrillascomo
semuestra.
58
Page 60

p p
GARANTIA DE LOS ELECTRODOMESTICOS PRINCIPALES
DE MAYTAG CORPORATION
GARANTJA LIMITADA
Durante un afio a partir de la fecha de compra, siempre y cuando se de a este electrodomestico principal un uso y mantenimiento de
conformidad con las instrucciones adjuntas o provistas con el producto, la marca Maytag de Whirlpool Corporation o Whirlpool
Canada LP (en Io sucesivo denominado "Maytag") se hara cargo del costo de las piezas especificadas de fabrica y del trabajo de
reparaci6n para corregir defectos en los materiales o en la mano de obra. El servicio deberA ser suministrado por una compafiia de
servicio designada por Maytag. Esta garantia limitada es valida solamente en Estados Unidos o en CanadA, y se aplica solamente
cuando el electrodomestico principal se use en el pais en el que se ha comprado. Esta garantia limitada no tiene vigor fuera de los
cincuenta Estados Unidos y CanadA. Se requiere una prueba de la fecha de compra original para obtener servicio bajo esta garantia
limitada.
EXCLUSIONES DE LA GARANTJA
Esta garantia limitada no cubre:
1. Visitas de servicio tecnico para corregir la instalaci6n de su electrodomestico principal, para ensefiarle a usar su electrodomestico
principal, para cambiar o reparar fusibles domesticos o para corregir la instalaci6n electrica o de la tuberia de la casa.
2. Visitas de servicio tecnico para reparar o reemplazar focos para electrodomesticos, filtros de aire o filtros de agua. Estas piezas de
consumo estan excluidas de la cobertura de la garantia.
3. Reparaciones cuando su electrodomestico principal se use de un modo diferente al domestico normal de una familia, o cuando se
use de un modo contrario alas instrucciones publicadas para el usuario u operador y/o las instrucciones de instalaci6n.
4. Dafios causados por accidente, alteraci6n, uso indebido, abuso, incendio, inundaci6n, actos fortuitos, instalaci6n incorrecta,
instalaci6n que no este de acuerdo con los c6digos electricos o de plomeria, o el empleo de articulos de consumo o productos de
limpieza no aprobados por Maytag.
5. Dafios esteticos, incluyendo rayaduras, abolladuras, desportilladuras u otro dafio al acabado de su electrodomestico principal, a
menos que el mismo sea debido a defectos en los materiales o la mano de obra y se le informe a Maytag en un lapso de 30 dias a
partir de la fecha de compra.
6. Cualquier perdida de comida debido a fallas del refrigerador o del congelador.
7. Costos relativos a la remoci6n de su electrodomestico principal desde su hogar para obtener reparaciones. Este electrodomestico
principal esta disefiado para ser reparado en el hogar y Qnicamente el servicio de reparaci6n en el hogar esta cubierto bajo esta
garantia.
8. Reparaciones de piezas o sistemas como resultado de modificaciones no autorizadas que se hayan efectuado en el
electrodomestico.
9. Gastos de viaje y transporte para obtener servicio para el producto, si su electrodomestico principal esta ubicado en un lugar
remoto en el cual no haya disponible un tecnico de servicio autorizado por Maytag.
10. La remoci6n y reinstalaci6n de su electrodomestico principal, si estuviera instalado en un lugar inaccesible o si no estuviera
instalado de conformidad con las instrucciones de instalaci6n publicadas.
11. Electrodomesticos principales con nQmeros de modelo/serie que se hayan removido, alterado o que no puedan ser identificados
con facilidad. Esta garantia se anularA si el nQmero de serie aplicado en la fabrica ha sido alterado o removido de su
electrodomestico principal.
El costo de la reparaci6n o el reemplazo bajo estas circunstancias excluidas, correrA por cuenta del cliente.
EL UNICO Y EXCLUSIVO RECURSO DEL CLIENTE SEGUN LOS TERMINOS DE ESTA GARANT[A LIMITADA SERA EL DE REPARAR
EL PRODUCTO SEGON SE ESTIPULA EN LA PRESENTE. LAS GARANT[AS IMPL[C,ITAS, INCLUYENDO LAS GARANT[AS DE
COMERCIABILIDAD O DE CAPACIDAD PARA UN PROPOSITO PARTICULAR, SERAN LIMITADAS A UN ANO O AL PER[ODO MAS
CORTO PERMITIDO POR LEY. MAYTAG NO SE RESPONSABILIZARA POR DANOS INCIDENTALES O CONSECUENTES. ALGUNOS
ESTADOS Y PROVINCIAS NO PERMITEN LAS EXCLUSIONES O LIMITACIONES POR DANOS INCIDENTALES O CONSECUENTES, O
LIMITACIONES ACERCA DE CUANTO DEBE DURAR UNA GARANT[A IMPL[CITA DE COMERCIABILIDAD O CAPACIDAD, DE MODO
QUE LAS LIMITACIONES O EXCLUSIONES ARRIBA MENCIONADAS PUEDEN NO APLICARSE EN SU CASO. ESTA GARANT[A LE
OTORGA DERECHOS LEGALES ESPEC[FICOS Y ES POSIBLE QUE USTED TENGA TAMBIC:N OTROS DERECHOS QUE PUEDEN
VARIAR DE UN ESTADO A OTRO O DE UNA PROVINCIA A OTRA.
Si usted se encuentra fuera de los cincuenta Estados Unidos y CanadA, p6ngase en contacto con su distribuidor autorizado de Maytag
para determinar si corresponde otra garantia.
Si necesita servicio, consulte primero la secci6n "Soluci6n de problemas" del Manual de uso y cuidado. Despu6s de consultar la
secci6n "Soluci6n de problemas", puede encontrar ayuda adicional en la secci6n "Ayuda o servicio tecnico," o Ilamando a Maytag. En
EE.UU., Ilame al 1-800-688-9900. En CanadA, Ilame al 1-800-807-6777.
Form No. A/01/08 Part No. 8113P734-60 Rev. 1 ¢c)2006 Maytag Appliances Sales Co. All rights reserved. Lithe U.S.A.
EXCLUSION DE GARANTJAS IMPLJ.CITAS; LIMITACION DE RECURSOS
9/07
 Loading...