

Maytag MER8800FZ Control Guide
Freestanding Electric Range Control Guide
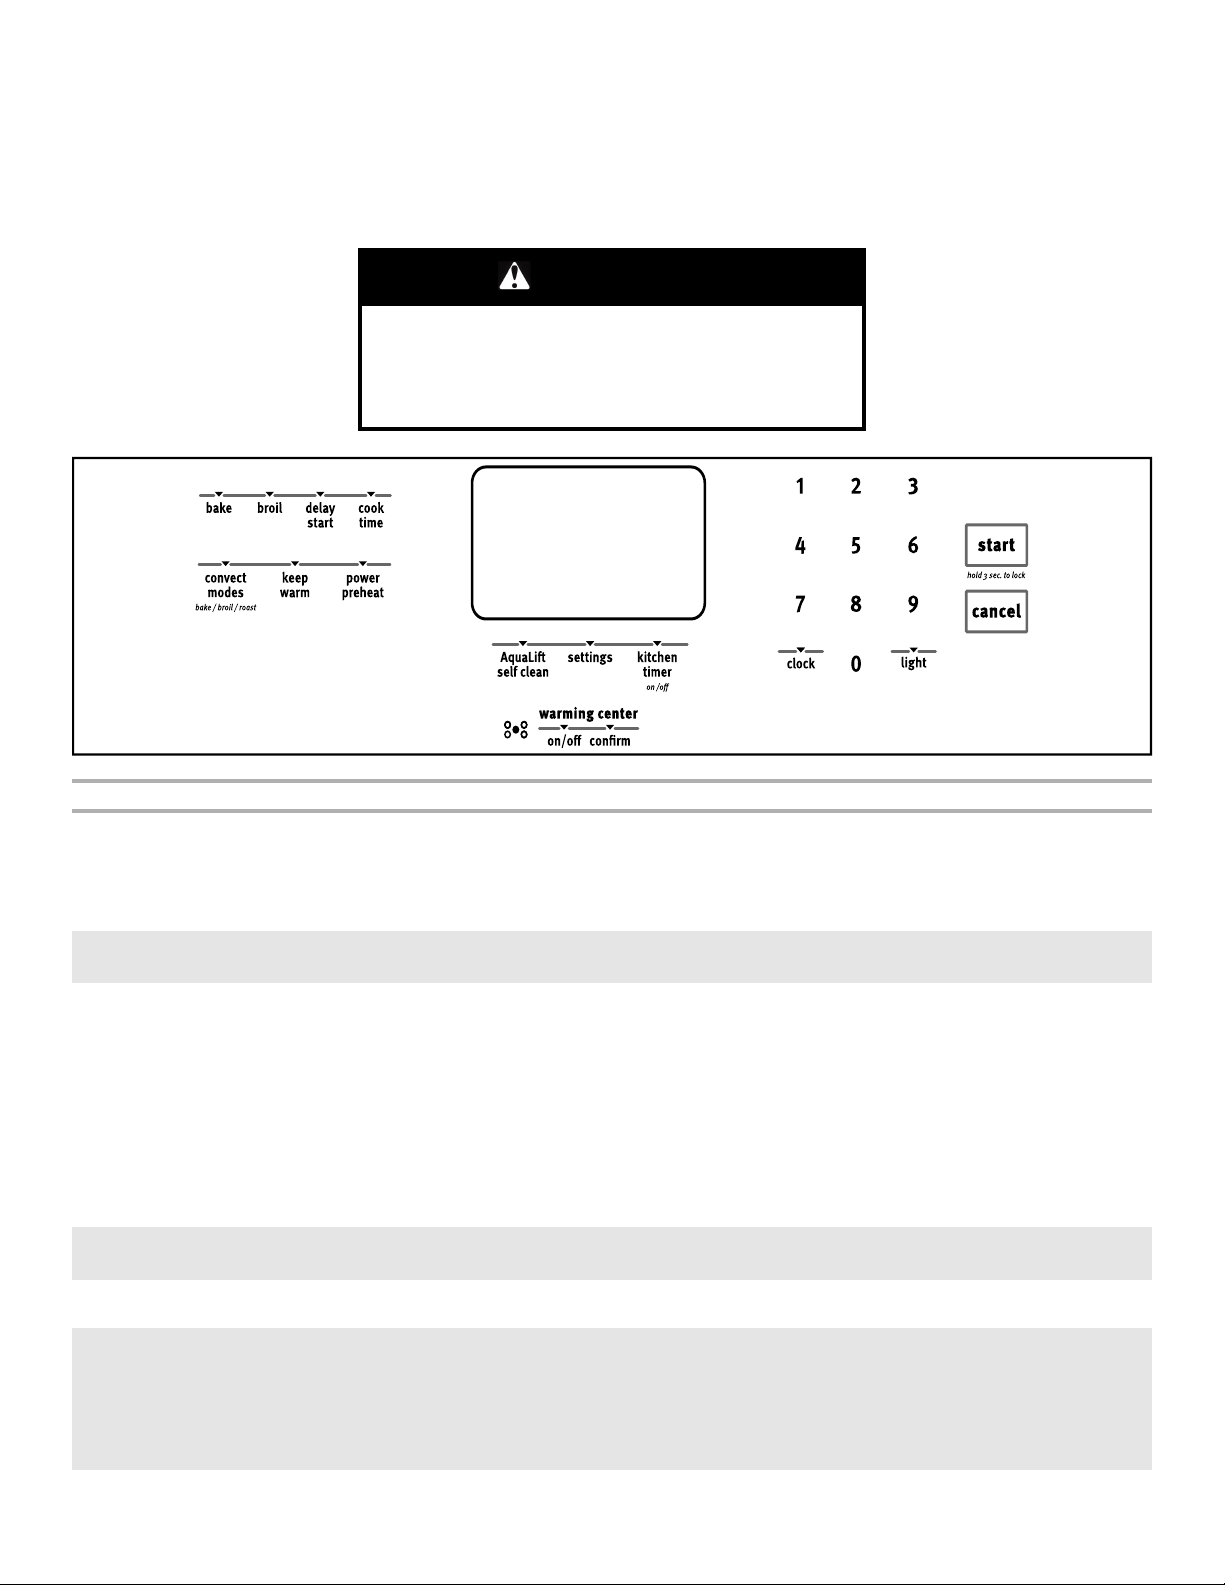
FEATURE GUIDE
WARNING: To reduce the risk of fire, electric shock, or injury to persons, read the IMPORTANT SAFETY INSTRUCTIONS, located in
your appliance's Owner's Manual, before operating this appliance.
This manual covers several models. Your model may have some or all of the items listed. Refer to this manual or Frequently Asked
Questions (FAQs) section of our website at www.maytag.com for more detailed instructions. In Canada, reference the Customer Service
section at www.maytag.ca.
WARNING
Food Poisoning Hazard
Do not let food sit for more than one hour before or
after cooking.
Doing so can result in food poisoning or sickness.
KEYPAD FEATURE INSTRUCTIONS
CLOCK Clock This clock can use a 12 or 24 hour cycle. See “Oven Use” section.
1. Press CLOCK once.
2. Press “3” for AM or “6” for PM.
3. Press the number keypads to set the time of day.
4. Press START.
LIGHT Oven cavity
KITCHEN TIMER
ON/OFF
START Cooking start The Start pad begins any oven function. If Start is not pressed within 2 minutes after
CANCEL Range
BAKE Baking and
light
Oven timer The Timer can be set in hours or minutes up to 9 hours and 59 minutes.
function
roasting
While the oven door is closed, press the OVEN LIGHT keypad to turn the light on and off.
The oven light will come on when the oven door is opened.
1. Press KITCHEN TIMER.
2. Press the number keypads to set the desired temperature. If the temperature entered
is not in the range of the temperatures allowed, the minimum or maximum allowed
temperature will be displayed. (between 170°F and 500°F (75°C and 260°C).)
3. Press KITCHEN TIMER to begin the countdown. If enabled, end-of-cycle tones will
sound at end of countdown.
4. Press KITCHEN TIMER again to cancel the Kitchen Timer and return to the time of
day. Do not press the Cancel keypad because the oven will turn off.
5. If the Kitchen Timer is running, but not in the display, press KITCHEN TIMER to
display the countdown for 5 seconds.
pressing a keypad, the function is canceled and the time of day is displayed.
The Cancel keypad stops any oven function except the Clock, Kitchen Timer, and Control
Lock.
1. Press BAKE.
2. Press the number keypads to set a temperature other than 350°F (175°C) in
5° increments between 170°F and 500°F (75°C and 260°C).
3. Press START.
4. To change the temperature, repeat step 2. Press START for the change to take effect.
5. Press CANCEL when finished.
1

KEYPAD FEATURE INSTRUCTIONS
BROIL Broiling
1. Press BROIL.
2. Select the broiling temperature by pressing 1-high, 2-medium, or 3-low.
3. Press START.
4. Position the cookware in the oven, and then close the door.
5. Press CANCEL when finished.
CONVECT Convecting
cooking
1. Press CONVECT once to select convection baking. Press twice for convection
broiling, or 3 times for convection roasting.
2. Press the number keypads to set a temperature other than 350°F (177°C) in
5° increments between 170°F and 500°F (77°C and 260°C).
3. Press START.
4. To change the temperature, repeat step 2. Press START for the change to take effect.
5. Press CANCEL when finished.
KEEP WARM Hold warm Food must be at serving temperature before placing it in the warmed oven.
1. Press KEEP WARM.
2. Set temperature between 145°F (63°C) and 190°F (88°C) using the number keypads.
The default temperature is 170°F (75°C).
3. Press START.
4. Press CANCEL when finished.
DELAY START Delayed start The DELAY START keypad is used to enter the starting time for an oven function with a
delayed start.
COOK TIME Timed coking Timed Cooking allows the oven to be set to turn on at a certain time of day, cook for a set
length of time, and/or shut off automatically. Delay start should not be used for foods such
as breads and cakes because they may not bake properly.
To set a Timed Cook or a Delayed Timed Cook, see “Cook Time” section.
POWER PREHEAT Rapid oven
preheating
Provides the fastest preheat time for the BAKE function.
1. Press POWER PREHEAT.
2. Press the number keypads in response to the scrolling text “Default is OFF for Bake;
Press 1 to turn ON”.
3. Press START.
4. A reminder tone will sound when the preheat temperature is reached. Place food
inside the oven.
NOTE: This feature should be used only for one-rack baking. Unused racks should be
removed prior to Power Preheat. A standard flat rack should be used for Power Preheat. If
preheating for the Bake cycle has already started, Power Preheat may be started directly
by pressing Power Preheat.
WARMING CENTER
Warming zone
ON/OFF
AQUALIFT SELF-
Clean cycle See the “Aqualift Clean Cycle” section in the Owner's Manual.
CLEAN
START/CONTROL
LOCK
Oven control
lockout
hold 3 sec.
SETTINGS Oven use
functions
1. Press COOKTOP WARMING CENTER ON/OFF to select the warming element on the
cooktop, and then press COOKTOP WARMING CENTER CONFIRM.
2. Press COOKTOP WARMING CENTER ON/OFF again to turn off the warming
element.
No keypads will function with the controls locked.
1. Check that the oven and the Kitchen Timer are off.
2. Press and hold START keypad for 3 seconds.
3. If enabled, a tone will sound, and “CONTROL LOCKED” will be displayed.
4. Repeat to unlock.
Enables you to personalize the audible tones and oven operation to suit your needs. See
the “Oven Use” section.
2

AquaLift®®Self-Cleaning Technology
AquaLift®Self-Cleaning Technology is a first-of-its-kind cleaning
solution designed to minimize the time, temperature and odors
that ordinarily come with traditional self-cleaning methods. With
AquaLift
interior of the oven is activated with heat and water to release
baked-on soil. To use AquaLift
wipe out loose debris, pour water into the oven bottom and run the
AquaLift
1 hour at a lower temperature than traditional self-cleaning
methods, just wipe out the remaining water and loose debris. See
the “Clean Cycle” section in the Owner’s Manual for more detailed
instructions. For additional information, frequently asked
questions and videos on using AquaLift
Technology, visit our website at
http://whirlpoolcorp.com/aqualift.
®
Self-Cleaning Technology, an exclusive coating on the
®
Self-Cleaning Technology, simply
®
Self-Cleaning cycle. When the cycle finishes in under
®
Self-Cleaning
Surface Temperature
When the range is in use, all range surfaces may become hot,
such as the knobs and oven door.
Storage Drawer, or Baking Drawer (On Some Models)
When the oven is in use, the drawer may become hot. Do not
store plastics, cloth, or other items that could melt or burn in the
drawer.
Oven Vent
The oven vent releases hot air and moisture from the oven, and
should not be blocked or covered. Do not set plastics, paper or
other items that could melt or burn near the oven vent.
Cooktop Use
Clean the cooktop after each use to help avoid scratches, pitting,
abrasions and to condition the glass surface. Ceramic glass
cooktop cleaner and a cooktop scraper are also recommended for
stubborn soils. Do not use abrasive cleaners, cleaning pads or
harsh chemicals for cleaning. The Cooktop Care Kit Part Number
31605 contains all of the items needed to clean and condition your
ceramic glass cooktop. Refer to the “Range Maintenance and
Care” section in the Owner’s Manual for additional information.
IMPORTANT: To avoid permanent damage to the cooktop surface
and to make soils easier to remove, clean the cooktop after each
use to remove all soils.
■ Avoid storing jars or cans above the cooktop. Dropping a
heavy or hard object onto the cooktop could crack the cooktop.
■ To avoid damage to the cooktop, do not leave a hot lid on the
cooktop. As the cooktop cools, air can become trapped
between the lid and the cooktop, and the ceramic glass could
break when the lid is removed.
■ For foods containing sugar in any form, clean up all spills and
soils as soon as possible. Allow the cooktop to cool down
slightly. Then, while wearing oven mitts, remove the spills
using a scraper while the surface is still warm. If sugary spills
are allowed to cool down, they can adhere to the cooktop and
can cause pitting and permanent marks.
■ To avoid scratches, do not slide cookware or bakeware across
the cooktop. Aluminum or copper bottoms and rough finishes
on cookware or bakeware could leave scratches or marks on
the cooktop.
■ Do not cook popcorn in prepackaged aluminum containers on
the cooktop. They could leave aluminum marks that cannot be
completely removed.
■ To avoid damage to the cooktop, do not allow objects that
could melt, such as plastic or aluminum foil, to touch any part
of the entire cooktop.
■ To avoid damage to the cooktop, do not use the cooktop as a
cutting board.
■ Use cookware about the same size as the surface cooking
area. Cookware should not extend more than 1/2" (1.3 cm)
outside the area.
WARNING
Fire Hazard
Turn off all controls when done cooking.
Failure to do so could result in death or fire.
Ceramic Glass
The surface cooking area will glow red when an element is on.
Some parts of the surface cooking area may not glow red when an
element is on. This is normal operation. It may cycle on and off to
maintain the selected heat level.
It is normal for the surface of light colored ceramic glass to appear
to change color when surface cooking areas are hot. As the glass
cools, it will return to its original color.
A. Surface cooking area
B. Cookware/canner
C. 1/2" (1.3 cm) maximum overhang
■ Use flat-bottomed cookware for best heat conduction and
energy efficiency. Cookware with rounded, warped, ribbed or
dented bottoms could cause uneven heating and poor cooking
results.
■ Determine flatness by placing the straight edge of a ruler
across the bottom of the cookware. While you rotate the ruler,
no space or light should be visible between it and the
cookware.
■ Cookware designed with slightly indented bottoms or small
expansion channels can be used.
■ Make sure the bottoms of pots and pans are clean and dry
before using them. Residue and water can leave deposits
when heated.
■ To avoid damage to the cooktop, do not cook foods directly on
the cooktop.
3
 Loading...