

Maytag MER6872BAW, MER6872BAS, MER6872BAQ, MER6872BAB Owner’s Manual

MAYTAG GEMINI TMELECTRIC RANGE
_y ............... Pages 1-2
Installer:Pleaseleavethis manualwith
this appliance.
Consumer:Please readand keep this
manualforfuturereference.Keepsales
receiptand/orcancelledcheckasproofof
purchase.
ModelNumber
SerialNumber
Dateof Purchase
ECOOKING....... Pages 3-5
COOKING........ Pages 6-11
_& CLEANING..... Pages 12-15
_ORE YOUCALL........ Page 16
............ Page 17
DEL'UTILISATEUfl. Page 18
Ifyouhavequestions,call:
1-888-4MAYTAG(1-888-462-9824)
1-800-688-2080( U.S.TTYfor
hearingor speechimpaired)
(Mon.-Fri.,8am-8 pm EasternTime)
Internet: http://www,maytag.com
Forserviceinformation, seepage17
Form No. A/05/01 Part No. 8113P293-60 h t t p :/ / w w w m a y t a g. c o m 74005918 Litho USA.
DELUSUARIO....... Page 38

Readandfollow all instructionsbeforeus-
ingthis appliancetopreventthepotentialrisk
of fire, electric shock, personalinjuryor dam-
ageto theapplianceasaresultof improperus-
ageoftheappliance.Useapplianceonlyforits
intendedpurposeasdescribedinthisguide.
To ensureproperand safe operation:Appli-
ancemustbe properlyinstalledand grounded
bya qualifiedtechnician.
To check if device is properly installed, look
underneathrangewithaflashlightto makesure
oneoftherearlevelinglegsis properlyengaged
in the bracketslot.The anti-tipdevicesecures
the rearlevelinglegto the floor when properly
engaged.You should checkthis anytimethe
rangehasbeenmoved.
Ot:
Turnoffapplianceandventilatinghoodtoavoid
spreadingtheflame.Extinguishflamethenturn
on hoodto removesmokeandodor.
Cooktop:Smotherfire orflameina panwith
a lidor cookiesheet.
NEVERpick upor movea flamingpan.
Oven: Smotherfire or flame by closingthe
ovendoor.
Do not usewater on greasefires. Use baking
soda,adrychemicalorfoam-typeextinguisher
tosmotherfire orflame.
WARNING:NEVERuseappliancedoor(s),or
drawer,ifequipped,asastepstoolorseatas
thismayresultin possibletippingof the appli-
ance,damageto the appliance,and serious
injuries.
If applianceis installednear a window,pre-
cautionsshouldbe takento preventcurtains
from blowingoversurfaceelements.
NEVERuse applianceto warm or heat the
room.Failuretofollowthis instructioncanlead
topossibleburns,injury,fire,ordamagetothe
appliance.
NEVERwearloose-fittingorhanginggarments
whileusingtheappliance.Clothingcouldcatch
utensilhandlesor igniteand cause burns if
garmentcomesincontactwithhotheatingel-
ements.
Toensureproperoperationandto avoiddam-
agetotheapplianceorpossibleinjury,do not
adjust,service, repairor replaceany partof
the appliance unless specifically recom-
mendedinthisguide.Referallotherservicing
to a qualifiedtechnician.
NEVERstoreor use gasolineor other com-
bustibleor flammable materialsin the oven,
near surface units or in the vicinity of this
applianceasfumescouldcreateafire hazard
or an explosion.
To prevent grease fires, do not let cooking
greaseorotherflammablematerialsaccumu-
lateinor neartheappliance.
Use only dry potholders. Moist or damp
potholderson hot surfaces may result in a
steamburn. Donot let potholderstouch hot
heatingelements.Donotuseatowelor other
bulkyclothwhichcouldeasilytouchhotheat-
ingelementsandignite.
Always turn off all controlswhen cookingis
completed.
NEVERheatunopenedcontainersonthe sur-
face unit or in theoven. Pressurebuild-upin
thecontainermaycausecontainerto burstre-
suitingin burns,injuryordamagetotheappli-
ance.
NEVERusealuminumfoilto linedripbowlsor
coverovenracksor oven bottom.This could
resultinriskof electricshock,fire,or damage
to the appliance.Usefoil only as directedin
thisguide.
Aerosol-typecans are EXPLOSIVEwhen
exposedtoheatandmaybehighlyflammable.
Donotuseor storenearappliance.
Thisappliancehasbeentestedforsafeper-
formanceusingconventionalcookware.Do
notuseany devicesor accessoriesthat are
notspecificallyrecommendedinthismanual.
Donotuse eyelid covers,stove top grillsor
add-onoven convectionsystems.The use
of devicesor accessoriesthat are not ex-
presslyrecommendedinthismanualcancre-
ateserioussafety hazards,resultin perfor-
manceproblems,andreducethe life of the
componentsofthis appliance.
NEVERleavesurfaceunits unattendedes-
peciallywhenusinghighheat.An unattended
boilovercouldcausesmokinganda greasy
spillovercancauseafire.
Thisapplianceisequippedwithdifferentsize
surfaceelements.Selectpans withflat bot-
tomslargeenoughtocoverelement.Fitting
pansizetoelementwill improvecookingef-
ficiency.
If pan is smallerthan element,a portion of
theelementwill beexposedtodirectcontact
andcouldigniteclothingor potholder.
Onlycertain types of glass, glass-ceramic,
ceramic,earthenware,or otherglazeduten-
sils aresuitablefor cooktoporoven service
withoutbreakingdueto thesuddenchange
intemperature.Followutensilmanufacturer's
instructionswhenusingglass.
Turnpan handletowardcenter of cooktop,
notout intotheroomoroveranothersurface
element.Thisreducestheriskofburns,igni-
tionofflammablematerials,or spillageifpan
is accidently bumpedor reachedby small
children.
iTS MODE[t}
Topreventdamagetoremovableheatingel-
ements,do not immerse,soakor cleanin a
dishwasheror self-cleanoven.A damaged
elementcouldshortresultinginafireorshock
hazard.
Makesuredripbowlsareinplaceasabsence
ofthesebowlsduringcookingcoulddamage
wiring.
]

ProtectiveLiners:Donotusealuminumfoilto
linesurfaceunitdripbowlsorovenbottoms,
exceptassuggestedinthemanual,Improper
installationoftheselinersmayresultinariskof
electricshockorfire,
I ELE(TMODELS}
NEVERcook on broken cooktop. If cooktop
shouldbreak,cleaningsolutionsandspillovers
maypenetratethebrokencooktopandcreate
ariskofelectricshock.Contactaqualifiedtech-
nicianimmediately.
Cleancooktopwithcaution.Somecleanerscan
producenoxiousfumesif appliedtoa hot sur-
face. If awet sponge,cloth, or papertowelis
usedona hotcookingarea,becarefultoavoid
steamburn.
Useextremecautionwhenmovingthegrease
panor disposingof hotgrease.Allowgrease
to coolbeforeattemptingto movepan.
Usecarewhenopeningdoor(s).Let hot air or
steamescape before removingor replacing
food.
Forproperoven operationandperformance,
donotblockor obstructovenventduct.When
ovenis in use,theventand surroundingarea
neartheventmaybecomehotenoughtocause
burns.
Alwaysplaceoven racks in desiredlocations
whileoveniscool.Ifrackmustbemovedwhile
oven is hot, do not let potholdercontact hot
elementin oven.
Cleanonlypartslistedinthisguide.Donotclean
doorgasket.Thegasketisessentialfora good
seal.Donotrub,damage,or movethegasket.
Donotuseovencleaners.Nocommercialoven
cleanerorovenlinerprotectivecoatingof any
kindshouldbe usedin or aroundanypartof
theoven.
Beforeself-cleaningtheoven, removebroiler
pan,oven racks andother utensilsto prevent
excessivesmoking,discolorationof the oven
racksorpossibledamageto utensils.
Wipeupexcessivespillovers,especiallygreasy
spills,beforethecleancycleto preventsmok-
ing,flare-upsorflaming.
It is normalforthe cooktopto becomehotdur-
inga cleancycle.Therefore,avoidtouchingthe
cooktop,door,windowor oven ventduring a
cleancycle.
iG ITS
NEVERtouchsurface or ovenheatingele-
ments,areasnearelements,or interiorsur-
faces ofoven.
Heatingelementsmaybehoteventhoughthey
aredarkincolor.Areasnearsurfaceelements
andinteriorsurfacesof anovenmaybecome
hotenoughto cause burns.Duringand after
use,do nottouchor letclothingor otherflam-
mablematerialscontactheatingelements,ar-
easnearelements,or interiorsurfacesofoven
untiltheyhavehadsufficienttime tocool.
Otherpotentiallyhotsurfacesinclude:Cooktop,
areasfacingthe cooktop,ovenvent,and sur-
facesneartheventopening,ovendoor(s),ar-
easaroundthe door(s)andovenwindow(s).
NEVERleavechildrenaloneor unsupervised
inareawhereapplianceisin useor isstillhot.
NEVERallowchildrento sit or standon any
partoftheapplianceastheycouldbeinjuredor
burned.
CAUTION:NEVERstore items of interestto
childrenincabinetsabovean applianceoron
backguardofa range.Childrenclimbingonap-
pliance,door or drawerto reachitemscould
damagetheapplianceorbeburnedorseriously
injured.
Childrenmustbetaughtthattheapplianceand
utensilsin or on it can be hot. Lethotutensils
coolin a safe place,out of reachof smallchil-
dren.Childrenshouldbe taughtthat an appli-
anceis nota toy.Childrenshouldnotbeallowed
to playwithcontrolsor otherpartsoftheunit.
IG
Cleanrangehoodandfiltersfrequentlytopre-
ventgreaseorotherflammablematerialsfrom
accumulatingon hood or filter and to avoid
greasefires.
Turnthe fan on when flambeingfoods (such
asCherriesJubilee)underthe hood.
AND
The CaliforniaSafeDrinkingWater andToxic
EnforcementAct of 1986 (Proposition65)re-
quiresthe Governorof Californiato publisha
listofsubstancesknownto the Stateof Califor-
nia to causecanceror reproductiveharm,and
requiresbusinessesto warn customersof po-
tentialexposuresto suchsubstances.
Usersof thisapplianceareherebywarnedthat
whentheovenisengagedintheself-cleancycle,
theremaybesomelowlevelexposureto some
ofthelistedsubstances,includingcarbonmon-
oxide. Exposureto these substancescan be
minimizedby properlyventingthe ovento the
outdoorsduringtheself-cleancyclebyopening
awindowand/ordoorinthe roomwheretheap-
plianceis located.
IMPORTANT NOTICE REGARDING PET
BIRDS:Neverkeeppetbirdsinthekitchenorin
roomswherethe fumesfromthe kitchencould
reach. Birds have a very sensitiverespiratory
system.Fumesreleasedduringan ovenself-
cleaningcyclemaybe harmfulorfatalto birds.
Fumesreleasedduetooverheatedcookingoil,
fat, margarineand overheatednon-stickcook-
waremaybe equallyharmful.
FOR

Usetoturnonthesurfaceelements.Aninfinite
choiceof heatsettingsisavailablefromLOW
toHIGH.Theknobscanbeseton orbetween
anyofthe settings.
SETTINGTHECONTROLS
1. Place panon surfaceelement.
2. Pushinandturntheknobineitherdirection
tothe desiredheatsetting.
_,- The backguardis markedto identify
whichelementthe knobcontrols.For
t xample, indicatesright front
• element.
,
Thereisan indicatorlight byeach pairof
control knobs. When one or both of the
surfacecontrol knobsare turned on, the
lightwill turnon.The lightwillturnoffwhen
thesurfaceelementsareturnedoff.
4. After cooking,turn knobto OFF.Remove
pan.
DUALELEMENT(selectmodels)
Selectglass-ceramicsurfaces
are equippedwitha dualele-
mentlocatedinthe rightfront
position.To operate,pressthe rockerswitch
onthecontrolpaneltoward (_) to controlthe
largeelementortoward • tocontrolthesmall
element.
Thesize,typeofcookwareandcookingopera-
tionwillaffecttheheatsetting.Forinformation
on cookwareand otherfactors affectingheat
settings,refer to "Cooking Made Simple"
booklet.
HIGH:
Use to bring liquidto a boil. Alwaysreduce
settingto a lower heat when liquids beginto
boilor foodsbegintocook.
MED.HIGH(8-9):
Usetobrownmeat,heatoilfor deepfatfrying
orsauteing.Maintainfastboilforlargeamounts
of liquids.
MEDIUM:
Usetomaintainslowboilforlargeamountsof
liquidsandfor mostfryingoperations.
MED,LOW(3-4):
Use to continue cooking covered foods or
steamfoods.
LOW:
Usetokeepfoodswarmand meltchocolate
and butter.
OFF
HIGH
i°w ]
5 7
MEDIUM
3

I ELECTMOK}ELS}
GLASS-CERAMIC SURFACE
I On Canadianmodels,the surfacewillnotoperateduringa self-cleancycle.
| Cooktopmayemitlightsmokeandodorthefirstfew timesthe cooktopis used.This
isnormal.
I Whenacontrolisturnedon,a redglowcanbeseenthroughtheglass-ceramicsurface.
Theelementwillcycle onand offto maintainthepresetheatsetting.
| Glass-ceramiccooktopsretainheatforaperiodoftimeaftertheunitisturnedoff.When
theHOTSURFACElightturnsoff(seebelow),thecookingareawillbecool enoughto
touch.
Becauseoftheheatretentioncharacteristics,theelementswillnotrespondtochanges
insettingsasquicklyascoilelements.
I NOTE:Donot attemptto liftthecooktop.
TIPSTO PROTECTTHE
GLASS-CERAMICSURFACE
Beforefirst use, cleanthe cooktop.(See
Cleaning,page 13.)
_,- Donotuseglasspans.Theymayscratch
thesurface.
_,- Do notallowplastic,sugaror foodswith
high sugar contentto melt ontothe hot
cooktop. Shouldthis happen,cleanim-
mediately.(SeeCleaning,page 13.)
_,- Neverletapanboildryasthiswilldamage
thesurfaceand pan.
_,- Neverusecooktopas aworksurfaceor
cuttingboard.Nevercookfooddirectlyon
thesurface.
COOKINGAREAS
Thecookingareason yourrangeareidenti-
fied by permanent patterns on the glass-
ceramicsurface.Formostefficientcooking,
fit the pansizetothe elementsize.
Pansshouldnotextendmorethan1/2to 1-
inchbeyondthecookingarea.
For moreinformationon cookware,referto
"Cooking Made Simple" booklet.
WAR/vllNG CENTER
DEL$)
LIGHT ON COOKTOP
HOTSURFACELIGHT
Thehotsurfaceindicatorlightislocatedatthe
frontcenter of the cooktop.Thelightwill be
illuminatedwhenany cookingarea is hot. It
willremainon,evenafterthecontrolisturned
off,untilthe areahascooled.
WARMINGCENTER
(selectmodels)
Use the Warming Center to keep cooked
foods warm, such as vegetables, gravies
andoven-safedinnerplates.
Pushthe switchon thecontrolpaneltoturn
theWarmingCenteron andoff.
WARMINGCENTER
Allfoodsshouldbecoveredwithalid
oraluminumfoiltomaintainfoodqual-
ity.
Whenwarmingpastriesand breads
thecovershouldhave anopeningto
allowmoistureto escape.
Donotuseplasticwraptocoverfoods.
Plasticmaymeltontothesurfaceand
beverydifficultto clean.
Use only cookware and dishesrec-
ommended as safe for oven and
cooktopuse.
Alwaysuseoven mittswhenremov-
ingfoodfromtheWarmingCenteras
cookwareandplateswill be hot.
It is not recommendedtowarmfood
for longer than one hour, as food
qualitymaydeteriorate.
It is not recommendedto heatcold
foodon the WarmingCenter.
_,- Neverusefoil-typedisposablecontainers
or place a trivetor wok ringbetweenthe
surfaceand pan. Theseitemscan mark
or etchthe top.
_,- Donotslidealuminumpansacrossahot
surface.Thepansmayleavemarkswhich
needtoberemovedpromptly.(SeeClean-
ing,page 13.)
_,- Makesure thesurfaceandthe pan bot-
tomarecleanbeforeturningontoprevent
scratches.
_,- To preventscratchingor damageto the
glass-ceramictop, do not leave sugar,
saltorfatsonthe cookingarea.Wipethe
cooktop surface with a clean cloth or
papertowelbeforeusing.
_,- Neveruseasoileddishclothorspongeto
cleanthecooktopsurface.A filmwill re-
mainwhichmaycausestainsonthecook-
ing surfaceaftertheareais heated.
To retainthe appearanceof the glass-
ceramiccooktop,clean aftereachuse.

COILELEMENT SURFACE
I On Canadianmodels,the two frontele-
mentswill notoperateduringself-clean. | Do not use oversized cookware. Pans
| Cleancooktopaftereachuse. beyondthe element.
| Wipe acid or sugarspillsassoonasthe | When homecanningor cookingwith big
cooktophascooled as these spills may pots,usetheCanningElement(ModelCE1).
discolororetch the porcelain. Contactyour Maytagdealerfor details ori:
To protectdripbowlfinish: call 1-800-688-8408to order, i:
I Tolessendiscolorationandcrazing,avoid I Cleanfrequently. (See page13.) ii
usinghighheatfor longperiods.
should not extend more than 1-2 inches
LIFT-UPPORCELAINCOOKTOPCOILELEMENTS
To lift: When cool,graspthe cooktopfront
edge. Gentlylift up untilthetwo supportrods
snapintoplace.
To lower: Hold the cooktopfront edgeand
carefullypushback on each support rod to
release. Then lowerthetopintoplace.
_,-Whenanelementison,itwillcycleon
and offto maintaintheheatsetting.
_,-Coilelementsareself-cleaning.Donot
immersein water.
Toremove:Whencool,raiseelement.Care-
fullypullout andawayfromreceptacle.
To replace: Insertelement terminals into
receptacle. Guide the element into place.
Press down on the outer edge of element
untilitsitslevel ondrip bowl.
TERMINALS
DRIPBOWLS
Thedripbowls undereach surfaceelement
catch boiloversand must always be used.
Absenceof drip bowlsduring cookingmay
damagewiring.
To preventthe riskof electricshockor fire,
neverline dripbowlswithaluminumfoil.
Dripbowlswilldiscolor(blue/goldstains)or
crazeovertimeifoverheated.Thisdiscolora-
tion or crazing is permanent.This will not
affectcookingperformance.
SUPPORT
ROD
5

Theelectroniccontrolis designedforeasein programming.Thedisplaywindowonthe controlshowstime of day,timer andovenfunctions.
Messageswillscrollto promptyourprogrammingsteps.Thedisplayshowsthelowerovensetat3750FandTIMER1setfor 45minutes.Bracket
line (upperleft side)coincideswith messagein display.ControlpanelshownincludesConvectBakefeature.
f
b P P E R 0 _ [
1 2 3
:W:_[m
12HourOff Time rBeep s Coo_Timeaeeps
4 5 6
ControlLock ScrollSpeed DisplayDirn
7 8 9
Terr_C/F Default
[ 0 /_ [ }! 0 _ [ h
i6
ii : _ faire _ic-:
ii
_,- Pressthedesiredfunctionpadforthe
upperor loweroven.
PresstheAUTOSETpad ortheap-
propriatenumberpad(s)toentertime
or temperature.
_,-A beep will soundwhen anypad is
pressed.
_,-A double beep will sound if a pro-
grammingerroroccurs.
_,- Furtherinstructionswill scrollin display
afterfunctionpadsare pressed.
NOTE: The temperature or time will be
automaticallyenteredfoursecondsafterse-
lection.
If more than 30 seconds elapse between
pressingafunctionpad andtheAUTOSET
pad or number pads, the function will be
canceledand the displaywill return to the
previousdisplay.
Severalcontroloptionsare indicatedunder
thenumberpadson the control.Factory-set
optionscanbechangedtoyourpreferences.
See page10formoreinformation.
,
PressCLOCKpad. IndicatorwordTIME
will flashinthe display.
2.
Pressthe appropriatenumberpads for
the current time. (Time is in a 12-hour
format.)
Afterapowerinterruption,thelastclocktime
beforethe interruptionwillflash.
Torecallthe timeof daywhen anotherfunction
isshowing,pressCLOCKpad. Clocktimecan-
not be changedwhenthe ovenhas beenpro-
grammedforclockcontrolledcooking,self-clean
ordelayedself-clean.
CANCELPAD
UsetocancelallprogrammingexcepttheClock
andTimerfunctions.
AUTOSET PAD
Usewithfunctionpadsto automaticallyset:
350oF baketemperature
HIor LObroil
threehoursof cleaningtime
_,- fourminutesof toastingtime
170° F keepwarmtemperature
_,- tochangecontroloptions
BAKEPAD
,(ONT.
Useforbakingandroasting.
1. PressBAKEpad.
2. Pressagainfor 350oForpresstheAUTO
SETpad. Eachadditionalpressof AUTO
SETwill raisethetemperature250F. Or,
presstheappropriatenumberpadsforthe
desiredtemperaturebetween100°F and
5500F.
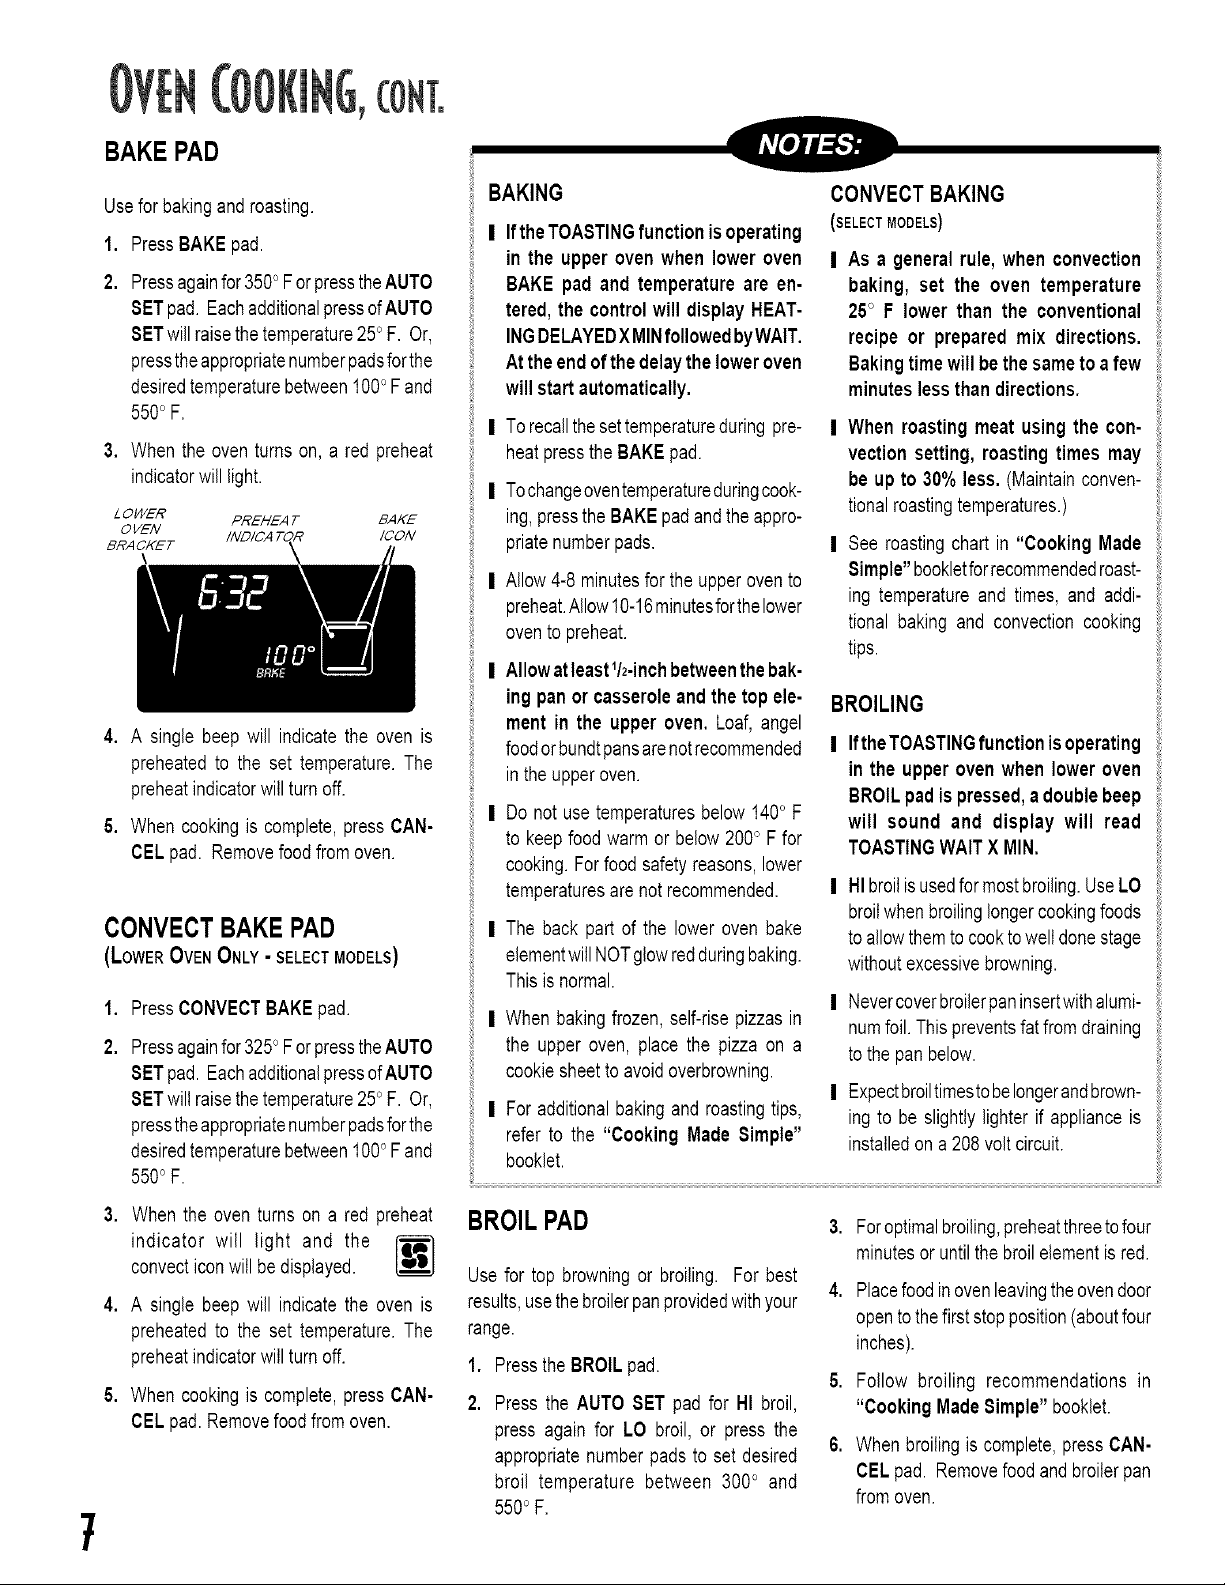
3, When the oven turns on, a red preheat
indicatorwilllight.
L O_/ER PREHEAT BAKE
OVEN /CON
BRACKET
4, A single beep will indicate the oven is
preheatedto the set temperature.The
preheatindicatorwill turn off.
5. When cookingis complete,press CAN-
CELpad. Removefoodfromoven.
CONVECTBAKEPAD
(LowEROVENONLY-SELECTMODELS)
1. PressCONVECTBAKEpad.
2. Pressagainfor 3250ForpresstheAUTO
SETpad. EachadditionalpressofAUTO
SETwill raisethetemperature250F. Or,
presstheappropriatenumberpadsforthe
desiredtemperaturebetween100°F and
5500F.
BAKING
| IftheTOASTINGfunction isoperating
in the upper oven when lower oven
BAKE pad and temperatureare en-
tered,the controlwill displayHEAT-
INGDELAYEDXMINfollowedbyWAIT.
Attheendofthe delaythe loweroven
will start automatically.
I To recallthesettemperatureduring pre-
heatpresstheBAKE pad.
| Tochangeoventemperatureduringcook-
ing,pressthe BAKEpadandtheappro-
priatenumberpads.
I Allow 4-8 minutesfor the upperovento
preheat.Allow10-16minutesforthelower
ovento preheat.
I Allowatleast%inch betweenthebak-
ingpanor casseroleand the top ele-
ment in the upper oven, Loaf, angel
foodorbundtpansarenotrecommended
intheupperoven.
| Donot usetemperaturesbelow1400F
to keepfood warmor below2000Ffor
cooking.Forfood safetyreasons,lower
temperaturesare not recommended.
I The back part of the lower oven bake
elementwillNOTglowredduringbaking.
This is normal.
I When bakingfrozen,self-risepizzasin
the upper oven, place the pizza on a
cookiesheettoavoidoverbrowning.
I Foradditionalbaking and roastingtips,
refer to the "Cooking Made Simple"
booklet.
CONVECTBAKING
(SELECT MODELS)
As a generalrule, when convection
baking, set the oven temperature
25° F lower than the conventional
recipe or prepared mix directions.
Bakingtimewillbethe sameto a few
minuteslessthan directions.
When roasting meat using the con-
vection setting, roastingtimes may
beup to 30% less. (Maintainconven-
tionalroastingtemperatures.)
See roastingchart in "Cooking Made
Simple"bookletforrecommendedroast-
ing temperatureand times, and addi-
tional baking and convection cooking
tips.
BROILING
IftheTOASTINGfunction isoperating
in the upperoven when lower oven
BROILpadispressed,a doublebeep
will sound and display will read
TOASTINGWAITX MIN.
HIbroilisusedfor mostbroiling.UseLO
broilwhenbroilinglongercookingfoods
toallowthemto cooktowelldonestage
withoutexcessivebrowning.
Nevercoverbroilerpaninsertwithalumi-
numfoil.Thispreventsfatfromdraining
to thepanbelow.
Expectbroiltimestobelongerandbrown-
ing to be slightly lighter if applianceis
installedona 208volt circuit.
3. When the oven turns on a red preheat
indicator will light and the
convecticonwillbe displayed.
4. A single beep will indicate the oven is
preheatedto the set temperature.The
preheatindicatorwill turn off.
5. When cookingis complete,press CAN-
CELpad.Removefoodfromoven.
7
BROILPAD
Usefor top browningor broiling. For best
results,usethe broilerpanprovidedwithyour
range.
1. PresstheBROILpad.
Press the AUTO SET pad for HI broil,
press again for LO broil, or press the
appropriatenumberpads to set desired
broil temperature between 3000 and
5500F.
,
Foroptimalbroiling,preheatthreetofour
minutesor untilthebroilelementis red.
4.
Placefoodinovenleavingtheovendoor
opentothefirst stopposition(aboutfour
inches).
,
Follow broiling recommendations in
"Cooking MadeSimple" booklet.
6.
Whenbroilingis complete,pressCAN-
CELpad. Removefoodandbroilerpan
fromoven.

TOASTINGPAD
(UPPER OVEN ONLY)
For toasting bread and products that are
toastedin a toasterortoasteroven.
1. Pressthe TOASTINGpad.
2. PresstheAUTOSETpadtoset4 minutes
oftoastingtime.Eachadditionalpresswill
increasethetoastingtimeby10seconds.
TOASTINGwill bedisplayed.
Or,presstheappropriatenumberpads
toset the toastingtimein minutesand
secondsbetween10 secondsand 10
minutes.
Browningtime may vary,watchtoast-
ing carefullyto avoid over-browning.
3. TheAUTOSETtoastingtime(4minutes)
canbechangedforyourconvenience.To
changetheAUTOSETtoastingtime,press
TOASTINGpad,enterthe desiredtime,
then pressand holdAUTO SETpad for
several seconds. The controlwill beep
and NEWAUTOSET ENTEREDwill be
displayed.
NOTE:TheAUTOSETtimefor TOAST-
INGcanbesetfrom3to 10minutesoron
select models from 10 seconds to 10
minutes.
4. If the lower oven is operatingwhen the
TOASTINGpad is pressed,TOASTING
NOT AVAILABLE - LOWER OVEN IN
USEwill be displayed.
Sliced White Bread31/2- 41/2min.
Waffles (frozen)
Toaster Pastry
(unfrozen)
Toaster Pastry
(frozen)
4 - 4V2min. ToasterBreaks**,
3V2- 4 min. Bagels 41/2- 5 min.
41/2- 43/4min CheeseSandwich 31/2- 41/2min
5. At the end of the set toastingtime,the
displaywillreadTOASTINGCOMPLETE
and beepfour times. Onereminderbeep
willsoundevery30secondsfor5 minutes
or untilCANCELpadis pressedordooris
opened.
NOTE:For optimalresultswhentoasting4-5
piecesof breador othersimilaritems,follow
diagrambelowforfood placement.
KEEP WARM PAD
(UPPER OVEN ONLY)
Forsafelykeepingfoodswarmorforwarming
breadsandplates.
1. PressKEEPWARMpad.
2. PressAUTOSETpadfor1700For press
theappropriatenumberpadsfortempera-
turesbetween1450and1900F.
3. KEEPWARM and the temperaturese-
lectedwillbe displayedwhenthefunction
is active.
4. When warmingis complete,pressCAN-
CEL pad.Removefoodfromthe oven.
Tortillas(flour) T/2- 3 min.
Hot Pockets** 4 - 5 rain.
EnglishMuffins 31/2- 4 min.
TOASTING
I
Toastingis basedon time not tem-
perature.
I
Formoreevenbrowningresults,pre-
heattheoven 3-4minutes.
I Toastingtimes will be shorterwhen
the oven is hot or when repeated
toastingfunctionsaredone.
KEEP WARM
I Foroptimalfoodqualityandnutrition,
oven cookedfoods shouldbe kept
warmfornolongerthan1to2 hours.
| Foroptimal food quality and color,
foodscookedontherangetopshould
be keptwarmforan houror less.
I To keep foods from drying, cover
looselywithfoil or alid.
I Towarmdinnerrolls:
- coverrollslooselywithfoil and
placein upperoven.
- pressKEEPWARM and
AUTOSETpads.
- warmfor 12-15minutes.
I Towarm plates:
- place2stacksofup to four plates
eachinthe upperoven.
- pressKEEPWARM andAUTO
SET pads.
- warmforfive minutes,turn offthe
ovenand leaveplatesin theoven
for 15minutesmore.
- useonlyoven-safeplates,check
withthe manufacturer.
- do notsetwarmdisheson acold
surfaceas rapidtemperature
changescouldcausecrazing.
* Toasting timesare approximateand shouldbe used as a guide only.
** Brand namesareregistered trademarksof therespective manufacturers.
,CONT.
COOK TIME/STOPTIME PADS
CLOCK CONTROLLED OVEN COOKING
Use to programthe ovensto start and stop 1,
automatically.Cooktimemaybesetfor upto
11hoursand59 minutes(11:59). Theclock
mustbefunctioningandcorrectlysetforthis
featuretowork. 2.
Both ovens may be set for clock con-
trolled cooking.To setbothovens:
.
SetCOOKTIMEandbaketemperatures
for both ovens.
SetSTOPTIMEforbothovens.
2,
_,- ThewordsSTOPTIMEmustbeflash-
ing inthe displaytoset STOPTIME.
To Start Immediately and TurnOff Auto-
matically:
PressCOOKTIMEpad.COOKTIMEwill
flash.Presstheappropriatenumberpads
to entercookingtime in hours and min-
utes.
Presstheupperor loweroven BAKE or
CONVECTBAKE (select models) pad
andselectthe baketemperature.COOK
TiME will be displayed along with the
temperature.
One minute beforethe end of the pro-
grammedcooktime,thelightwillturnon,
abeepwillsoundandCHECKFOODwill
bedisplayed.Lightwill turnoffautomati-
callywhen CANCEL pad is pressedor
afterovendoorisopenedand closed.
Attheendof cooktime, theovenwillshut
off automatically,"End"andCOOKTIME
willbedisplayedandfourbeepswillsound.
PressCANCELpad. Removefoodfrom
oven. If the programis not canceled,
therewillbe1reminderbeepeveryminute
for upto 30 minutes.
To Delaythe Start of CookingandTurn
Off Automatically:
6,
7.
8. Followsteps3-5in precedingsection.
PressCOOKTIMEpad. COOKTIMEwill
flash. Presstheappropriatenumberpads
toentercookingtimeinhoursandminutes.
Pressthe upperor loweroven BAKE or
CONVECTBAKE(selectmodels)padand
selectthebaketemperature.COOKTIME
will be displayedalongwith the tempera-
ture.
.
Press STOP TIME pad. Display shows
whentheovenwillstopbasedonanimme- 2.
diatestart.
.
PressSTOPTIMEpadagain.STOPTIME 3,
mustbe flashing to set thedelay start
time.
.
Presstheappropriatenumberpadsto en-
terthetimeyouwanttheovento stop.
DELAYandBAKEwill bedisplayed.
Atthe endofthe delayperiod,COOKTIME 4.
will be displayedalongwith the tempera-
ture.
Highlyperishablefoodssuchasdairy
products,pork,poultryorseafoodare
notrecommendedfordelayedcook-
ing.
Clockcontrolledbakingisnotrecom-
mendedfor bakeditemsthatrequire
a preheatedoven, such as cakes,
cookiesand breads.
TIMERPADS
Thetimer(s)maybesetfor anytime period
up to 99 hoursand 59minutes(99:59).
The timer(s)operate independentlyof any
otherfunctionandcanbe setwhileanother
oven function is operating. THE TIMER
DOESNOTCONTROLTHEOVEN.
PresstheTIMER1or2pad. TIMER1or
2 will flashrespectively.0HR:00willap-
pearinthe display.
Pressthe appropriatenumberpads to
enterdesiredtime.
TIMER1orTIMER2will bedisplayed. If
bothtimersareactiveTIMER1+2willbe
displayed.
EXAMPLE:Toset atimerfor5 minutes,
presstheTIMER1 padandthenumber
pad5. Thecontrolwillbegincountdown
after afour seconddelay.
Thelastminuteofthecountdownwillbe
displayedin seconds.
5.
At theendofthesettime,"END"will be
displayedandonefoursecondbeepwill
soundfollowedby two beeps every 30
secondsforuptofiveminutes.Pressthe
correspondingTIMER padto cancel
the beeps.
NOTE:TheTimerreminderbeepsatthe
end of a set timemaybe changed.See
ControlOptions(TimerBeeps),page10.
To Cancel a Set Time:
Pressand hold the correspondingTIMER
padforseveralseconds.Aftera slightdelay
thetimeof daywill appear.
OR
PresstheTIMER pad and the "0" number
pad. After a slight delay the timer will be
canceled.
NOTE: The Cook Time/Stop Time re-
minderbeepsmaybechanged.SeeCon-
trolOptions(CookTimeBeeps),page10.
9

ToChangeFactorySet DefaultOptions:
1. Control optionsmay be changedby se-
lectingtheSetup Options (0)padandthe
desiredoptionpad.(SeeOptionsbelow.)
2, Currentoptionwill appearin thedisplay.
CONTROLLOCK(4)
The functionpads onthe controlcan be
lockedtopreventunwantedusefor safety
and cleaningbenefits. Thecurrenttime of
daywill remaininthedisplay.
OVEN TEMPERATUREADJUSTMENT
Ifyouthinkthe ovenisoperatingtoocoldor
hot, you can adjustit. Bake severaltest
itemsandthenadjustthe temperatureset-
tingnotmorethan 100Fata time.
3. PresstheAUTO SETpadto changethe
option.
4, PressCANCELpadto set the displayed
optionand exittheprogram.
OPTIONSAVAILABLE:
12 HouROFF(1)
The oven may be set to turn off after 12
hoursorstayonindefinitely,Thedefaultis
setto turnoffafter 12hours.
TIMER BEEPS(2)
There are three choices for the end of
"timer" remindersignals.
_,- Onebeepfollowedbytwobeepsevery30
secondsfor up to five minutes (default
setting).
_,- One beep followedby two beepsevery
minutefor upto 30 minutes.
SCROLLSPEED(5) TO
The scroll speedof the messagesin the 1,
display may be changed from FAST to
MEDIUMto SLOW, Thedefaultissetfor the
mediumspeed.
2.
DISPLAYDIM(6)
The control intensitymaybe changedfor
easier reading, The default is set for the
highestintensity........ . The fewer ..... the
lesstheintensity.
TEMPC/F(7)
Thetemperaturescalemay bechangedto
Centigradeor Fahrenheit.Thedefaultisset
for Fahrenheit.
LANGUAGE(8) (select models)
Thewordswhichscrollinthedisplaymay
bechangedfrom EnglishtoFrenchorSpan-
ish.
Adjust:
Pressthe BAKE pad (upper or lower
oven)andenter550oF.
PressandholdtheBAKEpad(upperor
loweroven)for severalsecondsuntil
TEMPADJ is displayed.
,
PresstheAUTOSETpad- eachpress
changesthetemperatureby5oF. The
controlwillacceptchangesfrom-350to
+350F.
,
Iftheovenwaspreviouslyadjusted,the
changewillbedisplayed.Forexample,
iftheoventemperaturewasreducedby
150F,the displaywill show-150F.
,
Whenyouhave madetheadjustment,
presstheCANCELpadandthetimeof
daywill reappearin the display. The
oven will now bake at the adjusted
temperature.
One beepfollowedby nootherbeeps.
COOKTIMEBEEPS(3)
There are three choices for the end of
"clock controlledcooking"remindersig-
nals.
_'- Four short beeps followed by one beep
everyminuteforupto 30minutes(default
setting).
Four short beeps followed by no other
beeps.
Four short beeps followed by one beep
every30 secondsfor uptofive minutes.
DEFAULT(9)
The control can be reset to restorethe
factorysettingforeachoption.
DISPLAYON/OFF (CLOCK)
The time-of-daydisplay may be shut off
whentheovenisnotina cookingorclean-
ing function.
Theovenlightsautomaticallycomeonwhen
thedoorsareopened.Whenthe doorsare
closed, press the LIGHT pad (upper or
loweroven)on thecontrolpaneltoturnthe
lightson oroff.
The oven lightswill not operateduring a
cleancycle.The ovenlightswill comeon
automaticallyoneminutebeforetheendof
a clock controlledcookingoperation.

Whentheovenisinuse,theareanearthe
vent may becomehot enoughto cause
burns,NEVERblocktheventopening.
OVEN VENT LOCATION
on glass-ceramic range
on COl/element range
On a coil element
surface, besurethe
dripbowlinthevent
locationhas a hole OVENVENT
inthe center.Donot OPEN_N_
cover the drip bowl with aluminum
foil.
_,- Convection(selectmodels): Is equipped
withoneRollerGlideTMrackandtworegular
flat racks.
ToREMOVEOVENRACKS:
Pullrackstraightoutuntilitstopsatthelock-
stopposition;lift uponthe front oftherack
and pullout.
ForRollerGlideTMrack(selectmodels),pull
both the rack glide and rack baseout to-
gether.
RACK3:
Useformostbakedgoodson acookie
sheetor jelly roll pan,layer cakes,
fruit pies,orfrozenconveniencefoods,
andfor broiling.
RACK 2:
Useforroastingsmallcutsofmeat,casse-
roles,bakingloavesofbread,bundtcakes
or custardpies,andtwo-rackbaking.
RACK1:
Useforroastinglargecutsofmeatand
poultry,frozenpies,dessertsoufflesor
angelfoodcake, andtwo-rackbaking.
MultipleRackCooking:
Two rack:Userack positions2and4,
or 1and4.
Whenhighmoisturefoods are cookedin
the upper oven, steam may be visible
comingfrom the ovenvent. This is nor-
mal.
All racksaredesignedwitha lock-stopedge.
UPPEROVEN
_,- Isequippedwithonerackandrackposi-
tion.
Whenpullingtheup- !1 /_ \'_
per ovenrackoutto
remove or check t_ _-_
food, grasp the top
edge of the rack.
LOWEROVEN
_,- Conventional: Is equipped with one
RollerGlideTMrack and one regularflat
rack (select models)or two regularflat
racks.
ToREPLACEOVENRACKS:
Placerackon the racksupportintheoven;
tilt the frontendup slightly;slide rackback
until it clearsthe lock-stopposition; lower
frontand slidebackinto the oven.
RACKPOSITIONS
Three-rack Convection
Baking (Racks 1, 3 and 5)
RACK5: (highestposition)
Usefortoastingbreador broilingthin,non-
fatty foods.
RACK4:
Usefortwo-rackbakingandfor broiling.
-- 4
Three rack: (convectionbakingonly,
selectmodels)Userackpositions1, 3
and5.(Seeillustration.)
HALFRACKACCESSORY
(LOWEROVENONLY)
A half rack, to increaseoven capacity, is
availableas anaccessory.Itfits in the left,
upperportionoftheovenandprovidesspace
fora vegetabledishwhena largeroasteris
5
on the lower rack. Contact your Maytag
dealerforthe"HALFRACK"AccessoryKitor
3
call 1-800-688-8408to order.
2
1
]]

CLEANPAD
Use to set a self-clean cycle. (Only one
ovenmay becleanedat atime.Both ovens
will lock when eitheris being cleaned,)
Clean oven
frame, door
frame (area
outside of
gasket) and
around the
openinginthedoorgasketwithanonabra-
sive cleaner such as BonAmi*. These
areas are not exposedto cleaningtem-
peratures.
2, Removeoven racks. If racksare left in
duringa cleancycle,itmayimpairfunction
and they will discolor.Turnoff the oven
lightandclosedoor.
3. PressCLEANpad.
4, Pressthe AUTO SET pad for 3 hours of
cleaningtime,pressagainfor4 hoursand
again if 2 hoursof cleantimeisdesired.
5, CLEANINGand LOCplusthe cleantime
will appearin the displayand bothovens
will lock.
When the clean cycle is complete,
CLEANEDwill be displayed. LOC will
remainonuntiltheovenhascooled(approx.
1hour).
"'% , %. .= / ."
| Topreventdamagetoovendoor,do not
attemptto open eitheroven doorwhen
theLOCindicatorword is displayed.
I Duringthecleaningprocess,thekitchen
should be well ventilatedto help elimi-
natenormalodorsassociatedwithclean-
ing. Odorswilllessenwith use.
I It is normal for flare-ups, smoking or
flaming to occur during cleaningif the
ovenis heavilysoiled.Itisbettertoclean
theovenregularlyratherthantowaituntil
thereisa heavybuildupof soil.
| Wipe up excessgreaseor spilloversto
preventflare-ups. Foreasein cleaning,
the bakeelementin the upperor lower
ovencanbelifted slightly(1inch).
7, Whentheoveniscool,LOCwillnolonger
bedisplayedandthedoormaybeopened.
8, Wipe out the oven interiorwith a damp
cloth. Ifsoilremainsitindicatesthecycle
was notlong enough.
ToCancelSelf-CleanCycle:
1. PressCANCELpad.
2. IfLOCis NOTdisplayed,openovendoor.
If LOCisdisplayed,allowovento cool.
ToDelaythe Start of a Self-CleanCycle:
1. Followsteps1-4above.
2. Pressthe STOPTIMEpad. STOPTIME
willflash.
3. As STOPTIMEflashes,presstheappro-
priatenumberpadsto enterthetimeyou
wishtheoventostop.
4. DELAYCLNand LOCwillbe displayed.
5. Whenthedelayperiodis completedand
cleaningbegins, CLEANING,LOC and
thecleantime willbedisplayed.
| As the ovenheats andcools,you may
hear sounds of metal parts expanding
and contracting.This is normal andwill
notaffectperformance.
| Wipeupsugaryandacidicspilloverssuch
assweet potatoes,tomatoor milk-based
saucespriortoaself-cleancycle.Porce-
lain enamel is acid resistant, not acid
proofand may discolor if spills are not
wipedup beforea self-cleancycle.
| A white discolorationmay appearafter
cleaningifacidicorsugaryfoodsare not
wiped up before the clean cycle. This
discolorationisnormalandwill NOT af-
fect performance.
BROILER PAN AND INSERT
;_ Placesoapyclothover insertand pan;
letsoakto loosensoil.
;_ Washinwarmsoapywater. Usescour-
ingpad to removestubbornsoil.
;_ Broilerpanandinsertcanbecleanedin
dishwasher.
BRUSHED CHROME
(SELECT MODELS)
Whencool,washwithsoapywater,rinse
andbuffthe surface.
For heaviersoil, use a mild abrasive
cleaner such as baking soda or Bon
*Brandnamesforcleaningproductsareregisteredtrademarksofthe respectivemanufacturers.

&
,(ONT.
Ami*, rubbing with the grain to avoid
streakingthesurface.Rinseand buff.
Topreventscratching,do notuseabra-
sivecleaners.
To restore lusterand remove streaks,
followwithStainlessSteelMagicSpray*
(Part#20000008)**.Chrome will per-
manentlydiscolorifsoftisallowedto
bakeon.
8TAINLE88 STEEL-
(SELECT MODELS)
• DO NOT USEANY CLEANINGPROD-
UCTCONTAININGCHLORINEBLEACH.
• ALWAYSWIPEWITHTHEGRAINWHEN
CLEANING.
• DailyCleaning/LightSoil-- Wipe with
one of the following- soapywater,white
vinegar/watersolution,Formula409Glass
and SurfaceCleaner*or a similarglass
cleaner - using a sponge or soft cloth.
Rinseanddry.Topolishandhelpprevent
fingerprints,follow with Stainless Steel
MagicSpray(PartNo.20000008)**.
• Moderate/HeavySoil--Wipe withoneof
thefollowing- BonAmi,SmartCleanser,
or Soft Scrub*- usinga dampspongeor
soft cloth.Rinseand dry. Stubbornsoils
may be removedwith a damp Scotch-
Brite*pad;rubevenlywiththegrain.Rinse
and dry. To restore luster and remove
streaks,followwithStainlessSteelMagic
Spray*.
• Discoloration-- Usinga damp sponge
or soft cloth, wipe with CameoStainless
Steel Cleaner*.Rinse immediatelyand
dry.Toremovestreaksandrestoreluster,
followwithStainlessSteelMagicSpray*.
CLOCK AND CONTROL
PAD AREA
To activate"ControlLock"for cleaning,
seepage10.
Wipewitha damp clothanddry.
Glasscleanersmaybe used ifsprayed
on a clothfirst. DONOTspray directly
on control pad and display area.
CONTROL KNOBS
Removeknobs in the OFF position by
pullingforward.
Wash,rinseanddry.Donotuseabrasive
cleaningagentsasthey mayscratchthe
finish.
Turn on each element to be sure the
knobshavebeencorrectlyreplaced.
DRIP BOWLS - PORCELAIN
(SELECT MODELS)
Porcelainmaydiscolororcrazeifoverheated.
This is normal and will not affect cooking
performance.
Whencool, wash after each use, rinse
anddryto preventstainingor discolora-
tion.May bewashedinthe dishwasher.
To clean heavysoil, soak in hotsudsy
water,then use a mildabrasivecleaner
suchasSoftScrub*anda plasticscour-
ing pad.
For burnedon soil, removefrom range,
placeonnewspapersandcarefullyspray
with commercialovencleaner. (Do not
spraysurroundingsurfaces.)Placeinplas-
tic bagand allowtosoakseveralhours.
Wearingrubbergloves,removefrombag,
wash,rinseanddry.
DRIP BOWLS - CHROME
(SELECT MODELS)
Whencool, wash after each use, rinse
anddry topreventstainingor discolora-
tion.
To clean heavysoil, soak in hotsudsy
water,then use a mildabrasivecleaner
suchasSoftScrub*anda plasticscour-
ing pad. Do not use abrasivecleaning
agents.
ENAMEL (PAINTED)- SiDE PANELS,
DOOR PANELS & HANDLES
Whencool,washwithwarmsoapywater,
rinseand dry.Neverwipea warmor hot
surfacewith a dampcloth as this may
damagethe surface and may cause a
steamburn.
For stubborn soil, use mildly abrasive
cleaning agents such as baking soda
paste or Bon Ami*.Do not use abrasive
cleanerssuchassteelwoolpadsor oven
cleaners.These productswill scratch or
permanentlydamagethe surface.
NOTE:Usedrytowelordoth towipeupspills,
especial/yacidor sugarysp/l/s.Surfacemay
discolor or dull if soilis not immediatelyre-
moved. Thisis especiallyImportantfor white
surfaces.
GLASS - OVEN WINDOWS & DOORS
Avoid usingexcessiveamountsofwater
which may seep under or behind glass
causingstaining.
Wash with soap andwater. Rinse with
clearwateranddry. Glasscleanercanbe
usedifsprayedona clothfirst.
Do not use abrasive materialssuch as
scouring pads, steel wool or powdered
cleanersasthey will scratchglass.
GLASS-CERAMIC COOKTOP -
(SELECT MODELS)
Neveruseovencleaners,chlorinebleach,
ammoniaorglasscleanerswithammonia.
NOTE: Call an authorizedservicer if the
glass-ceramictopshouldcrack,breakorif
metalor aluminumfoilshouldmeltonthe
cooktop.
Allowthe cooktoptocoo!beforecleaning.
General - Always clean cooktop after
eachuse, or when needed,with a damp
papertowelandCooktopCleaningCreme
(Part No.20000001)**.Then,buff with a
clean, dry cloth.
NOTE: Permanentstains will developif
soil is allowedto cook on by repeatedly
usingthe cooktopwhen soiled.
HeavySoils orMetal Marks- Dampena
"scratchless"or"neverscratch"scrubber
sponge.ApplyCooktopCleaningCreme*
(Part No. 20000001)**and scrub to re-
move as much soil as possible.Apply a
thinlayerof the cremeoverthesoil,cover
witha damppapertowelandletstand30
to 45 minutes (2-3 hoursfor very heavy
soil). Keep moist by coveringthe paper
towelwith plasticwrap.Scrubagain,then
buff with a clean dry cloth.
* Brandnamesforcleaningproductsareregisteredtrademarksofthe respectivemanufacturers.
} ** Toorderdirect,call 1-800-688-8408.

NOTE:Onlyusea CLEAN,DAMP
"scratchless"padthatissafefornon-stick
cookware.Thepatternandglasswillbe
damagedifthepadisnotdamp,ifthepad
issoiled,orifanothertypeofpadisused.
Burned-onorCrustySoils- Scrubwith
a "scratchless"or "neverscratch"scour-
ing pad and CooktopCleaningCreme*.
NOTE: Hold a razor blade scraperat a
300 angle and scrape any re-
mainingsoil.Then,cleanas
describedabove.Donot
usetherazorblade
for daily cleaning
asitmaywear
the pattern
on the glass.
Melted Sugar or Plastic - Immediately
turnelementtoLOWandscrapefromhot
surfaceto a coolarea.Thenturn element
OFF and cool. Clean residuewith razor
blade scraper and Cooktop Cleaning
Creme*.
OVEN INTERIORS
Followinstructionson page 12 to set a
self-cleancycle.
OVEN RACKS
Cleanwith soapywater.
Removestubbornsoilwithcleansingpow-
derorsoap-filledscouringpad.Rinseand
dry.
Ifovertime,racksdonotslideouteasily,
wipethe rackedgeand racksupportwith
a smallamountofvegetableoiltorestore
easeof movement,thenwipeoff excess
oil.Likewise,placeonedropof vegetable
oil on rackroller.
NOTE: Removeovenracks duringa clean
cycle.Ifracksareleftintheoven,itmayimpal?
functionandthey willdiscolor
PLASTIC FINISHES -
TRIM & END CAPS
Whencool,cleanwithsoapand water,
rinseand dry.
Usea glasscleaneranda softcloth.
NOTE:Neveruseovencleaners,abras/ve
or caustic//_lU/dorpowderedcleanserson
plasticfinishes. Thesecleaningagentswill
scratchor mar hnish.
NOTE:Topreventsta/hingordiscoloration,
wipeupfat,grease oracid(tomato,lemon,
vlhegar,milk,fruity_lice,marinade)immedi-
ately witha drypaper towel
PORCELAIN ENAMEL-
BACKGUARDAREA, TRIM ONGLASS CERAMIC
SURFACE, COOKTOP ON COIL SURFACE
Porcelainenamelis glassfused onmetal
andmaycrackorchipwithmisuse.Itisacid
resistant,not acid proof.All spillovers,es-
peciallyacidicor sugaryspillovers,should
bewipedup immediatelywitha drycloth.
When cool, wash with soapy water,
rinseand dry.
Neverwipe off a warm orhot surface
with a damp cloth. This may cause
crackingorchipping.
Neveruse ovencleaners,abrasiveor
causticcleaningagentson exteriorfin-
ishofrange.
Both the upper and lower oven doors are
removable.
ToREMOVE:
1. Whencool,opentheovendoortothe broil
stopposition(openedaboutfourinches).
2. Graspdoorat eachside. Donotusethe
door handleto liftdoor.
3. Liftupevenlyuntildoorclearshingearms.
ToREPLACE:
1. Graspdoorateach side.
2. Alignslotsinthedoorwiththehingearms
on the range.
3. Slidethedoordownonto the hingearms
untilthedooriscompletelyseatedonthe
hinges.Pushdownon the top cornersof
thedoortocompletelyseatdooronhinges.
Doorshouldnotappearcrooked.
NOTE:Theoven dooron a newrange may
feel"spongy"whenit isclosed.Thisisnormal
andwilldecreasewith use.

OVENWINDOW(S)
TOPROTECTTHEOVENDOORWINDOW:
1. Donot useabrasivecleaningagentssuch
as steelwoolscouringpadsor powdered
cleanersas theymayscratchtheglass.
2. Donot hit the glasswithpots,pans,furni-
ture,toys, orotherobjects.
3. Donotclosethe ovendoor untilthe oven
racksarein place.
Scratching,hitting,jarringorstressingtheglass
mayweakenitsstructurecausinganincreased
riskof breakageata laterdate.
LEVELINGLEGS
Besuretheanti-tipbracketsecuresoneof
the rear leveling legs to the floor. This
bracketpreventsthe rangefromacciden-
tallytipping.
Therangeshouldbeleveledwhen
installed. If the rangeis notlevel, /_J
turn the plastic levelinglegs, Io- J ]
cated at each corner of the _,1
range, until range is _ '_,',J
level. L::__;: /
\LEVEZ//VG LEG
CONVENIENCEOUTLET
(CA.ADIANMODELSONLY)
Theconvenienceoutletislocatedonthe lower
leftsideofthe backguard.
Besureappliancecordsdonotrestonor near
thesurfaceelement.Ifthesurfaceelementis
turnedon,thecordandoutletwillbedamaged.
UPPER AND LOWER OVEN
LIGHTS(SELECTMODELS)
Toassuretheproperreplacementbulbis
used,orderbulbfrom MaytagCustomer
Service.Call 1-800-688-8408,askforpart
number74004458- halogenbulb.
TOREPLACEOVENLIGHTBULB:
1. Whenoveniscool,usefingertipstograsp
edgeofbulbcover.Pulloutandremove.
2, Carefully remove old bulb by pulling
straight out ofceramicbase.
3, To avoiddamagingordecreasingthelife
ofthenewbulb,donottouchthebulbwith
barehandsorfingers.Holdwithaclothor
paper towel. Push new bud prongs
straight intosmallholesofceramicbase.
4, Replace bulb cover by snapping into
place.
5, Reconnectpower to the range. Reset
clock.
LOWEROVENLIGHT
(SELECTMODELS)
BULB COVER
WIRE
RETAINER
TO REPLACEOVENLIGHTBULB:
1. When oven is cool, hold bulb cover in
place, then slide wire retaineroff cover.
NOTE:Bulb cover will fall if not held in
placewhileremovingwireretainer.
2. Removebulbcoverand light bulb.
3. Replacewith a 40-wattappliancebulb.
4. Replacebulbcover and securewith wire
retainer.
5.Reconnectpowerto range.Resetclock.
Theconvenienceoutletcircuitbreakermaytrip
ifthe smallappliancepluggedinto it exceeds
10amps.Toresetthecircuitbreaker,pressthe
switchlocatedonthe loweredgeof theback-
guard.
CIRCUIT BREAKER SWITCH
]5

FOR MOST CONCERNS,TRY
THESE FIRST:
I Checkif oven controlshavebeenprop-
erlyset.
I Checkto be sure plug is securelyin-
sertedintoreceptacle.
I Checkorre-setcircuitbreaker.Cheokor
replacefuse.
I Checkpowersupply.
PART OR ALL OF APPLIANCE
DOES NOT WORK.
NOTE:Canadianmodels:Duringaserf-
cleancycle, the glass-ceramiccooking
surface will not operate, and the two
frontelementson coil elementmodels
willnotoperate.
I Check if surface and/oroven controls
havebeenproperlyset.Seepgs.3 & 7.
I Checkifovendoorisunlockedafterself-
cleancycle. See pg.12.
| Checkifovenissetforadelayedcookor
cleanprogram.Seepgs.9 & 12.
| Upperoven maybe ina toastingopera-
tion. Lower oven will operatewhen the
toastingoperationiscompleted.
| Checkifcoilelementisproperlyinstalled
or needsto be replaced.Seepg.5.
GLASS-CERAMIC SURFACE
SHOWS WEAR.
1,Tiny scratchesorabrasions.
| Makesurecooktopand panbottom
areclean.Donotslideglassor metal
pansacrosstop. Makesurepanbot-
tomis notrough.Usetherecom-
mendedcleaningagents.Seepg. 13.
2,Metalmarks.
| Donotslidemetalpansacrosstop.
Whencool,cleanwith Cooktop
CleaningCreme.See pg. 13.
3,Brownstreaksand specks.
| Spillsnotremovedpromptly.Wiping
withsoiledclothor sponge.Pan
bottomnot clean.
4,Areaswith a metallicsheen.
| Mineraldepositsfromwaterandfood.
5,Pittingor flaking.
| Sugaryboiloversthatwerenot
removedpromptly.Seepg.13.
BAKINGRESULTSARE NOTAS
EXPECTEDOR DIFFER FROM
PREVIOUSOVEN.
I Make sure the oven vent has not been
blocked.See pg. 11for location.
| Checkto makesure rangeislevel.
| Temperaturesoften vary betweena new
ovenandanoldone.Asovensage,theoven
temperatureoften"drifts"andmay become
hotteror cooler. Seepg.10for instructions
on adjustingtheoventemperature. NOTE
It is not recommendedto adjust the tem-
peratureif only one or two recipesare in
question.
| Checkthat oventemperatureisdecreased
by25oFwhenconvectbaking.
I See "Cooking MadeSimple"bookletfor
moreinformationonbakewareandbaking.
FOOD IS NOT BROILING PROPERLY
OR SMOKES EXCESSIVELY.
I Checkovenrackpositions.Foodmaybetoo
closeto element.
I Broilelementwas notpreheated,
| Aluminumfoilwas incorrectlyused. Never
linethebroilerinsertwith foil.
| Ovendoorwasclosedduringbroiling.Leave
thedooropentothefirststopposition(about
4 inches).
| Trimexcessfat frommeatbeforebroiling.
| A soiledbroilerpanwasused.
OVENWILL NOTSELF-CLEAN.
I Checkto makesure the cycleisnotsetfor
a delayedstart.See pg. 12.
| Checkifdoor isclosed.
OVEN DID NOT CLEAN PROPERLY.
I Longercleaningtimemaybe needed.
I Excessivespillovers,especiallysugaryand/
or acidicfoods, were not removedpriorto
theself-cleancycle.
OVEN DOOR WILL NOT UNLOCK
AFTER SELF-CLEAN CYCLE.
I Oveninterioris still hot. Allowaboutone
hourfortheovento cool afterthecomple-
tionofa self-cleancycle.The doorcanbe
openedwhenthe LOCindicatorwordisnot
displayed.
I Both ovens will lock when either oven is
cleaned.
MOISTURE COLLECTS ON OVEN
WINDOW OR STEAM COMES FROM
OVEN VENT.
I This is normalwhencookingfoods highin
moisture.
| Excessivemoisturewas usedwhenclean-
ingthewindow.
THERE IS A STRONG ODOR OR
LIGHT SMOKE WHEN OVEN IS
TURNED ON.
I This is normalfor a new range and will
disappearafterafewuses.Initiatingaclean
cyclewill "burnoff" the odors morequickly.
I Turningonaventilationfanwillhelpremove
thesmokeand/orodor.
I Excessivefood soils on the oven bottom.
Usea self-cleancycle,
STEAMCOMESFROMVENTAREA.
I Whenhighmoisturefoodsarecookedinthe
upper oven,steam may be visiblecoming
fromthevent area.Thisis normal.
"F" PLUSA NUMBERAND THE
MESSAGE:"CALL ANAUTHORIZED
SERVICEROR 888-462-9824"*
| This is calleda fault code. If a fault code
appearsin the display and beeps sound,
presstheCANCELpad.Ifthefaultcodeand
beeps continue,disconnect power to the
appliance.Wait a fewminutes,thenrecon-
nect power. If fault code and beeps still
continue,disconnectpowertotheappliance
and call anauthorizedservicer.
I Iftheovenisheavilysoiled,excessiveflare-
upsmayresultina faultcodeduringa clean
cycle. Press CANCELpad and allow the
oventocoolcompletely,thenresettheclean
cycle. If thefault codeand beeps stillcon-
tinue, disconnectpower to the appliance
and call anauthorizedservicer.
* FOR PRIORITYONESERVICECALL TOLL-FREE
1-888-4MAYTAG (1-888-462-9824).
 Loading...