

Maytag MDE-MDG21PRA, MLE-MLG23PRF, MDE-MDG21PNA, MDE-MDG21PDA, MLE-MLG23PRA User Manual
...Page 1

This manual is to be used by qualified appliance
technicians only. Maytag does not assume any
responsibility for property damage or personal
injury for improper service procedures done by
an unqualified person.
Commercial
Single and
Stack Dryers
This Base Manual covers general information
Refer to individual Technical Sheet
for information on specific models
This manual includes, but is
not limited to the following:
MDE/MDG21PDA
MDE/MDG21PDD
MDE/MDG21PNA
MDE/MDG21PND
MDE/MDG21PRA
MLE/MLG23PDA
MLE/MLG23PDC
MLE/MLG23PRA
MLE/MLG23PDF
MLE/MLG23PRF
MLE/MLG23MNA
MLE/MLG23MNF
16022904
Revision 0
January 2004
Page 2
Important Information
Important Notices for Servicers and Consumers
Maytag will not be responsible for personal injury or property damage from improper service procedures. Pride and
workmanship go into every product to provide our customers with quality products. It is possible, however, that during
its lifetime a product may require service. Products should be serviced only by a qualified service technician who is
familiar with the safety procedures required in the repair and who is equipped with the proper tools, parts, testing
instruments and the appropriate service information. IT IS THE TECHNICIANS RESPONSIBLITY TO REVIEW ALL
APPROPRIATE SERVICE INFORMATION BEFORE BEGINNING REPAIRS.
!
To avoid risk of severe personal injury or death, disconnect power before working/servicing on appliance to avoid
electrical shock.
To locate an authorized servicer, please consult your telephone book or the distributor from whom you purchased this
product. For further assistance:
Contact your local commercial product distributor or visit Web site www.maytagcommerciallaundry.com.
Recognize Safety Symbols, Words, and Labels
DANGER
!
DANGER—Immediate hazards which WILL result in severe personal injury or death.
WARNING
!
WARNING—Hazards or unsafe practices which COULD result in severe personal injury or death.
WARNING
!
CAUTION
CAUTION—Hazards or unsafe practices which COULD result in minor personal injury, product or property
damage.
2 16022904 Rev. 0 ©2004 Maytag Appliances Company
Page 3

Table of Contents
Important Information ...................................................... 2
Important Safety Information ........................................... 4
General Information
Model Identification ..................................................... 7
Commercial Dryer Nomenclature ............................... 7
Terminology/Definitions ............................................... 8
How It Works .................................................................. 9
Gas Valve Assembly ................................................... 9
Test Equipment ............................................................ 12
Troubleshooting Procedures ......................................... 13
General Specifications ............................................... 13
Wattage Specifications ............................................. 13
Exhaust Ducts .......................................................... 13
Electrical Troubleshooting ......................................... 14
Drive Motor Check .................................................. 14
Motor Test Cord ..................................................... 15
Drive Motor Test ..................................................... 15
Centrifugal Switch ..................................................... 15
Air Shutter Adjustment .............................................. 15
Manometer ................................................................ 16
Mechanical Troubleshooting ...................................... 17
Single Dryer Troubleshooting Guide .......................... 18
Single Dryer Diagnostic Program ........................... 26
Single Dryer Diagnostic Code ................................ 27
Stack Dryer Troubleshooting Guide ........................... 29
Stack Dryer Diagnostic Program ............................ 34
Stack Dryer Diagnostic Code ................................. 35
Disassembly Procedures
Control Panel ............................................................ 37
Microprocessor Board ............................................... 37
Touch Pad Assembly ................................................ 37
Transformer ............................................................... 37
Meter Case ............................................................... 37
Service Door Switch .................................................. 38
Coin Vault Switch ...................................................... 38
Coin Drop Acceptor ................................................... 38
Coin Sensor .............................................................. 38
Door Assembly .......................................................... 38
Reversing Door Assembly ...................................... 39
Door Disassembly.................................................. 39
Front Panel ............................................................... 39
Top Cover .................................................................. 40
Door Switch............................................................... 40
Front Shroud Assembly Removal .............................. 41
Outlet Duct, Shroud & Tumbler Front .................... 41
Lint Filter ................................................................ 42
Bearing & Pads ...................................................... 42
Front Seal .............................................................. 42
Belt ............................................................................ 42
Baffles ....................................................................... 43
Rear Shroud Assembly ............................................. 43
Back Seal .............................................................. 44
Roller & Bearing Assembly .................................... 44
Thermostats .............................................................. 45
Cycling Thermostat ................................................ 45
Low-Cycling Thermostat ......................................... 45
Thermal Fuse ......................................................... 45
Hi-Limit Thermostat ................................................ 45
Blower Assembly ...................................................... 45
Blower Seal ............................................................ 45
Blower Cover .......................................................... 45
Blower .................................................................... 46
Exhaust Duct Pipe ................................................. 47
Drive Motor Assembly ............................................... 47
Assembly Breakdown ............................................... 47
Motor Switch .......................................................... 47
Idler Arm Assembly ................................................ 47
Gas Valve Assembly ................................................. 48
Coil ......................................................................... 48
Igniter ..................................................................... 48
Gas Valve ............................................................... 49
Combustion Cone .................................................. 49
Inlet Duct ................................................................... 49
Heater Enclosure ...................................................... 49
Stack Dryer-Sloped Front .......................................... 50
Service Panel & Switch ............................................. 50
Access Cover ......................................................... 50
Control Panel ......................................................... 50
Microprocessor ...................................................... 51
Coin Drop ............................................................... 51
Front Panel ............................................................ 52
Stack Dryer--Sloped Front (PR Model) ...................... 53
Microprocessor ...................................................... 53
Stack Dryer - MN Models .......................................... 53
Front Panel ............................................................ 53
Timer ...................................................................... 54
Selector Switch ...................................................... 54
Push-To-Start Switch ............................................. 54
Machine-In-Use Light ............................................. 54
Stack Dryer - Flat Front Models ................................ 55
Front Panel ............................................................ 55
Microprocessor ...................................................... 55
Front Shroud Assembly ......................................... 55
Motor & Heater Relays .......................................... 56
Appendix A ............................................................... 57
Programming ............................................................. 58
Start Operating Set-up ........................................... 58
General User Information ....................................... 58
Set-Up codes ......................................................... 60
Dryer Diagnostic Mode .......................................... 66
Dryer Help Mode .................................................... 66
©2004 Maytag Appliances Company 16022904 Rev. 0 3
Page 4

Important Safety Information
WARNING
!
To reduce the risk of fire, electric shock, serious injury
or death to persons when using your washer, follow
these basic precautions:
• Read all instructions before using the dryer.
• Refer to the Grounding Instructions in the
Installation Manual for the proper grounding of the
washer.
• Do not dry articles that have been previously
cleaned in, washed in, soaked in, or spotted with
gasoline, dry-cleaning solvents, or other flammable
or explosive substances as they give off vapors that
could ignite or explode.
• Do not add gasoline, dry-cleaning solvents, or other
flammable or explosive substances to the dryer.
These substances give off vapors that could ignite
or explode.
• Do not allow children to play on or in the dryer.
Close supervision of children is necessary when the
dryer is used near children. This is a safety rule for
all appliances.
• Before the dryer is removed from service or
discarded, remove the door to the drying
compartment.
• Do not reach into the dryer if the drying tumbler is
moving.
• Do not install or store the dryer where it will be
exposed to water and/or weather.
• Do not tamper with the controls.
• Do not repair or replace any part of the dryer, or
attempt any servicing unless specifically
recommended in the User-Maintenance instructions
or in published user-repair instructions that you
understand and have the skills to carry out.
• To reduce the risk of an electric shock or fire, do not
use an extension cord or an adapter to connect the
dryer to the electrical power source.
• Use your dryer only for its intended purpose, drying
clothes.
• Always disconnect the dryer from electrical supply
before attempting any service. Disconnect the
power cord by grasping the plug, not the cord.
• Install the dryer according to the Installation
Instructions. All connections for venting, electrical
power and grounding must comply with local codes
and be made by licensed personnel when required.
Do not do it yourself unless you know how!
• To reduce the risk of fire, clothes which have traces
of any flammable substances such as vegetable oil,
cooking oil, machine oil, flammable chemicals,
thinner, etc. or anything containing wax or chemicals
such as in mops and cleaning cloths, must not be
put into the dryer. These flammable substances may
cause the fabric to catch on fire by itself.
• Do not use fabric softeners or products to eliminate
static unless recommended by the manufacturer of
the fabric softener or product.
• Keep your dryer in good condition. Bumping or
dropping the dryer can damage safety features. If
this occurs, have your dryer checked by a qualified
service person.
• Replace worn power cords and/or loose plugs.
• Be sure water connections have a shut-off valve and
that fill hose connections are tight. Close the shut-off
valves at the end of each wash day.
• Loading door must be closed any time the dryer is in
operational fill, tumble, or spin. Do not attempt to
bypass the loading door switch by permitting the
dryer to operate with the loading door open.
• Always read and follow manufacturer’s instructions
on packages of laundry and cleaning aids. Heed all
warnings or precautions. To reduce the risk of
poisoning or chemical burns, keep them out of the
reach of children at all times (preferably in a locked
cabinet).
• Always follow the fabric care instructions supplied by
the garment manufacturer.
• Never operate the dryer with any guards and/or
panels removed.
• Do not operate the dryer with missing or broken
parts.
• Do not bypass any safety devices.
• Failure to install, maintain, and/or operate this dryer
according to the manufacturer’s instructions may
result in conditions which can produce bodily injury
and/or property damage.
NOTE: The Warnings and Important Safety Instructions
appearing in this manual are not meant to cover
all possible conditions and situations that may
occur. Common sense, caution and care must
be exercised when installing, maintaining, or
operating the dryer.
Always contact your dealer, distributor, service agent or
the manufacturer about any problems or conditions you
do not understand.
4 16022904 Rev. 0 ©2004 Maytag Appliances Company
Page 5

!
Important Safety Information
!
WARNING
!
To avoid personal injury or death from improper
servicing, make sure you read and understand the
descriptions and meaning of various safety symbols,
words and labels used in this manual, before
attempting any procedures described in the manual.
Failure to understand and comply with safety
information may result in severe personal injury or
death.
General Information
This Service Manual describes the operation,
troubleshooting, disassembly, and repair of Maytag
dryer. It is intended for use by authorized technicians
who troubleshoot and repair these units.
NOTE: It is assumed that users of this manual are
familiar with the use of tools and equipment used
to troubleshoot and repair electrical, and
mechanical systems; and understand the
terminology used to describe and discuss them.
®
About Ground Wires
In the event of an electrical short circuit, a ground wire
reduces the risk of electric shock by providing an escape
wire for the electric current.
Standard accepted color coding for ground wires is
green or green with a yellow stripe.
Grounding wires and wires colored like grounding wires
are NOT to be used as current carrying conductors.
WARNING
To reduce the risk of fire, electric shock, serious injury
or death, all wiring and grounding must conform with
the latest edition of the National Electric Code, ANSI/
NFPA 70, or the Canadian Electrical Code, CSA
C22.1, and such local regulations as might apply. It is
the customer’s responsibility to have the wiring and
fuses checked by a qualified electrician to make sure
your home has adequate electrical power to operate
the dryer.
WARNING
Related Publications
This is a base service manual, covering a range of
similar models. It is intended to be used in conjunction
with the Parts Manual and Technical Sheet covering the
specific model being serviced.
Electrical Service Information
Proper Grounding and Polarization of
120 Volts Wall Outlets
For the safety of our customers and the Service
Technician ALL appliances have a three–prong power
cord and MUST be connected to a properly polarized
AND grounded wall outlet.
This information was written for those who do not
understand grounding and polarization of a wall outlet.
A 120 volt wall outlet must always be wired as shown
below.
Ground
Neutral
0
V.A.C.
Neutral
side
L1
115±12
V.A.C.
To avoid risk of personal injury or death due to
electrical shock:
• Observe all local codes and ordinances.
• Disconnect electrical power to unit before servicing.
• Ground appliance properly.
• Check with a qualified electrician if you are not sure
this appliance is properly grounded.
• DO NOT ground to gas line.
• DO NOT ground to cold water pipe if pipe is
interrupted by plastic, nonmetallic gaskets, or other
insulating (nonconducting) materials.
• DO NOT modify plug on power cord. If plug does
not fit electrical outlet, have proper outlet installed
by qualified electrician.
• DO NOT have a fuse in the neutral or ground circuit.
A fuse in the neutral or ground circuit could result in
an electrical shock.
• DO NOT use an extension cord with this appliance.
• DO NOT use an adapter plug with this appliance.
• DO NOT pinch power cord.
Round
grounding
prong
©2004 Maytag Appliances Company 1602904 Rev. 0 5
115±12
V.A.C.
Page 6
Important Safety Information
!
Explanation
Polarization–This means that the larger slot must be
neutral and the small slot must be at line voltage.
Mispolarized–The outlet is incorrectly wired so that the
larger slot is at line voltage and the smaller slot is neutral.
Grounded–This means the round hole connection is connected to earth ground through a connection to the main
power panel.
Ungrounded–The round hole connection is not complete
to earth ground and/or the main power panel.
Grounding Instructions
WARNING
• To avoid the risk of electrical shock or death, do not
alter the plug.
• Do not remove grounding prong when installing
grounded appliance in a home that does not have
three wire grounding receptacle. Under no condition
is grounding prong to be cut off or removed. It is the
personal responsibility of the consumer to contact a
qualified electrician and have properly grounded
three prong wall receptacle installed in accordance
with appropriate electrical codes.
• To avoid the risk of electrical shock or death, this
equipment must be grounded.
This equipment MUST be grounded. In the event of an
electrical short circuit, grounding reduces the risk of
electric shock by providing an escape wire for the electric
current. This unit is equipped with a cord having a
grounding wire with a grounding plug. The plug must be
plugged into an outlet that is properly installed and
grounded.
Consult a qualified electrician or technician if grounding
instructions are not completely understood, or if doubt
exists as to whether the equipment is properly grounded.
Do not use an extension cord. If the product power cord
is too short, have a qualified electrician install a three-slot
receptacle. This unit should be plugged into a separate
60 hertz circuit with the electrical rating as shown in the
appropriate drawing. Models operate with a supply
voltage of 120 Volts.
6 16022904 Rev. 0 ©2004 Maytag Appliances Company
Page 7
General Information
Model Identification
Model and serial number is located on the back of the
console and cabinet. It is important that you keep a
record for future reference.
• For Maytag product call your distributor or visit the
Web Site at www.maytagcommerciallaundry.com
When contacting provide product information located on
rating plate. Record the following:
Model Number: ___________________
Serial or S/N Number: ___________________
Date of purchase: ___________________
Distributor name and address: ___________________
Commercial Dryer Nomenclature
M DE WWAPD21
Service
Keep a copy of sales receipt for future reference or in
case warranty service is required. To locate an
authorized distributor:
• For Maytag product call your distributor or visit the
Web Site at www.maytagcommerciallaundry.com.
Service should be performed by qualified service
technicians. We also recommend contacting an
authorized distibutor, if service is required.
Parts and Accessories
Purchase replacement parts and accessories over the
phone. To located an authorized distibutor:
• For Maytag product call your distributor or visit the
Web Site at www.maytagcommerciallaundry.com.
Only factory approved replacement parts should be
used.
Brand
M - Commercial Maytag
Product Type
DE - Electric Dryer
DG - Gas Dryer
LE - Stack Electric Dryer
LG - Stack Gas Dryer
21 - Single-Load Dryer
23 - Stack Dryer/Dryer
Model Number
Control Type
CS - Mechanical coin slide ready
MN - Mechanical non-coin
PD - Microprocessor with coin drop
PN - Microprocessor non-coin
PR - Microprocessor debit reader ready
PS - Microprocessor coin slide ready
Color Code
W - White
Q - Bisque
Voltage Code
W - 120V 60Hz
X - 120V 60Hz (Canada)
Y - 240V 60Hz
Z - 240 60Hz
Marketing Code
This identifies which
version of production
the unit is
©2004 Maytag Appliances Company 1602904 Rev. 0 7
Page 8

General Information
TERMINOLOGY/DEFINITIONS
TERM DEFINITIONS
Amperage - The amount or the rate of flow of electrical current.
Booster Coil - A coil used to assist the holding coil to raise the plunger in the gas valve allowing gas to
flow into the second chamber of the valve.
BTU - British Thermal Unit is the quantity of heat required to raise the temperature of one pound of
water 1o F.
Centrifugal - A switch device in a motor used to change the path of electricity from both start and run
winding to run winding only. It also completes the circuit to the heat source when motor
reaches speed.
CFM - Air movement measured in cubic feet per minute.
ClothesLifters - Devices attached to the inside of the tumbler used to lift and tumble the clothes during
operation of the dryer.
Coin Drop - A device which accepts and registers the number and denomination of coins used to start
the dryer.
Duct - A construction of aluminum or galvanized steel pipe used to convey moisture laden air from
the dryer to the outside.
Evaporation - The process of expelling moisture from garments by heat and/or air movement.
Exhaust Hood - A damper placed at the terminating end of the ducting which prevents air from entering the
duct when the dryer is not running.
Glide Strip - A stationary bearing surface at the front on which the dryer tumbler turns.
Holding Coil - A coil used to open the first valve in the gas valve assembly. It holds the valve open after
the initial assistance from the booster coil.
Igniter - A silicon carbide igniter located on the burner bracket near the main orifice. It can reach a
temperature of 2200
valve orifice).
Light Emitting - A solid state indicator unit found as a single light and in a display Diode arrangement to
form numbers and letters.
Manometer - An instrument for measuring the pressure of gas or air.
Microprocessor- The "brains" of the control board. A solid state "count and switch" processor device.
OHM - A unit of measurement of resistance (opposition to the flow of current).
Parallel Circuit - A circuit in which there is more than one current path.
Radiant Sensor- Thermostat-like device which reacts to the brightness or radiant energy output of a heat
source.
Sensor Relay - A coil operated switch used to control dryer motors, heating element or gas valve on
computer models.
Relay - A coil operated switch used to control dryer motors, heating element or gas valve on
Computer models.
Resistor - A device used to limit the flow of current or reduce voltage.
Run Winding - The main electromagnetic winding in a motor.
Series - A circuit in which there is only one current path through all components.
Start Winding - (Phase winding) An auxiliary winding used in an A.C. motor to assist the main winding in
developing starting torque.
Thermostat - A bimetal switch which reacts to temperature changes.
Tumbler - Cylinder which contains and tumbles clothes.
Voltage- Electric pressure that forces the current to flow in a circuit.
Wattage - Wattage is a unit of measurement of the capability of electricity to do work.
o
F. in 30 seconds to ignite the gas (when allowed to flow through gas
8 16022904 Rev. 0 ©2004 Maytag Appliances Company
Page 9
General Information
HOW IT WORKS
The cycles are made up of three basic operations.
White & Colors, Permanent Press and Delicates and
Knits. These operation are sequenced by the controls
(timer or microprocessor board) to provide a drying cycle
for each of several different fabrics.
Incoming air is pulled over and around the exterior of the
rotating tumbler. The air passing over the tumbler is
preheated from the warm tumbler. This incoming air also
passes over the inside of the cabinet lowering the
cabinets temperature and minimizing the heat being
dispelled into the laundry area.
The pre-conditioned air is pulled through the heat
enclosure. As the air passes over the flame or heating
element, it is heated causing the air to expand which
increases its ability to absorb more moisture.
The heated air is pulled up the stack and through the grid
in the tumbler back, through the tumbler, and to the lower
area of the tumbler front. The tumbler is rotating in a
clockwise direction lifting the
garments to the top of the tumbler. The garments fall
free of the clothes lifters through the air stream. As this
tumbling takes place, the garments keep turning over
within the tumbler. Moisture is evaporated from the
garments tumbling in the warm, dry air.
After passing through the garments, the air will contain
moisture and lint. This air is pulled from the tumbler
through a fine mesh filter located in the bottom of the
door opening. The quantity of lint collected on the filter is
dependent upon the size and type of load being dried.
From the filter, the air is pulled into the exhaust blower
and forced out the exhaust system. The high speed
blower is capable of moving up to 220 CFM of air. The
volume of the tumbling chamber is approximately 6.0
cubic feet.
Hi-limit
Thermostat
Radiant
Sensor
Igniter
Gas Valve
Holding &
Booster Coil
Igniter - When the controls call for heat, line voltage is
applied to the igniter. This causes the igniter to heat up
and glow. It can reach a temperature of approximately
2200º F in approximately 30 seconds. Gas contacting
the igniter at this temperature will ignite immediately.
Radiant Sensor - The radiant sensor operates much
like a regular thermostat. It is mounted to the side of
the combustion cone over an opening which exposes
the sensor to the heat of the igniter and burner flame.
In its normal condition, the contacts in the radiant sensor
are closed and the circuit is completed to the igniter.
The igniter glow causes the radiant sensor contacts to
open, thus breaking the circuit to the igniter.
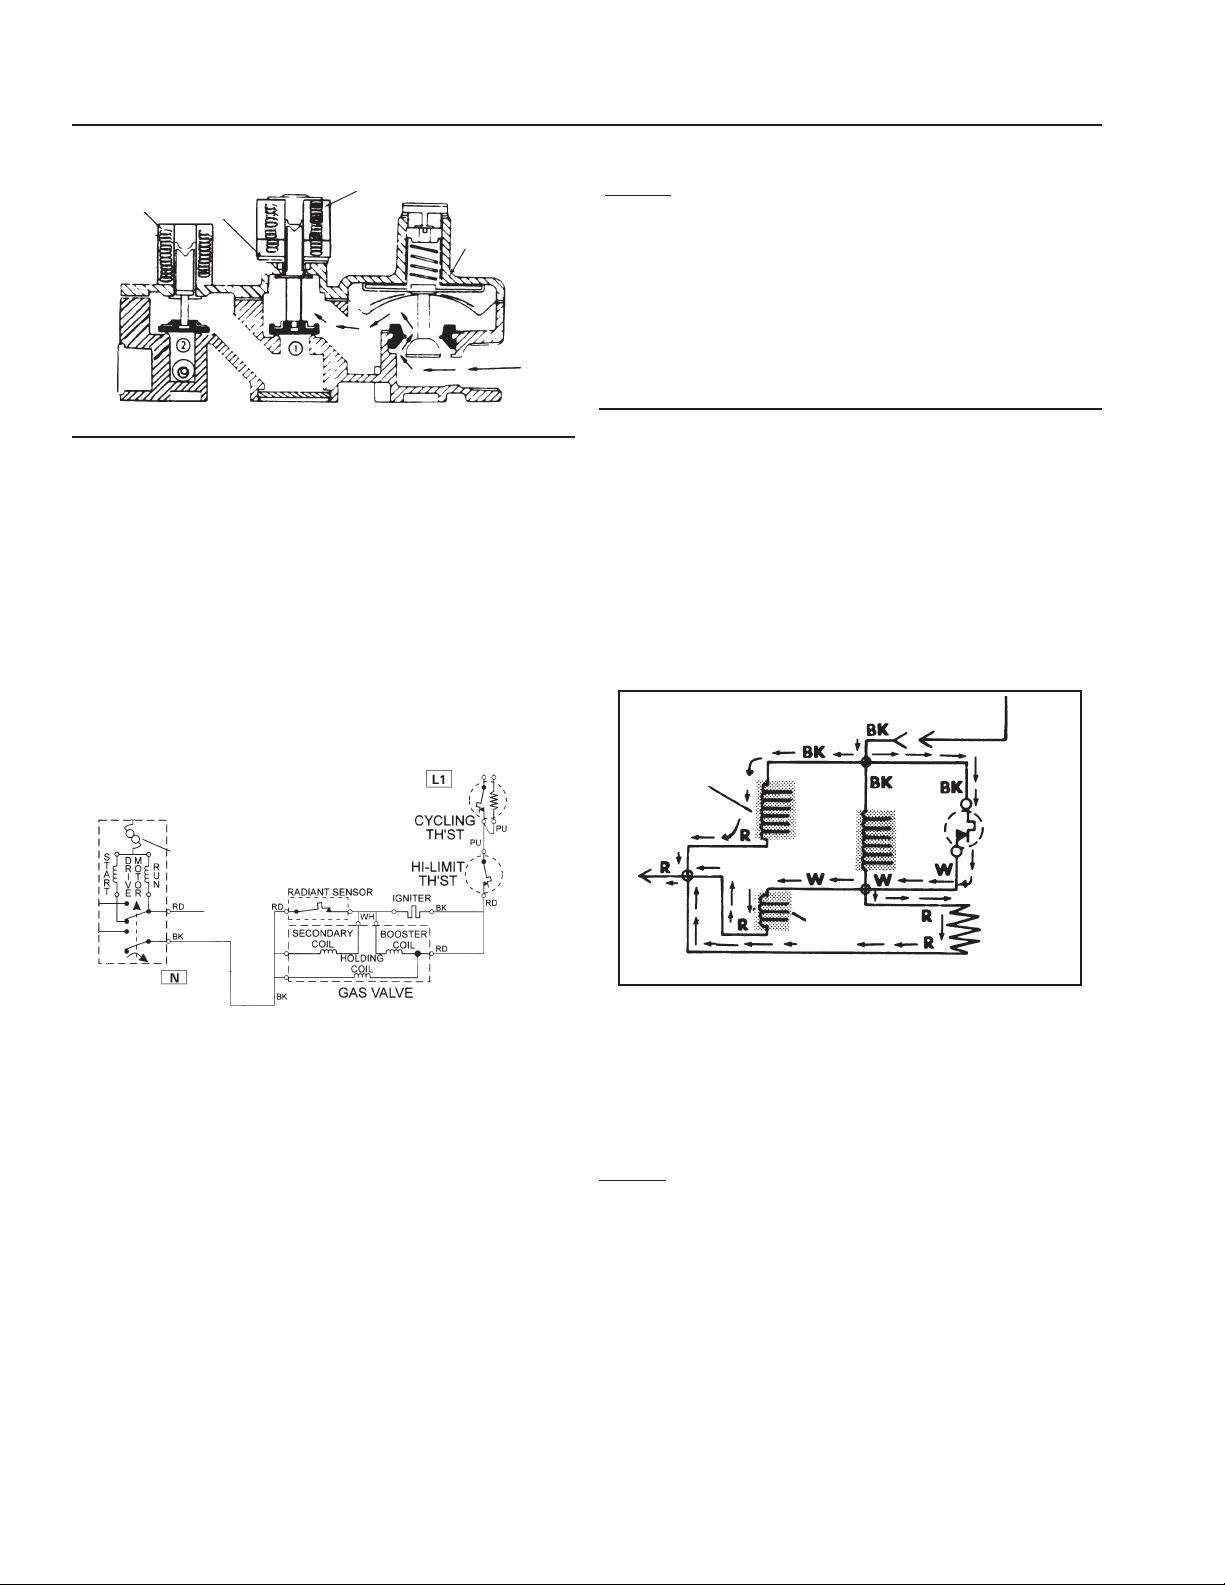
Gas Valve - The gas valve is actually two gas valves,
one in series with the other. The first valve is opened by
a solenoid which has two separate coils built into one
solenoid. This solenoid uses what is termed a split coil.
The coils are referred to as the Holding Coil and the
Booster Coil.
Secondary
Coil
Both coils are needed to lift the armature and open the
valve. The holding coil is strong enough to keep the
GAS VALVE ASSEMBLY
The gas controls utilize a hot surface ignition system.
The three major components of the gas ignition system
are: Igniter, Radiant Sensor and Gas Valve.
©2004 Maytag Appliances Company 1602904 Rev. 0 9
valve open once the armature has been lifted.
The second of the two valves is operated by a one-coil
solenoid. This is called a Secondary Coil.
Page 10
General Information
Secondary
Coil
Function of Gas Valve System
The sensor, igniter and gas valve are interrelated and
function as ignition and heat source. At the start of the
cycle, the radiant sensor contacts are closed, the igniter
is at room temperature and the gas valve is closed,
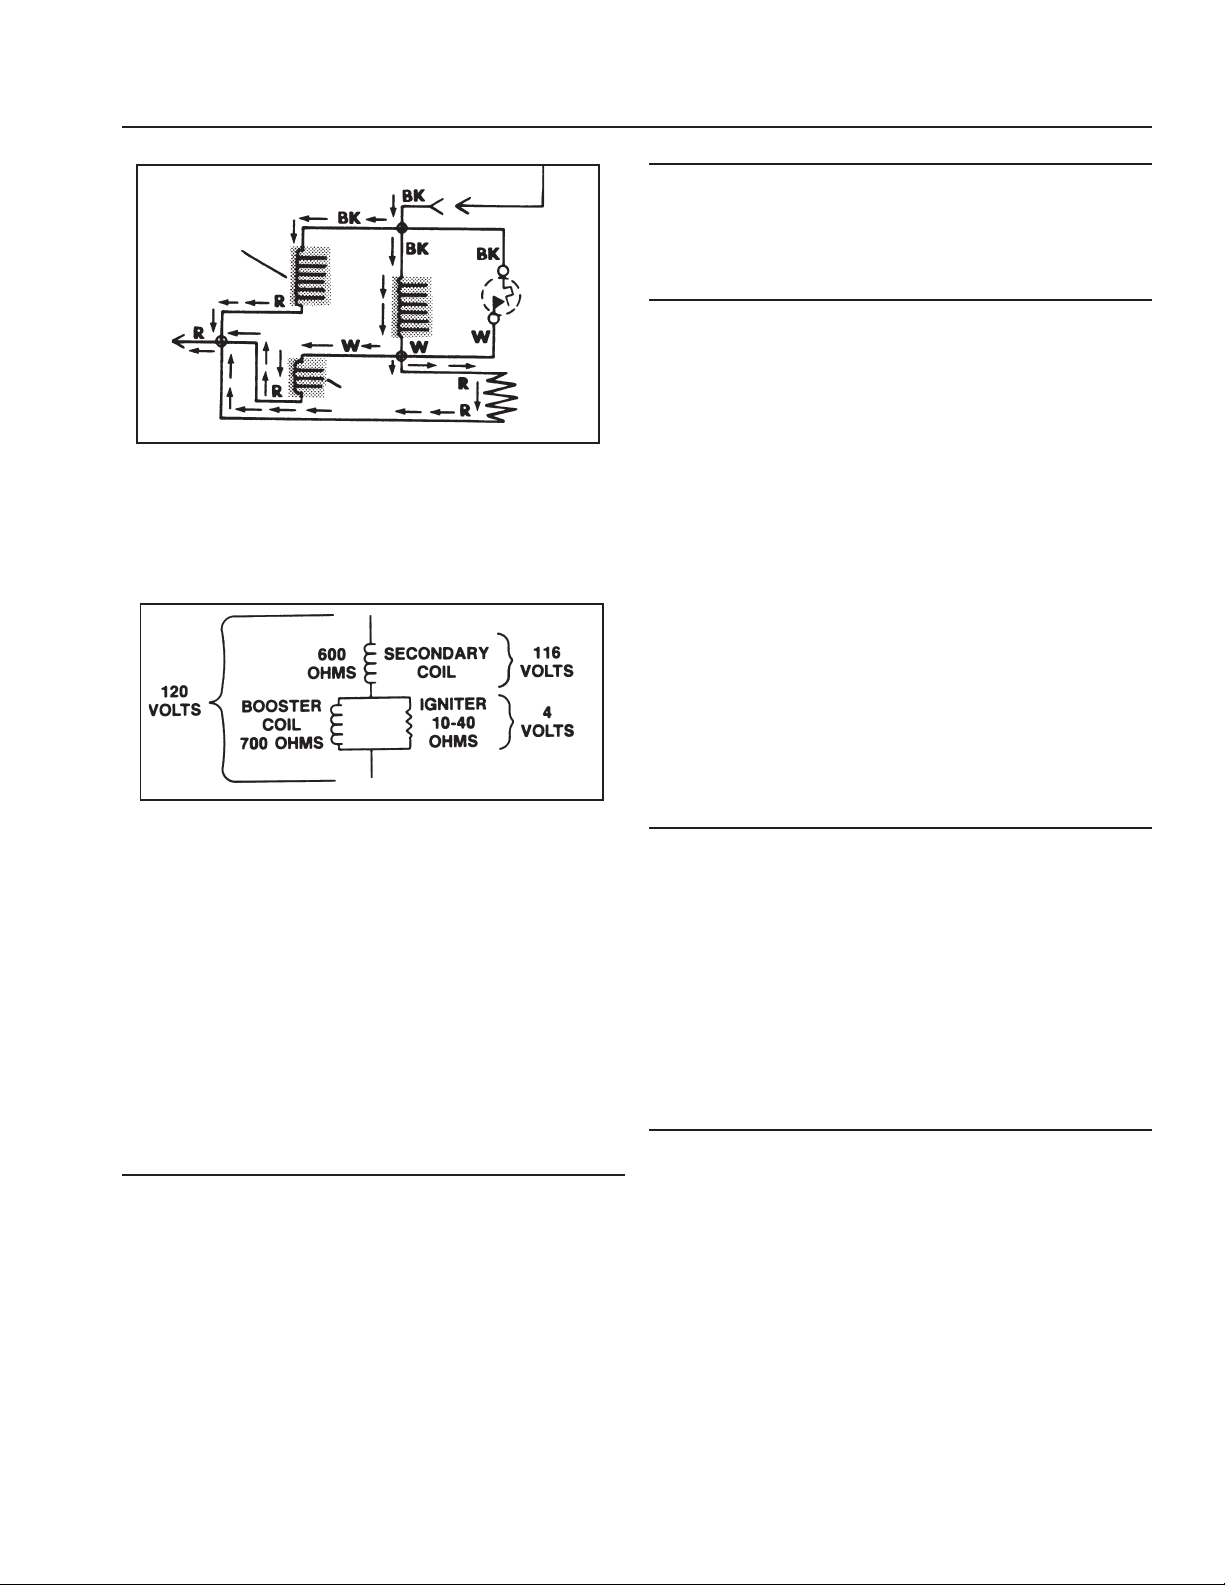
blocking the flow of gas. NOTE: On the wiring diagram,
the radiant sensor contacts are wired in parallel with the
secondary coil. This bypasses current around the
secondary coil when the radiant sensor contacts are
closed. Valve 2 cannot open with the radiant sensor
contacts closed.
Booster
Coil
Holding Coil
Step 1: Operation: Dryer Controls calling for heat:
The red wire in the gas valve harness is normally the
"hot" side of the line. Voltage is routed to the gas valve
assembly through the cycling thermostat located on the
blower cover and the hi-limit thermostat on the heater
cone. The black wire to the gas valve is normally the
neutral side of the line and is completed through the
motor centrifugal switch.
Radiant Sensor Contact Closed
The holding coil, booster coil and igniter all receive line
.
voltage
Valve 2 is still closed, prohibiting gas flow to the burner.
The igniter, operating at line voltage, begins to get very
hot. (As the igniter gets hotter, the resistance of the
igniter drops.) The igniter glow radiates heat to the
radiant sensor.
The holding coil and booster coil open Valve 1.
The booster coil and the igniter are wired in parallel.
Note: While these two components are in parallel with
each other, they are wired in series with both the
radiant sensor and secondary coil combination.
When the radiant sensor contacts are closed, full line
voltage is available to the booster coil and to the igniter.
When the radiant sensor contacts open, current has to
flow through the secondary coil on Valve 2 in order to get
to the booster coil and igniter. A significant voltage drop
develops across the secondary coil. While the parallel
booster coil and igniter are still in the circuit, they
become ineffective due to their low resistance and the
resulting reduced voltage available to them.
Holding
Coil
Radiant
Sensor
To
Motor
Valve 1 Valve 2
The secondary coil on Valve 2 is bypassed because the
radiant sensor contacts are closed. By not allowing
voltage to the secondary coil, the second valve cannot
open and prevents gas flow to burner.
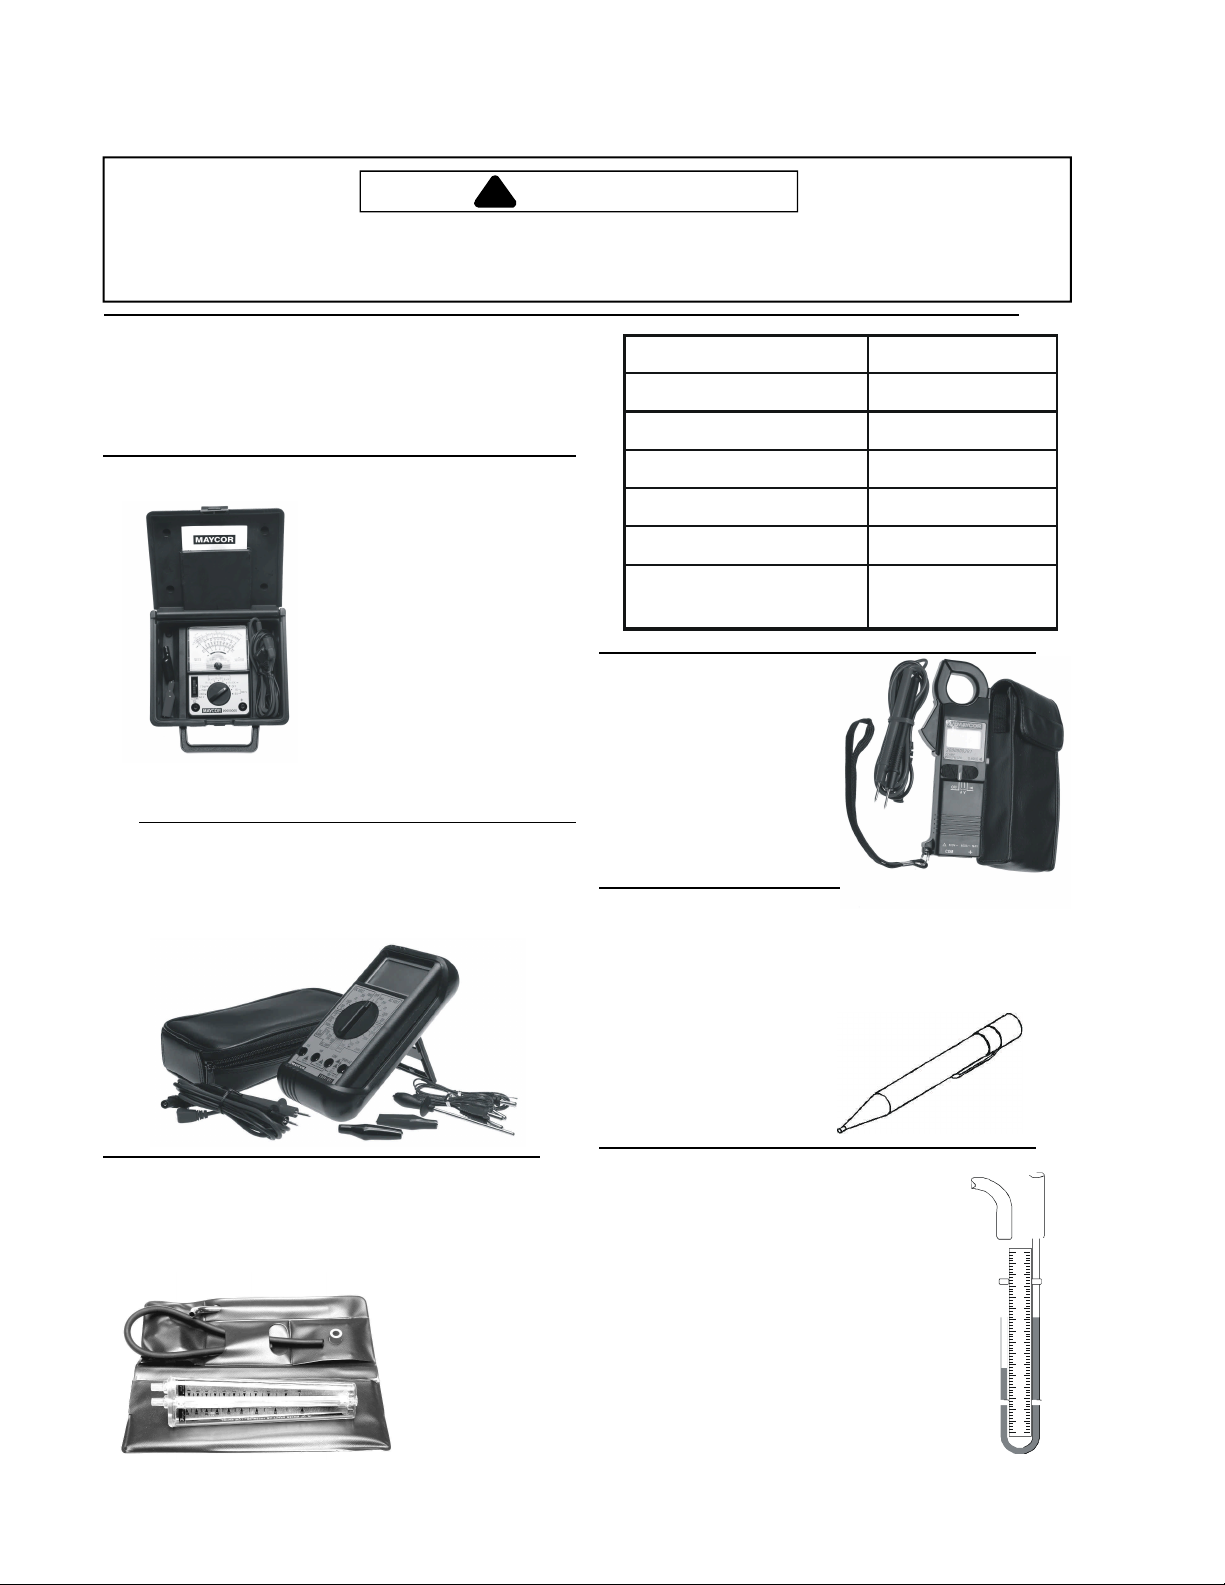
Step 2: Radiant Sensor Contact Open:
The igniter is now hot and valve one (1) is open. The
heat from the igniter causes the radiant sensor switch
contacts to open.
With the radiant sensor contacts open, the secondary
coil is no longer bypassed. The secondary coil is now in
series with the parallel circuit combination of the booster
coil and the igniter.
Booster
Coil
Igniter
10 16022904 Rev. 0 ©2004 Maytag Appliances Company
Page 11
General Information
Holding
Coil
Radiant
Sensor
To
Motor
Valve 1 Valve 2
Because of the relatively low resistance of the hot igniter,
most of the line voltage is dropped across the secondary
coil. The remaining voltage is dropped across the
booster coil and igniter.
Booster
Coil
Igniter
Safety Features
The design of the system provides for fail-safe operation
in the event of power interruption, ignition failure, or
flame failure as described below.
Power Interruptions
If the power to the burner assembly is cut off, either by
opening the dryer door or by a power line failure, both
valves in the gas valve assembly will close. Gas flow will
cease.
When power is restored to the valve, the radiant sensor
will start the process again. However, if the radiant
sensor has not cooled and the contacts are still open, the
secondary coil will receive full voltage and OPEN with no
gas flowing through the secondary valve.
Since the secondary coil is in series with the booster coil,
the reduced current flow through the booster coil is
insufficient to create a strong enough magnetic field to
help open the first coil valve. When the radiant sensor
cools and closes its contacts, the sensor will shut the
secondary coil again, providing a full current flow to the
igniter and the booster coil, and system will go through a
normal ignition sequence.
The secondary coil now opens the second valve
releasing gas across the still extremely hot igniter. The
gas ignites immediately and the burner flame is
established.
Note: Since the igniter will cool, the tip is positioned in
the burner flame which keeps it hot and
resistance low.
The ignition cycle is now completed and the drying cycle
begins.
Gas Conversions
The gas valve is set for use with natural gas when
shipped from the factory. Because of differences in
operating pressure and heat content of gases, the valve
must be converted to use fuels other that natural gas.
Conversion kits are available to convert from natural to
L.P. and back to natural. Check parts catalog for correct
part number.
Ignition Failures
When the radiant sensor reacts to the heat from the
igniter and the contacts open, the secondary coil
energizes, opening the secondary valve. This allows gas
to flow to the burner.
If no gas is present or the gas flow is not ignited, the
radiant sensor will cool and the contacts will close,
causing the secondary valve to close, thus allowing the
igniter to reheat. The system will continue to cycle in this
manner until normal ignition occurs or the dryer is turned
OFF.
Flame Failure
If the burner flame should go out for any reason, the
radiant sensor contacts will close in about 45 seconds
and the gas system will go through a normal ignition
sequence.
©2004 Maytag Appliances Company 1602904 Rev. 0 11
Page 12
General Information
20001001
20000002
20000081
20000029
038205
87654320123546781
WARNING
!
To avoid risk of electrical shock, personal injury or death from improper servicing, make sure you understand the
proper procedures and usage of tools listed, before attempting any procedures described in the manual. Failure
to understand and comply with safety information may result in severe personal injury or death.
TEST EQUIPMENT
The equipment required to service Maytag products
depends largely upon the condition you encounter.
Locating a malfunction will often require the use of
electrical testing equipment such as:
DESCRIPTION PART NUMBER
Analog Test Meter 20000005
Digital Test Meter
Analog Test Meter
can be used to check for open
or closed circuits, measure
resistance, AC and DC volts,
and temperature.
Digital Test Meter
can be used to check for open or closed circuits,
measure resistance, AC and DC volts, and
temperature.
Clamp-on Ammeter
AC Voltage Sensor
Air Test Meter
Water Column
Manometer
Clamp-On Ammeter can be
used to detect shorts.
Overloads on the circuit
breaker or fuse can be
traced to either the dryer or
circuit breaker by checking
the dryer current draw.
AC Voltage Sensor
can be used to alert you if AC voltage is present so
proper safety precautions can be observed. The tip of
the sensor will glow bright red if voltage is between
110-600 volts AC.
Air Test Meter
can be used to check back pressure in the
exhaust duct. Vent restriction can cause
back pressure and disrupt normal
operations of the dryer.
12 16022904 Rev. 0 ©2004 Maytag Appliances Company
Water Column Manometer can be used to
check gas pressure being supplied to the
dryer and the outlet tap pressure on the gas
valve.
Page 13
Troubleshooting Procedures
!
WARNING
To avoid risk of electrical shock, personal injury or death, disconnect power to unit before servicing, unless testing
requires power.
General Specifications
Capacity 6.0 Cubic Feet One washer load is a full dryer load
Motor Thermo-protected against overload auto-reset 1/4 HP, 120 Volt, 60 Hz
Air Flow Cubic feet per minute exhausted from dryer 220 CFM
Tumbler Revolution per minute 52 RPM
Rotation Drum Turning, when viewed from the front Clockwise
Heat Source • Electric • 240 volt, 5600 watts, 30 amp fuse
• Gas • Single port burner 24,000 BTU/hr.
direct ignition, automatic shut-off
Exhaust Venting size 4"(10.2 cm) duct, rigid aluminum
duct work. (See installation instructions that are provided with the
product for additional information.)
Makeup Air Free opening Requires 30 sq. in. per dryer pocket
Static Pressure Single unit exhausting, 4" round rigid Should not exceed 0.92" or less
than 0 water column inches
Wattage Specifications
DESCRIPTION WATTS
Gas Dryer 350 Maximum without igniter
Electric 5900 (240V)/5600 208V)
Heating Element 5600 (240V)/5100 (208V)
Igniter
(NOTE: Ohm room temperature 180-400)
600
Exhaust Ducts
©2004 Maytag Appliances Company 16022904 Rev. 0 13
Page 14
Troubleshooting Procedures
!
!
WARNING
To avoid risk of electrical shock, personal injury or death, disconnect power to unit before servicing, unless testing
requires power.
ELECTRICAL TROUBLESHOOTING
The malfunction of an electrical circuit cannot easily be
diagnosed unless you first understand how it functions
when operating normally. The electrical schematic and
wiring diagram includes a cycle sequence chart keyed to
the contacts in the timer, relay and/or control switches.
CAUTION
Resistance or continuity testing is done with the product
disconnected from power. Failure to do so can result in
damage to your meter.
For the most part, we will only be concerned with
continuity. Is there a path or not? References are made
between a “closed” (Continuity) reading and an “open (No
continuity) reading. One note, when you get and “open”
reading, try a higher resistance range (setting). A very
high resistance appears as an “open” on the lower ranges.
For best accuracy always “rezero” meter when changing
ranges and/or the physical position of the meter.
Continuity testing, as related to an electrical component,
is the check of a part for an “open” or closed” circuit.
Continuity test of load devices will show varying levels of
resistance from very low for some transformer and motor
windings to very high for some timer motors and
components on control boards. Usually it is more
important to know if there is a path for current flow through
a device (continuity ) that to know the exact resistance
(ohms) of the device.
Continuity tests of switches will show virtually no
resistance across a closed contacts. Resistance, even
low value indicate burned or dirty contacts in a switch.
When checking components or circuit paths for
continuity, external wiring should be disconnected to
eliminate false readings through external paths. Isolate
what you want to test.
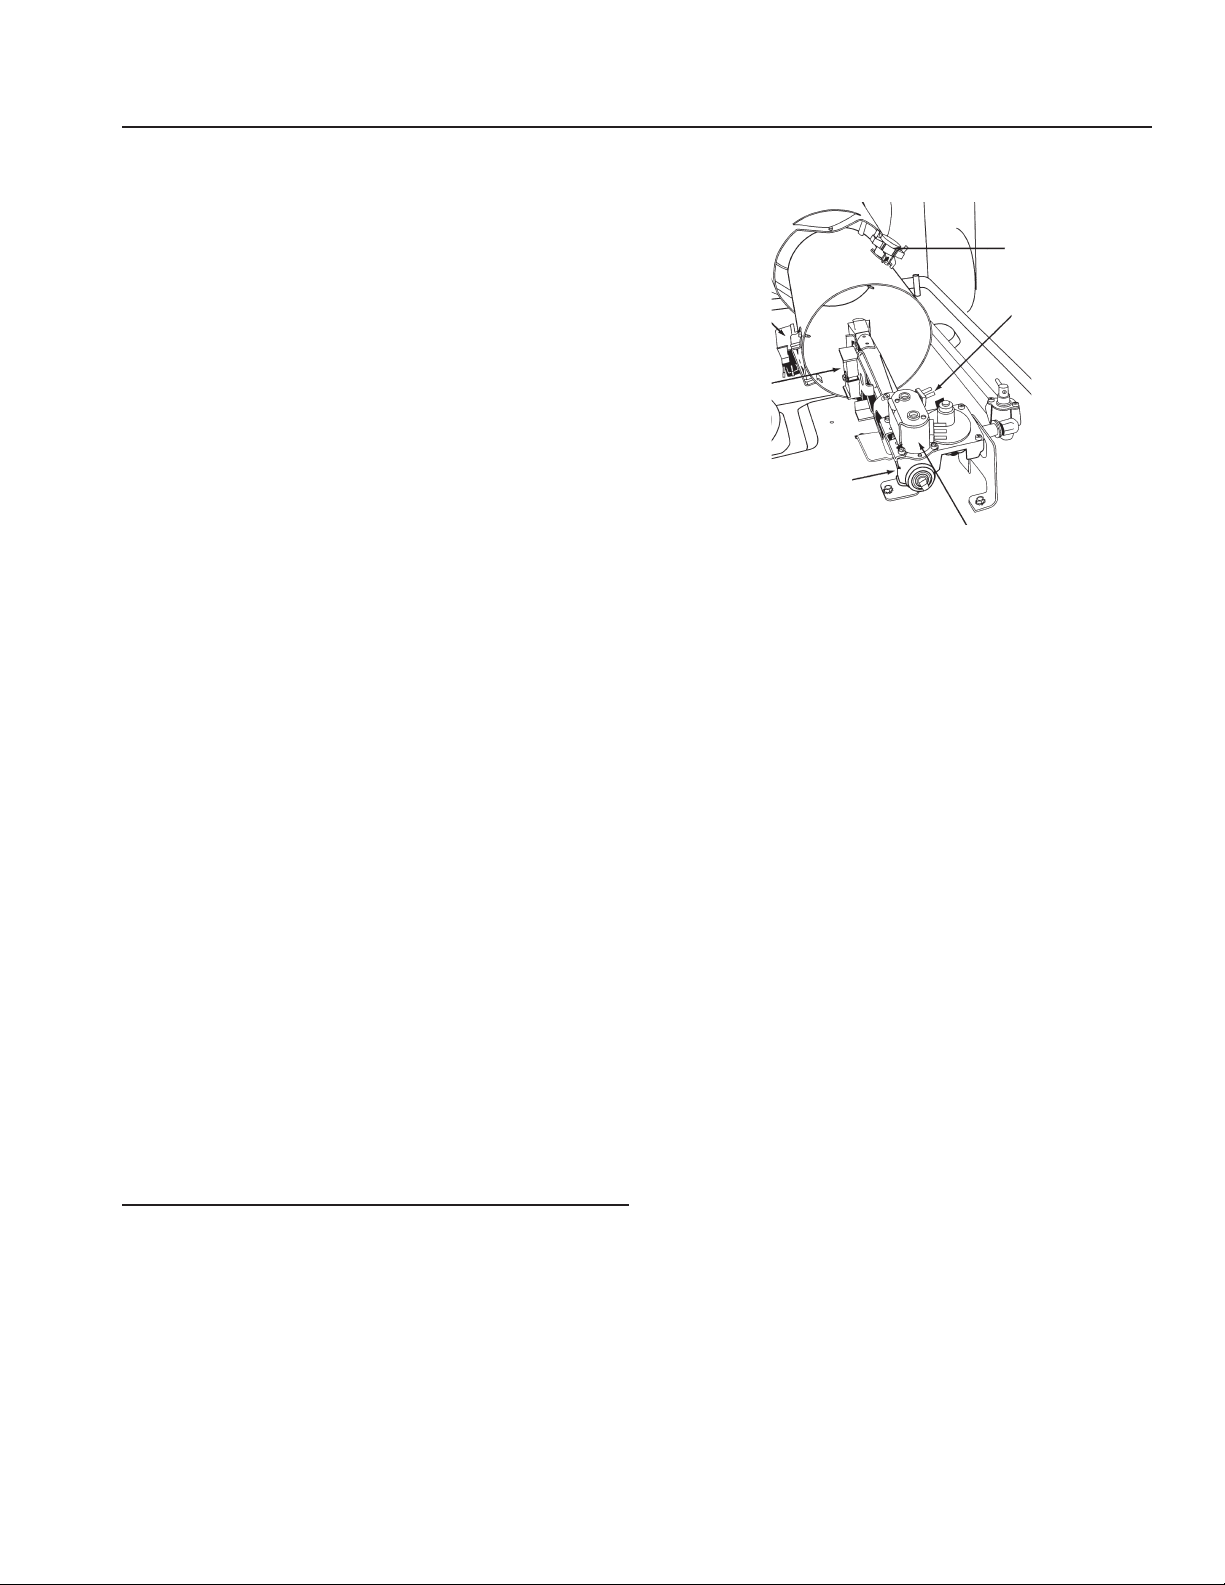
Drive Motor Check
The motor features a leadless motor connection,
comprised of a quick connector wire harness which
connects directly to the motor. The connector has two
locking tabs securing the connector to the motor switch.
Press on both locking tabs to release the connector from
the motor switch.
Press Here to Release
Electrical components fall into two general categories.
1. Loads - Devices that use or consume electricity.
Examples would include drive motor, timer and
solenoids coils.
2. Switches - Devices that control the supply of
electricity to the load or loads in a circuit.
Examples include lid switches, timer contacts
selector switch and relay contacts.
Connector
Motor Switch
With the wire harness connector removed, press inward
on the brown actuator disc in the motor. The start and run
winding can now be checked for proper ohms. Place the
leads from an ohm meter on the proper terminals as listed
in the following chart.
Using an ohm meter, you can also check the wiring
harness for continuity from the timer to the motor.
14 16022904 Rev. 0 ©2004 Maytag Appliances Company
Page 15
Troubleshooting Procedures
!
WARNING
To avoid risk of electrical shock, personal injury or death, disconnect power to unit before servicing, unless testing
requires power.
Centrifugal Switch
Checking heater/gas valve and motor:
1. Disconnect the wire harness from the motor.
2. Place ohm meter leads to terminals 1 and 2.
3. With your thumbs, depress the BROWN disc
located behind the motor switch on the motor
shaft. The BROWN disc actuates the lever of
the motor switch when the motor is at rest. At
optimum motor speed, the disc moves away from
the switch lever. When the disc is pressed in
toward the windings, the actuator arm of the
centrifugal switch will be relaxed. This allows the
contacts to close, completing the heater circuit.
If no continuity is found when the disc is
depressed, change the centrifugal switch.
Motor
Switch
Winding Terminal Terminal Ohms
Start 3 4 3.00
Run 5 4 2.25
Motor Test Cord
A motor test cord may be used to electrically check
operation of the various electrical components without
removing them from the unit. Testing in this manner
determines whether or not the part will function
independently of other electrical components. In order to
make an accurate test, proper connection of the motor
test cord is important.
Drive Motor Test
The motor may be checked in the dryer or removed and
checked.
Two test leads are required to check operation of the drive
motor. To check the motor for operation, hook the test
cord to terminals 4 and 5.
Side View of Motor
Air Shutter Adjustment
The air shutter has been
stamped "LP" and "N" (for
Natural). Loosen the screw
holding the shutter, rotate the
shutter until the end of the slot
(labeled for the gas to be used)
contacts the screw. Tighten the
screw to lock the shutter in
place.
Gas Type
BTU Per
Cu. Ft
Pressure
Switch
Specific
Gravity
Orifice
Size
Natural
1050 2050
3.5
0.65
41
"Brown" Disc
Switch Actuator
LP
11
1.53
53
©2004 Maytag Appliances Company 16022904 Rev. 0 15
Page 16
Troubleshooting Procedures
!
WARNING
To avoid risk of electrical shock, personal injury or death, disconnect power to unit before servicing, unless testing
requires power.
Manometers
Insufficient gas flow can cause problems. Therefore,
checking the gas pressure at the time service calls are
performed may prevent a return call.
Gas pressure can be checked with an instrument called a
"manometer." This device can detect a "low" LP tank,
restricted gas flow, bad gas valve, a malfunctioning
pressure regulator, too many gas appliances operating off
of a small supply line, or an improperly converted
appliance from Natural to LP gas.
Other types of manometers exist; however, the type of
manometer we will discuss in this manual is a "U" shaped
tube in which water is added. Both ends are open so the
water can equalize and seek its own level, which will be
the same in both arms of the "U" shaped tube.
A flexible rubber hose is connected to the lower, open end
of the manometer and to the gas source. Gas pressure is
exerted on one of the water columns, pushing it down.
The water level then rises in the other column. The
difference in water levels equals the measure of gas
pressure.
The water column (W.C.) for a Maytag dryer is 3.5" W.C.
for Natural gas and 11" W.C. for LP.
How to Use:
1. Disconnect power supply to unit.
2. Remove front panel.
3. Shut off the gas to the dryer.
4. Install a 1/4" tapered fitting at the gas valve pressure
tap. Use thread seal tape or compound on fitting.
5. Fill the manometer tube with water until each side
equalizes at "0" water column.
6. Push the end of the manometer hose onto the 1/4"
fitting located on the gas valve.
7. Connect hose to one end of the manometer.
8. Turn on the gas and reconnect dryer to power. Run
the dryer in a heat cycle. Read the manometer with
the burner ON, (check for gas leaks).
9. When the gas is on, the amount of water column
present is equal to the total amount of deflection
shown in the manometer.
Note: Once the test is completed, make sure the
tapered fitting is removed from the gas valve and
the plug is repositioned into the gas valve and
resealed with pipe seal. Check for gas leaks
again with a soap or bubble solution. NEVER
USE OPEN FLAME TO CHECK FOR GAS
LEAKS.
Note: IF HIGH WATER COLUMN PRESSURE IS
DETECTED; the gas flame can damage the
flame spreader on the burner. (this can be
cuased by the wrong orfice, improper air mixture
or high gas pressure. If pressure is as high as
suspected, contact the local gas utilities
company to check the outside regulator.)
Gas Valve
Orfice
Valve
Pressure Tap
16 16022904 Rev. 0 ©2004 Maytag Appliances Company
Page 17
Troubleshooting Procedures
!
WARNING
To avoid risk of electrical shock, personal injury or death, disconnect power to unit before servicing, unless testing
requires power.
Mechanical Troubleshooting
Will Not Run
If dryer will not start or run, check the following:
• All wires are hooked up to their corresponding
terminals.
• Dryer is plugged in.
• Blown fuse or circuit breaker.
• Door switch functional...door closed.
• Push-to-start switch functional.
• Timer functional...set in a cycle.
• Drive motor functional.
• Blown thermal fuse.
If drive motor runs, but the tumbler will not turn, check the
following:
• Belt off or broken/damaged.
• Idler tension spring too weak or stretched.
• Idler pulley jammed or stuck.
If dryer runs a few minutes and then stops - motor
overload protector opens, check the following:
• Lint buildup around drive motor.
• Low voltage present.
• Blower impeller blocked in blower housing.
• Drive motor - start switch contacts stuck closed.
If dryer blows fuses or trips circuit breaker, check the
following:
Electric Models
• The amperage readings are at 240 volts. One line
will be 24 amps and other line will be 21 amps.
The neutral line will be at 4 amps. If the above
amperages are present, then the house wiring,
fuse box or circuit breaker should be suspected.
• Shorted heating element to housing.
• Incorrect wiring or a wire shorting to ground.
• Drive motor winding shorting to ground.
Gas Models
• During ignition, the dryer will draw 7 amps. With
the burner ON, the dryer will draw 4.5 amps. If
the dryer is drawing amperages below this, then
the house wiring, fuse box or circuit breaker are
suspected to be at fault.
• Igniter harness loose and shorted to base.
• Incorrect wiring or wire shorted to ground.
• Drive motor winding shorting to ground.
©2004 Maytag Appliances Company 16022904 Rev. 0 17
Will Not Shut-Off
On time dry settings, check the following:
• Timer motor receiving proper voltage.
• Check timer motor connections.
• Timer functional.
Will Not Dry
If dryer will not heat (motor runs), check the following:
• Restricted exhaust caused by plastic or thin
foil flexible duct.
• Open heating element.
• Hi-Limit thermostat trips too soon or is open.
• Cycling thermostat trips too soon or is open.
• Temperature selector switch mis-wired or contacts
open.
• Timer functional.
• Cycle selector switch mis-wired or contacts open.
• Drive motor centrifugal start switch not allowing
voltage to gas valve or heating element.
If improper drying/clothes wrinkled/rough texture/taking
too long to dry, check the following:
• Restricted exhaust caused by plastic or thin foil
flexible duct.
• Lint filter is not clean.
• Restriction in exhaust.
• Outside exhaust hood damper door stuck closed.
• Exhaust too long, too many elbows, flex ductwork
installed.
• Poor makeup air available for the dryer.
• Incorrect tumbler speed. Tumbler belt slipping.
• Blower impeller bound; check for foreign material
in blower area.
• Customer overloading dryer.
• Check clothing labels for fabric content and cycle
selected.
• Gas valve coil opens - weak point in coil opens
when stressed under heated conditions.
• Clothes too wet due to insufficient spin- out by
washer.
Noisy and/Or Vibration
• Thumping. Check for loose tumbler baffle, rear
tumbler roller(s) worn or misaligned, out-of-round
tumbler or high weld seam on tumbler.
• Ticking. Check for loose wire harness or object
caught in blower wheel area.
• Scraping. Check for front or rear bulkhead
felt seal out of position or worn tumbler front
Rulon™ bearings.
• Popping or squealing sound. Check for a sticky or
frayed belt.
Page 18
Troubleshooting Procedures
!
WARNING
To avoid risk of electrical shock, personal injury or death, disconnect power to unit before servicing, unless testing
requires power.
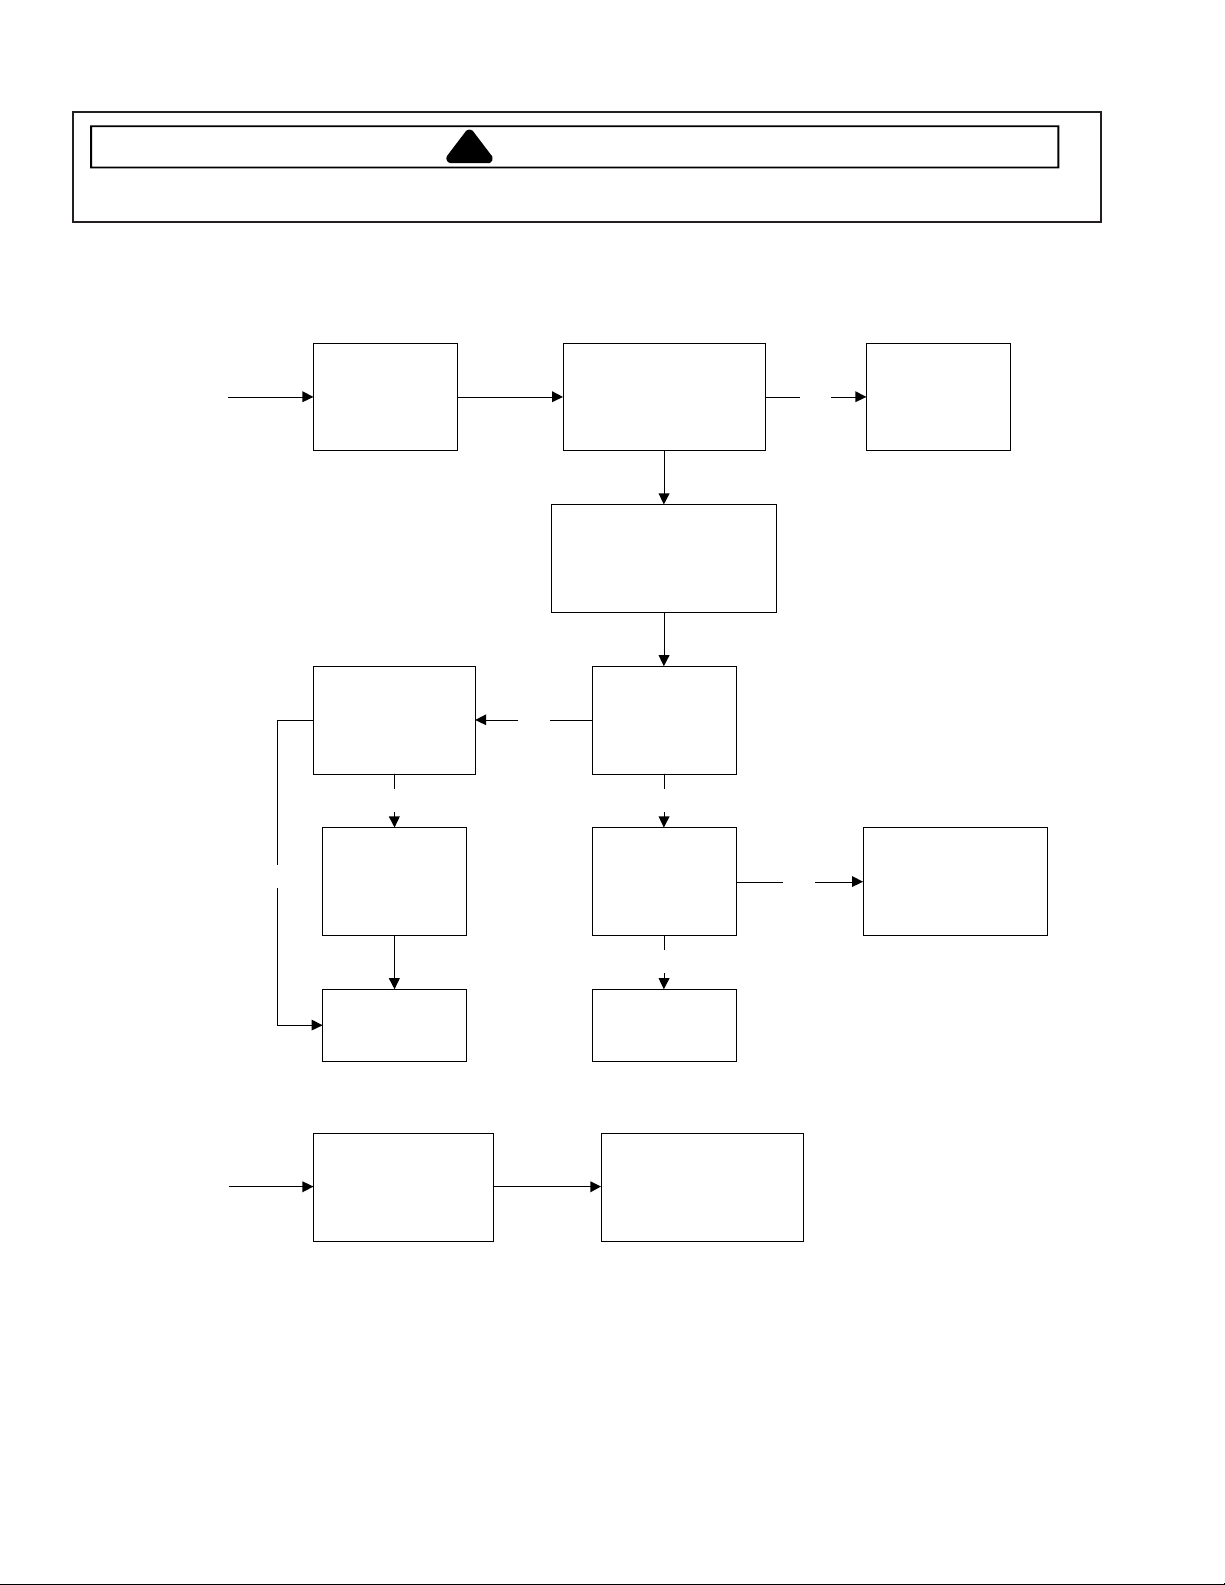
Single Dryer Troubleshooting Guide
Display Is
Blank
Make sure dryer is
Yes
plugged in to live
power source
Is the exhaust tube
nipple on the side of
the display
damaged?
No No
Initiates the
manual reset
sequence
Enter service mode
using service switch
does display contain
a diagnostic code?
Unplug dryer and check wiring
and termination between
transformer, service switch,
and control board.
Plug in dryer, open
service door is
Yes
there 26 VDC
across the service
door. switch?
Does 115 VAC
appear across the
primary of the
transformer?
Yes
Yes
See diagnostic
code guide.
Replace the
transformer, inspect
control board for burned
components and replace
it if damaged
No
Abnormal
Display
Function
If problem still
exists replace the
control board
Unplug the machine
then plug it back in. If
problem still exist,
initiate the manual reset
sequence.
Check wiring to
transformer and
power at outlet.
If problem still exists,
replace the control board.
18 16022904 Rev. 0 ©2004 Maytag Appliances Company
Page 19
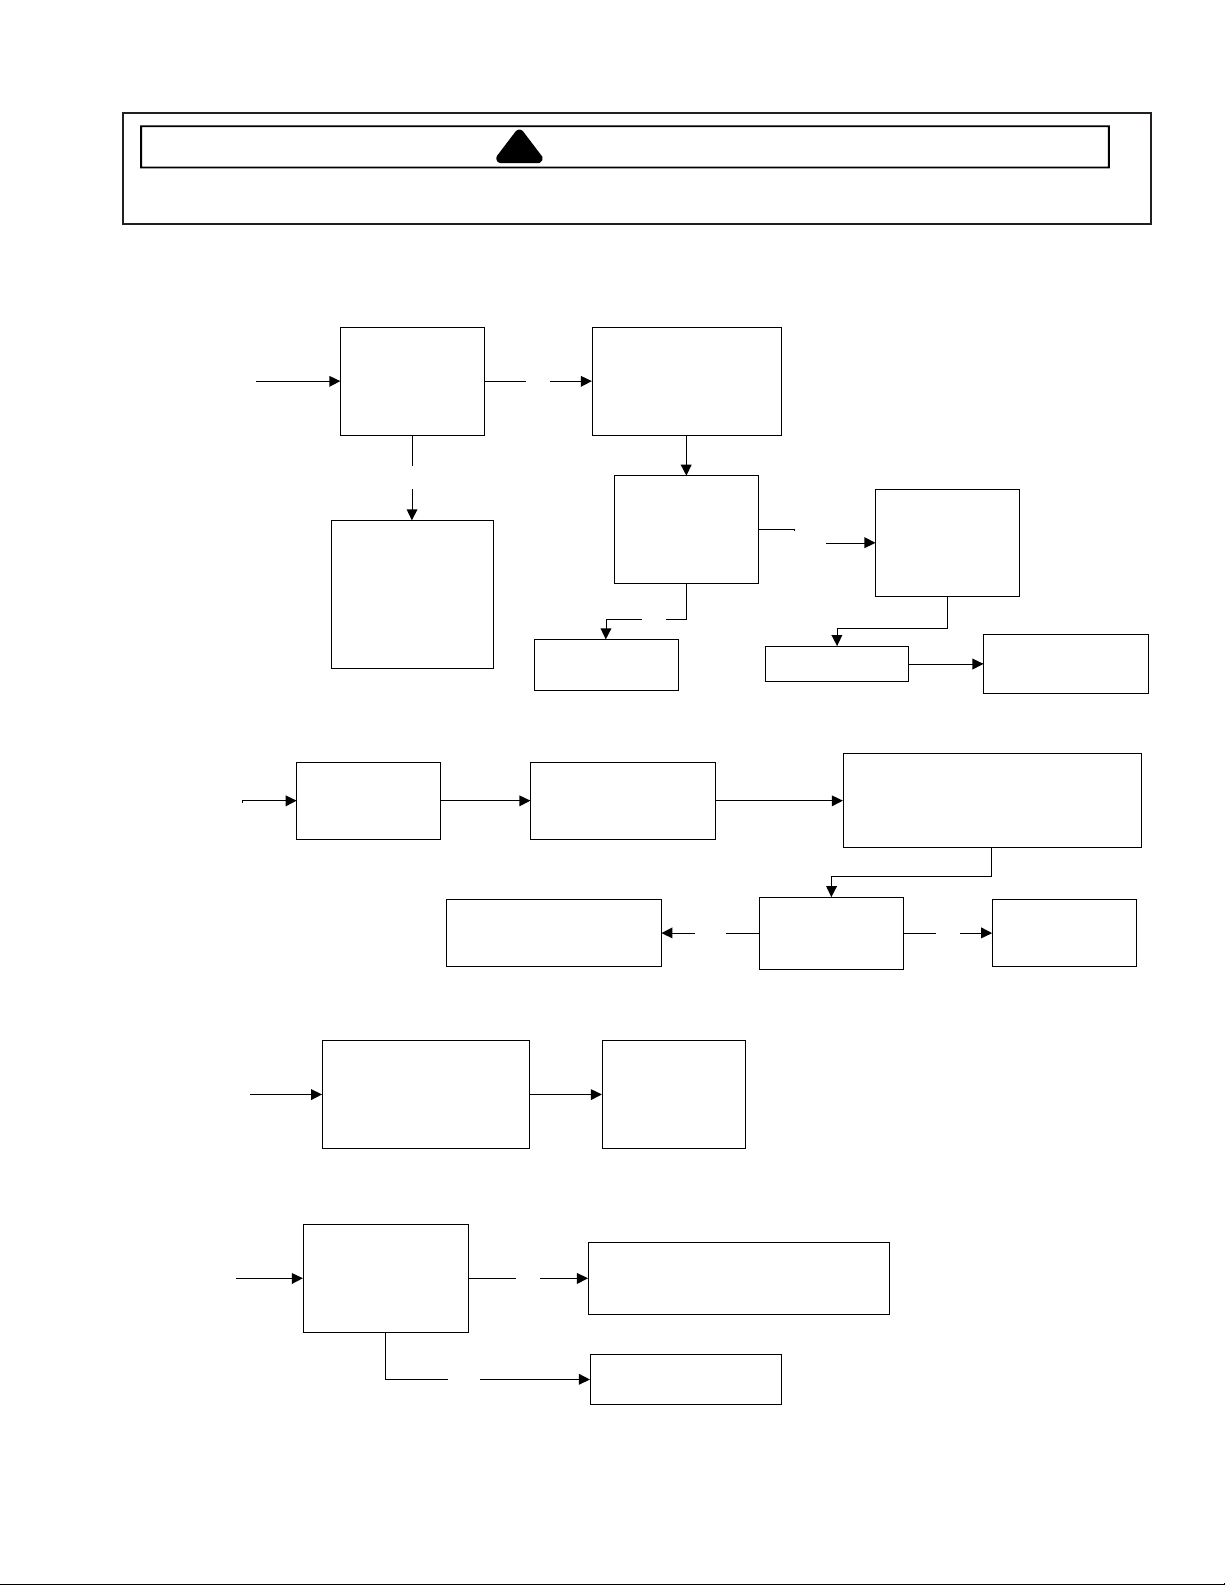
Troubleshooting Procedures
!
WARNING
To avoid risk of electrical shock, personal injury or death, disconnect power to unit before servicing, unless testing
requires power.
Single Dryer Troubleshooting Guide
Dryer
Stopped
with Zero
Minutes
Remaining
In The
Display
Open
corresponding
dryer door. Did
display change?
Yes
The dryer door must
be opened after the
end of a cycle before
the dryer will operate
again. Dryer is
operating normally.
No
Replace door
Unplug dryer and open
doors. Check continuity
of problem door switch
and replace it if shorted.
Does door switch
open and close
properly?
No
switch.
Yes
Plug In Dryer
Check wiring and
termination
between door
switch and control
board.
If problem persist,
replace control board.
Cannot
Enter Or
Exit
Operator
Mode
Operator
Options
Revert To
Defaults
Dryer
Runs
Without
Program
Selection
Check adjustment
of service switch
and lock.
problem still exists, replace
Setup operator options as
desired unplug machine for
minimum 15 seconds, then
plug in the dryer.
Unplug the dryer is
there continuity from
GG2 to GG3?
Check wiring and
terminations between
service switch and
control board.
Reconnect AA1. If the
the control board
persists, replace
No
Plug the dryer in . If problem still exists,
perform the single dryer diagnostics
If problem
control board
program.
Unplug the dryer and connector AA1.
Check for continuity between the yellow
wire (pin 2) and the orange wire (pin 3)
Does service
switch open and
close properly?
coming from the service switch.
NoYes
Replace service
switch
Yes
©2004 Maytag Appliances Company 16022904 Rev. 0 19
Replace the control
board.
Page 20
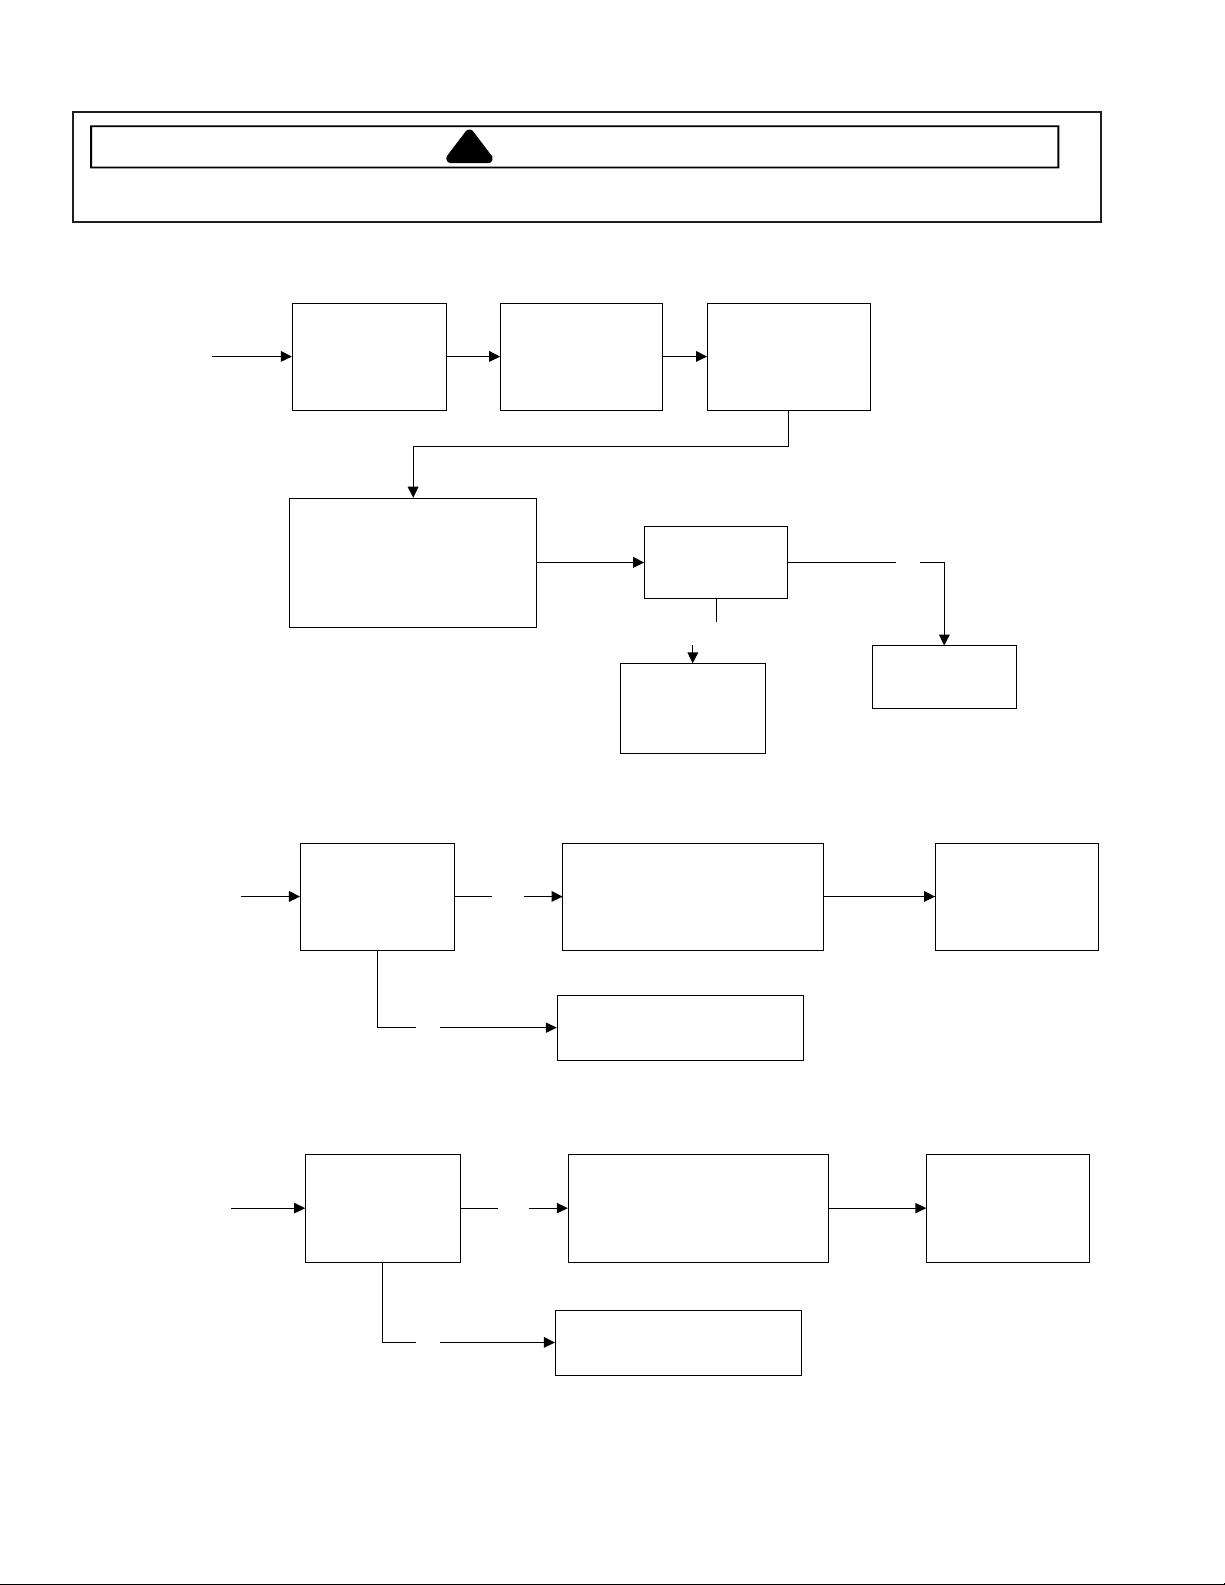
Troubleshooting Procedures
!
WARNING
To avoid risk of electrical shock, personal injury or death, disconnect power to unit before servicing, unless testing
requires power.
Single Dryer Troubleshooting Guide
Display
Flashes In
User Mode
Display
shows "Add"
Or "Available"
When Not In A
Cycle And No
Coins Have
Been Added
Make sure that the
vault box is in all the
way. If it is out, the
display will flash.
Unplug dryer. Disconnect lower
connector from control board.
check for continuity between
terminals 7 and 8 of connector
while cycling vault switch.
Is price suppression
mode selected?
Yes
Check for the proper
adjustment of vault
switch.
Reconnect AA1. If
problem persists,
Normal operation. Price
suppression is typically used when
a different control system that has
its own display is responsible for
starting the machine.
Check wiring and
termination between
vault switch and
Does vault switch
open and close
properly?
Yes
replace control
board
control board.
No
Replace vault
switch.
If price suppression
is not desired.
Deselect it in service
mode.
No
Go to the section "Abnormal
Display Or Function"
Coins
Dropped Into
Machine And
Credited Are
Eventually
Is the clear escrow
mode selected?
Yes
Normal operation. Money in escrow
is cleared out after 30 minutes
pass with no cycle in process or
coin related activity.
If clear escrow mode
is not desired,
deselect it in service
mode.
Lost
No
Go to the section "Abnormal
Display Or Function"
20 16022904 Rev. 0 ©2004 Maytag Appliances Company
Page 21

Troubleshooting Procedures
!
WARNING
To avoid risk of electrical shock, personal injury or death, disconnect power to unit before servicing, unless testing
requires power.
Single Dryer Troubleshooting Guide
Control
Does Not
Respond To
Program
Key Inputs
Enter service mode.
Does display contain
a diagnostic code?
No
Does the keys work
in service mode?
Yes
Exit service mode.
Does the display
show "Select
Cycle"?
No
Put the proper
number of coins
into the coin drop.
Yes
No
Yes No
See diagnostic code
troubleshooting guide
Unplug dyer and check
membrane switch tail
connection to the board.
Plug the dryer back in..
Is the door shut? Close the door.
Yes
Does the help mode
show that the door is
shut?
No
Unplug dryer and check
continuity of the door
switch when the door is
opened and closed.
Yes
If problem persists replace
membrane switch.
If problem persists,
replace control board.
Unplug the dryer , then
plug it back in.
If problem
persists, replace
control board.
Does door switch
open and close
properly?
Yes
Unplug dryers and check
wiring and termination
between door switch and
control board.
©2004 Maytag Appliances Company 16022904 Rev. 0 21
No
Adjust door switch
or replace it if
necessary.
If problem
persists, replace
control board.
Page 22

Troubleshooting Procedures
!
WARNING
To avoid risk of electrical shock, personal injury or death, disconnect power to unit before servicing, unless testing
requires power.
Single Dryer Troubleshooting Guide
Dryer Drum
Will Not
Turn
Enter service mode
using the service
switch.
No
Did a diagnostic code
appear?
No
Clear the diagnostic codes.
Exit service mode.
Does the display
show Zero minutes?
No
Start a diagnostic cycle .
Does 115 VAC appear
across the motor?
Let the motor and
thermal protector cool for
5 minutes.
Yes
Yes
Yes
See the single
dryer diagnostic
code guide.
Replace the door
switch.
Is the drum belt in the
proper position and not
damaged?
No
Position the belt
correctly or
replace the belt.
Check wiring and
termination between
control board, motor
relay, door switch, motor
and thermal fuse.
Does 115 VAC appear
across the motor?
No
Replace the
control board.
No Yes
Does the drum
Yes
turn?
Replace the motor
Normal operation
22 16022904 Rev. 0 ©2004 Maytag Appliances Company
Page 23

Troubleshooting Procedures
!
WARNING
To avoid risk of electrical shock, personal injury or death, disconnect power to unit before servicing, unless testing
requires power.
Single Dryer Troubleshooting Guide
No
Response
To Coin 1 or
Coin 2
Is the display blank?
Yes
See "Blank
Display " section.
Enter service mode using using
No
service switch. Does display
contain a diagnostic code?
Is the coin slide option
selected?
No
Is debit only mode
selected?
No
Is price suppression
selected?
No
Drop a coin through the coin
1 (or coin 2) drop. does the
"*" in the display flash?
Yes
Yes
Yes
Yes
See diagnostic
code guide
Timings for the coin slide
mode will cause coins to
not be counted .
Deselect the coin slide
mode.
Coins are ignored if in
debit only mode. Select
the coin and debit or coin
only mode.
The price and amount
remaining to be added
do not display in price
suppression mode.
Go to the section
"Abnormal Display
Or Function"
If the problem still
exists, replace the
optic sensor.
If the problem still
exists, replace the
control board.
Check the coin
mechanism for
proper adjustment.
Clean the optic
sensor, if
necessary
No
Is the resistance
between the red wire and
the white wire in the coin
1 connector greater than
Check wiring and termination
between coin 1 (or coin 2)
drop and the control board.
Unplug dryer and the
coin 1 connector
NoNo
10K ohms?
Make sure that there is not
too much ambient light. If
problem still exists, replace
the coin1 (or coin 2) optic
sensor.
©2004 Maytag Appliances Company 16022904 Rev. 0 23
Page 24

Troubleshooting Procedures
!
WARNING
To avoid risk of electrical shock, personal injury or death, disconnect power to unit before servicing, unless testing
requires power.
Single Dryer Troubleshooting Guide
Will not
respond to
handheld
PDA
Will Not Keep
Time Of Day
During Power
Interruptions
Does PDA
respond to other
machines?
No
PDA has failed.
Is a battery
installed?
No
A battery must be installed
in order to keep time of day
during power interruptions.
Check optic
Yes
Does greater than
Yes No
3.4VDC appear
between the red
and black wires of
the battery?
Check battery
connector and
window for
obstructions, dirt,
or scratches.
If problem still
exists replace
control board
Yes
termination
Replace Battery
If problem
persists, replace
control board.
No Decimal
Point Is Used
In The Price
Is Add coins mode
selected?
Yes
Normal operation. Add coins mode
is used in some countries as
needed based on local coin
denominations.
If add coins mode is
not desired, deselect
it in service mode.
Display
Go to the section "Abnormal
Display Or Function"
Dryer
Dries Too
Slowly
No
Check for exhaust
restriction
24 16022904 Rev. 0 ©2004 Maytag Appliances Company
Page 25

Troubleshooting Procedures
!
WARNING
To avoid risk of electrical shock, personal injury or death, disconnect power to unit before servicing, unless testing
requires power.
Single Dryer Troubleshooting Guide
Dryer Will
Not Heat
Open gas supply valves
for gas dryer (Gas Dryer
Only) . Check all circuit
breakers and fuses that
feed electric dryer.
Replace the 140
deg. thermostat.
If the problem still
exists, replace the
control board.
Replace the
155 deg.
thermostat
Unplug dryer. Check
wiring and terminations
between control board,
heater relay, heater,
thermostats and motor
Does the help
No
Unplug the dryer .
No Yes No
does the 155 deg.
mode show that
the 140 deg.
thermostat is
closed?
Yes
Unplug the dryer
does the high limit
thermostat show
continuity
Yes
thermostat show
continuity?
No
Plug the dryer in. Allow
the thermostats to cool.
Ensure that they are
close to room
temperature.
Replace high
limit
thermostat.
Unplug dryer. At room
temperature is the
resistance of the heating
element less than 20
ohms? (Electric dryer
only)
Replace the
heater coil
Yes
Check motor centrifugal
switch and replace if
necessary
Inspect the heater relay
and replace if necessary
(Electric Dryer only)
If problem persists,
replace the control
board
©2004 Maytag Appliances Company 16022904 Rev. 0 25
Page 26

Troubleshooting Procedures
!
WARNING
To avoid risk of electrical shock, personal injury or death, disconnect power to unit before servicing, unless testing
requires power.
Single Dryer Diagnostic Program
The dryer must be at or near
Dryer
Diagnostic
Program
room temperature and plugged
in with the door closed to run
this program. No user program
should be in progress
Enter operator mode
using the service
switch
Push the delicates
program keypad
for more than 1
second
Are all of the
segments in the
display working?
Yes
Push the permanent
press program keypad
to start the diagnostic
program
Is there a
code?
No
Yes
diagnostic
code?
board
Yes
No Yes
No
Replace the control
Is there diagnostic
Is the dryer drum turning?
No
See the single dryer
diagnostic code guide
See the single dryer
diagnostic code guide
See "Dryer Drum Will Not
Turn" in the troubleshooting
guide
Is the heater on (Allow
ample time for the gas
flame to ignite)?
Yes
Dryer is operating
normally
To cancel the diagnostic
program, push the delicates
program keypad
No
See "Dryer Will Not
Heat" in the
troubleshooting guide
Exit operator mode using
the service switch
26 16022904 Rev. 0 ©2004 Maytag Appliances Company
Page 27

Troubleshooting Procedures
!
WARNING
To avoid risk of electrical shock, personal injury or death, disconnect power to unit before servicing, unless testing
requires power.
Single Dryer Diagnostic Code
d1
Door Sense
Problem
d4
Motor Control
Circuit Problem
Try to Clear the diagnostic
code by pressing the
Delicates keypad for more
than 1 second while the
code is displayed.
Try to Clear the
diagnostic code by
pressing the
Delicates keypad
for more than 1
second while the
code is displayed.
Did the
diagnostic code
clear?
No
Replace the
control board.
Push the Perm
Press program
keypad to start the
diagnostic
program
Did the
diagnostic code
reappear?
indication.
Yes
No
Control board
is operating
normally.
If diagnostic code still
appears, the power
line is noisy and
should be tested.
indication.
Control board
is operating
normally.
False
False
d5 Blocked Coin 1or
d13 Blocked Coin 2
or Coin Drop circuit
Problem
Fix the power line
disturbance.
Unplug dryer and
check the wiring
and termination
between the coin
drop and the
control board.
Yes
Check the wiring between the
control board and the motor.
Is the power
Yes
line supply to the
machine noisy?
Check for an
object blocking the
coin drop optic
sensor. It takes 8
seconds for the
control to
recognize the
blockage
No
If the problem still
exists, replace the
coin drop coin
sensor.
Replace the
control board.
If the
problem
still exist,
replace the
control
board.
©2004 Maytag Appliances Company 16022904 Rev. 0 27
Page 28

Troubleshooting Procedures
!
WARNING
To avoid risk of electrical shock, personal injury or death, disconnect power to unit before servicing, unless testing
requires power.
Single Dryer Diagnostic Code
d9
Voltage Problem
Less Than 90
VAC
Try to clear the
diagnostic code by
pressing the Delicates
keypad for more than 1
second while the code
is displayed.
Check installation to
insure proper power
going to this dryer. If
d9 persist, check the
wiring or replace the
transformer
If problem persists replace
the control board.
Exit service mode , and pause for
10 seconds, enter service mode.
Did the
diagnostic code
cancel?
No
Are other machines
at this location giving a d9
diagnostic code?
Yes
YesNo
Low voltage was
sensed on the
power line, but is
now ok.
Check installation
to insure proper
power going to all
of the dryers
d12
Motor Sensed
Problem
d16
PR Models Only
Clear diagnostic
code by pushing a
Delicates keypad
for at least 1
second while code
is displayed.
Is card reader
installed?
No
Install reader call distributor to reset control
board. PDA will not reset board.
diagnostic code
Check wiring
between debit
card reader
and control
Does
remain?
board
Yes
No
Power down and
up machine to
reset card reader
Replace control
board
False indication
control board
Replace card
reader or
control board.
28 16022904 Rev. 0 ©2004 Maytag Appliances Company
Page 29

Troubleshooting Procedures
!
WARNING
To avoid risk of electrical shock, personal injury or death, disconnect power to unit before servicing, unless testing
requires power.
Stack Dryer Troubleshooting Guide
Display Is
Blank
Abnormal
Display Or
Function
Make sure both
dryers are plugged
into live power
source.
Unplug dryers. Check wiring
and terminations between
transformer, service switch
and control board.
Initiate reset
sequence. If
problem persists
replace control
board.
Cycle power to
both dryers.
Yes No
Enter operator
mode using
service switch. Is
diagnostic code
displayed?
No
Plug in dryer.
Does 115VAC
appear across the
primary of the
transformer?
Does each of 6.7 VAC,
22.6 VAC and 20.7 VAC
appear across
transformer secondary?
Initiate a service
cycle.
Yes
Yes
No
If problem
persists, initiate
reset sequence.
See Diagnostic
code Trouble
Shooting Guide.
Check wiring to
transformer, power
at outlet and
breaker.
Replace the transformer.
Inspect control board for
burned components and
replace it if damaged.
If problem persist,
replace control
board.
Upper or
Lower Dryer
Has Zero
Minutes
Remaining
Open
corresponding
dryer door. Did
display change?
No
Unplug both dryers and
open doors. Check
continuity of problem
door switch and replace
it if shorted.
In Display.
Yes
Check wiring and
The dryer door must
be opened after the
end of a cycle. This
is a safety check on
the door switch.
©2004 Maytag Appliances Company 16022904 Rev. 0 29
Does door switch
open and close
properly?
No
Replace door
switch.
Yes
termination
between door
switch and control
board.
If problem persist,
replace control board.
Page 30

Troubleshooting Procedures
!
WARNING
To avoid risk of electrical shock, personal injury or death, disconnect power to unit before servicing, unless testing
requires power.
Stack Dryer Troubleshooting Guide
Will not
respond to
handheld
PDA
Control
Board Does
Not
Respond To
Keypads
Does PDA
respond to other
machines?
No
PDA has failed.
When service door is
closed, dryer door
must be closed for
corresponding
keypads to work.
Enter operator mode
using service switch.
Does display contain
a diagnostic code?
Check optic
Yes
Yes
Does control board
No No
program keys?
window for
obstructions, dirt,
or scratches.
If problem still
exists replace
control board
Does Display
show "Select
Cycle"?
respond to
No
Cycle price must
be satisfied before
keypads will work.
Unplug dyers and
check problem
membrane switch
tail connection.
Yes
See diagnostic code
troubleshooting guide
Unplug dryers and check
wiring and termination
between door switch and
control board. Replace
door switch if necessary
Yes
Plug in dryer. If problem
persists replace
corresponding
membrane switch.
If problem
persists, initiate
reset sequence.
If problem
persists, replace
control board.
30 16022904 Rev. 0 ©2004 Maytag Appliances Company
Page 31

Troubleshooting Procedures
!
WARNING
To avoid risk of electrical shock, personal injury or death, disconnect power to unit before servicing, unless testing
requires power.
Stack Dryer Troubleshooting Guide
No
Response
To Coin 1
Or Coin 2
Is display blank
Yes
See "Blank
Display" section in
troubleshooting
guide.
Check lighting. Too
much ambient light in
the coin drop will cause
coins to not be
recognize.
If problem persists
replace coin
sensor.
No
Is a d5 or d13
displayed in
operator mode?
Yes No
See diagnostic
troubleshooting
guide
Unplug dryer disconnect
No
coin sensor and check
resistance between red and
white wire. Is resistance
greater than 10K ohms?
Is coin slide option
selected?
Check the coin
mechanism for
proper adjustment
Yes
Yes
Wait 20 seconds. If
replace control board.
Timing for the coin slide
YesNo
recognized. Deselect the
Reconnect
connector and
plug in dryer.
problem persists
mode will cause coin
drop coins to not be
coin slide mode.
Check wiring and
termination
between coin drop
and control board.
Will Not
Keep Time
Of Day
During
Power
Is a harnessed
battery installed?
Yes No
Does greater than
3.4VDC appear
between the red
and black wires of
the battery?
Replace Battery
Interruption
s
Dryer
Dries Too
Slowly
©2004 Maytag Appliances Company 16022904 Rev. 0 31
No Yes
A battery must be
installed in order
to keep time of
day during power
interruptions.
Check for exhaust
restriction
Check battery
connector and
termination
If problem
persists, replace
control board.
Page 32

Troubleshooting Procedures
!
WARNING
To avoid risk of electrical shock, personal injury or death, disconnect power to unit before servicing, unless testing
requires power.
Stack Dryer Troubleshooting Guide
Dryer Will
Not Heat
Open all gas supply
valves for gas dryer.
Check all circuit
breakers and fuses that
feed electric dryer.
Unplug dryer.
Does thermal fuse
show continuity?
No No No
Replace thermal
fuse and
thermostats.
Check motor
centrifugal switch
and replace if
necessary.
Unplug dryer does
Yes Yes
thermostat show
Replace high
limit thermostat.
Inspect heater
relay and replace if
(electric dryer)
Unplug dryer. Check
wiring and terminations
between control board,
heater relay, heater and
motor
high limit
continuity?
Check for
exhaust
restrictions.
necessary.
Unplug dryer.
Does 155 deg.
thermostat
show
continuity?
Replace 155
deg.
thermostat.
Yes
Check wiring and
termination
between
thermistor and
control board
room temperature is
Yes
the resistance of the
heating element less
(Electric dryer only)
Unplug dryer. At
than 20 ohms?
No
Replace heating
element.
Cannot
Enter Or
Exit
Operator
Check adjustment
of service switch
and lock.
Replace
thermistor.
Check wiring and
terminations between
service switch and
control board.
Disconnect harness
from thermistor check
between 5K and 15K
ohms at room
temperature?
Unplug dryer. Disconnect upper
connector from control board.
Check for conuity between terminal
13 and 14 of connector while
cycling the service switch
If problem persist,
YesNo
replace control
board.
Mode
If problem persists, replace
control board
Does service
switch open and
close properly?
NoYes
Replace service
switch
32 16022904 Rev. 0 ©2004 Maytag Appliances Company
Page 33

Troubleshooting Procedures
!
WARNING
To avoid risk of electrical shock, personal injury or death, disconnect power to unit before servicing, unless testing
requires power.
Stack Dryer Troubleshooting Guide
Operator
Options
Revert To
Defaults
Display
Flashes In
User Mode
Dryer
Runs
Without
Program
Selection
Setup operator
options as desired
unplug machine for
minimum 15
seconds, then plug in.
Check wiring and
termination
between vault
switch and control
board.
If problem
persists, replace
control board
Check for welded
motor relay and
replace if necessary.
If problem
persists, replace
control board
Unplug dryer. Disconnect lower
connector from control board.
check for conuity between
terminals 7 and 8 of connector
while cycling vault switch
Does vault switch
open and close
properly?
If problem
persists, initiates a
dryer service
cycle.
NoYes
Replace vault
switch.
Dryer
Drum
Will Not
Check wiring and termination
between control board, motor
relay, door switch, and motor.
Does dryer door
switch open and
close properly?
No
Replace Door
switch.
Turn
Yes
Close the dryer door and enter
operator mode using service
switch. Push a delicates keypad
for at least 1 second
If problem
persists, replace
control board.
©2004 Maytag Appliances Company 16022904 Rev. 0 33
Does 25 VDC appear
across coil of motor
Did a diagnostic code
appear?
No
relay?
Yes
YesNo
Replace motor
See the PD
stacked dryer
diagnostic code
troubleshooting
guide.
relay.
Page 34

Troubleshooting Procedures
!
WARNING
To avoid risk of electrical shock, personal injury or death, disconnect power to unit before servicing, unless testing
requires power.
Stack Dryer Diagnostic Program
Dryer
Diagnostic
Program
Enter Operator
Mode by unlocking
the service switch
If any segments of display
are not flashing. Replace
the control board.
Is dryer drum
turning?
Yes
If a diagnostic
code is displayed
refer to
corresponding
section of trouble
shooting guide.
Dryers should be
near room
temperature,
plugged in, and
doors closed.
Is heater on? (Allow
ample time for gas
flames to ignite)
Yes
To enter
diagnostic mode
or clear diagnostic
codes press a
delicates keypad
for at least 1
second. customer
cycles will be
terminated
To initiates a
service cycle push
the permanent
press keypad for
the dryer(s) to be
started-- upper or
lower.
Dryer check ok.
No No
Refer to dryer
drum will not turn
section.
Refer to no heat
section.
If desired, push
the respective
delicates keypad
to cancel the
service cycle.
Exit operator mode
by locking the
service door.
34 16022904 Rev. 0 ©2004 Maytag Appliances Company
Page 35

Troubleshooting Procedures
!
WARNING
To avoid risk of electrical shock, personal injury or death, disconnect power to unit before servicing, unless testing
requires power.
Stack Dryer Diagnostic Code
d1 or d17
Door Sense Problem
d4 or d20
Motor Control Circuit
Problem
d1 indicates the
upper dryer door,
d17 indicates the
lower dryer door
on control board or
due to power line
interference
Replace the
control board.
Try to Clear the
diagnostic code by
pressing the
Delicates keypad
for more than 1
second while the
code is displayed.
Try to Clear the
diagnostic code by
pressing the
Delicates keypad
for more than 1
second while the
code is displayed.
No
If diagnostic code
still appears, the
power line is noisy
and should be
tested.
Push the Perm
Press program
keypad to start the
diagnostic
program.
diagnostic code
reappear?
Did the
Did the
diagnostic code
clear?
No
Yes
Control board
indication.
Control board
is operating
normally.
False
indication.
is operating
normally.
False
Yes
Check the wiring between the
control board and the motor.
Fix the power line
disturbance.
d5 Blocked Coin 1
(d13 Blocked Coin 2)
Or Coin Drop Circuit
Problem
©2004 Maytag Appliances Company 16022904 Rev. 0 35
Unplug dryer and
check the wiring
and termination
between the coin
drop and the
control board.
Yes
Check for an
object blocking the
coin drop optic
sensor. It takes 8
seconds for the
control to
recognize the
blockage.
Is the power
line supply to the
machine noisy?
No
If the problem still
exists, replace the
coin drop coin
sensor.
Replace the
control board.
If the
problem
still exist,
replace the
control
board.
Page 36

Troubleshooting Procedures
!
WARNING
To avoid risk of electrical shock, personal injury or death, disconnect power to unit before servicing, unless testing
requires power.
Stack Dryer Diagnostic Code
Try to clear the
d9
Voltage Problem
Less Than 90 VAC
diagnostic code by
pressing the
Delicates keypad
for more than 1
second while the
code is displayed.
Exit service mode , and pause for
10 seconds, enter service mode.
d12 or d14 Motor
Sensed Problem
Check installation
to insure proper
power going to this
dryer. If d9
persist, check the
wiring or replace
the transformer
If problem persists replace
the control board.
d12 indicates
lower dryer motor
sense. d14
indicates upper
dryer motor sense
Did the
diagnostic code
cancel?
No
Are other machines
at this location giving a d9
diagnostic code?
Clear diagnostic
code by pushing a
Delicates keypad
for at least 1
second while code
is displayed.
Yes
YesNo
diagnostic code
Low voltage was
sensed on the
power line, but is
now ok.
Check installation
to insure proper
power going to all
of the dryers
Does
remain?
Yes
Replace card
reader or
control board.
d16
PR Models Only
False indication
control board
Check wiring
Is card reader
installed?
No
Install reader or use PDA to change mode out of
Gen 2 debit mode
between debit
card reader
and control
board
No
Replace control
board
Power down and
up machine to
reset card reader
36 16022904 Rev. 0 ©2004 Maytag Appliances Company
Page 37

Disassembly Procedures
!
WARNI NG
Control Panel
1. Disconnect power supply to unit.
2. Remove top two screws.
Remove Two
Top Screws
3. Carefully lay control Panel forward.
Microprocessor Board
1. Disconnect power supply to unit.
2. Remove Control Panel.
3. Disconnect wiring harness connectors.
Note: Observe the positions of the harness connectors
plugged into the control board.
To avoid risk of electrical shock, personal injury or death;
disconnect power to unit before servicing.
Transformer
1. Disconnect power to supply to unit.
2. Remove Control Panel.
3. Disconnect wiring harness connection.
4. Remove screws securing Transformer in place.
Meter Case
1. Disconnect power supply to unit.
2. Remove Service Access Door and Coin box.
4. Remove four nuts holding the Microprocessor Board to
the standoff studs.
5. Disconnect Ribbon connector to Touch Pad.
Touch Pad Assembly
!. Disconnect power supply to unit.
2. Remove the screws securing the Facia.
3. Remove Microprocessor Board.
4. Disconnect ribbon connector.
5. Remove screws securing Touch Pad Assembly to
Control Panel.
©2004 Maytag Appliances Company 16022904 Rev. 0 37
3. Remove two 9/16” hex nuts securing Meter Case.
4. Remove Control Panel.
5. Remove 1/4” hex head screws hold Meter Case to the
Console.
6. Disconnect wires for Service & Vault Switch and
connector for the Coin Drop Sensor.
7. Lift Meter Case off the Top Cover.
Page 38

Disassembly Procedures
!
WARNI NG
Service Door Switch
1. Disconnect power supply to unit.
2. Remove service access door.
3. Remove the screw securing the switch mounting
bracket and lift the switch from inside the meter case.
4. Disconnect wires from the switch, and squeeze tabs
on switch to remove from bracket.
To avoid risk of electrical shock, personal injury or death;
disconnect power to unit before servicing.
5. Disconnect wiring harness for Coin Sensor.
6. Remove Coin Drop Acceptor
Coin Sensor
1. Disconnect power supply to unit.
2. Remove Coin Acceptor.
3. Remove screw securing Coin Sensor to the rear of the
Coin Drop Acceptor.
Coin Vault Switch
1. Disconnect power supply to unit.
2. Remove service access door and coin box.
3. Disconnect wires from the switch.
4. Squeeze the two tabs on the switch and push the
switch through towards the front.
Coin Drop Acceptor
1. Disconnect power supply to unit.
2. Unlock service access door.
3. Loosen the two locking bolts from inside the meter
case.
4. Remove Control Panel.
Door Assembly
1. Disconnect power supply to unit.
2. Open the door and remove the center screw of each
hinge secured to the inner flange of the front panel in
the door opening.
Hinge
Slots
3. Grasp the door with both hands and lift the door in the
hinge area and draw the door assembly away from
the machine. This will disengage the hinges from the
slots in the front shroud.
38 16022904 Rev. 0 ©2004 Maytag Appliances Company
Page 39

Disassembly Procedures
!
WARNI NG
To avoid risk of electrical shock, personal injury or death;
disconnect power to unit before servicing.
Reversing Door Assembly
Note: NOT ALL DOORS ARE REVERSIBLE
1. Disconnect power supply to unit.
2. Remove Door Assembly.
3. Remove the plastic hinge hole covers on the opposite side of the door opening.
4. Remove the hinges from the door itself and relocate them to the other side of the door.
5. Remount the door into the slots on the opposite side of the door opening in the front shroud and secure with one
screw into each hinge.
6. Mount the plastic hinge hole covers onto the side the hinges were previously on, to cover the slots in the front
shroud.
Counter Sunk
Screw
Door
Hinge
Hole
Cover
Door
Catch
Cover
Hinge
Inner Door
Cover Plate
Door
Strike
Screw
Door
Screw
Door Disassembly
1. Disconnect power supply to unit.
2. Remove ten screws located across the bottom and along either side of the door panel. The top edge of the outer
panel is folded over the inner door plug.
Front Panel
1. Disconnect power supply to unit.
2. Open the door and remove the four screws along the
inside lip of the door opening.
Note: Two are located vertically on either side of the
door opening. These screws secure the front
panel to the front shroud assembly.
Remove
Four
Screws
3. Remove the two lower screws (T-25H Torx) securing
the front panel to the lower side flanges of the cabinet
assembly (If present).
Remove
Two Screws
©2004 Maytag Appliances Company 16022904 Rev. 0 39
Page 40

Disassembly Procedures
!
WARNI NG
4. Grasp the verticle sides of the front panel 3/4 of the
way down and pull front panel away from the dryer.
Note: The front panel is held to the cabinet by means
of clips secured to the front shroud. Small slots
in the front panel engage the clips and hold the
front panel in place.
Slot
Retaining
Clip
To avoid risk of electrical shock, personal injury or death;
disconnect power to unit before servicing.
3. Locate and remove two 5/16" hex head screws
securing the two hold down brackets for the top cover.
4. To remove the hold down brackets, swing the bracket
to the outside and unhook the bracket from the slot in
the top cover lip.
Note: If the door is still positioned on the front shroud,
open the door prior to lifting the front of the top
cover and tilt the top cover toward the rear of the
machine.
5. Tilt the top of the front panel away from the machine
and lift the panel off two clips retaining the front panel
to the base frame.
6. Disconnect wires to Door Switch.
Top Cover
1. Disconnect power supply to unit.
2. Remove the front panel
.
Cover
Hold
Down
Bracket
Door Switch
1. Disconnect power supply to unit.
2. Remove Front Panel.
3. Remove wires from switch.
4. Squeeze tabs on switch together and remove switch.
Shroud
40 16022904 Rev. 0 ©2004 Maytag Appliances Company
Page 41

Disassembly Procedures
!
WARNI NG
Front Shroud Assembly Removal
1. Disconnect power supply to unit.
2. Remove Front Panel and Door Assembly.
3. Remove hold down brackets securing Top Cover to the
Cabinet.
4. Remove four outer perimeter screws holding Shroud
Assembly to cabinet.
NOTE: Remove the lowest outside screws on each
corner and then the top outside screws. Leave
the four inner screws in place.
To avoid risk of electrical shock, personal injury or death;
disconnect power to unit before servicing.
Remove
Four
Screws
4. Remove the four 1/4" hex head screws and the one
cross recess countersunk screw securing the outlet
duct to the tumbler front.
Note: Two of the hex head screws are hidden under the
felt seal. Pull the outlet duct free from the
tumbler front.
Remove these
four screws.
Screws
5. Pull Front shroud Assembly out and away from
tumbler.
Note: Partially lift the Top Cover.
Note: When reinstalling the Front Shroud Assembly,
lift the front inner edge of the tumbler to allow the
front of the tumbler to rest on the teflon (Rulon™)
bearings on the shroud and tumbler front
assembly. Also, check the front felt seal to
ensure it is outside the lip of the tumbler.
Outlet Duct, Shroud & Tumbler Front
1. Disconnect power supply to unit.
2. Remove the shroud and tumbler front assembly from
the dryer.
3. Remove the two screws securing the shroud to the
tumbler front and the two screws securing the shroud
to the outlet duct. Pull the shroud free from the
assembly.
Remove
Five Screws
4. When reattaching the outlet duct assembly to the
tumbler front, install the center screw (found above the
grid area) first, followed by the four outside screws in
any order.
Install First
Screws
©2004 Maytag Appliances Company 16022904 Rev. 0 41
Page 42

Disassembly Procedures
!
WARNI NG
Lint Filter
Note: Lint Filter is one piece and can be removed for
cleaning.
Bearing & Pads
1. Disconnect power supply to unit.
2. Remove Front Shroud Assembly.
3. Drill out the old rivets and rivet new bearings in place.
Note: In positioning the bearing and cork pad, the face
of the bearing should ride against the tumbler.
To avoid risk of electrical shock, personal injury or death;
disconnect power to unit before servicing.
Felt
Seal
Locking
Tabs
Note: When reinstalling, the seal will be mounted to
the tumbler front in a counterclockwise rotation.
Start at the 3:00 position and place under the
locking tabs. The seal will overlap 1 1/4". The
coated side (which is the lighter of the two
colors) goes against the tumbler. The felt seal is
then looped in a "U-shape” so that the lightercolored side is against the tumbler front as it is
slid in place under the tabs. Bend tabs back
over the felt seal with a flat blade screwdriver.
Felt
Seal
Rivet
Teflon Bearings
on Cork Pads
Teflon Bearing
Steel
Bearing
Rivet
Surface
Cutaway of Bearing Surface
Cork
Pad
Rivet
Rivet
Front Seal
1. Disconnect power supply to unit.
2. Remove Front Shroud Assembly.
3. Remove old felt seal by prying the locking tabs up with
a flat-blade screwdriver.
Note: Pay close attention to the location of the seal
overlap. This will be important as you reinstall
the new seal.
Belt
1. Disconnect power supply to unit.
2. Remove Shroud Assembly.
3. Insert left hand along side of tumbler at the 8 o'clock
position. Insert right arm under tumbler (as close to
blower as possible).
View From the Back of the Dryer
Drive
Belt
Idler
Spring
Idler Arm
Idler
Pulley
Motor
Pulley
42 16022904 Rev. 0 ©2004 Maytag Appliances Company
Page 43

Disassembly Procedures
!
WARNI NG
4. Grasp the idler pulley in left hand, pull idler upward
and to the left.
Note: There is a built-in stop to prevent overstressing
of the idler arm spring. Slip belt off the motor
pulley.
5. Slip the belt off the back of the tumbler.
Pull to the Side
Work the Belt Off of the Pulley
To avoid risk of electrical shock, personal injury or death;
disconnect power to unit before servicing.
5. Locate the belt and create a small loop with your right
hand, ensuring the belt is free of twist.
6. Position the open end of the loop (ribbed side down)
onto the motor pulley with your right hand.
7. To clear the drive belt, grasp the idler pulley in left
hand, pull idler up and to the left.
NOTE: There is a built-in stop to prevent overstressing of
the idler arm spring.
8. Relax your left hand and allow the idler pulley to rest
down onto the belt.
9. Grasp baffles with both hands and rotate tumbler 1 or 2
turns clockwise to allow the belt to align itself.
As Viewed From The Front
Tumbler Belt
6. While lifting top cover, pull tumbler out of cabinet.
Installing Drive Belt
1. Disconnect power supply to unit.
2. Place belt onto the outside of the tumbler and position
the belt 1 1/2" in front of rear baffle mounting screws
with ribbed side against tumbler.
Rear
Bulkhead
Baffle Rear
Mounting Screw
Belt
3. Position tumbler into the rear felt seal, resting the
tumbler onto the rear rollers. Lower the front of the
tumbler onto the blower housing.
4. Insert left hand along side of tumbler at 8 o'clock.
Insert right arm under tumbler (as close to blower as
possible).
Cylinder
Idler
Pulley
Motor
Pulley
Baffles
1. Disconnect power supply to unit.
2. Remove Front Panel and Door.
3. Lift Top Cover.
4. Rotate the tumbler until the screws of the baffle to be
removed appear at the top of the tumbler.
5. Remove two screws holding the baffle to the tumbler.
Rear Shroud Assembly
1. Disconnect power supply to unit.
2. Remove Front Shroud Assembly.
3. Remove Tumbler and Belt
4. Remove Gas Valve Assembly or Heater Assembly.
Note: Be careful on gas models, the igniter is fragile.
5. Remove heat enclosure.
©2004 Maytag Appliances Company 16022904 Rev. 0 43
Page 44

Disassembly Procedures
!
WARNI NG
Four
Screws
6. From back of dryer, remove four screws holding
Tumbler Back Assembly.
7. Remove the assembly.
To avoid risk of electrical shock, personal injury or death;
disconnect power to unit before servicing.
Note: When reinstalling, the seal will be mounted to the
tumbler back in a clockwise rotation. Start at the
11:00 position and place under the locking tabs.
The seal will overlap 1 1/4". The coated side
(which is the lighter of the two colors) goes
against the tumbler. The seal is then looped in a
"U" shape so the lighter colored side is against
the tumbler back as it is slid in place under the
tabs. Bend tabs back over seal with a flat-bladed
screwdriver.
Roller and Bearing Assembly
1. Disconnect power supply to unit.
2. Remove Front Shroud/ Assembly
3. Remove Tumbler and Belt.
4. Remove retaining ring from groove in shaft
5. Remove fiber washer and roller.
6. Remove nut securing roller shaft.
Back Seal
1. Disconnect power supply to unit.
2. Remove Tumbler Back Assembly.
Note: For ease in servicing, we recommend removal
of the Tumbler Back Assembly from the dryer.
This will ensure the felt seal is secured
properly.
3. Remove the old felt seal by prying the locking tabs
out with a flat-blade screwdriver.
Note: Pay close attention to the location of the seal
overlap. This will be important as you install
the new seal.
Felt
Tumbler Rides on
Light-Colored Side
of Felt.
Nut
Washer
Roller Shaft
Roller
Fiber Washer
Retaining Ring
Note: There is a spacer behind the roller. When
replacing parts, be certain of the order of the
replacement.
Rear Bulkhead
44 16022904 Rev. 0 ©2004 Maytag Appliances Company
Dark-Colored Side of
Felt is Clamped to the
Channel of the Rear
Bulkhead by Tabs.
Page 45

Disassembly Procedures
!
WARNI NG
Thermostats
1. Disconnect power supply to unit.
2. Remove Front Panel.
Note: Thermostats are located on Blower Cover. Hi-
Limit Thermostat and is located on heating
source for gas and electric models.
Cycling
Thermostat
Thermal
Fuse
Low Cycling
Thermostat
Cycling Thermostat
1. Disconnect power supply to unit.
2. Remove Front Panel.
3. Disconnect wires to Cycling Thermostat.
4. Remove two screws securing thermostat to blower
cover.
To avoid risk of electrical shock, personal injury or death;
disconnect power to unit before servicing.
Hi-Limit Thermostat
1. Disconnect power supply to unit.
2. Remove Front Panel.
Note: Hi-Limit Thermostat is located on the right hand
side of the Heating Cone for Gas Models and on
the left hand side for Electric Models.
3. Disconnect wires to Hi-Limit Thermostat .
4. Loosen the rear mounting screw and remove the front
screw.
Note: The mounting tabs of the thermostat are open-
slotted.
Blower Assembly
1. Disconnect power supply to unit.
2. Remove Front Panel.
3. Remove Front Shroud Assembly.
Blower Seal
1. Disconnect power supply to unit.
2. `Remove Front Shroud Assembly.
Note: The rubber seal is secured to the outlet duct
opening. The seal is fitted around the outer
circumference lip of the outlet duct with the
flange of the seal facing the blower cover.
Low-cycling Thermostat
1. Disconnect power supply to unit.
2. Remove Front Panel.
3. Disconnect wires to Low-Cycling Thermostat.
4. Remove Two screws securing thermostat to blower
cover.
Thermal Fuse
1. Disconnect power supply to unit.
2. Remove Front Panel.
3. Disconnect wires to Thermal Fuse.
4. Remove Two screws securing fuse to blower cover.
Note: “MDE” dryers (Electric Dryer Models) also have a
Thermal Fuse mounted on the Heater Enclosure.
Air Outlet
Seal
Air Outlet
Duct
Blower Cover
1. Disconnect power supply to unit.
2. Remove Front Shroud Assembly.
3. Remove screws holding cover to blower housing.
Note: One screw secures blower Cover to base frame.
©2004 Maytag Appliances Company 16022904 Rev. 0 45
Page 46

Disassembly Procedures
!
WARNI NG
Remove
Screws
Note: It is not necessary to remove wires from
themostats to gain access to blower wheel. Lay
the blower cover aside.
Install This
Screw
Second
First Screw to
Install
To avoid risk of electrical shock, personal injury or death;
disconnect power to unit before servicing.
Retaining
Clip Clamp
Blower
Wheel
Note: When replacing a blower wheel , always replace
the clamp.
5. Work blower wheel back and forth while pulling off
shaft.
Note: It may require considerable effort to move the
blower wheel.
6. Rotate the blower wheel in a clockwise rotation by
hand to unscrew.
Note: The thread is left-hand and labeling on the rim of
the blower wheel indicates direction for blower
removal or installation.
Note: When reinstalling the Blower Cover. Install the
far right screw closest to the exhaust duct (right
most screw). Continue to assembly, moving to
the next screw in a counterclockwise motion
around the blower. Install the screw for the
blower cover tab to the base frame last.
Blower
1. Disconnect power supply to unit.
2. Remove Blower Cover.
Note: Models prior series 23, follow steps 3-5. Models
beginning with series 23 skip to Step 6-7
3. Remove Retaining clip.
4. Compress and remove Clamp around hub of blower
wheel.
46 16022904 Rev. 0 ©2004 Maytag Appliances Company
7. Remove blower wheel.
Note: The blower wheel is designed to be properly
seated by hand. Little torque is required when
reinstalling.
Page 47

Disassembly Procedures
!
WARNI NG
Exhaust Duct Pipe
1. Disconnect power supply to unit.
2. Remove Blower Assembly.
3. Remove screw on back of cabinet securing Exhaust
duct.
Exhaust
Duct
Mounting
Screw
Drive Motor Assembly
Note: The entire blower and drive motor assembly can
be removed for servicing.
1. Disconnect power supply to unit.
2. Remove Front Shroud Assembly.
3. Remove the Belt and Tumbler.
4. Remove the screw in front of the Blower Assembly
that secures the assembly to the base frame.
5. Remove wire harness from Drive Motor and
thermostats on Blower Cover.
6. Remove two screws securing motor to base frame. An
extension is required to reach the screws. Screws
are located directly behind the Blower Housing.
To avoid risk of electrical shock, personal injury or death;
disconnect power to unit before servicing.
Assembly Breakdown
1. Remove blower cover screws.
2. Remove blower wheel.
3. Remove retaining ring clip from motor shaft, positioned
behind the blower impeller.
4. Remove the motor support clips which retain the motor
to the motor base. Use a nut driver large enough to
accept the hook end of the clip. With a downward
push of the driver onto the clip, tilt the driver handle
toward the motor to unhook the clip from the support.
5. Remove motor from motor base.
Motor Switch
1. Disconnect power supply to unit.
2. Remove shroud/tumbler front assembly.
3. Remove belts.
4. Remove tumbler.
5. Remove wire harness from motor switch by depressing
tabs on either side of the harness connector and lift
the connector from the switch.
6. Remove two screws holding switch to Drive Motor.
7. Disengage the thermal protector switch from the motor
switch body.
Note: This can be done by either inserting a small flat
blade screwdriver into the slot near the switch
terminals or breaking the switch body. The
thermal protector switch is not replaceable and is
part of the motor assembly.
Idler Arm Assembly
1. Disconnect power supply to unit.
2. Remove Front Shroud Assembly.
3. Remove Belts and Tumbler.
4. Unhook idler spring from the base frame and remove
screw securing the assembly to motor support
bracket.
Remove Screws
7. Carefully lift the front half of the blower assembly and
slide forward to disengage the motor base rear tab
from the slot in the base frame.
©2004 Maytag Appliances Company 16022904 Rev. 0 47
Idler Arm
Assembly
Page 48

Disassembly Procedures
!
WARNI NG
5. Remove retaining clip from groove in shaft.
6. Remove fiber washer.
7. Remove Idler Pulley and bearing.
8. Remove second fiber washer.
Idler Shaft
Fiber
Washer
Idler Pulley
Fiber
WasherClip
Note: There is a fiber washer between the pulley and
the idler arm. When replacing parts, be certain
the order of replacement is correct,
Idler Arm
Washer
Hex-Head
Bolt
To avoid risk of electrical shock, personal injury or death;
disconnect power to unit before servicing.
4. Remove the two screws securing the coil holding
bracket.
Note: The position of the flange of the idler pulley is
important. The flange should be positioned on
the side opposite the idler arm.
Gas Valve Assembly
Hi-limit
Thermostat
Radiant
Sensor
Igniter
Gas Valve
Secondary
Coil
Holding &
Booster Coil
5. Remove the bracket and lift coils off.
Note: When repositioning the coils onto the valve, align
the coil positioning tabs and matching holes in the
coil holding bracket for each coil.
Igniter
1. Disconnect power supply to unit.
2. Remove Front Panel.
3. Unplug igniter from Gas Valve.
4. Remove screw holding Igniter to Burner.
Coils
1. Disconnect power supply to unit.
2. Remove Front Panel.
3. Unplug wires harness from the Gas Valve Coils.
48 16022904 Rev. 0 ©2004 Maytag Appliances Company
Page 49

Disassembly Procedures
!
WARNI NG
Gas Valve
1. Disconnect power supply to unit
2. Remove Front Panel.
3. Shut off gas supply and disconnect supply line to
valve.
4. Disconnect wire harness at valve coils.
5. Disconnect wires from radiant sensor.
6. Loosen brass nut attaching angle connector to gas
valve.
7. Remove two screws holding valve and burner
assembly to base.
8. Slide valve bracket out of slot in base and remove valve
and burner assembly.
9. Remove two screws holding gas valve to bracket on
underside.
Combustion Cone
1. Disconnect power supply to unit.
2. Remove Front Panel.
3. Remove burner and igniter. Be careful igniter is fragile.
4. Remove wires from hi-limit thermostat.
5. Remove screw in front of cone holding it to base.
6. Remove screw at back of combustion cone holding
cone tab to inlet duct.
7. Pull combustion cone out of dryer.
To avoid risk of electrical shock, personal injury or death;
disconnect power to unit before servicing.
5. Remove tumbler back assembly.
Note: Four screws are accessible from behind dryer.
5. Remove three screws securing inlet duct to the
tumbler back assembly. The two lower screws are
under the felt seal of the tumbler back assembly.
Note: For proper inlet duct to tumbler back assembly
alignment when reinstalling, align inlet duct to
large hole in the tumbler back assembly and
fasten top screw first.
Heater Enclosure
1. Disconnect power supply to unit.
2. Remove Front Panel and Door.
3. Remove screw holding Heater Enclosure shield to
base. Remove Heater Shield from dryer.
4. Remove screw in back of enclosure holding tab to inlet
duct.
Heater Enclosure
Thermal Fuse
Inlet Duct
1. Disconnect power supply to unit.
2. Remove Front Panel.
3. Remove Front Shroud Assembly, belt and tumbler.
4. Remove screws securing heat cone to base and to
inlet duct.
Inlet Duct
Retaining
Clip
Radiant
Sensor
Combustion
Cone
Hi-Limit
Thermostat
Hi-Limit
Thermostat
Terminal
Insulator
5. Remove wires from the Thermal Fuse and heater
terminal on left side of enclosure. Remove purple wire
from Hi-Limit Thermostat.
6. Pull heater assembly out of dryer.
Note: Terminal insulators are used on each end of the
element which attaches to spade connectors.
These spade connectors are "crimped" to the
wire and held in the insulator by small barbs on
each side of the terminal. The barb must be bent
parallel with each terminal before element
package can be removed from the enclosure.
Three screws hold the element package to the
enclosure.
©2004 Maytag Appliances Company 16022904 Rev. 0 49
Page 50

Disassembly Procedures
!
WARNI NG
STACK DRYER SLOPED FRONT MODELS
Note: The following section is exclusive to the stack
dryers.
Service Panel and Switch
1. Disconnect power to the machine.
2. Remove three security screws.
Service
Lock
Remove Security Screws
To avoid risk of electrical shock, personal injury or death;
disconnect power to unit before servicing.
5. Disconnect wires to service switch.
Access Cover
1. Disconnect power to unit.
2. Remove the Access Panel.
3. Locate and remove the 5/16" hex head screw located
in the front of the dryer base frame. This screw
secures the access cover to the base frame.
Screw
Access
Blower
Housing
Cover
3. Unlock the service lock.
4. Pull the service panel down.
4. Open the door.
5. Carefully slide the access cover down and away from
the machine to disengage the cover from retaining
clips on the front shroud located above the front panel
goal posts.
Slide
Access Cover
Front Panel
Access Cover
Hook
Control Panel
1. Disconnect power to the machine.
2. Remove the Access Panel.
3. Remove three security and two pozi drive screws
securing the Control Panel under the Console.
Service
Switch
50 16022904 Rev. 0 ©2004 Maytag Appliances Company
Wires
Page 51

Disassembly Procedures
!
WARNI NG
Screws
4. Lift Control Panel away from the dryer
To avoid risk of electrical shock, personal injury or death;
disconnect power to unit before servicing.
3. Remove three screws securing the Microprocessor to
the Control Panel.
Remove
Screws
4. Observe the position of the harness connector plugged
into the Microprocessor Board.
.
Control
Panel
Microprocessor
1. Disconnect power supply to unit.
2. Remove four security screws securing the Facia.
Harness Connector
Coin Drop
Coin Drop
1. Disconnect power to the machine.
Microprocessor
©2004 Maytag Appliances Company 16022904 Rev. 0 51
2. Remove the Service Panel.
3. Remove three security torx screws and two pozi-drive
screws securing the Control Panel.
Page 52

Disassembly Procedures
!
WARNI NG
Remove Screws
4. Lift control panel away from the dryer.
To avoid risk of electrical shock, personal injury or death;
disconnect power to unit before servicing.
6. Remove two screws securing coin drop to mounting
plate.
Remove
Two
Screws
Front Panel
1. Disconnect power to the machine.
2. Remove the Service Panel and Control Panel.
3. Remove two T-20H screws secured into lower flange
of the upper Front Panel.
Swing Out
and
Away
5. Remove two 5/16” screws holding coin drop mounting
plate.
Remove Screws
4. Remove the two 5/16" hex head screws located in the
top right and left front corners of the Front Panel.
Remove Screws
52 16022904 Rev. 0 ©2004 Maytag Appliances Company
Page 53

Disassembly Procedures
!
WARNI NG
Remove
Screws
5. Tip the top of the front panel forward and slightly
lift the Front Panel at the same time. Then
remove the wires from the door switch.
To avoid risk of electrical shock, personal injury or death;
disconnect power to unit before servicing.
STACK DRYER SLOPED FRONT (PR
MODEL)
Note: The following is exclusive to the PR Model -
sloped Front Dryer.
Microprocessor
1. Disconnect power supply to unit.
Note: Display is larger on “PR” model dryers.
2. Remove four security screws securing facia.
Tip
Forward
& Lift up
Slightly
6. With the wiring removed from the door switch,
continue to tilt the front panel forward while
lifting the panel to clear the two lower mounting
brackets.
3. Remove three screws securing the microprocessor to
the Control Console.
4. Remove Control Panel.
5. Disconnect wiring connections.
6. Remove Microprocessor Board and bracket.
STACK DRYER-MN Models
Note: The following section is exclusive to the MN
stack dryers.
Front Panel
1. Disconnect power supply to unit.
2. Remove two front screws.
3. Swing panel out and away from dryer.
©2004 Maytag Appliances Company 16022904 Rev. 0 53
Page 54

Disassembly Procedures
!
WARNI NG
Timer
1. Disconnect power supply to unit.
2. Remove Timer Knob.
3. Remove Front Panel Screws.
To avoid risk of electrical shock, personal injury or death;
disconnect power to unit before servicing.
5. Remove screws securing Front Panel.
6. Remove screws securing Selector Switch.
7. Disconnect wires on Selector Switch.
Note: Make note of wire location
Push-To-Start Switch
1. Disconnect power supply to unit.
2. Unscrew knurl nut
4. Remove two screws securing Timer to Front Panel.
5. Disconnect wires on Timer.
Note: Make note of wire locations.
Selector Switch
1. Disconnect power supply to unit.
2. Remove Timer Knobs (for both dryers)
3. Remove four screws securing Facia to Front Panel.
4. Remove Selector Switch Knob.
3. Remove Front Panel.
4. Disconnect wires on switch.
Machine-In-Use Light
1. Disconnect power supply to unit.
2. Remove Front Panel.
3. Slide light off lens.
4. Disconnect wire connection.
54 16022904 Rev. 0 ©2004 Maytag Appliances Company
Page 55

Disassembly Procedures
!
WARNI NG
STACK DRYER-FLAT FRONT MODELS
Note: The following section is exclusive to the “Flat
Front Model” stack dryers.
Front Panel
1. Disconnect power supply to unit.
2. Remove two security screws securing Front Panel.
To avoid risk of electrical shock, personal injury or death;
disconnect power to unit before servicing.
Front Shroud Assembly
1. Disconnect power supply to unit.
2. Remove Front Panel.
3. Swing Front Panel out and away from dryer.
Note: Observe the wire placement connected to
components attached to the Front Panel.
Microprocessor
1. Disconnect power supply to unit.
2. Remove four security screws securing facia.
3. Remove three screws securing the microprocessor to
the Front Panel.
4. Remove screws(T25 H) securing Front Panel.
5. Disconnect wiring connections.
6. Remove Microprocessor Board and bracket.
3. Remove screws securing cabinet brace.
4. Remove four outer screws.
©2004 Maytag Appliances Company 16022904 Rev. 0 55
Page 56

Disassembly Procedures
!
WARNI NG
Motor & Heater Relays
1. Disconnect power supply to unit.
2. Remove Cabinet Brace.
To avoid risk of electrical shock, personal injury or death;
disconnect power to unit before servicing.
Note: Heater Relays are used ONLY on “MDE” model
dryers (Electric Models).
3. Remove screws securing relay bracket.
4. Disconnect wires to relays.
56 16022904 Rev. 0 ©2004 Maytag Appliances Company
Page 57

Appendix A
©2004 Maytag Appliances Company 16022904 Rev. 0 57
Page 58

PROGRAMMING PROCEDURES
How to Use the Keypads to Program
the Controls
1. The
2. The
3. The
START OPERATING SET-UP
Whites & Colors
change information in the programming codes,
permitting adjustment. Pressing the keypad will
change the characters by one (1). Rapid
adjusting is possible by holding the keypad
down.
Permanent Press
through the programmed codes. Holding the
keypad down will automatically advance through
programs at a rate of one (1) per second.
Delicates
deselect options. This is an
selection.
keypad is used to select or
keypad is used to
keypad will advance you
"OFF"
or
"ON"
NOTE:
Before proceeding please note that an
owner can choose to uncrate a new commercial
machine, hook it up, plug it in and have a unit
which operates.
PD units are pre-set at the factory for fixed cycle
price with top off.
PR and PN units are pre-set for free cycle operation
so they can be run without readers or coins.
The appliance is programmed at the factory as
follows:
5 minutes dry time/quarter (Coin 1).
$1.50 dry price (Fixed cycle with top off-PD/
PS models).
$0.00 dry price (Fixed cycle-PR/PN
models).
PD and PS Models (Single Load Dryer): Insert
access door key, turn, and lift to remove access
door.
PD Models (Stacked Dryers): Insert access panel
key and turn.
PN Models: Insert service key and turn to
"PROGRAM."
PR Models: Once the debit card reader is installed
(according to the reader manufacturer's
instructions), the set-up mode can be entered by
inserting a manual set-up card (supplied by the
reader manufacturer) into the card slot.
If manual set-up card is not available, manual setup mode can be entered by removing connector
AA1 on the circuit board.
CAUTION: The console must not be opened
unless power is first removed from the dryer.
To access connector AA1, remove power, open
console, disconnect plug on AA1, close console,
apply power to dryer. The dryer is now in the set-up
mode.
GENERAL USER INFORMATION
Blank Display: This condition indicates that the
appliance is inoperative.
"0" Minutes Showing in Display: This condition
indicates that the appliance cannot be operated.
Coins dropped during this condition will be stored in
escrow, but cannot be used until normal operation
is restored by opening and closing the door. If the
door switch fails, recovery from this condition is
impossible without service.
Warm Start - After Power Failure: After a delay of
a few seconds, the appliance is restored to the
state that existed at the time of power failure.
"Reselect Cycle" will flash in the display. Select
fabric setting to restart dryer.
Pricing
After the door is opened, following the completion of
a cycle, the display indicates the cycle price (unless
set for free operation). As coins or debit inputs
arrive, the display will change to lead the user
through the intiation of a cycle.
There are four (4) types of pricing.
58 16022904 Rev. 0 ©2004 Maytag Appliances Company
Page 59

Fixed "Vend" Pricing
A dryer set up for "Fixed Cycle" operation can only
accept additional time accumulated by increments
equal to the length of a complete dry cycle. A
maximum of 99 minutes may be purchased; no
additional credit is given when 99 minutes is in the
display.
Accumulator Pricing
If the price is equal to the value of coin 1, then
accumulator mode is in effect (stacked models also
require Fixed Cycle with Top Off option to be
selected). Cycle time can be purchased one coin
at a time (PD and PS models) up to the maximum
time of 99 minutes. While in accumulator pricing,
stacked machines will credit all money to a cycle
with a single button press.
Fixed Cycle With Top Off Pricing
A dryer set to offer "Top Off" capability will allow
time to be added to an existing dry cycle in
increments equal to the number of minutes of dry
time per quarter (coin 1), up to 99 minutes,
regardless of the cost required to start the machine.
No credit is given for coins or debit inputs entered
when the control is displaying 99 minutes.
PR Models: In Enhanced Debit Mode, the Top Off
price can be set independently. (See VALUE OF
COIN 2), and the top off time is calculated
according to the following equation:
top off price = top off time
full cycle price = full cycle length
Penny increment offset is not applied to top off
purchases.
Free Cycles and PN Models
This is established by setting the cycle price to
zero. When this happens, "select cycle" will appear
rather than a cycle price. Any cycle started as a
free cycle will automatically terminate when the
door is opened.
Debit-Card Ready
This appliance is debit-card "cable ready." It will
accept a variety of debit card systems, but does
NOT come with a debit-card reader. Connection to
the control board is by means of a Molex brand
connector (housing and terminals.) See your
distributor for appropriate connector part numbers.
©2004 Maytag Appliances Company 16022904 Rev. 0 59
Page 60

SET UP CODES
The PERMANENT PRESS keypad will advance from code to code. The WHITES & COLORS keypad will
change the code value. The delicate keypad will select or deselect options.
Note: On all stacked dryer models, programming selections apply to both dryers. Stacked dryer selections
are accessed by pressing the LOWER DRYER keypads.
FOR PS, PR & PN MODELS ONLY: The default codes are the same for setting up the "PD" models. However,
additional information may be given that could affect the set up.
The set-up code is indicated by the one or two left-hand characters. The set-up code value is indicated by the
two or three right-hand characters.
CODE EXPLANATION
606 6 REGULAR CYCLE PRICE
06 Represents the number of coins. See VALUE OF COIN 1 and COIN 2. Ad-
justable from 0-39 by pressing the
set for six (6) quarters = $1.50.
Press
Permanent Press keypad once to advance to next code.
PS models ONLY: Represents the number of pushing actuations of the
coin slide to start the machine. We recommend "601" setting.
Whites & Colors keypad. Presently
705 7 REGULAR DRYING MINUTES PER COIN
05 Represents the number of minutes per coin. Presently set for 5 minutes
per coin. Example: Six (6) quarters times (x) five (5) minutes = 30
minutes. Adjustable from 1-99 minutes by pressing the Whites & Colors
keypad.
Press Permanent Press keypad once to advance to next code.
PN MODELS ONLY: Represents the cycle length for free cycles. An ex
ample: "730" represents 30 minutes.
PS MODELS ONLY: Represents the total number of minutes per slide.
Example: "748" represents 48 minutes.
800 8 TYPE OF DRY TIME
00 Fixed cycle with top off. For detailed description see "General Use Infor-
mation." Use Delicates keypad to make this selection.
FC Fixed cycle. For detailed description see "General User Information." Use
Delicates keypad to make this selection.
Press Permanent Press keypad once to advance to next code.
900 9 CYCLE COUNTER OPTION
This option is either Selected "ON" or Not Selected "OFF."
00 Not Selected or "OFF."
0C Selected or "ON." Press Delicates keypad three consecutive times to
select "ON." Once this option is selected, you cannot go back to "00."
Press
Permanent Press
60 16022904 Rev. 0 ©2004 Maytag Appliances Company
keypad once to advance to next code.
Page 61

CODE EXPLANATION
1.00 1. MONEY COUNTER OPTION
This option is either Selected "ON" or Not Selected "OFF."
00 Not Selected or "OFF."
0C Selected or "ON."
C0 Press
2.00 2. SPECIAL PRICING OPTION.
00 Not Selected or "OFF."
SP Selected or "ON." Press
Steps "3." thru "9." codes are skipped if mode "2.00" is selected.
3.06 3. SPECIAL CYCLE PRICE
06 Represents the number of coins. See value of coin 1 and coin 2.
Delicates
consecutive times to remove (Not Selected) "OFF."
Reset counter by going from "OFF" to "ON." To select "ON" and not be
able to be deselected, first select "ON," then within two seconds, press
Delicates
Press
Permanent Press
This option is either Selected "ON" or Selected "OFF."
keypad three consecutive times to select "ON" and three
twice,
Permanent Press
keypad once to advance to next code.
Delicates
Press
Permanent Press
Adjustable from 00 to 39 by pressing the
Presently set for six (6) quarters = $1.50.
keypad once to advance to next code.
once, and shut the service access door.
keypad once for this selection.
Whites & Colors
keypad.
Press
Permanent Press
PR &PN MODELS ONLY: Presently set for 0 quarters.
4.05 4. SPECIAL DRYING MINUTES PER COIN
05 Represents the number of minutes per coin. Presently set for 5 minutes
per coin. Example: Six (6) quarters times (x) five (5) minutes = 30
minutes. Adjustable from 1-99 minutes, by pressing the
keypad.
Press
Permanent Press
PN MODELS ONLY: Represnet the cycle length for free cycles. As example:
"730" represents 30 minutes.
5.00 5. MINUTES
00 This selection, "MINUTES," is the time of day clock. Select 00-59 minutes
by pressing
Press
6.00 6. HOURS
00 This selection, "HOUR," is the of time of day clock in hours; using
military time (24 hour clock). Select from 00 to 23 by pressing the
Whites & Colors
Whites & Colors
Permanent Press
keypad.
keypad once to advance to the next code.
keypad once to advance to the next code.
keypad.
keypad once to advance to the next code.
Whites & Colors
Press
Permanent Press
©2004 Maytag Appliances Company 16022904 Rev. 0 61
keypad once to advance to the next code.
Page 62

CODE EXPLANATION
7.00 7. STARTING OF SPECIAL PRICING HOUR
8.00 8. STOPPING OF SPECIAL PRICING DAYS
9.10 9. SPECIAL PRICE DAYS
.
00 This selection, "HOUR," is the of time of day clock in hours; using
military time (24 hour clock). Select from 00 to 23 by pressing the
Whites & Colors
Press
Permanent Press
00 This is the selection of the hours using military time (24 hour clock).
Select 0 to 23 hours by pressing
Press
Permanent Press
10 Represents the day of the week and if special pricing is to occur on that
day. The middle digit is the day of the week, and the last digit is "0" for
not selected or "S" for selected.
For example:
9.10 Special pricing not selected.
9.1S Special pricing selected for that individual day.
keypad.
keypad once to advance to the next code.
keypad once to advance to the next code.
Whites & Colors
.
Pressing the
Press
You must exit on current day of the week that it is for the special pricing
to occur on the correct day. Refer to chart for Special Price Days.
Press
A.00 A. VAULT VIEWING.
Once selected (SC), this option may be deselected (00).
00 Not Selected or "OFF."
SC Selected or "ON."
Press
cycle counter will be viewable when the vault is opened. If "00"
is selected, the service door will need to be opened to view the
money and/or cycle counter.
Press
b.05 b. VALUE OF COIN 1 (QUARTER DROP)
05 Represents the number of nickels (5 cent increments) given to the
value of each coin in code 600 "regular cycle price" or 3.00 "special
cycle price."
For example:
b. 05 equals five (5) nickels or one (1) quarter.
b. 20 equals twenty (20) nickels or one ($1.00) dollar.
Delicates
keypad once to select "0" and once for "S."
Whites & Colors
Permanent Press
Delicates
keypad once to select "SC," the money and/or
Permanent Press
keypad to advance to the next day of the week.
keypad once to advance to the next code.
keypad once to advance to next code.
Press
Whites & Colors
PS models ONLY: Represents the total vend price in nickels.
Example: b30 is equal to $1.50
Press
Permanent Press
62 16022904 Rev. 0 ©2004 Maytag Appliances Company
keypad to advance from 1 to 199 in nickels.
keypad once to advance to next code.
Page 63

CODE EXPLANATION
C.20 00 VALUE OF COIN 2 (CANADIAN DOLLAR DROP)
20 Represents the number of nickels (5 cent increments) given to the
value of each
For example:
c. 20 equals twenty (20) nickels or one (1) Canadian dollar.
c. 40 equals forty (40) nickels or two (2) Canadian dollars.
Press
Whites & Colors
Press
Permanent Press
d.00 d. COIN SLIDE OPTION.
Once selected (CS) this option may be deselected (00).
00 Not Selected or "OFF."
CS Selected or "ON."
Press
Delicates
"CS" for models not using a coin drop.
Press
Permanent Press
program mode.
E.00 E. Add coins option.
Once selected, the (AC) option may be deselected (00). This option
causes the customer display to show the number of coins (coin 1) to
enter, rather than the dollar-and-cents amount.
00 Not Selected or "OFF."
AC Selected or "ON."
Canadian dollar drop in the dollar coin slot.
keypad to advance from 1 to 199 in nickels.
keypad once to advance to the next code.
keypad once to select "00" when coin drop is used, and
keypad once to advance to the beginning of the
Press
Delicates
PR MODELS ONLY: In enhance debit mode, this option is not selectable.
Press
Permanent Press
J.Cd J. Coins/Debit Option.
Cd Both coin and debit selected.
C_ Coins selected.
_d Debit card option selected
PN MODELS ONLY: Must be set for _d.
Press
Delicates
Ed Enhanced debit is self-selected when a Genration 2 card reader is installed in
the dyrer. The Ed option cannot be manually slected or deselected. Not
avaiable on stacked dryer units.
Press
Permanent Press
keypad three (3) consecutive times for this selection.
keypad three (3) consecutive times for this selection.
keypad once to advance to next code.
keypad once to advance to next code.
©2004 Maytag Appliances Company 16022904 Rev. 0 63
Page 64

CODE EXPLANATION
L.00 L. Price Suppression Option.
Once selected (PS), this option may be deselected (00).
Bypass
"Available" rather than the amount of money to add. (Used mainly in
debit installation.)
00 Not Selected or "OFF."
PS Selected or "ON."
Press
n.CE n. Clear Escrow Option.
When "CE" is selected, the amount remaining in escrow will be "cleared,"
30 minutes after the end of the cycle or the last coin is deposited, which-
ever is later.
00 Not selected or "OFF."
CE Selected or "ON."
Press
Press
U.00 U. Penny Increment Offset
00 Thisrepresnets the penny increment price offfset used in Generation 2
(enhanced debit) PR models choose from 0-4 pennies by pressing the
White & Colors
Delicates
. This option causes the customer display to show
Permanent Press
Delicates
keypad once to select "00" or "CE."
Permanent Press
keypad.
keypad once to advance to next code.
keypad once to advance to the next cycle.
Not available on stacked units.
Press
Permanent Press
End of set-up procedures.
Exit from set-up mode.
PD/PS Models Reinstall access door.
PN Models Turn service key to "Run".
PR Models Remove power, open console, re-insert plug in AA1, close console and apply
power.
keypad once to advance to the next cycle.
64 16022904 Rev. 0 ©2004 Maytag Appliances Company
Page 65

SPECIAL PRICING DAYS
In reference to the "Special Price Days," the following will appear when programming that sequence:
(The number "5" is read as an "S" to represent special pricing in effect.)
Not Selected Selected Day Number Day of Week
9.10 9.15 Day 1 Sunday
9.20 9.25 Day 2 Monday
9.30 9.35 Day 3 Tuesday
9.40 9.45 Day 4 Wednesday
9.50 9.55 Day 5 Thursday
9.60 9.65 Day 6 Friday
9.70 9.75 Day 7 Saturday
Note: Remember you must show current day of week before proceeding to next code.
Cycles and Money Counter Options
The following will appear if you selected "0C" in the cycle counter option "900." This is a "View
Only" and cannot be altered. When cycle counter is selected, the numbers will "flash" in sequence.
Example:
100
200
Represents number of cycles in HUNDREDS
Represents number of cycles in ONES
102 = 200
225 = 25
Total = 225 Cycles
Press Permanent Press keypad once to advance to next code.
The following will appear if you selected "0C" in the money counter option "1.0C." This is a "VIEW
ONLY" and cannot be altered. The money counter can be reset by going to OFF (00) and ON (0C).
When money counter option is selected, the numbers will "flash" in sequence.
Example:
300
400
500
©2004 Maytag Appliances Company 16022904 Rev. 0 65
Represents number of cycles in HUNDREDS
Represents number of cycles in ONES
Number of CENTS
301 = $100.00
468 = 68.00
575 = .75
Total = $168.75
Page 66

DRYER DIAGNOSTIC MODE
This mode is entered by depressing DELICATES for one
second while in any of the set-up codes one through six
(or while dAS displays if operating with Maytag Data
Acquisition setup) or with a diagnostic code present.
Diagnostic codes are cleared on entry and all display
segments should flash. If a diagnostic code persists, it
must be corrected before the diagnostic cycle may be
executed.
All Single Load Models:
With all segments flashing, the diagnostic cycle is started
by depressing the PERMANENT PRESS key pad. The
cycle consists of seven minutes of heat and 1 minute of
cooldown. The WHITES & COLORS key pad will
increment the diagnostic cycle minutes up to 99, then roll
over to 2 minutes. The DELICATES key pad will cancel
this cycle and exit the diagnostic mode.
Dryer Help Mode
Stacked Models Only:
There are 2 procedures to initiate cycle activity from
diagnostic mode for these models:
1. Upper Dryer Field Diagnostic Cycle – With the entire
display flashing, the cycle is started by pressing the
UPPER DRYER PERMANENT PRESS key pad. The
cycle consists of seven minutes of heat and one
minute of cool down. The UPPER DRYER WHITES &
COLORS key pad will increment the diagnostic cycle
minutes up to 99, then roll over to 2 minutes. Pressing
the LOWER DRYER DELICATES key pad will cancel
this cycle and exit the diagnostic mode.
2. Lower Dryer Field Diagnostic Cycle – With entire
display flashing, the cycle is started by pressing the
LOWER DRYER PERMANENT PRESS key pad. The
cycle consists of seven minutes of heat and one
minute of cool down. The LOWER DRYER WHITES &
COLORS key pad will increment the diagnostic cycle
minutes up to 99, then roll over to 2 minutes. Pressing
the LOWER DRYER DELICATES key pad will cancel
this cycle and exit the diagnostic mode.
The Help Mode is entered by pressing the
dAS displays if operating with Maytag Data Acquisition set up). In help mode, the software revision is displayed in the
digits. Press the
In help mode, other display symbols and elements are mapped to reflect the state of various input and outputs as
follows:
Whites & Colors
DISPLAY DESCRIPTION
* Low voltage present (below 90VAC)
Circle above digit Door closed
& 140° thermostat closed
OR Motor sensed running
AIR Heater/gas valve relay on
FLUFF Motor relay on
Upper Dryer Only – Upper Half Of Display
Circle above digit Upper dryer door closed
COOL Upper dryer 140° thermostat closed
OR Upper dryer heater relay on
& Upper dryer motor relay on
Lower Dryer Only – Lower Half Of Display
* Low voltage present (below 90VAC)
Circle above digit Lower dryer door closed
COOL Lower dryer 140° thermostat closed
OR Lower dryer heater relay on
& Lower dryer motor relay on
key at anytime to exit help mode.
Stacked Dryer Models
Whites & Colors
Single Load Dryers
Upper dryer motor sensed running
Lower dryer motor sensed running
keypad while in special pricing option, step 2.XX (or while
66 16022904 Rev. 0 ©2004 Maytag Appliances Company
 Loading...