

Maytag MDE7550AGW User Manual

GUIDE
MAYTAG NEPTUNE
®
DRYER
USER
USER
GUIDE
MAYTAG NEPTUNE
®
DRYER
MODEL MDE7550AGW
6 3716340
Welcome ..................................................................... 1
Important Safety Instructions ............................. 1-2
Getting Started....................................................... 3-4
Laundry ................................................................. 3
Touchscreen......................................................... 3
Status Display....................................................... 4
Operating Instructions ......................................... 5-8
Cleaning the Lint Filter...................................... 5
Loading the Dryer.............................................. 5
Adding Fabric Softener...................................... 5
Setting the Programme.................................. 5-8
Favourites at a Glance........................................ 9-10
Using Help .......................................................... 11-13
Troubleshooting................................................ 11
Laundry Hints.................................................... 11
Operating Tips................................................... 12
Lock Out............................................................ 12
Select Preferences............................................ 13
Special Laundry Tips.................................................14
Care & Cleaning...................................................... 15
Cleaning the Dryer.......................................... 15
Using the Drying Rack ............................................15
Service and Troubleshooting................................. 16
Troubleshooting................................................ 16
Service Information ................................................ 17
Guide de l’utilisateur.............................................. 18
Benutzer-Handbuch ................................................ 36
Guía del Usuario ..................................................... 54
TABLE OF CONTENTS

1
Welcome
Welcome and congratulations on your
purchase of a Maytag Neptune®dryer!
Your complete satisfaction is very
important to us. For best results, we
suggest reading this material to help
acquaint you with proper operating and
maintenance procedures.
Save time and money. If something should
go wrong, we suggest consulting the
“Service and Troubleshooting” section in
the back of this book and in the HELP
screen displays. It is designed to help you
solve basic problems before consulting a
servicer.
However, should you need assistance in
the future, it is helpful to:
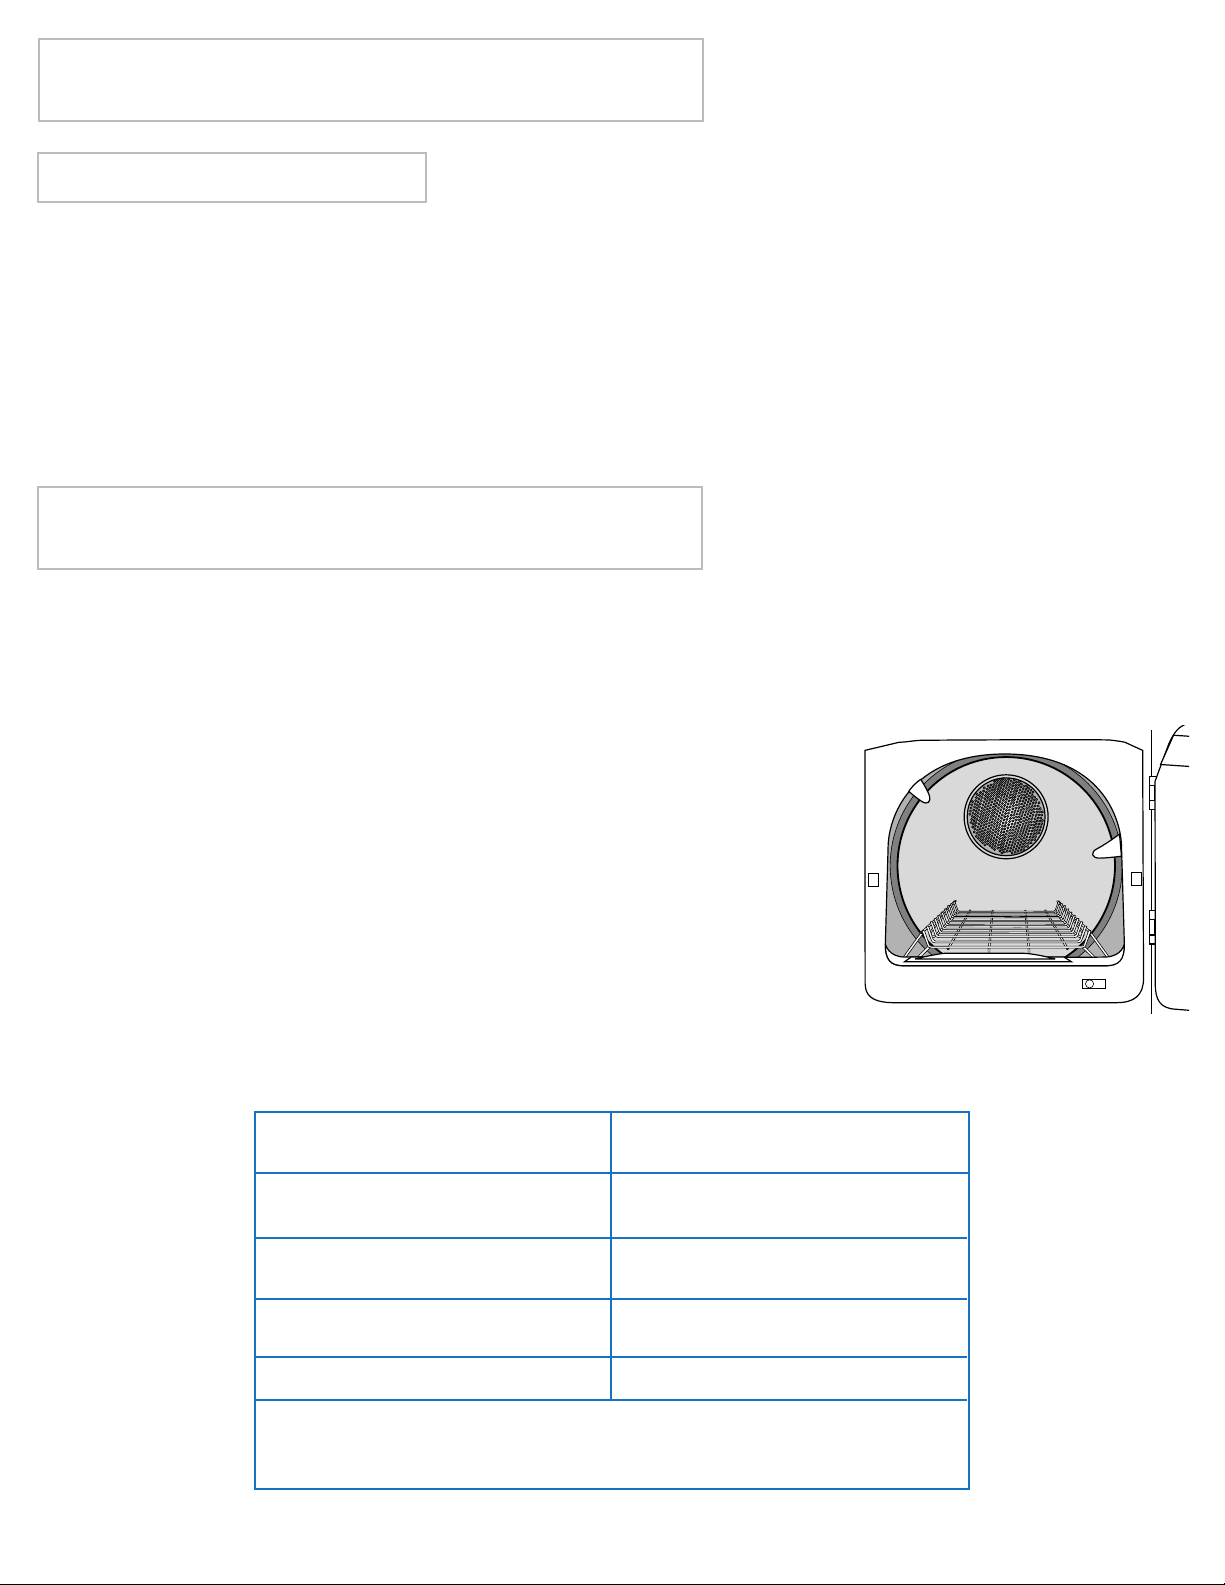
1) Have complete model and serial
number identification of your dryer.
This is located on a data plate in the
lower centre of the door opening.
Record these numbers below for easy
access:
Date of Purchase __________________
Model Number ____________________
Serial Number ____________________
2)
IMPORTANT: Keep this guide and
the sales receipt in a safe place for
future reference. Please attach your
sales receipt here.
If you have questions, please contact the
dealer from whom you purchased the
dryer.
For service information,see page 17.
NOTE: In our continuing effort to
improve the quality of our appliances, it
may be necessary to make changes to
the appliance without revising this
guide.
I
MPORTANTSAFETYINSTRUCTIONS
Read before operating your dryer.
WARNING: To reduce the risk of fire, electric shock or injury to persons
when using the appliance, follow basic precautions, including the following:
Read all instructions before using the appliance.
To avoid the possibility of fire or explosion:
• Do not dry items that have been previously cleaned in, washed in,
soaked in, or spotted with petrol, dry-cleaning solvents, other
flammable or explosive substances as they give off vapours that
could ignite or explode. Any material on which you have used a
cleaning solvent, or which is saturated with flammable liquids or
solids, should not be placed in the dryer, until all traces of these
flammable liquids or solids and their fumes have been removed.
There are many highly flammable items used in homes, such as:
acetone, denatured alcohol, petrol, paraffin, some liquid household
cleaners, some spot removers, turpentine, waxes and wax removers.
• Items containing foam rubber (may be labeled latex foam) or similar
textured rubber-like materials must not be dried on a heat setting.Foam
rubber materials when heated,can under certain circumstances produce
fire by spontaneous combustion.
Do not allow children to play on or in the appliance. Close supervision
of children is necessary when the appliance is used near children. This
appliance is not intended for use by young children or infirm persons
without supervision. Young children should be supervised to ensure that
they do not play with the appliance.
Before the appliance is removed from service or discarded, remove the
door to the drying compartment.
Do not reach into the appliance if the drum is moving.
Do not install or store this appliance where it will be exposed to the
weather.
Do not tamper with controls.
Do not repair or replace any part of the appliance or attempt any
servicing unless specifically recommended in published user-repair
instructions that you understand and have the skills to carry out.
Do not use fabric softeners or products to eliminate static unless
recommended for dryer use by the manufacturer of the fabric softener or
product.
Clean the lint filter before or after each load.
Keep the area around the dryer free from lint accumulation,dust and dirt.
The interior of the dryer and exhaust duct should be cleaned periodically
by qualified service personnel.
This appliance must be properly earthed. See installation instructions for
earthing this appliance.
Do not sit or stand on top of the clothes dryer.
Do not continue to use this appliance if it appears faulty.
If the touchscreen clear membrane becomes damaged (for instance, by a
split or hole), do not continue to use the machine until it has been repaired.
1
2
3
4
5
6
7
8
9
10
12
13
14
11
15
16

2
S
AVE
T
HESEINSTRUCTIONS
WARNING: For your safety, the information in this manual must be followed to minimize the risk of
fire or explosion or to prevent property damage, personal injury or death.
– Do not store or use petrol or other flammable vapours and liquids in the vicinity of this or any other
appliance.
WARNING: Do not place into your dryer items that have been spotted or soaked with vegetable oil
or cooking oil. Even after being washed, these items may contain significant amounts of these oils. The
remaining oil can ignite spontaneously. The potential for spontaneous ignition increases when the items
containing vegetable oil or cooking oil are exposed to heat.Heat sources, such as your clothes dryer, can
warm these items, allowing an oxidation reaction in the oil to occur. Oxidation creates heat. If this heat
cannot escape, the items can become hot enough to catch fire. Piling, stacking or storing these kinds of
items may prevent heat from escaping and can create a fire hazard.
All washed and unwashed fabrics that contain vegetable oil or cooking oil can be dangerous.Washing
these items in hot water with extra detergent will reduce, but will not eliminate, the hazard.Always use
the “cool down” programme for these items to reduce the items’ temperature. Never remove these
items from the clothes dryer hot or interrupt the drying programme until the items have run through
the “cool down” cycle. Never pile or stack these items when they are hot.
3
GETTING STARTED
LAUNDRY
To dry a load of laundry the following steps are taken. They are discussed in greater detail in later sections.
1. Clean the lint filter.
2. Load the dryer properly.
3. Add fabric softener sheet (if desired).
4. Set dryer programme.
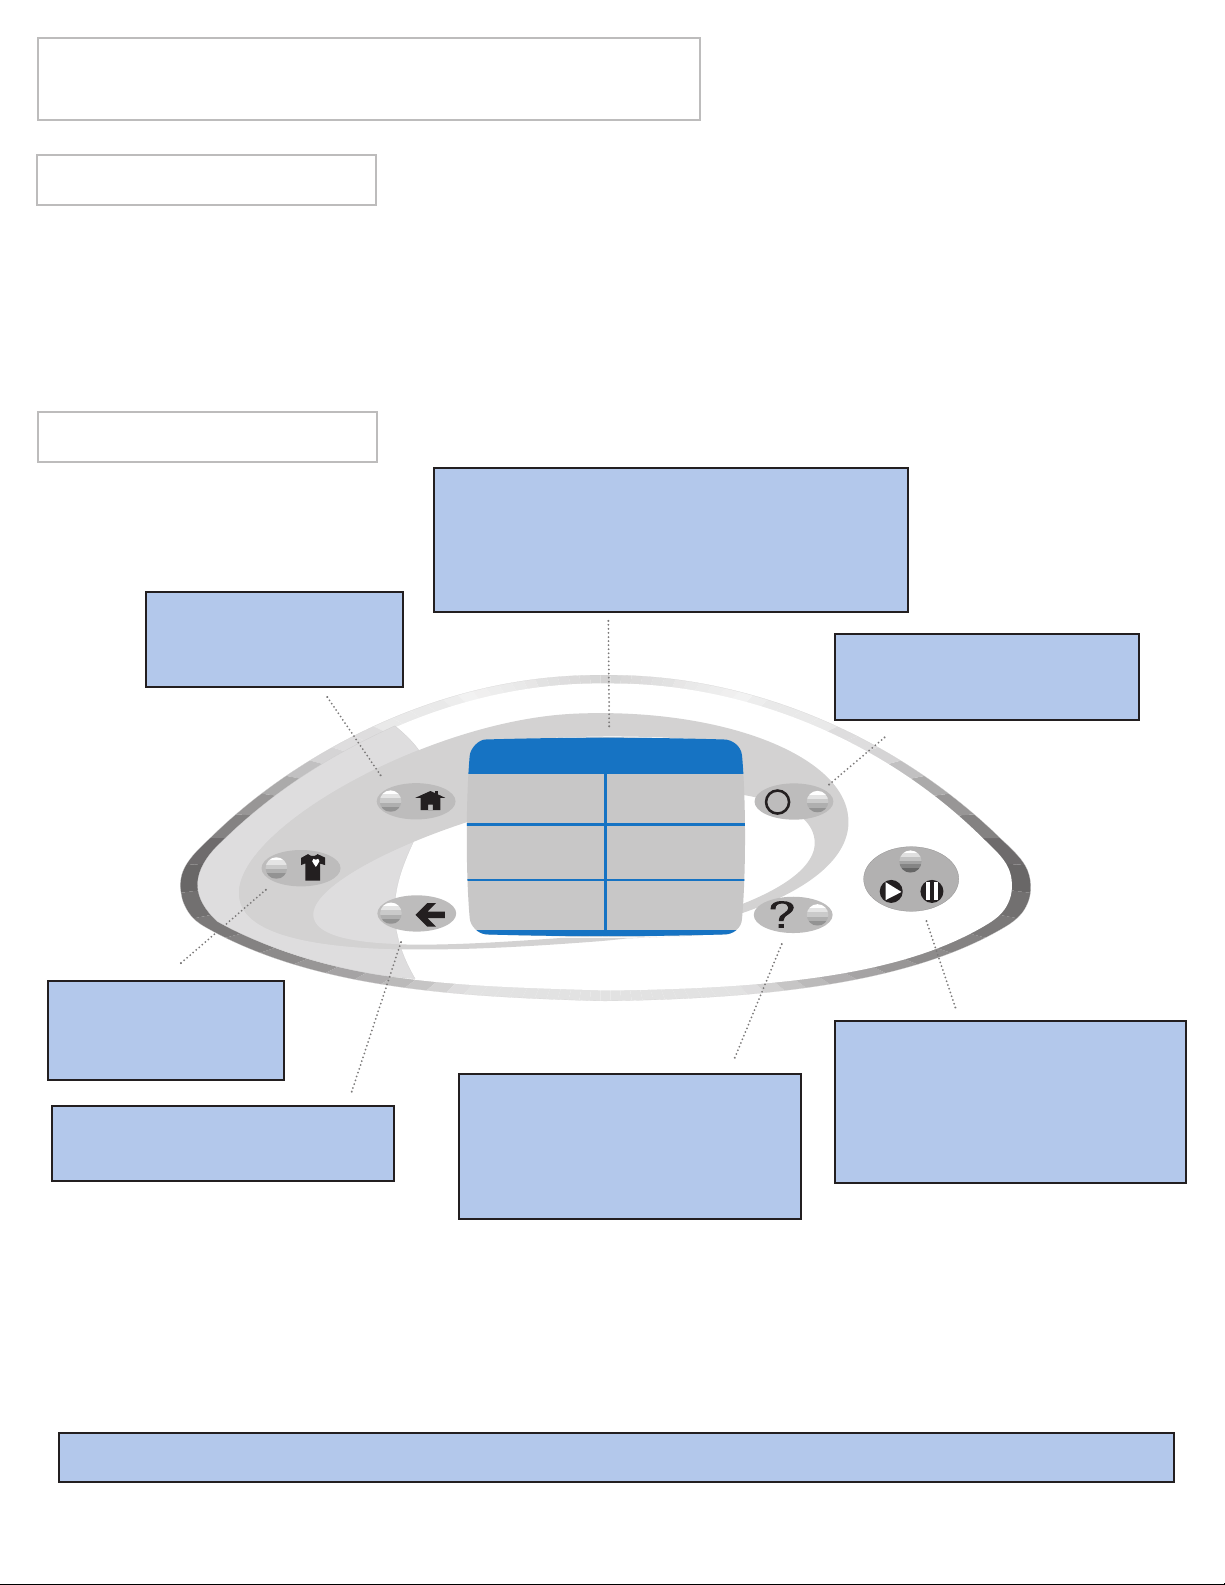
TOUCHSCREEN
If there are no words on the touchscreen, open the door,touch any key (except OFF),or touch the screen to “wake” the controls.
The machine will beep three short beeps if an invalid key sequence is pressed.
Power Outage – If the machine is running during a power cut, the machine will go into “PAUSE” mode. When power returns, the
screen will display a power failure message. Press “OK” to continue.
sensor dry
Home
timed dry
freshen up
air fluff
(no heat)
favourites
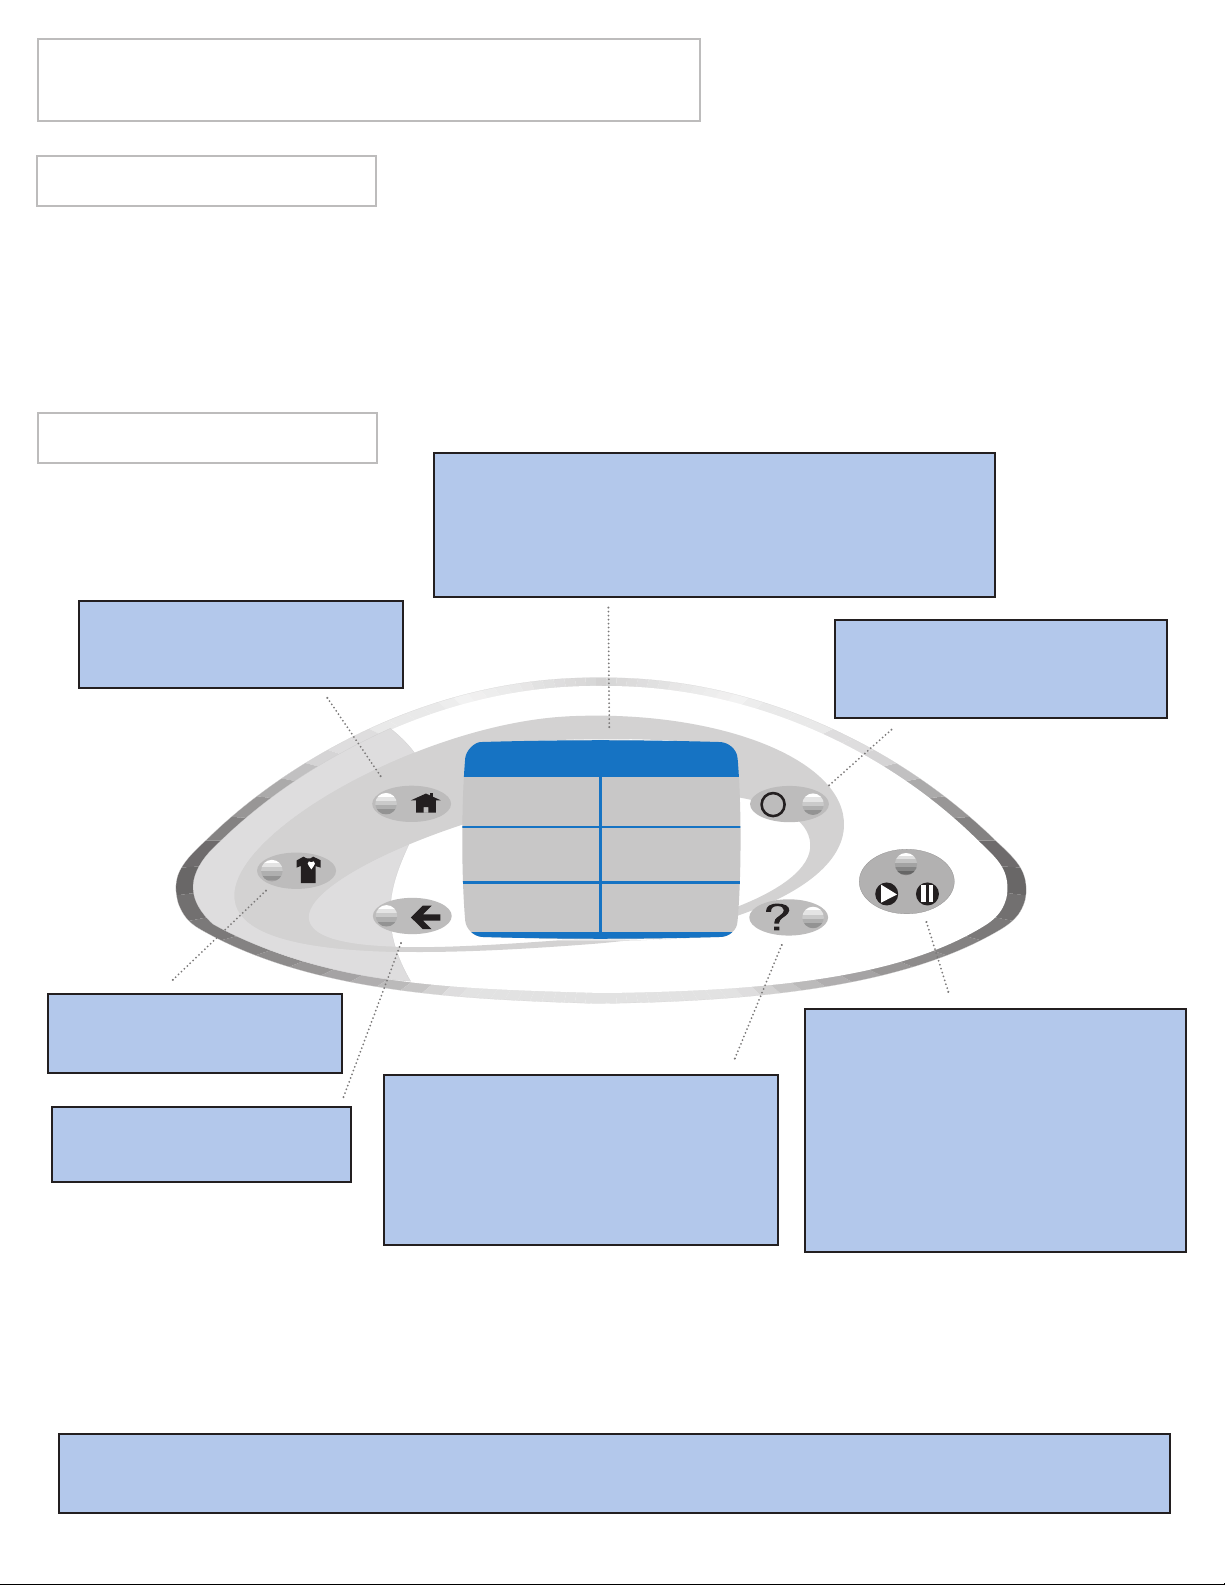
Touchscreen - An interactive display
that responds with the touch of a finger.
Note: Exposure of the touchscreen to
direct sunlight is not recommended.
Favourites - Quick
access to your
named cycles.
Start/Pause - Press this
pad to start a cycle. Once
started, pressing this pad
will stop the dryer at any
point in the cycle.
Help - Quick access to
Troubleshooting, Laundering
Hints, Operating Tips, Lock
Out and Select Preferences.
Back - Takes you to the
previous screen.
Home - Takes you
immediately to the
first screen.
Off - Stops the dryer
and turns off the display.
Special Note: As you use the touchscreen, if you feel you are lost, press Back or Home.
crease removal

4
STATUS DISPLAY
After pressing Start/Pause, this display will show the estimated time remaining in the programme.
ESTIMATED TIME
After pressing Start/Pause,this display will show which part of the programme is running (time/sensor dry, drying, cooling,air fluff,
crease removal or freshen up).
PROGRAMME STATUS
When running a Sensor Dry programme, the display will show the current dryness level of the load (sensing, least dry, less dry,
normal dry, more dry or most dry).
LOAD STATUS (SENSOR DRY ONLY)
When the dry programme is complete the screen will then go blank, until it is touched or the door is opened. If the remind chime
is selected, it will chime at the end of the programme, every 5 minutes for up to 2 hours.
END OF PROGRAMME

5
LOADING THE DRYER
The maximum clothes load for the Maytag Neptune®dryer is 8 kg Cottons.
• When only one or two articles need drying, add a few similar items to improve tumbling and drying efficiency.
• When drying large, bulky items such as a blanket or duvet, it may be necessary to reposition the load during the cycle to ensure
even drying.
Load the dryer properly...
• By placing only one wash load in the dryer at a time.
• By avoiding very small loads or mixing heavyweight or lightweight clothes.
ADDING FABRIC SOFTENER
After loading the dryer, a fabric softener sheet may be added to control static cling.
Add a fabric softener sheet (if desired)…
• Before the load becomes warm. This helps prevent greasy-looking softener stains.
• And remove any used softener sheets from the dryer to prevent softener stains.
WARNING: Do not overload the dryer, as a reduction in efficiency or damage to the machine may result.
SET THE PROGRAMME
Sensor Dry is the fastest and most energy efficient drying method. There are two sensor bars monitoring the drying progress.
When it has dried to the desired setting, the dryer will cool down to minimize creases. Options for dryness levels include Least
Dry to Most Dry. Least Dry will leave the clothes feeling slightly damp for touch up ironing. Most Dry will completely dry items.
To use this programme, select “Sensor Dry” from the Home Screen. See the following section for more details on using Sensor
Dry.
SENSOR DRY
There are five choices for dryer programmes. Select the appropriate programme and follow the touchscreen prompts.
OPERATING INSTRUCTIONS
CLEANING THE LINT FILTER
The lint filter is a “slide-in” filter located at the front of the door opening. Remove lint from filter and replace.
WARNING: Do not operate the dryer without the lint filter in place.

6
The Freshen Up programme is used to help remove odours from items. Adding a fabric softener sheet assists in freshening. It
provides an initial 5 minutes of heated tumble followed by 10 minutes of unheated tumbling. To use this programme, select “Freshen
Up” from the Home Screen.
FRESHEN UP PROGRAMME
The Crease Removal programme will release creases from items that are clean and dry but slightly creased,such as from a crowded
closet, packed suitcase, or from sitting in the dryer too long after the end of the cycle. It provides 10 minutes of heated tumbling
and 5 minutes of cool down tumbling without heat. To use this programme, select “Crease Removal” from the Home Screen.
CREASE REMOVAL PROGRAMME
This programme allows you to specify an amount of dry time. All temperature settings are available. To use this programme, select
“Timed Dry” from the Home Screen. See the following section for more details on using Timed Dry.
TIMED DRY
The Air Fluff programme is used for heat sensitive items or those needing to be freshened (e.g., sweaters, camping gear, shower
curtains, etc.) It provides tumbling without heat for a specified amount of tumble time. To use this programme, select “Air Fluff”
from the Home Screen.
AIR FLUFF PROGRAMME
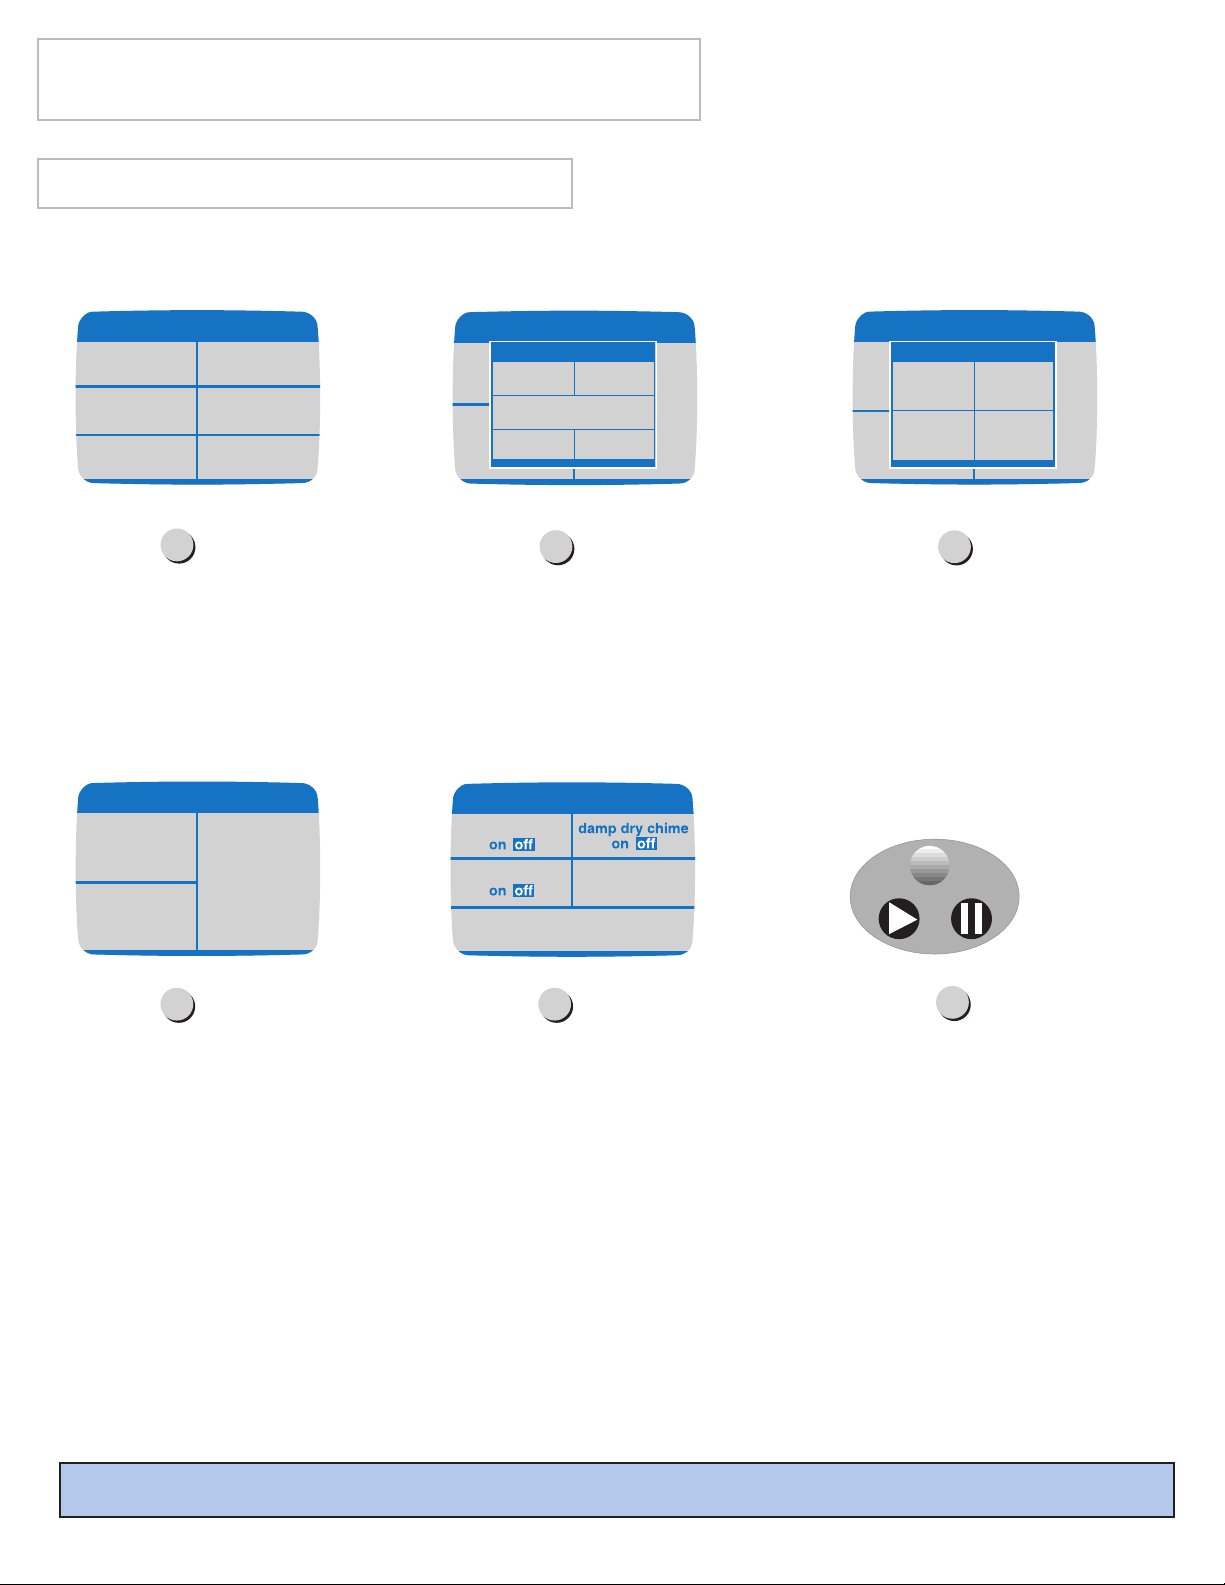
7
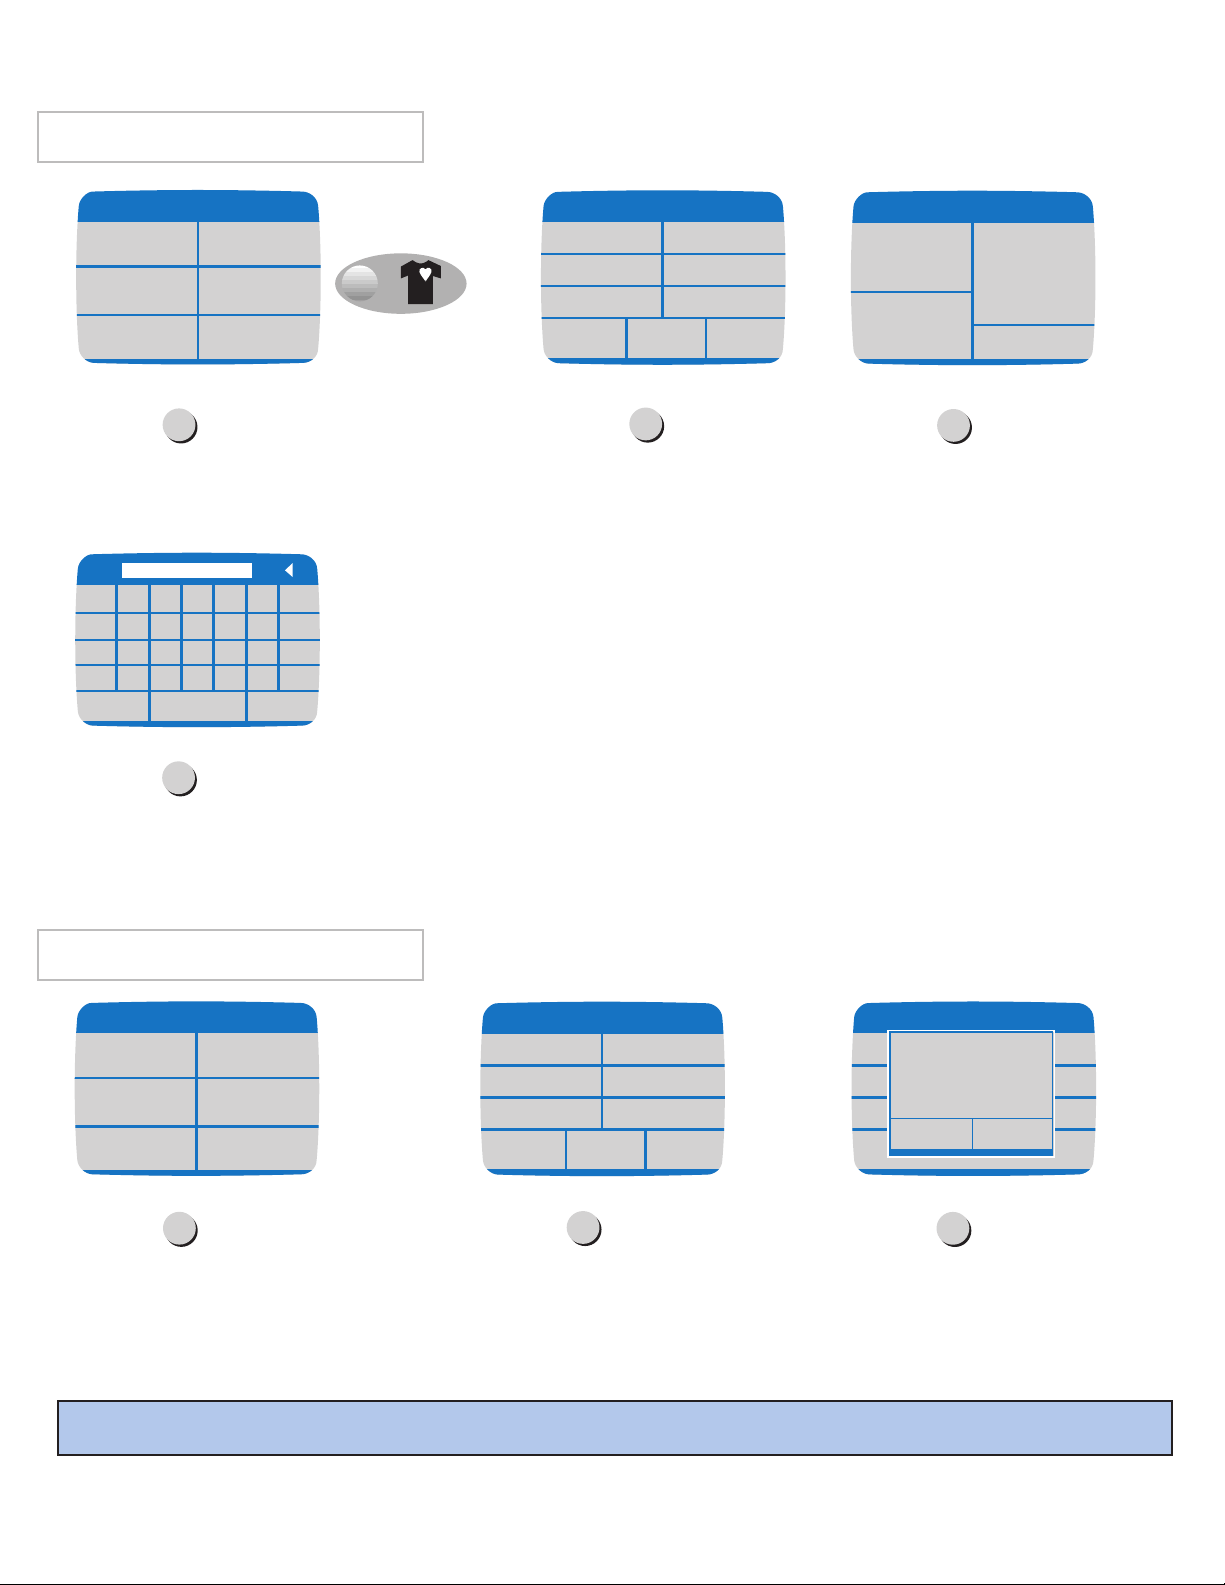
Select “Sensor Dry”. The next screen
will be the Review Screen. If the
selections are correct, press
Start/Pause. If changes need to be
made, follow the next steps.
Dryness Level – Select “Dryness
Level” to change from the default setting
(“Normal Dry”). The dryness level ranges
from least dry to driest. Select the level
appropriate for the load. The “Normal
Dry” level will be used for most loads.
Temperature – Select “Temperature” to change from the default
setting (“Medium”). The temperature
settings range from extra low to high.
Select the temperature that is
appropriate for the load.
SETTING A SENSOR DRY PROGRAMME
If there are no words on the touchscreen, open the door, touch any key (except OFF), or touch the screen to “wake” the
controls.
Step 1
Step 2
Step 3
sensor dry
Home
timed dry
freshen up
air fluff
(no heat)
favourites
crease removal
dryness level
normaldry
Press "Start/Pause" or
change your selections below.
temperature
medium
options
programme chime medium
Dryness
driest drier
normal dry
less dry
least dry
dryness level
normal dry
Press "Start/Pause" or
change your selections below.
temperature
medium
options
programme chime medium
Temperature
high medium
low
extra low
Remember: As you use the touchscreen, if you feel you are lost, press Back or Home.
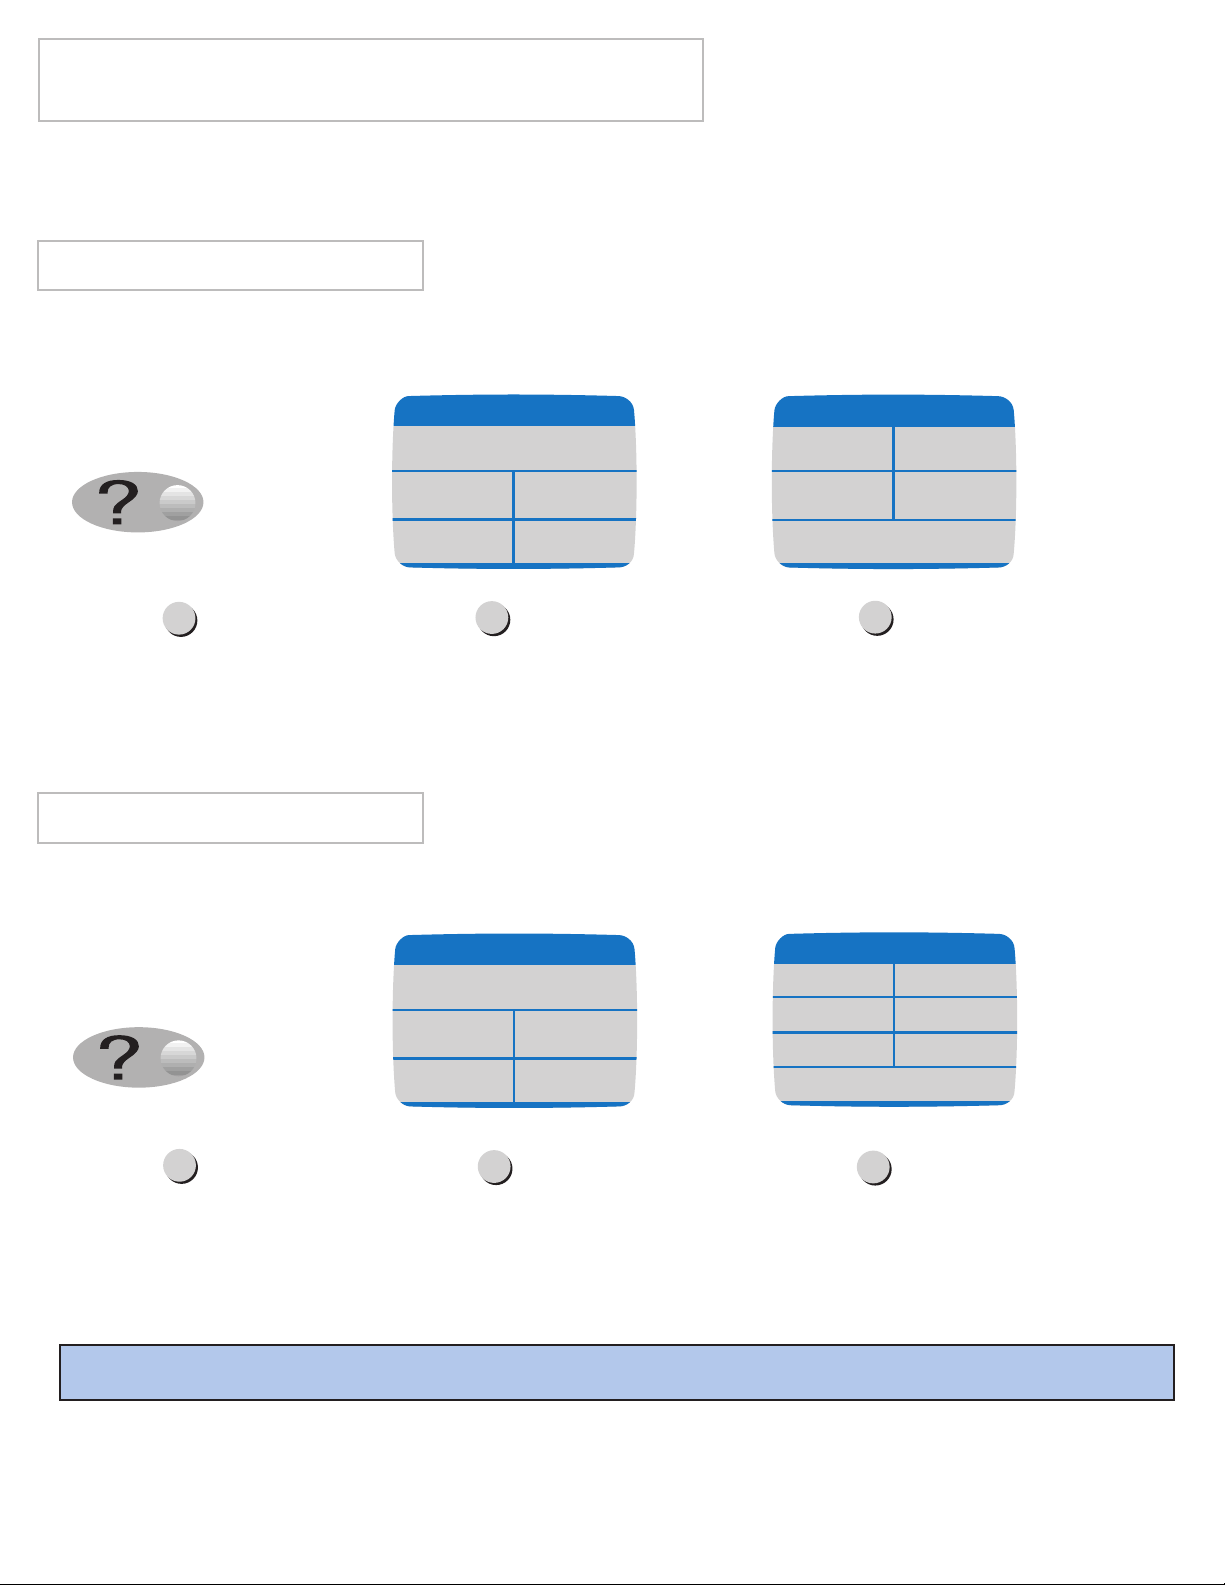
Review Screen – This screen reviews
your selections before starting the dryer,
and allows you to choose options to
further customise your drying
programme. You may press Start/Pause
to begin drying or press a displayed
choice to change previous selections.
Options Screen – There are four option
choices available, touch each option to
select or deselect it:
•
“Crease Prevent” - Intermittent
tumble in room temperature air for up to
two hours following the dry programme.
• “Damp Dry Chime” - Chimes when
load is damp.
• “Reminder Chime” - Chimes at the
end of the programme every 5 minutes
for up to two hours.
• “End Chime” - Chimes once when the
selected dryness level is reached.
Press “Continue” to return back to the
review screen.
Step 4 Step 5
dryness level
normal dry
Press "Start/Pause" or
change your selections below.
temperature
medium
options
end chime medium
end chime
medium
Options
continue
crease prevent
reminder chime
If you are satisfied with the selections,
press the Start/Pause touchpad to
begin the programme.
Step 6
OPERATING INSTRUCTIONS CONT.
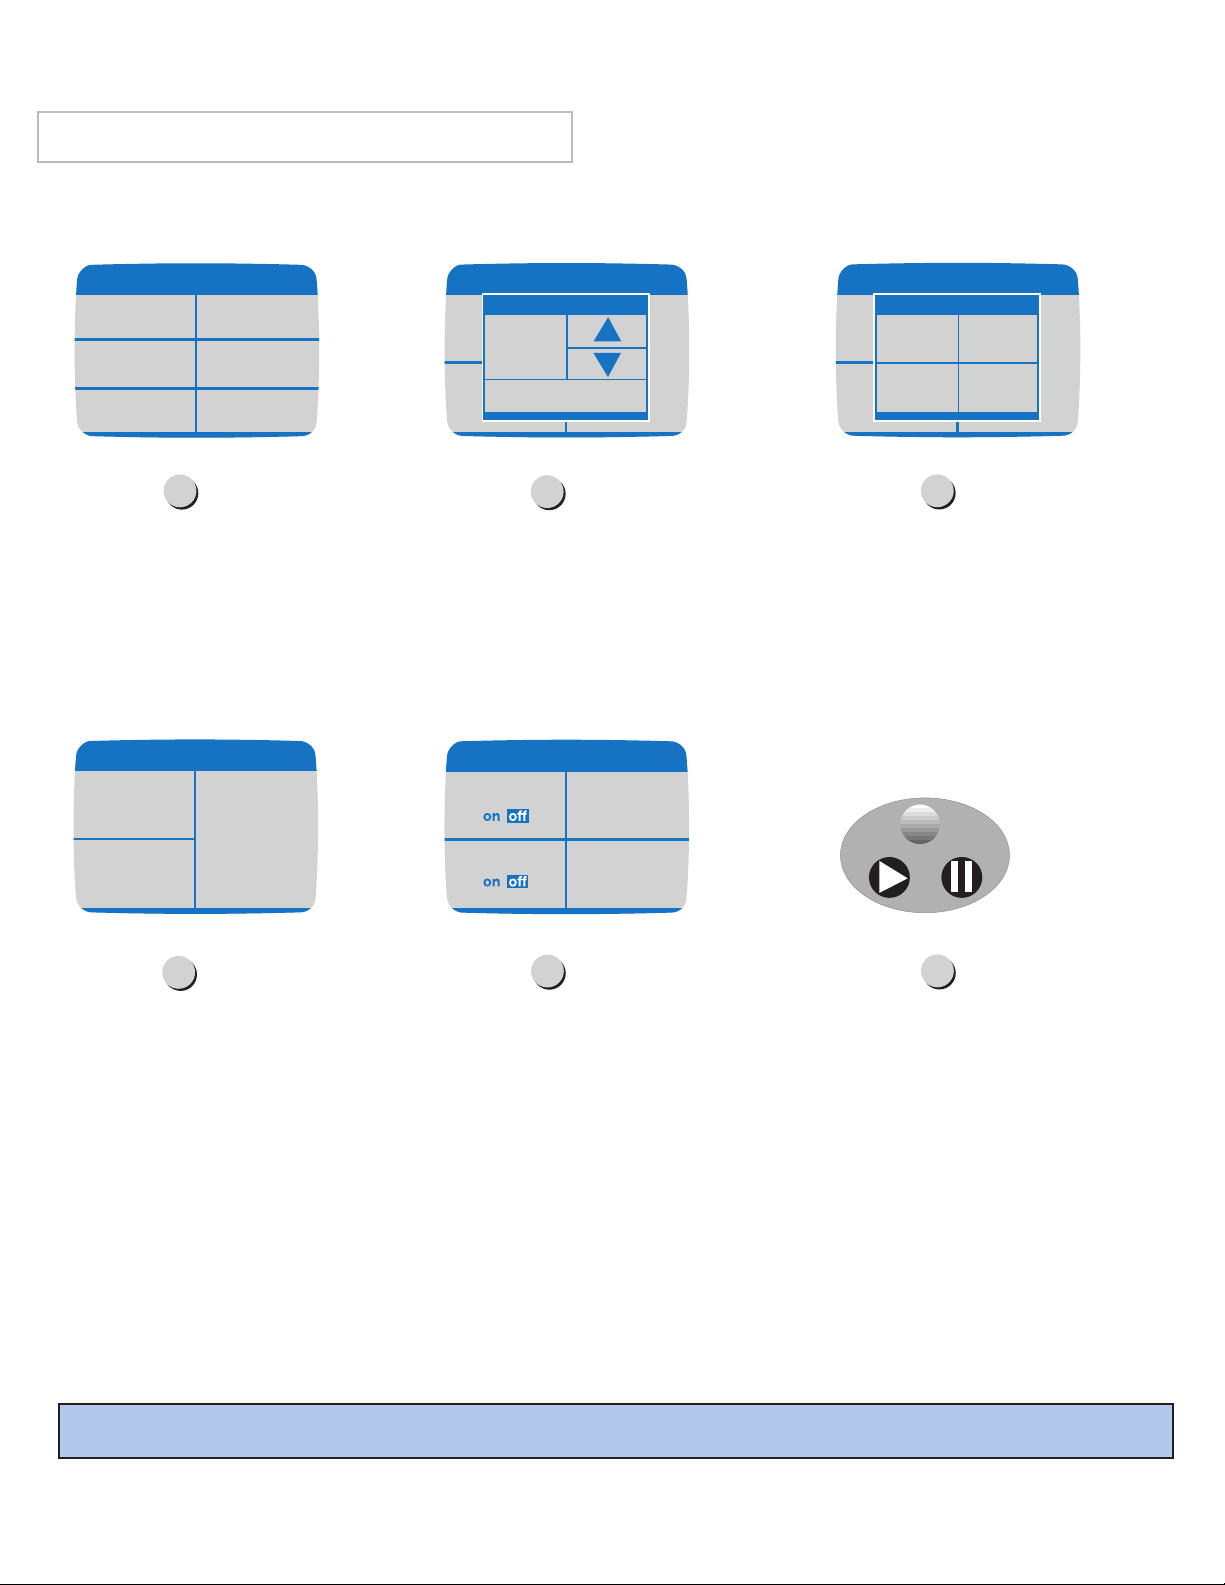
8
Select “Timed Dry” setting. The
next screen will be the Review
Screen. If the selections are correct,
press Start/Pause. If changes need
to be made, follow the next steps.
Step 1
Step 2
time
45 min
Press "Start/Pause" or
change your selections below.
temperature
medium
options
programme chime medium
Time
continue
45
minute(s)
Time – Press the “Timed Dry” area
to adjust the number of minutes to dry
the load (default is 45 min.) Press the up
and down arrows to set the time. The
time will increase or decrease in oneminute increments. Press “Continue”
when the desired time is selected to
return to the review screen.
sensor dry
Home
timed dry
freshen up
air fluff
(no heat)
favourites
crease removal
SETTING A TIME DRY PROGRAMME
If there are no words on the touchscreen, open the door, touch any pad (except OFF), or touch the screen to “wake” the
controls.
timed dry
45 minute(s)
Press "Start/Pause" or
change your selections below.
temperature
medium
options
end chime medium
Step 3
Step 4
Step 5
crease prevent
reminder chime
end chime
medium
Options
continue
Step 6
Temperature – Select the appropriate
temperature setting for drying the load.
Review Screen – This screen
reviews your selections before
starting the dryer, and allows you to
choose options to further customise
your dry programme. You may press
Start/Pause to begin drying, or
press a displayed choice to change
previous selections.
Options Screen – There are three
option choices available,touch each option
to select or deselect it:
• “Crease Prevent” - Intermittent
tumble in room temperature air for up
to two hours following the dry
programme.
• “Reminder Chime” - Chimes at the
end of the programme every 5 minutes
for up to two hours.
• “End Chime” - Chimes once when the
selected dryness level is reached.
If you are satisfied with the selections,
press the Start/Pause touchpad to begin
the programme.
time
45 min
Press "Start/Pause" or
change your selections below.
temperature
medium
options
programme chime medium
Temperature
high medium
low
extra low
Remember: As you use the touchscreen, if you feel you are lost, press Back or Home.
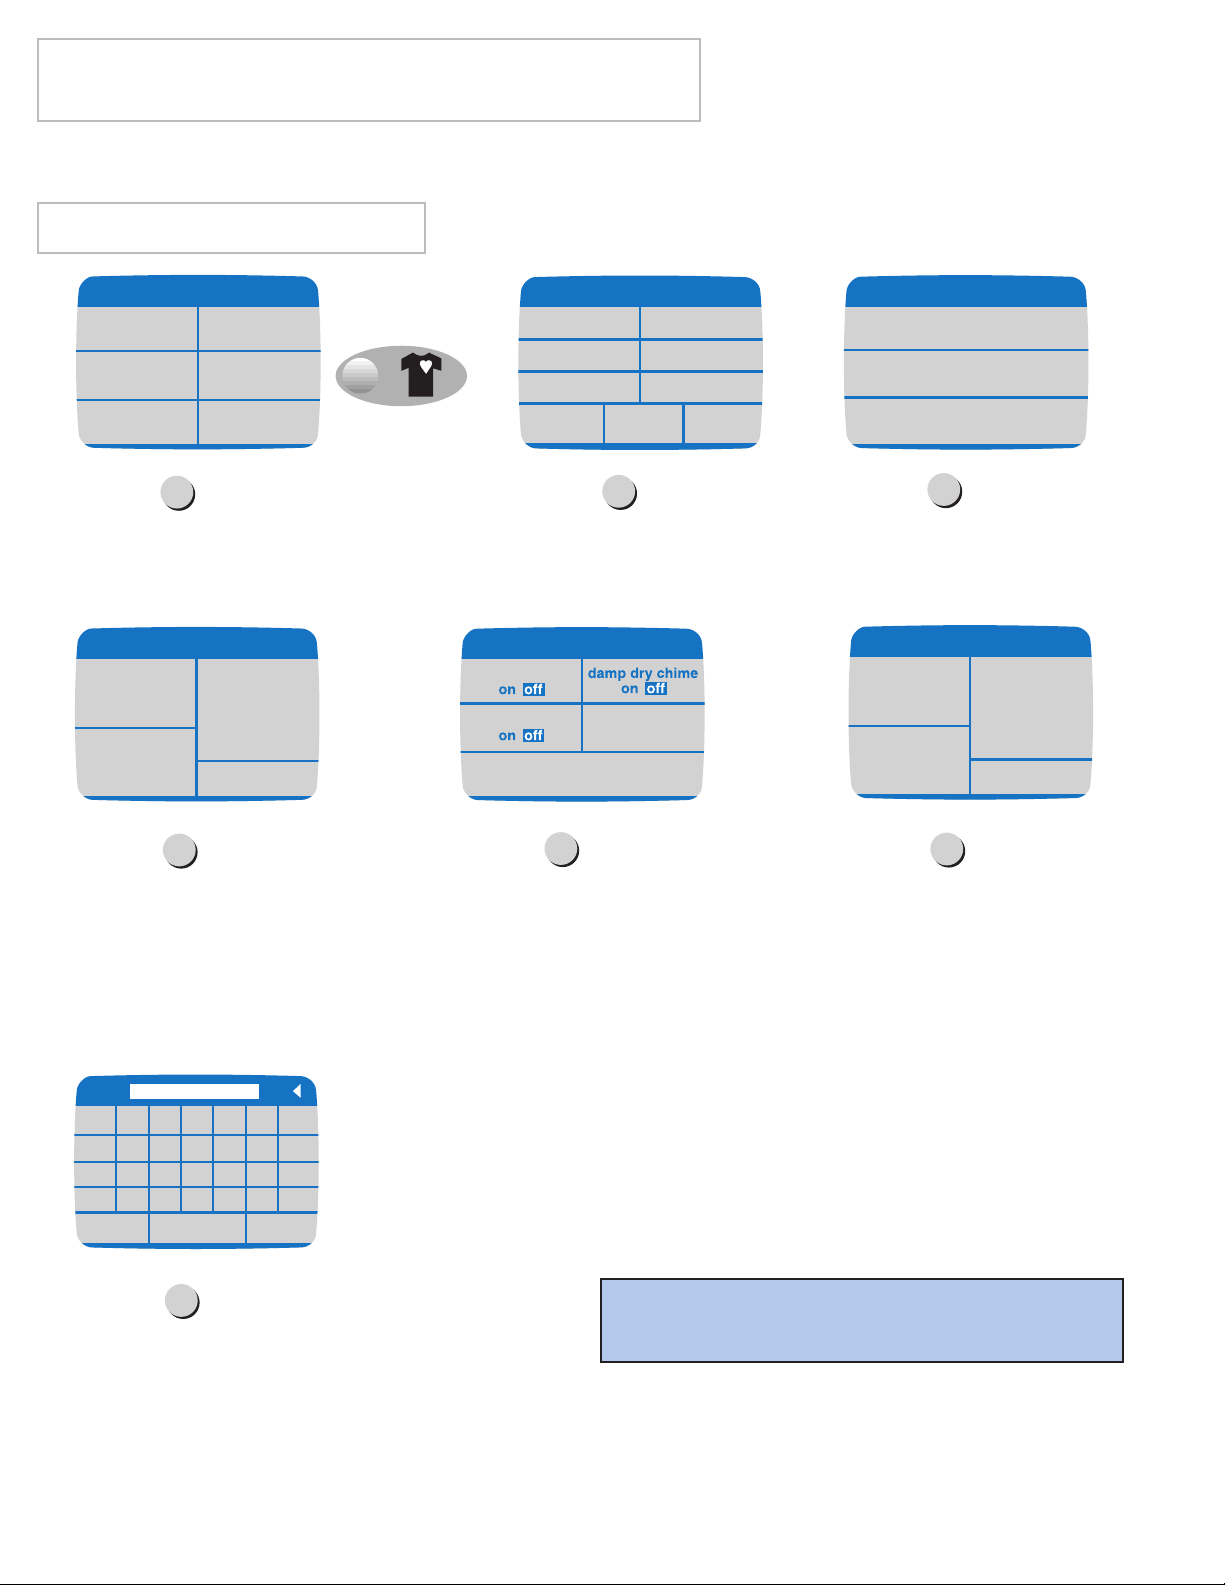
9
Press the Favourites touchpad or
select “Favourites” from the Home
Screen.
Select
“Create a Favourite” to
begin specifying your favourite.
Step 1
Step 2
Favourites
create a
favourite
edit a
favourite
delete a
favourite
sensor dry
Home
timed dry
freshen up
air fluff
(no heat)
favourites
crease removal
Favourites allow you to create, name and save up to 6 commonly used dry programmes.
FAVOURITES AT A GLANCE
Name A Favourite Cycle – Touch the
corresponding letter and space combination to spell
out your Favourite programme name, up to 12
characters. Use the arrow at the top of the screen to
delete characters. Press “Save”. Your new Favourite
programme will be displayed on the Favourites page.
Step 3
Step 4
sensor dry
Programmes
timed dry
air fluff
Select a drying programme to use for the
Favourite you would like to create.
Step 7
abcdef
g
vwx z&
'
y
hi
j
klmn
o
qp
clear
space
save
rstu
towels
dryness level
normal dry
Press "continue" to name your
favourite or change selections below .
temperature
medium
options
end chime medium
continue
Review Screen – This screen reviews
your programme choices and allows
you to choose options to further
customise your dry programme. Press
“Options” if desired, or press
“Continue” to name your favourite
(skip to Step 7).
Step 5
Options Screen – Selecting the
“Options” button will let you choose
between a variety of different options
which can be switched on and off by
touching the screen. When the desired
selections have been made, touch
“Continue” to see the review screen
once again.
end chime
medium
Options
continue
crease prevent
reminder chime
Step 6
dryness level
normal dry
Press "continue" to name your
favourite or change selections below .
temperature
medium
options
end chime medium
continue
If satisfied with your selections, press
“Continue” to name your Favourite
programme.
Remember: As you use the touchscreen, if
you feel you are lost, press
Back or Home.
CREATE A FAVOURITE
10
Press the Favourites touchpad or
select “Favourites” from the Home
Screen.
Touch “Delete A Favourite”.
Touch the Favourite programme
you want to delete.
Step 1
Step 2
sensor dry
Home
timed dry
freshen up
air fluff
(no heat)
favourites
crease removal
red towels
Favourites
create a
favourite
edit a
favourite
delete a
favourite
A screen confirming the deletion of the
Favourite programme will be displayed.
Press “Yes” to complete the deletion or
“No” to return to the Favourites screen
without making changes.
Step 3
blue jeans towels
Select a favourite to delete
return without
making changes
Are you sure you want
to delete this favourite:
"red towels"?
yes no
Press the Favourites touchpad or
select “Favourites” from the Home
Screen.
Touch “Edit A Favourite”.
Touch the Favourite programme
you want to edit.
Review Screen – The review
screen for that specific programme
will be displayed. Make the
appropriate changes by touching the
area. Press “Continue” to edit the
name of the favourite.
If the current Favourite programme name still
applies, touch “Save”. If you prefer a new name,
type in the new name and touch “Save”. Use the
arrow at the top of the screen to delete characters.
Step 1
Step 2
Step 3
Step 4
dryness level
normal dry
Press "continue" to name your
favourite or change selections below .
temperature
medium
options
end chime medium
continue
sensor dry
Home
timed dry
freshen up
air fluff
(no heat)
favourites
crease removal
abcdef
g
vwx z&
.
y
hi
j
klmn
o
qp
clear
space
save
rstu
red towels
towels
Favourites
create a
favourite
edit a
favourite
delete a
favourite
Remember: As you use the touchscreen, if you feel you are lost, press Back or Home.
EDIT A FAVOURITE
DELETE A FAVOURITE
11
USING HELP
Touch the Help touchpad.
Select
“Laundry Hints” to begin.
Step 1
Step 2
Help Menu
laundry hints
lock-out
feature
troubleshooting tips
operating tips
select
preferences
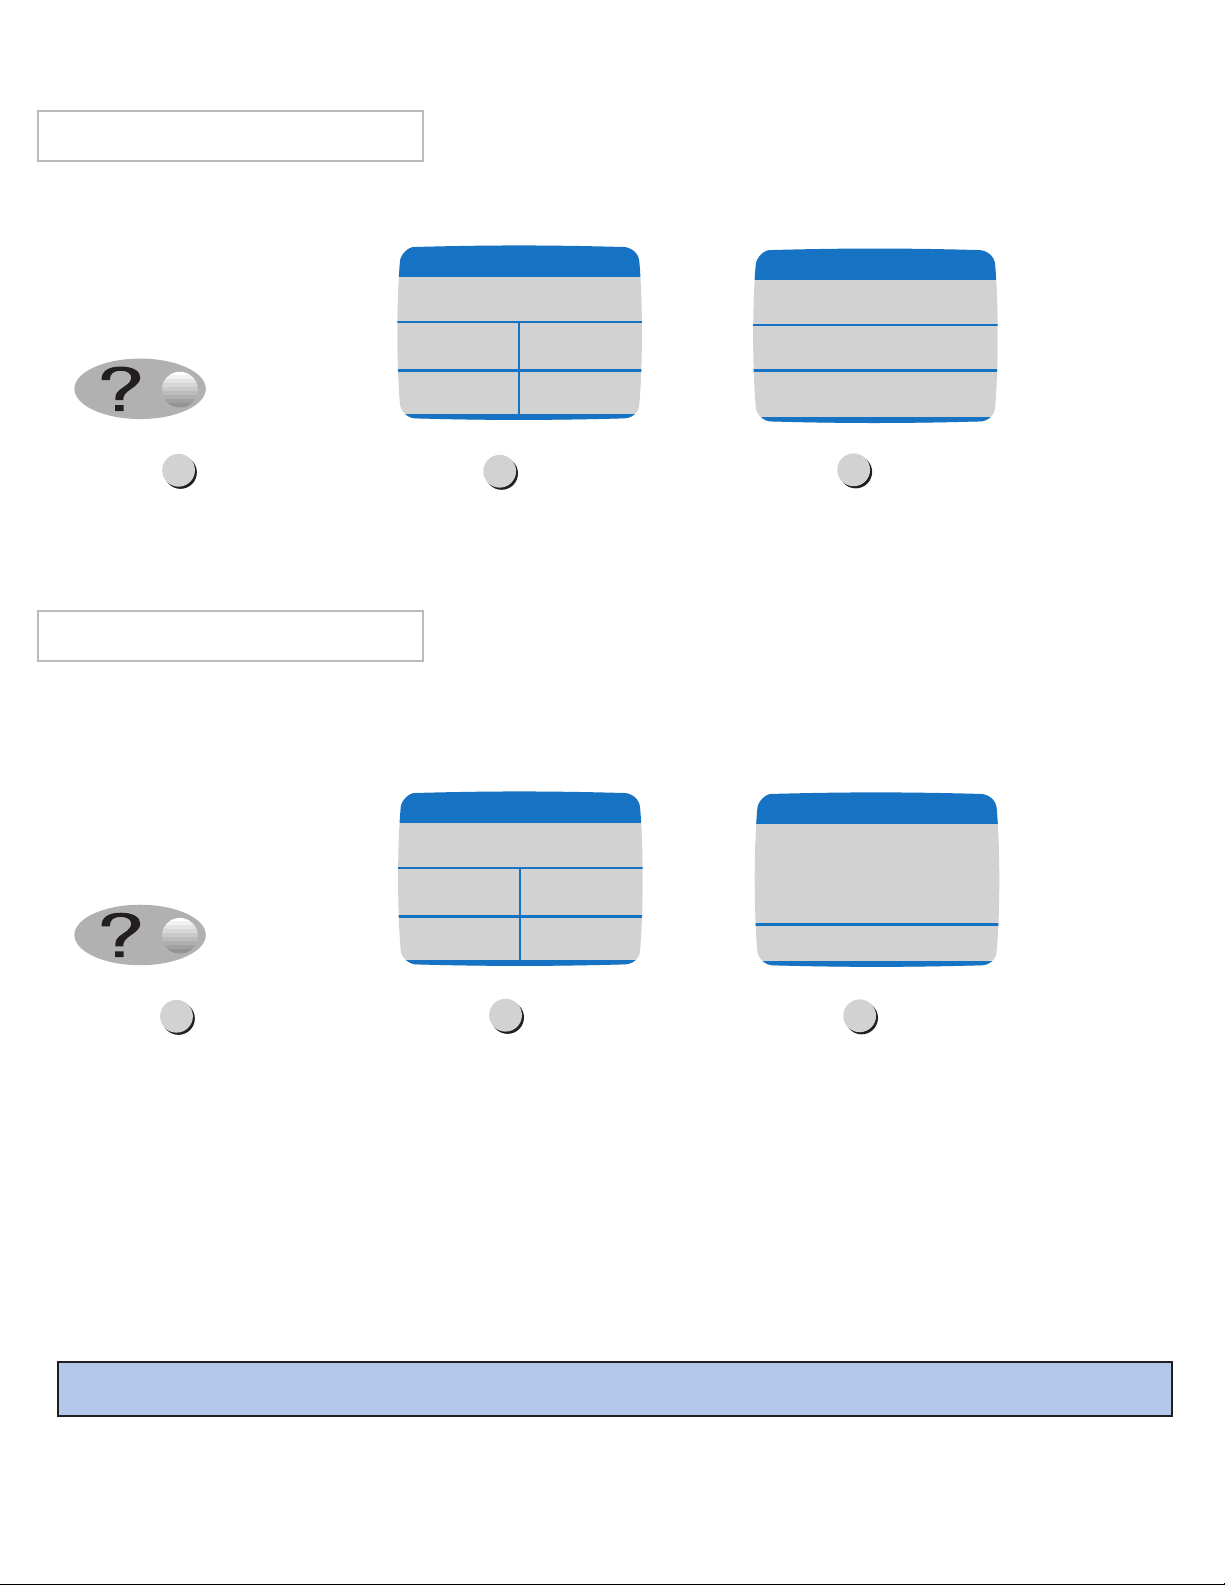
Touch the Help touchpad.
Select “Troubleshooting Tips”
on the Help screen.
The Help feature offers a variety of detailed information on troubleshooting tips, laundry hints and dryer operating tips.
The Help screen is also where you can access the Lock Out feature and Select Preferences.
Step 1
Step 2
Help Menu
laundry hints
lock-out
feature
troubleshooting tips
operating tips
select
preferences
Here you will see headings for common
troubleshooting topics. Touch one of the
displayed areas to see specific information.
Step 3
Tr oubleshooting Tips
doesn't run
doesn't dry
doesn't heat
too noisy
contact your dealer for service information.
TROUBLESHOOTING
This feature allows you to review the more common troubleshooting topics. For more detailed information, see the
“Service and Troubleshooting” section (page 16), or contact your dealer for service information.
LAUNDRY HINTS
The Laundry Hints feature provides information to help you care for your clothes and achieve optimum dryer performance.
Here you will see the available topics. Touch the
topics to see specific information.
Step 3
Laundry Hints
items to
avoid drying
drying special items
dryer
additives
drying rack
lint filter/
venting
dryer
sorting
line dry/
flat dry
Remember: As you use the touchscreen, if you feel you are lost, press Back or Home.
12
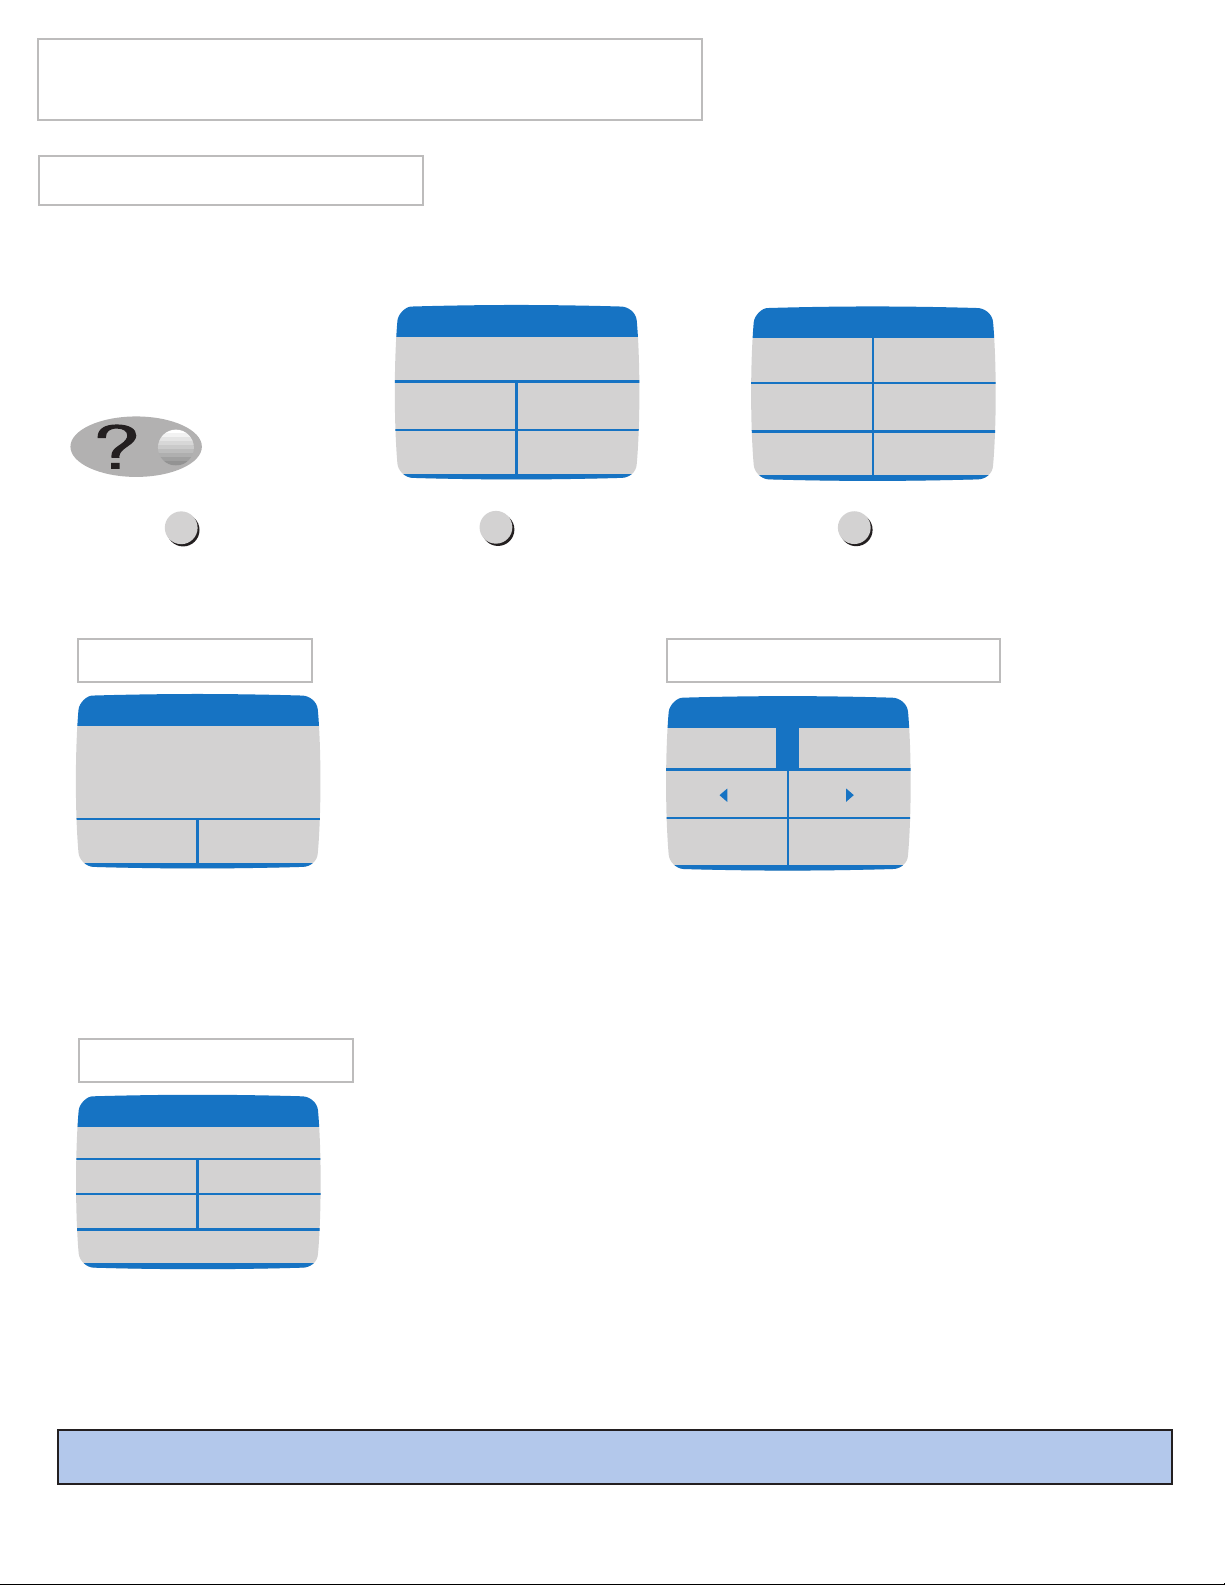
Touch the Help touchpad.
Step 1
control settings
Operating Tips
lock-out feature
dryer care
Help Menu
laundry hints
lock-out
feature
troubleshooting tips
operating tips
select
preferences
Step 2
Select “Operating Tips” to begin.
Here you will see the available topics. Touch
the topics to see specific information.
Step 3
OPERATING TIPS
To activate lock-out,
press here
Lock-Out Feature
To lock-out the controls, touch
the area below for three seconds.
Press the area labelled “To activate lock-out
press here” for three seconds.After activating the
lock out feature, press the area labelled “To
deactivate lock-out press here” for three
seconds to deactivate.
Touch the Help touchpad.
Step 1
Help Menu
laundry hints
lock-out
feature
troubleshooting tips
operating tips
select
preferences
Step 2
Select “Lock-Out Feature”
from the Help screen.
Step 3
LOCK-OUT
The Operating Tips feature provides information on maximizing the touchscreen controls and use of your dryer.
The Lock-Out feature deactivates the touchscreen or touchpads. Use this feature for cleaning the control panel or to
prevent unwanted use of the dryer.
Remember: As you use the touchscreen, if you feel you are lost, press Back or Home.
13
Touch “Loud”, “Medium”, “Soft”,or
“Off” to set the volume level of the
touchscreen beeps. Touch “Continue” to
accept the selected volume setting.
This provides audible feedback upon
making selections on the touch screen.
loud
soft
medium
off
Touch Screen Volume
continue
Depending on the lighting in your home and other
factors, you may want to adjust the intensity of your
touchscreen. Touch the arrows to lighten or darken the
display. Touch “Default” to return to the dryer’s preselected levels.Touch “Continue” when finished.
Use the arrow keys to adjust
the contrast of the viewing screen.
default
continue
You have the ability to change the language between
English, French, Spanish and German.You will always
see the next screen in the selected language to make
sure you want to change the language.
Are you sure you would like to change the
language to French?
English to French
De l'anglais au français
yes/oui
no/non
Souhaitez-vous vraiment sélectionner le
français?
TOUCHSCREEN VOLUME
CHANGE MONITOR CONTRASTCHANGE LANGUAGE
Remember: As you use the touchscreen, if you feel you are lost, press Back or Home.
Touch the Help touchpad.
Touch the
“Select Preferences” area.
Step 1
touch screen
volume medium
change
to english
Select Preferences
change monitor
contrast
sélectionner
le français
cambiar a
español
zu Deutsch
überwechseln
Step 2
Here you will see the available topics. Touch the
topics to see specific information.
Help Menu
laundry hints
lock-out
feature
troubleshooting tips
operating tips
select
preferences
Step 3
SELECT PREFERENCES
The Select Preferences feature allows you to change the display language from English (default) to French, Spanish or
German, set the intensity of the screen display, and select the volume of the touchscreen beeps.
USING HELP CONT.

14
• Follow the care label instructions or dry using the Sensor Dry programme.
• Be sure the item is thoroughly dry before using or storing.
• May require repositioning to ensure even drying.
• Dry only one blanket at a time for best tumbling action.
• Be sure the item is thoroughly dry before using or storing.
• Use Sensor Dry programme and the extra low temperature setting to help
minimize wrinkling.
• Dry these in small loads for best results and remove as soon as possible.
• Use Sensor Dry and the regular temperature setting for soft, fluffy nappies.
• Use Sensor Dry and the extra low temperature setting.
• Place a clean pair of trainers in the dryer with the item to fluff down-filled items.
Adding a couple of dry towels shortens dry time and absorbs moisture.
• DO NOT dry on a heat setting. Use Air Fluff option (no-heat).
• WARNING – Drying a rubber item with heat may damage it or be a fire
hazard.
• Use Sensor Dry.
• Add a couple of dry towels and a pair of clean trainers to help the tumbling action and to fluff the item.
• DO NOT dryer-dry kapok or foam pillows.
• Use Air Fluff or Time Dry and the extra low temperature setting depending on
the care label instructions.
Bedspreads & Duvets
Blankets
Curtains & Drapes
Cloth Nappies
Down–filled Items
(jackets, sleeping bags, duvets,
etc.)
Foam Rubber
(rug backs, stuffed toys, shoulder
pads, etc.)
Pillows
Plastics
(shower curtains, outdoor
furniture covers, etc.)
Please follow the care label or manufacturer’s instructions for drying special items. If care label instructions are not
available, use the following information as a guide.
• Fiberglass Items (curtains, drapes, etc.)
• Woolens, unless recommended on the label.
• Vegetable or cooking oil soaked items. (See pg.2)
AVOID TUMBLE-DRYING
SPECIAL LAUNDRY TIPS
15
CARE & CLEANING
Control Panel – clean with a soft, damp cloth. Do not use
abrasive powders or cleaning pads. Do not scratch or scrape the
control panel with any sharp object, including fingernails. Do not
spray cleaners directly on the panel.
Cabinet – clean with soap and water followed with an appliance
wax, if desired.
Drum – remove any stains such as crayon, ink pen or fabric dye
(from new items such as towels or jeans) with an all-purpose
cleaner. Then tumble old towels or rags to remove any excess
stain or cleaning substance. Once these steps are done, stains
may still be visible, but should not transfer to subsequent loads.
Dryer Exhaust System – should be inspected and cleaned
once a year to maintain optimum performance. The outside
exhaust hood should be cleaned more frequently to ensure
proper operation.(Refer to the Installation Instructions for more
information.)
CLEANING THE DRYER
USING THE DRYING RACK
Suggested Items Suggested Temperature
Settings
Washable sweaters (block to shape Heat
and lay flat on rack)
Stuffed toys or pillows Heat
(cotton or polyester fibre filled)
*Stuffed toys Air Fluff
(foam or rubber filled)
Trainers Air Fluff or Heat
*Warning: When drying foam rubber, plastic or rubber with heat, it is
possible they will suffer damage and could lead to a fire
hazard.
The drying rack allows you to dry items that you don’t want to tumble dry, for example, trainers, washable sweaters,
stuffed toys or pillows, etc.
The rack remains stationary, but the drum rotates.
(Make sure nothing hangs over the edges of the rack.)
To Use Rack:
1. Open dryer door.
2. Position drying rack in drum with the two extension wires toward you. These wires
will brace the rack against the front surface of the drum. Legs will rest on front
ledge and at back of drum.
3. Place wet items on the rack, leaving space between them so air can reach all surfaces.
4. Close dryer door.
5. Use the Time Dry programme. Select time according to moisture and weight of
item. Push the Start/Pause button. It may be necessary to reset the controls if a
longer drying time is needed.
To Remove Rack:
1. Open dryer door.
2. Lift rack straight up and out.

16
SERVICE AND TROUBLESHOOTING
TROUBLESHOOTING
• Be sure the door is latched shut.
• Be sure the power cord is plugged into a live electricity supply.
• Check the home’s circuit breaker and fuses.
• Press the Start/Pause button again if the door is opened during the programme.
• Check the home’s circuit breaker and fuses.
• Select a heat setting, not air fluff.
• Clean the lint filter and exhaust duct.
• Dryer may have moved into the cool-down portion of the cycle.
• Check all of the above, plus...
• Be sure the exhaust hood at the outside of the home can open and close freely.
• Check exhaust system for lint build-up. Ducting should be inspected and cleaned annually.
• Use 4” rigid metal exhaust duct.
• Do not overload. 1 Wash load = 1 Dryer load.
• Sort heavy items from lightweight items.
• Large, bulky items like blankets or duvets may require repositioning to ensure even drying.
• Check that the washer is draining properly to extract adequate water from the load.
• Clothes load too small to tumble properly. Add a few towels.
• Check the load for objects such as coins, loose buttons, nails, etc. Remove promptly.
• It is normal to hear the dryer heating element cycle on and off during the drying programme.
• Be sure the dryer is leveled properly as outlined in the installation manual.
• Be sure the vinyl feet are installed on the leveling legs.
• It is normal for the dryer to hum due to the high velocity of air moving through the dryer drum
and exhaust system.
Doesn’t Run
Doesn’t Heat
Doesn’t Dry
Is Noisy
Contact your dealer for further assistance or for service information.
CHECK THESE POINTS IF YOUR MAYTAG NEPTUNE
®
DRYER...

17
For service, please contact the Maytag dealer from whom you purchased this appliance.
For service in Australia, please contact Maytag appliances on 1 800 819 925
For service in the United Kingdom, please contact Maytag U.K.on 01737 231000.
Manufacturer: MAYTAG APPLIANCES: 1 Dependability Square, Newton, Iowa 50208, U.S.A.
SERVICE INFORMATION

DE L’UTILISATEUR
SÉCHE-LINGE MAYTAG NEPTUNE
®
GUIDE
GUIDE
DE L’UTILISATEUR
SÉCHE-LINGE MAYTAG NEPTUNE
®
MODÈLE MDE7550AGW
Bienvenue.................................................................. 19
Instructions de sécurité importantes........... 19-20
Mise en marche ................................................. 21-22
Séchage ............................................................... 21
Écran tactile....................................................... 21
Affichage du statut ........................................... 22
Mode d'emploi................................................... 23-26
Nettoyage du filtre à peluches...................... 23
Chargement du sèche-linge.............................23
Ajout d’assouplissant....................................... 23
Réglage du programme............................. 23-26
Aperçu des favoris............................................ 27-28
Utilisation de l'aide ........................................... 29-31
Diagnostic........................................................... 29
Conseils de séchage......................................... 29
Conseils d'utilisation........................................ 30
Verrouillage ........................................................ 30
Sélection des préférences .............................. 31
Conseils de séchage spéciaux .............................. 32
Entretien et nettoyage ........................................... 33
Nettoyage du sèche-linge............................... 33
Utilisation de la grille de séchage .........................33
Entretien et diagnostic........................................... 34
Diagnostic........................................................... 34
Information sur le service après-vente.............. 35
Benutzer-Handbuch ................................................ 36
Guía del Usuario ..................................................... 54
TABLE DES MATIÈRES

19
Bienvenue
Bienvenue et félicitations pour votre
achat d’un sèche-linge Maytag Neptune®!
Il est très important pour nous que vous
soyez totalement satisfait. Pour
l’obtention des meilleurs résultats, nous
vous suggérons de lire la totalité de cette
brochure pour vous familiariser avec les
méthodes adéquates d’utilisation et
d'entretien de l’appareil.
Économisez du temps et de l'argent. En
cas de problème, nous vous suggérons de
consulter la section «Entretien et
diagnostic» à la fin de ce guide ainsi que
les écrans d'AIDE qui ont été conçus
pour vous aider à résoudre les problèmes
courants avant de consulter un
dépanneur.
Toutefois, pour tout besoin d’assistance à
l’avenir, il sera utile de disposer:
1) Du numéro de modèle et du numéro
de série de l’appareil; on trouve cette
information sur la plaque signalétique,
au centre en bas de l’ouverture de la
porte. Inscrivez les informations cidessous pour les avoir facilement sous
la main:
Date d’achat ______________________
Numéro de modèle ________________
Numéro de série __________________
2)
IMPORTANT : Conservez ce guide
et la facture d’achat en lieu sûr
pour utilisation ultérieure. Veuillez
attacher votre reçu ici.
Si vous avez des questions, veuillez
contacter le revendeur où vous avez
acheté le sèche-linge.
Pour l’information sur le service
après-vente, voyez page 35.
REMARQUE : Dans le cadre de nos
pratiques d’amélioration constantes de
la qualité de nos appareils, des
modifications peuvent être introduites
sur les appareils sans que cela donne lieu
à une révision de ce guide.
I
NSTRUCTIONS DESÉCURITÉIMPORTANTES
Lisez ce qui suit avant d’utiliser le sèche-linge.
AVERTISSEMENT : Pour minimiser les risques d’incendie, explosion,choc
électrique, dommages matériels ou dommages corporels lors de l’utilisation de
l’appareil, appliquez les précautions fondamentales, dont les suivantes.
Lisez la totalité des instructions avant d’utiliser l’appareil.
Pour éviter tout risque d’incendie ou d’explosion :
• Ne séchez pas des articles qui ont été précédemment nettoyés, lavés,
trempés ou imprégnés d'essence, de solvants de nettoyage à sec, ou
autres substances explosives ou inflammables. Ces produits libèrent
des vapeurs qui peuvent prendre feu ou exploser. Tout article sur
lequel vous avez utilisé un solvant de nettoyage à sec ou qui est saturé
de liquides ou de solides inflammables ne doit pas être placé dans le
sèche-linge tant que toutes les traces de ces liquides ou solides
inflammables et leurs vapeurs n’ont pas été enlevées. Ces produits
comprennent l’acétone, l’alcool dénaturé, l’essence, la paraffine,
certains produits de nettoyage liquides ménagers,certains détachants,
la térébenthine, les cires et produits pour enlever les cires.
• Ne faites jamais sécher avec chauffage des articles contenant du
caoutchouc mousse (parfois appelé mousse de latex) ou autres articles
à texture caoutchouteuse similaire. Dans certaines circonstances un
article à base de caoutchouc mousse peut s’enflammer spontanément
sous l’effet de la chaleur.
Ne laissez pas des enfants jouer avec ou sur l’appareil. Il convient de
superviser attentivement les enfants lorsque l’appareil est utilisé en leur
présence. Cet appareil n'est pas conçu pour être utilisé par de jeunes
enfants ou des personnes infirmes sans supervision. Il faut surveiller les
jeunes enfants pour s'assurer qu'ils ne jouent pas avec l'appareil.
Avant de retirer l’appareil du service ou de le mettre au rebut, démontez
la porte du compartiment de séchage.
N’introduisez pas une main dans l’appareil lorsque le tambour est en
mouvement.
N’installez ou ne rangez pas cet appareil en un endroit où il serait exposé
aux intempéries.
Ne circonvenez pas les organes de commande.
Ne réparez ou remplacez aucun composant de cet appareil; vous ne
devez entreprendre aucune opération d’entretien qui n’est pas
spécifiquement recommandée dans des instructions de réparation
publiées à l’intention des utilisateurs, ou que vous ne seriez pas en
mesure d’exécuter parfaitement.
N’utilisez pas un assouplissant de tissu ou produit similaire pour éliminer
les charges statiques, sauf si le fabricant du produit en recommande
l’emploi dans un sèche-linge.
Nettoyez le filtre à peluches avant ou après chaque utilisation.
Veillez à ce que la zone voisine du sèche-linge demeure exempte
d’accumulation de peluches, poussière et souillures.
Faites nettoyer périodiquement l’intérieur du sèche-linge et le conduit
d’évacuation par un technicien qualifié.
Il faut que cet appareil soit convenablement relié à la terre. Voyez les
instructions d’installation concernant la liaison à la terre de cet appareil.
On ne doit jamais s’asseoir ou se tenir debout sur le sèche-linge.
Ne continuez pas à utiliser cet appareil s'il paraît être défectueux.
Si la membrane translucide de l'écran tactile est endommagée (par
exemple, par une fissure ou un trou), ne continuez pas à utiliser la
machine tant qu'elle n'est pas réparée.
1
2
3
4
5
6
7
8
9
10
12
13
14
11
15
16

20
C
ONSERVER CESINSTRUCTIONS
AVERTISSEMENT : Pour votre sécurité,vous devez vous conformer aux instructions de ce guide pour
minimiser les risques d’incendie ou explosion et pour éviter dommages matériels, dommages corporels
ou accident mortel.
– Ne rangez et n’utilisez jamais de l’essence ou un autre produit liquide ou gazeux inflammable au
voisinage de cet appareil ou de tout autre appareil.
AVERTISSEMENT : Ne placez jamais dans le sèche-linge un article qui aurait été taché ou trempé avec
de l’huile végétale ou de l’huile de cuisson. Même après lavage, ces articles peuvent contenir une quantité
résiduelle significative de ces huiles. Le résidu d’huile peut s’enflammer spontanément. Le risque
d’inflammation spontanée augmente lorsque l’article est exposé à la chaleur. Une source de chaleur,
comme le séchage, peut provoquer une augmentation de la température de ces articles et déclencher une
réaction d’oxydation de l’huile. Par lui-même le processus d’oxydation est générateur de chaleur; si cette
chaleur ne peut s’échapper, l’article peut s’échauffer suffisamment pour pouvoir s’enflammer. Lorsque
vous rangez ou empilez ces articles, ceci peut empêcher l’évacuation de la chaleur et susciter un risque
d’incendie.
Tout textile lavé ou non lavé qui contient de l’huile végétale ou de l’huile de cuisson peut être dangereux.
Le lavage de ces articles à l’eau chaude avec une quantité additionnelle de détergent peut réduire le
risque, mais sans l’éliminer. Vous devez toujours utiliser le programme de refroidissement pour réduire
la température de ces articles; ne retirez jamais ces articles du sèche-linge alors qu’ils sont chauds, et
n’interrompez le séchage avant que le refroidissement programmé n’ait été exécuté.N’empilez jamais ces
articles lorsqu’ils sont chauds.
21
MISE EN MARCHE
SÉCHAGE
Pour sécher une charge de linge, suivez les étapes ci-après qui sont discutées plus en détail dans les sections suivantes.
1. Nettoyez le filtre à peluches.
2. Chargez le sèche-linge correctement.
3. Ajoutez une feuille d'assouplissant (si vous le désirez)
4. Réglez le programme du sèche-linge.
ÉCRAN TACTILE
Si l'affichage est totalement vierge, il suffit d'ouvrir la porte, appuyer sur une touche sauf Arrêt ou de toucher l'écran pour que celuici redevienne actif.
La machine émettra trois signaux sonores courts si vous appuyez sur une séquence de touche non valide.
Panne de courant – Si une panne de courant se produit pendant le fonctionnement du sèche-linge, il se mettra en mode «Pause».
Lors du rétablissement du courant, l’écran affichera un message indiquant la panne de courant.Touchez «OK» pour continuer.
séchage-
capteur
Début
séchage
minute
rafraîchis-
sement
duvetage
(sans chaleur)
favoris
Écran tactile - Afficheur interactif qui réagit au
contact du doigt.
Remarque : L’exposition de l’écran tactile à la
lumière directe du soleil n’est pas recommandée.
Favoris - Accès rapide
aux programmes favoris.
Mise en marche/pause -
Appuyez sur cette touche pour
commander le déclenchement
d’un programme. Après le
déclenchement,une pression sur
cette touche commande l’arrêt
du sèche-linge (en tout point du
programme).
Aide - Accès instantané à
diverses instructions :Diagnostic,
Conseils pour le séchage,
Conseils d’utilisation,Verrouillage
et Sélection des préférences.
Retour - Pour retourner
à l’écran précédent.
Début - Accès instantané
à l’écran d’accueil.
Arrêt - Commande d’arrêt
du sèche-linge et extinction
de l’afficheur.
Remarque spéciale : Si vous vous êtes égaré parmi les écrans successifs,
utilisez la touche
Retour ou Début.
défroissage
 Loading...