

Page 1

MD-24
Table of Contents
Important Safety
Instructions . . . . . . . . . . . . . .1-2
Operating Instructions . . . . . . 3-4
Clean the Lint Filter
ss L
roperly
evel
oad the Dryer P
L
Start/Pause
Turn the Dryer Off
Estimated Time Display
Cycle Status Lights
Using the Controls . . . . . . . . . 5-7
Select Cycle
Select Dryne
Select Temperature
Select Options
Press Start/Pause
Use & Care Guide
Care & Cleaning . . . . . . . . . . . . . 8
Control Panel
Dryer Exterior
Dryer Exhaust S
Stainless Steel
Special Laundry Tips
Dryer Exhaust Tips . . . . . . . . . . . 9
Troubleshooting . . . . . . . . . . . . . 10
Service & Warranty . . . . . . . . . . 11
Guide d’utilisation et
d’entretien . . . . . . . . . . . . . . . 12
Guía de uso y cuidado . . . . . . .22
ystem
orm No. A/01/06 Part No. DC68-02031A-01 www.maytag.com ©2006 Maytag Appliances Sales Co.
F
Page 2

Important Safety Instructions
Installer: Please leave this manual with this
appliance.
Consumer: Please read and keep this manual for
future reference. Keep sales receipt and/or canceled
check as proof of purchase.
Model Number _______________________________
Serial Number ________________________________
Date of Purchase______________________________
If you have questions, call:
Maytag Customer Assistance
1-800-688-9900 U.S.A.
1-800-688-2002 Canada
(Mon.–Fri. 8 a.m.–8 p.m. Eastern Time)
Internet: http://www.maytag.com
U.S.A. Customers using TTY for deaf, hearing
impaired or speech impaired, call 1-8
In our continuing effort to improve the quality and
performance of our appliances, it may be necessary
to make changes to the appliance without revising
this guide.
For service inf
ormation, see page 11.
00-688-20
80.
WARNING
FIRE HAZARD – Do not place into your dryer items
that have been spotted or soaked with vegetable oil
or cooking oil. Even after being washed, these items
may contain significant amounts of these oils. The
remaining oil can ignite spontaneously. The potential
for spontaneous ignition increases when the items
containing vegetable oil or cooking oil are exposed
to heat. Heat sources, such as your clothes dryer,
can warm these items, allowing an oxidation
reaction in the oil to occur. Oxidation creates heat. If
this heat cannot escape, the items can become hot
enough to catch fire. Piling, stacking or storing
these kinds of items may prevent heat from
escaping and can create a fire hazard.
All washed and unwashed fabrics that contain
vegetable oil or cooking oil can be dangerous.
Washing these items in hot water with extra
detergent will reduce, but will not eliminate, the
hazard. Always use the Cool Down cycle for these
items to reduce the items’ temperature. Never
remove these items from the clothes dryer hot or
interrupt the drying cycle until the items have run
through the Cool Down cycle. Never pile or stack
these items when they are hot.
What You Need to Know About
Safety Instructions
Warning and Important Safety Instructions appearing in
this manual are not meant to cover all possible
conditions and situations that may occur. Common
sense, caution and care must be exercised when
alling, maint
inst
Always contact your dealer, distributor, service agent or
manufacturer about problems or conditions you do not
understand.
Recognize Safety Symbols, Words
and Labels
NING –
AR
W
COULD result in severe personal injury or death.
O
AUTI
C
OULDresult in minor personal injury.
C
aining or operating appliance.
WARNING
Hazards or uns
afe practice
CAUTION
N –
Hazards or uns
afe practice
s which
s which
1
Page 3

Important Safety Instructions
WARNING
To reduce the risk of fire, explosion, electric shock,
or personal injury when using your dryer; follow
basic safety precautions, including the following:
1. Read all instructions before using the appliance.
2. To avoid the possibility of fire or explosion:
a. Do not dry items that have been previously
cleaned in, washed in, soaked in, or spotted
with gasoline, dry-cleaning solvents, other
flammable or explosive substances as they give
off vapors that could ignite or explode. Any
material on which you have used a cleaning
solvent, or which is saturated with flammable
liquids or solids, should not be placed in the
dryer, until all traces of these flammable liquids
or solids and their fumes have been removed.
There are many highly flammable items used in
homes, such as: acetone, denatured alcohol,
gasoline, kerosene, some liquid household
cleaners, some spot removers, turpentine, waxe
and wax removers.
b. Items containing foam rubber (may be labeled
latex foam) or similarly textured rubber-like
materials must not be dried on a heat setting.
Foam rubber materials when heated, can under
certain circumstances produce fire by
spontaneous combustion.
3. Do not allow children or pets to play on, in, or in
front of the appliance. Close supervision is
necessary when the appliance is used near
children and pet
Before the appliance is removed from service or
4.
arded, remove the door to the drying
disc
compartment.
s.
5. Do not reach into the appliance if the drum is moving.
6. Do not install or store this appliance where it will
be exposed to the weather.
7. Do not tamper with controls.
8. Do not repair or replace any part of the appliance
or attempt any servicing unless specifically
recommended in published user-repair instructions
that you understand and have the skills to carry out.
9. Do not use fabric softeners or products to eliminate
static unless recommended for dryer use by the
manufacturer of the fabric softener or product.
10. Clean the lint screen before or after each load.
11. Keep the area around the exhaust opening and
surrounding areas free from lint accumulation, dust
and dirt.
12. The interior of the dryer and exhaust duct should be
cleaned periodically by qualified service personnel.
13. This appliance must be properly grounded. Never
s
plug the appliance cord into a receptacle which is
not grounded adequately and in accordance with
al and national codes. See installation
loc
instructions for grounding this appliance.
14. Do not place items exposed to cooking oils in your
dryer. Items contaminated with cooking oils may
contribute to a chemical reaction that could cause
a load to catch fire.
15. Do not sit on top of the clothes dryer.
Note
ause of continuing product improvement
Bec
•
Maytag reserves the right to change specifications
without notice. For complete details, see the
allation Instructions packed with your product
Inst
before selecting cabinetry, making cutouts or
beginning installation.
s,
SAVE THESE INSTRUCTIONS
2
Page 4
Operating Instructions
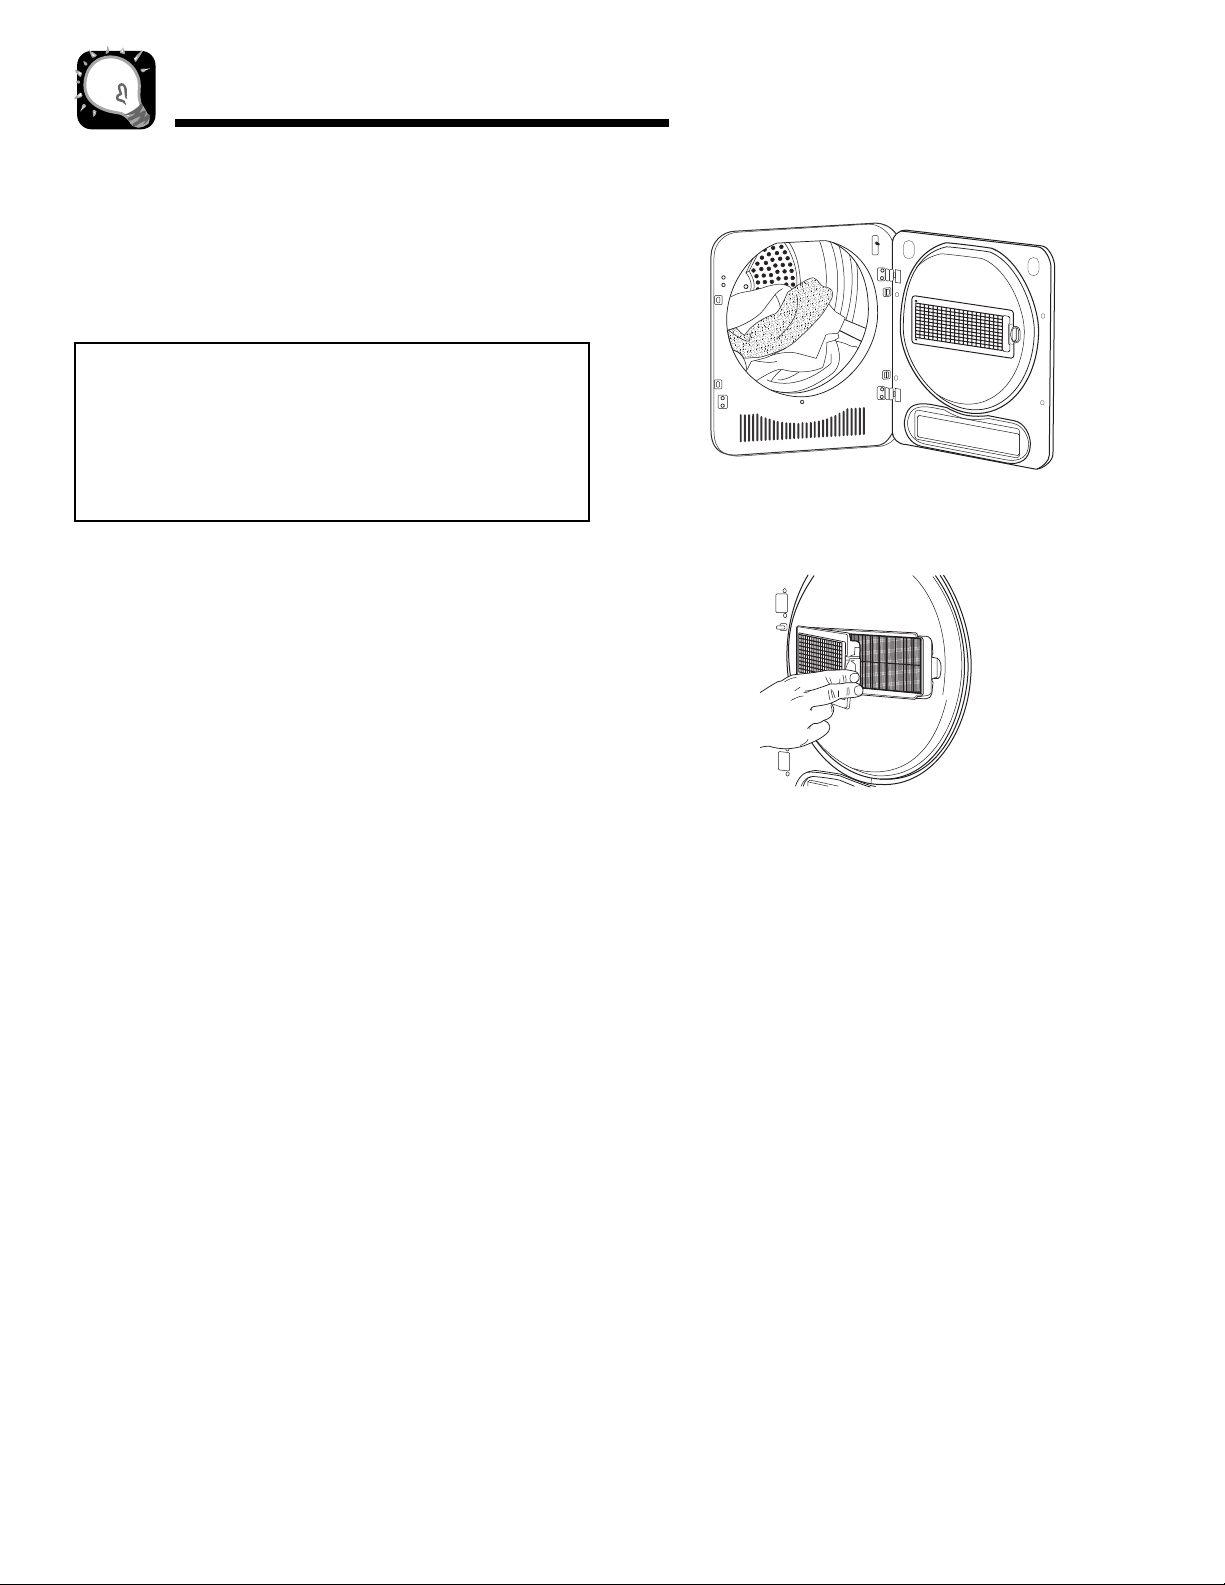
Clean the Lint Filter
• After each load.
• To shorten drying time.
• To operate more energy efficiently.
Note
• Do not operate the dryer without the lint filter grid
in place.
• Do not operate the dryer without the filter in place.
To Clean the Filter
1. Remove the lint filter grid by depressing the latch
on the right end.
wing the lint filter away from the grid.
2. S
3. Remove lint from the filter.
wing the filter back so it lays flat against the grid.
4. S
5. Place the left end of the grid in the filter opening
and push the right side in until it latches.
Load the Dryer Properly
• Place only one washload in the dryer at a time.
• Mixed loads of heavy and lightweight clothes will dry
differently. Lightweight clothes will dry, while heavy
clothes may be damp.
• Add one or more similar items to the dryer when only
one or two articles need drying. This improves the
.
tumbling action and drying efficienc
s tumbling action, re
Overloading re
•
uneven drying as well as excessive wrinkling of some
fabrics.
strict
y
sulting in
3
Page 5

Operating Instructions
Start/Pause
After setting the cycle and desired options, press the
Start/Pause pad to start the dryer. To pause the cycle,
press
Start/Pause again. To restart the cycle, press
Start/Pause and the cycle will resume from the point
of interruption.
Turn the Dryer Off
Power Off
Press the Power Off pad to cancel the cycle and stop
the dryer.
Estimated Time Display
The display window shows the estimated time
remaining in the cycle after the Start/Pause pad is
ssed. The e
pre
as the c
ycle progresses.
stimated time remaining may fluctuate
Cycle Status Lights
The Drying light will illuminate and remain lit until the
cycle is complete. When the dryer is in the cool down
tion of the cycle, the
por
When the cycle is complete, “End” will appear in the
display and the Complete light will illuminate, until the
dryer door is opened.
If the dryer is paused during a cycle, the indicator
lights will blink until the
Cooling light will illuminate.
Start/Pause pad is pressed.
4
Page 6
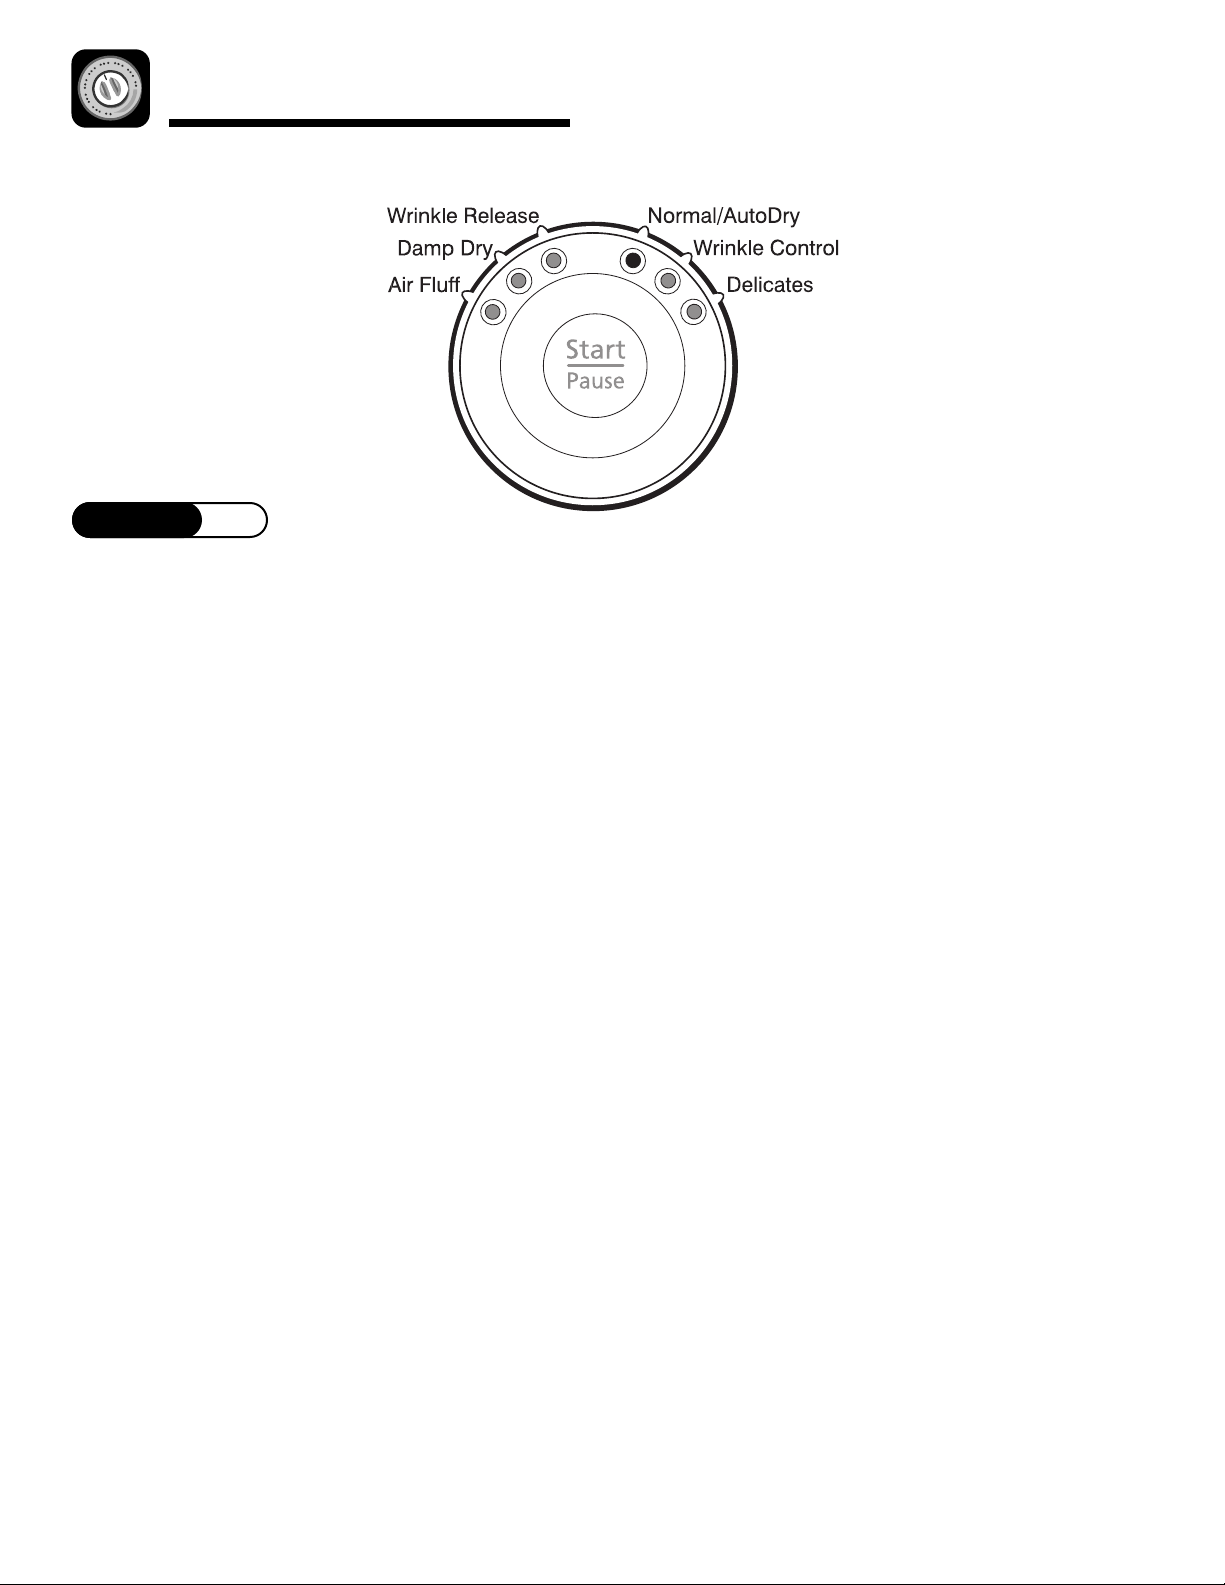
Using the Controls
STEP 1
Select Cycle
To select a cycle, rotate the control dial to the desired
cycle. The indicator light by the cycle name will
illuminate.
Wrinkle Release
The Wrinkle Release cycle will release wrinkles from
items that are clean and dry but only slightly wrinkled,
such as from a crowded closet or suitcase or from
sitting in the dryer too long after the c
Wrinkle Release can be used with
selection.
Damp Dry
The Damp Dry cycle is designed to partially dry loads.
Damp Dry can be used with any temperature selection.
ycle has ended.
any temperature
Air Fluff
The Air Fluff cycle tumble
temperature air.
s the load in room
Normal/Auto Dry
The Normal/Auto Dry cycle is designed to dry loads
such as towels, underwear, jeans, etc.
Wrinkle Control
The Wrinkle Control cycle is designed to dry
wrinkle-free cottons, synthetic fabrics, knits and
permanent press fabrics automatically. The cycle
minimizes wrinkling by providing a longer unheated
cool-down period at the end of the cycle.
Delicates
The Delicates cycle is designed to dry heat-sensitive
items at the lowest drying temperature.
5
Page 7
Using the Controls
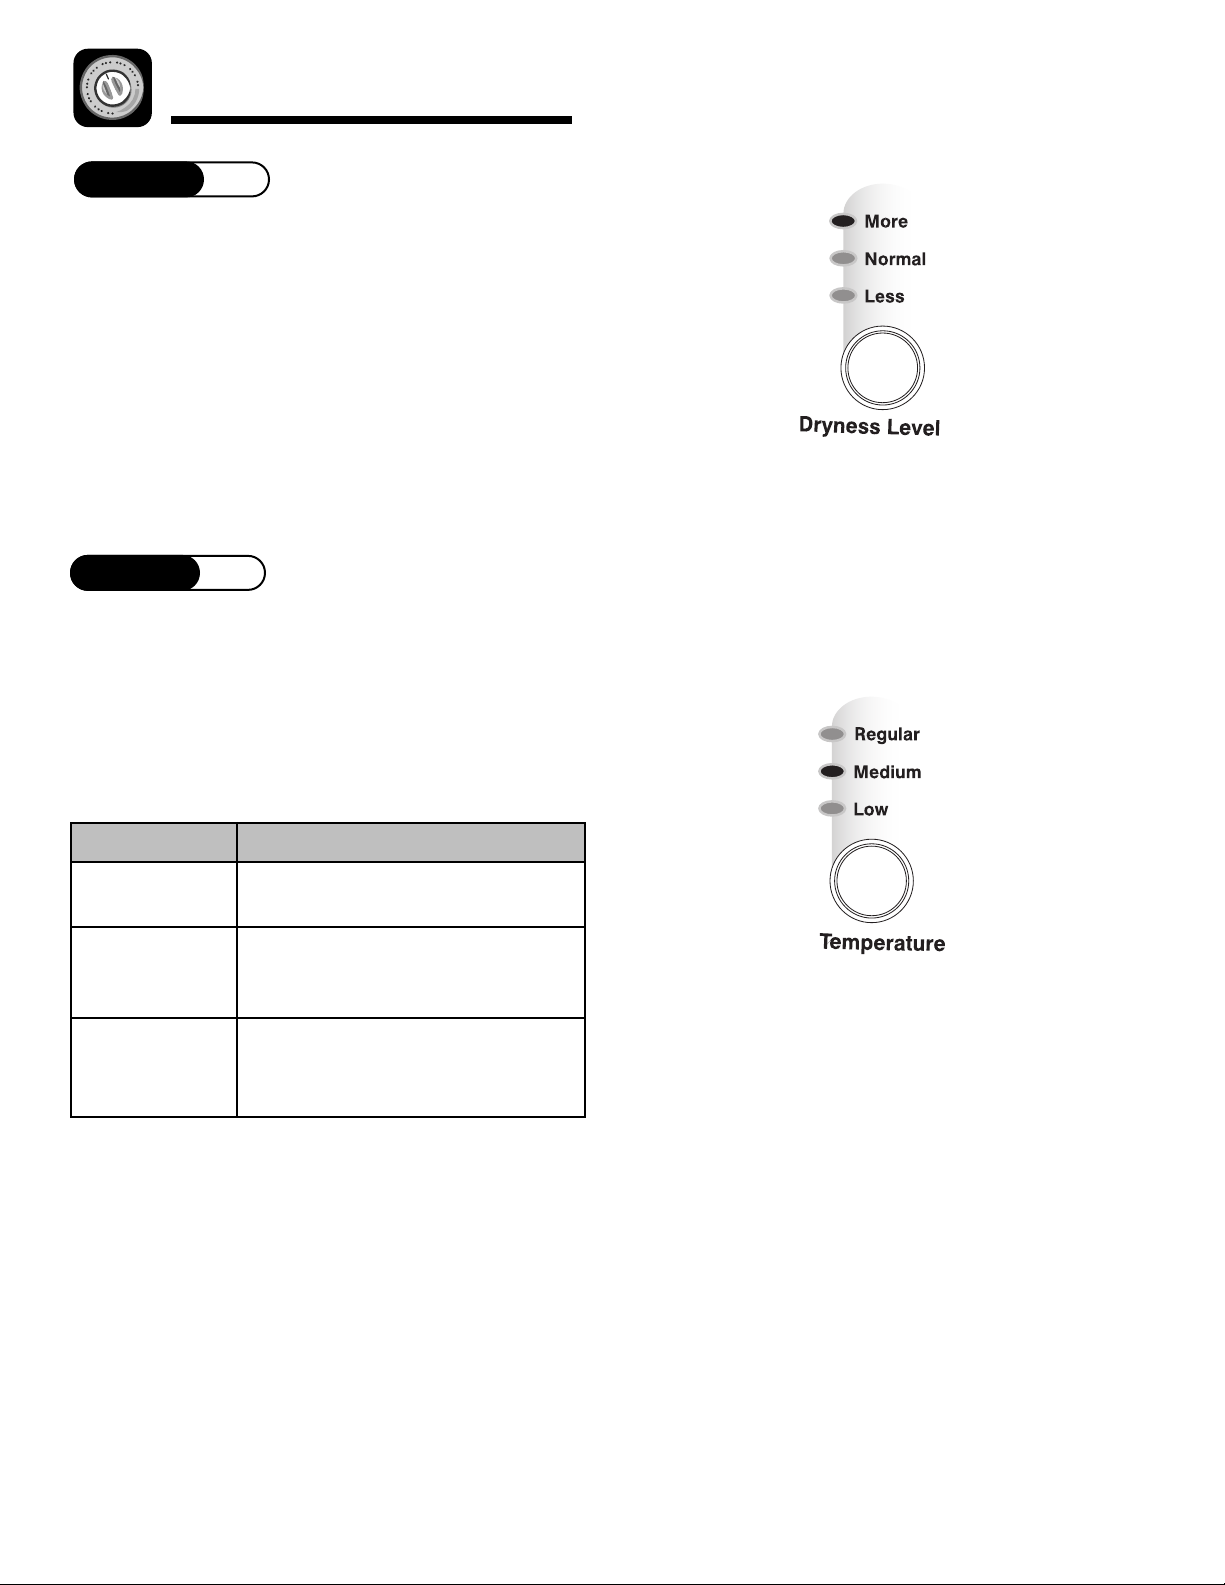
STEP 2
Select Dryness Level
To select the dryness level in the Normal/Auto Dry or
Wrinkle Control cycles, press the
An indicator light will illuminate next to the desired
dryness level. Press the pad repeatedly to scroll
through the settings.
Dryness Level pad.
Loads of larger or bulkier size may require the
Dry Setting to completely dry the load. The Less Dry
setting is best suited for lightweight fabrics or for
leaving some moisture in the clothing at the end of the
cycle.
More
STEP 3
Select Temperature
To select the correct temperature, in the Normal/Auto
Dry, Wrinkle Release or Damp Dry cycles, press the
Temperature pad. An indicator light will illuminate
next to the desired temperature. Press the pad
repeatedly to scroll through the settings.
Use the chart below as a guide:
DRYER TEMPS
Regular
Medium
For sturdy cottons or those labeled
Tumble Dry
For permanent press, synthetics,
lightweight cottons or items labeled
Tumble Dry Medium.
LOAD TYPE
.
Low
For heat sensitive items labeled
umble Dry Low or Tumble Dry
T
Warm.
6
Page 8
Using the Controls
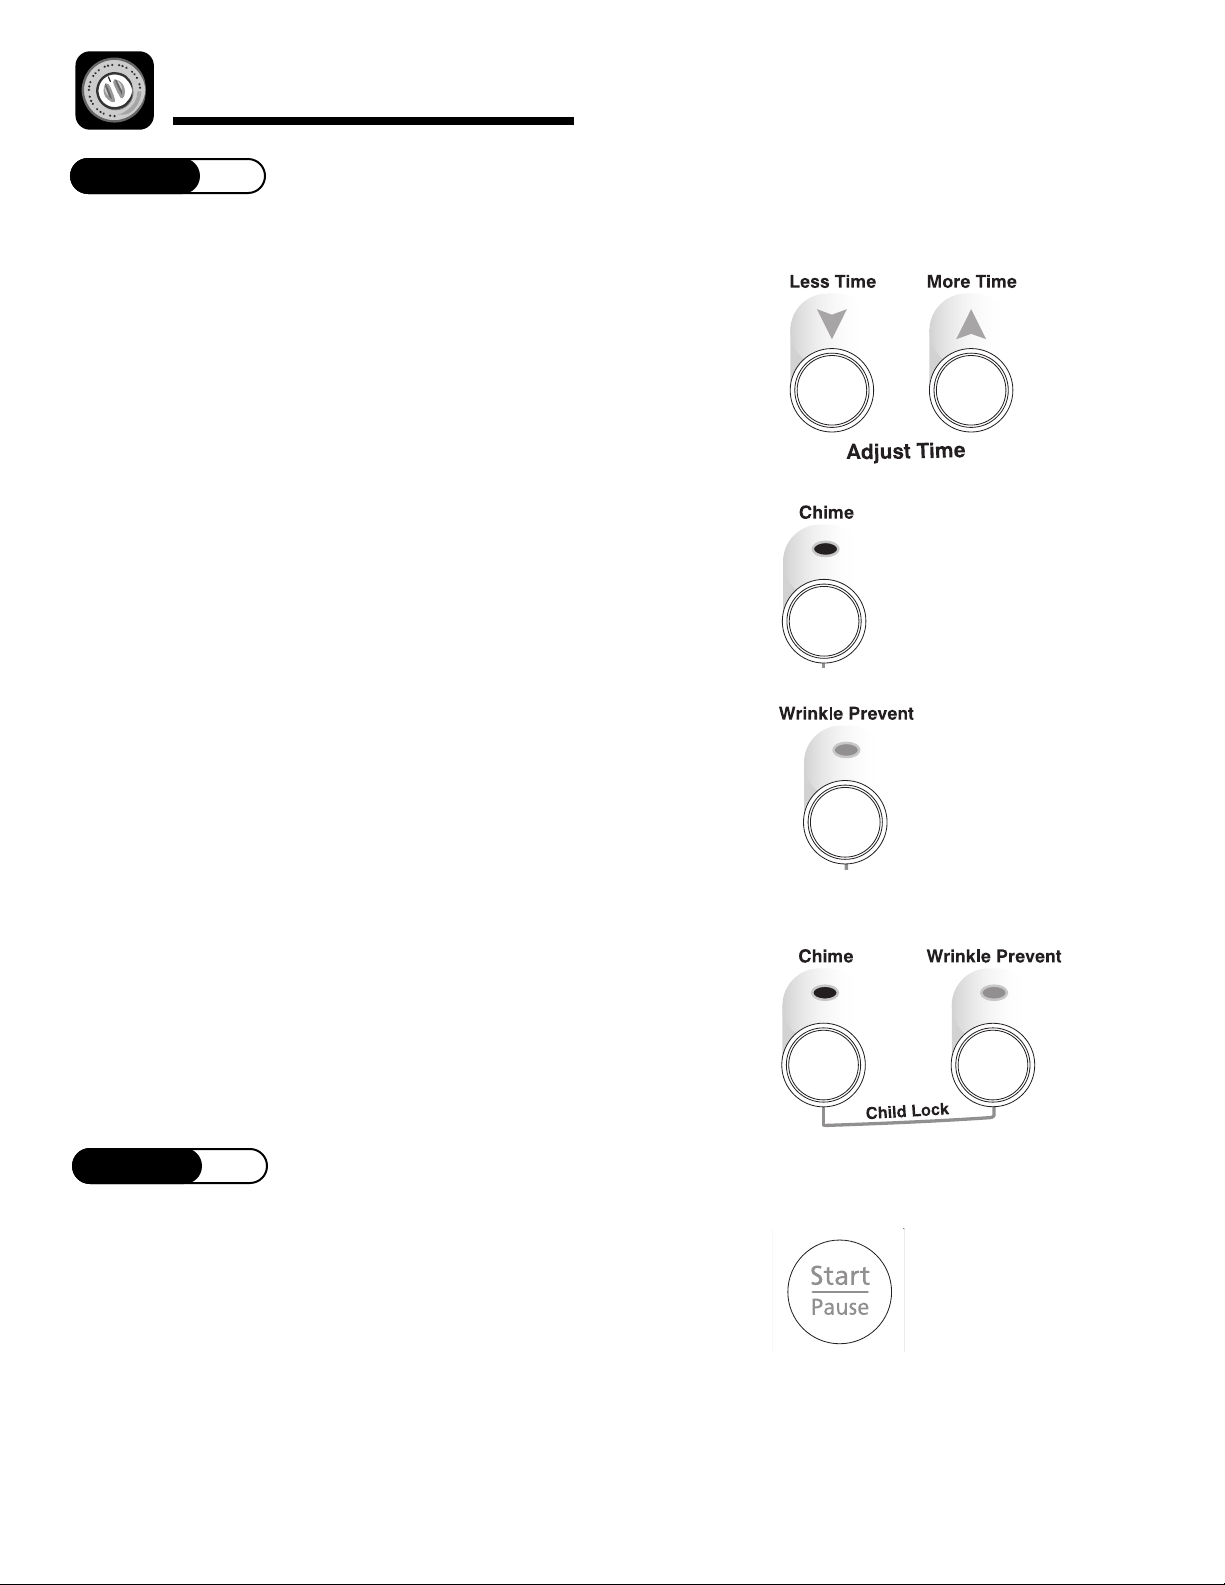
STEP 4
Select Options (if desired)
Adjust Time
Time can be added or subtracted from the
automatically set times in the Delicates, Wrinkle
Release, Damp Dry or Air Fluff cycles.
To subtract time from the cycle, press the
pad until the desired time is displayed. To add time to
the cycle, press the
time is displayed.
More Time pad until the desired
Less Time
End of Cycle Chime
hen the cycle is complete, an audible chime will
W
sound. When the Wrinkle Prevent option is selected,
the chime will sound intermittently.
Wrinkle Prevent
Wrinkle Prevent provides approximately 95 minutes of
intermittent tumbling in unheated air at the end of the
cycle to reduce wrinkling.
Child Lock
The control panel c
to prevent unwanted use. The pads will NOT function
when locked.
To lock the controls, press and hold the
event
rinkle P
W
indicator light will illuminate.
r
an be locked for s
pads for 3 seconds. T
afety, cleaning or
Chime and
he Child L
ock
o unlock the controls, pre
T
rinkle Prevent
W
indic
ator light will go out.
pads for 3 seconds. T
ss and hold the
he Child Lock
Chime and
STEP 5
Press Start/Pause
Press this pad to start the dryer. The dryer door must
be closed for the dryer to operate. If the door is
opened during the cycle, the
be pushed again to resume the cycle once the door is
closed.
7
Start/Pause pad must
Page 9
Care & Cleaning
Control Panel
Clean with a soft, damp cloth. Do not use abrasive
substances.
The control panel finish could be damaged by some
laundry pre-treatment soil and stain-remover products.
Apply such products away from the dryer and wipe up
any spills or overspray immediately.
Dryer Exhaust System
Inspect and clean once a year to maintain optimum
performance. The outside exhaust hood should be
cleaned more frequently to ensure proper operation.
Refer to the installation instructions for more
information.
Stainless Steel
Dryer Exterior
Clean with a soft, damp cloth. Do not use abrasive
substances. Protect the surface from sharp objects.
To clean the stainless steel tumbler, use a damp cloth
with a mild, non-abrasive cleaner suitable for stainless
steel surfaces. Remove the cleaner residue and then
dry with a clean cloth.
Special Laundry Tips
Please follow the care label or manufacturer’s instructions for drying special items. If care label instructions are not
available, use the following information as a guide.
ITEM
Blankets
Curtains and
Draperies
Cloth Diapers
Down-Filled
Items
sleeping bags,
comforters, etc.)
F
(rug backs,
stuffed toys,
certain shoulder
pads, etc.)
Pillows
Plastics
(shower curtains,
outdoor furniture
covers, etc.)
(jackets,
oam Rubber
LAUNDERING TIPS
• Dry only one blanket at a time for be
• Be sure the item is thoroughly dry before using or storing.
• Use the Wrinkle Control cycle to help minimize wrinkling.
• Dry in small loads for best results and remove as soon as possible.
• Use the Normal/Auto Dry cycle for soft, fluffy diapers.
• Use the Normal/Auto Dry cycle and a delicate temperature setting.
• Place a clean pair of sneakers in the dryer with the item to fluff the down comforters, etc.
Adding a couple of dry towels shortens dry time and absorbs moisture.
T dry on a heat setting. Use the Air Fluff (no-heat) c
O
O N
D
•
• WARNING – Drying a rubber item with heat may damage it or be a fire hazard.
• Use the Normal cycle.
Add a couple of dry towels and a pair of clean sneakers to help the tumbling action and
•
to fluff the item.
T dryer-dry kapok or foam pillows.
O
O N
D
•
Use the Air Fluff c
•
care label instructions.
ycle on a L
ow or Air Fluff temperature depending on the
st tumbling action.
ycle.
IMPORTANT: Avoid Dryer Drying . . .
ains, draperie
• Fiberglass Items (cur
• Woolens, unless recommended on the label.
• Vegetable or cooking oil soaked items (see page 2).
t
s, etc.).
8
Page 10

Dryer Exhaust Tips
WARNING
Plastic or nonmetal flexible duct presents a potential
fire hazard.
Do
Read the installation instructions and the use and
care guide.
Do
Let your dryer exhaust
the air easily.
Do
Use 4" diameter rigid
metal duct. Tape all joints,
including at the dryer.
Never use lint-trapping screws.
Don’t
Let a poor exhaust system cause slow drying.
Don’t
Restrict your dryer
with a poor exhaust
system.
Don’t
Use plastic, thin foil, or
non-metal flexible duct.
Do
K
eep duct runs as
straight as possible.
Do
Clean all old duct
before installing your new
. Be sure vent flap opens
dryer
and closes freely. Inspect and
clean the exhaust system
annually
9
.
s
Don’t
Use longer than
necessary duct runs
with many elbows.
Don’t
Allow crushed
or clogged
s and vent.
duct
Page 11
Troubleshooting
Doesn’t Run
Doesn’t Heat
Doesn’t Dry
Properly
Is Noisy
• Be sure the door is shut.
• Is the electrical cord plugged in?
• Has a fuse blown or the circuit breaker tripped?
• Push the Start/Pause pad again if the door was opened during the cycle.
• Has a fuse blown or the circuit breaker tripped?
• Select a heat setting, not air fluff.
• Clean the lint filter and exhaust duct.
• Dryer timer may have moved into the cool-down portion of the cycle.
• Check all of the above, plus . . .
• Check the exhaust hood outside the house, does it open and close freely?
• Check exhaust system for lint buildup. Ducting should be inspected and cleaned annually.
• Use rigid 4" metal exhaust duct.
• Do not overload. 1 wash load = 1 dryer load.
• Sort heavy items from lightweight items.
• Check the washer to be sure it is draining properly to extract water from the load.
• Clothes load is too small to tumble properly. Add a few towels.
• Check the load for object
• It is normal to hear the heating element cycle on and off during the drying cycle.
• The dryer should be level and installed on a solid floor.
• It is normal for the dryer to hum due to the high velocity of air moving through the dryer
drum and exhaust system.
• Make sure lint filter is securely attached.
s such as coins, nails, etc. Remove promptly from dryer.
Dries Unevenly
Has an Odor
Dryer shuts off
before load is
dry
For further assistance contact Maytag ServicesSM, Maytag Customer Assistance: U.S.A. 1-800-688-9900 or
Canada 1-800-688-2002. U.S.A. Customers using TTY for deaf, hearing impaired or speech impaired, call 1-800-688-2080.
• Seams, pockets and other similar heavy areas may not be completely dry when the re
the load has reached the selected dryness level. This is normal. Select the More Dry
setting if desired.
• If one heavy item is dried with a lightweight load, such as one towel with sheets, it is
possible that the heavy item will not be completely dry when the rest of the load has
reached the selected dryness level. Sort heavy items from lightweight items for best drying
results.
• Household odors such as from painting, varnishing, strong cleaners, etc. may enter the
dryer with the surrounding room air
room, heats it, pulls it through the tumbler and exhausts it to the outside. When these
odors are present in the air, ventilate the room completely before using the dryer.
Clothe
•
• Clothe
s load is too small. Add more similar items or a few towels and restart the cycle.
s load is too large. Remove some of the load and restart the dryer.
. This is normal as the dryer draws the air from the
st of
10
Page 12

Service & Warranty
Warranty
Limited One Year Warranty Parts and Labor
For one (1) year from the original retail
purchase date, any part which fails in
normal home use will be repaired or
replaced free of charge.
Canadian Residents
The above warranties only cover an
appliance installed in Canada that has
been certified or listed by appropriate test
agencies for a compliance to a National
Standard of Canada unless the appliance
was brought into Canada due to transfer
of residence from the United States to
Canada.
The specific warranties expressed above are
the ONLY warranties provided by the
manufacturer. These warranties give you
specific legal rights, and you may also have
other rights which vary from state to state.
CUSTOMER’S SOLE AND EXCLUSIVE
REMEDY UNDER THIS LIMITED
WARRANTY SHALL BE PRODUCT REPAIR
AS PROVIDED HEREIN. IMPLIED
WARRANTIES, INCLUDING WARRANTIES
OF MERCHANTABILITY OR FITNESS FOR
A PARTICULAR PURPOSE, ARE LIMITED
NE YEAR OR THE SHORTEST
TO O
PERIOD ALLOWED BY LAW. MAYTAG
CORPORATION SHALL NOT BE LIABLE
FOR INCIDENTAL OR CONSEQUENTIAL
DAMAGES. SOME STATES AND
PROVINCES DO NOT ALLOW THE
EXCLUSION OR LIMITATION OF
I
NCIDENTAL OR CONSEQUENTIAL
DAMAGES, OR LIMITATIONS ON THE
TION OF IMPLIED WARRANTIES OF
A
R
U
D
BILITY OR FITNESS, SO
A
NT
A
H
C
R
E
M
THESE EXCLUSIONS OR LIMITATIONS
Y NOT APPLY TO YOU. THIS
A
M
Y GIVES YOU SPECIFIC LEGAL
NT
A
R
R
A
W
RIGHTS AND YOU MAY ALSO HAVE
ER RIGHTS, WHICH VARY STATE TO
TH
O
OVINCE TO PROVINCE.
R
R P
TE O
STA
What is Not Covered By These Warranties
. Conditions and damages resulting from any of the following:
1
. Improper installation, delivery, or maintenance.
a
b. Any repair, modification, alteration, or adjustment not authorized by the
manufacturer or an authorized servicer.
c. Misuse, abuse, accidents, unreasonable use, or acts of God.
d. Incorrect electric current, voltage, electrical and/or gas supply.
e. Improper setting of any control.
2. Warranties are void if the original serial numbers have been removed, altered,
or cannot be readily determined.
3. Light bulbs, water filters and air filters.
4. Products purchased for commercial or industrial use.
5. The cost of service or service call to:
a. Correct installation errors. For products requiring ventilation, rigid metal
ducting must be used.
b. Instruct the user on the proper use of the product.
c. Transport the appliance to and from the servicer.
6. Any food loss due to refrigerator or freezer product failures.
7. Expenses for travel and transportation for product service in remote locations.
8. Outside of the United States and Canada this warranty does not apply.
Contact your dealer to determine if another warranty applies.
9. Consequential or incidental damages sustained by any person as a result of
any breach of these warranties. Some states do not allow the exclusion or
limitation of consequential or incidental damages, so the above exclusion may
not apply.
If You Need Service
First see the Troubleshooting section in your Use and Care Guide or call the
dealer from whom your appliance was purchased or call Maytag Services, LLC,
Customer Assistance at 1-800-688-9900 USA and 1-800-688-2002 Canada to
locate an authorized servicer.
• Be sure to retain proof of purchase to verify warranty status. Refer to WARRANTY
ther information on owner’s responsibilities for warranty service.
for fur
If the dealer or service company c
•
Services, LLC, Attn: CAIR
1-800-688-9900 USA and 1-800-688-2002 Canada. U.S. customers using
Y for deaf, hearing impaired or speech impaired, call 1-800-6
T
T
User’s guides, service manuals and parts information are available from Maytag
•
Services, LLC, Customer Assistance.
®
annot resolve the problem, write to Maytag
Center, P.O. Box 2370, Cleveland, TN 37320-2370, or call
88-2080.
Notes: When writing or calling about a service problem, please include:
a. Your name, address and telephone number;
b. Model number and serial number;
c. Name and address of your dealer or servicer;
d. A clear description of the problem you are having;
e. Proof of purchase (sales receipt).
11
Page 13

MD-24
Guide d’utilisation et d’entretien
Table des matières
Importantes Consignes
de Sécurité . . . . . . . . . . . . . . . 13-14
Conseils d’utilisation . . . . . . . . 15-16
Nettoyer du filtre à charpie
Chargement approprié de la sécheuse
Mise en marche/Pause
Mise à l’arrêt de la sécheuse
fichage de la durée restante
Af
Voyants de déroulement du cycle
Utilisation des commandes . . . 17-19
Sélection de cycle
Sélection du niveau de séchage
Sélection de température
Sélection d’option
ouche Start/Pause
T
Entretien et nettoyage . . . . . . . . . . 20
Tableau de commande
Extérieur de la sécheuse
Systéme de circuit d’évacuation
de la sécheuse
Accier inoxydable
Conseils spéciaux pour la lessive
Conseils pour l’évacuation
de l’air . . . . . . . . . . . . . . . . . . . . . . . . 21
Recherche des pannes . . . . . . . . . . 22
Garantie et service
après-vente . . . . . . . . . . . . . . . . . . . 23
Guía de uso y cuidado . . . . . . . . . . .24
Page 14

Importantes Consignes de Sécurité
Installateur : Remettre ce manuel au propriétaire.
Consommateur : Lire le manuel; le conserver pour
consultation ultérieure. Conserver la facture d’achat ou le
chèque encaissé come preuve de l’achat.
Numéro de modèle _________________________________
Numéro de série ___________________________________
Date d’achat_______________________________________
Pour toute question, contacter :
Service-Clients Maytag
1-800-688-2002 Canada
(Lundi au Vendredi, 8 h à 8 h, heure de l’Est)
Site Internet: http://www.maytag.com
En raison de nos efforts constants d’amélioration de la
qualité de nos appareils électro-ménagers, il se peut
qu’une machine à laver soit modifée sans que le guide
soit révisé.
Pour le service après-vente, voir page 23.
Ce qu’il faut savoir à propos
des consignes de sécurité
Les consignes de sécurité et les mises en garde présentées
s situations
dans ce manuel ne couvrent pas toute
possibles. Faire preuve de jugement, de prudence et
d’attention lors de l’installation, de l’entretien et de
l’utilisation du propriétaire.
s le
AVERTISSEMENT
RISQUE D’INCENDIE –
rempé dans de l’huile végétale ou de l’huile de cuisine
t
ou en sont tachés. Même après avoir été lavés, ces
articles peuvent encore contenir des quantités non
négligeables de ces substances. L’huile dont ils sont
encore imbibés peut prendre feu spontanément. Le
risque de combustion spontanée de ces articles
augmente quand ils sont exposés à la chaleur. Des
sources de chaleur, telles qu’une sécheuse, peuvent
chauffer ces articles et entraîner une réaction d’oxydation
de l’huile. L’oxydation produit de la chaleur. Si cette
chaleur n’est pas dissipée, les articles peuvent chauffer
suffisamment pour prendre feu. Le fait d’empiler ou
d’entreposer ce type d’articles peut empêcher la
dissipation de la chaleur et créer ainsi un risque
d’incendie.
Tous les articles, lavés ou non, qui contiennent de l’huile
végétale ou de l’huile de cuisine sont un danger potentiel.
Le fait de les laver à l’eau chaude avec une plus grande
quantité de détergent que la normale réduit les risques
mais ne les élimine pas. Toujours utiliser le cycle « cool
down » (cycle de refroidissement) pour réduire la
température de ce type d’article. Ne jamais retirer ces
articles de la sécheuse alors qu’ils sont encore chauds ni
interrompre le cycle de séchage avant que l’appareil n’ait
effectué un cycle de refroidissement. Ne jamais empiler ou
entreposer ces articles pendant qu’ils sont encore chauds.
Ne pas sécher d’articles qui ont
orsque survient un problème ou une situation inhabituelle,
L
toujours communiquer avec le détaillant, le distributeur, le
technicien agréé ou le fabricant.
Reconnaissez les étiquettes, phrases
ou symboles sur la securite
AVERTISSEMENT
AVERTISSEMENT – Risques ou pratiques non sûres, qui
RRAIENT
U
O
P
la mor
résulter en de grave
t.
s ble
ssure
s ou même
ATTENTION
ATTENTION – Risques ou pratiques non sûres qui
POURRAIENT résulter en blessures mineures.
13
Page 15

Importantes Consignes de Sécurité
AVERTISSEMENT
Pour réduire les risques d’incendie, d’explosion,
d’électrocution ou des blessures lors de l’utilisation de cet
ppareil, suivre les précautions d’usage, dont les suivantes :
a
1. Lire toutes les instructions avant d’utiliser la sécheuse.
2. Pour éviter les risques d’incendie ou d’explosion :
a. Ne pas sécher d’articles qui ont auparavant été
nettoyés ou lavés à l’aide d’essence, de solvants de
nettoyage à sec ou d’autres produits explosifs ou
inflammables, ou qui en sont imbibés ou éclaboussés,
car ces substances produisent des vapeurs qui
peuvent s’
des solvants de nettoyage ont été utilisés ou qui sont
saturés de liquides ou solides inflammables ne doit
pas être mis dans la sécheuse avant que toute trace
et toute vapeur de ces liquides ou solides ne soient
complètement éliminées. De nombreux produits
extrêmement inflammables sont communément
utilisés à la maison, entre autre
dénaturé, l’essence, le kérosène, cer
nettoyage ménagers, les détachants, la térébenthine,
les cires et les décapants de cire.
Les articles contenant du caoutchouc mousse
b.
(l’étiquette indique parfois : mousse de latex) ou tout
matériau de texture similaire ne doivent pas être
séchés sur un cycle utilisant de l’air chaud. Lorsqu’ils
sont exposés à la chaleur, ces matériaux peuvent,
dans certaines conditions, s’enflammer par un
phénomène de combustion spontanée.
Ne pas permettre aux enfant
3.
de jouer sur l’appareil, à l’intérieur ou en face de celui-ci.
Une supervision étroite est nécessaire lorsque l’appareil
est utilisé à proximité d’enfants ou d’animaux familiers.
enflammer ou exploser. Tout tissu sur lequel
s l’acétone, l’alcool
tains produits de
s ou aux animaux familiers
4. Avant de mettre l’appareil hors service ou au rebut,
retirer la porte du compartiment de séchage.
5. Ne pas mettre la main ou le bras dans l’appareil si le
tambour est en mouvement.
6. Ne pas installer ou remiser l’appareil dans un endroit où
il est exposé aux intempéries.
7. Ne pas modifier les mécanismes de commande.
8. Ne pas réparer ou remplacer une pièce de l’appareil ou
procéder à un dépannage, sauf si les instructions
publiées le recommandent et que la personne effectuant
la réparation les comprend et possède les connaissances
voulues pour les exécuter.
9. Ne pas utiliser d'assouplissant textile ni de produit visant
à réduire l'électricité statique sauf si le fabricant de ces
produits recommande leur usage dans la sécheuse.
10. Nettoyer le filtre à charpie avant et après chaque utilisation.
11. Éviter l’accumulation de charpie, de poussière et de
saleté directement autour du conduit d’évacuation et
dans toute la zone environnante.
12. Faire nettoyer régulièrement l’intérieur de la sécheuse et
du conduit d’évacuation par des techniciens qualifiés.
13. Cet appareil doit être correctement mis à la terre. Ne
jamais brancher le câble électrique de l’
prise murale non mise à la terre conformément aux
codes locaux et nationaux. Voir les instructions
d’installation pour la mise à la terre de cet appareil.
s exposés aux huiles de cuisine
ticle
14. Ne placez pas le
dans votre de
huiles de cuisine peuvent contribuer à une réaction
chimique qui pourrait faire attraper une charge le feu.
Ne pas s'asseoir sur la sécheuse.
15.
s ar
ateur. Les articles souillés avec les
ssicc
appareil sur une
Remarque
•
En raison des améliorations apportées régulièrement à
ses produits, Maytag se réserve le droit de modifier les
spécifications sans préavis. Pour de plus amples
renseignements, consulter les instructions d’installation
incluses avec votre appareil avant de choisir des
meubles de rangement, de faire du découpage ou de
commencer l’installation.
CONSERVER CES INSTRUCTIONS
14
Page 16

Conseils d’utilisation
Nettoyage du filtre à charpie
• Après chaque séchage
• Raccourcit la durée de séchage.
• Permet un fonctionnement plus efficace en énergie.
Remarque :
• N’utilisez pas la sécheuse sans la grille du filtre à
charpie en place.
• N’utilisez pas la sécheuse sans le filtre à charpie en
place.
Nettoyage du filtre à charpie
1. Retirez la grille du filtre à charpie en appuyant sur le
loquet du côté droit.
s pivoter le filtre à charpie en l’éloignant de la grille.
aite
2. F
3. Retirez la charpie du filtre.
4. Repoussez le filtre en le pivotant pour le mettre à plat
contre la grille.
5. Mettez le côté gauche de la grille dans l’ouverture du
filtre et poussez le côté droit pour l’enclencher.
Chargement approprié de la
sécheuse
• Placez seulement le linge d’une charge de lavage à la fois
dans la sécheuse.
e mélange d’
L
•
séchage uniforme. L
que les lourds seront humides.
• Ajoutez un ou plusieurs articles quand vous n’avez que un
ou deux articles à sécher. Ceci améliore l’efficacité du
age et du séchage.
culbut
• Un chargement trop important réduit le culbutage, d’où
séchage irrégulier et froissement exce
tissus.
articles lourds et légers ne donnera pas un
s articles légers seront secs tandis
e
ains
ssif de cer
t
15
Page 17

Conseils d’utilisation
Mise en marche/Pause
Après avoir programmé le cycle et les options désirées,
appuyez sur
marche. Pour mettre le cycle en pause, appuyez à nouveau
sur
Start/Pause. Pour relancer le cycle, appuyez sur
Start/Pause et le cycle reprendra là où il a été interrompu.
Mise à l’arrêt de la sécheuse
Touche Power Off
Appuyez sur cette touche pour annuler le cycle et arrêter la
sécheuse.
Affichage de la durée restante
L’afficheur montre une estimation de la durée restante du
cycle une fois que vous avez appuyé sur Start/Pause. La
durée e
ycle.
du c
Start/Pause pour mettre la sécheuse en
stimative rest
ante peut fluctuer selon la progre
ssion
Voyants de déroulement du
cycle
Le voyant Drying reste allumé tant que le cycle n’est pas
terminé. Lorsque la sécheuse atteint la par
du cycle, le voyant Cooling s’allume. Une fois le cycle
terminé, « End » paraît à l’afficheur et le voyant Complete
allume et ce, tant que la porte demeure ouverte.
s’
Si la sécheuse est mise en pause lors d’un cycle, les voyants
clignotent jusqu’au moment où vous appuyez sur
Start/Pause
.
tie
refroidissement
16
Page 18

Utilisation des commandes
ÉTAPE 1
Sélection de cycle
Pour choisir un cycle, tournez le cadran de commande
jusqu’au cycle désiré. Le voyant au niveau du nom du cycle
allume.
s’
Défroissage (Wrinkle Release)
Le cycle Défroissage permet de défroisser des articles
propres et secs, et légèrement froissés comme ceux
provenant d’une armoire trop encombrée, d’une valise trop
remplie ou s’ils sont restés trop longtemps dans la sécheuse
après un séchage. Le Défroiss
n’importe quel choix de température.
Séchage humide (Damp Dry)
Le cycle Séchage humide est conçu pour des séchages
e Séchage humide peut être utilisé avec n’importe
tiels. L
par
quel choix
de température.
age peut être utilisé avec
Duvetage (Air Fluff)
Le cycle Duvetage permet d’obtenir un culbutage à la
température ambiante.
Séchage normal/Autom.
(Normal/Auto Dry)
Le cycle de séchage normal/automatique est conçu pour
sécher de
s serviette
s, sous-vêtements, jeans, etc.
Anti-froissement (Wrinkle Control)
Le cycle anti-froissement est conçu pour le séchage
automatique des cotons, tissus synthétique
s. Ce c
tissus infroiss
le froissement en fournissant une période de refroidissement
sans chaleur plus longue à la fin du cycle.
able
ycle permet de réduire au
s, tricots et autres
minimum
Délicats (Delicates)
Le cycle Délicats est conçu pour le séchage à la température
de séchage la plus basse de
s articles sensibles à la chaleur.
17
Page 19

Utilisation des commandes
ÉTAPE 2
Sélection du niveau de
séchage
Pour sélectionner le niveau de séchage lors des cycles de
séchage Normal/Autom. ou anti-froissement, appuyez sur la
touche Dryness Level (niveau de séchage). Un voyant près
du niveau de séchage désiré s’allume. Appuyez sur la touche
plusieurs fois pour faire défiler les réglages.
Le séchage complet de gros articles ou de volumes
importants de linge peut nécessiter le réglage
Le réglage de séchage
tissus légers ou bien pour laisser une certaine humidité dans
les vêtements à la fin du cycle.
Less (Moins) convient le mieux aux
ÉTAPE 3
Sélection de température
More (Plus).
Pour choisir la bonne température lors des cycles de séchage
Normal/Autom., défroissage ou humide, appuyez sur la
touche de tempér
température désirée s’allume. Appuyez sur la touche
plusieurs fois pour faire défiler les réglages.
Utilisez comme guide le t
TEMP. DE SÉCHAGE
normale
(regular)
moyenne
(medium)
basse
(low)
ature
. Un voyant au niveau de la
ableau ci-dessous :
LINGE
Cotons robuste
étiquette avec Séchage par
culbutage.
Cotons légers, tissus synthétique
pressage permanent ou ceux portant
une étiquette avec Séchage par
age (temp. moyenne
culbut
Articles sensibles à la chaleur
portant une étiquette avec Séchage
par culbutage (temp. basses) ou
(temp. tiède
s ou ceux portant une
s).
s).
s, à
18
Page 20

Utilisation des commandes
ÉTAPE 4
Sélection d’option
(si vous le désirez)
Réglage de la durée
La durée automatiquement programmée des cycles Délicats,
Anti-froissement, Défroissage, Séchage humide et Duvetage
peut être prolongée ou réduite.
Pour réduire la durée d’un cycle, appuyez sur la touche
Time
(Durée réduite) jusqu’à l’affichage de la durée désirée.
Pour prolonger la durée d’un cycle, appuyez sur la touche
More Time (Durée augmentée) jusqu’à l’affichage de la
durée désirée.
(Adjust Time)
Less
Signal sonore de fin de cycle
(Chime)
Lorsque le cycle e
Lorsque l’option Pressage permanent est sélectionnée, le
signal sonore retentit par intermittence.
st terminé, un signal sonore retentit.
Pressage permanent (Wrinkle Prevent)
Le cycle Pressage permanent fournit un culbutage par
intermittence pendant une durée d’environ 95 minutes avec
de l’air non chauffé à la fin du cycle pour réduire le froissage.
Verrouillage pour enfants (Child Lock)
Le tableau de commande peut être verrouillé pour la sécurité,
le nettoyage ou pour empêcher l’
fois le t
fonctionnent plus.
Pour verrouiller les commandes, appuyez pendant 3
secondes sur les touches
voyant Child L
Pour déverrouiller les commandes, appuyez pendant 3
seconde
voyant Child Lock s’éteint.
ableau de commande verrouillé, le
ock s’allume.
s sur le
s touche
s
emploi non autorisé. Une
s touches ne
Chime et Wrinkle Prevent. Le
ent
ev
Chime et W
rinkle P
r
. L
e
ÉTAPE 5
Touche Start/Pause
Appuyez sur cette touche pour mettre en marche la
sécheuse. La porte de la sécheuse doit être fermée pour que
la sécheuse puisse fonctionner. Si vous ouvrez la porte lors
d’un cycle, il vous faudra appuyer à nouveau sur la touche
ause
Start/
cycle.
P
après avoir refermé la por
te pour continuer le
19
Page 21

Entretien et nettoyage
Tableau de commande
Nettoyez avec un linge doux et humide. N’utilisez pas un
produit abrasif.
Certains détachants et produits de prétraitement de la
lessive peuvent endommager le fini du tableau de
commande. N’appliquez pas de tels produits près de la
laveuse. Essuyez immédiatement les éclaboussures.
Extérieur de la sécheuse
Nettoyez avec un linge doux et humide. N’utilisez pas un
produit abrasif. Protégez la surface des objets comportant
des arêtes vives.
Système de circuit
d’évacuation de la sécheuse
Inspectez et nettoyez le circuit une fois par année pour
garder un rendement maximum. La bouche d’évacuation
extérieure doit être nettoyée plus fréquemment afin d’assurer
un bon fonctionnement. Reportez-vous aux instructions
d’installation pour obtenir de plus amples renseignements.
Acier inoxydable
Pour nettoyer le tambour en acier inoxydable, utilisez un linge
humide et un nettoyant doux non abrasif convenant aux
surfaces en acier inoxydable. Enlevez les résidus du
nettoyant puis, séchez avec un linge propre.
Conseils spéciaux pour la lessive
Pour le séchage d’articles spéciaux, procédez conformément aux instructions du fabricant ou de l’étiquette d’entretien. Si
l’étiquette d’entretien n’est pas disponible, utilisez l’information qui suit
ARTICLE
Couvertures
• Ne séchez qu’une couver
• Vérifiez que les articles sont parfaitement secs avant de les utiliser ou de les ranger.
ture à la fois pour obtenir le meilleur culbutage.
.
CONSEILS DE LESSIVE
Rideaux et
tentures
Couches de textile
Articles garnis de
duvet
(anoraks, sacs
de couchage,
couvre-lits, etc.)
Caoutchouc
mousse
(endos de tapis,
jouets en peluche,
eillers
es
s et nappe
s, etc.)
s
épaulette
Or
Matièr
plastiques
(rideaux de douche,
housse
de mobilier
d’extérieur, etc.)
• Utilisez le cycle anti-froissement pour minimiser les faux plis.
• Séchez ces ar
sécheuse dès que possible.
• Utilisez le c
• Utilisez le c
• Placez dans la sécheuse avec l’article une paire de chaussures de gymnastique propres pour
optimiser le duvetage des articles garnis de duvet, etc.
Ajoutez quelques serviettes sèches pour réduire le temps de séchage et absorber l’humidité.
• Effectuez le séchage SANS CHALEUR. Utilisez le cycle Duvetage/sans chaleur.
ERTISSEMENT – L’exposition des articles en caoutchouc à la chaleur leur fait subir des
V
A
•
dommages et suscite un risque d’incendie.
Utilisez le c
•
• Ajoutez deux ou trois serviettes sèches et une paire de chaussures de gymnastique propres pour
optimiser l’action de culbutage et faciliter le duvetage de l’article.
E mettez PAS dans la sécheuse des oreillers de mousse ou de kapok.
N
•
Utilisez le c
•
les instructions données sur l’étiquette du vêtement.
ticles dans une petite charge pour obtenir le meilleur résultat, et retirez-le
ycle Normal/Autom. pour obtenir de
ycle Normal/Autom. et un réglage de température Délicat
ycle Normal.
ycle Duvetage/sans chaleur et le réglage de température basse ou de duvetage selon
s couche
s douces et moelleuses.
s.
s de la
PORTANT :
M
I
s à base de fibre
ticle
• Ar
• Lainages (sauf si les indications de l’étiquette le permettent).
ticles trempés d’huile végétale ou de cuisson (page 14).
• Ar
Évitez de placer dans la sécheuse... . .
s de verre (rideaux, tenture
s, etc.)
20
Page 22

Conseils pour l’évacuation de l’air
AVERTISSEMENT
Les conduits flexibles en plastique ou non métalliques
présentent des risques d’incendie.
Faire
Lire les instructions de mise en service et le guide de
l’utilisateur.
Faire
Faire en sorte que l’air
s’évacue de la sécheuse
avec facilité.
Faire
Utiliser un conduit métallique
rigide de 10,2 cm (4 po) de diamètre.
Rubaner toutes les jointures et conduites
au niveau de la sécheuse. Ne pas utiliser
de vis, qui retiennent la charpie.
Ne pas faire
Permettre qu’un système d’évacuation inadéquat
ralentisse le séchage du linge.
Ne pas
faire
Restreindre l’efficacité
de la sécheuse avec un
système d’évacuation
médiocre.
Ne pas faire
Utiliser un conduit en
plastique, en aluminium
fin ou un conduit flexible
non métallique.
Faire
S’organiser pour que le
conduit soit aussi droit
que possible.
Faire
Nettoyer à fond tout
ancien conduit d’évacuation avant
d’y raccorder la nouvelle sécheuse.
assurer que le clapet de la hotte
S’
d’évacuation s’
librement. Vérifier et nettoyer une fois
par an le système d’évacuation.
21
ouvre et se ferme
Ne pas faire
Utiliser un conduit trop
long avec de nombreux
coudes.
Ne pas faire
Utiliser de
un clapet d’évacuation
écrasés ou bloqués.
s conduit
s et
Page 23

Recherche des pannes
La sécheuse ne
fonctionne pas
Absence de
chauffage
Ne sèche pas
correctement
Fonctionnement
bruyant
• Vérifiez que la porte est bien fermée.
• Vérifiez que l’appareil est bien branché.
• Assurez-vous que le fusible n’est pas brûlé ou que le disjoncteur n’est pas déclenché.
• Appuyez à nouveau sur la touche Start/Pause si la porte a été ouverte lors du cycle.
• Assurez-vous que le fusible n’est pas brûlé ou que le disjoncteur n’est pas déclenché.
• Sélectionnez un cycle de séchage avec chaleur - pas duvetage à l’air.
• Nettoyez le filtre à charpie et le conduit d’évacuation.
• La sécheuse exécute peut-être la phase de refroidissement du cycle.
• Vérifiez tout ce qui a été mentionné ci-dessus et en plus.
• Assurez-vous que le clapet de décharge à l’extérieur de la résidence peut manoeuvrer librement.
• Recherchez l’accumulation de charpie dans le circuit d’évacuation. Inspectez et nettoyez le circuit au
moins chaque année.
• Utilisez un conduit métallique rigide de 4 pouces (10,2 cm).
• Ne chargez pas excessivement la sécheuse. 1 charge de lavage = 1 charge de séchage.
• Triez le linge - séparez les articles lourds des articles légers.
• Vérifiez la laveuse pour vous assurer que l’évacuation de l’
extraction adéquate de l’eau.
• Charge de linge trop petite pour un culbutage adéquat. Ajoutez quelques serviettes.
• Recherchez dans la charge de linge de
immédiatement ces articles.
• Il est normal que vous entendiez le fonctionnement intermittent de l’élément chauffant pendant le
séchage.
• La sécheuse doit être installée parfaitement d’aplomb sur un sol résistant.
• Il est normal que la sécheuse émette un ronflement provenant du mouvement rapide de l’air dans le
tambour et le système d’évacuation.
• Assurez-vous que filtre de fibre est solidement jointe.
s objets comme pièces de monnaie, clous, etc. Enlevez
eau est appropriée, afin d’obtenir une
Séchage non
uniforme
Odeur
perceptible
Arrêt de la
sécheuse avant
que le linge ne
soit sec
• Les jointures, les poches et d’autres parties semblables du linge peuvent ne pas être parfaitement
s alors que le re
sèche
normal. Sélectionnez le réglage More Dry si vous le désirez.
Si vous séchez un ar
•
serviette en présence de draps, il est possible que l’article lourd ne soit pas complètement sec
lorsque le reste de la charge a atteint le niveau d’assèchement choisi. Pour obtenir les meilleurs
s, séparez le
at
résult
• Les odeurs imputables à peinture, vernis, produits de nettoyage énergiques, etc. peuvent s’introduire
dans la sécheuse avec l’air de l’environnement. Ceci est normal - la sécheuse aspire l’air de la pièce,
le chauffe, le fait circuler à travers le tambour, et le rejette à l’extérieur. Si des matières véhiculant
s odeurs sont présente
ce
• Il y a trop peu de linge dans la sécheuse. Ajoutez d’autres articles semblables ou quelques
serviettes et relancez le cycle.
• La charge de vêtements est trop grande. Enlevez une partie de la charge et remettez en marche le
dessiccateur.
or further assistance contact Maytag Services
F
U.S.A. 1
ste du linge a déjà atteint le niveau d’
ticle lourd en même temps qu’une charge d’
s lourds des articles légers.
ticle
s ar
, aérez adéquatement la pièce avant d’utiliser la sécheuse.
air
SM
, Service à la clientèle de Maytag :
900 ou Canada 1-800-688-2002.
-8
00-6
s dans l’
8-9
8
assèchement sélectionné. Ceci est
articles légers, comme une
22
Page 24

Garantie et service après-vente
Garantie
Garantie limitée d’un an pièces et main-d’œuvre
Durant une période d’un (1) an à
compter de la date de l’achat initial,
toute pièce qui se révélerait défectueuse
dans les conditions normales d’usage
ménager sera réparée ou remplacée
gratuitement.
Résidents du Canada
Les garanties ci-dessus couvrent un
appareil installé au Canada seulement
s’il a été agréé par les agences de test
habilitées (vérification de la conformité
à une norme nationale du Canada), sauf
si l’appareil a été introduit au Canada à
l’occasion d’un changement de
résidence des États-Unis vers le
Canada.
Les garanties spécifiques formulées
ci-dessus sont les SEULES que le
fabricant accorde. Ces garanties vous
confèrent des droits juridiques
spécifiques et vous pouvez également
jouir d’autres droits, variables d’un État à
l’autre ou d’une province à l’autre.
LE SEUL ET UNIQUE RECOURS DU CLIENT EN
VERTU DE CETTE GARANTIE LIMITÉE EST LA
RÉPARATION DU PRODUIT COMME DÉCRITE
PRÉCÉDEMMENT. LES GARANTIES
IMPLICITES, Y COMPRIS LES GARANTIES DE
QUALITÉ MARCHANDE OU D’ADAPTATION À
N USAGE PARTICULIER, SONT LIMITÉES À
U
A PÉRIODE LA PLUS COURTE
U À L
N O
N A
U
PERMISE PAR LA LOI. MAYTAG CORPORATION
NE SERA PAS TENUE RESPONSABLE DES
MMAGES DIRECTS OU INDIRECTS.
O
D
CERTAINS ÉTATS ET CERTAINES PROVINCES
INTERDISENT L’EXCLUSION ET LA LIMITATION
DES DOMMAGES DIRECTS OU INDIRECTS
AINSI QUE LES LIMITATIONS SUR LA DURÉE
DES GARANTIES IMPLICITES DE QUALITÉ
MARCHANDE OU D’ADAPTATION À UN
USAGE PARTICULIER. IL EST DONC POSSIBLE
QUE CES LIMITATIONS NE S’APPLIQUENT PAS
À VOUS. CETTE GARANTIE VOUS CONFÈRE
DES DROITS JURIDIQUES SPÉCIFIQUES ET IL
SE PEUT QUE VOUS AYIEZ D’AUTRES DROITS,
QUI VARIENT D’UN ÉTAT À L’AUTRE OU D’UNE
PROVINCE À L’AUTRE.
Ne sont pas couverts par ces garanties
. Les problèmes et dommages résultant des situations suivantes :
1
. Mise en service, livraison ou entretien effectués incorrectement.
a
b. Toute réparation, modification, altération et tout réglage non autorisés par le
fabricant ou par un prestataire de service après-vente agréé.
c. Mauvais emploi, emploi abusif, accidents, usage non raisonnable, ou
catastrophe naturelle.
d. Courant électrique, tension, alimentation électrique ou en gaz incorrects.
e. Réglage incorrect d’une commande.
2. Les garanties ne peuvent être honorées si les numéros de série d’origine ont
été enlevés, modifiés ou ne sont pas facilement lisibles.
3. Ampoules, filtres à eau et filtres à air.
4. Les produits achetés à des fins commerciales ou industrielles.
5. Les frais de dépannage ou de visite pour :
a. Correction d’erreurs de mise en service. Pour les produits nécessitant une
ventilation, un conduit métallique rigide doit être utilisé.
b. Initiation de l’utilisateur à l’emploi de l’appareil.
c. Transport de l’appareil chez le réparateur et retour de l’appareil chez
l’utilisateur.
6. Tout aliment perdu en raison de pannes du réfrigérateur ou du congélateur.
7. Dépenses de déplacement et de transport pour la réparation du produit dans
des endroits éloignés.
8. Cette garantie n’est pas valide à l’extérieur des États-Unis et du Canada.
Communiquez avec votre détaillant pour savoir si une autre garantie
s’applique.
9. Dommages indirects ou accessoires subis par toute personne à la suite d'une
quelconque violation des garanties. Certains États ou provinces ne permettent
pas l’exclusion ou la limitation de responsabilité en ce qui
concerne les dommages directs ou indirects. L’exclusion ci-dessus peut en
conséquence ne pas s'appliquer à votre cas.
Si vous avez besoin d’aide
Consultez d’
entretien, puis appelez le détaillant de qui vous avez acheté votre appareil ou le
d’
service à la clientèle de Maytag Services, LLC au 1-800-688-9900 aux États-Unis
et au 1-800-688-2002 au Canada pour savoir où trouver un réparateur autorisé.
eillez à conserver la facture d’
• V
garantie. Pour d’
propriétaire à l’égard du service sous garantie, voir le texte de la GARANTIE.
• Si le détaillant ou l’agence de service après-vente ne peut résoudre le
problème, écrivez à Maytag Services, LLC à l’adresse suivante : CAIR
Center, P.O. Box 2370, Cleveland, TN 37320-2370 États-Unis, ou appelez au
1-800-688-9900 aux États-Unis ou au 1-800-688-2002 au Canada.
• Les guides d’utilisation, les manuels de service et les renseignements sur
les pièces sont disponibles auprès du service à la clientèle de Maytag
Services, LLC.
Remarques : Veillez à fournir l’information suivante lorsque vous communiquez
avec nous au sujet d’un problème
a.
b. Numéro de modèle et numéro de série de l’appareil;
c. Nom et adresse du détaillant avec la date l’appareil acheté;
d.
e. Preuve d’achat (facture de vente).
abord la section sur le dépannage dans le manuel d’utilisation et
achat pour justifier de la validité de la
autres renseignements concernant les responsabilités du
:
os nom, adre
V
scription dét
De
sse et numéro de téléphone;
aillée du problème observé;
®
23
Page 25

MD-24
Tabla de Materias
Instrucciones importantes sobre
seguridad . . . . . . . . . . . . . .25-26
Instructions d’utilisation . . 27-28
Limpie el filtro de hilachas
Cargue la secadora adecuadamente
Encendido/Pausa
Apague la secadora
Despliegue del tiempo estimado
Luces de estado del ciclo
Uso de los controles . . . . . 29-31
Seleccione el ciclo
Seleccione el nivel de secado
Seleccione la temperatura
Seleccione las opcione
Oprima la tecla ‘Start/Pause’
(Encendido/Pausa)
s
Guía de Uso y Cuidado
Cuidado y limpieza . . . . . . . . . . 32
Panel de control
Exterior de la secadora
ape de la secadora
Sistema de e
Acero inoxidable
Sugerencias especiales para el secado
Sugerencias para el escape de la
secadora . . . . . . . . . . . . . . . . . 33
Localización y solución
de averías . . . . . . . . . . . . . . . . 34
Servicio y garantía . . . . . . . . . . 35
sc
Page 26

Instrucciones importantes sobre seguridad
Instalador: Por favor deje esta guía junto con el
electrodoméstico.
Consumidor: Por favor lea y conserve esta guía
para referencia futura. Conserve el recibo de compra
y/o el cheque cancelado como prueba de compra.
Número de modelo ____________________________
Número de serie ______________________________
Fecha de compra______________________________
Si tiene alguna pregunta, llame a:
Asistencia al Cliente de Maytag
1-800-688-9900 en EE.UU. o al
1-800-688-2002 en Canadá
(Lunes a Viernes, de 8 a.m. a 8 p.m. hora del este).
Internet: http://www.maytag.com
U. que utilizan el sistema TTY
Los clientes en E
para personas con impedimentos auditivos o del
habla pueden llamar al 1-800-688-2080.
En nuestro continuo afán de mejorar la calidad de
nuestros electrodomésticos puede ser necesario
modificar este electrodoméstico sin actualizar esta
guía.
Para inf
página 35.
ormación sobre servicio, vea la
E.U
Ahora debe conocer las
instrucciones de seguridad
ADVERTENCIA
PELIGRO DE INCENDIO –
secadora objetos que estén manchados o rociados
con aceite vegetal o de cocina. Incluso después de
haberse lavado, estos artículos pueden contener
cantidades importantes de estos aceites. El aceite
restante se puede encender espontáneamente. El
potencial de encendido espontáneo aumenta
cuando los artículos que contienen aceite vegetal o
de cocción se exponen al calor. Las fuentes de calor
tales como su secadora pueden calentar estos
artículos, lo que permite que ocurra la reacción de
oxidación en el aceite. La oxidación genera calor. Si
este calor no puede escapar, los artículos pueden
calentarse lo suficiente como para encenderse. El
apilamiento, amontonamiento o almacenamiento de
estos artículos puede evitar que el calor escape y
puede crear un rie
Todas las telas lavadas y no lavadas que contengan
aceite vegetal o de cocina pueden ser peligrosos. Si
estos ar
detergente adicional reducirá, mas no eliminará, el
riesgo de incendio. Siempre use el ciclo de
Enfriamiento para reducir la temperatura de estos
artículos. Nunca retire estos artículos de la secadora
cuando e
sec
ciclo de Enfriamiento. Nunca apile o amontone
estos artículos cuando e
tículos se lavan en agua caliente con
stén c
ado hasta que los artículos hayan pasado por el
sgo de incendio.
alientes y no interrumpa el ciclo de
No coloque en la
stén calientes.
as advertencias y las instrucciones importantes de
L
seguridad que aparecen en este manual no tienen el
propósito de cubrir todas las condiciones posibles que
podrían ocurrir
cuidado cuando se inst
opere el electrodoméstico.
Siempre comuníquese con el distribuidor, concesionario,
agente de servicio o fabricante para los asuntos relacionados
con problemas o condiciones que no entienda.
. Debe us
arsé sentido común, prec
ale, se pre
sente maintenimiemto o se
aución y
Reconozca los símbolos de seguridad,
advertencias, etiquetas
ADVERTENCIA
ERTENCIA –Peligros o prácticas no seguras que
ADV
PODRIAN causar lesión personal grave o mortal.
PRECAUCIÓN
ECAUCIÓN –
R
P
PODRIAN causar lesión personal menos grave.
25
eligros o práctic
P
as no seguras que
Page 27

Instrucciones importantes sobre seguridad
ADVERTENCIA
Para reducir el riesgo de incendio, explosión, choque
eléctrico o lesiones personales cuando use esta
secadora, siga las siguientes precauciones básicas
de seguridad:
1. Lea todas las instrucciones antes de usar el
electrodoméstico.
2. Para evitar la posibilidad de un incendio o
explosión:
a. No seque artículos que hayan sido limpiados,
lavados, remojados o manchados con gasolina,
solventes de lavado en seco u otras sustancias
inflamables o explosivas, ya que estas emiten
vapores que podrían encenderse o explotar.
Cualquier material que haya sido expuesto a un
aturado de
solvente de limpieza o que e
líquidos o sólidos inflamables no debe ser
colocado en la secadora hast
rastros de e
vapores se hayan removido. Existen muchos
artículos inflamable
como: acetona, alcohol desnaturalizado,
gasolina, keroseno, algunos limpiadores
líquidos, algunos quitamanchas, trementina,
ceras y removedore
stos materiales inflamables y sus
s en uso en el hogar tales
s de cera.
sté s
a que todos los
7. No altere los controles.
8. No repare o reemplace ninguna pieza de este
electrodoméstico ni intente realizar el servicio a
menos que sea recomendado en publicaciones con
instrucciones de reparación para el usuario que
usted comprenda y que tenga las habilidades para
llevarlo a cabo.
9. No use suavizantes de telas o productos para
eliminar estática a menos que el fabricante de
dichos productos los recomiende.
10. Limpie el filtro de hilachas antes o después de
cada carga.
11. Mantenga el área que rodea la abertura del escape
y las áreas cercanas libres de acumulación de
hilachas, polvo y sucio.
12. El interior de la secadora y el conducto del escape
deben limpiarse a menudo por personal de servicio
ado.
calific
13. Este electrodoméstico debe ser debidamente
puesto a tierra. Nunca enchufe el electrodoméstico
en un tomacorriente que no esté debidamente
puesto a tierra de acuerdo con los códigos locales
y nacionales. Consulte las instrucciones de
alación para la puesta a tierra de e
inst
electrodoméstico.
ste
tículos que contengan goma espuma
Los ar
b.
(pueden e
látex) o de materiales de textura similar no
deben secarse en el ajuste de alta temperatura.
Los materiales de goma espuma, cuando se
calientan, pueden crear bajo ciertas
circunstancias un incendio por combustión
spontánea.
e
No permit
3.
dentro o sobre el electrodoméstico o delante del
mismo. Se requiere supervisión estricta cuando se
use el electrodoméstico cerca de niños y mascotas.
s de de
Ante
4.
realizar reparaciones o para descartarlo, retire la
puerta del compartimiento de secado.
5.
No introduzca las manos en el electrodoméstico
cuando el tambor esté en movimiento.
6. No instale o almacene este electrodoméstico a la
intemperie.
star marcados como espuma de
a que los niños o las mascotas jueguen
alar el electrodoméstico para
sinst
14. No coloque los artículos expuestos a los aceites de
. Los ar
cocina en su sec
con aceite
reacción química que podría hacer una carga
coger el fuego.
15. No se siente sobre la secadora.
s de cocina pueden contribuir a una
ador
tículos contaminados
Nota
• Debido a las mejoras continuas del producto,
ag se re
Mayt
specific
e
detalles completos, consulte las instrucciones de
instalación incluidas con su producto antes de
elegir los armarios, realizar los cortes o comenzar
la instalación.
serva el derecho de c
aciones sin aviso previo. Para obtener
ambiar sus
CONSERVE ESTAS INSTRUCCIONES
26
Page 28

Instructions d’utilisation
Limpie el filtro de hilachas
• Después de cada carga de ropa.
• Para reducir el tiempo de secado.
• Para ahorrar energía.
Nota
• No haga funcionar la secadora sin la rejilla del
filtro de hilachas en su lugar.
• No haga funcionar la secadora sin el filtro en su
lugar.
Para limpiar el filtro
1. Retire la rejilla del filtro oprimiendo el pestillo
en el lado derecho.
2. Gire el filtro para alejarlo de la rejilla.
3. Retire las hilachas del filtro.
4. Gire el filtro nuevamente de manera que quede
plano sobre la rejilla.
5. Coloque el extremo izquierdo de la rejilla en la
tura del filtro y oprima el lado derecho hasta
aber
que encaje.
Cargue la secadora
adecuadamente
• Coloque una sola carga de ropa en la secadora a la
vez.
• Las cargas mixtas de ropa pesada y ligera se
arán de manera diferente. L
sec
ará, mientras que la ropa pe
sec
húmeda.
• Añada uno o más artículos similares en la secadora
cuando necesite secar sólo uno o dos artículos. Esto
mejora la acción giratoria del t
del secado.
a ropa ligera se
ada puede quedar
s
ambor y la eficiencia
a sobrec
L
•
hace que el secado no sea uniforme y que algunas
telas se arruguen de manera excesiva.
27
arga re
stringe la acción giratoria, lo que
Page 29

Instructions d’utilisation
Encendido/Pausa
Después de programar el ciclo y las opciones
deseadas, oprima la tecla
(Encendido/Pausa) para encender la secadora. Para
interrumpir el ciclo, oprima la tecla
(Encendido/Pausa) nuevamente. Para reiniciar el ciclo,
oprima la tecla
ciclo continuará a partir del punto de interrupción.
‘Start/Pause’ (Encendido/Pausa) y el
Apague la secadora
Apagado
Oprima la tecla ‘Power Off’ (Apagado) para anular el
ciclo y detener la secadora.
Despliegue del tiempo
estimado
La pant
ciclo después de oprimir la tecla
(Encendido/Pausa). El tiempo estimado restante puede
variar a medida que el ciclo avanza.
alla mue
stra el tiempo estimado restante del
‘Start/Pause’
‘Start/Pause’
‘Start/Pause’
Luces de estado del ciclo
La luz ‘Drying’ (Secando) se encenderá y
permanecerá encendida hasta que finalice el ciclo.
Cuando la sec
del ciclo, la luz ‘Cooling’ (Enfriando) se encenderá.
Cuando finalice el ciclo, ‘End’ (Fin) se desplegará en la
pantalla y la luz ‘Complete’ (Completo) se encenderá
y permanecerá encendida hasta que se abra la puerta.
Si se interrumpe el sec
indicadoras destellarán hasta que se oprima la tecla
‘Start/
P
adora esté en la porción de
ado durante el ciclo, las luces
ause’
(Encendido/
P
aus
enfriamiento
a).
28
Page 30

Uso de los controles
PASO 1
Seleccione el ciclo
Para seleccionar un ciclo, gire la perilla de control al
ciclo de
correspondiente se encenderá.
Ciclo ‘Wrinkle Release’
(Eliminación de arrugas)
El ciclo de Eliminación de arrugas elimina las arrugas
de los artículos que están limpios y secos pero que
están ligeramente arrugados, tales como los artículos
que han estado guardados en un armario lleno o en
una maleta o que han e
demasiado tiempo después de que el ciclo haya
finalizado. Este ciclo puede utilizarse
ajuste de temperatura.
Ciclo ‘Damp Dry’ (Secado húmedo)
El ciclo de Secado húmedo está diseñado para secar la
ropa parcialmente. Este ciclo puede utilizarse con
cualquier ajuste de temperatura.
seado. La luz indicadora al lado del ciclo
stado en la sec
adora por
con cualquier
Ciclo ‘Air Fluff’ (Esponjado con aire)
El ciclo de Esponjado con aire hace girar la ropa a
temperatura ambiente.
Ciclo ‘Normal/Auto Dry’
(Normal/Secado automático)
El ciclo Normal/Sec
secar artículos como toallas, ropa interior, pantalones
de mezclilla, etc.
ado automático está diseñado para
Ciclo ‘Wrinkle Control’
(Control de arrugas)
El ciclo de Control de arrugas e
automátic
telas sintéticas, tejidos y telas de planchado
permanente. Este ciclo
proporcionando un período mayor de enfriamiento sin
calor al final del ciclo.
amente artículos inarrugables de algodón,
minimiza las arrugas
stá diseñado para secar
Ciclo ‘Delicates’ (Ropa delicada)
stá diseñado para secar los
El ciclo de Ropa delic
artículos sensibles al calor a la temperatura
secado.
ada e
mínima de
29
Page 31

Uso de los controles
PASO 2
Seleccione el nivel de secado
Para seleccionar el nivel de secado en los ciclos
Normal/Secado automático o de Control de arrugas,
oprima la tecla
luz indicadora se iluminará junto al nivel de secado
deseado. Oprima la tecla repetidamente para navegar
entre los ajustes.
Las cargas de mayor tamaño o de artículos más
voluminosos requerirán el ajuste
secado) para secar completamente la carga. El ajuste
‘Less Dry’ (Menor secado) es mejor para las telas más
livianas o para dejar algo de humedad en la ropa al
finalizar el ciclo.
PASO 3
Seleccione la temperatura
‘Dryness Level’ (Nivel de secado). Una
‘More Dry’ (Mayor
Para seleccionar la temperatura correct
Normal/Secado automático, de Eliminación de arrugas
o de Secado húmedo, oprima la tecla de
emperatura). Una luz indicadora se iluminará junto a
(T
la temperatura deseada. Oprima la tecla repetidamente
para navegar entre los ajustes.
Use la siguiente tabla como guía:
TEMP. DE SEC.
Regular
Intermedia
(Medium)
Baja
(Low)
Para algodones resistentes o
etiquetados para secado en tambor.
ara telas de planchado
P
permanente, sintéticas, de algodón
liviano o etiquetadas para secado
en tambor a temperatura
intermedia.
ara ar
P
etiquetados para secado en tambor
a temperatura baja o tibia.
TIPO DE CARGA
tículos sensibles al calor
a en los ciclos
Temperature
30
Page 32

Uso de los controles
PASO 4
Seleccione las opciones
(si lo desea)
‘Adjust Time’ (Ajuste el tiempo)
Se puede aumentar o disminuir el tiempo programado
automáticamente para los ciclos de Ropa delicada, de
Control de arrugas, de Eliminación de arrugas, de
Secado húmedo o de Esponjado con aire.
Para disminuir la duración del ciclo, oprima la tecla
‘Less Time’ (Menos tiempo) hasta que se muestre el
tiempo deseado. Para aumentar la duración del ciclo,
oprima la tecla
muestre el tiempo deseado.
‘Chime’ (Señal de finalización del ciclo)
Cuando el ciclo haya terminado, escuchará una señal
sonora. Cuando se selecciona la opción ‘Wrinkle
Prevent’ (Prevención de arrugas), la señal sonará
intermitentemente.
‘More Time’ (Más tiempo) hasta que se
‘Wrinkle Prevent’
(Prevención de arrugas)
a opción ofrece aproximadamente 95 minutos de
Est
acción giratoria intermitente con aire no calentado al
final del ciclo para reducir las arrugas.
‘Child Lock’ (Bloqueo para niños)
Se puede bloquear el panel de control para mayor
seguridad, limpieza o para prevenir el uso no autorizado
de la secadora. Las teclas dejarán de funcionar cuando
estén bloqueadas.
Para bloquear los controles, oprima y mantenga
oprimidas las teclas ‘Chime’ (Señal sonora) y ‘Wrinkle
Prevent’ (Prevención de arrugas) durante 3 segundos.
La luz indicadora de bloqueo para niños se encenderá.
Para desbloquear los controles, oprima y mantenga
oprimidas las teclas
Prevent’ (Prevención de arrugas) durante 3 segundos.
La luz indicadora de bloqueo para niños se apagará.
‘Chime’ (Señal sonora) y ‘Wrinkle
PASO 5
Oprima la tecla ‘Start/Pause’
(Encendido/Pausa)
a tecla para encender la secadora. La
Oprima e
puerta de la secadora debe estar cerrada para que la
secadora pueda funcionar. Si se abre la puerta durante
el ciclo, oprima esta tecla nuevamente para reiniciar el
ciclo una vez se haya cerrado la puer
31
st
a.
t
Page 33

Cuidado y limpieza
Panel de control
Limpie con un paño suave y húmedo. No use
sustancias abrasivas.
El acabado del panel de control podría dañarse con el
uso de algunos productos de lavandería para el
tratamiento y remoción de manchas. Aplique estos
productos alejado de la secadora y limpie cualquier
derrame o exceso de rociado inmediatamente.
Sistema de escape de la
secadora
Inspeccione y limpie el sistema de escape una vez al
año para mantener un rendimiento óptimo. La
campana de ventilación externa debe limpiarse con
mayor frecuencia para asegurar su funcionamiento
correcto. Consulte las instrucciones de instalación
para mayor información.
Acero inoxidable
Exterior de la secadora
Limpie con un paño suave y húmedo. No use
sustancias abrasivas. Proteja la superficie de objetos
afilados.
Para limpiar el tambor de acero inoxidable, use un
paño húmedo con un limpiador suave no abrasivo
adecuado para limpiar superficies de acero inoxidable.
Elimine los residuos de limpiador y seque con un paño
limpio.
Sugerencias especiales para el secado
Por favor siga las instrucciones de cuidado de la ropa que se encuentran en las etiquetas para secar artículos de
secado especial. Si las instrucciones de la etiqueta no están disponibles, use la siguiente información a modo de guía.
ARTÍCULO
Frazadas
• Seque sólo una frazada a la vez para una mejor acción giratoria.
• Asegúrese de que el ar
SUGERENCIAS DE SECADO
tículo esté completamente seco antes de usarlo o almacenarlo.
Cortinas y telas
Pañales de tela
Artículos
rellenos de
plumas
sacos de dormir,
edredone
Goma espuma
(reversos de
alfombras,
peluche
tipos de
hombreras, etc.)
Almohadas
Artículos de
plástico
(cortinas de la
ducha, cubiertas
de mueble
(abrigos,
s, etc.)
s, algunos
s, etc.)
• Use el ciclo de Control de arrugas para minimizar las arrugas.
• Seque en cargas pequeñas para obtener los mejores resultados y retíre de la secadora lo
más rápido posible.
• Use el ciclo Normal/Secado Automático para secar pañales suaves y esponjosos.
• Use el ciclo Normal/Secado Automático y un ajuste de temperatura delicado.
• Coloque un par de zapatos de goma en la secadora con el artículo para esponjar los
edredones de plumas, etc. Si añade un par de toallas secas a la carga reducirá el tiempo
de secado y absorberá la humedad.
• NO use temperatura caliente para secar. Use el ciclo de Esponjado con aire (sin calor).
ADVERTENCIA – Secar un artículo de goma con calor puede dañarlo o causar un
•
sgo de incendio.
rie
Use el ciclo Normal.
•
• Añada un par de toallas secas y un par de zapatos de goma limpios para mejorar la
acción giratoria y para e
O seque en la sec
N
•
Use el ciclo de Esponjado con aire con un ajuste de temperatura bajo o de e
•
aire según las instruccione
sponjar el artículo.
adora almohadas de c
s de cuidado de la etiquet
apoc o de espuma.
sponjado con
a.
IMPORTANTE: Evite secar en la secadora . . .
tículos de fibra de vidrio (cor
• Ar
• Tejidos de lana a menos que lo recomiende la etiqueta de cuidado.
• Artículos empapados de aceite vegetal o de cocina (vea la página 26).
tinas, telas, etc.).
32
Page 34

Sugerencias para el escape de la secadora
ADVERTENCIA
Los conductos plásticos o flexibles de material no
metálico representan un riesgo potencial de
incendio.
Se debe
Leer las instrucciones de instalación y la guía de
uso y cuidado.
Se debe
Dejar que el escape
de su secadora ventile
el aire fácilmente.
Se debe
ar un conducto de metal
Us
rígido de 4” (10,2 cm) de
diámetro. Aisle las juntas con
a adhesiva, incluyendo la
cint
junta de la secadora.
Nunca use tornillos que atrapen
hilachas.
No se debe
Dejar que un sistema de escape inadecuado
cause lentitud en el secado.
No se debe
Restringir su
secadora con un
sistema de escape
inadecuado.
No se debe
ar conductos de
Us
plástico, de aluminio
delgado o conductos
flexible
s no metálicos.
Se debe
Mantener la
instalación de los
conductos tan recta
como sea posible.
Se debe
impiar todos los conductos
L
antiguos antes de instalar una
adora nueva. Asegúre
sec
que la cubierta del escape se
abra y cierre libremente.
Inspeccione y limpie el sistema
ape una vez al año.
sc
de e
33
se de
No se debe
Us
ar conductos más
largos de lo
necesario con
muchos codos.
No se debe
ermitir que los
P
conductos y escapes
stén aplast
e
bloqueados.
ados o
Page 35

Localización y solución de averías
No funciona
No calienta
No seca bien
•
Asegúrese de que la puerta esté cerrada.
• ¿El cordón eléctrico está enchufado?
• ¿Se quemó un fusible o se disparó el disyuntor?
• Oprima la tecla ‘Start/Pause’ (Encendido/Pausa) nuevamente si se abrió la puerta durante el
ciclo.
• ¿Se quemó un fusible o se disparó el disyuntor?
• Seleccione un ajuste de temperatura con calor, no el esponjado con aire.
• Limpie el filtro de hilachas y el conducto de escape.
• El temporizador de la secadora puede haber pasado a la porción de enfriamiento del ciclo.
• Verifique lo anterior y también lo siguiente.
• Verifique la campana de ventilación en el exterior de la vivienda: ¿Se abre y se cierra
libremente?
• Verifique que no hayan acumulaciones de hilachas en el sistema de escape. Los conductos
deben ser inspeccionados y limpiados una vez al año.
• Use conductos de escape rígidos de metal de 4” (10,2 cm) de diámetro.
• No sobrec
• Separe los artículos de ropa pesados de los livianos.
• Verifique la lavadora para asegurarse de que está drenando el agua de la carga de ropa
adecuadamente.
• La carga de ropa es demasiado pequeña para que la acción giratoria sea la adecuada. Añada
algunas toallas.
argue la sec
adora. 1 carga de lavadora = 1 carga de sec
adora.
Es ruidosa
No seca de
manera
uniforme
T
iene olor
La secadora se
apaga antes de
que la carga de
ropa esté seca
• Verifique la carga de ropa en busc
inmediatamente de la secadora.
• Es normal escuchar el elemento calefactor encenderse y apagarse durante el ciclo de secado.
• La secadora debe est
• Es normal que la secadora emita un zumbido debido a la alta velocidad del aire cuando
se mueve a través del tambor y del sistema de escape.
• Cerciórese de que filtro de la pelusa esté unida con seguridad.
• Las costuras, bolsillos y otras áreas gruesas similares pueden no quedar completamente secas
cuando el resto de la carga haya alcanzado el nivel de secado seleccionado. Esto es normal.
Seleccione la opción ‘More Dry’ (Mayor secado) si lo desea.
• Si se está secando un artículo pesado en una carga de ropa liviana, como por ejemplo una
toalla en una carga de sábanas, es posible que el artículo pesado no esté completamente seco
cuando el resto de la carga haya alcanzado el nivel de secado seleccionado. Separe los
ados de los livianos para obtener los mejore
tículos pe
ar
•
Los olores del hogar tales como la pintura, el barniz, los limpiadores fuertes, etc. pueden estar
entrando en la secadora con el aire de la habitación. Esto es normal ya que la secadora toma
el aire de la habitación, lo calienta, lo lleva a través del tambor y lo ventila a través del sistema
de escape al exterior. Cuando estos olores estén en el aire, ventile completamente la
habit
• La carga de ropa es demasiado pequeña. Añada artículos similares o algunas toallas y reinicie
el ciclo.
• La carga de las ropas es demasiado grande. Quite algo de la carga y recomience el secador.
s
ación antes de usar la secadora.
ar nivelada e instalada sobre un piso firme.
a de objetos tales como monedas, clavos, etc. Retírelos
sultados del secado.
s re
Para obtener mayor asistencia, póngase en contacto con Maytag ServicesSM, Maytag Customer Assistance:
88-9900 o, en Canadá, al 1-800-688-2002.
00-6
En E
U., llame al 1
E.U
-8
34
Page 36

Servicio y garantía
Garantía
Garantía limitada de un año –
Piezas y mano de obra
Durante un (1) año a partir de la fecha
original de compra al detal, se reparará o
reemplazará gratuitamente cualquier pieza
que falle durante el uso normal en el hogar.
Residentes Canadienses
Las garantías anteriores cubren solamente
aquellos electrodomésticos instalados en
Canadá que han sido certificados o
aprobados por las agencias de prueba
correspondientes para cumplimiento con la
Norma Nacional de Canadá a menos que el
electrodoméstico haya sido traído a Canadá
sde los EE.UU. debido a un cambio de
de
residencia.
Las garantías específicas expresadas
anteriormente son las UNICAS garantías
provistas por el fabricante. Estas garantías le
otorgan derechos legales específicos y usted
puede tener además otros derechos que
varían de un estado a otro.
LA ÚNICA Y EXCLUSIVA SOLUCIÓN PARA EL
CLIENTE BAJO ESTA GARANTÍA LIMITADA ES
LA REPARACIÓN DEL PRODUCTO SEGÚN SE
INDICA AQUÍ. LAS GARANTÍAS IMPLÍCITAS,
INCLUYENDO LAS GARANTÍAS DE
COMERCIALIZACIÓN O DE APTITUD PARA UN
PROPÓSITO EN PARTICULAR ESTÁN
MITADAS A UN AÑO O AL PERÍODO DE
LI
TIEMPO MÍNIMO PERMITIDO POR LA LEY.
MAYTAG CORPORATION NO SERÁ
RESPONSABLE DE DAÑOS INCIDENTALES O
CONSECUENTES. ALGUNOS ESTADOS Y
PROVINCIAS NO PERMITEN LA EXCLUSIÓN O
LIMITACIÓN DE DAÑOS INCIDENTALES O
CONSECUENTES O LA LIMITACIÓN DE LA
URACIÓN DE LAS GARANTÍAS IMPLÍCITAS
D
DE COMERCIALIZACIÓN O APTITUD, POR LO
QUE ESTAS EXCLUSIONES O LIMITACIONES
PUEDEN NO APLICARSE EN SU CASO. ESTA
GARANTÍA LE OTORGA DERECHOS LEGALES
ESPECÍFICOS. USTED TAMBIÉN PUEDE TENER
OTROS DERECHOS QUE VARÍAN DE UN
ESTADO A OTRO O DE UNA PROVINCIA A
OTRA.
Lo que no cubren estas garantías
1. Situaciones y daños resultantes de cualquiera de las siguientes
situaciones:
a. Instalación, entrega o mantenimiento inapropiados.
. Cualquier reparación, modificación, alteración o ajuste no autorizados por
b
l fabricante o taller de servicio autorizado.
e
c. Mal uso, abuso, accidentes, uso no razonable o hechos fortuitos.
d. Corriente, voltaje, suministro eléctrico o suministro de gas incorrectos.
e. Ajuste inadecuado de cualquier
2. Las garantías quedan nulas si los números de serie originales han sido
retirados, alterados o no se pueden determinar fácilmente.
3. Bombillas, filtros de agua y filtros de aire.
4. Los productos comprados para uso comercial o industrial.
El costo del servicio o llamada de servicio para:
5.
a. Corregir errores de instalación. Para los productos que requieran
ventilación, se deben usar conductos de metal rígido.
Instruir al usuario en el uso adecuado del producto.
b.
c. Transporte del electrodoméstico al establecimiento de servicio y de regreso.
6. Cualquier pérdida de alimentos debido a fallas del refrigerador o
congelador.
7. Costos de viaje y transporte de servicio en áreas remotas.
8. Esta garantía no se aplica fuera de los Estados Unidos y Canadá. Póngase en
contacto con su distribuidor para determinar si se aplica cualquier otra
garantía.
9. Los daños consecuentes o incidentales sufridos por cualquier persona como
resultado del incumplimiento de esta garantía. En algunos
estados no se permite la exclusión o limitación de daños consecuentes o
incidentales, por lo tanto la limitación o exclusión anterior puede no aplicarse
en su caso.
Si necesita servicio
Primero revise la sección de localización y solución de averías en su guía de uso
y cuidado o llame al distribuidor donde adquirió el electrodoméstico. También
puede llamar a Mayt
EE.UU. y al 1-800-688-2002 en Canadá para ubicar a un agente de servicio
calificado.
• Asegúrese de conservar el comprobante de compra para verificar el estado de
la garantía. Consulte la sección sobre la GARANTÍA para mayor información
sobre las re
garantía.
Si el distribuidor o la compañía de servicio no pueden resolver el problema,
•
escriba a Maytag Services, LLC, Attn: CAIR
7320-23
TN 3
8-2002 en Canadá.
8
00-6
-8
1
• Las guías del propietario, manuales de servicio e información sobre las piezas
pueden solicitarse a Maytag Services, LLC, Atención al cliente.
ag Service
abilidade
spons
0 o llame al
7
s, LLC, Atención al cliente, al 1-800-688-9900 en
s del propiet
00-6
-8
1
ario para obtener servicio bajo la
®
Center, P.O. Box 2370, Cleveland,
88-9900 en EE.UU. y al
Notas: Cuando llame o escriba acerca de un problema de servicio, por
favor incluya la siguiente información:
Su nombre, dirección y número de teléfono;
a.
b. Número de modelo y número de serie;
Nombre y dirección de su distribuidor o técnico de servicio;
c.
d. Una descripción clara del problema que está experimentando;
e. Comprobante de compra (recibo de compra).
orm No. A/01/0
F
art No. DC68-02031A-01 www.maytag.com ©2006 Maytag Appliances Sales Co.
6
P
 Loading...