

Page 1
MAV-1
Use & Care Guide
Table of Contents
Important Safety Instructions 1-2
Operating Tips . . . . . . . . . . . 3-4
Using the Controls
3 Speed Select Models . . . . . . . 5-6
4 Speed Select Models . . . . . . . 7-8
Electronic Control Models . . . . . .9-11
Special Features . . . . . . . . 12-13
Care & Cleaning . . . . . . . . . . . 13
Troubleshooting . . . . . . . . . . . 14
Service & W
arranty . . . . . . . . 15
Guide d’utilisation
et d’entretien . . . . . . . . . . . . . . 16
Guía de uso y cuidado . . . . . 34
03 A P
orm No. Y81
F
9
art No. 2206671 www.maytag.com Litho U.S.A. ©2006 Maytag Appliances Sales Co.
Page 2

Important Safety Instructions
Installer: Please leave this guide with this
appliance.
Consumer: Please read and keep this guide for
future reference. Keep sales receipt and/or canceled
check as proof of purchase.
Model Number _______________________________
Serial Number ________________________________
Date of Purchase______________________________
If you have questions, call:
Maytag Customer Assistance
1-800-688-9900 U.S.A.
1-800-688-2002 Canada
(Mon.-Fri., 8am-8pm Eastern Time)
Internet: http://www.maytag.com
U.S. Customers using TTY for deaf, hearing impaired
or speech impaired, call 1-8
In our continuing effort to improve the quality and
performance of our appliances, it may be necessary
to make changes to the appliance without revising
this guide.
For service information, see page 15.
00-688-2080.
What You Need to Know About
Safety Instructions
Warning and Important Safety Instructions appearing in
this guide are not meant to cover all possible
conditions and situations that may occur. Common
sense, caution and care must be exercised when
alling, maint
inst
Always contact the manufacturer about problems or
conditions you do not underst
Recognize Safety Symbols, Words,
Labels
WARNING – Hazards or unsafe practices which COULD
result in severe personal injury or death.
aining or operating appliance.
and.
WARNING
WARNING! FIRE HAZARD
Do not add gasoline, dry-cleaning solvents, or other
flammable or explosive substances to the wash
water. These substances give off vapors that could
ignite or explode.
Do not wash articles which have been previously
cleaned, washed, soaked, or spotted with gasoline,
dry-cleaning solvents, oil, waxes, chemical solvents,
alcohol, turpentine, or other flammable or explosive
materials. These substances will be retained in
articles, and articles which still contain these
flammable or explosive substances give off vapors
that could ignite or explode.
Observe these precautions when using cleaning
fluids, spot or stain removers, etc. These products
should be labeled “nonflammable.” Use according to
manufacturers directions in a well ventilated area or
outdoors. Thoroughly rinse articles by hand before
placing them in the washer
– rust removers for example – will damage
components and the finish of the washer.
Keep area around and underneath washer free from
the accumulation of combustible materials, such as
lint, paper, rags, gasoline, and all other flammable
vapors and liquids.
ROGEN GAS IS EXPLOSIVE!
HYD
conditions, hydrogen gas may be produced in a hot
water system that has not been used for two weeks
or more. If the hot water system has not been used
for such a period, before using the washer, turn on
all the hot water faucets and let the water flow from
each faucet for several minute
accumulated hydrogen gas. As this gas is
flammable, do not smoke or use an open flame
during this time.
Recent studies have shown that if vegetable oil
contaminated materials are incompletely washed, a
arry-over and buildup of the oil may contribute to a
c
chemical reaction (spontaneous combustion) that
could c
be more likely to happen if the load were left in the
dryer after tumbling stopped or if items were folded
and st
ause a load to c
acked while warm.
. Some of the
his will release any
s. T
atch fire by it
se products
Under cer
his would
. T
self
tain
CAUTION
CAUTION – Hazards or unsafe practices which COULD
result in minor personal injury.
1
Page 3

Important Safety Instructions
WARNING
To reduce the risk of fire, explosion, electric shock,
or personal injury when using your washer, follow
basic safety precautions, including the following:
1. Read all instructions before using the appliance.
2. As with any equipment using electricity and having
moving parts, there are potential hazards. To use this
appliance safely, the operator should become familiar
with the instructions for operation of the appliance
and always exercise care when using it.
3.
Do not install or store this appliance where it will be
exposed to the weather.
4. Install and level washer on a floor that can support
the weight.
5. This appliance must be properly grounded. Never
plug the appliance cord into a receptacle which is not
grounded adequately and in accordance with local
and national codes. See installation instructions for
grounding this appliance.
6. To avoid the possibility of fire or explosion:
a.
Do not wash items that have been previously
cleaned in, washed in, soaked in, or spotted with
gasoline, dry-cleaning solvents, other flammable or
explosive substances as they give off vapors that
could ignite or explode. Hand wash and line dry
any items containing these substances.
Any material on which you have used a cleaning
solvent, or which is saturated with flammable
liquids or solids, should not be placed in the
washer until all traces of these liquids or solids
and their fumes have been removed.
These items include acetone, denatured alcohol,
gasoline, kerosene, some liquid household
cleaners, some spot removers, turpentine, waxes
and wax removers.
Do not add gasoline, dry-cleaning solvents, or
b.
other flammable or explosive substances to the
wash water. These substances give off vapors that
could ignite or explode.
ain conditions, hydrogen gas may be
Under cer
c.
produced in a hot water system that has not been
used for two weeks or more. HYD
XPLOSIVE. If the hot water system has not been
E
used for such a period, before using a washing
machine or combination washer-dryer
hot water faucets and let the water flow from each
for several minute
t
AS IS
N G
E
G
O
R
, turn on all
his will release any
s. T
accumulated hydrogen gas. As the gas is
flammable, do not smoke or use an open flame
during this time.
d. Do not wash or dry items that are soiled with
vegetable or cooking oil. These items may contain
some oil after laundering. Due to the remaining oil,
the fabric may smoke or catch fire by itself.
7. Do not reach into the appliance if the tub or agitator
is moving.
Do not allow children or pets to play on, in, or in
8.
front of the appliance. Close supervision is necessary
when the appliance is used near children and pets.
9.
Do not tamper with controls.
Do not repair or replace any part of the appliance or
10.
attempt any servicing unless specifically
recommended in published user-repair instructions
that you understand and have the skills to carry out.
11. Unplug power supply cord before attempting to
service your washer. Service is to be done only by
qualified service personnel.
12. The agit
removed, it must be replaced by pushing down
completely and the locking screw tightened before
the washer is operated.
13. Keep all laundry aids such as detergents, bleach, etc.,
out of the reach of children, preferably in a locked
cabinet. Use laundry aids only as directed by the
manufacturer. Observe all warnings on container labels.
14. Keep the area around and underneath washer free
from the accumulation of combustible materials, such
as lint, paper, rags, gasoline, and all other flammable
vapors and liquids.
15.
Do not use chlorine bleach and ammonia or acids
(such as vinegar or rust remover) in the s
Hazardous fumes can form.
16. Do not machine wash fiberglass materials. Small
particles can stick to fabrics washed in following
loads and c
17. For flame resistant finishes - follow garment
manufacturer's instructions carefully. Improper
laundering could remove the finish.
18. Before the appliance is removed from service or
disc
19. Inlet hoses are subject to damage and deterioration
over time. Check the hoses periodically for bulges, kinks,
cuts, wear or leaks and replace them every five years.
ator should not be removed. If the agitator is
ame wash.
ause skin irrit
arded, remove the door to the washing compar
ation.
tment.
SAVE THESE INSTRUCTIONS
2
Page 4
Operating Tips
Detergent
• Use either liquid or granular laundry detergent. For
best results, be sure detergent is added to the
washer BEFORE the load and be sure the wash
water is above 60
• Use the correct amount of detergent for the load size,
soil level and water conditions. Use more detergent if
you have hard water and very soiled loads.
If you have soft water or a lightly soiled load, use less
detergent. (See manufacturer’s instructions.)
• Wipe up any detergent spills on the washer.
Loading
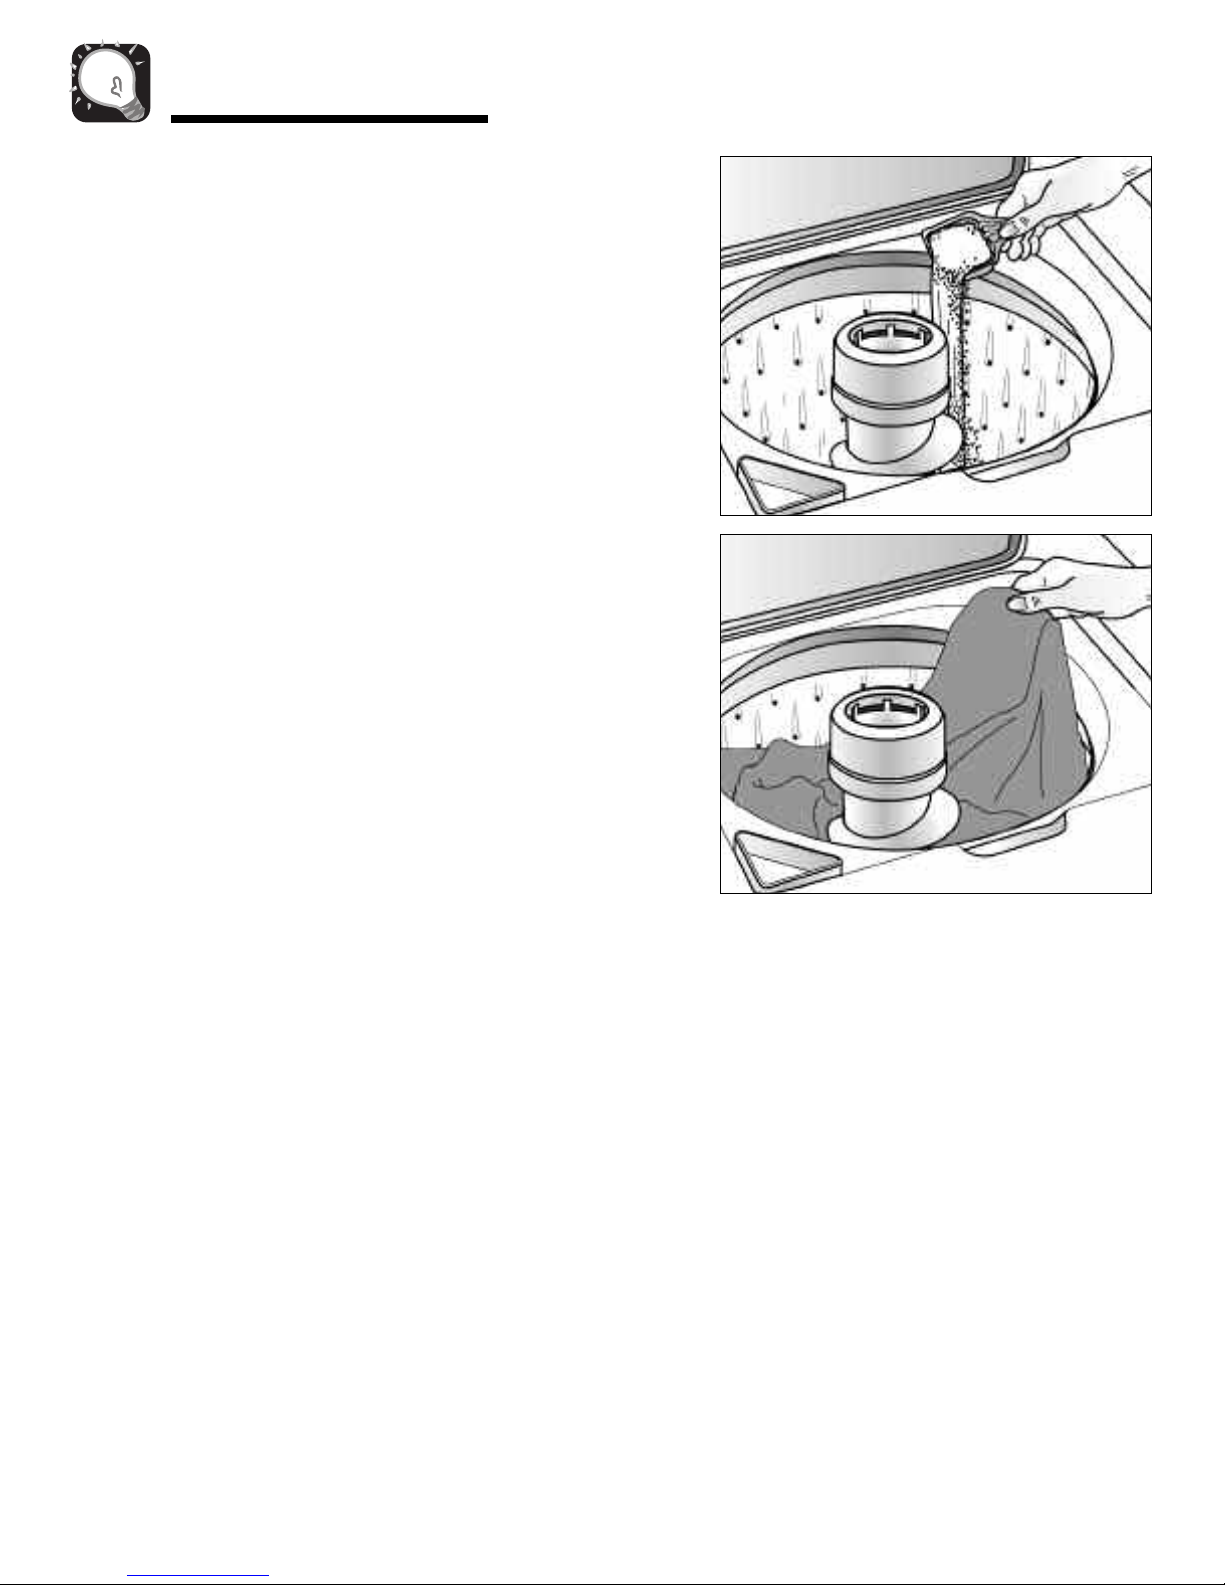
For best results add the detergent to the washtub
•
before adding the load.
• Put dry, unfolded clothes loosely in the tub, up to the
top row of holes for a maximum load.
°
F.
•
Do not wrap large items like sheets around the
ator.
agit
• Mix large and small items for best circulation. W
bulky items like blankets separately.
• When laundering wrinkle-free items or items of
ate construction, washable woolens or loosely
delic
knit items, never use le
level setting. This will minimize shrinkage, wrinkling
and pulling of seams.
Close lid c
•
arefully to avoid slamming.
ss than the MEDIUM water
ash
3
Page 5

Operating Tips
Additional Tips
• During the spin, it is possible for the load to become
unevenly distributed in the tub. If this happens, push
in the control dial, open the lid, redistribute the load,
close the lid and restart the washer. The spin will
resume at the point it was interrupted.
• The washer will pause briefly throughout each cycle.
These pauses are normal.
• This washer is designed so that it
spin when the lid is open. It will, however, fill with the
lid open so water is available for pretreating stains or
diluting fabric softener.
• If you open the lid during a spin cycle, the washer
will stop. When the lid is closed and the washer is
restarted, the washer will continue the cycle at the
point it was interrupted.
will not agitate or
4
Page 6
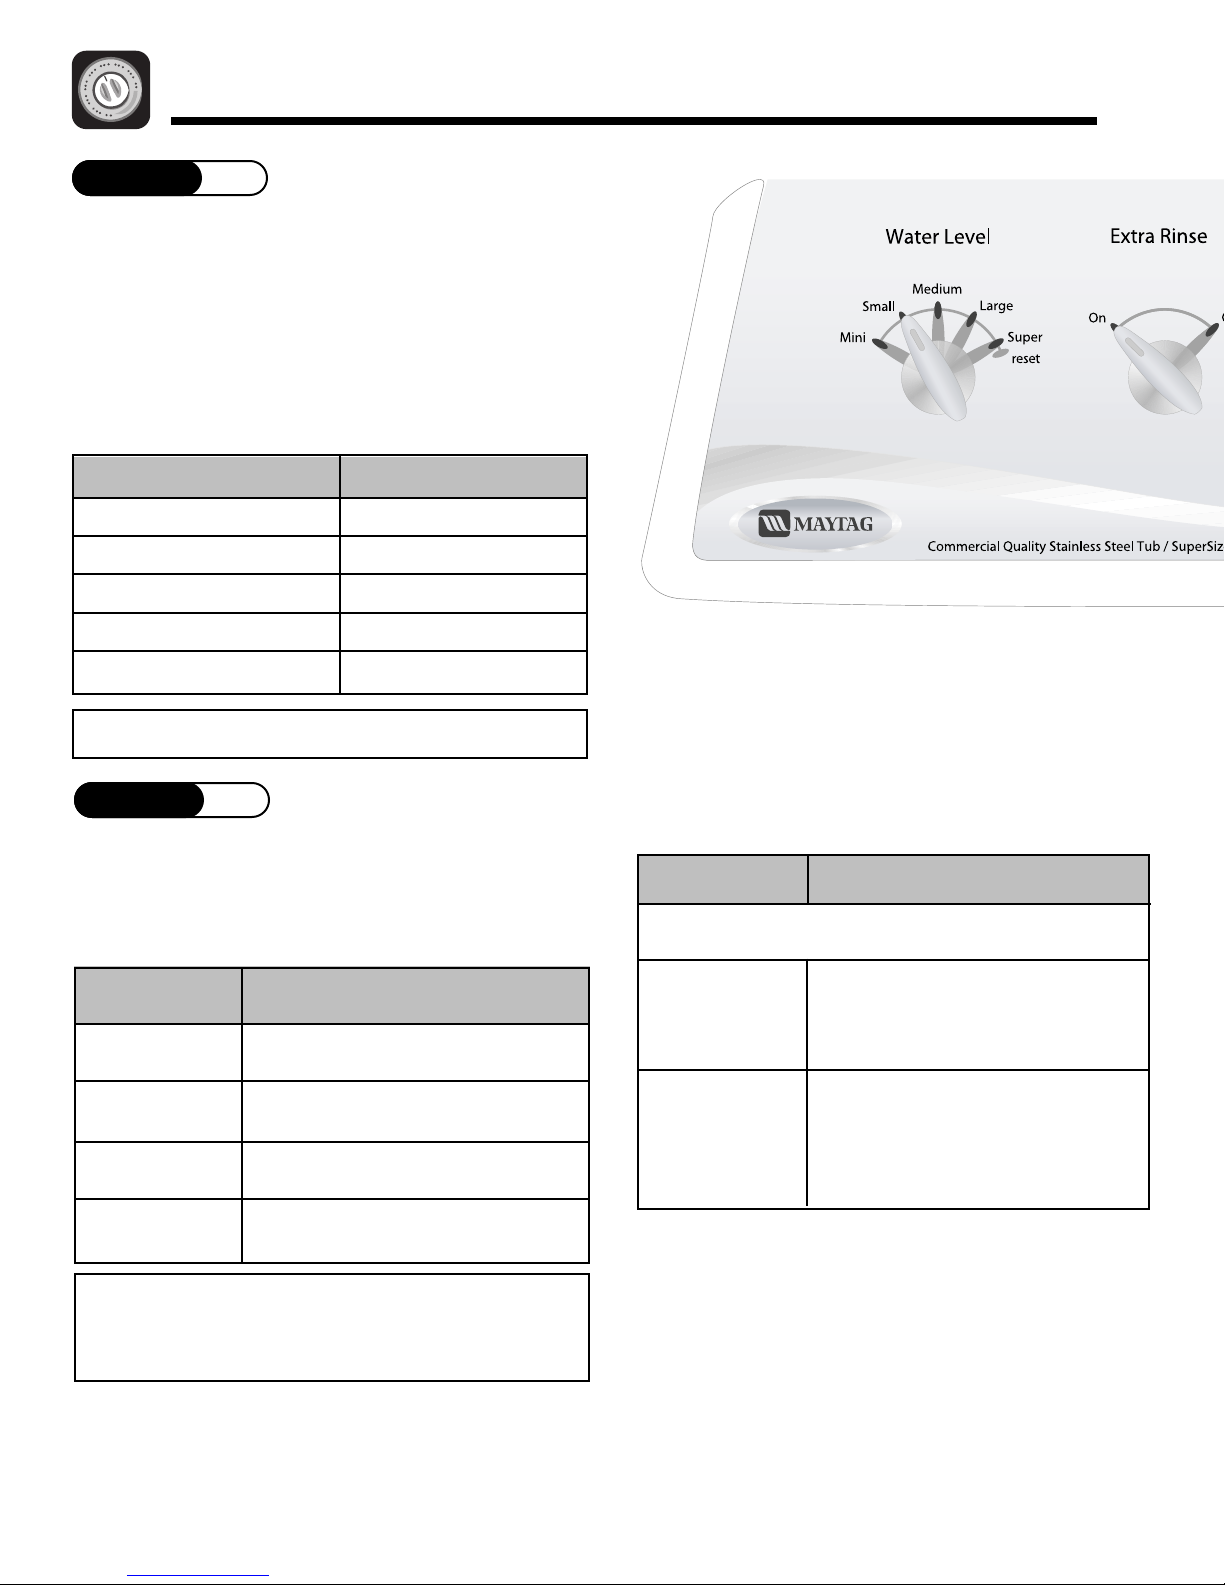
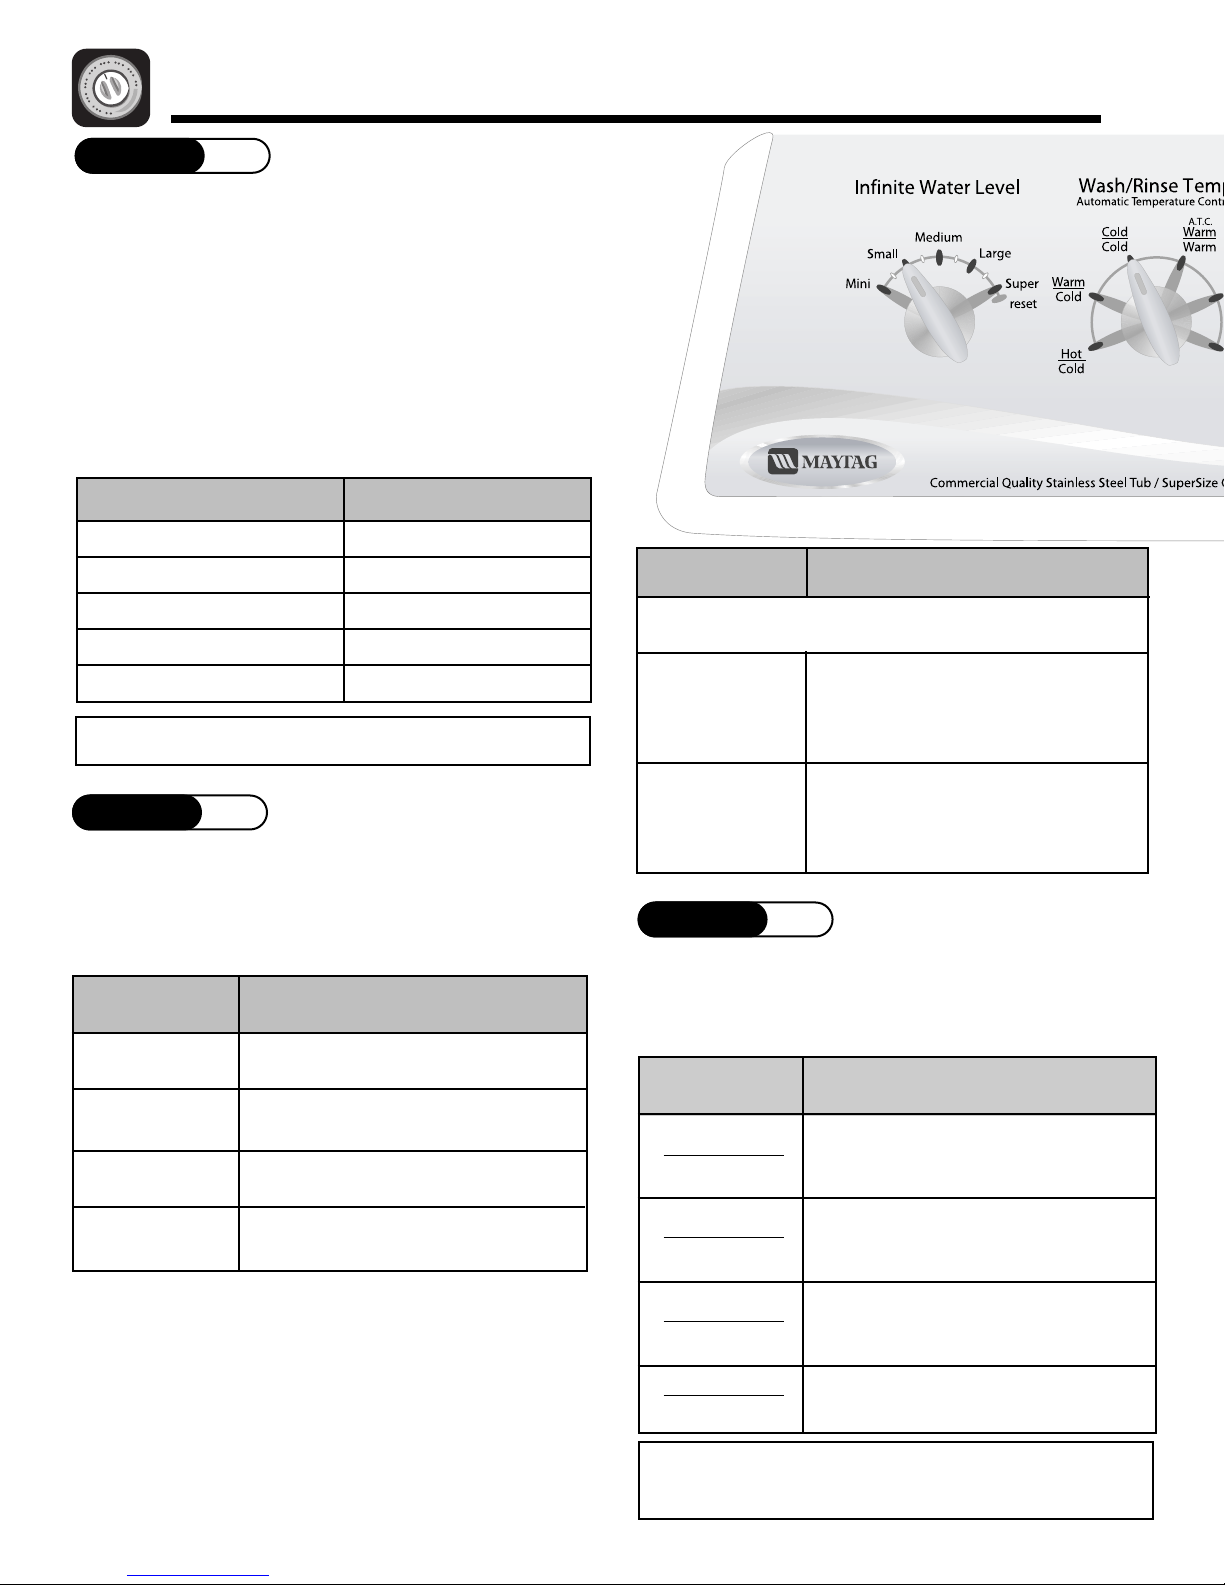
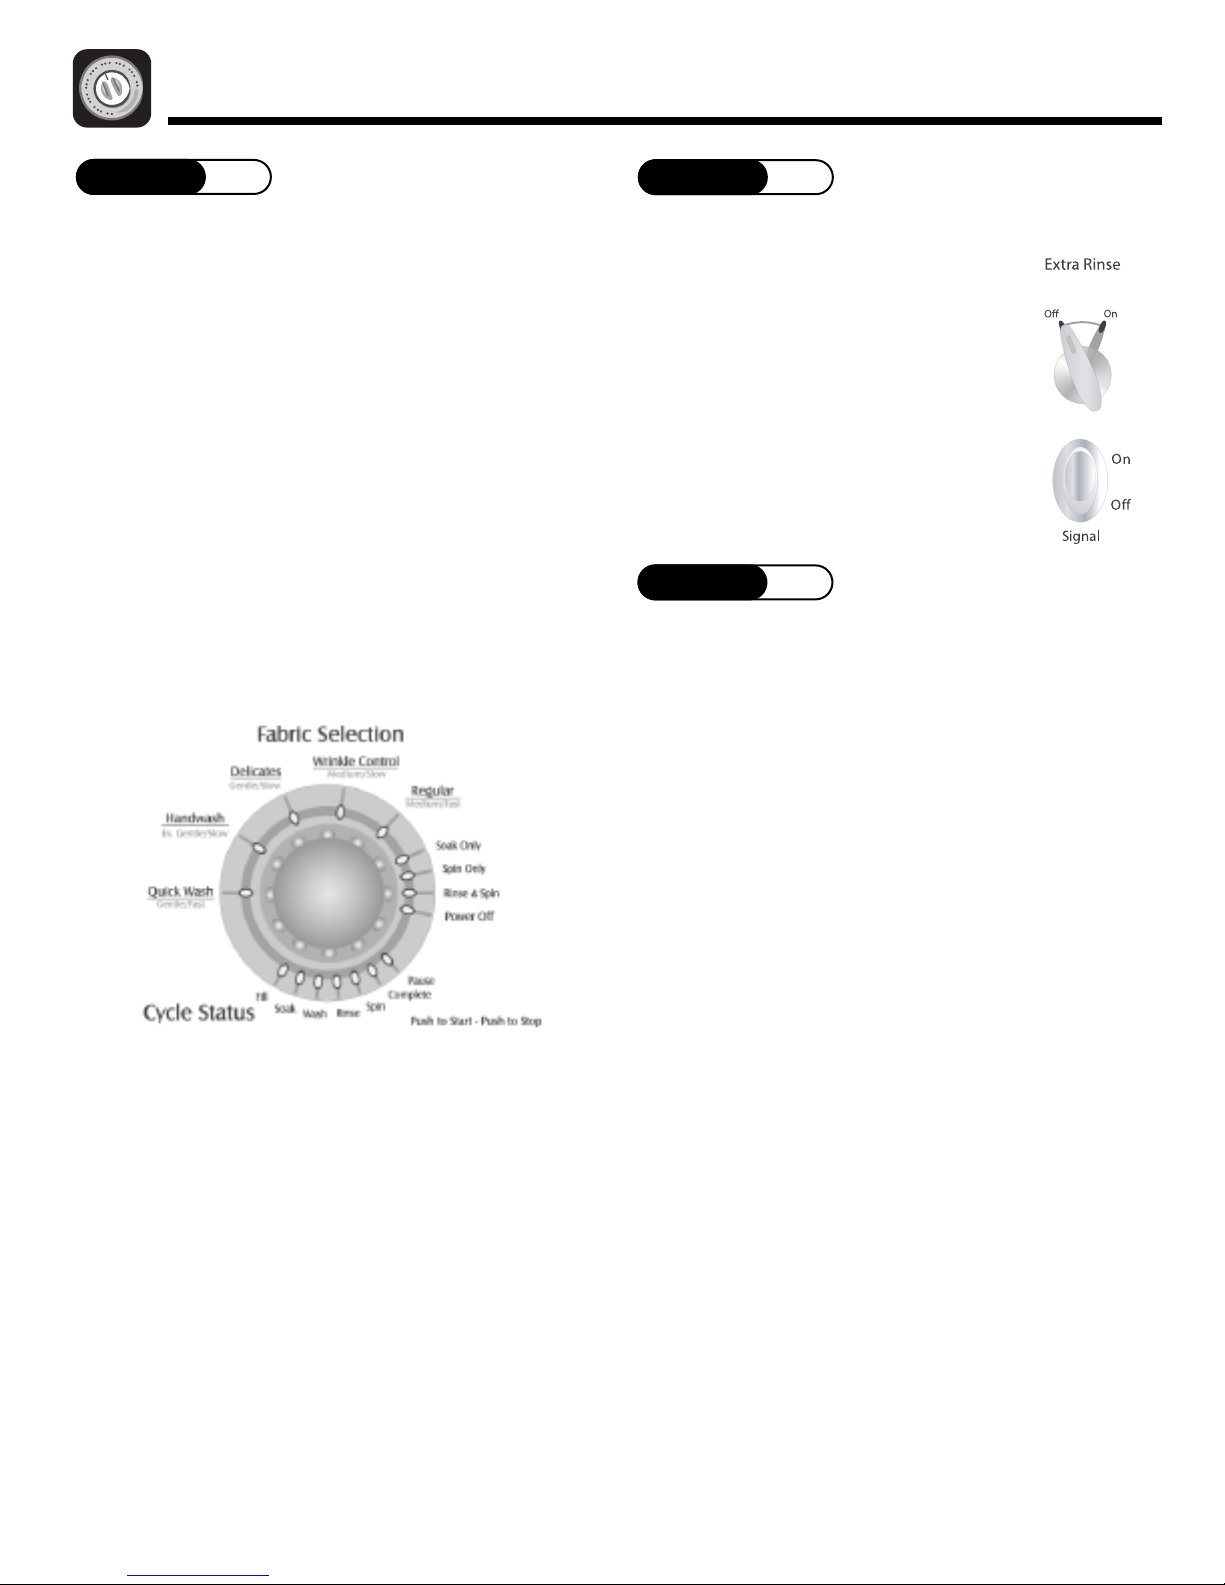
Using the Controls – 3 Speed Select Models
STEP 1
Select Water Level
Determine the selected setting based on clothes load
size. Selection should provide sufficient water to permit
clothes to circulate freely during agitation.
It may become necessary, due to bulky fabrics, to
adjust the water level after agitation begins. To adjust
the water level, turn the control to
to the desired setting.
WATER LEVEL SETTING LOAD SIZE
reset and then back
Mini
Small 1/4 - 1/3
Medium 1/3 – 1/2
Large 1/2 – 2/3
Super 3/4 – Full
Note: Items must circulate freely for best re
1/4 Full
sults.
STEP 2
Select Wash/Rinse Temperature
Your washer gives you a choice of hot, warm or cold
water for washing and cold or warm water (select
models) for rinsing. Use the char
/RINSE LOAD TYPE
H
AS
W
TEMPS
Hot/Cold
arm/W
W
(select models)
arm/Cold
W
Cold/Cold
arm
White and heavily soiled, color-fast
items.
Moderately soiled, colored items.
Moderately soiled, colored items;
most wrinkle-free items.
Brightly colored, lightly soiled
items; washable woolens.
t below as a guide.
Automatic Temperature Control (A.T.C.)
(select models) provide
temperature
Automatic Temperature Control will regulate wash
water temperatures by mixing hot and cold water to
reach the proper water temperature.
WASH/RINSE LOAD TYPE
TEMPS
ATC Hot/Cold,
ATC Warm/Cold
ATC Warm/Warm
(select models) at lower temperatures.
A
TC Cold/Cold
s for cleaning. To save energy
These settings feature Automatic
Temperature Control:
Save
to the hot water from your water
heater. Provides optimum cleaning
May add hot water to the incoming
cold water as the washer fills. This
assure
enough to properly activate
detergent.
s the optimal wash water
, the
s energy by adding cold water
s that the water will be warm
Note: In wash water temperatures below 60
detergent
labels define cold water as up to 85°F.
5
s
do not dissolve well or clean well. Care
°
F,
Page 7
C
ontrol features vary by model.
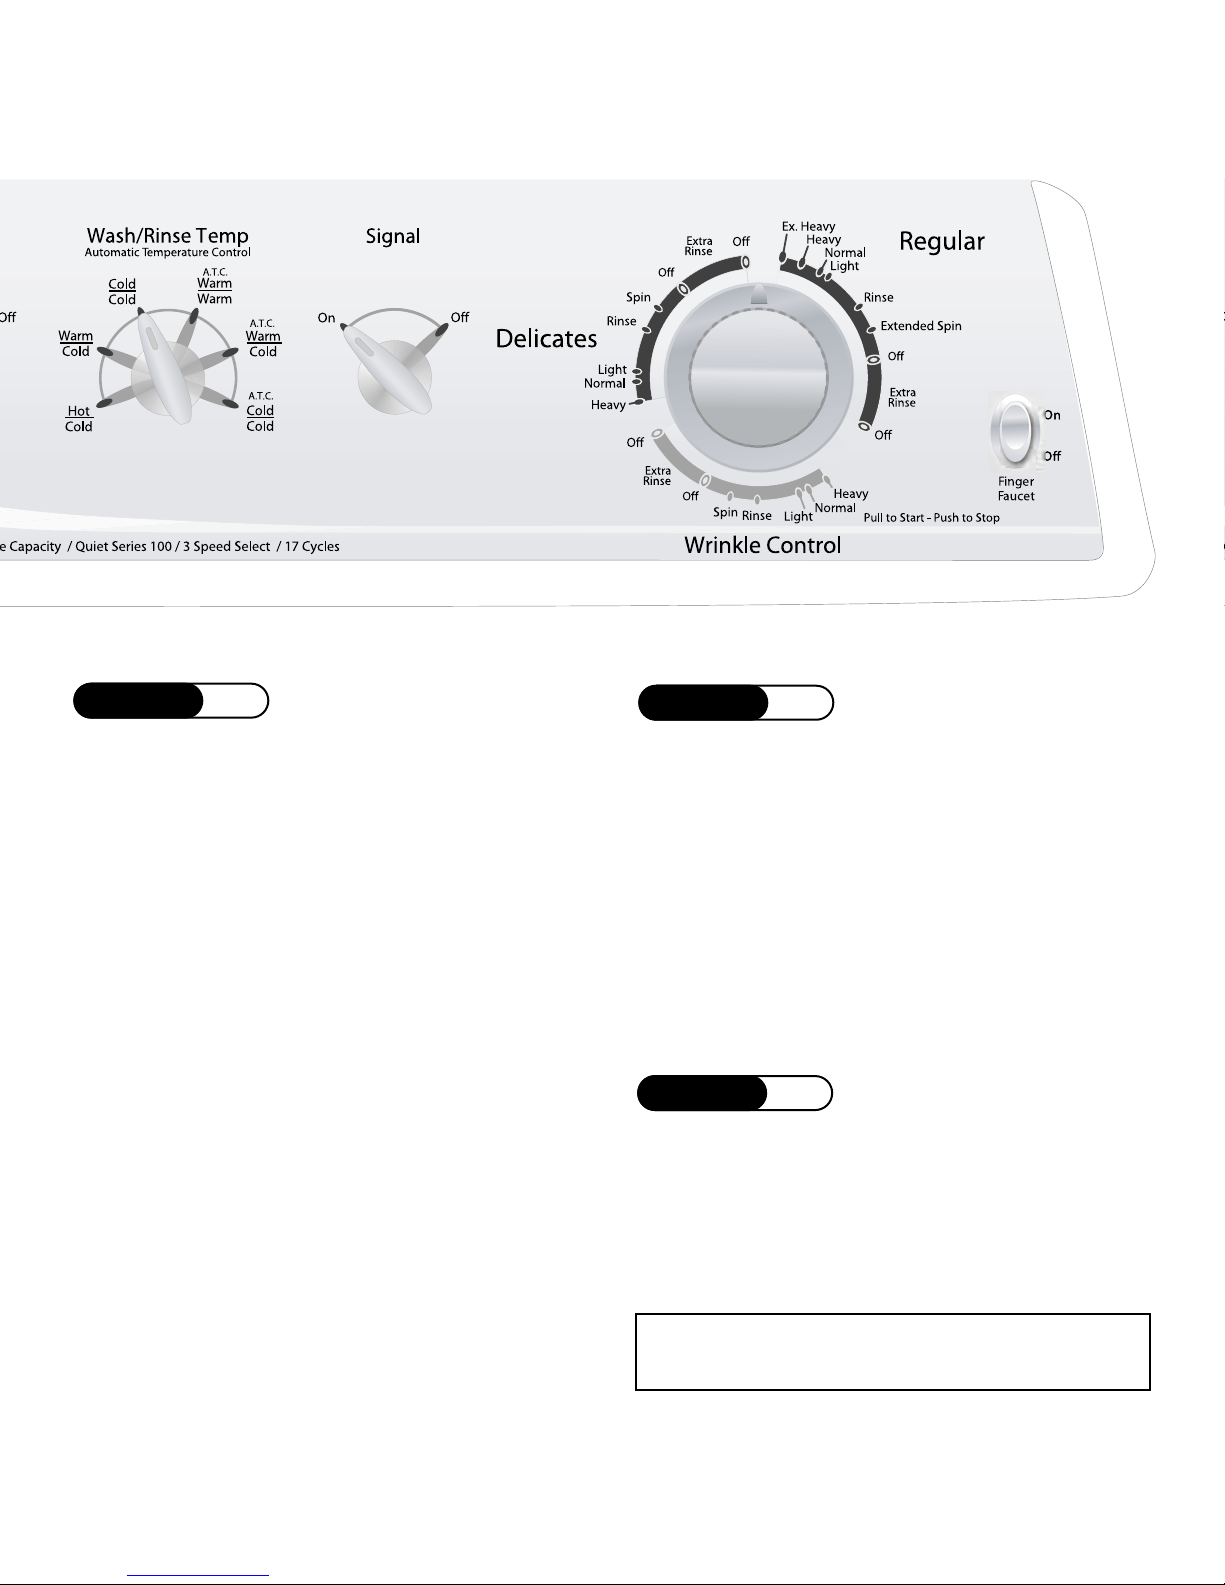
STEP 3
Select Cycle
To select a cycle, push the control dial in (off position)
and turn it to the right (clockwise) until the pointer is at
the soil level needed for the wash load in the Regular,
Wrinkle Control or Delicates cycles.
Regular Cycle
Provides normal agitation and normal spin speeds to
wash cottons and heavily soiled items. For maximum
cleaning, set the dial at Extra Heavy.
Wrinkle Control Cycle
Provides normal agitation and slow spin speed to
protect wrinkle control fabrics.
Delicates Cycle
s slow agitation speed and slow spin speed for
rovide
P
delicates and knits.
STEP 4
Select Options (if desired)
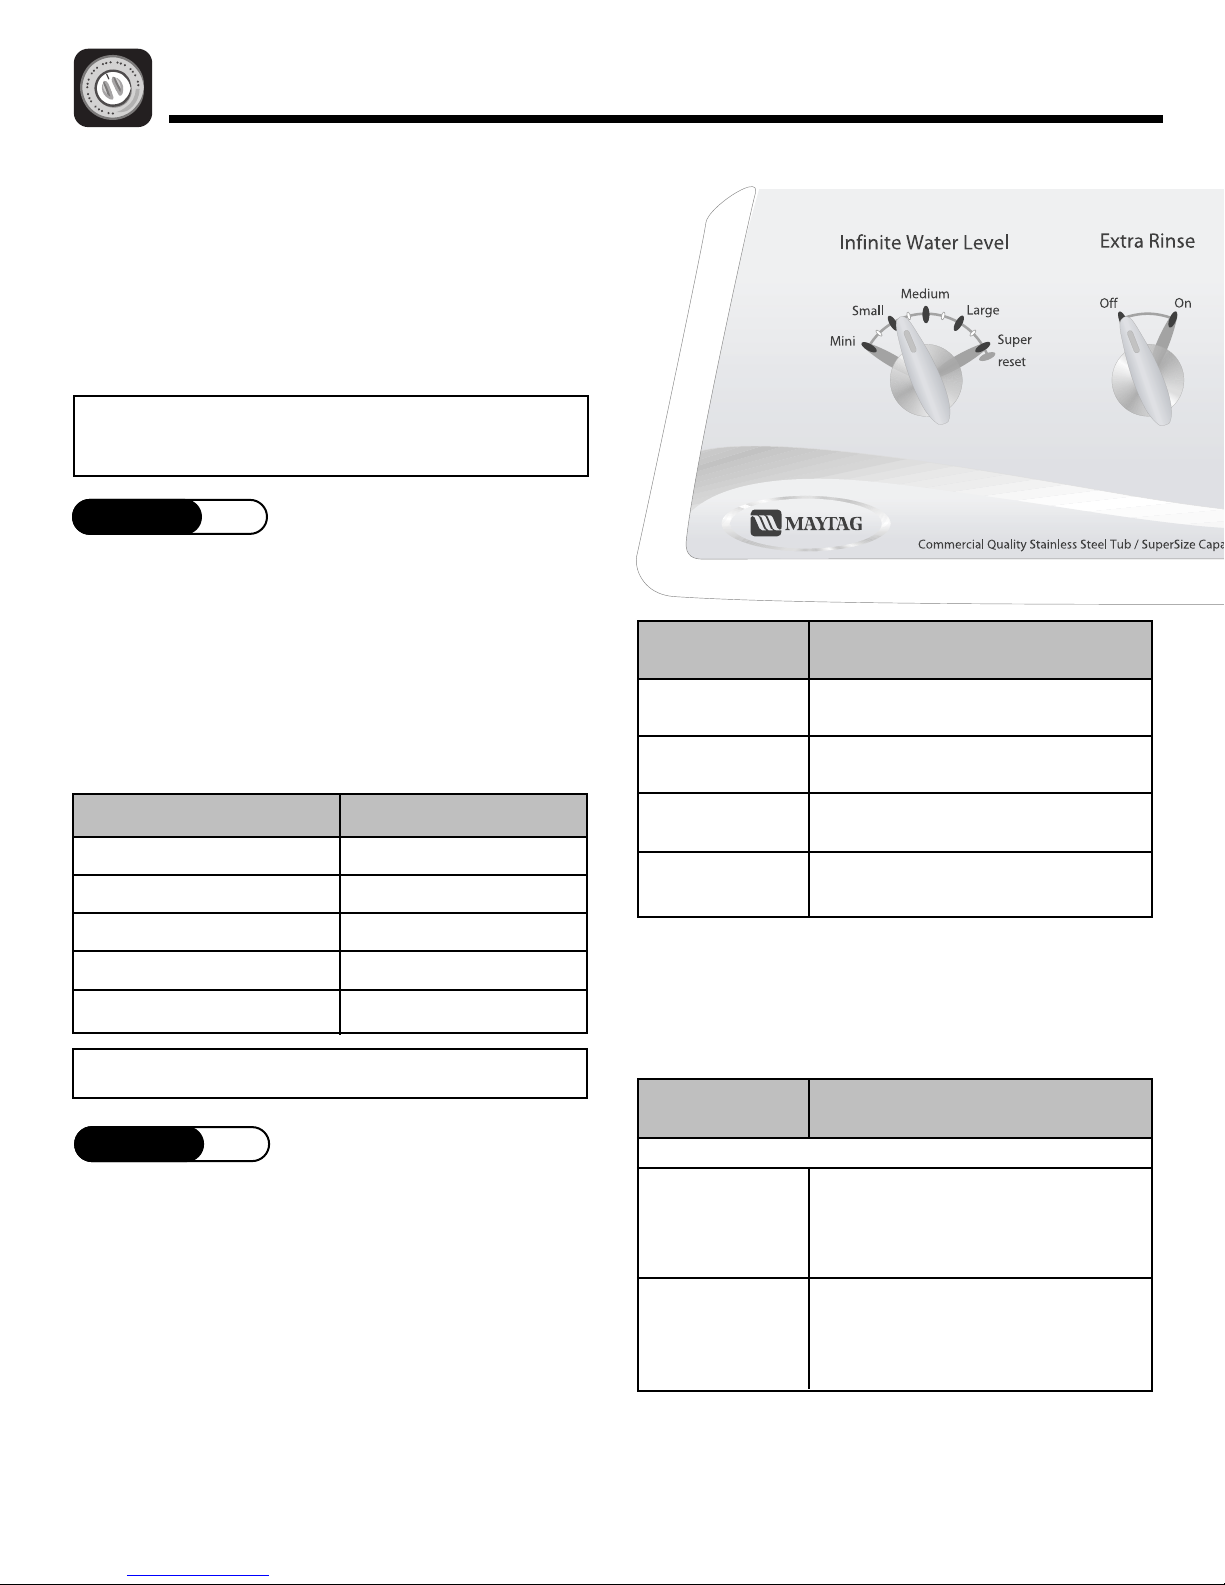
Extra Rinse
When the switch is in the On position, an additional
rinse at the end of the Regular, Wrinkle Control and
Delicates cycles is provided to more completely
remove laundry additives, suds, perfumes, etc.
End of Cycle Signal (select models)
he End of Cycle Signal will sound once the c
T
completed. The End of Cycle Signal can be canceled by
setting the switch to
Off.
ycle is
STEP 5
Pull Control Dial Out to Start
ou may stop the washer at any time by simply
Y
pushing the control dial in. Therefore, it is possible to
obtain a non-agitated soak or to shorten, skip or
repeat any par
pushed
in (off position) when you change the setting.
t of a c
ycle. The control dial must be
Note: Do not attempt to turn the control dial
counterclockwise. Damage to the timer will result.
6
Page 8
Using the Controls – 4 Speed Select Models
STEP 1
Select Water Level
Determine the selected setting based on clothes load
size. Selection should provide sufficient water to permit
clothes to circulate freely during agitation. On select
models, the Infinite Water Level control allows you to
select a specific setting or anywhere in between.
It may become necessary, due to bulky fabrics, to
adjust the water level after agitation begins. To adjust
the water level, turn the control to
to the desired setting.
WATER LEVEL SETTING LOAD SIZE
Mini
Small 1/4 - 1/3
Medium 1/3 – 1/2
Large 1/2 – 2/3
Super 3/4 – Full
Note: Items must circulate freely for best results.
STEP 2
Select Wash/Rinse Temperature
reset and then back
4 Full
1/
WASH/RINSE LOAD TYPE
MPS
TE
These settings feature Automatic
Temperature Control:
ATC Hot/Cold,
ATC Warm/Cold
ATC Warm/Warm
ATC Cold/Cold
Saves energy by adding cold water
to the hot water from your water
heater. Provides optimum cleaning
at lower temperatures.
May add hot water to the incoming
cold water as the washer fills. This
assures that the water will be warm
enough to properly activate detergent.
Your washer gives you a choice of hot, warm or cold
water for washing and cold or warm water (select
models) for rinsing.
RINSE LOAD TYPE
/
H
AS
W
TEMPS
Hot/Cold
Warm/Warm Moderately soiled, colored items.
(select models)
Warm/Cold
Cold/Cold
Automatic Temperature Control (A.T.C.) (select
models) provides the optimal wash water temperature
for cleaning. T
wash water temperatures by mixing hot and cold water
to reach the proper water temperature.
White and heavily soiled, color-fast
items.
Moderately soiled, colored items;
most wrinkle-free items.
Brightly colored, lightly soiled
items; washable woolens.
ave energy
o s
, this washer will regulate
STEP 3
Select Wash/Spin Speed
our washer has select
Y
combinations.
WASH/SPIN LOAD TYPE
PEED
S
Regular
Normal/Fast
Wrinkle Control
Normal/Slow
Delicate
Gentle/Slow
Handw
Ex. Gentle/Slow
ash
Note: In wash water temperatures below 60
detergents
do not dissolve well or clean well.
able wash and spin speed
Sturdy fabrics needing maximum
water extraction like jeans, towels
and bedding
Sturdy fabrics needing a slower spin
speed to reduce wrinkling, such as
s and dress pants
ss shir
dre
Delicate fabrics needing slower spin
speed because of clothing
construction
Intermittent slow agitation and soak
to gently wash the most delic
t
ate
°
items
F,
7
Page 9
STEP 4
STEP 5
Select Cycle
To select a cycle, push the control dial in (off position)
and turn it to the right (clockwise) until the pointer is at
the soil level needed for the wash load.
Important: For optimum fabric care, the appropriate
wash and spin speed for the load type must be
selected using the wash/spin speed knob.
Regular Cycle
ycle provide
This c
Select the
Regular Wash/Spin Speed setting.
s up to 16 minutes of agit
Wrinkle Control
his cycle is designed for sturdy fabrics needing a
T
slower spin speed to reduce wrinkling, such as dress
shirts and dress pants. Select the
ash/Spin Speed
W
setting.
Wrinkle Control
Delicates Cycle
ates is designed for items requiring delicate wash
Delic
action. Select the
setting.
When washing delicate fabrics labeled hand wash,
select the
setting provides intermittent slow agitation and soak
with a slow spin.
Handwash Wash/Spin Speed setting. This
Delicates Wash/Spin Speed
ation.
Select Options (if desired)
Extra Rinse
When the knob is in the On position, an additional
rinse at the end of the Regular
Delicates cycles is provided to more completely
remove laundry additives, suds, perfumes, etc.
, Wrinkle Control and
End of Cycle Signal (select models)
The end of cycle signal will sound once the cycle is
completed. The end of cycle signal can be canceled by
setting the switch to Off.
STEP 6
Pull Control Dial Out to Start
You may stop the washer at any time by simply
pushing the control dial in. Therefore it is possible to
ain a non-agit
obt
repeat any part of a cycle. The control dial must be
pushed
in (off position) when you change the setting.
ated soak or to shor
Note: Do not attempt to turn the control dial
counterclockwise. Damage to the timer will result.
ten, skip or
Soak Only (select models)
Provides 4 minutes of agitation, then soak. Avoid
0 minutes or less.
extended soaking – soak f
The control dial must be manually advanced to a spin
setting to spin and drain the water.
or 3
8
Page 10
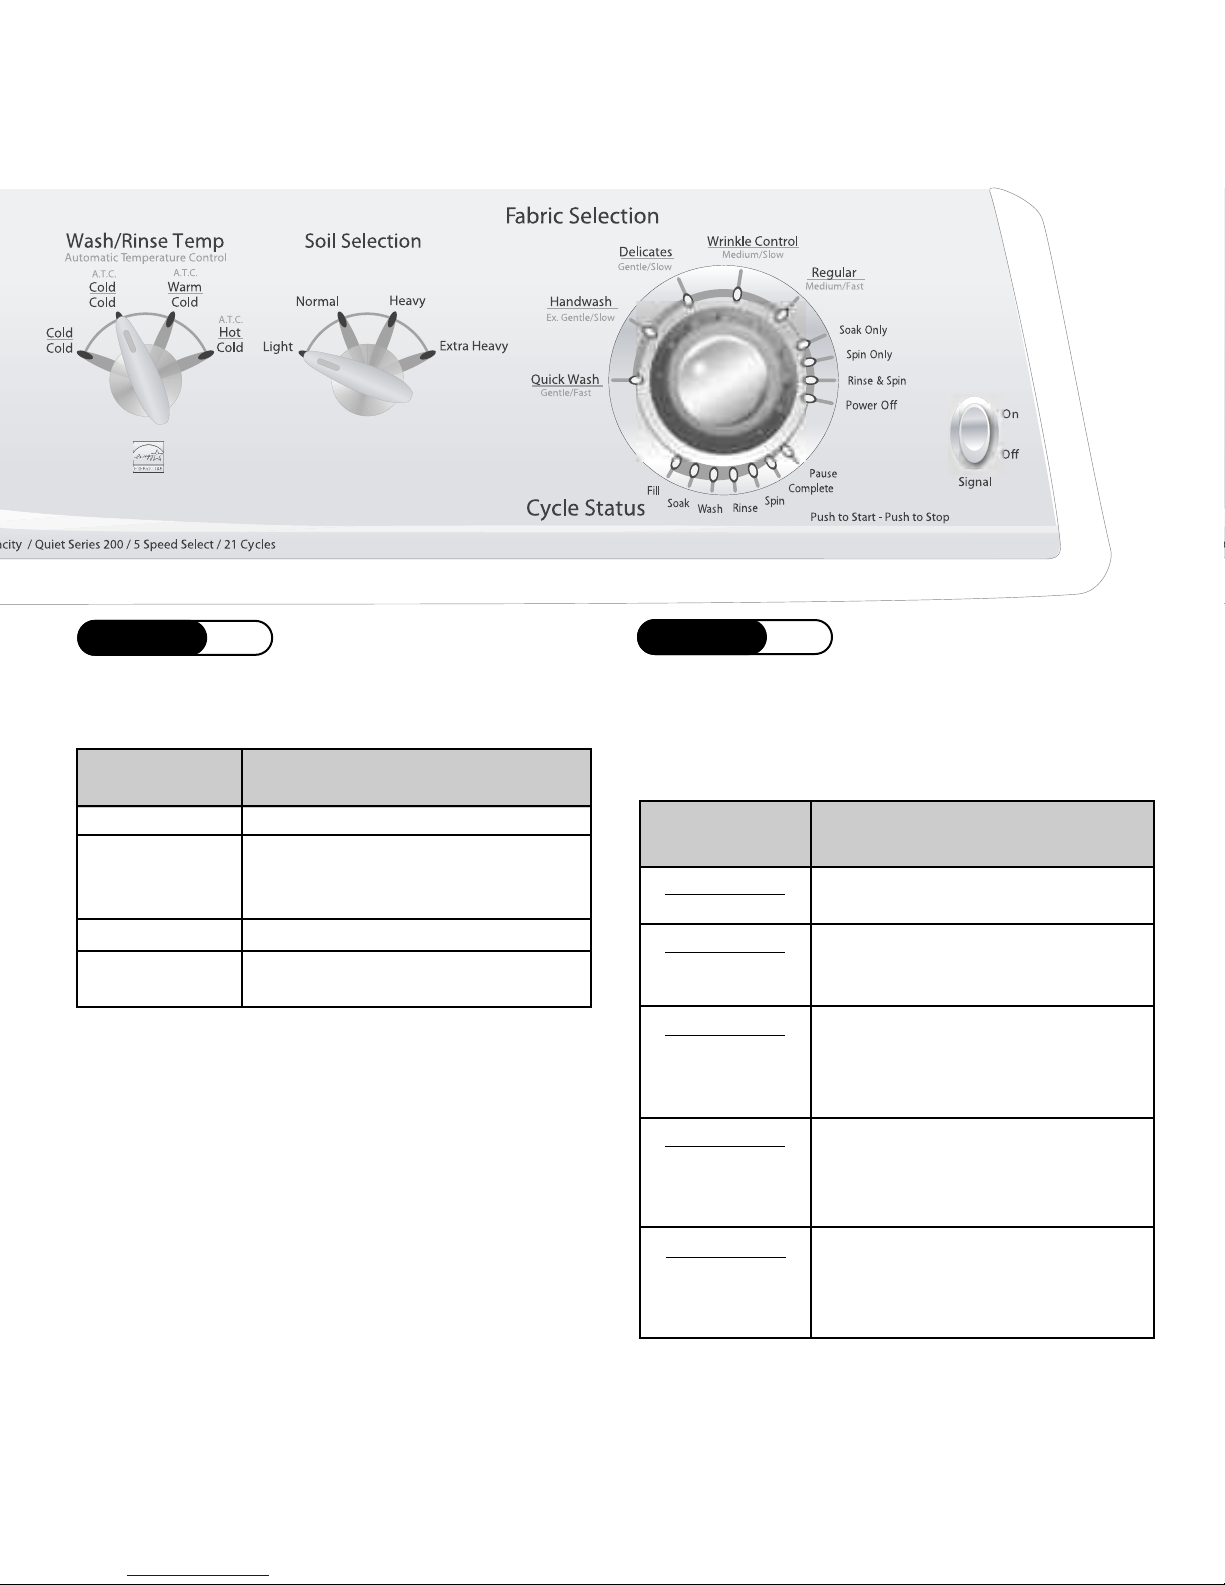
Using the Controls – Electronic Control Models
Getting Started
1. Add detergent and additives to the washer.
2. Load the washer.
3. Close the lid.
4. Select the appropriate cycle and options for the load.
5. Press the
6. The Fill indicator light will illuminate and the washer
will start to fill.
Note: The lid must be completely closed in order
to operate the washer controls.
STEP 1
Select Water Level
Determine the selected setting based on clothes load
size. Selection should provide sufficient water to permit
clothes to circulate freely during agitation.
It may become necessary, due to bulky fabrics, to
adjust the water level after agit
the water level, turn the Infinite Water Level control to
reset and then back to the desired setting.
WATER LEVEL SETTING LOAD SIZE
Cycle Selector dial.
ation begins. T
Mini
Small 1/4 - 1/3
1/4 Full
o adjust
WASH/RINSE LOAD TYPE
TEMPS
Hot/Cold White and heavily soiled, color-fast
(select models) items.
Warm/Warm Moderately soiled, colored items.
(select models)
Warm/Cold Moderately soiled, colored items;
(select models) most wrinkle-free items.
Cold/Cold Brightly colored, lightly soiled
items; washable woolens.
Medium 1/3 – 1/2
Large 1/2 – 2/3
Super 3/4 – Full
Note: Items must circulate freely for best results.
STEP 2
Select Wash/Rinse Temperature
our washer give
Y
water for washing and cold water or warm water
(select models) for rinsing. Use the chart as a guide.
s you a choice of hot, warm or cold
Automatic T
the optimal wash water temperature for cleaning. To
ave energy
s
temperatures by mixing hot and cold water to reach
the proper water temperature.
H/RINSE LOAD TYPE
AS
W
TEMPS
These settings feature Automatic Temperature Control:
ATC Hot/Cold,
ATC Warm/Cold
A
TC Warm/Warm
(select models) at lower temperatures.
ATC Cold/Cold
emperature Control (A.T.C.)
, this washer will regulate wash water
Saves energy by adding cold water
to the hot water from your water
heater. Provides optimum cleaning
May add hot water to the incoming
cold water as the washer fills. This
assures that the water will be warm
enough to properly activate detergent.
provide
s
9
Page 11
C
ontrol features vary by model.
STEP 3
Soil Selection
Your washer has select
SOIL LOAD TYPE
SELECTION
Light Use for cleaning lightly soiled loads.
Normal Use for cleaning moderately soiled
Heavy Use for cleaning heavily soiled loads.
Extra Heavy Use for cleaning stained, heavily
able soil level settings.
loads. T
for most loads.
soiled sturdy loads.
his setting will be appropriate
STEP 4
Fabric Selection
Select the appropriate fabric cycle for the type of load
by turning the cycle selector dial until the indicator
light by the desired fabric selection is illuminated.
WASH/SPIN FABRIC SELECTION
SPEED
Quick Wash For lightly soiled or wrinkled
Gentle/Fast garments needed quickly.
Hand Wash Provides intermittent agitation and
Ex. Gentle/Slow soak. For wool, silk, and other
hand-wash-only fabrics.
Delicates For sheer fabrics, bras and lingerie
Gentle/Slow needing slower agit
speeds bec
construction.
rinkle Contr
W
Medium/Slow fabrics and lightly to normally soiled
Regular For most sturdy fabrics including
Medium/Fast cottons, linens and normally soiled
ol
or “wash and wear” and synthetic
F
garments needing a slower spin
speed to reduce wrinkling.
garment
extraction.
ause
s needing maximum water
ation and spin
of clothing
10
Page 12
Using the Controls – Electronic Control Models
STEP 5
Soak Only (select models)
Provides approximately 33 minutes of alternating
periods of soaking with brief agitation at slow speed.
At the end of the cycle, the Cycle Selector dial must be
manually set to a wash cycle or spin cycle to drain the
washer. Avoid extended soaking.
Spin Only
Provides a spin to remove more water from the load.
Rinse and Spin
Use for loads that need rinsing only or to add rinseadded fabric softener to a load.
Power Off
To cancel the cycle and turn off the washer, turn the
Cycle Selector dial to
Power Off and push the dial in.
STEP 6
Select Options
Extra Rinse
When the knob is in the On position, an
additional rinse at the end of all cycles
is provided to more completely remove
laundry additives, suds, perfumes, etc.
End of Cycle Signal
The end of cycle signal will sound once the
cycle is completed. On select models, the
end of cycle signal can be canceled by
setting the switch to Off.
STEP 7
Start the Washer
To start the washer, press the cycle selector dial.
Changing a Cycle
If an incorrect cy
selected:
cle has been accidentally
1. Press the cycle selector dial.
2. Turn the
3. Set the desired options for the cycle.
4. Press the cycle selector dial. The Wash indicator
lights stop flashing and the new cycle starts.
cycle selector dial to the desired cycle.
Canceling a Cycle
To cancel a cycle:
ss the
re
P
1.
2. Turn the cycle selector dial to
the dial in.
To drain the washer:
1. Select the Rinse and Spin or Spin Only cycle.
2. Press the
illuminates and the washer starts the rinse or spin.
cle selector
cy
cycle selector dial. The Spin light
.
dial
Power Off and push
11
Page 13
Special Features
Liquid Bleach Dispenser
The dispenser automatically dilutes liquid chlorine
bleach before it reaches your wash load.
To use, follow these steps:
1. Measure liquid chlorine bleach carefully, following
the instructions on the bottle.
2.
Pour liquid chlorine bleach into bleach
dispenser before adding the load. Avoid splashing
or over-filling the dispenser.
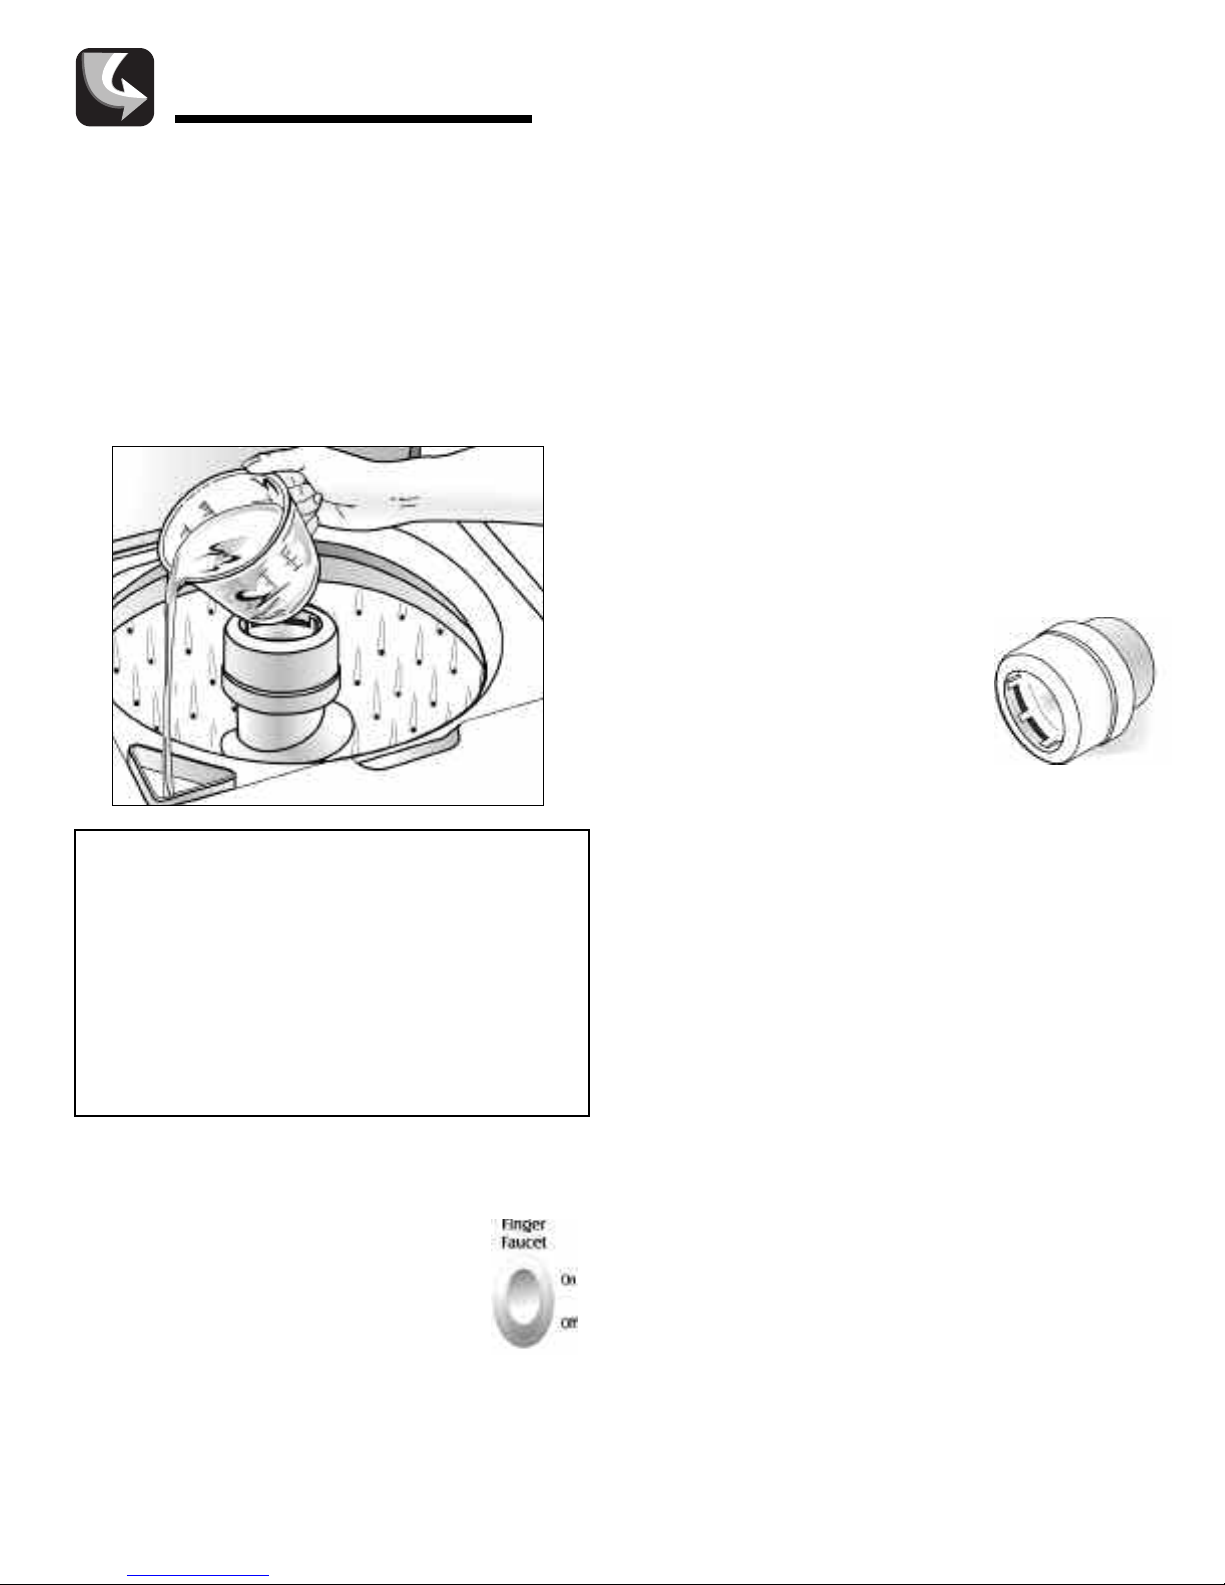
Fabric Softener Dispenser
The dispenser automatically releases liquid fabric
softener at the proper time during the cycle.
To use, follow these steps:
1. Pour a measured amount of fabric softener into
the dispenser to fill line only.
2. If fabric softener comes below line, add warm
water.
If it is necessary to clean the dispenser:
1. Pull the dispenser off of the top of the agitator.
2. Soak for one hour in sink or container in hot water
and dishwashing liquid.
3. Hold hands over top and bottom of dispenser and
shake to loosen buildup.
4. Rinse with clean, hot water.
5. Repeat process if necessary.
6. Replace dispenser on agitator.
Do not use dishwashing liquid
inside the washer. Oversudsing
can occur.
Notes:
• Never pour undiluted liquid chlorine bleach
directly onto the load or into the wash tub. It is a
powerful chemical and can cause fabric damage,
such as tearing or color loss, if not used properly
• If you prefer to use color-safe, non-chlorine
bleach, pour it into the wash tub with your
detergent.
the bleach dispenser.
Do not pour non-chlorine bleaches into
Finger Faucet (select models)
Provides a flow of water when holding the
switch in the
On position.
Automatic Lint Filtering System
The Lint Filtering System does not require
cleaning.
.
Wash and rinse water is filtered and re-filtered
continuously to trap lint shed by most fabrics during
the agitation cycle before it can be redeposited on the
wash load. The engineered hole design on the wash
basket in conjunction with water flow produced by the
agitator, traps lint away from the clothes between the
inner wash basket and the outer tub. Lint is
automatically flushed from the washer during the spin
cycle.
Safety Spin
If for any reason you open the washer lid when the
washer is in a spin or extract period, the operation will
immediately stop. This is for your personal safety. If
your washer doe
immediately
automatically resume.
s not stop, c
hen the lid is closed, the operation will
. W
all your service technician
12
Page 14

Special Features
Unbalanced Spin Load
Compensator
Your new washer is designed to handle out-of-balance
loads without shutting down or interrupting the
washing cycle.
For this reason, the cycle will always be completed. If
heavier fabrics in such out-of-balance loads should
ever contain excessive moisture at the completion of
the cycle, redistribute the clothes in the washer and
reset the control dial for the final spin period.
Care & Cleaning
1. After washing, leave the lid open until the interior
is dry.
Check hoses to be sure there are no kinks or knots.
2.
3. Your washer should not be installed where
temperatures will go below freezing, as damage to
the washer could re
4. To clean, occasionally wipe exterior with a clean
damp sponge or cloth.
plastic par
5. Lifetime lubrication is done at the factory, so your
washer never needs to be oiled or greased.
6.
Do not lay heavy or sharp objects on top of your
washer.
7. The top of the washer should not be used for
removing stains from garments. Some stain
removers, such as rust remover, will mar the finish.
ts.
sult.
Do not use polish on
Overload Protector
A built-in protector automatically shuts off the washer
motor in case of an overload. This can occur if:
• The load being washed is too heavy.
• Too many appliances are plugged into the line
operating your washer.
• A low voltage condition exists on the line.
• Lid is opened and closed repeatedly.
The overload protector permits the washer to start again
when the motor has cooled to a safe operating temperature.
If the motor stops repeatedly, call your service technician.
Cleaning the Interior
Clean the interior of the washer periodically to remove
any dir
that may remain in the washer as a result of washing
clothes. We recommend taking the following steps
every 60 to 120 days to clean and freshen your washer
interior. The frequenc
be cleaned and freshened depends on factors such as
usage, the amount of dirt, soil or bacteria being run
through your washer
to follow these instructions may result in unsatisfactory
conditions, including unpleasant odor and/or
permanent st
To clean and freshen the washer interior:
1. Add a measured amount of chlorine bleach to the
2. Add 1/4 cup of detergent to the tub.
t, soil, odor
bleach dispenser
, mold, mildew or bacteria residue
y with which the washer should
, or the use of cold water
ains on the washer or washload.
, following package directions.
. Failure
Remove pins, buckles or other sharp objects from
8.
clothes to prevent scratching interior parts.
s should not be stored in washer
Clothe
9.
10. Bleach, detergent, solvents, etc. spilled on the top
of your washer that are allowed to remain will
remove the glossy finish. Remove all spills with a
damp, soft cloth.
11. If you close your home for the winter, have a service
technician drain the washer
electric
13
al outlet and disconnect hose
. Unplug cord from
.
s from faucet
Run the washer without a load through a complete
3.
cycle using hot water.
4. Repeat the process if necessary.
s.
Page 15
Troubleshooting
Won’t Fill
Won’t Agitate
Won’t Spin
or Drain
Load is Wet
Stops
• Plug cord into live electrical outlet.
• Check fuse or reset circuit breaker.
• Turn the control dial to proper cycle and restart the washer.
• Turn both faucets on fully.
• Straighten inlet hoses.
• Disconnect hoses and clean screens. Hose filter screens may be plugged.
• Check fuse or reset circuit breaker.
• Make sure the lid is completely closed.
• Turn the control dial to proper cycle and restart the washer.
• Pauses are normal. Wait and see if the washer will start again.
• Check fuse or reset circuit breaker.
• Straighten drain hoses. Eliminate kinked hoses. If there is a home drain restriction, call for
drain service.
• Close lid and restart the washer. For your safety, washer will not spin unless the lid is closed.
• Suds lock – caused by too much suds. Rewash without detergent. Use correct amount of a
low-sudsing detergent.
• Unevenly distributed load. Redistribute the load, close the lid and restart the washer. Check for
leveling. Be sure water level is acceptable for load size.
• A normal spin speed is recommended for heavy loads like jeans or towels.
• Plug cord into live electrical outlet.
• Check fuse or reset circuit breaker.
• Close lid and restart the washer. For your safety, washer will not agitate or spin unless lid is closed.
• This may be a pause in the cycle. Wait briefly and it may start.
Leaks Water
Is Noisy
Fills with
the Wrong
Temperature
Water
e Selector
cl
Cy
Advances Through
Off
• Make sure hose connections are tight.
• Make sure end of drain hose is correctly inserted and secured to drain facility.
• Avoid extended soaking – soak for 30 minutes or less.
• Avoid overloading.
• Be sure washer is leveled properly as outlined in installation manual.
• Weak floors can cause vibration and walking.
• Operating sounds will vary depending on agitation speed.
on fully
urn both faucet
T
•
If equipped with a temperature selector dial, be sure it is set directly on a temperature setting and
•
not between settings.
• Make sure temperature selection is correct.
• While the washer is filling, you may notice just hot and/or just cold water entering the tub when
cold or warm wash temperatures are selected. This is a normal function of the Automatic
emperature Control (select models) feature as the washer determine
T
the water.
• If Auto Temperature Control (select models) is selected, cold water may feel warmer than cold
water from the tap.
• Make sure hoses are connected to correct faucets and inlet connections. Be sure water supply is
regulated correctly. Flush water line before filling washer
Check the water heater
•
Also check water heater capacity and recovery rate.
• Disconnect hoses and clean screens. Hose filter screens may be plugged.
•
Extra Rinse (select models) is selected.
s
.
s the temperature of
.
. It should be set to deliver a minimum 120° F (49° C) hot water at the tap.
or further assistance, call Maytag Customer A
F
U.S. customers using TTY for deaf, hearing impaired or speech impaired, call 1-800-688-2080.
ssistance toll-free at
1-800-688-9900 USA or 1-800-688-2002 Canada.
14
Page 16

Warranty & Service
Warranty
Limited One Year Warranty Parts and Labor
For one (1) year from the original retail
purchase date, any part which fails in
normal home use will be repaired or
replaced free of charge.
Canadian Residents
The above warranties only cover an
appliance installed in Canada that has
been certified or listed by appropriate test
agencies for a compliance to a National
Standard of Canada unless the appliance
was brought into Canada due to transfer
of residence from the United States to
Canada.
The specific warranties expressed above are
the ONLY warranties provided by the
manufacturer. These warranties give you
specific legal rights, and you may also have
other rights which vary from state to state.
CUSTOMER’S SOLE AND EXCLUSIVE
REMEDY UNDER THIS LIMITED
WARRANTY SHALL BE PRODUCT REPAIR
AS PROVIDED HEREIN. IMPLIED
WARRANTIES, INCLUDING WARRANTIES
OF MERCHANTABILITY OR FITNESS FOR
A PARTICULAR PURPOSE, ARE LIMITED
TO ONE YEAR OR THE SHORTEST
PERIOD ALLOWED BY LAW. MAYTAG
CORPORATION SHALL NOT BE LIABLE
FOR INCIDENTAL OR CONSEQUENTIAL
DAMAGES. SOME STATES AND
PROVINCES DO NOT ALLOW THE
N OR LIMITATION OF
O
I
S
LU
XC
E
INCIDENTAL OR CONSEQUENTIAL
AGES, OR LIMITATIONS ON THE
M
A
D
N OF IMPLIED WARRANTIES OF
O
TI
A
R
U
D
MERCHANTABILITY OR FITNESS, SO
SE EXCLUSIONS OR LIMITATIONS
E
TH
T APPLY TO YOU. THIS
O
Y N
A
M
Y GIVES YOU SPECIFIC LEGAL
NT
A
R
R
A
W
RIGHTS AND YOU MAY ALSO HAVE
R RIGHTS, WHICH VARY STATE TO
E
TH
O
OVINCE TO PROVINCE.
R
R P
TE O
A
ST
What is Not Covered By These Warranties
1. Conditions and damages resulting from any of the following:
. Improper installation, delivery, or maintenance.
a
b. Any repair, modification, alteration, or adjustment not authorized by the
manufacturer or an authorized servicer.
c. Misuse, abuse, accidents, unreasonable use, or acts of God.
d. Incorrect electric current, voltage, electrical and/or gas supply.
e. Improper setting of any control.
2. Warranties are void if the original serial numbers have been removed, altered,
or cannot be readily determined.
3. Light bulbs, water filters and air filters.
4. Products purchased for commercial or industrial use.
5. The cost of service or service call to:
a. Correct installation errors. For products requiring ventilation, rigid metal
ducting must be used.
b. Instruct the user on the proper use of the product.
c. Transport the appliance to and from the servicer.
6. Any food loss due to refrigerator or freezer product failures.
7. Expenses for travel and transportation for product service in remote locations.
8. Outside of the United States and Canada this warranty does not apply.
Contact your dealer to determine if another warranty applies.
9. Consequential or incidental damages sustained by any person as a result of
any breach of these warranties. Some states do not allow the exclusion or
limitation of consequential or incidental damages, so the above exclusion may
not apply.
If You Need Service
First see the Troubleshooting section in your Use and Care Guide or call the
dealer from whom your appliance was purchased or call Maytag Services, LLC,
Customer Assistance at 1-800-688-9900 USA and 1-800-688-2002 Canada to
locate an authorized servicer.
• Be sure to retain proof of purchase to verify warranty status. Refer to WARRANTY
for further information on owner’s responsibilities for warranty service.
If the dealer or service company c
•
Services, LLC, Attn: CAIR
1-800-688-9900 USA and 1-800-688-2002 Canada. U.S. customers using
TTY for deaf, hearing impaired or speech impaired, call 1-800-688-2080.
User’s guides, service manuals and parts information are available from Maytag
•
Services, LLC, Customer Assistance.
®
annot resolve the problem, write to Maytag
Center, P.O. Box 2370, Cleveland, TN 37320-2370, or call
Notes: When writing or calling about a service problem, please include:
a. Your name, address and telephone number;
b. Model number and serial number;
c. Name and address of your dealer or servicer;
d. A clear description of the problem you are having;
e. Proof of purchase (sales receipt).
15
Page 17

MAV-1
Guide d’utilisation et d’entretien
Table des matières
Importantes consignes
de sécurité . . . . . . . . . . . . . 17-18
Fonctionnement . . . . . . . . 19-20
Utilisation des commandes
Modèles à trois vitesses . . . . 21-22
Modèles à quatr
Modèles électroniques . . . . . 26-28
e vitesses
. . . 23-25
Caractéristiques
spéciales . . . . . . . . . . . . . . 29-30
Nettoyage et entretien . . . . . 30
Recherche des pannes . . 31-32
Garantie et service
après-vente . . . . . . . . . . . . . . . 33
Guía de uso y cuidado . . . . . 34
Page 18

S
pecial Features
Importantes consignes de sécurité
C
ycles, options, lights
S
pecial Features
Installateur : Veuillez laisser le présent guide avec
’appareil.
l
Client : Veuillez lire le présent guide et le conserver pour
éférence future. Conservez aussi les reçus de caisse et
r
les chèques oblitérés à titre de preuve d’achat.
Numéro de modèle ________________________________
Numéro de série___________________________________
Date d’achat ______________________________________
Pour toute question, contacter :
Service à la clientèle de Maytag
1-800-688-2002 Canada
(lundi au Vendredi, 8 h à 20 h, heure de l’est)
Site Internet: http://www.maytag.com
En raison de nos efforts constants d’amélioration de la
qualité de nos appareils électro-ménagers, il se peut
qu’une laveuse soit modifiée sans que le guide soit révisé.
Pour le service après-vente, voir page 33.
Ce qu’il faut savoir à propos
des consignes de sécurité
Les consignes de sécurité et les mises en garde présentées
dans ce guide ne couvrent pas toutes les situations
possibles. Faire preuve de jugement, de prudence et
d’attention lors de l’installation, de l’entretien et de
l’utilisation de l’appareil.
Lorsque survient un problème ou une situation inhabituelle,
toujours communiquer avec le fabric
Reconnaissez les étiquettes, phrases
ou symboles sur la securite
AVERTISSEMENT
AVERTISSEMENT – Risques ou pratiques non sûres, qui
URRAIENT
O
P
la mort.
résulter en de grave
ATTENTION
ATTENTION – Risques ou pratiques non sûres qui
OURRAIENT
P
résulter en ble
ant.
ssures ou même
s ble
ssures mineures.
AVERTISSEMENT ! RISQUE D’INCENDIE
Ne pas ajouter d’essence, de solvants de nettoyage à sec
ou toute autre substance inflammable ou explosive à
l’eau de lavage. Ces substances produisent des vapeurs
ui pourraient s’enflammer ou exploser.
q
Ne pas laver d’articles qui ont auparavant été nettoyés,
lavés, trempés ou détachés à l’aide d’essence, de solvants
de nettoyage à sec, d’huiles, de cires, de solvants
chimiques, d’alcool, de térébenthine ou d’autres produits
explosifs ou inflammables. Ces substances resteront
incrustées dans les articles, et ceux-ci produisent des
vapeurs qui peuvent s’enflammer ou exploser.
Suivre ces précautions lors de l’utilisation de produits
nettoyants liquides, de détachants, etc. Ces produits
doivent porter la mention ininflammable. Utiliser
conformément aux directive
endroit bien aéré ou à l’extérieur. Rincer à fond les
articles à la main avant de les mettre dans la laveuse.
Certains produits - ceux qui enlèvent la rouille par
exemple - peuvent endommager les pièces et la finition
de la laveuse.
Éviter toute accumulation de matériaux combustibles, tels
que la charpie, le papier, les chiffons, l’essence et autres
vapeurs et liquides inflammables, sous la laveuse et
autour de celle-ci.
L’HYDROGÈNE EST UN GAZ EXPLOSIF ! Dans
certaines conditions, il peut y avoir production
d’hydrogène dans un système de chauffage d’eau qui
n’est pas utilisé pendant 2 semaines ou davantage. Si le
système de chauffage d’eau n’a pas été utilisé pendant
une telle durée, ouvrir tous les robinets d’eau chaude et
laisser couler l’
d’utiliser la laveuse. Ceci élimine toute accumulation
d’hydrogène. Ce gaz étant inflammable, ne pas fumer ni
utiliser de flamme vive pendant cette procédure.
Des études récentes ont démontré que si les substances
aminées d’huile végétale ne sont pas complètement
cont
nettoyées, une accumulation d’huile peut provoquer une
réaction chimique (combustion spontanée) qui pourrait
causer un incendie. Cela risque davantage de survenir
lorsque les vêtements sont laissés dans la sécheuse
après que le tambour ait cessé de tourner ou que les
articles sont pliés et empilés avant que la chaleur ne se
soit dissipée.
eau pendant plusieurs minutes avant
s du fabricant dans un
17
Page 19

S
pecial Features
Importantes consignes de sécurité
C
ycles, options, lights
S
pecial Features
AVERTISSEMENT
Pour réduire les risques d’incendie, d’explosion,
d’électrocution ou de blessures lors de l’utilisation de cet
ppareil, suivre les précautions d’usage, dont les suivantes :
a
1. Lire toutes les instructions avant d’utiliser la laveuse.
2. Comme avec tout équipement fonctionnant à l’électricité
et comportant des pièces mobiles, il existe toujours des
possibilités de danger. Pour utiliser cette machine dans
les meilleures conditions de sécurité, l’opérateur doit se
familiariser avec les instructions de fonctionnement de
l’appareil et user de prudence pendant son utilisation.
Ne pas installer ni remiser la laveuse dans un endroit
3.
où elle e
4. Installer la laveuse et la mettre de niveau sur un
plancher pouvant supporter son poids.
5. Cet appareil doit être correctement mis à la terre. Ne
jamais brancher le câble électrique d’une laveuse sur
une prise murale non mise à la terre conformément aux
codes locaux et nationaux. Voir les instructions
d’installation pour la mise à la terre de cette machine.
6. Pour éviter les risques d’incendie ou d’explosion :
a.
b.
c. Dans certaines conditions, il peut y avoir production
st exposée aux intempéries.
Ne pas laver d’articles qui ont auparavant été
nettoyés ou lavés à l’aide d’essence, de solvants de
nettoyage à sec ou d’autres produits explosifs ou
inflammables, ou qui en sont imbibés ou éclaboussés,
car ces substances produisent des vapeurs qui
peuvent s’enflammer ou exploser. Laver à la main et
sécher à l’air tout article contenant ces substances.
Tout tissu sur lequel des solvants de nettoyage ont
été utilisés ou qui est s
inflammables ne doit pas être mis dans la laveuse
avant que toute trace et toute vapeur de ces liquides
ou solides ne soient complètement éliminées.
Ces produits comprennent l’acétone, l’alcool
dénaturé, l’essence, le kérosène, certains produits de
nettoyage ménagers, les détachants, la térébenthine,
s décapants de cire.
s et le
les cire
Ne pas ajouter d’essence, de solvants de nettoyage à
sec ou toute autre subst
explosive à l’eau de lavage. Ces substances produisent
des vapeurs qui pourraient s’enflammer ou exploser.
d’hydrogène dans un système de chauffage d’eau qui
n’est pas utilisé pendant 2 semaines ou plus.
L’HYDROGÈNE EST UN GAZ EXPLOSIF. Si le système
de chauffage d’eau n’est pas utilisé sur une telle
durée, ouvrir tous les robinets d’eau chaude et laisser
couler l’eau pendant plusieurs minutes avant d’utiliser
la laveuse ou la ensemble laveuse-sécheuse. Ceci
élimine toute accumulation d’hydrogène. Ce gaz étant
inflammable,
pendant cette procédure.
ne pas fumer ni utiliser de flamme vive
aturé de liquides ou solides
ance inflammable ou
CONSERVER CES INSTRUCTIONS
d. Ne pas laver ou sécher d’articles tachés d’huile
égétale ou de cuisson. Ces articles pourraient être
v
encore imprégnés d’huile après la lessive. Pour cette
raison, le tissu pourrait émettre des fumées ou
prendre feu de lui-même.
7. Ne pas mettre la main ou le bras dans la laveuse si
l’agitateur ou cuve est en mouvement.
Ne pas permettre aux enfants ou aux animaux familiers
8.
de jouer sur l’appareil, à l’intérieur ou en face de celuici. Une supervision étroite est nécessaire lorsque
l’appareil est utilisé à proximité d’enfants ou d’animaux
familiers.
Ne pas modifier les mécanismes de commande.
9.
10. Ne pas réparer ou remplacer une pièce de la laveuse
ou procéder à un dépannage, sauf si les instructions
publiées le recommandent et que la personne effectuant
la réparation les comprend et possède les
connaissances voulues pour les exécuter.
11. Débrancher le cordon d’alimentation électrique avant
d’essayer de réparer la laveuse. Les réparations ne
doivent être effectuées que par du personnel qualifié.
12. L’agitateur ne doit pas être retiré. S’il est retiré, le
replacer en l’enfonçant à fond, puis serrer la vis de
blocage avant de faire fonctionner la laveuse.
13. Conserver tous les produits de lessive, les détergents,
les produits de blanchiment, etc., hors de portée des
enfants, et de préférence dans une armoire fermée à
clé. N’utiliser ces produits que selon les directives du
fabricant. Observer tous les avertissements paraissant
sur les étiquettes des différents produits.
14. S’assurer que toute la zone autour de la laveuse et en
dessous, soit dégagée de toute accumulation de
matériaux combustibles comme charpie, papier, chiffons,
ssence et tout autre liquide ou vapeur inflammable.
e
Ne pas mélanger de javellisant et d’ammoniaque ou
15.
s (tels que du vinaigre ou du produit pour enlever
acide
d’
la rouille) pour une même charge de linge. Des vapeurs
nocives peuvent se former.
s en fibre de verre à la laveuse. De
ticle
16. Ne pas laver d’
petites particules peuvent se coller sur le linge lavé par
la suite et provoquer des irritations cutanées.
17. Apprêts résistants aux flammes – suivre attentivement
les instructions du fabricant du vêtement. Un vêtement
incorrectement lavé ou séché pourrait perdre son apprêt
ignifuge.
Avant de mettre la laveuse hors service ou au rebut,
18.
retirer la porte du compartiment de lavage.
Les tuyaux d’alimentation se détériorent progressivement.
19.
Inspecter les tuyaux à intervalle régulier; rechercher
dilatations, écrasements, coupures, fuites et indices
d’usure. Remplacer les tuyaux après 5 ans de service.
ar
18
Page 20

C
ycles, options, lights
W
hat can & cannot be
w
ashed
o
perating tips
S
pecial Features
Fonctionnement
Détergent
• Utiliser du détergent liquide ou en poudre. Pour des
ésultats optimums, ajouter suffisamment de
r
détergent dans la laveuse AVANT de la remplir et
régler la température de l’eau à plus de 16 °C (60 °F).
• Utiliser la quantité de détergent qui convient à la charge,
au degré de saleté et à la dureté de l’eau. Utiliser plus de
détergent si l’eau est dure et que la charge est très sale.
Si l’eau est douce ou que la charge est peu sale, utiliser
moins de détergent. (Voir les instructions du fabricant.)
• Essuyer la laveuse si elle se trouve éclaboussée de
détergent.
Chargement
• Pour des résultats optimums, mettre du détergent dans la
cuve avant d’ajouter le linge.
• Mettre le linge sec, non plié sans le tasser dans la laveuse,
en remplissant le panier jusqu’au rang supérieur de trous
pour une charge maximum.
Ne pas enrouler de grands articles tels que des draps
•
autour de l’agitateur.
• Pour une meilleure circulation, mélanger les petits et les
grands articles. Laver les articles volumineux comme les
couvertures séparément.
• Lors du lavage d’articles infroissables, fragiles, de lainages
lavables ou d’articles en tricot à mailles lâches, ne jamais
utiliser un niveau d’eau inférieur au réglage MEDIUM
(moyen). Ils auront moins tendance à rétrécir, à se froisser
et les coutures tiendront mieux.
• Refermer soigneusement le couvercle pour qu’il ne
claque pas.
19
Page 21

C
ycles, options, lights
W
hat can & cannot be
w
ashed
o
perating tips
S
pecial Features
Fonctionnement
Conseils supplementaires
• Il est possible que la charge puisse être déséquilibrée
endant l’essorage. Si cela se produit, poussersur le
p
sélecteur, ouvrir le couvercle, rééquilibrer la charge, fermer
le couvercle et mettre la laveuse en marche. L’essorage
reprend au point où il s’était interrompu.
• Cette machine effectue des pauses à plusieurs reprises au
cours d’un cycle de lavage. Ces pauses momentanées font
partie de son fonctionnement normal.
• Cette laveuse est conçue pour
le couvercle est ouvert. Toutefois, elle se remplit et
l’agitation a lieu même si le couvercle est ouvert pour que
l’eau soit disponible pour permettre le prélavage des
taches ou la dilution de l’assouplissant.
• Si le couvercle est ouvert au cours d’un cycle d’essorage,
la laveuse s’arrête. Une fois le couvercle fermé et la
laveuse en marche, le cycle reprend là où il avait été
interrompu.
ne pas essorer lorsque que
20
Page 22

C
ycles, options, lights
What can & cannot be
w
ashed
operating tips
d
ishwasher use
l
oading
Controls at a glance
S
pecial Features
Utilisation des commandes –
modèles à trois vitesses
ÉTAPE 1
Sélection du niveau d’eau
Régler le sélecteur sur le réglage correspondant à la
grosseur de la charge. Cette sélection devrait fournir le
niveau d’eau suffisante pour permettre la circulation de la
charge au cours de l’agitation.
Il peut s’avérer nécessaire, en raison de l’épaisseur de
certains tissus, de régler le niveau d’eau après le début de
l’agitation. Pour régler le niveau d’eau, placer le sélecteur sur
la position
face de la quantité d’eau désirée.
reset (nouveau réglage), puis le positionner en
RÉGLAGE DU GROSSEUR DE
NIVEAU D’EAU LA CHARGE
Mini
(extra-petit)
1/4 plein
Small
Medium
Large
Super
Remarque : Pour des résultats optimums, le linge doit
circuler librement.
ÉTAPE 2
(petit)
(moyen)
(élevé)
(gros)
1/4 - 1/3
1/3 – 1/2
1/2 – 2/3
3/4 – plein
Sélection de la température de
l’eau de lavage/rinçage
La température de l’eau de lavage peut être chaude, tiède ou
froide, tandis que la température de l’eau de rinçage peut
être tiède ou froide (cer
ci-dessous sert de guide.
LAVAGE/RINÇAGE
PÉRATURE TYPE DE CHARGE
M
TE
Hot/Cold
(chaude/froide)
arm/Warm
W
(tiède/tiède)
ains modèle
t
(cer
Warm/Cold
(tiède/froide)
Cold/Cold
(froide/froide) lainage
s)
tains modèles). Le tableau présenté
Blancs et couleurs bon teints très
sales.
s de couleur modérément s
ticle
Ar
Articles de couleur modérément
s ; la plupar
ale
s
s.
infroiss
Ar
able
s aux couleurs vive
ticle
s lavable
t des articles
s, peu sales ;
s.
ale
s.
Remarque : À moins de 16 °C (60 °F), l’eau est trop
froide pour dissoudre les détergents en poudre et les
activer. Les étiquettes d’entretien considèrent l’eau froide
jusqu’à 29 °C (85 °F).
Automatic Temperature Control (A.T.C.) (la commande
automatique de température, certains modèles) établit
la température de lavage optimale. Pour économiser
l’énergie, cette laveuse module les températures de l’eau de
lavage en mélangeant l’eau froide et l’eau chaude afin
d’obtenir la température appropriée de l’eau.
TEMPÉRATURE TYPE DE CHARGE
LAVAGE/RINÇAGE
Réglage par le système de commande
automatique de température :
ATC Hot/Cold,
ATC Warm/Warm,
A
TC Warm/Cold
(CAT Eau chaude/Eau
froide, Eau tiède/Eau
tiède, Eau tiède/Eau froide)
ATC Cold/Cold
T Eau froide/
(CA
Eau froide)
Économise de l’énergie en ajoutant
eau froide à de l’eau chaude à
de l’
partir du chauffe-eau. Donne un
lavage optimal à de
plus basses.
De l’eau chaude peut être ajoutée à
l’eau froide lors du remplissage de la
laveuse. Ceci assure que l’eau sera
amment tiède pour bien activer
suffis
le détergent.
s températures
21
Page 23

Les caractéristiques des commandes et le style varient selon le modèle.
ÉTAPE 3
Sélection du cycle
Pour sélectionner un cycle, pousser sur le sélecteur (en
position arrêt) et le tourner vers la droite (dans le sens des
aiguilles d’une montre) jusqu’à ce que la flèche soit vis-à-vis
le niveau de saleté requis en le cycle Regular (tissus
normales), Wrinkle Control (tissus infroissables), ou
Delicates (tricots et tissus délicats) désiré.
Cycle Regular (pour tissus normales)
Procure une vitesse d’agitation et d’essorage normale pour
laver les articles en coton et le linge très sale. Pour un
lavage optimum, régler le sélecteur à la position
Heavy
(robuste).
Cycle Wrinkle Control (pour tissus
infroissables)
Procure une agitation normale et une vitesse d’essorage
lente pour protéger les tissus à pli permanent.
Cycle Delicates (pour tricots et
tissus délicats)
rocure une vite
P
ation et d’e
agit
d’
délicats.
sse d’agitation lente et une vitesse
ssorage lente pour le
s tricots et les tissus
Extra
ÉTAPE 4
Sélection des options (si l’on désire)
Extra Rinse (rinçage supplémentaire)
Lorsque le sélecteur est à la position On (marche), un
rinçage supplémentaire suit les cycles tissus
normales/vêtements infroissables/délicats pour enlever
complètement les additifs des détergents à lessive, la mousse
de savon, les parfums, etc.
End of Cycle Signal (signal - fin de cycle,
certains modèles)
e signal sonore de fin de cycle est émis une fois après
L
l’achèvement du cycle. Le signal de fin de c
annulé en mettant le sélecteur sur
Off (arrêt).
ycle peut être
ÉTAPE 5
Tirer le sélecteur pour mettre
en marche
a laveuse peut être arrêtée à tout moment en
L
st alors possible d’
le sélecteur
ation ou de raccourcir, sauter ou répéter toute partie
agit
d’un c
lorsque le réglage est modifié.
. Il e
e sélecteur doit être
ycle. L
obtenir un trempage s
oncé
enf
poussant sur
ans
(position arrêt)
Remarque : Ne pas tourner le sélecteur dans le
sens contraire des aiguilles d’une montre car la minuterie
pourrait se trouver endommagée.
22
Page 24

C
ycles, options, lights
What can & cannot be
w
ashed
operating tips
d
ishwasher use
l
oading
Controls at a glance
S
pecial Features
Utilisation des commandes –
modèles à quatre vitesses
ÉTAPE 1
Sélection du niveau d’eau
Régler le sélecteur sur le réglage correspondant à la
grosseur de la charge. Cette sélection devrait fournir le
niveau d’eau suffisante pour permettre la circulation de la
charge au cours de l’agitation.
Il peut s’avérer nécessaire, en raison de l’épaisseur de
certains tissus, de régler le niveau d’eau après le début de
l’agitation. Pour régler le niveau d’eau, placer le sélecteur sur
la position
face de la quantité d’eau désirée.
Remarque : Pour des résultats optimums, le linge doit
circuler librement.
reset (nouveau réglage), puis le positionner en
RÉGLAGE DU GROSSEUR DE
NIVEAU D’EAU LA CHARGE
(extra-petit)
Mini
Small
Medium
Large
Super
(petit)
(moyen)
(élevé)
(gros)
1/4 plein
1/4 - 1/3
1/3 – 1/2
1/2 – 2/3
3/4 – plein
Automatic Temperature Control (A.T.C.) (la commande
automatique de température, certains modèles)
la température de lavage optimale. Pour économiser
l’énergie, cette laveuse module les températures de l’eau de
lavage en mélangeant l’eau froide et l’eau chaude afin
d’obtenir la température appropriée de l’eau.
établit
TEMPÉRATURE TYPE DE CHARGE
LAVAGE/RINÇAGE
Réglage par le système de commande
automatique de température :
ÉTAPE 2
Sélection de la température de
lavage/rinçage de l’eau
a température de lavage de l’eau peut être chaude, tiède ou
L
froide, t
être tiède ou froide (certains modèles).
andis que la température de rinçage de l’
MPÉRATURE TYPE DE CHARGE
TE
LAVAGE/RINÇAGE
Hot/Cold
(chaude/froide)
Warm/Warm
(tiède/tiède) couleur.
(certains modèles)
arm/Cold
W
(tiède/froide)
Cold/Cold
(froide/froide) lainages lavables.
Blanc très s
teint.
Linge modérément sale, articles de
inge modérément s
L
couleur ; la plupart des articles à pli
permanent.
Articles aux couleurs vives, peu sales ;
ale et couleurs bon
eau peut
ale, articles de
ATC Hot/Cold,
ATC Warm/Warm,
ATC Warm/Cold
T Eau chaude/
(CA
froide, Eau tiède/
tiède, Eau tiède/
ATC Cold/Cold
(CAT Eau froide/
Eau froide)
Eau froide)
Économise de l’énergie en ajoutant
de l’eau froide à de l’eau chaude à
tir du chauffe-eau. Donne un
par
Eau
lavage optimal à des températures
Eau
plus basses.
De l’eau chaude peut être ajoutée à
eau froide lors du remplissage de la
l’
laveuse. Ceci assure que l’eau sera
suffisamment tiède pour bien activer
le détergent.
ÉTAPE 3
Sélection du cycle de
lavage/d’essorage
La laveuse est programmée pour effectuer combinaisons de
vitesses de lavage et d’essorage.
23
Page 25

Les caractéristiques des commandes et le style varient selon le modèle.
VITESSE DE CHOIX DE TISSU
LAVAGE/
ESSORAGE
Regular
Wrinkle-Control
(
tissus infroissables)
Normal/Slow
Delicate
Ex. Gentle/Slow
(extra-douce/lente)
(normale)
Normal/Fast
(normale/rapide)
(normale/lente)
(délicats)
Gentle/Slow
(douce/lente)
Handwash Action intermittente d’agit
(lavage manuel)
Tissus robustes nécessitant un
essorage maximum : jeans, serviettes,
articles de literie.
Tissus robustes nécessitant un
essorage à moindre vitesse qui
minimisera le froissement : chemises,
pantalons élégants.
Tissus fragiles, nécessitant un essorage
à moindre vitesse en raison du type
de tissu.
ation lente et
de trempage pour les tissus délicats
.
Remarque : À moins de 16° C (60° F), l’eau est trop
froide pour dissoudre les détergents en poudre et les
activer.
ÉTAPE 4
Sélection du cycle
our sélectionner un c
P
le sélecteur et le tourner vers la droite (dans le sens des
aiguilles d’une montre) jusqu’à ce que la flèche soit vis-à-vis
le niveau de saleté requis.
Important: Pour un entretien maximal des tissus, il faut
choisir la vite
spondant au type de charge, à l’
corre
vitesse de lavage/essorage.
sse appropriée de lavage et d’essorage
ycle,
pousser (en position arrêt) sur
aide du bouton de
Cycle Regular (cycle standard pour/tissus
normales)
Ce cycle procure jusqu’à 16 minutes d’agitation. Sélectionner
le réglage Regular Wash/Spin Speed (réglage de vitesse
de lavage/essorage standard).
Wrinkle Control (tissus infroissables)
Ce cycle est prévu pour des tissus robustes nécessitant une
vitesse d’essorage plus lente pour réduire les faux plis,
comme pour les chemises et pantalons élégants. Choisissez
le Wrinkle Control Wash/Spin Speed (réglage de vitesse
de lavage/essorage antifroissement).
Cycle Delicates (pour tricots et
tissus délicats)
Procure une action de lavage délicate. Choisissez le
Delicates Wash/Spin Speed (réglage de vitesse de
lavage/essorage pour linge délicat).
P
our le lavage de tissus fragile
choisissez le
sse de lavage/e
vite
procure un trempage et une agit
avec essorage lent.
Hand Wash Wash/Spin Speed (réglage de
ssorage pour lavage manuel). Ce réglage
s étiquetés lavables à la main,
ation lente par intermittence
Soak Only (trempage seulement, certains
modèles)
Ce cycle procure jusqu’à 4 minutes d’agitation, suivi du
trempage. Éviter un trempage prolongé – ne pas
dépasser 30 minutes.
et l’essorage, on doit sélectionner ensuite manuellement une
opération d’essorage.
Pour commander la vidange de l’eau
24
Page 26

C
ycles, options, lights
What can & cannot be
washed
operating tips
d
ishwasher use
l
oading
Controls at a glance
Special Features
Utilisation des commandes
ÉTAPE 5
Sélection des options (si l’on désire)
Extra Rinse (rinçage supplémentaire)
Lorsque le bouton est à la position On (marche), un rinçage
supplémentaire suit le cycles Regular (tissus normales),
Wrinkle Control (tissus infroissables) et Delicates (délicats)
pour enlever complètement les additifs des détergents à
lessive, la mousse de savon, les parfums, etc.
End of Cycle Signal (signal - fin de cycle,
certains modèles)
Le signal sonore de fin de cycle est émis une fois après
l’achèvement du cycle. Le signal de fin de cycle peut être
annulé en mettant le sélecteur sur Off (arrêt).
ÉTAPE 6
Tirer le selecteur pour mettre
en marche
La laveuse peut être arrêtée à tout moment en poussant sur
le sélecteur. Il est alors possible d’obtenir un trempage sans
agitation ou de raccourcir, sauter ou répéter toute partie
d’un cycle. Le sélecteur doit être
lorsque le réglage est modifié.
Remarque : Ne pas tourner le sélecteur dans le
sens contraire des aiguilles d’une montre car la minuterie
pourrait se trouver endommagée.
enfoncé (position arrêt)
25
Page 27

C
ycles, options, lights
What can & cannot be
w
ashed
operating tips
d
ishwasher use
l
oading
Controls at a glance
S
pecial Features
Utilisation des commandes –
modèles électroniques
Pour commencer
1. Ajoutez du détergent et des additifs dans la
machine.
2. Chargez la laveuse.
3. Fermez le couvercle.
4. Choisissez le cycle et les options convenant à la
charge.
5. Appuyez sur le
6. Le voyant de remplissage s’allume et la laveuse
commence à se remplir.
Remarque : Le couvercle doit être bien fermé
pour que les commandes de la laveuse soient
opérationnelle
ÉTAPE 1
Sélection du niveau d’eau
Régler le sélecteur sur le réglage corre
grosseur de la charge. Cette sélection devrait fournir le
niveau d’
charge au cours de l’agitation.
Il peut s’avérer nécessaire, en raison de l’épaisseur de
cert
l’
la position
face de la quantité d’eau désirée.
eau suffis
ains tissus, de régler le niveau d’eau après le début de
agit
ation. P
our régler le niveau d’
reset (nouveau réglage), puis le positionner en
RÉGLAGE DU GROSSEUR DE
NIVEAU D’EAU LA CHARGE
Mini
sélecteur de cycle.
s.
spondant à la
ante pour permettre la circulation de la
eau, placer le sélecteur sur
(extra-petit)
1/4 plein
Les caractéristiques des commandes et le
style varient selon le modèle.
Remarque : Pour des résultats optimums, le linge doit
circuler librement.
ÉTAPE 2
Sélection de la température de
lavage/rinçage de l’eau
La température de lavage de l’eau peut être chaude, tiède ou
froide, tandis que la température de rinçage de l’eau peut
être tiède (certains modèles) ou froide. Le tableau présenté
ci-dessous sert de guide.
TEMPÉRATURE TYPE DE CHARGE
LAVAG
Automatic T
automatique de température)
lavage optimale. Pour économiser l’énergie, cette laveuse
module le
l’
appropriée de l’eau.
E/RINÇAGE
Hot/Cold Blanc très sale et couleurs bon
(chaude/froide) teint.
(certains modèles)
Warm/Warm Linge modérément sale, articles de
(tiède/tiède) couleur.
(certains modèles)
arm/Cold
W
(tiède/froide) couleur ; la plupart des articles à pli
(certains modèles) permanent.
Cold/Cold Ar
(froide/froide) lainages lavables.
emperature Control (A.T.C.) (la commande
s températures de l’eau de lavage en mélangeant
eau froide et l’
eau chaude afin d’
inge modérément s
L
ticles aux couleurs vives, peu sales ;
établit la température de
obtenir la température
ale, articles de
Small
Medium
Large
Super
(petit)
(moyen)
(élevé)
(gros)
1/3 – 1/2
1/2 – 2/3
3/
1/4 - 1/3
4 – plein
26
Page 28

Cycles, options, lights
W
hat can & cannot be
w
ashed
o
perating tips
d
ishwasher use
l
oading
C
ontrols at a glance
S
pecial Features
Utilisation des commandes –
modèles électroniques
TEMPÉRATURE TYPE DE CHARGE
LAVAGE/RINÇAGE
Réglage par le système de commande
automatique de température :
ATC Hot/Cold,
ATC Warm/Warm,
ATC Warm/Cold
(CAT Eau chaude/Eau
froide, Eau tiède/Eau
tiède, Eau tiède/Eau froide)
(certains modèles)
ATC Cold/Cold
(CAT Eau froide/
Eau froide)
Économise de l’énergie en ajoutant
de l’eau froide à de l’eau chaude à
partir du chauffe-eau. Donne un
lavage optimal à des températures
plus basses.
De l’eau chaude peut être ajoutée à
l’eau froide lors du remplissage de la
laveuse. Ceci assure que l’eau sera
suffisamment tiède pour bien activer
le détergent.
ÉTAPE 3
Sélection du niveau de saleté
Votre laveuse est équipée d’un niveau réglable de la
saleté.
SÉLECTION DU TYPE DE CHARGE
NIVEAU DE
SALETÉ
Light (peu sale) S’utilise pour le linge légèrement sale.
Normal (normale) S’utilise pour le linge moyennement
sale. Ce réglage convient à la majorité
du linge.
Heavy (très sale) S’utilise pour le linge très encrassé.
a Heavy
Extr
(Extrêmement sale) très sale.
S’utilise
pour le linge robuste t
aché et
ÉTAPE 4
Choix de tissu
Choisissez le cycle de tissu convenant au type de charge, en
tournant le sélecteur jusqu’à ce que le voyant correspondant
au tissu souhaité s’allume.
VITESSE DE
LAVAGE/ CHOIX DE TISSU
ESSORAGE
Quick Wash
(Lavage rapide)
Gentle/Fast
(Douce/
(Lavage à la main)
Ex. Gentle/Slow
(Ex. Douce/Lente)
Wrinkle Control
(Antifroissement)
Medium/Slow
(Moyenne/Lente)
(Moyenne/Rapide)
Rapide)
Hand Wash
Delicates
(Linge délicat)
Gentle/Slow
(Douce/Lente)
Regular
(Normal)
Medium/Fast
Pour les vêtements peu sales ou
froissés que vous désirez rapidement.
Trempage et agitation par intermittence.
Pour la laine, la soie et les autres
tissus lavables à la main seulement.
Pour les tissus transparents, les
soutiens-gorge et la lingerie nécessitant
des vitesses d’agitation et d’essorage
plus lentes en raison du type de tissu.
Pour les tissus synthétiques et les
« lavez et portez », et les vêtements peu
à normalement salis, nécessitant une
vitesse d’essorage plus lente pour
réduire les faux plis.
Pour la majorité des tissus robustes y
compris coton, linge de maison et
vêtements normalement salis
nécessitant une extraction maximale
eau.
de l’
27
Page 29

C
ycles, options, lights
What can & cannot be
washed
operating tips
d
ishwasher use
loading
C
ontrols at a glance
Special Features
Utilisation des commandes –
modèles électroniques
ÉTAPE 5
Soak Only (Trempage seulement, certains
modèles)
33 minutes environ de périodes de trempage alternées avec
une brève agitation à vitesse lente. À la fin du cycle, remettez
manuellement le sélecteur sur un cycle de lavage ou
d’essorage pour vidanger la laveuse. Évitez un trempage
prolongé.
Spin Only (Essorage seulement)
Donne un e
ssorage pour extraire plus d’eau du linge.
Rinse and Spin (Rinçage et essorage)
S’utilise pour le linge qui n’a besoin que d’être rincé ou pour
ajouter de l’adoucissant (s’ajoutant lors du rinçage) au linge.
Power Off (Arrêt)
Pour annuler le cycle et arrêter la laveuse, tourner le
sélecteur sur Power Off (Arrêt) et enfoncer le sélecteur.
Sélection des options
ÉTAPE 6
Extra Rinse (rinçage supplémentaire)
Lorsque le bouton de sélection d’options est à
la position On (marche), une période
additionnelle de rinçage est ajoutée à la fin
tous les cycles ce qui permet une meilleure
élimination des additifs des détergents à lessive,
de la mousse de savon, des parfums, etc.
End of Cycle Signal (signal - fin
de cycle)
Le signal sonore de fin de cycle est émis une fois après
l’achèvement du cycle. En certains modèles le signal de fin
de cycle peut être annulé en mettant le bouton sur Off
(arrêt).
ÉTAPE 7
Mise en marche de la laveuse
Pour mettre la laveuse en marche, appuyez sur le sélecteur
de cycle.
Changement de cycle
Si un cycle inapproprié a été choisi accidentellement :
1. Appuyez sur le sélecteur.
2. Tournez le sélecteur au cycle voulu.
3. Choisissez les options désirées du cycle.
4. Appuyez sur le
s’arrête de clignoter et le nouveau cycle démarre.
sélecteur. Le témoin de lavage
Annulation d’un cycle
Pour annuler un cycle :
1. Appuyez sur le sélecteur.
2. Tourner le sélecteur sur Power Off (Arrêt) et enfoncer
le sélecteur
our vidanger la laveuse :
P
Choisissez le cycle d’option
1.
inçage et e
(R
seulement).
2. Appuyez sur le sélecteur. Le témoin d’essorage
s’allume et le rinçage ou l’essorage commence.
.
ssorage) ou
Rinse & Spin
Spin Only (Essorage
28
Page 30

S
pecial Features
Caractéristiques spéciales
Distributeur de javellisant
liquide
Le distributeur dilue automatiquement le javellisant liquide
vant qu’il atteigne le linge.
a
Pour l’utiliser, procéder comme suit :
1. Mesurer la quantité de javellisant liquide avec soin en
suivant les instructions sur le récipient.
2.
Verser le javellisant liquide dans le distributeur de
javellisant avant d’ajouter le linge. Éviter les
éclaboussures ou le débordement du distributeur.
Distributeur d’assouplissant
e distributeur ajoute l’adoucissant liquide au moment voulu
C
du cycle.
Pour l’utiliser, procéder comme suit :
1. Verser la quantité voulue de liquide dans le distributeur,
jusqu’au repère de remplissage seulement.
2. Si le liquide n’atteint pas le repère, ajouter de l’eau tiède.
S’il devient nécessaire de nettoyer le distributeur :
1. Retirez le distributeur du haut de l’agitateur.
2. Trempez-le pendant une heure dans l’évier ou dans un
recipient dans une solution d’eau chaude et de
détergent liquide pour la vaisselle.
3. Mettez les mains sur le dessus et le dessous du
distributeur et secouez-le, pour déloger les dépôts des
côtés du distributeur.
4. Le rincer à l’eau chaude.
5. Répétez au besoin le processus.
6. Remettre le distributeur sur
l’agitateur.
N’utilisez pas de liquide pour la
vaisselle à l’intérieur de la laveuse, il
y aurait risqué d’un excès de mousse.
Remarques :
• Ne jamais verser de javellisant liquide non dilué
directement sur le linge ou dans la cuve. Ce produit
chimique est puiss
en les déchirant ou décolorant, s’il n’est pas utilisé
correctement.
orsqu’un javellisant s
L
•
les couleurs est utilisé, le verser dans la cuve avec le
détergent. Ne pas verser de javellisant sans chlore
dans le distributeur de javellis
ant et peut endommager les tissus,
ans chlore et s
ans danger pour
ant.
Finger Faucet (admission d’eau,
certains modèles)
Introduction d’
maintenu à la position
eau lorsque le sélecteur e
On (marche).
st
Filtre à charpie auto-nettoyant
Le filtre à charpie auto-nettoyant ne nécessite
aucun entretien.
L’eau de lavage et de rinçage est filtrée et refiltrée
continuellement pour retenir la charpie laissée par la plupart
des tissus durant le cycle d’agitation avant d’être déposée de
nouveau sur le linge. L
cuve de lavage et le débit d’eau produit par l’agitateur
permettent conjointement de retenir la charpie entre la cuve
intérieure de lavage et la cuve extérieure. L
automatiquement évacuée de la laveuse pendant le cycle
d’essorage.
a conception de
s trous percés dans la
a charpie e
st
Essorage sécuritaire
Si pour une raison quelconque le couvercle de la laveuse est
ouvert pendant le cycle d’essorage ou la période
d’extraction, l’essorage sera interrompu immédiatement pour
votre sécurité. Si la laveuse ne s’arrête pas, appeler
immédiatement un technicien. Lorsque le couvercle est
refermé, l’essorage se poursuit automatiquement.
29
Page 31

S
pecial Features
Caractéristiques spéciales
C
ycles, options, lights
What can & cannot be
washed
S
pecial Features
Compensateur de charge
déséquilibrée pendant
l’essorage
Cette laveuse est conçue pour contenir des charges
déséquilibrées sans s’arrêter ou interrompre le cycle de
lavage.
Pour cette raison, le cycle sera toujours complété. Si des
tissus plus épais contenus dans les charges déséquilibrées
renferment un surplus d’humidité à la fin du cycle,
redistribuer le linge dans la laveuse et régler de nouveau le
sélecteur pour terminer l’essorage.
Nettoyage et entretien
Dispositif de protection contre
les surcharges
Un dispositif de protection intégré arrête automatiquement
le moteur de la laveuse en cas de surcharge. Cela peut se
produire dans l’un des cas suivants :
• Charge trop lourde dans la laveuse.
• Surplus d’appareils ménagers branchés dans la ligne de la
laveuse.
• Faible tension sur la ligne.
• Couvercle ouvert et fermé à répétition.
Le dispositif de protection contre les surcharges permet de
remettre en marche la laveuse lorsque le moteur a refroidi à
une température de fonctionnement sécuritaire.
Si le moteur s’arrête souvent, appeler le technicien.
1. Après le lavage, laisser le couvercle ouvert jusqu’à ce
que l’intérieur soit sec.
2. Vérifier les boyaux pour s’assurer qu’il n’y a pas de
noeuds ou d’entortillements.
3. La laveuse ne doit pas être installée où la température
descend sous le point de congélation car cela pourrait
endommager la laveuse.
4. Essuyer de temps à autre l’extérieur de la laveuse avec
une éponge ou un linge propre et humide.
les parties en plastique.
Une lubrific
5.
ne nécessite donc aucune huile ou graisse.
6.
Ne pas déposer d’articles lourds ou tranchants sur le
dessus de la laveuse.
7. Le dessus de la laveuse ne doit pas être utilisé pour
détacher les vêtements. Certains détachants, pour la
rouille, entre autre
8. Enlever les épingles, les ceintures et autres objets
tranchants des vêtements afin de prévenir les
égratignures sur les parties intérieures.
9. Les vêtements ne doivent pas être rangés dans la
laveuse.
s javellis
e
L
10.
qui sont renversés sur le dessus de la laveuse et y
demeurent ternissent le fini. Enlever toutes les
éclaboussure
ation à vie e
s, détergents, solvants et autres produits
ant
s avec un linge douce et humide.
st effectuée à l’usine ; la laveuse
s, abîmeront le fini.
Ne pas polir
11. Si vous fermez votre maison durant l’hiver, demandez à
un technicien de vider l’eau de la laveuse. Débrancher le
cordon d’alimentation de la prise de courant et les
boyaux des robinets.
Nettoyage de l’intérieur
Nettoyer périodiquement l’intérieur de la laveuse pour retirer
toutes saletés, odeurs ou bactéries qui resteraient dans la
laveuse par suite du lavage du linge. Nous recommandons
de suivre les étapes suivantes tous les 60 – 120 jours pour
nettoyer et rafraîchir l’intérieur de la laveuse. La fréquence à
laquelle la laveuse doit être nettoyée et rafraîchie dépend de
facteurs tels qu’utilisation, quantité de saleté ou bactéries
ant par la laveuse, ou encore l’utilisation d'eau froide. Le
pass
spect de ce
non-re
insatisfaisantes, incluant de mauvaises odeurs et/ou des
taches permanentes sur la laveuse ou sur la lessive.
Pour nettoyer et rafraîchir l’intérieur de la laveuse :
1. Ajouter une quantité mesurée de javellis
distributeur de javellisant, en suivant les instructions
données sur le paquet.
2. Ajouter 1/4 tasse de détergent dans la cuve.
3. Faire à la laveuse un cycle complet sans linge avec de
eau très chaude.
l’
4. Répéter au besoin le processus.
s directive
s peut entraîner des conditions
ant dans le
30
Page 32

Recherche des pannes
Cycles, options, lights
W
hat can & cannot be
w
ashed
operating tips
d
ishwasher use
l
oading
Special Features
Ne se remplit pas
Ne produit pas
d’agitation
N’essore pas, ne se
vidange pas
Linge mouillé
• Brancher la laveuse sur une prise murale sous tension.
Vérifier le fusible ou réenclencher le disjoncteur.
•
Mettre le sélecteur sur le cycle voulu et mettre la laveuse en marche.
•
uvrirles deux robinets à fond.
O
•
• Redresser les boyaux d’arrivée.
• Débrancher les boyaux et nettoyer les filtres. Les filtres des boyaux pourraient être bouchés.
• Vérifier le fusible ou réenclencher le disjoncteur.
• S’assurer que le couvercle est bien fermé.
• Mettre le sélecteur sur le cycle voulu et mettre la laveuse en marche.
• Les pauses sont normales. Attendre pour voir si la laveuse va se remettre en marche.
• Vérifier le fusible ou réenclencher le disjoncteur.
• Redresser les boyaux. Éliminer les boyaux ne pouvant plus être redressés. Si l’évacuation est
bouchée, appeler le service après-vente.
• Fermer le couvercle et mettre la laveuse en marche. Pour des raisons de sécurité, l’essorage
ne fonctionne pas si le couvercle est ouvert.
• Blocage causé par une quantité trop abondante de mousse. Relaver sans détergent. Utiliser
une quantité correcte de détergent à mousse réduite.
• La charge est déséquilibrée. Redistribuer le linge, fermer le couvercle et tirer sur le sélecteur.
Vérifier que la laveuse est de niveau. S’assurer que le niveau d’eau choisi est suffisant pour
la quantité de linge lavée.
• Une vitesse d'essorage normale est recommandée pour du linge lourd comme jeans et
serviettes.
S’arrête
uit
F
Est bruyante
• Brancher la laveuse sur une prise murale sous tension.
• Vérifier le fusible ou réenclencher le disjoncteur.
• Fermer le couvercle et mettre la laveuse en marche. Pour des raisons de sécurité, l’agitation
et l’essorage ne fonctionnent pas si le couvercle est ouvert.
• C’est peut-être simplement une pause du cycle de lavage. Attendre quelques minutes ; il est
possible que la laveuse se remette en marche.
• Vérifier que les raccords des boyaux sont bien serrés.
• S’assurer que l’extrémité du boyau d’évacuation est insérée correctement et bien fixée sur le
système d’évacuation.
• Trempage prolongé ; faire tremper 30 minutes maximum.
• Éviter de trop mettre de linge.
• Vérifier que la laveuse a été mise de niveau tel qu’indiqué dans le guide de mise en service.
• Les planchers peu solides peuvent produire des vibrations et le déplacement de la laveuse.
s bruit
De
•
s de fonctionnement varient selon la vite
sse de l’agitation.
31
Page 33

Recherche des pannes
Cycles, options, lights
W
hat can & cannot be
w
ashed
operating tips
d
ishwasher use
l
oading
Special Features
e remplit d’eau à une
S
température incorrecte
Le sélecteur passe
automatiquement à un
réglage au-delà de
Off (arrêt)
• Ouvrir les deux robinets à fond.
Si la laveuse est dotée d’un sélecteur de température, vérifier que celui-ci est bien placé sur
•
une température et non pas entre deux réglages.
S’assurer que la température sélectionnée est la bonne.
•
• Lors du remplissage de la laveuse, vous pouvez remarquer que soit de l’eau chaude, soit de
l’eau froide entre dans la cuve, alors que vous avez choisi des températures d’eau de lavage
froide ou tiède. Ceci est une fonction normale de la commande automatique de température
(certains modèles), la laveuse déterminant la température de l’eau.
• Si le réglage Auto Temperature Control (contrôle automatique de la température) (certains
modèles) a été sélectionné, l’eau froide peut paraître plus chaude par rapport à l’eau du
robinet.
• S’assurer que les boyaux sont raccordés aux robinets et raccords d’arrivée d’eau voulus.
S’assurer que l’alimentation en eau est correctement réglée. Faire passer de l’eau sous forte
pression dans les conduites avant de remplir la laveuse.
• Vérifier le chauffe-eau. Il doit être réglé pour assurer une eau chaude à 49 °C (120 °F) au
robinet. Également vérifier la capacité du chauffe-eau et sa rapidité de chauffage une fois
qu’il a été vidé.
• Déconnecter les boyaux et nettoyer les filtres. Les filtres des boyaux pourraient être bouchés.
Un Extra Rinse
•
(rinçage supplémentaire, certains modèles)
a été sélectionné.
our toute assistance technique, communiquer av
P
Service à la clientèle de Maytag : au Canada : 1-8
ec
Maytag Services
8-2
8
00-6
002.
SM
,
32
Page 34

C
ycles, options, lights
W
hat can & cannot be
w
ashed
o
perating tips
S
pecial Features
Garantie et service après-vente
Garantie
Garantie limitée d’un an pièces et main-d’œuvre
Durant une période d’un (1) an à
compter de la date de l’achat initial,
toute pièce qui se révélerait défectueuse
dans les conditions normales d’usage
ménager sera réparée ou remplacée
gratuitement.
Résidents du Canada
Les garanties ci-dessus couvrent un
appareil installé au Canada seulement
s’il a été agréé par les agences de test
habilitées (vérification de la conformité
à une norme nationale du Canada), sauf
si l’appareil a été introduit au Canada à
l’occasion d’un changement de
résidence des États-Unis vers le
Canada.
Les garanties spécifiques formulées
ci-dessus sont les SEULES que le
fabricant accorde. Ces garanties vous
confèrent des droits juridiques
spécifiques et vous pouvez également
jouir d’autres droits, variables d’un État à
l’autre ou d’une province à l’autre.
LE SEUL ET UNIQUE RECOURS DU CLIENT EN
VERTU DE CETTE GARANTIE LIMITÉE EST LA
RÉPARATION DU PRODUIT COMME DÉCRITE
PRÉCÉDEMMENT. LES GARANTIES
IMPLICITES, Y COMPRIS LES GARANTIES DE
QUALITÉ MARCHANDE OU D’ADAPTATION À
E PARTICULIER, SONT LIMITÉES À
SAG
N U
U
N AN OU À LA PÉRIODE LA PLUS COURTE
U
PERMISE PAR LA LOI. MAYTAG CORPORATION
E SERA PAS TENUE RESPONSABLE DES
N
MAGES DIRECTS OU INDIRECTS.
M
O
D
S ÉTATS ET CERTAINES PROVINCES
N
I
A
RT
E
C
INTERDISENT L’EXCLUSION ET LA LIMITATION
ES DOMMAGES DIRECTS OU INDIRECTS
D
I QUE LES LIMITATIONS SUR LA DURÉE
S
N
I
A
DES GARANTIES IMPLICITES DE QUALITÉ
MARCHANDE OU D’ADAPTATION À UN
ARTICULIER. IL EST DONC POSSIBLE
E P
SAG
U
QUE CES LIMITATIONS NE S’APPLIQUENT PAS
À VOUS. CETTE GARANTIE VOUS CONFÈRE
ES DROITS JURIDIQUES SPÉCIFIQUES ET IL
D
E VOUS AYIEZ D’AUTRES DROITS,
U
UT Q
E
E P
S
QUI VARIENT D’UN ÉTAT À L’AUTRE OU D’UNE
PROVINCE À L’AUTRE.
Ne sont pas couverts par ces garanties
1. Les problèmes et dommages résultant des situations suivantes :
a. Mise en service, livraison ou entretien effectués incorrectement.
b. Toute réparation, modification, altération et tout réglage non autorisés par le
abricant ou par un prestataire de service après-vente agréé.
f
. Mauvais emploi, emploi abusif, accidents, usage non raisonnable, ou
c
catastrophe naturelle.
d. Courant électrique, tension, alimentation électrique ou en gaz incorrects.
e. Réglage incorrect d’une commande.
2. Les garanties ne peuvent être honorées si les numéros de série d’origine ont
été enlevés, modifiés ou ne sont pas facilement lisibles.
3. Ampoules, filtres à eau et filtres à air.
4. Les produits achetés à des fins commerciales ou industrielles.
5. Les frais de dépannage ou de visite pour :
a. Correction d’erreurs de mise en service. Pour les produits nécessitant une
ventilation, un conduit métallique rigide doit être utilisé.
b. Initiation de l’utilisateur à l’emploi de l’appareil.
c. Transport de l’appareil chez le réparateur et retour de l’appareil chez
l’utilisateur.
6. Tout aliment perdu en raison de pannes du réfrigérateur ou du congélateur.
7. Dépenses de déplacement et de transport pour la réparation du produit dans
des endroits éloignés.
8. Cette garantie n’est pas valide à l’extérieur des États-Unis et du Canada.
Communiquez avec votre détaillant pour savoir si une autre garantie
s’applique.
9. Dommages indirects ou accessoires subis par toute personne à la suite d'une
quelconque violation des garanties. Certains États ou provinces ne permettent
pas l’exclusion ou la limitation de responsabilité en ce qui
concerne les dommages directs ou indirects. L’exclusion ci-dessus peut en
conséquence ne pas s'appliquer à votre cas.
Si vous avez besoin d’aide
Consultez d’abord la section sur le dépannage dans le manuel d’utilisation et
d’entretien, puis appelez le détaillant de qui vous avez acheté votre appareil ou le
service à la clientèle de Maytag Services, LLC au 1-800-688-9900 aux États-Unis
et au 1-800-6
• Veillez à conserver la facture d’achat pour justifier de la validité de la
garantie. P
propriétaire à l’égard du service sous garantie, voir le texte de la GARANTIE.
• Si le détaillant ou l’agence de service après-vente ne peut résoudre le
problème, écrivez à Maytag Services, LLC à l’adresse suivante : CAIR
Center
1-800-688-9900 aux États-Unis ou au 1-800-688-2002 au Canada.
• Les guides d’utilisation, les manuels de service et les renseignements sur
s pièces sont disponibles auprès du service à la clientèle de Maytag
le
Services, LLC.
Remarques : Veillez à fournir l’information suivante lorsque vous communiquez
avec nous au sujet d’un problème
a. Vos nom, adresse et numéro de téléphone;
b.
c. Nom et adresse du détaillant avec la date l’appareil acheté;
d. Description détaillée du problème observé;
e. Preuve d’achat (facture de vente).
88-2002 au Canada pour savoir où trouver un réparateur autorisé.
autres renseignements concernant les responsabilités du
our d’
®
, P.O. Box 2370, Cleveland, TN 37320-2370 États-Unis, ou appelez au
:
Numéro de modèle et numéro de série de l’
appareil;
33
Page 35

MAV-1
Guía de uso y cuidado
Tabla de materias
Instrucciones importantes
de seguridad . . . . . . . . . . 35-36
Sugerencias para
la operación . . . . . . . . . . . 37-38
Uso de los controles
Modelos con
tres velocidades . . . . . . . 39-40
Modelos con
cuatro velocidades . . . . . 41-43
Modelos electrónicos . . . . . . 44-46
Características
especiales . . . . . . . . . . . . . 47-48
Cuidado y limpieza . . . . . . . . 48
Localización y solución
de averías . . . . . . . . . . . . . 49-50
Garantía y
servicio . . . . . . . . .últimia página
Page 36

S
pecial Features
Instrucciones importantes de seguridad
C
ycles, options, lights
S
pecial Features
Instalador: Deje esta guía con el electrodoméstico.
Cliente: Lea y conserve esta guía para futuras
referencias. Conserve el recibo de compra y/o el cheque
cancelado como comprobante de compra.
Número de modelo ________________________________
Número de serie___________________________________
Fecha de compra __________________________________
Si tiene preguntas llame a:
Maytag Customer Assistance
1-800-688-9900 EE.UU.
1-800-688-2002 Canadá
(De lunes a viernes de 8 a.m. a 8 p.m. hora del Este)
Internet: http://www.maytag.com
En nuestro esfuerzo continuo para mejorar la calidad y el
rendimiento de nuestros productos, puede ser necesario
hacer cambios a este electrodoméstico sin necesidad de
revisar esta guía.
Si desea obtener más información sobre el servicio,
ver la última página.
Ahora debe conocer las
instrucciones de seguridad
Las advertencias y las instrucciones importantes de
seguridad que aparecen en esta guía no tienen el propósito
de cubrir todas las condiciones posibles que podrían ocurrir.
Se debe usar el sentido común, precaución y cuidado
cuando se instale, se efectúe mantenimiento o se use el
electrodoméstico.
Siempre comuníque
relacionados con problemas o condiciones que no entienda.
Reconozca los símbolos de seguridad,
advertencias, etiquetas
ADVERTENCIA – Peligros o prácticas no seguras que
DRÍAN
O
P
RECAUCIÓN –Peligros o prácticas no seguras que
P
RÍAN
D
O
P
se con el fabricante para los asuntos
ADVERTENCIA
ar lesión personal grave o mortal.
aus
c
PRECAUCIÓN
sión personal menos grave.
ar le
aus
c
¡ADVERTENCIA! RIESGO DE INCENDIO
No añada al agua de lavado gasolina, solventes de
limpieza en seco, ni otras sustancias inflamables o
explosivas. Estas sustancias desprenden vapores que se
odrían inflamar o explotar.
p
No lave artículos previamente limpiados, lavados,
sumergidos o manchados con gasolina, solventes de
limpieza en seco, aceite, ceras, solventes químicos,
alcohol, trementina u otros materiales inflamables o
explosivos. Estas sustancias quedan retenidas en los
artículos y es posible que desprendan vapores que se
pueden inflamar o explotar.
Observe estas precauciones cuando utilice líquidos de
limpieza, productos para quitar manchas, etc. Estos
productos deben estar clasificados como “no
inflamables”. Utilícelos de acuerdo con las instrucciones
del fabricante en un área bien ventilada o al aire libre.
Enjuague minuciosamente a mano las prendas que
contengan estas sustancias antes de ponerlas en la
lavadora. Algunos de estos productos, por ejemplo los
productos para quitar manchas de óxido, dañarán los
componentes y el acabado de la lavadora.
Mantenga el área alrededor y debajo de la lavadora libre
de materiales combustibles tales como pelusa, papel,
trapos, gasolina y otros vapores y líquidos inflamables.
¡EL HIDRÓGENO GASEOSO ES EXPLOSIVO! Bajo
ciertas condiciones, en un sistema de agua caliente que
no se ha usado durante dos semanas o más tiempo se
puede producir hidrógeno gaseoso. Si el sistema de agua
caliente no se ha usado durante ese período, antes de
usar la lavadora abra todos los grifos de agua caliente
durante varios minutos. Esto permitirá la liberación del
hidrógeno gaseoso que se pudiese haber acumulado.
Debido a que este gas es inflamable, cuando realice este
procedimiento no fume ni use una llama abierta.
En estudios recientes se ha demostrado que si los
materiales contaminados con aceite vegetal se lavan
inadecuadamente, la acumulación del aceite puede
contribuir a que ocurra una reacción química
(combustión espontánea) que podría causar la
inflamación repentina de una carga de ropa. Esto puede
suceder con más probabilidad cuando se deja la c
de ropa en la lavadora después de que termina el ciclo
de secado o cuando las prendas se doblan y apilan
mientras están calientes.
arga
35
Page 37

S
pecial Features
Instrucciones importantes de seguridad
C
ycles, options, lights
S
pecial Features
ADVERTENCIA
Para reducir el riesgo de incendio, explosión, descarga
léctrica o lesiones personales al usar su lavadora, siga
e
las precauciones básicas de seguridad, entre ellas las
siguientes:
1. Lea todas las instrucciones antes de usar el
electrodoméstico.
2. Al igual que con cualquier equipo que utiliza electricidad
y que tiene piezas móviles, existen ciertos riesgos
potenciales. Para usar este electrodoméstico con
seguridad, el usuario debe familiarizarse con las
instrucciones de funcionamiento del electrodoméstico y
ejercer siempre cuidado cuando lo usa.
No instale ni almacene este electrodoméstico donde
3.
estará expuesto a las inclemencias del tiempo.
4. Instale y nivele la lavadora sobre un piso firme que pueda
soportar el peso.
5. Este electrodoméstico debe ser puesto a tierra de manera
apropiada. Nunca enchufe el cordón del
electrodoméstico en un tomacorriente que no esté
debidamente puesto a tierra y de acuerdo con el código
nacional y local. Vea las instrucciones de instalación para
la puesta a tierra de este electrodoméstico.
6. Para evitar la posibilidad de incendio o explosión:
No lave artículos que han sido previamente limpiados,
a.
lavados, sumergidos o manchados con gasolina,
solventes de limpiar en seco u otras sustancias
inflamables o explosivas pues pueden emitir vapores
inflamables o producir una explosión. Lave a mano y
cuelgue en una cuerda de secar cualquier artículo que
contenga estas sustancias.
Cualquier material en el cual se haya usado un agente
aturado con líquidos o sólidos
de limpieza o que e
inflamables, no debe ser colocado en la lavadora hasta
que todos los restos de estos líquidos o sólidos y sus
vapores hayan sido eliminados.
Estos artículos incluyen acetona, alcohol
desnaturalizado, gasolina, keroseno, algunos líquidos
de limpieza domésticos, algunos quitamanchas,
aguarrás ras, ceras y quitaceras.
No agregue gasolina, solventes de lavado en seco ni
b.
otras sustancias inflamables o explosivas al agua del
lavado. Estas sustancias emiten vapores que pueden
encenderse o explot
Bajo ciert
c.
hidrógeno en un sistema de agua c
sido usado durante dos semanas o más. EL GAS
DRÓGENO ES EXPLOSIVO. Si el sistema del agua
I
H
aliente no ha sido us
c
usar una lavadora o una combinación de lavadora y
sec
que el agua e
eliminará cualquier gas hidrógeno acumulado. Debido
as condiciones, se puede producir gas
adora, abra todas las llaves del agua caliente y deje
sté s
.
ar
ado durante t
scurra durante varios minutos. Esto
CONSERVE ESTAS INSTRUCCIONES
aliente que no ha
al período, ante
s de
a que el gas es inflamable, no fume ni use una llama
bierta durante este período.
a
d.
No lave ni seque artículos que estén sucios con aceite
vegetal o de cocinar. Estos artículos pueden contener
lgo de aceite después de ser lavados. Debido al
a
aceite remanente, la tela puede echar humo o
prenderse fuego por sí sola.
No coloque la mano dentro del electrodoméstico cuando
7.
la tina o el agitador esté en movimiento.
No permita que los niños o animales domésticos jueguen
8.
encima, dentro o delante del electrodoméstico. Es
necesaria una supervisión estricta cuando el
electrodoméstico es usado cerca de los niños o animales
domésticos.
No altere los controles.
9.
10. No repare ni reemplace ninguna pieza de la lavadora ni
intente efectuar ningún servicio a menos que haya sido
recomendado específicamente en las instrucciones de
reparación por el usuario y que usted las comprenda y
tenga habilidad para efectuarlas.
11. Desenchufe el cordón eléctrico antes de intentar reparar
su lavadora. La reparación debe ser efectuada solamente
por personal de servicio calificado.
12. El agitador no debe ser sacado. Si el agitador se retira,
debe ser colocado nuevamente oprimiéndolo hacia bajo
completamente y apretando el tornillo de bloqueo antes
de que la lavadora sea usada.
13. Mantenga todos los aditivos del lavado, tales como
detergentes, blanqueador, etc. fuera del alcance de los
niños, preferiblemente en un armario con llave. Use los
aditivos del lavado solamente de acuerdo con las
instrucciones del fabricante. Observe todas las
advertencias en las etiquetas de los envases.
14. Mantenga el área alrededor y debajo de la lavadora sin
acumulación de materiales combustibles, tales como
a, papel, trapos, gasolina y todos los otros vapore
pelus
líquidos inflamables.
No use blanqueador de cloro ni amoníaco o ácidos (t
15.
como vinagre o de
pueden formar vapores peligrosos.
16.
No lave en la lavadora materiale
pueden pegar partículas en las ropas que se vayan a
lavar a continuación y causar irritación a la piel.
17. Para acabados de telas resistentes a las llamas - siga
cuidadosamente las instrucciones del fabricante de la
prenda. El lavado inapropiado puede eliminar el ac
18. Antes de que la lavadora sea puesta fuera de servicio o
scartada, retire la puerta del compartimiento del lavado.
de
19. Las mangueras de admisión del agua están sujetas a
daño y deterioro con el paso del tiempo. Revise
periódicamente las mangueras para comprobar que no
tengan protuberancias, torceduras, cortes, desgaste o
escapes y reemplácelas cada cinco años.
soxidante
s) en el mismo lavado. Se
s de fibra de vidrio. Se
s y
ale
abado.
s
36
Page 38

Cycles, options, lights
W
hat can & cannot be
w
ashed
o
perating tips
Special Features
Sugerencias para la operación
Detergente
• Utilice detergente líquido o granular para lavar ropa. Para
btener los mejores resultados, asegúrese de añadir
o
el detergente a la lavadora ANTES de colocar la
carga de ropa, y de que el agua de lavado tenga una
temperatura mayor que 16° C (60° F).
• Use la cantidad de detergente adecuada para el tamaño
de la carga, el grado de suciedad y las condiciones del
agua. Utilice más detergente si el agua es dura y las
cargas están muy sucias.
Si el agua es suave o la carga está ligeramente sucia,
utilice menos detergente. (Consulte las instrucciones del
fabricante.)
• Quite el detergente que caiga en la lavadora.
Colocación de la carga de ropa
• Para obtener mejores resultados, ponga el detergente en
la tina de lavado antes de añadir la carga.
• Coloque en la tina de la lavadora la ropa seca, desdoblada
y de manera holgada, hasta la fila superior de orificios en
el caso de una carga completa.
• No envuelva alrededor del agitador las prendas grandes,
como por ejemplo las sábanas.
• Mezcle prendas pequeñas y grandes para obtener la
mejor circulación. Lave por separado los artículos
voluminosos como por ejemplo cobijas o cobertores.
• Cuando lave artículos de planchado permanente o de
hechura delicada, lanas lavables o artículos de tela de
punto, nunca use menos del ajuste de agua MEDIUM
(Mediana). Esto reducirá al mínimo el encogimiento,
arrugado y los tirones de las costuras.
• Cierre cuidadosamente la tapa para evitar golpearla.
37
Page 39

C
ycles, options, lights
W
hat can & cannot be
w
ashed
o
perating tips
S
pecial Features
Sugerencias para la operación
Sugerencias adicionales
• Es posible que la ropa llegue a estar distribuida de
anera no uniforme durante en centrifugado. Si esto
m
sucede, oprima la perilla de control, abra la tapa, vuelva a
distribuir la ropa, cierre la tapa y vuelva a poner la
lavadora en marcha. El centrifugado continuará desde el
punto en que fue interrumpido.
• La lavadora se detendrá brevemente a través de cada
ciclo. Estas pausas son normales.
La lavadora está diseñada para que nof
•
iclo de centrifugado cuando la tapa está levantada. Sin
c
embargo, se puede llenar con la tapa levantada para
permitir el acceso al agua durante el pretratamiento de
manchas o para diluir el suavizante de ropa.
• Si usted abre la tapa durante un ciclo, la lavadora se
detendrá. Cuando se cierre la tapa la lavadora se vuelva a
poner en marcha, la lavadora continuará el ciclo en el
punto en que fue interrumpido.
uncione en el
38
Page 40

C
ycles, options, lights
What can & cannot be
w
ashed
operating tips
d
ishwasher use
l
oading
Controls at a glance
S
pecial Features
Uso de los controles – modelos con tres
PASO 1
Selección del nivel del agua
etermine el ajuste de acuerdo con el tamaño de la carga
D
de ropa. Este ajuste debe proporcionar suficiente agua para
permitir que la ropa se mueva libremente durante la
agitación.
Es posible que sea necesario, como por ejemplo en el caso
de telas voluminosas, ajustar el nivel del agua después de
que comienza la agitación. Para ajustar el nivel del agua,
gire el control hasta
colocar en el ajuste deseado.
AJUSTE DEL NIVEL TAMAÑO DE
DEL AGUA LA CARGA
reset (reajustar) y luego vuélvalo a
Mini
Small
Medium
Large
Super
(extragrande)
(mini)
(pequeño)
(mediano)
(grande)
1/4 llena
1/4 - 1/3
1/3 – 1/2
1/2 – 2/3
3/4 – llena
Nota: Los artículos deben moverse libremente para
obtener los mejores resultados.
PASO 2
Selección de las temperaturas
de lavado y enjuague
La lavadora le permite seleccionar entre agua caliente, tibia
o fría para lavar, y agua fría o tibia (modelos selectos) para
enjuagar
A
L
Warm/Warm
. Utilice la siguiente t
TEMP. DE TIPO DE CARGA
O/ENJUAGUE
AD
V
Hot/Cold
(caliente/fría)
(tibia/tibia) Ropa de color moderadamente
(modelos selectos) sucia.
arm/Cold
W
(tibia/fría)
Cold/Cold
(fría/fría) ligeramente sucia; lanas lavables.
abla como guía.
Ropa blanca y ropa de colores
steñibles muy sucia.
no de
Ropa de color moderadamente
sucia; la mayoría de la ropa
inarrugable.
Ropa de colore
s brillante
s,
‘Automatic Temperature Control’ (A.T.C.) (control
automático de la temperatura, modelos selectos) le
ofrece la temperatura de agua de lavado óptima para
limpieza. Para ahorrar energía, el control automático de la
tempertura regulará las temperaturas del agua mezclando
agua caliente con agua fría a fin de lograr la temperatura
apropiada del agua.
TEMP. DE TIPO DE CARGA
UE
UAG
O/ENJ
LAVAD
Estos ajustes tienen control automático de la temperatura:
ATC Hot/Cold, Ahorra energía agregando agua
ATC Warm/Warm, fría al agua caliente del calentador.
ATC Warm/Cold Proporciona limpieza óptima a
(Control automático de)
temperatura caliente/fría,
tibia/tibia, tibia/fría)
C Cold/Cold
T
A
(Control automático de
temperatura fría/fría)
temperaturas más bajas.
uede agregar agua c
P
agua fría que va entrando a medida
que la lavadora se llena. Esto
asegura que el agua esté lo
suficientemente tibia para activar
el detergente de forma apropiada.
aliente al
Nota: El detergente no se disuelve bien en el agua de
lavado con temperatura menor que 16˚ C (60˚ F), y por lo
anto
t
no limpiará adecuadamente la ropa. L
de cuidado de la ropa definen agua fría como aquélla con
una temperatura de hasta 29,4˚ C (85˚ F).
39
as etiquet
as
Page 41

velocidades
Las características de control y los estilos varían según el modelo.
PASO 3
Selección del ciclo
Para seleccionar un ciclo, presione (posición de apagado) el
disco de control y hágalo girar a la derecha hasta que el
indicador apunte al nivel de suciedad necesario para la
carga de ropa en los ciclos ‘Regular’, ‘Wrinkle Control’
(control de arrugas) o ‘Delicates’ (ropa delicada).
‘Regular’ (ciclo regular)
Permite velocidades normales de agitación y de centrifugado
para lavar ropa de algodón y ropa muy sucia. Para obtener la
máxima limpieza ajuste el disco en el número a ‘Extra
Heavy’.
‘Wrinkle Control’ (control de arrugas)
Permite una agitación normal y centrifugado lento para
proteger las telas inarrugables.
‘Delicates’ (ropa delicada)
Permite velocidades lentas de agitación y de centrifugado
para la ropa delicada y tejida.
PASO 4
Selección de opciones
(si se desea)
‘Extra Rinse’ (enjuague adicional)
Cuando el interruptor está en la posición ‘On’ (encendido),
se realizará un enjuague adicional al final ‘Regular’, ‘Wrinkle
Control’ (control de arrugas) o ‘Delicates’ (ropa delicada)
para eliminar mejor los aditivos de lavandería, espuma de
jabón, perfumes, etc.
‘End of cycle signal’ Señal – fin de ciclo
(modelos selectos)
a señal de fin de ciclo sonará cuando se haya complet
L
el ciclo. La señal de fin de ciclo puede ser cancelada
colocando el interruptor ‘Signal’ en la posición
(apagado).
‘Off’
ado
PASO 5
Tire del disco de control para
comenzar
Puede detener el funcionamiento de la lavadora en cualquier
momento presionando el disco de control. Por lo tanto, es
posible realizar un remojo sin agitación o acortar, pasar por
alto o repetir cualquier parte de un ciclo. El disco de control
debe estar
ambie el ajuste.
c
presionado (posición de apagado) cuando
Nota: No intente girar el disco de control hacia la
izquierda, de lo contrario dañará el temporizador
.
40
Page 42

C
ycles, options, lights
What can & cannot be
w
ashed
operating tips
d
ishwasher use
l
oading
Controls at a glance
S
pecial Features
Uso de los controles – modelos
con cuatro velocidades
PASO 1
Selección del nivel del agua
Determine el ajuste de acuerdo con el tamaño de la carga
de ropa. Este ajuste debe proporcionar suficiente agua para
permitir que la ropa se mueva libremente durante la
agitación. Enalgunos modelos, el control ‘Infinite Water Level’
(control infinito de nivel del agua) le permite seleccionar un
ajuste específico o cualquier punto intermedio.
Es posible que sea necesario, como por ejemplo en el caso
de telas voluminosas, ajustar el nivel del agua después de
que comienza la agitación. Para ajustar el nivel del agua,
gire el control hasta
colocar en el ajuste deseado.
AJUSTE DEL NIVEL TAMAÑO DE
DEL AGUA LA CARGA
Mini
Small
Medium
Large
Super
Nota: L
obtener los mejores resultados.
os artículos deben moverse libremente para
reset (reajustar) y luego vuélvalo a
(mini)
(bajo)
(mediano)
(grande)
(extra-grande)
1/4 llena
1/4 - 1/3
1/3 – 1/2
1/2 – 2/3
3/4 – llena
TEMP. DE TIPO DE CARGA
LAVADO/ENJUAGUE
Hot/Cold
(caliente/fría)
Warm/Warm
(modelos selectos) sucia.
Warm/Cold
(tibia/fría)
Cold/Cold
(fría/fría) ligeramente sucia; lanas lavables.
Automatic Temperature Control (A.T.C.) (control
automático de la temperatura, modelos selectos) le
ofrece la temperatura de agua de lavado óptima para
limpieza. Para ahorrar energía, esta lavadora regulará las
temperaturas del agua mezclando agua caliente con agua
fría a fin de lograr la temperatura apropiada del agua.
(tibia/tibia) Ropa de color moderadamente
Ropa blanca y ropa de colores
no desteñibles muy sucia.
Ropa de color moderadamente
sucia; la mayoría de la ropa
inarrugable.
Ropa de colores brillantes,
TEMP. DE TIPO DE CARGA
ADO/ENJUAGUE
V
A
L
Estos ajustes tienen control automático de la temperatura:
ATC Hot/Cold, Ahorra energía agregando agua
TC Warm/Warm,fría al agua caliente del calentador.
A
ATC Warm/Cold Proporciona limpieza óptima a
(Control automático de)
temperatura c
tibia/tibia, tibia/fría)
aliente/fría,
temperaturas más bajas.
PASO 2
Selección de las temperaturas
de lavado y enjuague
a lavadora le permite seleccionar entre agua c
L
o fría para lavar, y agua fría o tibia (modelos selectos) para
enjuagar.
41
aliente, tibia
ATC Cold/Cold
(Control automático de
temperatura fría/fría)
uede agregar agua c
P
agua fría que va entrando a medida
que la lavadora se llena. Esto
asegura que el agua esté lo
suficientemente tibia para activar
el detergente de forma apropiada.
aliente al
Page 43

Las características de control y los estilos varían según el modelo.
PASO 3
Selección del tipo de lavado y
la velocidad de centrifugado
La lavadora ofrece varias combinaciones de tipo de lavado y
velocidad de centrifugado de las cuales puede seleccionar.
LAVAD
CENTRIFUGADO
Wrinkle Control Telas resistentes que necesitan una
planchado permanente
Ex. Gentle/Slow
Nota: El detergente no se disuelve bien en el agua de
lavado con temperatura menor que 16˚ C (60˚ F), y por lo
anto no limpiará adecuadamente la ropa.
t
O/VEL.
DE
Regular Telas resistentes que necesitan la
Normal/Fast
regular
normal/alta
Normal/Slow
normal/baja
Delicate Telas delicadas que necesitan una
Gentle/Slow
delicados
lenta/baja
Handwash Agitación intermitente lenta y remojo
lavado a mano
extra lenta/baja
máxima extracción de agua como
vaqueros, toallas, ropa de cama.
velocidad de centrifugado menor
debido a que se arrugan tales como
camisas de vestir, pantalones de vestir.
velocidad de centrifugado menor
debido a la construcción de la ropa.
para lavar cuidados
artículos más delicados
TIPO DE CARGA
amente los
.
PASO 4
Selección del ciclo
Para seleccionar un ciclo, presione (posición de apagado) el disco
de control y hágalo girar hacia la derecha hasta que el indicador
apunte al nivel del suciedad necesario para la cargade ropa.
Importante: Para el cuidado óptimo de las telas, debe seleccionar
el ciclo de lavado y la velocidad de centrifugado adecuados para el
tipo de carga usando la perilla de lavado/centrifugado.
‘Regular’ (tejidos regulares)
Este ciclo proporciona hasta 16 minutos de agitación.
Seleccione el ciclo y gire la perilla de selección de telas a
‘Regular Wash/Spin Speed’.
‘Wrinkle Control’ (planchado permanente)
Este ciclo fue diseñado para lavar telas resistentes que necesitan
una velocidad de centrifugado menor para reducir las arrugas (por
ejemplo, camisas y pantalones de vestir). Elija el ajuste ‘Wrinkle
Control Wash/Spin Speed’ (planchado permanente velocidad de
lavado/exprimido).
‘Delicates’ (delicados)
Este ciclo fue diseñado para artículos que requieren una agitación
suave. Seleccione el ajuste ‘Delicates’ con la perilla ‘Wash/Spin
Speed’ (velocidad de lavado/exprimido).
Cuando lave telas delicadas que deban ser lavadas a mano, elija el
ajuste ‘Handwash’ (lavado a mano) con la perilla ‘Wash/Spin
Speed’
. Este ajuste proporciona agitación lenta intermitente y
remojo con un centrifugado lento.
‘Soak Only’ (remojar, modelos selectos)
Esta opción ofrece 4 minutos de agitación y luego remojo. Evite el
remojo prolongado — remoje durante 30 minutos o menos.
La perilla de control debe ser avanzada manualmente a un ajuste de
centrifugado para centrifugar y drenar el agua.
42
Page 44

Cycles, options, lights
W
hat can & cannot be
washed
o
perating tips
d
ishwasher use
l
oading
Controls at a glance
S
pecial Features
Uso de los controles
PASO 5
Selección de opciones (si se desea)
‘Extra Rinse’ (extra enjuague)
Cuando la perilla está en la posición ‘On’ (Si), se realizará
un enjuague adicional al final del ciclo ‘Regular’, ‘Wrinkle
Control’ (planchado permanente) o ‘Delicates’ (delicades)
para eliminar mejor los aditivos de lavandería, espuma de
jabón, perfumes, etc.
‘End of Cycle Signal’ Señal – fin de
ciclo
La señal de fin de ciclo puede ser cancelada colocando el
interruptor ‘Signal’ cuando se haya completado el ciclo. La
señal de fin de ciclo puede ser cancelada colocando el
interruptor ‘Signal’ en la posición
(modelos selectos)
‘Off’ (apagado).
PASO 6
Tire del disco de control para
comenzar
Puede detener el funcionamiento de la lavadora en cualquier
momento presionando el disco de control. Por lo tanto, es
posible realizar un remojo sin agitación o acortar, pasar por
alto o repetir cualquier parte de un ciclo. El disco de control
debe estar
cambie el ajuste.
Nota: No intente girar el disco de control hacia la
izquierda, de lo contrario dañará el temporizador.
presionado (posición de apagado) cuando
43
Page 45

C
ycles, options, lights
What can & cannot be
w
ashed
operating tips
d
ishwasher use
l
oading
Controls at a glance
S
pecial Features
Uso de los controles - Modelos electrónicos
Para comenzar
1. Añada el detergente y los aditivos a la lavadora.
. Cargue la lavadora.
2
3. Cierre la tapa.
. Elija el ciclo adecuado y las opciones para la carga.
4
5. Oprima la perilla de selección del ciclo.
6. La luz indicadora de llenado se encenderá y la
lavadora comenzará a llenarse.
Nota: La tapa debe estar completamente cerrada para
poder Uso de los controles de la lavadora.
PASO 1
Selección del nivel del agua
Determine el ajuste de acuerdo con el tamaño de la carga
de ropa. Este ajuste debe proporcionar suficiente agua para
permitir que la ropa se mueva libremente durante la
agitación.
Es posible que sea necesario, como por ejemplo en el caso
de telas voluminosas, ajustar el nivel del agua después de
que comienza la agitación. Para ajustar el nivel del agua,
gire el control ‘Infinite Water Level’ (control infinito de nivel
de aqua) hasta
en el ajuste deseado.
NIVEL DEL AGUA LA CARGA
Small (pequeño)
Medium
Super
Nota: Los artículos deben moverse libremente para
obtener los mejores resultados.
reset (reajustar) y luego vuélvalo a colocar
AJUSTE DEL TAMAÑO DE
Mini
Large
(extra-grande)
(mini)
(mediano)
(grande)
1/4 llena
1/4 - 1/3
1/3 – 1/2
1/2 – 2/3
3/4 – llena
PASO 2
Selección de la temperatura de
lavado y enjuague
La lavadora le permite seleccionar entre agua caliente, tibia
o fría para lavar, y agua fría o tibia (modelos selectos) para
enjuagar. Utilice la siguiente tabla como guía.
TEMP. DE TIPO DE CARGA
LAVADO/ENJUAGUE
Hot/Cold Ropa blanca y ropa de colores
(caliente/fría) no desteñibles muy sucia.
(modelos selectos)
Warm/Warm (tibia/tibia) Ropa de color moderadamente
(modelos selectos) sucia.
Warm/Cold Ropa de color moderadamente
(tibia/fría) sucia; la mayoría de la ropa
(modelos selectos) inarrugable.
Cold/Cold Ropa de colores brillantes,
(fría/fría) ligeramente sucia; lanas lavables.
Automatic Temperature Control (A.T.C.) (control
automático de la temperatura)
de agua de lavado óptima para limpieza. Para ahorrar
energía, esta lavadora regulará las temperaturas del agua
mezclando agua caliente con agua fría a fin de lograr la
temperatura apropiada del agua.
TE
MP. D
E TI
LAVADO/ENJUAGUE
Estos ajustes tienen control automático de la temper
ATC Hot/Cold, Ahorra energía agregando agua
ATC Warm/Warm, fría al agua caliente del calentador.
ATC Warm/Cold Proporciona limpieza óptima a
(Control automático de)
temperatura caliente/fría,
tibia/tibia, tibia/fría)
(modelos selectos)
ATC Cold/Cold
(Control automático de
temperatura fría/fría)
temperaturas más bajas.
Puede agregar agua caliente al
agua fría que va entrando a medida
que la lavadora se llena. Esto
asegura que el agua e
suficientemente tibia para activar
el detergente de forma apropiada.
le ofrece la temperatura
PO DE CARGA
atura:
sté lo
44
Page 46

C
ycles, options, lights
What can & cannot be
washed
operating tips
d
ishwasher use
loading
C
ontrols at a glance
Special Features
Uso de los controles - Modelos electrónicos
Las características de control y los estilos varían según el modelo.
PASO 3
Seleccione del nivel de
suciedad
Su lavadora tiene la opción de elegir el nivel de suciedad de
la ropa.
NIVEL DE TIPO DE CARGA
SUCIEDAD
Light (ligera) Use para lavar cargas de ropa
levemente sucia.
Normal Use para lavar cargas de ropa
moderadamente sucia. Este ajuste
Heavy (sucia) Use para lavar cargas de ropa muy
Extra Heavy Use este ciclo para lavar cargas de
(muy sucia) ropa resistente manchada y muy
es el apropiado para la mayoría de
las cargas de ropa.
sucias.
sucia.
PASO 4
Selección del tipo de tela
Elija el ciclo adecuado para el tipo de ropa girando la perilla
de selección del ciclo hasta que se encienda la luz
indicadora para el tipo de tela.
LAVADO/ SELECCIÓN DEL
VELOCIDAD TIPO DE TELA
DE
CENTRIFUGADO
Quick Wash
(lavado rápido)
Gentle/Fast
(suave/rápido)
Hand Wash
(lavado a mano)
Ex. Gentle/Slow
(extra suave/lento)
Delicates
(ropa delicada)
Gentle/Slow
(suave/lento)
Para artículos de ropa ligeramente
sucios o arrugados que se
necesiten con urgencia.
Proporciona agitación intermitente
y remojo. Para lana, seda y otras
telas que sólo deben ser lavadas a
mano.
Para telas diáfanas, sostenes y
lencería que necesiten velocidades
de agitación y centrifugado más
lentas debido a la fabricación de la
ropa.
45
Wrinkle Control
(control de arrugas)
Medium/Slow
(intermedio/lento)
Regular
Medium/Fast
(intermedio/rápido)
Para telas de “lavar y usar” y
sintétic
sucia que necesiten velocidades
de centrifugado más lentas para
reducir las arrugas.
P
resistentes como el algodón, la
ropa de cama y los artículos de
ropa con suciedad normal que
nece
del agua.
as y ropa levemente
ara la mayoría de las telas
siten una extracción máxima
Page 47

Cycles, options, lights
W
hat can & cannot be
w
ashed
o
perating tips
d
ishwasher use
loading
C
ontrols at a glance
S
pecial Features
Uso de los controles - Modelos electrónicos
PASO 5
‘Soak Only’ (sólo remojo, modelos selectos)
Proporciona aproximadamente 33 minutos de períodos
alternados de remojo con agitaciones breves a baja
velocidad. Al finalizar el ciclo, la perilla de selección del ciclo
debe ser girada manualmente a un ciclo de lavado o de
centrifugado para drenar el agua de la lavadora. Evite
períodos largos de remojo.
‘Spin Only’ (sólo centrifugado)
Proporciona un centrifugado para remover una mayor
cantidad de agua de la ropa.
‘Rinse & Spin’ (enjuague y centrifugado)
Use para cargas que necesiten enjuague solamente o para
añadir suavizante durante el enjuague.
‘Power Off’ (apagado)
Para cancelar el ciclo y apagar la lavadora, gire el disco de
selección de ciclo a ‘Power Off’ y oprima el disco.
PASO 6
Selección de opciones
‘Extra Rinse’ (enjuague
adicional)
Cuando el interruptor está en la posición
‘On’ (Encendido), se realizará un enjuague
adicional al final de todos los ciclos, para
eliminar mejor los aditivos de lavandería,
espuma de jabón, perfumes, etc.
‘End of Cycle Signal’ (Señal de
fin de ciclo)
La señal de fin de ciclo sonará cuando se haya
completado el ciclo. La señal de fin de ciclo
puede ser cancelado (modelos selectos) colocando el
interruptor en la posición
‘Off’ (apagado).
PASO 7
Encienda la lavadora
Para encender la lavadora, oprima la perilla de selección
del ciclo.
Cambio de ciclo
Si se seleccionó accidentalmente un ciclo incorrecto:
1. Oprima la perilla de selección del ciclo.
2. Gire la perilla de selección del ciclo a la posición
deseada.
3. Programe las opciones deseadas para el ciclo.
4. Oprima la perilla de selección del ciclo. Las luces
indicadoras de lavado dejan de destellar y el nuevo
ciclo se inicia.
Anulación de un ciclo
Para anular un ciclo:
1. Oprima la perilla de selección del ciclo.
2. Gire la perilla de selección del ciclo a la posición
’
er Off
ow
‘P
a drenar el agua de la lavadora:
ar
P
Seleccione el ciclo
1.
centrifugado) o ‘Spin Only’ (sólo centrifugado).
Oprima la perilla de
2.
indicadora de centrifugado se enciende y la
lavadora inicia el enjuague o el centrifugado.
(apagado) y oprima la perilla.
‘Rinse & Spin’ (enjuague y
selección del ciclo. L
a luz
46
Page 48

S
pecial Features
Características especiales
Surtidor de blanqueador líquido
l surtidor diluye automáticamente el blanqueador de cloro
E
líquido antes de que éste entre en contacto con la carga de
ropa.
Siga estos pasos para usar el surtidor:
1. Mida cuidadosamente el blanqueador de cloro líquido,
siguiendo las instrucciones del envase.
2. Vierta el blanqueador de cloro líquido en el surtidor
de blanqueador
Evite salpicar o llenar en exceso el surtidor.
Notas:
antes de colocar la carga de ropa.
Surtidor de líquidos
ste surtidor automáticamente descarga el suavizante
E
líquido de telas en el momento adecuado durante el ciclo.
Siga estos pasos para usar el surtidor:
1. Vierta una cantidad medida del suavizante en el
surtidor, solamente hasta la línea de llenado.
2. Si el suavizante no llega hasta esta línea, añada agua
tibia.
Si es necesario limpiar el surtidor:
1. Retire el dispensador del agitador.
2. Remoje en el fregadero o en un recipiente en agua
caliente y detergente de lavar platos durante una hora.
3. Coloque las manos sobre les partes superior e inferior
del dispensador y agítelo para aflojar el material
acumulado.
4. Enjuague con agua limpia y
caliente.
5. Repita el proceso si es necessario.
6. Reinstale el dispensador en el
agitador.
No use detergente líquido de lavar
platos dentro de la lavadora pues se puede formar mucha
espuma.
• Nunca vierta blanqueador de cloro líquido no diluido
directamente sobre la carga de ropa ni en la tina de la
lavadora. Es una sustancia química muy fuerte y si no
se usa adecuadamente puede dañar las telas; por
ejemplo, puede romperlas o decolorarlas.
• Si prefiere utilizar un blanqueador sin cloro que no
decolore, viért
detergente.
surtidor de blanqueador.
alo en la tina de lavado junto con el
No vierta blanqueadores sin cloro en el
‘Finger Faucet’ (llave de agua,
modelos selectos)
Ofrece un chorro de agua cuando el interruptor
está en la posición ‘On’.
Sistema automático de
filtrado de pelusa
El sistema de filtrado de pelusa no requiere
limpieza.
El agua de lavado y enjuague se filtra repetida y
continuamente para atrapar la pelusa que desprende la
mayoría de las telas durante el ciclo de agitación, antes de
que se vuelva a depositar en la ropa. El diseño de la canasta
de lavado y el flujo de agua que produce el agitador separan
la pelusa de la ropa y la atrapan entre la canasta de lavado
interna y la tina externa. Durante el ciclo de centrifugado, la
pelusa sale automáticamente de la lavadora.
Centrifugdo de seguridad
Si por alguna razón levanta la t
período de centrifugado o de extracción, la lavadora dejará
de funcionar inmediat
personal. Si su lavadora no deja de funcionar
inmediatamente a un técnico de servicio. Cuando baje la
apa la lavadora automáticamente comenzará a funcionar
t
otra vez.
amente. Esto e
apa de la lavadora durante el
s para su seguridad
, llame
47
Page 49

S
pecial Features
Características especiales
Cycles, options, lights
What can & cannot be
washed
Special Features
Compensador de carga en
caso de centrifugado
desequilibrado
Su nueva lavadora está diseñada para corregir cargas no
balanceadas sin necesidad de apagar o interrumpir el ciclo
de lavado.
Por esta razón siempre se completará el ciclo. Si en alguna
ocasión las telas pesadas de una carga desequilibradas
contienen humedad excesiva al final del ciclo, redistribuya la
ropa en la lavadora y vuelva a ajustar la perilla de control a
centrifugado.
Cuidado y limpieza
1. Después de lavar la ropa deje la lavadora abierta hasta
que se seque el interior.
2. Revise las mangueras para asegurarse de que no estén
torcidas ni dobladas.
3. La lavadora no se debe instalar en lugares con
temperaturas menores que el punto de congelación ya
que se podría dañar.
4. Ocasionalmente limpie el exterior de la lavadora con
una esponja o paño limpio y húmedo.
lustrar en las piezas de plástico.
5. En la fábrica se hace una lubricación que dura toda la
vida útil de la lavadora, de manera que usted nunc
necesitará aceitarla ni engrasarla.
No coloque objetos pesados ni de bordes agudos sobre
6.
la lavadora.
7. Nunca debe utilizar la superficie superior de la lavadora
para quitar manchas de sus prendas. Algunos productos
para quitar manchas, como por ejemplo los que se usan
para manchas de óxido, dañarán el acabado.
8. Quite alfileres, hebillas u otros objetos de bordes
agudos de la ropa para evitar raspar las partes internas
de la lavadora.
9. No debe almacenar ropa en la lavadora.
os blanqueadore
L
10.
derraman y permanecen en la superficie de la lavadora
dañarán su ac
material derramado con un paño suave y húmedo.
s, detergente
abado brilloso. Quite de la lavadora el
s, solvente
No use cera de
a
s, etc. que se
Protector de sobrecarga
Un protector integrado automáticamente apaga el motor de
a lavadora en caso de una sobrecarga. Esto puede ocurrir
l
cuando:
• La carga que se está lavando es muy pesada.
• Demasiados electrodomésticos están conectados en la
línea de la cual se alimenta su lavadora.
• Hay bajo voltaje en la línea eléctrica.
• Se levanta y baja repetidamente la tapa.
El protector de sobrecarga permite que la lavadora reanude
su funcionamiento cuando el motor se enfría hasta alcanzar
una temperatura de funcionamiento segura.
Si el motor se detiene repetidamente llame a su técnico de
servicio.
11. Si va a desocupar su casa durante el invierno, pida a un
técnico de servicio que drene la lavadora. Desenchufe
el cable eléctrico del tomacorriente y desconecte las
mangueras de los grifos.
Limpieza del interior
El interior de la lavadora debe ser limpiado periódicamente
a fin de sacar cualquier suciedad, tierra, olor o residuos de
bacterias que puedan quedar en la lavadora después que se
lava la ropa. Recomendamos que se proceda de la siguiente
manera cada 60 a 120 días para limpiar y refrescar el
interior de la lavadora. La frecuencia de la limpieza de la
lavadora depende de factores tales como el uso, la cantidad
de suciedad, tierra o bacterias que pase por su lavadora, o
el uso de agua fría. Si no se siguen estas instrucciones se
pueden producir condiciones no satisfactorias, incluyendo
olores desagradables y/o manchas permanentes en la
lavadora o la c
a limpiar y refrescar el interior de la lavadora:
ar
P
1. Agregue una cantidad medida de blanqueador de cloro
en el surtidor del blanqueador, siguiendo las
instrucciones del envase.
2. Agregue 1/4 taza de detergente a la tina de la lavadora.
3. Haga funcionar la lavadora sin ropa durante un ciclo
completo usando agua caliente.
4. Repita el proceso si es necesario.
arga de ropa.
48
Page 50

Localización y solución de averías
Cycles, options, lights
W
hat can & cannot be
w
ashed
operating tips
d
ishwasher use
l
oading
Special Features
La lavadora no se llena
La lavadora no agita
La lavadora no
centrifuga ni desagua
La ropa queda mojada
La lavadora se detiene
Hay escape de agua
Funcionamiento ruidoso
Enchufe el cordón en un tomacorriente eléctrico con corriente.
•
• Verifique el fusible o reponga el disyuntor.
• Gire la perilla de control al ciclo apropiado y tire de la perilla hacia afuera para poner en
marcha la lavadora.
•
Abra ambas llaves completamente.
• Enderece las mangueras de admisión.
• Desconecte las mangueras y lave las mallas. Las mallas de filtrado de las mangueras pueden
estar obstruidas.
• Verifique el fusible o reponga el disyuntor.
• Asegúrese de que la tapa esté bien cerrada.
• Gire la perilla de control al ciclo apropiado y ponga en marcha la lavadora.
• Las pausas son normales. Espere y vea si la lavadora vuelve a arrancar.
• Verifique el fusible o reponga el disyuntor.
• Enderece las mangueras de desagüe. Elimine las mangueras torcidas. Si hay una restricción
del desagüe de la residencia, llame a un téncnico de servicio de desagües.
• Cierre la tapa y ponga en marcha la lavadora. Para su seguridad, la lavadora no centrifuga ni
agita a menos que la tapa esté cerrada.
• Bloqueo por espuma – causado por exceso de espuma. Vuelva a lavar sin detergente. Use la
cantidad correcta de un detergente que forme poca espuma.
• La ropa no está distribuida uniformemente. Vuelva a distribuir la ropa, cierre la tapa y ponga
en marcha la lavadora. Verifique si la lavadora está nivelada. Asegúrese de que el nivel del
agua sea aceptable para el tamaño de la carga de ropa.
• Para las cargas pesadas, tales como vaqueros o toallas, se recomienda la velocidad de
centrifugado normal.
• Enchufe el cordón en un tomacorriente eléctrico con corriente.
• Verifique el fusible o reponga el disyuntor.
• Cierre la tapa y ponga en marcha la lavadora. Para su seguridad, la lavadora no centrifuga ni
agita a menos que la tapa esté cerrada.
• Puede ser una pausa del ciclo. Espere unos momentos para ver si continúa funcionando.
Asegúre
•
se de que las conexiones de la manguera estén herméticas.
• Asegúrese de que el extremo de la manguera de desagüe esté correctamente insertado y
asegurado en el receptáculo de des
agüe.
• Evite el remojo prolongado – remoje durante 30 minutos o menos.
• Evite cargar demasiado la lavadora.
• Asegúrese de que la lavadora esté debidamente nivelada como se describe en el manual de
instalación.
• Los pisos débiles pueden causar vibración y movimiento.
os sonidos del funcionamiento variarán de acuerdo con la velocidad de agit
L
•
ación.
49
Page 51

Localización y solución de averías
Cycles, options, lights
W
hat can & cannot be
w
ashed
operating tips
d
ishwasher use
l
oading
Special Features
La lavadora se llena
pero con temperatura
ncorrecta del agua
i
La perilla de control de
ciclo avanza más allá
de ‘Off’ (apagado)
• Abra ambas llaves completamente.
• Si está equipada con una perilla selectora de temperatura, asegúrese de que esté colocada
exactamente en el ajuste de temperatura y no entre dos ajustes.
• Asegúrese de que la selección de temperatura sea correcta.
• Mientras se llena la lavadora, podrá observar la entrada de sólo agua caliente o sólo agua
fría en la tina cuando se seleccionan las temperaturas de lavado correspondientes. Ésta es
una función normal del control automático de temperatura (modelos selectos) durante la
medición de temperatura del agua que realiza la lavadora.
• Si se selecciona el control automático de la temperatura (modelos selectos), el agua fría
puede estar más tibia que el agua de la llave.
• Asegúrese de que las mangueras estén conectadas a las llaves y las conexiones de admisión
correctas. Asegúrese de que el suministro del agua esté regulado correctamente. Deje correr
agua dentro de la tubería del agua antes de llenar la lavadora.
• Verifique el calefactor del agua. Debe estar ajustado para entregar de agua caliente a 120° F
(49° C) como mínimo en la llave. También verifique la capacidad del calefactor del agua y la
velocidad de recuperación.
• Desconecte las mangueras y limpie las mallas. Las mallas de filtrado de las mangueras
pueden estar obstruidas.
• La opción
Extra Rinse (modelos selectos) está seleccionada.
Si desea recibir más asistencia comuníquese con el Departamento de Asistencia al Cliente de Maytag al :
1-800-688-9900 en EE.UU. o 1-800-688-2002 en Canadá (llamada gratuita).
50
Page 52

C
ycles, options, lights
W
hat can & cannot be
w
ashed
o
perating tips
S
pecial Features
Garantía y servicio
Garantía
Garantía limitada de un año –
Piezas y mano de obra
Durante un (1) año a partir de la fecha
original de compra al detal, se reparará o
reemplazará gratuitamente cualquier pieza
que falle durante el uso normal en el hogar.
Residentes Canadienses
Las garantías anteriores cubren solamente
aquellos electrodomésticos instalados en
Canadá que han sido certificados o
aprobados por las agencias de prueba
correspondientes para cumplimiento con la
Norma Nacional de Canadá a menos que el
electrodoméstico haya sido traído a Canadá
desde los EE.UU. debido a un cambio de
sidencia.
re
Las garantías específicas expresadas
anteriormente son las UNICAS garantías
provistas por el fabricante. Estas garantías le
otorgan derechos legales específicos y usted
puede tener además otros derechos que
varían de un estado a otro.
LA ÚNICA Y EXCLUSIVA SOLUCIÓN PARA EL
CLIENTE BAJO ESTA GARANTÍA LIMITADA ES
LA REPARACIÓN DEL PRODUCTO SEGÚN SE
INDICA AQUÍ. LAS GARANTÍAS IMPLÍCITAS,
INCLUYENDO LAS GARANTÍAS DE
COMERCIALIZACIÓN O DE APTITUD PARA UN
PROPÓSITO EN PARTICULAR ESTÁN
LIMITADAS A UN AÑO O AL PERÍODO DE
TIEMPO MÍNIMO PERMITIDO POR LA LEY.
AYTAG CORPORATION NO SERÁ
M
RESPONSABLE DE DAÑOS INCIDENTALES O
CONSECUENTES. ALGUNOS ESTADOS Y
OVINCIAS NO PERMITEN LA EXCLUSIÓN O
R
P
AÑOS INCIDENTALES O
E D
IÓN D
AC
IT
M
LI
CONSECUENTES O LA LIMITACIÓN DE LA
DURACIÓN DE LAS GARANTÍAS IMPLÍCITAS
MERCIALIZACIÓN O APTITUD, POR LO
O
E C
D
QUE ESTAS EXCLUSIONES O LIMITACIONES
PUEDEN NO APLICARSE EN SU CASO. ESTA
RANTÍA LE OTORGA DERECHOS LEGALES
A
G
ESPECÍFICOS. USTED TAMBIÉN PUEDE TENER
OTROS DERECHOS QUE VARÍAN DE UN
ESTADO A OTRO O DE UNA PROVINCIA A
OTRA.
03 A P
orm No. Y81
F
9
art No. 220
71 www
6
6
Lo que no cubren estas garantías
1. Situaciones y daños resultantes de cualquiera de las siguientes
situaciones:
a. Instalación, entrega o mantenimiento inapropiados.
b. Cualquier reparación, modificación, alteración o ajuste no autorizados por
el fabricante o taller de servicio autorizado.
c. Mal uso, abuso, accidentes, uso no razonable o hechos fortuitos.
d. Corriente, voltaje, suministro eléctrico o suministro de gas incorrectos.
e. Ajuste inadecuado de cualquier
2. Las garantías quedan nulas si los números de serie originales han sido
retirados, alterados o no se pueden determinar fácilmente.
3. Bombillas, filtros de agua y filtros de aire.
4. Los productos comprados para uso comercial o industrial.
5. El costo del servicio o llamada de servicio para:
a. Corregir errores de instalación. Para los productos que requieran
ventilación, se deben usar conductos de metal rígido.
b. Instruir al usuario en el uso adecuado del producto.
c. Transporte del electrodoméstico al establecimiento de servicio y de regreso.
6. Cualquier pérdida de alimentos debido a fallas del refrigerador o
congelador.
7. Costos de viaje y transporte de servicio en áreas remotas.
8. Esta garantía no se aplica fuera de los Estados Unidos y Canadá. Póngase en
contacto con su distribuidor para determinar si se aplica cualquier otra
garantía.
9. Los daños consecuentes o incidentales sufridos por cualquier persona como
resultado del incumplimiento de esta garantía. En algunos
estados no se permite la exclusión o limitación de daños consecuentes o
incidentales, por lo tanto la limitación o exclusión anterior puede no aplicarse
en su caso.
Si necesita servicio
Primero revise la sección de localización y solución de averías en su guía de uso
y cuidado o llame al distribuidor donde adquirió el electrodoméstico. También
puede llamar a Maytag Services, LLC, Atención al cliente, al 1-800-688-9900 en
EE.UU. y al 1-800-688-2002 en Canadá para ubicar a un agente de servicio
c
alific
ado.
• Asegúrese de conservar el comprobante de compra para verificar el estado de
la garantía. Consulte la sección sobre la GARANTÍA para mayor información
sobre las responsabilidades del propietario para obtener servicio bajo la
garantía.
• Si el distribuidor o la compañía de servicio no pueden resolver el problema,
escriba a Maytag Services, LLC, Attn: CAIR
TN 37320-23
0 o llame al
7
-8
1
88-9900 en EE.UU. y al
00-6
®
Center, P.O. Box 2370, Cleveland,
1-800-688-2002 en Canadá.
• Las guías del propietario, manuales de servicio e información sobre las piezas
pueden solicitarse a Maytag Services, LLC, Atención al cliente.
Notas: Cuando llame o escriba acerca de un problema de servicio, por
favor incluya la siguiente información:
Su nombre, dirección y número de teléfono;
a.
b. Número de modelo y número de serie;
c. Nombre y dirección de su distribuidor o técnico de servicio;
d. Una descripción clara del problema que está experimentando;
Comprobante de compra (recibo de compra).
e.
.maytag.com Litho U.S.A. ©200
6 Maytag Appliances Sales Co.
 Loading...