

Page 1
Health & Safety, Use & Care and Installation guide
www.maytag.co.uk/warranty
Page 2

ENGLISH .......................................3
2
Page 3
ENGLISH
HEALTH & SAFETY, USE & CARE
and INSTALLATION GUIDES
THANK YOU FOR BUYING A MAYTAG PRODUCT.
In order to receive comprehensive service and support,
please register your appliance at www.maytag.co.uk/warranty
Index
EN
Health and Safety Guide
SAFETY INSTRUCTIONS ..............................................................................5
SAFEGUARDING THE ENVIRONMENT ................................................................8
DECLARATION OF CONFORMITY .....................................................................9
Use and Care guide
PRODUCT DESCRIPTION ............................................................................10
APPLIANCE ..........................................................................................10
DETERGENT DISPENSER ..............................................................................10
CONTROL PANEL .....................................................................................11
TECHNICAL DATA FOR WATER CONNECTION ..........................................................12
DOOR ...............................................................................................13
DRUM LIGHT (if available) ............................................................................13
ACCESSORIES ........................................................................................13
HOW TO USE THE APPLIANCE .......................................................................14
FIRST TIME USE ......................................................................................14
3
Page 4

DAILY USE ...........................................................................................15
PROGRAMMES AND OPTIONS ........................................................................19
FUNCTIONS ..........................................................................................27
INDICATORS .........................................................................................29
DOSING AID / FIRST USE ..............................................................................30
DOSING AID / DAILY USE .............................................................................32
SAVING TIPS .........................................................................................33
CLEANING & MAINTENANCE ........................................................................34
CLEANING THE OUTSIDE OF THE WASHING MACHINE ..................................................34
CHECKING THE WATER SUPPLY HOSE .................................................................35
CLEANING THE MESH FILTERS IN THE WATER SUPPLY HOSE ............................................36
CLEANING THE DETERGENT DISPENSER ...............................................................37
CLEANING THE WATER FILTER / DRAINING RESIDUAL WATER ...........................................38
TRANSPORT AND HANDLING ........................................................................40
TROUBLESHOOTING ................................................................................41
DOOR – HOW TO OPEN IT IN CASE OF A FAILURE, TO TAKE OUT YOUR LAUNDRY ........................45
AFTER-SALES SERVICE ................................................................................46
Instrallation Guide ..................................................................................47
4
Page 5
Health and Safety Guide
SAFETY
INSTRUCTIONS
IMPORTANT TO BE READ AND OBSERVED
EN
Before using the washing
machine carefully read Health
and Safety and Use and Care
guides.
Keep these instructions close
at hand for future reference.
YOUR SAFETY AND THE
SAFETY OF OTHERS IS VERY
IMPORTANT.
This manual and the washing
machine itself provide
important safety warnings, to
be read and observed at all
times.
This is the safety alert symbol.
This symbol alerts you to
potential hazards that can kill
or hurt you and others.
All safety messages will follow
the safety alert symbol or the
word DANGER or WARNING.
These words mean:
DANGER
Indicates a hazardous situation
which, if not avoided, will
cause serious injury.
WARNING
Indicates a hazardous situation
which, if not avoided, could
cause in serious injury.
All safety warnings give
specic details of the potential
risk presented and indicate
how to reduce risk of injury,
damage and electric shock
resulting from improper use of
the washing machine. Carefully
observe the following
instructions.
Failure to observe these
instructions may lead to risks.
The Manufacturer declines any
liability for injury to persons or
animals or damage to property
if these advices and
precautions are not respected.
Very young (0-3 years) and
young children (3-8 years) shall
be kept away unless
continuously supervised.
Children from 8 years old and
above and persons with
reduced physical, sensory or
mental capabilities or lack of
experience and knowledge can
use this washing machine only
if they are supervised or have
been given instructions on safe
washing machine use and if
they understand the hazards
involved. Children shall not
play with the washing
machine. Cleaning and user
maintenance shall not be
made by children without
supervision.
Remove the transport bolts.
The washing machine is tted
with transport bolts to avoid
any possible damage to the
interior during transport.
Before using the machine, it is
imperative that the transport
bolts are removed.
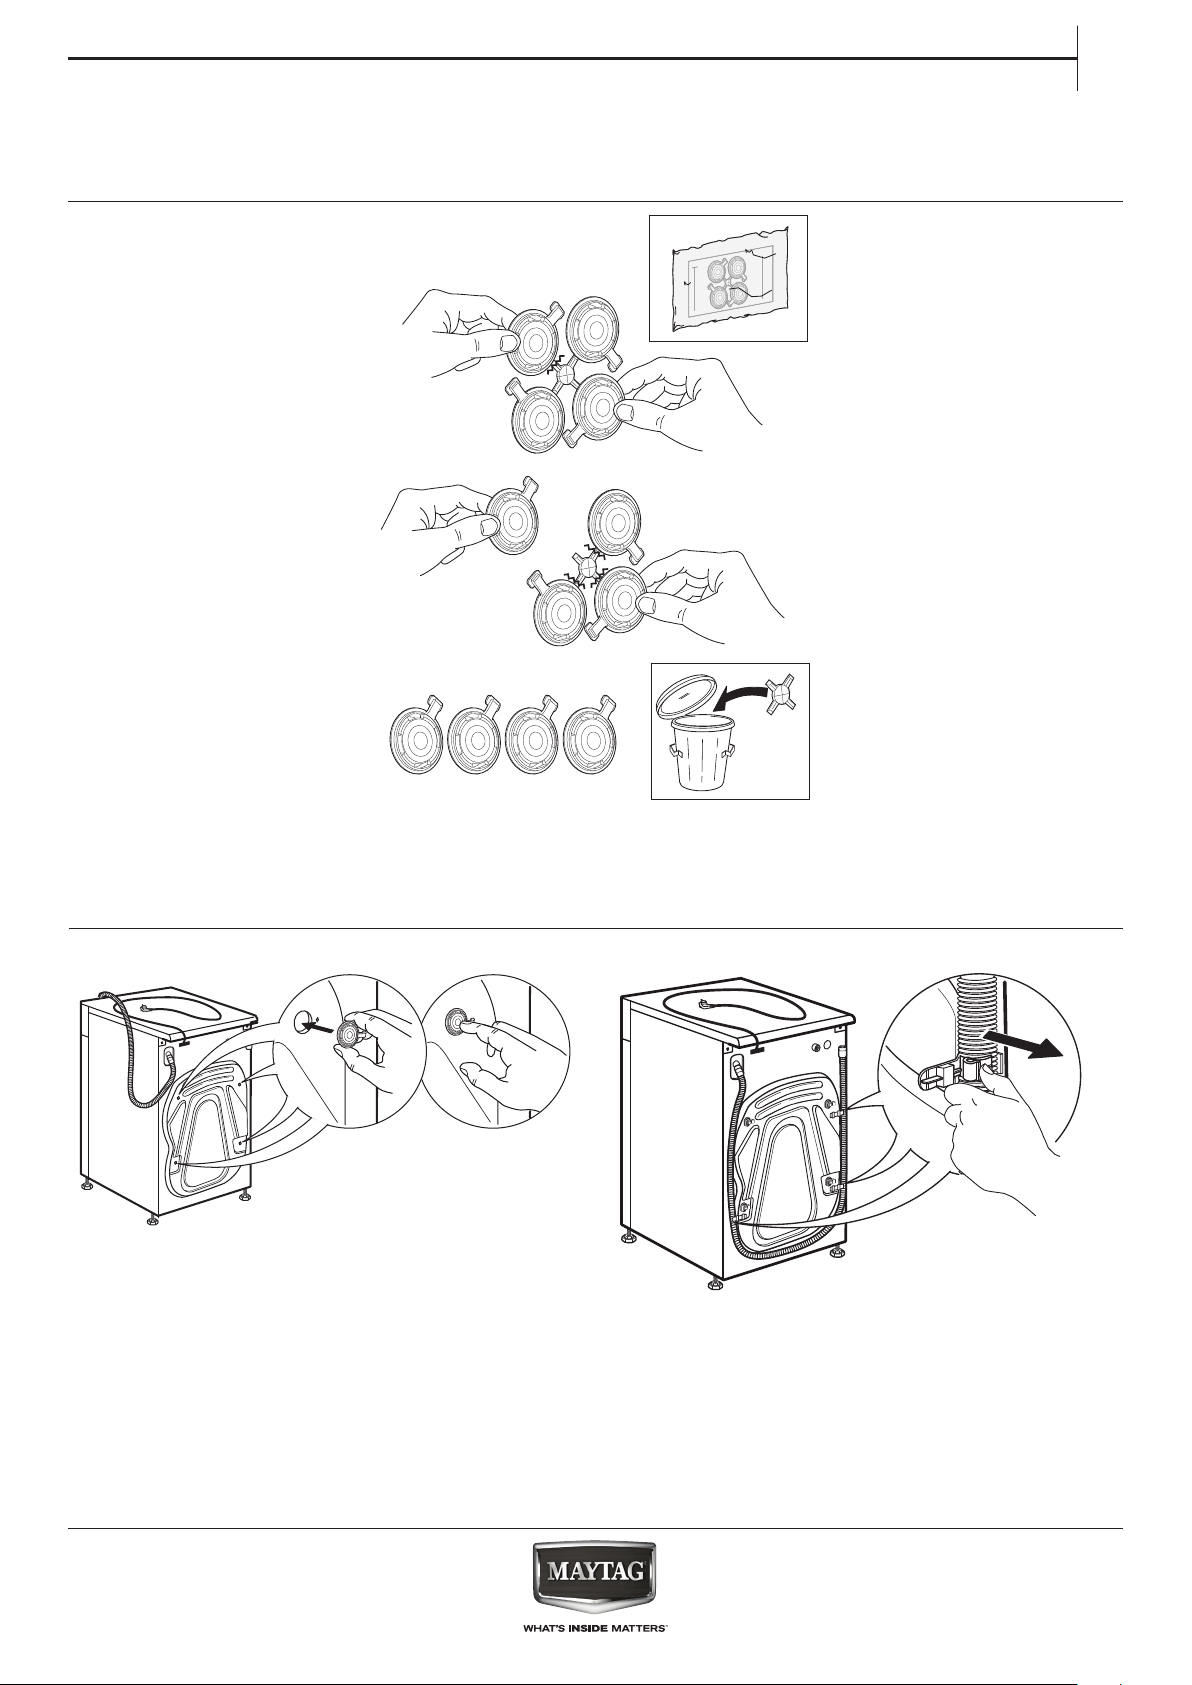
After their removal, cover the
openings with the 4 enclosed
plastic caps.
Never open the door forcibly or
use it as a step.
INTENDED USE
OF THE PRODUCT
This washing machine is
designed solely for domestic
usage. To aim the washing
machine as professional use is
forbidden. The manufacturer
declines all responsibility for
inappropriate use or incorrect
setting of the controls.
CAUTION: The washing
machine is not intended to be
operated by means of an
external timer or separate
remote control system.
Do not use the washing
machine outdoors.
Do not store explosive or
ammable substances such as
aerosol cans and do not place
or use gasoline or other
ammable materials in or near
the washing machine: a re
may break out if the washing
machine is inadvertently
switched on.
5
Page 6
This washing machine is
exclusively destined to treat
machine washable laundry in
quantities which are usual for
private households.
INSTALLATION
Installation and repairs must
be carried out by a qualied
technician, in compliance with
the manufacturer’s instructions
and local safety regulations. Do
not repair or replace any part
of the washing machine unless
specically stated in the user
manual.
Children should not perform
installation operations. Keep
children away during
installation of the washing
machine. Keep the packaging
materials (plastic bags,
polystyrene parts, etc.) out of
reach of children, during and
after the installation of the
washing machine.
Use protective gloves to
perform all unpacking and
installation operations.
After unpacking the washing
machine, make sure that it has
not been damaged during
transport. In the event of
problems, contact the dealer or
your nearest After-sales
Service.
The washing machine must be
handled and installed by two
or more persons.
Keep children away during
installation of the washing
machine.
The washing machine must be
disconnected from the power
supply before carrying out any
installation operation.
During installation, make sure
the washing machine does not
damage the power cable.
Only activate the washing
machine when the installation
procedure has been
completed.
After installation of the device
wait a few hours before
starting it, to acclimatize to the
environmental conditions of
the room.
Do not install your washing
machine where it may be
exposed to extreme
conditions, such as: poor
ventilation, high temperature
or below 5°C or above 35°C.
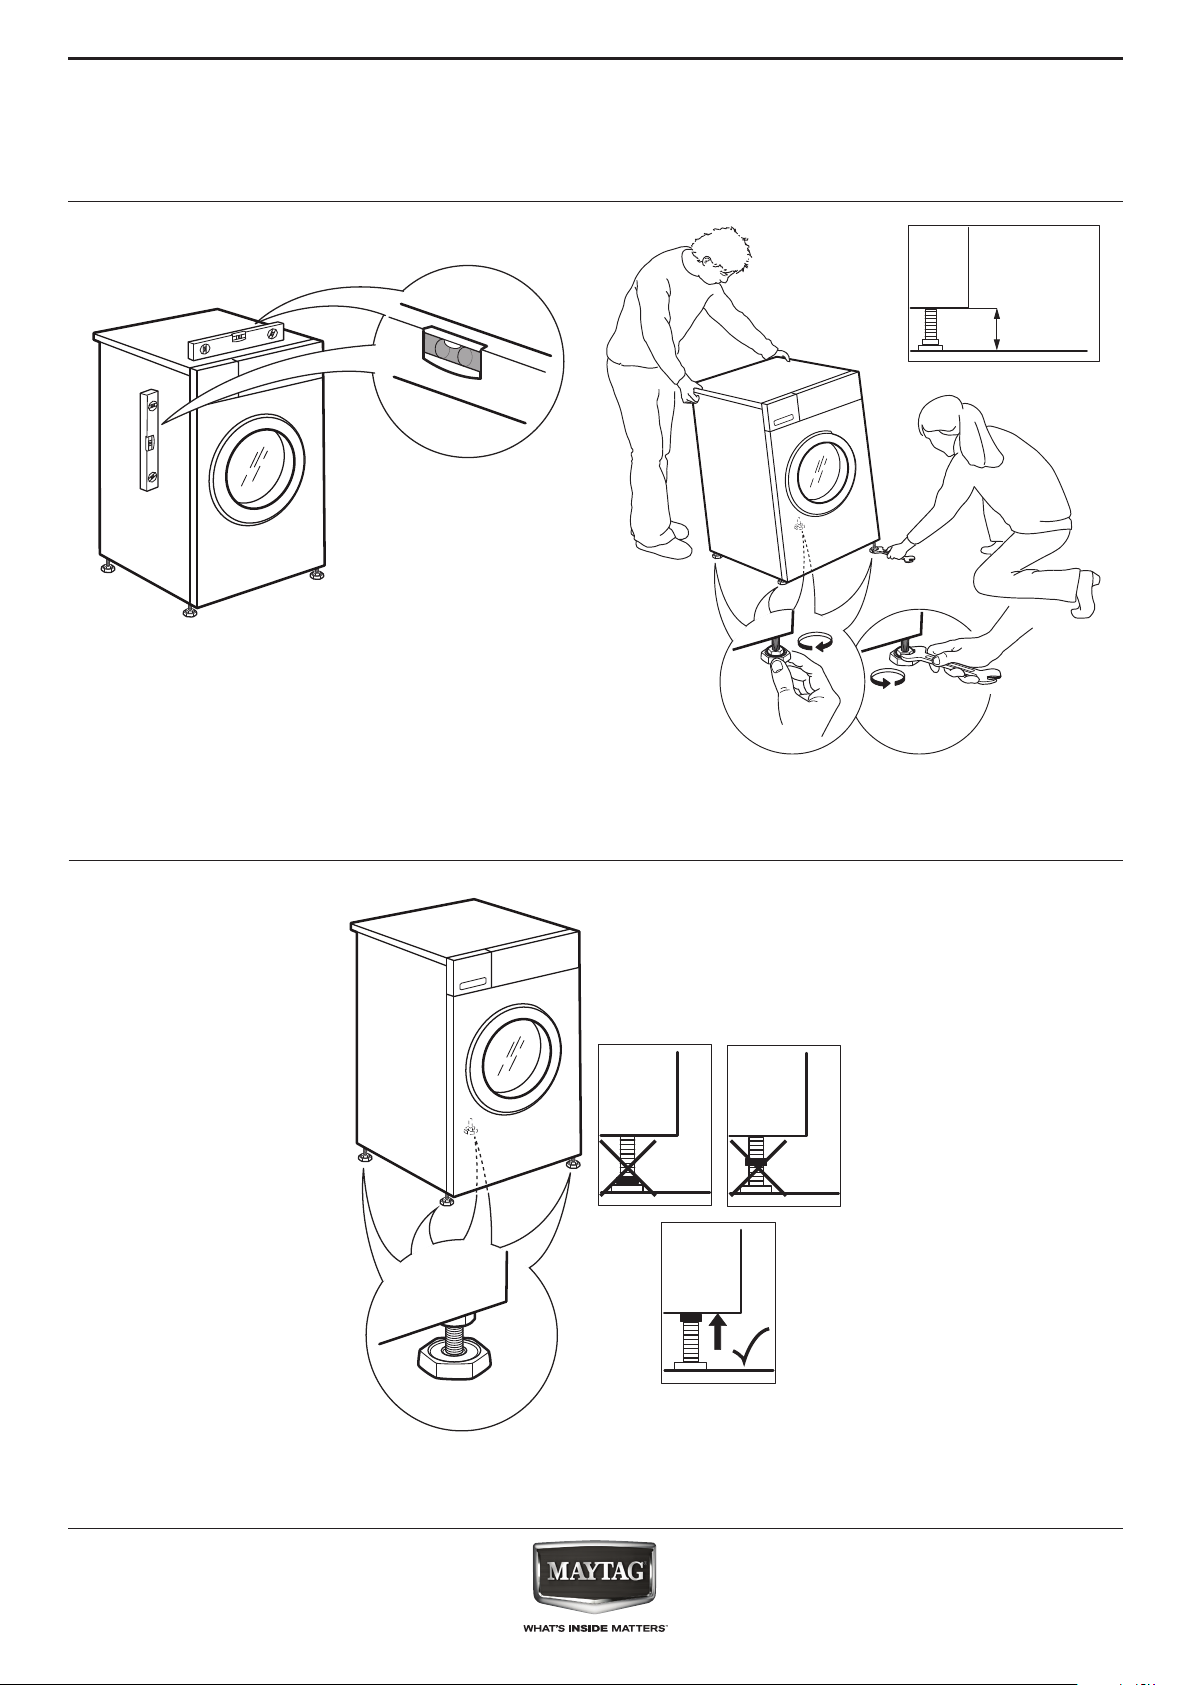
When installing the washing
machine make sure that the
four feet are stable and resting
on the oor, adjusting them as
required, and check that the
washing machine is perfectly
level using a spirit level.
In case of wooden or so-called
“oating oors” (for instance
certain parquet or laminate
oors), place the washing
machine on a sheet of plywood
at least 60 x 60 cm wide/ deep
and at least 3 cm thick which is
secured to the oor.
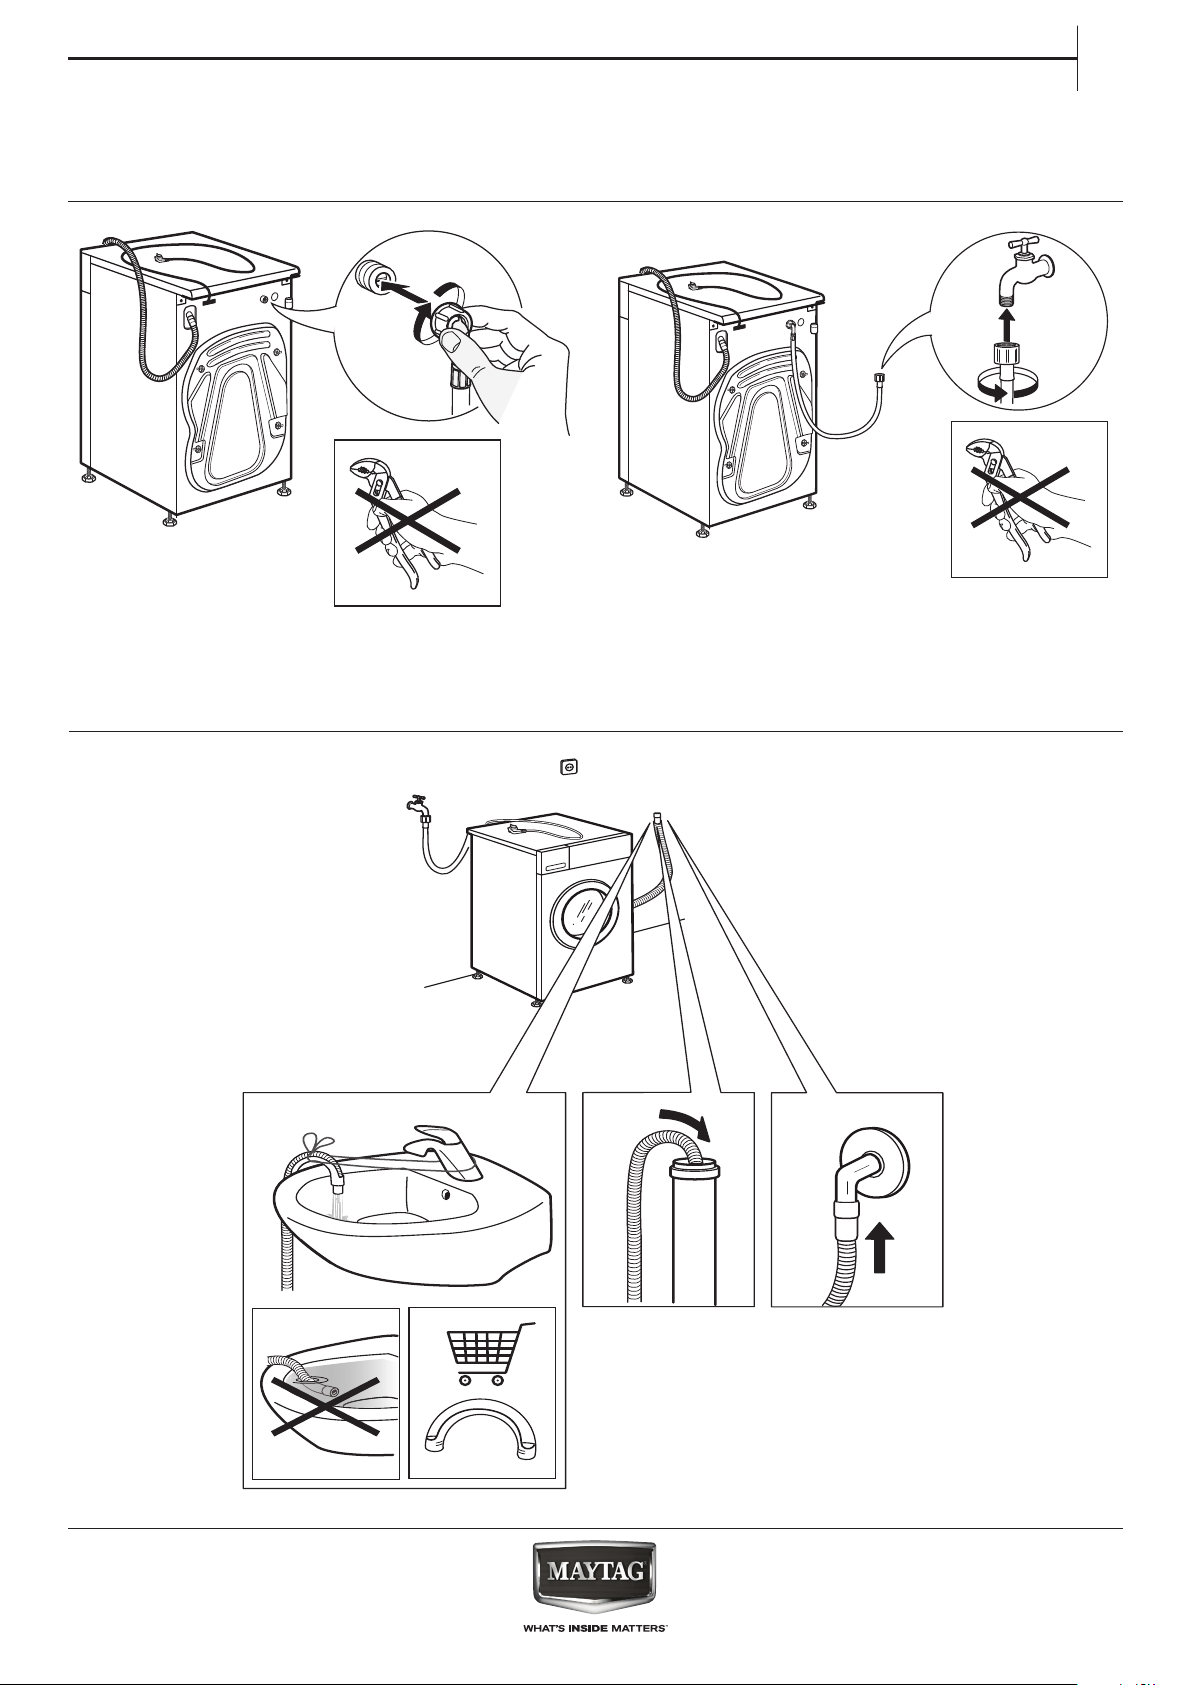
Use only new hoses to connect
the washing machine to the
water supply. Used hoses must
not be used and should be
discarded.
Move the washing machine
without lifting it by the
worktop.
Connect the water inlet hose(s)
to the water supply in
accordance with the
regulations of your local water
company.
For models dedicated only for
cold water: Do not connect to
the hot water supply.
For models with hot ll: the hot
water inlet temperature must
not exceed 60 °C.
Make sure that the ventilation
openings in the base of your
washing machine (if available
on your model) are not
obstructed by a carpet or other
material.
The supply water pressure
must be in range 0.1 -1 MPa.
If you want to place a dryer on
top of your washing machine,
rst contact our After-Sales
Service or your specialist dealer
to verify if this is possible. This
is only admitted if the dryer is
xed on the washing machine
by using an appropriate
stacking kit available through
our After- Sales Service or your
specialist dealer.
ELECTRICAL WARNINGS
Make sure the voltage
specied on the rating plate
corresponds to that of your
home.
For installation to comply with
current safety regulations, an
omnipolar switch with
minimum contact gap of 3mm
is required.
Regulation require that the
washing machine is earthed.
For washing machines with
tted plug, if the plug is not
suitable for you socket outlet,
contact a qualied technician.
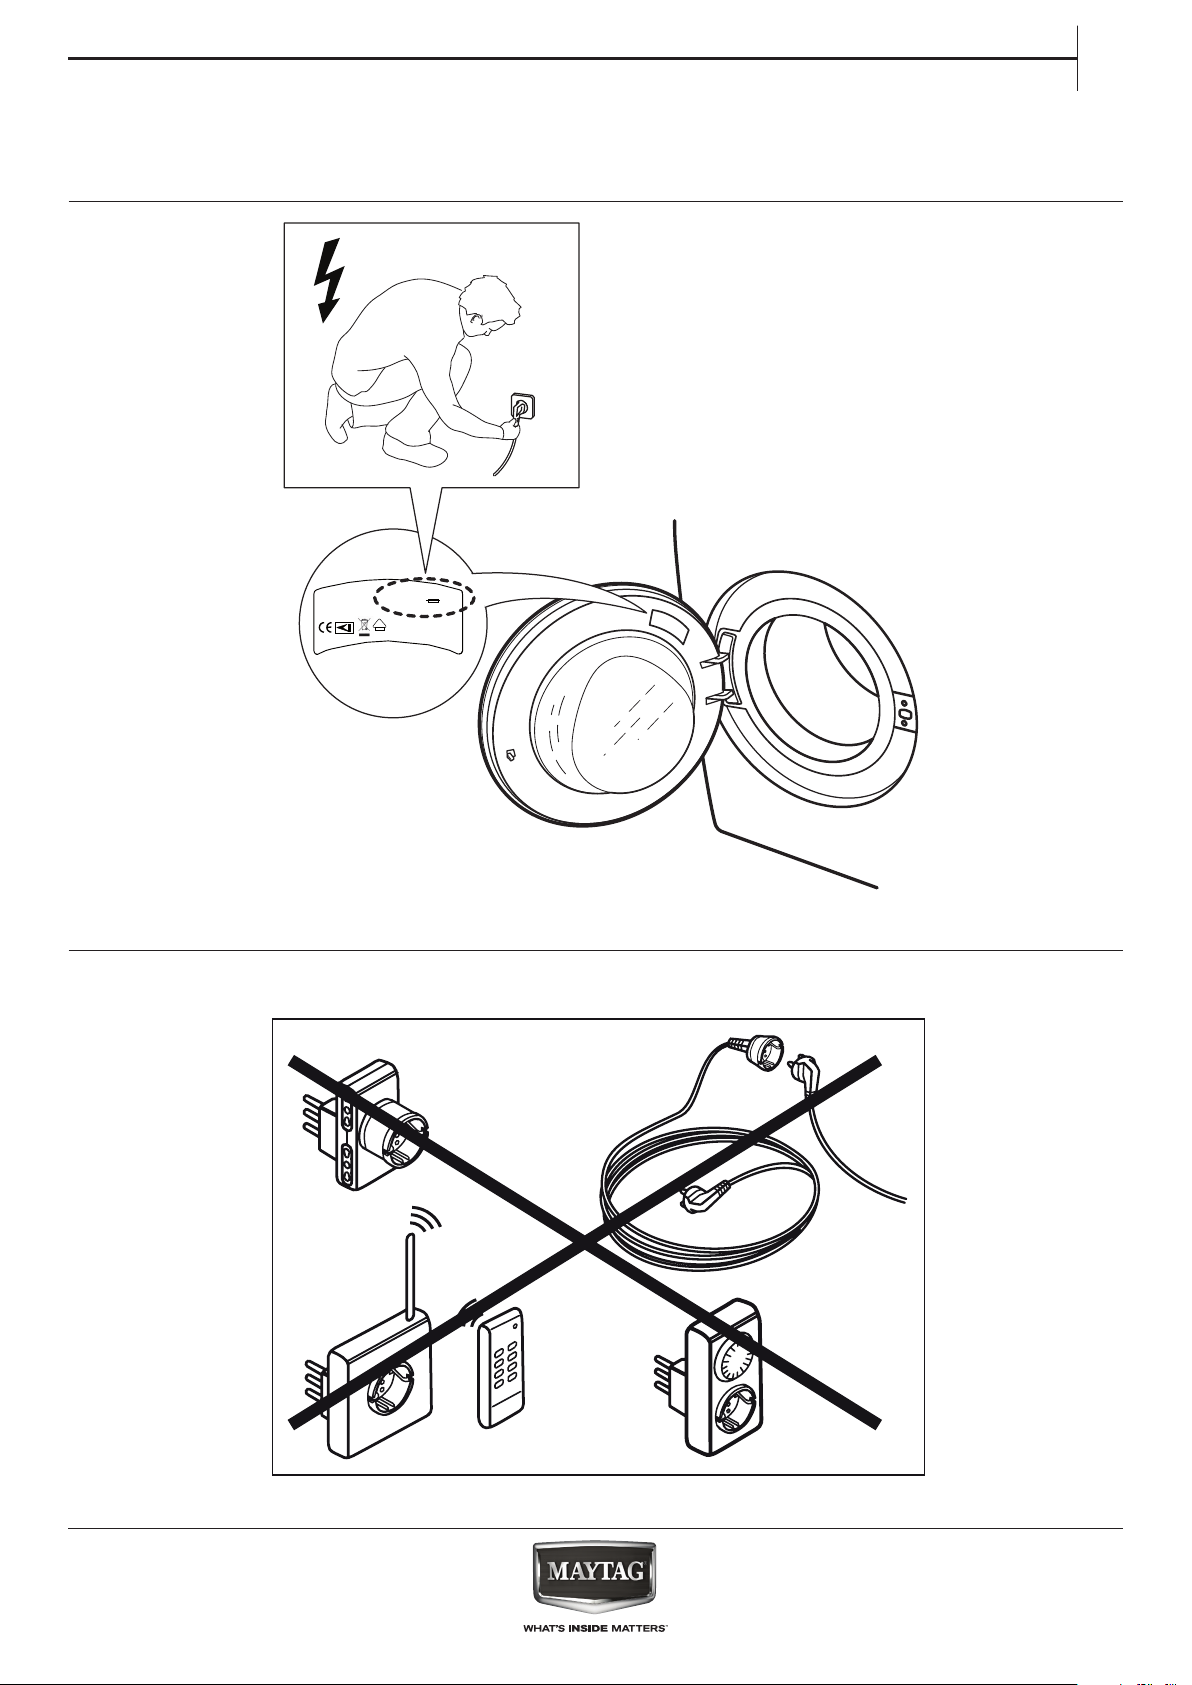
Do not use extension leads,
multiple sockets or adapters.
6
Page 7
EN
Do not connect the washing
machine to a socket which can
be operated by remote control.
The power cable must be long
enough for connecting the
washing machine, once tted
in its housing, to the main
power supply.
Do not pull the power supply
cable.
If the power cable is damaged
it must be replaced with an
identical one. The power cable
must only be replaced by a
qualied technician in
compliance with the
manufacturer instruction and
current safety regulations.
Contact an authorized service
centre.
Do not operate this washing
machine if it has a damaged
mains cord or plug, if it is not
working properly, or if it has
been damaged or dropped. Do
not immerse the mains cord or
plug in water. Keep the cord
away from hot surfaces.
The electrical components
must not be accessible to the
user after installation.
Do not touch the washing
machine with any wet part of
the body and do not operate it
when barefoot.
ELECTRICAL CONNECTION
FOR GREAT BRITAIN AND
IRELAND ONLY
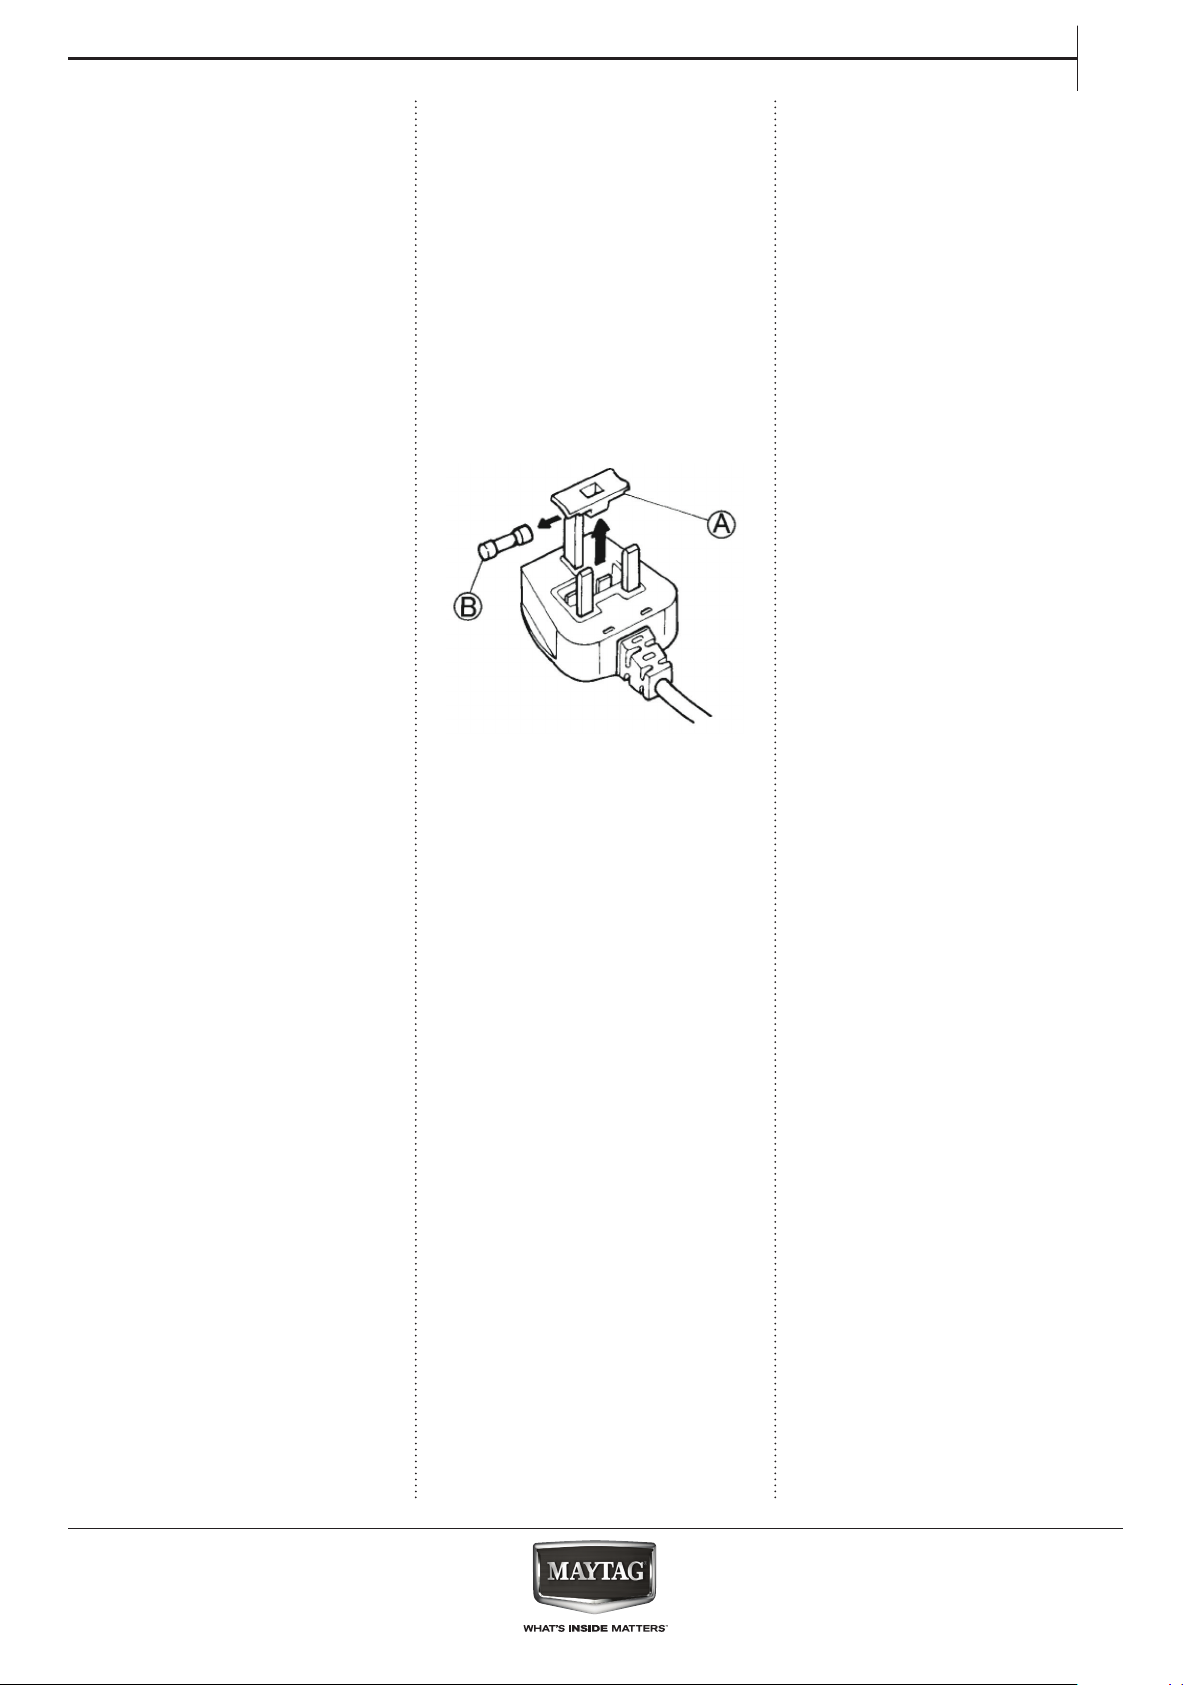
Fuse replacement
If the mains lead of this
washing machine is tted with
a BS 1363A 13amp fused plug,
to change a fuse in this type of
plug use an A .S .T .A . approved
fuse to BS 1362 type and
proceed as follows:
1 .Remove the fuse cover (A)
and fuse (B).
2 .Fit replacement 13A fuse
into fuse cover.
3 .Ret both into plug.
Important:
The fuse cover must be retted
when changing a fuse and if
the fuse cover is lost, the plug
must not be used until a
correct replacement is tted.
Correct replacement are
identied by the colour insert
or the colour embossed in
words on the base of the plug.
Replacement fuse covers are
available from your local
electrical store.
Socket outlet/plug (valid for
both countries)
If the tted plug is not suitable
for your socket outlet, contact
After-Sales Service for further
instruction. Do not attempt to
change the plug yourself .This
procedure needs to be carried
out by a qualied technician in
compliance with the
manufacturer’s instructions
and current standard safety
regulations.
CORRECT USE
Do not exceed the maximum
load allowed. Check the
maximum load allowed in the
programme chart.
Turn o the tap when not in
use.
Do not use any solvents (e.g.
turpentine, benzene),
detergents containing
solvents, scouring powder,
glass or general purpose
cleaners, and ammable uids;
do not machine wash fabrics
that have been treated with
solvents or ammable liquids.
CLEANING AND
MAINTENANCE
The washing machine must be
disconnected from the power
supply before carrying out any
cleaning or maintenance
operation.
For the Republic of Ireland
only
The information given in
respect of Great Britain will
frequently apply, but a third
type of plug and socket is also
used, the 2-pin, side earth type.
Never use steam cleaning
equipment.
7
Page 8
SAFEGUARDING
THE ENVIRONMENT
DISPOSING OF PACKAGING
MATERIALS
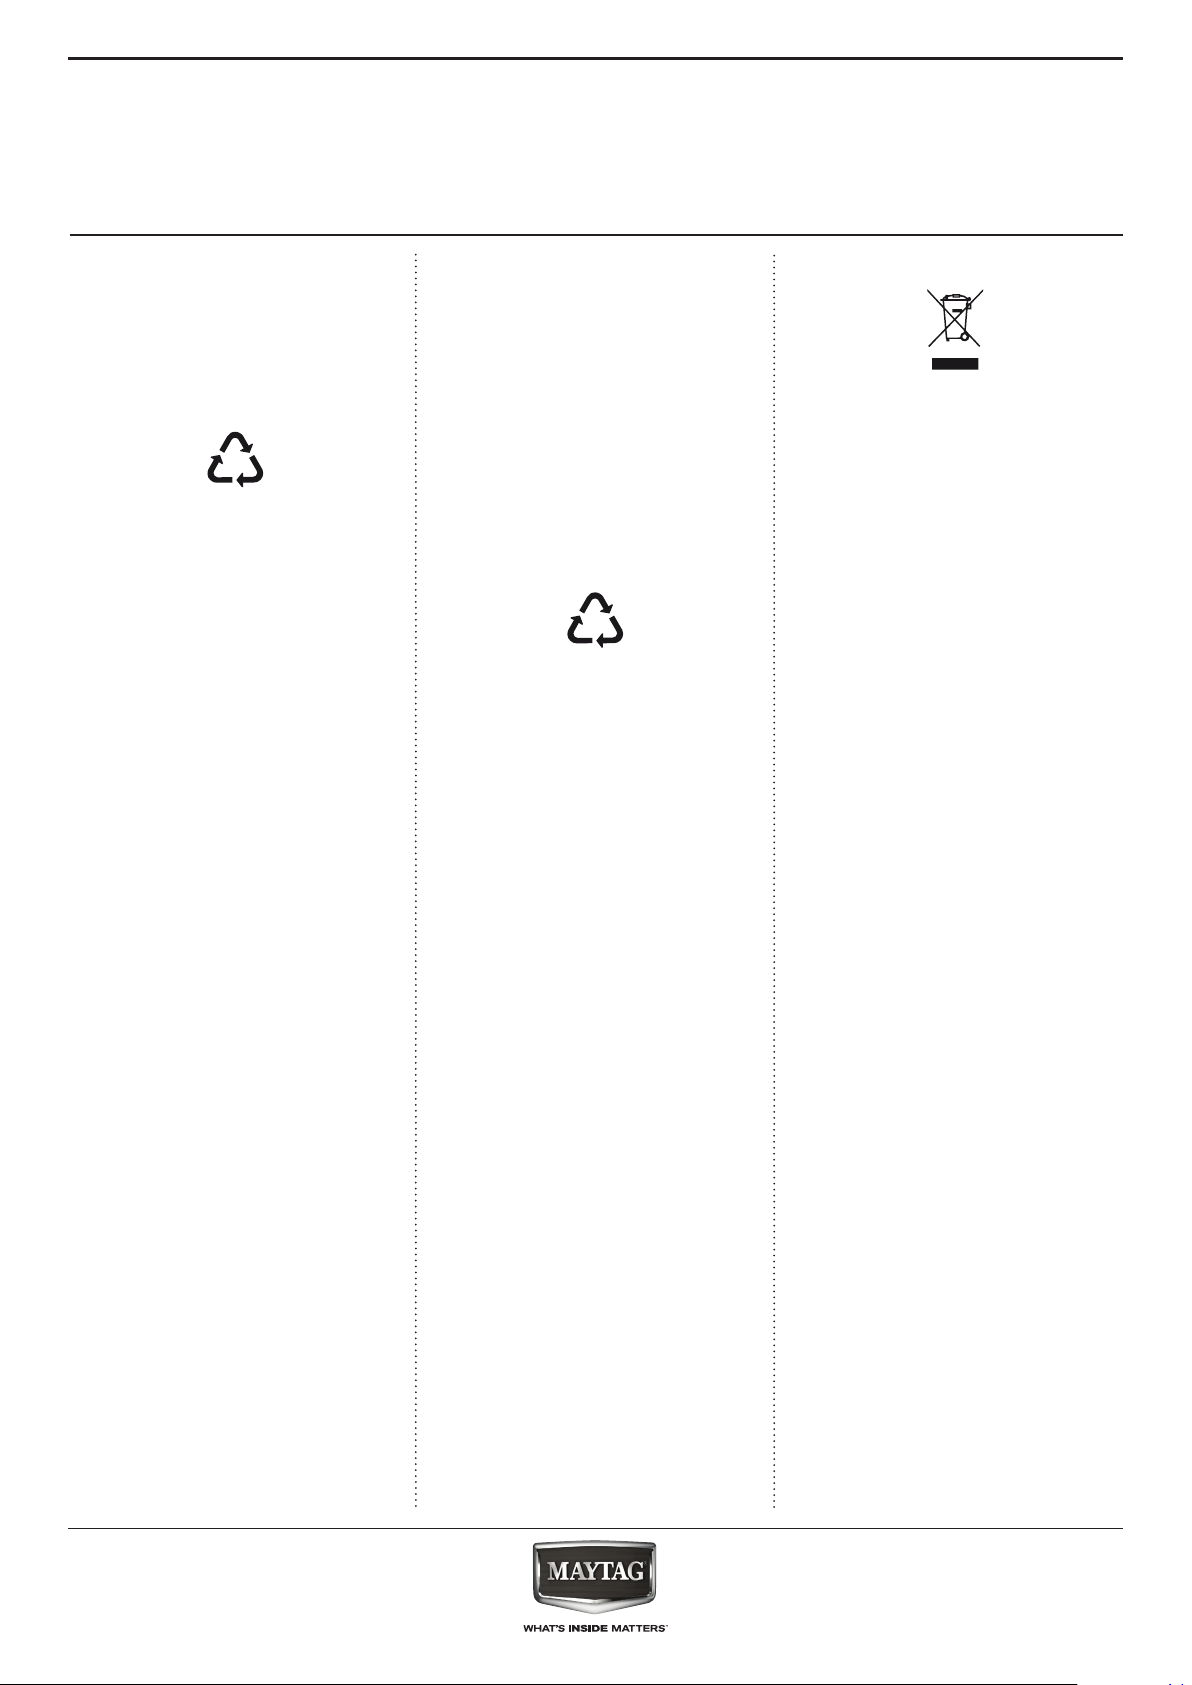
The packaging material is
100% recyclable and is marked
with the recycle symbol:
The various parts of the
packaging must therefore be
disposed of responsibility and
in full compliance with local
authority regulations
governing waste disposal.
SCRAPPING OF
HOUSEHOLD APPLIANCES
When scrapping the washing
machine, make it unusable by
cutting o the power cable and
removing the doors and
shelves (if present) so that
children cannot easily climb
inside and become trapped.
This washing machine is
manufactured with recyclable
or reusable materials. Dispose
of it in accordance with local
waste disposal regulations.
For further information on the
treatment, recovery and
recycling of household
electrical appliances, contact
your competent local
authority, the collection
service for household waste or
the store where you purchase
the washing machine.
The symbol
on the product or on the
accompanying documentation
indicates that it should not be
treated as domestic waste but
must be taken to an
appropriate collection centre
for the recycling of electrical
and electronic equipment.
This washing machine is
marked in compliance with
European Directive 2012/19/
EU, Waste Electrical and
Electronic Equipment (WEEE).
By ensuring this product is
disposed of correctly, you will
help prevent potential
negative consequences for the
environment and human
health, which could otherwise
be caused by inappropriate
waste handling of this product.
8
Page 9

DECLARATION
OF CONFORMITY
This washing machine has
been designed, constructed
and distributed in compliance
with the safety requirements of
European Directives:
• 2006/95/EC Low Voltage
Directive
• 2004/108/EC
Electromagnetic
Compatibility Directive.
EN
9
Page 10
Use and Care guide
PRODUCT
DESCRIPTION
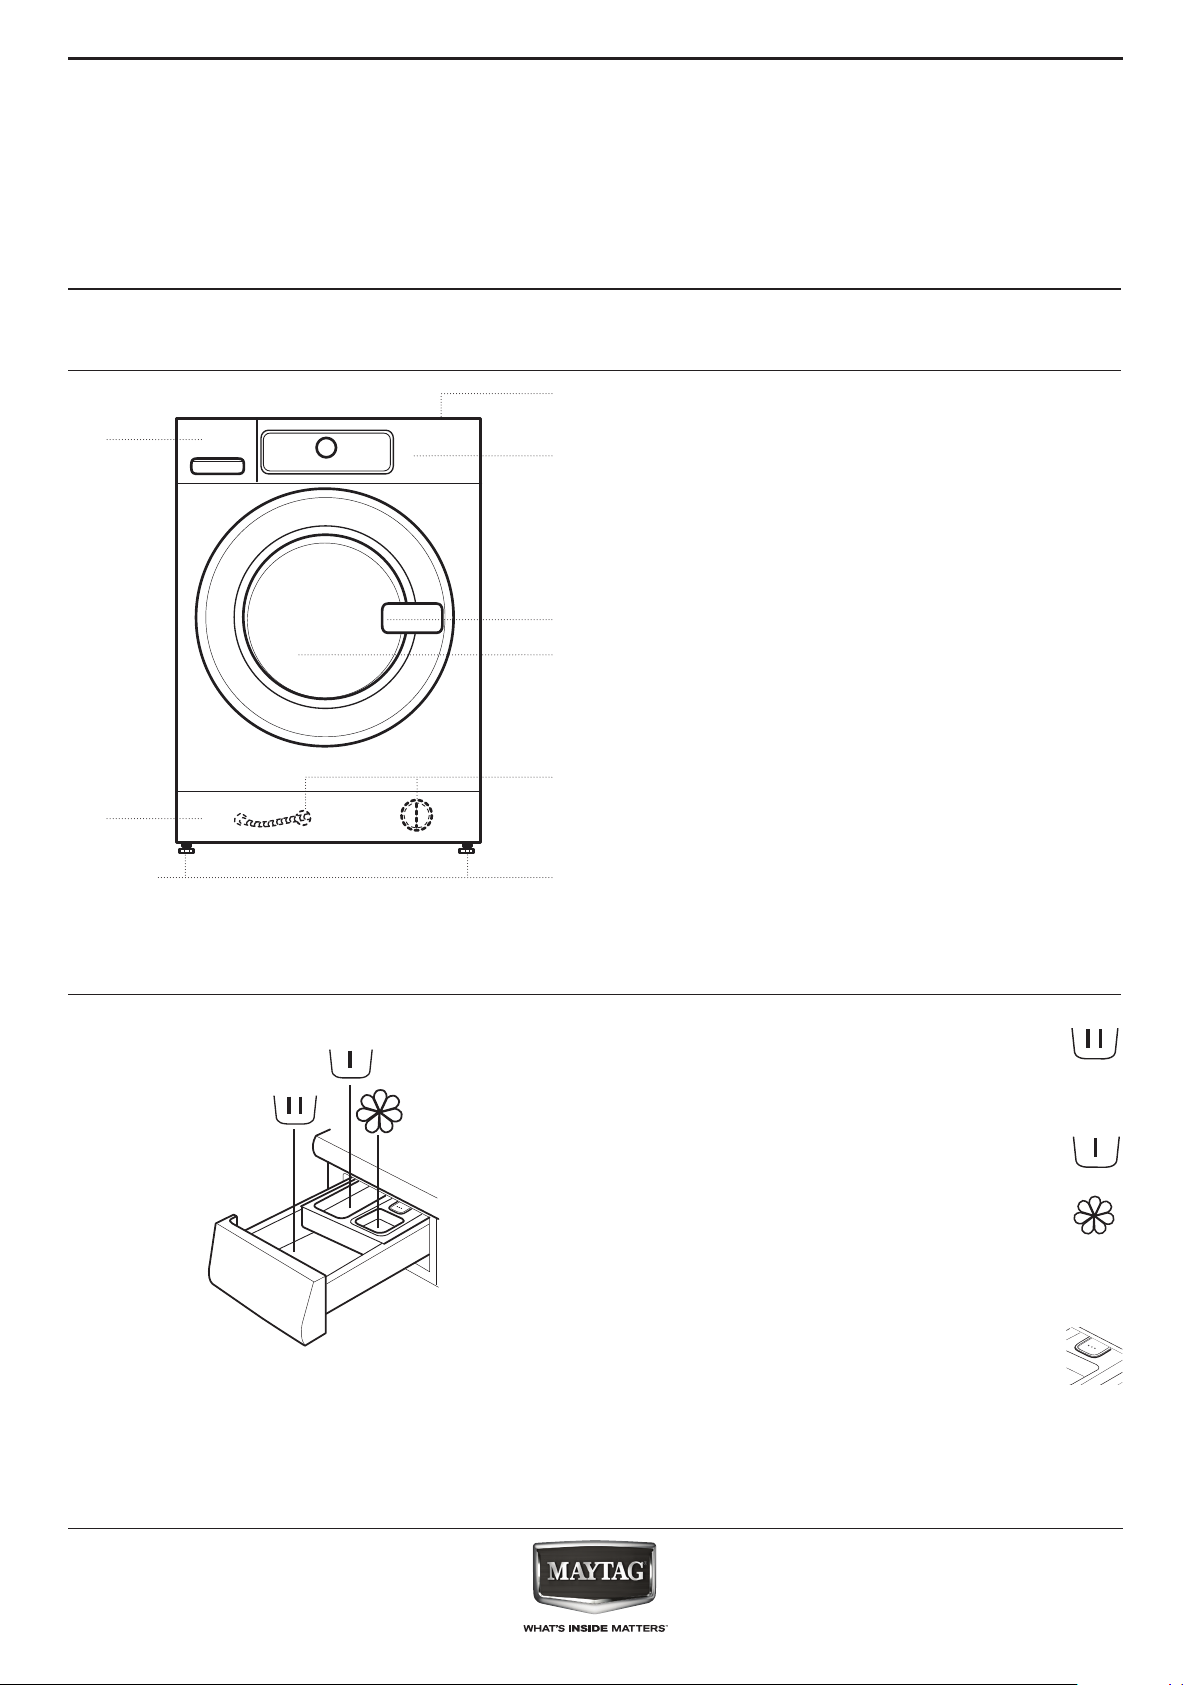
APPLIANCE
2.
1.
1. Worktop
2. Detergent dispenser
3.
3. Control panel
4. Door handle
5. Door
6. Water filter / Emergency drain hose (if available)
- behind plinth -
7. Plinth (removable)
4.
8. Adjustable feet (4)
5.
6.
7.
8.
DETERGENT DISPENSER
1. Main wash compartment
• Detergent for the main wash
• Stain remover
• Water softener
2. Prewash compartment
• Detergent for the prewash
3. Softener compartment
• Fabric softener
• Liquid starch
Pour softener or starch solution only up to the
“MAX” mark.
4. Release button
(press to remove the detergent dispenser for
cleaning)
10
Page 11
Detergent recommenDations for various types of launDry
White robust laundry (cold-95°C) Heavy duty detergents
EN
White delicate laundry (cold-40°C)
Light/pastel- shaded colours (cold-60°C)
Intensive colours (cold-60°C)
Mild detergents containing whitener and/or optical
brighteners
Detergents containing whitener and/or optical brighteners
Colour detergents without whitener / optical brighteners
Black/dark colours (cold-60°C) Special detergents for black/dark laundry
CONTROL PANEL
13
12
MAX
60°
40°
30’
1. 7.2.
6. 8.4. 10.3. 9.5. 11.
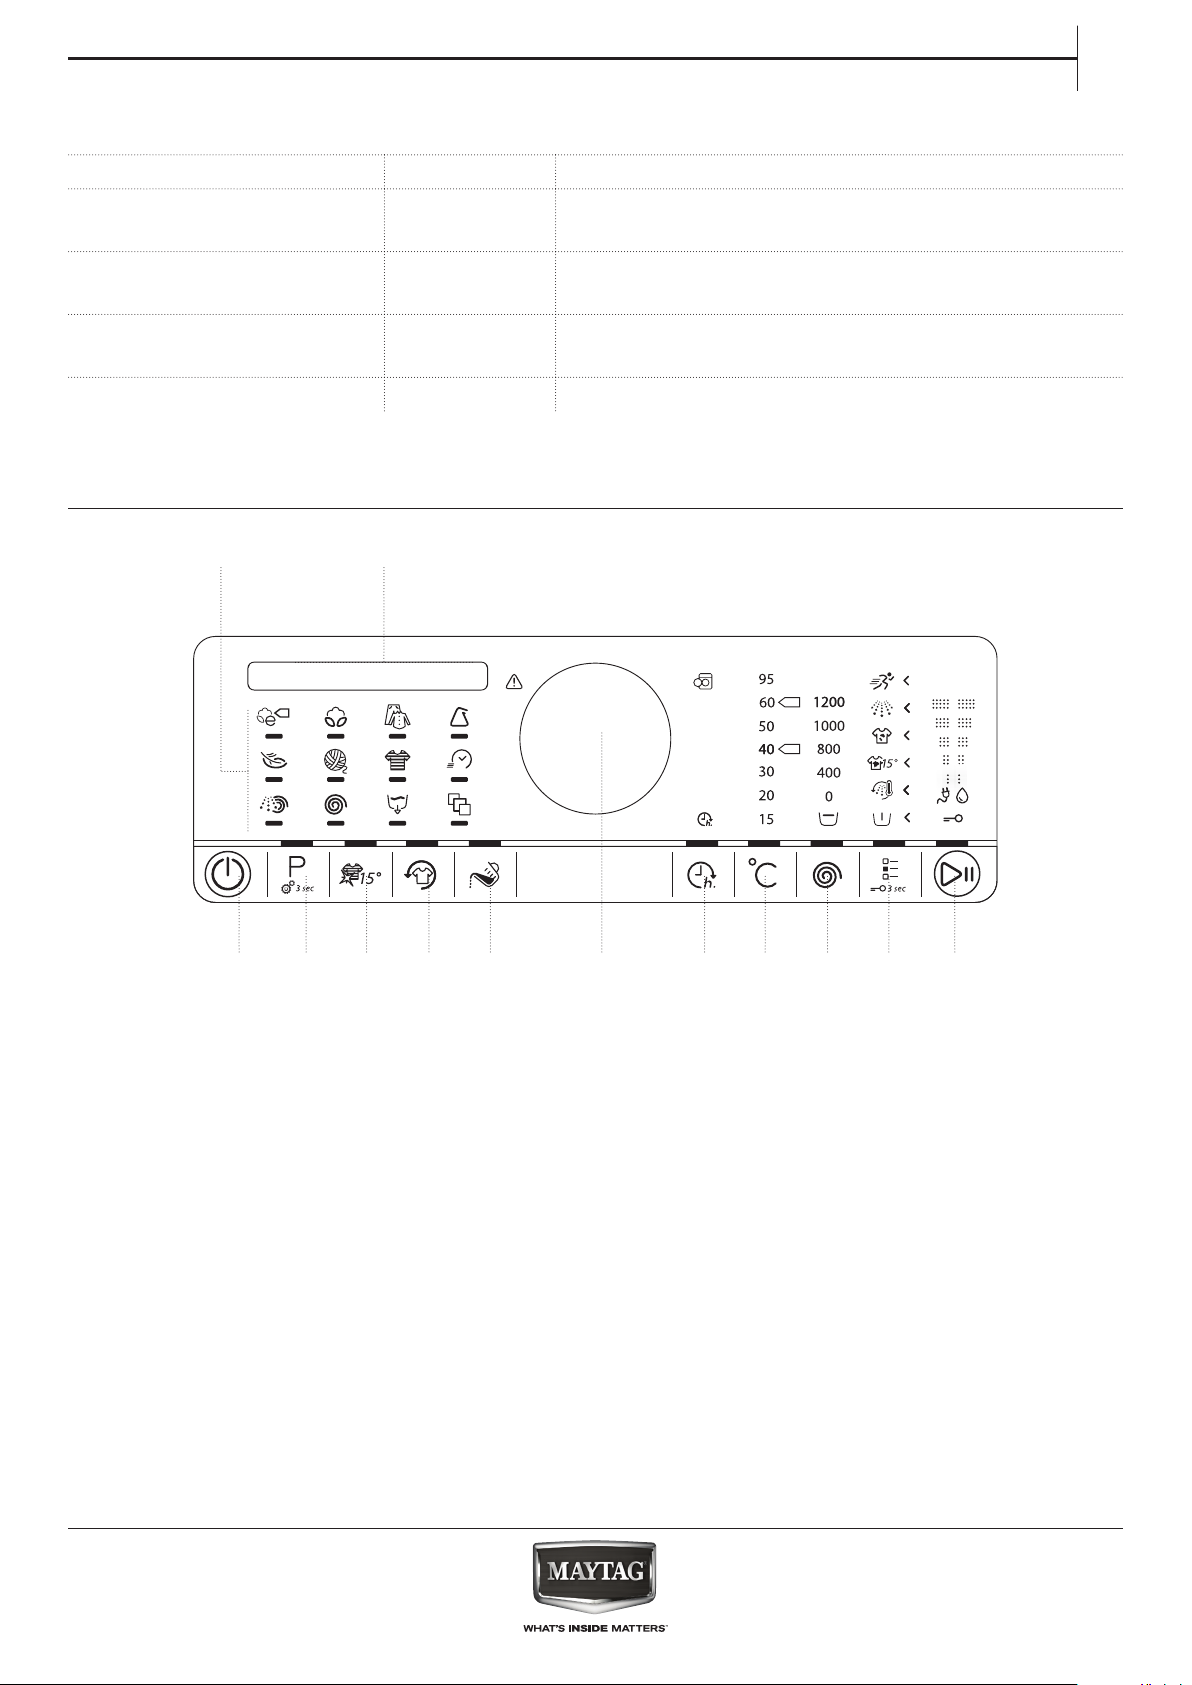
1. On/O button
(Reset/Drain if pressed and held down)
2. Programme button
3. Colours 15° button
4. Fresh Care button
5. Dosing Aid button
6. Knob (Turn to select/Press to conrm)
7. Finish in button
8. Temperature button
9. Spin Speed button
10. Options button
(Key lock if pressed and held down)
11. Start / Pause button
12. Display
13. Programmes area
11
Page 12
TECHNICAL DATA FOR WATER
CONNECTION
WATER CONNECTION
WATER SUPPLY Cold
WATER TAP 3/4” threaded hose connector
MINIMUM WATER SUPPLY PRESSURE 100 kPa (1 bar)
MAXIMUM WATER SUPPLY PRESSURE 1000 kPa (10 bar)
12
Page 13
DOOR
EN
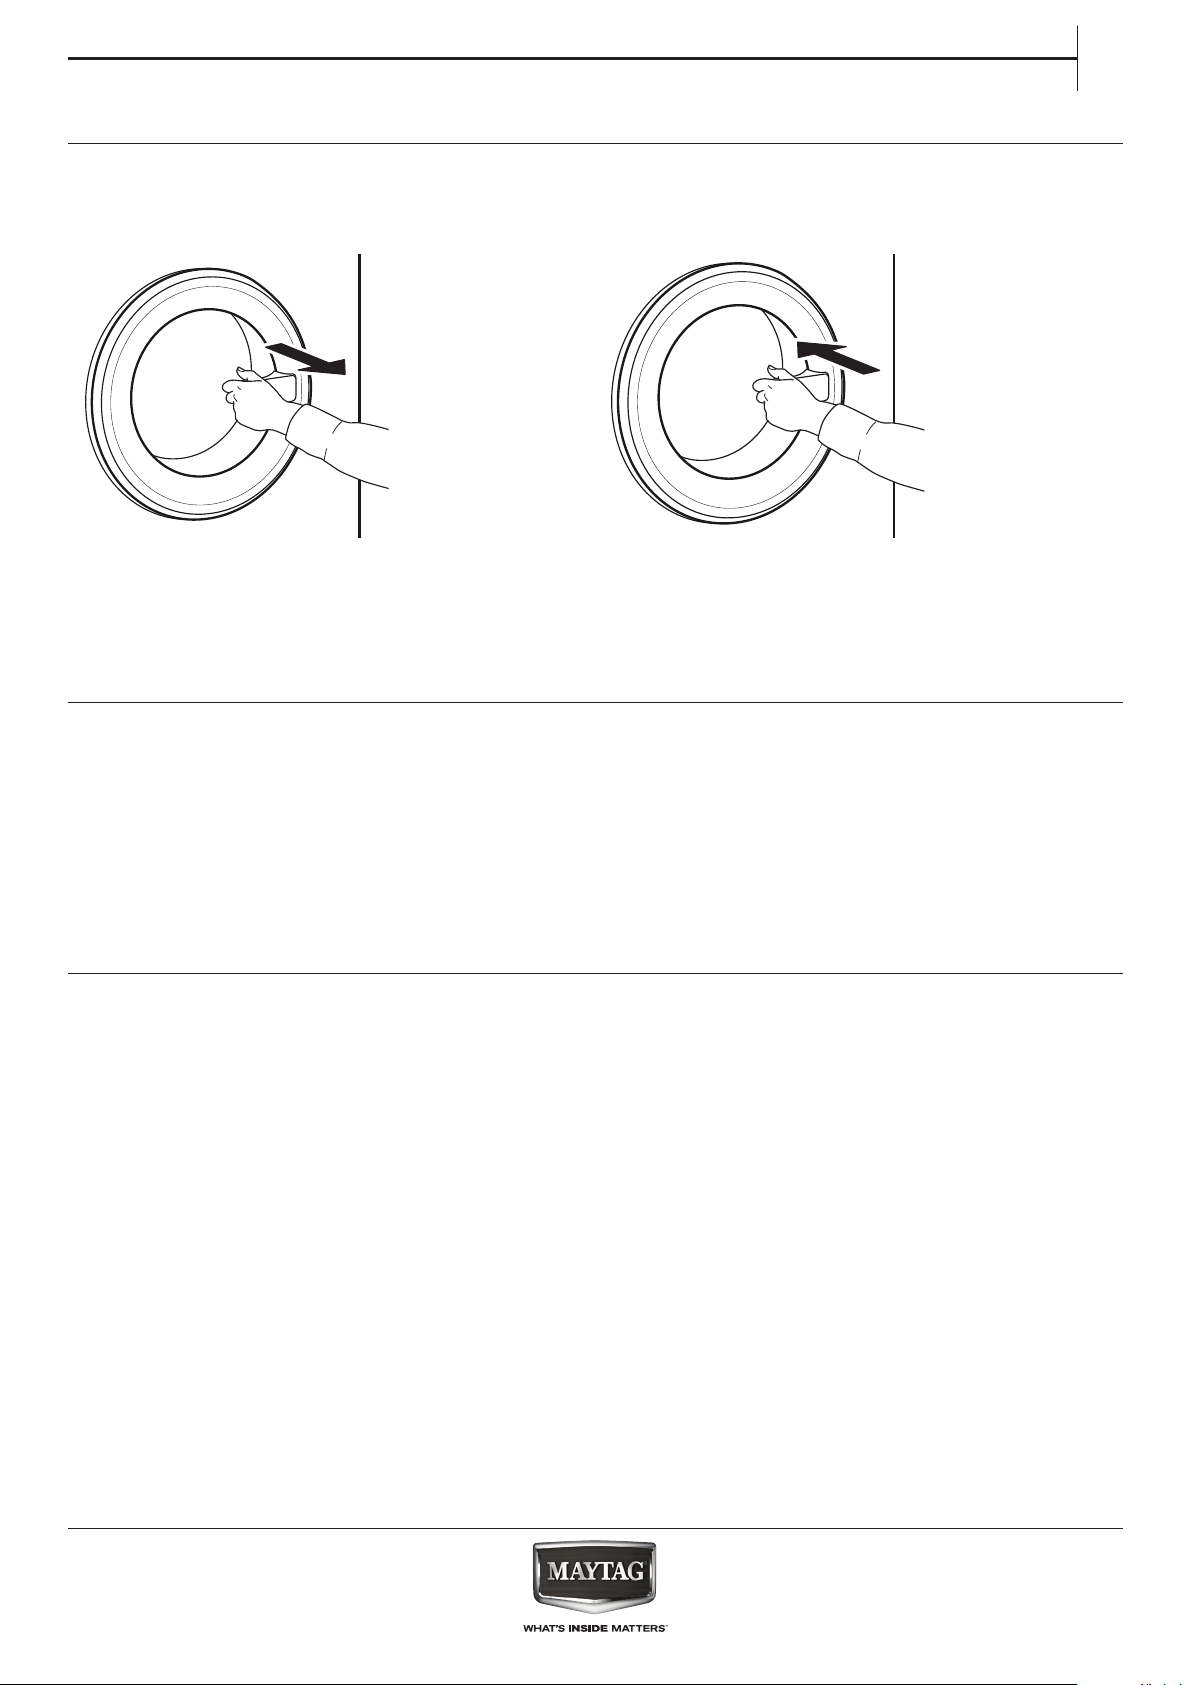
To open the door, pull the handle
To close the door, hold the handle and push so that
you can hear it click shut.
DRUM LIGHT (if available)
• During programme selection: the light goes on
for laundry loading
• After programme start, the light fades on and o
while the laundry load is detected.
• After programme end, when you open the door,
the light goes on for a while for unloading the
laundry. Then it goes o to save energy; touch
any button to switch it on again.
ACCESSORIES
Contact our After-Sales Service to check if the
following accessories are available for your washing
machine (and dryer) model
PEDESTAL
Can be installed beneath your washing machine,
to raise the appliance and allow for a more
comfortable laundry loading and unloading.
STACKING KIT SHELF
by which your dryer can be xed on top of your
washing machine to save space and to facilitate
loading and unloading your dryer in the higher
position.
13
Page 14
HOW TO USE
THE APPLIANCE
FIRST TIME USE
If you plug in the washing machine, it will switch on
automatically. You will be asked to set the desired
language for the display.
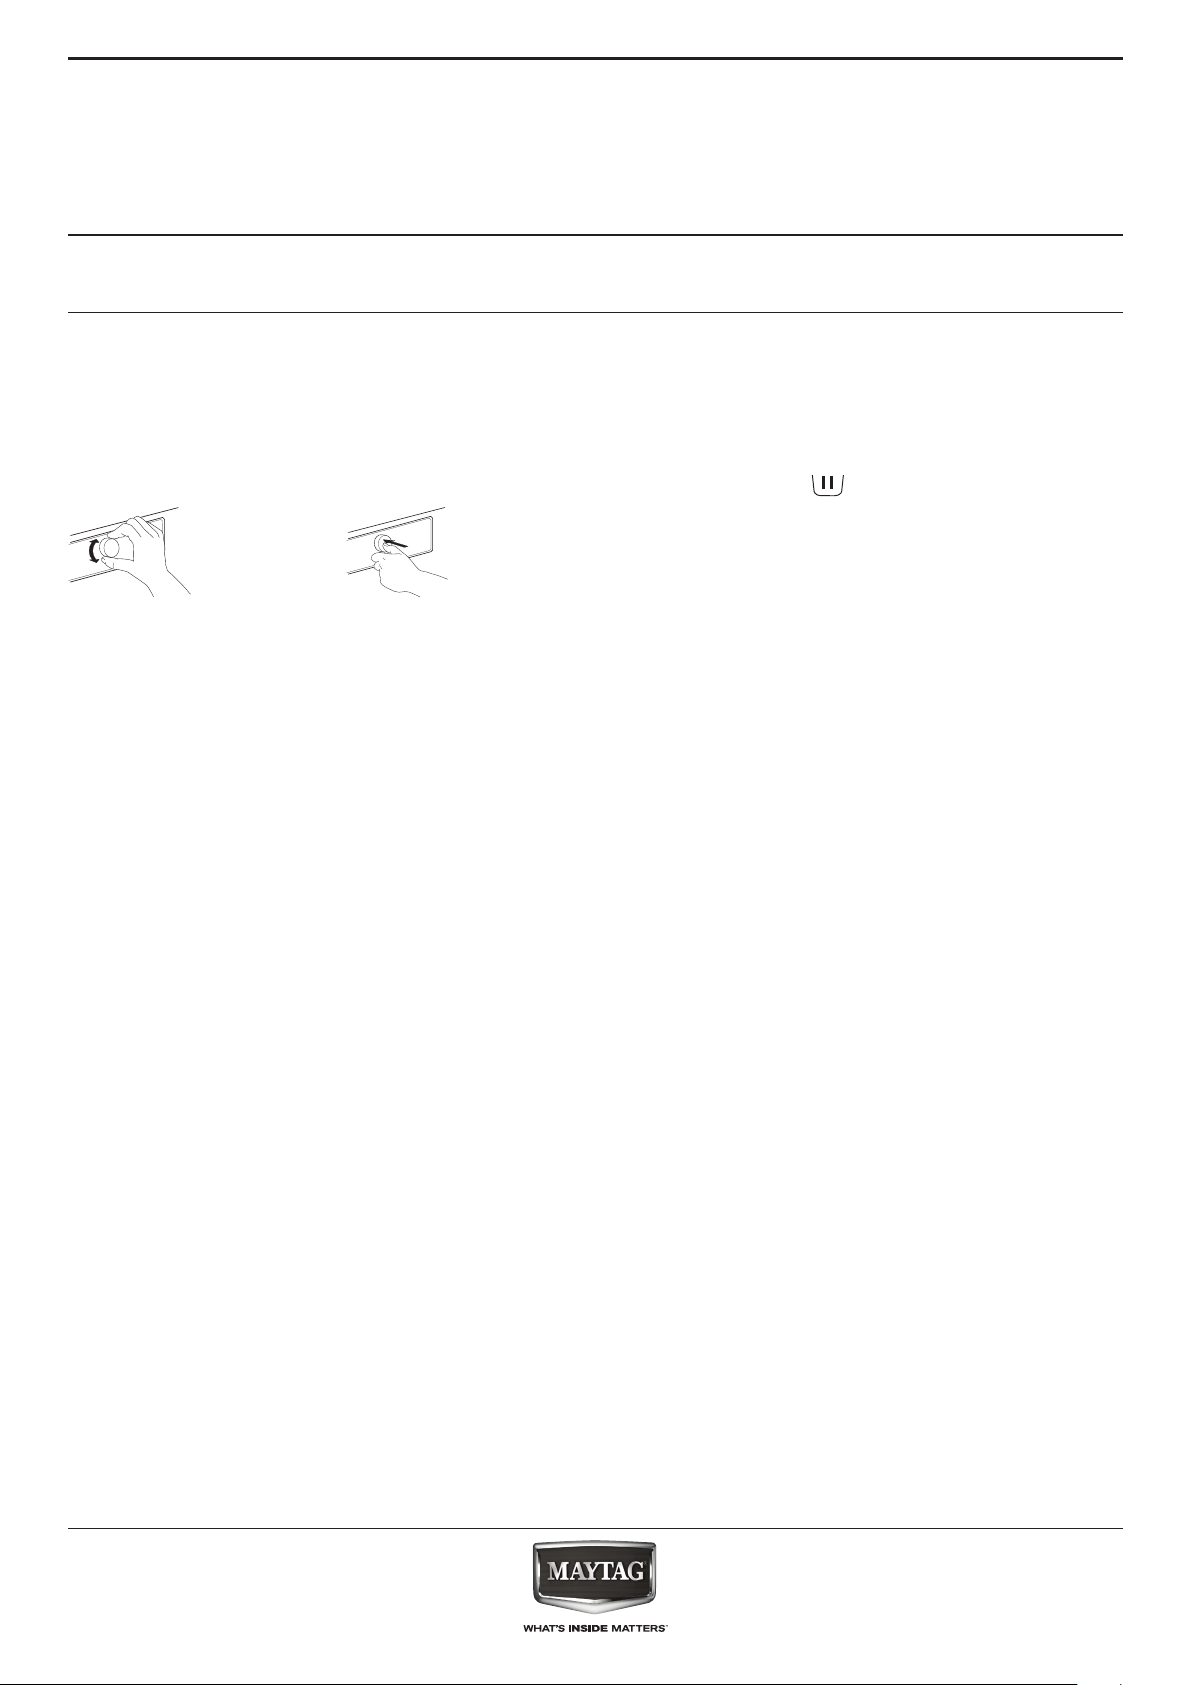
Turn the knob to select the desired language, then
press the knob to conrm.
Afterwards you can adapt the water hardness
setting of your washing machine to your regional
water hardness. This is recommended in order to
optimize the Dosing Aid function. Turn the knob to
choose between soft / medium / hard and conrm
by pressing the knob.
To remove any residues from the manufacturing
process.
1. Select programme “Cotton” with temperature
95°C.
2. Add a small amount of detergent to the main
wash compartment of the detergent dispenser
(maximum 1/3 of the quantity the detergent
manufacturer recommends for lightly soiled
laundry).
3. Start the programme without adding any
laundry.
See section “DAILY USE” for more information on
how to select and start a programme.
14
Page 15
DAILY USE
SORTING YOUR LAUNDRY
EN
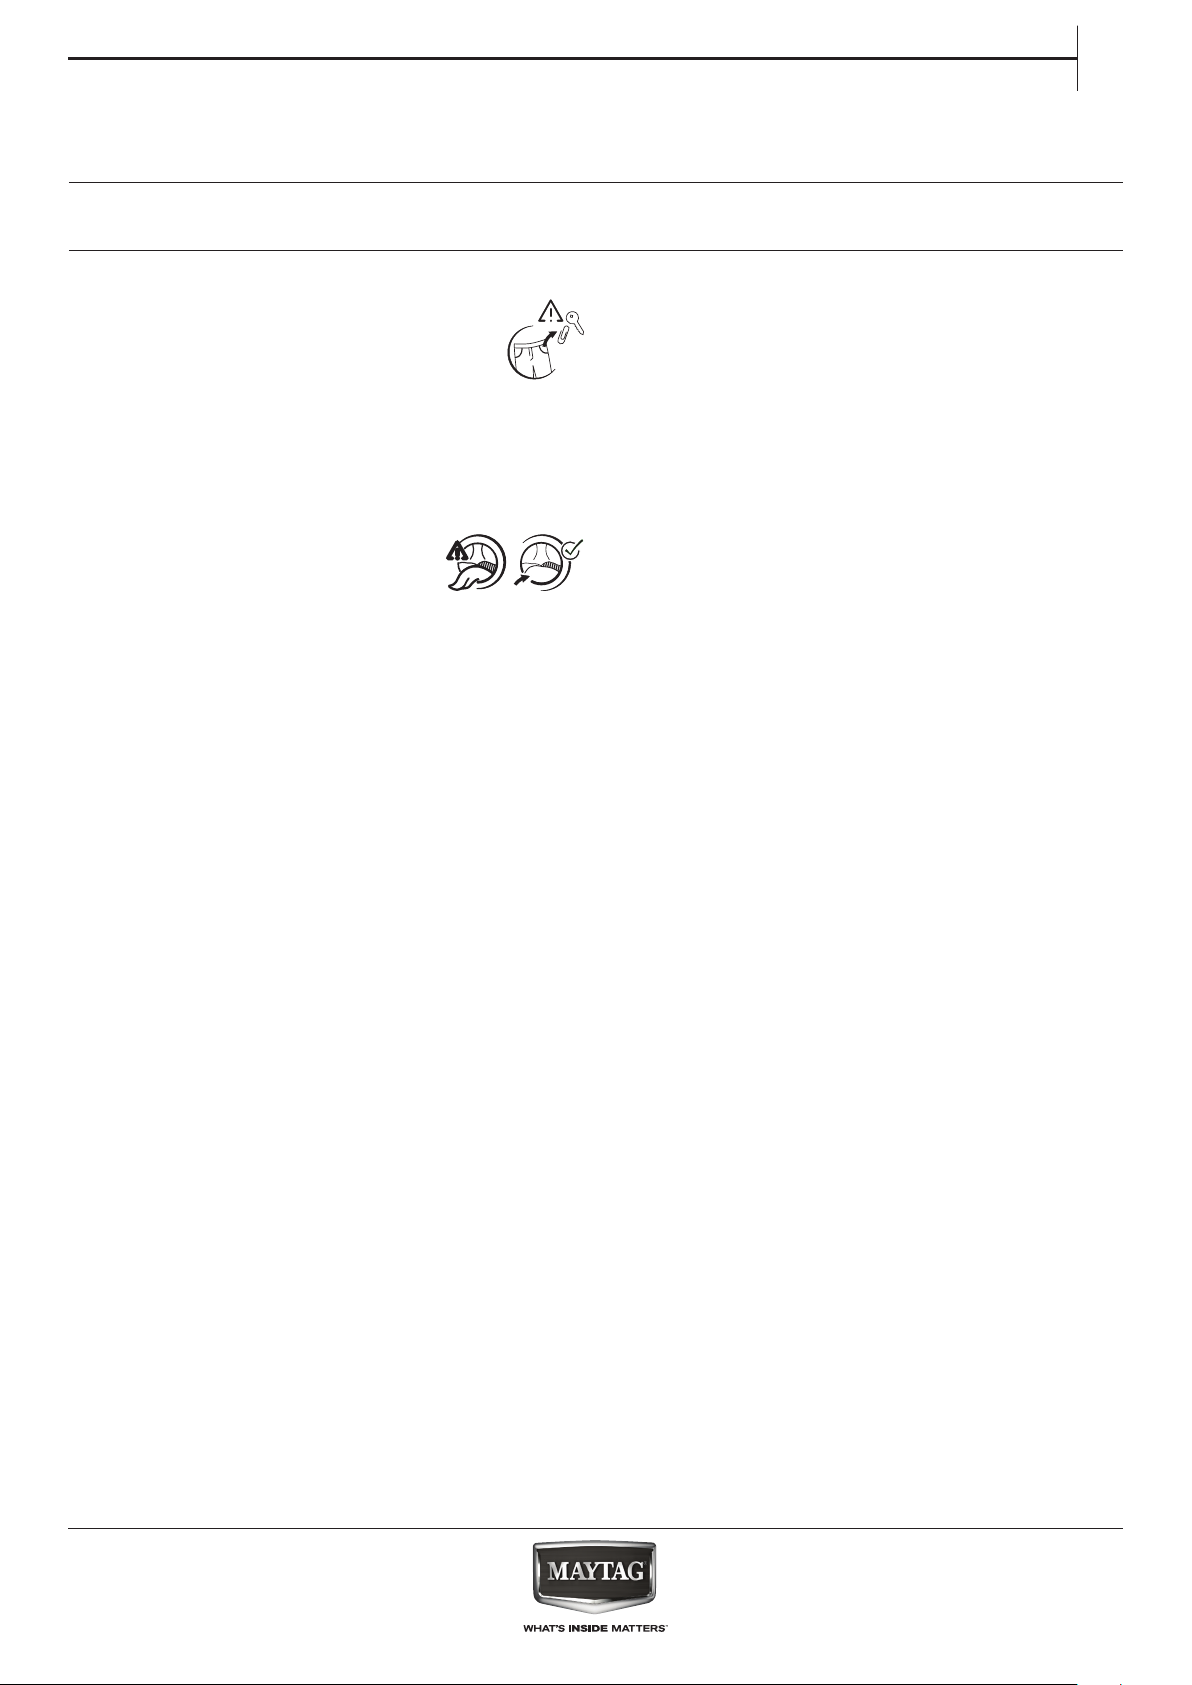
1. REMOVE ALL OBJECTS FROM
POCKETS
• Coins, pins etc. can damage your laundry
as well as parts of the washing machine.
• Objects like paper handkerchiefs will tear into
small pieces which must be removed manually
after the wash.
2. CLOSE ZIP FASTENERS,
BUTTONS OR HOOKS. TIE LOOSE
BELTS OR RIBBONS TOGETHER.
• Wash small items (e.g. nylon stockings, belts etc.)
and items with hooks (e.g. bras) in a laundry bag
or pillow case with zip fastener. Always remove
curtain rings, or wash curtains with the rings
safely tied inside a cotton bag.
3. TYPE OF FABRIC / CARE LABEL SYMBOL
Cottons, mixed bres, easy care / synthetics, wool,
handwash items.
• Colour
separate coloured and white items. Wash new
coloured articles separately.
• Size
Wash items of dierent sizes in the same
wash load, to improve washing eciency and
distribution of the articles in the drum.
• Delicates
Wash delicate items separately; they require
gentle treatment.
15
Page 16
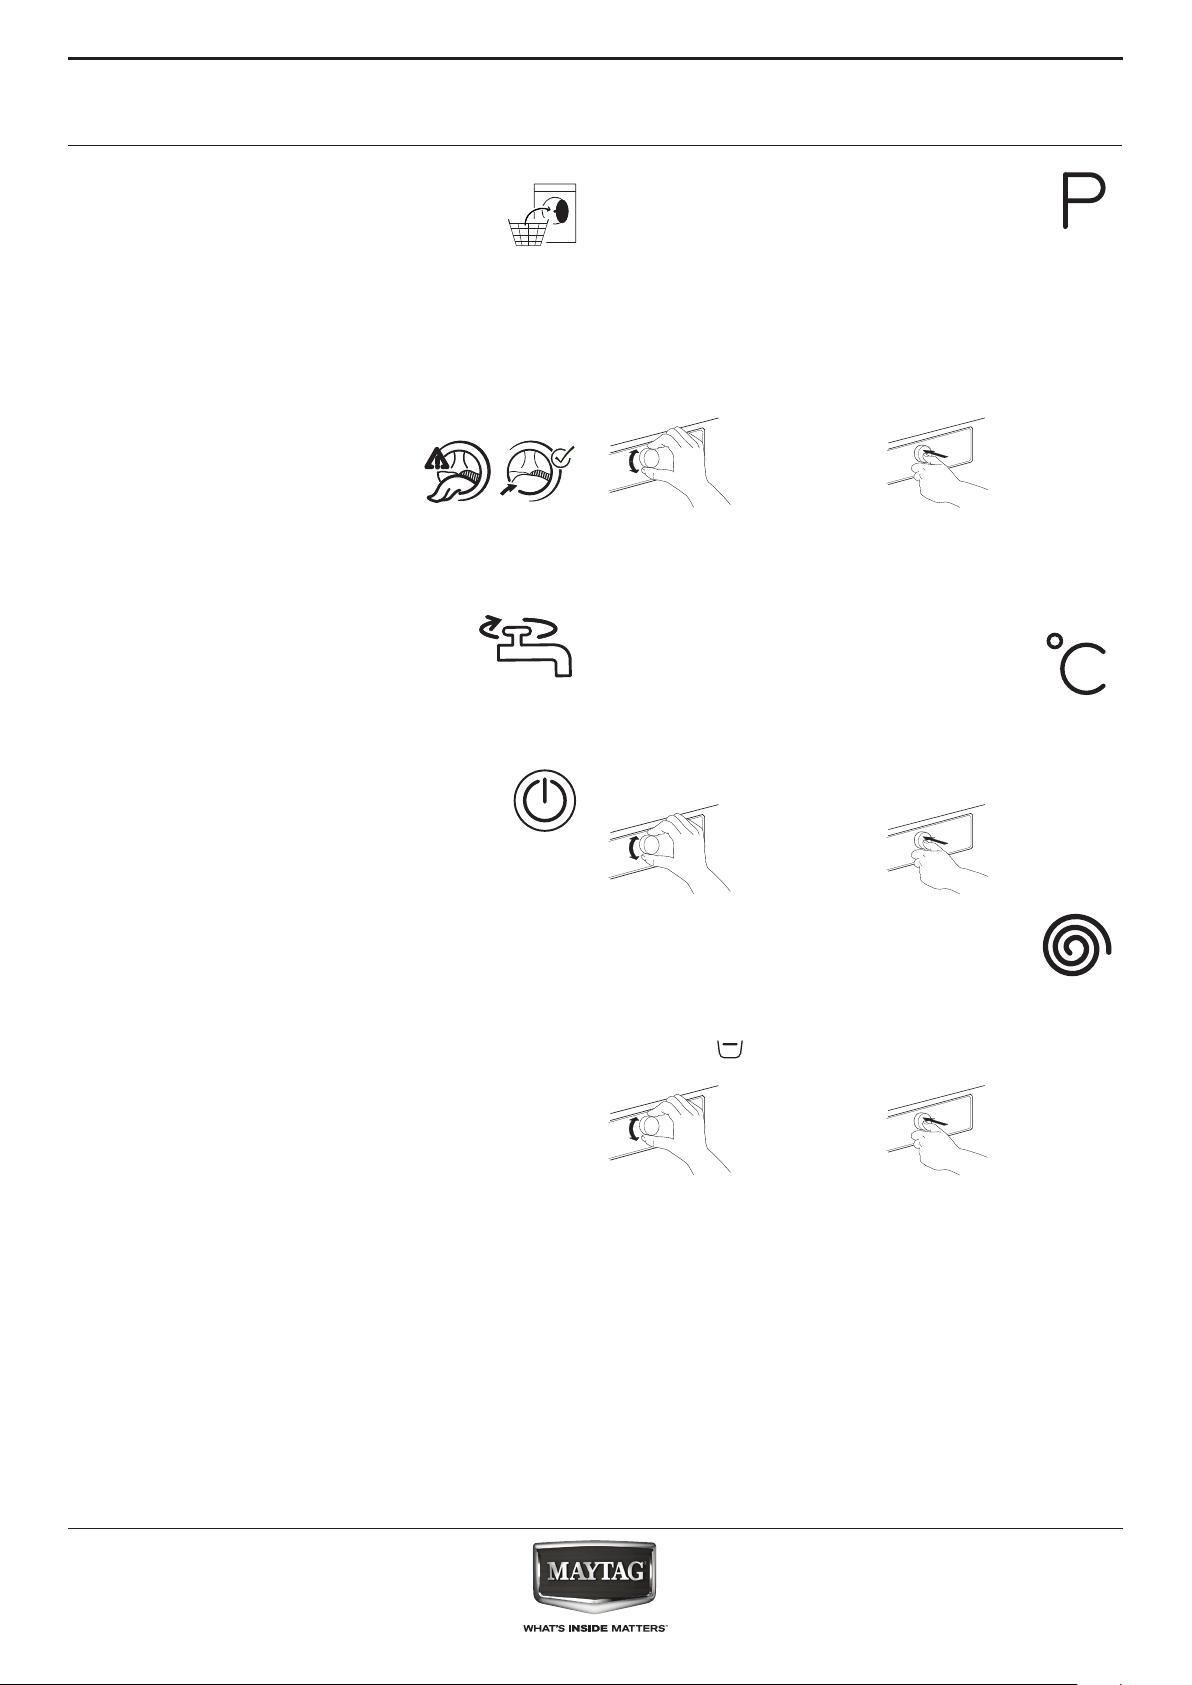
HOW TO USE THE WASHING MACHINE
1. LOAD LAUNDRY
• Open the door and load the laundry.
Load the articles one at a time loosely
into the drum, without overlling. Observe the
load sizes given in the programme chart.
Overloading the machine will result in
unsatisfactory washing results and creased
laundry.
2. CLOSE DOOR
• Make sure that no laundry gets
stuck between door glass and
rubber seal.
• Close the door so that you can hear it click shut.
3. OPEN WATER TAP
• Make sure that the washing machine is
connected to the mains.
• Open the water tap.
4. SWITCH ON WASHING MACHINE
• Press the On/O button until the
programme button lights up. An
animation will appear, and there will be a sound.
Afterwards the washing machine is ready to be
operated.
• The programme setting which you used last will
appear on the control panel.
5. SET THE DESIRED PROGRAMME
GUIDED MODE
the button light will guide you through setting a
programme in the following order: selection of
programme / temperature / spin speed / options.
As soon as you conrm a selection by pressing the
knob, the button light will jump to the next step.
Select programme
Make sure that the programme button
lights up. Turn the knob to select the
desired programme. The indicator of the selected
programme lights up, and the programme and its
default duration appear on the display.
Conrm the desired programme by pressing the
knob. The maximum possible laundry load for the
selected programme is indicated on the display.
Find more information regarding programmes in
section PROGRAMMES, OPTIONS AND FUNCTIONS
and in the Daily Reference Guide.
Change temperature, if needed
If you want to change the temperature
indicated on the display, make sure that the
Temperature button lights up.
Turn the knob to select the desired temperature,
then press the knob to conrm
Change spin speed, if needed
If you want to change the spin speed
indicated on the display, make sure that
the Spin button lights up.
Turn the knob to select the desired spin speed, or
Rinse hold , then press the knob to conrm.
If you select spin speed “0”, the programme ends
with draining the rinse water. No nal spin cycle
will be applied.
If you select “Rinse hold”, the programme will
stop after the rinse phase. The laundry will remain
immerged in the last rinse water. See more
information in section PROGRAMMES, OPTIONS
AND FUNCTIONS / Rinse hold.
16
Page 17
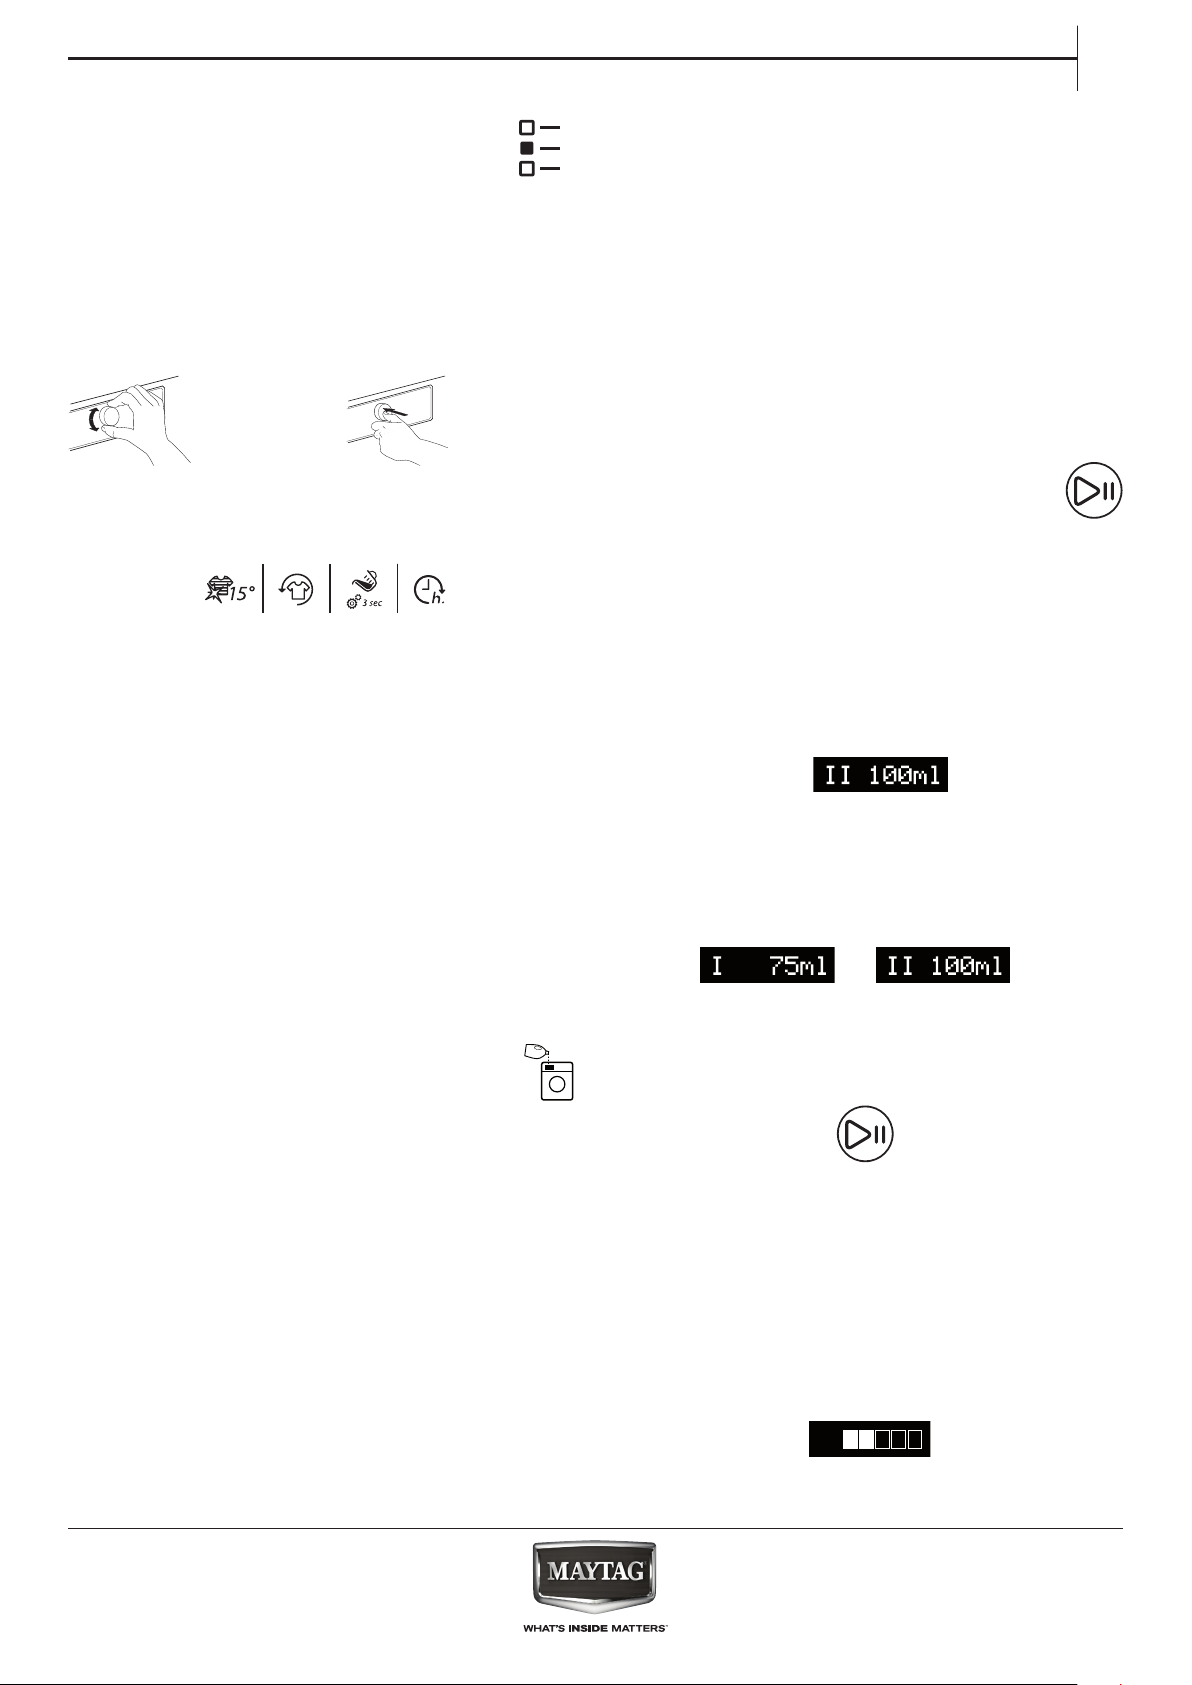
EN
Select options, if needed
If you want to select additional options,
make sure that the options button lights
up. The options which are selectable for your
programme are indicated by lighting arrows.
Turn the knob to select the desired options. The
symbol of the selected optionblinks.
To conrm it, press the knob. The option symbol
lights up solidly.
Some options / functions can be selected by
directly pressing the button:
Refer to section PROGRAMMES, OPTIONS AND
FUNCTIONS for more information.
INDIVIDUAL MODE
After you have switched on the washing machine,
you are not forced to follow the GUIDED MODE.
It is up to you which order you choose to set your
programme. To do a setting, rst press the relevant
button, then turn the knob to select, and nally
press the knob to conrm.
The range of temperatures, spin speeds and
options depend on the programme selected.
Therefore it is recommended to start your setting
with selecting the programme.
6. ADD DETERGENT
• If you do not use the Dosing Aid function,
pull out the detergent dispenser and
add detergent (and additives/softener) now, as
indicated in section DETERGENT DISPENSER.
Observe the dosing recommendations on the
detergent pack. If you have selected PREWASH or
START DELAY, observe the instructions in section
PROGRAMMES, OPTIONS AND FUNCTIONS.
Afterwards carefully close the detergent
dispenser again.
• If you use the “Dosing Aid” function, add
detergent later, after you have started the
programme. Refer to section DOSING AID/DAILY
USE.
Correct dosing of detergent / additives is
important, because
• it optimizes the cleaning result
• it avoids irritating residues of surplus detergent in
your laundry
• it saves money by avoiding waste of surplus
detergent
• it protects the washing machine by avoiding
calcication of components
• it respects the environment by avoiding
unnecessary environmental burden
7. START PROGRAMME
• Press and hold “Start/Pause” until the
button lights up solidly; the programme will
start.
• If you have selected “Dosing Aid”, the washing
machine indicates the recommended detergent
amount for your laundry load a short time after
programme start. – Add your detergent to the
main wash compartment of the detergent
dispenser, or directly into the drum in a detergent
ball.
• If you have selected “Dosing Aid” and also
“Prewash”, the washing machine will alternately
indicate you the recommended detergent
amount for the Prewash (I) and the Main wash (II)
compartment.
Add the recommended detergent amounts to the
compartments and press “Start/Pause” to
proceed with the programme.
• To avoid overow, do not open the detergent
dispenser during a running programme anymore.
• The remaining programme duration which is
indicated on the display can vary. Factors like
unbalance in the wash load, or foam formation,
can have an eect on the programme duration.
Whenever the remaining programme duration is
calculated newly, an animation appears on the
display.
17
Page 18
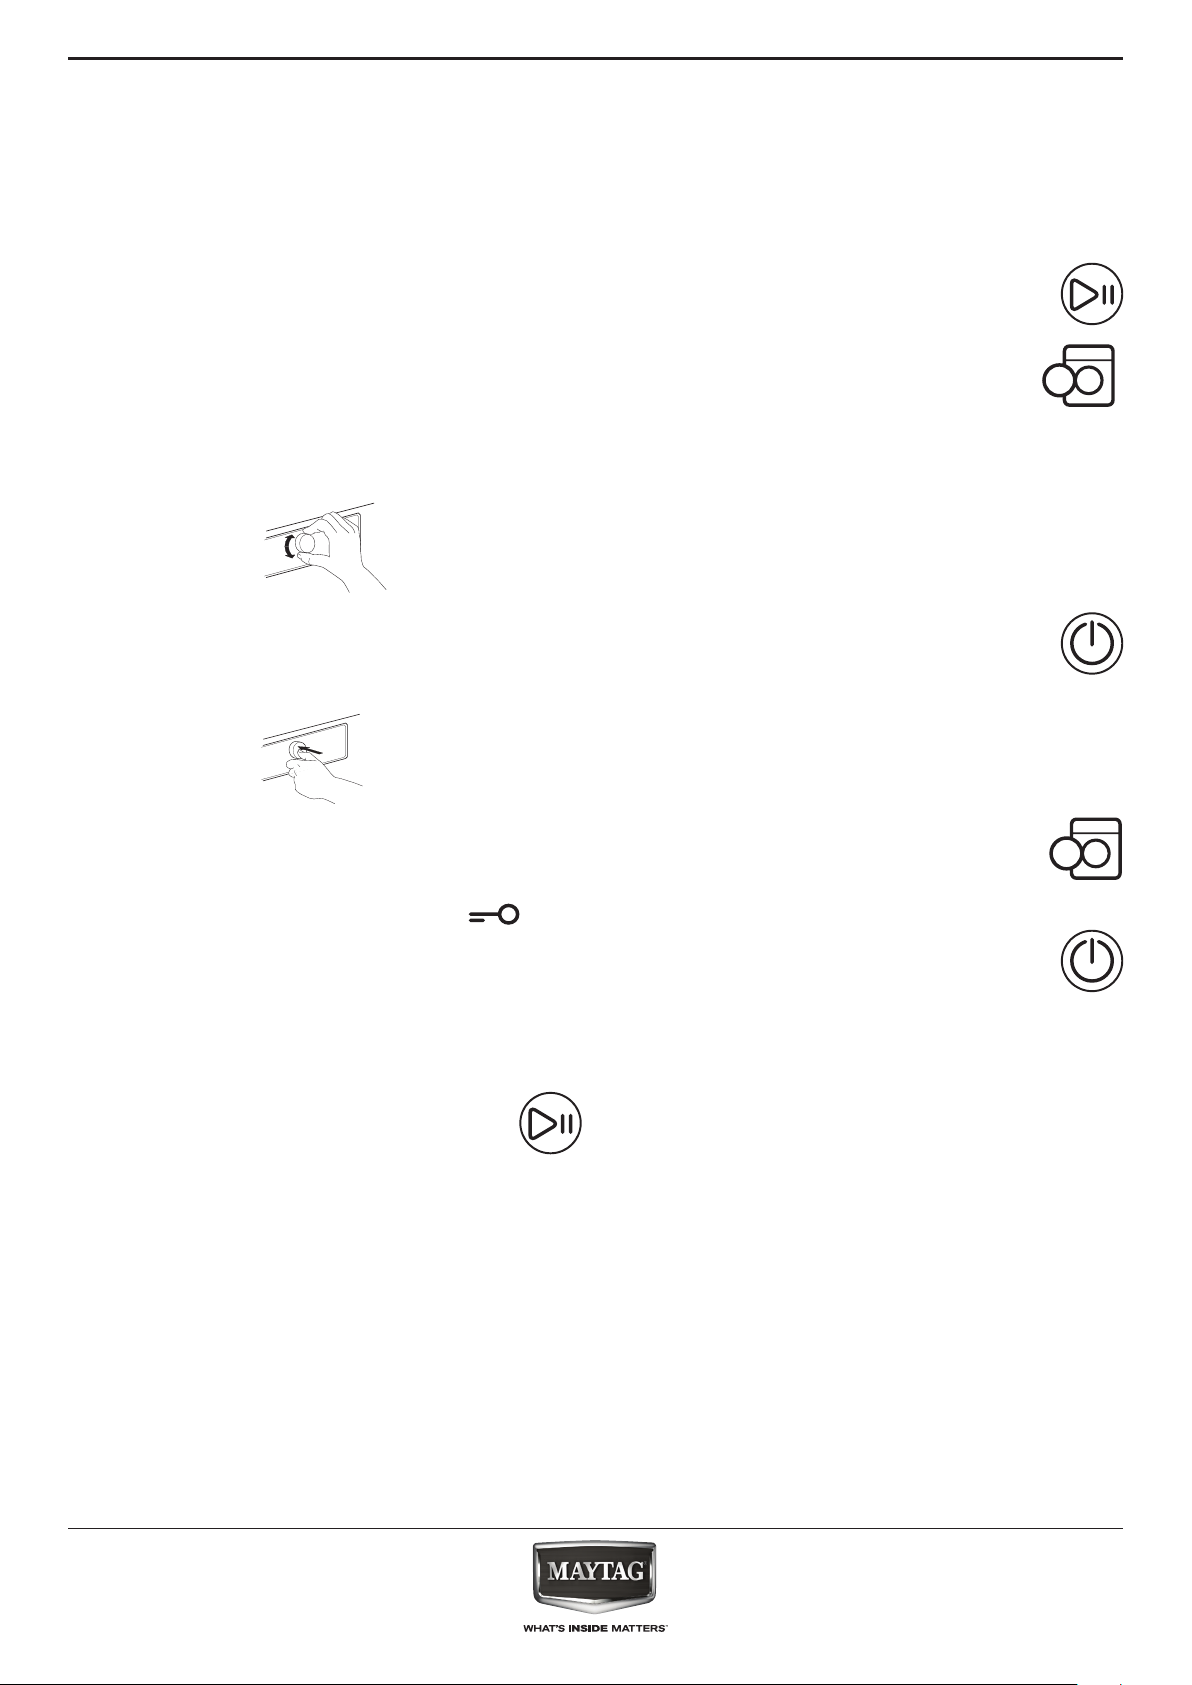
8. CHANGE THE SETTINGS OF A RUNNING
PROGRAMME, IF NEEDED
You can still change the settings while a
programme is running. The changes will be
applied, provided the respective programme phase
has not nished yet.
• Press the relevant button (for example the “Spin
speed” button to change the spin speed). The
value will blink for a few seconds.
• While blinking, you can adjust the setting
by turning the knob. If the value stopped
blinking and you have not yet done the desired
modication, press the button again.
• Press the knob to conrm the modication. If you
do not conrm, the modication will be
conrmed automatically – the modied setting
will stop blinking.
9. PAUSE A RUNNING PROGRAMME AND
OPEN THE DOOR, IF NEEDED
After programme start, the display indicates
when the programme can still be paused to add
garments.
• Press and hold “Start/Pause” to pause
a running programme
• Provided water level or temperature is
not too high, the “door open” indicator
lights up. You can open the door, for
example to add more laundry, or to
remove laundry which was loaded by mistake.
• Press “Start/Pause” to proceed with the
programme
10. RESET A RUNNING PROGRAMME, IF
NEEDED
• Press and hold the “On/O” button until
the display indicates that the programme
is cancelled. The water drains. The
programme is ended, and the door unlocks.
The programme will proceed automatically after
you have changed the setting. To prevent that a
running programme is changed by accident (for
instance by children), use the “Key lock” (see
paragraph PROGRAMMES, OPTIONS AND
FUNCTIONS).
To change the settings of a running programme,
you can also
• Press “Start/Pause” to put the running
programme on pause
• Change your settings
• Press “Start/Pause” again to continue the
programme.
If you have changed the programme, do not add
detergent for the new programme.
11. SWITCH OFF THE WASHING MACHINE
AFTER PROGRAMME END
• The display indicates that the cycle is
nished, and the “Door open” indicator
lights up – you can take out your
laundry.
• Press “On/O” to switch o the washing
machine. If you do not switch it o, the
washing machine will switch o
automatically after about a quarter of an hour
after programme end, to save energy.
• Leave the door ajar, so that the inside of the
washing machine can dry.
18
Page 19
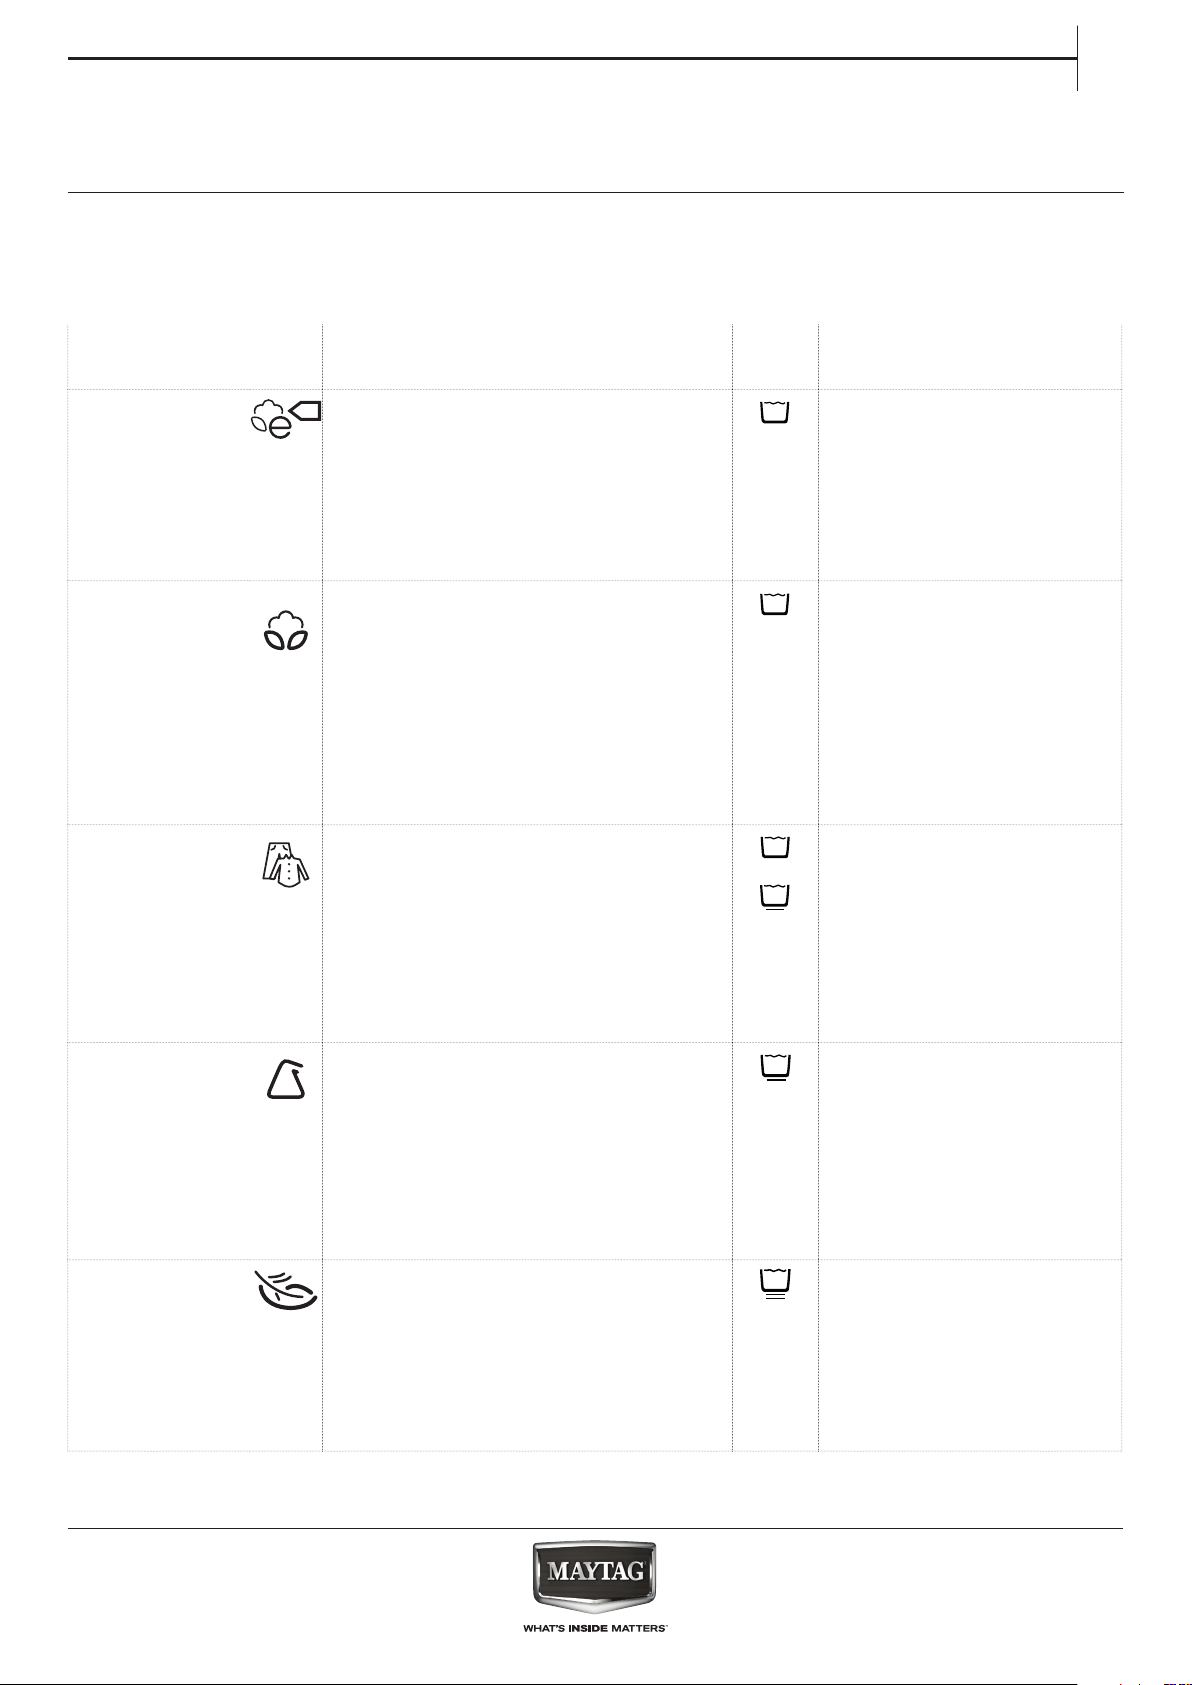
PROGRAMMES
AND OPTIONS
For choosing the appropriate programme for your
kind of laundry, always respect the instructions on the
care labels of the laundry.
EN
PROGRAMME Type of Wash
and Recommendations
Eco Cotton
Normally soiled cotton laundry.
At 40 °C and 60 °C standard cotton
programme and most favourable
programme in terms of combined
water and energy consumption. Basis
for the values indicated on the Energy
Label.
COTTON
Normally to heavily soiled robust
laundry made of cotton and linen, such
as towels, underwear, table, bed linen
etc.
MIXED
Lightly to normally soiled robust
laundry made of cotton, linen, articial
bres and their blends.
Eective one-hour programme. Only
wash similar colours together in one
wash load.
SYNTHETICS
Normally soiled laundry made
of articial bres (like polyester,
polyacrylics, viscose etc.) or their
blends with cotton.
DELICATES
Fine laundry made of delicate fabrics,
which needs gentle treatment.
Care
Labels
Settings
max. load max
temperature range Cold to
60°C
max spin speed max
selectable options Intensive
Rinse, Rapid, Colours 15°,
Fresh Care
max. load max
temperature range Cold to
95°C
max spin speed max
selectable options Prewash,
Hot nish, Bio Stain 15°,
Heavy soil, Intensive rinse,
Rapid, Colours 15°, Fresh
care
max. load 6.0 kg
temperature range Cold to
60°C
max spin speed max
selectable options Hot Finish,
Bio Stain 15, Intensive
Rinse, Rapid, Colours 15°,
Fresh Care
max. load 3.5 kg
temperature range Cold to
60°C
max spin speed max
selectable options Prewash,
Bio Stain 15, Heavy Soil,
Intensive Rinse, Rapid,
Colours 15°, Fresh Care
max. load 2.5 kg
temperature range Cold to
40°C
max spin speed 1000
selectable options Prewash,
Rapid, Colours 15°, Fresh
Care
19
Page 20
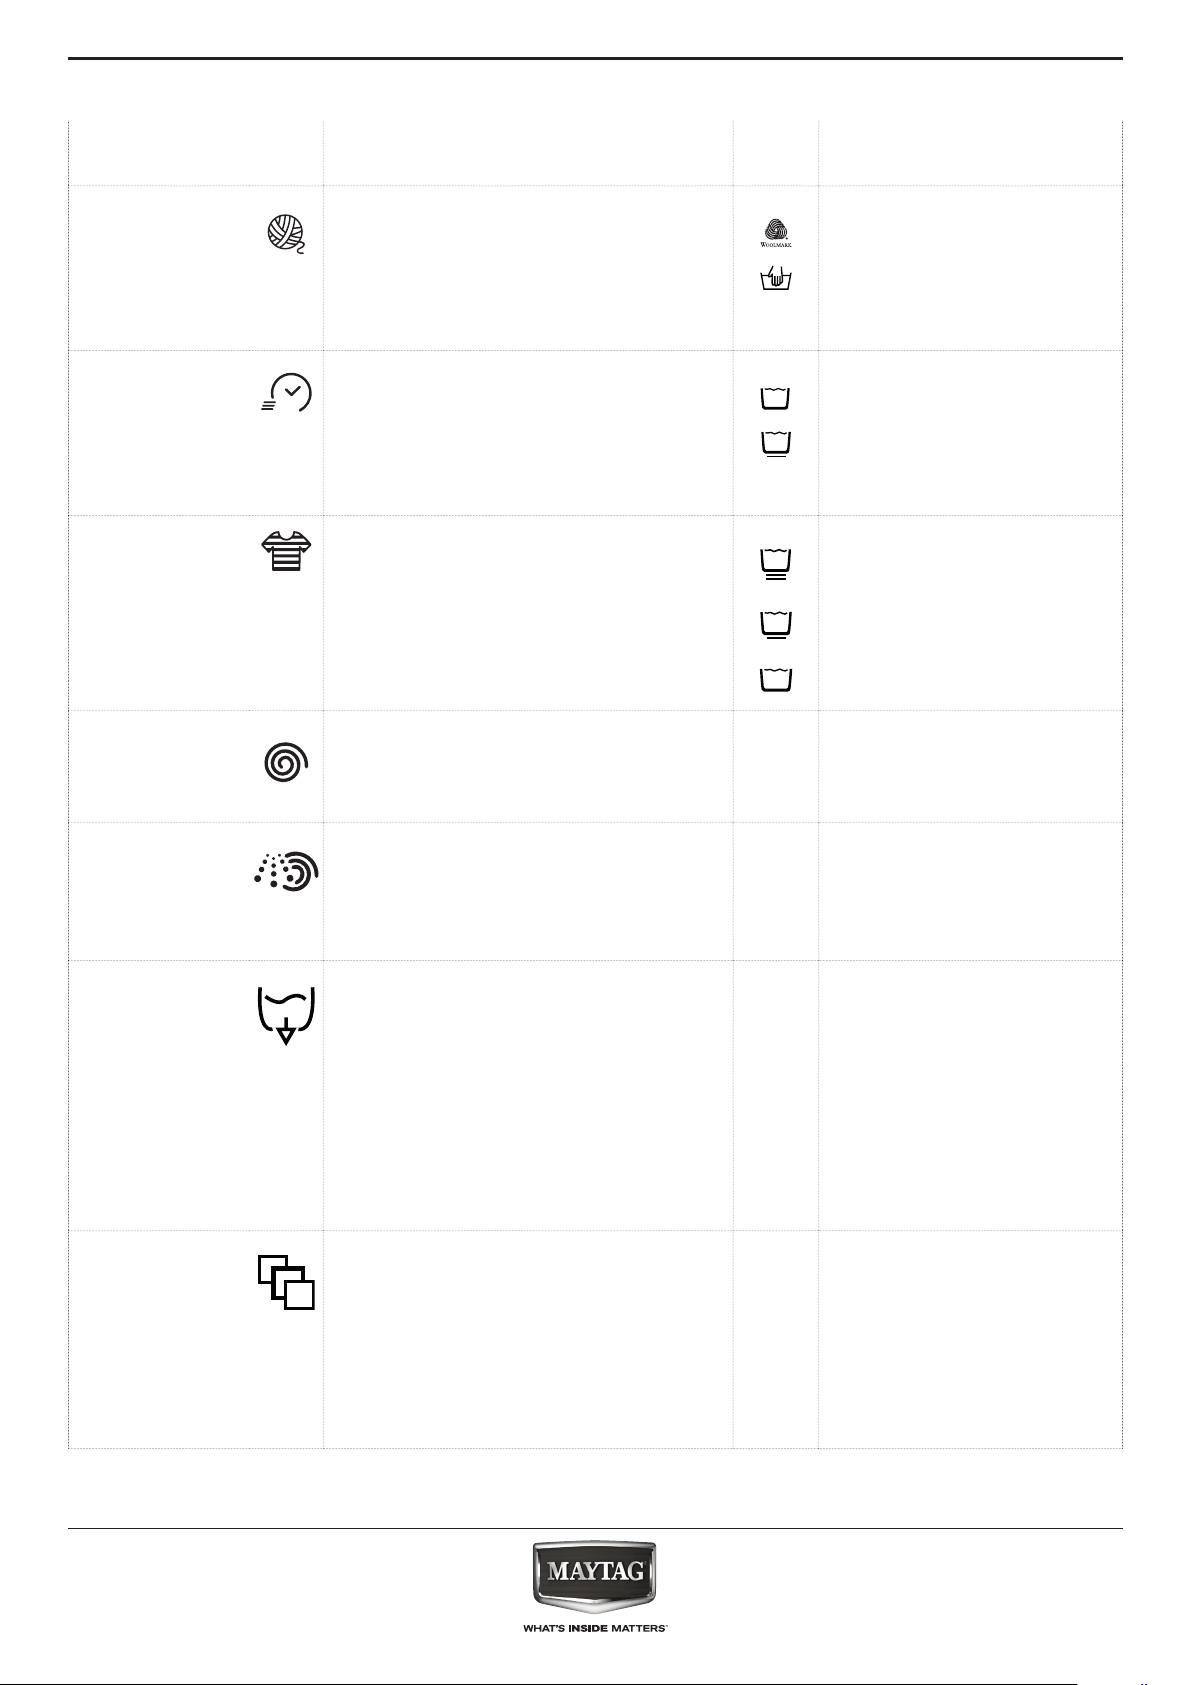
PROGRAMME Type of Wash
and Recommendations
Care
Labels
Settings
WOOL
RAPID 30’
COLOURS
SPIN
RINSE&SPIN
DRAIN
SPECIAL
PROGRAMMES
Woollens, labelled with the Woolmark
and identied as machine washable, as
well as textiles made of silk, linen, wool
and viscose marked as handwashable.
Respect the manufacturers
recommendations on the care label.
Lightly soiled laundry without stains,
made of cotton and/or synthetics.
30’
Refresh programme.
Lightly to normally soiled laundry
made of cotton, synthetics or their
blends; also delicates.
Helps preserving the colours of your
laundry. Take care to use detergent
which is appropriate for the colours of
your laundry load.
Separate intensive spin programme.
Suitable for robust laundry.
Separate rinse and intensive spin
programme. Suitable for robust
laundry.
Separate programme to drain the
water, without spinning. Can be
selected if your laundry is in Rinse
hold, and you want to drain the water
without spinning the wet laundry. As
an alternative to the Drain programme,
you can select spin speed “0” to
terminate the Rinse hold without
spinning. Appropriate for delicate
laundry like ne garments or curtains.
To set one of the following
programmes, select and conrm the
special programmes position. Then
turn the knob to select one of the
following eight programmes; the
display indicates the programme
name. Conrm the desired programme
by pressing the knob.
max. load 2.0 kg
temperature range Cold to
40°C
max spin speed 1000
selectable options Rapid,
Colours 15°, Fresh Care
max. load 3.0 kg
temperature range Cold to
30°C
max spin speed max
selectable options Colours 15°,
Fresh Care
max. load 6.0 kg
temperature range Cold to
60°C
max spin speed 1000
selectable options Prewash,
Bio Stain 15, Heavy Soil,
Rapid, Colours 15°
max. load max
temperature range Cold
max spin speed max
selectable options Fresh Care
max. load max
temperature range Cold
max spin speed max
selectable options Intensive
Rinse, Fresh Care
20
Page 21
EN
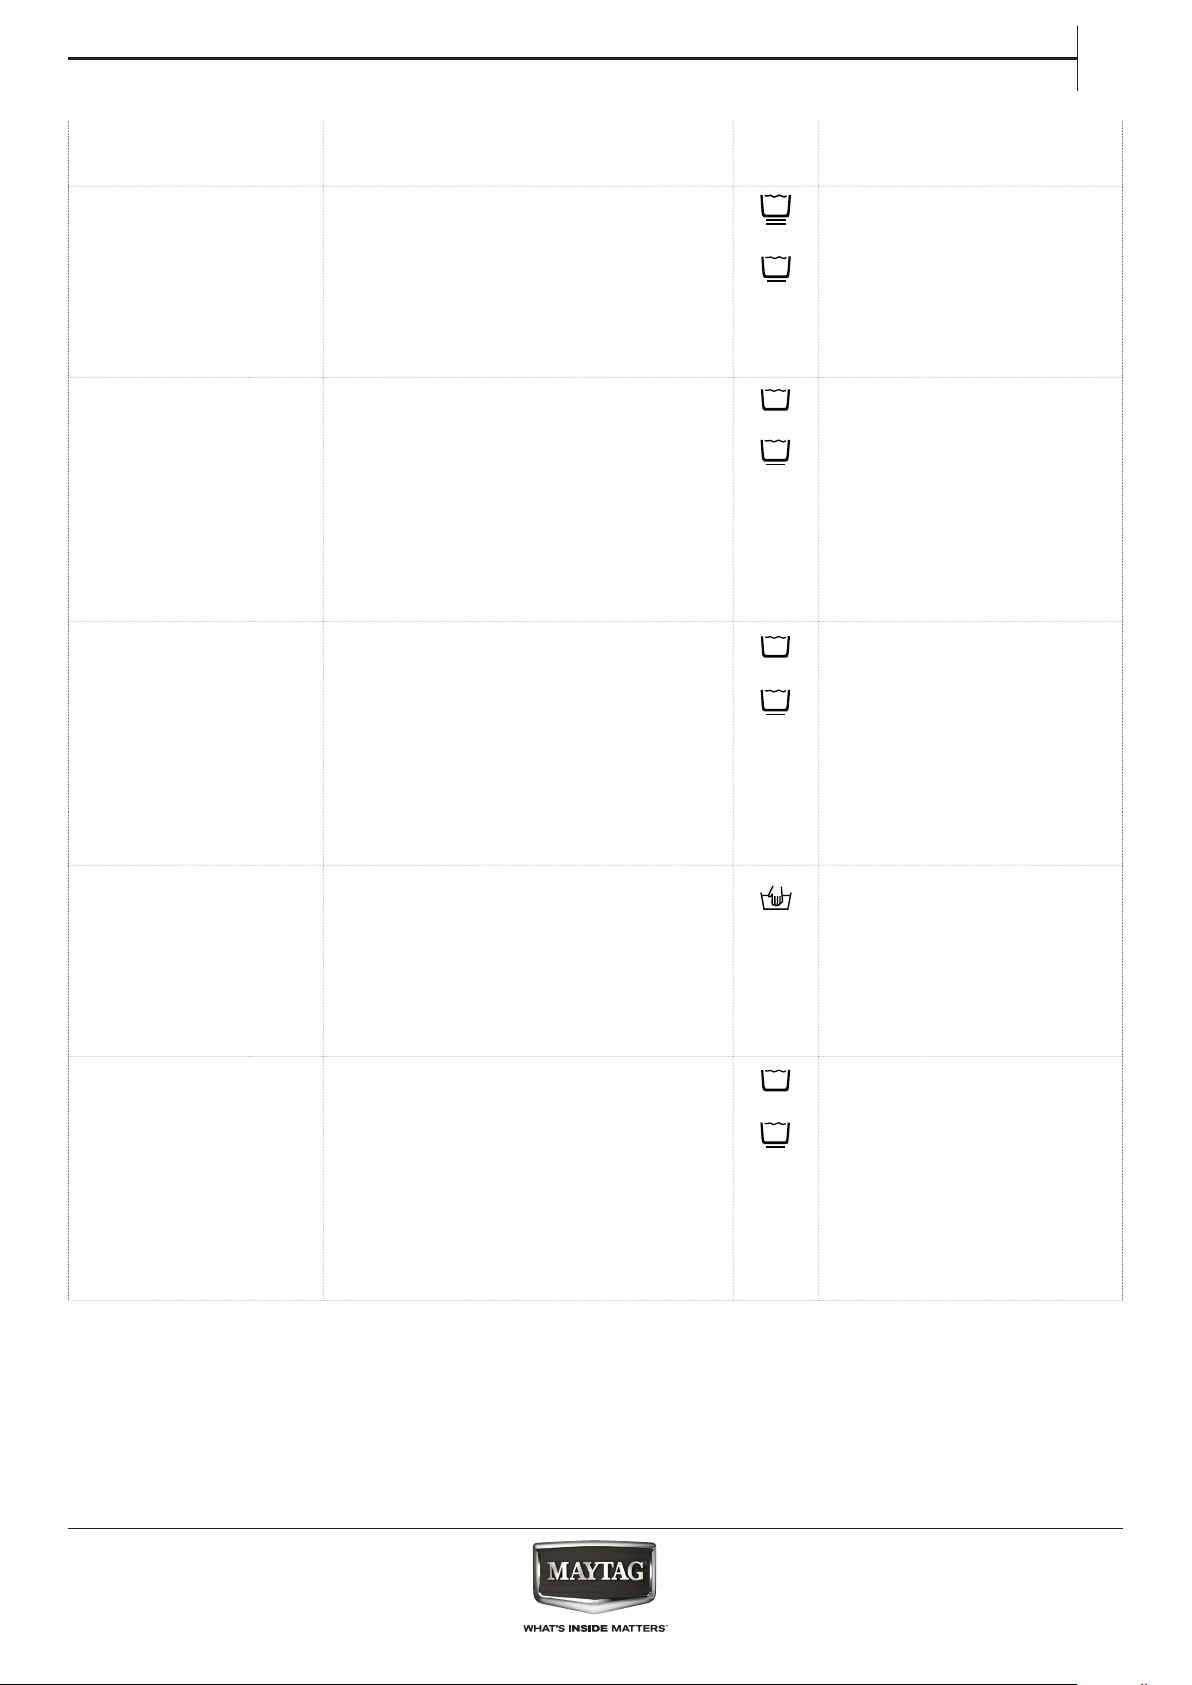
PROGRAMME Type of Wash
and Recommendations
Shirts, blouses and ne business
SHIRTS
clothes made of cotton, synthetics or
their blends.
Provides gentle treatment for ne
garments.
DUVET
Big items such as sleeping bags,
washable blankets, bathmats, pillows
and duvets lled with feathers or
synthetic material.
Adapted to wash and spin big laundry
items.
Respect the manufacturer’s
recommendations on the care label of
the laundry
BED LINEN
White or coloured bed linen made of
cotton and synthetic bres, or blends
of both.
Reduces microbes and gently cleans,
also delicate bed linen. A thorough
rinse phase helps to prevent detergent
and pollen residues.
Prefer powder detergent for this
programme.
High-quality cashmere garments
CASHMERE
identied as machine washable or
hand washable.
Use liquid detergent for woollen
laundry. Respect the manufacturer’s
recommendations on the care label of
the laundry.
Normally soiled and sweaty sportswear
SPORT
made of cotton jersey or microbres.
This programme includes a prewash
cycle – you can add detergent also
to the prewash chamber for washing
soiled sports garments.
Do not use softener; this can harm
the elastane bres often contained in
sportswear.
Care
Labels
Settings
max. load 2.5 kg
temperature range Cold to
40°C
max spin speed 1000 rpm
selectable options Prewash,
Colours 15°, Rapid, Fresh
Care
max. load 3.0 kg
temperature range Cold to
60°C
max spin speed 1000 rpm
selectable options
Prewash,BioStain 15,
Intensive rinse, Hot nish,
Colours 15°, Rapid, Fresh
Care
max. load 3.5 kg
temperature range Cold to
95°C
max spin speed max
selectable options Prewash,
BioStain 15, Intensive
Rinse, Hot nish, Colours
15°, Rapid, Fresh Care
max. load 2.0 kg
temperature range Cold to
40°C
max spin speed 400 rpm
selectable options Colours 15°,
Rapid, Fresh Care
max. load 3.5 kg
temperature range Cold to
40°C
max spin speed max
selectable options Prewash,
BioStain 15, Intensive
Rinse, Colours 15°, Rapid,
Fresh Care
21
Page 22
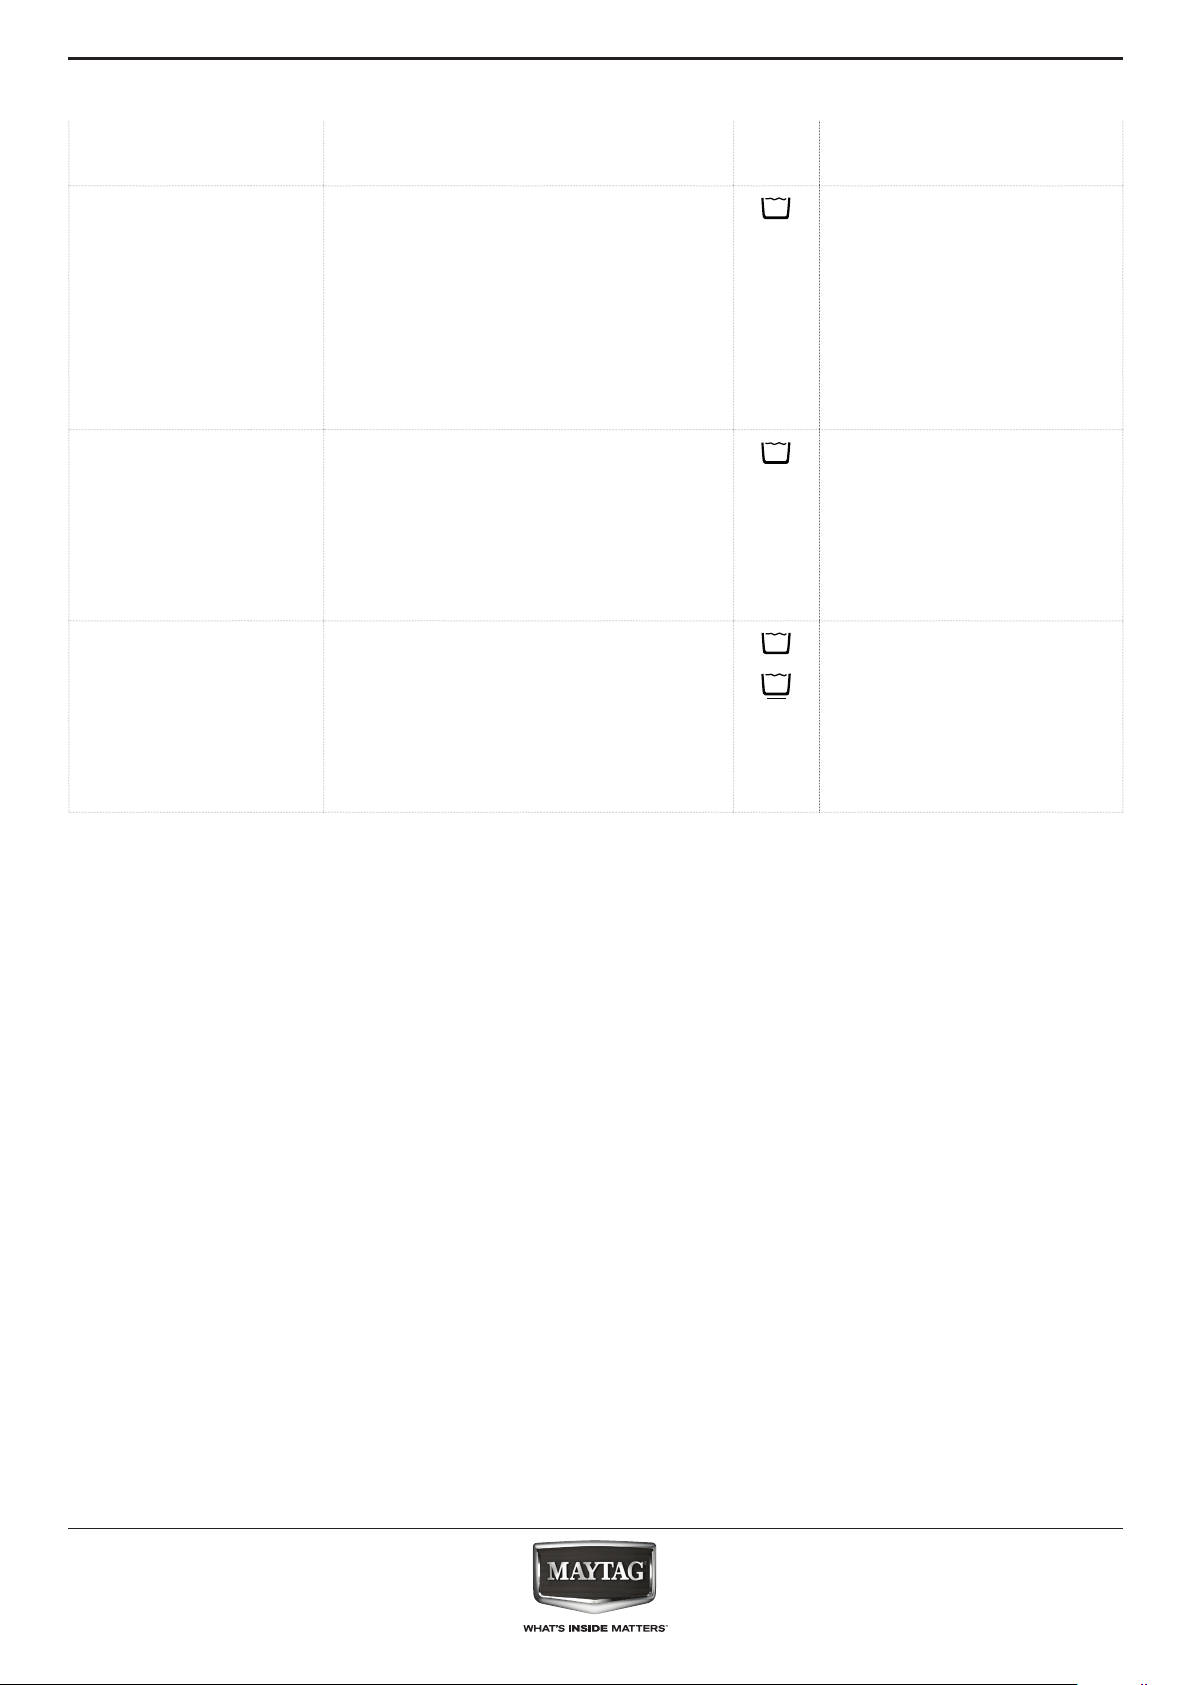
PROGRAMME Type of Wash
and Recommendations
Care
Labels
Settings
JEANS
BABY ITEMS
MINI LOAD
Normally soiled cotton jeans-wear and
garments made of robust jeans-like
material, such as trousers and jackets.
For dark jeans-wear, use of
special detergent for dark laundry
recommended.
Normally soiled baby clothes made of
cotton and/or linen.
The suds are rinsed out even more
thoroughly, which helps to protect
sensitive baby skin.
Cotton and/or synthetic laundry made
of stable fabric types.
Ideal for washing a small laundry load
in an economic way.
Pre-treatment of stains recommended.
Not appropriate for delicate laundry.
max. load 5.0 kg
temperature range Cold to
60°C
max spin speed max
selectable options Prewash,
BioStain 15, Heavy soil,
Intensive Rinse, Hot nish,
Colours 15°, Rapid, Fresh
Care
max. load 5.0 kg
temperature range Cold to
60°C
max spin speed max
selectable options Intensive
Rinse, Colours 15°, Rapid,
Fresh Care
max. load 1.0 kg
temperature range Cold to
40°C
max spin speed max
selectable options Intensive
Rinse, Colours 15°, Rapid,
Fresh Care
22
Page 23
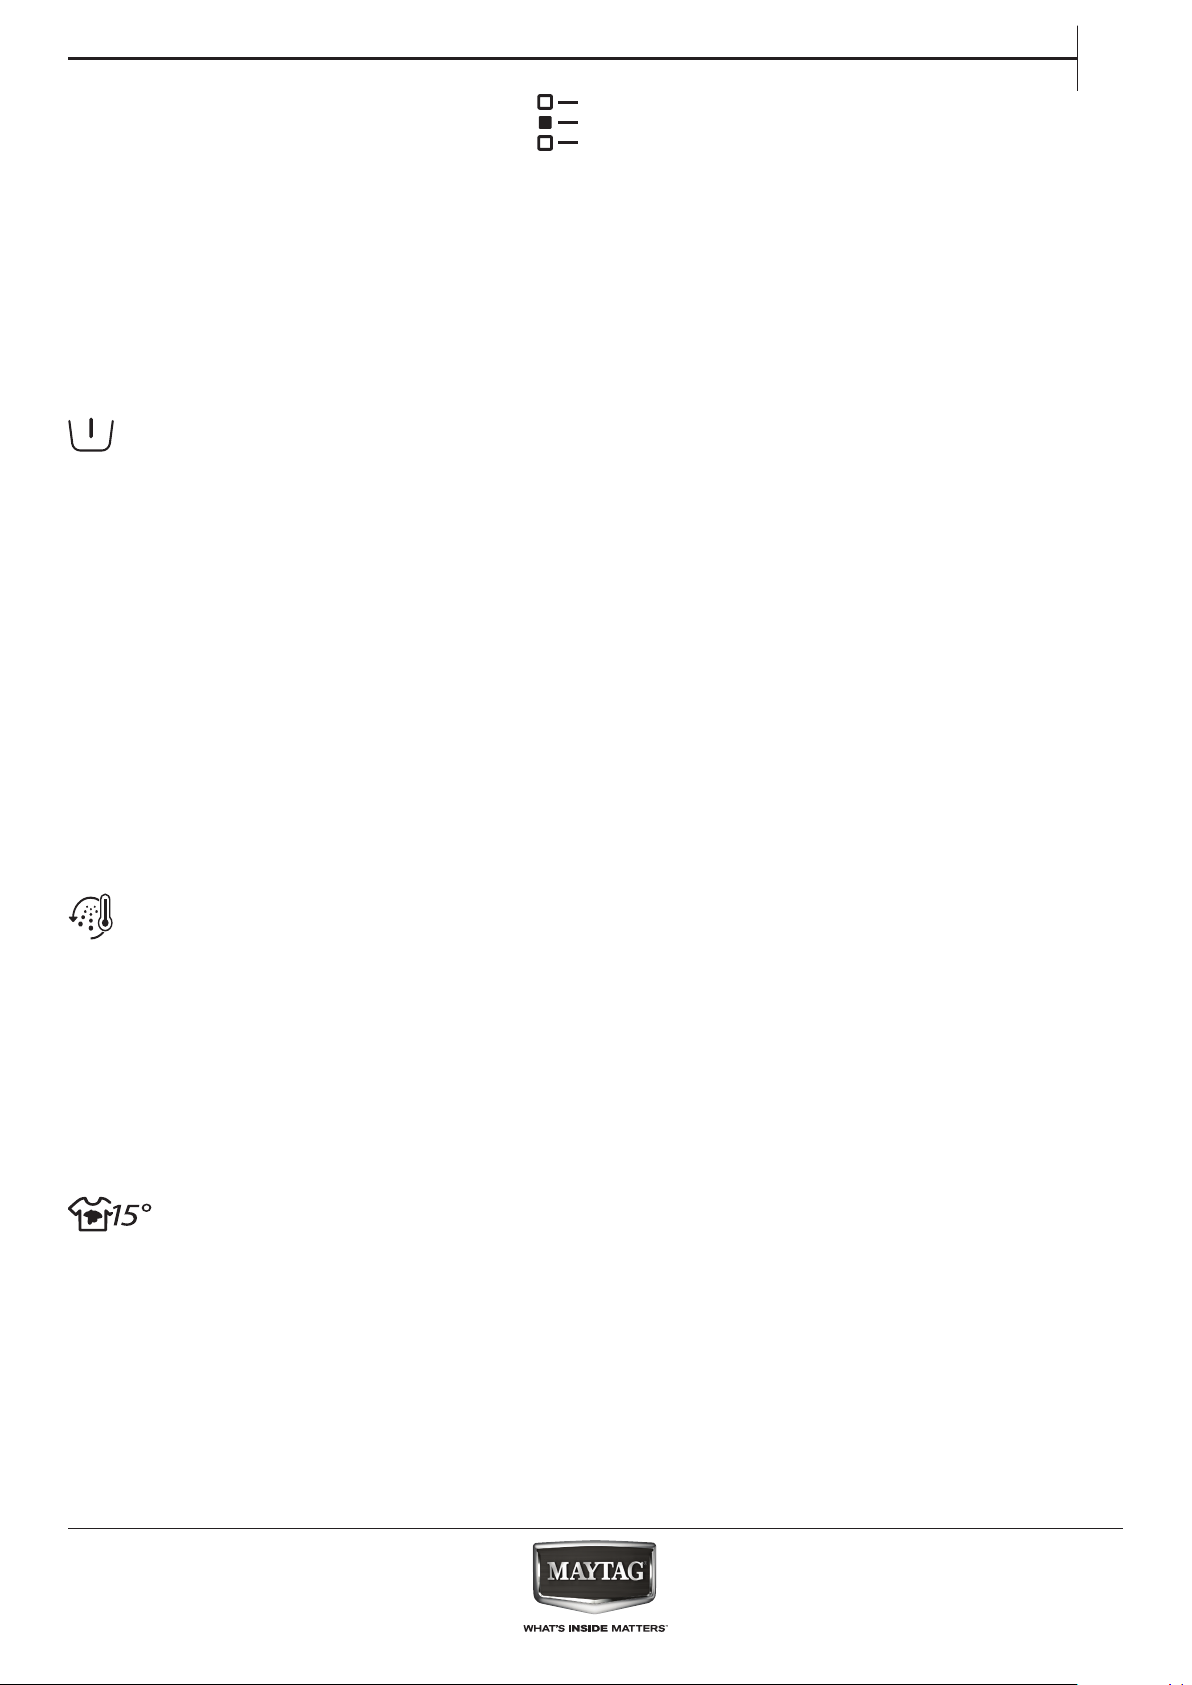
OPTIONS SELECTABLE BY THE OPTIONS
BUTTON
EN
The programme chart gives an
overview of possible combinations
of programmes and options. Not
all combinations of programmes
PREWASH Adds a prewash phase to the wash
programme selected.
For heavily soiled laundry (e.g. with
sand or granular dirt). – Shake out the
laundry thoroughly before loading it
into the drum.
You can add a small amount of
detergent also to the prewash
compartment of the detergent
dispenser, or directly into the drum.
and options are selectable.
Also certain options are not
combinable. In this case, the
indicator of the non-combinable
option blinks and switches o
again, and a signal sounds.
– When selecting “Prewash”, use
powder detergent for the main wash,
to ensure that the detergent stays in
the detergent dispenser until start of
the main wash phase. Respect the
detergent manufacturer’s dosing
recommendations, or use the “Dosing
Aid” option.
Prolongs the programme by about 20
minutes.
HOT FINISH
BIO STAINS 15°
The rinse phase completes with a
warm rinse, which relaxes the fabric
bres and passes into a gentle and
shorter spin phase.
Helps to remove all kinds of stains,
except grease/oil.
The programme begins with a
cold water wash phase. Duration is
prolonged by about 10 minutes.
The laundry feels comfortably warm
when taking it out shortly after
programme end.
Pre-treatment recommended for
obstinate stains.
Not selectable for Cotton 95°C
23
Page 24
HEAVY SOIL Helps to clean heavily soiled, stained
laundry by optimizing the eciency
of additives for stain removal.
Add an appropriate amount
of in-wash additive for stain
removal (powder) to the main
wash compartment, together
with your detergent. Only use
powder detergent with this option.
Respect the manufacturer’s dosing
instructions.
May prolong the programme by up to
15 minutes.
IMPORTANT: Appropriate for use
of stain removers and bleaches on
oxygen basis.
Chlorine or perborate bleaches must
not be used!.
INTENSIVE RINSE
RAPID
Helps to avoid detergent residues
in the laundry by a prolonged rinse
phase.
Particularly suitable for washing baby
laundry, for people suering from
allergies and for areas with soft water.
Enables quicker washing. Shortens
the programme duration while
keeping a good wash result.
Recommendable for only lightly
soiled laundry.
Not selectable for Cotton 95 °C.
.
24
Page 25
OPTIONS WHICH ARE DIRECTLY SELECTABLE
BY PRESSING THE RESPECTIVE BUTTON
EN
COLOURS 15° Helps to preserve the colours of
your laundry by washing it with cold
water (15°C). Saves energy for water
heating, while keeping a good wash
result.
Suitable for lightly soiled coloured
laundry without stains.
FRESH CARE
Helps to keep your laundry fresh
if you cannot unload it soon after
programme end.
The washing machine starts to
tumble the laundry periodically
a few minutes after programme
end. This tumbling will last up to
Make sure that your detergent can
be used with cold wash temperatures
(15 or 20 °C).
Not selectable for Cotton 95°C.
approximately 6 hours after end of
your wash programme. You can stop
it at any time by pressing any button;
the door unlocks and you can take
out your laundry.
TEMPERATURE
If you want to change the
temperature, press the temperature
button, turn the knob to select the
desired temperature and conrm it by
pressing the knob.
If you switch on the washing
machine, the last used programme
and temperature setting will appear
on the control panel.
If you change the programme, the
default temperature of the selected
programme will appear on the
display.
25
Page 26

SPIN
If you want to change the spin speed,
press the Spin button, turn the knob
to select the desired spin speed and
press the knob to conrm.
If you select spin speed “0”, the rinse
water will be drained at the end of
the programme, and there will be no
nal spin cycle.
If you switch on the washing
machine, the last used programme
and spin speed setting will appear on
the control panel.
If you change the programme, the
default spin speed of the selected
programme will appear on the
display.
RINSE HOLD To avoid automatic spinning of the
laundry at the end of the programme.
The laundry remains in the last rinse
water, the programme does not
proceed. The display indicates when
the washing machine has reached the
rinse hold.
Suitable for delicate laundry which
is not appropriate for spinning, or
which should be spun with a lower
spin speed.
Not appropriate for silk.
To terminate the “Rinse hold”, choose
between:
• draining the water, no spinning:
turn the knob to select spin speed
“0”, then press “Start/Pause”: the
water will be drained and the
programme ended
• spinning the laundry:
the default spin speed blinks - start
the spin cycle by pressing “Start/
Pause”. Or select a dierent spin
speed by turning the knob, press it
to conrm, and press Start/Pause”
to start the spin cycle
26
Page 27
FUNCTIONS
EN
ON/OFF To switch on the washing machine:
press the button until the Start/Pause
button lights up.
To cancel a running programme:
press and hold the button until the
display indicates that the programme
is cancelled; the washing machine
will perform a drain cycle to end the
program.
KNOB • To select and conrm programmes
and options
• Turn to select
To switch o the washing machine
after programme end:
press the key until the lights go o.
• Push to conrm
START/PAUSE
KEY LOCK
• To start the programme, after you
have nished your settings
This function allows you to lock the
buttons and the knob of the control
panel against unwanted operation,
for example by small children.
The washing machine must be
switched on.
Press and hold the option
button for at least 3 seconds;
the display indicates that the
keys are locked.
• To pause a running programme
• To continue a paused programme
Knob and buttons are locked now.
The only working function is “On/
O” to switch the washing machine
o. – The key lock will remain active
also if you switch o and on again the
washing machine.
To unlock the buttons/knob, press
and hold the option button again for
at least 3 seconds, until the display
indicates that the keys are unlocked.
27
Page 28
DOSING AID See separate section Dosing Aid – rst
use / daily use.
FINISH IN
Moves the end of your programme
to a later time. Helps to prot from
more favourable energy rates (for
example during the night), or to have
the laundry ready at a certain time.
Do not use liquid detergent with this
function.
Choose a delay up to 23:30 hours.
• Select programme, temperature
and options.
• Press the “Finish in” button –
the symbol over the button
blinks.
• Turn the knob to select a delay up
to 23:30 hours, which will be shown
on the display. Conrm the desired
delay by pressing the knob. The
symbol over the nish in button
lights up solidly.
• When you have nished your
settings, press “Start / Pause”
– the light over the button
lights up solidly. The display shows
the countdown of the time until
end of the programme. The door
locks.
• After the delay phase, the
programme starts automatically.
The display then indicates the
remaining programme duration.
To cancel the delay
• either press “Start/Pause” to cancel
the delay; to start the selected
programme immediately, press
“Start/Pause” again
• or press and hold “On/O” to cancel
the complete programme setting.
SETTINGS
28
The following settings can be
changed:
Language (= display language) /
key tones / cycle end alert / display
contrast / water hardness / dosing
aid (adjust dosing amounts for the
detergents you use) / eco mode
(automatic switch-o function after
programme end) / factory settings (=
return to factory settings).
• Press and hold the Programme
button for at least 3 seconds.
• Turn the knob to select the setting
which you want to change; it
appears on the display. Conrm it
by pressing the knob.
• Turn the knob to adjust the setting;
conrm by pressing the knob.
• To exit the Settings mode, either
turn the knob until the display
indicates that you can exit – then
conrm by pressing the knob. Or
alternatively press the Programme
button.
Page 29
INDICATORS
EN
DOOR CAN
BE OPENED
ENERGY /
WATER
MONITOR
DESCALING
FAILURE: Refer to the Troubleshooting section for more information.
This indicator will light
• before you have started a programme
• when you have paused a programme and the water level is not
too high, or the laundry is not too hot in that programme phase
• when a programme is nished and the laundry can be unloaded
Gives feedback about the energy and water consumption of
your programme setting. The less indicators light up, the more
economic is your programme setting. Can still adapt after sensing
phase of laundry load.
A display message will remind you regularly to descale the
washing machine. Find descaler appropriate for the washing
machine (WPRO) on wpro.eu
To cancel the display reminder, press the knob.
29
Page 30
DOSING AID / FIRST USE
The concentration of detergents available on the
market diers considerably. For that reason, adapt
the washing machine to the dosing amounts of the
detergents which you use.
Furthermore, check if the washing machine’s preset
water hardness level (soft) corresponds to your local
water hardness level – if not adapt it (see “DOSING
AID / FIRST USE”).
SAVE THE DOSING VALUES FOR THE
DETERGENTS YOU USE
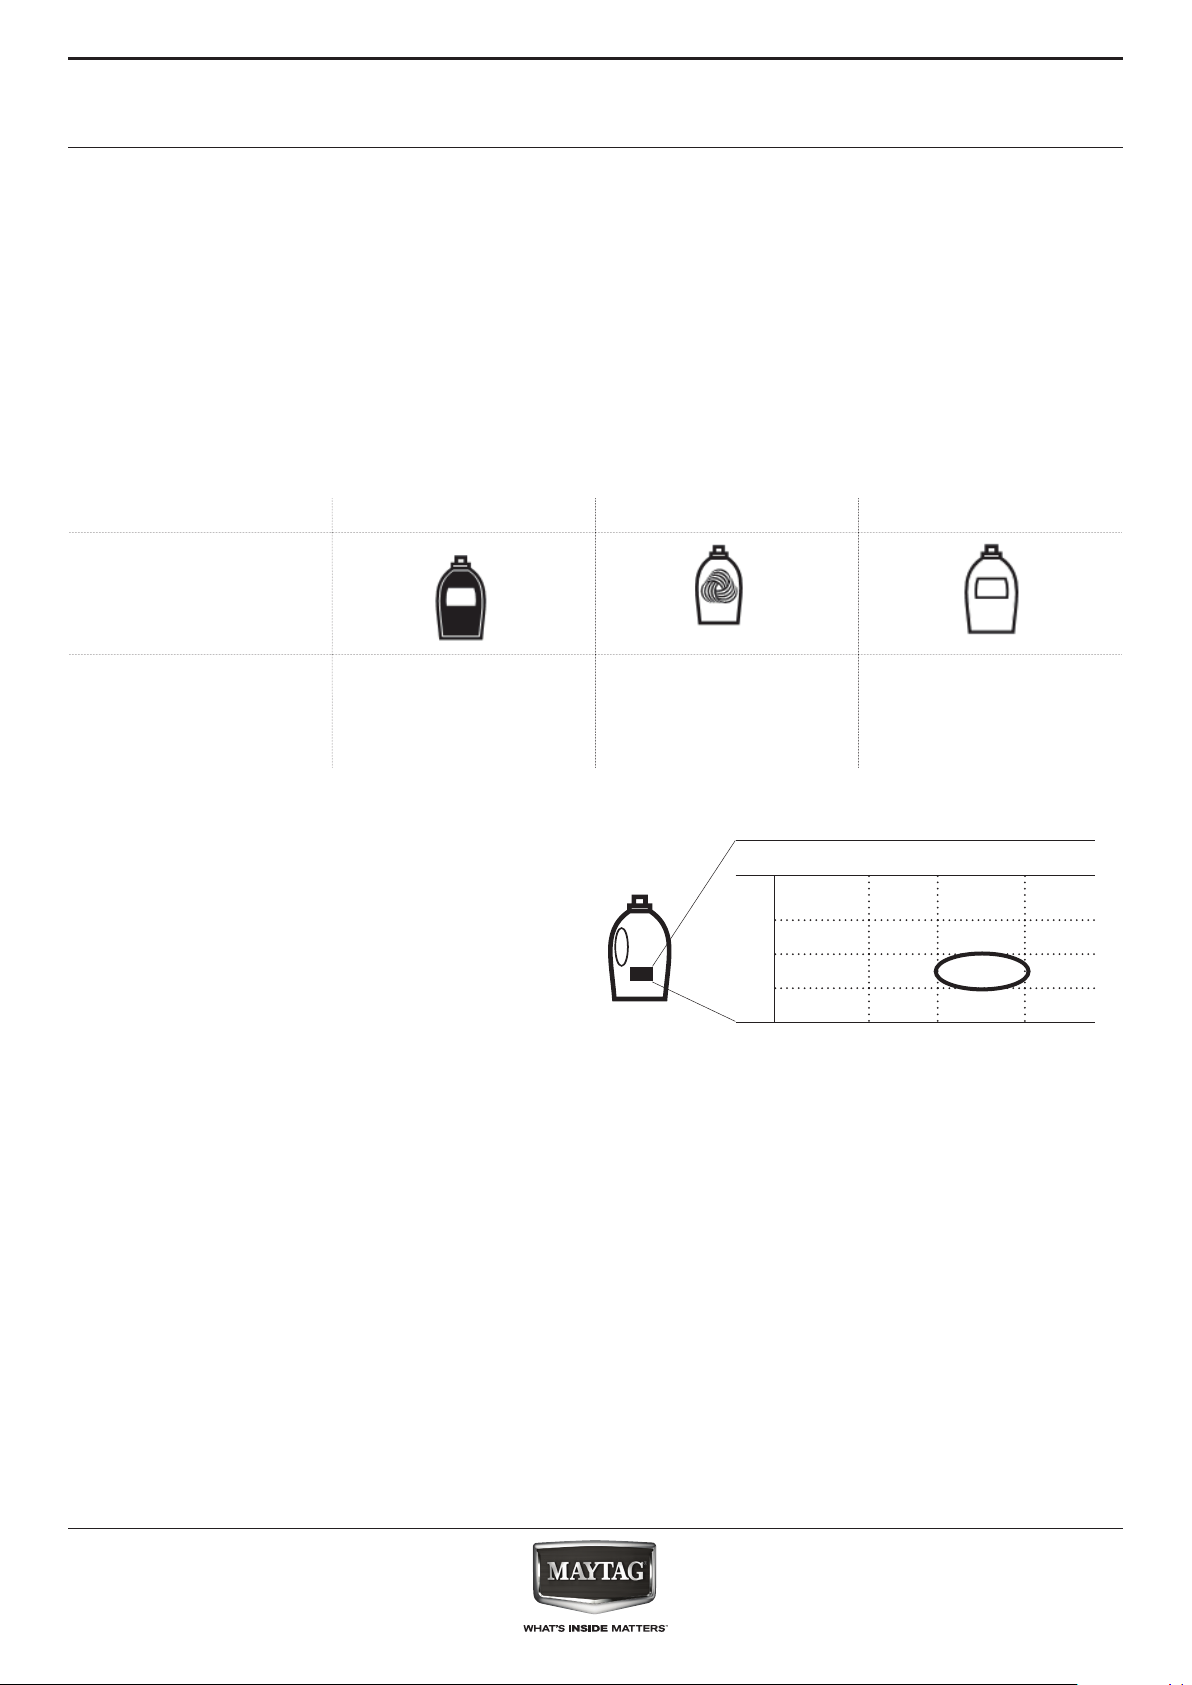
Detergent types: Coloured detergent Delicate detergent Generic detergent
Programmes: Colours Wool
All other programmes
Delicates
Cashmere
Shirts
Check on the packs of your detergents the dosing
amount for medium soil level and medium water
hardness
water harDness
soft medium hard
light
medium ml
soil level
heavy
30
Page 31
EN
1. Press and hold the Programme button
to enter into the settings mode.
2. Select DOSING AID by turning and pressing
the knob.
3. Select the detergent group for which you
want to save the dosing value; chose between:
• Coloured detergent
• Generic detergent
• Delicate detergent by turning and pressing the
knob.
4. Select and conrm the dosing value, which
you have identied before on the detergent pack,
by turning and pressing the knob.
5. Select EXIT to exit the settings mode by
turning and pressing the knob.
Do this procedure for all 3 programme groups.
ADAPT THE WASHING MACHINE TO YOUR LO
CAL WATER HARDNESS
The washing machine comes with preset water
hardness level soft. Check your regional water
hardness level, for example by consulting your
local authorities or via internet. – If your local water
hardness is not soft, adjust the washing machine as
follows:
1. Press and hold the Programme button to enter
into the settings mode.
2. Select WATER HARDNESS by turning and
pressing the knob.
3. Select the relevant water hardness level (soft,
medium or hard) by turning and pressing the knob.
4. Select EXIT to exit the settings mode by
turning and pressing the knob.
31
Page 32
DOSING AID / DAILY USE
1. After you have loaded the laundry,
closed the door and selected programme
and options, press the “Dosing Aid” button. The
Dosing Aid button lights up.
2. Start the programme by pressing "Start/
Pause". – The drum rotates to detect the
laundry load; the display indicates the load sensing
phase. On the control panel, an animation occurs.
Afterwards the recommended detergent amount
for the main wash compartment in ml appears on
the display.
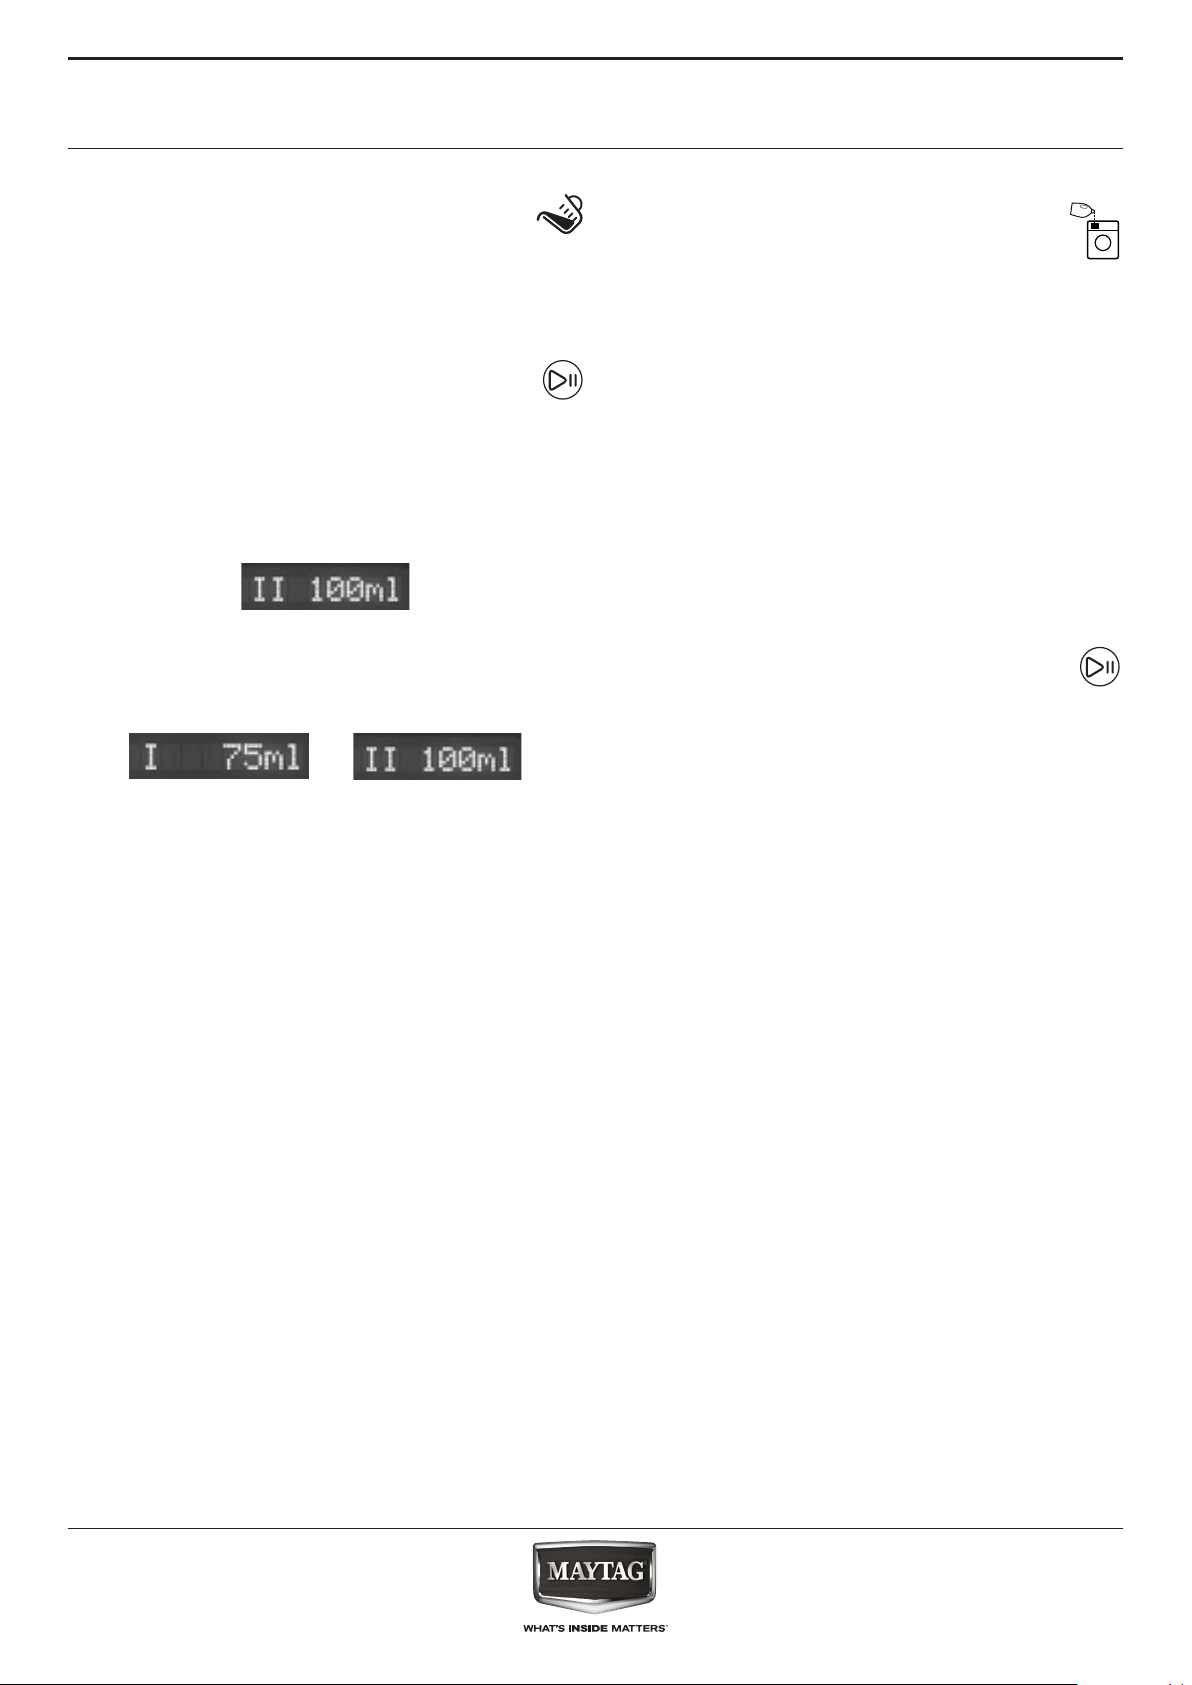
If you have selected Prewash option, the display
alternately shows the amount for prewash (I) and
main wash (II) compartment.
3. Pull out the detergent dispenser and
pour the recommended detergent quantity
into the main wash (II) and, if Prewash is
selected, also into the prewash (I)
compartment of the detergent dispenser.
Instead of adding the detergent to the detergent
dispenser, it can also be added directly into the
drum, in a detergent ball.
If Prewash is selected: prewash detergent can be
added into the drum, main wash detergent must
be added to the main wash compartment of the
detergent dispenser. Use powder detergent for the
main wash in this case, to ensure that it stays in the
detergent dispenser until start of the main wash
phase.
4. Close the detergent dispenser (or the
door) and press “Start/Pause” to continue the
programme.
32
Page 33
SAVING TIPS
EN
• Achieve the best use of energy, water, detergent
and time by using the recommended maximum
load size for the programmes, as indicated in the
programme chart.
• Do not exceed the detergent dosages indicated
in the detergents manufacturer’s instructions. Use
the Dosing Aid function; prepare this function as
indicated in “First use of the Dosing Aid function”.
• Use “Prewash” for heavily soiled laundry only.
• Pre-treat stains with stain remover or soak dried
in stains in water before washing to reduce the
necessity of a hot wash programme.
• Save energy by using a 60°C instead of a 95°C
wash programme or a 40°C instead of a 60°C
wash programme. For cotton laundry, prefer
using programme Eco Cotton with 40°C or
60°C.
• Save energy and time by selecting a high spin
speed to reduce the water content in laundry
before using a tumble dryer.
• Use option Colours 15° for lightly soiled coloured
laundry; it saves energy for water heating.
33
Page 34
CLEANING &
MAINTENANCE
WARNING
For any cleaning and maintenance, switch o
and unplug the washing machine.
Do not use ammable uids to clean the
washing machine.
CLEANING THE OUTSIDE
OF THE WASHING MACHINE
Use a soft damp cloth to clean the outer parts of
the washing machine.
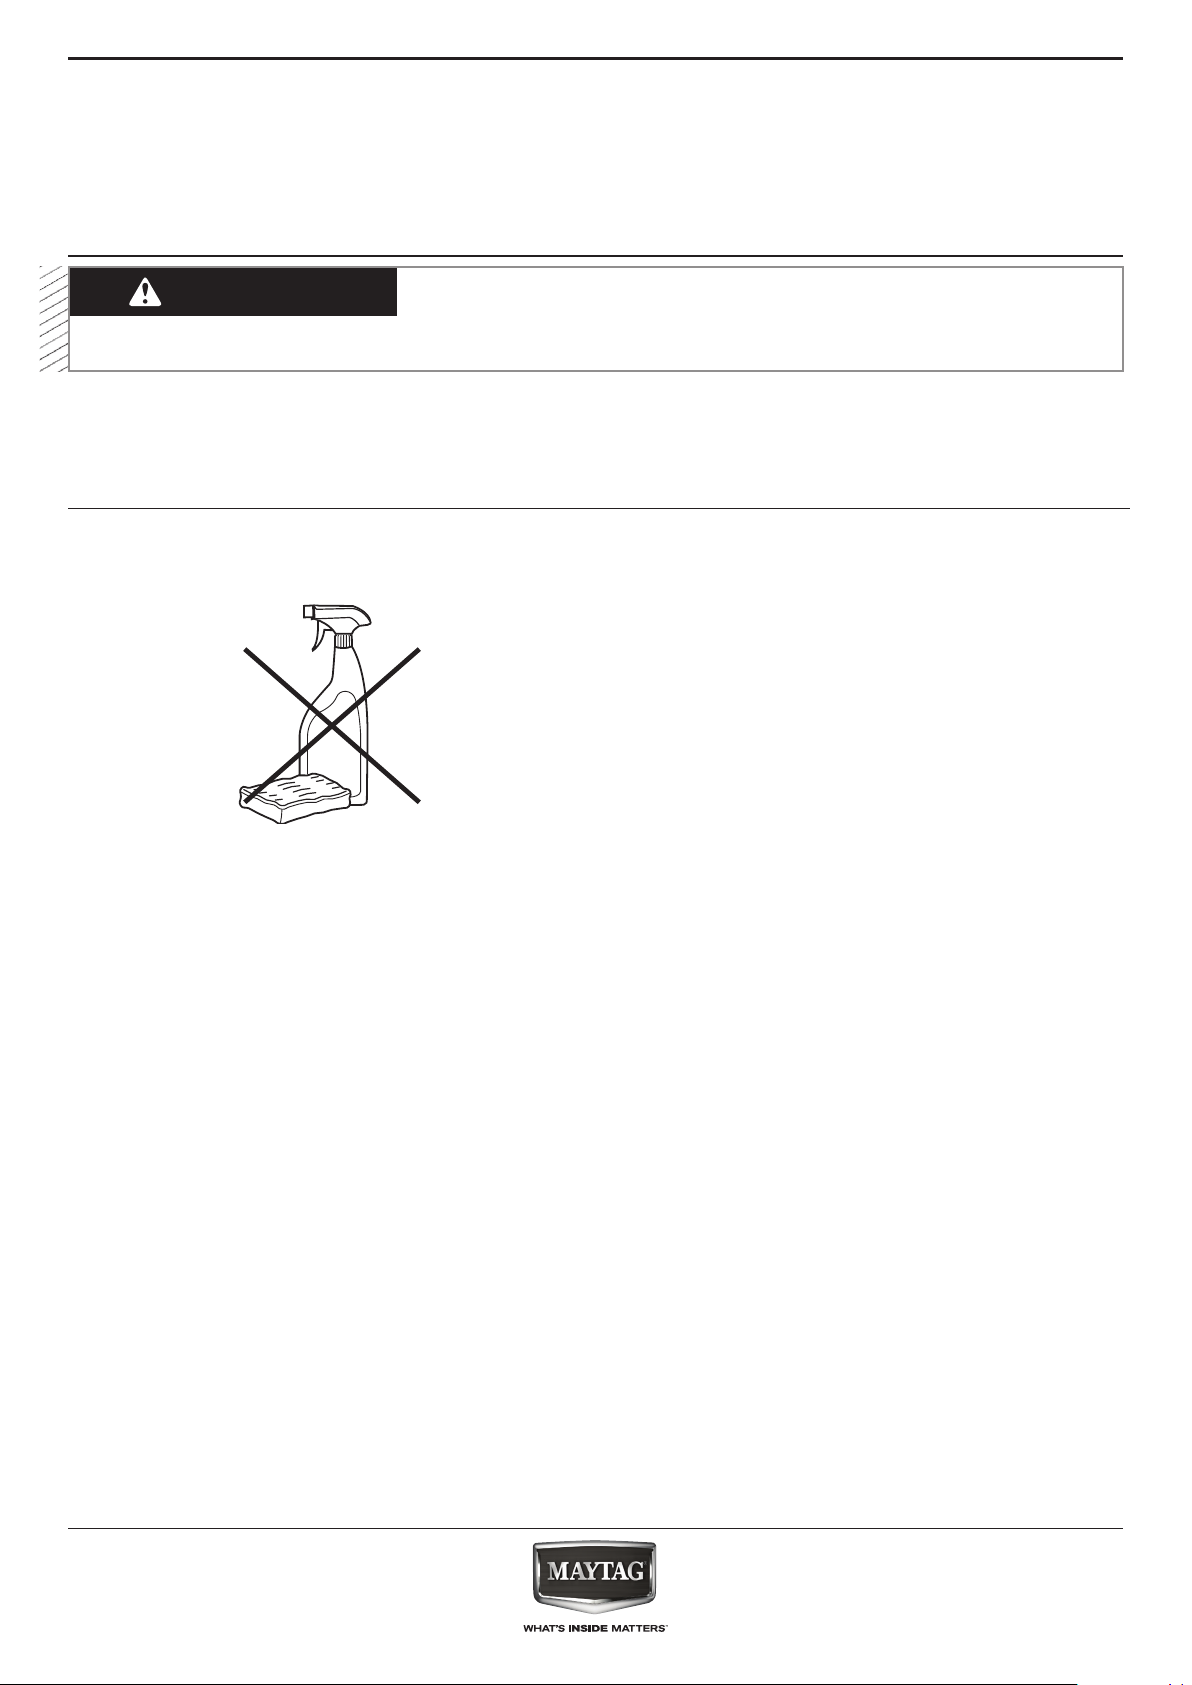
Do not use glass or general purpose cleaners,
scouring powder or similar to clean the control
panel – these substances might damage the
printing.
34
Page 35
CHECKING THE WATER
SUPPLY HOSE
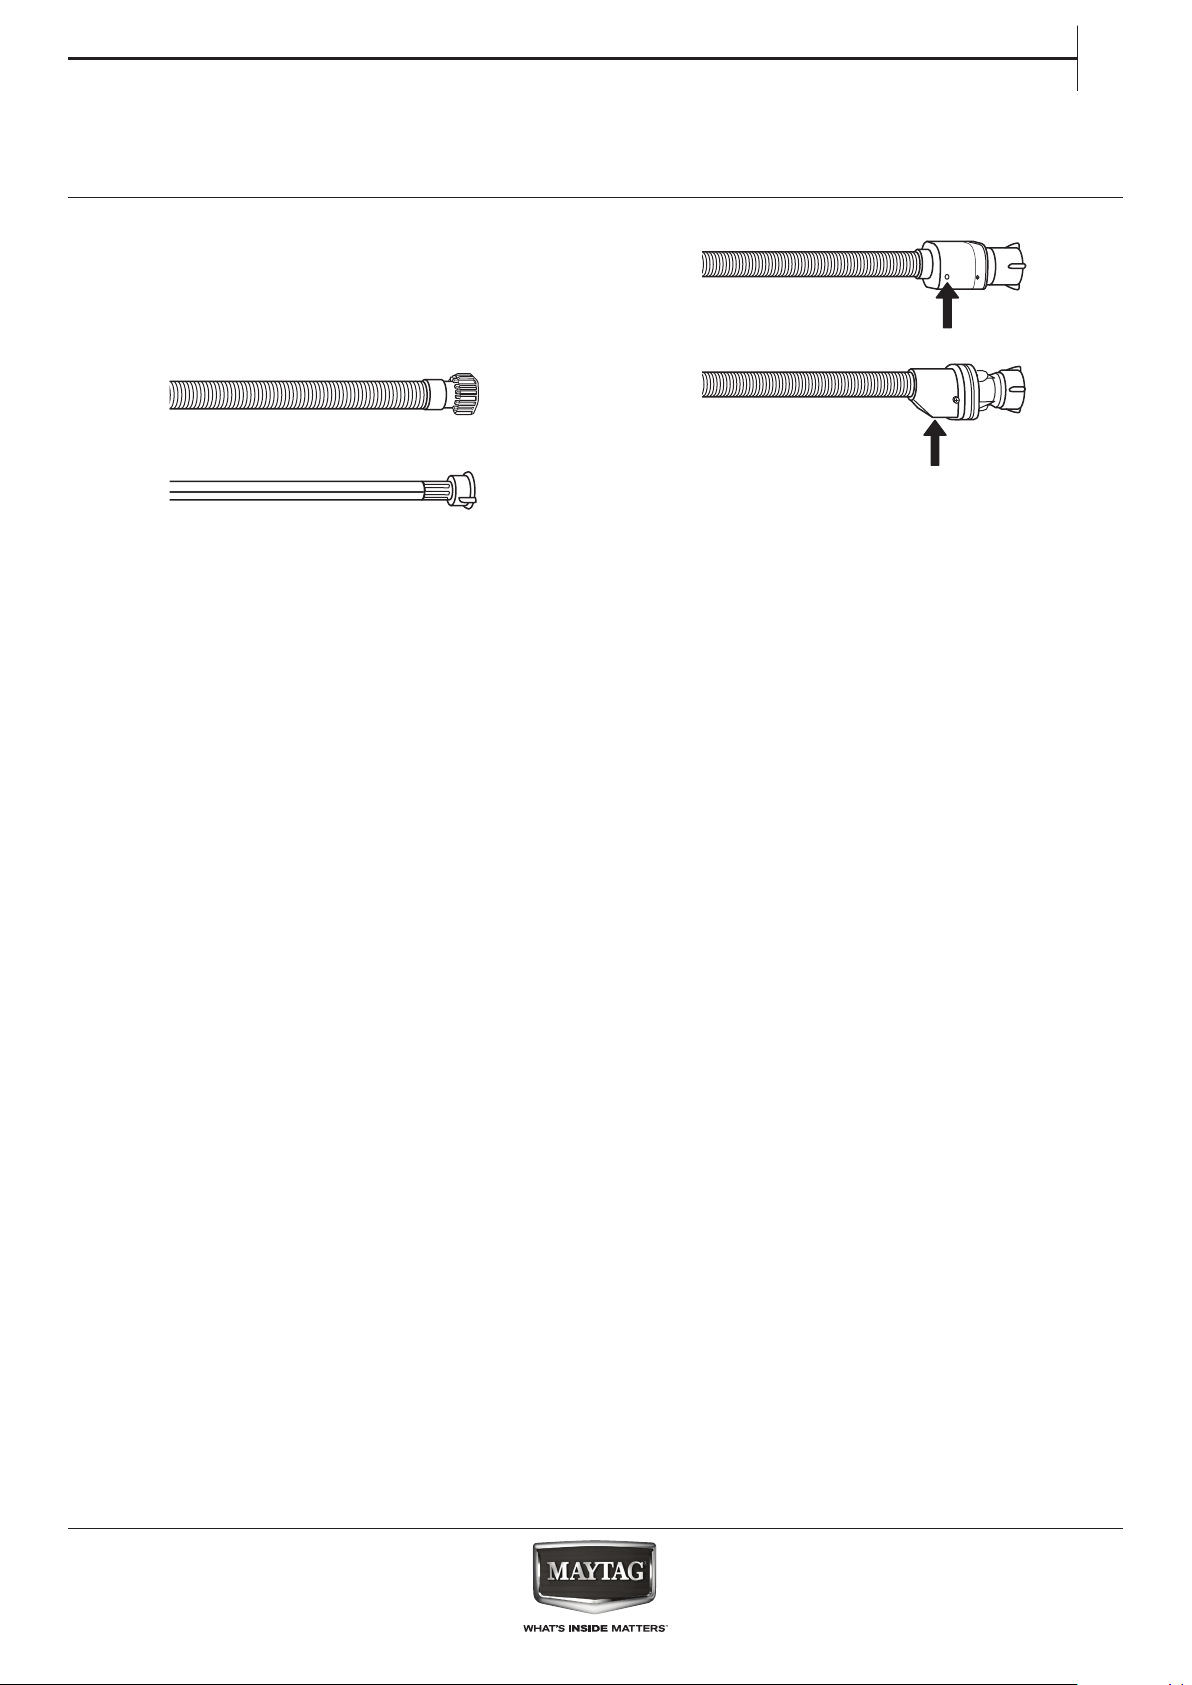
Check the inlet hose regularly for brittleness
and cracks. If damaged, replace it by a new hose
available through our After-Sales Service or your
specialist dealer.
Depending on the hose type:
If the inlet hose has a transparent coating,
periodically check if the colour intensies locally.
If yes, the hose may have a leak and should be
replaced.
EN
For water stop hoses: check the small safety valve
inspection window (see arrow). If it is red, the water
stop function was triggered, and the hose must be
replaced by a new one.
For unscrewing this hose, press the release button
(if available) while unscrewing the hose.
35
Page 36
CLEANING THE MESH FILTERS
IN THE WATER SUPPLY HOSE
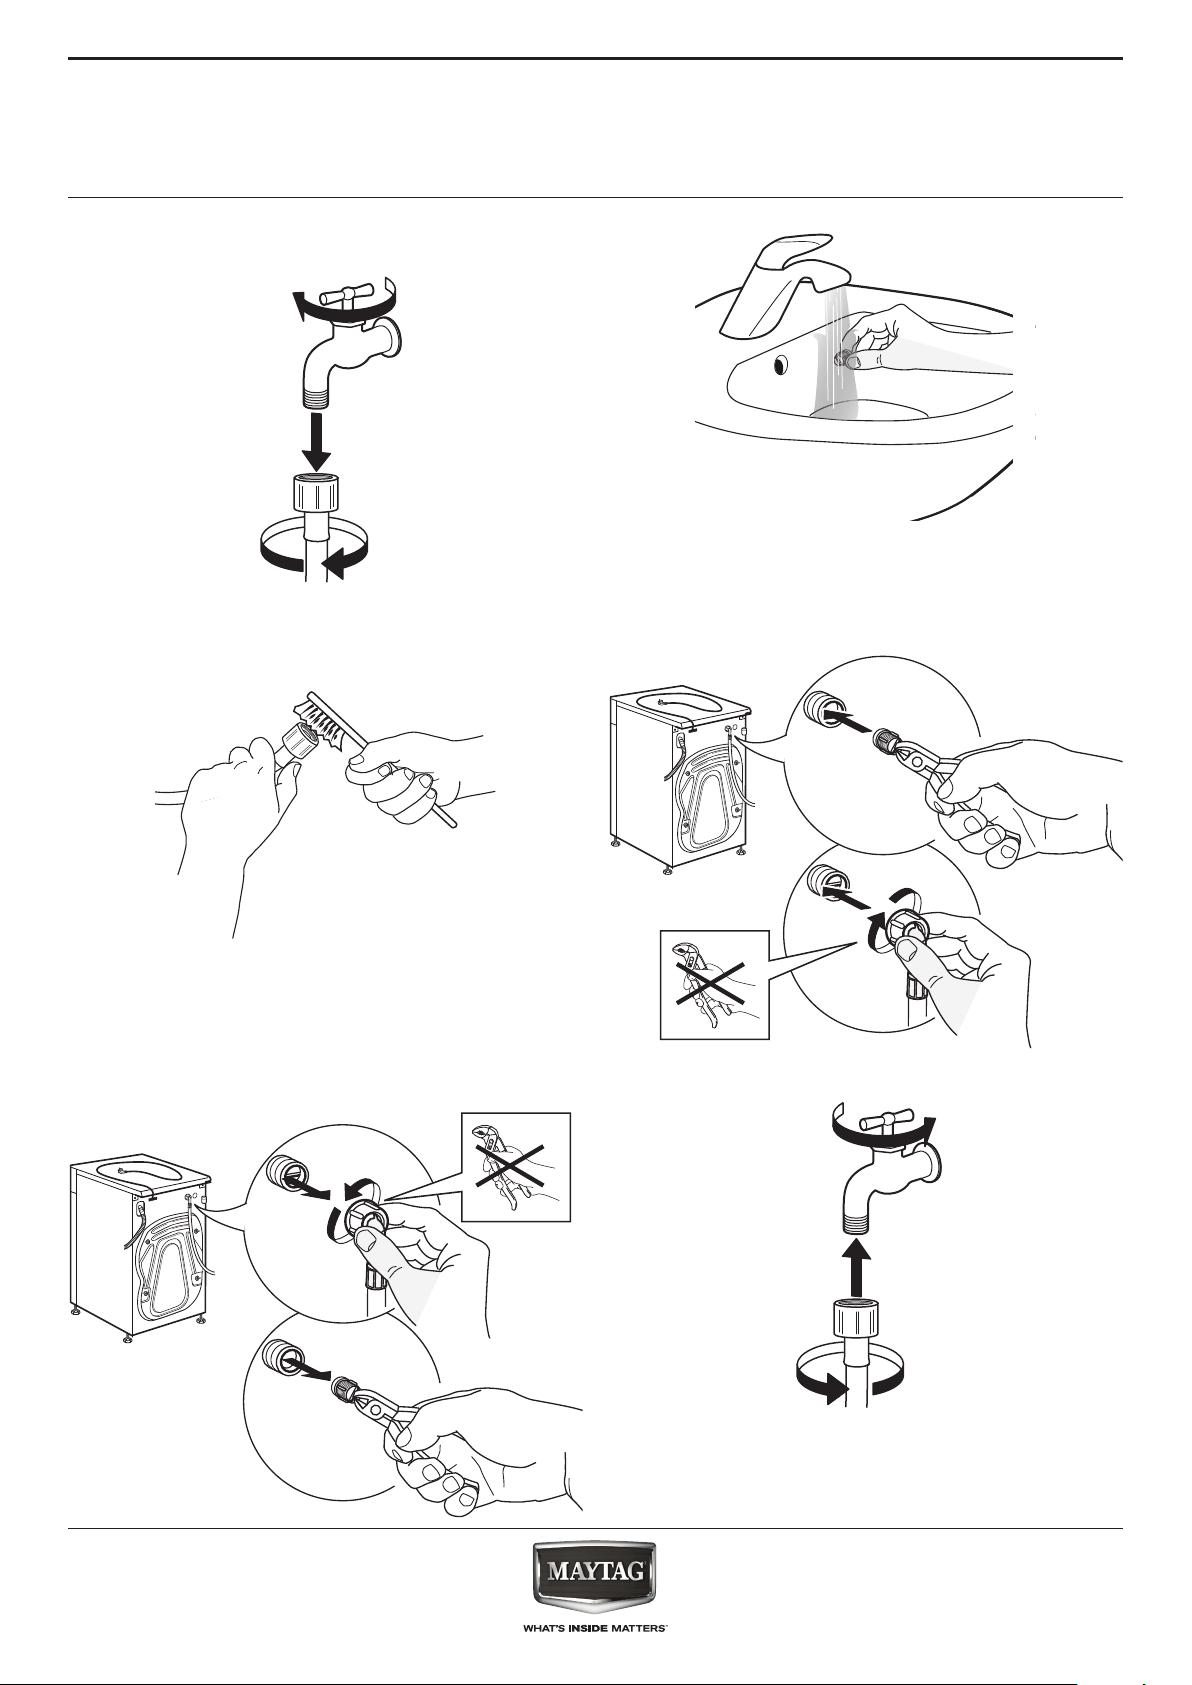
1. Close water tap and screw o the inlet hose.
1
2
4. Insert the mesh lter again. Connect the inlet
hose to water tap and washing machine again. Do
not use a tool to connect the inlet hose. Open the
2. Clean the mesh lter at the hose’s end
carefully with a ne brush.
water tap and check that all connections are tight.
3. Now unscrew the inlet hose on the back of the
washing machine by hand.
Pull out the mesh lter from the valve on the back
of the washing machine with pliers and carefully
clean it.
2
1
36
Page 37
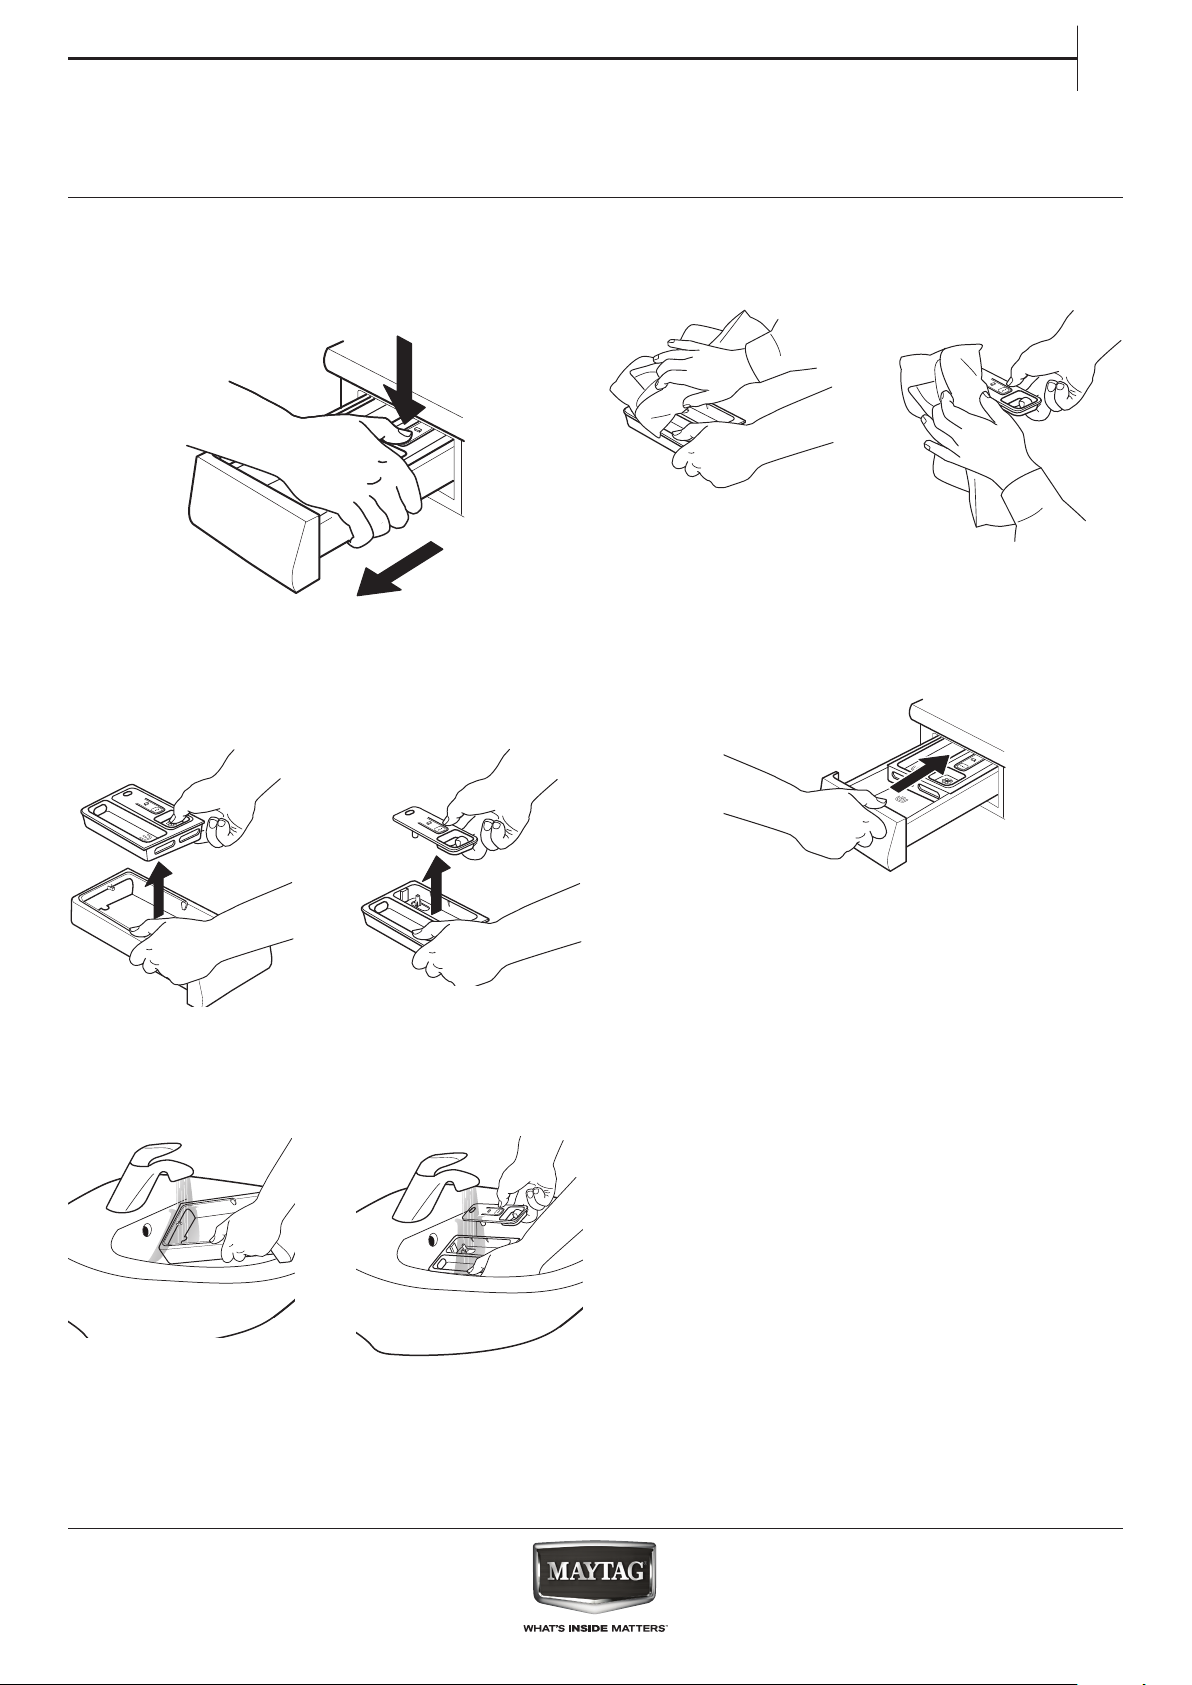
CLEANING THE DETERGENT
DISPENSER
EN
1. Remove the detergent dispenser by pressing
on the release button and at the same time pulling
out the detergent dispenser.
1
2
2. Remove the insert from the detergent
dispenser, as well as the insert of the softener
compartment.
4. Wipe the parts dry with a soft cloth.
5. Reinstall the detergent dispenser and push it
back into the detergent compartment.
3. Clean all parts under running water, removing
all detergent or softener residues.
37
Page 38
CLEANING THE WATER FILTER / DRAINING
RESIDUAL WATER
Clean the water lter regularly, to avoid that
WARNING
Switch o and unplug the washing machine before
cleaning the water lter or draining residual water.
If you used a hot wash programme, wait until the
water has cooled down before draining any water.
the water cannot drain after the wash due to
obstruction of the lter.
If the water cannot drain, the display indicates that
the water lter may be clogged.
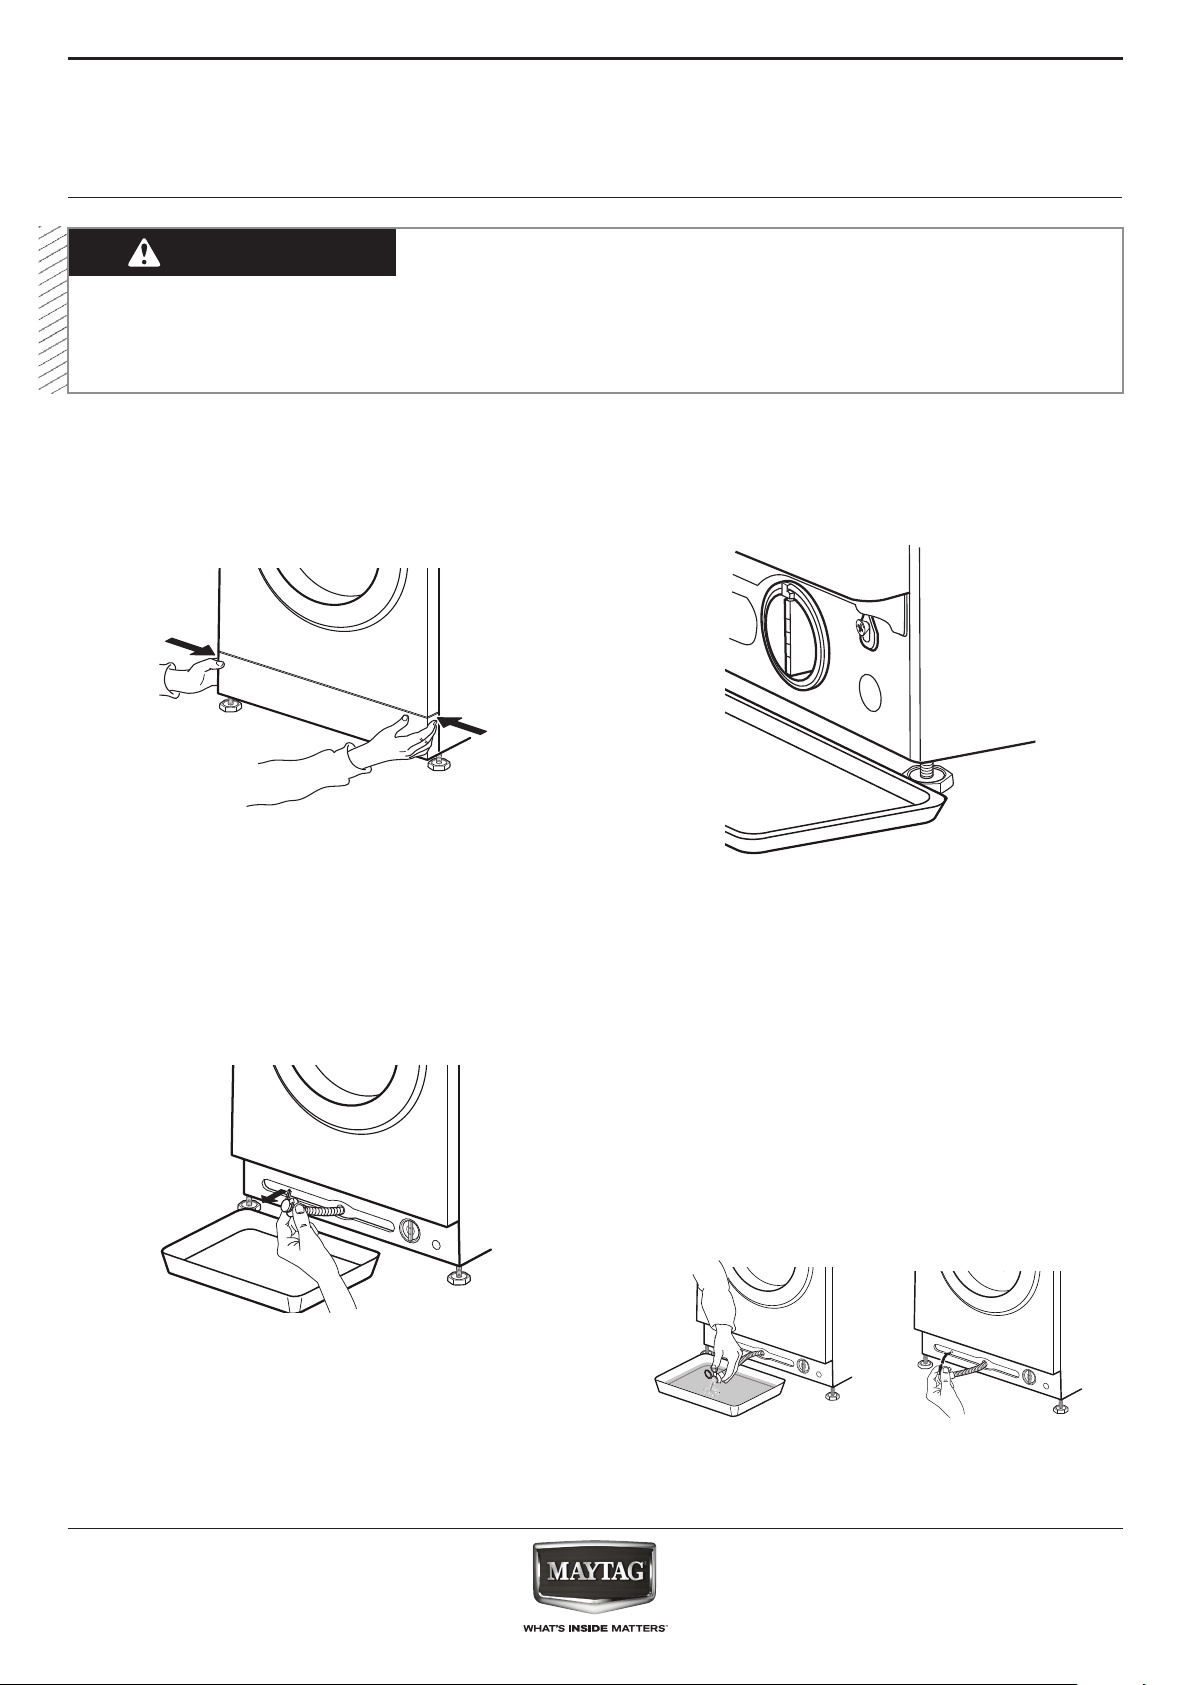
1. Remove the plinth: Push the tabs left and right
to release the plinth and remove it.
2. Container for drain water:
If your washing machine model has an emergency
drain hose:
Provide a at container for the drain water. Remove
the emergency drain hose from the base of the
washing machine.
Place a broad, at container beneath the water
lter, to collect the drain water.
3. Drain the water:
If your washing machine model has an emergency
drain hose:
Remove the stopper at the end of the hose and
let the water ow into the container. When the
container is full with water, plug the stopper to
the hose end and empty the container. Repeat
this procedure until no more water ows out.
Afterwards rmly close the emergency drain hose
with the stopper and reinsert the hose in the
washing machine’s base.
If your washing machine model has no emergency
drain hose:
38
Page 39
EN
If your washing machine model has no emergency
drain hose:
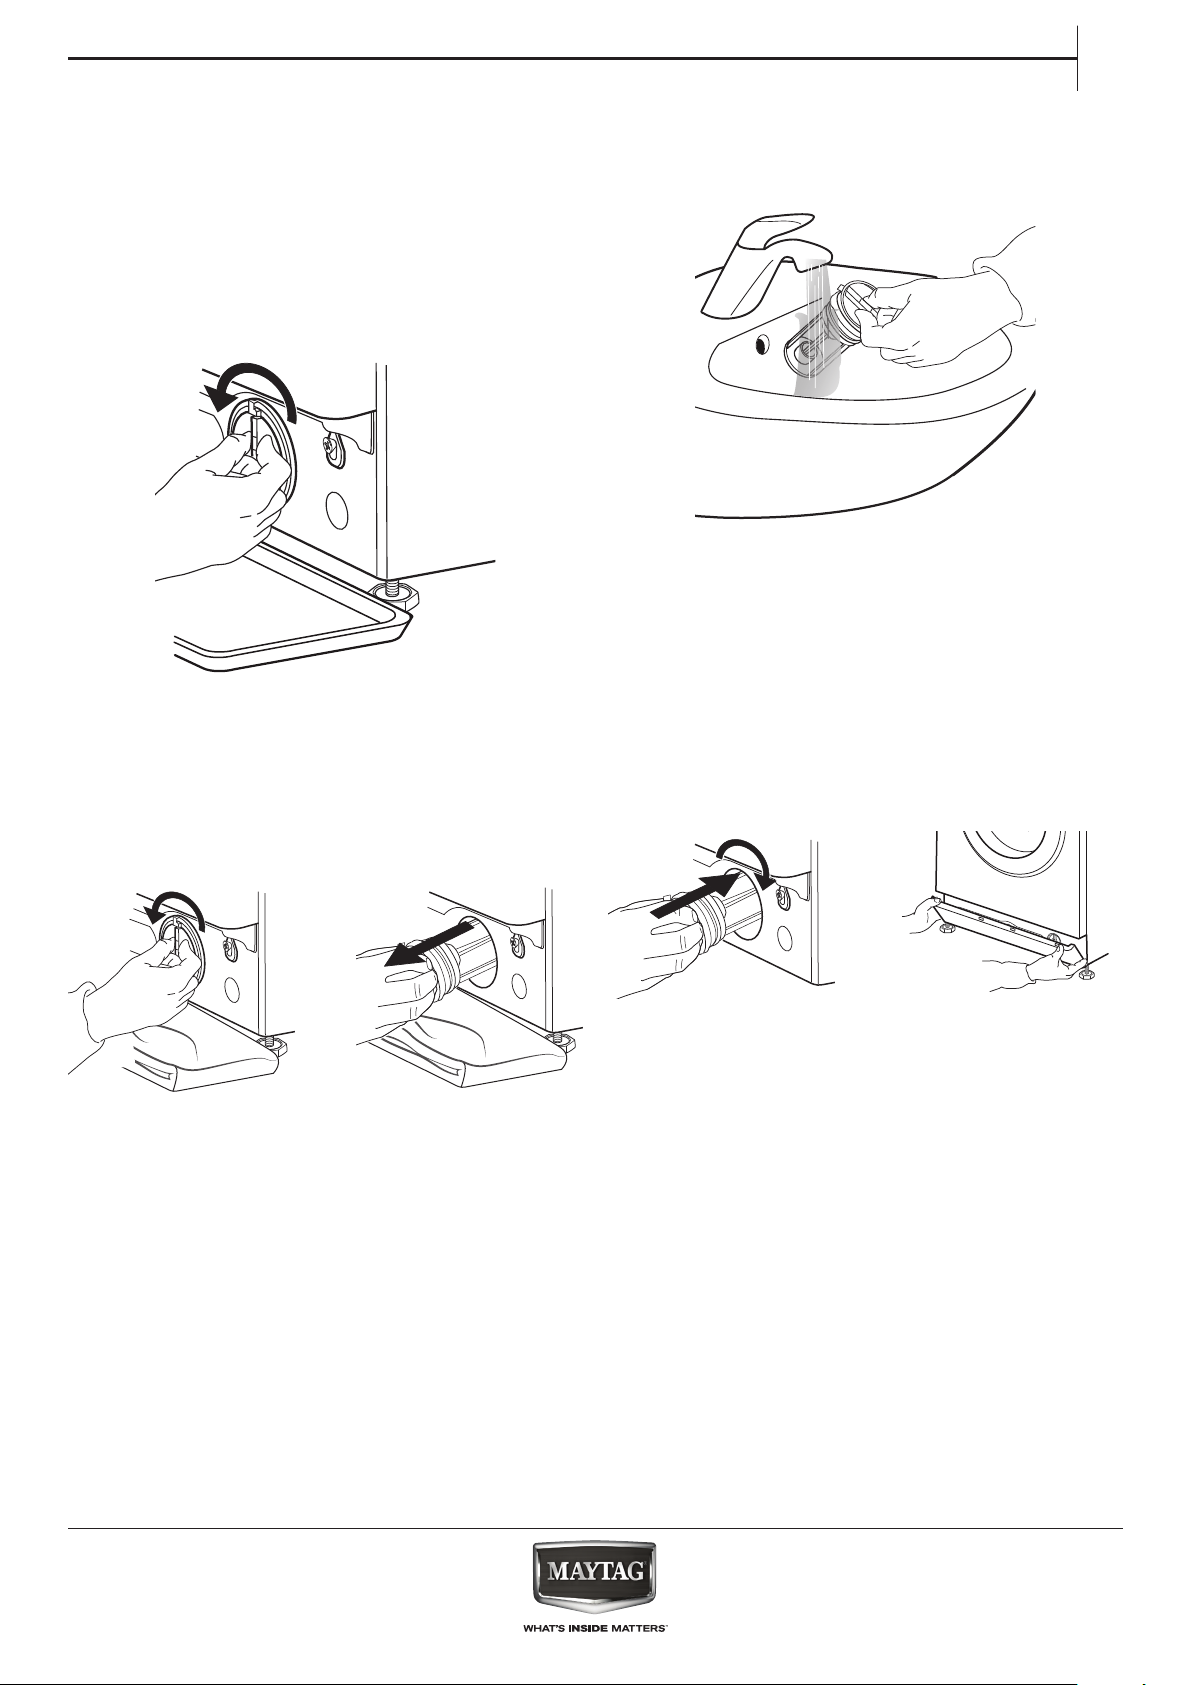
Slowly turn the lter counterclockwise until water
ows out. Let the water ow out, without removing
the lter.
When the container is full, close the water lter by
turning it in clockwise. Empty the container. Repeat
this procedure until all the water has drained.
4. Remove lter: Lay a cotton cloth beneath the
water lter, which can absorb a small amount of
rest water. Then remove the water lter by turning
it out anticlockwise.
5. Clean the water lter: remove residues in the
lter and clean it under running water.
6. Insert the water lter and reinstall the plinth:
Reinsert the water lter again by turning it in
clockwise direction. Make sure to turn it in as far
as it goes; the lter handle must be in vertical
position. To test water tightness of the water
lter, you can pour about 1 liter of water into the
detergent dispenser.
Then reinstall the plinth.
2
1
39
Page 40
TRANSPORT
AND HANDLING
WARNING
Never lift the washing machine by holding it at the
worktop.
1. Pull out the mains plug, and close the water
tap.
2. Make sure that door and detergent dispenser
are properly closed.
3. Disconnect the inlet hose from the water tap,
and remove the drain hose from your draining
point. Remove all rest water from the hoses, and
x them so that they cannot get damaged during
transport.
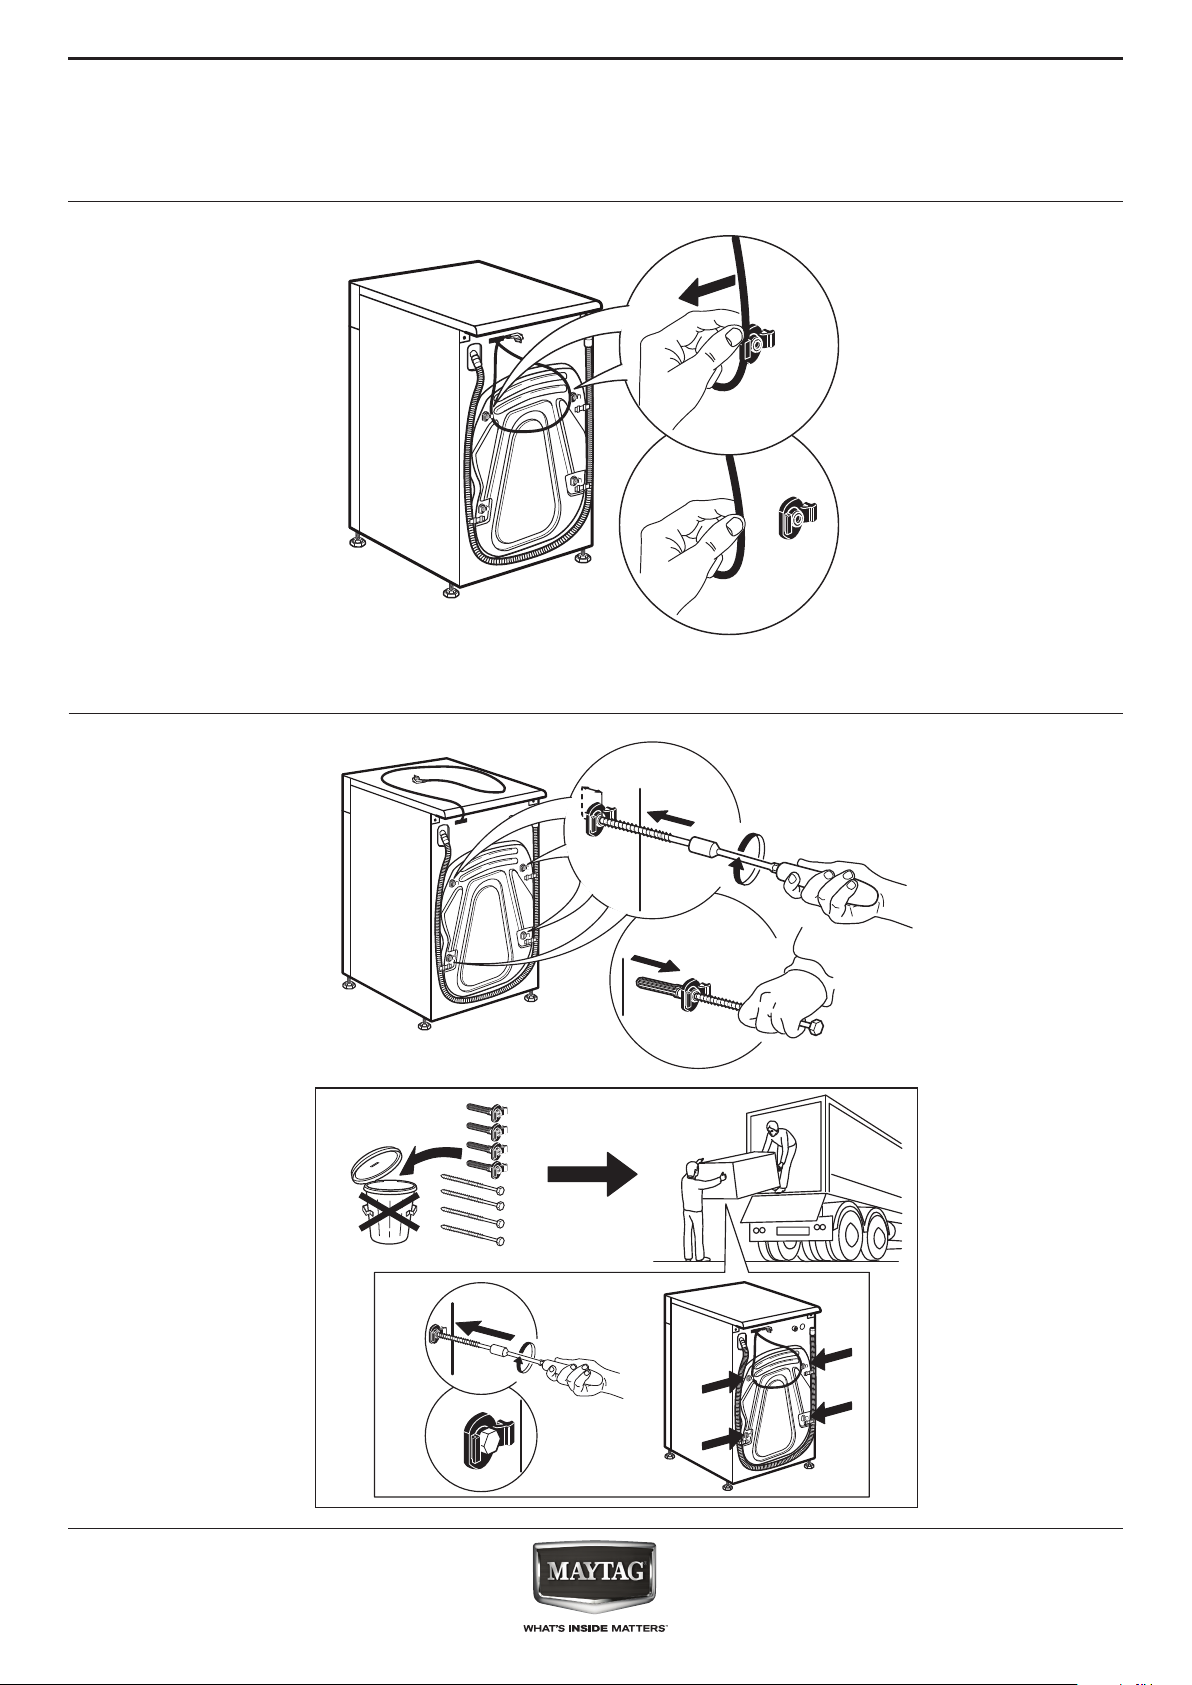
4. Ret the transport bolts. Follow the
instructions for removing the transport bolts in the
Installation Guide in reverse order.
Important: Do not transport the washing machine
without having xed the transport bolts.
40
Page 41
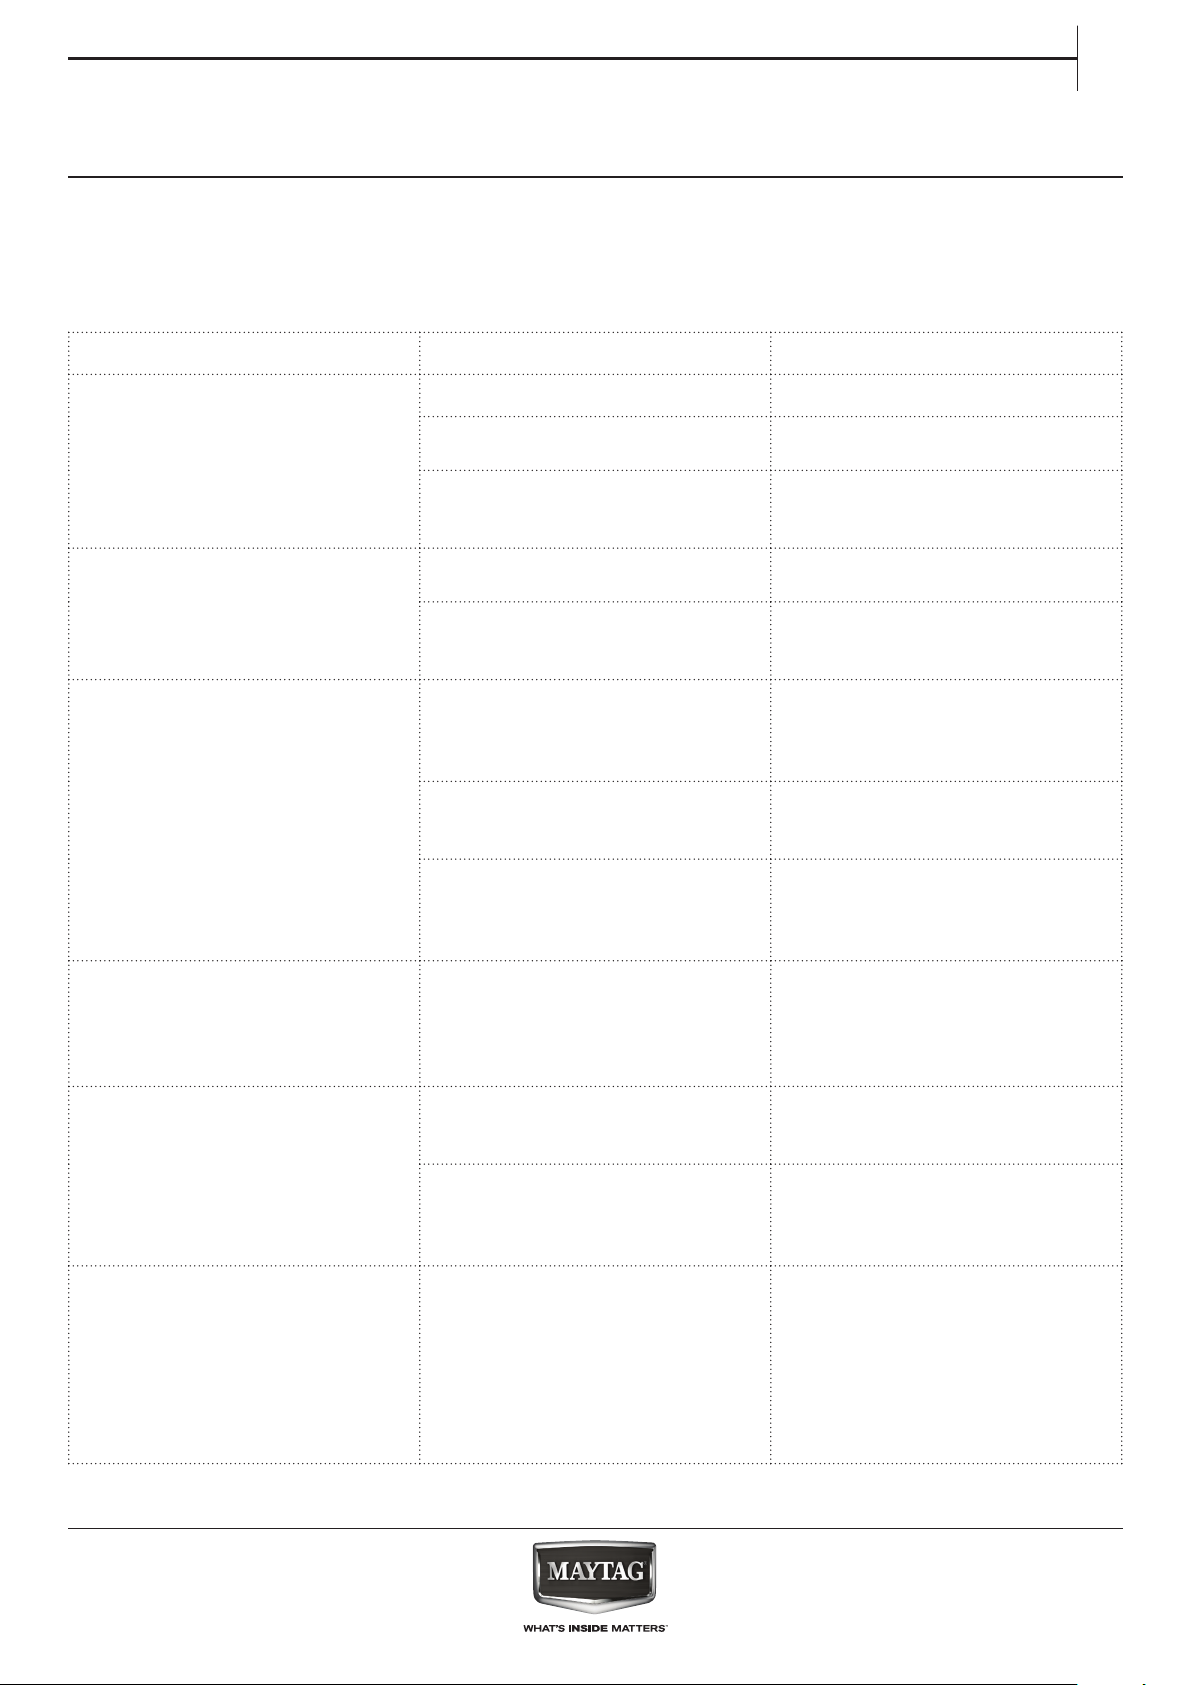
TROUBLESHOOTING
EN
Your washing machine is equipped with various
automatic safety and feedback functions. They
These failures are frequently so minor that they can
be removed within a few minutes.
enable failures and needed maintenance to be
detected and indicated accordingly.
PROBLEM POSSIBLE CAUSE SOLUTION
Washing machine does not start,
no indicators are on
Washing machine does not start,
although “Start/Pause” has been
pressed
Washing machine stops during
the programme, and “Start/Pause”
blinks
Detergent dispenser contains
detergent residues after
programme end
Washing machine vibrates during
spinning
Spin speed “0” blinks on control
panel and/or laundry still very wet
Not connected to mains Insert plug into socket
Socket or fuse does not function Test function with a lamp, have
faulty part repaired
Power breakdown The washing machine will
automatically continue when
power is available again
Door not properly closed Push door to close it until it clicks
shut
Key lock is activated Press the button with the key
symbol at least 3 seconds to
deactivate the key lock
Rinse hold (= positon of spin
button) is activated
Programme was interrupted,
maybe door has been opened
Safety system has been activated:
failure indicator lights up and/or
display shows failure (F…); water
tap might be closed
Inlet water pressure too low; mesh
lter of the water supply hose may
be blocked
Transport bolts have not been
removed (!)
Washing machine not standing
level on all four feet
Unbalance of laundry load
prevented spin cycle, to protect
the washing machine
Terminate Rinse hold with draining
the water or spinning the laundry
(see “Rinse hold” – FUNCTIONS
AND OPTIONS).
Make sure door is closed
Press “Start/Pause” to proceed with
the programme
Refer to paragraph “Failure
indicators”. Make sure that water
tap is open and inlet hose has no
kinks.
Make sure water tap is properly
opened. Check mesh lters of
inlet hose, see CLEANING AND
MAINTENANCE / Cleaning the
mesh lters of the inlet hose
Remove transport bolts according
to the instructions in the
INSTALLATION GUIDE
Adjust feet (INSTALLATION
GUIDE). Make sure that washing
machine stands on level and rm
underground.
If you want to spin the wet
laundry, add more laundry
items of dierent sizes and start
“Rinse&Spin” programme.
Avoid small laundry loads
consisting of few big, absorbent
pieces of laundry / wash dierent
sizes of articles in one load
41
Page 42

PROBLEM POSSIBLE CAUSE SOLUTION
Spin result poor Spin button was set to a low spin
speed.
Unbalance during spinning
prevented nal spin cycle.
Excessive foam formation
prevented spinning.
Detergent residues on laundry
after wash
Washing machine stands still
during programme / programme
seems not to proceed / during
standstill, animation may appear
on display
Programme duration is longer or
shorter as initially indicated on the
display / in the programme chart.
Door is locked, with or without
failure indication, and the
programme does not run.
Drum light (if available) does not
work anymore.
Too much powder detergent used
/ quality of detergent.
Programme phases without drum
movement.
Excessive foam formation (maybe
by overdosage of detergent)
interrupted the programme. Can
be repeated several times until the
foam reduction is sucient.
Under- or overvoltage of mains
might be detected.
Washing machine adapts to factors
having an eect on duration, such
as size of laundry load, excessive
foam formation, load unbalance,
prolonged heating time due to
low inlet water temperature etc..
When programme duration is
recalculated, an animation appears
on the display.
Door is locked in case of power
breakdown.
Washing machine is in a standstill
(as described in previous section
“Washing machine stands still…).
Water level or temperature too
high, or electrical component
failure.
Light bulb needs to be replaced. Call our After-Sales Service to
Select and start “Spin” programme
with a higher spin speed (if
selectable).
See line above.
Start “Rinse&Spin” programme.
Avoid excessive detergent dosing.
Adjust and use the Dosing Aid
function.
Avoid detergent overdosing
Brush out the fabric.
Use “Intensive Rinse” option (if
selectable).
Use liquid detergent / use special
detergent for black or dark laundry.
Standstill phases lasting up to
about 2 minutes are normal in
some wash programmes.
The programme continues
automatically, as soon as the foam
reduction is sucient.
If display shows Fod (=failure
overdosage), refer to table FAILURE
INDICATORS AND MESSAGES.
Programme will automatically
continue as soon as the mains
voltage is in the proper range.
Avoid small laundry loads with
absorbent, big pieces of laundry /
add articles of dierent sizes.
Avoid detergent overdosing
– respect the dosing
recommendations of the detergent
manufacturer. Adjust and use the
Dosing Aid function.
Programme will continue
automatically as soon as the mains
is available again.
Programme will continue
automatically after the origin of the
standstill does not persist anymore.
See instructions for failure
“Service”: doorlock failure” / FdL /
F29 in section Failure indicators.
exchange the light bulb.
42
Page 43
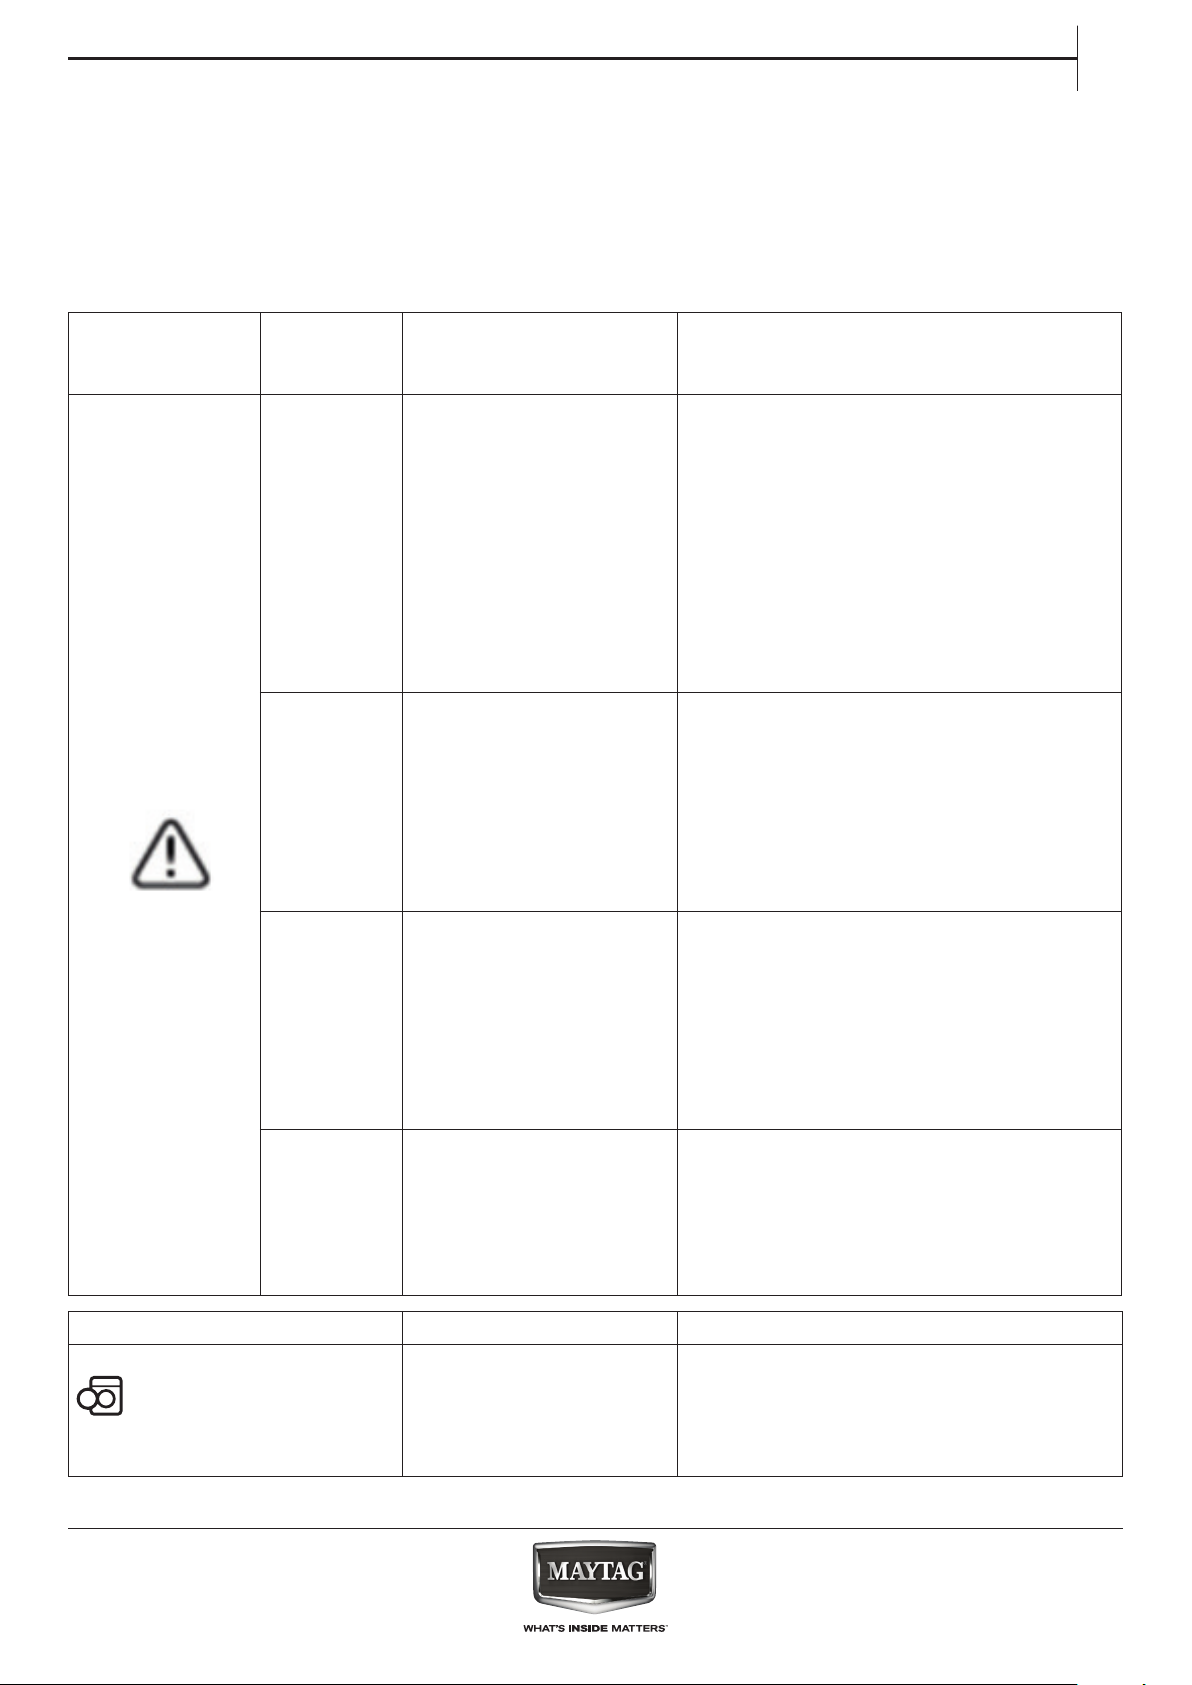
FAILURE INDICATORS AND MESSAGES
EN
Below is a summary of possible failure causes and
solutions.
If the problem persists after having removed the
origin of the failure, press On/O for at least three
seconds. If afterwards the failure indication still
Failure Indicator
lights up
Display
message
Open water
tap
Possible Cause Possible Solution
No or not sucient water
supply
• Water tap closed
• Kinks in inlet hose
• Water tap pressure too
low
• Mesh lters in inlet hose
clogged
• Water inlet hose frozen
up
Water lter
clogged
Waste water is not
pumped out
• Kinks in drain hose
• Drain hose blocked or
frozen up
• Filter blocked
• Pump blocked
persists, close the water tap, switch o and unplug
the washing machine and contact our After-Sales
Service.
Open water tap
Make sure there are no kinks in the inlet
hose
Make sure water pressure is sucient
Clean mesh lters in inlet hose (CLEANING
AND MAINTENANCE)
Install washing machine at an ambient
temperature of at least 5°C
After problem has been removed, press
Start/Pause. If problem persists, press On/
O for at least 3 seconds.
Check drain hose for kinks
Install washing machine at an ambient
temperature of at least 5°C
Clean water lter as described in section
CLEANING THE FILTER.
After problem has been removed, press
Start/Pause. If problem persists, press On/
O for at least 3 seconds.
Over
foaming
Excessive foam formation
(maybe by overdosage
of detergent) interrupted
the programme. The
interruption can be
repeated several times
Start “Rinse&Spin” programme, with
option Intensive Rinse.
Respect the dosing recommendations by
the detergent manufacturer.
Adjust and use the Dosing Aid function.
Make sure that the water lter is clean.
until the foam reduction
is sucient.
Load
unbalance
Spin speed
“0” blinks
Unbalance in laundry
load prevented spin
cycle, to protect washing
machine
If you want to spin the wet laundry, add
more laundry items of dierent sizes and
start “Rinse&Spin”.
Avoid small laundry loads consisting of
few big, absorbent pieces of laundry. Wash
dierent sizes of articles in one load.
Indication on control panel Possible Cause Possible Solution
The door cannot lock Firmly press the door in area of door lock, to pro-
perly close it. Then press Start/Pause. If the problem
persists, press On/O for at least 3 seconds.
Door open indicator blinks
43
Page 44
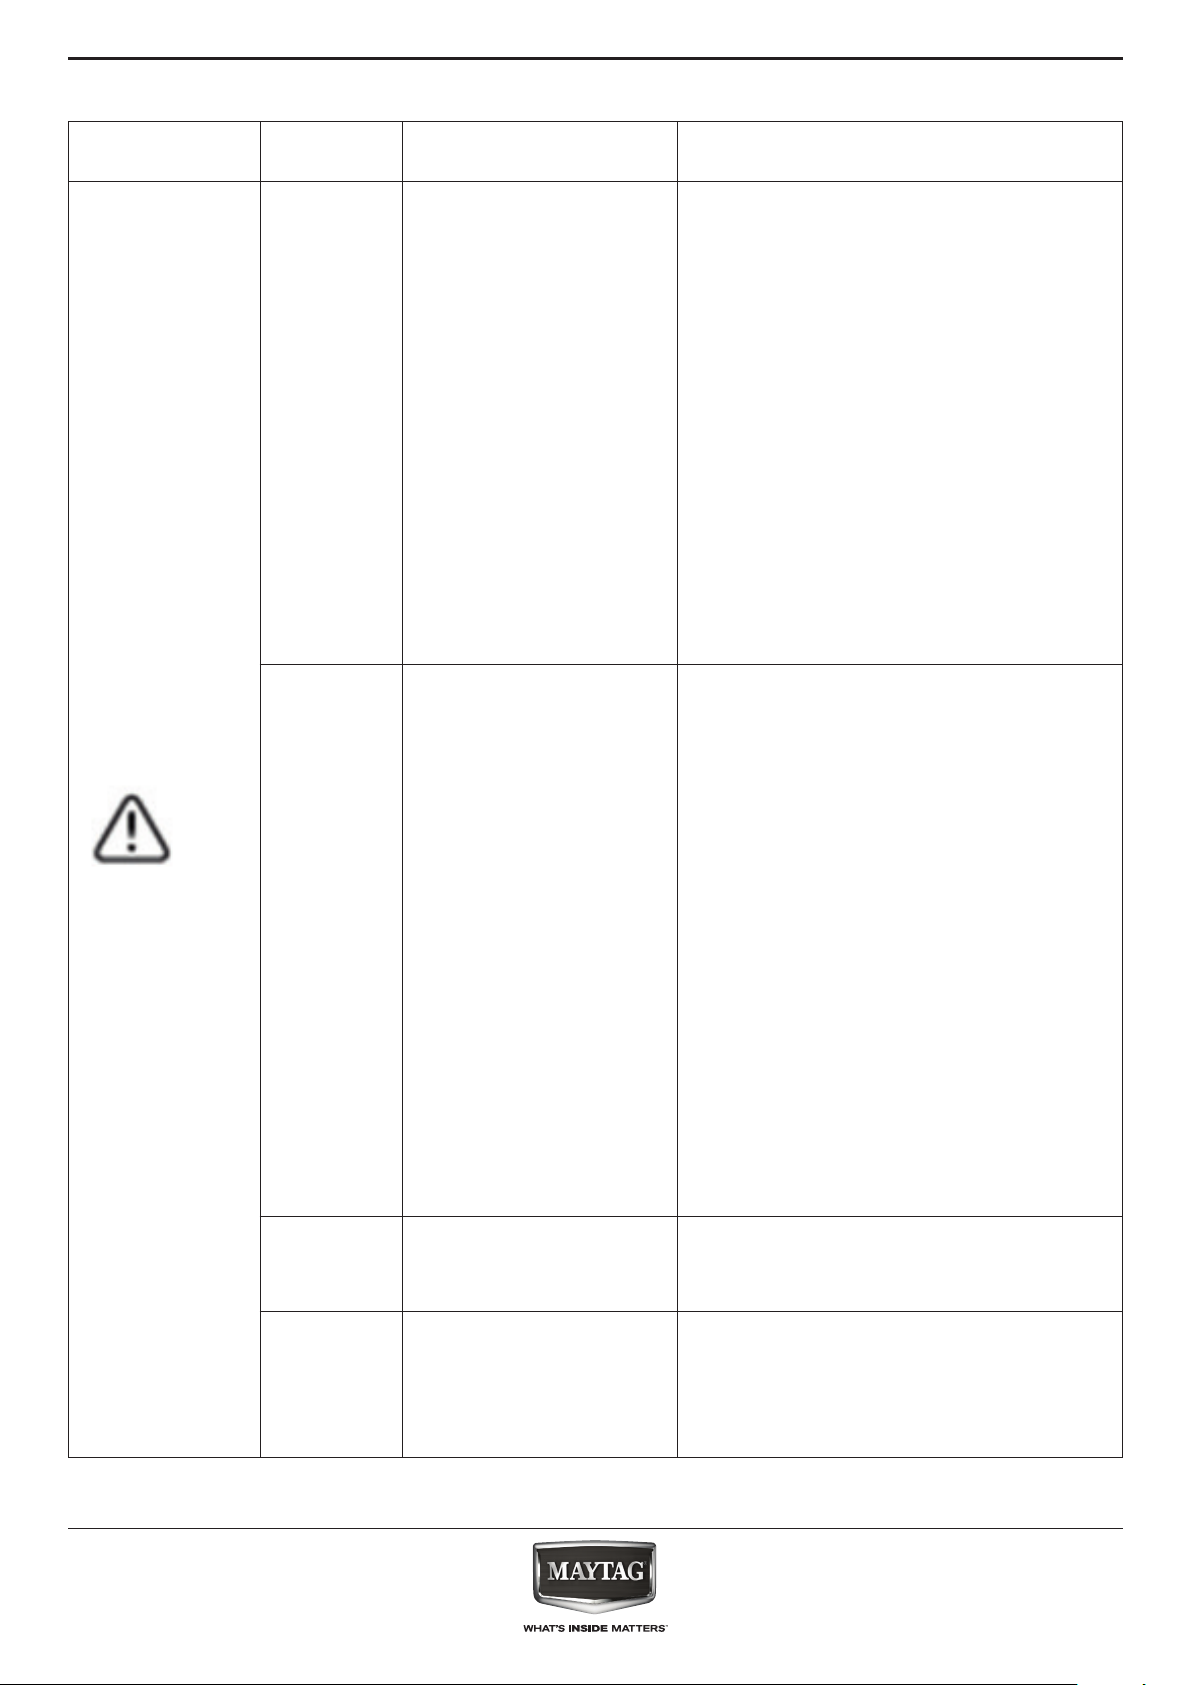
Failure indicator
lights up
Display
message
FdL
(or F29)
Possible Cause Possible Solution
The door cannot unlock. Firmly press the door on the area of the
door lock, then press On/O for at least 3
seconds.
If hot cycle is selected, wait until cool
down and press again On/O for at least 3
seconds.
Switch on the washing machine. If failure
still appears, check and eventually remove
possible cause as indicated for failure
“Clean lter”. Then switch the washing
machine on again. If door does not unlock,
press On/O for at least 3 seconds.
If door still does not unlock, refer to
section “DOOR – HOW TO OPEN IT IN CASE
OF A FAILURE”. Before draining water /
opening the door, wait until the water has
cooled down (for hot wash programmes).
Call Service
F24
Call Service
F02
Too much laundry for a
programme with small
maximum load
Too much inlet water
Water stop failure – water
leakage detected in
bottom tray.
Select and start programme “Rinse and
Spin” to complete the interrupted wash
programme.
Do not overload the washing machine.
Respect the maximum load size of the
programmes indicated in the Programme
Chart.
Turn o the water tap. Press On/O for at
least 3 seconds to drain the water; wait
until the drain phase has ended (End will
appear on display).
Turn on the water tap again. – If water
immediately ows into the washing
machine (without having started a
programme), there is a failure of an
electrical component. Close water tap,
switch o and unplug the washing
machine. Contact our After-Sales Service.
Press Start/Pause. If problem persists, press
On/O for at least 3 seconds. If failure
persists, contact After-Sales Service.
44
Call Service
F04 to F99
Failure of an electrical
component
Press On/O button for at least 3 seconds
to reset the failure. If problem persists,
switch o washing machine, close the
water tap and unplug it; call After-Sales
Service.
Page 45
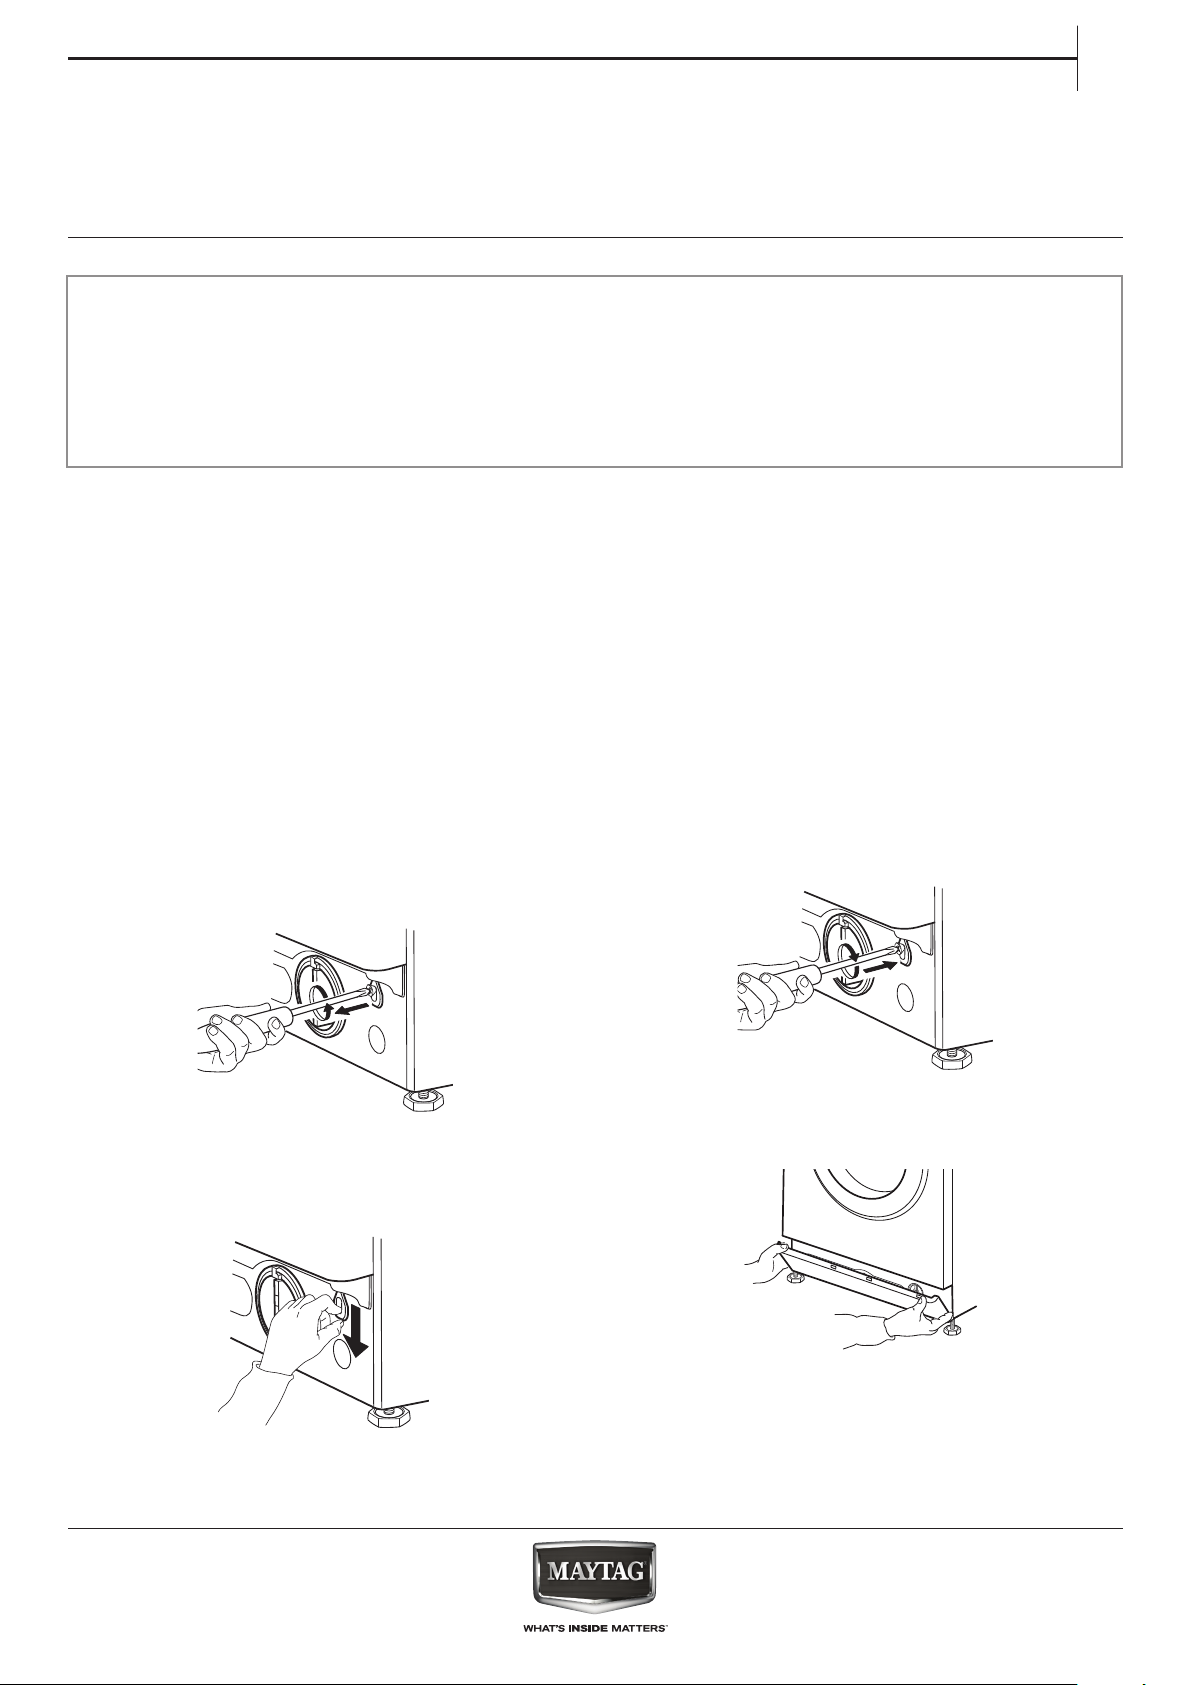
DOOR – HOW TO OPEN IT IN CASE OF A
FAILURE, TO TAKE OUT YOUR LAUNDRY
(IF FEATURE IS AVAILABLE)
EN
Switch o the washing machine and unplug it.
Close the water tap.
Wait until the drum has stopped rotating.
Never open the door while the drum is in
motion.
Wait until water and laundry have cooled down
when washing with high temperatures.
Before opening the door as described in below
section, refer to failure “Door is locked with or
without failure indication, and the programme
does not run”. The door may unlock by itself after
conditions like for example a power breakdown do
not persist anymore.
If you want to take out your laundry immediately,
rst try to unlock the door as described in FAILURE
INDICATORS AND MESSAGES (FdL or F29). Only
1. First drain the residual water, as described in
section “Draining residual water”
Always drain the water before opening the
door, either by pressing and holding On/O
until "rES" appears on the display, or by doing
it manually as described in section DRAINING
RESIDUAL WATER.
if the door cannot be opened as described in the
section mentioned before, proceed as described
below.
In case of a power breakdown, the washing
machine will proceed where it was interrupted as
soon as power is available again.
If a failure occurs on the washing machine and the
door is locked, but you must take out your laundry:
4. Afterwards x the strap again by rmly turning
in the screw with the screwdriver.
2. Remove the screw with a screwdriver.
3. Then pull downwards the strap marked with
“Door open”. You can now open the door and take
out your laundry.
5. Reinstall the plinth
45
Page 46
AFTER-SALES
SERVICE
BEFORE CALLING
THE AFTER SALES SERVICE
IF AFTERWARDS THE FAILURE STILL OCCURS,
CONTACT THE AFTER SALES SERVICE
Call the number shown on the warranty booklet, or
follow the instructions on
website www.maytag.co.uk
1. Check if you can solve the problem yourself by
consulting section
TROUBLESHOOTING GUIDE.
2. Switch the washing machine o and on again
to see if the failure persists.
Always indicate
• A brief description of the failure
• Washing machine model (see rating plate inside
door)
• Service number (on service sticker inside door;
number after “Service”)
• Your full address and telephone number.
Manufacturer:
Whirlpool Europe s.r.l. Socio Unico
Viale Guido Borghi 27
21025 Comerio (VA)
Italy
46
For any repairs, use our authorized After Sales
Service, to ensure proper repairing and use of
original spare parts.
Page 47
INSTALLATION
xxxxxxx xxxxx
GUIDE
EN
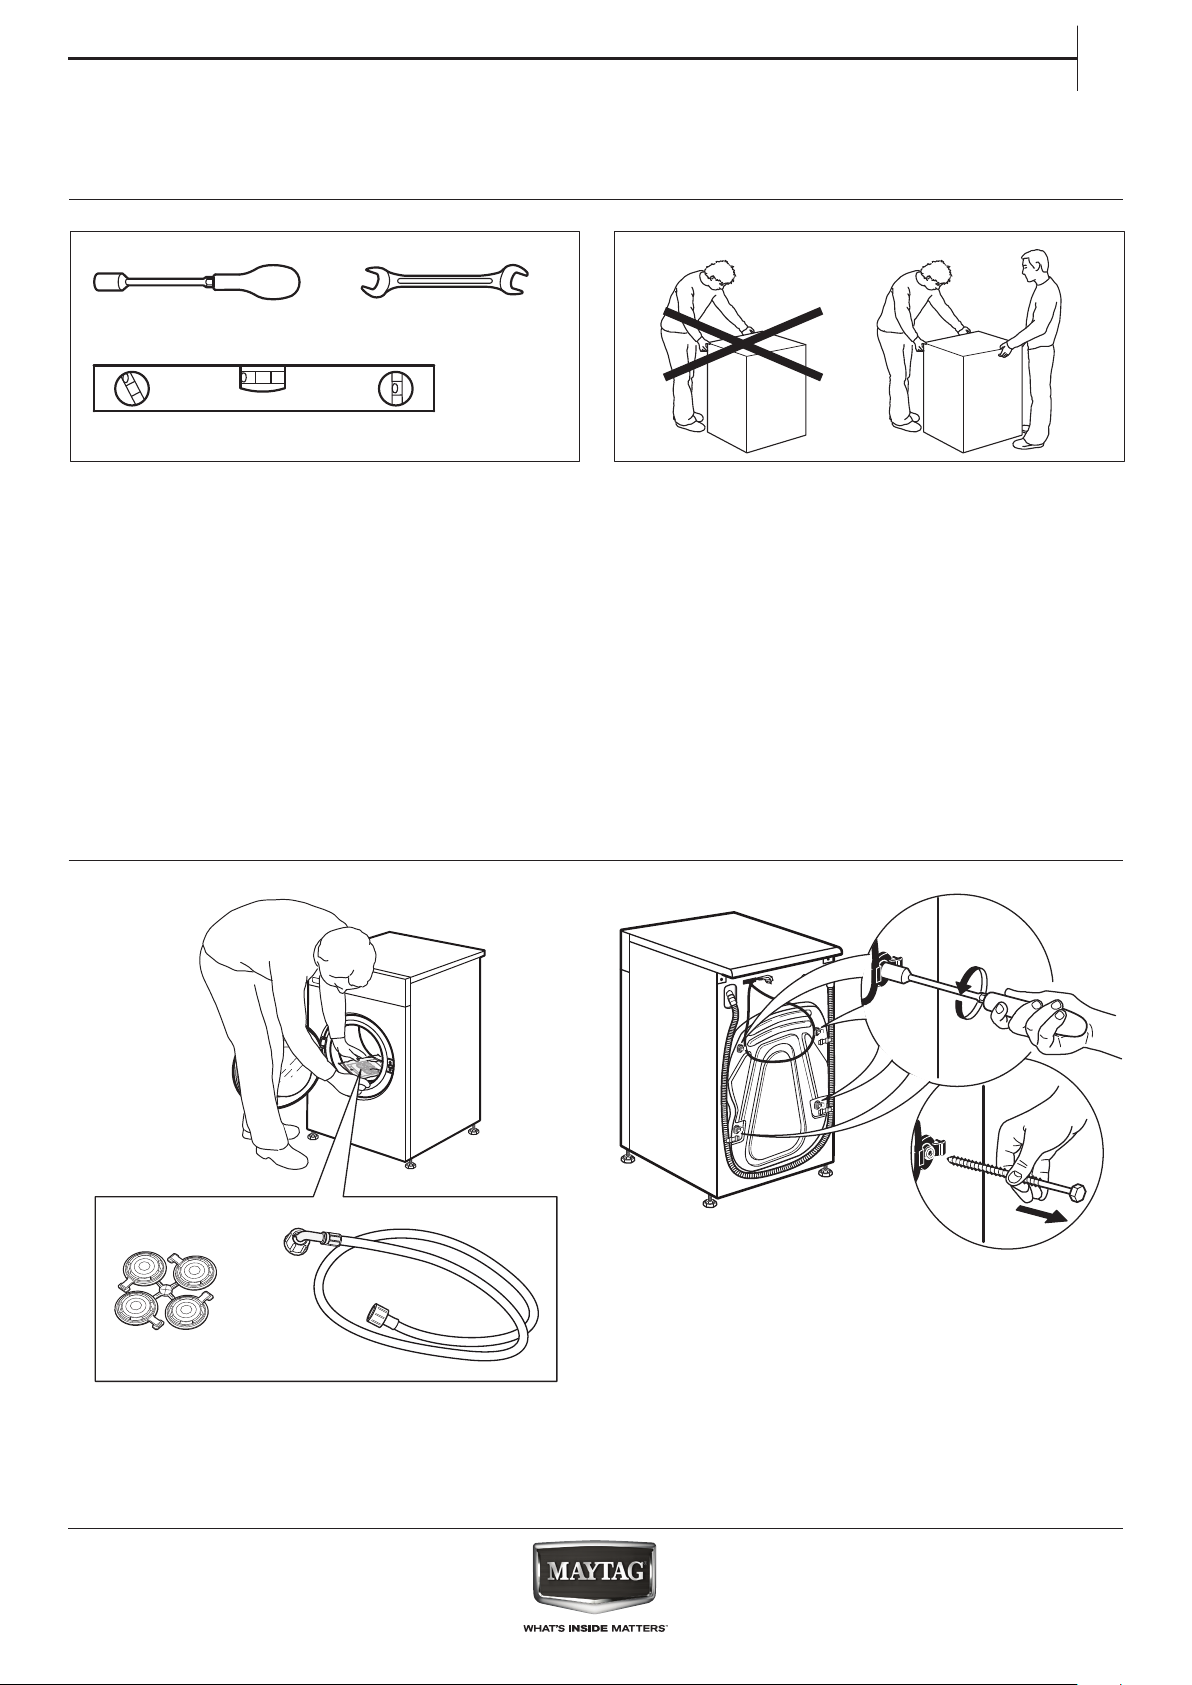
12 mm - 0,47 inch
17 mm - 0,67 inch
1. 2.
xxxxxxx xxxxx
47
Page 48
3.
4.
2 cm - 0,7 inch
48
Page 49
5.
EN
xxxxxxx xxxxx
6. 7.
49
Page 50
8. 9.
max 2,5 cm
max 0,9 inch
10.
1
2
50
Page 51
11. 12.
EN
13.
51
Page 52
14.
max 125 cm
49 inch
min 60 cm
24 inch
max 125 cm
49 inch
min 60 cm
24 inch
max 125 cm
49 inch
min 60 cm
24 inch
52
Page 53
15.
Type D xxx
..............
xxx V ~ xx Hz
xx A
W
IPX4
E
V
D
xxxx xxxx xxxx
Whirlpool Europe s.r.l.
Viale G.Borghi 27
21025 Comerio - Italy
EN
16.
53
Page 54

001
n
EN
400010810311
®/TM © 2015 Maytag. All rights reserved.
54
 Loading...