

Page 1

GAS BUILT-IN OVEN
USER INSTRUCTIONS
THANK YOU for purchasing this high-quality product. If you should experience a problem not covered in TROUBLESHOOTING,
please visit our website at www.maytag.com for additional information. If you still need assistance, call us at 1-800-688-9900.
You will need your model and serial number located on the oven frame behind the oven door.
Table of Contents
OVEN SAFETY .........................................................................................1
FEATURE GUIDE .....................................................................................3
OVEN USE ................................................................................................4
Electronic Oven Controls......................................................................4
Aluminum Foil........................................................................................5
Positioning Racks and Bakeware.........................................................5
Oven Vent..............................................................................................5
Baking and Roasting.............................................................................5
Broiling ..................................................................................................5
Timed Cooking (on some models)........................................................6
OVEN CARE .............................................................................................6
General Cleaning...................................................................................6
Oven Light.............................................................................................6
TROUBLESHOOTING..............................................................................7
ACCESSORIES ........................................................................................7
WARRANTY..............................................................................................8
OVEN SAFETY
Your safety and the safety of others are very important.
We have provided many important safety messages in this manual and on your appliance. Always read and obey all safety
messages.
This is the safety alert symbol.
This symbol alerts you to potential hazards that can kill or hurt you and others.
All safety messages will follow the safety alert symbol and either the word “DANGER” or “WARNING.”
These words mean:
You can be killed or seriously injured if you don't immediately
DANGER
WARNING
All safety messages will tell you what the potential hazard is, tell you how to reduce the chance of injury, and tell you what can
happen if the instructions are not followed.
follow instructions.
can be killed or seriously injured if you don't
You
instructions.
follow
W10203503B
Page 2

WARNING: If the information in this manual is not followed exactly, a fire or explosion
may result causing property damage, personal injury or death.
– Do not store or use gasoline or other flammable vapors and liquids in the vicinity of this
or any other appliance.
– WHAT TO DO IF YOU SMELL GAS:
Do not try to light any appliance.
•
Do not touch any electrical switch.
•
Do not use any phone in your building.
•
Immediately call your gas supplier from a neighbor's phone. Follow the gas supplier's
•
instructions.
If you cannot reach your gas supplier, call the fire department.
•
– Installation and service must be performed by a qualified installer, service agency or
the gas supplier.
WARNING: Gas leaks cannot always be detected by smell.
Gas suppliers recommend that you use a gas detector approved by UL or CSA.
For more information, contact your gas supplier.
If a gas leak is detected, follow the “What to do if you smell gas” instructions.
State of California Proposition 65 Warnings:
WARNING: This product contains a chemical known to the State of California to cause cancer.
WARNING: This product contains a chemical known to the State of California to cause birth defects or other reproductive harm.
IMPORTANT SAFETY INSTRUCTIONS
WARNING: To reduce the risk of fire, electrical shock,
injury to persons, or damage when using the oven, follow
basic precautions, including the following:
■ WARNING: NEVER use this appliance as a space
heater to heat or warm the room. Doing so may result in
carbon monoxide poisoning and overheating of the oven.
■ WARNING: NEVER cover any slots, holes or passages
in the oven bottom or cover an entire rack with materials
such as aluminum foil. Doing so blocks air flow through the
oven and may cause carbon monoxide poisoning.
Aluminum foil linings may also trap heat, causing a fire
hazard.
■ WARNING: NEVER obstruct the flow of combustion and
ventilation air by blocking the oven vent or air intakes.
Doing so restricts air to the burners and may result in
carbon monoxide poisoning.
■ CAUTION: Do not store items of interest to children in
cabinets above an oven – children climbing on the oven to
reach items could be seriously injured.
■ Proper Installation – The oven, when installed, must be
electrically grounded in accordance with local codes or, in
the absence of local codes, with the
Code, ANSI/NFPA 70
installed and grounded by a qualified technician.
■ This oven is equipped with a three-prong grounding plug
for your protection against shock hazard and should be
plugged directly into a properly grounded receptacle. Do
not cut or remove the grounding prong from this plug.
■ Disconnect power before servicing.
■ Injuries may result from the misuse of appliance doors or
drawers such as stepping, leaning, or sitting on the doors
or drawers.
. Be sure the oven is properly
National Electrical
SAVE THESE INSTRUCTIONS
2
Page 3
IMPORTANT SAFETY INSTRUCTIONS
■
Maintenance – Keep oven area clear and free from
combustible materials, gasoline, and other flammable
vapors and liquids.
■
Storage in the Oven – Flammable materials should not be
stored in an oven or near surface units.
For self-cleaning ovens –
■
Before Self-Cleaning the Oven – Remove broiler pan and
other utensils. Wipe off all excessive spillage before
initiating the cleaning cycle.
SAVE THESE INSTRUCTIONS
FEATURE GUIDE
This manual covers several models. Your model may have some or all of the items listed. Refer to this manual or the Frequently Asked
Questions (FAQs) section of our website at www.maytag.com for more detailed instructions.
WARNING
Food Poisoning Hazard
Do not let food sit in oven more than one hour before
or after cooking.
Doing so can result in food poisoning or sickness.
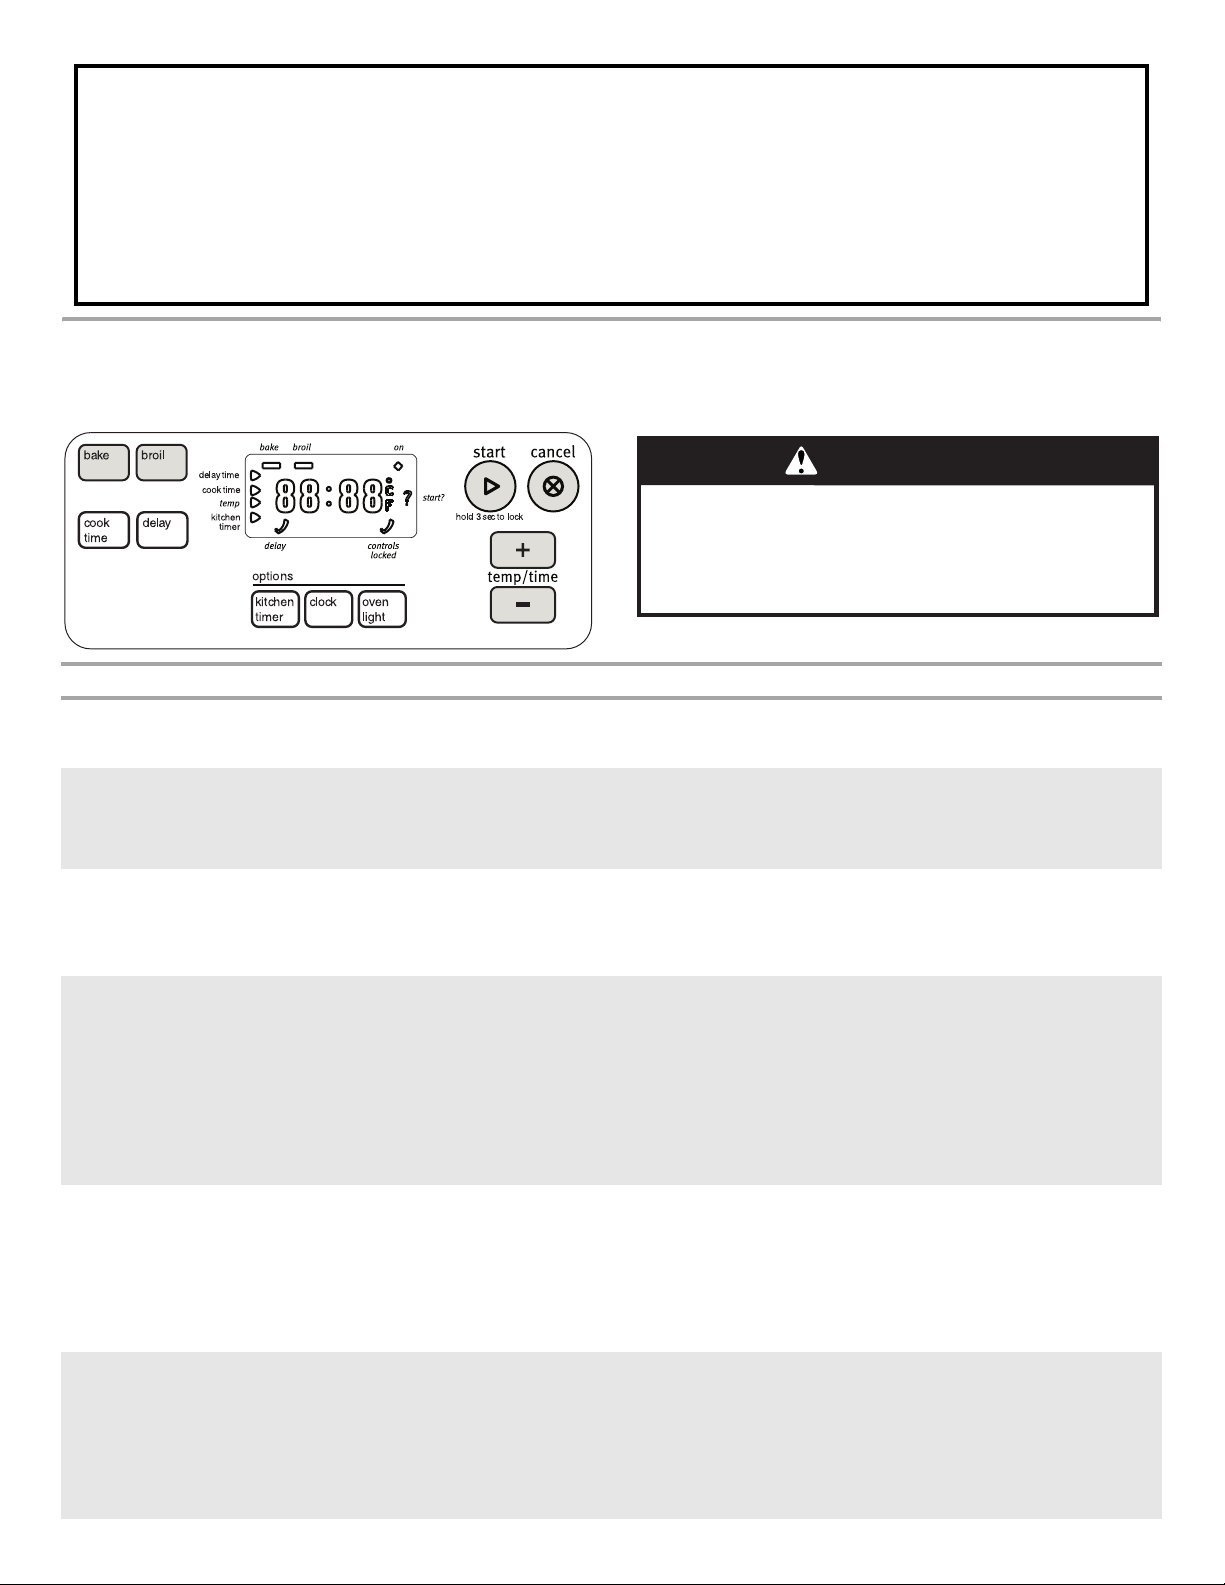
KEYPAD FEATURE INSTRUCTIONS
OVEN LIGHT Oven cavity light While the oven door is closed, press OVEN LIGHT to turn the light on and off. The oven light will
come on when the oven door is opened. The oven light will not come on during the Self-Clean
cycle.
HOLD 3 SEC
TO LOCK
CLOCK Clock The Clock uses a 12-hour cycle with a.m. and p.m.
KITCHEN
TIMER
BAKE Baking and
BROIL Broiling 1. Position cookware in oven and close door to broil stop position. The door should remain open
Oven control
lockout
Oven timer The Kitchen Timer can be set in hours or minutes up to 12 hours and 59 minutes.
roasting
1. Press and hold the Oven Control Lockout keypad for 3 seconds
2. A tone will sound, and “Loc” or “Controls Locked” will be displayed.
3. Repeat to unlock. Only the CLOCK and KITCHEN TIMER keypads will function with the
controls locked.
1. Press CLOCK.
2. Press TEMP/TIME “+” or “-” arrow pads to set the time of day, including a.m. or p.m.
3. Press CLOCK or START.
1. Press KITCHEN TIMER.
2. Press TEMP/TIME “+” or “-” arrow pads to set the length of time.
3. Press KITCHEN TIMER to begin the countdown. If enabled, end-of-cycle tones will sound at
end of countdown.
4. Press KITCHEN TIMER twice to cancel the Kitchen Timer. Do not press the CANCEL keypad
because the oven will turn off.
5. If the Kitchen Timer is running, but not in the display, press KITCHEN TIMER to display the
countdown for 5 seconds.
1. Press BAKE.
2. Press TEMP/TIME “+” or “-” arrow pads to set a temperature other than 350°F (175°C) in
5° increments between 170°F and 500°F (75°C and 260°C).
3. Press START.
4. To change the temperature repeat steps 1 and 2. Press START or wait 5 seconds for the
change to take effect.
5. Press CANCEL when finished.
approximately 5" (12.7 cm).
2. Press BROIL.
3. Press TEMP/TIME “+” or “-” arrow pads to change the temperature in 5°F (5°C) increments
between 300°F and 500°F (150°C and 260°C).
4. Press START.
5. Press CANCEL when finished.
3
Page 4

KEYPAD FEATURE INSTRUCTIONS
COOK TIME Timed Cooking Timed Cooking allows the oven to be set to turn on at a certain time of day, cook for a set length of
DELAY Delayed Start The DELAY keypad is used to enter the starting time for an oven function with a delayed start.
START Cooking start The Start keypad begins any oven function. If Start is not pressed within 1 minute after pressing a
CANCEL Oven function The Cancel keypad stops any function except the Clock, Kitchen Timer, and Oven Control
TEMP/TIME Temperature and
time adjust
time, and/or shut off automatically.
To set a Timed Cook see “Timed Cooking” section.
Delay start should not be used for foods such as breads and cakes because they may not bake
properly.
To set a Delay Timed Cook see “Timed Cooking” section.
keypad, that function is canceled and the time of day is displayed.
Lockout.
The “+” or “-” arrow pads are used to adjust time and temperature settings.
OVEN USE
Odors and smoke are normal when the oven is used the first few
times, or when it is heavily soiled.
This oven is equipped with a pilotless ignition. The oven will not
operate during a power failure or if disconnected from the wall
outlet. Do not attempt to operate the oven without power.
Electronic Oven Controls
IMPORTANT: The health of some birds is extremely sensitive to the
fumes given off. Exposure to the fumes may result in death to
certain birds. Always move birds to another closed and wellventilated room.
Control Display
The display will flash when powered up or after a power loss. Press
CANCEL to clear. When oven is not in use, the time of day is
displayed. Indicator lights show functions that are in use.
To n e s
Tones are audible signals, indicating the following:
Basic Functions
One tone
■ Valid pad press
■ Oven is preheated (long tone)
■ Function has been entered
■ Reminder (on some models), repeating each minute after the
end-of-cycle tones
Three tones
■ Invalid pad press
Four tones
■ End of cycle
Reminder Tones: The audible tones at the end of the Kitchen
Timer may be set to beep once (“b1”) or continue to beep (“b”).
Press and hold KITCHEN TIMER for 5 seconds to enter Options
mode. “Opt” will appear on the display. Use TEMP/TIME to cycle
through the options until “b” or “b1” is shown in the display.
Choose on or off using the KITCHEN TIMER keypad. Press
CANCEL to exit the mode.
Fahrenheit and Celsius
The temperature is preset at Fahrenheit, but can be changed to
Celsius.
To ch an ge : Press and hold BROIL for 5 seconds. A tone will
sound, and “°C” or “°F” will appear on the display. Repeat to
change back.
To exit mode, press CANCEL.
Oven Control Lockout
Only the Clock and Kitchen Timer keypads will function with the
controls locked.
To lock controls: Press and hold START for 3 seconds. The
display will show “Loc.”
To unlock controls: Press and hold START for 3 seconds. The
display will show “Time of Day.”
12-Hour Shutoff
The oven control is set to automatically shut off the oven 12 hours
after the oven turns on. This will not interfere with any timed or
delayed cook function.
Oven Temperature Control
IMPORTANT: Do not use a thermometer to measure oven
temperature because opening the oven door may cause element
cycling to give incorrect readings.
The oven provides accurate temperatures; however, it may cook
faster or slower than your previous oven, so the temperature
calibration can be adjusted. It can be changed in Fahrenheit or
Celsius.
To Adjust Oven Temperature Calibration:
1. Press and hold BAKE for 5 seconds until the oven display
shows the current calibration, for example “0°F CAL” or “00.”
2. Press the TEMP/TIME “+” or “-” arrow pads to increase or to
decrease the temperature in 10°F (5°C) amounts. The
adjustment can be set between 30°F (17°C) and -30°F (-17°C).
3. Press START.
4
Page 5

Aluminum Foil
A
C
IMPORTANT: To avoid permanent damage to the oven bottom
finish, do not line the oven bottom with any type of foil or liner.
Positioning Racks and Bakeware
IMPORTANT: To avoid permanent damage to the porcelain finish,
do not place food or bakeware directly on the oven door or bottom.
Bakeware
To cook food evenly, hot air must be able to circulate. Allow
2" (5 cm) of space around bakeware and oven walls. Make sure
that no bakeware piece is directly over another.
Racks
■ Position racks before turning on the oven.
■ Do not move racks with bakeware on them.
■ Make sure racks are level.
To move a rack, pull it out to the stop position, raise the front edge,
and then lift out. Use the following illustration and charts as a
guide.
4
3
2
1
For best cooking results, do not cover entire oven rack with foil
because air must be able to move freely.
Rack Positions
Rack 4: Use for broiling and 2-rack baking.
Rack 3: Most baked goods on a cookie sheet or jelly roll pan, layer
cakes, frozen convenience foods. Broiling chicken pieces.
Rack 2: Roasting small cuts of meat, pies, loaves of bread, bundt
cakes, and 2-rack baking.
NOTE: For best performance, place bakeware from front to
back.
Rack 1: Roasting large cuts of meat and poultry.
Multiple Rack Cooking
2-rack: Use rack positions 2 and 4 or 1 and 4.
Baking Layer Cakes on 2 Racks
For best results when baking cakes on 2 racks use racks 2 and 4 or
1 and 4 for baking. Place the cakes on the racks as shown.
Oven Vent
B
A. Control panel
B. Oven vent
C. Oven door
Baking and Roasting
The bake element or burner will glow red when cycling on; the broil
element or burner will not. This feature is automatically activated
when the oven is in use.
Before baking and roasting, position racks according to
“Positioning Racks and Bakeware” section. When roasting, it is not
necessary to wait for the oven preheat cycle to end before putting
food in unless it is recommended in the recipe.
Broiling
Broiling uses direct radiant heat to cook food. Changing the
temperature when broiling allows more precise control when
cooking. The lower the temperature, the slower the cooking.
Thicker cuts and unevenly shaped pieces of meat, fish and poultry
may cook better at lower broiling temperatures.
■ For best results, use a broiler pan and grid. It is designed to
drain juices and help avoid spatter and smoke.
The oven vent releases hot air and moisture from the oven, and
should not be blocked or covered. Blocking or covering the vent
will cause poor air circulation, affecting cooking and cleaning
results. Do not set plastics, paper or other items that could melt or
burn near the oven vent.
Preheating
After START is pressed, the oven will begin preheating. Once
100ºF (38ºC) is reached, the display temperature will increase as
the actual temperature of the oven increases. When the preheat
temperature is reached, a tone will sound, and the selected
temperature will appear on the display.
If you would like to purchase a broiler pan, one may be ordered.
Please refer to the cover for contact information. Ask for Part
Number 12500100.
It is not necessary to preheat the oven before putting food in unless
recommended in the recipe. Position food on grid in a broiler pan,
then place it in the center of the oven rack. Close the door.
5
Page 6

Timed Cooking (on some models)
WARNING
Food Poisoning Hazard
Do not let food sit in oven more than one hour before
or after cooking.
Doing so can result in food poisoning or sickness.
To Set a Timed Cook:
1. Press BAKE. The bake indicator light will light up.
2. Press the TEMP/TIME “+” or “-” arrow pads to enter a
temperature other than the one displayed.
3. Press COOK TIME. The cook time oven indicator light will light
up.
4. Press the TEMP/TIME “+” or “-” arrow pads to enter the length
of time to cook.
5. Press START. The display will count down the time. When the
time ends, the oven will shut off automatically, “End” will
appear on the display, and End of Cycle tones will sound.
6. Press CANCEL to clear the display.
OVEN CARE
To Set a Delayed Timed Cook:
Before setting, make sure the clock is set to the correct time of day.
See the “Clock” keypad feature in the “Feature Guide” section.
1. Press BAKE.
2. Press the TEMP/TIME “+” or “-” arrow pads to enter a
temperature other than the one displayed.
3. Press COOK TIME. The cook time oven indicator light will light
up.
4. Press TEMP/TIME “+” or “-” arrow pads to enter the length of
time to cook.
5. Press DELAY. The start time/delay oven indicator light will light
up.
6. Press TEMP/TIME “+” or “-” arrow pads to enter the time of
day to start.
7. Press START.
When the start time is reached, the oven will automatically turn on.
The temperature and/or time settings can be changed anytime
after pressing Start by repeating steps 2-7. When the set cook time
ends, the oven will shut off automatically and “End” will appear on
the display.
8. Press CANCEL to clear the display.
General Cleaning
IMPORTANT: Before cleaning, make sure all controls are off and
the oven is cool. Always follow label instructions on cleaning
products. For additional information, you can visit the Frequently
Asked Questions (FAQs) section of our website at
www.maytag.com.
Soap, water and a soft cloth or sponge are suggested first unless
otherwise noted.
STAINLESS STEEL (on some models)
NOTE: To avoid damage to stainless steel surfaces, do not use
soap-filled scouring pads, abrasive cleaners, Cooktop Cleaner,
steel-wool pads, gritty washcloths or abrasive paper towels.
Damage may occur to stainless steel surfaces, even with one-time
or limited use.
Cleaning Method:
Rub in direction of grain to avoid damaging.
■ Stainless Steel Cleaner and Polish Part Number 31462 (not
included):
See cover for contact information.
■ Liquid detergent or all-purpose cleaner:
Rinse with clean water and dry with soft, lint-free cloth.
CONTROL PANEL AND OVEN DOOR EXTERIOR
To avoid damage to the control panel, do not use abrasive
cleaners, steel-wool pads, gritty washcloths or abrasive paper
towels.
Cleaning Method:
■ Glass cleaner and soft cloth or sponge:
Apply glass cleaner to soft cloth or sponge, not directly on
panel.
■ All-Purpose Appliance Cleaner Part Number 31682 (not
included):
See cover for contact information.
OVEN CAVITY
Do not use oven cleaners.
Food spills should be cleaned when oven cools. At high
temperatures, foods react with porcelain and staining, etching,
pitting or faint white spots can result.
OVEN RACKS
Cleaning Method:
■ Steel-wool pad
■ For racks that have discolored and are harder to slide, a light
coating of vegetable oil applied to the rack guides will help
them slide.
The oven light is a standard 40-watt appliance bulb. Before
replacing, make sure the oven and cooktop are cool and the
control knobs are in the off position.
To Replace:
1. Unplug oven or disconnect power.
2. Turn the glass bulb cover in the back of the oven
counterclockwise to remove.
6
Oven Light
3. Turn bulb counterclockwise to remove from socket.
4. Replace bulb, then bulb cover by turning clockwise.
5. Plug in oven or reconnect power.
Page 7

TROUBLESHOOTING
First try the solutions suggested here or visit our website and reference Frequently Asked Questions (FAQs)
to possibly avoid the cost of a service call.
www.maytag.com
Nothing will operate
WARNING
Electrical Shock Hazard
Plug into a grounded 3 prong outlet.
Do not remove ground prong.
Do not use an adapter.
Do not use an extension cord.
Failure to follow these instructions can result in death,
fire, or electrical shock.
■ Is the power supply cord unplugged?
Plug into a grounded 3 prong outlet.
■ Household fuse blown or circuit breaker tripped?
Replace the fuse or reset the circuit breaker. If the problem
continues, call an electrician.
■ Is the main or regulator gas shutoff valve in the off
position?
See Installation Instructions.
■ Is the oven properly connected to the gas supply?
Contact a trained repair specialist or see Installation
Instructions.
Oven will not operate
■ Is this the first time the oven has been used?
Turn on any one of the surface burner knobs to release air from
the gas lines.
■ Is the electronic oven control set correctly?
See “Electronic Oven Controls” section.
■ Is the control lock set?
See “Oven Control Lockout” section of the “Electronic Oven
Controls” section.
■ Has a delay start been set?
See “Timed Cooking” section.
■ On some models, does the cooling fan run during Bake,
Broil or Clean?
It is normal for the fan to automatically run when the oven is in
use. This helps cool the electronic control.
Oven burner flames are yellow or noisy
■ Is propane gas being used?
The oven may have been converted improperly. Contact a
service technician or see cover for contact information.
Oven temperature too high or too low
■ Does the oven temperature calibration need adjustment?
See “Oven Temperature Control” section of the “Electronic
Oven Controls” section.
Oven indicator lights flash
■ Do the oven indicator lights flash?
See “Control Display” in the “Electronic Oven Controls”
section. If the indicator light(s) keeps flashing, call for service.
See cover for contact information.
Display shows messages
■ Is “BAKE” or “LOCK” flashing in the display?
There has been a power failure. Clear the display. On some
models, reset the clock, if needed. See “Clock” keypad feature
in the “Feature Guide” section.
Oven cooking results not what expected
■ Is the proper temperature set?
Double-check the recipe in a reliable cookbook.
■ Is the proper oven temperature calibration set?
See “Oven Temperature Control” section of the “Electronic
Oven Controls” section.
■ Was the oven preheated?
See “Baking and Roasting” section.
■ Are the racks positioned properly?
See “Positioning Racks and Bakeware” section.
■ Is there proper air circulation around bakeware?
See “Positioning Racks and Bakeware” section.
■ Is the batter evenly distributed in the pan?
Check that batter is level in the pan.
■ Is the proper length of time being used?
Adjust cooking time.
■ Has the oven door been opened while cooking?
Oven peeking releases oven heat and can result in longer
cooking times.
■ Are baked items too brown on the bottom?
Move rack to higher position in the oven.
■ Are pie crust edges browning early?
Use aluminum foil to cover the edge of the crust and/or reduce
baking temperature.
Stainless Steel Cleaner and Polish
(stainless steel models)
Order Part Number 31462
ACCESSORIES
All-Purpose Appliance Cleaner
Order Part Number 31682
Broiler Pan
Order Part Number 12500100
7
Page 8

MAYTAG® MAJOR APPLIANCE WARRANTY
LIMITED WARRANTY
For one year from the date of purchase, when this major appliance is operated and maintained according to instructions attached to or
furnished with the product, Maytag brand of Whirlpool Corporation or Whirlpool Canada LP (hereafter “Maytag”) will pay for factory
specified parts and repair labor to correct defects in materials or workmanship. Service must be provided by a Maytag designated service
company. This limited warranty is valid only in the United States or Canada and applies only when the major appliance is used in the
country in which it was purchased. Outside the 50 United States and Canada, this limited warranty does not apply. Proof of original
purchase date is required to obtain service under this limited warranty.
ITEMS EXCLUDED FROM WARRANTY
This limited warranty does not cover:
1. Service calls to correct the installation of your major appliance, to instruct you on how to use your major appliance, to replace or repair
house fuses, or to correct house wiring or plumbing.
2. Service calls to repair or replace appliance light bulbs, air filters or water filters. Consumable parts are excluded from warranty
coverage.
3. Repairs when your major appliance is used for other than normal, single-family household use or when it is used in a manner that is
contrary to published user or operator instructions and/or installation instructions.
4. Damage resulting from accident, alteration, misuse, abuse, fire, flood, acts of God, improper installation, installation not in accordance
with electrical or plumbing codes, or use of consumables or cleaning products not approved by Maytag.
5. Cosmetic damage, including scratches, dents, chips or other damage to the finish of your major appliance, unless such damage
results from defects in materials or workmanship and is reported to Maytag within 30 days from the date of purchase.
6. Any food loss due to refrigerator or freezer product failures.
7. Costs associated with the removal from your home of your major appliance for repairs. This major appliance is designed to be
repaired in the home and only in-home service is covered by this warranty.
8. Repairs to parts or systems resulting from unauthorized modifications made to the appliance.
9. Expenses for travel and transportation for product service if your major appliance is located in a remote area where service by an
authorized Maytag servicer is not available.
10. The removal and reinstallation of your major appliance if it is installed in an inaccessible location or is not installed in accordance with
published installation instructions.
11. Major appliances with original model/serial numbers that have been removed, altered or cannot be easily determined. This warranty is
void if the factory applied serial number has been altered or removed from your major appliance.
The cost of repair or replacement under these excluded circumstances shall be borne by the customer.
DISCLAIMER OF IMPLIED WARRANTIES; LIMITATION OF REMEDIES
CUSTOMER'S SOLE AND EXCLUSIVE REMEDY UNDER THIS LIMITED WARRANTY SHALL BE PRODUCT REPAIR AS PROVIDED
HEREIN. IMPLIED WARRANTIES, INCLUDING WARRANTIES OF MERCHANTABILITY OR FITNESS FOR A PARTICULAR PURPOSE,
ARE LIMITED TO ONE YEAR OR THE SHORTEST PERIOD ALLOWED BY LAW. MAYTAG SHALL NOT BE LIABLE FOR INCIDENTAL OR
CONSEQUENTIAL DAMAGES. SOME STATES AND PROVINCES DO NOT ALLOW THE EXCLUSION OR LIMITATION OF INCIDENTAL OR
CONSEQUENTIAL DAMAGES, OR LIMITATIONS ON THE DURATION OF IMPLIED WARRANTIES OF MERCHANTABILITY OR FITNESS,
SO THESE EXCLUSIONS OR LIMITATIONS MAY NOT APPLY TO YOU. THIS WARRANTY GIVES YOU SPECIFIC LEGAL RIGHTS, AND
YOU MAY ALSO HAVE OTHER RIGHTS WHICH VARY FROM STATE TO STATE OR PROVINCE TO PROVINCE.
If outside the 50 United States and Canada, contact your authorized Maytag dealer to determine if another warranty applies.
9/07
For additional product information, visit www.maytag.com.
If you do not have access to the Internet and you need assistance using your product or you would like to schedule service, you may
contact us at the number below.
Have your complete model number ready. You can find your model number and serial number on the label, located on the oven frame
behind the storage drawer panel.
For assistance or service, call 1-800-688-9900.
If you need further assistance, you can write with any questions or concerns to the address below:
Maytag Brand Home Appliances
Customer eXperience Center
553 Benson Road
Benton Harbor, MI 49022-2692
Please include a daytime phone number in your correspondence.
Please keep these User Instructions and model number information for future reference.
W10203503B
© 2009
All rights reserved.
®
Registered Trademark/ ™ Trademark of Maytag Corporation or its related companies.
Printed in U.S.A.
2/09
 Loading...