Page 1
TABLE OF CONTENTS
Pag e
For Fu t ure Reference ...................................................................... 1
Importan t Safety Ins t ruc t ions ............................................................... 2 - 3
Oven Fea t ures ............................................................................. 4_5
• Ele ctr o n ic Cl oc k a n d Ove n Co ntr ol ........................................................ 4 5
• S e tting t he C l ock an d Ti m e r .............................................................. 5
U sing Your O ven ........................................................................... 6 - 9
• Bak i ng an d R o ast i ng .................................................................... 6 - 7
• Broi li ng ............................................................................... 8
• Pr o gramm e d Oven Op e rat io ns ............................................................ 8 - 9
Cleaning .................................................................................. 10 - i 2
• S e lf - C l ean Ov e n ........................................................................ 10 - 11
• Ove n Cl e an i ng C h art .................................................................... i1 - i2
Maintenance .............................................................................. 12
• A djust i ng Ov e n The rm o stat .............................................................. 1 2
• L i ght R epl ac e me n t ..................................................................... 12
• Ov e n Door ............................................................................ 12
B efore You Call for Service ................................................................. 1 3
Warranty .............................................................................. Back C o ver
Page 2
FOR FUTURE REFERENCE
Congratulations on your ehoice of a Maytag electric wall For future reference, keep this manual in a convenient
oven. As you use your new wall oven we know you x _411 location. Record the model number, serial number and
appreciate the many features that provide excellent purchase date of this electric wall oven in the spaces
performance, ease of cleaning, convenience and provided. (This information can be found on the data
d epe n dability plate, located o n t he frame ar o u nd the oven.)
Read this manual. New features have dramatically Model Number
changed today's cooki n g appliance s and the way we
cook. It is therefore very important to understand how
? , our new electric wall oven operates. On the tbllowing
pages you _ x dll find information regarding its operation. Serial Number ]
By following these instructions carefully you will be
able to h i lly enjoy' and properly maintain your new
May_ag wall oven. Purchase Date
Save time and money. Please t ake a moment to
review the enclosed booklet, " C ooki ng Made
S impl e ." Whether you need assistance in selecting the
r i gh t bakeware o r r e v iewing th e " ' d os and dou' ts " o f
baking , roasting and broiling, the answers are contained
in this booklet.
If smnething goes wrong, check the "Before You Call
for Service" section of this manual. It is designed to
solve common problems you may encounter.
/
Should you have any questions about using your Mayqtag
wall oven, call or write us. Be sure to provide the model
and serial numbers of your wall oven.
BE SURE Y O U READ THE SAFETY
INSTRUCTIONS ON PAGES 2 - 3 BEFORE
YOU START TO USE THIS WALL OVEN .
PAGE 1
Page 3
IMPORTANT SAFETY INSTRUCTIONS
Read all instructions before using CAUTI O N: Do not store i t ems of interest to children
this appliance, in cabinets above an appliance. Children climbing Oil
The fol l owing ins t ructions are based on safety injured.
considerations and must be strictly _bllowed to reduce
the potential risks of fire, electric shock, or personal About Y our A pplia n ce
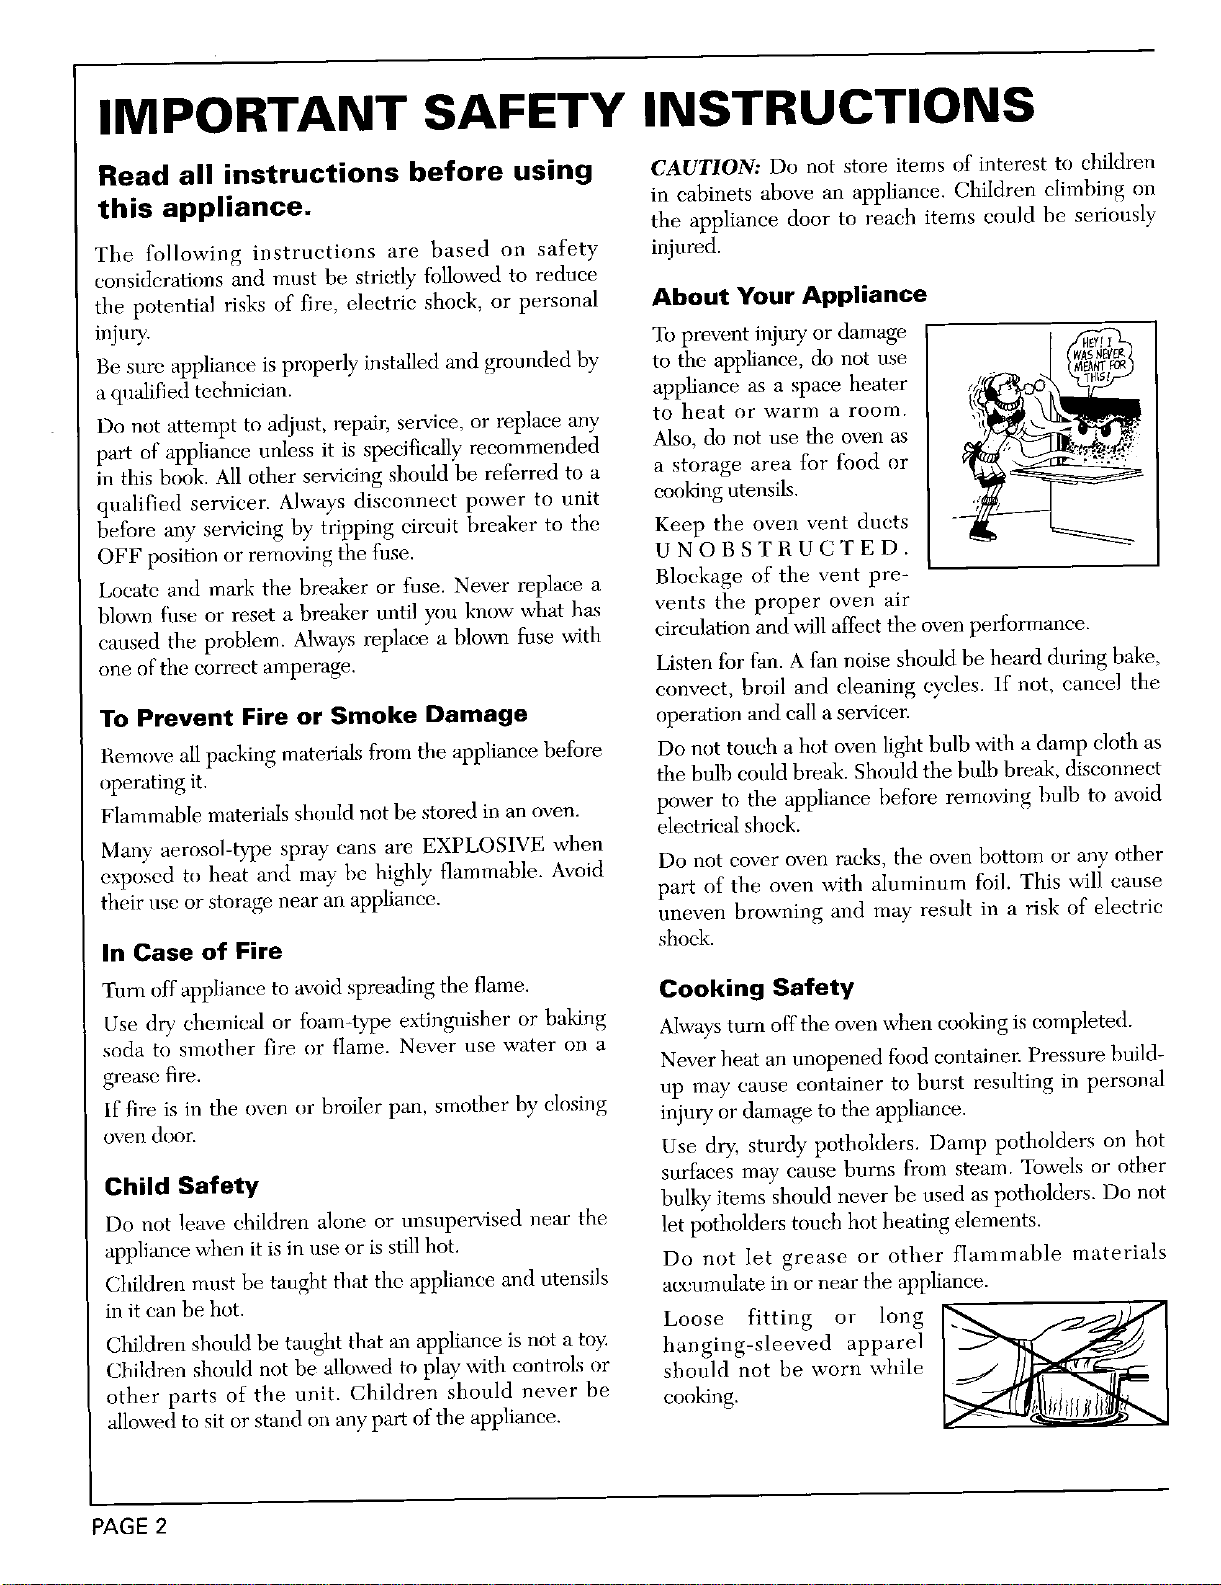
injui_. To prevent injury or damage
B e s ure applian c e i s properly in s talled and grounded by t o the applia n ce, d o not u s e
a qualified technician, appliance as a space heater
Do not attempt to adjnst, repair, service, or replace any to hea t or warm a room.
part of appliance unless it is specificalIy recommended Also, do not u se t he o v en as
in this book All other servicing should be referred to a a storage area for food or
qualified servicer. Always disconnect power to unit cooking utensils.
before any set,icing by tripping cireuit breaker to the Keep the ove n vent ducts
OFF position or removing the fnse. U N O B S T R U C T E D .
Loca t e and mark the breaker o r f us e. Ne v er replace a Blockage of the vent pre-
blo,_ (hse or reset a breaker until you know what has vents the proper oven air
caused the problem. Always replace a blown fuse with circulation and will affect the oven performance.
one of the correct amperage. Listen for fan. A fan noise should be heard durillg bake,
To Prevent Fire or Smoke Damage operation and call a servicer.
the appliance door to reach items could he seriously
convect, broil and cleaning cycles. If not, cancel the
Remove all packing materials from the appliance before Do not toneh a hot oven light bulb with a damp cloth as
operating it. the bulb could break. Should the bnlb break, disconnect
F l ammable materials shou l d not be stored in an oven. power to the appliance before removing bulb to aw ) id
Many aerosol-type spray cans are EXPLOSIVE when
exposed to heat and may tie highly flammable. Avoid Do not cover oven racks, the oven bottom or any other
their nee or storage near an appliance, part of the oven with aluminum foil, This will cause
In Case of Fire shock.
Turn off appliance to avoid spreading the flame. Cooking Safety
Use dry chemic_d or foam-type extinguisher or baking A l ways tur n o ff t he oven when eookiug i s c o mplete d .
soda to smother fire or flame. Never use water on a
grease fire. Never heat an unopened food containei: Pressure build-
If { ; re is in the oven or broi l er pan, smother by c l osing injury or damage to the appliance.
oven duor.
Child Safety surfaces may cause burn s I?om steam. Towels or other
Do not leave children alone or unsupervised near the let potholders touch hot heating elements.
appliance when it i s in use o r is still hot.
Children mnst be taught that the appliance and utensils accumulate in or near the appliance.
in it can be hot. L o o s e fitting or long F 2 "_ _...-_ ; . 2 , 4 _1
Children should be tanght that an appliance is not a toy. hanging-sleeved apparel
Children shonld not be allowed to play with controls or shou l d not be worn while
other parts of the unit. children should never be cooking.
allowed to sit or stand on an} , part of the appliance.
electrical shock.
uneven browning and may result in a risk of electric
up may cause container to burst resulting in personal
Use dry, stnrdy potholders. Damp potholders on hot
bulky" items should never be used as potholders. Do not
Do not let grease or other fIammable materials
PAGE 2
Page 4
Ahvays place oven racks in the desired positions while Cleaning Safety
oven is cool. If a rack must be moved while hot, use a Turn off all controls and wait for appliance parts to cool
dD ' potholder and avoid touching hot element in oven.
before touehing or cleaning them.
Use care when opening the oven door. Let hot air or C lean only parts listed in this manual.
steam escape before remm4ng or replacing food.
Do not clean door gasket. The door gasket is essential
PR EPA RE D F OOD WA R NING: Follow food for a good seal . Care should be taken not to rub,
manufacturer ' s instructions. If a plastic frozen food damage or move the gasket.
containe r and / o r i t s cov er dist ort s , wa r p s , o r i s othe r wi se
damaged during cooking, immediately discard the food Self-Clean Oven
and its contai n er. The fuod could be contaminated.
Do not use oven cleaners of any kind in or around any
DO NOT TOUCH THE OVEN ELEMENTS, AREAS pair of the self-clean oven.
NEAIl THE ELEMENTS Oil THE INTERIOR
SURFACES OF OVEN. Elements may be hot even Before self-cleaning the oven, remove broiler pan, oven
though they are dark in color. The interior surfaces of racks, and other utensils, and wipe off excessive
the oven )nay become hot enough to cause burns, s pillover s to prevent exces s i v e s moke o r flar e -up s .
During and after use, do not touch or let clothing or
CAUT I ON ; DO NOT LEAVE FOOD Oil COOKING
other flammable materials contact heating elements, UTENSILS, ETC., IN THE OVEN DUllING THE
areas near elements or interior surfaces of oven until SELF-CLEAN CYCLE.
they have had sufficient time to cool. Other surfaces of
the appliance may become hot enough to cause burns. Important Safety N otice and Warning
Among the s e area s are the oven vent opening and the The California Safe Drinking Wate r and Toxic
s u rCc aee s near opening, oven dool; and oven windo_v Enfo r cement Act of I986 (Proposition 65) r equires the
Do not allow ahnniunm foil or any othe r metal object to Governor of California to publish a list of substances
co n tact hea t ing elements, known t o the State o f Calif o rnia t o cau s e cance r o r
rep r oductive harm , and requires busine s ses to warn
Utensil Safety customers of potential exposures to such substances.
Be sure uten s il is large enough to prope r ly contain food Users of this appliance a r e hereby warned that when
and avoid spillove r s, the oven is engaged in the self-clean cycle, there may be
some low level expo s ure to some of the li s ted
Follow the manui?tcture r 's directions when using oven s ubstances , including carbon monoxide. Exposure to
cooking bag s . these s ubstance s can he min i mized by p r operly ven t ing
Only ce r tain types of glass, glass / ce r amic, ceramic , or the oven to the outdoors during the self-clean cycle by
glazed utensil s a r e suitable for oven u s age without opening the window s and / or door in the r oom where
b r eaking due to the sudden change in temperature, the appliance is located.
This appliance has been tested for safe performance
using conventional cookware. Do not use any devices o r
acce s sories that are not specifically r ecommended in
this manual. Do not u s e add - on oven convection
system s . The use of devices or accessorie s that are not
exp r essly recommended in this manual can create
serious safety hazard s , result in performance problems,
and reduce the lif b of the components of the applianee.
SAVE THESE INSTRUCTIONS
!ii!i!iiii
PAGE 3
iiiiiii!ii
Page 5
OVEN FEATURES
Electronic Clock and Oven Control
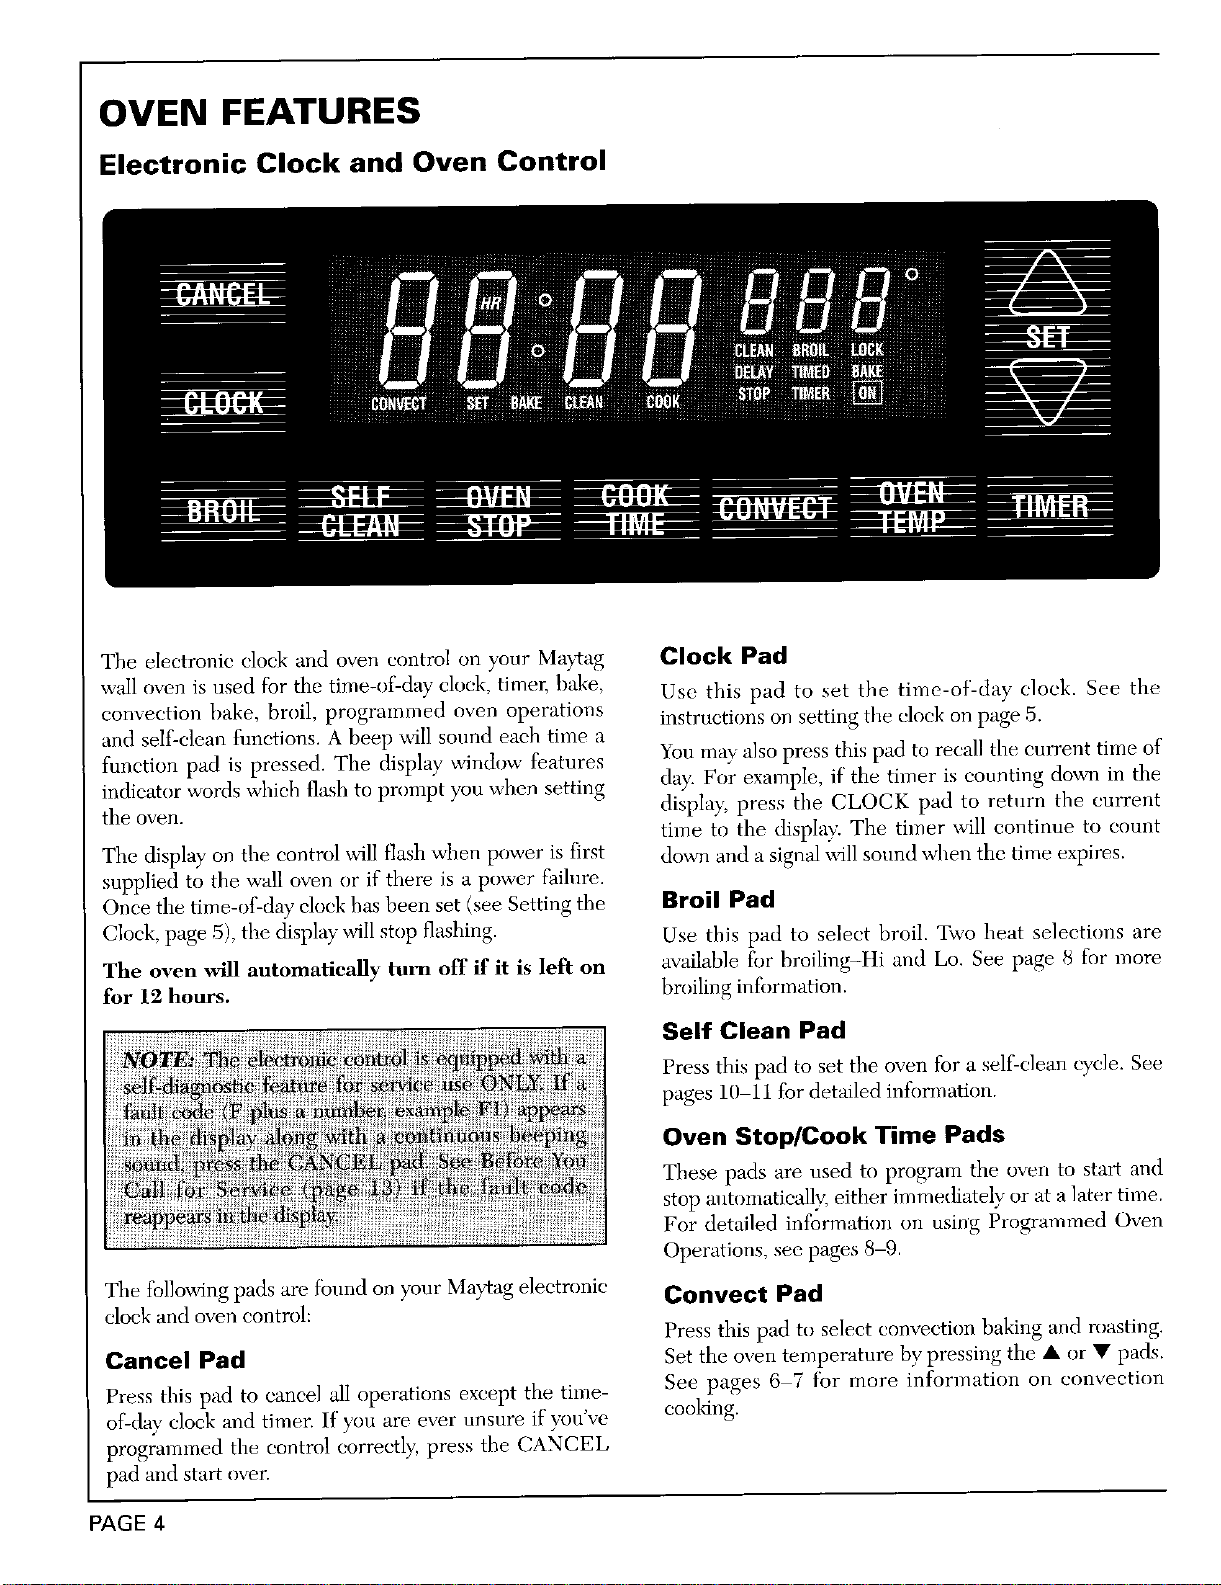
The e l ectronic eloek and oven c o ntr o l o n your Ma_ag Clock Pad
wail oven is used for the time - of-day clock, timer, hake, Use this pad to set the tinae-of-day clock. See the
convection bake , broil , programmed ove n operations instructions on setting the dock on page 5.
and se l f-clean fimct i ons. A beep wi ll sound each t i me a
fimction pad is p r e s sed. The display window features You ma._ also press this pad to recall the current tirne of
indicator words which flash to prompt you when setting day. For example , if the timer is counting down in the
the o ven. display , p r ess the C LOCK pad to retnrn the cu r rent
time to the display. The time r will continue to count
The displa y on the control will flash when power is first down and a signal x _qll sound when the time expires.
supplied to the wall oven o r if there is a power failure.
Once t h e time-of-day dock has been set (see Setting the Broil P ad
Clock, page 5), the display will stop flashing. Use this pad to select broil. Two heat selections are
The o ven will aut o matically t u rn off if it is left o n available fo r broiling-Hi and Lo. See page 8 fo r mo r e
for 12 h o urs , broiling inforlnation.
Self Clean Pad
Press this pad to set the oven for a se l f-clean cycle. See
pages 10 11 fo r detailed info r mation.
Ov e n Stop / Co o k Time Pads
These pads are used to program the oven to start and
s top antoinaticafly, either immediately or at a later time.
For deta i led inf o rmation ori u sing Programmed O v en
Operations, see pages 8-9.
The following pads are fbnnd on your Ma_ag electronic Convect Pad
clock and oven control:
Press thi s pad to s elect convection baking and roasting.
Cancel Pad Set the oven temperature by pressing the • or • pads.
Press th i s pad t o cance l al l opera t ions except the time- See pages 6 7 I ' or more information on convection
of-day clock and timer. If you are ever unsu r e if you ' ve cooking.
p r og r ammed the cont r ol cor r ectly , p r ess the CANCEL
pad and st ar t ove r .
PAGE 4
Page 6
Oven Temp Pad Timer
Press this pad to select regular baking and roasting. Set To set t he timer:
the oven temperature by pressing the • or • pads. 1. Press the TIMER pad once. The words "SET
Additional information can be found on pages 6-7. TIMER" will flash in the display.
Timer Pad 2. Set the desired time using the • and • pads.
The timer can be set from 1 minute to 9 hours, 50 • Press either pad once to change the time by 1
minutes. It w i ll count down by seconds (when set for 1 minute (if the Timer is set for up to 1 hour), 5
minute) or minutes (when set for 2 minutes or more minutes (if the Timer is set for over 1 hour), or 10
time). See below fbr instructions on setting the timer, minutes (if the Timer is set for over 2 hours).
• and • Pads • P re ss a n d hold either pad to change the time in
Press or press and hold these pads to enter the time or
temperature desired. These pads are also used to select upon the time set in the display.
Hi or [ 1o broil. The TIMER can be set from 1 minute (0HR:01) up to 9
,5 minute or 10 minute increments , depending
hours and 50 minutes (9 HR:50).
Setting the Clock and Timer The timing operation will start automatieally. Colons
will flash in the display to indicate a timing operation.
Clock One long continuous beep will signal the end of the
To set the time-of-day clock: timing operation and "End" will briefly appear in the
1. Press the CLOCK pad once. The words "SET display. The time of day will automatically reappear in
TIME" will flash in the display, the display. The TIMER p a d d oes no t control the
2. Set the correct time of day using the • and • pads.
• To change the time by one minute, press either
pad o nce. delay.
• To change the time in increme n ts of 10 minutes,
press and h o ld either pad.
When the power is first supplied to the wall oven or if
there has been a power failure, the display" w ill flash.
Follow above instructions to set the clock. The clock
time cannot be changed when the oven is set for a cook
or self-clean operation. Cancel the operation to set the
clock.
o ve n.
To eaneeh Press the TIMER pad and hold for 3
seconds. The time of day will reappear after a slight
Press the CLOCK pad to recall the time of day when
another function is displayed.
PAGE 5
Page 7
USING YOUR OVEN
Ev e r y ov e n has its own characteristics. You may find Oven Racks
that the cooking times vary slightly" from your old oven. The f})ur oven racks are designed with a loek-stop edge
This is normal, to keep the racks from coming completely o ut of the
For safety reasons , when opening the oven door , allow oven when there is food placed on them.
ste am and h ot ai r to e s cap e before reaching int o t h e To rem o ve : Be sure the rack is tool. Pull the rack
oven to remove food. straight out until it stops. Tilt the front end of the rack
up and contin u e p u ll i ng it on t .
Baking and Roasting To r eplace: Tilt the front end of the rack up and plaee
( F or add i tional baking, roasting and convection tips , it between the rack supports. S l ide it b aek unti l it c l ears
refer to "Coo k ing Made Simple" booklet.) the lock-stop position. Lower the front and slide the
rack s traigl_t in .
Setting the Oven Controls for Baking, D o n ot co v e r a n e ntir e o v e n r a c k o r ove n b otto m
Convection Baking, Roasting and . dt h al u min u m fo i l. This wil l restrict air floua
Convection Roasting
1. Place racks on proper rack positions.
2. Press the OV E N TE MP pad or CO N VECT pad. oven is h ot. U s e fi le f o llowing guideline s when selecting
"BAKE" or " CONVECT BAKE" and 000 ° will the proper rack positio n . N e v er pl a ce pans dire ct ly
appear in the display, on t h e o v e n bo t t om .
3. Press either the • or • pad once and 350 ° will
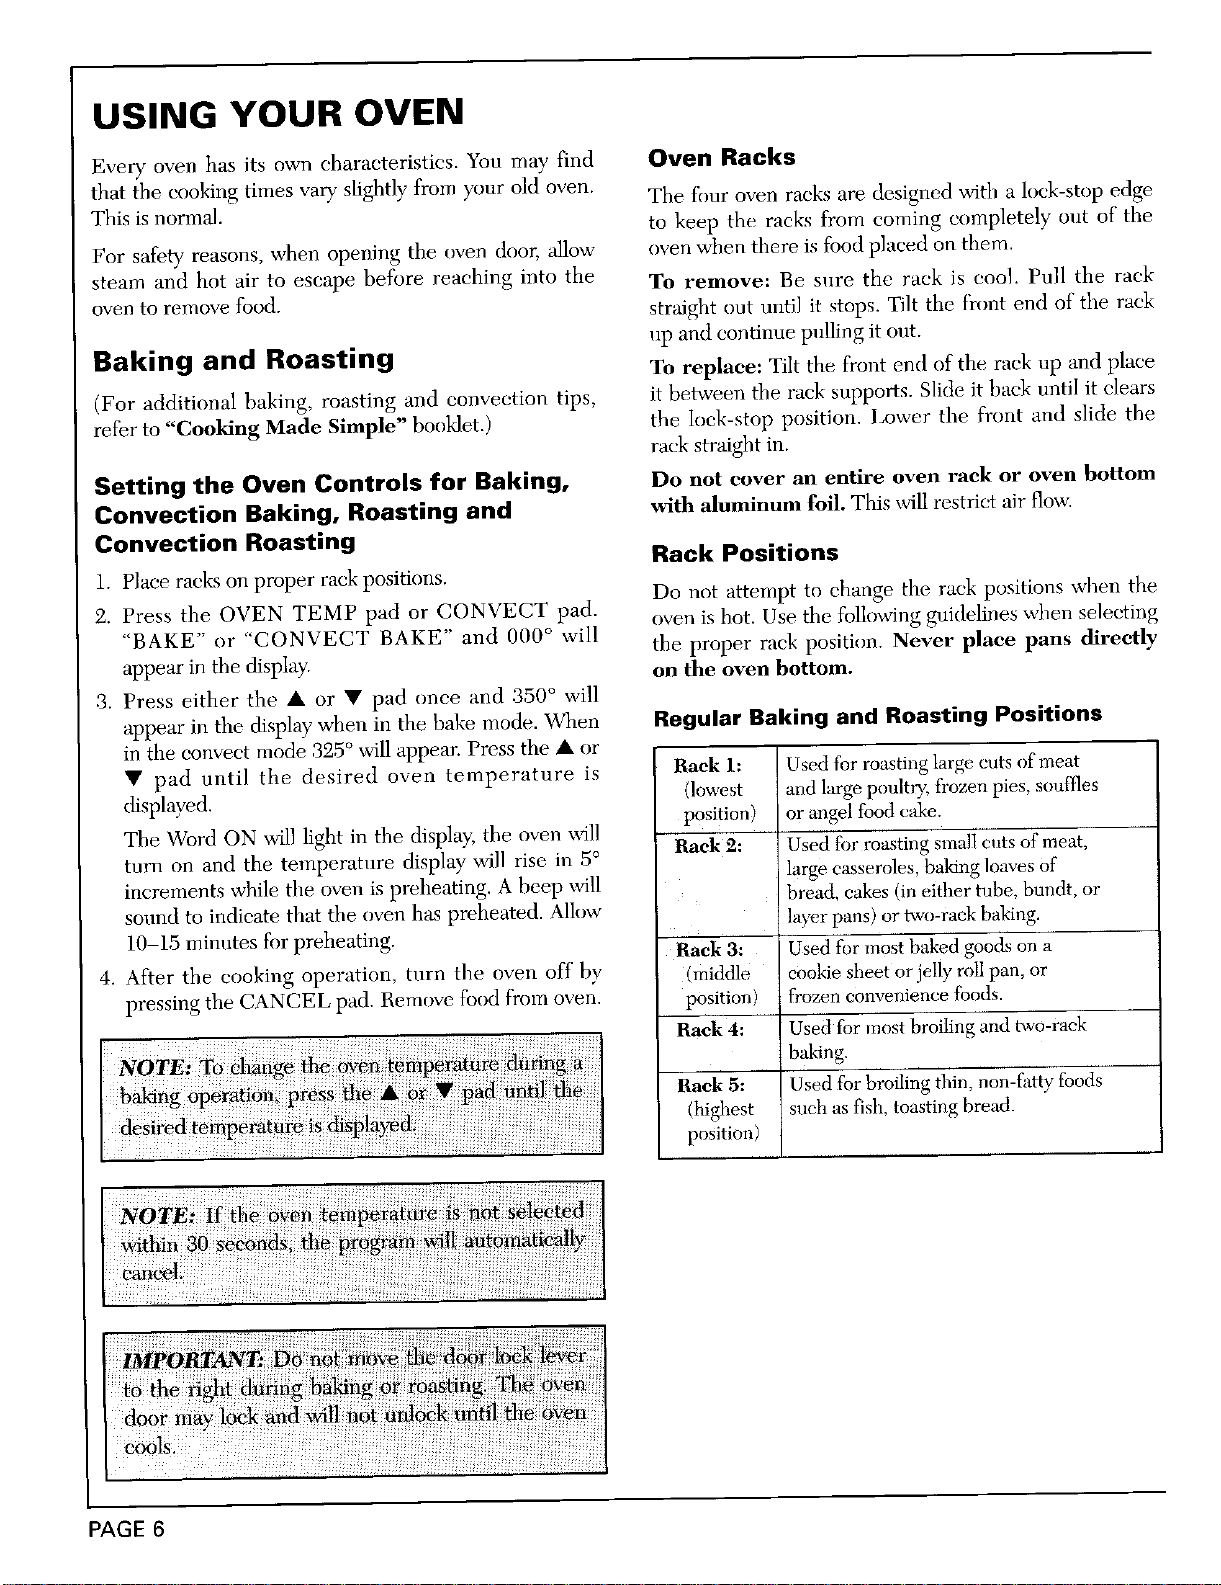
appear in the display when in the bake mode. W hen Regular Baking and Roasting Positions
in the eonveet mode 325 ° will appear. Press the • or
• pad until the desired oven temperature is Rack 1: Used for roasting large cots of meat
displayed, position) or angel food cake.
The Word ON will light in the displa y ; the oven x sdll
tuna on and the ternperatnre display will rise in 5 ° R a ck 2 : U s ed for roasting small ents of mea t ,
increments while the oven is preheating. A beep will bread, cakes (in either tube, bundt , or
sound to indicate that the oven has preheated. M low layer pans) or two-rack baking.
10-15 minutes for preheating. Rack 3: Used for most baked goods on a
4. After the cooking operation, turn the oven off by (middle cookie sheet or jelly roll pan, or
pressing the CANCEL pad. Remove food from oven. position) froTxen convenience {hods.
Rack Positions
Do not attempt to change the rack positions when the
(lowest mid large poultry, frozen pies, soutlqes
large casseroles, baking loaves of
Rack 4: U sed for most broiling and two-rack
bak i ng.
Rack 5 : Used for broiling thin, non-fatty fi ) ods
(highest : sneh as fish, toasting bread.
position)
PAGE 6
Page 8
Convection Baking and Roasting Positions Oven Light
Becanse heated air is cirenlated evenly tbongbont the Push the switch on tile control panel marked OVEN
oven, foods ean be b aked with good msult s on 2 , 3 and 4 LIGHT t o turn it on and off. The oven light
rack s at a time. Multi-rack baking may increase cook automatically come s on whenever the oven door is
times slightly for some foods , but the overall result is opened.
time s aved.
• When usi n g three racks during convection baking Oven V e nt
place the racks ir_ position s 1, 3 a n d 5 ( re fer t o The oven v ent is located below the c o ntrol panel on
diagram 1). your wall oven. When the oven is in use, this area m W
• When using four racks during convection baking, fee] warm or hot to the touch. To prevent problems, do
place the racks in positions 2, 3, 4 and 5 (refer to not block the vent opening.
diagram 2). Oven Fans
NOT E: F ood i n the lowest rack p o s itio n ma y "
need t o b e rem oved 1--2 m inu t e s b ef o re t h e set Your wall oven is equipped with t wo fans--a cool i ng fan
t i me to preven t overbrowning , and a convection fan.
The c oo l i n g f an is used to help keep internal parts on
the control panel cool. This fan will automatic al ly turn
on whe n ever the oven is set for a cooking (convection or
regular) or a self - cleaning operation. The fan will
automatically turn off when parts have cooled. The fan
5 may continue to operate af t er the oven has been ttmaed
J _ 4 off. This is normal.
3 A eonveeti o n f a n is used to circnlate hot air in the
oven when the convection feature is selected. It
2 antomatically tunas on whenever the C O N VEC T pad is
t pressed and will turn o ffwhen C O N V E C T is cancell e d.
NOTE: The convection fan will au t omatically s top
DIAGRAM 1 whenever the oven door is opened.
5
4
3
2
DIAG R AM 2
PAGE 7
Page 9
Broiling
For best results , use the broiler pan and insert supplied 2. Place tile broiler pan on the recommended rack
with your wall oven. position shown in the broiling chart.
(For additional broiling tips, refer to "Cooking Made 3. Follow the suggested times in the broiling chart
Simple " booklet.) below. Broil with the oven door open about 4 inches.
4. Check the doneness by cutting a slit in the meat near
Setting the Oven Controls for Broiling the center to check the color.
1. Press the BROIL pad and press the • or • pad to 5. To cancel or end t i le broi l ing operation , press the
se l ect either Hi or Lo broil as indicated in the CANCEL pad.
disp l ay. Hi is used for most broiling operations. Lo 6. Broil times may need to be increased if the wall oven
should be selected when broiling thicker meats to is installed on a 208 volt circuit.
the well-done stage (to prevent excessive browning).
Broiling times may increase if Lo is selected. Allow
t he e l e ment t o p r e h e at f o r 3_1 min u t e s .
Broiling Chart
Uutil you become more familiar with your new wail oven, use the fo l lowing chart a.s a guide when broiling foods.
Bacon Hi 4 well 4.5 2- 4 .
Beef Patties 3 /4 -inch thick tli 4 well 8-10 74
Steaks 1-inch thick Hi 4 medium 8-10 7 -8
4 well 10-i3 9-10
Chicken Pieces Lo 3 well 16 - 25 14-20
Fish l / 2-inch thick Hi 4 flaky 4-5 4_6
1-inch thick Hi 4 flaky 7-9 4-6
Ham Slices precooked 1 /2 -inch thick Hi 4 heated ,5- 7 4-6
Pork Chops 1-inch thick Hi 3 well 12-14 10-12
°Th/_ I n _ttom ra c k position is #1.
Programmed Oven Operations
The Programmed Oven Operations feature is nsed to To reset or cancel tbe program, press the CANCEL
turn the oven off at a preset time of day or delay the pad.
start and then turn offthe oven.
This feature will not operate unless the clock is
fimctioning and is set to the correct time of day.
If you delay more than 30 seconds between touching a
pad and pressing the • or • pad, the display will either
return to the previous setting or the time of day will
reappear and the program will cancel.
To recall the preset stop time or cook time, just press
the corresponding pad.
PAGE 8
Page 10
Bake by Time (with immediate start)
l. Place the tbod in the oven. 4. Pres s the OVEN STOP pad. The words "SET
2. Press the COOK TIME pad. The words "SET ST O P TIME" will fla s h in flm d is pla )z
COOK TIME" will flash in the display ' . 5. Enter the time you wish the oven to turn off by
3. Enter the cooking time (how ]ong you wish the t b od pressing the • or • pad. The words "DE L A Y
to cook) by pressing the • or • pad. The time will ST O P TI M E" will light i n the display.
appear in hours and minutes. The maximum time 6. Press the OVEN TEMP or CONVECT pad. The
that can be set is 11 honrs and 55 minutes, words "DELA Y BAKE" or "DELA Y CONVECT
4. Press the OVEN TEMP or CONVECT pad. The BAK E " and 000 ° will light in the disp l ay.
word "BAKE" or "CONVECT BAKE" and 000 ° will 7. Enter the oven temperature by pressing the • or •
light in the display: If this step is not done within 7 pad.
seconds after entering the cook time, the control will 8. If desired, press the CLOCK pad. The time of day
beep until another pad is pressed, will reappear in the display and "DELAY BAKE".
,5. Enter the oven temperature with the • or • pad. 9. At the preset time the oven will automaticall y turn
6. The oven will automatic_flly turn on and the words on and "TIMED BAKE ON" will appear in the
"TIMED BAKE ON" will light in the display. The display.
display will begin to count dm_m the time remaining. 10. A t the end o f the pre s et cooking t ime, t be
7. At the end of the preset cooking time, the oven oven will automatically turn off and
will automatically turn off and continuous continuous beeps will sound. Remove the food
beeps will sound. Remove the food from the oven from the oven and press the CANCEL pad to stop
and press the CANCEL pad to stop the beeps, the beeps.
To Bake by Time ( w i th delayed start)
1. Place the food in the oven.
2. Press the COOK TIME pad. The words "SET
COOK TIM E " _ x 411 flash in the displa?:
3. Enter the cooking time (how long you wish the food
to cook) by pressing the • or • pad. The time wil l
appear in hours and minutes. T he maximum time
that can be set is 11 hours and 55 minutes. NOTE:
The oven automatically programs the start time.
PAGE 9
Page 11
CLEA N I N G
Self-Clean Oven
A self-clean oven u s es above n ormal temperatures to 4. Wipe up acid spi l lovers such as lemon juice, tomato
automatically dean the entire oven. The separate clean sauce or milk-based sauces and suga_ spillovers.
cycle eliminates soil completely or reduces it to a gray ash The porcelain fi nish may discolor if acid spills
which is easily wiped up with a damp cloth when the are not wiped up prior to a self-dean cycle.
cycle i s complete and the oven has cooled. 5. Do not u s e oven cleaner s or oven liner
It is b ette r t o cl ea n th e o ven re gularl y t h a n t o w ait p r o tec tive coa ting s of an y kind on the self - cl ea n
until there is a heavy build-up of soil in th e oven. oven fi nish or around any part of th e oven as
It is norural for the oven doo r and w i ndow to hecome hot t hey will damag e t he ov e n finish.
during a clean cyc l e. T herefore, avoid touching these 6. To prevent damage, do not clea n or rub the gasket
aretts during a dean cycle. As the oven heats and cools, on the oven door. The gasket is designed to seal in
you may hear the sounds of metal parts expanding and heat during the clean cycle.
contracting. Thisis normal and will not damage your wall 7. T urn off the oven light before the self-clean
oven. operation. If the oven light is lef} on dnring the clean
The first few times the oven is cleaned, some smoke and cycle, the light bulb will bum out.
odor may be detected. This is noma d and wi l l lessen or Se tt ing the Controls for the Self-Clean
disappear with use. If the oven is heavily soiled, smoke Cycle
and odor are common. During the cleaning process the
kitchen should be well ventilated, i. Close the oven door and move " the door lock lever to
The oven will automatically begin to heat when the door the right u n ti l it rests in the lock position.
is locked and the SELF CLEAN pad is pressed. When 2. Press the SELF CLEAN pad. The words "S E T
t he ov e n r ea che s d ea nl ng te mpe r a t u re , t he w o r d CLEAN T 1ME" wil l fla s h and "3:00" will appear in
"LOC K" w i ll l igh t i n the di s pl a y . A t th is po i n t , the the display. Also, " C LEAN ON" will light as the ove n
o v e n d oo r cann o t be manu a lly opene d, hegins to heat.
To prevent damage to the door and lock lever, do not The oven will automatically set a clean cycle of three
force the door open when the word "LOCK" is displayed, hours. A shorter ('2 hours) or longer (4 hours) clean
cycle can be selected by pressing the SELF CLEAN
pad and pressing the • or • pad to select 2 to 4
hours.
3. Press the CLOCK pad and the current time of day
will reappear in the clispla)_ "CLEAN" and "ON" will
remain in the displav to show that the oven is in a
Preparing for the Self-Clean Cycle clean cycle.
l. Remove oven racks and any pans, utensils or the If the door is not locked properly, the word "door" will
broiler pan from the oven. The oven racks should be appear in the display and beeps will sound.
washed by hand. If left in the oven during the
s e l f-cl e an c y c l e, t h e r a ck s wil l bec o me To Interrupt or Reset the Clean Cycle
permanently dis colo r ed and may not slide
easily. If the internal lock has not engaged, the lock lever can
2 . Clean the oven frame and door ffmne with a non- be moved completely to the left to cancel the cycle.
abrasive cleaning agent such as Bon Ami. These If the internal lock has engaged, push the CANCEL
areas are not exposed to cleaning temperatures and pad. The door will not open until "LOCK" tu n as off in
should be cleaned to prevent soil from baking on the displa y . At that time, the door lock lever can be
during the clean cycle, opened. The oven will still be hot.
3. Wipe up any excess grease or spillovers from the
oven bottom to prevent excessive smoking and llare-
ups during the clean cycle.
returned to its original position and the door can be
PAGE 1 0
Page 12
After the Self-Clean Cycle
Ahout one hour after the clean cvcle is complete, the If the oven racks were left in the oven during the self-
word " L O C K" will turn off in the ' display and the door clean cycle and do not slide S l noothly, wipe the rack
lever can be returned to its original position. The oven edges and rack supports with a small amount of
_411 still he hot. vegetable oil to restore the ease of movement.
Some soft m W leave a light grav, powde U ash which can Fine hairlike lines may appear in the oven interior or
be removed with a damp cloth. If soil remains, it oven door. This is a normal condition resulting from the
indicates that the clean cycle was not long enough or a heating and cooling of the porcelain finish. These lines
large spilh w er was not wiped tip before the sell'clean do not a/} b ct the performance of the oven.
cycle. The soil should be removed during tile next clean Fo r m o r e in fo rma t i o n o n cle anin g you r Ma y ta g
cycle, wall o v en, r e f er t o t h e c le anin g c h a r t b e lo w .
Wall Oven Cleaning Chart
Cleaning Agents*
Ma n y different eleaning agents are recommended for the various parts of the wall oven. Read p r oduct l a bels for
specific re c ommendations. The following brand na m es may help you to inake an appropriate selection:
1. Mild ahrasive cleaners such as Bon Ami , Sot} Scrub, Smart Scrub, Baking Soda.
2. Mild liquid sprays such as Fantastik and Formlila 4 ( 19.
3. Glass cleaners such as Windex and Glass Phis.
4. Non-ahrasive plastic mesh and nylon scouring pads such as Tuff?_:
DO NOT USE abrasive cleansing powders such as Conlet, map-filled seonring pads like S.O.S. or Brillo, commercial
oven cleaners, or an automatic dishwasher ex c ept when i ndi c ated.
Be certain all wall oven parts are cool before removing any part or cleaning the uni t to avoid damage. Any
parts that are removed for cleaning should be replaced correctl y -.
q_ralld nanlles of clemfing agents are tradt'nlarks ill " the respective n3anut_tcturcrs
Soap and water Soaking makes cleaning easier.
Plastic o r soap £ illed
scouring pad
Dishwasher
Soap and water Wipe with paper towels dampened with soapy water or
Glass Cleaners glass cleaner. D o not spray any cleaning solutions
directly onto the display window Mr use large amounts
of soap and water. Do NOT scrub with soap-filled
scouring pads or abrasive cleaners.
Soap and water Av0id using excessiv e amp_mts of water W h eh ma y see p
_nder or behilld gi_
Soap aud water Do not use ()Veil cleaner Mr abrasive agents.
Mild liquid sprays Polish with a soft cloth.
Soap and water If racks are left in oven during a self-clean cycle they will
Plastic scouring pads discolor and may become difficult to slide. A thin coat
Cleansing powders of vegetable oil on the rack edges will make sliding
Soap-filled scouring pads easier.
C I mtinued on next pa g e
PAGE 11
Page 13
W a ll Ove n Cl e aning Cha r t { ¢ o. ti .. e d }
MAINTENANCE
Adjusting th e O v en Thermostat
After using your oven the first f e w times, i t n]ay seen] t o lleh a h ot bulb w i th a damp cloth a s the lmJb may
hotter or cooler than your previous oven. Oven break.
ther m ostats, over a period of years, m W drifit from the
factoi y setting and timing diffe r ences ot '5 to 1 0 minutes
are not unusual be h veen an old and a new oven. Carefidly unscrew the lens cover with a dry potholder.
If you think tbe oven should be hotter or cooler, you can Replace with a 40 watt appliance bulb. Reconnect the
adjust it. To decide how much to change the thermostat, power to the wall oven and reset the clock.
set the ov en t e mp er ature 25°F higher o r l o we r tha_ tim
temperature in your recipe , then bake. The results of Ovell Door
tim "test" should indicate how much the thermostat
should be adjus t ed. To Re move: Open the door to
TO a dju s t the th er m o stat: about 4 - 6 inches) and grasp the
1. Press the OVEN T EMPpad. do o r with both bands at each
2. Press the • pad and select au oven temperature side. Do not use the dour handle
between 500°F and 550°F. to lift the door. Lift up evenly
3 Press and hold the OVEN T EMP pad fi}r about four until t he door clear s the hinge
seeunds. The display will change to the oven arms.
adjustment display which reads 00 °.
4. The oven thermostat can be adjusted up +35°F
hotter o r -3 5 °F cooler. Use the • o r • pa d t o s elec t
the desired change in the disp l ay.
5. When you have made the adjustment, press the
CANCEL pad to retuln to the time of" day displa?:
Use your oven as your would normally .
To Replace Oven Light
Very carefi d ly remove the bulb with the potholder.
the first st o p pos i t io n ( o pened
T o Replac e : Grasp t h e door at eaeh s ide, align th e sl ots
in the door ,Mth the hinge arms and slide the door down
onto the hinge arms until it is completely seated on the
hinge s .
Do not attempt to open or close the door until the door
is completely seated o n the binge arms. Never turn the
Light Replacement oven on unless the door is properly in place. When
baking, be sure the door is completely closed. Your
Before replacing the light bulb, dise o nnee t the po wer baking results will be a ff ected if the door is not securely
t o th e wall oven. 13e sure the bulb i s cooL Do n ot c l osed.
PAGE 12
Page 14
BEFORE YOU CALL FOR SERVICE
Check these points if ...
P art or a ll o f y ou r wall oven d o es no t op er ate • Is the bu l b loose or burned out?
• Is t h e w a ll oven plug loose or d isconnecte d from the * Is the light switch in the On position?
electrical outlet (if not wired d irect to the electrical
supply)? Oven w i ll not self-clean
• Are any house fuses blown or circ u it breakers * Is the self-e l eau control set properly? (See Self Clean
trippe d ? instllletions, p ages 10-ii.)
• Iias the power supply to the home been interrupted? • Is the oven set for a programmed oven operation?
• Are the oven cont r ol s propedy set? Oven door will not unlock
• Is the oven set fo r a prog r ammed operation? • Has the self-clean cycle been finished for at least one
Food not baking correctl y " hou r ?
• Are the oven racks prnpedy placed f br baking? (See • Electric cur r ent coming into oven mav be off.
Rack Positions, pages 6 - 7) " F " plu s a nu mb e r appe ar s i n th e disp l ay
• ilave you used aluminum fbil correctly? • These are fault codes. If a t3ault code appears in the
• Was the oven preheated as recommended? display and a continuous beep sounds , p r ess the
• Are the cont r ol s f br bake operations properly s et? CA N CEL pad. If the fault code reappears,
• Is the r e 1 to 2 inches of s pace between pans and the disconnect power to the wall oven and call a qualified
oven walls? Are the wall oven and oven rack s level? service technician.
• Wa s good bakeware of the p r oper s ize used? We r e the
pans placed correctly in the oven? (See "Cooking Fan sound
Made Simple" booklet.) • A fan will automatically turn on when the oven is
• A r e you using a tested r ecipe fi'om a r eliable sou r ce? operated to cool the clock controls. This is normal. It
The oven thermostat on you r new wall oven may be mav continue to nm even afte r the oven is turned off
more accurate than the one on your old wall oven.
• Was the oven vent covered or blocked on the wall Convection fan not operating during convection
oven surfa c e? c oo king
• Did you check the food at the minimum cooking time • Are the controls for convection set properly? (See
to avoid overcookiug? page 6.)
For Couveetion--
• Did ynu reduce oven te m perature by 25 F..
Food does not broil properly U.S. 1-800-688-9900
• Are the controls tor broiling set properly? (See CANADA 1-800-688-2002
Broiling section, page 8.)
• Was the proper rack position used? (See Broiling
section, page 8.)
• Did you allow tir c _e f br the broil element to preheat?
• Was the broiler pan received with the wall oven used?
• Was ahlminum foil used on the broiler pan insert,
blocking the slits for fat drainage?
• Was the correct electric voltage available? (See
Broiling section, page 8.)
o 9 For further assistance contact your Maytag dealer
or c all Maytag Customer Service:
Oven light does not operate
PAGE 13
Page 15
WALL OVEN WARRANTY
Fu l l O n e Y ea r W a rra nt y
For on e (1) year [_ c om the date of original retail purchase, any part whieh fails in normal home use will be
repaired or replaced free of charge.
Limit e d Wa rr anty
Second Year
After the first year from the date of original retail purchase, through the second year, parts which fail in
normal home use will be repaired or replaced free of charge for the part itself, with the owner paying all
other cos t s_ including labor, mileage and transportation.
Thir d T h roug h F i fth Y ear
After the second year from the da t e of origin al retail purchase, t hrough the fi_h year, a l l of the fo l lowing
component s which fail in normal home use will be repaired or replaced free of charge for the part itself.
with the owler paying all other costs, including labor, mileage and transportation.
These components include:
Al l El ectronic Clocks: Ou elec t r i c or gas wall ovens
Ele ct ri c N e ari n g E l e m en t s: I ncl u des the Ov en Ba ke E lemen t and Ov en Broil E leme nt i n El ect ri c
Wa l l Ov ens
C a n ad i an Re s id e nt s
This warranty covers only those wall ovens inst_led in Canada that have been listed with Canadian S t andards
Association unless the wall ovens are brought into Canada due t o tr a nsfer of residence from the United States to
CanMa.
Li mited P a rts W arra n ty O u ts id e United States mi d Cana da
Fo r a pp l i a nc es lo ca ted out si de th e Un i t ed S t at e s and C a n ad a , t he O NLY w arranty p r o vi ded wit h t h e applian c e i s
as follows.. For two (2) y ears from th e date of original retai pur c hase any pa_ which fails in normal home use will
be repaired or replaced free of charge for the part itsel£ with the owner paying all other costs, including labor,
mileage and transportation.
The specific warranties expressed above are the ONLY warranties provided by the manu t aeturer. This Warranty
gnves you specific legN rights , mad you may also have other rights which vary from state to state.
To Receive Warranty Service
Tu locate an authorized service company in , v°ur area contact the Maytag dealer from whom your appliance was
purchased; or call Maytag Customer Service. Should you not receive s atisfactory wa rr anty service, plea s e call o r write:
lVlaytag C ustomer Assistance
% Maytag Customer Service
Re . Box 2370
Cleveland, TN 37320- 2 370
US 1-800-688-9900
CANADA 1-800-688-2002
When cont a cting Maytag Customer Service be sure t t _ provide the model and se ri al nmubers of your appliance, the
name and address of the dea l er frolu whom you purchased the appliance and t he ( l ate of p u rchase.
S hould you still have a problem , write to: Major Appliance Consumer Action Progrmu, '20 North Wacker Drive, Chicago,
Illinois 60606. MACAP is an industry sponsored but independent group of consumer experts who receive and act on complaints
from appliance owners.
NOTE: When writing about an unsolved service problem, please include the following information:
(a) Your name, address and telephone number;
(b ) Model m l mber a r t d s erial n u mber (f o m_d on th e data plate) of yo a r a p pli_mee;
(e ) Name and address of your dealer and date the applianee was bought;
(d ) A clear des o ription of the problem you are ha, A ug.
MAYTAG * O n e D epend a bilit y S qua re • N ew t o n, I owa 5 02 0 8
Form N O . 021CM-0196 Part No. 8111Pl13 - 60 MP L i tho U , S.A.
Page 16
CLEANING
Self-Clean O ven 3. Wipe up any excess grebe o r spill o vers from
the o ven b o t to m to preven t excessive smokil
A self-clean oven uses above normal and flare-ups during the clean cycle.
temperature s t o automatically c l ean the e n tir e 4. Wipe up acid spillovers such as lemon juice ,
oven. The separate clean cycle ehminates soil tomato sauce or milk-based sauces and suga
completely or reduces it to a gray ash which is spillovers. Porcelain enamel is acid resistant
easily wiped up with a damp c l oth when the cyc l e not acid proof. The porcelain finish may
is complete and the oven has cooled, discolor if acid spills are not wiped up.
It is better to clean the oven regularly than to 5. Do n ot use o v e n cl e a n ers o r o ven li ne r
wait until there is a heavy build-up of soil in the pr o t ecti v e eoatlngs of any kind on the
oven. sel f - d ean oven finish or around any pai
It is normal for the o ven door and wind o w to of th e o v e n a s th e y w ill da m ag e t h e o ne ;
become hot during a clean cycle. Therefore, finish.
avoid touching these area s duri ng a clean cycle. 6. To prevent damage , do not clean or rub the
As the oven heats a n d cools, you may hear the gasket around the front o v en frame. The
sounds of metal parts expanding and contractin g , gasket is designed to seal in heat during the
This is normal and will not damage y our wall clean cycle,
oven. 7. Turn off the oven li ht before the self-clean
The first few times the oven is cleaned , some operatio n . If the oven light is left on during
smoke and odor may be detected. This is normal the clean c y cle, the li g ht bulb wil l burn out.
and will lessen or disappear with use. If the oven
is heavily s o iled, sm o ke and o dor are common. Setting the Controls for the Self-
During the cleaning process the kitchen shonld C lean Cy c le
be well ventilated , 1 . Close the oven door and move the door loe"
g
The ove n will automatically begin to heat whe n lever to the right until it rests in the lock
the door is locked and the SELF-CLEAN pad is position.
pressed. When the oven reaches eleanlng 2 . Press the SELF CLEAN pad. The words "5
te m p e ra t u r e , th e w ord " Lo c k" w ill lig h t i n Ti m e" wi l l flash and " C lean Time 3 :00 " will
th e display. At th i s point, the oven d o or appear in the displa y '. Also, "Clean On" will
cannot be man u ally opened, light as the oven begins to heat.
To prevent damage to the door and lock lever , do The oven will automatically set a clean cyck
not force the door open when the word "Lock" is three hours. A shorter (2 hours) or longer ( ,
displayed, hours) clean cycle can be selected by pressi
the SELF CLEAN pad and pressing the •
• pad to select 2 or 4 hours.
3. Press the C LOCK pad and the current tim_
day will reappear in the display. "Clean" an<
"On" will remain in the display to show thai
Pr e paring f or th e Self-C l ea n Cy c le the oven is in a clean cycle.
1. Remove o v en racks and any pans , utensils or If the door is not locked properly, the word
the broiler pan from the oven. The oven racks "Door" will appear in the displa y " and beeps w:
should be washed by hand. If left in the sound.
oven during the self-clean cycle, the racks
w i ll b ecome perm an en t ly discolore d an d TO Interrupt or Reset the Clean
m a y no t s li d e easil y af t er a cl e an c y cl e . Cycle
2 . Cle an th e o v e n fr a me and doo r f r am e with a I f the doo r ha s n o t lo ck ed, th e lo ck l e v e r c an 1
n o n -abra siv e c l ean ing a g ent su ch a s B o n A m i. mo v ed co m p l e t ely t o t he l e ft t o can cel t he c y <
The s e areas ar e n o t expo s ed t o c le an i ng
t empe ratur e s an d s hould be cl ean ed t o If th e doo r i s l o ck ed , pu s h t he CANCEL p a d
prevent soil from baking o n d u ri ng the clean The d oor wi ll not o pe n u ntil "L o ck" turns o ff
cycle, be returned to its original position and the do
the display. At that time, the door lock lever c
can b e o pen e d . Th e o v e n w ill still b e h o t .
PAGE 1 6
Page 17
After the Self - Clean Cycle If the oven racks were left in the oven dnring th_
About one ho u r af t er the c l ean cyc l e is comp l ete, self-clean c y cle and do not slide smoothly, wipe
t he word "Lock" will turn off in th e displa y and
the door lever can be re t urned to its original oven walls) with a small amount ofvegetable oil
t he racks and embossed rack supports (on the
to restore the ease of movement.
position, The oven will still be hot.
Fine hair-like lines may appea r in the oven
Some soil ]nay leave a light g r ay , powdery a s h interior or oven doo r . This is a normal condition
which can be removed with a damp cloth. If soil resulting from the heating and cooling of the
remains, it i n dicates that the cle a n cycle was not porcelain t ]nish. These l i nes do not affec t the
long enough or a large spillover was not wiped up performance of the oven.
before the self - clean cycle. The soil should be F o r m o re in f o rm ation on c l ean in g y ou r
removed during the next clean cycle. M ay t ag wall oven, refer to the cl e a n ing
chart below.
Oven Cleaning Chart
Cleaning Agents*
Many different cleaning agents are recommended for the various parts of the wall oven. The following
brand names may help you to make an appropriate selection:
I. Mild abrasive cleaners such as Bon Ami , Soft Scrub, Bar Keepers Friend, Cameo.
2. Mild liquid sprays such as Fantastik, Formula 409.
3. Glass cleaner such as Windex, Glass Plus.
4. Non-abrasive plastic and nylon scouring pads
DO NOT USE abrasive cleansin g powders such as Comet or Zud , soap-filled scouring pads like S.O.S.,
Brillo, commercial oven cleaners, or an automatic dishwasher except when indicated.
Be certain all oven parts are cool before handling to avoid damage.
°Brand names of c l eaning agents are trademarks of the respective manufacturers.
Pa rt C leani n g A gen ts T ips an d Pr e cau t ions
Broiler Pan ai m Insert Soap and water Pretreat the broiler pan and insert with a non stick
Plastic or soap-filled scouring vegetahle coating such as Pare or M_ola to make
pads cleaning easier.
Dishwasher Soaking makes cleani n g easien
Glass Oven Door Soap and water Avoid usil_g excessive amounts of water which may seep
Glass cleaners under or behind glass.
Metal Finishes and Trim Soap and water Do not use oven cleaner or abrasive agents.
Door H a n dle Mild liquid sprays Polish with a soft cloth.
Oven Racks Soap and water If racks are left in oven during a sell-dean cycle they will
Plastic scourin g pads discolor and may become dJfiqcuh to slide. A flli n coat
Cleansing powders of vegetable oil on the underside of the rack will make
Soap-filled scouring pads sliding easier.
P l a st ic F b_ is he s: S o ap a n d wat er Do no t use ab r asi v e c l e an s e rs .
Control Panel Trim Mild liquid spray , s
Endcaps
Sel f- Cle an C _ h , e n I nte ri or Fo ll ow i nstr u ct i o ns o n page s N e v cr u s e o v e n cl eaner on a s elf- d ean ov e n .
16 17 for the selt:- d ean c y cle. Do not clean or rub door gasket.
Wipe up acid spills (lemon , If an acid spill is not wiped up, it may discolor the
tomato or milk based sauces) porcelabJ.
as soon a_s possi bl e with soap
and water.
PA(
Page 18
MAINTENANCE
Light Replacement
Adjusting the Oven
Thermostat powe r to t he w a l l o ven . Be s ure th e bulb i s
After using your oven the first few times , it may as the bulb may brea k .
seem h o tter o r c o oler than y o ur previ o us o ven.
Over a period o f year s oven thermostats may drift To Replace Oven Light from the fact o ry setting. Thus timing diflbrenees
of 5 to 1 0 minutes are not unusual between an Very carefully unscrew the lens cover with a du
old and a new oven. You may be inclined to think potholder to prevent possible harm to hands ,
that the new oven is not performing correctly; then very carefully remove the bulb with a dry
however, your new oven has been set correctly at potholder. Replace with a 40 watt appliance bu ' J
the factor y and is more accurate than the oven it Reconnect the power to the wall oven and rese_
replaced, the clock to the current time-of-day.
After using the oven for a period of time, if you
think it should be hotter or cooler, you can adjust
it yourself. To decide how much to change the
higher or lower than the temperature in your
recipe, then bake. The results of the "test" should _ __ _ __ _
give you an idea of how much the thermostat
should be changed.
therm ° stat'setthe°ventemperature25°F _ _ _ I :::: _
To adjust the thermostat:
1. Press the OVEN TEMP pad.
2 . Using the • or • Pad, select an oven
temperature between 500°F. and 550°F.
3. Press and hold the OVEN TEMP pad for
about four seconds. The display will change to
the oven adjustment displa y - which reads 00 ° .
4. The oven thermostat can be adjusted up to
+35°F. hotter or 35°E cooler. Use the • or
• pad to select the desired change in the
display.
5. When you have made the adjustment, press
the CANCEL pad to return to the time-of-da y -
display. Use your oven as you would normally.
Before replacing the light bulb, di sc on n ec t t h,
c oo l. Do no t t o uch a h o t bulb with a damp cl o t]
PAGE 18
Page 19
Oven Door To Replace Door
Do not place excessive weight on an open oven Grasp the door at each side, align the slots in the
door or stand on an open oven door as, in some door with the hinge arms and slide the door dow
cases, it could damage the door and possibly onto the hinge arms lmtil it is completely seated
injure the user. on the hinges.
When opening the oven door , allow steam and Do not attempt to open or close the door until
hot air to e s cape before reach in g into the oven to the door is completely seated on the hinge arms.
check , add or remove food. Never turn the oven on unless the door is
TO R e mo v e Lift - Off Door properly in place. When baking, be sure the doo:
Open the door to the first stop position (opened affeeted if the door is not securely closed.
about 4 4 5 inches) and grasp the door with both
hands at each side. Do not use the door handle to Circu i t Breaker
lift the door. Lift up evenly until the door clears
the hinge arms. (Canadian Models Only)
is completely closed. Your baking results will be
Your appliance is equipped with a circuit breake
box. The box is located either on a wall or in a
cabinet next to or near the app l iance. If part or
of the appliance does not operate , check to see i
one of the breakers has tripped. Reset the
breaker t o the O N p o siti o n.
PA(
Page 20
BEFORE YOU CALL FOR SERVICE
Ch e ck th e s e p o ints i f ... • Did you allow time for tile broil element to
P art or all of your wall oven do e s not preheat?
operate • V egas the broiler pan receive d with the wa l l
• Is the wall oven plug loose or disconnected
from the electrical outlet (if not wired direct to • Was aluminum foil used on the broiler pan
the electrical supply)? insert, blocking tile slits for fat dra i nage?
• Are any house fuses blown or circuit breakers • Was the correct electric voltage available? (
tripped? Broiling section.)
• Has a wall oven breaker tripped (Canadian wall Oven light d o es n o t o perate
ovens only)? • Is the bulb loose or burned out?
• Has the power supply to the home been • Is tbe light switch in the On position?
inten'upted?
• Are the oven controls properly" set? Oven w ill not self-dean
• W as the door left in the l ocked posi t ion • Is t i le self-elean c o ntrol set properl y '? (See
following a self-clean cycle? Clean instructions.)
• Is the oven set for a programmed operation? • Is the oven set for a programmed operatiol
Food not baking correctly Oven door w on't latch
• Are the oven racks properly placed for baking? • Are the proper controls set for the self-dee
• Have you used aluminum foil correctly? cycle? (See Self-Clean instructions.)
• Was the oven preheated as recommended? Oven door will not unlock
• Are the controls for bake operations properly • Has the self-clean cycle been finished for a
set? least one hour?
oven used?
• Is there 1 to 2 inches of space between pans "F" plus a number appears i n the displa]
and the oven walls? Are the wall oveo and oven • These are fault codes. If a fault code appea
racks level? the display and a continuous beep sounds,
• Was good cookware / bakeware of the proper press the CANCE L button. If the fault coc
size used? reappears , disconnect power to the wall ov
• Are you using a tested recipe from a reliable and call a qualified service technician.
source? The oven thermostat on your new wall F an sound
oven may be more accurate than the one on • A fan wil l automatically turn on when the c
your old wall oven. is ope r ated to cool the dock controls. Thi s
• Was the oven vent covered o r blocked on the no r mal. The fan may continue to run even
wall oven surface? afte r the ov en is tu rne d off.
• Did you check the food at the minimum
cooking time to avoid overeooking? cooking
Fo r C o n v e c tio n-
• Did you reduce oven temperature by 25°E? (See page 8.)
F ood do e s not b roil p ro perl y F or furth e r a ss i s tance co n ta c t yo ur Ma y
• A r e t h e co ntr ol s f o r br oil i n g s e t pr op e rly ? (S ee de al er or call Maytag Customer Service
Broi l ing section.) U.S. 1 - 80 0- 688 -9 9 0 0
• Was the proper rack p os iti o _ used? ( S ee CANADA 1-8 00 -688-2002
Broiling section.)
Oven fan not operating during eonveeti,
- A re t h e c o ntr ol s f o r co nv e ct io n set pr ope r]
PAGE 20
Page 21
WALL OVEN WARRANTY
Full One Ye ar W a rra nt y
F o r o n e (1) ye ar from date of original retai l purchase, any part which fails in norma l home use will be repaired
or replaced free of charge when the applia n ce is located in the United States or Ca n ada.
L i mited Parts Warranty
All Wall Ovens: After the first year frmn the date of original retail purchase, through the second year ,
parts which flail in normal home use will be repaired or replaced free of charge for the part itself , with the
re, met paying all other costs, including labor, when the appliance is located in the United States or
Canada.
Al l H eat i ng Elem e nt s : After the second year frmn the date of original retail purchase, through the fifth
• year , the oven bake element and oven broil elenmnt in electric wall ovens which fail in normal home use
wilI be repaired or replaced free of charge for the part itself, with the owner paying all other costs,
including labor, when the appliance is located in the United States or Canada.
Canadian Res i dents
This warranty covers only those appliances installed in Canada that ha v e been listed with Ca n adian Standards
Association unless the appliances a x e brought into Canada due to transfer of residence from the United States to
Canada.
L i m i ted Parts Warranty Outside The United State s Or C anada
For two (2) years from the date of original retail purchase, any part which fails in normal home use will be
repaired or replaced free of charge for the part itself, with the owner paving all other costs, including labor, when
the appliance is located outside the United States or Canada.
This Warranty gives you specific legal rights, arid you may also have other rights which yaw- from state to state.
To Receive Warranty Service
To locate an authorized service company in your area contact the IVlaytag dealer from whom your appliance was
purchased; or call Maytag Customer Service. Should you not receive satisfactory warranty service, call or write:
Maytag Customer Service
2 40 Edwards St. S.E.
Cleveland, TN 37311
US 1-800-688-9900
CANADA 1-800-688-2002
When contacting Maytag Customer SmMce be sure to provide the model and seria l number of your appliance, the
name and address of the dealer from whom you purchased the appliance and the date of purchase.
Should you still have a problem , write to: Major A ppliance Consumer A ction P_mel , 20 North Wacker Drive, Chicago, I llinois
6 0606. MACAP is an indush y sponsored but independent group of consumer experts who receive and act on complaints from
apphance owners.
NOTE: When writing about an unsolved service problem , please inelnde the following inforInation:
(a) Your name, address and telephone nunlber;
(h) Model number and serial number (found on the data plate; see page 1 fbr location) of your appliance;
(c) Name and address of y our dealer and date the appliance was bought;
(d) A c l ear description of the problem you are having.
PAGE ;


 Loading...