

Page 1
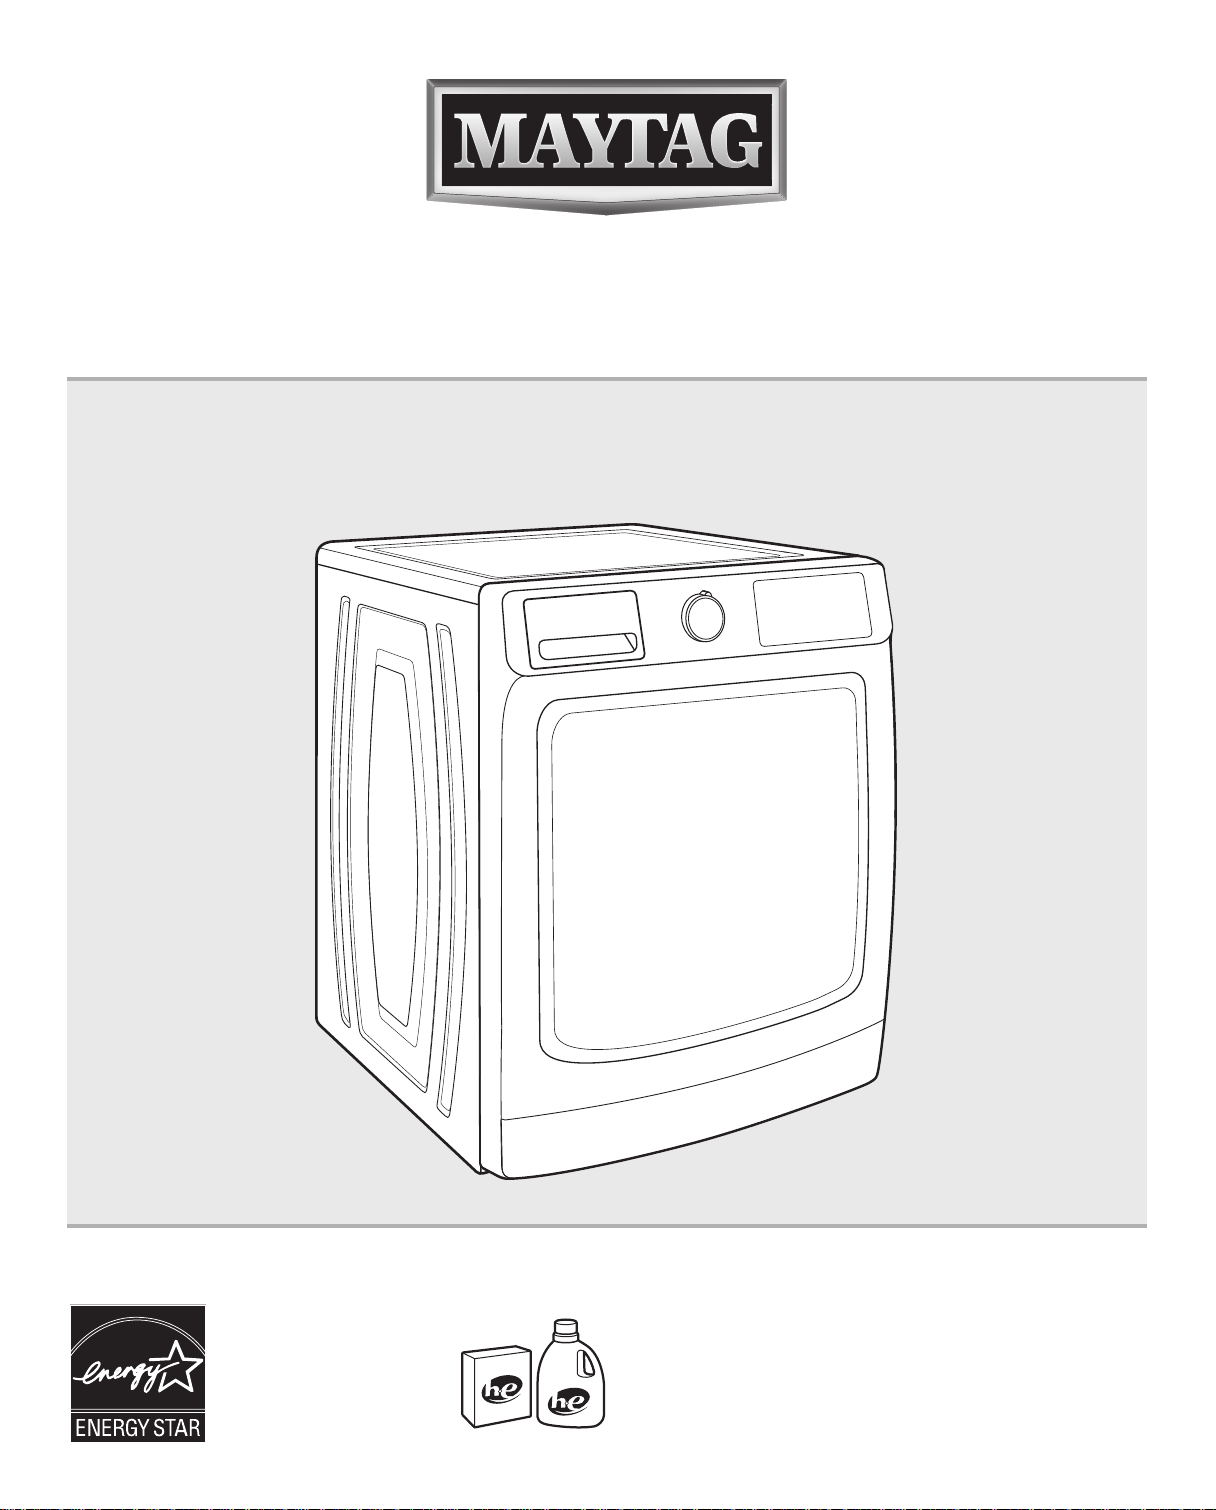
使用保養指南
適用型號: 8TMHW6630HW
Use & Care Guide
Applicable model: 8TMHW6630HW
滾筒洗衣機
FRONT-LOADING AUTOMATIC WASHER
請至官網參閱更多產品相關訊息: www.maytag.com.tw
If you have any problems or questions, visit us at www.maytag.com.tw
請僅使用 HE 高效能洗衣精。
Designed to use only HE
High Efficiency detergents.
Page 2
目錄/TABLE OF CONTENTS
產品規格 .......................................................................................................................2
使用安全 .......................................................................................................................3
適用配件 .......................................................................................................................4
控制面板和功能...............................................................................................................5
行程指南 .......................................................................................................................7
選擇適用的洗衣精...........................................................................................................9
使用洗衣機.......................................................................................................................9
洗衣機保養.................................................................................................................... 13
故障排除 .................................................................................................................... 17
幫助和服務...................................................................................................................26
產品規格:
機 型
商品名稱 洗衣機
適用電源
最大洗衣量(乾燥衣物)
適用水壓
額定消耗電功率
最高旋轉速度
產品顏色說明(末碼)
重量
外觀尺寸(高 x 寬 x 深)
註:規格以實際的機身銘牌為主。
如需查詢RoHs資訊,請瀏覽官方網站: www.maytag.com.tw.
PRODUCT SPECIFICATION ...................................................................................27
WASHER SAFETY ....................................................................................................28
ACCESSORIES .........................................................................................................29
CONTROL PANEL AND FEATURES .....................................................................30
CYCLE GUIDE ............................................................................................................32
CHOOSING THE RIGHT DETERGENT .................................................................34
USING YOUR WASHER ..........................................................................................35
WASHER MAINTENANCE ......................................................................................39
TROUBLESHOOTING ..............................................................................................43
ASSISTANCE OR SERVICE ............................................................ BACK COVER
8TMHW6630HW
120 V / 60 Hz
17.0 kg
0.03~0.7 MPa
1,000 W
1,160 rpm
W=白
100 kg
982 x 686 x 837 (mm)
Page 3
PRODUCT SPECIFICATIONS:
Models 8TMHW6630HW
Product name Washer
Power supply 120 V / 60 Hz
Max. wash load (dry clothes) 17.0 kg
Water pressure 0.03~0.7 MPa
Rated power 1,000 W
Maximum Spin Speed 1,160 rpm
Product color (end digit) W=White
Weight 100 kg
External dimensions (H x W x D) 982 x 686 x 837 (mm)
NOTE: Actual specifications are as shown on the machine nameplate.
For information on RoHs, please visit the official website: www.maytag.com.tw.
Page 4
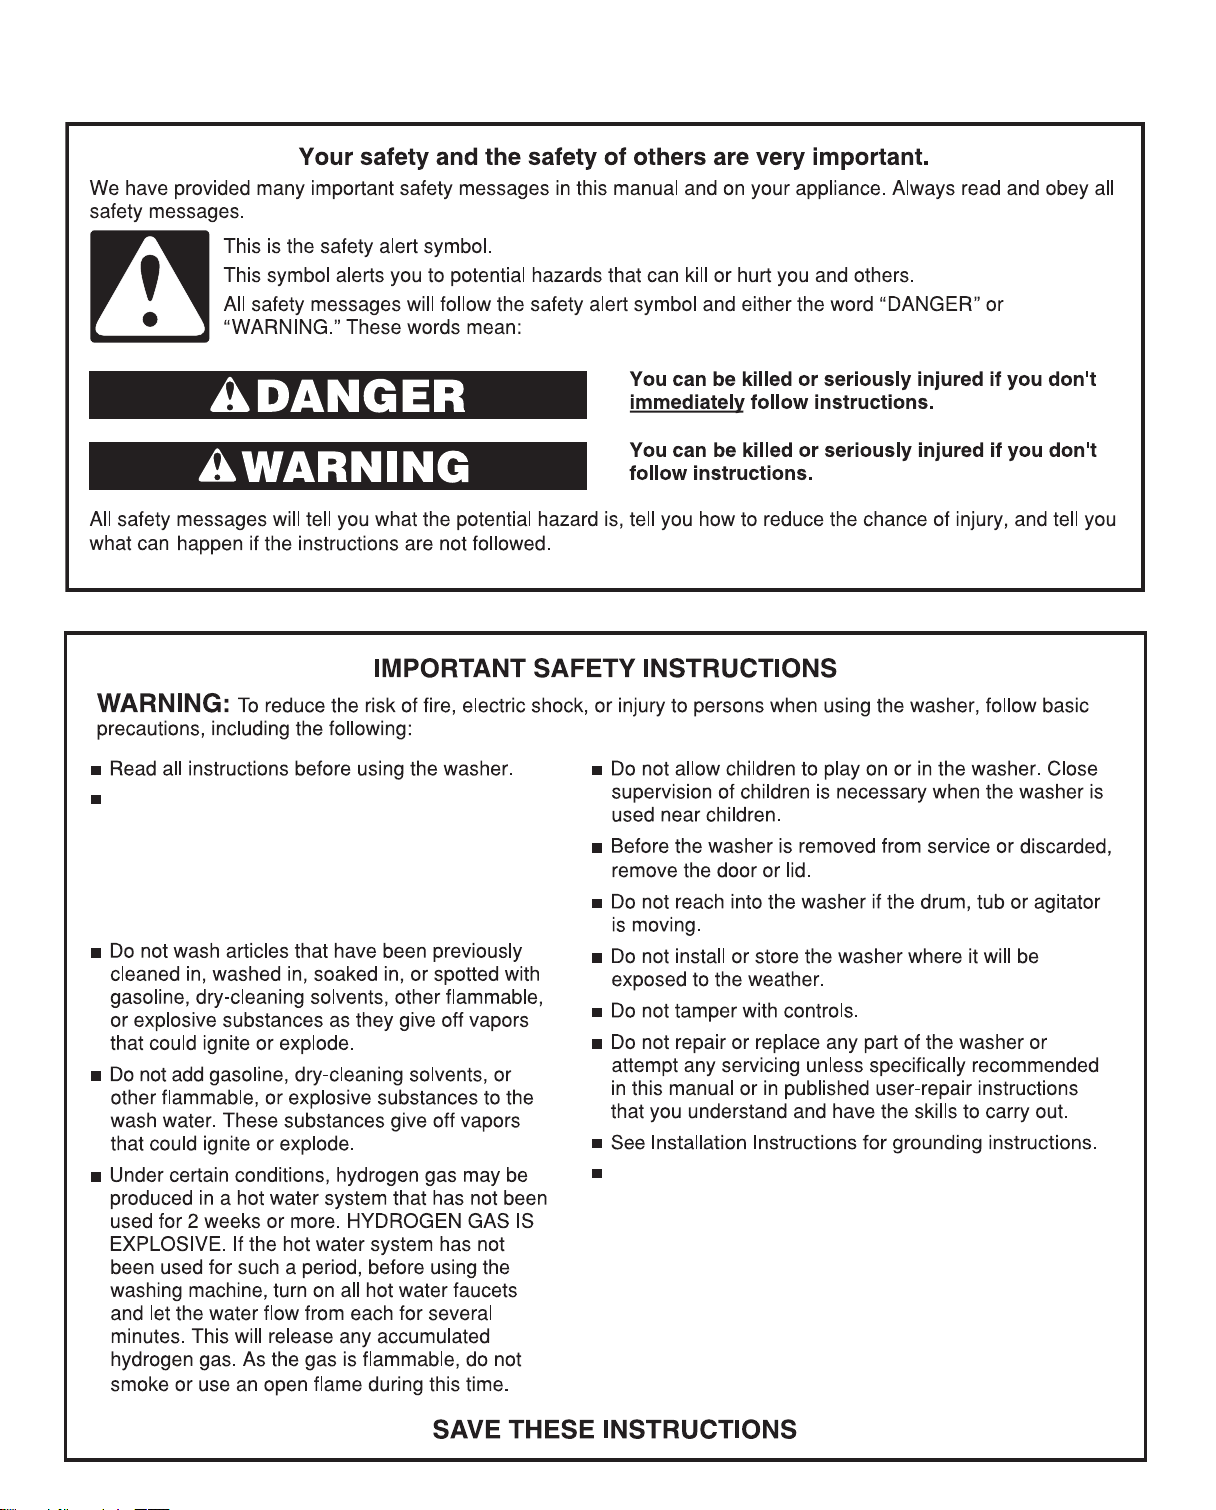
WASHER SAFETY
This appliance is not intended for use by persons
(including children) with reduced physical, sensory
or mental capabilities, or lack of experience and
knowledge, unless they have been given
supervision or instruction concerning use of the
appliance by a person responsible for their safety.
If the power supply cord is damaged, it must be replaced
by manufacturer or its service agent or similarly qualied
person in order to avoid a hazard.
Page 5
ACCESSORIES
INSTALLATION & MAINTENANCE
ACCESSORIES
FACTORY CERTIFIED PARTS – these three
words represent quality parts and accessories
designed specically for your appliance.
Time tested engineering that meets
our strict quality specications.
FACTORY CERTIFIED PARTS
Accessories designed for your appliance:
Customize your new washer and dryer with the following
genuine Maytag accessories. For more information on
options and ordering, call 0800-258-558 or visit us at:
www.maytag.com.tw.
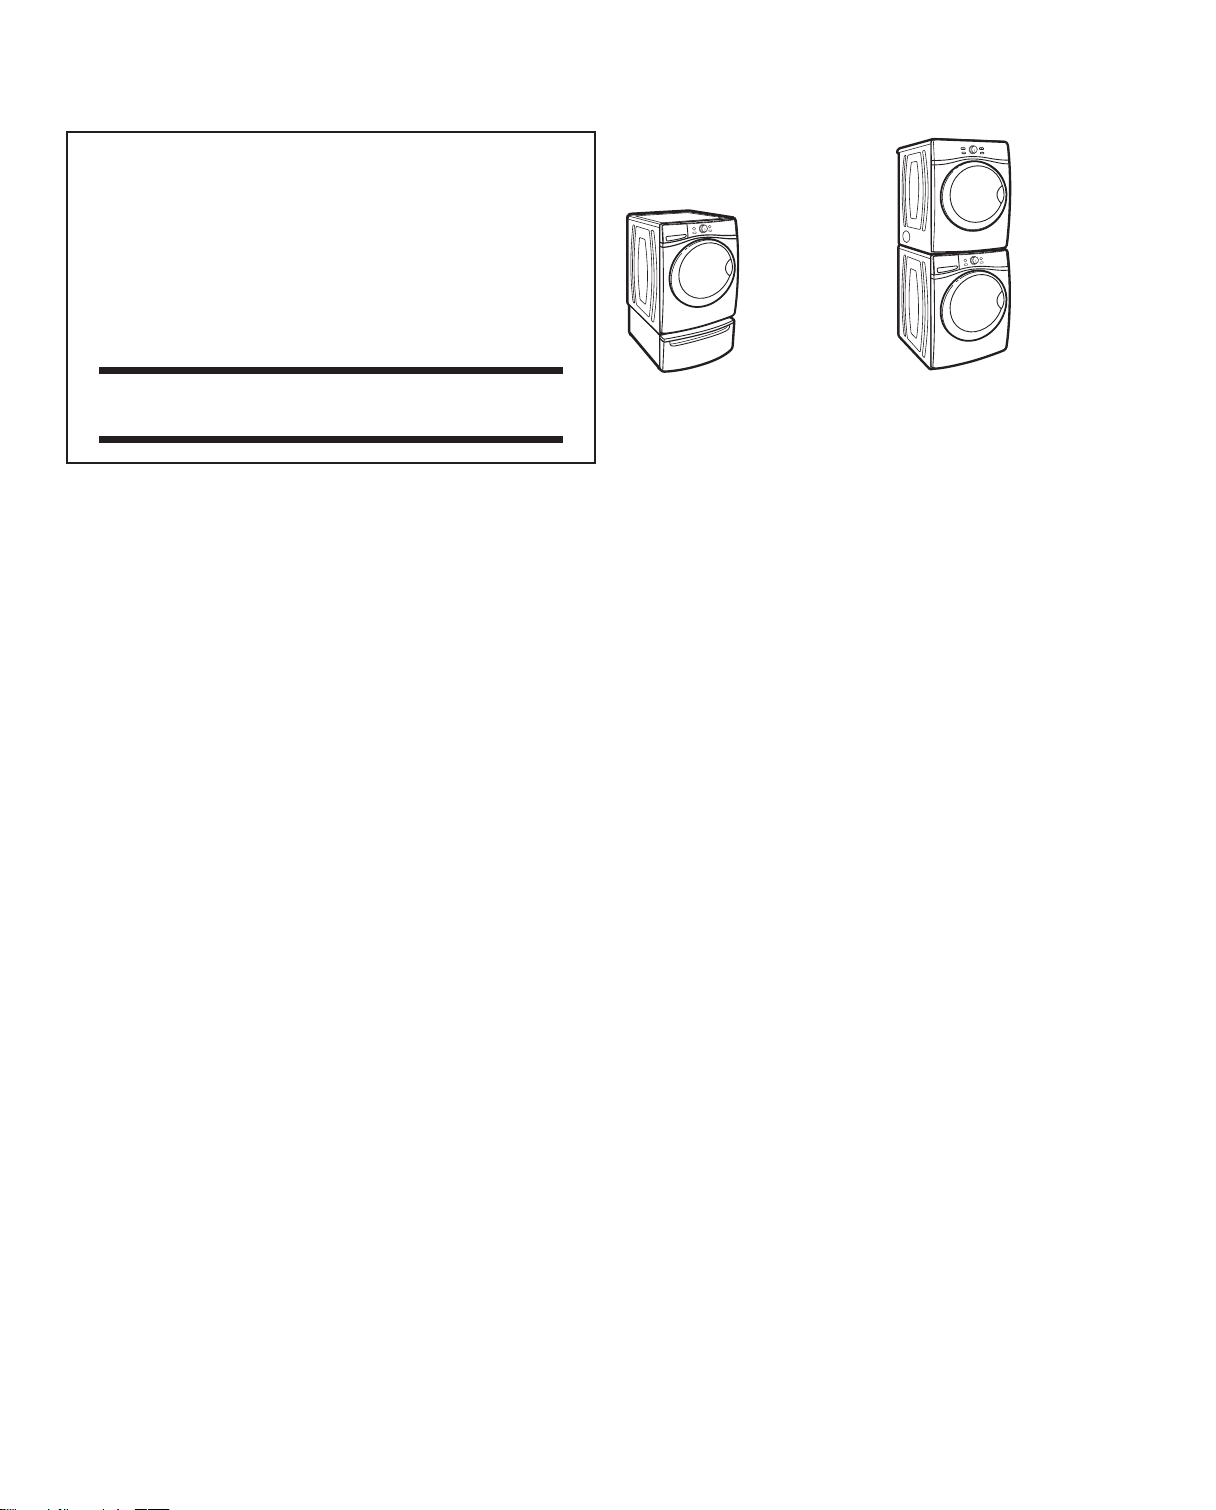
15" Pedestal
Color-matched pedestals raise
the washer and dryer to a more
comfortable working height.
The large drawer provides
convenient storage.
Stack Kit
If space is at a premium,
the stack kit allows the dryer
to be installed on top of the
washer.
Page 6
CONTROL PANEL AND FEATURES
Not all features and cycles are available on all models.
NOTES:
■ The control panel features a sensitive surface that responds to a light touch of your nger. To ensure your selections are registered,
touch the control panel with your ngertip, not your ngernail. When selecting a setting or option, simply touch its name.
■ At cycle completion, your setting and option choices will be remembered for your next use of that cycle. However, if power is lost
to the washer, the settings and options will go back to the factory defaults.
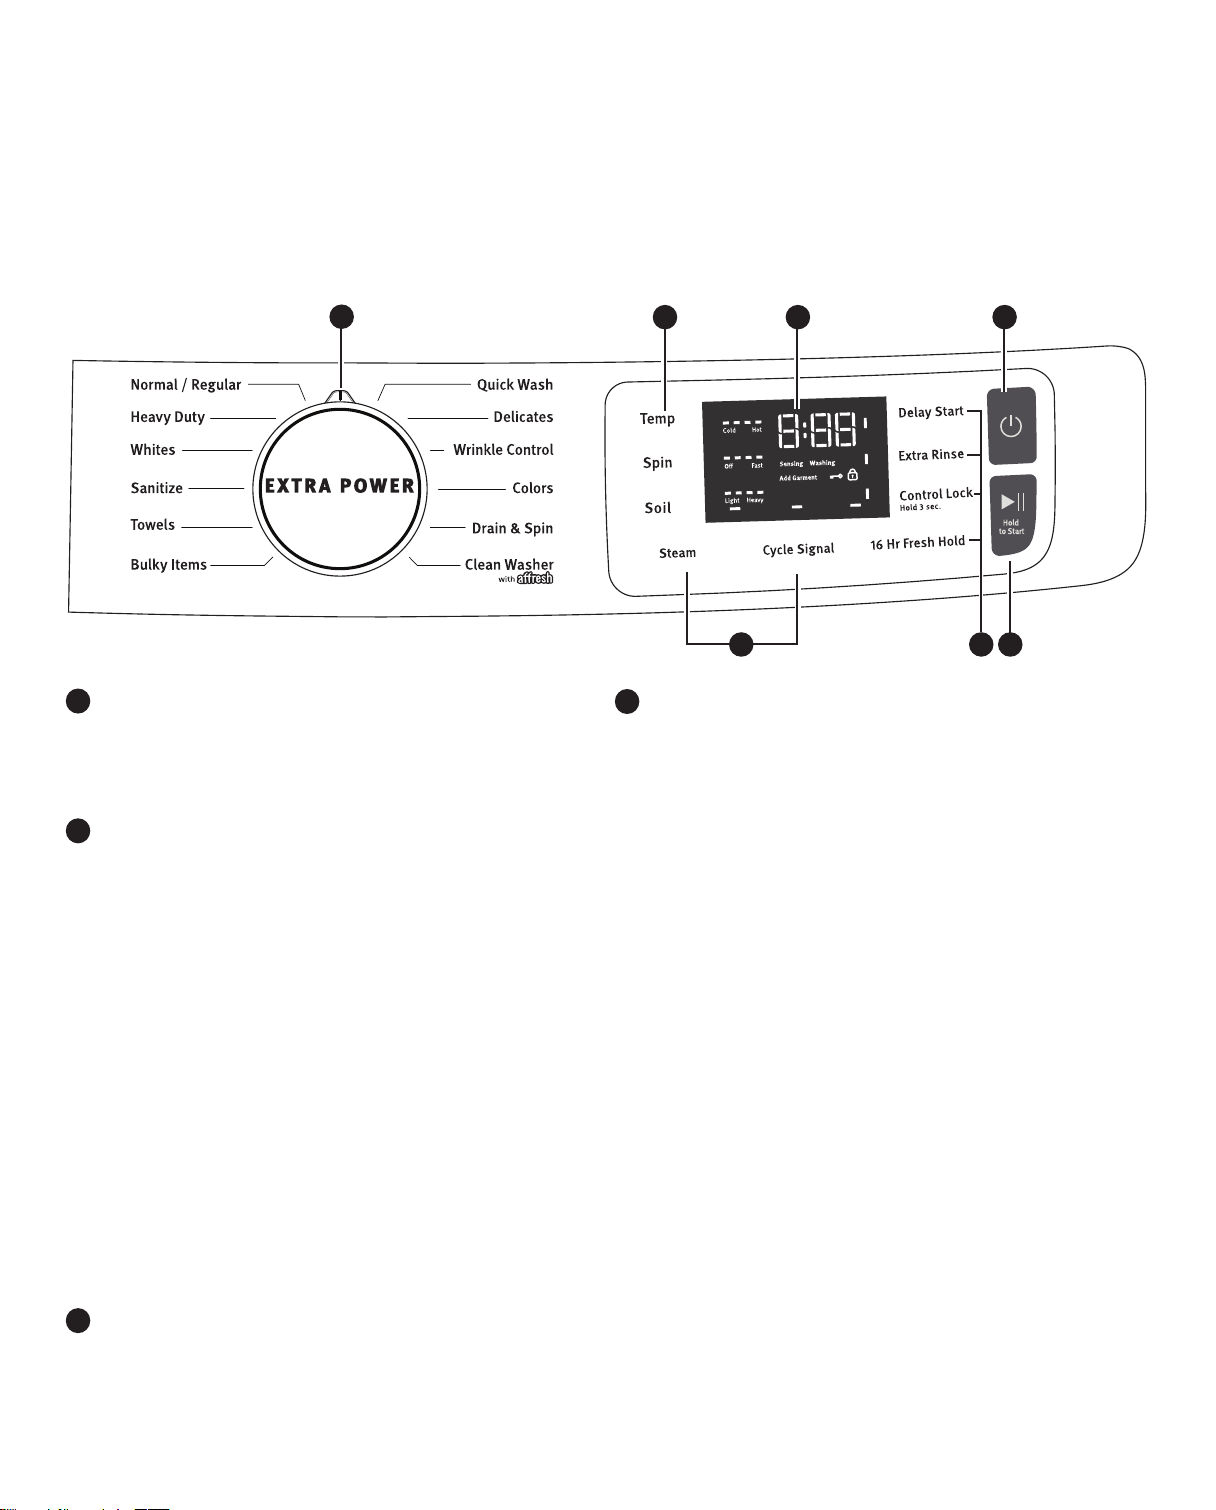
2
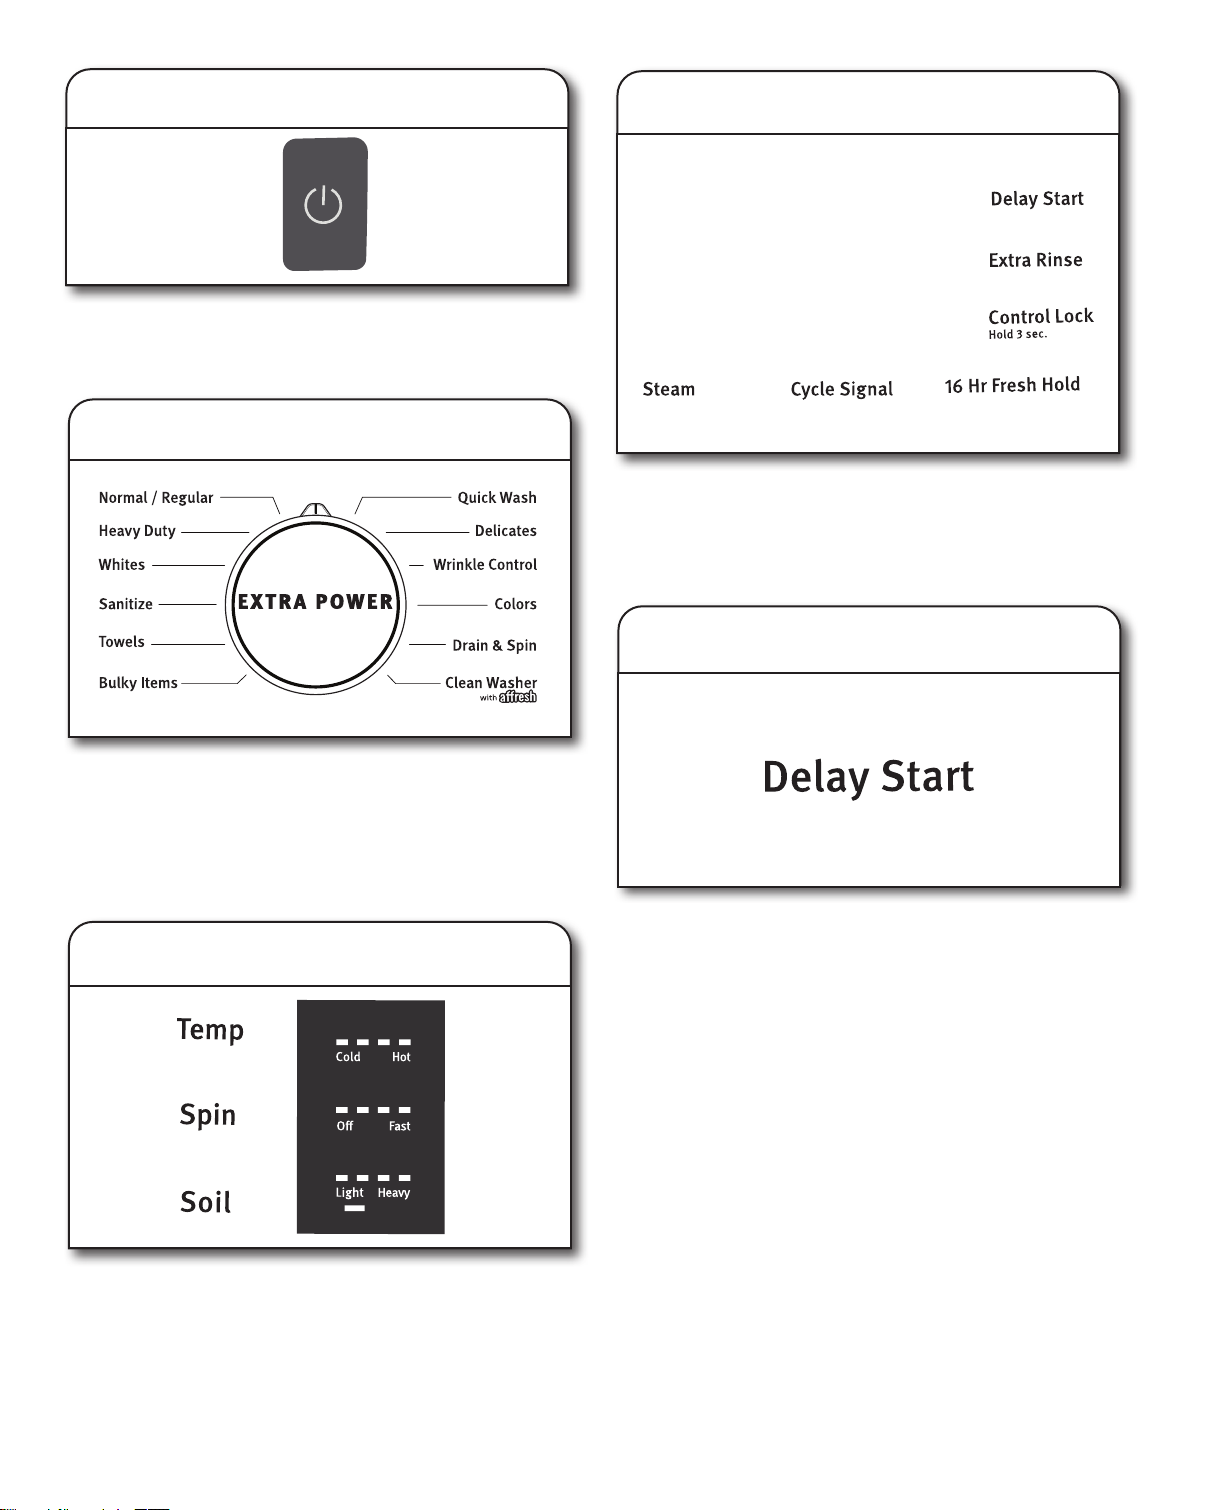
POWER
1
Touch to turn the washer on and off. Touch to stop/cancel
a cycle at any time.
NOTE: Turning the Wash Cycle knob will also turn the
washer on.
WASH CYCLE KNOB
2
Turn the knob to select a cycle for your laundry load. Press
the Wash Cycle knob to enable the Extra Power option.
NOTE: The Clean Washer with affresh LED will ash when
the washer has run 30 wash cycles as a reminder to run the
Clean Washer with affresh cycle.
See “Cycle Guide” for detailed descriptions of cycles.
NOTE: For best results when using the Overnight Wash &
Dry cycle, use for loads weighing 2 lbs or less, such as a
soccer uniform or a running tank and shorts. Allow the cycle
to run the full duration of 12 hours.
EXTRA POWER
Extra Power option can be used for increased cleaning
power. Press the Wash Cycle Knob to activate the Extra
Power option, which runs a cold pre-wash cycle before
the main cycle. When Extra Power is activated, the Cycle
Control Knob will illuminate and the estimated time
remaining on the display will increase. On single load
dispenser models, add an extra dose of detergent to the
Bleach/Detergent for Extra Power compartment when using
Extra Power, for best results.
START
3
Touch and hold for 3 seconds until the light above START
comes on to start a cycle or touch once while a cycle is in
process to pause it. If you want to add a garment, you can
touch START when the “Add Garment” LED is on.
54
6
LED DISPLAY AND SETTINGS
4
When you select a cycle, its default settings will light up and
the Estimated Time Remaining will be displayed. Factors
such as load size, wash temperature, and water pressure
may affect the time shown in the display. Tightly packing,
unbalanced loads, or excessive suds may cause the washer
to lengthen the cycle time as well.
Touch the desired setting on the display to adjust. See
“Cycle Guide” for available settings on each cycle. Not all
settings are available with all cycles.
Temp
The recommended wash temperature is preset for each
cycle. You may also select a wash temperature based
on the type of fabric and soils being washed. For best
results, use the warmest wash water safe for your
fabric, following the garment label instructions. All wash
temperatures feature a cold rinse.
Spin
This washer automatically selects the spin speed
based on the cycle selected. Some preset speeds
can be changed.
■ Faster spin speeds mean shorter dry times but may
increase wrinkling in your load.
■ Slower spin speeds reduce wrinkling but will leave
your load more damp.
Soil
Soil Level (wash time) is preset for each wash cycle.
When you change the soil setting, the cycle time will
increase or decrease in the Estimated Cycle Time
display.
For most loads, use the soil level that is preset with the
cycle you have chosen. For heavily soiled and sturdy
fabrics, use the Soil Level setting to select a higher soil
level. For lightly soiled and delicate fabrics, use the Soil
Level setting to select a lower soil level. Lower soil level
settings will help reduce tangling and wrinkling.
1
6
3
Page 7
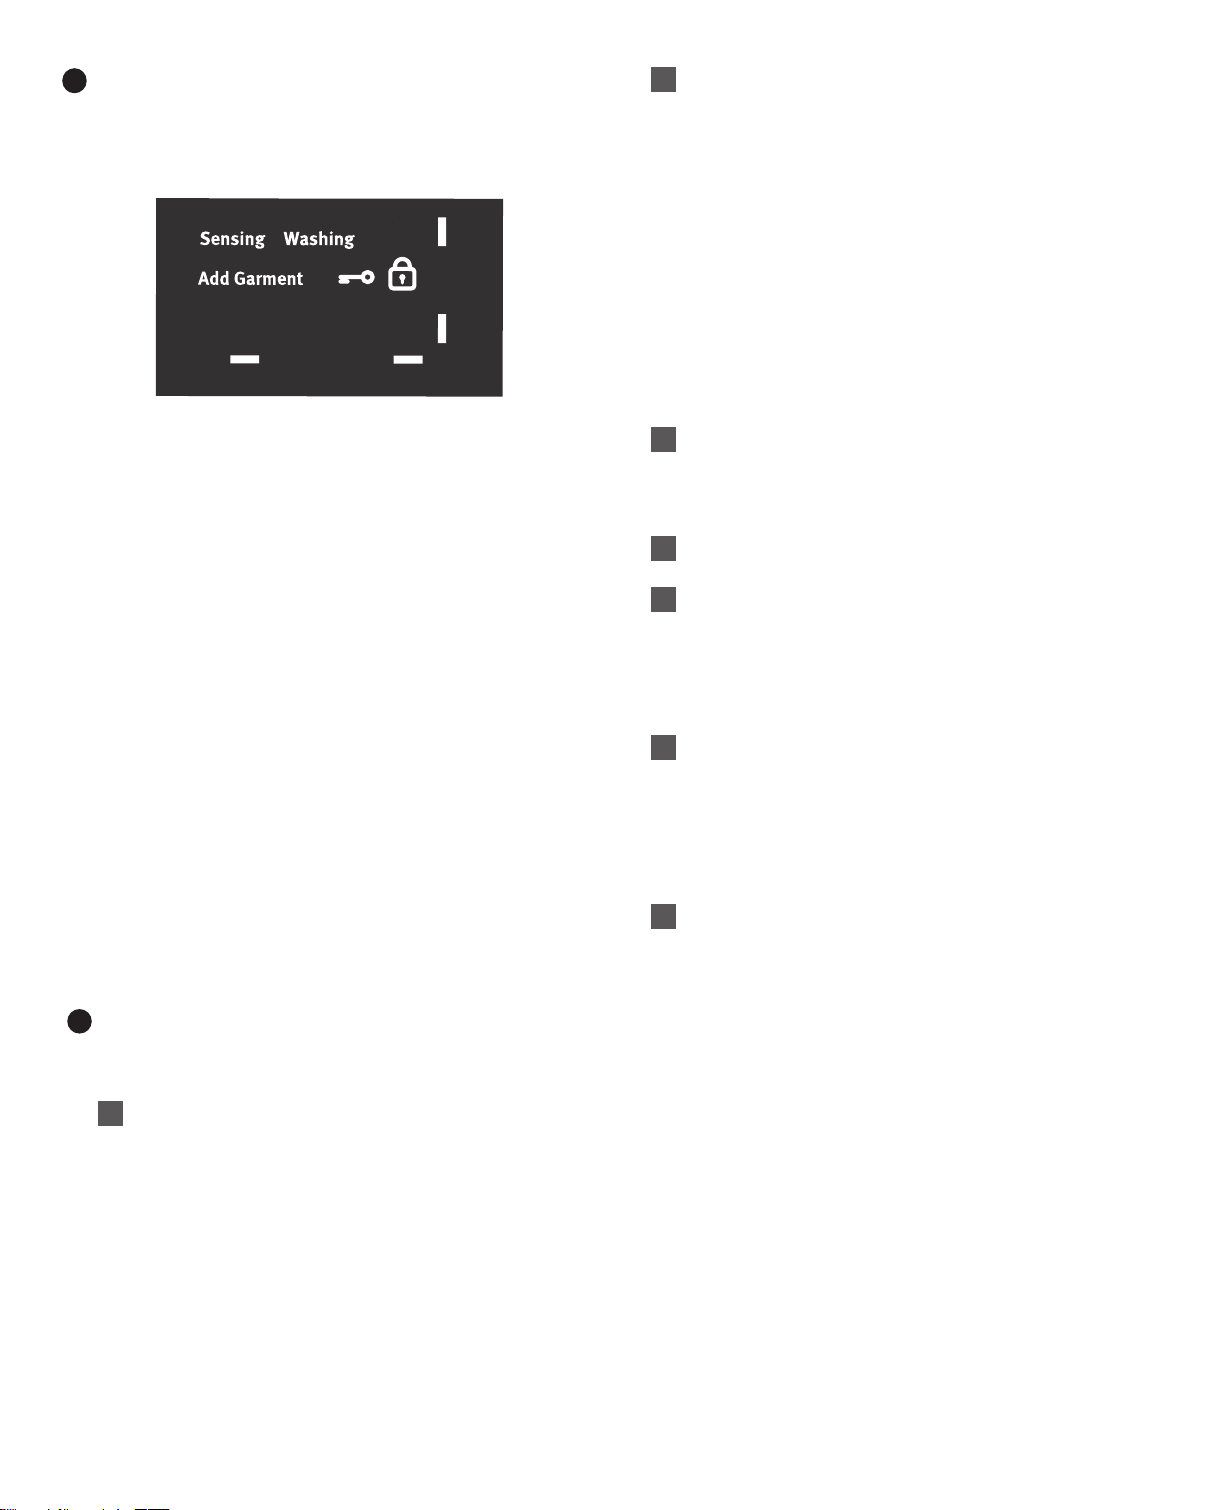
CYCLE STATUS LIGHTS
5
NOTE: Not all Cycle Status Lights are available on all models.
The Cycle Status Lights show the progress of a cycle.
At each stage of the process, you may notice sounds
or pauses that are different from traditional washers.
Sensing
When START is touched and held, the washer will rst
perform a self-test on the door lock mechanism and the
sensing light will come on. You will hear a click, the drum will
make a partial turn, and the door will click again as it unlocks
briey. The door will click one more time when it locks again.
Once the door has locked the second time, the washer will
begin spinning to sense the load size. This sensing process
will continue throughout the cycle. You may also hear water
owing through the dispenser, adding detergent to the load.
After the load size is sensed, the estimated time based on
load size will be displayed. The actual cycle time may be
lengthened; however, the display will continue to show the
estimated time.
The sensing light will blink once a second at various times
during the cycle, such as when the washer is reducing
extra suds.
Washing
During the wash cycle, this will display to let you know the
cycle is in progress.
Add Garment
When “Add Garment” is lit, you may pause the washer, open
the door, and add items. Touch and hold START to start the
washer again.
Detergent Low
When detergent in the dispenser is running low, the display
will show the detergent level (Low).
OPTIONS
6
Touch to activate additional wash options or additional
features on the washer. Not all options are available on
all models.
A
Delay Start
Touch this option to delay the start of the wash cycle
by up to 12 hours.
B
Fresh Hold/Fresh Spin
The Fresh Hold/Fresh Spin option will periodically tumble
the load after the end of the cycle for up to 24 hours
while the integrated fan circulates air through the washer
to reduce humidity. Fresh Spin also periodically tumbles
the load after the end of the cycle but does not use an
integrated fan. To turn on the Fresh Hold/Fresh Spin
option, touch FRESH HOLD. If, however, the Fresh Hold/
Fresh Spin option is turned on, it will stay on for all future
cycles until turned back off – the washer remembers the
last on/off status set. To turn off the Fresh Hold/Fresh
Spin option, touch FRESH HOLD.
To turn off the Fresh Hold/Fresh Spin option when it is
running, touch POWER.
NOTE: The door will lock while the Fresh Hold/Fresh
Spin option is active. To cancel the option and unlock
the door, touch POWER.
Steam
C
The Steam option adds additional soak and wash time
to many cycles to help remove tough stains as well as
a steam boost for added cleaning power. An integrated
heater helps to maintain optimal wash temperatures.
D
Extra Rinse
Activate this option to add an extra rinse to most cycles.
E
Cycle Signal
Touch and hold CYCLE SIGNAL for about 3 seconds the
display will count down you will see “3,” then “2,” then
“1.” The display will start displaying the sound levels you
will see “1,” then “2,” then “3,” then “OFF.” When the
CYCLE SIGNAL is released the last value shown will be
the current selection.
F
Control Lock
Touch and hold for 3 seconds to lock the controls to
avoid unwanted changes or operation. Touch and hold
3 seconds again to unlock. For each second CONTROL
LOCK is held down, the display will count down 1
second; you will see “3,” then “2,” then “1.” You may still
touch START to pause the cycle or touch POWER to turn
off the washer.
G
Extra Power
The Extra Power option boosts stain ghting
performance on any wash cycle with a dual temperature
wash, combining cold and hot temperature during
different phases of the wash time. To use this function
press the knob to activate the Extra Power option.
For single dose dispensers and an additional 1/2 the
manufacturer’s recommended amount into the dispenser
marked for Extra Power.
Page 8
DISPENSERS
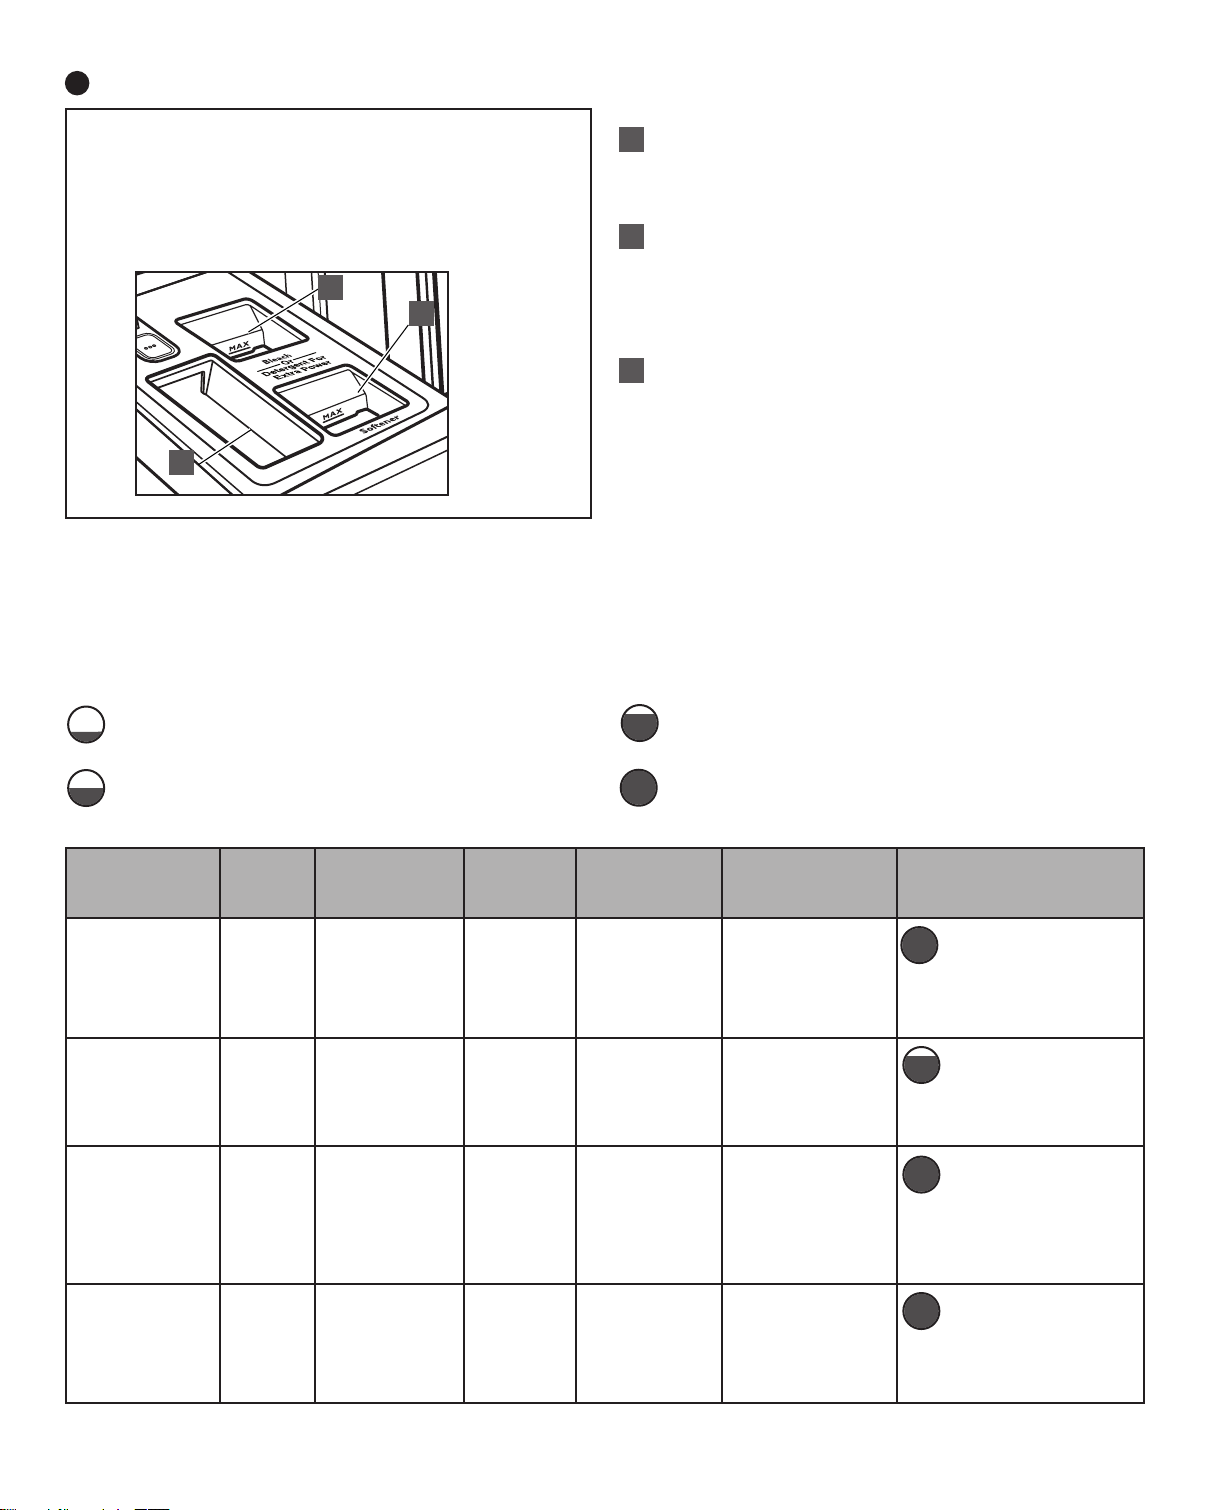
7
Single Load Dispenser Drawer (on some
models)
The dispenser drawer gives you the convenience
of adding HE detergent, liquid chlorine bleach,
and liquid fabric softener to the wash load at the
proper time. See “Using the Dispenser Drawer”
for information on using the dispenser drawer.
B
A
C
A
Liquid fabric softener compartment
Automatically dilutes and dispenses liquid fabric softener at
the optimum time in the cycle.
■ Use only liquid fabric softener in this dispenser.
B
Liquid chlorine bleach compartment
Automatically dilutes and dispenses liquid chlorine bleach at
the optimum time during the rst rinse after the wash cycle.
This compartment cannot dilute powdered bleach. On single
load dispenser models, use this compartment to add an
extra dose of detergent when using the Extra Power option.
Liquid High Efficiency “HE” detergent compartment
C
This compartment holds liquid or powdered HE detergent for
your main wash cycle.
CYCLE GUIDE
Settings and options shown in bold are default settings for that cycle. For best fabric care, choose the cycle, options, and settings
that best t the load being washed. Not all settings are available with each cycle and some options cannot be used together.
Not all cycles and options are available on all models.
Load Size Recommendations
For best results, follow the load size recommendations noted for each cycle.
Small load: Fill the washer drum with 3–4 items, not more
than 1/4 full.
Medium load: Fill the washer drum up to about 1/2 full.
Items to wash
using default
Cycle:
Wash
Temperature
*
Speed***
Spin
Large load: Fill the washer drum up to about 3/4 full.
Extra-large load: Fill the washer drum, but make
sure clothes can tumble freely. For best results, avoid
packing tightly.
Soil
Level:
Options/
Modifiers:
cycle settings:
Normally soiled
cottons, linens,
sheets, and
mixed garment
loads
Sturdy colorfast
fabrics and
heavily soiled
garments
Heavily soiled
white fabrics
and garments
Sturdy towels
and wash cloths
*All temperature selections feature a Cold rinse.
**The Steam option is only available when a Warm, Very Warm, or Hot water temperature is selected.
***Spin speed varies by model.
Normal Cold
Cool
Warm
Very Warm
Hot
Heavy
Duty
Whites Cold
Towels Cold
Cold
Cool
Warm
Very Warm
Hot
Cool
Warm
Very Warm
Hot
Cool
Warm
Very Warm
Hot
Off
Medium
Med Fast
Fast
Off
Slow
Medium
Med Fast
Fast
Off
Slow
Medium
Med Fast
Fast
Off
Slow
Medium
Med Fast
Fast
Light
Medium
Med Heavy
Heavy
Light
Medium
Med Heavy
Heavy
Light
Medium
Med Heavy
Heavy
Light
Medium
Med Heavy
Heavy
Extra Rinse
Fresh Hold/Fresh
Extra power
Extra Rinse
Fresh Hold/Fresh
Extra power
Extra Rinse
Fresh Hold/Fresh
Extra power
Extra Rinse
Fresh Hold/Fresh
Extra power
Steam**
Spin
Steam**
Spin
Steam**
Spin
Steam**
Spin
Cycle Details:
This cycle combines
medium-speed tumbling
and an extra-highspeed spin. This cycle is
designed to provide the
most energy efficiency.
Fast-speed tumbling and
an extra-fast-speed final
spin help provide optimal
cleaning and reduce
drying times.
Uses a longer wash
time with fast-speed
tumbling, extra rinsing,
and an extra-fast-speed
spin to provide optimal
cleaning and rinsing
when bleach is used.
Provides fast-speed
tumbling, longer wash
time, normal rinsing,
and an xtrafast- speed
spin to shorten drying
time.
Continued on next page
Page 9
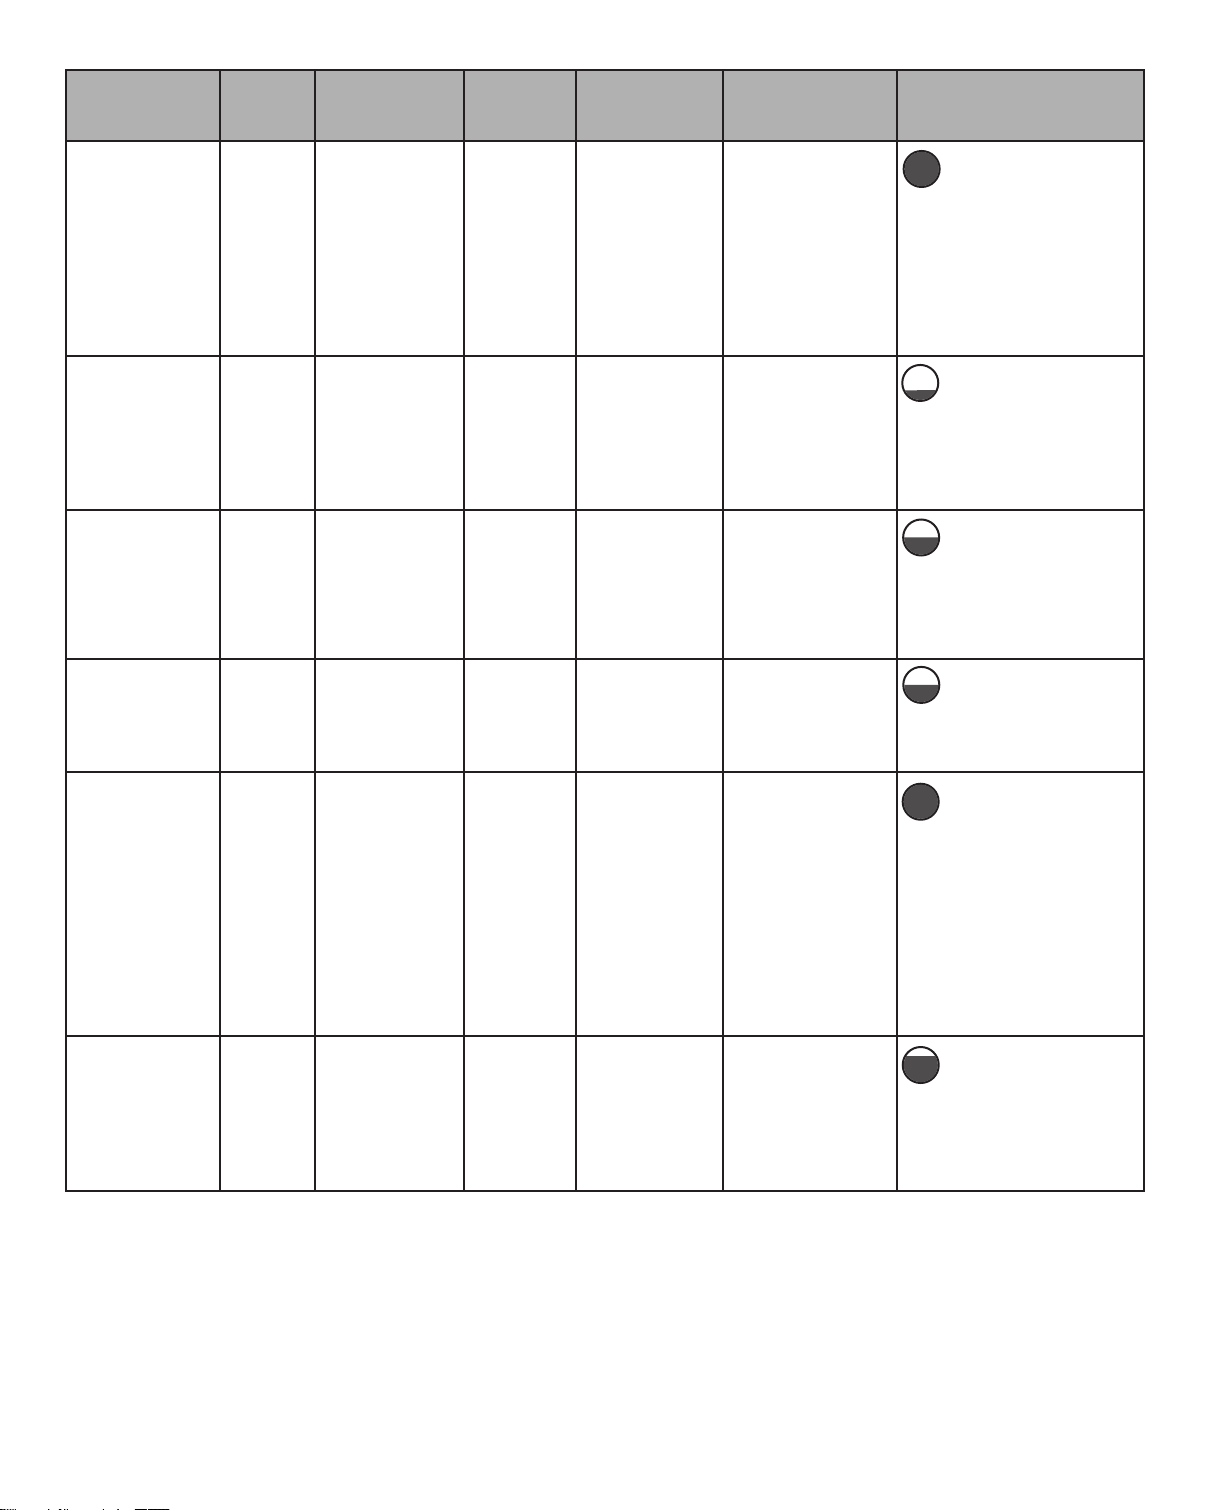
Items to wash
using default
cycle settings:
Large items
such as sleeping
bags, small
comforters,
jackets
Small loads of
2–4 lightly soiled
garments
Sheer fabrics,
lingerie,
sweaters, and
lightly soiled
shirts, blouses,
trousers, pants,
and skirts
Lightly soiled
shirts, blouses,
trousers, pants,
and dresses
Clothing,
bedding and
towels requiring
sanitization
Bright or darkly
colored cottons,
linens, casual
and mixed loads
Cycle:
Bulky
Items
Quick
Wash
Delicates Cold
Wrinkle
Control
Sanitize Hot Off
Colors Cold Off
Wash
Temperature
Cold
Cool
Warm
Very Warm
Hot
Cold
Cool
Warm
Very Warm
Hot
Cool
Warm
Very Warm
Hot
Cold
Cool
Warm
Very Warm
Hot
*
Spin
Speed***
Off
Slow
Medium
Med Fast
Fast
Off
Slow
Medium
Med Fast
Fast
Off
Slow
Medium
Med Fast
Fast
Off
Slow
Medium
Med Fast
Fast
Slow
Medium
Med Fast
Fast
Medium
Med Fast
Fast
Soil
Level:
Light
Medium
Med Heavy
Heavy
Light
Medium
Med Heavy
Heavy
Light
Medium
Med Heavy
Heavy
Light
Medium
Med Heavy
Heavy
Light
Medium
Med Heavy
Heavy
Light
Medium
Med Heavy
Heavy
Options/
Modifiers:
Steam**
Extra Rinse
Fresh Hold/Fresh
Spin
Extra power
Steam**
Extra Rinse
Fresh Hold/Fresh
Spin
Extra power
Steam**
Extra Rinse
Fresh Hold/Fresh
Spin
Extra power
Steam**
Extra Rinse
Fresh Hold/Fresh
Spin
Extra power
Steam**
Extra Rinse
Fresh Hold/Fresh
Spin
Extra power
Extra Rinse
Fresh Hold/Fresh
Spin
Extra power
Cycle Details:
Use this cycle to wash
large items such as
jackets and small
comforters. The washer
will ll with enough
water to wet down the
load before the wash
portion of the cycle
begins.
Do not tightly pack
basket.
For small loads (2–4
items) needed quickly.
This cycle combines
fast-speed tumbling, a
shortened wash time,
and an extra-fastspeed spin for reduced
drying times.
This cycle combines
slow-speed tumbling
and slow-speed spin
for gentle fabric care
and reduced wrinkling.
This cycle combines
low-speed tumbling and
medium-speed spin for
gentle fabric care and
reduced wrinkling.
This cycle eliminates
99.99% of the most
common bacteria
found in clothes,
sheets, and towels.
The extra hot wash
temperature ensures
sanitization. Check
recommended wash
temperature of your
items. Bacteria tested
were K. pneumonia,
P. aureginosa, and S.
aureus.
Cold water with an
additional wash action
gently lifts stains while
caring for fabrics.
Settings may be
adjusted as desired,
but must use only cold
water settings.
*All temperature selections feature a Cold rinse.
**The Steam option is only available when a Warm, Very Warm, or Hot water temperature is selected.
***Spin speed varies by model.
Continued on next page
Page 10
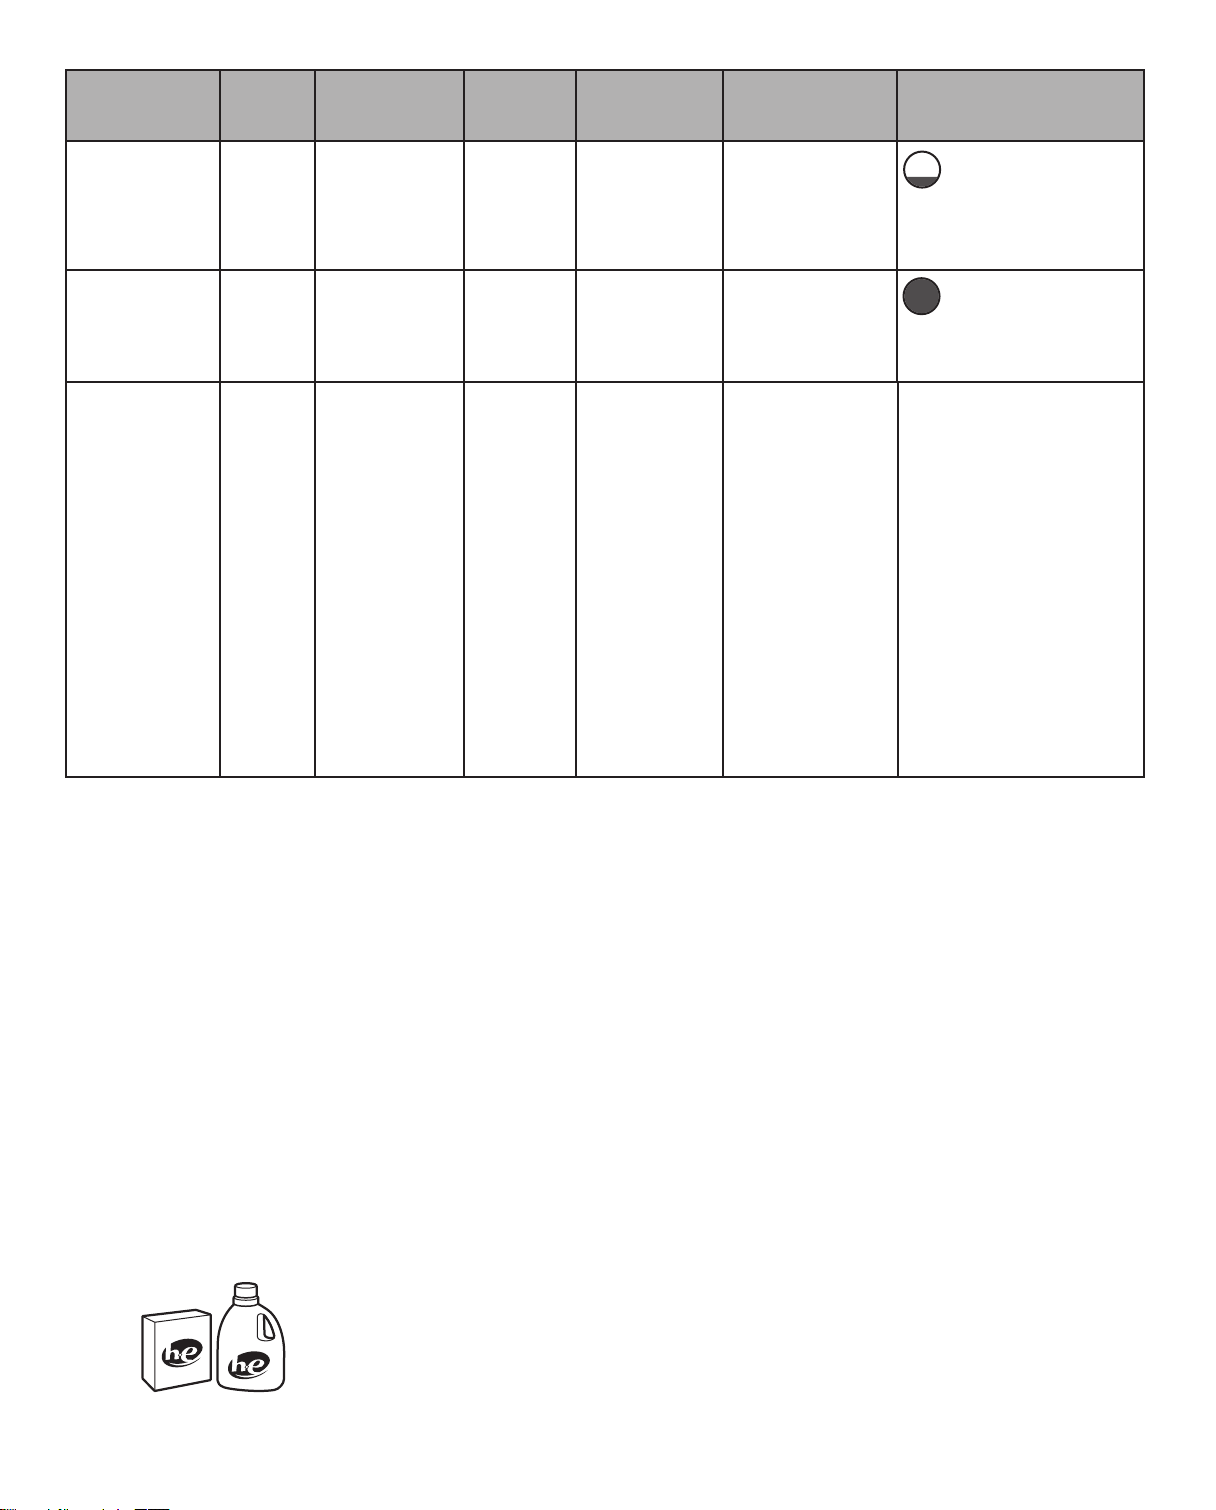
Items to wash
using default
cycle settings:
2–4 lightly
soiled synthetic
garments,
athletic
uniforms, or
workout wear
Wet load of
clothes
No clothes in
washer
Cycle:
Overnight
Wash &
Dry
Drain
& Spin
Clean
Washer
with
affresh
Wash
Temperature
Cold
Cool
Warm
Very Warm
Hot
N/A Off
N/A N/A N/A N/A Use this cycle every 30
Spin
*
Speed***
Fast Light
Slow
Medium
Med Fast
Fast
Soil
Level:
Medium
Med Heavy
Heavy
N/A Extra Rinse
Options/
Modifiers:
Steam**
Extra Rinse
Fresh Hold/Fresh
Extra power
Fresh Hold/Fresh
Spin
Spin
Cycle Details:
This short wash cycle
has an extra-highspeed spin followed by
intermittent tumbling and
fan activation to circulate
air through the clothes.
Use Drain & Spin to
remove excess water
from the load. Spin
speed can be set to a
lower setting.
washes to keep the inside
of your washer fresh and
clean. This cycle uses a
higher water level. Use with
affresh washer cleaner tablet
or liquid chlorine bleach to
thoroughly clean the inside
of your washer. This cycle
should not be interrupted.
See “Washer Care.”
IMPORTANT: Do not place
garments or other items
in the washer during the
Clean Washer with affresh
cycle. Use this cycle with
an empty wash tub. See
“Washer Care” in “Washer
Maintenance.”
*All temperature selections feature a Cold rinse.
**The Steam option is only available when a Warm, Very Warm, or Hot water temperature is selected.
***Spin speed varies by model.
CHOOSING THE RIGHT DETERGENT
Use only High Efciency detergents. The package will be
marked “HE” or “High Efciency.” Low-water washing creates
excessive sudsing with a non-HE detergent. Using non-HE
detergent will likely result in longer cycle times and reduced
rinsing performance. It may also result in component failure and,
over time, buildup of mold or mildew. HE detergents should be
low-sudsing and quick-dispersing to produce the right amount
of suds for the best performance. They should hold soil in
suspension so it is not redeposited onto clean clothes. Not all
detergents labeled as High Efciency are identical in formulation
and their ability to reduce suds. For example, natural, organic,
or homemade HE detergents may generate a high level of suds.
If you use one of these and see an “Sd” or “Sud” error code
appear in the display, consider using a different HE detergent.
Always follow the detergent manufacturer’s instructions to
determine the amount of detergent to use. Do not go over the
Max line on the dispenser.
Use only High Efficiency
(HE) detergent.
About Detergent Dosing
If you do not get your desired cleaning results, try using a larger
amount of detergent. If you have excess suds, try using less
detergent.
NOTES:
■ A small amount of water may remain in the dispensers from
the previous wash cycle. This is normal.
■ To add single-dose and Oxi-type boosters, see the “Using
Your Washer” section.
Page 11
USING YOUR WASHER
First wash cycle without laundry
Before washing clothes for the rst time, add liquid or powdered
HE detergent to the detergent dispenser. Choose the Quick
Wash cycle and run it without clothes. Use only HE detergent.
This initial cycle serves to ensure the interior is clean and the
dispenser drawer is ready for use before washing clothes.
1. Sort and prepare your laundry
Sort items by recommended cycle, water temperature,
and colorfastness. Separate heavily soiled items from lightly
soiled. Separate delicate items from sturdy fabrics. Treat
stains promptly and check for colorfastness by testing stain
remover products on an inside seam.
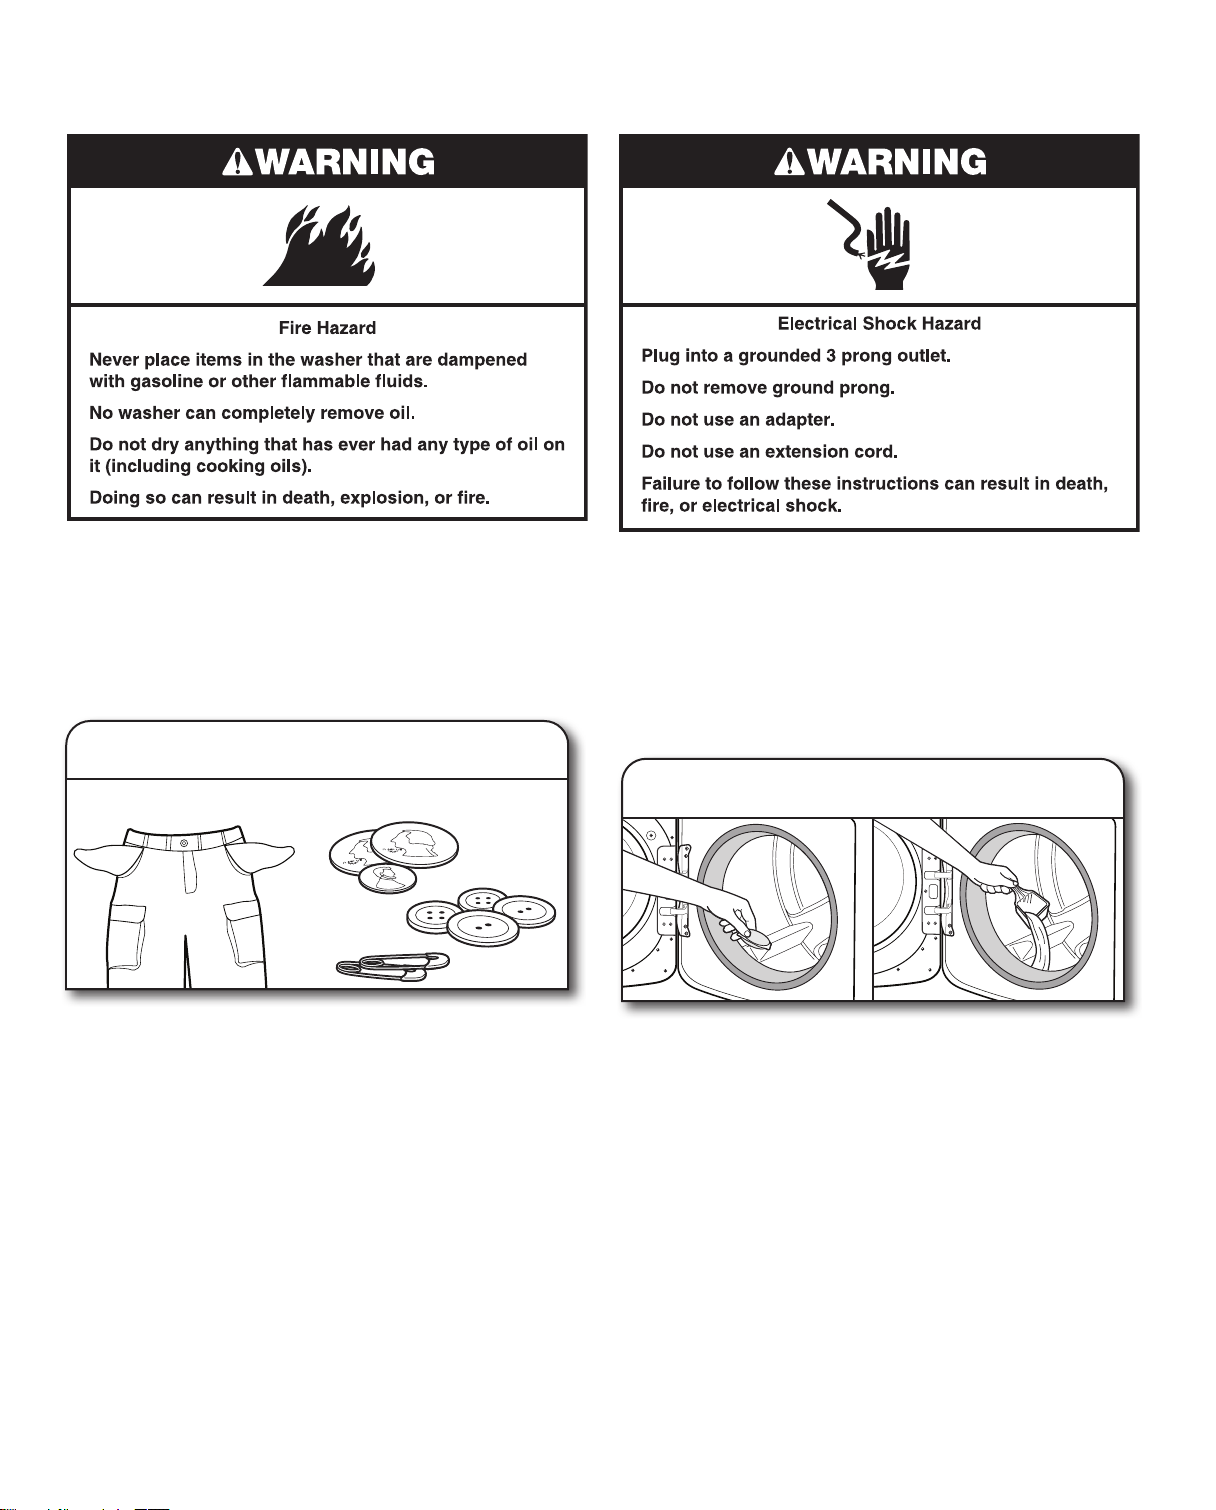
IMPORTANT:
■ Empty pockets. Loose change, buttons, or any small
object can plug pumps and may require a service call.
■ Close zippers, fasten hooks, tie strings and sashes,
and remove non-washable trim and ornaments.
■ Mend rips and tears to avoid further damage to items
during washing.
■ Turn knits inside out to prevent pilling. Separate lint-takers from
lint-givers. Synthetics, knits, and corduroy fabrics will pick up
lint from towels, rugs, and chenille fabrics.
■ Do not dry garments if stains remain after washing because
heat can set stains into fabric.
■ Always read and follow fabric care labels and laundry
product instructions. Improper usage may cause damage
to your garments.
2. Add laundry products (if desired)
Single-dose laundry packets, Oxi-type boosters, color-safe
bleach, or fabric softener crystals can be added to the drum
prior to adding laundry.
NOTE: Always follow manufacturer’s instructions.
Page 12
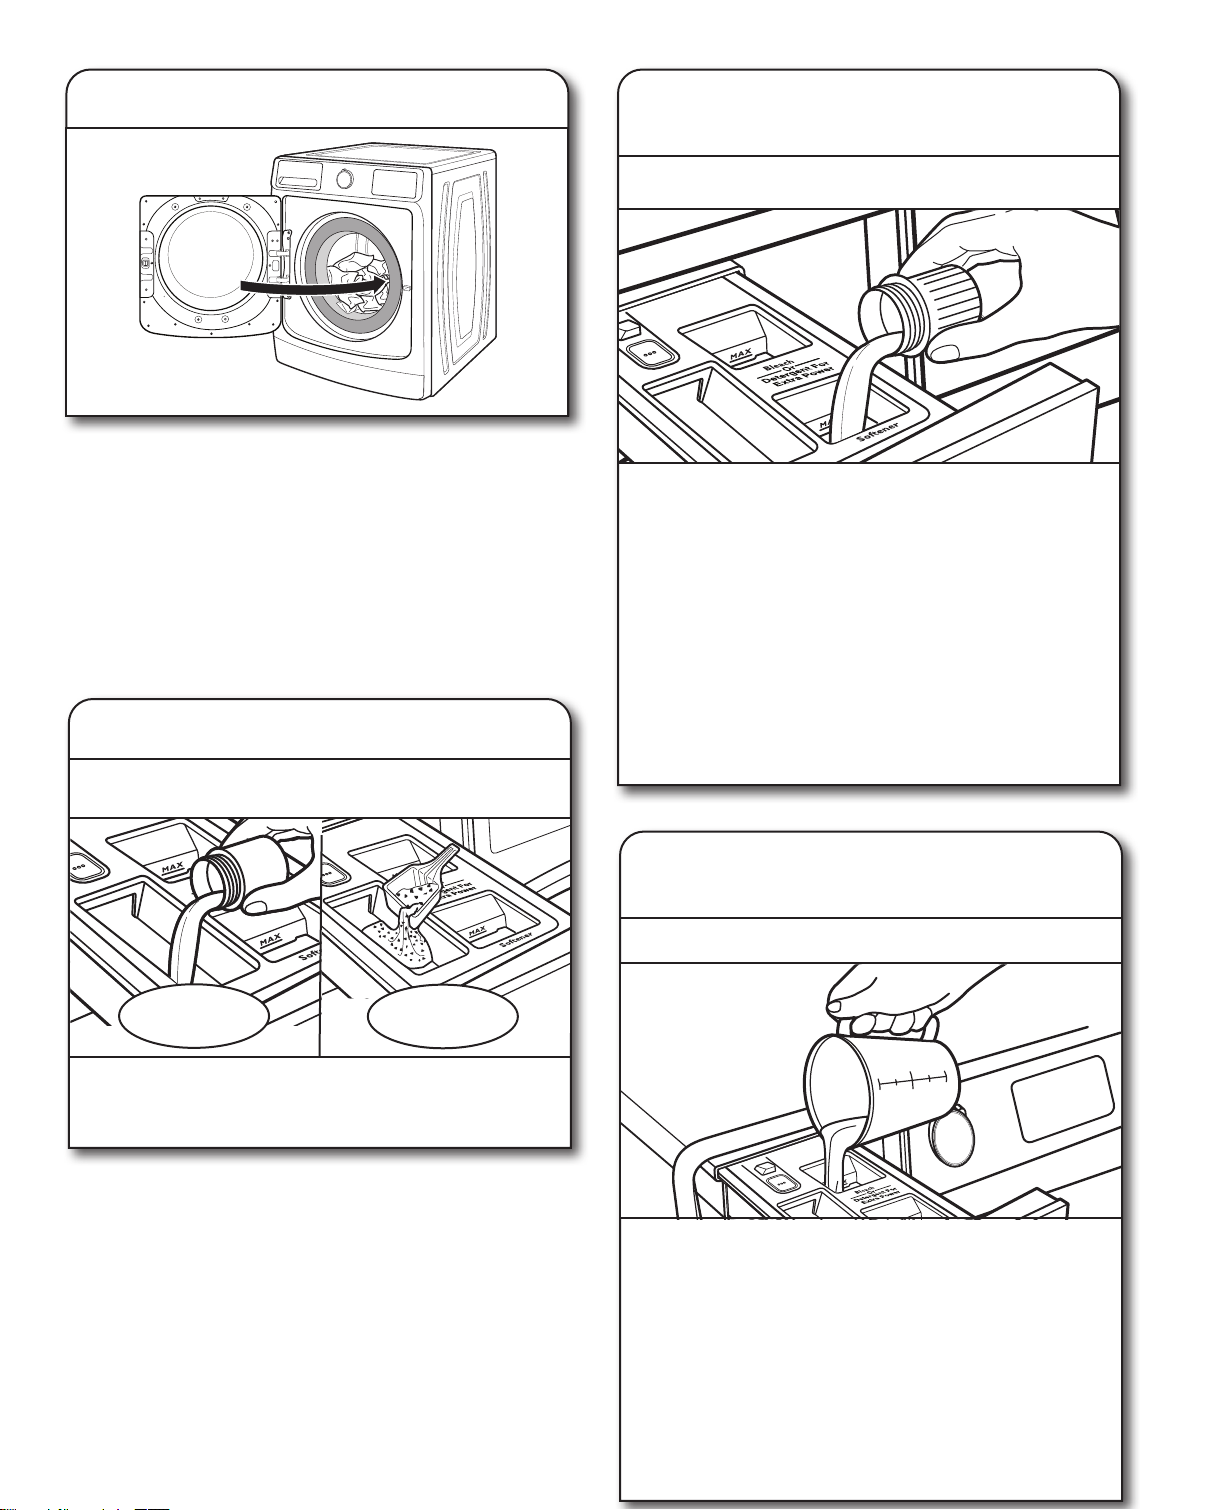
3. Load laundry into washer
Place a load of sorted items loosely in the washer. Items need
to move freely for best cleaning and to reduce wrinkling and
tangling. Close the washer door by pushing it rmly until the
latch clicks.
■ Depending on load type and cycle, the washer can be fully
loaded but not tightly packed. Washer door should close
easily. See “Cycle Guide” for loading suggestions.
■ Mix large and small items and avoid washing single items.
Load evenly.
■ Wash small items in mesh garment bags. For multiple items,
use more than one bag and ll bags equally.
4. Add HE detergent
Single Load Dispenser Drawer
5. Add liquid fabric softener to dispenser
(if desired)
Single Load Dispenser Drawer
Pour a measured amount of liquid fabric softener into
liquid fabric softener compartment. Always follow
manufacturer’s directions for correct amount of fabric
softener based on your load size.
Fabric softener is always dispensed in the last rinse,
even if Extra Rinse is selected.
IMPORTANT: Do not overll, dilute, or use more than
manufacturer's recommendation for dosing of fabric
softener. Do not ll past the Max line. Overlling dispenser
will cause fabric softener to immediately dispense into
washer.
■ Do not spill or drip any fabric softener onto the clothes.
■ Do not use liquid fabric softener dispenser balls in this
washer. They will not dispense correctly.
Liquid
HE detergent
Adjust the selector, based on type of HE detergent used
(either liquid or powdered). See “Using the Dispenser
Drawer” section on how to use the dispenser.
■ Push load fully into washer. Make sure no items are resting on
the rubber seal to avoid trapping them between the seal and
the door glass.
NOTE: Do not add single-dose laundry packets, Oxi-type
boosters, color-safe bleach, or fabric softener crystals to
dispensers. They will not dispense correctly.
Powdered
HE detergent
6. Add liquid chlorine bleach
to dispenser (if desired)
Single Load Dispenser Drawer
Add liquid chlorine bleach to the bleach compartment.
Do not overll, dilute, or use more than manufacturer's
recommendation for dosing. Do not use color-safe bleach
or Oxi in the same cycle with liquid chlorine bleach.
IMPORTANT:
■ Always measure liquid chlorine bleach. Use a measuring
cup with a pour spout; do not guess.
■ Do not ll beyond the Max level. Overlling could cause
garment damage.
■ Do not use thickened, easy-pour, or no-splash bleach
when running the Clean Washer with affresh cycle as
excess suds may occur.
Page 13
7. Touch POWER to turn on washer
Slowly close the Dispense drawer. Make sure the drawer is
closed completely, then touch POWER to turn on the washer
or go to Step 8.
8. Select CYCLE*
10. Select any additional options*
To add an option to the cycle, touch its name – Fresh Hold,
Steam, Extra Rinse, Cycle Signal, or Control Lock.
To remove an option from the selected cycle, touch the
option again.
11. Set a delayed wash
Turn cycle knob to select your wash cycle. See “Cycle Guide”
for details on cycle features. Press the knob for enabling the
Extra Power option.
The Extra Power option boosts stain ghting performance on
any wash cycle with a dual temperature wash, combining cold
and hot temperature during different phases of the wash time.
Press the knob to select this option.
9. Adjust settings, if desired*
The display will show the default settings for the selected cycle.
To adjust a setting, touch its name – Temp, Spin or Soil.
Adjusting settings will change the Estimated Cycle Time.
Tightly packing the load, unbalanced loads, or excessive
suds may also cause the washer to increase the cycle time.
If you do not want to begin a cycle immediately, you may
choose the Delay Hrs. option. This will delay the start of
the wash cycle by up to 12 hours.
To set a delayed wash:
1. Touch SELECT Delay Start to set the desired delay time.
2. Touch and hold START to start the delay countdown.
The countdown stops blinking.
* Not all options and settings are available with all cycles.
See “Cycle Guide” for available options and settings.
Page 14
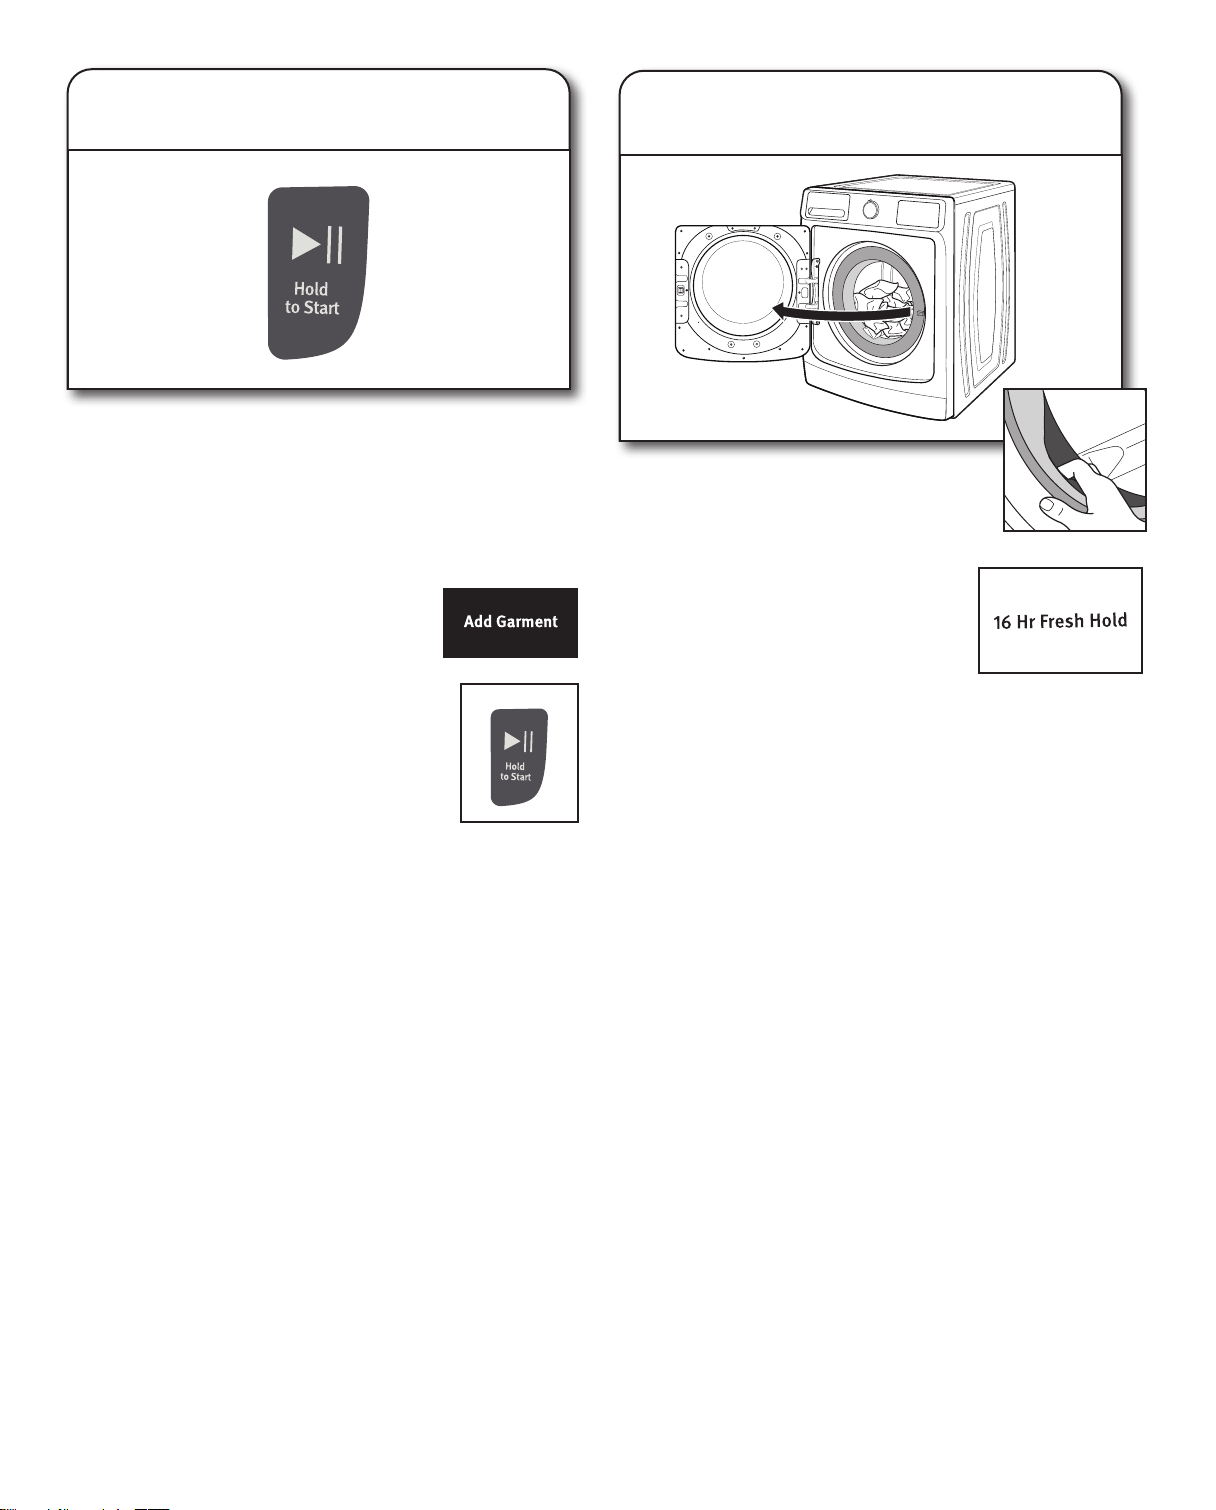
12. Touch and hold START to begin
wash cycle
Touch and hold START to start the wash cycle. To pause
a cycle in progress, touch START once, then touch and
hold again to continue the cycle. To cancel a cycle, touch
POWER.
Once you touch and hold START, you will hear the door lock,
unlock, and lock again. The washer door will remain locked
during the wash cycle.
Unlocking the door to add garments:
If you need to open the door to add 1 or 2
missed garments, you may do so while the
“Add Garment” light is lit. The time allowed
to add a garment will vary based on cycle
selection and load size.
Touch START once; the door will unlock once
the washer movement has stopped. This may
take several minutes. Then close the door and
touch and hold START again to restart the cycle.
Adding items after “Add Garment” light
is off:
Cancel current cycle. Water will drain and you will need to
reselect cycle and restart.
For wash performance and optimal energy savings, add
garments only when the “Add Garment” light is on.
13. Remove garments promptly
after cycle is finished
Promptly remove garments after cycle
has completed to avoid odor and rusting of
metal objects on garments. When unloading
garments, pull back the door seal and check
for small items between the tub and the
washer drum.
If you will be unable to remove the load
promptly, use the Fresh Hold/Fresh Spin
option. If the Fresh Hold/Fresh Spin option
is selected, the washer will automatically
activate the fan and tumble the load
periodically for up to 16 hours. To turn off the Fresh Hold/Fresh
Spin option, touch POWER. To set the washer so that the
Fresh Hold/Fresh Spin option does not come on for future
cycles, touch FRESH HOLD.
NOTES:
■ The door will remain locked while the Fresh Hold/Fresh Spin
option is active. To cancel the option and unlock the door,
touch POWER.
■ A small amount of water may remain in the dispensers after
the wash cycle is complete. This is normal.
■ This washer has a tight seal to avoid water leaks. To avoid
odors, leave the door open to allow the washer to dry
between uses.
Page 15
WASHER MAINTENANCE
WATER INLET HOSES
Replace inlet hoses after 5 years of use to reduce the risk
of hose failure. Periodically inspect and replace inlet hoses
if bulges, kinks, cuts, wear, or leaks are found.
When replacing your inlet hoses:
■ Mark the date of replacement on the label with a permanent
marker.
■ Check that the old washers are not stuck on the washer
inlet valves.
■ Use new washers in the new inlet hoses to ensure
a proper seal.
WASHER CARE
Recommendations to Help Keep Your Washer Clean
and Performing at Its Best
1. Always use High Efciency (HE) detergents and follow
the HE detergent manufacturer’s instructions regarding
the amount of HE detergent to use. Never use more than
the recommended amount because that may increase the
rate at which detergent and soil residue accumulate inside
your washer which, in turn, may result in undesirable odor.
2. Use warm or hot water washes sometimes (not exclusively
cold water washes) because they do a better job of
controlling the rate at which soils and detergent accumulate.
3. Always leave the washer door slightly ajar between
uses to help dry out the washer and avoid the buildup
of odor-causing residue.
4. Periodically clean residue from all interior surfaces
of the glass window. For better care, wipe the entire
inside of the glass door with a damp cloth.
Cleaning Your Front-Loading Washer
Read these instructions completely before beginning
the routine cleaning processes recommended below.
This Washer Maintenance Procedure should be performed,
at a minimum, once per month or every 30 wash cycles,
whichever occurs sooner, to control the rate at which soils
and detergent may otherwise accumulate in your washer.
Cleaning the Door Seal
1. Open the washer door and remove any clothing or items
from the washer.
2. Inspect the gray-colored seal between the door opening
and the drum for stained areas or soil buildup. Pull back
the seal to inspect all areas under the seal and to check
for foreign objects.
WASHER CARE (cont.)
3. If stained areas or soil buildup is found, wipe down
these areas of the seal using either of the following two
procedures:
a. affresh Machine Cleaning Wipes Procedure:
i. When the cycle is complete, gently pull back the
rubber door seal and clean the entire surface with
the textured side of an affresh Machine Cleaning
Wipe.
b. Dilute Liquid Chlorine Bleach Procedure:
i. Mix a dilute bleach solution, using 3/4 cup (177 mL)
of liquid chlorine bleach and 1 gallon (3.8 L) of
warm tap water.
ii. Wipe the seal area with the dilute solution, using
a damp cloth.
iii. Let stand 5 minutes.
iv. Wipe down area thoroughly with a dry cloth and let
washer interior air dry with door open.
IMPORTANT:
■ Wear rubber gloves when cleaning with bleach.
■ Refer to the bleach manufacturer’s instructions
for proper use.
Cleaning the Inside of the Washer
This washer has a special cycle that uses higher water
volumes in combination with affresh Washer Cleaner or
regular liquid chlorine bleach to thoroughly clean the inside
of the washer. Steam washer models also utilize steam to
enhance cleaning in this special cycle.
IMPORTANT: Do not use thickened, easy-pour, or no-splash
bleach when running the Clean Washer with affresh cycle as
excess suds may occur.
NOTE: Read these instructions completely before beginning
the cleaning process.
Page 16
WASHER CARE (cont.) WASHER CARE (cont.)
Begin Procedure
1. Clean Washer with affresh Cycle Procedure
(Recommended for Best Performance):
a. Open the washer door and remove any clothing
or items.
b. Use an affresh Machine Cleaning Wipe or a soft, damp
cloth or sponge to clean the inside door glass.
c. Add an affresh Washer Cleaner tablet to the
washer drum.
d. Do not add the affresh Washer Cleaner tablet
to the dispenser drawer.
e. Do not add any detergent or other chemical to the
washer when following this procedure.
f. Close the washer door.
g. Select the Clean Washer with affresh cycle.
h. On some models: Select the Fresh Hold/Fresh Spin
option to help dry the washer interior after the cycle is
complete.
NOTE: The washer remembers your last option
selection and will use it for future wash cycles until
you deselect that option. While the fan is ON, the
washer door will lock. To unlock the door, touch
POWER.
i. Touch and hold START to begin the cycle. The
Clean Washer with affresh Cycle Operation is described
below.
2. Chlorine Bleach Procedure:
a. Open the washer door and remove any clothing
or items.
b. Open the dispenser drawer and add regular liquid
chlorine bleach to the MAX level in both the bleach
compartment and the fabric softener compartment.
Either traditional or HE chlorine bleach can be used.
IMPORTANT: Do not use thickened, easy-pour,
or no-splash bleach as excess suds may occur.
NOTE: Use of more liquid chlorine bleach than is
recommended above could cause washer damage
over time.
c. Close the washer door and the dispenser drawer.
d. Do not add any detergent or other chemicals to the
washer when following this procedure.
e. Select the Clean Washer with affresh cycle.
f. On some models: Select the Fresh Hold/Fresh Spin
option to help dry the washer interior after the cycle is
complete.
NOTE: The washer remembers your last option
selection and will use it for future wash cycles until
you deselect that option. While the fan is ON, the
washer door will lock. To unlock the door, touch
POWER.
g. Touch and hold START to begin the cycle. The
Clean Washer with affresh Cycle Operation is described
below.
NOTE: For best results, do not interrupt cycle.
Description of Clean Washer with affresh Cycle Operation:
1. The Clean Washer with affresh cycle will determine whether
clothing or other items are in the washer.
2. If no items are detected in the washer, it will proceed
with the cycle.
a. If any items are detected in the washer, “rL”
(remove load) will be displayed. The door will unlock.
Open washer and remove any garments from the
washer drum.
b. Touch POWER to clear the “rL” code.
c. Touch and hold START to restart the cycle.
3. Steam models only: During the rst 20 minutes of the
cycle, it will activate the steamer but the drum will not spin
or ll with water. You may see condensation on the door
glass during this initial phase. If you are using an affresh
Washer Cleaner tablet, it will not dissolve completely during
the steam phase. This is normal.
After the cycle is complete, leave the door open slightly to
allow for better ventilation and drying of the washer interior.
Cleaning the Dispensers
After a period of using your washer, you may nd some
residue buildup in the washer’s dispensers. To remove residue
from the dispensers, remove the drawer and wipe
the surfaces with an affresh Machine Cleaning Wipe or a
damp cloth and towel dry either before or after you run the
Clean Washer with affresh cycle. Use an all-purpose surface
cleaner, if needed.
IMPORTANT: Dispenser is not dishwasher safe.
Cleaning the Outside of the Washer
Use an affresh Machine Cleaning Wipe or a soft, damp cloth
or sponge to wipe up any spills. Occasionally wipe the outside
of your washer to help keep it looking new. Use an affresh
Machine Cleaning Wipe or mild soap and water.
IMPORTANT: To avoid damaging the washer’s nish,
do not use abrasive products.
CLEAN WASHER CYCLE REMINDER
NOTE: Not all models have the Clean Washer with affresh
cycle reminder light.
The Clean Washer with affresh LED
will ash at the end of a wash cycle
when the washer has run 30 wash
cycles. This is a reminder to run the
Clean Washer with affresh cycle.
If the Clean Washer with affresh cycle is not turned on, the
LED will stop ashing at the end of a wash cycle after running
3 more regular wash cycles. After 30 more wash cycles are
completed, the Clean Washer with affresh LED will again
ash at the end of a wash cycle as a reminder.
Page 17
REMOVING THE DISPENSER REMOVING THE DISPENSER (cont.)
Single Load Dispenser Drawer Single Load Dispenser Drawer (cont.)
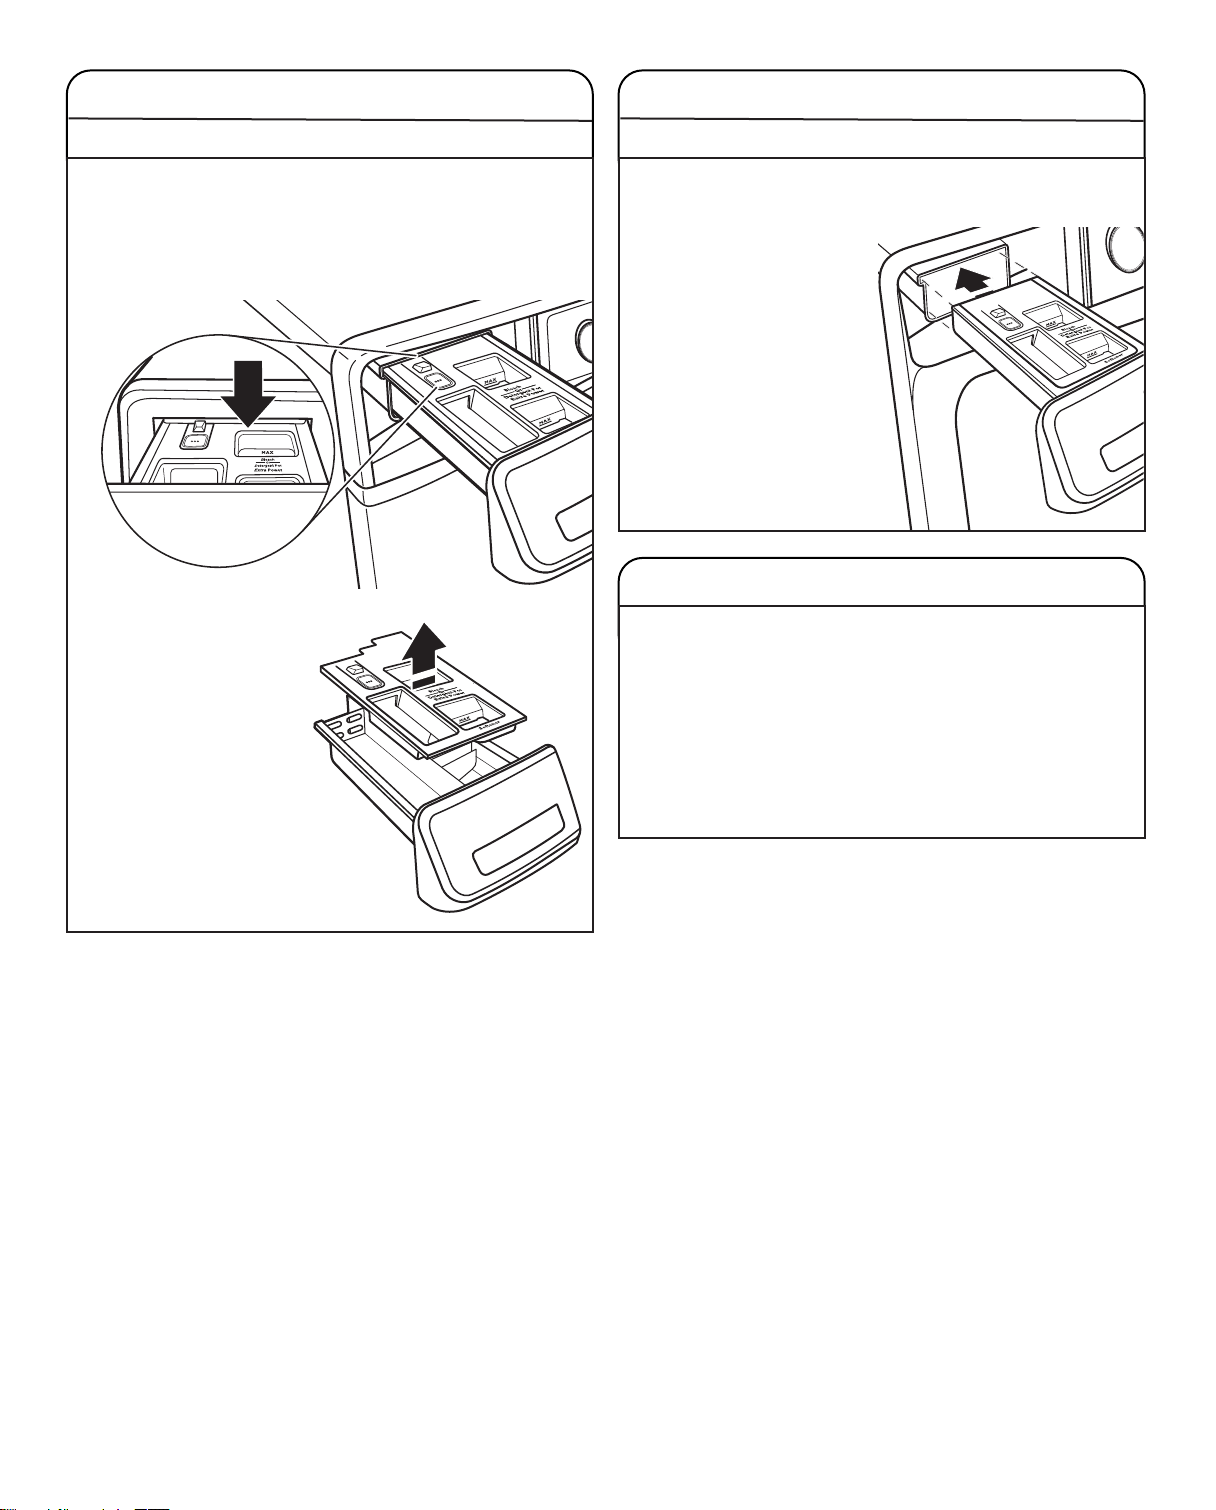
Removing the Dispenser
To remove:
1. Pull dispenser drawer out until it stops.
2. Press down on the release tab and pull straight out
to remove the dispenser.
3. Lift off cover panel by
pulling straight up.
To replace:
1. Slide cover panel back onto posts on dispenser.
2. Align edges of dispenser
with guides in washer,
then slide dispenser
back into slot.
NON-USE AND VACATION CARE
Operate your washer only when you are home. If moving,
or not using your washer for a period of time, follow these
steps:
1. Unplug or disconnect power to washer.
2. Turn off water supply to washer to avoid ooding due
to water pressure surges.
HELPFUL TIP: Attach a reminder note to the washer
to turn the water back on before washer’s next use.
3. Clean the dispensers. See “Cleaning the Dispensers.”
Page 18
WINTER STORAGE CARE
IMPORTANT: To avoid damage, install and store washer
where it will not freeze. Because some water may stay in
hoses, freezing can damage washer. If storing or moving
during freezing weather, winterize your washer.
To winterize washer:
1. Shut off both water faucets, then disconnect and drain
water inlet hoses.
HELPFUL TIP: Attach a reminder note to the washer
to turn the water back on before washer’s next use.
2. Put 1 qt (1 L) of R.V.-type antifreeze in washer drum
and run washer on Normal cycle for about 2 minutes to
mix antifreeze and remaining water.
3. Unplug washer or disconnect power.
TRANSPORTING YOUR WASHER
1. Shut off both water faucets. Disconnect and drain water
inlet hoses.
2. If washer will be moved during freezing weather, follow
“Winter Storage Care” directions before moving.
3. Disconnect drain hose from drain system and from back
of washer.
4. Unplug power cord.
5. Place inlet hoses and drain hose inside washer drum.
6. Bundle power cord with a rubber band or cable tie to
keep it from hanging onto the ground.
IMPORTANT: Call for service to install new transport bolts.
Do not reuse transport bolts. Washer must be transported
in the upright position. To avoid structural damage to
your washer, it must be properly set up for relocation
by a certied technician.
REINSTALLING/USING WASHER AGAIN
To reinstall washer after non-use, vacation, winter storage,
or moving:
1. Refer to Installation Instructions to locate, level, and
connect washer.
2. Before using again, run washer through the following
recommended procedure:
To use washer again:
1. Flush water pipes and hoses. Reconnect water inlet
hoses. Turn on both water faucets.
2. Plug in washer or reconnect power.
3. Run washer through Power Wash cycle to clean washer
and remove antifreeze, if used. Use only HE detergent.
Use half the manufacturer’s recommended amount for
a medium-size load.
Page 19
TROUBLESHOOTING
First try the solutions suggested here or visit our website at www.maytag.com.tw.
If you experience Possible Causes Solution
Error Code Appears in Display (for 2- and 3-digit displays)
Once any possible issues are corrected, touch POWER once to clear the code. Reselect and restart the cycle.
“Sd” or “Sud”
(excess suds) appears
in display
Lo followed by FL or F8
followed by E1
or
Lo followed by FL or
F08 followed by E01
(water supply error)
appears in display
Excessive suds in washer. Washer is
running a suds-reduction routine.
Check for proper water supply. Unit will drain for 8 minutes while door remains locked. The
Allow the washer to continue. Use only HE detergent. Always
follow the detergent manufacturer’s instructions to determine
the amount of detergent to use and base detergent quantity
on load size. Not all detergents labeled as High Efciency are
identical in formulation and their ability to reduce suds. For
example, natural, organic, or homemade HE detergents may
generate a high level of suds. If you use one of these and see
an “Sd” or “Sud” error code appear in the display, consider
using a different HE detergent.
drain cycle must be allowed to complete or the error code
cannot reset. When complete, touch POWER once to clear the
code. Then touch POWER again to restart washer.
If code appears again, call for service.
Both hoses must be attached and have water owing to the
inlet valve.
Both hot and cold water faucets must be ON.
Inlet valve screens on washer may be clogged.
Remove any kinks in the inlet hose.
F9 followed by E1
or
F09 followed by E 01
(drain pump system
error) appears in display
F5 followed by E2
or
F05 followed by E 02
(door will not lock)
appears in display
“rL” (remove load)
appears in display
If used, auto shut-off connectors and hoses must be properly
installed and in working order.
Check for proper inlet hoses. Use only manufacturer’s recommended inlet hoses.
Check plumbing for correct drain
hose installation. Drain hose extends
into standpipe farther than
41⁄2" (114 mm).
Not using HE detergent or using too
much HE detergent.
Washer door not locking. Touch POWER to cancel the cycle. Check that the door is
Load detected in drum during Clean
Washer with affresh cycle.
Check drain hose for proper installation.
Make sure the drain hose is not kinked, pinched, or blocked.
Remove any clogs from drain hose.
Use drain hose form and securely attach to drainpipe or tub.
Lower drain hose if the end is higher than 96" (2.4 m) above
the oor.
Use only HE detergent. Always measure detergent and follow
manufacturer’s directions based on load size and soil level.
closed completely and latching. Check for items in the washer
drum that may be keeping the door from closing completely.
Remove items from washer drum and restart Clean Washer
with affresh cycle.
Page 20
TROUBLESHOOTING
First try the solutions suggested here or visit our website at www.maytag.com.tw.
If you experience Possible Causes Solution
Error Code Appears in Display (for 2- and 3-digit displays) (cont.)
F# E# or F## E## code
other than as described
above appears in display
Washer making error
beeps
Washer beeps when
START is touched
Clean Washer LED ashing
at end of wash cycle
(on some models)
System error code. Touch POWER once to clear the code. Then touch POWER
again to restart washer. If code appears again, call for service.
Unplug washer for 30 seconds, then plug back in.
Door has not been opened and
closed for at least 3 cycles.
Door not closed. Close the door completely.
The washer has run 30 wash cycles
and is indicating a reminder to run
the Clean Washer with affresh cycle.
This code may occur when the washer is rst turned on.
Open and close the door to clear the display.
Run the Clean Washer with affresh cycle. If the Clean Washer
with affresh cycle is not turned on, the LED will stop ashing
at the end of a wash cycle after running 3 more regular wash
cycles. After 30 more wash cycles are completed, the Clean
Washer with affresh LED will again ash at the end of a wash
cycle as a reminder.
Page 21
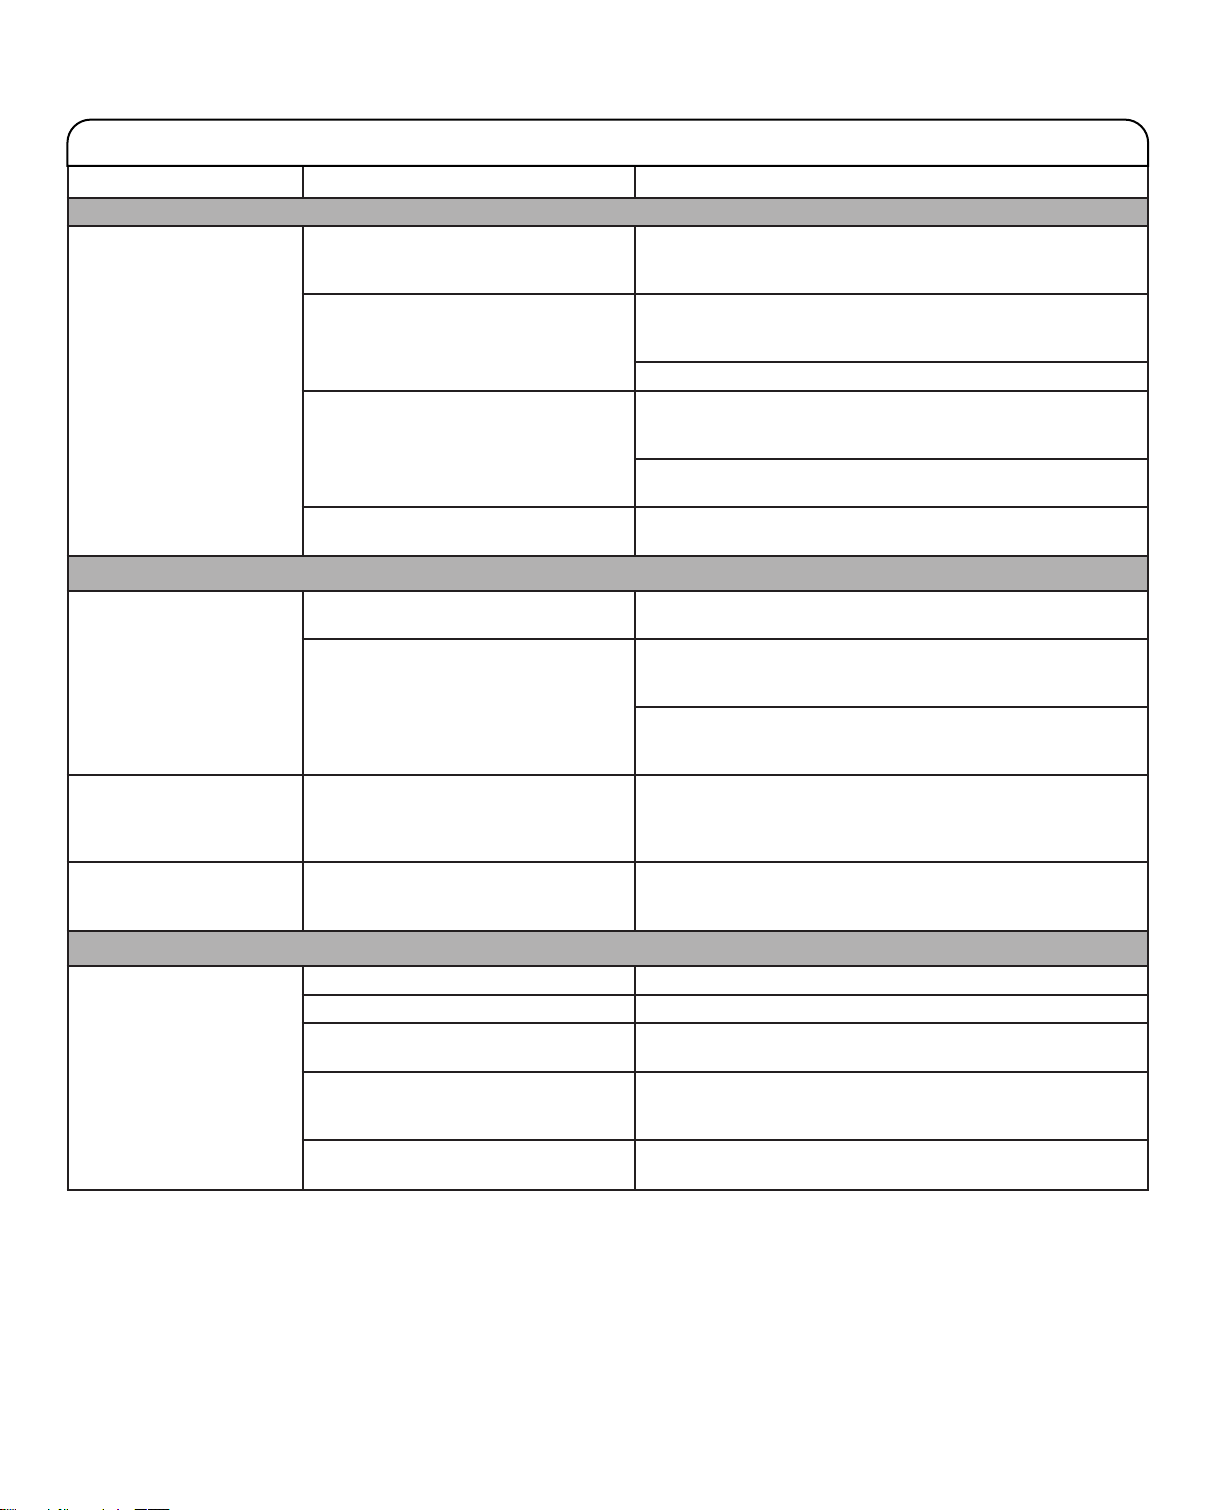
TROUBLESHOOTING
First try the solutions suggested here or visit our website at www.maytag.com.tw.
If you experience Possible Causes Solution
Vibration or Off-Balance
Vibration, rocking,
or “walking”
Noises
Clicking or metallic noises Door locking or unlocking. The door will lock, unlock, and lock again. You will hear
Gurgling or humming Washer may be draining water. The pump may make a humming sound with periodic gurgling
Rolling or sloshing
and occasional clicking
(on slow-speed spin)
Water Leaks
Check the following for
proper installation
Feet may not be in contact with the
oor and locked.
Washer may not be level. Check oor for exing or sagging. If ooring is uneven, a
Load could be unbalanced or too large. Avoid tightly packing the load. Avoid washing single items.
The shipping bolts are still in the back
of the washer.
Objects caught in washer drain system. Empty pockets before washing. Loose items such as coins
Steel balls in the balancing system are
balancing the load.
Fill hoses not attached tightly. Tighten ll-hose connection.
Fill-hose washers. Properly seat all four ll-hose at washers.
Drain hose connection. Check that the drain hose is properly secured to drainpipe or
Check household plumbing for leaks
or clogged sink or drain.
Strainer (or nylon stocking) on end of
drain hose is clogged.
Front and rear feet must be in rm contact with oor and
washer must be level to operate properly. Jam nuts must be
tight against the bottom of the cabinet.
3/4" (19 mm) piece of plywood under your washer will reduce
sound. Do not install washer on a raised wooden platform.
See “Level the Washer” in Installation Instructions.
Balance a single item such as a rug or jeans jacket with a
few extra items.
Item or load is not suitable for selected cycle. See “Cycle
Guide” and “Using Your Washer.”
See “Remove transport bolts from washer” in the
Installation Instructions.
3 clicks after touching and holding START. This is normal.
could fall between washer drum and tub or may block pump.
It may be necessary to call for service to remove items.
It is normal to hear metal items on clothing, such as metal
snaps, buckles, or zippers, touch against the stainless
steel drum.
or surging as nal amounts of water are removed during the
spin/drain cycles. This is normal at certain stages of
the cycle.
This is normal at certain stages of the cycle.
laundry tub.
Water can back up out of a clogged sink or drainpipe. Check
all household plumbing for leaks (laundry tubs, drain pipe,
water pipes, and faucets).
Remove strainer/nylon stocking from drain hose.
Page 22
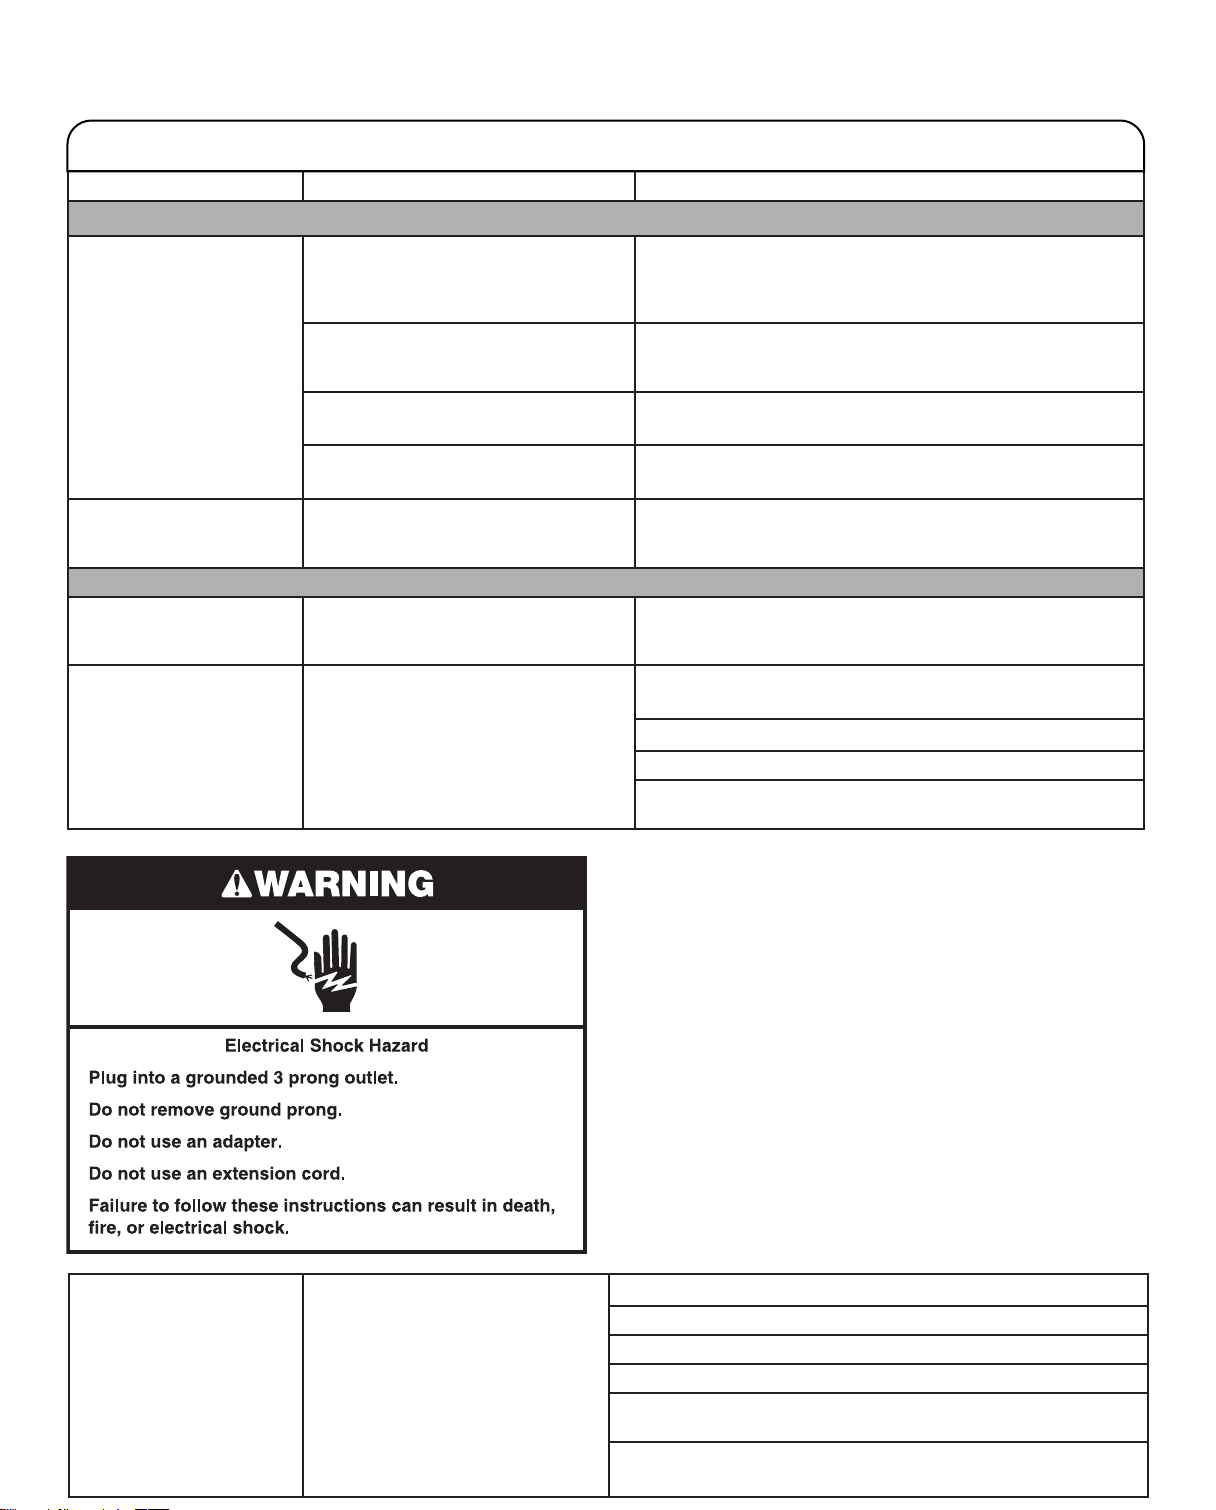
TROUBLESHOOTING
First try the solutions suggested here or visit our website at www.maytag.com.tw.
If you experience Possible Causes Solution
Water Leaks (cont.)
Water or suds leaking from
door or rear of cabinet
Leaking around door Hair, lint, or other debris on inner
Washer not performing as expected
Load not completely
covered in water
Washer won’t run or ll;
washer stops working
Not using HE detergent or using too
much HE detergent.
Using thickened, easy-pour,
or no-splash bleach when running
the Clean Washer with affresh cycle.
Residue on door glass. Periodically clean the underside of the glass window to avoid
Door opened during “Add Garment.” Water can drip off the inside of the door when the door is
door glass preventing proper seal
with rubber door seal.
Water level not visible on door or does
not cover clothes.
Check for proper water supply. Both hoses must be attached and have water owing
Only use HE detergent. Suds from regular detergents
can cause leaking from the door or rear of cabinet. Always
measure detergent and follow manufacturer’s directions
based on your load requirements.
Use affresh tablet or regular, non-thickened chlorine bleach
when running the Clean Washer with affresh cycle.
potential leaks.
opened after the start of a cycle.
Clean inner door glass and seal. See “Cleaning the Door
Seal” in the “Washer Maintenance” section.
This is normal for an HE front-load washer. The washer
senses load sizes and adds the correct amount of water
for optimal cleaning.
to the inlet valve.
Both hot and cold water faucets must be turned on.
Check that inlet valve screens have not become clogged.
Check for any kinks in inlet hoses, which can restrict
water ow.
Washer won’t run or ll;
washer stops working
(cont.)
Check proper electrical supply. Plug power cord into a grounded 3 prong outlet.
Do not use an extension cord.
Ensure there is power to outlet.
Do not plug into a GFCI (Ground Fault Circuit Interrupter).
Check electrical source or call an electrician to check if voltage
is low.
Reset a tripped circuit breaker. Replace any blown fuses.
NOTE: If problems continue, contact an electrician.
Page 23
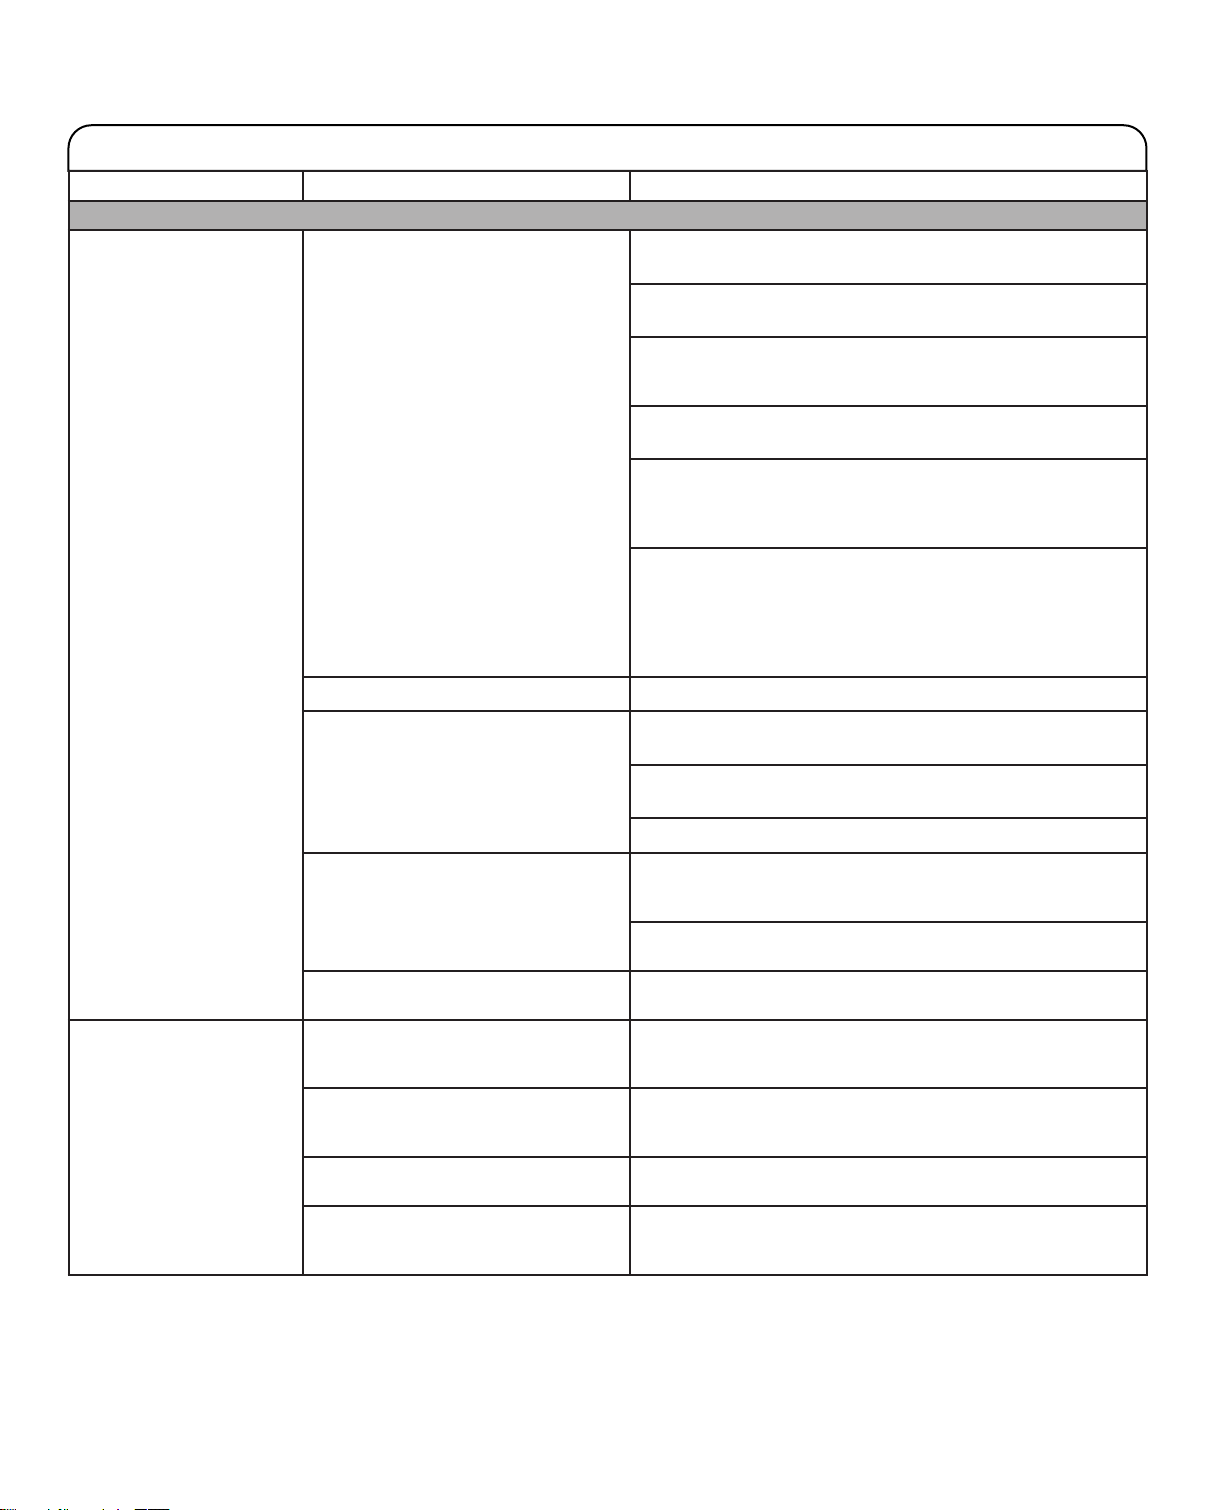
TROUBLESHOOTING
First try the solutions suggested here or visit our website at www.maytag.com.tw.
If you experience Possible Causes Solution
Washer not performing as expected (cont.)
Washer won’t run or ll;
washer stops working
(cont.)
Normal washer operation. Door must be completely closed and latched for washer
to run.
Washer will pause during certain phases of cycle.
Do not interrupt cycle.
The washer pauses for about 2 minutes during certain cycles.
Allow the cycle to continue. Some cycles feature periods of
tumbling and soak.
Washer may be stopped to reduce suds. Use only a proper
amount of HE detergent.
Cold Wash uses less water in the beginning of the cycle to
provide a high concentration of detergent for optimal cleaning
action. Following this concentrated tumbling, more water is
used to complete the wash.
Steam Models only: During the rst 20 minutes of the Clean
Washer with affresh cycle, it will activate the steamer but the
drum will not spin or ll with water. You may see condensation
on the door glass during this initial phase. If you are using an
affresh Washer Cleaner tablet, it will not dissolve completely
during the steam phase. This is normal.
The washer door is not rmly shut. The door must be closed during operation.
Washer not draining/
spinning; loads are
still wet
Washer not loaded as recommended. Remove several items and rearrange load evenly in washer
drum. Close door, then touch and hold START.
Do not add more than 1 or 2 additional items after cycle has
started to avoid tightly packing or unbalancing.
Do not add more water to the washer.
Not using HE detergent or using too
much HE detergent.
Door not opened between cycles. After any wash cycle is completed, the door must be opened
Drain hose extends into standpipe
farther than 4.5" (114 mm).
The drain hose is clogged or the
end of the drain hose is more than
96" (2.4 m) above the oor.
Strainer/nylon stocking on end of
drain hose.
The drain hose ts too tightly
in the standpipe or it is taped
to the standpipe.
Only use HE detergent. Suds from regular detergents can
slow or stop the washer. Always measure detergent, following
manufacturer’s directions based on your load requirements.
To remove suds, cancel cycle. Select DRAIN & SPIN with
Extra Rinse. Touch START. Do not add more detergent.
and then closed before a new cycle can begin.
Check drain hose for proper installation. Use drain hose form
and securely attach to drainpipe or tub. Do not tape over
drain opening.
Lower drain hose if the end is higher than 96" (2.4 m) above
the oor. Remove any clogs from drain hose. See “Installation
Requirements” in Installation Instructions.
Remove strainer/nylon stocking from drain hose.
The drain hose should be loose, yet t securely. Do not seal
the drain hose with tape. The hose needs an air gap. See
“Secure the Drain Hose” in Installation Instructions.
Page 24
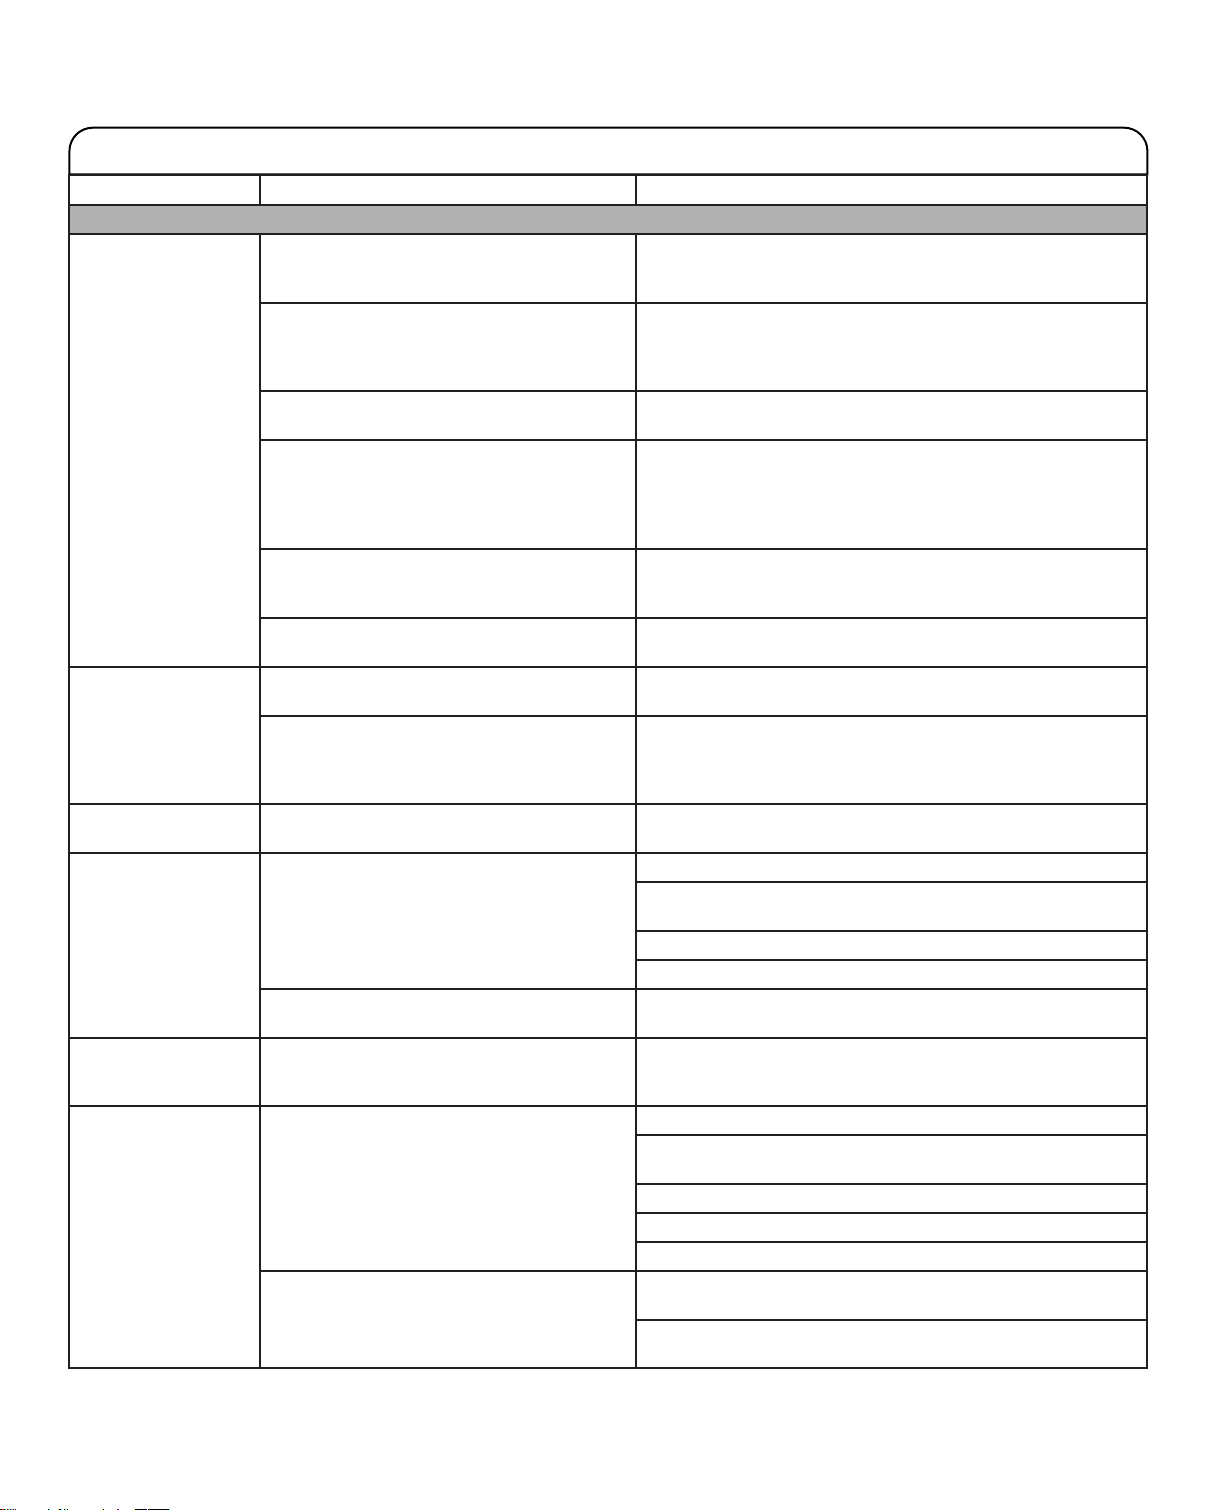
TROUBLESHOOTING
First try the solutions suggested here or visit our website at www.maytag.com.tw.
If you experience Possible Causes Solution
Washer not performing as expected (cont.)
Washer not draining/
spinning; loads are
still wet (cont.)
Door locked at end
of wash cycle
Door will not unlock Door locks when cycle has started. If the “Add Garment” light is lit, touch START once.
Incorrect or wrong
wash or rinse
temperatures
Desired setting or
option does not light
Load not rinsed Check for proper water supply. Make sure hot and cold inlet hoses are not reversed.
Using cycles with a slower spin speed. Cycles with slower spin speeds remove less water than
cycles with fast spin speeds. Use the recommended cycle/
speed spin for your garment.
Washer not loaded as recommended. A tightly packed or unbalanced load may not allow the
washer to spin correctly, leaving the load wetter than
normal. See “Cycle Guide” for load size recommendation
for each cycle.
The load may be out of balance. Avoid washing single items. Balance a single item, such as
a rug or jeans jacket, with a few extra items.
Not using HE detergent or using too much
HE detergent.
Small items may have been caught in the
pump or stuck between the washer drum
and the outer tub.
There are too many clothes in the Overnight
Wash & Dry cycle.
Water remaining in washer after cycle. Select DRAIN & SPIN to remove any water remaining in the
Fresh Hold/Fresh Spin option is ON. While this option is ON, the fan blows and the load is tumbled
Check for proper water supply. Make sure hot and cold inlet hoses are not reversed.
Washing many loads. Your hot water tank may not have enough hot water to keep
For best performance, not all settings are
available with each cycle and some options
cannot be used together.
Not using HE detergent or using too much
HE detergent.
Use only HE detergent. Suds from regular detergent or using
too much detergent can slow or stop draining or spinning.
Always measure and follow manufacturer’s directions for your
load. To remove extra suds, select DRAIN & SPIN with Extra
Rinse. Do not add detergent.
Check the drum for any items sticking through the drum
holes. Empty pockets and use garment bags when washing
small items.
Only use the Overnight Wash & Dry cycle for 2–4 lightly soiled
synthetic garments, athletic uniforms, or workout wear.
washer. The washer door will unlock at the end of the drain.
periodically for up to 12 hours. The door remains locked
during this time. To unlock the door, cancel the Fresh Hold/
Fresh Spin option by touching POWER.
The door will unlock.
Both hoses must be attached to both washer and faucet,
and have both hot and cold water owing to inlet valve.
Check that inlet valve screens are not clogged.
Remove any kinks in hoses.
up with the number of hot or warm washes. This is normal.
See the “Cycle Guide” for the available settings and options
for each cycle.
Both hoses must be attached and have water owing to the
inlet valve.
Both hot and cold water faucets must be on.
Inlet valve screens on washer may be clogged.
Remove any kinks in the inlet hose.
The suds from non-HE detergent can cause the washer
to operate incorrectly.
Use only HE detergent. Always measure detergent and follow
manufacturer’s directions based on load size and soil level.
Page 25
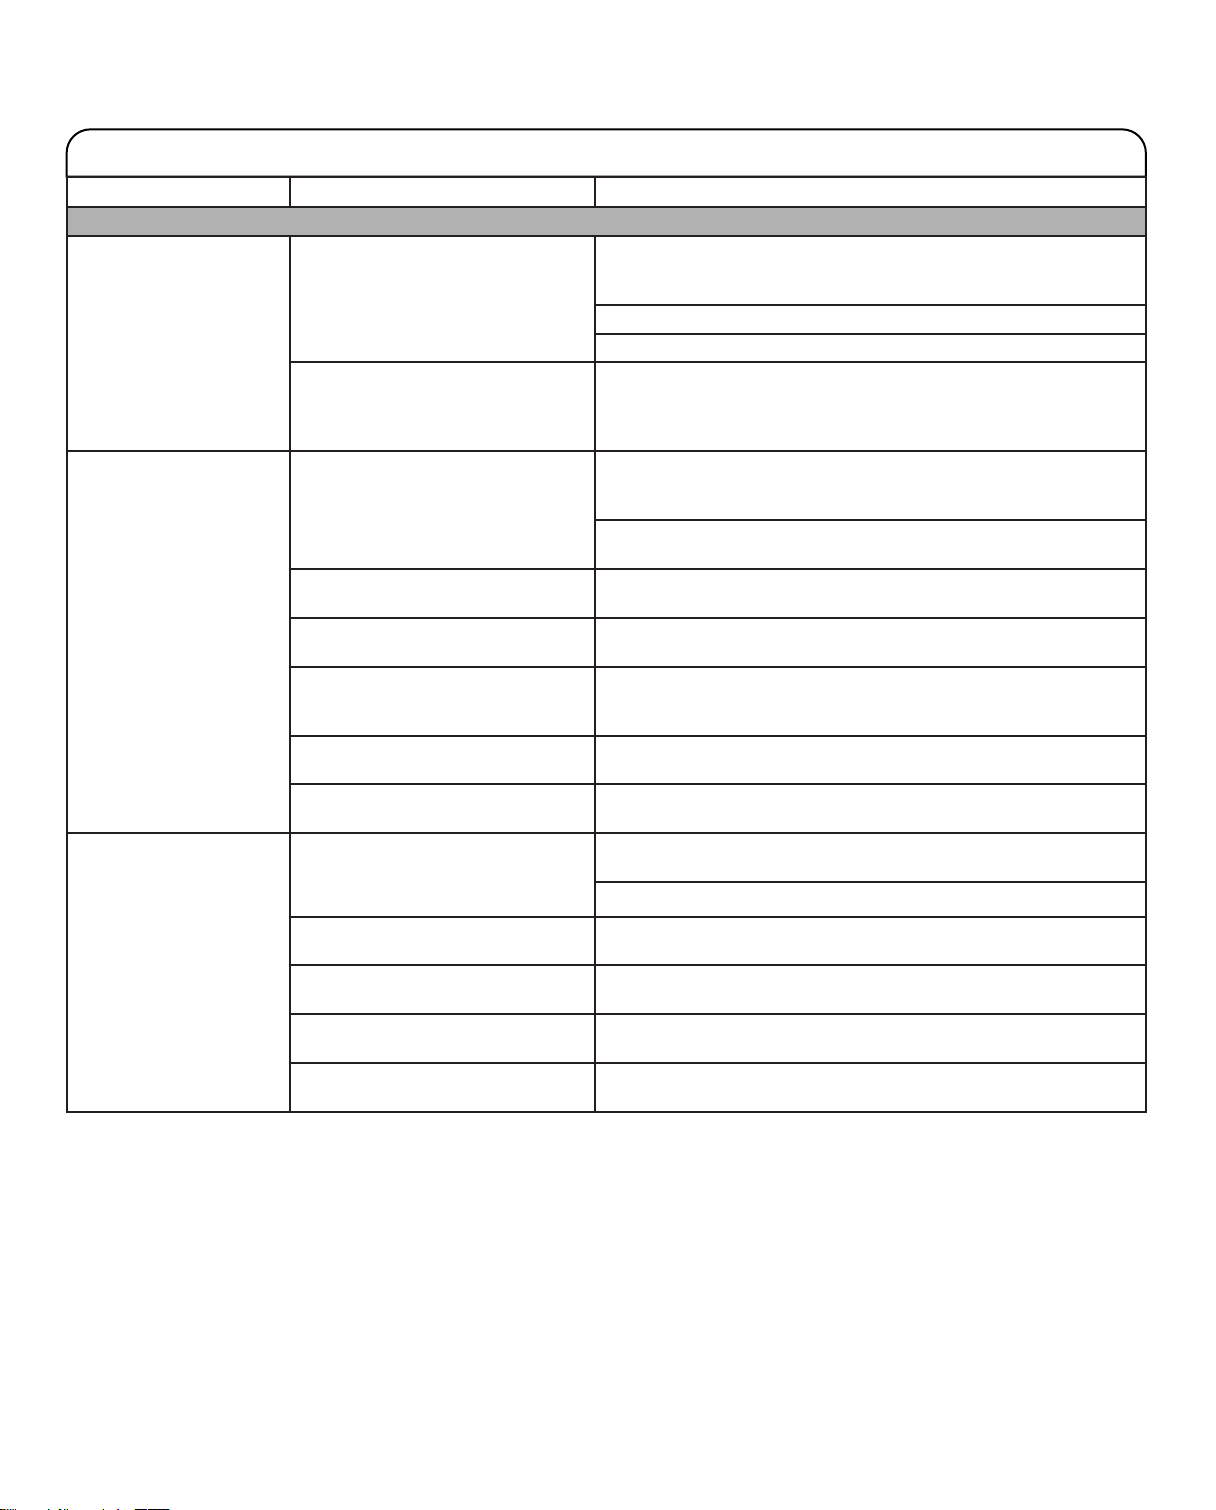
TROUBLESHOOTING
First try the solutions suggested here or visit our website at www.maytag.com.tw.
If you experience Possible Causes Solution
Washer not performing as expected (cont.)
Load not rinsed (cont.) Washer not loaded as
recommended.
The load may be out of balance. When load unbalance occurs, a washing process will start to
Load is wrinkled, twisted,
or tangled
Not cleaning or
removing stains
Washer not loaded as
recommended.
Wash action too long for load. Select a lower soil level. Note that items will not be cleaned as
Spin speed too fast for load. Select a slower spin speed. Note that items will be wetter than
The washer is not unloaded
promptly.
Not choosing the right cycle for
the load being washed.
The wash water was not warm
enough to relax wrinkles.
Washer not loaded as
recommended.
Avoid tightly packing the washer. The washer will not rinse well
if tightly packed. Load with dry items only. See the “Cycle Guide”
for load size recommendations for each cycle.
Use cycle designed for the fabrics being washed.
Add only 1 or 2 garments after washer has started.
redistribute the load. This may lengthen the cycle time. Avoid
washing single items. Balance a single item, such as a rug or
jeans jacket, with a few extra items.
Add load loosely. Items need to move freely to reduce
wrinkling and tangling. See the “Cycle Guide” for load size
recommendations for each cycle.
Reduce tangling by mixing types of load items. Use the
recommended cycle for the type of garments being washed.
deeply as when using a higher soil level.
when using a faster speed spin.
Unload the washer as soon as it stops or use Fresh Hold/Fresh
Spin option if you will not be able to unload the washer at the end
of the cycle.
Use the Delicates cycle or another cycle with a slow spin speed
to reduce wrinkling.
If safe for load, use warm or hot wash water.
Add load loosely. Items need to move freely for best cleaning. See
the “Cycle Guide” for load size recommendations for each cycle.
Add only 1 or 2 garments after washer has started.
Not using HE detergent or using
too much HE detergent.
Hard water or high level of iron
(rust) in water.
Fabric softener dispensing
ball used.
Powdered detergent used for
slow-speed cycle.
Use only HE detergent. Always measure detergent and follow
manufacturer’s directions based on load size and soil level.
You may need to install a water softener and/or iron lter.
Dispensing balls will not operate correctly with this washer.
Add liquid fabric softener to the fabric softener compartment.
Consider using liquid detergent.
Page 26
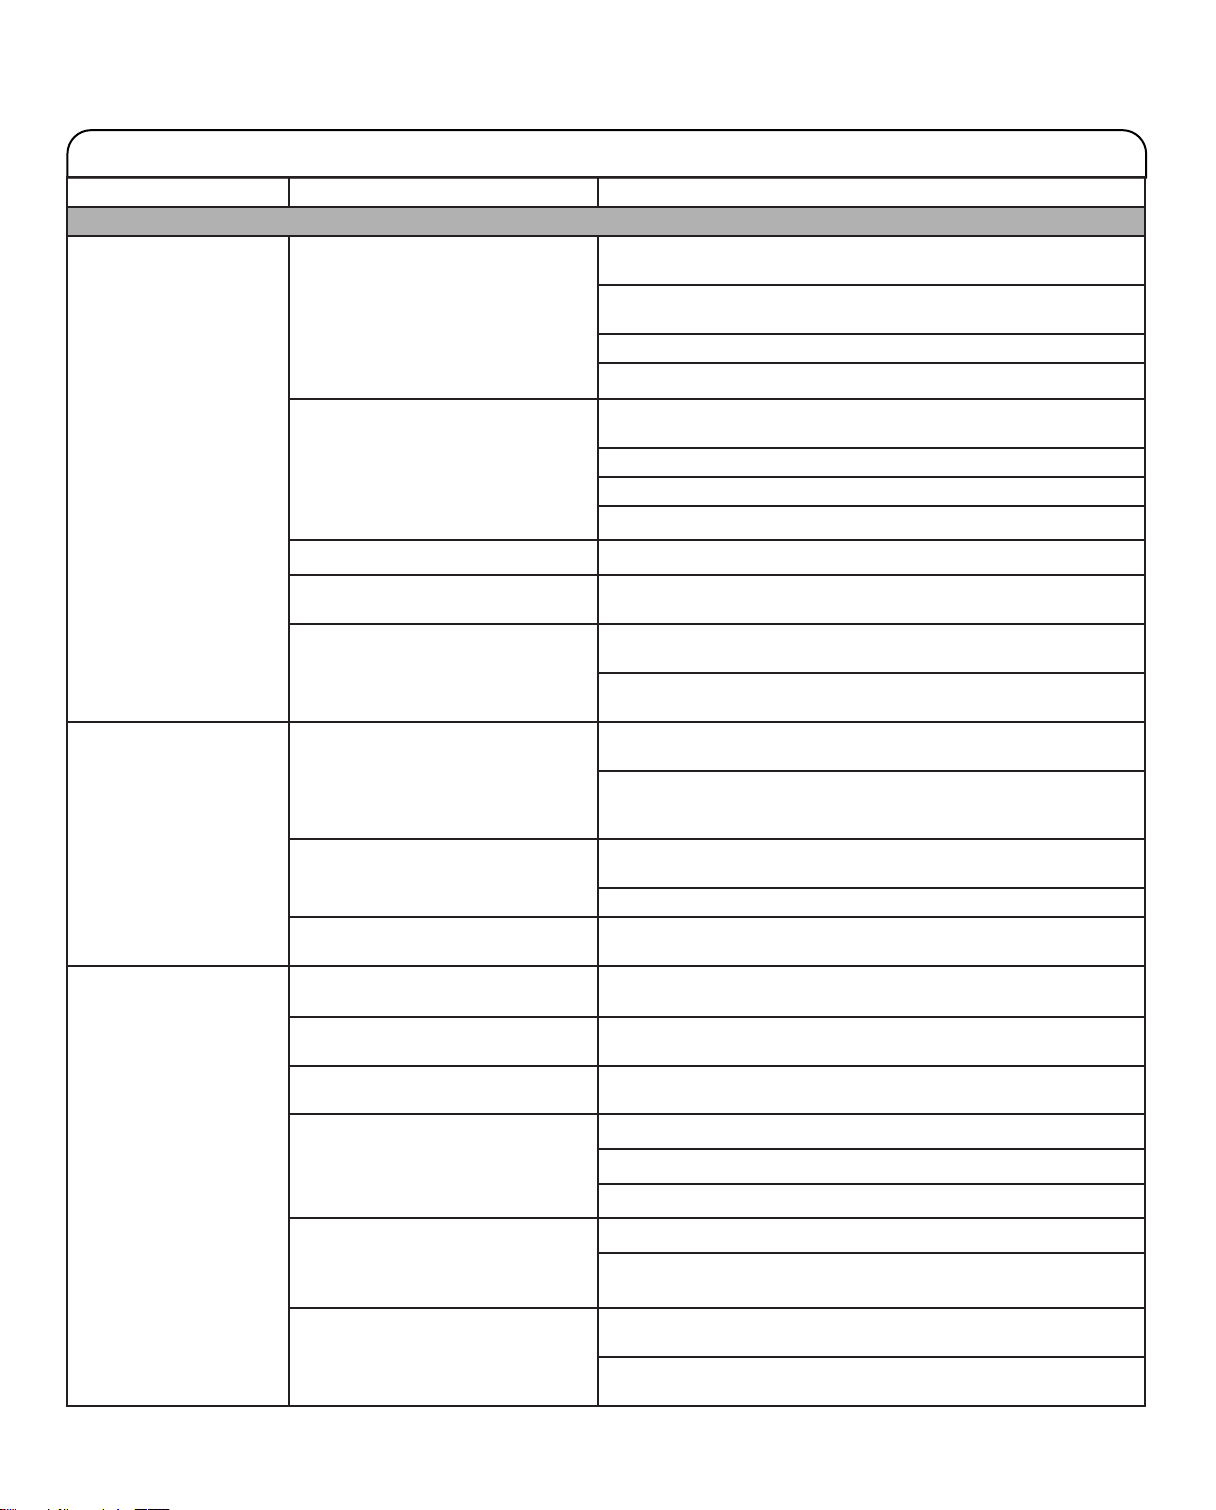
TROUBLESHOOTING
First try the solutions suggested here or visit our website at www.maytag.com.tw.
If you experience Possible Causes Solution
Washer not performing as expected (cont.)
Not cleaning or
removing stains
(cont.)
Odors Monthly maintenance not done as
Fabric damage Sharp items were in pockets during
Not using correct cycle for fabric
type.
Not using dispensers. Use dispensers to avoid chlorine bleach and fabric softener
Dispense cartridge is empty. Fill dispense cartridge to the Max line with HE liquid detergent.
Not washing like colors together. Wash like colors together and remove promptly after the cycle is
Hard water or not enough
detergent used.
recommended.
Not using HE detergent or using too
much HE detergent.
Door not left open after use. This washer has a tight seal to avoid water leaks. To avoid odors,
wash cycle.
Strings and straps could have
tangled.
Items may have been damaged
before washing.
Fabric damage can occur if washer
is tightly packed.
Use a higher soil level setting and warmer wash temperature
to improve cleaning.
If using the Overnight Wash & Dry or Rapid Wash cycles, wash
only a few items.
Use Power Wash for tough cleaning.
Add an extra rinse for heavily soiled loads.
staining.
Load dispensers before starting a cycle.
Avoid overlling.
Do not add products other than those specied directly to load.
complete to avoid dye transfer.
Use more detergent for washing heavy soils in cold or
hard water.
Touch WATER HARDNESS (on some models) to change water
hardness to “hard.”
Run the Clean Washer with affresh cycle monthly or every 30
wash cycles. See “Washer Care” in “Washer Maintenance.”
Unload washer as soon as cycle is complete. Use the
Fresh Hold/Fresh Spin option if load cannot be removed
immediately after the wash is complete.
Use only HE detergent. Be sure to measure correctly. Always
follow the manufacturer’s directions.
See “Washer Care” section.
leave the door open to allow the washer to dry between uses.
Empty pockets, zip zippers, and snap or hook fasteners before
washing to avoid snags and tears.
Tie all strings and straps before starting wash load.
Mend rips and broken threads in seams before washing.
Avoid tightly packing the washer. Load with dry items only.
Use cycle designed for the fabrics being washed.
Fabric damage can occur if washer
door is closed on an item, trapping
it between the door glass and the
rubber seal.
Liquid chlorine bleach may have
been added incorrectly.
Add only 1 or 2 garments after washer has started.
Do not overll the washer.
Push wash load fully into the washer.
Do not pour liquid chlorine bleach directly onto load. Wipe up
bleach spills.
Undiluted bleach will damage fabrics. Do not use more than
recommended by manufacturer.
Page 27
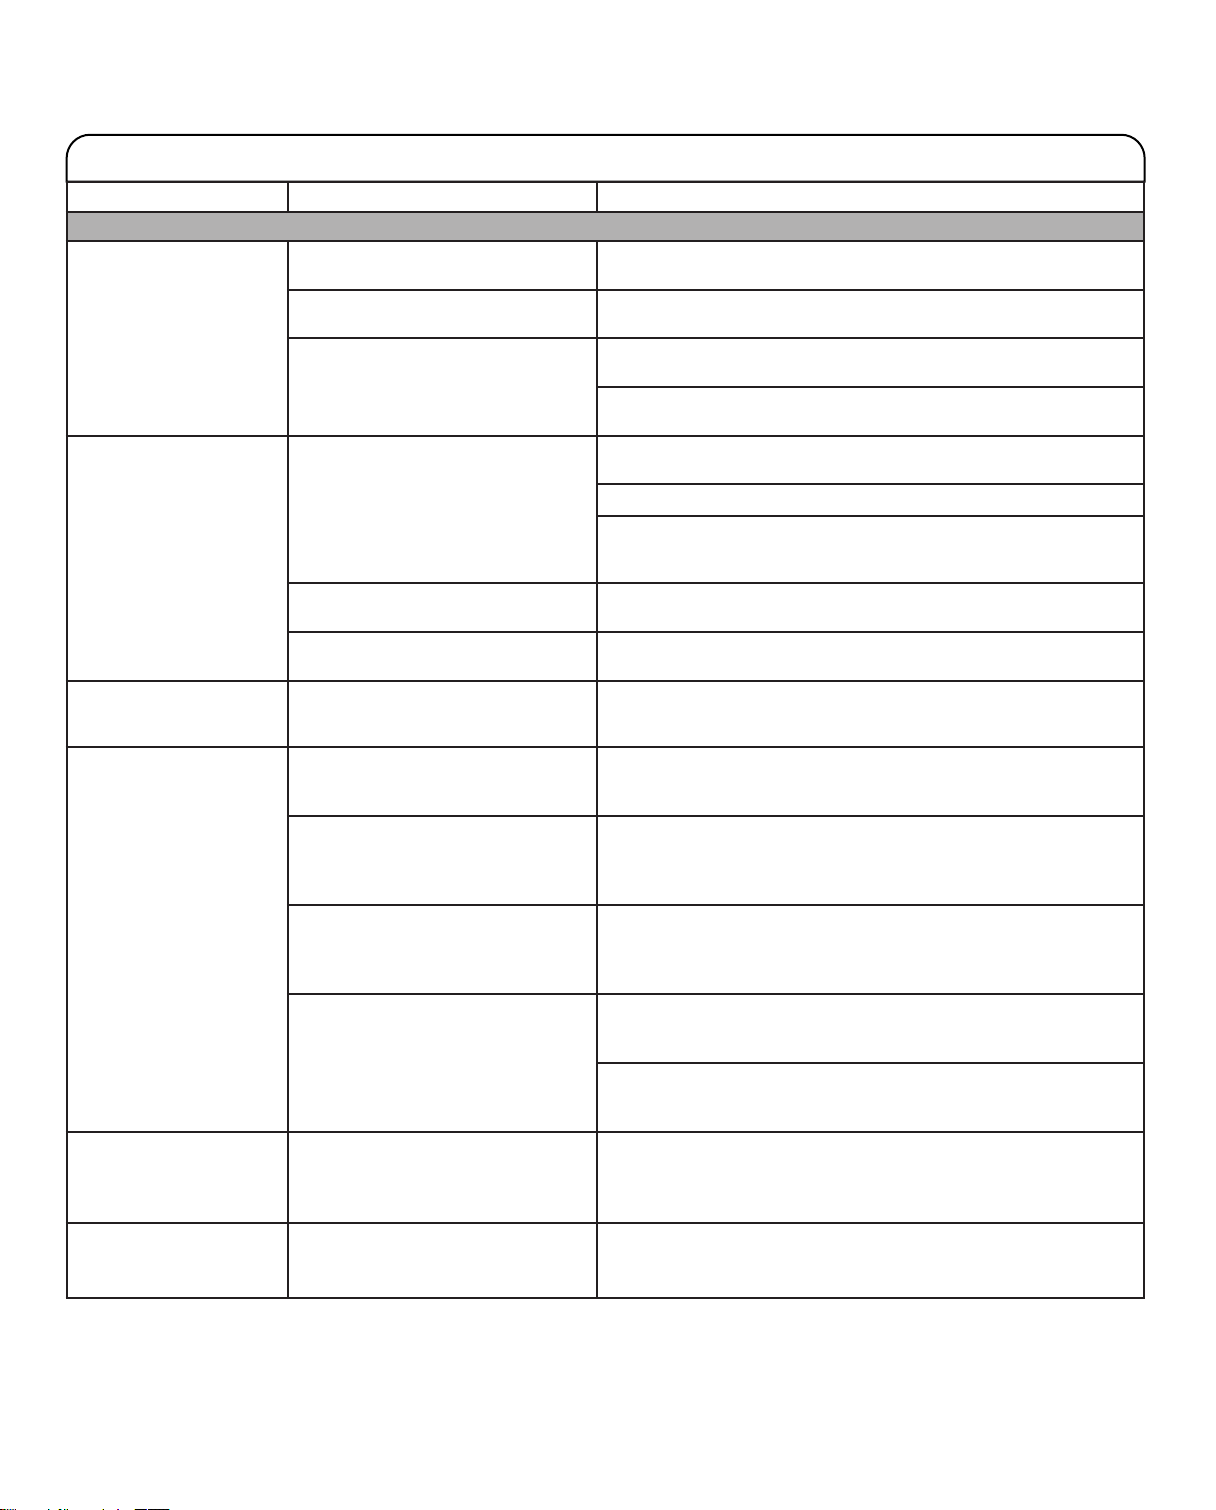
TROUBLESHOOTING
First try the solutions suggested here or visit our website at www.maytag.com.tw.
If you experience Possible Causes Solution
Washer not performing as expected (cont.)
Gray whites, dingy colors Load not sorted properly. The transfer of dye can occur when mixing whites and colors
in a load. Sort dark clothes from whites and lights.
Wash temperatures too low. Use hot or warm temperatures if safe for the load. Make sure your
hot water system is adequate to provide a hot water wash.
Incorrect dispenser
operation
Single-dose laundry
packet not dissolving
Cycle time changes
or cycle time too long
The controls are not
responding
Liquid detergent on door
glass prior to beginning
of cycle
Hard water or not enough
detergent used.
Clogged dispensers or laundry
products dispensing too soon.
Liquid chlorine bleach not used
in bleach compartment.
Water in dispenser after cycle has
nished.
Adding laundry packet incorrectly. Be sure laundry packet is added to washer drum before
Normal washer operation. The cycle times vary automatically based on your water pressure,
Excessive suds in washer. When excessive suds are detected, a special suds routine
Load may be out of balance. When load unbalance occurs, a washing process will start to
Not using correct cycle for
load type.
Control Lock is ON. Touch and hold CONTROL LOCK for 3 seconds to turn off
Detergent is free to ow from the
single-dose dispenser.
Use more detergent for washing heavy soils in cold or
hard water.
Touch WATER HARDNESS (on some models) to change water
hardness to “hard.”
Do not overll dispenser. Overlling causes immediate
dispensing.
Load dispensers before starting a cycle.
Homes with low water pressure may result in residual powder
in the dispenser. To avoid, select a warmer wash temperature
if possible, depending on your load.
Use only liquid chlorine bleach in the bleach compartment.
It is normal for small amounts of water to remain in dispenser
at the end of the cycle.
adding clothes. Do not add packet to dispenser. Follow the
manufacturer’s instructions to avoid damage to your garments.
water temperature, detergent, and clothes load. The options you
select will also affect the cycle times.
automatically starts to remove extra suds and ensure proper
rinsing of your garments. This routine will add time to the
original cycle.
redistribute the load. This extends the cycle time. Avoid washing
single items. Balance a single item such as a rug or jeans jacket
with a few extra items.
The Rapid Wash cycle is designed for smaller load sizes
(2–4 items) of lightly soiled garments. If larger loads are washed
in this cycle, cycle time will be increased.
When using the Rapid Wash or Delicates cycle, you should wash
small loads. This ensures a gentle wash for your garments without
increasing cycle time.
Control Lock. For each second CONTROL LOCK is held down,
the display will count down one second, you will see “3,” then
“2,” then “1.”
Do not add liquid detergent until laundry is loaded.
Page 28

ASSISTANCE AND SERVICE
Before calling for assistance or service, please check the
“Troubleshooting” section. It may help you save the cost
of a service call. If you still need help, please follow the
instructions below:
Before calling, please know the purchase date and the
complete model and serial number of the washer.
This information can help us to better respond to your request.
IMPORTER INFORMATION
WHIRLPOOL (TAIWAN) CO., LTD.
Customer Service toll free helpline: 0800 258 558
Customer Service e-mail: [email protected]
Website: www.maytag.com.tw
If you need replacement parts
If you need to order replacement parts, we recommend that you
only use factory-specified parts. These parts fit right and work right
because they are manufactured to the same precise standards used
to make each new Maytag product.
To locate original factory-specified parts in your area:
Please directly contact the dealer who sold the washer, or contact
Whirlpool company.
W11411493B
©2020 版權所有。
All rights reserved.
 Loading...