

Page 1
BUILT-IN SELF CLEANING
OVEN - MICROWAVE INSERTABLE
-USE AND CARE MANUAL
Copy Your Model and Serial Numbers
IN THE BOX BELOW
Model and Serial numbers are on
a plate on the front frame behind
the oven door. If you call for service,
or with a question, have this information ready.
Kee this book, your installation
gui B e, your warranty and the sales
slip together.
Sectal No ~.
Purchase Date
Parl No 338974
- . .-
Page 2
b
5
E
0
0
SAFETY RULES
HOWTOUSEYOUROVEN
l
Clock and Oven Controls
l
Oven Light T.
l
Rack and Pan Arrangemenl
l
Oven Vent
l
Moisture.
l
New Oven Odor
l
Preheating..
-
COOKING HINTS
l
Using Foil.
l
Choosing Oven Cookware
l
Common Baking Problems and Causes
l
Broiling Tips
l
Positioning Broiler Pan
3-4 CLEANING AND CARE
10-14
l
Oven Cleanmg
10.11
l
Cleaning Instructions
12
l
Removable Oven Racks and Gurdes
12
l
Removable Oven Door
13
l
Replacing the Mrcrowave Oven Fuse
14
l
Replacrng the Oven Light
15
PREVENTING SERVICE CALLS
14.15
L.P. BURNER ADJUSTMENTS
The adlustments rn your lnstallatron Guide must be made before
you try lo use your oven.
If you are usrng Lrquified Petroleum Gas (bothed gas) all L P
adjustmenls in your installation guide must be made before use
If your oven is not properly adlusted, flames may be too high,
or Ihe range may use too much fuel, release toxic fumes or cook
poorly.
FOR YOUR SAFETY
If you smell gas:
1. Open windows.
2. Don’t touch electrical switches.
3. Put out any open flame.
4. Call your gas supplier at once.
/
Ii
2
I
Y
FOR YOUR SAFETY
Do not store or use gasoline or
other flammable vapors and liquids
near thus or any other applrance.
.-
Page 3
IMPORTANT INSTRUCTIONS
Read the Safety Rules below and all operating Instructions
before using this appliance.
m
GENERAL
Keep this manual for iurther USC
f3e sure your oven IS properly Installed and grolJndetl b,t
a quaIlfled technicIan
-.
Never try to repalr or replace any part of the oien u~+x;
speclflcally recommended In thls manual All other scrv~c~
Ing should be done by a quaIlfled lechnlctarl
Never block the flow of ventllatlon air Always keep oven
vent ducts open for free air flow The oven vent duct IS below
the control panel
PROTECT YOUR CHILDREN
Teach your children not to play with overi controls As lhey
become old enough, teach them lo use the OVW safei) and
correctly
Never leave children alone or unwatched In an area where
an oven IS or- use Children should never be allowed to SII
or stand on the open oven door Never leave the oven door
open when the oven IS unaltended
SAFETY
Never use your oven for warmlng or heating a room Such
use can be dangerous as well as damaglng lo oven
parts
Never wear loose fitting or hanging clothes while using your
oven Such clothes may catch fire and cause serious injury
Never heal urlopeneo lood containers Pressure build-up
may make contaner burst and cause Injury
Always use care v&en opening oven door Let hot air or
sli?a17i escape before removing or replaclng food
Always move oven racks wli~le oven IS cool If a rack must
he moved while Ihe oven It hot, do not let the pot holder
touch the hot heating elemenl In the oven
Always use dry pot holders when removing pans from the
oven Moist or damp pot holders can cause steam burns
Do not lel a pol holder touch a hot heating element Do not
use a lowel or other bulky clolh
Never louch oven heatlnq elements or lnterlor surfaces 01
the oven Heating elements and nearby areas rnay be hot
enough to burn you even though lhey are dark ln color Dur
ing and after use, do not let clolhlng or flammable materials
touch heating elements or oven surfaces until they have had
time to cool Other surfaces thal may become hot during
use are the over) VC’I’ door and Ihe ov?n,door
Page 4
GREASE FIRES
Always keep Ihe appliance area clear and free from lhlngs
that WIII burn, gasoline and other llammable vapors and IIquads Never store materials In an oven Flammable Items
may catch fire and nlastlc Items may melt and burn
When brolllng, always remember to remove the broiler pan
from the oven and clean It when you are done cooklng II
you leave a broiler pan full of grease In the oven and later
use the oven, you may have a broiler IIre
Never use aluminum loll to line tb oven bottom, excepi
as suggested on page 8 of this manual Improper use 01
lhese liners may create a IIre hazard
PUTTING OUT AN OVEN FIRE
If you do have an oven fire, do not try to
move the pan. Instead:
1. Keep oven door closed.
2. Turn oven off.
3. If the fire continues, throw baking soda
on the fire.
Never use water on a grease fire - it will
only spread the flames. Never pick up a
flaming pan.
4
SELF-CLEANING OVEN
Always remove Ihe oven racks, the broiler pan and other
ulenslls before a self-clear~lng cycle
Never use any type 01 cornrnerclal oven cleaner or oven
llner protective coating In or around any part of your oven
Do not use any type 01 aerosol product near your oven
because the chemical thal produces the spraying action.
may, in the presence of heat, cause melal parts lo corrode
and could be flammable
The door gasket IS essenllal for a good seal so care should
be taken not to rub damage, or move the gasket Clean
only with hydrogen peroxide See page 10
Clean only oven parls Itsted In this manual See pages 1 O-1 3
for special cleaning InstructIons
Page 5
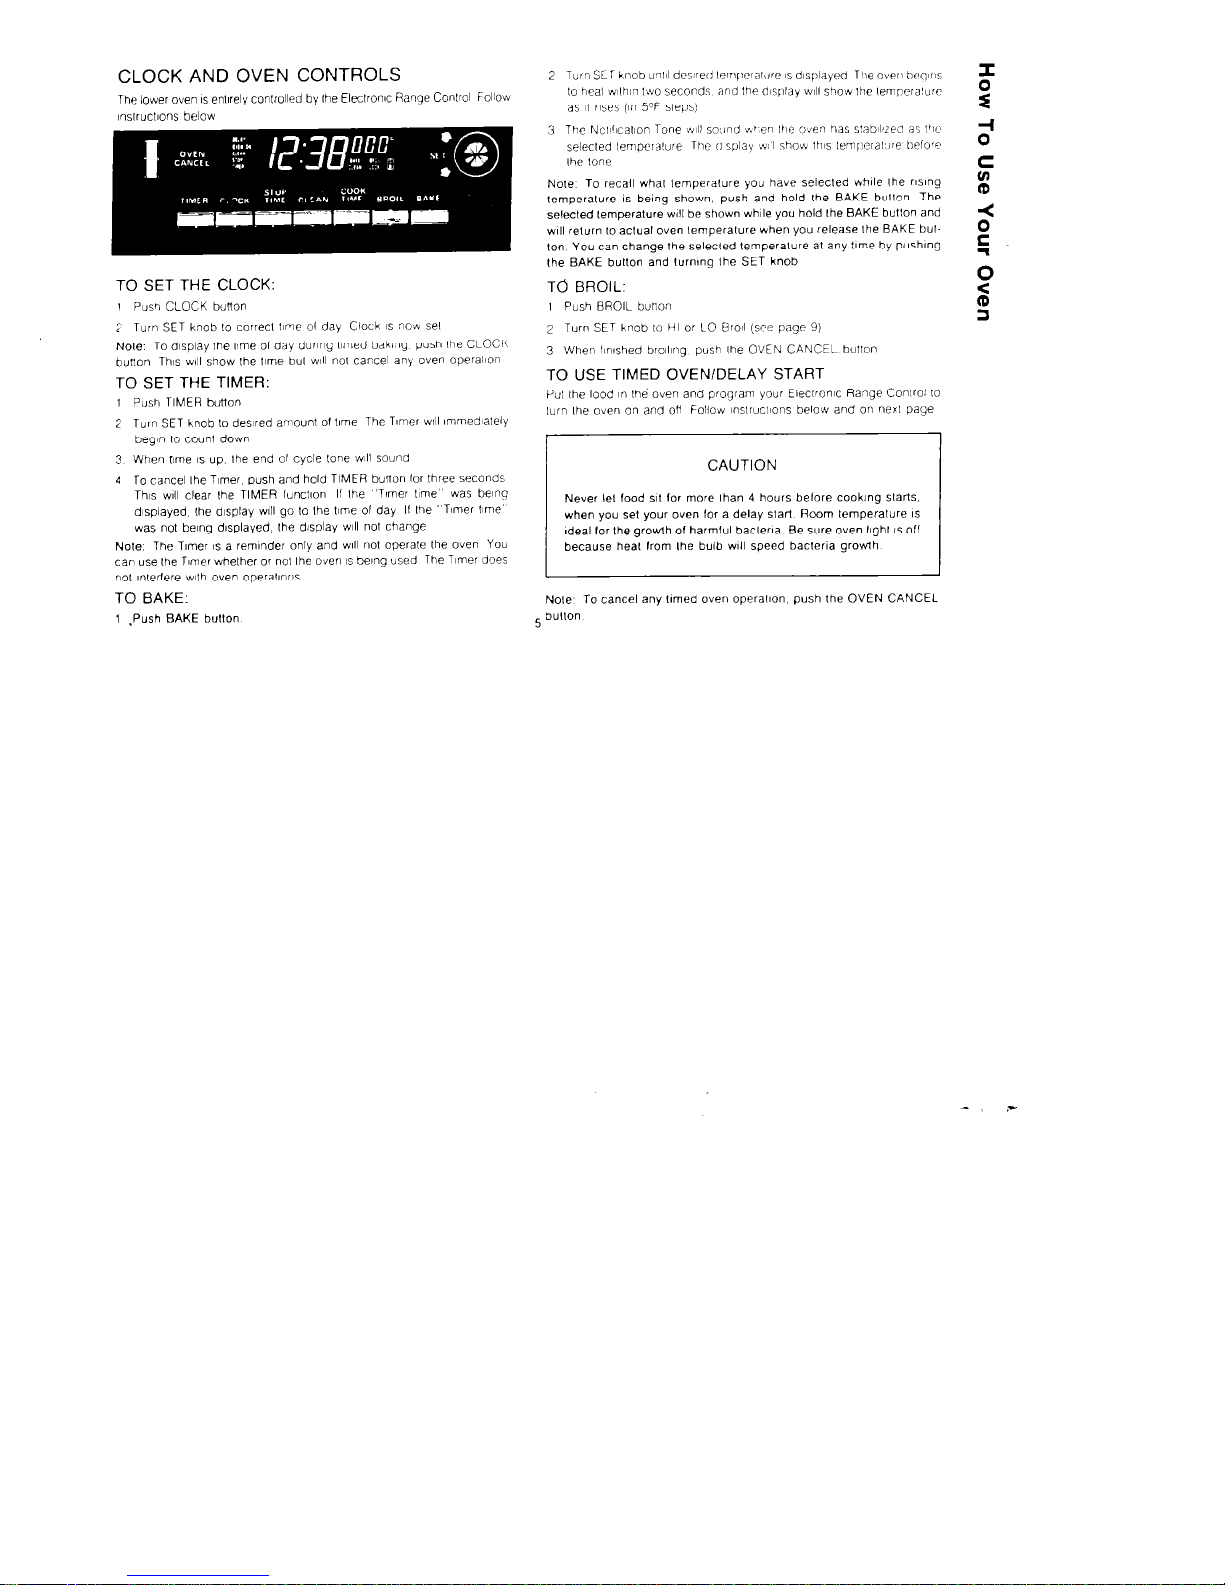
CLOCK AND OVEN CONTROLS
The lower oven IS enllrely conlrolled
by Ihe Eleclron~c Aanqe Conlrol Follow
TO SET THE CLOCK:
I Pusri CLOCK button
; Turn SET knob lo corvecl I~me 01 day CloLk IS n”~ sel
Nole- To display the ,,me 01 day during limed baking push lhe CLOCK
bunon Th,s will show Ihe Ume bul WIII no, cancel any oven operac~on
TO SET THE TIMER:
1 Push TIMER button
2
Turn SET knob !o dared amounl 01 Lyme The Timer WIII fmmed~ately
begIn 10 coun, down
3 When I,me IS up Ihe end 01 cycle lone WIII sound
4
To cancel Ihe T,met push and hold TIMER button lor three seconds
This WIII clear Ihe TIMER luncl~on If Ihe “Timer ,,me was belnq
dIsplayed Ihe display vwll go lo Ihe tome 01 day II the Timer IIme
was not befng dIsplayed, Ihe display WIII no, change
Note The Timer IS a reminder only and WIII nol operate Ihe oven You
can use Ihe Timer whelher or nol Ihe oven 1s being used The Timer does
not mlerlere wllh oven operalIons
TO BAKE:
1 .Push BAKE bullon
Note To recall whal lempeialure you have selecled tihlle Ihe rlslng
remperalure 1s being shown, push and hold Ihe BAKE bullon The
selected lemperature will be shown while you hold lhe BAKE buflon and
WIII relurn 10 actual oven lemperalure when you release lhe BAKE bulton You can change the selecled lemperalure at any time by pushing
the BAKE butlo” and ,urn,ng Ihe SET knob
To BROIL:
I Push BROIL burlon
2 Turn SET knob la HI or LO tiro~l (we page 9)
3 When fInIshed broiling push Ihe OVEN CANCEL buflon
TO USE TIMED OVEN/DELAY START
Pul Ihe load in Ihe oven and prograri your Eleclron~c Range Conlro! lo
lurn Ihe oven on and ofI Follow ~nsllucl~ons below and on nexl page
CAUTION
Never lel food s,, lor more lhan 4 hours before cooklng slatis,
when you sel your oven for a delay slarl Room remperalure IS
Ideal for the growlh of harmful baclerla Be wre oven llghl 6 off
because heal from Ihe bulb WIII speed bacrerla growth
Nole To cancel any tamed oven operal~on, push the OVEN CANCEL
5 bullon
Page 6

TO START NOW AND STOP LATER:
1 Push COOK TIME bultov
;’ Sel lengrh 01 hakIng ,~v(’ w,,h SET knot
I Push BAKE bunon ,
A Set desired lemperal~re wllh SET knob
E When COOK TIMC ,I, reached Ihe end “I cycle lone WIII sound and
Ihe oven WIII lur” 01’
Nore You can push Ihe STOP TIME bulfon lo find oul when Ihe end
of cycle WIII sound and lhe oven will lurn off
--
TO START LATER AND STOP LATER:
1 Push COOK TIME bu:l”r
2 Set length of baking I~me wllh SET knob
3 Push STOP TIME but’on
4 Sel Ume of day whw baking should be compleled wlfh SET knob
5 Push BAKE bulion
6 Sel desired femperalure wllh SET knob
7 When STOP TIME 1s reached Ihe end of cycle lone wll sound and the
oven WI1 l”,” OH
Note You can push Ihp STOP TIME button 10 find out when Ihe ““en
w,lI lurn ofi Push and hold Ihe COOK TIME bution lo find “uf when Ihe
oven Will ,utn on
When a funcl~on has been enlered, you can recall whal has been pro
qrammed by pushing lhe corresponding luncl~on bullon The messages
; Ihe dfspla; show you which luncl~on 15 currenlly being dIsplayed While
thr luncl~on IS d,solaved Y”,, can chanae I, wlh Ihe SET knob You can
change any programmed luncl~on at any Ilme
6
TONES
End of Cycle Tone (3 long beeps one second on one second oq sho:;s
Ihn’ a rImed oven operallon has reached STOP TIME or I-al the Timer
1 as counled down
Ar~enflon Tone (sews of short beeps one quarter second on. one quarter
second ofl unl,I proper response IS given) WIII sound If ““en has only
been partially programmed For example. II you have selecled a COOK
1IME bul no lemperaiure. you will hear Ihe atlenl~on lone unlll you s&cl
a lemperalure or push OVEN CANCEL
Notlhcallon Tone (wgle. one second beep) shows lhal the ““en has
slab~llred al the selecled lemperalure
Keylone (single. one tenth second beep) sounds wllerl any builon 15
pushed
Failure Tone (sews 01 very rapId beeps. one eighth second on one quarler
second off) display WIII show FO FB Cancel Iallure lone by pushng Ihe
OVFN CANCEL butlon II the failure occured while you were programm
,“g Ihe Eleclrlc Range Conlrol push Ihe OVEN CANCEL butIon and Iry
agal” If you sIllI ger a failure lone lhal does not slop after 16 seconds
ml for serwce If you are unable lo cailcel Ihe Iallure lone wlh Ihe OVEN
CANCEL button. unplug Ihe range or dlsconnecl the CI~CUII breaker
II you preler lhat your range nol have a” audible lone al Ihe end “I a cycle
or when you push a bufion (Key Tone). you can elim~nale Ihe End “I Cy
cle and Key Tone by pushing and holding Ihe OVEN CANCEL bullon “”
111 you hear a short beep (in approximately Iwo seconds) If you wsh lo
acl~vale lhe fones agal” push and hold lhe OVEN CANCEL bullor? once
more unlh yo,, Ihear a shorf beep CancellIng or acllvallng the lanes should
only be done when there IS no oven operal~on proyranlmcrl Pus11 nq Itlc
OVEN CANCEL button WIII clear alI luncl~ons except the clock snii 11wr
- -
Page 7

, When us\lq a Wherl bakino
be placed on
Ihe lower 01
Ihe Iwo racks
on one rack II,
the lowesl
powon
:*nq~l Food or
Sponqe Cake
When us,r,g
Cake Layers Pies
8 Pans (sraaaeredi
Page 8

USING FOIL
For Baking
To catch sp,llovets, cu, a p,ece 01 loll sllghlly larger lhan the pan and lurn
up ,he edges use IWO oven racks and pu, the 1011 on the lower we” rack
below the pan Do not use aluminum 1011 dlreclly under a pan on rhe same
we? iack The loll w~II reflect heal away lrom the pan
[A
Do no! cover Ihe oven bottom or an enl!re oven rack
wfth loll The loll can block normal heat flow. cause
cookrng failures, and damage the oven ~nler!or
For Roasrlng
For slow brornlng. place a 1011 “lent lw& over the meal Thus 1s especlai
ly good on a large lurkey The ‘tent’ lels oven heal c~rculale under Ihe
1011 Sealing Ihe 1011 WIII tend to sleam Ihe meat
To reduce spatwrmg, llghlly crush lo11 and pur I! in Ihe bottom 01 Ihe pan
under the load
For Brollmg
Do nor cover the enlire broiler grid with loll Poor
A
drainage of hot fal may cause a braler fire
If a fire starts, close Ihe oven door and turn conlrols
OH. If lwe conlmues. rhrow baking soda on the Ilre. Do
not put water on the fire.
CHOOSING OVEN COOKWARE
ALUMINUM- Absorbs heal lasler lhan glass or sleel and conducls heal
well Gives delicate brownfng. tender crusls. and reduces spanerlng 01
roasls Besl for cakes, mutlfns. quack breads. cookies and roastlng
OVENPROOF GLASS/PO~ERY Because lhls cookware absorbs and
holds heal well you should lower your oven temperalure 25oF Gfves a
load a deep, crusty brown lop Best for casseroles
TEFLON” DULL OR DARKENED COOKWARE: Absorbs heal quicker
lhan shiny cookware Lower your oven temperalure 25Fo (except lor paslry)
Good lor pes and olher loads baked I” pastry shells
COMMON BAKING PROBLEMS AND CAUSES
CAKE RISES UNEVENLY
BOTTOM PIE CRUST
l
Range or OY~T rack not
SOGGY
level
l
Fllllng too ,u~cy
- Pan warped
- Batter spread unevenly in
Pan
. Flll,lg allowed 10 sland ,n
pfe shell before baking
l
Used shiny pans
l
Temoeralure too low al
l
Pan too close 10 we7
wall or rack lo crowded
CAKE HIGH IN MIDDLE
l
Too much flour
l Oven lemperalure 100
h,gh n,gn
sra” of bakfng
. Crust and/or hll,ng no,
allowed 10 cool belore 1111
1ng crust
BURNING AROUND EDGES G AROUND EDGES
OF PIE CRUST 3RUST
* Oven lemDeral”re 100
lemDeral”re 100
hlqh hlqh
CAKE NOT DONE IN
CENTER
- Wrong pan stze
. E;ges 01 crusl ,“o Ihln or
loo high
l
Oven 100 full or pans too
close logelher
l
Oven loo hot
. Pan not centered <n oven
CAKE FALLS
Too much shortening II
quid or sugar
Temperature loo low
Pan loo small
COOKIES AND BISCUITS
BURN ON BOTTOM
. Oven preheat hme 100
shorl
. Pan loo deep or too larqe
l
Used dark pans
l
Used wronq rack pos~hon
FOOD NOT DbNE AT END
OF COOKING TIME
Oven door opened 100
ohen
. Oven (emperalure set 100
IOW
. Oven 100 crowded
Too much leavening or
slale leavenfng
. Oven door opened loo
onen
Overmlxlng aHer addlng
flour
- Aluminum fool blccklng atr
mO”eme”,
Page 9

BROILING TIPS
* Your oven door should be open lo the slop pos111on while brollng II
the door 1s closed Ihe load w/I roast nsfead 01 broil (see page 13)
- Uo nor preneal wIEII wwIy 1 VI ClLrl UI1,/ .d ,. _I*, _ ~+,..
,Irr rh,i
load on a cold pan Allow Shghlly more lhan hall Ihe cooklng I~me lor Ihe
hrsl side [hen Urn Ihe load using longs If you pierce Ihe meal wllh a fork
Ihe lu~ces WIII escape
l
When brollmg lrozen meal, use one rack pos~l~on lower than recommend
ed up ‘q 1 ‘V, I~mes fhe suggesled broll~n@me
- Trim Ihe ouler layer of lal from sleaks and chops Sl:l Ihe lally edges lo
keep Ihe meal from curling
- Always pul Ihe load being broIled on Ihe proper rack (see charl al rlghl )
Food olaced loo close 10 Ihe broiler may spal!er smoke or catch II’C
Ihe second side lus, before serving
. Brush chIcken and f,sh w,lh butler several limes as lhey bra11 When hrollq
Ilsh grease Ihe gnd lo prevenl sllcklng
l
Never leave a solled broiler pan I” fhe range Grease in Ihe pan may
smoke or lgn!te Ihe nexl lime oven IS used See page 12 Ior Imps on Clean
mg lhe broiler pan and grid
- Be sure you know the correcl procedure for pulling ouI a grease Ilre
See Page 4
POSITIONING BROILER PAN
Brohng 1s cookIng by dlrecl heat from Ihe upper oven elemenl Tender culs
01 mea, ar mannated mea, should be selected lor brolllng For besl resulis
steaks and chops should be a, leas1 ‘/n (hick
AHer placlng load on Ihe brcxler pan. pul Ihe pan on an oven rack 1x1 Ihe
proper poslllon The recommended rack posll~on and cookIng INme can be
found I” Ihe char! below
Most loads can be brolled on Ihe HI senlng Selecr Ihe LO brotl setUng 10
avold exceswe browning 07 drying of loads thal should be cooked lo Ihe
well done slage (such as IhIck pork chops or poullry)
The closer the load IS lo Ihe broil &men\ the lasler Ihe me31 browns 01’
Ihe oulslde. ye, slays red 10 p,nk ,n rhe cenler Moving liw meal larther atid,
“am Ihe elemenl lels the meal cook lo the center while brownlng oufslde
FOOD
SIeak
: Thick
t
t
i
.-
Thus charI IS a general guide The we. wefghl. lhfckness and slanlng
temperature 01 the food. as well as your own personal preference. will
etfecl the dewed cookIng
9
- . .--
Page 10

THE SELF-CLEAN CYCLE
1
Remove Ihe brad pan and grad. oven racks all ulens~ls and any 1011
that may be I” Ihe oven II ““en racks are leh I” Ihe range durmg a
clean cyc$. lhey wll darken lose IheIr luslef and become hard lo slide
2 SolI on the oven lronl lrame.‘;nder Ihe Iron1 edge of the cooklop. Ihe
door loner “ulstde the door seal and the IronI edae “I Ihe oven cawlv
(abad 1’ I”,” Ihe “ven~mll no, be cleaned durnlng a clean cycle (see
~Ilusfrat~on below) Clean rhese areas by hand before srartrng a clean
cycle
Use detergent and hol waler wlh a soap-Illled 51881 wool pad then
rmse well wlh a wnegar and waler mxlure Th& wll help prevenl a
brown restdue lrom lormng when the ewen IS healed
Before A Clean Cycle
3 Wipe up heavy spllovers on the oven bonom Too much xl11 may cause
smokfng during the clean cycle
4 Clean the door seal by using a clean sponge 1” soak Ihe soiled area
wlh hvdrooen oeroxlde Reoealed so&n” mav be needed deoen
dmg in the ambunl 01 solI irequenl cleanyng vill prevent exceiwe
sotI bufld up Do no1 rub Ihe door seal exceswely The lberglass
malerlal 01 the seal has an exlremely low reststance lo abrason Any
conon malerlal esc-%xlly $cludmg collonballs). can easll
6
rub a hole
INO the seal Do not use any collon materials 1” clean I c seal An
mlacl and well Mllng oven door seal IS essenl~al lor energy
ellcrenf oven operaIron and good baking resu1fs If you nowe rhe seal
becomng worn hayed or damaged I” any way “1 II II has become
displaced on Ihe door you should reolace the seal
/:
10
DO NOT use commerc,a oven cleaners or oven pr”wcl”,s ~1 “1 fwa’ IIv
oven These producrs plus ihe h,gh 1rempera’u.e “1 :IY? ~‘~a.1 CVC’~ -‘.I)
damage Ihe porcelain l~msh
DO NOTclean glass ceramtc cookware or any other tookii.irr 811 !he oven
dumg a sell clean Cycle
IMPORTANT INFORMATION
1 The conlrols are sel
2 The word CLEAN will be on I” Ihe display. the oven b<glns 1” hea!
and the door lotks aulomaltcally
3 For your salety the oven door can no1 be opened (the word LOCK
WIII be on un the Eleclron~c Range Control dtsolay )
4 When Ihe 3% hour clean cycle IS over Ihe word CLEAN wll be
on I” Ihe dfsplay Ihe oven begtns lo cool
5 When Ihe lemperature has lallen below locking lemperawe IPe door
can be opened (Ihe word LOCK will be “II in the dtsplay)
Afler a cleamg cycle, lhe “hen door cannol be unlock.ed on!ess
The temperature has had lime lo drop lo a sale level and :he
word LOCK IS ofi m Ihe Eleclron~c Range Conlrol dtsplay
Page 11

TO SET A CLEAN CYCLE
The
sell~cleanlng Cyclt’ :s PreDrogrammed for 3’/7 hours.
YOU can
also
set Ihe eleclron~c range conlrol lor a delayed slarl 01 the clex cycle
To sell-clean,
--
1 Push the CLEAN t’ rtion
2 Turn SET knob r e clockwIse dlrecrlon about % turn
The word CLEAN WIII : 9 on in the display
NOTE. You can llnd o,.’ when Ihe clean cycle WIII be hnsfhed bi
pushing the STOP Tlvi but?on
To use delayed sellclean-
1
Push STOP TIME !,Jnon
2 Turn SET knob to wne of day when you wish cleaning lo be com-
pleted (must be mr ,e lhan 3% hours later than current lime al
day)
3 Push Ihe CLEAN t, non
4 Turn SET knob in lie clockwIse dwcllon about l/z lurn
The words DELAY CLEAN WIII be on I” the display until Ihe clean cycle
starts After the clean cvcle starts the word CLEAN WIII be on in the
display
Note: During a delayed sell-clean operal~on you can llnd au1 when Ihe
oven turns on by push ng and holdfng the CLEAN bunon
TO STOP A CLEAN CYCLE.
’
0
Press Ihe OVEN CANCEL bunon
E
;
Walt U’IIII lhe oven has cooled below lxklng lemperature and
!i
the word LOCK 1s OH in the d,splay
-.
\a,, wll rno! be able 1” open Ihe door unless the oven lempera!Ure 1s 81
3
m
a safe le,el If you canno, “pen lhe oven door lmmedlalely after the
word LOCK goes “H wan! about “rw mlnule and Iry agaIn
5
WHEN A CLEAN CYCLE IS FINISHED
P
When a clean cycle IS fInIshed Ihe word CLEAN will be OH I” Ihe
i?
disolay
2
Wall until Ihe oven has cooled below lwklng lemperalure and
z
Ihe word LOCK 1s OH r Ihe a~splay
vou iv111 nol be able 1” open Ihe door unless Ihe oven lemperature 1s al
a safe lew If you cannot open Ihe oven door lmmedialely aher the
word LOCK goes OH. wa0 aboul one mlnule and Iry agaln
AFTER A CLEAN CYCLE
After a clean cycle, you may no(~ce some whlfe ash r Ihe oven Jusl
wipe it up wllh a damp clolh
If whfle spols remain remove them wllh a soap Illled s&e wool pad Be
sure lo rinse lhoroughly w$lh a v!neQar and waler mixture These
deposals are usually a sail restdue lhal can not be removed by the
clean cycle
If Ihe oven IS nol clean aher one clean cycle Ihe cycle may be
repealed
Page 12

CLEANING lNSTRUCTlONS
CONTROL PANEL
Wash wllh soap i rid waler rinse then dry with a paper
towel
c
OVEN FINISHES
SELF-CLEANING Use soap, water ard a scouring pad
for touch up clean II<] between self cleaning cycles Give
a fInal rinse with vlr,c:gar and water_ AvoId any contact with
oven door seal (set: below) Never use any oven cleaners
OVEN RACKS: A?move from oven (see InstructIons on
page 12) and wast- at sink with soap, water and a scounng
pad
BROILER PAN AND GRID:
Do not leave In range to cool
If you soak rlght away, clean-up WIII be easier. Remove pan
from oven and remove fat and drippIngs Spnnkle pan with
detergent then cover with a wet cloth or paper towel and
let soak Later wash In soap and water using a scouring
pad as necessary Both the pan and the grad are dlshwasher
L
safe
5 OUTSIDE FINISHES
z
CHROME: Wash wth soap and water A chrome cleaner
Q
may be used
E GLASS: Wash with a damp, soapy cloth Remove stubborn
.-
solI with a paste of baking soda or ammonia and water Do
c
not use abrasive materials. Before using an all purpose
i
cleaner, check the label to be sure 11 IS recommended for
glass-some
will
permanently damage glass
0
12
Page 13

REMOVABLE OVEN DOOR
Th? oven doors can be r?,noved for cleanrng
To remove:
1 Open the door to the Pro11 slop positron and grasp the
door at each side {set> ~Ilustrallon)
2 t~lfl the door up a bit, lhen pull straight toward you
To replace:
1
Make sure that t-ilnge afms are jr- pos~ton B (broil stop
posltlon)
Note, II a hinge arm snaps into position A, it must be
moved back lo positlon B before the door can be
replaced.
2 Carefully Insert the hinge arms through the openings
In the front frame and push the door Into place while
holdtng the door up
3 When the bottom edge of the door IS flush against the
front frame, allow the door to settle Into place
13
Page 14

REPLACING THE MICROWAVE
OVEN FUSE
1
2.
3
L
4
s
5.
z
Q
E
6
.-
c
Below the mlcrowave oven there IS a fuse to protect the
mlcrowave oven from malfuncllons In the electrlcal system
or componenls ’
If your lower oven works but your mlcrowave oven will not
work,
Check your microwave oven manual to be sure you
have followed operating InstructIons exactly
Remove the two screws In the side trim and the two
screws in the vent trim and remove the lrlmlvent box
assembly.
If there IS no adjacent counter or table, move a chair
close to the oven. Remove the microwave oven and
place It on a counter, table or chair.
Replace the old fuse with a 15 amp, type S fuse
Loft the mtcrowave oven and slide back into place above
the lower oven Be careful not to pinch or damage the
microwave oven cord on the back of the lower oven
when sliding the mlcrowave oven back Into place
~ePosltlon the trImkent box assembly and attach with
screws previously removed
VENT TRIM
L
If your microwave oven still will not work, or if it blows
another fuse, call for service.
0
14
Page 15

RETAINER -
GASKET
BULB
COLLAR
REPLACING THE OVEN LIGHT
Do nol touch we” bulb when hol. wllh wet hands, or w,pe oven llghl
atea wllh wet clolh Unplug or dlsconnecl lhe eleclncal supply lo oven
before remowng
Never (ouch lhe eleclncally love collar on Ihe bulb when replacing II
Eleclrical power mus, be sh,,’ 011 II you have Ic replace a broker
bul!,
Page 16

OVEN/BROILER ELEMENT DOES NOT WORK
RANGE IS BEEPING
BROILING PROBLEMS
. Oven (:onlrol knob nol sel lo BROIL See pages 5 and 6
. Usmg wrong rack pos~l~on See chart on page 9
a Aluminum Ia nol used properly and grease can’! drain correclly
See page 8
OVEN DOOR WILL NOT UNLOCK AFTER CLEANING
. The door w,ll no, unlock ~nlil Ihe ““en has cooled lo a sale IemPeia’ure
See page I 1 lor ~nslrucl~ons on unlocking Ihe door
OVEN WILL NOT SELF-CLEAN
l
Oven conlrols not se1 properly Review slep by slep ~nslrucl~ons on
page 11
. Heavy spillovers were nol wiped up before slarimg clean cycle See
page IO
l
Oven 100 d!rly - should be cleaned m”re oflen
16
Push Ihe BAKE burlon
S&cl a lemperature belween 5OOOF and 550°F wllh Ihe SET knob
Oulckly (wlhln Iwo seconds, before rhe BAKE funcl~on enerqlzes)
push and hold Ihe BAKE bullon
The dlsplav $41 q” blank and lhen will show the am”““, of dearees
dltference belw&n lhe orlginal faclory lemperalure setl~ng and lhe
currenl lemperalure senmg If Ihe ““en ,empeta,ure has never been
adjusled Ihe dsplay WIII read 00
The lemperature can be adjusted up lo 35oF hotter or 3YF cooler
in 5oF steps A nxnus sign (-) before the number means lhal Ihe
“ven WIII be cooler by dIsplayed amounl of degrees
When you have made Ihe dewed adjuslmenl, push Ihe CLOCK
bullon lo g” back lo Ihe lfme 01 day display or use you “en as
you would normally
NOW: The self-clean temperalure will not change by lhe adjusrmenl
described above
- I
 Loading...