

Page 1

MAYFAG
Dehumidifier
Deshumificador
D6shumidificateur
For Future Reference
Write down the model and serial numbers
Tile model and serial numbers can be found
on the back of the unit, Use these numbers
in any correspondence or service calls
concerning your dehumidifier.
Para referencia futura
Escriba los numeros del modelo
y de la serie
Puede encontrar los nfimeros de modelo y de serie en el
parte posterior del acondicionador. Use estos nfimeros en
cualquier correspondencia o llamada de servicio con
relacidn a su deshumificador.
23-11-2233N-007
Pour r6f6rence ult6rieure
Inscrivez les numeros de modele et de serie
Les num_ros de module et de s_rie se trouvent sur le c?)t_ de
arri_re de l'appareil. Utilisez ces num4ros lors de toute
correspondance ou appel au service apr_s-vente ayant trait
votre deshumidificateur.
Model No., Modelo No., N ° de modOle
Serial No., Nl_mero de serie, N ° de s&ie
Date of Purchase, Fecha de la compra, Date d'achat
For additional questions please call:
1-866-MAYTAG- 1
or e-maih
customerservice@maytagair.com
Keep these instructions for future reference
l:eatures and specifications subject to change without notice.
Las caracteristicas y especificaciones est_n sujetas a cainbio sin plTevio aviso.
Les caract_ristiques et spficifications sont sujettes ,5 modifications sans pr_avis.
Page 2

Important Safety Instructions°° ooooooooooooooooooooooooooooo
Electrical Shock Hazard
1. Plug unit only into grounded electrical outlet.
2. Do not use an extension cord or plug adaptor with
this unit.
3. Do not operate unit with filter removed.
Failure to follow the above precautions could result in
electrical shock, fire or personal injury,
If the dehumidifier has a serial plate rating of 115 volts
and up to and including 7.5 amps the unit may be on
a fuse or circuit breaker with other devices. However, the
maximum amps of all devices on that fuse or circuit breaker
can not exceed the amps of the fuse or circuit breaker.
Notice
Do not operate this dehumidifier without proper time
delay circuit protection. Refer to serial plate for proper
power supply requirements.
RECOMMENDED CIRCUIT WIRE SIZES
PROTECTOR SIZE WIRE GAUGE
15 AMP #14 MINIMUM
20 AMP #12 MINIMUM
30 AMP #10 MINIMUM
(As installed per building code)
@©©@
115V 230V 230V 230V
15A 15A 20A 30A
For Your Safety:
Do not store or use gasoline or other flammable vapors
and liquids in the vicinity of this or any other appliance.
The fumes can create a fire hazard or explosion.
Power Supply:
Outlet Requirement:
Grounding Type:
Minimum Wire Size:
Circuit Protector:
llSV, 60HZ
AC Only 1-Phase
3-Prong
125 V, 1S Amp
#14 (A.W.G.) 3-Wire
Use Copper Wire Only
15 Amp Time Delay Fuse
or Circuit Breaker
important
Grounding Requirements
Your Dehumidifier will operate on any 115 volt, 3-pronged
(grounded), 60 Hz circuit. A separate line is not required, but
it is advisable not to overload the circuit with heavy duty
appliances such as washing machines, etc. For your safety,
this dehumidifier is equipped with a 3-pronged, grounding
plug and must be plugged into a properly grounded outlet
(Figs. 1 & 2). If your outlet is not of the proper type, it is your
responsibility to have the outlet and wiring changed to the
correct type. DO NOT cut off the third (grounding) prong.
DO NOT USE AN ADAPTER.
Grounded
three-prong
wail receptacle
_ Single outlet
grounding
wall receptacle
Close Windows and Doors
To assure efficient dehumidification, close all windows
and doors in the area where the dehumidifier is to
operate (Fig.3).
Plug In
Once you have assembled your dehumidifier and
installed it in an appropriate location, plug the cord into
a properly grounded outlet as indicated in the electrical
requirement (Fig. 4).
Important:
If the unit has been transported or stored in any
position other than upright, you should wait three
hours before strarting unit
Three-prong
grounding plug >
W
M
Page 3
Operation oooooooooooooooooooooooooooooooooooooooooooooooooooooooo
Q MAYIrAG
Powei"
Pause
1 hour
Humidily/Temp
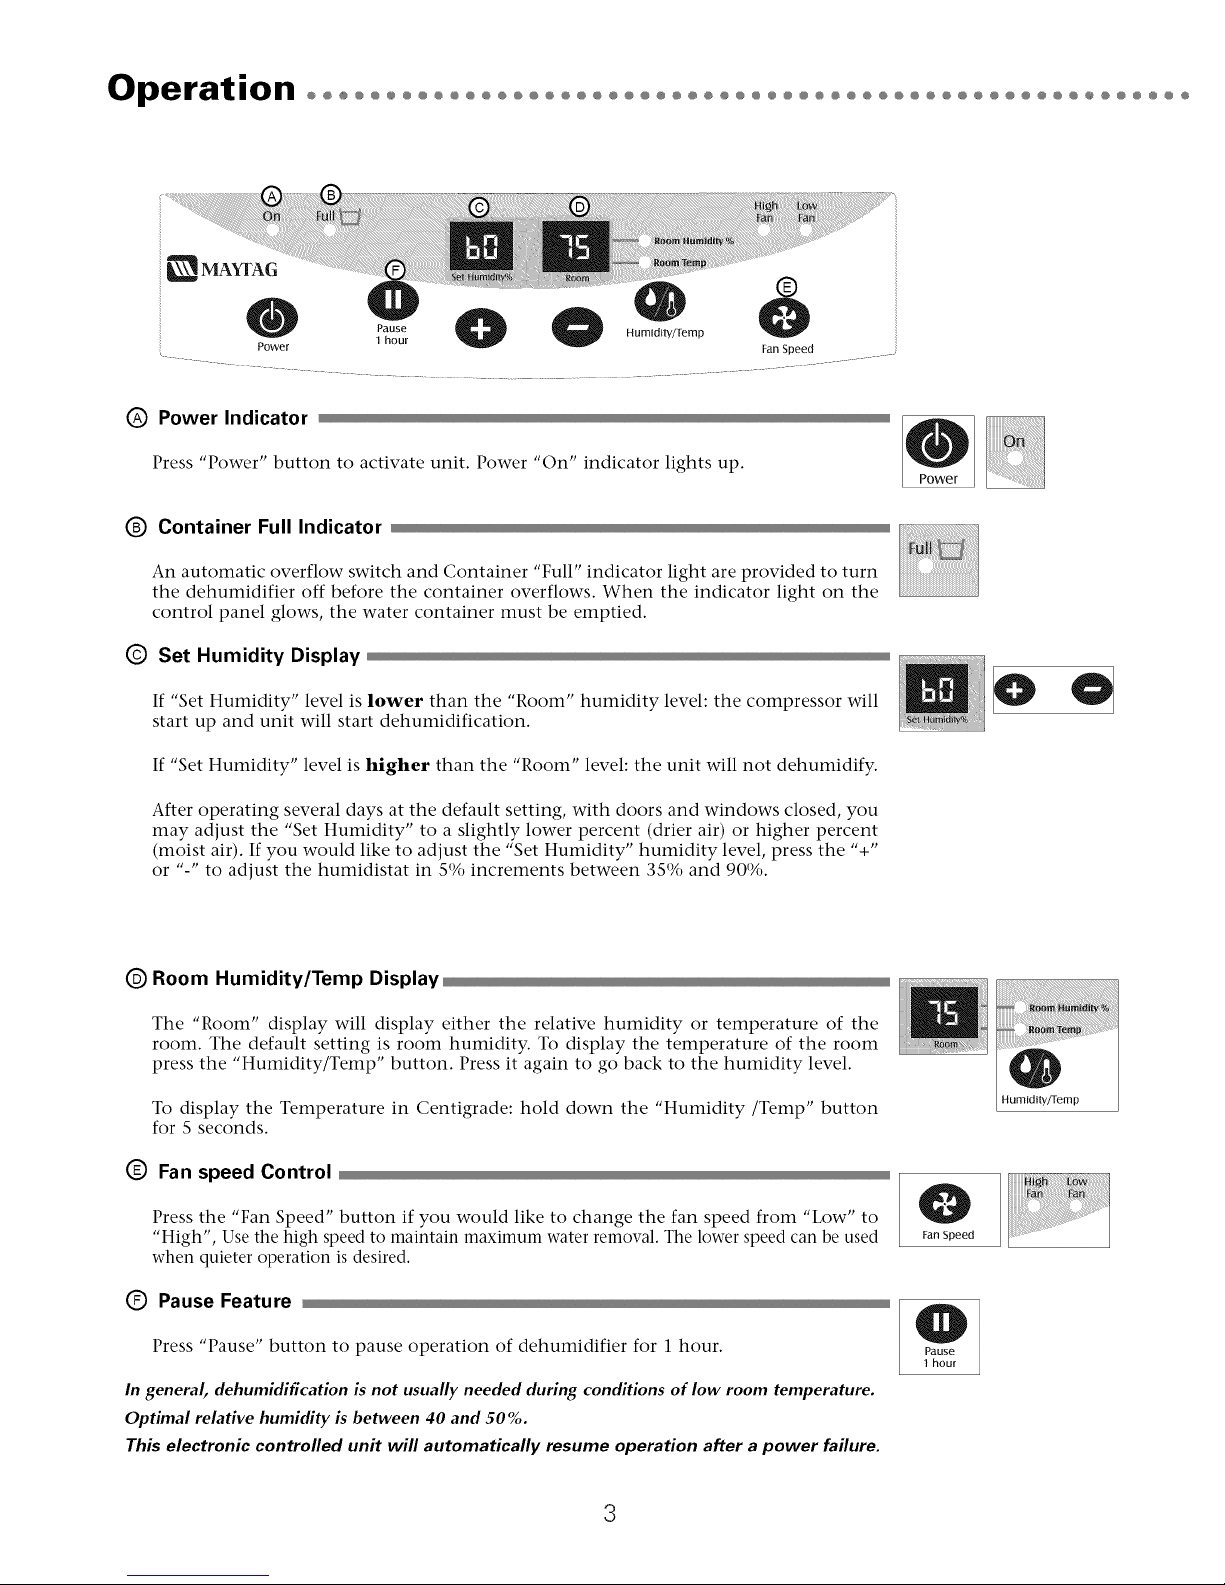
oPower,nO,catorPress "Power" button to activate unit. Power "On" indicator lights up.
C) Container Full Indicator
An automatic overflow switch and Container "Full" indicator light are provided to turn
the dehumidifier off before the container overflows. When the indicator light on the
control panel glows, the water container must be emptied.
(_ Set Humidity Display
If "Set Humidity" level is lower than the "Room" humidity level: the compressor will
start up and unit will start dehumidification.
If "Set Humidity" level is higher than the "Room" level: the unit will not dehumidify.
After operating several days at the default setting, with doors and windows closed, you
may adjust the "Set Humidity" to a slightly lower percent (drier air) or higher percent
(moist air). If you would like to adjust the "Set Humidity" humidity level, press the '%"
or "-" to adjust the humidistat in S% increments between 3S% and 90%.
(_ Room Humidity/Temp Display
The "Room" display will display either the relative humidity or temperature of the
room. The default setting is room humidity. To display the temperature of the room
press the "Humidity/Temp" button. Press it again to go back to the humidity level.
To display the Temperature in Centigrade: hold down the "Humidity/Temp" button
for S seconds.
(_ Fan speed Control
Press the "Fan Speed" button if you would like to change the fan speed from "Low" to
"High", Use the high speed to maintain maximum water removal. The lower speed can be used
when quieter operation is desired.
(_ Pause Feature
Press "Pause" button to pause operation of dehumidifier for ] hour.
In general, dehumidification is not usually needed during conditions of low room temperature.
Optimal relative humidity is between 40 and 50%.
This electronic controlled unit will automatically resume operation after a power failure.
3
Humidity/Temp
Fan Speed
Page 4
Maintenance ooooooooooooooooooooooooooooooooooooooooooooooooooo
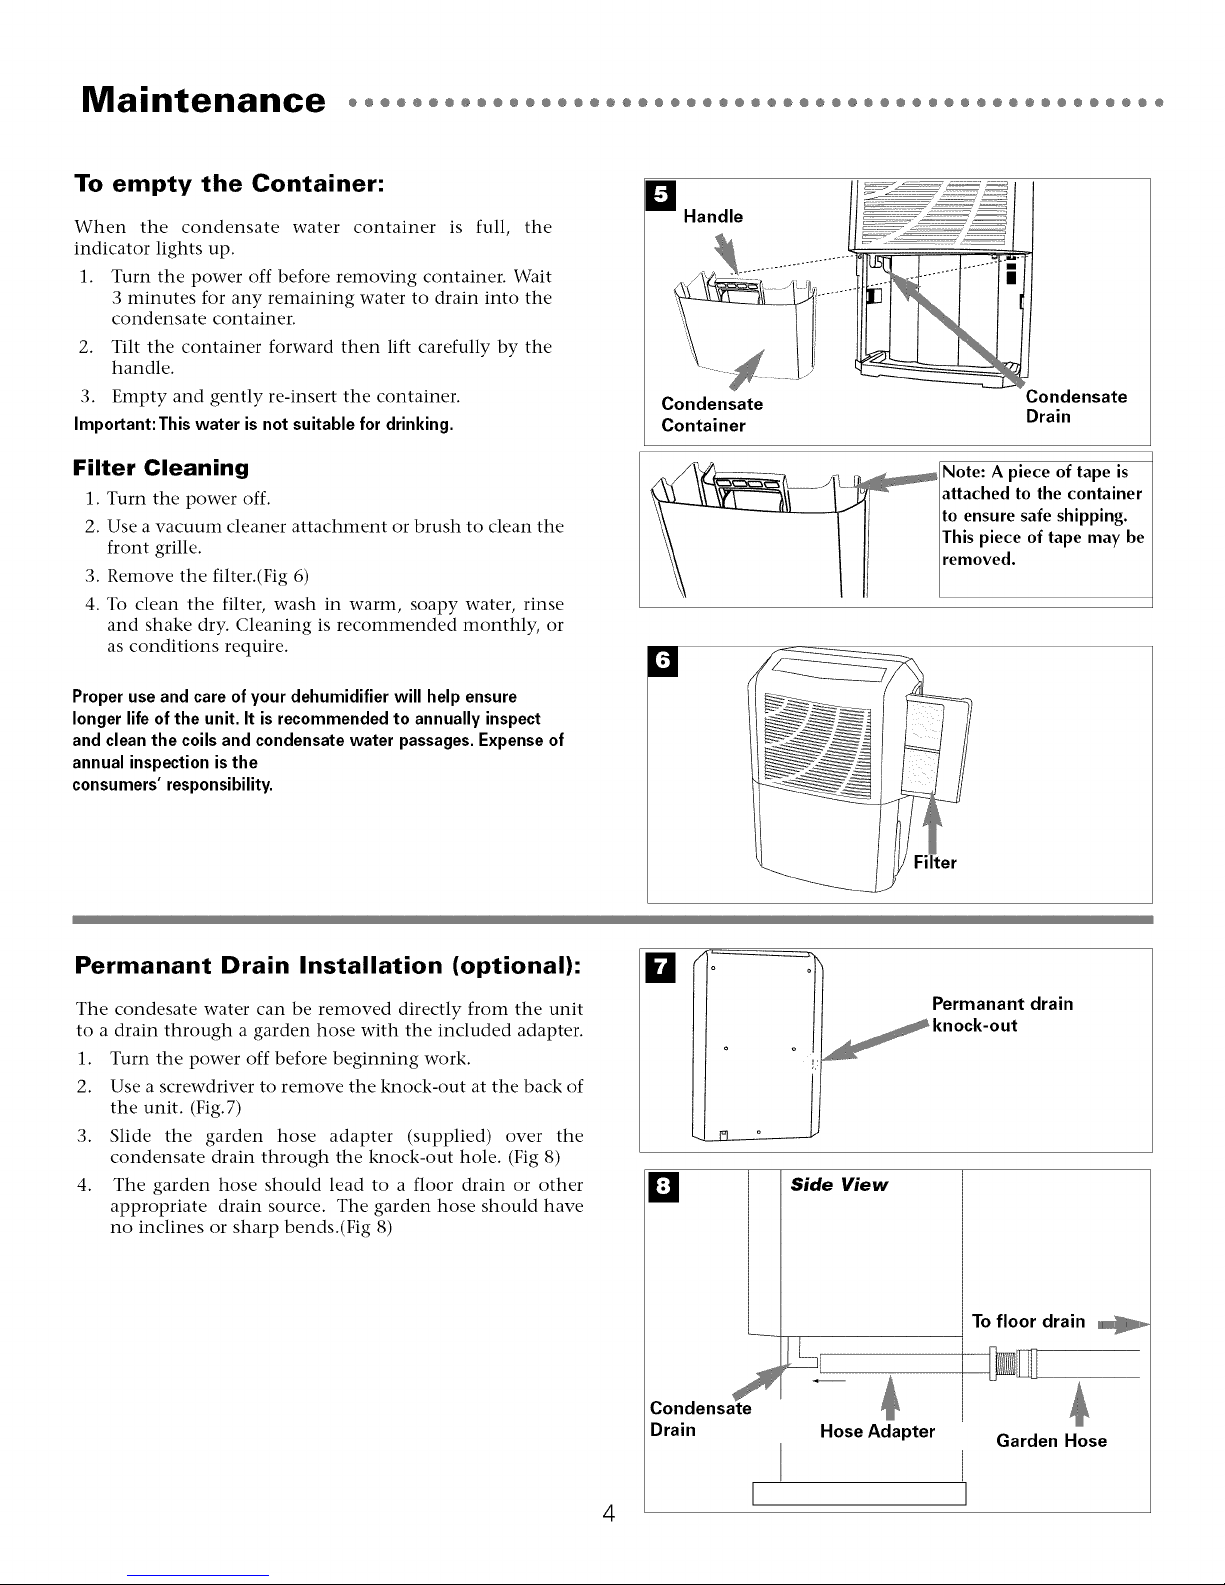
To empty the Container:
When the condensate water container is full, the
indicator lights up.
l. Turn the power off before removing container. Wait
3 minutes for any remaining water to drain into the
condensate container.
2. Tilt the container forward then lift carefully by the
handle.
3. Empty and gently re-insert the container.
Important: This water is not suitable for drinking.
Filter Cleaning
1. Turn tile power off.
2. Use a vacuum cleaner attachment or brush to clean the
front grille.
3. Remove the filter.(Fig 6)
4. To clean the filter, wash in warm, soapy water, rinse
and shake dry. Cleaning is recommended monthly, or
as conditions require.
Proper use and care of your dehumidifier will help ensure
longer life of the unit. It is recommended to annually inspect
and clean the coils and condensate water passages. Expense of
annual inspection isthe
consumers' responsibility.
El
Handle
Condensate
Container
W
Condensate
Drain
Note: A piece of tape is
attached to the container
to ensure safe shipping.
This piece of tape may be
removed.
Permanant Drain Installation (optional):
The condesate water can be removed directly from the unit
to a drain through a garden hose with the included adapter.
1. Turn the power off before beginning work.
2. Use a screwdriver to remove the knock-out at the back of
the unit. (Fig.7)
3. Slide the garden hose adapter (supplied) over the
condensate drain through the knock-out hole. (Fig 8)
4. The garden hose should lead to a floor drain or other
appropriate drain source. The garden hose should have
no inclines or sharp bends.(Fig 8)
El
Side View
Co°.e°s!
Drain Hose Adapter
Filter
Permanant drain
To floor drain _ ......
Garden Hose
4
I I
Page 5
Service ooooooooooooooooooooooooooooooooooooooooooooooooooo
Troubleshooting
If the Dehumidifier Fails to Start
Make sure the unit is plugged into an operating
outlet.
If the indicator light (most models) is on, empty the
full water container. The indicator light should now
go OFF, and the dehumidifier will begin to operate. If
the dehumidifier does not begin to operate make sure
the float is attached to the water container.
Unit Runs, But Very Little Water is
Collected
• Tile amount of water removed from tile air depends on
the relative humidity of the air and the capacity of the
dehumidifier purchased. When the air feels damp
(high relative humidity), more moisture will be
removed and the container will fill up more rapidly.
As the unit continues to remove moisture and reduce
the humidity in the area, less water will be collected
in the container.
This unit is equipped with a defrost control, which
will automatically activate when needed. When in
defrost mode the compressor will cycle on and off and
the unit will make less water.
• Room humidity is low (below 40%).
Save Electricity
• In general, dehumidification is not usually needed
during conditions of low room temperature. To save
electricity, it is best to turn the unit OFF during these
conditions.
Sounds
It is reassuring to know that your dehumidifier is
functioning properly. These are some normal sounds
which should not be a cause for concern:
• Air rushing over air drying coils.
• Hissing or thumping - refrigerant is flowing
throughout the sealed system and may generate a
"boiling" sound right after the compressor stops.
• Compressor may "thump" as it cycles on and off.
• Water dripping from coils onto the drain plate.
• The humidistat control, compressor and fan "tick" as
they turn on and off. Metal makes a similar sound
when expanding or contracting.
Page 6

Warranty oooooooooooooooooooooooooooooooooooooooooooooooooooooooo
For Models Installed in North America -
If Service or Parts are Required
First, make the recommended checks. If it appears that service or
parts are still required, see your room dehumidifier warranty
"How to Obtain Warranty Service or Parts".
For Models Installed Outside North America
For dehumidifiers purchased for use outside North America, the
manufacturer does not extend any warranty either expressed or
implied. Consult your local dealer for any warranty terms
extended by the importer in your country.
Room dehumidifier Warranty
(Within the 48 contiguous United States, state of Hawaii,
the District of Columbia, Puerto Rico and Canada)
Full (FiveYear) Parts and Labor Warranty
During the five years after the date of original purchase, Fedders
North America will, through its authorized servicers and free of
charge to the owner or any subsequent user, repair or replace any
parts which are defective in material or workmanship due to
normal use when the unit is delivered by the owner to and picked
up from one of our authorized servicers. If requested, in-home
service, pick-up, redelivery and reinstallation will be provided,
but are the owner's responsibility.
Note: In the event of any required parts replacement within the period of
this warranty. Fedders North America replacement parts shaft be used and
will be warranted only for the period remaining on the original warranty,
Exceptions
The above warranty does not cover failure to function caused by
damage to the unit while in your possession (other than damage
caused by defect or malfunction), or by its improper installation,
or by unreasonable use of the unit, including without limitation,
failure to provide reasonable and necessary maintenance or to
follow the written Installation and Operating Instructions. If the
unit is put to commercial, business, rental, or other use or
application other than for consumer use, we make no warranties,
express or implied, including but not limited to, any implied
warranty of merchantability or fitness for particular use or
purpose.
THE REMEDIES PROVIDED FOR IN THE ABOVE EXPRESS
WARRANTY ARE THE SOLE AND EXCLUSIVE REMEDIES
THEREFOR, NO OTHER EXPRESS WARRANTIES ARE MADE. ALL
IMPLIED WARRANTIES, INCLUDING BUT NOT LIMITED TO
ANY IMPLIED WARRANTY OF MERCHANTABILITY OR FITNESS
FOR A PARTICULAR USE OR PURPOSE, ARE LIMITED IN
DURATION TO FIVE YEARS FROM THE DATE OF ORIGINAL
PURCHASE. IN NO EVENT SHALL FEDDERS NORTH AMERICA
BE LIABLE FOR INDIRECT, INCIDENTAL, OR CONSEQUENTIAL
DAMAGES, EVEN IF ADVISED IN ADVANCE OF THE
POSSIBILITY OF SUCH DAMAGES. NO WARRANTIES, EXPRESS
OR IMPLIED, ARE MADE TO ANY BUYER UPON RESALE.
Some states do not allow limitations on how long an implied
warranty lasts or do not allow the exclusion or limitation of
incidental or consequential damages, so the above limitations or
exclusions may not apply to you. This warranty gives you specific
legal rights, and you may also have other rights which may vary
from state to state.
No warranties are made for units sold outside of the above stated
areas. Your distributor or final seller may provide a warranty on
units sold outside of these areas.
How to Obtain Warranty Service or Parts
Service for your dehumidifier will be provided by CareCo, a
division of the manufacturer with authorized independent
CareCo servicers nationwide,
Note: Before calling for service, carefully read the Installation and
Operating Instructions bookleL Then ff you need service:
1. Call a CareCo authorized servicer and advise them of model
number, serial number, date of purchase and nature of
complaint. Service will be provided during normal working
hours. Contact your dealer for the name of an authorized
servicer if unknown to you.
2. If your dealer is unable to give you the name of a servicer or if
you need other assistance, call the following toll-free number
for the name of an authorized servicer or authorized parts
distributor:
1-866-MAYTAG 1
or you may write:
CareCo, Service Department
415 W. Wabash Ave., RO. Box 200
Effingham, IL 62401
Proof of Purchase Date
It is the responsibility of the consumer to establish the original
purchase date for warranty purposes. We recommend that a bill
of sale, cancelled check, or some other appropriate payment
record be kept for that purpose.
6
Page 7

|nstrucciones irnportantes de seguridadooooooooooo
_eq[_fsftos p_r_ _ efectdcos
Peligro de descarga el6ctrica
1. Enchufe la unidad en un
tomacorriente con conexi6n a tierra.
2. No use un cable de extensi6n ni un
adaptador de enchufe con este aparato.
3. No lo haga funcionar sin la cubierta
delantera.
E1no seguir las precauciones enumeradas
anteriormente podrfa causar descargas
el6ctricas, incendio o lesiones personales.
Si el deshumidificador trae en la placa
una clasificaci6n de 11S voltios y hasta
7.S amperios inclusive, la unidad puede ir
conectada al mismo fusible o
cortacircuitos junto con otros aparatos.
Sin embargo, el m_ximo amperaje de
todos los aparatos conectados a la vez a
ese fusible o cortacircuitos no debe set
mayor que la capacidad (amperios) de
dicho fusible o cortacircuitos.
La ubicaci6n de la placa en _ste modelo
se encuentra en la p_gina del frente de
_ste manual.
Aviso
No haga funcionar estre destmmidificador sin
un circuito temporizador que brinde la
protecci6n adecuada. En la placa de
Mentificaddn aparecen los requBitos
correctos de alhnentaddn.
TAMAf40S RECOMENDADOS
PARA LOSALAMBRESDEL CIRCUITO
(Insta/ado seg(m los reglamentos de construcci6n)
TAMAf40 DEL PROTECTOR CALIBREDEL ALAMBRE
15 AMP #14 MINIM()
20 AMP #12 MINIM(-)
-_0 AMP #10 MINIM(-)
Para Su Seguridad
No guarde ni utilice gasolina ni otros
liquidos o vapores inflamables en las
inmediaciones de este o ningOn otto
aparato. Las emanaciones pueden crear
un peligro de incendio o explosi6n.
Suministro Electrico: Ca De 115V,60HZ
Tipo De Tomacorriente:
Tamafio Minimo Del Alambre:
Protector del Circuito:
Monofasica
Tipo de 3 Puntas con
Conexi6n a Tierra
De 125 Voltios y 15
Amperios
3 Conductores #14 (A.W.G.)
Usar Solo Alambre de Cobre
Fusible con Retardo tie
Tiempo de 15 Amp
0 Interruptor Automatico
E! eceptlculo Receptlculomural de tres i mural con salida
espigas con i simple de puesta
_i rra
Enchufe de .puesta a tierra
con tres espigas
Suministro el6ctrico
Su deshumidificador funcionar_ en
cualquier circuito de 11S voltios, 60 Hz
y tres terminales (conectados a tierra).
No es necesario disponer de una linea
separada, sin embargo se recomienda no
sobrecargar el circuito con artefactos
que consuman mucha carga tales como
m_quinas de lavar ropa, etc. Para su
seguridad, este deshumidificador tiene
un enchufe de tres puntas, con
conexi6n a tierra y se debe conectar en
un tomacorriente que est6 conectado a
tierra de manera correcta (Figs. 1 & 2).
En caso de que su tomacorriente no sea
del tipo correcto, es su responsabilidad
ordenar el cambio del tomacorriente y
el cableado pot otto del tipo correcto.
NO corte la tercera punta (conexi6n a
tierra). NI USE UN ADAPTADOR.
@©©@
115V 230V 230V 230V
15A 15A 20A 30A
Instalaci6n oooooooooooooooooooooooooooooooooooooooooooooooo
Cerrar ventanas y puertas
Para asegurar una deshumidificaci6n eficaz, cierre todas las
ventanas y puertas en el _rea donde debe funcionar el
deshumidificador. (Fig.3)
Enchufar
Una vez armado e instalado el deshumidificador en la
ubicaci6n correcta, enchufe el cord6n en un tomacorriente
correctamente conectado a tierra, tal como se indica en el
apartado de suministro el6ctrico.(Fig.4)
u
7
Page 8

Funcionamiento oooooooooooooooooooooooooooooooooooooooooooooooo
Power
Pause
1 hour
Humidtty/Temp
C) Boton de Puesta en Marcha
()prima el bot6n "Power" para poner en marcha el deshumificador. La luz
indicadora "On" se ilumina.
(_ Luz Indicadora de Deposito Lleno
Se provee un interruptor automitico de rebalse y una luz indicadora de dep6sito
"Lleno" ("Full") para apagar el deshumidificador antes de que el dep6sito se rebalse.
Cuando se ilumina la luz indicadora en el panel de control, el dep6sito del agua
debe ser vaciado.
(_ Indicador de Humedad Preajustada
Si el nivel de humedad preajustado ("Set Humidity") es mils bajo que el nivel de la
habitaci6n ("Room"): el compresor se pondri en marcha y el deshumificador
comenzari la deshumidificaci6n.
Si el nivel de humedad preajustado ("Set Humidity") es mis alto que el nivel de la
habitaci6n ("Room"): el deshumificador no funcionando.
Despu_s de funcionar varios dias al nivel preajustado, con las puertas y ventanas
cerradas, usted puede ajustar el nivel de humedad preajustado ("Set Humidity") a
un porcentaje ligeramente mis bajo (aire mis seco) o a un porcentaje mis alto (aire
hhmedo). Si usted desea ajustar el nivel de humedad preajustado, oprima "+" o "-"
para ajustar el humidistato en incrementos de S%, entre 3S% y 90%.
1_) Indicador de Humedad Preajustada
E1 indicador "Room" (Habitaci6n) mostrari ya sea la humedad relativa o la
temperatura de la habitaci6n. E1 ajuste implicito es humedad de la habitaci6n. Para
desplegar la temperatura de la habitaci6n, oprima el bot6n "Humidity/Temp"
(Humedad/Temperatura). Oprimalo nuevamente para volver a desplegar el nivel de
humedad.
Para desplegar la temperatura en centigrados: mantenga oprimido el bot6n
"Humidity/Temp" durante S segundos.
Boton de la Velocidad del Ventilador
()prima el bot6n "Fan Speed" (Velocidad del Ventilador) si desea cambiar la
velocidad del ventilador de "Low" (Baja) a "High" (Alta). Use la velocidad alta para
mantener el nivel miximo de extracci6n de agua. La velocidad baja puede usarse FanSpeed
cuando se desea un funcionamiento mis silencioso.
Boton de Pausa _ ......
()prima el bot6n "Pause" para detener el funcionamiento del deshumidificador _,_
durante 1 hora.
8
Humidtty/Temp
Page 9

Mantenimiento ooooooooooooooooooooooooooooooooooooooooooooooooo
Eliminacibn del agua
Cuando el dep6sito del agua de condensaci6n estfi lleno, la luz
indicadora se enciende.
1. Desconecte la energia el_ctrica antes de retirar el dep6sito.
Espere 3 minutos hasta que toda el agua de condensaci6n
se escurra hacia el dep6sito.
2. Incline hacia adelante el dep6sito y luego lev_ntelo
cuidadosamente tom_ndolo de la manija.
3. Vuelva a poner el dep6sito del agua.
Importante: Esta agua no es potable
Limpieza del filtro
1. Utilice un accesorio o cepillo de aspiradora para limpiar la
parrilla delantera.
2. Saque el filtro desliz_ndolo.
3. Para limpiar el filtro, l_velo en agua tibia jabonosa, y
enjuague y seque. Se recomien da limpiar mensualmente, o
segOn lo requieran las condiciones.
D Manija
Dep6sito
del agua de ........
condensaci6n
Desag_ie del agua
de condensaci6n
Nota: Se ha colocado un
pedazo de cinta adhesiva
en el depbsito para
asegurarlo durante el
embarque. Este pedazo
de cinta puede retirarlo.
Filtro
El uso y mantenimiento adecuados del deshumidificador prolongar_ la vida _til de la unidad. Se
recomienda inspeccionar y limpiar anualmente el serpentfn y los pasajes para agua de condensaci6n.
El diente deber_ cubrir los gastos de inspecci6n anual.
Instalaci6n de DesagiJe Permanente (opcional):
E1agua de condensaci6n puede ser extraida directamente
del acondicionador de aire hacia un desag_ie utilizando una
manguera de jardin con el adaptador que se incluye.
Desconecte la energia el_ctrica antes de comenzar el trabajo.
Use un destornillador para quitar el disco removible en la
parte posterior del acondicionador.
• Coloque el adaptador de la manguera de jardin
(suministrado) sobre el desag{ie del agua de condensaci6n a
trav_s del agujero del disco removible.
• La manguera de jardin debe orientarse hacia un desag{ie de
piso o hacia otra fuente de desag_ie apropiada. La manguera
no debe tener secciones inclinadas o dobleces bruscos.
11
W
Desag_ie
agua de
condensaci6n
9
Disco removible del
desagtie permanente
Adaptador de
manguera
Hacia el desag{ie
Manguera de
J
jardin
Vista Lateral
del piso
Page 10

Servicio ooooooooooooooooooooooooooooooooooooooooooooooooooo
Servicio (Leaconatenci6nantesdesolicitarservicio)
Si no arranca el deshumidificador
1" Cerci6rese de que la unidad est_ conectada en un
tomacorriente que funcione.
1" Si la luz indicadora est_ encendida vacie el dep6sito de
agua.
1" Si el deshumidificador no empieza a funcionar,
compruebe el brazo del flotador para cerciorarse de que
puede moverse libremente. Se encuentra en el el dep6sito
de agua.
La unidad funciona pero se reune muy poca agua
1" La cantidad de agua extraida del aire depende de la
humedad relativa del aire y de la capacidad del
deshumidificador adquirido. Cuando el aire se siente
hfimedo (humedad relativa alta), se eliminarfi mils
humedad y el dep6sito se llenarfi mils rfipidamente. A
medida que la unidad elimina humedad y la reduce en el
firea, se captarfi menos agua en el dep6sito.
Ahorrar electricidad
1" En general, en condiciones de temperatura ambiente baja
o de baja humedad relativa no se necesita
deshumidificaci6n. Para ahorrar electricidad es mejor
apagarla.
Ruidos
Es alentador saber que su deshumidificador funciona
correctamente. Estos son algunos de los ruidos normales
que no deberian causarle preocupaci6n:
1" Aire circulando sobre los serpentines de secado de aire.
1" Silbido o golpeteo - el refrigerante fluye por el sistema
sellado y puede producir un sonido de "hervor"
justamente despu_s de detenerse el compresor.
1" E1compresor podria "golpetear" mientras cicla entre
encendido y apagado.
1" Agua que gotea de los serpentines a la placa de drenaje.
1" E1control del humidistato, el compresor y el ventilador
hacen "tics" al encenderse o apagarse. E1metal hace un
ruido parecido al expandirse o contraerse.
10
Page 11

Servicio y Garantia ooooooooooooooooooooooooooooooooooo
Para modelos instalados en Norteam_rica - En
caso de necesidad de servicio o piezas
Haga primer() las verificaciones recomendadas. En caso
de necesitarse servicio o piezas, consulte en la garantia de
su deshumidificador en la seccidn "Cdmo obtener
servicio o piezas de garantia'.
Para modelos instalados fuera de Norteam_rica
Para aires deshumificadores comprados para uso fuera de
Norteam_rica el fabricante no otorgar_ ninguna garantia
implicita o explicita. Consulte a su distribuidor
autorizado sobre las condiciones de la garantia extendida
por el importador de los equipos de su pais.
Garantia del deshumidificador
(Dentro de los 48 estados contiguos de los Estados Unidos,
estado de Hawai, Distrito de Columbia, Puerto Rico y
Canada)
Garantia para todas las piezas (cinco afios) y
mano de obra
A partir de la fecha de compra y durante un periodo de
cinco aflos, Fedders North America, mediante sus
estaciones de servicio autorizadas, repararfi o reemplazarfi
sin costo alguno para el propietario o usuario, cualquier
pieza que presente daflos de material o mano de obra
derivados del uso normal del producto. Si se solicita, se
puede proporcionar servico a domicilio, recoger la unidad,
volveral a dejar y reinstalarla, pero todo esto se harfi bajo
la responsabilidad del duello.
Nota: En caso de que se requiera reemplazar una pieza mientras
la garantia esta vigente, se utilizaran los repuestos de Fedders
North America los cuales continuaran en vignecia solamente
durante el resto del periodo de garantia de la unidad.
Excepciones
La garantia antes indicada no cubre las fallas de
funcionamiento causadas por daflos que sufra la unidad
mientras _sta est_ en posesidn del usuario (excluyendo los
daflos causados por defecto o funcionamiento defectuoso),
o por la instalacidn incorrecta, o la utilizacidn indebida de
la unidad, incluyendo pero sin limitarse a ello, la
negligencia en proporcionar el mantenimiento necesario y
adecuado o en seguir las "instrucciones de Instalaci0n y
Uso" indicadas por escrito. En caso de utilizarse la unidad
para fines comerciales, de negocios, de arriendo u otro uso
o aplicacidn que no sea el uso del consumidor, no
otorgamos garantia explicita ni implicita, incluyendo, pero
sin limitarse a, toda garantia implicita de negociabilidad o
idoneidad para un uso o finalidad particular.
Algunos estados no permiten limitar el tiempo de
duraci0n de una garantia implicita ni permiten excluir ni
limitar los daflos incidentales o emergentes, de modo que
las limitaciones o exclusiones antes indicadas podrian no
aplicarse en su caso. Esta garantia le otorga derechos
legales especificos. Usted podria tener tambi_n otros
derechos que pueden variar de estado a estado.
No se ofrecen garantias para las unidades vendidas fuera
de las _reas antes indicadas. Su distribuidor o vendedor
final podria proporcionar una garantia para las unidades
vendidas fuera de estas _reas.
C6mo obtener servicio o piezas de garantia
E1 servicio para su deshumidificador serfi provisto por
CareCo, una divisi6n del fabricante con estaciones de
servicio independientes CareCo autorizadas en todo el
pais.
Nota: Antes de solicitar servicio, lea cuidadosamente el folleto
de "lnstrucciones de Instalacion y Uso" Luego, si
necesita servicio:
1. Llame a un taller de servicio autorizado CareCo y
suministreles el nfimero de modelo, nfimero de serie, la
fecha de compra y la naturaleza del problema. E1 servicio
se prestarfi durante horas normales de trabajo.
Comuniquese con su distribuidor para obtener
recomendaciones sobre una estacidnde servicio
autorizada.
2. Si su distribuidor no puede proporcionarle el hombre de
un taller de servicio o si necesita otto tipo de asistencia,
llame al siguiente nfimero gratis para obtener el hombre
de un taller de servicio autorizado o distribuidor de piezas
autorizado:
1-866-MAYTAG 1
o escriba ah
Departamente de Servicio de CareCo
415 W. Wabash Ave.. P.O.Box 200
Effingham. IL 62401 EE. UU.
Prueba de la fecha de compra
E1 establecimiento de la fecha de compra original para
efectos de la garantia es responsabilidad del consumidor.
Recomendamos mantener la factura de compra, el cheque
cancelado o algOn otro registro de pago apropiado para
dicho efecto.
LAS SOLUCIONES EXPUESTAS EN LA (;ARANTIA ANTERIOR SON
EXCLUSIVAS. SE RECHAZA CUALQUIER OTRA (;ARANTIA YA SEA
EXPRESA 0 IMPLICITA, INCLUYENDO, PERO SIN LIMITARSE A
ELLO, TODAS LAS (;ARANTIAS DE COMERCIABILIDAD 0
IDONEIDAD PARA UN FIN EN PARTICULAR DURANTE CINCO
AJ_OS A PARTIR DE LA FECHA DE COMPRA. BAJO NIN(;UNA
CIRCUNSTANCIA FEDDERS NORTH AMERICA SE HARA
RESPONSABLE POR NIN(;UN DAJ_O DIRECT(), INDIRECT() 0
CONSECUENCIAL, SIN IMPORTAR LA CAUSA DE LA ACCION,
A UN CUANDO FEDDERS NORTH AMERICA HAYA SIDO
ADVERTIDO CON ANTERIORIDAD DE LA POSIBILIDAD DE
DICHOS DAJ_OS. NO SE OFRECE NIN(;UNA (;ARANTIA EXPRESA
0 IMPLICITA A COMPRADORES DESPUES DE LA REVENTA.
11
Page 12

Directives de s4curit4 importanteSoooooooooooooooooo
EKi_ge_¢es e_e¢{dqgae
Danger de choc 61ectrique
1.N'enficfier le d6sfiumidificateur que dans
une prise 6lectrique raise _ la terre.
2.Ne passe servir d'une rallonge ou d'un
adaptateur avec cet appareil.
3.Ne pas faire marcher le
d6shumidificateur si le panneau avant a
6t6 retir6.
Suivre les pr@autions indiqu6es ci-dessus pour
@iter tout risque d'_lectrocution, d'incendie
ou de lOsioncorporelle.
Si la plaque de s6rie du d6shumidificateur
indique une tension nominale de 115
volts et une intensit6 en ampOres
nominale allant jusqu' a 7,SA, l'appareil
peut _tre branch6 sur le m_me fusible ou
disjoncteur que d'autres appareils.
Toutefois, l'intensit6 maximale en amperes de
l'ensemble des appareils branchOs sur ce
fusible ou disjoncteur ne dolt pas
d6passer celle du fusible ou du disjoncteur.
L'emplacement de la plaque de s6rie de ce
module est indiqu6 sur la page couverture
du pr6sent manuel.
Avis
Ne pas utiliser le d6sfiumidificateur sans la
protection d'un circuit de temporisation.
Se reporter _ la plaque signal6tique pour
toute indication de puissance exig6e.
CALIBRESDE FIL RECOMMANDES
(Selon I'installation stipul& par le code de construction)
PROTECTION DU CIRCUIT CALIBRE DE FIL
15 A N°14 MINIMUM
20 A N°12 MINIMUM
30 A N°I 0 MINIMUM
Ne pas entreposer et ne pas utiliser
d'essence ou d'autres vapeurs et
liquides inflammables a proximit4
du d_shumidificateur ou de tout
autre appareil. Les vapeurs peuvent
crier un danger d'incendie ou une
explosion.
Alimentation
Oectrique:
Courant Alternatif
Uniquement
115V, 60 HZ
Monophas4
Specifications
dela Prise:
Calibre
Minimum de Fih Cable 3 Fils
Type2 POles+ Terre
125 Volts, 15 Amp
N°14 (A.W.G.)
N'utiliser que du fil
de cuivre
ProtectionduCircuit:
Fusible15
Amp_actionretard4e
ou disjoncteur
I!
Prise murale ii
trois broches
avec terre
Fiche _ trois
broches avec terre
Prise murale
unique avec
terre
Specifications _lectriques
Votre d6shumidificateur fonctionne sur
tout circuit 115 volts 60 Hz et se branche
dans une prise 2 p61es + terre. Une ligne
suppDmentaire n'est pas n6cessaire, bien
qu'il soit recommand6 de ne pas
surcharger le circuit en y raccordant des
gros appareils 61ectrom6nagers tels que
machines _ laver, etc. Pour des raisons de
s_curit_, ce d_shumid-ificateur est _quip_
d'une fiche 3 broches _ raise _ la terre et
doit _tre branchO dans une prise
correctement raise _ la terre (Figs. 1 & 2). Si
votre prise n'est pas du type correct, il vous
incombe de faire remplacer la prise et
modifier le cSblage pour qu'ils soient du
type correct. NE coupez PAS la troisiOme
broche (de raise _ la terre). N'UTILISEZPAS
D'ADAPTATEUR.
@©©@
l15V 230V 230V 230V
15A 15A 20,4 30,4
Montage°°°°°°°°°°°°°°°°°°°°°°°°°°°°°°°°°°°°°°°°°°°°°°°°°°°°
Fermez les portes et fen_tres
Pour garantir une d_sfiydratation efficace, fermez toutes les portes
et fen_tres _ l'endroit dans lequel le dOshumidificateur doit
fonctionner (Fig. 3).
Branchement
Une fois que vous avez mont6 votre dOsfiumidificateur et l'avez
installO dans un endroit appropriO, branchez son cordon
d'alimentation dans une prise correctement raise _ la terre
comme indiquO dans les spOcifications Olectriques (Fig. 4).
[I
II
12
Page 13

Fonctionnement oooooooooooooooooooooooooooooooooooooooooooooooo
Q MAYIrAG
Pause
Power
1 hour
C) Commande marche/arr@t
Appuyer sur le bouton <<Powe>,pour la mise en marche. Le t_moin de
fonctionnement <<ON,,s'allume.
(_) T@moin((r@servoirplein-
Un contacteur de d4tection automatique de niveau associ4/_ un thmoin
lumineux qui indique que le rhservoir est plein commande l'arrht du
d4shumidificateur avant le dhbordement. Lorsque le t4moin lumineux indiquant
que le r4serw)ir est plein s'allume, on dolt vider le r4servoir de condensat.
C) Afficheurdu r@glagede I'humidit@
Si l'humidit_ correspondant au pr_r_glage est inf_rieure/_ l'humidit_ qui r_gne
dans la piece, le compresseur se met en marche et l'appareil entreprend la
d_shumidification.
Si l'humidit_ correspondant au pr_r_glage est sup_rieure/_ celle qui r_gne dans la
piece, seul le ventilateur continue/_ fonctionner.
Apr_s quelques jours de fonctionnement sans modification du r_glage de
l'appareil, alors que les portes et fen_tres sont ferm_es, on pourra l_g_rement
augmenter (atmosphere plus humide) ou diminuer (atmosphere plus s_che) la
valeur de maintien de l'humidit_.
Pour modifier la valeur de maintien de l'humidit_, appuyer sur <<+_,ou <<-,,pour
faire varlet la valeur de maintien de l'humidit_ entre 3S % et 90 %, par
intervalles de S %.
Humidily/Temp
(_) Afficheur ((humidit@/temp@rature-
L'afficheur _Room>, affiche l'humidit_ relative ou la temperature de la piece.
L'appareil affiche par d_faut la valeur de l'humidit_. Pour obtenir l'affichage de la
temperature, appuyer sur le bouton _Humidity/Temp>,. Appuyer de nouveau sur
le bouton pour obtenir de nouveau l'affichage de l'humidit_.
Pour obtenir l'affichage de la temperature en degr_s Celsius, appuyer pendant
S secondes sur le bouton <<Humidity/Temp>,.
(_ S@lecteurde vitesse du ventilateur
Pour permuter la vitesse du ventilateur entre basse vitesse et haute vitesse,
appuyer sur le bouton <<FanSpeed,,. Utiliser la vitesse sup_rieure pour maintenir
la capacit_ maximale d'extraction d'eau. On peut utiliser la basse vitesse
lorsqu'un fonctionnement plus silencieux est souhaitable.
(_ Fonction de pause
Pour interrompre l'alimentation du d_shumidificateur pendant une heure,
appuyer sur le bouton <<Pause>>.
Humidity/Temp
Fan Speed
13
Page 14

Depannage oooooooooooooooooooooooooooooooooooooooooooooooooooooooooo
Evacuation de I'eau []
• Lorsque le r_serw)ir de condensat est plein, le
t6moin s'allume.
• Interrompre l'alimentation avant d'enlever le r@servoir.
Attendre trois minutes pour que tout r@sidu d'eau s'@coule
dans le r@servoir.
• Incliner le r@servoir vers l'avant, puis soulever prudemment
avec la poign@e. (Fig. S)
Remarque Importante: Cette eats n'est pas potable.
Nettoyage du filtre
1. Servez-w)us d'un accessoire d'aspirateur ou d'une brosse pour
nettoyer la grille avant.
2. Retirez le filtre en faisant glisser le filtre vers le haut au moyen
des deux languettes encastr@es command@es par simple
pression du doigt. (Fig. 6)
3. Pour nettoyer le filtre, lavez-le dans de l'eau savonneuse tilde,
rincez-le et secouez-le pour le s@cher. I1 est recommand@ de
proc@der _ ce nettoyage tous les mois ou en fonction des
conditions ambiantes.
m
condensat
Sortie de
condensat
Remarque : Un morceau
de ruban est fixe au
contenant pour une
expedition plus sore.
Ce morceau de ruban
_tre enleve.
"gl
Filtres it air
ta dur_e de vie de votre d_shumidificateur est prolong_e par un usage et un
entretien ad_quats. II est recommand_ d'effectuer annuellement une inspection et
un nettoyage des serpentins et des conduites d'eau de condensation. Les cofits
associ_s _ cet entretien annuel sont aux frais de I'acheteur.
Instalacion de drenado permanente
1. On peut acheminer l'eau de condensation directement de
l'appareil /_un point d'_vacuation, avec un tuyau de jardin
(avec l'adaptateur inclus).
2. Interrompre l'alimentation _lectrique avant d'entreprendre
le travail.
3. Utiliser un tournevis pour enlever l'opercule d@fongable
it l'arri_re.
4. Enfiler l'adaptateur du tuyau de jardin (fourni) sur la sortie
de condensat, _ travers le trou que bouchait l'opercule.
S. Le tuyau d'@vacuation doit acheminer le condensat jusqu'g
un siphon de plancher ou autre point d'_vacuation
approprKe.
6. Le tuyau d'@vacuation ne doit comporter aucun brusque
changement de direction et aucune pente montante.
ii
13
Sortie de
condensat
Arri_re de
l'appareil
Opercule d_fongable,
pour drainage
Vers point
d'@vacuatiol:
/
i
Adaptateur
pour tuyau
Tuyau de jardin
1
14
Page 15

Service°°° ooooooooooooooooooooooooooooooooooooooooooooooooooooooooooo
Guide de diagnostic
(Veuillez lire attentivement ce qui suit avant de demander un dr4pannage)
Si le deshumidificateur ne se met pas en marche:
¢" V_rifiez que l'appareil est branch_ dans une prise de courant sous tension.
¢" Si le t_moin lumineux (sur la plupart des modules) est allum_, videz le r_servoir d'eau. I1
doit alors s'_teindre et le d_shumidificateur se remettre en marche. I1 se trouve dans le
compartiment de r_servoir d'eau.
L'apparei| fonctionne, mais ne recueille que tr_s peu d'eau
¢" La quantit_ d'eau extraite de Fair d@end de l'humidit_ relative de Fair et de la capacit_
du d_shumidificateur que vous avez achet_. Lorsque Fair parait humide (humidit_ relative
_lev_e), une plus grande quantit_ d'eau sera extraite et le r_serwAr se remplira plus vite. Au
fur et/_ mesure que l'appareil continue 5 extraire de l'eau et/_ diminuer Fhumidit_ r_gnant
dans l'endroit considerS, le r_servoir recueillera une moindre quantit_ d'eau.
¢" Cet appareil comporte une commande de d_givrage qui se met au besoin,
automatiquement en marche. Lots du mode de d_givrage, le compresseur se met en
marche par intermittence et l'appareil produit moins d'eau.
¢" Uhumidit_ ambiante est faible (en dessous de 40 %).
R6duire la consommatio, d'6|ectricit
¢" En g_n_ral, aucune d_shydratation n'est n_cessaire lorsque la temperature ambiante est
basse et l'humidit_ relative faible. I1 est preferable d'arr_ter l'appareil pour r_duire la
consommation d'_lectricit_.
Bruits
I1est rassurant pour vous de savoir que votre d_shumidificateur fonctionne correctement.
Certains bruits sont normaux et vous n'avez aucune raison de vous en inquKter:
¢" Circulation de Fair sur le serpentind_shumidificateur.
¢" Sifflement ou bruits sourds - le r_frig_rant circule dans le circuit scell_ et peut produire un
<<bouillonnement>> juste apr_s l'arr_t du compresseur.
¢" Le compresseur peut _mettre des bruits sourds lorsqu'il se met en marche et s'arr_te.
¢" Eau coulant du serpentin dans le plateau d'_vacuation.
¢" La commande par humidistat, le compresseur et la soufflante tictaquent lorsqu'ilsmettent
en marche et s'arr_tent.
¢" Le m_tal fait le m_me bruit lorsqu'il se dilate ou se contracte.
15
Page 16

Garantieoooooooooooooooooooooooooooooooooooooooooooooooooooo
Pour les modules install6s en Am6rique du Nord - Si des
r6parations ou pi_ces s'av_rent n6cessaires
S'il s'av_re, apr_s les v6rifications recommand6es, qu'il est n6cessaire
d'effectuer des r6parations ou de se procurer des pi_ces, reportez-vous
<<Comment obtenir des r6parations ou pi_ces dans le cadre de la
garantie>> dans la garantie de votre d6shunfidificateur.
Pour les modules install_s en dehors de I'Am_rique du Nord
Le fabricant n'offre aucune garantie expresse ni tacite pour les
d6shumidificateurs achet6s pour _tre utilis6s en dehors de l'Am6rique
du Nord. Consultez votre revendeur local pour connaitre les
modalit6s de la garantie offerte par l'importateur dans votre pays.
Garantie du d_shumidificateur
(Applicable dans les 48 Etats-Unis limitrophes, I_tat d'HawaJ, le
District de Columbia. a Porto-Rico, au Canada)
Garantie complete (cinq ans) sur les pi_ces et la main d'oeuvre
Pour une p6riode de cinq ans suivant la date de l'achat initial, Fedders
North America, par l'entremise de ses centres de service aprOs-vente
agr66s, r6parera ou remplacera gratuitement, pour le propri6taire ou
tout utilisateur post6rieur, toute piece devenue d6fectueuse en termes
de mati_re ou de fabrication lors d'une utilisation normale, _ condition
que celui-ci apporte le d6shumidificateur dans l'un de nos centres de
service aprOs-vente agr66s et vienne l'y rechercher. La r6paration sur
place, l'enl_vement, la relivraison et la r6installation peuvent _tre
effectu6s sur demande, mais reDvent de la responsabilit6 de
propri6taire.
Remarque: Dans le cas o_J tout remplacement de pieces est requis
dans les limites de temps de cette garantie, les pieces de rechange de
Fedders North America sont usagees et ne sont garanties que pour la
periode restante de la garantie originale.
Exceptions
Les garanties limit6es susmentionn6es ne couvrent pas les d6faillances
caus6es par des dommages subis par l'appareil tant qu'il est en votre
possession (autres que les dommages dos _ un d6faut ou _ un
d6rangement), par son installation incorrecte ou par une utilisation
d6raisonnable de l'appareil, y compris, entre autres, l'absence
d'entretien raisonnable et n6cessaire ou le non respect des instructions
6crites d'installation et d'utilisation. Si l'appareil est utilis6 _ des fins
commerciales, de location ou autres que domestiques, nous n'offrons
aucune garantie expresse ou tacite, y compris, entre autres, des
garanties tacites de qualit6 marchande ou d'adaptation _ un usage ou
objet particulier.
LES RECOURS STIPULES DANS LA (;ARANTIE EXPRESSE SUSMENTIONNEE
REPRESENTENT LES SEULS RECOURS EXCLUSIFS DISPONIBLES. IL
N'EXISTE A UCUNE A UTRE GARANTIE EXPRESSE. TOUTES LES GARANTIES
IMPLICITES, Y COMPRIS ]t TITRE NON LIMITATIF TOUTES GARANTIES
IMPLICITES DE QUALITE LOYALE ET MARCHANDE ET D'UTILITE
PARTICULIERE, SONT LIMITEES ]t CINQ ANS ]t PARTIR DE LA DATE DE
L 'ACHAT INITIAL. FEDDERS NORTH AMERICA NE SAURAIT EN AUCUN
CAS ETRE TENU RESPONSABLE POUR LES DOMMAGES INDIRECT&
SECONDAIRES OU ACCESS(fiRE& SANS EGARD ]t LA CAUSE, M!_ME AU
CAS 0_] FEDDERS NORTH AMERICA AURAIT ETE PREVENU DE LA
POSSIBILITE DE TELS DOMMAGES. AUCUNE GARANTIE, EXPRESSE OU
IMPLICITE, N'EST OFFERTE ]t UN ACHETEUR QUELCONQUE EN CAS DE
REVENTE.
Certains Otats n'autorisent pas les limitations de durOe des garanties
tacites, ni les exclusions ou limitations frappant les dommages
accessoires ou indirects. I1 se peut donc que les exclusions ou
limitations susmentionnOes ne vous soient pas opposables. La prOsente
garantie vous confOre des droits prOcis; vous pouvez Ogalement jouir
d'autres droits qui varient d'un Otat 5 l'autre.
Les appareils vendus en dehors des rOgions susmentionnOes ne sont
couverts par aucune garantie. I1 se peut que votre distributeur ou
revendeur vous offre une garantie si vous rOsidez en dehors de ces
rOgions.
Comment obtenir des r_parations ou pi_ces dans le cadre de
la garantie
Le service aprOs-vente pour votre dOshumidificateur sera assurO par
CareCo, une division du fabricant qui dispose d'un rOseau de centres de
service agrOOs indOpendants dans tout le pays.
Remarque: Avant de demander une intervention, lisez attentivement
le livret d'instructions d'installation et d'utilisation. Si vous devez
ensuite avoir recours au service apres-vente:
1. Appelez un centre de service aprOs-vente agrOOCareCo en indiquant
le numOro de module, le numOro de sOrie, la date de l'achat et la
nature du probDme. La rOparation sera effectuOe pendant les heures
ouvrables. En cas de besoin, demandez _ votre revendeur les
coordonnOes d'un centre de service aprOs-vente agrOO.
2. Si votre revendeur n'est pas en mesure de vous indiquer les
coordonnOes d'un centre de service aprOs-vente agrOOou si vous avez
besoin d'une autre assistance quelconque, appelez sans frais le
numOro suivant pour obtenir les coordonnOes d'un centre de service
aprOs-vente ou distributeur de pi_ces agrOO:
1-866-MAYTAG 1
Vous pouvez egalement ecrire a:
CareCo, Service Department
415 W Wabash Ave., P.O. Box 200
Effingham, IL 62401 E.-U.
Preuve de la date de I'achat
I1 incombe au client de fournir la preuve de la date de l'achat initial
pour des raisons tenant 5 la garantie. Nous vous recommandons de
conserver dans ce but une facture, un cheque annuD ou tout autre
document appropriO apportant la preuve du rOglement.
Maytagis atrademarkof the MaytagCorporationandis usedunderlicensebyFeddersNorthAmerica,Inc.
Maytagesunamarcaregistradade MaytagCorporationyse usabaiolicenciaotorgadaaFeddersNorthAmericaInc.
Maytagestunemarquedecommercede MaytagCorporation,utilisdesouslicenceparFeddersNorth America,Inc.
 Loading...