

Page 1

B'I&YrAG
Room Air Conditioners for Double-Hung Windows
Acondicionadores de aire ambientales para ventanas de guillotina
Climatiseur d'air individuel pour fen_tres a guillotine
For Future Reference
Write down the model and serial numbers
The model and serial numbers can be found
on the left hand side of the decorative front
grille. Use these numbers in any
correspondence or service calls concerning
your air conditioner.
Para referencia futura
Anote los numeros de modelo y series
EncontraM los nOmeros de modelos y series en la mano
izquierda del panel decorativo. Use estos nOmeros en
cualquier correspondencia o Ilamadas de servicio respecto a su
aire acondicionado.
Pour r_f_rence ult_rieure
Inscrire les numeros de module et de serie
On trouvera les num6ros de module et de s6rie sur le c6t6
gauche du panneau d6coratif. Utiliser ces num6ros dans route
correspondance ou tout appel d'entretien au sujet de son
climatiseur.
ENGLISH
Important Safety Instructions .................................... 1
Installation .............................................................. 2
Operation ................................................................ 4
Maintenance ........................................................... 3
Warranty .................................................................. -
ESPAIRIOL
Instrucciones irnportantes de seguridad .................... 8
Instalaci6n ............................................................... 9
Funcionamiento ................................................... 11
Mantenimiento ..................................................... 12
Garanti'a .............................................................. 14
FRAN(_AIS
Directives de s6curit6 irnportantes ......................... 15
Installation ............................................................ 16
UtiIisation .............................................................. 18
Maintneance ................................. 19
Garantie ................................................................ 23
Model No., Modelo No., N° de mod_.le
Serial No., NOmero de serie, N° de s6rie
Date of Purchase, Fecha de la compra, Date d'achat
Questions? • i.Preguntas?
866-MAYTAG 1
customerservice@maytagair.com
Page 2
iNSTALLATiON
ELECTRICAl_ REQUIREMENTS
& SAFETY PRECAUTIONS
Power Cord with
Arc Detection Device
The power cord supplied with this air
conditioner is equipped with an Arc
Detection Device designed to shut off power
to the unit when it senses an arc fault
condition. An arc fault is an unintentional
electrical discharge that occurs when
electrical products or wires are damaged,
aged, or improperly used. An arc fault can be
potentially hazardous if [eft undetected.
• Do not remove or modify this plug
• Do not use as an on/off switch
• Do not use outdoors
• Do not push furniture against or place
furniture on the electrical cord. This can trip
the test switch and/or damage the cord and
become a potential condition for arcing
• Do not attempt to repair the cord. If the cord
requires replacement, ca[[ an authorized
servicer.
• The Arc Detection Device is not a Ground
Fault Interrupter and should not be used as
such
• The Arc Detection Device contains an
electronic circuit board and should not be
submerged or exposed to water spray
Resetting
If the Arc Detection Device has tripped, the
reset button will pop up.
Follow these steps to reset the Arc Detection
Device:
1. Unplug unit from electrical outlet
2. Press the reset button
3. Plug the unit back into electrical outlet
4. Check to see if power has returned to the
unit
Testing
You should test the Arc Detection Device
equipped power cord monthly, after every
major electrical storm, or if power to your
Room Air Conditioner has been interrupted.
Follow these steps to test the Arc Detection
Device:
1. Unplug unit from electrical outlet
2. Press the reset button
3. Plug the unit back into electrical outlet
4. Press test button. Unit should trip and reset
button will pop up.
5. Press reset button again for use
If above test fails, stop using the air
conditioner and contact customer service.
Electrical Shock Hazard_jl
• Plug unit only into a grounded "_ A
electrical outlet.
• Do not use an extension cord or plug
adapter with this unit.
• Do not operate unit with decorative front
or filter removed.
• Failure to follow these precautions could
result in electrical shock, fire or personal
injury.
• If the air conditioner has a serial plate
rating of 115 volts and greater than 7.5
amps, it must have its own fuse or circuit
breaker, and no other device or unit
should be operated on that fuse or circuit
breaker.
• If the air conditioner has a serial plate
rating of 230 volts, it must have its own
fuse or circuit breaker, and no other
device or unit should be operated on that
fuse or circuit breaker.
• We recommend that a qualified
electrician install unit in accordance with
the National Electrical Code and local
codes and ordinances.
• Use copper conductors of correct wire
gauge and protector size only.
• Do not alter cord or plug end. Do not
remove warning label on cord.
Important Grounding Requirements
• Air conditioner has a three-prong
grounding plug on the power supply cord,
which must be plugged into a properly
grounded three-prong wall receptacle for
your protection against possible shock
hazard. For models up to and including
7.5 amperes, use a grounding type wall
receptacle to match the cord plug.
• For models above 7.5 amperes use a single
outlet grounding type wall receptacle to
match the cord plug.
Do not operate this air conditioner without
proper time delay circuit protection (circuit
breaker or fuse). Refer to serial plate for
proper power supply requirements.
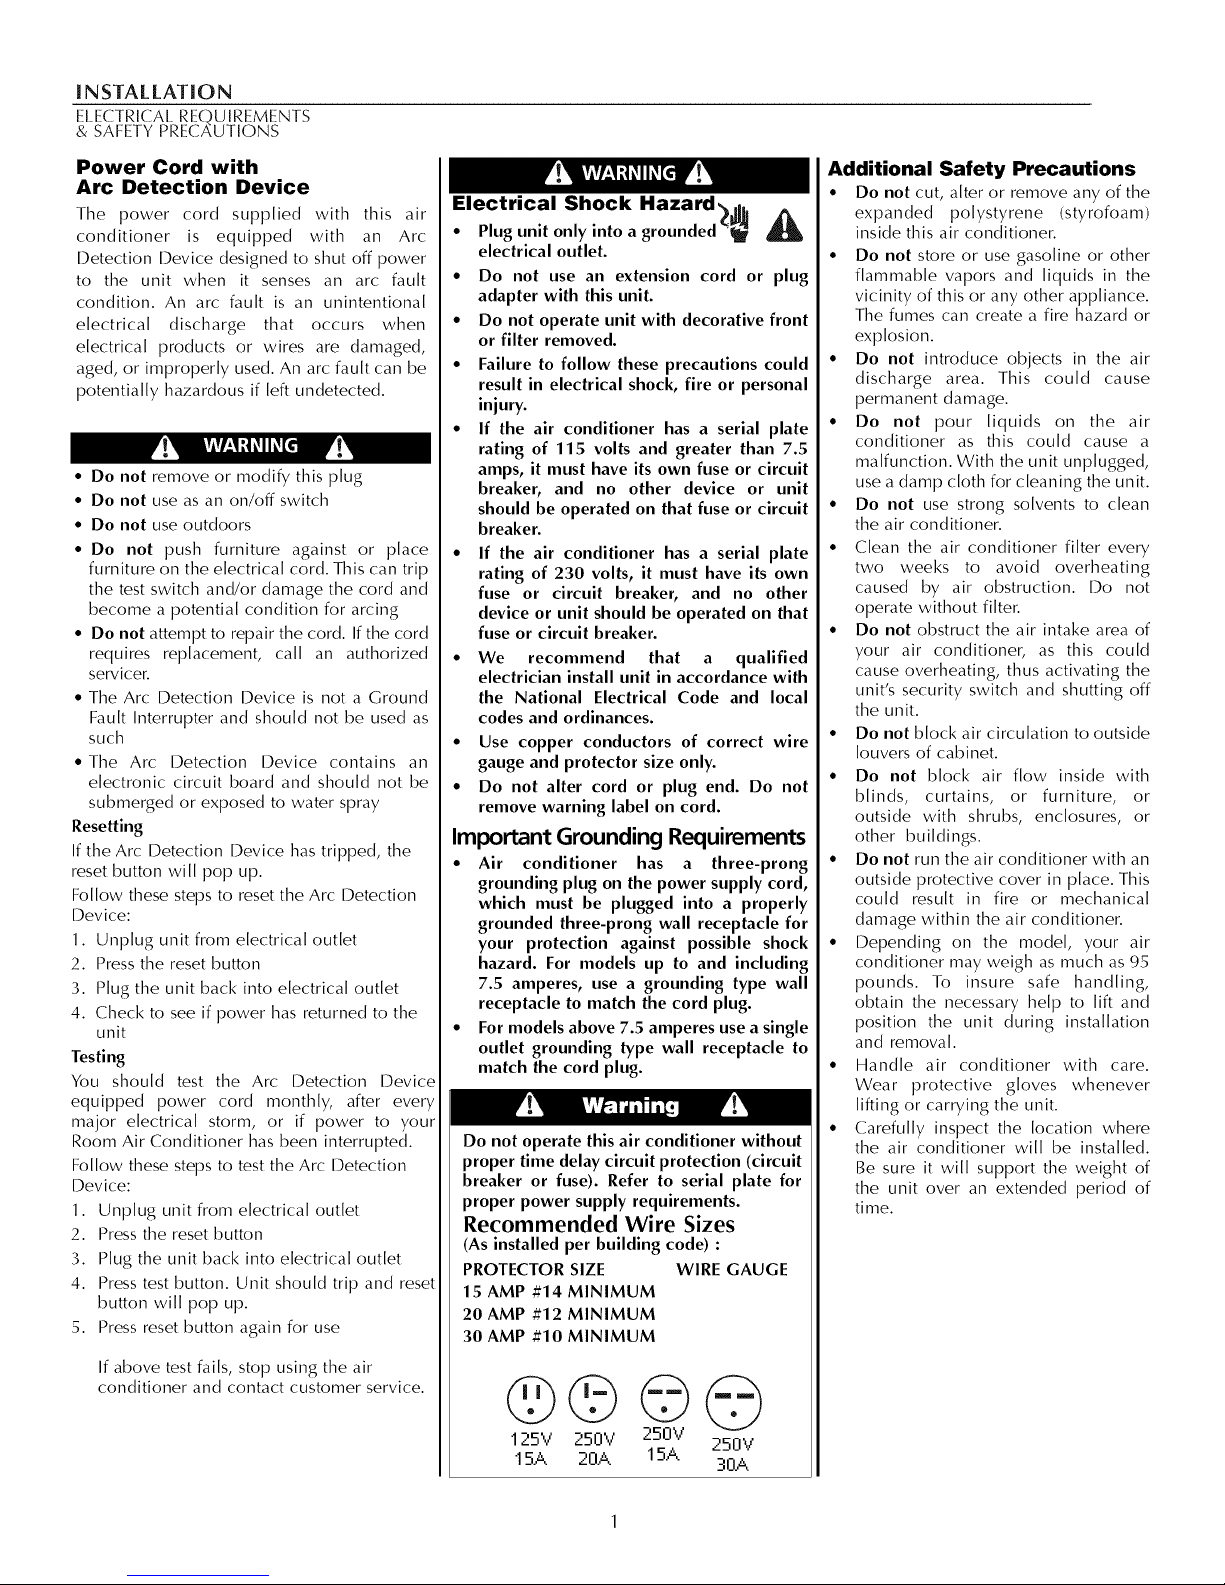
Recommended Wire Sizes
(As installed per building code) :
PROTECTOR SIZE WIRE GAUGE
15 AMP #14 MINIMUM
20 AMP #12 MINIMUM
30 AMP #10 MINIMUM
©©©©
IZ5V Z50V Z50V
15A 20A 15A
250V
30A
Additional Safety Precautions
• Do not cut, alter or remove any of the
expanded polystyrene (styrofoam)
inside this air conditioner.
• Do not store or use gasoline or other
flammable vapors and liquids in the
vicinity of this or any other appliance.
The fumes can create a fire hazard or
explosion.
• Do not introduce objects in the air
discharge area. This could cause
permanent damage.
• Do not pour liquids on the air
conditioner as this could cause a
malfunction. With the unit unplugged,
use a damp cloth for cleaning the unit.
• Do not use strong solvents to clean
the air conditioner.
• Clean the air conditioner filter every
two weeks to avoid overheating
caused by air obstruction. Do not
operate without filter.
• Do not obstruct the air intake area of
your air conditioner, as this could
cause overheating, thus activating the
unit's security switch and shutting off
the unit.
• Do not block air circulation to outside
louvers of cabinet.
• Do not block air flow inside with
blinds, curtains, or furniture, or
outside with shrubs, enclosures, or
other buildings.
• Do not run the air conditioner with an
outside protective cover in place. This
could result in fire or mechanical
damage within the air conditioner.
• Depending on the model, your air
conditioner may weigh as much as 95
pounds. To insure safe handling,
obtain the necessary help to lift and
position the unit during installation
and removal.
• Handle air conditioner with care.
Wear protective gloves whenever
lifting or carrying the unit.
• Carefully inspect the location where
the air conditioner will be installed.
Be sure it will support the weight of
the unit over an extended period of
time.
Page 3
iNSTALLATiON
WINDOW INSTAI.I.ATON
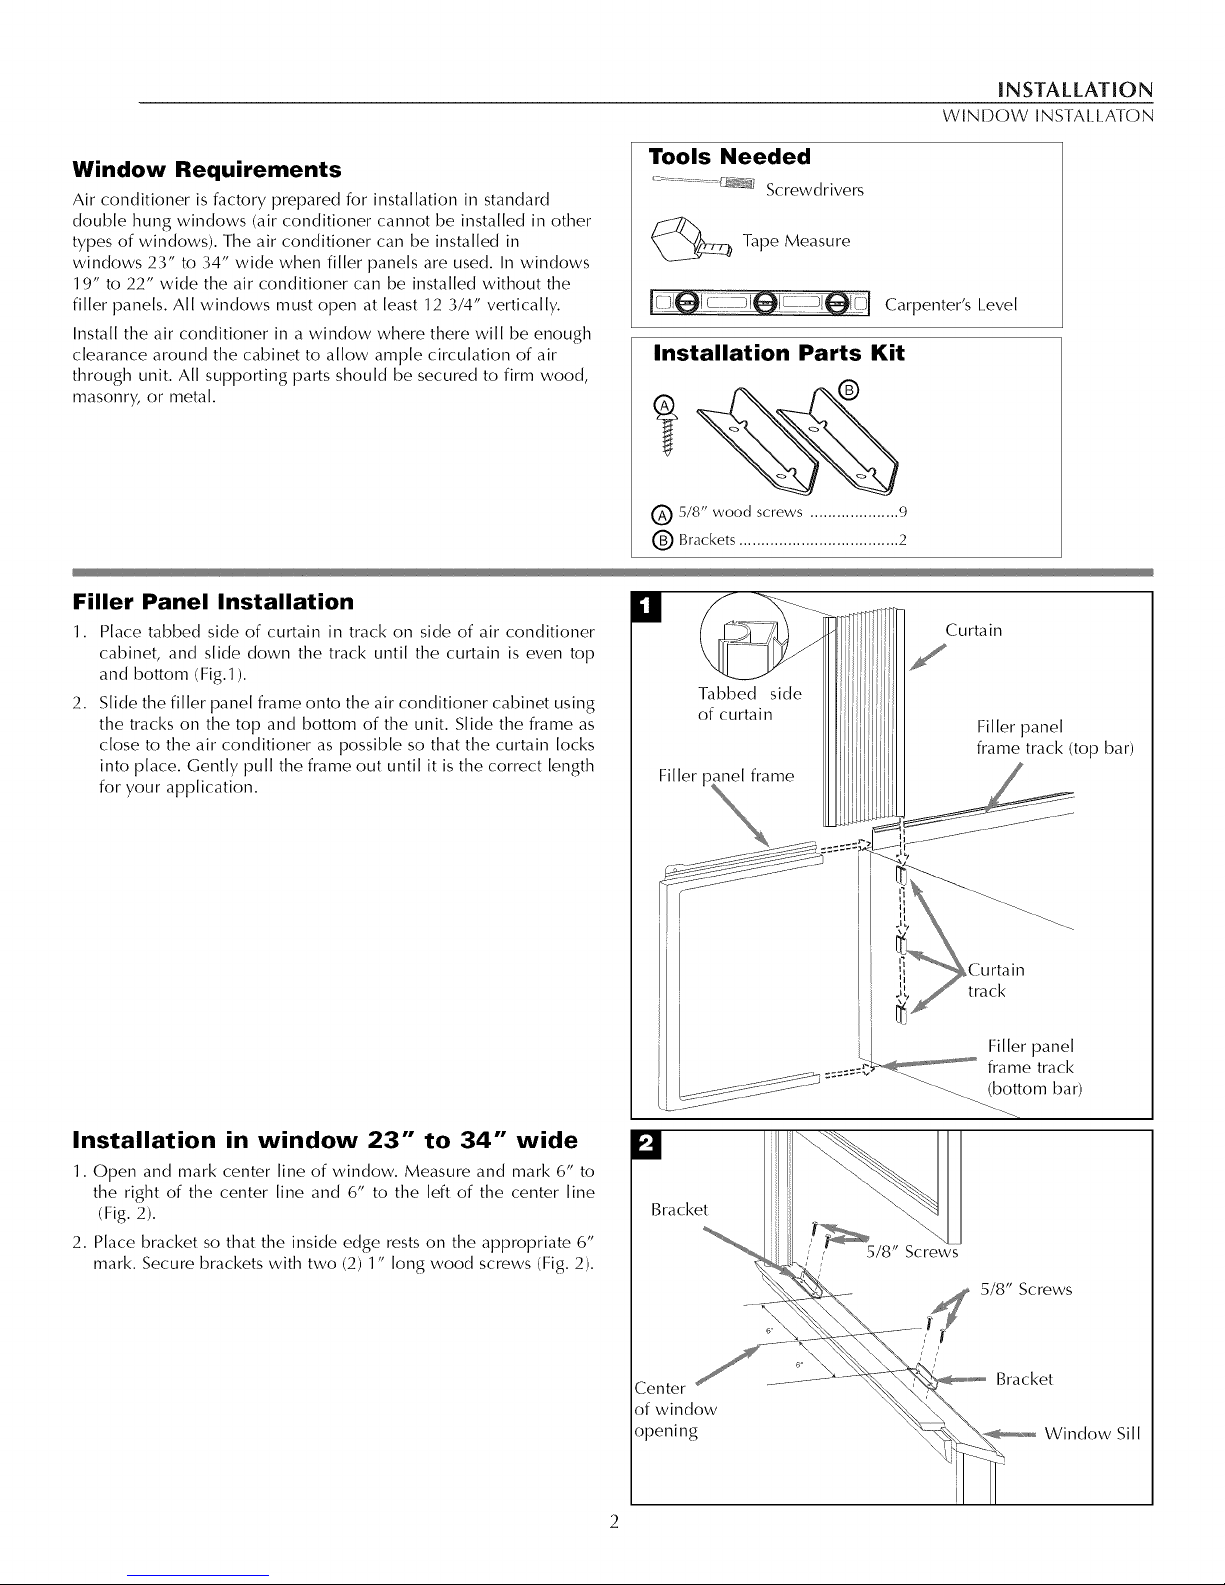
Window Requirements
Air conditioner is factory prepared for installation in standard
double hung windows (air conditioner cannot be installed in other
types of windows). The air conditioner can be installed in
windows 23" to 34" wide when filler panels are used. In windows
19" to 22" wide the air conditioner can be installed without the
filler panels. All windows must open at least 12 3/4" vertically.
Install the air conditioner in a window where there will be enough
clearance around the cabinet to allow ample circulation of air
through unit. All supporting parts should be secured to firm wood,
masonry, or metal.
Filler Panel Installation
Place tabbed side of curtain in track on side of air conditioner
1.
cabinet, and slide down the track until the curtain is even top
and bottom (Fig.1).
2.
Slide the filler panel frame onto the air conditioner cabinet using
the tracks on the top and bottom of the unit. Slide the frame as
close to the air conditioner as possible so that the curtain locks
into place. Gently pull the frame out until it is the correct length
for your application.
Tools Needed
........ r_<.:_ Screwdrivers
Tape Measure
i" i:Cl Carpenter's,.evem
Installation Parts Kit
@ 5/8" wood screws .................... 9
(_) Brackets .................................... 2
M
Curtain
IIIIIJl
Tabbed side
of curtain
Filler panel
frame track (top bar)
Installation in window 23" to 34" wide
1. Open and mark center line of window. Measure and mark 6" to
the right of the center line and 6" to the left of the center line
(Fig. 2).
2. Place bracket so that the inside edge rests on the appropriate 6"
mark. Secure brackets with two (2) 1" long wood screws (Fig. 2).
_Bracket
Center
of window
opening
5/8" Screws
/ /
Bracket
Window Sill
Page 4
INSTALLATION
WINDOW INSTALLATON
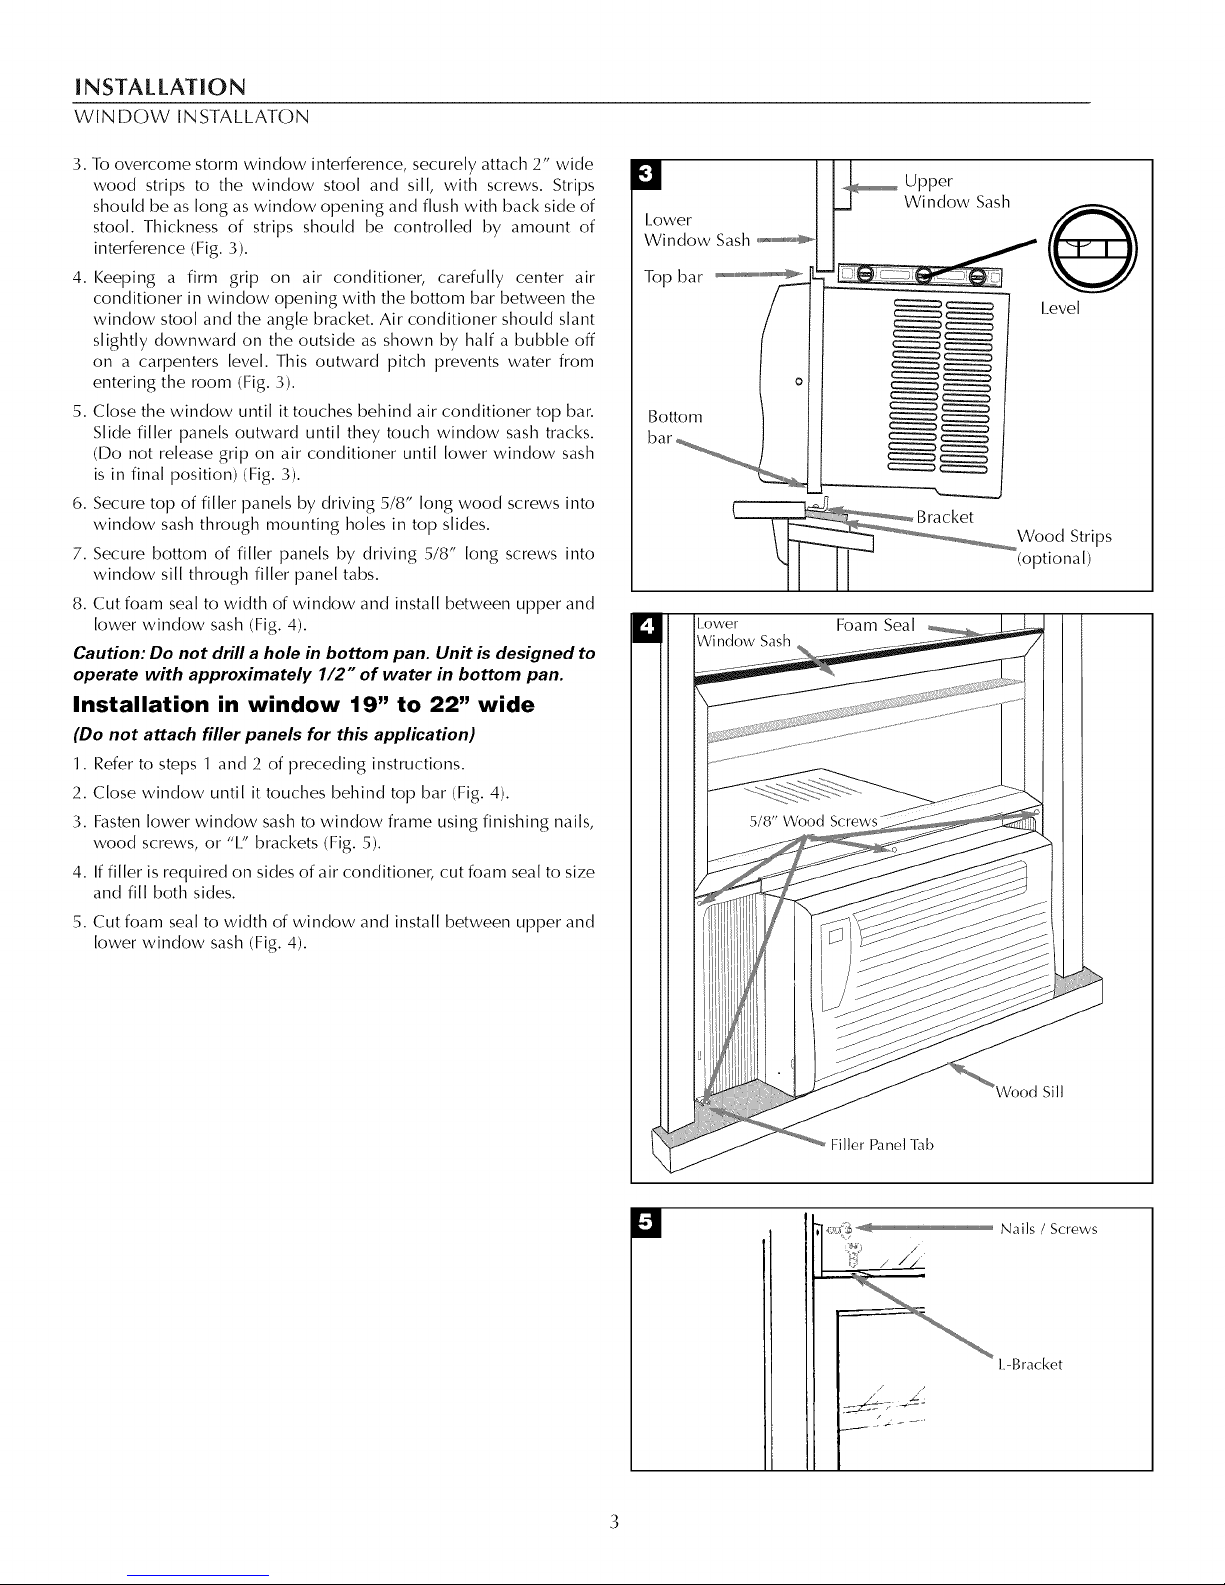
3. To overcome storm window interference, securely attach 2" wide
wood strips to the window stool and sill, with screws. Strips
should be as long as window opening and flush with back side of
stool Thickness of strips should be controlled by amount of
interference (Fig. 3).
4. Keeping a firm grip on air conditioner, carefully center air
conditioner in window opening with the bottom bar between the
window stool and the angle bracket. Air conditioner should slant
slightly downward on the outside as shown by half a bubble off
on a carpenters level. This outward pitch prevents water from
entering the room (Fig. 3).
5. Close the window until it touches behind air conditioner top bar.
Slide filler panels outward until they touch window sash tracks.
(Do not release grip on air conditioner until lower window sash
is in final position)(Fig. 3).
6. Secure top of filler panels by driving 5/8" long wood screws into
window sash through mounting holes in top slides.
7. Secure bottom of filler panels by driving 5/8" long screws into
window sill through filler panel tabs.
8. Cut foam seal to width of window and install between upper and
lower window sash (Fig. 4).
Caution: Do not drill a hole in bottom pan. Unit is designed to
operate with approximately 1/2" of water in bottom pan.
Installation in window 19" to 22" wide
(Do not attach filler panels for this application)
1. Refer to steps 1 and 2 of preceding instructions.
2. Close window until it touches behind top bar (Fig. 4).
3. Fasten lower window sash to window frame using finishing nails,
wood screws, or "1." brackets (Fig. 5).
4. Iffiller is required on sides of air conditioner, cut foam seal to size
and fill both sides.
5. Cut foam seal to width of window and install between upper and
lower window sash (Fig. 4).
Lower
Window Sash
Top bar ...................................._
lower
Window Sash
Upper
Window Sash
(D
I.evel
Wood Strips
(optional)
Foam Seal
Lll
Wood Sill
Filler Panel l_fl)
Nails / Screws
:_2]:, /
L-Bracket
,/ ./
Page 5
OPERATION
EI.ECTRONIC CONTROI.S
ELECTRONIC CONTROL PANEL
Power Control
The Power Control turns the unit on and off.
The Temperature/Hour Display
Shows the set temperature or the timer setting. THE TEMPERATURE DISPLAY ONLY
SHOWS THE SET TEMPERATURI:, NOT THE ACTUAL. ROOM TEMPERATURE.
Temperature/Hour Controls
These buttons are used to raise or lower the set temperature in increments of 1o from
66 ° to 88 °. They also raise or lower the hour setting in increments of 1 from 00 to 24
when the timer is being set. In order to toggle between °F or °C, depress both of the
controls at the same time.
Mode Control
The Mode Control has two settings: FAN and COOl .....
The settings are adjusted with the Mode Control button. A green light indicates which
setting is currently being used. When the COOl. mode is selected, the unit will circulate
and cool the air.
If the FAN mode is selected, the unit will only circulate the air.
Fan Speed Control
The Fan Speed Control has three
settings: High, I_ow and Auto. The settings are adjusted with the Fan Speed button,
each time the button is depressed it changes the
setting. A green light will indicate which setting is currently being used.
When the Auto feature is selected while the air conditioner is in the COOl. mode, the
fan speeds will change automatically as the temperature in the room changes.
• 4 ° or more above the set temperature the unit will be in HI FAN mode.
• 4 ° or less above the set temperature the unit will be in LO FAN mode.
Timer Control
The timer can be set to either lure the unit on or off.
To turn the unit on using the Timer:
• Depress the timer key when the power is off, the display will read 00. Adjust to the
desired number of hours before TURN ON using the up/down arrows.
• The display will show the time by hours [eft until TURN ON.
• To Turn the timer off, depress the timer key.
• A green light next to the Timer Control indicates that the timer is set.
To turn the unit OFF using the Timer:
• Depress the timer key when the power is on, the display will read 00. Adjust to the desired
number of hours beforeTURN OFF using the up/down arrows. The display will automatically
go back to the set temperature after 10 seconds.
• To display the amount of time left until TURN OFF, depress the timer button once.
• To turn the TIMER OFF, depress the timer button twice.
• A green light next to the ]]mer Control indicates that the timer is set.
.Izl
©
Power Control
Temperature/Timer Display
O Temperature/Timer Controls
Mode Control
Far] Speed (ontrol
O Timer On/Off
Built-in three minute timing delay.
If this electronic unit will not respond
to touch pad or remote control
commands, it is necessary to unplug
the unit from the electrical outlet for
five seconds and then plug the unit
back in.
Auto restart feature:
In the event of a power failure,
this feature allows the unit to
resume operation once power has
been restored, retaining the most
recent settings
4
Page 6
SERVICE
TROUBLESHOOTING
Air Conditioner Remote Control
lhe functions work the same as your air conditioner's touch controls.
V!_ [a[:,lul/[o_ pv_
Use only AAA or IEC R03 1.5V batteries.
Remove the batteries if the remote controller is not used for a
month or longer.
Do not attempt to recharge the supplied batteries
All batteries should be replaced at the same time.
Do not dispose of the batteries in a fire as they may explode.
Do not mix old and new batteries.
Do not mix alkaline, standard (carbon - zinc), or rechargeable
(nickel-cadmium) batteries.
Do not install the batteries with the polarity (+/-) reversed.
Keep batteries and other things that could be swallowed
away from young children. Contact a doctor immediately if
an object is swallowed.
o
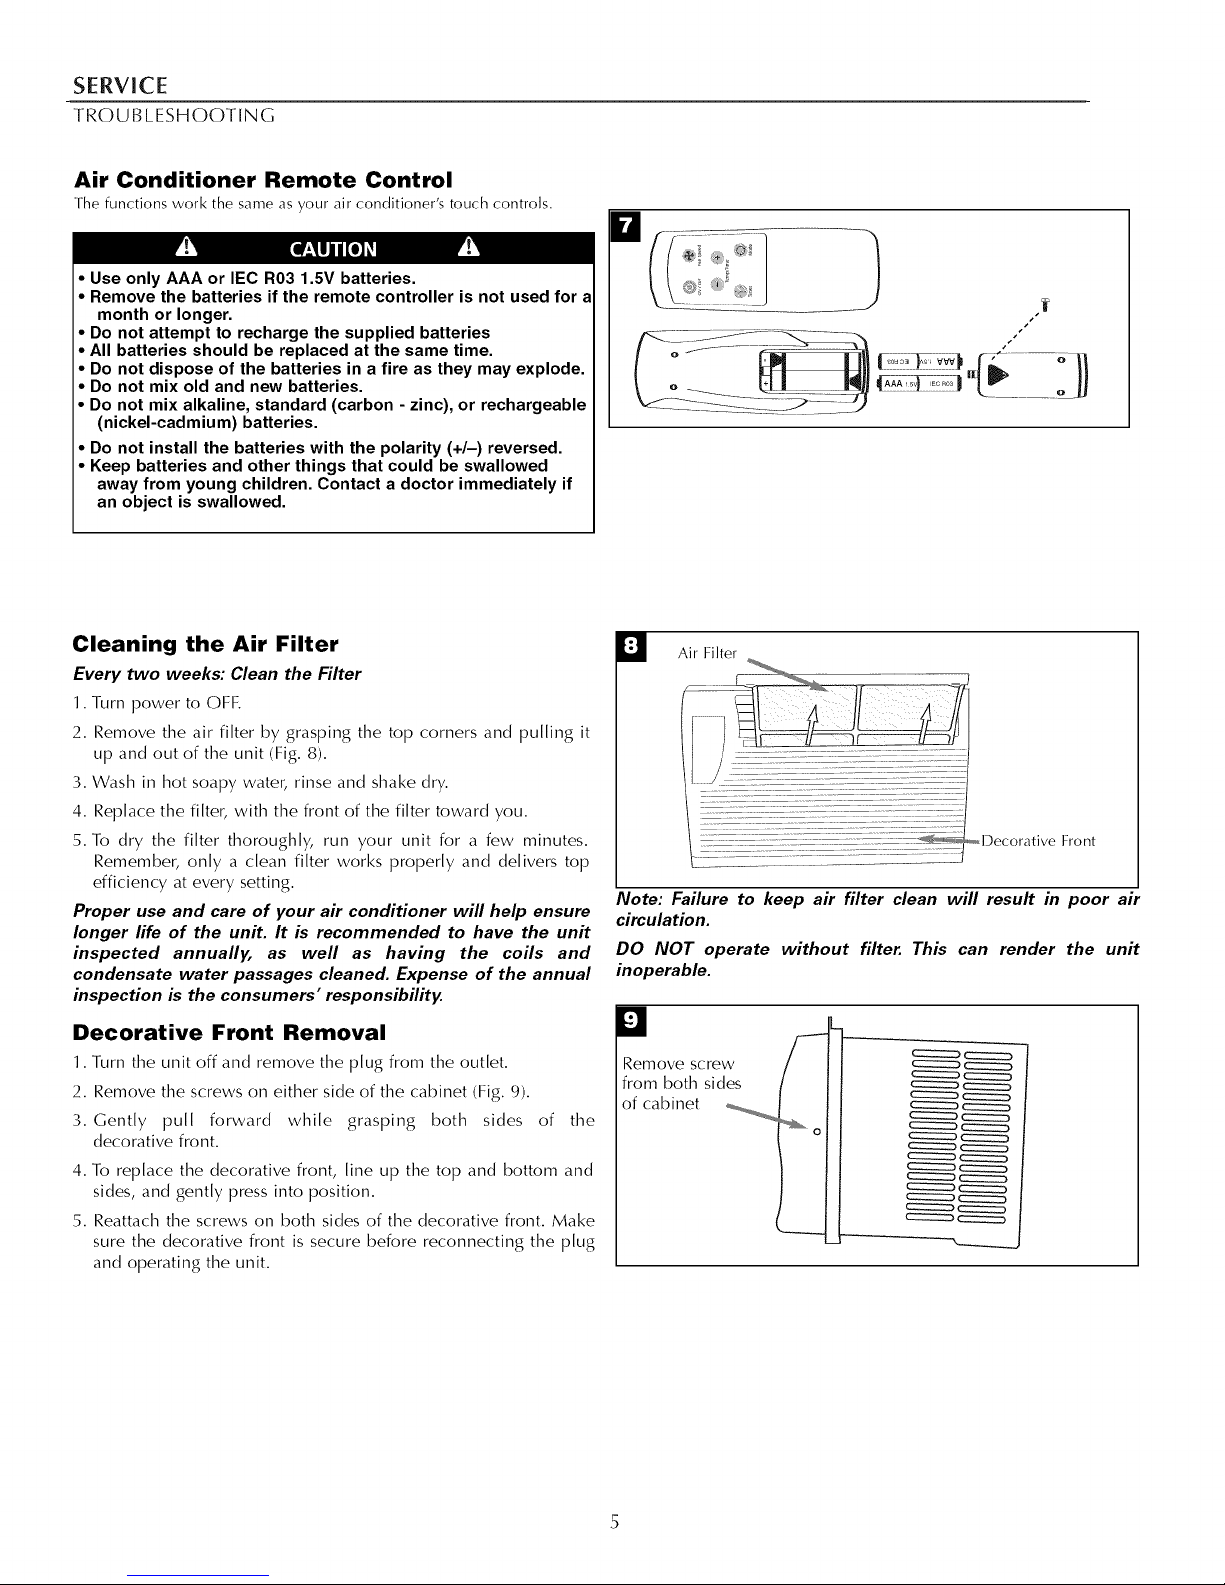
Cleaning the Air Filter
Every two weeks: Clean the Filter
1. Turn power to OFF.
2. Remove the air filter by grasping the top corners and pulling it
up and out of the unit (Fig. 8).
3. Wash in hot soapy water, rinse and shake dry.
4. Replace the filter, with the front of the filter toward you.
5. To dry the filter thoroughly, run your unit for a few minutes.
Remember, only a clean filter works properly and delivers top
efficiency at every setting.
Proper use and care of your air conditioner will help ensure
longer life of the unit. It is recommended to have the unit
inspected annually, as well as having the coils and
condensate water passages cleaned. Expense of the annual
inspection is the consumers" responsibility.
Decorative Front Removal
1. Turn the unit off and remove the plug from the outlet.
2. Remove the screws on either side of the cabinet (Fig. 9).
3. Gently pull forward while grasping both sides of the
decorative front.
4. To replace the decorative front, line up the top and bottom and
sides, and gently press into position.
5. Reattach the screws on both sides of the decorative front. Make
sure the decorative front is secure before reconnecting the plug
and operating the unit.
W Air Filter
Decorative Front
Note: Failure to keep air filter clean will result in poor aur
circulation.
DO NOT operate without filter. This can render the unit
inoperable.
D
Remove screw
from both sides
of cabinet
C:::::::2D
C:::::::::D
C:::::::::D
C::::::::::D
-L______
Page 7
SERVICE
TROUBI.ESHOOTING
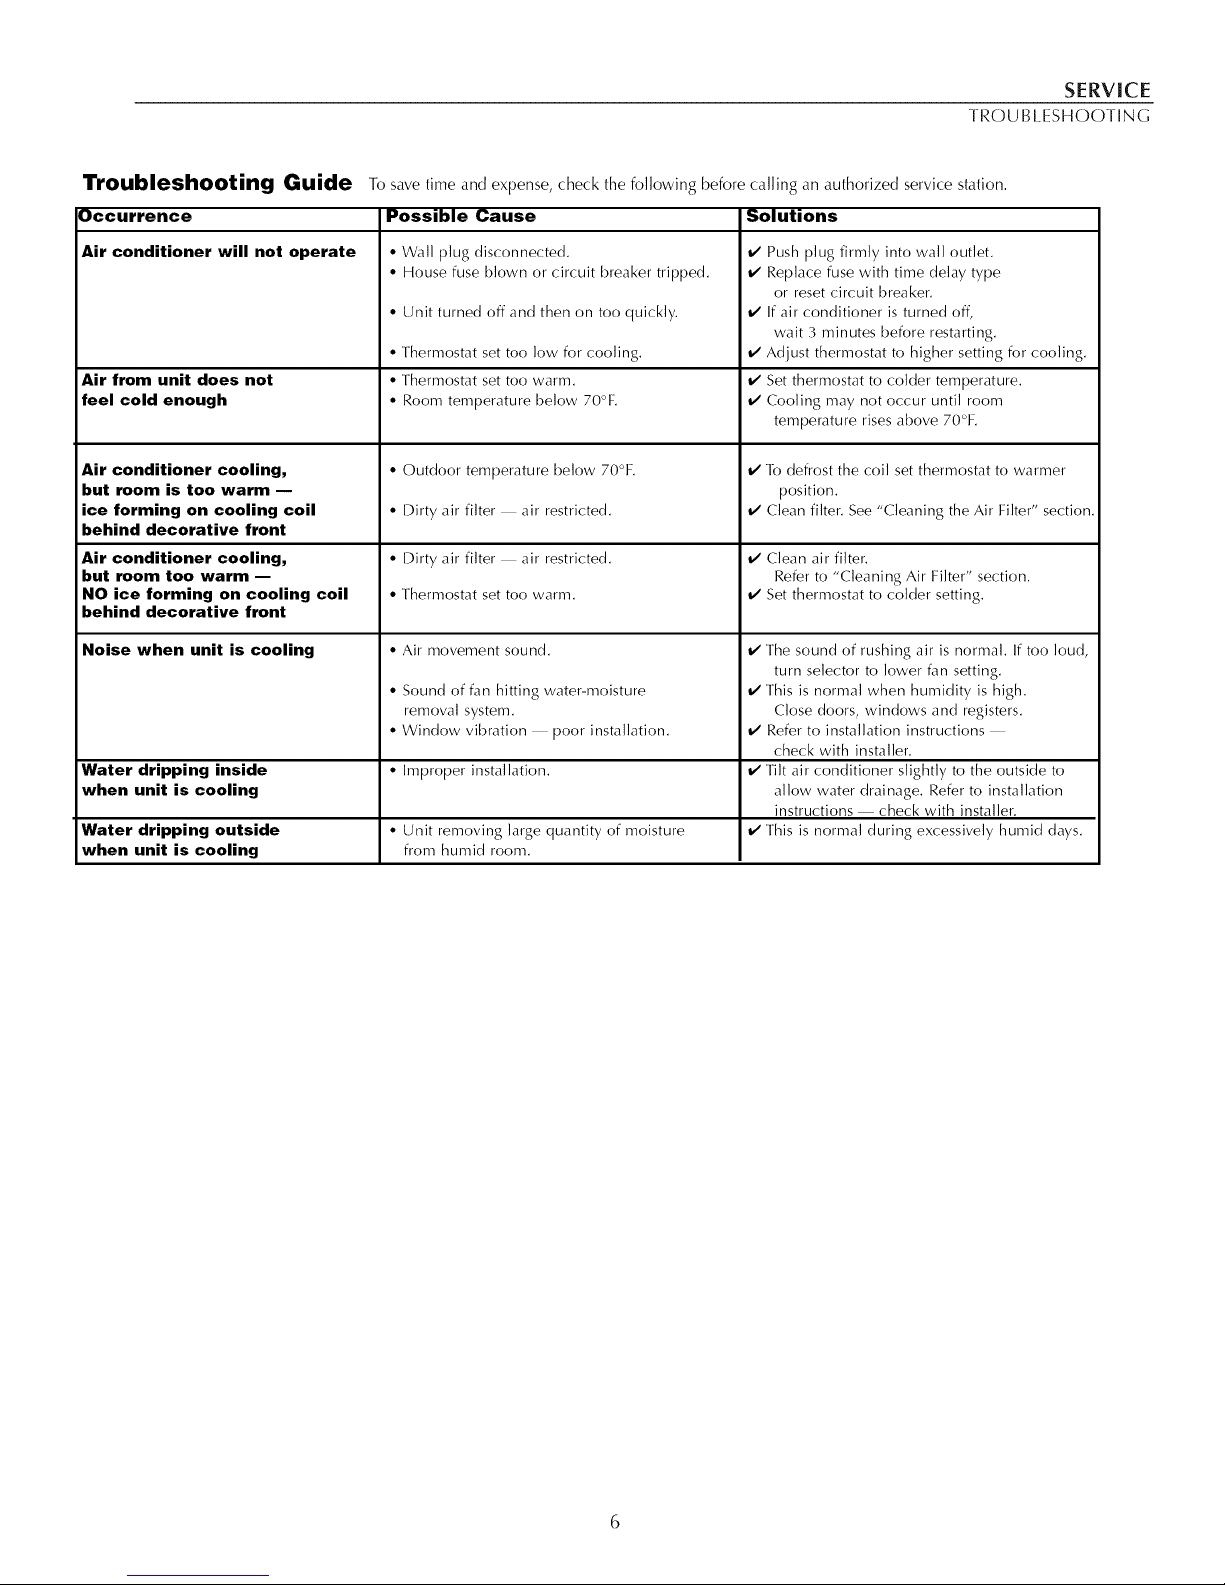
Troubleshooting Guide
Dccurrence
Air conditioner will not operate
Air from unit does not
feel cold enough
Air conditioner cooling,
To save time and expense, check the following before
Possible Cause
• Wall plug disconnected.
• House fuse blown or circuit breaker tripped.
• Unit turned off and then on too quickly.
• Thermostat set too low for cooling.
• Thermostat set too warm.
• Room temperature below 70°F.
• Outdoor temperature below 70°F.
but room is too warm
ice forming on cooling coil
• Dirty air filter air restricted.
behind decorative front
Air conditioner cooling,
but room too warm --
NO ice forming on cooling coil
behind decorative front
Noise when unit is cooling
• Dirty air filter air restricted.
• Thermostat set too warm.
• Air movement sound.
• Sound of fan hitting water-moisture
removal system.
• Window vibration poor installation.
Water dripping inside • Improper installation.
when unit is cooling
Water dripping outside • Unit removing large quantity of moisture
when unit is cooling from humid room.
calling an authorized service station.
Solutions
v_ Push plug firmly into wall outlet.
v_ Replace fuse with time delay type
or reset circuit breaker.
v_ If air conditioner is turned off,
wait 3 minutes before restarting.
v_ Adjust thermostat to higher setting for cooling.
v_ Set thermostat to colder temperature.
v_ Cooling may not occur until room
temperature rises above 70°F.
_/1o defrost the coil set thermostat to warmer
position.
_/Clean filter. See "Cleaning the Air Filter" section.
t/Clean air filter.
Refer to "Cleaning Air Filter" section.
Set thermostat to colder setting.
v_lhe sound of rushing air is normal. If too loud,
turn selector to lower fan setting.
v_This is normal when humidity is high.
Close doors, windows and registers.
v_ Refer to installation instructions
check with installer.
v_Tilt air conditioner slightly to the outside to
allow water drainage. Refer to installation
instructions check with installer.
v_This is normal during excessively humid days.
6
Page 8

WARRANTY
How to Obtain Warranty Service or Parts
Note: Before calling for service, carefully read this
Installation and Operations manual.
For Models Installed in North America :
First make the recommended checks in the Troubleshooting guide
on page 6. Then, if you still need assistance:
1. Ca[[ a CareCo authorized servicer and advise them of mode[
number, serial number, date of purchase and nature of
complaint. Service will be provided during normal working
hours. Contact your dealer for the name of an authorized
servicer, if unknown to you.
2. If your dealer is unable to give you the name of a servicer or if
you need other assistance, contact CareCo for the name of an
authorized servicer.
You may contact CareCo by email:
customerservice@coolmate.biz
by calling the following toll-free number:
1-866-MAYTAG 1
or you may write:
CareCo, Service Department
415 W. Wabash Ave., RO. Box 200
Effingham, IL 62401
For Models Installed Outside North America :
For room air conditioners purchased for use outside North
America, the manufacturer does not extend any warranty either
expressed or implied. Consult your local dealer for any warranty
terms extended by the importer in your country.
Proof of Purchase Date
It is the responsibility of the consumer to establish the original
purchase date for warranty purposes. We recommend that a bill of
sale, cancelled check, or some other appropriate payment record be
kept for that purpose.
Room Air Conditioner Warranty
(Within the 48 contiguous United States, state of Hawaii,
the District of Columbia, Puerto Rico and Canada)
Full (FiveYear) Parts and Labor Warranty
During the five years after the date of original purchase, Fedders
North America will, through its authorized servicers and free of
charge to the owner or any subsequent user, repair or replace any
parts which are defective in material or workmanship due to normal
use. Ready access to the air conditioner is the responsibility of the
owner.
Note: In the event of any required parts replacement within
the period of this warranty, Fedders North America
replacement parts shall be used and will be warranted only
for the period remaining on the original warranty.
Exceptions
The above warranty does not cover failure to function caused by
damage to the unit while in your possession (other than damage
caused by defect or malfunction), or by its improper installation, or
by unreasonable use of the unit, including without limitation, failure
to provide reasonable and necessary maintenance or to follow the
written Installation and Operating Instructions. If the unit is put to
commercial, business, rental, or other use or application other than
for consumer use, we make no warranties, express or implied,
including but not limited to, any implied warranty of
merchantability or fitness for particular use or purpose.
THE REMEDIES PROVIDED FOR IN THE ABOVE EXPRESS
WARRANTY ARE THE SOLE AND EXCLUSIVE REMEDIES
THEREFOR, NO OTHER EXPRESS WARRANTIES ARE MADE. ALL
IMPI_IED WARRANTIES, INCI_UDING BUT NOT I_IMITED TO ANY
IMPI_IED WARRANTY OF MERCHANTABILITY OR FITNESS FOR A
PARTICULAR USE OR PURPOSE, ARE HMITED IN DURATION TO
FIVE YEARS FROM THE DATE OF ORIGINAl_ PURCHASE. IN NO
EVENT SHALL FEDDERS NORTH AMERICA BE LIABLE FOR
INDIRECT, INCIDENTAL, OR CONSEQUENTIAl_ DAMAGES, EVEN
IF ADVISED IN ADVANCE OF THE POSSIBILITY OF SUCH
DAMAGES. NO WARRANTIES, EXPRESS OR IMPI.IED, ARE MADE
TO ANY BUYER UPON RESAI.E.
Some states do not allow limitations on how long an implied
warranty lasts or do not allow the exclusion or limitation of
incidental or consequential damages, so the above limitations or
exclusions may not apply to you. This warranty gives you specific
legal rights, and you may also have other rights which may vary
from state to state.
No warranties are made for units sold outside of the above stated
areas. Your distributor or final seller may provide a warranty on units
sold outside of these areas.
7
Page 9

Cord6n con dispositivo de detecci6n
de arco electrico
El cord6n eldctrico proporcionado con este
acondicionador de aire viene equipado con un
dispositivo de detecci6n de arco eldctrico diseffado
para apagar el suministro eldctrico a la unidad
cuando detecta una condici6n de falla por arco
eldctrico. Una falla por arco eldctrico es una
descarga eldctrica accidental cuando los artefactos
o cables eldctricos est_in daffados, son antiguos o no
se han usado de manera adecuada. Una falla por
arco eldctrico puede set peligrosa si no se detecta a
tiempo.
• No retire o modifique este enchufe
• No 1o utilice como un interruptor de
encendido/apagado
• No [o use en el exterior
• No co[oque mueb[es contra o sobre el
cord6n e[dctrico. Esto puede disparar el
interruptor de prueba y/o dafiar el cord6n,
adem,_s de crear una condici6n potencia[ de
arco e[dctrico
• No intente reparar el cord6n. Si necesita
reemp[azar el cord6n, [lame a un t6cnico de
servicio autorizado
• El dispositivo de detecci6n de arco e[dctrico
no es un interruptor de fa[[a de conexi6n a
tierra y no se debe usar como ta[
• El dispositivo de detecci6n de arco e[dctrico
contiene un tab[ero de circuitos e[ectr6nico y
no se debe sumergir o exponer a[ agua
Restablecimiento
Si el dispositivo de detecci6n de arco
e[dctrico se ha disparado, el bot6n 'RESET'
(Restab[ecer) se [evantard.
Siga los siguientes pasos para restab[ecer el
dispositivo de detecci6n de arco e[dctrico:
1. Desenchufe [a unidad de[ tomacorriente
2. Optima el bot6n 'RESET' (Restab[ecer)
3. Enchufe [a unidad nuevamente en el
tomacorriente
4. Verifique que [[ega energi'a e[dctrica a [a
unidad
Pruebas
Rea[ice pruebas de[ dispositivo de detecci6n de
arco e[dctrico una vez a[ mes, despuds de cada
tormenta e[dctrica grande, o si se ha
interrumpido el suministro e[dctrico a[
acondicionador de aire de habitaci6n.
Siga los siguientes pasos para probar el
dispositivo de detecci6n de arco e[dctrico:
1. Desenchufe [a unidad de[ tomacorriente
2. Optima el bot6n 'RESET' (Restab[ecer)
3. Enchufe [a unidad nuevamente en el
tomacorriente
4. Optima el bot6n de prueba. El dispositivo
debe dispararse y el bot6n 'RESET'
(restab[ecer) debe [evantarse.
5. Optima el bot6n 'RESET' (Restab[ecer)
nuevamente para activar [a unidad
Si [a prueba anterior fa[[a, deje de usar el
acondicionador de aire y p6ngase en contacto
con servicio a[ c[iente.
REQUERIMIENTOS ELECTRICOS Y PRECAUCIONES DE SEGURIDAD
Riesgo de Choque Electrico _1
• Enchufe el aparato solamente en "i_
un tomacorriente e[6ctrico
puesto a tierra.
• Con este aparato no use un cord6n de
extensi6n ni un adaptador de enchufe.
• No haga funcionar el acondicionador de
aire sin el pane[ de[antero.
• El incumplimiento de estas precauciones
pueden causar un choque el6ctrico,
incendio o lesi6n personal.
• Si el acondicionador de aire tiene una
potencia nominal indicada en [a placa de
serie de 115 voltios y de mds de 7,5
amperes, es necesario que sea protegido
con su propio fusible o disyuntor y ning6n
otro dispositivo debe usar ese mismo
disyuntor o fusible. Si el acondicionador de
aire tiene una potencia nominal en [a placa
de serie de 230 voltios, es necesario que sea
protegido con su propio fusible o disyuntor
y ning6n otro aparato debe usar ese mismo
disyuntor o fusible.
• Recomendamos que un electricista
calificado instale el acondicionador de aire
de acuerdo con el c6digo eldctrico naciona[
y los c6digos y reglamentos locales.
• Use solamente conductores de cobre y
fusibles de calibre y capacidad adecuada.
• No modifique el cord6n ni el enchufe de[
extremo. No retire [a etiqueta de advertencia
de[ cord6n de alimentaci6n.
Requerimientos Importantes para la
Puesta a Tierra
• El cord6n de alimentaci6n de[
acondicionador de aire tiene un enchufe de
tres clavijas con puesta a tierra el cua[ debe
ser enchufado en un tomacorriente mural
puesto a tierra de tres alvdolos para su
protecci6n contra posible riesgo de choque
eldctrico. Para los modelos de hasta 7,5
amperes o menos, use un tomacorriente
mural del tipo con puesta a tierra que tenga
la misma configuraci6n que el enchufe del
cord6n de alimentaci6n.
• Para los modelos de m4s de 7,5 amperes,
use un tomacorriente mural sencillo con
puesta a tierra que tenga la misma
configuraci6n que el enchufe del cord6n de
alimentaci6n.
8
INSTALACION
No haga funcionar este acondicionador
de aire sin protecci6n adecuada del
circuito de retardo. Consulte la placa
de serie para los requerimientos
apropiados de alimentaci6n el6ctrica.
Tamaffos Recomendados de los
conductores del circuito
([nstaladossegtinel c6digo de construcd6n) :
CAPACIDADDE CA[[BREDElOS
lOS FUSIBI.ES CON[_)UCTORES
15AMP #14 COMO MINIMO
20 AMP #12 COMO MINIMO
30 AMP #10 COMO MINIMO
©©©©
125V 250V 250V
15A 20A 15A
Precauciones de Seguridad
Adicionales
• No corte, modifique ni retire ningtin
pedazo de poliestireno expandido
(espuma blanca) situado dentro de este
acondicionador de aire.
• No guarde ni use gasolina u otros
vapores y li'quidos inflamables en la
vecindad de este o cualquier otro
artefacto. I.os vapores emitidos pueden
crear un riesgo de incendio o
explosi6n.
• No introduzca objetos en el ,_rea de
descarga del aire. Esto puede causar
da_o irreparable a su acondicionador
de aire.
• No vierta li'quidos de limpieza en el
acondicionador de aire pues esto
puede causar un malfuncionamiento.
Use un paffo htimedo para limpiarlo.
• Evite usar solventes fuertes para limpiar
el acondicionador de aire.
I.impie el filtro del acondicionador de
aire cada dos semanas para evitar
sobrecalentamiento causado por
obstrucci6n del aire.
• No obstruya el ,_rea de entrada del aire
de su acondicionador, pues esto puede
causar sobrecalentamiento, Io cual
activar_ el interruptor de seguridad y
apagar,_ el aparato.
• No bloquee la circulaci6n del aire
hacia las rejillas de ventilaci6n
exteriores del gabinete.
• No obstruya el flujo del aire hacia el
interior con persianas, cortinas o
muebles o hacia el exterior con
arbustos, recintos u otros edificios.
• No haga funcionar el acondicionador
de aire teniendo instalada la cubierta
protectora exterior. Esto podri'a resultar
en daffo mec,_nico dentro del
acondicionador de aire.
250V
30A
Page 10

JNSTALAaON
INSTALACION EN LA VENTANA
Requisitos de la ventana
El acondicionador de aire viene preparado de f,_brica para ser
instalado en ventanas de guillotina comunes (el acondicionador de
aire no puede instalarse en otro tipo de ventanas). El acondicionador
de aire puede instalarse en ventanas de 58,4cm (23 pulg) a 91,4cm
(34 pulg) de ancho si se usan paneles de relleno. En las ventanas de
48,3 cm (19 pulg) a 55,9cm (22 pulg) de ancho no son necesarios
paneles de relleno para instalar el acondicionador de aire. Todas las
ventanas deben poder abrirse por Io menos 32,4cm (12 3/4 pulg) en
direcci6n vertical.
Instale el acondicionador de aire en una ventana donde haya espacio
suficiente alrededor del gabinete para permitir la libre circulaci6n de
aire a trav6s de la unidad.
Instalaci6n del panel de relleno
1.Coloque el lado con lengLieta (Fig. 3) de la cortina en la gui'a que
se encuentra a los lados del gabinete del acondicionador de aire
y deslice la cortina por la gui'a hasta que la cortina est6 pareja
arriba y abajo (Fig. 1 ).
2. I)eslice el marco del panel de relleno en el gabinete del
acondicionador de aire usando las gui'as que se encuentran
arriba y abajo de la unidad. I)eslice el marco Io m,_s cerca
posible del acondicionador de aire para que la cortina quede
trabada en la posiciBn adecuada. Tire suavemente del marco
hasta obtener la Iongitud que necesita para realizar la instalaciBn
(Fig. 1 ).
Herramientas necesarias
....... ==t_:_:.:_s_I)estornilladores
Regla
:ill!z@4N vel
Partes de Instalaci6n
(_ lornillos para madera de 1,59cm (5/8 pulg) .... 9
(_ Soportes ........................................................ 2
Panel de relleno
IIIllll
Borde con
lengLieta
Marco del panel
de relleno
Gui'a que se
encuentran
(arriba)
ffJJ_-
Instalaci6n en una ventana de 58,4cm (23
pulg) a 91,4cm (34 pulg) de ancho
1. Abra la ventana y marque la li'nea central. Mida y marque
15,24cm (6 pulg) hacia la derecha de la li'nea central y 15,24 cm
(6 pulg) hacia la izquierda de la li'nea central (Fig. 2).
2. Coloque el soporte de forma tal que el borde exterior descanse
sobre la marca de 6" adecuada, y la parte posterior del soporte
se encuentre sobre el borde del marco de la ventana.Asegure los
soportes con dos (2) tornillos para madera de 1,59cm (5/8 pulg)
de largo (Fig. 2).
u ade,a
!i cortina
Gui'a inferior
.... del panel de
Tornillos
)orte
li'nea central
Marco de
ventana
9
Page 11

3. Para evitar [a interferencia de [as contraventanas, asegure
firmemente con clavos o tornillos tiras de madera de 5,1cm (2
pulg) de ancho al antepecho y a la repisa de la ventana. I_astiras
deben tener el largo de la abertura de la ventana y deben
colocarse a nivel con el lado posterior de la repisa de la ventana.
El grosor de las tiras variar,_ segOn el grado de interferencia (Fig.
3).
4. Sosteniendo firmemente el acondicionador de aire, col6quelo
cuidadosamente en la abertura de la ventana con la barra
inferior entre la repisa de la ventana y el soporte. Aseg0rese de
que el gabinete se incline hacia el exterior.
El acondicionador de aire debe estar inclinado levemente hacia
abajo, como Io indica media burbuja desplazada en un nivel de
carpintero. Esta inclinaci6n hacia afuera evita que el agua
ingrese en la habitaci6n (Fig. 3).
5. Cierre la ventana hasta que se apoye detr,_s de la barra superior
del acondicionador de aire. I)eslice los paneles de relleno hacia
afuera hasta que toquen las gui'as de la hoja de la ventana. (No
suelte el acondicionador de aire hasta que la hoja inferior de la
ventana se encuentre en la posici6n final) (Fig. 3).
6. Asegure el lado superior de los paneles de relleno pasando
tornillos para madera de 1,59cm (5/8 pulg) de largo hasta la hoja
de [a ventana a trav6s de los orificios de montaje de [as ranuras
superiores.
7. Asegure el lado inferior de los paneles de
relleno pasando tornillos para madera de 1,59cm (5/8 pulg)
hasta [a el antepecho de [a ventana a trav6s de [as [engLietas de
los pana[es de re[[eno.
8. Recorte el sello de espuma segOn la anchura de la ventana e
inst,_lelo entre la hoja superior y la hoja inferior de la ventana
(Fig. 4).
Precaucion: No realice perforaciones en la bandeja inferior.
La unidad esta diseffada para operar con aproximadamente
1,3cm (1/2 pulg) de agua en la bandeja inferior.
INSTALACION
INSTALACION EN LA VENTANA
H"_ja inferior de _ Hoia superior
' de [a ventana
laventana...............oo.J Q
c==_:_ _ Nive[
C====:D _
_orte
oTablade relleno
(opcional)
Sello de espuma
Hoja inferior de
/a ventana
Instalaci6n en una ventana de 48,3cm
(19 pulg) a 55,9cm (22 pulg) de ancho
(No se necesita utilizar paneles de relleno)
1. Consulte los pasos 1 y 2 de las instrucciones anteriores.
2. Cierre [a ventana hasta que se apoye detr,_s de [a barra superior.
3. Asegure [a hoja inferior de [a ventana a[ marco de [a ventana
usando c[avos de acabado, torni[[os para madera o soportes en I.....
(Fig. 5)
4. Si se necesita re[[eno a los [ados de[ acondicionador de aire,
recorte se[[o de espuma de[ tamafio necesario y co[6que[o a
ambos [ados.
5. Recorte el sel[o de espuma seg_n [a anchura de [a ventana e
inst,_lelo entre la hoja superior y la hoja inferior de la ventana.
10
Lll
Antepecho
de madera
I.engLietas de los
panales de relleno
<:"'_:_',_, lornillos
_ / /L
L-Bracket
Page 12

FUNaONAMIENTO
Control de alimentaci6n
El control de alimentaci6n enciende y apaga la unidad.
Pantalla de temperaturalhora
Muestra [a temperatura fijada o la configuracidn del relo i. LA PANTALLA DE
TEMPERATURA SOLO MUESTRA LA TEMPERATURA FIJADA, NO LA
TEMPERATURA REAL DE LA HABITACION.
Controles de temperaturalhora
Estos botones se usan para subir o bajar [a temperatura fijada enincrementos de 1° de
66 ° a 88 ° . Tambidn suben y bajan la hora en incrementos de 1 hora de O0 a 24 horas
cuando se est4 programando el reloj. Para pasar de °F a °C y viceversa presione
ambos controles al mismo tiempo.
Control de modo
El control de modo tiene dos posiciones: FAN (Ventilaci6n) y COOl. (Enfriamiento).
I.as posiciones se ajustan con el bot6n del Control de modo. Una luz verde indica
qu6 posici6n se est_ usando actualmente. Cuando se selecciona el modo COOl_
(Enfriamiento), la unidad har_ circular el aire y Io enfriar_. Si se selecciona el modo
FAN (Ventilaci6n), la unidad s61o har_ circular el aire.
Control de la velocidad del ventilador
El control de velocidad del ventilador tiene tres posiciones: High (alta), I_ow (baja) y
Auto (autom,_tica). I.as posiciones se ajustan con el bot6n de ve[ocidad de[ venti[ador.
I.a posici6n cambia cada vez que se presiona el bot6n. Una [uz verde indica qu6
posiciBn se est,_ usando actua[mente.
Cuando se se[ecciona [a funci6n Auto mientras el acondicionador de aire se
encuentra en el modo COOl. (enfriamiento), [a ve[ocidad de[ venti[ador cambiar,_
autom,_ticamente a medida que cambia [a temperatura de [a habitaci6n.
• 4° o mds sobre la temperatura fijada: la unidad estard en el modo HI FAN (Ventilacidn alta).
• 4° o menos pot encima de la temperatura fijada: la unidad estard en el modo LO FAN
(Ventilacidn baja).
Control del reloj El temporizador puede hacer que la unidad se prenda o apague.
Para PRENDER la unidad usando el temporizador:
• Presione la tec[a del temporizador cuando el suministro de energi'a est6 apagado,
[a panta[[a [eeM 00. Ajuste a[ nfimero deseado de horas antes que SE PRENDA
usando [as f[echas de arriba / abajo.
• I.a panta[[a mostraM el tiempo pot horas que fa[tan para que SE PRENDA.
• Para apagar el temporizador, presione [a tec[a de[ temporizador.
• Una [uz verde junto a[ control de[ temporizador indica que se ha prendido.
Para APAGAR la unidad usando el temporizador.
• Presione la tec[a del temporizador cuando el suministro de energi'a est_ prendido,
[a panta[[a [eer,_ 00. Ajuste a[ nfimero de horas deseadas antes de APAGAR usando
[as f[echas de arriba / abajo. I.a panta[[a ir,_ autom,_ticamente a [a temperatura
programada despu6s de 10 segundos.
• Para mostrar [a cantidad de tiempo hasta que SE APAGUE, presione el bot6n de[
temporizador una vez.
• Para APAGAR el temporizador, presione el bot6n dos veces.
• Una [uz verde junto a[ control de[ temporizador indica que se ha prendido.
W
®
©
®
O Control de alimentaci6n
@ _ntalla de temperatura/hora
O Controles de temperatura/hora
@Control de modo
Control de la velocidad del ventilador
Control del reloj
Mecanismo de retraso de tres
minutos incorporado.
Si este aparato electrdnico no
responde a los mandos del control
remoto o cojinete tdctil, serd
necesario desenchufarlo cinco
segundos y luego volver a
enchufar.
Caracteristica de encendido
automatico: En caso de falla
electrica, esta caracteristica
permite que la unidad se encienda
nuevamente de manera
automatica cuando se restablece el
servicio electrico manteniendo Is
ajustes mas recientes.
11
Page 13

Control Remoto de Acondicionador de Aire
I_asfunciones trabaian igual que los controles manuales de su
aondicionador de aire.
ATENCION
• Use solabente pilas AAA o IEC r03 de 1,5V.
• Retire las pilas si el control remoto no va a ser usado durante un rues o m_s.
• No intente recargar las pilas suministradas.
• Todas las pilas deben ser reemplazadas a un mismo tiempo.
• No incrinere las pilas pues pueden explotar.
• No instale las pilas con la polaridad (+/-) inversa.
• No mezcle pilas alcalinas, standard (carbon-zinc), con pilas recargables
(nickel-cadium).
• Mantenga fuera del alcance de los nifios pequefios las pilas y otros articulos
que puedan ser tragados. P6ngase inmediatamente en contacto con un
m_dico si un nifio pequefio se traga un objeto.
MANTENIMIENTO
//
__. t/t
Limpieza del filtro de aire
Limpie el filtro de aire cada dos semanas
1. Mueva e] contro] principal hasta ]a posici6n OFF (apagado).
2. Retire el filtro de aire tom_ndo]o pot ]as dos esquinas superiores y tirando
hacia arriba hasta retirarlo de ]a unidad (Fig. 10).
3. I._ve]o con agua tibia jabonosa, enju_guelo y sactida]o para que se seque.
4. Vue]va a colocar el filtro, con el frente hacia usted.
5. Para secar comp]etamente el filtro, encienda ]a unidad durante unos
minutos. Recuerde que es necesario que el filtro est6 ]impio para obtener
un buen funcionamiento y ]a mayor eficacia posible en todos ]os nive]es
de operaci6n.
Para retirar el frente decorativo
1.Apague la unidad y desenchLifela.
2. Retire los tornillos que se encuentran a ambos lados del gabinete (Fig. 9).
3. Tire suavemente hacia adelante mientras sostiene ]os dos ]ados del frente
decorativo.
4. Para volver a colocar el frente decorativo, alinee las partes superior e
inferior y los lados, y presione suavemente hasta volver a colocarlo.
5. Vuelva a colocar los tornillos a ambos lados del frente decorativo.
Cerci6rese de que el frente decorativo est6 bien asegurado antes de volver
a enchufar la unidad y ponerla en funcionamiento.
E]
Filtro de
alre
Frente
decorativo
Nota: El filtro de abe debe mantenerse limpio; de Io
contrario, habr_ mala circulaci6n de abe. NO haga
funcionar la unidad sin filtro. Estopuede arruinar la
unidad.
gabinete =:=_ ==:_===_=::=_
de ambos lados_ _j l _=_,:===_del / II _==_
Retire los tornillo /-_- _ 1
..................................................................... i
...... ::: ::........
12
Page 14

MANTENIMIENTO
LOCALIZACION Y
SOLUCION DE AVERIAS
Localizaci6n y Soluci6n de Averias Paraahorrar tiempo y dinero, verifique Io siguiente antes de Ilamar a un centro de servicio autorizado.
Problema Soluciones
El acondicionador de aire no funciona
El aire proveniente delacondicionador de
aire no es suficientemente frio
El acondicionador de aireenfria, pero la
habitacibn estd demasiado tibia - se forma
hielo en las espirales deenfriamiento
detras del panel decorativo delantero
El acondicionador de aireenfria, pero la
habitacibn est_ demasiado tibia - NOse
forma hielo en las espirales de
enfriamiento detras del panel decorativo
Causa Posible
• El enchufe mural est_i desconectado.
• Se ha fundido un fusible o se ha disparado el disyuntor.
El interruptor principal est_qen la posici6n 'OFF'
(APAGADO).
El acondicionador de aire fue accidentalmente apagado al
mover el termostato a una temperatura m_is aha y luego se
coloc6 inmediatamente en una posici6n m_is fffa.
El acondicionador de aire se apag6 y luego se encendi6
demasiado r_pidamente.
El ajuste del termostato es muy bajo para enfriamiento.
El termostato est_ en un ajuste demasiado caliente.
I.a temperatura de la habitaci6n es inferior a 70°F.
I.a temperatura exterior es inferior a 70°F.
• El fihro de aire est4 sucio- restricci6n del aire.
• El termostato est_ien un ajuste demasiado fifo i)ara
enfriamiento nocturno.
• Fihro de aire sucio- restricci6n del aire.
• El termostato est_ien un ajuste demasiado caliente.
Inserte bien el enchufe en el tomacorriente mural.
Reemplace el fusible con un tipo de fusible con retardo o reponga
el disyuntor.
l/
Cambie el interruptor principal a la posici6n 'ON' (ENCENDIDO).
l/
Espere aproximadamente 3 minutos. Escuche si el compresor
empieza a funcionar.
l/
Si el acondicionador de aire est_i aDagado espere 3 minutos antes
de volver a encenderlo.
l/
Cambie el termostato a un ajuste m_is alto Dara enfriamiento.
l/
Coloque el termostato en una temperatura m_is fffa.
l/
No se producir_i enfriamiento hasta que la temperatura de la
habitaci6n no sea superior a 70°F.
l/
Para descongelar el serpentm, coloque el termostato en
una posici6n nr_is caliente.
l/
I.impie el fihro, vea la secci6n "l.impieza del Fihro del Aire".
l/
Para descongelar la espiral, coloque el termostato en una posici6n
normal.
l/
I.impie el filtro del aire. Consulte la secci6n "Limpieza del Fihro
del Aire".
l/
Coloque el termostato en un ajuste m_is fifo.
delantero
Se produce ruido cuando el
acondicionador de aire est_ enfriando
Ruido del movimiento del aire.
Ruido del ventilador al golpear el sistema de extracci6n de
agua y humedad.
Vibraci6n de la ventana - instalaci6n deficiente.
i/ El sonido del aire movi6ndose es normal. Si es demasiado fuerte,
gire el selector a un ajuste del ventilador m_is bajo.
i/ Esto es normal cuando la humedad es aha. Cierre las puertas,
ventanas y rejillas de ventilaci6n.
i/ Consuhe las instrucciones de instalaci6n - consulte con el
instalador.
Goteo de agua dentrodel acondicionador
de aire cuando esta enfriando
Goteo de agua fuera del acondicionador de
aire cuando esta enfriando
Instalaci6n incorrecta.
El acondicionador de aire esta extrayendo gran cantidad
de humedad de habitaci6n.
Incline ligeramente el acondicionador de aire hacia el exterior para
desaguar el agua. Consulte las instrucciones de instalaci6n -
verifique con el instalador.
i/ Esto es normal durante dfas excesivamente hOmedos.
13
Page 15

SERVICIO Y GARANTIA
Como Obtener Servicio o Repuestos Bajo la
Garantia
Para los modelos instalados en Norteamerica - Si necesita servicio
o repuestos Primero, rea]ice ]as verificaciones recomendadas
anteriormente. Si considera de que todavi'a es necesario servicio
o repuestos, consulte ]a secci6n "Como Obtener Servicio o
Repuestos bajo la Garanti'a" inclufda en la garanti'a de su
acondicionador de aire individual.
Para modelos vendidos fuera de Norteamerica - Para los
acondicionadores de aire comprados para uso fuera de
Norteam6rica, el fabricante no ofrece ninguna garanti'a ya sea
expresa o impli'cita. Consulte a su distribuidor local para
cualquier garanti'a que ofrezca el importador en su pal's.
Nota: Antes de soficitar servicio, lea cuidadosamente et
manual de instrucciones de funcionamiento y de
instalacion. Si despues de hacerlo adn necesita servicio:
1. 1. I.lame a un centro de servicio autorizado CareCo
dando el nfimero del modelo, el nfimero de serie, la
fecha de compra y la naturaleza del problema. El
servicio se ofrece durante las horas de trabajo normal.
P6ngase en contacto con su distribuidor para obtener el
hombre de un tdcnico o establecimiento autorizado.
2. Si su distribuidor no puede proporcionarle el nombre de
un tdcnico o si usted necesita m,_s ayuda, Ilame gratis al
siguiente nfimero para obtener el hombre de un tdcnico
autorizado o de un distribuidor de repuestos autorizado:
1-866-MAYTAG 1
o escriba a:
customerservice@coomate.biz
o escriba a:
CareCo, Service Department
415 W. Wabash Ave., RO. Box 200
Effingham, IL 62401
Comprobante de la Fecha de Compra
El consurnidor es responsable de proporcionar un
comprobante de la fecha de compra original para los
prop6sitos de la garanti'a. Recomendamos que conserve la
boleta de venta, el cheque cancelado o algfin otro registro
de pago apropiado para este prop6sito.
Garantia del acondicionador de aire
(Dentro de los 48 estados contiguos de los Estados Unidos, estado
de Hawai, Distrito de Columbia, Puerto Rico y Canada)
Garantia para todas las piezas (cinco afios)
y mano de obra
A partir de la fecha de cornpra y durante un peri'odo de cinco afios, Fedders
North America, mediante sus estaciones de servicio autorizadas, reparar4 o
reemp[azar,_ sin costo a[guno para e[ propietario o usuario, cua[quier pieza
que presente dafios de material o mano de obra derivados de[ uso normal
de[ producto. Es responsabi[idad de[ propietario faci[itar e[ acceso a[
acondicionador de aire para rea[izar los servicios de reparaci6n.
Nota: En caso de que se requiera reemplazar una pieza mientras la
garantia esta vigente, se utilizaran los repuestos de Fedders North
America los cuales continuaran en vignecia solamente durante el
resto del periodo de garantia de la unidad.
Excepciones
I.a garanti'a antes indicada no cubre las fallas de funcionamiento causadas
por dafios que sufra la unidad mientras 6sta est6 en posesi6n del usuario
(excluyendo los dafios causados por defecto o funcionamiento defectuoso),
o por la instalaci6n incorrecta, o la utilizaci6n indebida de la unidad,
incluyendo pero sin limitarse a ello, la negligencia en proporcionar el
mantenimiento necesario y adecuado o en seguir las "instrucciones de
Instalaci6n y Uso" indicadas por escrito. En caso de utilizarse la unidad
para fines comerciales, de negocios, de arriendo u otro uso o aplicaciBn
que no sea el uso del consumidor, no otorgamos garanti'a expli'cita ni
impli'cita, incluyendo, pero sin limitarse a, toda garanti'a impli'cita de
negociabilidad o idoneidad para un uso o finalidad particular.
I.AS SOI_UCIONES EXPUESTAS EN LA GARANTIA ANTERIOR SON
EXCI_USIVAS. SE RECHAZA CUALQUIER OTRA GARANTIA YA SEA
EXPRESA O IMPI_ICITA, INCI_UYENDO, PERO SIN LIMITARSE A ELI_O,
TODAS LAS GARANTIAS DE COMERCIABILIDAD O IDONEIDAD PARA
UN FIN EN PARTICULAR DURANTE CINCO ANOS A PARTIR DE I_A
FECHA DE COMPRA. BAJO NINGUNA CIRCUNSTANCIA FEDDERS
NORTH AMERICA SE HARA RESPONSABI.E POR NINGUN I])ANO
DIRECTO, INDIRECTO O CONSECUENCIAL, SIN IMPORTAR LA CAUSA
DE I.A ACCION, AUN CUANDO FEDDERS NORTH AMERICA HAYA SIDO
ADVERTIDO CON ANTERIORIDAD DE I_A POSIBII_IDAD DE DICHOS
DANOS. NO SE OFRECE NINGUNA GARANTIA EXPRESA O IMPI.ICITA A
COMPRADORES DESPUES DE I.A REVENTA.
Algunos estados no permiten limitar el tiempo de duraci6n de una garanti'a
impli'cita ni permiten excluir ni limitar los dafios incidentales o emergentes,
de modo que las limitaciones o exclusiones antes indicadas podri'an no
aplicarse en su caso. Esta garanti'a le otorga derechos legales especi'ficos.
Usted podri'a tener tambidn otros derechos que pueden variar de estado a
estado.
No se ofrecen garanti'as para las unidades vendidas fuera de las ,_reas antes
indicadas. Su distribuidor o vendedor final podri'a proporcionar una
garanti'a para las unidades vendidas fuera de estas ,_reas.
14
Page 16

INSTALLATION
AL[MENTAT[ON ELECTR[QUE ET MESURES DE SECUR[TE
Cordon 61ectri.que avec dispositif
de d6tection d'arc
I.e cordon dlectrique fourni avec ce climatiseur
comporte un dispositif de ddtection d'arc (!lectrique
con_:u pour couper I'alimentation de I'appareil
quand une formation d'arc est ddtectde. I'arc est le
rdsultat d'une ddcharge dlectrique involontaire qui
a lieu Iorsque des produits ou des ills dlectriques
sont endommag(!s, ddt6,rior(_s ou ma] utilis(_s, la
formation d'arc peut 6tre dangereuse si elle n'est
pas d(!tect(!e.
• N'enlevez pas cette fiche et ne la modifiez
pas.
• Ne ['uti[isez pas comme interrupteur.
• Ne ['uti[isez pas b_['extdrieur.
• Ne poussez pas [es meub[es contre [e
cordon 6[ectrique ou ne [es mettez pas sur
ce cordon. Ceci peut ddc[encher [e
commutateur de test ou endommager [e
cordon et par consdquent entra_ner une
formation d'arc.
• N'essayez pas de rdparer le cordon. S'il faut
remplacer le cordon, faites appel _ un
rdparateur autoris6.
• I.e dispositif de ddtection d'arc n'est pas un
disjoncteur et il ne faut pas I'utiliser comme
tel.
• I.e dispositif de ddtection d'arc contient une
carte de circuit imprim6 qui ne doit pas 6tre
exposde _ I'eau.
R_armement
Si le dispositif de d6tection d'arc se
d6clenche, le bouton de r6arrnernent sort.
Suivez ces 6tapes pour rdarmer [e dispositif
de ddtection d'arc :
1.E)dbranchez ['apparei[.
2. Appuyez sur [e bouton de rdarmement.
3.Rebranchez ['apparei[.
4.Vdrifiez si ['apparei[ est a[iment6 en
courant.
Tests
Vous devez tester [e cordon 6[ectrique 6quip6
du dispositif de d6tection d'arc, une fois par
mois ou apr6s chaque orage 6[ectrique, ou si
['a[imentation du c[imatiseur a 6t6 coup6e.
Suivez ces 6tapes pour tester [e dispositif de
d6tection d'arc :
1.E)6branchez ['apparei[.
2.Appuyez sur [e bouton de
r6armement.
3. Rebranchez ['apparei[.
4.Appuyez sur [e bouton d'essai. Un
d6c[enchement de ['apparei[ devrait
avoir lieu et [e bouton de
r6armement devrait sortir.
5.Appuyez b_nouveau sur [e bouton de
r6armement.
Si ce test ne donne pas [e bon r6su[tat,
n'uti[isez plus [e c[imatiseur et prenez contact
avec [e service .
Risque de choc _1_.
electrique
• Brancher I'appareil uniquernent sur une
prise de courant 61ectrique relide _ la terre.
• Ne pas utiliser avec cet appareil un c&ble
de rallonge ou un adaptateur de fiche.
• Ne pas faire fonctionner cet appareil
Iorsque le panneau de faqade est enlev6.
• I.e non-respect de ces prdcautions peut
entrainer choc 61ectrique, incendie ou
blessures.
• Si les param6tres d'alimentation 61ectrique
sur la plaque signaldtique sont 1 15 volts et
7,5 A ou plus, il faut que I'appareil soit
protdg6 par son propre fusible ou
disjoncteur, et aucun autre appareil ne
devrait 6tre branch6 sur le m6me circuit
d'alimentation. Si la plaque signaldtique
du climatiseur indique qu'il doit 6tre
aliment6 sous 230 volts, il faut que
I'appareil soit protdg6 par son propre
fusible ou disjoncteur, et aucun autre
appareil ne devrait 6tre branch6 sur le
m6me circuit d'alimentation.
• II est recommand6 qu'un 61ectricien
qualifi6 installe I'appareil conformdment
aux prescriptions du code national des
installations 61ectriques et des codes et
r6glements Iocaux applicables.
• Utiliser uniquement des conducteurs en
cuivre et dispositifs de protection de
calibre et de capacit6 addquate.
• Ne pas modifier le cordon d'alimentation
ou la fiche de branchement. N'enlever
aucune 6tiquette d'avertissement fixde sur
le cordon d'alimentation.
Liaison a la terre - Exigences importantes
• Pour [a protection des utilisateurs contre
[es risques de choc 6[ectrique, [e
c[imatiseur comporte un cordon
d'a[imentation muni d'une fiche de
branchement b_trois broches (liaison _ [a
terre) qu'on doit brancher sur une prise de
courant murale b_ trois alv6oles
convenab[ement re[i6e b_[a terre. Pour un
mod6[e dont [a demande de courant est de
7,5 A ou moins, uti[iser une prise de
courant mura[e re[i6e b_[a terre de m6me
configuration que [a fiche de
branchement.
• Pour un mod6[e dont [a demande de
courant est sup6rieure b_7,5 A, uti[iser une
prise de courant simple avec liaison _ [a
terre, de m6me configuration que [a fiche
de branchement.
",_ dL
W
Ne pas faire fonctionner ce climatiseur
si [e circuit d'alimentation n'est pas
prot6g6 par un fusible ou disjoncteur
chronometr6 de capacit6 convenable.
Pour les caract6ristiques
d'alimentation 61ectrique, voir la
plaque signal6tique de I'appareil.
Calibre Recommande des conducteurs
(selon le code du b_tJment) :
CAPA.CIT¢- CALIBREDES
DU FUSIBLE CONDUCTEURS
15 A N° 14 ou plus 9ros
20 A N° 12 ou plus 9ros
30 A N° 10 ou plus 9ros
©©©©
125V 250V 250V
15A 20A 15A
Mesures de securite additionnelles
• Ne pas couper, modifier ou enlever
aucun des composants de po[ystyr6ne
expans6 (materiel iso[ant blanc) p[acds
b_['intdrieur du c[imatiseur.
• Ne jamais remiser ou uti[iser d'essence
ou autre produit inflammable [iquide
ou gazeux au voisinage des apparei[s
ou de tout autre apparei[ mdnager. I.es
vapeurs 6mises pourraient entra_ner un
risque d'incendie ou d'explosion.
• N'introduire aucun objet dans la zone
de d6charge de Pair; ceci pourrait
provoquer une d6t6rioration non
r6parable de I'appareil.
• Ne verser aucun liquide sur le
climatiseur; ceci pourrait entra_ner une
anomalie de fonctionnement. Pour le
nettoyage de I'appareil, utiliser un
chiffon humide.
• I.ors du nettoyage du climatiseur, 6viter
d'employer un solvant 6nergique.
• Pour 6viter une obstruction et un
6chauffement excessif, nettoyer le filtre
du climatiseur _ intervalles de deux
semaines.
• Veiller _ ne pas obstruer les entr6es
d'air du climatiseur; ceci provoquerait
un 6chauffement excessif et le
d6clenchement des dispositifs de
s6curit6 qui provoquent I'arr6t de
I'appareil.
• Ne pas bloquer la circulation de Pair
vers les claires-voies ext6rieures de la
caisse.
• Ne pas bloquer la circulation de Pair
au voisinage de I'appareil, _ I'int6rieur
(stores, rideaux, meubles), ou
I'ext6rieur (arbustes, enceintes ou autre
b_timent).
• Ne pas faire fonctionner le climatiseur
Iorsque la housse de protection est en
place. Ceci pourrait faire subir des
dommages m6caniques au climatiseur.
250V
30A
15
Page 17

INSTALLATION
INSTALLATION DANS UNE FENETRE
Sp6cifications de la fen6tre
I.e climatiseur est pr6par6 en usine pour 6tre install6 dans
I'ouverture d'une fen6tre _ guillotine et ne peut 6tre install6 sur
d'autres types de fen6tres. I_e climatiseur peut 6tre install6 sur des
fen6tres de 58,4 cm (23 po) _ 91,4 cm (34 po) de large _ condition
d'utiliser des panneaux de remplissage. Pour les fen6tres de 48,3 cm
(19 po) _ 55,9 cm (22 po) de large, les panneaux de remplissage
sont inutiles. Toutes les fen6tres doivent avoir une ouverture
verticale minimale de 32,4 cm (12 3/4 po).
Installer le climatiseur sur une fen6tre o@ il existe un d6gagement
suffisant autour du boTtier pour qu'il se produise une bonne
circulation d'air dans I'appareil.
Installation du panneau de remplissage
Placer le c6t6 coulissant du rideau dans le rail lat6ral du
boTtier du c[imatiseur et faire cou[isser [e rail de haut en
bas de fa_:on _ ce qu'i[ soit au m6me niveau que [e rideau
(Fig. 1).
2.
Faire coulisser le cadre du panneau de
remplissage sur le boTtier du climatiseur en utilisant les
rails sup6rieur et inf6rieur de I'appareil. Faire coulisser le
cadre aussi pros que possible du climatiseur de mani6re
que le rideau se verrouille en place. Tirer sur le cadre
avec pr6caution jusqu'_ ce qu'il se trouve _ la bonne
hauteur.
Outils n6cessaires
........ :_'::_ I.ame droite et tournevis Phillips
R_gle
C)Vis _ibois de 1,9cm (5/8 po) de long (9)
(_Charni6re (2)
M
Panneau de
remp[issage
Bord de
verrouillage
Cadre du panneau
de remplissage
IIIIIII
IIIIIl!i
i Barre
sup6rieure
Installation dans une ouverture de fen6tre
de 58, 4 cm (23 po) a 91,4 cm (34 po) de
large
1. Ouvrir la fen6tre et en marquer le centre. Mesurer et marquer
une distance de 22,2 cm (8 3/4 po) de part et d'autre du
centre(Fig. 2).
2.
Placer la fixation de faqon _ que le bord ext6rieur repose
environ sur la marque appropri6e _ 22,2 cm et que I'arri6re de
la fixation se trouve au bord du cadre de la vitre. Fixer les
charni6res _ I'aide de 2 vis _ bois de 1,59 cm (5/8 po) de long
(Fig. 2).
16
_ rideau
l .... s_ ..... "_ de rem p li ssage
Charni6re
Centre
L._ Rail inf6rieur du panneau
Page 18

INSTALLATION
INSTALLATION DANS UNE FENETRE
3.
Pour palier _ I'interfdrence de la contre-fen6tre, fixer solidement
les baguettes de bois de 5,1 cm (2 po) de large au bord int6rieur
et au rebord de la fen6tre, en utilisant des clous ou des vis. I.es
baguettes devraient 6tre de la Iongueur de I'ouverture de la
fen6tre et au m6me niveau que le c6t6 arri_re de la base de
dormant. I.'6paisseur des baguettes varie se[on [e degr6
d'interf6rence (Fig. 3).
4. Tout en maintenant le climatiseur d'une main ferme, le centrer
avec pr6caution dans I'ouverture de la fen6tre, la barre
inf6rieure se trouvant entre le bord int6rieur de la fen6tre et la
charni6re. S'assurer que le bo_tier demeure inclin6 vers
I'ext6rieur. I_e climatiseur doit pencher 16g6rement _ I'ext6rieur
vers le bas, comme indiqu6 par un d6calage d'une demi-bulle
sur un niveau _ bulle. Cette inclinaison vers I'ext6rieur emp6che
I'eau de p6n6trer dans la pi6ce (Fig. 3).
5. Fermer la fen6tre jusqu'_ ce qu'elle repose en arri6re de la barre
sup6rieure du climatiseur. Faire glisser les panneaux de
remplissage vers I'ext6rieur jusqu'_ ce qu'ils touchent les
rainures du chassis de la fen6tre. (Ne pas rel&cher la prise sur le
climatiseur jusqu'_ la rainure de la fen6tre inf6rieure soit en
position finale)(Fig. 3).
6. Fixer solidement la partie sup6rieure des panneaux de
remplissage en enfonqant des vis de 1,59 cm (5/8 po) dans les
orifices de montage des rainures sup6rieures.
7. Fixer solidement la partie inf6rieure des
panneaux de remplissage en enfonqant des vis de 1,59 cm (5/8
po) dans le rebord de la fen6tre _ travers les taquets des
panneaux de remplissage.
8. Couper la mousse _ la largeur de la fen6tre
et I'installer entre la fen6tre sup6rieure et inf6rieure (Fig. 4).
Ale jamais percer un trou clans le plateau de recuperation
inferieur. L'appareil est con cu pour fonctionner avec
environ 13 mm (1/2 po) d'eau clans le plateau de
recuperation.
W
Fen6tre
inf(!rieure
Bande de
mousse
Fen6tre
sup(!rior
0
Niveau
guettes de bois
(en option)
Fen6tre inf6rieure
Installation dans une ouverture de fen6tre
de 48,3 cm (19 po) a 55,9 cm (22 po) de
large
(I.es panneaux de rernplissage ne sont pas n6cessaires dans ce cas)
1. Se reporter aux 6tapes 1 et 2 des instructions pr6c6dentes.
2. Fermer la fen6tre jusqu'_ ce qu'elle repose en arri6re de la barre
sup6rieure.
3. Fixer la fen6tre inf6rieure au cadre de la fen6tre _ I'aide de clous
de finition, de vis _ bois ou de charni6res en <<I. >>.(Fig. 5)
4. S'il est n6cessaire de calfeutrer les cBt6s du climatiseur, couper
une bande de mousse _ la dimension de chaque c6t6.
5. Couper une bande de mousse de la largeur de la fen6tre et
I'installer entre la fen6tre sup6rieure et inf6rieure (Fig. 4).
17
Lll
Rebord de
fen6tre
Taquets des panneaus
de remplissage
Vis b_bois
Charni6res en <<I >>
,/ ./
Page 19

Commande principale
Elle permet de mettre en marche et d'arr6ter I'appareil.
Affichage de la temperature et du nombre d'heures
Affiche le r6glage de la ternp6rature ou celui de
[a minuterie. L'AH:ICHAGE DE LA TEMPERATURE INDIQUE LA
TEMPERATURE DE REGLAGE ET NON PAS LA TEMPERATURE REICLLE
DE LA PI[:-CE.
Temp_rature/Dur_e
Ces boutons servent _ augmenter ou abaisser la temp6rature par 6chelon
de 1°, de 66 _ 88 °. IIs permettent 6galement d'augmenter ou de
diminuer le hombre d'heures par 6chelon de 1 heure, de 0 _ 24 heures,
si la fonction de la minuterie est utilis6e. Si vous appuyez sur les deux
boutons en m6me temps, I'affichage passera de Fahrenheit _ Celsius ou
vice versa.
Mode
Cette cornrnande cornporte deux modes: FAN (ventilation) et COOl ....
(refroidissement).
I_e bouton de commande du mode permet de passer de ['un b_['autre.
Un voyant vert s'a[[ume indiquant [e mode choisi. Si[e mode COOl ....
(refroidissement) est choisi, ['apparel[ fait circu[er ['air tout en [e
refroidissant. Si[e mode FAN (ventilation) est choisi, ['apparel[ fait
circu[er ['air ambiant sans [e refroidir.
Vitesse de ventilation
Cette commande comporte trois positions: High (rapide),
I_ow (lent) et Auto (autornatique). A chaque fois que vous appuyez une
fois sur [e bouton de r6g[age de [a vitesse, i[ passe b_[a position suivante.
Un voyant vert indique [a position choisie.
I_orsque [e venti[ateur est r6g[6 sur AUTO et [e mode sur COOl_
(refroidissement), [a vitesse de ventilation va changer automatiquement b_
mesure que [a temp6rature de [a pi6ce change.
• A 4° ou plus au-dessus de la temperature r_gl_e, I'appareil utilisera la vitesse
de ventilation HI (rapide).
• A 4° ou moins au-dessus de la temperature r_gl_e, I'appareil utilisera la
vitessede ventilation LO (lent).
Commande de la minuterie
On peut r_gler la minuterie afin de mettre I'appareil en marche ou de I'arr_ter.
Pour mettre I'appareil en marche au moyen de la minuterie, alors que
I'appareil
• Est hors tension, enfoncer la touche de la rninuterie; I'afficheur
indiquera 00. Choisir [e hombre d'heures qui doivent s'6cou[er avant
[a MISE EN MARCHE de ['apparel[ au moyen des f[6ches vers [e haut
ou vers [e bas.
• I_'afficheur indiquera [e hombre d'heures qui restent avant [a MISE EN
MARCHE.
• Pour arr6ter la minuterie, enfoncer de nouveau la touche
correspondante.
• Un voyant vert situ6 b_c6t6 de la commande de la minuterie s'allume
pour indiquer que cette derni6re est rdglde.
Pour ARRETER I'appareil au moyen de la minuterie,
• Alors que I'appareil est sous tension, enfoncer la touche de la
minuterie; I'afficheur indiqueFa 00. Choisir le hombre d'heures qui
doivent s'6couler avant I'ARRET de I'appareil au moyen des fl6ches
vers le haut ou vers le bas. I:afficheur reviendra automatiquement _ la
temp6rature choisie apr6s 10 secondes.
• Pour afficher le hombre d'heures qui restent avant I'ARRET, appuyer
une seule fois sur la touche de la minuterie.
• Pour ARRETER la minuterie, appuyer deux fois sur cette touche.
• Un voyant vert situ6 _ c6t6 de la commande de minuterie s'allume
pour indiquer que cette derni6re est r6gl6e.
UTILISATION
COMMAN DES MECANIQUES
®
®
©
® Commande principale
® Affichage de la tempdrature
et du nombre d'heures
® Tempdrature/Durde
® Mode
® Vitesse de ventilation
® Commande de la minuterie
Temporisation int_gr_e de trois minutes.
Lorsque cet appareil _lectrique ne
r_pond ni au bloc _ effleurement, ni
aux commandes _ distance, le
d_brancher de sa prise, attendre cinq
secondes, puis le rebrancher.
Caract_ristique de red_marrage
automatique :
Si une panne d'_lectricit_ survient,
cette caract_ristique permet
I'appareil de reprendre son
fonctionnement, une fois
I'_lectricit_ r_tablie, en retenant les
r_.glages les plus r_cents.
18
Page 20

UTILISATION
COMMANDES MECANIOUES
Telecommande de Climatiseur
I_es cornrnades fonctionnent de la rn6rne fa_;on que les cornrnades b_
touche de votre c[imatiseur.
AVERTISSEMENTS
• Utilisez seulement de piles AAA ou IEC R03 de 1,5 volts.
• Retirez les piles si la telecommande n'est pas utilisee pendant plus d'un
mois.
• N'essayez pas de recharger les piles fournies.
• Toutes les piles doivent _tre remplacees en m_me temps.
• Ne jetez pas les piles clans un feu, elles pourraient exploser.
• Ne pas metre ensemble des piles neuves et usagees.
• Ale pas mettre ensemble les piles alkaline, standard (carbone-zinc), ou
rechargeables (nickels-cadmium)
• Veiller a ce qu'un jeune enfant ne puisse avoir acces aux piles ou
d'autres petits objets qu'il pourrait avaler. Contacter immediatement un
medecin si un jeune enfant avale un objet de petite taille.
o
Nettoyage du filtre & air To.tes/esde.x semaines:Nettoyer /e filtre
1. Mettre [a commande principale sur OFF (arr6t).
2. Retirer le filtre b_air en agrippant les coins sup6rieurs et [e tirant vers [e
haut (Fig. 9).
3. I.aver [e fi[tre b_['eau chaude savonneuse, [e rincer puis [e secouer pour
[e faire s6cher.
4. Remettre [e fi[tre en place, en vous assurant que [e devant du fi[tre vous
fair face.
5. Pour s6cher [e fi[tre comp[6tement, mettre ['apparel[ en marche pendant
que[ques minutes. Rappe[ez-vous que seu[ un fi[tre propre permet un
fonctionnement correct et vous offre [e rendement [e mei[[eur b_tous[es
niveaux.
Remarque:Lefiltre_air dolt _tre tenupropre,souspelnede constaterune diminution des
performancesde ventilation.NE PASfalrefonctlonnerI'apparellsanslefiltre,sousrisque
d'endommagerI'appareil.
D_pose du panneau frontal d_coratif
1. Mettre ['apparel[ b_['arr6t et[e d6brancher.
2. Retirer [es vis de chaque c6t6 du bo?tier (Fig. 10).
3. Tirer avec pr6caution vers ['avant tout tenant bien [es deux c6t6s du
panneau frontal d6coratif.
4. Pour remettre [e panneau d6coratif en place, aligner [es parties
sup6rieures, inf6rieure et [at6ra[es, et appuyer avec pr6caution pour [e
replacer.
5. Remettre [es vis en place de chaque c6t6. S'assurer que [e panneau
d6coratif est so[idement fix6 avant de rebrancher et de faire fonctionner
['apparel[.
W Filtre b_air
Retirer la vis de
chaque c6t6 du
bo?tier _ ......
Panneau ddcoratif
Uneutillsatlonetun entretlen correctsdevotrecllmatlseurvousalderont_prolongerlaIong_vlt_
deI'appareil.II estrecommand_desoumettreI'apparell_ uneinspectionannuelle,alnslquede
falrenettoyer lesserpentinsetlesconduitesdecondensationd'eau.Lesfralsdentretienannuel
z
19
Page 21

D PANNAGE
GUIDE DE DIAGNOSTIC
Guide de diagnostic Pour gagner du temps et pour 6viter des d6penses, 6tudier ce qui suit avant de contacter un centre de service agr66.
Sympt6me Causes possibles Solutions
Le climatiseur ne fonctionne pas • Fiche de brandrement d6hranch&e.
• Fusible grill& ou disjoncteur ouvert.
• Commutateur d'alimentation ;/la position d'ARREI.
• Arr6t accidentel de I'appareil Iorsqu'on a fair tourner le
bouton du thermostat vers la temp&rature &lev&e et qu'on
I'a imm&diatement ramen& vers latemp&rature basse.
• Processus trop rapide d'arr6themise en marche.
• Refroidissement pas possible pour la temp&rature
s&lectionn&eparle thermostat.
L'air rejet_ par I'appareil n'est pas
suffisamment froid
L'appareil produit un refroidissement, mais
• ]_mp&rature trop &lev&e s&lectionn&e par le thermostat.
• ]_mp&rature de la pi&ce inf&rieure 5/21 °C (70 °F).
• ]_mp&rature _ Pext&rieur inf&rieure ;/21 °C (70 °F).
la temperature dans la piece demeure trop
_lev_e - formation de glace sur I'_changeur
de chaleur, derriere le panneau de facade
d_coratif
• Filtre encrass&- bloque la circulation de Pain
Enfoncer fermement la fiche dans la prise de courant murale.
v' Remplacer le fusible par un fusible temporis&, ou r&armer le
disjoncteur.
v' Placer le commutateur _ la position de ON/MARCHE
v' Attendre environ 3 minutes. Ecouter le son de mise en marche du
compresseur.
v' Apr@s un arr&t du climatiseur, attendre 3 minutes awmt la remise en
marche.
v' Modifier le r&glage du thermostat pour obtenir un refroidissement.
v' S&lectionner une temp&rature plus basse avec le thermostat.
v' Un refroidissement ne peut passe produire awmt que la temp&rature
de la piece ne s'&16ve _/plus de 21 °C (70 °F).
v' S&lectionner une temp&rature plus &lev&e avec le thermostat.
v' Nettoyer le filtre. Voir la section <<Nettoyage du filtre _ airh Pour le
d&givrage, s&lectionner la position FAN/VENIII.KflON.
L'appareil produit un refroidissement, mais
la temperature dans la pibce demeure trop
• Filtreencrass&- bloque lacirculation de I'air
• Thermostatr&gl&pour une temp&raturetrop &lev&e
v' Nettoyer le fihre. Voir la section <_Netioyage du filtre _ air.
v' S&lectionner une plus basse temp&rature avec le thermostat.
_lev_e - PAS de formation de glace sur
I'_changeur de chaleur, derriere le panneau
de facaded_coratif
I_mission debruitsdurant le fonctionnement
au mode derefroidissement
Egouttement d'eau a I'int_rieur Iors de i# Incliner I&g&rement le climatiseur vers I'ext&rieur pour permettre
I'utilisation au mode de refroidissement I'&coulement de I'eau. Voir les instructions d'installation - Consuher
legouttement d'eau a rext_rieur lots de • Extraction d'une grande quantit& d'humidit& dans la pi&ee I# Ceei est normal Iorsque I'atmosph&re est tr_s humide.
I'utilisation au mode de refroidissement par I'appareil.
• Son d_:i _ la circulation de I'air
• Son du ventilateur heurtant le syst6me d'&vacuation de
I'humidit&
• Vibration de la fen6tre- installation m&diocre
• Installation incorrecte
II est normal qu'on per_oive le son de circulation de Vain S'il est trop
&lev&, s&lectionner une plus basse vitesse pour le ventilateur.
v' Ceci est normal Iorsque I'l'humidite est &lev&e. Fermer les portes, les
fen6tres et les bouches d'entr&e d'air.
v' Voir les instructions d'installation - Consuher I'installateur.
I'installateur.
2O
Page 22

GARANTIE
Obtention de pieces ou de services au titre de la
garantie
Appareils installes en Amerique du Nord - Pour un besoin de
depannage ou de pi_ces, ex6cuter d'abord ]es op6rations de contr61e
d6crites ci-dessus. S'i] s'av6re qu'une intervention ou un
rempiacement de pi6ce est n6cessaire, voir _ ]a page de garantie
<<Obtention de pi6ces ou de services au titre de ]a garantie_.
Remarque : Avant de contacter un etabfissement de
service, etudier attentivement la brochure des instructions
d'installation et utilisation. Si une intervention demeure
necessaire :
1. Contacter un 6tablissement de service agr66 CareCo; il
sera n6cessaire de communiquer ['information suivante :
num6ro de mod6[e, num6ro de s6rie et date d'achat de
['apparel[, et nature de ['anoma[ie constat6e. I_es services
n6cessaires sont dispens6s durant ['horaire de travail
normal I_e cas 6ch6ant, contacter [e commer£:ant qui a
vendu ['apparel[ pour obtenir [es coordonn6es d'un
6tab[issement de service agr66.
2. Si [e revendeur ne peut communiquer ['information
demand6e, on peut t6[6phoner au num6ro ci-dessous
(appe[ sans frais) pour obtenir [es coordonn6es d'un
distributeur de pi6ces ou d'un 6tab[issement de service
agr66, ou pour toute autre assistance :
1-866-MAYTAG 1
ou bien ecrire & :
(ustomerservice@coolmate.biz
CareCo, Service Department
415 W. Wabash Ave.,
P.O. Box 200
Effingham, IL 62401
Appareils installes hors de I'Amerique du Nord - I.e fabricant
n'accorde aucune garantie expresse ou impiicite pour un climatiseur
achet6 hors de ]'Am6rique du Nord. Consulter ]e revendeur local au
sujet des garanties 6ventuei]ement accord6es par ]'importateur dans
le pays concern&
Preuve de la date d'acquisition du produit
C'est au consommateur qu'incombe [a responsabilit6 de
fournir [a preuve de [a date de ['acquisition initia[e du produit,
[ors d'une demande de recours b_[a garantie. /_ cet effet i[
convient de conserver [a facture d'achat, [e ch6que annul6, ou
un autre document de paiement appropri6 attestant de [a date
d'acquisition du produit.
Garantie du climatiseur
(Applicable dans les 48 Etats-Unis limitrophes, I_tat d'Hawai, le
District de Columbia, _ Porto-Rico, au Canada)
Garantie complete (cinq ans) sur les pi_ces et la main
d'oeuvre
Pour une p6riode de cinq ans suivant la date d'achat par I'acheteur original,
Fedders North America s'engage, par le biais de ses postes de service agr66s
et sans aucun frais de la part de I'acheteur ou de tout utilisateur subs6quent,
b_r6parer ou remplacer route pi6ce d6fectueuse darts la mati6re ou la
fabrication darts des conditions normales d'utilisation. Un acc6s rapide au
conditionneur d'air pour en permettre I'entretien est la responsabilit6 du
propridtaire.
Remarque: Dans le cas ou tout remplacement de pieces est requis
dans /es limites de temps de cette garantie, /es pieces de rechange
de Fedders North America sont usagees et ne sont garanties que
pour la periode restante de la garantie originale.
Exceptions
I.a garantie susmentionn6e ne couvre pas les d6faillances caus6es par des
dommages subis par I'appareil rant qu'il est en votre possession (autres que
les dommages dus b_un d6faut ou b_un d6r6glement), par son installation
incorrecte ou par une utilisation d6raisonnable de I'appareil, y compris,
entre autres, I'absence d'entretien rdgulier et ndcessaire ou le non-respect
des instructions 6crites d'installation et d'utilisation. Si I'appareil est utilis6
b_des fins commerciales, de location ou autres que domestiques, nous
n'offrons aucune garantie expresse ou tacite, y compris, entre autres, des
garanties tacites de qualit6 marchande ou d'adaptation b_un usage ou objet
particulier.
I_ES RECOURS STIPUI_ES DANS I_A GARANTIE EXPRESSE
SUSMENTIONNEE REPRESENTENT LES SEUI_S RECOURS EXCI_USIFS
DISPONIBI_ES. IL N'EXISTE AUCUNE AUTRE GARANTIE EXPRESSE.
TOUTES I_ESGARANTIES IMPI_ICITES, Y COMPRIS/_ TITRE NON LIMITATIF
TOUTES GARANTIES IMPLICITES DE QUALITE I_OYAI_E ET MARCHANDE
ET I])'UTII_ITE PARTICUI_IERE, SONT I_IMITEES/_ CINQ ANS /_ PARTIR I])E
I.A DATE DE I.'ACHAT INITIAL. FEDDERS NORTH AMERICA NE SAURAIT
EN AUCUN CAS ETRE TENU RESPONSABI_E POUR LES DOMMAGES
IN I])1RECTS,SECON DAI RESOU ACCESSOI RES,SAN S EGARI])/_ LA CAUSE,
MEME AU CAS O0 FEDDERS NORTH AMERICA AURAIT ETE PREVENU DE
I_A POSSIBII.ITE DETEI_S DOMMAGES. AUCUNE GARANTIE, EXPRESSE OU
IMPLICITE, N'EST OFFERTE/_ UN ACHETEUR QUEI.CONQUE EN CAS DE
REVENTE.
Certains 6tats n'autorisent pas [es limitations de durde des garanties
tacites, ni les exclusions ou limitations frappant les dommages accessoires
ou indirects. II se peut doric que les exclusions ou limitations
susmentionndes ne vous soient pas opposables. I.a prdsente garantie vous
conf6re des droits pr6cis; vous pouvez 6galement jouir d'autres droits qui
varient d'un 6tat b_I'autre.
I.es appareils vendus en dehors des rdgions susmentionndes ne sont
couverts par aucune garantie. II se peut que votre distributeur ou
revendeur vous offre une garantie si vous rdsidez en dehors de ces
rdgions.
21
Page 23

Notes:
Page 24

23-11-2198N-009
2
• Attach filler panels
• Paneles adjuntos de relleno
• Fixer les panneau de remplissage
• Attach [)rackets
• Sujete el soporte
• Fixer 1'6querre
• Attach filler panel frames
• Paneles adjuntos de relleno
• Fixer les Cadre du panneau de remplissage
5
• Insert air conditioner
• Coloque el aire acondicionado
• Positionner le climatisateur
• Mark window sill -
Center 6"
• Marque el alf6izar de la ventana -
Centro (222 ram)
• Marquage de ]'appui de fen6tre -
Centrer - 222 mm
*Fasten curtains and insert foam insulation
• Sujete las cortinas y coloque la espuma
insuladora
• Fixer les rideaux et introduire I'isolant
nlousse
Features and specifications subject to change without notice.
[as caracter_sticas y especificaciones estJul sujetas a cambio shl previo aviso.
[es caract_ristiques et spdcifications sont sujettes _1modifications sans prdavis.
Maytagisa trademarkoftheMaytagCorporationandis usedunderlicenseby FeddersNorthAmerica,Inc.
Maytages unamarcaregistradadeMaytagCorporationyseusa bajo[icenciaotorgadaaFeddersNorthAmericaInc.
Maytagestunemarquedecommercede MaytagCorporation,utilisdesous [icenceparFeddersNorthAmerica,Inc.
 Loading...