

Page 1
REAR CYCLE CARRIER - BC2085
Thank you for purchasing your cycle carrier.
Please read this leaflet carefully and retain for future reference.
THIS LEAFLET CONTAINS:
1. General Information and Warnings
2. Parts list.
3. Assembly instructions.
4. Fitting of the carrier to your vehicle.
5. Loading bikes onto the carrier.
1. GENERAL INFORMATION AND WARNINGS MUST BE READ
1.1 This carrier has been designed and manufactured to attach securely to a variety of vehicles. The attachment of this
carrier to a vehicle is safety critical and beyond the control of the manufacturer. The user must therefore ensure that
the cycle carrier is suitable for use with their particular vehicle and that both carrier and cycles are securely and safely
attached to the vehicle.
1.2 Roof or boot spoilers and plastic trims may prevent the correct fitting of the cycle carrier as straps and carrier
framework should not be in contact with them when fitted.
1.3 For hatchback vehicles with glass to the top of the hatch an adaptor kit with Foam Puller bars must be used (not
included in this kit).
1.4 During your journey, frequently check the tension of carrier fixing straps and the security of the cycles carried.
1.5 Secure cycles to the carrier using straps or rope (not supplied). Ensure that bicycles do not come into contact with the
vehicle bodywork and provide protection as required.
1.6 Drive carefully, be aware of cross winds, avoid sudden braking or hard cornering, reduce speed accordingly when
using the carrier.
1.7 Remove any loose objects from the cycles carried i.e. pumps, bottles etc.
1.8 The rear windscreen wiper (if fitted) may be obstructed by the cycle carrier, do not use.
1.9 A powered tailgate should not be used with the cycle carrier fitted.
1.10 Every time before use, check the carrier for the security of fittings or any sign of wear and tear. Replace any worn or
damaged parts.
1.11 If possible avoid any protrusions beyond the side of the car as these may present a risk of injury to passers - by. Under
any circumstances the load should not protrude more than 40cm to the side of the rear lights.
1.12 Should your rear lights or number plate be obscured when carrying cycles, an auxiliary lighting board and number plate
must be provided. Lighting boards and wiring systems are specifically designed for this purpose.
1.13 The maximum carrying capacity of this product is 3 cycles not exceeding a total of 45Kg. Check the weight of your
cycles, a typical mountain bike may weigh 16Kg. Check the vehicle manufacturer’s specification to ensure that you do
not overload the rear hatch or door.
1.14 If towing a trailer with the carrier fitted, ensure that sufficient clearance exists between the draw bar and cycles to allow
for manoeuvring.
1.15 This carrier is designed for temporary use only; remove when not in use or before going through a car wash.
KEEP THIS LEAFLET IN A SAFE PLACE FOR FUTURE USE
2. PARTS LIST
1 x Carrier, 6 x Straps
3. ASSEMBLY
The Cycle Carrier comes ready assembled, in some circumstances it may be necessary to adjust the 2 clamshell fixings with
a 10mm spanner while holding the lamping handle until the teeth fully engage when the clamping handles are depressed. The
6 cycle cradles will need to be rotated into position and their bolts tightened with a screwdriver. Do so carefully in both cases
and do not over-tighten. Check all fixings are secure before use.
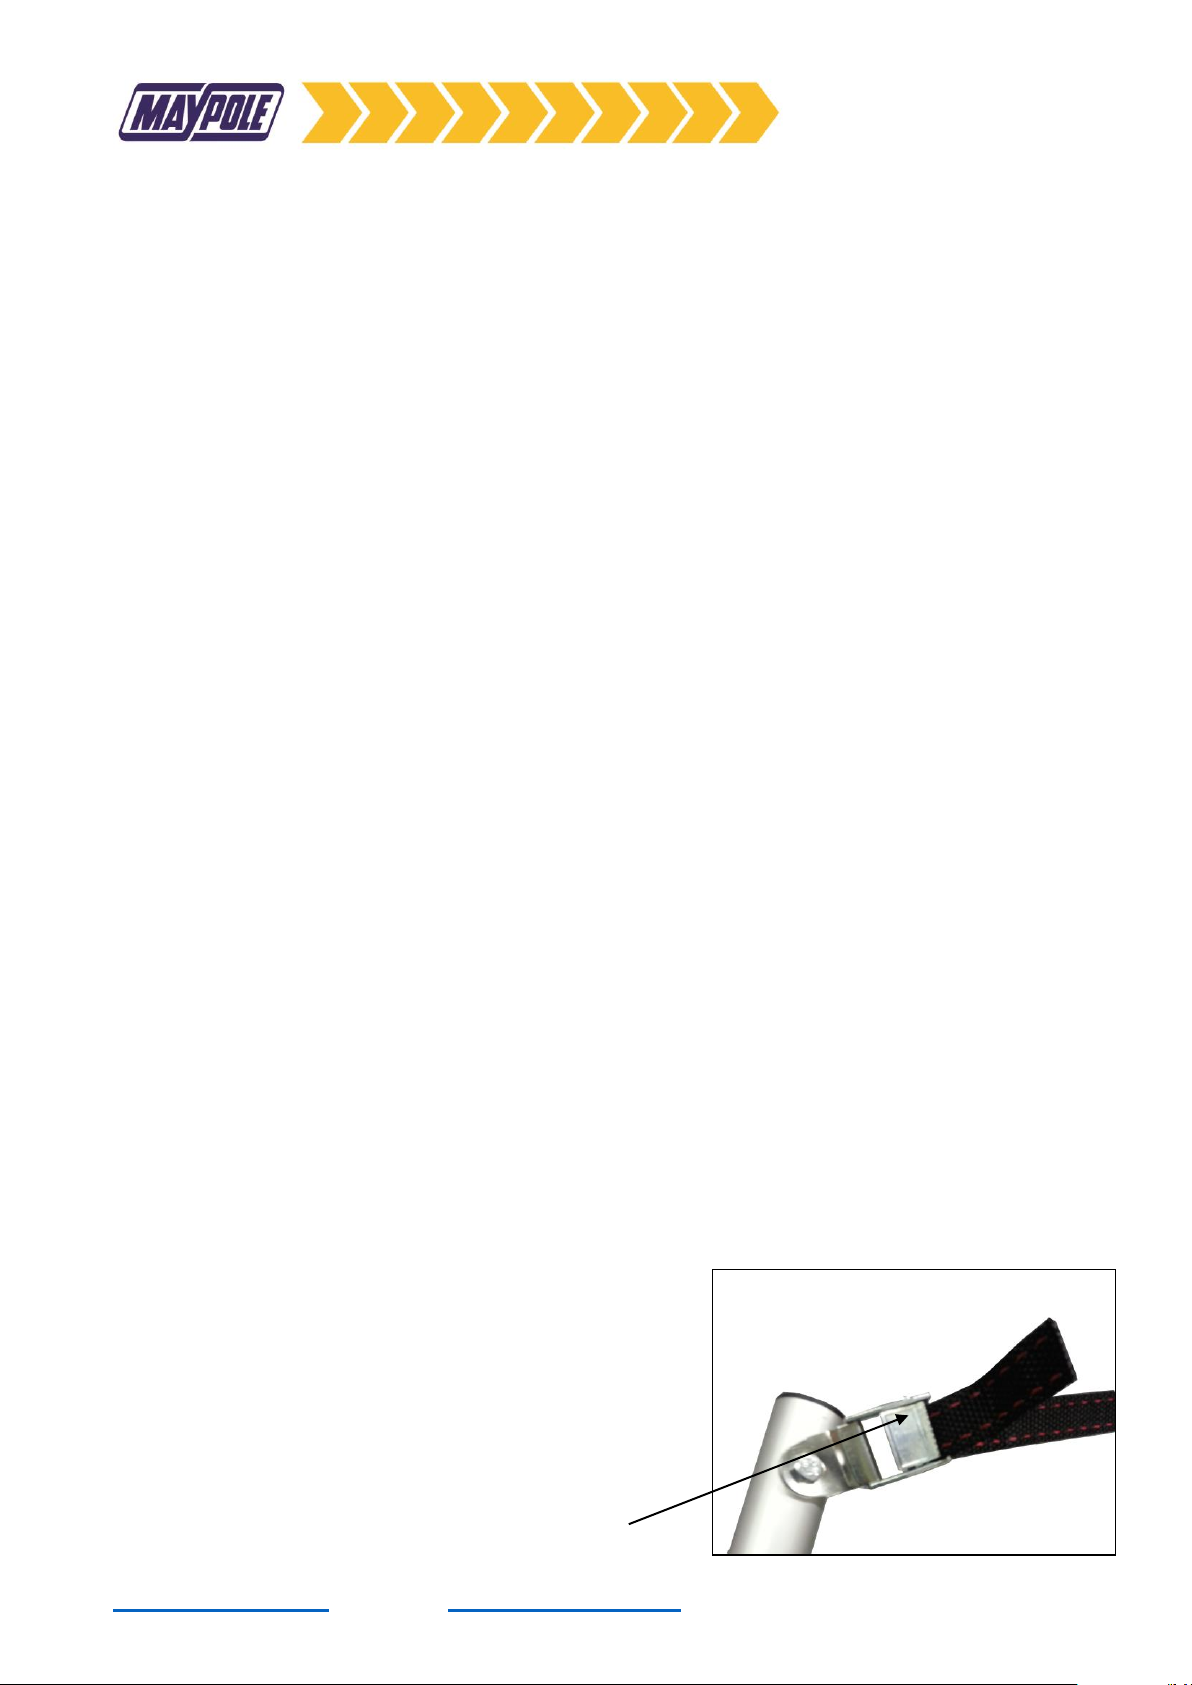
If at any time straps are detached from the carrier, they must be
rethreaded as shown in Diag. 1. The loose end of the strap being
threaded through from the rear of the buckle as illustrated.
The spring loaded catch must be pressed into the buckle to release the
strap. Pulling the loose end of the strap through the buckle should easily
adjust the strap length. To release the straps, press the cam (A) into the
buckle as shown in Diag. 1.
(A)
Diag. 1
Page 2
4. FITTING THE CARRIER TO YOUR VEHICLE
Clean the vehicle bodywork before fitting the cycle carrier, this along with the protective foam pads fitted will help to avoid
scratches. Further protection for car paintwork may be required.
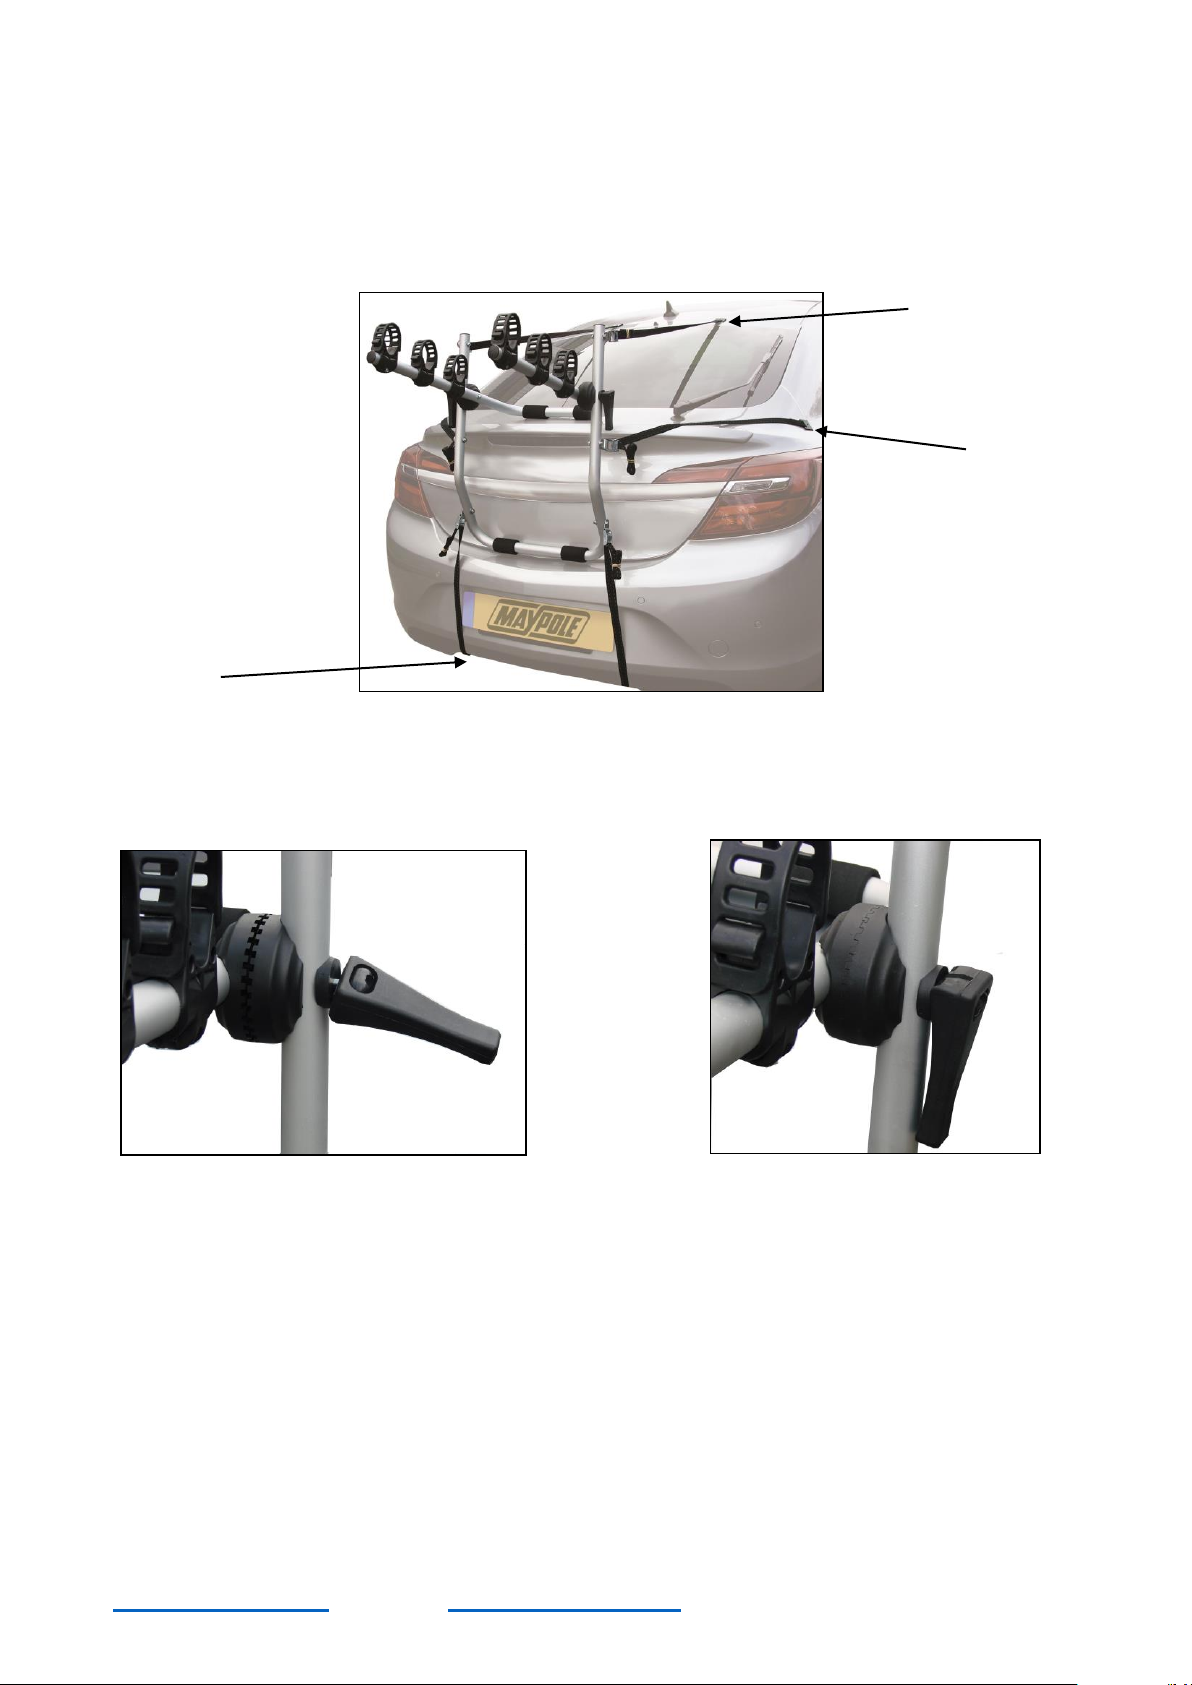
Open the clamshell clamps by lifting the clamping handle Diag. 3 Unfold and adjust the carrier frame to fit the car Diag. 2.
Position the Carrier on the rear of your vehicle and fit the two hooks (A) Diag.2 of the upper straps onto the top edge of the
boot lid, hatch or door. Adjust the straps in order to hold the Cycle Carrier in place as shown in Diag. 2.
Attach the side straps (B) Diag. 2 to a suitable position on the side of the boot lid, hatch or door.
(C)
Diag. 2
Adjust the angle of the carrier arms as shown in Diag.2, the arms should be at an angle of between 10 and 30 degrees above
the horizontal. When the arms are in the correct position, push the clamping handle down as shown in Diag.4. The clamshell
joint should close completely and prevent any movement of the cycle carrier frame. Adjust the clamshell clamps if necessary
by screwing in or unscrewing the clamping handle while holding the nut with a 10mm spanner.
Diag. 3 Diag.4
Attach the lower straps (C) in (Diag.2) to the lower edge of the boot lid, hatch, door or to a secure position on the vehicle
bodywork, tow bar or chassis. The straps must be as straight as possible and not twisted.
Progressively tighten the straps one by one to an equal tension, ensuring the carrier is firmly and centrally positioned.
Important: straps should always be attached to metal parts of the vehicle, never to glass hatch backs, rubber seals, thin
plastic bumpers or trim.
(A)
(B)
Page 3
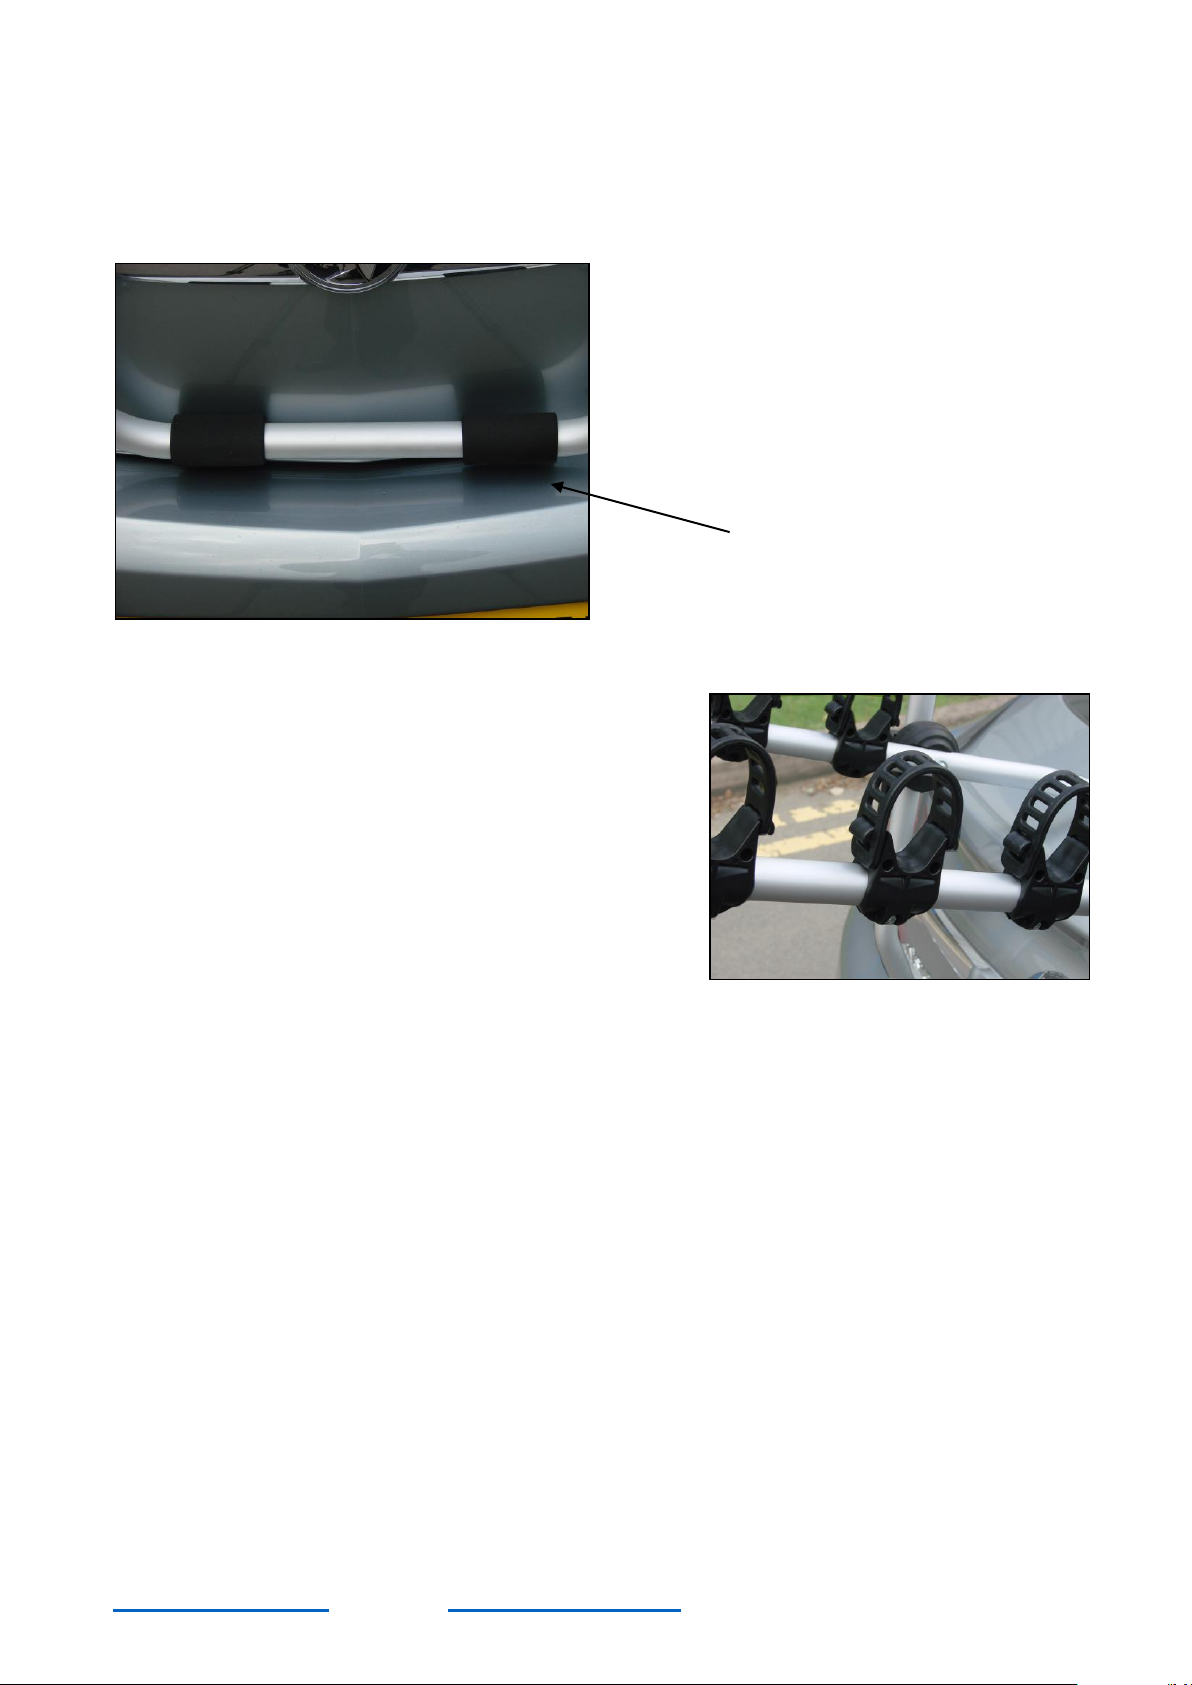
Adjust the straps to position the carrier ensuring that the rubber pads (A) are firmly in contact with the vehicle bodywork
(Diag.5). Avoid placing these feet on large or unsupported panels, or areas of bodywork, which may be liable to damage due
to the pressure applied by the loaded carrier.
Check and tighten all straps again the carrier should not move if lifted, pulled sideways or pushed downwards.
(A)
Diag.5
5. PLACING YOUR CYCLE ON YOUR CARRIER
When placing the cycles (max. of 3) onto the carrier support arms, place
them in opposite directions. Avoid positioning them directly next to the
vehicle exhaust.
Position the cross bar of each cycle into a pair of easy-fit cradles on the
cycle support arms Diag. 6.
Secure cycles to the cradles using the rubber cycle securing straps
provided, these can be pulled down over the cross bar and clipped onto
the cradles. (Diag. 6).
To secure the cycles to the carrier the 2.5m securing strap provided
should be passed around the uprights of the carrier frame and around
the cycles. Ensure that cycle steering, wheels and pedals are secured
and will not come into contact with the vehicle bodywork.
Diag.6
After placing the cycles on the carrier, re-tension all of the straps and tie off the surplus lengths of strap at the base of the
buckles for extra security and to prevent the loose ends flapping.
Remember: The driver of the vehicle is responsible for the security and safety of the load carried, check frequently during your
journey.
If your lights or number plate are obscured, you must use an auxiliary
lighting board.
 Loading...