

Mayones Electric Guitar User Manual


www.mayones.com
DEAR GUITAR PLAYER!
Thank you for purchasing an electric guitar of our production. We are convinced that you
have made a good choice and that your new instrument will help you in developing your
musical talent.
We would like to help you in achieving this goal and this is why we would like you to
familiarise yourself with a number of maintenance rules.
EN
Maintenance and operation.
1. Use only good quality strings, preferably from a single set. Acoustic and classical guitar
strings are NOT suitable for an electric guitar.
2. The way you wind the strings around the tuning keys is crucial for the instrument to stay
in tune. Remember to read the chapter explaining this procedure.
3. In order to work correctly, a bridge (especially a tremolo bridge) has to be correctly
balanced and adjusted. It is the bridge that determines if the instrument is tuned well.
It also determines the overall comfort of playing.
4. Setting up the proper neck relief and the action of the strings is very important to achieve
good comfort of playing. These procedures need to be perf ormed each time the gauges
of the strings are changed.
5. In order for a string to hold its pitch well, its intonation has to be adjusted.
A separate chapter is devoted to this procedure.
6. It is recommended to change the strings after 30 hours of operation. After this period
most strings tend to lose their bright sound and stop holding their pitch.
7. It is advised to clean the instrument, particularly the strings, after each period of playing
it. Suitable products are available in good music shops.
8. When transporting the instrument, a gig bag or a hardshell case should be used in order
to prevent damage caused by mechanical shock or temperature change.
9. A guitar is a delicate instrument. The finish is vulnerable to scratches, fractures and even
chipping. Take good care of your instrument and use it according to the goal it was built for.
10. Protect your instrument from low and high temperature, and also from humidity.
11. Do not expose the instrument to direct sunlight for long periods of time. Do not leave
your instrument close to heating devices, nor in a car on a hot day.
12. Avoid sudden changes of temperature or humidity. In winter, after bringing a chilled
instrument into a heated room, leave it for a few hours in its case, until it has returned to
room temperature.
13. Clean the strings and lacquer surfaces with a dry, delicate cotton cloth. For thorough cleaning,
use specialized products only (Guitar Polish and String Cleaner). Instruments with natural
finish should be conserved with special products based on natural wax and oils.
14. Make sure that all parts of the instrument are cleaned regularly. Use bear ing lube to
regularly clean the tremolo arm´s socket, and remember to lubricate the spot, where the
tremolo´s knife-edge meets the stud bolts.
Disregard of the above rules may result in loss of warranty.
- 2 -
Electric Guitar User’s Manual

www.mayones.com
Main parts of the guitar
1. headstock
2. logo
3. tuning mechanics
4. tuning key post
5. truss rod adjustment screw (plate)
6. nut (locking nut)
7. strings
8. frets
9. fingerboard
10. neck joint
11. neck joint screws
12. pickup mounting ring
13. pickup selector switch
14. volume knob
15. tone control knob (piezo blender)
16. output jack
17. front strap button
18. neck pickup (humbucker)
19. pickup height adjustment screws
20. bridge pickup (humbucker)
21. bridge height adjustment screws
22. bridge saddles
23. string ferrules
24. rear strap button
25. electronic compartment plate
26. string ferrules (back of the guitar)
27. battery compartment
EN
Headstock
Neck
Electric Guitar User’s Manual
Body
- 3 -
www.mayones.com
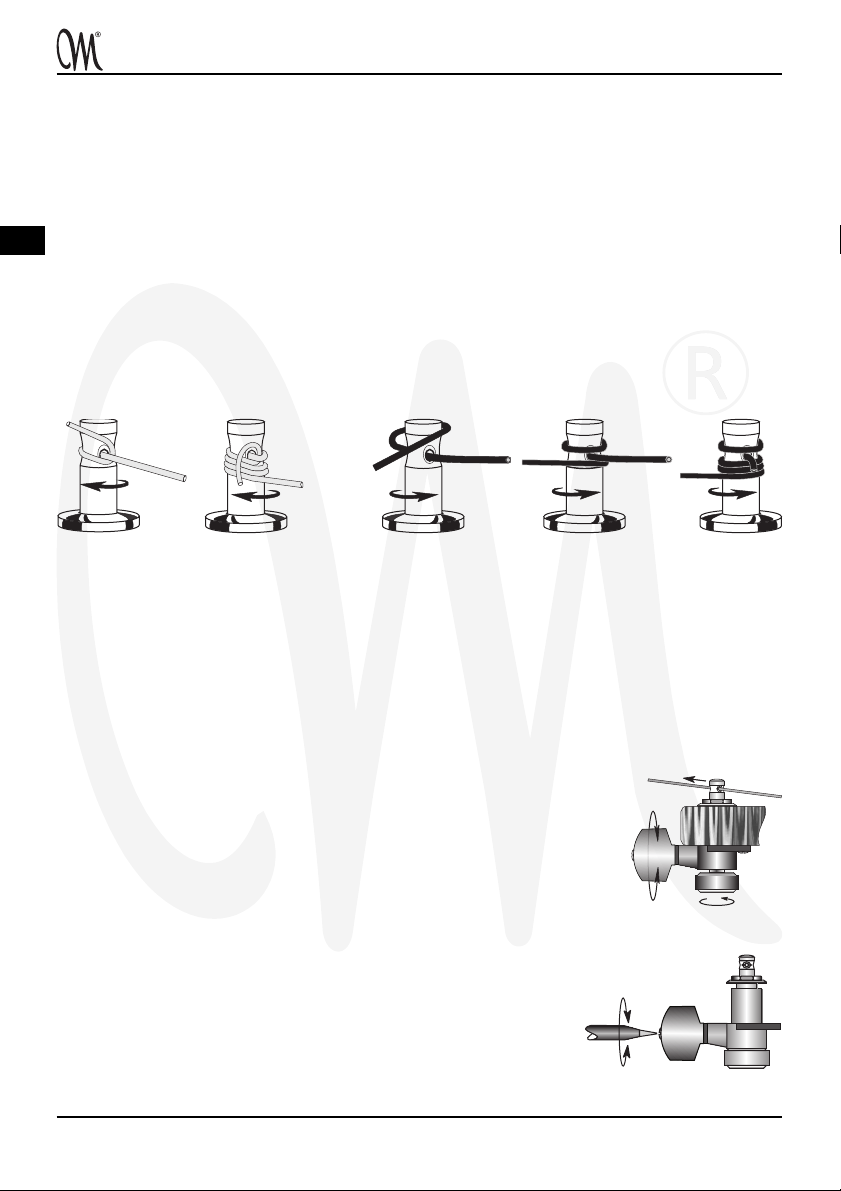
Winding the strings on tuning keys
Depending on the construction of the bridge, insert the ball into the slot of the bridge, pull
the string through the hole in the tremolo block, pull the string through the hole in the body,
or cut off the ball and install the string in the locking saddle (Floyd Rose). Next, pull the string
through the hole in the tuning key’s post. Next, stretch the string and bend it (90o) 3-5cm
behind the tuning key. Position the bent part of the string at the edge of the hole in the tuning
EN
key’s post and point the end down (6 tuners in line; when the tuners use 3+3 system - point
the end of the string towards the centre of the headstock. Next, paying attention that the
string clings tightly to the edge of the slot, put the loose end of the string under the part of the
string between the tuning key and the nut (locking nut). Next, pull it strongly up and back
(fig. 1). Wind the string over the tuning key in the way that the string winds around and
pushes the created loop to the surface of the tuning key (fig. 2). The above procedure should
be performed only on unwound strings (E1, H2 and G3).
fig. 1 fig. 2 fig. 3 fig. 4 fig. 5
In case of wound strings (D4, A5 and E6) we do not make a loop before winding them over
the tuning key. The first turn of the string around the key should go above the bent part of
the string. Further turns should go under the bent part (fig. 3). The windings should cling
to each other, but the string should not cross itself (fig. 4).
After having tuned the instrument, it is advised to cut the loose ends of the string more
or less 0,5cm behind the keys. The ends should be bent towards the front of the headstock
(fig. 5).
If an instrument is equipped with locking tuning pegs, the string
winding procedure is the same for all strings. We do not wind the
string around the tuning peg. After installing a string in the bridge,
we pull it through the hole in the tuning key’s post and, while holding
the string behind it, we stretch it firmly (fig. 6). We lock the stretched
string by tightening the bolt inside the key using the correct screw.
Next, we tune the string to the desired pitch. It should only take
several turns of the key.
In many tuning keys, it is possible to adjust the strength needed
to turn a key by using a special screw (fig. 7).
Remember:
even if the instrument is equipped with a locking nut,
you still need to correctly install the strings on the tuning pegs.
- 4-
1. pull the string through
and stretch it firmly
fig. 6
3. tune the string
2. tighten the screw
locking the string
fig. 7
Electric Guitar User’s Manual
 Loading...