

Mayon MWM719 User Manual
DIGITAL WIRELESS LCD DVR SYSTEM
( NETWORK VERSION )
USER’S MANUAL
PLEASE READ THIS MANUAL CAREFULLY BEFORE OPERATING EQUIPMENT.
RETAIN IT FOR FUTURE REFERENCE.

CONTENTS
CAUTION
WARNING
1
WHAT IS INCLUDED
………………………………………………………..… 2
2
PRODUCTS
2.1 LCD DVR ………………………………………………………… 3
2.2 Panel Button Function ………………………………………………………… 3
2.3 Camera ………………………………………………………… 4
3
SPECIFICATIONS
3.1 LCD DVR ……………………………………………………………… 4~5
3.2 Outdoor Camera ……………………………………………………………… 5
3.3 Indoor Camera ……………………………………………………………… 6
4
INSTALLATION
4.1 Install the LCD DVR ………………………………………………………… 6
4.2 Install the Camera ……………………………………………………………… 7
5
MENU AND BUTTON OPERATION
5.1 Camera setting ……………………………………………………………… 7~9
5.2 REC setting ……………………………………………………………… 9~12
5.3 System setting ……………………………………………………………… 12~14
5.4 System Info ……………………………………………………………… 15~16
5.5 Playback ……………………………………………………………… 17
6
USAGE OF SOFTWARE IN APPLE CLIENT
6.1 Install client-end software ……………………………………………….…… 17
6.2 Add network DVR methods ………………………………………………….… 18~19
6.3 User operation ……………………………………………………………… 19~21
6.4 System settings ……………………………………………………………… 21~22
6.5 Delete network DVR methods ………………………………………….…..… 22
7
USAGE OF SOFTWARE IN ANDROID CLIENT
7.1 Install client-end software ……………...……………………………………… 23
7.2 Add network DVR methods ………………...…………………………………… 23~24
8
STATEMENT
…………………………………….………………………… 25
9
TROUBLE SHOOTING
…………………………..……………………………... 25~26
1
CAUTION
* Please read the following manual details before using.
* Pay attention to dampproof for the high resolution unit.
* Don't scratch the LCD screen surface and clean the surface by soft cloth if the screen was dirty.
* This unit should be opened and serviced only by a qualified technician.
* Push the unit MIR switch if finding the picture reverse.
* Install the bottom side of the outer shell or inner side chamfer by customer's self-selection in
accordance with bedframe.
The lighting flash with arrowhead symbol within an equilateral triangle
Is intended to alert the user to the presence of uninsulated.
“dangerous voltage” within the products enclosure that may be of
sufficient magnitude to constitute risk of electric shock to person.
The exclamation point within an equilateral triangle is intended to alert
the user to the presence of important operating and maintenance
(servicing) instructions in the literature accompanying the appliance.
WARNING
To prevent injury, this equipment must be securely attached to the floor /wall in accordance with the
installation instructions.
2
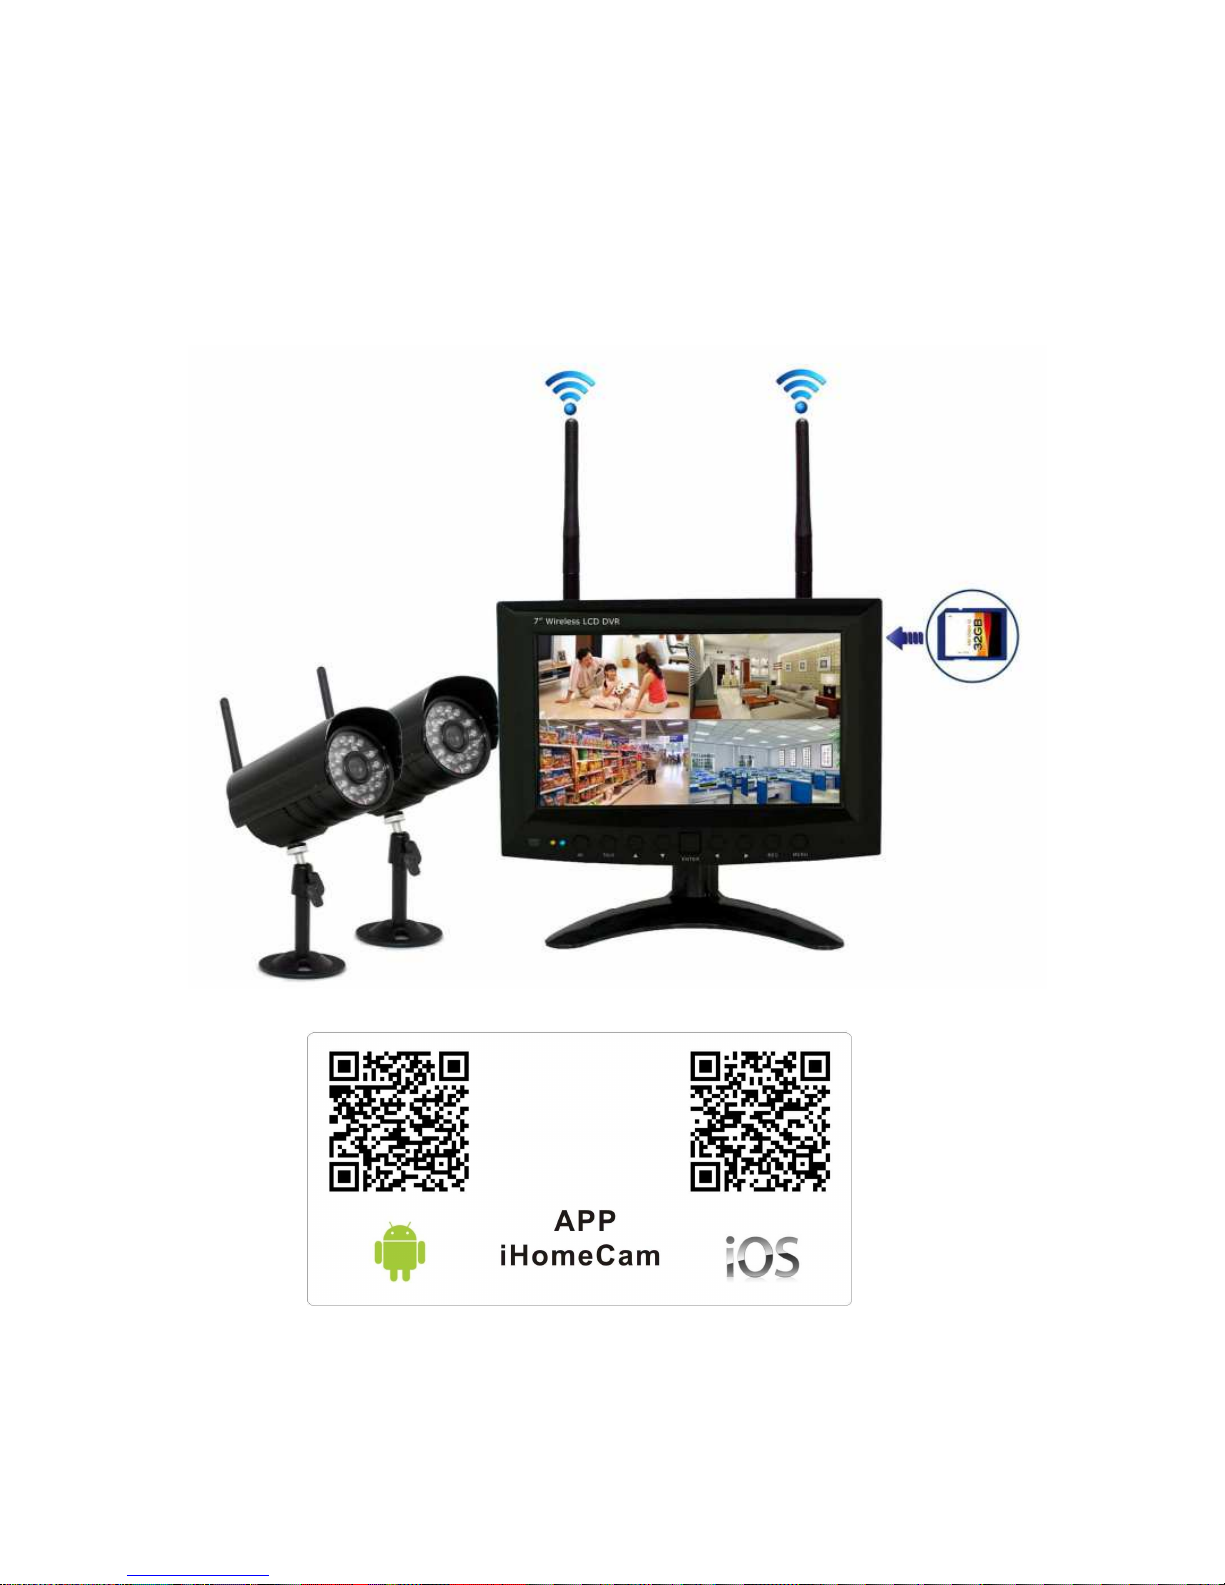
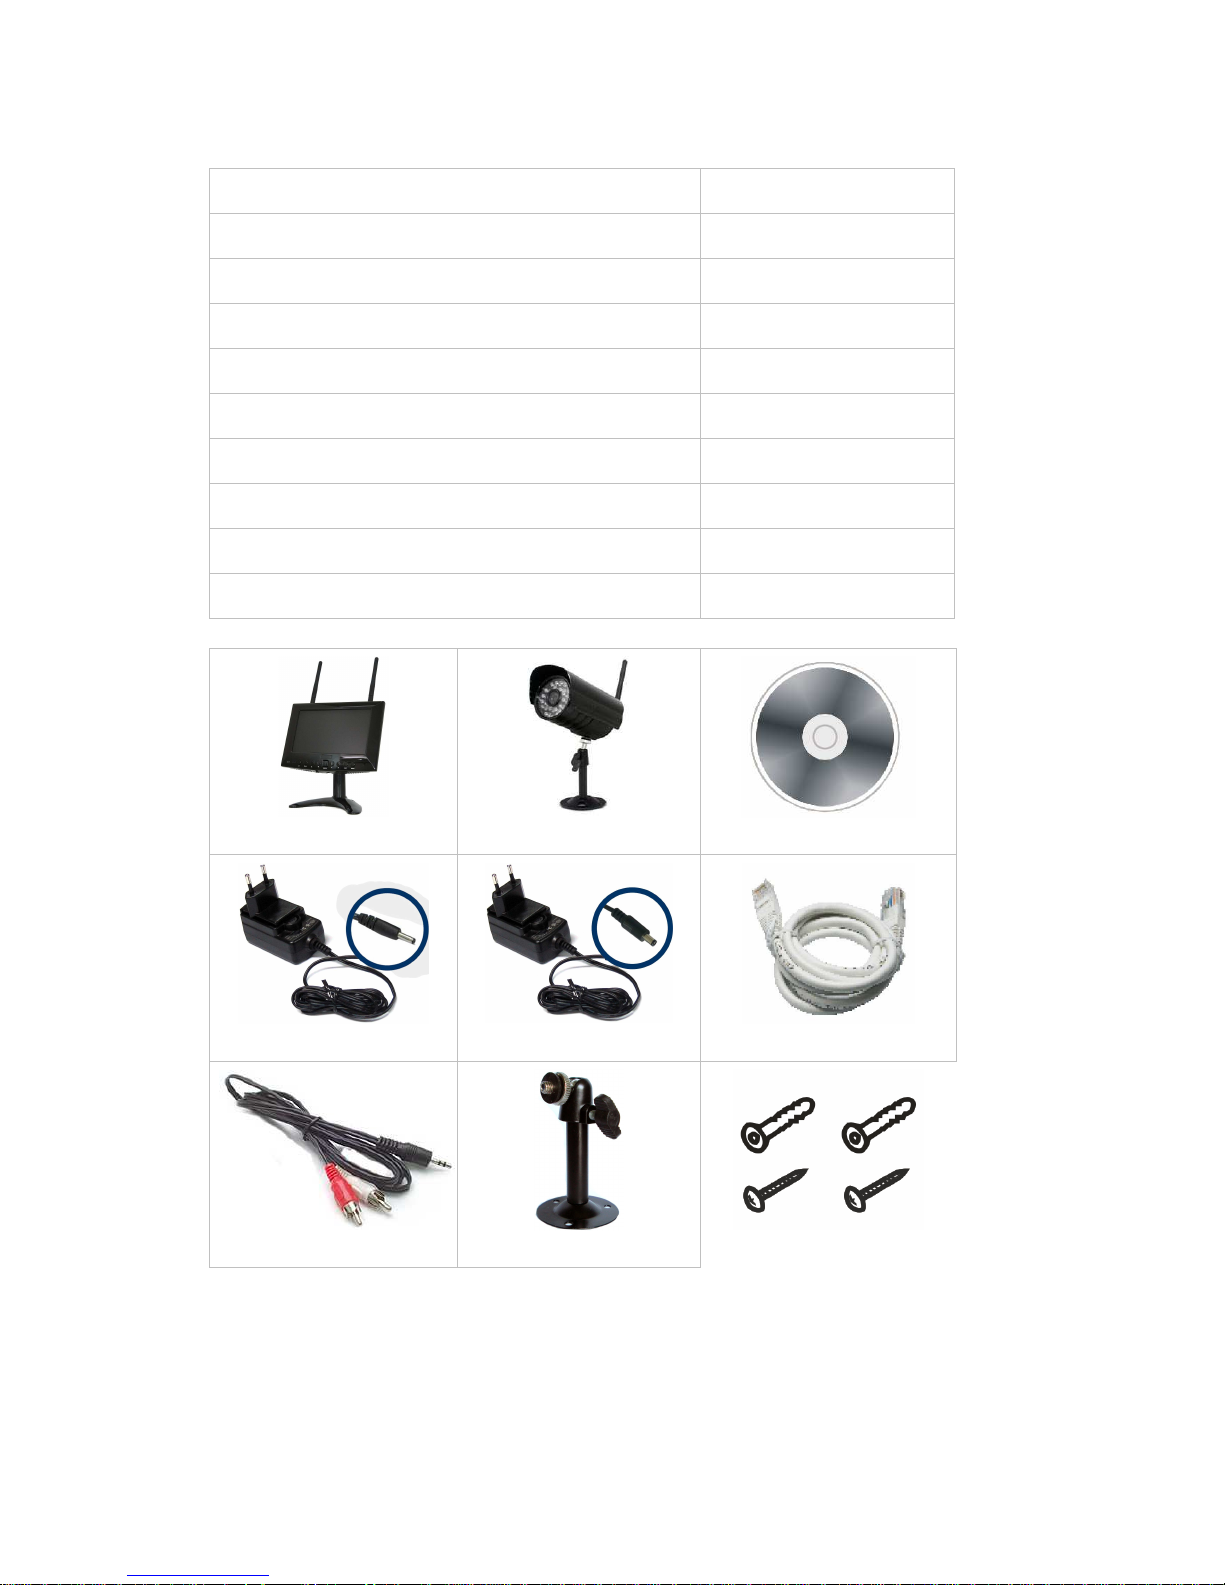
1. WHAT IS INCLUDED?
ITEM QUANTITY
LCD DVR with antenna 1 unit
Camera with antenna 2 unit
CD ( software / manual ) 1 unit
Power Adapter (DVR) 1 unit
Power Adapter (Camera) 2 unit
RJ45 cable 1 unit
AV cable 1 unit
Camera bracket 2 unit
Mounting hardware 3 unit
DVR
Camera
CD
Power Adapter (DVR) Power Adapter (Camera)
RJ45 cable
AV Cable
Camera bracket
Mounting hardware
Note: The above packing list is basing on the package of 1 LCD DVR with 2 cameras. the packing list will
be changed according to the quantity of cameras.
Photos are only for reference and subject to the real product in the box.

3
2. PRODUCTS
2.1 LCD DVR appearance
2.2 Panel Button Function
AV
: Switch to turn on/off the screen display
TALK
: Turn on/off the 2-way audio intercom (only for 2-way audio model
)
▲
: Move to previous column or Adjust the digital
▼
: Move to next column or Adjust the digital
ENTER
: Confirm the settings
◄
: Move to left column or Switch to previous option
►
: Move to right column or Switch to next option
4
REC
: Start / Stop manual recording
MENU
: Enter the main menu or Exit the menu operation
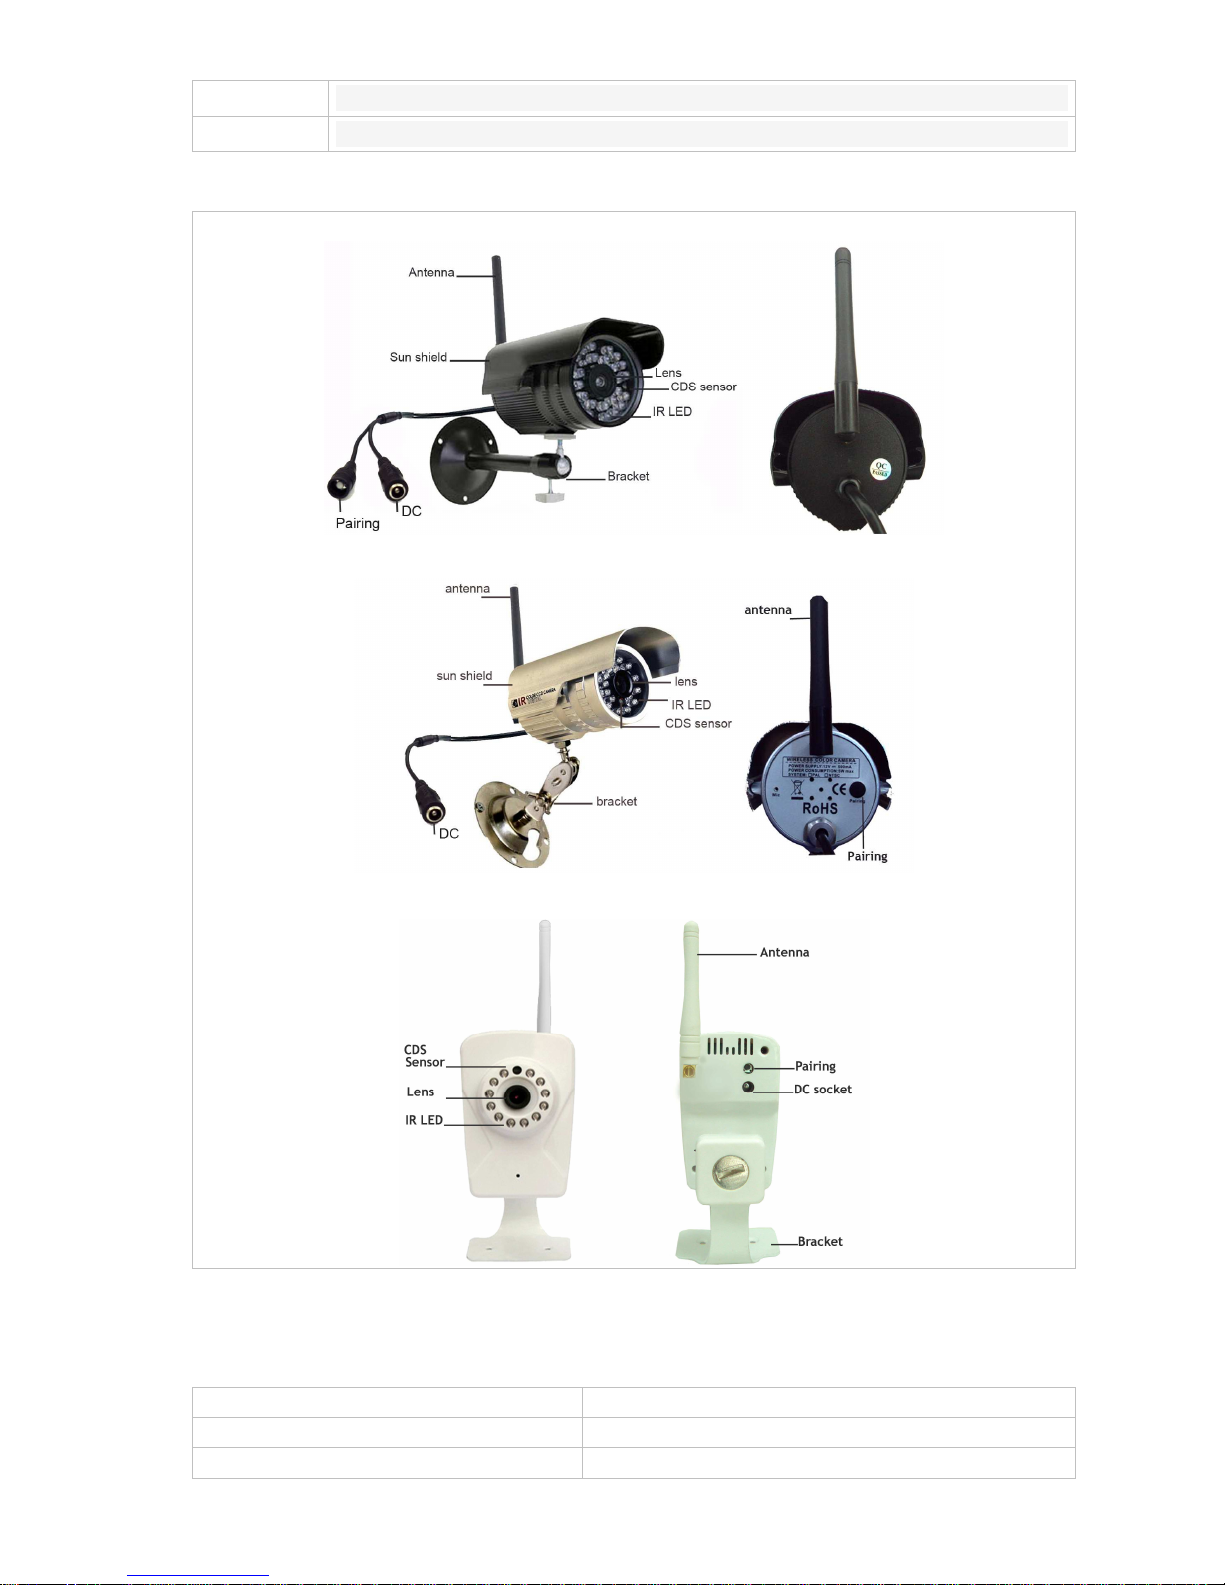
2.3 Camera appearance
A. Housing for camera without speaker
B. Housing for camera with speaker
C. Indoor Camera
3. SPECIFICATIONS
3.1 LCD DVR
ITEMS DESCRIPTION
Display Screen 7inch TFT LCD (16:9) LED back-light
Resolution 800(H)×RGB×480(V)

5
Display Area
154.08mm(H)×85.92mm(V)
White Luminance
250cd/㎡
Frequency Range 2.4G FHSS
Cameras Supported
4 channels
Transmission distance
200~300 meters Line of sight
Frame Rate
2-CH: 15fps@1280X720 HD
2-CH: 25fps@ 640×480 VGA
Compression MPEG-4
File Type
ASF
Record Mode 4-CH record separately
Start recording mode
Manual / Motion detect / Schedule
Scheduled Recording
1 Week
Automatic Overwrite
Optional
Maximum SD Card Size
CLASS 10 128GB
Network communication mode P2P
Network Interface RJ45 10M/ 100M Ethernet Auto Detect
Monitoring methods Special software: iOS, Android customers end
Video playback Smart phone video playback
Power Supply
100-240V~50/60Hz 5V/1000mA
Power consumption 5W max.
Operating Temperature
0℃~+40℃
Operating Humidity 65%
Storage temperature
-10℃~+50℃
Dimensions 200(W)×140(H)×30mm(D)
3.2 Outdoor Camera
ITEMS DESCRIPTION
Image Sensor 1/4 inch color CMOS Sensor
Active pixels 1280(H)×720(V)
Horizontal Resolution 1.0 Megapixel
Min illumination 0.1Lux/F=1.2 (0Lux LED On)
Lens 6mm fixed lens ( 3.6mm optional)
Night Vision Yes
IR LED control Automatic (CDS Sensor)
Quantity of IR LED 24 pcs
Night vision range 12-15 Meters
Frequency Range
2.4G FHSS
Transmission distance
200~300 meters Line of sight
User ID Random ID
Outdoor use Yes
Waterproof IP55
Operating Temperature
-10℃~+40℃
Operating Humidity 85%
Storage temperature
-20℃~+50℃
Power Supply
100-240V~50/60Hz 12V/500mA
Power consumption 5W max.
6
Dimensions 110(W)×150(H)×105mm(D)(With Stand)
3.3 Indoor Camera
ITEMS DESCRIPTION
Image Sensor 1/4 inch color CMOS Sensor
Active pixels 1280(H)×720(V)
Horizontal Resolution 1.0 Megapixel
Min illumination 0.1Lux/F=1.2 (0Lux LED On)
Lens 3.6mm fixed lens (6mm lens is optional)
Night Vision Yes
IR LED control Automatic (CDS Sensor)
Quantity of IR LED 12 pcs
Night vision range 6-8 Meters
Frequency Range
2.4G FHSS
Transmission distance
200~300 meters Line of sight
User ID Random ID
Usage Environment Indoor
Operating Temperature
0℃~+40℃
Operating Humidity 65%
Storage temperature
-10℃~+50℃
Power Supply
100-240V~50/60Hz 12V/500mA
Power consumption 5W max.
Dimensions 64(L)×130(H)×80(D)mm (with stand / no antenna )
4. INSTALLATION
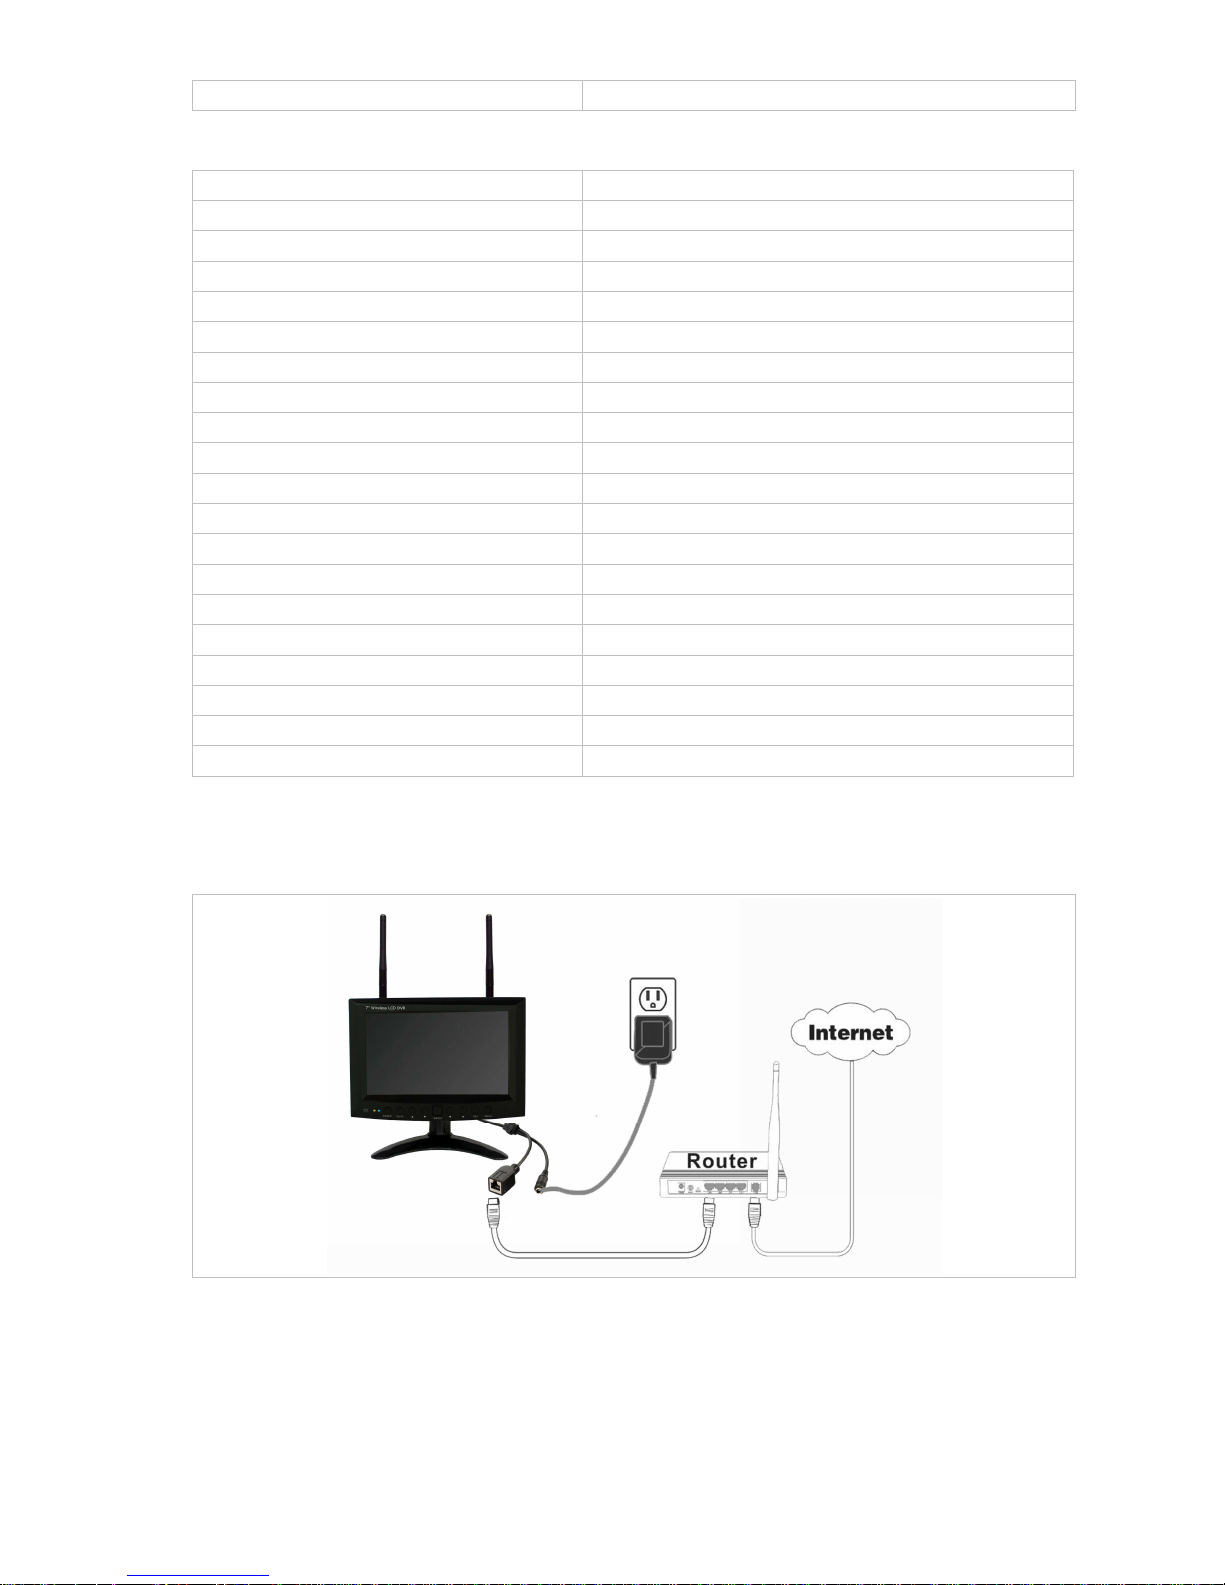
4.1 Install the LCD DVR
Lock the LCD DVR on the bracket and install the antenna to the LCD DVR, connect the RJ45
network cable between LCD DVR and Router, then plug and turn on the power adapters of LCD
DVR and Router.
Before using the LCD DVR, please confirm the Router is open DHCP service (Generally
speaking, the router is open DHCP service automatically).
Note: This product is no PPPOE dial function, and can not connect with the Modem.
7
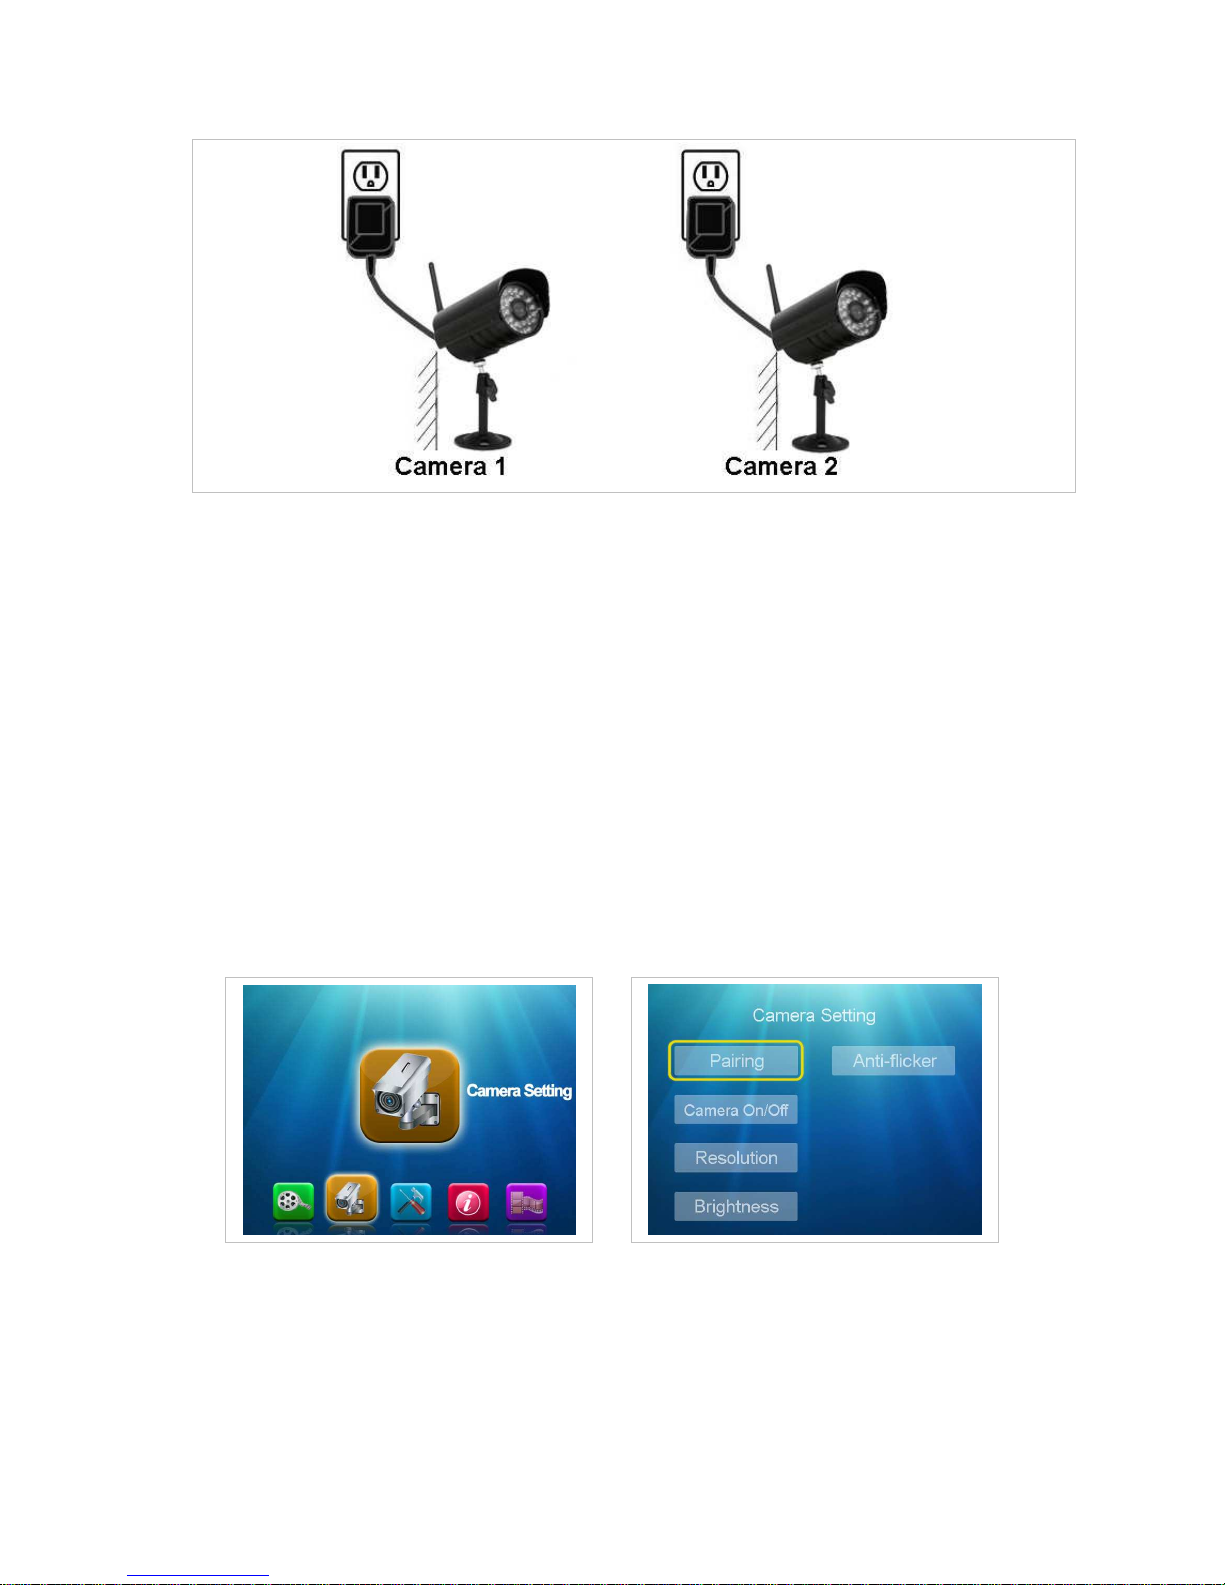
4.2 Install the Camera
Please pair the camera with the LCD DVR firstly, then install the cameras on the wall or other
safe places, finally plug and turn on the power adapter of cameras.
Note: The camera position must be within the valid transfer distance to ensure the LCD DVR
can receive the stable and clear image from the cameras. Please pay attention to your safety in
the outside installation.
5. MENU OPERATION
5.1 Camera Setting
5.1.1 Pairing
5.1.1.1 Plug and turn on the power adapters of LCD DVR and cameras.
5.1.1.2 Press "Menu" to enter the main menu, and press "◄ ►" to select "Camera setting", then
press "Enter" to enter next step. Press "▲ ▼" to select "Pairing" column.
5.1.1.3 At the “Pairing” screen, press the "Enter" to enter next step, and press "▲ ▼" to select
"Cam 1-2-3-4", and press "Enter" to confirm, then press “Pairing” button at the back of
camera within 30 seconds to finish pairing.
 Loading...