

Page 1

User Manual
Electric Oven
Model No.: MMO36
SAFETY PRECAUTIONS
When using electrical appliance, the following basic safety
precautions should always be followed:
1. Read all instructions.
2. Before use check that the voltage power corresponds to the one shown on
the appliance’s rating label.
3. Unplug from outlet when not in use and before cleaning. Allow to cool before
cleaning the appliance.
4. Do not let cord hang over edge of that table or counter, or touch hot surface.
5. Place the appliance on the flat surface. Do not place on the heated surface.
6. Close supervision is necessary when any appliance is used by or near
children.
7. Do not touch hot surface. Use handle or knobs only.
8. When in use, the oven is hot! Never touch the oven and the glass door.
9. Don’t sprinkle water on the glass window whilst it is still very hot, this could
cause the glass to crack.
10. A distance of at least 10cm should be maintained between the oven and the
wall. The rear surface of appliances which, according to the instructions,
Page 2
shall be placed against a wall;and are not accessible with test probe 41 of EN
61032.
11. Do not operate any appliance with a damaged cord or plug or after the
appliance malfunctions. Return the appliance to the nearest authorized
service center for examination, repair or adjustment.
12. If the supply cord is damaged, it must be replaced by the manufacturer or its
service agent in order to avoid a hazard.
13. Do not use outdoors.
14. The oven is equipped with a manual reposition thermal-fuse that makes the
oven much safer and more reliable.
15. Save these instructions.
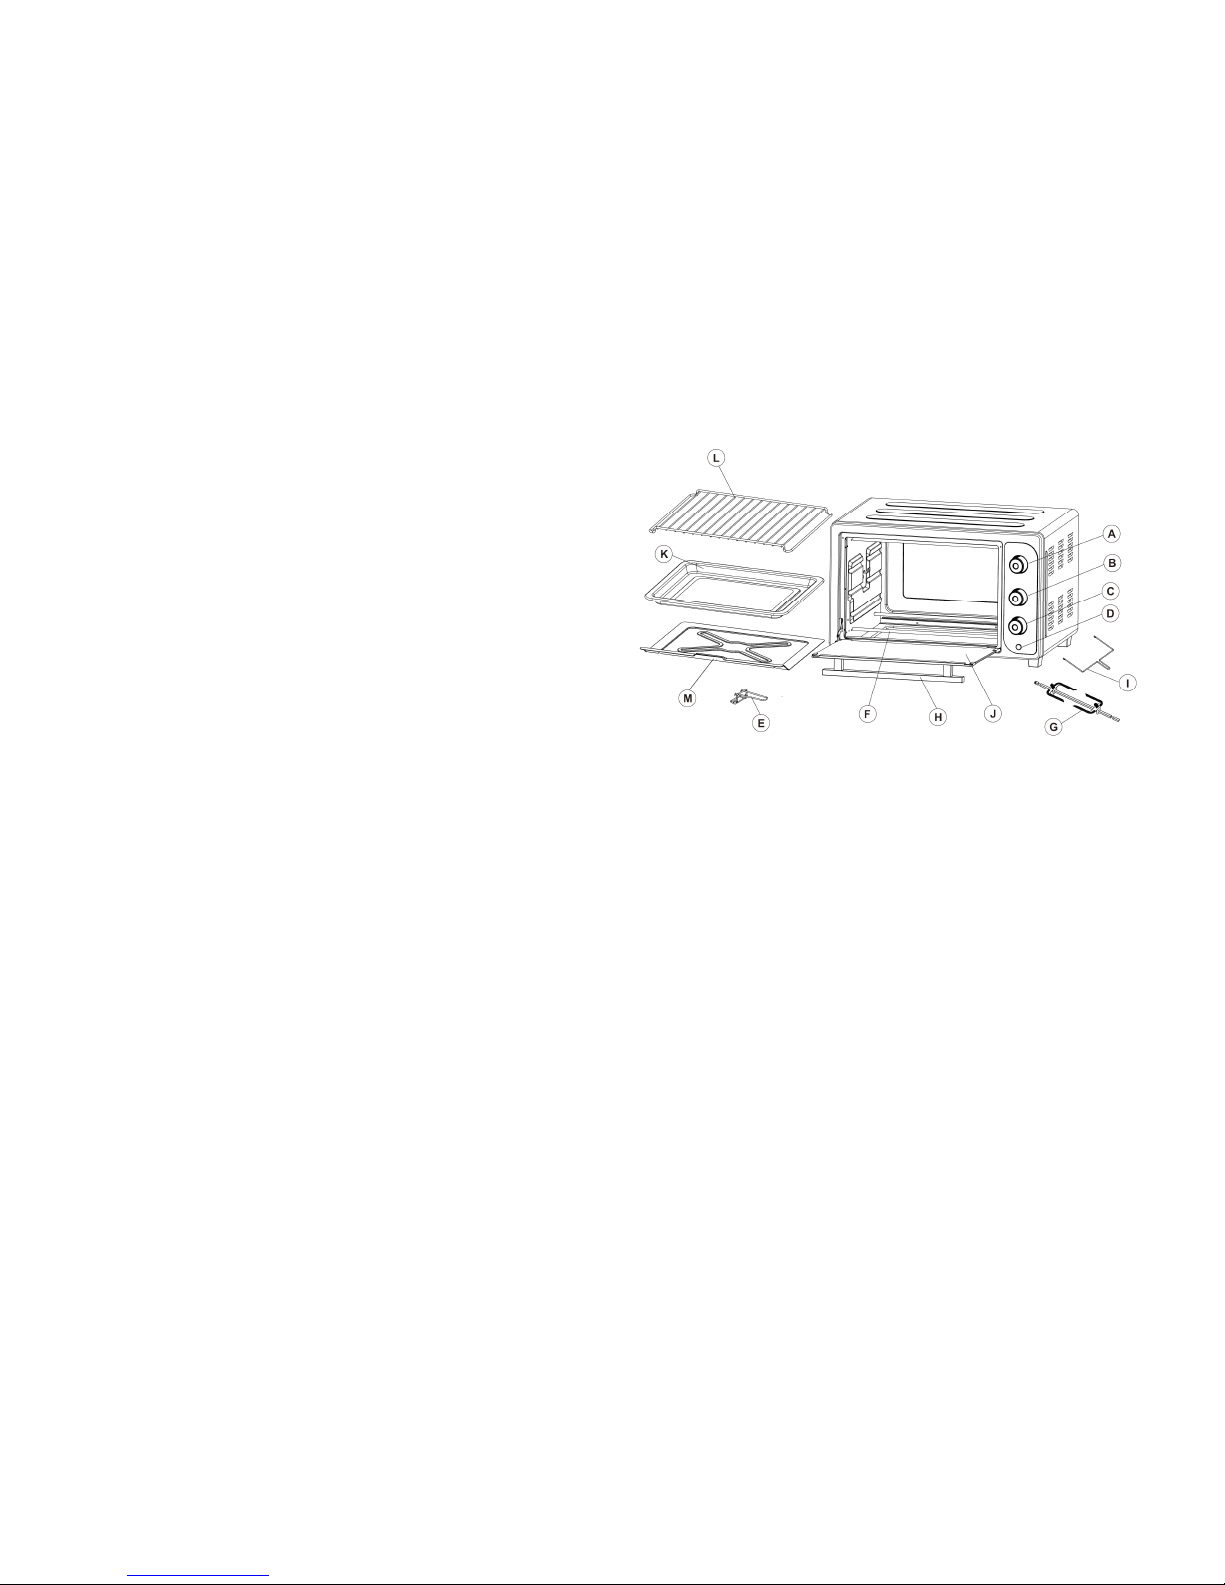
1. GUIDE TO THE PARTS
A. Temperature Control Knob G. Rotisserie Spit
B. Function Control Knob H. Door Handle
C. Time Control Knob I. Rotisserie Spit Handle
D. Indicator Light J. Glass Door
E. Tray Handle K. Baking Tray
F. Heating Element L. Wire Rack
M.Crumb tray
2. BEFORE FIRST USE
● Remove all packaging material from the appliance.
● Remove all accessories (rack, tray) from the oven.
Page 3

● Wipe the oven and the accessories with a damp cloth and dry them.
● Fully unwind the power cord and plug it in the power socket.
● Set the function control to .
● Set the temperature to 250°C. Use the timer to let the appliance run (without
any food or accessories in it) for about 15 minutes.
● If the unit is used for the first time, it may slightly emit smell and smoke. This
is normal and only lasts for a short time. Make sure to use the appliance in a
well ventilated area.•
3. USING THE OVEN
3.1 Cooking tips
● When baking or grilling, it is advisable to always pre-heat the oven to the
desired temperature, to get the best possible cooking results.
● Oil the grilled exterior before placing food in the oven to be grilled.
● Place the baking tray under the wire rack in order to avoid oil dropping down
to the bottom and bottom heater.
● If the food to be cooked is oily or greasy, you can use two pieces of
oil-aluminum foils. Place one piece on the baking tray and use the other
piece to cover the foods. This avoids oil/grease splashing during cooking.
● About convection cooking
Convection cooking combines hot air movement by means of a fan with the
regular features(grill, bake, toast, etc.). Convection cooking provides faster
cooking in many cases than regular radiant types electric oven. The fan
gently sends air to every area of the food, quickly browning, crisping and
sealing in moisture and flavor. It produces more even temperature all around
the food by air movement, so that food cooks/bakes/grills evenly versus the
normal ovens hot and cold spots. The convection feature allows
cooking/baking at lower temperatures, which saves energy and helps keep
the kitchen cooler. Convection air is superheated and it circulates around the
food so it cooks food significantly faster than conventional ovens.
3.2 Keeping food warm
● Set the function selector knob to position or (with convection).
● Set the temperature to 100°C.
● Insert the wire rack, and place the food on top of it.
● If the food needs to be kept warm for longer than 20~30 minutes, it should be
covered with tinfoil, to prevent it from becoming too dry.
Do not leave the food in the oven for a long time as it may become too dry!
3.3 Baking
This function is ideal for flans, fruit puddings, quiche, pies, etc.
● Insert the wire rack to the bottom position.
● Turn the function selector knob to position or (with convection).
● Set the thermostat at required temperature.
● Set the timer knob to the required cooking time.
● Wait for the oven to reach the set temperature, then put the food in.
Page 4

● If cooking is completed before the end of the set time, please manually turn
the timer knob to position “OFF”.
3.4 Traditional oven cooking
This function is ideal for cooking great pizzas, lasagne, first courses au gratin,
small fowl, all kinds of fish, stuffed vegetables au gratin and different kinds of
cakes.
● Insert the wire rack to the bottom position.
● Turn the function selector knob to position or (with convection).
● Set the thermostat at required temperature.
● Set the timer knob to the required cooking time.
● Wait for the oven to reach the set temperature, then put the food in.
● If cooking is completed before the end of the set time, please manually turn
the timer knob to position “OFF”.
ENGLISH
3.5 Grilling with convection
This function is ideal for grilling hamburgers, chops, frankfurters, sausages, etc.
In addition, this function may be used for browning foods: coquilles saint-jacques,
etc.
● Insert the wire rack to the top position and the baking tray onto the bottom
heating element.
Hint: We suggest pouring two glasses of water into the baking tray so as to avoid
smoke and bad stains resulting from burning fat, and for easy cleaning.
● Set the function selector knob to position .
● Set the thermostat at required temperature.
● Set the timer knob to the required cooking time.
● Preheat the oven for about 5 minutes with slight ajar of the door.
● Place the food on the wire rack, and close the door, leaving it ajar, and
remember to turn the food half way during cooking.
● If cooking is completed before the end of the set time, please manually turn
the timer knob to position “OFF”.
3.6 Rotisserie
The function is ideal for cooking chicken on the spit, fowl in general, roast veal.
● Place the food on the spit and hold it firm by using the forks (for best results,
tie down the meat using kitchen string).
● Place the baking tray onto the bottom heating element, then insert the spit on
the spit mount inside the oven.
● Close the door, leaving it slightly ajar (half-open).
● Then oven does not need to be preheated for this function.
● Turn the function selector knob to position or (with convection
and lower heating, in this case please fill baking tray with enough water to
avoid boil dry) .
● Set the thermostat at required temperature.
● Set the timer knob to the required time.
Page 5

● Once cooking is completed, please manually turn the timer knob to position
“OFF”.
4. CLEANING
● After use, set timer knob counter counterclockwise to “0FF” position.
● Allow the appliance to cool completely before cleaning. Unplug cord from the
socket.
● Remove the plug from the power socket.
● Cool the oven down to the room temperature.
● Remove all accessories from inside the oven.
● The wire rack and baking tray may be washed as other kitchenware, either
by hand or by dishwasher.
● You can always use a moist sponge to clean the outside surfaces. Avoid
using abrasive products that could damage the finish. Ensure water or soap
does not penetrate the oven inside through the vents of the oven.
● Clean the oven surface and interior with a damp cloth or a sponge and take
the tray, rack out to wash.
● Never use aluminum-corrosive products(spray detergents) to clean the
inside aluminum walls and never scrape the walls with sharp or pointed
objects.
Warning: ON NO ACCOUNT should water be allowed to get inside the oven!
Technical specifications:
Description: Electric Oven
Model No.: MMO36
Oven capacity: 36 L
Temperature range: 100~250 °C
Timer: max. 60 minutes
Power consumption: 1500 Watts max.
Power supply: AC 220-240V, 50/60Hz
Positioning of the Wire Rack
Cookies – Use bottom and middle support guides.
Layer Cakes – Use bottom support guide only.
Pies – Use bottom and middle support guides
 Loading...