

Page 1
1
User’s Manual
Air Fryer
Model: MMAF3
Page 2
2
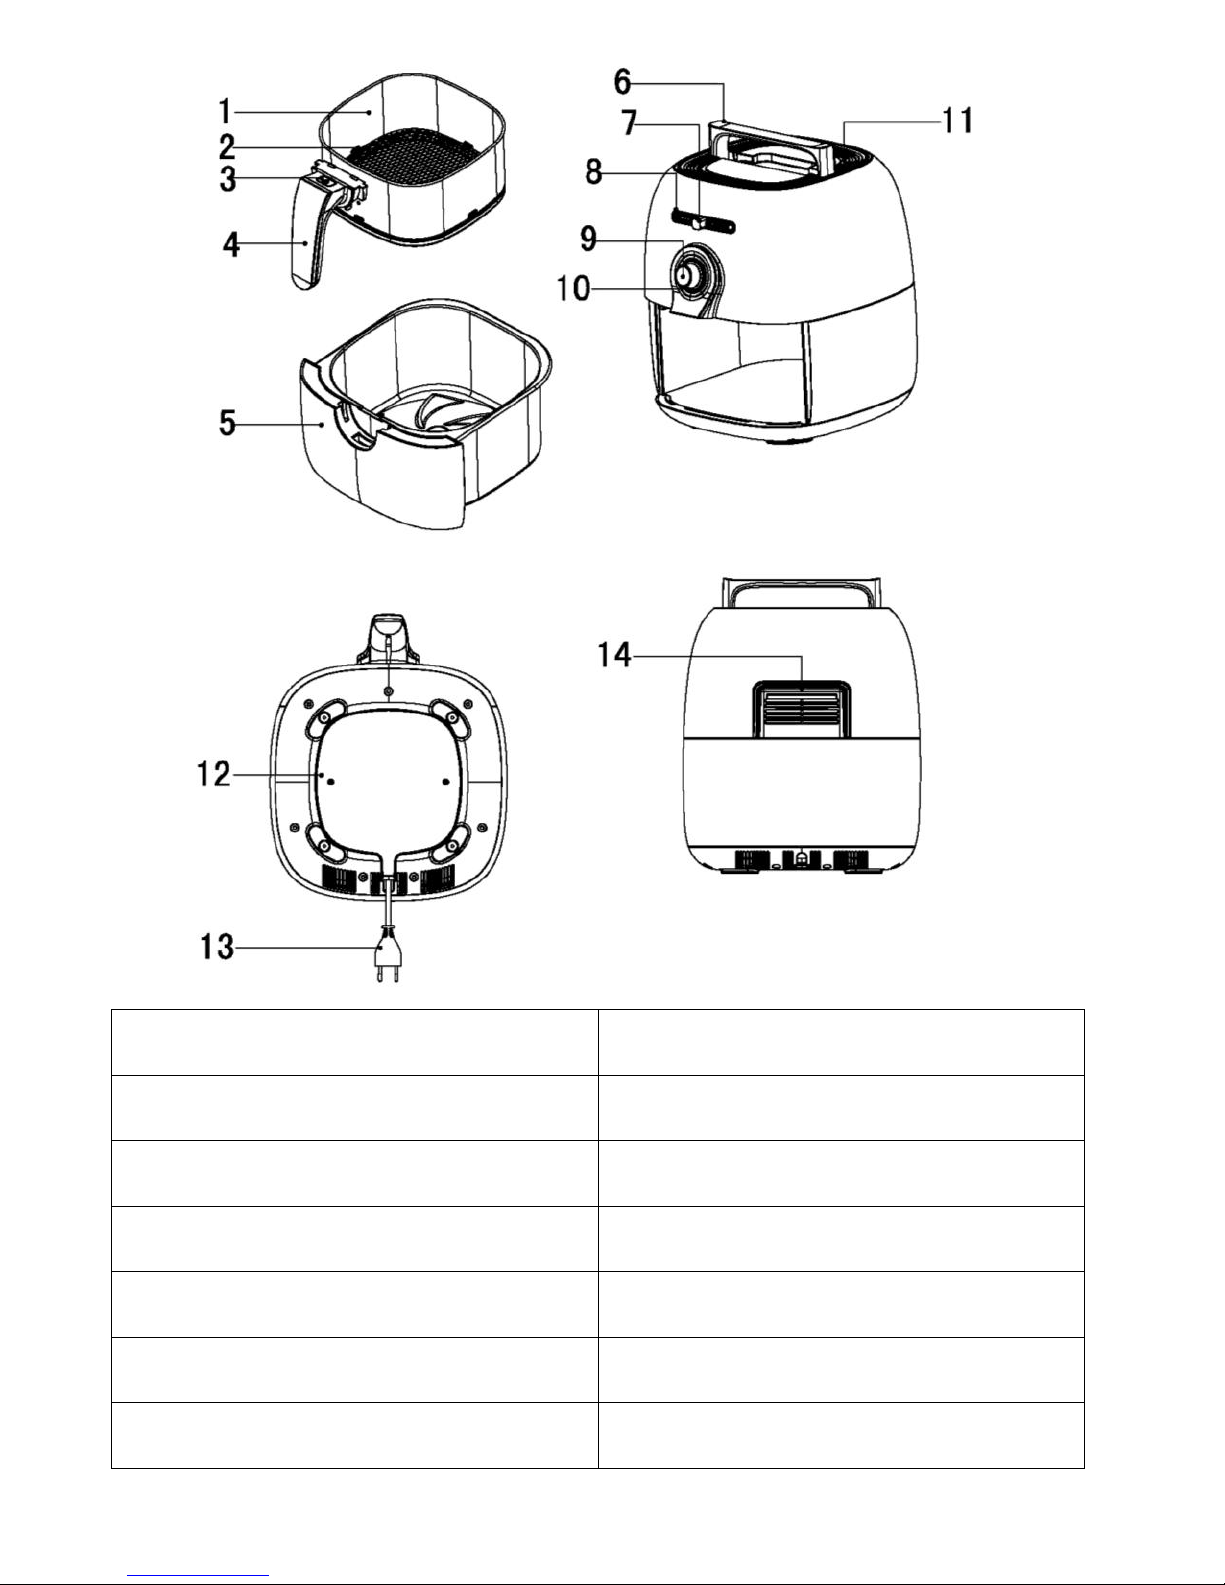
01. Frying Basket
08. Work Lights
02. Grill
09. Timing Adjustment Knob
03. Frying Basket Remove Button
10. Power Indicator
04. Frying Basket Handle
11. Inlet
05. Fryer
12. Power Cord Storage Compartment
06. Handle
13. Power Cord
07. Temperature Control Knob
14. Outlet
Page 3

3
Attentions
Before using this product, please read through the instruction manual, and
preserve the booklet for later reference.
I. Danger
1. Do not soak the out crust into water, or wash it under the tap, for there are
electric components and heating components in the crust.
2. Do not let water or other liquid flow into the product, in case electric shocks
might take place.
3. Always put the food ingredients in the frying basket for frying, thus to avoid
their contact with the heating components
4. While the product is working, do not cover the air inlet and outlet opening.
5. Never pout oil into the fryer, for this may cause fire.
6. Do not touch the inside of the product while it is working.
II. Warning
1. Before connecting the product with the electric power, please check if the
power provided is in accordance with the rated power of the product.
2. If there are damages to the plugs, power wire or the product, you should no
longer use the product.
3. This product can be used by child over the age of 8, and persons with
imperfect limbs or with feeling, metal handicaps, but the precondition is that
specially assigned person must give supervision and guidance to their using
the product, thus to ensure their safety.
4. When the product is in power or is cooling, the product and the power wire
must be placed at a location ort of the reach of children under the age of 8.
5. Do not let the power wire torch surfaces with high temperature.
6. Never insert wet hands into the plugs and controlling panel of the product.
7. The product must be connected with a grounded socket, and one must make
sure that it is inserted correctly.
8. Never connect the product with external timer, in case danger might occur.
Never put the product on or near combustible material like the table cloth, or
the curtain, etc.
Page 4

4
9. Never put the product against the wall or other products. There should be at
least 10 cm of free space for the back side, left/right sides, and the upper side
of the product. Do not put things on top of the product.
10. Never use the product for purposes not illustrated in the manual.
11. The product must be watched by someone while operating.
12. During the period of fat-free frying, steam with high temperature will be
emitted from the air outlet opening. The hands and moving the fryer away
from the product.
13. When using the product, the surface that it touches might become very hot.
14. If the product is smoking, unplug the power immediately. Remove the fryer
away from the product after it has stopped smoking.
III. Notice
1. Put the product on a surface that is leveled, even, and stable.
2. The product is limited to normal domestic usage. It should not used in the
dining rooms of shops offices, farms or other working environments. And
should not be used by customers in hotels, motels, guest houses or breakfast
rooms, or other accommodation environments.
3. If the customer has failed to use the product correctly, or has used the product
for professional or half professional purposes, or failed to follow the
instructions in the manual while using, then such misuse will invalidate the
guarantee.
4. Do not repair the product by yourself, for such action will invalidate the
guarantee.
5. Always unplug the power after use.
6. Before treating or cleaning the product, the product must be given 30 minutes
for cooling down.
7. Ensure that the food ingredients fried in the product turn into the golden color,
and not the black or brown color, the burned places should be given away.
Page 5

5
IV. Automatic Closing
The product is equipped with a timer. When the timer countdown the time to OFF,
the product will ring and close automatically. To close the product manually,
please turn the knob of the timer anticlockwise to OFF.
Before the first use
1. Remove all the packing material.
2. Remove the glue and labels on the product.
3. Clean the frying basket and the frying-pan thoroughly with hot water,
detergent and non-abrasive sponge.
Notice: Dishwasher machine can be used to wash these components.
4. Clean the inside and outside of the product with wet cloth.
5. The fat-free fryer uses the technology of hot air heating. Never pour oil or fat
into the fryer.
V. Operation preparation
The fat-free fryer can be used to cook many types of food ingredients. The
additional food making manual will assist you to understand this product.
1. Put the product on a surface that is leveled, even, and stable, do not put the
product on surfaces that is not heat-resistant.
2. Put the frying basket into the fryer correctly
3. Pull the wire ort of the wire capsule at the bottom of the product.
4. Never pour oil or other liquid into the fryer.
5. Never put things on top of the product, for this will prevent the air flow and
reduce the effect of hot air heating.
VI. Fat-free frying
1. Insert the plug into the grounded socket.
2. Pull out the frying-pan carefully from the fat-free fryer
3. Put the food ingredients into the frying basket
4. Slip the frying-pan back to the fat-free fryer.
Do not use the fryer before putting in the frying basket
Notice: Do not touch the fryer shortly after its operation, as it is very hot. One
can only move the fryer by holding the handle.
Page 6

6
5. Adjust to the right temperature by turning the temperature control knob.
Please refer to the “setting” part of this chapter.
6. Determine the time for cooking the food ingredients.(please refer to the
“setting” part of this chapter).
7. To turn on the product. Please adjust the knob of the timer to decide the time
for cooking (Figure 8) if the product starts with cold boot, the cooking time
should be 3 minutes longer.
Notice: If required, you can preheat the product without putting in the food
ingredients. At this point, the knob of the timer should be set to more than 3
minutes, then wait for the heating indicator lamp to turn off (about 3 minutes
later). After that, put in the frying basket and adjust the timer knob to decide
the cooking time.
The power wire indicator lamp and the heating indicator lamp will turn on.
The timer will begin to countdown the time according to the setting time.
During the operation of the fat-free, the heating indicator lamp will turn on
and off continuously. This shows that the heating components are turning on
and off continuously, thus to maintain the setting temperature.
The redundant oil from the food ingredients will be collected at the bottom
of the frying-pan.
8.Some food ingredients require overturning during the middle term of cooking
(refer to the “setting” part of this chapter). To overturn the food ingredients, hold
the handle and pull out the frying-pan from the product, and then make the
turning. After that, slip the frying-pan back to the fat-free fryer.
Notice: Do not press the demounting button of the frying basket during the
process of overturning. To reduce the weight, you can take out the frying basket
from the frying-pan, thus you can overturn only the frying basket. To take out the
frying basket, please pull out the frying-pan from the product, put it on heat
resistant surface then press the demounting button of the frying basket.
If yon have set the time with the timer as only half of the cooking time, then you
may here the ringing of the timer while overturning the food ingredients. However,
this only means that you have to set the time again with the timer for the
remaining cooking time.
9. The ringing of the timer means that the setting time has expired. Then pull the
frying-pan out of the product, and put it on heat-resistant surface.
Page 7

7
Notice: you can also close the product manually. To do this, turn the timer
knob to OFF.
10. Check to see if the food ingredients are cooked ripe.
If the food ingredients require more cooking, then slip the frying-pan into the
product, and set the timer with additional minutes.
11. To pout out the small size food ingredients (e.g. chips), please press the
demounting button of the frying basket(1),and take the frying basket out of
the frying-pan(2).
Do not overturn the frying basket before demounting the frying-pan, for this will
cause the redundant oil collected at the bottom of the frying-pan to leak onto the
food ingredients.
After cooking with the fat-free fryer, the frying-pan and the food ingredients are
still very hot. With respect to different types of food ingredients in the fat-free
fryer, there might be steam jetting out from the fryer.
12. Pour the food ingredients in the frying basket all into the bowls or plates.
Note: to fetch the big size or fragile food ingredients, you can use the clamps to
take them out from the frying basket.
13. After completing the cooking of one batch of food ingredients, the fat-free
fryer can begin to cook another batch of food ingredients at any time.
VII. Settings
The following table will assist you to choose the basic settings for the food
ingredients you want to cook.
Notice: please remember that these settings offer only a reference. For food
ingredients differ in source, size, shape and brand, we can not guarantee to
provide the best settings for your food ingredients.
As the fast air change technology can give renewed heating to the air inside the
product immediately, so, to pull the frying-pan out of the fat-free fryer during the
operation will hardly affect the process of cooking.
Page 8

8
VIII. Note:
1. Compare with the food ingredients with larger size, the small size food
ingredients will require less time for cooking.
2. With larger amount of food ingredients, the time for cooking will only be
required to increase a little, with lesser amount of food ingredients, the time
will only be required to decrease a little.
3. During the process of cooking, overturning the small size food can promote
the final cooking effect, and can help the food ingredients to get
well-distributed frying.
4. By adding small amount oil to the fresh potatoes, the food can be made crisper.
After adding the oil, the food ingredients should be shelved for several
minutes frying them in the fat-free fryer.
5. Never cook the food ingredients with high oil content in the fat-free, like the
sausages.
6. The refreshment that can be cooked in the oven can also be cooked in the
fat-free fryer.
7. The best weight of the food ingredients for cooking crisp chips is 500g.
8. Sandwich food can be made quickly and conveniently with the using of pre
fermented dough. Comparing with the homemade dough, the pre fermented
dough requires a shorter cooking time.
9. You can use the fat-free fryer to reheat the food ingredients. To reheat food
ingredients, please set the temperature at 150℃, the maximum cooking time
is 10 minutes.
Page 9

9
IX. Potatoes and Chips
Type
Min-Max
Food
Ingredient
s Amount
Time
(Minutes)
Temperature
(℃)
Overturning
Additional
information
Frozen Thin
chips
300-700
12-16
200
Overturning
Frozen Thick
chips
300-700
12-20
200
Overturning
Self-made
chips
(8*8)mm
300-800
18-25
180
Overturning
Adding 1/2
spoon of oil
Self-made
Potato Chips
300-800
18-22
180
Overturning
Adding 1/2
spoon of oil
Self-made
Potato Chips
300-750
12-18
180
Overturning
Adding 1/2
spoon of oil
Potato Cakes
250
15-18
180
Butter
Potatoes
500
18-22
180
Page 10

10
X. Meat
Type
Min-Max
Food
Ingredient
s Amount
Time
(Minutes)
Temperature
(℃)
Overturning
Additional
information
Beefsteak
100-500
8-12
180
Overturning
Pork Chop
100-500
10-14
180
Overturning
Hamburger
100-500
7-14
180
Overturnin
g
Adding 1/2
spoon of
oil
Sausage
Rolls
100-500
13-15
200
Overturning
Adding 1/2
spoon of oil
Chicken
Drumstick
100-500
18-22
180
Overturning
Adding 1/2
spoon of oil
Chicken
Breast
100-500
10-15
180
Page 11

11
XI. Refreshment
Type
Min-Max
Food
Ingredients
Amount
Time
(Minutes)
Temperature
(℃)
Overturning
Additional
information
Spring Roll
100-400
8-10
200
Overturning
Adding 1/2
spoon of oil
Frozen
Chicken
Nuggets
100-500
6-10
200
Overturning
Adding 1/2
spoon of oil
Frozen
Frying Fish
Slices
100-400
6-10
200
Adding 1/2
spoon of oil
Frozen
Breaded
Cheese
Snack
100-400
8-10
200
Adding 1/2
spoon of oil
Brewed
Vegetable
100-400
10
180
Page 12

12
XII. Frying Chips
For the purpose to have the best effect, we advise you to use the pre
baked chips (e.g. frozen chips). To make frying chips, please follow the
steps below.
1. Husk the potatoes and cut them into small chips.
2. Soak the potato chips in a bowl for at least 20 minutes, fetch them out and
drain them on the paper tor cooking room use.
3. Pour olive oil into the bowl with a spoon, put the potato chips into the bowl
and mix the, round, until all the potato chips are oiled evenly/
4. Fetch the potatoes chips out of the bowl with your hands or kitchenware;
leave the redundant oil in the bowl. Then pour the potato chips into the frying
basket.
Notice: Do not pour all the potato chips into the frying basket in just one time,
thus to prevent too much oil being collected at the bottom of the
frying-pan in the end.
XIII. Cleaning
Clean the product each time after using.
The inside of the frying-pan, frying basket and the product are all covered with
un-sticking painted coat. Do not use metal kitchen wares or abrasive cleaning
material to do the cleaning, for this will damage the un-sticking painted coat.
1. Pull out the plug from the power socket, let the product cool down.
2. Use wet cloth to scrub the outside part of the product.
3. Clean the frying-pan or the bottom of the frying-pan with hot water, detergent
and non-abrasive sponge, please add hot water into the frying-pan together
with some detergent. Put the frying basket into the frying-pan, and then soak
the frying-pan and the frying basket for 10 minutes.
4. Clean the inside of the product with hot water and non-abrasive sponge.
5. Use cleaning brush to clean the heating components, swept away any
remaining food residual.
Page 13

13
MAYER MARKERTING PTE LTD
www.mayer.com.sg
 Loading...