

Page 1
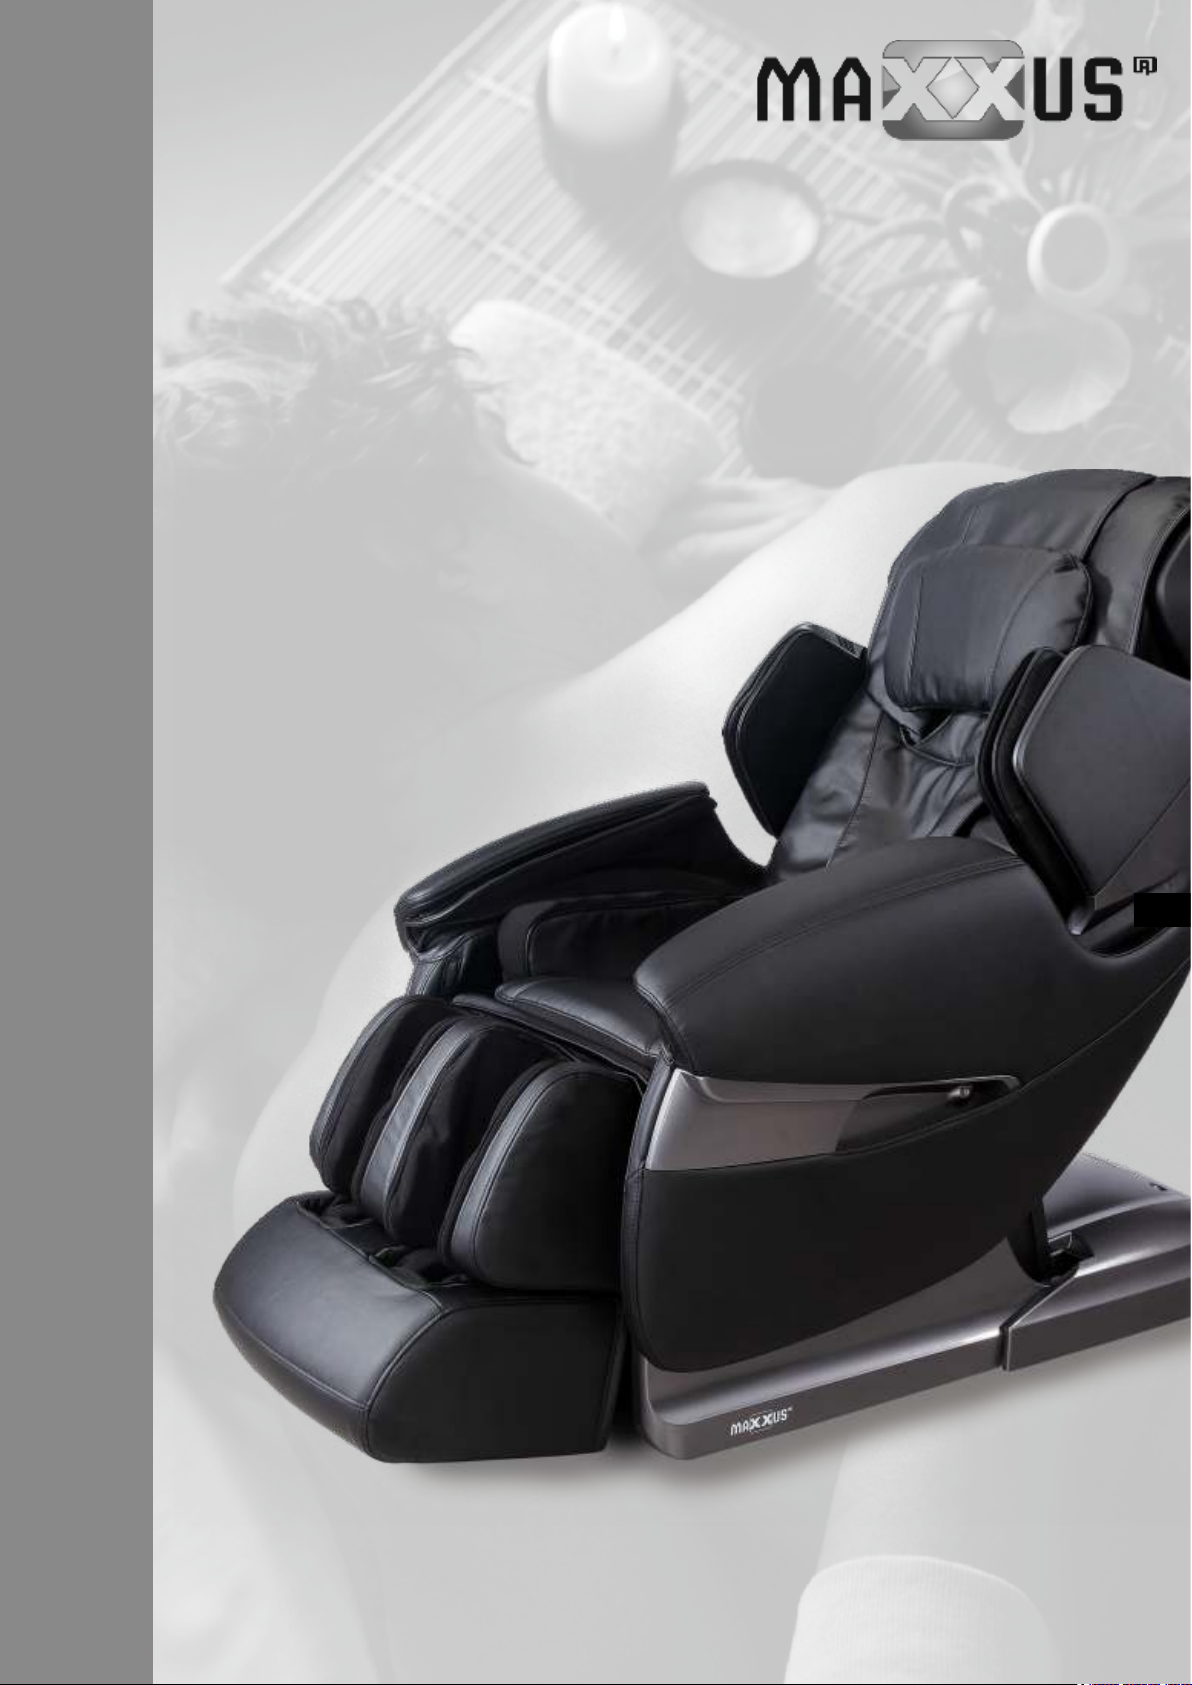
Massage Chair
MX 20.0
ENG
INSTALLATION & OPERATING MANUAL
Page 2
Index
Index 2
Safety & Maintenance 3-5
Description of Parts 6
Functions 6-7
Application Areas 7
Use 8-12
Assembling the Arm Rests 13
Setting up and Transporting the Device 14
Exploded Drawing 15
Spare Parts List 16
Warranty 18
Service Contract 19
© 2019 MAXXUS Group GmbH & Co. KG
All rights reserved / All rights reserved
This publication may not be reproduced, stored in a retrieval system, or transmitted in whole or in part, in any form or by any means, electronic,
mechanical, photocopying, recording, or otherwise without the prior written permission of Maxxus Group GmbH & Co. KG.
Errors, colour and technical modication subject to change, reproduction as well as electronic duplication only with written permission of MAXX-
US Group GmbH & Co. KG.
2
Page 3
Safety and Maintenance
1. Important Safety Instructions
− Keep children away from all moving parts of the chair.
− Connect the device to an earthed electrical socket
− Remove the electrical plug from the socket after use and before cleaning to avoid
personal injury or damage to the device.
− Only use the chair as instructed in this operating instruction manual.
− Do not use any additional parts or components which are not included in this scope
of delivery.
− Never use this device outside or on a balcony or terrace.
− Please read the operating instructions carefully before using the device.
− All types of use which are not described in this manual are prohibited.
− It is recommended to use the device for no longer than 20 minutes in a given ses-
sion.
− Please do not use this device if:
− the leather is torn or damaged.
− any of the covers are broken or damaged
− the heating or ventilation vent is covered up or blocked.
− If you have consumed excessive alcohol or you are feeling sick or unwell.
− Wait for at least an hour after a big meal before using the device.
− Do not fall asleep on the chair during a massage.
− To avoid injury, do not turn the massage function up too high.
2. Installation Location
− Please do not use the device:
− In rooms with high temperatures and/or in rooms with a high humidity.
− When the room temperature varies rapidly or quickly
− In very dusty rooms
− In any location where there is not enough space for the necessary ventilation.
ENG
3
Page 4
Safety and Maintenance
3. Personal Conditions
− If you suer from any of the following ailments or illnesses, we advise against using
this device:
− Osteoporosis
− Heart problems or heart disease
− If you have a pacemaker or any other electronic medical device
− High temperature or fever
− Any open wounds
− Skin diseases
− During pregnancy or menstruation
− If your doctor has ordered you to rest, we also advise not to use this device.
− Children under the age of 14 years should not be allowed to use this chair without
supervision.
− Do not use this device if your body is wet or damp
4. General Safety Instructions
− Check the electrical supply voltage before turning the device on for the rst time.
− Do not remove the electrical plug from the socket with wet hands
− Keep water or any other liquids away and avoid them getting into the device
− Do not damage any cables and do not exchange any circuits on this product.
− Do not use wet or damp cloths or similar to clean electrical components like switch-
es or electrical plugs.
− Keep away from the device during a power cut to avoid being injured when the
electricity goes back on.
− Please stop using the device immediately if any kind of malfunction occurs.
− Also stop using the device if you start to feel unwell.
− If the electrical cable is damaged, remove the plug from the socket and contact the
supplier or another qualied electrical technician for a replacement.
− Children must be supervised when they are near the unit.
− The device is not suitable for use by persons with diminished physical, sensory or
mental abilities. It is also not suitable to be used by inexperienced or unknowledgeable persons (eg children) without supervision.
4
Page 5
Safety and Maintenance
5. Service and Maintenance
− The maintenance of the device may only be carried out by qualied personnel.
Please do not disassemble or try to maintain the device yourself. Exceptions are
only small maintenance works or repairs under the instruction of a technician of the
supplier.
− Do not forget to turn o the power to the device at the mains after use.
− Do not use the device if the electrical plug is loose in the socket.
− If the chair is not to be used for a long period of time, roll up the cable and store it in
a dry and dust-free place.
− Do not expose the device to high temperatures or long periods of direct sunlight.
− If the electrical cable is damaged, remove the plug from the socket and contact the
supplier or another qualied electrical technician for a replacement
− Please clean the device with a dry cloth. Do not ever use thinner, mineral spirits, or
alcohol for cleaning.
− All mechanical components of the chair are designed so that no special mainte-
nance is required.
− Avoid contact with sharp objects with the chair.
− Please do not push or pull the chair over uneven ground. The chair must always be
lifted to be transported.
− Please use the device with enough time intervals between each application. Do not
have the device in constant use..
6. Commonly Alleged Malfunctions
− It is normal for the electronic motors to make buzzing noises during operation.
− If the control unit does not operate, please check rst if the electrical plug is correct-
ly plugged into the socket and it is turned on at the mains.
− The device will switch o automatically when the set program has come to an end.
− If the device runs too long, the chair temperature protection system will switch o
automatically.
− If the device switches o automatically, it should be possible to switch it on again for
use after approximately 30 minutes.
ENG
5
Page 6
Description of Parts
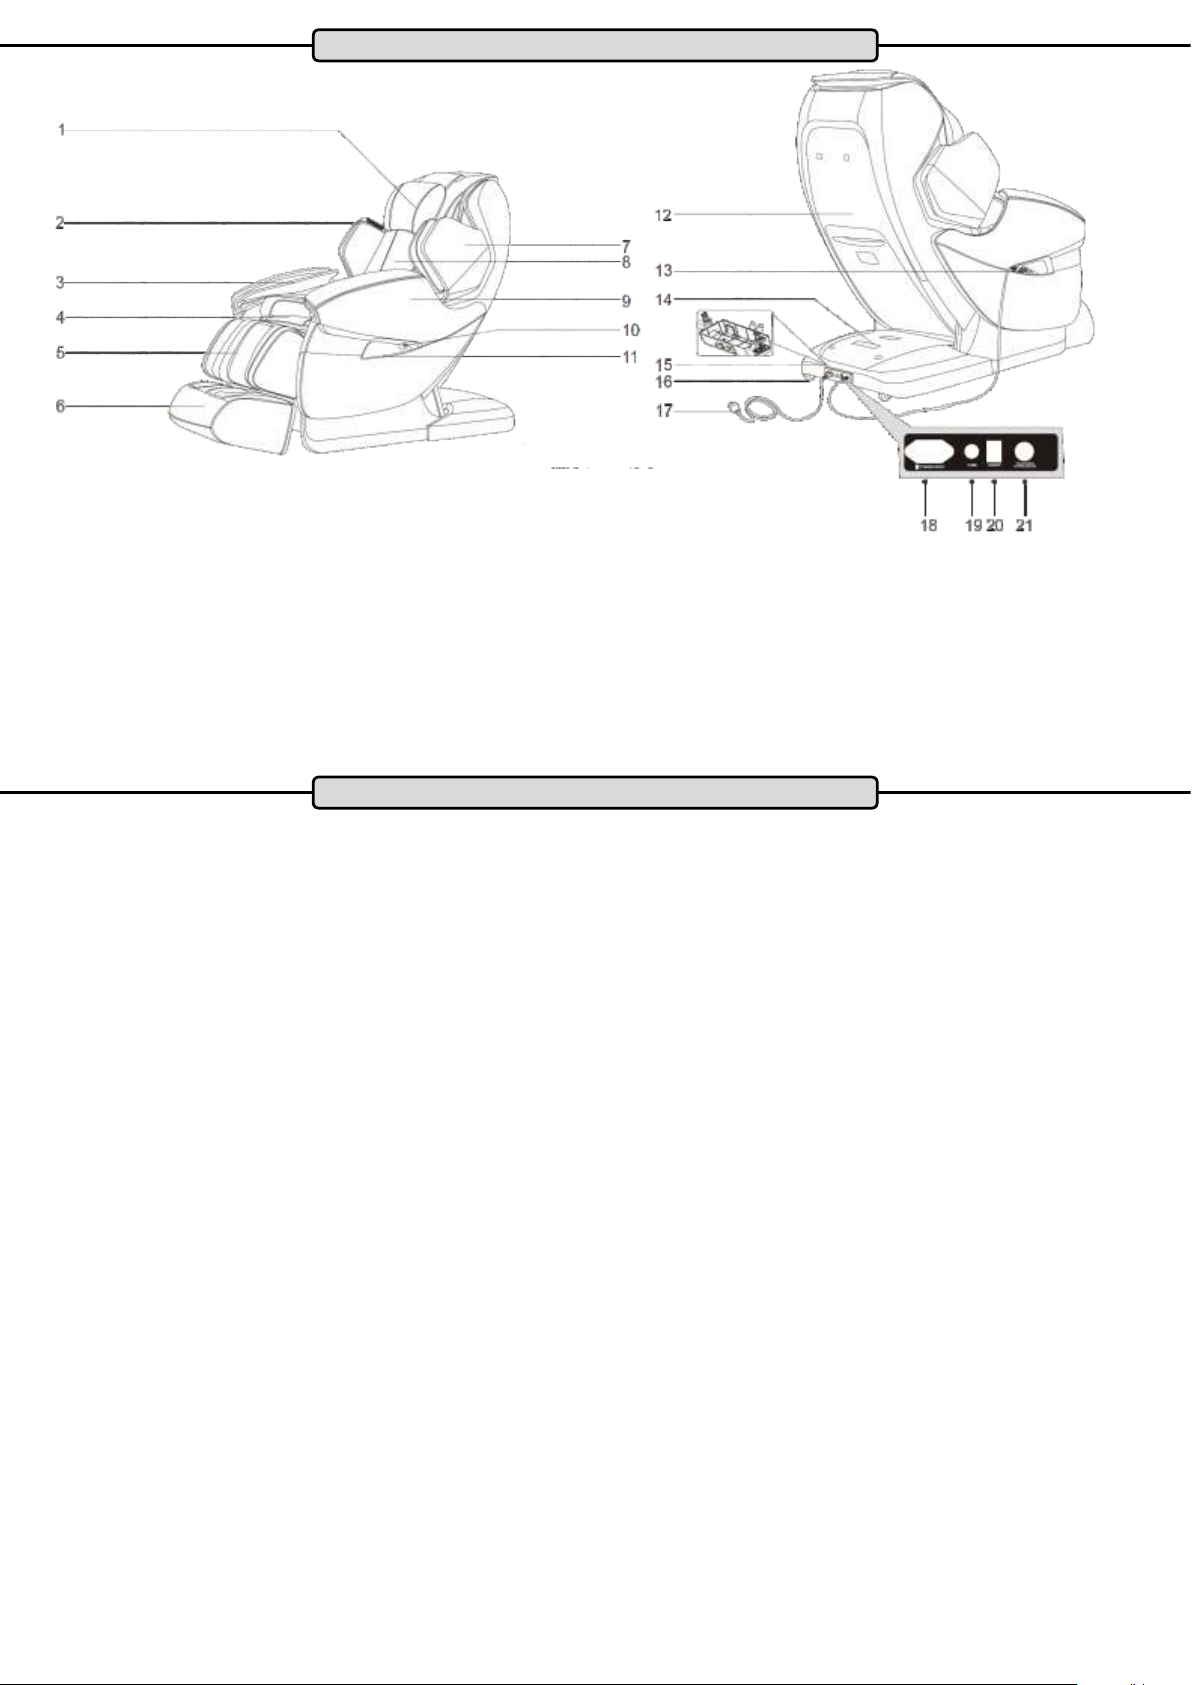
1. Head / Neck rest cushions
2. Negative oxygen ions
3. Air cushion (lower arm)
4. Seat cushion
5. Air cushion (calves)
6. Foot rest
7. Air cushion (upper arm, shoulder)
8. Back rest cushion
9. Arm rest
10. Connection (jack)
11. Pocket for remote control
12. Rear cover
13. Remote control
14. Cover (lower)
15. Safety switch
16. Transport rollers
17. Adapter plug
18. Mains connection
19. Fuse
20. Mains switch
21. Remote control connection
Functions
1. The armchair is equipped with intelligent, mechanical 3D “hands”. These units can
move in all directions to make the massage as natural and as lifelike as possible
2. There are sensors in the shoulder area which automatically detect the contours of
the body and massage points. With this the necessary micro-adjustments of the
massage hands are made to achieve the best results.
3. The chair has many dierent massage programs to choose from.
4. The air pressure technology enables the hip-stretching and rotation exercises.
5. You can select from the following functions by selecting the manual massage program.
Massage Positions:
− Full body
− Partial body
− Fixed position
Massage Types:
− Shoulder massage
− Kneading massage
− Tap massage
− Knead and tap massage
− 3D Massage
− Shiatsu massage
−
6
Page 7
Functions
6. The massage chair has air cushions to massage the arms and legs. The
intensity of the massage can be selected from three levels.
7. There are also air cushions integrated for neck, shoulders, buttocks
and rear thigh massage. For the neck/shoulder areas there are eight
air cushions and for the buttocks/upper thigh areas there are sixteen air
cushion units.
8. The heating in the back area uses carbon as an infra-red heat source.
9. The foot rest is adjustable and can be easily adapted to suit the body
size of the user.
10. The foot rest and back rest are tilt-adjustable.
11. Zero-Wall and Zero-Gravity function
12. After switching o the appliance the massage hands return to their original position, so the user can comfortably remain seated.
Application Areas
There are many positive eects which can be gained from using the massage
chair. In addition to general relaxation, depending on the program selected,
time and intensity it is possible to achieve the following results.
1. Vitalisation of the whole body
2. Improvement of blood circulation
3. Relief of muscle tension
4. Relaxation from nerve pain
5. Reduction of muscle aching and soreness
ENG
7
Page 8
I Switching on the Device
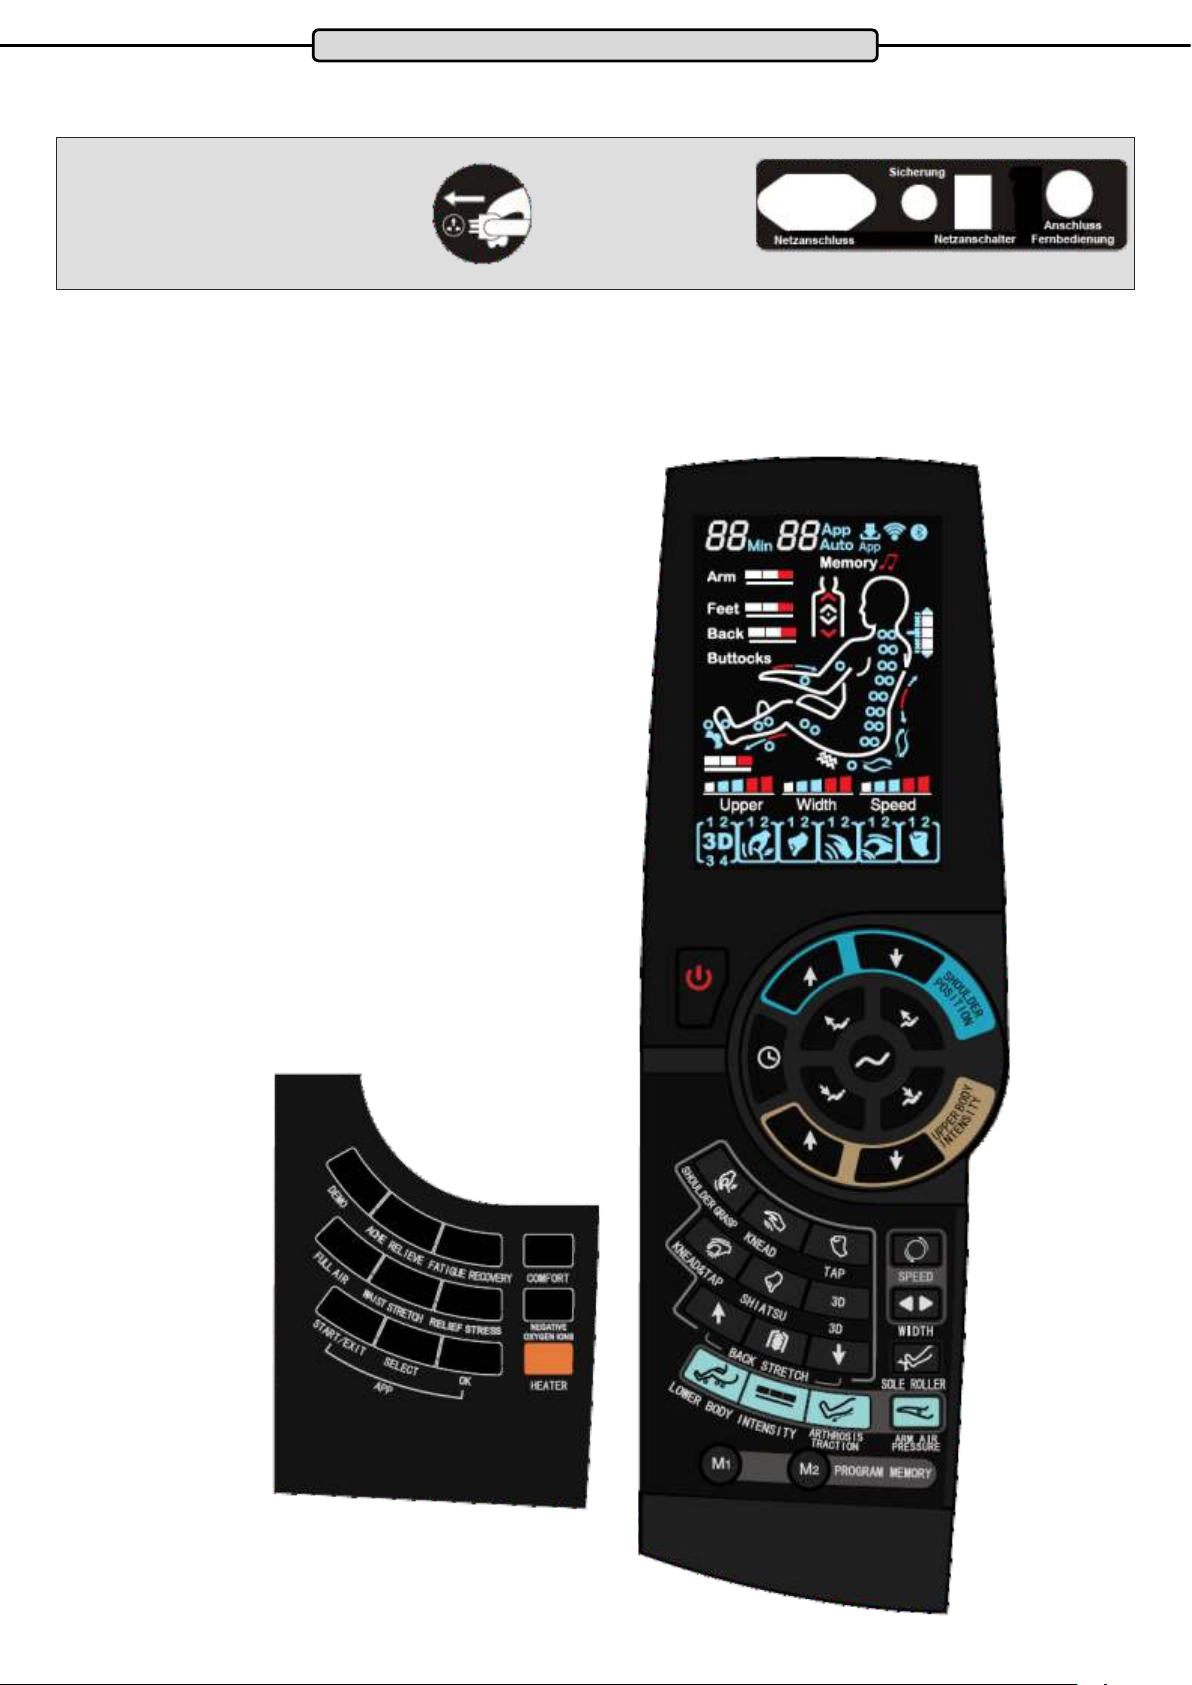
Insert the mains adapter plug into socket
(1) located on the back of the chair.
Push the electrical plug into the socket
and switch on the device at the power
switch (2)
Remote Control
Use
1 2
8
Page 9
1
2
Use
II Starting the Massage
1. Press the red power button to activate your massage chair. The chair will initially
automatically be in the correct position.
2. To start the fully automatic body measurement, select a massage program. You can
select any program to start the body measurement detection and then change the
massage program again if required.
3. The determination of the sitting position / height and the resulting massage points is
done automatically. Please wait until the automatic detection is completed. This can
take up to a minute.
4. After the process has nished, a signal will repeatedly sound. You can now select a
massage program. If you do not select an alternative program the initially selected
massage program will start. before the measurement selected massage program,
automatically.
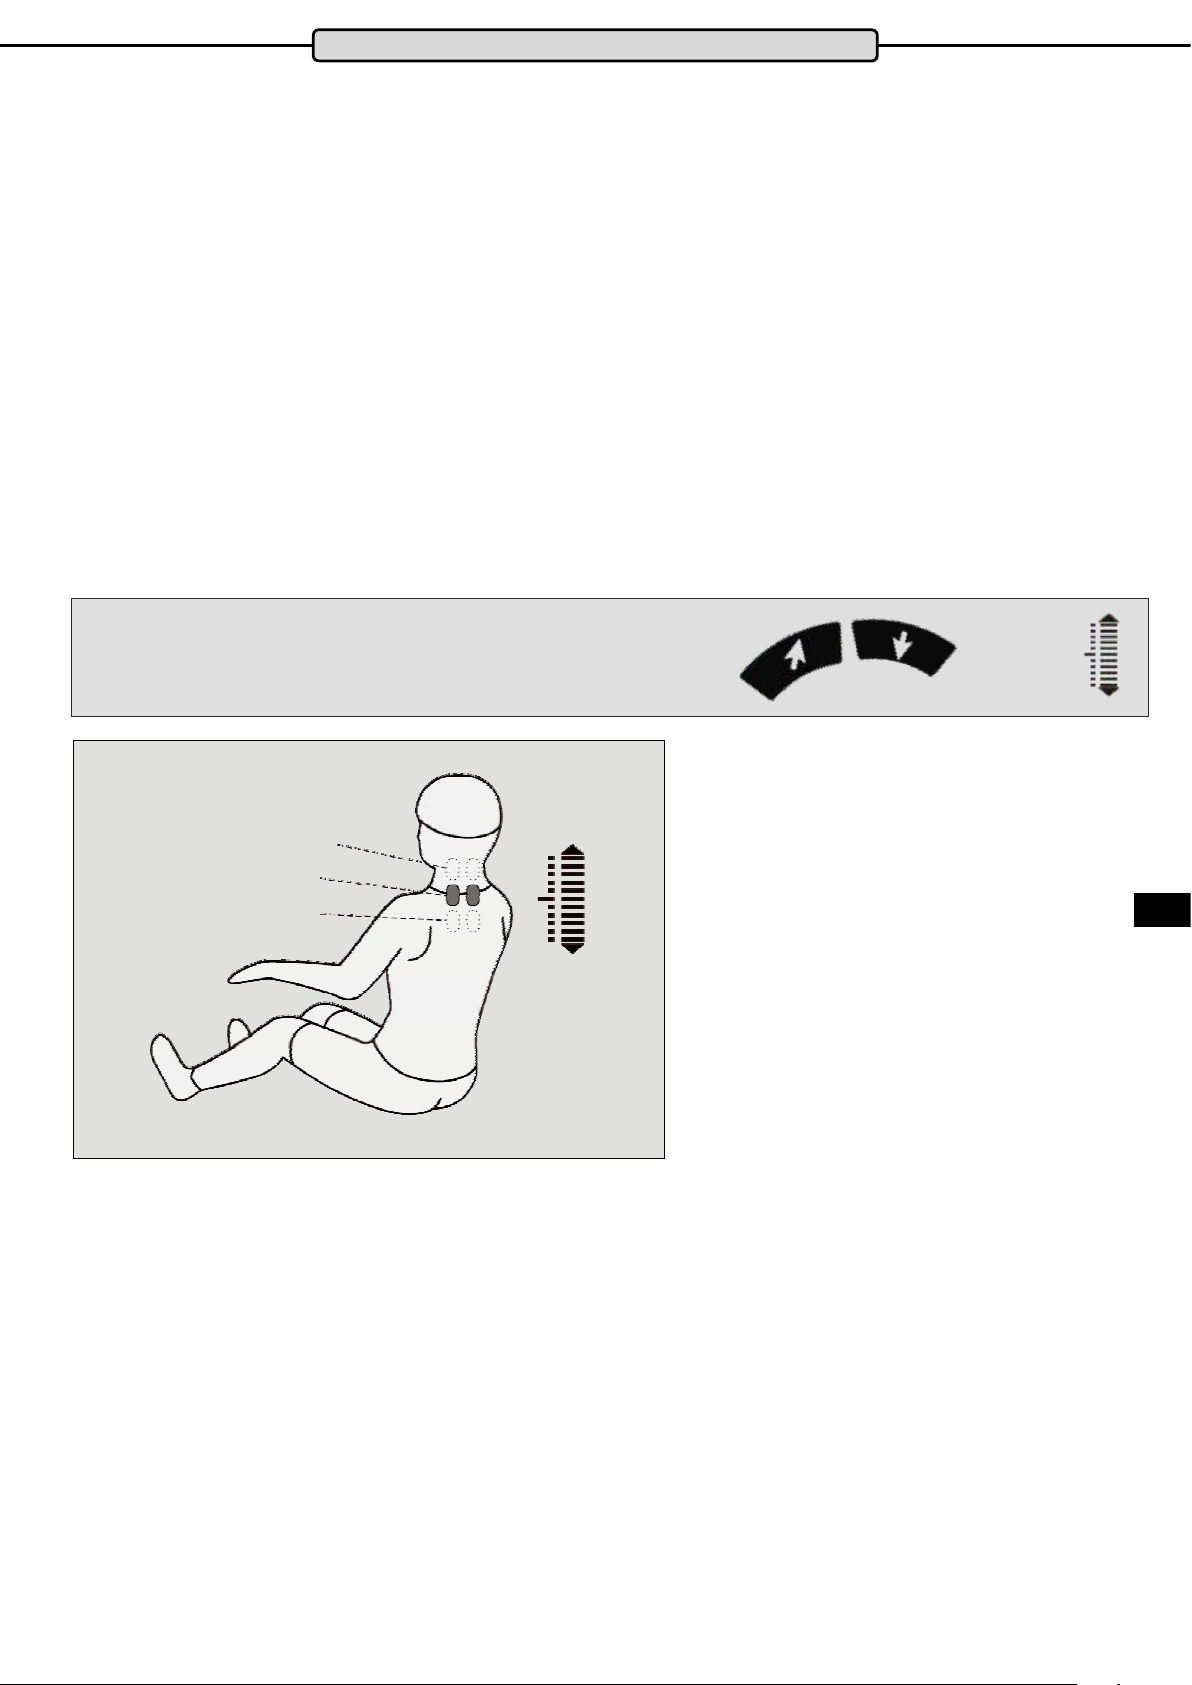
5. You can adjust the shoulder massage unit manually at any time (see below).
Press the arrows on the remote control to adjust the massage hands upwards or
downwards.
Shoulder
adjust
Position too high
Position correct
Position too low
ENG
9
Page 10
Use
III Types of Massage
You can choose from several dierent automatic and manual programs. Below is a detailed guide on
how to select the various programs.
Automatic Massage Types
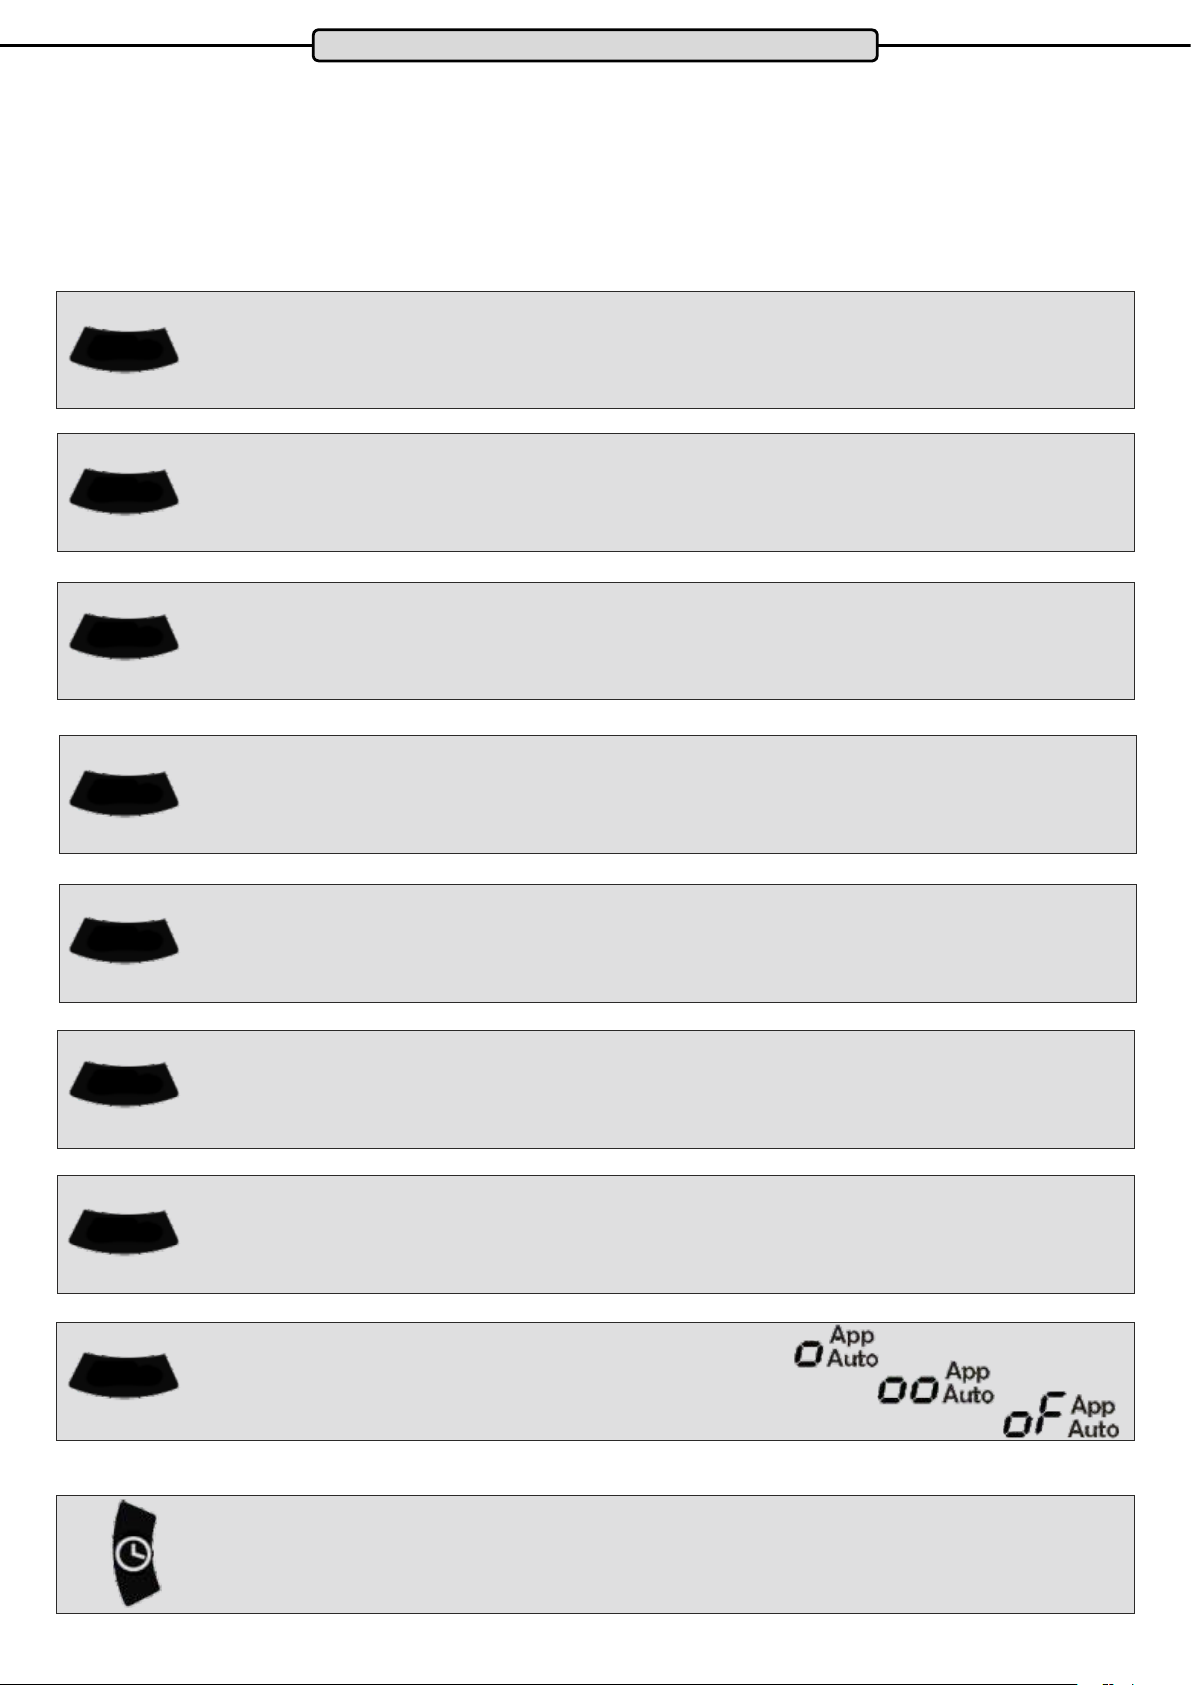
To select the automatic massage types, press the appropriate key on the remote control as follows:
DEMO
COMFORT
FATIQUE
RECOVERY
ACHE
RELIEVE
Demonstration: Get to know your chair! Here the chair will automatically take your through all the
massage types.
Relaxing: Soothing full-body massage
Vitalising: Massage to improve blood circulation
Pain relieving: Deep massage to relax the areas of pain
AUTO
F0
AUTO
F1
AUTO
F2
AUTO
F3
FULL AIR
WAIST
STRETCH
RELIEF
STRESS
NEGATIVE
OXYGEN IONS
Full Body Air Cushion Massage: Relaxes your muscles and activates the entire body.
Waist Stretch: The hip stretching program relaxes the complete torso. Your calves will be held rmly
by the air cushions and the back rest will move into a lying position so the areas of the hips, upper
thighs and stomach muscles in particular are stretched.
Full Body Air Cushion Massage: Relaxes your muscles, promotes circulation, relieves tension and
activates the entire body.
Negative Oxygen Ions: By pressing the control button multiple
times you can regulate and switch o the intensity of the ion output.
AUTO
F5
AUTO
F6
AUTO
F7
Time Setting: The massage chair is factory set with a massage time of 20 minutes. By pressing the
“TIME” button repeatedly, you can increase the time in 5-minute increments.
10
Page 11
Use
Manual Upper Body Massage
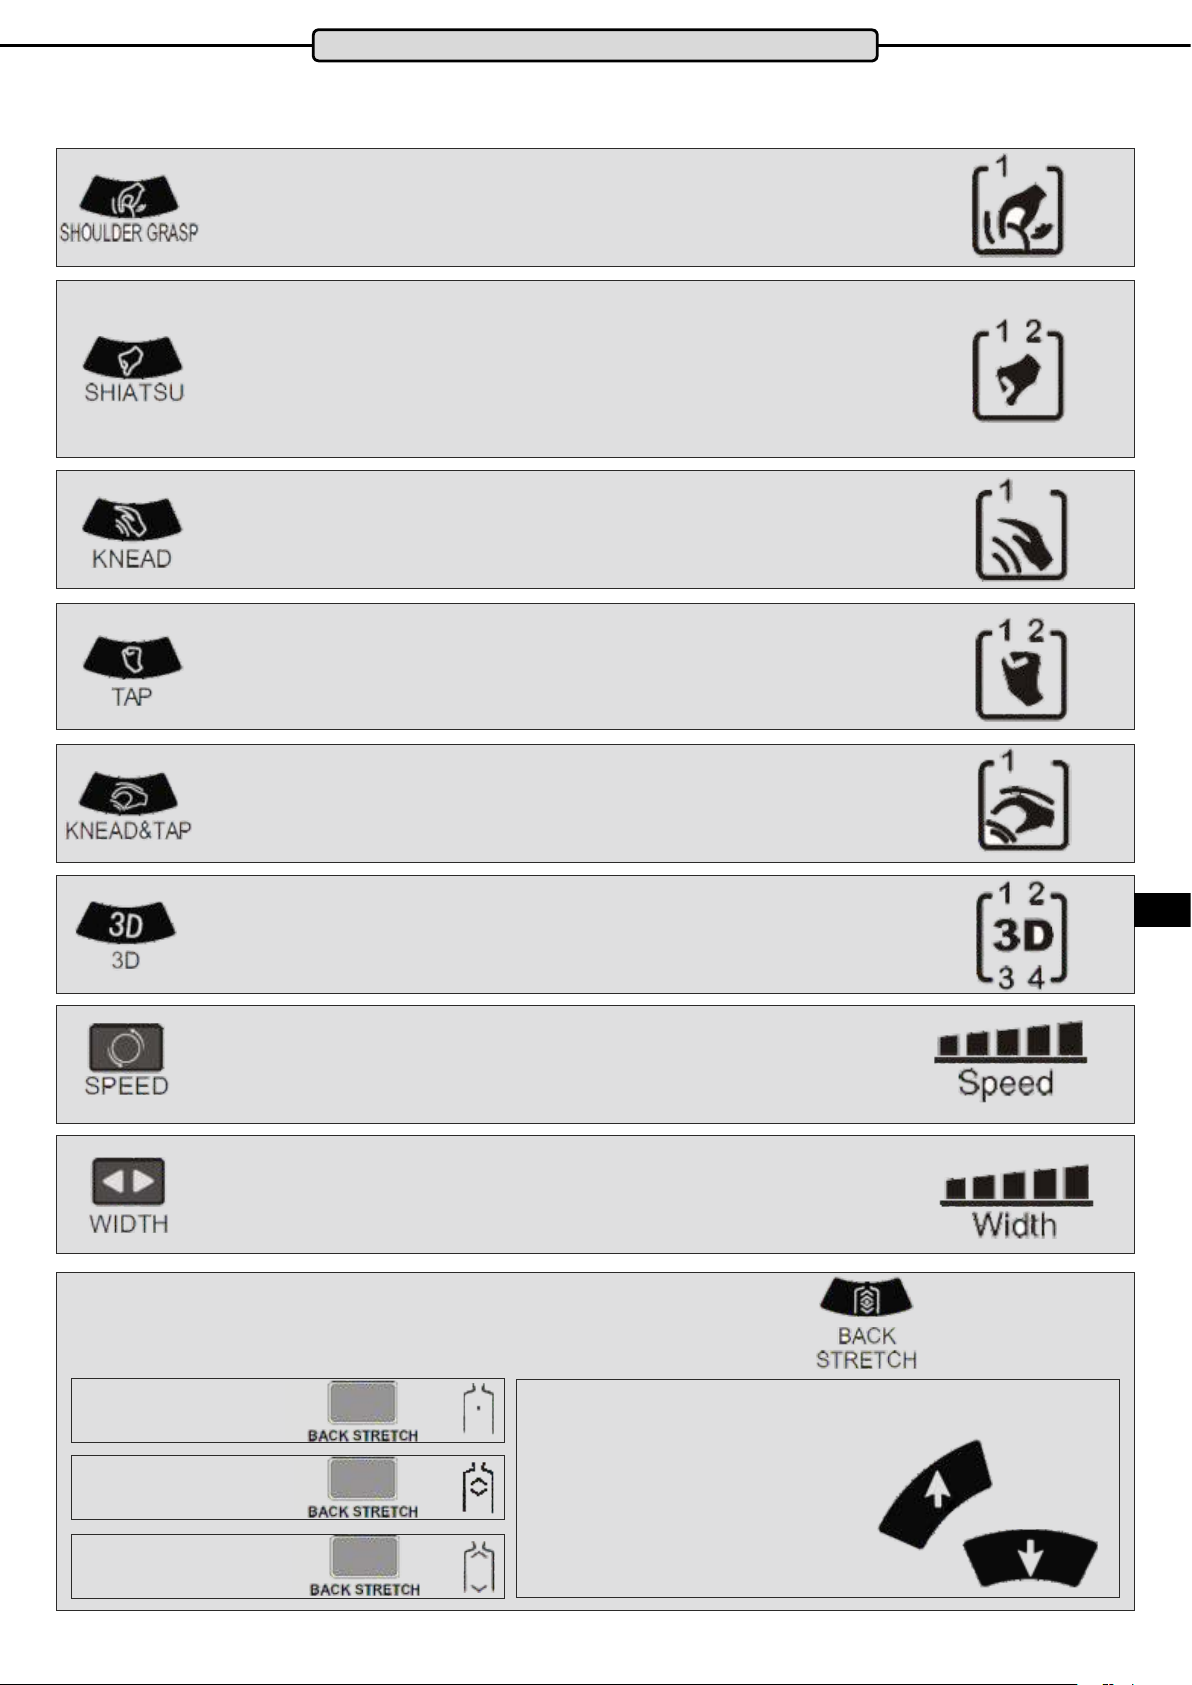
Shoulder Massage:
Select the intensity and speed you require.
Shiatsu-Massage:
You can choose between 2 modes for this massage. In addition, you can choose the intensity and speed of the massage which you would like. You can also select the distance
between the massage rollers in order to nd the perfect setting for you.
Kneading Massage:
Select the intensity and speed you require..
Tap Massage:
Select one of the two programs available and choose the intensity and speed you re-
quire. Here you can also adjust the distance between the massage rollers.
Kneading and Tap Massage:
Select the intensity and speed you require
3D Massage:
Select one of the four programs available and choose the intensity and speed you require.
Setting the Speed:
This option is available in all automatic programs.
Setting the Distance Between Massage Rollers:
This option is only available for tap and shiatsu massages.
ENG
Back Stretch Massage:
Apart from in the shoulder massage program, this massage can be added in all other
manual programs..
Point Massage
Partial Massage
Full-Body Massage
Setting the Position of the Massage Rollers:
You can choose these settings with both the
partial and the point massages::
Massage rollers move further up
Massage rollers move further down
11
Page 12
Use
Additional Manual Functions
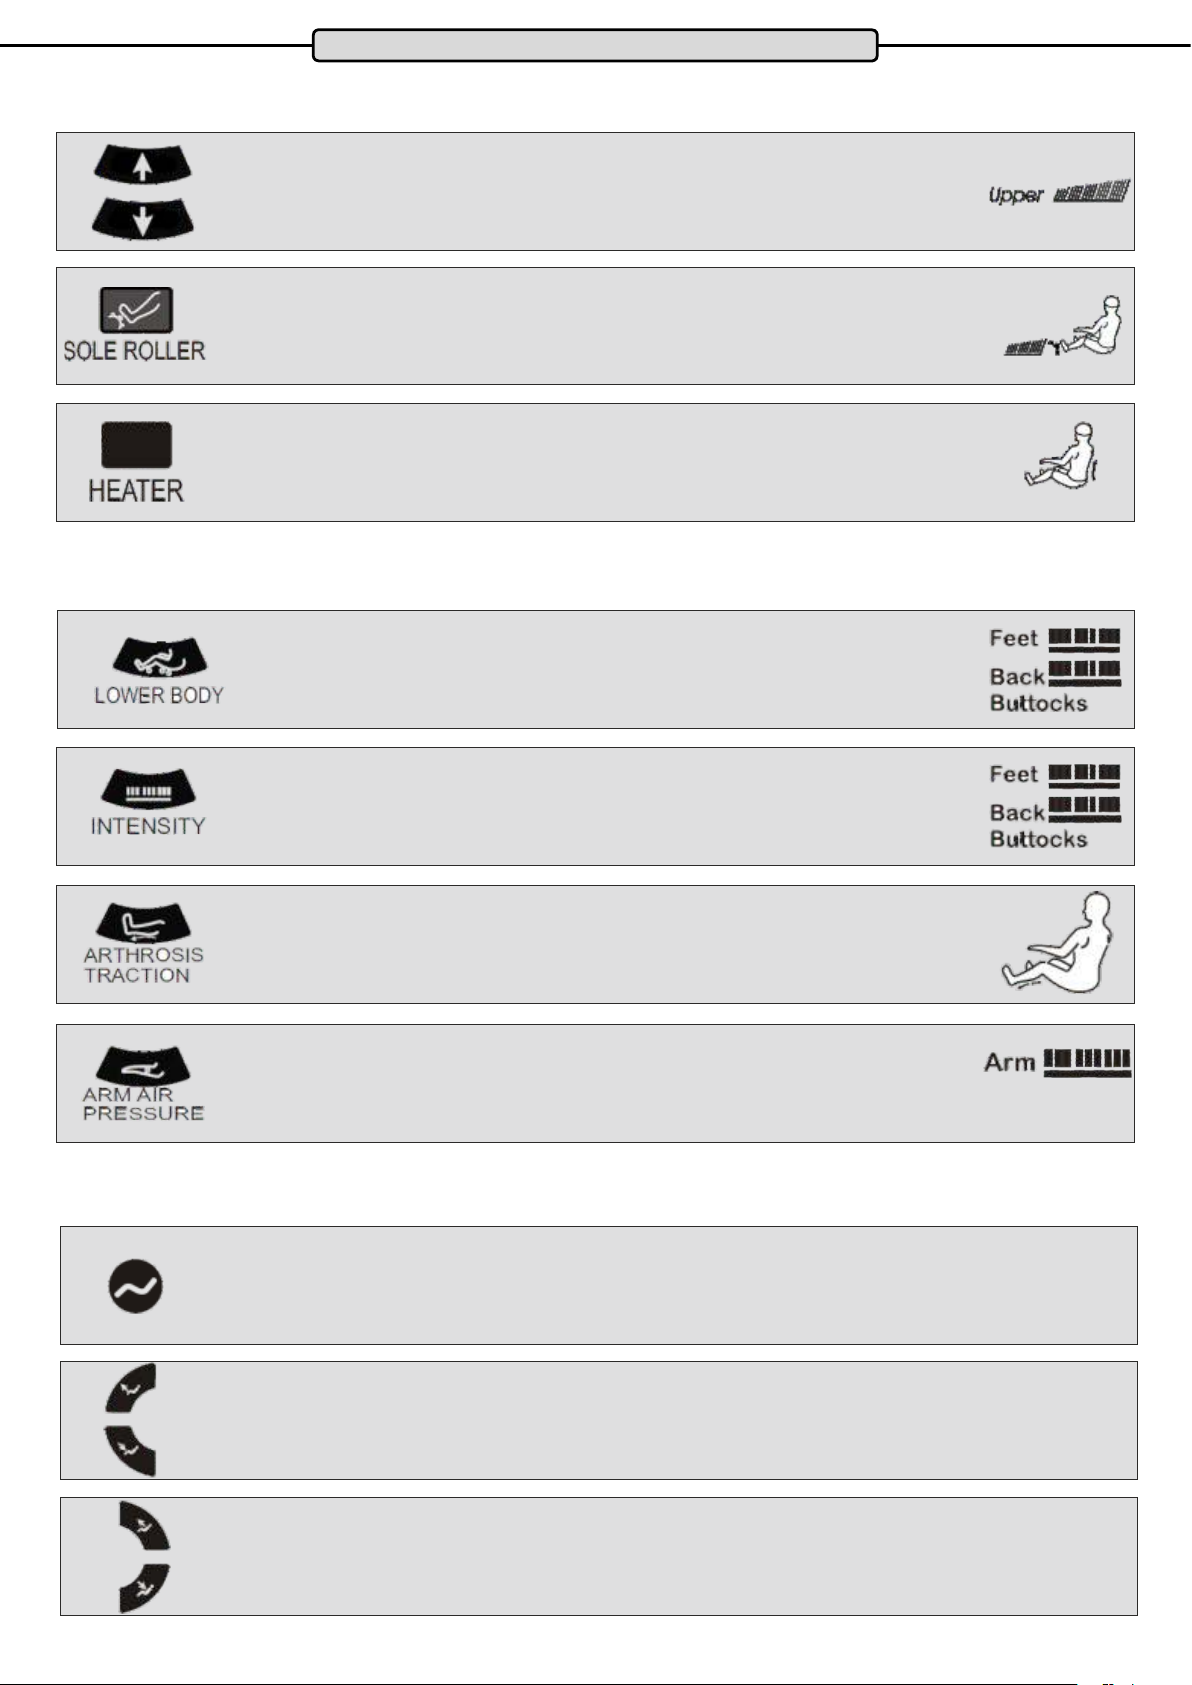
Intensity of Back Massage
You can regulate the intensity of the back massage (upper body massage) using the
“Plus” and “Minus” keys.
Roller foot massage:
Using the “sole roller” key you can add a foot massage and choose the intensity from 3
dierent levels.
Seat Heater:
The “heater” key switches on the heating function for the back area on and o.
Air Cushion Massages
Lower Body Massage
The control key turns the entire lower body area cushion massage on and o
I
Intensity of the Air Cushion Massage
Here the intensity of the air cushion massage in the feet, upper thigh and buttock areas
can be regulated.
Air Cushion - Legs
Use the Quick Selection Key to switch o all the air cushions in the leg areas (leg massage units)
Air Cushion – Arms
Here it is possible to regulate the intensity of the air cushion massage in the arms.
Adjustment of the Seat and Lying Functions
Changing the Lying Position:
The complete chair (leg unit and back rest) will move into the lying position when you press this key. Press the
key once for “half-recline” position and press it again a second time to bring the chair into “zero gravity” position.
Adjusting the Leg Unit:
With this key you can control the leg unit (up and down).
Adjusting the Back Rest:
With this key you can control the back rest (up and down)..
12
Page 13
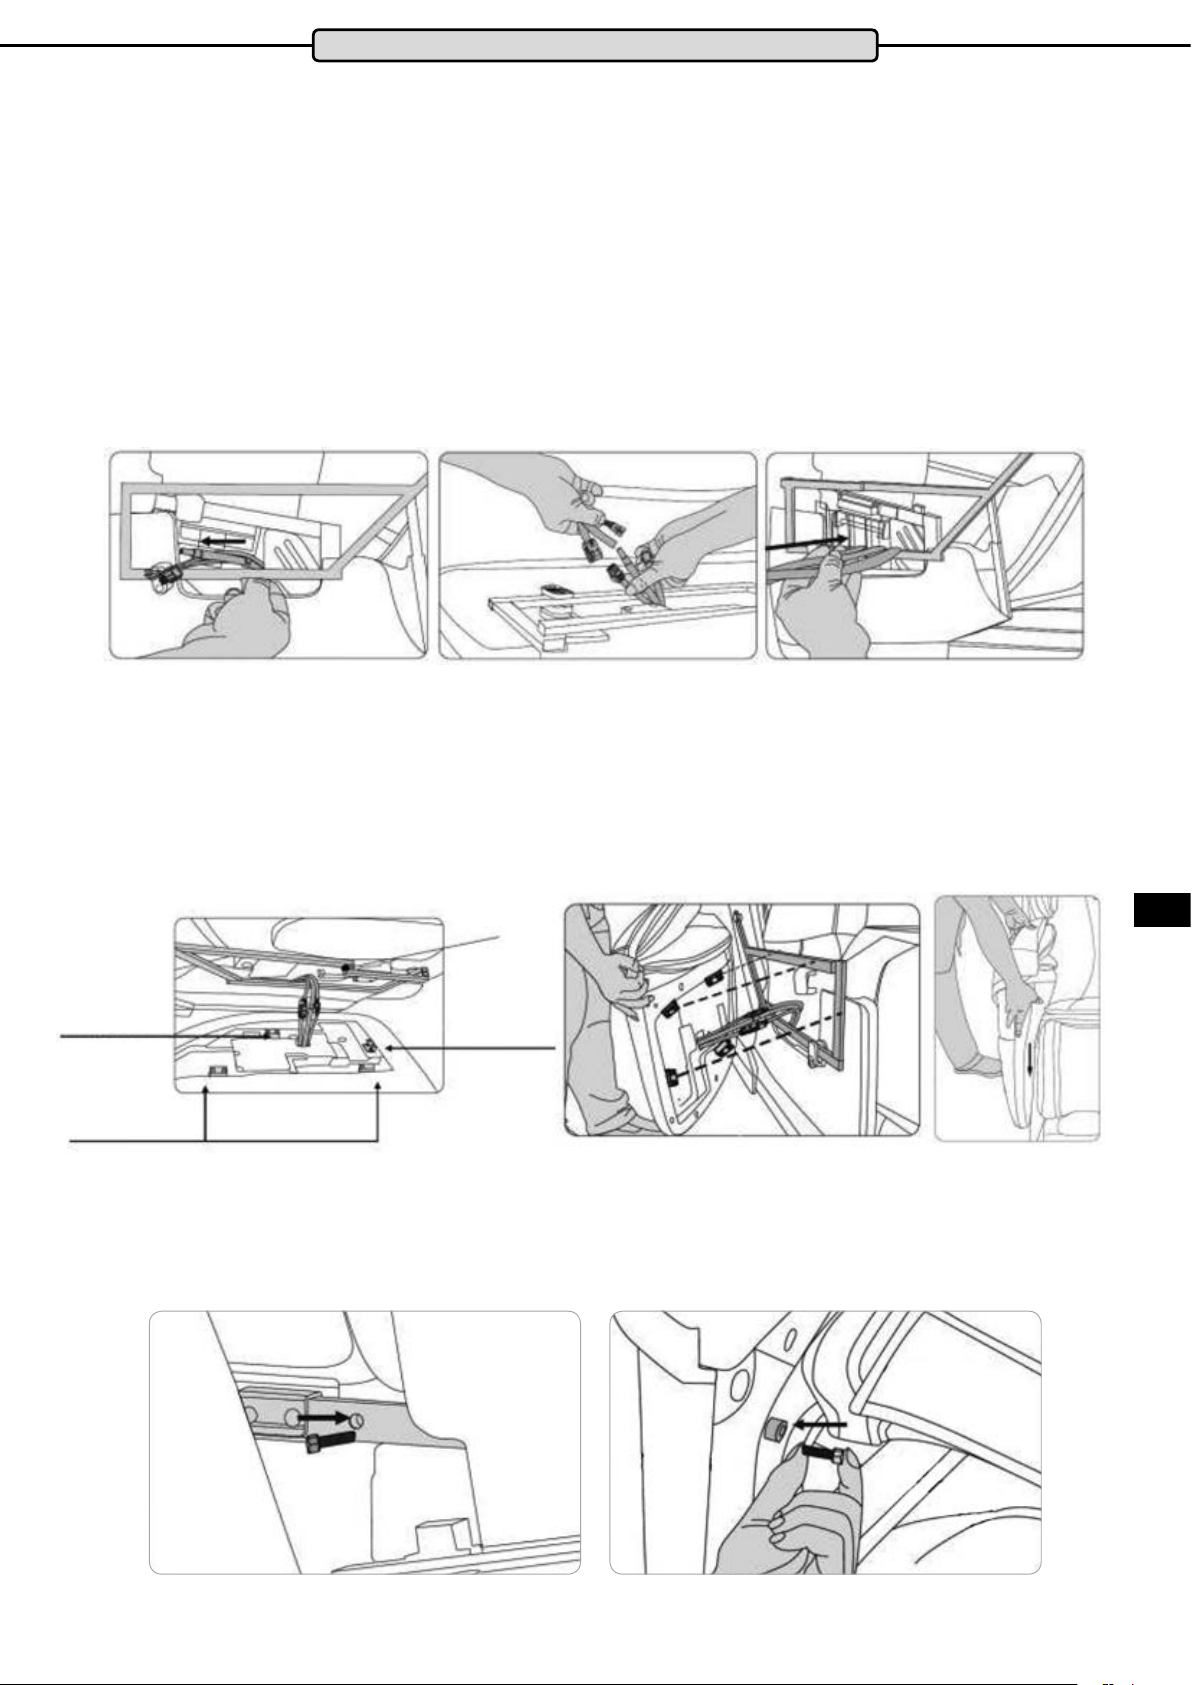
Assembling the Arm Rests
Step by Step Instructions for Assembling the Arm Rests
For assembly, lower the chair into the lying position. Please check before starting the
assembly that none of the air hoses or cables are damaged. There is one more air hose
on the left side than on the right. This is correct. Assembly is very easy as can be seen in
the steps shown below. The arm rest is xed simply using two Allen screws.
It is much easier to have a second person to help you with the assembly.
1) Take the cable from the inside of the chair through the steel frame and out to the
outside. Connect the appropriate cables/hoses on the arm rest to those coming out
of the chair. Press the compressed air hose rmly onto the connecting piece. Push
the cable/hose back into the chair as far as it will go, before/whilst bringing the arm
rest into position.
Bottom Clip
Top Clip
2) Using the illustrations identify the steel frame on the chair and the four clips on the
arm rest. Place the clips on the steel frame as follows. The clips should be clipped
onto the frame as follows. Starting with the front clip, push it from the front onto the
steel frame. If it does not clip on immediately, you can apply some “gentle force” on
the arm rest by hitting it gently with the palm of your hand. The top and bottom clips
will snap on easily by putting some light pressure from above onto the steel frame.
Steel Frame
Front Clip
3) The armrest is xed in position using only two screws. Insert and tighten the rst
Allen screw at the back between the seat cushion and the backrest. The second
screw should be inserted and tightened at the front, between the seat cushion and
the leg unit.
ENG
Arm Rest
Back Rest
13
Arm Rest
Seat Cushion
Leg Unit
Page 14
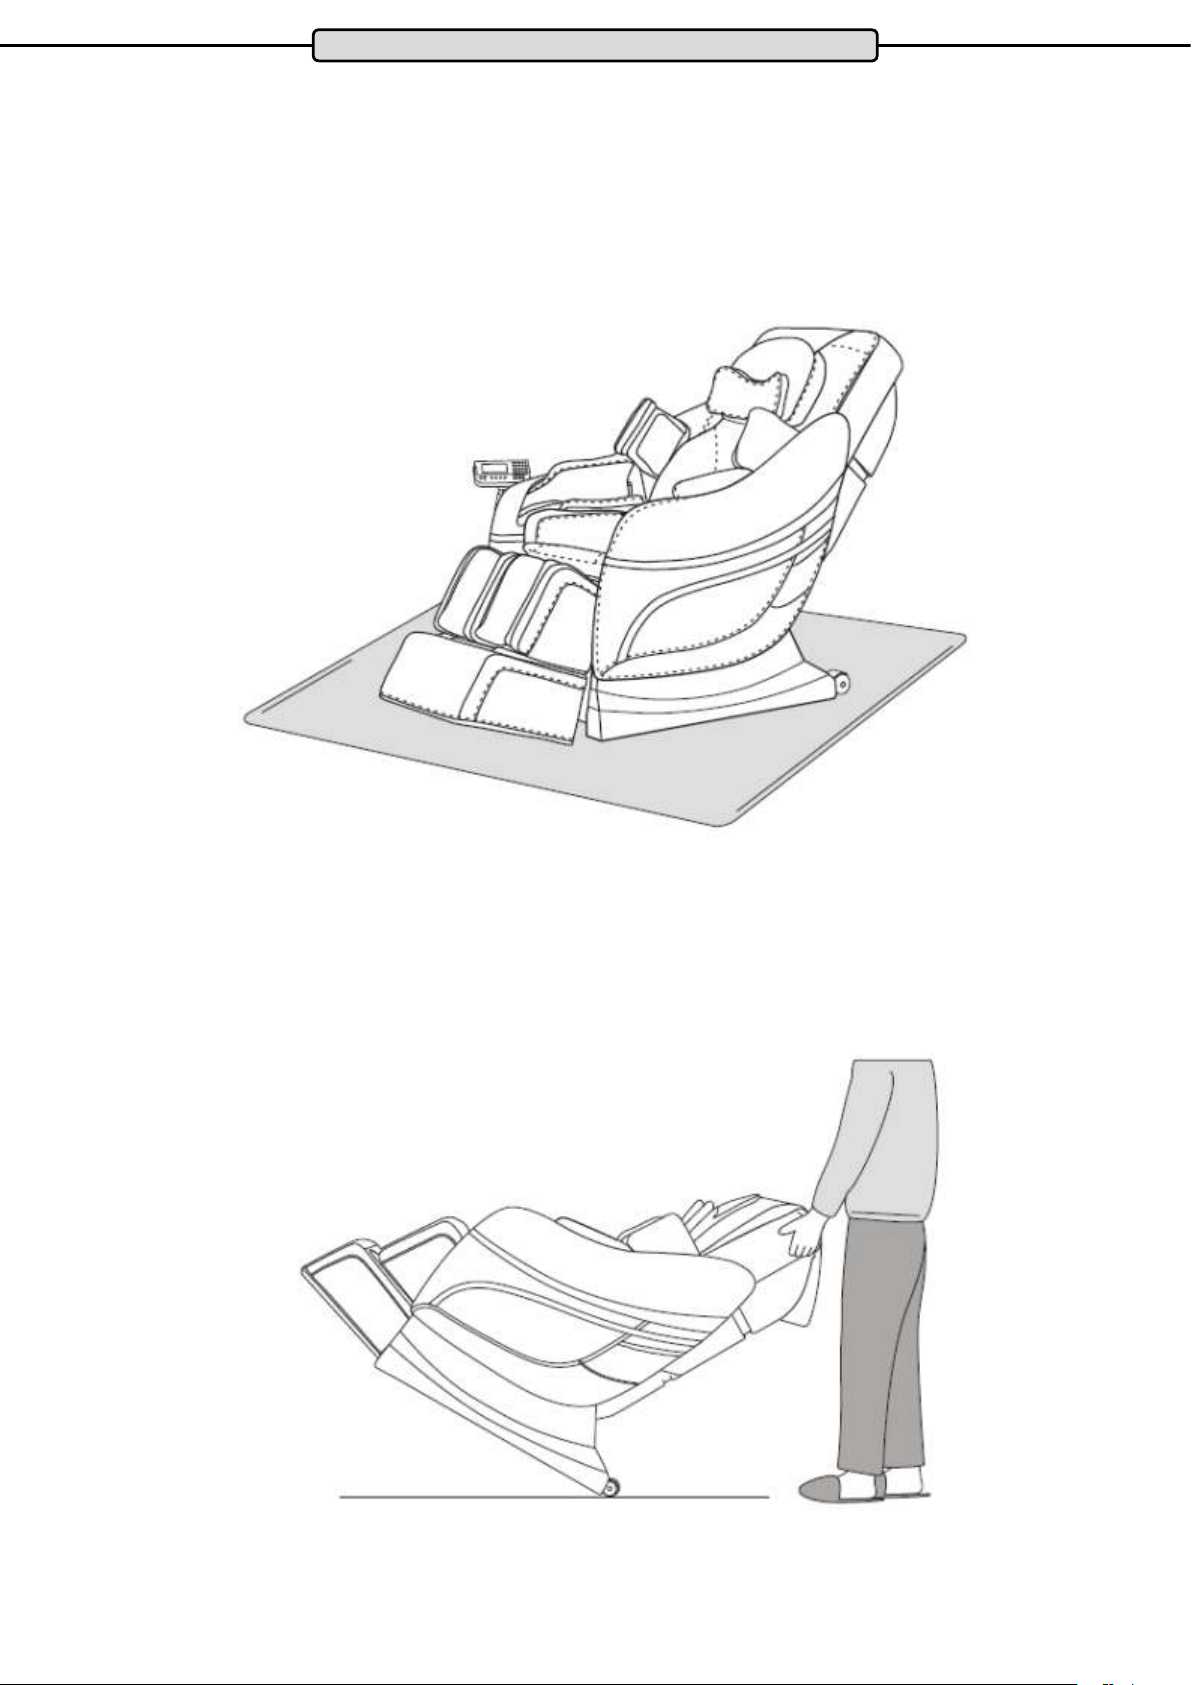
Setting up and Transporting the Device
Setting up your Massage Chair:
Please note the safety warnings in this manual regarding where to locate the device.
Make sure that you do not place the device directly onto oor surfaces such as laminate
or parquet. With these types of oors, please lay down a carpet or a protection mat under the chair to avoid pressure marks on the ooring.
Transporting your Massage Chair
Please remember to remove the electrical plug from the socket before transport!
To roll the chair please make sure that all cables and tubes are kept at enough distance
away from the oor. Tip the chair backwards with the back rest until the point of gravity of
the chair is directly above the transport rollers. Now it is possible to push the chair on the
rollers easily.
.
14
Page 15
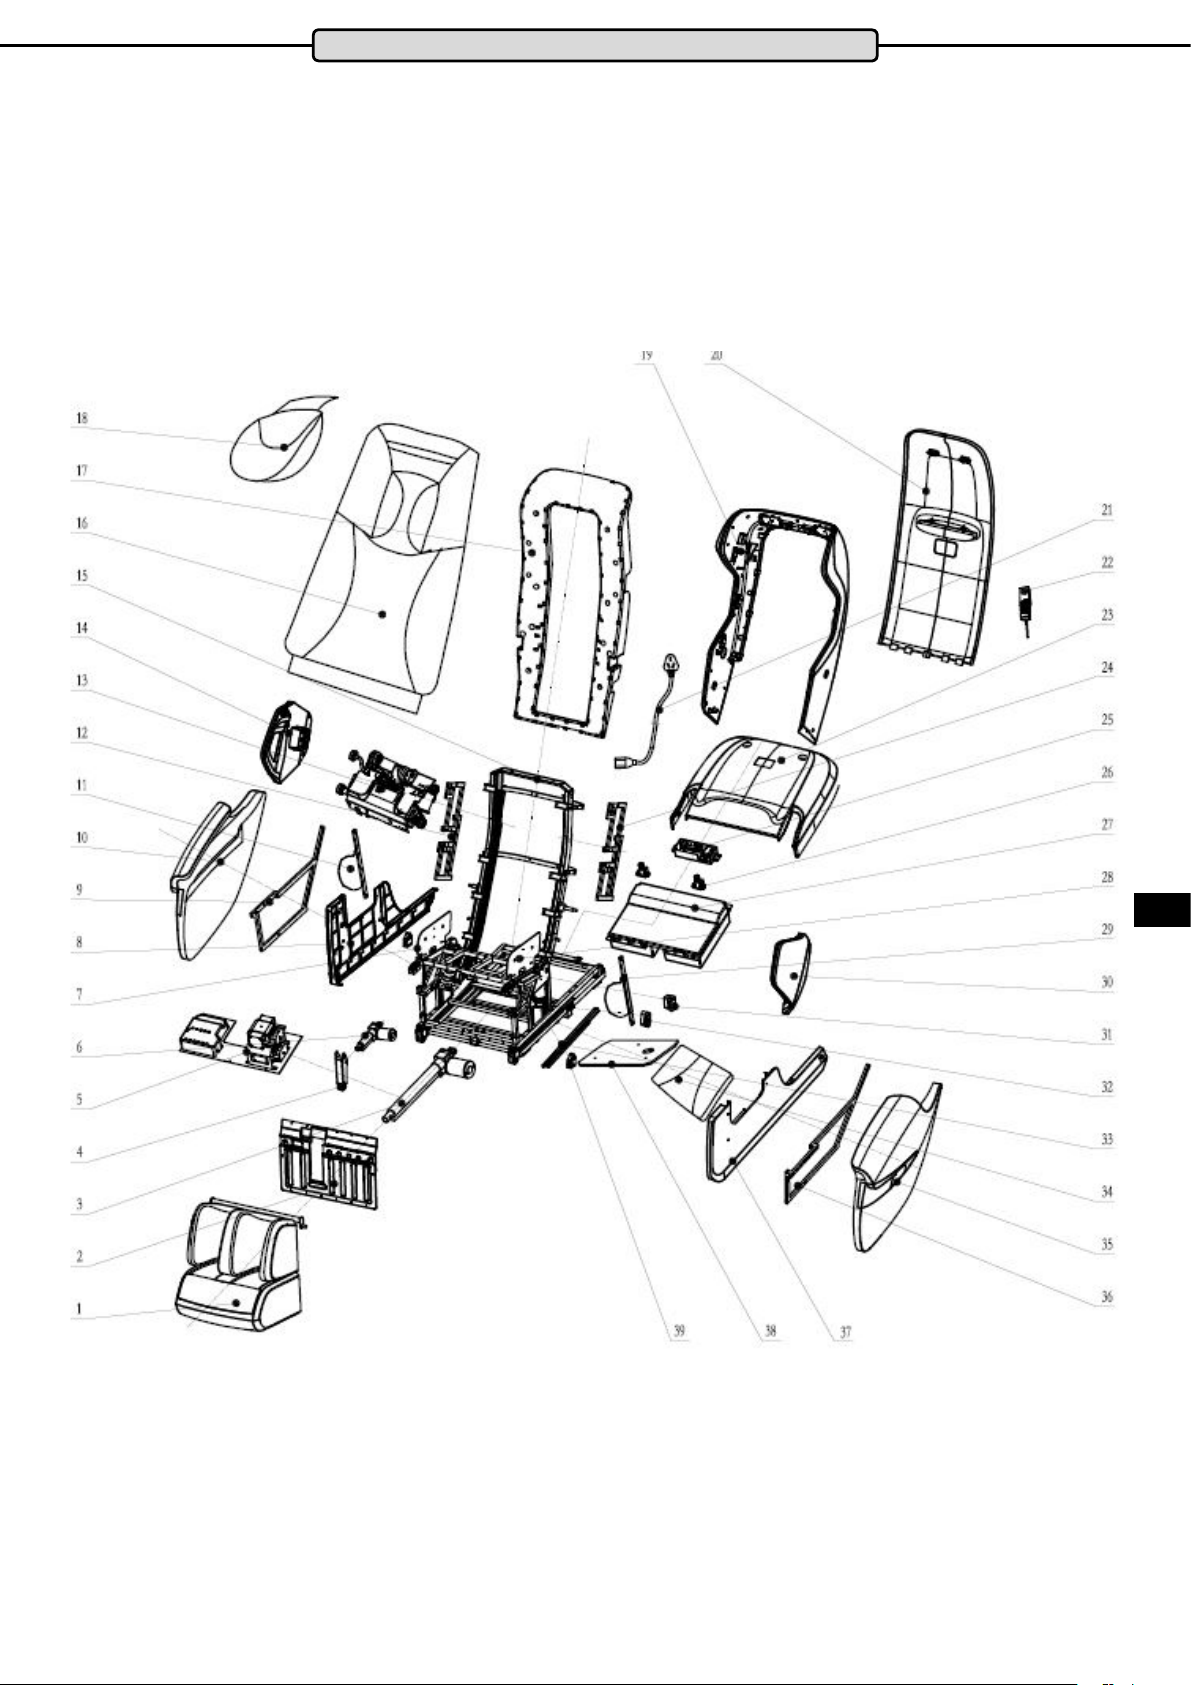
Exploded Drawing
ENG
15
Page 16
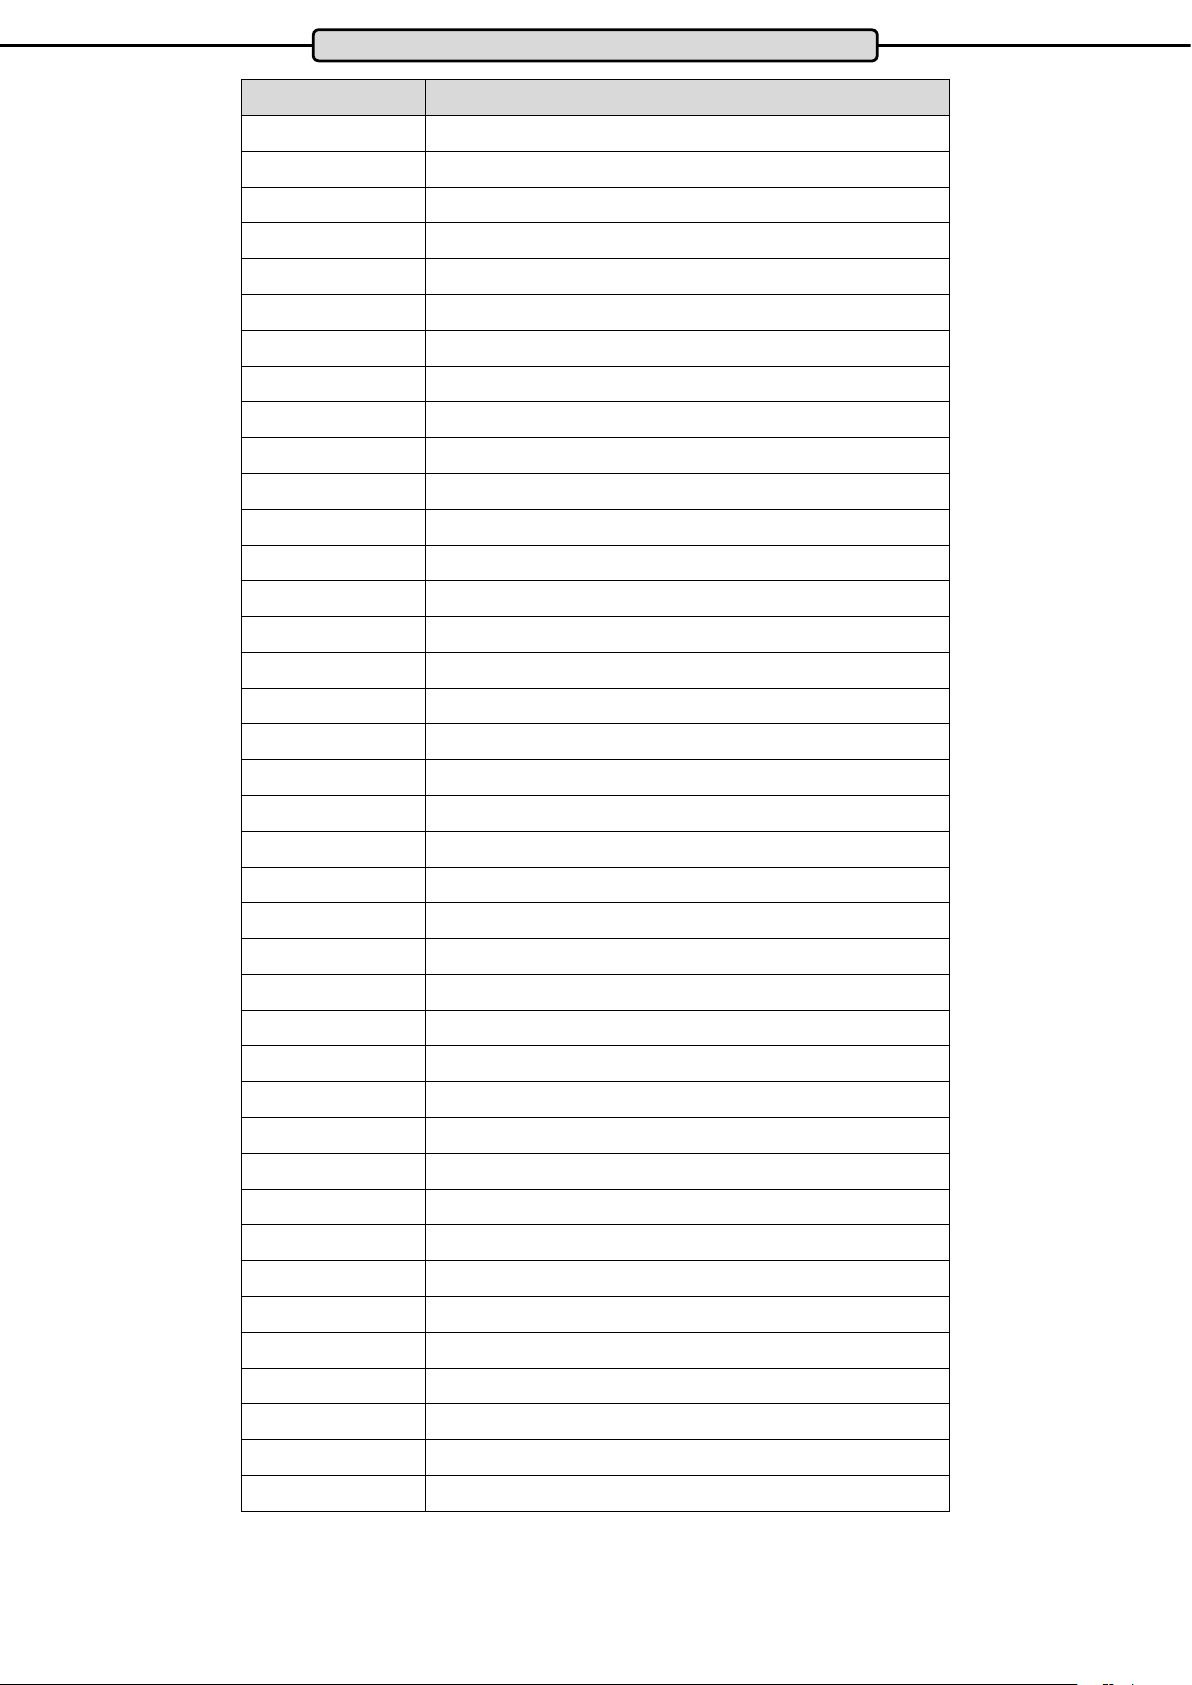
Spare Parts List
Part Description
1 Foot massage component
2 Front cover component
3 Back rest cylinder
4 Foot rest pushing arm
5 Air pump valve component
6 Foot rest cylinder
7 Seat side airbag
8 Seat frame side cover component (right)
9 Arm rest steel component
10 Right arm rest
11 Connecting component (right)
12 Space capsule base install component (right)
13 3D massage mechanism component
14 Upper arm component (right)
15 Steel frame
16 Back cushion
17 Back frame component
18 Head cushion
19 Space capsule component
20 Up back cover
21 Power wire
22 Remote control component
23 Seat frame back cover
24 Space capsule base install component (left)
25 Power drive component
26 Emergency stop component
27 Main drive component
28 Side airbag component (left)
29 Connecting component (left)
30 Upper arm component (left)
31 Armrest back limits
32 armrest forward guide component
33 450 slideway component
34 Seat cover
35 Left arm rest
36 Arm rest steel component
37 Seat side cover component
38 Seat frame board component
39 Arm rest slipper component
16
Page 17
Notes
ENG
17
Page 18
Warranty*
For MAXXUS® Support Team to help you as quickly as possible with service, we will require certain information
about your tness device and about you. To nd the exact spare parts required, we will need the product name,
date of purchase and serial number.
If necessary, please ll out completely the Service Contract form attached to this User Manual and send it to us
by post or you are welcome to use our online form “Service Contract” which you will nd under the “Service”
section at www.maxxus.com
Areas of Application & Warranty Periods
Depending on the model, tness devices from MAXXUS® are suitable for use in dierent areas. Find the appropriate area of use for your tness device from the “Technical Data” in this User Manual.
Home Use:
Exclusively for private use
Warranty Period: 2 Years
Semi-Professional Use:
Use under instruction in hotels, physiotherapy practices, etc.
Use in a tness studio or similar establishment is hereby excluded!
Warranty Period: 1 Year
Professional Use:
Use in a tness studio or similar establishment under supervision by trained personnel.
Warranty Period: 1 Year
Use of your training device in an area which is not suitable for your device will cause immediate expiry of its
guarantee and cancel your right to claim warranty!
Sole private use and warranty period of 2 years assumes that the purchase invoice is made out to the end user.
Proof of Purchase and Serial Number
To claim your right to service works within the warranty period we will in each case require proof of purchase.
Keep your proof or purchase or purchase invoice in a safe place and in warranty cases send us a copy together
with your Service Contract. This will ensure that we can process the service work as quickly as possible. So
that we can identify which model version requires to be serviced correctly, we will require; Product Name, Serial
Number and Date of Purchase.
Terms and Conditions of Warranty:
The warranty period for your training device starts on the date of purchase and applies solely to products which
were purchased directly from the MAXXUS Group GmbH & Co KG or one of the MAXXUS Group GmbH & Co
KG direct and authorised distribution partners.
The warranty covers defects caused by production or material faults and only apply to devices purchased in
Germany. The warranty does not apply to damages or defects caused by culpable improper use, negligent
or purposeful destruction, lack or failure to carry out maintenance and/or cleaning measures, force majeure,
operational causes and to normal wear and tear, damages caused by penetration of liquids, damage caused by
repairs or modications made with spare parts from a dierent supplier. The warranty also does not apply for
damages due to faulty assembly or damages which occur because of faulty assembly. Certain component parts
will wear out during use or from normal wear and tear. This includes for example:
▪ Ball bearings ▪ Bearing bushings ▪ Bearings ▪ Drive belts ▪ Rollers
▪ Switches and push-buttons ▪ Treadmill belts (bands) ▪ Treadmill decks (running deck)
Signs of wear and tear on wearing parts are not items covered under the warranty.
For assistance with warranty service or warranty repair enquiries for devices not in Germany, please contact our
Service Department at MAXXUS Group GmbH & Co KGM by sending an Email to: [email protected] and we
will be happy to help.
Service Outside the Warranty and Ordering Spare Parts
The MAXXUS® Service Team is happy to be of assistance to help solve any problems with faults which may
arise following expiry of the warranty period, or in cases of defects arising which are not covered by the
warranty.
In this case please contact us by email direct to:
Orders for Spare Parts or Worn Parts should be sent along with information on the Product Name, spare part
description and number and the quantity required to:
Please be informed that additional xing materials such as screws, bolts, washers etc are not included in the
scope of delivery for individual spare parts. These should be ordered separately.
*Version: June/2016
18
Page 19
Service Contract
Device Details
Product Name: MX 20.0Z
Serial Number: _______________________________________
Date of Purchase: _____________________________________
Accessories: _________________________________________
Type of Use:
Private Use
Personal Details
Company: ___________________________________________
First Name: __________________________________________
Street: ______________________________________________
Post Code / Town/City: _________________________________
E-Mail: _____________________________________________
Fax. No.*: ___________________________________________
* The elds marked with an asterisk are optional. The remaining elds are mandatory elds that must be completed..
Fault Description
Please enter a short description of the error as precisely as possible below:
(For example, when, where and how does the error occur? Frequency, after which period, at what Use, etc ....).
Product Group: Massage Chair
Invoice Number: ______________________________________
Where Purchased: ____________________________________
________________________________________________
Commercial Use
Contact Person: _______________________________________
Second Name: ________________________________________
House Number: _______________________________________
Country: _____________________________________________
Tel.No.: _____________________________________________
Mobile No.*: __________________________________________
A copy of the proof of purchase / invoice / receipt is attached.
I accept the General Terms and Conditions of MAXXUS® Group GmbH & Co. KG.
I hereby instruct the company MAXXUS® Group GmbH & Co. KG to repair the above defects. In Warranty cases I will not be charged
for the cost. The costs for repairs which are excluded from liability for defects in quality will be charged to me and must be settled
immediately. In cases of repairs carried out on site, our sta are entitled to collect payment. This agreement is conrmed with here with
my signature.
Date Location Signature
Please be aware that contracts can only be processed if this form has been completed in full. Be sure to attach a copy of your purchase
invoice. Send the fully completed Repairs Contract / Notication of Damage Claim to:
Post*: Maxxus Group GmbH & Co KG, Service Department, Zeppelinstr. 2, 64331 Weiterstadt
Fax: +49 (0) 6151 39735 400
E-Mail**: [email protected]
ENG
* Please stamp with sucient postage – letters which are not sent postage paid will unfortunately not be accepted.
** Submission by E-Mail is only possible as a scanned document with original signature.
You are welcome to use our online form “Service Contract” which you will nd under the “Service” section at www.maxxus.com
19
Page 20

Maxxus Group GmbH & Co. KG
Zeppelinstr. 2
DE-64331 Weiterstadt
Germany
E-Mail: [email protected]
www.maxxus.com
 Loading...