

Page 1
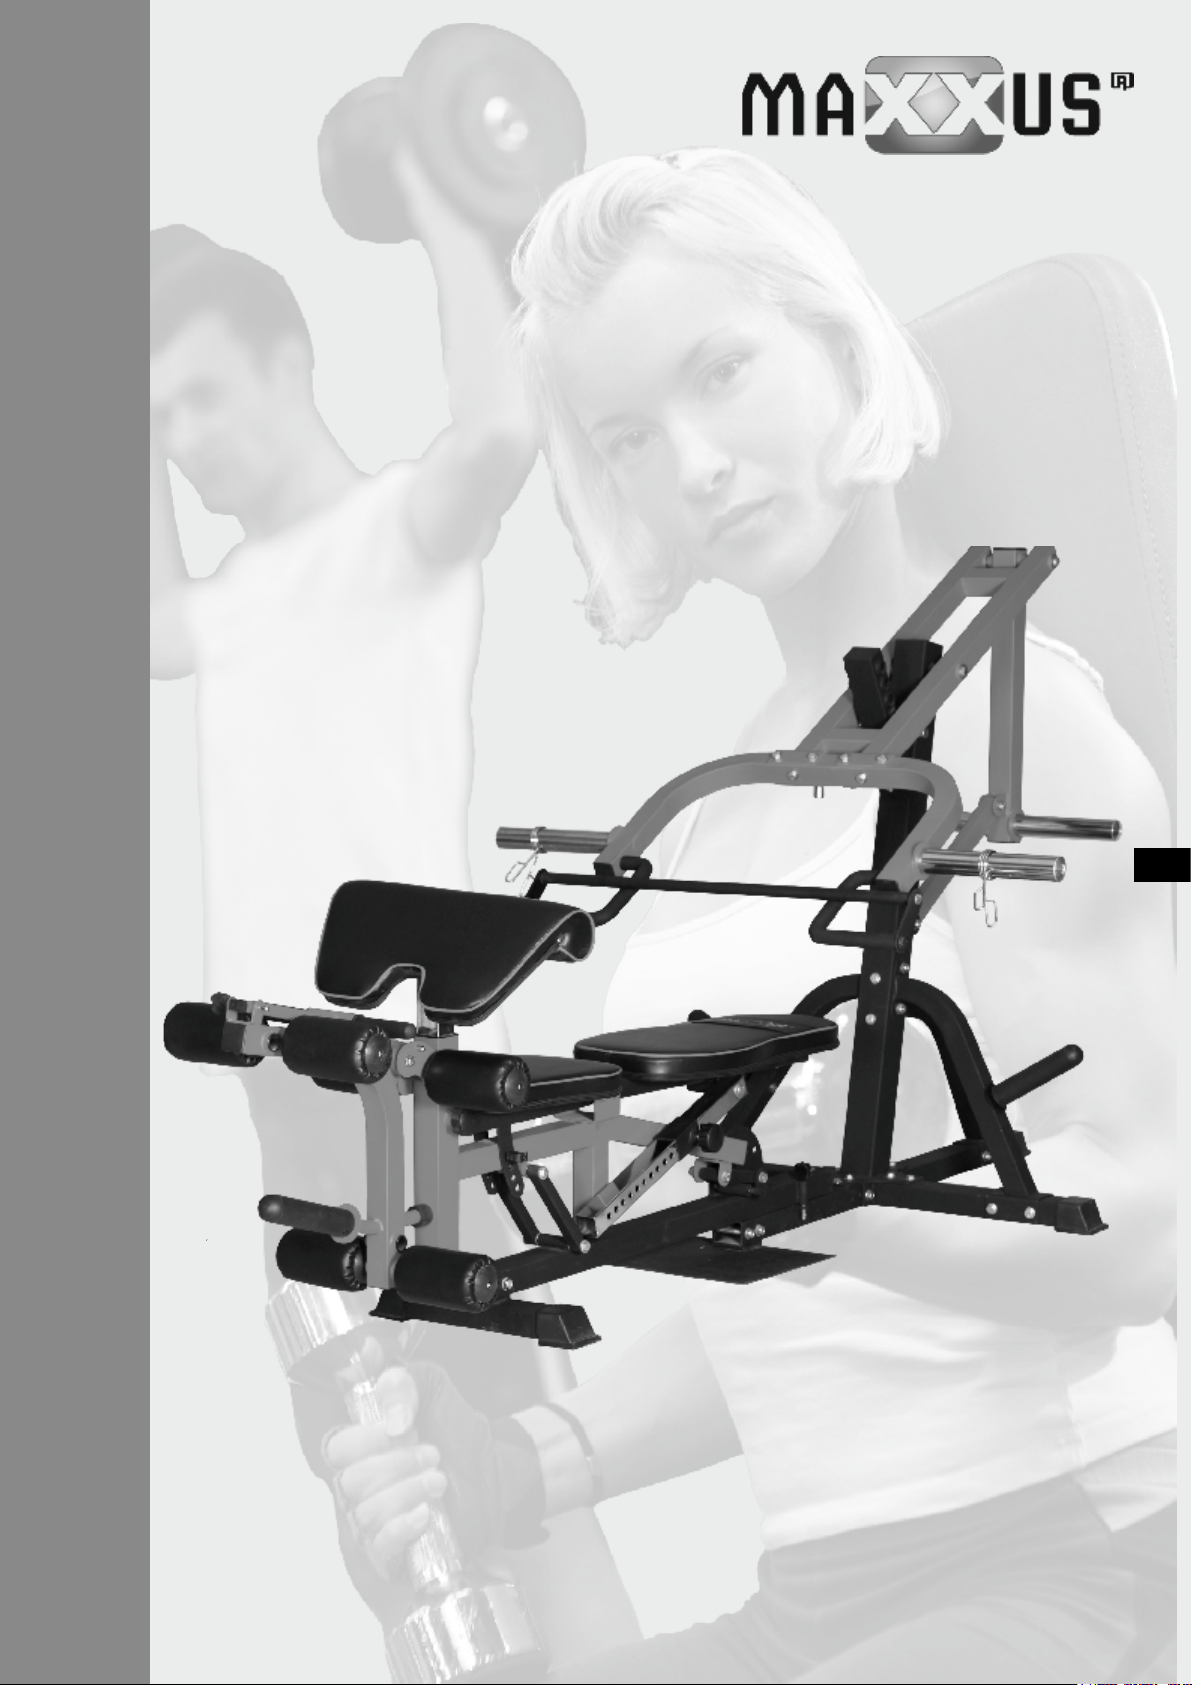
Multi-Press 6.0
ENG
INSTALLATION & OPERATING MANUAL
Page 2

Index
Index 2
Safety Instructions 3
Scope of Delivery 4 - 5
Assembly 6 - 13
Care, Cleaning & Maintenance 14
Disposal 14
Recommended Accessories 14
Training Recommendations 15- 16
Exploded Drawing 17
Parts List 18 - 19
Warranty 22
Service Contract 23
© 2018 MAXXUS Group GmbH & Co. KG
All rights reserved / All rights reserved
This publication may not be reproduced, stored in a retrieval system, or transmitted in whole or in part, in any form or by any means, electronic,
mechanical, photocopying, recording, or otherwise without the prior written permission of Maxxus Group GmbH & Co. KG.
Errors, colour and technical modication subject to change, reproduction as well as electronic duplication only with written permission of MAXX-
US Group GmbH & Co. KG.
2
Page 3
Safety Instructions
Please read and observe all sections of this Operating Manual. Thorough attention should be paid to the safety,
service and maintenance instructions and to the training information at all times. Please ensure that anyone using
the training device is equally familiar with these instructions and that they follow them. Keep this manual in a safe
place for further reference on information, maintenance and cleaning and for details on ordering of spare parts.
It is very important strictly to follow the service and maintenance and safety instructions contained in this Manual.
This training device is only to be used for its intended purpose. This means it is to be used for body workouts by adults only.
If this equipment is used for any other purposes than intended, there is a possible risk of accident, damage to health or
damage to the training device. The Distributor cannot be held responsible for damages caused by improper use.
Training Environment
− Select a suitable space for your training device to provide an optimum amount of free space and highest level of safe-
ty.
− Ensure that the load capacity of the oor or ground of the chosen area is sucient for the load.
− Make sure that the area is well ventilated and that an optimum amount of oxygen is available during training. Avoid
draughts.
− It is not permitted to locate your training device in busy areas or areas near to main walkways (emergency exits, doors
or passageways)
− Your training device is not suitable for outside use and so storage and training can only take place in a temperate, dry
clean room.
− Operation and storage of your training device in wet areas such as in swimming pools, saunas etc. is not possible.
− Make sure that your training device is kept on at, hard and clean ground both in operation and at standstill. Any une-
ven surfaces must be removed or made good.
− It is recommended that a oor covering (carpet, mat, etc.) should be placed under the device to protect damageable
oors such as wood, laminates, oor tiles etc. We recommend placing MAXXUS® oor protection mats permanently
under the device. Please ensure that these mats cannot slip or slide.
− Do not put this training device on pale or white coloured carpets or rugs as the feet of the device may leave marks.
− Make sure that your training device is kept out of contact with hot items and is kept at a safe distance from any sourc-
es of heat e.g. central heating, hot stoves, furnaces, ovens or open res.
Personal Safety Instructions for Training
− You should go to the doctor and have a health check before you start working out.
− Stop training immediately if you feel physically unwell or are experiencing any breathing diculties.
− Always start your training session at a low workload increasing it slowly but steadily throughout. Reduce the workload
again towards the end of your training session.
− Suitable sports shoes and clothes should always be worn during training sessions. Make sure that loose clothes do not
get caught up in any moving parts of the device.
− Your training device is only to be used by one person at a time.
− Check each time before a training session to see if your device is in perfect condition. Never use your training device if
it is faulty or defective.
− You are only permitted to carry out repairs to the device yourself after having contacted our Service Department and
on receipt of explicit permission to do so. Only original spare parts may be used at any time.
− Improper repairs or structural modications (attachment of non-permissible parts, removal of original parts etc) are not
permitted. This can impair the technical safety of the device and cause risk for the user.
− Your training device must be cleaned after each use. Remove all dirt including body sweat or any other liquids.
− Your training device is not suitable for use by children.
− Third parties, especially children and animals, must be kept at an appropriate safety distance during training.
− Check before each training session if there are any items underneath the training device and remove them without fail.
Never use the training device when items are underneath it.
− Do not allow children to use your training device as a toy or climbing frame at any time.
− Ensure that no body parts of your own or of third parties ever come into contact with any of the moving mechanisms.
− Warn anyone present at your training sessions, especially children, of the possible risk. This applies to the areas
where weight plates, weight stacks or barbells.
− Check all parts at regular intervals (at least once a month) and make sure that all screws and nuts are tightened prop-
erly.
ENG
The construction of this training device is based on state of the art technology and highest modern technical safety standards.
This training device is to be used by adults only!
Extreme misuse and/or unplanned training can cause damage to your health!
Any manipulation of or interference with the device can cause damage to the device and be a danger to people.
If you have any questions or queries contact your specialist dealer or the MAXXUS Service Team and they will be pleased
to help you further.
3
Page 4
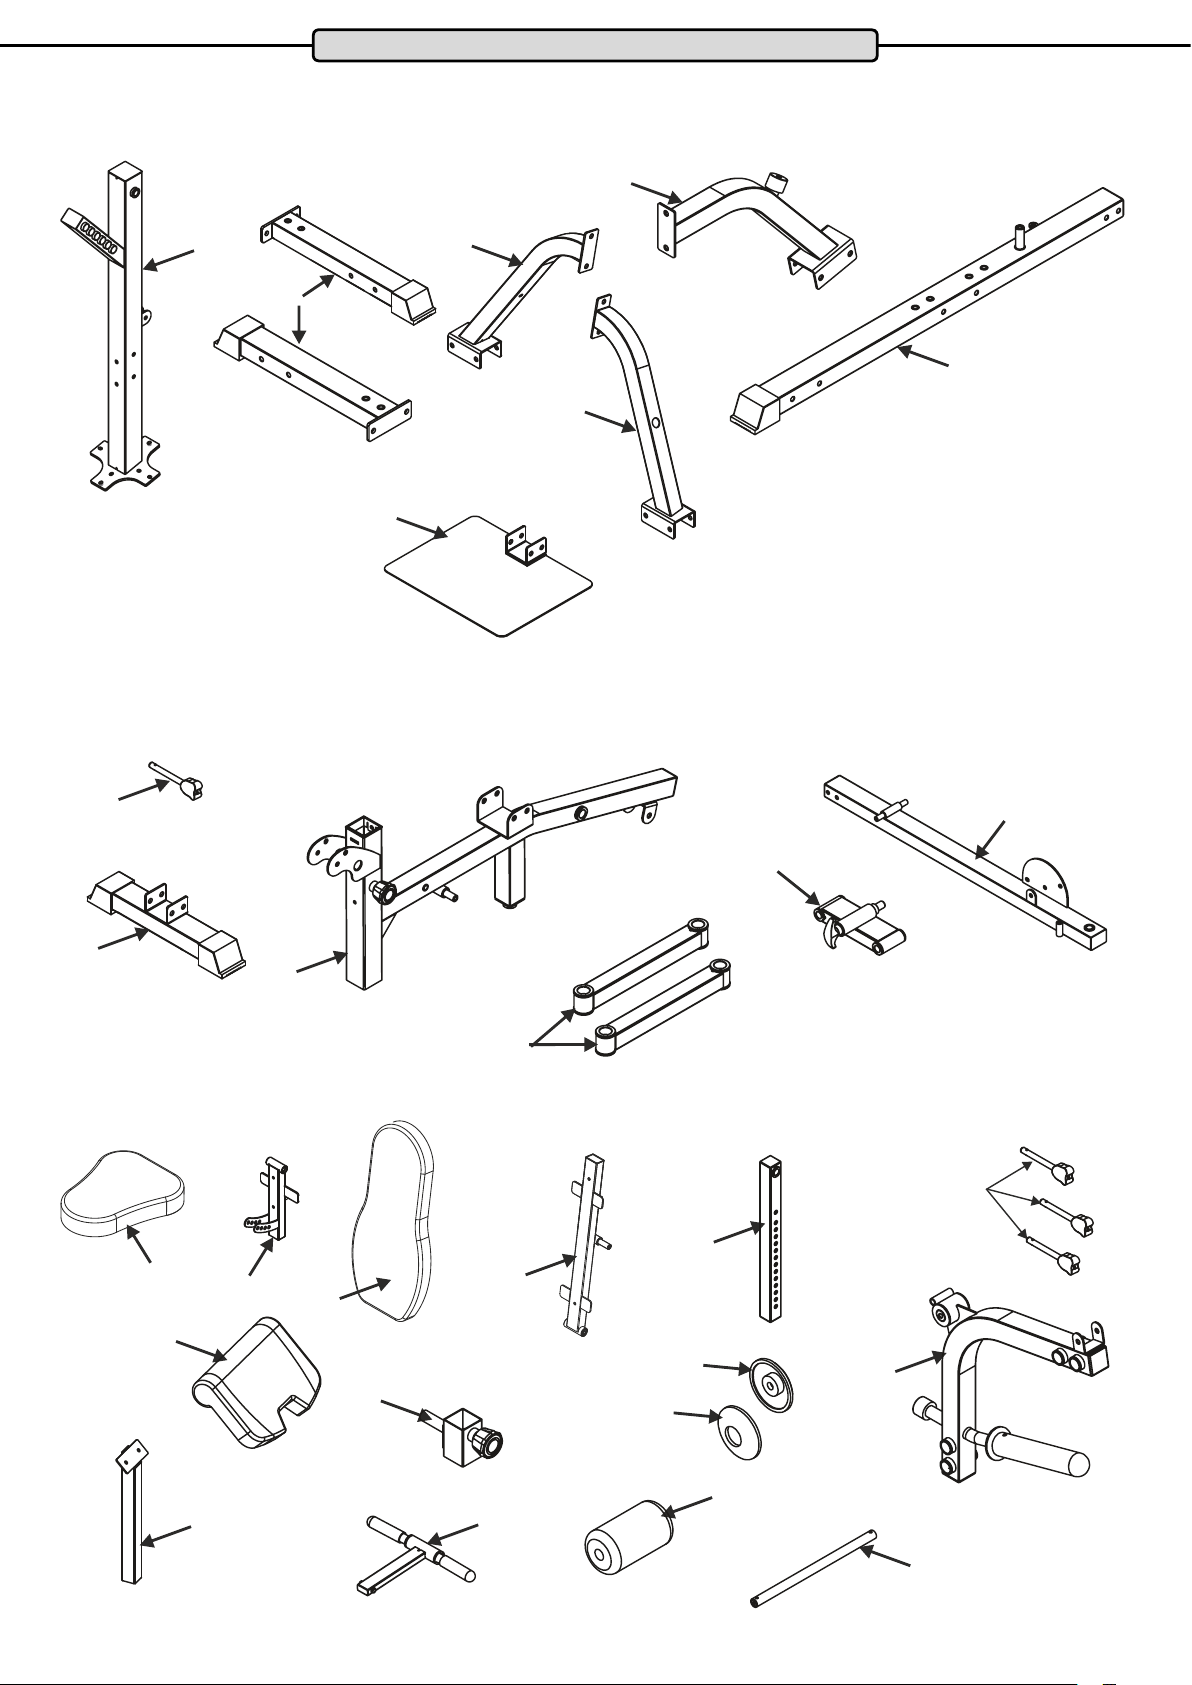
Scope of Delivery – Assembly Step 1:
Scope of Delivery
9
5
4
Scope of Delivery – Assembly Step 2:
29
8
1
7
2
21
22
25
Scope of Delivery – Assembly Step 3:
49
38
52
66
41
23
24
29
42
39
59
43
60
47
58
45
44
4
Page 5
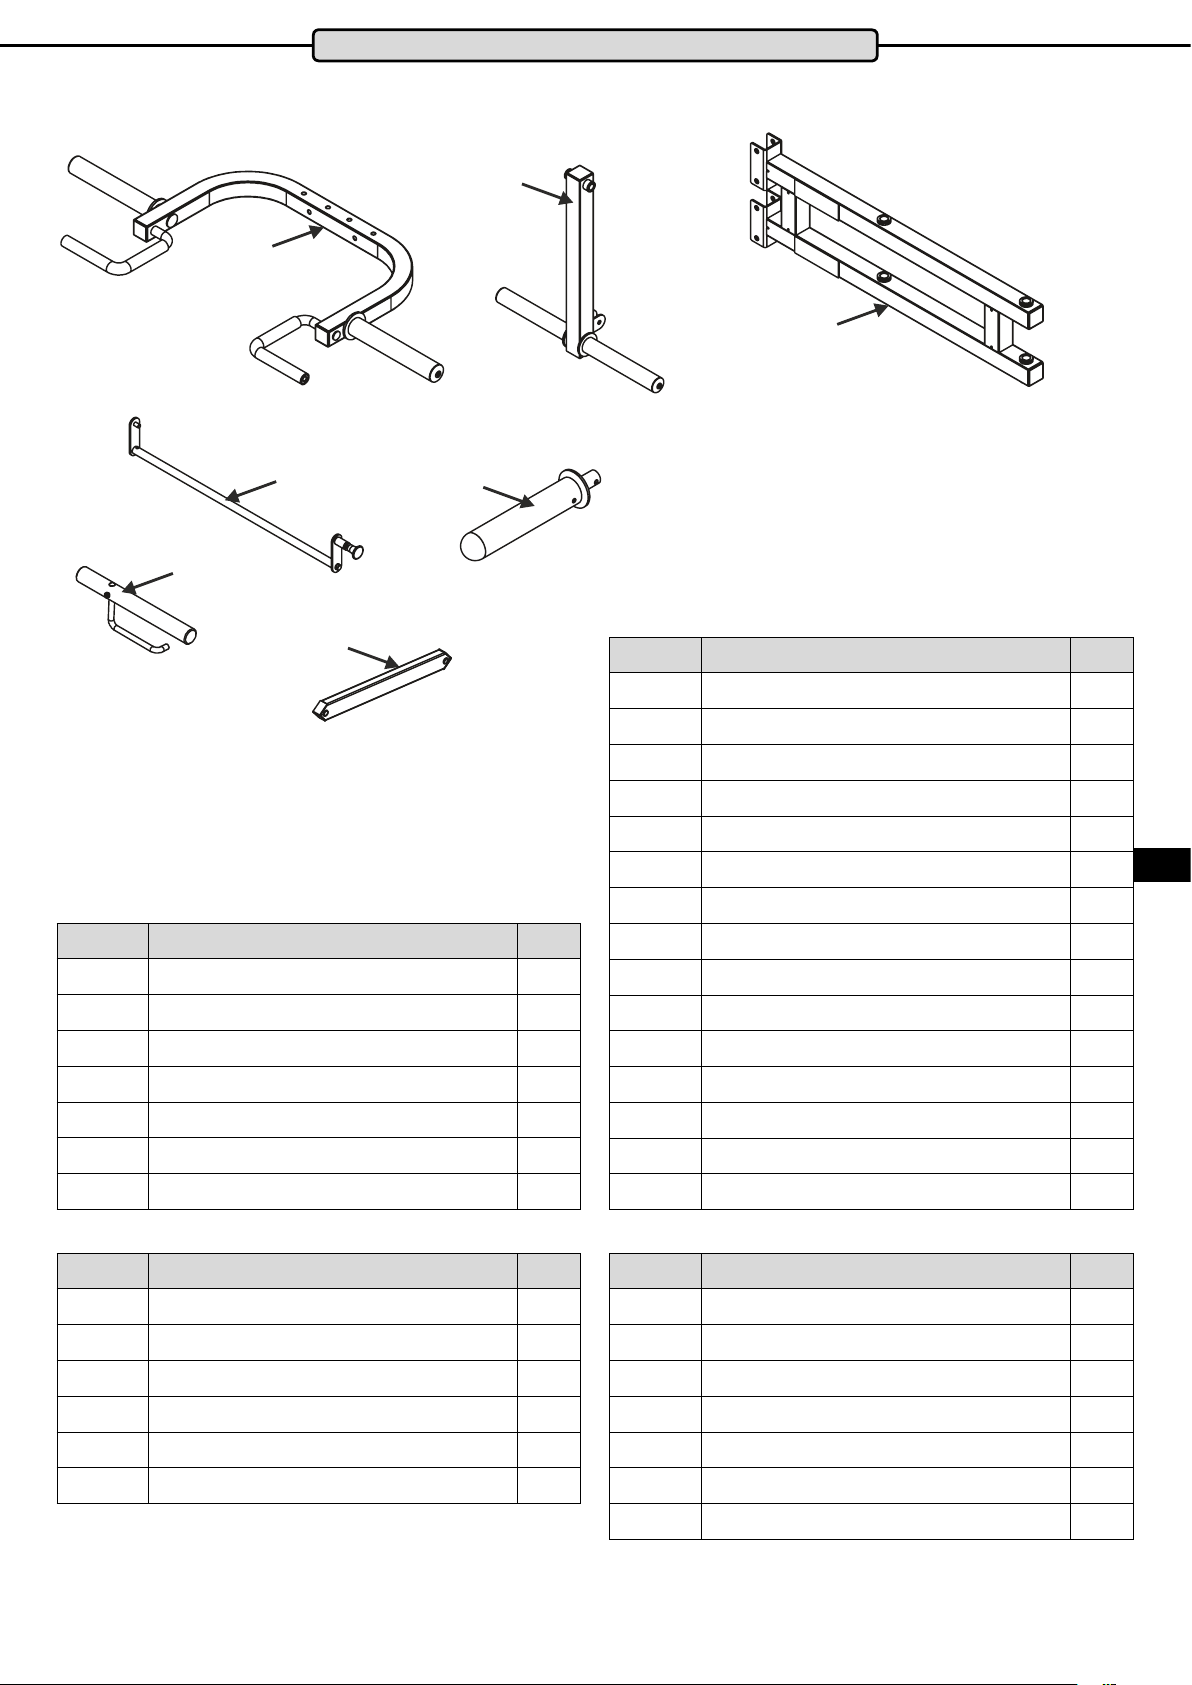
Scope of Delivery – Assembly Step 4:
74
Scope of Delivery
70
69
77
78
73
71
Part No. Description - Step 1 Qty
1 Main tube, xed 1
2 Foot plate 1
4 Stabiliser, side 2
Part No. Description - Step 3 Qty
29 Safety pin 3
38 Bracket for seat cushion 1
39 Bracket for back rest 1
41 Adjuster pin unit 1
42 Adjuster tube 1
43 Leg curler 1
44 Tube for round cushion 3
45 Arm curl 1
47 Tube for arm curl cushion 1
49 Seat cushion 1
52 Back cushion 1
ENG
5 Base tube, upright 1
7 Support, right 1
8 Support, left 1
9 Support, rear 1
Part No. Description - Step 2 Qty
21 Main tube, moveable 1
22 Stand tube, front 1
23 Bracket with safety pin 1
24 Guide pipe 2
25 Main frame 1
29 Safety pin 1
58 Round cushion 6
66 Arm curl cushion 1
59 Cover, inner 6
60 Cover, outer 6
Part No. Description - Step 4 Qty
69 Double frame 1
70 Weight support 1
71 Guide tube 1
73 Safety lock 1
74 Bank press unit 1
77 Adapter rod 1
78 Weight plate holder 2
5
Page 6
Assembly
Carefully unpack all delivered parts. Have someone there to help you as some of the training device parts are
bulky and heavy.
Check that all the parts and xing materials (screws, nuts, etc.) have been delivered.
Assemble the parts carefully as any damages or defects occurring due to mistakes made at the time of assembly are not covered by the warranty or guarantee. Therefore, read through the assembly instructions carefully
before you start assembling, follow each assembly step exactly as described and keep to the correct sequence
of assembly as instructed.
Assembly of the training device must be carried out thoroughly by an adult person only.
Assemble the training device in a location which is level, clean and clear of obstructions. 2 people are required
to carry out the assembly.
Please be aware a possible risk of injury at the time of assembly and at each time of using this device exists.
For this reason, always be careful and thorough in your actions when assembling this device.
Make sure that the parts necessary for each stage of assembly are only hand tightened together and only tight-
en parts completely when all parts have been tted together perfectly.
Training can only start when the training device has been fully assembled.
ATTENTION: All the screws, washers and nuts required for the assembly of this training device come
pre-assembled. Please loosen these xing materials before each assembly step and then follow each
step as indicated in the diagrams and then tighten the xing material back up again.
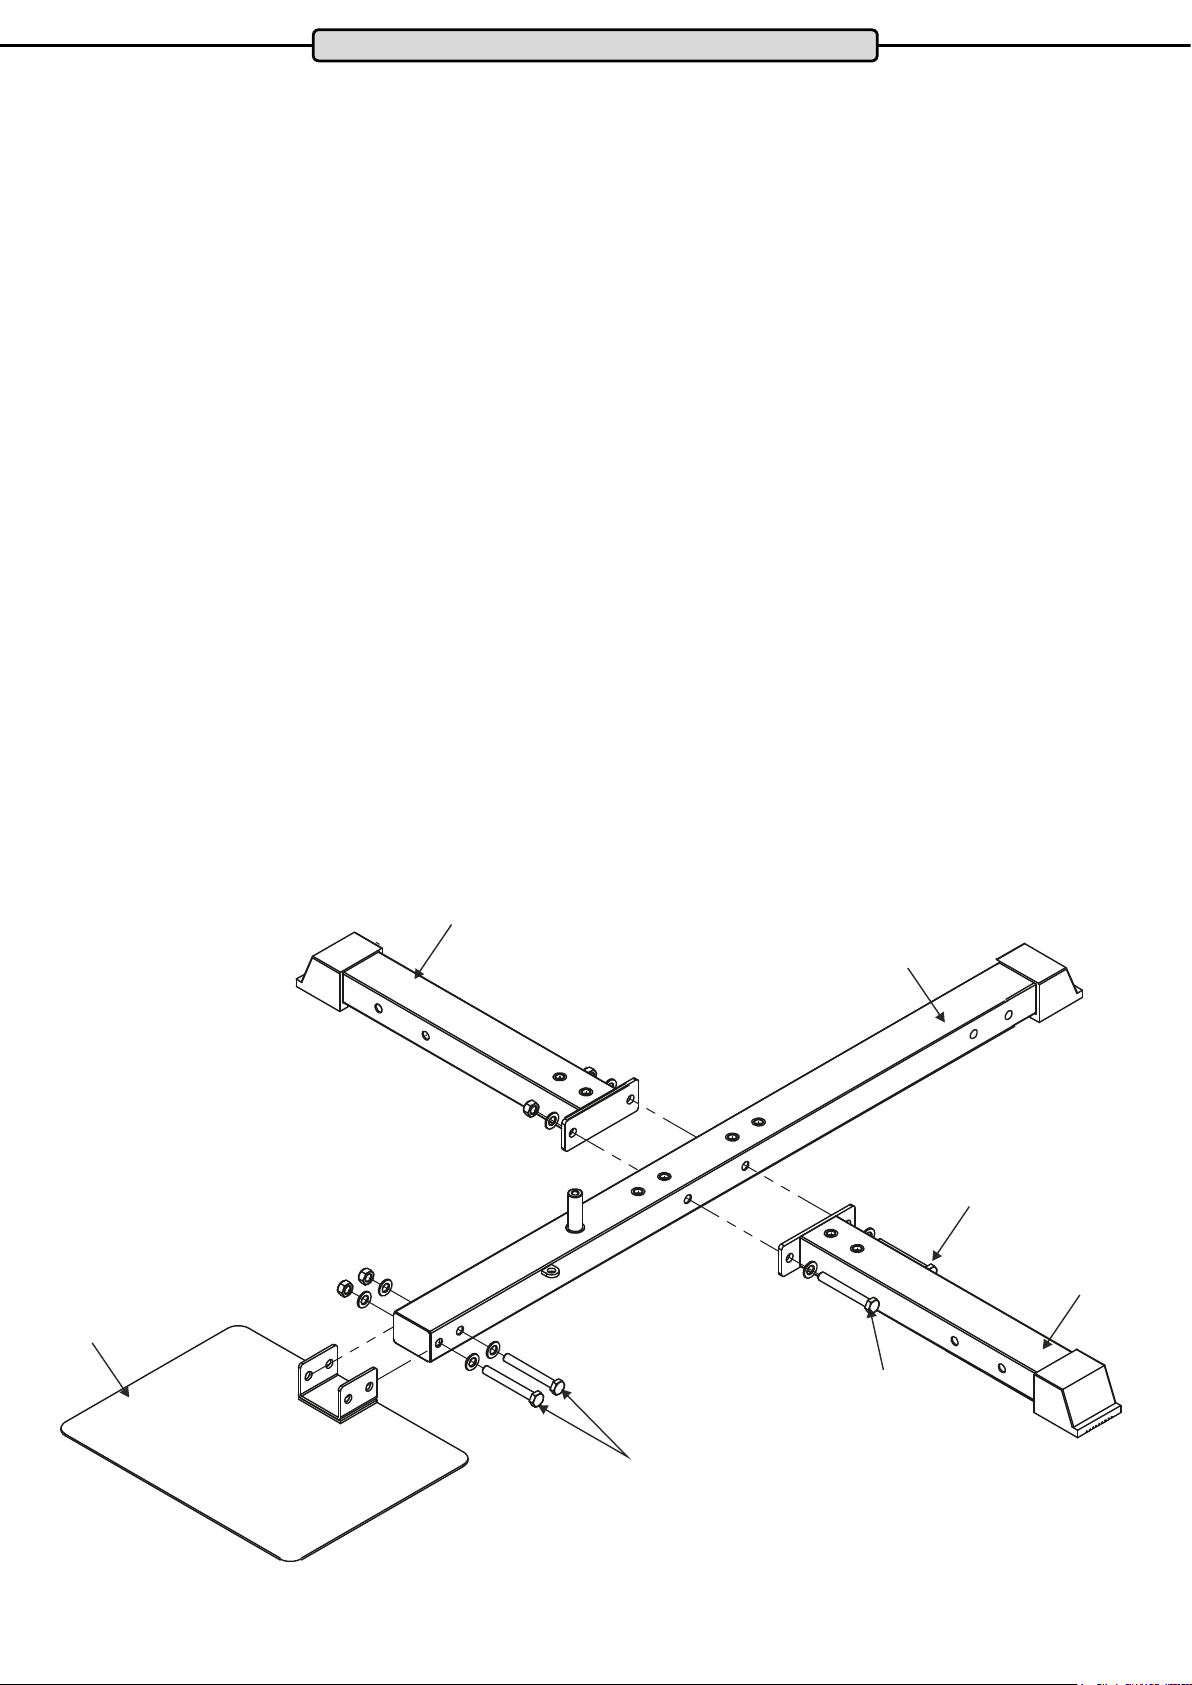
Assembly Step 1.1:
Connect the right and left side stabilisers (4) to the main tube, xed (1). For this use two screw sets (3). Then x
foot plate (2) to the front end of the main tube, xed (1) using two screw sets (3).
Caution:
Please only tighten the screws hand tight until all components have been assembled correctly. Only after this
should the screws be tightened rmly.
4
1
3
2
4
3
3
6
Page 7
Assembly
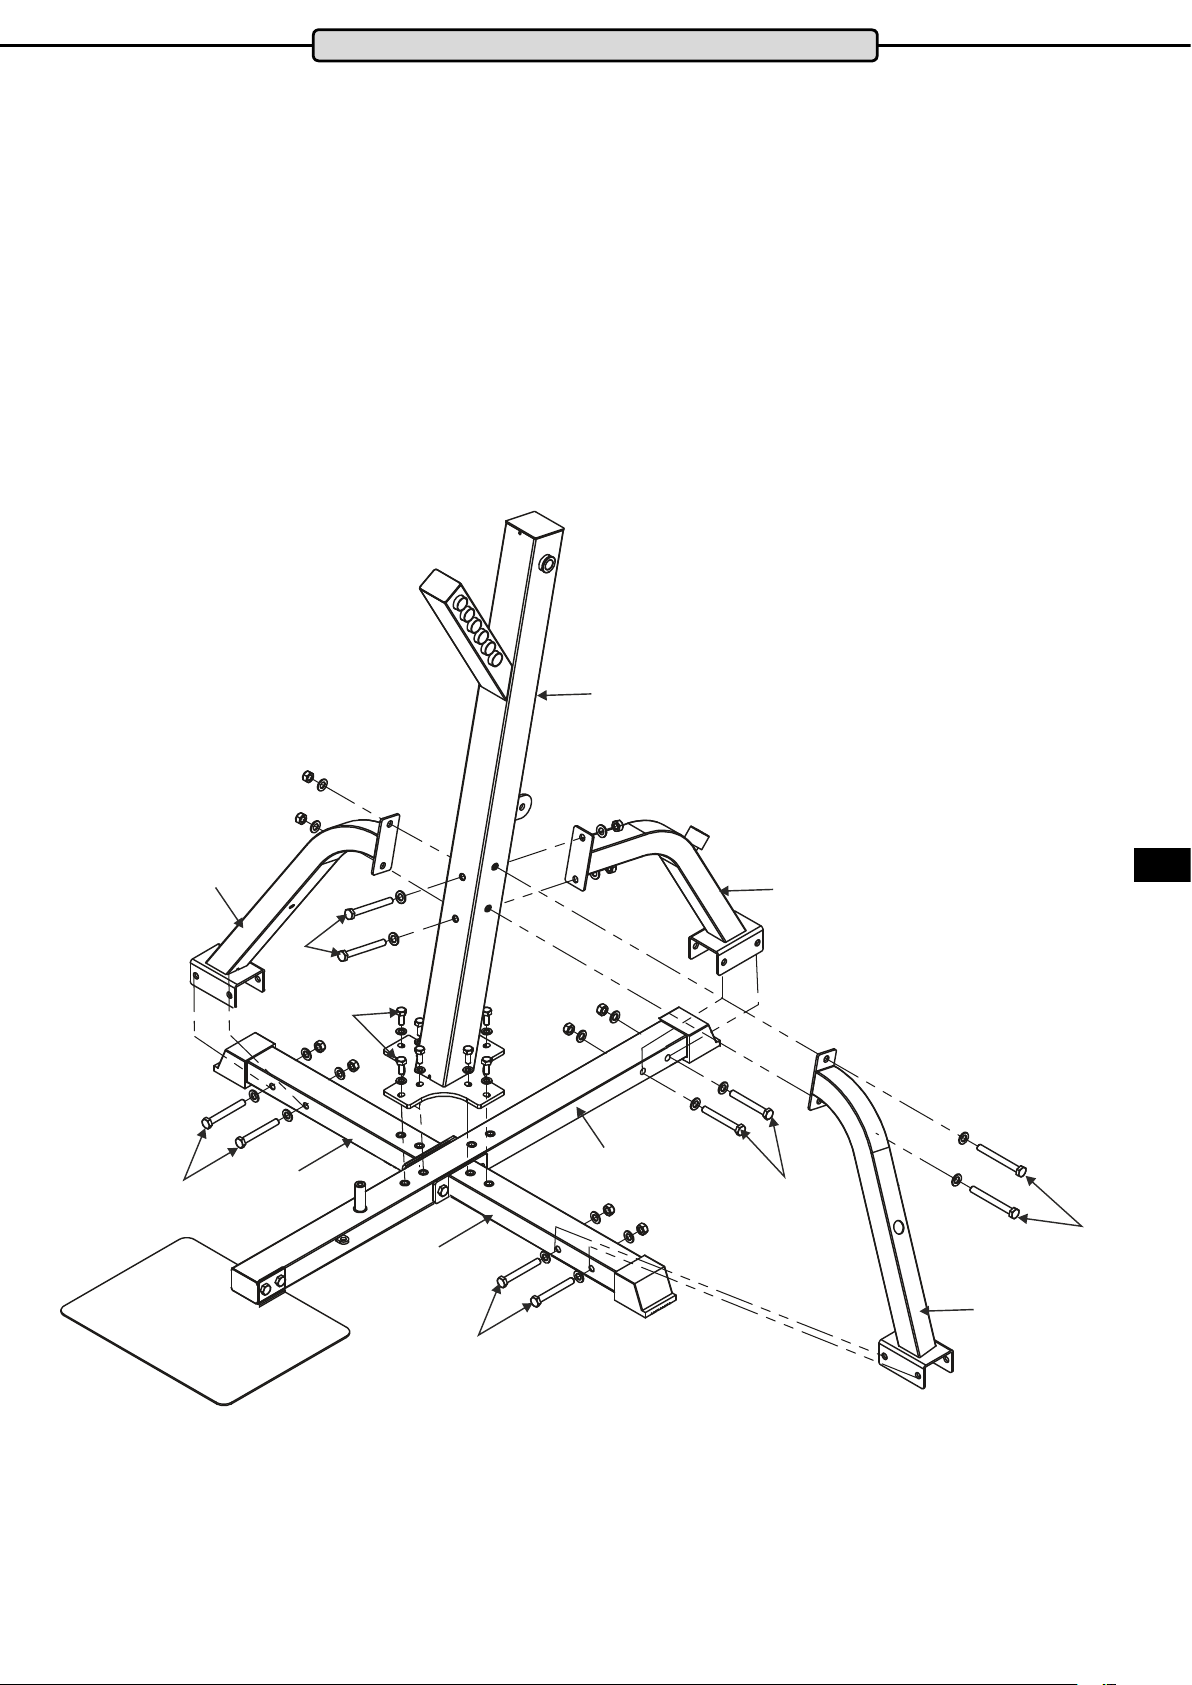
Assembly Step 1.2:
Place the upright main tube (5) onto the joint between the xed main tube (1) and the two side stabilisers (4)
and then x them using eight screw sets (6).
Then, x the two support (8-left/7-right) to the upright main tube (5) and to the right and left side stabilisers (4).
To to this, use two screw sets (10) on the upright main tube (5) and two screw sets (3) on each side stabiliser
(4).
Caution:
Please only tighten the screws hand tight until all components have been assembled correctly. Only after this
should the screws be tightened rmly.
3
8
5
ENG
9
3
6
1
4
3
10
4
3
7
7
Page 8
Assembly
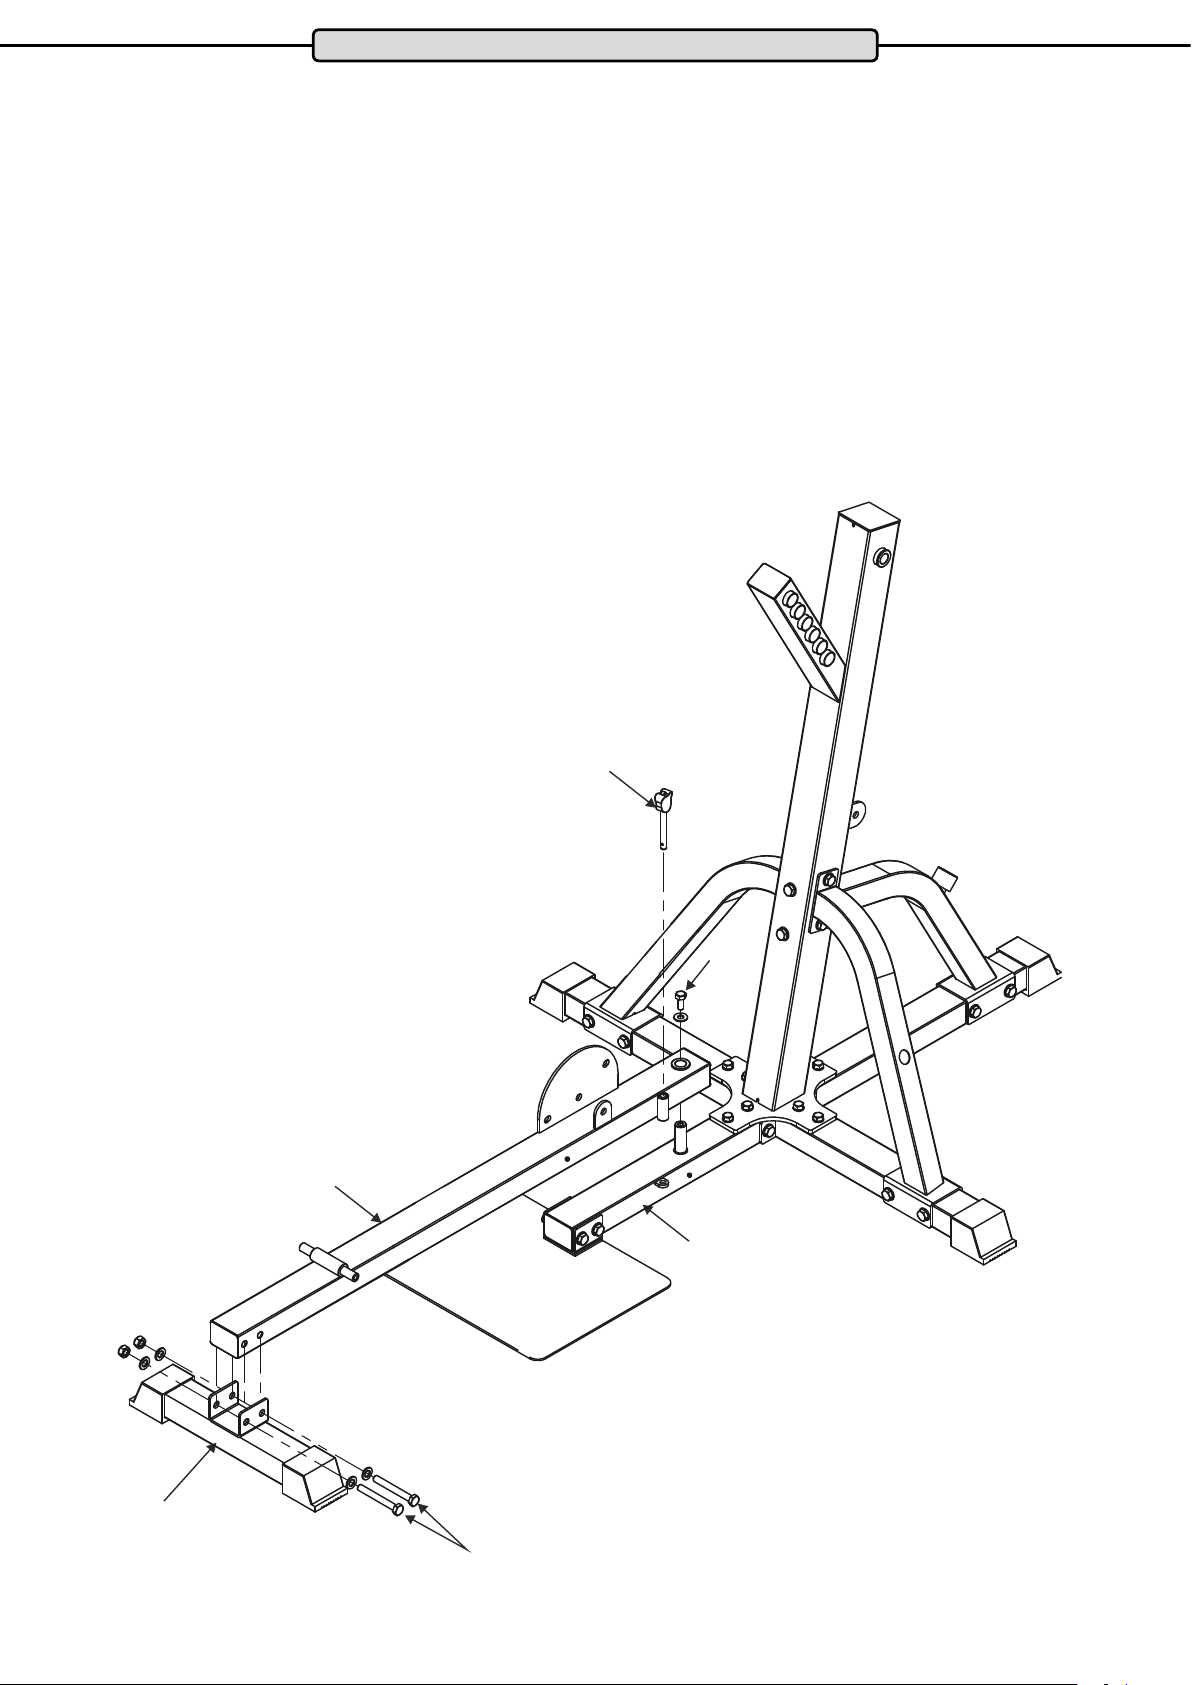
Assembly Step 2.1:
Fix the front stand tube (22) with two screw sets (3) to the moveable main tube (21). Place the moveable main
tube (21) with the guide bushing onto the bolt on the xed main tube (1) and x it with screw set (A).
Caution:
Be very careful putting the moveable tube (21) onto the bolt. Make sure that the guide bushing on the moveable
tube (21) does not get damaged and ensure that it is sitting straight and not squint.
Secure the moveable main tube (21) with the safety pin (29).
Caution:
Please only tighten the screws hand tight until all components have been assembled correctly. Only after this
should the screws be tightened rmly.
22
A
21
1
3
8
Page 9
Assembly
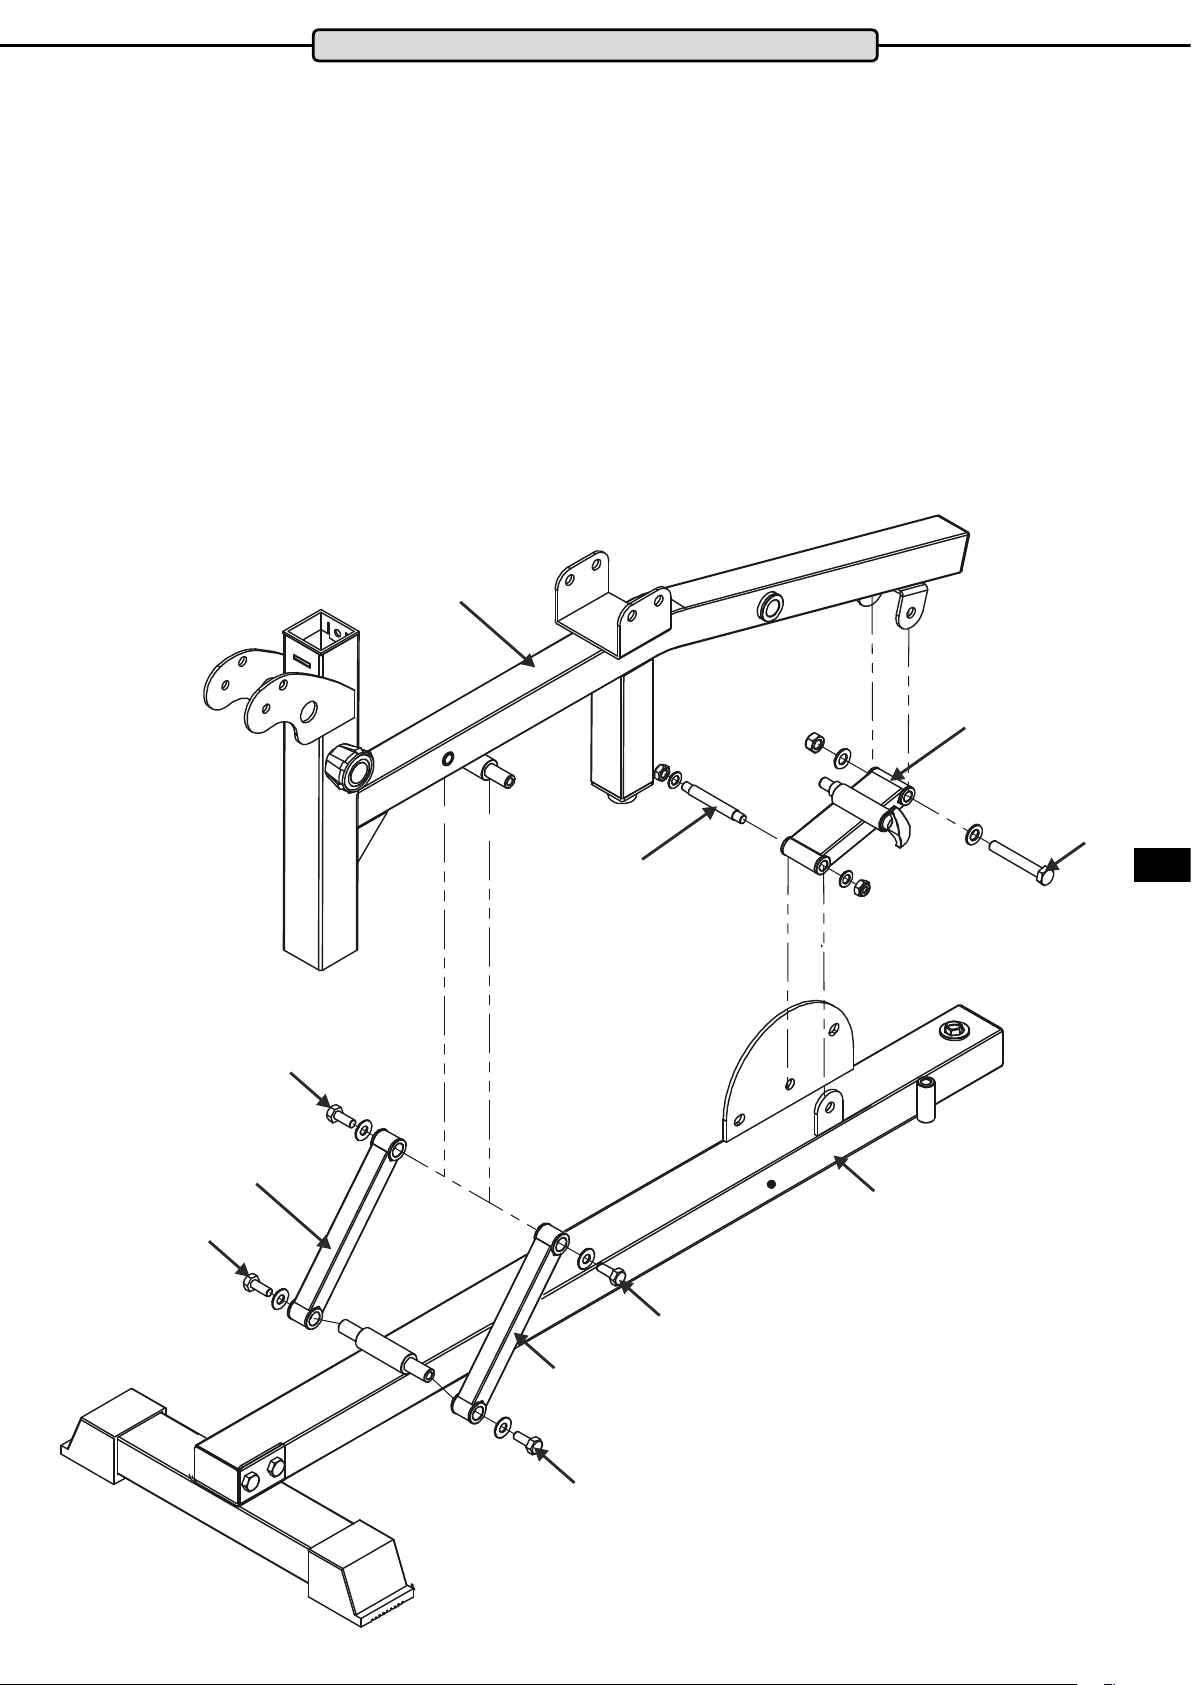
Assembly Step 2.2:
Fix the bracket with safety pin (23) to the rear mount on the main frame (25) using one screw set (28). Make
sure that bracket (23) is the right way around – see diagram.
Then x the bracket with safety pin (23) using the axle set (26) to the moveable base tube (21).
Then place guide tube (24) onto the right and left of the front axle mount on the main frame (25) and the axle
mount on the moveable main tube (21) and x each of these with two screw sets (6).
Caution:
Please only tighten the screws hand tight until all components have been assembled correctly. Only after this
should the screws be tightened rmly.
25
6
24
6
26
23
28
ENG
21
24
6
6
9
Page 10
Assembly
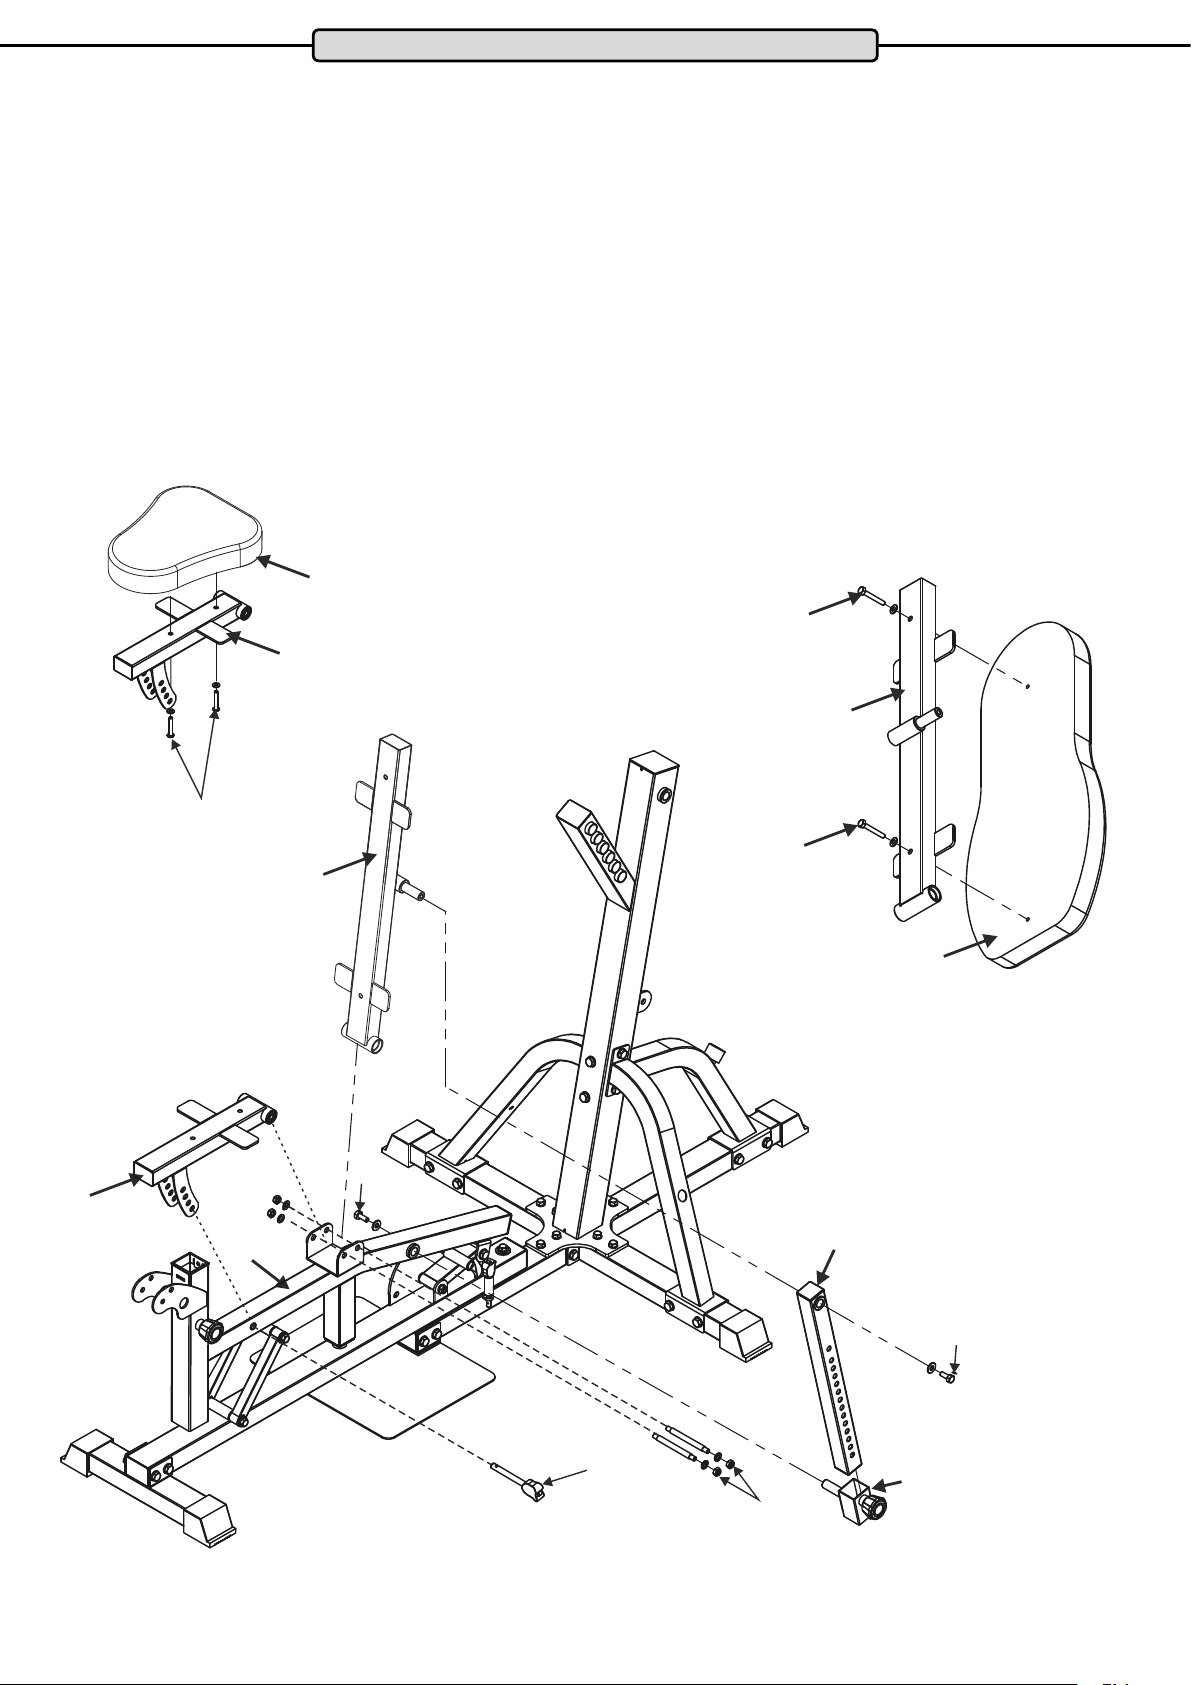
Assembly Step 3.1
Fix the seat cushion (49) using two screw sets (51) to the seat frame (38). Then x the back-rest cushion (52)
using two screw sets (51) to the back frame (39).
Next put the seat frame (38) using axle set (40) onto the bracket on the main frame (25) and x the height of the
seat frame with safety pin (29).
Slide the adjustment pin unit (41) from below onto the adjustment tube (42). Then place the adjustment tube
onto the axle of the back frame (39) and x it with screw set (A).
Then put the back frame (39) onto the bracket on the main frame (25) using axle set (40) and put the adjustment pin unit (41) into the drill hole with guide bushing in the main frame (25). Fix on the adjustment pin unit
(41) using screw set (B).
49
51
38
51
25
38
39
51
39
52
B
42
29
10
A
41
40
Page 11
Assembly
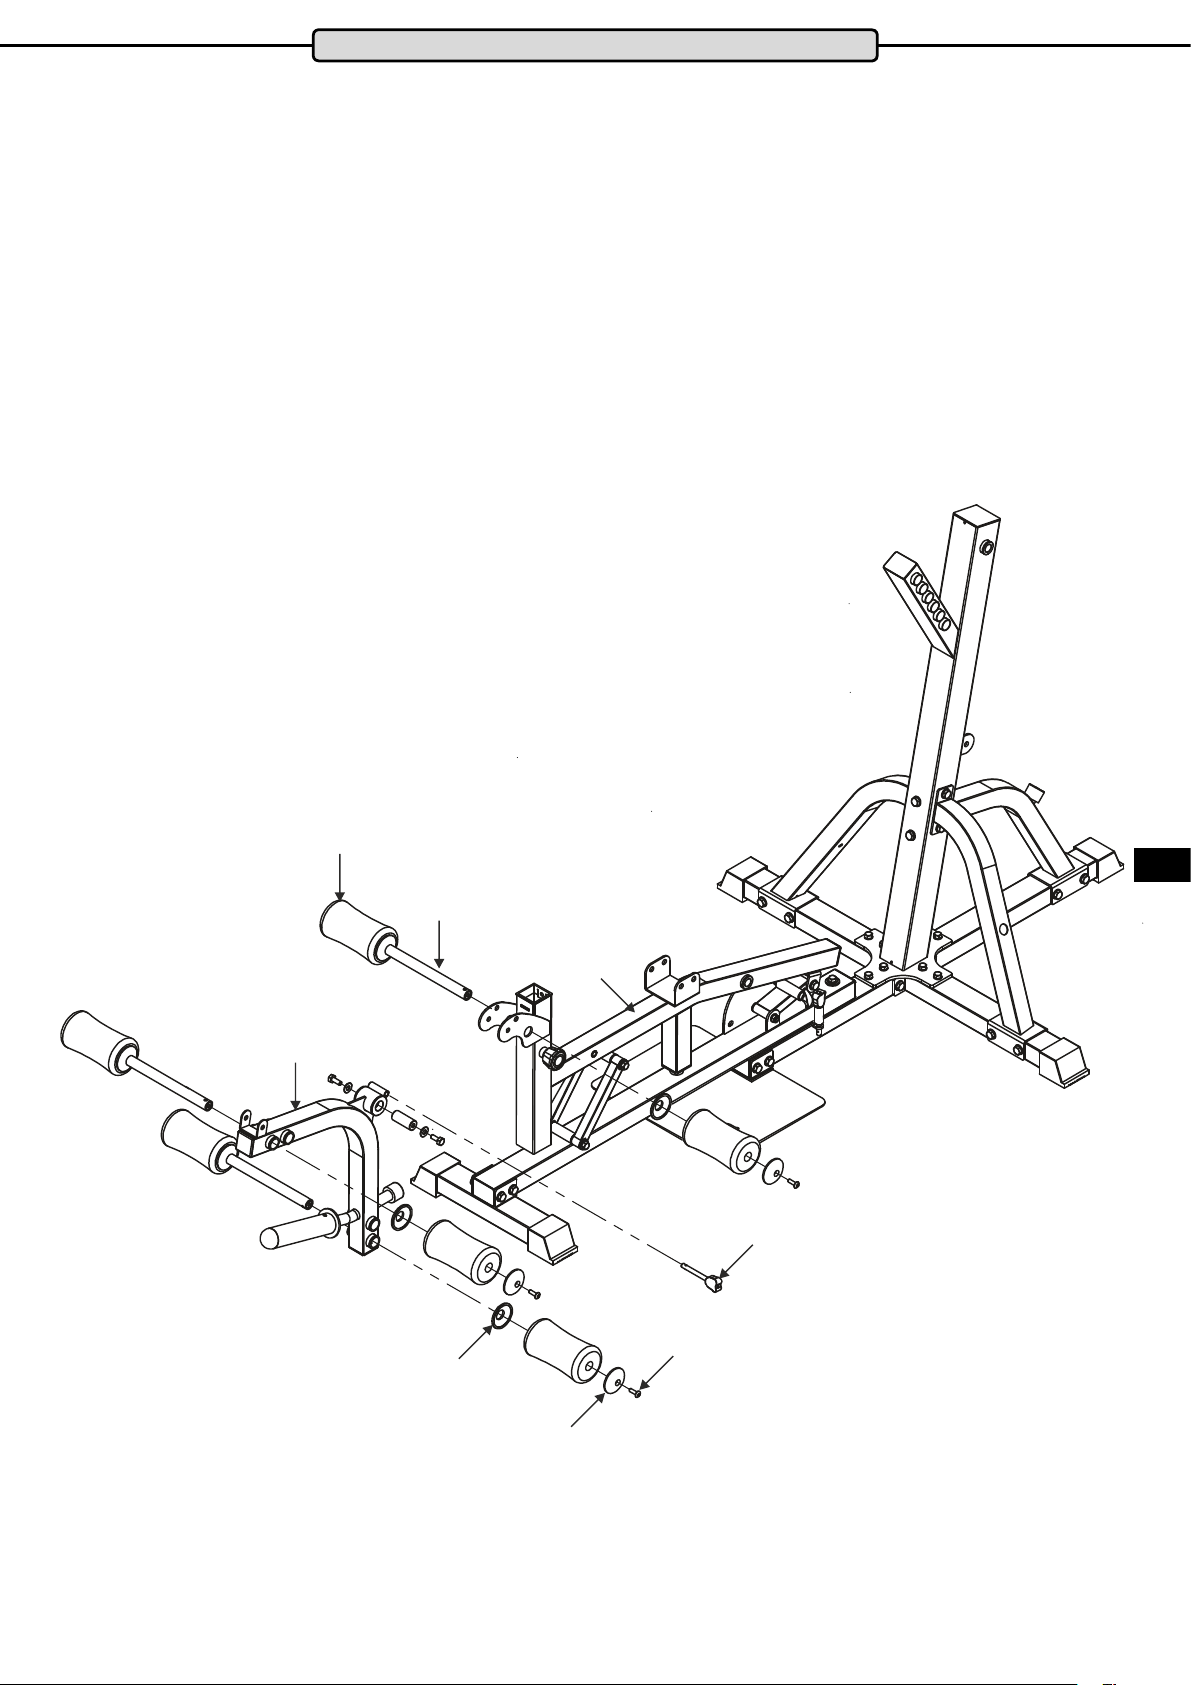
Assembly 3.2
Place leg curl (43) onto the front mount on the main frame (25) and x it left and right using a screw set (6)
Place the three tubes for the round cushions (44) into the mounts on the main frame (25) and into the front and
lower ends of the leg curl (43). Please note that the leg curl (43) has two possible positions for each of the tubes
(44). Choose the position which is suitable for the length of your legs.
Then on push an inner cover (59) onto each end of the tubes. Then slide a round cushion (58) onto the tubes
(44) at each side. Push another outer cover (60) onto each end of the tubes (44) and then x each of them with
a screw (61).
When not in use, x leg curl (43) using a safety pin (29).
43
58
ENG
44
25
29
61
59
60
11
Page 12
Assembly
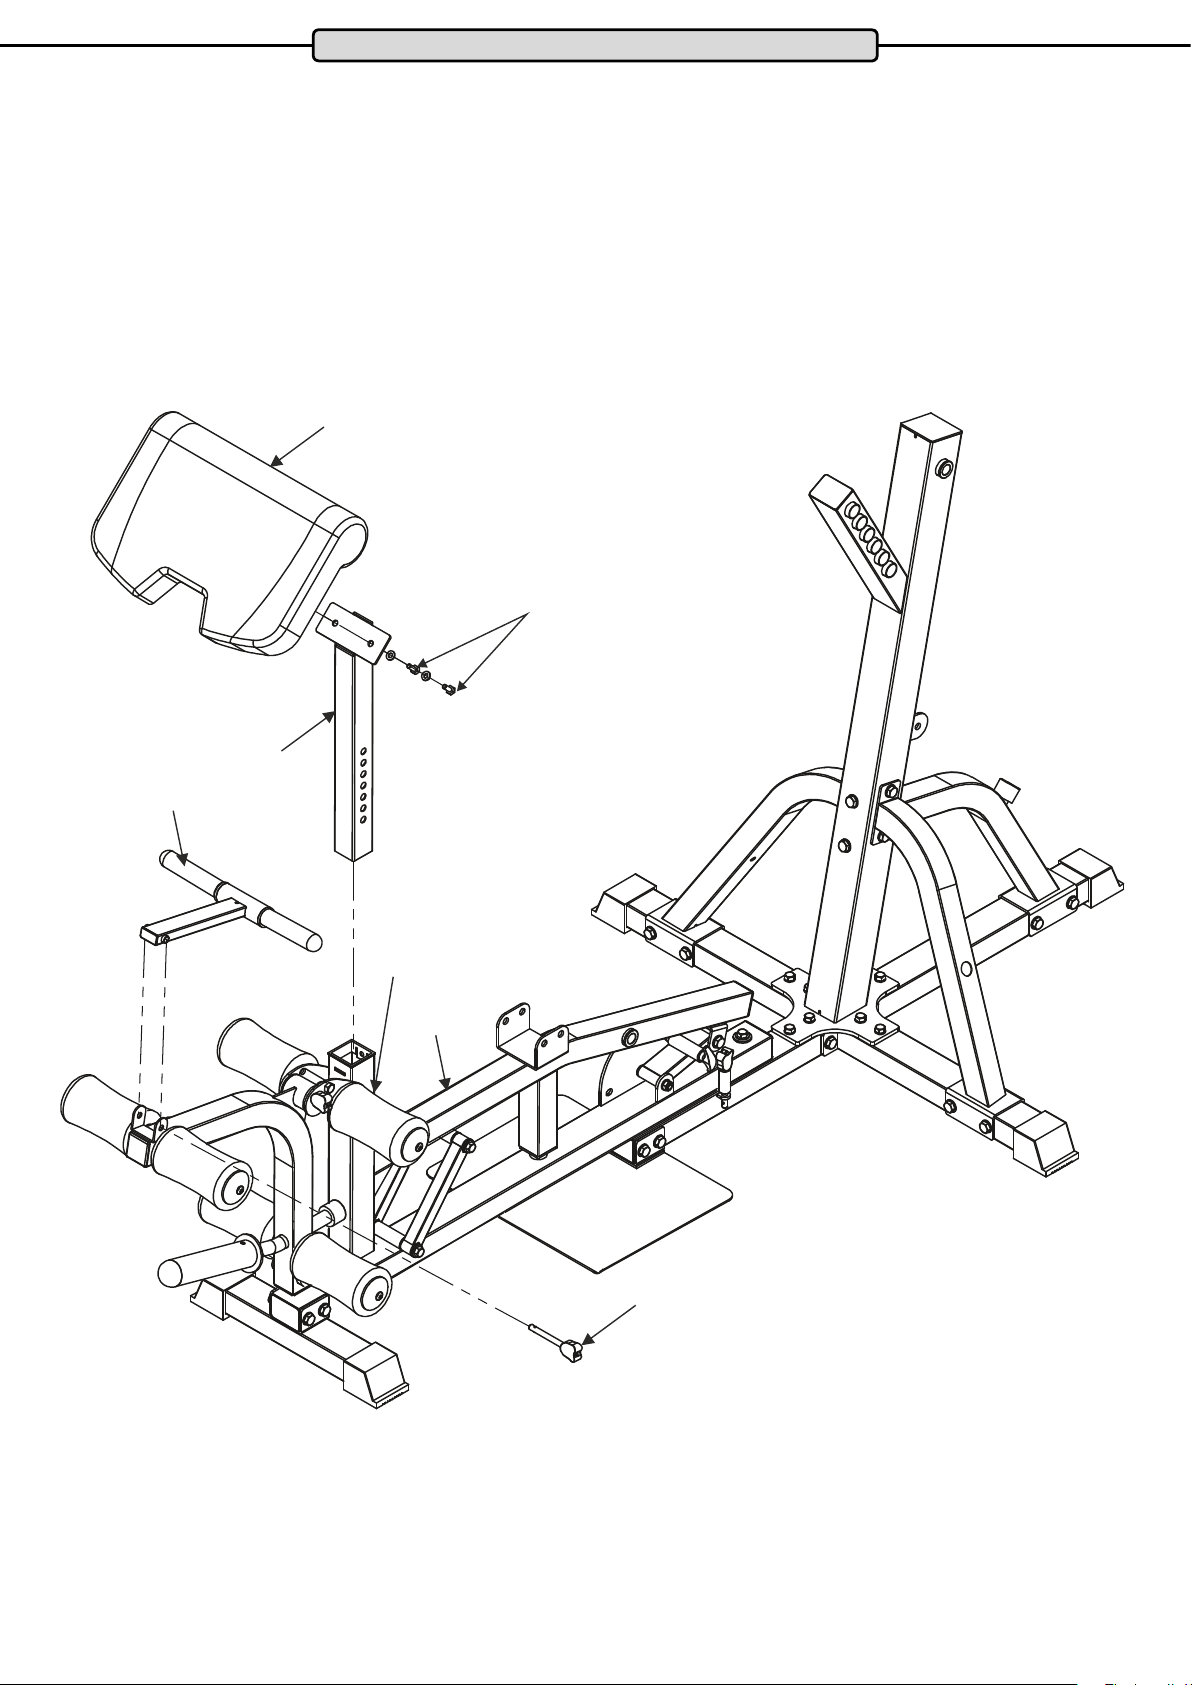
Assembly Step 3.3
Fix the arm curl cushion (66) with two screw sets (37) onto the arm curl tube (47). Next put the arm curl tube
(47) into the mount on the main frame (25) and x it in the required position using the knob (34).
Next x the hand grip on the arm curl (45) onto the leg curl (43) using a safety pin (29).
66
37
45
47
Handrad
25
29
12
Page 13
Assembly
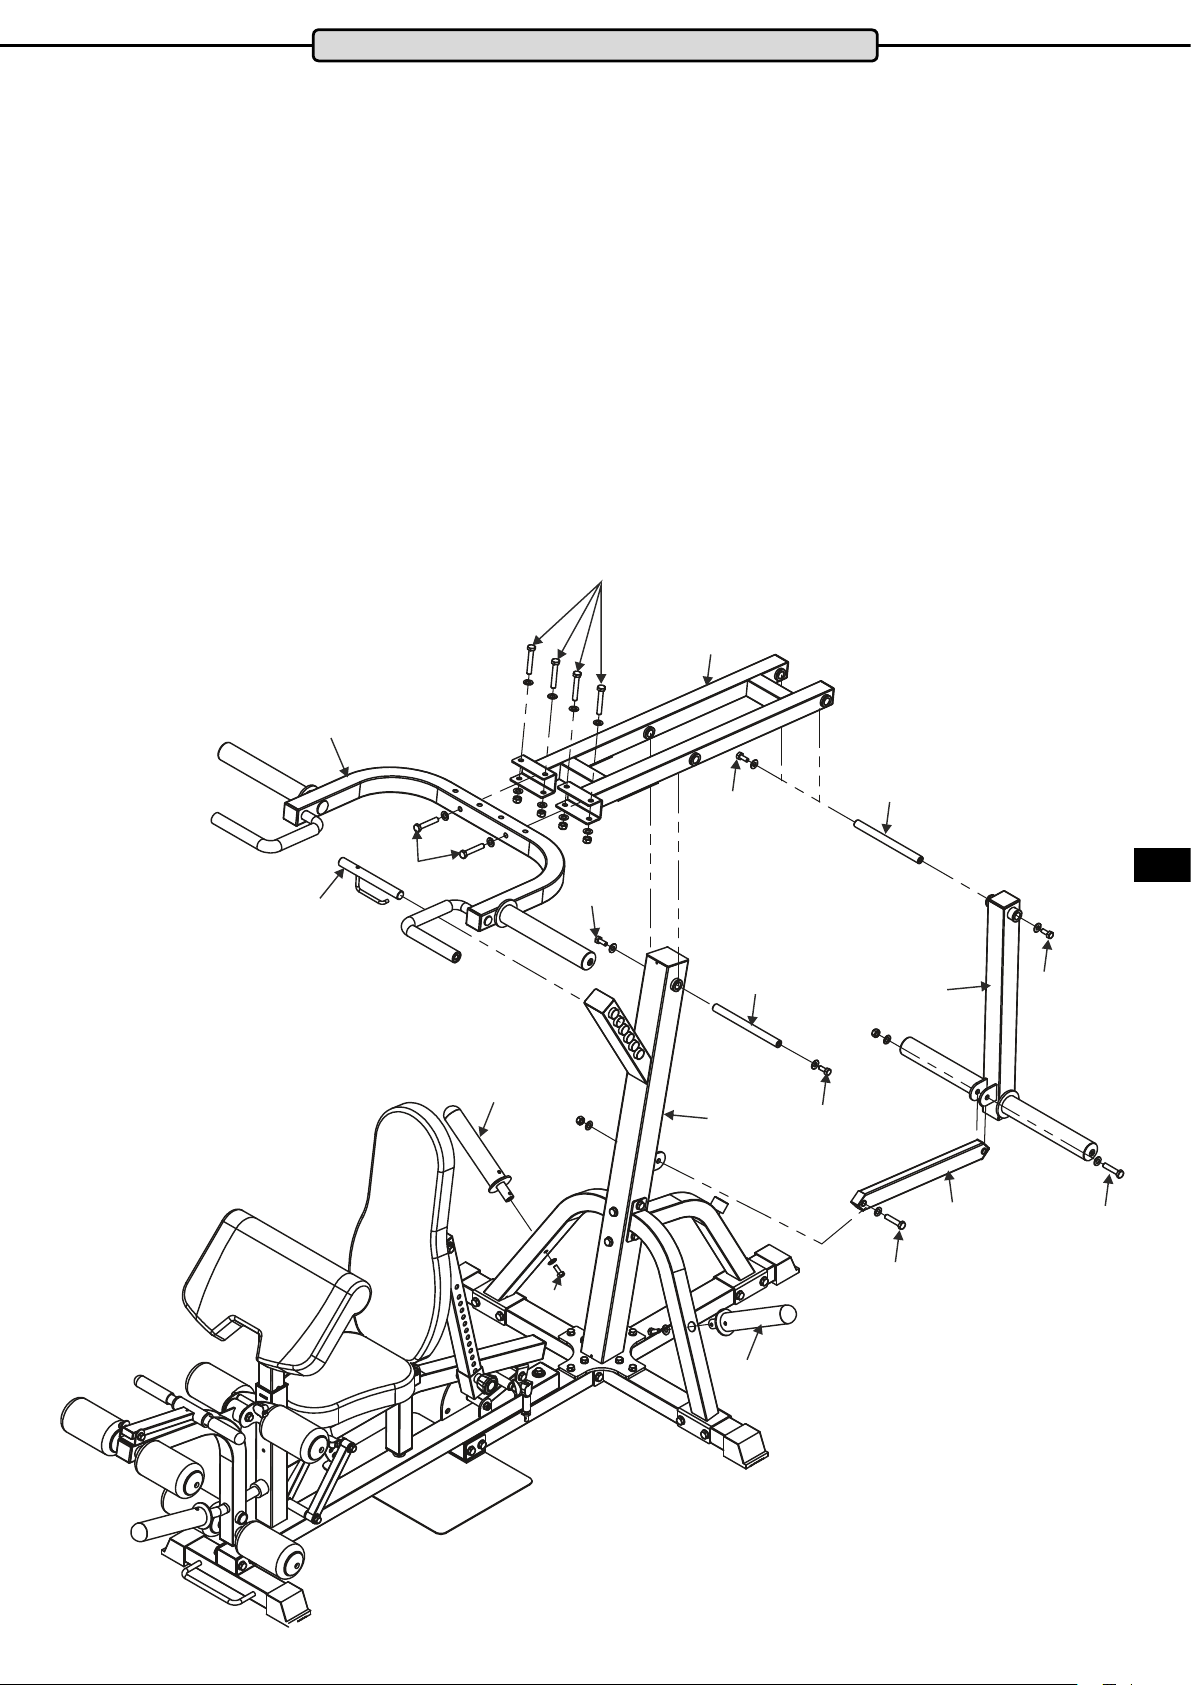
Assembly Step 4
Place the double frame (69) using axle (2) onto the top mount on the upright main frame (5) and x it with two
screw sets (6).
Next connect the weight support (70) and the upright main frame (5) to the connecting tube (71). To do this use
two screw sets (72).
Now place the bench press unit (74) into the front mount on the double frame (6) and x from above with four
screw sets (76) and at the front with two screw sets (75).
Using the safety bolt (73) adjust the incline of the bench press as required. Place the weight plate holders (78)
into the right and left supports (8-left/7-right) and x them each with a screw set (E).
76
73
74
75
78
69
6
2
ENG
6
2
5
6
70
71
6
72
E
72
78
13
Page 14
Care, Cleaning & Maintenance
Cleaning:
Clean the training device each time after training with a damp cloth to remove any sweat and or liquids. Do not
use solvents. Dry o the cleaned areas thoroughly.
Regular cleaning helps to keep your device in good condition and therefore also signicantly contributes to the
length of its service life. The costs of repairing a training device which has not been properly maintained will
not be covered in any way by the warranty.
Also clean the traction cables regularly.
Cleaning and Lubricating the Chrome Guide Pipes
The barbell bar guide pipes must also be cleaned and lubricated regularly to guarantee optimum smooth
running. To achieve this clean the guide pipes with a damp cloth and some liquid soap or washing up liquid.
Alternatively, you can use the MAXXUS® degreaser spray (optionally available). After this, dry the guide pipes
o thoroughly and lubricate them with MAXXUS® lubricant spray (optionally available) leaving a thin lm on the
surface.
With regular use you should lubricate the guide pipes once a month. If squeaking noises occur during training
the pipes require lubricating immediately. MAXXUS® degreaser and lubricating sprays are available from our
Online Shop at www.maxxus.com.
Maintenance
Checking the Fixing Materials
At least 1 x monthly you must check that the screws and nuts are tightened securely and tighten them if necessary.
Disposal
European Disposal Regulations 2012/19/EU
Do not dispose your training device in the normal household rubbish.
Dispose the device at a communal waste disposal facility or at a registered waste disposal company.
Observe current regulations which apply accordingly. If in doubt seek advice from your local government oce
or county council as to where you can dispose of the device properly and in an environmentally sound manner.
Batteries / Rechargeable Batteries
Batteries and rechargeable batteries should never be disposed of in the household rubbish.
Please be aware that all batteries can contain toxic substances and all consumers are obliged by law to dispose
these at an appropriate collection point either at your local government oce, county council or retail outlet.
If in doubt seek advice from your local government oce or county council as to where you can dispose batter-
ies properly and in an environmentally sound manner. Only dispose of batteries when they are empty.
Recommended Accessories
These accessories are the perfect supplement for your training device. All products are
available in our online shop at www.maxxus.com.
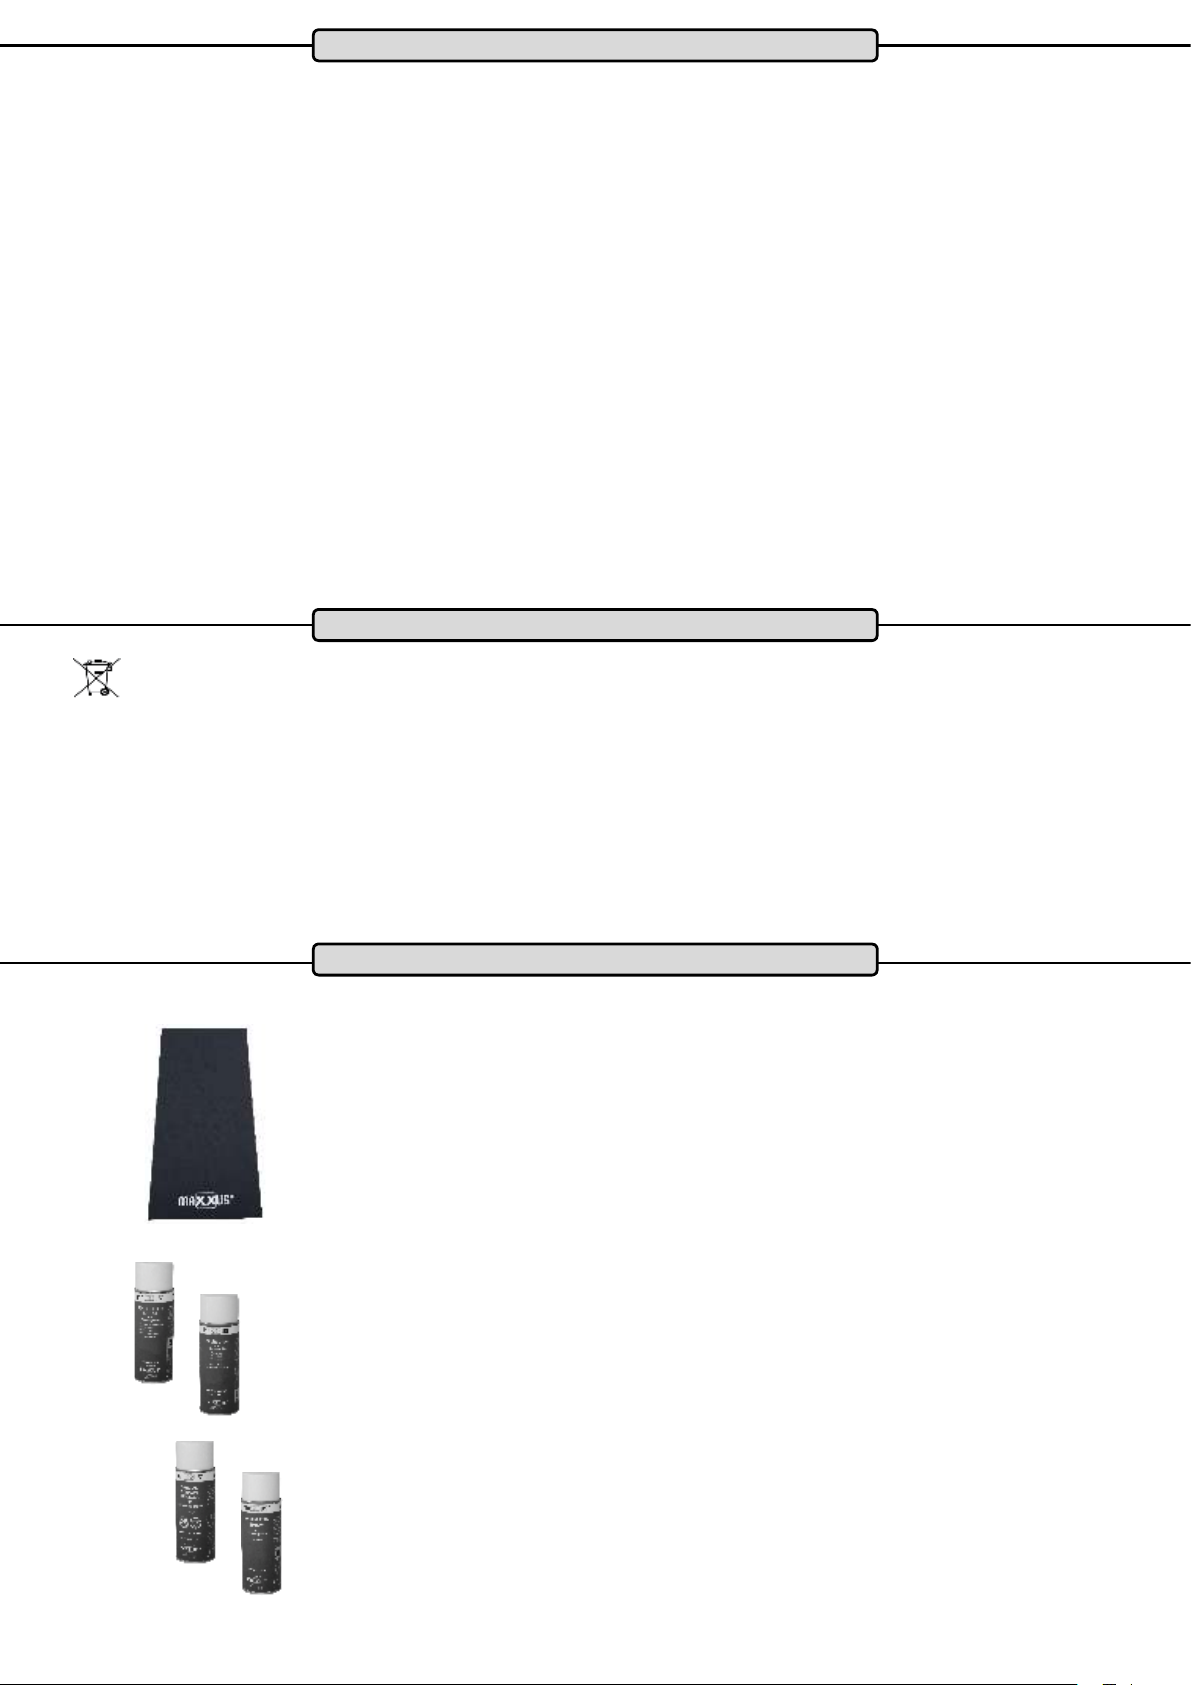
MAXXUS® Floor Protection Mats
Due to its extreme density and material thickness of 0.5 cm and 1.2 cm, these mats
provide perfect protection for oors and oor coverings against damaging, scratches
and soiling through body sweat. Noise caused by running and movement is signicantly
reduced.
Available in the following sizes:
− 160 x 90 cm – thickness 0.5 cm
− 210 x 100 cm – thickness 0.5 cm
− 100 x 100 cm - thickness 1.2 cm
MAXXUS® Degreaser Spray - Optimum cleaner for cleaning o dirt and maintaining the
guide pipes and roller surfaces.
MAXXUS® Lubricating Spray – Optimum lubrication for guide pipes.
MAXXUS® Anti-Static Spray – Eective against the static charges created in frames,
clothing and training computers. Devices which are located on carpets or synthetic oors
will become statically charged. MAXXUS ® Anti-Static Spray will deter this.
Synthetic surfaces treated with MAXXUS® Anti-Static Spray do not attract dust as quick-
ly and will remain clean for longer.
MAXXUS® Special Foam Cleaner – Use for regular cleaning of your training device.
Plastic covers and metal frames can be easily cleaned and perfectly maintained with
MAXXUS ® Special Foam Cleaner. It is also suitable for cleaning pulse belts and other
training accessories.
14
Page 15
Training Recommendations
Preparation Before Training
Before you start training make sure that not only your training device is in perfect condition, your body must also
be prepared for training. Therefore, if you have not done any endurance training for some time, you should con-
sult your GP and undergo a tness check-up. Also discuss your training target; they will certainly be able to give
you valuable advice and information. This applies to people who are over 35, have problems with overweight,
heart or circulatory system problems.
Training Plan
Essential to eective, target orientated, and motivating training is to have a forward-looking trainings plan.
Plan your tness training as an integral part of your daily routine. If you don’t have a xed plan, training can
easily interfere with regular commitments or continually be put o to another unspecied time.
If possible, create a long term monthly plan and not just from day to day or week to week. A training plan should
also include sucient motivation and distraction during training sessions. An ideal distraction is to watch TV
during training as this diverts your attention both visually and acoustically. Make sure that you reward yourself
and set realistic targets such as to losing 1 or 2kgs in four weeks or to increase your training time by 10 minutes
within two weeks for example. If you reach your targets, then reward yourself with a favourite meal which you
have not allowed yourself till then.
Warm-Up Before Training
Warm-up on your training device for 3-5 minutes at minimum resistance. This will best prepare your body for the
up-coming exertion in training.
Cool-Down After Training
Do not just get o your training device immediately the training session is nished. Like with the warm-up stage
you should continue for 3-5 minutes at minimum resistance to cool down. After training you should stretch your
muscles thoroughly.
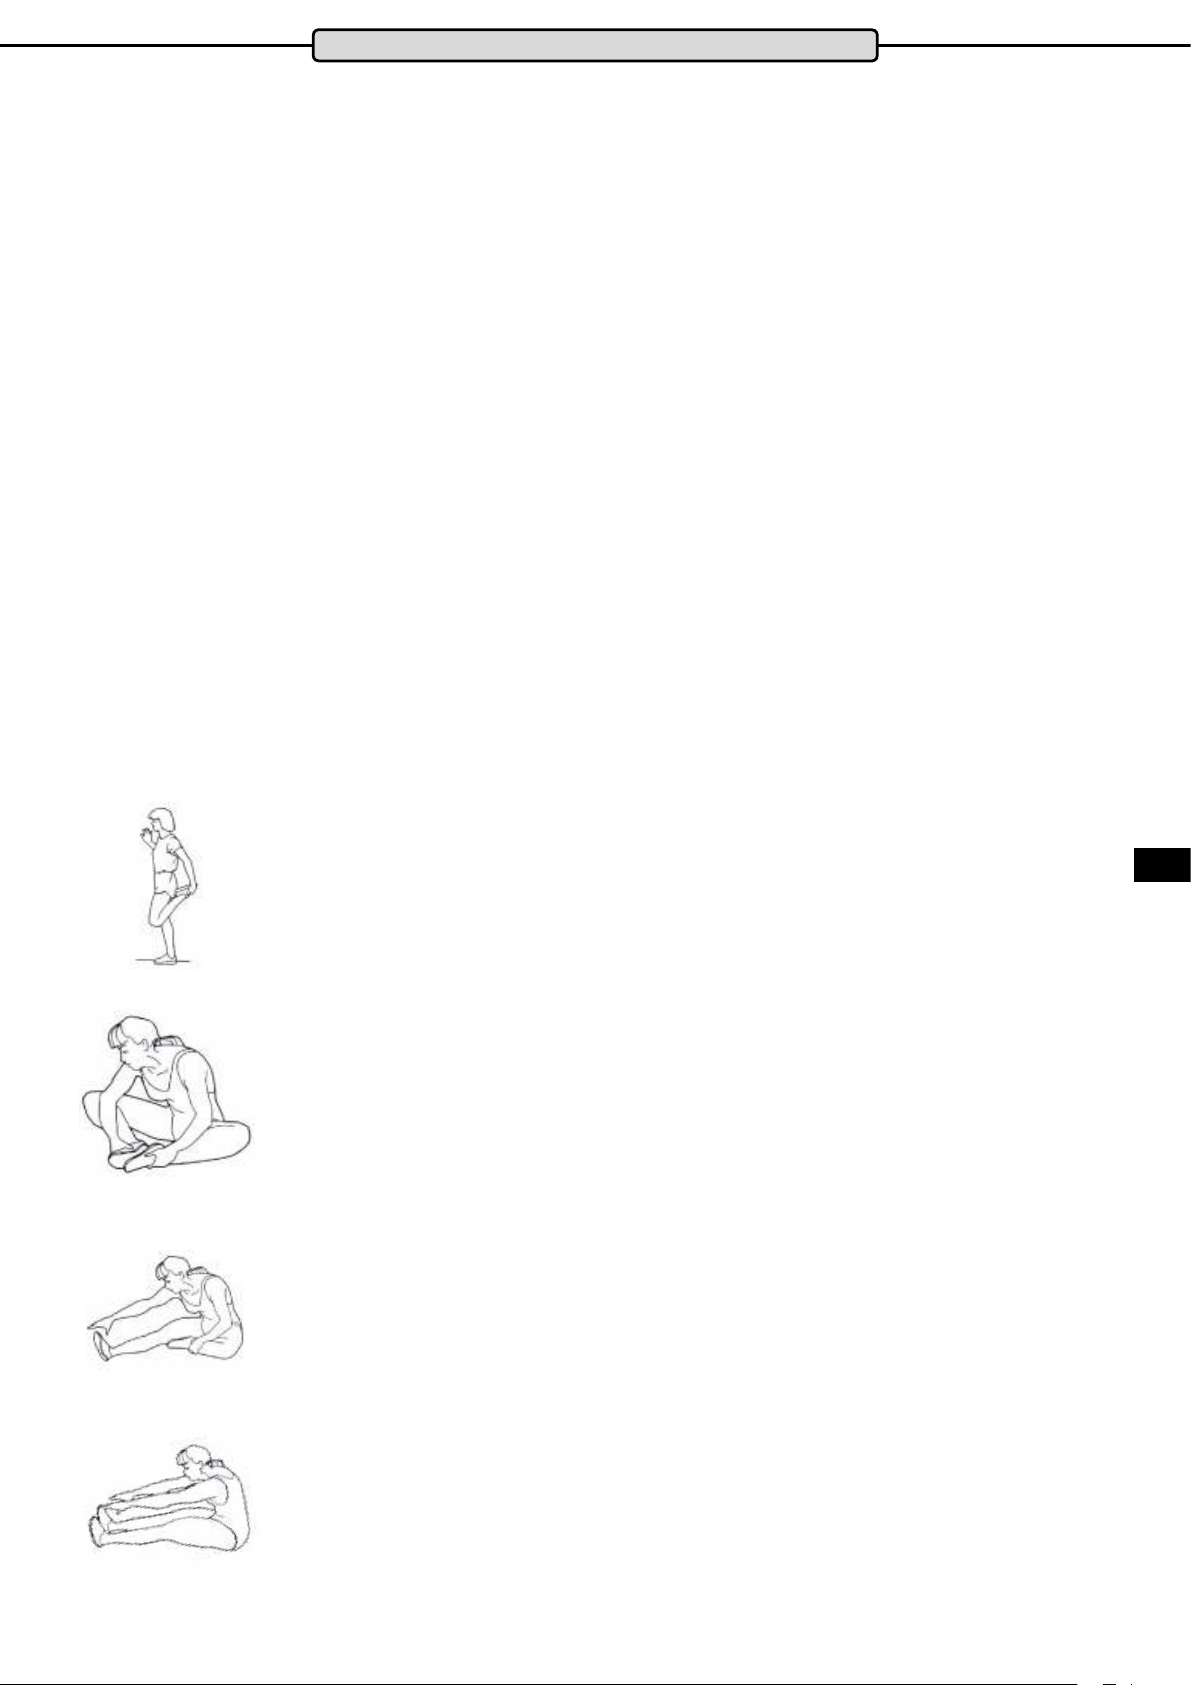
Front Thigh Muscles
Support yourself with your right hand against the wall or on your training device. Bend
your knee and raise your left foot backwards so you can hold it with your left hand. Your
knee should be pointing straight down to the oor. Pull your leg backwards until you feel
a light pulling in your thigh muscles. Hold this position for 10 to 15 seconds. Let your foot
go and stand it back on the oor. Repeat the exercise with your right leg.
Inner Thigh Muscles
Sit on the oor. Pull the soles of your feet together in front of you raising your knees
slightly. Grasp the upper sides of your feet and place your elbows on your thighs. Press
your thighs down towards the oor with your arms until you feel a light pulling in your
thigh muscles. Hold this position for 10 to 15 seconds. Make sure to keep your upper
body straight throughout the exercise. Release the pressure from your thighs and slowly
stretch out your legs to the front. Stand up slowly steadily.
Legs, Calves and Buttocks
Sit on the oor. Stretch out your right leg and bend your left leg to place the sole of your
foot on your right thigh. Bend your top body over so you can stretch out your right hand
to touch your right toes. Hold this position for 10 to 15 seconds. Let go of your toes and
sit slowly and steadily up straight again. Repeat this exercise with your left leg.
ENG
Leg and Lower Back Muscles
Sit on the oor with your legs stretched out. Stretch forward with your hands and try to
grasp the tips of your toes with both hands. Hold this position for 10 to 15 seconds. Let
go of your toes and slowly and steadily sit back up straight again.
15
Page 16
Training Recommendations
Intake of Liquids
The intake of sucient liquids before and during training is vital. During a 60-minute training session it is possible to lose up to 0.5 litres
of liquid. To compensate for this loss, you can drink a mix of one third apple juice to two thirds water to replace all electrolytes and min-
erals which your body loses through sweat. 30 minutes before you begin training you should drink approx. 330 ml. Make sure that you
take in enough liquids during training.
Training Frequency
Experts recommend doing weight training 3 to 4 days a week. You will of course reach your training target quicker if you train more
regularly.
Make sure that you allow for sucient breaks in your training plan to give your body time to recover and regenerate. After each training
session you should take at least a one-day break. The rule of “less is often more” even applies to tness and weight training!
Trainings Records
To optimise your training and make it as eective as possible you should work out a training plan, before you start training, which you
either write down or create a table for in your computer. Here you should make a record of training session and how you feel during the
training session.
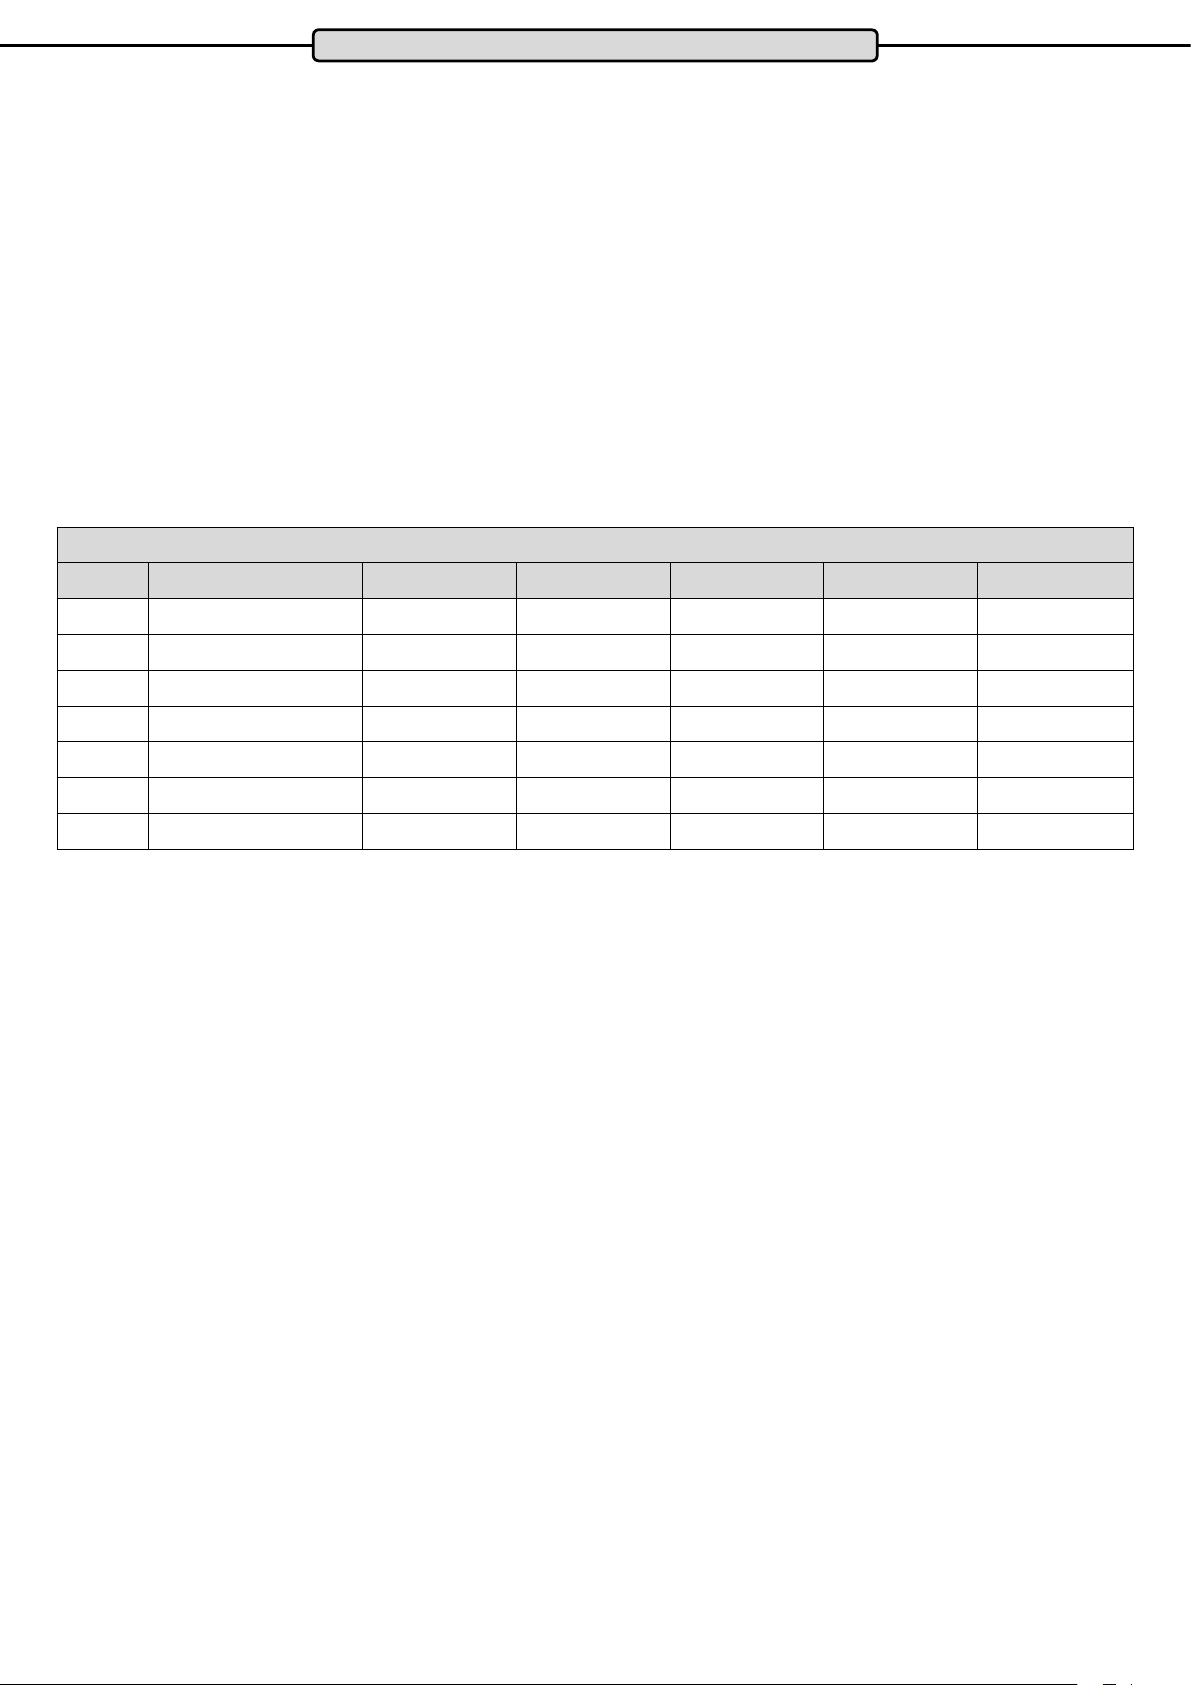
Here is a recommended weekly plan.
Calendar Week:_____ Year: 20____
Date Exercise Sequence 1 Sequence 2 Sequence 3 Sequence 4 Comments
___kg___Rep. ___kg___Rep. ___kg___Rep. ___kg___Rep.
___kg___Rep. ___kg___Rep. ___kg___Rep. ___kg___Rep.
___kg___Rep. ___kg___Rep. ___kg___Rep. ___kg___Rep.
___kg___Rep. ___kg___Rep. ___kg___Rep. ___kg___Rep.
___kg___Rep. ___kg___Rep. ___kg___Rep. ___kg___Rep.
___kg___Rep. ___kg___Rep. ___kg___Rep. ___kg___Rep.
___kg___Rep. ___kg___Rep. ___kg___Rep. ___kg___Rep.
Rep. = Repetition
Explanation of Terms:
Weight training exercises are usually made up of three or four training sequences. Each training sequence is normally made up of 10 to
12 repetitions of an exercise. At the end of each training sequence you should have a 1 to 2-minute recovery break.
Normally the weights used in training are increased from sequence to sequence.
A Training Session could be as follows:
1. Training Sequence – Training Weight 20 kg - 10 Repetitions
Break 1 Minute
2. Training Sequence – Training Weight 25 kg - 10 Repetitions
Break 1 Minute
3. Training Sequence – Training Weight 30 kg - 10 Repetitions
Break 1 Minute
4. Training Sequence – Training Weight 35 kg - 10 Repetitions
Break 1 Minute
16
Page 17
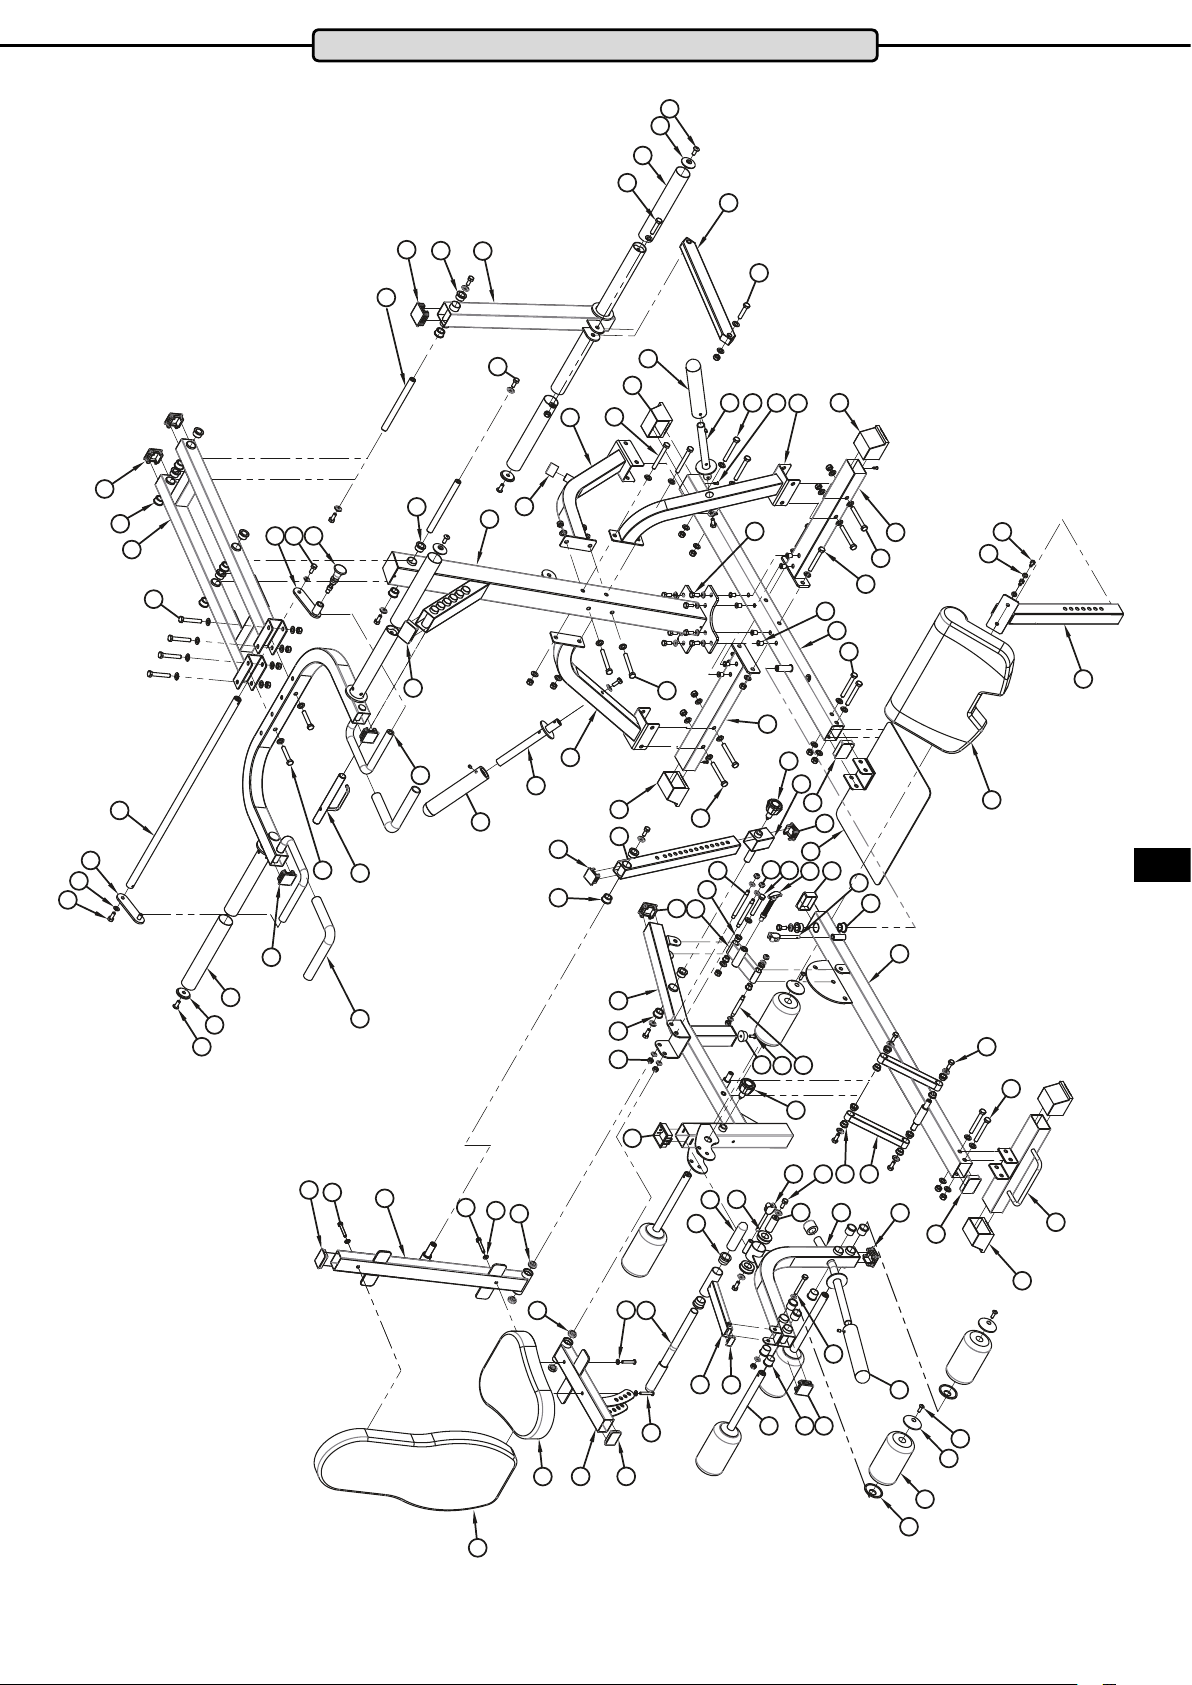
Exploded Drawing
6
81
80
72
71
79
16
70
72
68
6
9
35
16
69
76
77
85
10
6
6
84
83
75
17
13
74
73
16
5
8
78
56
53
16
56
12
10
11
12
42
35
3
7
78
15
6
4
3
27
40
30
23
12
4
3
3
14
1
3
34
41
13
53
2
28
31
13
29
16
37
67
47
66
ENG
35
80
81
6
82
50
51
39
51
67
48
48
49
52
25
16
27
33
62
67
64
45
51
50
38
36
26
37
34
6
29
55
65
63
57
46
44
54
35
21
6
3
24
25
43
35
13
56
61
60
58
59
22
12
17
Page 18
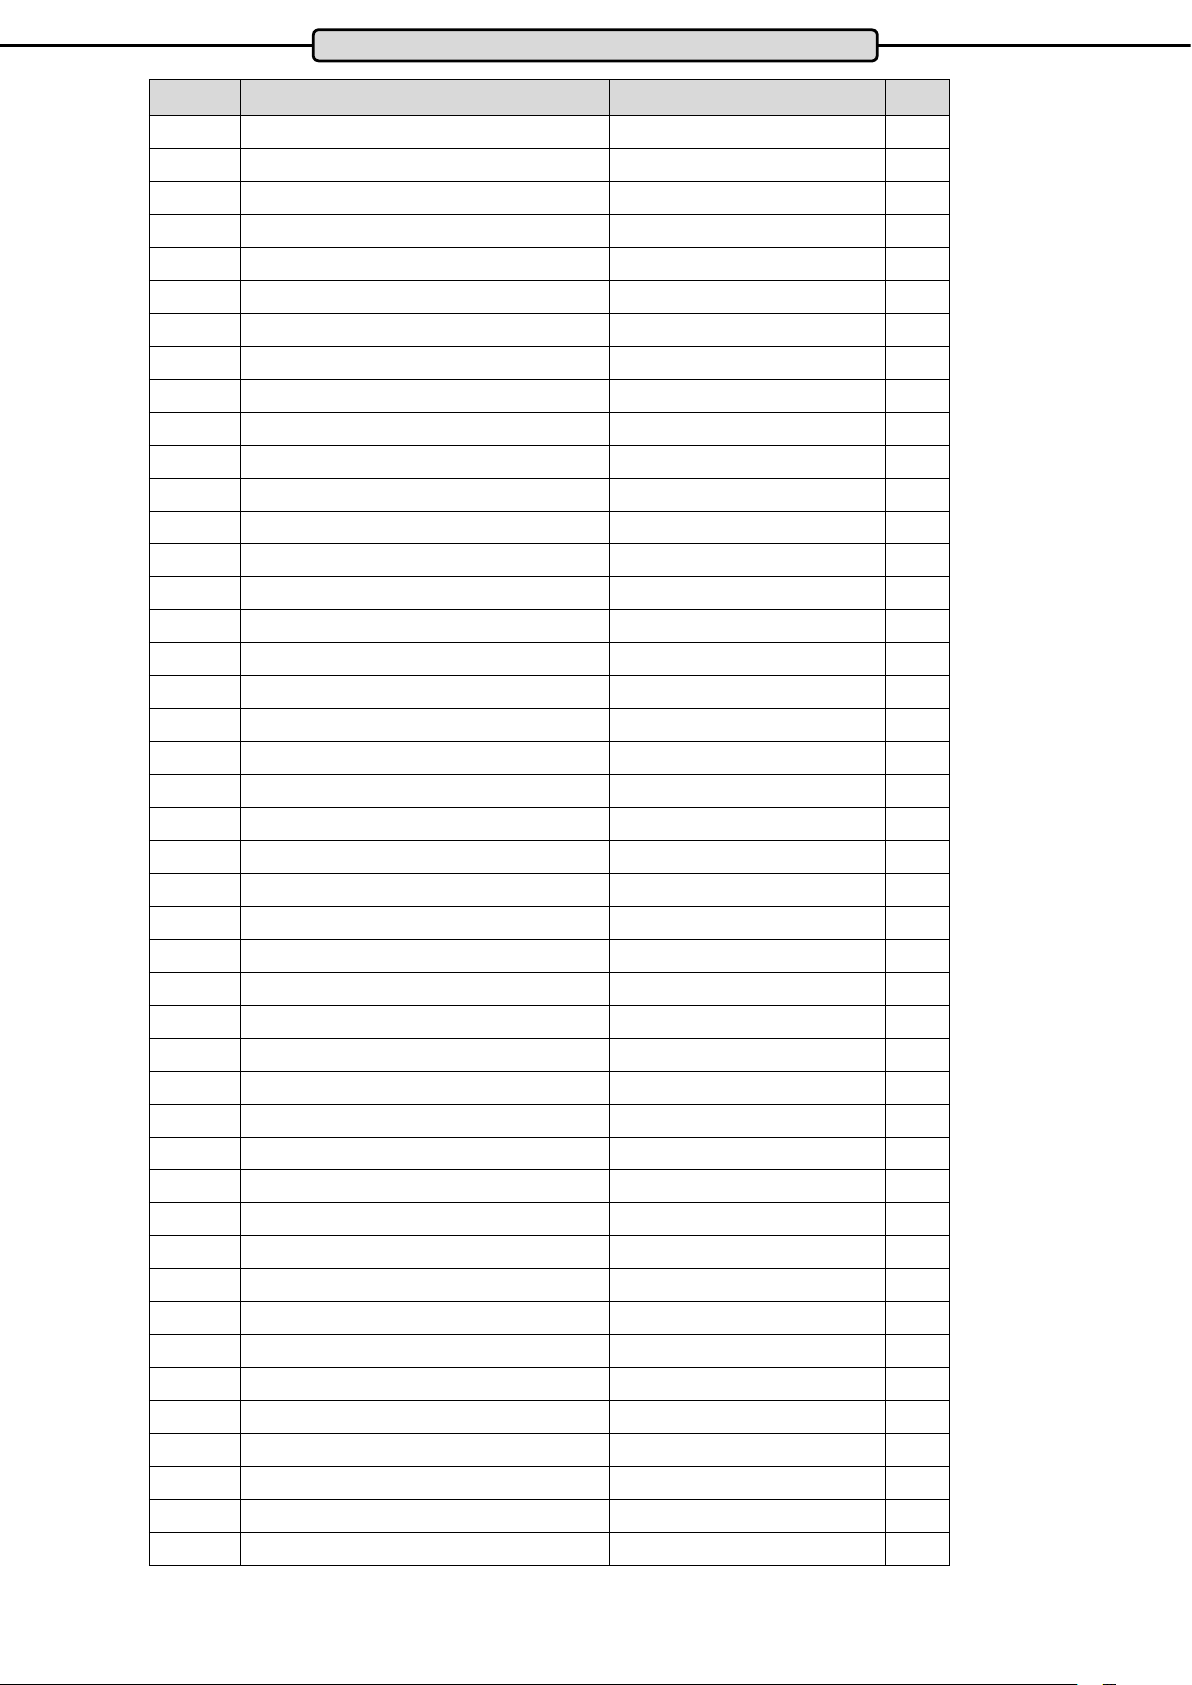
Parts List
Part No. Description Size Qty
1 under main frame 1
2 feet pad 1
3 bolt M12x95 12
4 side ground tube 2
5 stand tube 1
6 bolt M10x25 25
7 right side support tube 1
8 left side support tube 1
9 back support tube 1
10 bolt M12x105 2
11 bolt M12x100 2
12 tube cap □50-70 4
13 tube cap □50x70x2.0 4
14 nut M10 6
15 Countersunk head tapping screws ST4.0X16 2
16 Powder metallurgy set Ø32 18
17 rubber mat Ø40xØ25.5x29 2
18 shim Ø12 48
19 Lock nut M12 24
20 shim Ø10 31
21 ground tube 1
22 short ground tube 1
23 back side support tube 1
24 side support tube 2
25 seat bending tube 1
26 seat bending tube axis of rotation Ø12x92 1
27 lock nut M10 9
28 bolt M12x80 1
29 Flat head pin 4
30 Powder metallurgy set Ø22xØ18xØ12x15 4
31 Pull pin handle group 1
32 Powder metallurgy set Ø26xØ16x12 4
33 bush □60-□50 1
34 The plum ower pull pin 2
35 tube cap □50x50xt2.0 7
36 rubber mat Ø37xØ7x16 1
37 Hexagon socket button head screws M8x20 3
38 dumbbell chair seat frame 1
39 dumbbell chair back frame 1
40 axis Ø12x128 2
41 back pad adjust turning set 1
42 inside adjustable tube 1
43 leg lift bending tube 1
44 sponge tube 3
18
Page 19
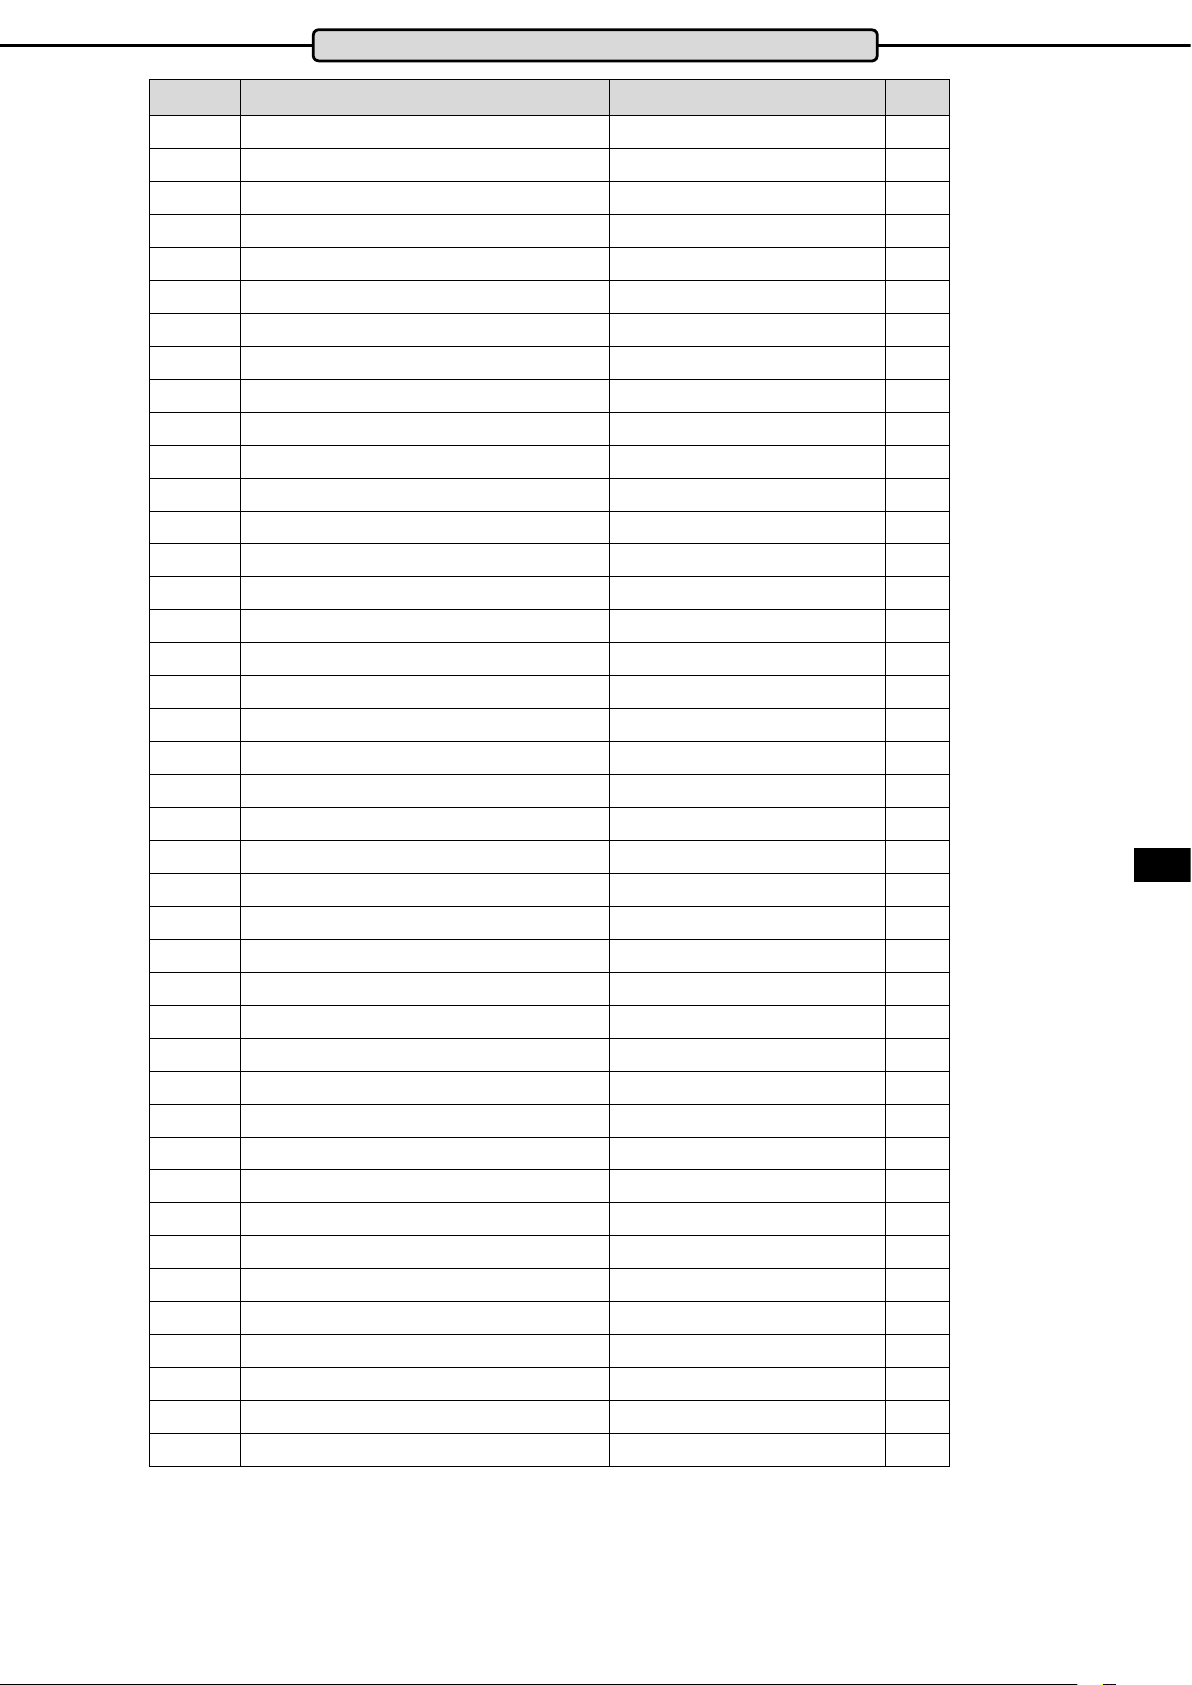
Parts List
Part No. Description Size Qty
45 pull bar 1
46 bolt M10x75 1
47 cheast pad 1
48 bearing 4
49 seat pad 1
50 tube cap 40x60 2
51 bolt M8x55 4
52 back pad 1
53 tube cap 45x45x2.0 2
54 shaft sleeve Ø32xØ25.8x25 8
55 Powder metallurgy set 2
56 sleeve 3
57 axis of rotation 1
58 sponge 6
59 inside sponge cap 6
60 outside sponge cap 6
61 Hexagon socket button head screws M8x25 6
62 sleeve Ø38xØ27.6x25 2
63 tube cap 20x40 1
64 pull bar 1
65 handlebar grip Ø25x110 2
66 cheast pad 1
67 shim Ø8 6
68 shoulder press connecting shaft Ø20x238 2
69 shoulder press double connecting 1
70 back barbell hanging tube 1
71 high pull connecting tube 1
72 bolt M12x55 2
73 handle limited tube 1
74 shoulder press bending tube 1
75 bolt M12x70 2
76 bolt M12x75 4
77 shoulder press set 1
78 barbell plate inside tube 2
79 tube cap 60x60 1
80 Stainless steel outer casing Ø51xt1.0x310 4
81 aluminium cap 4
82 handlebar grip 2
83 shoulder press connecting plate 1
84 pin 1
85 shoulder press connecting plate 1
ENG
19
Page 20
Notes
20
Page 21
Notes
ENG
21
Page 22
Warranty*
For MAXXUS® Support Team to help you as quickly as possible with service, we will require certain information
about your tness device and about you. To nd the exact spare parts required, we will need the product name,
date of purchase and serial number.
If necessary, please ll out completely the Repairs Contract/Damage Report form attached to this User Manual
and send it to us by post or by fax.
Areas of Application & Warranty Periods
Depending on the model, tness devices from MAXXUS® are suitable for use in dierent areas. Find the appropriate area of use for your tness device from the “Technical Data” in this User Manual.
Home Use:
Exclusively for private use
Warranty Period: 2 Years
Semi-Professional Use:
Use under instruction in hotels, physiotherapy practices, etc.
Use in a tness studio or similar establishment is hereby excluded!
Warranty Period: 1 Year
Professional Use:
Use in a tness studio or similar establishment under supervision by trained personnel.
Warranty Period: 1 Year
Use of your training device in an area which is not suitable for your device will cause immediate expiry of its
guarantee and cancel your right to claim warranty!
Sole private use and warranty period of 2 years assumes that the purchase invoice is made out to the end user.
Proof of Purchase and Serial Number
To claim your right to service works within the warranty period we will in each case require proof of purchase.
Keep your proof or purchase or purchase invoice in a safe place and in warranty cases send us a copy together
with your Repairs Contract/Damage Notication. This will ensure that we can process the service work as quickly as possible. So that we can identify which model version requires to be serviced correctly, we will require;
Product Name, Serial Number and Date of Purchase.
Terms and Conditions of Warranty:
The warranty period for your training device starts on the date of purchase and applies solely to products which
were purchased directly from the MAXXUS Group GmbH & Co KG or one of the MAXXUS Group GmbH & Co
KG direct and authorised distribution partners.
The warranty covers defects caused by production or material faults and only apply to devices purchased in
Germany. The warranty does not apply to damages or defects caused by culpable improper use, negligent
or purposeful destruction, lack or failure to carry out maintenance and/or cleaning measures, force majeure,
operational causes and to normal wear and tear, damages caused by penetration of liquids, damage caused by
repairs or modications made with spare parts from a dierent supplier. The warranty also does not apply for
damages due to faulty assembly or damages which occur because of faulty assembly. Certain component parts
will wear out during use or from normal wear and tear. This includes for example:
▪ Ball bearings ▪ Bearing bushings ▪ Bearings ▪ Drive belts ▪ Rollers
▪ Switches and push-buttons ▪ Treadmill belts (bands) ▪ Treadmill decks (running deck)
Signs of wear and tear on wearing parts are not items covered under the warranty.
For assistance with warranty service or warranty repair enquiries for devices not in Germany, please contact our
Service Department at MAXXUS Group GmbH & Co KGM by sending an Email to: [email protected] and
we will be happy to help.
Service Outside the Warranty and Ordering Spare Parts
The MAXXUS® Service Team is happy to be of assistance to help solve any problems with faults which may
arise following expiry of the warranty period, or in cases of defects arising which are not covered by the
warranty.
In this case please contact us by email direct to:
Orders for Spare Parts or Worn Parts should be sent along with information on the Product Name, spare part
description and number and the quantity required to:
Please be informed that additional xing materials such as screws, bolts, washers etc are not included in the
scope of delivery for individual spare parts. These should be ordered separately.
*Version: June/2016
22
Page 23
Service Contract
Device Details
Product Name: MAXXUS Multi-Press 6.0
Serial Number: _______________________________________
Date of Purchase: _____________________________________
Accessories: _________________________________________
Type of Use:
Private Use
Personal Details
Company: ___________________________________________
First Name: __________________________________________
Street: ______________________________________________
Post Code / Town/City: _________________________________
E-Mail: _____________________________________________
Fax. No.*: ___________________________________________
* The elds marked with an asterisk are optional. The remaining elds are mandatory elds that must be completed.
Fault Description
Please enter a short description of the error as precisely as possible below:
(For example, when, where and how does the error occur? Frequency, after which period, at what Use, etc ....)
Product Group: Multipress
Invoice Number: ______________________________________
Where Purchased: ____________________________________
________________________________________________
Commercial Use
Contact Person: _______________________________________
Second Name: ________________________________________
House Number: _______________________________________
Country: _____________________________________________
Tel.No.: _____________________________________________
Mobile No.*: __________________________________________
A copy of the proof of purchase / invoice / receipt is attached.
I accept the General Terms and Conditions of MAXXUS® Group GmbH & Co. KG.
I hereby instruct the company MAXXUS® Group GmbH & Co. KG to repair the above defects. In Warranty cases I will not be charged
for the cost. The costs for repairs which are excluded from liability for defects in quality will be charged to me and must be settled
immediately. In cases of repairs carried out on site, our sta are entitled to collect payment. This agreement is conrmed with here with
my signature.
Date Location Signature
Please be aware that contracts can only be processed if this form has been completed in full. Be sure to attach a copy of your purchase
invoice. Send the fully completed Service Contract to:
ENG
Post*: Maxxus Group GmbH & Co KG, Service Department, Zeppelinstr. 2, 64331 Weiterstadt
Fax: +49 (0) 6151 39735 400
E-Mail**: [email protected]
* Please stamp with sucient postage – letters which are not sent postage paid will unfortunately not be accepted.
** Submission by E-Mail is only possible as a scanned document with original signature.
You are welcome to use our online form “Service Contract” which you will nd under the “Service” section at www.maxxus.com
23
Page 24
Maxxus Group GmbH & Co. KG
Zeppelinstr. 2
D-64331 Weiterstadt
Germany
E-Mail: [email protected]
www.maxxus.com
 Loading...