

Page 1
User Guide
4.
0
ENG
© 2017 by MAXXUS Group GmbH & Co. KG
All rights reserved
This publication may not be reproduced, stored in retrieval system, or transmitted in whole or in part, in any form or by any means, electronic,
mechanical, photocopying, recording, or otherwise, without the prior written permission of Maxxus Group GmbH & Co. KG.
Duplication, including electronic form, is only permitted with prior written permission directly from MAXXUS Group GmbH & Co. KG.
Errors, colour and technical modication are subject to change
Page 2

Index
Index 2
General Information and Warnings 2
Safety Instructions 3
Overview of the Device 4
Operation 5-8
Manual Training 9
Training Programs 10
Training Frequencies 11
Training 12 - 13
Mains Connection 14
Attaching the Training Belts 10
Recommended Accessories 14
Technical Information 15
Cleaning and Maintenance 15
Location & Storage 15
Technical Details 16
Error Messages 16
Disposal 16
Exploded Drawing and Parts List 17
Warranty 18
Damage Report / Repairs Contract 19
General Information and Warnings
Training with a vibration plate is a very comprehensive training method, which in addition to inuencing the muscles it also inuences
the rest of the body. For example, blood circulation is stimulated, and body metabolism is improved. For some years, professional and
top athletes have used vibration equipment in training for its intensive and eective athletic eects, and for therapeutic purposes.
In tness gyms vibration plates are now often found and they are becoming increasingly popular and enjoyed by more and more users.
Due to the gentle but also highly eective training with vibration plates, many physiotherapy practices use these devices to build muscles up again after injuries or for rehabilitation purposes. With the appropriate professional advice from your therapist, you can now use
a vibration plate at home for both therapeutic and sport training purposes.
Please keep in mind when planning your workouts that training with a vibration plate, while being very gentle on the body, is still very in-
tense. Therefore, give your body enough time to rest between each individual training. In addition to the intensive and eective muscle
training provided by a vibration plate, it also has other, very positive eects on the body.
For example, this type of training has a major impact on bone density. The metabolism is optimally stimulated by the vibrations, and this
can have a positive eect on the fat loss.
If the following points apply to you, you should always clarify in advance with your doctor, if and how training with a vibration plate could
be good for you:
− Pacemaker
− Tumors
− Epilepsy
− Acute wounds
− Freshly used spiral
− Acute inammation
− Metal or plastic based implants
− Kidney, gallbladder and / or bladder stones
− Diabetes
− Disc degeneration
− Cardiovascular diseases
If you have any medical conditions, restrictions or complaints that are not mentioned here, please discuss with your consulting doctor
or therapist if and how you should train on this device before you start training.
− Thrombosis
− Metastases
− Recent operations
− Pregnancy
− Acute fractures
− Acute infections, eg. u-or similar
− Dental implants
− Muscle and joint diseases
− Deformation of bones and / or joints
− Heart and Cardiovascular Diseases
2
Page 3
Safety Instructions
Please read and observe all sections of this Operating Manual. Thorough attention should always be paid to the safety
instructions, the maintenance instructions and the training information.
It is very important to adhere strictly to the maintenance and safety instructions and maintenance instructions contained in
this Manual.
This training device is only to be used for its intended purpose. If this equipment is used for any other purposes than intended, there is a possible risk of accident, damage to health or damage to the training device. The Distributor cannot be held
responsible in these circumstances.
Electrical Connection
− A mains voltage of 220-230V is required for the training operation of the device.
− The training device may only be connected using the supplied power cord to a grounded, individually protected 16 A
socket installed by a professional electrician.
− Always disconnect the electric plug from the power outlet if you want to change the location of the tness device.
− Always disconnect the electric plug from the mains before carrying out any cleaning, maintenance or other work.
− Do not use socket strips or cable reels when connecting the electric plug to a socket.
− When using a cable extension, make sure that it complies with the guidelines and regulations of the VDE.
− Always lay the power cable in such a way that it cannot be damaged or cause a tripping hazard.
− Electrical appliances such as tablet PCs, smart phones, PC, TV (LCD, plasma, tubes, etc.), game consoles, etc.
send out electromagnetic radiation during their operation and in stand-by mode. Keep these devices away from your
exerciser as they may cause malfunctions, interference and incorrect information, especially during heart rate measurement.
Training Environment
− Select a suitable space for your training device to provide an optimum amount of free space and highest level of safe-
ty. You should leave a free space of at least 150 cm behind, 150 cm to each side and a minimum of 100 cm in front of
the training device.
− Make sure that the area is well ventilated and that an optimum amount of oxygen is available during training. Avoid
draughts.
− Your training device is not suitable for outside use and so storage and training can only take place in a temperate,
clean dry room.
− Do not operate or store your training device in wet areas such as in swimming pools, saunas etc.
− Make sure that your training device is kept on at, hard, clean ground both in operation and at rest. Any uneven surfac-
es must be removed or made good.
− It is recommended that a oor covering (carpet, mat, etc.) should be placed under the device to protect damageable
oors such as wood, laminates, oor tiles etc. Please ensure that this underlay cannot slip or slide.
− Do not put this training device on pale or white coloured carpets or rugs as the feet of the device may leave marks.
− Make sure that your training device and mains cable are kept out of contact with hot surfaces and are kept at a safe
distance from any sources of heat e.g. central heating, hot stoves, furnaces, ovens or open res.
ENG
Personal Safety Instructions for Training
− The mains cable should be removed while the device is not in use to avoid any misuse or uncontrolled use by a third
party, for example, by children
− You should have a health check carried out by your doctor before you start any training
− Stop training immediately if you feel physically unwell or are experiencing any breathing diculties.
− Always start your training session at a low workload increasing it slowly but steadily throughout. Reduce the workload
again towards the end of your training session.
− Suitable sports shoes and clothes should always be worn during training sessions. Make sure that loose clothes do not
get caught up in the treadmill belt or rollers.
− Your training device is only to be used by one person at a time.
− Check each time before a training session to see if your device is in perfect condition. Never use your training device if
it is faulty or defective.
− You are only permitted to carry out repairs to the device yourself after having contacted our Service Department and
on receipt of explicit permission to do so. Only original spare parts may be used at any time.
− Your training device must be cleaned after each use. Remove all dirt including body sweat or any other liquids.
− Always make sure that liquids (drinks, body sweat, etc.) do not get onto the vibrating plate or into the cockpit as this
can cause damage to the mechanical and electronic components.
− Your training device is not suitable for use by children. Children under 12 years are not permitted to use this device.
Children over 12 years are permitted to use the device but only under the supervision of an adult.
− Third parties, especially children and animals, must be kept at a safety distance of at least 3m from the device during
training.
− Check if there are any items underneath the training device before each training session and remove them without fail.
Never use the training device when items are underneath it.
− Do not allow children to use your training device as a toy or climbing frame at any time.
− Ensure that no body parts of your own or of third parties ever get into contact with any of the moving mechanisms.
The construction of this training device is based on state-of-the-art technology and highest modern technical safety standards. This training device is to be used by adults only! Extreme misuse and/or unplanned training can cause damage to
your health!
3
Page 4
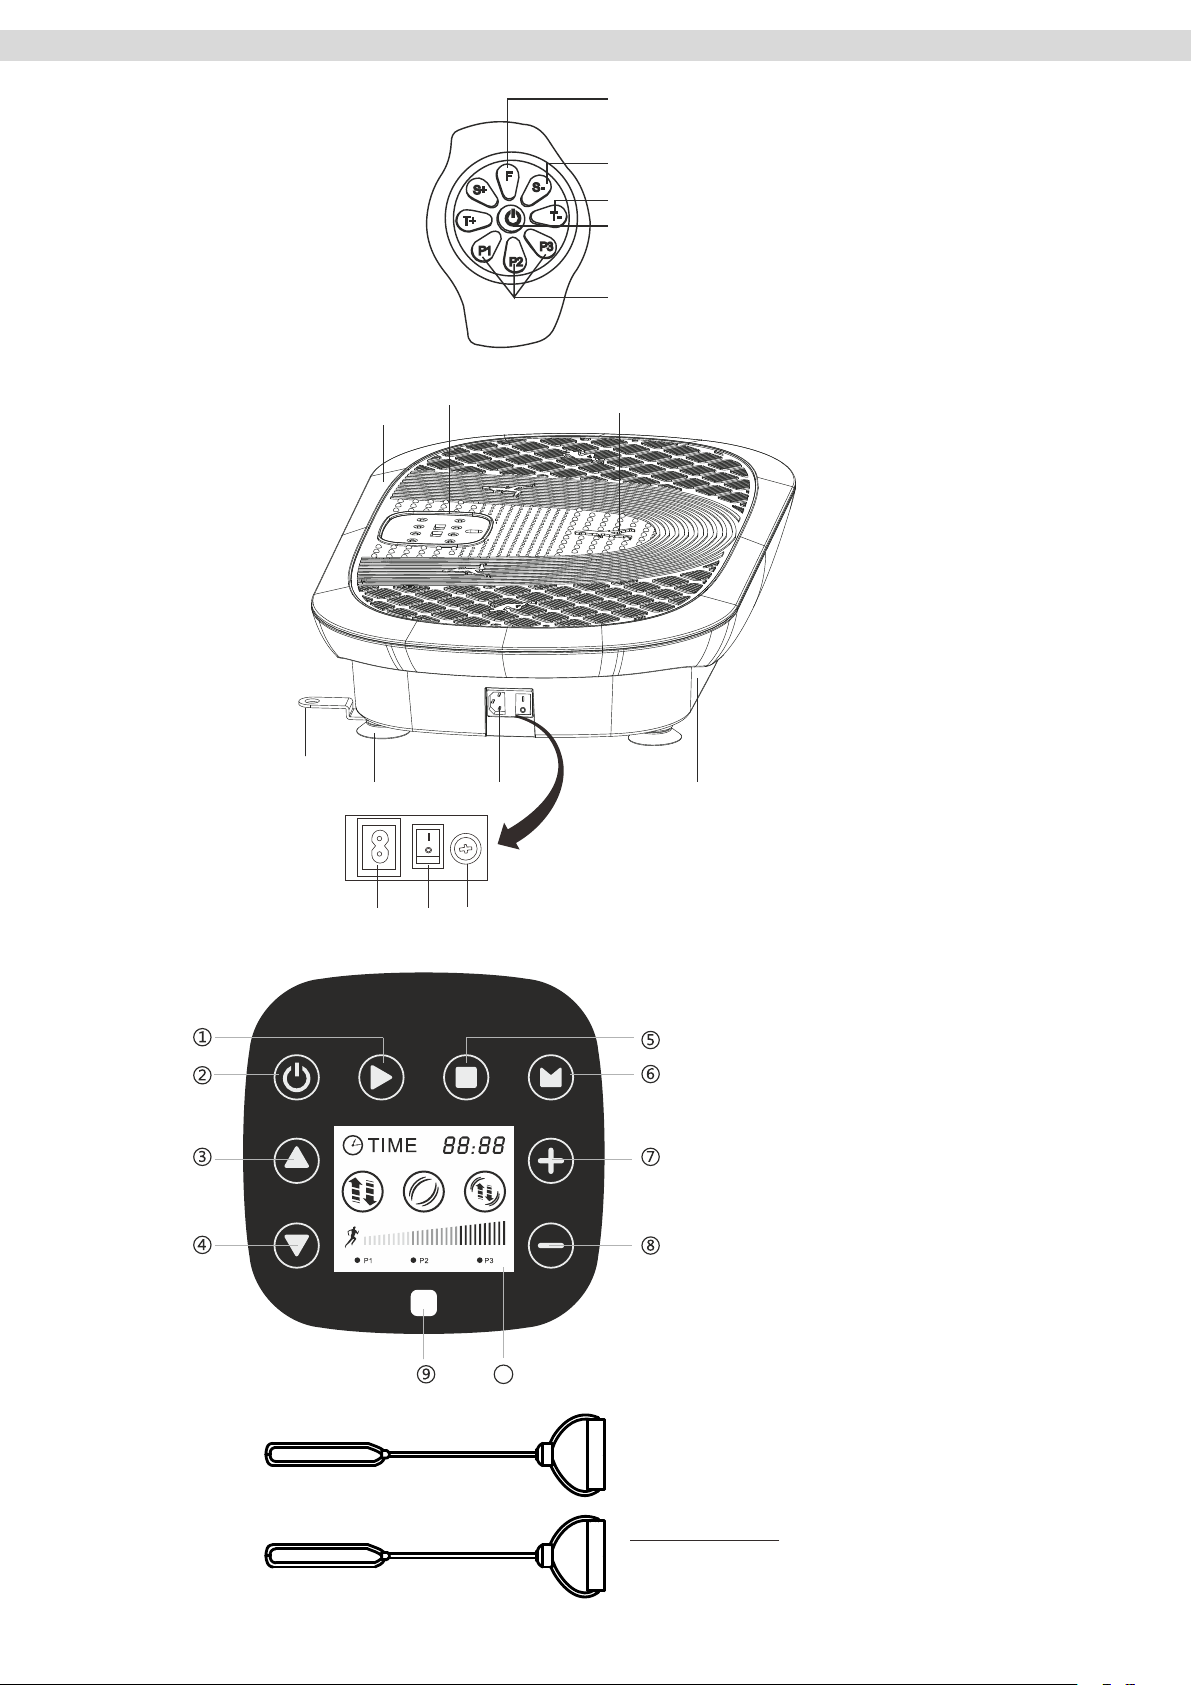
Overall View of the Device
1
Remote Control
2
3
4
5
1. Functions
2. Speed (S+/S-)
3. Time (T+/T-)
4. Power
5. Programs (P1/P2/P3)
A
B
C
Vibration Plate
A Housing, top
B Computer & Display
C Training Surface
D
E
F1
F2
F
F3
G
D Bracket for Training Belt
E Foot
F Electronic Unit
F1 Power Cable Connection
F2 Main Switch
F3 Fuse
G Housing, bottom
Key Pad
1. START
2. POWER
3. SPEED +
4. SPEED –
5. FUNCTIONS
6. MODE
7. TIME +
8. TIME –
9. Receiver for remote control signal
10. Display
10
Accessories
Training Belt
4
Page 5

Operating Instructions
Operating the Display
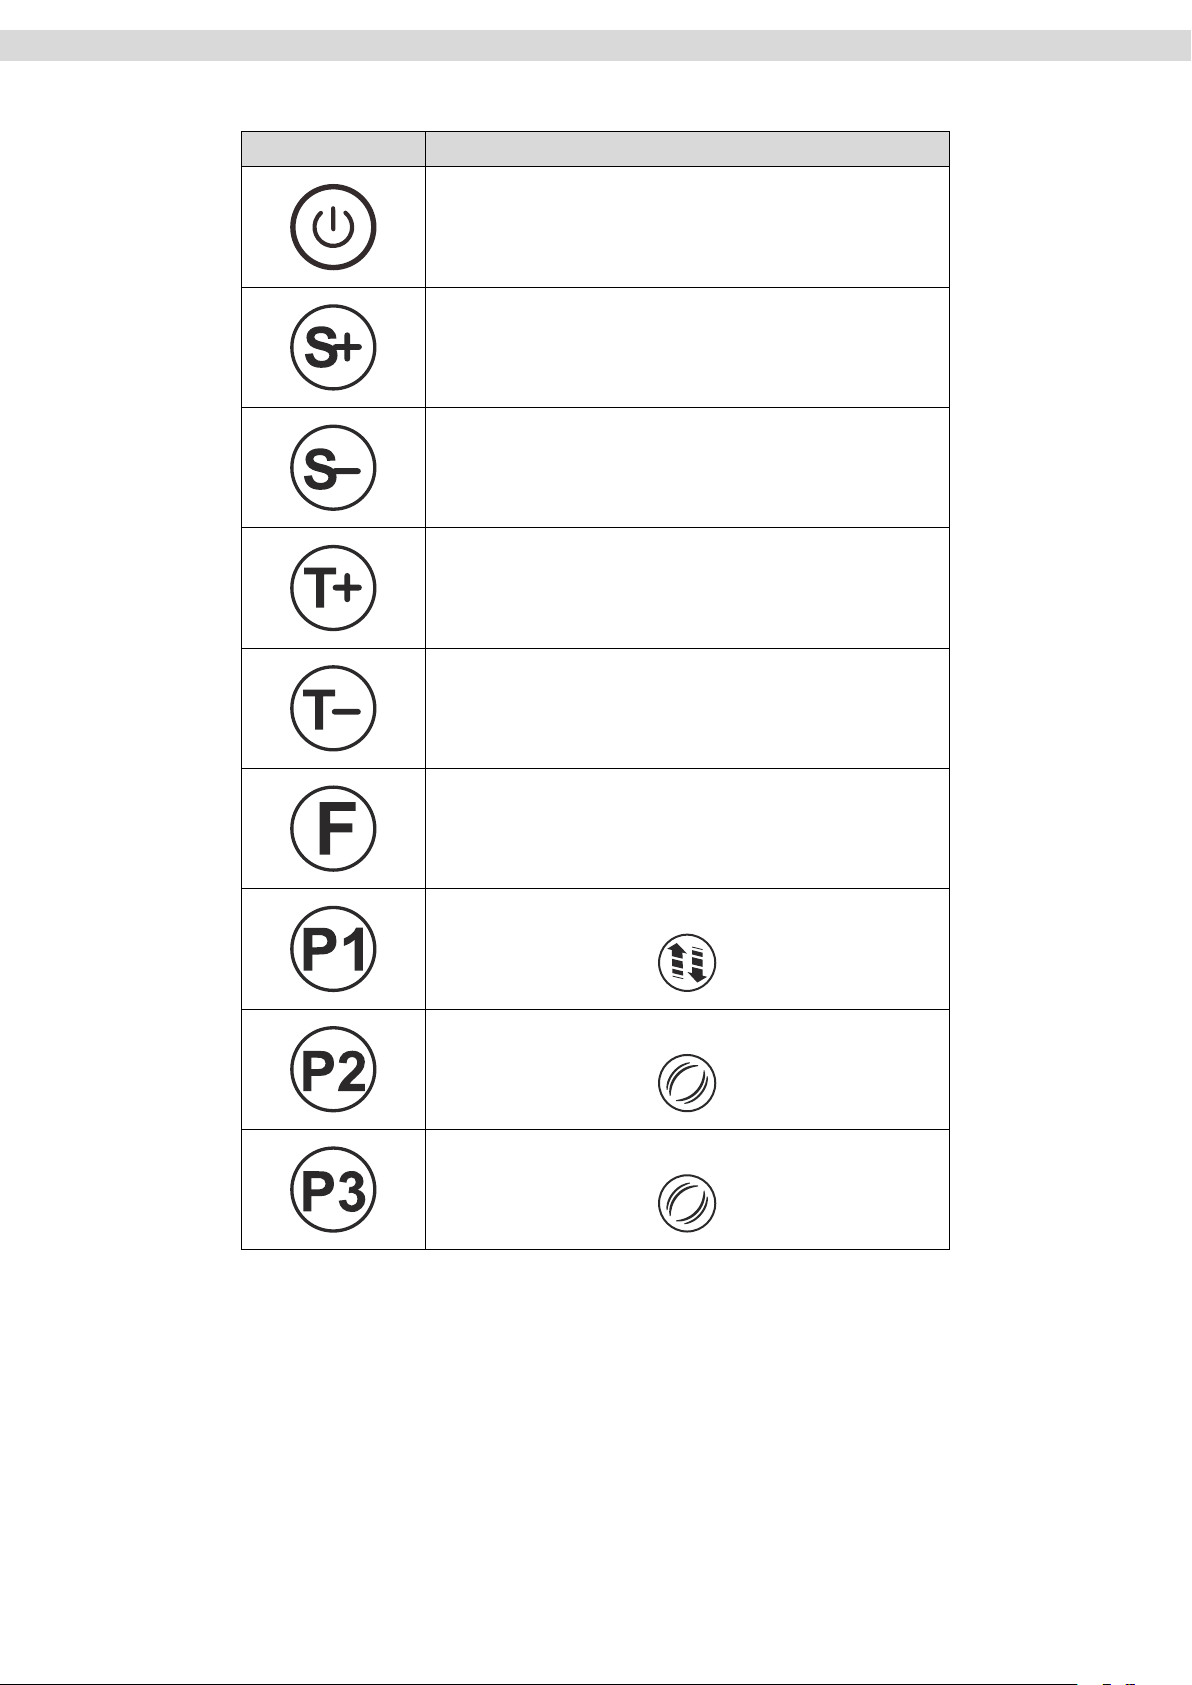
Key Description
On/O Mode – to switch the cockpit on or o. The device
must rst be switched on at the main switch.
Interrupt the selected training program or training mode =
pause mode. To resume training, press the key again.
Increase the training level
Reduce the training level
Set the training time (increase the time)
Set the training time (reduce the time)
Select one of the three training modes:
Select the training program
Before using this device please make sure that you or any other third party intending to
use the device has carefully read and familiarised themselves with the safety and operating instructions in this manual.
This product must be operated with a mains voltage of 220V-240V ~ 50 / 60Hz.
Always connect the power cable to the device rst before connecting it to an electrical
socket. Only then should you switch on the device using the main switch.
Before disconnecting the device from the power supply, switch it o at the main switch
and then unplug the power cable from the electrical power socket. Only then should you
remove the power cable from the device if necessary. to switch the vibration plate on and
o. The device must rst be switched on at the main switch.
ENG
5
Page 6
Operating Instructions
Operating the Remote Control
Key Description
On/O Mode – to switch the cockpit on or o. The device
must rst be switched on at the main switch.
Increase the training level
Reduce the training level
Set the training time (increase the time)
Set the training time (reduce the time)
Select one of the three training modes:
Select the training program P1
Select the training program P2
Select the training program P3
Please note that the maximum range of the remote control is 200 cm (with fully charged
batteries). Always direct the remote-control transmitter towards the receiver on the vibration plate. There must be no obstacles between the transmitter and receiver
6
Page 7
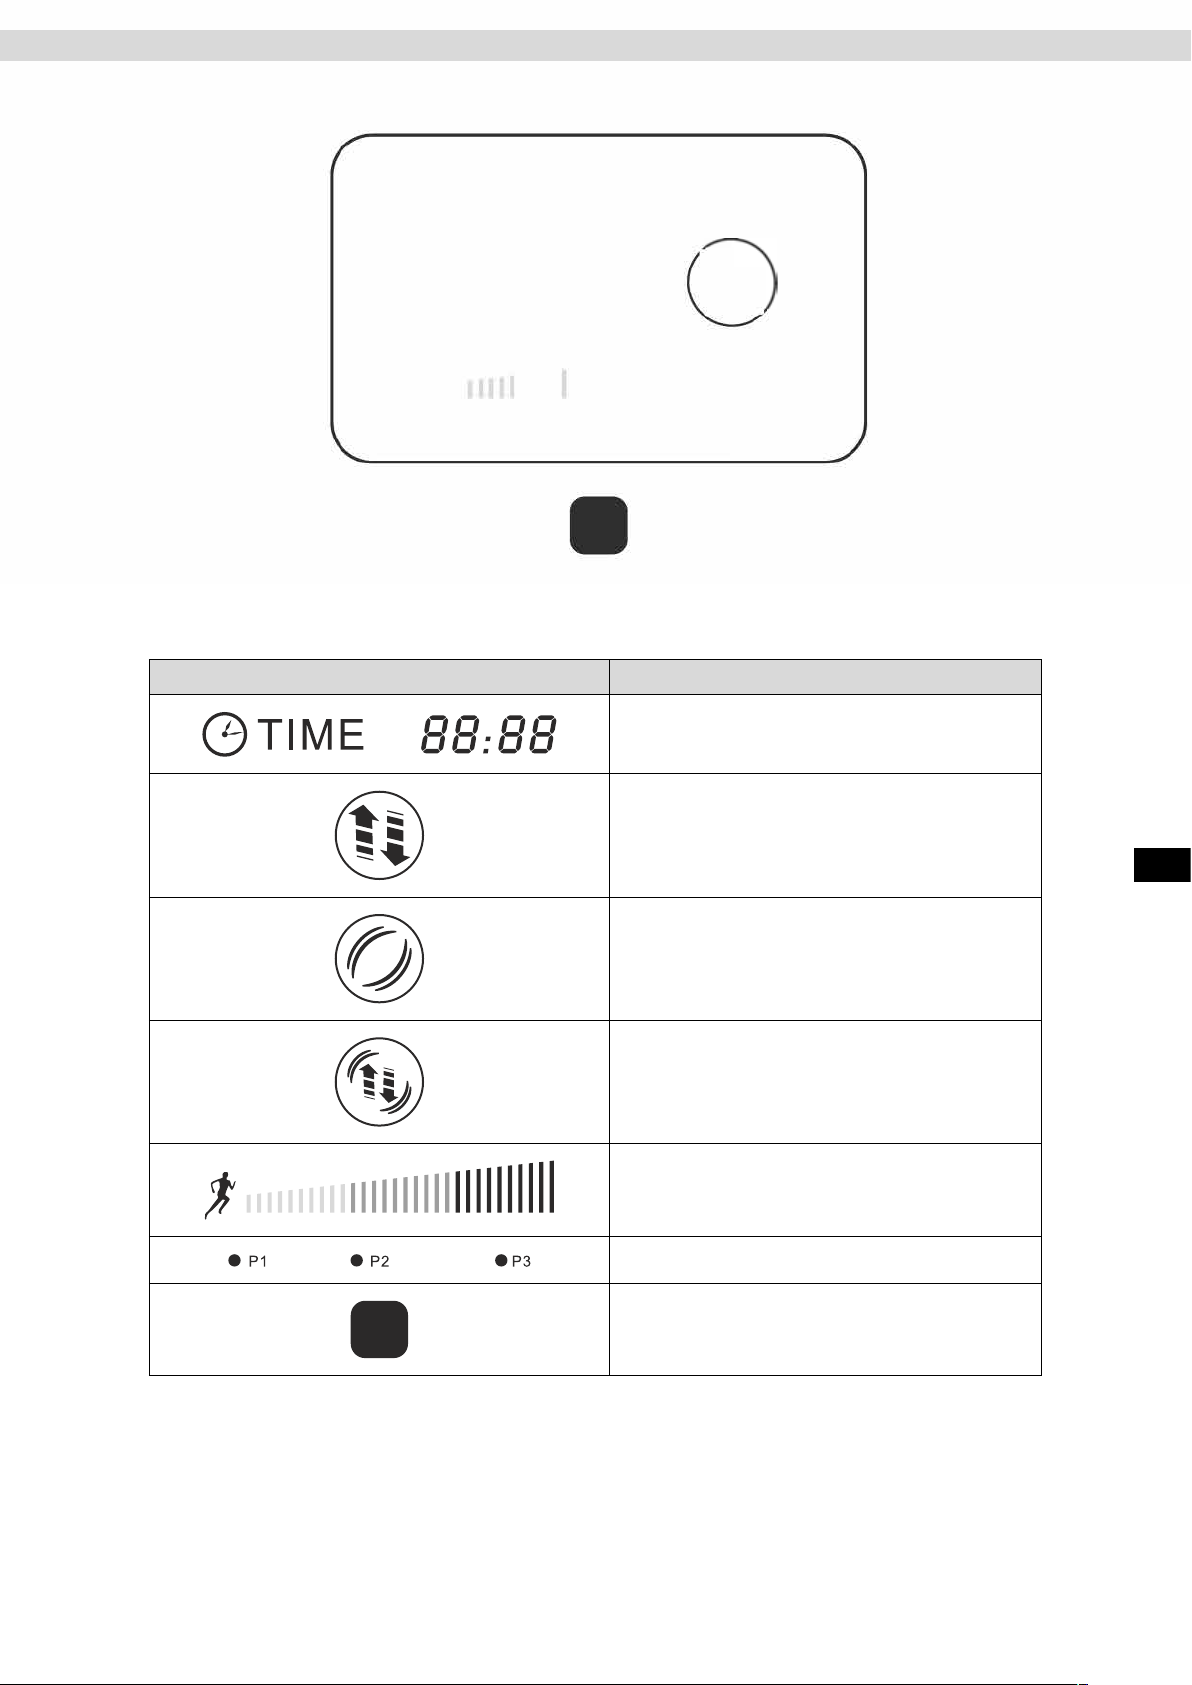
Operating Instructions
Display
0TIME 88:88
@
e P1 e P2 ep3
Display Description
Displays the training time
Displays the selected training modus. Mode: Oscillating motion
Displays the training modeMode: 3D-Vibration
Displays the selected training mode Mode: Oscillating & 3D Vibrations
Displays the current training level
Displays the current training program
ENG
Receiver for remote control signal
7
Page 8
Operating Instructions
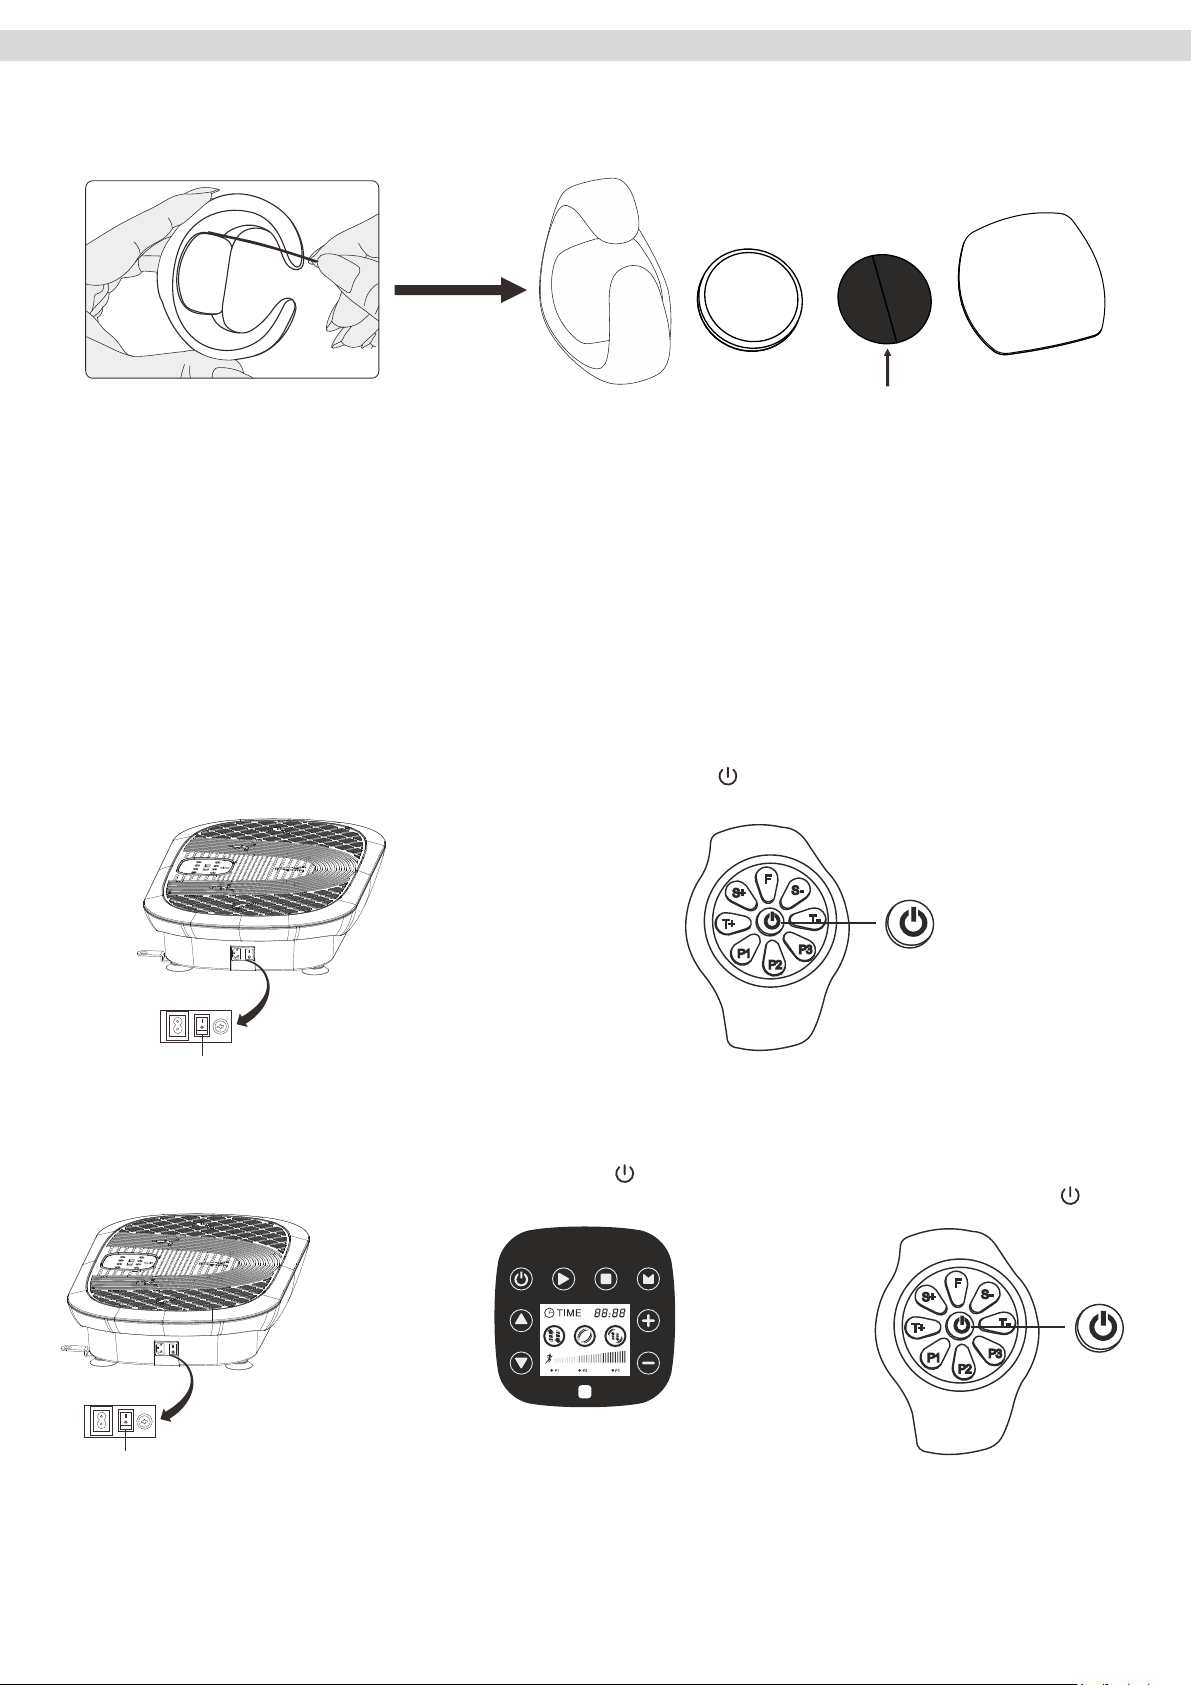
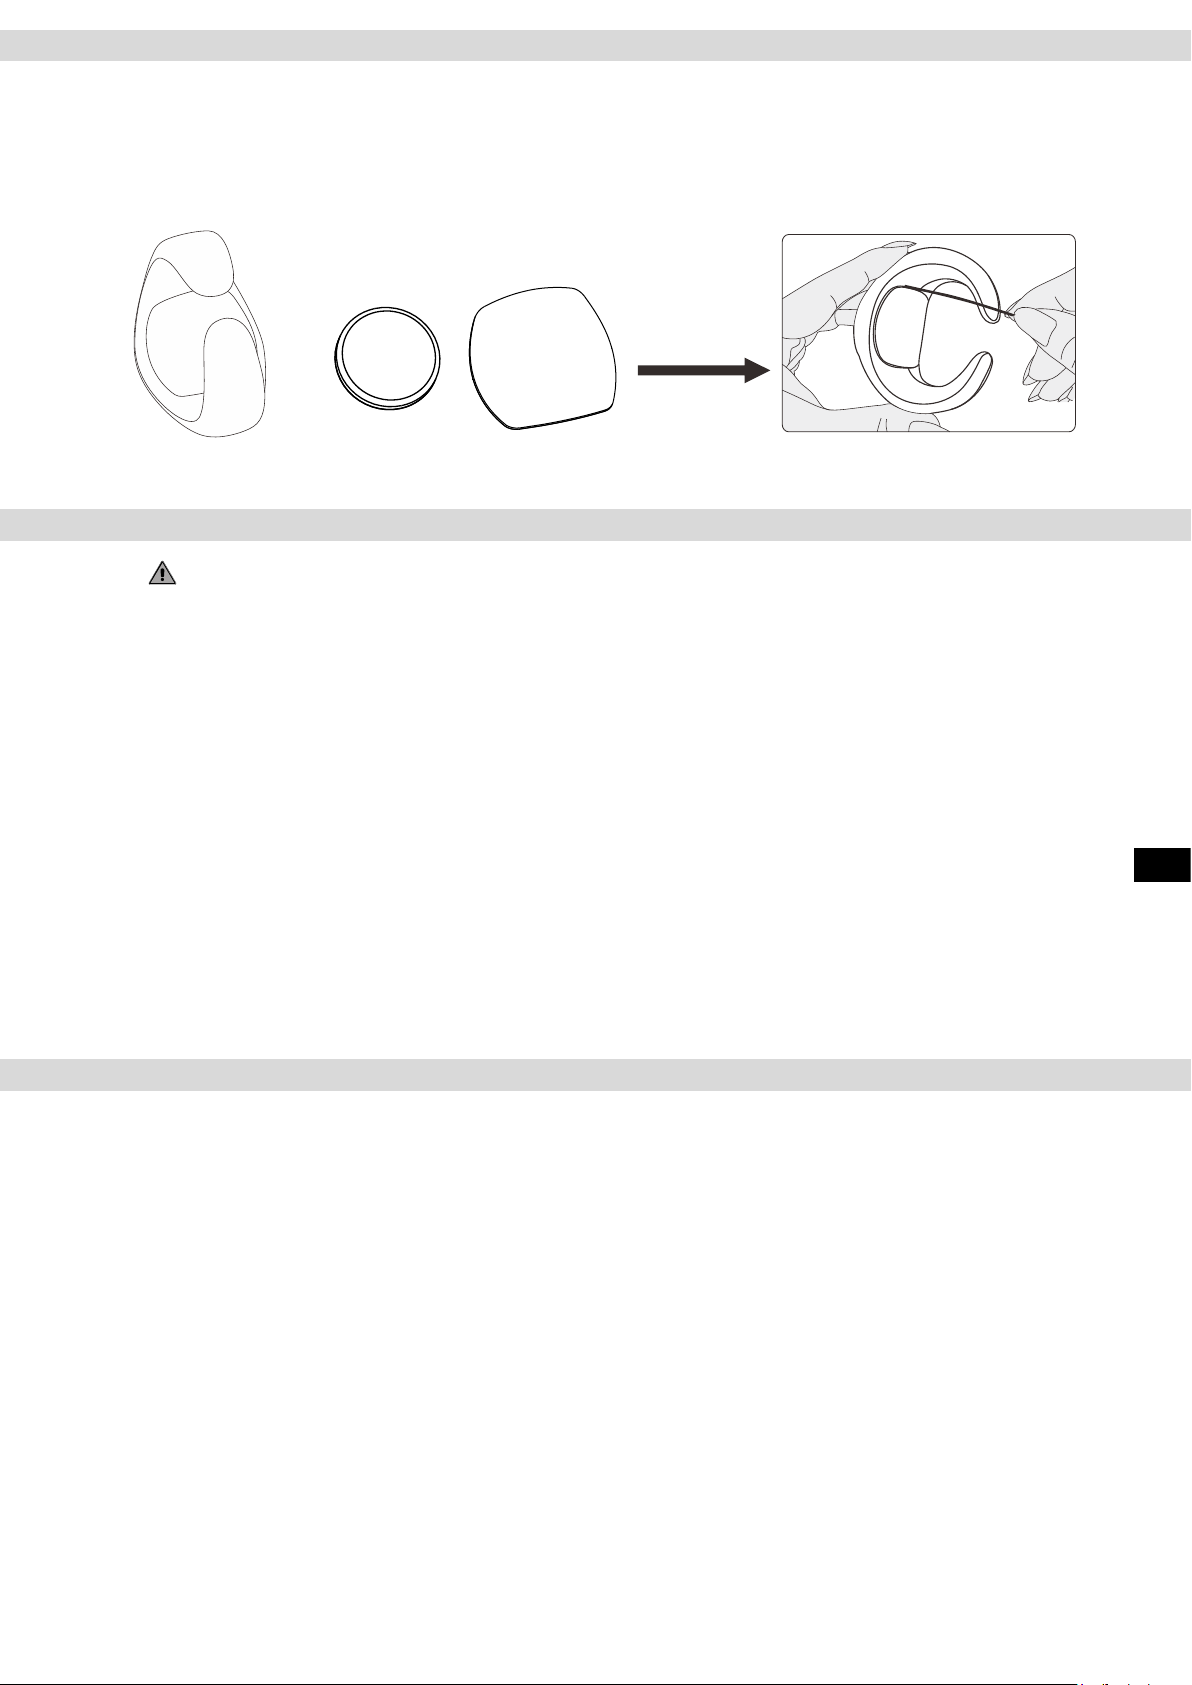
Before you can use the remote control, you must remove the protective foil from the battery. Open the battery compartment cover,
remove the protective foil from the battery and then replace the battery compartment cover again.
CR 2032
Remove the protective foil
Before you use the remote control for the rst time, you must connect it to the vibration plate. To do this, switch on the vibration plate at
the main switch on the side of the device and then press the power button on the remote control.
CAUTION:
If you switch on the vibration plate at the main switch and then press the power button on the vibration plate cockpit it will no longer be
possible to connect with the remote control. , the connection with the remote control is no longer possible.
If this is the case, switch the vibration plate o and on again at the main switch and then proceed as described above.
Correct sequence to connect the remote control with the vibration plate:
Step 1:
Switch the vibration plate on at the main switch
Main Switch
Incorrect sequence to connect the remote control with the vibration plate:
Step 1:
Switch the vibration plate on at the main
switch
Step 2:
Press the power button
Step 2:
Hold the remote control over the vibration plate and press the
power button
on the cockpit.
.
Step 3:
Hold the remote control over the vibration
plate and press the power button
.
Main Switch
If you have used the wrong sequence to connect the remote control to the vibration
plate, just switch o the plate at the main switch. After approximately 10 seconds, switch
it on again and try to connect the remote control with the vibration plate again.
8
Page 9
Manual Training
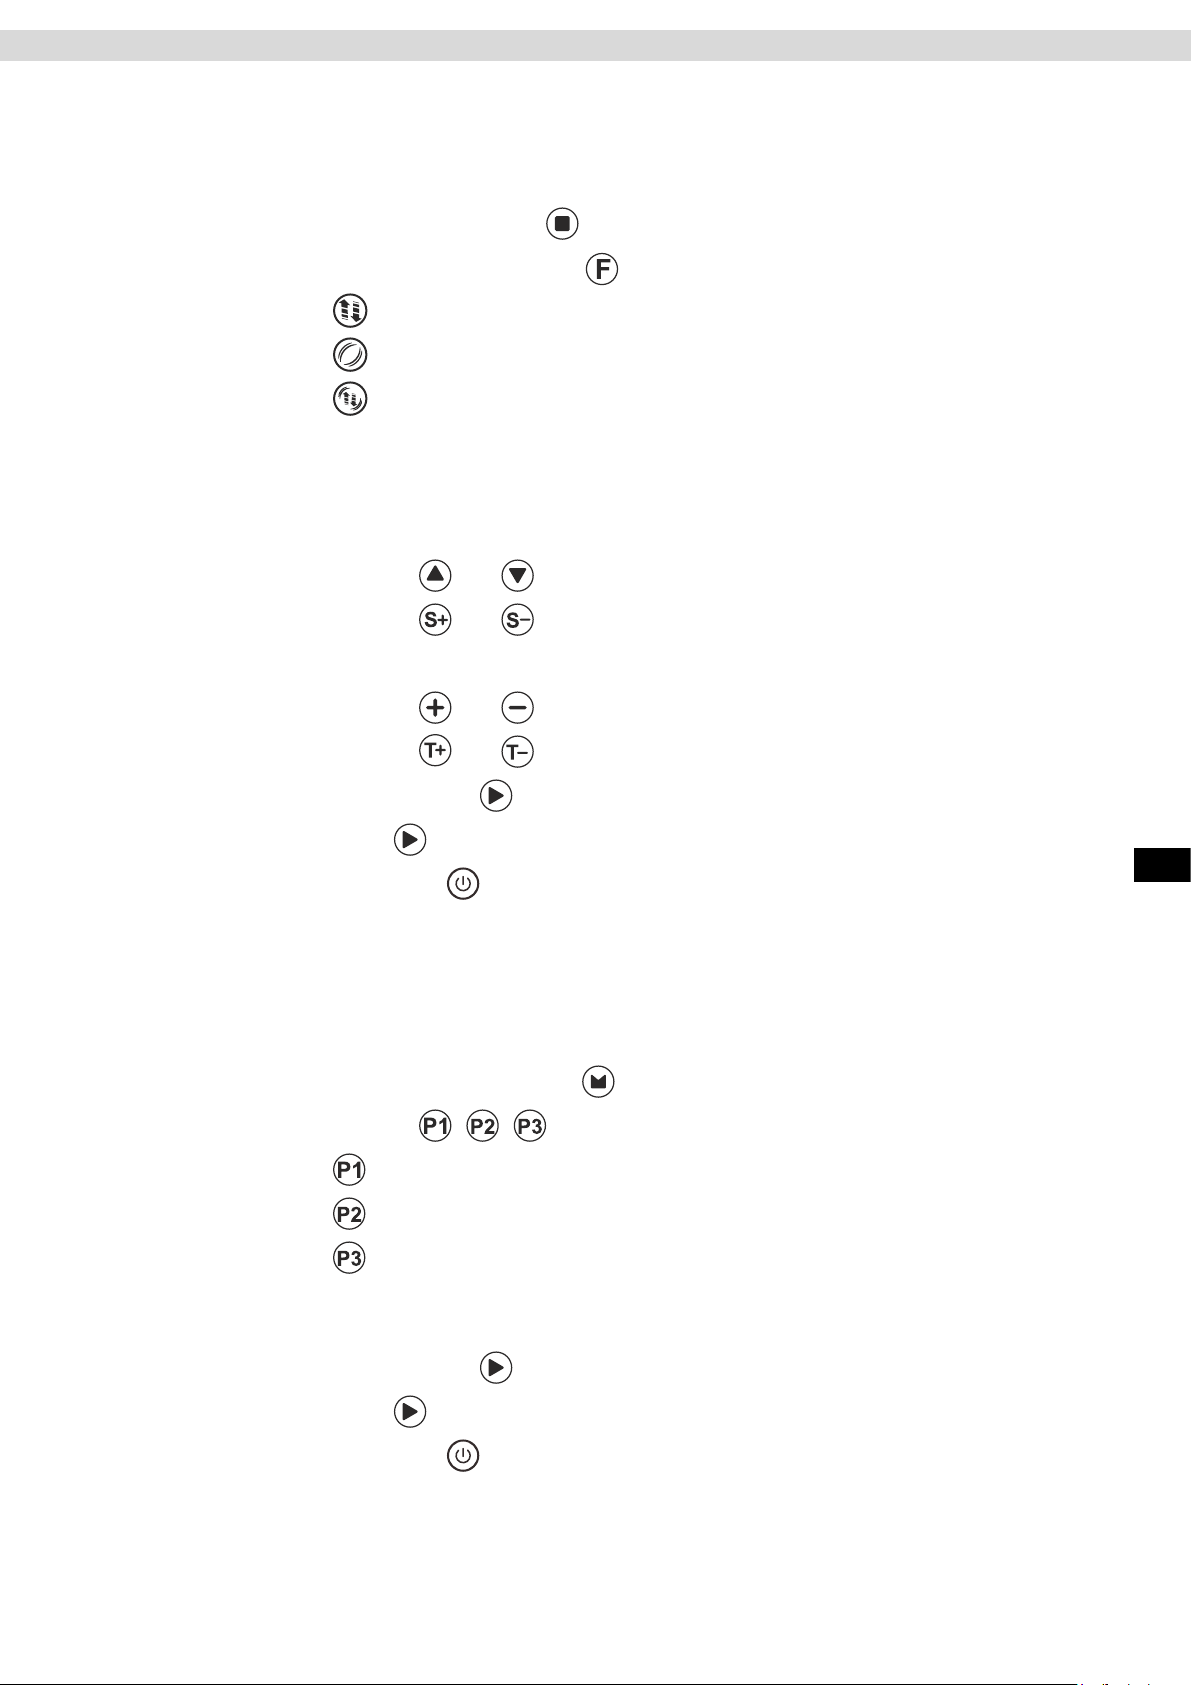
Manual Training
Step 1: Switch on the training device at the main switch.
Step 2: Select a training mode
On the key pad using key
On the remote control with key
Step 3: The vibration plate will start automatically after selection of the training mode.
Training Level:
Using the
Using the
Training Time:
Using the
Using the
If you want to interrupt training press the
To continue training press the
To end training completely press the
= Oscillation
= 3D
= Oscillation & 3D
Now you can select the training level and change the training time.
and keys on the keypad.
and keys on the remote control
and keys on the keypad
and buttons on the remote control
key on the keypad
key again.
key on the keypad or on the remote control
ENG
Training mit Trainingsprogrammen P1, P2 und P3
Step 1: Switch the training device on at the main switch.
Step 2: Select the required training program
Using the keypad with the key
Using the
The selected training program will start automatically.
The training level and training time cannot be changed here.
If you want to interrupt training press the
To continue training press the
To end training completely press the
= Oscillation
= 3D
= Oszillation & 3D
button on the remote control
key on the keypad
key again.
key on the keypad or on the remote control
9
Page 10
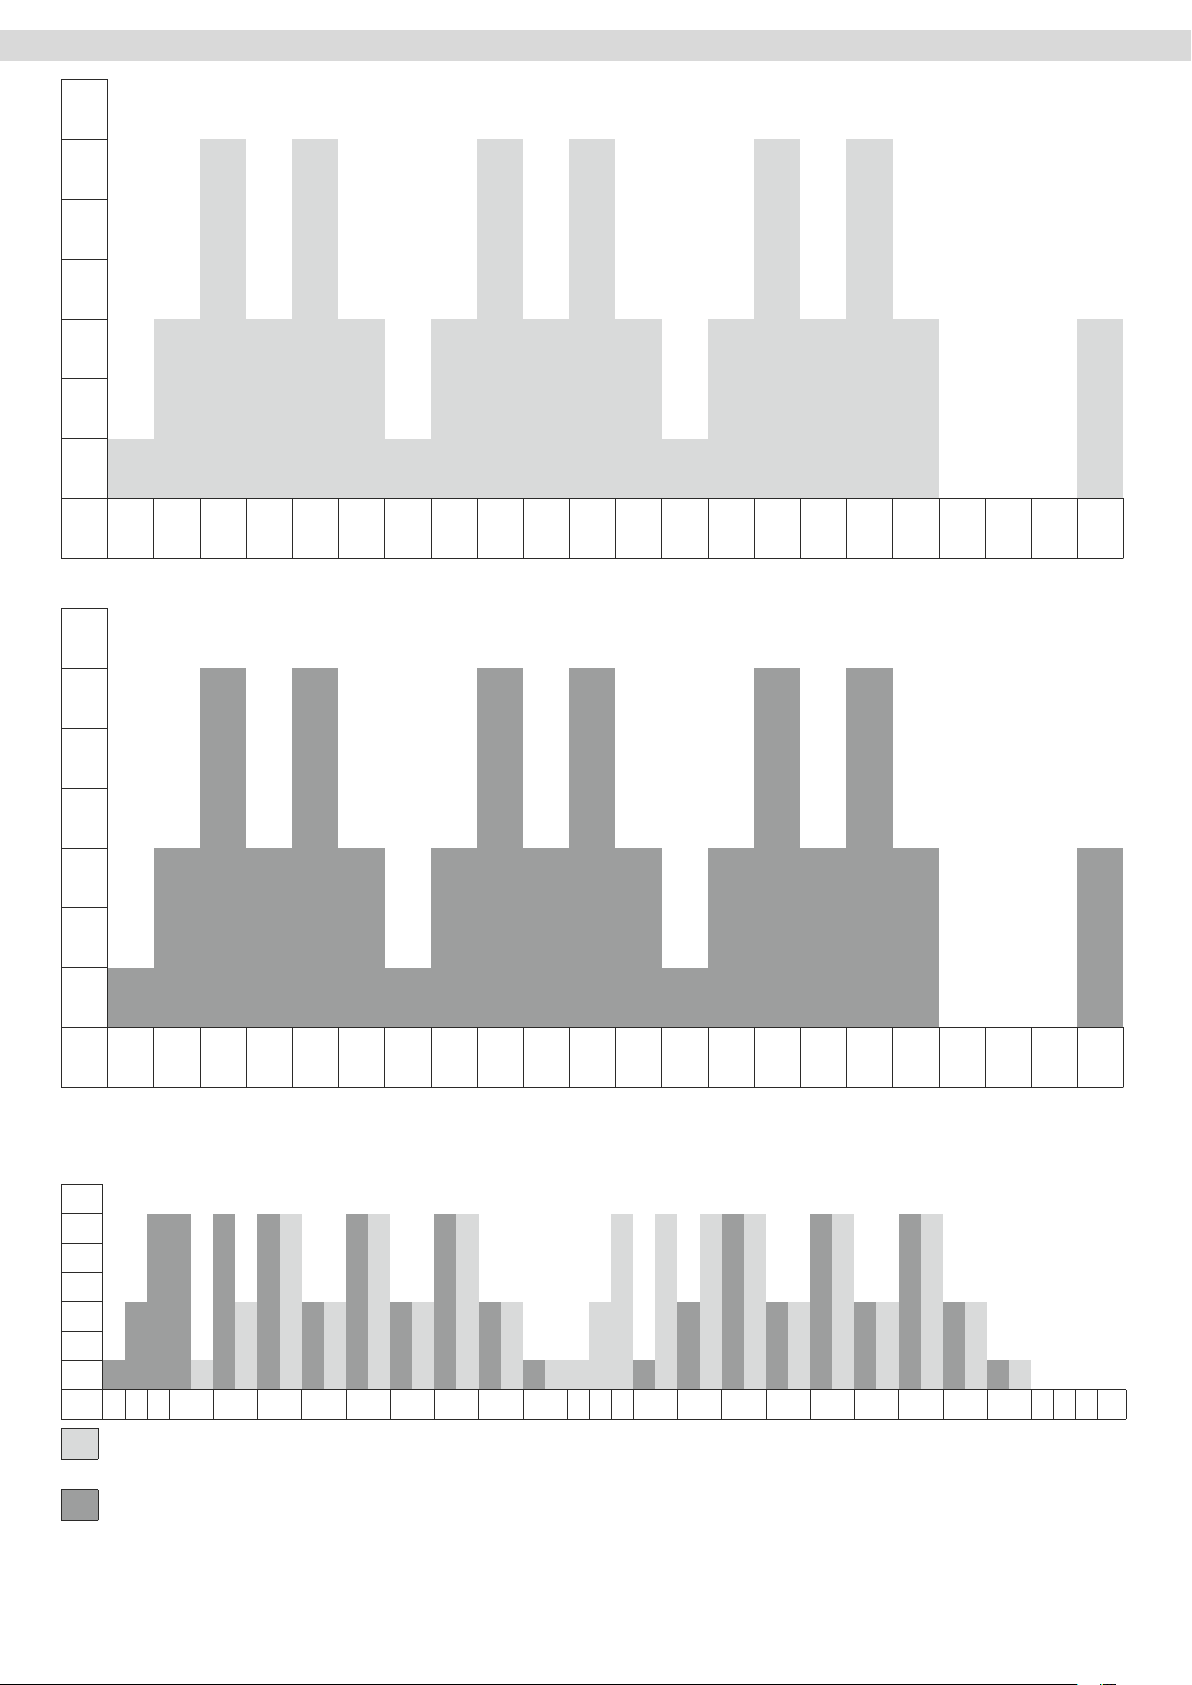
Training Programs
Level
30
25
20
15
10
5
Time
Level
Program P1 Oscillation
5 10 15 20 25 30 35 40 45 50 55 60 65 70 75 80 85 90 ... ... ... 900
Program P2 – 3D
30
25
20
15
10
5
Time
5 10 15 20 25 30 35 40 45 50 55 60 65 70 75 80 85 90 ... ... ... 900
Program P3 – Oscillation & 3D
Level
30
25
20
15
10
5
Time
5 10 15 20 25 30 35 40 45 50 55 60 65 70 75 80 85 90 95 100 105 110 115 120 ... ... ... 900
= Oscillation
= 3D
CAUTION: Please note that the training programs shown on the supplied poster have no connection with the
training programs permanently installed in the cockpit of the vibration plate. The training programs on the poster
are suggestions on how you can combine the individual exercises of the poster into individual training programs.
10
Page 11
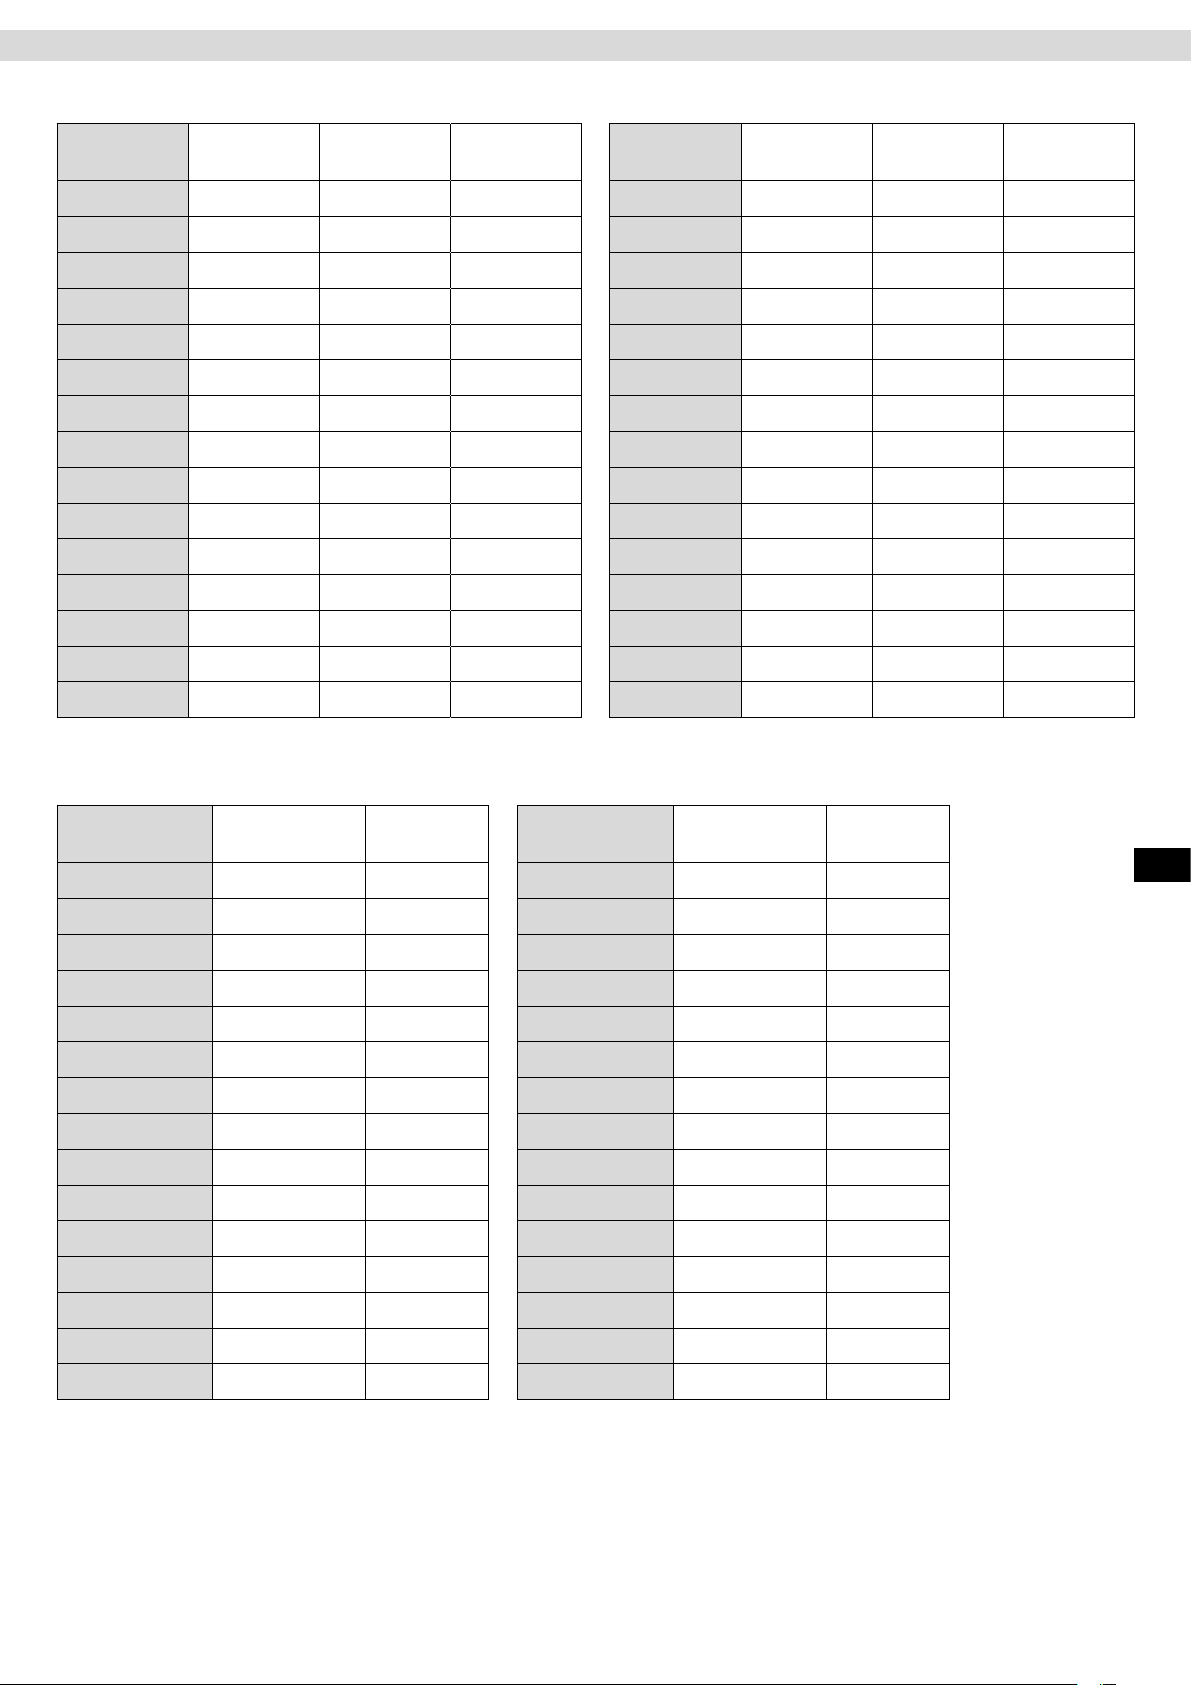
Training Frequencies
Oscillation
Level Motor(r/min) Oscillation
per Min.
1 1694 435 7.3
2 1725 443 7.4
3 1753 450 7.5
4 1784 458 7.6
5 1827 469 7.8
6 1850 475 7.9
7 1881 483 8.1
8 1912 491 8.2
9 1943 499 8.3
10 1979 508 8.5
11 2006 515 8.6
12 2033 522 8.7
13 2064 530 8.8
14 2095 538 9.0
15 2130 547 9.1
Oscillation
(HZ)
Level Motor(r/min) Oscillation
per Min.
16 2162 555 9.3
17 2193 563 9.4
18 2228 572 9.5
19 2259 580 9.7
20 2298 590 9.8
21 2325 597 10.0
22 2356 605 10.1
23 2380 611 10.2
24 2419 621 10.4
25 2450 629 10.5
26 2477 636 10.6
27 2516 646 10.8
28 2543 653 10.9
29 2571 660 11.0
30 2609 670 11.2
Oscillation
(HZ)
3D
Level Motor (r/min) Vibration
1 2102 35.0
2 2133 35.5
3 2164 36.1
4 2225 37.1
5 2256 37.6
6 2272 37.9
7 2318 38.6
8 2349 39.2
9 2395 39.9
10 2426 40.4
11 2473 41.2
12 2504 41.7
13 2535 42.2
14 2581 43.0
(HZ)
Level Motor (r/min) Vibration
(HZ)
ENG
16 2658 44.3
17 2689 44.8
18 2705 45.1
19 2751 45.8
20 2797 46.6
21 2828 47.1
22 2859 47.7
23 2890 48.2
24 2936 48.9
25 2967 49.5
26 2998 50.0
27 3045 50.7
28 3075 51.3
29 3106 51.8
15 2612 43.5
Note: Unfortunately, it is not possible to measure the values with a combination of oscillation and 3D
30 3137 52.3
11
Page 12
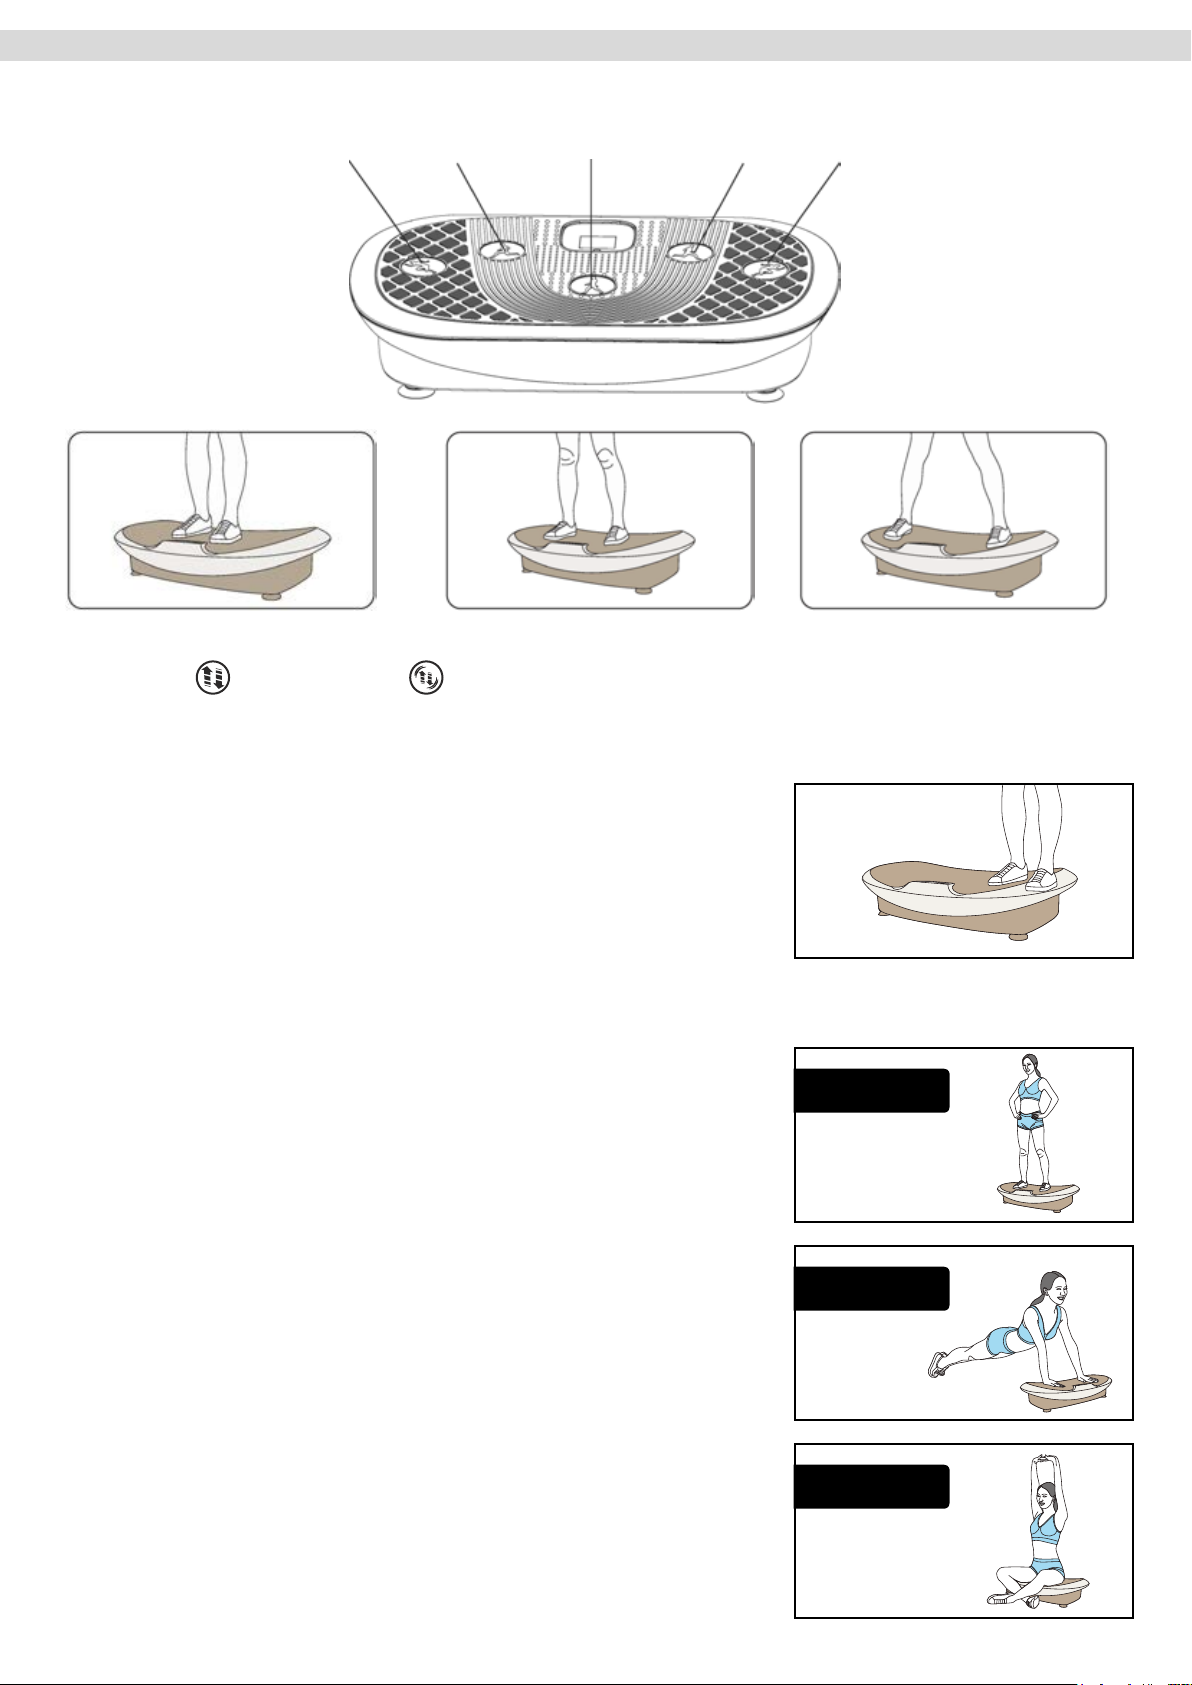
Training
There are three dierent training positions available.
Intensive Medium Gentle Medium Intensive
Gentle Medium Intensive
In the oscillation and oscillation & 3D modes it is possible to increase the training intensity and the training speed in three
dierent training positions.
CAUTION:
Never stand with both feet on one side of the plate surface. This can cause interferences
to the training programs or can even lead to damage (if the user weighs over 85kgs). In
this case an error message „E02“ will appear in the display. You should then switch o
the device and wait for at least 30 seconds before switching it on again.
Training Overview
In addition to the example exercises shown on the training poster, the following exercises
are ideal for training and relaxing the dierent muscle groups:
Standing loosens and relaxes the muscles
Stimulates blood circulation.
Press-Ups loosens and relaxes the muscles
Trains the upper body muscles intensively
Ensures optimum body tension.
Standing
Press-Ups
Sitting/Stretch Loosens and relaxes the muscles in the upper body
and hip areas
Trains the upper body and stomach muscles
Ensures optimum body tension.
12
Sitting/Stretch
Page 13
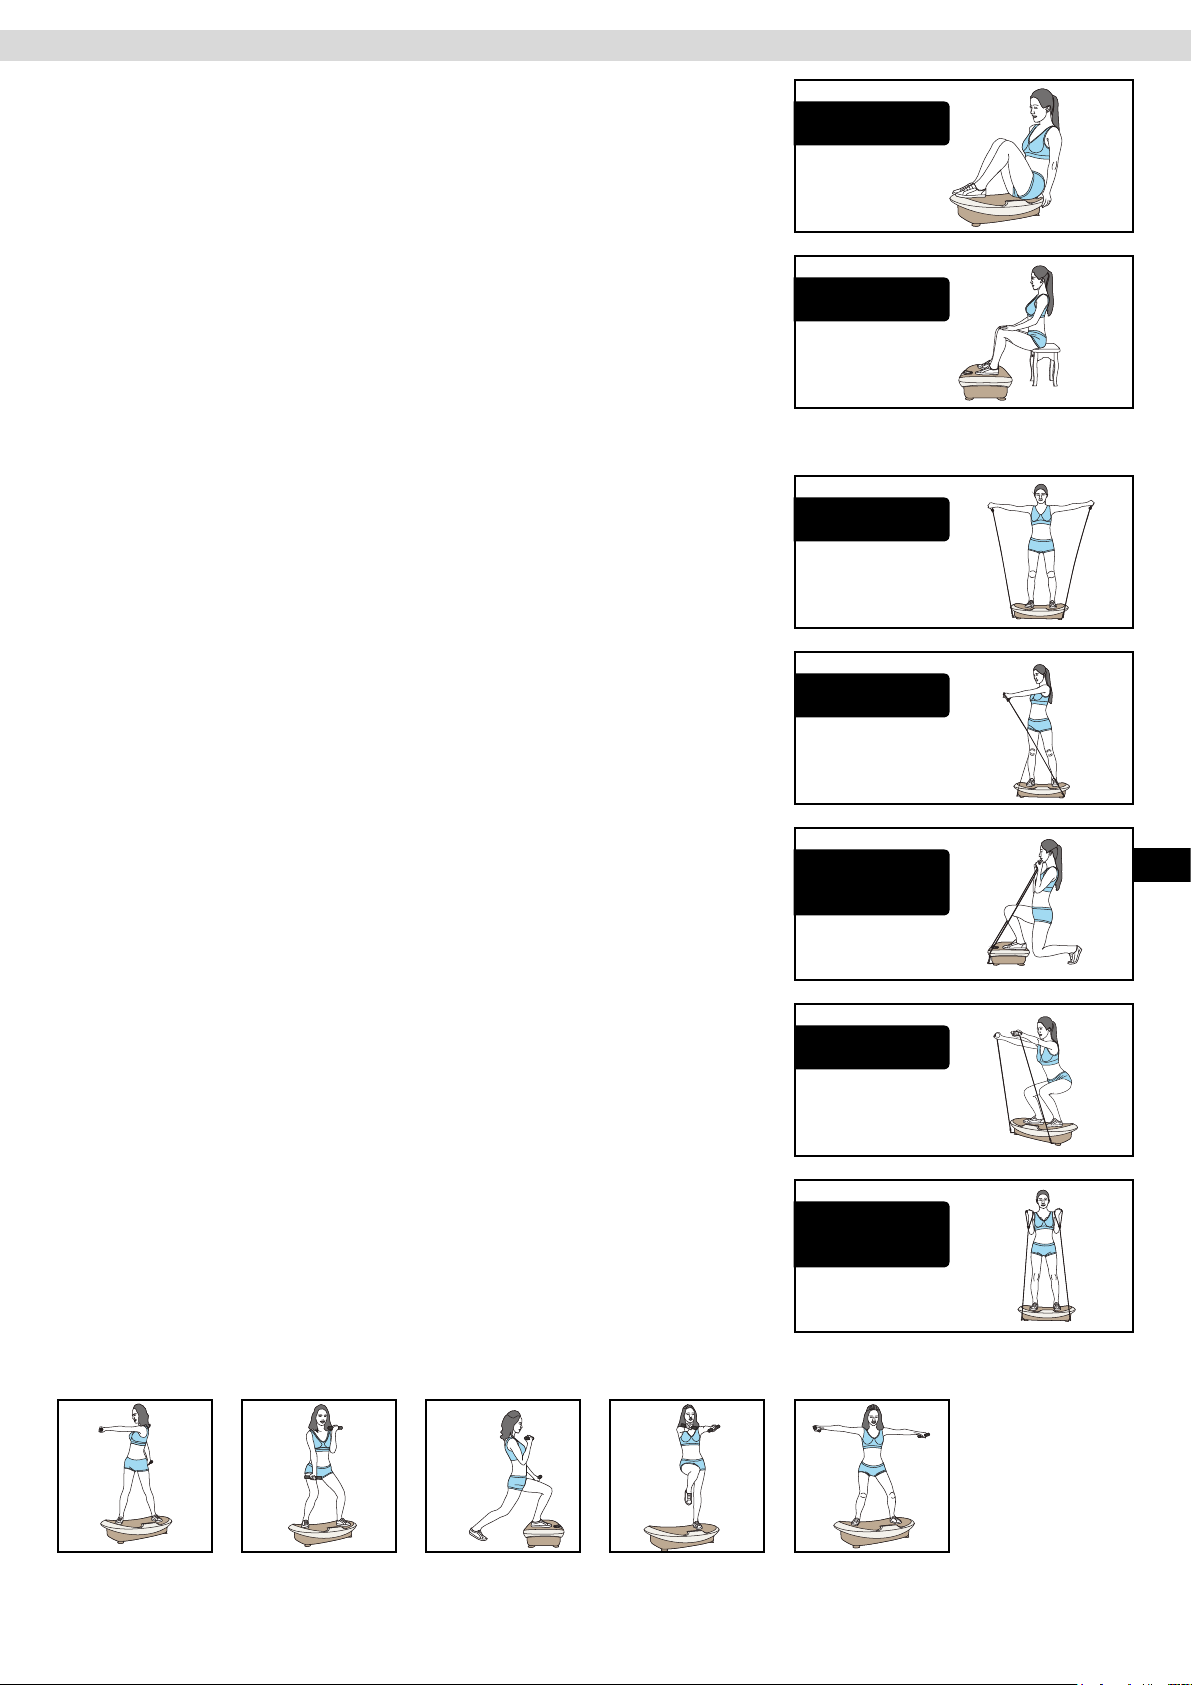
Training
Relax/Upper Body Loosens and relaxes the muscles in the shoulder throat and neck
areas
Light training for the stomach muscles
Relax / Lower Body Loosens and relaxes the all leg muscles and hip area
Ideal for older users with restricted movement.
Dynamic Exercises with Training Belts
Side Lifts
Stand with both feet on the plate (you are free to choose the position of your feet and
training speed).
Take hold of the training belts and raise both arms together straight until they are parallel
out to the sides.
Then lower both arms to hang down at your sides.
Repeat this exercise slowly and smoothly.
Relax/Upper Body
Relax/Lower Body
Side Lifts
Cross-Over Lifts
Stand with both feet on the plate (you are free to choose the position of your feet and
training speed).
Take hold of the training belts and alternately raise your left and right arms to shoulder
height in front of you and each time point the arm in the opposite direction across your
body in front of you. Turn your body in the same direction as your arm is pointing.
Repeat this exercise slowly and smoothly.
Back Step / Biceps Curl
Stand with one foot on the plate (you are free to choose the position of your feet and
training speed).
Take hold of the training belts and whilst bending the knee of the leg which is still on the
oor. Bend your arms and raise your hands up towards your chin keeping your upper
arms at against your body. Whilst straightening your bent knee and coming up again
with your body, lower your hands back down in front of you. Repeat this exercise slowly
and smoothly and change legs to bend the other knee at half time.
Squat / Front Lift
Stand with both feet on the plate (you are free to choose the position of your feet and
training speed).
Take hold of the training belts. Whilst doing a squat, raise both arms to be level with your
chin and outstretched to the front. Whilst straightening your body again, lower your arms
back down again.
Repeat this exercise slowly and smoothly.
Standing Biceps Curl
Stand with both feet on the plate (you are free to choose the position of your feet and
training speed).
Take hold of the training belts and bend your arms to bring your hands up to your shoul-
ders and keeping your upper arms at against your body. Then bring the lower part of
your arm back down so your arms are pointing down again.
As an alternative, you can supplement this exercise with a squat.
Repeat this exercise slowly and smoothly.
Cross-Over Lifts
Back Step /
Biceps Curl
Squat / Front Lift
Standing
Biceps Curl
ENG
Alternatively, you can do these individual exercises without using the training belts but using weights such as
dumbbells, lled water bottles etc for example (these accessories are not included in delivery).
13
Page 14
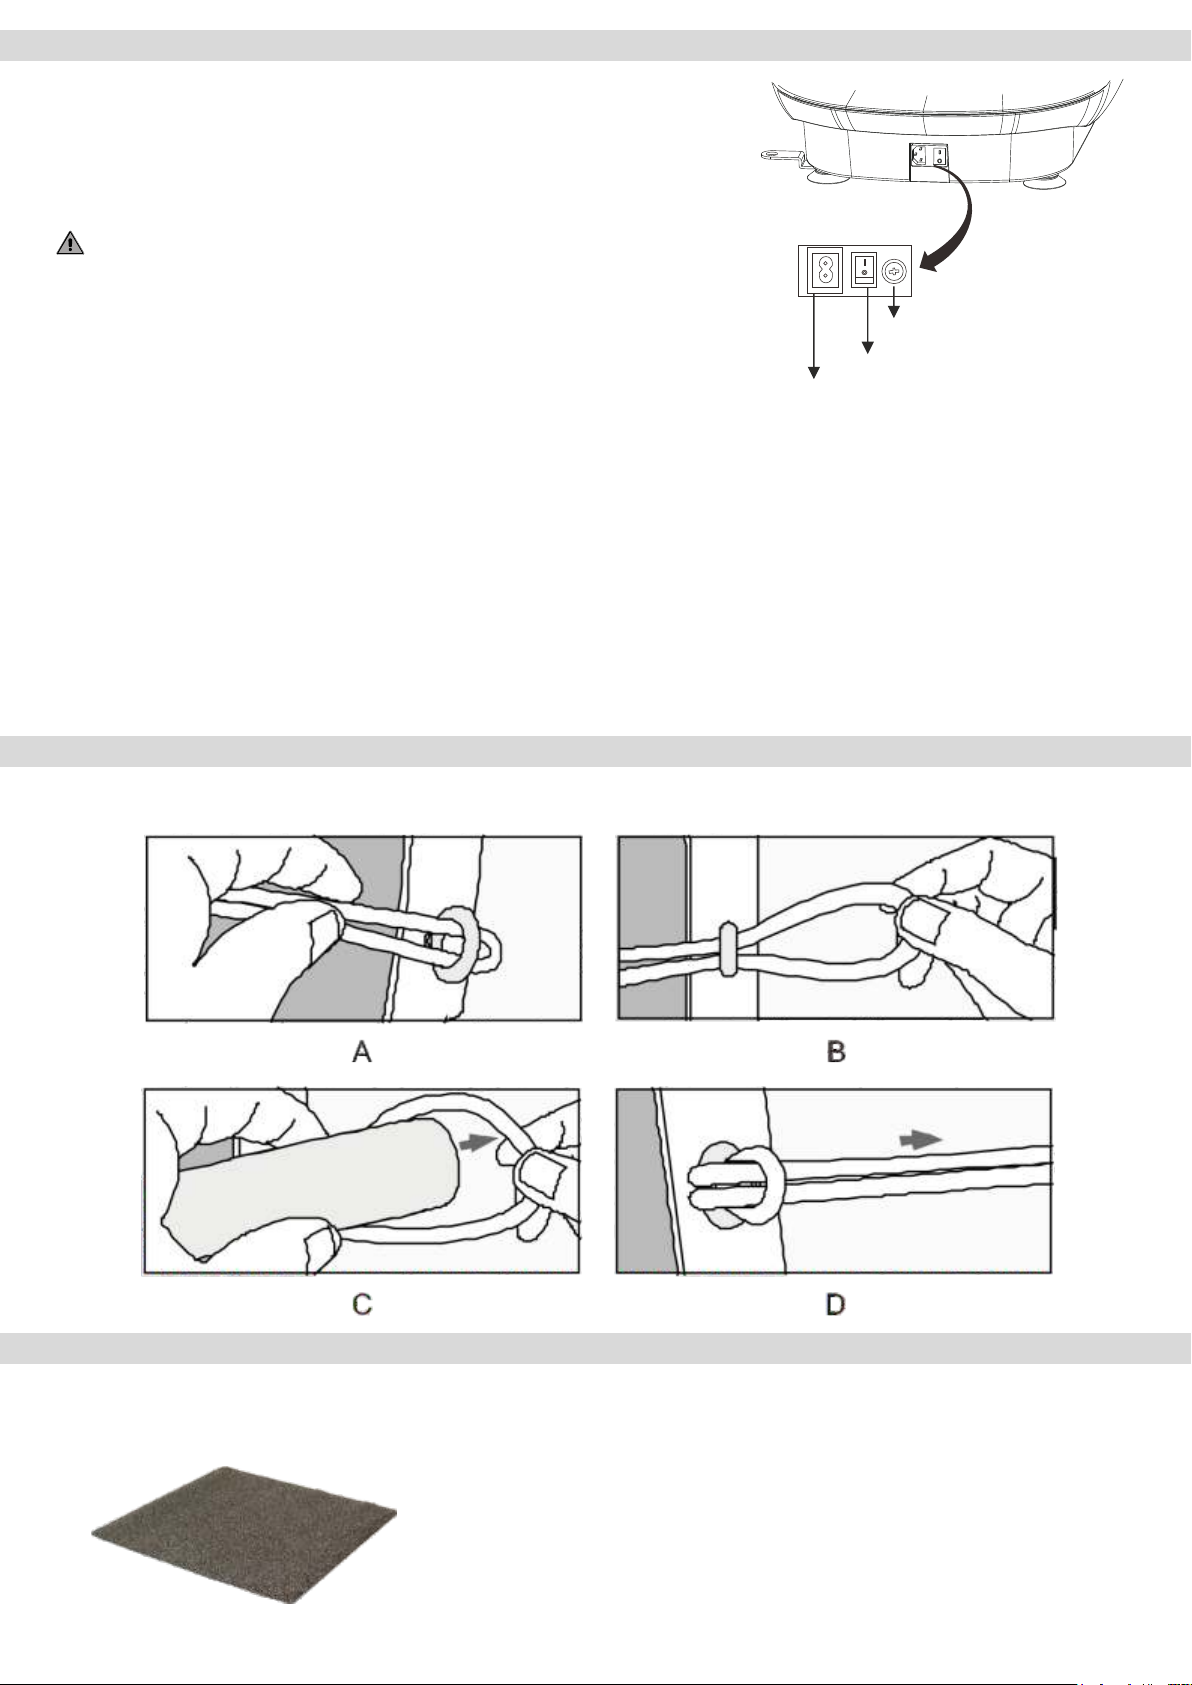
Mains Connection
Power Cable
Only use the power cable included in delivery to operate your training device. First,
attach the connector on the power cable to the connection at the back of the device.
Only then connect the mains plug on the power cable to the electrical supply socket. If
you want to remove the power cable from your device, rst pull the mains plug out of the
electrical socket before disconnecting the power cable from the device.
CAUTION
Only connect your training device to grounded electrical socket installed by qualied
electrician. Do not plug this device into a power strip or cable reel.
When using cable extensions, these should comply with the regulations and guidelines
of the German VDE or equivalent and be labelled appropriately.
Fuse
Mains Switch
After connecting the power cable correctly, you can switch your device on and o at the
main switch. To switch on the device, press the switch into position “I”.
To switch o the device, press the switch into position “0”.
Fuse
The fuse is located between the on / o switch and the mains connection socket. This is
a F 4A / 250V glass fuse. If renewal is necessary, remove the fuse cover using a suitable
at head or Phillips screwdriver and remove the fuse. When replacing the fuse, make
sure that it is the correct type.
Attaching the Training Belts
Please attach the training belts to the brackets as shown in the following diagrams:
Main Switch
Mains connection socket
Recommended Accessories
This accessory is the optimum supplement to your training device. All products are available from our online shop at www.maxxus.de or direct from our showroom.
MAXXUS® Vibration Plate - Floor Protection Mat
Due to its extreme density and material thickness of 1.0cm, this mat optimally dampens
the vibrations and noise of the vibration plate during training. In addition, it also provides
perfect protection for oors and oor coverings against damaging, scratches and soiling
through body sweat.
Dimensions: 100 x 100 cm
14
Page 15
Technical Information
Changing the Batteries in the Remote Control
1. Remove the cover on the battery compartment at back of the remote control. To do this put your thumb on
the ribbed and slightly indented markings on the top of the battery compartment cover and push this back
whilst pushing gently down with your thumb.
2. Change the batteries. The remote control needs 2 type AAA Micro 1.5V batteries.
3. Replace the cover to the battery compartment.
Cleaning & Maintenance
CAUTION:
Before you perform any care, cleaning, maintenance, repair or similar work on your training device, it
must be completely disconnected from the mains. This is only the case if the plug is removed from the
electrical power supply socket and the mains cable is disconnected from the device. When doing this
always remove the plug from the socket rst and then disconnect the mains cable from the device. The
mains cable may only be reconnected to the device and then plugged into the electrical socket when all
work is fully completed, and the device is restored to perfectly functioning condition.
CR 2032
Cleaning
Clean your device after each training session using a damp cloth and soap. Never use solvents for this purpose.
Regular cleaning contributes signicantly to the preservation and life service of your training device.
Damage caused by body perspiration or other liquids will not under any circumstances be covered by the warranty. During training make sure that no liquids get into contact with the device or get into the computer.
Maintenance
Checking the Fixing Materials
Make regular checks to ensure that xing materials such as screws, nuts etc are tightened rmly. If not, tighten
them wherever necessary.
Location and Storage
This training device was exclusively designed for use indoor dry and temperate areas.
Use or storage in damp or wet areas, such as sauna, swimming pool, etc. and in outdoor areas,
like balcony, terrace, garden, garage, etc. is not permitted.
In these locations the prevailing high humidity and low temperatures may lead to defects in the electronics, corrosion and rust. No warranty claims for damages of this kind will be accepted under the warranty.
Please choose a dry, well-tempered and completely at location for training and storage of this device. For training, locate the device in an area where the walls and furniture are at least 1 meter away from the device.
For your own safety and comfort, make sure that the training area is adequately ventilated during exercise, to
allow for optimal oxygenation.
Before using your training device after a long period of non-use, make sure that all xings are secured tightly. If
you have stored the product for a long time in a cold storage location or otherwise have stored it in a non-temperate place, leave the device for at least one hour at room temperature before switching it on again.
ENG
15
Page 16
Technical Details
LCD Display
Display of:
Time
Training Level
Mode
Program
Technical Details
Training Level: 30 Levels
Training Positions: gentle, medium, intensive
Training Modes: Oscillation, 3D and Oscillation & 3D
Time Range: Maximum 15 Minutes
Time Adjustment: in 1-minute increments
No. of Motors: 2
Motor Type: DC Motors
Performance: 200Watt (Oszillation) / 40W (3D)
Training Surface: ca. 655x390mm
Dimensions (BxWxH): approximately 750x460x140mm
Total Weight: approximately 16.5kg
Maximum User Weight: 100 kg
Input Selection: via Keypad or Remote Control
Power Supply: 220-230V - 50Hz
Battery (Remote Control): Button cell battery Lithium 3V / 230mAh, CR2032
Noise Level: ≤55dB
Area of Application: Home Use
Error Messages
Error Message Error Trouble Shooting
Er 01 The computer/controller connection is
faulty
Er 02 The remote control does not function See instructions on page 11
Er 03 The vibration plate no longer responds to
commands
Switch the device on and o. If the error message appears
again, please contact the Service Department at MAXXUS
Switch the device on and o. If the error message appears
again, please contact the Service Department at MAXXUS.
Disposal
European Disposal Regulations 2002/96/EG
Do not dispose your training device in the normal household rubbish.
Dispose the device at a communal waste disposal facility or at a registered waste disposal company.
Observe current regulations which apply accordingly. If in doubt seek advice from your local government oce
or county council as to where you can dispose of the device properly and in an environmentally sound manner.
Batteries / Rechargeable Batteries
Batteries and rechargeable batteries should never be disposed of in the household rubbish.
Please be aware that all batteries can contain toxic substances and all consumers are obliged by law to dispose
these at an appropriate collection point either at your local government oce, county council or retail outlet.
If in doubt seek advice from your local government oce or county council as to where you can dispose batter-
ies properly and in an environmentally sound manner. Only dispose of batteries when they are empty.
16
Page 17
Exploded Drawing & Parts List
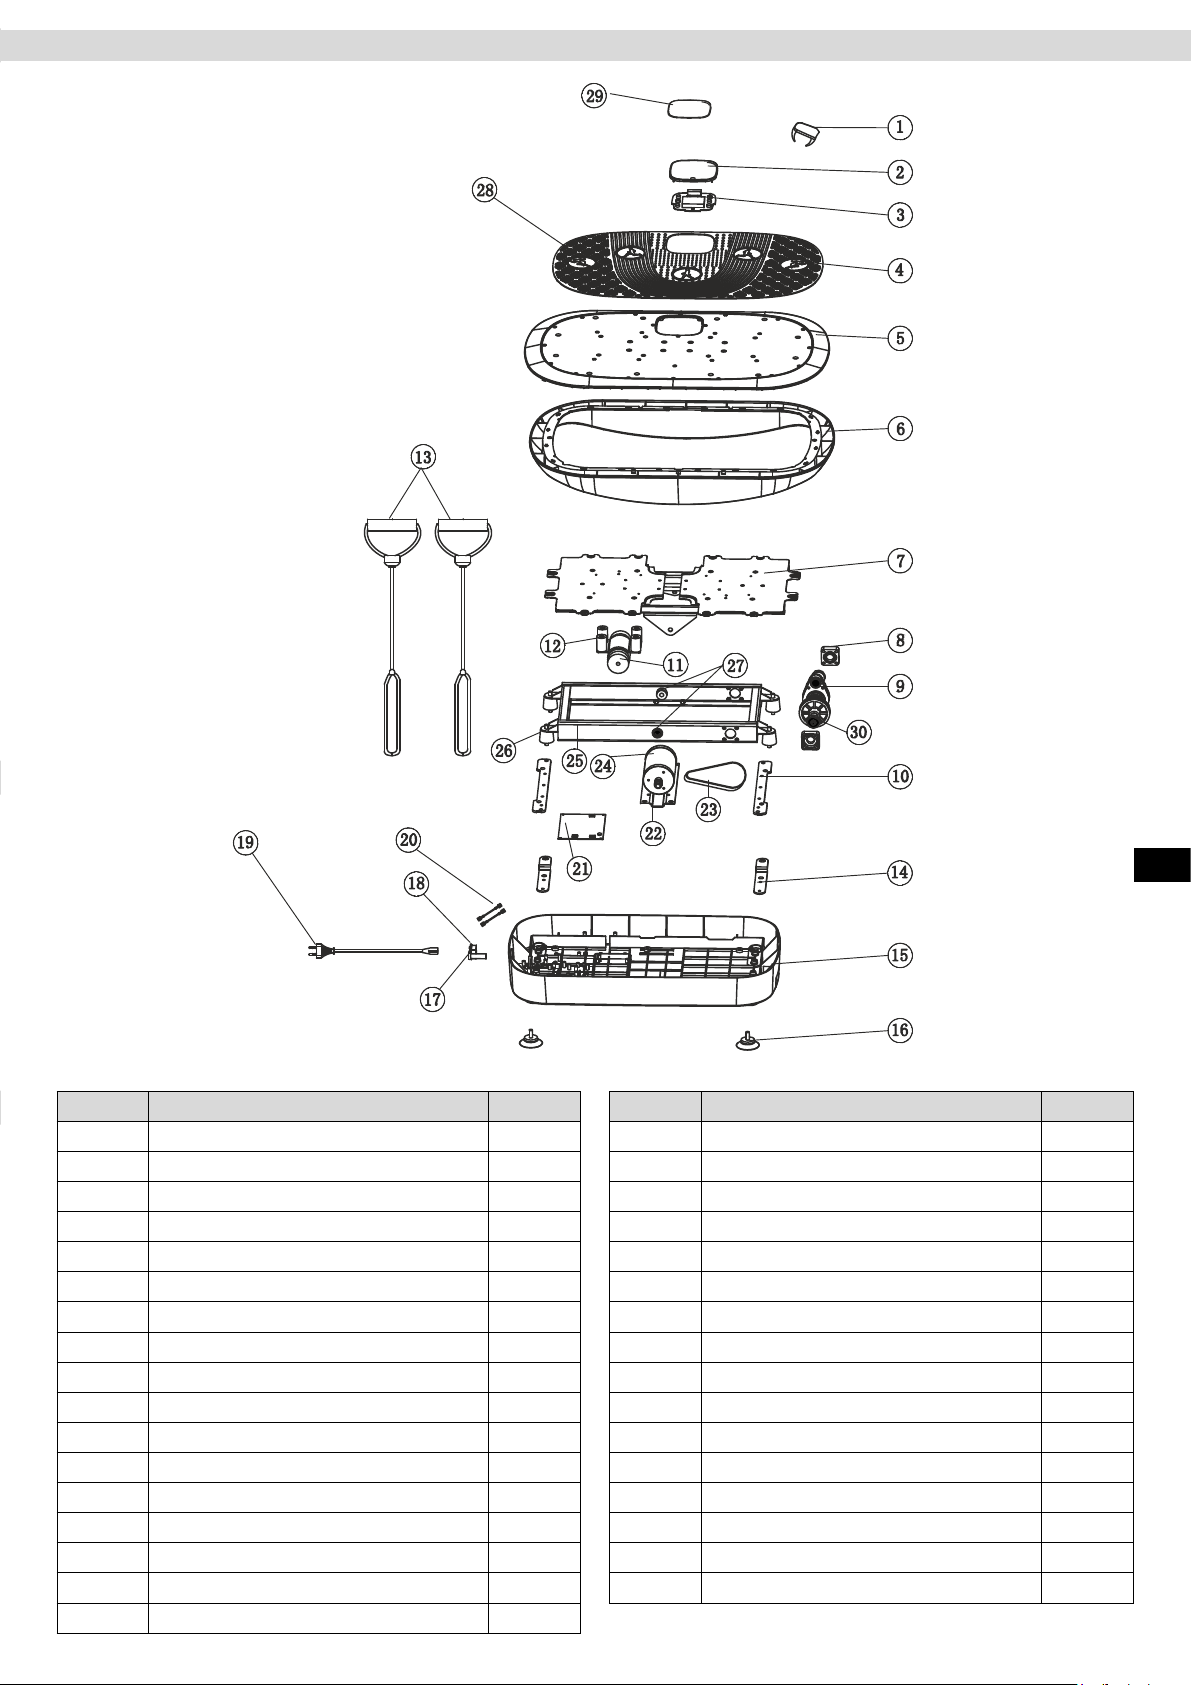
Part Description Qty
1 Remote Controller 1
2 Console panel 1
3 Console board 1
4 Foot pedal cover 1
5 Upper cover 1
6 Middle cover 1
7 Main plate 1
8 Main axle bracket 2
9 Main axle set 1
10 Metal reinforcement 2
11 Vibration motor 1
12 insert rubber post 4
13 Rope 2
14 Pull hook 2
15 Bottom cover 1
16 Foot cushion 4
17 Fuse holder 1
ENG
Part Description Qty
18 Power socket + switch 1
19 Power cord 1
20A Electrical wire A 2
20B Electrical wire B 1
21 Lower controller board 1
22 bas plate for motor 1
23 belt 1
24 Oscillation motor 1
25 Main frame 1
26 Rubber cushion 4
27 Plastic suppurt plug 2
28A „Running“ plastic label 2
28B „Jogging“ plastic label 2
28C „Walking“ plastic label 2
29 Console overlay 1
30 Bearing 6201 2
17
Page 18

Warranty *
For MAXXUS® Support Team to help you as quickly as possible with service, we will require certain information about your tness
device and about you. To nd the exact spare parts required, we will need the product name, date of purchase and serial number.
If necessary, please ll out completely the Repairs Contract/Damage Report form attached to this User Manual and send it to us by
post or by fax.
Areas of Application & Warranty Periods
Depending on the model, tness devices from MAXXUS® are suitable for use in dierent areas. Find the appropriate area of use for
your tness device from the “Technical Data” in this User Manual.
Home Use:
Exclusively for private use
Warranty Period: 2 Years
Semi-Professional Use:
Use under instruction in hotels, physiotherapy practices, etc.
Use in a tness studio or similar establishment is hereby excluded!
Warranty Period: 1 Year
Professional Use:
Use in a tness studio or similar establishment under supervision by trained personnel.
Warranty Period: 1 Year
Use of your training device in an area which is not suitable for your device will cause immediate expiry of its guarantee and cancel your
right to claim warranty!
Sole private use and warranty period of 2 years assumes that the purchase invoice is made out to the end user.
Proof of Purchase and Serial Number
To claim your right to service works within the warranty period we will in each case require proof of purchase. Keep your proof or purchase or purchase invoice in a safe place and in warranty cases send us a copy together with your Repairs Contract/Damage Notication. This will ensure that we can process the service work as quickly as possible. So that we can identify which model version requires
to be serviced correctly, we will require; Product Name, Serial Number and Date of Purchase.
Terms and Conditions of Warranty:
The warranty period for your training device starts on the date of purchase and applies solely to products which were purchased directly from the MAXXUS Group GmbH & Co KG or one of the MAXXUS Group GmbH & Co KG direct and authorised distribution partners.
The warranty covers defects caused by production or material faults and only apply to devices purchased in Germany. The warranty
does not apply to damages or defects caused by culpable improper use, negligent or purposeful destruction, lack or failure to carry out
maintenance and/or cleaning measures, force majeure, operational causes and to normal wear and tear, damages caused by penetration of liquids, damage caused by repairs or modications made with spare parts from a dierent supplier. The warranty also does not
apply for damages due to faulty assembly or damages which occur because of faulty assembly. Certain component parts will wear out
during use or from normal wear and tear. This includes for example:
▪ Ball bearings ▪ Bearing bushings ▪ Bearings ▪ Drive belts
▪ Switches and push-buttons ▪ Treadmill belts (bands) ▪ Treadmill decks (running deck) ▪ Rollers
Signs of wear and tear on wearing parts are not items covered under the warranty.
For assistance with warranty service or warranty repair enquiries for devices not in Germany, please contact our Service Department at
MAXXUS Group GmbH & Co KGM by sending an Email to: [email protected] and we will be happy to help.
IMPORTANT: Please include the product name, your name and postal address, and a telephone number where we can contact you.
Service Outside the Warranty and Ordering Spare Parts
The MAXXUS® Service Team is happy to be of assistance to help solve any problems with faults which may arise following expiry of
the warranty period, or in cases of defects arising which are not covered by the warranty.
In this case please contact us by email direct to:
Orders for Spare Parts or Worn Parts should be sent along with information on the Product Name, spare part description and number
and the quantity required to:
Please be informed that additional xing materials such as screws, bolts, washers etc are not included in the scope of delivery for individual spare parts. These should be ordered separately.
*Version: June/2016
18
Page 19
Repairs Contract / Notication of a Damage Claim
Repair order / damage report
Device Details
Product Name: Lifeplate 4.0
Serial Number: _______________________________________
Date of Purchase: _____________________________________
Accessories: _________________________________________
Type of Use:
Private Use
Personal Details
Company: ___________________________________________
First Name: __________________________________________
Street: ______________________________________________
Post Code / Town/City: _________________________________
E-Mail: _____________________________________________
Fax. No.*: ___________________________________________
* The elds marked with an asterisk are optional. The remaining elds are mandatory elds that must be completed.
Fault Description
Please enter a short description of the error as precisely as possible below:
(For example, when, where and how does the error occur? Frequency, after which period, at what Use, etc ....)
Product Group: Vibration Plates
Invoice Number: ______________________________________
Where Purchased: ____________________________________
________________________________________________
Commercial Use
Contact Person: _______________________________________
Second Name: ________________________________________
House Number: _______________________________________
Country: _____________________________________________
Tel.No.: _____________________________________________
Mobile No.*: __________________________________________
A copy of the proof of purchase / invoice / receipt is attached.
I accept the General Terms and Conditions of MAXXUS® Group GmbH & Co. KG.
I hereby instruct the company MAXXUS® Group GmbH & Co. KG to repair the above defects. In Warranty cases I will not be charged
for the cost. The costs for repairs which are excluded from liability for defects in quality will be charged to me and must be settled
immediately. In cases of repairs carried out on site, our sta are entitled to collect payment. This agreement is conrmed with here with
my signature.
Date Location Signature
Please be aware that contracts can only be processed if this form has been completed in full. Be sure to attach a copy of your purchase
invoice. Send the fully completed Repairs Contract / Notication of Damage Claim to:
ENG
Post*: Maxxus Group GmbH & Co KG, Service Department, Zeppelinstr. 2, 64331 Weiterstadt
Fax: +49 (0) 6151 39735 400
E-Mail**: [email protected]
* Please stamp with sucient postage – letters which are not sent postage paid will unfortunately not be accepted.
** Submission by E-Mail is only possible as a scanned document with original signature.
19
Page 20
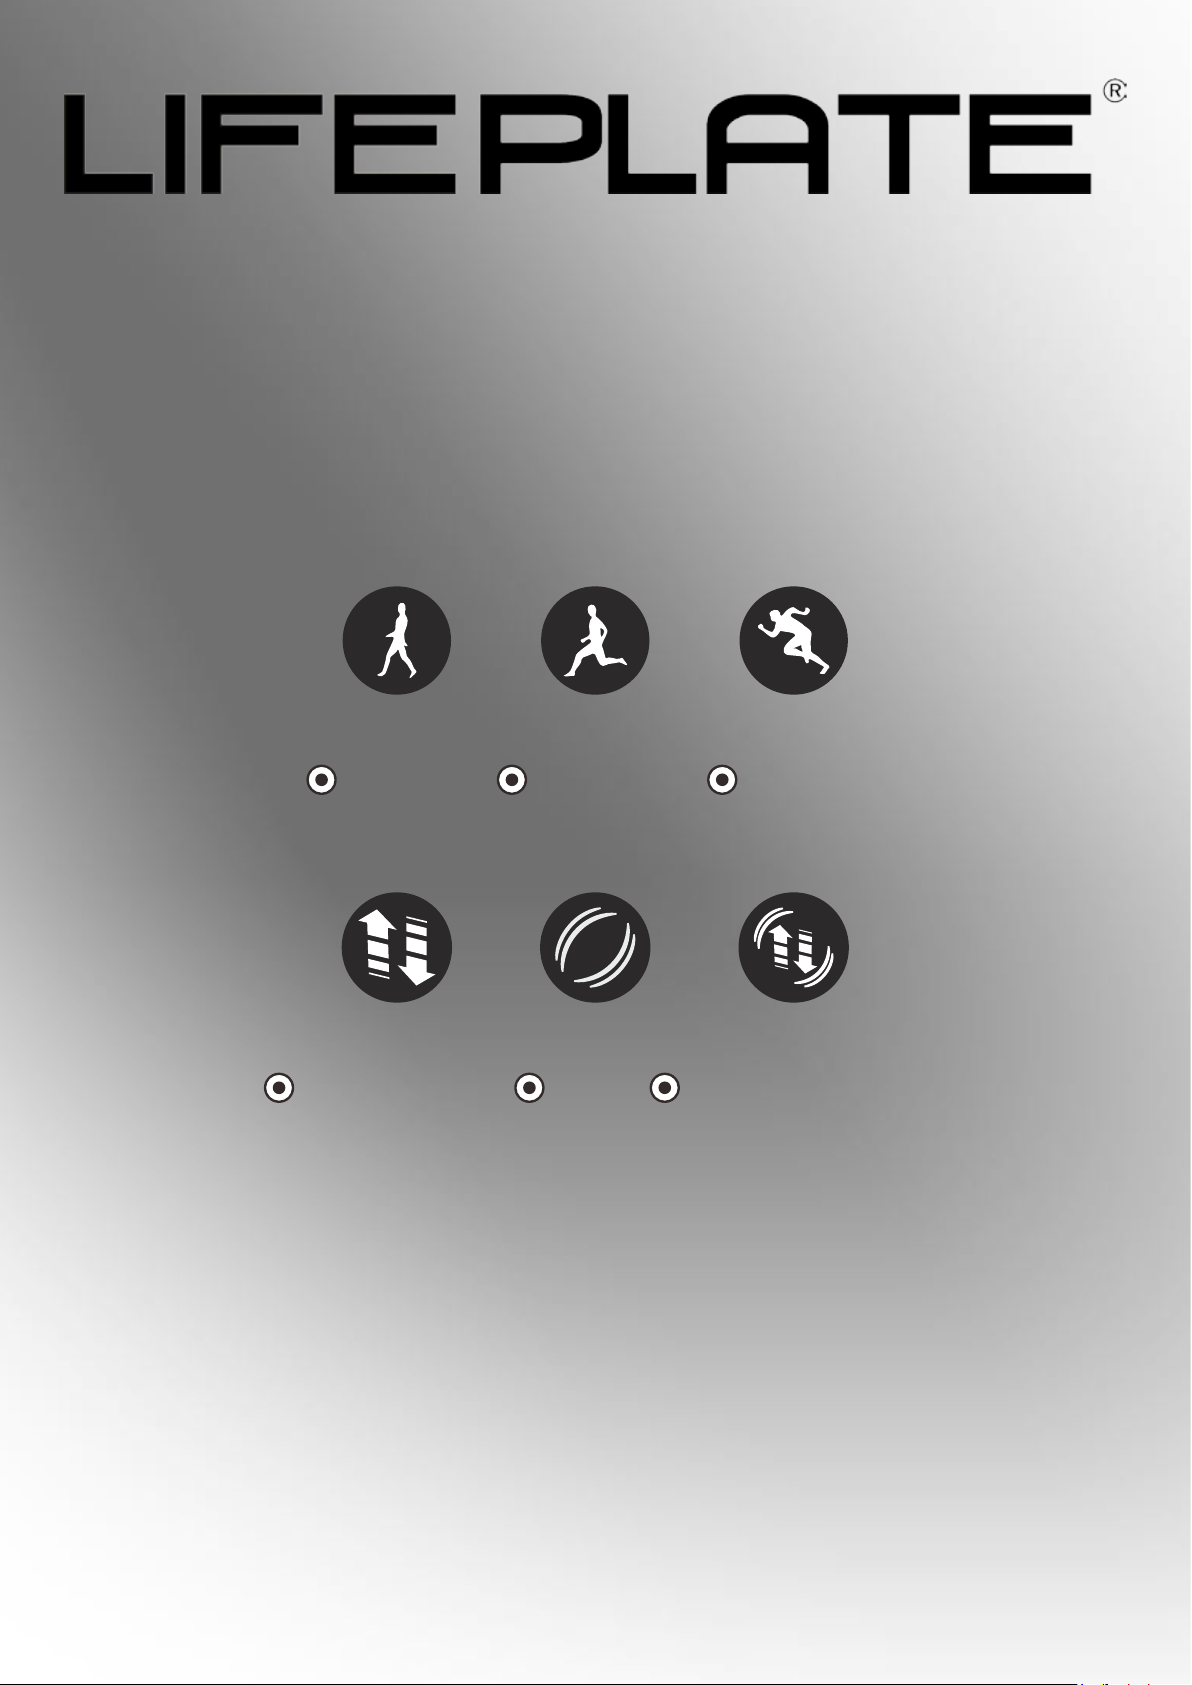
– Three dierent types of training for maximum training success –
Gentle Medium Intensive
– Three dierent training modes for maximum training success –
Oscillating 3D Oscillating & 3D
Maxxus Group GmbH & Co. KG
Zeppelinstr. 2
D-64331 Weiterstadt
Germany
E-Mail: [email protected]
www.maxxus.de
 Loading...