

Page 1
ACT-IPC-01
USER MANUAL
HANDBUCH
HANDLEIDING
MANUEL DESCRIPTIF
INSTRUKCJA OBSŁUGI
ROTATING HD WIFI CAMERA
HD SMART WIFI IP-CAM
DRAAIBARE SMART HD WIFI CAMERA
CAMERA NUMÉRIQUE HD À TÊTE PIVOTANTE + WIFI
OBROTOWA KAMERA HD WIFI W KOLORZE BIAŁYM
Page 2

2
All brands and logos are registered trademarks of their respective owners
ACT-IPC-01
ROTATING HD WIFI CAMERA
FEATURES
HD 720p indoor WiFi IP-camera with built-in microphone, speaker
WiFi function - easily connect the camera to your network via your smartphone or tablet
LAN port for connecting to wired network
Practical microSD slot for easy video recording and capturing snapshots
Free mobile apps allow you to monitor your camera from all over the world via internet
Rotates up to 350° horizontally and tilts up to 90° vertically
Motion detection, alarm alerts by e-mail and push message
Place it on any flat surface, or easily mount it to a wall or ceiling
SPECIFICATIONS
Interfaces: WiFi: 802.11 b/g/n, RJ45 LAN
Image sensor: 1/4'' CMOS 1 Mega pixels, 3.6 mm lens system, F = 2.0; 90 degrees angle
of view
Video resolution: 30 fps at 1280 x 720, 640 x 360, 320 x 180
Video format: H.264/MJPEG
Sound SNR: 48 dB
Electronic shutter speed: 1/50 - 1/100000 second
Web-protocols supported: TCP/I, UDP/IP, HTTP, SMTP, FTP, DHCP, DDNS, UPNP, NTP,
RTSP, ONVIF
Built-in speaker
Built-in IR backlight and IR-CUT filter
MicroSD card up to 64 GB supported
Power consumption: 5 VDC up to 2 A, no battery inside
AC power adapter: 100 - 240 V AC input, 5 V DC output up to 2 A
Dimensions: 120 x 120 x 135 mm
Weight: 0.3 kg
Operating conditions: -10 - 50 Celsius degrees at 10-85% humidity
FOR INDOOR USE ONLY
Page 3

3
All brands and logos are registered trademarks of their respective owners
ACT-IPC-01
ROTATING HD WIFI CAMERA
CONNECTING IP CAMERA TO WIFI AND YOUR PHONE / PC
MOBILE PHONE SOFTWARE OPERATION
INSTALLING APP:
1. Open the Apple App store or Google Play store on your phone/tablet
and search for “iVIEW PRO”. Download and install the iVIEW PRO app
on your phone or tablet.
APP REGISTRATION AND LOGIN:
2. When you open the app for the first time, you have to two options. Either
to create a personal user account and register with your email, or to
jump right in and use the app anonymous (no registration). (if you want
to use the camera on several devices, it is advised to register it on a
user account. For the anonymous login, just push the anonymous login
button (door). For the account registration option, follow the following 4
easy steps.
Page 4
4
All brands and logos are registered trademarks of their respective owners
ACT-IPC-01
ROTATING HD WIFI CAMERA
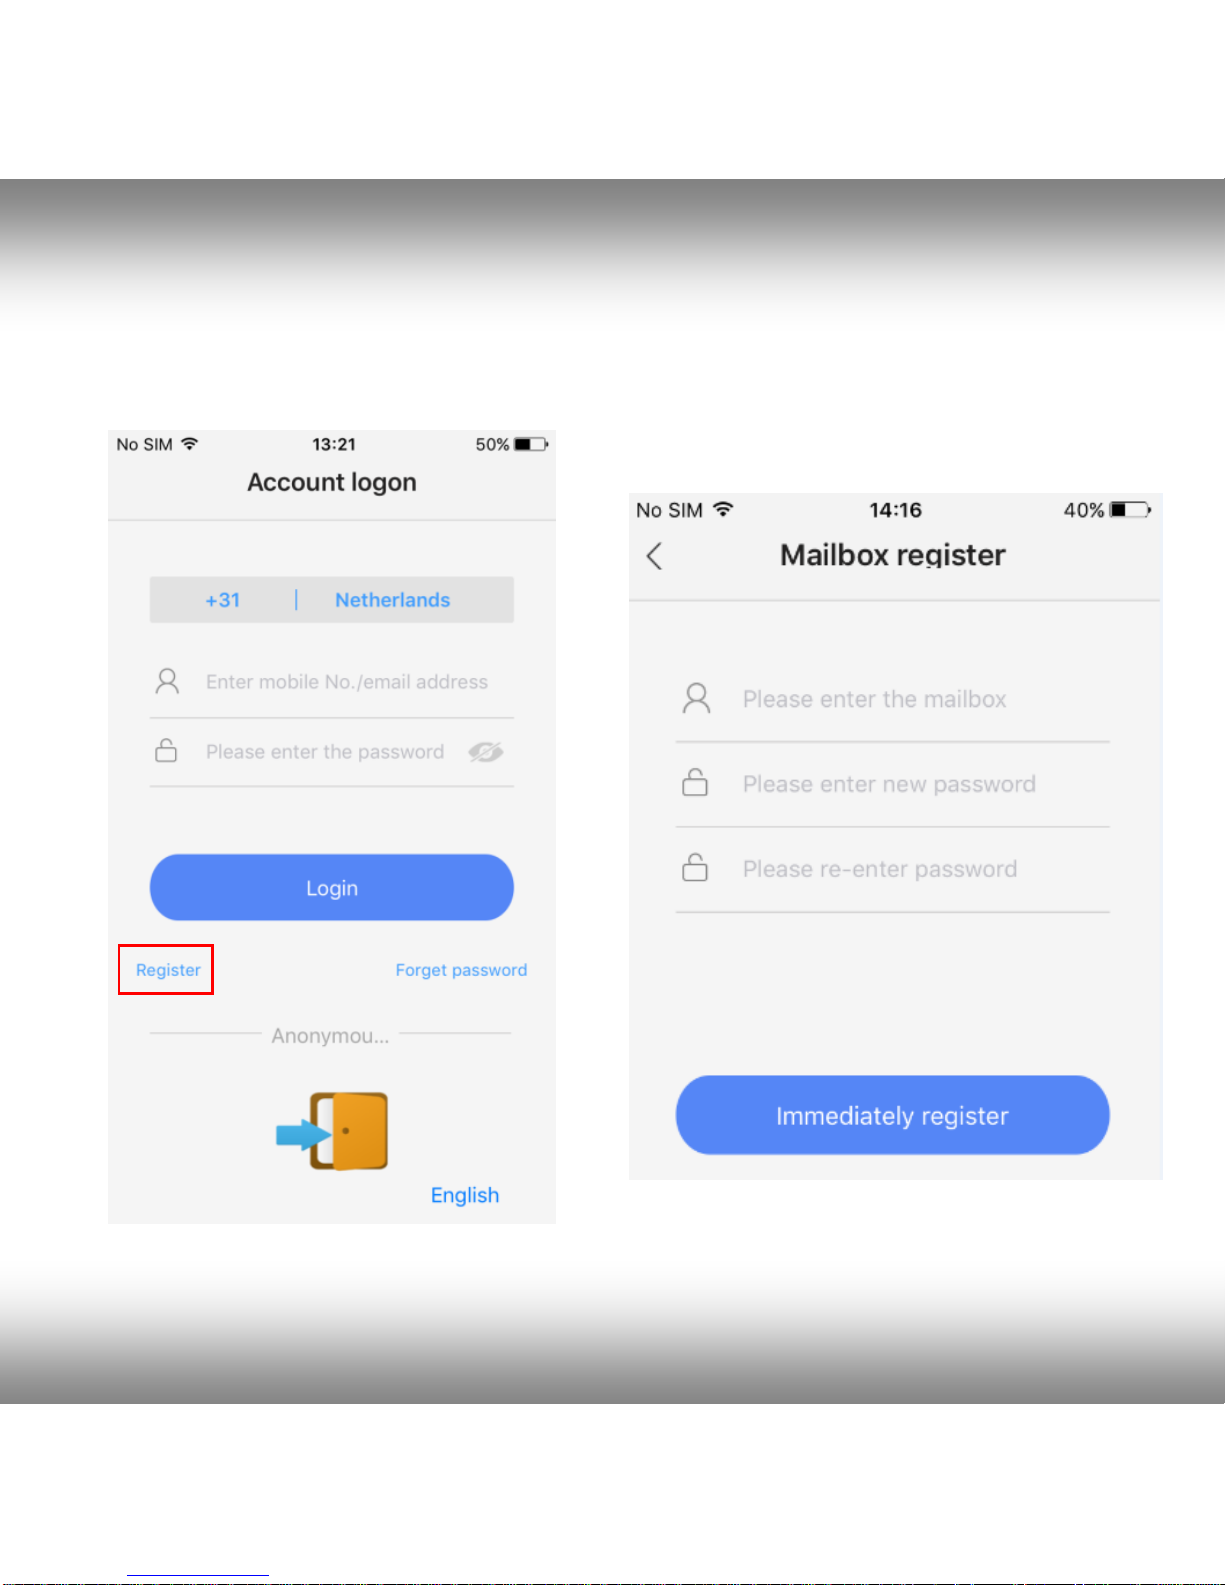
I. Open your app on the phone and
click on “Register”.
II. Input your email address and
create password
Page 5

5
All brands and logos are registered trademarks of their respective owners
ACT-IPC-01
ROTATING HD WIFI CAMERA
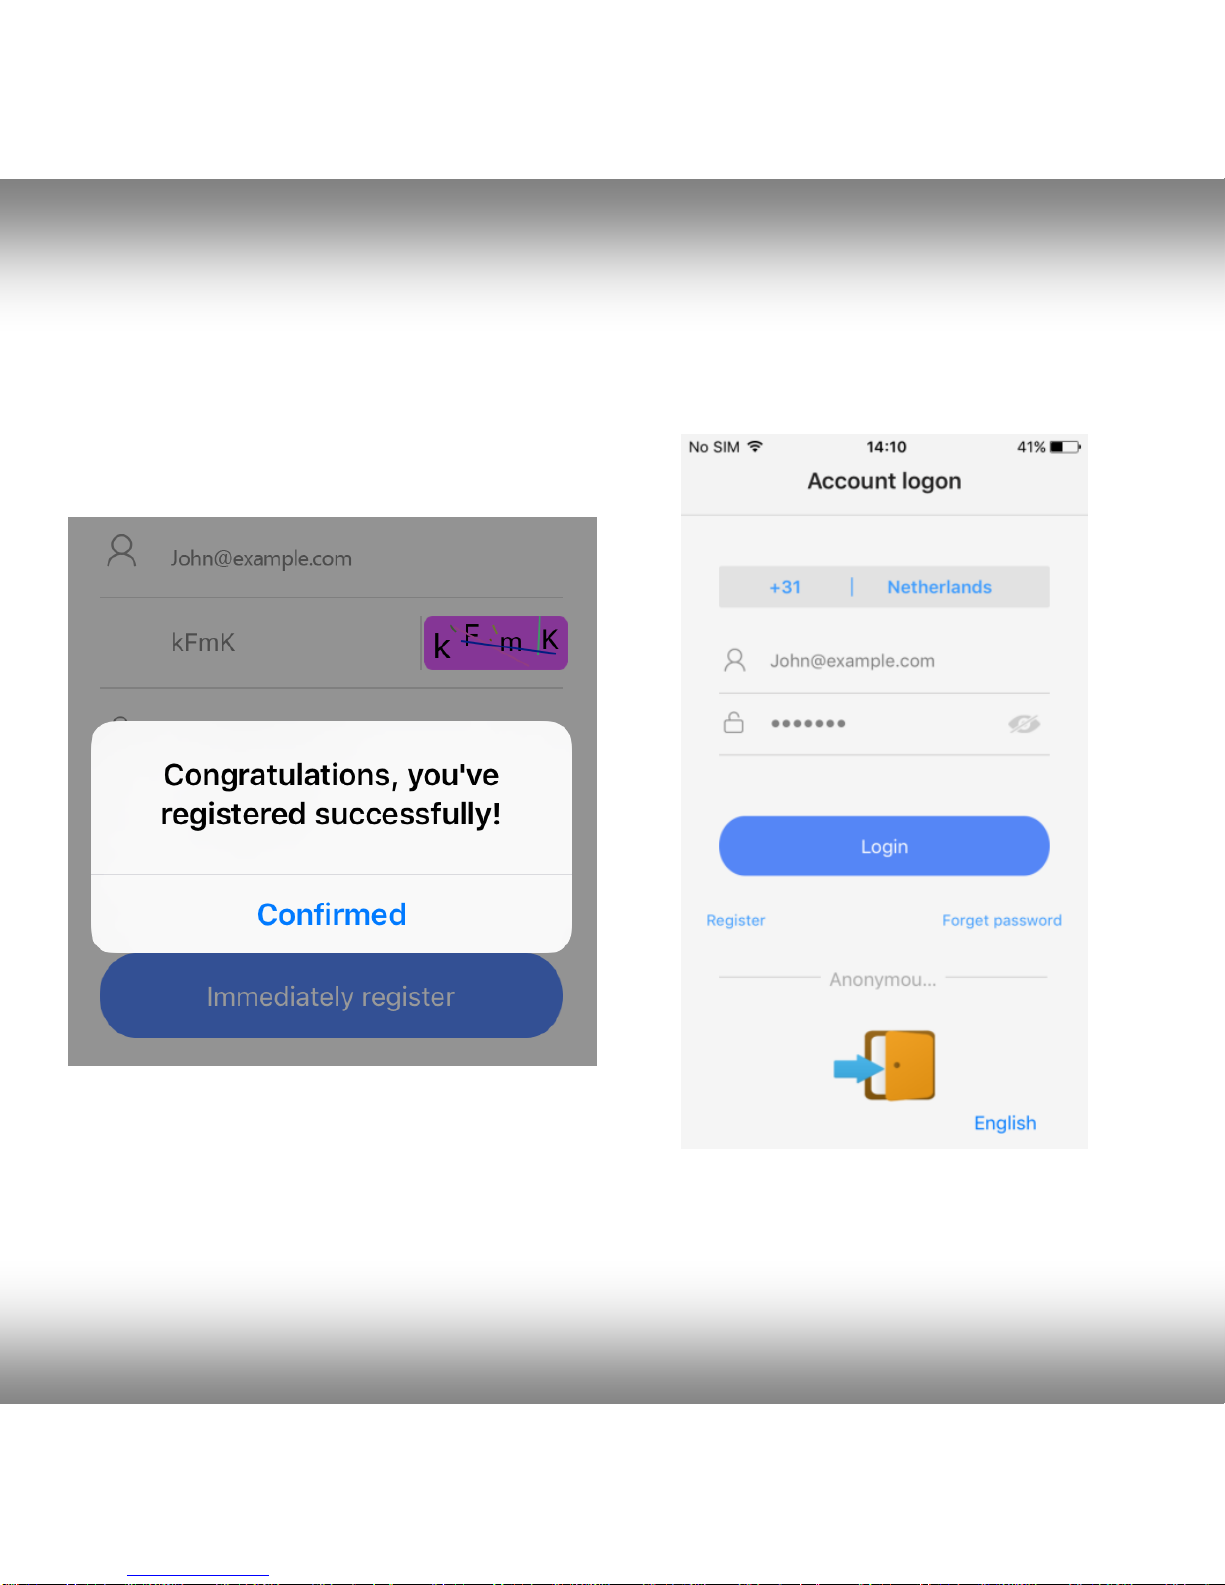
III. Enter the random code (case
sensitive) and press “register”.
IV. now login with your email
address and password
Page 6

6
All brands and logos are registered trademarks of their respective owners
ACT-IPC-01
ROTATING HD WIFI CAMERA
CONNECTING THE IP CAMERA TO WIFI:
3. Now please power the camera on with power adapter. Make sure your
phone WiFi is turned on. The camera now starts up and will start
beeping every other second. Follow next steps to connect camera to wifi.
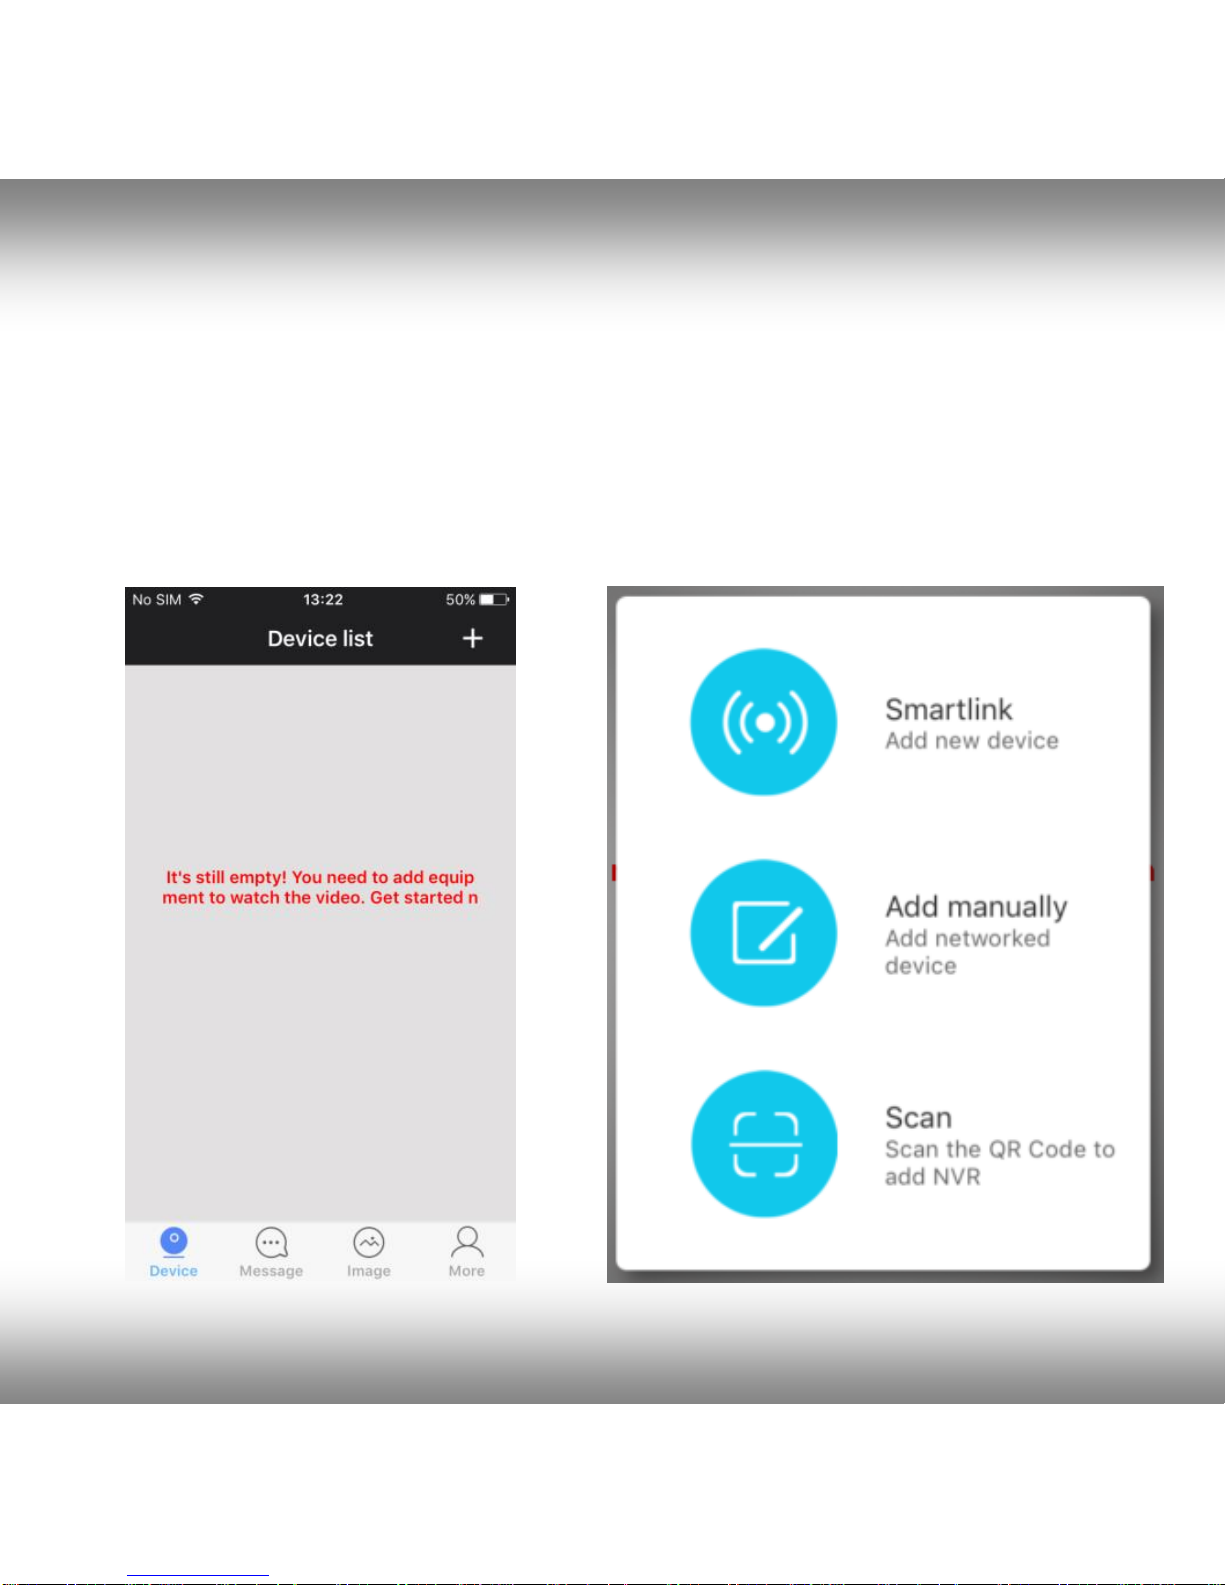
I. Press “+” to connect the camera
and add it to the device list.
II. Three ways for connecting, Smart
link manual add and via QR code.
Page 7

7
All brands and logos are registered trademarks of their respective owners
ACT-IPC-01
ROTATING HD WIFI CAMERA
4. Now press the plus (+) sign in the top right corner of the screen to add a
camera to the app camera list.
5. There are three ways for connecting your camera:
I. Smartlink
II. Add manually.
III. QR code scan (only if QR code is present on your camera)
Easiest is the Smartlink option. To use this, put the phone near the camera.
Listen carefully, the Smartlink option only works when the camera is beeping
every other second. This beeping means the camera can be paired to your
wifi network. If this is not the case, please try to reset the camera with a pin
via the reset button at the bottom of the camera.
The Manual Add option is only suitable to add cameras that are already
connected to wifi. If this is not the case, please use the Smartlink option.
The QR code scanning option is only available when a sticker with QR code
is present on your camera. If there is no sticker, the QR code option is not
available.
Please follow the steps on the next pages to connect the camera to your wifi
network via the Smartlink option.
Page 8
8
All brands and logos are registered trademarks of their respective owners
ACT-IPC-01
ROTATING HD WIFI CAMERA
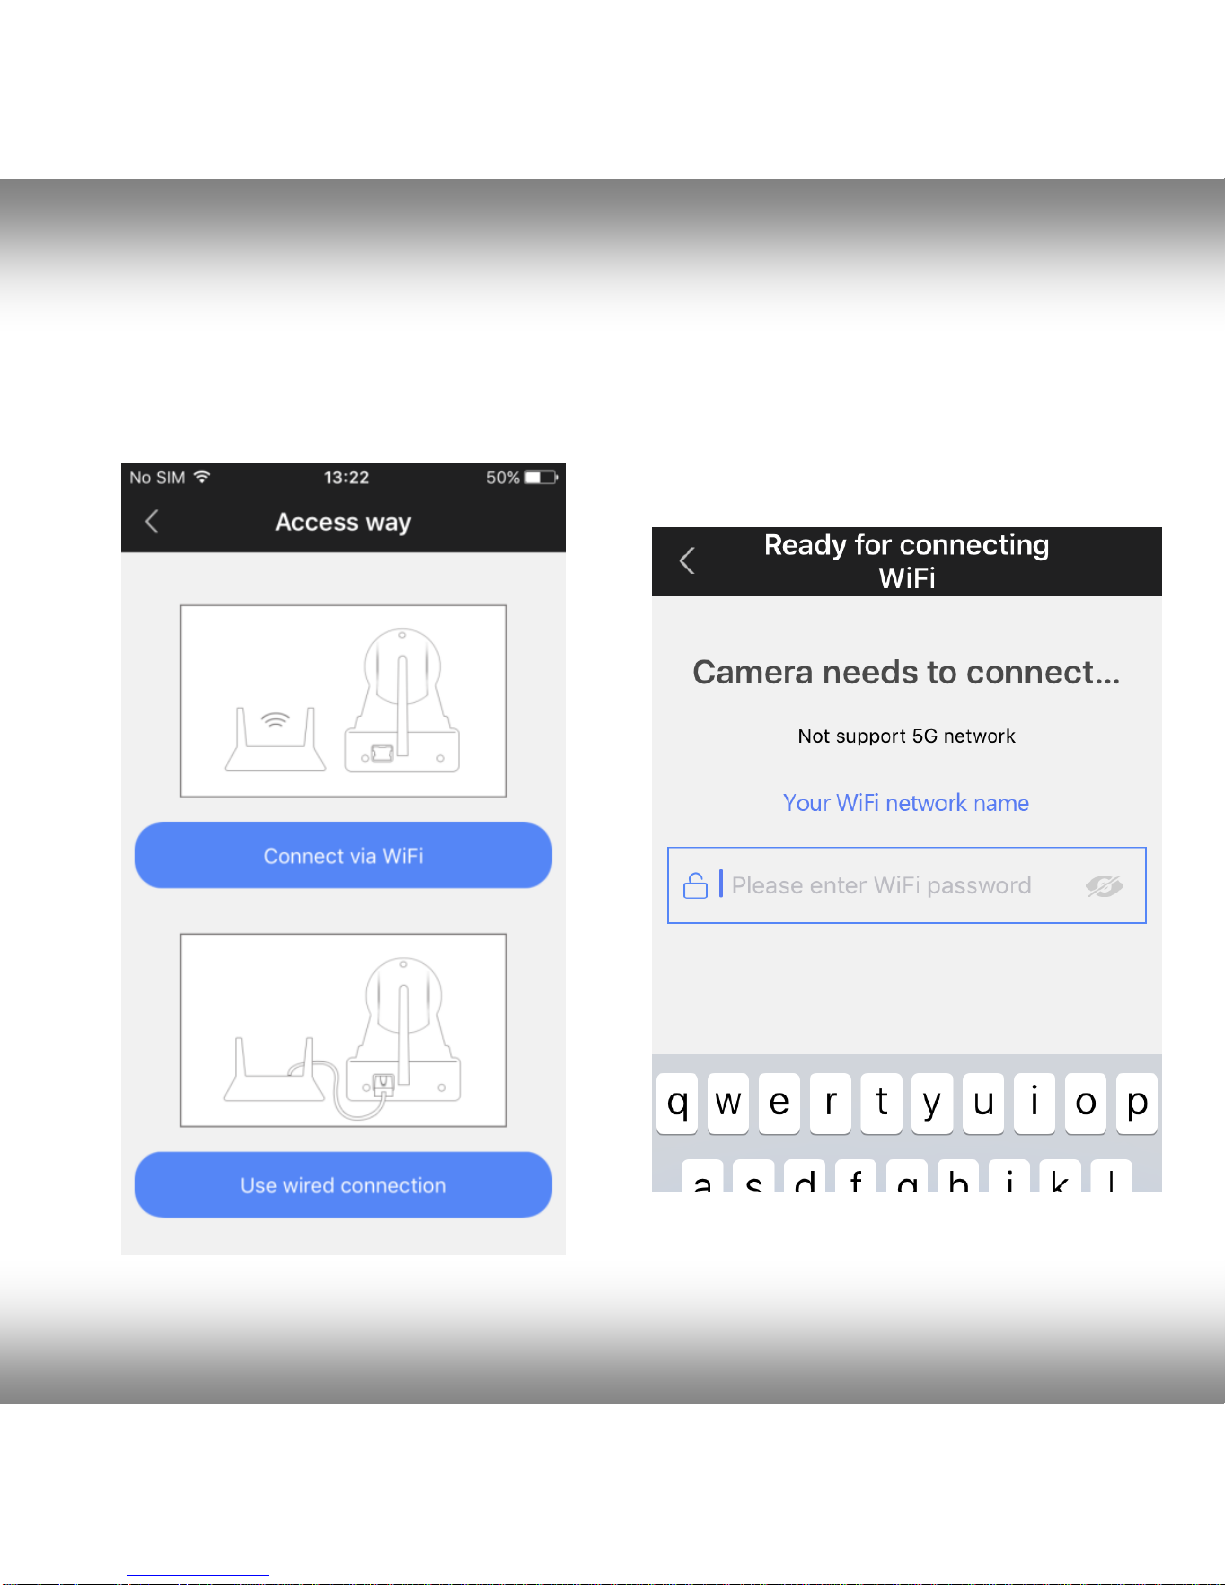
I. Press “connect via wifi” button
II. Enter the password of your wifi
network
Page 9

9
All brands and logos are registered trademarks of their respective owners
ACT-IPC-01
ROTATING HD WIFI CAMERA
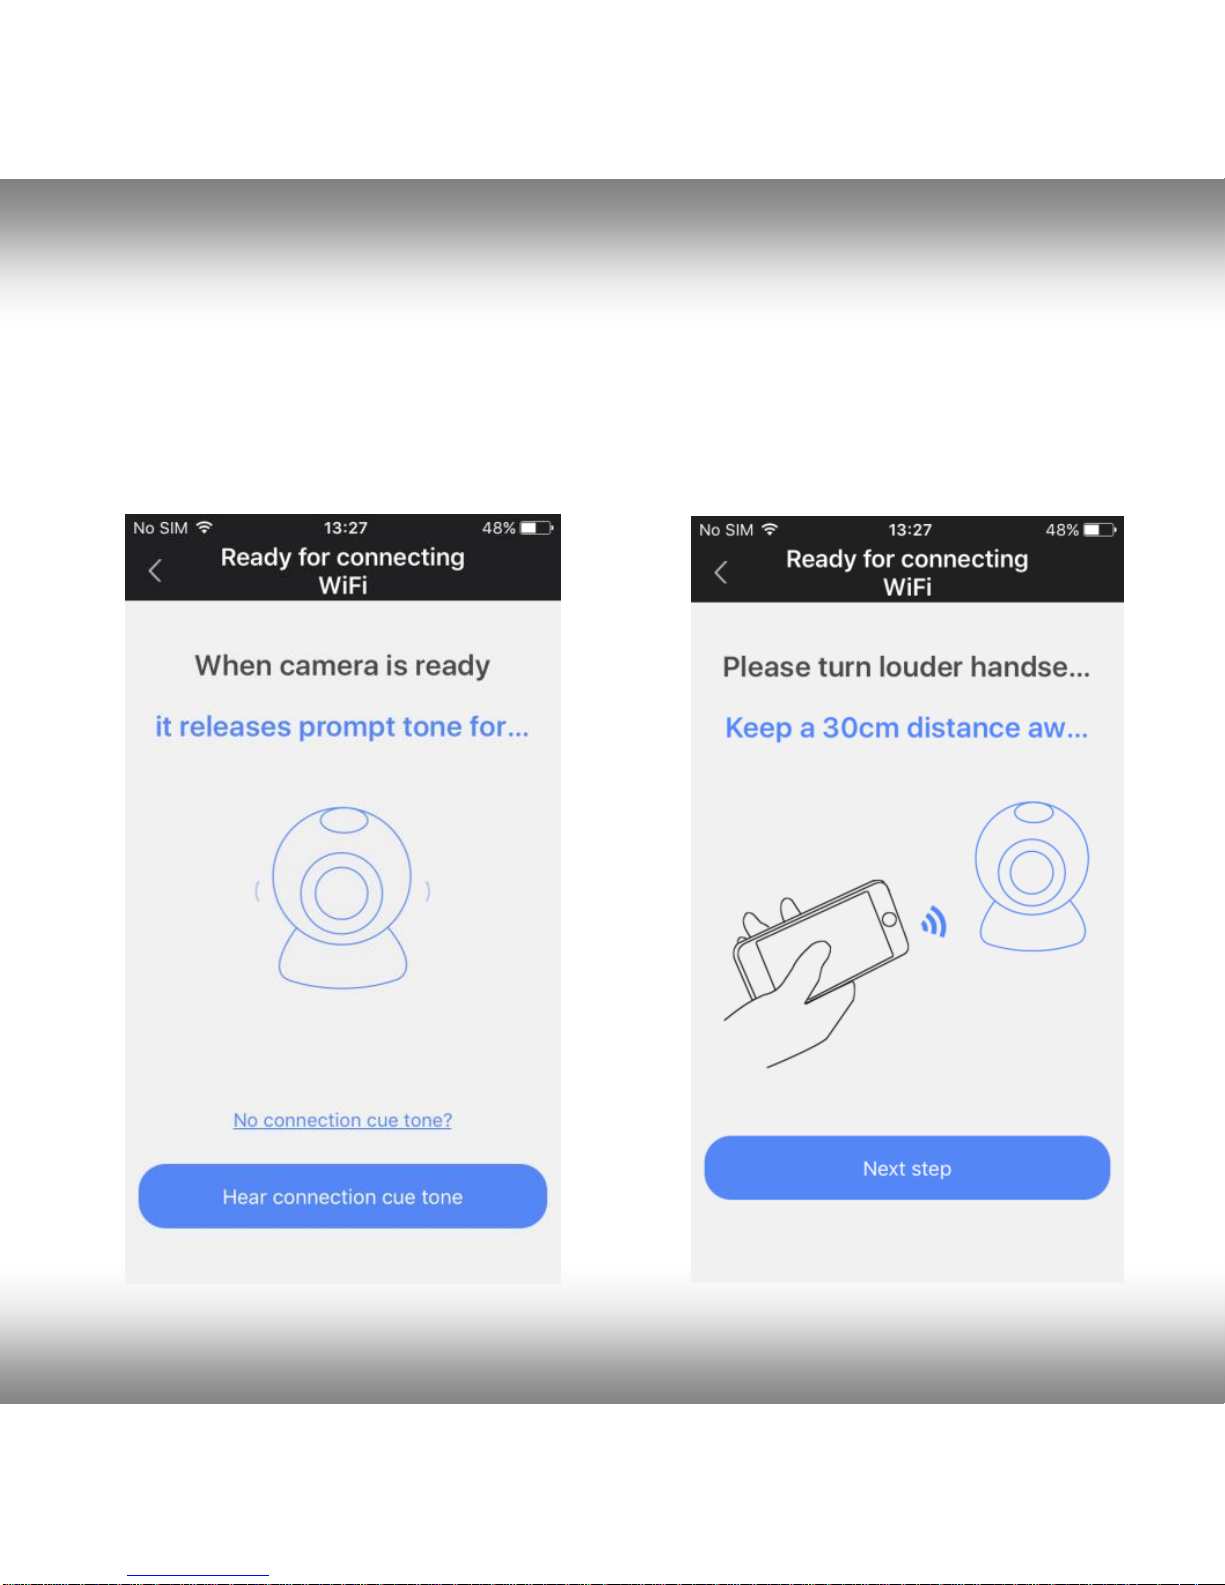
III. If you hear the camera beeping,
continue by pressing blue button. (Not
beeping? Reset camera first)
IV. Turn up the volume of your
phone/tablet and click ‘next’
Page 10

10
All brands and logos are registered trademarks of their respective owners
ACT-IPC-01
ROTATING HD WIFI CAMERA
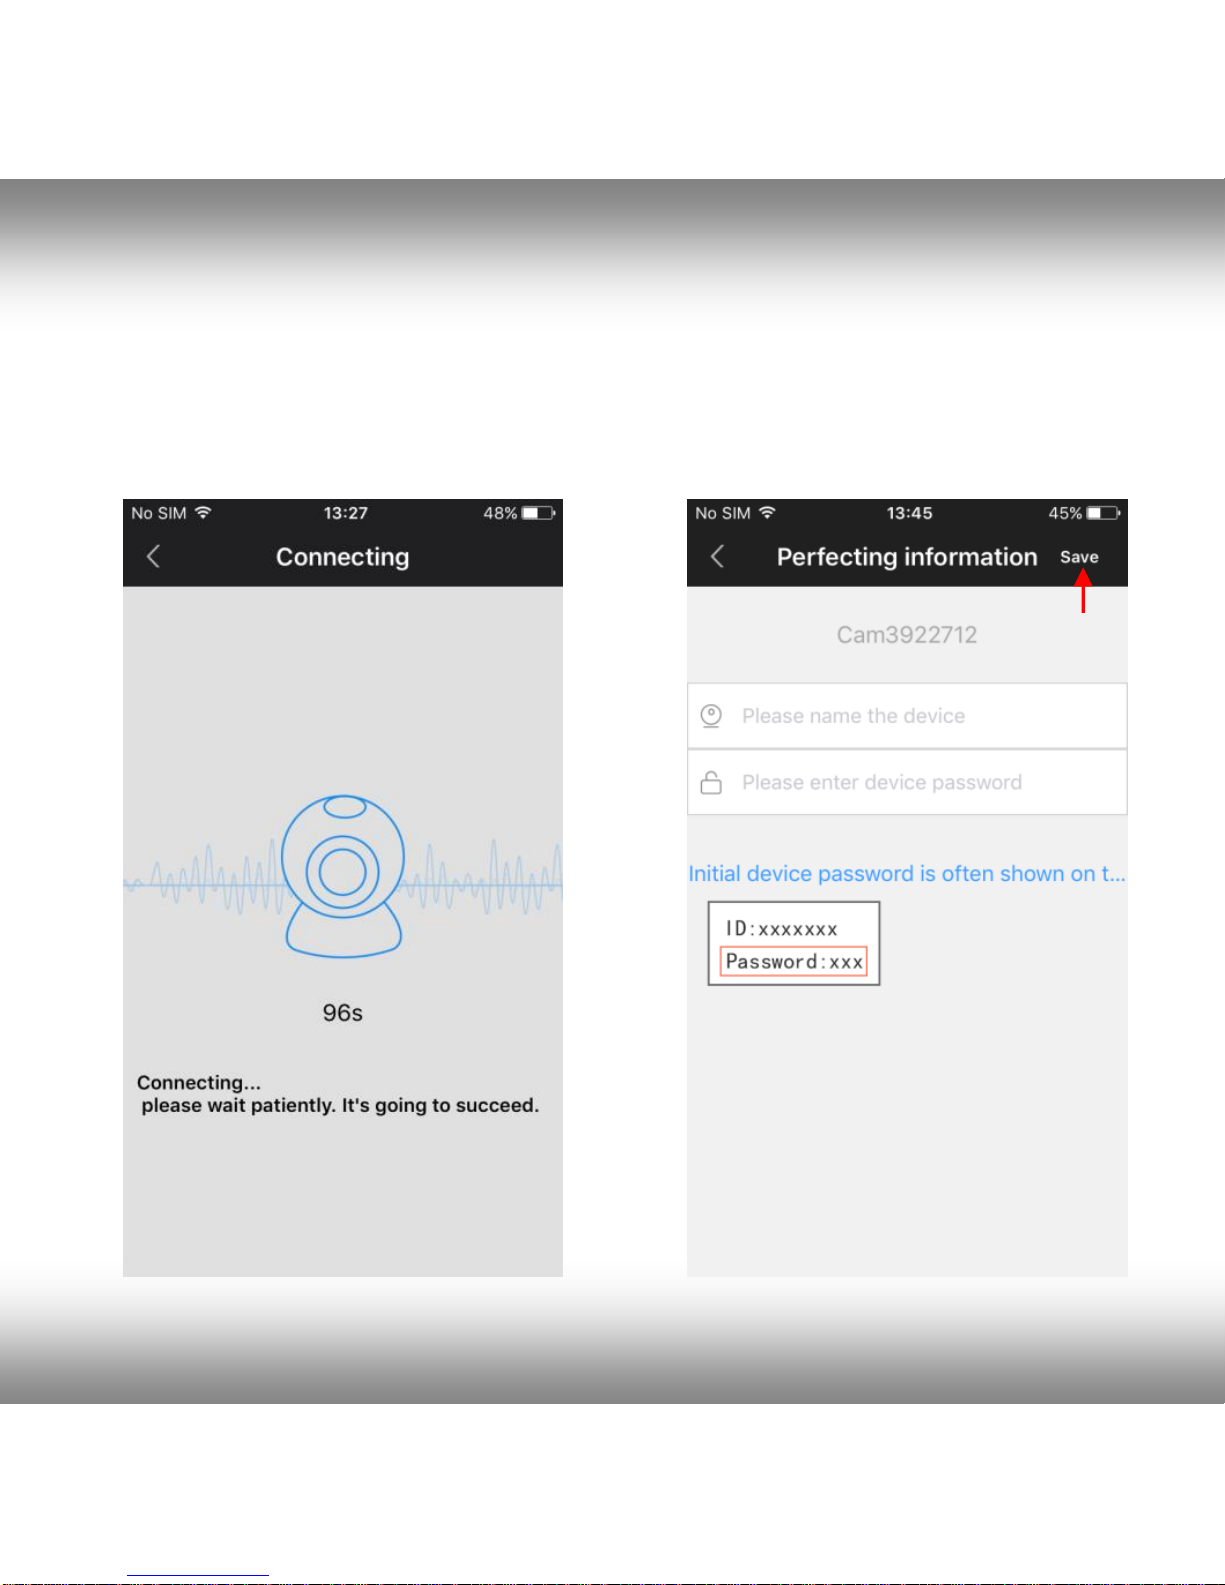
V. You will now hear sonic connection
tone sequence from phone. Please
wait…
VI. When connected, you can name
your camera and enter the camera
password (123). Click ‘save’.
Page 11
11
All brands and logos are registered trademarks of their respective owners
ACT-IPC-01
ROTATING HD WIFI CAMERA
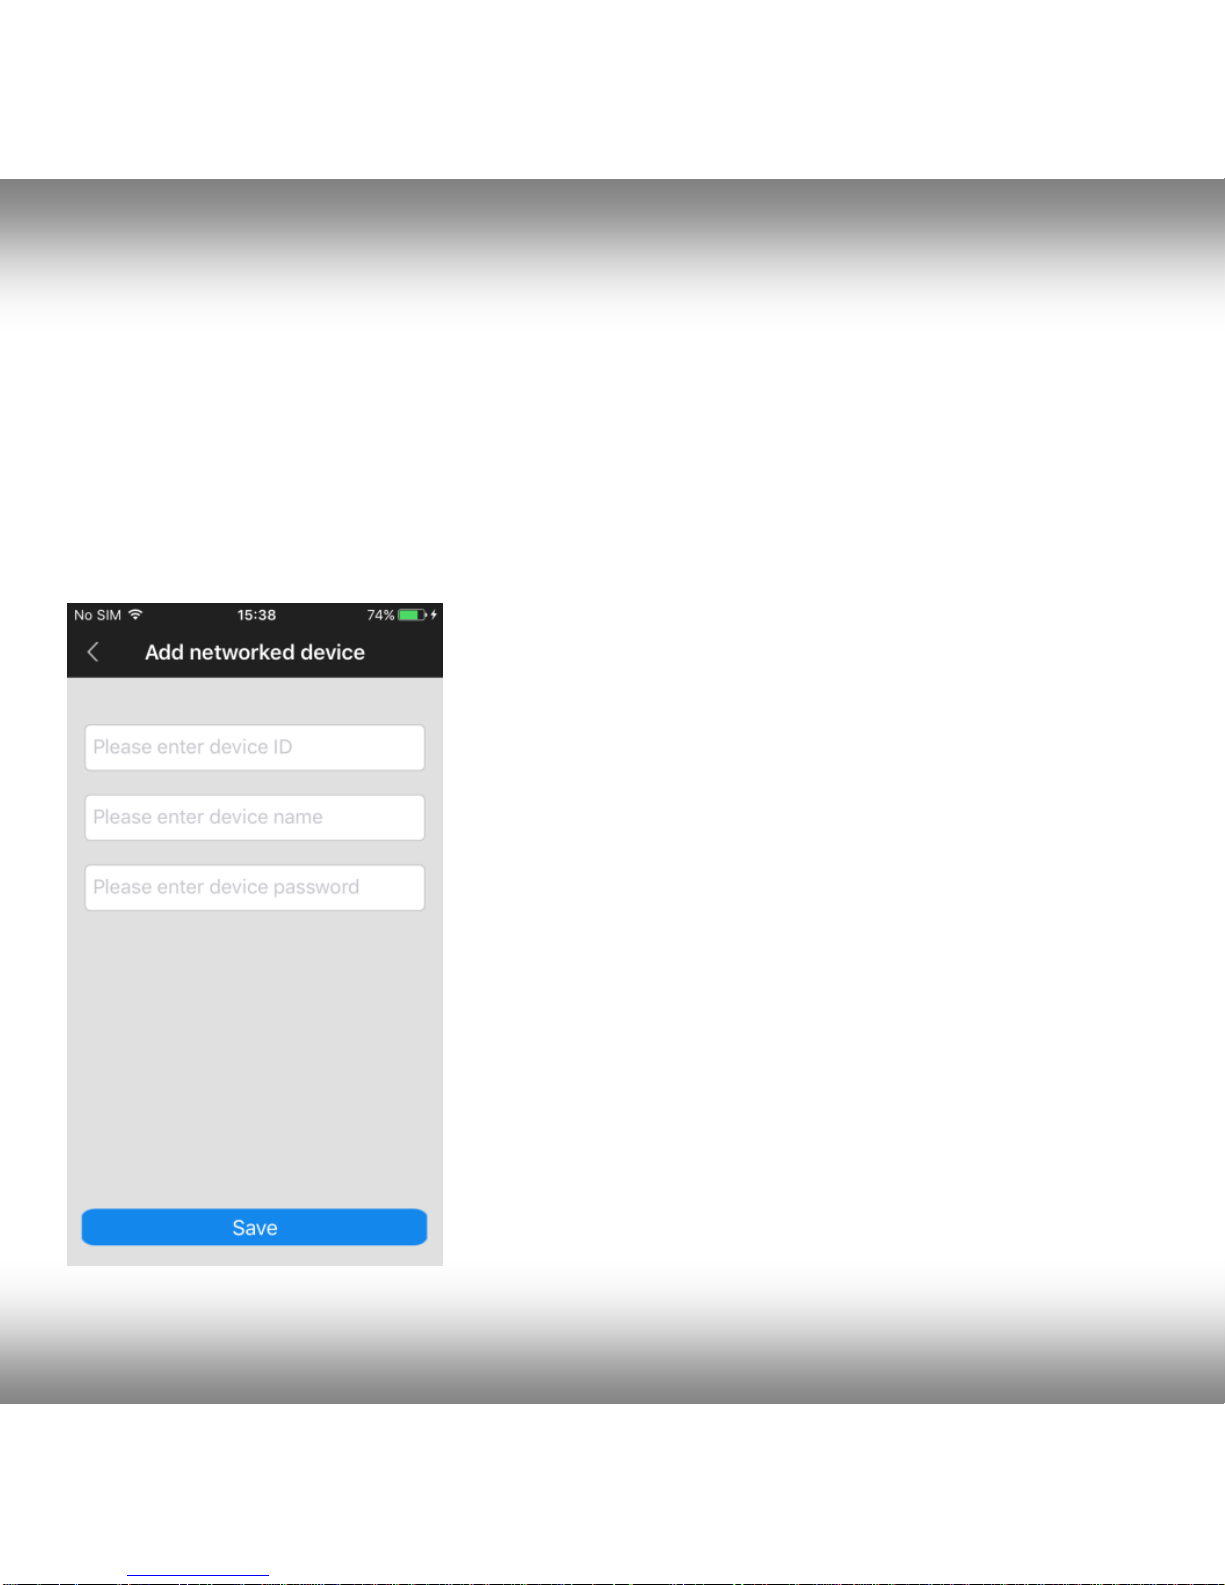
Adding camera manually:
If your camera is already connected to your home wifi (online camera) and
you want to add it to the iVIEW PRO app on your second phone/tablet, you
can add it manually. For this, you need the camera ID number and its
password. The ID number is written on a sticker on the camera itself. The
default password is 123, but if you changed this
password, you should use the camera’s current
personal password to add it.
In the ‘Device name” field you can type any
name you like, e.g. ‘Living room cam1”.
Click ‘Save’ to add the camera to your device
list.
Page 12

12
All brands and logos are registered trademarks of their respective owners
ACT-IPC-01
ROTATING HD WIFI CAMERA
HOW TO USE THE APP / VIEW CAMERA VIDEO FEED:
Function and button overview:
Page 13

13
All brands and logos are registered trademarks of their respective owners
ACT-IPC-01
ROTATING HD WIFI CAMERA
1. Mute button
2. Enable full screen mode
3. Toggle alarm mode
4. Microphone button (hold to talk)
5. Snapshot button
6. Settings menu button
7. Video quality settings
8. Toggle alarm mode
9. Mute button
10. Microphone
11. Snapshot button
12. Live video feed from camera
13. Exit camera
14. Exit full screen mode
Page 14

14
All brands and logos are registered trademarks of their respective owners
ACT-IPC-01
ROTATING HD WIFI CAMERA
Page 15
15
All brands and logos are registered trademarks of their respective owners
ACT-IPC-01
ROTATING HD WIFI CAMERA
1. Device information
Check device information (e.g. device ID number) and change camera
name.
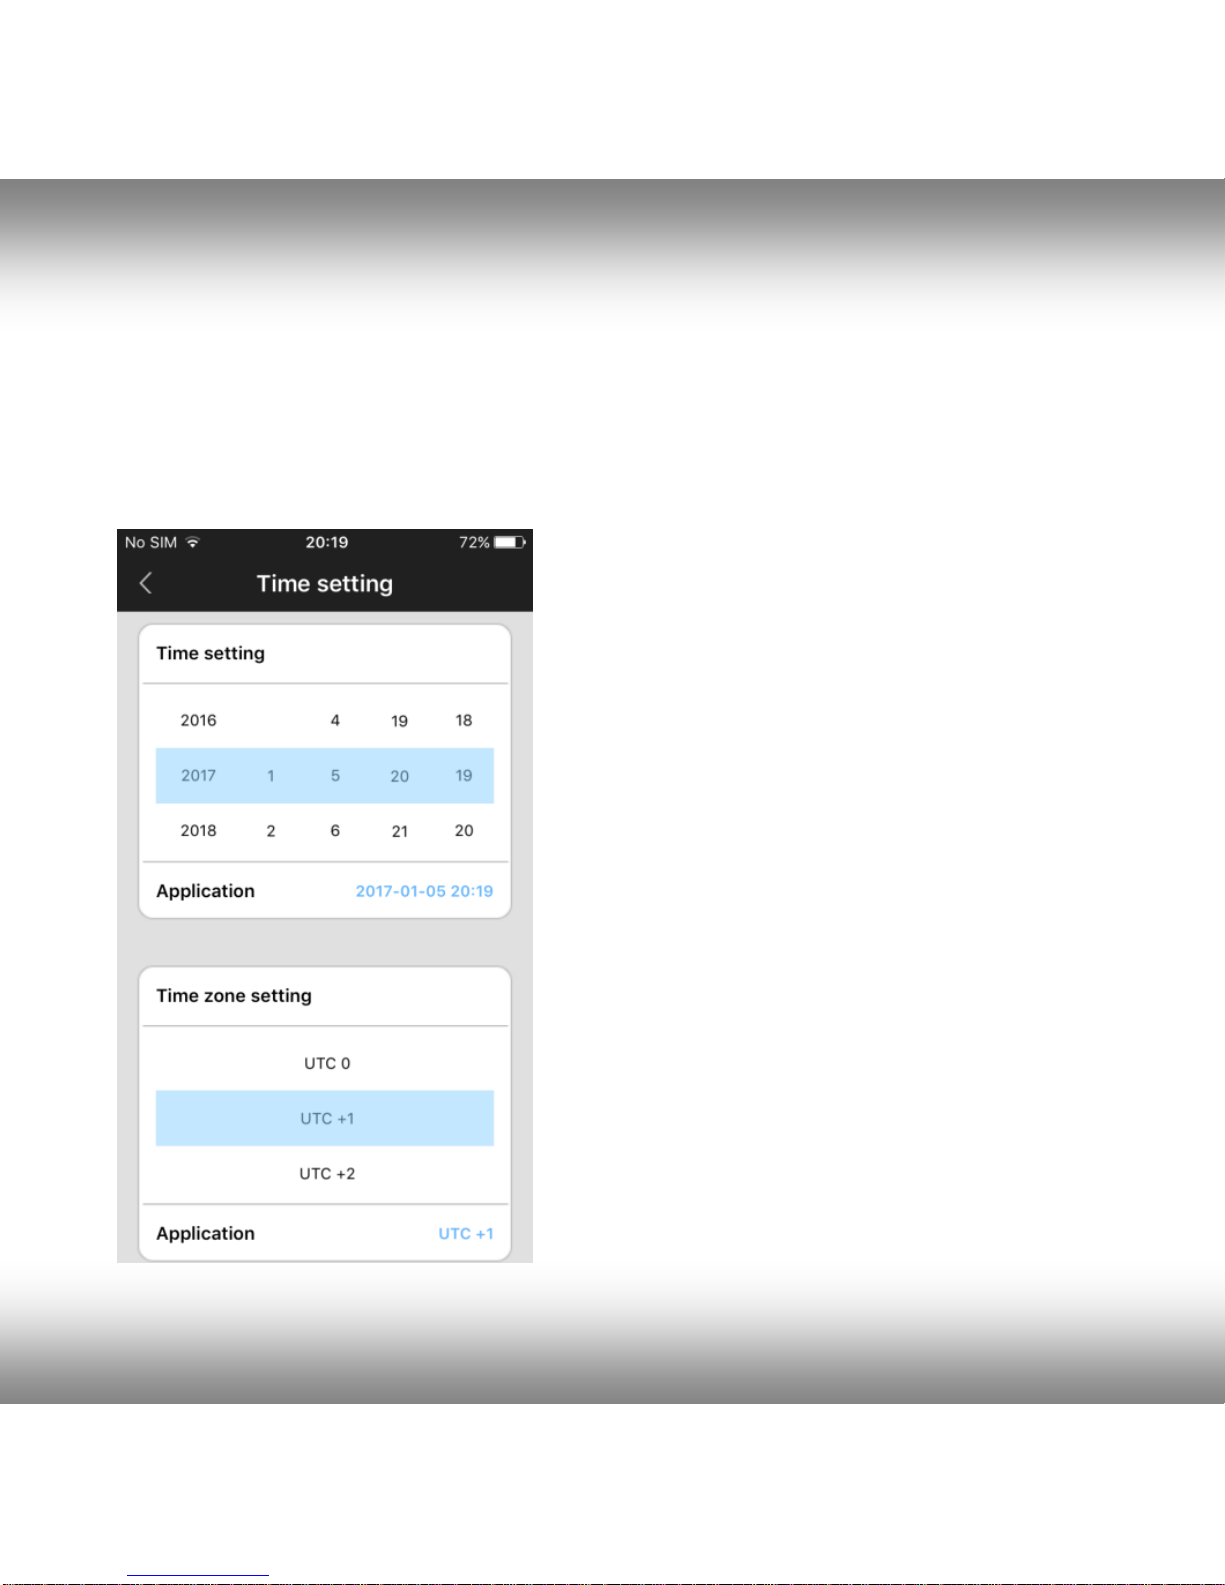
2. Time settings.
The camera should show the right time
automatically. If not, you can also set it
manually. First set the correct time zone
(for NL, DE, FR, BE, CZ set time zone to
UTC+1) and press ‘application’ in the
Time zone setting area. Then check if
time and date are correct and press
‘application’ in the Time setting area.
Time should now be correctly set.
Page 16
16
All brands and logos are registered trademarks of their respective owners
ACT-IPC-01
ROTATING HD WIFI CAMERA
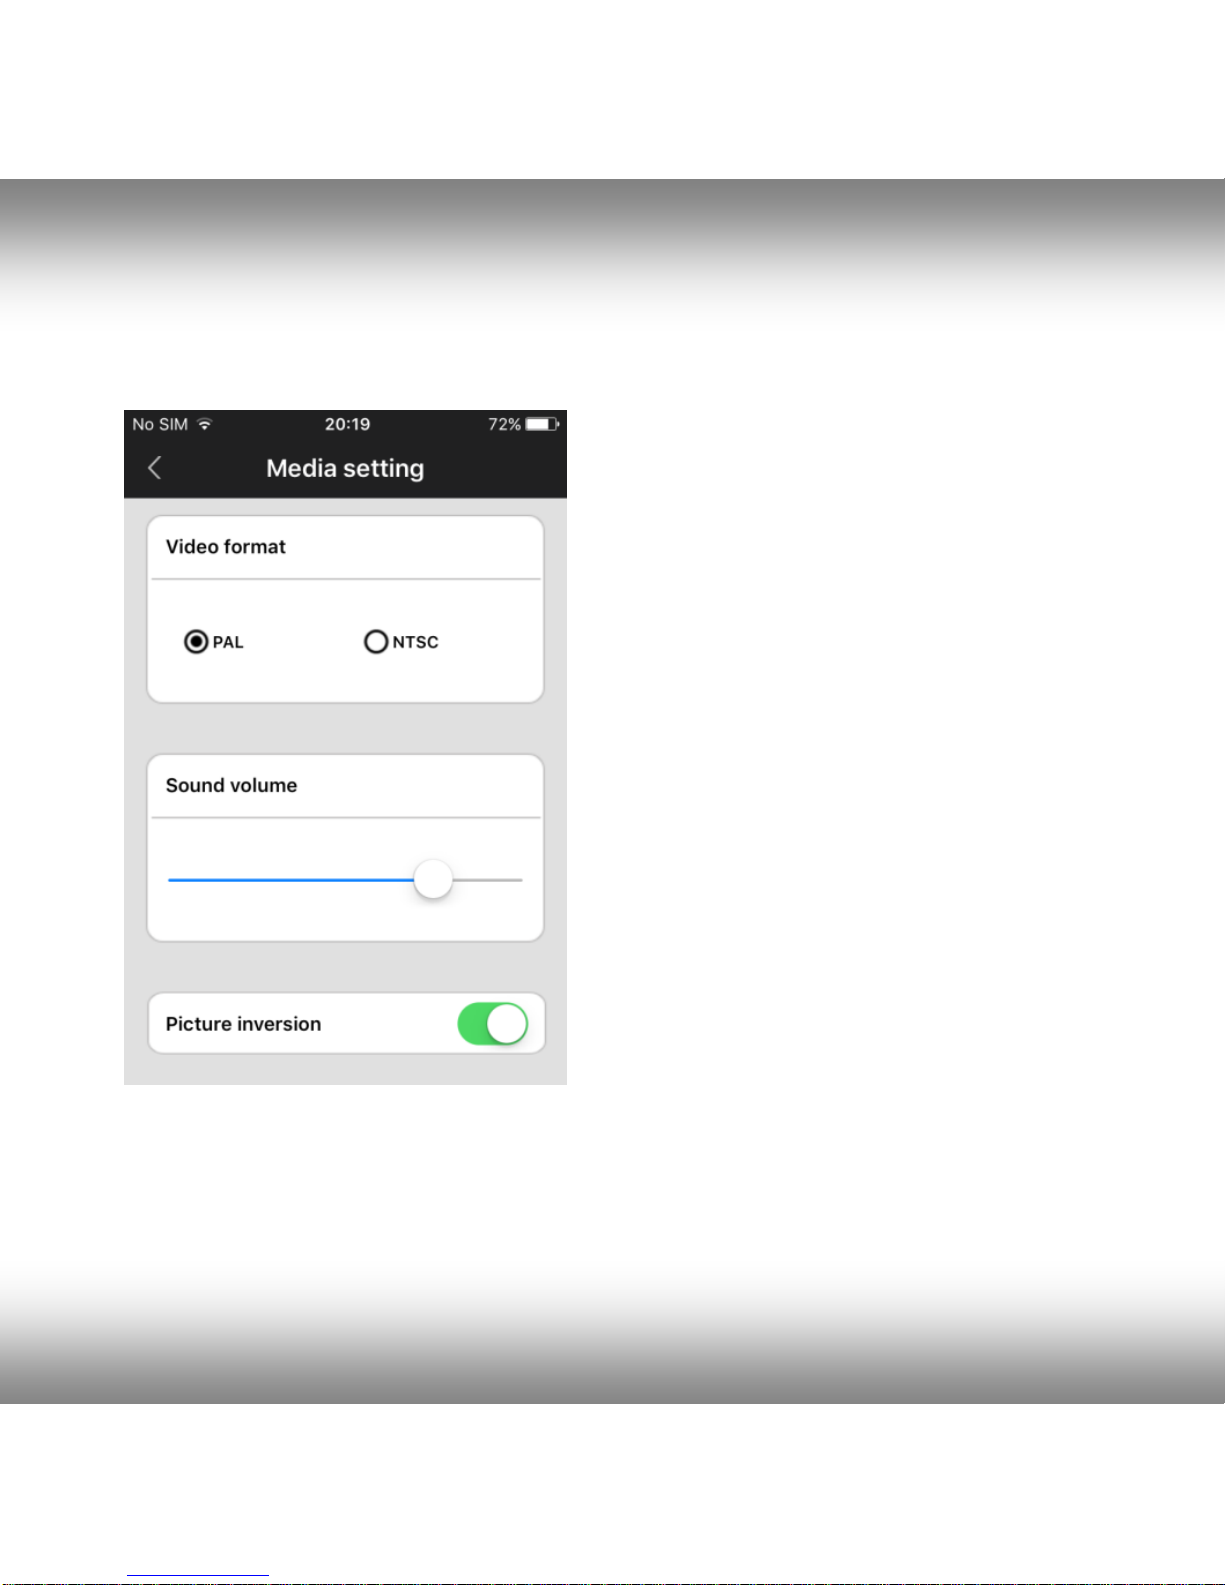
3. Media settings
Here you can setup video format (set to
PAL for EU), device volume and also
invert the camera image. This is
required when the camera is mounted
upside down on e.g. a ceiling.
Page 17
17
All brands and logos are registered trademarks of their respective owners
ACT-IPC-01
ROTATING HD WIFI CAMERA
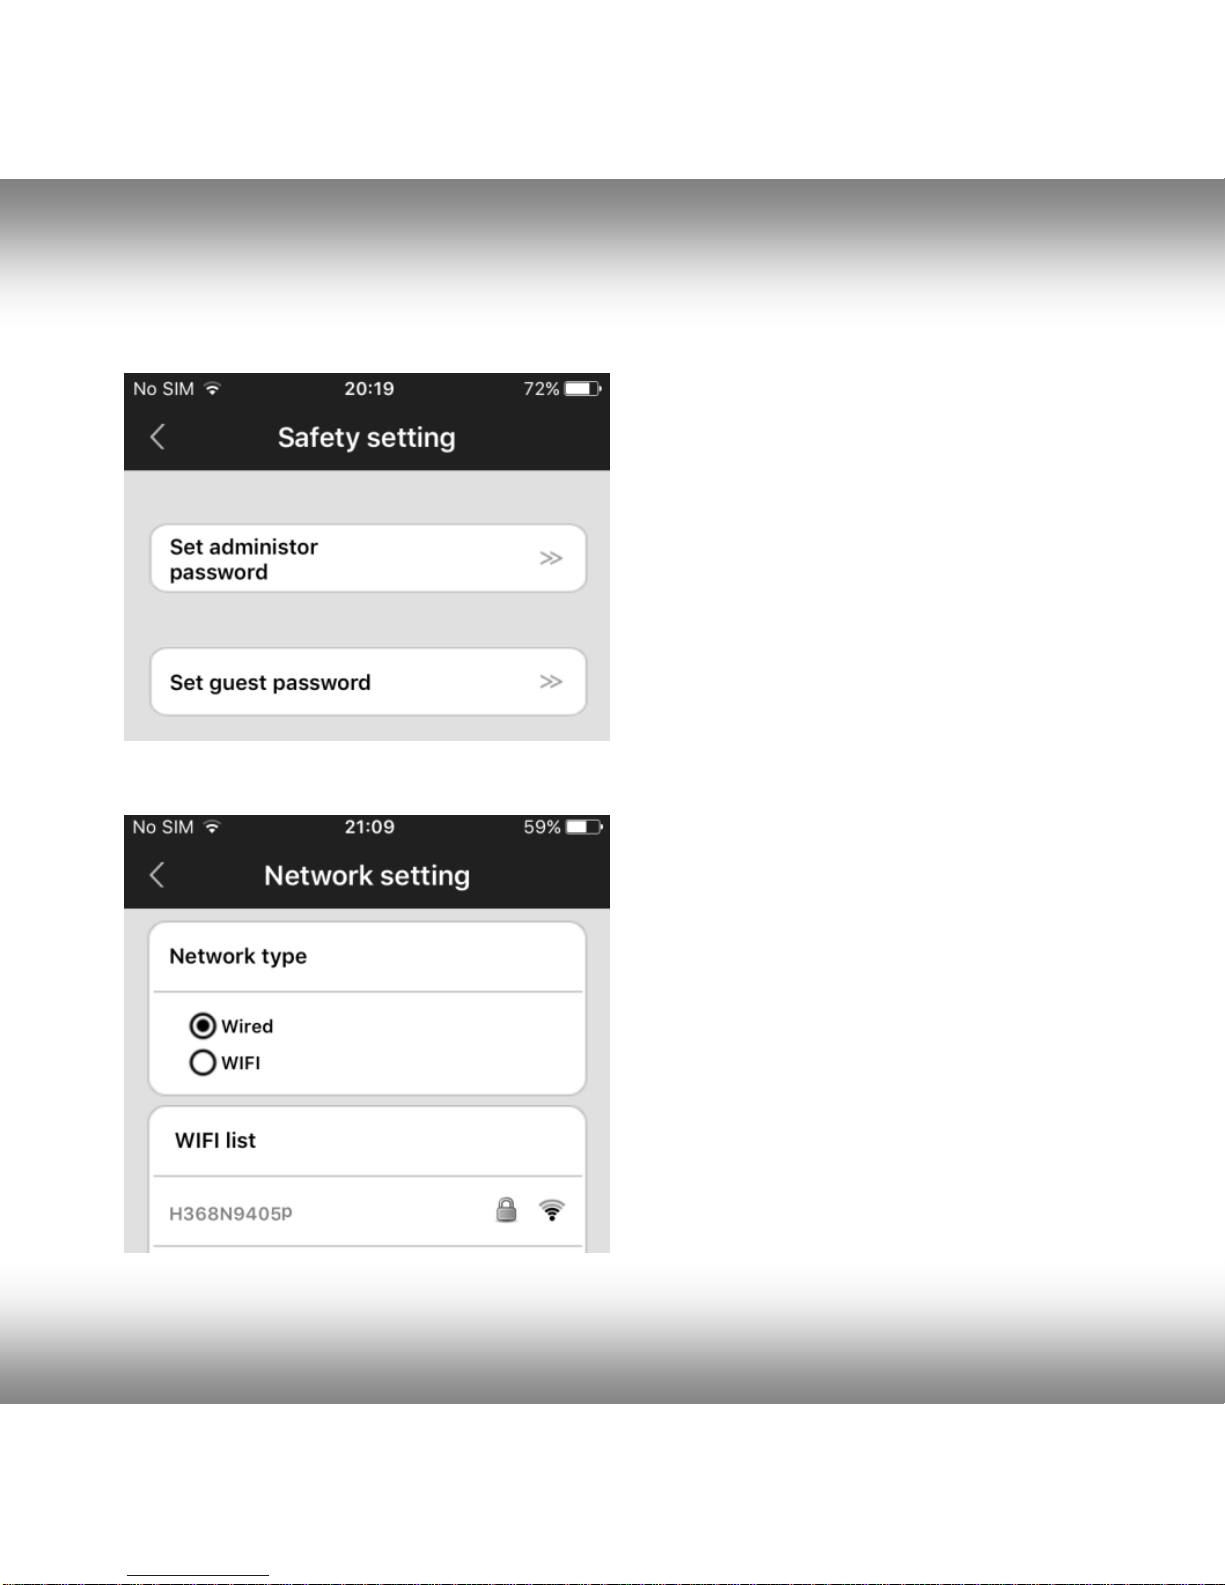
4. Safety settings
The default password for your
camera is 123. This is a very weak
standard password. It is highly
recommended to change it to a
stronger personal password. The
administrator password gives
access to all camera functions. You
can also set a separate Guest
password for viewing only (no
administrator rights).
5. Network settings
You can switch between wired and
wifi connection method here.
Page 18
18
All brands and logos are registered trademarks of their respective owners
ACT-IPC-01
ROTATING HD WIFI CAMERA
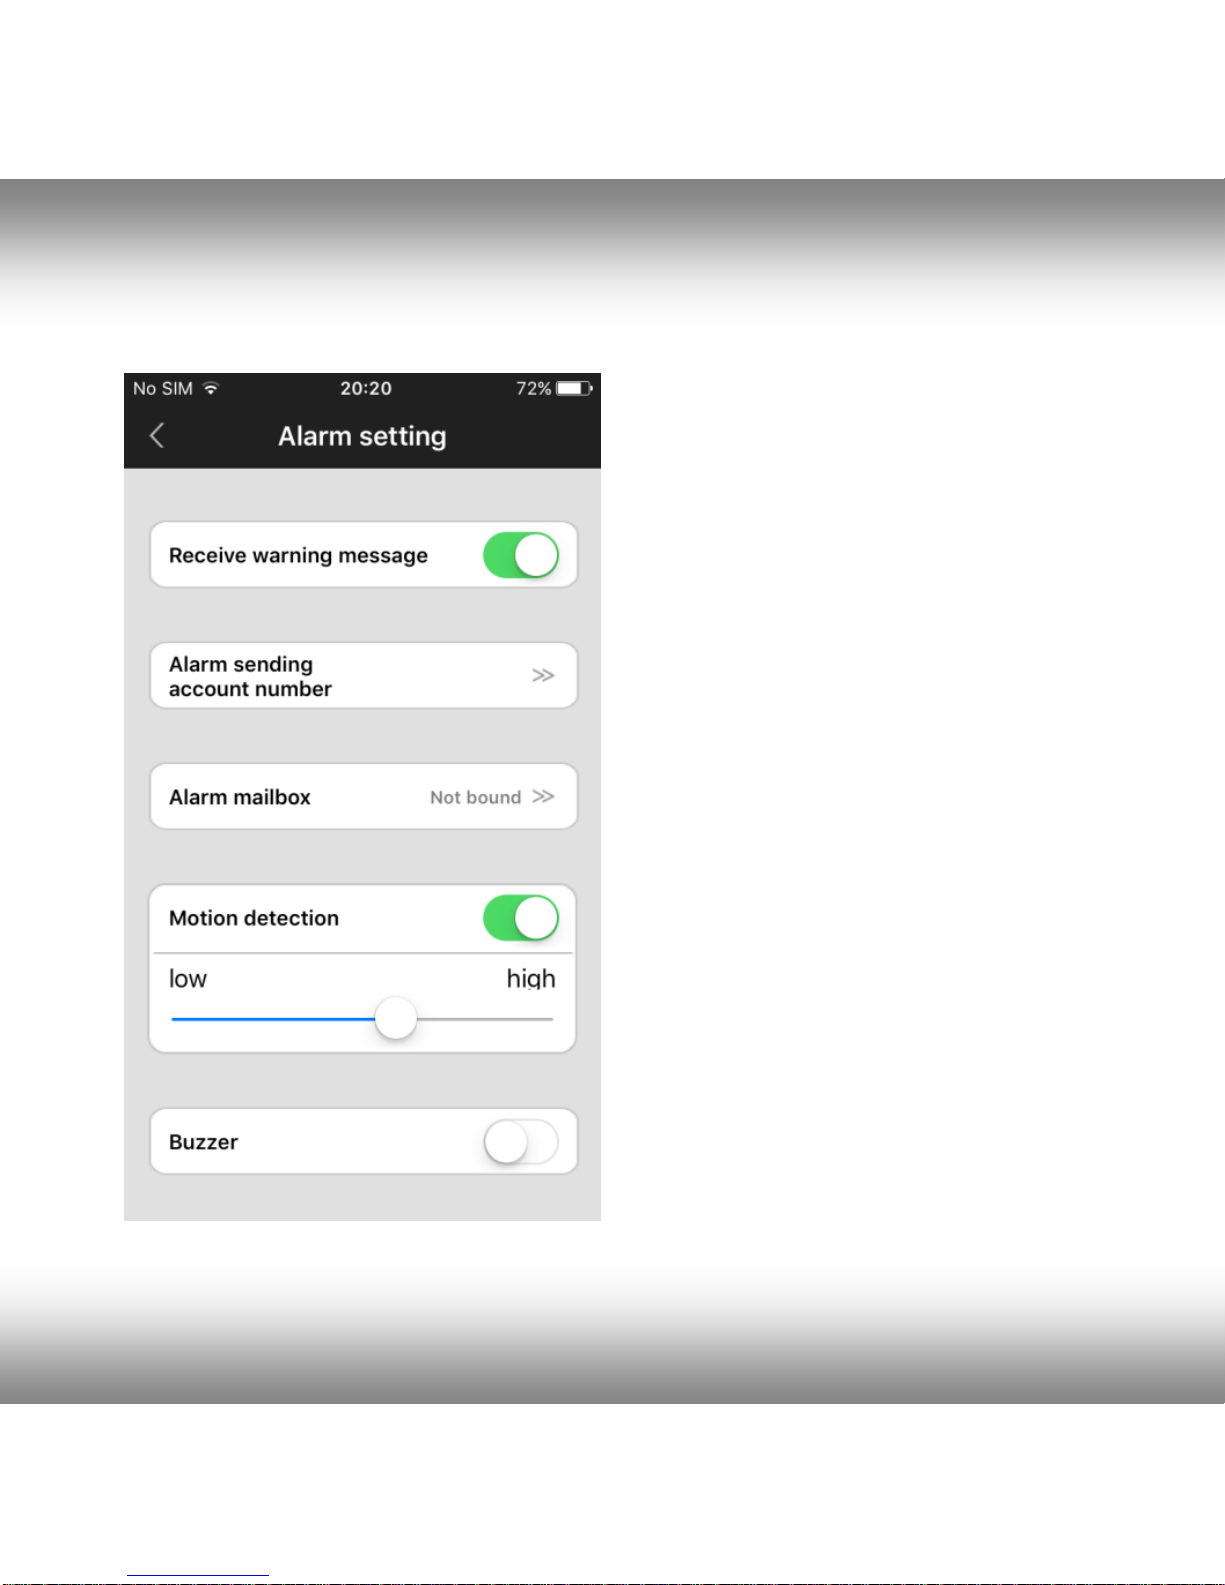
6. Alarm settings
Here you can setup motion detection
and alarm messages.
Enable “receive warning message”
to receive push message alarm
notifications on your phone/tablet.
If you enable motion detection, you
can set the sensitivity by moving the
slider to lower or higher level.
You can also enable an alarm
buzzer (siren) which will sound from
the camera when motion is detected.
The buzzer duration can be set to
1/3/5 minutes.
The camera also is able to send
alarm notification by email. On the
next page the email settings are
explained.
Page 19
19
All brands and logos are registered trademarks of their respective owners
ACT-IPC-01
ROTATING HD WIFI CAMERA
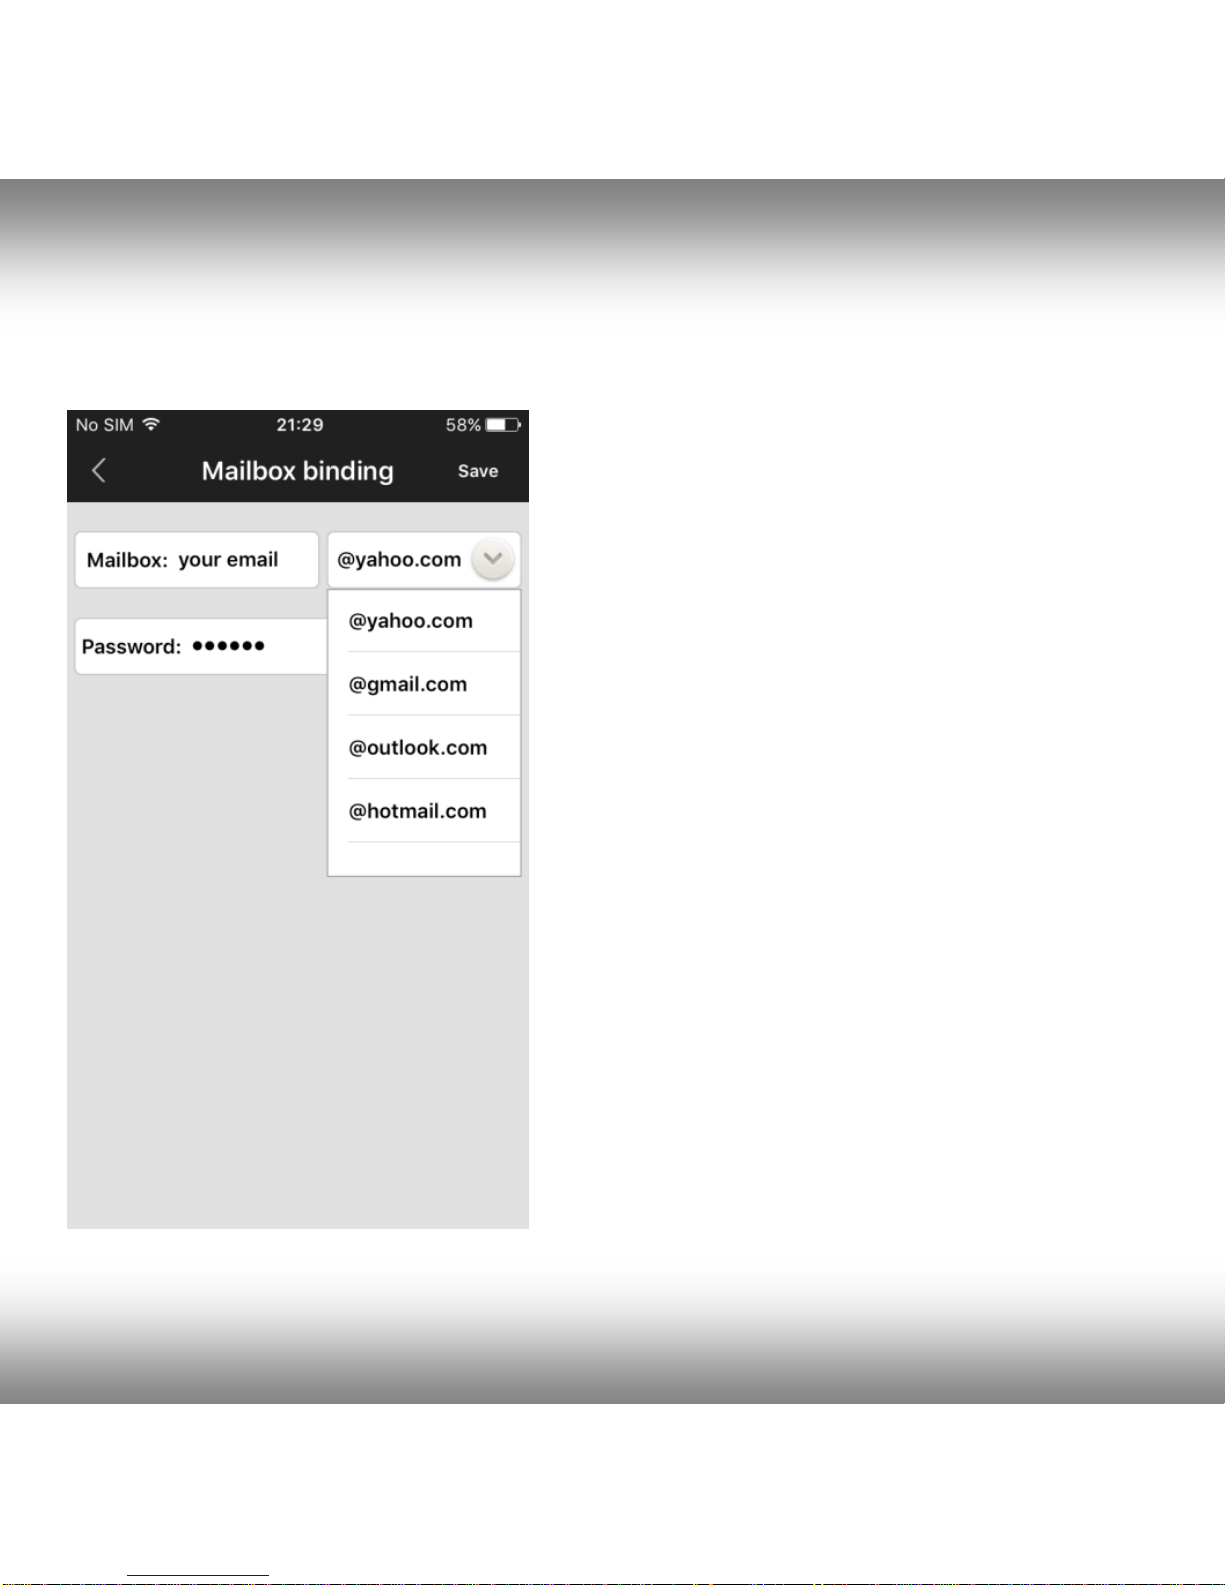
6.1 Email settings
If you press the “Alarm mailbox” option,
the email settings screen appears. Here
you can setup your email account
information to enable the camera to send
you an email message in case of an
alarm detection. The email message will
be just a short message to notify you of
the alarm and it will have a snapshot
attached. The camera supports the most
used email services like Gmail, Outlook,
yahoo, etc. IT is also possible to setup
your email settings manually, but not
every private email provider supports this.
TIP: if your private email provider’s mail
(SMTP) server does not accept mail sent
from this camera, you can always setup a
free email account from one of the above
mentioned providers and have the emails
from this free account automatically
forwarded to you private email address.
Page 20
20
All brands and logos are registered trademarks of their respective owners
ACT-IPC-01
ROTATING HD WIFI CAMERA
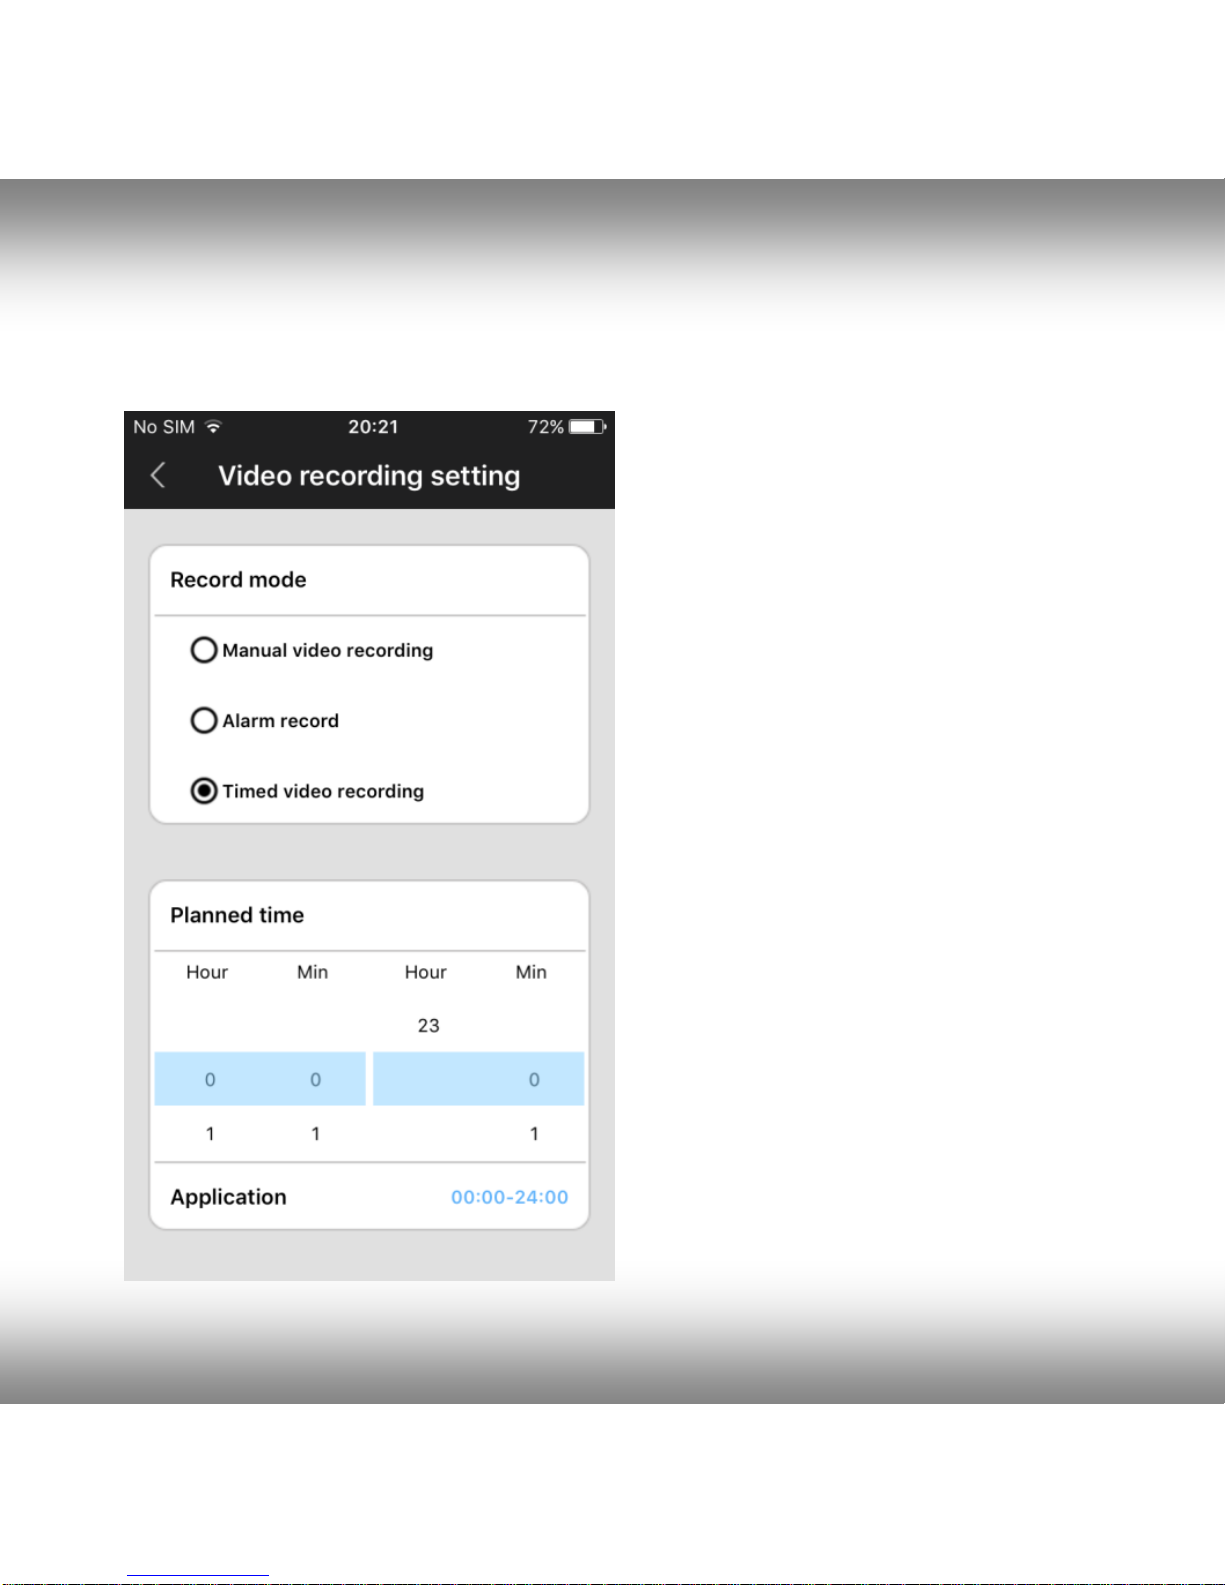
7. Recording settings
Setup recording settings to manual,
alarm-triggered or scheduled
recording.
To use the recording function, a
micro SD card must be inserted into
the camera.
If you select the timed video
recording option, the camera will
record automatically on the
predefined time-period. When the
SD card is full, it will automatically
overwrite the oldest recordings.
If you select the alarm recording
option, the camera will only record
when motion is detected. The
recording will be either 1, 2 or 3
minutes in duration.
Page 21

21
All brands and logos are registered trademarks of their respective owners
ACT-IPC-01
ROTATING HD WIFI CAMERA
FAQ
Q: How to restore the factory default settings?
A: There is one small hole at the bottom of the camera. Press the small reset
button inside with until you hear a sound like "drawing a sword”. This sound
means that the reset was successful.
Q: Failure when adding devices
A: Please check that if the camera and the phone are in the same LAN.
If the camera and the phone aren’t in the same LAN, users should use ID
number to manually add the camera.
Q: When trying to watch camera live feed, is says password is wrong.
A: Please check if the remote access password is right or not, the password
set up when adding the camera. If it is wrong, please select "edit" in the
entry list of the camera and set up a remote access password again.
If you forget the remote access password of the camera, you can press
“Reset” and the device will restore the factory default setting. When you add
the camera in the first time, you need to set up a new password. Otherwise,
you cannot continue the remote access.
Q: It shows that devices offline in the devices list.
A: Please check that if camera is connected to the internet.
Page 22

22
All brands and logos are registered trademarks of their respective owners
ACT-IPC-01
ROTATING HD WIFI CAMERA
Q: When video playback, the video files cannot be found.
A: Please check if SD card is damaged.
Please check when the video files are searched and the system time of
camera.
Q: The camera can’t connect with WIFI
A: Please check if the password of WIFI is right.
Note: The camera doesn’t support 5GHz networks, please connect the
phone with 2.4 GHz WIFI network when setting up the camera.
Page 23
23
All brands and logos are registered trademarks of their respective owners
ACT-IPC-01
ROTATING HD WIFI CAMERA
DE CAMERA MET WIFI VERBINDEN EN DE APP INSTALLEREN EN
GEBRUIKEN
APP INSTALLEREN:
1. Open de Apple App store of Google Play store op de smartphone/tablet
en zoek naar “iVIEW PRO”. Download en installeer de iVIEW PRO app
op uw phone of tablet.
APP REGISTRATIE EN LOGIN:
2. Als u de APP de eerste keer opent, dan heeft u twee opties. U kunt een
persoonlijk gebruikersaccount aanmaken o.b.v uw email, of u kunt direct
beginnen zonder registreren. Als u de camera op meerdere apparaten
wilt gebruiken is het aanmaken van een account aanbevolen. Voor
inloggen zonder registratie drukt u op de Anonieme inlogknop (deur).
Voor het aanmaken van een eigen account, volgt u de volgende 4
eenvoudige stappen.
Page 24

24
All brands and logos are registered trademarks of their respective owners
ACT-IPC-01
ROTATING HD WIFI CAMERA
I. Open de app op de smartphone en
click op “Registreren”.
II. Vul uw email adres in en maak
een sterk wachtwoord aan.
Page 25
25
All brands and logos are registered trademarks of their respective owners
ACT-IPC-01
ROTATING HD WIFI CAMERA
III. type de random code (hoofdlettergevoelig) over en druk op “registreer”
IV. log nu in met uw email adres en
zojuist aangemaakte wachtwoord
Page 26
26
All brands and logos are registered trademarks of their respective owners
ACT-IPC-01
ROTATING HD WIFI CAMERA
IP CAMERA MET WIFI VERBINDEN:
3. Sluit nu de power adapter aan op de camera. Zorg ervoor dat de
smartphone met wifi is verbonden. Na opstart begint de camera om de
seconde te piepen. Volg de volgende stappen om met wifi te verbinden.
I. Druk op de “+” om te starten en
de camera toe te voegen.
II. Er zijn 3 manieren: Smart link
handmatig en via QR code.
Page 27

27
All brands and logos are registered trademarks of their respective owners
ACT-IPC-01
ROTATING HD WIFI CAMERA
4. Druk op de plus (+) knop in de rechterbovenhoek van het scherm om
een camera toe te voegen aan de apparaatlijst van de app.
5. Er zijn 3 manieren om camera’s te verbinden:
IV. Smartlink
V. Handmatig toevoegen
VI. QR code scan (kan alleen als er een QR code op de camera staat)
Voor het verbinden van een camera met wifi (nieuwe cam) kiest u voor
Smartlink. Deze optie werkt alleen als de camera elke seconde een piepje
geeft. Deze piepjes betekenen dat de camera klaar is om met wifi te
verbinden. Als uw camera niet (meer) piept kunt u hem even uit en aan
zetten, of resetten met het knopje in het resetgaatje onderop. Houdt bij het
uitvoeren van de procedure de telefoon in de buurt van de camera.
Handmatig toevoegen kan alleen met een camera die reeds met een
(wifi)netwerk is verbonden. Is dat nog niet gebeurd, kies dan voor Smartlink.
De QR code optie is alleen beschikbaar als er een sticker met een QR code
op uw camera zit. Is dit niet het geval, dan is deze optie niet beschikbaar.
Volgt u de stappen op de volgende pagina’s om u camera via de Smartlink
procedure met wifi te verbinden.
Page 28

28
All brands and logos are registered trademarks of their respective owners
ACT-IPC-01
ROTATING HD WIFI CAMERA
I. Kies de bovenste optie: “verbind via
wifi”
II. Vul het wachtwoord in van uw
wifi netwerk
Page 29
29
All brands and logos are registered trademarks of their respective owners
ACT-IPC-01
ROTATING HD WIFI CAMERA
III. Als u de piepjes van de camera
hoort, drukt op de blauwe knop. (Geen
piepjes? Reset camera eerst)
IV. Zet het volume van uw
smartphone/tablet hoog en druk op
‘next’
Page 30
30
All brands and logos are registered trademarks of their respective owners
ACT-IPC-01
ROTATING HD WIFI CAMERA
V. De app stuurt nu de wifi-gegevens
via sonische geluidsgolven naar de
camera. Even geduld….
VI. Gelukt, geef nu de camera een
naam en vul het wachtwoord in
(123). Druk op ‘opslaan’.
Page 31

31
All brands and logos are registered trademarks of their respective owners
ACT-IPC-01
ROTATING HD WIFI CAMERA
Camera handmatig toevoegen:
als uw camera al met een (wifi)network is verbonden (online camera) en u
wilt hem toevoegen aan de iVIEW PRO app op een andere
smartphone/tablet, dan kunt u dit snel handmatig doen. Hiervoor heeft u
alleen het camera ID nummer nodig en het wachtwoord van de betreffende
camera. Het ID nummer staat op een sticker op
de camera. Het standard wachtwoord is 123,
maar als u het wachtwoord van de camera ooit
gewijzigd heeft (aanbevolen), dan heeft u het
huidige zelf aangemaakt wachtwoord van de
camera nodig om hem toe te kunnen voegen
aan de app op een andere tablet/telefoon.
In het ‘Device name” invoerveld kunt u elke
naam invullen die u maar wilt, bijv. “Huiskamer
cam1”.
Druk op ‘Save’ om de cameragegevens op te
slaan en de camera toe te voegen aan de
apparaatlijst.
Page 32

32
All brands and logos are registered trademarks of their respective owners
ACT-IPC-01
ROTATING HD WIFI CAMERA
DE APP GEBRUIKEN EN BEELDEN VAN DE CAMERA BEKIJKEN:
Functie- en knoppenoverzicht:
Page 33

33
All brands and logos are registered trademarks of their respective owners
ACT-IPC-01
ROTATING HD WIFI CAMERA
1. Geluid aan/uit (mute)
2. Volledig scherm aan
3. Alarm modus aan/uit
4. Microfoon knop (houd ingedrukt om te praten)
5. Foto maken (snapshot)
6. Menuknop
7. Instellen beeldkwaliteit
8. Alarm modus aan/uit
9. Geluid aan/uit (mute
10. Microfoon
11. Foto maken (snapshot)
12. Live videobeeld van de camera
13. Camerascherm verlaten
14. Volledig scherm uit
Op de volgende pagina’s vindt u een overzicht van alle menu instellingen:
Page 34

34
All brands and logos are registered trademarks of their respective owners
ACT-IPC-01
ROTATING HD WIFI CAMERA
Page 35

35
All brands and logos are registered trademarks of their respective owners
ACT-IPC-01
ROTATING HD WIFI CAMERA
1. Apparaat informatie
Hier kunt u de apparaatgegevens raadplegen (b.v. apparaat ID nummer)
en de naam van de camera wijzigen.
2. Datum/tijd instellingen.
De camera stelt zichzelf meestal op de
correcte tijd in. Als dit om welke reden
dan ook niet het geval is, dan kunt u de
tijd ook handmatig instellen. Stel eerst de
correcte tijdzone in (voor NL, DE, FR, BE,
CZ is dit UTC+1) en druk op ‘application’
in het tijdzone veld. Vervolgens
controleert u of de datum en tijd correct
zijn weergegeven en drukt u op
‘application’ in het tijd/datum veld. De tijd
en datum zijn nu correct ingesteld.
Page 36

36
All brands and logos are registered trademarks of their respective owners
ACT-IPC-01
ROTATING HD WIFI CAMERA
3. Media-instellingen
Hier kunt u het videoformaat instellen
(kies PAL in de EU), het
apparaatvolume instellen en het beeld
van de camera omdraaien. Dit laatste
is nodig als de camera ondersteboven
is opgehangen, bijv. aan het plafond.
Page 37

37
All brands and logos are registered trademarks of their respective owners
ACT-IPC-01
ROTATING HD WIFI CAMERA
4. Veiligheidsinstellingen
Het standaard wachtwoord van de
camera is 123. Dit is een erg zwak
standaard wachtwoord. Het is sterk
aanbevolen om dit te wijzigen naar
een sterk zelf gekozen wachtwoord.
Het beheerderswachtwoord biedt
volledige toegang tot alle
camerafuncties. U kunt ook een
special gastwachtwoord aanmaken
(alleen kijken).
5. Netwerkinstellingen
Hier kunt u instellen of de camera
via wifi, of via een netwerkkabel met
internet verbonden is.
Page 38

38
All brands and logos are registered trademarks of their respective owners
ACT-IPC-01
ROTATING HD WIFI CAMERA
6. Alarm-instelling
Hier kunt u de bewegingsdetectie en
alarmberichten instellen.
zet “ontvang alarmbericht” aan om
alarmberichten als push notificatie
op uw telefoon/tablet te ontvangen.
Als u de bewegingsdetectie
inschakelt, kan de gevoeligheid met
de schuif worden ingesteld.
Het is mogelijk een alarmsignaal
(zoemer) aan te zetten bij
waargenomen beweging. De duur
van de sirene bedraagt 1/3/5
minuten.
De camera kan ook alarm notificaties
via email versturen. Meer details
over email-instellingen op de
volgende pagina.
Page 39

39
All brands and logos are registered trademarks of their respective owners
ACT-IPC-01
ROTATING HD WIFI CAMERA
6.1 Email-instellingen
Als u op “Alarm email” drukt, komen de
email-instellingen in beeld. Hier kunt u uw
email account informatie invullen, zodat
de camera u in alarmgevallen een email
kan sturen. Het emailbericht is een korte
alarmmelding met een foto van het
alarmbeeld als bijlage. De camera
ondersteunt de meestgebruikte email
services zoals Gmail, Outlook, yahoo, etc.
Het is ook mogelijk om uw het emailadres
van andere providers handmatig in te
stellen, maar niet elke mailprovider
ondersteunt dit.
TIP: als de (SMTP) mailserver van uw
provider het versturen van emails via
deze camera niet ondersteunt, kunt u
altijd een gratis account aanmaken bij een
van de bovengenoemde providers. Deze
mail kunt u eventueel automatisch laten
doorsturen naar uw meest gebruikte
private email adres.
Page 40

40
All brands and logos are registered trademarks of their respective owners
ACT-IPC-01
ROTATING HD WIFI CAMERA
7. Recording settings
Opname-instellingen kunnen
worden ingesteld voor handmatig
opnemen, opnemen bij alarm, of op
een tijdschema.
Om te kunnen opnemen moet er
wel een micro SD kaart in de
camera geplaatst worden.
Als u kiest voor opnemen via een
tijdschema, zal er op de ingestelde
tijden automatisch worden
opgenomen. Als de geheugenkaart
vol is, dan worden de oudste
bestanden overschreven.
Als u kiest voor alarmopnames, dan
neemt de camera alleen op als er
beweging is waargenomen.
Opnames duren 1, 2 of 3 minuten,
afhankelijk van de instellingen.
Page 41

41
All brands and logos are registered trademarks of their respective owners
ACT-IPC-01
ROTATING HD WIFI CAMERA
FAQ
Q: Hoe zet ik de camera terug naar de fabrieksinstellingen?
A: Onderop de camera zit een klein resetgaatje. Druk met een dun stomp
voorwerk op het resetknopje tot u een geluid hoort dat een beetje klinkt als
het "trekken van een zwaard”. Dit geluid betekent dat de reset is geslaagd.
Q: Probleem bij het toevoegen van camera’s aan de app
A: Controleer of de telefoon en de camera met hetzelfde netwerk verbonden
zijn. Als dit niet het geval is dan dient u de camera handmatig toe te voegen.
Q: Melding fout wachtwoord bij bekijken camera beelden.
A: Controleer of u het correcte wachtwoord hebt ingevoerd voor de camera.
Als u het wachtwoord bent vergeten moet u de camera resetten. Daarna is
het wachtwoord weer 123.
Q: De camera wordt weergegeven als offline in de apparaatlijst.
A: Controleer de internetverbinding en probeer opnieuw.
Page 42

42
All brands and logos are registered trademarks of their respective owners
ACT-IPC-01
ROTATING HD WIFI CAMERA
Q: Bij het afspelen van opnames worden geen bestanden gevonden.
A: Controleer of de SD kaart is beschadigd. Zoek bestanden met de juiste
tijdselectie.
Q: De camera kan niet met wifi verbonden worden
A: Controleer of u het correcte wifi wachtwoord hebt ingevoerd.
Wachtwoorden met leestekens of spaties kunnen soms verbindingsproblemen geven.
LET OP: De camera ondersteunt geen 5GHz netwerken, verbind de camera
altijd met het 2.4 GHz WIFI netwerk van uw router bij het installeren.
Page 43

43
All brands and logos are registered trademarks of their respective owners
ACT-IPC-01
ROTATING HD WIFI CAMERA
ANSCHLIESSEN IP-KAMERA UND DIE APP BENUTZEN
APP INSTALLIEREN:
1. Öffnen Sie den Apple App Store oder den Google Play Store auf Ihrem
Telefon / Tablet und suchen Sie nach "iVIEW PRO". Downloaden und
installieren Sie die iVIEW PRO App auf Ihrem Telefon oder Tablet.
APP REGISTRIERUNG UND LOGIN:
2. Wenn Sie die App zum ersten Mal öffnen, müssen Sie zwei Optionen
haben. Entweder, um ein persönliches Benutzerkonto zu erstellen und
sich mit Ihrer E-Mail zu registrieren oder direkt einspringen und die App
anonym nutzen (keine Registrierung). (Wenn Sie die Kamera auf
mehreren Geräten verwenden möchten, empfiehlt es sich, sie auf einem
Benutzerkonto zu registrieren.) Für die anonyme Anmeldung drücken
Sie einfach die anonyme Login-Taste (Tür) .
Page 44

44
All brands and logos are registered trademarks of their respective owners
ACT-IPC-01
ROTATING HD WIFI CAMERA
I. Öffnen Sie Ihre App auf dem
Telefon und klick auf "Registrieren".
II. Geben Sie Ihre E-Mail-Adresse ein
und erstellen Sie ein Passwort
Page 45

45
All brands and logos are registered trademarks of their respective owners
ACT-IPC-01
ROTATING HD WIFI CAMERA
III. Geben Sie den Zufallscode ein
(Groß- / Kleinschreibung beachten)
und drücken Sie "Registrieren".
IV. Melden Sie sich jetzt mit Ihrer E-
Mail-Adresse und Ihrem Passwort
an
Page 46

46
All brands and logos are registered trademarks of their respective owners
ACT-IPC-01
ROTATING HD WIFI CAMERA
3. ANSCHLIESSEN DER IP-KAMERA ZUM WIFI:
Schalten Sie die Kamera nun mit Netzteil ein. Vergewissern Sie sich, dass
Ihr Telefon WiFi eingeschaltet ist. Die Kamera startet zu piepsen. Folgen Sie
den folgenden Schritten, um die Kamera mit wifi zu verbinden.
I. Drücken Sie "+", um die Kamera
anzuschließen und zur Geräteliste
hinzuzufügen.
II. Drei Möglichkeiten für die
Verbindung, Smart Link manuell
hinzufügen und über QR-Code.
Page 47

47
All brands and logos are registered trademarks of their respective owners
ACT-IPC-01
ROTATING HD WIFI CAMERA
4. Drücken Sie nun das Pluszeichen (+) in der oberen rechten Ecke des
Bildschirms, um eine Kamera zur App-Kameraliste hinzuzufügen.
5. Es gibt zwei Möglichkeiten, Ihre Kamera anzuschließen:
a. Smartlink
b. Manuell hinzufügen.
c. QR-Code-Scan (nur wenn QR-Code auf Ihrer Kamera
vorhanden ist)
Am einfachsten ist die Smartlink-Option. Um dies zu verwenden, setzen Sie
das Telefon in die Nähe der Kamera. Hören Sie aufmerksam, die SmartlinkOption funktioniert nur, wenn die Kamera jede zweite Sekunde piept. Dieses
Piepen bedeutet, dass die Kamera mit Ihrem Wifi-Netzwerk verbunden
werden kann. Wenn dies nicht der Fall ist, versuchen Sie bitte, die Kamera
mit einem Stift über die Reset-Taste unten auf der Kamera zurückzusetzen.
Die Option Manuell hinzufügen ist nur geeignet, um Kameras hinzuzufügen,
die bereits mit wifi verbunden sind. Wenn dies nicht der Fall ist, verwenden
Sie bitte die Smartlink-Option.
Die Option QR-Code ist nur verfügbar, wenn ein Aufkleber mit QR-Code auf
Ihrer Kamera vorhanden ist. Wenn kein Aufkleber vorhanden ist, ist die QRCode-Option nicht verfügbar.
Bitte folgen Sie den Schritten auf den nächsten Seiten, um die Kamera über
die Smartlink-Option mit Ihrem Wifi-Netzwerk zu verbinden.
Page 48

48
All brands and logos are registered trademarks of their respective owners
ACT-IPC-01
ROTATING HD WIFI CAMERA
I. Drücken Sie "connect via wifi" -Taste
II. Geben Sie das Kennwort Ihres
WLAN-Netzwerks ein
Page 49

49
All brands and logos are registered trademarks of their respective owners
ACT-IPC-01
ROTATING HD WIFI CAMERA
III. Wenn Sie den Piepton hören,
fahren Sie mit der blauen Taste fort.
(Kein Piepen? Kamera resetten)
IV. Stellen Sie die Lautstärke Ihres
Telefons / Tabletts ein und klicken
Sie auf "Weiter"
Page 50

50
All brands and logos are registered trademarks of their respective owners
ACT-IPC-01
ROTATING HD WIFI CAMERA
V. Sie hören nun die Tonfolge des
Telefons. Warten Sie mal…
VI. Wenn verbunden, können Sie
Ihre Kamera benennen und das
Passwort eingeben (123). Klicken
Sie auf "Speichern".
Page 51

51
All brands and logos are registered trademarks of their respective owners
ACT-IPC-01
ROTATING HD WIFI CAMERA
Kamera manuell hinzufügen:
Wenn Ihre Kamera bereits mit Ihrem Heim-Wifi (Online-Kamera) verbunden
ist und Sie es der iVIEW PRO App auf Ihrem zweiten Telefon / Tablet
hinzufügen möchten, können Sie sie manuell hinzufügen. Dazu benötigen
Sie die Kamera-ID-Nummer und das Passwort. Die ID-Nummer wird auf
einen Aufkleber auf der Kamera selbst
geschrieben. Das Standardkennwort lautet 123,
aber wenn Sie dieses Kennwort geändert haben,
sollten Sie das aktuelle Kennwort der Kamera
verwenden, um es hinzuzufügen.
Im Feld 'Gerätename' können Sie einen
beliebigen Namen eingeben, z.B. 'Wohnzimmer
cam1'.
Klicken Sie auf "Speichern", um die Kamera zu
Ihrer Geräteliste hinzuzufügen.
Page 52

52
All brands and logos are registered trademarks of their respective owners
ACT-IPC-01
ROTATING HD WIFI CAMERA
ANWENDUNG DER APP / ANZEIGE KAMERA VIDEO
Funktions- und Tastenübersicht:
Page 53

53
All brands and logos are registered trademarks of their respective owners
ACT-IPC-01
ROTATING HD WIFI CAMERA
1. Stummschalttaste
2. Vollbildmodus aktivieren
3. Wechseln Sie in den Alarmmodus
4. Mikrofon-Taste (zum Sprechen halten)
5. Snapshot-Schaltfläche
6. Schaltfläche Einstellungen
7. Einstellungen für die Videoqualität
8. Wechseln Sie in den Alarmmodus
9. Stummschalttaste
10. Mikrofon
11. Snapshot-Schaltfläche
12. Live-Video-Feed von der Kamera
13. Kamera ausschalten
14. Beenden Vollbildmodus
Page 54

54
All brands and logos are registered trademarks of their respective owners
ACT-IPC-01
ROTATING HD WIFI CAMERA
Page 55

55
All brands and logos are registered trademarks of their respective owners
ACT-IPC-01
ROTATING HD WIFI CAMERA
1. Geräteinformationen
Überprüfen Sie Geräteinformationen (z. B. Geräte-ID-Nummer) und
ändern Sie den Kameranamen.
2. Zeiteinstellungen
Die Kamera sollte den richtigen Zeitpunkt
automatisch anzeigen. Wenn nicht,
können Sie sie auch manuell einstellen.
Stellen Sie zuerst die richtige Zeitzone
(für NL, DE, FR, BE, CZ eingestellte
Zeitzone auf UTC + 1) ein und drücken
Sie "Anwendung" im Bereich Zeitzone.
Überprüfen Sie dann, ob Uhrzeit und
Datum korrekt sind, und drücken Sie
"Anwendung" im Bereich Zeiteinstellung.
Die Zeit sollte nun korrekt eingestellt sein.
Page 56

56
All brands and logos are registered trademarks of their respective owners
ACT-IPC-01
ROTATING HD WIFI CAMERA
3. Medieneinstellungen
Hier können Sie das Videoformat
(eingestellt auf PAL für EU), das
Gerätevolumen und auch das
Kamerabild invertieren. Dies ist
erforderlich, wenn die Kamera z.B. eine
Decke.
Page 57

57
All brands and logos are registered trademarks of their respective owners
ACT-IPC-01
ROTATING HD WIFI CAMERA
4. Sicherheitseinstellungen
Das Standardkennwort für Ihre
Kamera lautet 123. Dies ist ein sehr
schwaches Standardkennwort. Es
wird dringend empfohlen, es zu
einem stärkeren persönlichen
Passwort zu ändern. Das
Administratorkennwort gibt Zugriff
auf alle Kamerafunktionen. Sie
können auch ein separates GuestKennwort nur für die Anzeige
festlegen (keine Administratorrechte).
5. Netzwerkeinstellungen
Hier können Sie zwischen LAN- und
WLAN-Verbindung umschalten.
Page 58

58
All brands and logos are registered trademarks of their respective owners
ACT-IPC-01
ROTATING HD WIFI CAMERA
6. Alarmeinstellungen
Hier können Sie Bewegungserkennung und Alarmmeldungen
einrichten.
Aktivieren Sie die Warnmeldung
"Warnmeldung empfangen", um
Alarmmeldungen auf dem Telefon /
Tablet zu empfangen.
Wenn Sie die Bewegungserkennung
aktivieren, können Sie die Empfindlichkeit einstellen, indem Sie den
Schieberegler nach unten oder nach
oben bewegen.
Sie können auch einen
Alarmsummer (Sirene) aktivieren,
der von der Kamera ausgegeben
wird, wenn eine Bewegung erkannt
wird. Die Summendauer kann auf
1/3/5 Minuten eingestellt werden.
Die Kamera kann auch Alarmmeldungen per E-Mail senden. Auf
der nächsten Seite werden die E-Mail-Einstellungen erklärt.
Page 59

59
All brands and logos are registered trademarks of their respective owners
ACT-IPC-01
ROTATING HD WIFI CAMERA
6.1 Emaileinstellungen
Wenn Sie die Option "Alarmmailbox"
drücken, wird der Bildschirm für die EMail-Einstellungen angezeigt. Hier
können Sie Ihre E-MailKontoinformationen einrichten, damit die
Kamera Ihnen eine E-Mail-Nachricht im
Falle einer Alarm-erkennung senden kann.
Die E-Mail-Nachricht wird nur eine kurze
Nachricht, um Sie über den Alarm zu
benach-richtigen und es wird ein
Snapshot beigefügt werden. Die Kamera
unterstützt die gängigsten E-Mail-Dienste
wie Gmail, Outlook, yahoo usw. Es ist
auch möglich, E-Mail-Einstellungen
manuell einzurichten, aber nicht jeder
private E-Mail-Anbieter unterstützt dies.
TIPP: Wenn der SMTP-Server Ihres
privaten E-Mail-Anbieters keine von
dieser Kamera gesendeten E-Mails
akzeptiert, können Sie ein kostenloses EMail-Konto von einem der oben
genannten Anbieter einrichten und die EMails von diesem Konto automatisch an
private E-Mails weiterleiten.
Page 60

60
All brands and logos are registered trademarks of their respective owners
ACT-IPC-01
ROTATING HD WIFI CAMERA
7. Aufnahmeeinstellungen
Stellen Sie die Aufnahmeeinstellungen auf manuelle,
alarmgesteuerte oder geplante
Aufnahmen ein.
Um die Aufnahmefunktion zu
verwenden, muss eine Micro-SDKarte in die Kamera eingesetzt
werden.
Wenn Sie die Option für die
zeitgesteuerte Videoaufnahme
auswählen, wird die Kamera
automatisch in der vorgegebenen
Zeitspanne aufgenommen. Wenn
die SD-Karte voll ist, werden
automatisch die ältesten
Aufzeichnungen überschrieben.
Wenn Sie die Alarmaufnahmeoption
auswählen, wird die Kamera nur
dann aufnehmen, wenn eine
Bewegung erkannt wird. Die
Aufnahme dauert 1, 2 oder 3 Min.
Page 61

61
All brands and logos are registered trademarks of their respective owners
ACT-IPC-01
ROTATING HD WIFI CAMERA
FAQ
F: Wie werden die Standardeinstellungen wiederhergestellt?
A: Am unteren Ende der Kamera befindet sich ein kleines Loch. Betätigen
Sie den kleinen Reset-Knopf im Inneren, bis Sie ein Geräusch wie
"Schwertschleife" hören. Dieser Ton bedeutet, dass das Reset erfolgreich
war.
F: Fehler beim Hinzufügen von Geräten
A: Bitte überprüfen Sie, ob sich Kamera und Telefon im selben LAN
befinden. Wenn sich die Kamera und das Telefon nicht im selben LAN
befinden, sollten die Benutzer die ID-Nummer verwenden, um die Kamera
manuell hinzuzufügen.
F: Beim Versuch, Kamera Live-Feed zu sehen, heißt das Passwort
falsch.
A: Überprüfen Sie, ob das Fernzugangspasswort richtig ist oder nicht, das
Passwort, das beim Hinzufügen der Kamera eingerichtet wurde. Wenn es
falsch ist, wählen Sie bitte "Bearbeiten" in der Eintragsliste der Kamera und
richten Sie ein Remote-Zugriffspasswort erneut ein. Wenn Sie das
Fernzugangspasswort der Kamera vergessen haben, können Sie "Reset"
drücken und das Gerät stellt die werkseitige Voreinstellung wieder her.
Wenn Sie die Kamera zum ersten Mal hinzufügen, müssen Sie ein neues
Passwort einrichten. Andernfalls können Sie den Fernzugriff nicht fortsetzen.
F: Es zeigt, dass Geräte in der Geräteliste offline sind.
A: Bitte überprüfen Sie, ob die Kamera mit dem Internet verbunden ist.
Page 62

62
All brands and logos are registered trademarks of their respective owners
ACT-IPC-01
ROTATING HD WIFI CAMERA
F: Bei Videowiedergabe können die Videodateien nicht gefunden
werden.
A: Überprüfen Sie, ob die SD-Karte beschädigt ist. Überprüfen Sie, ob die
Videodateien und die Systemzeit der Kamera gesucht werden.
F: Die Kamera kann keine Verbindung mit WIFI herstellen
A: Bitte überprüfen Sie, ob das Passwort des WIFI richtig ist.
Hinweis: Die Kamera unterstützt keine 5-GHz-Netze, bitte verbinden Sie
das Telefon mit dem 2,4-GHz-WIFI-Netzwerk beim Einrichten der Kamera.
Page 63

63
All brands and logos are registered trademarks of their respective owners
ACT-IPC-01
ROTATING HD WIFI CAMERA
CONNECTER L'APPAREIL IP AU WIFI ET COMMENT UTILISER L'APP
1. INSTALLATION DE L'APPLICATION
Ouvrez l'App Store d'Apple ou Google Play Store sur votre téléphone
/tablette et recherchez "iVIEW PRO". Téléchargez et installez
l'application iVIEW PRO sur votre téléphone ou votre ablette.
2. APP REGISTRATION ET LOGIN:
Lorsque vous ouvrez l'application pour la première fois, vous avez deux
options. Soit pour créer un compte d'utilisateur personnel et vous enregistrer
avec votre e-mail, soit pour sauter directement et utiliser l'application
anonyme (pas d'inscription). (Si vous voulez utiliser la caméra sur plusieurs
périphériques, il est conseillé de l'enregistrer sur un compte d'utilisateur.
Pour l'ouverture de session anonyme, appuyez simplement sur le bouton de
connexion anonyme (porte).
Page 64

64
All brands and logos are registered trademarks of their respective owners
ACT-IPC-01
ROTATING HD WIFI CAMERA
I. Ouvrez votre application sur le
téléphone et cliquez sur
"Enregistrer".
II. Entrez votre adresse e-mail et
créez un mot de passe
Page 65

65
All brands and logos are registered trademarks of their respective owners
ACT-IPC-01
ROTATING HD WIFI CAMERA
III. Entrez le code aléatoire (sensible
à la casse) et appuyez sur
"enregistrer".
IV. Connectez-vous maintenant
avec votre adresse e-mail et votre
mot de passe
Page 66

66
All brands and logos are registered trademarks of their respective owners
ACT-IPC-01
ROTATING HD WIFI CAMERA
3. CONNEXION DE L'IP-CAMERA AU WIFI:
Connectez l'adaptateur secteur.. Assurez-vous que votre téléphone WiFi est
allumé. La caméra démarre et commence à sonner toutes les deux
secondes. Suivez les étapes suivantes pour connecter la caméra au wifi.
I. Appuyez sur "+" pour connecter
la caméra et l'ajouter à la liste des
périphériques.
II. Trois manières de se connecter,
Smart link manuel ajouter et via code
QR.
Page 67

67
All brands and logos are registered trademarks of their respective owners
ACT-IPC-01
ROTATING HD WIFI CAMERA
4. Maintenant, appuyez sur le signe plus (+) dans le coin supérieur droit de
l'écran pour ajouter une caméra à la liste des caméras d'application.
5. Il existe deux façons de connecter votre appareil photo:
a. Smartlink
b. Ajouter manuellement.
c. Analyse du code QR (uniquement si le code QR est présent sur
votre appareil photo)
Le plus simple est l'option Smartlink. Pour l'utiliser, mettez le téléphone près
de la caméra. Écoutez attentivement, l'option Smartlink ne fonctionne que
lorsque la caméra émet un bip toutes les deux secondes. Ce bip signifie que
la caméra peut être jumelée à votre réseau wifi. Si ce n'est pas le cas,
essayez de réinitialiser la caméra avec une broche via le bouton de
réinitialisation situé au bas de la caméra.
L'option Ajouter du manuel ne convient que pour ajouter des caméras déjà
connectées au wifi. Si ce n'est pas le cas, utilisez l'option Smartlink.
L'option de numérisation de code QR est uniquement disponible lorsqu'un
autocollant avec code QR est présent sur votre appareil photo. S'il n'y a pas
d'autocollant, l'option de code QR n'est pas disponible.
Veuillez suivre les étapes des pages suivantes pour connecter la caméra à
votre réseau wifi via l'option Smartlink.
Page 68

68
All brands and logos are registered trademarks of their respective owners
ACT-IPC-01
ROTATING HD WIFI CAMERA
I. Appuyez sur le bouton "connexion
via wifi"
II. Entrez le mot de passe de votre
réseau wifi
Page 69

69
All brands and logos are registered trademarks of their respective owners
ACT-IPC-01
ROTATING HD WIFI CAMERA
III. Si vous entendez un bip de la
camera, continuez en appuyant sur le
bouton bleu. (Pas de bip? Réinitialiser
la caméra d'abord)
IV. Augmentez le volume de votre
téléphone / tablette et cliquez sur
'Suivant'
Page 70

70
All brands and logos are registered trademarks of their respective owners
ACT-IPC-01
ROTATING HD WIFI CAMERA
V. Vous entendrez maintenant la
séquence de tonalités de connexion
du téléphone. S'il vous plaît,
attendez…
VI. Une fois connecté, vous pouvez
nommer votre caméra et entrer le
mot de passe de la caméra (123).
Cliquez sur "enregistrer".
Page 71

71
All brands and logos are registered trademarks of their respective owners
ACT-IPC-01
ROTATING HD WIFI CAMERA
Ajout de la caméra manuellement:
Si votre appareil est déjà connecté à votre maison wifi (caméra en ligne) et
que vous souhaitez ajouter à la iVIEW PRO app sur votre deuxième
téléphone / tablette, vous pouvez l'ajouter manuellement. Pour cela, vous
avez besoin du numéro d'identification de la caméra et de son mot de passe.
Le numéro d'identification est écrit sur un
autocollant sur la caméra elle-même. Le mot de
passe par défaut est 123, mais si vous avez
modifié ce mot de passe, vous devez utiliser le
mot de passe personnel actuel de la camera
pour l'ajouter.
Dans le champ "Nom de l'appareil", vous
pouvez saisir le nom que vous souhaitez, par ex.
"Salle de séjour cam1".
Cliquez sur "Enregistrer" pour ajouter la camera
à votre liste d'appareils.
Page 72

72
All brands and logos are registered trademarks of their respective owners
ACT-IPC-01
ROTATING HD WIFI CAMERA
COMMENT UTILISER L'APP / VOIR LA VIDÉO:
Présentation des fonctions et des boutons:
Page 73

73
All brands and logos are registered trademarks of their respective owners
ACT-IPC-01
ROTATING HD WIFI CAMERA
1. Bouton de sourdine
2. Activer le mode plein écran
3. Basculer le mode d'alarme
4. Bouton du microphone (tenir pour parler)
5. Bouton d'instantané
6. Bouton du menu Paramètres
7. Paramètres de qualité vidéo
8. Basculer le mode d'alarme
9. Bouton de sourdine
10. Microphone
11. Bouton d'instantané
12. Vidéo en direct de la caméra
13. Sortir de la caméra
14. Quitter le mode plein écran
Page 74

74
All brands and logos are registered trademarks of their respective owners
ACT-IPC-01
ROTATING HD WIFI CAMERA
Page 75

75
All brands and logos are registered trademarks of their respective owners
ACT-IPC-01
ROTATING HD WIFI CAMERA
1. Informations sur l'appareil
Vérifiez les informations sur le périphérique (par exemple, le numéro
d'identification du périphérique) et changez le nom de la caméra.
2. Réglages de l'heure.
La caméra doit montrer
automatiquement le bon moment. Sinon,
vous pouvez également le configurer
manuellement. Réglez d'abord le fuseau
horaire correct (pour NL, DE, FR, BE, CZ
définissez le fuseau horaire à UTC + 1) et
appuyez sur 'application' dans la zone de
réglage du fuseau horaire. Vérifiez
ensuite si l'heure et la date sont correctes
et appuyez sur 'application' dans la zone
de réglage de l'heure. Le temps doit
maintenant être réglé correctement.
Page 76

76
All brands and logos are registered trademarks of their respective owners
ACT-IPC-01
ROTATING HD WIFI CAMERA
3. Paramètres des médias
Ici, vous pouvez configurer le format
vidéo (défini sur PAL pour l'UE), le
volume de l'appareil et également
inverser l'image de la caméra. Ceci est
nécessaire lorsque la caméra est
montée à l'envers, par ex. un plafond.
Page 77

77
All brands and logos are registered trademarks of their respective owners
ACT-IPC-01
ROTATING HD WIFI CAMERA
4. Paramètres de sécurité
Le mot de passe par défaut de
votre appareil photo est 123. Il s'agit
d'un mot de passe standard très
faible. Il est fortement recommandé
de le changer pour un mot de passe
personnel plus fort. Le mot de
passe administrateur donne accès à
toutes les fonctions de la caméra.
Vous pouvez également définir un
mot de passe d'hôte séparé pour
l'affichage uniquement (aucun droit d'administrateur).
5. Paramètres réseau
Vous pouvez basculer entre les
méthodes de connexion filaire et wifi
ici.
Page 78

78
All brands and logos are registered trademarks of their respective owners
ACT-IPC-01
ROTATING HD WIFI CAMERA
6. Paramètres d'alarme
Ici vous pouvez configurer la
détection de mouvement et les
messages d'alarme.
Activez "recevoir un message
d'avertissement" pour recevoir des
notifications d'alarme par message
push sur votre téléphone / tablette.
Si vous activez la détection de
mouvement, vous pouvez régler la
sensibilité en déplaçant le curseur au
niveau inférieur ou supérieur.
Vous pouvez également activer un
buzzer d'alarme (sirène) qui retentira
de la caméra lorsque le mouvement
est détecté. La durée du buzzer peut
être réglée sur 1/3/5 minutes.
La caméra peut également envoyer
une notification d'alarme par courrier
électronique. Sur la page suivante,
les paramètres de messagerie sont
expliqués.
Page 79

79
All brands and logos are registered trademarks of their respective owners
ACT-IPC-01
ROTATING HD WIFI CAMERA
6.1 Paramètres e-mail
Si vous appuyez sur l'option "Boîte aux
lettres d'alarme", l'écran des paramètres
de messagerie s'affiche. Ici vous pouvez
configurer vos informations de compte de
messagerie pour permettre à la caméra
de vous envoyer un message
électronique en cas de détection d'alarme.
Le message électronique sera juste un
message court pour vous informer de
l'alarme et il aura un instantané joint. La
caméra prend en charge les services de
messagerie les plus utilisés comme Gmail,
Outlook, yahoo, etc. Il est également
possible de configurer vos paramètres de
messagerie manuellement, mais pas tous
les fournisseurs de messagerie privée
prend en charge.
CONSEIL: si le serveur de courrier électronique (SMTP) de votre fournisseur de
messagerie n'accepte pas les messages
envoyés depuis cet appareil, vous pouvez
configurer un compte Gmail et transférer
automatiquement les e-mails de ce
compte gratuit à votre adresse électronique privée.
Page 80

80
All brands and logos are registered trademarks of their respective owners
ACT-IPC-01
ROTATING HD WIFI CAMERA
7. Paramètres d'enregistrement
Configurez les réglages
d'enregistrement en mode manuel,
déclenché par alarme ou
programmé.
Pour utiliser la fonction
d'enregistrement, une carte micro
SD doit être insérée dans la caméra.
Si vous sélectionnez l'option
d'enregistrement vidéo programmé,
l'appareil enregistre
automatiquement sur la période
prédéfinie. Lorsque la carte SD est
pleine, elle écrase
automatiquement les
enregistrements les plus anciens.
Si vous sélectionnez l'option
d'enregistrement d'alarme, la
caméra n'enregistre que lorsque le
mouvement est détecté.
L'enregistrement aura une durée de
1, 2 ou 3 minutes.
Page 81

81
All brands and logos are registered trademarks of their respective owners
ACT-IPC-01
ROTATING HD WIFI CAMERA
FAQ
Q: Comment rétablir les paramètres par défaut?
R: Il ya un petit trou au bas de la caméra. Appuyez sur le petit bouton de
réinitialisation à l'intérieur jusqu'à ce que vous entendiez un son comme
«dessin d'une épée». Ce son signifie que la réinitialisation a réussi.
Q: Échec lors de l'ajout d'appareils
R: Vérifiez que l'appareil photo et le téléphone sont dans le même réseau
local. Si l'appareil photo et le téléphone ne sont pas dans le même réseau
local, les utilisateurs doivent utiliser le numéro d'identification pour ajouter
manuellement la caméra.
Q: Lorsque vous essayez de regarder la vidéo en direct, le mot de
passe est incorrect.
R: Veuillez vérifier si le mot de passe d'accès distant est correct ou non, le
mot de passe configuré lors de l'ajout de la caméra. Si elle est erronée,
veuillez sélectionner "edit" dans la liste d'entrée de la caméra et configurer à
nouveau un mot de passe d'accès à distance.
Si vous oubliez le mot de passe d'accès à distance de l'appareil photo,
vous pouvez appuyer sur «Réinitialiser» et l'appareil rétablira le réglage par
défaut. Lorsque vous ajoutez l'appareil photo la première fois, vous devez
configurer un nouveau mot de passe. Sinon, vous ne pouvez pas continuer
l'accès à distance.
Q: Cela montre que les périphériques sont hors ligne dans la liste des
périphériques.
R: Veuillez vérifier si l'appareil photo est connecté à Internet.
Page 82

82
All brands and logos are registered trademarks of their respective owners
ACT-IPC-01
ROTATING HD WIFI CAMERA
Q: Lors de la lecture vidéo, les fichiers vidéo ne peuvent pas être
trouvés.
R: Veuillez vérifier si la carte SD est endommagée.
Veuillez vérifier quand les fichiers vidéo sont recherchés et l'heure
système de l'appareil photo.
Q: L'appareil photo ne peut pas se connecter au WIFI
R: Veuillez vérifier si le mot de passe du WIFI est correct.
Remarque: l'appareil photo ne prend pas en charge les réseaux 5GHz,
veuillez connecter le téléphone à un réseau WIFI 2,4 GHz lors de la
configuration de l'appareil photo.
Page 83

83
All brands and logos are registered trademarks of their respective owners
ACT-IPC-01
ROTATING HD WIFI CAMERA
PŘIPOJENÍ IP KAMERA K WIFI A APLIKACE
INSTALACE APP:
1. Otevřete obchod Apple App store nebo Play Google v telefonu / tabletu
a hledat "IVIEW PRO". Stáhnout a nainstalovat IVIEW PRO aplikaci v
telefonu nebo tabletu
APP REGISTRACE A PŘIHLÁŠENÍ:
2. Když otevřete aplikaci poprvé, máte dvě možnosti. Buď vytvořit osobní
uživatelský účet a zaregistrovat se svým e-mailem, nebo spustit přímo a
používat aplikaci anonymní (bez registrace). (Chcete-li fotoaparát
používat na několika zařízeními, doporučuje se zaregistrovat na
uživatelský účet. Při anonymním přihlašováním, stačí stisknout
anonymní přihlašovací tlačítko (dveře). Pro volbu registraci účtu,
postupujte podle následujících 4 jednoduchých krocích
Page 84

84
All brands and logos are registered trademarks of their respective owners
ACT-IPC-01
ROTATING HD WIFI CAMERA
I. Otevřete si aplikaci na telefonu a
klikněte na “Register”.
II. Vstupní e-mailovou adresu a
vytvořte heslo
Page 85

85
All brands and logos are registered trademarks of their respective owners
ACT-IPC-01
ROTATING HD WIFI CAMERA
III. Zadejte náhodný kód (velká a
malá písmena) a stiskněte “register”.
IV. Nyní přihlásit pomocí své e-
mailové adresy a hesla
Page 86

86
All brands and logos are registered trademarks of their respective owners
ACT-IPC-01
ROTATING HD WIFI CAMERA
PŘIPOJENÍ IP KAMERY K WIFI:
3. Nyní připojte napájecí adaptér. Ujistěte se, že váš telefon WiFi zapnutý.
Kamera nyní začne pípat každou druhou vteřinu. Postupujte podle
následujících kroků pro připojení kamery k wifi.
I. Stisknutím tlačítka "+" pro
připojení fotoaparátu a přidat ji do
seznamu zařízení.
II. Tři způsoby pro připojení Smart link
manuální přidat i pomocí QR kódu.
Page 87

87
All brands and logos are registered trademarks of their respective owners
ACT-IPC-01
ROTATING HD WIFI CAMERA
4. Nyní stiskněte znaménko plus (+) v pravém horním rohu obrazovky
přidat kameru do seznamu aplikace fotoaparátu.
5. Existují tři způsoby připojení fotoaparátu:
a. Smartlink
b. Přidat manuálně.
c. QR kód skenování (pouze pokud je to QR kód přítomen ve
fotoaparátu)
Nejjednodušší je možnost Smartlink. Chcete-li využít této funkce, položil
telefon v blízkosti kamery. Poslouchejte pozorně, možnost Smartlink pracuje
pouze tehdy, když je fotoaparát pípá každou druhou vteřinu. To pípání
znamená, že fotoaparát může být spárován s wifi síti. Pokud tomu tak není,
zkuste resetovat fotoaparát s kolíkem přes resetovací tlačítko na spodní
straně fotoaparátu.
Manuál možnost Add je vhodný pouze pro přidání kamery, které jsou již
připojeny k wifi. Pokud tomu tak není, použijte volbu Smartlink.
Možnost kód skenování QR je k dispozici pouze tehdy, když je přítomen ve
fotoaparátu nálepka s QR kódem. Není-li nálepka, možnost QR kód není k
dispozici.
Prosím, postupujte podle pokynů na následujících stranách připojit
fotoaparát k wifi síti prostřednictvím volby SmartLink.
Page 88

88
All brands and logos are registered trademarks of their respective owners
ACT-IPC-01
ROTATING HD WIFI CAMERA
I. Stisknutím tlačítka “connect via wifi”
tlačítkem
II. Zadejte heslo vaší wifi sítě
Page 89

89
All brands and logos are registered trademarks of their respective owners
ACT-IPC-01
ROTATING HD WIFI CAMERA
III. Pokud slyšíte zvuky fotoaparátu,
pokračujte stiskem modrého tlačítka.
První (ne pípání? Reset kamery)
IV. Zvyšte hlasitost telefonu /
tabletu a klikněte ‘next’
Page 90

90
All brands and logos are registered trademarks of their respective owners
ACT-IPC-01
ROTATING HD WIFI CAMERA
V. Nyní budete slyšet zvukové spojení
tónovou sekvenci z telefonu. Prosím,
čekejte…
VI. Po připojení, můžete
pojmenovat svůj fotoaparát a zadat
heslo fotoaparátu (123). klikněte
‘save’.
Page 91

91
All brands and logos are registered trademarks of their respective owners
ACT-IPC-01
ROTATING HD WIFI CAMERA
Přidávání kameru manuálně:
Pokud je kamera již připojen k vaší domácí wifi (on-line kamery) a chcete jej
přidat do IVIEW PRO app v druhém telefonu / tabletu, můžete ji přidat ručně.
Za tímto účelem budete potřebovat identifikační číslo kameru a jeho heslo.
Identifikační číslo je napsáno na štítku na samotném fotoaparátu. Výchozí
heslo je 123, ale pokud jste změnili toto heslo,
byste měli používat stávající osobní heslo
fotoaparátu ji přidat.
V "Device name" pole můžete zadat libovolný
název se vám líbí, např. "Living CAM1".
Klepněte na tlačítko "Uložit" přidat kameru do
svého seznamu přístrojů.
Page 92

92
All brands and logos are registered trademarks of their respective owners
ACT-IPC-01
ROTATING HD WIFI CAMERA
JAK POUŽÍVAT APLIKACI / ZOBRAZIT FOTOAPARÁT VIDEO:
Funkce a tlačítka Přehled:
Page 93

93
All brands and logos are registered trademarks of their respective owners
ACT-IPC-01
ROTATING HD WIFI CAMERA
1. tlačítko ztlumení
2. Povolení režimu celé obrazovky
3. Přepnout režim alarm
4. Tlačítko mikrofonu (držet to talk)
5. tlačítko snímek
6. Tlačítko Menu nastavení
7. Nastavení kvality videa
8. Přepnout režim alarm
9. tlačítko ztlumení
10. Mikrofon
11. tlačítko snímek
12. Živý přenos videa z kamery
13. Konec kameru
14. Zastavení režimu celé obrazovky
Page 94

94
All brands and logos are registered trademarks of their respective owners
ACT-IPC-01
ROTATING HD WIFI CAMERA
Page 95

95
All brands and logos are registered trademarks of their respective owners
ACT-IPC-01
ROTATING HD WIFI CAMERA
1. Device information (informace o zařízení)
Zkontrolujte informace o zařízení (např. Zařízení ID číslo) a změnit
název kamery.
2. Time settings (Nastavení času)
Kamera by měla automaticky zobrazí
správný čas. Pokud ne, můžete jej také
nastavit ručně. Nejprve nastavte správné
časové pásmo (pro NL, DE, FR, BE, CZ
nastavit časové pásmo na UTC + 1) a
stiskněte tlačítko "žádost" v časovém
pásmu nastavení plochy. Poté
zkontrolujte, zda datum a čas jsou
správné a stiskněte tlačítko "aplikace" v
zapadajícím oblasti Time. Čas by nyní
měla být správně nastaven.
Page 96

96
All brands and logos are registered trademarks of their respective owners
ACT-IPC-01
ROTATING HD WIFI CAMERA
3. Media settings (Nastavení médií)
Zde si můžete nastavit formát videa
(nastaven na PAL pro EU), objem
zařízení a také inverzi obraz z kamery.
Tento krok je nutný, pokud je
fotoaparát připevněn vzhůru nohama
na např. strop.
Page 97

97
All brands and logos are registered trademarks of their respective owners
ACT-IPC-01
ROTATING HD WIFI CAMERA
4. Safety settings
(Bezpečnostní nastavení)
Výchozí heslo pro váš fotoaparát je
123. To je velmi slabý standardní
heslo. Je velmi doporučeno, aby jej
změnit na silnější osobního hesla.
Heslo správce umožňuje přístup ke
všem funkcím kameru. Můžete také
nastavit samostatnou Hodnocení
heslo pouze k prohlížení (žádná
administrátorská práva).
5. Network settings (Nastavení sítě)
Můžete přepínat mezi kabelovým a
wifi připojení metodou zde
Page 98

98
All brands and logos are registered trademarks of their respective owners
ACT-IPC-01
ROTATING HD WIFI CAMERA
6. Alarm settings (nastavení budíku)
Zde si můžete nastavit detekci
pohybu a poplašných zpráv.
Aktivovat "zobrazí varovné hlášení"
přijímat oznámení o poplachu Push
zprávy o telefonu / tabletu.
Pokud povolíte detekci pohybu,
můžete nastavit citlivost pomocí
posuvníku na nižší nebo vyšší úrovni.
Můžete také povolit poplachového
bzučáku (sirény), která zazní z
kamery při detekci pohybu. Trvání
bzučák může být nastavena na 1/3/5
minut.
Fotoaparát je také schopen posílat
upozornění na poplach e-mailem. Na
další stránce jsou vysvětleny
nastavení e-mailu.
Page 99

99
All brands and logos are registered trademarks of their respective owners
ACT-IPC-01
ROTATING HD WIFI CAMERA
6.1 Email settings (nastavení e-mailu)
Stisknete-li možnost "Alarm schránky",
objeví se obrazovka nastavení e-mailu.
Zde si můžete nastavit vaše informace e-
mailový účet k tomu, aby fotoaparát, aby
vám poslal e-mailovou zprávu v případě
detekce alarmu. E-mailová zpráva bude
jen krátká zpráva, která vás informuje o
alarmu a bude mít snímek připojen.
Fotoaparát podporuje nejrozšířenější emailové služby jako Gmail, Outlook,
Yahoo, apod Je také možné nastavit vaše
e-mailové nastavení ručně, ale ne každý
soukromý poskytovatel e-mailu podporuje.
TIP: pokud mailová váš soukromý
poskytovatel e-mailu je (SMTP) server
nepřijímá maily odeslané z tohoto
fotoaparátu, vždy můžete nastavit
bezplatný e-mailový účet z jedné z výše
uvedených poskytovatelů a mají e-maily z
tohoto účtu zdarma automaticky
přesměrován na vás soukromého e-mailu
adresa.
Page 100

100
All brands and logos are registered trademarks of their respective owners
ACT-IPC-01
ROTATING HD WIFI CAMERA
7. Recording settings (nastavení nahrávání)
Nastavení nahrávání nastaven tak,
aby příručce, alarm spouštěné či
plánovaného nahrávání.
Chcete-li použít funkci záznamu,
musí být micro SD karta vložena do
fotoaparátu.
Zvolíte-li časovanou možnost
nahrávání videa, fotoaparát se
automaticky ukládat do předem
určeného časového období. Když je
SD karta plná, bude automaticky
přepisovat nejstarší nahrávky.
Zvolíte-li možnost alarm nahrávání,
fotoaparát zaznamená jen tehdy,
když je detekován pohyb. Nahrávka
bude buď 1, 2 nebo 3 minut v trvání.
 Loading...