

MaxxMar Domlux, Cool Motion, MaxxLink, Solo-A1, HWM-10 Instructions Manual
...
MAXX MOTORS
by
OPERATION AND PROGRAMMING INSTRUCTIONS
JANUARY 2018

New Generation Maxx Motors
Original Maxx Motors
(with Bluetooth)
Solo – A1 4-5
Domlux 6-8
Cool Motion 6-8
HWM-10 6-8
HWM-20 6-8
MaxxLink Controller 8
Bluetooth Connection Instructions 9-13
(without Bluetooth)
Solo – A1 14-15
Domlux 16-17
Cool Motion 16-17
MaxxLink Controller 18
Remote Transmitters 19
3

New Generation Maxx Motors with Bluetooth
Operation & Programming Instructions
Solo-A1 - New Generation Smart Motor
• New and Quieter Generation Smart Motor with Bluetooth
• Rechargeable Wand Control System with Internal Battery Motor
• 12V DC with Battery charger
Visit link: neosmartblinds.com/motors-accessories/
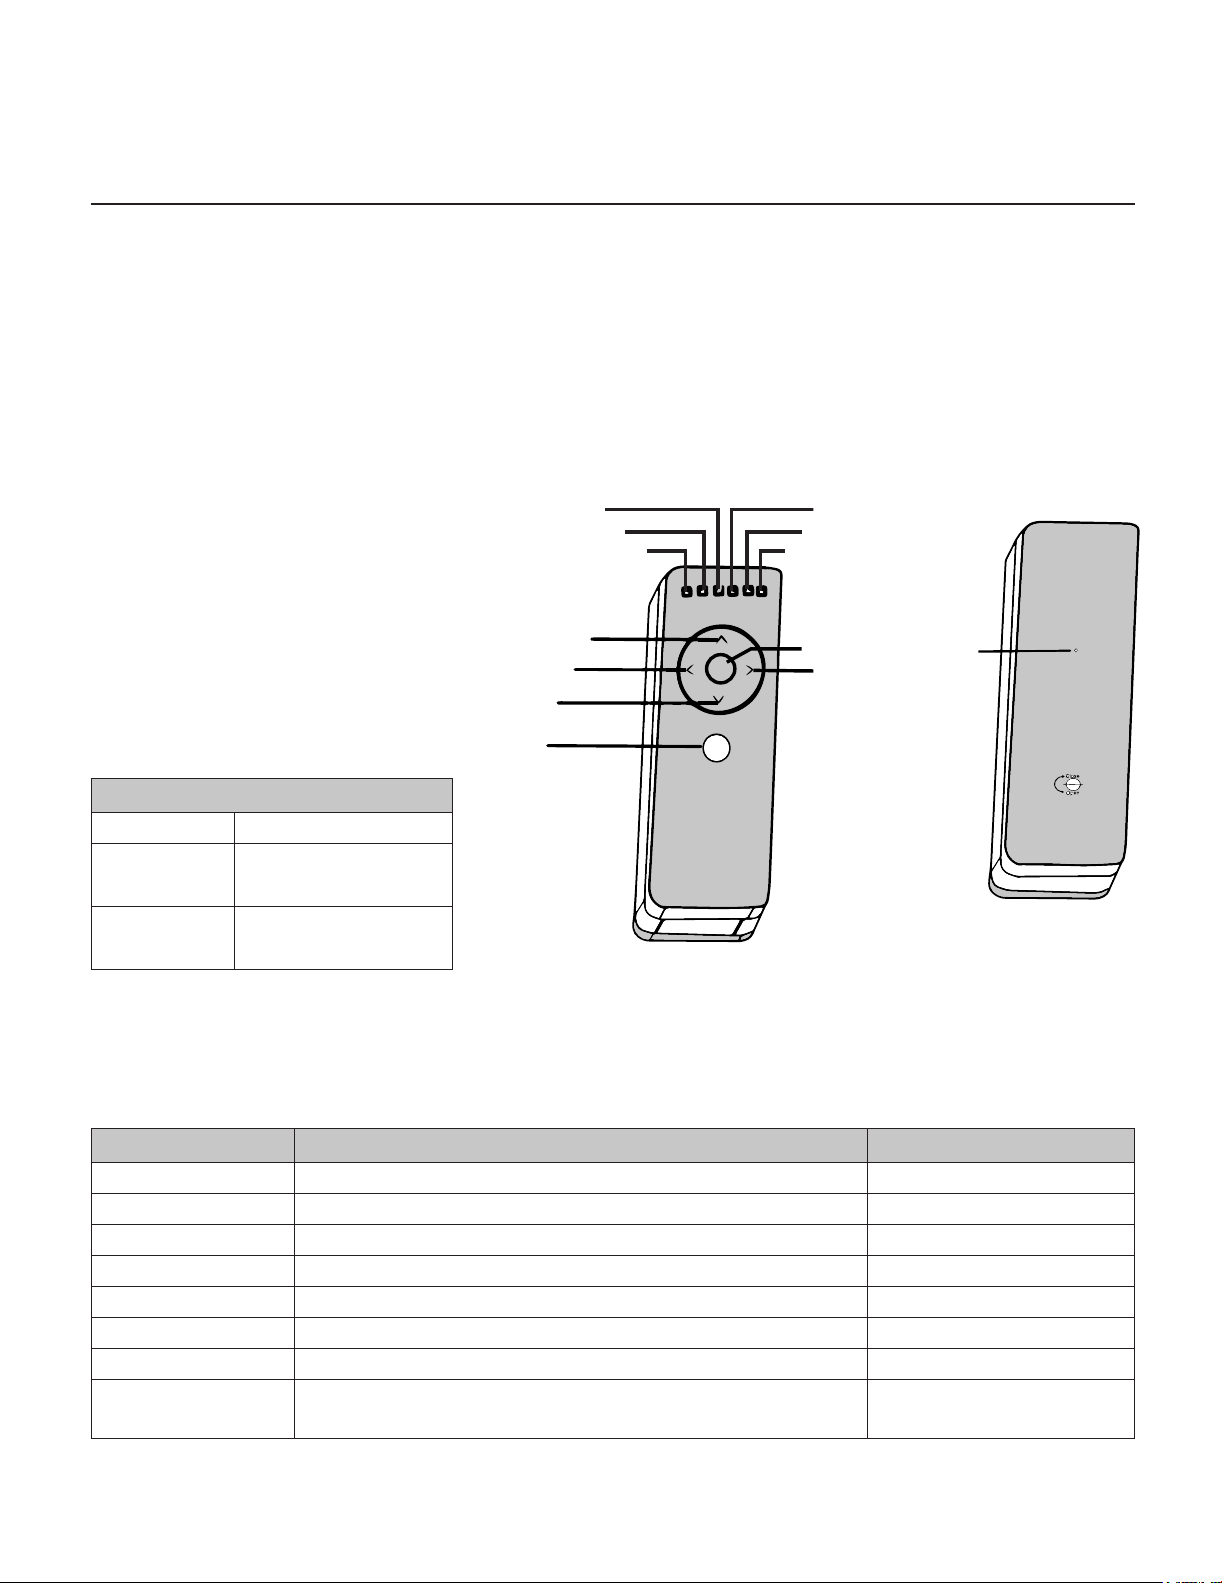
Wand Buttons and Controls
1. Reference
Up
Down
Set
2. Basic Operations
Pressing and holding up for 2 seconds will bring
your blind in the up position.
Pressing the up button will jog your blind 1/8 of
an inch in the upward position.
Pressing and holding the down button will bring
your blind down to the lower position.
Pressing the down button will jog your blind 1/8
of and inch in the downward.
Double click the up button will bring your blind to
the favourite position 1.
Double click the down button will bring your
blind to the favourite position 2.
Types of Button Presses
Click Press and release
Hold Press and hold for specied time
Double-Click Two clicks in less than 3/4 of a second
4

3. Advanced Operations
Command Description Key Combination
Enter-Settings-Mode Put the motor into Settings Mode. (The motor will jog, and LED
will turn ON.)
Leave-Settings-
Mode
Return the motor to Normal Mode. (This will happen automatically if no action is taken for 30 seconds. LED will turn OFF.)
Adjust-Upper-Limit Start the process of setting the motor's upper rotational limit.
(See Limit Setting Process below)
Adjust-Lower-Limit Start the process of setting the motor's lower rotational limit.
(See Limit Setting Process below)
Save-Limit End the limit setting process, and save the limit at the current
position. (See Limit Setting Process below)
Reverse-Rotation Reverse the direction of rotation. i.e. switch up and down. Enter-Settings-Mode, then
Set-Favourite-1 Set favourite position 1 at this position.
(See Setting Favourite Positions below)
Set-Favourite-2 Set favourite position 2 at this position.
(See Setting Favourite Positions below)
Hold SET for 5 seconds3 or
Hold HEAD for 3 seconds
Enter-Settings-Mode, then
Click SET
Enter-Settings-Mode, then
Click UP
Enter-Settings-Mode, then
Click DOWN
Adjust-Upper-Limit or
Adjust-Lower-Limit, then
Click SET
Hold SET for 5 seconds
3
3
Double-Click SET, then
Double-Click UP3
4
Double-Click SET, then
Double-Click DOWN3
4
3
3- The motor will Jog back-and-forth after this command.
4- This entire key sequence must be completed within 10 seconds.
Limit Setting Process
The motor’s upper and lower rotational limits are set individually. To set a limit:
1. Hold SET for 5 seconds (Enter-Settings-Mode).
2. Choose the limit to set. Click UP (Adjust-Upper-Limit) to adjust the upper limit, or Click DOWN (Adjust-Lower-
Limit) to adjust the lower limit.
3. Adjust the motor to the desired limit position using the UP and DOWN buttons.
4. Click SET to save the limit at this new position (Save-Limit). The motor will jog back-and-forth to conrm the that
the new limit has been saved.
Setting Favourite Positions
Once the upper and lower limits are set, the motor can store two favourite (intermediate) positions.
To set one of these positions:
1. Move to the position you want to store as a favourite position using UP and DOWN.
2. Use Set-Favourite-1 or Set-Favorite-2 to save. The motor will jog back-and-forth to conrm.
You can also clear a favourite position by setting it at the same place again. For example, to delete favourite position
1:
1. Move to that stored favourite position using GoTo-Favorite-1.
2. Call Set-Favourite-1 to delete. The motor will jog back-and-forth to conrm.
Note: you cannot set favourite positions until after the upper and lower limits are both set.
5
The following operation and programming instructions
apply to the following New Generation Maxx Motors:
Domlux
New and Quieter Generation
Smart Motor with Bluetooth
Motor with Transformer and Remote
Control plugs into Electrical Outlet
24V DC Low Voltage with
Transformer
1. Reference
Jog Down/Favourite position 1
Types of Button Presses
Click Press and release
Hold Press and hold for
specied time
Double-Click Two clicks in less than
3/4 of a second
Cool Motion
New and Quieter Generation
Smart Motor with Bluetooth
Rechargeable Internal Battery
Motor with Remote Control
12V DC with battery charger
Ch: 3
Ch: 2
Ch: 1
Up
Down
Channel
Selection
HWM-10 & HWM-20
New and Quieter Generation
Smart Motor with Bluetooth
Hardwire - 110V AC Motor
Note: ALL 4 MOTORS - DOMLUX,
COOL MOTION, HWM-10 & HWM-20
WORK WITH BLUETOOTH
Ch: 4
Ch: 5
Ch: 6
Stop
Jog Down/
Favourite
position 2
Set
Unless noted, all commands are sent from a remote control to a motor, and will only have effect if the remote control’s
active channel has been paired with the target motor. (See Pairing Process below)
2. Basic Operations
Command Description Key Combination
Go-Up Move all the way to the upper limit.
Go-Down Move all the way to the lower limit.
Stop Stop ongoing motion. Click STOP
Step-Up Move the motor up a small amount. Click LEFT
Step-Down Move the motor down a small amount. Click RIGHT
Go-To-Favorite-1 Move the motor to favourite position 1. Hold LEFT for 2 seconds
Go-To-Favorite-2 Move the motor to favourite position 2. Hold RIGHT for 2 seconds
Next-Channel2 Cycle to the next channel (or group of channels) on the
remote, making it active.
1- The motor Will stop on button release if the not yet set.
2- This command is not sent to the motor, and affects only the remote.
1
1
6
Click UP
Click DOWN
Click CHANNEL

New Generation MaxxMotors (Domlux, Cool Motion, HWM-10, HWM-20)
New and Quieter Generation Smart Motor with Bluetooth
Visit link: neosmartblinds.com/motors-accessories/
3. Advanced Operations
Enter Setting Mode
• Put the motor into Settings Mode by Hold SET button for 3 seconds: the red LED light will turn on indicating the blind
is in setting mode.
Pairing a channel
• To pair a remotes active channel with a motor: you must rst place the motor in setting mode by pressing the set
button located on the motor. Once the motor is in setting mode, make sure the remote is on the active channel that
you want to program. Once that’s conrmed, press the set button located on the back of the remote.
Deleting channels
• To delete all paired remotes from the motor: you must press and hold the set option located on the motor for seven
seconds (note: this does not delete limits or favourite positions ). The blind will jog twice indicating that paired
remotes are no longer paired.
Setting The Upper Rotational Limit
• To set the upper rotational limit: you must press the up and set option at the same time for 3 seconds (note: remote
must st be paired to the blind your trying to set the limit for). Once blind is in the limit mode, you may press up or
down depending on the length that you want the upper limit to be at. Once the blind is at the correct level, you may
press the set option located in the back of the remote to save that position.
Setting the lower rotational limit
• To set the lower rotational limit: you must press the down and set option at the same time for 3 seconds (note:
remote must rst be paired to the blind your trying to set the limit for). Once blind is in the limit mode, you may press
up or down depending on the length that you want the lower limit to be at. Once the blind is at the correct level you
may press the set option located in the back of the remote to save that position.
Deleting limits
• To delete favourite position and limits: press the stop button and set located in the back of the remote at the same
time for 3 seconds (note: make sure the remote is programmed to the blind on which you want to erase limits and
favourite positions).
7
 Loading...