

Page 1
SAFETY INFORMATION
GB-1
MP3/WMA PLAYER WITH FM TRANSMITTER
MP610TR (1GB) / MP620TR (2GB)
INSTRUCTION MANUAL
INPORTANT NOTE: To reduce the risk of fire or shock hazard, do not expose
this player to rain or moisture.
ATTENTION: TO REDUCE THE RISK OF ELECTRIC
SHOCK, DO NOT REMOVE THE COVER (OR BACK). NO
USER-SERVICEABLE PARTS ARE INSIDE. REFER
SERVICING TO THE QUALIFIED SERVICE PERSONNEL.
This symbol indicates “dangerous voltage” inside the product
that presents a risk of electric shock or personal injury.
This symbol indicates important instructions accompanying
the product.
In full power, the continuous listening of the player may
damage the user’s hearing.
Your player is a device that stores and plays multi-format digital audio files
including MP3, WMA, and WAV files. Please read this manual carefully before
using this product for the first time.
The descriptions and characteristics given in this document are given as a
general indication and not as a guarantee. In order to provide the highest
quality product possible, we reserve the right to make any improvement or
modification without prior notice.
Page 2

BEFORE YOU BEGIN
GB-2
GB-3
FCC WARNING:
This equipment may generate or use radio frequency energy. Changes or
modifications to this equipment may cause harmful interference unless the
modifications are expressly approved in the instruction manual. The user
could lose the authority to operate this equipment if an unauthorized
change or modification is made.
FCC DECLARATION
This device complies with Part 15 of the FCC rules. Operation is subject to the
following two conditions: 1) This device may not cause harmful interference,
and 2) This device must accept any interference received, including
interference that may cause undesired operation.
Warning: Changes or modifications to this unit not expressly approved by the
party responsible for compliance could void the user’s authority to operate the
equipment.
NOTE: This equipment has been tested and found to comply with the limits for
a Class B digital device, pursuant to Part 15 of the FCC Rules. These limits
are designed to provide reasonable protection against harmful interference in
a residential installation. This equipment generates, uses and can radiate radio
frequency energy and, if not installed and used in accordance with the
instructions, may cause harmful interference to radio communications.
However, there is no guarantee that interference will not occur in a particular
installation. If this equipment does cause harmful interference to radio or
television reception, which can be determined by turning the equipment off and
on, the user is encouraged to try to correct the interference by one or more of
the following measures:
Reorient or relocate the receiving antenna.
Increase the separation between the equipment and receiver.
Connect the equipment into an outlet on a circuit different from that to
which the receiver is connected.
Consult the dealer or an experienced radio/TV technician for help.
After purchasing and downloading music to your PC, you are now ready to
move content to your player. To transfer the music, you must use Windows
Media Player or the application recommended by the online music download
service.
(Note: Services and applications must be Windows Media audio-compliant and
support Digital Rights Management.)
Unpacking Your Unit
When you unpack your new player, be sure you have removed all the
accessories and information papers. The items below should have been
packed in the box with your player.
• Player
• Installation CD-ROM
• USB cable
• Earphones
• 1 x AAA / LR03 battery
Computer System Requirements
• Pentium III 500MHz or higher recommended
• Macintosh iMac G3 or higher
• Windows 98SE, Me, 2000, or XP
• Mac OS X Version 10.1.5 or higher
• Internet Explorer 4.0 or higher
• Internet access
• 100MB free hard disk space for the software
• 64MB RAM (128 MB recommended)
• CD-ROM drive capable of digital audio extraction
• USB port (2.0 recommended)
• Sound card
Warning: Use of this product is for your personal use only. Unauthorized
recording or duplication of copyrighted material may infringe upon the rights of
third parties and may be contrary to copyright laws.
Note :
Make sure the tracks are encoded in mp3 or Windows Media formats and
supported bitrates.
Bitrates supported by player:
mp3 - 8 to 320 kbps
wma - 5 to 192 kbps
Page 3

GB-4
GB-5
Precautions for the Unit
• Do not use the unit immediately after transportation from a cold place to a
warm place: condensation problem may result.
• Avoid shock to the unit especially during recording. Recorded data may be
damaged.
• Do not store the unit near fire, places with high temperature or in direct
sunlight.
• Do not operate or store unit in places with frequent static electricity or
electrical noise (e.g. speaker, TV set).
• Clean the unit with a soft cloth or a damp chamois leather. Never use
solvents.
• The unit must only be opened by qualified personnel.
Note: This unit may temporarily cease to function if subjected to electrostatic
disturbance.
To resume normal operation, it may be necessary to cycle the power off and
back on or to remove and reinstall the batteries.
Caution
• Keep product out of direct sunlight. Exposure to direct sunlight or extreme
heat (such as inside a parked car) may cause damage or malfunction.
• Do not expose to rain or moisture.
Caution While Driving
Use of headphones while operating an automobile or moving vehicle is not
recommended and is unlawful in some states and areas. Be careful and
attentive on the road. Stop operation of the unit if you find it disruptive or
distracting while driving.
Important Battery Information
• When storing the unit, be sure to remove the batteries because they may
leak and damage the unit.
• Batteries may leak electrolyte if inserted incorrectly, if disposed of in fire,
or if an attempt is made to charge a battery not intended to be recharged.
• Discard leaky batteries immediately. Leaking batteries may cause skin
burns or other personal injury.
• Do not charge batteries which are not intended to be recharged.
• Dispose of batteries, according to federal, state and local regulations.
Please Respect the Environment!
Before throwing any batteries away, consult your distributor who may
be able to take them back for specific recycling.
Headset Safety
Have a Blast- Just Not in Your Eardrums. Make sure you turn down
the volume on the unit before you put on headphones. Increase the
volume to the desired level only after headphones are in place.
• Do not play your headset at a high volume. Hearing experts warn against
extended high volume play.
• If you experience a ringing in your ears, reduce volume or discontinue use.
• You should use extreme caution or temporarily discontinue use in
potentially hazardous situations. Even if your headset is an open-air type
designed to let your hear outside sounds, don’t turn up the volume so high
that you are unable to hear what is around you.
Insert battery into the player
1. To insert battery, open the battery door on back of unit.
2. Insert a “AAA” battery with polarities corresponding to the indications (+,-)
on the compartment.
3. Close the door to the battery compartment.
Note:
Refer to the power level indicator on display for battery level.
Replace with new battery when the indicator is empty.
Using Headphones
Insert phone plug into the headphones jack on the player for listening.
Have a Blast - Just Not in Your Eardrums. Make sure you turn down the
volume on the unit before you put on headphones. Increase the volume to the
desired level only after headphones are in place.
Connecting the Player to your Computer
Insert the USB plug into the socket on the computer tightly.
Or use the extended USB cable to connect the unit with the computer.
Note:
• Refer to the “USB Driver Installation” instruction manual for procedures in
setting up USB drivers and transferring files to the player.
• You must profile your contents on your PC after file transfer in order for the
new files to appear in the Navigation Menus. Refer to the “USB Driver
Installation” instruction manual for profiling details.
• Secure music download files must be transferred to your player through
Windows Media Player or the application recommended by the online
music download service. Please visit the online music download service’s
website where you purchased your content from for more details on
transferring secure music to your player. For more information on Windows
Media Player, visit http://www/microsoft.com/windows/windowsmedia.
Page 4
CONTROL LOCATIONS
OPERATION
GB-6
GB-7
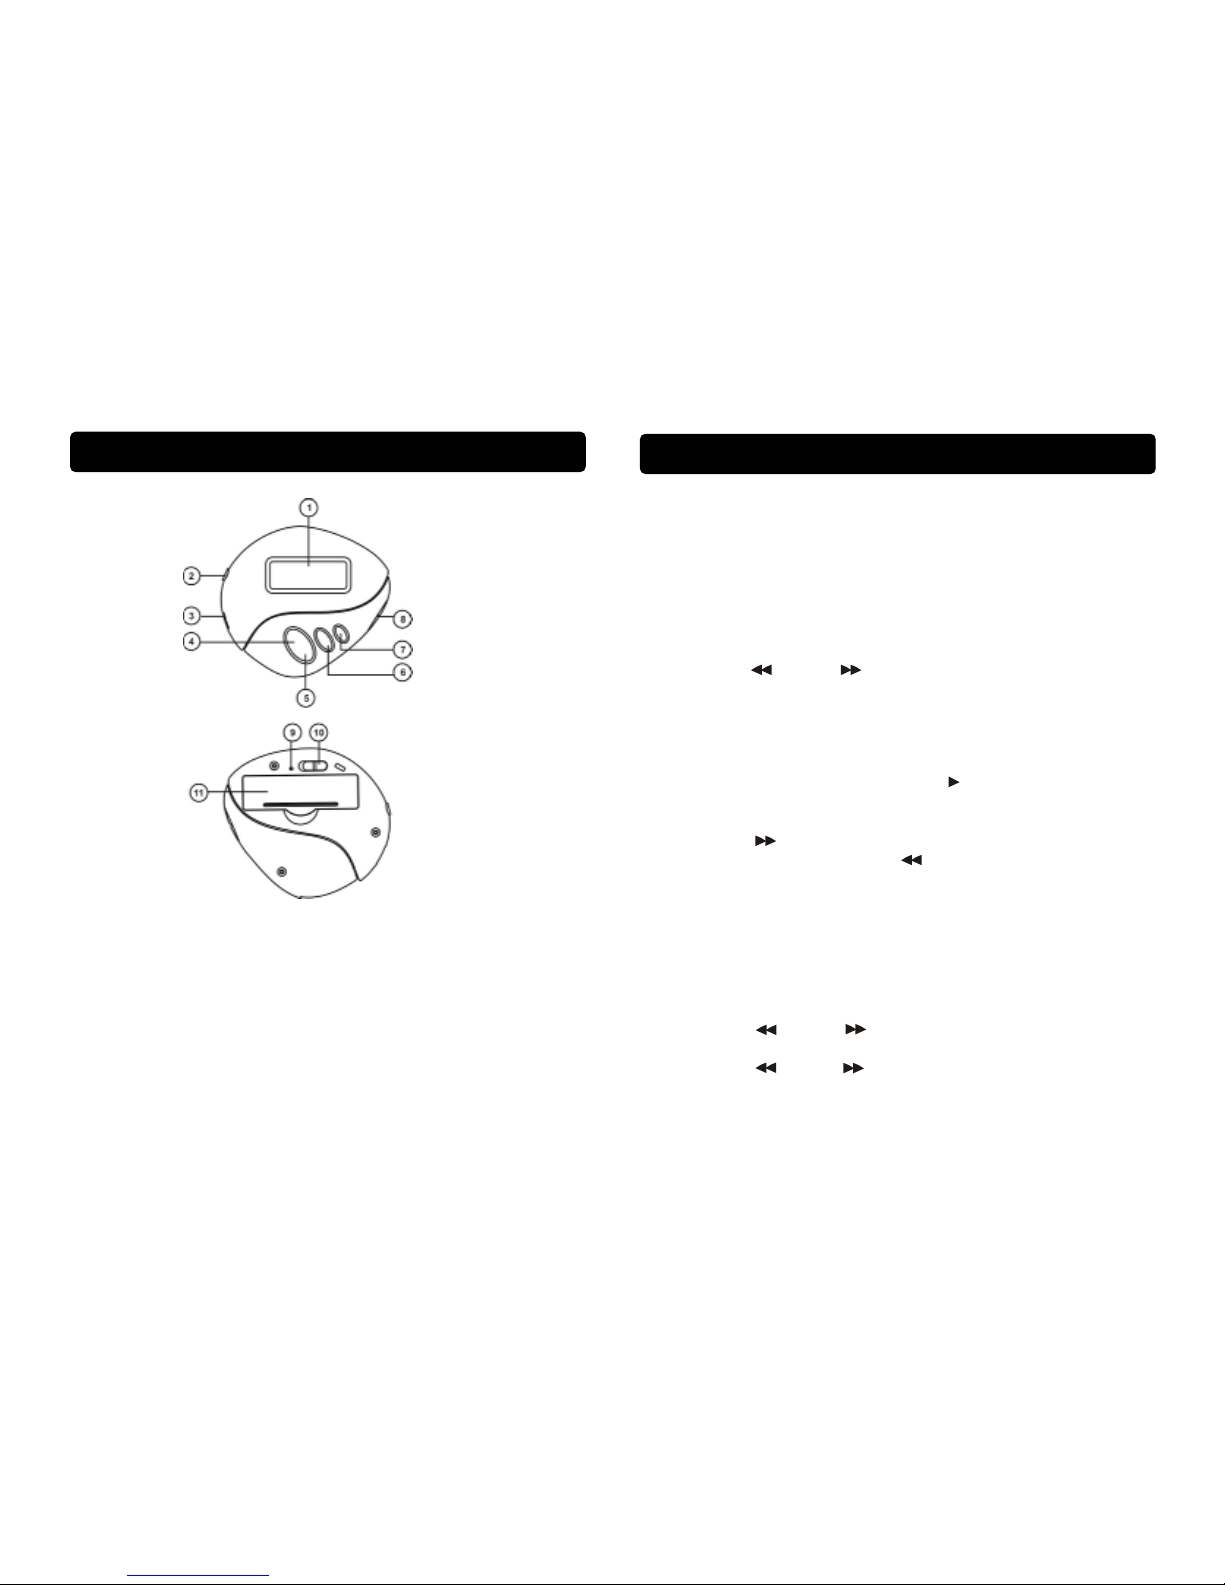
1. LCD DISPLAY
2. EARPHONE JACK
3. USB JACK
4. POWER ON/OFF/PLAY/PAUSE/STOP
5. MODE BUTTON
6. LAST BUTTON
7. NEXT BUTTON
8. VOLUME SWITCH
9. MIC
10. HOLD SWITCH
11. BATTERY COMPARTMENT
Turn the player ON/OFF.
Press PLAY button to turn the unit ON .
Press and hold PLAY button to turn the unit OFF.
Warning: Do not turn the unit OFF when it is playing music. Otherwise, the
unsaved data will be lost.
Select Menu
1. Press PLAY to turn the unit ON and enter music standby mode.
2. Press and hold MODE to enter main menu.
3. Press LAST or NEXT to select the desired menu: Play Music,
Voice, FM Tuner, Record, Delete, Settings and About (memory status).
4. Press MODE to confirm your selection.
Play Music
1. Press PLAY to turn the unit ON and enter music standby mode.
2. Press PLAY to start music playback. Icon “ ” appears on display.
Note: Use this knob to suspend momentarily the playing track. Icon “II ”
will appear on display. Press PLAY again to resume normal playback.
3. Press NEXT to skip forward to the next track or repeatedly to skip
forward several tracks. Press LAST to skip backward to the previous
track or repeatedly to skip backward several tracks. Press and hold LAST
or NEXT to search quickly within a track.
4. To adjust the volume level, press VOLUME +/- button.
5. In playing or pause mode, press PLAY for two seconds to enter stop mode.
Music playback stops. Press PLAY to resume.
Voice (Play record file)
1. Press MODE for 2 seconds to enter main menu.
2. Press LAST or NEXT to select “ VOICE “ mode, then press
MODE to confirm. Press PLAY to start playing record file.
3. Press LAST or NEXT to search your desired record file.
Page 5
GB-8
GB-9
Record
1. Press MODE for two seconds to enter main menu.
2. Press LAST or NEXT to select “ RECORD “ mode. Press MODE
to confirm and start recording.
3. Press PLAY to pause recording. Press PLAY again to resume.
4. Press PLAY for two seconds to enter stop record mode. Press MODE
button for record other message.
Delete file
1. In stop mode, press MODE for two seconds to enter main menu.
2. Press LAST or NEXT to select “ Delete ” icon. Press Mode to
enter “ Delete ” mode.
3. Press LAST or NEXT to select the file (Voice/All Voice) you want
to delete. Press MODE, select “yes” and press MODE to confirm delete;
select “no” and press MODE to jump to the next file.
Note: “Read-only” music file can not be deleted.
Settings
1. Press MODE for two seconds to enter main menu.
2. Press LAST or NEXT to select “ Setting” icon. Then press MODE
to confirm and enter submenu.
Equalizer
Press LAST or NEXT to select equalizer mode: Normal, Rock, Jazz,
DDB, POP, Classic. Press MODE to confirm your selection.
Play mode
Press LAST or NEXT to select desired play mode: Normal, Repeat
one, Repeat All, Random, Random All.
Note:
Random: Playback will stop after all tracks have been randomly played.
Random All: Random play continuously.
Contrast
Press LAST or NEXT to adjust LCD contrast. Press MODE to confirm
your setting.
Backlight
Press LAST or NEXT to select backlight time: 0 secs, 5 secs, 10 secs,
20 secs, 30 secs, 40 secs, 50 secs, 60 secs. Press MODE to confirm your
selection.
Auto off (Power set)
Press LAST or NEXT to select desired time of auto power-off: disable,
1 mins, 2 mins, 5 mins, 10 mins. Press MODE to confirm your selection.
Records (Record set)
Press LAST or NEXT to select Sample (8000Hz or 11025Hz),
“Encode” format is set IMADPCM and “Source” is set from microphone. Press
MODE to confirm your selection.
Language
Press LAST or NEXT to select your desired language. Press MODE
to confirm.
Exit
Return to last menu.
About memory size
1. Press MODE for two seconds to enter main menu.
2. Press LAST or NEXT to select “ About ” icon, then press MODE
to enter and check the total memory of the player and the available
memory capacity.
= Time & Date
1. Press MODE for two seconds to enter main menu.
2. Press LAST or NEXT to select “Time & Date” icon, then press
MODE to enter and check the time and date of the player.
A-B repeat (Only available in music play mode or voice mode)
To repeat a sequence between two points A and B, press MODE at the
beginning of the sequence you want to repeat. Then press MODE again at the
end of sequence. Then the sequence is played repeatedly until you press
MODE to resume normal playback.
Page 6
TROUBLE SHOOTING
TECHNICAL SPECIFICATION
GB-10
GB-11
Hold
Slide “ HOLD ” switch to the arrowhead direction to lock player. Lock icon
appears on display. This deactivates all buttons’ functions and eliminates the
possibility of accidentally pressing buttons. Slide HOLD switch to opposite
direction to unlock all buttons. Lock icon disappears
.
Lyrics
This player supports lyrics function with MP3 playback.
Note:
1. Lyric file format should be *.LRC.
2. Lyric file name should be same as the song’s name.
For example:
Song name: Jay-Sky.mp3
Lyric file name: Jay-Sky.lrc
3. Lyric file should be saved in the same folder as in the song’s.
FM transmitter
In FM Mode, there are two steps to control FM transmitter, ON/OFF & Output
Frequency.
1. ON/OFF - While the player is playing a music and transmitter power turned
on, you may receive the signals by other FM receivers. To prevent battery
loss, please turn off the transmitter unless you want to transmit the playing
music.
2. Output frequency – you may set the frequency of FM transmitter between
94.0MHz to 96.0MHz. Remember FM receiver’s frequency must be the
same as FM transmitter.
Symptom Cause Solutions
Press PLAY but
no display.
1. No battery in the
compartment.
2. Battery is out of power.
1. Insert the battery.
2. Replace a new battery.
No sound.
1. Low volume or no
music file inside the
memory.
2. Battery is out of power.
3. MP3/WMA/WAV music
file is damaged.
1. Adjust the volume.
2. Replace a new battery.
3. Download other music files.
Can not play the
MP3/WMA file
that is made by
user.
Player only support
playback of compressed
audio file in MP3/WMA
format, please do not
download non-standard
audio file into the player.
Re- download the standard
MP3/WMA file.
No function on
buttons.
HOLD is switched to
arrowhead direction.
Slide HOLD switch to the
opposite direction to unlock.
Bit rate: 8~320Kbps
Contrast of LCD: 0-10
SN R: >80(1KHZ)
USB port: USB2.0 full speed
ID3 Tag display with Lyrics, blue backlight
Memory size: MP610TR (1GB)/MP620TR (2GB)
MP3 / WMA (DRM)
FM Transmit Frequency 94-96MHz
Operation conditions: humidity <85%, -10°C ~ 40°C
Battery life: About 7 hrs (Alkaline battery recommended), low power
consumption.
Page 7

WARRANTY
LIMITED WARRANTY PARTS AND LABOR STATEMENT
MAXX DIGITAL LIMITED WARRANTS THIS PRODUCT TO BE FREE FROM
DEFECTS IN MATERIAL AND WORKMANSHIP WITHIN THE FOLLOWING
WARRANTY PERIOD, STARTING FROM DATED OF SALE TO THE ORIGINAL
CONSUMER PURCHASER.
90 DAYS LABOR – 1 YEAR PARTS
IF THIS PRODUCT SHOULD PROVE DEFECTIVE W ITHIN THE FIRST NINETY (90)
DAYS WARRANTY PERIOD, MAXX DIGITAL LIMITED W ILL REPAIR OR REPLACE
(AT ITS SOLE DISCRETION) FREE OF CHARGE. ACCESSORIES ARE
WARRANTED FOR NINETY (90) DAYS. SAID PRODUCT MUST BE RETURNED TO
MAXX DIGITAL LIMITED OR its AGENT AT CONSUMER’S EXPENSE (MUST
INCLUDE DATED SALES RECEIPT AS PROOF OF PURCHASE). IN ADDITION
MAXX DIGITAL LIMITED. WILL REPLACE ANY COVERED PART (WITH NEW OR
RE-MANUFACTURED) OF THIS PRODUCT THAT PROVES DEFECTIVE DURING
THE NEXT NINE (9) MONTHS AFTER THE FIRST NINETY (90) DAYS AS NOTED
ABOVE.
THIS WARRANTY DOES NOT APPLY TO ANY MAXX DIGITAL LIMITED PRODUCT,
WHICH IS USED FOR; COMMERCIAL, RENTAL, OR INDUSTRIAL PURPOSES. IS
DAMAGED BY ACCIDENT, MISUSE, ABUSE, IMPROPER LINE VOLTAGE, W ATER
LIGHTENING, OR ANY ACTS OF GOD. THIS WARRANTY IS VOID IF PRODUCT IS
ALTERED, MODIFIED, OR IF ANY PARTS OR SERVICE COVERED BY THIS
WARRANTY ARE FURNISHED BY ANYONE OTHER THAN MAXX DIGITAL LIMITED.
OR ONE OF ITS INDEPENDENT AUTHORIZED WARRANTY STATIONS. THE
WARRANTY DOES NOT COVER CARTONS, CARRYING CASED, BATTERIES,
COSMETIC PARTS, BROKEN OR MARRED CABINETS, COMPACT DISCS, OR ANY
OTHER ACCESSORIES USED IN CONNECTION WITH THE PRODUCT OR
CONSEQUENTIAL DAMAGES DUE TO A DEFECT IN THE PRODUCT. ALL IMPLIED
WARRANTIES ARE LIMITED TO THE DURATION OF THIS WARRANTY.
THIS IS THE COMPLETE WARRANTY BY MAXX DIGITAL LIMITED. AND NO
OTHER EXPRESSES WARRANTY IS VALID AGAINST MAXX DIGITAL LIMITED.
SOME STATES (PROVINCES) DO NOT ALLOW LIMITATIONS OR
CONSEQUENTIAL DAMAGES, SO THE ABOVE LIMITATIONS OR EXCLUSIONS
MAY NOT APPLY TO YOU.
IF THIS UNIT SHOULD PROVE DEFECTIVE DURING THE NEXT NINE (9) MONTHS
FOLLOWING THE FIRST NINETY (90) DAYS CONTACT MAXX DIGITAL LIMITED AT
(877) 270-9585 ON REQUEST MAXX DIGITAL LIMITED (OR ITS AGENT) WILL GIVE
THE NAME AND LOCATION FOR WARRANTY REPAIR. YOUR DATED SALES
RECEIPT OR OTHER PROOF OF PURCHASE WILL ESTABLISH YOUR ELIGIBILITY
FOR WARRANTY SERVICES. MAXX DIGITAL LIMITED WILL BE RESPONSIBLE
ONLY FOR SERVICES RENDERS UNDER THIS WARRANTY AND NOT THE LOSS
OF ANY UNIT DELIVERED TO AN INDEPENDENT WARRANTY STATION. THIS
WARRANTY GIVES YOU SPECIFIC LEGAL RIGHTS, AND YOU MAY HAVE OTHER
RIGHTS, WHICH MAY VARY FROM STATE TO STATE (PROVINCE TO PROVINCE).
MAXX DIGITAL LIMITED
(877) 270-9585
KEEP YOUR SALES SLIP WITH THIS WARRANTY STATEMENT
 Loading...